

Omar_Hayat
59 Posts

Omar_Hayat
Report
Block User
Market Analysts || Sharing Market insight 📈
Frequent Trader
5.8 Years
20 Following
41 Followers
24 Liked
Posts
All
Quotes
·
--
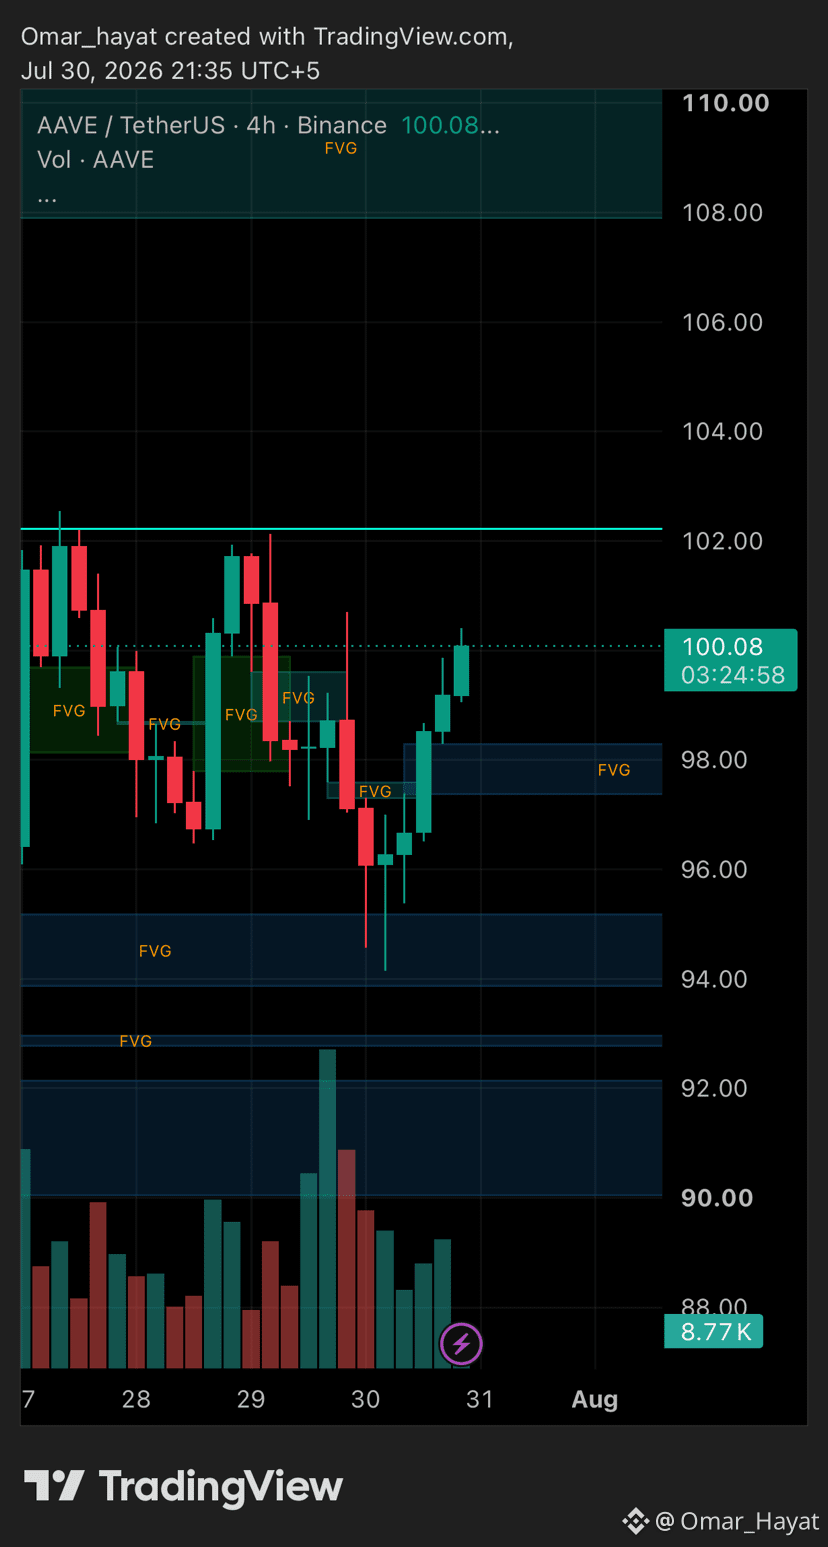
🎯 $AAVE UPDATE: TP1 SMASHED ACCURATELY! 🚀
Our $AAVE long setup played out with total precision! Price bounced straight out of our entry zone ($94.50 – $97.00) and ripped past $100.00, cleanly hitting TP1 ($99.50)! ✅
📌 Trade Action Plan:
💰 TP1 ($99.50): DONE ✅ (Partial profits locked in!)
🛑 Risk Management: Move your Stop Loss to Breakeven now to make this trade 100% risk-free.
🎯 Next Targets: TP2 ($102.00) | TP3 ($106.50)
💬 Who locked in profits on this move with me? Drop your results in the comments below! 👇
🔥 Like, Share, and Follow for live trade updates! 🎯
#AAVE #BinanceSquare #CryptoSignals #TP1Hit #CryptoTrading #DYOR
🎯 $AAVE UPDATE: TP1 SMASHED ACCURATELY! 🚀
Our $AAVE long setup played out with total precision! Price bounced straight out of our entry zone ($94.50 – $97.00) and ripped past $100.00, cleanly hitting TP1 ($99.50)! ✅
📌 Trade Action Plan:
💰 TP1 ($99.50): DONE ✅ (Partial profits locked in!)
🛑 Risk Management: Move your Stop Loss to Breakeven now to make this trade 100% risk-free.
🎯 Next Targets: TP2 ($102.00) | TP3 ($106.50)
💬 Who locked in profits on this move with me? Drop your results in the comments below! 👇
🔥 Like, Share, and Follow for live trade updates! 🎯
#AAVE #BinanceSquare #CryptoSignals #TP1Hit #CryptoTrading #DYOR
Our $AAVE long setup played out with total precision! Price bounced straight out of our entry zone ($94.50 – $97.00) and ripped past $100.00, cleanly hitting TP1 ($99.50)! ✅
📌 Trade Action Plan:
💰 TP1 ($99.50): DONE ✅ (Partial profits locked in!)
🛑 Risk Management: Move your Stop Loss to Breakeven now to make this trade 100% risk-free.
🎯 Next Targets: TP2 ($102.00) | TP3 ($106.50)
💬 Who locked in profits on this move with me? Drop your results in the comments below! 👇
🔥 Like, Share, and Follow for live trade updates! 🎯
#AAVE #BinanceSquare #CryptoSignals #TP1Hit #CryptoTrading #DYOR
Omar_Hayat
·
--
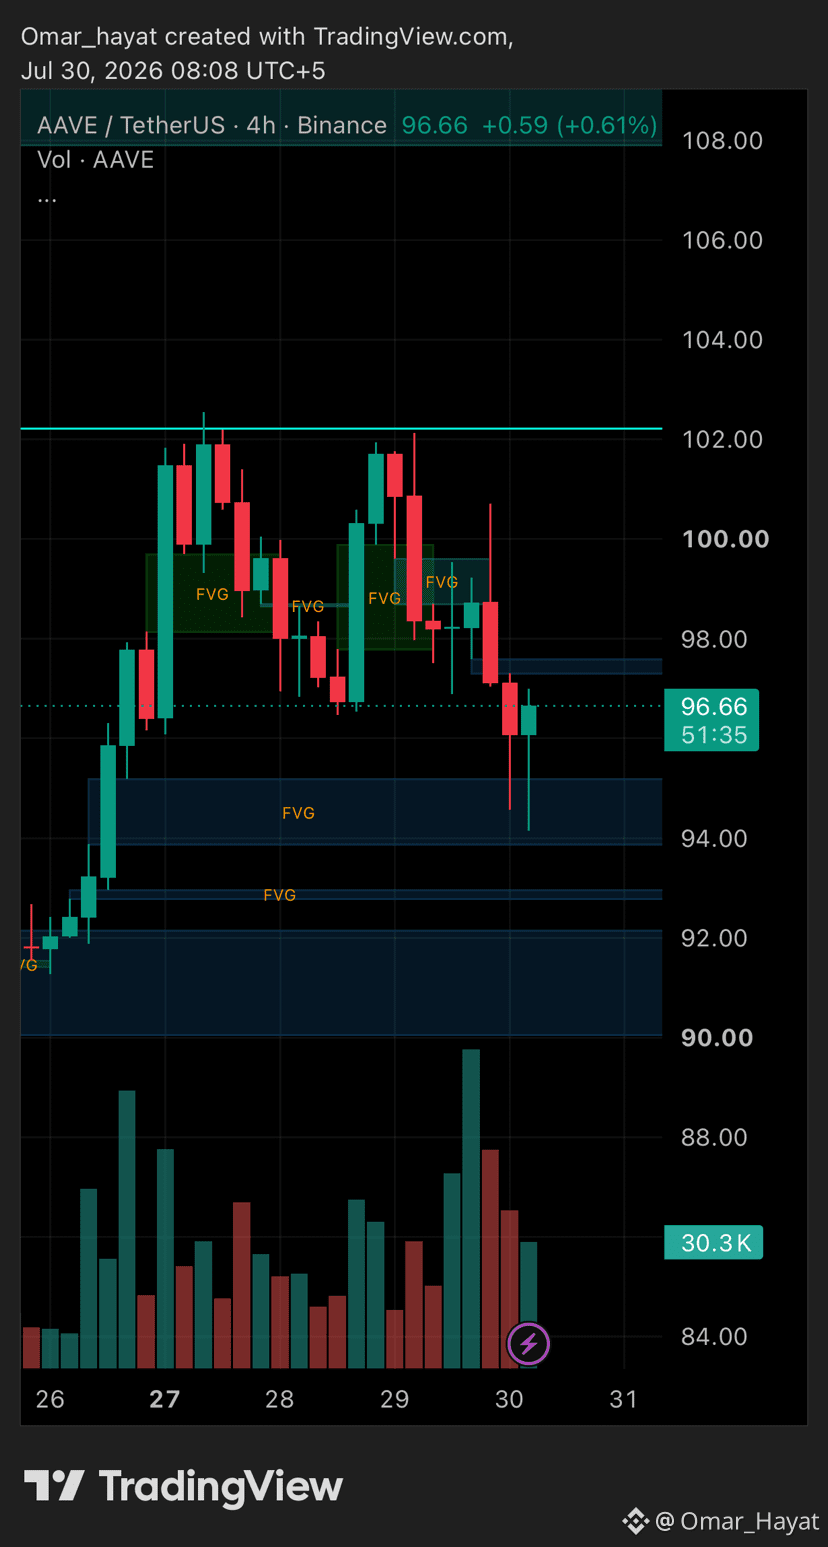
🚨 I’M SCALING INTO $AAVE HERE! Major Liquidity Sweep Completed — Ready for the Next Leg Up! 🚀
📊 My Technical Analysis & Trade Plan (4H Chart)
Aave ($AAVE) just executed a clean sell-side liquidity sweep into the $94.00 – $95.50 demand block and is already showing a strong bullish reaction, currently sitting at $96.66. I am entering a long position on this bounce!
🔍 Key Technical Observations:
* Liquidity Sweep & Demand Rejection: Price swept local stop losses down to $94.20 before aggressive buyers stepped in, leaving a long lower tail/wick.
* Unfilled Overhead FVGs: The sharp dip leaves clear 4-hour Fair Value Gaps sitting above at $99.50 and the $102.00 structural resistance level.
* High Risk-to-Reward: Defending the $94.00 demand floor provides a high-probability R:R setup for a move back to local range highs.
🎯 My Active Trade Setup:
* 🟢 My Entry Zone: $94.50 – $97.00 (Current Price: ~$96.66 — Entering Now!)
* 🎯 Take Profit 1 (TP1): $99.50 (Overhead FVG / Local Resistance)
* 🎯 Take Profit 2 (TP2): $102.00 (Recent Double Top / High Retest)
* 🎯 Take Profit 3 (TP3): $106.50 (Upper Expansion Target)
* 🛑 Stop Loss (SL): $92.80 (Strict stop below local liquidity sweep floor)
💡 Strategy & Risk Management Tip:
Once price pushes up to hit TP1 ($99.50), I will secure partial profits and immediately move my Stop Loss to Breakeven to make this a completely risk-free trade!
📢 Call To Action (CTA)
Are you jumping into this $AAVE trade with me, or waiting for a confirmed breakout above $102.00? Let me know your entry price in the comments below! 💬👇
🔥 Like, Share, and Follow to track this trade step-by-step and catch daily high-accuracy SMC setups! 🎯
⚠️ Disclaimer: For educational purposes only. I am sharing my personal trade execution. Always manage your risk carefully and DYOR.
#AAVE #BinanceSquare #CryptoSignals #TechnicalAnalysis #CryptoTrading #DYOR #TradingView
📊 My Technical Analysis & Trade Plan (4H Chart)
Aave ($AAVE) just executed a clean sell-side liquidity sweep into the $94.00 – $95.50 demand block and is already showing a strong bullish reaction, currently sitting at $96.66. I am entering a long position on this bounce!
🔍 Key Technical Observations:
* Liquidity Sweep & Demand Rejection: Price swept local stop losses down to $94.20 before aggressive buyers stepped in, leaving a long lower tail/wick.
* Unfilled Overhead FVGs: The sharp dip leaves clear 4-hour Fair Value Gaps sitting above at $99.50 and the $102.00 structural resistance level.
* High Risk-to-Reward: Defending the $94.00 demand floor provides a high-probability R:R setup for a move back to local range highs.
🎯 My Active Trade Setup:
* 🟢 My Entry Zone: $94.50 – $97.00 (Current Price: ~$96.66 — Entering Now!)
* 🎯 Take Profit 1 (TP1): $99.50 (Overhead FVG / Local Resistance)
* 🎯 Take Profit 2 (TP2): $102.00 (Recent Double Top / High Retest)
* 🎯 Take Profit 3 (TP3): $106.50 (Upper Expansion Target)
* 🛑 Stop Loss (SL): $92.80 (Strict stop below local liquidity sweep floor)
💡 Strategy & Risk Management Tip:
Once price pushes up to hit TP1 ($99.50), I will secure partial profits and immediately move my Stop Loss to Breakeven to make this a completely risk-free trade!
📢 Call To Action (CTA)
Are you jumping into this $AAVE trade with me, or waiting for a confirmed breakout above $102.00? Let me know your entry price in the comments below! 💬👇
🔥 Like, Share, and Follow to track this trade step-by-step and catch daily high-accuracy SMC setups! 🎯
⚠️ Disclaimer: For educational purposes only. I am sharing my personal trade execution. Always manage your risk carefully and DYOR.
#AAVE #BinanceSquare #CryptoSignals #TechnicalAnalysis #CryptoTrading #DYOR #TradingView
53
·
--
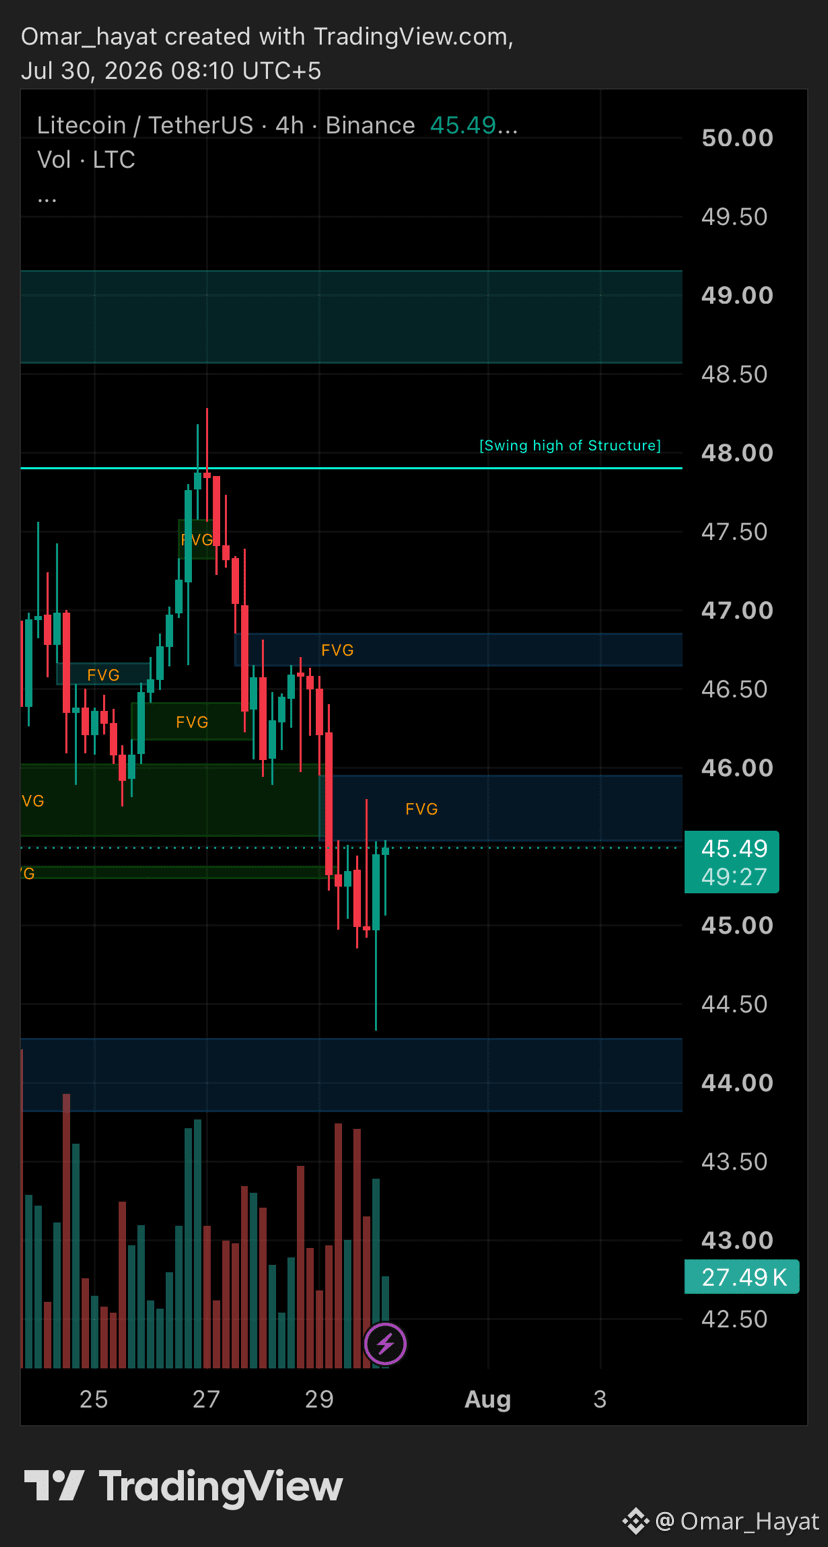
🚨 I’M SCALING INTO $LTC HERE! Massive Liquidity Sweep Completed — Bounce Loading! 🚀
📊 My Technical Analysis & Trade Plan (4H Chart)
Litecoin ($LTC) just completed a clean sell-side liquidity sweep down to $44.40, grabbing stop losses before bouncing straight back into our $44.80 – $45.80 demand zone. Price is currently sitting at $45.49, and I am actively scaling into a long position right here!
🔍 Key Technical Observations:
Liquidity Sweep & Quick Rejection: The aggressive wick down to $44.40 swept local market structure lows, showing immediate buying defense and high volume absorption.
Unfilled Overhead FVGs: A clean cluster of unmitigated 4-hour Fair Value Gaps sit above at $46.50 – $46.80, acting as the primary magnetic target for this relief move.
Clear Target Levels: Holding above $44.80 clears the path for a retest of the structural swing high at $48.00 and the upper supply block near $49.00.
🎯 My Active Trade Setup:
🟢 My Entry Zone: $44.80 – $45.80 (Current Price: ~$45.49 — Entering Now!)
🎯 Take Profit 1 (TP1): $46.80 (First Overhead FVG Resistance)
🎯 Take Profit 2 (TP2): $48.00 (Swing High of Structure)
🎯 Take Profit 3 (TP3): $49.20 (Major Upper Supply Block)
🛑 Stop Loss (SL): $43.90 (Strict stop below the liquidity sweep low)
💡 Strategy & Risk Management Tip:
As soon as price moves up to hit TP1 ($46.80), I will lock in partial profits and immediately shift my Stop Loss to Breakeven to make this a risk-free trade!
📢 Call To Action (CTA)
Are you jumping into this $LTC trade with me, or waiting for further confirmation? Share your entry price in the comments below! 💬👇
🔥 Like, Share, and Follow to track this trade step-by-step and catch daily high-accuracy SMC setups!
⚠️ Disclaimer: For educational purposes only. I am sharing my personal trade execution. Always manage your risk exposure carefully and DYOR.
#LTC #Litecoin #BinanceSquare #CryptoSignals #TechnicalAnalysis #CryptoTrading #DYOR #TradingView
🚨 I’M SCALING INTO $LTC HERE! Massive Liquidity Sweep Completed — Bounce Loading! 🚀
📊 My Technical Analysis & Trade Plan (4H Chart)
Litecoin ($LTC) just completed a clean sell-side liquidity sweep down to $44.40, grabbing stop losses before bouncing straight back into our $44.80 – $45.80 demand zone. Price is currently sitting at $45.49, and I am actively scaling into a long position right here!
🔍 Key Technical Observations:
Liquidity Sweep & Quick Rejection: The aggressive wick down to $44.40 swept local market structure lows, showing immediate buying defense and high volume absorption.
Unfilled Overhead FVGs: A clean cluster of unmitigated 4-hour Fair Value Gaps sit above at $46.50 – $46.80, acting as the primary magnetic target for this relief move.
Clear Target Levels: Holding above $44.80 clears the path for a retest of the structural swing high at $48.00 and the upper supply block near $49.00.
🎯 My Active Trade Setup:
🟢 My Entry Zone: $44.80 – $45.80 (Current Price: ~$45.49 — Entering Now!)
🎯 Take Profit 1 (TP1): $46.80 (First Overhead FVG Resistance)
🎯 Take Profit 2 (TP2): $48.00 (Swing High of Structure)
🎯 Take Profit 3 (TP3): $49.20 (Major Upper Supply Block)
🛑 Stop Loss (SL): $43.90 (Strict stop below the liquidity sweep low)
💡 Strategy & Risk Management Tip:
As soon as price moves up to hit TP1 ($46.80), I will lock in partial profits and immediately shift my Stop Loss to Breakeven to make this a risk-free trade!
📢 Call To Action (CTA)
Are you jumping into this $LTC trade with me, or waiting for further confirmation? Share your entry price in the comments below! 💬👇
🔥 Like, Share, and Follow to track this trade step-by-step and catch daily high-accuracy SMC setups!
⚠️ Disclaimer: For educational purposes only. I am sharing my personal trade execution. Always manage your risk exposure carefully and DYOR.
#LTC #Litecoin #BinanceSquare #CryptoSignals #TechnicalAnalysis #CryptoTrading #DYOR #TradingView
📊 My Technical Analysis & Trade Plan (4H Chart)
Litecoin ($LTC) just completed a clean sell-side liquidity sweep down to $44.40, grabbing stop losses before bouncing straight back into our $44.80 – $45.80 demand zone. Price is currently sitting at $45.49, and I am actively scaling into a long position right here!
🔍 Key Technical Observations:
Liquidity Sweep & Quick Rejection: The aggressive wick down to $44.40 swept local market structure lows, showing immediate buying defense and high volume absorption.
Unfilled Overhead FVGs: A clean cluster of unmitigated 4-hour Fair Value Gaps sit above at $46.50 – $46.80, acting as the primary magnetic target for this relief move.
Clear Target Levels: Holding above $44.80 clears the path for a retest of the structural swing high at $48.00 and the upper supply block near $49.00.
🎯 My Active Trade Setup:
🟢 My Entry Zone: $44.80 – $45.80 (Current Price: ~$45.49 — Entering Now!)
🎯 Take Profit 1 (TP1): $46.80 (First Overhead FVG Resistance)
🎯 Take Profit 2 (TP2): $48.00 (Swing High of Structure)
🎯 Take Profit 3 (TP3): $49.20 (Major Upper Supply Block)
🛑 Stop Loss (SL): $43.90 (Strict stop below the liquidity sweep low)
💡 Strategy & Risk Management Tip:
As soon as price moves up to hit TP1 ($46.80), I will lock in partial profits and immediately shift my Stop Loss to Breakeven to make this a risk-free trade!
📢 Call To Action (CTA)
Are you jumping into this $LTC trade with me, or waiting for further confirmation? Share your entry price in the comments below! 💬👇
🔥 Like, Share, and Follow to track this trade step-by-step and catch daily high-accuracy SMC setups!
⚠️ Disclaimer: For educational purposes only. I am sharing my personal trade execution. Always manage your risk exposure carefully and DYOR.
#LTC #Litecoin #BinanceSquare #CryptoSignals #TechnicalAnalysis #CryptoTrading #DYOR #TradingView
171
·
--
🚨 I’M SCALING INTO $AAVE HERE! Major Liquidity Sweep Completed — Ready for the Next Leg Up! 🚀
📊 My Technical Analysis & Trade Plan (4H Chart)
Aave ($AAVE) just executed a clean sell-side liquidity sweep into the $94.00 – $95.50 demand block and is already showing a strong bullish reaction, currently sitting at $96.66. I am entering a long position on this bounce!
🔍 Key Technical Observations:
* Liquidity Sweep & Demand Rejection: Price swept local stop losses down to $94.20 before aggressive buyers stepped in, leaving a long lower tail/wick.
* Unfilled Overhead FVGs: The sharp dip leaves clear 4-hour Fair Value Gaps sitting above at $99.50 and the $102.00 structural resistance level.
* High Risk-to-Reward: Defending the $94.00 demand floor provides a high-probability R:R setup for a move back to local range highs.
🎯 My Active Trade Setup:
* 🟢 My Entry Zone: $94.50 – $97.00 (Current Price: ~$96.66 — Entering Now!)
* 🎯 Take Profit 1 (TP1): $99.50 (Overhead FVG / Local Resistance)
* 🎯 Take Profit 2 (TP2): $102.00 (Recent Double Top / High Retest)
* 🎯 Take Profit 3 (TP3): $106.50 (Upper Expansion Target)
* 🛑 Stop Loss (SL): $92.80 (Strict stop below local liquidity sweep floor)
💡 Strategy & Risk Management Tip:
Once price pushes up to hit TP1 ($99.50), I will secure partial profits and immediately move my Stop Loss to Breakeven to make this a completely risk-free trade!
📢 Call To Action (CTA)
Are you jumping into this $AAVE trade with me, or waiting for a confirmed breakout above $102.00? Let me know your entry price in the comments below! 💬👇
🔥 Like, Share, and Follow to track this trade step-by-step and catch daily high-accuracy SMC setups! 🎯
⚠️ Disclaimer: For educational purposes only. I am sharing my personal trade execution. Always manage your risk carefully and DYOR.
#AAVE #BinanceSquare #CryptoSignals #TechnicalAnalysis #CryptoTrading #DYOR #TradingView
🚨 I’M SCALING INTO $AAVE HERE! Major Liquidity Sweep Completed — Ready for the Next Leg Up! 🚀
📊 My Technical Analysis & Trade Plan (4H Chart)
Aave ($AAVE) just executed a clean sell-side liquidity sweep into the $94.00 – $95.50 demand block and is already showing a strong bullish reaction, currently sitting at $96.66. I am entering a long position on this bounce!
🔍 Key Technical Observations:
* Liquidity Sweep & Demand Rejection: Price swept local stop losses down to $94.20 before aggressive buyers stepped in, leaving a long lower tail/wick.
* Unfilled Overhead FVGs: The sharp dip leaves clear 4-hour Fair Value Gaps sitting above at $99.50 and the $102.00 structural resistance level.
* High Risk-to-Reward: Defending the $94.00 demand floor provides a high-probability R:R setup for a move back to local range highs.
🎯 My Active Trade Setup:
* 🟢 My Entry Zone: $94.50 – $97.00 (Current Price: ~$96.66 — Entering Now!)
* 🎯 Take Profit 1 (TP1): $99.50 (Overhead FVG / Local Resistance)
* 🎯 Take Profit 2 (TP2): $102.00 (Recent Double Top / High Retest)
* 🎯 Take Profit 3 (TP3): $106.50 (Upper Expansion Target)
* 🛑 Stop Loss (SL): $92.80 (Strict stop below local liquidity sweep floor)
💡 Strategy & Risk Management Tip:
Once price pushes up to hit TP1 ($99.50), I will secure partial profits and immediately move my Stop Loss to Breakeven to make this a completely risk-free trade!
📢 Call To Action (CTA)
Are you jumping into this $AAVE trade with me, or waiting for a confirmed breakout above $102.00? Let me know your entry price in the comments below! 💬👇
🔥 Like, Share, and Follow to track this trade step-by-step and catch daily high-accuracy SMC setups! 🎯
⚠️ Disclaimer: For educational purposes only. I am sharing my personal trade execution. Always manage your risk carefully and DYOR.
#AAVE #BinanceSquare #CryptoSignals #TechnicalAnalysis #CryptoTrading #DYOR #TradingView
📊 My Technical Analysis & Trade Plan (4H Chart)
Aave ($AAVE) just executed a clean sell-side liquidity sweep into the $94.00 – $95.50 demand block and is already showing a strong bullish reaction, currently sitting at $96.66. I am entering a long position on this bounce!
🔍 Key Technical Observations:
* Liquidity Sweep & Demand Rejection: Price swept local stop losses down to $94.20 before aggressive buyers stepped in, leaving a long lower tail/wick.
* Unfilled Overhead FVGs: The sharp dip leaves clear 4-hour Fair Value Gaps sitting above at $99.50 and the $102.00 structural resistance level.
* High Risk-to-Reward: Defending the $94.00 demand floor provides a high-probability R:R setup for a move back to local range highs.
🎯 My Active Trade Setup:
* 🟢 My Entry Zone: $94.50 – $97.00 (Current Price: ~$96.66 — Entering Now!)
* 🎯 Take Profit 1 (TP1): $99.50 (Overhead FVG / Local Resistance)
* 🎯 Take Profit 2 (TP2): $102.00 (Recent Double Top / High Retest)
* 🎯 Take Profit 3 (TP3): $106.50 (Upper Expansion Target)
* 🛑 Stop Loss (SL): $92.80 (Strict stop below local liquidity sweep floor)
💡 Strategy & Risk Management Tip:
Once price pushes up to hit TP1 ($99.50), I will secure partial profits and immediately move my Stop Loss to Breakeven to make this a completely risk-free trade!
📢 Call To Action (CTA)
Are you jumping into this $AAVE trade with me, or waiting for a confirmed breakout above $102.00? Let me know your entry price in the comments below! 💬👇
🔥 Like, Share, and Follow to track this trade step-by-step and catch daily high-accuracy SMC setups! 🎯
⚠️ Disclaimer: For educational purposes only. I am sharing my personal trade execution. Always manage your risk carefully and DYOR.
#AAVE #BinanceSquare #CryptoSignals #TechnicalAnalysis #CryptoTrading #DYOR #TradingView
1
95
·
--
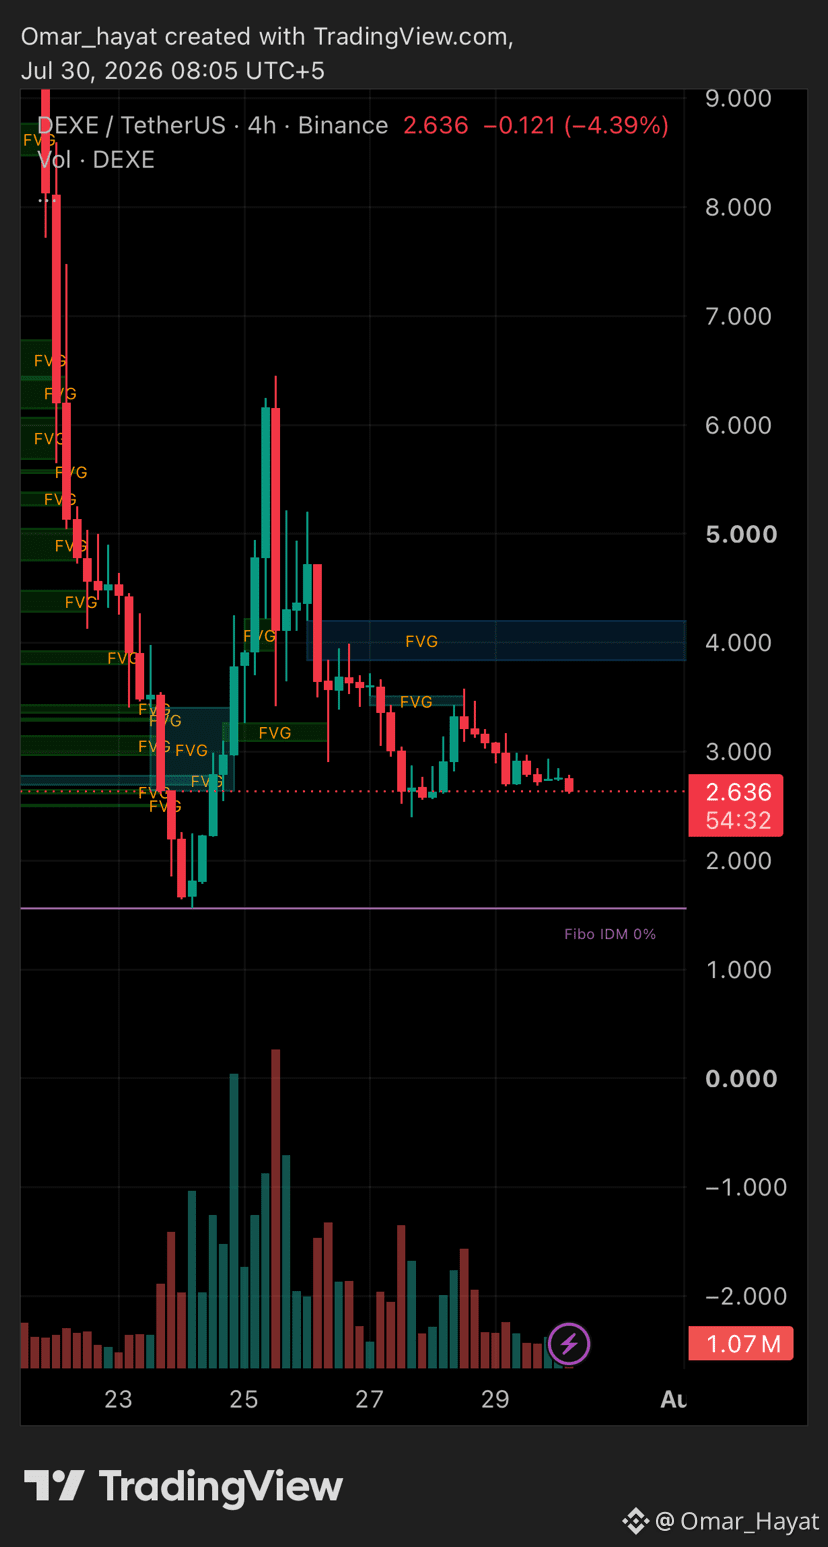
🚨 I’M SCALING INTO $DEXE HERE! Testing Critical Support Floor — Huge R:R Setup! 🚀
📊 Technical Analysis & My Trade Plan (4H Chart)
DeXe ($DEXE) has pulled back straight into our key $2.450 – $2.650 green demand block, currently trading at $2.636. I am actively scaling into a long position at these discounted levels!
🔍 Key Technical Observations:
* Liquidity Sweep: Price is sweeping sell-side liquidity around the $2.50 – $2.60 support region, absorbing sell volume into the demand floor.
* Massive Overhead FVGs: Multiple unmitigated 4-hour Fair Value Gaps sit untouched above at $3.15 and $3.80 – $4.10, acting as strong magnetic targets for a relief expansion.
* High Risk-to-Reward: Defending this structural support offers an exceptional R:R ratio for a strong bounce.
🎯 My Active Trade Setup:
* 🟢 My Entry Zone: $2.450 – $2.650 (Current Price: ~$2.636 — Scaling In!)
* 🎯 Take Profit 1 (TP1): $3.150 (First Local FVG Fill)
* 🎯 Take Profit 2 (TP2): $3.800 (Secondary Imbalance Target)
* 🎯 Take Profit 3 (TP3): $4.800 (Major Expansion Target)
* 🛑 Stop Loss (SL): $2.200 (Strict stop below key support floor)
💡 Strategy & Risk Tip:
Once price pushes up to hit TP1 ($3.150), secure partial profits and immediately move your Stop Loss to Breakeven to make this trade risk-free!
📢 Call To Action (CTA)
Are you grabbing $DEXE at this floor with me, or watching from the sidelines? Drop your entry price in the comments below! 💬👇
🔥 Like, Share, and Follow to track this trade step-by-step and catch daily high-accuracy SMC setups! 🎯
⚠️ Disclaimer: For educational purposes only. I am sharing my personal trade execution. Always manage your risk carefully and DYOR.
#DEXE #DeXe #BinanceSquare #CryptoSignals #TechnicalAnalysis #CryptoTrading #DYOR #TradingView
🚨 I’M SCALING INTO $DEXE HERE! Testing Critical Support Floor — Huge R:R Setup! 🚀
📊 Technical Analysis & My Trade Plan (4H Chart)
DeXe ($DEXE) has pulled back straight into our key $2.450 – $2.650 green demand block, currently trading at $2.636. I am actively scaling into a long position at these discounted levels!
🔍 Key Technical Observations:
* Liquidity Sweep: Price is sweeping sell-side liquidity around the $2.50 – $2.60 support region, absorbing sell volume into the demand floor.
* Massive Overhead FVGs: Multiple unmitigated 4-hour Fair Value Gaps sit untouched above at $3.15 and $3.80 – $4.10, acting as strong magnetic targets for a relief expansion.
* High Risk-to-Reward: Defending this structural support offers an exceptional R:R ratio for a strong bounce.
🎯 My Active Trade Setup:
* 🟢 My Entry Zone: $2.450 – $2.650 (Current Price: ~$2.636 — Scaling In!)
* 🎯 Take Profit 1 (TP1): $3.150 (First Local FVG Fill)
* 🎯 Take Profit 2 (TP2): $3.800 (Secondary Imbalance Target)
* 🎯 Take Profit 3 (TP3): $4.800 (Major Expansion Target)
* 🛑 Stop Loss (SL): $2.200 (Strict stop below key support floor)
💡 Strategy & Risk Tip:
Once price pushes up to hit TP1 ($3.150), secure partial profits and immediately move your Stop Loss to Breakeven to make this trade risk-free!
📢 Call To Action (CTA)
Are you grabbing $DEXE at this floor with me, or watching from the sidelines? Drop your entry price in the comments below! 💬👇
🔥 Like, Share, and Follow to track this trade step-by-step and catch daily high-accuracy SMC setups! 🎯
⚠️ Disclaimer: For educational purposes only. I am sharing my personal trade execution. Always manage your risk carefully and DYOR.
#DEXE #DeXe #BinanceSquare #CryptoSignals #TechnicalAnalysis #CryptoTrading #DYOR #TradingView
📊 Technical Analysis & My Trade Plan (4H Chart)
DeXe ($DEXE) has pulled back straight into our key $2.450 – $2.650 green demand block, currently trading at $2.636. I am actively scaling into a long position at these discounted levels!
🔍 Key Technical Observations:
* Liquidity Sweep: Price is sweeping sell-side liquidity around the $2.50 – $2.60 support region, absorbing sell volume into the demand floor.
* Massive Overhead FVGs: Multiple unmitigated 4-hour Fair Value Gaps sit untouched above at $3.15 and $3.80 – $4.10, acting as strong magnetic targets for a relief expansion.
* High Risk-to-Reward: Defending this structural support offers an exceptional R:R ratio for a strong bounce.
🎯 My Active Trade Setup:
* 🟢 My Entry Zone: $2.450 – $2.650 (Current Price: ~$2.636 — Scaling In!)
* 🎯 Take Profit 1 (TP1): $3.150 (First Local FVG Fill)
* 🎯 Take Profit 2 (TP2): $3.800 (Secondary Imbalance Target)
* 🎯 Take Profit 3 (TP3): $4.800 (Major Expansion Target)
* 🛑 Stop Loss (SL): $2.200 (Strict stop below key support floor)
💡 Strategy & Risk Tip:
Once price pushes up to hit TP1 ($3.150), secure partial profits and immediately move your Stop Loss to Breakeven to make this trade risk-free!
📢 Call To Action (CTA)
Are you grabbing $DEXE at this floor with me, or watching from the sidelines? Drop your entry price in the comments below! 💬👇
🔥 Like, Share, and Follow to track this trade step-by-step and catch daily high-accuracy SMC setups! 🎯
⚠️ Disclaimer: For educational purposes only. I am sharing my personal trade execution. Always manage your risk carefully and DYOR.
#DEXE #DeXe #BinanceSquare #CryptoSignals #TechnicalAnalysis #CryptoTrading #DYOR #TradingView
578
·
--
🚨 I’M ENTERING $BANK HERE! Key Demand Floor Reached — High Risk-to-Reward Setup! 🚀
📊 My Technical Analysis & Trade Plan (4H Chart)
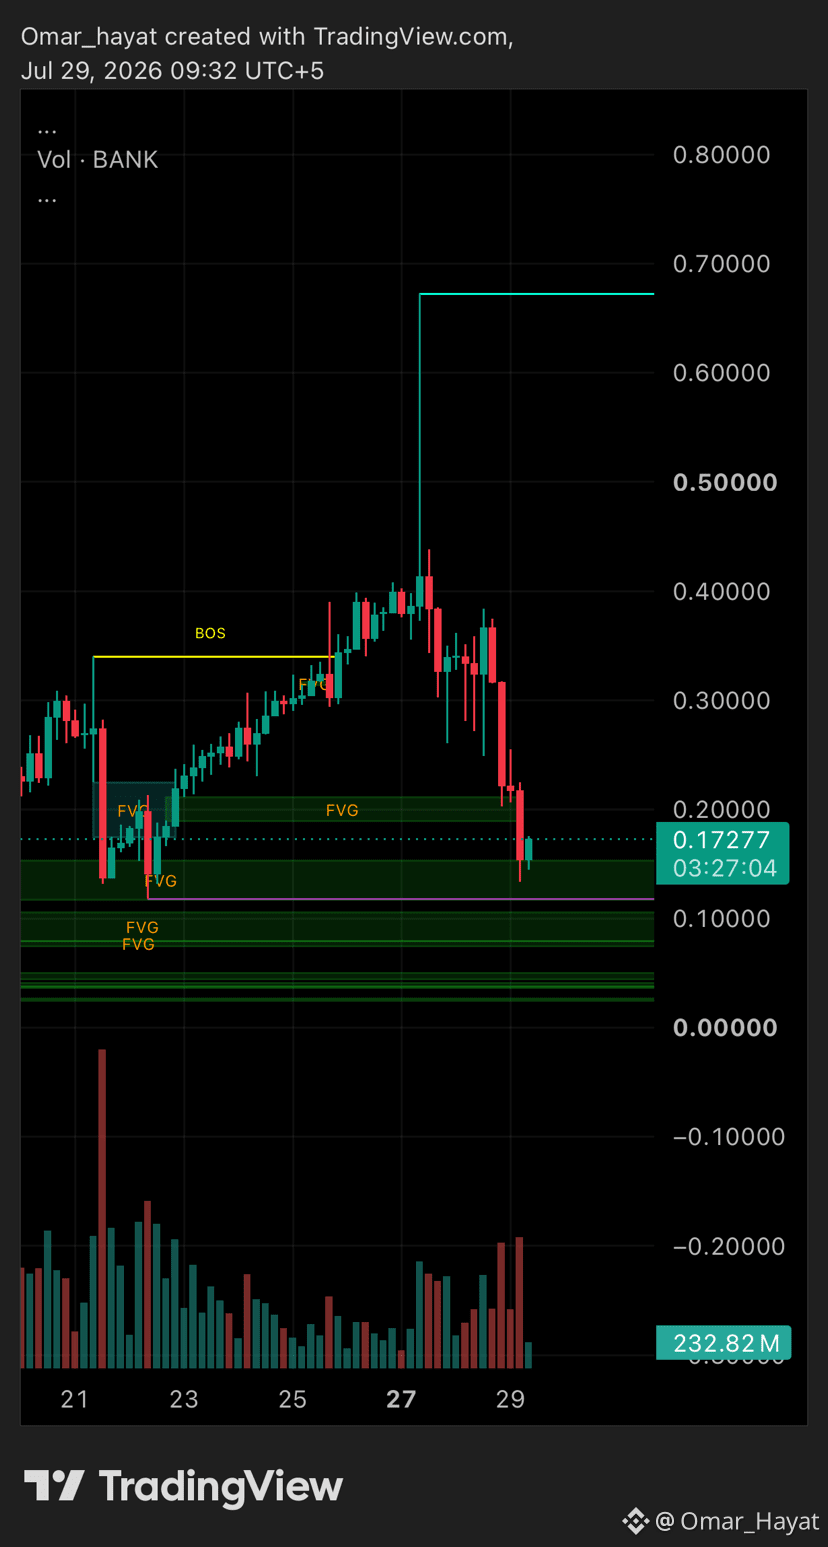
After our last massive profit run, $BANK has pulled all the way back into the major $0.15000 – $0.18000 green demand zone. Price is currently sitting at $0.17277, and I am scaling into a long position right here!
🔍 Why I'm Taking This Trade:
* Liquidity Sweep & FVG Mitigation: Price has aggressively swept lower liquidity and filled the deep 4-hour Fair Value Gap (FVG) imbalance.
* Prime Risk-to-Reward Ratio: Buying at the bottom of this demand floor offers an exceptional R:R for a strong mean-reversion relief rally.
* Key Support Defense: Buyers are actively stepping in to defend the $0.1500 structural floor.
🎯 My Active Trade Setup:
* 🟢 My Entry Zone: $0.15000 – $0.18000 (Current Price: ~$0.17277 — Scaling In!)
* 🎯 Take Profit 1 (TP1): $0.25000 (First Overhead FVG Fill)
* 🎯 Take Profit 2 (TP2): $0.32000 (Mid-Structure Resistance)
* 🎯 Take Profit 3 (TP3): $0.40000 (Major Resistance & High Target)
* 🛑 Stop Loss (SL): $0.12500 (Strict stop below key demand floor)
💡 My Strategy Tip:
Once price pushes up and hits TP1 ($0.25000), I will lock in partial profits and move my Stop Loss to Breakeven to make this a completely risk-free trade!
📢 Call To Action (CTA)
Are you jumping into this $BANK trade with me, or waiting for further confirmation? Share your entry price in the comments below! 💬👇
🔥 Like, Share, and Follow to track this trade with me step-by-step! 🎯
⚠️ Disclaimer: For educational purposes only. I am sharing my personal trade setup. Always manage your risk exposure and DYOR.
#BANK #BinanceSquare #CryptoSignals #TechnicalAnalysis #CryptoTrading #DYOR #TradingView
🚨 I’M ENTERING $BANK HERE! Key Demand Floor Reached — High Risk-to-Reward Setup! 🚀
📊 My Technical Analysis & Trade Plan (4H Chart)
After our last massive profit run, $BANK has pulled all the way back into the major $0.15000 – $0.18000 green demand zone. Price is currently sitting at $0.17277, and I am scaling into a long position right here!
🔍 Why I'm Taking This Trade:
* Liquidity Sweep & FVG Mitigation: Price has aggressively swept lower liquidity and filled the deep 4-hour Fair Value Gap (FVG) imbalance.
* Prime Risk-to-Reward Ratio: Buying at the bottom of this demand floor offers an exceptional R:R for a strong mean-reversion relief rally.
* Key Support Defense: Buyers are actively stepping in to defend the $0.1500 structural floor.
🎯 My Active Trade Setup:
* 🟢 My Entry Zone: $0.15000 – $0.18000 (Current Price: ~$0.17277 — Scaling In!)
* 🎯 Take Profit 1 (TP1): $0.25000 (First Overhead FVG Fill)
* 🎯 Take Profit 2 (TP2): $0.32000 (Mid-Structure Resistance)
* 🎯 Take Profit 3 (TP3): $0.40000 (Major Resistance & High Target)
* 🛑 Stop Loss (SL): $0.12500 (Strict stop below key demand floor)
💡 My Strategy Tip:
Once price pushes up and hits TP1 ($0.25000), I will lock in partial profits and move my Stop Loss to Breakeven to make this a completely risk-free trade!
📢 Call To Action (CTA)
Are you jumping into this $BANK trade with me, or waiting for further confirmation? Share your entry price in the comments below! 💬👇
🔥 Like, Share, and Follow to track this trade with me step-by-step! 🎯
⚠️ Disclaimer: For educational purposes only. I am sharing my personal trade setup. Always manage your risk exposure and DYOR.
#BANK #BinanceSquare #CryptoSignals #TechnicalAnalysis #CryptoTrading #DYOR #TradingView
📊 My Technical Analysis & Trade Plan (4H Chart)
After our last massive profit run, $BANK has pulled all the way back into the major $0.15000 – $0.18000 green demand zone. Price is currently sitting at $0.17277, and I am scaling into a long position right here!
🔍 Why I'm Taking This Trade:
* Liquidity Sweep & FVG Mitigation: Price has aggressively swept lower liquidity and filled the deep 4-hour Fair Value Gap (FVG) imbalance.
* Prime Risk-to-Reward Ratio: Buying at the bottom of this demand floor offers an exceptional R:R for a strong mean-reversion relief rally.
* Key Support Defense: Buyers are actively stepping in to defend the $0.1500 structural floor.
🎯 My Active Trade Setup:
* 🟢 My Entry Zone: $0.15000 – $0.18000 (Current Price: ~$0.17277 — Scaling In!)
* 🎯 Take Profit 1 (TP1): $0.25000 (First Overhead FVG Fill)
* 🎯 Take Profit 2 (TP2): $0.32000 (Mid-Structure Resistance)
* 🎯 Take Profit 3 (TP3): $0.40000 (Major Resistance & High Target)
* 🛑 Stop Loss (SL): $0.12500 (Strict stop below key demand floor)
💡 My Strategy Tip:
Once price pushes up and hits TP1 ($0.25000), I will lock in partial profits and move my Stop Loss to Breakeven to make this a completely risk-free trade!
📢 Call To Action (CTA)
Are you jumping into this $BANK trade with me, or waiting for further confirmation? Share your entry price in the comments below! 💬👇
🔥 Like, Share, and Follow to track this trade with me step-by-step! 🎯
⚠️ Disclaimer: For educational purposes only. I am sharing my personal trade setup. Always manage your risk exposure and DYOR.
#BANK #BinanceSquare #CryptoSignals #TechnicalAnalysis #CryptoTrading #DYOR #TradingView
344
·
--
🚨 $ZEC SUPPORT BREAKDOWN: $470 Demand Lost — Here Is the Updated Pivot Plan! 📉👇
📊 Technical Analysis & Value Update (4H Chart)
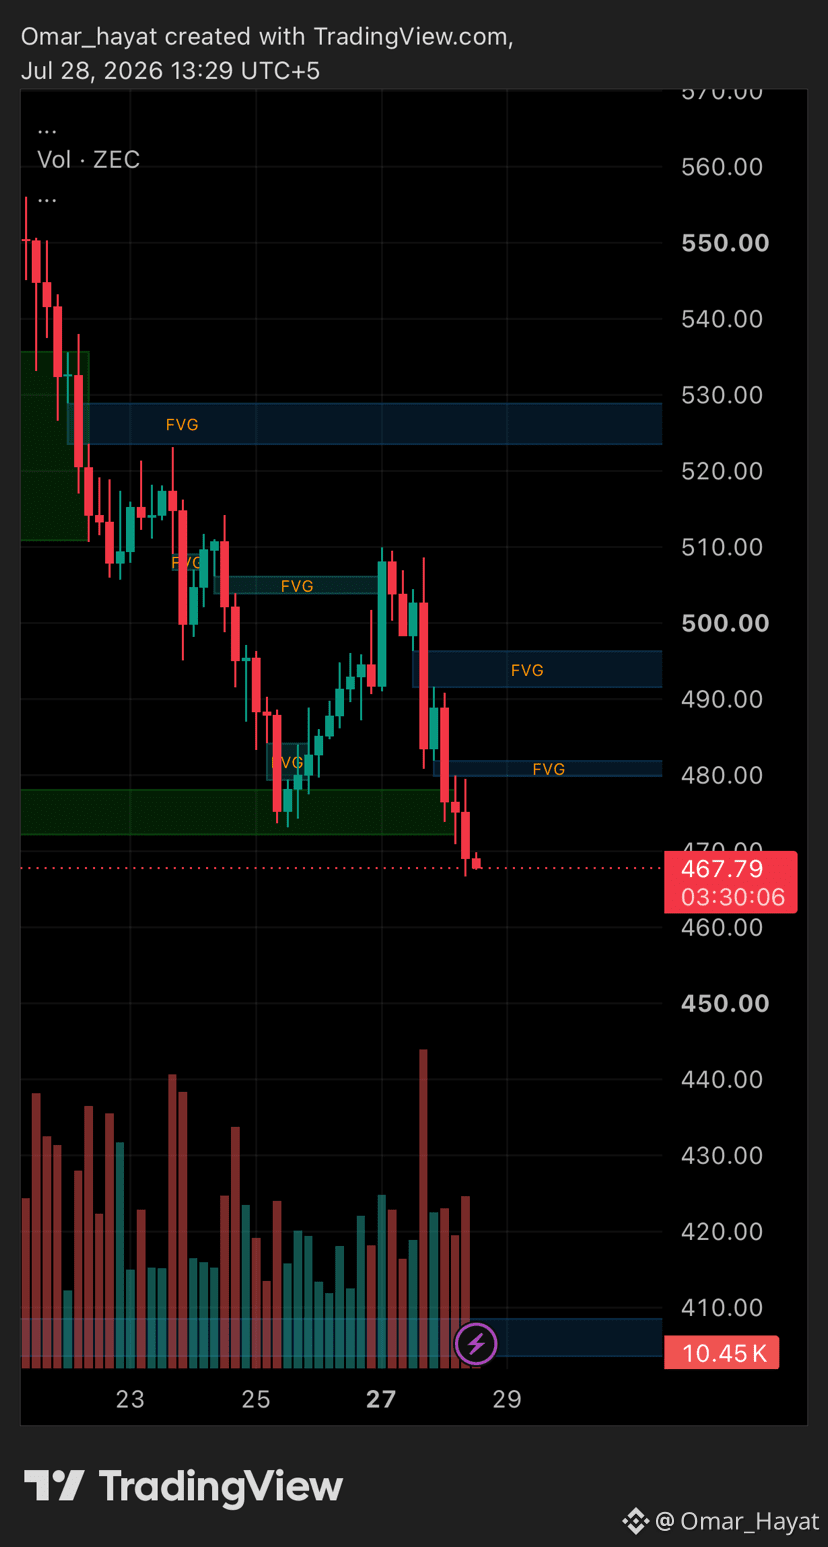
Transparency and risk management are crucial in trading! $ZEC failed to defend the $470.00 – $478.00 green demand block, breaking down to $467.79 and invalidating our earlier bounce setup (Stop Loss triggered).
🔍 Key Technical Breakdown Observations:
* Support Flipped to Resistance: The former $470.00 – $480.00 demand floor has officially broken down with red candle closure, flipping this area into immediate overhead FVG resistance.
* Market Structure Shift: Sellers have taken full control on the 4H timeframe, creating fresh imbalance (FVG) gaps above between $480.00 – $490.00.
* Next Major Target Floor: With local liquidity swept, $ZEC is heading toward the primary macro demand zone sitting lower around $400.00 – $410.00 (marked by the blue support block at the bottom).
🎯 Updated Trade Setup (Short / Bearish Retest):
* 🔴 Entry Zone: $478.00 – $488.00 (Overhead Resistance / FVG Retest)
* 🎯 Take Profit 1 (TP1): $450.00 (Local Extension)
* 🎯 Take Profit 2 (TP2): $425.00 (Mid-Way Liquidity Fill)
* 🎯 Take Profit 3 (TP3): $405.00 (Primary Macro Demand Floor)
* 🛑 Stop Loss (SL): $498.00 (Strict stop above structural resistance)
> 💡 Note for Spot Buyers: Wait patiently for price to reach the $400.00 – $410.00 macro demand block before attempting new long accumulation.
>
📢 Call To Action (CTA)
Did your Stop Loss protect your capital on this breakdown? Drop your current $ZEC strategy in the comments below! 💬👇
🔥 Like, Share, and Follow for transparent, real-time updates and strict risk management setups! 🎯
⚠️ Disclaimer: For educational purposes only. Always respect your Stop Loss, manage leverage carefully, and DYOR.
#ZEC #Zcash #BinanceSquare #CryptoSignals #TechnicalAnalysis #RiskManagement #CryptoTrading #DYOR #TradingView
🚨 $ZEC SUPPORT BREAKDOWN: $470 Demand Lost — Here Is the Updated Pivot Plan! 📉👇
📊 Technical Analysis & Value Update (4H Chart)
Transparency and risk management are crucial in trading! $ZEC failed to defend the $470.00 – $478.00 green demand block, breaking down to $467.79 and invalidating our earlier bounce setup (Stop Loss triggered).
🔍 Key Technical Breakdown Observations:
* Support Flipped to Resistance: The former $470.00 – $480.00 demand floor has officially broken down with red candle closure, flipping this area into immediate overhead FVG resistance.
* Market Structure Shift: Sellers have taken full control on the 4H timeframe, creating fresh imbalance (FVG) gaps above between $480.00 – $490.00.
* Next Major Target Floor: With local liquidity swept, $ZEC is heading toward the primary macro demand zone sitting lower around $400.00 – $410.00 (marked by the blue support block at the bottom).
🎯 Updated Trade Setup (Short / Bearish Retest):
* 🔴 Entry Zone: $478.00 – $488.00 (Overhead Resistance / FVG Retest)
* 🎯 Take Profit 1 (TP1): $450.00 (Local Extension)
* 🎯 Take Profit 2 (TP2): $425.00 (Mid-Way Liquidity Fill)
* 🎯 Take Profit 3 (TP3): $405.00 (Primary Macro Demand Floor)
* 🛑 Stop Loss (SL): $498.00 (Strict stop above structural resistance)
> 💡 Note for Spot Buyers: Wait patiently for price to reach the $400.00 – $410.00 macro demand block before attempting new long accumulation.
>
📢 Call To Action (CTA)
Did your Stop Loss protect your capital on this breakdown? Drop your current $ZEC strategy in the comments below! 💬👇
🔥 Like, Share, and Follow for transparent, real-time updates and strict risk management setups! 🎯
⚠️ Disclaimer: For educational purposes only. Always respect your Stop Loss, manage leverage carefully, and DYOR.
#ZEC #Zcash #BinanceSquare #CryptoSignals #TechnicalAnalysis #RiskManagement #CryptoTrading #DYOR #TradingView
📊 Technical Analysis & Value Update (4H Chart)
Transparency and risk management are crucial in trading! $ZEC failed to defend the $470.00 – $478.00 green demand block, breaking down to $467.79 and invalidating our earlier bounce setup (Stop Loss triggered).
🔍 Key Technical Breakdown Observations:
* Support Flipped to Resistance: The former $470.00 – $480.00 demand floor has officially broken down with red candle closure, flipping this area into immediate overhead FVG resistance.
* Market Structure Shift: Sellers have taken full control on the 4H timeframe, creating fresh imbalance (FVG) gaps above between $480.00 – $490.00.
* Next Major Target Floor: With local liquidity swept, $ZEC is heading toward the primary macro demand zone sitting lower around $400.00 – $410.00 (marked by the blue support block at the bottom).
🎯 Updated Trade Setup (Short / Bearish Retest):
* 🔴 Entry Zone: $478.00 – $488.00 (Overhead Resistance / FVG Retest)
* 🎯 Take Profit 1 (TP1): $450.00 (Local Extension)
* 🎯 Take Profit 2 (TP2): $425.00 (Mid-Way Liquidity Fill)
* 🎯 Take Profit 3 (TP3): $405.00 (Primary Macro Demand Floor)
* 🛑 Stop Loss (SL): $498.00 (Strict stop above structural resistance)
> 💡 Note for Spot Buyers: Wait patiently for price to reach the $400.00 – $410.00 macro demand block before attempting new long accumulation.
>
📢 Call To Action (CTA)
Did your Stop Loss protect your capital on this breakdown? Drop your current $ZEC strategy in the comments below! 💬👇
🔥 Like, Share, and Follow for transparent, real-time updates and strict risk management setups! 🎯
⚠️ Disclaimer: For educational purposes only. Always respect your Stop Loss, manage leverage carefully, and DYOR.
#ZEC #Zcash #BinanceSquare #CryptoSignals #TechnicalAnalysis #RiskManagement #CryptoTrading #DYOR #TradingView
48
·
--
🚨 $DEXE BUILDING A POTENTIAL BOTTOM! Is a Massive 4H Relief Rally Incoming? 🚀
📊 Technical Analysis & Value Update (4H Chart)
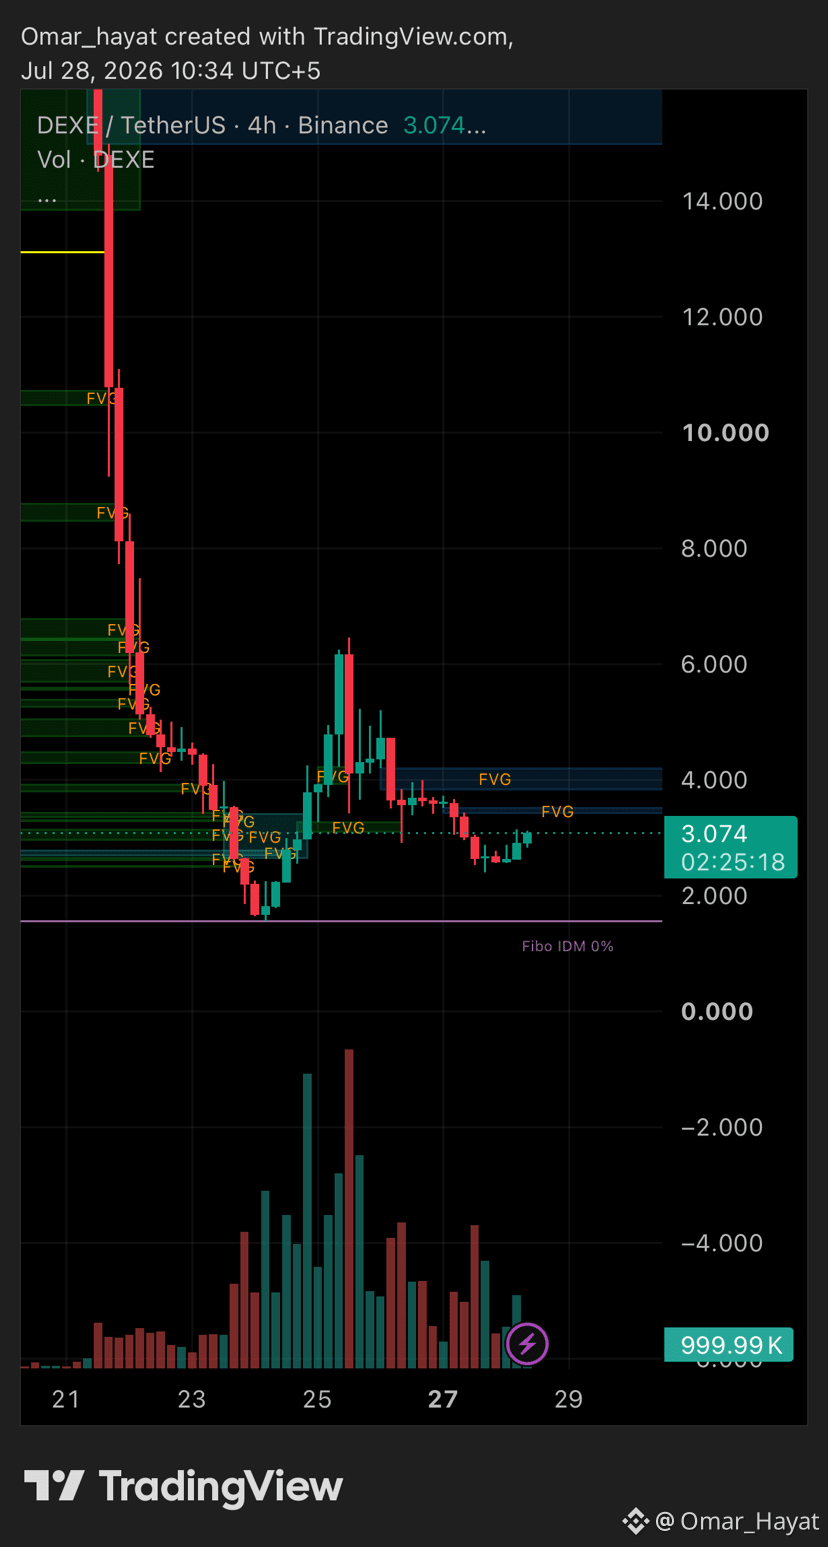
DeXe ($DEXE) is forming a solid consolidation base around $3.07, holding firmly above its demand floor after cooling down from its recent impulse wave!
🔍 Key Technical Observations:
* Demand Base Defense: Price swept local lower liquidity and is holding support inside the $2.800 – $3.150 accumulation zone.
* Unfilled Overhead FVGs: Multiple unmitigated 4-hour Fair Value Gaps sit above between $3.500 – $3.700 and $4.000 – $4.300, acting as strong magnetic targets for buyers.
* Higher Low Potential: Defense of the $2.500 macro support level keeps the structural recovery scenario alive for a push back toward local swing highs.
🎯 Trade Setup:
* 🟢 Entry Zone: $2.800 – $3.150 (Demand Floor / Consolidation Accumulation)
* 🎯 Take Profit 1 (TP1): $3.6000 (First 4H FVG Fill)
* 🎯 Take Profit 2 (TP2): $4.3000 (Secondary FVG & Resistance Target)
* 🎯 Take Profit 3 (TP3): $5.5000 (Major Swing High Retest)
* 🛑 Stop Loss (SL): $2.4500 (Strict stop below key support floor)
💡 Strategy & Risk Tip:
Look for lower-timeframe (15M / 1H) bullish confirmation inside the entry zone before taking positions. Once TP1 ($3.60) is reached, secure partial profits and shift your Stop Loss to Breakeven to keep the trade risk-free!
📢 Call To Action (CTA)
Are you accumulating $DEXE at this bottom support or waiting for a breakout above $3.50? Let me know in the comments below!
💬👇
🔥 Like, Share, and Follow for daily high-accuracy SMC setups and real-time market updates! 🎯
⚠️ Disclaimer: Educational purposes only. Not financial advice. Always practice strict risk management and DYOR.
#DEXE #DeXe #BinanceSquare #CryptoSignals #TechnicalAnalysis #CryptoTrading #DYOR #TradingView
🚨 $DEXE BUILDING A POTENTIAL BOTTOM! Is a Massive 4H Relief Rally Incoming? 🚀
📊 Technical Analysis & Value Update (4H Chart)
DeXe ($DEXE) is forming a solid consolidation base around $3.07, holding firmly above its demand floor after cooling down from its recent impulse wave!
🔍 Key Technical Observations:
* Demand Base Defense: Price swept local lower liquidity and is holding support inside the $2.800 – $3.150 accumulation zone.
* Unfilled Overhead FVGs: Multiple unmitigated 4-hour Fair Value Gaps sit above between $3.500 – $3.700 and $4.000 – $4.300, acting as strong magnetic targets for buyers.
* Higher Low Potential: Defense of the $2.500 macro support level keeps the structural recovery scenario alive for a push back toward local swing highs.
🎯 Trade Setup:
* 🟢 Entry Zone: $2.800 – $3.150 (Demand Floor / Consolidation Accumulation)
* 🎯 Take Profit 1 (TP1): $3.6000 (First 4H FVG Fill)
* 🎯 Take Profit 2 (TP2): $4.3000 (Secondary FVG & Resistance Target)
* 🎯 Take Profit 3 (TP3): $5.5000 (Major Swing High Retest)
* 🛑 Stop Loss (SL): $2.4500 (Strict stop below key support floor)
💡 Strategy & Risk Tip:
Look for lower-timeframe (15M / 1H) bullish confirmation inside the entry zone before taking positions. Once TP1 ($3.60) is reached, secure partial profits and shift your Stop Loss to Breakeven to keep the trade risk-free!
📢 Call To Action (CTA)
Are you accumulating $DEXE at this bottom support or waiting for a breakout above $3.50? Let me know in the comments below!
💬👇
🔥 Like, Share, and Follow for daily high-accuracy SMC setups and real-time market updates! 🎯
⚠️ Disclaimer: Educational purposes only. Not financial advice. Always practice strict risk management and DYOR.
#DEXE #DeXe #BinanceSquare #CryptoSignals #TechnicalAnalysis #CryptoTrading #DYOR #TradingView
📊 Technical Analysis & Value Update (4H Chart)
DeXe ($DEXE) is forming a solid consolidation base around $3.07, holding firmly above its demand floor after cooling down from its recent impulse wave!
🔍 Key Technical Observations:
* Demand Base Defense: Price swept local lower liquidity and is holding support inside the $2.800 – $3.150 accumulation zone.
* Unfilled Overhead FVGs: Multiple unmitigated 4-hour Fair Value Gaps sit above between $3.500 – $3.700 and $4.000 – $4.300, acting as strong magnetic targets for buyers.
* Higher Low Potential: Defense of the $2.500 macro support level keeps the structural recovery scenario alive for a push back toward local swing highs.
🎯 Trade Setup:
* 🟢 Entry Zone: $2.800 – $3.150 (Demand Floor / Consolidation Accumulation)
* 🎯 Take Profit 1 (TP1): $3.6000 (First 4H FVG Fill)
* 🎯 Take Profit 2 (TP2): $4.3000 (Secondary FVG & Resistance Target)
* 🎯 Take Profit 3 (TP3): $5.5000 (Major Swing High Retest)
* 🛑 Stop Loss (SL): $2.4500 (Strict stop below key support floor)
💡 Strategy & Risk Tip:
Look for lower-timeframe (15M / 1H) bullish confirmation inside the entry zone before taking positions. Once TP1 ($3.60) is reached, secure partial profits and shift your Stop Loss to Breakeven to keep the trade risk-free!
📢 Call To Action (CTA)
Are you accumulating $DEXE at this bottom support or waiting for a breakout above $3.50? Let me know in the comments below!
💬👇
🔥 Like, Share, and Follow for daily high-accuracy SMC setups and real-time market updates! 🎯
⚠️ Disclaimer: Educational purposes only. Not financial advice. Always practice strict risk management and DYOR.
#DEXE #DeXe #BinanceSquare #CryptoSignals #TechnicalAnalysis #CryptoTrading #DYOR #TradingView
621
·
--
🚨 $SUI AT CRITICAL LIQUIDITY SWEEP! Relief Bounce or Deeper Breakdown Ahead? 🚀📉
📊 Technical Analysis & Value Update (4H Chart)
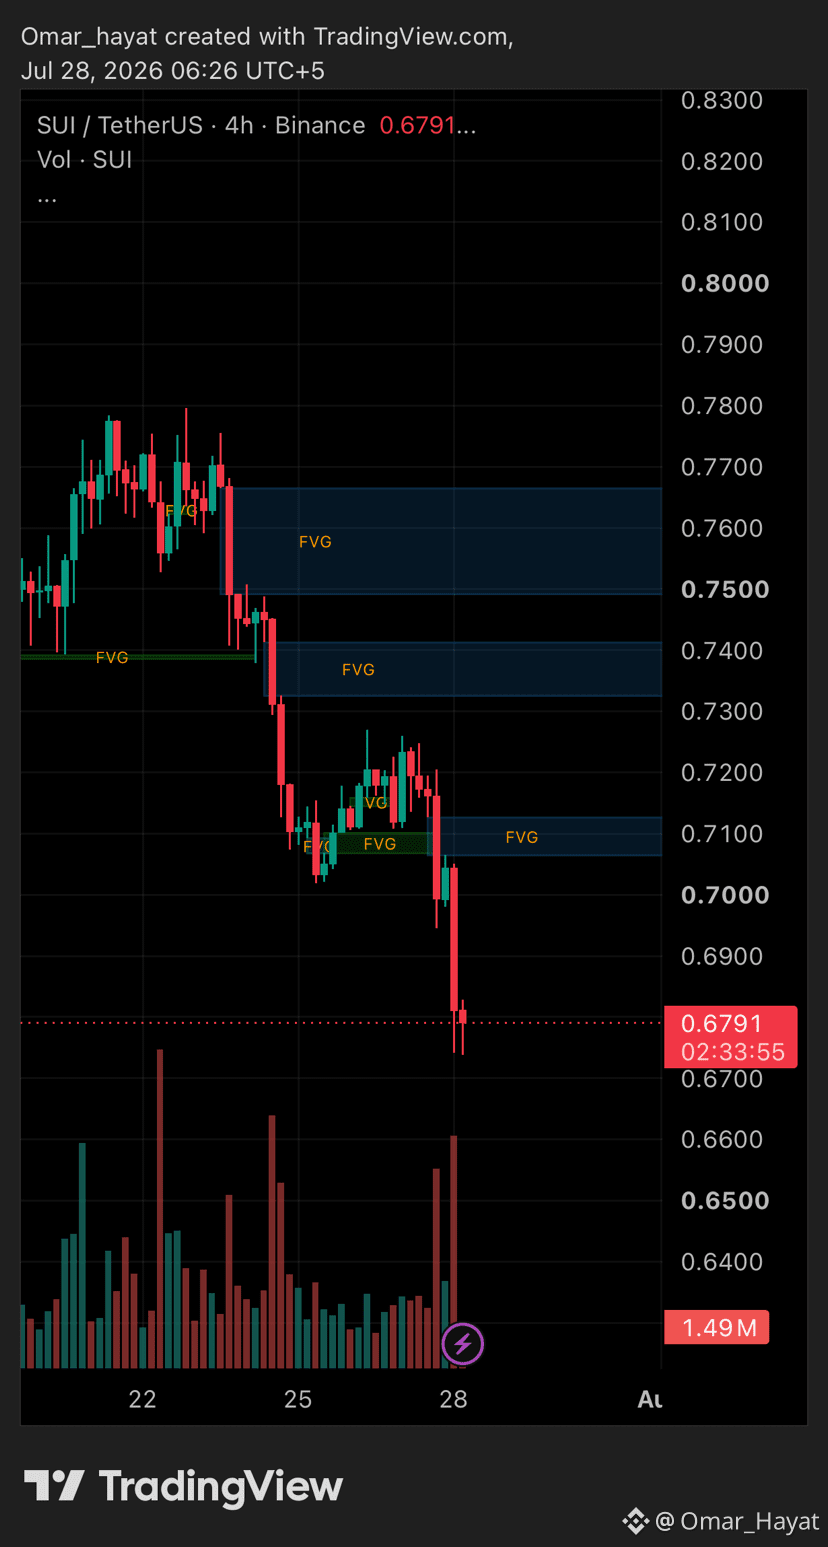
Sui ($SUI) has experienced an aggressive sell-off from the $0.7800 highs down to test key lower liquidity around $0.6700 – $0.6791.
🔍 Key Technical Observations:
* Liquidity Sweep in Progress: Price swept past local market structure lows, tapping into the $0.6700 – $0.6750 demand zone with strong volume.
* Overhead Imbalances (FVGs): A sharp drop leaves a cluster of unmitigated 4H Fair Value Gaps above at $0.7080 – $0.7150 and $0.7320 – $0.7420.
* Bounce Scenario: Holding above $0.6700 establishes a local bottom for a mean-reversion relief rally into the overhead FVG blocks.
🎯 Trade Setup:
* 🟢 Entry Zone: $0.6700 – $0.6850 (Demand / Liquidity Sweep Zone)
* 🎯 Take Profit 1 (TP1): $0.7100 (First Overhead FVG Fill)
* 🎯 Take Profit 2 (TP2): $0.7350 (Mid-Level Imbalance Target)
* 🎯 Take Profit 3 (TP3): $0.7600 (Major Supply & Swing High Resistance)
* 🛑 Stop Loss (SL): $0.6550 (Strict stop below key liquidity floor)
💡 Strategy & Risk Tip:
Wait for lower-timeframe (15M / 1H) bullish displacement or an engulfing candle above $0.6800 before scaling in. Lock in partial profits at TP1 and shift your Stop Loss to Breakeven immediately to keep the trade risk-free.
📢 Call To Action (CTA)
Are you buying this $SUI dip or waiting for $0.7100+ confirmation? Share your target in the comments below! 💬👇
🔥 Like, Share, and Follow for daily high-accuracy SMC trade setups and real-time market updates! 🎯
⚠️ Disclaimer: For educational purposes only. Not financial advice. Always practice strict risk management and DYOR.
#SUI #SuiNetwork #BinanceSquare #CryptoSignals #TechnicalAnalysis #CryptoTrading #DYOR #TradingView
🚨 $SUI AT CRITICAL LIQUIDITY SWEEP! Relief Bounce or Deeper Breakdown Ahead? 🚀📉
📊 Technical Analysis & Value Update (4H Chart)
Sui ($SUI) has experienced an aggressive sell-off from the $0.7800 highs down to test key lower liquidity around $0.6700 – $0.6791.
🔍 Key Technical Observations:
* Liquidity Sweep in Progress: Price swept past local market structure lows, tapping into the $0.6700 – $0.6750 demand zone with strong volume.
* Overhead Imbalances (FVGs): A sharp drop leaves a cluster of unmitigated 4H Fair Value Gaps above at $0.7080 – $0.7150 and $0.7320 – $0.7420.
* Bounce Scenario: Holding above $0.6700 establishes a local bottom for a mean-reversion relief rally into the overhead FVG blocks.
🎯 Trade Setup:
* 🟢 Entry Zone: $0.6700 – $0.6850 (Demand / Liquidity Sweep Zone)
* 🎯 Take Profit 1 (TP1): $0.7100 (First Overhead FVG Fill)
* 🎯 Take Profit 2 (TP2): $0.7350 (Mid-Level Imbalance Target)
* 🎯 Take Profit 3 (TP3): $0.7600 (Major Supply & Swing High Resistance)
* 🛑 Stop Loss (SL): $0.6550 (Strict stop below key liquidity floor)
💡 Strategy & Risk Tip:
Wait for lower-timeframe (15M / 1H) bullish displacement or an engulfing candle above $0.6800 before scaling in. Lock in partial profits at TP1 and shift your Stop Loss to Breakeven immediately to keep the trade risk-free.
📢 Call To Action (CTA)
Are you buying this $SUI dip or waiting for $0.7100+ confirmation? Share your target in the comments below! 💬👇
🔥 Like, Share, and Follow for daily high-accuracy SMC trade setups and real-time market updates! 🎯
⚠️ Disclaimer: For educational purposes only. Not financial advice. Always practice strict risk management and DYOR.
#SUI #SuiNetwork #BinanceSquare #CryptoSignals #TechnicalAnalysis #CryptoTrading #DYOR #TradingView
📊 Technical Analysis & Value Update (4H Chart)
Sui ($SUI) has experienced an aggressive sell-off from the $0.7800 highs down to test key lower liquidity around $0.6700 – $0.6791.
🔍 Key Technical Observations:
* Liquidity Sweep in Progress: Price swept past local market structure lows, tapping into the $0.6700 – $0.6750 demand zone with strong volume.
* Overhead Imbalances (FVGs): A sharp drop leaves a cluster of unmitigated 4H Fair Value Gaps above at $0.7080 – $0.7150 and $0.7320 – $0.7420.
* Bounce Scenario: Holding above $0.6700 establishes a local bottom for a mean-reversion relief rally into the overhead FVG blocks.
🎯 Trade Setup:
* 🟢 Entry Zone: $0.6700 – $0.6850 (Demand / Liquidity Sweep Zone)
* 🎯 Take Profit 1 (TP1): $0.7100 (First Overhead FVG Fill)
* 🎯 Take Profit 2 (TP2): $0.7350 (Mid-Level Imbalance Target)
* 🎯 Take Profit 3 (TP3): $0.7600 (Major Supply & Swing High Resistance)
* 🛑 Stop Loss (SL): $0.6550 (Strict stop below key liquidity floor)
💡 Strategy & Risk Tip:
Wait for lower-timeframe (15M / 1H) bullish displacement or an engulfing candle above $0.6800 before scaling in. Lock in partial profits at TP1 and shift your Stop Loss to Breakeven immediately to keep the trade risk-free.
📢 Call To Action (CTA)
Are you buying this $SUI dip or waiting for $0.7100+ confirmation? Share your target in the comments below! 💬👇
🔥 Like, Share, and Follow for daily high-accuracy SMC trade setups and real-time market updates! 🎯
⚠️ Disclaimer: For educational purposes only. Not financial advice. Always practice strict risk management and DYOR.
#SUI #SuiNetwork #BinanceSquare #CryptoSignals #TechnicalAnalysis #CryptoTrading #DYOR #TradingView
117
·
--
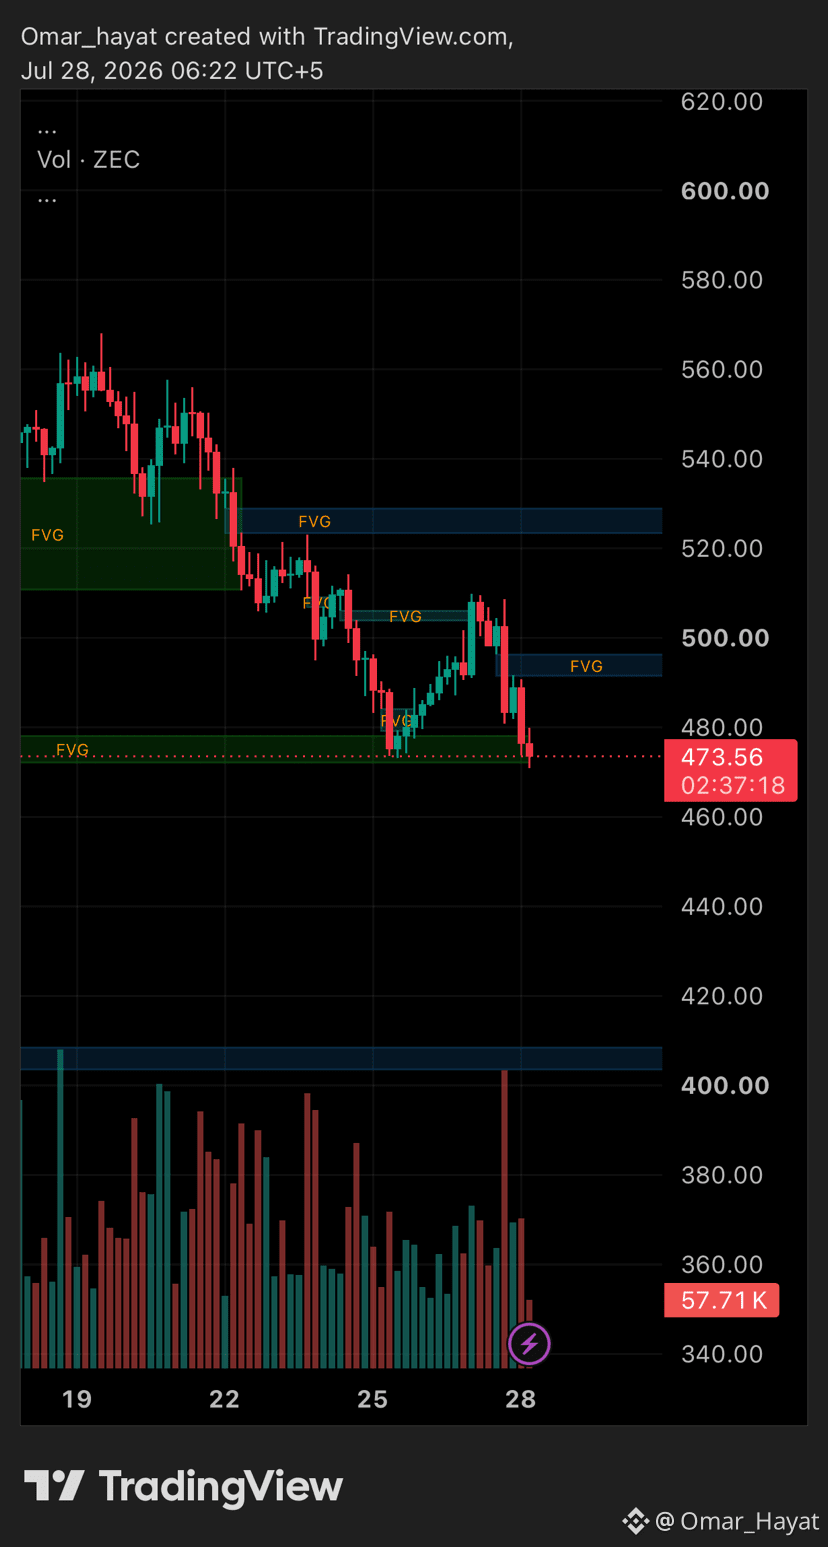
🚨 $ZEC RETESTING CRITICAL DEMAND FLOOR! Bounce or Breakdown Ahead? 📉👇
📊 Technical Analysis & Value Update (4H Chart)
$ZEC has pulled back directly into our key $470.00 – $478.00 4-hour demand zone / FVG support, currently trading around $473.56.
🔍 Key Technical Observations:
* Key Support Retest: After rejecting from the $508 overhead FVG, price returned to retest the exact green demand block where buyers previously stepped in strong.
* Double Bottom Potential: Holding firmly above $470.00 keeps the local double-bottom structure intact for a potential bullish reversal.
* Overhead Targets: A clean bounce off this floor targets the local $495.00 – $500.00 FVG first, before expanding toward the major $525.00 supply block.
🎯 Trade Setup:
* 🟢 Entry Zone: $470.00 – $478.00 (4H Demand Retest Zone)
* 🎯 Take Profit 1 (TP1): $500.00 (Local FVG Fill)
* 🎯 Take Profit 2 (TP2): $525.00 (Major Overhead Supply)
* 🎯 Take Profit 3 (TP3): $550.00 (Swing High Resistance)
* 🛑 Stop Loss (SL): $458.00 (Below Key Support Floor)
💡 Strategy & Risk Tip:
Look for lower-timeframe (15M / 1H) bullish confirmation—such as a strong rejection wick or engulfing candle—inside the $470 – $475 zone before entering. Once TP1 is hit, move your Stop Loss to Breakeven!
📢 Call To Action (CTA)
Are you taking entries on this $ZEC demand retest or waiting for higher confirmation? Drop your plan in the comments below! 💬👇
🔥 Like, Share, and Follow for daily high-accuracy SMC setups and real-time market updates! 🎯
⚠️ Disclaimer: For educational purposes only and does not constitute financial advice. Always practice strict risk management and DYOR.
#ZEC #Zcash #BinanceSquare #CryptoSignals #TechnicalAnalysis #CryptoTrading #DYOR #TradingView
🚨 $ZEC RETESTING CRITICAL DEMAND FLOOR! Bounce or Breakdown Ahead? 📉👇
📊 Technical Analysis & Value Update (4H Chart)
$ZEC has pulled back directly into our key $470.00 – $478.00 4-hour demand zone / FVG support, currently trading around $473.56.
🔍 Key Technical Observations:
* Key Support Retest: After rejecting from the $508 overhead FVG, price returned to retest the exact green demand block where buyers previously stepped in strong.
* Double Bottom Potential: Holding firmly above $470.00 keeps the local double-bottom structure intact for a potential bullish reversal.
* Overhead Targets: A clean bounce off this floor targets the local $495.00 – $500.00 FVG first, before expanding toward the major $525.00 supply block.
🎯 Trade Setup:
* 🟢 Entry Zone: $470.00 – $478.00 (4H Demand Retest Zone)
* 🎯 Take Profit 1 (TP1): $500.00 (Local FVG Fill)
* 🎯 Take Profit 2 (TP2): $525.00 (Major Overhead Supply)
* 🎯 Take Profit 3 (TP3): $550.00 (Swing High Resistance)
* 🛑 Stop Loss (SL): $458.00 (Below Key Support Floor)
💡 Strategy & Risk Tip:
Look for lower-timeframe (15M / 1H) bullish confirmation—such as a strong rejection wick or engulfing candle—inside the $470 – $475 zone before entering. Once TP1 is hit, move your Stop Loss to Breakeven!
📢 Call To Action (CTA)
Are you taking entries on this $ZEC demand retest or waiting for higher confirmation? Drop your plan in the comments below! 💬👇
🔥 Like, Share, and Follow for daily high-accuracy SMC setups and real-time market updates! 🎯
⚠️ Disclaimer: For educational purposes only and does not constitute financial advice. Always practice strict risk management and DYOR.
#ZEC #Zcash #BinanceSquare #CryptoSignals #TechnicalAnalysis #CryptoTrading #DYOR #TradingView
📊 Technical Analysis & Value Update (4H Chart)
$ZEC has pulled back directly into our key $470.00 – $478.00 4-hour demand zone / FVG support, currently trading around $473.56.
🔍 Key Technical Observations:
* Key Support Retest: After rejecting from the $508 overhead FVG, price returned to retest the exact green demand block where buyers previously stepped in strong.
* Double Bottom Potential: Holding firmly above $470.00 keeps the local double-bottom structure intact for a potential bullish reversal.
* Overhead Targets: A clean bounce off this floor targets the local $495.00 – $500.00 FVG first, before expanding toward the major $525.00 supply block.
🎯 Trade Setup:
* 🟢 Entry Zone: $470.00 – $478.00 (4H Demand Retest Zone)
* 🎯 Take Profit 1 (TP1): $500.00 (Local FVG Fill)
* 🎯 Take Profit 2 (TP2): $525.00 (Major Overhead Supply)
* 🎯 Take Profit 3 (TP3): $550.00 (Swing High Resistance)
* 🛑 Stop Loss (SL): $458.00 (Below Key Support Floor)
💡 Strategy & Risk Tip:
Look for lower-timeframe (15M / 1H) bullish confirmation—such as a strong rejection wick or engulfing candle—inside the $470 – $475 zone before entering. Once TP1 is hit, move your Stop Loss to Breakeven!
📢 Call To Action (CTA)
Are you taking entries on this $ZEC demand retest or waiting for higher confirmation? Drop your plan in the comments below! 💬👇
🔥 Like, Share, and Follow for daily high-accuracy SMC setups and real-time market updates! 🎯
⚠️ Disclaimer: For educational purposes only and does not constitute financial advice. Always practice strict risk management and DYOR.
#ZEC #Zcash #BinanceSquare #CryptoSignals #TechnicalAnalysis #CryptoTrading #DYOR #TradingView
191
·
--
🎯 $BANK / USDT UPDATE: ALL TAKE PROFIT TARGETS SMASHED TO PIECES! 💥🚀
🚨 Flawless Execution & Trade Acknowledgment 📊
Another masterclass setup played out with absolute 100% precision! Following our call inside the $0.34000 – $0.38500 accumulation zone, $BANK delivered an explosive vertical surge, spiking all the way past $0.67000 and obliterating every single target!
🔍 Trade Highlights:
* Perfect Entry: Price consolidated right in our BOS retest zone before triggering a massive impulse wave.
* Maximum Target Hit: Not only did it smash TP1 and TP2, but it flew straight through TP3 ($0.60000) to print a huge high of $0.67000+!
* Massive Profit: Traders who followed this setup secured an easy +70% to +80%+ gain on spot/leverage!
🎯 Trade Setup Status:
* 🟢 Entry Zone: $0.34000 – $0.38500 [FILLED PERFECTLY ✅]
* 🎯 Take Profit 1 (TP1): $0.41800 [DONE ✅]
* 🎯 Take Profit 2 (TP2): $0.50000 [DONE ✅]
* 🎯 Take Profit 3 (TP3): $0.60000 [SMASHED & EXCEEDED TO $0.67+ ✅]
📢 Call To Action (CTA)
Congratulations to everyone who trusted the analysis and booked massive profits on $BANK! 🥳💰
Did you lock in your gains on this move? Drop your profit percentages and thoughts in the comments below! 💬👇
🔥 Hit the Like button, Quote/Share this post to show the power of precision setups, and Follow for daily high-accuracy SMC calls! 🎯
⚠️ Disclaimer: For educational purposes only. Always secure profits, manage your risk, and DYOR.
#BANK #BinanceSquare #CryptoTrading #CryptoSignals #TP3Hit #TechnicalAnalysis #DYOR #TradingView
🎯 $BANK / USDT UPDATE: ALL TAKE PROFIT TARGETS SMASHED TO PIECES! 💥🚀
🚨 Flawless Execution & Trade Acknowledgment 📊
Another masterclass setup played out with absolute 100% precision! Following our call inside the $0.34000 – $0.38500 accumulation zone, $BANK delivered an explosive vertical surge, spiking all the way past $0.67000 and obliterating every single target!
🔍 Trade Highlights:
* Perfect Entry: Price consolidated right in our BOS retest zone before triggering a massive impulse wave.
* Maximum Target Hit: Not only did it smash TP1 and TP2, but it flew straight through TP3 ($0.60000) to print a huge high of $0.67000+!
* Massive Profit: Traders who followed this setup secured an easy +70% to +80%+ gain on spot/leverage!
🎯 Trade Setup Status:
* 🟢 Entry Zone: $0.34000 – $0.38500 [FILLED PERFECTLY ✅]
* 🎯 Take Profit 1 (TP1): $0.41800 [DONE ✅]
* 🎯 Take Profit 2 (TP2): $0.50000 [DONE ✅]
* 🎯 Take Profit 3 (TP3): $0.60000 [SMASHED & EXCEEDED TO $0.67+ ✅]
📢 Call To Action (CTA)
Congratulations to everyone who trusted the analysis and booked massive profits on $BANK! 🥳💰
Did you lock in your gains on this move? Drop your profit percentages and thoughts in the comments below! 💬👇
🔥 Hit the Like button, Quote/Share this post to show the power of precision setups, and Follow for daily high-accuracy SMC calls! 🎯
⚠️ Disclaimer: For educational purposes only. Always secure profits, manage your risk, and DYOR.
#BANK #BinanceSquare #CryptoTrading #CryptoSignals #TP3Hit #TechnicalAnalysis #DYOR #TradingView
🚨 Flawless Execution & Trade Acknowledgment 📊
Another masterclass setup played out with absolute 100% precision! Following our call inside the $0.34000 – $0.38500 accumulation zone, $BANK delivered an explosive vertical surge, spiking all the way past $0.67000 and obliterating every single target!
🔍 Trade Highlights:
* Perfect Entry: Price consolidated right in our BOS retest zone before triggering a massive impulse wave.
* Maximum Target Hit: Not only did it smash TP1 and TP2, but it flew straight through TP3 ($0.60000) to print a huge high of $0.67000+!
* Massive Profit: Traders who followed this setup secured an easy +70% to +80%+ gain on spot/leverage!
🎯 Trade Setup Status:
* 🟢 Entry Zone: $0.34000 – $0.38500 [FILLED PERFECTLY ✅]
* 🎯 Take Profit 1 (TP1): $0.41800 [DONE ✅]
* 🎯 Take Profit 2 (TP2): $0.50000 [DONE ✅]
* 🎯 Take Profit 3 (TP3): $0.60000 [SMASHED & EXCEEDED TO $0.67+ ✅]
📢 Call To Action (CTA)
Congratulations to everyone who trusted the analysis and booked massive profits on $BANK! 🥳💰
Did you lock in your gains on this move? Drop your profit percentages and thoughts in the comments below! 💬👇
🔥 Hit the Like button, Quote/Share this post to show the power of precision setups, and Follow for daily high-accuracy SMC calls! 🎯
⚠️ Disclaimer: For educational purposes only. Always secure profits, manage your risk, and DYOR.
#BANK #BinanceSquare #CryptoTrading #CryptoSignals #TP3Hit #TechnicalAnalysis #DYOR #TradingView
Omar_Hayat
·
--
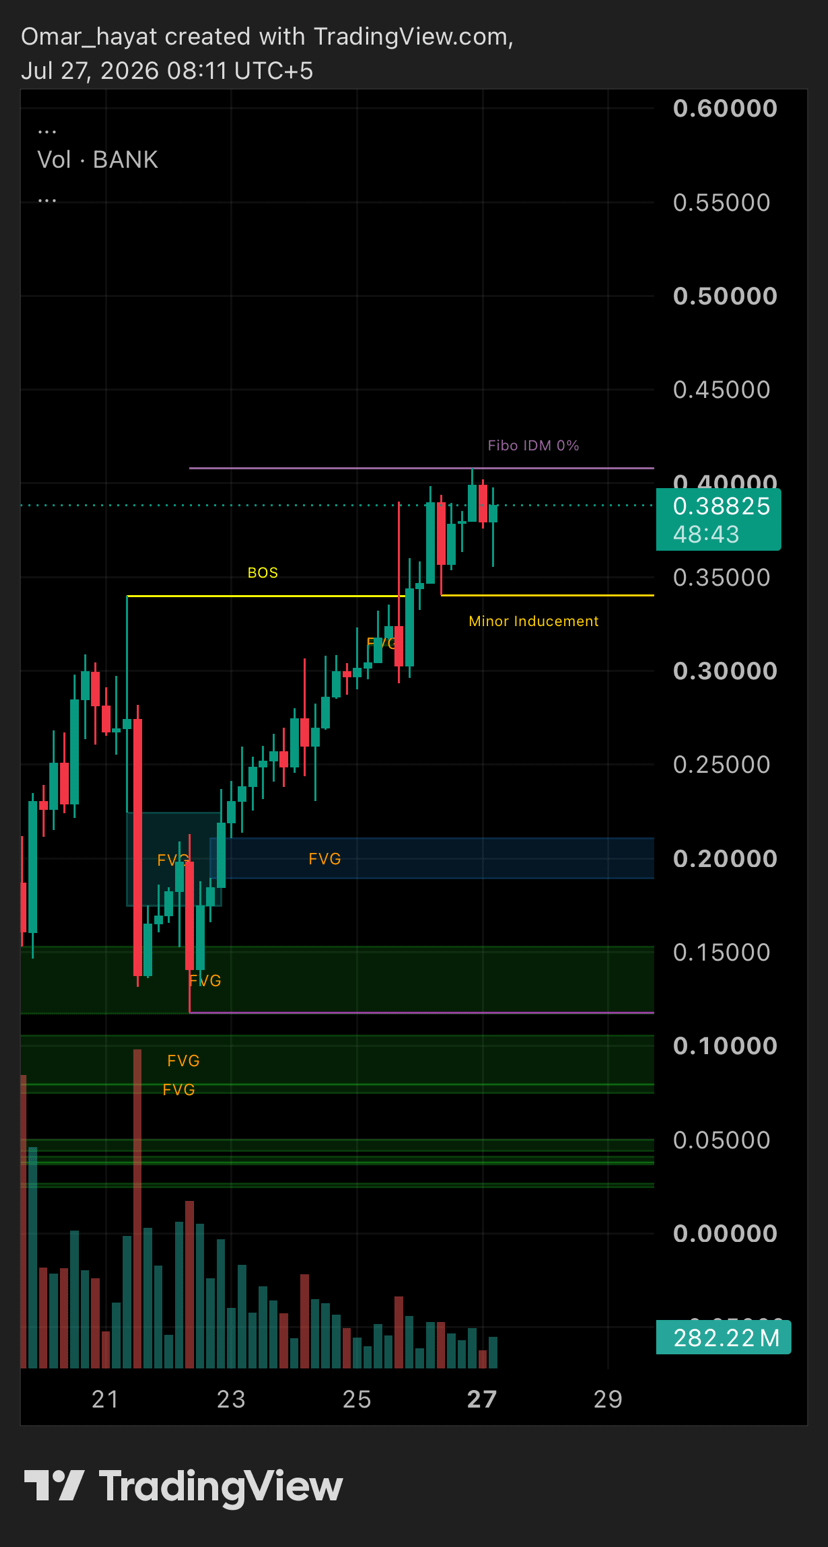
🚀 $BANK / USDT Technical Analysis & Trade Setup (4H Chart) 📈
🔍 Market Analysis:
$BANK has delivered an explosive bullish expansion on the 4-hour timeframe, surging from the $0.150 accumulation base up to $0.415+, and is currently consolidating around $0.388.
🔑Key technical observations:
* Break of Structure (BOS): Price aggressively broke through structural resistance at $0.340, confirming a strong shift in market structure toward buyers.
* Minor Inducement & Demand Retest: A clear minor inducement level sits right around $0.340 – $0.350. A retest or quick liquidity sweep of this zone provides a high-confluence entry before the next impulse wave.
* Upside Expansion Targets: Defending the $0.330 – $0.350 retest floor keeps the bullish market structure intact, opening the path for a retest of the $0.415 swing high (Fibo IDM 0%) and psychological expansion targets toward $0.500 and $0.600.
🎯 Trade Setup:
* 🟢 Entry Zone: $0.34000 – $0.38500 (BOS Retest / Accumulation Zone)
* 🎯 Take Profit 1 (TP1): $0.41800 (Recent Swing High / Fibo IDM 0% Resistance)
* 🎯 Take Profit 2 (TP2): $0.50000 (Psychological & Technical Extension Level)
* 🎯 Take Profit 3 (TP3): $0.60000 (Upper Expansion Target)
* 🛑 Stop Loss (SL): $0.29500 (Below Local Structure Support)
💡 Trading Strategy & Risk Tip:
Monitor lower timeframes (15M / 1H) for a bullish confirmation signal (such as an engulfing candle or displacement) if price dips into the $0.340 – $0.350 inducement level. Secure partial profits at TP1 and adjust your Stop Loss to Breakeven once the first target is hit.
⚠️ Disclaimer:
This post is for educational and informational purposes only and does not constitute financial advice. Cryptocurrency markets carry high volatility and risk. Always manage your risk carefully and Do Your Own Research (DYOR).
#BANK #CryptoTrading #BinanceSquare #TechnicalAnalysis #CryptoSignals #DYOR #TradingView
🔍 Market Analysis:
$BANK has delivered an explosive bullish expansion on the 4-hour timeframe, surging from the $0.150 accumulation base up to $0.415+, and is currently consolidating around $0.388.
🔑Key technical observations:
* Break of Structure (BOS): Price aggressively broke through structural resistance at $0.340, confirming a strong shift in market structure toward buyers.
* Minor Inducement & Demand Retest: A clear minor inducement level sits right around $0.340 – $0.350. A retest or quick liquidity sweep of this zone provides a high-confluence entry before the next impulse wave.
* Upside Expansion Targets: Defending the $0.330 – $0.350 retest floor keeps the bullish market structure intact, opening the path for a retest of the $0.415 swing high (Fibo IDM 0%) and psychological expansion targets toward $0.500 and $0.600.
🎯 Trade Setup:
* 🟢 Entry Zone: $0.34000 – $0.38500 (BOS Retest / Accumulation Zone)
* 🎯 Take Profit 1 (TP1): $0.41800 (Recent Swing High / Fibo IDM 0% Resistance)
* 🎯 Take Profit 2 (TP2): $0.50000 (Psychological & Technical Extension Level)
* 🎯 Take Profit 3 (TP3): $0.60000 (Upper Expansion Target)
* 🛑 Stop Loss (SL): $0.29500 (Below Local Structure Support)
💡 Trading Strategy & Risk Tip:
Monitor lower timeframes (15M / 1H) for a bullish confirmation signal (such as an engulfing candle or displacement) if price dips into the $0.340 – $0.350 inducement level. Secure partial profits at TP1 and adjust your Stop Loss to Breakeven once the first target is hit.
⚠️ Disclaimer:
This post is for educational and informational purposes only and does not constitute financial advice. Cryptocurrency markets carry high volatility and risk. Always manage your risk carefully and Do Your Own Research (DYOR).
#BANK #CryptoTrading #BinanceSquare #TechnicalAnalysis #CryptoSignals #DYOR #TradingView
189
·
--
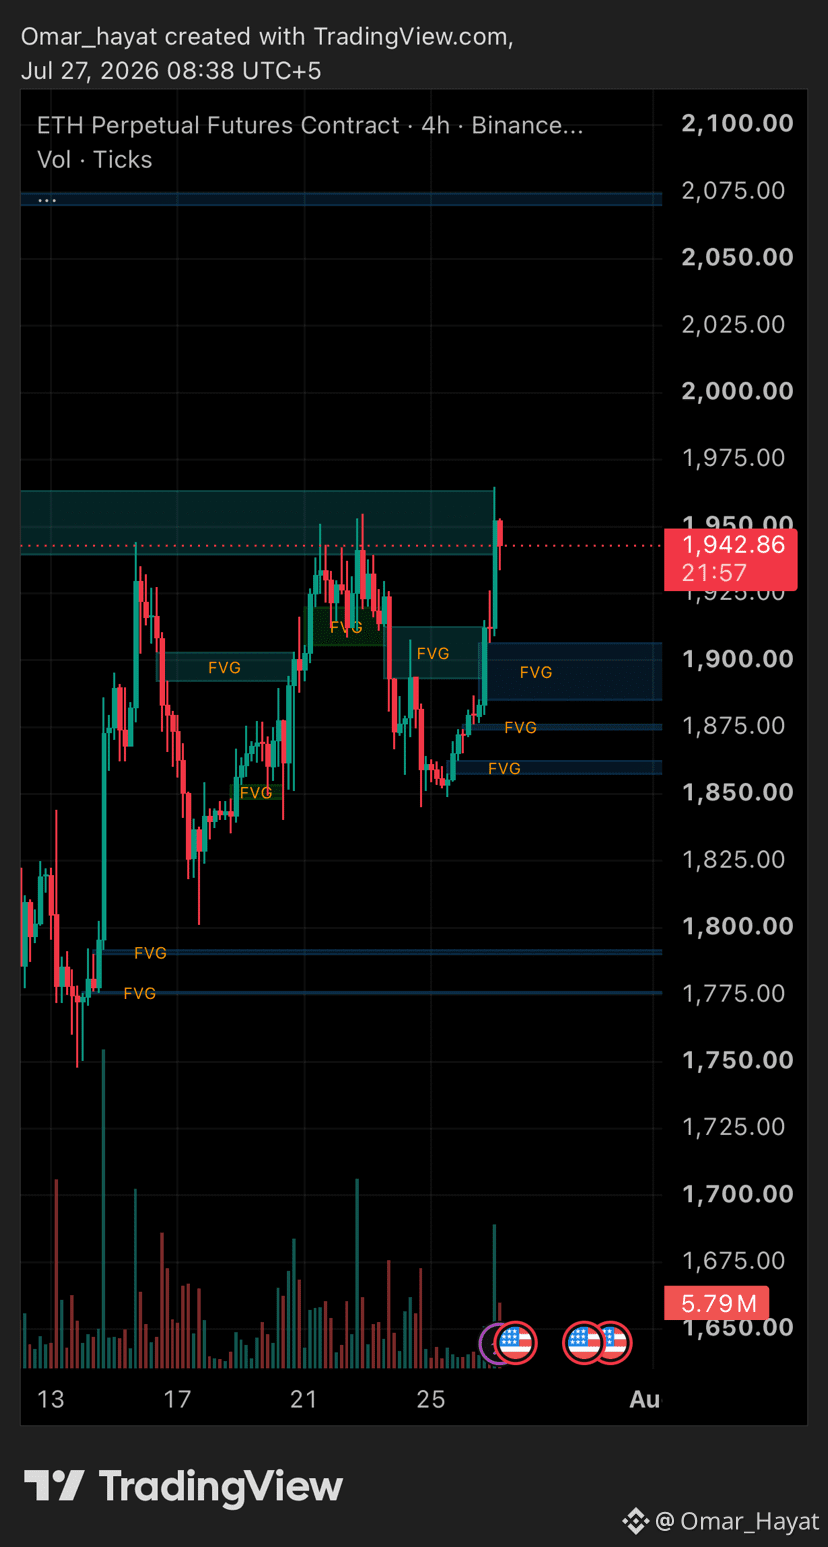
⚡ ETH SMASHING INTO $1,950 RESISTANCE! Is $2,000+ Next? 🚀
📊 Technical Analysis & Value Update (4H Chart)
Ethereum ($ETH) printed a strong bullish impulse off the $1,850 demand floor, pushing directly into the $1,950 – $1,965 supply zone!
🔍 Key Observations:
Strong Displacement: Buyers stepped in at $1,850 with solid volume, filling overhead FVGs and shifting the 4H market structure bullish.
Testing Supply: $ETH is probing $1,950 – $1,965. A decisive 4H close above $1,965 opens a clear path toward $2,000+.
Dip Support: The reclaimed 4H FVG zone between $1,880 – $1,905 serves as strong confluence for any pullback accumulation.
🎯 Trade Setup:
🟢 Entry Zone: $1,890.00 – $1,940.00 (4H FVG Retest)
🎯 Take Profit 1 (TP1): $1,965.00
🎯 Take Profit 2 (TP2): $2,020.00
🎯 Take Profit 3 (TP3): $2,075.00
🛑 Stop Loss (SL): $1,845.00
💡 Strategy Tip:
Watch lower timeframes (15M/1H) for bullish confirmation inside the $1,890 – $1,910 FVG zone on a retest, or trade a clean breakout above $1,965. Always enforce strict risk control!
📢 Call To Action (CTA)
Are you holding $ETH for $2,000+ or waiting for a dip? Drop your thoughts below! 💬👇
🔥 Like, Share, and Follow for daily high-accuracy SMC setups! 🎯
⚠️ Educational only, not financial advice. DYOR.
#ETH #Ethereum #BinanceSquare #CryptoSignals #TechnicalAnalysis #CryptoTrading #DYOR #TradingView
⚡ ETH SMASHING INTO $1,950 RESISTANCE! Is $2,000+ Next? 🚀
📊 Technical Analysis & Value Update (4H Chart)
Ethereum ($ETH) printed a strong bullish impulse off the $1,850 demand floor, pushing directly into the $1,950 – $1,965 supply zone!
🔍 Key Observations:
Strong Displacement: Buyers stepped in at $1,850 with solid volume, filling overhead FVGs and shifting the 4H market structure bullish.
Testing Supply: $ETH is probing $1,950 – $1,965. A decisive 4H close above $1,965 opens a clear path toward $2,000+.
Dip Support: The reclaimed 4H FVG zone between $1,880 – $1,905 serves as strong confluence for any pullback accumulation.
🎯 Trade Setup:
🟢 Entry Zone: $1,890.00 – $1,940.00 (4H FVG Retest)
🎯 Take Profit 1 (TP1): $1,965.00
🎯 Take Profit 2 (TP2): $2,020.00
🎯 Take Profit 3 (TP3): $2,075.00
🛑 Stop Loss (SL): $1,845.00
💡 Strategy Tip:
Watch lower timeframes (15M/1H) for bullish confirmation inside the $1,890 – $1,910 FVG zone on a retest, or trade a clean breakout above $1,965. Always enforce strict risk control!
📢 Call To Action (CTA)
Are you holding $ETH for $2,000+ or waiting for a dip? Drop your thoughts below! 💬👇
🔥 Like, Share, and Follow for daily high-accuracy SMC setups! 🎯
⚠️ Educational only, not financial advice. DYOR.
#ETH #Ethereum #BinanceSquare #CryptoSignals #TechnicalAnalysis #CryptoTrading #DYOR #TradingView
📊 Technical Analysis & Value Update (4H Chart)
Ethereum ($ETH) printed a strong bullish impulse off the $1,850 demand floor, pushing directly into the $1,950 – $1,965 supply zone!
🔍 Key Observations:
Strong Displacement: Buyers stepped in at $1,850 with solid volume, filling overhead FVGs and shifting the 4H market structure bullish.
Testing Supply: $ETH is probing $1,950 – $1,965. A decisive 4H close above $1,965 opens a clear path toward $2,000+.
Dip Support: The reclaimed 4H FVG zone between $1,880 – $1,905 serves as strong confluence for any pullback accumulation.
🎯 Trade Setup:
🟢 Entry Zone: $1,890.00 – $1,940.00 (4H FVG Retest)
🎯 Take Profit 1 (TP1): $1,965.00
🎯 Take Profit 2 (TP2): $2,020.00
🎯 Take Profit 3 (TP3): $2,075.00
🛑 Stop Loss (SL): $1,845.00
💡 Strategy Tip:
Watch lower timeframes (15M/1H) for bullish confirmation inside the $1,890 – $1,910 FVG zone on a retest, or trade a clean breakout above $1,965. Always enforce strict risk control!
📢 Call To Action (CTA)
Are you holding $ETH for $2,000+ or waiting for a dip? Drop your thoughts below! 💬👇
🔥 Like, Share, and Follow for daily high-accuracy SMC setups! 🎯
⚠️ Educational only, not financial advice. DYOR.
#ETH #Ethereum #BinanceSquare #CryptoSignals #TechnicalAnalysis #CryptoTrading #DYOR #TradingView
59
·
--
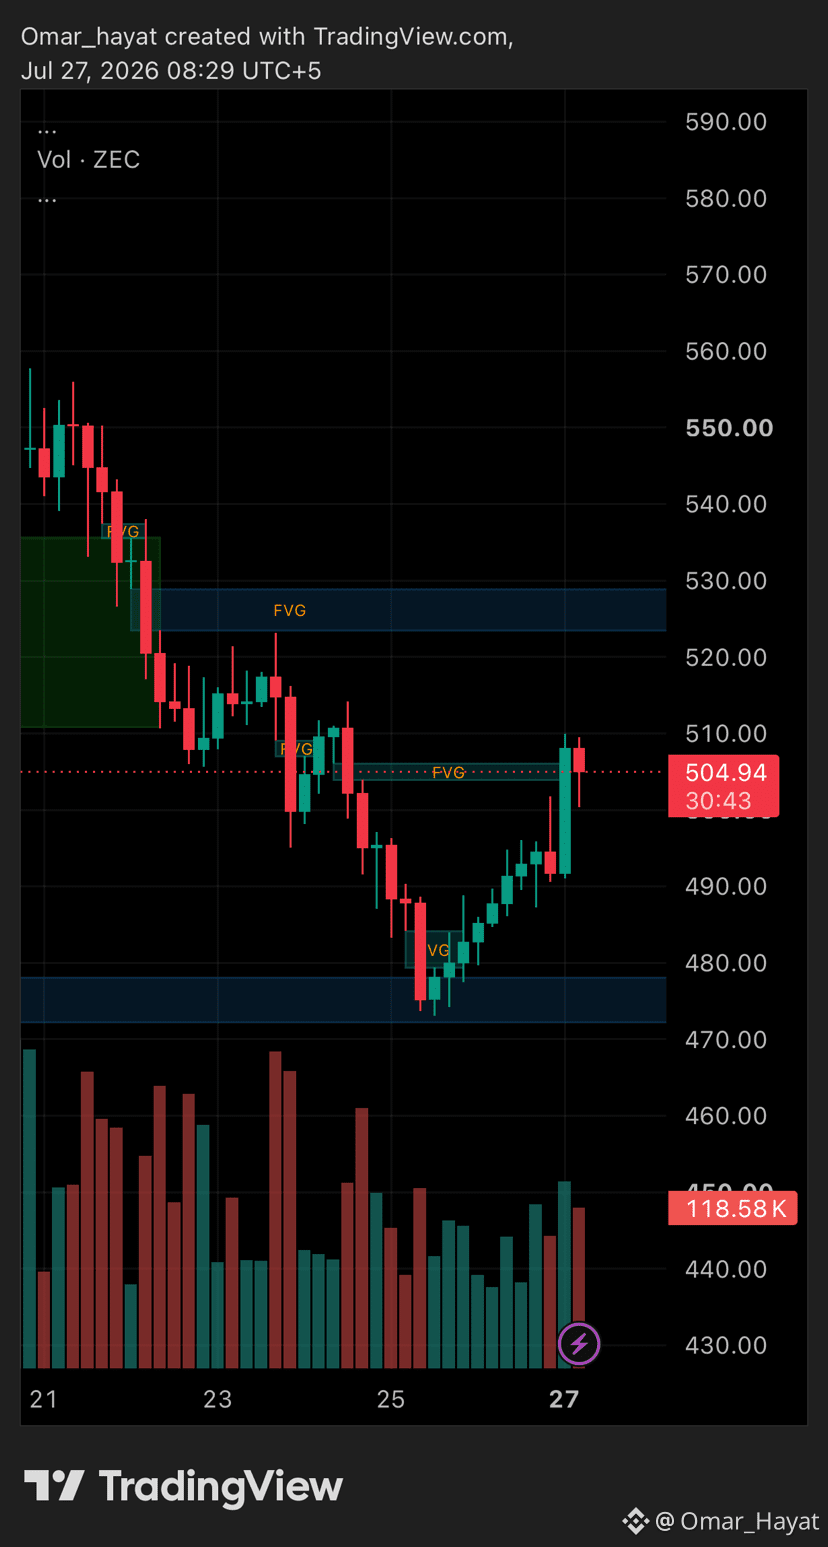
🚨 $ZEC BOUNCING HARD FROM THE DEMAND FLOOR! Did You Catch This Move? 🚀
📊 Technical Analysis & Value Update
$ZEC is executing a clean reversal off the $470.00 – $480.00 demand zone, surging straight back up to $504.94 as buyers step in with strong momentum!
🔍 Key Technical Observations:
* Liquidity Sweep & Demand Defense: Price swept local lower liquidity down into the $472 support block before printing back-to-back bullish expansion candles.
* FVG Breakout in Progress: $ZEC is currently breaking through the local $500.00 – $508.00 Fair Value Gap (FVG) imbalance.
* Next Overhead Target: Sustaining above $505 clears the local seller resistance, paving a direct path toward the primary overhead FVG block at $522.00 – $530.00.
🎯 Active Trade Setup:
* 🟢 Entry Zone: $475.00 – $505.00 (Filled / In Profit)
* 🎯 Take Profit 1 (TP1): $525.00 (Major Overhead FVG Resistance)
* 🎯 Take Profit 2 (TP2): $550.00 (Structural Swing High Retest)
* 🎯 Take Profit 3 (TP3): $580.00 (Extended Liquidity Target)
* 🛑 Stop Loss (SL): $468.00 (Strict stop below key demand floor)
💡 Trade Management Tip:
If you took entries near the $475 – $488 dip, your position is sitting in great profit! As price tests the $508 – $525 resistance levels, consider taking partial profits and moving your Stop Loss to entry (Breakeven) for a completely risk-free trade.
📢 Call To Action (CTA)
Did you ride this $ZEC bounce with us? Let me know your current position in the comments below! 💬👇
🔥 Hit the Like button, Quote/Share this post with your fellow traders, and Follow for daily high-accuracy SMC setups! 🎯
⚠️ Disclaimer: For educational purposes only. Not financial advice. Always manage your risk exposure and DYOR.
#ZEC #Zcash #BinanceSquare #CryptoSignals #TechnicalAnalysis #CryptoTrading #DYOR #TradingView
🚨 $ZEC BOUNCING HARD FROM THE DEMAND FLOOR! Did You Catch This Move? 🚀
📊 Technical Analysis & Value Update
$ZEC is executing a clean reversal off the $470.00 – $480.00 demand zone, surging straight back up to $504.94 as buyers step in with strong momentum!
🔍 Key Technical Observations:
* Liquidity Sweep & Demand Defense: Price swept local lower liquidity down into the $472 support block before printing back-to-back bullish expansion candles.
* FVG Breakout in Progress: $ZEC is currently breaking through the local $500.00 – $508.00 Fair Value Gap (FVG) imbalance.
* Next Overhead Target: Sustaining above $505 clears the local seller resistance, paving a direct path toward the primary overhead FVG block at $522.00 – $530.00.
🎯 Active Trade Setup:
* 🟢 Entry Zone: $475.00 – $505.00 (Filled / In Profit)
* 🎯 Take Profit 1 (TP1): $525.00 (Major Overhead FVG Resistance)
* 🎯 Take Profit 2 (TP2): $550.00 (Structural Swing High Retest)
* 🎯 Take Profit 3 (TP3): $580.00 (Extended Liquidity Target)
* 🛑 Stop Loss (SL): $468.00 (Strict stop below key demand floor)
💡 Trade Management Tip:
If you took entries near the $475 – $488 dip, your position is sitting in great profit! As price tests the $508 – $525 resistance levels, consider taking partial profits and moving your Stop Loss to entry (Breakeven) for a completely risk-free trade.
📢 Call To Action (CTA)
Did you ride this $ZEC bounce with us? Let me know your current position in the comments below! 💬👇
🔥 Hit the Like button, Quote/Share this post with your fellow traders, and Follow for daily high-accuracy SMC setups! 🎯
⚠️ Disclaimer: For educational purposes only. Not financial advice. Always manage your risk exposure and DYOR.
#ZEC #Zcash #BinanceSquare #CryptoSignals #TechnicalAnalysis #CryptoTrading #DYOR #TradingView
📊 Technical Analysis & Value Update
$ZEC is executing a clean reversal off the $470.00 – $480.00 demand zone, surging straight back up to $504.94 as buyers step in with strong momentum!
🔍 Key Technical Observations:
* Liquidity Sweep & Demand Defense: Price swept local lower liquidity down into the $472 support block before printing back-to-back bullish expansion candles.
* FVG Breakout in Progress: $ZEC is currently breaking through the local $500.00 – $508.00 Fair Value Gap (FVG) imbalance.
* Next Overhead Target: Sustaining above $505 clears the local seller resistance, paving a direct path toward the primary overhead FVG block at $522.00 – $530.00.
🎯 Active Trade Setup:
* 🟢 Entry Zone: $475.00 – $505.00 (Filled / In Profit)
* 🎯 Take Profit 1 (TP1): $525.00 (Major Overhead FVG Resistance)
* 🎯 Take Profit 2 (TP2): $550.00 (Structural Swing High Retest)
* 🎯 Take Profit 3 (TP3): $580.00 (Extended Liquidity Target)
* 🛑 Stop Loss (SL): $468.00 (Strict stop below key demand floor)
💡 Trade Management Tip:
If you took entries near the $475 – $488 dip, your position is sitting in great profit! As price tests the $508 – $525 resistance levels, consider taking partial profits and moving your Stop Loss to entry (Breakeven) for a completely risk-free trade.
📢 Call To Action (CTA)
Did you ride this $ZEC bounce with us? Let me know your current position in the comments below! 💬👇
🔥 Hit the Like button, Quote/Share this post with your fellow traders, and Follow for daily high-accuracy SMC setups! 🎯
⚠️ Disclaimer: For educational purposes only. Not financial advice. Always manage your risk exposure and DYOR.
#ZEC #Zcash #BinanceSquare #CryptoSignals #TechnicalAnalysis #CryptoTrading #DYOR #TradingView
83
·
--
⚠️ MARKET ALERT: High Volatility & FOMO Warning on $SOON,$UB, and $4! 🚨📉
🔍 Market Analysis & Risk Overview:
$SOON,$UB, and $4 have recently experienced rapid, double-digit vertical price pumps (+16% to +17%+), drawing heavy retail attention and triggering intense FOMO across perpetual markets.
Key technical observations:
* Overextended Rallies: All three assets—$SOON ($0.1981), $UB ($0.1467), and $4 ($0.009783)—pushed directly into local overhead resistance in a very short timeframe.
* High Liquidation & Trap Risk: Entering late long positions at the absolute peak of parabolic pumps leaves traders vulnerable to sharp profit-taking dumps and long squeeze liquidations.
* Correction Probability: Vertical expansions without established support floors often result in aggressive mean-reversion pullbacks as momentum slows down.
🛡️ Risk Management Strategy:
* ❌ Avoid Chasing FOMO: Refrain from placing market buy orders at local highs after consecutive large green candles.
* ⏳ Wait for Market Structure Confirmation: Allow price to cool down and seek fresh entries only at established demand zones or after technical Fair Value Gap (FVG) fills.
* 🛑 Enforce Strict Stop Losses: When trading high-beta, volatile movers, maintain strict risk control and position sizing to protect capital against sudden market reversals.
❗️Mark my words they will dump soon❗️
⚠️ Disclaimer:
This post is for educational and informational purposes only and does not constitute financial advice. Crypto markets carry high volatility and risk. Always practice strict risk management and Do Your Own Research (DYOR).
#SOON #UB #4USDT #CryptoAlert #BinanceSquare #RiskManagement #CryptoTrading #DYOR
⚠️ MARKET ALERT: High Volatility & FOMO Warning on $SOON,$UB, and $4! 🚨📉
🔍 Market Analysis & Risk Overview:
$SOON,$UB, and $4 have recently experienced rapid, double-digit vertical price pumps (+16% to +17%+), drawing heavy retail attention and triggering intense FOMO across perpetual markets.
Key technical observations:
* Overextended Rallies: All three assets—$SOON ($0.1981), $UB ($0.1467), and $4 ($0.009783)—pushed directly into local overhead resistance in a very short timeframe.
* High Liquidation & Trap Risk: Entering late long positions at the absolute peak of parabolic pumps leaves traders vulnerable to sharp profit-taking dumps and long squeeze liquidations.
* Correction Probability: Vertical expansions without established support floors often result in aggressive mean-reversion pullbacks as momentum slows down.
🛡️ Risk Management Strategy:
* ❌ Avoid Chasing FOMO: Refrain from placing market buy orders at local highs after consecutive large green candles.
* ⏳ Wait for Market Structure Confirmation: Allow price to cool down and seek fresh entries only at established demand zones or after technical Fair Value Gap (FVG) fills.
* 🛑 Enforce Strict Stop Losses: When trading high-beta, volatile movers, maintain strict risk control and position sizing to protect capital against sudden market reversals.
❗️Mark my words they will dump soon❗️
⚠️ Disclaimer:
This post is for educational and informational purposes only and does not constitute financial advice. Crypto markets carry high volatility and risk. Always practice strict risk management and Do Your Own Research (DYOR).
#SOON #UB #4USDT #CryptoAlert #BinanceSquare #RiskManagement #CryptoTrading #DYOR
🔍 Market Analysis & Risk Overview:
$SOON,$UB, and $4 have recently experienced rapid, double-digit vertical price pumps (+16% to +17%+), drawing heavy retail attention and triggering intense FOMO across perpetual markets.
Key technical observations:
* Overextended Rallies: All three assets—$SOON ($0.1981), $UB ($0.1467), and $4 ($0.009783)—pushed directly into local overhead resistance in a very short timeframe.
* High Liquidation & Trap Risk: Entering late long positions at the absolute peak of parabolic pumps leaves traders vulnerable to sharp profit-taking dumps and long squeeze liquidations.
* Correction Probability: Vertical expansions without established support floors often result in aggressive mean-reversion pullbacks as momentum slows down.
🛡️ Risk Management Strategy:
* ❌ Avoid Chasing FOMO: Refrain from placing market buy orders at local highs after consecutive large green candles.
* ⏳ Wait for Market Structure Confirmation: Allow price to cool down and seek fresh entries only at established demand zones or after technical Fair Value Gap (FVG) fills.
* 🛑 Enforce Strict Stop Losses: When trading high-beta, volatile movers, maintain strict risk control and position sizing to protect capital against sudden market reversals.
❗️Mark my words they will dump soon❗️
⚠️ Disclaimer:
This post is for educational and informational purposes only and does not constitute financial advice. Crypto markets carry high volatility and risk. Always practice strict risk management and Do Your Own Research (DYOR).
#SOON #UB #4USDT #CryptoAlert #BinanceSquare #RiskManagement #CryptoTrading #DYOR
193
·
--
🚀 $BANK / USDT Technical Analysis & Trade Setup (4H Chart) 📈
🔍 Market Analysis:
$BANK has delivered an explosive bullish expansion on the 4-hour timeframe, surging from the $0.150 accumulation base up to $0.415+, and is currently consolidating around $0.388.
🔑Key technical observations:
* Break of Structure (BOS): Price aggressively broke through structural resistance at $0.340, confirming a strong shift in market structure toward buyers.
* Minor Inducement & Demand Retest: A clear minor inducement level sits right around $0.340 – $0.350. A retest or quick liquidity sweep of this zone provides a high-confluence entry before the next impulse wave.
* Upside Expansion Targets: Defending the $0.330 – $0.350 retest floor keeps the bullish market structure intact, opening the path for a retest of the $0.415 swing high (Fibo IDM 0%) and psychological expansion targets toward $0.500 and $0.600.
🎯 Trade Setup:
* 🟢 Entry Zone: $0.34000 – $0.38500 (BOS Retest / Accumulation Zone)
* 🎯 Take Profit 1 (TP1): $0.41800 (Recent Swing High / Fibo IDM 0% Resistance)
* 🎯 Take Profit 2 (TP2): $0.50000 (Psychological & Technical Extension Level)
* 🎯 Take Profit 3 (TP3): $0.60000 (Upper Expansion Target)
* 🛑 Stop Loss (SL): $0.29500 (Below Local Structure Support)
💡 Trading Strategy & Risk Tip:
Monitor lower timeframes (15M / 1H) for a bullish confirmation signal (such as an engulfing candle or displacement) if price dips into the $0.340 – $0.350 inducement level. Secure partial profits at TP1 and adjust your Stop Loss to Breakeven once the first target is hit.
⚠️ Disclaimer:
This post is for educational and informational purposes only and does not constitute financial advice. Cryptocurrency markets carry high volatility and risk. Always manage your risk carefully and Do Your Own Research (DYOR).
#BANK #CryptoTrading #BinanceSquare #TechnicalAnalysis #CryptoSignals #DYOR #TradingView
🚀 $BANK / USDT Technical Analysis & Trade Setup (4H Chart) 📈
🔍 Market Analysis:
$BANK has delivered an explosive bullish expansion on the 4-hour timeframe, surging from the $0.150 accumulation base up to $0.415+, and is currently consolidating around $0.388.
🔑Key technical observations:
* Break of Structure (BOS): Price aggressively broke through structural resistance at $0.340, confirming a strong shift in market structure toward buyers.
* Minor Inducement & Demand Retest: A clear minor inducement level sits right around $0.340 – $0.350. A retest or quick liquidity sweep of this zone provides a high-confluence entry before the next impulse wave.
* Upside Expansion Targets: Defending the $0.330 – $0.350 retest floor keeps the bullish market structure intact, opening the path for a retest of the $0.415 swing high (Fibo IDM 0%) and psychological expansion targets toward $0.500 and $0.600.
🎯 Trade Setup:
* 🟢 Entry Zone: $0.34000 – $0.38500 (BOS Retest / Accumulation Zone)
* 🎯 Take Profit 1 (TP1): $0.41800 (Recent Swing High / Fibo IDM 0% Resistance)
* 🎯 Take Profit 2 (TP2): $0.50000 (Psychological & Technical Extension Level)
* 🎯 Take Profit 3 (TP3): $0.60000 (Upper Expansion Target)
* 🛑 Stop Loss (SL): $0.29500 (Below Local Structure Support)
💡 Trading Strategy & Risk Tip:
Monitor lower timeframes (15M / 1H) for a bullish confirmation signal (such as an engulfing candle or displacement) if price dips into the $0.340 – $0.350 inducement level. Secure partial profits at TP1 and adjust your Stop Loss to Breakeven once the first target is hit.
⚠️ Disclaimer:
This post is for educational and informational purposes only and does not constitute financial advice. Cryptocurrency markets carry high volatility and risk. Always manage your risk carefully and Do Your Own Research (DYOR).
#BANK #CryptoTrading #BinanceSquare #TechnicalAnalysis #CryptoSignals #DYOR #TradingView
🔍 Market Analysis:
$BANK has delivered an explosive bullish expansion on the 4-hour timeframe, surging from the $0.150 accumulation base up to $0.415+, and is currently consolidating around $0.388.
🔑Key technical observations:
* Break of Structure (BOS): Price aggressively broke through structural resistance at $0.340, confirming a strong shift in market structure toward buyers.
* Minor Inducement & Demand Retest: A clear minor inducement level sits right around $0.340 – $0.350. A retest or quick liquidity sweep of this zone provides a high-confluence entry before the next impulse wave.
* Upside Expansion Targets: Defending the $0.330 – $0.350 retest floor keeps the bullish market structure intact, opening the path for a retest of the $0.415 swing high (Fibo IDM 0%) and psychological expansion targets toward $0.500 and $0.600.
🎯 Trade Setup:
* 🟢 Entry Zone: $0.34000 – $0.38500 (BOS Retest / Accumulation Zone)
* 🎯 Take Profit 1 (TP1): $0.41800 (Recent Swing High / Fibo IDM 0% Resistance)
* 🎯 Take Profit 2 (TP2): $0.50000 (Psychological & Technical Extension Level)
* 🎯 Take Profit 3 (TP3): $0.60000 (Upper Expansion Target)
* 🛑 Stop Loss (SL): $0.29500 (Below Local Structure Support)
💡 Trading Strategy & Risk Tip:
Monitor lower timeframes (15M / 1H) for a bullish confirmation signal (such as an engulfing candle or displacement) if price dips into the $0.340 – $0.350 inducement level. Secure partial profits at TP1 and adjust your Stop Loss to Breakeven once the first target is hit.
⚠️ Disclaimer:
This post is for educational and informational purposes only and does not constitute financial advice. Cryptocurrency markets carry high volatility and risk. Always manage your risk carefully and Do Your Own Research (DYOR).
#BANK #CryptoTrading #BinanceSquare #TechnicalAnalysis #CryptoSignals #DYOR #TradingView
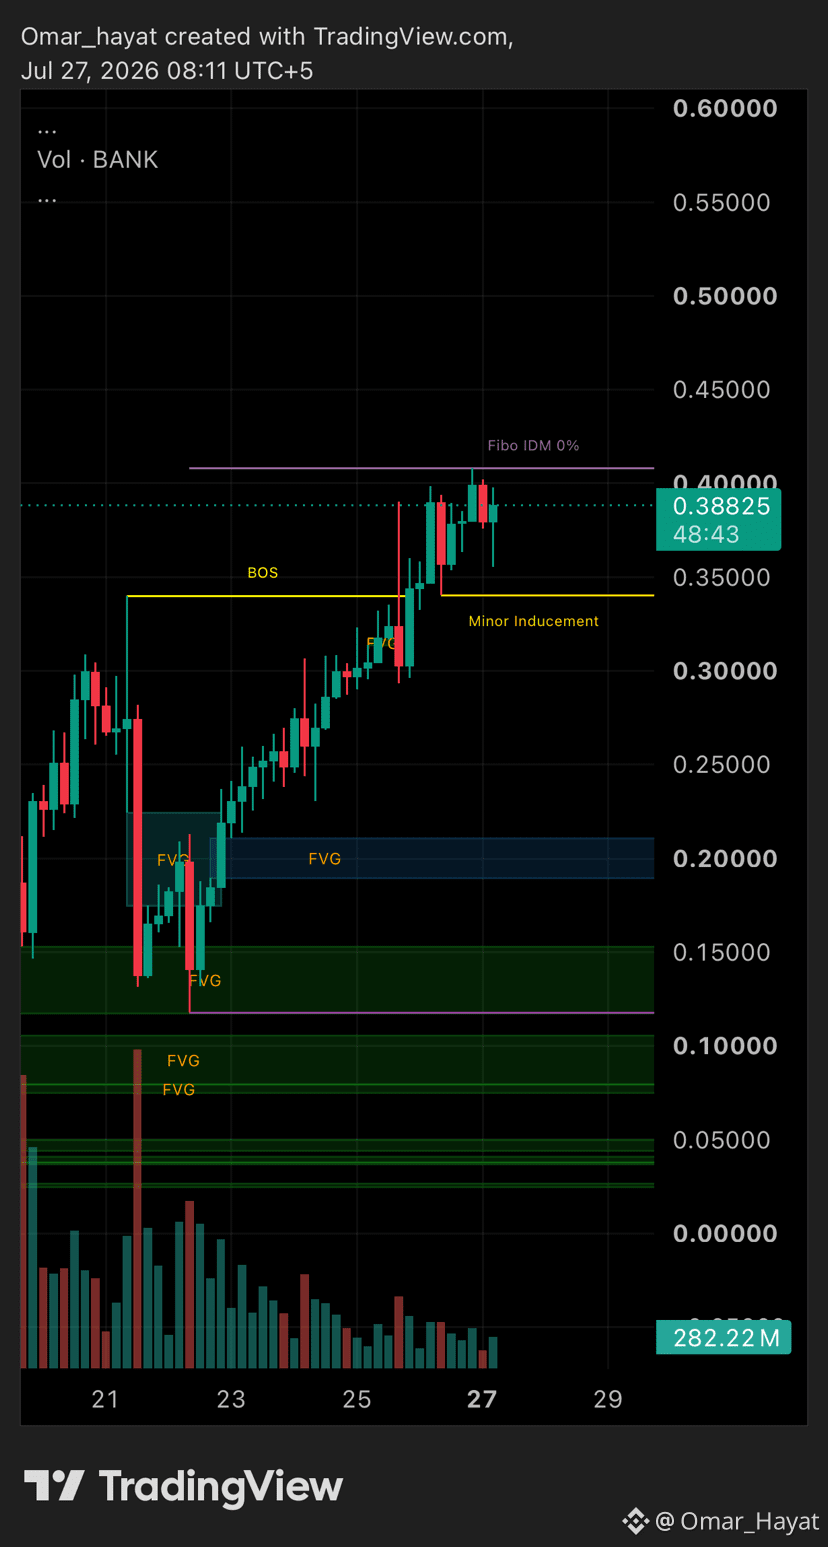
1
198
·
--
🎯 $BTC / USDT UPDATE: TAKE PROFIT 1 HIT WITH PINPOINT PRECISION! 💥🚀
🚨 Trade Target Hit & Technical Update 📊
🔍 Market Update:
Our analysis on Bitcoin ($BTC) played out with absolute perfection! Following our entry in the $63,800 – $64,500 accumulation zone, $BTC printed a strong bullish expansion candle straight into the 4-hour Fair Value Gap (FVG), smashing right through Take Profit 1 ($65,300) to hit a high of $65,391.15!
Key technical highlights:
* Flawless Execution: Price respected our support floor sweep and surged higher with strong volume as predicted.
* FVG Filled: The overhead 4H FVG resistance level was engulfed cleanly by bulls.
* Bullish Momentum: The higher timeframe structure remains heavily in favor of buyers as momentum builds toward the next resistance zones.
🎯 Trade Setup Status:
* 🟢 Entry Zone: $63,800 – $64,500 (FILLED / IN PROFIT)
* 🎯 Take Profit 1 (TP1): $65,300 [SMASHED / DONE ✅]
* 🎯 Take Profit 2 (TP2): $67,200 (RUNNING / NEXT TARGET ⏳)
* 🎯 Take Profit 3 (TP3): $69,200 (UPPER TARGET 🚀)
* 🛑 Stop Loss (SL): Move to Breakeven (Risk-Free Trade)
💡 Trade Management & Risk Tip:
Congratulations to everyone who took this trade! 🥳
* Secure Profits: Take partial profits at TP1 ($65,300).
* Risk-Free Setup: Move your Stop Loss (SL) to your entry price / breakeven so the remaining position runs with zero risk toward TP2 ($67,200).
⚠️ Disclaimer:
This post is for educational and informational purposes only and does not constitute financial advice. Cryptocurrency trading carries high market risk. Always secure profits, manage risk, and Do Your Own Research (DYOR).
#BTC #Bitcoin #BinanceSquare #CryptoSignals #TP1Hit #TechnicalAnalysis #CryptoTrading #TradingView #DYOR
🎯 $BTC / USDT UPDATE: TAKE PROFIT 1 HIT WITH PINPOINT PRECISION! 💥🚀
🚨 Trade Target Hit & Technical Update 📊
🔍 Market Update:
Our analysis on Bitcoin ($BTC) played out with absolute perfection! Following our entry in the $63,800 – $64,500 accumulation zone, $BTC printed a strong bullish expansion candle straight into the 4-hour Fair Value Gap (FVG), smashing right through Take Profit 1 ($65,300) to hit a high of $65,391.15!
Key technical highlights:
* Flawless Execution: Price respected our support floor sweep and surged higher with strong volume as predicted.
* FVG Filled: The overhead 4H FVG resistance level was engulfed cleanly by bulls.
* Bullish Momentum: The higher timeframe structure remains heavily in favor of buyers as momentum builds toward the next resistance zones.
🎯 Trade Setup Status:
* 🟢 Entry Zone: $63,800 – $64,500 (FILLED / IN PROFIT)
* 🎯 Take Profit 1 (TP1): $65,300 [SMASHED / DONE ✅]
* 🎯 Take Profit 2 (TP2): $67,200 (RUNNING / NEXT TARGET ⏳)
* 🎯 Take Profit 3 (TP3): $69,200 (UPPER TARGET 🚀)
* 🛑 Stop Loss (SL): Move to Breakeven (Risk-Free Trade)
💡 Trade Management & Risk Tip:
Congratulations to everyone who took this trade! 🥳
* Secure Profits: Take partial profits at TP1 ($65,300).
* Risk-Free Setup: Move your Stop Loss (SL) to your entry price / breakeven so the remaining position runs with zero risk toward TP2 ($67,200).
⚠️ Disclaimer:
This post is for educational and informational purposes only and does not constitute financial advice. Cryptocurrency trading carries high market risk. Always secure profits, manage risk, and Do Your Own Research (DYOR).
#BTC #Bitcoin #BinanceSquare #CryptoSignals #TP1Hit #TechnicalAnalysis #CryptoTrading #TradingView #DYOR
🚨 Trade Target Hit & Technical Update 📊
🔍 Market Update:
Our analysis on Bitcoin ($BTC) played out with absolute perfection! Following our entry in the $63,800 – $64,500 accumulation zone, $BTC printed a strong bullish expansion candle straight into the 4-hour Fair Value Gap (FVG), smashing right through Take Profit 1 ($65,300) to hit a high of $65,391.15!
Key technical highlights:
* Flawless Execution: Price respected our support floor sweep and surged higher with strong volume as predicted.
* FVG Filled: The overhead 4H FVG resistance level was engulfed cleanly by bulls.
* Bullish Momentum: The higher timeframe structure remains heavily in favor of buyers as momentum builds toward the next resistance zones.
🎯 Trade Setup Status:
* 🟢 Entry Zone: $63,800 – $64,500 (FILLED / IN PROFIT)
* 🎯 Take Profit 1 (TP1): $65,300 [SMASHED / DONE ✅]
* 🎯 Take Profit 2 (TP2): $67,200 (RUNNING / NEXT TARGET ⏳)
* 🎯 Take Profit 3 (TP3): $69,200 (UPPER TARGET 🚀)
* 🛑 Stop Loss (SL): Move to Breakeven (Risk-Free Trade)
💡 Trade Management & Risk Tip:
Congratulations to everyone who took this trade! 🥳
* Secure Profits: Take partial profits at TP1 ($65,300).
* Risk-Free Setup: Move your Stop Loss (SL) to your entry price / breakeven so the remaining position runs with zero risk toward TP2 ($67,200).
⚠️ Disclaimer:
This post is for educational and informational purposes only and does not constitute financial advice. Cryptocurrency trading carries high market risk. Always secure profits, manage risk, and Do Your Own Research (DYOR).
#BTC #Bitcoin #BinanceSquare #CryptoSignals #TP1Hit #TechnicalAnalysis #CryptoTrading #TradingView #DYOR
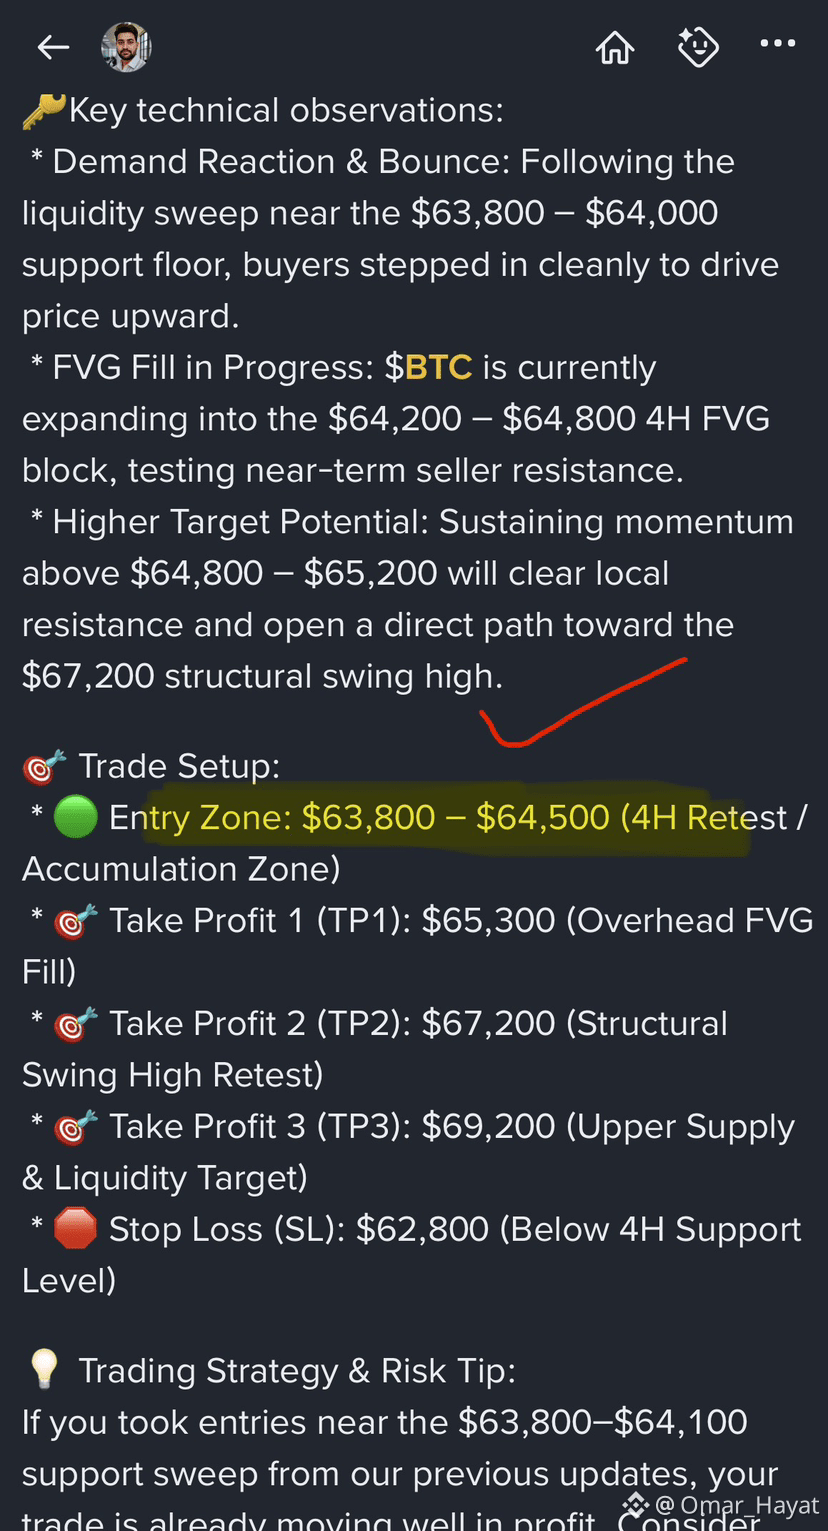
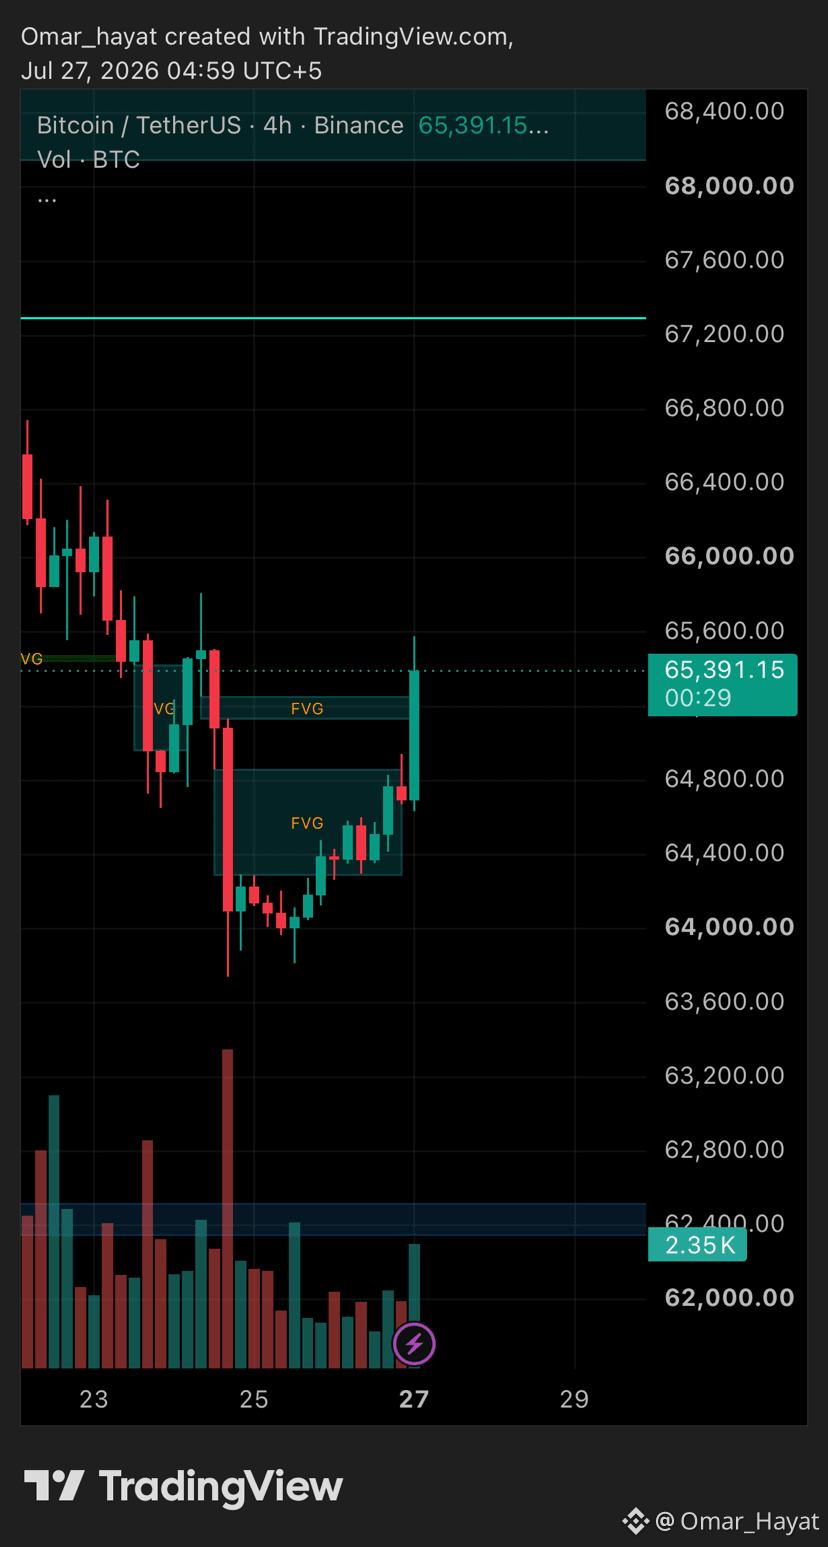
89
·
--
🚀 $BTC / USDT Technical Analysis & Trade Setup (4H Chart) 📈
🔍 Market Analysis:
Bitcoin ($BTC) is executing a strong recovery push on the 4-hour timeframe, trading around $64,507.97 as it moves up to fill the overhead Fair Value Gap (FVG) zone.
🔑Key technical observations:
* Demand Reaction & Bounce: Following the liquidity sweep near the $63,800 – $64,000 support floor, buyers stepped in cleanly to drive price upward.
* FVG Fill in Progress: $BTC is currently expanding into the $64,200 – $64,800 4H FVG block, testing near-term seller resistance.
* Higher Target Potential: Sustaining momentum above $64,800 – $65,200 will clear local resistance and open a direct path toward the $67,200 structural swing high.
🎯 Trade Setup:
* 🟢 Entry Zone: $63,800 – $64,500 (4H Retest / Accumulation Zone)
* 🎯 Take Profit 1 (TP1): $65,300 (Overhead FVG Fill)
* 🎯 Take Profit 2 (TP2): $67,200 (Structural Swing High Retest)
* 🎯 Take Profit 3 (TP3): $69,200 (Upper Supply & Liquidity Target)
* 🛑 Stop Loss (SL): $62,800 (Below 4H Support Level)
💡 Trading Strategy & Risk Tip:
If you took entries near the $63,800–$64,100 support sweep from our previous updates, your trade is already moving well in profit. Consider locking in partial profits as price reaches $65,300 and adjusting your Stop Loss to Breakeven to secure a risk-free trade.
⚠️ Disclaimer:
This post is for educational and informational purposes only and does not constitute financial advice. Cryptocurrency markets carry high volatility and risk. Always manage your risk carefully and Do Your Own Research (DYOR).
#BTC #Bitcoin #BinanceSquare #CryptoTrading #TechnicalAnalysis #CryptoSignals #DYOR #TradingView
🚀 $BTC / USDT Technical Analysis & Trade Setup (4H Chart) 📈
🔍 Market Analysis:
Bitcoin ($BTC) is executing a strong recovery push on the 4-hour timeframe, trading around $64,507.97 as it moves up to fill the overhead Fair Value Gap (FVG) zone.
🔑Key technical observations:
* Demand Reaction & Bounce: Following the liquidity sweep near the $63,800 – $64,000 support floor, buyers stepped in cleanly to drive price upward.
* FVG Fill in Progress: $BTC is currently expanding into the $64,200 – $64,800 4H FVG block, testing near-term seller resistance.
* Higher Target Potential: Sustaining momentum above $64,800 – $65,200 will clear local resistance and open a direct path toward the $67,200 structural swing high.
🎯 Trade Setup:
* 🟢 Entry Zone: $63,800 – $64,500 (4H Retest / Accumulation Zone)
* 🎯 Take Profit 1 (TP1): $65,300 (Overhead FVG Fill)
* 🎯 Take Profit 2 (TP2): $67,200 (Structural Swing High Retest)
* 🎯 Take Profit 3 (TP3): $69,200 (Upper Supply & Liquidity Target)
* 🛑 Stop Loss (SL): $62,800 (Below 4H Support Level)
💡 Trading Strategy & Risk Tip:
If you took entries near the $63,800–$64,100 support sweep from our previous updates, your trade is already moving well in profit. Consider locking in partial profits as price reaches $65,300 and adjusting your Stop Loss to Breakeven to secure a risk-free trade.
⚠️ Disclaimer:
This post is for educational and informational purposes only and does not constitute financial advice. Cryptocurrency markets carry high volatility and risk. Always manage your risk carefully and Do Your Own Research (DYOR).
#BTC #Bitcoin #BinanceSquare #CryptoTrading #TechnicalAnalysis #CryptoSignals #DYOR #TradingView
🔍 Market Analysis:
Bitcoin ($BTC) is executing a strong recovery push on the 4-hour timeframe, trading around $64,507.97 as it moves up to fill the overhead Fair Value Gap (FVG) zone.
🔑Key technical observations:
* Demand Reaction & Bounce: Following the liquidity sweep near the $63,800 – $64,000 support floor, buyers stepped in cleanly to drive price upward.
* FVG Fill in Progress: $BTC is currently expanding into the $64,200 – $64,800 4H FVG block, testing near-term seller resistance.
* Higher Target Potential: Sustaining momentum above $64,800 – $65,200 will clear local resistance and open a direct path toward the $67,200 structural swing high.
🎯 Trade Setup:
* 🟢 Entry Zone: $63,800 – $64,500 (4H Retest / Accumulation Zone)
* 🎯 Take Profit 1 (TP1): $65,300 (Overhead FVG Fill)
* 🎯 Take Profit 2 (TP2): $67,200 (Structural Swing High Retest)
* 🎯 Take Profit 3 (TP3): $69,200 (Upper Supply & Liquidity Target)
* 🛑 Stop Loss (SL): $62,800 (Below 4H Support Level)
💡 Trading Strategy & Risk Tip:
If you took entries near the $63,800–$64,100 support sweep from our previous updates, your trade is already moving well in profit. Consider locking in partial profits as price reaches $65,300 and adjusting your Stop Loss to Breakeven to secure a risk-free trade.
⚠️ Disclaimer:
This post is for educational and informational purposes only and does not constitute financial advice. Cryptocurrency markets carry high volatility and risk. Always manage your risk carefully and Do Your Own Research (DYOR).
#BTC #Bitcoin #BinanceSquare #CryptoTrading #TechnicalAnalysis #CryptoSignals #DYOR #TradingView
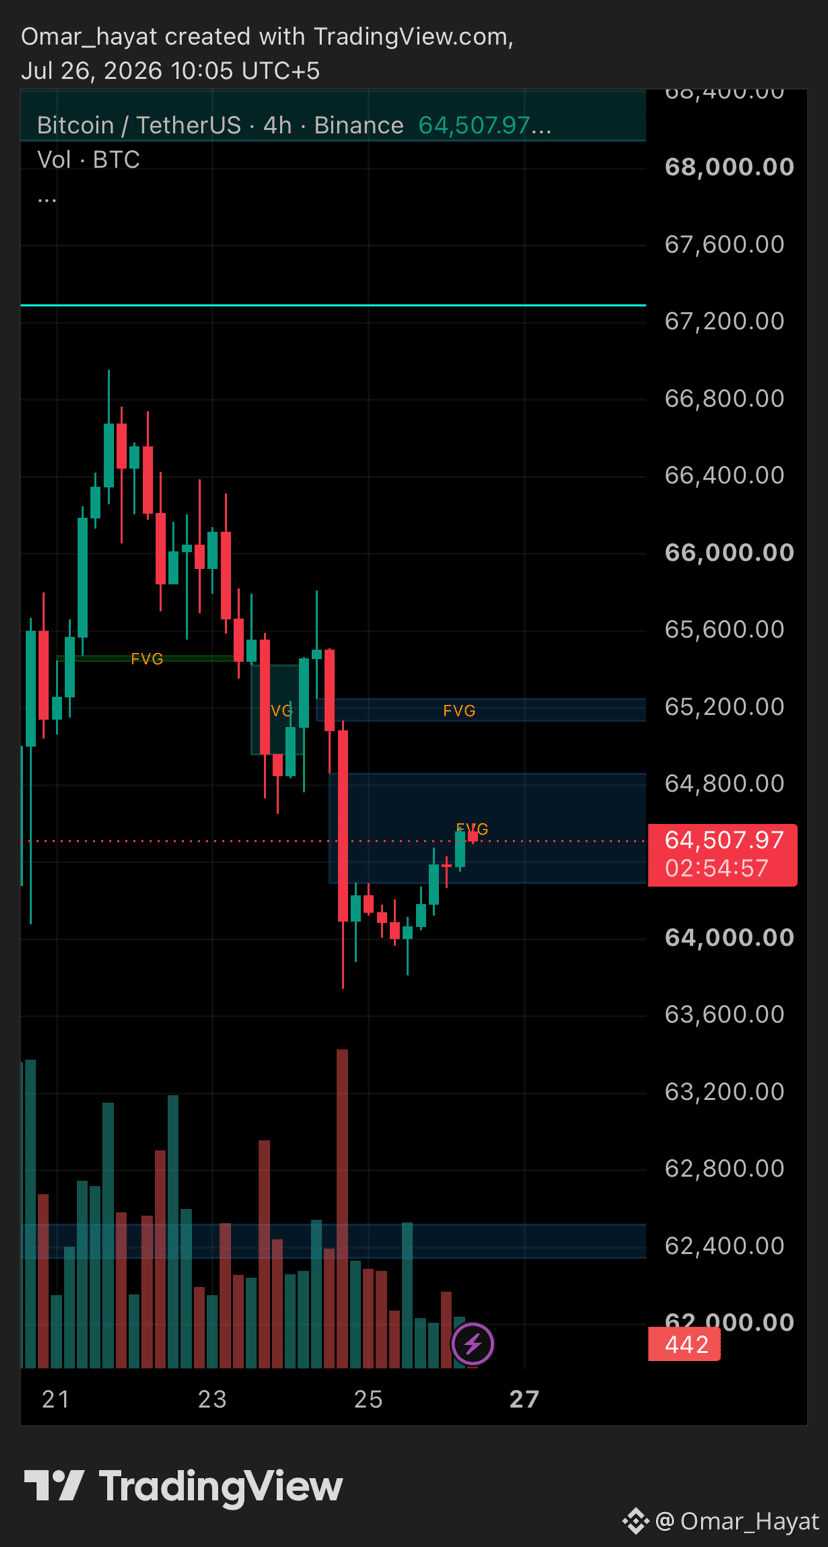
64
·
--
🚀 $TAO / USDT Technical Analysis & Trade Setup (4H Chart) 📈
🔍 Market Analysis:
Bittensor ($TAO) is showing strong bullish momentum on the 4-hour timeframe, bouncing cleanly off the $187.0 – $190.0 demand sweep level and pushing up to $196.4 (+2.45%).
Key technical observations:
* Liquidity Sweep & Aggressive Bounce: Price swept lower liquidity down to the $187.0 support region before buyers stepped in aggressively, forming strong bullish engulfing candles on the 4H timeframe.
* FVG Reclaimed: $TAO has successfully pushed through the fair value gap (FVG) between $192.0 – $195.0, flipping local market structure bullish in the near term.
* Upside Expansion Potential: Holding above the $192.0 – $194.0 reclaimed floor opens a clear path toward the $202.5 swing highs and upper supply levels.
🎯 Trade Setup:
* 🟢 Entry Zone: $191.0 – $196.0 (Current 4H Bullish Retest / Accumulation Zone)
* 🎯 Take Profit 1 (TP1): $202.5 (Recent Swing High / First Resistance)
* 🎯 Take Profit 2 (TP2): $210.0 (Psychological & Technical Supply Level)
* 🎯 Take Profit 3 (TP3): $218.0 (Upper Liquidity Pool Target)
* 🛑 Stop Loss (SL): $187.0 (Below 4H Liquidity Sweep Low)
💡 Trading Strategy & Risk Tip:
Monitor for a brief consolidation or low-timeframe (15M/1H) retest around $194.0 – $195.0 to optimize entry position. Once price hits TP1 ($202.5), consider taking partial profits and moving your Stop Loss to Breakeven to secure a risk-free position.
⚠️ Disclaimer:
This post is for educational and informational purposes only and does not constitute financial advice. Cryptocurrency markets carry high volatility and risk. Always manage your risk carefully and Do Your Own Research (DYOR).
#TAO #Bittensor #BinanceSquare #CryptoTrading #TechnicalAnalysis #CryptoSignals #DYOR #TradingView
🚀 $TAO / USDT Technical Analysis & Trade Setup (4H Chart) 📈
🔍 Market Analysis:
Bittensor ($TAO) is showing strong bullish momentum on the 4-hour timeframe, bouncing cleanly off the $187.0 – $190.0 demand sweep level and pushing up to $196.4 (+2.45%).
Key technical observations:
* Liquidity Sweep & Aggressive Bounce: Price swept lower liquidity down to the $187.0 support region before buyers stepped in aggressively, forming strong bullish engulfing candles on the 4H timeframe.
* FVG Reclaimed: $TAO has successfully pushed through the fair value gap (FVG) between $192.0 – $195.0, flipping local market structure bullish in the near term.
* Upside Expansion Potential: Holding above the $192.0 – $194.0 reclaimed floor opens a clear path toward the $202.5 swing highs and upper supply levels.
🎯 Trade Setup:
* 🟢 Entry Zone: $191.0 – $196.0 (Current 4H Bullish Retest / Accumulation Zone)
* 🎯 Take Profit 1 (TP1): $202.5 (Recent Swing High / First Resistance)
* 🎯 Take Profit 2 (TP2): $210.0 (Psychological & Technical Supply Level)
* 🎯 Take Profit 3 (TP3): $218.0 (Upper Liquidity Pool Target)
* 🛑 Stop Loss (SL): $187.0 (Below 4H Liquidity Sweep Low)
💡 Trading Strategy & Risk Tip:
Monitor for a brief consolidation or low-timeframe (15M/1H) retest around $194.0 – $195.0 to optimize entry position. Once price hits TP1 ($202.5), consider taking partial profits and moving your Stop Loss to Breakeven to secure a risk-free position.
⚠️ Disclaimer:
This post is for educational and informational purposes only and does not constitute financial advice. Cryptocurrency markets carry high volatility and risk. Always manage your risk carefully and Do Your Own Research (DYOR).
#TAO #Bittensor #BinanceSquare #CryptoTrading #TechnicalAnalysis #CryptoSignals #DYOR #TradingView
🔍 Market Analysis:
Bittensor ($TAO) is showing strong bullish momentum on the 4-hour timeframe, bouncing cleanly off the $187.0 – $190.0 demand sweep level and pushing up to $196.4 (+2.45%).
Key technical observations:
* Liquidity Sweep & Aggressive Bounce: Price swept lower liquidity down to the $187.0 support region before buyers stepped in aggressively, forming strong bullish engulfing candles on the 4H timeframe.
* FVG Reclaimed: $TAO has successfully pushed through the fair value gap (FVG) between $192.0 – $195.0, flipping local market structure bullish in the near term.
* Upside Expansion Potential: Holding above the $192.0 – $194.0 reclaimed floor opens a clear path toward the $202.5 swing highs and upper supply levels.
🎯 Trade Setup:
* 🟢 Entry Zone: $191.0 – $196.0 (Current 4H Bullish Retest / Accumulation Zone)
* 🎯 Take Profit 1 (TP1): $202.5 (Recent Swing High / First Resistance)
* 🎯 Take Profit 2 (TP2): $210.0 (Psychological & Technical Supply Level)
* 🎯 Take Profit 3 (TP3): $218.0 (Upper Liquidity Pool Target)
* 🛑 Stop Loss (SL): $187.0 (Below 4H Liquidity Sweep Low)
💡 Trading Strategy & Risk Tip:
Monitor for a brief consolidation or low-timeframe (15M/1H) retest around $194.0 – $195.0 to optimize entry position. Once price hits TP1 ($202.5), consider taking partial profits and moving your Stop Loss to Breakeven to secure a risk-free position.
⚠️ Disclaimer:
This post is for educational and informational purposes only and does not constitute financial advice. Cryptocurrency markets carry high volatility and risk. Always manage your risk carefully and Do Your Own Research (DYOR).
#TAO #Bittensor #BinanceSquare #CryptoTrading #TechnicalAnalysis #CryptoSignals #DYOR #TradingView
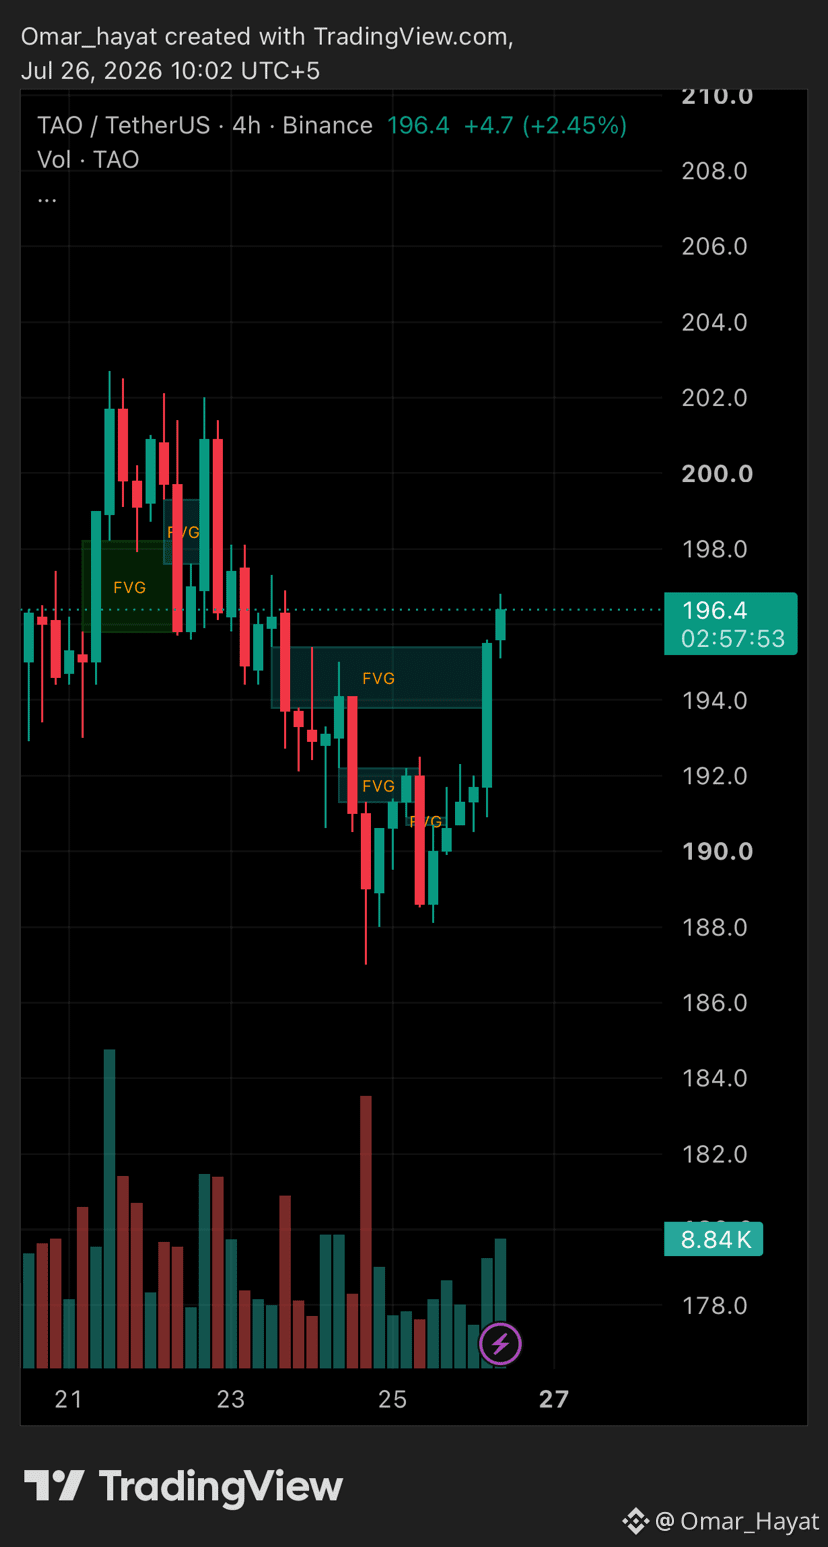
170
·
--
🚀 $DEXE / USDT Technical Analysis & Trade Setup (4H Chart) 📈
🔍 Market Analysis:
$DEXE is currently trading around $3.570 following a strong impulse move from the $1.80 lows up to $6.40+, followed by a healthy technical pull-back into a key support region.
Key technical observations:
* Demand Zone & FVG Retest: Price has pulled back directly into a major 4-hour Fair Value Gap (FVG) and demand order block located between $3.100 – $3.500.
* Bullish Structure Retained: The pullback is holding above structural higher lows, showing buyer absorption inside the entry block.
* Upside Target Potential: Successfully defending this demand floor sets up a continuation move back toward the $5.00 mid-range pivot, the $6.40 swing high, and upper liquidity pools.
🎯 Trade Setup:
* 🟢 Entry Zone: $3.150 – $3.600 (4H FVG / Key Demand Accumulation Level)
* 🎯 Take Profit 1 (TP1): $5.000 (Mid-Range Resistance / First Profit Level)
* 🎯 Take Profit 2 (TP2): $6.400 (Structural Swing High Retest)
* 🎯 Take Profit 3 (TP3): $8.500 (Upper Supply & Liquidity Target)
* 🛑 Stop Loss (SL): $2.850 (Below 4H Key Demand Support)
💡 Trading Strategy & Risk Tip:
Look for lower timeframe (15M / 1H) bullish confirmation (such as a shift in market structure or strong engulfing candles) inside the entry zone before executing. Maintain disciplined position sizing and risk no more than 2% to 3% of your portfolio on this trade.
⚠️ Disclaimer:
This post is for educational and informational purposes only and does not constitute financial advice. Cryptocurrency markets carry significant volatility and risk. Always manage your risk carefully and Do Your Own Research (DYOR).
#DEXE #DeXe #BinanceSquare #CryptoTrading #TechnicalAnalysis #CryptoSignals #DYOR #TradingView
🚀 $DEXE / USDT Technical Analysis & Trade Setup (4H Chart) 📈
🔍 Market Analysis:
$DEXE is currently trading around $3.570 following a strong impulse move from the $1.80 lows up to $6.40+, followed by a healthy technical pull-back into a key support region.
Key technical observations:
* Demand Zone & FVG Retest: Price has pulled back directly into a major 4-hour Fair Value Gap (FVG) and demand order block located between $3.100 – $3.500.
* Bullish Structure Retained: The pullback is holding above structural higher lows, showing buyer absorption inside the entry block.
* Upside Target Potential: Successfully defending this demand floor sets up a continuation move back toward the $5.00 mid-range pivot, the $6.40 swing high, and upper liquidity pools.
🎯 Trade Setup:
* 🟢 Entry Zone: $3.150 – $3.600 (4H FVG / Key Demand Accumulation Level)
* 🎯 Take Profit 1 (TP1): $5.000 (Mid-Range Resistance / First Profit Level)
* 🎯 Take Profit 2 (TP2): $6.400 (Structural Swing High Retest)
* 🎯 Take Profit 3 (TP3): $8.500 (Upper Supply & Liquidity Target)
* 🛑 Stop Loss (SL): $2.850 (Below 4H Key Demand Support)
💡 Trading Strategy & Risk Tip:
Look for lower timeframe (15M / 1H) bullish confirmation (such as a shift in market structure or strong engulfing candles) inside the entry zone before executing. Maintain disciplined position sizing and risk no more than 2% to 3% of your portfolio on this trade.
⚠️ Disclaimer:
This post is for educational and informational purposes only and does not constitute financial advice. Cryptocurrency markets carry significant volatility and risk. Always manage your risk carefully and Do Your Own Research (DYOR).
#DEXE #DeXe #BinanceSquare #CryptoTrading #TechnicalAnalysis #CryptoSignals #DYOR #TradingView
🔍 Market Analysis:
$DEXE is currently trading around $3.570 following a strong impulse move from the $1.80 lows up to $6.40+, followed by a healthy technical pull-back into a key support region.
Key technical observations:
* Demand Zone & FVG Retest: Price has pulled back directly into a major 4-hour Fair Value Gap (FVG) and demand order block located between $3.100 – $3.500.
* Bullish Structure Retained: The pullback is holding above structural higher lows, showing buyer absorption inside the entry block.
* Upside Target Potential: Successfully defending this demand floor sets up a continuation move back toward the $5.00 mid-range pivot, the $6.40 swing high, and upper liquidity pools.
🎯 Trade Setup:
* 🟢 Entry Zone: $3.150 – $3.600 (4H FVG / Key Demand Accumulation Level)
* 🎯 Take Profit 1 (TP1): $5.000 (Mid-Range Resistance / First Profit Level)
* 🎯 Take Profit 2 (TP2): $6.400 (Structural Swing High Retest)
* 🎯 Take Profit 3 (TP3): $8.500 (Upper Supply & Liquidity Target)
* 🛑 Stop Loss (SL): $2.850 (Below 4H Key Demand Support)
💡 Trading Strategy & Risk Tip:
Look for lower timeframe (15M / 1H) bullish confirmation (such as a shift in market structure or strong engulfing candles) inside the entry zone before executing. Maintain disciplined position sizing and risk no more than 2% to 3% of your portfolio on this trade.
⚠️ Disclaimer:
This post is for educational and informational purposes only and does not constitute financial advice. Cryptocurrency markets carry significant volatility and risk. Always manage your risk carefully and Do Your Own Research (DYOR).
#DEXE #DeXe #BinanceSquare #CryptoTrading #TechnicalAnalysis #CryptoSignals #DYOR #TradingView
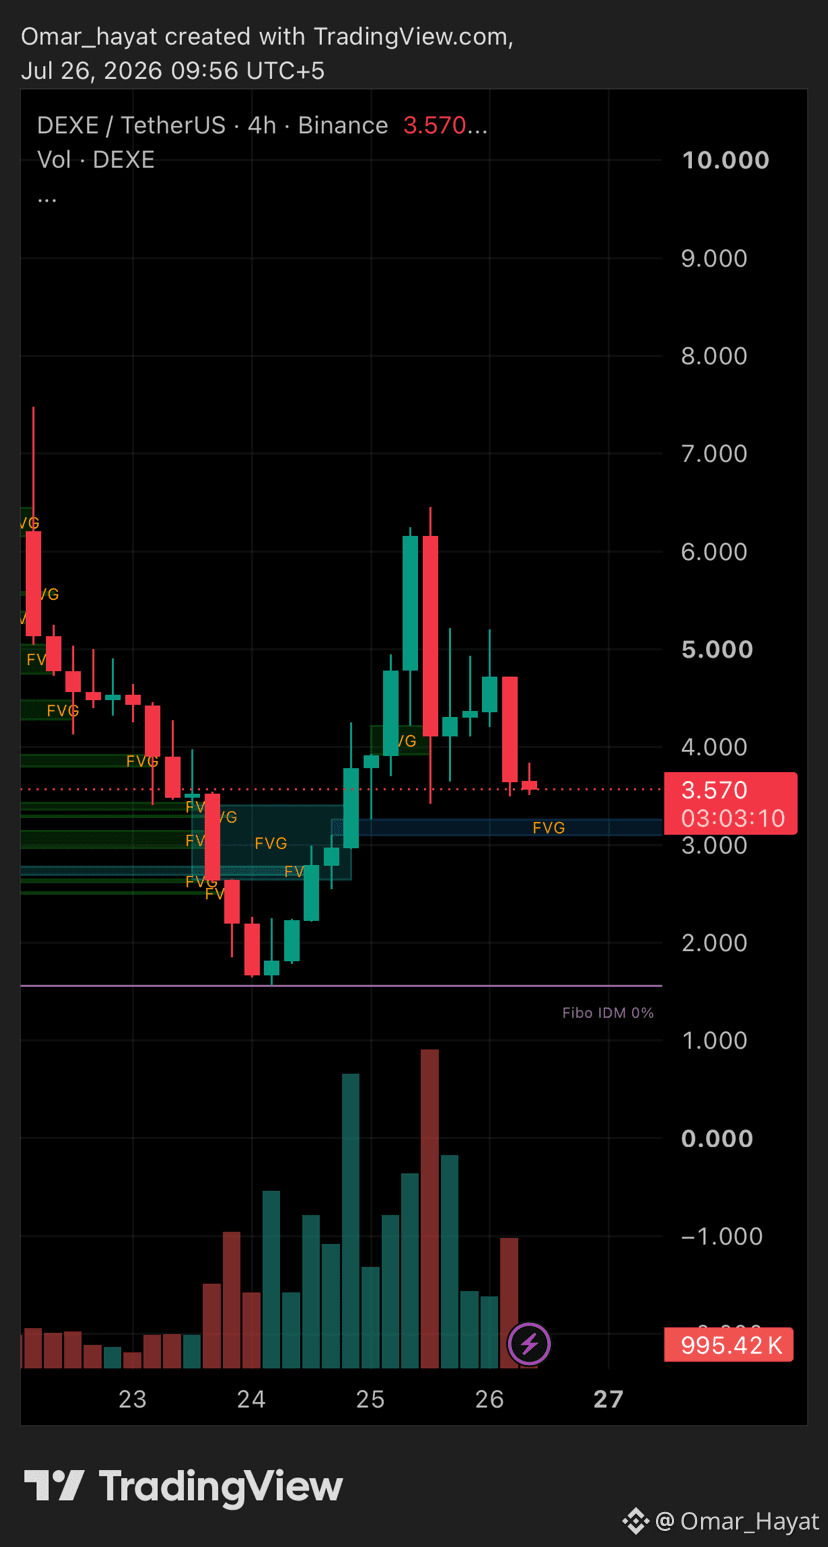
526
·
--
🎯 $BTC / USDT Update: Demand Zone & Entry Filled Perfectly! 🚀
🚨 Trade Setup Update & Technical Analysis 📊
🔍 Market Update:
Our technical outlook on Bitcoin ($BTC) played out with pinpoint precision! As highlighted in our previous post, price retraced directly into our designated Demand & Accumulation Zone ($63,300 – $64,100), currently sitting at $64,078.
Key technical observations:
Precision Fill: Price swept lower liquidity down to the $63,500 mark, filling our entry zone cleanly before finding immediate buying pressure.
Support Defense: The $63,500 – $64,000 local demand floor has been successfully defended by bulls on the 4-hour timeframe.
Structure Preserved: Market structure remains bullish, and holding above this key accumulation block sets up the next leg higher toward overhead Fair Value Gaps (FVGs) and swing high liquidity.
🎯 Trade Status & Active Targets:
🟢 Entry Zone Status: TRIGGERED / FILLED ($63,300 – $64,100)
🎯 Take Profit 1 (TP1): $65,300 (Overhead FVG Resistance)
🎯 Take Profit 2 (TP2): $67,200 (Structural Swing High Retest)
🎯 Take Profit 3 (TP3): $69,200 (Upper FVG Liquidity Target)
🛑 Stop Loss (SL): $62,200 (Strict Stop Below 4H Key Support)
💡 Trading Strategy & Risk Tip:
If you took entries inside the $63,300 – $64,100 zone, remain patient and adhere to strict risk management. Consider securing partial profits or moving your Stop Loss to Breakeven once TP1 ($65,300) is reached to guarantee a risk-free trade.
⚠️ Disclaimer:
This post is for educational and informational purposes only and does not constitute financial advice. Cryptocurrency markets involve significant risk and volatility. Always manage your risk exposure carefully and Do Your Own Research (DYOR).
#BTC #Bitcoin #BinanceSquare #CryptoSignals #TechnicalAnalysis #DYOR #CryptoTrading #TradingView
🎯 $BTC / USDT Update: Demand Zone & Entry Filled Perfectly! 🚀
🚨 Trade Setup Update & Technical Analysis 📊
🔍 Market Update:
Our technical outlook on Bitcoin ($BTC) played out with pinpoint precision! As highlighted in our previous post, price retraced directly into our designated Demand & Accumulation Zone ($63,300 – $64,100), currently sitting at $64,078.
Key technical observations:
Precision Fill: Price swept lower liquidity down to the $63,500 mark, filling our entry zone cleanly before finding immediate buying pressure.
Support Defense: The $63,500 – $64,000 local demand floor has been successfully defended by bulls on the 4-hour timeframe.
Structure Preserved: Market structure remains bullish, and holding above this key accumulation block sets up the next leg higher toward overhead Fair Value Gaps (FVGs) and swing high liquidity.
🎯 Trade Status & Active Targets:
🟢 Entry Zone Status: TRIGGERED / FILLED ($63,300 – $64,100)
🎯 Take Profit 1 (TP1): $65,300 (Overhead FVG Resistance)
🎯 Take Profit 2 (TP2): $67,200 (Structural Swing High Retest)
🎯 Take Profit 3 (TP3): $69,200 (Upper FVG Liquidity Target)
🛑 Stop Loss (SL): $62,200 (Strict Stop Below 4H Key Support)
💡 Trading Strategy & Risk Tip:
If you took entries inside the $63,300 – $64,100 zone, remain patient and adhere to strict risk management. Consider securing partial profits or moving your Stop Loss to Breakeven once TP1 ($65,300) is reached to guarantee a risk-free trade.
⚠️ Disclaimer:
This post is for educational and informational purposes only and does not constitute financial advice. Cryptocurrency markets involve significant risk and volatility. Always manage your risk exposure carefully and Do Your Own Research (DYOR).
#BTC #Bitcoin #BinanceSquare #CryptoSignals #TechnicalAnalysis #DYOR #CryptoTrading #TradingView
🚨 Trade Setup Update & Technical Analysis 📊
🔍 Market Update:
Our technical outlook on Bitcoin ($BTC) played out with pinpoint precision! As highlighted in our previous post, price retraced directly into our designated Demand & Accumulation Zone ($63,300 – $64,100), currently sitting at $64,078.
Key technical observations:
Precision Fill: Price swept lower liquidity down to the $63,500 mark, filling our entry zone cleanly before finding immediate buying pressure.
Support Defense: The $63,500 – $64,000 local demand floor has been successfully defended by bulls on the 4-hour timeframe.
Structure Preserved: Market structure remains bullish, and holding above this key accumulation block sets up the next leg higher toward overhead Fair Value Gaps (FVGs) and swing high liquidity.
🎯 Trade Status & Active Targets:
🟢 Entry Zone Status: TRIGGERED / FILLED ($63,300 – $64,100)
🎯 Take Profit 1 (TP1): $65,300 (Overhead FVG Resistance)
🎯 Take Profit 2 (TP2): $67,200 (Structural Swing High Retest)
🎯 Take Profit 3 (TP3): $69,200 (Upper FVG Liquidity Target)
🛑 Stop Loss (SL): $62,200 (Strict Stop Below 4H Key Support)
💡 Trading Strategy & Risk Tip:
If you took entries inside the $63,300 – $64,100 zone, remain patient and adhere to strict risk management. Consider securing partial profits or moving your Stop Loss to Breakeven once TP1 ($65,300) is reached to guarantee a risk-free trade.
⚠️ Disclaimer:
This post is for educational and informational purposes only and does not constitute financial advice. Cryptocurrency markets involve significant risk and volatility. Always manage your risk exposure carefully and Do Your Own Research (DYOR).
#BTC #Bitcoin #BinanceSquare #CryptoSignals #TechnicalAnalysis #DYOR #CryptoTrading #TradingView
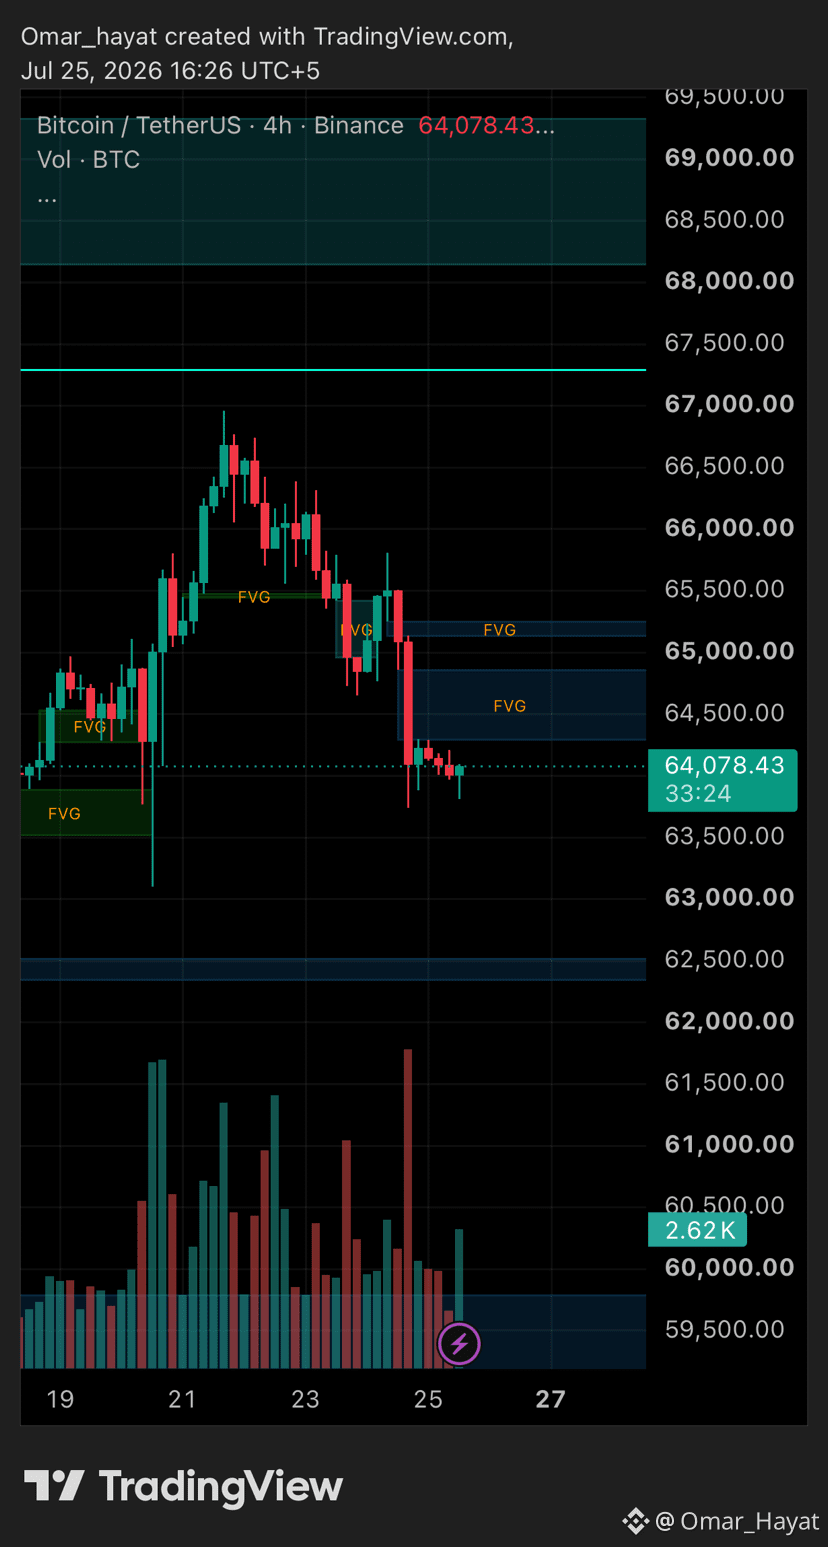
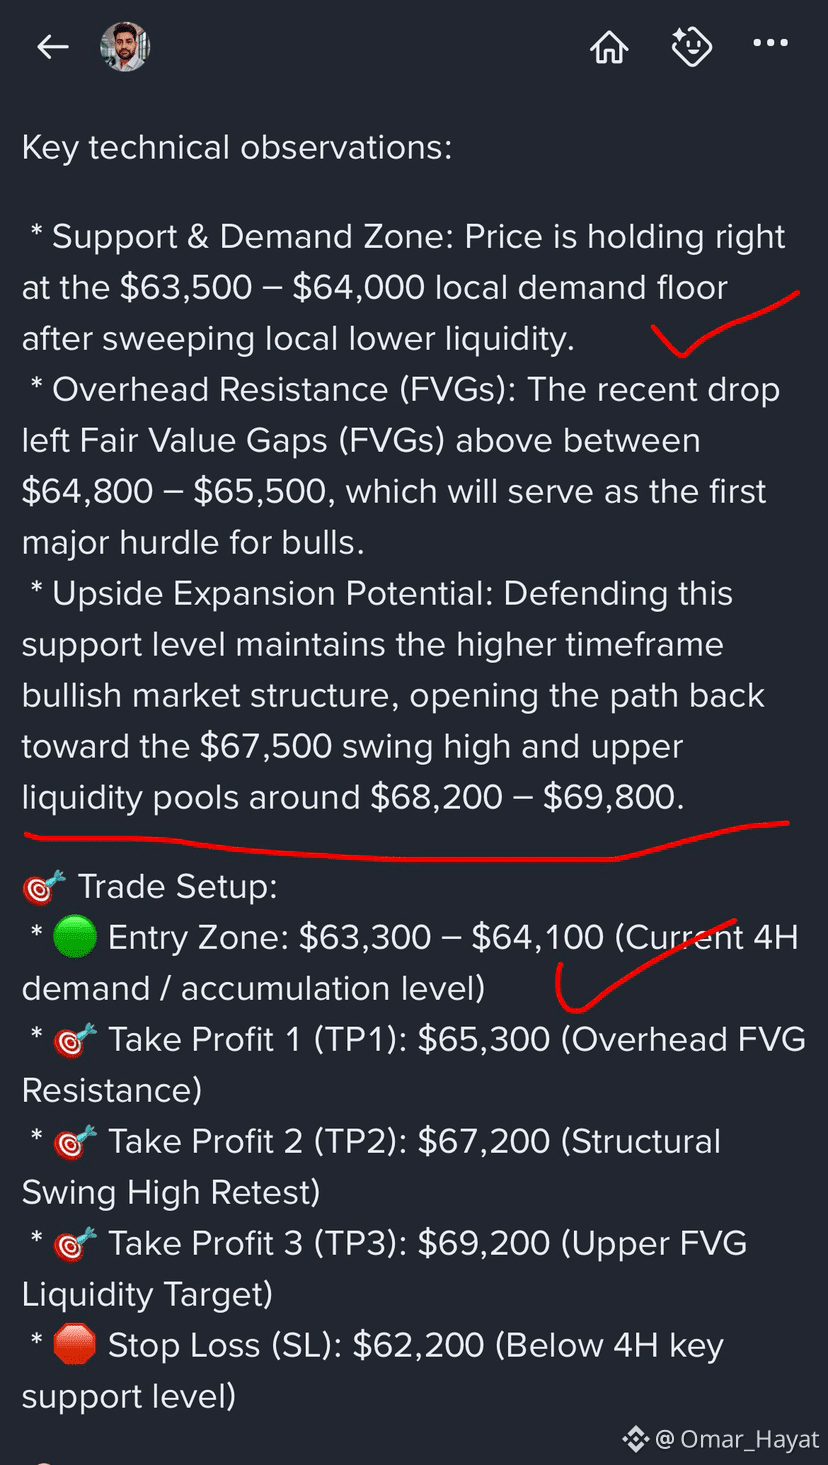
70
·
--
🚀 $BTC / USDT Technical Analysis & Trade Setup (4H Chart) 📈
🔍 Market Analysis:
Bitcoin ($BTC) is currently trading around $63,883.16 on the 4-hour timeframe, testing a key demand region following a pullback from the $67,500 structural swing high.
Key technical observations:
* Support & Demand Zone: Price is holding right at the $63,500 – $64,000 local demand floor after sweeping local lower liquidity.
* Overhead Resistance (FVGs): The recent drop left Fair Value Gaps (FVGs) above between $64,800 – $65,500, which will serve as the first major hurdle for bulls.
* Upside Expansion Potential: Defending this support level maintains the higher timeframe bullish market structure, opening the path back toward the $67,500 swing high and upper liquidity pools around $68,200 – $69,800.
🎯 Trade Setup:
* 🟢 Entry Zone: $63,300 – $64,100 (Current 4H demand / accumulation level)
* 🎯 Take Profit 1 (TP1): $65,300 (Overhead FVG Resistance)
* 🎯 Take Profit 2 (TP2): $67,200 (Structural Swing High Retest)
* 🎯 Take Profit 3 (TP3): $69,200 (Upper FVG Liquidity Target)
* 🛑 Stop Loss (SL): $62,200 (Below 4H key support level)
💡 Trading Strategy & Risk Tip:
Look for bullish confirmation on lower timeframes (15M/1H) inside the entry block before taking execution. Always apply strict risk management—never risk more than 2% to 3% of your account on a single setup.
⚠️ Disclaimer:
This post is for educational and informational purposes only and does not constitute financial advice. Cryptocurrency trading involves substantial risk of capital loss. Always Do Your Own Research (DYOR) before placing any trades.
#BTC #Bitcoin #BinanceSquare #CryptoTrading #TechnicalAnalysis #CryptoSignals #DYOR #TradingView
🚀 $BTC / USDT Technical Analysis & Trade Setup (4H Chart) 📈
🔍 Market Analysis:
Bitcoin ($BTC) is currently trading around $63,883.16 on the 4-hour timeframe, testing a key demand region following a pullback from the $67,500 structural swing high.
Key technical observations:
* Support & Demand Zone: Price is holding right at the $63,500 – $64,000 local demand floor after sweeping local lower liquidity.
* Overhead Resistance (FVGs): The recent drop left Fair Value Gaps (FVGs) above between $64,800 – $65,500, which will serve as the first major hurdle for bulls.
* Upside Expansion Potential: Defending this support level maintains the higher timeframe bullish market structure, opening the path back toward the $67,500 swing high and upper liquidity pools around $68,200 – $69,800.
🎯 Trade Setup:
* 🟢 Entry Zone: $63,300 – $64,100 (Current 4H demand / accumulation level)
* 🎯 Take Profit 1 (TP1): $65,300 (Overhead FVG Resistance)
* 🎯 Take Profit 2 (TP2): $67,200 (Structural Swing High Retest)
* 🎯 Take Profit 3 (TP3): $69,200 (Upper FVG Liquidity Target)
* 🛑 Stop Loss (SL): $62,200 (Below 4H key support level)
💡 Trading Strategy & Risk Tip:
Look for bullish confirmation on lower timeframes (15M/1H) inside the entry block before taking execution. Always apply strict risk management—never risk more than 2% to 3% of your account on a single setup.
⚠️ Disclaimer:
This post is for educational and informational purposes only and does not constitute financial advice. Cryptocurrency trading involves substantial risk of capital loss. Always Do Your Own Research (DYOR) before placing any trades.
#BTC #Bitcoin #BinanceSquare #CryptoTrading #TechnicalAnalysis #CryptoSignals #DYOR #TradingView
🔍 Market Analysis:
Bitcoin ($BTC) is currently trading around $63,883.16 on the 4-hour timeframe, testing a key demand region following a pullback from the $67,500 structural swing high.
Key technical observations:
* Support & Demand Zone: Price is holding right at the $63,500 – $64,000 local demand floor after sweeping local lower liquidity.
* Overhead Resistance (FVGs): The recent drop left Fair Value Gaps (FVGs) above between $64,800 – $65,500, which will serve as the first major hurdle for bulls.
* Upside Expansion Potential: Defending this support level maintains the higher timeframe bullish market structure, opening the path back toward the $67,500 swing high and upper liquidity pools around $68,200 – $69,800.
🎯 Trade Setup:
* 🟢 Entry Zone: $63,300 – $64,100 (Current 4H demand / accumulation level)
* 🎯 Take Profit 1 (TP1): $65,300 (Overhead FVG Resistance)
* 🎯 Take Profit 2 (TP2): $67,200 (Structural Swing High Retest)
* 🎯 Take Profit 3 (TP3): $69,200 (Upper FVG Liquidity Target)
* 🛑 Stop Loss (SL): $62,200 (Below 4H key support level)
💡 Trading Strategy & Risk Tip:
Look for bullish confirmation on lower timeframes (15M/1H) inside the entry block before taking execution. Always apply strict risk management—never risk more than 2% to 3% of your account on a single setup.
⚠️ Disclaimer:
This post is for educational and informational purposes only and does not constitute financial advice. Cryptocurrency trading involves substantial risk of capital loss. Always Do Your Own Research (DYOR) before placing any trades.
#BTC #Bitcoin #BinanceSquare #CryptoTrading #TechnicalAnalysis #CryptoSignals #DYOR #TradingView
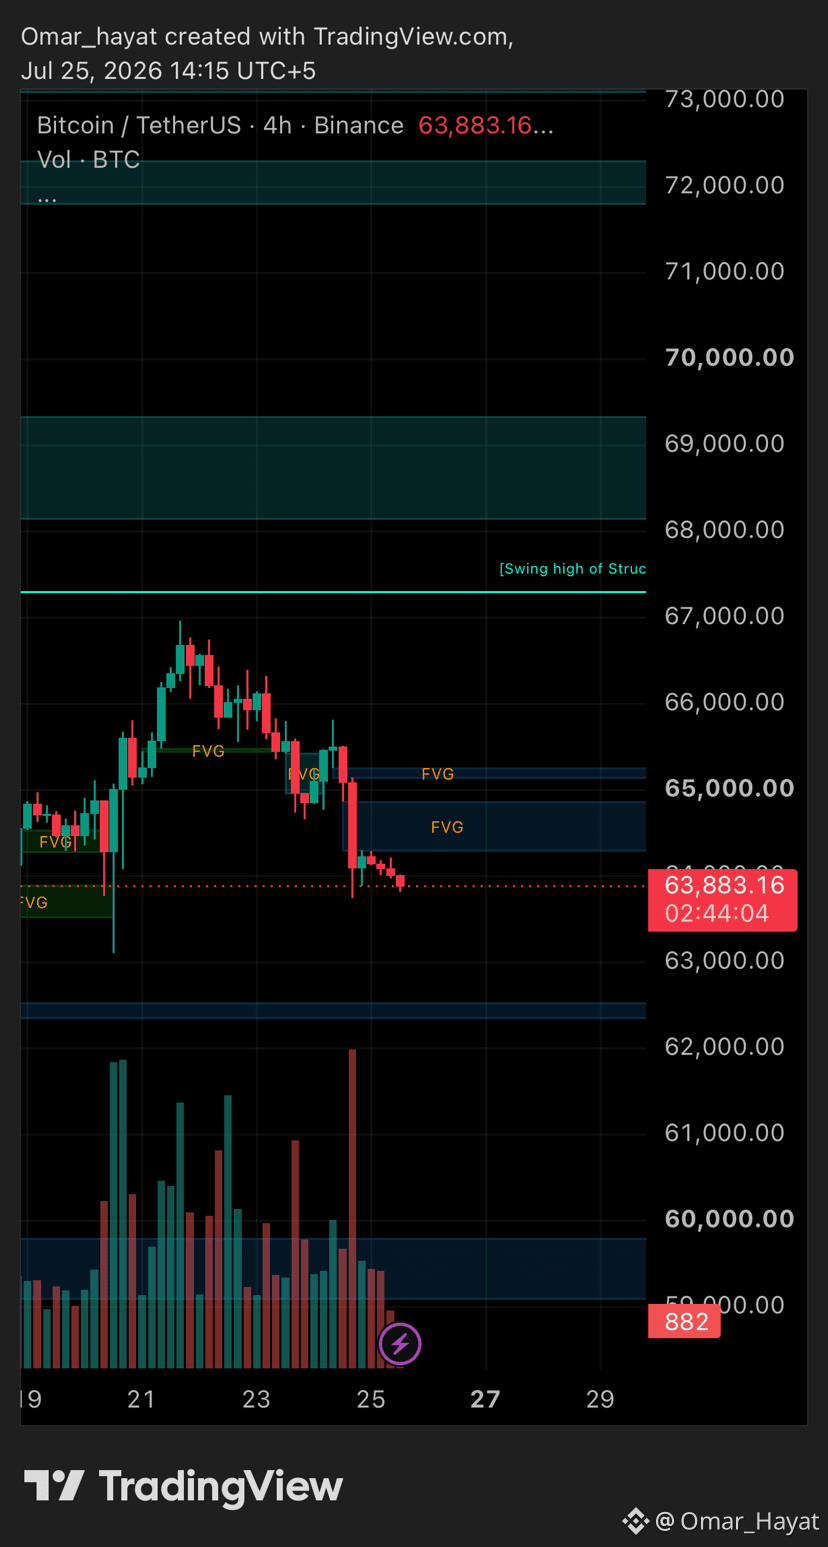
65
Log in to explore more content
Join global crypto users on Binance Square
⚡️ Get latest and useful information about crypto.
💬 Trusted by the world’s largest crypto exchange.
👍 Discover real insights from verified creators.
Email / Phone number
Trending Topics
BinancePick
2.7M views
144,021 Discussing
Join #EarningsSeason: Predict Earnings on Binance Pick, Share Your Take on Binance Square!
Binance Square Official
·402 Likes
·339.3k views
EarningsSeason
5M views
24,720 Discussing
SouthKoreaReportedlyWeighsFourthCryptoTaxDelay
2,920 views
136 Discussing