
spot_traders1
249 Posts

spot_traders1
Report
Block User
14 Following
5 Followers
6 Liked
Posts
All
Videos
·
--
Bearish
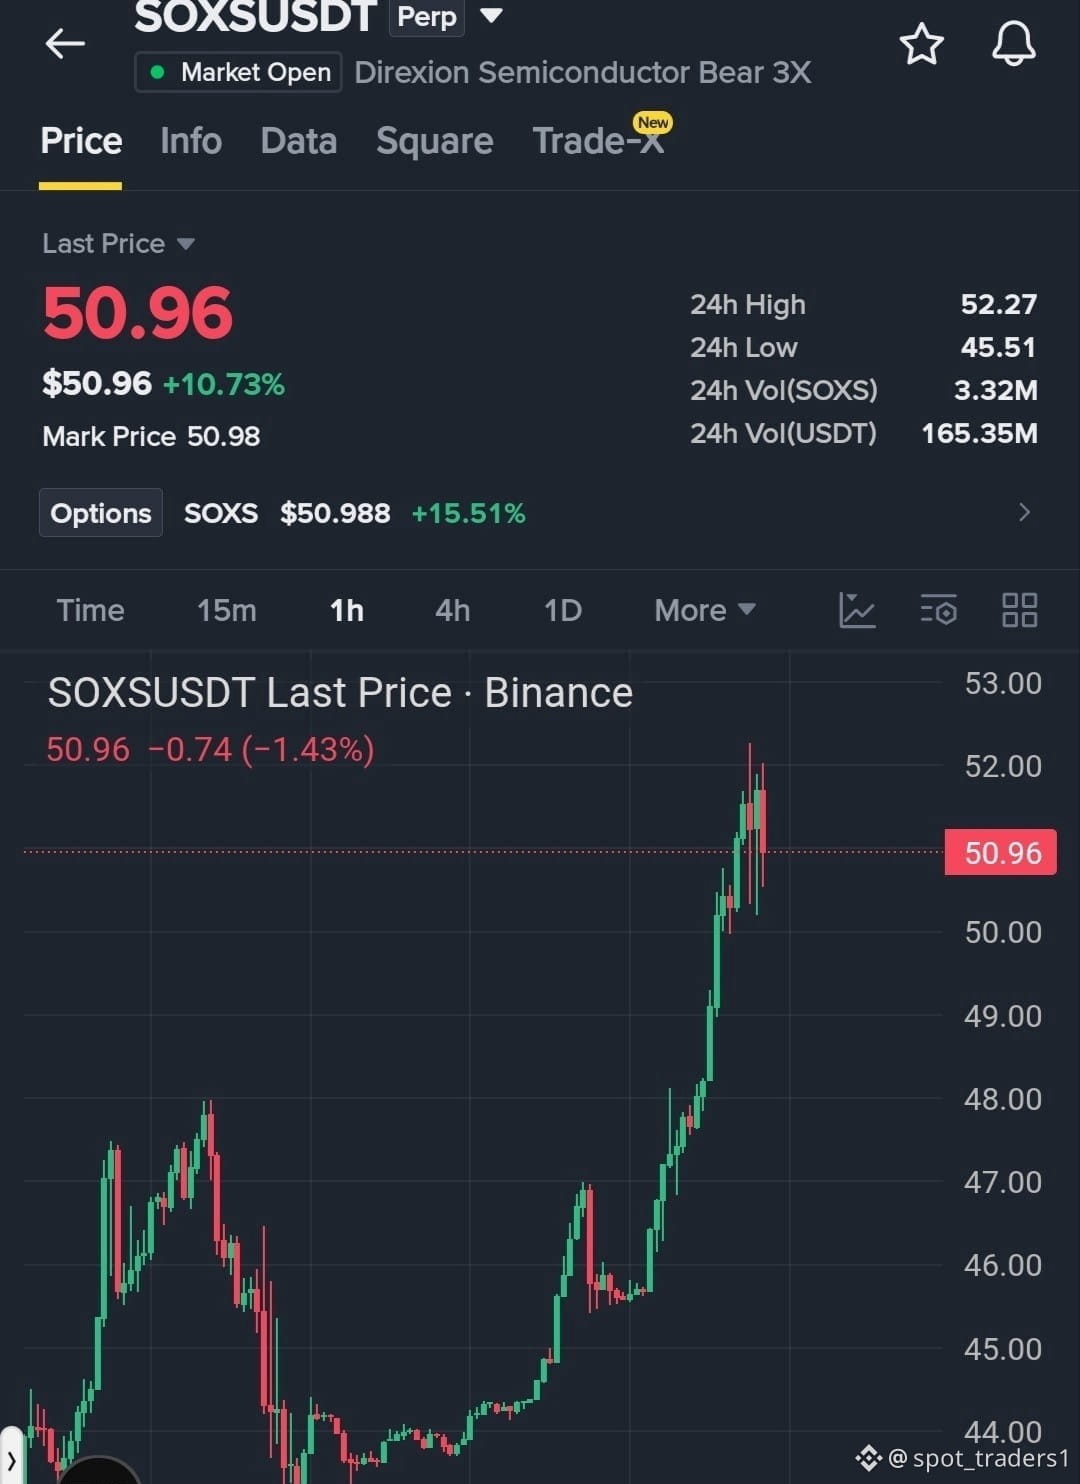
📉 $SOXS — SHORT WATCH
$SOXS is showing signs of exhaustion after its recent strong move, with momentum potentially starting to fade.
A clear rejection or further weakness could create a potential short opportunity, with 48 as the target.
Target: 48
SL: Manage according to your position size and risk tolerance.
Wait for confirmation, avoid chasing the move, and manage risk carefully.
DYOR — Do Your Own Research
{future}(SOXSUSDT)
$SOXS
📉 $SOXS — SHORT WATCH
$SOXS is showing signs of exhaustion after its recent strong move, with momentum potentially starting to fade.
A clear rejection or further weakness could create a potential short opportunity, with 48 as the target.
Target: 48
SL: Manage according to your position size and risk tolerance.
Wait for confirmation, avoid chasing the move, and manage risk carefully.
DYOR — Do Your Own Research
$SOXS
$SOXS is showing signs of exhaustion after its recent strong move, with momentum potentially starting to fade.
A clear rejection or further weakness could create a potential short opportunity, with 48 as the target.
Target: 48
SL: Manage according to your position size and risk tolerance.
Wait for confirmation, avoid chasing the move, and manage risk carefully.
DYOR — Do Your Own Research
$SOXS

26
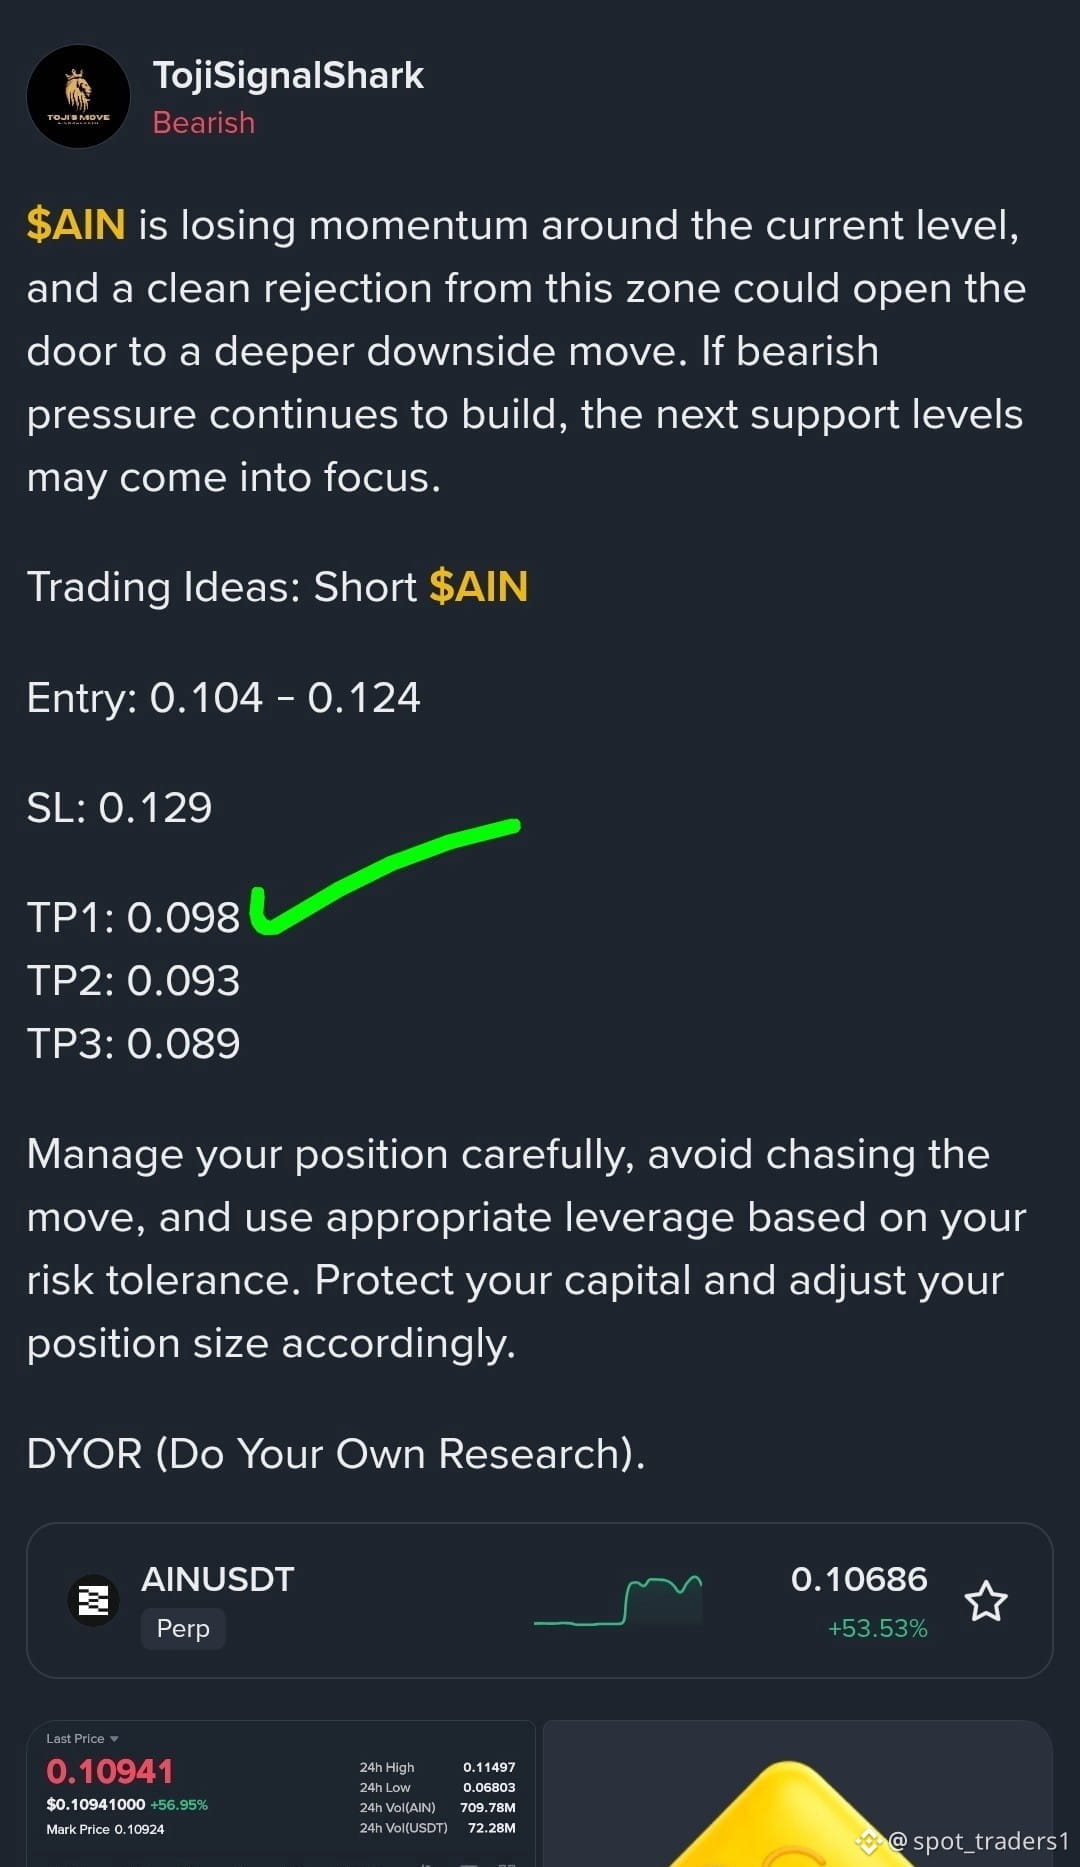
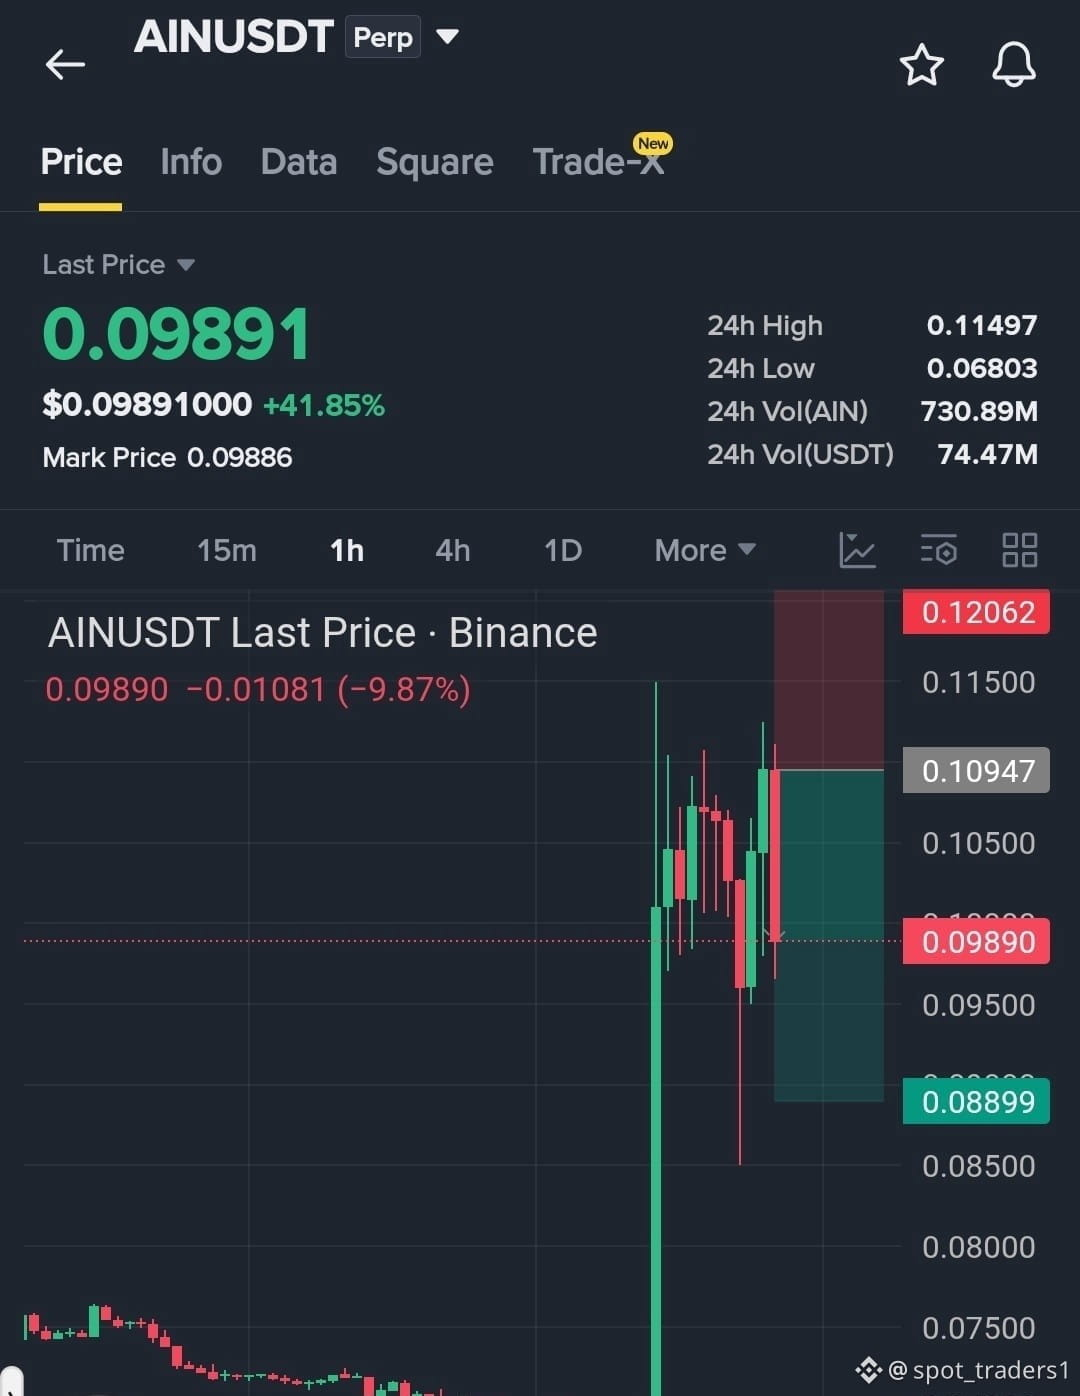
📉 $AIN — SHORT UPDATE
🎯 TP1 HIT!
$AIN delivered a quick move to the first target, playing out as expected.
Consider securing 30% gains here and moving SL to entry to help protect the remaining position. If you’re still holding, bearish momentum remains active for now, so continue managing the short according to your risk plan.
Stay disciplined, avoid chasing sudden moves, use controlled leverage, and protect your capital.
DYOR — Do Your Own Research
{future}(AINUSDT)
$AIN
📉 $AIN — SHORT UPDATE
🎯 TP1 HIT!
$AIN delivered a quick move to the first target, playing out as expected.
Consider securing 30% gains here and moving SL to entry to help protect the remaining position. If you’re still holding, bearish momentum remains active for now, so continue managing the short according to your risk plan.
Stay disciplined, avoid chasing sudden moves, use controlled leverage, and protect your capital.
DYOR — Do Your Own Research
$AIN
🎯 TP1 HIT!
$AIN delivered a quick move to the first target, playing out as expected.
Consider securing 30% gains here and moving SL to entry to help protect the remaining position. If you’re still holding, bearish momentum remains active for now, so continue managing the short according to your risk plan.
Stay disciplined, avoid chasing sudden moves, use controlled leverage, and protect your capital.
DYOR — Do Your Own Research
$AIN
37
·
--
Bearish
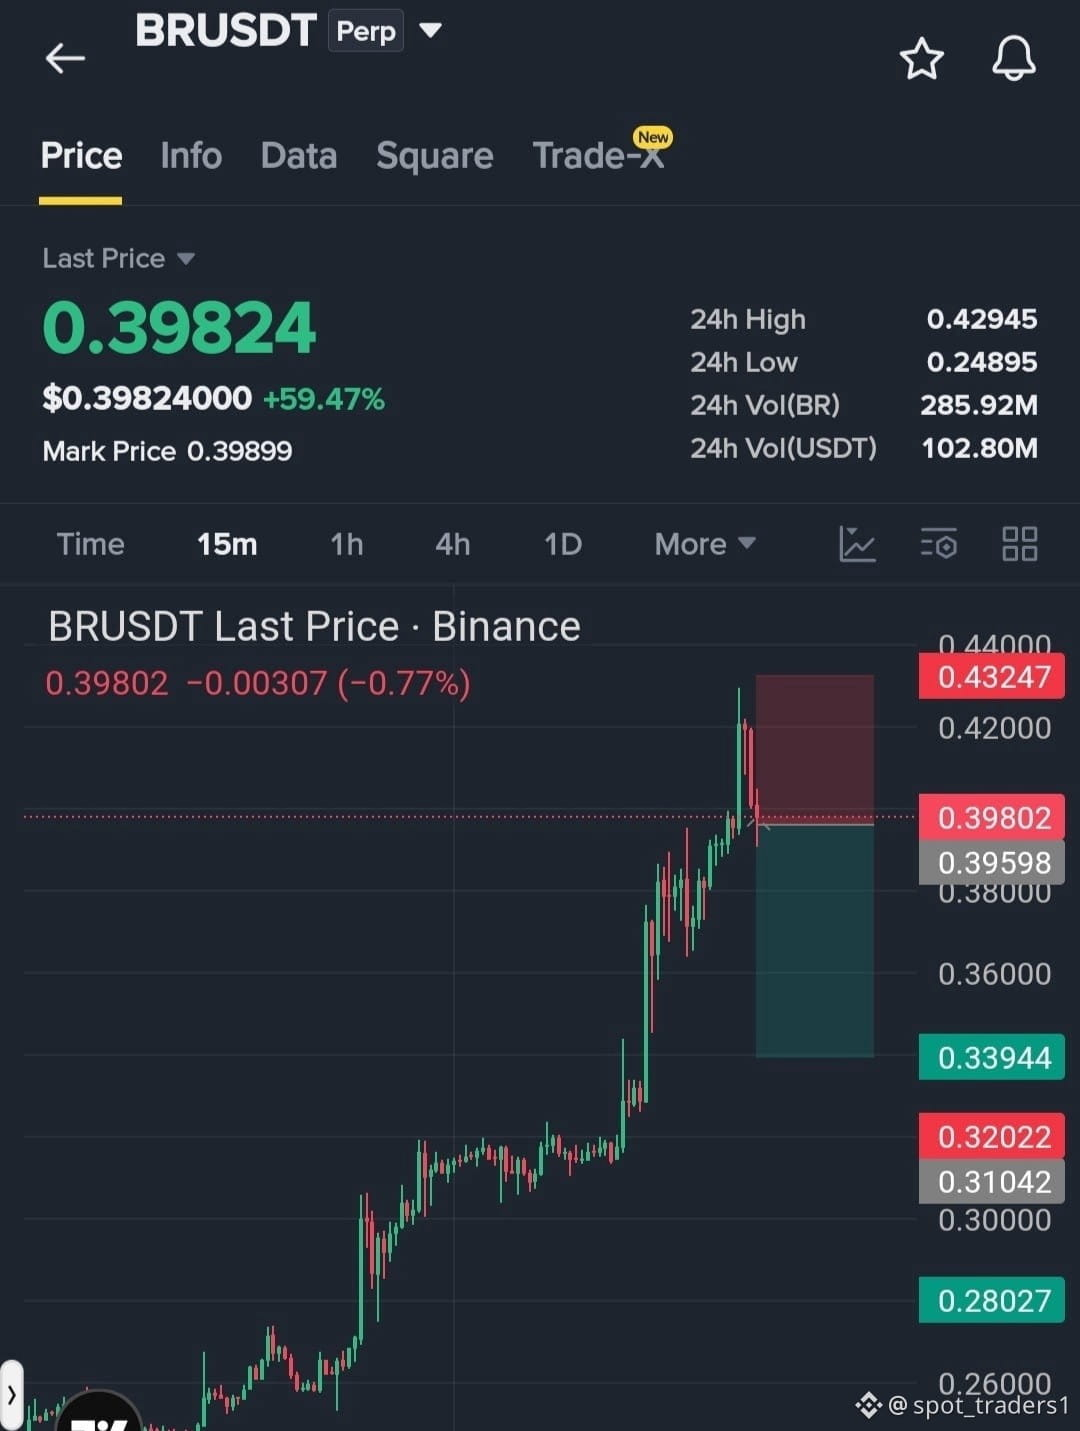
📉 $BR — SHORT SETUP
$BR is showing clear weakness around the current zone, with sellers continuing to apply pressure. If price confirms a breakdown and rejection from this area, a deeper downside move toward the lower targets could develop.
Trading Idea: SHORT $BR
Entry: 0.400–0.424
SL: 0.445
TP1: 0.380
TP2: 0.360
TP3: 0.340
Stay patient and wait for confirmation rather than chasing the move. Manage your position and risk carefully according to your own strategy.
DYOR — Do Your Own Research
{future}(BRUSDT)
📉 $BR — SHORT SETUP
$BR is showing clear weakness around the current zone, with sellers continuing to apply pressure. If price confirms a breakdown and rejection from this area, a deeper downside move toward the lower targets could develop.
Trading Idea: SHORT $BR
Entry: 0.400–0.424
SL: 0.445
TP1: 0.380
TP2: 0.360
TP3: 0.340
Stay patient and wait for confirmation rather than chasing the move. Manage your position and risk carefully according to your own strategy.
DYOR — Do Your Own Research
$BR is showing clear weakness around the current zone, with sellers continuing to apply pressure. If price confirms a breakdown and rejection from this area, a deeper downside move toward the lower targets could develop.
Trading Idea: SHORT $BR
Entry: 0.400–0.424
SL: 0.445
TP1: 0.380
TP2: 0.360
TP3: 0.340
Stay patient and wait for confirmation rather than chasing the move. Manage your position and risk carefully according to your own strategy.
DYOR — Do Your Own Research

62
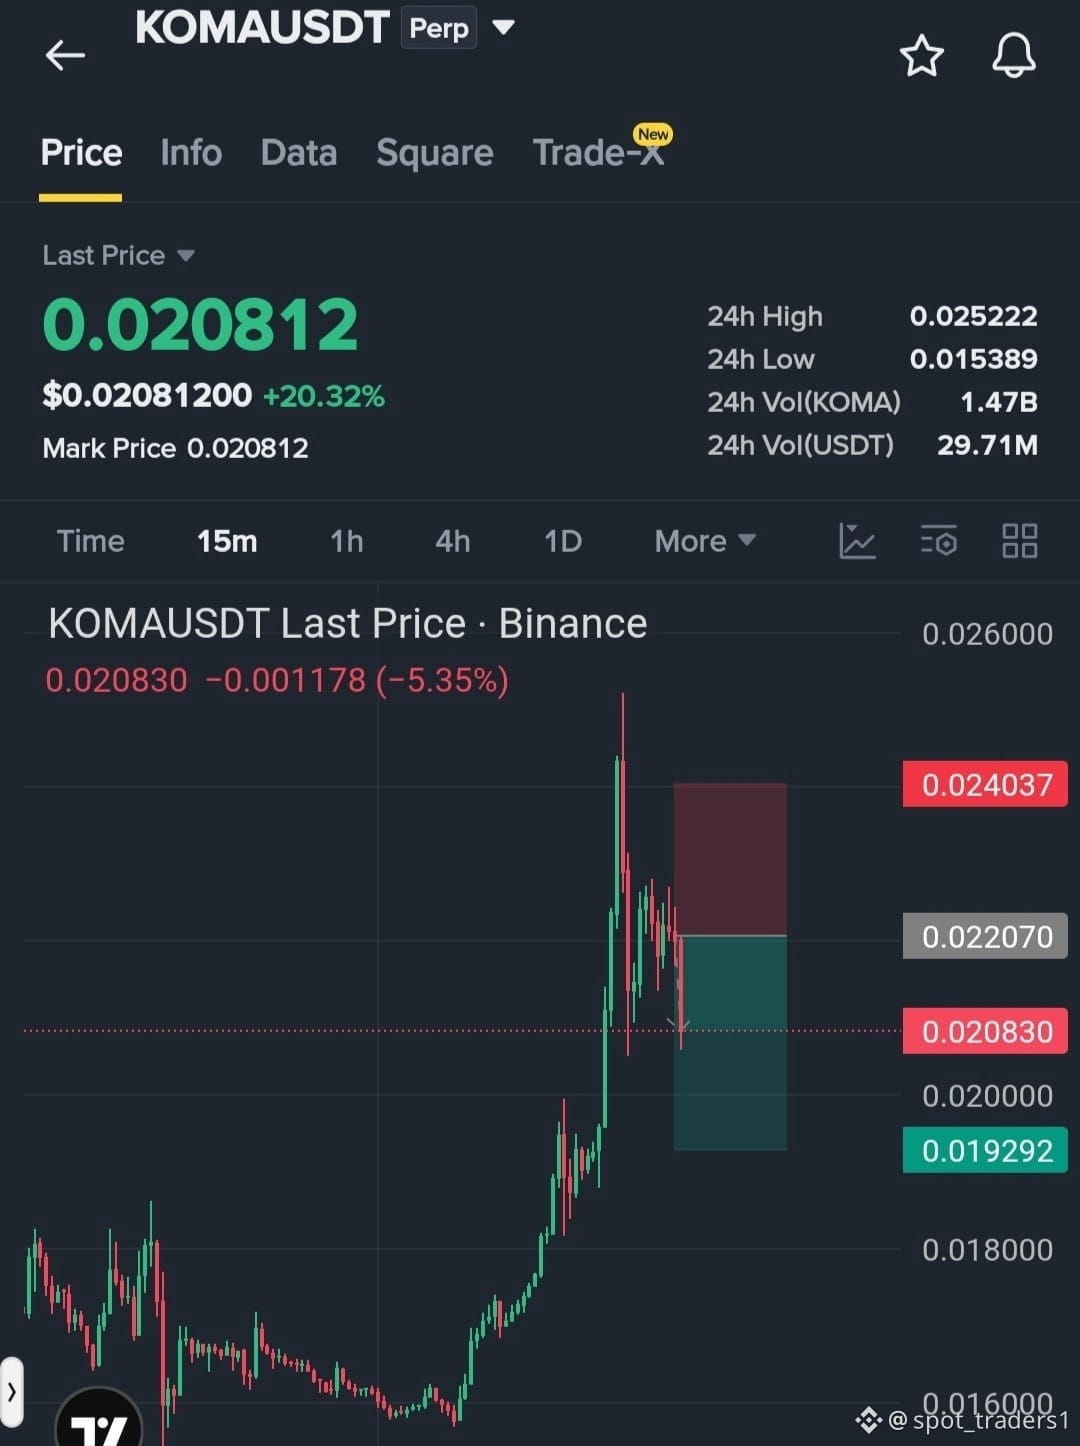
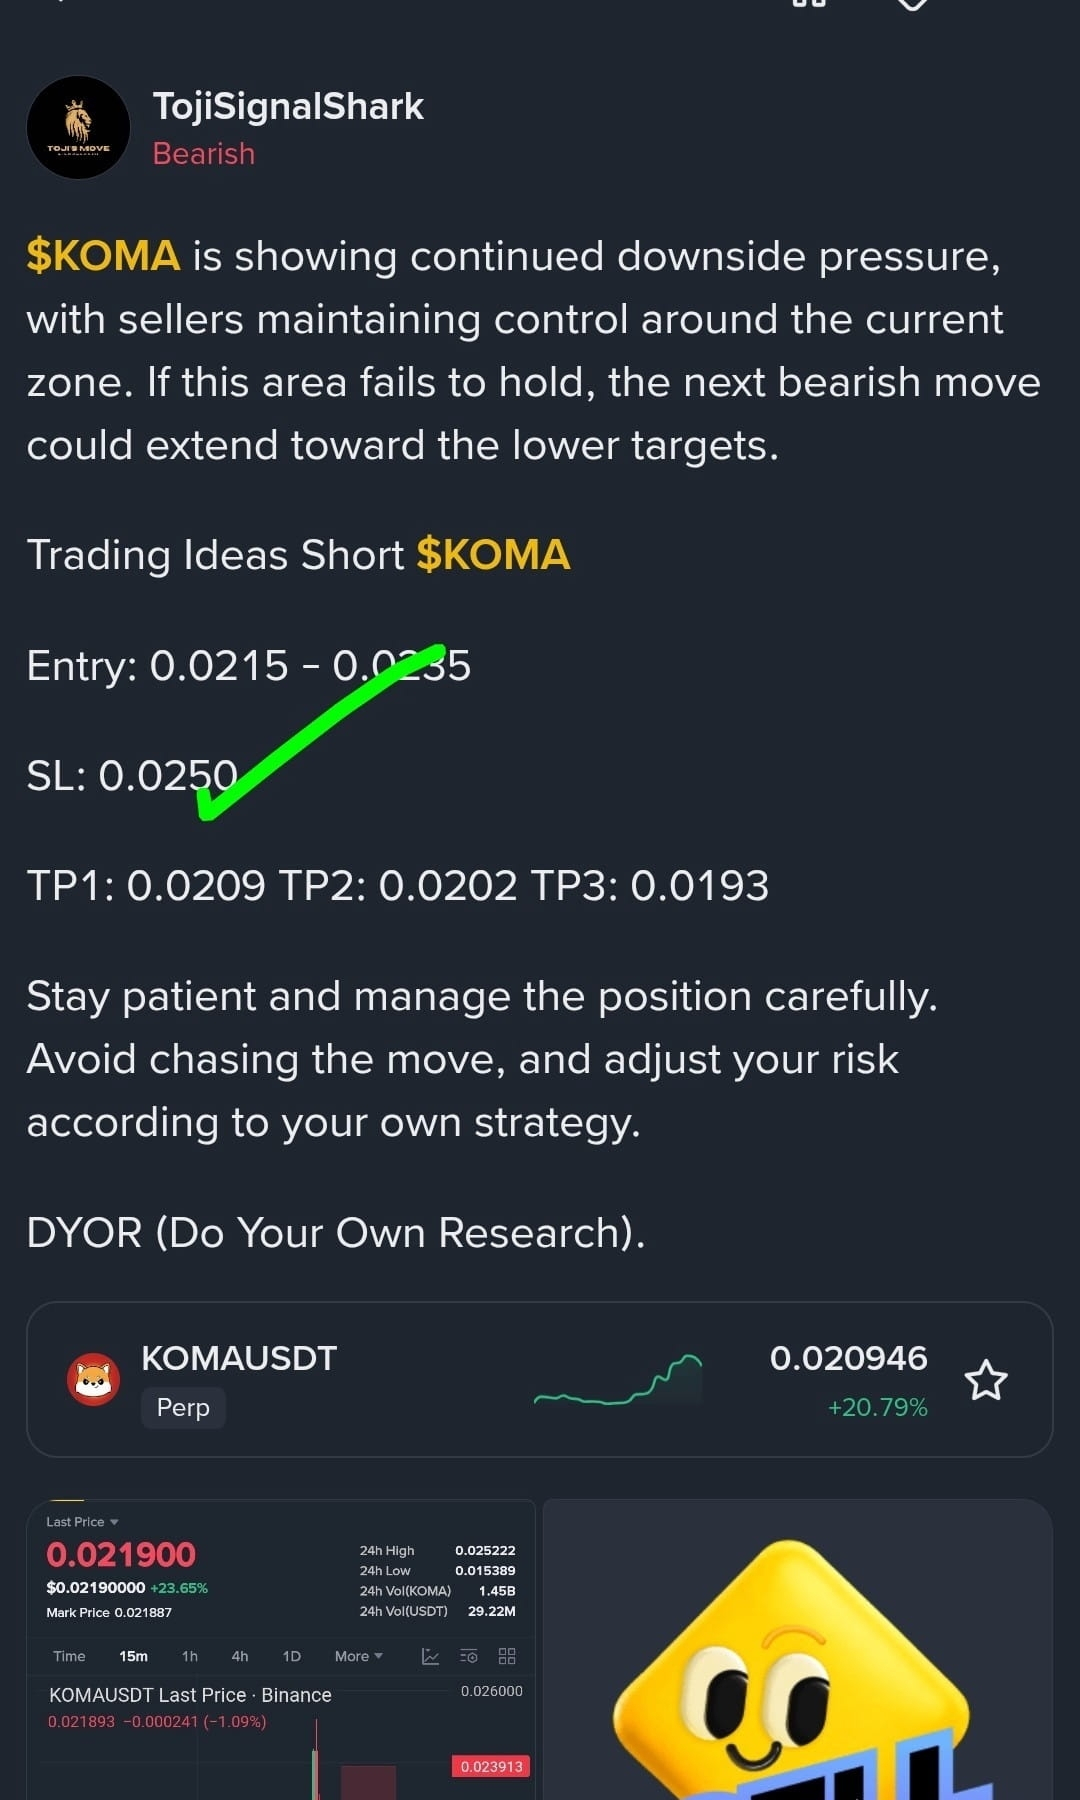
📉 $KOMA — SHORT UPDATE
🎯 TP1 HIT!
The $KOMA short has reached the first target successfully. Consider securing 30% of the position in profit and moving SL to entry to help protect the remaining trade.
Bearish momentum remains active for now, so the remaining short can stay open while watching the next targets.
Manage your position and risk carefully, and avoid excessive exposure or chasing the move.
DYOR — Do Your Own Research.
📉 $KOMA — SHORT UPDATE
🎯 TP1 HIT!
The $KOMA short has reached the first target successfully. Consider securing 30% of the position in profit and moving SL to entry to help protect the remaining trade.
Bearish momentum remains active for now, so the remaining short can stay open while watching the next targets.
Manage your position and risk carefully, and avoid excessive exposure or chasing the move.
DYOR — Do Your Own Research.
🎯 TP1 HIT!
The $KOMA short has reached the first target successfully. Consider securing 30% of the position in profit and moving SL to entry to help protect the remaining trade.
Bearish momentum remains active for now, so the remaining short can stay open while watching the next targets.
Manage your position and risk carefully, and avoid excessive exposure or chasing the move.
DYOR — Do Your Own Research.
5
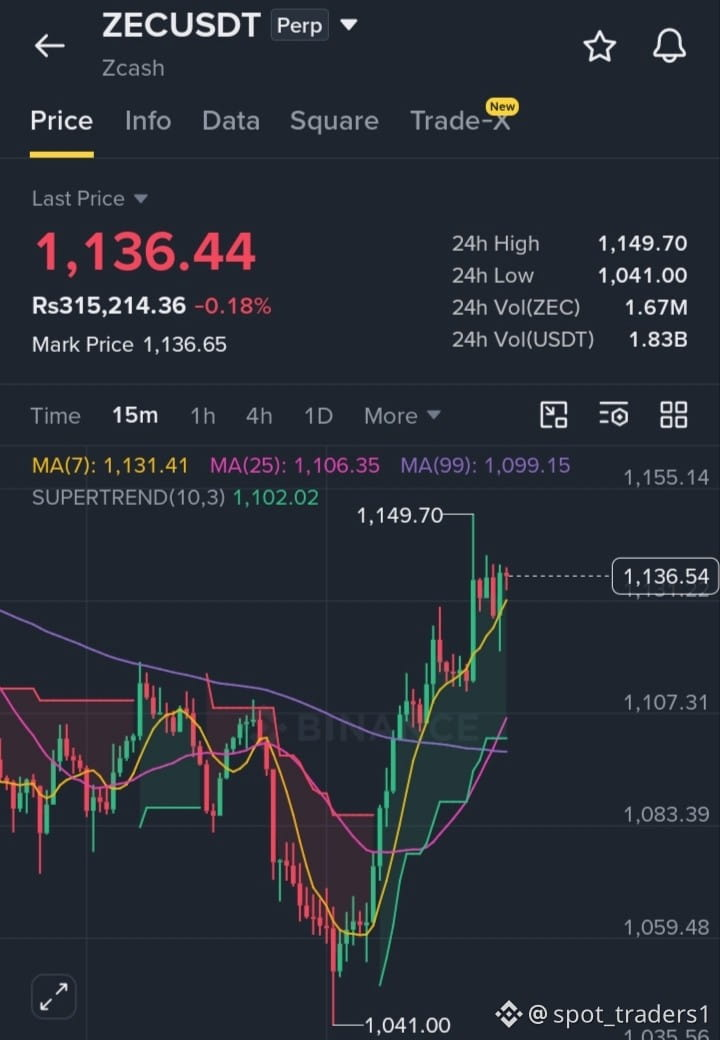
$ZEC is showing signs of exhaustion around this zone, with sellers beginning to regain control. If rejection strengthens, another potential downside leg could develop.
Trading Idea: SHORT $ZEC
- Entry: 1,120–1,170
- SL: 1,240
- TP1: 1,090
- TP2: 1,040
- TP3: 1,000
Wait for confirmation before entering, and avoid chasing the move. Manage your position and risk carefully, adjusting according to your own strategy.
DYOR — Do Your Own Research
{future}(ZECUSDT)
$ZEC is showing signs of exhaustion around this zone, with sellers beginning to regain control. If rejection strengthens, another potential downside leg could develop.
Trading Idea: SHORT $ZEC
- Entry: 1,120–1,170
- SL: 1,240
- TP1: 1,090
- TP2: 1,040
- TP3: 1,000
Wait for confirmation before entering, and avoid chasing the move. Manage your position and risk carefully, adjusting according to your own strategy.
DYOR — Do Your Own Research
Trading Idea: SHORT $ZEC
- Entry: 1,120–1,170
- SL: 1,240
- TP1: 1,090
- TP2: 1,040
- TP3: 1,000
Wait for confirmation before entering, and avoid chasing the move. Manage your position and risk carefully, adjusting according to your own strategy.
DYOR — Do Your Own Research
·
--
Bearish
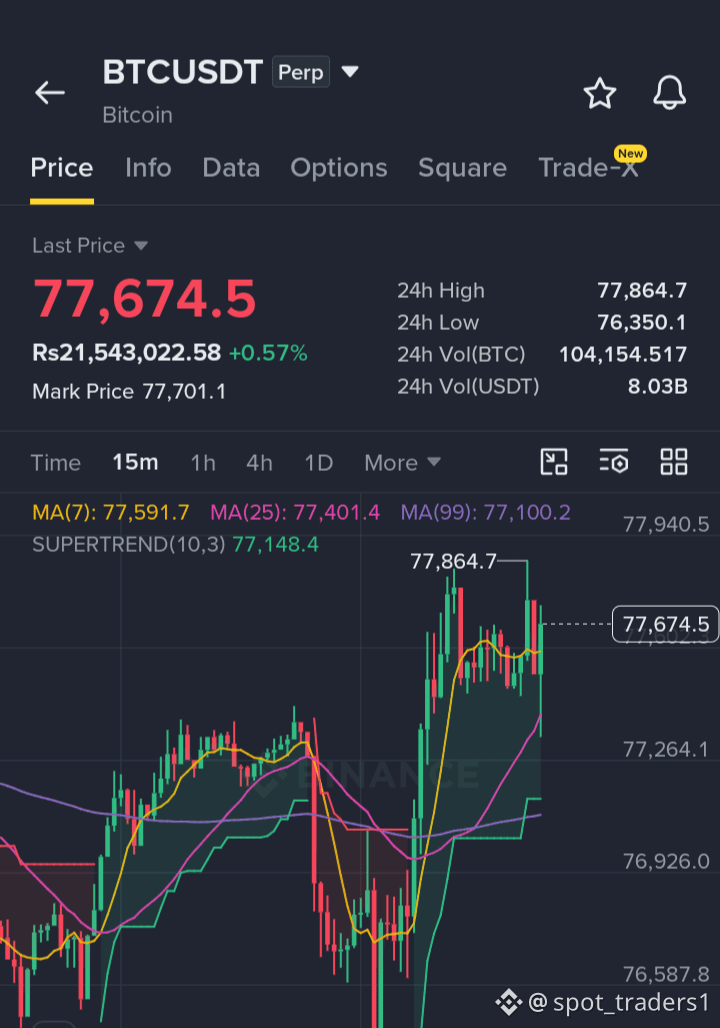
📉 $BTC — SHORT UPDATE
Still holding the $BTC short as the bearish structure remains intact. Current momentum continues to lean toward the downside, so I’m staying patient and keeping the position open for the remaining targets.
TPs: Same as previously mentioned.
Stay disciplined, avoid chasing the move, and manage your position and risk according to your own strategy.
DYOR — Do Your Own Research
{future}(BTCUSDT)
$BTC
📉 $BTC — SHORT UPDATE
Still holding the $BTC short as the bearish structure remains intact. Current momentum continues to lean toward the downside, so I’m staying patient and keeping the position open for the remaining targets.
TPs: Same as previously mentioned.
Stay disciplined, avoid chasing the move, and manage your position and risk according to your own strategy.
DYOR — Do Your Own Research
$BTC
Still holding the $BTC short as the bearish structure remains intact. Current momentum continues to lean toward the downside, so I’m staying patient and keeping the position open for the remaining targets.
TPs: Same as previously mentioned.
Stay disciplined, avoid chasing the move, and manage your position and risk according to your own strategy.
DYOR — Do Your Own Research
$BTC

2
·
--
Bearish
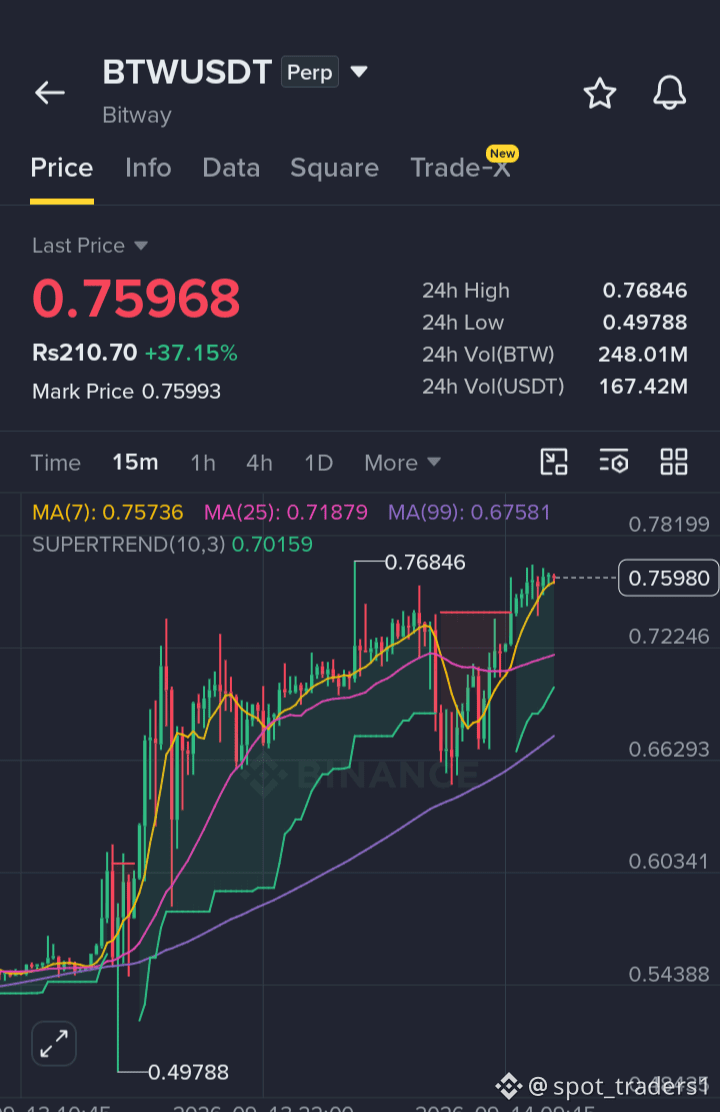
$BTW is pushing toward a potential fresh all-time high. Rather than chasing the move, I’d wait for the ATH to form and look for a clear rejection before considering a scalp short.
Short Setup to Watch:
Entry: After ATH rejection
TP1: 0.73
TP2: 0.70
TP3: 0.65
Wait for proper confirmation before taking any setup. Manage risk carefully and adjust your position according to your own strategy.
DYOR — Do Your Own Research
{future}(BTWUSDT)
$BTW
$BTW is pushing toward a potential fresh all-time high. Rather than chasing the move, I’d wait for the ATH to form and look for a clear rejection before considering a scalp short.
Short Setup to Watch:
Entry: After ATH rejection
TP1: 0.73
TP2: 0.70
TP3: 0.65
Wait for proper confirmation before taking any setup. Manage risk carefully and adjust your position according to your own strategy.
DYOR — Do Your Own Research
$BTW
Short Setup to Watch:
Entry: After ATH rejection
TP1: 0.73
TP2: 0.70
TP3: 0.65
Wait for proper confirmation before taking any setup. Manage risk carefully and adjust your position according to your own strategy.
DYOR — Do Your Own Research
$BTW

1
Today’s Binance Trading PNL — Real-Time Performance Update
Today’s Binance Trading PNL — Real-Time Performance Update
1
·
--
Bearish
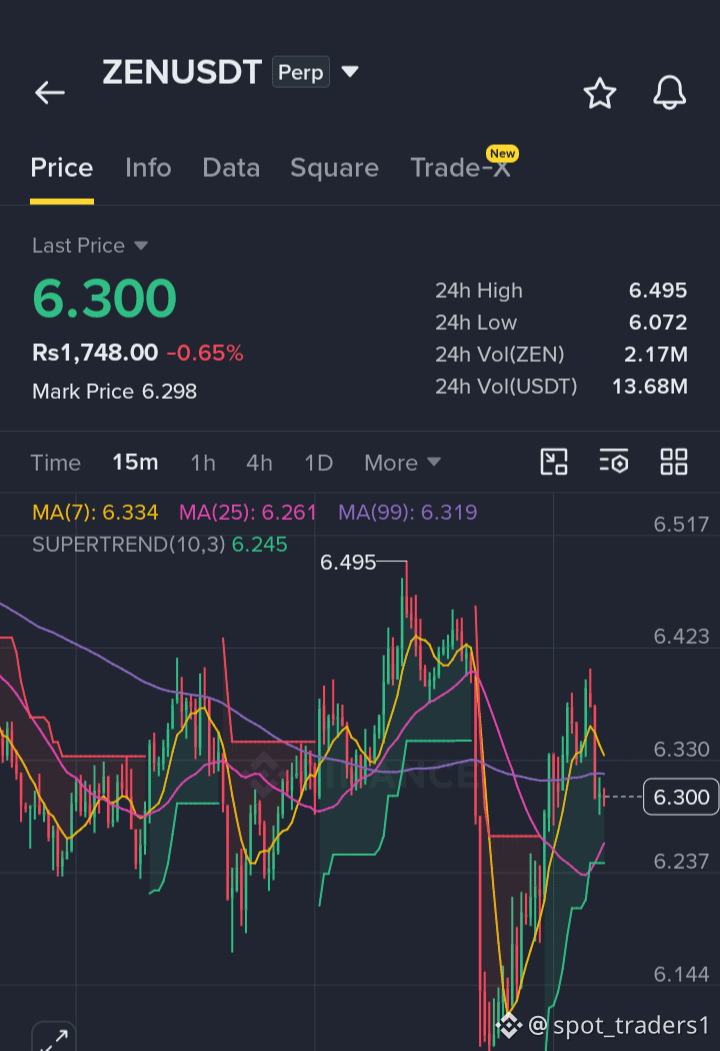
Still holding the $ZEN short as the bearish setup remains active. Keeping the position open while downside momentum stays weak.
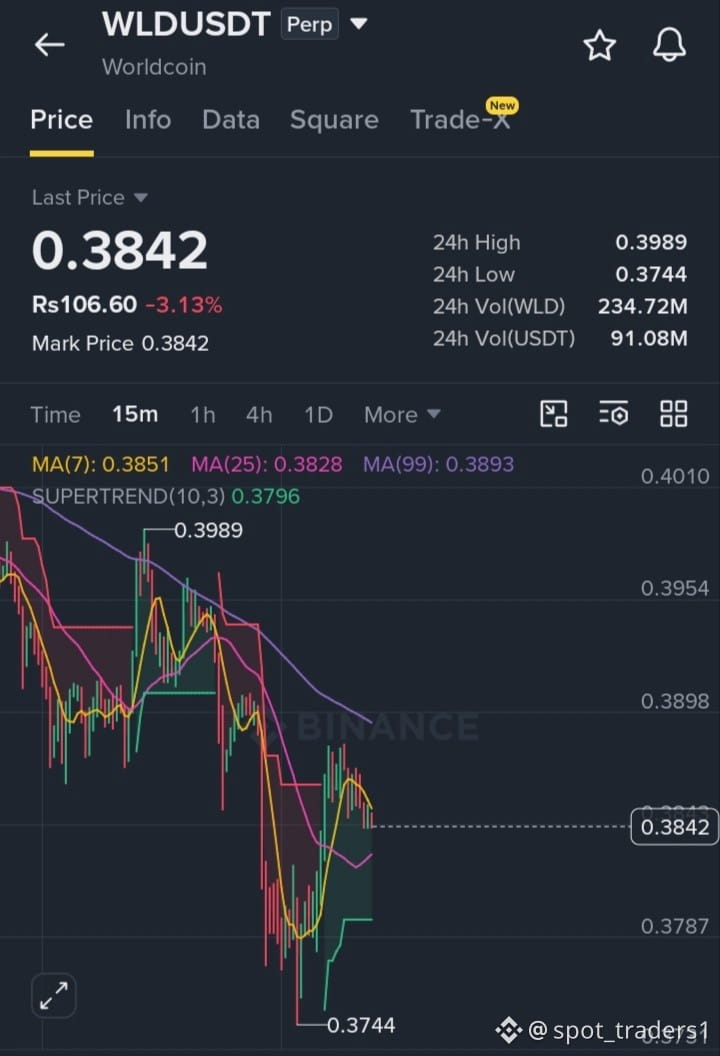
$WLD — TP1 HIT!
If you’re still holding, consider securing some gains at TP1 and managing the remaining position carefully.
Stay patient, avoid chasing the move, and keep risk under control.
DYOR — Do Your Own Research
{future}(ZENUSDT)
{future}(WLDUSDT)
Still holding the $ZEN short as the bearish setup remains active. Keeping the position open while downside momentum stays weak.
$WLD — TP1 HIT!
If you’re still holding, consider securing some gains at TP1 and managing the remaining position carefully.
Stay patient, avoid chasing the move, and keep risk under control.
DYOR — Do Your Own Research
$WLD — TP1 HIT!
If you’re still holding, consider securing some gains at TP1 and managing the remaining position carefully.
Stay patient, avoid chasing the move, and keep risk under control.
DYOR — Do Your Own Research
3
📉 SHORT SETUP UPDATES
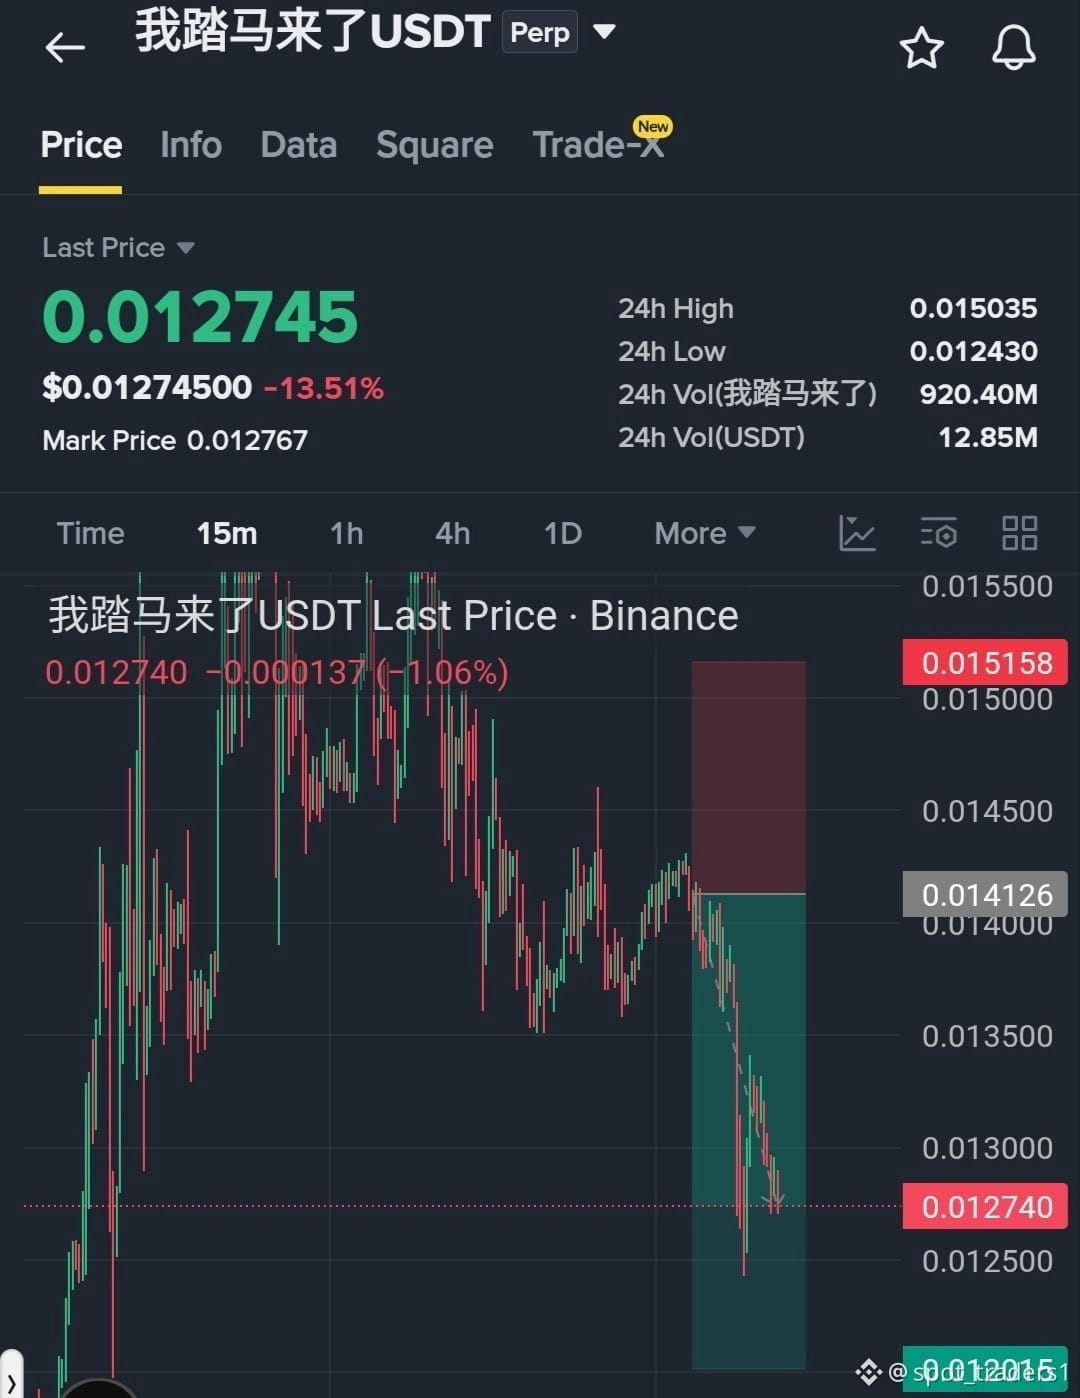
$我踏马来了 — FINAL TARGETS NEAR
The short setup is approaching the final targets, with downside momentum still holding control. If you’re still in the position, consider keeping the short active while securing partial gains as the move develops.
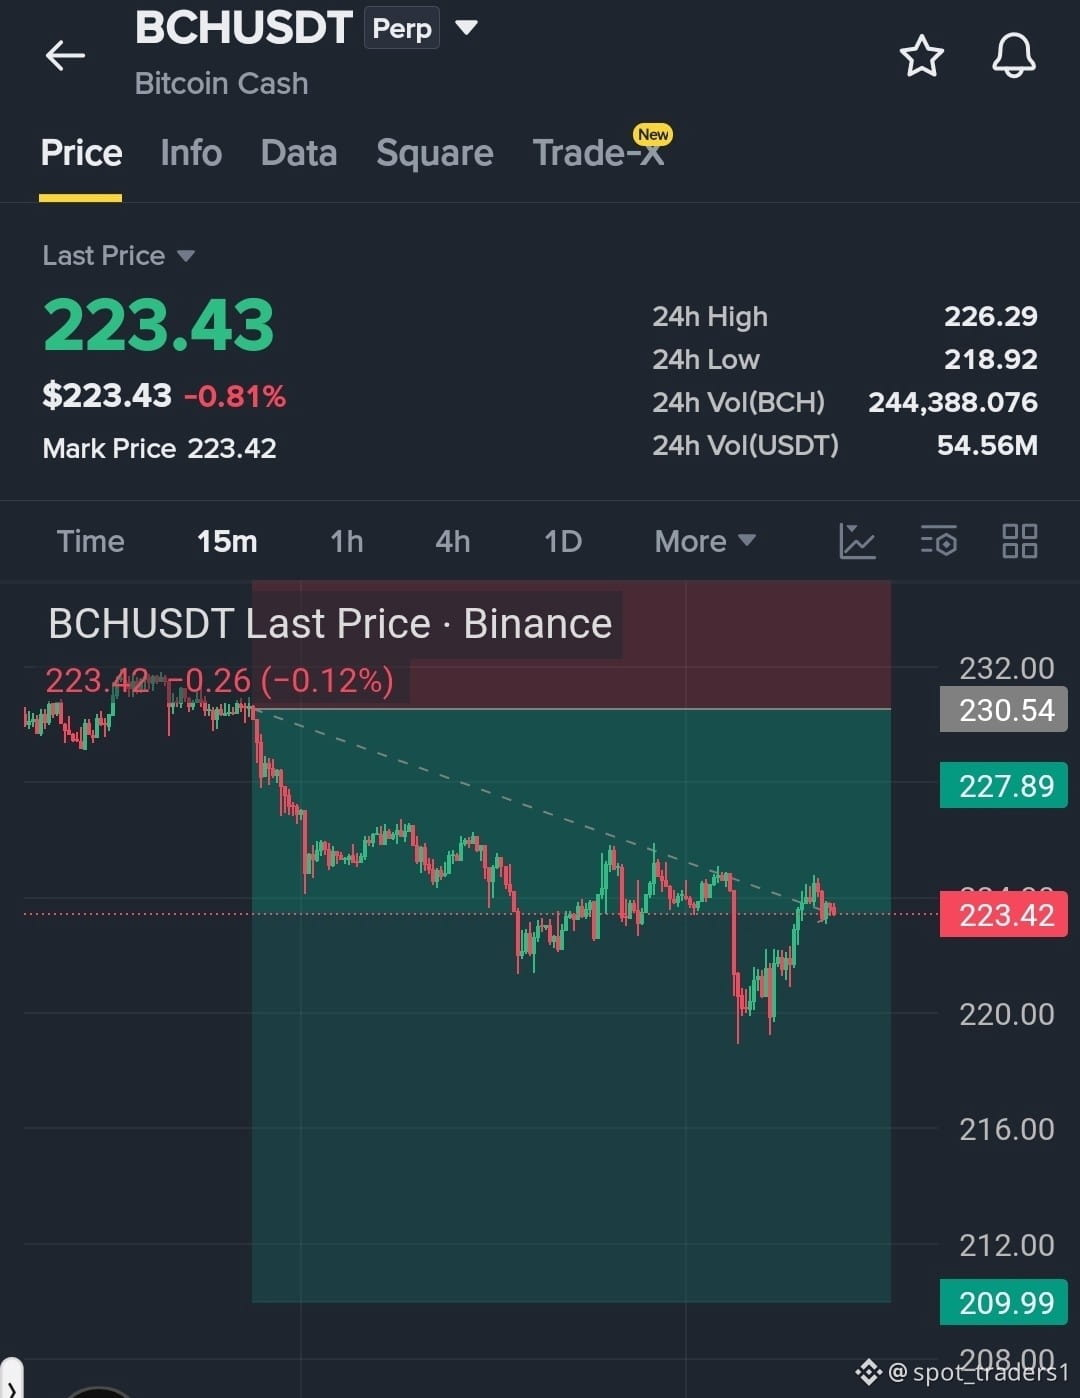
$BCH — TP2 HIT!
Consider closing 50% of the position to secure gains and moving SL to breakeven, helping protect the remaining trade while keeping some exposure for the next move.
$BEAT could become interesting if bearish momentum strengthens. Wait for confirmation before considering any setup.
Manage risk carefully, avoid chasing moves, and don’t overexpose your position.
DYOR.
{future}(BEATUSDT)
{future}(BCHUSDT)
{future}(我踏马来了USDT)
📉 SHORT SETUP UPDATES
$我踏马来了 — FINAL TARGETS NEAR
The short setup is approaching the final targets, with downside momentum still holding control. If you’re still in the position, consider keeping the short active while securing partial gains as the move develops.
$BCH — TP2 HIT!
Consider closing 50% of the position to secure gains and moving SL to breakeven, helping protect the remaining trade while keeping some exposure for the next move.
$BEAT could become interesting if bearish momentum strengthens. Wait for confirmation before considering any setup.
Manage risk carefully, avoid chasing moves, and don’t overexpose your position.
DYOR.
$我踏马来了 — FINAL TARGETS NEAR
The short setup is approaching the final targets, with downside momentum still holding control. If you’re still in the position, consider keeping the short active while securing partial gains as the move develops.
$BCH — TP2 HIT!
Consider closing 50% of the position to secure gains and moving SL to breakeven, helping protect the remaining trade while keeping some exposure for the next move.
$BEAT could become interesting if bearish momentum strengthens. Wait for confirmation before considering any setup.
Manage risk carefully, avoid chasing moves, and don’t overexpose your position.
DYOR.
350
📉 SHORT SETUP UPDATES
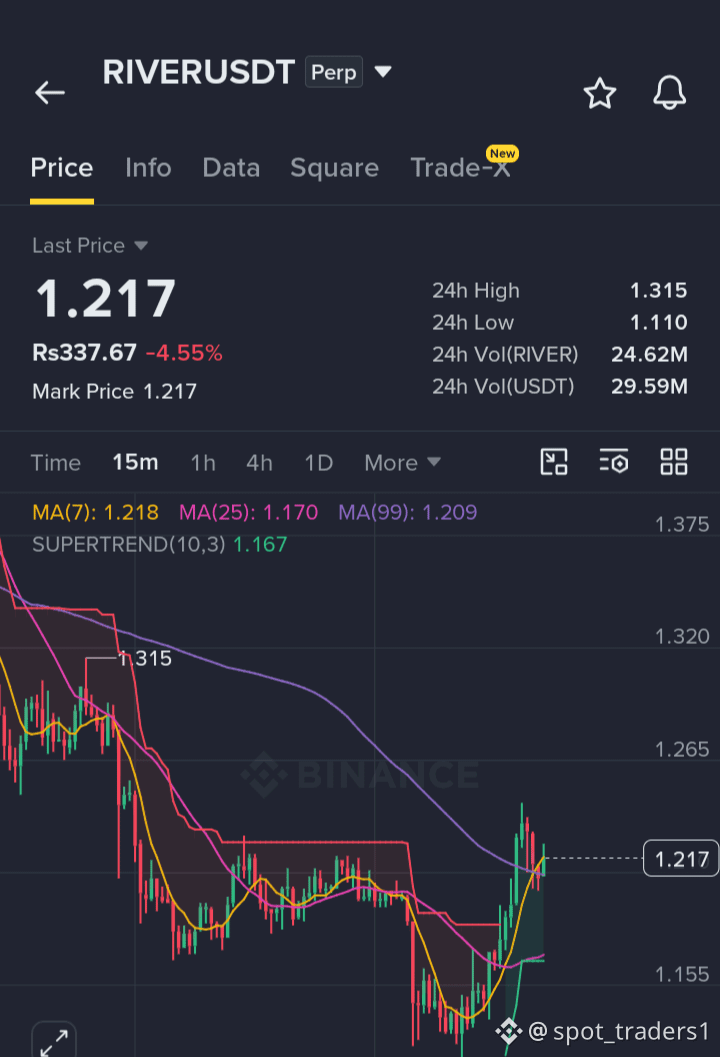
$RIVER — TP1 HIT!
If you’re still holding, consider closing 30% to secure partial gains and moving SL to entry. Keep the remaining short open for the next potential targets.
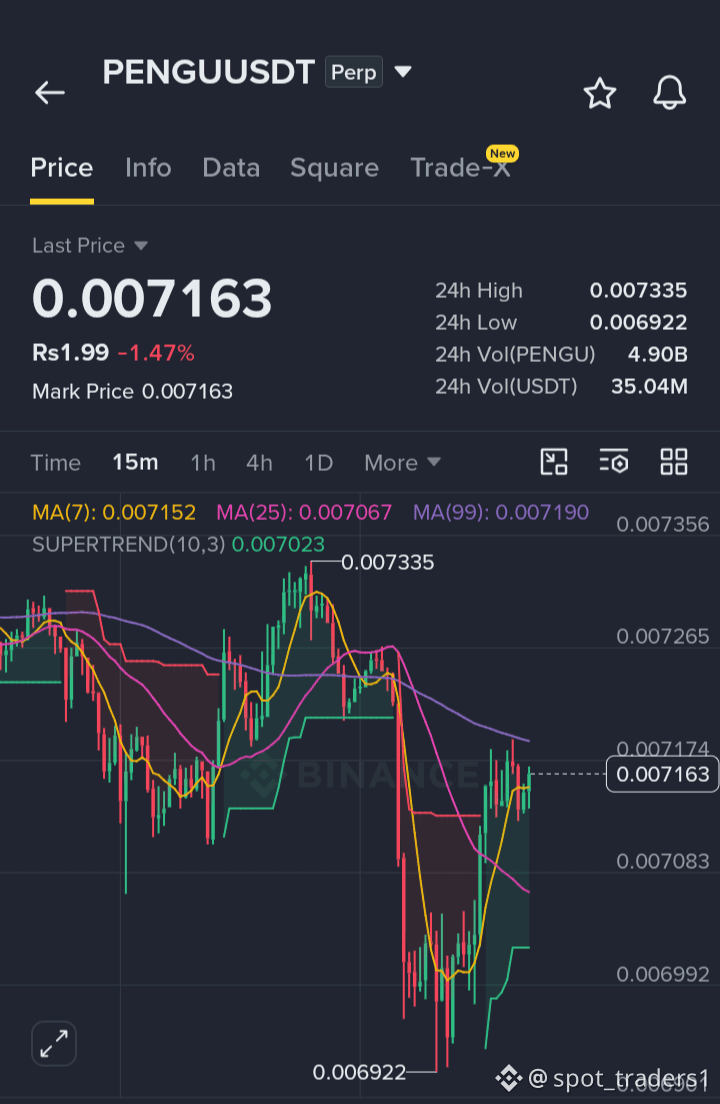
$PENGU — TP2 HIT!
Consider securing 50% gains and moving SL to breakeven to help protect the remaining position while maintaining exposure to the next move.
Stay disciplined, manage risk carefully, avoid chasing, and adjust your position according to your own strategy.
$SIREN
DYOR — Do Your Own Research
{future}(RIVERUSDT)
{future}(PENGUUSDT)
{future}(SIRENUSDT)
📉 SHORT SETUP UPDATES
$RIVER — TP1 HIT!
If you’re still holding, consider closing 30% to secure partial gains and moving SL to entry. Keep the remaining short open for the next potential targets.
$PENGU — TP2 HIT!
Consider securing 50% gains and moving SL to breakeven to help protect the remaining position while maintaining exposure to the next move.
Stay disciplined, manage risk carefully, avoid chasing, and adjust your position according to your own strategy.
$SIREN
DYOR — Do Your Own Research
$RIVER — TP1 HIT!
If you’re still holding, consider closing 30% to secure partial gains and moving SL to entry. Keep the remaining short open for the next potential targets.
$PENGU — TP2 HIT!
Consider securing 50% gains and moving SL to breakeven to help protect the remaining position while maintaining exposure to the next move.
Stay disciplined, manage risk carefully, avoid chasing, and adjust your position according to your own strategy.
$SIREN
DYOR — Do Your Own Research
23
📉 SHORT SETUP UPDATES
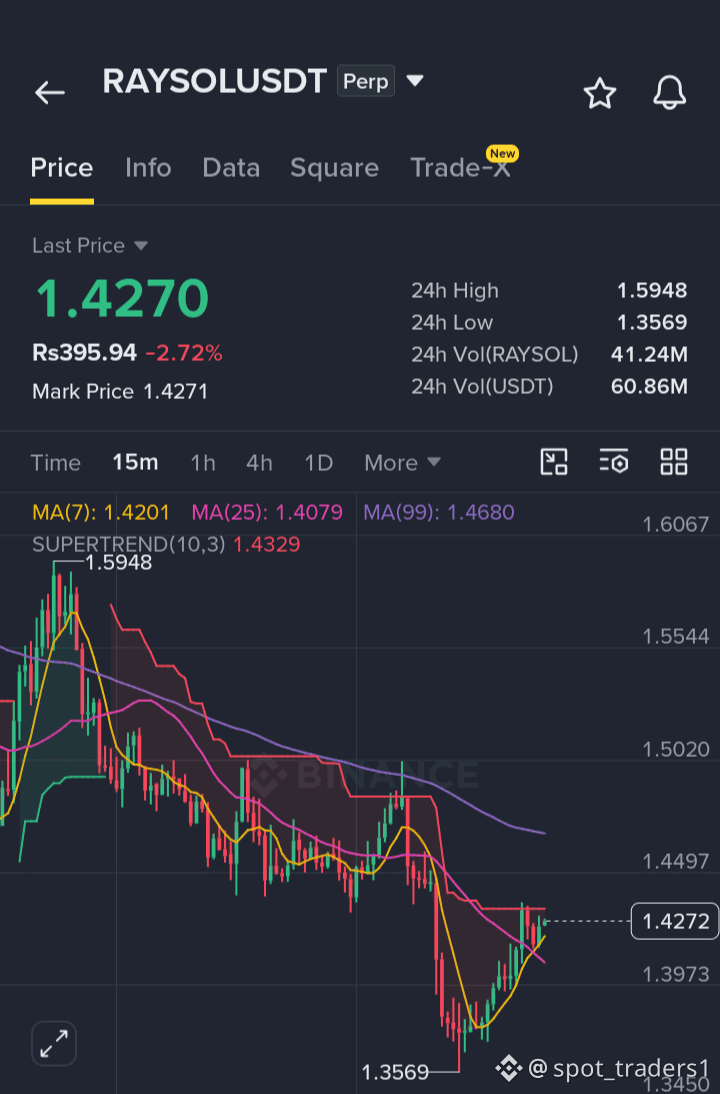
The $RAYSOL short setup played out as planned, with all targets successfully reached. A clean move from start to finish.
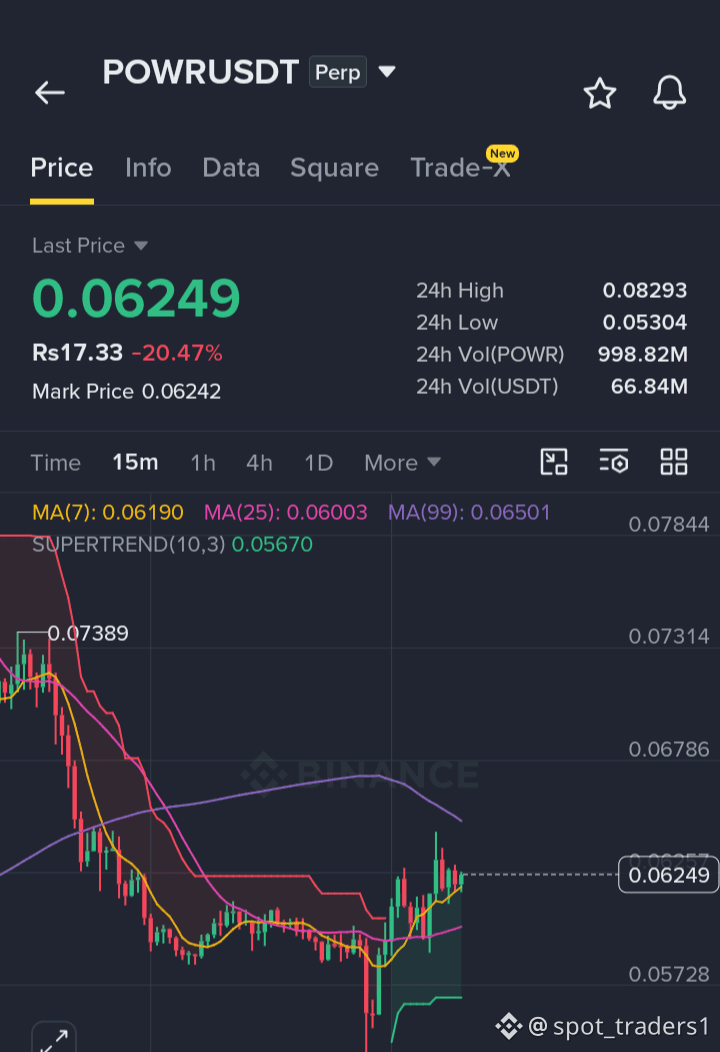
The $POWR short also completed its full target journey earlier. Hope you caught the move.
I’m still holding mshort, as downside momentum remains active. Staying patient and watching for a potential continuation lower.
Keep $BEAT on your watchlist and stay close for the next update.
Manage positions carefully, avoid chasing moves or excessive leverage, and use proper risk management.
DYOR — Do Your Own Research
{future}(POWRUSDT)
{future}(RAYSOLUSDT)
{future}(BEATUSDT)
📉 SHORT SETUP UPDATES
The $RAYSOL short setup played out as planned, with all targets successfully reached. A clean move from start to finish.
The $POWR short also completed its full target journey earlier. Hope you caught the move.
I’m still holding mshort, as downside momentum remains active. Staying patient and watching for a potential continuation lower.
Keep $BEAT on your watchlist and stay close for the next update.
Manage positions carefully, avoid chasing moves or excessive leverage, and use proper risk management.
DYOR — Do Your Own Research
The $RAYSOL short setup played out as planned, with all targets successfully reached. A clean move from start to finish.
The $POWR short also completed its full target journey earlier. Hope you caught the move.
I’m still holding mshort, as downside momentum remains active. Staying patient and watching for a potential continuation lower.
Keep $BEAT on your watchlist and stay close for the next update.
Manage positions carefully, avoid chasing moves or excessive leverage, and use proper risk management.
DYOR — Do Your Own Research
37
·
--
Bullish
📈 $HYPE — LONG SETUP
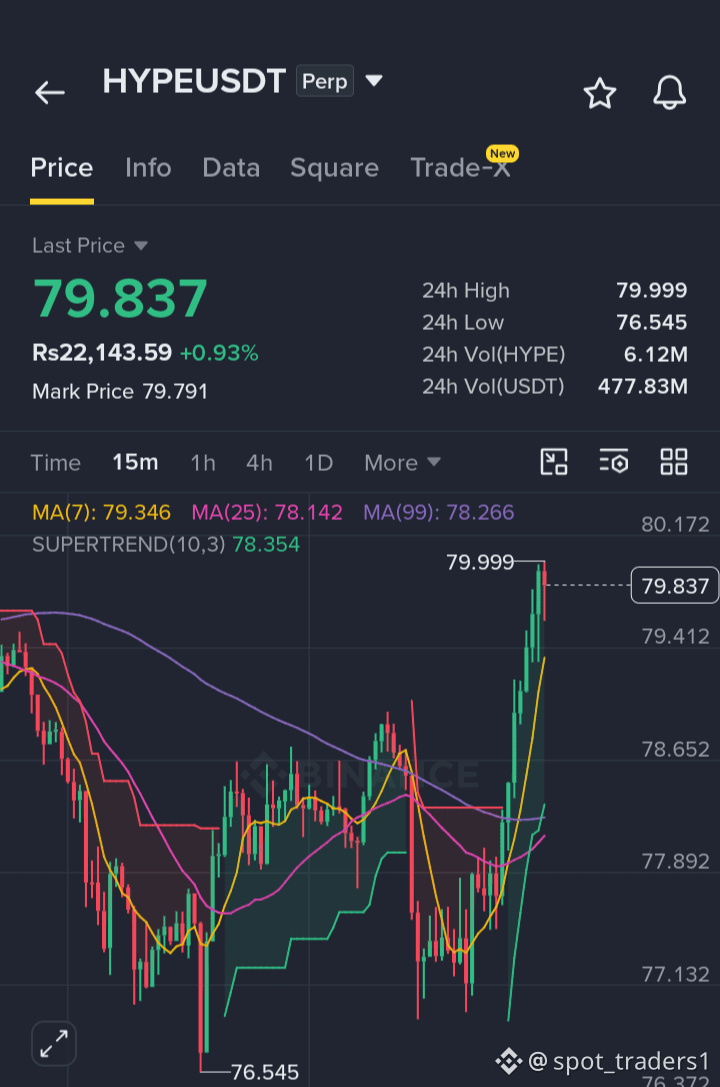
New week, fresh bullish momentum. If buyers stay in control, $HYPE could push toward higher levels.
Entry: $78–$80
TP: $82 / $84 / $87 / $90 / $93 / $96 / $100
SL: $74
Manage risk carefully, avoid excessive leverage, and don’t chase the move.
DYOR.
{future}(HYPEUSDT)
$HYPE
📈 $HYPE — LONG SETUP
New week, fresh bullish momentum. If buyers stay in control, $HYPE could push toward higher levels.
Entry: $78–$80
TP: $82 / $84 / $87 / $90 / $93 / $96 / $100
SL: $74
Manage risk carefully, avoid excessive leverage, and don’t chase the move.
DYOR.
$HYPE
New week, fresh bullish momentum. If buyers stay in control, $HYPE could push toward higher levels.
Entry: $78–$80
TP: $82 / $84 / $87 / $90 / $93 / $96 / $100
SL: $74
Manage risk carefully, avoid excessive leverage, and don’t chase the move.
DYOR.
$HYPE
83
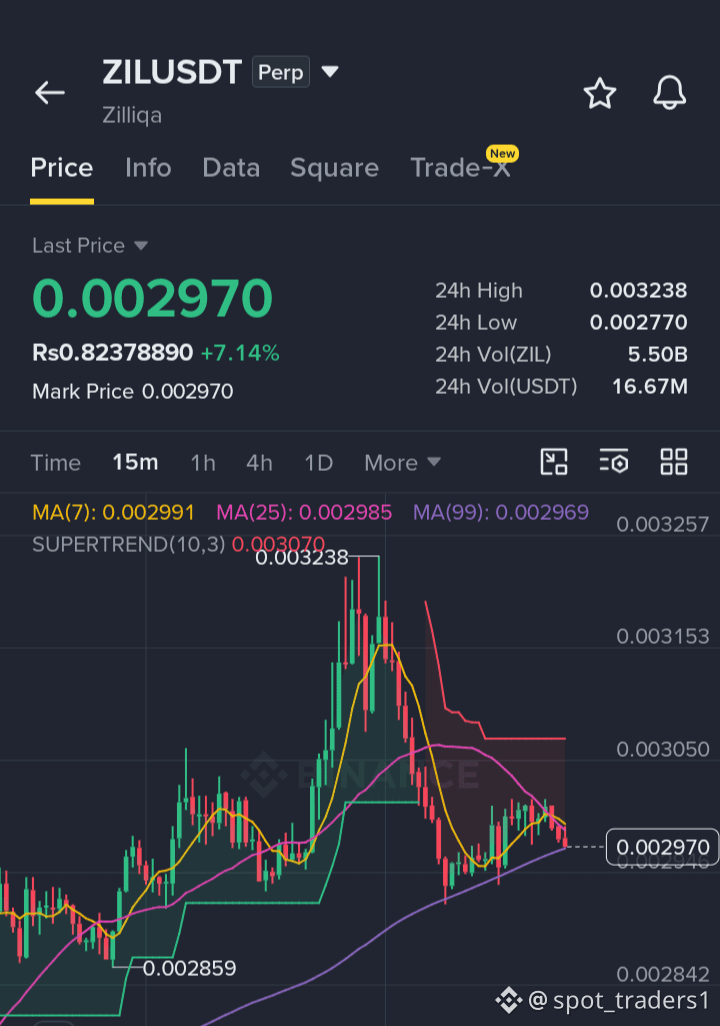
$ZIL is showing signs of a possible pullback after the recent strong move. If sellers regain control, a downside move toward the following levels could develop.
TP1: 0.00290
TP2: 0.00282
TP3: 0.00275
Next Target: 0.00265
Invalidation: Above 0.00305
Stay disciplined, manage risk carefully, and avoid chasing the move.
DYOR — Do Your Own Research
{future}(ZILUSDT)
$ZIL
$ZIL is showing signs of a possible pullback after the recent strong move. If sellers regain control, a downside move toward the following levels could develop.
TP1: 0.00290
TP2: 0.00282
TP3: 0.00275
Next Target: 0.00265
Invalidation: Above 0.00305
Stay disciplined, manage risk carefully, and avoid chasing the move.
DYOR — Do Your Own Research
$ZIL
TP1: 0.00290
TP2: 0.00282
TP3: 0.00275
Next Target: 0.00265
Invalidation: Above 0.00305
Stay disciplined, manage risk carefully, and avoid chasing the move.
DYOR — Do Your Own Research
$ZIL
94
·
--
Bullish
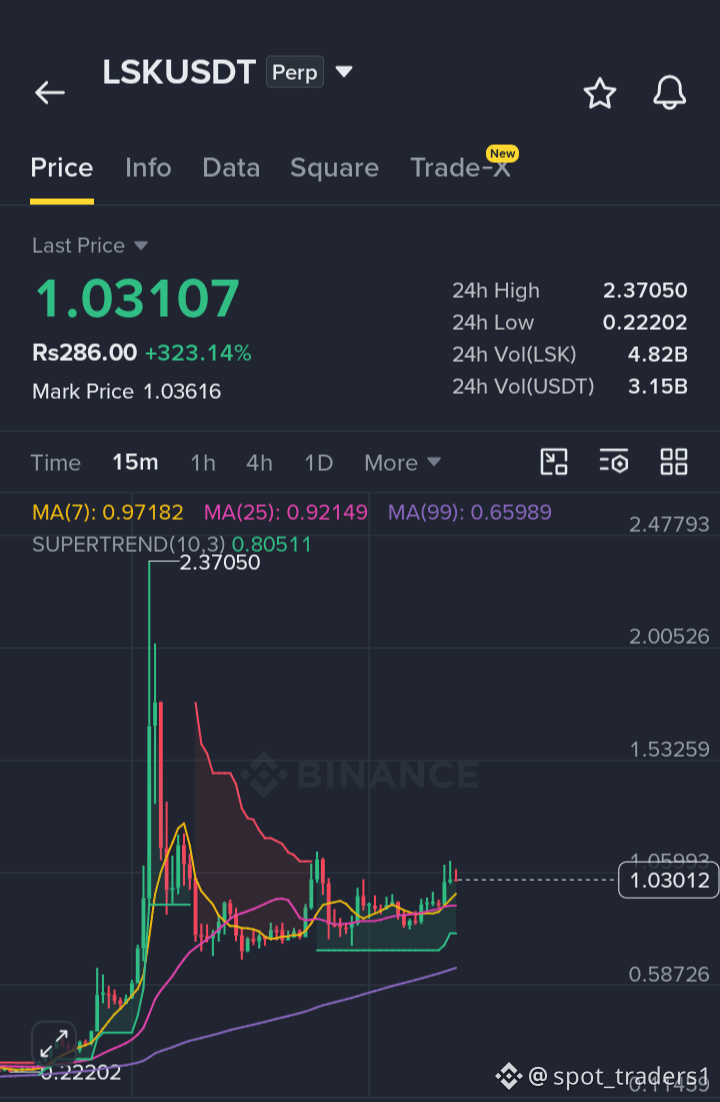
📈Missed the $LSK move? No worries. A retest of the $0.86 area could happen before another potential move higher.
Trading Idea: LONG $LSK
Entry: $0.84–$0.86
TP1: $0.90
TP2: $1
TP3: $1.50
TP4: $2
TP5: $3
TP6: $4
SL: $0.77
Stay patient, wait for confirmation around the entry zone, and manage position size and risk carefully. Avoid chasing the move.
DYOR — Do Your Own Research
{future}(LSKUSDT)
$LSK
📈Missed the $LSK move? No worries. A retest of the $0.86 area could happen before another potential move higher.
Trading Idea: LONG $LSK
Entry: $0.84–$0.86
TP1: $0.90
TP2: $1
TP3: $1.50
TP4: $2
TP5: $3
TP6: $4
SL: $0.77
Stay patient, wait for confirmation around the entry zone, and manage position size and risk carefully. Avoid chasing the move.
DYOR — Do Your Own Research
$LSK
Trading Idea: LONG $LSK
Entry: $0.84–$0.86
TP1: $0.90
TP2: $1
TP3: $1.50
TP4: $2
TP5: $3
TP6: $4
SL: $0.77
Stay patient, wait for confirmation around the entry zone, and manage position size and risk carefully. Avoid chasing the move.
DYOR — Do Your Own Research
$LSK
154
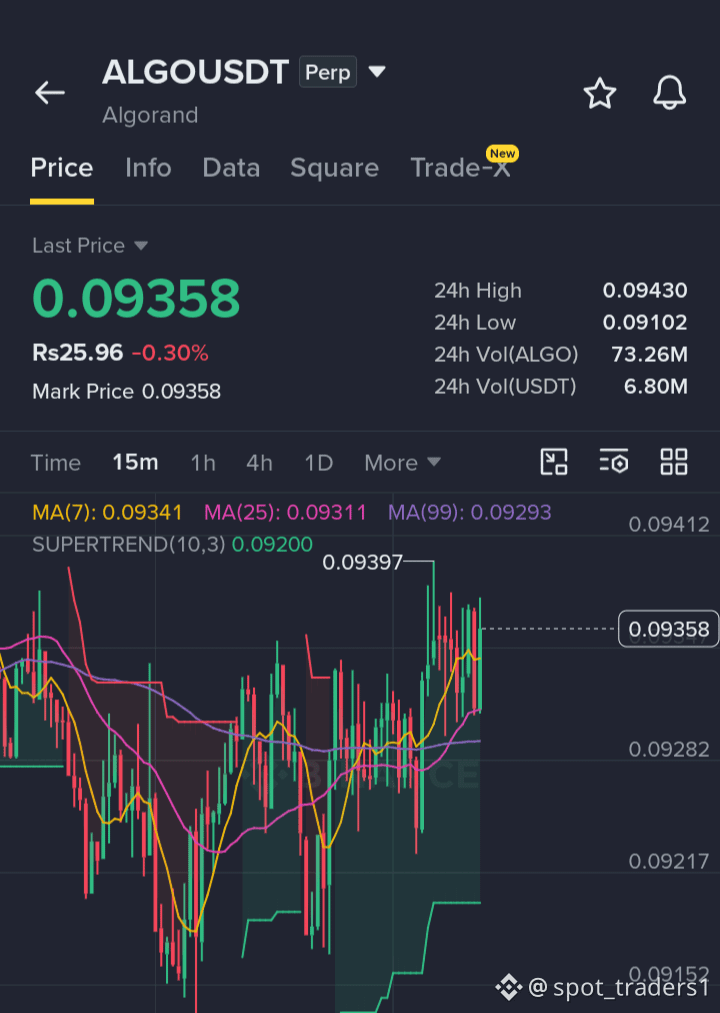
$ALGO is trading around 0.09763 and showing a potential recovery setup near the current support zone. If buyers regain control and price holds above 0.0975, a move toward the next resistance levels could develop.
TP1: 0.0990
TP2: 0.1005
Next Target: 0.1020+
Invalidation: Below 0.0965
Stay disciplined, wait for confirmation, manage risk carefully, and avoid chasing the move.
DYOR — Do Your Own Research
{future}(ALGOUSDT)
$ALGO
$ALGO is trading around 0.09763 and showing a potential recovery setup near the current support zone. If buyers regain control and price holds above 0.0975, a move toward the next resistance levels could develop.
TP1: 0.0990
TP2: 0.1005
Next Target: 0.1020+
Invalidation: Below 0.0965
Stay disciplined, wait for confirmation, manage risk carefully, and avoid chasing the move.
DYOR — Do Your Own Research
$ALGO
TP1: 0.0990
TP2: 0.1005
Next Target: 0.1020+
Invalidation: Below 0.0965
Stay disciplined, wait for confirmation, manage risk carefully, and avoid chasing the move.
DYOR — Do Your Own Research
$ALGO
62
·
--
Bearish
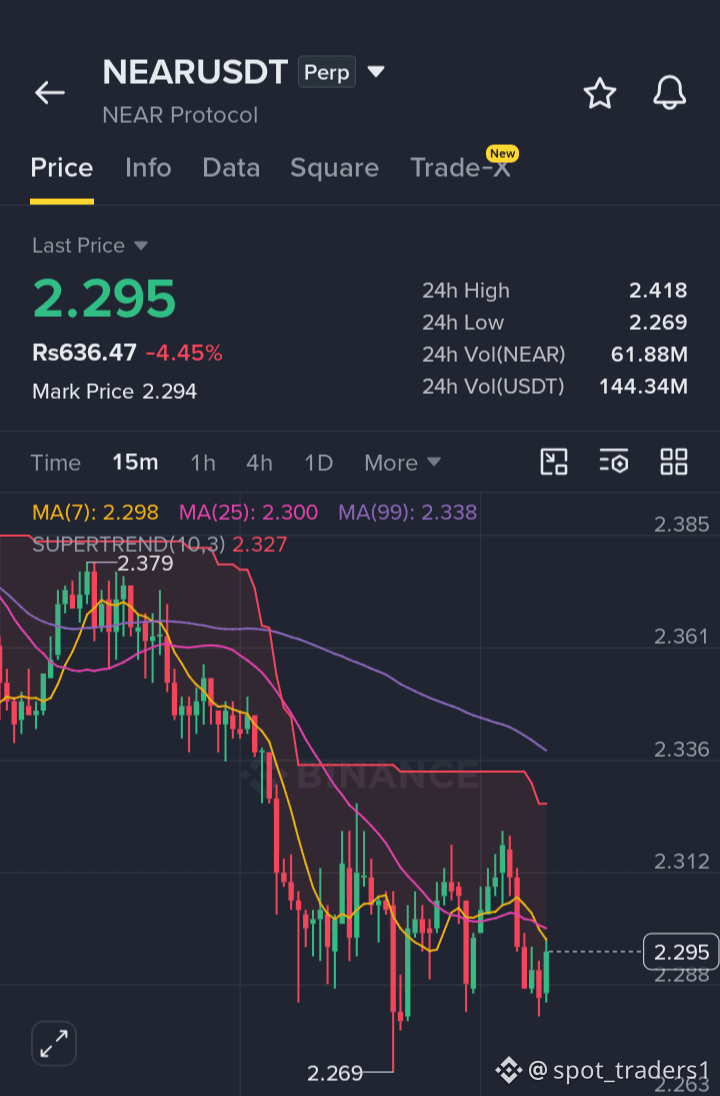
$NEAR is showing signs of a potential rebound around the 2.40 zone. Buyers are currently showing some strength, and if this support holds, a move toward the next resistance levels could develop.
TP1: 2.42
TP2: 2.45
Next Target: 2.48+
Invalidation: Below 2.39
Stay disciplined, wait for confirmation, manage risk carefully, and avoid chasing the move.
DYOR — Do Your Own Research
{future}(NEARUSDT)
$NEAR
$NEAR is showing signs of a potential rebound around the 2.40 zone. Buyers are currently showing some strength, and if this support holds, a move toward the next resistance levels could develop.
TP1: 2.42
TP2: 2.45
Next Target: 2.48+
Invalidation: Below 2.39
Stay disciplined, wait for confirmation, manage risk carefully, and avoid chasing the move.
DYOR — Do Your Own Research
$NEAR
TP1: 2.42
TP2: 2.45
Next Target: 2.48+
Invalidation: Below 2.39
Stay disciplined, wait for confirmation, manage risk carefully, and avoid chasing the move.
DYOR — Do Your Own Research
$NEAR
22
·
--
Bearish
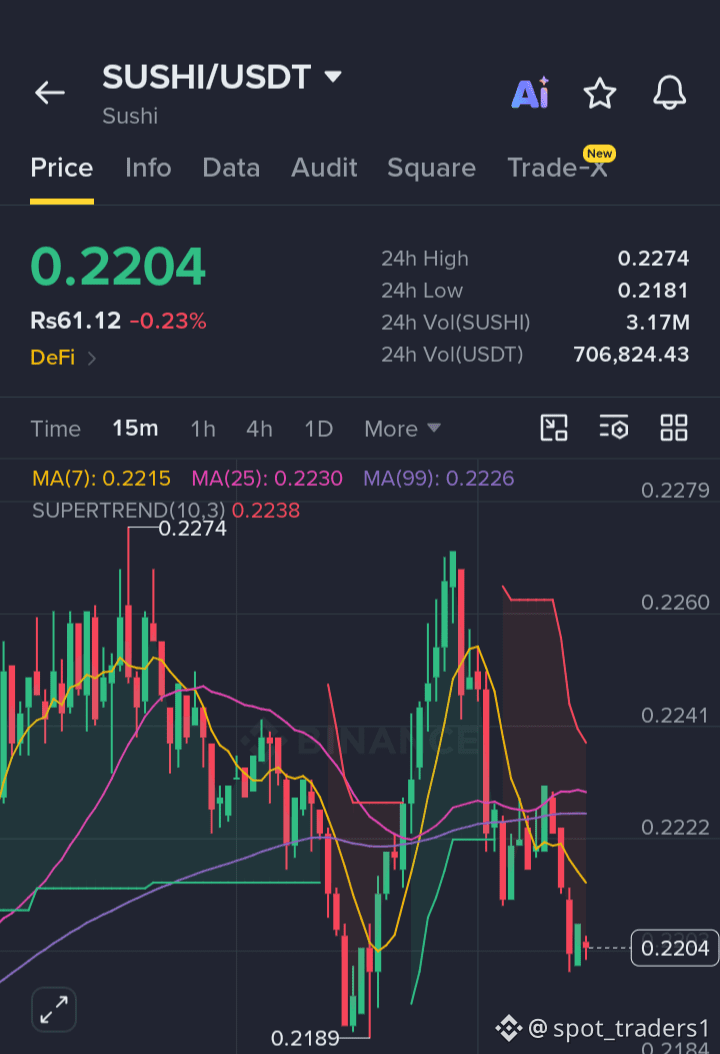
$SUSHI is showing signs of a possible rebound after the recent drop. If buyers regain control and the current support holds, a move higher could follow.
TP1: 0.220
TP2: 0.225
Next Target: 0.230+
Stay disciplined, manage risk, and wait for confirmation.
DYOR — Do Your Own Research
{future}(SUSHIUSDT)
$SUSHI
$SUSHI is showing signs of a possible rebound after the recent drop. If buyers regain control and the current support holds, a move higher could follow.
TP1: 0.220
TP2: 0.225
Next Target: 0.230+
Stay disciplined, manage risk, and wait for confirmation.
DYOR — Do Your Own Research
$SUSHI
TP1: 0.220
TP2: 0.225
Next Target: 0.230+
Stay disciplined, manage risk, and wait for confirmation.
DYOR — Do Your Own Research
$SUSHI

47
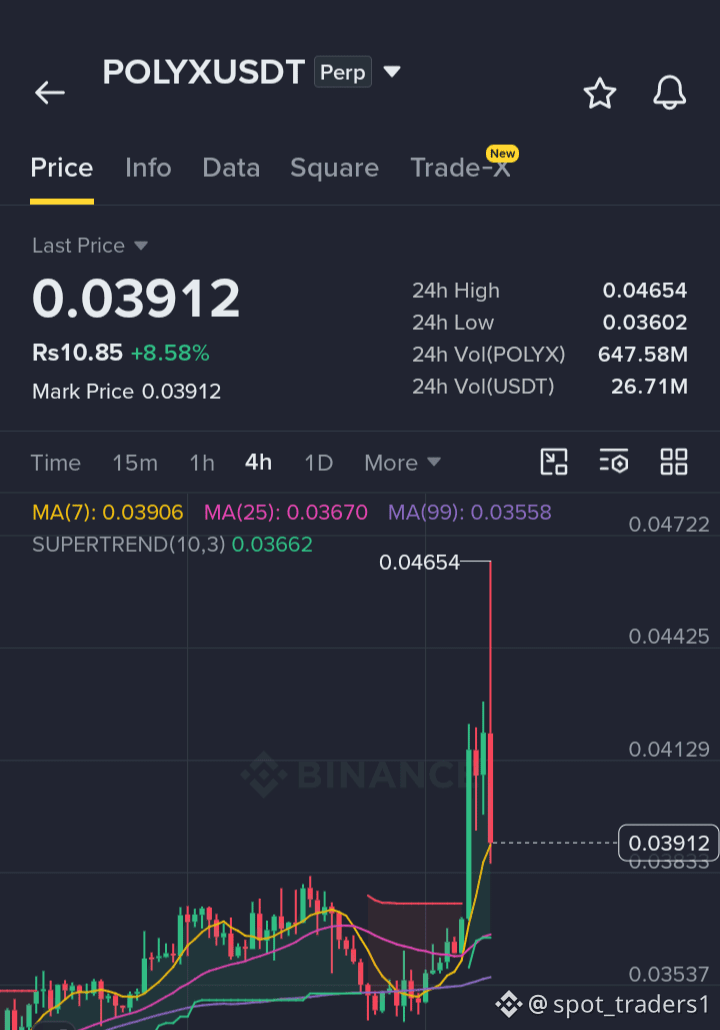
📉$POLYX is starting to show weakness, with current price action suggesting signs of exhaustion. I’m watching this zone closely for a potential short if sellers continue to gain control.
Stay patient and keep monitoring the price action. I’ll share the next update once the setup becomes clearer and confirmation appears.
DYOR — Do Your Own Research
{future}(POLYXUSDT)
$POLYX
📉$POLYX is starting to show weakness, with current price action suggesting signs of exhaustion. I’m watching this zone closely for a potential short if sellers continue to gain control.
Stay patient and keep monitoring the price action. I’ll share the next update once the setup becomes clearer and confirmation appears.
DYOR — Do Your Own Research
$POLYX
Stay patient and keep monitoring the price action. I’ll share the next update once the setup becomes clearer and confirmation appears.
DYOR — Do Your Own Research
$POLYX
1
·
--
Bearish
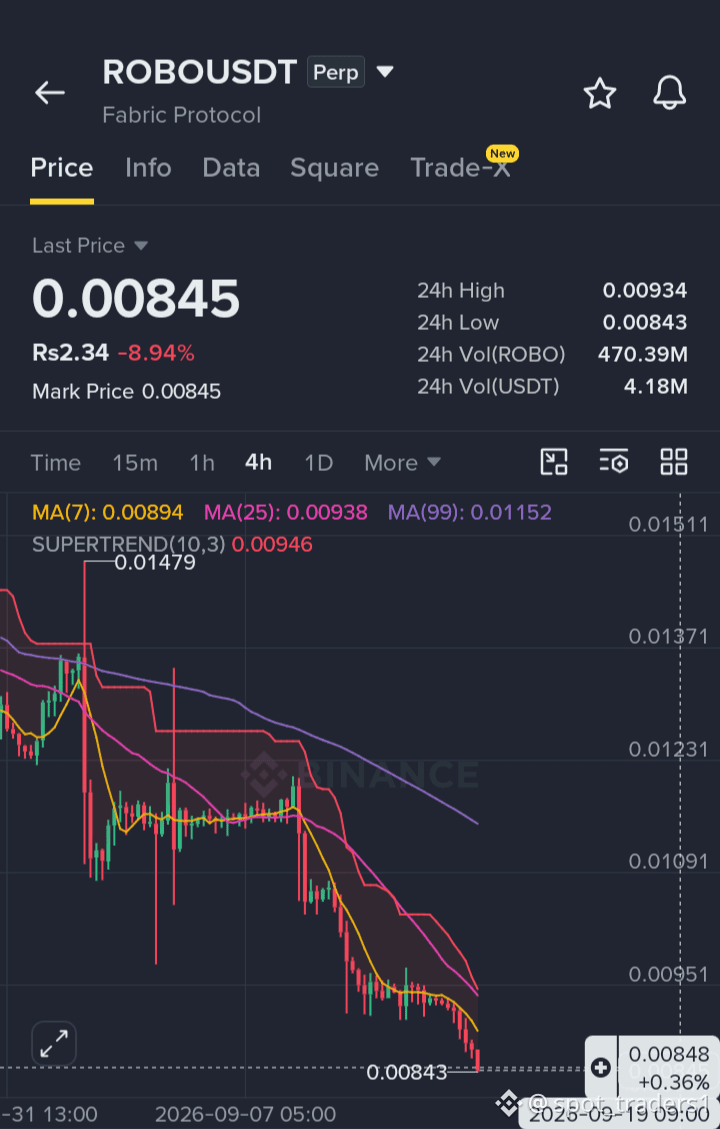
📉$ROBO continues to show bearish momentum, with sellers maintaining control for now. If the downside structure remains intact, the short setup could continue to develop.
Stay patient, manage the position and risk carefully, and avoid chasing sudden moves or using excessive leverage.
DYOR — Do Your Own Research
{future}(ROBOUSDT)
$ROBO
📉$ROBO continues to show bearish momentum, with sellers maintaining control for now. If the downside structure remains intact, the short setup could continue to develop.
Stay patient, manage the position and risk carefully, and avoid chasing sudden moves or using excessive leverage.
DYOR — Do Your Own Research
$ROBO
Stay patient, manage the position and risk carefully, and avoid chasing sudden moves or using excessive leverage.
DYOR — Do Your Own Research
$ROBO
3
Log in to explore more content
Join global crypto users on Binance Square
⚡️ Get latest and useful information about crypto.
💬 Trusted by the world’s largest crypto exchange.
👍 Discover real insights from verified creators.
Email / Phone number
Trending Topics
BitcoinReboundsTo$79K
19,353 views
162 Discussing
🚨 $BTC is pushing higher.
Bitcoin is trading around $78,804, up roughly 1.9%, after reclaiming the $78K area. The next level to watch is the intraday high near $78,905.
A clean break above that level could open the way toward $79K–$80K. If BTC gets rejected, support sits around $78,300, then $77,975.
Bulls have momentum, but BTC needs to hold above $78K.
#Bitcoin #BTC #CryptoTrading #CryptoMarket #CryptoAnalysis
PulseON
·17 Likes
·16.8k views
BitcoinSpotETFsNetInflow$160M
19 views
21 Discussing
SouthKoreaCryptoTaxDelayPetitionTops50000
7,338 views
198 Discussing