

النعيمـي ⁵⁸
159 Posts

النعيمـي ⁵⁸
Report
Block User
الله المعطي سيعطيك ,حتى ترضى ثق به .
High-Frequency Trader
2.3 Years
83 Following
104 Followers
109 Liked
Posts
All
Quotes
·
--
$NMR
Buy (Long) — waiting for the correction to finish
Best entry area: between 14.35 - 14.45 (upon touching the MA25 average and the previous bottom support).
Stop loss (SL): a 3-minute candle close below 14.15.
Targets (TP): 14.80 then 15.20 then 15.50.
Sell (Short) — taking advantage of the immediate correction
Best entry area: when retesting the resistance between 14.80 - 14.95 and rejecting from it.
Stop loss (SL): a close above 15.15.
Targets (TP): 14.42 then 14.00.
$NMR
Buy (Long) — waiting for the correction to finish
Best entry area: between 14.35 - 14.45 (upon touching the MA25 average and the previous bottom support).
Stop loss (SL): a 3-minute candle close below 14.15.
Targets (TP): 14.80 then 15.20 then 15.50.
Sell (Short) — taking advantage of the immediate correction
Best entry area: when retesting the resistance between 14.80 - 14.95 and rejecting from it.
Stop loss (SL): a close above 15.15.
Targets (TP): 14.42 then 14.00.
Buy (Long) — waiting for the correction to finish
Best entry area: between 14.35 - 14.45 (upon touching the MA25 average and the previous bottom support).
Stop loss (SL): a 3-minute candle close below 14.15.
Targets (TP): 14.80 then 15.20 then 15.50.
Sell (Short) — taking advantage of the immediate correction
Best entry area: when retesting the resistance between 14.80 - 14.95 and rejecting from it.
Stop loss (SL): a close above 15.15.
Targets (TP): 14.42 then 14.00.
2
1
213
·
--
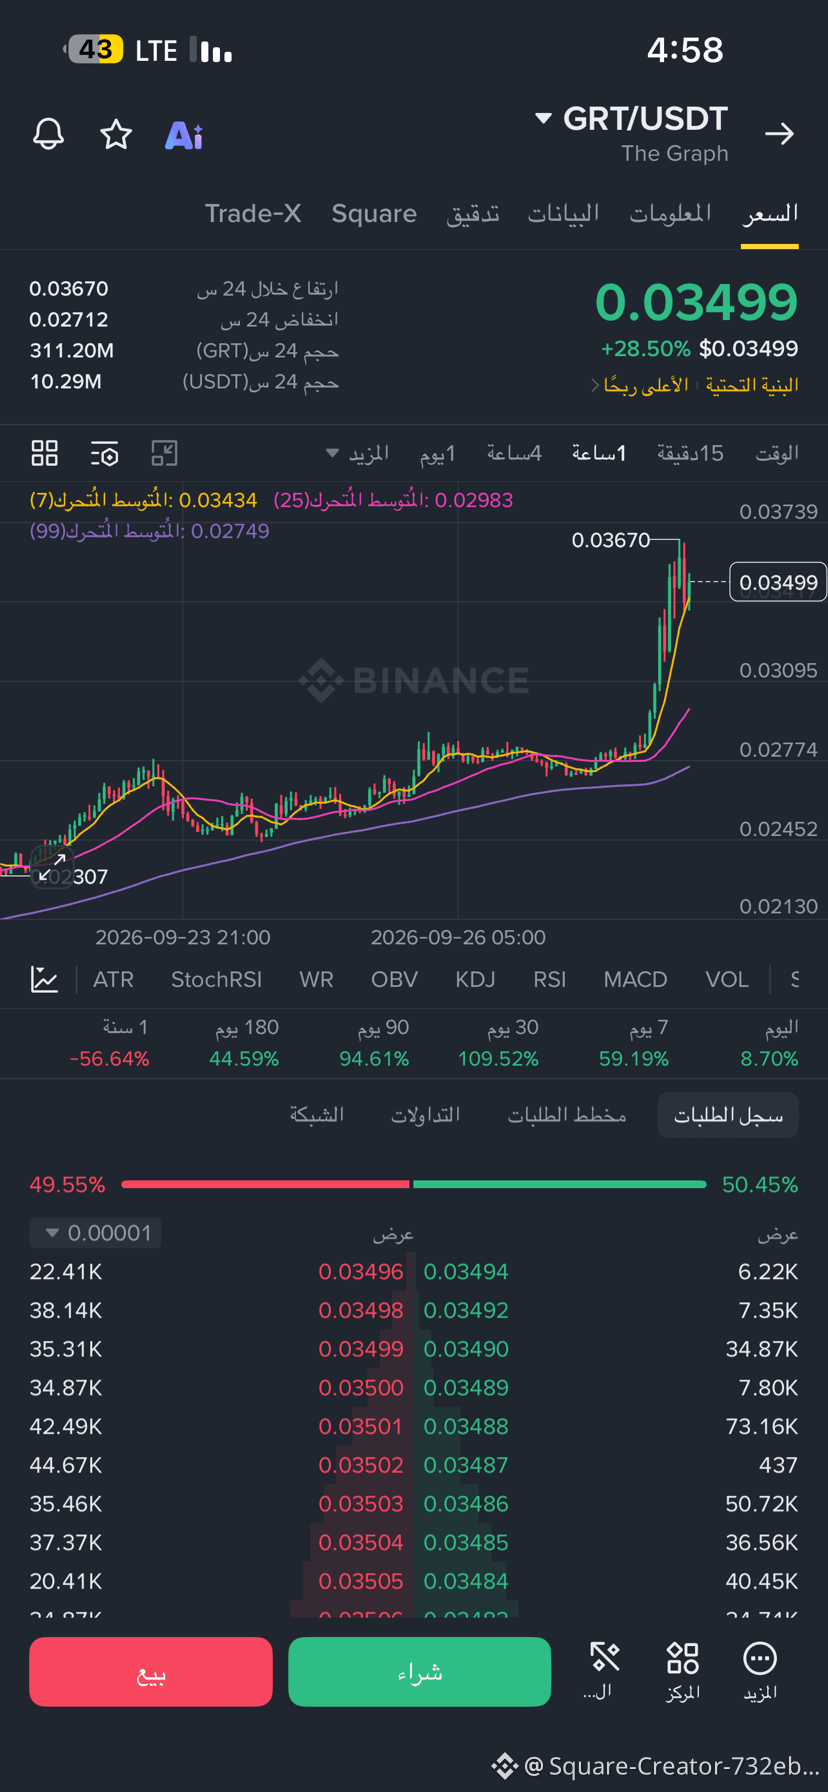
$GRT
According to the image GRT/USDT – 1-hour timeframe:
* 📈 Trend: Strong uptrend, and the price 0.03499 is close to the high 0.03670.
* 🟢 Long: 0.0338–0.0344 with a clear bounce.
* 🟢 Stronger long: 0.0298–0.0310.
* 🔴 Short: 0.0365–0.0372 only if a strong rejection appears.
* 💧 Liquidity: Above 0.03670, and below 0.0338 then 0.0300.
* ⚠️ At 0.035, I don’t chase the entry; price is moving up strongly and a quick liquidity pullback may happen
$GRT
According to the image GRT/USDT – 1-hour timeframe:
* 📈 Trend: Strong uptrend, and the price 0.03499 is close to the high 0.03670.
* 🟢 Long: 0.0338–0.0344 with a clear bounce.
* 🟢 Stronger long: 0.0298–0.0310.
* 🔴 Short: 0.0365–0.0372 only if a strong rejection appears.
* 💧 Liquidity: Above 0.03670, and below 0.0338 then 0.0300.
* ⚠️ At 0.035, I don’t chase the entry; price is moving up strongly and a quick liquidity pullback may happen
According to the image GRT/USDT – 1-hour timeframe:
* 📈 Trend: Strong uptrend, and the price 0.03499 is close to the high 0.03670.
* 🟢 Long: 0.0338–0.0344 with a clear bounce.
* 🟢 Stronger long: 0.0298–0.0310.
* 🔴 Short: 0.0365–0.0372 only if a strong rejection appears.
* 💧 Liquidity: Above 0.03670, and below 0.0338 then 0.0300.
* ⚠️ At 0.035, I don’t chase the entry; price is moving up strongly and a quick liquidity pullback may happen
254
·
--
$QI
According to the image for QI/USDT – 1-hour timeframe:
* Trend: short-term bullish, and the current price is 0.00367.
* 🟢 Buy: 0.00320–0.00330 when a bounce appears.
* 🟢 Strong support: 0.00280–0.00290.
* 🔴 Short: 0.00440–0.00460 if a clear rejection appears.
* 💧 Liquidity: above 0.0040 then 0.00508, and below 0.00280
$QI
According to the image for QI/USDT – 1-hour timeframe:
* Trend: short-term bullish, and the current price is 0.00367.
* 🟢 Buy: 0.00320–0.00330 when a bounce appears.
* 🟢 Strong support: 0.00280–0.00290.
* 🔴 Short: 0.00440–0.00460 if a clear rejection appears.
* 💧 Liquidity: above 0.0040 then 0.00508, and below 0.00280
According to the image for QI/USDT – 1-hour timeframe:
* Trend: short-term bullish, and the current price is 0.00367.
* 🟢 Buy: 0.00320–0.00330 when a bounce appears.
* 🟢 Strong support: 0.00280–0.00290.
* 🔴 Short: 0.00440–0.00460 if a clear rejection appears.
* 💧 Liquidity: above 0.0040 then 0.00508, and below 0.00280
227
·
--
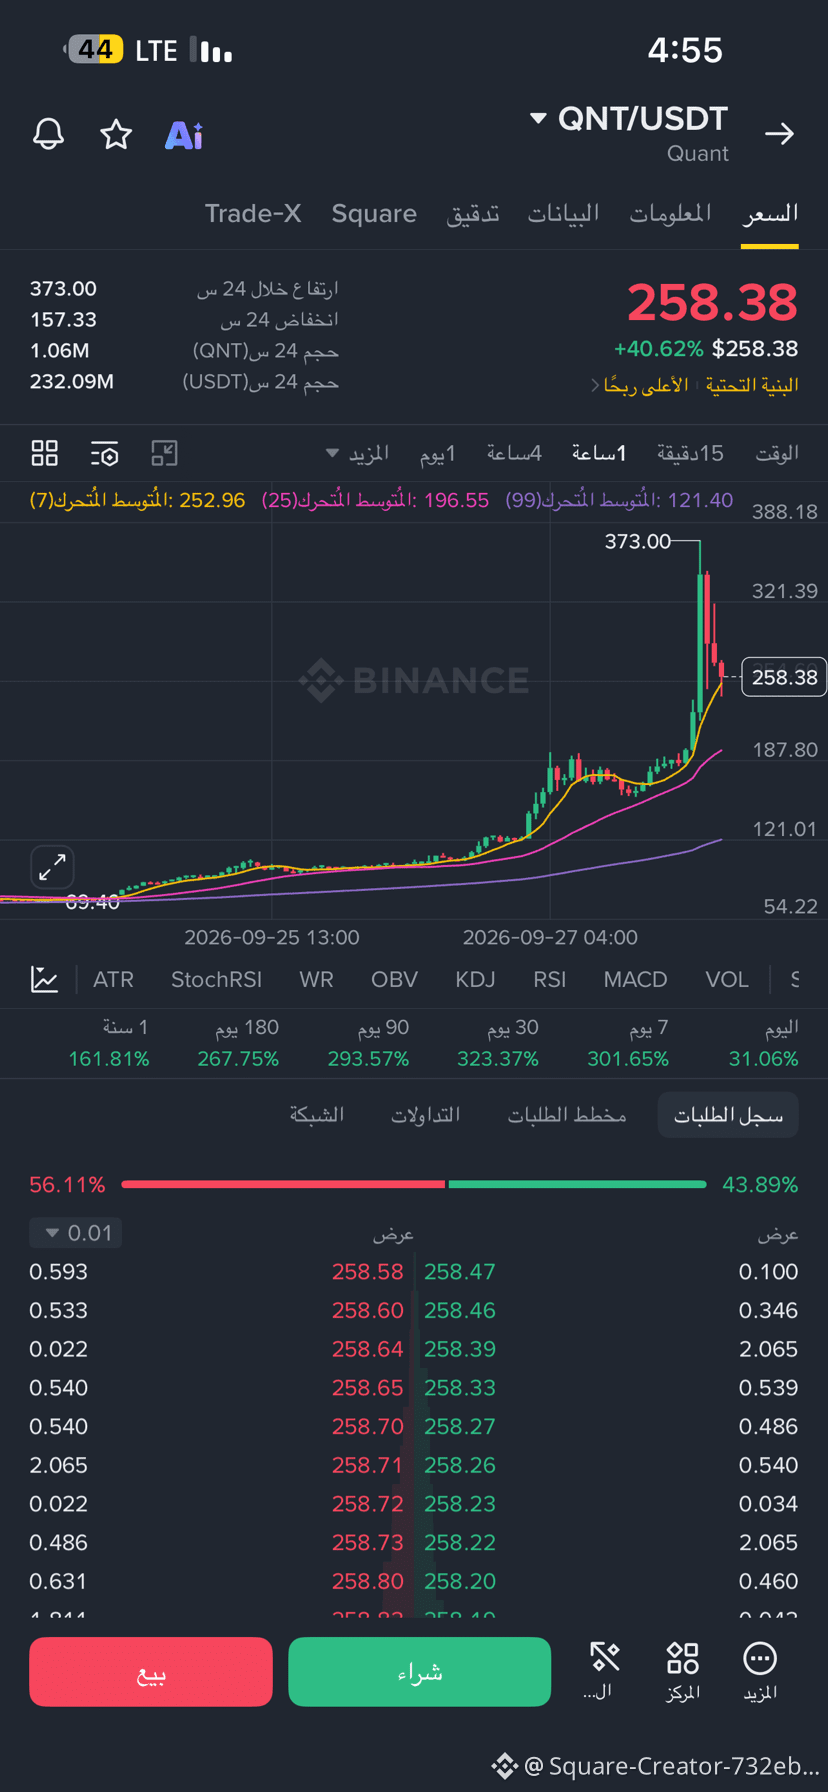
$QNT
According to the picture on the watch frame:
* Trend: Upward, but there was a sharp correction from 373 to 258.
* 🟢 Buy: 245–255 if the price stabilizes and a rebound appears.
* 🟢 Stronger buy: 190–200 if the price reaches it.
* 🔴 Short / liquidity zone: 315–325 then 360–373; previous peak zones where a rejection may occur.
* 💧 The clearest liquidity: above 320 and above the 373 peak, then below 245 and then 190
$QNT
According to the picture on the watch frame:
* Trend: Upward, but there was a sharp correction from 373 to 258.
* 🟢 Buy: 245–255 if the price stabilizes and a rebound appears.
* 🟢 Stronger buy: 190–200 if the price reaches it.
* 🔴 Short / liquidity zone: 315–325 then 360–373; previous peak zones where a rejection may occur.
* 💧 The clearest liquidity: above 320 and above the 373 peak, then below 245 and then 190
According to the picture on the watch frame:
* Trend: Upward, but there was a sharp correction from 373 to 258.
* 🟢 Buy: 245–255 if the price stabilizes and a rebound appears.
* 🟢 Stronger buy: 190–200 if the price reaches it.
* 🔴 Short / liquidity zone: 315–325 then 360–373; previous peak zones where a rejection may occur.
* 💧 The clearest liquidity: above 320 and above the 373 peak, then below 245 and then 190
1
225
·
--
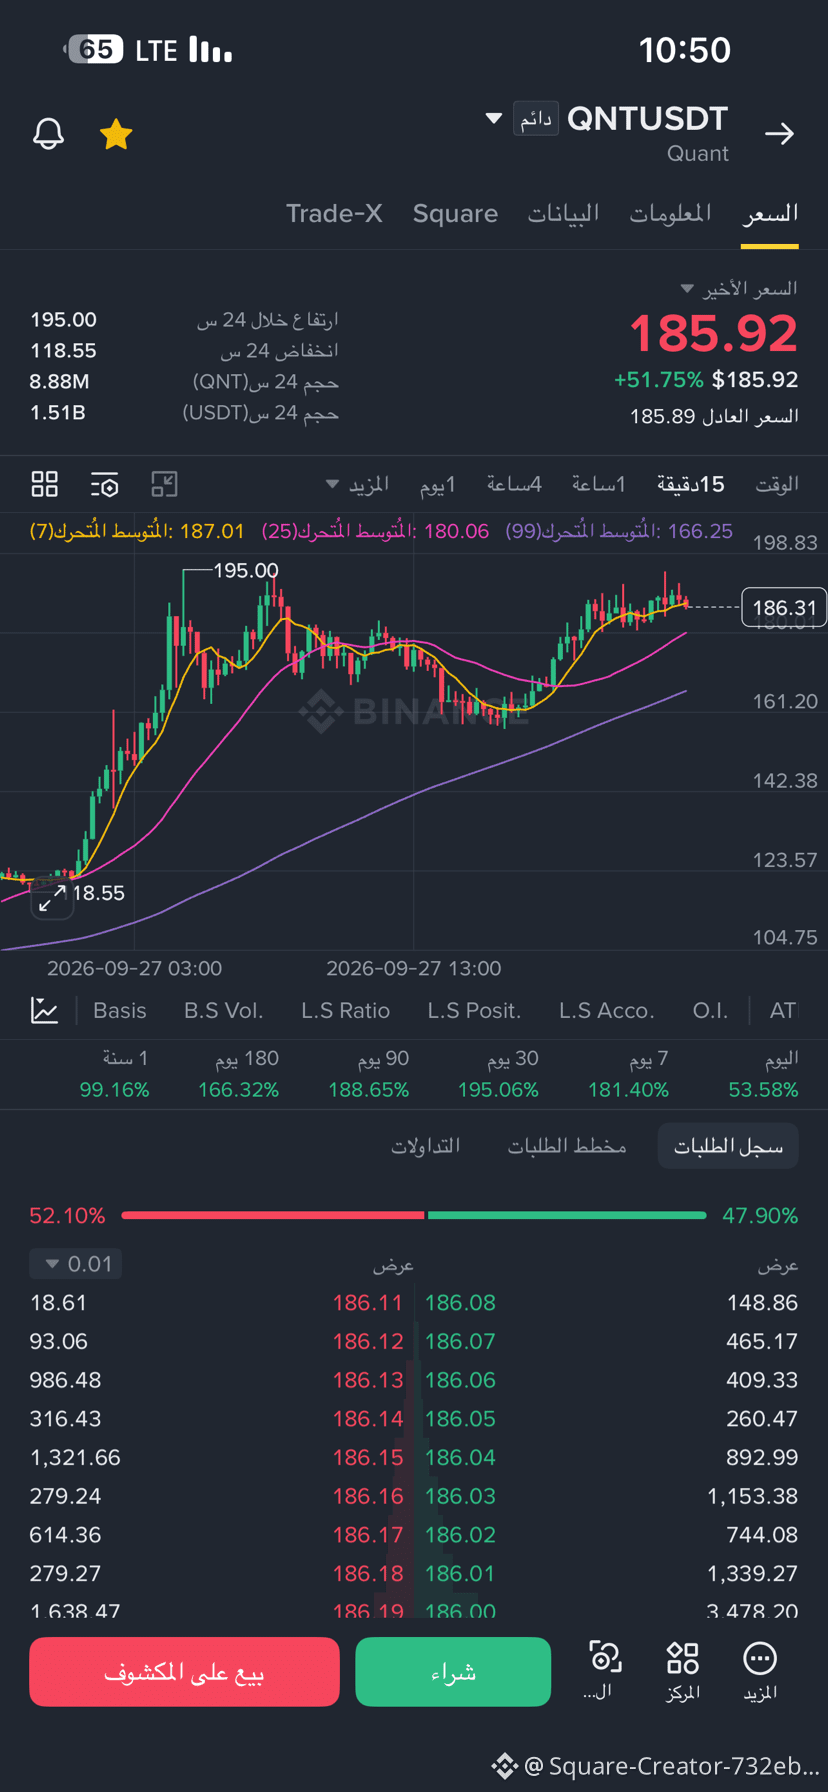
$QNT
According to the 15-minute chart only:
* Upper liquidity: 190–195, strongest near 195.
* Lower liquidity: 180–182, then 161–166.
* Long: If price holds above 187–188 → targets 190 then 195, and stop below 184.
* Short: If it reaches 192–195 and a clear rejection appears → targets 187 then 182, and stop above 196.
* Leverage for a $10 balance: Best 3x–5x; avoid high leverage because a sudden move could wipe out the account quickly.
Currently around 186: I’m not chasing the price; I’m waiting for confirmation of 187–188 or rejection of 192–195
$QNT
According to the 15-minute chart only:
* Upper liquidity: 190–195, strongest near 195.
* Lower liquidity: 180–182, then 161–166.
* Long: If price holds above 187–188 → targets 190 then 195, and stop below 184.
* Short: If it reaches 192–195 and a clear rejection appears → targets 187 then 182, and stop above 196.
* Leverage for a $10 balance: Best 3x–5x; avoid high leverage because a sudden move could wipe out the account quickly.
Currently around 186: I’m not chasing the price; I’m waiting for confirmation of 187–188 or rejection of 192–195
According to the 15-minute chart only:
* Upper liquidity: 190–195, strongest near 195.
* Lower liquidity: 180–182, then 161–166.
* Long: If price holds above 187–188 → targets 190 then 195, and stop below 184.
* Short: If it reaches 192–195 and a clear rejection appears → targets 187 then 182, and stop above 196.
* Leverage for a $10 balance: Best 3x–5x; avoid high leverage because a sudden move could wipe out the account quickly.
Currently around 186: I’m not chasing the price; I’m waiting for confirmation of 187–188 or rejection of 192–195
1
215
·
--
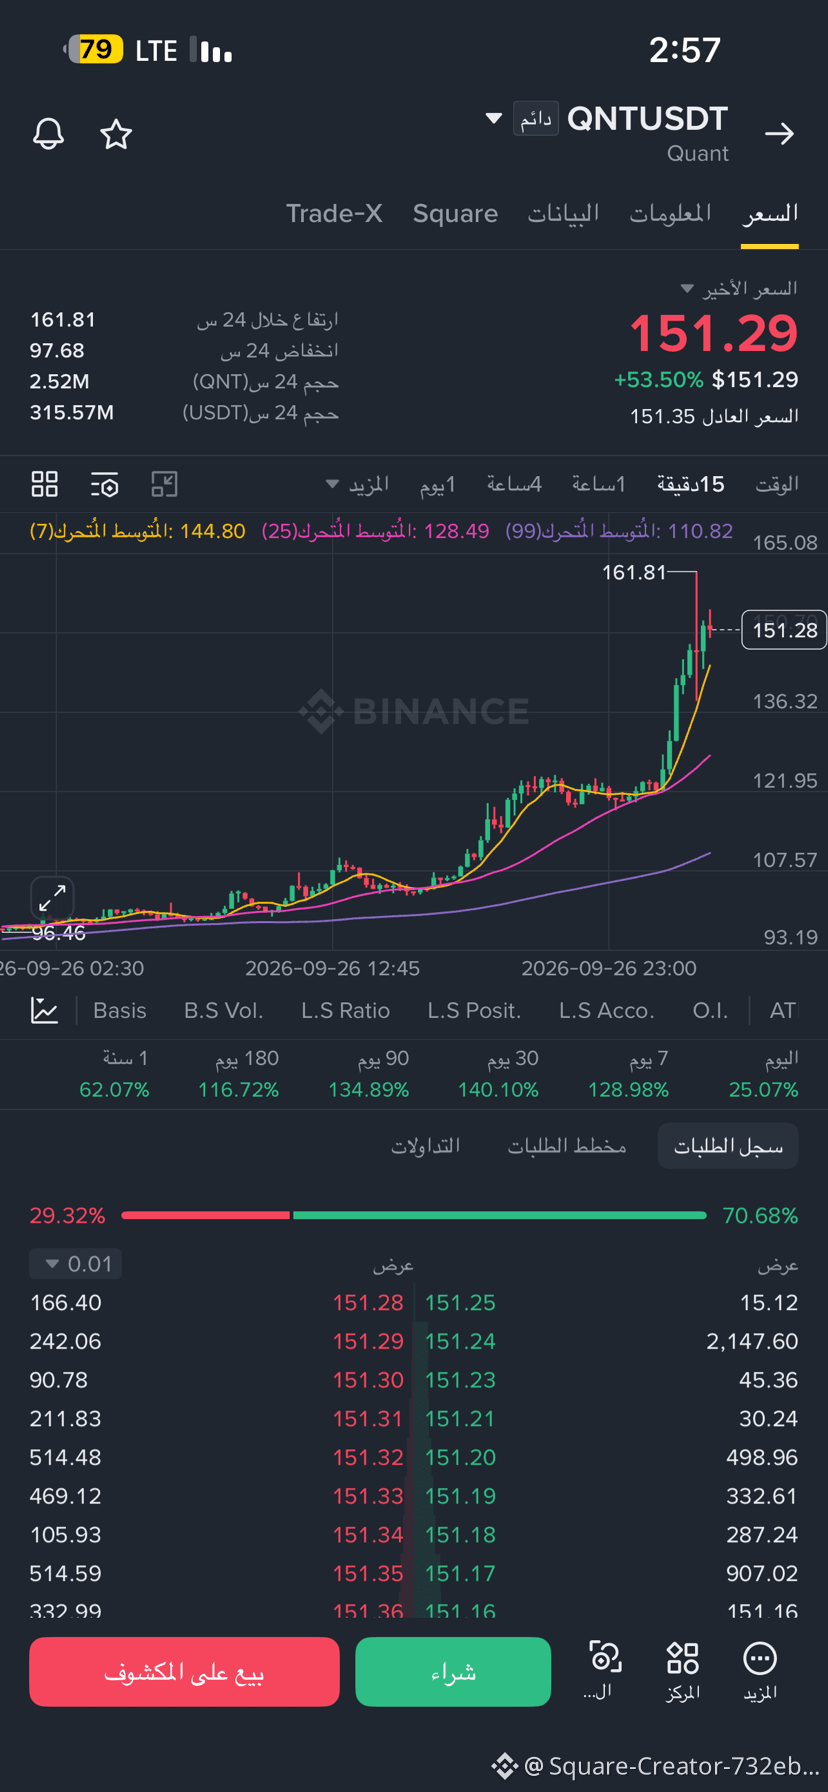
$QNT
QNTUSDT – 15-minute frame
* 🔴 Sell: 155–161 if a clear rejection appears → targets 148 then 144.
* 🟢 Buy: 143–146 on a bounce and stabilization → targets 151–155.
* 💧 Liquidity: above 161.8, and below 143–145.
* ⚠️ The price is too high after a rapid rise; don’t chase the buy at 151
$QNT
QNTUSDT – 15-minute frame
* 🔴 Sell: 155–161 if a clear rejection appears → targets 148 then 144.
* 🟢 Buy: 143–146 on a bounce and stabilization → targets 151–155.
* 💧 Liquidity: above 161.8, and below 143–145.
* ⚠️ The price is too high after a rapid rise; don’t chase the buy at 151
QNTUSDT – 15-minute frame
* 🔴 Sell: 155–161 if a clear rejection appears → targets 148 then 144.
* 🟢 Buy: 143–146 on a bounce and stabilization → targets 151–155.
* 💧 Liquidity: above 161.8, and below 143–145.
* ⚠️ The price is too high after a rapid rise; don’t chase the buy at 151
140
·
--
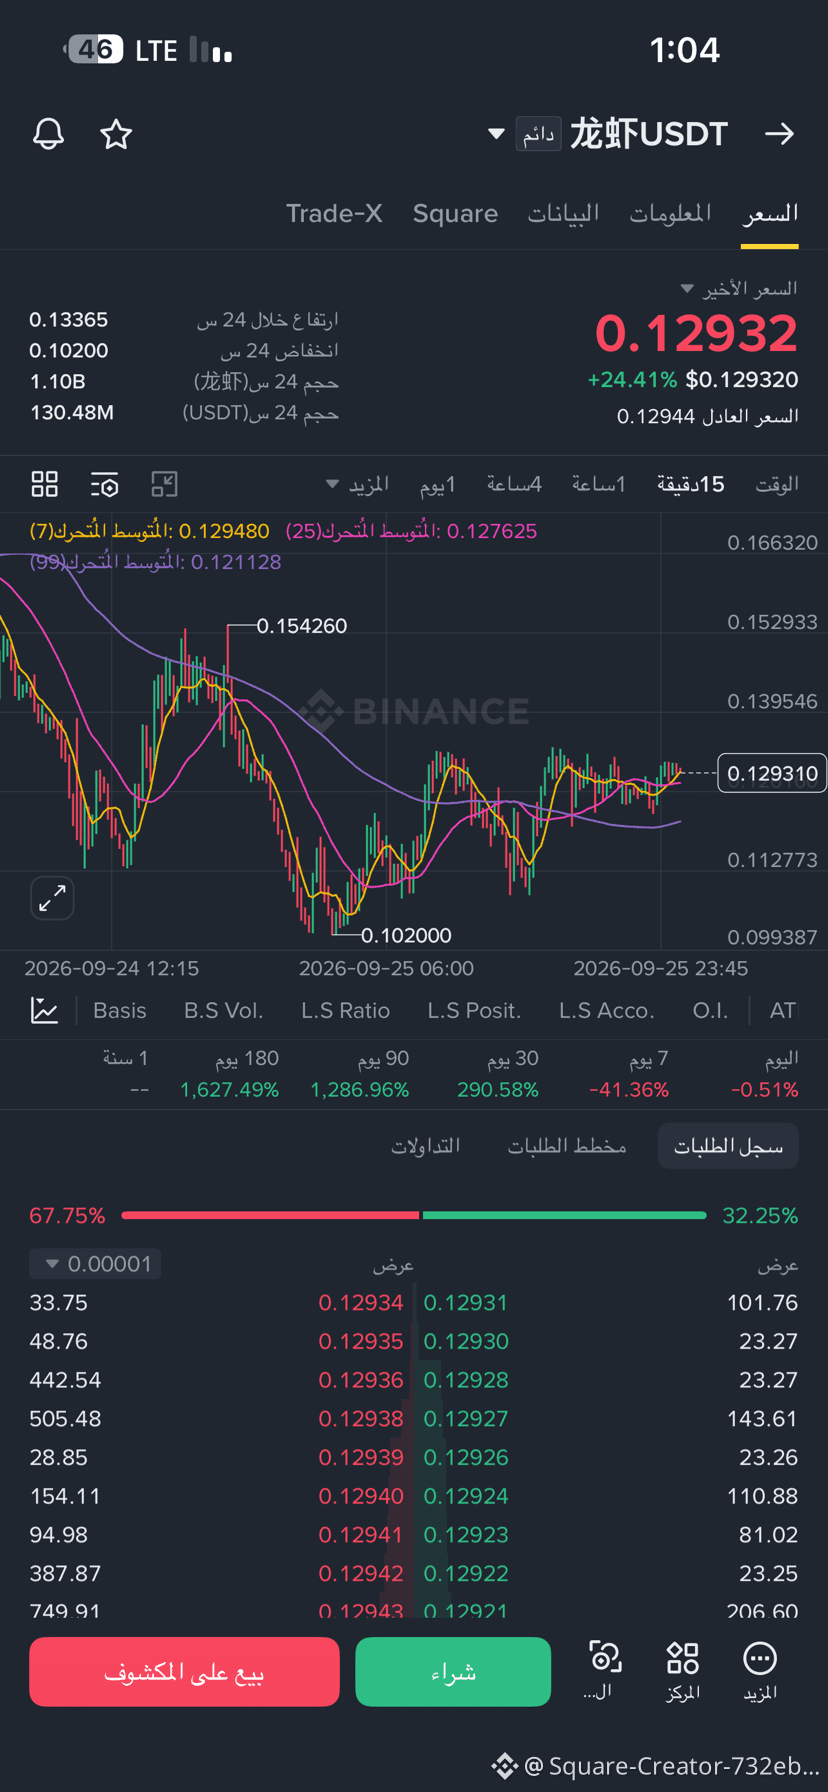
$龙虾
Lobster USDT – 15-minute frame
* 🟢 Buy: 0.1265–0.1280 after a rebound appears
🎯 0.1320 then 0.1390
🛑 Stop: 0.1245
* 🔴 Sell: 0.1325–0.1345 if a price rejection appears
🎯 0.1280 then 0.1250
🛑 Stop: 0.1360
* 💧 Liquidity: above 0.132–0.134, and below 0.125–
$龙虾
Lobster USDT – 15-minute frame
* 🟢 Buy: 0.1265–0.1280 after a rebound appears
🎯 0.1320 then 0.1390
🛑 Stop: 0.1245
* 🔴 Sell: 0.1325–0.1345 if a price rejection appears
🎯 0.1280 then 0.1250
🛑 Stop: 0.1360
* 💧 Liquidity: above 0.132–0.134, and below 0.125–
Lobster USDT – 15-minute frame
* 🟢 Buy: 0.1265–0.1280 after a rebound appears
🎯 0.1320 then 0.1390
🛑 Stop: 0.1245
* 🔴 Sell: 0.1325–0.1345 if a price rejection appears
🎯 0.1280 then 0.1250
🛑 Stop: 0.1360
* 💧 Liquidity: above 0.132–0.134, and below 0.125–
1
320
·
--
Bullish
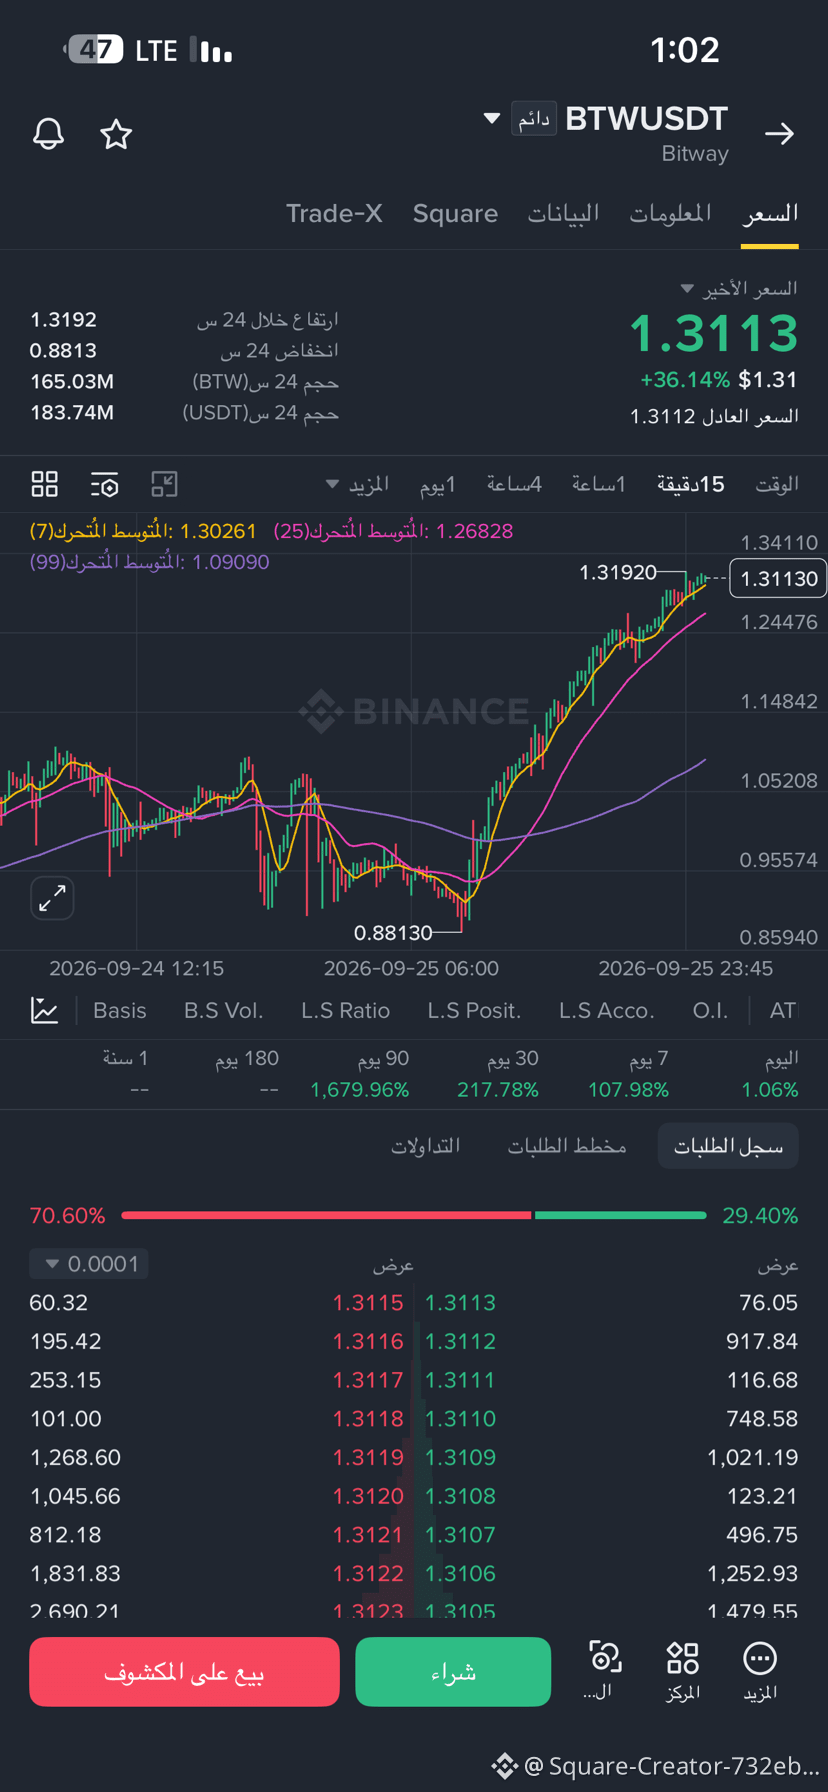
$BTW
Buy: 1.27–1.29 on a clear bounce → targets 1.32 then 1.34
* 🔴 Sell: 1.32–1.34 if rejection appears → 1.29 then 1.27
* 💧 Liquidity: above 1.3192, and below 1.27.
* 🛑 Stop: buy below 1.26 / sell above 1.345
$BTW
Buy: 1.27–1.29 on a clear bounce → targets 1.32 then 1.34
* 🔴 Sell: 1.32–1.34 if rejection appears → 1.29 then 1.27
* 💧 Liquidity: above 1.3192, and below 1.27.
* 🛑 Stop: buy below 1.26 / sell above 1.345
Buy: 1.27–1.29 on a clear bounce → targets 1.32 then 1.34
* 🔴 Sell: 1.32–1.34 if rejection appears → 1.29 then 1.27
* 💧 Liquidity: above 1.3192, and below 1.27.
* 🛑 Stop: buy below 1.26 / sell above 1.345
201
·
--
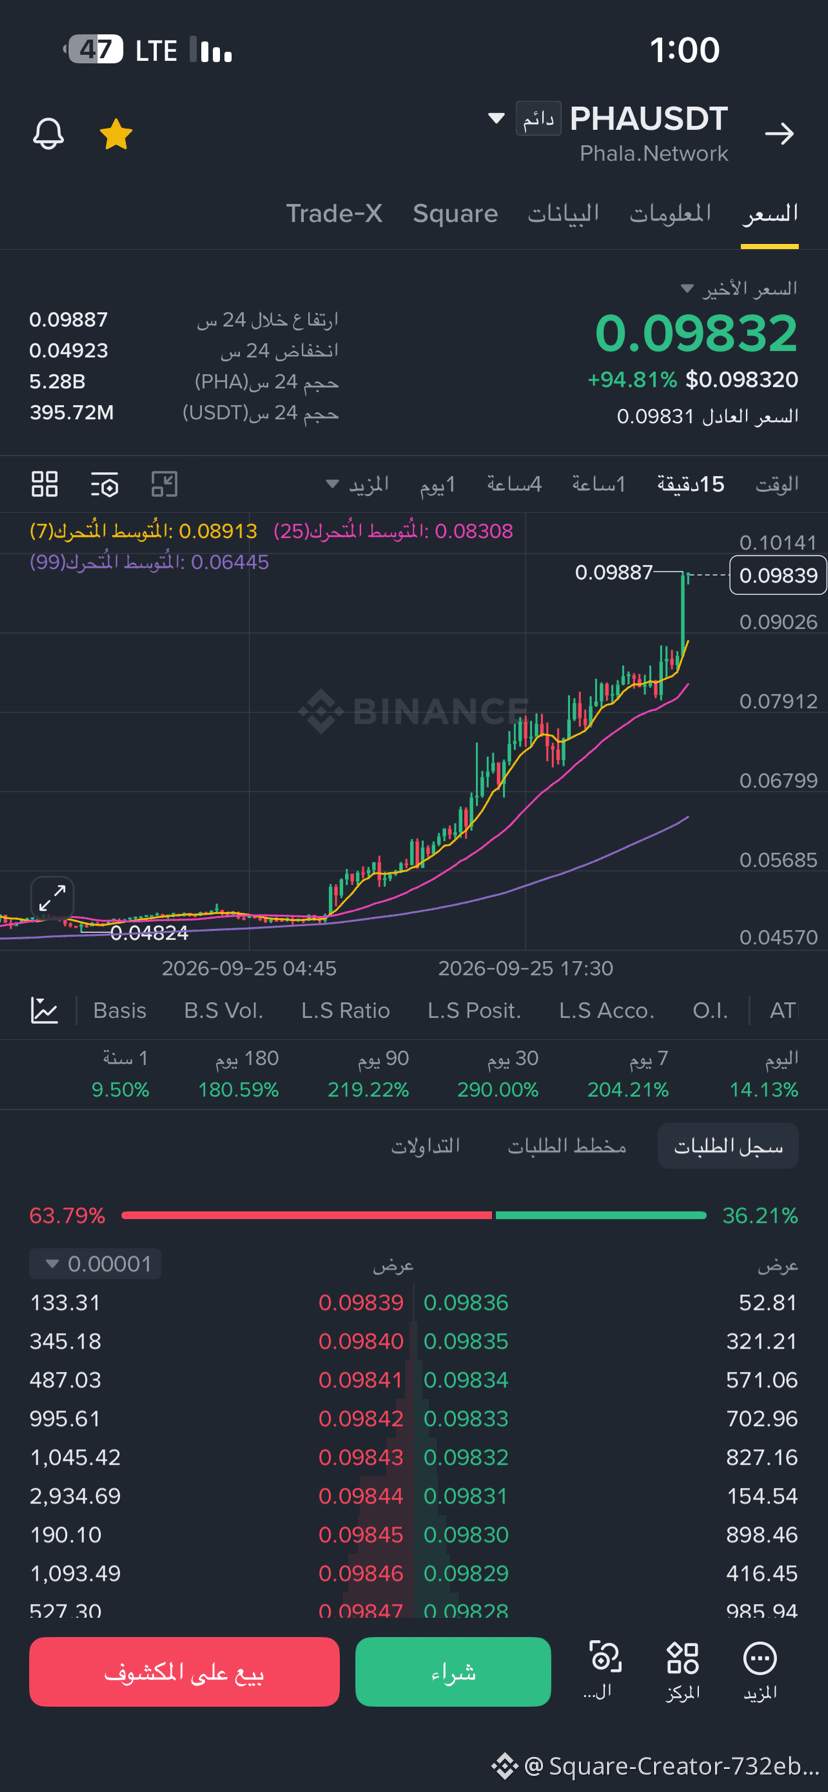
$PHA
PHAUSDT – 15-minute chart
* 🟢 Buy: 0.0890–0.0910 after a clear rebound
🎯 0.0980 then 0.1010
* 🔴 Sell: 0.0990–0.1010 if a strong rejection appears
🎯 0.0910 then 0.0890
* 💧 Liquidity: above 0.09887–0.1010, and below 0.0890.
* ⚙️ $10 balance: 3x–5x Isolated only.
⚠️ The price has risen sharply, so don’t chase a buy at 0.0983; wait for a pullback or a confirmed breakout
$PHA
PHAUSDT – 15-minute chart
* 🟢 Buy: 0.0890–0.0910 after a clear rebound
🎯 0.0980 then 0.1010
* 🔴 Sell: 0.0990–0.1010 if a strong rejection appears
🎯 0.0910 then 0.0890
* 💧 Liquidity: above 0.09887–0.1010, and below 0.0890.
* ⚙️ $10 balance: 3x–5x Isolated only.
⚠️ The price has risen sharply, so don’t chase a buy at 0.0983; wait for a pullback or a confirmed breakout
PHAUSDT – 15-minute chart
* 🟢 Buy: 0.0890–0.0910 after a clear rebound
🎯 0.0980 then 0.1010
* 🔴 Sell: 0.0990–0.1010 if a strong rejection appears
🎯 0.0910 then 0.0890
* 💧 Liquidity: above 0.09887–0.1010, and below 0.0890.
* ⚙️ $10 balance: 3x–5x Isolated only.
⚠️ The price has risen sharply, so don’t chase a buy at 0.0983; wait for a pullback or a confirmed breakout
1
252
·
--
Bullish
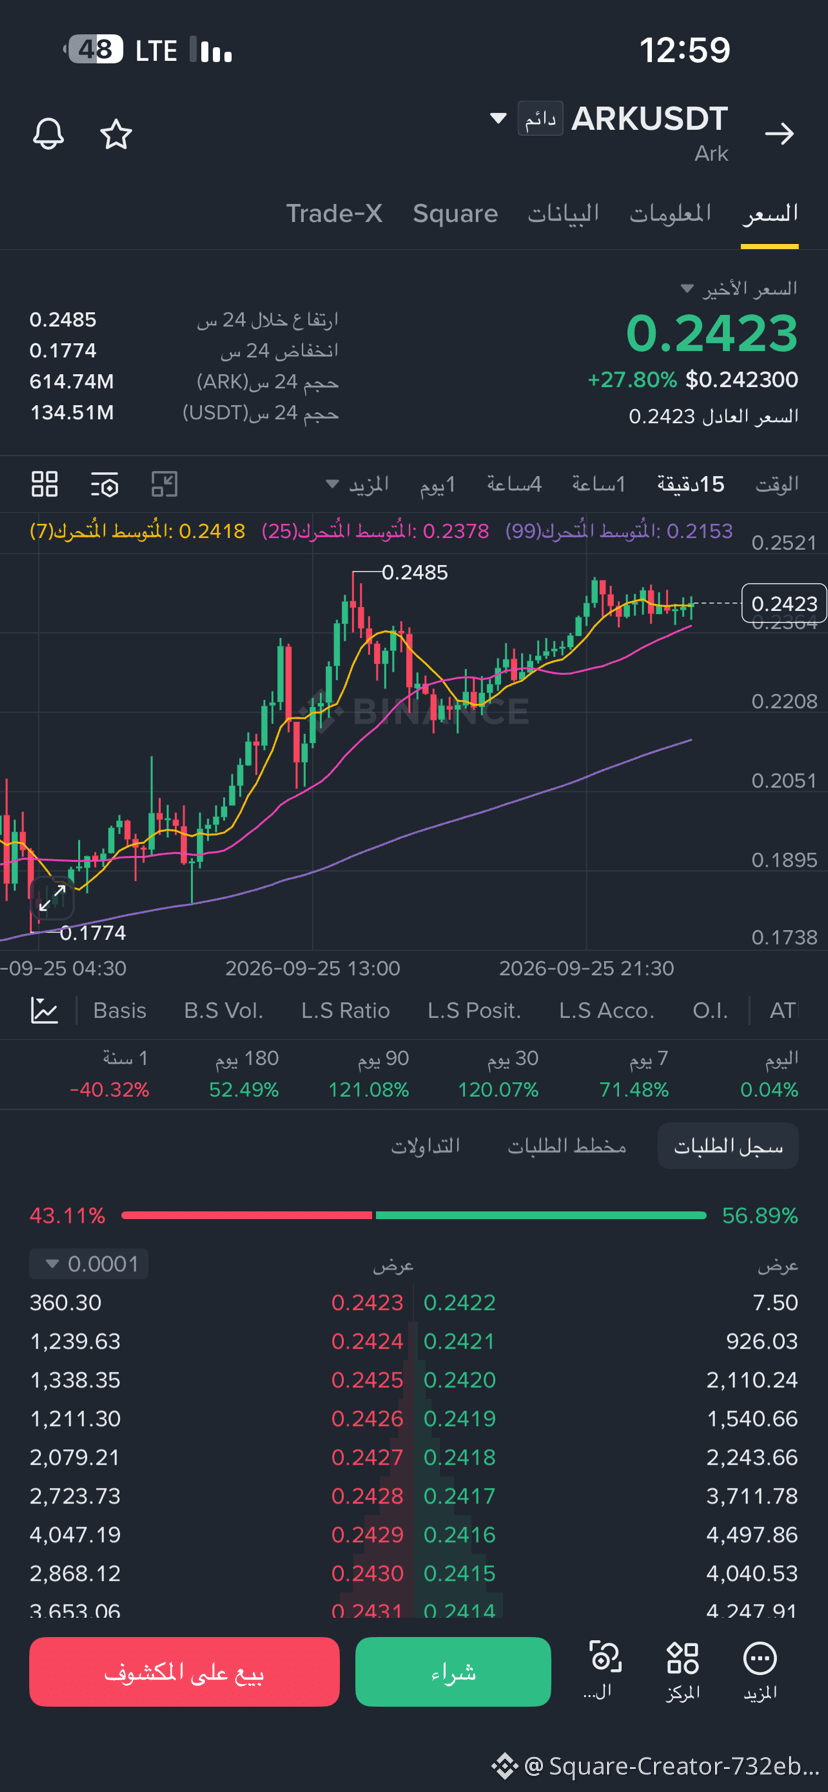
$ARK
ARKUSDT – 15-minute chart
* 🟢 Buy: 0.2380–0.2400 on a clear bounce
🎯 0.2450 then 0.2485
* 🔴 Sell: 0.2470–0.2490 if a strong rejection appears
🎯 0.2420 then 0.2380
* 💧 Liquidity: above 0.2485, and below 0.2370–0.2380.
* 🛑 Stop buying below 0.2370, and sell above 0.2500.
* ⚙️ Balance: $10. Best 3x–5x Isolated; I don’t recommend high leverage.
The current trend on the chart is bullish, and buying from the pullback is less risky than chasing the price at the top
$ARK
ARKUSDT – 15-minute chart
* 🟢 Buy: 0.2380–0.2400 on a clear bounce
🎯 0.2450 then 0.2485
* 🔴 Sell: 0.2470–0.2490 if a strong rejection appears
🎯 0.2420 then 0.2380
* 💧 Liquidity: above 0.2485, and below 0.2370–0.2380.
* 🛑 Stop buying below 0.2370, and sell above 0.2500.
* ⚙️ Balance: $10. Best 3x–5x Isolated; I don’t recommend high leverage.
The current trend on the chart is bullish, and buying from the pullback is less risky than chasing the price at the top
ARKUSDT – 15-minute chart
* 🟢 Buy: 0.2380–0.2400 on a clear bounce
🎯 0.2450 then 0.2485
* 🔴 Sell: 0.2470–0.2490 if a strong rejection appears
🎯 0.2420 then 0.2380
* 💧 Liquidity: above 0.2485, and below 0.2370–0.2380.
* 🛑 Stop buying below 0.2370, and sell above 0.2500.
* ⚙️ Balance: $10. Best 3x–5x Isolated; I don’t recommend high leverage.
The current trend on the chart is bullish, and buying from the pullback is less risky than chasing the price at the top
189
·
--
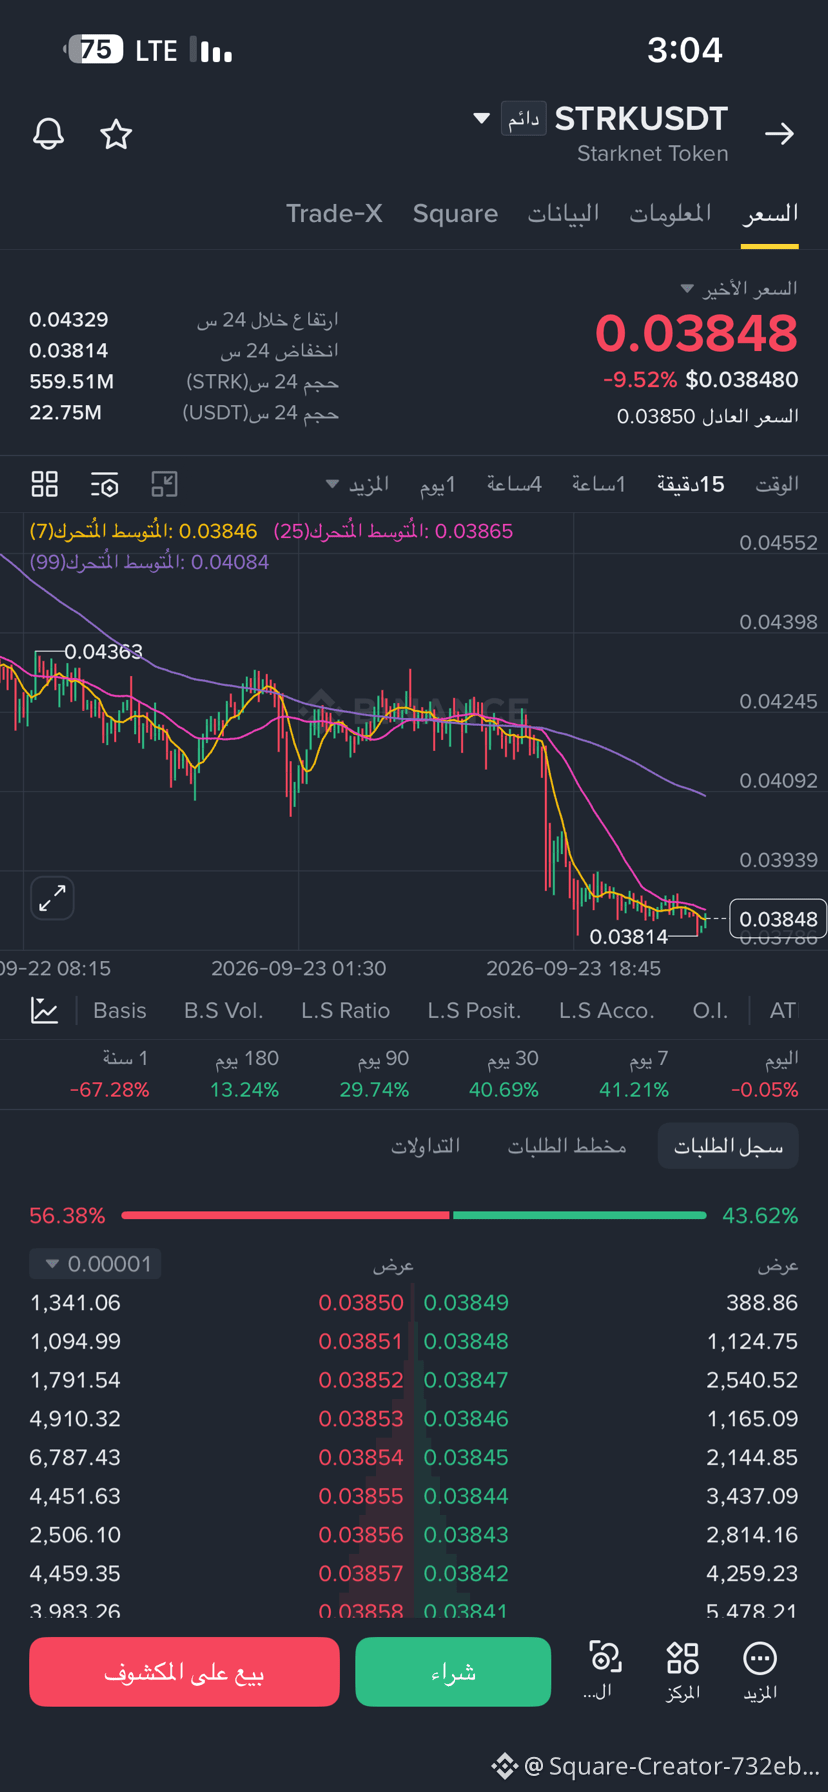
$STRK
STRKUSDT – 15-min chart
* 🔴 Sell: 0.03930–0.03990 after price rejection
🎯 0.03820 then 0.03780
🛑 Stop: above 0.04010–0.04030
* 🟢 Buy: 0.03810–0.03830 only if there is a clear rebound
🎯 0.03930 then 0.04000
🛑 Stop: below 0.03780
* 💧 Liquidity: below 0.03814, and above 0.0399–0.0409.
* ⚙️ Balance 10$: Use 3x–5x isolated (Isolated), and avoid 10x+ because the margin of error is very small
$STRK
STRKUSDT – 15-min chart
* 🔴 Sell: 0.03930–0.03990 after price rejection
🎯 0.03820 then 0.03780
🛑 Stop: above 0.04010–0.04030
* 🟢 Buy: 0.03810–0.03830 only if there is a clear rebound
🎯 0.03930 then 0.04000
🛑 Stop: below 0.03780
* 💧 Liquidity: below 0.03814, and above 0.0399–0.0409.
* ⚙️ Balance 10$: Use 3x–5x isolated (Isolated), and avoid 10x+ because the margin of error is very small
STRKUSDT – 15-min chart
* 🔴 Sell: 0.03930–0.03990 after price rejection
🎯 0.03820 then 0.03780
🛑 Stop: above 0.04010–0.04030
* 🟢 Buy: 0.03810–0.03830 only if there is a clear rebound
🎯 0.03930 then 0.04000
🛑 Stop: below 0.03780
* 💧 Liquidity: below 0.03814, and above 0.0399–0.0409.
* ⚙️ Balance 10$: Use 3x–5x isolated (Isolated), and avoid 10x+ because the margin of error is very small
100
·
--
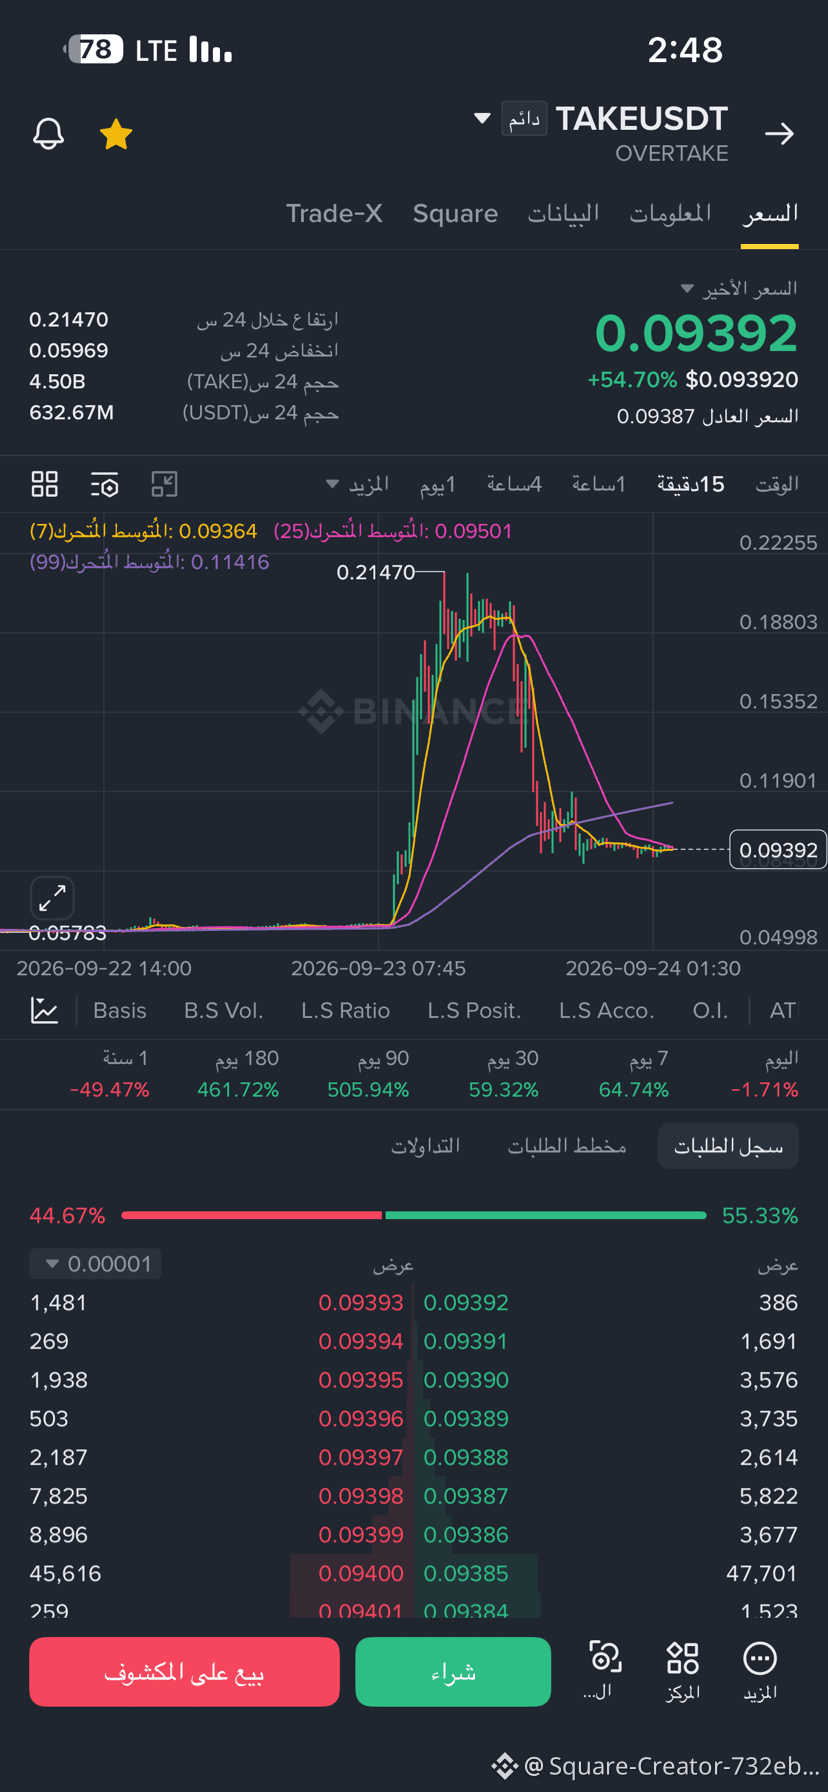
$TAKE
Only according to the picture and on a 15-minute timeframe:
* Price: 0.09392
* Sell: 0.0948–0.0960 upon appearing rejection ⬇️
Stop: 0.0980
Targets: 0.0915 then 0.0885
* Buy: 0.0900–0.0920 if there is a liquidity pullback and a clear rebound ⬆️
Stop: 0.0880
Targets: 0.0940 then 0.0970
* Clear liquidity: sell near 0.09400, and a strong buy signal appears near 0.09385 in the order book, but it may change quickly.
* Leverage for $10 balance: 2x–3x maximum, and it’s best to use 2x with a stop-loss
$TAKE
Only according to the picture and on a 15-minute timeframe:
* Price: 0.09392
* Sell: 0.0948–0.0960 upon appearing rejection ⬇️
Stop: 0.0980
Targets: 0.0915 then 0.0885
* Buy: 0.0900–0.0920 if there is a liquidity pullback and a clear rebound ⬆️
Stop: 0.0880
Targets: 0.0940 then 0.0970
* Clear liquidity: sell near 0.09400, and a strong buy signal appears near 0.09385 in the order book, but it may change quickly.
* Leverage for $10 balance: 2x–3x maximum, and it’s best to use 2x with a stop-loss
Only according to the picture and on a 15-minute timeframe:
* Price: 0.09392
* Sell: 0.0948–0.0960 upon appearing rejection ⬇️
Stop: 0.0980
Targets: 0.0915 then 0.0885
* Buy: 0.0900–0.0920 if there is a liquidity pullback and a clear rebound ⬆️
Stop: 0.0880
Targets: 0.0940 then 0.0970
* Clear liquidity: sell near 0.09400, and a strong buy signal appears near 0.09385 in the order book, but it may change quickly.
* Leverage for $10 balance: 2x–3x maximum, and it’s best to use 2x with a stop-loss
377
·
--
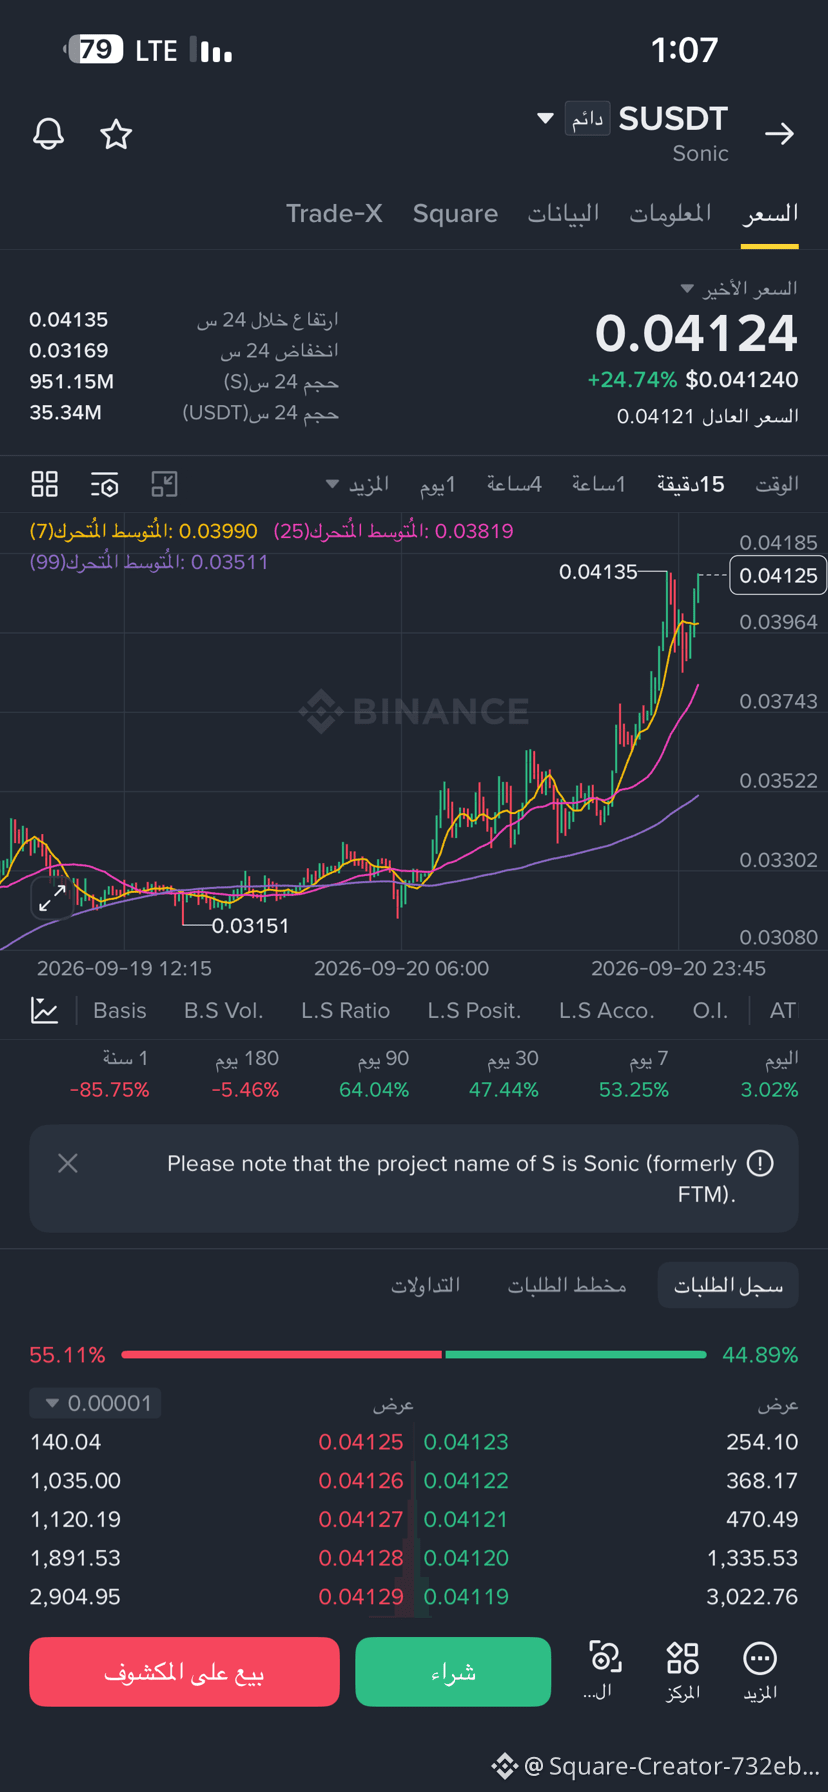
$S
Buy: 0.0395 – 0.0400 after confirmation of the bounce.
* 🟢 Stronger buy: 0.0381 – 0.0385.
* 🔴 Sell: 0.0413 – 0.0415 if a clear rejection appears.
* 💧 Upper liquidity zone: 0.04135 – 0.04185.
* 💧 Lower liquidity: 0.0396 then 0.0382.
* ⚠️ Current price 0.04124 is near the top, so I don’t recommend chasing the buy.
💰 Balance $10: Use isolated 3x leverage (Isolated), and risk only about $0.10–$0.20 per trade.
Best: Wait for 0.0395–0.0400 to buy, or 0.0413–0.0415 to sell after confirmation appears
$S
Buy: 0.0395 – 0.0400 after confirmation of the bounce.
* 🟢 Stronger buy: 0.0381 – 0.0385.
* 🔴 Sell: 0.0413 – 0.0415 if a clear rejection appears.
* 💧 Upper liquidity zone: 0.04135 – 0.04185.
* 💧 Lower liquidity: 0.0396 then 0.0382.
* ⚠️ Current price 0.04124 is near the top, so I don’t recommend chasing the buy.
💰 Balance $10: Use isolated 3x leverage (Isolated), and risk only about $0.10–$0.20 per trade.
Best: Wait for 0.0395–0.0400 to buy, or 0.0413–0.0415 to sell after confirmation appears
Buy: 0.0395 – 0.0400 after confirmation of the bounce.
* 🟢 Stronger buy: 0.0381 – 0.0385.
* 🔴 Sell: 0.0413 – 0.0415 if a clear rejection appears.
* 💧 Upper liquidity zone: 0.04135 – 0.04185.
* 💧 Lower liquidity: 0.0396 then 0.0382.
* ⚠️ Current price 0.04124 is near the top, so I don’t recommend chasing the buy.
💰 Balance $10: Use isolated 3x leverage (Isolated), and risk only about $0.10–$0.20 per trade.
Best: Wait for 0.0395–0.0400 to buy, or 0.0413–0.0415 to sell after confirmation appears
271
·
--
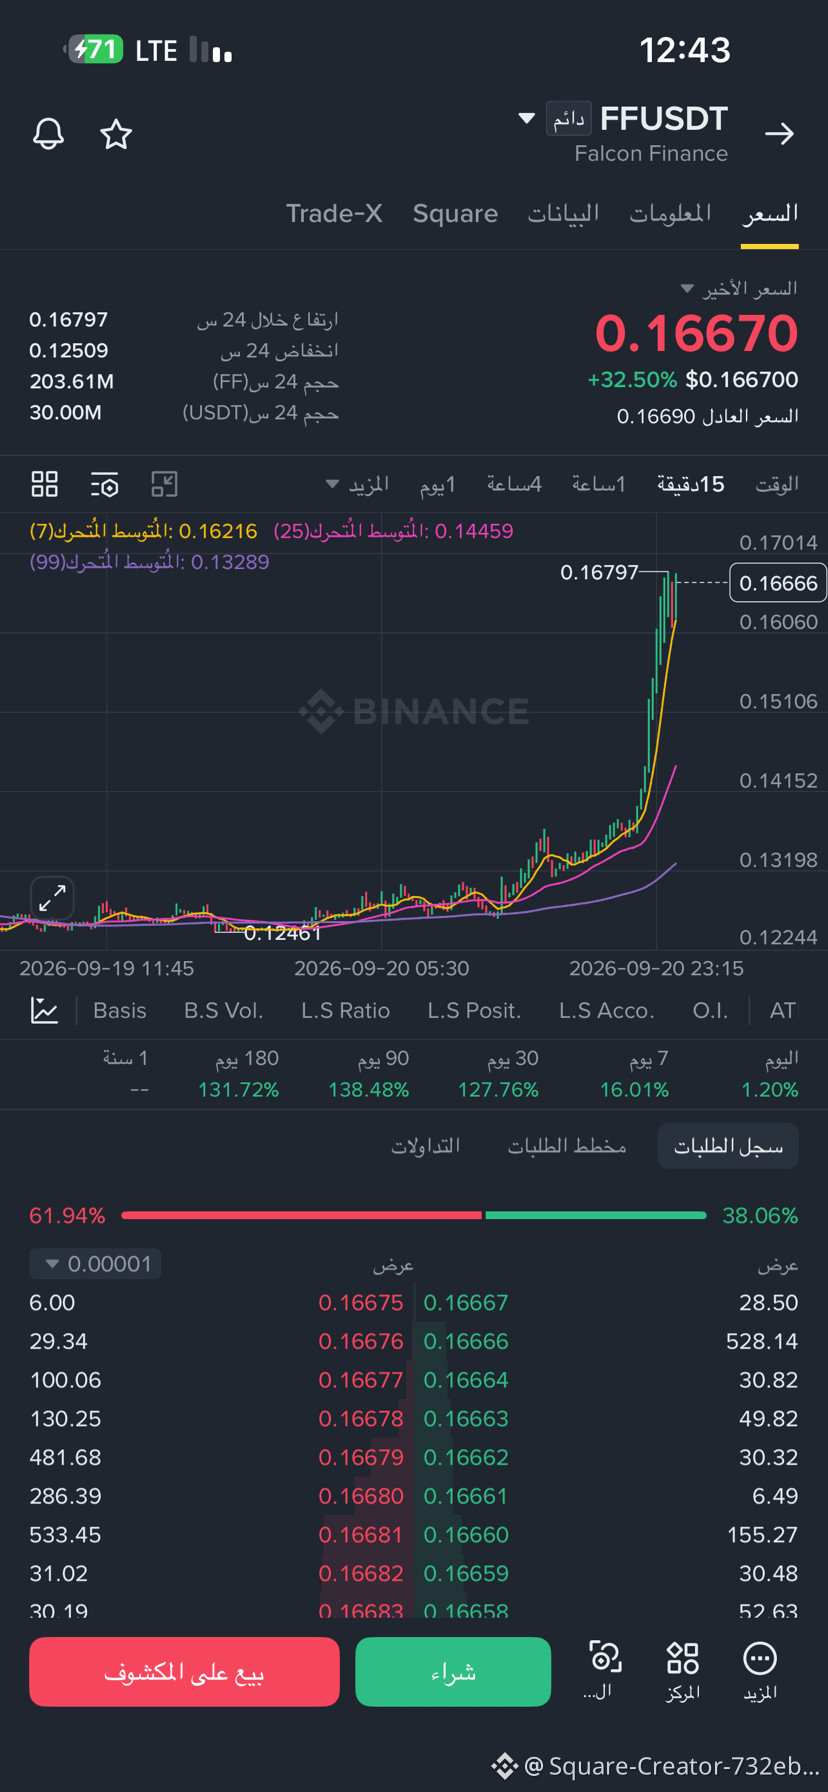
$FF
According to the FFUSDT chart – 15m:
* 🟢 LONG: 0.1600–0.1625 after a bounce and confirmation.
* 🟢 Deeper / better-priced LONG: 0.1445–0.1460 near the MA25.
* 🔴 SHORT: 0.1695–0.1705 only if a rejection appears.
* 💧 Upper liquidity: 0.16997 then 0.17014.
* 💧 Lower liquidity: 0.1600 then 0.1510–0.1530.
* ⚠️ Price 0.1667 is very close to the top after a sharp rise; I’m not chasing LONG now.
💰 Balance $10: use 3x Isolated, and risk about $0.10–$0.20 max per trade. Avoid 10x+.
Best: wait for a drop to 0.1600–0.1625 for the LONG, or a rejection at 0.1695–0.1705 for the SHORT
$FF
According to the FFUSDT chart – 15m:
* 🟢 LONG: 0.1600–0.1625 after a bounce and confirmation.
* 🟢 Deeper / better-priced LONG: 0.1445–0.1460 near the MA25.
* 🔴 SHORT: 0.1695–0.1705 only if a rejection appears.
* 💧 Upper liquidity: 0.16997 then 0.17014.
* 💧 Lower liquidity: 0.1600 then 0.1510–0.1530.
* ⚠️ Price 0.1667 is very close to the top after a sharp rise; I’m not chasing LONG now.
💰 Balance $10: use 3x Isolated, and risk about $0.10–$0.20 max per trade. Avoid 10x+.
Best: wait for a drop to 0.1600–0.1625 for the LONG, or a rejection at 0.1695–0.1705 for the SHORT
According to the FFUSDT chart – 15m:
* 🟢 LONG: 0.1600–0.1625 after a bounce and confirmation.
* 🟢 Deeper / better-priced LONG: 0.1445–0.1460 near the MA25.
* 🔴 SHORT: 0.1695–0.1705 only if a rejection appears.
* 💧 Upper liquidity: 0.16997 then 0.17014.
* 💧 Lower liquidity: 0.1600 then 0.1510–0.1530.
* ⚠️ Price 0.1667 is very close to the top after a sharp rise; I’m not chasing LONG now.
💰 Balance $10: use 3x Isolated, and risk about $0.10–$0.20 max per trade. Avoid 10x+.
Best: wait for a drop to 0.1600–0.1625 for the LONG, or a rejection at 0.1695–0.1705 for the SHORT
581
·
--
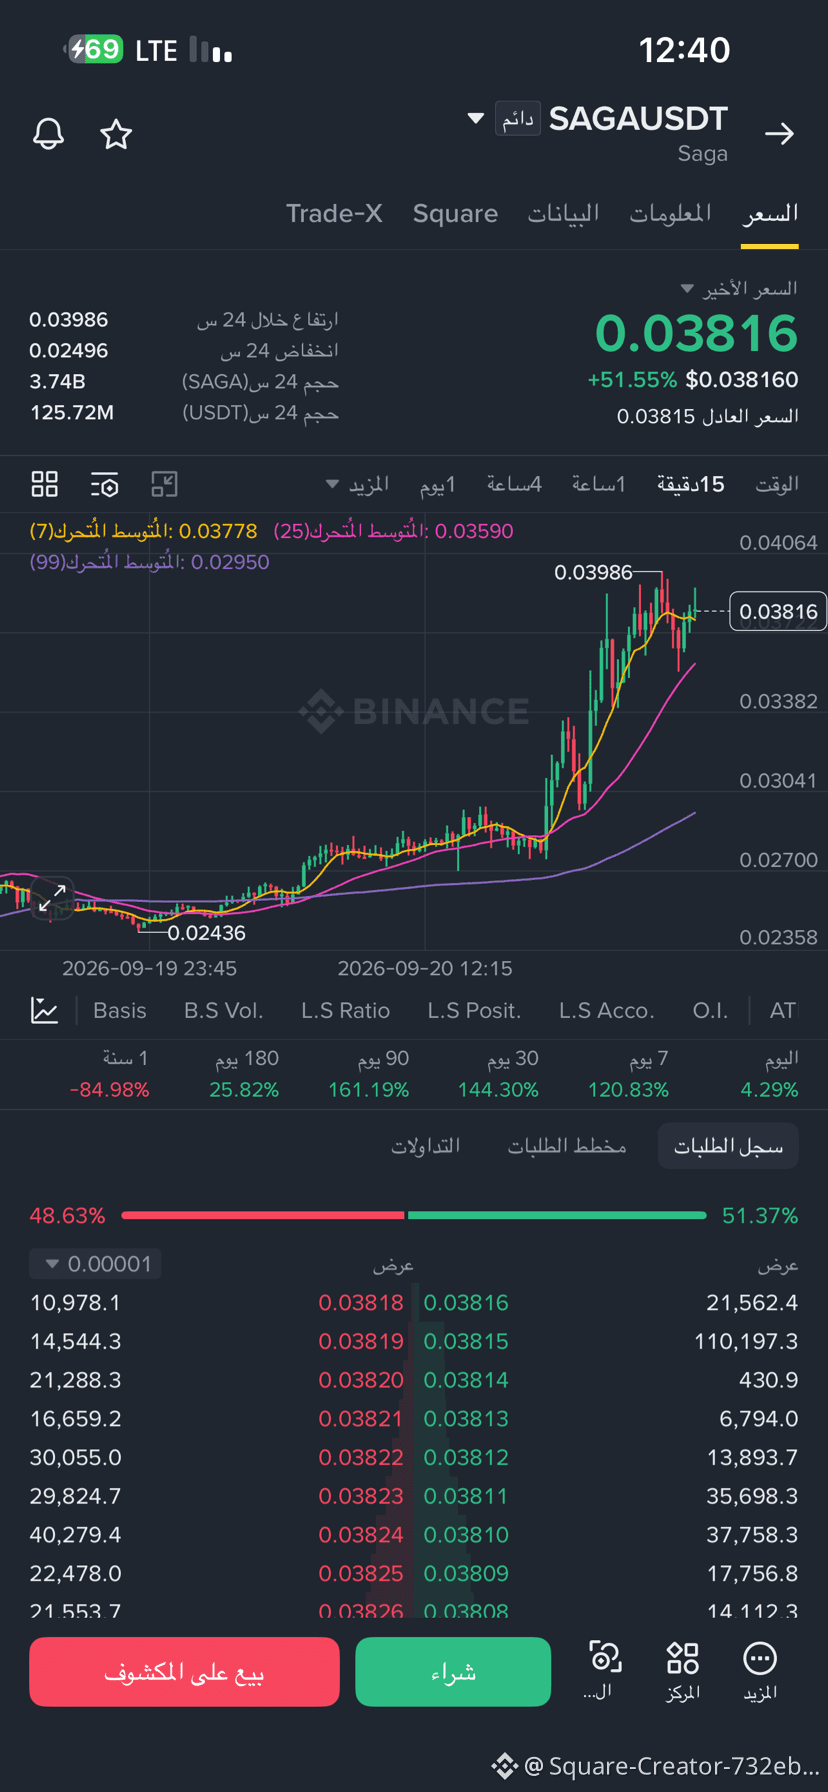
$SAGA
🟢 LONG: 0.0357–0.0361 ⭐
* 🟢 LONG deeper: 0.0337–0.0340
* 🔴 SHORT: 0.0395–0.0400 after rejection
* 💧 Top liquidity: 0.03986 then 0.0406
* 💧 Bottom liquidity: 0.0359 then 0.0338
* ⚠️ Current price 0.03816: don’t chase a buy; near the top.
💰 Balance $10: 3x Isolated, and risk should not exceed approximately $0.10–$0.20 per trade.
Best right now: wait for 0.0357–0.0361 for the LONG, or 0.0395–0.0400 for the SHORT, provided that a rejection appears
$SAGA
🟢 LONG: 0.0357–0.0361 ⭐
* 🟢 LONG deeper: 0.0337–0.0340
* 🔴 SHORT: 0.0395–0.0400 after rejection
* 💧 Top liquidity: 0.03986 then 0.0406
* 💧 Bottom liquidity: 0.0359 then 0.0338
* ⚠️ Current price 0.03816: don’t chase a buy; near the top.
💰 Balance $10: 3x Isolated, and risk should not exceed approximately $0.10–$0.20 per trade.
Best right now: wait for 0.0357–0.0361 for the LONG, or 0.0395–0.0400 for the SHORT, provided that a rejection appears
🟢 LONG: 0.0357–0.0361 ⭐
* 🟢 LONG deeper: 0.0337–0.0340
* 🔴 SHORT: 0.0395–0.0400 after rejection
* 💧 Top liquidity: 0.03986 then 0.0406
* 💧 Bottom liquidity: 0.0359 then 0.0338
* ⚠️ Current price 0.03816: don’t chase a buy; near the top.
💰 Balance $10: 3x Isolated, and risk should not exceed approximately $0.10–$0.20 per trade.
Best right now: wait for 0.0357–0.0361 for the LONG, or 0.0395–0.0400 for the SHORT, provided that a rejection appears
174
·
--
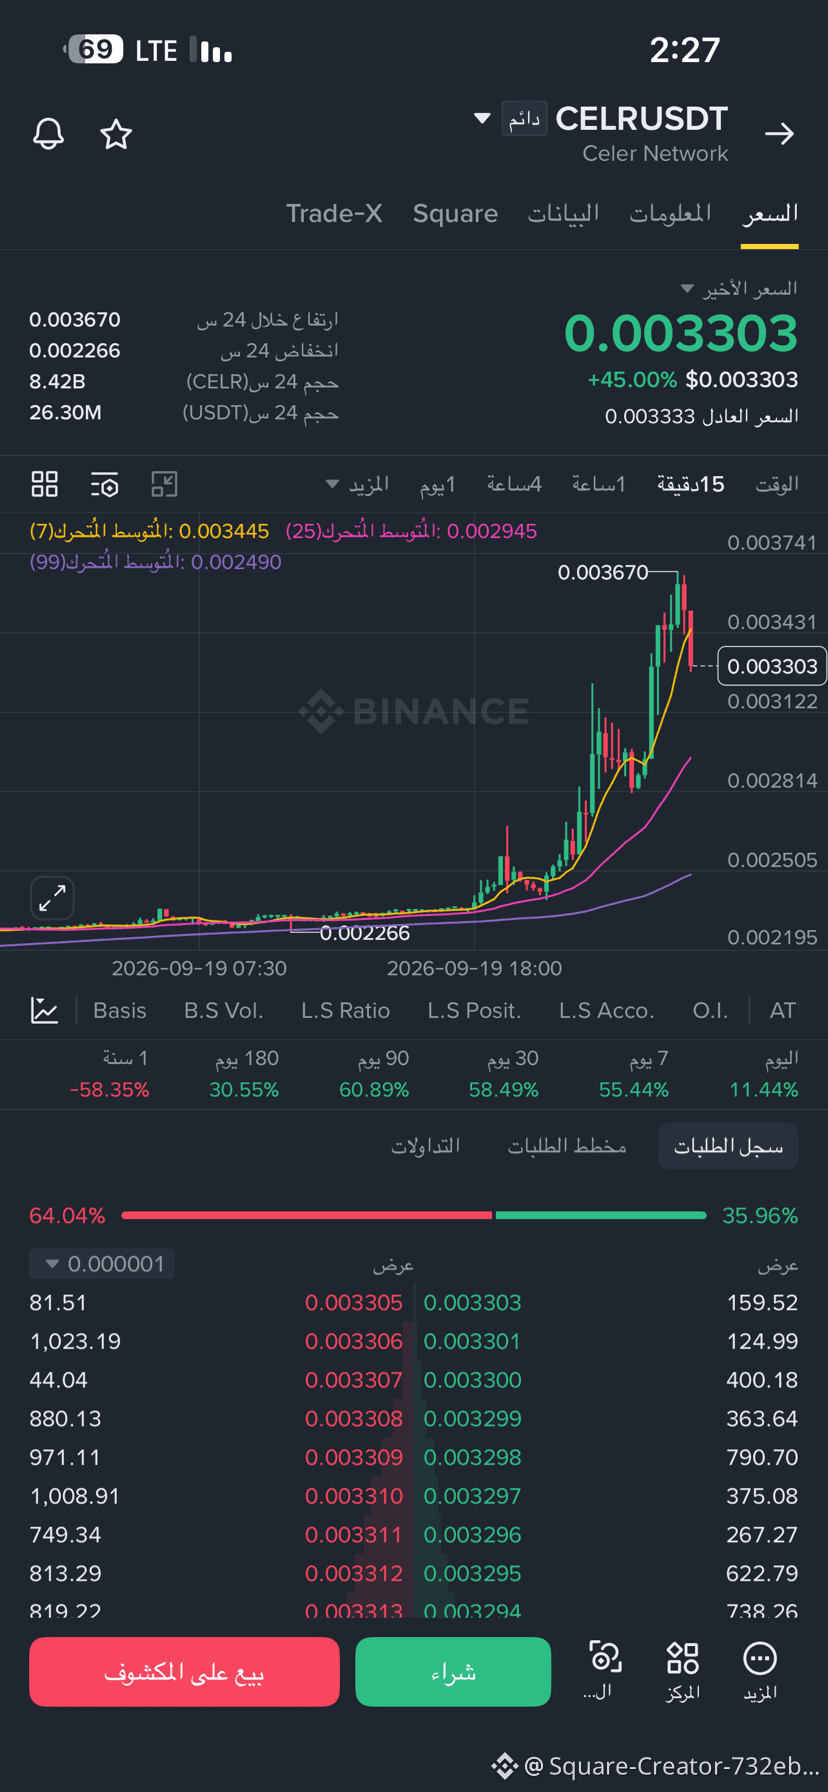
$CELR
Buy: 0.00310–0.00315
⭐ Strongest buy: 0.00290–0.00297
* 🔴 Sell: 0.00343–0.00350 if rejection appears
🔴 Higher liquidity: 0.00365–0.00374 near the top 0.003670
* 💧 Liquidity/Lower support: 0.00312 then 0.00281–0.00295
* ⚠️ Current price 0.00330: Don’t chase the entry; it’s between support and resistance.
For a balance of $10: use 3x Isolated, and preferably don’t risk more than $0.10–$0.20 per trade. Avoid 10x–50x with this fast move
$CELR
Buy: 0.00310–0.00315
⭐ Strongest buy: 0.00290–0.00297
* 🔴 Sell: 0.00343–0.00350 if rejection appears
🔴 Higher liquidity: 0.00365–0.00374 near the top 0.003670
* 💧 Liquidity/Lower support: 0.00312 then 0.00281–0.00295
* ⚠️ Current price 0.00330: Don’t chase the entry; it’s between support and resistance.
For a balance of $10: use 3x Isolated, and preferably don’t risk more than $0.10–$0.20 per trade. Avoid 10x–50x with this fast move
Buy: 0.00310–0.00315
⭐ Strongest buy: 0.00290–0.00297
* 🔴 Sell: 0.00343–0.00350 if rejection appears
🔴 Higher liquidity: 0.00365–0.00374 near the top 0.003670
* 💧 Liquidity/Lower support: 0.00312 then 0.00281–0.00295
* ⚠️ Current price 0.00330: Don’t chase the entry; it’s between support and resistance.
For a balance of $10: use 3x Isolated, and preferably don’t risk more than $0.10–$0.20 per trade. Avoid 10x–50x with this fast move
101
·
--
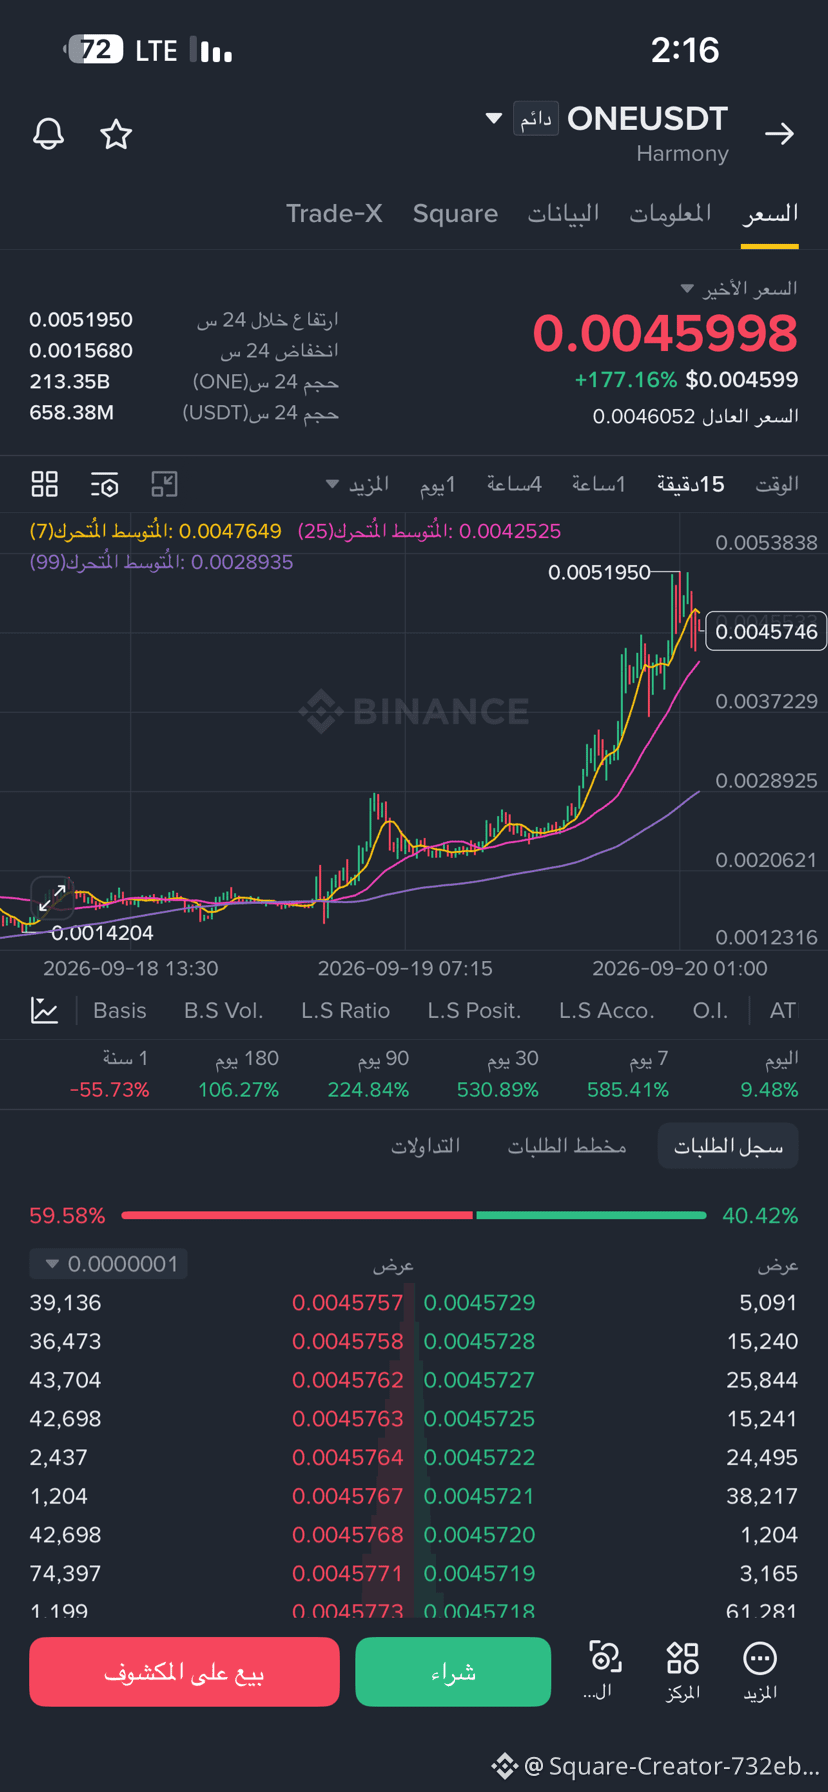
$ONE
LONG
① 0.00450 – 0.00460 — Quick entry
* The current price inside it is approximately.
* The order book in the image shows clear buy orders around 0.004572–0.004579.
* Don’t enter directly; it’s better to wait for a 15m candle to bounce from the zone.
② 0.00420 – 0.00430 ⭐ — The most important zone
* MA25 = 0.0042525.
* A strong retest area after the move up.
* If price drops to it and then reclaims 0.00430 with a 15m closing, this is a clearer LONG setup than chasing the current price.
③ 0.00370 – 0.00380
* Deeper support in case of a larger correction.
* I don’t consider it an entry unless an reversal appears.
🔴 SHORT zones / Liquidity
① 0.00515 – 0.00520 ⭐
* Current top = 0.005195.
* This is the most important visible upper liquidity on the chart.
* If price reaches it, then pulls the high and closes below it → that’s where I’m watching for a SHORT.
② 0.00530 – 0.00540
* If 0.00520 is broken strongly, don’t open a SHORT immediately.
* I wait for an extension, then a rejection
$ONE
LONG
① 0.00450 – 0.00460 — Quick entry
* The current price inside it is approximately.
* The order book in the image shows clear buy orders around 0.004572–0.004579.
* Don’t enter directly; it’s better to wait for a 15m candle to bounce from the zone.
② 0.00420 – 0.00430 ⭐ — The most important zone
* MA25 = 0.0042525.
* A strong retest area after the move up.
* If price drops to it and then reclaims 0.00430 with a 15m closing, this is a clearer LONG setup than chasing the current price.
③ 0.00370 – 0.00380
* Deeper support in case of a larger correction.
* I don’t consider it an entry unless an reversal appears.
🔴 SHORT zones / Liquidity
① 0.00515 – 0.00520 ⭐
* Current top = 0.005195.
* This is the most important visible upper liquidity on the chart.
* If price reaches it, then pulls the high and closes below it → that’s where I’m watching for a SHORT.
② 0.00530 – 0.00540
* If 0.00520 is broken strongly, don’t open a SHORT immediately.
* I wait for an extension, then a rejection
LONG
① 0.00450 – 0.00460 — Quick entry
* The current price inside it is approximately.
* The order book in the image shows clear buy orders around 0.004572–0.004579.
* Don’t enter directly; it’s better to wait for a 15m candle to bounce from the zone.
② 0.00420 – 0.00430 ⭐ — The most important zone
* MA25 = 0.0042525.
* A strong retest area after the move up.
* If price drops to it and then reclaims 0.00430 with a 15m closing, this is a clearer LONG setup than chasing the current price.
③ 0.00370 – 0.00380
* Deeper support in case of a larger correction.
* I don’t consider it an entry unless an reversal appears.
🔴 SHORT zones / Liquidity
① 0.00515 – 0.00520 ⭐
* Current top = 0.005195.
* This is the most important visible upper liquidity on the chart.
* If price reaches it, then pulls the high and closes below it → that’s where I’m watching for a SHORT.
② 0.00530 – 0.00540
* If 0.00520 is broken strongly, don’t open a SHORT immediately.
* I wait for an extension, then a rejection
1
1
1.3k
·
--
$STRK
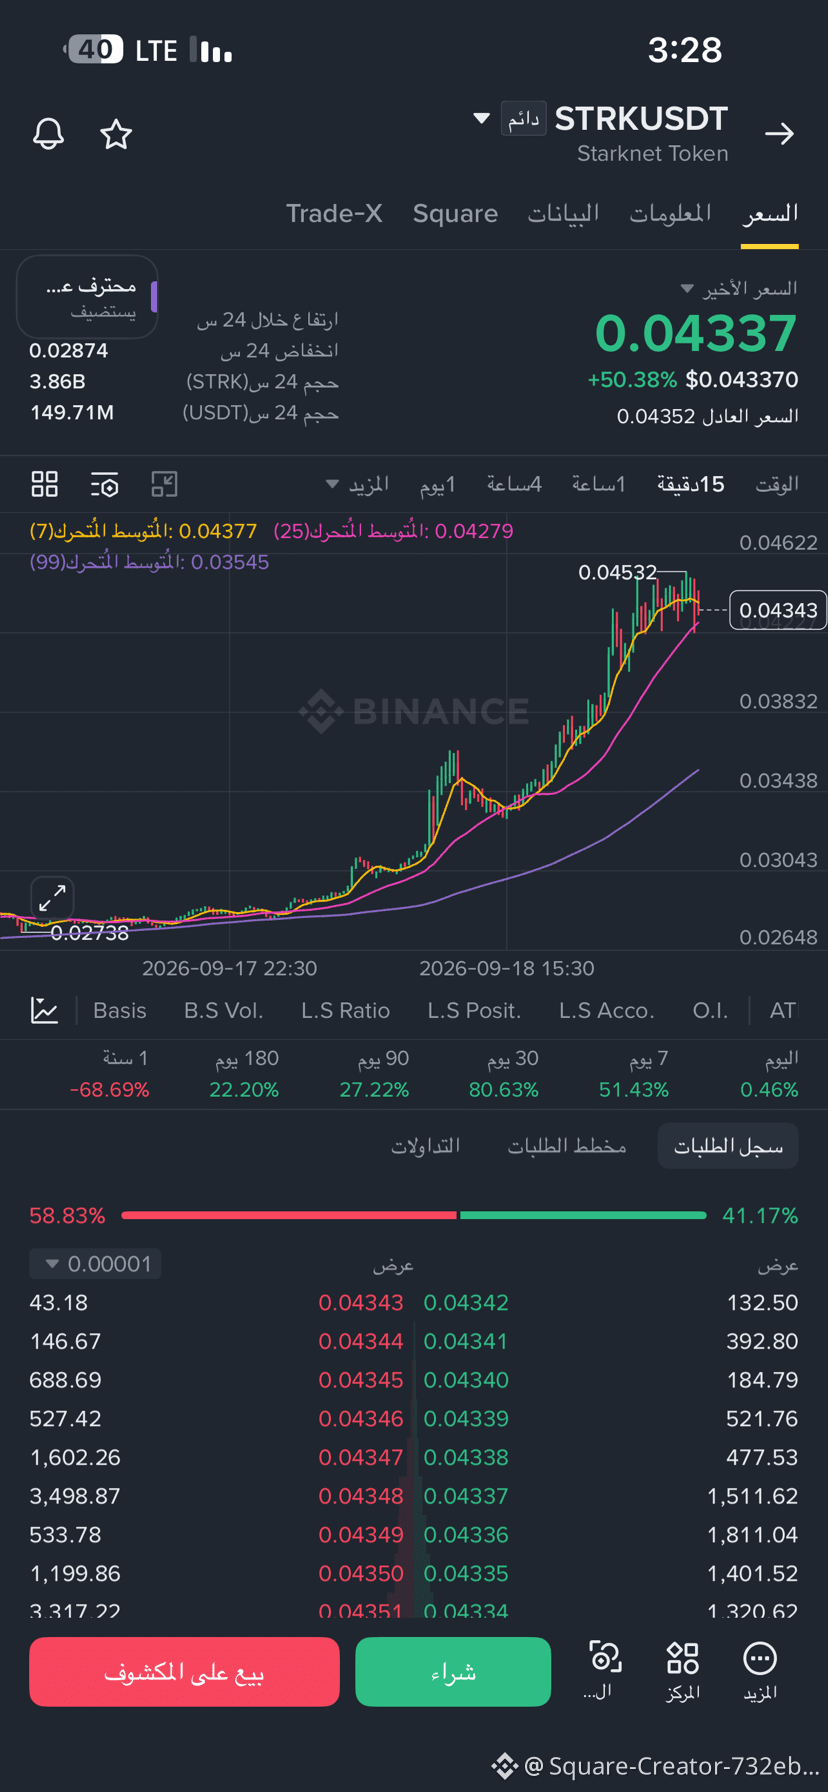
From the chart you sent, STRKUSDT on the 15-minute timeframe shows a price of 0.04337. The momentum is still strongly bullish, but the price is below MA7=0.04377 and close to MA25=0.04279. The last peak is 0.04532.
Important: The current external price I found for STRK differs from the price shown in your image, so the levels below are based on the chart in the image, not on the external price.
🟢 LONG zones
1) 0.04270 – 0.04300 ⭐
* The most important buying zone I’m watching.
* Close to MA25 at 0.04279.
* Best to wait for price to drop into this zone, then bounce, and close a 15m candle above 0.04300.
2) 0.04320 – 0.04345
* Faster entry if price holds the current area.
* The order book in the image shows accumulated buy orders roughly around 0.04334–0.04342.
* Don’t enter just from a touch; wait for stabilization/bounce.
3) 0.03820 – 0.03850
* Deeper support if a strong pullback happens.
* Close to the 0.03832 level visible on the chart.
🔴 SHORT zones / upper liquidity
1) 0.04500 – 0.04535 ⭐
* The most important liquidity zone right now.
* The previous top is 0.04532.
* If price reaches it, pulls from the top, and then closes a 15m candle below it → this is a SHORT watch signal.
2) 0.04610 – 0.04630
* A higher zone near the visible level at 0.04622.
* If 0.04532 is broken with strength, don’t open a SHORT immediately; wait for price to reach this zone or for a rejection to appear
$STRK
From the chart you sent, STRKUSDT on the 15-minute timeframe shows a price of 0.04337. The momentum is still strongly bullish, but the price is below MA7=0.04377 and close to MA25=0.04279. The last peak is 0.04532.
Important: The current external price I found for STRK differs from the price shown in your image, so the levels below are based on the chart in the image, not on the external price.
🟢 LONG zones
1) 0.04270 – 0.04300 ⭐
* The most important buying zone I’m watching.
* Close to MA25 at 0.04279.
* Best to wait for price to drop into this zone, then bounce, and close a 15m candle above 0.04300.
2) 0.04320 – 0.04345
* Faster entry if price holds the current area.
* The order book in the image shows accumulated buy orders roughly around 0.04334–0.04342.
* Don’t enter just from a touch; wait for stabilization/bounce.
3) 0.03820 – 0.03850
* Deeper support if a strong pullback happens.
* Close to the 0.03832 level visible on the chart.
🔴 SHORT zones / upper liquidity
1) 0.04500 – 0.04535 ⭐
* The most important liquidity zone right now.
* The previous top is 0.04532.
* If price reaches it, pulls from the top, and then closes a 15m candle below it → this is a SHORT watch signal.
2) 0.04610 – 0.04630
* A higher zone near the visible level at 0.04622.
* If 0.04532 is broken with strength, don’t open a SHORT immediately; wait for price to reach this zone or for a rejection to appear
From the chart you sent, STRKUSDT on the 15-minute timeframe shows a price of 0.04337. The momentum is still strongly bullish, but the price is below MA7=0.04377 and close to MA25=0.04279. The last peak is 0.04532.
Important: The current external price I found for STRK differs from the price shown in your image, so the levels below are based on the chart in the image, not on the external price.
🟢 LONG zones
1) 0.04270 – 0.04300 ⭐
* The most important buying zone I’m watching.
* Close to MA25 at 0.04279.
* Best to wait for price to drop into this zone, then bounce, and close a 15m candle above 0.04300.
2) 0.04320 – 0.04345
* Faster entry if price holds the current area.
* The order book in the image shows accumulated buy orders roughly around 0.04334–0.04342.
* Don’t enter just from a touch; wait for stabilization/bounce.
3) 0.03820 – 0.03850
* Deeper support if a strong pullback happens.
* Close to the 0.03832 level visible on the chart.
🔴 SHORT zones / upper liquidity
1) 0.04500 – 0.04535 ⭐
* The most important liquidity zone right now.
* The previous top is 0.04532.
* If price reaches it, pulls from the top, and then closes a 15m candle below it → this is a SHORT watch signal.
2) 0.04610 – 0.04630
* A higher zone near the visible level at 0.04622.
* If 0.04532 is broken with strength, don’t open a SHORT immediately; wait for price to reach this zone or for a rejection to appear
104
·
--
$G
ء
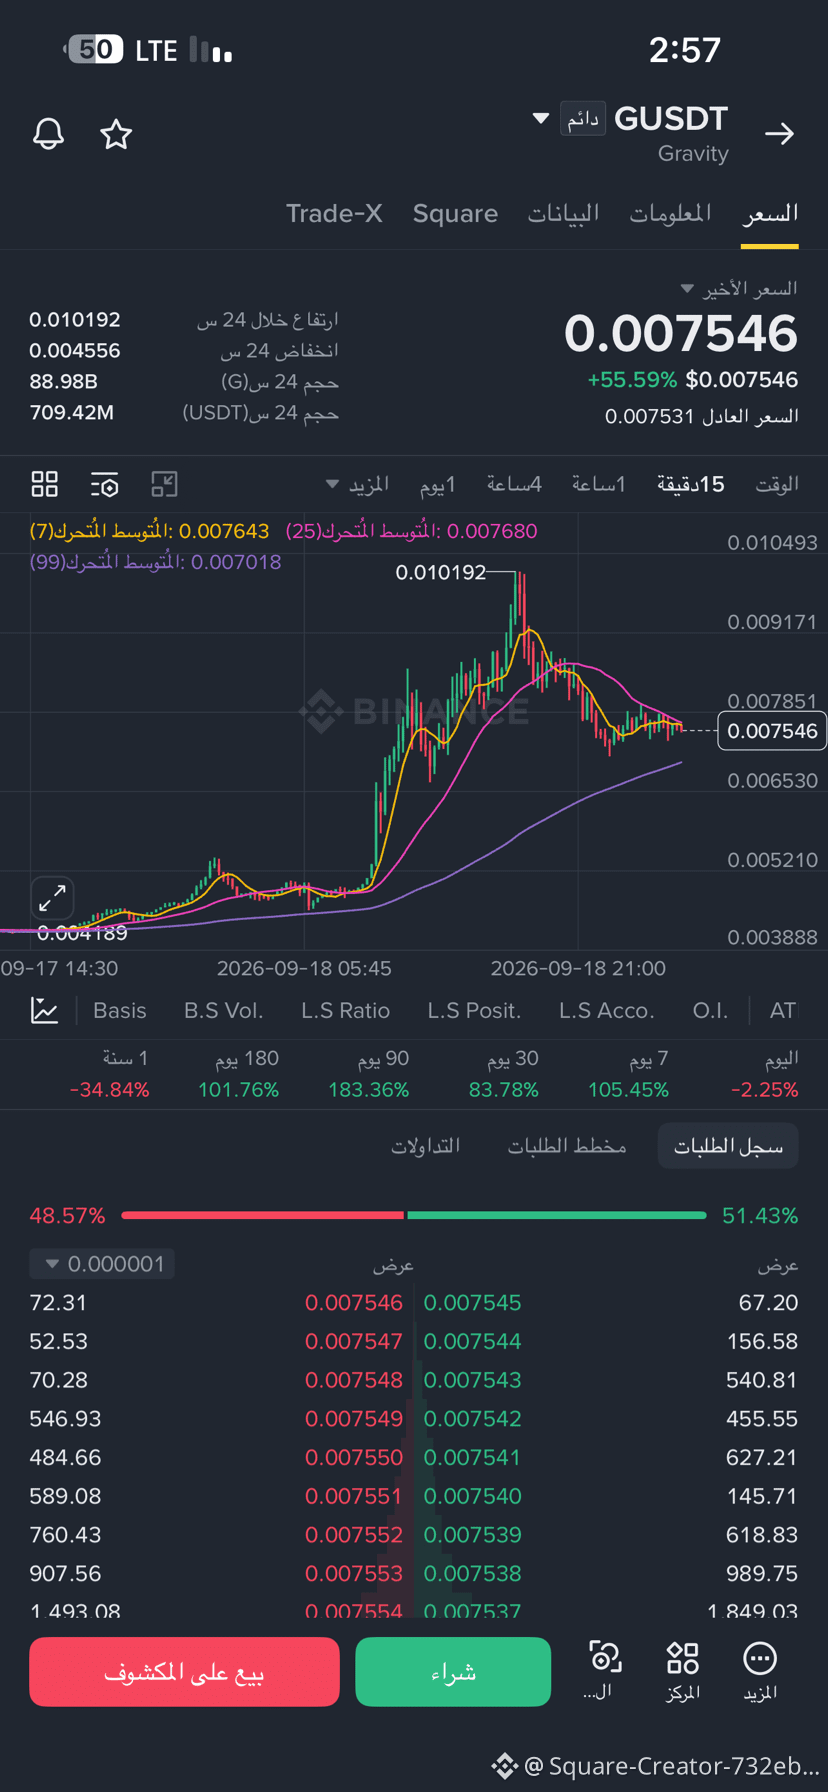
1. 0.00750 – 0.00755 — Quick entry
* In the order book shown in the image, there is clear buy-side liquidity roughly around 0.007537–0.007540.
* Don’t enter just on touch; I want to see the price hold it and bounce.
2. 0.00700 – 0.00715 ⭐ — Key zone
* Close to MA99 at 0.007018.
* This is a support zone that appeared after the drop.
* If the price reaches it, pulls liquidity, and then closes a 15-minute candle above it, this becomes the better LONG zone than chasing the current price.
🔴 Sell zones / SHORT liquidity
1. 0.00785 – 0.00800 ⭐
* Clear resistance zone from the last move.
* The price needs to break through it and stay above it for the short-term move shape to change.
2. 0.00850 – 0.00880
* Higher resistance zone in case a strong rebound happens.
* Not an automatic entry; we wait for a clear rejection.
3. 0.01019
* The big top shown on the chart.
* Above it, there is potential liquidity from Breakout/Stop orders, but reaching it requires a strong rally
$G
ء
1. 0.00750 – 0.00755 — Quick entry
* In the order book shown in the image, there is clear buy-side liquidity roughly around 0.007537–0.007540.
* Don’t enter just on touch; I want to see the price hold it and bounce.
2. 0.00700 – 0.00715 ⭐ — Key zone
* Close to MA99 at 0.007018.
* This is a support zone that appeared after the drop.
* If the price reaches it, pulls liquidity, and then closes a 15-minute candle above it, this becomes the better LONG zone than chasing the current price.
🔴 Sell zones / SHORT liquidity
1. 0.00785 – 0.00800 ⭐
* Clear resistance zone from the last move.
* The price needs to break through it and stay above it for the short-term move shape to change.
2. 0.00850 – 0.00880
* Higher resistance zone in case a strong rebound happens.
* Not an automatic entry; we wait for a clear rejection.
3. 0.01019
* The big top shown on the chart.
* Above it, there is potential liquidity from Breakout/Stop orders, but reaching it requires a strong rally
ء
1. 0.00750 – 0.00755 — Quick entry
* In the order book shown in the image, there is clear buy-side liquidity roughly around 0.007537–0.007540.
* Don’t enter just on touch; I want to see the price hold it and bounce.
2. 0.00700 – 0.00715 ⭐ — Key zone
* Close to MA99 at 0.007018.
* This is a support zone that appeared after the drop.
* If the price reaches it, pulls liquidity, and then closes a 15-minute candle above it, this becomes the better LONG zone than chasing the current price.
🔴 Sell zones / SHORT liquidity
1. 0.00785 – 0.00800 ⭐
* Clear resistance zone from the last move.
* The price needs to break through it and stay above it for the short-term move shape to change.
2. 0.00850 – 0.00880
* Higher resistance zone in case a strong rebound happens.
* Not an automatic entry; we wait for a clear rejection.
3. 0.01019
* The big top shown on the chart.
* Above it, there is potential liquidity from Breakout/Stop orders, but reaching it requires a strong rally
56
Log in to explore more content
Join global crypto users on Binance Square
⚡️ Get latest and useful information about crypto.
💬 Trusted by the world’s largest crypto exchange.
👍 Discover real insights from verified creators.
Email / Phone number
Trending Topics
US10YearYieldNears5.3%
2,576 views
98 Discussing
#US10YearYieldNears5.3%
📊 BOND YIELDS AT MULTI-YEAR HIGHS!
The US 10-year Treasury yield approaching 5.3% is creating a major talking point across global financial markets. Rising yields reflect changing expectations around inflation, economic growth, and government borrowing.
🌍 What makes this situation particularly interesting is the impact on crypto sentiment. Higher bond yields may reduce demand for riskier assets, while persistent institutional interest could provide some support to crypto markets.
₿ The real question is: Can Bitcoin maintain its strength while traditional financial markets face rising borrowing costs?
💡 Sometimes, the biggest market signals come from outside the crypto market.
#Bitcoin #CryptoMarket #US10YearYield #TreasuryYields #BTC $BTC
PALASH5
·0 Likes
·1.9k views
BitcoinETFsTake$6.34BillionInQ3
234 views
14 Discussing
KoreaProposesTokenizingStocksAndBonds
24,454 views
361 Discussing