

Target pulse6424
1.8k Posts

Target pulse6424
Report
Block User
اور تم اپنے پروردگار کی کون کون سی نعمتوں کو جھٹلاؤ گے
25 Following
15.7K+ Followers
4.7K+ Liked
Posts
All
Quotes
Videos
Live
·
--
Bearish
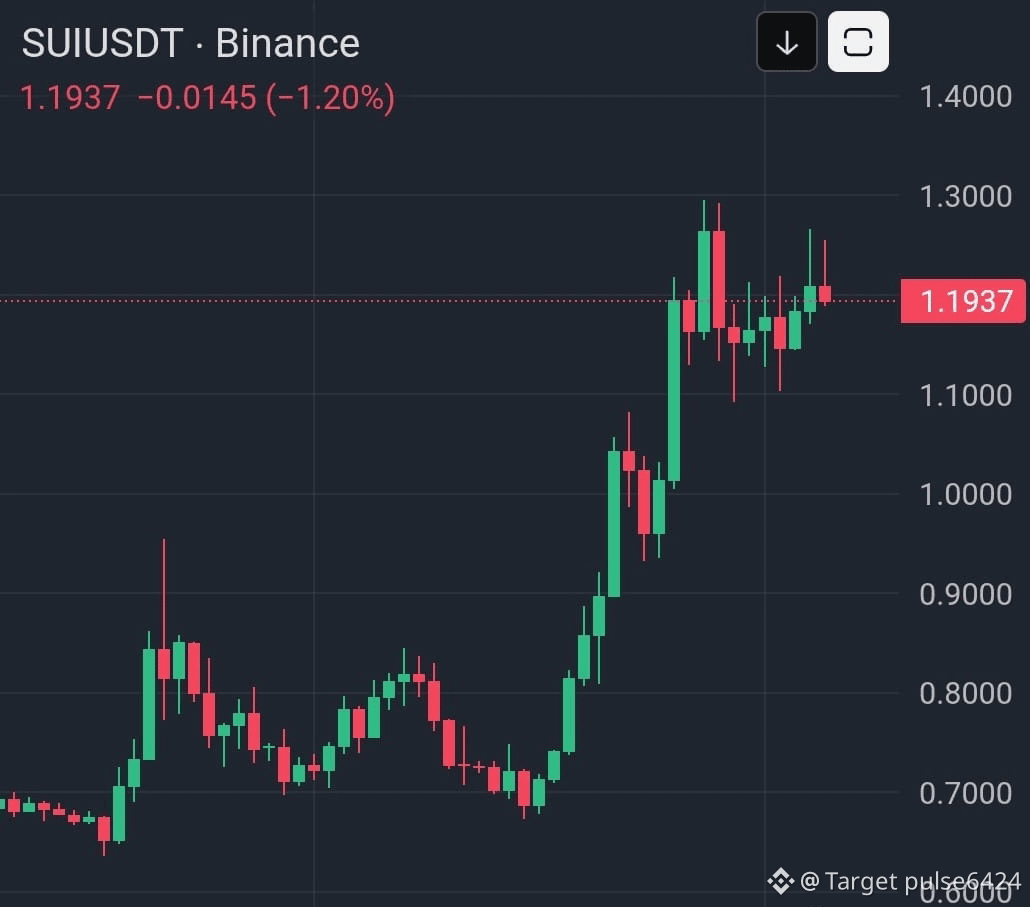
🚨 $SUI /USDT — SHORT SETUP 📉
⚡ Leverage: 30X Cross
🏦Trade Here👇$SUI
{spot}(SUIUSDT)
📍 Entry Zone: 1.240 – 1.260
🎯 Target 1: 1.225
🎯 Target 2: 1.210
🎯 Target 3: 1.195
🎯 Target 4: 1.180
🛑 Stop Loss: 1.280
SUI is showing weakness near the resistance area. If sellers maintain control, a move toward the lower support levels could follow.
#SUI #CryptoTrading #NFA #TargetPulse6424
🚨 $SUI /USDT — SHORT SETUP 📉
⚡ Leverage: 30X Cross
🏦Trade Here👇$SUI
📍 Entry Zone: 1.240 – 1.260
🎯 Target 1: 1.225
🎯 Target 2: 1.210
🎯 Target 3: 1.195
🎯 Target 4: 1.180
🛑 Stop Loss: 1.280
SUI is showing weakness near the resistance area. If sellers maintain control, a move toward the lower support levels could follow.
#SUI #CryptoTrading #NFA #TargetPulse6424
⚡ Leverage: 30X Cross
🏦Trade Here👇$SUI
📍 Entry Zone: 1.240 – 1.260
🎯 Target 1: 1.225
🎯 Target 2: 1.210
🎯 Target 3: 1.195
🎯 Target 4: 1.180
🛑 Stop Loss: 1.280
SUI is showing weakness near the resistance area. If sellers maintain control, a move toward the lower support levels could follow.
#SUI #CryptoTrading #NFA #TargetPulse6424
58
·
--
Bullish
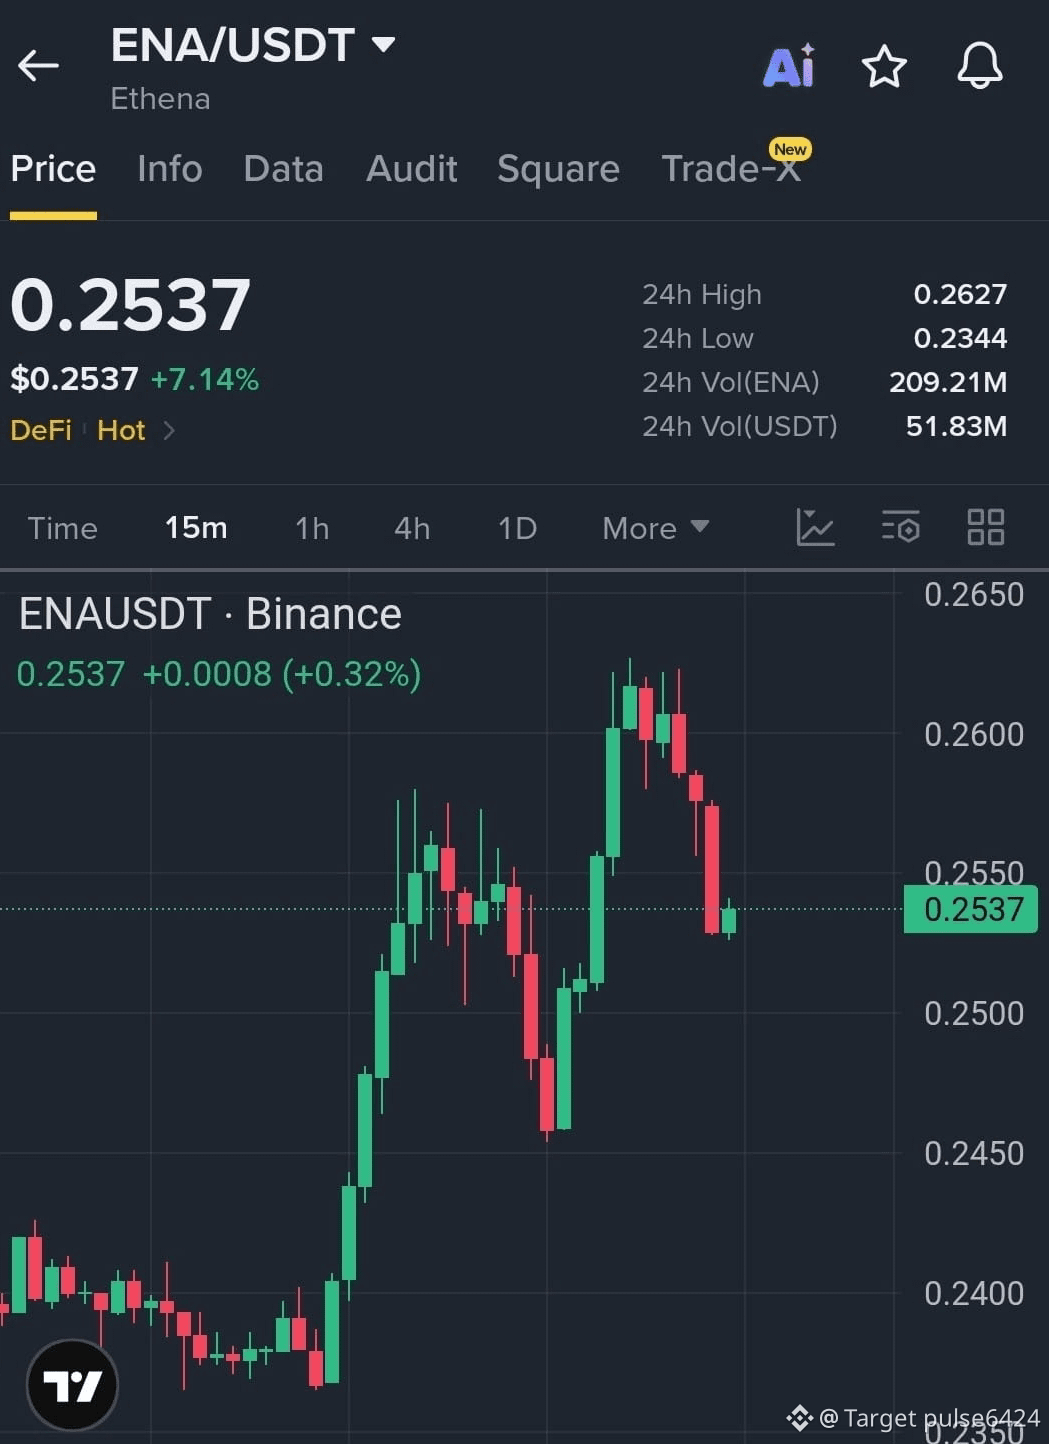
🚀 $ENA / USDT — Bulls Are Defending The Structure 🔥
📈 Trade Direction: LONG
⚡ Leverage: Up to 10x
🏦Trade Here👇$ENA
{spot}(ENAUSDT)
📍 Entry Zone: 0.2520 – 0.2540
🛑 Stop Loss: 0.2470
🎯 TP1: 0.2580
🎯 TP2: 0.2627
🎯 TP3: 0.2680
$ENA is maintaining a strong higher-low pattern after the pullback from 0.2627. Buyers are stepping in around the 0.2500 support zone, showing continued strength.
As long as this key level holds, momentum could push price back above 0.2580 and open the way for another retest of recent highs.
#TargetPulse6424 #crypto #Binance #trading
🚀 $ENA / USDT — Bulls Are Defending The Structure 🔥
📈 Trade Direction: LONG
⚡ Leverage: Up to 10x
🏦Trade Here👇$ENA
📍 Entry Zone: 0.2520 – 0.2540
🛑 Stop Loss: 0.2470
🎯 TP1: 0.2580
🎯 TP2: 0.2627
🎯 TP3: 0.2680
$ENA is maintaining a strong higher-low pattern after the pullback from 0.2627. Buyers are stepping in around the 0.2500 support zone, showing continued strength.
As long as this key level holds, momentum could push price back above 0.2580 and open the way for another retest of recent highs.
#TargetPulse6424 #crypto #Binance #trading
📈 Trade Direction: LONG
⚡ Leverage: Up to 10x
🏦Trade Here👇$ENA
📍 Entry Zone: 0.2520 – 0.2540
🛑 Stop Loss: 0.2470
🎯 TP1: 0.2580
🎯 TP2: 0.2627
🎯 TP3: 0.2680
$ENA is maintaining a strong higher-low pattern after the pullback from 0.2627. Buyers are stepping in around the 0.2500 support zone, showing continued strength.
As long as this key level holds, momentum could push price back above 0.2580 and open the way for another retest of recent highs.
#TargetPulse6424 #crypto #Binance #trading
59
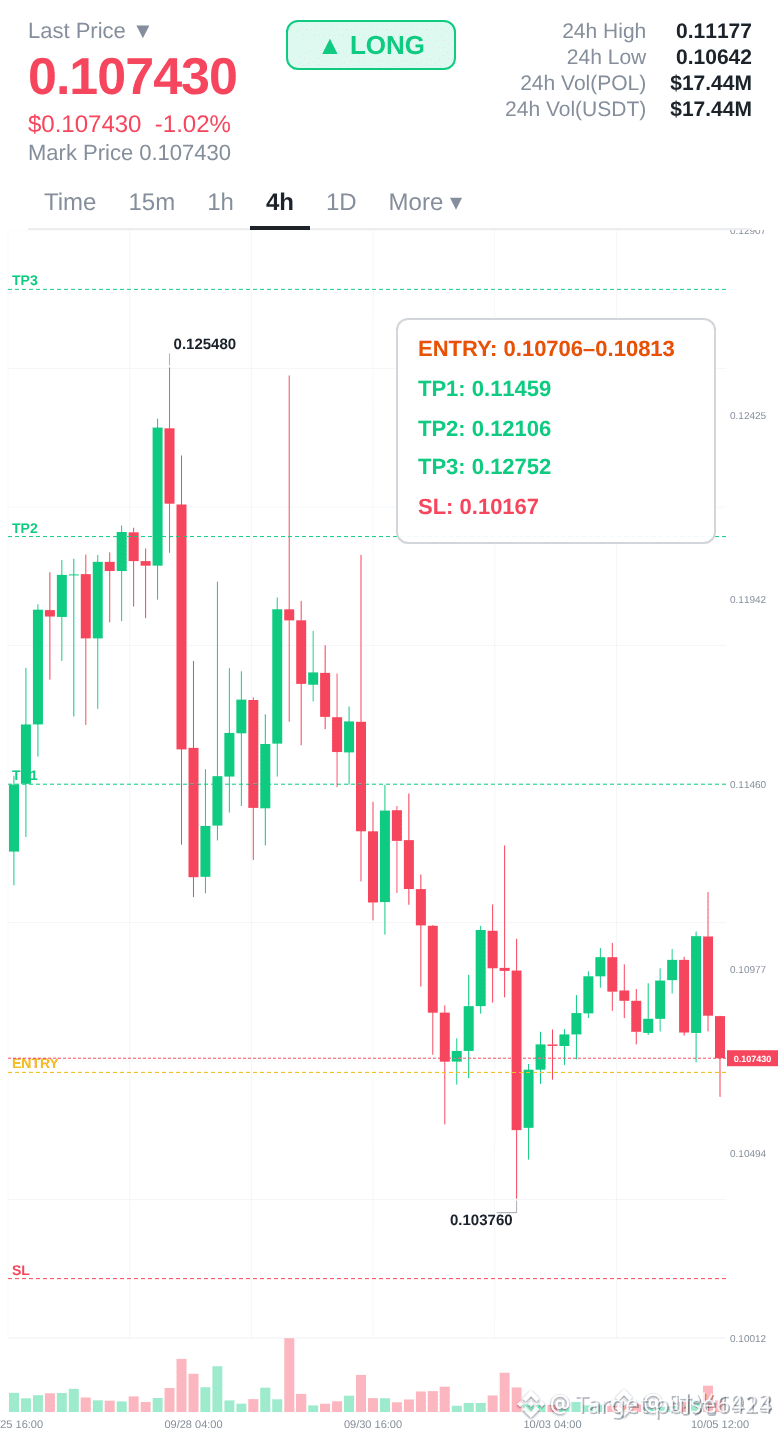
🚀 $POL / USDT — LONG SETUP
Buyers are defending support, keeping the bullish structure intact.
🏦Trade Here👇$POL
{spot}(POLUSDT)
📍 Entry: 0.10706 – 0.10813
🛑 SL: 0.10167
🎯 TP1: 0.11459
🎯 TP2: 0.12106
🎯 TP3: 0.12752
A sustained hold above the entry zone could trigger the next move toward the listed targets.
NFA. Manage your risk.
#TargetPulse6424 #perfectwajid1
🚀 $POL / USDT — LONG SETUP
Buyers are defending support, keeping the bullish structure intact.
🏦Trade Here👇$POL
📍 Entry: 0.10706 – 0.10813
🛑 SL: 0.10167
🎯 TP1: 0.11459
🎯 TP2: 0.12106
🎯 TP3: 0.12752
A sustained hold above the entry zone could trigger the next move toward the listed targets.
NFA. Manage your risk.
#TargetPulse6424 #perfectwajid1
Buyers are defending support, keeping the bullish structure intact.
🏦Trade Here👇$POL
📍 Entry: 0.10706 – 0.10813
🛑 SL: 0.10167
🎯 TP1: 0.11459
🎯 TP2: 0.12106
🎯 TP3: 0.12752
A sustained hold above the entry zone could trigger the next move toward the listed targets.
NFA. Manage your risk.
#TargetPulse6424 #perfectwajid1
36
·
--
Bullish
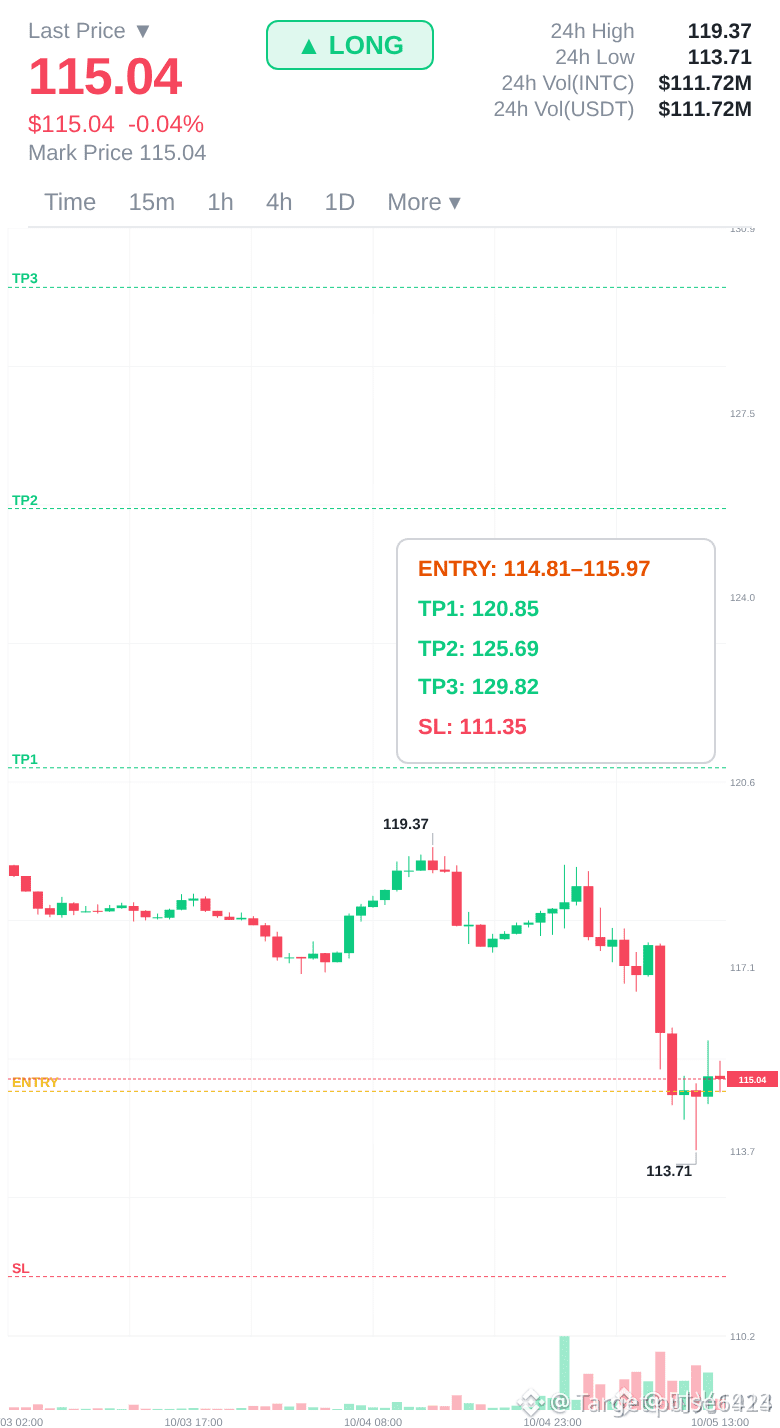
🚀 $INTC / USDT — LONG SETUP
Momentum remains positive as buyers continue defending higher levels.
🏦Trade Here👇$INTC
{future}(INTCUSDT)
📍 Entry: 115.81 – 117.37
🛑 SL: 111.35
🎯 TP1: 120.85
🎯 TP2: 125.69
🎯 TP3: 129.82
A sustained move above the entry zone could extend the rally toward the listed targets.
NFA. Manage your risk.
#TargetPulse6424
🚀 $INTC / USDT — LONG SETUP
Momentum remains positive as buyers continue defending higher levels.
🏦Trade Here👇$INTC
📍 Entry: 115.81 – 117.37
🛑 SL: 111.35
🎯 TP1: 120.85
🎯 TP2: 125.69
🎯 TP3: 129.82
A sustained move above the entry zone could extend the rally toward the listed targets.
NFA. Manage your risk.
#TargetPulse6424
Momentum remains positive as buyers continue defending higher levels.
🏦Trade Here👇$INTC
📍 Entry: 115.81 – 117.37
🛑 SL: 111.35
🎯 TP1: 120.85
🎯 TP2: 125.69
🎯 TP3: 129.82
A sustained move above the entry zone could extend the rally toward the listed targets.
NFA. Manage your risk.
#TargetPulse6424
162
·
--
Bullish
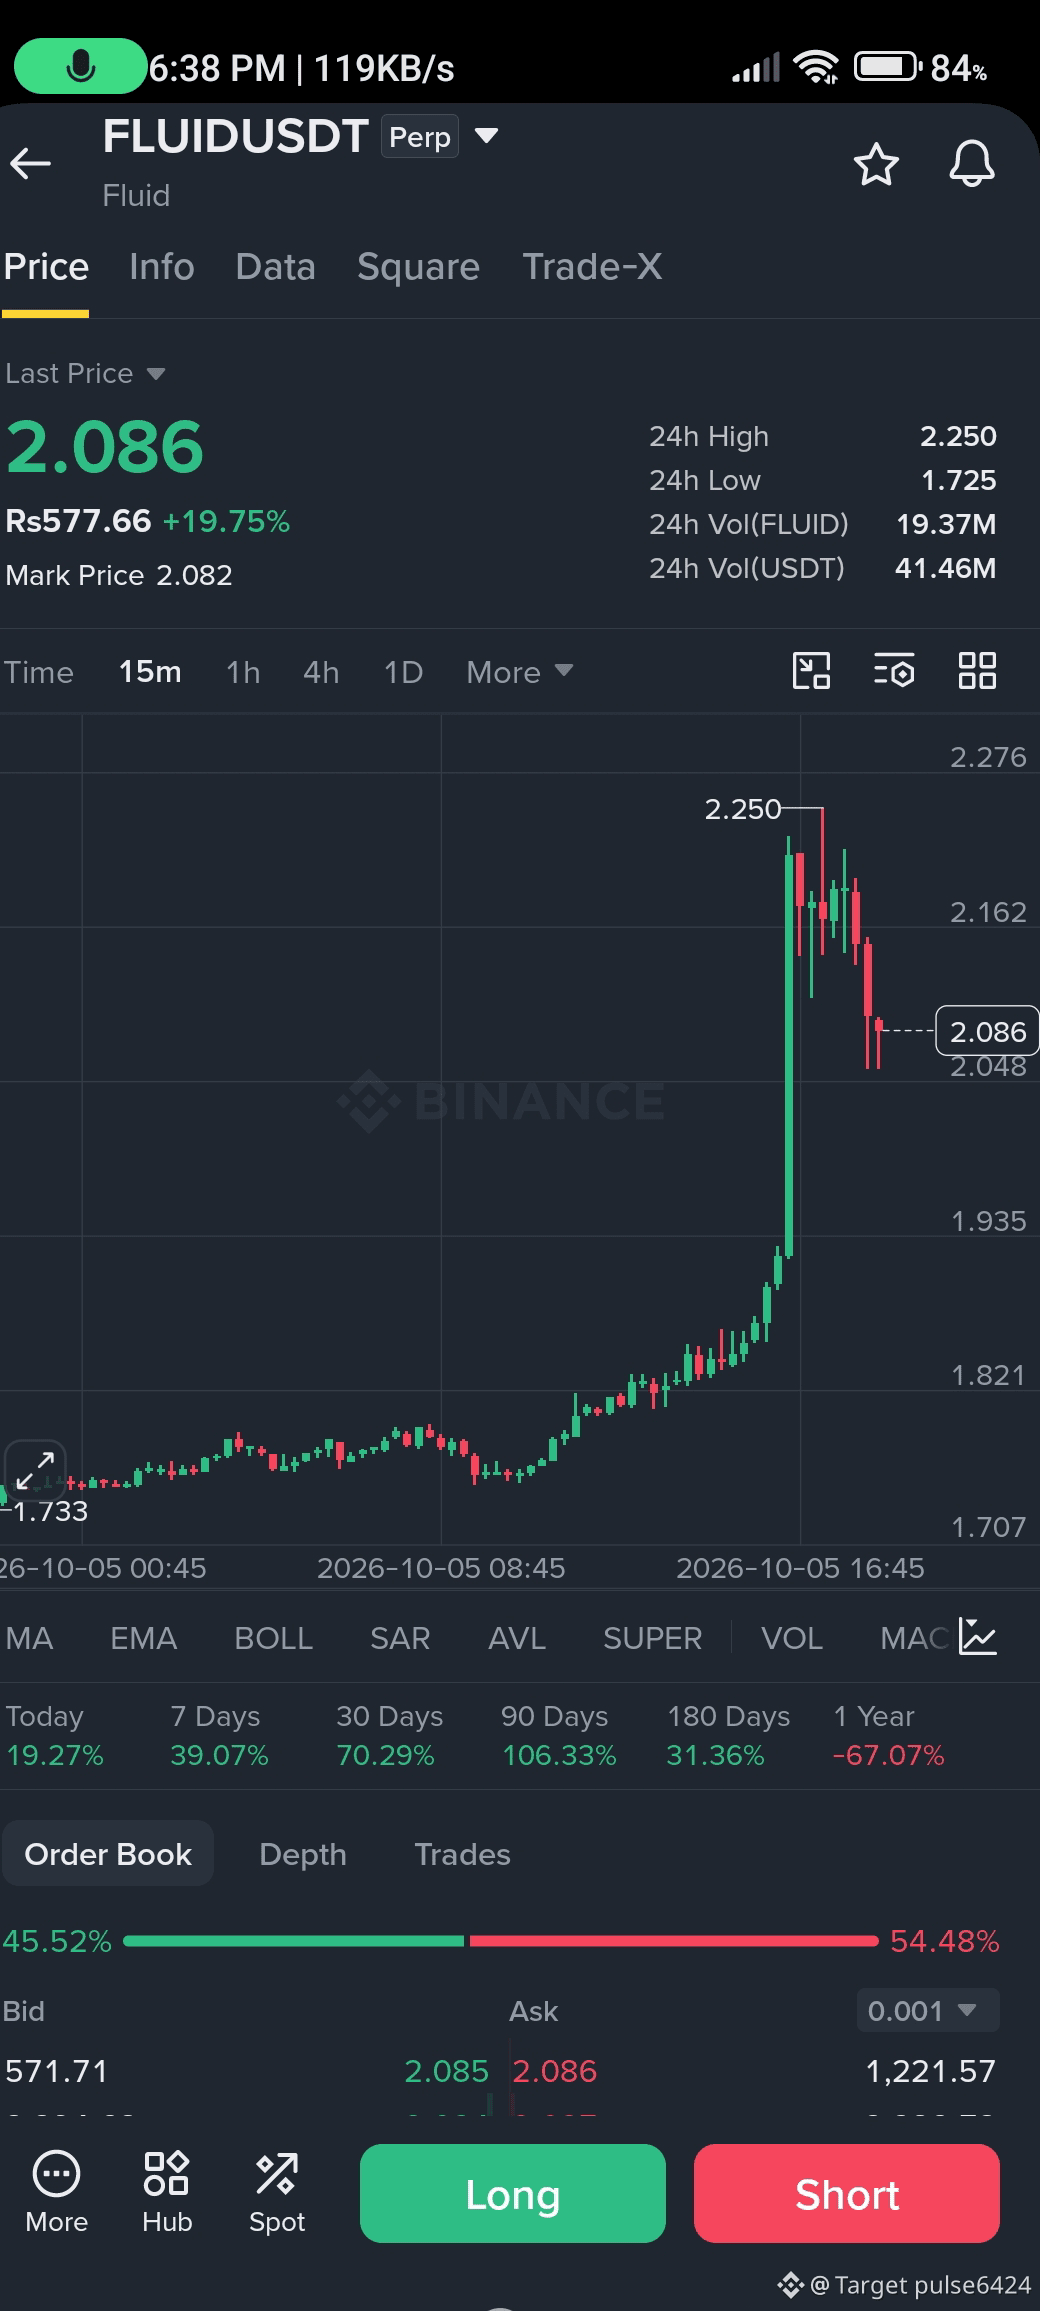
🚀 $FLUID / USDT — BULLISH MOMENTUM CONTINUES
FLUID is maintaining a strong upside structure after breaking above key resistance. Buyers remain in control, and holding above the entry zone could fuel another leg higher.
🏦Trade Here👇$FLUID
{future}(FLUIDUSDT)
📍 Entry: $2.18 – $2.13
🛑 Stop Loss: $2.,02
🎯 TP1: $2.24
🎯 TP2: $2.27
🎯 TP3: $2.30
A sustained hold above $2.20 keeps the bullish outlook intact, with momentum favoring a move toward the listed targets.
NFA. Trade with proper risk management.
#TargetPulse6424
🚀 $FLUID / USDT — BULLISH MOMENTUM CONTINUES
FLUID is maintaining a strong upside structure after breaking above key resistance. Buyers remain in control, and holding above the entry zone could fuel another leg higher.
🏦Trade Here👇$FLUID
📍 Entry: $2.18 – $2.13
🛑 Stop Loss: $2.,02
🎯 TP1: $2.24
🎯 TP2: $2.27
🎯 TP3: $2.30
A sustained hold above $2.20 keeps the bullish outlook intact, with momentum favoring a move toward the listed targets.
NFA. Trade with proper risk management.
#TargetPulse6424
FLUID is maintaining a strong upside structure after breaking above key resistance. Buyers remain in control, and holding above the entry zone could fuel another leg higher.
🏦Trade Here👇$FLUID
📍 Entry: $2.18 – $2.13
🛑 Stop Loss: $2.,02
🎯 TP1: $2.24
🎯 TP2: $2.27
🎯 TP3: $2.30
A sustained hold above $2.20 keeps the bullish outlook intact, with momentum favoring a move toward the listed targets.
NFA. Trade with proper risk management.
#TargetPulse6424
78
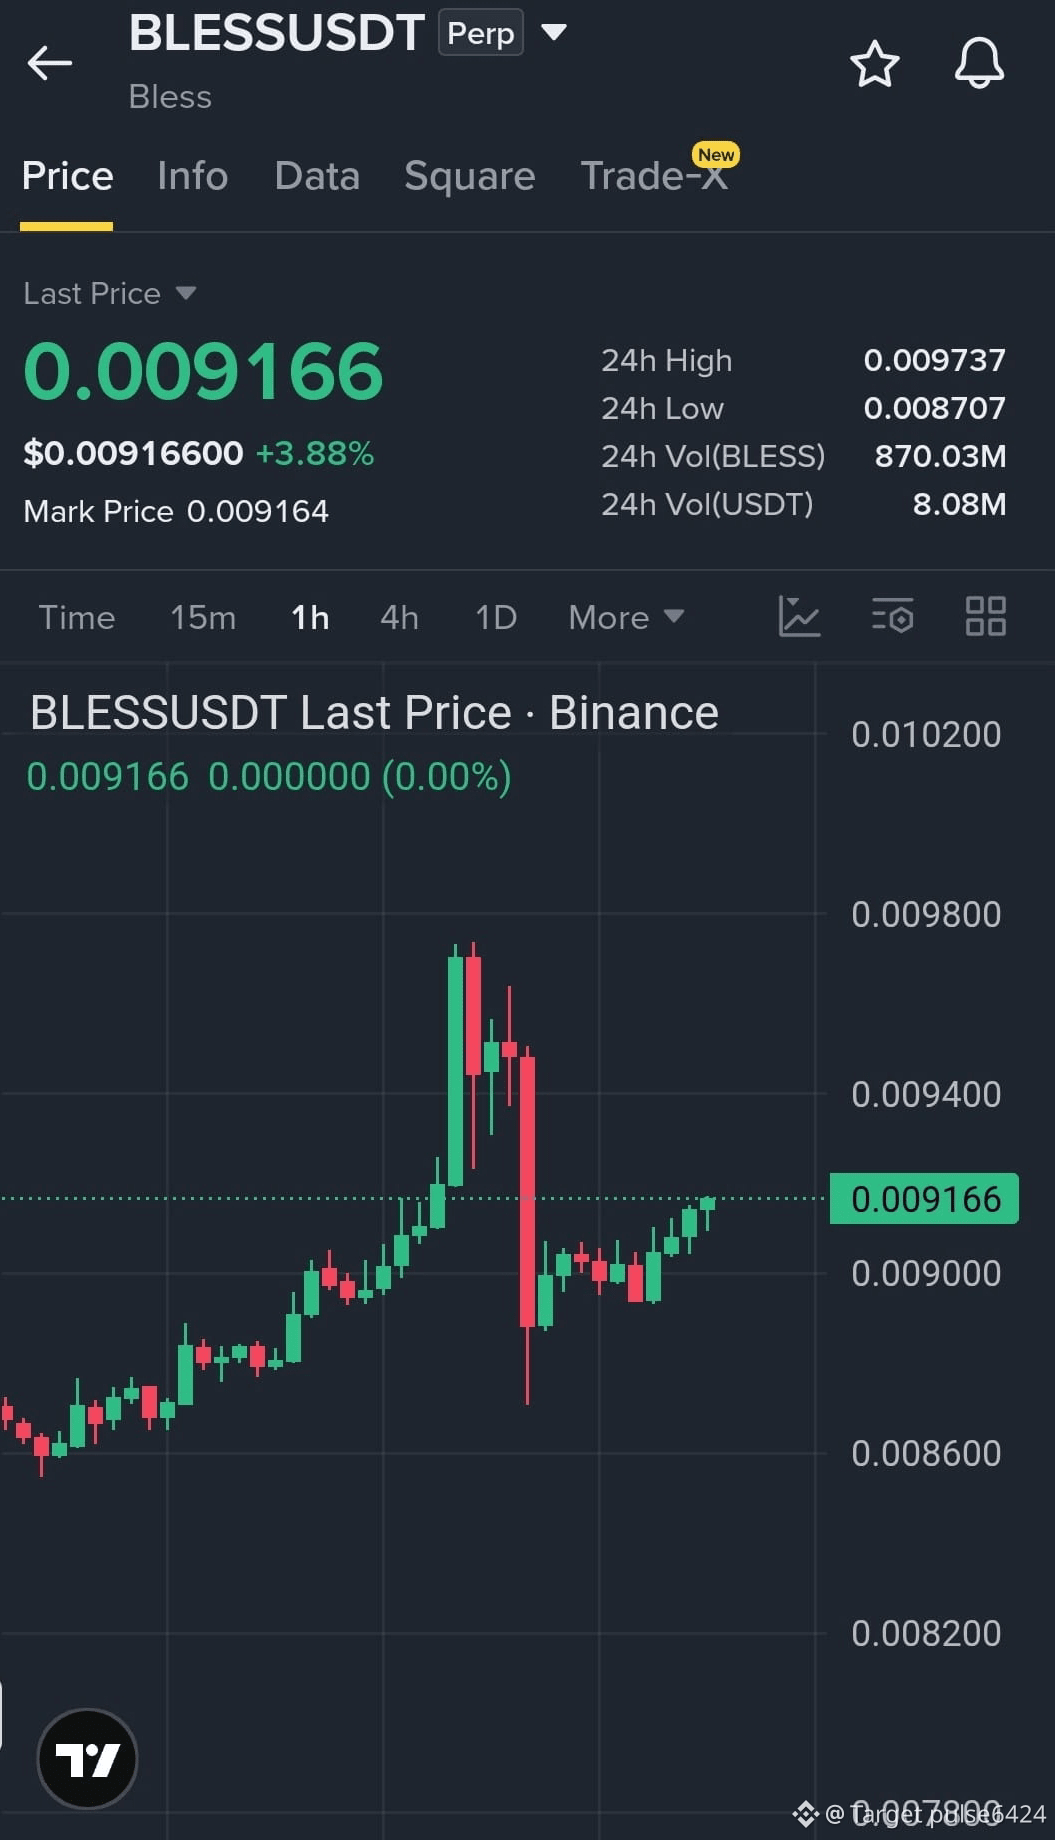
🚀 $BLESS / USDT — BULLISH RECOVERY
After finding strong support, $BLESS is showing signs of a healthy rebound. Price is holding above the recent low, and continued buying pressure could fuel another leg higher.
🏦Trade Here👇$BLESS
{future}(BLESSUSDT)
📍 Entry: $0.00910 – $0.00918
🛑 Stop Loss: $0.00885
🎯 TP1: $0.00935
🎯 TP2: $0.00955
🎯 TP3: $0.00975
A sustained hold above the entry zone keeps the bullish outlook intact, with buyers targeting the next resistance levels.
#TargetPulse6424
🚀 $BLESS / USDT — BULLISH RECOVERY
After finding strong support, $BLESS is showing signs of a healthy rebound. Price is holding above the recent low, and continued buying pressure could fuel another leg higher.
🏦Trade Here👇$BLESS
📍 Entry: $0.00910 – $0.00918
🛑 Stop Loss: $0.00885
🎯 TP1: $0.00935
🎯 TP2: $0.00955
🎯 TP3: $0.00975
A sustained hold above the entry zone keeps the bullish outlook intact, with buyers targeting the next resistance levels.
#TargetPulse6424
After finding strong support, $BLESS is showing signs of a healthy rebound. Price is holding above the recent low, and continued buying pressure could fuel another leg higher.
🏦Trade Here👇$BLESS
📍 Entry: $0.00910 – $0.00918
🛑 Stop Loss: $0.00885
🎯 TP1: $0.00935
🎯 TP2: $0.00955
🎯 TP3: $0.00975
A sustained hold above the entry zone keeps the bullish outlook intact, with buyers targeting the next resistance levels.
#TargetPulse6424
67
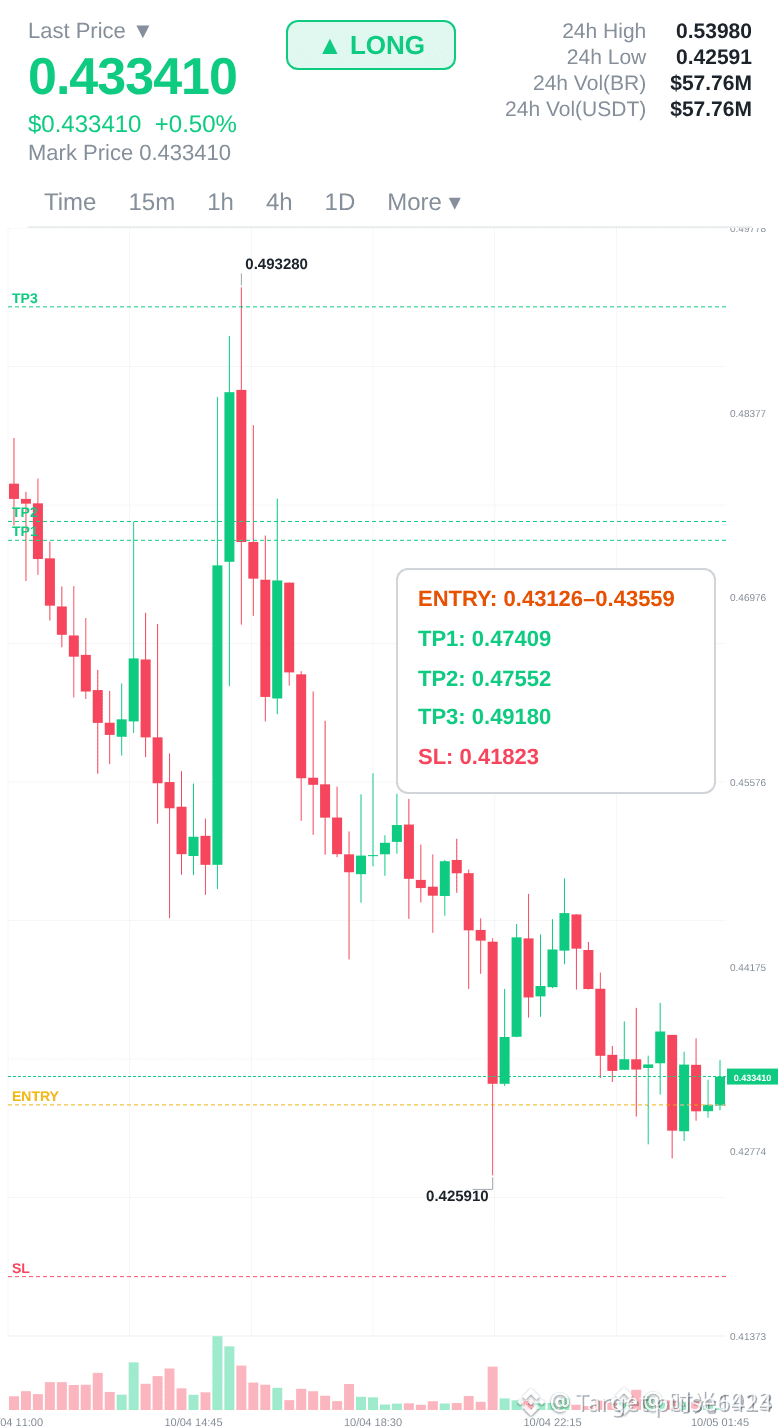
🚀 $BR / USDT — LONG SETUP
🏦Trade Here👇$BR
{future}(BRUSDT)
📍 Entry: 0.43126 – 0.43559
🛑 Stop Loss: 0.41823
🎯 TP1: 0.47409
🎯 TP2: 0.47552
🎯 TP3: 0.49180
BR has broken out of its consolidation range, signaling renewed bullish momentum. If price holds above the breakout zone, buyers could push toward the listed upside targets.
#TargetPulse6424
🚀 $BR / USDT — LONG SETUP
🏦Trade Here👇$BR
📍 Entry: 0.43126 – 0.43559
🛑 Stop Loss: 0.41823
🎯 TP1: 0.47409
🎯 TP2: 0.47552
🎯 TP3: 0.49180
BR has broken out of its consolidation range, signaling renewed bullish momentum. If price holds above the breakout zone, buyers could push toward the listed upside targets.
#TargetPulse6424
🏦Trade Here👇$BR
📍 Entry: 0.43126 – 0.43559
🛑 Stop Loss: 0.41823
🎯 TP1: 0.47409
🎯 TP2: 0.47552
🎯 TP3: 0.49180
BR has broken out of its consolidation range, signaling renewed bullish momentum. If price holds above the breakout zone, buyers could push toward the listed upside targets.
#TargetPulse6424
121
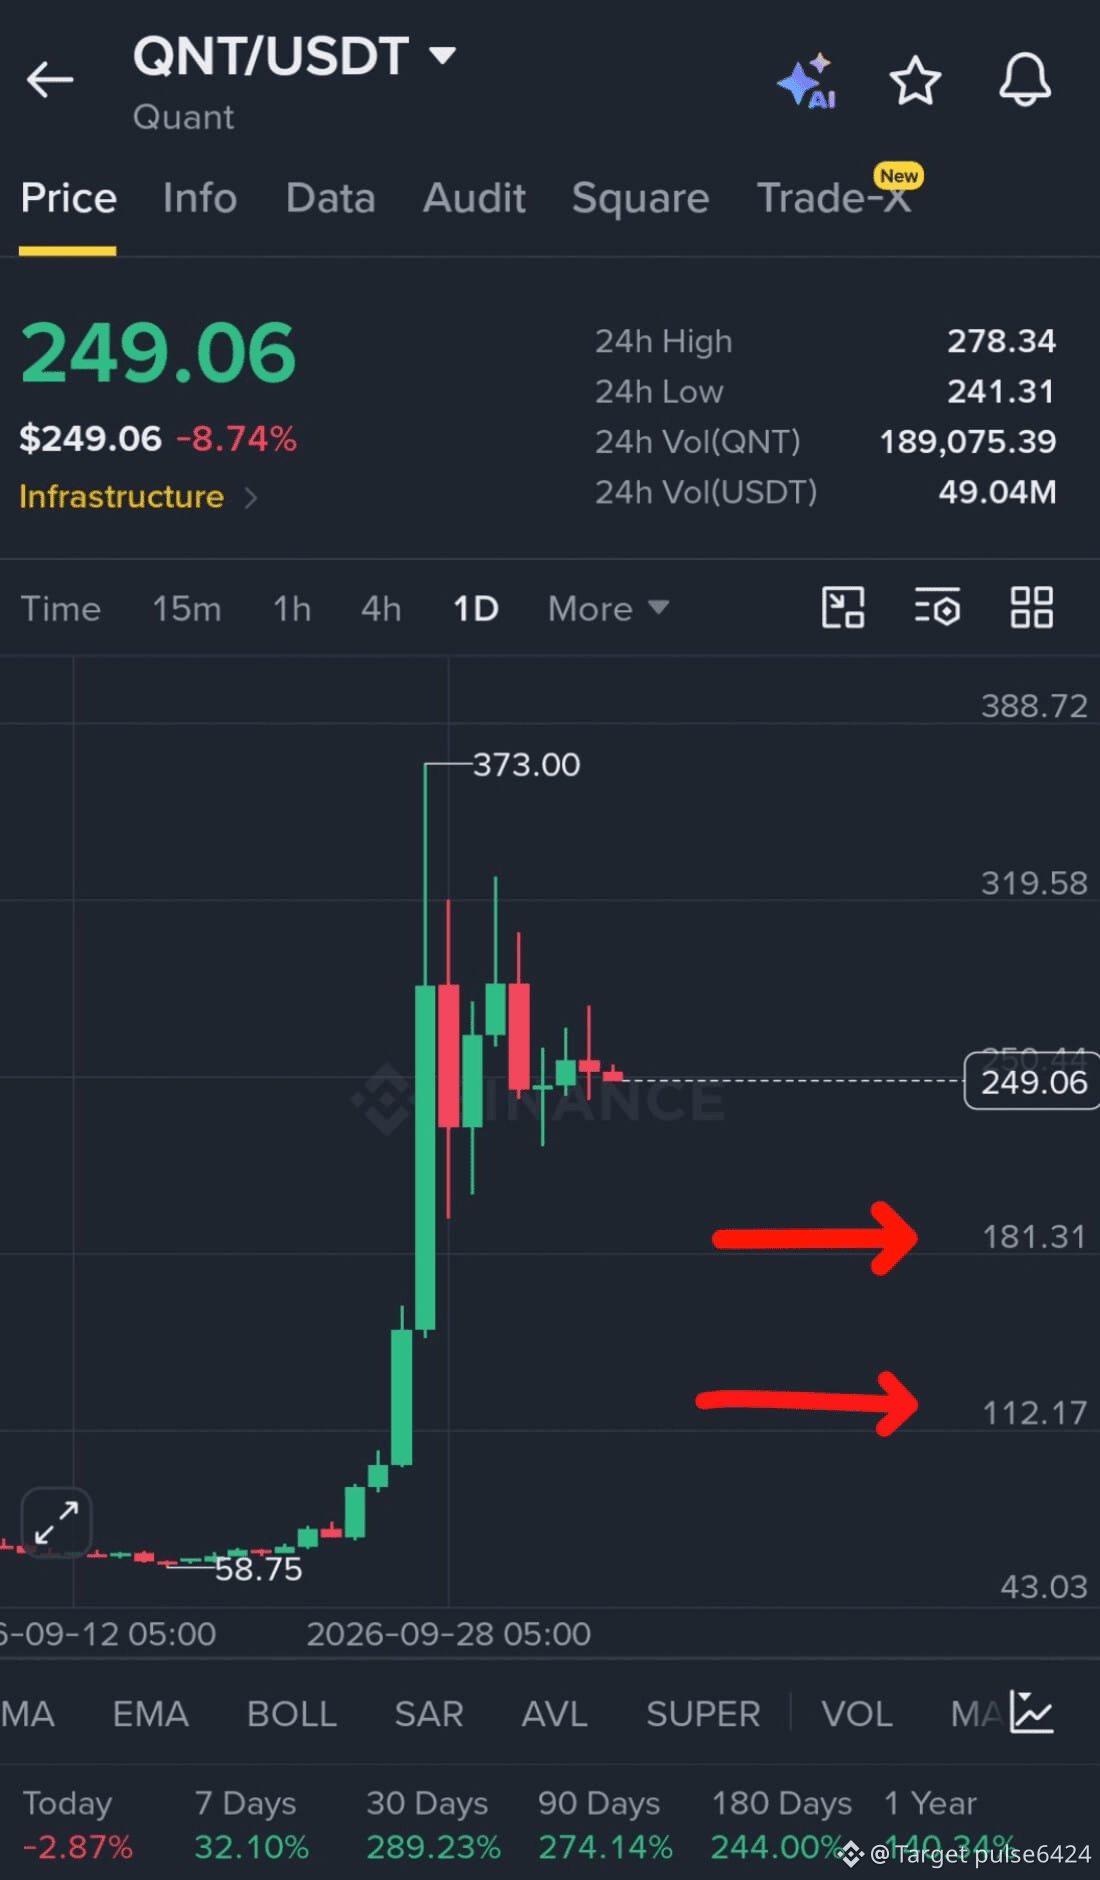
🔻 $QNT / USDT — SHORT SETUP
🏦Trade Here👇$QNT
{spot}(QNTUSDT)
📍 Entry: $249
🛑 Stop Loss: $280
🎯 TP1: $181
🎯 TP2: $112
QNT is showing signs of weakness below key resistance. As long as price remains under the invalidation level, sellers may continue driving the market toward lower support zones.
#TargetPulse6424
🔻 $QNT / USDT — SHORT SETUP
🏦Trade Here👇$QNT
📍 Entry: $249
🛑 Stop Loss: $280
🎯 TP1: $181
🎯 TP2: $112
QNT is showing signs of weakness below key resistance. As long as price remains under the invalidation level, sellers may continue driving the market toward lower support zones.
#TargetPulse6424
🏦Trade Here👇$QNT
📍 Entry: $249
🛑 Stop Loss: $280
🎯 TP1: $181
🎯 TP2: $112
QNT is showing signs of weakness below key resistance. As long as price remains under the invalidation level, sellers may continue driving the market toward lower support zones.
#TargetPulse6424
213
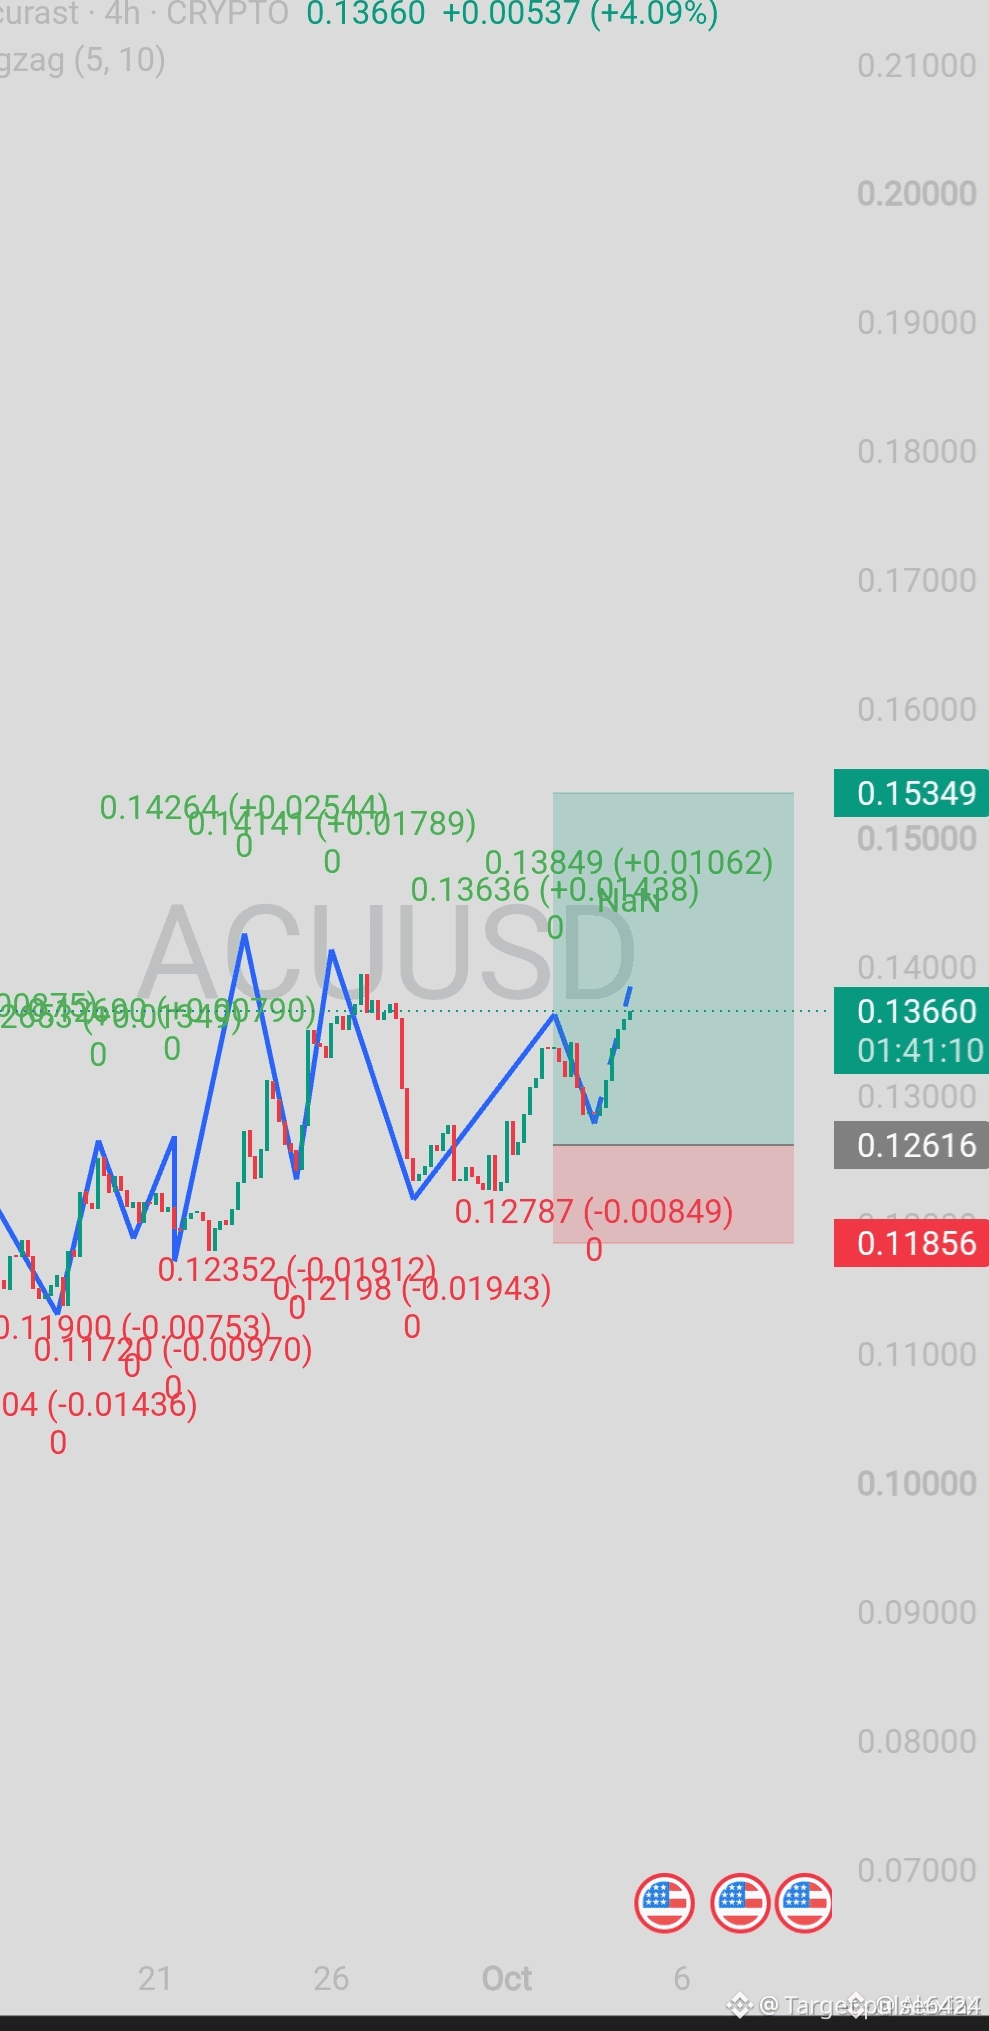
🚀 $ACU | BUYERS ARE REGAINING CONTROL
The 4H trend is improving as ACU continues to build a stronger market structure. Price has recovered above the $0.136 region, while higher lows suggest bullish momentum is gradually strengthening.
🏦Trade Here👇$ACU
{future}(ACUUSDT)
📊 Key Levels
🟢 Support: $0.126
⚡ Breakout Level: $0.142
🎯 Target: $0.153
🛑 Invalidation: $0.118
A decisive close above $0.142 could confirm the breakout and open the way for a continuation toward the $0.153 resistance zone.
NFA | Trade with proper risk management.
#TargetPulse6424
🚀 $ACU | BUYERS ARE REGAINING CONTROL
The 4H trend is improving as ACU continues to build a stronger market structure. Price has recovered above the $0.136 region, while higher lows suggest bullish momentum is gradually strengthening.
🏦Trade Here👇$ACU
📊 Key Levels
🟢 Support: $0.126
⚡ Breakout Level: $0.142
🎯 Target: $0.153
🛑 Invalidation: $0.118
A decisive close above $0.142 could confirm the breakout and open the way for a continuation toward the $0.153 resistance zone.
NFA | Trade with proper risk management.
#TargetPulse6424
The 4H trend is improving as ACU continues to build a stronger market structure. Price has recovered above the $0.136 region, while higher lows suggest bullish momentum is gradually strengthening.
🏦Trade Here👇$ACU
📊 Key Levels
🟢 Support: $0.126
⚡ Breakout Level: $0.142
🎯 Target: $0.153
🛑 Invalidation: $0.118
A decisive close above $0.142 could confirm the breakout and open the way for a continuation toward the $0.153 resistance zone.
NFA | Trade with proper risk management.
#TargetPulse6424
47
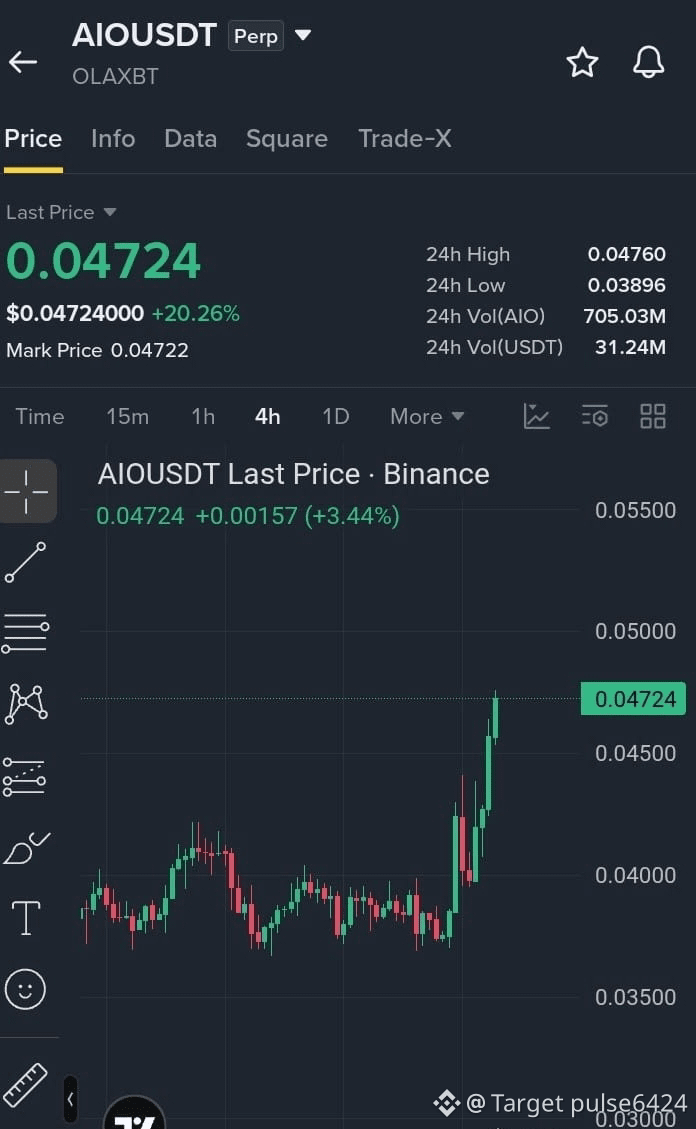
🚀 $AIO | BULLISH BREAKOUT GAINING STRENGTH
AIO has broken above a key resistance zone, with strong 4H buying pressure keeping the trend intact. As long as price remains above support, the path toward higher levels stays favorable.
📈 LONG Setup
🏦Trade Here👇$AIO
{future}(AIOUSDT)
Entry: $0.0460 – $0.0472
🛑 Stop Loss: $0.0445
🎯 TP1: $0.0485
🎯 TP2: $0.0500
🎯 TP3: $0.0520
A sustained move above $0.0476 could trigger fresh momentum and increase the chances of reaching the upside targets.
NFA | Always manage your risk.
#TargetPulse6424
🚀 $AIO | BULLISH BREAKOUT GAINING STRENGTH
AIO has broken above a key resistance zone, with strong 4H buying pressure keeping the trend intact. As long as price remains above support, the path toward higher levels stays favorable.
📈 LONG Setup
🏦Trade Here👇$AIO
Entry: $0.0460 – $0.0472
🛑 Stop Loss: $0.0445
🎯 TP1: $0.0485
🎯 TP2: $0.0500
🎯 TP3: $0.0520
A sustained move above $0.0476 could trigger fresh momentum and increase the chances of reaching the upside targets.
NFA | Always manage your risk.
#TargetPulse6424
AIO has broken above a key resistance zone, with strong 4H buying pressure keeping the trend intact. As long as price remains above support, the path toward higher levels stays favorable.
📈 LONG Setup
🏦Trade Here👇$AIO
Entry: $0.0460 – $0.0472
🛑 Stop Loss: $0.0445
🎯 TP1: $0.0485
🎯 TP2: $0.0500
🎯 TP3: $0.0520
A sustained move above $0.0476 could trigger fresh momentum and increase the chances of reaching the upside targets.
NFA | Always manage your risk.
#TargetPulse6424
57
·
--
Bullish
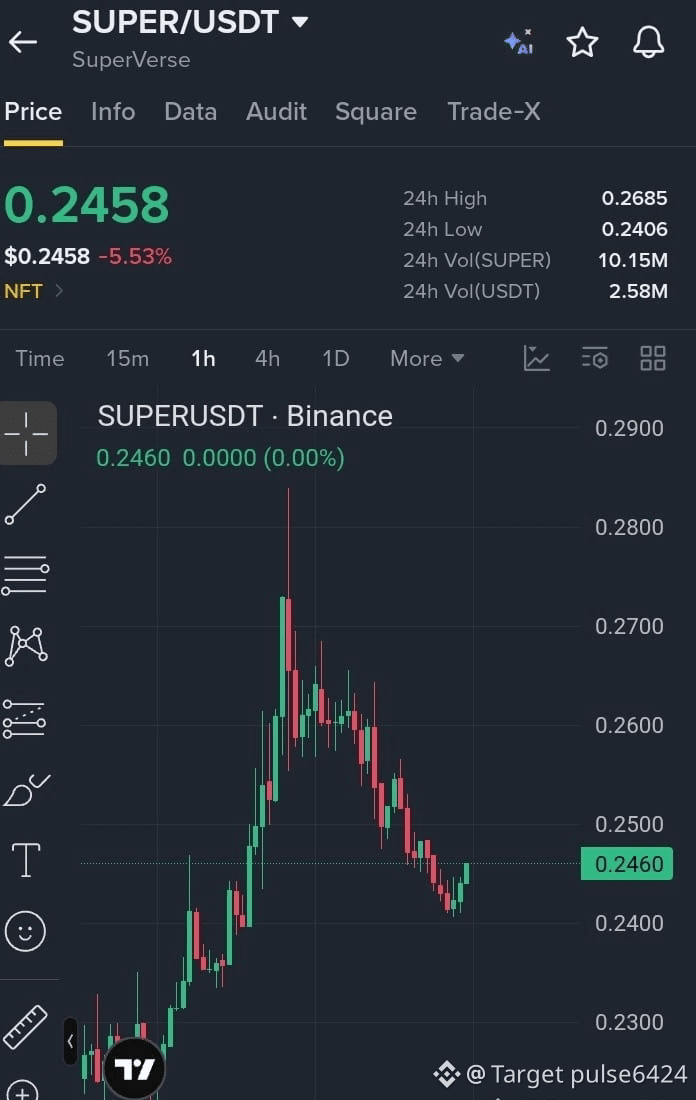
🚀 $SUPER | BULLISH RECOVERY IN PROGRESS
Buyers are stepping back in after the recent correction, with price holding firm above the key support zone. If momentum continues above $0.245, the next upside move could accelerate.
📈 LONG Setup
🏦Trade Here👇$SUPER
{spot}(SUPERUSDT)
Entry: $0.2440 – $0.2470
🛑 Stop Loss: $0.2400
🎯 TP1: $0.2500
🎯 TP2: $0.2550
🎯 TP3: $0.2620
A clean breakout above the entry zone may strengthen bullish momentum toward the listed targets.
#TargetPulse6424
NFA | Trade with proper risk management.
🚀 $SUPER | BULLISH RECOVERY IN PROGRESS
Buyers are stepping back in after the recent correction, with price holding firm above the key support zone. If momentum continues above $0.245, the next upside move could accelerate.
📈 LONG Setup
🏦Trade Here👇$SUPER
Entry: $0.2440 – $0.2470
🛑 Stop Loss: $0.2400
🎯 TP1: $0.2500
🎯 TP2: $0.2550
🎯 TP3: $0.2620
A clean breakout above the entry zone may strengthen bullish momentum toward the listed targets.
#TargetPulse6424
NFA | Trade with proper risk management.
Buyers are stepping back in after the recent correction, with price holding firm above the key support zone. If momentum continues above $0.245, the next upside move could accelerate.
📈 LONG Setup
🏦Trade Here👇$SUPER
Entry: $0.2440 – $0.2470
🛑 Stop Loss: $0.2400
🎯 TP1: $0.2500
🎯 TP2: $0.2550
🎯 TP3: $0.2620
A clean breakout above the entry zone may strengthen bullish momentum toward the listed targets.
#TargetPulse6424
NFA | Trade with proper risk management.
20
🏆 FULL TARGET ACHIEVED!
🎯 TP1 ✅ | TP2 ✅ | TP3 ✅
Thanks for trusting the signals. More setups coming soon.
🏆 FULL TARGET ACHIEVED!
🎯 TP1 ✅ | TP2 ✅ | TP3 ✅
Thanks for trusting the signals. More setups coming soon.
🎯 TP1 ✅ | TP2 ✅ | TP3 ✅
Thanks for trusting the signals. More setups coming soon.
Target pulse6424
·
--
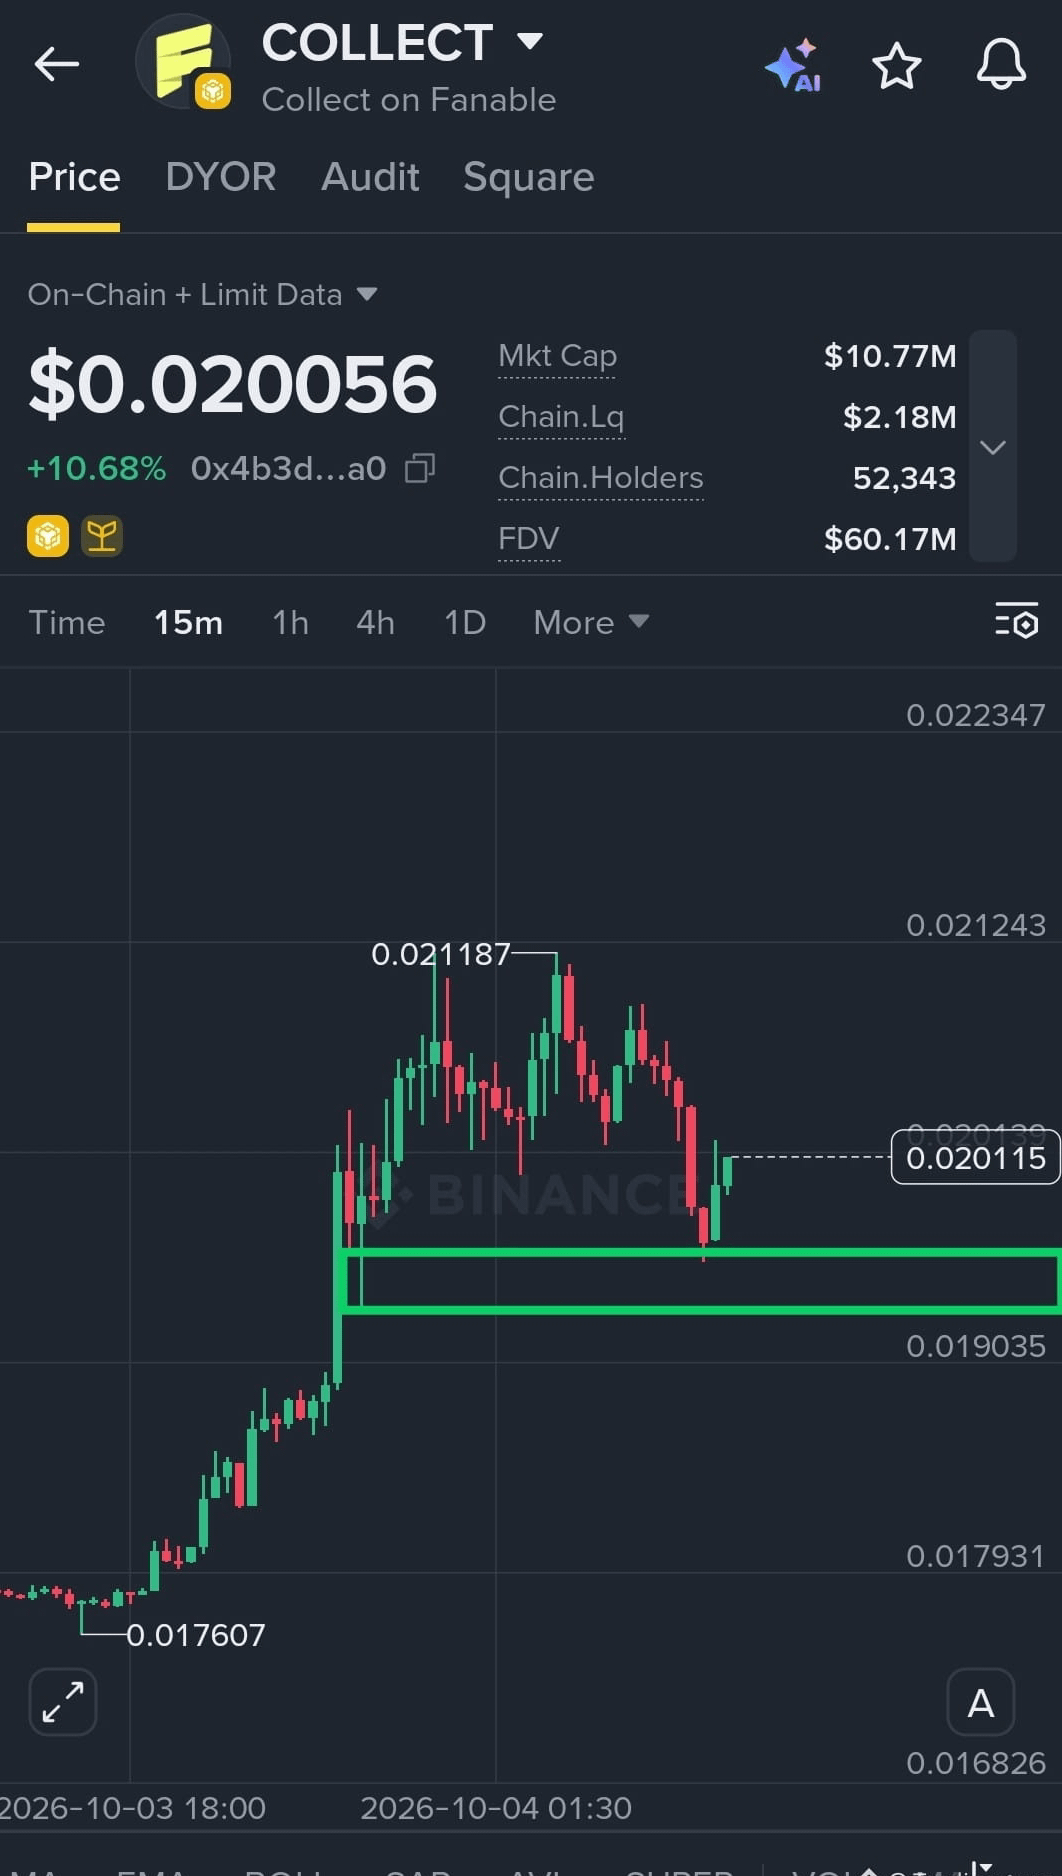
Bullish🚀 $COLLECT / USDT — RECOVERY LONG SETUP 📈
A potential recovery move is developing as $COLLECT rebounds from the $0.0193 support zone and starts reclaiming the $0.0200 level. If buyers continue defending this area, further upside could follow.
🏦Trade Here👇$COLLECT
📍 Buy Zone: $0.0198 – $0.0202
🛑 Stop Loss: $0.0192
🎯 TP1: $0.0205
🎯 TP2: $0.0210
🎯 TP3: $0.0215
Momentum is shifting back toward buyers. Watch the $0.0200 zone closely — a strong hold here could fuel the next recovery leg. 🚀 NFA
#TargetPulse6424
A potential recovery move is developing as $COLLECT rebounds from the $0.0193 support zone and starts reclaiming the $0.0200 level. If buyers continue defending this area, further upside could follow.
🏦Trade Here👇$COLLECT
📍 Buy Zone: $0.0198 – $0.0202
🛑 Stop Loss: $0.0192
🎯 TP1: $0.0205
🎯 TP2: $0.0210
🎯 TP3: $0.0215
Momentum is shifting back toward buyers. Watch the $0.0200 zone closely — a strong hold here could fuel the next recovery leg. 🚀 NFA
#TargetPulse6424
9
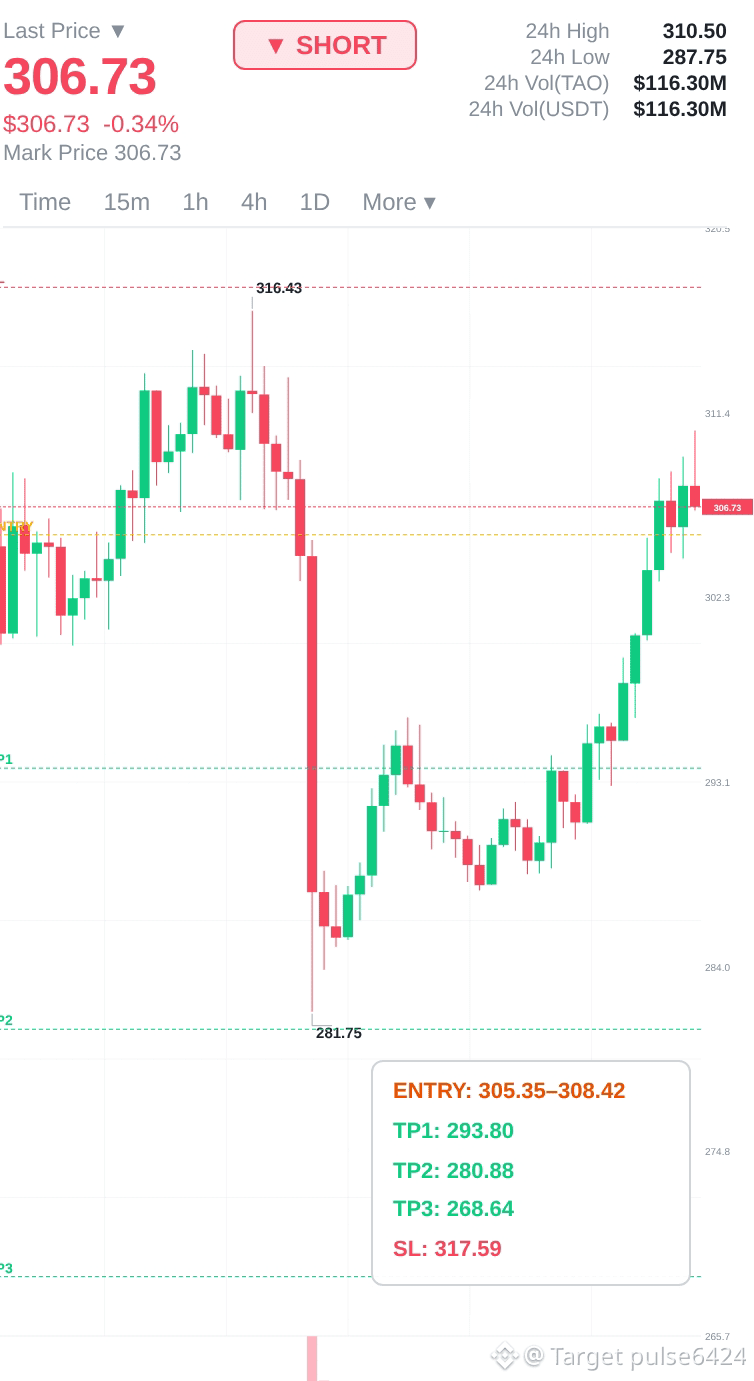
📉 $TAO USDT — Bearish Pressure Taking Over
The momentum has shifted from bullish to bearish, with sellers stepping in aggressively after rejection from higher levels.
🔻 SHORT SETUP
🏦Trade Here👇$TAO
{spot}(TAOUSDT)
📍 Entry: 305.35 – 308.42
🛑 Stop Loss: 317.59
🎯 TP1: 293.80
🎯 TP2: 280.88
🎯 TP3: 268.64
Watch the breakdown carefully — if sellers maintain control, TAO could continue its move toward lower support zones.
#TAO #CryptoTrading. #NFA #TargetPulse6424
📉 $TAO USDT — Bearish Pressure Taking Over
The momentum has shifted from bullish to bearish, with sellers stepping in aggressively after rejection from higher levels.
🔻 SHORT SETUP
🏦Trade Here👇$TAO
📍 Entry: 305.35 – 308.42
🛑 Stop Loss: 317.59
🎯 TP1: 293.80
🎯 TP2: 280.88
🎯 TP3: 268.64
Watch the breakdown carefully — if sellers maintain control, TAO could continue its move toward lower support zones.
#TAO #CryptoTrading. #NFA #TargetPulse6424
The momentum has shifted from bullish to bearish, with sellers stepping in aggressively after rejection from higher levels.
🔻 SHORT SETUP
🏦Trade Here👇$TAO
📍 Entry: 305.35 – 308.42
🛑 Stop Loss: 317.59
🎯 TP1: 293.80
🎯 TP2: 280.88
🎯 TP3: 268.64
Watch the breakdown carefully — if sellers maintain control, TAO could continue its move toward lower support zones.
#TAO #CryptoTrading. #NFA #TargetPulse6424
77
·
--
Bullish
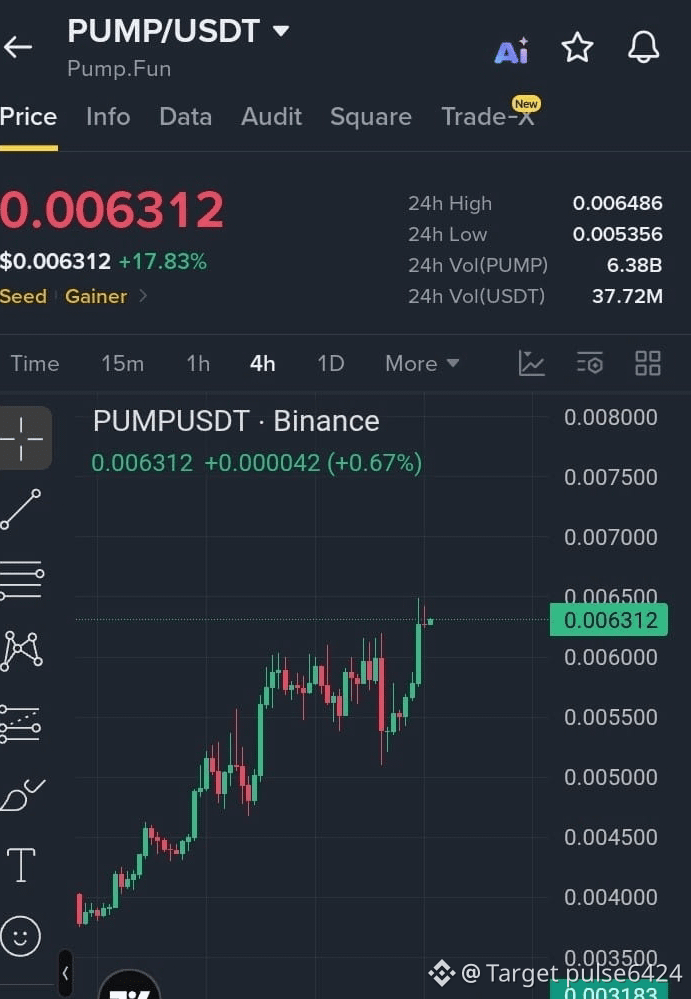
🚀 $PUMP / USDT — BREAKOUT CONTINUATION SETUP 📈
$PUMP is showing strong strength after breaking out of its recent consolidation range. Buyers are stepping in, and momentum is building for a potential move toward new highs.
🏦Trade Here👇$PUMP
{spot}(PUMPUSDT)
📍 Entry Zone: $0.00620 – $0.00632
🛑 Stop Loss: $0.00575
🎯 TP1: $0.00680
🎯 TP2: $0.00720
🎯 TP3: $0.00760
The key support level to watch is $0.0060. If bulls continue defending this area, the breakout structure remains active and another push toward higher resistance levels could develop.
#TargetPulse6424
🚀 $PUMP / USDT — BREAKOUT CONTINUATION SETUP 📈
$PUMP is showing strong strength after breaking out of its recent consolidation range. Buyers are stepping in, and momentum is building for a potential move toward new highs.
🏦Trade Here👇$PUMP
📍 Entry Zone: $0.00620 – $0.00632
🛑 Stop Loss: $0.00575
🎯 TP1: $0.00680
🎯 TP2: $0.00720
🎯 TP3: $0.00760
The key support level to watch is $0.0060. If bulls continue defending this area, the breakout structure remains active and another push toward higher resistance levels could develop.
#TargetPulse6424
$PUMP is showing strong strength after breaking out of its recent consolidation range. Buyers are stepping in, and momentum is building for a potential move toward new highs.
🏦Trade Here👇$PUMP
📍 Entry Zone: $0.00620 – $0.00632
🛑 Stop Loss: $0.00575
🎯 TP1: $0.00680
🎯 TP2: $0.00720
🎯 TP3: $0.00760
The key support level to watch is $0.0060. If bulls continue defending this area, the breakout structure remains active and another push toward higher resistance levels could develop.
#TargetPulse6424
46
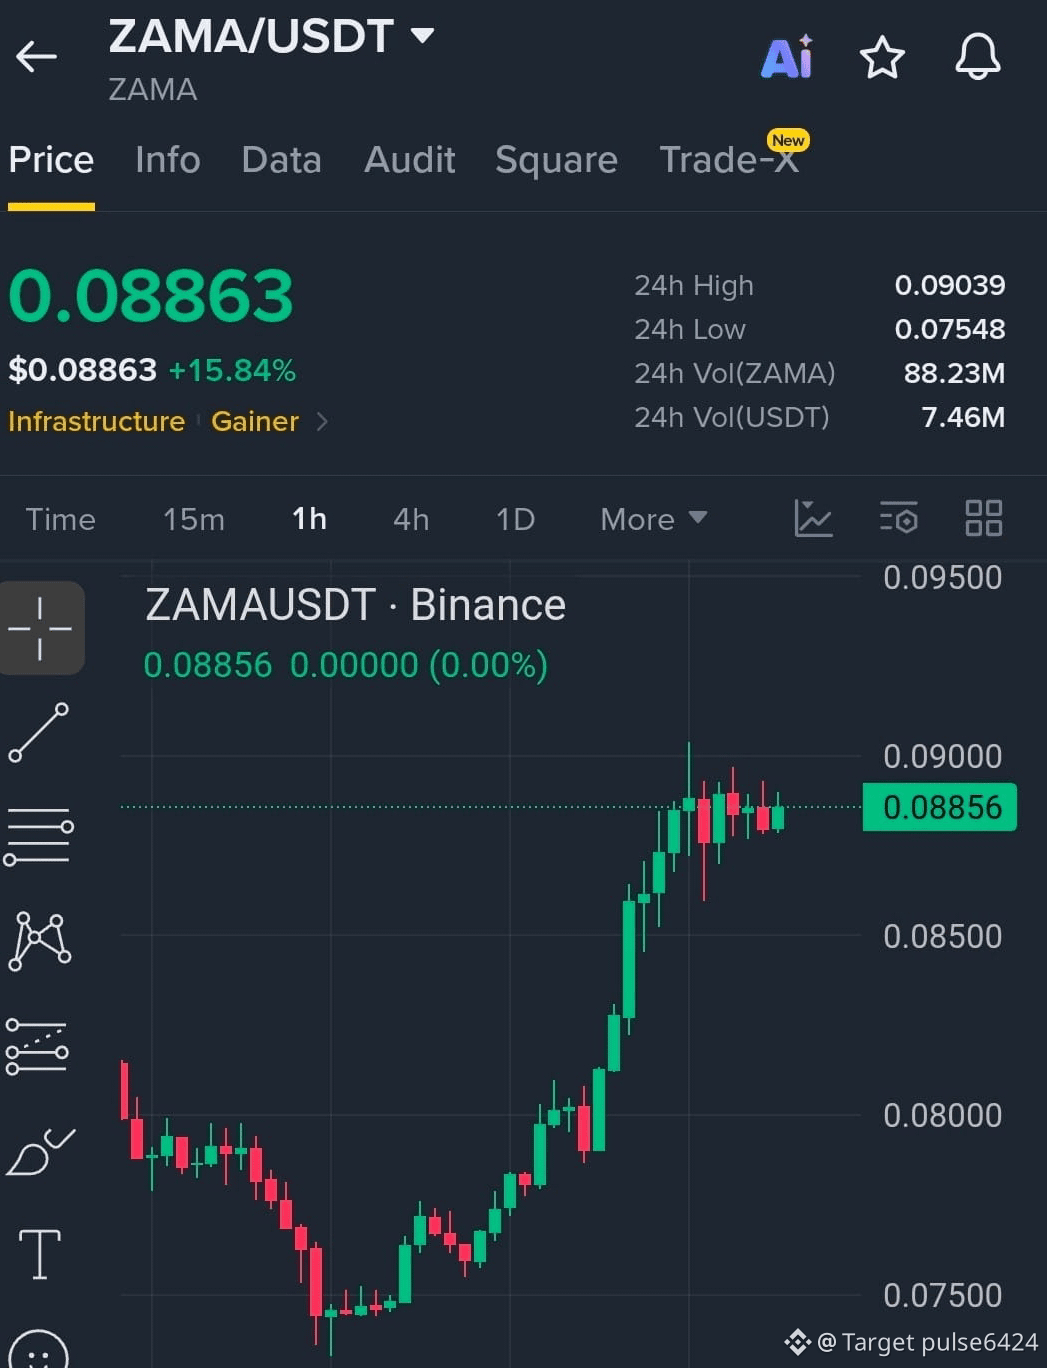
🚀 $ZAMA / USDT — BULLISH BREAKOUT WATCH 📈
$ZAMA is gaining strong momentum as buyers continue to push higher. A breakout above the $0.0900 resistance zone could open the door for the next leg toward higher targets.
🏦Trade Here👇$ZAMA
{spot}(ZAMAUSDT)
📍 Entry Zone: $0.08650 – $0.08973
🛑 Stop Loss: $0.08200
🎯 TP1: $0.09200
🎯 TP2: $0.09600
🎯 TP3: $0.10000
With strong buying pressure and recent momentum strength, ZAMA is showing potential for further continuation. A confirmed hold above $0.0900 could bring more buyers into the market and drive price toward the upside targets.
Will ZAMA break resistance and continue the rally? 🔥 NFA
🚀 $ZAMA / USDT — BULLISH BREAKOUT WATCH 📈
$ZAMA is gaining strong momentum as buyers continue to push higher. A breakout above the $0.0900 resistance zone could open the door for the next leg toward higher targets.
🏦Trade Here👇$ZAMA
📍 Entry Zone: $0.08650 – $0.08973
🛑 Stop Loss: $0.08200
🎯 TP1: $0.09200
🎯 TP2: $0.09600
🎯 TP3: $0.10000
With strong buying pressure and recent momentum strength, ZAMA is showing potential for further continuation. A confirmed hold above $0.0900 could bring more buyers into the market and drive price toward the upside targets.
Will ZAMA break resistance and continue the rally? 🔥 NFA
$ZAMA is gaining strong momentum as buyers continue to push higher. A breakout above the $0.0900 resistance zone could open the door for the next leg toward higher targets.
🏦Trade Here👇$ZAMA
📍 Entry Zone: $0.08650 – $0.08973
🛑 Stop Loss: $0.08200
🎯 TP1: $0.09200
🎯 TP2: $0.09600
🎯 TP3: $0.10000
With strong buying pressure and recent momentum strength, ZAMA is showing potential for further continuation. A confirmed hold above $0.0900 could bring more buyers into the market and drive price toward the upside targets.
Will ZAMA break resistance and continue the rally? 🔥 NFA
29
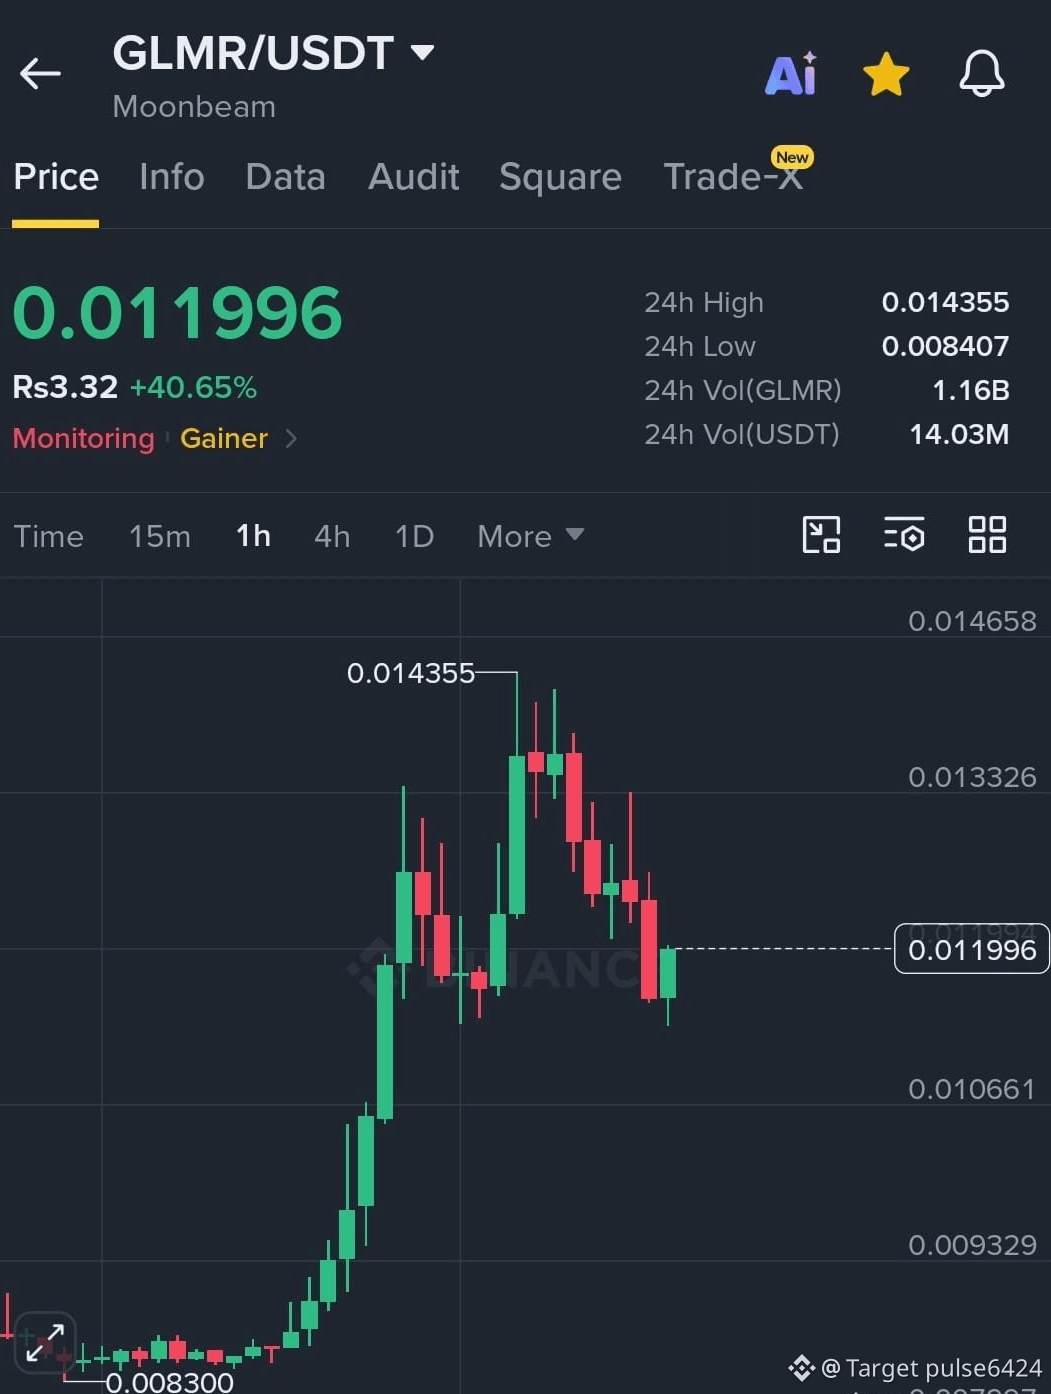
🚀 $GLMR / USDT — PULLBACK REVERSAL SETUP 📈
$GLMR is showing signs of a potential recovery after a strong breakout move. Buyers are defending the current zone, creating an opportunity for another push higher if support continues to hold.
🏦Trade Here👇$GLMR
{spot}(GLMRUSDT)
📍 Entry Zone: $0.01190 – $0.01215
🛑 Stop Loss: $0.01125
🎯 TP1: $0.01280
🎯 TP2: $0.01335
🎯 TP3: $0.01430
After breaking out from the $0.0093 area and reaching $0.01435, GLMR entered a healthy pullback. Holding the $0.012 zone could fuel the next move toward resistance levels, while losing $0.01125 would invalidate the setup.
Can GLMR regain momentum and challenge the recent highs again? 👀 NFA
🚀 $GLMR / USDT — PULLBACK REVERSAL SETUP 📈
$GLMR is showing signs of a potential recovery after a strong breakout move. Buyers are defending the current zone, creating an opportunity for another push higher if support continues to hold.
🏦Trade Here👇$GLMR
📍 Entry Zone: $0.01190 – $0.01215
🛑 Stop Loss: $0.01125
🎯 TP1: $0.01280
🎯 TP2: $0.01335
🎯 TP3: $0.01430
After breaking out from the $0.0093 area and reaching $0.01435, GLMR entered a healthy pullback. Holding the $0.012 zone could fuel the next move toward resistance levels, while losing $0.01125 would invalidate the setup.
Can GLMR regain momentum and challenge the recent highs again? 👀 NFA
$GLMR is showing signs of a potential recovery after a strong breakout move. Buyers are defending the current zone, creating an opportunity for another push higher if support continues to hold.
🏦Trade Here👇$GLMR
📍 Entry Zone: $0.01190 – $0.01215
🛑 Stop Loss: $0.01125
🎯 TP1: $0.01280
🎯 TP2: $0.01335
🎯 TP3: $0.01430
After breaking out from the $0.0093 area and reaching $0.01435, GLMR entered a healthy pullback. Holding the $0.012 zone could fuel the next move toward resistance levels, while losing $0.01125 would invalidate the setup.
Can GLMR regain momentum and challenge the recent highs again? 👀 NFA
44
·
--
Bullish
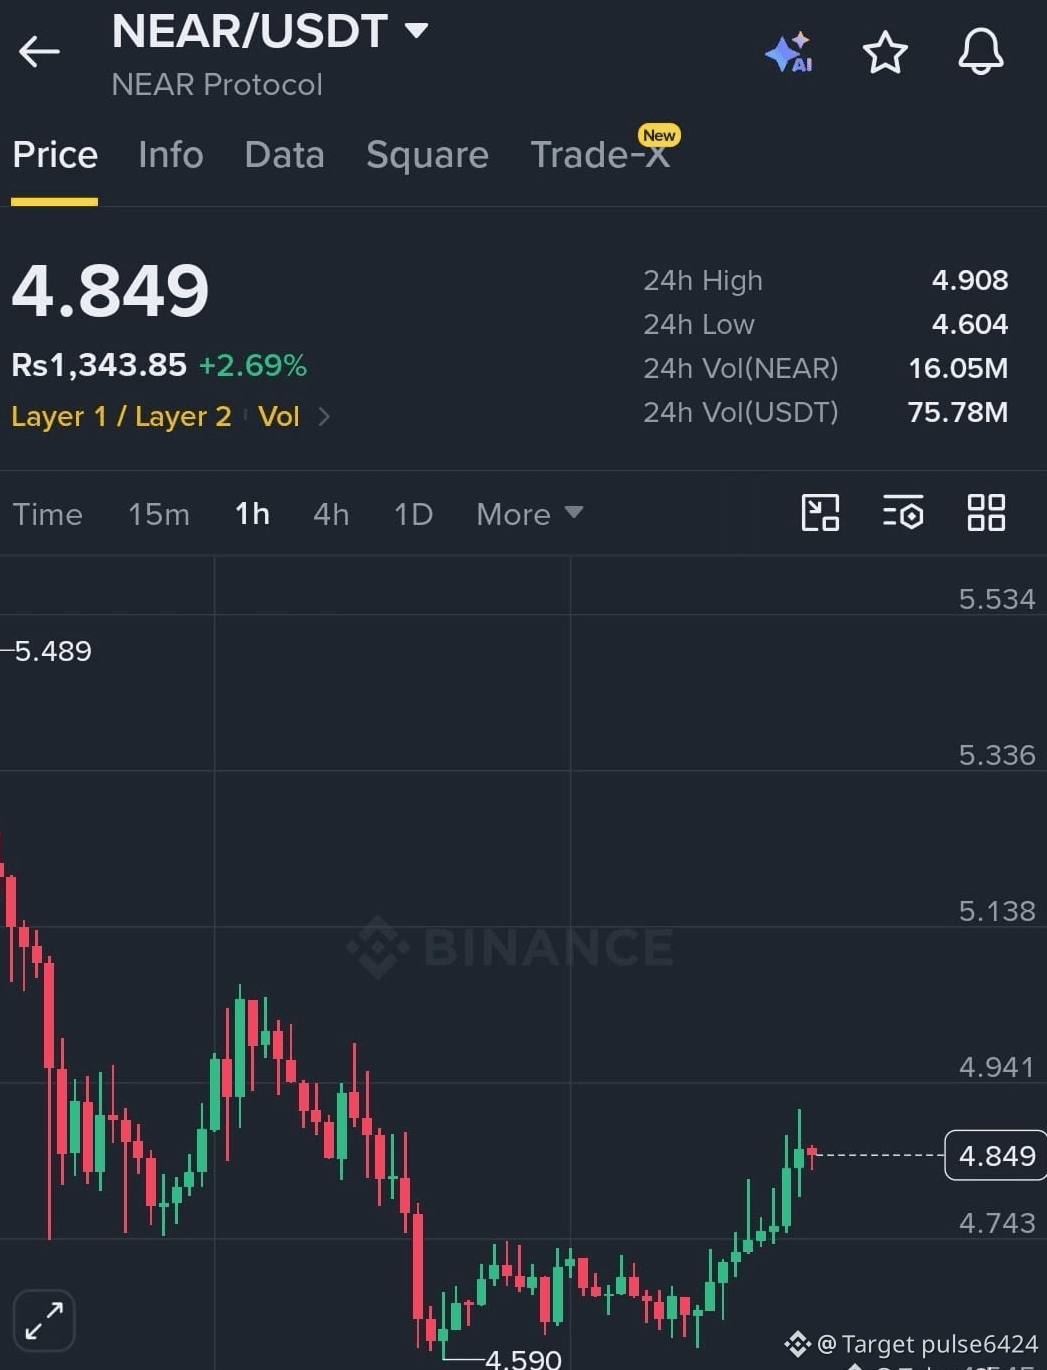
🚀 $NEAR / USDT — BULLISH RECOVERY SETUP 📈
$NEAR is gaining strength as buyers continue to step in after the recent bounce. The recovery structure remains positive with higher lows forming and momentum building toward the upside.
🏦Trade Here👇$NEAR
{spot}(NEARUSDT)
📍 Entry Zone: $4.80 – $4.85
🛑 Stop Loss: $4.70
🎯 TP1: $4.94
🎯 TP2: $5.10
🎯 TP3: $5.30
Price has recovered from the $4.59 low and is now challenging key resistance areas. A strong hold above $4.80 could keep the bullish setup active, while a breakout above $4.91 may open the path toward higher targets.
🚀 $NEAR / USDT — BULLISH RECOVERY SETUP 📈
$NEAR is gaining strength as buyers continue to step in after the recent bounce. The recovery structure remains positive with higher lows forming and momentum building toward the upside.
🏦Trade Here👇$NEAR
📍 Entry Zone: $4.80 – $4.85
🛑 Stop Loss: $4.70
🎯 TP1: $4.94
🎯 TP2: $5.10
🎯 TP3: $5.30
Price has recovered from the $4.59 low and is now challenging key resistance areas. A strong hold above $4.80 could keep the bullish setup active, while a breakout above $4.91 may open the path toward higher targets.
$NEAR is gaining strength as buyers continue to step in after the recent bounce. The recovery structure remains positive with higher lows forming and momentum building toward the upside.
🏦Trade Here👇$NEAR
📍 Entry Zone: $4.80 – $4.85
🛑 Stop Loss: $4.70
🎯 TP1: $4.94
🎯 TP2: $5.10
🎯 TP3: $5.30
Price has recovered from the $4.59 low and is now challenging key resistance areas. A strong hold above $4.80 could keep the bullish setup active, while a breakout above $4.91 may open the path toward higher targets.
53
·
--
Bullish
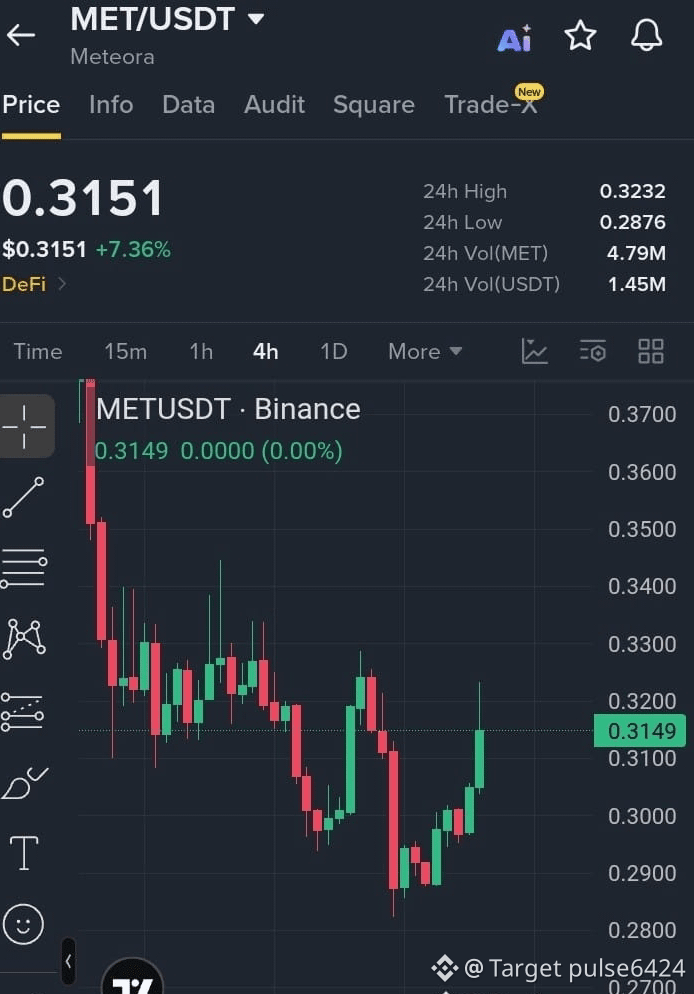
🚀 $MET / USDT — BULLISH CONTINUATION SETUP 📈
$MET is showing renewed strength as buyers step back in after a solid recovery from the $0.29 support zone. Momentum is building for another potential upside move.
🏦Trade Here👇$MET
{spot}(METUSDT)
📍 Entry Zone: $0.312 – $0.316
🛑 Stop Loss: $0.302
🎯 TP1: $0.323
🎯 TP2: $0.333
🎯 TP3: $0.345
A breakout and strong hold above $0.323 could confirm further bullish continuation toward the next resistance levels.
#TargetPulse6424
🚀 $MET / USDT — BULLISH CONTINUATION SETUP 📈
$MET is showing renewed strength as buyers step back in after a solid recovery from the $0.29 support zone. Momentum is building for another potential upside move.
🏦Trade Here👇$MET
📍 Entry Zone: $0.312 – $0.316
🛑 Stop Loss: $0.302
🎯 TP1: $0.323
🎯 TP2: $0.333
🎯 TP3: $0.345
A breakout and strong hold above $0.323 could confirm further bullish continuation toward the next resistance levels.
#TargetPulse6424
$MET is showing renewed strength as buyers step back in after a solid recovery from the $0.29 support zone. Momentum is building for another potential upside move.
🏦Trade Here👇$MET
📍 Entry Zone: $0.312 – $0.316
🛑 Stop Loss: $0.302
🎯 TP1: $0.323
🎯 TP2: $0.333
🎯 TP3: $0.345
A breakout and strong hold above $0.323 could confirm further bullish continuation toward the next resistance levels.
#TargetPulse6424
35
·
--
Bullish
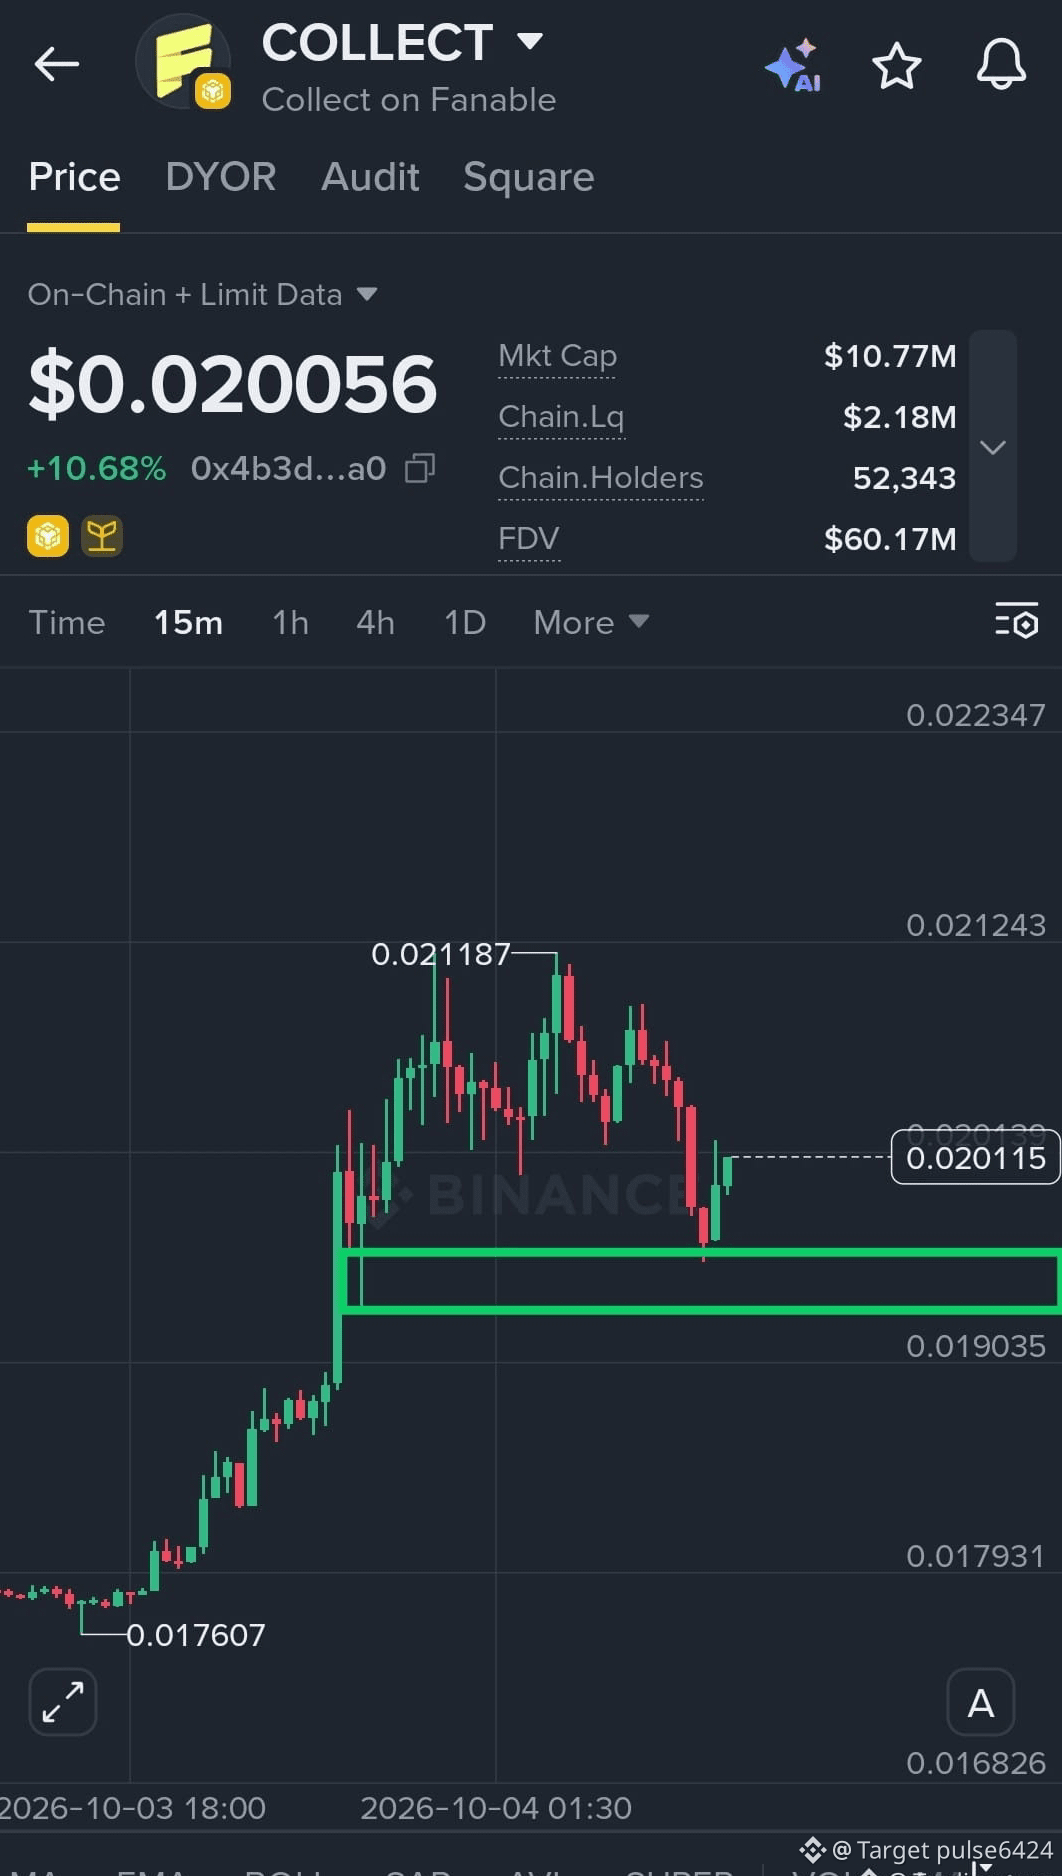
🚀 $COLLECT / USDT — RECOVERY LONG SETUP 📈
A potential recovery move is developing as $COLLECT rebounds from the $0.0193 support zone and starts reclaiming the $0.0200 level. If buyers continue defending this area, further upside could follow.
🏦Trade Here👇$COLLECT
{future}(COLLECTUSDT)
📍 Buy Zone: $0.0198 – $0.0202
🛑 Stop Loss: $0.0192
🎯 TP1: $0.0205
🎯 TP2: $0.0210
🎯 TP3: $0.0215
Momentum is shifting back toward buyers. Watch the $0.0200 zone closely — a strong hold here could fuel the next recovery leg. 🚀 NFA
#TargetPulse6424
🚀 $COLLECT / USDT — RECOVERY LONG SETUP 📈
A potential recovery move is developing as $COLLECT rebounds from the $0.0193 support zone and starts reclaiming the $0.0200 level. If buyers continue defending this area, further upside could follow.
🏦Trade Here👇$COLLECT
📍 Buy Zone: $0.0198 – $0.0202
🛑 Stop Loss: $0.0192
🎯 TP1: $0.0205
🎯 TP2: $0.0210
🎯 TP3: $0.0215
Momentum is shifting back toward buyers. Watch the $0.0200 zone closely — a strong hold here could fuel the next recovery leg. 🚀 NFA
#TargetPulse6424
A potential recovery move is developing as $COLLECT rebounds from the $0.0193 support zone and starts reclaiming the $0.0200 level. If buyers continue defending this area, further upside could follow.
🏦Trade Here👇$COLLECT
📍 Buy Zone: $0.0198 – $0.0202
🛑 Stop Loss: $0.0192
🎯 TP1: $0.0205
🎯 TP2: $0.0210
🎯 TP3: $0.0215
Momentum is shifting back toward buyers. Watch the $0.0200 zone closely — a strong hold here could fuel the next recovery leg. 🚀 NFA
#TargetPulse6424
1
28
·
--
Bullish
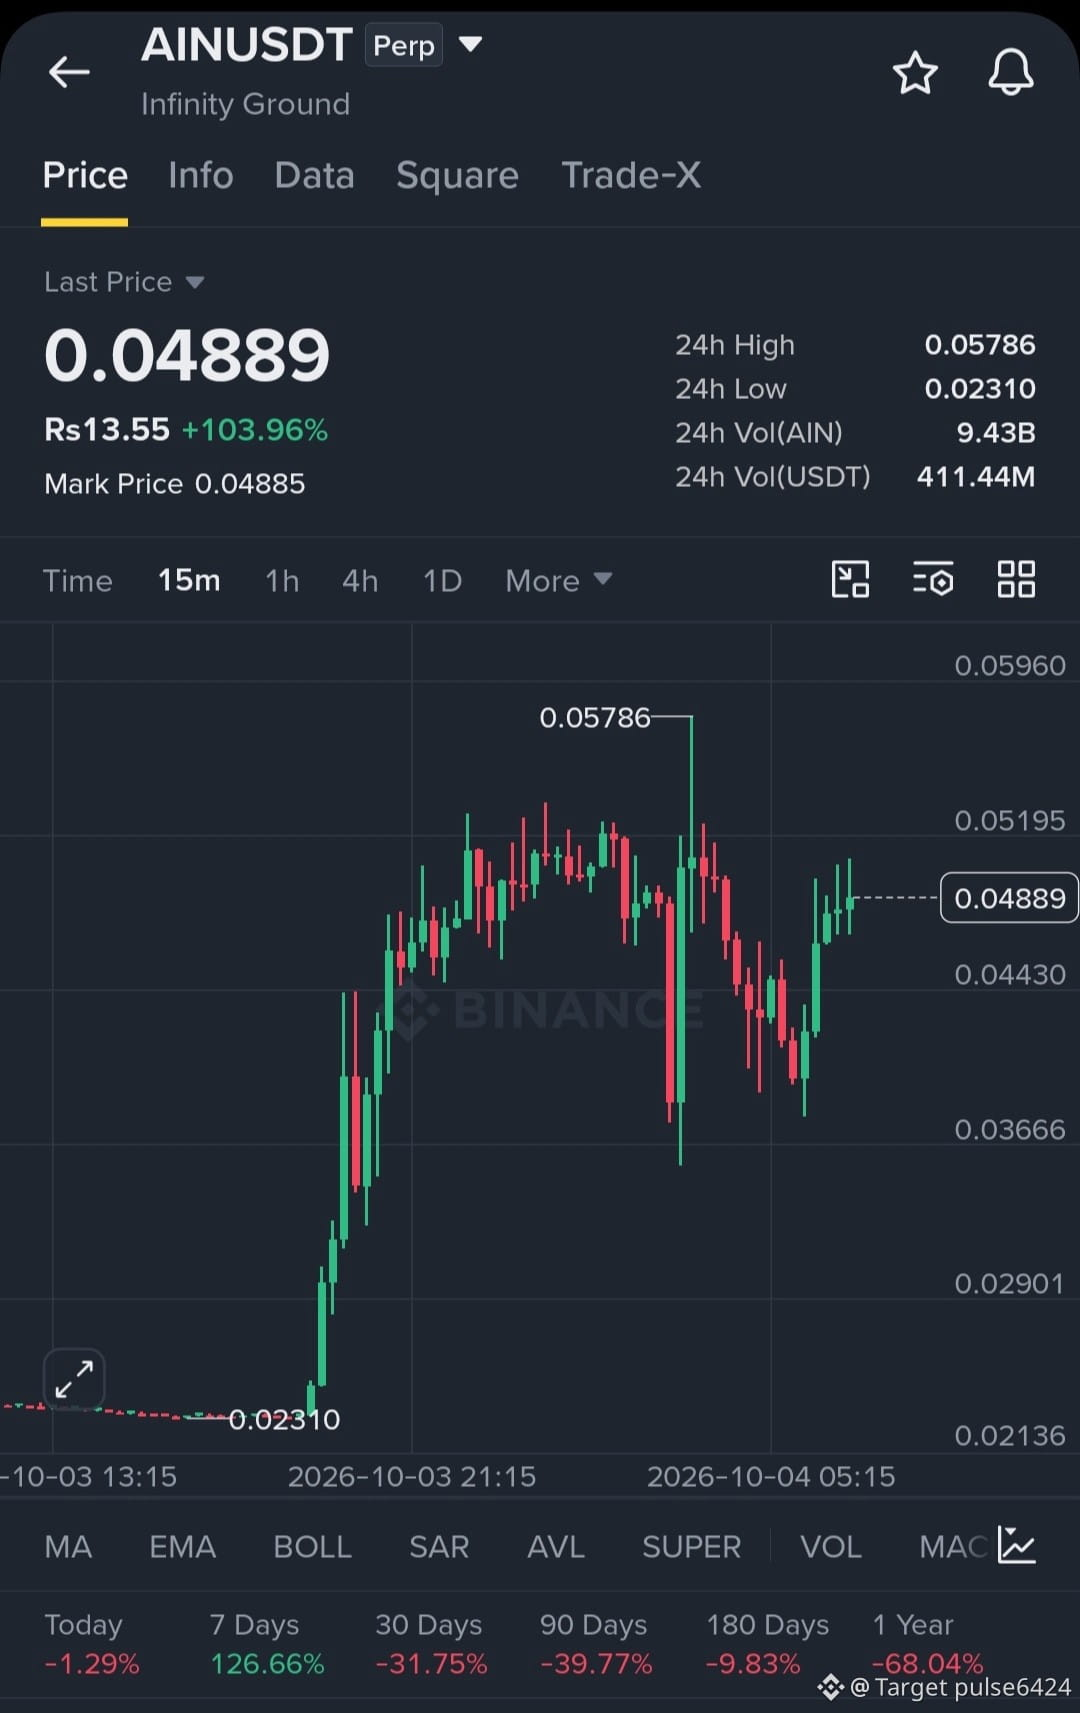
🚨 $AIN / USDT — SHORT SETUP 🔻
🏦Trade Here👇$AIN
{future}(AINUSDT)
📍 Entry Zone: $0.04725 – $0.05199
🛑 Stop Loss: $0.04592
🎯 TP1: $0.05500
🎯 TP2: $0.06200
🎯 TP3: $0.07504
$AIN is approaching a key trading zone where price action could decide the next move. Watch the reaction carefully and manage risk properly before entering the trade. NFA
#TargetPulse6424
🚨 $AIN / USDT — SHORT SETUP 🔻
🏦Trade Here👇$AIN
📍 Entry Zone: $0.04725 – $0.05199
🛑 Stop Loss: $0.04592
🎯 TP1: $0.05500
🎯 TP2: $0.06200
🎯 TP3: $0.07504
$AIN is approaching a key trading zone where price action could decide the next move. Watch the reaction carefully and manage risk properly before entering the trade. NFA
#TargetPulse6424
🏦Trade Here👇$AIN
📍 Entry Zone: $0.04725 – $0.05199
🛑 Stop Loss: $0.04592
🎯 TP1: $0.05500
🎯 TP2: $0.06200
🎯 TP3: $0.07504
$AIN is approaching a key trading zone where price action could decide the next move. Watch the reaction carefully and manage risk properly before entering the trade. NFA
#TargetPulse6424
125
Log in to explore more content
Join global crypto users on Binance Square
⚡️ Get latest and useful information about crypto.
💬 Trusted by the world’s largest crypto exchange.
👍 Discover real insights from verified creators.
Email / Phone number
Trending Topics
FedMinutesFocusOnOctoberPause
40,248 views
672 Discussing
#fedminutesfocusonoctoberpause
🚨 OCTOBER FED HIKE ODDS COLLAPSE TO 21.6%… Is $BTC About to React? 👀
The Fed is about to give markets another major clue.
Investors are waiting for today’s FOMC minutes — and the biggest question is whether October brings another rate hike… or a pause.
Right now, the odds of a 25-basis-point October hike have fallen to just 21.6%.
That’s a huge shift in expectations.
But here’s what makes this interesting… 👀
The Fed raised rates to 3.75%–4.00% in September, but recent weakness in jobs data and softer inflation have made another immediate hike look less certain.
And for crypto, this matters.
A Fed pause could reduce pressure on financial conditions and potentially improve risk appetite.
That could become a tailwind for BTC
But there’s a catch…
Bitcoin is already under pressure as the dollar and Treasury yields move higher.
So tonight’s minutes could become a volatility trigger.
Dovish Fed → liquidity hopes → bullish .
BTC narrative?
Hawkish Fed → higher-rate fears → more pressure on risk assets?
The real question:
Is October becoming the pause Bitcoin bulls have been waiting for… or could the Fed surprise the market again? 👀
Watch BTC + Fed expectations + Treasury yields closely.
#FederalReserve #Fed #Crypto #InterestRates
$ETH
$SOL
Shae Cassler Sw9r
·21 Likes
·42.8k views
BinanceLaunchesBinanceIntelligence
978,548 views
5,927 Discussing
EvernorthDelaysNasdaqDebutToOct12
1,236 views
82 Discussing