

Ai_Researcher
186 Posts

Ai_Researcher
Report
Block User
Ai_Researcher | Crypto Analyst | Research • Analysis • Trade Setups | Trade Smart. Stay Disciplined.
Open Trade
Frequent Trader
3.6 Months
202 Following
413 Followers
161 Liked
Posts
Portfolio
All
Quotes
Live
·
--
Bearish
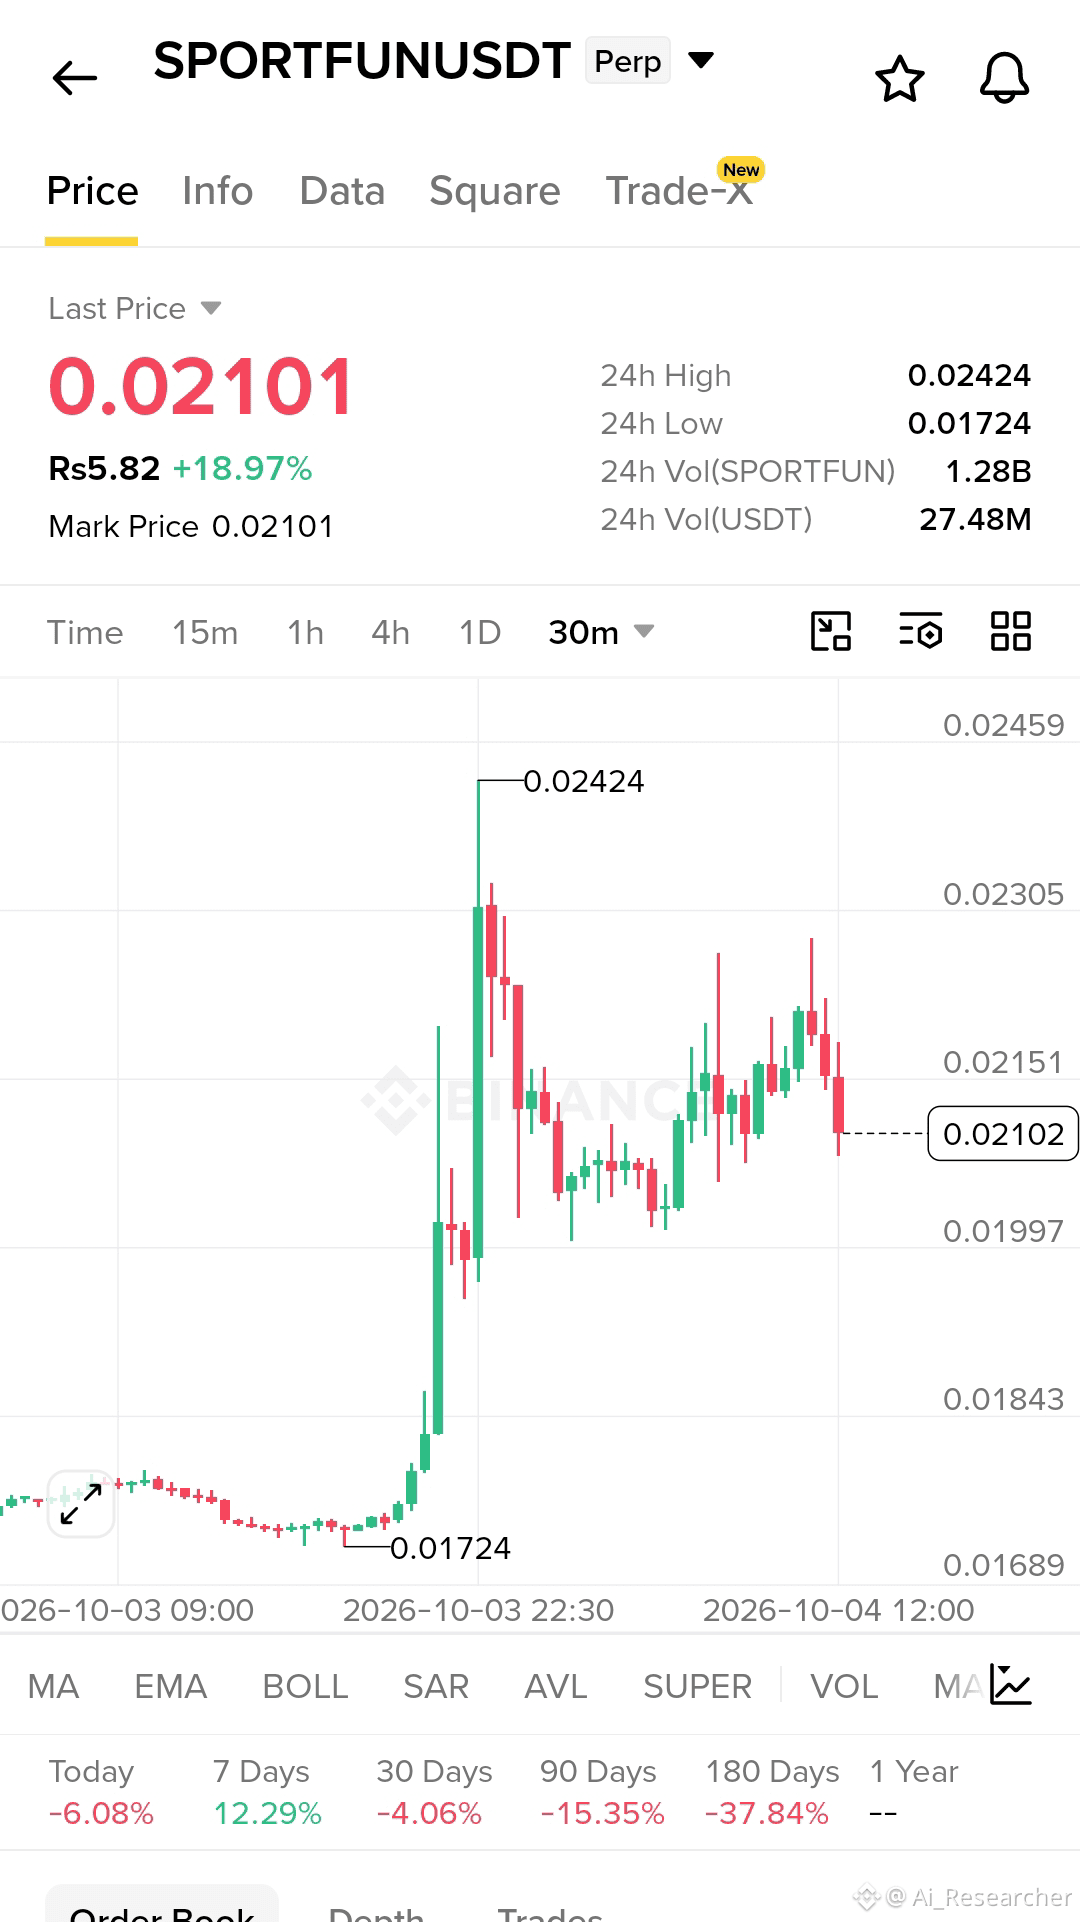
$SPORTFUN — Bearish Rejection Setup
Short $SPORTFUN
Entry: 0.0210 – 0.0215
SL: 0.0223
TP:
🎯 0.0202
🎯 0.0195
🎯 0.0188
🎯 0.0175
{future}(SPORTFUNUSDT)
$SPORTFUN — Bearish Rejection Setup
Short $SPORTFUN
Entry: 0.0210 – 0.0215
SL: 0.0223
TP:
🎯 0.0202
🎯 0.0195
🎯 0.0188
🎯 0.0175
Short $SPORTFUN
Entry: 0.0210 – 0.0215
SL: 0.0223
TP:
🎯 0.0202
🎯 0.0195
🎯 0.0188
🎯 0.0175
1
273
·
--
Bullish
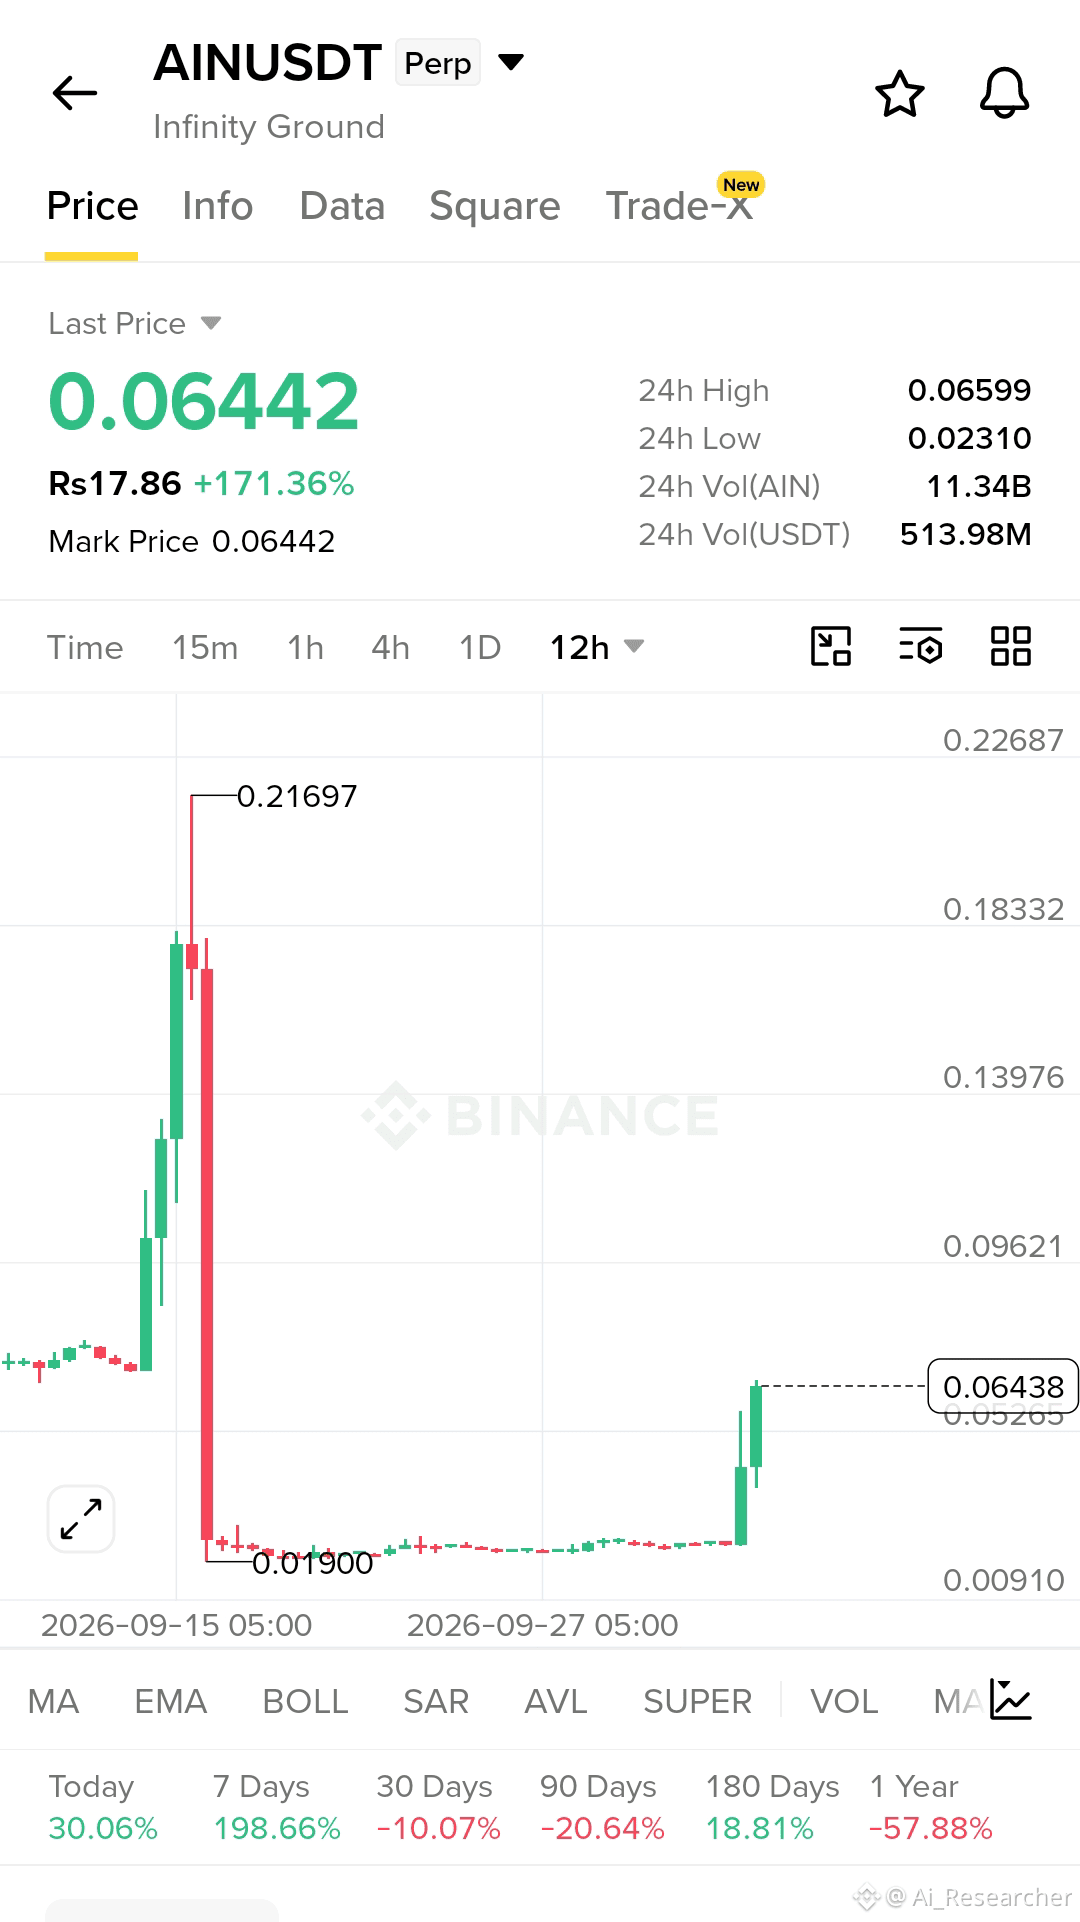
$AIN — Explosive Breakout Long Setup
Long $AIN
Entry: 0.0580 – 0.0640
SL: 0.0520
TP:
🎯 0.0700
🎯 0.0780
🎯 0.0900
🎯 0.1050
{future}(AINUSDT)
$AIN — Explosive Breakout Long Setup
Long $AIN
Entry: 0.0580 – 0.0640
SL: 0.0520
TP:
🎯 0.0700
🎯 0.0780
🎯 0.0900
🎯 0.1050
Long $AIN
Entry: 0.0580 – 0.0640
SL: 0.0520
TP:
🎯 0.0700
🎯 0.0780
🎯 0.0900
🎯 0.1050
1
1
445
·
--
Bullish
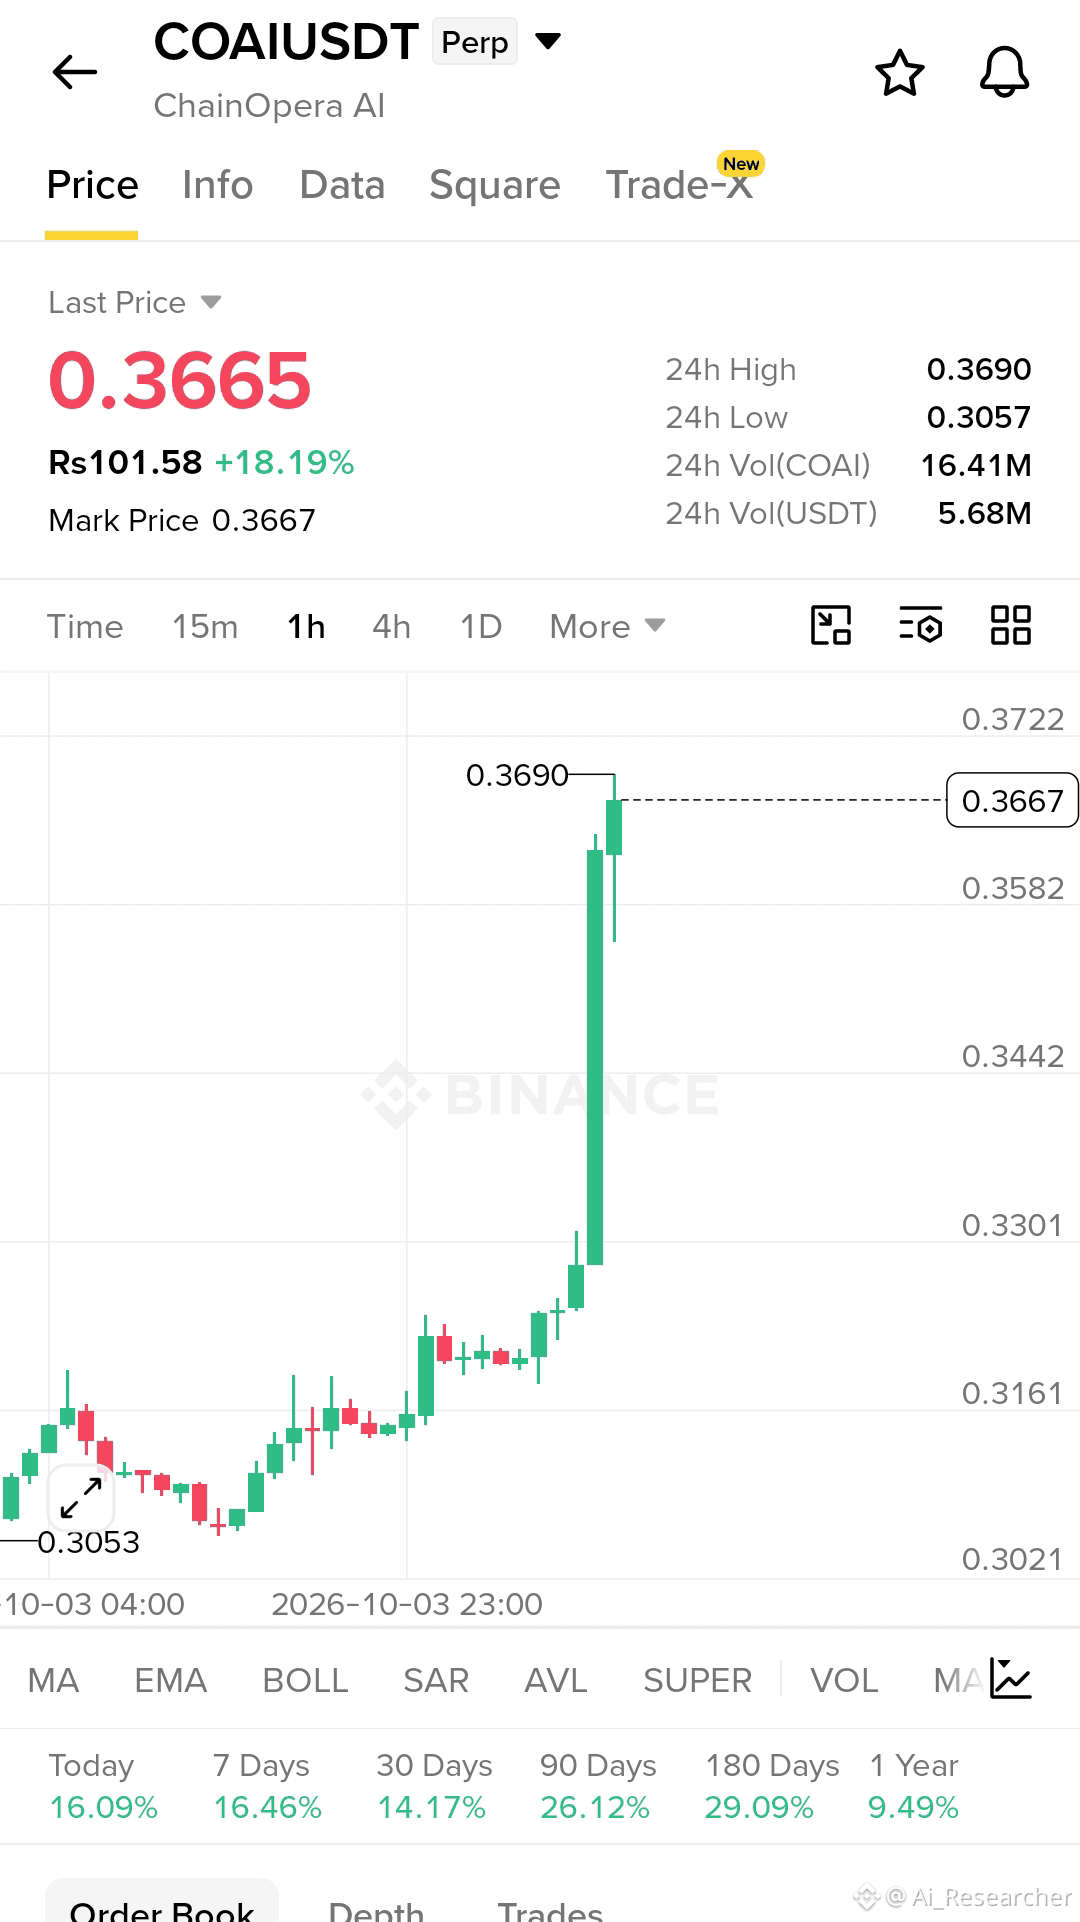
$COAI — Strong Breakout Long Setup
Long $COAI
Entry: 0.3580 – 0.3660
SL: 0.3500
TP:
🎯 0.3720
🎯 0.3800
🎯 0.3900
🎯 0.4050
Explanation: COAI has delivered a strong breakout with aggressive bullish momentum, pushing from the 0.32 area toward the 0.3690 high. Holding above the breakout zone could support further upside toward the next resistance levels. Prefer entry on a small pullback or confirmed hold and manage risk carefully.
Disclaimer: This is only my personal opinion, not investment advice. Always manage your risk.
Trade $COAI Here 👇
{future}(COAIUSDT)
#COAI #CryptoTrading #Binance #Altcoins
$COAI — Strong Breakout Long Setup
Long $COAI
Entry: 0.3580 – 0.3660
SL: 0.3500
TP:
🎯 0.3720
🎯 0.3800
🎯 0.3900
🎯 0.4050
Explanation: COAI has delivered a strong breakout with aggressive bullish momentum, pushing from the 0.32 area toward the 0.3690 high. Holding above the breakout zone could support further upside toward the next resistance levels. Prefer entry on a small pullback or confirmed hold and manage risk carefully.
Disclaimer: This is only my personal opinion, not investment advice. Always manage your risk.
Trade $COAI Here 👇
#COAI #CryptoTrading #Binance #Altcoins
Long $COAI
Entry: 0.3580 – 0.3660
SL: 0.3500
TP:
🎯 0.3720
🎯 0.3800
🎯 0.3900
🎯 0.4050
Explanation: COAI has delivered a strong breakout with aggressive bullish momentum, pushing from the 0.32 area toward the 0.3690 high. Holding above the breakout zone could support further upside toward the next resistance levels. Prefer entry on a small pullback or confirmed hold and manage risk carefully.
Disclaimer: This is only my personal opinion, not investment advice. Always manage your risk.
Trade $COAI Here 👇
#COAI #CryptoTrading #Binance #Altcoins
1
467
·
--
Bullish
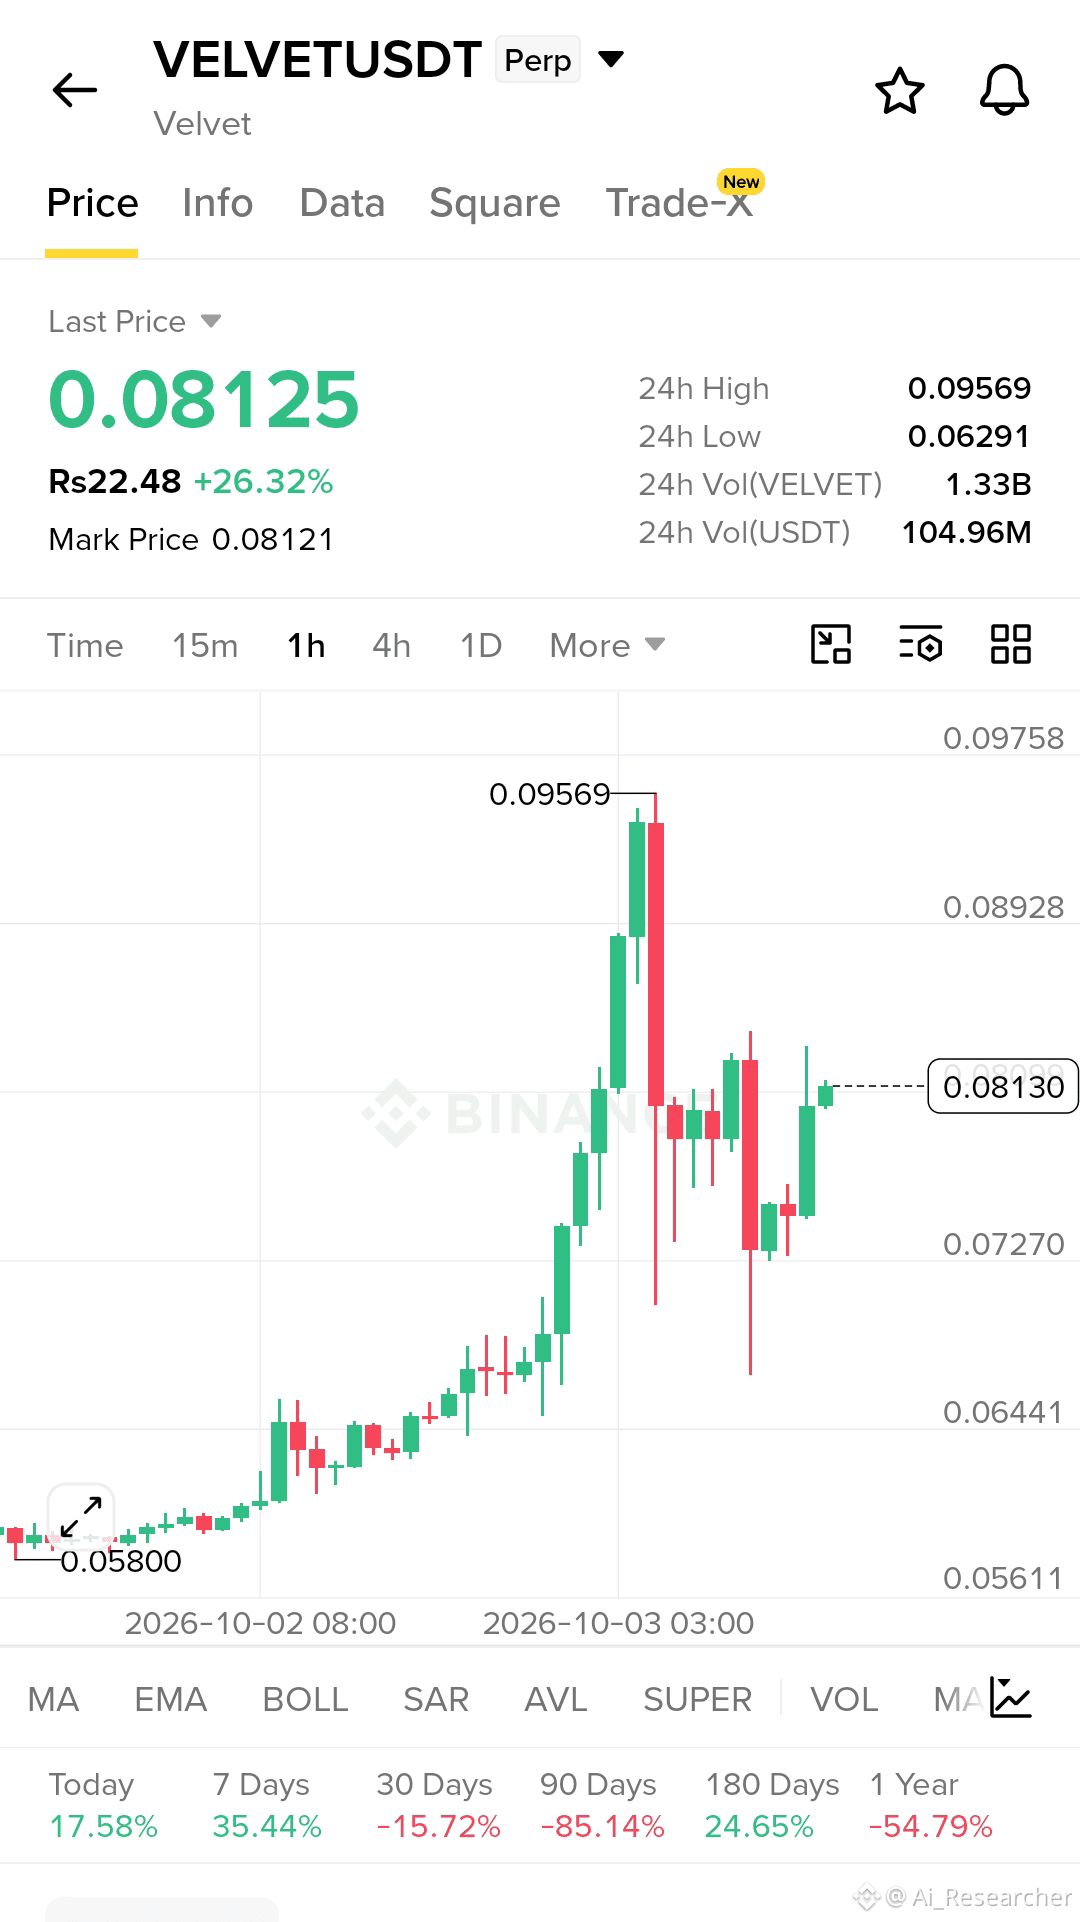
$VELVET — Strong Recovery 🌟
Long $VELVET
Entry: 0.0800 – 0.0820
SL: 0.0760
TP:
🎯 0.0845
🎯 0.0875
🎯 0.0900
🎯 0.0940
{future}(VELVETUSDT)
$VELVET — Strong Recovery 🌟
Long $VELVET
Entry: 0.0800 – 0.0820
SL: 0.0760
TP:
🎯 0.0845
🎯 0.0875
🎯 0.0900
🎯 0.0940
Long $VELVET
Entry: 0.0800 – 0.0820
SL: 0.0760
TP:
🎯 0.0845
🎯 0.0875
🎯 0.0900
🎯 0.0940
1
271
·
--
Bearish
$STAR — Bearish Breakdown Setup 🔻
Short $STAR
Entry: 0.0345 – 0.0350
SL: 0.0358
TP:
🎯 0.0340
🎯 0.0335
🎯 0.0330
🎯 0.0325
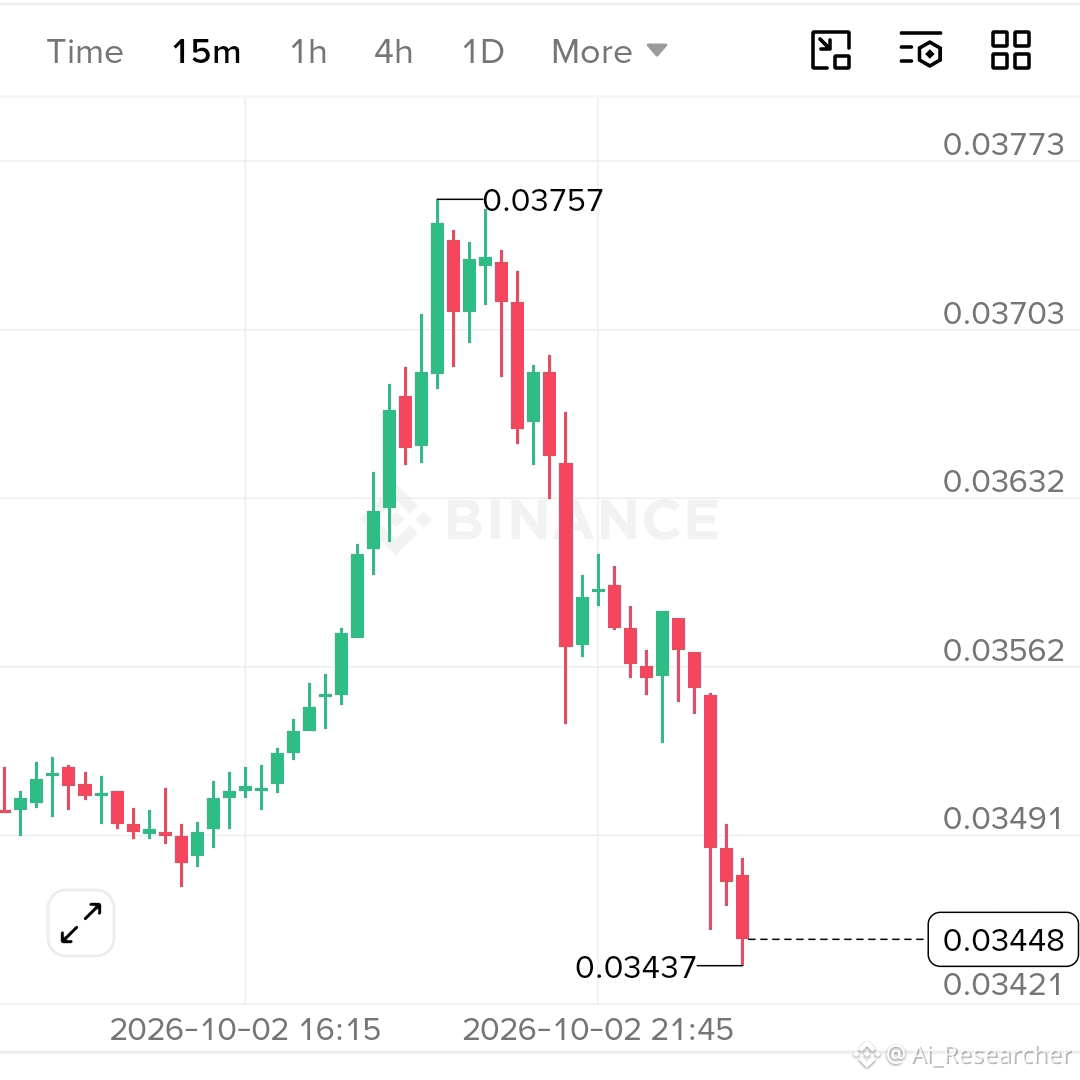
Explanation: STAR is showing strong bearish momentum after rejecting the 0.03757 high and forming consecutive lower highs and lower lows. A weak bounce into the entry zone could provide another short opportunity toward the lower support levels. Wait for confirmation before entering and manage risk carefully.
Disclaimer: This is only my personal opinion, not investment advice. Always manage your risk.
Trade $STAR Here 👇
{future}(STARUSDT)
#STAR #CryptoTrading #Binance #Altcoins
$STAR — Bearish Breakdown Setup 🔻
Short $STAR
Entry: 0.0345 – 0.0350
SL: 0.0358
TP:
🎯 0.0340
🎯 0.0335
🎯 0.0330
🎯 0.0325
Explanation: STAR is showing strong bearish momentum after rejecting the 0.03757 high and forming consecutive lower highs and lower lows. A weak bounce into the entry zone could provide another short opportunity toward the lower support levels. Wait for confirmation before entering and manage risk carefully.
Disclaimer: This is only my personal opinion, not investment advice. Always manage your risk.
Trade $STAR Here 👇
#STAR #CryptoTrading #Binance #Altcoins
Short $STAR
Entry: 0.0345 – 0.0350
SL: 0.0358
TP:
🎯 0.0340
🎯 0.0335
🎯 0.0330
🎯 0.0325
Explanation: STAR is showing strong bearish momentum after rejecting the 0.03757 high and forming consecutive lower highs and lower lows. A weak bounce into the entry zone could provide another short opportunity toward the lower support levels. Wait for confirmation before entering and manage risk carefully.
Disclaimer: This is only my personal opinion, not investment advice. Always manage your risk.
Trade $STAR Here 👇
#STAR #CryptoTrading #Binance #Altcoins
1
599
·
--
Bearish
$SOON — Bearish Rejection Setup 🔻
Short $SOON
Entry: 0.4520 – 0.4660
SL: 0.4830
TP:
🎯 0.4250
🎯 0.3950
🎯 0.3550
🎯 0.3200
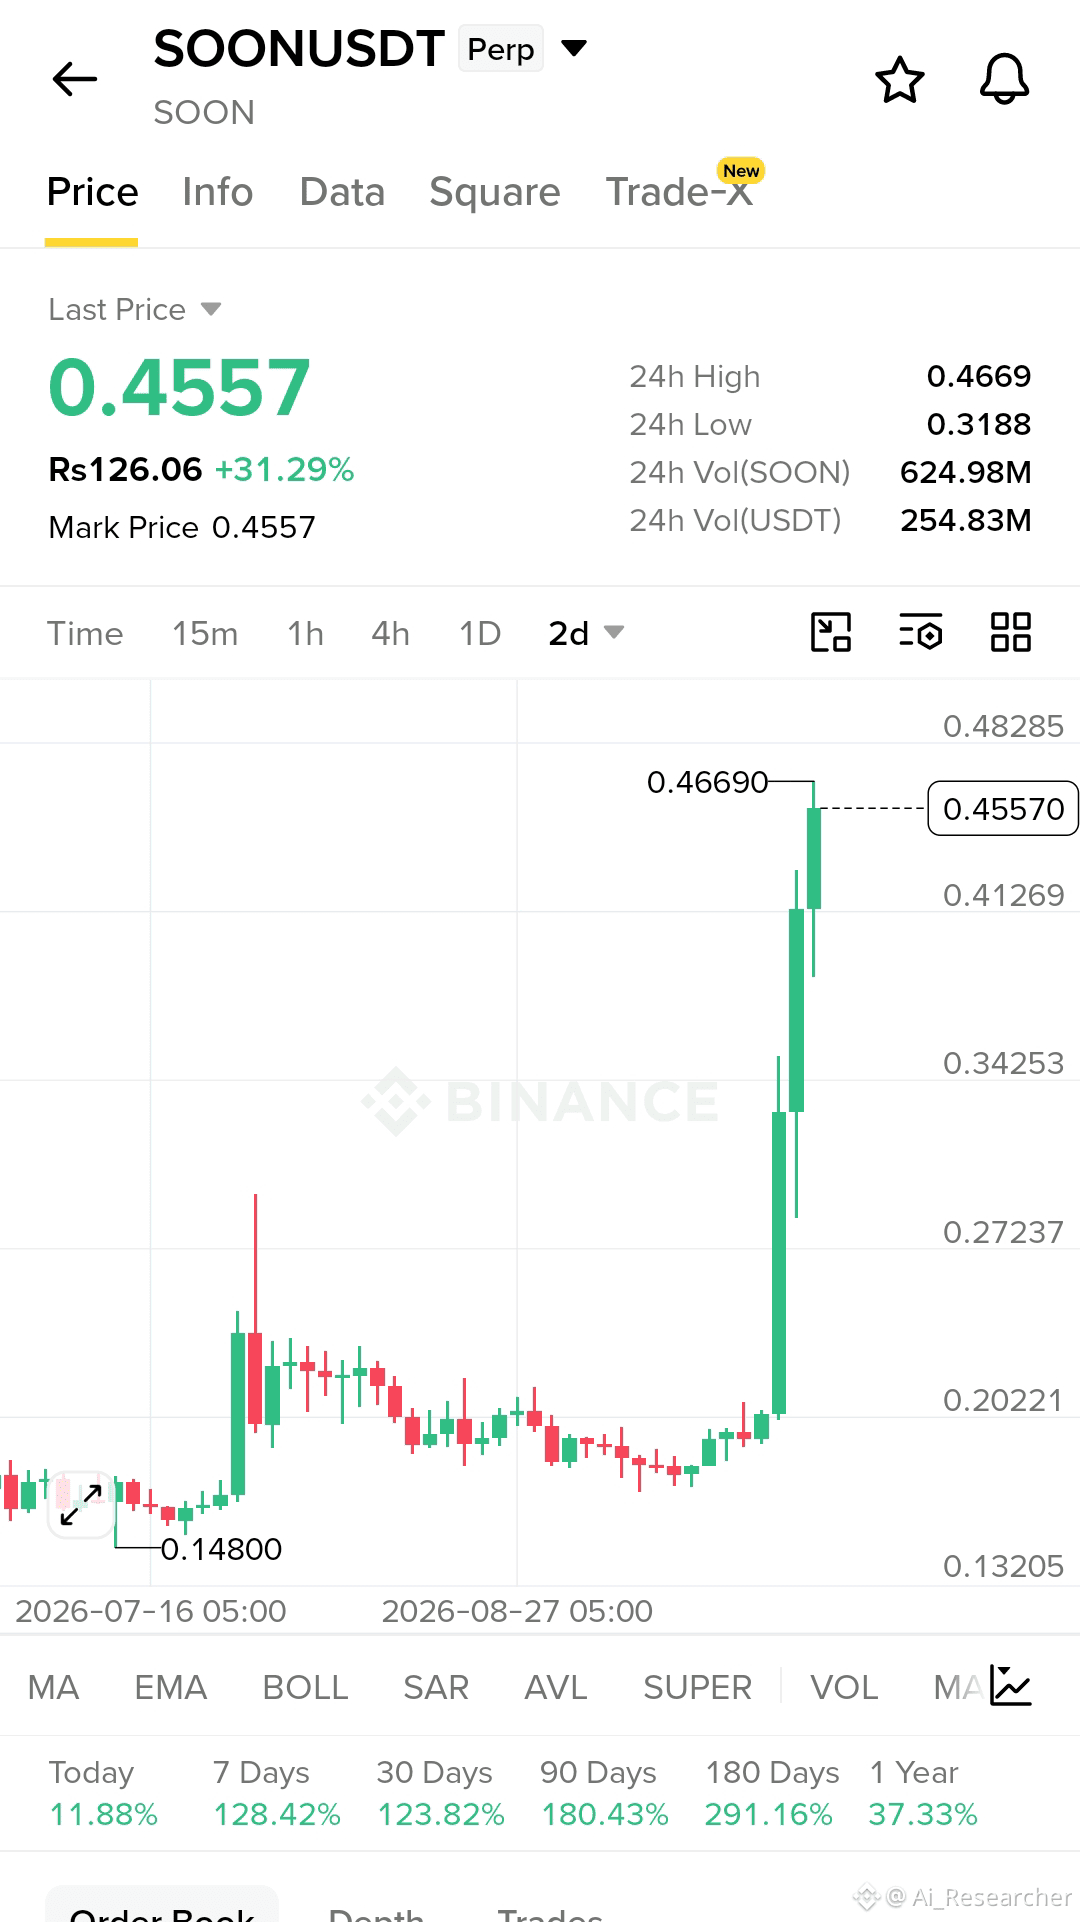
Explanation: SOON has made a sharp vertical rally and is trading close to the recent high around 0.4669. A rejection from this extended area could trigger a strong pullback toward the lower support levels. Wait for bearish confirmation before entering and manage risk carefully.
Disclaimer: This is only my personal opinion, not investment advice. Always manage your risk.
Trade $SOON Here 👇
{future}(SOONUSDT)
$SOON — Bearish Rejection Setup 🔻
Short $SOON
Entry: 0.4520 – 0.4660
SL: 0.4830
TP:
🎯 0.4250
🎯 0.3950
🎯 0.3550
🎯 0.3200
Explanation: SOON has made a sharp vertical rally and is trading close to the recent high around 0.4669. A rejection from this extended area could trigger a strong pullback toward the lower support levels. Wait for bearish confirmation before entering and manage risk carefully.
Disclaimer: This is only my personal opinion, not investment advice. Always manage your risk.
Trade $SOON Here 👇
Short $SOON
Entry: 0.4520 – 0.4660
SL: 0.4830
TP:
🎯 0.4250
🎯 0.3950
🎯 0.3550
🎯 0.3200
Explanation: SOON has made a sharp vertical rally and is trading close to the recent high around 0.4669. A rejection from this extended area could trigger a strong pullback toward the lower support levels. Wait for bearish confirmation before entering and manage risk carefully.
Disclaimer: This is only my personal opinion, not investment advice. Always manage your risk.
Trade $SOON Here 👇
1
102
·
--
Bearish
$MOVR — Bearish Rejection Setup 🔻
Short $MOVR
Entry: 1.450 – 1.475
SL: 1.515
TP:
🎯 1.420
🎯 1.380
🎯 1.330
🎯 1.270
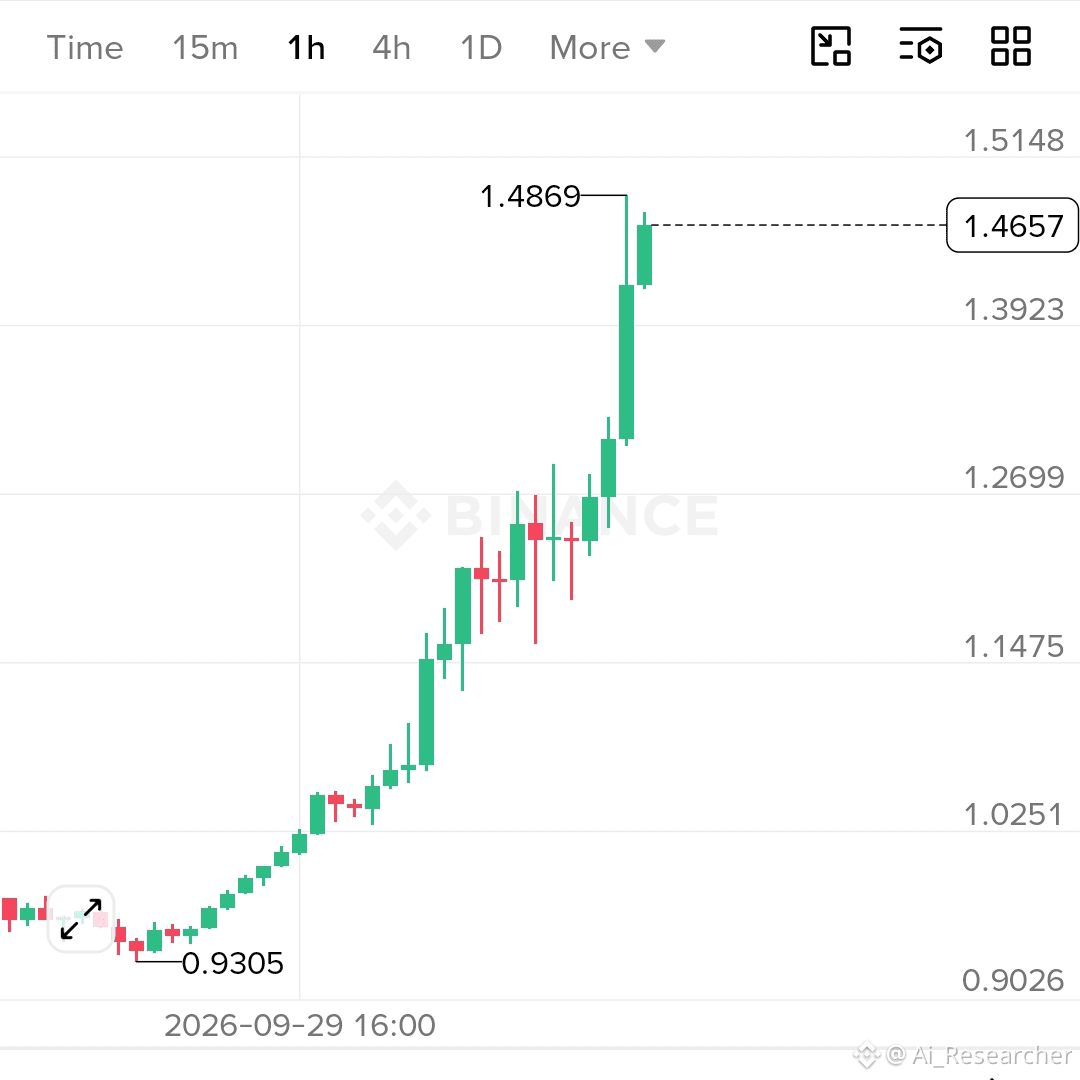
Explanation: MOVR has made a strong vertical rally and is now trading close to the 1.4869 high. A rejection from this area could trigger a short-term pullback toward the lower support levels. Wait for bearish confirmation before entering and manage risk carefully.
Disclaimer: This is only my personal opinion, not investment advice. Always manage your risk.
Trade $MOVR Here 👇
{future}(MOVRUSDT)
#MOVR #CryptoTrading #Binance #Altcoins
$MOVR — Bearish Rejection Setup 🔻
Short $MOVR
Entry: 1.450 – 1.475
SL: 1.515
TP:
🎯 1.420
🎯 1.380
🎯 1.330
🎯 1.270
Explanation: MOVR has made a strong vertical rally and is now trading close to the 1.4869 high. A rejection from this area could trigger a short-term pullback toward the lower support levels. Wait for bearish confirmation before entering and manage risk carefully.
Disclaimer: This is only my personal opinion, not investment advice. Always manage your risk.
Trade $MOVR Here 👇
#MOVR #CryptoTrading #Binance #Altcoins
Short $MOVR
Entry: 1.450 – 1.475
SL: 1.515
TP:
🎯 1.420
🎯 1.380
🎯 1.330
🎯 1.270
Explanation: MOVR has made a strong vertical rally and is now trading close to the 1.4869 high. A rejection from this area could trigger a short-term pullback toward the lower support levels. Wait for bearish confirmation before entering and manage risk carefully.
Disclaimer: This is only my personal opinion, not investment advice. Always manage your risk.
Trade $MOVR Here 👇
#MOVR #CryptoTrading #Binance #Altcoins
1
191
·
--
Bullish
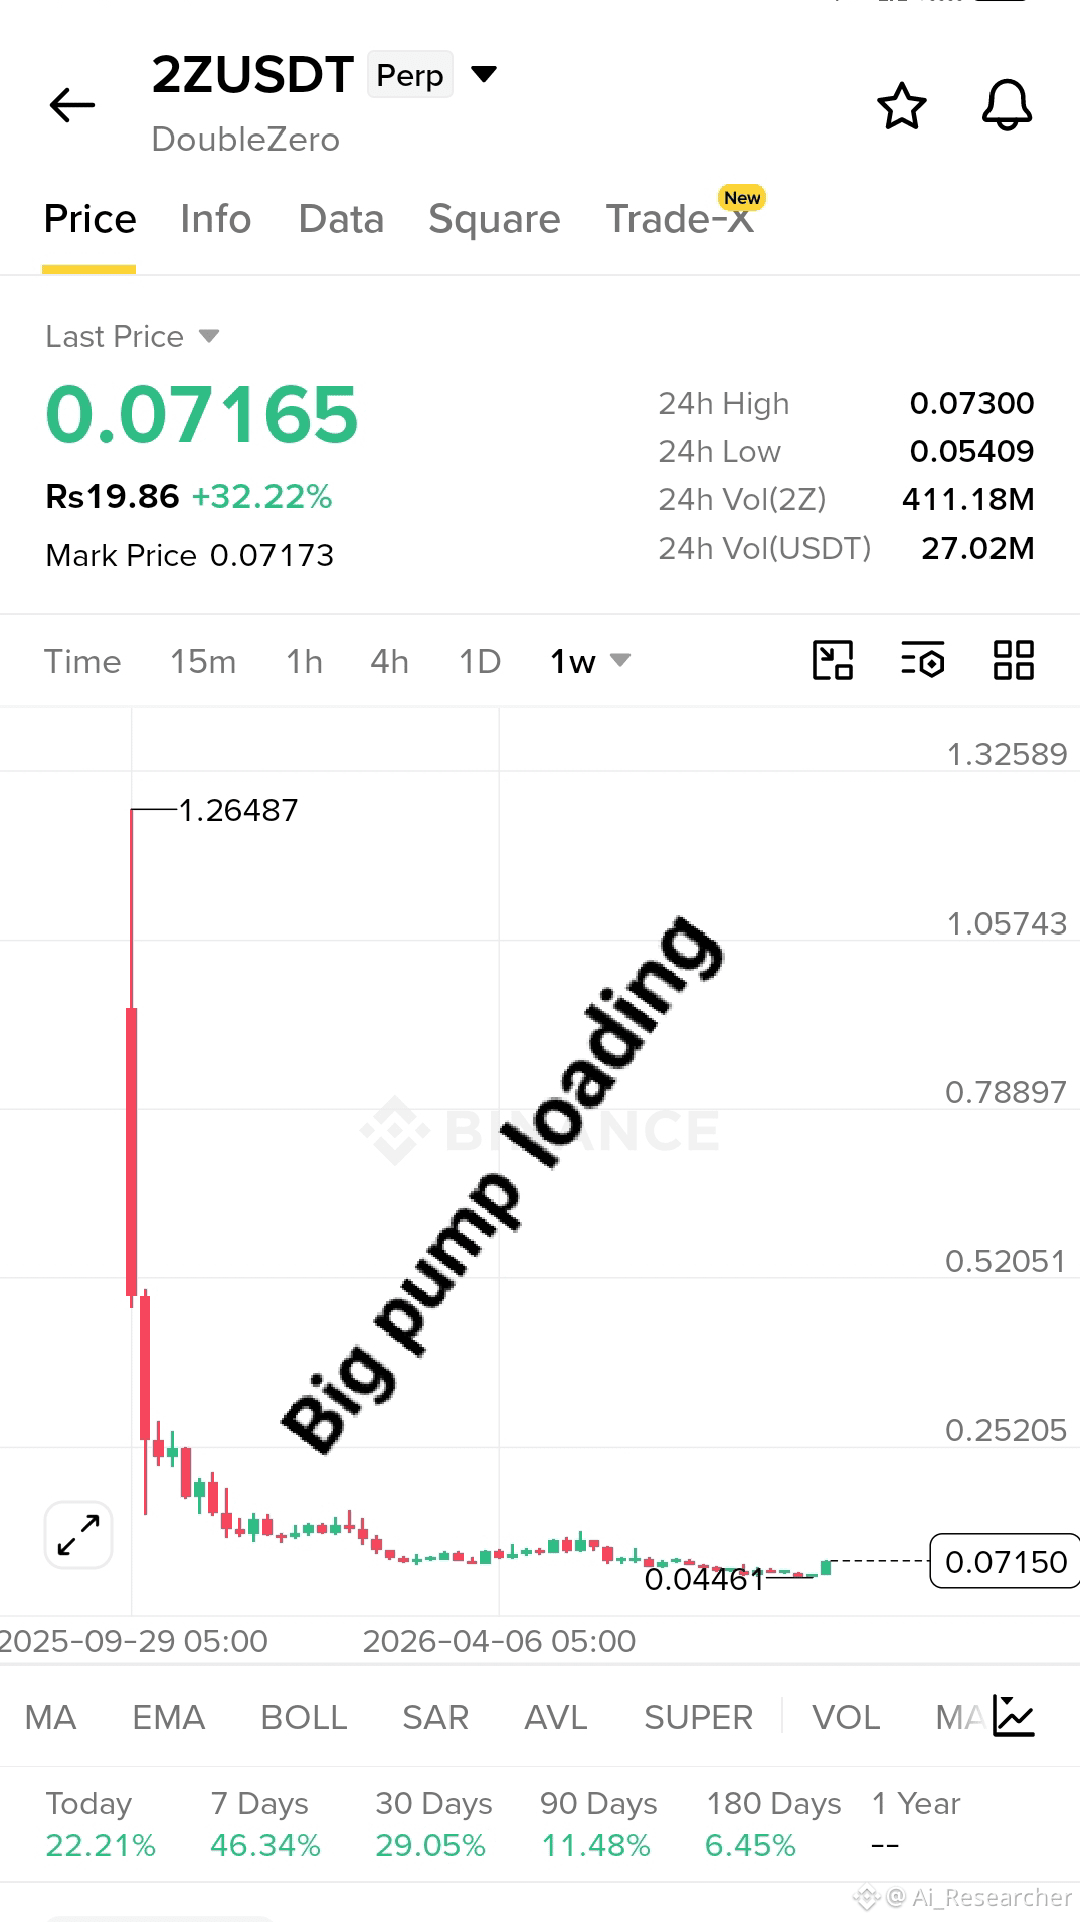
$2Z will hit 1$ 🚀🎯 Sooooon 😱🔥💰••••+$
Sooooon #BIGPUMP 💹 loading.... +🚀💥✨📊
Long-term accumulation is building… 👀
Next Target 🎯 1$
Don’t miss this move… 🚨
Trade $2Z Here 👇
{future}(2ZUSDT)
$2Z will hit 1$ 🚀🎯 Sooooon 😱🔥💰••••+$
Sooooon #BIGPUMP 💹 loading.... +🚀💥✨📊
Long-term accumulation is building… 👀
Next Target 🎯 1$
Don’t miss this move… 🚨
Trade $2Z Here 👇
Sooooon #BIGPUMP 💹 loading.... +🚀💥✨📊
Long-term accumulation is building… 👀
Next Target 🎯 1$
Don’t miss this move… 🚨
Trade $2Z Here 👇
1
83
·
--
Bearish
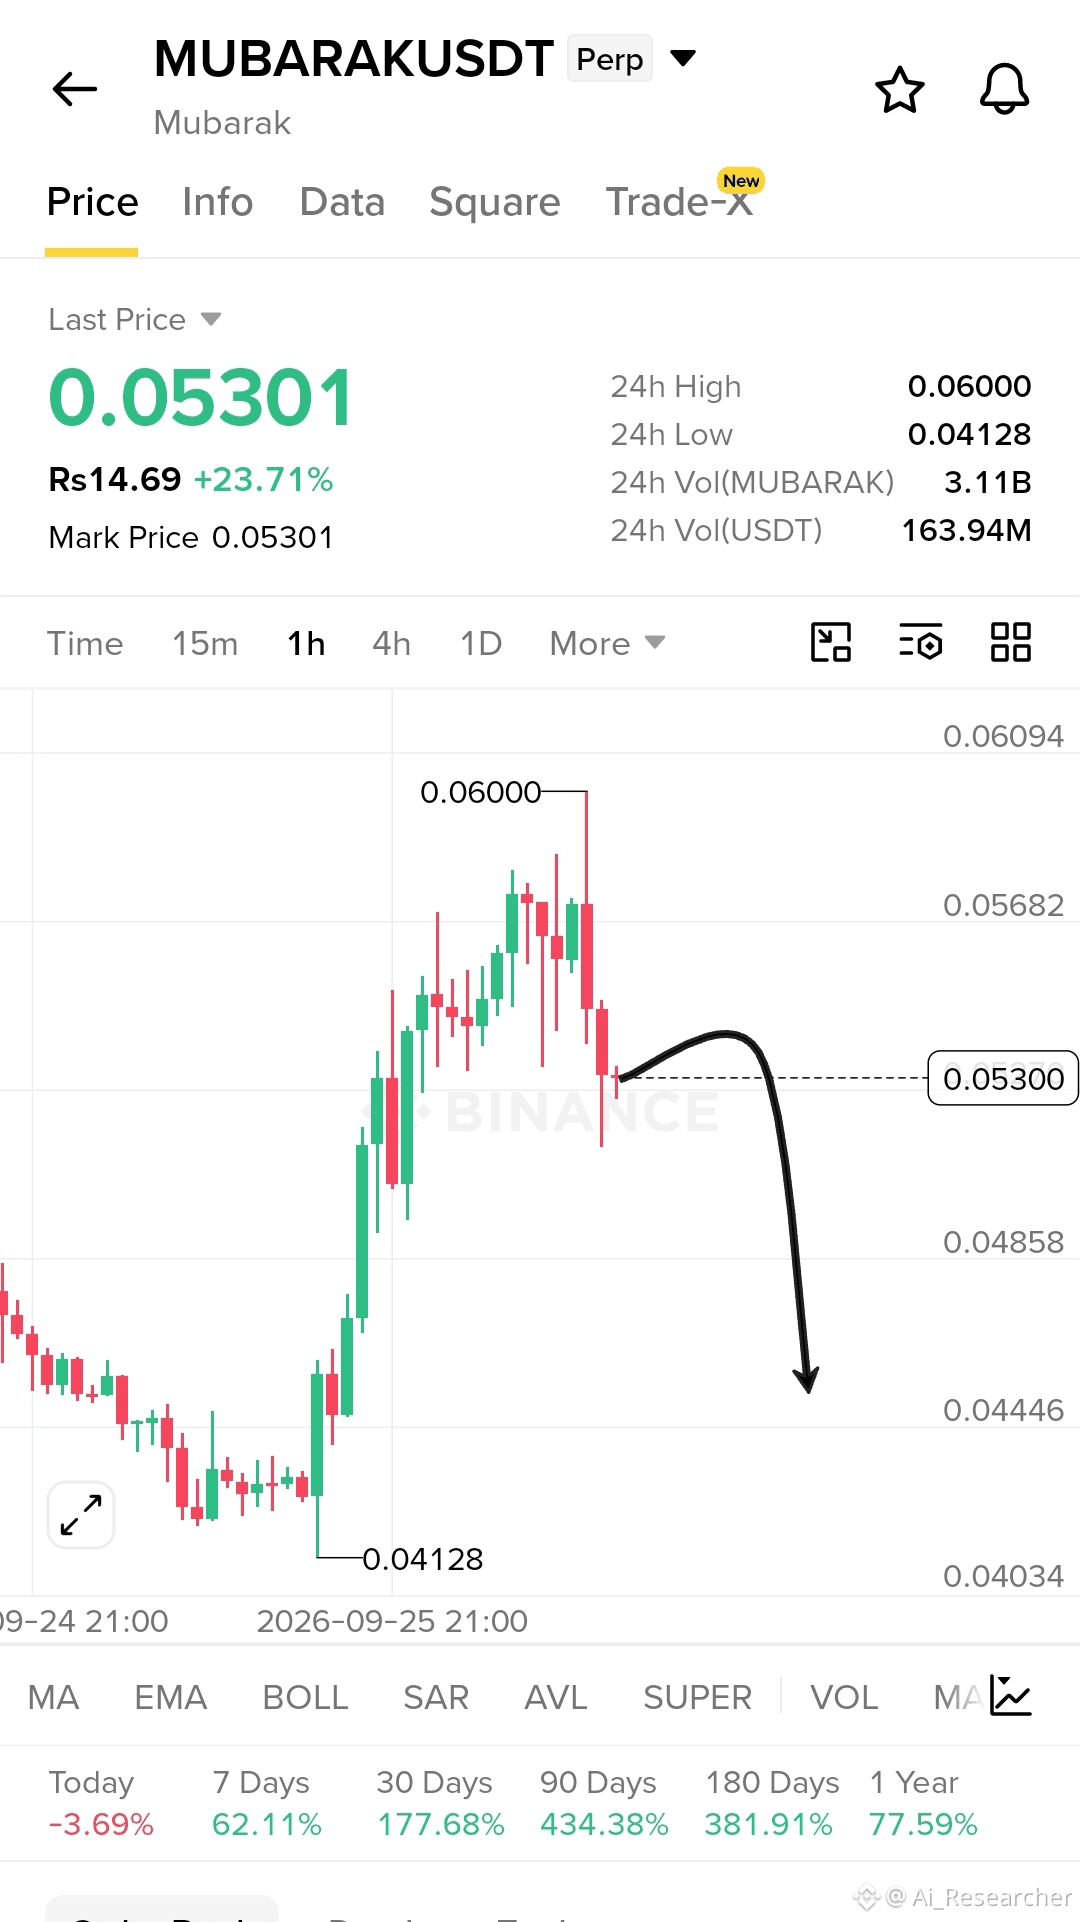
$MUBARAK — Bearish Rejection Setup
Short $MUBARAK
Entry: 0.0528 – 0.0535
SL: 0.0572
TP:
🎯 0.0505
🎯 0.0485
🎯 0.0465
🎯 0.0445
Explanation: MUBARAK is showing rejection after failing to sustain the move toward the 0.0600 high. A confirmed bearish breakdown below the current support area could trigger a deeper pullback toward lower support levels. Wait for confirmation before entering and manage risk carefully.
Disclaimer: This is only my personal opinion, not investment advice. Always manage your risk.
Trade $MUBARAK Here 👇
{future}(MUBARAKUSDT)
#MUBARAK #CryptoTrading #Binance #Altcoins
$MUBARAK — Bearish Rejection Setup
Short $MUBARAK
Entry: 0.0528 – 0.0535
SL: 0.0572
TP:
🎯 0.0505
🎯 0.0485
🎯 0.0465
🎯 0.0445
Explanation: MUBARAK is showing rejection after failing to sustain the move toward the 0.0600 high. A confirmed bearish breakdown below the current support area could trigger a deeper pullback toward lower support levels. Wait for confirmation before entering and manage risk carefully.
Disclaimer: This is only my personal opinion, not investment advice. Always manage your risk.
Trade $MUBARAK Here 👇
#MUBARAK #CryptoTrading #Binance #Altcoins
Short $MUBARAK
Entry: 0.0528 – 0.0535
SL: 0.0572
TP:
🎯 0.0505
🎯 0.0485
🎯 0.0465
🎯 0.0445
Explanation: MUBARAK is showing rejection after failing to sustain the move toward the 0.0600 high. A confirmed bearish breakdown below the current support area could trigger a deeper pullback toward lower support levels. Wait for confirmation before entering and manage risk carefully.
Disclaimer: This is only my personal opinion, not investment advice. Always manage your risk.
Trade $MUBARAK Here 👇
#MUBARAK #CryptoTrading #Binance #Altcoins
1
72
·
--
Bullish
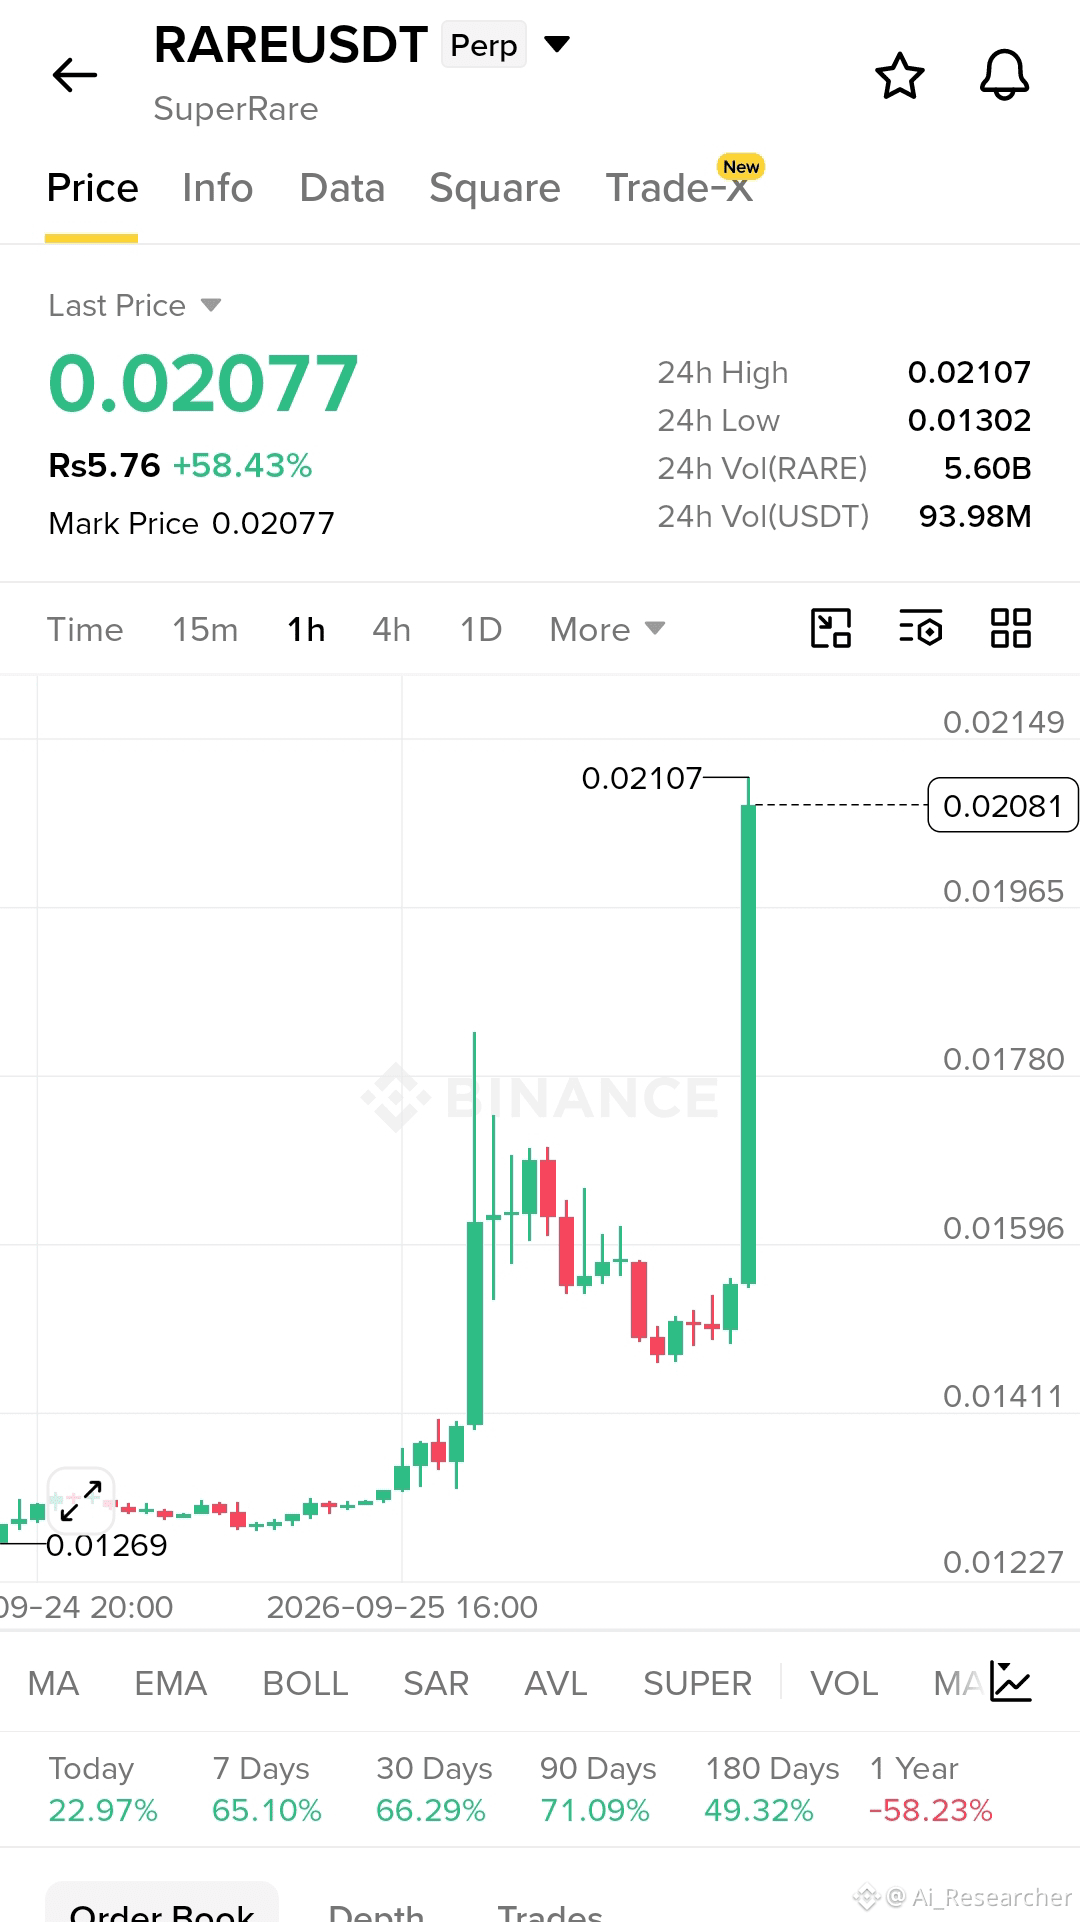
$RARE — Bullish Breakout Setup 🚀🔥
Long $RARE
Entry: 0.0202 – 0.0208
SL: 0.0192
TP:
🎯 0.0215
🎯 0.0225
🎯 0.0240
🎯 0.0260
Explanation: RARE has delivered a strong breakout from the recent consolidation range with powerful momentum. Holding above the breakout area could open the way toward the next resistance levels. Wait for confirmation or a clean retest before entering and manage risk carefully.
Disclaimer: This is only my personal opinion, not investment advice. Always manage your risk.
Trade $RARE Here 👇
{future}(RAREUSDT)
#RARE #CryptoTrading #Binance #Altcoins
$RARE — Bullish Breakout Setup 🚀🔥
Long $RARE
Entry: 0.0202 – 0.0208
SL: 0.0192
TP:
🎯 0.0215
🎯 0.0225
🎯 0.0240
🎯 0.0260
Explanation: RARE has delivered a strong breakout from the recent consolidation range with powerful momentum. Holding above the breakout area could open the way toward the next resistance levels. Wait for confirmation or a clean retest before entering and manage risk carefully.
Disclaimer: This is only my personal opinion, not investment advice. Always manage your risk.
Trade $RARE Here 👇
#RARE #CryptoTrading #Binance #Altcoins
Long $RARE
Entry: 0.0202 – 0.0208
SL: 0.0192
TP:
🎯 0.0215
🎯 0.0225
🎯 0.0240
🎯 0.0260
Explanation: RARE has delivered a strong breakout from the recent consolidation range with powerful momentum. Holding above the breakout area could open the way toward the next resistance levels. Wait for confirmation or a clean retest before entering and manage risk carefully.
Disclaimer: This is only my personal opinion, not investment advice. Always manage your risk.
Trade $RARE Here 👇
#RARE #CryptoTrading #Binance #Altcoins
1
65
·
--
Bullish
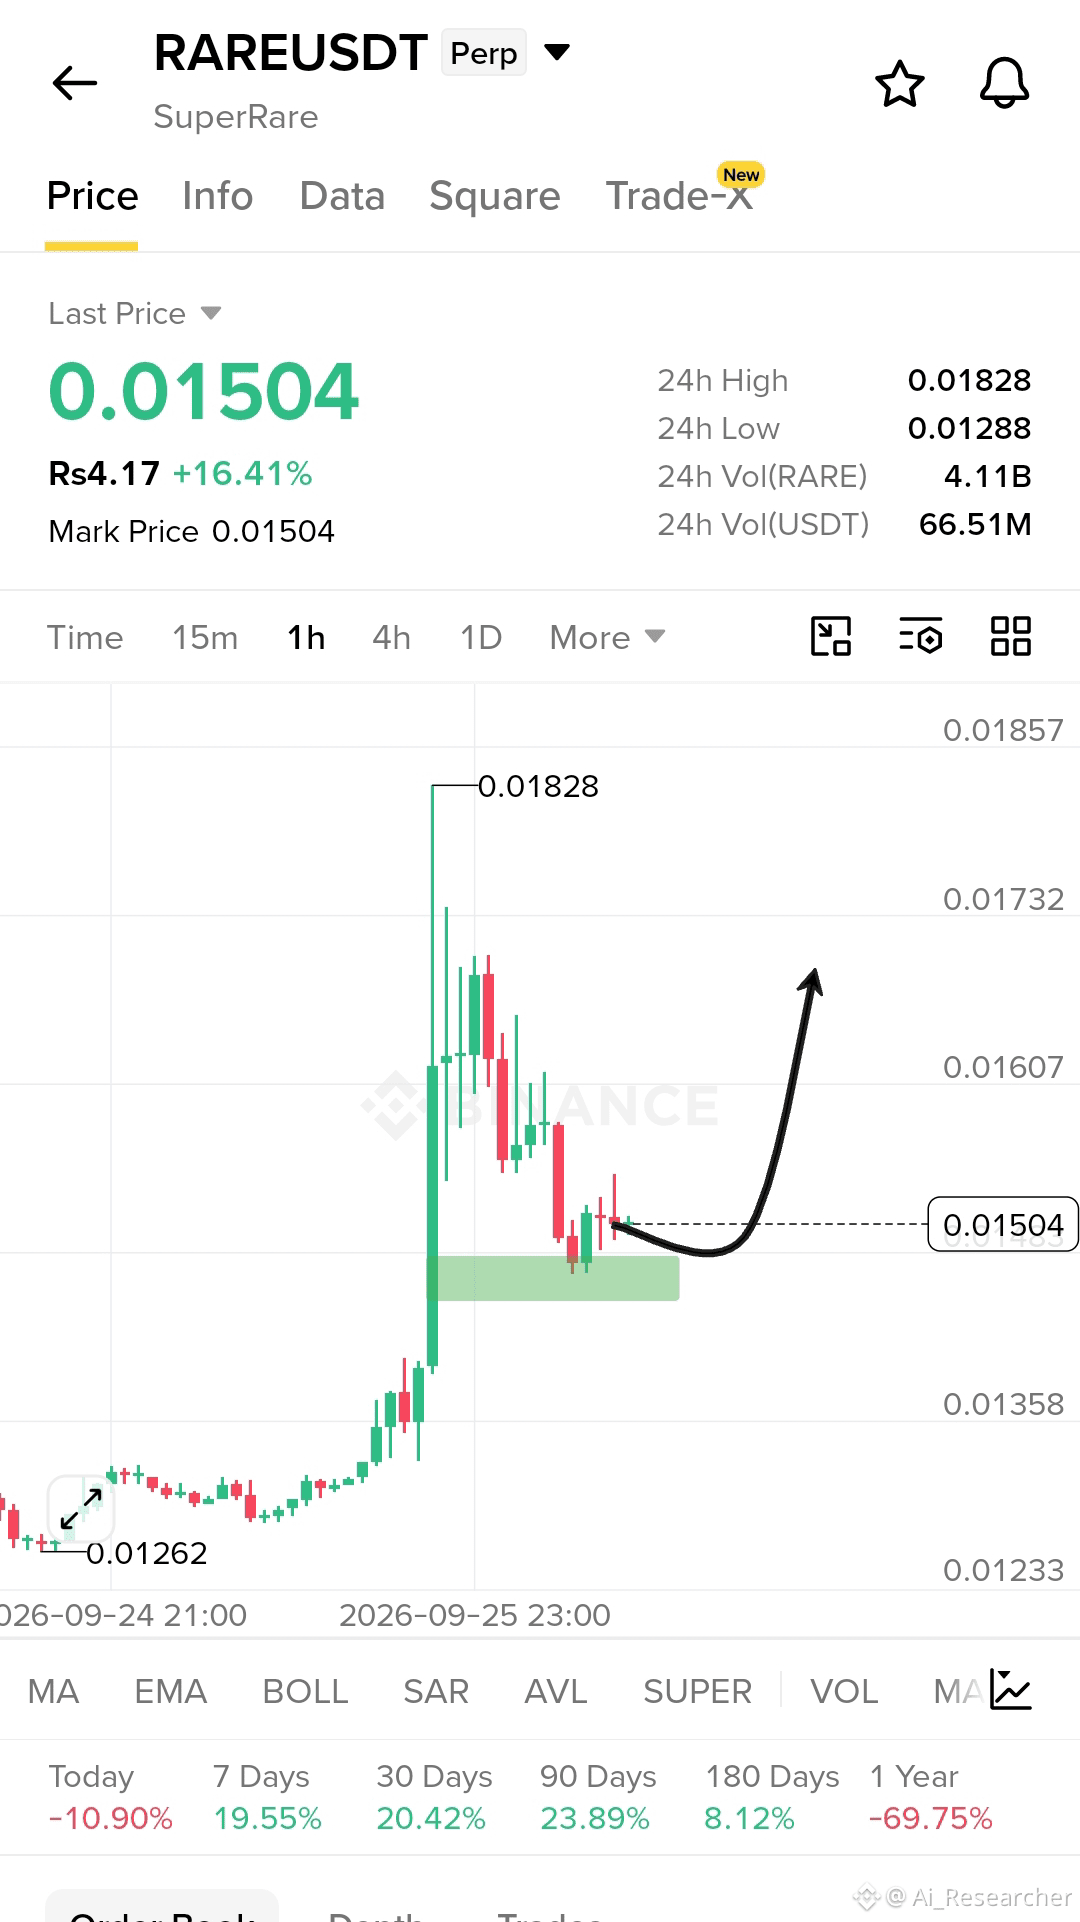
$RARE — Bullish Reversal Setup 💹
Long $RARE
Entry: 0.0149 – 0.0152
SL: 0.0141
TP:
🎯 0.0158
🎯 0.0165
🎯 0.0172
🎯 0.0180
Explanation: RARE is consolidating above the marked support zone after a sharp breakout and pullback. If buyers continue defending this area and price confirms a bullish reversal, a move toward the previous resistance levels could develop. Wait for confirmation before entering and manage risk carefully.
Disclaimer: This is only my personal opinion, not investment advice. Always manage your risk.
Trade $RARE Here 👇
{future}(RAREUSDT)
#RARE #CryptoTrading #Binance #Altcoins
$RARE — Bullish Reversal Setup 💹
Long $RARE
Entry: 0.0149 – 0.0152
SL: 0.0141
TP:
🎯 0.0158
🎯 0.0165
🎯 0.0172
🎯 0.0180
Explanation: RARE is consolidating above the marked support zone after a sharp breakout and pullback. If buyers continue defending this area and price confirms a bullish reversal, a move toward the previous resistance levels could develop. Wait for confirmation before entering and manage risk carefully.
Disclaimer: This is only my personal opinion, not investment advice. Always manage your risk.
Trade $RARE Here 👇
#RARE #CryptoTrading #Binance #Altcoins
Long $RARE
Entry: 0.0149 – 0.0152
SL: 0.0141
TP:
🎯 0.0158
🎯 0.0165
🎯 0.0172
🎯 0.0180
Explanation: RARE is consolidating above the marked support zone after a sharp breakout and pullback. If buyers continue defending this area and price confirms a bullish reversal, a move toward the previous resistance levels could develop. Wait for confirmation before entering and manage risk carefully.
Disclaimer: This is only my personal opinion, not investment advice. Always manage your risk.
Trade $RARE Here 👇
#RARE #CryptoTrading #Binance #Altcoins
1
42
·
--
Bullish
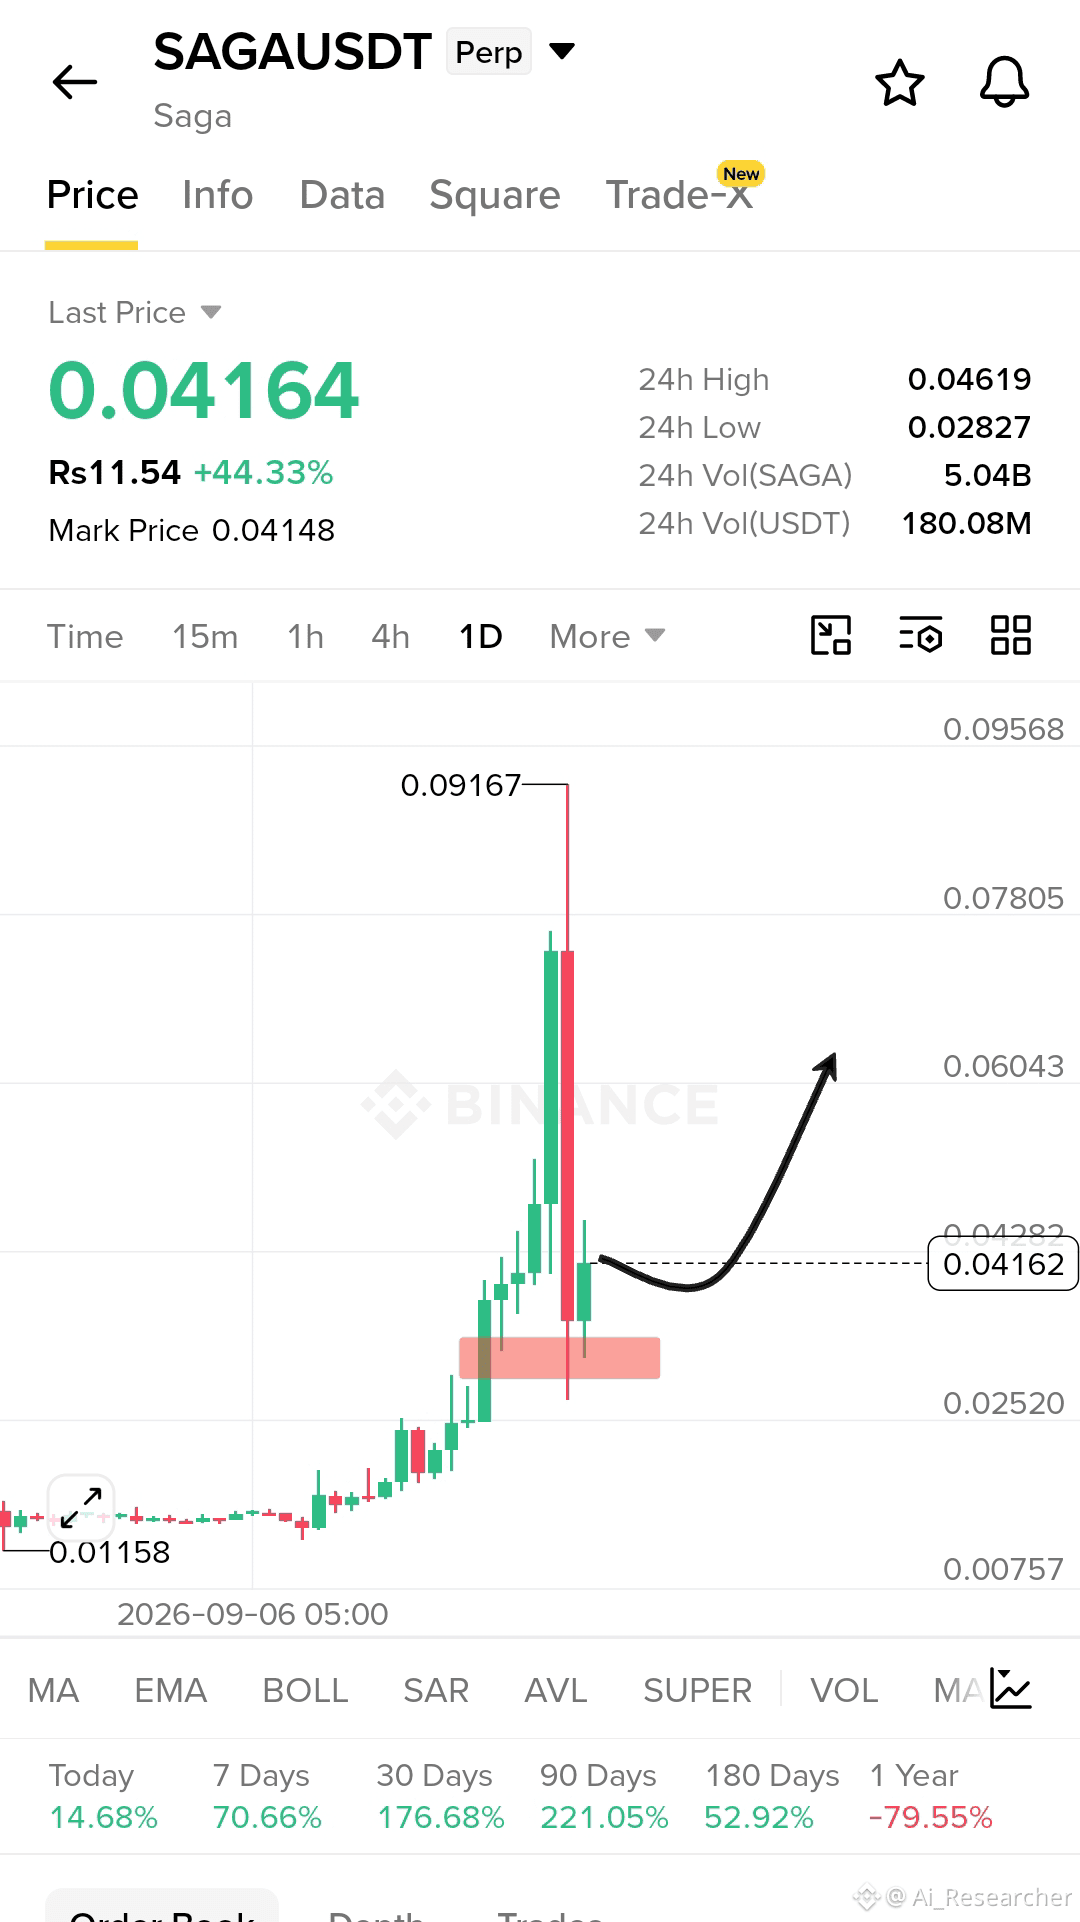
$SAGA — Bullish Reversal Setup 💹
Long $SAGA
Entry: 0.0400 – 0.0420
SL: 0.0345
TP:
🎯 0.0460
🎯 0.0500
🎯 0.0550
🎯 0.0600
Explanation: SAGA is holding above the marked support zone after a sharp correction from the recent high. If buyers defend this area and price confirms a bullish reversal, a recovery toward the next resistance levels could develop. Wait for confirmation before entering and manage risk carefully.
Disclaimer: This is only my personal opinion, not investment advice. Always manage your risk.
Trade $SAGA Here 👇
{future}(SAGAUSDT)
#SAGA #CryptoTrading #Binance #Altcoins
$SAGA — Bullish Reversal Setup 💹
Long $SAGA
Entry: 0.0400 – 0.0420
SL: 0.0345
TP:
🎯 0.0460
🎯 0.0500
🎯 0.0550
🎯 0.0600
Explanation: SAGA is holding above the marked support zone after a sharp correction from the recent high. If buyers defend this area and price confirms a bullish reversal, a recovery toward the next resistance levels could develop. Wait for confirmation before entering and manage risk carefully.
Disclaimer: This is only my personal opinion, not investment advice. Always manage your risk.
Trade $SAGA Here 👇
#SAGA #CryptoTrading #Binance #Altcoins
Long $SAGA
Entry: 0.0400 – 0.0420
SL: 0.0345
TP:
🎯 0.0460
🎯 0.0500
🎯 0.0550
🎯 0.0600
Explanation: SAGA is holding above the marked support zone after a sharp correction from the recent high. If buyers defend this area and price confirms a bullish reversal, a recovery toward the next resistance levels could develop. Wait for confirmation before entering and manage risk carefully.
Disclaimer: This is only my personal opinion, not investment advice. Always manage your risk.
Trade $SAGA Here 👇
#SAGA #CryptoTrading #Binance #Altcoins
2
215
·
--
Bullish
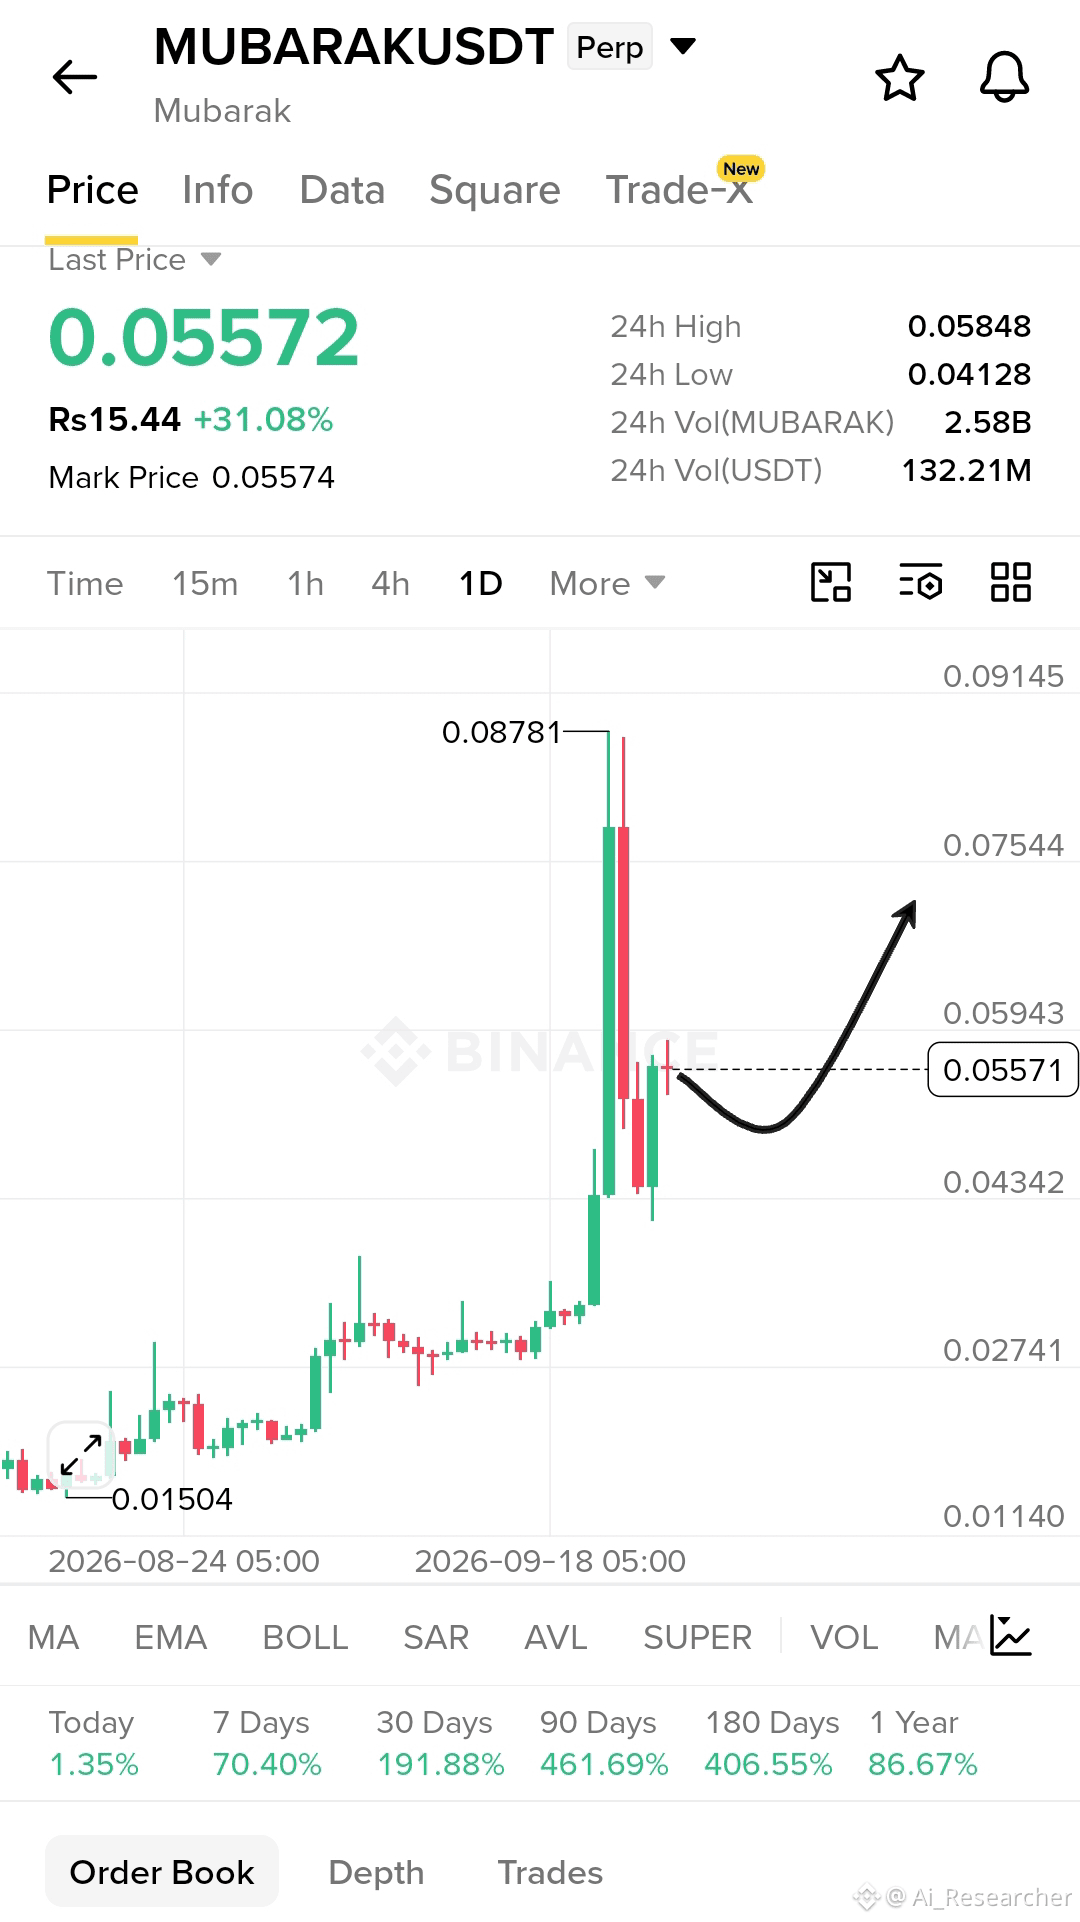
$MUBARAK — Bullish Continuation Setup
Long $MUBARAK
Entry: 0.0545 – 0.0560
SL: 0.0500
TP:
🎯 0.0595
🎯 0.0640
🎯 0.0690
🎯 0.0750
Explanation: MUBARAK is consolidating after a strong breakout and is holding above the recent support area. A confirmed move above the nearby resistance could support another bullish continuation toward higher levels. Wait for confirmation and manage risk carefully.
Disclaimer: This is only my personal opinion, not investment advice. Always manage your risk.
Trade $MUBARAK Here 👇
{future}(MUBARAKUSDT)
#MUBARAK #CryptoTrading #Binance #Altcoins
$MUBARAK — Bullish Continuation Setup
Long $MUBARAK
Entry: 0.0545 – 0.0560
SL: 0.0500
TP:
🎯 0.0595
🎯 0.0640
🎯 0.0690
🎯 0.0750
Explanation: MUBARAK is consolidating after a strong breakout and is holding above the recent support area. A confirmed move above the nearby resistance could support another bullish continuation toward higher levels. Wait for confirmation and manage risk carefully.
Disclaimer: This is only my personal opinion, not investment advice. Always manage your risk.
Trade $MUBARAK Here 👇
#MUBARAK #CryptoTrading #Binance #Altcoins
Long $MUBARAK
Entry: 0.0545 – 0.0560
SL: 0.0500
TP:
🎯 0.0595
🎯 0.0640
🎯 0.0690
🎯 0.0750
Explanation: MUBARAK is consolidating after a strong breakout and is holding above the recent support area. A confirmed move above the nearby resistance could support another bullish continuation toward higher levels. Wait for confirmation and manage risk carefully.
Disclaimer: This is only my personal opinion, not investment advice. Always manage your risk.
Trade $MUBARAK Here 👇
#MUBARAK #CryptoTrading #Binance #Altcoins
1
164
·
--
Bullish
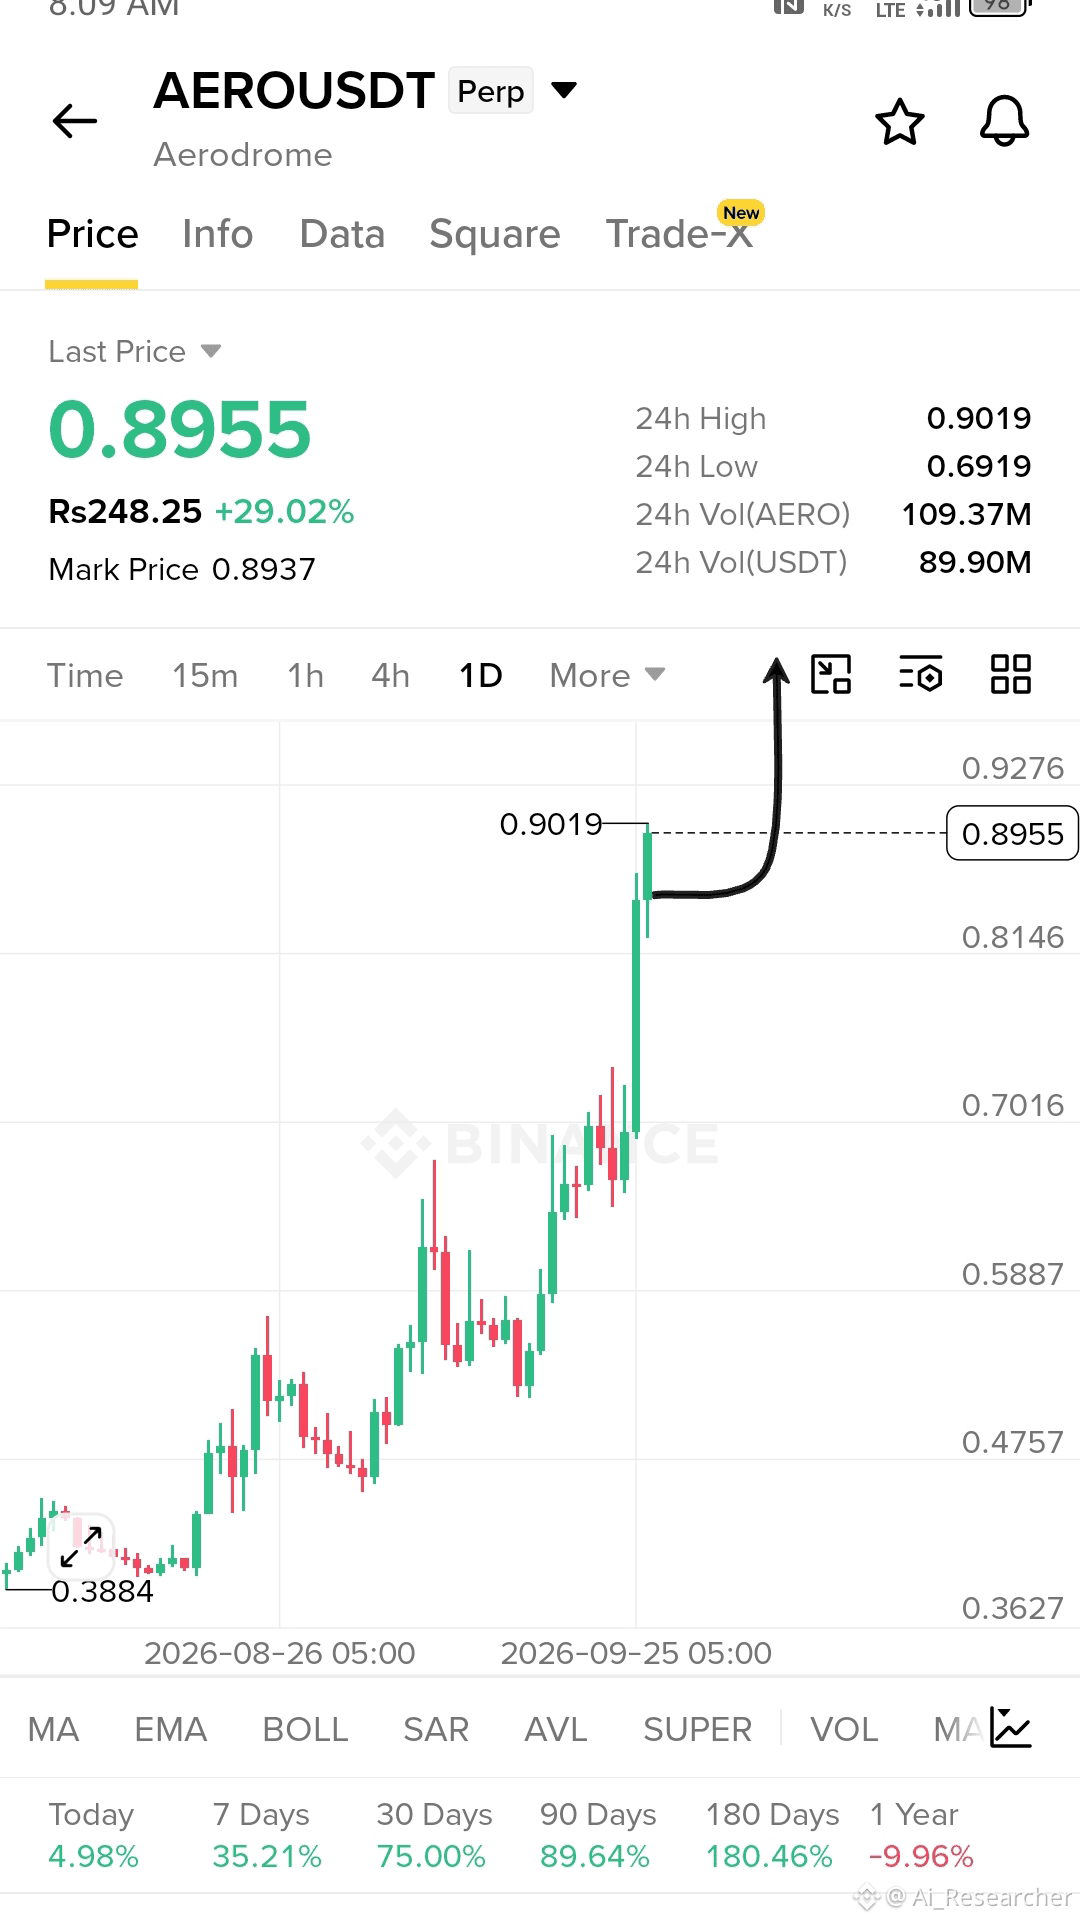
$AERO — Bullish Breakout Setup 💹
Long $AERO
Entry: 0.8800 – 0.8950
SL: 0.8450
TP:
🎯 0.9200
🎯 0.9500
🎯 0.9900
🎯 1.0300
Explanation: AERO has broken strongly above the previous resistance zone with strong momentum. A hold above the breakout area could support further continuation toward the next psychological resistance levels. Wait for confirmation and manage risk carefully.
Disclaimer: This is only my personal opinion, not investment advice. Always manage your risk.
Trade $AERO Here 👇
{future}(AEROUSDT)
#AERO #CryptoTrading #Binance #Altcoins
$AERO — Bullish Breakout Setup 💹
Long $AERO
Entry: 0.8800 – 0.8950
SL: 0.8450
TP:
🎯 0.9200
🎯 0.9500
🎯 0.9900
🎯 1.0300
Explanation: AERO has broken strongly above the previous resistance zone with strong momentum. A hold above the breakout area could support further continuation toward the next psychological resistance levels. Wait for confirmation and manage risk carefully.
Disclaimer: This is only my personal opinion, not investment advice. Always manage your risk.
Trade $AERO Here 👇
#AERO #CryptoTrading #Binance #Altcoins
Long $AERO
Entry: 0.8800 – 0.8950
SL: 0.8450
TP:
🎯 0.9200
🎯 0.9500
🎯 0.9900
🎯 1.0300
Explanation: AERO has broken strongly above the previous resistance zone with strong momentum. A hold above the breakout area could support further continuation toward the next psychological resistance levels. Wait for confirmation and manage risk carefully.
Disclaimer: This is only my personal opinion, not investment advice. Always manage your risk.
Trade $AERO Here 👇
#AERO #CryptoTrading #Binance #Altcoins
1
90
·
--
Bearish
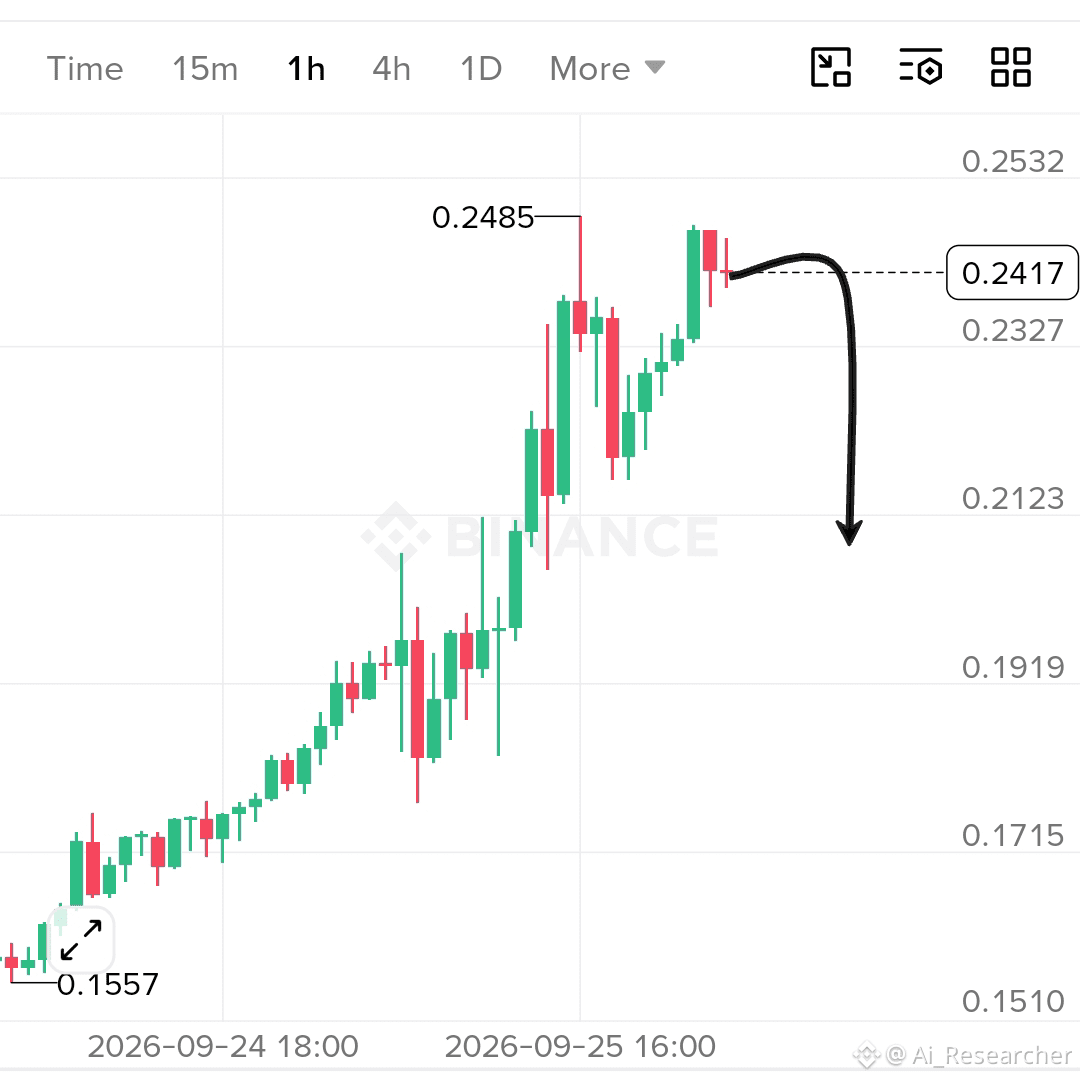
$ARK — Bearish Rejection Setup 🔻
Short $ARK
Entry: 0.2400 – 0.2430
SL: 0.2515
TP:
* 🎯 0.2327
* 🎯 0.2250
* 🎯 0.2180
* 🎯 0.2123
Explanation: ARK has experienced a strong upward move and is showing rejection near the recent high zone around 0.2485. A confirmed bearish rejection could trigger a pullback toward lower support levels. Wait for confirmation before entering and manage risk carefully.
Disclaimer: This is only my personal opinion, not investment advice. Always manage your risk.
Trade $ARK Here 👇
{future}(ARKUSDT)
#ARK #CryptoTrading #Binance #GuruTraders #Altcoins
$ARK — Bearish Rejection Setup 🔻
Short $ARK
Entry: 0.2400 – 0.2430
SL: 0.2515
TP:
* 🎯 0.2327
* 🎯 0.2250
* 🎯 0.2180
* 🎯 0.2123
Explanation: ARK has experienced a strong upward move and is showing rejection near the recent high zone around 0.2485. A confirmed bearish rejection could trigger a pullback toward lower support levels. Wait for confirmation before entering and manage risk carefully.
Disclaimer: This is only my personal opinion, not investment advice. Always manage your risk.
Trade $ARK Here 👇
#ARK #CryptoTrading #Binance #GuruTraders #Altcoins
Short $ARK
Entry: 0.2400 – 0.2430
SL: 0.2515
TP:
* 🎯 0.2327
* 🎯 0.2250
* 🎯 0.2180
* 🎯 0.2123
Explanation: ARK has experienced a strong upward move and is showing rejection near the recent high zone around 0.2485. A confirmed bearish rejection could trigger a pullback toward lower support levels. Wait for confirmation before entering and manage risk carefully.
Disclaimer: This is only my personal opinion, not investment advice. Always manage your risk.
Trade $ARK Here 👇
#ARK #CryptoTrading #Binance #GuruTraders #Altcoins
1
12
·
--
Bearish
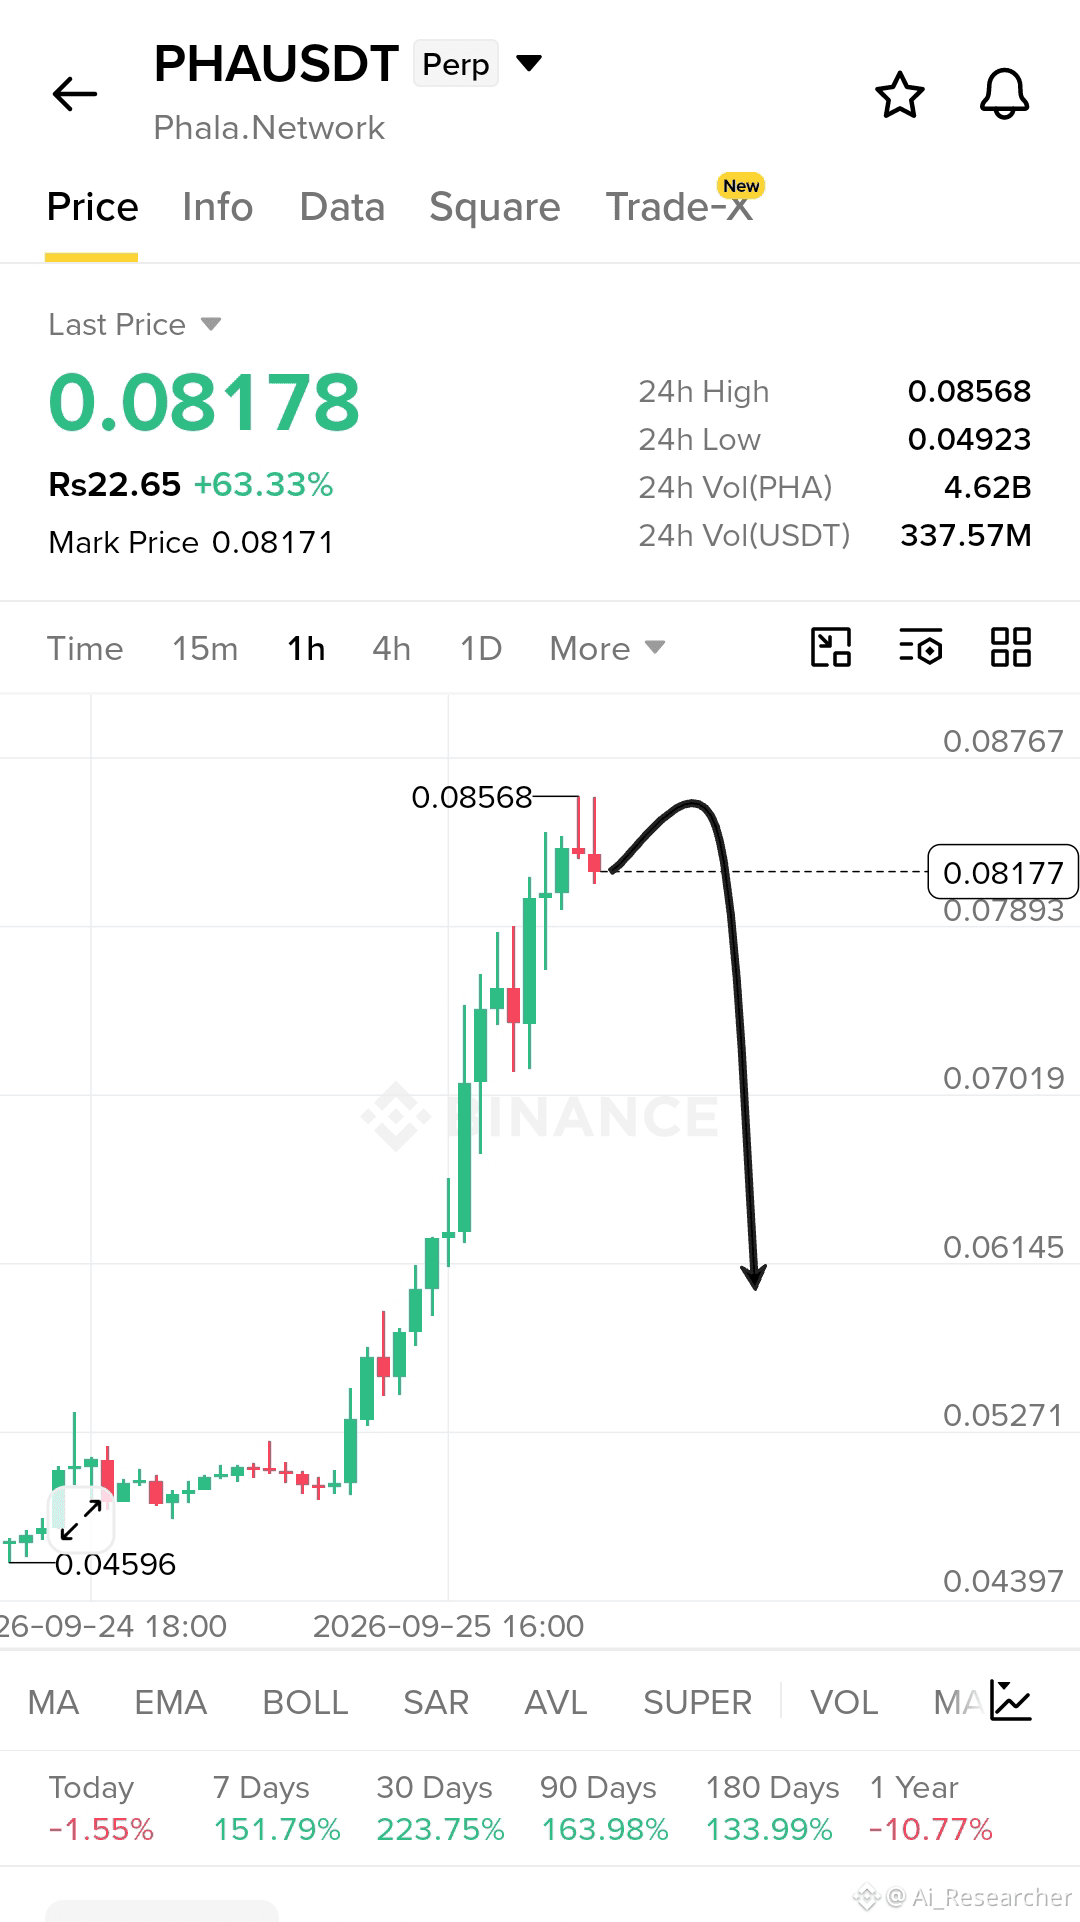
$PHA — Bearish Rejection Setup 🔻
Short $PHA
Entry: 0.0815 – 0.0825
SL: 0.0865
TP:
* 🎯 0.0789
* 🎯 0.0730
* 🎯 0.0670
* 🎯 0.0615
Explanation: PHA has experienced a strong upward move and is showing signs of rejection near the recent high zone. A confirmed bearish rejection could trigger a pullback toward lower support levels. Wait for confirmation before entering and manage risk carefully.
Disclaimer: This is only my personal opinion, not investment advice. Always manage your risk.
Trade $PHA Here 👇
{future}(PHAUSDT)
#PHA #CryptoTrading #Binance #GuruTraders #Altcoins
$PHA — Bearish Rejection Setup 🔻
Short $PHA
Entry: 0.0815 – 0.0825
SL: 0.0865
TP:
* 🎯 0.0789
* 🎯 0.0730
* 🎯 0.0670
* 🎯 0.0615
Explanation: PHA has experienced a strong upward move and is showing signs of rejection near the recent high zone. A confirmed bearish rejection could trigger a pullback toward lower support levels. Wait for confirmation before entering and manage risk carefully.
Disclaimer: This is only my personal opinion, not investment advice. Always manage your risk.
Trade $PHA Here 👇
#PHA #CryptoTrading #Binance #GuruTraders #Altcoins
Short $PHA
Entry: 0.0815 – 0.0825
SL: 0.0865
TP:
* 🎯 0.0789
* 🎯 0.0730
* 🎯 0.0670
* 🎯 0.0615
Explanation: PHA has experienced a strong upward move and is showing signs of rejection near the recent high zone. A confirmed bearish rejection could trigger a pullback toward lower support levels. Wait for confirmation before entering and manage risk carefully.
Disclaimer: This is only my personal opinion, not investment advice. Always manage your risk.
Trade $PHA Here 👇
#PHA #CryptoTrading #Binance #GuruTraders #Altcoins
1
12
·
--
Bearish
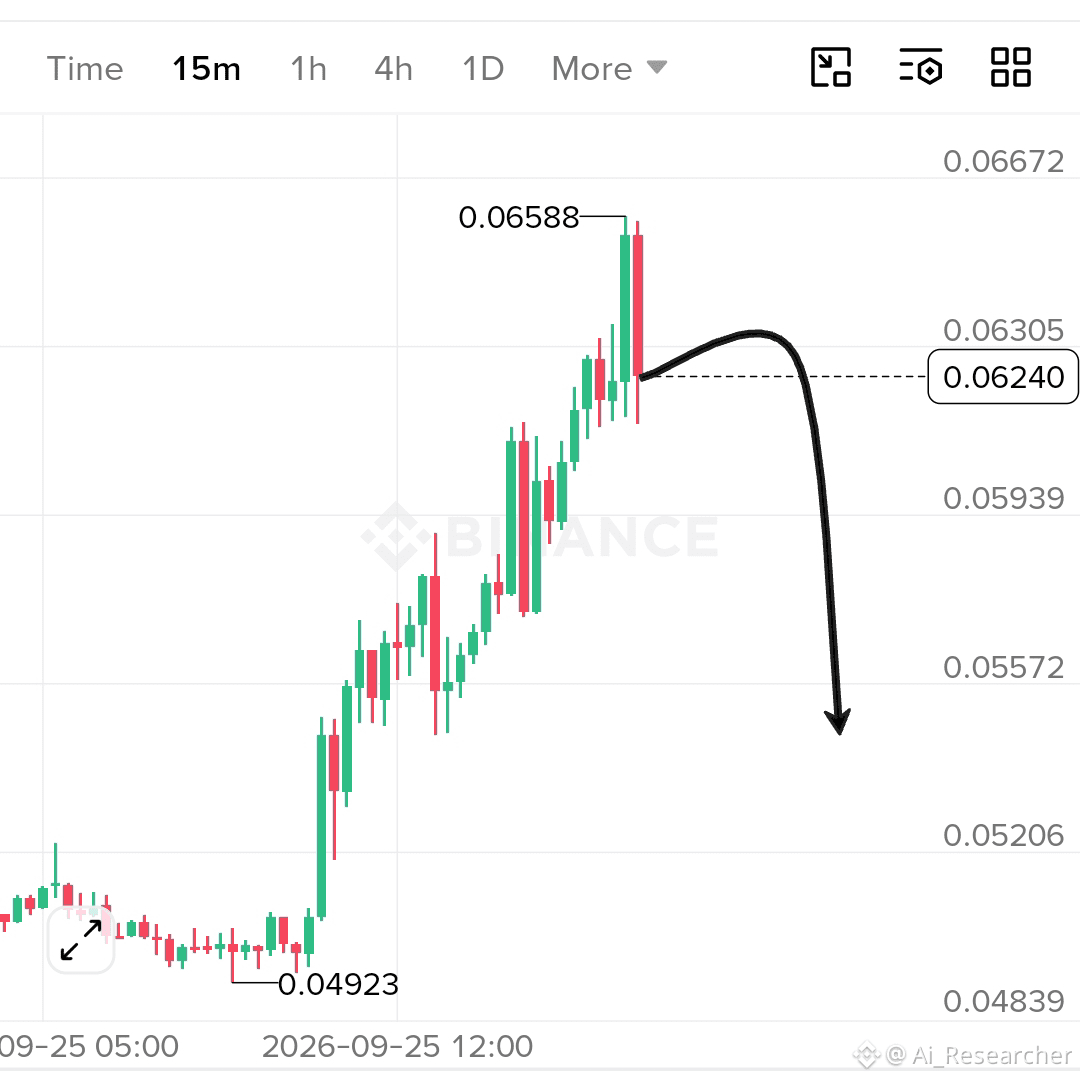
$PHA — Bearish Rejection Setup 🔻
Short $PHA
Entry: 0.0620 – 0.0635
SL: 0.0668
TP:
* 🎯 0.0595
* 🎯 0.0570
* 🎯 0.0545
* 🎯 0.0520
Explanation: PHA is showing a potential rejection after a strong bullish rally toward the 0.06588 resistance area. A confirmed bearish rejection could trigger a pullback toward lower support levels. Wait for confirmation before entering and manage risk carefully.
Disclaimer: This is only my personal opinion, not investment advice. Always manage your risk.
Trade $PHA Here 👇
{future}(PHAUSDT)
#PHA #CryptoTrading #Binance #Altcoins
$PHA — Bearish Rejection Setup 🔻
Short $PHA
Entry: 0.0620 – 0.0635
SL: 0.0668
TP:
* 🎯 0.0595
* 🎯 0.0570
* 🎯 0.0545
* 🎯 0.0520
Explanation: PHA is showing a potential rejection after a strong bullish rally toward the 0.06588 resistance area. A confirmed bearish rejection could trigger a pullback toward lower support levels. Wait for confirmation before entering and manage risk carefully.
Disclaimer: This is only my personal opinion, not investment advice. Always manage your risk.
Trade $PHA Here 👇
#PHA #CryptoTrading #Binance #Altcoins
Short $PHA
Entry: 0.0620 – 0.0635
SL: 0.0668
TP:
* 🎯 0.0595
* 🎯 0.0570
* 🎯 0.0545
* 🎯 0.0520
Explanation: PHA is showing a potential rejection after a strong bullish rally toward the 0.06588 resistance area. A confirmed bearish rejection could trigger a pullback toward lower support levels. Wait for confirmation before entering and manage risk carefully.
Disclaimer: This is only my personal opinion, not investment advice. Always manage your risk.
Trade $PHA Here 👇
#PHA #CryptoTrading #Binance #Altcoins
1
12
·
--
Bullish
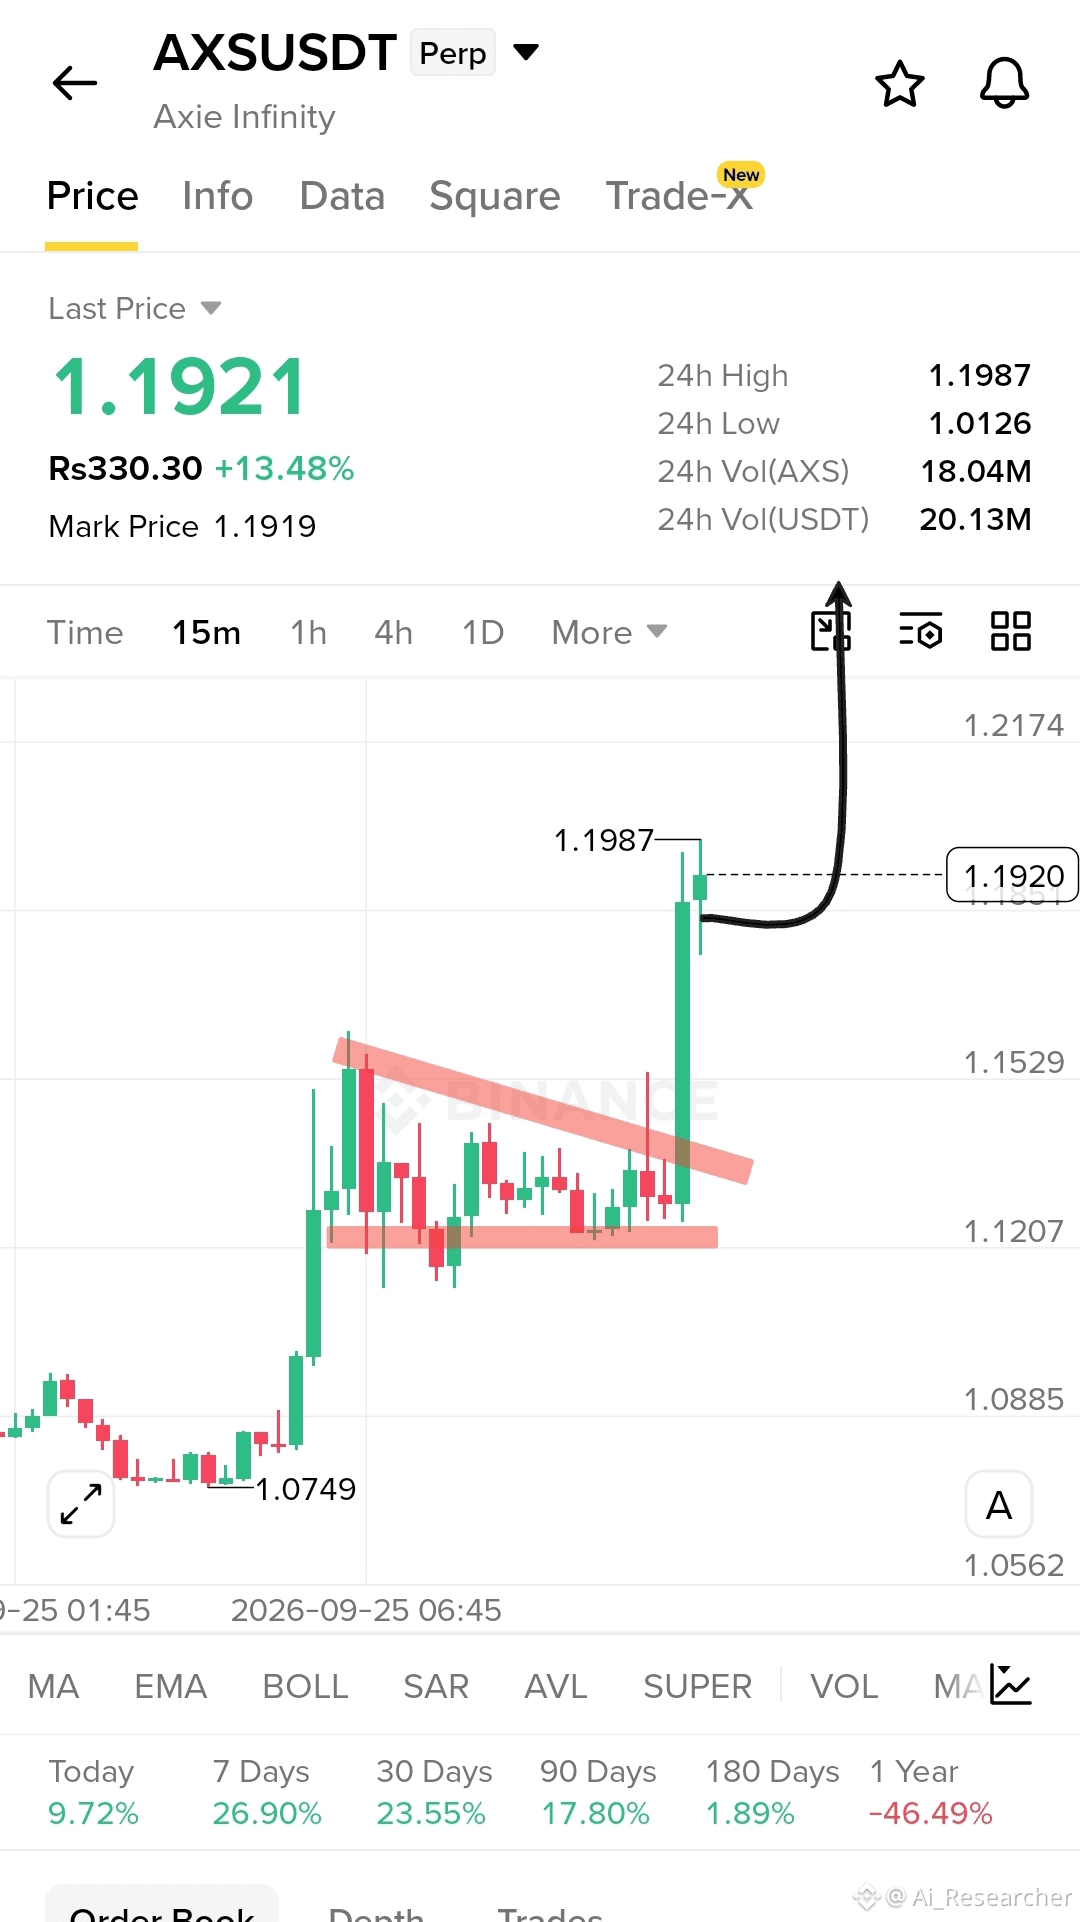
$AXS — Bullish Breakout Setup
Long $AXS
Entry: 1.1800 – 1.1950
SL: 1.1550
TP:
* 🎯 1.2170
* 🎯 1.2350
* 🎯 1.2550
* 🎯 1.2800
Explanation: AXS has broken above the descending resistance trendline with strong bullish momentum. The breakout suggests potential continuation toward higher resistance levels. Wait for a successful retest or confirmation before entering and manage risk carefully.
Disclaimer: This is only my personal opinion, not investment advice. Always manage your risk.
Trade $AXS Here 👇
{future}(AXSUSDT)
#AXS #CryptoTrading #Binance #Altcoins
$AXS — Bullish Breakout Setup
Long $AXS
Entry: 1.1800 – 1.1950
SL: 1.1550
TP:
* 🎯 1.2170
* 🎯 1.2350
* 🎯 1.2550
* 🎯 1.2800
Explanation: AXS has broken above the descending resistance trendline with strong bullish momentum. The breakout suggests potential continuation toward higher resistance levels. Wait for a successful retest or confirmation before entering and manage risk carefully.
Disclaimer: This is only my personal opinion, not investment advice. Always manage your risk.
Trade $AXS Here 👇
#AXS #CryptoTrading #Binance #Altcoins
Long $AXS
Entry: 1.1800 – 1.1950
SL: 1.1550
TP:
* 🎯 1.2170
* 🎯 1.2350
* 🎯 1.2550
* 🎯 1.2800
Explanation: AXS has broken above the descending resistance trendline with strong bullish momentum. The breakout suggests potential continuation toward higher resistance levels. Wait for a successful retest or confirmation before entering and manage risk carefully.
Disclaimer: This is only my personal opinion, not investment advice. Always manage your risk.
Trade $AXS Here 👇
#AXS #CryptoTrading #Binance #Altcoins
1
153
·
--
Bearish
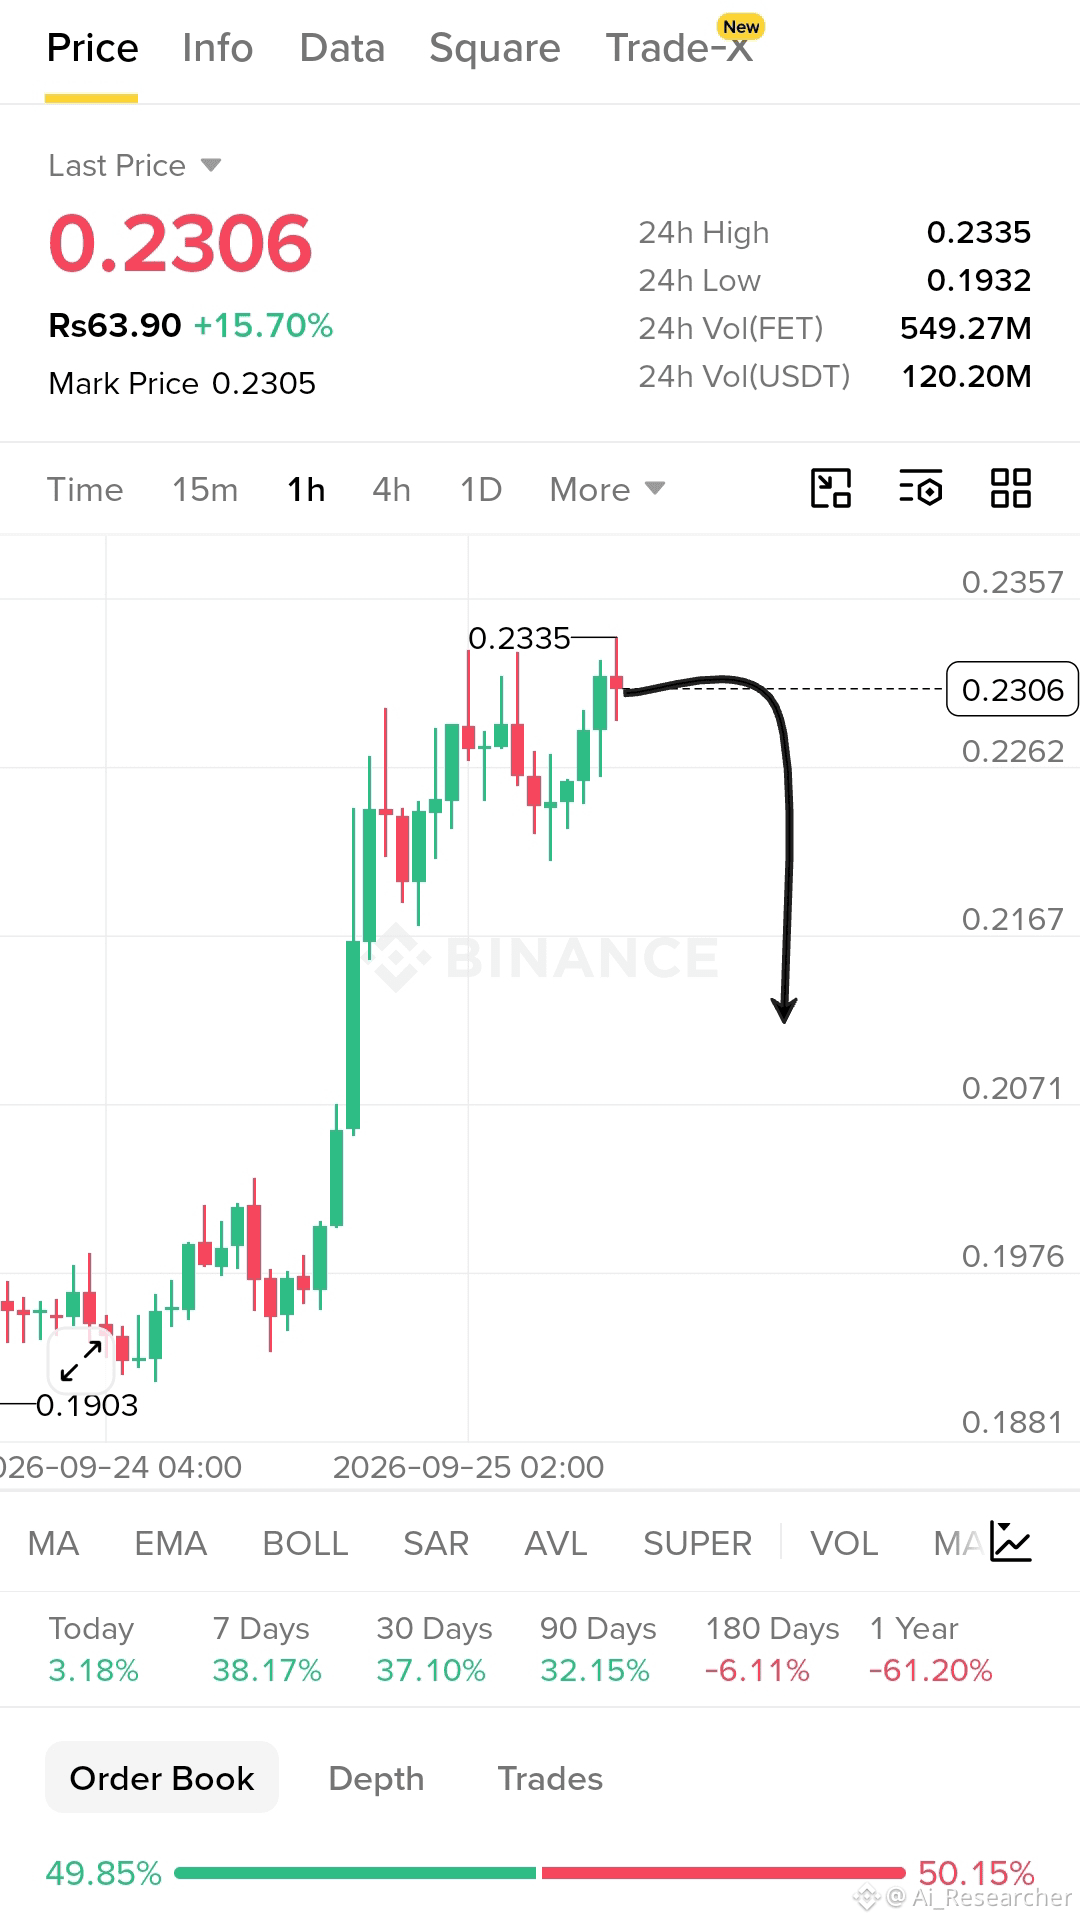
$FET — Bearish Rejection Setup 🔻
Short $FET
Entry: 0.2300 – 0.2330
SL: 0.2370
TP:
* 🎯 0.2262
* 🎯 0.2220
* 🎯 0.2167
* 🎯 0.2120
Explanation: FET is testing resistance near the recent high after a strong bullish move. A confirmed bearish rejection around the 0.2300–0.2330 zone could trigger a pullback toward lower support levels. Wait for confirmation before entering and manage risk carefully.
Disclaimer: This is only my personal opinion, not investment advice. Always manage your risk.
Trade $FET Here 👇
{future}(FETUSDT)
#FET #CryptoTrading #Binance #Altcoins
$FET — Bearish Rejection Setup 🔻
Short $FET
Entry: 0.2300 – 0.2330
SL: 0.2370
TP:
* 🎯 0.2262
* 🎯 0.2220
* 🎯 0.2167
* 🎯 0.2120
Explanation: FET is testing resistance near the recent high after a strong bullish move. A confirmed bearish rejection around the 0.2300–0.2330 zone could trigger a pullback toward lower support levels. Wait for confirmation before entering and manage risk carefully.
Disclaimer: This is only my personal opinion, not investment advice. Always manage your risk.
Trade $FET Here 👇
#FET #CryptoTrading #Binance #Altcoins
Short $FET
Entry: 0.2300 – 0.2330
SL: 0.2370
TP:
* 🎯 0.2262
* 🎯 0.2220
* 🎯 0.2167
* 🎯 0.2120
Explanation: FET is testing resistance near the recent high after a strong bullish move. A confirmed bearish rejection around the 0.2300–0.2330 zone could trigger a pullback toward lower support levels. Wait for confirmation before entering and manage risk carefully.
Disclaimer: This is only my personal opinion, not investment advice. Always manage your risk.
Trade $FET Here 👇
#FET #CryptoTrading #Binance #Altcoins
1
158
·
--
Bearish
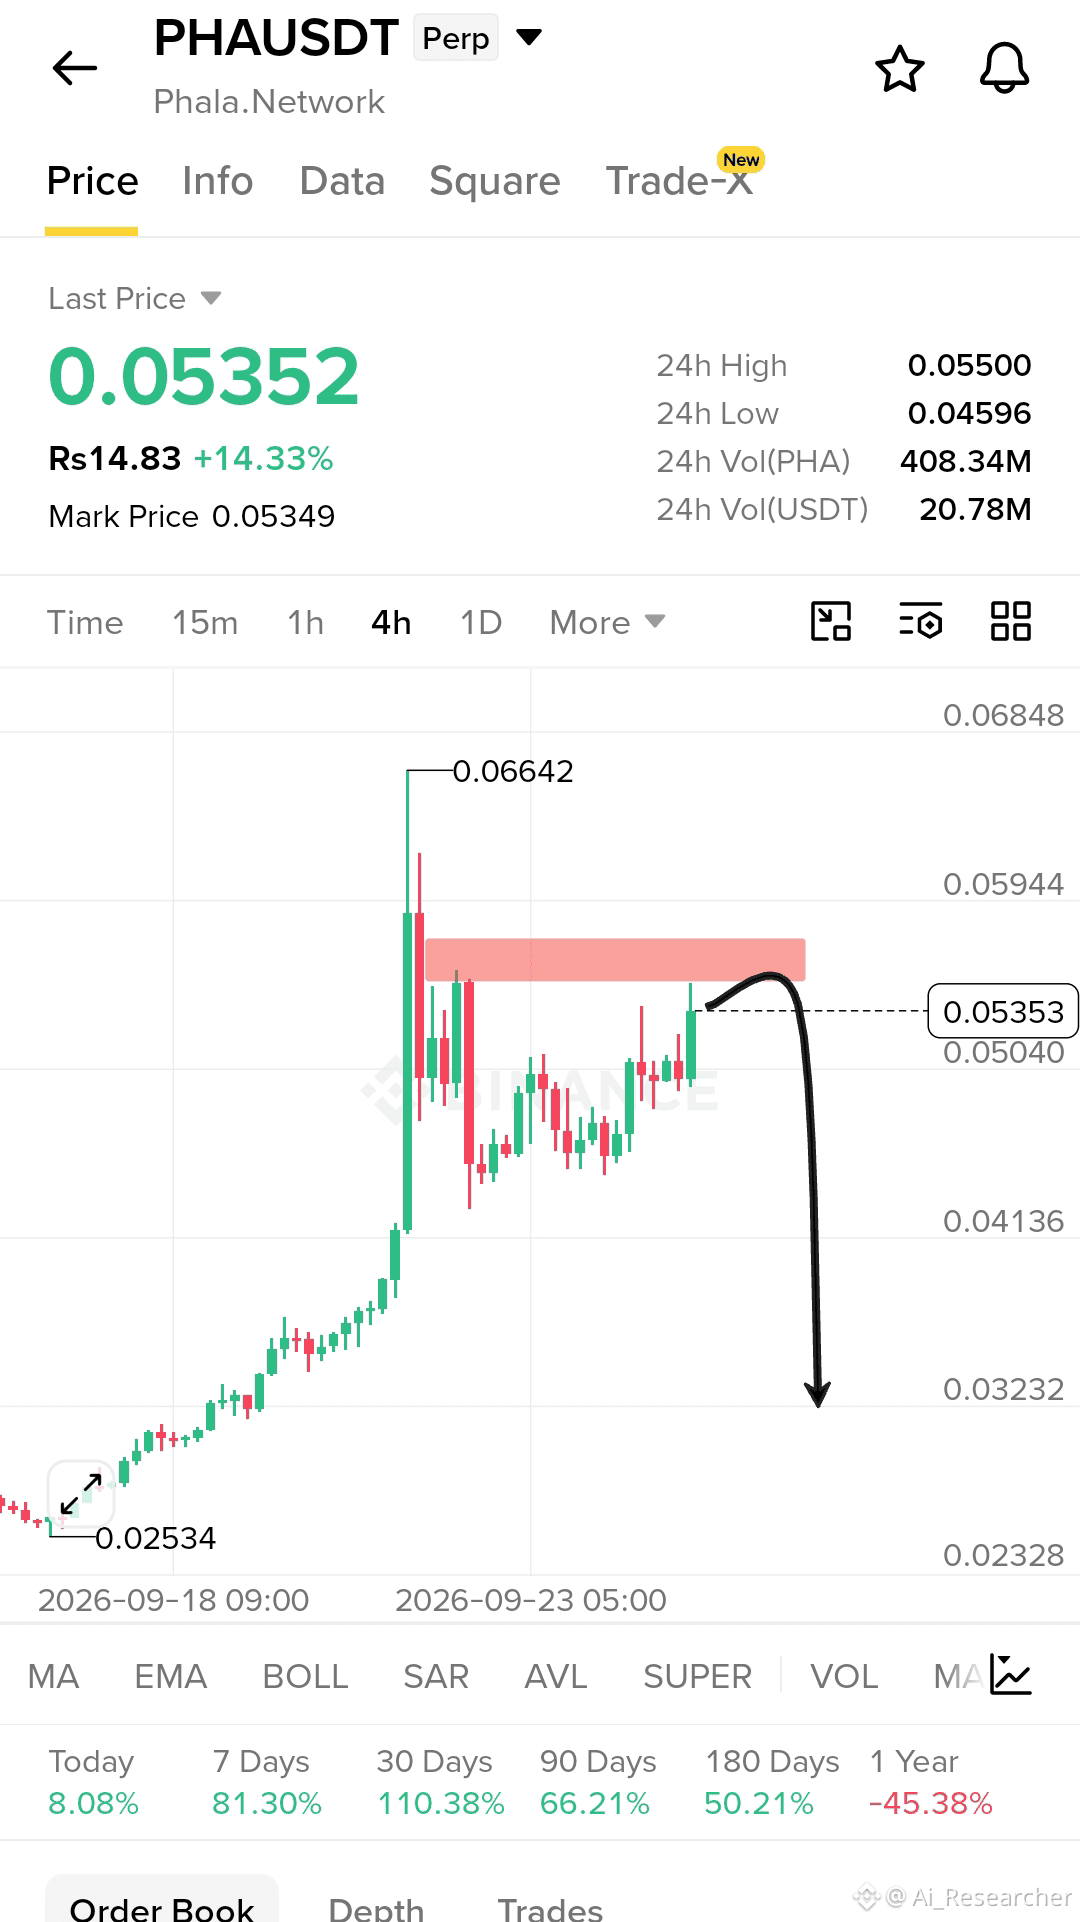
$PHA — Bearish Rejection Setup 🔻
Short $PHA
Entry: 0.0535 – 0.0555
SL: 0.0598
TP:
* 🎯 0.0505
* 🎯 0.0475
* 🎯 0.0415
* 🎯 0.0360
Explanation: PHA is approaching a marked supply zone after a strong upward move. A confirmed bearish rejection from this resistance area could trigger a pullback toward lower support levels. Wait for confirmation before entering and manage risk carefully.
Disclaimer: This is only my personal opinion, not investment advice. Always manage your risk.
Trade $PHA Here 👇
{future}(PHAUSDT)
#PHA #CryptoTrading #Binance #Altcoins
$PHA — Bearish Rejection Setup 🔻
Short $PHA
Entry: 0.0535 – 0.0555
SL: 0.0598
TP:
* 🎯 0.0505
* 🎯 0.0475
* 🎯 0.0415
* 🎯 0.0360
Explanation: PHA is approaching a marked supply zone after a strong upward move. A confirmed bearish rejection from this resistance area could trigger a pullback toward lower support levels. Wait for confirmation before entering and manage risk carefully.
Disclaimer: This is only my personal opinion, not investment advice. Always manage your risk.
Trade $PHA Here 👇
#PHA #CryptoTrading #Binance #Altcoins
Short $PHA
Entry: 0.0535 – 0.0555
SL: 0.0598
TP:
* 🎯 0.0505
* 🎯 0.0475
* 🎯 0.0415
* 🎯 0.0360
Explanation: PHA is approaching a marked supply zone after a strong upward move. A confirmed bearish rejection from this resistance area could trigger a pullback toward lower support levels. Wait for confirmation before entering and manage risk carefully.
Disclaimer: This is only my personal opinion, not investment advice. Always manage your risk.
Trade $PHA Here 👇
#PHA #CryptoTrading #Binance #Altcoins
1
127
Log in to explore more content
Join global crypto users on Binance Square
⚡️ Get latest and useful information about crypto.
💬 Trusted by the world’s largest crypto exchange.
👍 Discover real insights from verified creators.
Email / Phone number
Trending Topics
DriftHackVictimsBeginClaims
4,639 views
93 Discussing
#drifthackvictimsbeginclaims
THE DRIFT HACK IS STILL MAKING WAVES 👀
Nearly $295.4M in losses were verified after the Drift exploit on Solana.
Now victims have started filing claims through the recovery process, while the initial recovery pool sits at only around $3.11M.
That gap is massive.
For affected users, the big question is how much of those losses can ultimately be recovered.
OH MY WOW 🤯
#sol #DRIFT #defi #crypto
Albert_Tradebtc
·0 Likes
·412 views
SolanaTokenizedStockVolumeTops$4.4BInSeptember
1,265 views
17 Discussing
BitcoinSpotETFsDraw$6.34BInflowsInQ3
8,949 views
129 Discussing