
笔谈
545 Posts

笔谈
Report
Block User
市场是持续震荡与单边交替进行,没有只升不降的波浪。
Open Trade
Frequent Trader
2.4 Years
69 Following
3.6K+ Followers
2.6K+ Liked
Posts
Portfolio
All
Quotes
Live
·
--
Purely for laughs, the return rate is over 3% for only 99.7% of people. Why the hell are you still doing this— the market is full of people losing money.
Purely for laughs, the return rate is over 3% for only 99.7% of people. Why the hell are you still doing this— the market is full of people losing money.

1
2
1k
·
--
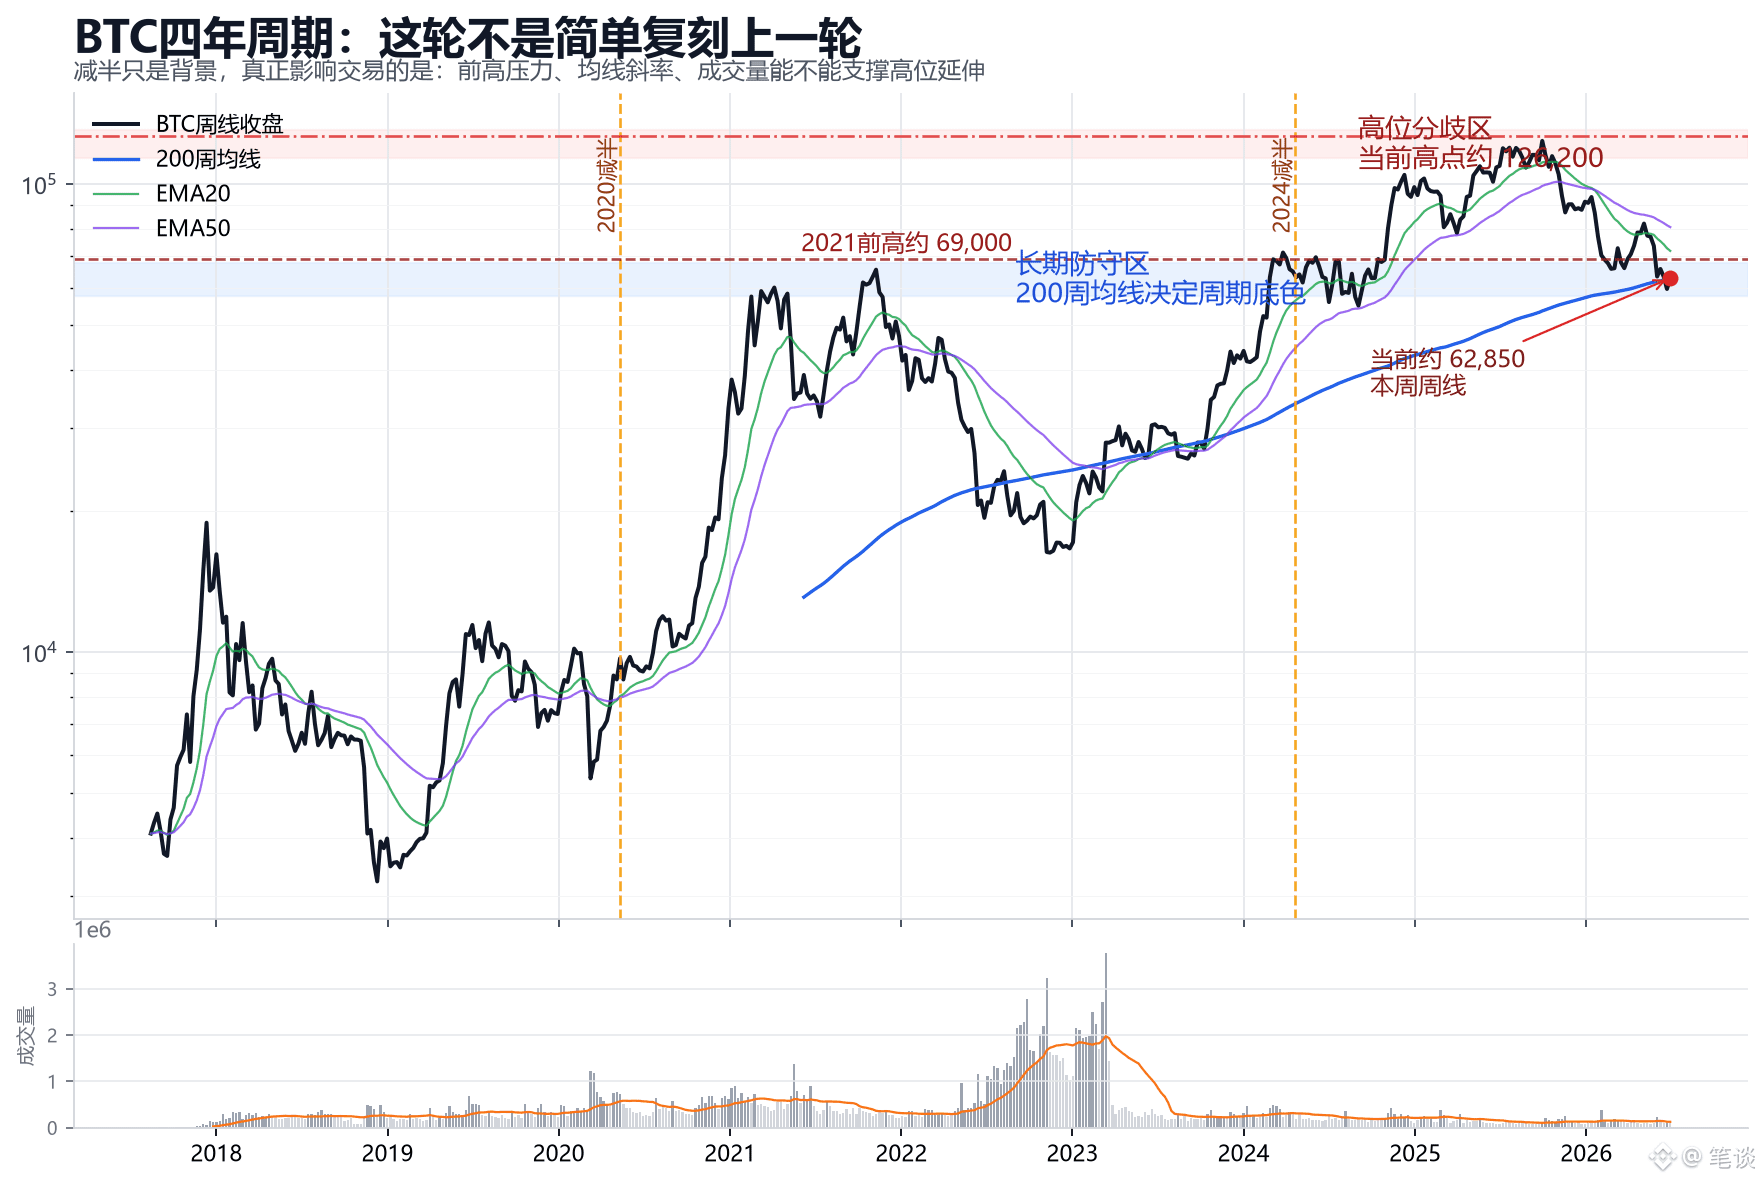
BTC’s four-year cycle—the most dangerous mistake is not misreading the direction, but treating the cycle like a countdown.
In this round, the biggest difference between $BTC and 2021 isn’t whether there was a halving; it’s that the way the top is priced has changed. ETF and institutional flows make the trend smoother, but they also make the top signals more blunt. That kind of “crazy volume spike that you can see at a glance” topping out may not appear in exactly the same way again.
So now I only focus on one core disagreement: is this a high-level extension, or is it a wide reallocation after the cycle has been stretched?
The chart has three layers of evidence.
First, the 2021 prior high and the current cycle’s high are already stacked into one resistance band. When price moves close to this area, chasing is easiest to mistake a “breakout story” for “breakout confirmation.” True confirmation isn’t just a quick poke to a new high—it’s when the weekly close holds above it, and then a pullback still manages to stay.
Second, the 200-week moving average is around 62,657, and the current distance is about 0.3%. This line isn’t a short-term buy/sell point, but it tells you which part of the cycle the market is in. When price is too far away, the edge comes from waiting for a pullback. Only when it’s close enough and can still be reclaimed does it indicate long-term capital is willing to take over.
Third, the current weekly candle is below the 20-week line. This week’s volume is about 0.83 times the 20-week average. If price pushes up but volume can’t keep up, the wave looks more like an end-stage extension or an M-wave (or B-wave) to lure longs. If there’s a breakout on heavy volume but then it pulls back on reduced volume and doesn’t break again, that’s more like a new leg’s consolidation relay within a primary uptrend.
This round, I won’t force wave counts. Only count waves when the structure is clear; when it isn’t, just look at the verification path:
Upward: it must hold steady above the high-level resistance band, and pullbacks must not drop back into the range.
Downward: if it breaks below the EMA50 and the rebound lacks strength, then the “cycle extension” logic should be downgraded—treat it as large-timeframe consolidation first.
The truly advantageous position isn’t chasing just because you hear “four-year cycle,” but waiting until the market proves it: the breakout isn’t a bull trap, and the pullback isn’t catching a falling knife.
#BTC走势 #Cycle analysis
BTC’s four-year cycle—the most dangerous mistake is not misreading the direction, but treating the cycle like a countdown.
In this round, the biggest difference between $BTC and 2021 isn’t whether there was a halving; it’s that the way the top is priced has changed. ETF and institutional flows make the trend smoother, but they also make the top signals more blunt. That kind of “crazy volume spike that you can see at a glance” topping out may not appear in exactly the same way again.
So now I only focus on one core disagreement: is this a high-level extension, or is it a wide reallocation after the cycle has been stretched?
The chart has three layers of evidence.
First, the 2021 prior high and the current cycle’s high are already stacked into one resistance band. When price moves close to this area, chasing is easiest to mistake a “breakout story” for “breakout confirmation.” True confirmation isn’t just a quick poke to a new high—it’s when the weekly close holds above it, and then a pullback still manages to stay.
Second, the 200-week moving average is around 62,657, and the current distance is about 0.3%. This line isn’t a short-term buy/sell point, but it tells you which part of the cycle the market is in. When price is too far away, the edge comes from waiting for a pullback. Only when it’s close enough and can still be reclaimed does it indicate long-term capital is willing to take over.
Third, the current weekly candle is below the 20-week line. This week’s volume is about 0.83 times the 20-week average. If price pushes up but volume can’t keep up, the wave looks more like an end-stage extension or an M-wave (or B-wave) to lure longs. If there’s a breakout on heavy volume but then it pulls back on reduced volume and doesn’t break again, that’s more like a new leg’s consolidation relay within a primary uptrend.
This round, I won’t force wave counts. Only count waves when the structure is clear; when it isn’t, just look at the verification path:
Upward: it must hold steady above the high-level resistance band, and pullbacks must not drop back into the range.
Downward: if it breaks below the EMA50 and the rebound lacks strength, then the “cycle extension” logic should be downgraded—treat it as large-timeframe consolidation first.
The truly advantageous position isn’t chasing just because you hear “four-year cycle,” but waiting until the market proves it: the breakout isn’t a bull trap, and the pullback isn’t catching a falling knife.
#BTC走势 #Cycle analysis
In this round, the biggest difference between $BTC and 2021 isn’t whether there was a halving; it’s that the way the top is priced has changed. ETF and institutional flows make the trend smoother, but they also make the top signals more blunt. That kind of “crazy volume spike that you can see at a glance” topping out may not appear in exactly the same way again.
So now I only focus on one core disagreement: is this a high-level extension, or is it a wide reallocation after the cycle has been stretched?
The chart has three layers of evidence.
First, the 2021 prior high and the current cycle’s high are already stacked into one resistance band. When price moves close to this area, chasing is easiest to mistake a “breakout story” for “breakout confirmation.” True confirmation isn’t just a quick poke to a new high—it’s when the weekly close holds above it, and then a pullback still manages to stay.
Second, the 200-week moving average is around 62,657, and the current distance is about 0.3%. This line isn’t a short-term buy/sell point, but it tells you which part of the cycle the market is in. When price is too far away, the edge comes from waiting for a pullback. Only when it’s close enough and can still be reclaimed does it indicate long-term capital is willing to take over.
Third, the current weekly candle is below the 20-week line. This week’s volume is about 0.83 times the 20-week average. If price pushes up but volume can’t keep up, the wave looks more like an end-stage extension or an M-wave (or B-wave) to lure longs. If there’s a breakout on heavy volume but then it pulls back on reduced volume and doesn’t break again, that’s more like a new leg’s consolidation relay within a primary uptrend.
This round, I won’t force wave counts. Only count waves when the structure is clear; when it isn’t, just look at the verification path:
Upward: it must hold steady above the high-level resistance band, and pullbacks must not drop back into the range.
Downward: if it breaks below the EMA50 and the rebound lacks strength, then the “cycle extension” logic should be downgraded—treat it as large-timeframe consolidation first.
The truly advantageous position isn’t chasing just because you hear “four-year cycle,” but waiting until the market proves it: the breakout isn’t a bull trap, and the pullback isn’t catching a falling knife.
#BTC走势 #Cycle analysis
2
1.8k
·
--
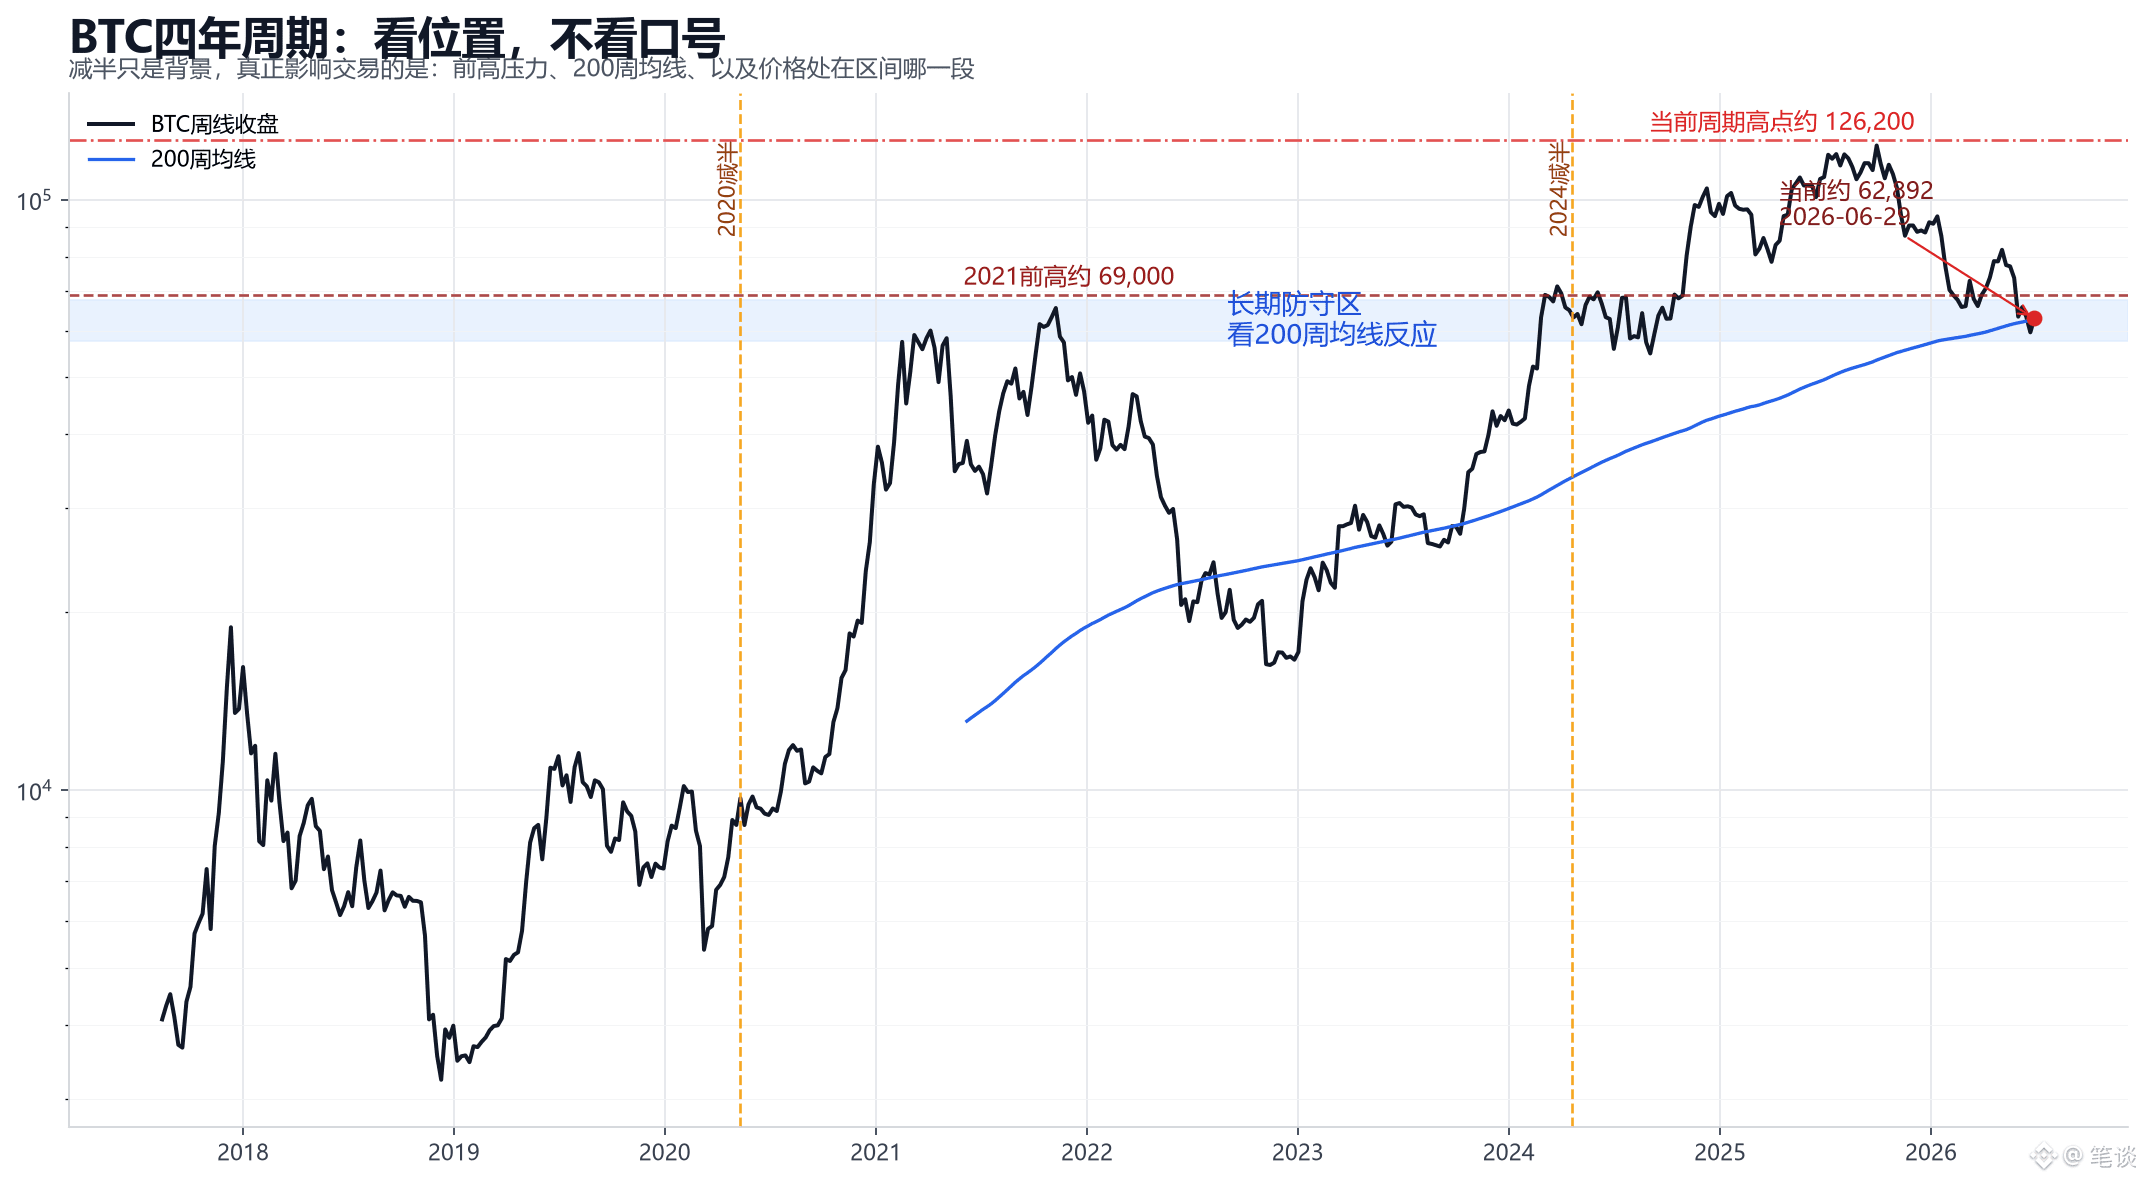
The four-year BTC cycle: the easiest mistake is to treat years as direction.
$BTC What you should look at now isn’t “what will happen in which year for sure,” but three key locations: the 2021 previous high, the current cycle’s high point, and the 200-week moving average.
Halving changes the narrative, but it won’t do the work of choosing an entry point for you.
What’s truly useful is this: when price approaches the prior high on the weekly chart, whether it gains volume and holds; and during pullbacks, whether there’s buy support near the long-term moving average.
In this chart, I focus on two layers:
The upper high-point zone—this is where people often confuse the cycle story with “breakout confirmation.”
The area near the 200-week moving average below—currently about 62,657—which is more like an observation area to see whether long-term capital is willing to step in.
Right now, the price is about 0.4% away from the 200-week moving average, which means it’s not a “cheap deal” at a low level, nor is it something you can blindly chase.
The invalidation conditions are simple:
If the weekly chart can’t reclaim and hold the key high zone, then any notion of “cycle continuation” is discounted for now; if, after a pullback, it can trade back up with increased volume near the long-term moving average, then you can start talking about a new round of structural repair.
You can use the four-year cycle as a reference, but don’t let the cycle place your orders. The real “cost” is paying when the story feels most convenient—then forgetting to check the actual location.
#BTC走势 #Cycle Analysis
The four-year BTC cycle: the easiest mistake is to treat years as direction.
$BTC What you should look at now isn’t “what will happen in which year for sure,” but three key locations: the 2021 previous high, the current cycle’s high point, and the 200-week moving average.
Halving changes the narrative, but it won’t do the work of choosing an entry point for you.
What’s truly useful is this: when price approaches the prior high on the weekly chart, whether it gains volume and holds; and during pullbacks, whether there’s buy support near the long-term moving average.
In this chart, I focus on two layers:
The upper high-point zone—this is where people often confuse the cycle story with “breakout confirmation.”
The area near the 200-week moving average below—currently about 62,657—which is more like an observation area to see whether long-term capital is willing to step in.
Right now, the price is about 0.4% away from the 200-week moving average, which means it’s not a “cheap deal” at a low level, nor is it something you can blindly chase.
The invalidation conditions are simple:
If the weekly chart can’t reclaim and hold the key high zone, then any notion of “cycle continuation” is discounted for now; if, after a pullback, it can trade back up with increased volume near the long-term moving average, then you can start talking about a new round of structural repair.
You can use the four-year cycle as a reference, but don’t let the cycle place your orders. The real “cost” is paying when the story feels most convenient—then forgetting to check the actual location.
#BTC走势 #Cycle Analysis
$BTC What you should look at now isn’t “what will happen in which year for sure,” but three key locations: the 2021 previous high, the current cycle’s high point, and the 200-week moving average.
Halving changes the narrative, but it won’t do the work of choosing an entry point for you.
What’s truly useful is this: when price approaches the prior high on the weekly chart, whether it gains volume and holds; and during pullbacks, whether there’s buy support near the long-term moving average.
In this chart, I focus on two layers:
The upper high-point zone—this is where people often confuse the cycle story with “breakout confirmation.”
The area near the 200-week moving average below—currently about 62,657—which is more like an observation area to see whether long-term capital is willing to step in.
Right now, the price is about 0.4% away from the 200-week moving average, which means it’s not a “cheap deal” at a low level, nor is it something you can blindly chase.
The invalidation conditions are simple:
If the weekly chart can’t reclaim and hold the key high zone, then any notion of “cycle continuation” is discounted for now; if, after a pullback, it can trade back up with increased volume near the long-term moving average, then you can start talking about a new round of structural repair.
You can use the four-year cycle as a reference, but don’t let the cycle place your orders. The real “cost” is paying when the story feels most convenient—then forgetting to check the actual location.
#BTC走势 #Cycle Analysis
1
701
·
--
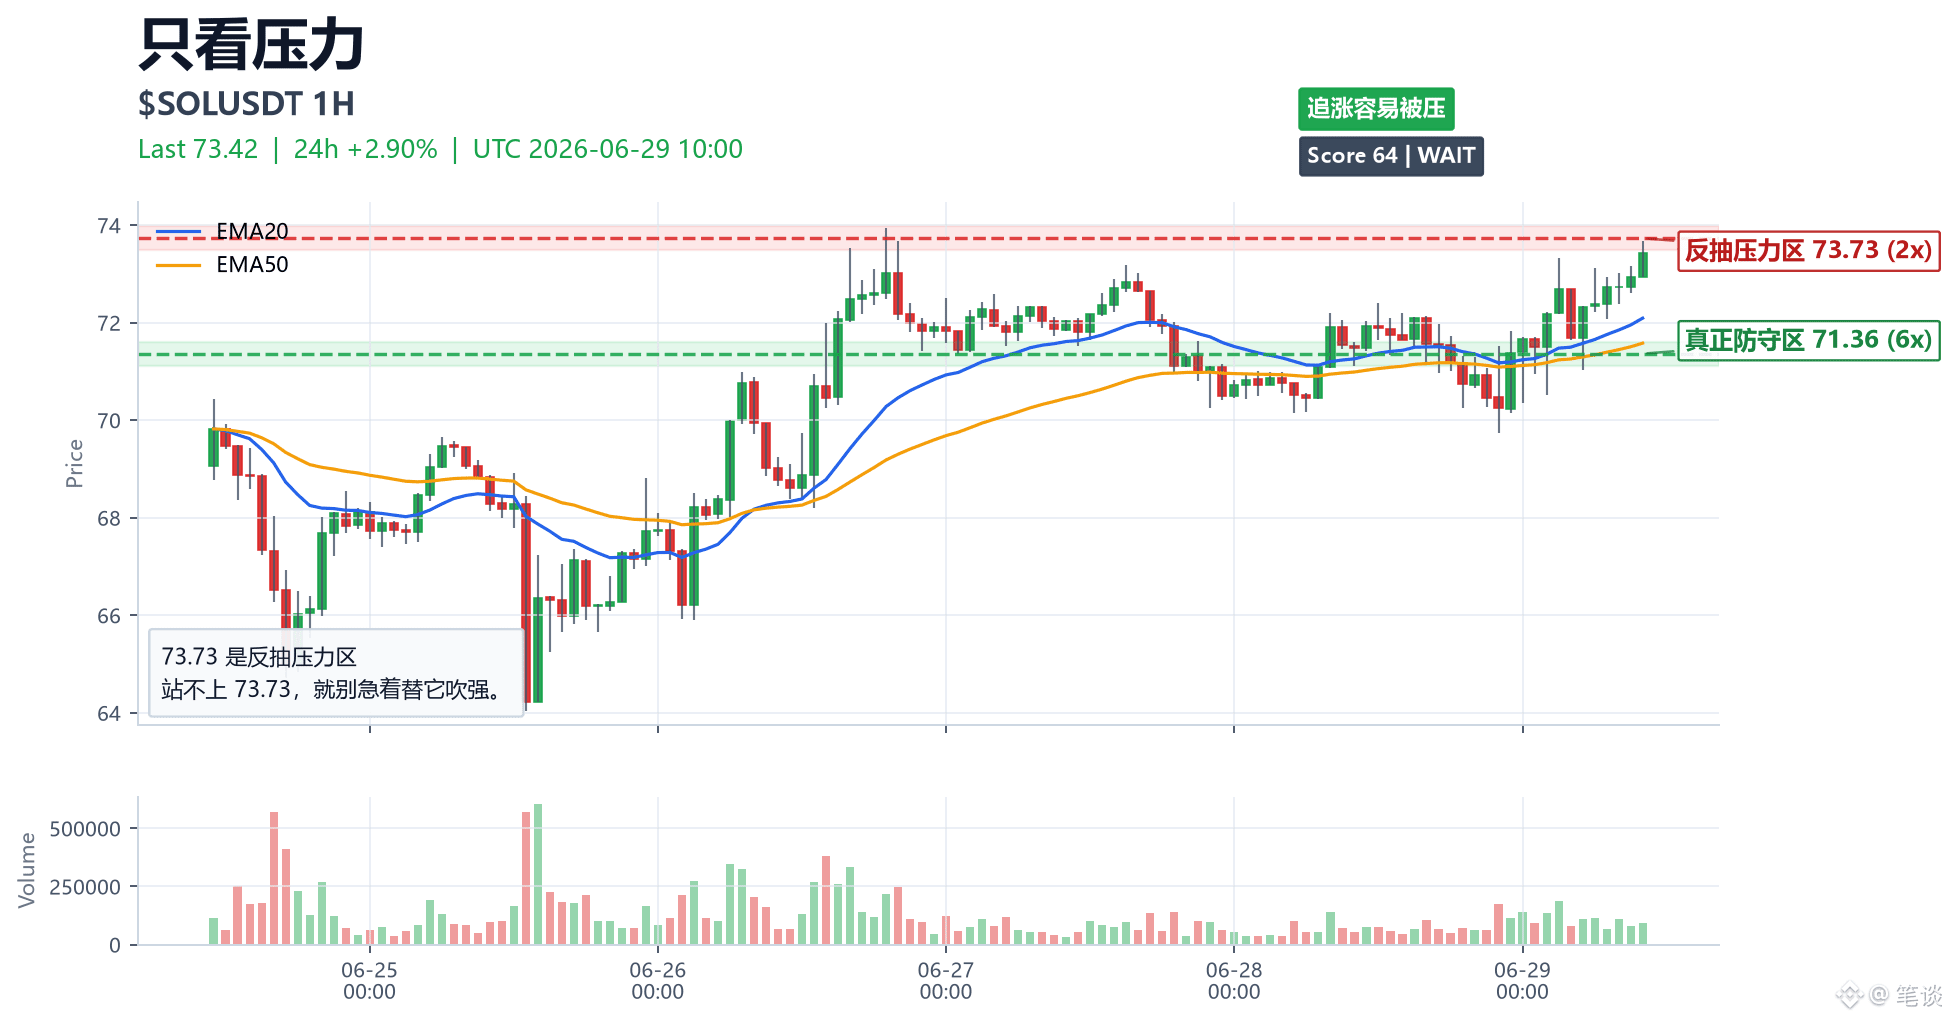
SOL only looks at one position before bed: 73.73 is the pullback resistance zone.
$SOL Tomorrow first look at: 73.73 is the pullback resistance zone.
If you can’t get above the resistance, don’t treat the pullback as a reversal; if it breaks through support and you can’t get it back, don’t rush to guess the bottom.
In situations like this, you don’t need to watch a bunch of indicators—understanding one key zone is more useful than chasing ten pieces of news.
#SOL走势 #market analysis
SOL only looks at one position before bed: 73.73 is the pullback resistance zone.
$SOL Tomorrow first look at: 73.73 is the pullback resistance zone.
If you can’t get above the resistance, don’t treat the pullback as a reversal; if it breaks through support and you can’t get it back, don’t rush to guess the bottom.
In situations like this, you don’t need to watch a bunch of indicators—understanding one key zone is more useful than chasing ten pieces of news.
#SOL走势 #market analysis
$SOL Tomorrow first look at: 73.73 is the pullback resistance zone.
If you can’t get above the resistance, don’t treat the pullback as a reversal; if it breaks through support and you can’t get it back, don’t rush to guess the bottom.
In situations like this, you don’t need to watch a bunch of indicators—understanding one key zone is more useful than chasing ten pieces of news.
#SOL走势 #market analysis
1
513
·
--
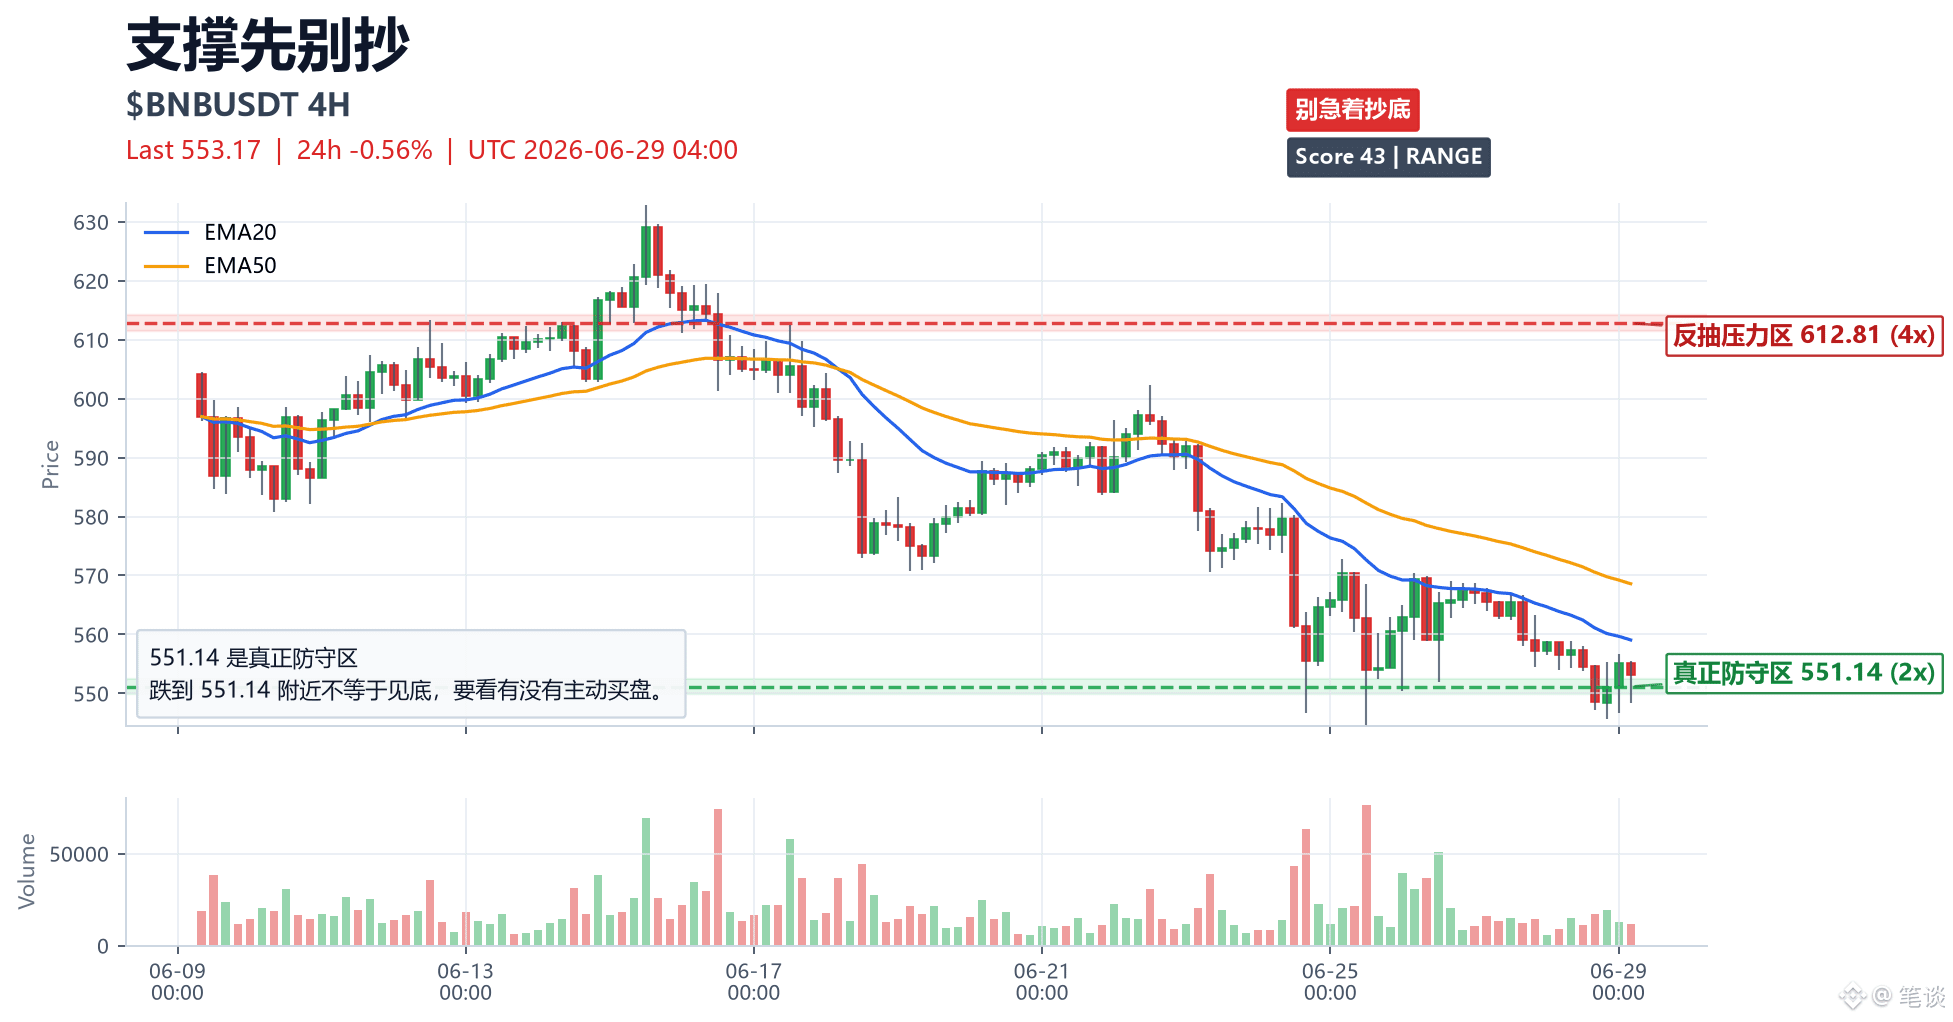
BNB Now first look at 551.14 as the real defense zone—don’t rush to hand yourself over.
$BNB 24h -0.56%, first see: 551.14 is the real defense zone.
In the most recent 120 4H candlesticks, this level has been traded repeatedly.
EMA20/EMA50, RSI 41, and a pullback on reduced volume are only supportive confirmations.
The trading action is simple:
Falling to around 551.14 doesn’t mean it’s the bottom—you need to see whether there is active buy support.
This is the most likely place to get heated: left-side bottom-picking or waiting for confirmation. I’d rather first see whether there is acceptance/support.
Invalidation conditions:
If, after the 4H breaks below 551.14, it can’t reclaim it, then 612.81 above will be treated as rebound resistance.
First look at the level, then the volume, then the closing price.
Let price move near the key zone first, then see who can take it.
#BNB走势 #交易笔记
BNB Now first look at 551.14 as the real defense zone—don’t rush to hand yourself over.
$BNB 24h -0.56%, first see: 551.14 is the real defense zone.
In the most recent 120 4H candlesticks, this level has been traded repeatedly.
EMA20/EMA50, RSI 41, and a pullback on reduced volume are only supportive confirmations.
The trading action is simple:
Falling to around 551.14 doesn’t mean it’s the bottom—you need to see whether there is active buy support.
This is the most likely place to get heated: left-side bottom-picking or waiting for confirmation. I’d rather first see whether there is acceptance/support.
Invalidation conditions:
If, after the 4H breaks below 551.14, it can’t reclaim it, then 612.81 above will be treated as rebound resistance.
First look at the level, then the volume, then the closing price.
Let price move near the key zone first, then see who can take it.
#BNB走势 #交易笔记
$BNB 24h -0.56%, first see: 551.14 is the real defense zone.
In the most recent 120 4H candlesticks, this level has been traded repeatedly.
EMA20/EMA50, RSI 41, and a pullback on reduced volume are only supportive confirmations.
The trading action is simple:
Falling to around 551.14 doesn’t mean it’s the bottom—you need to see whether there is active buy support.
This is the most likely place to get heated: left-side bottom-picking or waiting for confirmation. I’d rather first see whether there is acceptance/support.
Invalidation conditions:
If, after the 4H breaks below 551.14, it can’t reclaim it, then 612.81 above will be treated as rebound resistance.
First look at the level, then the volume, then the closing price.
Let price move near the key zone first, then see who can take it.
#BNB走势 #交易笔记
315
·
--
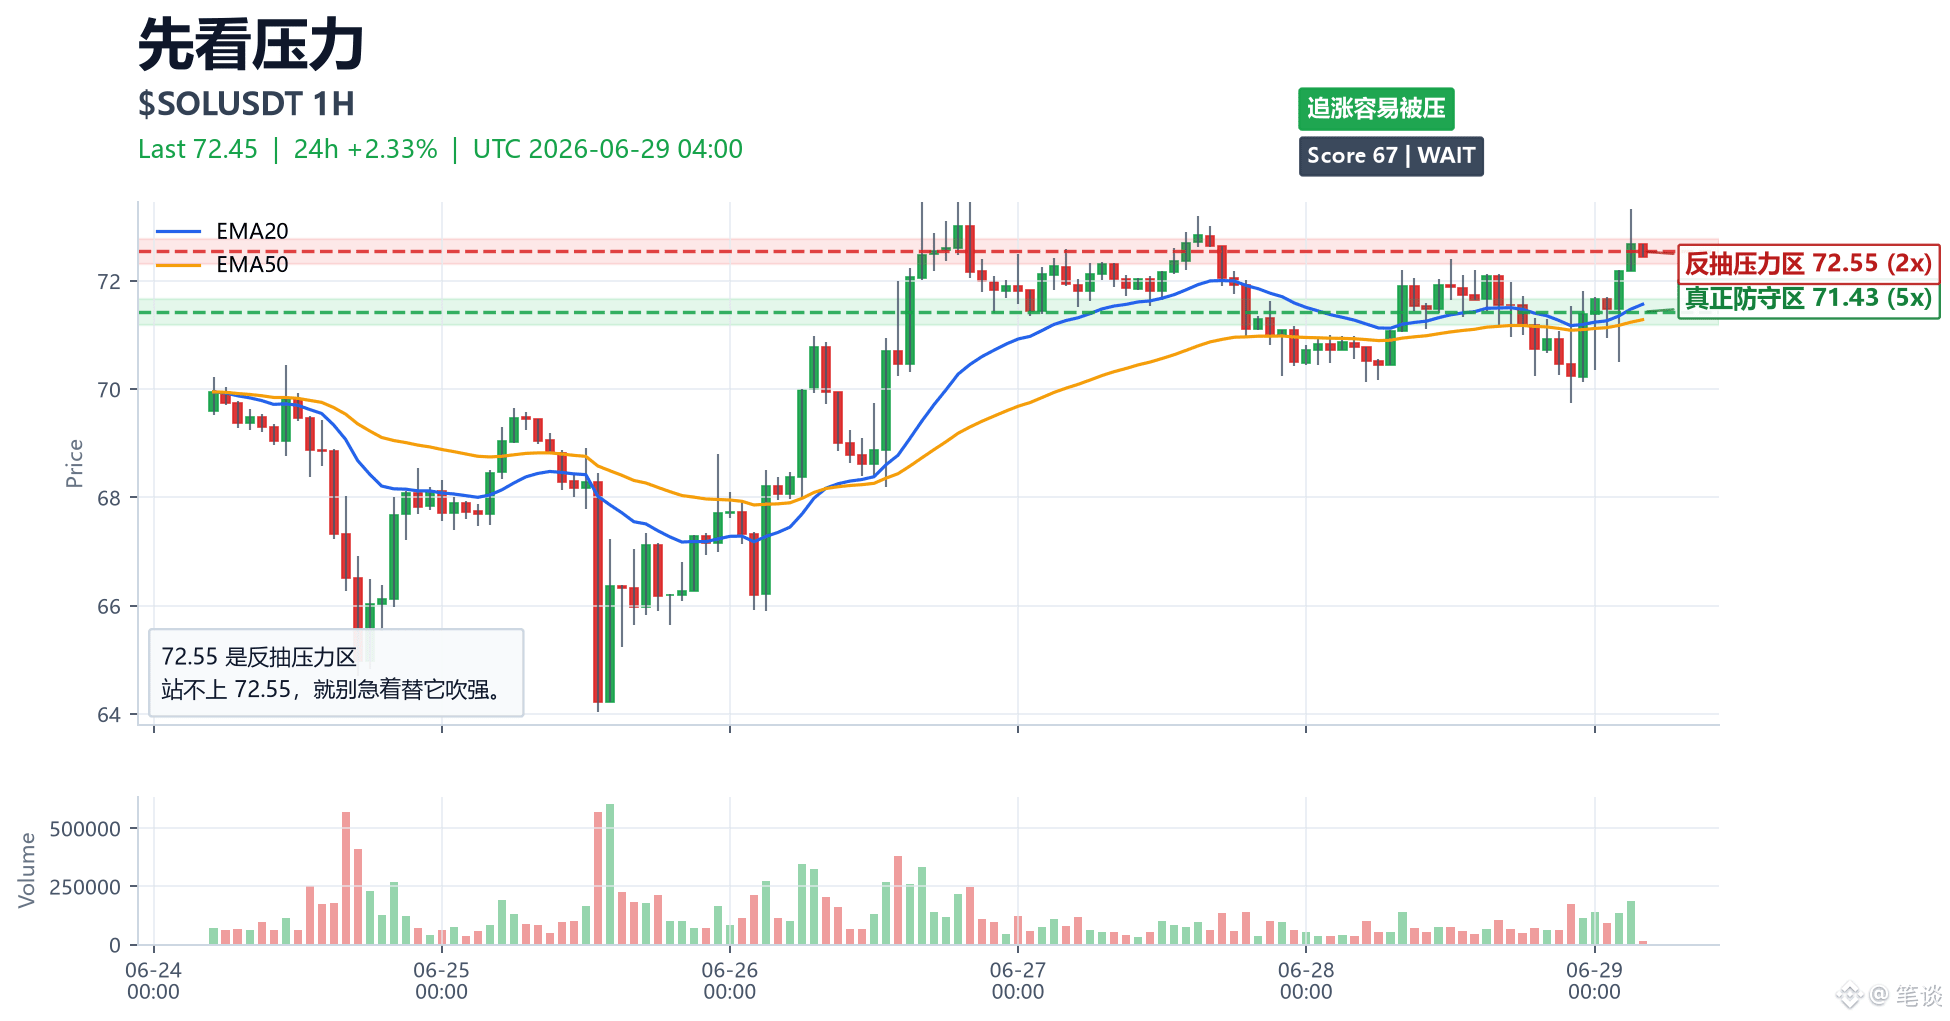
SOL heats up quickly, but it doesn’t mean it can go far. First, take a look at 72.55—this is the pullback pressure zone.
$SOL 24h +2.33%. For this one, I only look at one area: 72.55 is the pullback pressure zone.
If the price just pushes into the pressure zone but the volume can’t keep up, the “hot” momentum can easily turn into a chase-and-trap.
Only if there are buyers stepping in at a key level on the pullback does the momentum have a foundation to continue.
The two zones on the chart come from the clustering of swing highs and lows across the most recent 120 K-lines:
Pressure is near 72.55.
Support/defense is near 71.43.
Now don’t let the percentage moves drive your decisions.
If you can’t stand above 72.55, don’t rush to hype it as strong.
The biggest point of disagreement here: some people are watching for a breakout, while others are watching for a bull trap/false move. I place more importance on whether the close can hold above it.
Invalidation conditions:
If it spikes up and then falls back below the EMA20, treat this as a failed breakout; 71.43 on the downside is the level to reassess.
You can watch the momentum, but don’t let the gainers/leaderboard decide for you.
#SOL走势 #market analysis
SOL heats up quickly, but it doesn’t mean it can go far. First, take a look at 72.55—this is the pullback pressure zone.
$SOL 24h +2.33%. For this one, I only look at one area: 72.55 is the pullback pressure zone.
If the price just pushes into the pressure zone but the volume can’t keep up, the “hot” momentum can easily turn into a chase-and-trap.
Only if there are buyers stepping in at a key level on the pullback does the momentum have a foundation to continue.
The two zones on the chart come from the clustering of swing highs and lows across the most recent 120 K-lines:
Pressure is near 72.55.
Support/defense is near 71.43.
Now don’t let the percentage moves drive your decisions.
If you can’t stand above 72.55, don’t rush to hype it as strong.
The biggest point of disagreement here: some people are watching for a breakout, while others are watching for a bull trap/false move. I place more importance on whether the close can hold above it.
Invalidation conditions:
If it spikes up and then falls back below the EMA20, treat this as a failed breakout; 71.43 on the downside is the level to reassess.
You can watch the momentum, but don’t let the gainers/leaderboard decide for you.
#SOL走势 #market analysis
$SOL 24h +2.33%. For this one, I only look at one area: 72.55 is the pullback pressure zone.
If the price just pushes into the pressure zone but the volume can’t keep up, the “hot” momentum can easily turn into a chase-and-trap.
Only if there are buyers stepping in at a key level on the pullback does the momentum have a foundation to continue.
The two zones on the chart come from the clustering of swing highs and lows across the most recent 120 K-lines:
Pressure is near 72.55.
Support/defense is near 71.43.
Now don’t let the percentage moves drive your decisions.
If you can’t stand above 72.55, don’t rush to hype it as strong.
The biggest point of disagreement here: some people are watching for a breakout, while others are watching for a bull trap/false move. I place more importance on whether the close can hold above it.
Invalidation conditions:
If it spikes up and then falls back below the EMA20, treat this as a failed breakout; 71.43 on the downside is the level to reassess.
You can watch the momentum, but don’t let the gainers/leaderboard decide for you.
#SOL走势 #market analysis
1
461
·
--
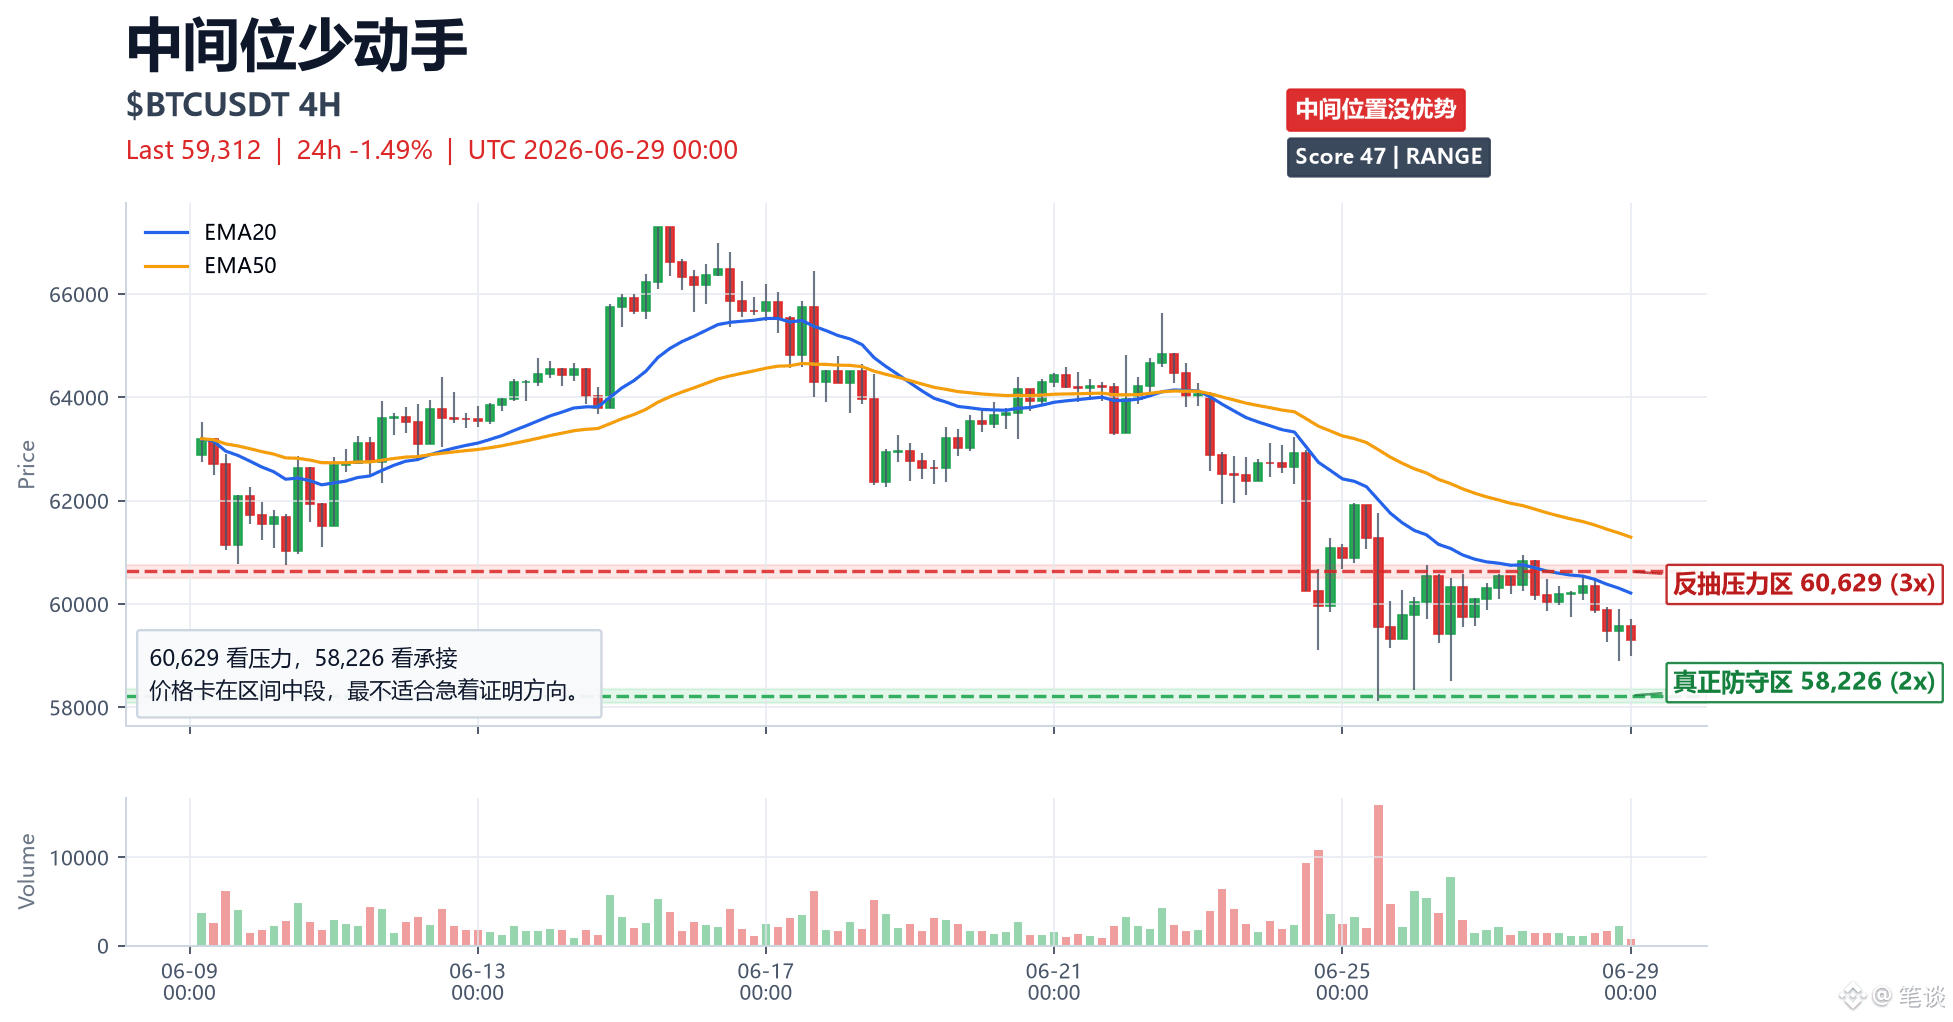
BTC morning session first look at 60,629 for resistance, 58,226 for support.
$BTC 24h -1.49%, today I’m only focused on one thing: 60,629 for resistance, 58,226 for support.
The zone on the chart isn’t formed by hitting an integer—it’s a level that has been traded repeatedly in the past 120 4H candles.
Resistance at 60,629 above, support at 58,226 below.
The technical read is very straightforward:
Short-term EMA is weak, RSI is 38, and the price is 1.5% away from EMA20.
The volume shows a contraction pullback; this determines whether it’s a valid repair or just baiting quick hands.
No need to make it complicated for the morning plan:
Price is stuck in the middle of the range, which is the worst place to rush to prove a direction.
The middle segment is the easiest area to get people to choose sides, but this position itself doesn’t have much advantage.
Invalidation conditions:
Only when price is close to the key zone, then looking at volume and the close, does it become meaningful.
Block the moves that are easy to lose on first—when the real opportunity appears, it will be cleaner.
#BTC走势 #Intraday observation
BTC morning session first look at 60,629 for resistance, 58,226 for support.
$BTC 24h -1.49%, today I’m only focused on one thing: 60,629 for resistance, 58,226 for support.
The zone on the chart isn’t formed by hitting an integer—it’s a level that has been traded repeatedly in the past 120 4H candles.
Resistance at 60,629 above, support at 58,226 below.
The technical read is very straightforward:
Short-term EMA is weak, RSI is 38, and the price is 1.5% away from EMA20.
The volume shows a contraction pullback; this determines whether it’s a valid repair or just baiting quick hands.
No need to make it complicated for the morning plan:
Price is stuck in the middle of the range, which is the worst place to rush to prove a direction.
The middle segment is the easiest area to get people to choose sides, but this position itself doesn’t have much advantage.
Invalidation conditions:
Only when price is close to the key zone, then looking at volume and the close, does it become meaningful.
Block the moves that are easy to lose on first—when the real opportunity appears, it will be cleaner.
#BTC走势 #Intraday observation
$BTC 24h -1.49%, today I’m only focused on one thing: 60,629 for resistance, 58,226 for support.
The zone on the chart isn’t formed by hitting an integer—it’s a level that has been traded repeatedly in the past 120 4H candles.
Resistance at 60,629 above, support at 58,226 below.
The technical read is very straightforward:
Short-term EMA is weak, RSI is 38, and the price is 1.5% away from EMA20.
The volume shows a contraction pullback; this determines whether it’s a valid repair or just baiting quick hands.
No need to make it complicated for the morning plan:
Price is stuck in the middle of the range, which is the worst place to rush to prove a direction.
The middle segment is the easiest area to get people to choose sides, but this position itself doesn’t have much advantage.
Invalidation conditions:
Only when price is close to the key zone, then looking at volume and the close, does it become meaningful.
Block the moves that are easy to lose on first—when the real opportunity appears, it will be cleaner.
#BTC走势 #Intraday observation
399
·
--
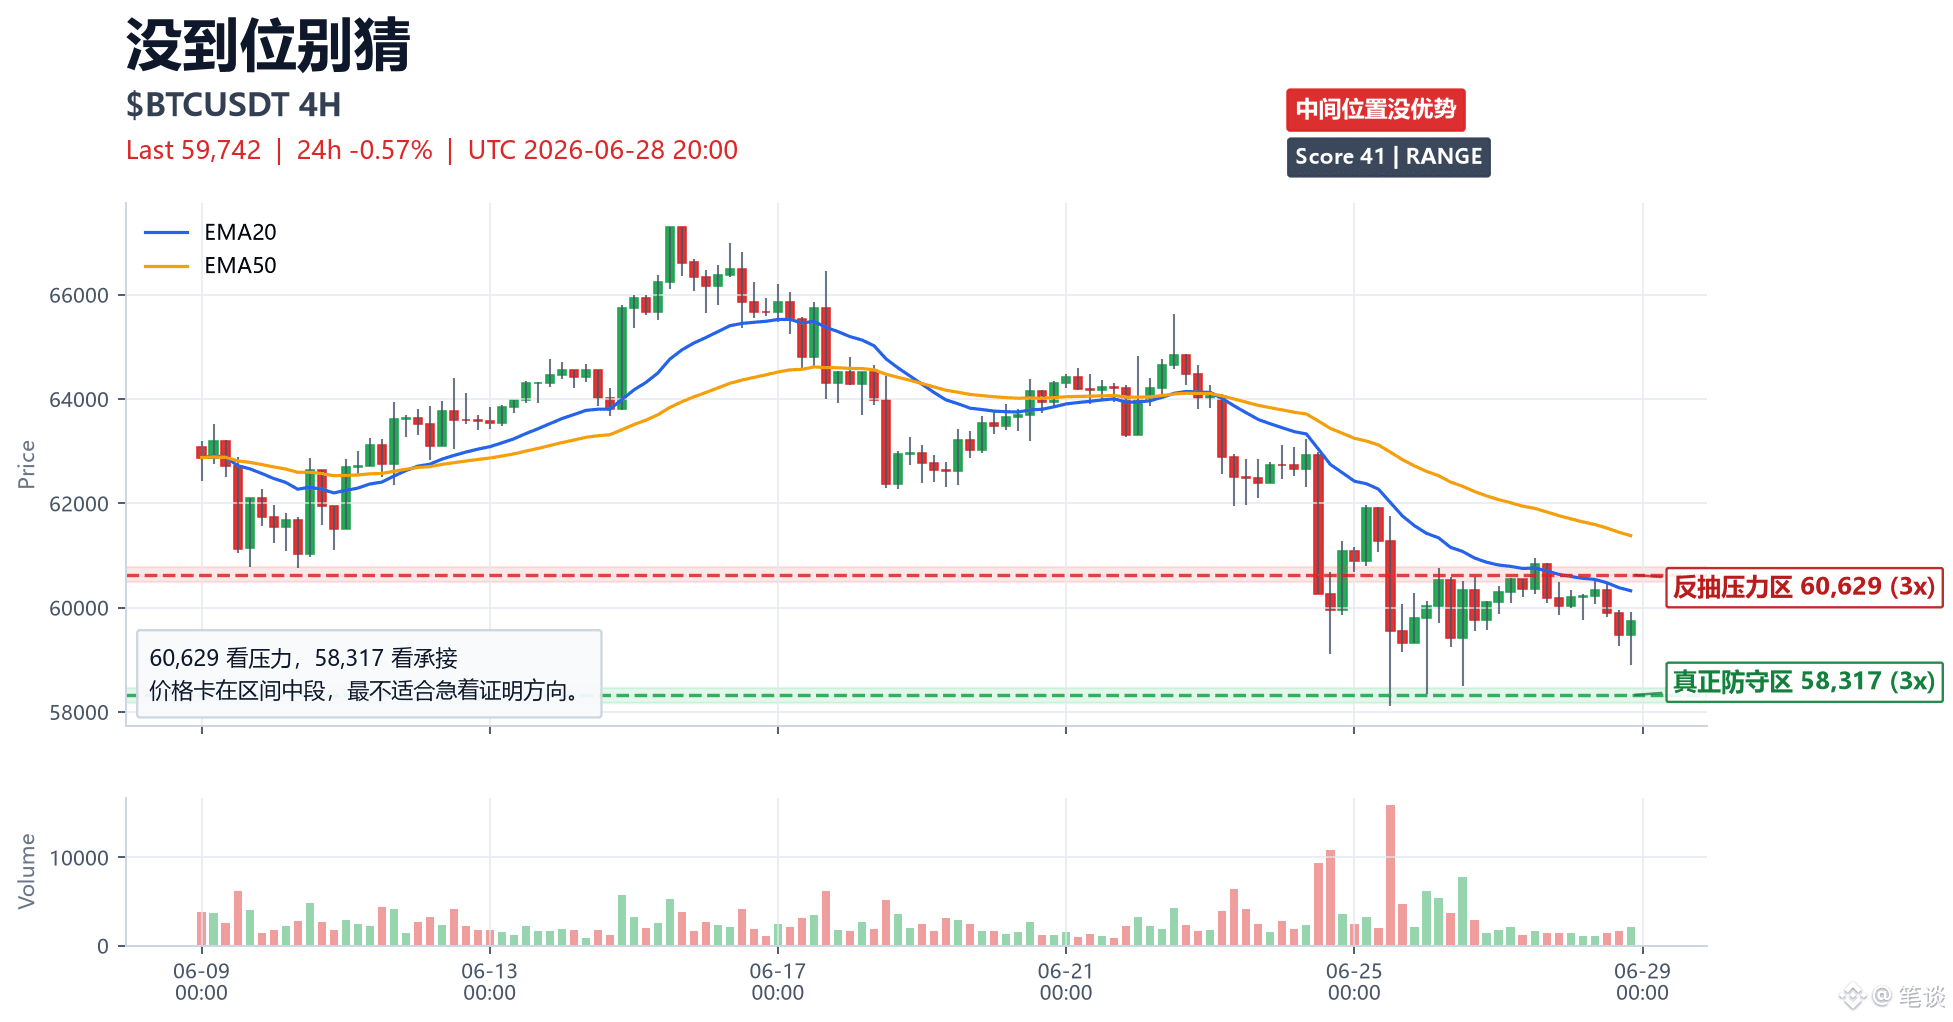
The easiest way to lose money in BTC today is to rush to prove you were right.
$BTC , what you should keep an eye on still is this: 60,629 watch the pressure, 58,317 watch the follow-through.
Don’t force a direction before the position is reached; once the position is reached, don’t just look at the price—look at volume/strength and the close.
The most expensive move in trading is often not being wrong, but knowing you don’t have an advantage and still trying to get ahead early.
#BTC走势 #intraday observation
The easiest way to lose money in BTC today is to rush to prove you were right.
$BTC , what you should keep an eye on still is this: 60,629 watch the pressure, 58,317 watch the follow-through.
Don’t force a direction before the position is reached; once the position is reached, don’t just look at the price—look at volume/strength and the close.
The most expensive move in trading is often not being wrong, but knowing you don’t have an advantage and still trying to get ahead early.
#BTC走势 #intraday observation
$BTC , what you should keep an eye on still is this: 60,629 watch the pressure, 58,317 watch the follow-through.
Don’t force a direction before the position is reached; once the position is reached, don’t just look at the price—look at volume/strength and the close.
The most expensive move in trading is often not being wrong, but knowing you don’t have an advantage and still trying to get ahead early.
#BTC走势 #intraday observation
301
·
--
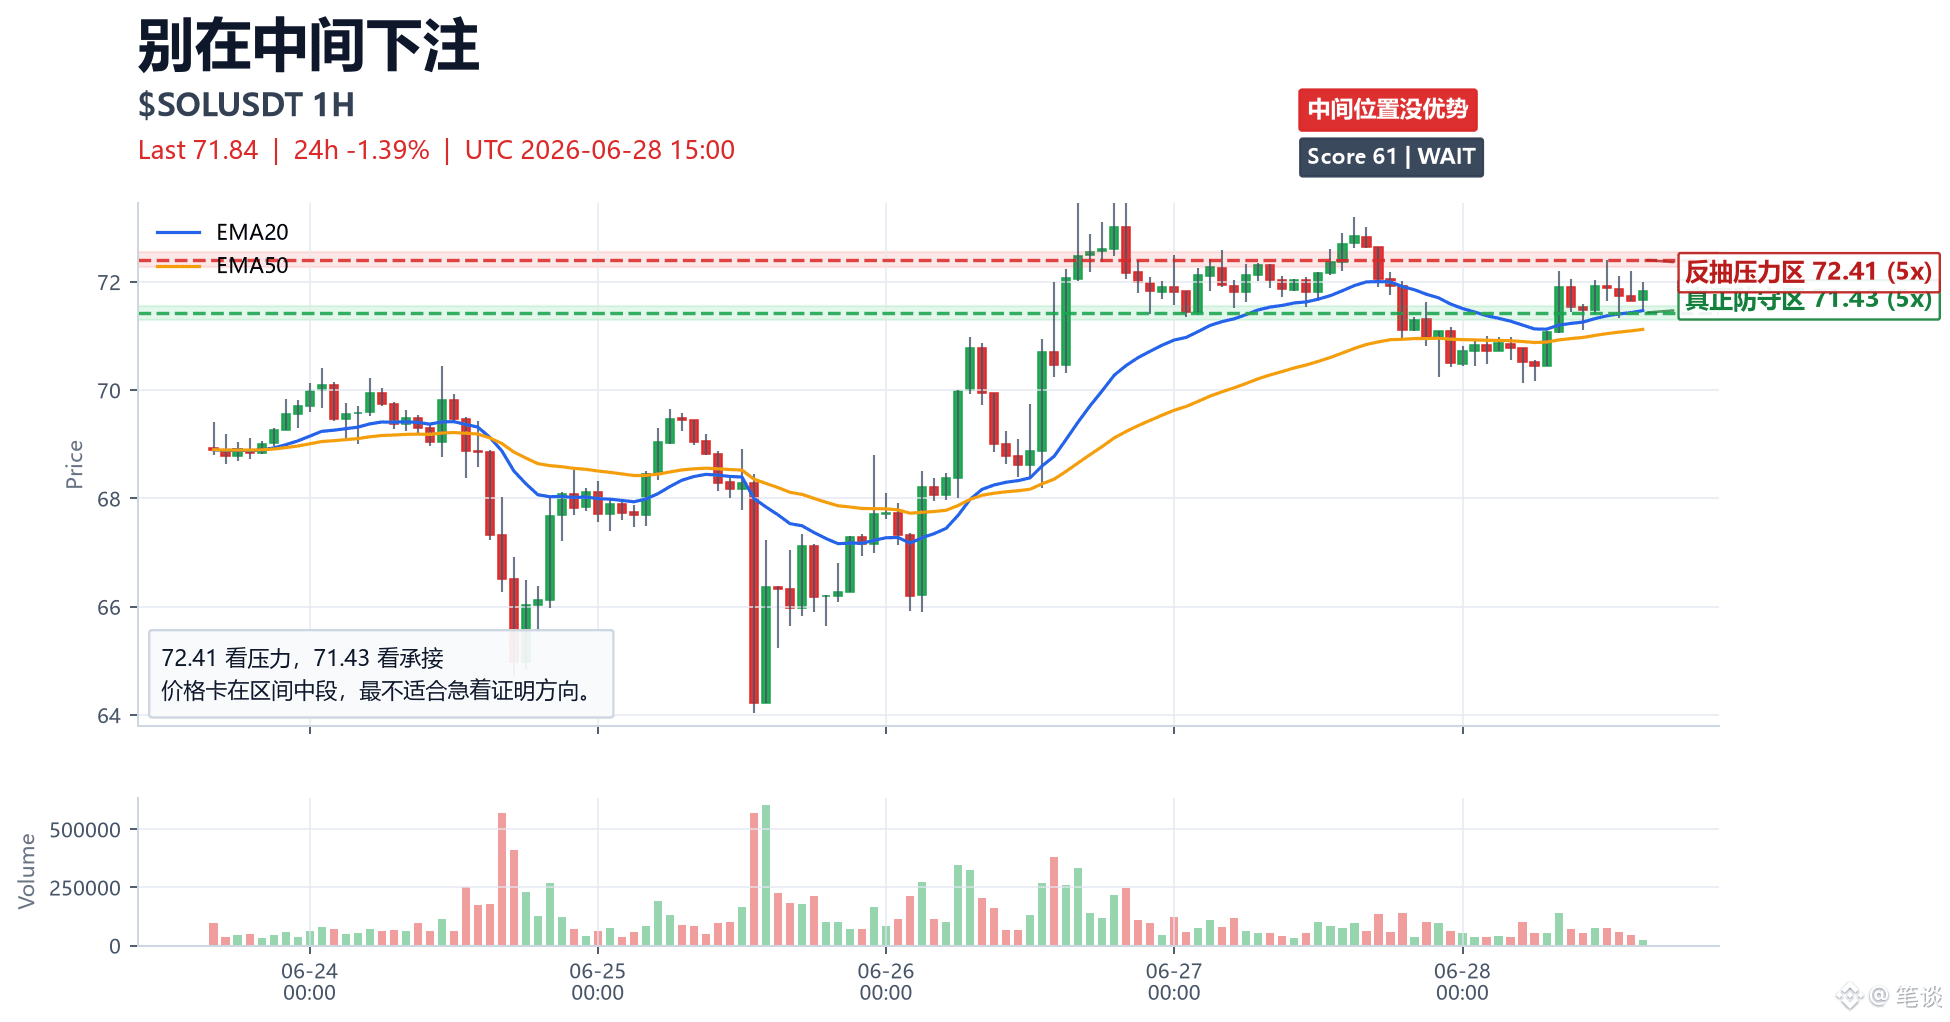
SOL bedtime only looks at one location: 72.41 for pressure, 71.43 for follow-through.
$SOL tomorrow first look: 72.41 for pressure, 71.43 for follow-through.
If you can’t hold the pressure, don’t treat the pullback as a reversal; if a breakdown of support can’t be recovered, don’t rush to guess the bottom.
In this kind of situation, you don’t need to watch a bunch of indicators—understanding one key zone is more useful than chasing ten headlines.
#SOL走势 #Intraday observation
SOL bedtime only looks at one location: 72.41 for pressure, 71.43 for follow-through.
$SOL tomorrow first look: 72.41 for pressure, 71.43 for follow-through.
If you can’t hold the pressure, don’t treat the pullback as a reversal; if a breakdown of support can’t be recovered, don’t rush to guess the bottom.
In this kind of situation, you don’t need to watch a bunch of indicators—understanding one key zone is more useful than chasing ten headlines.
#SOL走势 #Intraday observation
$SOL tomorrow first look: 72.41 for pressure, 71.43 for follow-through.
If you can’t hold the pressure, don’t treat the pullback as a reversal; if a breakdown of support can’t be recovered, don’t rush to guess the bottom.
In this kind of situation, you don’t need to watch a bunch of indicators—understanding one key zone is more useful than chasing ten headlines.
#SOL走势 #Intraday observation
435
·
--
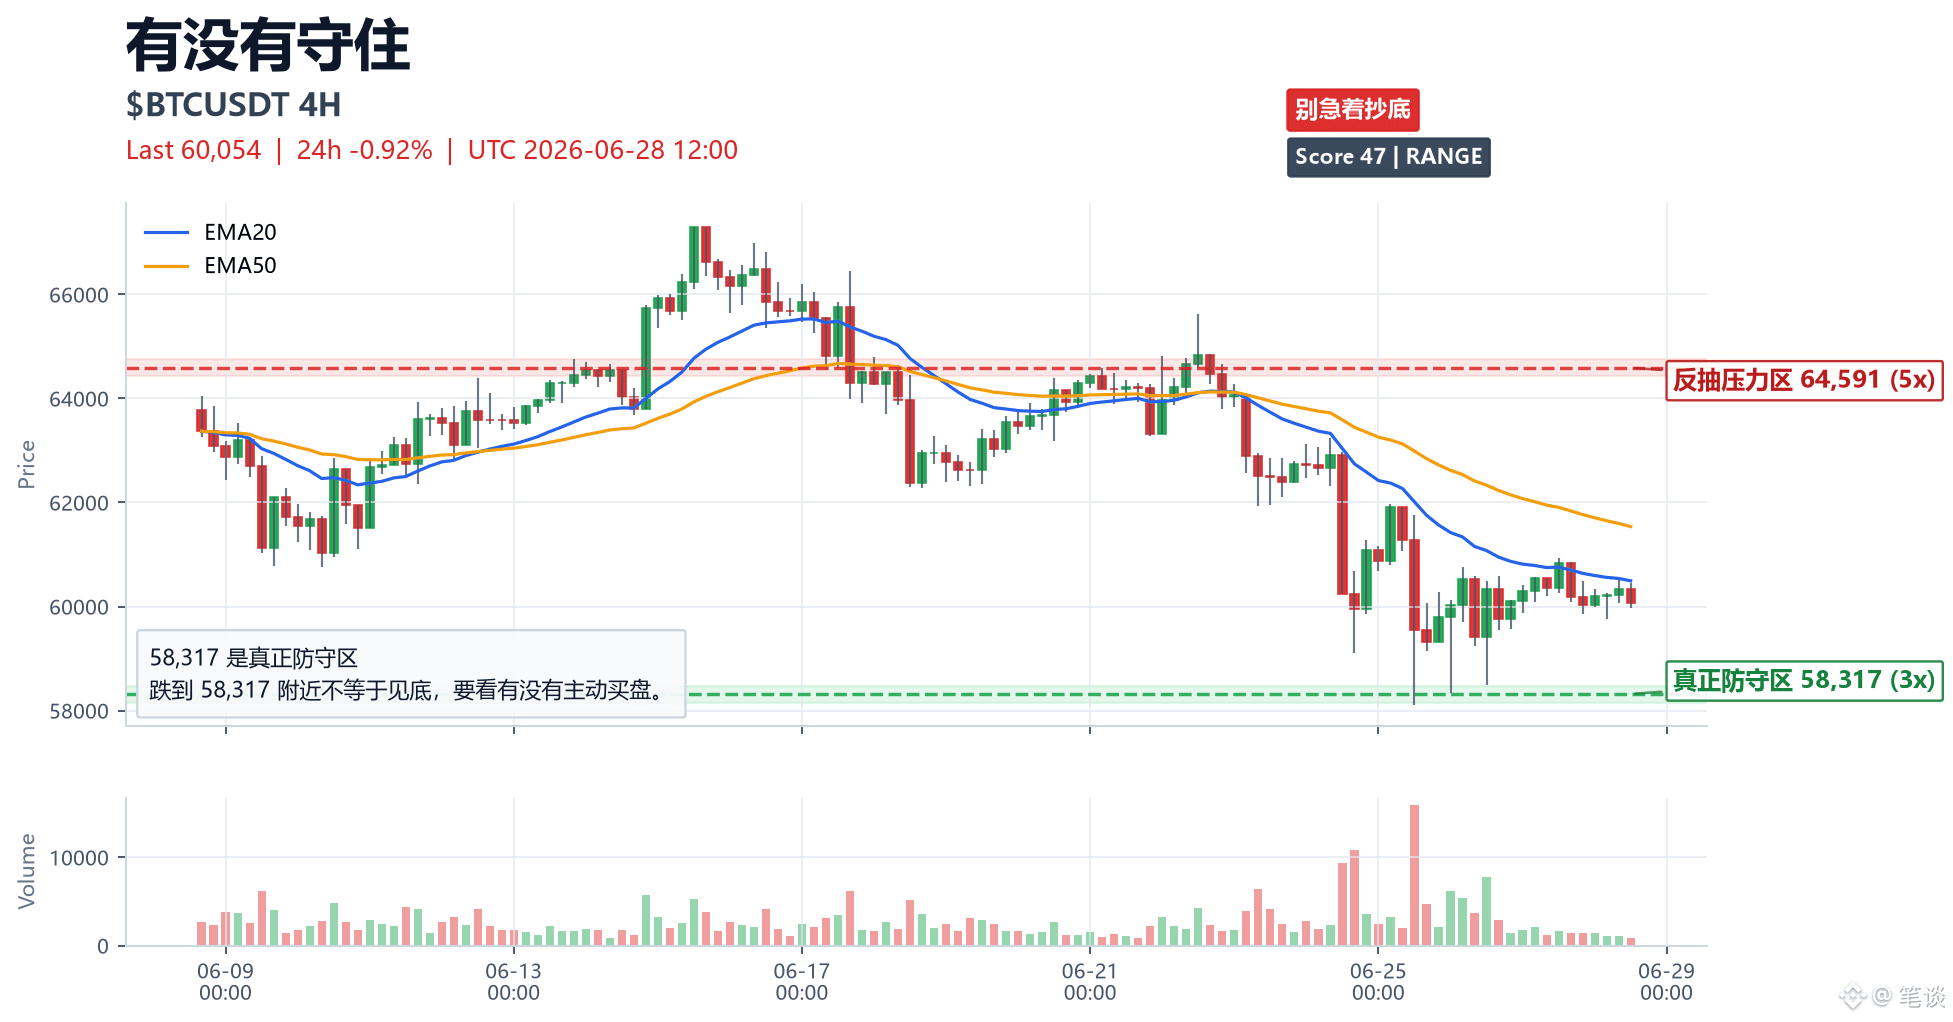
BTC daily review: the most important thing to remember today is: in a weak market, don’t look for certainty halfway through.
$BTC 24h -0.92%. During the day, the main line is still the 64,591 resistance, with 58,317 as the defense.
Today, price neither reclaimed the resistance nor hit the defense zone to provide a clear handoff.
In this kind of middle position, it’s easiest to make people feel like they want to chase an upside rebound, and then they feel like they should bottom-buy—only to end up uncomfortable on both sides.
Tomorrow, focus on only one condition:
On 4H, if it breaks down through 58,317 and can’t close back above it, treat any rebound first as hitting resistance; if price approaches this level and can reclaim it with increased volume, then look for repair.
A review isn’t for excuses—it’s to stop your next urge to trade early.
#BTC走势 # trading notes
BTC daily review: the most important thing to remember today is: in a weak market, don’t look for certainty halfway through.
$BTC 24h -0.92%. During the day, the main line is still the 64,591 resistance, with 58,317 as the defense.
Today, price neither reclaimed the resistance nor hit the defense zone to provide a clear handoff.
In this kind of middle position, it’s easiest to make people feel like they want to chase an upside rebound, and then they feel like they should bottom-buy—only to end up uncomfortable on both sides.
Tomorrow, focus on only one condition:
On 4H, if it breaks down through 58,317 and can’t close back above it, treat any rebound first as hitting resistance; if price approaches this level and can reclaim it with increased volume, then look for repair.
A review isn’t for excuses—it’s to stop your next urge to trade early.
#BTC走势 # trading notes
$BTC 24h -0.92%. During the day, the main line is still the 64,591 resistance, with 58,317 as the defense.
Today, price neither reclaimed the resistance nor hit the defense zone to provide a clear handoff.
In this kind of middle position, it’s easiest to make people feel like they want to chase an upside rebound, and then they feel like they should bottom-buy—only to end up uncomfortable on both sides.
Tomorrow, focus on only one condition:
On 4H, if it breaks down through 58,317 and can’t close back above it, treat any rebound first as hitting resistance; if price approaches this level and can reclaim it with increased volume, then look for repair.
A review isn’t for excuses—it’s to stop your next urge to trade early.
#BTC走势 # trading notes
1
469
·
--
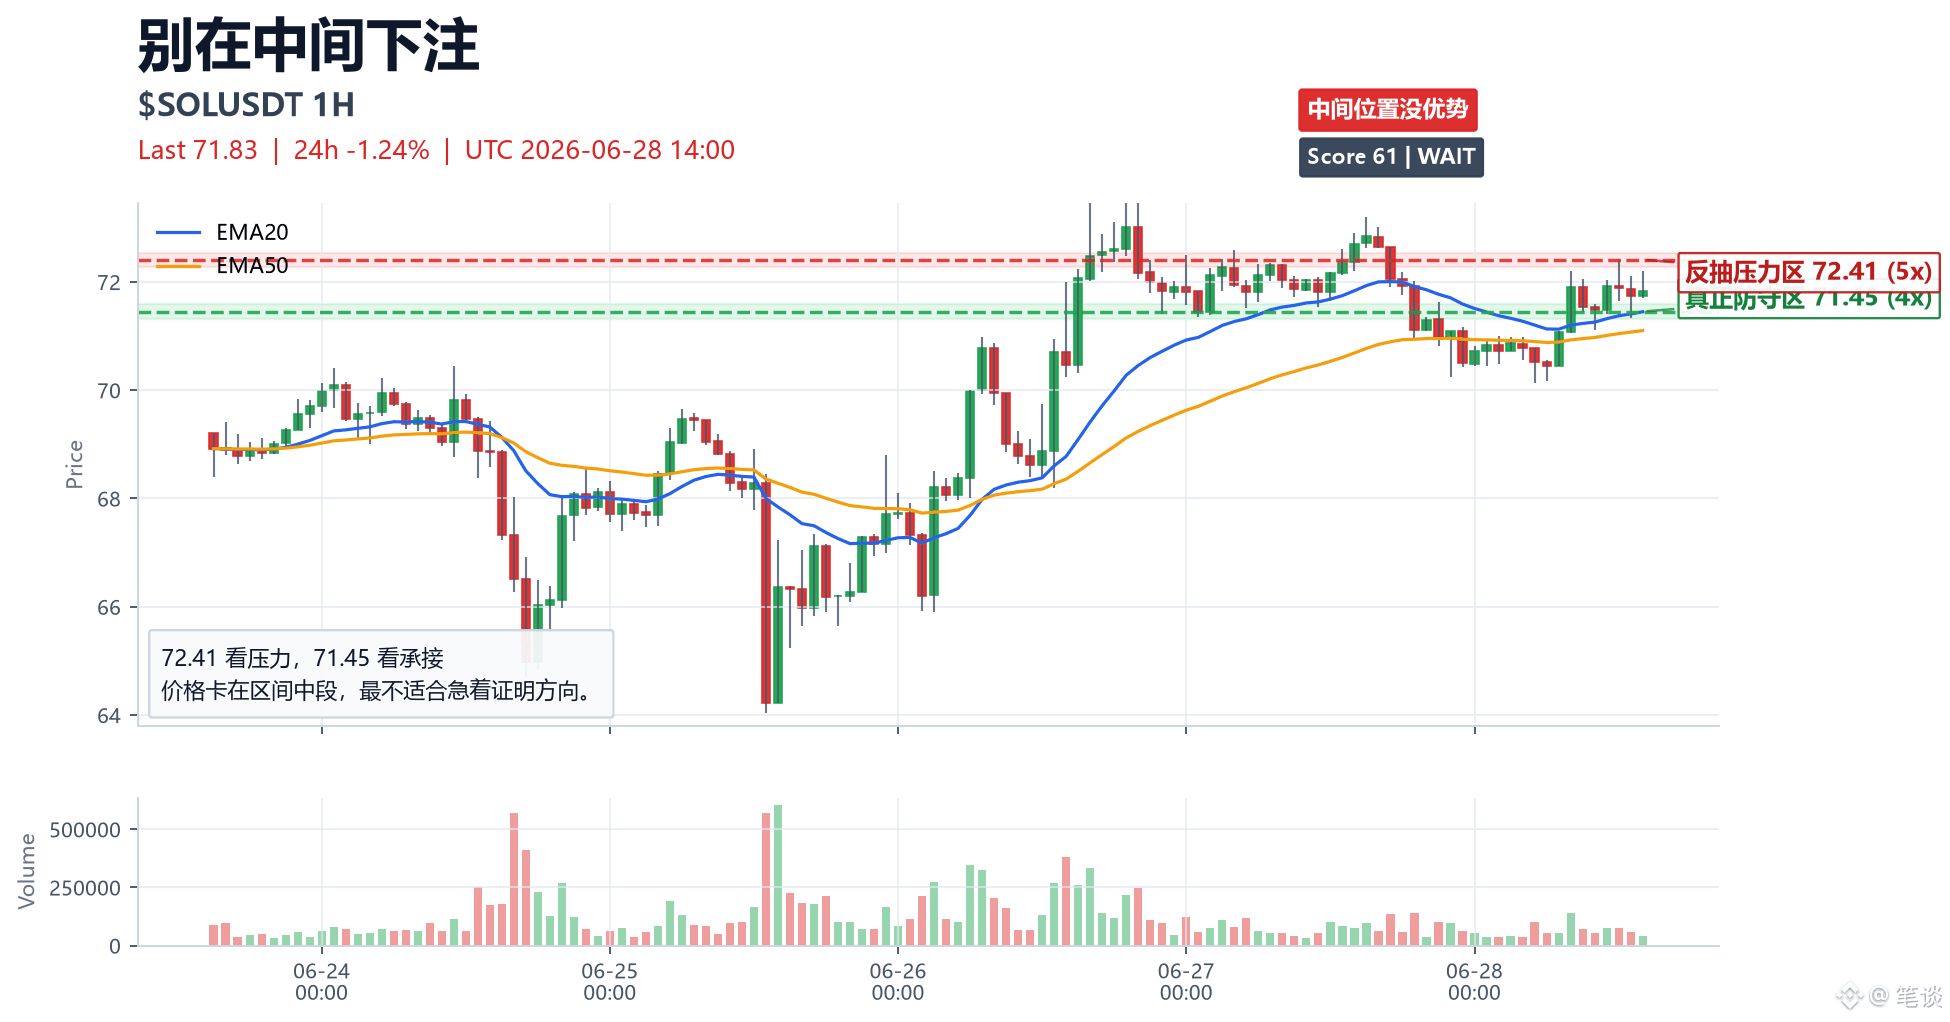
SOL After work, the easiest way to lose money is when you’re down just a little and can’t help trying to prove yourself—that you’re shorting all the way.
$SOL 24h -1.17%, now focus only on: 72.41 resistance, 71.45 support/absorption.
The price is still within a small range. Don’t rush to add orders unless you get a good entry position.
If you can’t hold above 72.41, then on any pullback, watch the resistance first. If it drops toward 71.45 and can’t reclaim it, then in the short term the support/absorption setup should be downgraded.
Don’t watch too many indicators tonight.
Before your position shows a response, use less emotion to place trades.
#SOL走势 # Trading notes
SOL After work, the easiest way to lose money is when you’re down just a little and can’t help trying to prove yourself—that you’re shorting all the way.
$SOL 24h -1.17%, now focus only on: 72.41 resistance, 71.45 support/absorption.
The price is still within a small range. Don’t rush to add orders unless you get a good entry position.
If you can’t hold above 72.41, then on any pullback, watch the resistance first. If it drops toward 71.45 and can’t reclaim it, then in the short term the support/absorption setup should be downgraded.
Don’t watch too many indicators tonight.
Before your position shows a response, use less emotion to place trades.
#SOL走势 # Trading notes
$SOL 24h -1.17%, now focus only on: 72.41 resistance, 71.45 support/absorption.
The price is still within a small range. Don’t rush to add orders unless you get a good entry position.
If you can’t hold above 72.41, then on any pullback, watch the resistance first. If it drops toward 71.45 and can’t reclaim it, then in the short term the support/absorption setup should be downgraded.
Don’t watch too many indicators tonight.
Before your position shows a response, use less emotion to place trades.
#SOL走势 # Trading notes
1
790
·
--
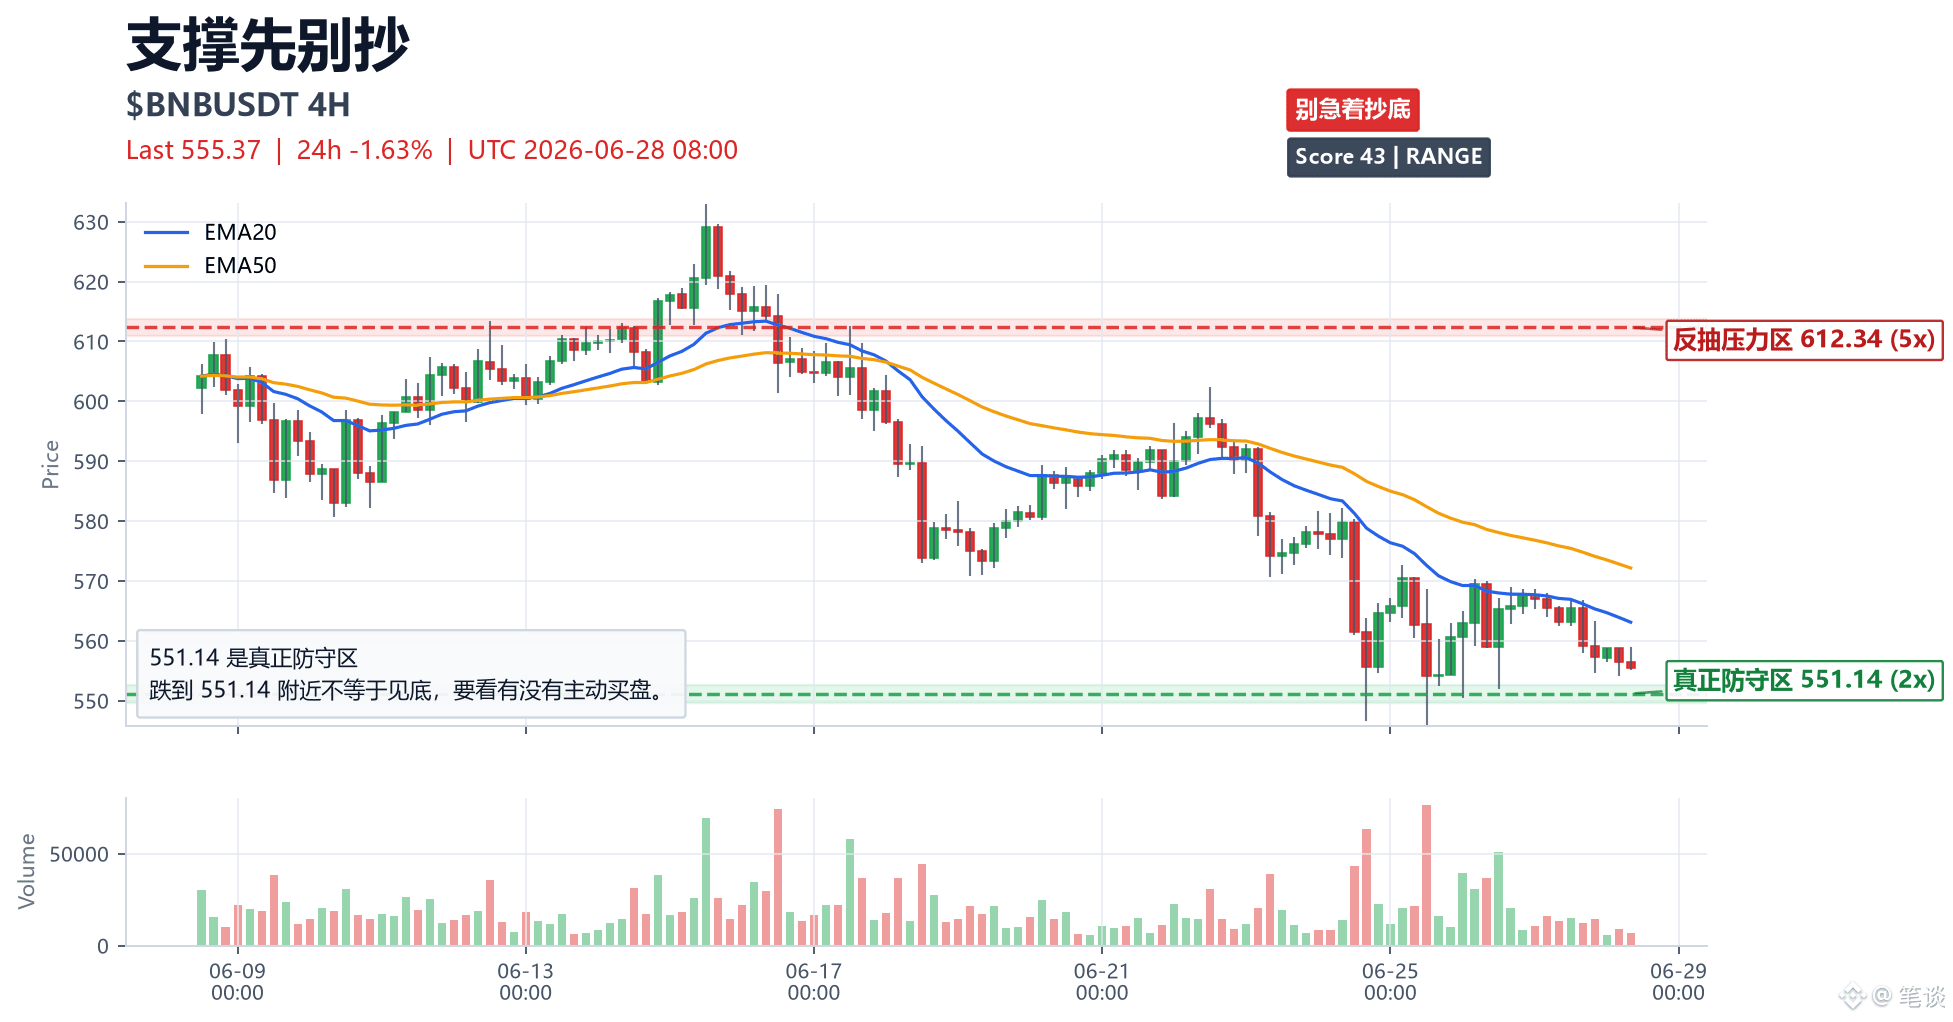
BNB now first look at 551.14—it’s the real defensive zone. Don’t rush to hand yourself over.
$BNB 24h -1.63%, first look: 551.14 is the real defensive zone.
In the most recent 120 4H candles, this level has been traded back and forth repeatedly.
EMA20/EMA50, RSI 39, and a pullback on shrinking volume are only supporting confirmations.
The trading action is simple:
Falling to around 551.14 does not automatically mean the bottom—look to see whether there is active buying.
This is the area most likely to spark arguments: bottom-fishing from the left side, or waiting for confirmation. I’d rather first see whether there’s acceptance/support.
Invalidation condition:
If, after the 4H candle breaks below 551.14, it can’t reclaim it, then 612.34 above will be treated as rebound resistance.
First look at the level, then look at volume, then look at the close.
Let price move near the key zone first, then see who can hold it.
#BNB走势 #交易笔记
BNB now first look at 551.14—it’s the real defensive zone. Don’t rush to hand yourself over.
$BNB 24h -1.63%, first look: 551.14 is the real defensive zone.
In the most recent 120 4H candles, this level has been traded back and forth repeatedly.
EMA20/EMA50, RSI 39, and a pullback on shrinking volume are only supporting confirmations.
The trading action is simple:
Falling to around 551.14 does not automatically mean the bottom—look to see whether there is active buying.
This is the area most likely to spark arguments: bottom-fishing from the left side, or waiting for confirmation. I’d rather first see whether there’s acceptance/support.
Invalidation condition:
If, after the 4H candle breaks below 551.14, it can’t reclaim it, then 612.34 above will be treated as rebound resistance.
First look at the level, then look at volume, then look at the close.
Let price move near the key zone first, then see who can hold it.
#BNB走势 #交易笔记
$BNB 24h -1.63%, first look: 551.14 is the real defensive zone.
In the most recent 120 4H candles, this level has been traded back and forth repeatedly.
EMA20/EMA50, RSI 39, and a pullback on shrinking volume are only supporting confirmations.
The trading action is simple:
Falling to around 551.14 does not automatically mean the bottom—look to see whether there is active buying.
This is the area most likely to spark arguments: bottom-fishing from the left side, or waiting for confirmation. I’d rather first see whether there’s acceptance/support.
Invalidation condition:
If, after the 4H candle breaks below 551.14, it can’t reclaim it, then 612.34 above will be treated as rebound resistance.
First look at the level, then look at volume, then look at the close.
Let price move near the key zone first, then see who can hold it.
#BNB走势 #交易笔记
396
·
--
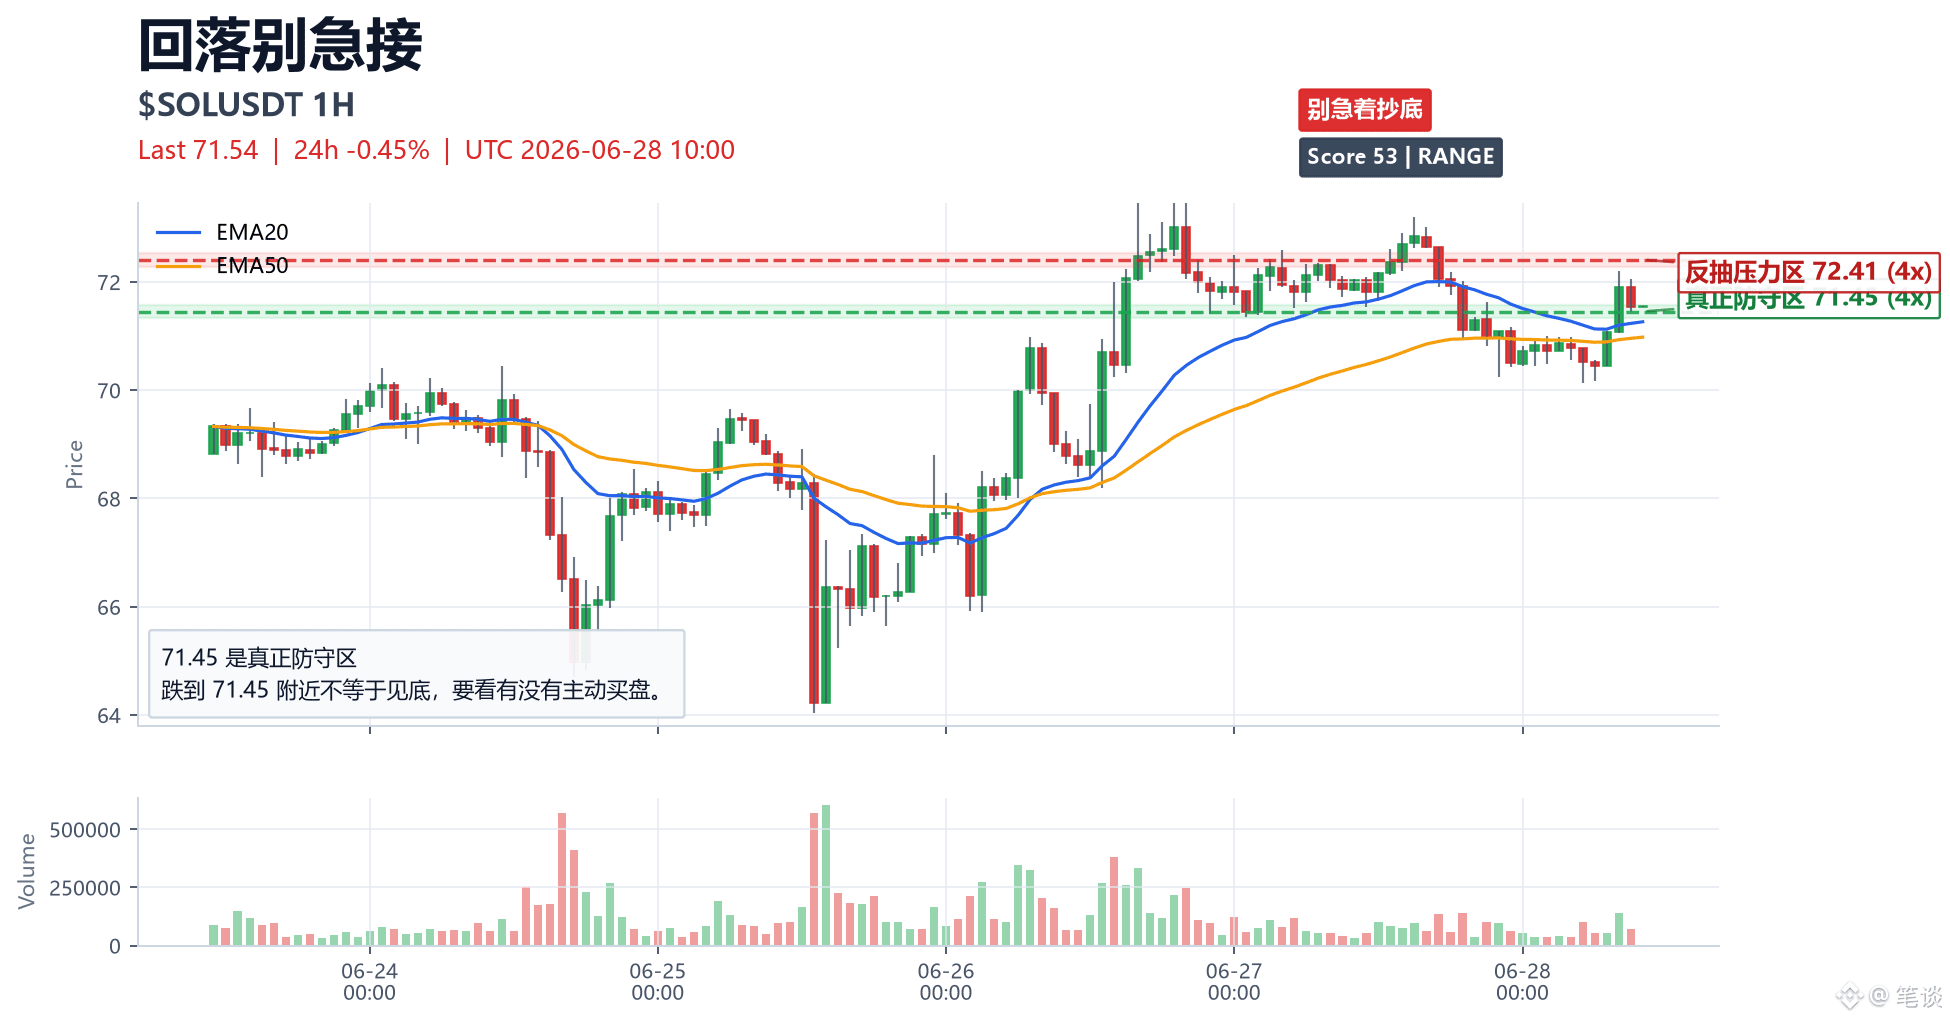
SOL heats up quickly, but it doesn’t mean it can go far. First look at 71.45—this is the real defense zone.
$SOL 24h -0.45%. For this one, I only focus on one area: 71.45 is the real defense zone.
If the price only rushes into the resistance zone but the volume can’t keep up, the momentum can easily turn into a chasing-high trap.
Only if the pullback to the key zone has buyers stepping in can the heat have a basis to continue.
The two highlighted regions on the chart come from the recent 120 candlesticks’ swing high/low clustering:
Resistance is around 72.41.
Defense is around 71.45.
Now don’t let the percentage move dictate your actions.
Dropping to around 71.45 doesn’t automatically mean the bottom is in—you need to see whether there is active buy support.
This is the spot most likely to spark debate: trying to buy the dip on the left side, or waiting for confirmation. I’d rather first check whether there is follow-through/support.
Invalidation conditions:
If on the 4H timeframe it drops through 71.45 and then fails to reclaim it, then 72.41 above should be treated as resistance for the rebound.
You can watch the hype, but don’t let the gainers’ list make the decision for you.
#SOL走势 #Trading Notes
SOL heats up quickly, but it doesn’t mean it can go far. First look at 71.45—this is the real defense zone.
$SOL 24h -0.45%. For this one, I only focus on one area: 71.45 is the real defense zone.
If the price only rushes into the resistance zone but the volume can’t keep up, the momentum can easily turn into a chasing-high trap.
Only if the pullback to the key zone has buyers stepping in can the heat have a basis to continue.
The two highlighted regions on the chart come from the recent 120 candlesticks’ swing high/low clustering:
Resistance is around 72.41.
Defense is around 71.45.
Now don’t let the percentage move dictate your actions.
Dropping to around 71.45 doesn’t automatically mean the bottom is in—you need to see whether there is active buy support.
This is the spot most likely to spark debate: trying to buy the dip on the left side, or waiting for confirmation. I’d rather first check whether there is follow-through/support.
Invalidation conditions:
If on the 4H timeframe it drops through 71.45 and then fails to reclaim it, then 72.41 above should be treated as resistance for the rebound.
You can watch the hype, but don’t let the gainers’ list make the decision for you.
#SOL走势 #Trading Notes
$SOL 24h -0.45%. For this one, I only focus on one area: 71.45 is the real defense zone.
If the price only rushes into the resistance zone but the volume can’t keep up, the momentum can easily turn into a chasing-high trap.
Only if the pullback to the key zone has buyers stepping in can the heat have a basis to continue.
The two highlighted regions on the chart come from the recent 120 candlesticks’ swing high/low clustering:
Resistance is around 72.41.
Defense is around 71.45.
Now don’t let the percentage move dictate your actions.
Dropping to around 71.45 doesn’t automatically mean the bottom is in—you need to see whether there is active buy support.
This is the spot most likely to spark debate: trying to buy the dip on the left side, or waiting for confirmation. I’d rather first check whether there is follow-through/support.
Invalidation conditions:
If on the 4H timeframe it drops through 71.45 and then fails to reclaim it, then 72.41 above should be treated as resistance for the rebound.
You can watch the hype, but don’t let the gainers’ list make the decision for you.
#SOL走势 #Trading Notes
802
·
--
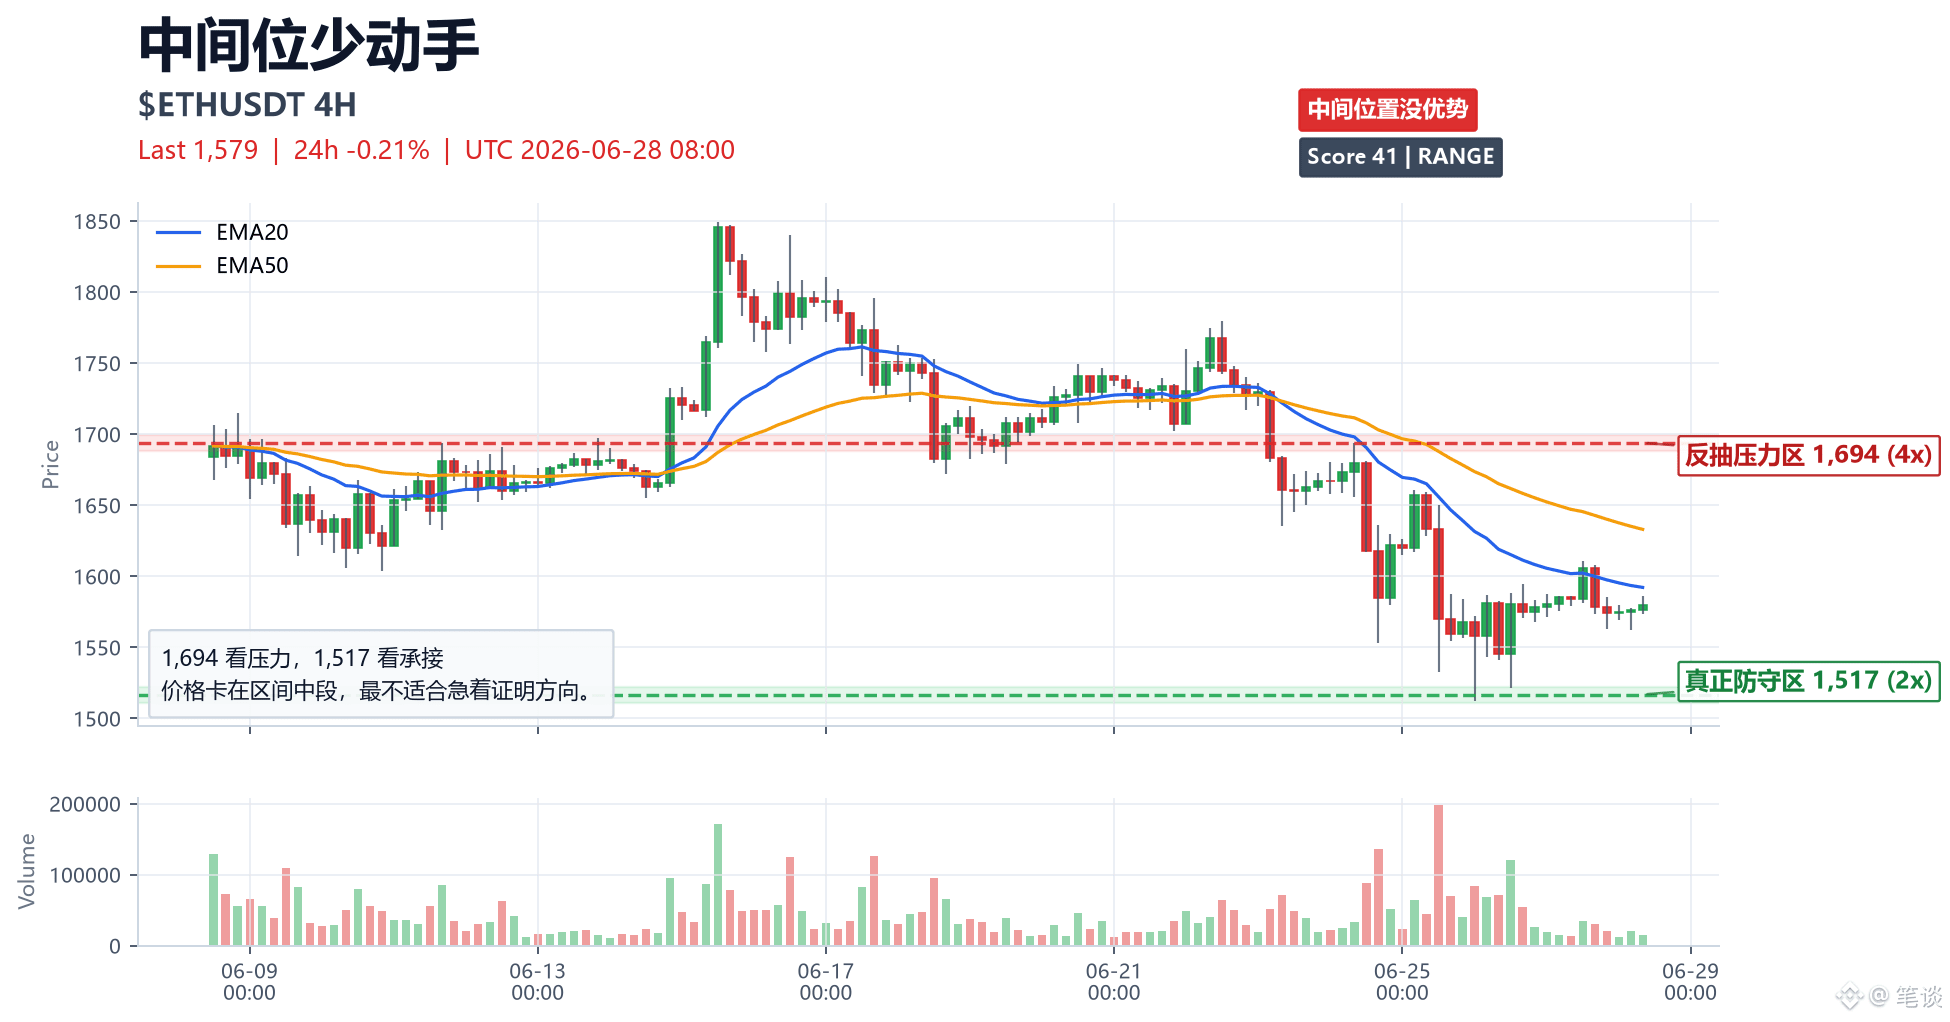
The most likely way to lose money in ETH in the morning session is to treat the middle area as a breakout level.
$ETH 24h -0.21%, today only watch: 1,694 resistance, 1,517 support.
These two levels weren’t made up.
In the recent 4H timeframe, the price has repeatedly tried to bounce from above and been rejected, while there’s trading activity lingering below; EMA20/EMA50 also haven’t diverged to confirm direction.
So the worst move right now is to place a directional bet before price reaches the key zone.
Invalidation conditions:
If, on 4H, there is a volume-backed move that stands above 1,694, then only a weak retest counts as correction; if price falls back and closes below 1,517 and can’t reclaim, then treat the setup/support as a failure.
Don’t trade much from the middle area—wait until price reaches the level and then observe how it reacts.
#ETH走势 #trading notes
The most likely way to lose money in ETH in the morning session is to treat the middle area as a breakout level.
$ETH 24h -0.21%, today only watch: 1,694 resistance, 1,517 support.
These two levels weren’t made up.
In the recent 4H timeframe, the price has repeatedly tried to bounce from above and been rejected, while there’s trading activity lingering below; EMA20/EMA50 also haven’t diverged to confirm direction.
So the worst move right now is to place a directional bet before price reaches the key zone.
Invalidation conditions:
If, on 4H, there is a volume-backed move that stands above 1,694, then only a weak retest counts as correction; if price falls back and closes below 1,517 and can’t reclaim, then treat the setup/support as a failure.
Don’t trade much from the middle area—wait until price reaches the level and then observe how it reacts.
#ETH走势 #trading notes
$ETH 24h -0.21%, today only watch: 1,694 resistance, 1,517 support.
These two levels weren’t made up.
In the recent 4H timeframe, the price has repeatedly tried to bounce from above and been rejected, while there’s trading activity lingering below; EMA20/EMA50 also haven’t diverged to confirm direction.
So the worst move right now is to place a directional bet before price reaches the key zone.
Invalidation conditions:
If, on 4H, there is a volume-backed move that stands above 1,694, then only a weak retest counts as correction; if price falls back and closes below 1,517 and can’t reclaim, then treat the setup/support as a failure.
Don’t trade much from the middle area—wait until price reaches the level and then observe how it reacts.
#ETH走势 #trading notes
1
277
·
--
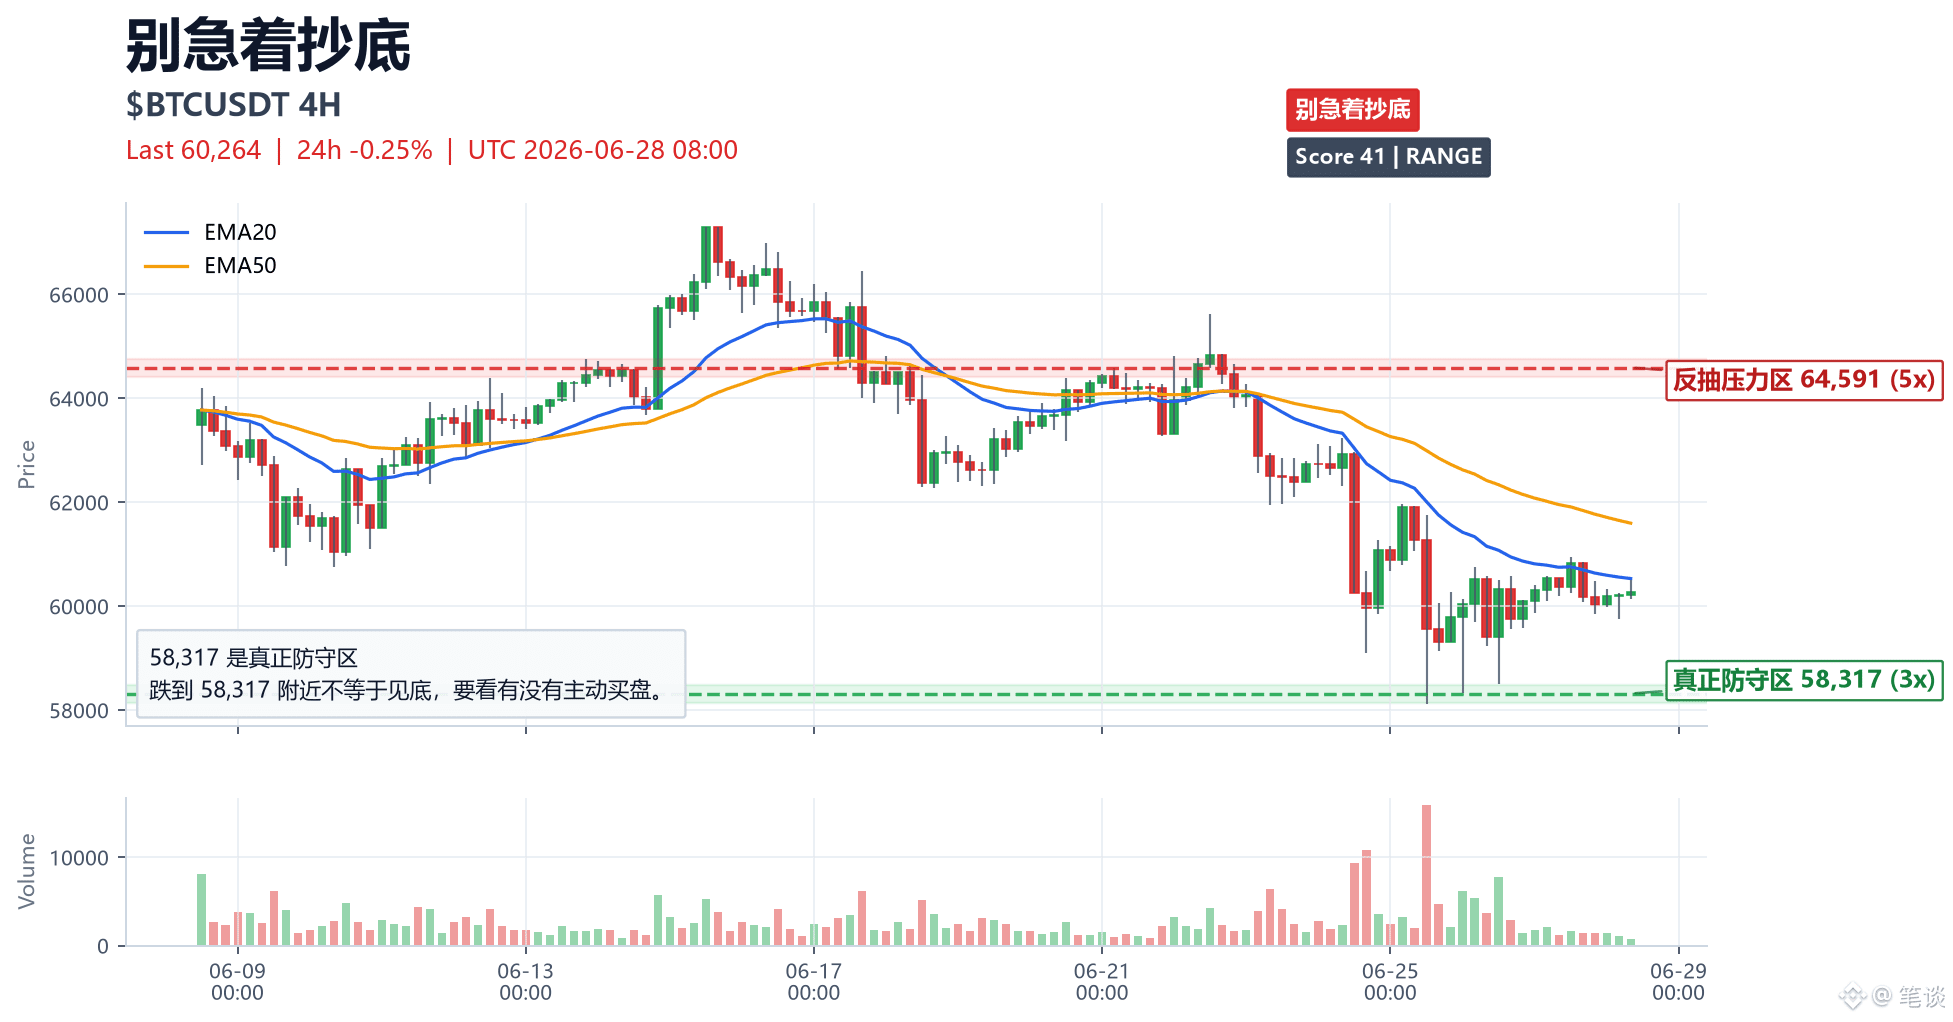
The easiest way to lose money in BTC today is to rush to prove you were right.
$BTC : what you should still focus on now is this—58,317 is the real defensive zone.
If you haven’t reached the position, don’t force the direction; if you’ve reached the position, don’t only look at price—watch the volume and the close.
The most expensive move in trading is often not being wrong, but knowing you don’t have an edge and still trying to get ahead.
#BTC走势 #交易笔记
The easiest way to lose money in BTC today is to rush to prove you were right.
$BTC : what you should still focus on now is this—58,317 is the real defensive zone.
If you haven’t reached the position, don’t force the direction; if you’ve reached the position, don’t only look at price—watch the volume and the close.
The most expensive move in trading is often not being wrong, but knowing you don’t have an edge and still trying to get ahead.
#BTC走势 #交易笔记
$BTC : what you should still focus on now is this—58,317 is the real defensive zone.
If you haven’t reached the position, don’t force the direction; if you’ve reached the position, don’t only look at price—watch the volume and the close.
The most expensive move in trading is often not being wrong, but knowing you don’t have an edge and still trying to get ahead.
#BTC走势 #交易笔记
285
·
--
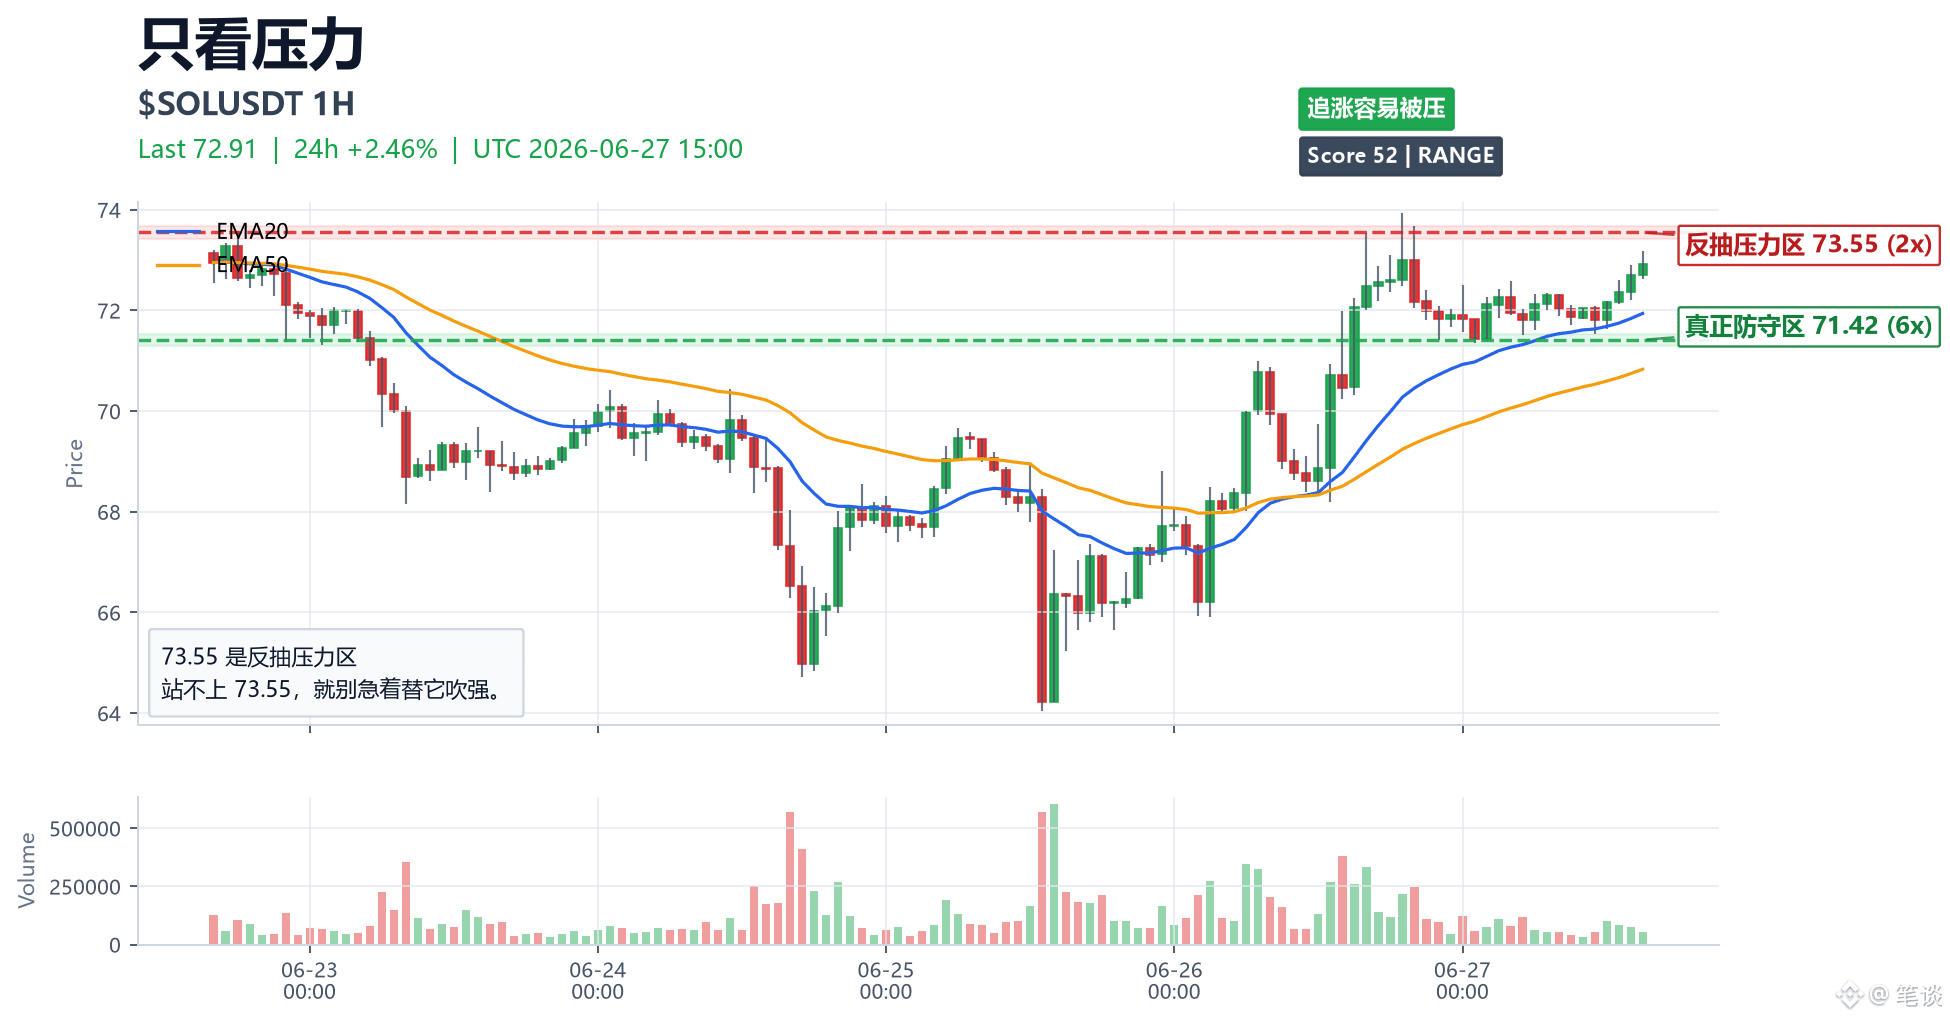
SOL Don’t let the gain leaderboard lead you astray before bed.
$SOL 24h +2.52%, tonight only watch: 73.34 resistance, 72.58 support.
Being strong is fine, but what we’re most afraid of right now is chasing while price is still below resistance.
Only talk about continuation once it breaks above 73.34. If it pulls back to 72.58 and can still be reclaimed, it means short-term support is still there.
Invalidation conditions:
If on the 1H it drops back below 72.58 and still can’t be reclaimed, don’t rush to look for a second wave tomorrow.
You can watch the hot spots—just don’t move faster than your entry level.
#SOL走势 #Intraday observation
SOL Don’t let the gain leaderboard lead you astray before bed.
$SOL 24h +2.52%, tonight only watch: 73.34 resistance, 72.58 support.
Being strong is fine, but what we’re most afraid of right now is chasing while price is still below resistance.
Only talk about continuation once it breaks above 73.34. If it pulls back to 72.58 and can still be reclaimed, it means short-term support is still there.
Invalidation conditions:
If on the 1H it drops back below 72.58 and still can’t be reclaimed, don’t rush to look for a second wave tomorrow.
You can watch the hot spots—just don’t move faster than your entry level.
#SOL走势 #Intraday observation
$SOL 24h +2.52%, tonight only watch: 73.34 resistance, 72.58 support.
Being strong is fine, but what we’re most afraid of right now is chasing while price is still below resistance.
Only talk about continuation once it breaks above 73.34. If it pulls back to 72.58 and can still be reclaimed, it means short-term support is still there.
Invalidation conditions:
If on the 1H it drops back below 72.58 and still can’t be reclaimed, don’t rush to look for a second wave tomorrow.
You can watch the hot spots—just don’t move faster than your entry level.
#SOL走势 #Intraday observation
3
869
·
--
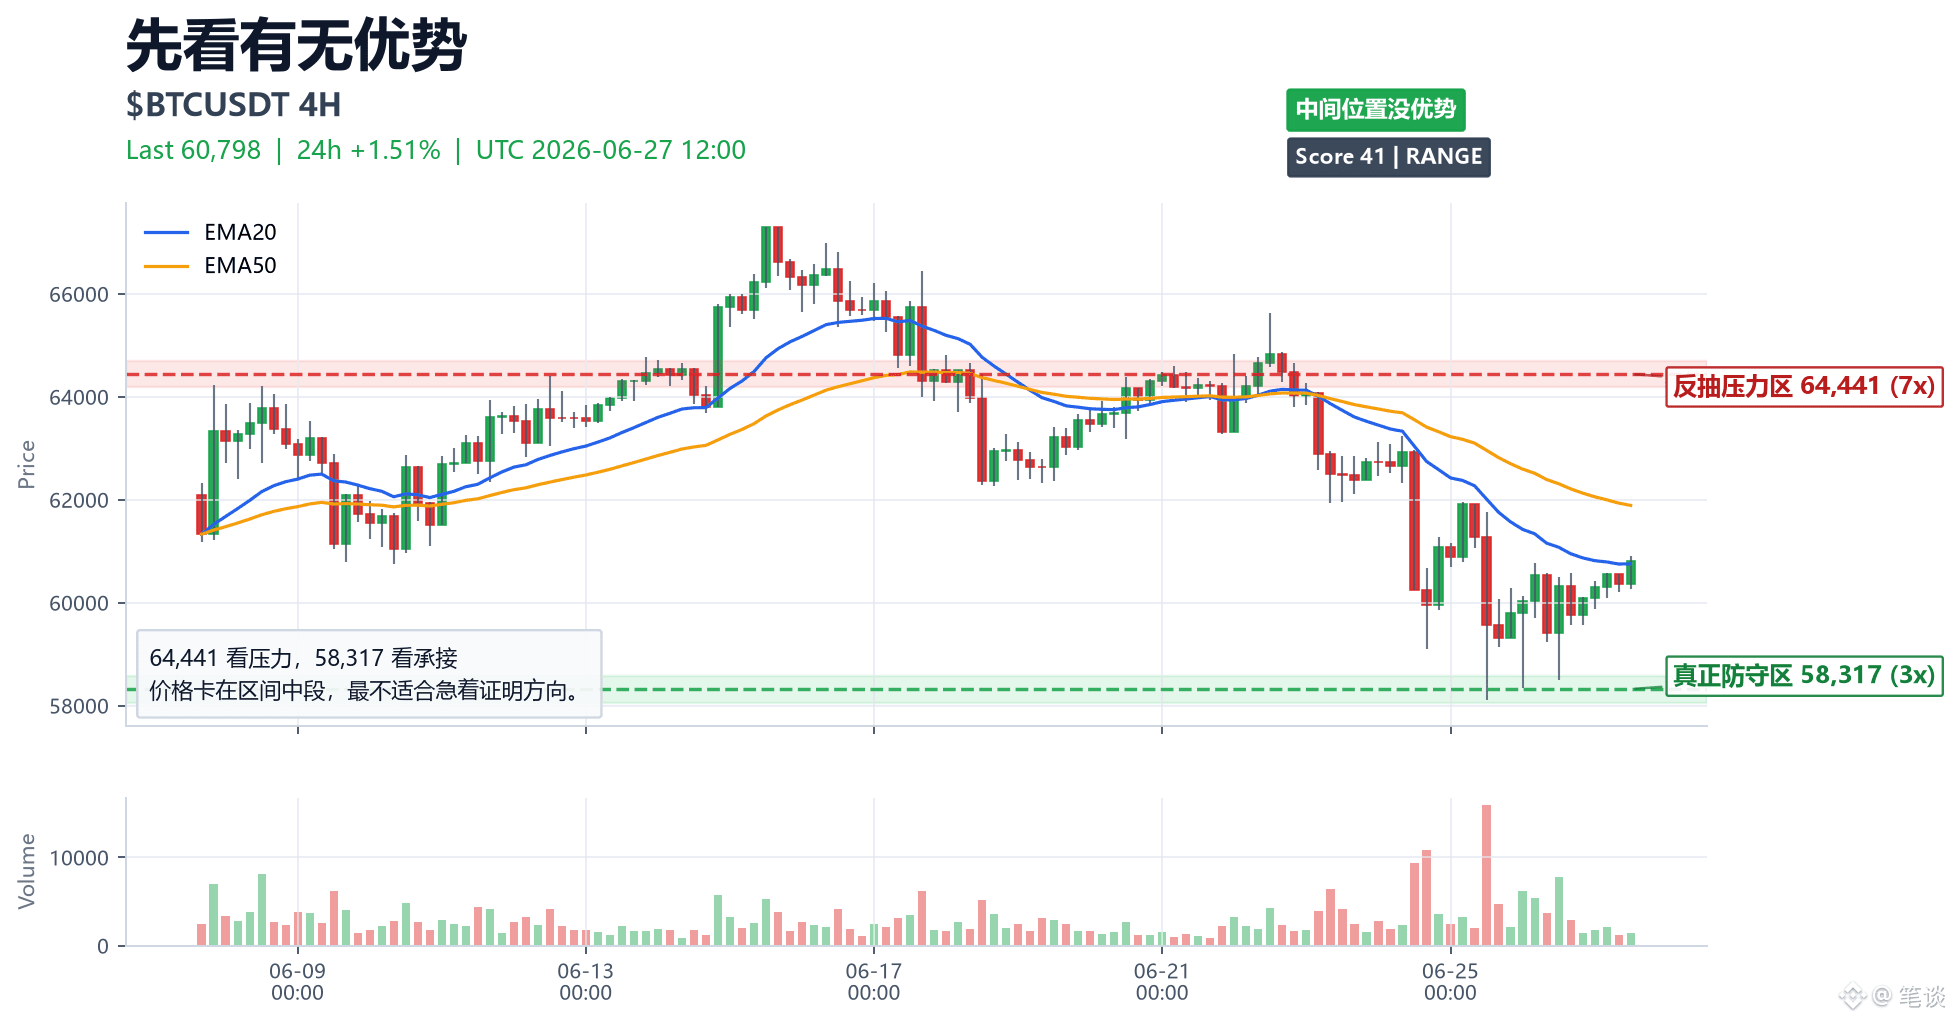
BTC Daily Recap: the focus isn’t how much it went up—it’s whether those two zones from the morning were respected.
$BTC 24h +1.51%, the daytime main line is still: 64,441 resistance, 58,317 support.
As mentioned this morning, don’t rush to pick a side at the middle position.
Today’s price didn’t truly break through resistance, nor did it return to the support zone to provide a reaction. Many positions lost money on the “it looks like it’s about to move” late entry.
Tomorrow, I’ll only look at one condition:
On the 4H chart, if volume expands and price closes above 64,441, then a pullback reclaim would earn the right to keep discussing further. If it can’t get above that, then even if it spikes, handle it first as resistance.
A recap isn’t about finding excuses—it’s about blocking the urge to trade early next time.
#BTC走势 #交易笔记
BTC Daily Recap: the focus isn’t how much it went up—it’s whether those two zones from the morning were respected.
$BTC 24h +1.51%, the daytime main line is still: 64,441 resistance, 58,317 support.
As mentioned this morning, don’t rush to pick a side at the middle position.
Today’s price didn’t truly break through resistance, nor did it return to the support zone to provide a reaction. Many positions lost money on the “it looks like it’s about to move” late entry.
Tomorrow, I’ll only look at one condition:
On the 4H chart, if volume expands and price closes above 64,441, then a pullback reclaim would earn the right to keep discussing further. If it can’t get above that, then even if it spikes, handle it first as resistance.
A recap isn’t about finding excuses—it’s about blocking the urge to trade early next time.
#BTC走势 #交易笔记
$BTC 24h +1.51%, the daytime main line is still: 64,441 resistance, 58,317 support.
As mentioned this morning, don’t rush to pick a side at the middle position.
Today’s price didn’t truly break through resistance, nor did it return to the support zone to provide a reaction. Many positions lost money on the “it looks like it’s about to move” late entry.
Tomorrow, I’ll only look at one condition:
On the 4H chart, if volume expands and price closes above 64,441, then a pullback reclaim would earn the right to keep discussing further. If it can’t get above that, then even if it spikes, handle it first as resistance.
A recap isn’t about finding excuses—it’s about blocking the urge to trade early next time.
#BTC走势 #交易笔记
270
·
--
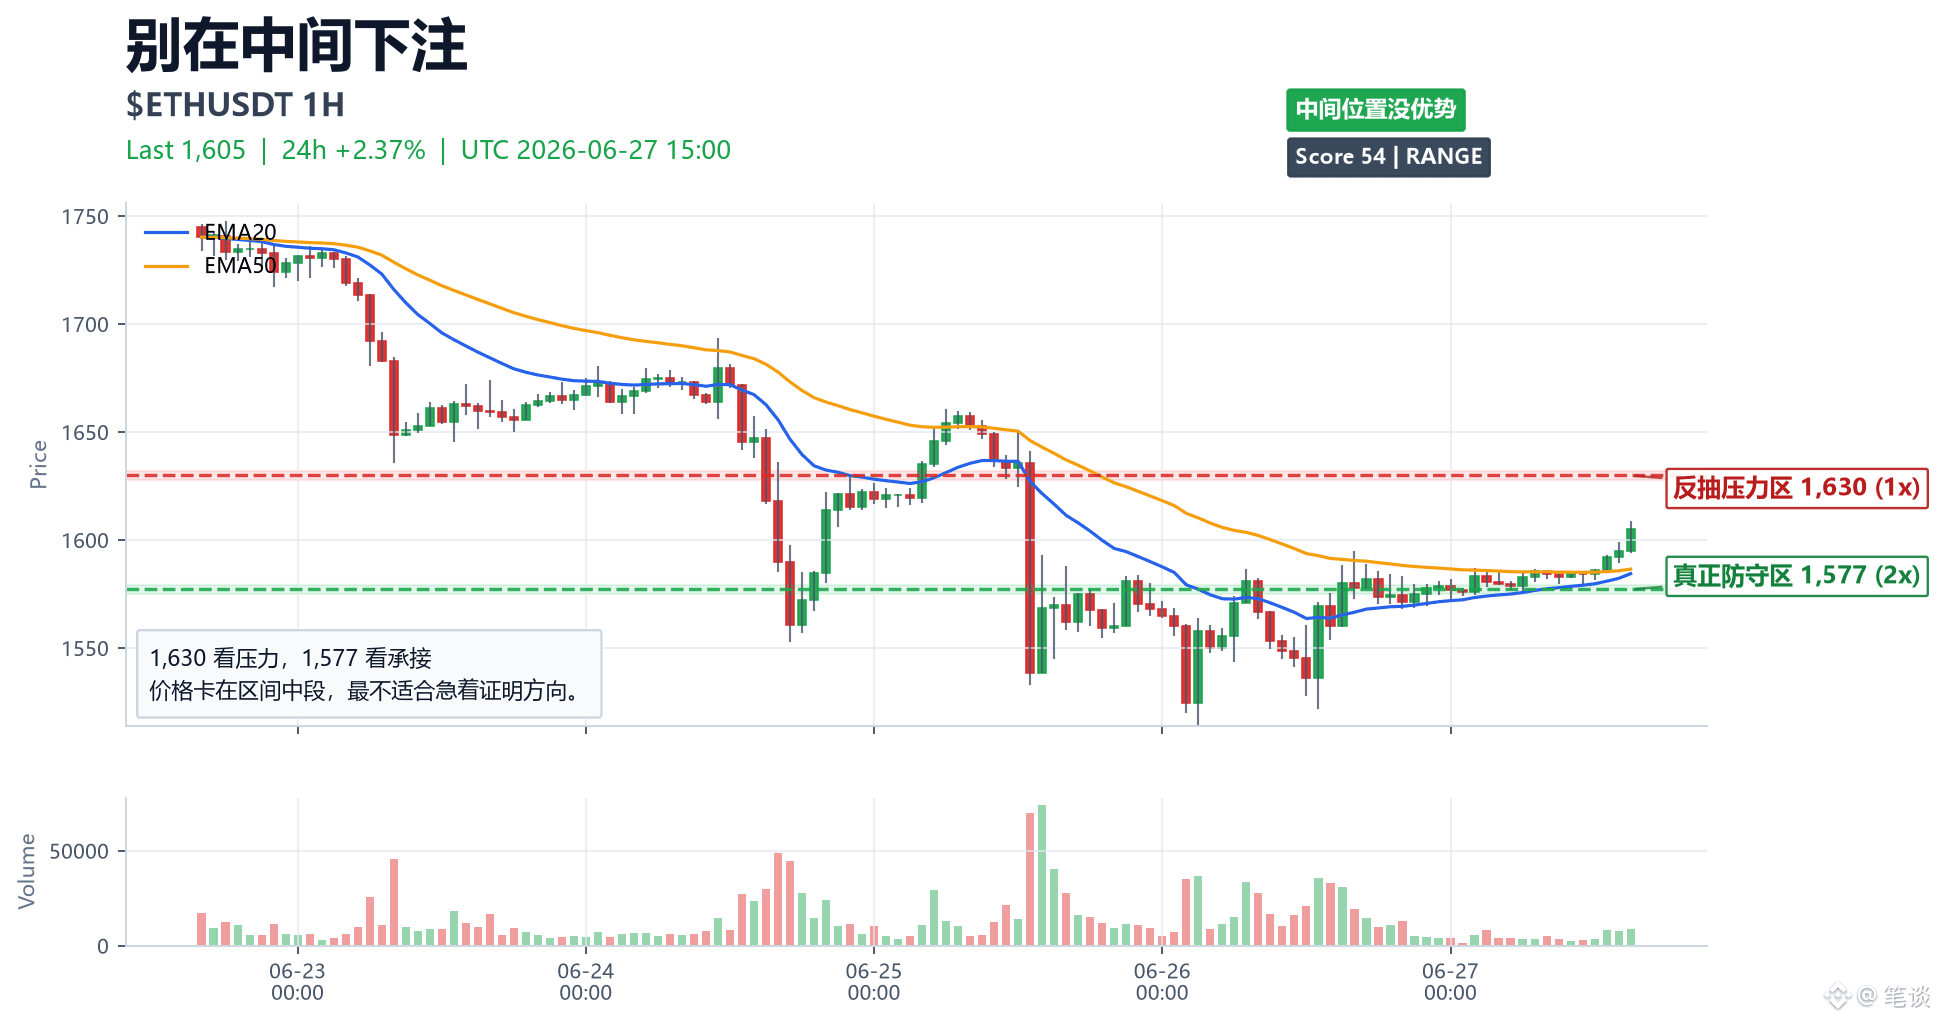
The most common mistake after hours in ETH is wanting to make up for the trades you didn’t do during the day as soon as you see a rebound.
$ETH 24h +2.40%, now I’m only watching one set of levels: 1,630 resistance, 1,577 support.
If the move above 1,630 can’t hold on with strong volume, don’t rush to treat the rebound as a reversal.
If the pullback near 1,577 can still be reclaimed, then it shows that short-term buyers are willing to step in.
Don’t chase emotions during this time window.
If the levels aren’t given, use your speed less to compensate for missed opportunities.
#ETH走势 #Trading Notes
The most common mistake after hours in ETH is wanting to make up for the trades you didn’t do during the day as soon as you see a rebound.
$ETH 24h +2.40%, now I’m only watching one set of levels: 1,630 resistance, 1,577 support.
If the move above 1,630 can’t hold on with strong volume, don’t rush to treat the rebound as a reversal.
If the pullback near 1,577 can still be reclaimed, then it shows that short-term buyers are willing to step in.
Don’t chase emotions during this time window.
If the levels aren’t given, use your speed less to compensate for missed opportunities.
#ETH走势 #Trading Notes
$ETH 24h +2.40%, now I’m only watching one set of levels: 1,630 resistance, 1,577 support.
If the move above 1,630 can’t hold on with strong volume, don’t rush to treat the rebound as a reversal.
If the pullback near 1,577 can still be reclaimed, then it shows that short-term buyers are willing to step in.
Don’t chase emotions during this time window.
If the levels aren’t given, use your speed less to compensate for missed opportunities.
#ETH走势 #Trading Notes
1
737
·
--
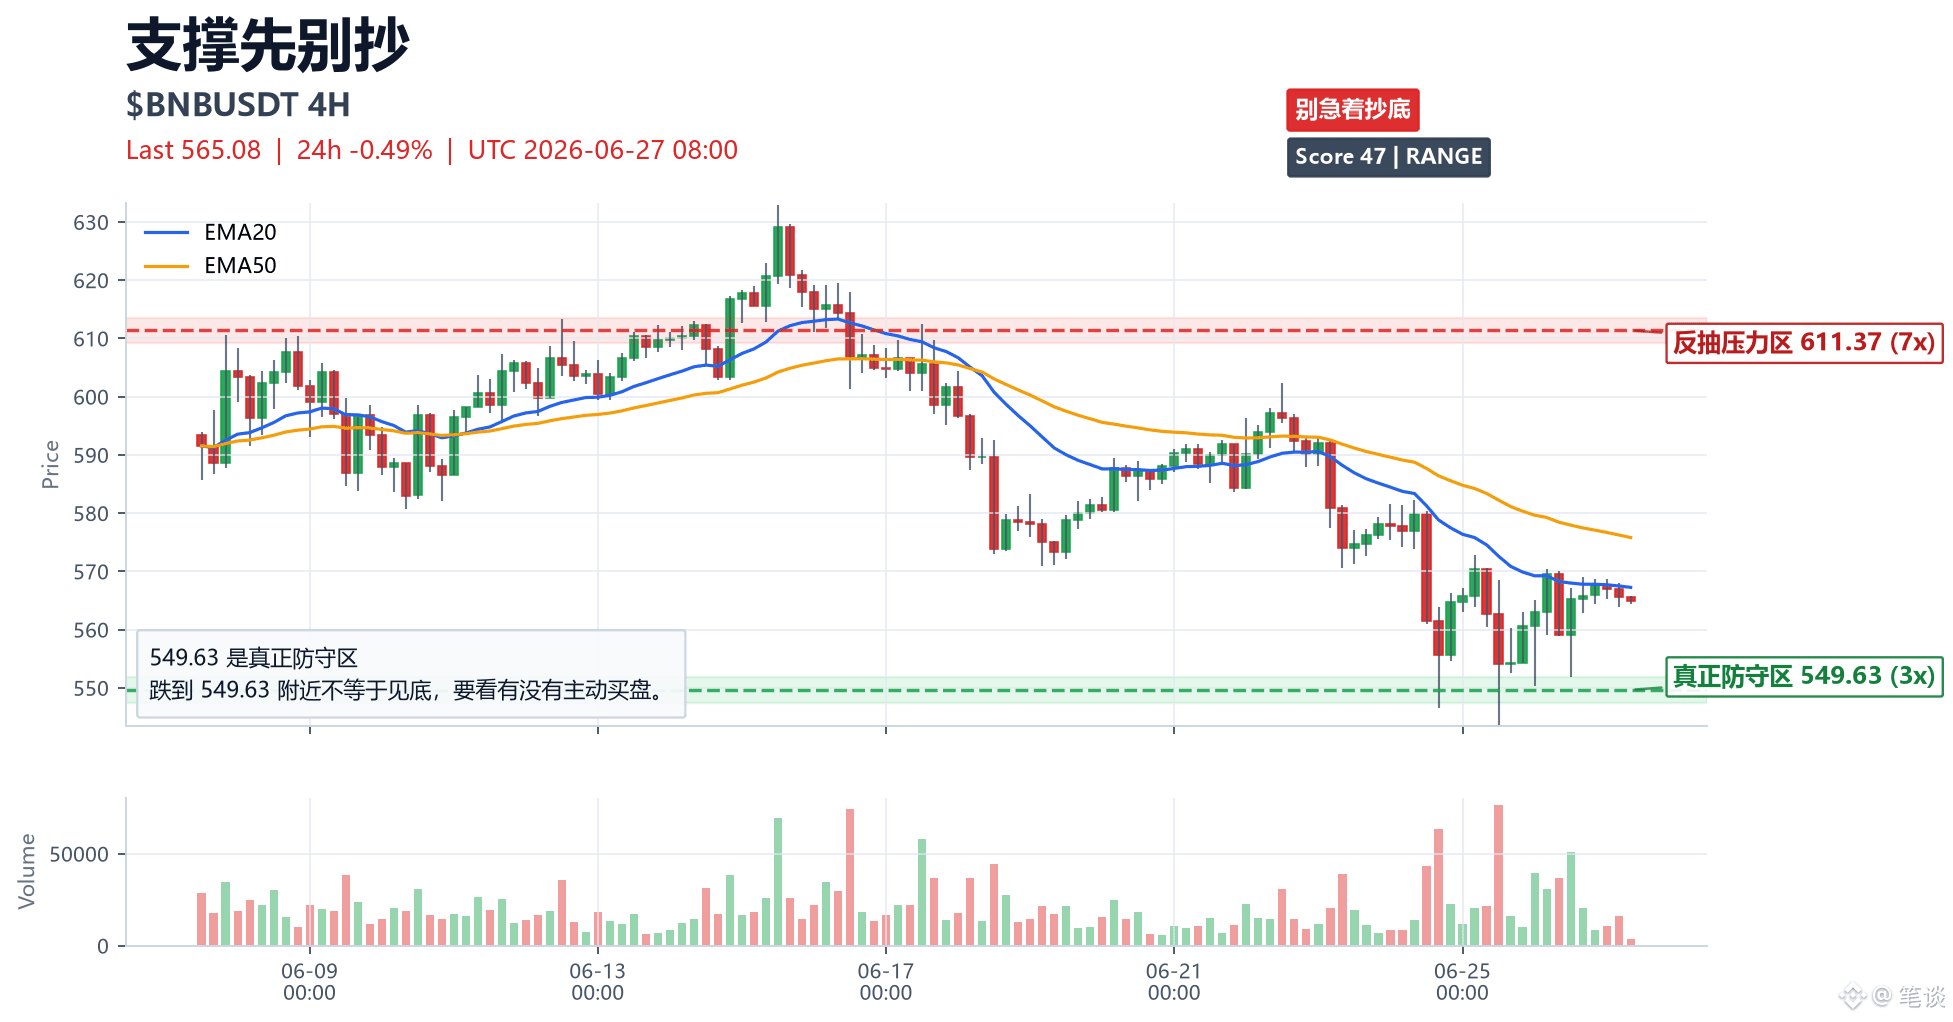
BNB This chart is suitable for making one point: you can’t buy just because the price has reached support.
$BNB 24h -0.49%, today we only focus on the defense zone at 549.63.
This level is valid not because it looks good.
In the recent 4H timeframe, there have been multiple trades lingering around this area; the prior low and the EMA structure also turn it into a short-term boundary between longs and shorts.
But dropping to 549.63 doesn’t mean a bottom has been formed.
What really matters is whether there is active buying, whether price is reclaimed, and whether the volume confirms.
Invalidation conditions:
After a 4H breakdown below 549.63, if it can’t reclaim it, then the first area to watch is 611.37 as resistance to treat any rebound.
Being more professional isn’t about guessing the bottom—it’s about waiting for the level to show its reaction.
#BNB走势 #Trading notes
BNB This chart is suitable for making one point: you can’t buy just because the price has reached support.
$BNB 24h -0.49%, today we only focus on the defense zone at 549.63.
This level is valid not because it looks good.
In the recent 4H timeframe, there have been multiple trades lingering around this area; the prior low and the EMA structure also turn it into a short-term boundary between longs and shorts.
But dropping to 549.63 doesn’t mean a bottom has been formed.
What really matters is whether there is active buying, whether price is reclaimed, and whether the volume confirms.
Invalidation conditions:
After a 4H breakdown below 549.63, if it can’t reclaim it, then the first area to watch is 611.37 as resistance to treat any rebound.
Being more professional isn’t about guessing the bottom—it’s about waiting for the level to show its reaction.
#BNB走势 #Trading notes
$BNB 24h -0.49%, today we only focus on the defense zone at 549.63.
This level is valid not because it looks good.
In the recent 4H timeframe, there have been multiple trades lingering around this area; the prior low and the EMA structure also turn it into a short-term boundary between longs and shorts.
But dropping to 549.63 doesn’t mean a bottom has been formed.
What really matters is whether there is active buying, whether price is reclaimed, and whether the volume confirms.
Invalidation conditions:
After a 4H breakdown below 549.63, if it can’t reclaim it, then the first area to watch is 611.37 as resistance to treat any rebound.
Being more professional isn’t about guessing the bottom—it’s about waiting for the level to show its reaction.
#BNB走势 #Trading notes
1.1k
·
--
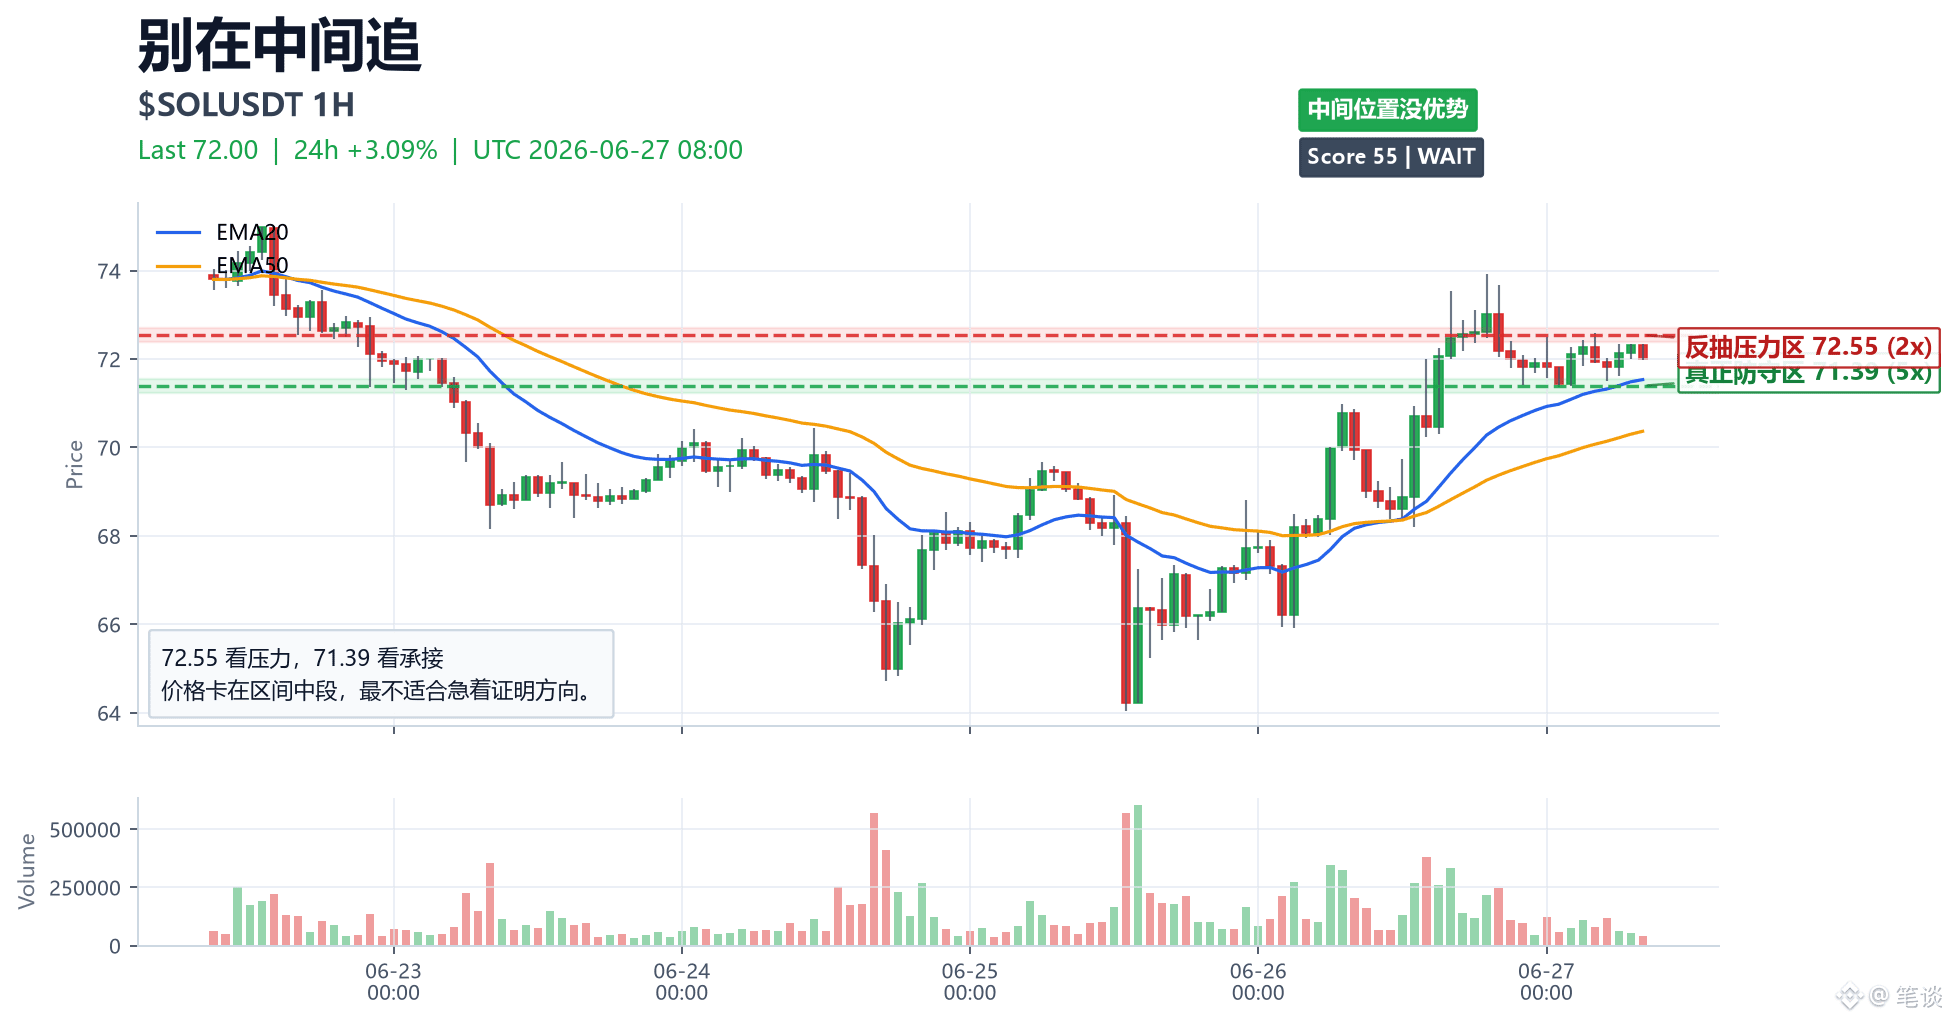
SOL heats up fast, but it doesn’t mean chasing in right now will feel comfortable.
$SOL 24h +3.09%, the key area that the hot spot is watching is only one set of levels: 72.55 as resistance, and 71.39 as support/absorption.
Strong coins are easiest to fool with quick hands.
If you rush into the area around 72.55 but the volume can’t keep up, then the short-term move is basically a high-chase trap. If it pulls back near 71.39 and you can hold there, then the momentum has a foundation to continue.
The point of contention is very clear:
Is it a breakout continuation, or a high-pull to lure longs?
Invalidation conditions:
If within 1H it drops back below 71.39 and you can’t reclaim it, the hot spot will be downgraded—don’t rush to look for a second-wave reason.
You can watch the hot spot, but don’t let the gainers board make the decision for you.
#SOL走势 #Market analysis
SOL heats up fast, but it doesn’t mean chasing in right now will feel comfortable.
$SOL 24h +3.09%, the key area that the hot spot is watching is only one set of levels: 72.55 as resistance, and 71.39 as support/absorption.
Strong coins are easiest to fool with quick hands.
If you rush into the area around 72.55 but the volume can’t keep up, then the short-term move is basically a high-chase trap. If it pulls back near 71.39 and you can hold there, then the momentum has a foundation to continue.
The point of contention is very clear:
Is it a breakout continuation, or a high-pull to lure longs?
Invalidation conditions:
If within 1H it drops back below 71.39 and you can’t reclaim it, the hot spot will be downgraded—don’t rush to look for a second-wave reason.
You can watch the hot spot, but don’t let the gainers board make the decision for you.
#SOL走势 #Market analysis
$SOL 24h +3.09%, the key area that the hot spot is watching is only one set of levels: 72.55 as resistance, and 71.39 as support/absorption.
Strong coins are easiest to fool with quick hands.
If you rush into the area around 72.55 but the volume can’t keep up, then the short-term move is basically a high-chase trap. If it pulls back near 71.39 and you can hold there, then the momentum has a foundation to continue.
The point of contention is very clear:
Is it a breakout continuation, or a high-pull to lure longs?
Invalidation conditions:
If within 1H it drops back below 71.39 and you can’t reclaim it, the hot spot will be downgraded—don’t rush to look for a second-wave reason.
You can watch the hot spot, but don’t let the gainers board make the decision for you.
#SOL走势 #Market analysis
403
Log in to explore more content
Join global crypto users on Binance Square
⚡️ Get latest and useful information about crypto.
💬 Trusted by the world’s largest crypto exchange.
👍 Discover real insights from verified creators.
Email / Phone number
Trending Topics
AppleDebutsFoldablePhone
42,105 views
839 Discussing
Apple just dropped the foldable iPhone — and the market is paying attention. This isn't just another product cycle; it's a new product category, a new CEO on stage, and a $1,999 price tag that pushes $AAPL further into ultra-premium territory. Foldables are the narrative, and Apple is now the headline.
#appledebutsfoldablephone #EUExtendsCentralContactPointToCASPs #US10YTreasuryYieldHitsHighestSinceNov2023 #BrentCrudeTops$100 #USTreasuryToBuyBackUpTo$6BLongDatedDebt
KimHotbae
·2 Likes
·2.9k views
TSMCAugustRevenueUp53.3%YoY
8,608 views
262 Discussing
IranSaysReadyToEscalateWarWithUS
11,441 views
269 Discussing