
TojiSignalShark
19.7k Posts

TojiSignalShark
Report
Block User
Turning Charts Into OpportunitiesFutures • Spot • Technical Analysis Follow for High-Conviction Setups | DYOR
128 Following
1.9K+ Followers
16.9K+ Liked
Posts
All
Quotes
Live
PINNED
🌟 Welcome to Our Official Binance Profile 🌟
We are dedicated to providing insights, guidance, and education for traders who want to navigate the crypto market with confidence.
Here, you’ll find:
✅ Expert analysis and market perspectives
✅ Strategies that prioritize risk management
✅ Tips to enhance your trading mindset and decision-making
Our mission is simple: Empower traders to make informed decisions, stay disciplined, and grow their portfolios responsibly.
Follow us to stay updated with the latest market trends, insights, and professional guidance.
Your journey to smarter trading starts here.
📌 Remember: DYOR (Do Your Own Research) before making any trading decisions.
$ZEC $RIVER $PIPPIN
{future}(PIPPINUSDT)
{future}(RIVERUSDT)
{future}(ZECUSDT)
#PredictionMarketsCFTCBacking #BTCMiningDifficultyIncrease #StrategyBTCPurchase #WriteToEarnUpgrade
🌟 Welcome to Our Official Binance Profile 🌟
We are dedicated to providing insights, guidance, and education for traders who want to navigate the crypto market with confidence.
Here, you’ll find:
✅ Expert analysis and market perspectives
✅ Strategies that prioritize risk management
✅ Tips to enhance your trading mindset and decision-making
Our mission is simple: Empower traders to make informed decisions, stay disciplined, and grow their portfolios responsibly.
Follow us to stay updated with the latest market trends, insights, and professional guidance.
Your journey to smarter trading starts here.
📌 Remember: DYOR (Do Your Own Research) before making any trading decisions.
$ZEC $RIVER $PIPPIN
#PredictionMarketsCFTCBacking #BTCMiningDifficultyIncrease #StrategyBTCPurchase #WriteToEarnUpgrade
We are dedicated to providing insights, guidance, and education for traders who want to navigate the crypto market with confidence.
Here, you’ll find:
✅ Expert analysis and market perspectives
✅ Strategies that prioritize risk management
✅ Tips to enhance your trading mindset and decision-making
Our mission is simple: Empower traders to make informed decisions, stay disciplined, and grow their portfolios responsibly.
Follow us to stay updated with the latest market trends, insights, and professional guidance.
Your journey to smarter trading starts here.
📌 Remember: DYOR (Do Your Own Research) before making any trading decisions.
$ZEC $RIVER $PIPPIN
#PredictionMarketsCFTCBacking #BTCMiningDifficultyIncrease #StrategyBTCPurchase #WriteToEarnUpgrade

11
23
335
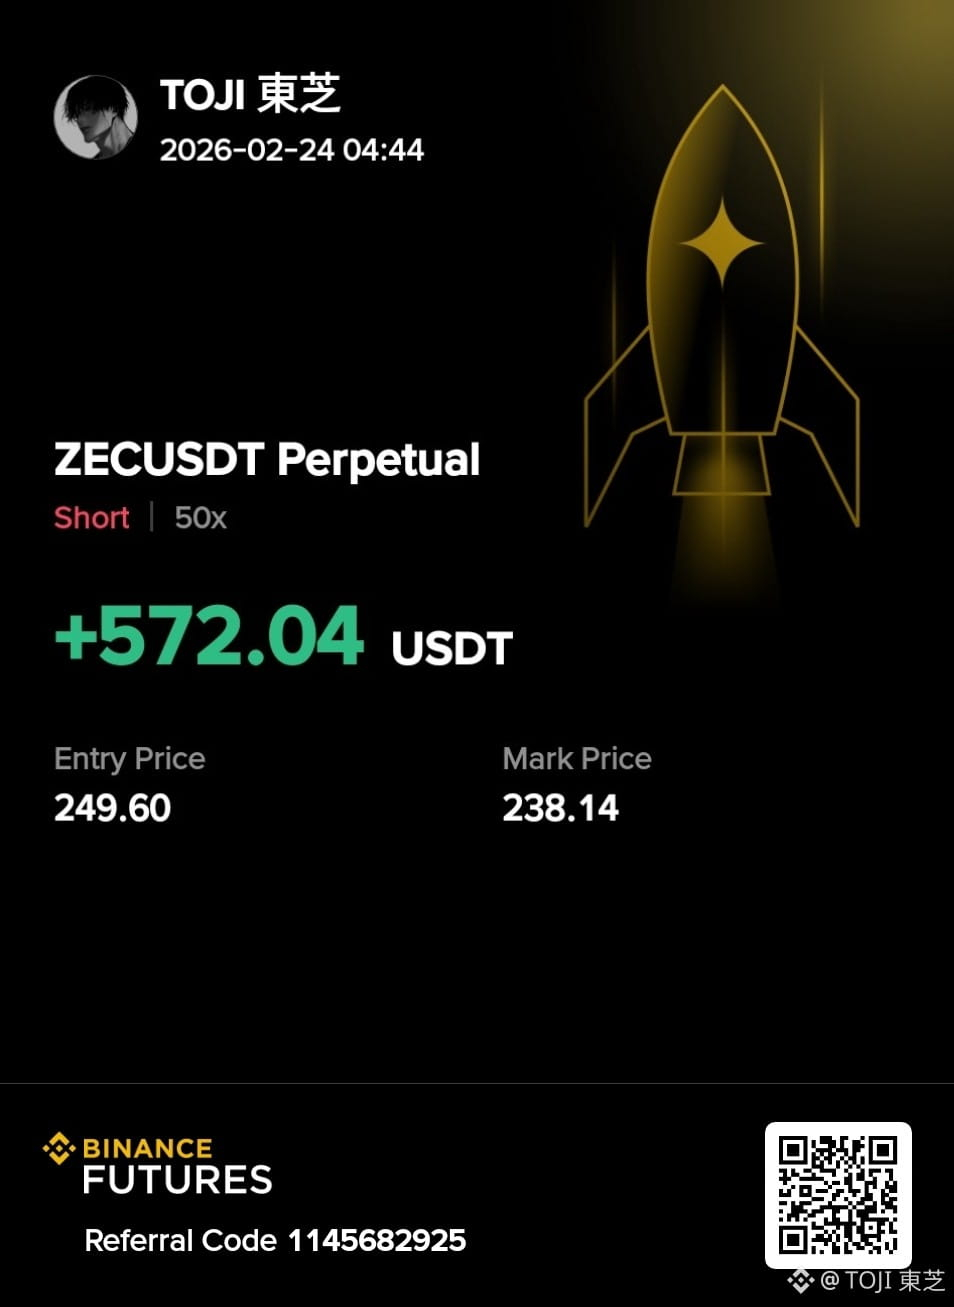
Today’s session closed with another handsome profit, continuing the strong momentum from the previous days.
We caught solid moves across multiple setups, including ZEC, LAB, BTR, SKY, ETC, ARB, PENGU, PUMP, B, BULLA, SWARMS, $KAT , $WLD , $TUT and many others. Several setups delivered strong gains and reached multiple targets. We also had 2–3 SL hits along the way, but that is simply part of trading. Not every setup will work, and proper risk management is what keeps us in the game.
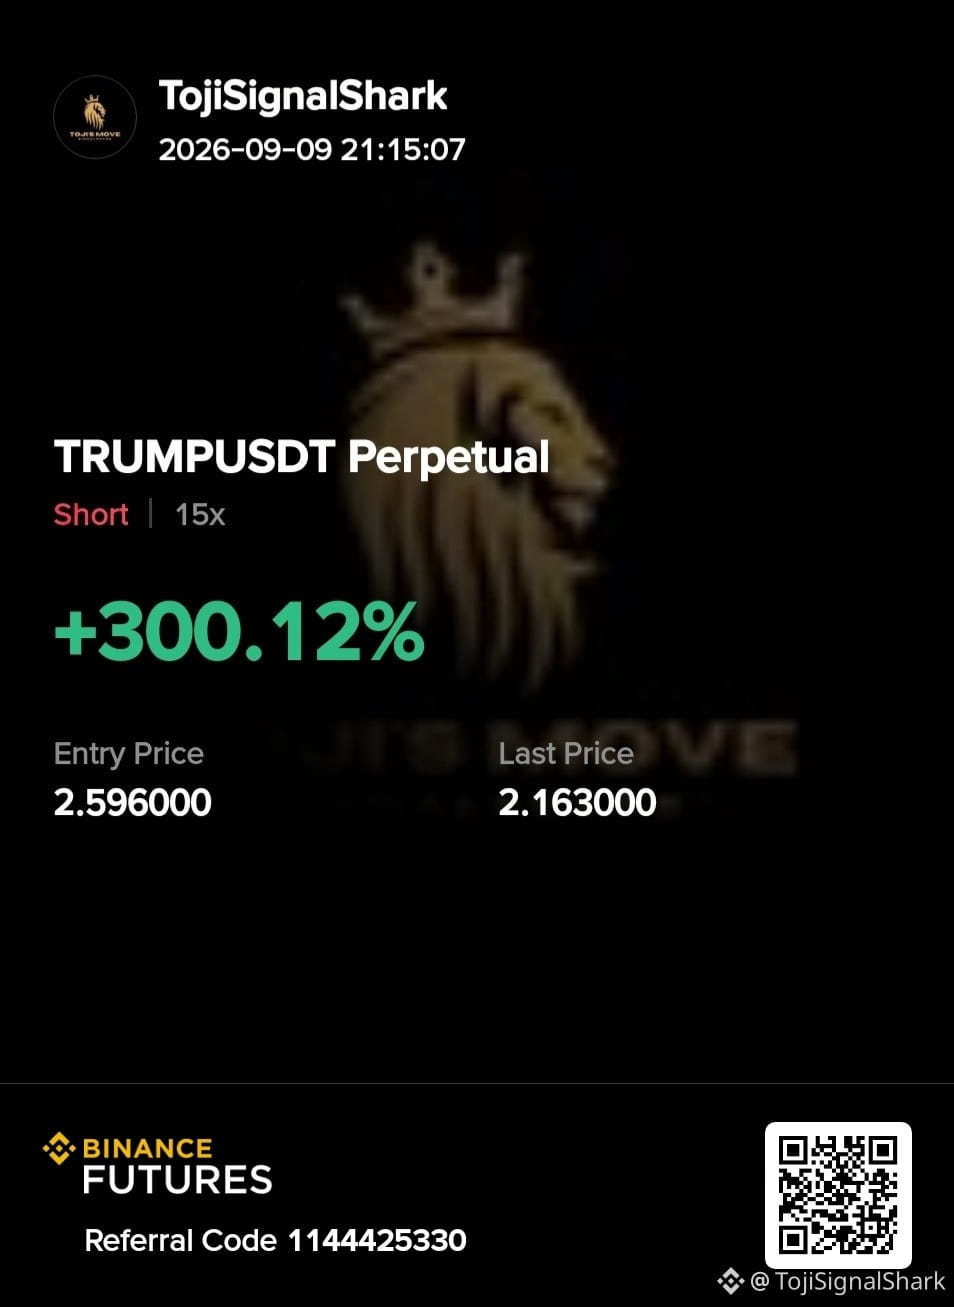
I’m still holding several active setups, including HYPE, VVV, BZ, PHA, SOPH, TRX, LINK, SUI, TRUMP, BICO and many others. I’ll continue monitoring them closely and will share the next updates as the market develops.
For now, it’s time to step away, secure the gains, clear the mind and get some proper rest. Tomorrow we come back with a fresh mind, fresh analysis and fresh setups.
Thank you everyone for the support today. Stay patient, manage your risk and never chase a move.
Good night everyone. See you tomorrow with another session.
DYOR (Do Your Own Research).
{future}(TUTUSDT)
{future}(WLDUSDT)
{future}(KATUSDT)
Today’s session closed with another handsome profit, continuing the strong momentum from the previous days.
We caught solid moves across multiple setups, including ZEC, LAB, BTR, SKY, ETC, ARB, PENGU, PUMP, B, BULLA, SWARMS, $KAT , $WLD , $TUT and many others. Several setups delivered strong gains and reached multiple targets. We also had 2–3 SL hits along the way, but that is simply part of trading. Not every setup will work, and proper risk management is what keeps us in the game.
I’m still holding several active setups, including HYPE, VVV, BZ, PHA, SOPH, TRX, LINK, SUI, TRUMP, BICO and many others. I’ll continue monitoring them closely and will share the next updates as the market develops.
For now, it’s time to step away, secure the gains, clear the mind and get some proper rest. Tomorrow we come back with a fresh mind, fresh analysis and fresh setups.
Thank you everyone for the support today. Stay patient, manage your risk and never chase a move.
Good night everyone. See you tomorrow with another session.
DYOR (Do Your Own Research).
We caught solid moves across multiple setups, including ZEC, LAB, BTR, SKY, ETC, ARB, PENGU, PUMP, B, BULLA, SWARMS, $KAT , $WLD , $TUT and many others. Several setups delivered strong gains and reached multiple targets. We also had 2–3 SL hits along the way, but that is simply part of trading. Not every setup will work, and proper risk management is what keeps us in the game.
I’m still holding several active setups, including HYPE, VVV, BZ, PHA, SOPH, TRX, LINK, SUI, TRUMP, BICO and many others. I’ll continue monitoring them closely and will share the next updates as the market develops.
For now, it’s time to step away, secure the gains, clear the mind and get some proper rest. Tomorrow we come back with a fresh mind, fresh analysis and fresh setups.
Thank you everyone for the support today. Stay patient, manage your risk and never chase a move.
Good night everyone. See you tomorrow with another session.
DYOR (Do Your Own Research).
2
487
·
--
Bearish
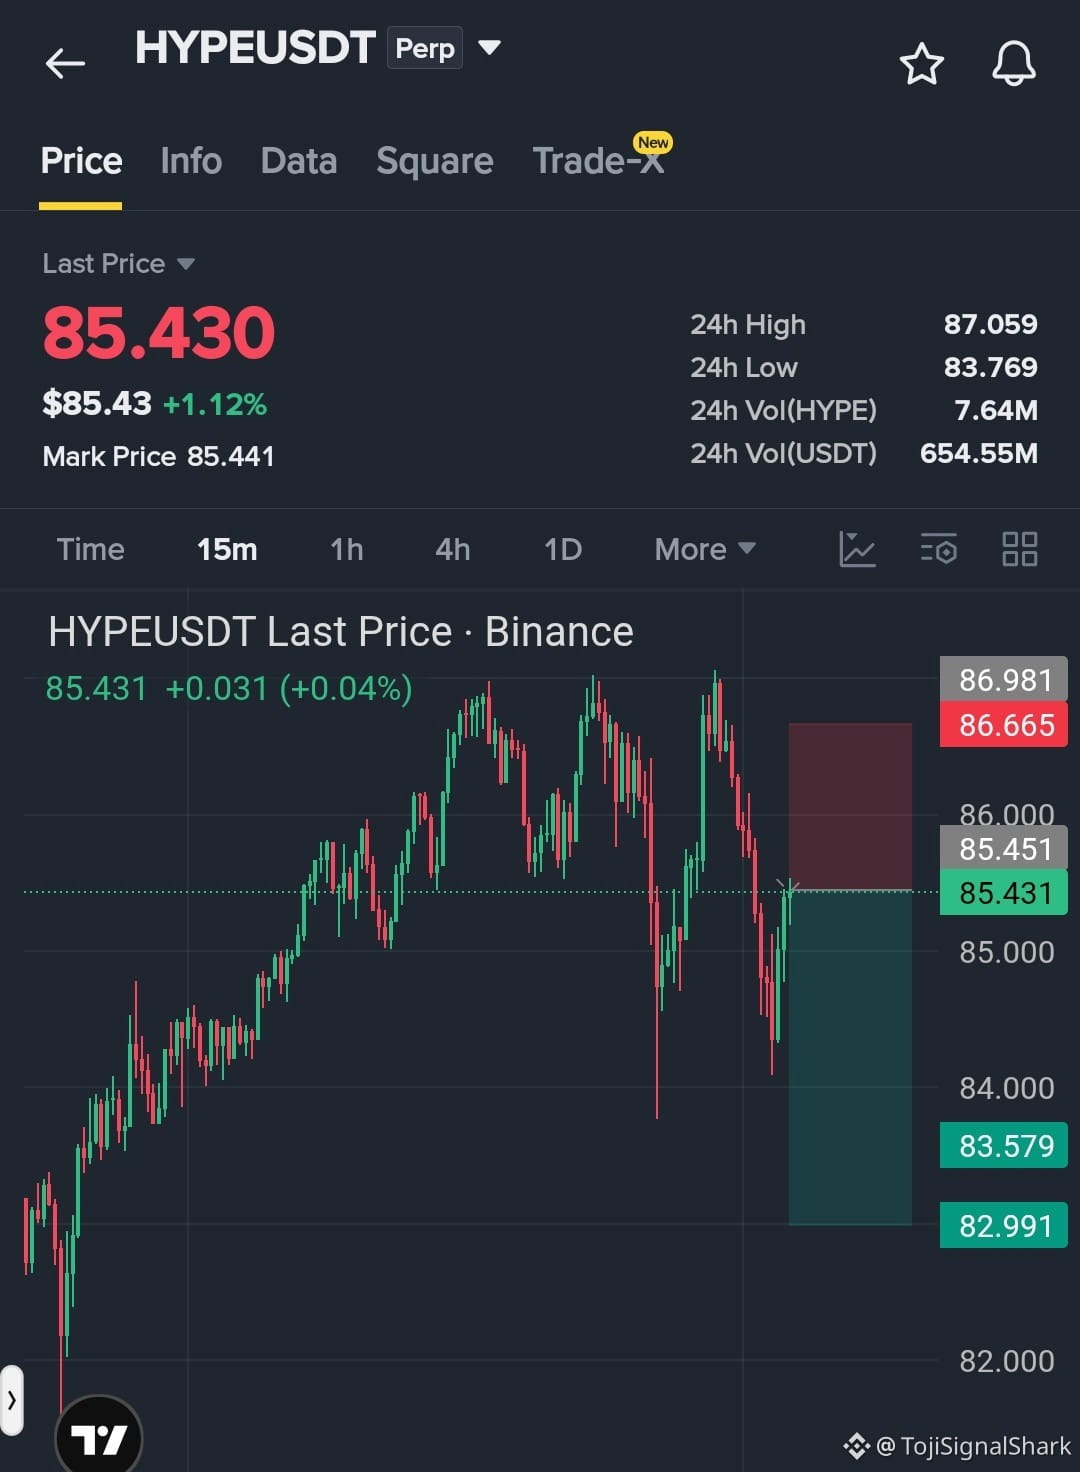
$HYPE is approaching the bounce zone I’m watching closely. If the rebound gets rejected around the entry area, sellers could step back in and push price toward the lower targets.
SHORT SETUP
Entry: $85.3–$87.0
SL: $87.4
TP1: $84.0 TP2: $83.0 TP3: $82.0
Wait for confirmation on the bounce instead of chasing the move. Keep your position size controlled, use sensible leverage, and respect the invalidation level.
DYOR (Do Your Own Research).
{future}(HYPEUSDT)
$HYPE is approaching the bounce zone I’m watching closely. If the rebound gets rejected around the entry area, sellers could step back in and push price toward the lower targets.
SHORT SETUP
Entry: $85.3–$87.0
SL: $87.4
TP1: $84.0 TP2: $83.0 TP3: $82.0
Wait for confirmation on the bounce instead of chasing the move. Keep your position size controlled, use sensible leverage, and respect the invalidation level.
DYOR (Do Your Own Research).
SHORT SETUP
Entry: $85.3–$87.0
SL: $87.4
TP1: $84.0 TP2: $83.0 TP3: $82.0
Wait for confirmation on the bounce instead of chasing the move. Keep your position size controlled, use sensible leverage, and respect the invalidation level.
DYOR (Do Your Own Research).

2
88
·
--
Bearish
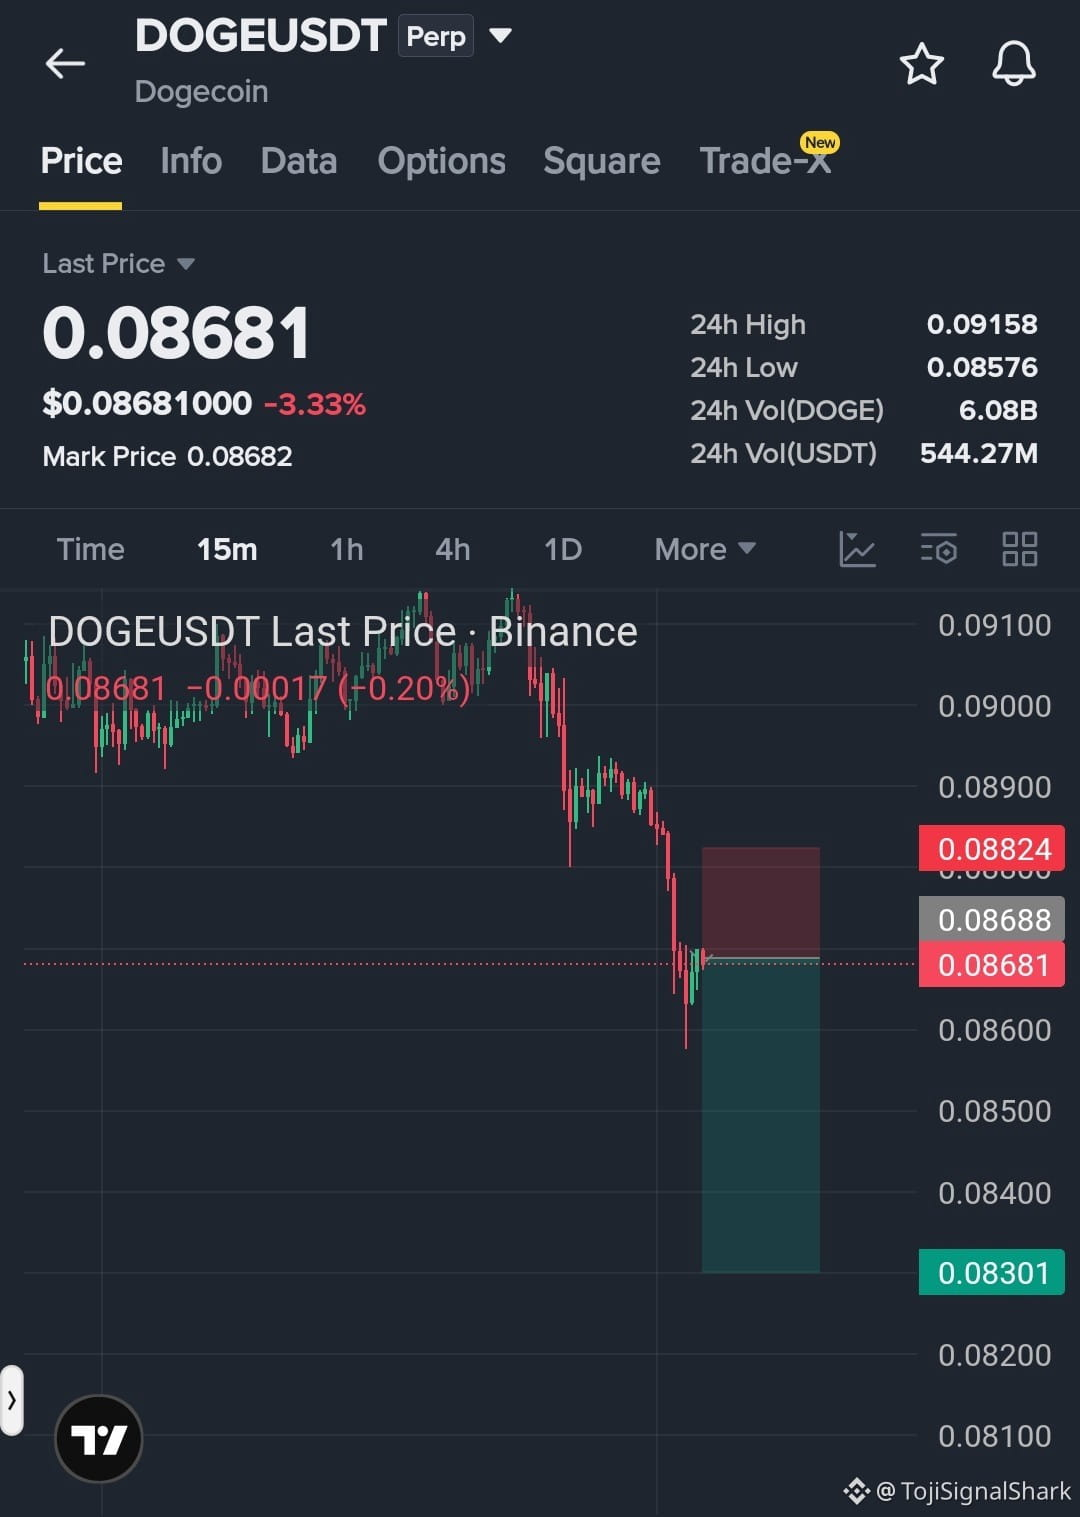
$DOGE just lost the key level that buyers were defending, showing weakness in the current structure. Now I’m watching the bounce closely to see whether sellers step back in and push price lower.
SHORT SETUP $DOGE
Entry: $0.0860–0.0890
SL: $0.0905
TP1: $0.085 TP2: $0.084 TP3: $0.083
If the bounce gets rejected inside the entry zone, the downside move could continue toward the listed targets. Avoid chasing the move and keep risk controlled with proper position sizing and leverage.
DYOR (Do Your Own Research).
{future}(DOGEUSDT)
$DOGE just lost the key level that buyers were defending, showing weakness in the current structure. Now I’m watching the bounce closely to see whether sellers step back in and push price lower.
SHORT SETUP $DOGE
Entry: $0.0860–0.0890
SL: $0.0905
TP1: $0.085 TP2: $0.084 TP3: $0.083
If the bounce gets rejected inside the entry zone, the downside move could continue toward the listed targets. Avoid chasing the move and keep risk controlled with proper position sizing and leverage.
DYOR (Do Your Own Research).
SHORT SETUP $DOGE
Entry: $0.0860–0.0890
SL: $0.0905
TP1: $0.085 TP2: $0.084 TP3: $0.083
If the bounce gets rejected inside the entry zone, the downside move could continue toward the listed targets. Avoid chasing the move and keep risk controlled with proper position sizing and leverage.
DYOR (Do Your Own Research).

1
98

Article
Four Coins, Four Critical Setups The Levels Traders Should Watch Next$BZ , $HYPE , $CL & $ZEC — FOUR SETUPS THAT COULD DEFINE THE NEXT MOVE
The market is entering an interesting phase where positioning, liquidity and price structure are creating very different opportunities across these four coins.
I’m watching the following levels closely because the next confirmed breakout or breakdown could determine the direction.
BZ — Sellers Still In Control
Key resistance: 105
Key support: 99
Bearish scenario:
If BZ continues rejecting the 105 area and sellers push price below 99, the next downside levels to watch are 98 and 97.
Bullish scenario:
A strong reclaim and hold above 105 would weaken the bearish structure and could trigger a short squeeze toward higher resistance.
For now, 105 remains the key level separating bearish continuation from a potential reversal.
HYPE — Waiting For Confirmation
Key resistance: 88–90
Key support: 81.5–82
Bearish scenario:
If HYPE fails to reclaim 88–90 and loses 81.5–82 with volume, downside targets around 79 and 76 could come into focus.
Bullish scenario:
A clean breakout above 90 followed by a successful retest could open the way toward 92–95.
The best approach here is to wait for confirmation instead of chasing the middle of the range.
CL — Positioning Could Fuel Volatility
Key resistance: 40.50
Key support: 38.00
Bearish scenario:
A rejection from 40.50 followed by a breakdown below 38 would strengthen the downside structure, with 37.40 and 37.10 as the next levels to monitor.
Bullish scenario:
If CL reclaims 40.50 and holds above it, trapped shorts could provide additional fuel for an upside squeeze.
Negative funding can show crowded short positioning, but it should never be treated as a guaranteed reversal signal.
ZEC — Momentum Meets Major Resistance
Key resistance: 1,230–1,260
Key support: 1,100
Bullish scenario:
A decisive breakout above 1,260 with strong volume and a successful retest could bring 1,300 and 1,350 into focus.
Bearish scenario:
If ZEC gets rejected around 1,230–1,260 and eventually loses 1,100, the pullback could extend toward 1,025 and potentially 950.
After such a strong move, risk management becomes even more important because volatility can increase rapidly in both directions.
THE BIGGER PICTURE
These four setups are showing different market conditions:
BZ: Bearish pressure and crowded positioning
HYPE: Reversal versus continuation
CL: Heavy positioning with squeeze potential
ZEC: Strong momentum facing major resistance
The key is not simply choosing long or short.
Wait for price to confirm the level, watch volume and open interest, and define your invalidation before entering.
Do not chase moves after a breakout or breakdown. Use controlled leverage, avoid going all-in, and protect your capital first.
Which setup do you think will make the strongest move next?
DYOR (Do Your Own Research).
Four Coins, Four Critical Setups The Levels Traders Should Watch Next
$BZ , $HYPE , $CL & $ZEC — FOUR SETUPS THAT COULD DEFINE THE NEXT MOVE
The market is entering an interesting phase where positioning, liquidity and price structure are creating very different opportunities across these four coins.
I’m watching the following levels closely because the next confirmed breakout or breakdown could determine the direction.
BZ — Sellers Still In Control
Key resistance: 105
Key support: 99
Bearish scenario:
If BZ continues rejecting the 105 area and sellers push price below 99, the next downside levels to watch are 98 and 97.
Bullish scenario:
A strong reclaim and hold above 105 would weaken the bearish structure and could trigger a short squeeze toward higher resistance.
For now, 105 remains the key level separating bearish continuation from a potential reversal.
HYPE — Waiting For Confirmation
Key resistance: 88–90
Key support: 81.5–82
Bearish scenario:
If HYPE fails to reclaim 88–90 and loses 81.5–82 with volume, downside targets around 79 and 76 could come into focus.
Bullish scenario:
A clean breakout above 90 followed by a successful retest could open the way toward 92–95.
The best approach here is to wait for confirmation instead of chasing the middle of the range.
CL — Positioning Could Fuel Volatility
Key resistance: 40.50
Key support: 38.00
Bearish scenario:
A rejection from 40.50 followed by a breakdown below 38 would strengthen the downside structure, with 37.40 and 37.10 as the next levels to monitor.
Bullish scenario:
If CL reclaims 40.50 and holds above it, trapped shorts could provide additional fuel for an upside squeeze.
Negative funding can show crowded short positioning, but it should never be treated as a guaranteed reversal signal.
ZEC — Momentum Meets Major Resistance
Key resistance: 1,230–1,260
Key support: 1,100
Bullish scenario:
A decisive breakout above 1,260 with strong volume and a successful retest could bring 1,300 and 1,350 into focus.
Bearish scenario:
If ZEC gets rejected around 1,230–1,260 and eventually loses 1,100, the pullback could extend toward 1,025 and potentially 950.
After such a strong move, risk management becomes even more important because volatility can increase rapidly in both directions.
THE BIGGER PICTURE
These four setups are showing different market conditions:
BZ: Bearish pressure and crowded positioning
HYPE: Reversal versus continuation
CL: Heavy positioning with squeeze potential
ZEC: Strong momentum facing major resistance
The key is not simply choosing long or short.
Wait for price to confirm the level, watch volume and open interest, and define your invalidation before entering.
Do not chase moves after a breakout or breakdown. Use controlled leverage, avoid going all-in, and protect your capital first.
Which setup do you think will make the strongest move next?
DYOR (Do Your Own Research).
The market is entering an interesting phase where positioning, liquidity and price structure are creating very different opportunities across these four coins.
I’m watching the following levels closely because the next confirmed breakout or breakdown could determine the direction.
BZ — Sellers Still In Control
Key resistance: 105
Key support: 99
Bearish scenario:
If BZ continues rejecting the 105 area and sellers push price below 99, the next downside levels to watch are 98 and 97.
Bullish scenario:
A strong reclaim and hold above 105 would weaken the bearish structure and could trigger a short squeeze toward higher resistance.
For now, 105 remains the key level separating bearish continuation from a potential reversal.
HYPE — Waiting For Confirmation
Key resistance: 88–90
Key support: 81.5–82
Bearish scenario:
If HYPE fails to reclaim 88–90 and loses 81.5–82 with volume, downside targets around 79 and 76 could come into focus.
Bullish scenario:
A clean breakout above 90 followed by a successful retest could open the way toward 92–95.
The best approach here is to wait for confirmation instead of chasing the middle of the range.
CL — Positioning Could Fuel Volatility
Key resistance: 40.50
Key support: 38.00
Bearish scenario:
A rejection from 40.50 followed by a breakdown below 38 would strengthen the downside structure, with 37.40 and 37.10 as the next levels to monitor.
Bullish scenario:
If CL reclaims 40.50 and holds above it, trapped shorts could provide additional fuel for an upside squeeze.
Negative funding can show crowded short positioning, but it should never be treated as a guaranteed reversal signal.
ZEC — Momentum Meets Major Resistance
Key resistance: 1,230–1,260
Key support: 1,100
Bullish scenario:
A decisive breakout above 1,260 with strong volume and a successful retest could bring 1,300 and 1,350 into focus.
Bearish scenario:
If ZEC gets rejected around 1,230–1,260 and eventually loses 1,100, the pullback could extend toward 1,025 and potentially 950.
After such a strong move, risk management becomes even more important because volatility can increase rapidly in both directions.
THE BIGGER PICTURE
These four setups are showing different market conditions:
BZ: Bearish pressure and crowded positioning
HYPE: Reversal versus continuation
CL: Heavy positioning with squeeze potential
ZEC: Strong momentum facing major resistance
The key is not simply choosing long or short.
Wait for price to confirm the level, watch volume and open interest, and define your invalidation before entering.
Do not chase moves after a breakout or breakdown. Use controlled leverage, avoid going all-in, and protect your capital first.
Which setup do you think will make the strongest move next?
DYOR (Do Your Own Research).
2
320
·
--
Bearish
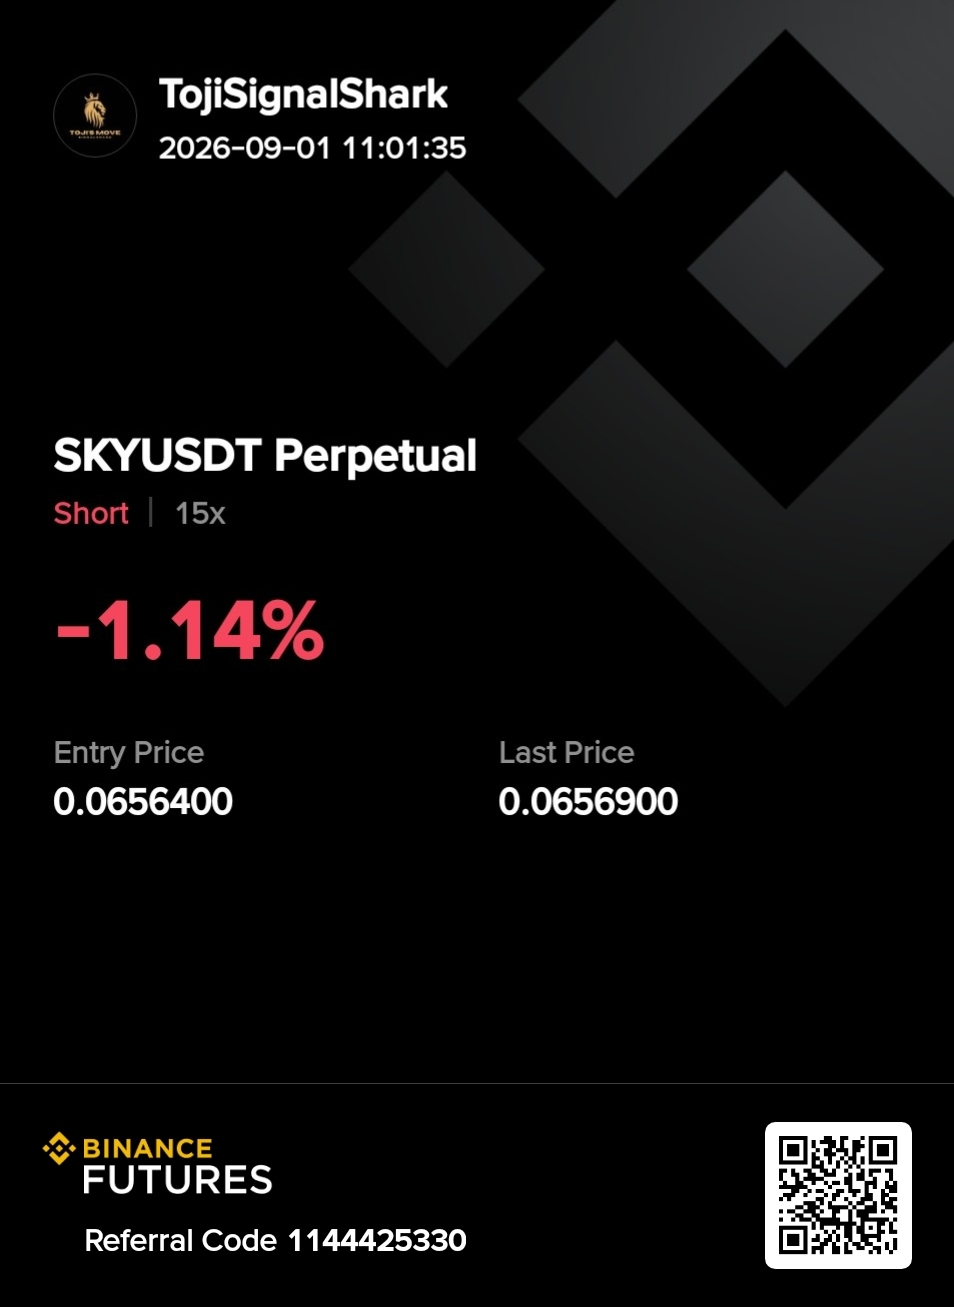
$SKY short setup is playing out perfectly.
Second TP has been hit. Close 50% gains and move your SL to breakeven to secure the position while keeping the remaining short active.
Stay disciplined and let the trade work toward the next target. Manage risk properly and avoid overexposure.
DYOR (Do Your Own Research).
{future}(SKYUSDT)
$SKY short setup is playing out perfectly.
Second TP has been hit. Close 50% gains and move your SL to breakeven to secure the position while keeping the remaining short active.
Stay disciplined and let the trade work toward the next target. Manage risk properly and avoid overexposure.
DYOR (Do Your Own Research).
Second TP has been hit. Close 50% gains and move your SL to breakeven to secure the position while keeping the remaining short active.
Stay disciplined and let the trade work toward the next target. Manage risk properly and avoid overexposure.
DYOR (Do Your Own Research).
TojiSignalShark
·
--
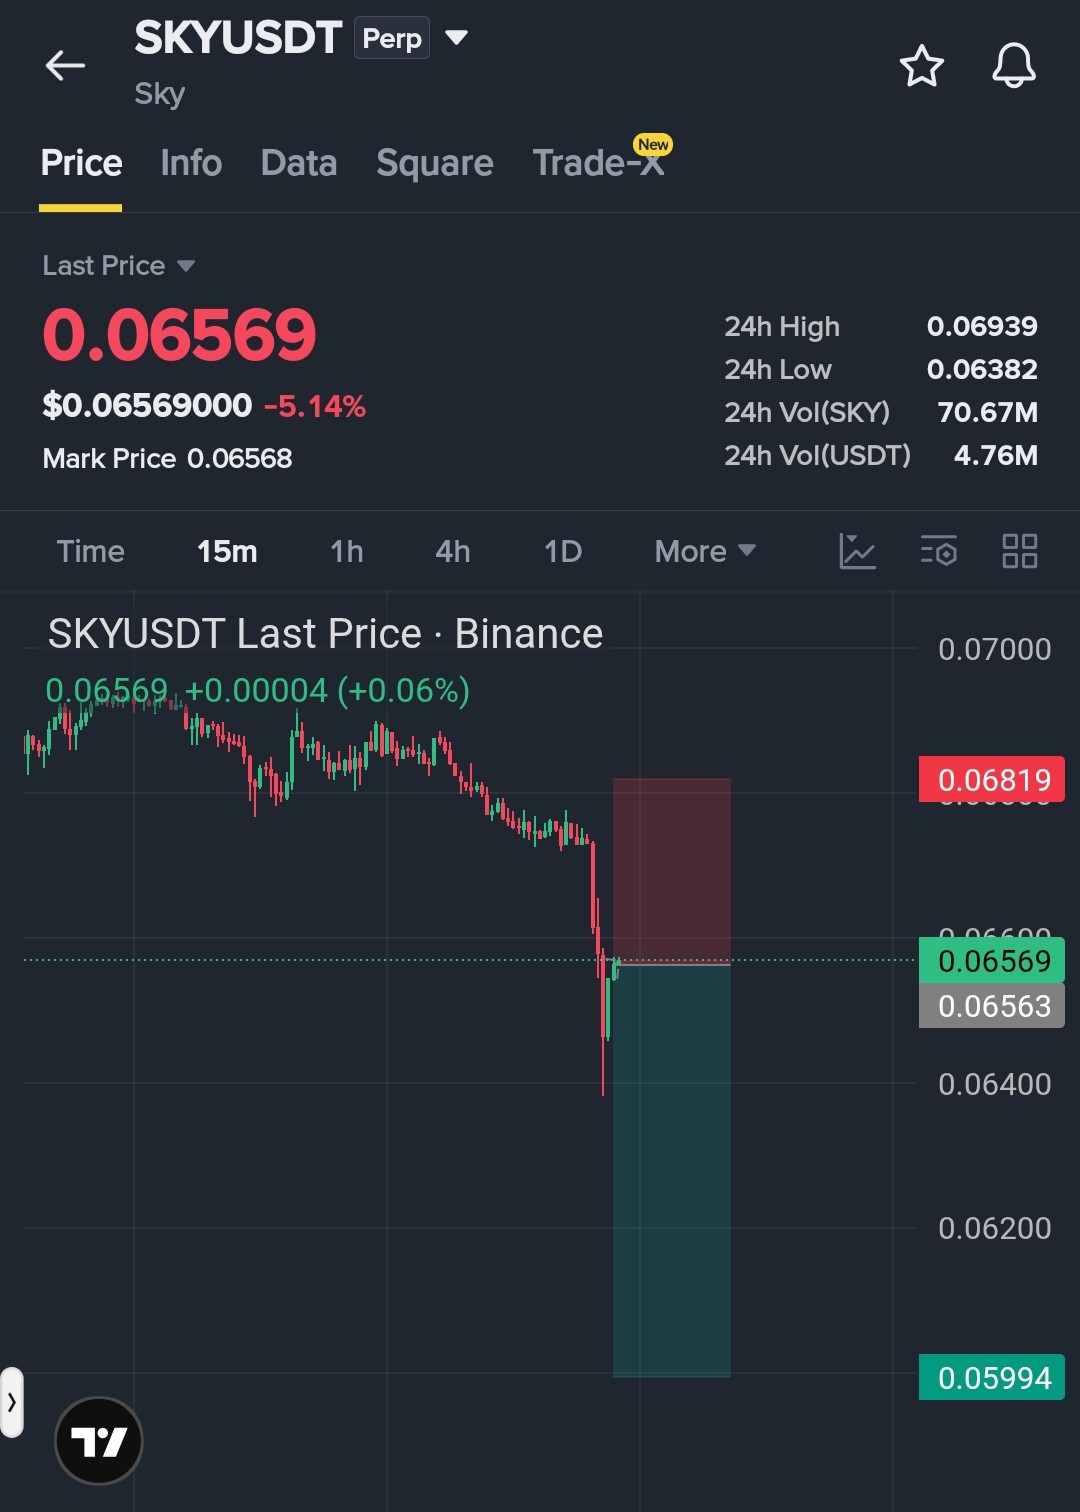
Bearish$SKY SHORT SETUP IS LIVE — Sellers are gaining momentum, and the chart is showing potential for another strong move to the downside. I’m watching the entry zone closely for a clean bearish continuation.
Trading Idea Short $SKY
Entry: 0.0650 - 0.0683
SL: 0.0715
TP1: 0.0640
TP2: 0.0620
TP3: 0.0600
Stay disciplined and keep your position size aligned with your risk tolerance. Secure partial profits as targets are reached and protect the remaining position if momentum continues in your favor.
DYOR (Do Your Own Research).
Trading Idea Short $SKY
Entry: 0.0650 - 0.0683
SL: 0.0715
TP1: 0.0640
TP2: 0.0620
TP3: 0.0600
Stay disciplined and keep your position size aligned with your risk tolerance. Secure partial profits as targets are reached and protect the remaining position if momentum continues in your favor.
DYOR (Do Your Own Research).
3
100
·
--
Bullish
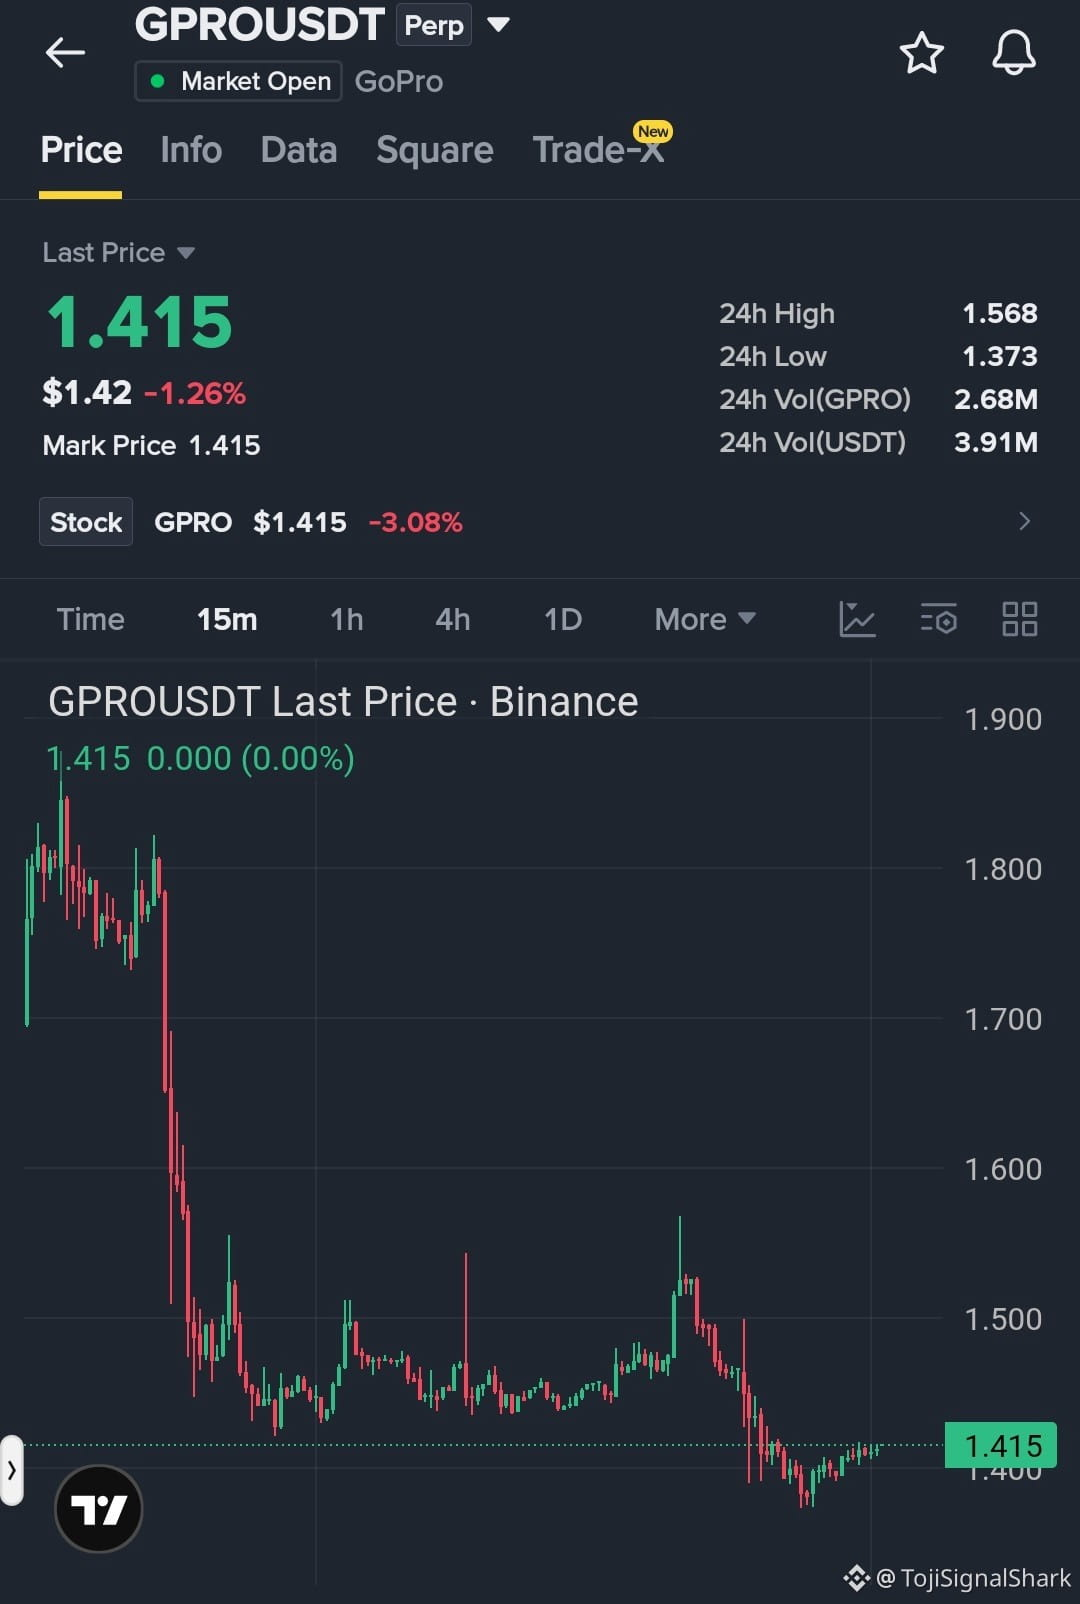
After that sharp breakdown, $GPRO is starting to regain momentum and buyers are stepping back in.
I’m looking for a long from here, with the next upside target set at 1.50.
Stay patient, manage risk properly, and avoid chasing the move after a sudden breakout.
TP: 1.50
DYOR (Do Your Own Research).
{future}(GPROUSDT)
After that sharp breakdown, $GPRO is starting to regain momentum and buyers are stepping back in.
I’m looking for a long from here, with the next upside target set at 1.50.
Stay patient, manage risk properly, and avoid chasing the move after a sudden breakout.
TP: 1.50
DYOR (Do Your Own Research).
I’m looking for a long from here, with the next upside target set at 1.50.
Stay patient, manage risk properly, and avoid chasing the move after a sudden breakout.
TP: 1.50
DYOR (Do Your Own Research).
67
·
--
Bearish
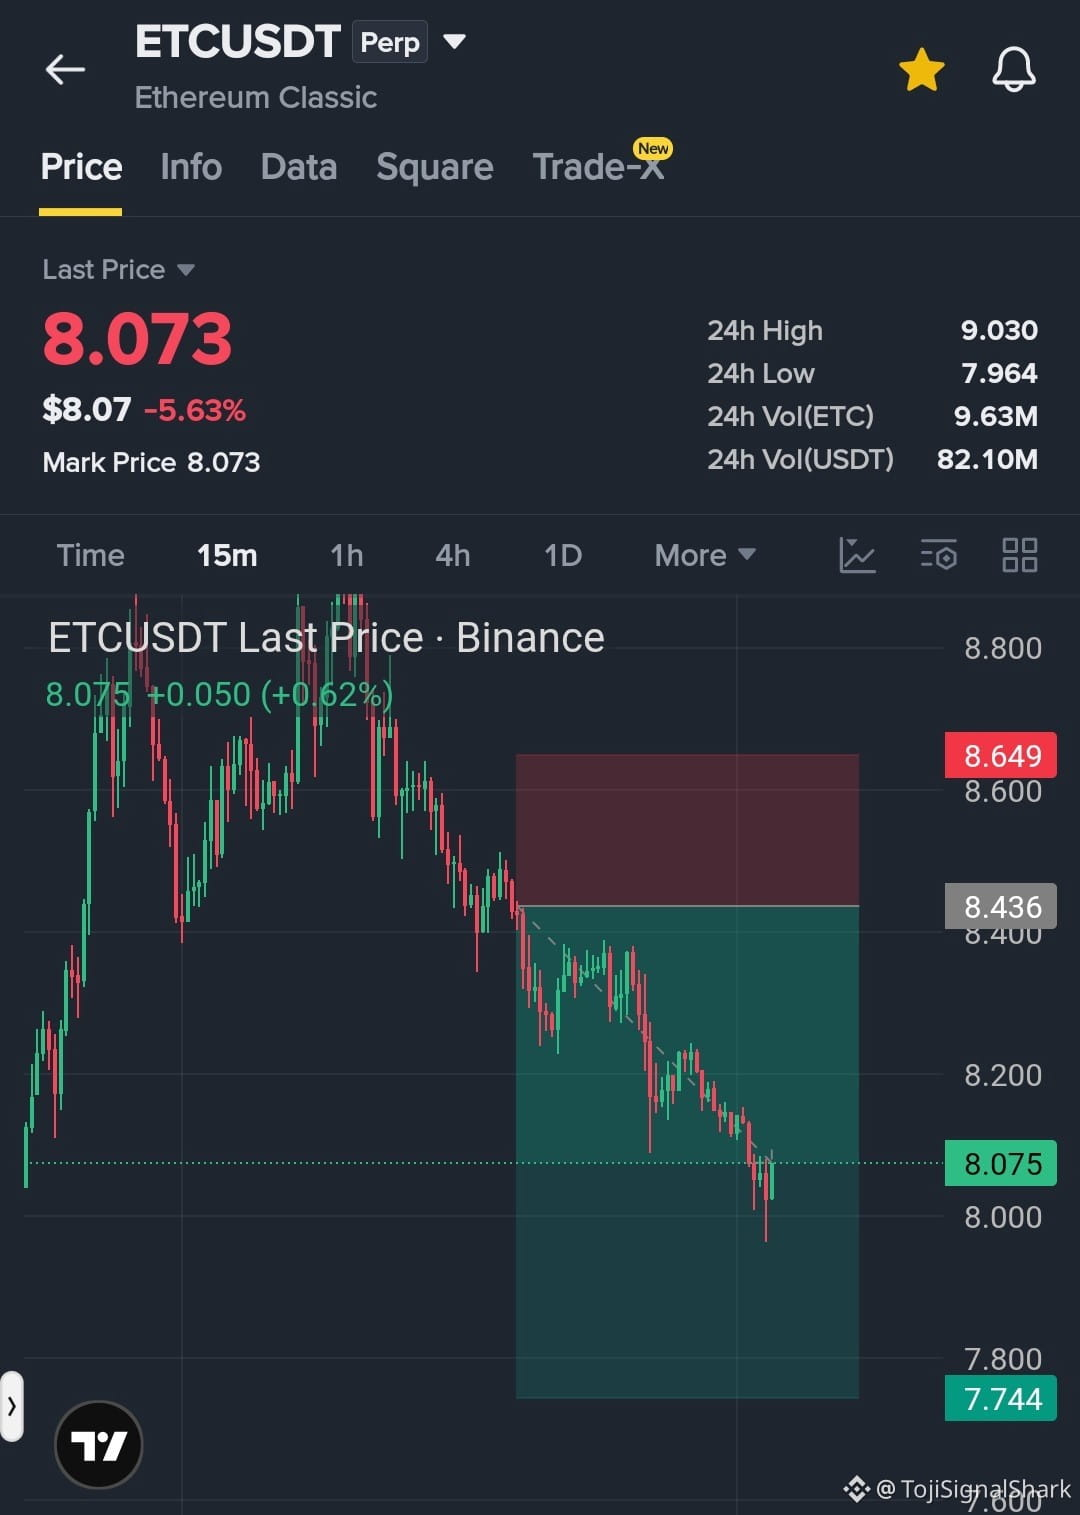
$ETC short setup second TP hit. Close 50% of the position and move SL to breakeven to protect your gains while keeping the remaining short active.
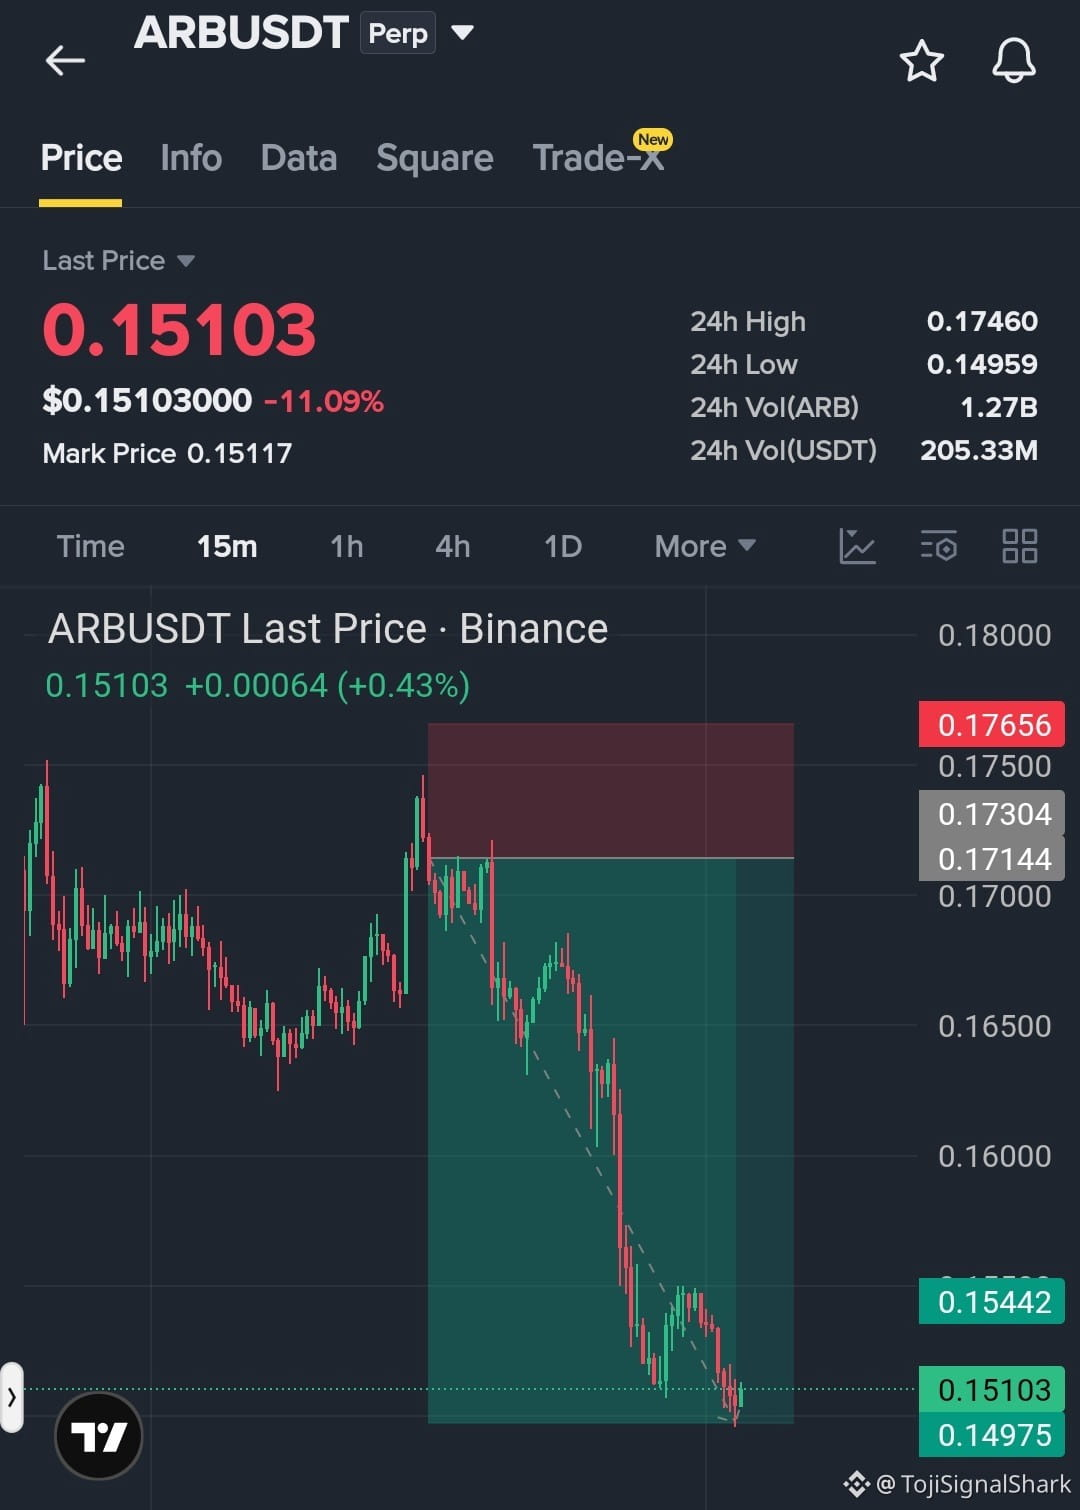
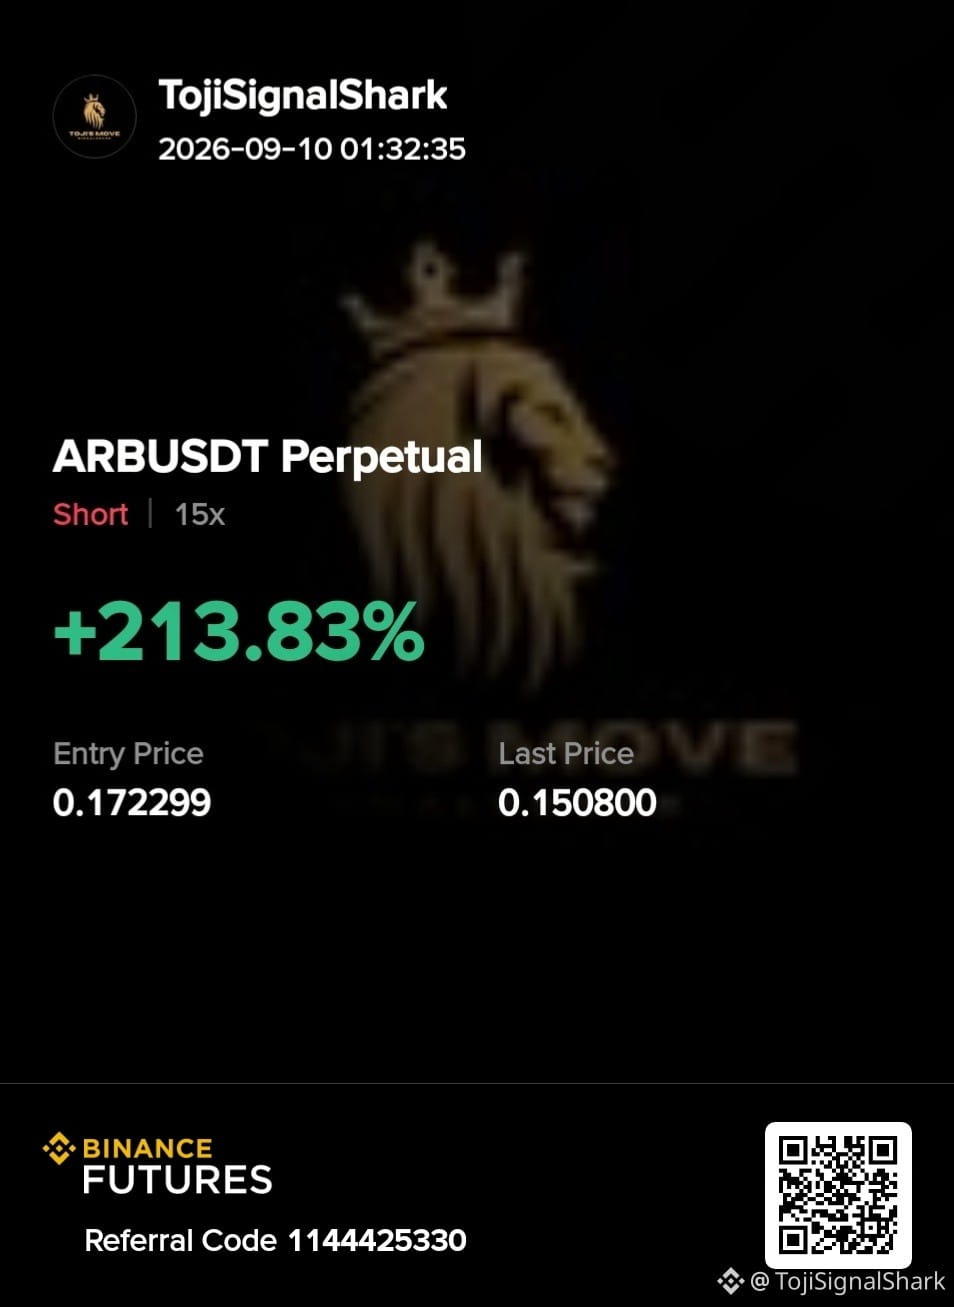
$ARB short setup all TPs have been hit successfully exactly as mentioned. Another setup played out according to plan.
Hope you guys didn’t miss these moves. Stay close for the next update and keep managing your risk properly.
DYOR (Do Your Own Research).
$TUT
{future}(TUTUSDT)
{future}(ARBUSDT)
{future}(ETCUSDT)
$ETC short setup second TP hit. Close 50% of the position and move SL to breakeven to protect your gains while keeping the remaining short active.
$ARB short setup all TPs have been hit successfully exactly as mentioned. Another setup played out according to plan.
Hope you guys didn’t miss these moves. Stay close for the next update and keep managing your risk properly.
DYOR (Do Your Own Research).
$TUT
$ARB short setup all TPs have been hit successfully exactly as mentioned. Another setup played out according to plan.
Hope you guys didn’t miss these moves. Stay close for the next update and keep managing your risk properly.
DYOR (Do Your Own Research).
$TUT
TojiSignalShark
·
--
Bearish$ARB SHORT — Sellers are gaining control as bearish pressure continues to build. The current structure is showing weakness, creating a potential downside opportunity if the rejection holds and selling momentum expands.
Trading Ideas: Short $ARB
Entry: 0.171 - 0.183
SL: 0.189
TP1: 0.165
TP2: 0.158
TP3: 0.150
Consider securing partial profits as targets are reached and manage position size according to your risk. DYOR (Do Your Own Research).
Trading Ideas: Short $ARB
Entry: 0.171 - 0.183
SL: 0.189
TP1: 0.165
TP2: 0.158
TP3: 0.150
Consider securing partial profits as targets are reached and manage position size according to your risk. DYOR (Do Your Own Research).
1
349
·
--
Bearish
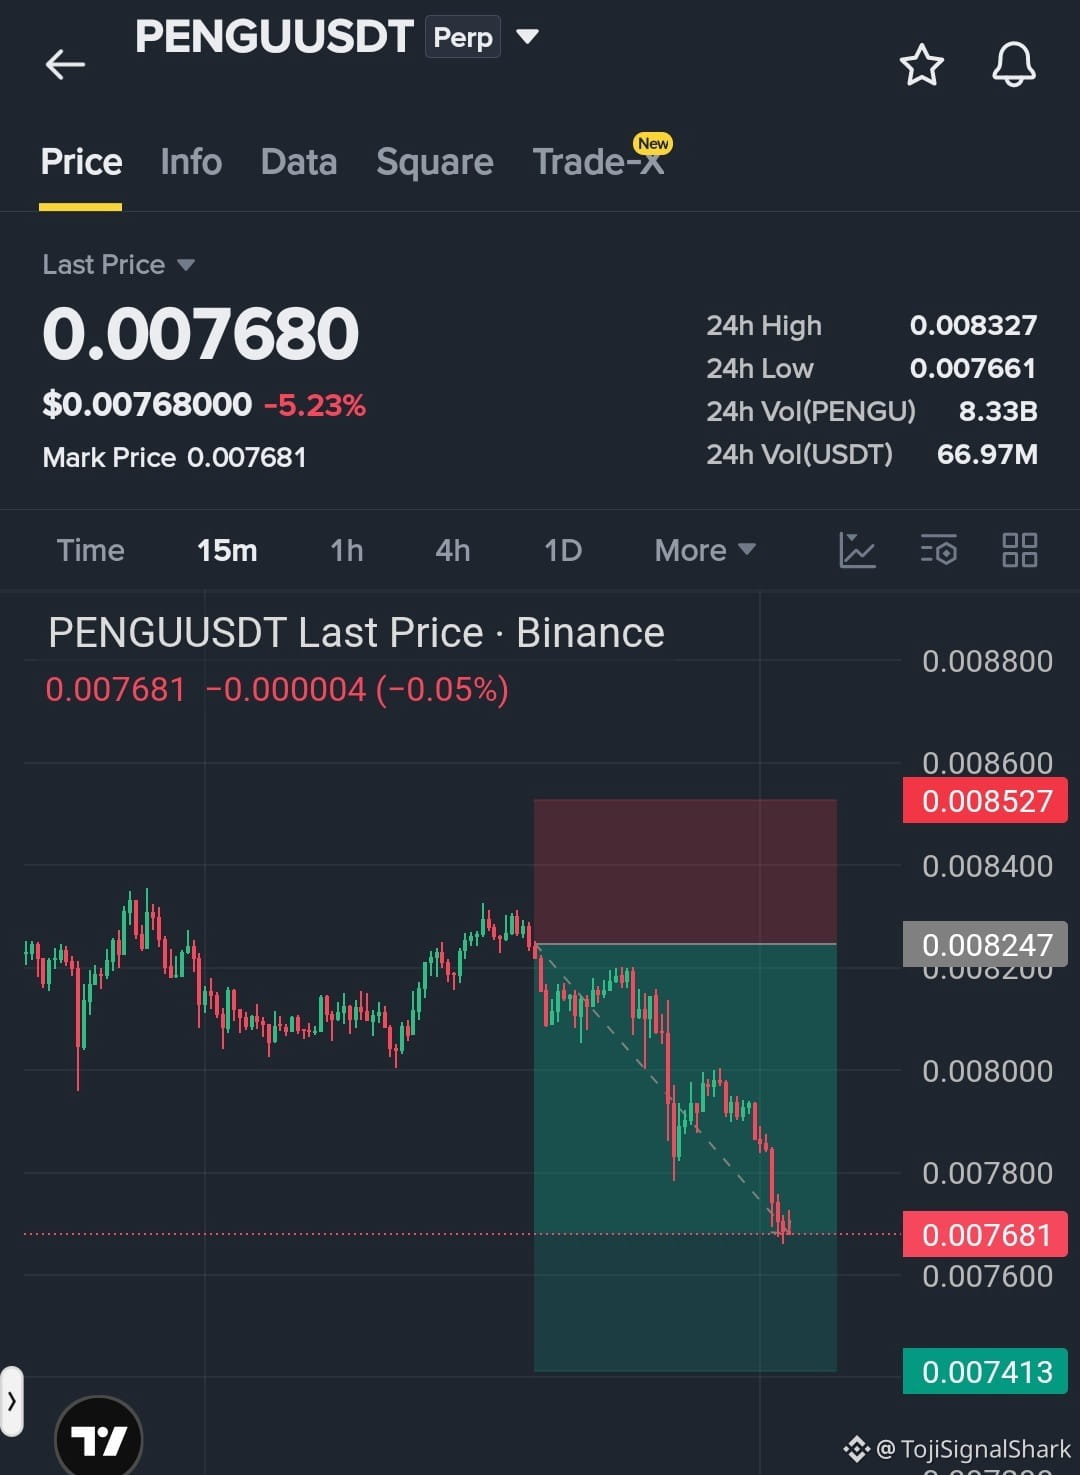
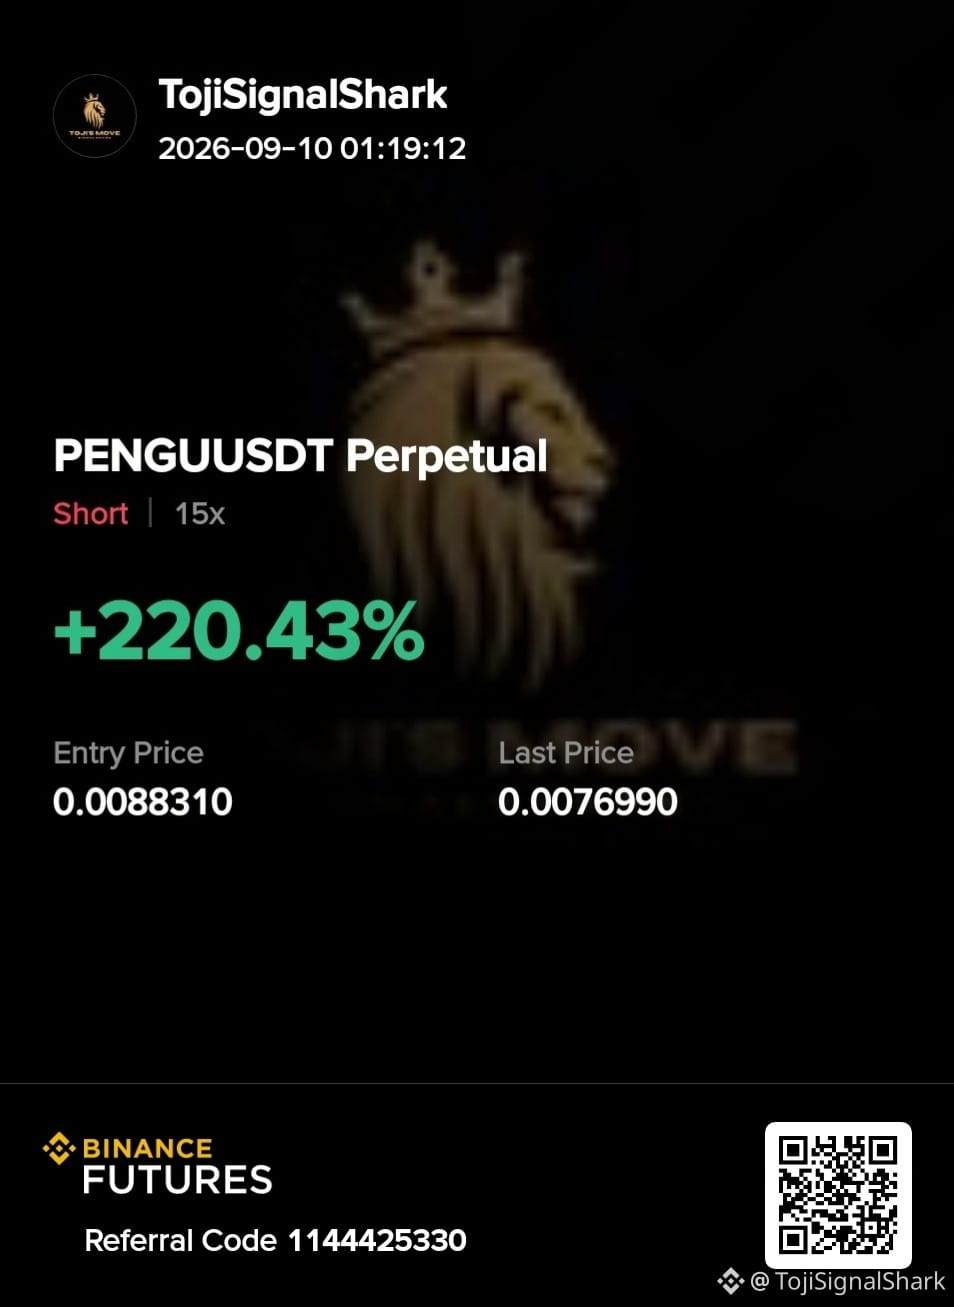
$PENGU short setup is playing out exactly as planned.
Second TP has been hit. Close 50% of the position here and move your SL to breakeven to protect the remaining trade.
Keep the short active for the next target, but stay disciplined and avoid overexposure.
Secure profits and manage risk properly.
DYOR (Do Your Own Research).
{future}(PENGUUSDT)
$PENGU short setup is playing out exactly as planned.
Second TP has been hit. Close 50% of the position here and move your SL to breakeven to protect the remaining trade.
Keep the short active for the next target, but stay disciplined and avoid overexposure.
Secure profits and manage risk properly.
DYOR (Do Your Own Research).
Second TP has been hit. Close 50% of the position here and move your SL to breakeven to protect the remaining trade.
Keep the short active for the next target, but stay disciplined and avoid overexposure.
Secure profits and manage risk properly.
DYOR (Do Your Own Research).
TojiSignalShark
·
--
Bearish$PENGU SHORT — Sellers are gaining control as bearish pressure builds, creating a potential opportunity for another downside move. If the weakness continues, the lower support levels could come into focus.
Trading Idea: Short $PENGU
Entry: 0.0082 - 0.0085
SL: 0.0090
TP1: 0.0080
TP2: 0.0077
TP3: 0.0074
Stay patient, manage your position size carefully, and consider securing partial profits as targets are reached.
DYOR (Do Your Own Research).
Trading Idea: Short $PENGU
Entry: 0.0082 - 0.0085
SL: 0.0090
TP1: 0.0080
TP2: 0.0077
TP3: 0.0074
Stay patient, manage your position size carefully, and consider securing partial profits as targets are reached.
DYOR (Do Your Own Research).
1
165
·
--
Bullish
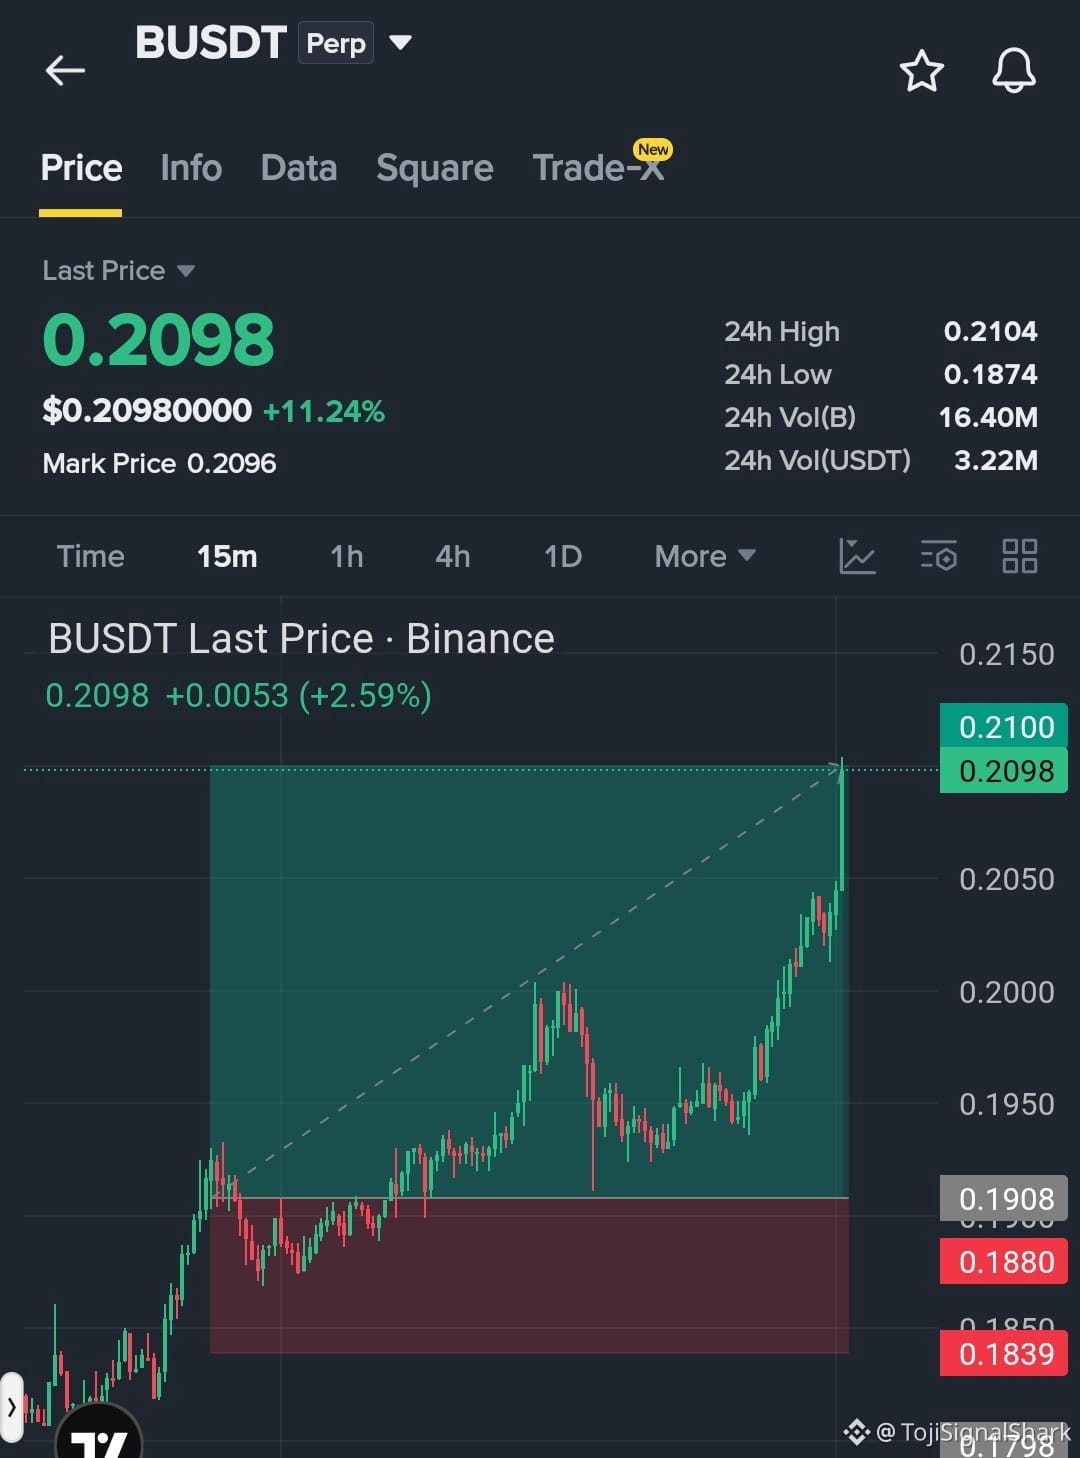
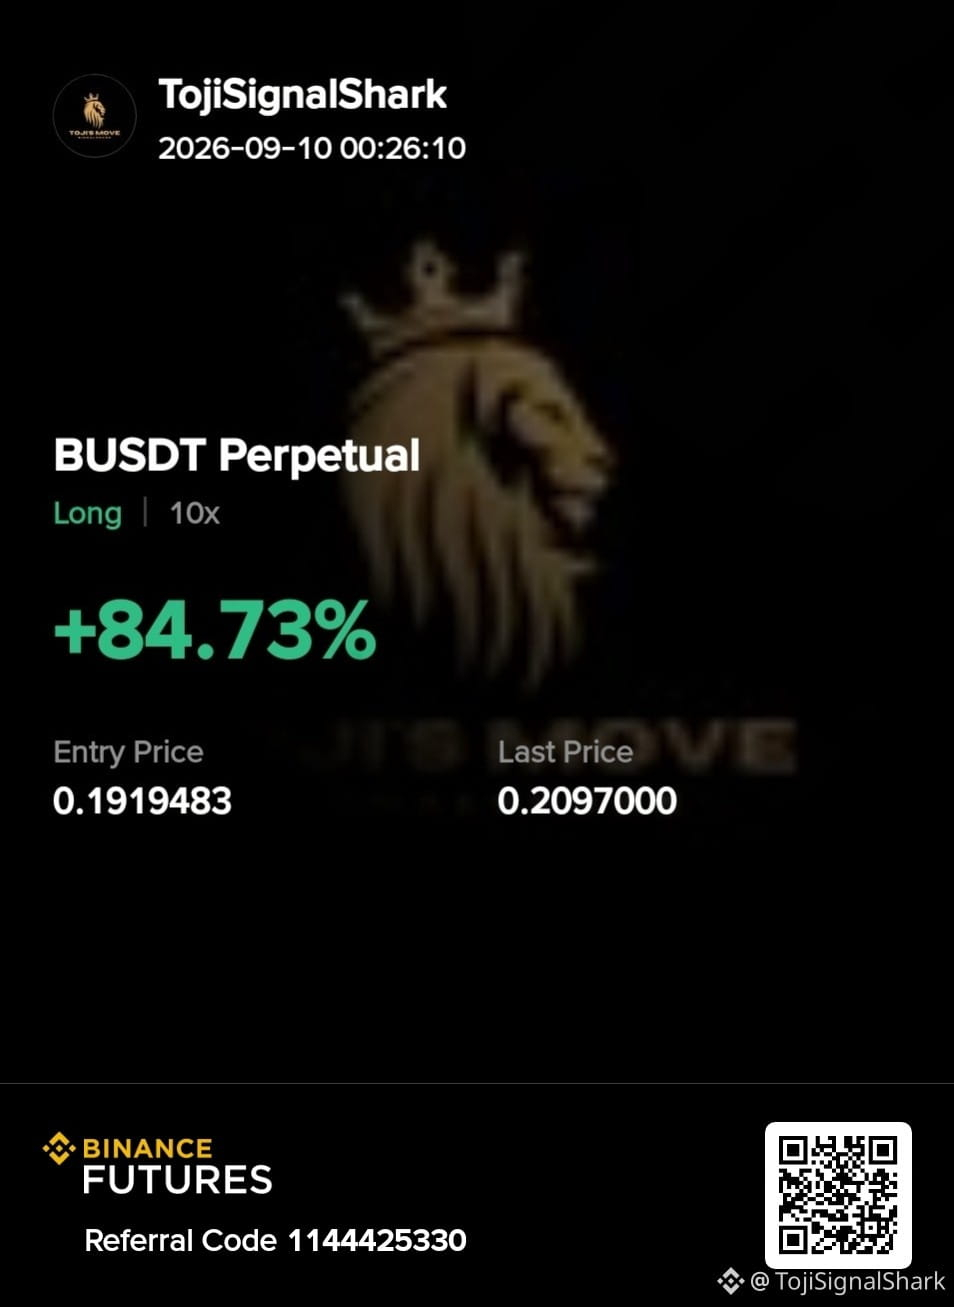
$B LONG SCALP All TPs have been hit with a sharp breakout and strong upside momentum.
Hope you didn’t miss this setup and managed to secure some solid gains. The move played out cleanly as planned.
Stay close and keep watching for the next update. More setups are coming.
DYOR (Do Your Own Research). $PTB $KOMA
{future}(KOMAUSDT)
{future}(PTBUSDT)
{future}(BUSDT)
$B LONG SCALP All TPs have been hit with a sharp breakout and strong upside momentum.
Hope you didn’t miss this setup and managed to secure some solid gains. The move played out cleanly as planned.
Stay close and keep watching for the next update. More setups are coming.
DYOR (Do Your Own Research). $PTB $KOMA
Hope you didn’t miss this setup and managed to secure some solid gains. The move played out cleanly as planned.
Stay close and keep watching for the next update. More setups are coming.
DYOR (Do Your Own Research). $PTB $KOMA
TojiSignalShark
·
--
Bullish$B LONG — $B is holding firmly above its key moving averages, keeping the short-term structure tilted toward the upside. The next resistance test could be crucial in determining whether buyers can trigger another leg higher.
Trading Ideas Long $B
Entry: $0.180 - $0.190
SL: $0.170
TP1: $0.200
TP2: $0.205
TP3: $0.210
Watch the breakout and volume confirmation closely. Manage risk properly and DYOR.
Trading Ideas Long $B
Entry: $0.180 - $0.190
SL: $0.170
TP1: $0.200
TP2: $0.205
TP3: $0.210
Watch the breakout and volume confirmation closely. Manage risk properly and DYOR.
1
458
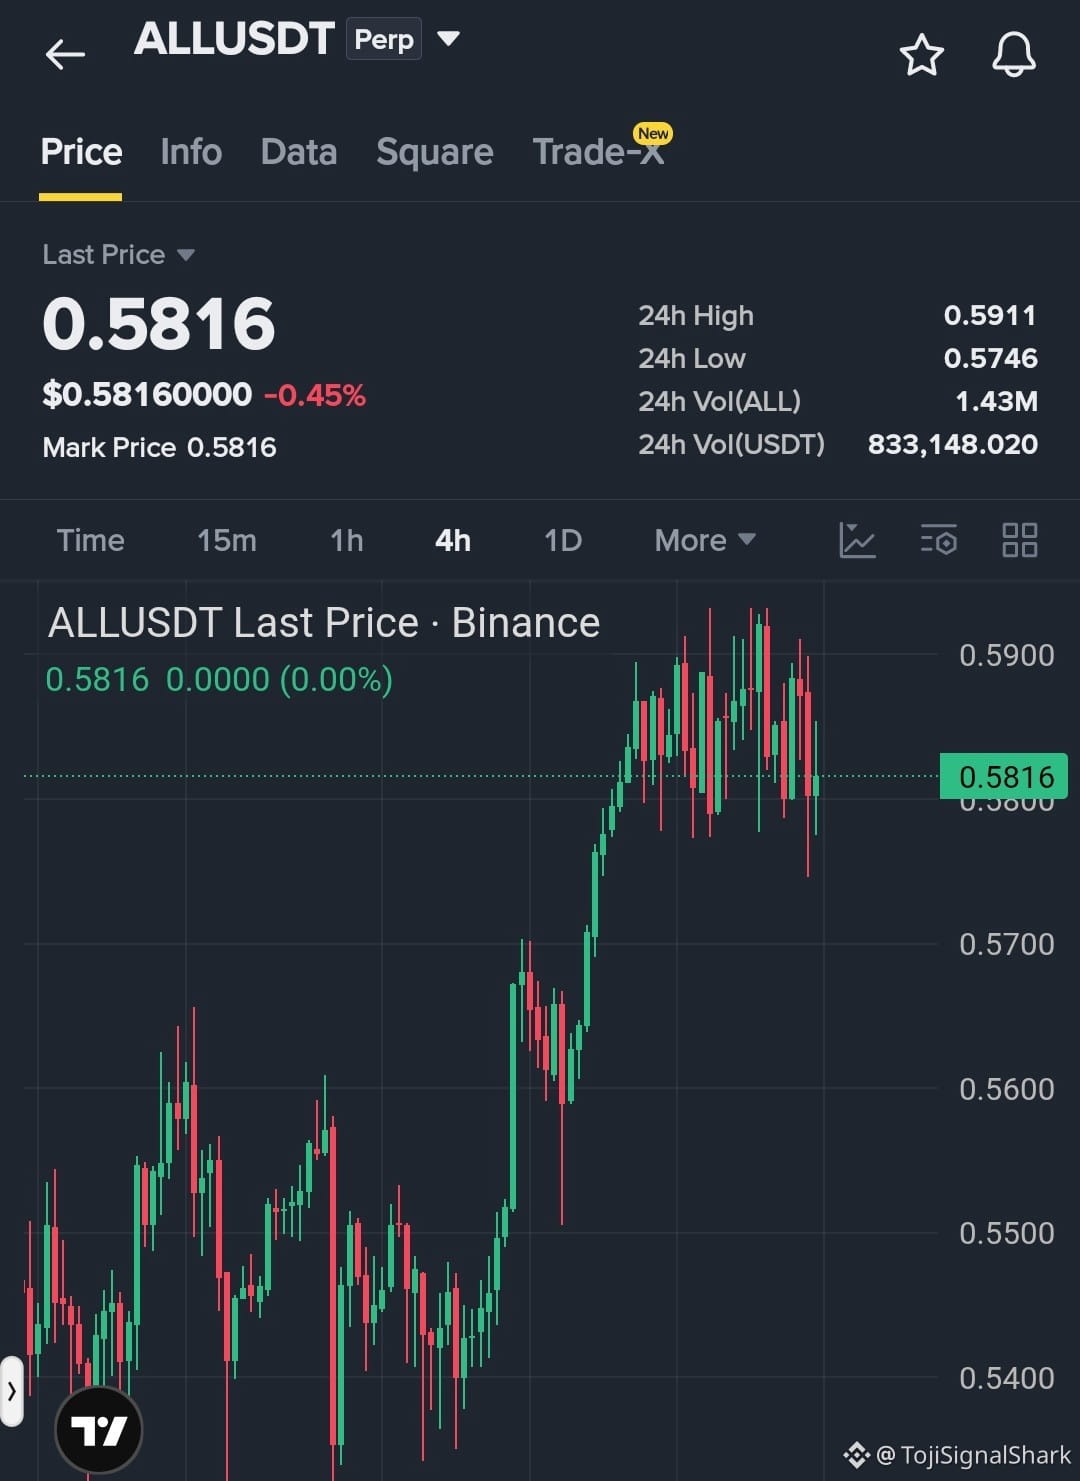
I’m expecting a strong dump on $ALL .
The price action is starting to look vulnerable, and I’m watching for further downside as sellers take control. Stay patient and wait for clean confirmation before adding risk.
Manage leverage carefully and never risk more than you can afford to lose.
DYOR (Do Your Own Research).
{future}(ALLUSDT)
I’m expecting a strong dump on $ALL .
The price action is starting to look vulnerable, and I’m watching for further downside as sellers take control. Stay patient and wait for clean confirmation before adding risk.
Manage leverage carefully and never risk more than you can afford to lose.
DYOR (Do Your Own Research).
The price action is starting to look vulnerable, and I’m watching for further downside as sellers take control. Stay patient and wait for clean confirmation before adding risk.
Manage leverage carefully and never risk more than you can afford to lose.
DYOR (Do Your Own Research).
34
·
--
Bearish
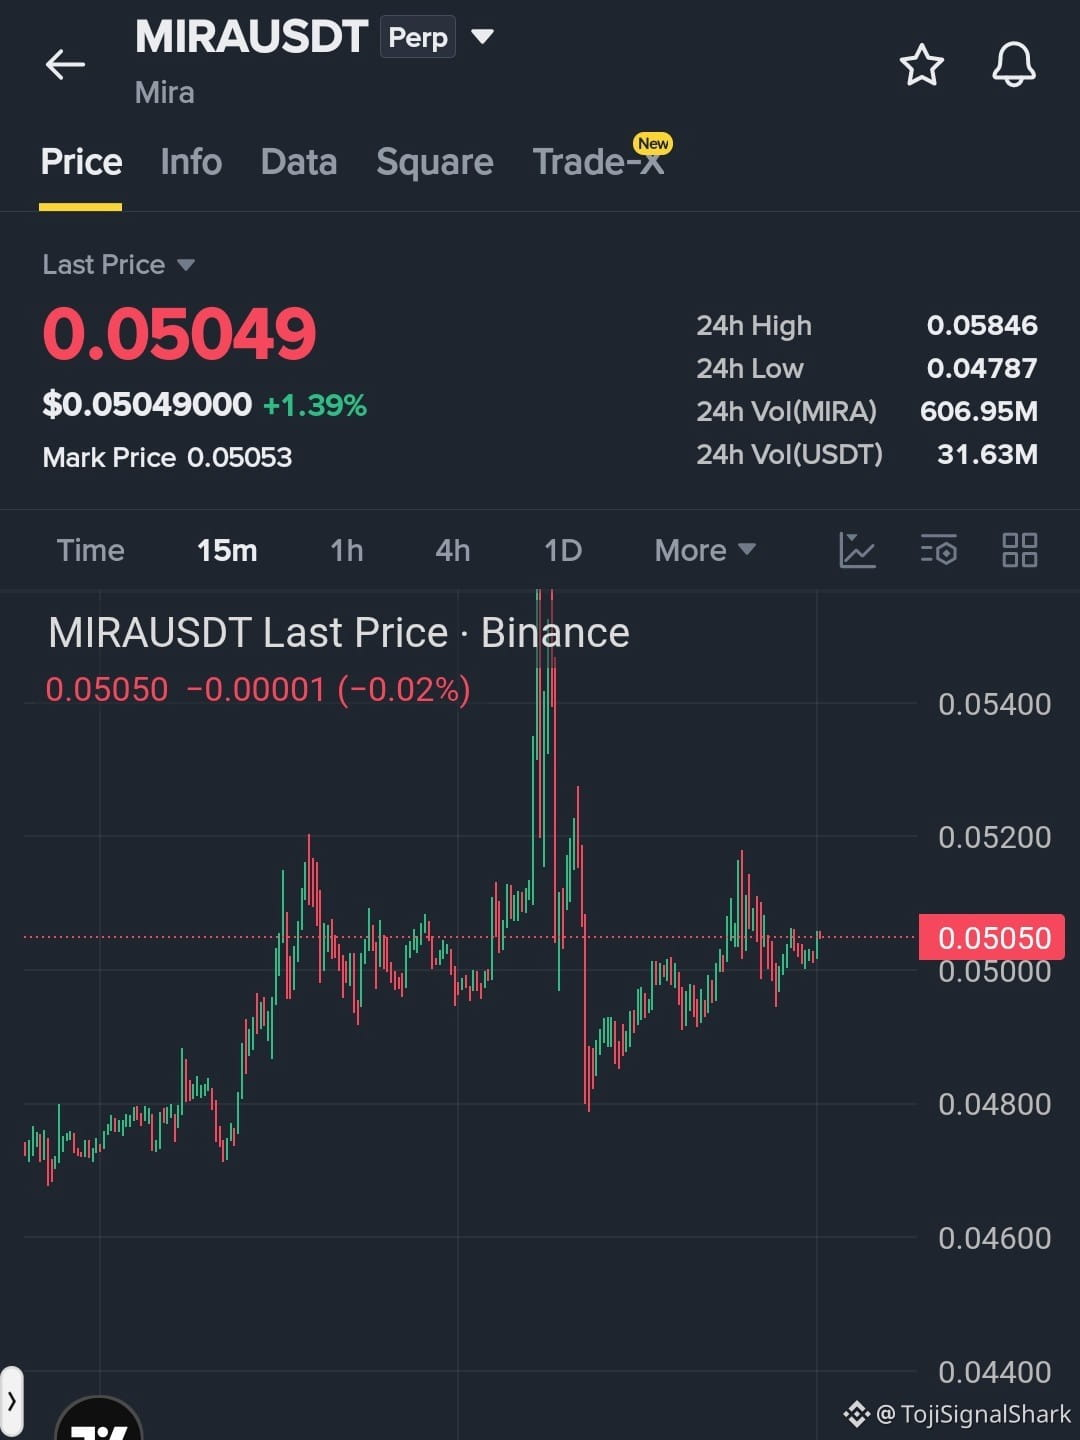
I’m still holding my $MIRA short and staying with the bearish setup.
My downside target remains 0.048. I’ll continue holding as long as the setup stays valid and the bearish structure remains intact.
Manage your risk, avoid overleveraging, and don’t chase the move.
DYOR (Do Your Own Research).
{future}(MIRAUSDT)
I’m still holding my $MIRA short and staying with the bearish setup.
My downside target remains 0.048. I’ll continue holding as long as the setup stays valid and the bearish structure remains intact.
Manage your risk, avoid overleveraging, and don’t chase the move.
DYOR (Do Your Own Research).
My downside target remains 0.048. I’ll continue holding as long as the setup stays valid and the bearish structure remains intact.
Manage your risk, avoid overleveraging, and don’t chase the move.
DYOR (Do Your Own Research).
92
·
--
Bearish
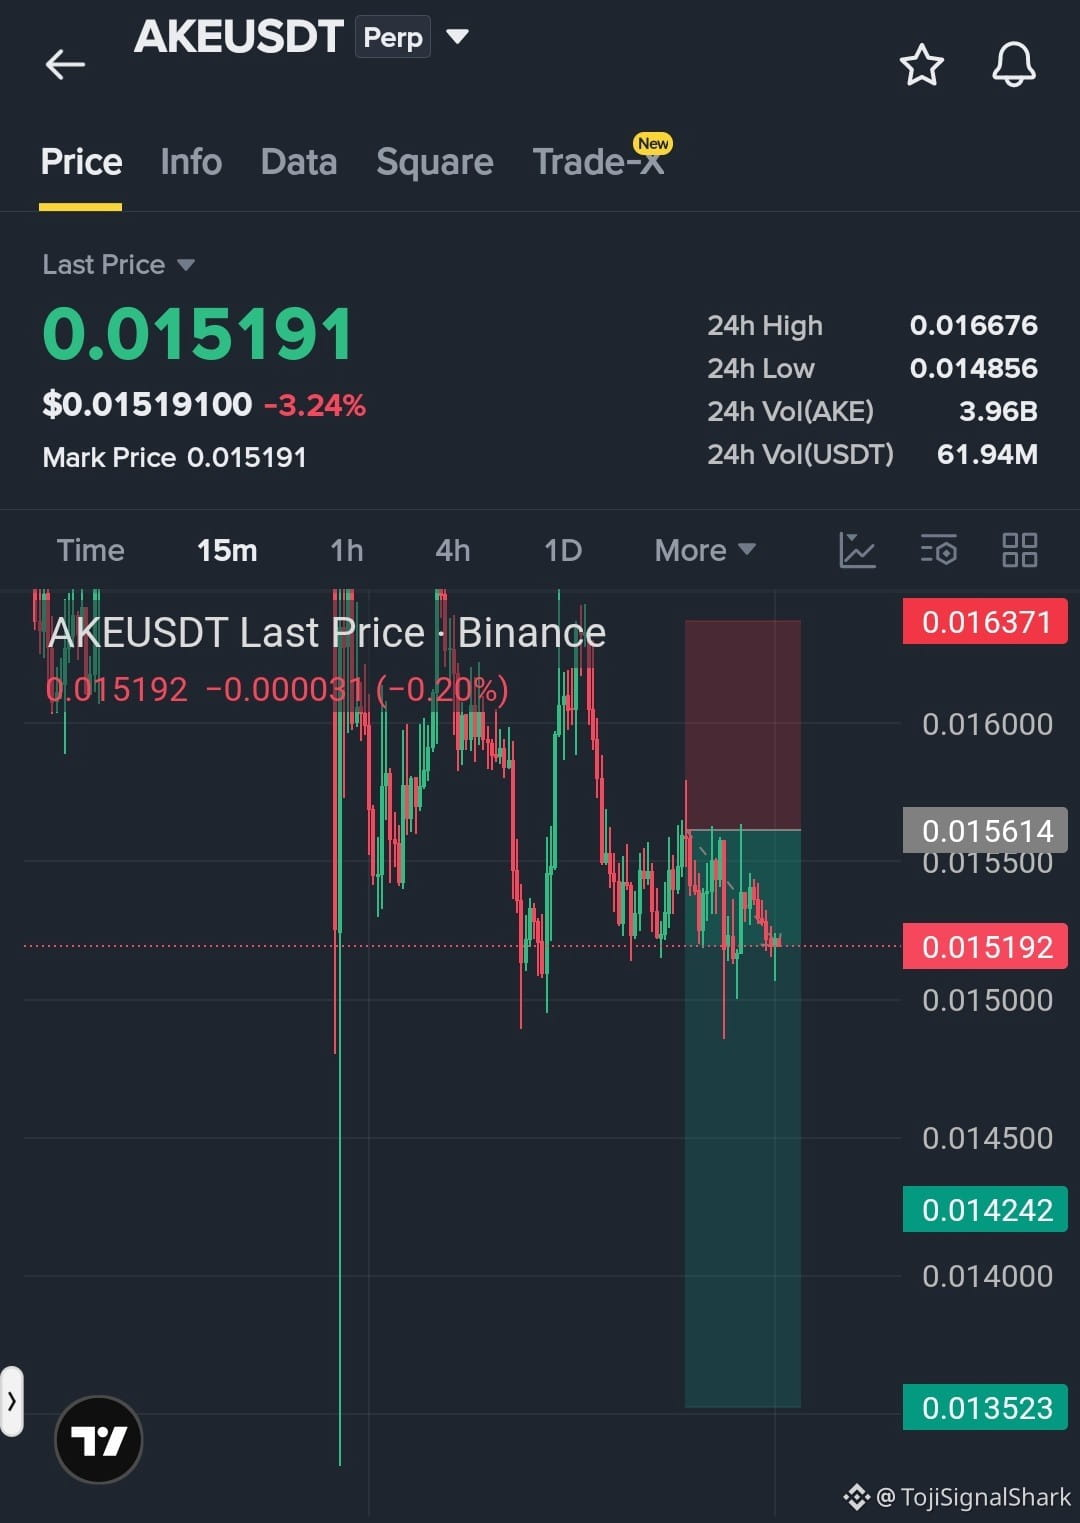
Still holding my $AKE short and the bearish setup remains active.
I’m staying with the short as long as the setup remains valid. The targets remain unchanged, so keep the same TP levels in focus and manage risk carefully.
Don’t chase the move, avoid overleveraging, and protect your capital if market conditions change.
DYOR (Do Your Own Research).
{future}(AKEUSDT)
Still holding my $AKE short and the bearish setup remains active.
I’m staying with the short as long as the setup remains valid. The targets remain unchanged, so keep the same TP levels in focus and manage risk carefully.
Don’t chase the move, avoid overleveraging, and protect your capital if market conditions change.
DYOR (Do Your Own Research).
I’m staying with the short as long as the setup remains valid. The targets remain unchanged, so keep the same TP levels in focus and manage risk carefully.
Don’t chase the move, avoid overleveraging, and protect your capital if market conditions change.
DYOR (Do Your Own Research).

TojiSignalShark
·
--
Bearish$AKE SHORT — Sellers are stepping back in as bearish pressure builds, opening another potential downside opportunity. The rejection near the upper range suggests weakness, so I’m watching for continued selling momentum from the entry zone.
Trading Ideas: Short $AKE
Entry: 0.0150 - 0.0165
SL: 0.0172
TP1: 0.0145
TP2: 0.0140
TP3: 0.0135
Manage risk carefully and consider securing partial profits as targets are reached. DYOR (Do Your Own Research).
Trading Ideas: Short $AKE
Entry: 0.0150 - 0.0165
SL: 0.0172
TP1: 0.0145
TP2: 0.0140
TP3: 0.0135
Manage risk carefully and consider securing partial profits as targets are reached. DYOR (Do Your Own Research).
1
103
·
--
Bearish
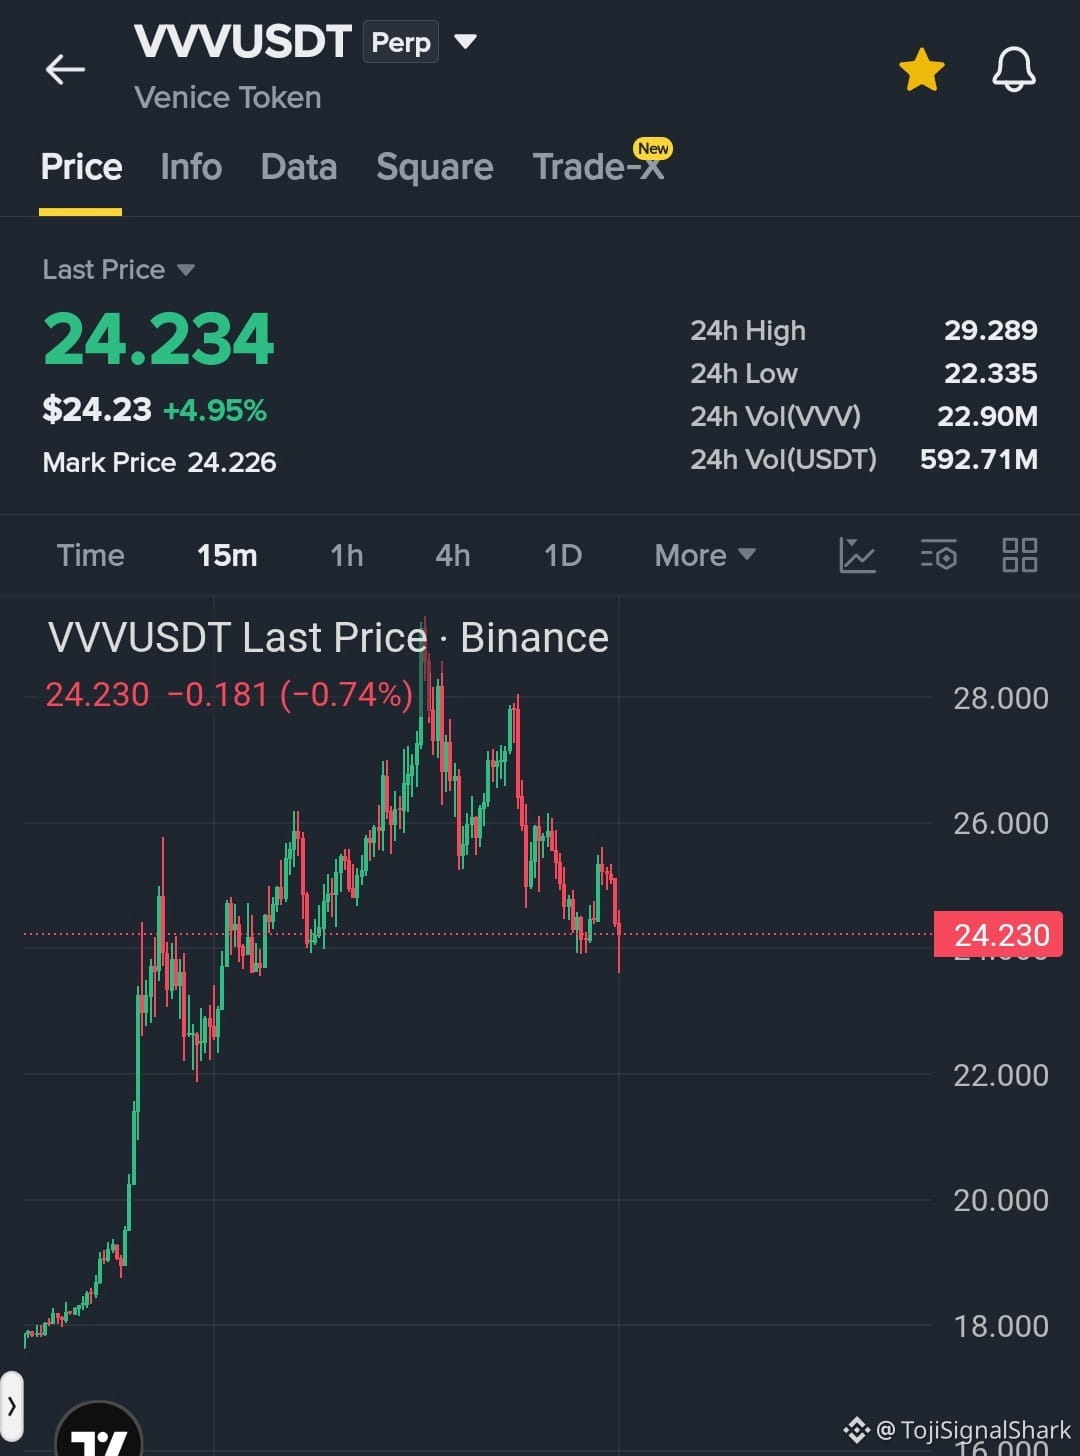
$VVV is still looking weak here, with sellers maintaining pressure and the bearish structure remaining intact.
I’m keeping the short bias active and continuing to watch the downside for further weakness. Stay patient and avoid chasing sudden moves.
Keep shorting with proper position sizing and risk management.
DYOR (Do Your Own Research).
{future}(VVVUSDT)
$VVV is still looking weak here, with sellers maintaining pressure and the bearish structure remaining intact.
I’m keeping the short bias active and continuing to watch the downside for further weakness. Stay patient and avoid chasing sudden moves.
Keep shorting with proper position sizing and risk management.
DYOR (Do Your Own Research).
I’m keeping the short bias active and continuing to watch the downside for further weakness. Stay patient and avoid chasing sudden moves.
Keep shorting with proper position sizing and risk management.
DYOR (Do Your Own Research).
34
The market is showing some interesting positioning right now, especially around $BZ , $ZEC , $HYPE and $CL .
If you had to pick ONE for the next major move,
which setup would you choose?
What’s your pick, and are you expecting a continuation or a squeeze?
{future}(ZECUSDT)
{future}(BZUSDT)
{future}(CLUSDT)
The market is showing some interesting positioning right now, especially around $BZ , $ZEC , $HYPE and $CL .
If you had to pick ONE for the next major move,
which setup would you choose?
What’s your pick, and are you expecting a continuation or a squeeze?
If you had to pick ONE for the next major move,
which setup would you choose?
What’s your pick, and are you expecting a continuation or a squeeze?
BZ Strong selling pressure
HYPE Potential reversal setup
CL — Extreme positioning
ZEC — Momentum building
16 hr(s) left
2
4.9k
·
--
Bearish
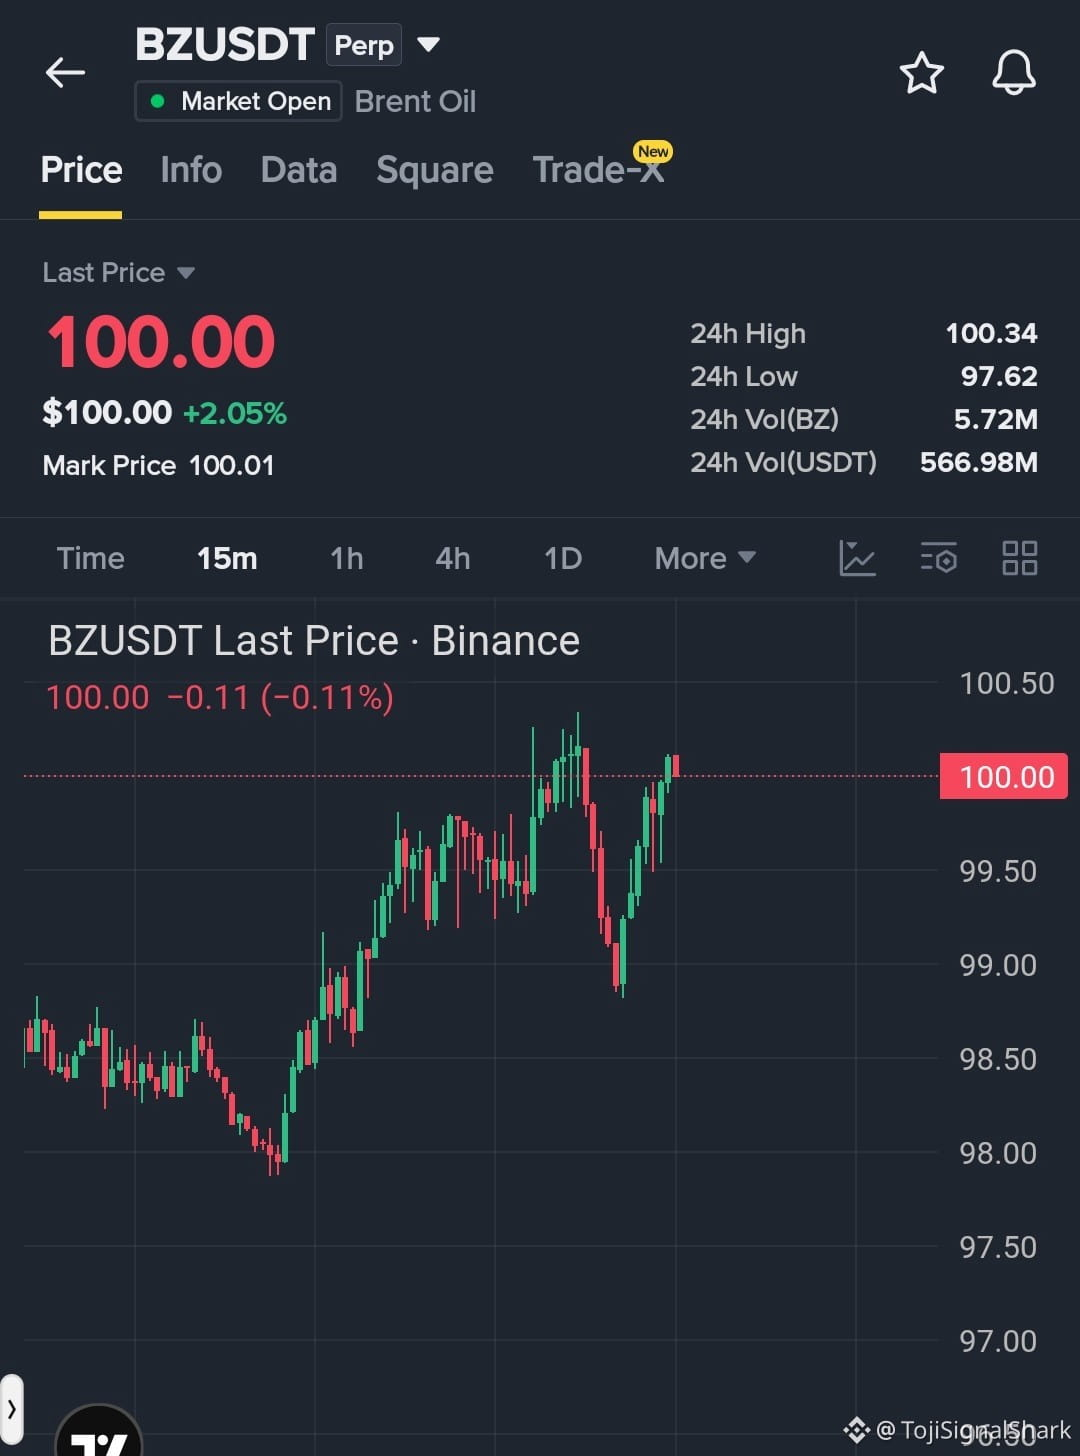
$BZ is looking noticeably weak here, with sellers starting to take control around the current levels.
I’m looking for a short move from here, targeting the following downside levels:
Entry: Current levels
SL: Above 105
TP1: 99
TP2: 98
TP3: 97
Stay patient, manage your position size carefully, and don’t chase the move. Secure partial profits as targets are reached.
DYOR (Do Your Own Research).
{future}(BZUSDT)
$BZ is looking noticeably weak here, with sellers starting to take control around the current levels.
I’m looking for a short move from here, targeting the following downside levels:
Entry: Current levels
SL: Above 105
TP1: 99
TP2: 98
TP3: 97
Stay patient, manage your position size carefully, and don’t chase the move. Secure partial profits as targets are reached.
DYOR (Do Your Own Research).
I’m looking for a short move from here, targeting the following downside levels:
Entry: Current levels
SL: Above 105
TP1: 99
TP2: 98
TP3: 97
Stay patient, manage your position size carefully, and don’t chase the move. Secure partial profits as targets are reached.
DYOR (Do Your Own Research).
1
110
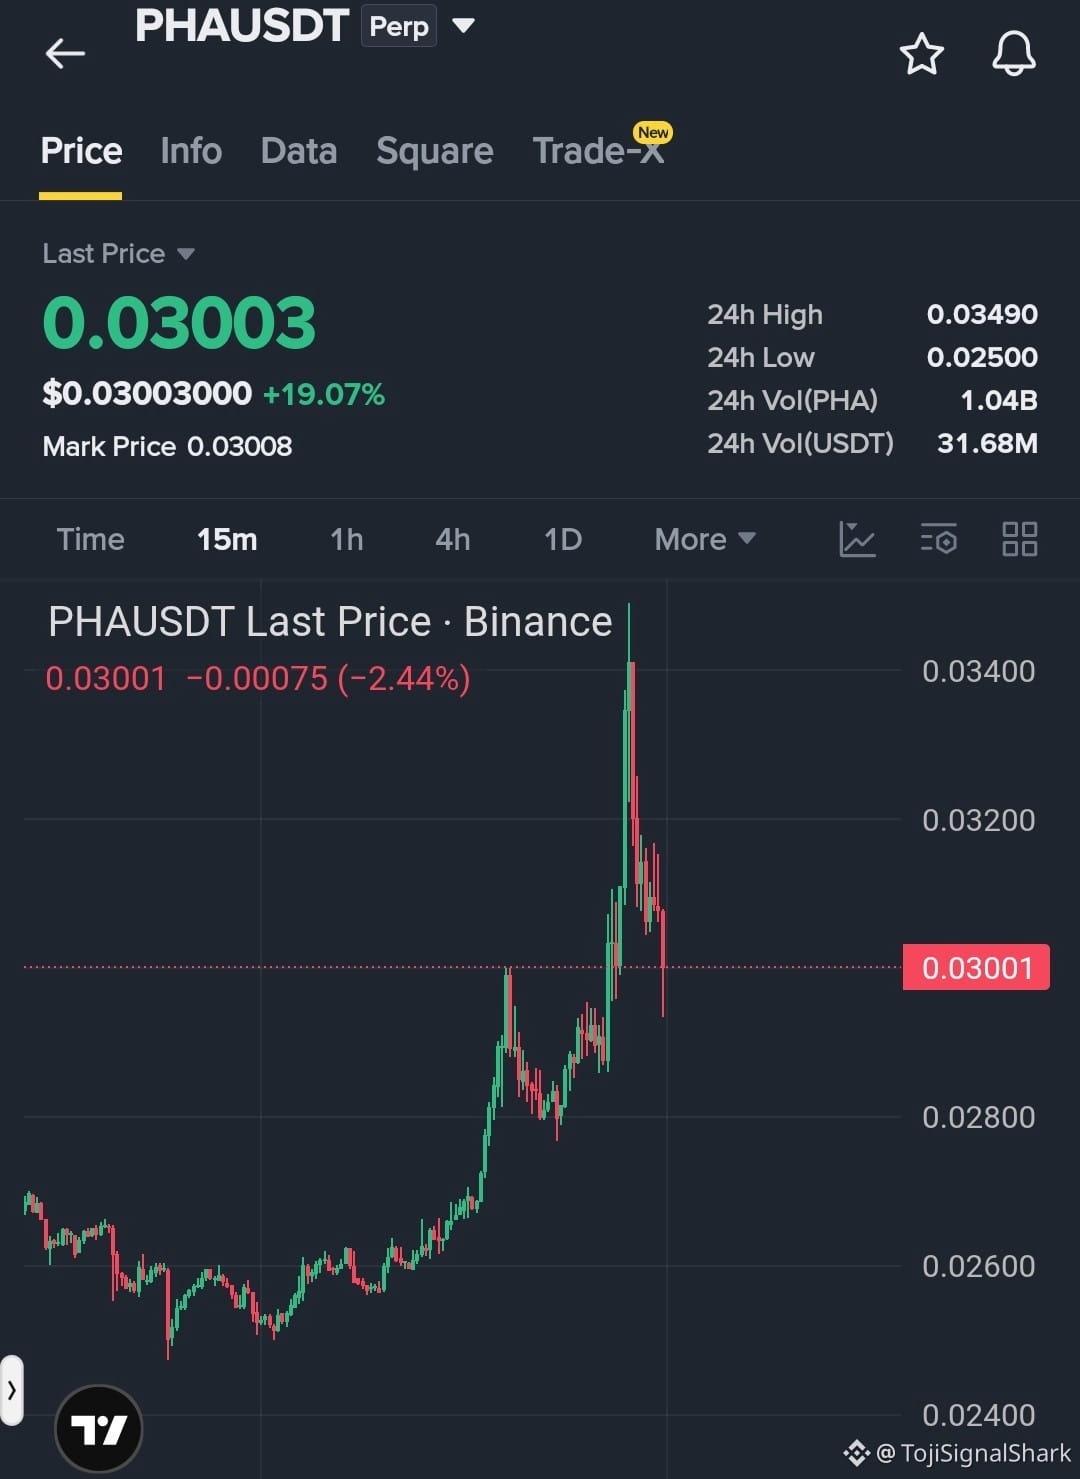
$PHA is starting to look weak here, with sellers showing more pressure around the current levels.
I’m looking for a short from here as the downside move develops. Stay patient and watch for confirmation before adding to the position.
Manage risk carefully and avoid chasing the move.
DYOR (Do Your Own Research).
{future}(PHAUSDT)
$PHA is starting to look weak here, with sellers showing more pressure around the current levels.
I’m looking for a short from here as the downside move develops. Stay patient and watch for confirmation before adding to the position.
Manage risk carefully and avoid chasing the move.
DYOR (Do Your Own Research).
I’m looking for a short from here as the downside move develops. Stay patient and watch for confirmation before adding to the position.
Manage risk carefully and avoid chasing the move.
DYOR (Do Your Own Research).
49
·
--
Bearish
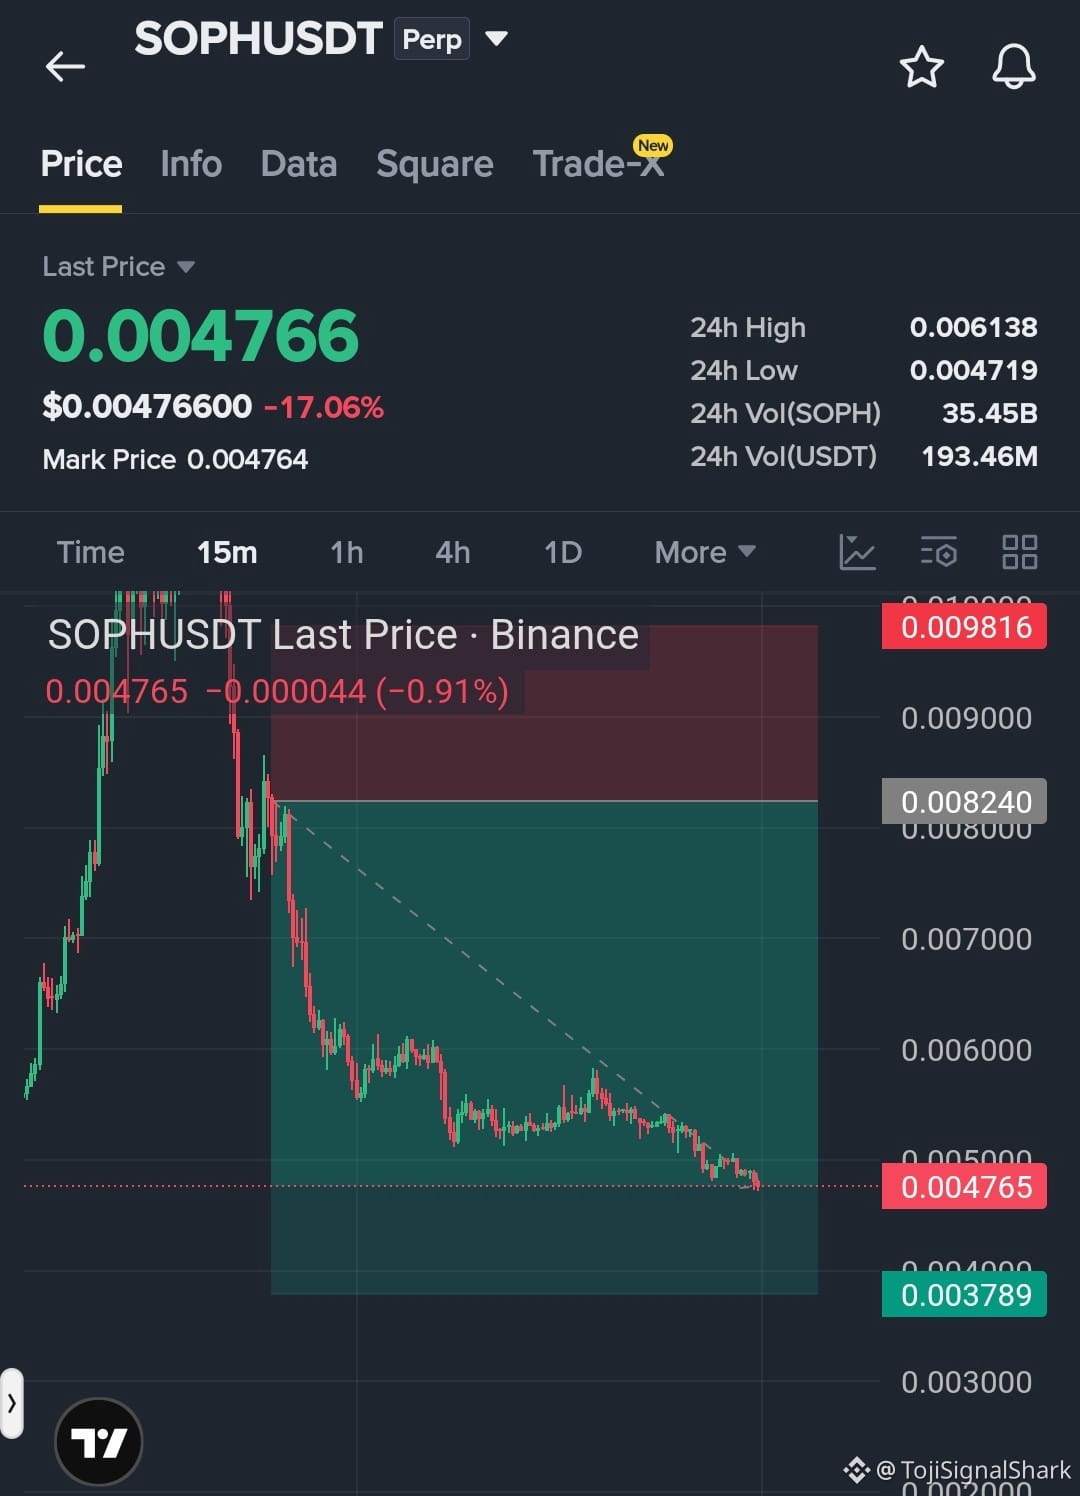
I’m still holding my $SOPH short and the setup is continuing to play out as expected.
I’m keeping the short active and watching the downside levels closely. Stay patient and manage the position carefully rather than chasing the move.
TP1: 0.0043
TP2: 0.0040
TP3: 0.0038
Keep shorting only with proper risk management. Secure partial profits as targets are reached and adjust your SL accordingly.
DYOR (Do Your Own Research).
{future}(SOPHUSDT)
I’m still holding my $SOPH short and the setup is continuing to play out as expected.
I’m keeping the short active and watching the downside levels closely. Stay patient and manage the position carefully rather than chasing the move.
TP1: 0.0043
TP2: 0.0040
TP3: 0.0038
Keep shorting only with proper risk management. Secure partial profits as targets are reached and adjust your SL accordingly.
DYOR (Do Your Own Research).
I’m keeping the short active and watching the downside levels closely. Stay patient and manage the position carefully rather than chasing the move.
TP1: 0.0043
TP2: 0.0040
TP3: 0.0038
Keep shorting only with proper risk management. Secure partial profits as targets are reached and adjust your SL accordingly.
DYOR (Do Your Own Research).
TojiSignalShark
·
--
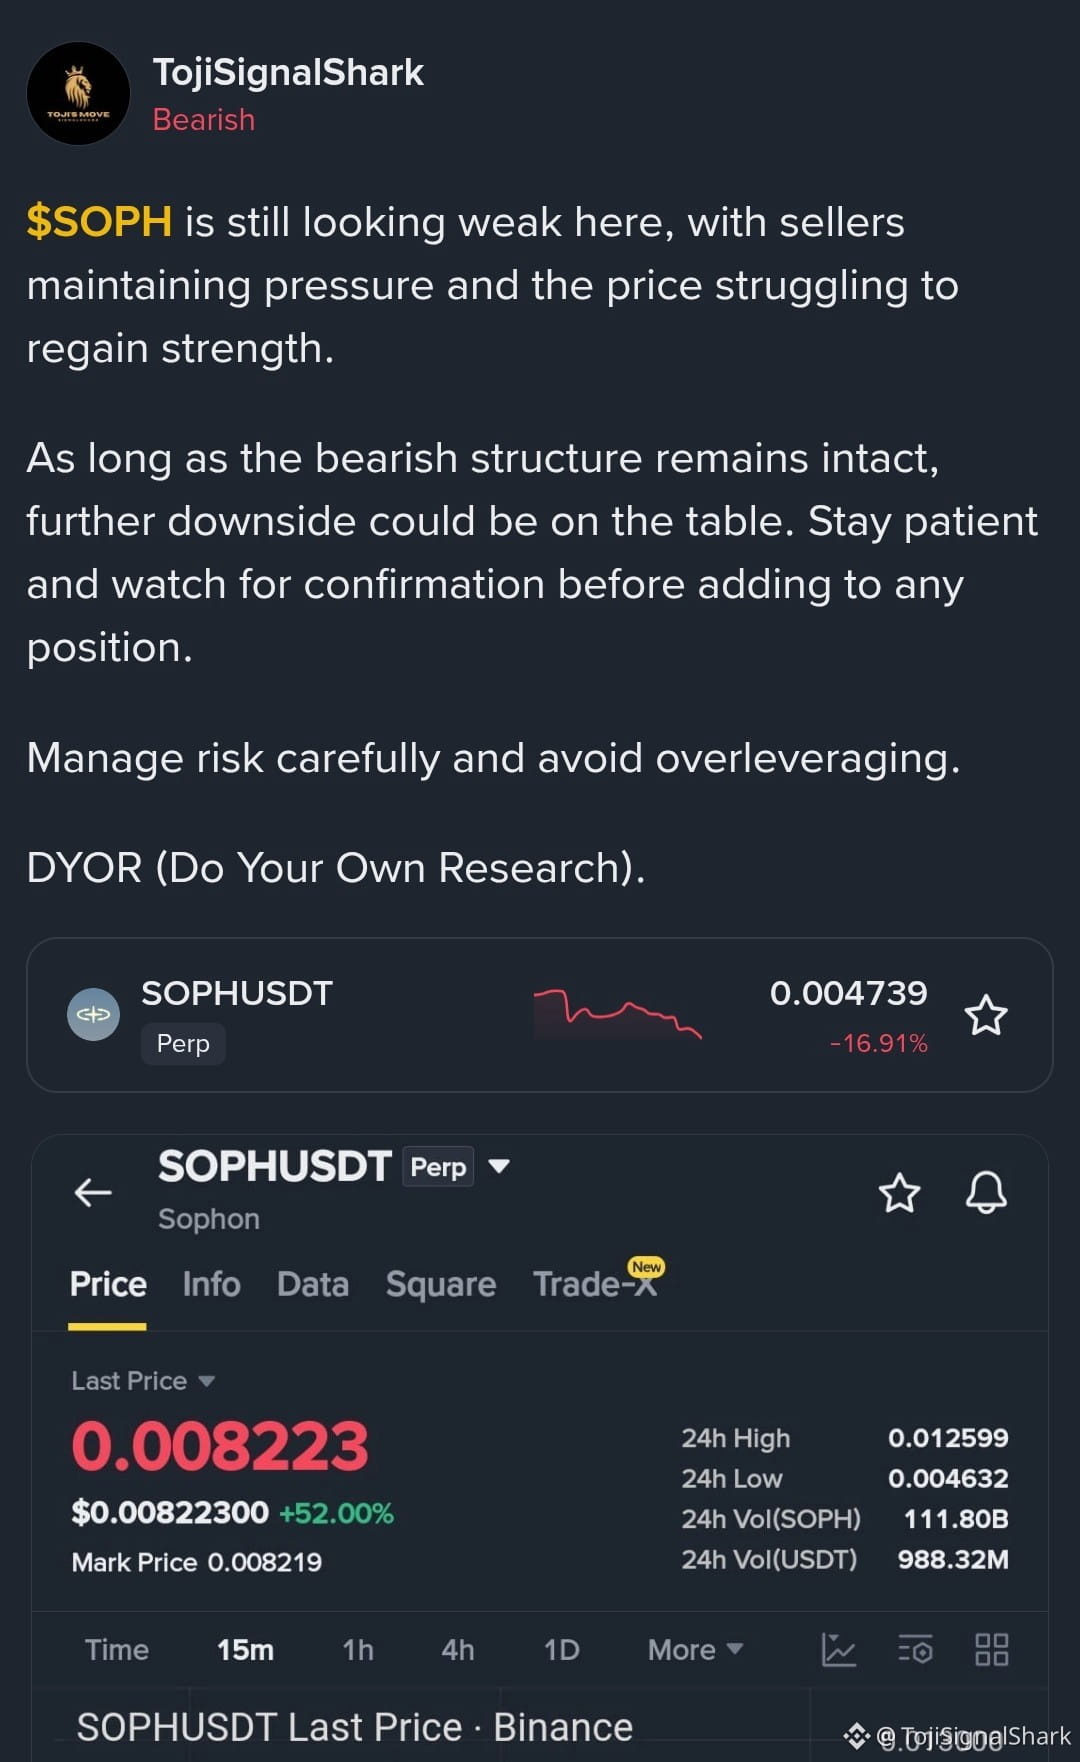
Bearish$SOPH is still looking weak here, with sellers maintaining pressure and the price struggling to regain strength.
As long as the bearish structure remains intact, further downside could be on the table. Stay patient and watch for confirmation before adding to any position.
Manage risk carefully and avoid overleveraging.
DYOR (Do Your Own Research).
As long as the bearish structure remains intact, further downside could be on the table. Stay patient and watch for confirmation before adding to any position.
Manage risk carefully and avoid overleveraging.
DYOR (Do Your Own Research).
1
97
·
--
Bearish
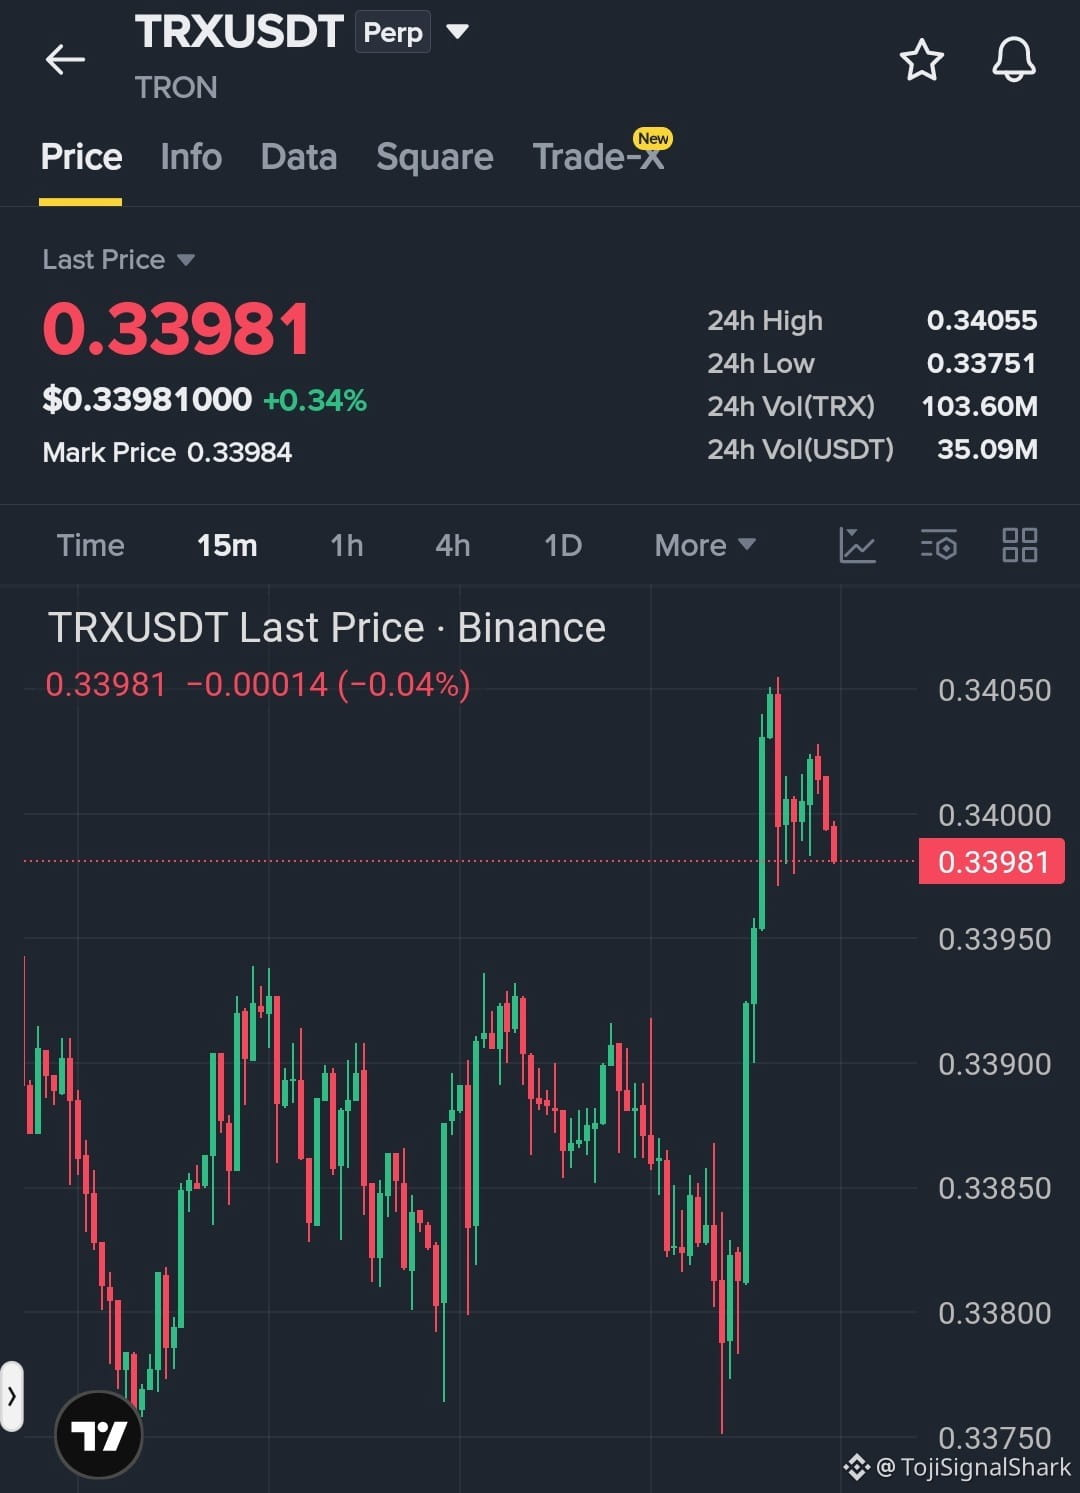
$TRX short setup is now active, with sellers showing weakness around the current levels. The downside move could extend if resistance continues to hold.
Trading Ideas Short $TRX
Entry: Current zone
SL: Above 0.35
TP1: 0.335
TP2: 0.330
TP3: 0.325
Manage your position carefully, avoid over-leverage, and secure partial profits as targets are reached. DYOR (Do Your Own Research).
{future}(TRXUSDT)
$TRX short setup is now active, with sellers showing weakness around the current levels. The downside move could extend if resistance continues to hold.
Trading Ideas Short $TRX
Entry: Current zone
SL: Above 0.35
TP1: 0.335
TP2: 0.330
TP3: 0.325
Manage your position carefully, avoid over-leverage, and secure partial profits as targets are reached. DYOR (Do Your Own Research).
Trading Ideas Short $TRX
Entry: Current zone
SL: Above 0.35
TP1: 0.335
TP2: 0.330
TP3: 0.325
Manage your position carefully, avoid over-leverage, and secure partial profits as targets are reached. DYOR (Do Your Own Research).

1
32
·
--
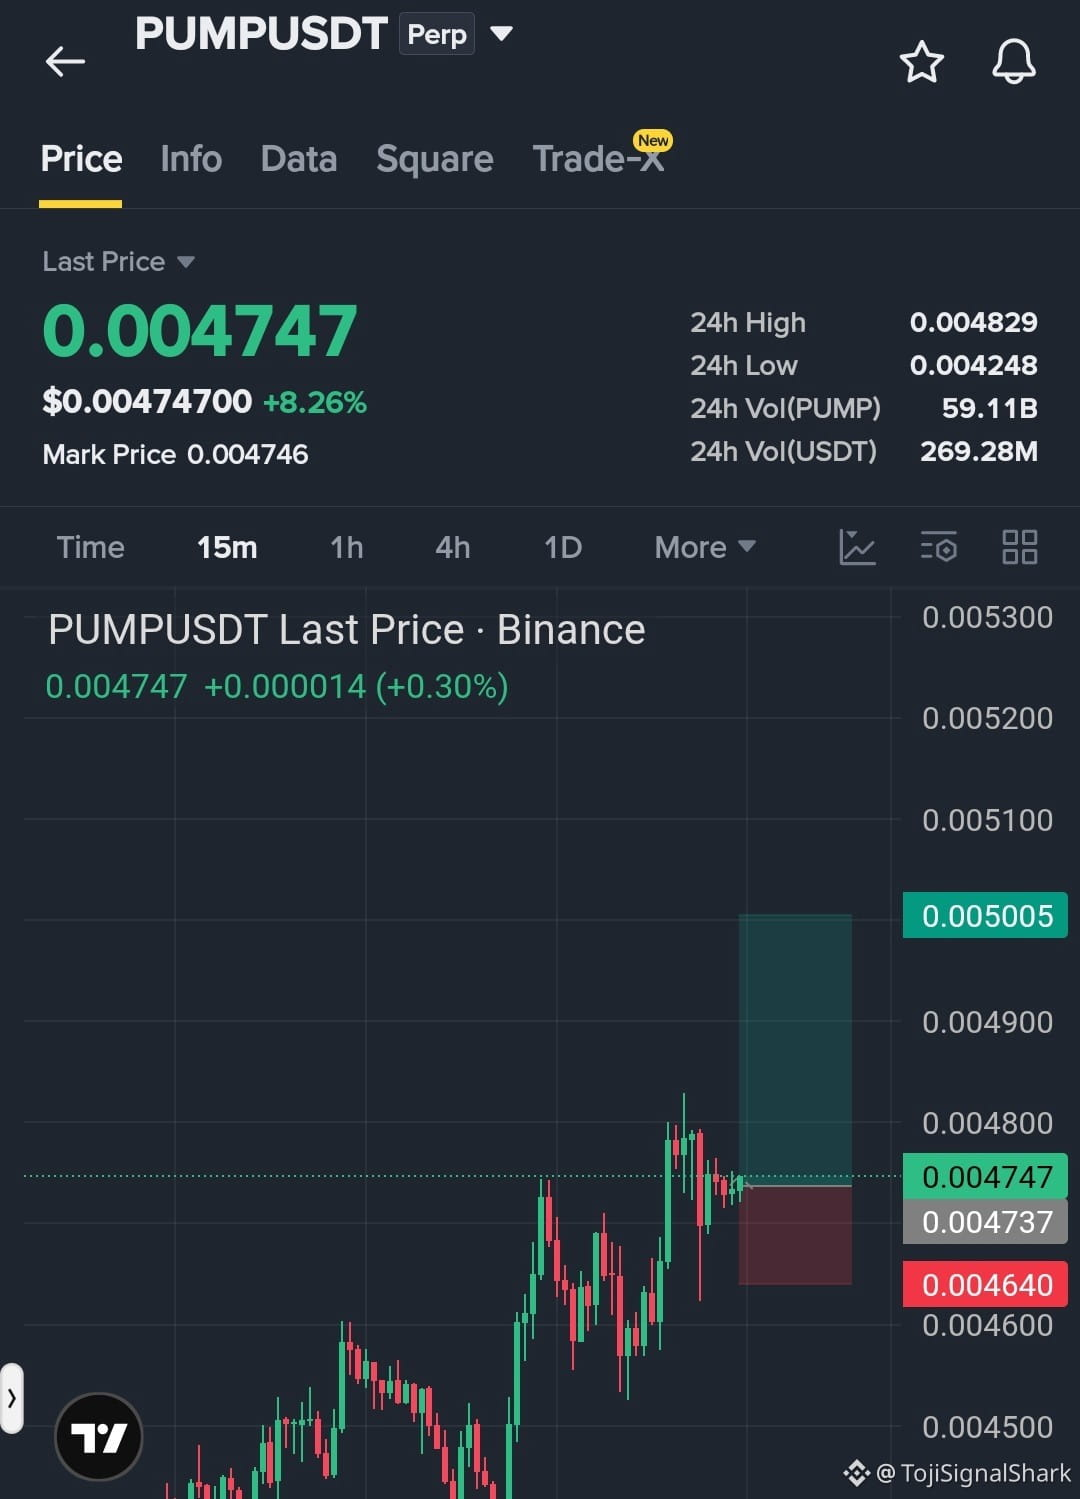
Bullish
$PUMP LONG — Buyers are stepping in, and momentum is building for another potential upside move.
The long setup is active now. I’m targeting the next resistance levels while keeping the invalidation zone clearly defined.
TP1: 0.0048
TP2: 0.0049
TP3: 0.0050
SL: Below 0.0044
Manage your position carefully and secure partial profits as targets are reached. Stay alert for the next update.
DYOR (Do Your Own Research).
{future}(PUMPUSDT)
$PUMP LONG — Buyers are stepping in, and momentum is building for another potential upside move.
The long setup is active now. I’m targeting the next resistance levels while keeping the invalidation zone clearly defined.
TP1: 0.0048
TP2: 0.0049
TP3: 0.0050
SL: Below 0.0044
Manage your position carefully and secure partial profits as targets are reached. Stay alert for the next update.
DYOR (Do Your Own Research).
The long setup is active now. I’m targeting the next resistance levels while keeping the invalidation zone clearly defined.
TP1: 0.0048
TP2: 0.0049
TP3: 0.0050
SL: Below 0.0044
Manage your position carefully and secure partial profits as targets are reached. Stay alert for the next update.
DYOR (Do Your Own Research).

1
73
Log in to explore more content
Join global crypto users on Binance Square
⚡️ Get latest and useful information about crypto.
💬 Trusted by the world’s largest crypto exchange.
👍 Discover real insights from verified creators.
Email / Phone number
Trending Topics
US10YTreasuryYieldHitsHighestSinceNov2023
891 views
52 Discussing
#us10ytreasuryyieldhitshighestsincenov2023
🚨 MACRO ALERT: US 10-Year Treasury Yield Hits Highest Level Since Nov 2023!
The financial markets are feeling the heat as the benchmark U.S. 10-year Treasury yield surged past 4.8%, touching levels not seen since November 2023.
Rising yields are tightening financial conditions, putting pressure on equities, and creating ripples across global markets as investors re-evaluate risk assets, debt pressures, and macroeconomic stability.
Watchlist & Tradeable Assets
As volatility shifts capital across markets, keep a close eye on these setups:
$ZEC (Zcash): Privacy coins are seeing renewed speculative interest as traders hedge against broader macroeconomic shifts and regulatory tightening.
$MET (Metis / Meteorology tokens): Layer-2 scaling activity and ecosystem updates continue to drive localized volume despite macro headwinds.
$META (Meta Platforms): Traditional tech giant acting as a core barometer for how mega-cap equities react to spiking bond yields and shifting borrowing costs.
Disclaimer: Macro shifts bring high volatility. Always manage your risk and trade with a plan.
Axiom AlphA
·0 Likes
·88 views
USTreasuryToBuyBackUpTo$6BLongDatedDebt
7,777 views
123 Discussing
BitcoinSurpasses$79K
51,048 views
245 Discussing