Binance Square
Crypto Sat
10.1k Posts

Crypto Sat

Square Verified+
Signals Provider - Scalping & Swing | Insights | Latest Updates I X & CMC - CryptoSatRed ✅
High-Frequency Trader
5.1 Years
29 Following
44.8K+ Followers
59.4K+ Liked
Posts
PINNED
·
--
3 years ago we started the CryptoSat community… and honestly, I still feel like this is just the beginning. So much more to achieve, so many more milestones to unlock together. ❤️ At the beginning, a lot of people helped me build this community into something strong and powerful. I still remember every one of them. Some are still with me, some disappeared with time… that’s life. People change, situations change, and days keep moving. Meanwhile, I’m still here… a solo warrior managing 6 platforms every single day — Binance Square, Telegram, X, Gate Moments, Bitget Insights, and CMC 😅 Sometimes I feel like I’m just posting random content and disturbing all of you daily 😂 But truthfully? I enjoy every second of it. In real life, I’m actually an introvert. Social media became the only place where I can express myself freely, share thoughts, charts, wins, losses, and connect with people who understand this journey. Sounds kinda crazy, right? 😄 Life isn’t always easy. Fighting real-life situations alone while trying to stay consistent online every single day is challenging… but at the same time, I enjoy the process. That’s what keeps me going. Every day, some people join the community and some leave. But one thing remains permanent… CryptoSat is still here. ❤️😅 [JOIN OUR TRADING GROUP](https://app.binance.com/uni-qr/p2p-group-list?chatId=v1.00.QzJDSWRDcnlwdEZpeGRJVrCYgJ4bTIse-llfx9Jvmgs&source=squareProfile)
3 years ago we started the CryptoSat community… and honestly, I still feel like this is just the beginning. So much more to achieve, so many more milestones to unlock together. ❤️

At the beginning, a lot of people helped me build this community into something strong and powerful. I still remember every one of them. Some are still with me, some disappeared with time… that’s life. People change, situations change, and days keep moving.

Meanwhile, I’m still here… a solo warrior managing 6 platforms every single day — Binance Square, Telegram, X, Gate Moments, Bitget Insights, and CMC 😅

Sometimes I feel like I’m just posting random content and disturbing all of you daily 😂
But truthfully? I enjoy every second of it.

In real life, I’m actually an introvert. Social media became the only place where I can express myself freely, share thoughts, charts, wins, losses, and connect with people who understand this journey. Sounds kinda crazy, right? 😄

Life isn’t always easy. Fighting real-life situations alone while trying to stay consistent online every single day is challenging… but at the same time, I enjoy the process. That’s what keeps me going.

Every day, some people join the community and some leave.
But one thing remains permanent…

CryptoSat is still here. ❤️😅

JOIN OUR TRADING GROUP
PINNED
TRADING STRATEGY ✍️ MARGIN MODE ✅ Using CROSS MARGIN Leverage Capital per trade(not per entry) 1x to 10x Upto 8% 11x to 25x Upto 5% 26x to 50x Upto 3% Morethan 51x Upto 2% ⚠️ Hold 2 to 3 trades , when you're using cross margin and maintain risk ratio less than 5% Using ISOLATED MARGIN 😀Use leverage 5x to 10x only and invest 5 to 8% funds ENTRY STRATEGY ✅ Take 2 to 3 entries ( DCA STRATEGY ) RESTRICTING TAKING ENTRIES ✅ Existing users If you took the trade at entry 1 then it achieved tp2 quickly , Don't take further entries. New users Don't take entries after tp2 hit. SECURING PROFITS ✅ 🟢 If 2 or 3 Entry Points(EPs) achieved , then you should shift Target points. If entry 2 achieved , then Ep 1 will be 1st TP. 🟢Always exit 20% (tp1) , 30% (tp2) and remaining tps , exit equal portions 🟢Move SL to Entry-Price after tp3 🟢Take profits at every tp , Don't be greedy and hold only for final tp. 1% RISK RULE is more safe ✅ Like 😀 & Share 😀 [JOIN OUR TRADING GROUP](https://app.binance.com/uni-qr/group-chat-landing?channelToken=-E5sVvNOuX03e3NZfTUjZg&type=1&entrySource=sharing_link)
TRADING STRATEGY ✍️

MARGIN MODE ✅

Using CROSS MARGIN

Leverage Capital per trade(not
per entry)

1x to 10x Upto 8%
11x to 25x Upto 5%
26x to 50x Upto 3%
Morethan 51x Upto 2%

⚠️ Hold 2 to 3 trades , when you're using cross margin and maintain risk ratio less than 5%

Using ISOLATED MARGIN

😀Use leverage 5x to 10x only and invest 5 to 8% funds

ENTRY STRATEGY ✅
Take 2 to 3 entries ( DCA STRATEGY )

RESTRICTING TAKING ENTRIES ✅

Existing users
If you took the trade at entry 1 then it achieved tp2 quickly , Don't take further entries.

New users
Don't take entries after tp2 hit.

SECURING PROFITS ✅
🟢 If 2 or 3 Entry Points(EPs) achieved , then you should shift Target points. If entry 2 achieved , then Ep 1 will be 1st TP.
🟢Always exit 20% (tp1) , 30% (tp2) and remaining tps , exit equal portions
🟢Move SL to Entry-Price after tp3
🟢Take profits at every tp , Don't be greedy and hold only for final tp.

1% RISK RULE is more safe ✅

Like 😀 & Share 😀

JOIN OUR TRADING GROUP
$KOMA – Bulls Just Took Control! Our short setup got invalidated this morning, and the market proved the bulls were stronger than expected. That's part of trading—now it's time to adapt to what the chart is showing. Current Technical Outlook 🟢 Strong Bullish Momentum Price has surged over 110% today, confirming aggressive buying pressure. Buyers continue to defend every dip, showing strong demand. 🟢 Healthy Trend Structure As long as the 15-minute MA7 continues acting as dynamic support, the bullish trend remains intact. A brief pullback to MA7 would be a healthy reset before another leg higher. 🟢 Key Support Zone 0.017 – 0.018 is now the strongest support area. Holding this zone keeps the bullish structure valid. 🎯 Bullish Targets • Target 1: 0.023 • Target 2: 0.025 • Extended Target: 0.030 If momentum remains strong and #KOMA keeps consolidating above the MA7 on the 15-minute chart, an explosive move toward 0.040 cannot be ruled out. ⚠️ Trading Plan Avoid chasing long green candles. Wait for a healthy pullback into support or the 15m MA7 before considering fresh entries. A loss of the 0.017 support would weaken the short-term bullish outlook.
$KOMA – Bulls Just Took Control!

Our short setup got invalidated this morning, and the market proved the bulls were stronger than expected. That's part of trading—now it's time to adapt to what the chart is showing.

Current Technical Outlook

🟢 Strong Bullish Momentum

Price has surged over 110% today, confirming aggressive buying pressure.

Buyers continue to defend every dip, showing strong demand.

🟢 Healthy Trend Structure

As long as the 15-minute MA7 continues acting as dynamic support, the bullish trend remains intact.

A brief pullback to MA7 would be a healthy reset before another leg higher.

🟢 Key Support Zone

0.017 – 0.018 is now the strongest support area.

Holding this zone keeps the bullish structure valid.

🎯 Bullish Targets

• Target 1: 0.023
• Target 2: 0.025
• Extended Target: 0.030

If momentum remains strong and #KOMA keeps consolidating above the MA7 on the 15-minute chart, an explosive move toward 0.040 cannot be ruled out.

⚠️ Trading Plan

Avoid chasing long green candles.

Wait for a healthy pullback into support or the 15m MA7 before considering fresh entries.

A loss of the 0.017 support would weaken the short-term bullish outlook.
🇯🇵 Bank of Japan has kept its benchmark interest rate unchanged at 1%.
don't enter
don't enter
Crypto Sat
·
--
Bearish
💰 $KOMA /USDT

🔽SHORT

✳️ ENTRY (Use DCA STRATEGY) : 13400 , 13900 , 14500

🎯 TARGETS - 13000 , 12500 , 11700 , 10600 , 9500 , 7500

🀄️ LEVERAGE -  cross 10x

🔴 STOPLOSS - 15000
$AKE remains in a bullish market structure, with the Daily MA7 continuing to support the uptrend. The recent pullback successfully tested the levels we shared previously before bouncing back strongly, showing buyers are still active. Previously, we highlighted 0.0038 as the key support. Price lost that level, dropped to 0.0035, and then recovered toward 0.0047, completing the projected targets. Now, we can follow a similar approach again. Resistance: 0.0047 – 0.0048 Support: 0.0039 – 0.0038 Major Supports: 0.0035 and 0.0033 Preferred Entry Zone: 0.0038 – 0.0039 Stop Loss: Below the 1H MA200 (currently acting as dynamic trend support) 📈 Bullish Scenario – If #AKE holds above 0.0038–0.0039 and buyers defend the Daily MA7, the next move could target 0.0047 – 0.0048 A successful breakout above 0.0048 could extend the rally toward 0.0055 – 0.0060, with the potential to retest the previous all-time high if momentum accelerates. 📉 Bearish Scenario – If price loses 0.0038 again, expect a quick pullback toward 0.0035. If selling pressure continues, 0.0033 becomes the next major support and would weaken the current bullish structure. ⚠️ Wait for confirmation before entering. The 0.0038–0.0039 zone offers the best risk-to-reward, while the 1H MA200 remains the key invalidation level for bullish positions.
$AKE remains in a bullish market structure, with the Daily MA7 continuing to support the uptrend. The recent pullback successfully tested the levels we shared previously before bouncing back strongly, showing buyers are still active.

Previously, we highlighted 0.0038 as the key support. Price lost that level, dropped to 0.0035, and then recovered toward 0.0047, completing the projected targets. Now, we can follow a similar approach again.

Resistance: 0.0047 – 0.0048

Support: 0.0039 – 0.0038

Major Supports: 0.0035 and 0.0033

Preferred Entry Zone: 0.0038 – 0.0039

Stop Loss: Below the 1H MA200 (currently acting as dynamic trend support)

📈 Bullish Scenario – If #AKE holds above 0.0038–0.0039 and buyers defend the Daily MA7, the next move could target 0.0047 – 0.0048

A successful breakout above 0.0048 could extend the rally toward 0.0055 – 0.0060, with the potential to retest the previous all-time high if momentum accelerates.

📉 Bearish Scenario – If price loses 0.0038 again, expect a quick pullback toward 0.0035.

If selling pressure continues, 0.0033 becomes the next major support and would weaken the current bullish structure.

⚠️ Wait for confirmation before entering. The 0.0038–0.0039 zone offers the best risk-to-reward, while the 1H MA200 remains the key invalidation level for bullish positions.
Crypto Sat
·
--
$AKE Technical Analysis

Both the 1Hr and 4Hr charts are telling the same story. Price is approaching a key resistance zone, so the next move could be decisive.

Key Levels

Resistance: 0.0043 – 0.0044

Support: 0.0038

Major Supports: 0.0032 and 0.0028

📈 Bullish Scenario - If #AKE breaks and holds above 0.0044, expect the next move toward 0.0046 – 0.0048

If price consolidates above that range with healthy volume, the rally could extend toward 0.0055 – 0.0060

A strong bullish momentum could even push price to a new all-time high.

📉 Bearish Scenario - If price loses 0.0038, be prepared for a quick pullback toward 0.0035 – 0.0032

If selling pressure increases further, 0.0028 becomes the next major support.
·
--
Bearish
💰 $KOMA /USDT 🔽SHORT ✳️ ENTRY (Use DCA STRATEGY) : 13400 , 13900 , 14500 🎯 TARGETS - 13000 , 12500 , 11700 , 10600 , 9500 , 7500 🀄️ LEVERAGE -  cross 10x 🔴 STOPLOSS - 15000
💰 $KOMA /USDT

🔽SHORT

✳️ ENTRY (Use DCA STRATEGY) : 13400 , 13900 , 14500

🎯 TARGETS - 13000 , 12500 , 11700 , 10600 , 9500 , 7500

🀄️ LEVERAGE - cross 10x

🔴 STOPLOSS - 15000
🚨 Top 10 TradFi Gainers (Last 24Hrs) $SNX +77.14% (Tradr 2X Long SNDK ETF) $MU +53.80% (Direxion MU Bull 2X) $KORU +42.85% (Direxion Korea Bull 3X) $MVL +41.72% $INTW +36.88% $NBIS +36.11% $SNDK +35.86% $IREN +34.96% $BE +34.73% $SKHY +29.25% Leveraged semis and memory names leading hard today 👀
🚨 Top 10 TradFi Gainers (Last 24Hrs)

$SNX +77.14% (Tradr 2X Long SNDK ETF)
$MU +53.80% (Direxion MU Bull 2X)
$KORU +42.85% (Direxion Korea Bull 3X)
$MVL +41.72%
$INTW +36.88%
$NBIS +36.11%
$SNDK +35.86%
$IREN +34.96%
$BE +34.73%
$SKHY +29.25%

Leveraged semis and memory names leading hard today 👀
$XAU is showing signs of recovery after bouncing from intraday lows and is now moving toward a key resistance zone. The next reaction around resistance will likely determine the short-term direction. Resistance: 4,110 – 4,120 Support: 4,080 Major Supports: 4,050 and 4,010 MA7 (15M): 4,105 – Immediate dynamic resistance MA25 (15M): 4,112 – Key resistance confluence MA99 (15M): 4,090 – Immediate support MA200 (15M): 4,067 – Strong trend support 📈 Bullish Scenario – If #XAU breaks and holds above 4,130 , buyers could target 4,150 followed by 4,180. 📉 Bearish Scenario – If price gets rejected around 4,110–4,120, expect a pullback toward 4,080. If 4,080 fails to hold, the next downside targets are 4,050 and 4,010. ⚠️ Wait for confirmation before entering. Let the breakout or rejection confirm the direction, and always trade with proper risk management.
$XAU is showing signs of recovery after bouncing from intraday lows and is now moving toward a key resistance zone. The next reaction around resistance will likely determine the short-term direction.

Resistance: 4,110 – 4,120

Support: 4,080

Major Supports: 4,050 and 4,010

MA7 (15M): 4,105 – Immediate dynamic resistance

MA25 (15M): 4,112 – Key resistance confluence

MA99 (15M): 4,090 – Immediate support

MA200 (15M): 4,067 – Strong trend support

📈 Bullish Scenario – If #XAU breaks and holds above 4,130 , buyers could target 4,150 followed by 4,180.

📉 Bearish Scenario – If price gets rejected around 4,110–4,120, expect a pullback toward 4,080.

If 4,080 fails to hold, the next downside targets are 4,050 and 4,010.

⚠️ Wait for confirmation before entering. Let the breakout or rejection confirm the direction, and always trade with proper risk management.
🚨 $43M $SKHX Whale Turns a $5M Loss Into a $6.44M Profit Just days ago, whale 0xC8b5 was making headlines for losing over $1M on each of its previous three trades, including positions in $SNDK , $MU , and $GOOGL Now the story has completely flipped. The whale's massive 37,229 $SKHX position, worth ~$43M, has surged into a profit of $6.44M, fully recovering all previous losses. The position is currently using 3x cross leverage, with an average entry around $981.6. $SKHYNIX Technical Outlook • Price is up 27% and trading around $1,166 • Next major resistance is the 4H MA99 at $1,191 • A confirmed breakout above $1,191 could open the door to $1,250–$1,350 • 4Hr MA200 sits near $1,360, which is the next major resistance • Immediate support is around $1,120 • Losing $1,120 could trigger a pullback toward $1,070–$1,020 The comeback highlights how quickly high-leverage positions can swing. After three painful losses, one strong rebound has put the whale back in the green.
🚨 $43M $SKHX Whale Turns a $5M Loss Into a $6.44M Profit

Just days ago, whale 0xC8b5 was making headlines for losing over $1M on each of its previous three trades, including positions in $SNDK , $MU , and $GOOGL

Now the story has completely flipped.

The whale's massive 37,229 $SKHX position, worth ~$43M, has surged into a profit of $6.44M, fully recovering all previous losses. The position is currently using 3x cross leverage, with an average entry around $981.6.

$SKHYNIX Technical Outlook
• Price is up 27% and trading around $1,166
• Next major resistance is the 4H MA99 at $1,191
• A confirmed breakout above $1,191 could open the door to $1,250–$1,350
• 4Hr MA200 sits near $1,360, which is the next major resistance
• Immediate support is around $1,120
• Losing $1,120 could trigger a pullback toward $1,070–$1,020

The comeback highlights how quickly high-leverage positions can swing. After three painful losses, one strong rebound has put the whale back in the green.
$COTI has lost the 0.0144–0.0150 support zone, turning the short-term market structure bearish. Unless buyers reclaim this level, downside pressure is likely to continue. Resistance: 0.0144 – 0.0150 Support: 0.0123 Major Support: 0.0100 📈 Bullish Scenario – If #COTI reclaims and holds above 0.0150, the bearish structure will be invalidated and price could rally toward 0.0170. A successful breakout with strong buying volume may open the door for further upside in the coming sessions. 📉 Bearish Scenario – As long as price remains below 0.0150, expect further weakness toward 0.0123. If selling pressure accelerates and 0.0123 fails to hold, the next major downside target sits around 0.0100. ⚠️ Wait for confirmation before entering a trade. Let the market confirm the direction instead of predicting it. Always use proper risk management and a stop-loss.
$COTI has lost the 0.0144–0.0150 support zone, turning the short-term market structure bearish. Unless buyers reclaim this level, downside pressure is likely to continue.

Resistance: 0.0144 – 0.0150

Support: 0.0123

Major Support: 0.0100

📈 Bullish Scenario – If #COTI reclaims and holds above 0.0150, the bearish structure will be invalidated and price could rally toward 0.0170.

A successful breakout with strong buying volume may open the door for further upside in the coming sessions.

📉 Bearish Scenario – As long as price remains below 0.0150, expect further weakness toward 0.0123.

If selling pressure accelerates and 0.0123 fails to hold, the next major downside target sits around 0.0100.

⚠️ Wait for confirmation before entering a trade. Let the market confirm the direction instead of predicting it. Always use proper risk management and a stop-loss.
·
--
Bearish
Crypto Market Shows Signs of Recovery 🔥 The overall crypto market is up 1.10% over the past 24 hours, while $BTC has gained 1.26%, currently trading around $64,821. Market sentiment remains cautious, with the Fear & Greed Index at 38, indicating investors are still in the Fear zone despite today's rebound. Top Performing Sectors (24Hrs): ▪️ AI Agents: +5.38% ▪️ DeFiance Capital: +7.60% ▪️ Pump dot fun Ecosystem: +4.51% ▪️ Yield Farming: +5.01% ▪️ Research: +4.42% Institutional demand also stayed positive, with U.S. Spot Bitcoin ETFs recording a net inflow of $30.45M on July 30. While the market is showing strength, sentiment hasn't fully recovered yet. A sustained move above key resistance levels could be the next signal that confidence is returning.
Crypto Market Shows Signs of Recovery 🔥

The overall crypto market is up 1.10% over the past 24 hours, while $BTC has gained 1.26%, currently trading around $64,821.

Market sentiment remains cautious, with the Fear & Greed Index at 38, indicating investors are still in the Fear zone despite today's rebound.

Top Performing Sectors (24Hrs):
▪️ AI Agents: +5.38%
▪️ DeFiance Capital: +7.60%
▪️ Pump dot fun Ecosystem: +4.51%
▪️ Yield Farming: +5.01%
▪️ Research: +4.42%

Institutional demand also stayed positive, with U.S. Spot Bitcoin ETFs recording a net inflow of $30.45M on July 30.

While the market is showing strength, sentiment hasn't fully recovered yet. A sustained move above key resistance levels could be the next signal that confidence is returning.
Article
Why Winning Every Trade Doesn't Matter in Crypto Trading 😉Imagine two traders enter the exact same Bitcoin trade. Both buy at the same price. Both use the same chart. Both believe Bitcoin is about to rally. A few days later... One trader has grown their account. The other has taken a huge loss. The difference wasn't their entry. It was how they managed Risk vs Reward. This is the golden rule that separates professional traders from emotional traders. 🔹️ What Is Risk? Risk is the amount you're willing to lose if the market proves your idea wrong. Before entering any trade, every professional trader asks one simple question: "If this trade fails, how much am I comfortably willing to lose?" That answer determines the trade—not emotions. 🎯 What Is Reward? Reward is the potential profit you expect if the market moves in your favor. Every trade should have a clear destination before it's opened. That's why professionals always define: ▪️ Stop Loss – The point where the trade is closed if the idea is invalid. ▪️ Take Profit – The point where profits are planned to be locked in. If you don't know where you'll exit before entering... You're gambling, not trading. 📊 Understanding Risk-to-Reward You'll often hear traders talk about: ▫️ 1:1 ▫️ 1:2 ▫️ 1:3 Think of it like this: 🟢 1:1 You're aiming to make roughly the same amount you're willing to risk. 🟢 1:2 If your trade works, your potential reward is about twice your planned risk. 🟢 1:3 One successful trade can potentially outweigh several small losses. This is why professional traders don't need to win every trade to stay profitable. 📈 Bitcoin Example Imagine $BTC breaks above an important resistance level after confirming a bullish trend. You wait for the breakout confirmation and enter the trade. Before clicking Buy, you've already decided: ▪️ Where your Stop Loss will be if BTC proves you wrong. ▪️ Where your Take Profit will be if the trend continues. Now imagine the next three trades don't work. You accept the small planned losses and move on. Then the fourth trade reaches its full target. Because your winning trade was larger than your planned losses, you're still in a strong position. That's how consistency is built. 🧠 Why Professionals Focus on Losses Most beginners spend all their time asking: "How much can I make?" Professionals ask a different question: "How much can I lose?" Because every trader will experience losing trades. The difference is that experienced traders keep losses small and controlled. Protecting capital always comes before chasing profits. ⚠️ Common Beginner Mistakes ▫️ Risking too much on a single trade. ▫️ Trading without a Stop Loss. ▫️ Moving the Stop Loss because they "hope" price will recover. ▫️ Taking profits too early out of fear. ▫️ Letting one losing trade damage weeks of hard-earned progress. Most trading accounts don't fail because of one bad trade. They fail because of poor risk management repeated over and over. 📌 The goal of trading isn't to win every trade. The goal is to make sure your winners are larger than your losers while protecting your capital along the way. Remember this: Great traders don't become successful because they avoid losses. They become successful because they manage losses better than everyone else. 💬 Before entering your next trade, ask yourself: "Do I know exactly where I'll exit if I'm wrong—and where I'll take profit if I'm right?"

Why Winning Every Trade Doesn't Matter in Crypto Trading 😉

Imagine two traders enter the exact same Bitcoin trade.
Both buy at the same price.
Both use the same chart.
Both believe Bitcoin is about to rally.
A few days later...
One trader has grown their account.
The other has taken a huge loss.
The difference wasn't their entry.
It was how they managed Risk vs Reward.
This is the golden rule that separates professional traders from emotional traders.
🔹️ What Is Risk?
Risk is the amount you're willing to lose if the market proves your idea wrong.
Before entering any trade, every professional trader asks one simple question:
"If this trade fails, how much am I comfortably willing to lose?"
That answer determines the trade—not emotions.
🎯 What Is Reward?
Reward is the potential profit you expect if the market moves in your favor.
Every trade should have a clear destination before it's opened.
That's why professionals always define:
▪️ Stop Loss – The point where the trade is closed if the idea is invalid.
▪️ Take Profit – The point where profits are planned to be locked in.
If you don't know where you'll exit before entering...
You're gambling, not trading.
📊 Understanding Risk-to-Reward
You'll often hear traders talk about:
▫️ 1:1
▫️ 1:2
▫️ 1:3
Think of it like this:
🟢 1:1
You're aiming to make roughly the same amount you're willing to risk.
🟢 1:2
If your trade works, your potential reward is about twice your planned risk.
🟢 1:3
One successful trade can potentially outweigh several small losses.
This is why professional traders don't need to win every trade to stay profitable.
📈 Bitcoin Example
Imagine $BTC breaks above an important resistance level after confirming a bullish trend.
You wait for the breakout confirmation and enter the trade.
Before clicking Buy, you've already decided:
▪️ Where your Stop Loss will be if BTC proves you wrong.
▪️ Where your Take Profit will be if the trend continues.
Now imagine the next three trades don't work.
You accept the small planned losses and move on.
Then the fourth trade reaches its full target.
Because your winning trade was larger than your planned losses, you're still in a strong position.
That's how consistency is built.
🧠 Why Professionals Focus on Losses
Most beginners spend all their time asking: "How much can I make?"
Professionals ask a different question: "How much can I lose?"
Because every trader will experience losing trades.
The difference is that experienced traders keep losses small and controlled.
Protecting capital always comes before chasing profits.
⚠️ Common Beginner Mistakes
▫️ Risking too much on a single trade.
▫️ Trading without a Stop Loss.
▫️ Moving the Stop Loss because they "hope" price will recover.
▫️ Taking profits too early out of fear.
▫️ Letting one losing trade damage weeks of hard-earned progress.
Most trading accounts don't fail because of one bad trade.
They fail because of poor risk management repeated over and over.
📌 The goal of trading isn't to win every trade.
The goal is to make sure your winners are larger than your losers while protecting your capital along the way.
Remember this:
Great traders don't become successful because they avoid losses.
They become successful because they manage losses better than everyone else.
💬 Before entering your next trade, ask yourself: "Do I know exactly where I'll exit if I'm wrong—and where I'll take profit if I'm right?"
Article
Why High Leverage Can Destroy a Trading Account 😱Leverage is one of the most powerful tools in crypto trading. It's also one of the fastest ways to lose money if you don't understand it. Many beginners see screenshots of traders making huge profits with high leverage... But they rarely see the accounts that were liquidated along the way. Before you use leverage, you need to understand what it actually does. 🔹️ What Is Leverage? Leverage allows you to control a larger trading position using a smaller amount of your own money. Think of it as increasing your market exposure without paying the full value of the position upfront. This means both your potential profits and your potential losses become larger. 📊 Bitcoin Examples Imagine Bitcoin is trading at $100,000. 🟢 2x Leverage You control a position that's roughly twice the size of your own capital. Small market moves have a slightly bigger impact on your trade, while giving you more room to manage risk. 🟢 5x Leverage Now your position becomes much larger. A good move in your favor produces bigger profits... But a move against you also hurts much faster. 🟢 10x Leverage Price doesn't need to move very far before your emotions are tested. Many beginners start making impulsive decisions because every candle feels significant. 🔴 20x Leverage Now even a normal Bitcoin pullback can become dangerous. The market doesn't need a major crash. A small move against your position may be enough to force you out of the trade. ⚠️ The Benefit of Leverage Used correctly, leverage can: ▪️ Increase capital efficiency. ▪️ Allow traders to use less capital for the same market exposure. ▪️ Provide opportunities in both Long and Short trades. For experienced traders with strict risk management, leverage can be a useful tool. ⚠️ The Danger of Leverage Leverage magnifies everything. Not just profits. Losses too. This is why beginners often lose money quickly. They focus on how much they can make... Instead of how much they can lose. ⛔️ What Is Liquidation? Liquidation happens when the market moves too far against your leveraged position. Instead of waiting for unlimited losses, the exchange automatically closes your trade. In simple terms: The trade ends because your remaining margin is no longer enough to support the position. Once you're liquidated, that position is gone. That's why protecting your capital is far more important than chasing quick gains. 🎯 Why Professionals Often Use Lower Leverage Many beginners believe professional traders always use 20x, 50x, or even 100x leverage. The reality is often the opposite. Experienced traders usually prefer lower leverage because it: ▪️ Gives the trade more room to breathe. ▪️ Reduces emotional pressure. ▪️ Lowers liquidation risk. ▪️ Encourages disciplined decision-making. Their goal isn't to hit one huge trade. It's to stay consistently profitable over hundreds of trades. ⚠️ Common Beginner Mistakes ▫️ Using the highest leverage available. ▫️ Trading without a stop-loss. ▫️ Risking too much on a single trade. ▫️ Increasing leverage after a losing trade. ▫️ Chasing profits instead of following a trading plan. These mistakes can wipe out an account much faster than most people expect. 📌 Leverage doesn't create great traders. Discipline does. Use leverage as a tool—not as a shortcut. Protect your capital, respect your risk, and remember "The traders who survive the longest are usually the ones who use leverage the most responsibly" 💬 Have you ever traded with leverage, or are you planning to master Spot Trading first? Follow this series as we continue building your trading knowledge—one lesson at a time.

Why High Leverage Can Destroy a Trading Account 😱

Leverage is one of the most powerful tools in crypto trading.
It's also one of the fastest ways to lose money if you don't understand it.
Many beginners see screenshots of traders making huge profits with high leverage...
But they rarely see the accounts that were liquidated along the way.
Before you use leverage, you need to understand what it actually does.
🔹️ What Is Leverage?
Leverage allows you to control a larger trading position using a smaller amount of your own money.
Think of it as increasing your market exposure without paying the full value of the position upfront.
This means both your potential profits and your potential losses become larger.
📊 Bitcoin Examples
Imagine Bitcoin is trading at $100,000.
🟢 2x Leverage
You control a position that's roughly twice the size of your own capital.
Small market moves have a slightly bigger impact on your trade, while giving you more room to manage risk.
🟢 5x Leverage
Now your position becomes much larger.
A good move in your favor produces bigger profits...
But a move against you also hurts much faster.
🟢 10x Leverage
Price doesn't need to move very far before your emotions are tested.
Many beginners start making impulsive decisions because every candle feels significant.
🔴 20x Leverage
Now even a normal Bitcoin pullback can become dangerous.
The market doesn't need a major crash.
A small move against your position may be enough to force you out of the trade.
⚠️ The Benefit of Leverage
Used correctly, leverage can:
▪️ Increase capital efficiency.
▪️ Allow traders to use less capital for the same market exposure.
▪️ Provide opportunities in both Long and Short trades.
For experienced traders with strict risk management, leverage can be a useful tool.
⚠️ The Danger of Leverage
Leverage magnifies everything.
Not just profits.
Losses too.
This is why beginners often lose money quickly.
They focus on how much they can make...
Instead of how much they can lose.
⛔️ What Is Liquidation?
Liquidation happens when the market moves too far against your leveraged position.
Instead of waiting for unlimited losses, the exchange automatically closes your trade.
In simple terms:
The trade ends because your remaining margin is no longer enough to support the position.
Once you're liquidated, that position is gone.
That's why protecting your capital is far more important than chasing quick gains.
🎯 Why Professionals Often Use Lower Leverage
Many beginners believe professional traders always use 20x, 50x, or even 100x leverage.
The reality is often the opposite.
Experienced traders usually prefer lower leverage because it:
▪️ Gives the trade more room to breathe.
▪️ Reduces emotional pressure.
▪️ Lowers liquidation risk.
▪️ Encourages disciplined decision-making.
Their goal isn't to hit one huge trade.
It's to stay consistently profitable over hundreds of trades.
⚠️ Common Beginner Mistakes
▫️ Using the highest leverage available.
▫️ Trading without a stop-loss.
▫️ Risking too much on a single trade.
▫️ Increasing leverage after a losing trade.
▫️ Chasing profits instead of following a trading plan.
These mistakes can wipe out an account much faster than most people expect.
📌 Leverage doesn't create great traders.
Discipline does.
Use leverage as a tool—not as a shortcut.
Protect your capital, respect your risk, and remember "The traders who survive the longest are usually the ones who use leverage the most responsibly"
💬 Have you ever traded with leverage, or are you planning to master Spot Trading first?
Follow this series as we continue building your trading knowledge—one lesson at a time.
$AKE Technical Analysis Both the 1Hr and 4Hr charts are telling the same story. Price is approaching a key resistance zone, so the next move could be decisive. Key Levels Resistance: 0.0043 – 0.0044 Support: 0.0038 Major Supports: 0.0032 and 0.0028 📈 Bullish Scenario - If #AKE breaks and holds above 0.0044, expect the next move toward 0.0046 – 0.0048 If price consolidates above that range with healthy volume, the rally could extend toward 0.0055 – 0.0060 A strong bullish momentum could even push price to a new all-time high. 📉 Bearish Scenario - If price loses 0.0038, be prepared for a quick pullback toward 0.0035 – 0.0032 If selling pressure increases further, 0.0028 becomes the next major support.
$AKE Technical Analysis

Both the 1Hr and 4Hr charts are telling the same story. Price is approaching a key resistance zone, so the next move could be decisive.

Key Levels

Resistance: 0.0043 – 0.0044

Support: 0.0038

Major Supports: 0.0032 and 0.0028

📈 Bullish Scenario - If #AKE breaks and holds above 0.0044, expect the next move toward 0.0046 – 0.0048

If price consolidates above that range with healthy volume, the rally could extend toward 0.0055 – 0.0060

A strong bullish momentum could even push price to a new all-time high.

📉 Bearish Scenario - If price loses 0.0038, be prepared for a quick pullback toward 0.0035 – 0.0032

If selling pressure increases further, 0.0028 becomes the next major support.
Nicolás Cucatto
·
--
Can you analyze it in 1h and 4h bro?
·
--
Bearish
$ZIL 4th Target Completed 🤗
Crypto Sat
·
--
Bearish
💰 $ZIL  /USDT

🔽SHORT

✳️ ENTRY (Use DCA STRATEGY) : 2730 , 2800

🎯 TARGETS - 2690 , 2643 , 2585 , 2520 , 2440 , 2300

🀄️ LEVERAGE -  cross 10x

🔴 STOPLOSS - 2860
A Whale purchased 3,128 $ETH (valued at $5.95M) six months ago and is currently facing a loss exceeding $3.87M (-40%). Today, he decided to deposit all 3,128 $ETH into #Coinbase to sell at a loss.
A Whale purchased 3,128 $ETH (valued at $5.95M) six months ago and is currently facing a loss exceeding $3.87M (-40%).

Today, he decided to deposit all 3,128 $ETH into #Coinbase to sell at a loss.
Coin of the Month? $AKE Might Be 🤑 Just 20 days ago (July 10), AKEDAO was sitting at its all-time low of $0.0001729. Today, it has surged to a new all-time high of $0.00690, erasing one zero in the process. 📈 That's an incredible gain of nearly +3,890% in less than a month. If You Had Invested... $10,000 at the ATL ($0.0001729)... at ATH price ($0.00690), your investment would have grown to ~$399,000. ✅ Profit: ~$389,000 ✅ Return: ~3,890% (39.9x)
Coin of the Month?
$AKE Might Be 🤑

Just 20 days ago (July 10), AKEDAO was sitting at its all-time low of $0.0001729.

Today, it has surged to a new all-time high of $0.00690, erasing one zero in the process.

📈 That's an incredible gain of nearly +3,890% in less than a month.

If You Had Invested... $10,000 at the ATL ($0.0001729)... at ATH price ($0.00690), your investment would have grown to ~$399,000.

✅ Profit: ~$389,000
✅ Return: ~3,890% (39.9x)
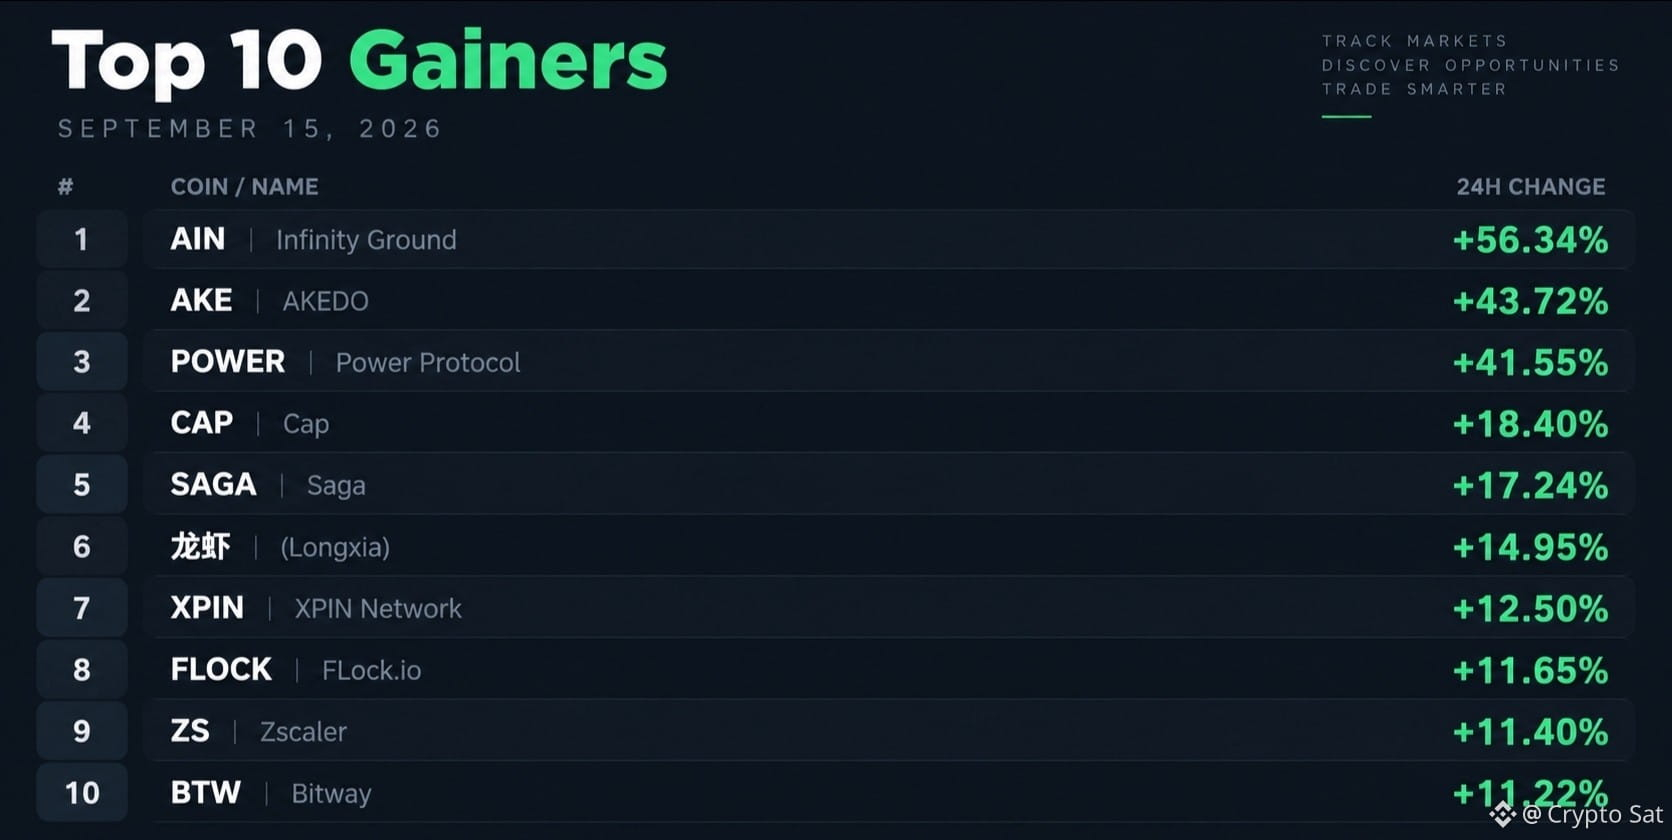
🚨 Top 10 Crypto Gainers (Last 24Hrs) $BEAT +33.01% $ON +30.82% $ZIL +19.52% $UB +16.84% $EUL +16.37% $BOT +16.19% $PRL +14.22% $BTW +13.79% $COTI +13.25% $龙虾 +13.19% Strong movers today 👀
🚨 Top 10 Crypto Gainers (Last 24Hrs)

$BEAT +33.01%
$ON +30.82%
$ZIL +19.52%
$UB +16.84%
$EUL +16.37%
$BOT +16.19%
$PRL +14.22%
$BTW +13.79%
$COTI +13.25%
$龙虾 +13.19%

Strong movers today 👀
Log in to explore more content
Join global crypto users on Binance Square
⚡️ Get latest and useful information about crypto.
💬 Trusted by the world’s largest crypto exchange.
👍 Discover real insights from verified creators.
Email / Phone number
Sitemap
Cookie Preferences
Platform T&Cs