

Ông Chú Trader
99 Posts

Ông Chú Trader
Report
Block User
Set-up giao dịch chất lượng: Cập nhật tín hiệu giao dịch mỗi ngày dựa trên phân tích kỹ thuật (TA) vững chắc. Kèm theo quản lý rủi ro chặt chẽ.
Open Trade
Frequent Trader
5.2 Years
92 Following
1.0K+ Followers
140 Liked
Posts
Portfolio
All
Live
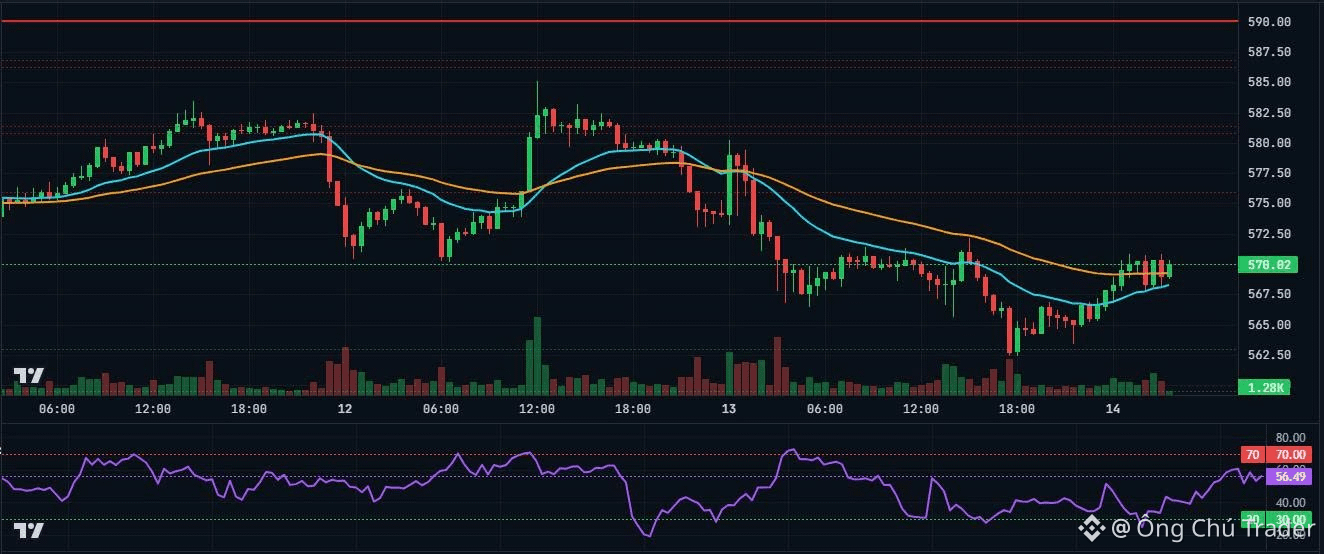
#BNB/USDT
📉 Trend: Sideways.
Following a sharp drop to $562.52, the price shows signs of accumulation and a gradual recovery, printing higher lows and oscillating around the EMA 20 axis.
🔹 Support:
$567.00 – $568.00 (Short-term confluence of Fib 0.786, middle Bollinger Band, and EMA 20)
$564.50 – $565.50 (Minor higher low formed during the recent rebound)
$562.50 – $563.00 (Critical swing low floor / Fib 1.0)
🔸 Resistance:
$571.00 – $572.00 (Fib 0.618 and upper Bollinger Band confluence area)
$573.00 – $574.50 (Strong hurdle consisting of the EMA 200 and Fib 0.50)
$576.45 – $578.40 (Fib 0.382 and swing pivot resistance)
⚙️ Price Scenarios:
✅ Continuation: Look for Long entries if the price reacts well at the $567 – $568 base (EMA 20 + Fib 0.786), targeting the upper $571 boundary and the tough EMA 200 resistance around $573.
❌ Pullback: Consider short-term Scalp Shorts if the price faces a heavy rejection (bearish reversal candle) at the $571 – $572 zone, targeting a retest of the $568 – $565 downside levels.
⚠️ Disclaimer: For informational purposes only. Manage your own risk.
$BNB #BinanceSquare #CryptoTrading #TechnicalAnalysis
#BNB/USDT
📉 Trend: Sideways.
Following a sharp drop to $562.52, the price shows signs of accumulation and a gradual recovery, printing higher lows and oscillating around the EMA 20 axis.
🔹 Support:
$567.00 – $568.00 (Short-term confluence of Fib 0.786, middle Bollinger Band, and EMA 20)
$564.50 – $565.50 (Minor higher low formed during the recent rebound)
$562.50 – $563.00 (Critical swing low floor / Fib 1.0)
🔸 Resistance:
$571.00 – $572.00 (Fib 0.618 and upper Bollinger Band confluence area)
$573.00 – $574.50 (Strong hurdle consisting of the EMA 200 and Fib 0.50)
$576.45 – $578.40 (Fib 0.382 and swing pivot resistance)
⚙️ Price Scenarios:
✅ Continuation: Look for Long entries if the price reacts well at the $567 – $568 base (EMA 20 + Fib 0.786), targeting the upper $571 boundary and the tough EMA 200 resistance around $573.
❌ Pullback: Consider short-term Scalp Shorts if the price faces a heavy rejection (bearish reversal candle) at the $571 – $572 zone, targeting a retest of the $568 – $565 downside levels.
⚠️ Disclaimer: For informational purposes only. Manage your own risk.
$BNB #BinanceSquare #CryptoTrading #TechnicalAnalysis
📉 Trend: Sideways.
Following a sharp drop to $562.52, the price shows signs of accumulation and a gradual recovery, printing higher lows and oscillating around the EMA 20 axis.
🔹 Support:
$567.00 – $568.00 (Short-term confluence of Fib 0.786, middle Bollinger Band, and EMA 20)
$564.50 – $565.50 (Minor higher low formed during the recent rebound)
$562.50 – $563.00 (Critical swing low floor / Fib 1.0)
🔸 Resistance:
$571.00 – $572.00 (Fib 0.618 and upper Bollinger Band confluence area)
$573.00 – $574.50 (Strong hurdle consisting of the EMA 200 and Fib 0.50)
$576.45 – $578.40 (Fib 0.382 and swing pivot resistance)
⚙️ Price Scenarios:
✅ Continuation: Look for Long entries if the price reacts well at the $567 – $568 base (EMA 20 + Fib 0.786), targeting the upper $571 boundary and the tough EMA 200 resistance around $573.
❌ Pullback: Consider short-term Scalp Shorts if the price faces a heavy rejection (bearish reversal candle) at the $571 – $572 zone, targeting a retest of the $568 – $565 downside levels.
⚠️ Disclaimer: For informational purposes only. Manage your own risk.
$BNB #BinanceSquare #CryptoTrading #TechnicalAnalysis
112
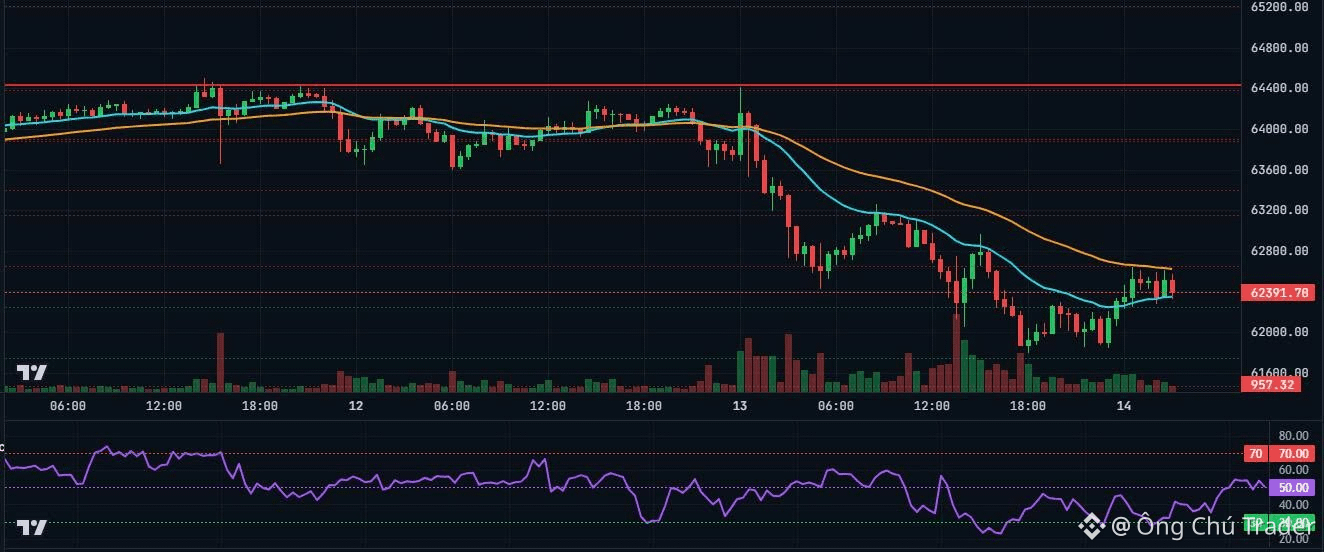
#BTC/USDT
📉 Trend: Short-term bearish structure following a sharp drop from $64.4k. The price is currently in a technical rebound (pullback) from a local bottom at $61.8k.
🔹 Support:
$62,350 – $62,365 (Fib 0.786 and EMA 20 confluence zone maintaining the rebound pace)
$61,775 – $61,806 (Recent swing low / lower Bollinger Band boundary)
$61,500 (Psychological support and downside liquidity pocket)
🔸 Resistance:
$62,623 – $62,801 (EMA 50, upper Bollinger Band, and Fib 0.618 immediate resistance cluster)
$63,108 – $63,262 (Fib 0.50 and EMA 200 crucial structural trend barrier)
$63,416 – $63,495 (Fib 0.382 and swing pivot resistance)
⚙️ Price Scenarios:
✅ Continuation: A clean breakout and candle close above the $62,800 cluster (Fib 0.618) will sustain the recovery, targeting a retest of the EMA 200 around $63,100 – $63,260.
❌ Pullback: A heavy rejection at the $62,620 – $62,800 cluster (EMA 50 / Fib 0.618) will print a Lower High structure, sending the price back to test the $61,800 bottom or sweep deeper liquidity.
⚠️ Disclaimer: For informational purposes only. Manage your own risk.
$BTC #BinanceSquare #CryptoTrading #TechnicalAnalysis
#BTC/USDT
📉 Trend: Short-term bearish structure following a sharp drop from $64.4k. The price is currently in a technical rebound (pullback) from a local bottom at $61.8k.
🔹 Support:
$62,350 – $62,365 (Fib 0.786 and EMA 20 confluence zone maintaining the rebound pace)
$61,775 – $61,806 (Recent swing low / lower Bollinger Band boundary)
$61,500 (Psychological support and downside liquidity pocket)
🔸 Resistance:
$62,623 – $62,801 (EMA 50, upper Bollinger Band, and Fib 0.618 immediate resistance cluster)
$63,108 – $63,262 (Fib 0.50 and EMA 200 crucial structural trend barrier)
$63,416 – $63,495 (Fib 0.382 and swing pivot resistance)
⚙️ Price Scenarios:
✅ Continuation: A clean breakout and candle close above the $62,800 cluster (Fib 0.618) will sustain the recovery, targeting a retest of the EMA 200 around $63,100 – $63,260.
❌ Pullback: A heavy rejection at the $62,620 – $62,800 cluster (EMA 50 / Fib 0.618) will print a Lower High structure, sending the price back to test the $61,800 bottom or sweep deeper liquidity.
⚠️ Disclaimer: For informational purposes only. Manage your own risk.
$BTC #BinanceSquare #CryptoTrading #TechnicalAnalysis
📉 Trend: Short-term bearish structure following a sharp drop from $64.4k. The price is currently in a technical rebound (pullback) from a local bottom at $61.8k.
🔹 Support:
$62,350 – $62,365 (Fib 0.786 and EMA 20 confluence zone maintaining the rebound pace)
$61,775 – $61,806 (Recent swing low / lower Bollinger Band boundary)
$61,500 (Psychological support and downside liquidity pocket)
🔸 Resistance:
$62,623 – $62,801 (EMA 50, upper Bollinger Band, and Fib 0.618 immediate resistance cluster)
$63,108 – $63,262 (Fib 0.50 and EMA 200 crucial structural trend barrier)
$63,416 – $63,495 (Fib 0.382 and swing pivot resistance)
⚙️ Price Scenarios:
✅ Continuation: A clean breakout and candle close above the $62,800 cluster (Fib 0.618) will sustain the recovery, targeting a retest of the EMA 200 around $63,100 – $63,260.
❌ Pullback: A heavy rejection at the $62,620 – $62,800 cluster (EMA 50 / Fib 0.618) will print a Lower High structure, sending the price back to test the $61,800 bottom or sweep deeper liquidity.
⚠️ Disclaimer: For informational purposes only. Manage your own risk.
$BTC #BinanceSquare #CryptoTrading #TechnicalAnalysis
94
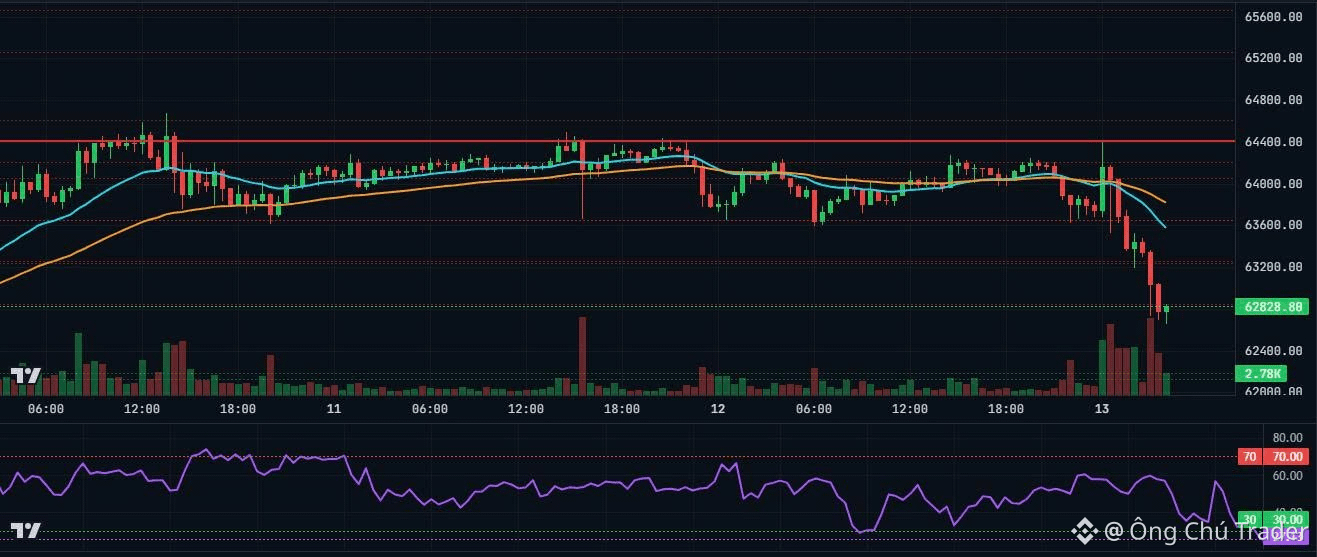
#BTC/USDT
📉 Trend: Short-term Bearish (EMA 20 < EMA 50) / RSI Oversold.
The current price is trading around $63,045.2.
Weekly Profile: PWH $64,691.9 / PWL $61,297.0 (Bullish structure).
🔹 Support:
$61,406.0 – $61,658.2 (Immediate support zone)
$61,658.2 – $61,910.4 (Confluent support floor)
🔸 Resistance:
$63,378.3 – $63,630.5 (Fib 0.618 resistance cluster)
$64,180.0 – $64,432.2 (Fib 0.0% overhead supply)
⚙️ Price Scenarios:
✅ Continuation: A candle close above $63,504.4 shifts momentum to the upside, targeting the next structural level around $64,306.1.
❌ Pullback: If the price breaks below $61,532.1, it may pivot back toward the $61,784.3 area to regenerate buying pressure.
⚠️ Disclaimer: For informational purposes only. Manage your own risk.
$BTC #BinanceSquare #CryptoTrading #TechnicalAnalysis
#BTC/USDT
📉 Trend: Short-term Bearish (EMA 20 < EMA 50) / RSI Oversold.
The current price is trading around $63,045.2.
Weekly Profile: PWH $64,691.9 / PWL $61,297.0 (Bullish structure).
🔹 Support:
$61,406.0 – $61,658.2 (Immediate support zone)
$61,658.2 – $61,910.4 (Confluent support floor)
🔸 Resistance:
$63,378.3 – $63,630.5 (Fib 0.618 resistance cluster)
$64,180.0 – $64,432.2 (Fib 0.0% overhead supply)
⚙️ Price Scenarios:
✅ Continuation: A candle close above $63,504.4 shifts momentum to the upside, targeting the next structural level around $64,306.1.
❌ Pullback: If the price breaks below $61,532.1, it may pivot back toward the $61,784.3 area to regenerate buying pressure.
⚠️ Disclaimer: For informational purposes only. Manage your own risk.
$BTC #BinanceSquare #CryptoTrading #TechnicalAnalysis
📉 Trend: Short-term Bearish (EMA 20 < EMA 50) / RSI Oversold.
The current price is trading around $63,045.2.
Weekly Profile: PWH $64,691.9 / PWL $61,297.0 (Bullish structure).
🔹 Support:
$61,406.0 – $61,658.2 (Immediate support zone)
$61,658.2 – $61,910.4 (Confluent support floor)
🔸 Resistance:
$63,378.3 – $63,630.5 (Fib 0.618 resistance cluster)
$64,180.0 – $64,432.2 (Fib 0.0% overhead supply)
⚙️ Price Scenarios:
✅ Continuation: A candle close above $63,504.4 shifts momentum to the upside, targeting the next structural level around $64,306.1.
❌ Pullback: If the price breaks below $61,532.1, it may pivot back toward the $61,784.3 area to regenerate buying pressure.
⚠️ Disclaimer: For informational purposes only. Manage your own risk.
$BTC #BinanceSquare #CryptoTrading #TechnicalAnalysis
73
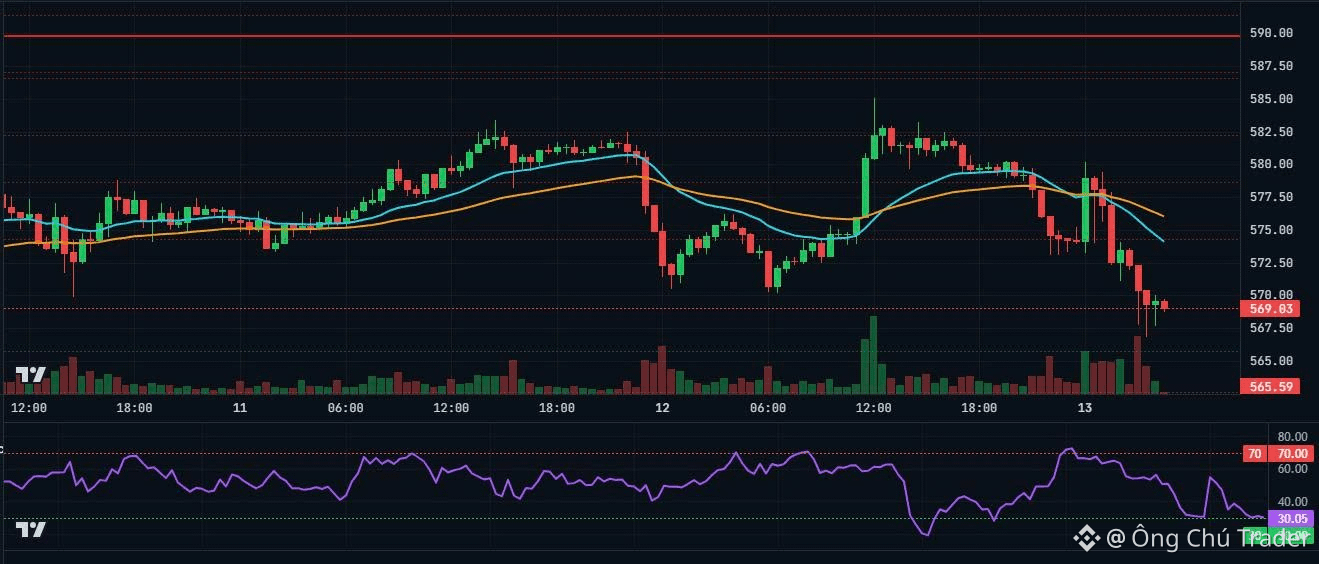
#BNB/USDT
📉 Trend: Short-term Bearish (EMA 20 < EMA 50).
The price is currently trading around $569.030, remaining under short-term downward pressure as the moving averages favor the sellers.
🔹 Support:
$555.31 – $558.79 (Overlapping demand zone cluster)
🔸 Resistance:
$579.27 – $581.94 (Fib 0.236 resistance confluence area)
⚙️ Price Scenarios:
✅ Continuation: A decisive candle close above $580.804 shifts the short-term structure, paving the way for further upside momentum to reclaim higher targets.
❌ Pullback: If the price breaks below $556.450, it risks a deeper technical retest down toward the $555.31 – $557.59 base to recharge buying power.
⚠️ Disclaimer: For informational purposes only. Manage your own risk.
$BNB #BinanceSquare #CryptoTrading #TechnicalAnalysis
#BNB/USDT
📉 Trend: Short-term Bearish (EMA 20 < EMA 50).
The price is currently trading around $569.030, remaining under short-term downward pressure as the moving averages favor the sellers.
🔹 Support:
$555.31 – $558.79 (Overlapping demand zone cluster)
🔸 Resistance:
$579.27 – $581.94 (Fib 0.236 resistance confluence area)
⚙️ Price Scenarios:
✅ Continuation: A decisive candle close above $580.804 shifts the short-term structure, paving the way for further upside momentum to reclaim higher targets.
❌ Pullback: If the price breaks below $556.450, it risks a deeper technical retest down toward the $555.31 – $557.59 base to recharge buying power.
⚠️ Disclaimer: For informational purposes only. Manage your own risk.
$BNB #BinanceSquare #CryptoTrading #TechnicalAnalysis
📉 Trend: Short-term Bearish (EMA 20 < EMA 50).
The price is currently trading around $569.030, remaining under short-term downward pressure as the moving averages favor the sellers.
🔹 Support:
$555.31 – $558.79 (Overlapping demand zone cluster)
🔸 Resistance:
$579.27 – $581.94 (Fib 0.236 resistance confluence area)
⚙️ Price Scenarios:
✅ Continuation: A decisive candle close above $580.804 shifts the short-term structure, paving the way for further upside momentum to reclaim higher targets.
❌ Pullback: If the price breaks below $556.450, it risks a deeper technical retest down toward the $555.31 – $557.59 base to recharge buying power.
⚠️ Disclaimer: For informational purposes only. Manage your own risk.
$BNB #BinanceSquare #CryptoTrading #TechnicalAnalysis
111
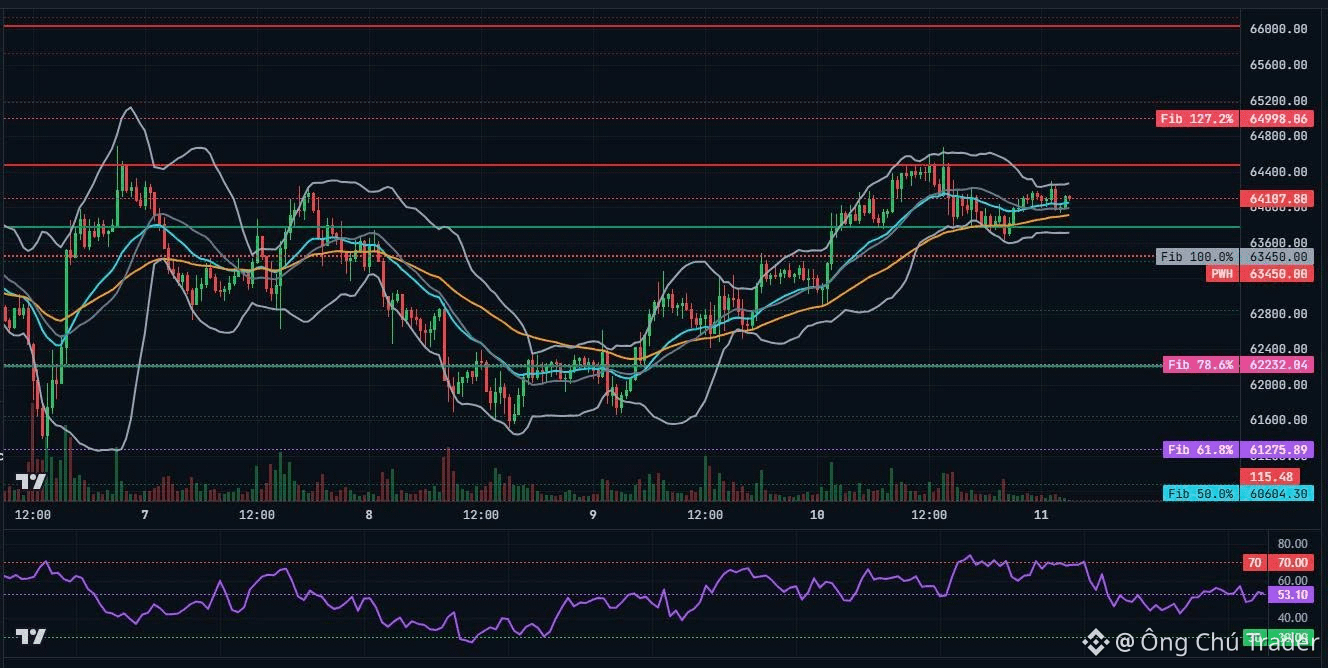
#BTC/USDT
📈 Trend: Bullish.
The price is in a short-term sideways consolidation phase a fter hitting a local peak at $64,680. It remains well above the EMA 20 and EMA 50, indicating that buyers maintain control over the primary trend.
🔹 Support:
$63,910 – $63,968 (EMA 50, Fib 0.236, and middle Bollinger Band confluence)
$63,528 – $63,600 (Fib 0.382 of the recent swing from $61,666 to $64,680)
$63,173 – $63,250 (Fib 0.50 and EMA 200 confluence area)
🔸 Resistance:
$64,268 – $64,350 (Immediate upper Bollinger Band boundary)
$64,680 – $64,685 (Recent swing high / peak liquidity zone)
$65,000 – $65,200 (Major psychological round number cluster)
✅ Continuation: Price holds firm above $63,900 during consolidation, followed by a high-volume breakout past $64,300 to clear the $64,680 peak and sustain the Higher High/Higher Low structure.
❌ Pullback: If sellers break below the $63,800 milestone, the price will likely slide deeper to test the Fib 0.382 level ($63,528) or seek liquidity down at the EMA 200.
📊 Strategy:
While the bullish structure is intact, the price is compressing within a tight range. Optimized R:R entries are found either during structural pullbacks or clear rejections at key boundaries.
Plan 1 (Buy): Entry on a pullback around $63,850 – $63,950, SL: $63,600 (below the EMA 50 and Fib 0.382), TP: $64,250 – $64,650.
Plan 2 (Short Scalp): Counter-trend short upon a clear bearish reversal or divergence at the $64,500 – $64,680 resistance zone, SL: $64,850, TP: $64,200 – $63,950.
⚠️ Disclaimer: For informational purposes only. Manage your own risk.
$BTC #BinanceSquare #CryptoTrading #TechnicalAnalysis
#BTC/USDT
📈 Trend: Bullish.
The price is in a short-term sideways consolidation phase a fter hitting a local peak at $64,680. It remains well above the EMA 20 and EMA 50, indicating that buyers maintain control over the primary trend.
🔹 Support:
$63,910 – $63,968 (EMA 50, Fib 0.236, and middle Bollinger Band confluence)
$63,528 – $63,600 (Fib 0.382 of the recent swing from $61,666 to $64,680)
$63,173 – $63,250 (Fib 0.50 and EMA 200 confluence area)
🔸 Resistance:
$64,268 – $64,350 (Immediate upper Bollinger Band boundary)
$64,680 – $64,685 (Recent swing high / peak liquidity zone)
$65,000 – $65,200 (Major psychological round number cluster)
✅ Continuation: Price holds firm above $63,900 during consolidation, followed by a high-volume breakout past $64,300 to clear the $64,680 peak and sustain the Higher High/Higher Low structure.
❌ Pullback: If sellers break below the $63,800 milestone, the price will likely slide deeper to test the Fib 0.382 level ($63,528) or seek liquidity down at the EMA 200.
📊 Strategy:
While the bullish structure is intact, the price is compressing within a tight range. Optimized R:R entries are found either during structural pullbacks or clear rejections at key boundaries.
Plan 1 (Buy): Entry on a pullback around $63,850 – $63,950, SL: $63,600 (below the EMA 50 and Fib 0.382), TP: $64,250 – $64,650.
Plan 2 (Short Scalp): Counter-trend short upon a clear bearish reversal or divergence at the $64,500 – $64,680 resistance zone, SL: $64,850, TP: $64,200 – $63,950.
⚠️ Disclaimer: For informational purposes only. Manage your own risk.
$BTC #BinanceSquare #CryptoTrading #TechnicalAnalysis
📈 Trend: Bullish.
The price is in a short-term sideways consolidation phase a fter hitting a local peak at $64,680. It remains well above the EMA 20 and EMA 50, indicating that buyers maintain control over the primary trend.
🔹 Support:
$63,910 – $63,968 (EMA 50, Fib 0.236, and middle Bollinger Band confluence)
$63,528 – $63,600 (Fib 0.382 of the recent swing from $61,666 to $64,680)
$63,173 – $63,250 (Fib 0.50 and EMA 200 confluence area)
🔸 Resistance:
$64,268 – $64,350 (Immediate upper Bollinger Band boundary)
$64,680 – $64,685 (Recent swing high / peak liquidity zone)
$65,000 – $65,200 (Major psychological round number cluster)
✅ Continuation: Price holds firm above $63,900 during consolidation, followed by a high-volume breakout past $64,300 to clear the $64,680 peak and sustain the Higher High/Higher Low structure.
❌ Pullback: If sellers break below the $63,800 milestone, the price will likely slide deeper to test the Fib 0.382 level ($63,528) or seek liquidity down at the EMA 200.
📊 Strategy:
While the bullish structure is intact, the price is compressing within a tight range. Optimized R:R entries are found either during structural pullbacks or clear rejections at key boundaries.
Plan 1 (Buy): Entry on a pullback around $63,850 – $63,950, SL: $63,600 (below the EMA 50 and Fib 0.382), TP: $64,250 – $64,650.
Plan 2 (Short Scalp): Counter-trend short upon a clear bearish reversal or divergence at the $64,500 – $64,680 resistance zone, SL: $64,850, TP: $64,200 – $63,950.
⚠️ Disclaimer: For informational purposes only. Manage your own risk.
$BTC #BinanceSquare #CryptoTrading #TechnicalAnalysis
85
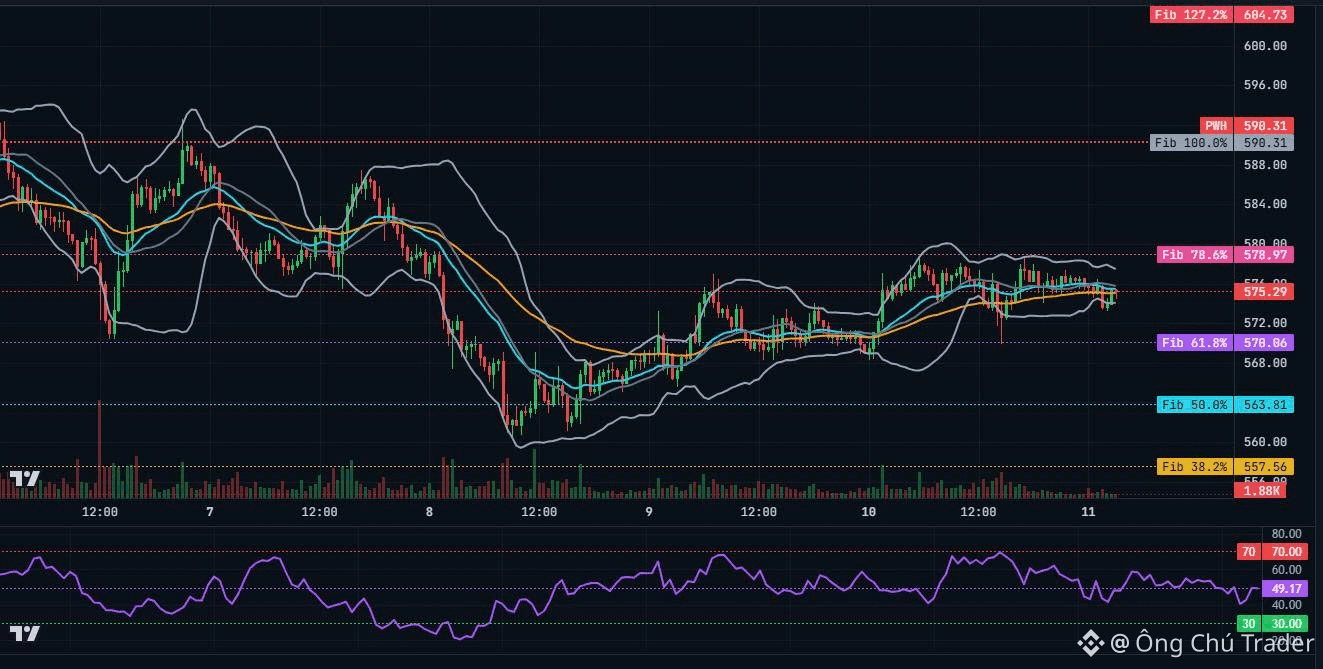
#BNB/USDT
📉 Trend: Sideways Consolidation.
The price is moving sideways after a short rally, compressing within a tight range around the EMA 20 and 50 cluster.
🔹 Support:
$573.50 – $574.05 (EMA 200, lower Bollinger Band, and Fib 0.382 confluence)
$570.00 – $571.74 (Previous swing low and key weekly Fib 0.618 confluence)
🔸 Resistance:
$577.38 – $578.96 (Immediate swing high and weekly Fib 0.786 confluence)
$590.31 – $591.02 (Previous Weekly High / strong psychological cap)
✅ Continuation: A powerful breakout and candle close above $579 validates a push toward the $590 – $591 PWH targets.
❌ Pullback: Rejection at $578 or a breakdown below the $573.69 EMA 200 level risks a slide back into the $570 – $571 support zone.
📊 Strategy:
Given the tight consolidation, execution yields a better R:R when buying or selling the boundaries of the sideway range rather than chasing mid-range prices.
Plan 1 (Long): Entry around $573.50 – $574.05, SL: $570.50, TP: $577.00 – $578.00.
Plan 2 (Short): Scalp short upon a clear bearish reversal at $577.50 – $578.50, SL: $580.00, TP: $574.00.
⚠️ Disclaimer: For informational purposes only. Manage your own risk.
$BNB #BinanceSquare #CryptoTrading #TechnicalAnalysis
#BNB/USDT
📉 Trend: Sideways Consolidation.
The price is moving sideways after a short rally, compressing within a tight range around the EMA 20 and 50 cluster.
🔹 Support:
$573.50 – $574.05 (EMA 200, lower Bollinger Band, and Fib 0.382 confluence)
$570.00 – $571.74 (Previous swing low and key weekly Fib 0.618 confluence)
🔸 Resistance:
$577.38 – $578.96 (Immediate swing high and weekly Fib 0.786 confluence)
$590.31 – $591.02 (Previous Weekly High / strong psychological cap)
✅ Continuation: A powerful breakout and candle close above $579 validates a push toward the $590 – $591 PWH targets.
❌ Pullback: Rejection at $578 or a breakdown below the $573.69 EMA 200 level risks a slide back into the $570 – $571 support zone.
📊 Strategy:
Given the tight consolidation, execution yields a better R:R when buying or selling the boundaries of the sideway range rather than chasing mid-range prices.
Plan 1 (Long): Entry around $573.50 – $574.05, SL: $570.50, TP: $577.00 – $578.00.
Plan 2 (Short): Scalp short upon a clear bearish reversal at $577.50 – $578.50, SL: $580.00, TP: $574.00.
⚠️ Disclaimer: For informational purposes only. Manage your own risk.
$BNB #BinanceSquare #CryptoTrading #TechnicalAnalysis
📉 Trend: Sideways Consolidation.
The price is moving sideways after a short rally, compressing within a tight range around the EMA 20 and 50 cluster.
🔹 Support:
$573.50 – $574.05 (EMA 200, lower Bollinger Band, and Fib 0.382 confluence)
$570.00 – $571.74 (Previous swing low and key weekly Fib 0.618 confluence)
🔸 Resistance:
$577.38 – $578.96 (Immediate swing high and weekly Fib 0.786 confluence)
$590.31 – $591.02 (Previous Weekly High / strong psychological cap)
✅ Continuation: A powerful breakout and candle close above $579 validates a push toward the $590 – $591 PWH targets.
❌ Pullback: Rejection at $578 or a breakdown below the $573.69 EMA 200 level risks a slide back into the $570 – $571 support zone.
📊 Strategy:
Given the tight consolidation, execution yields a better R:R when buying or selling the boundaries of the sideway range rather than chasing mid-range prices.
Plan 1 (Long): Entry around $573.50 – $574.05, SL: $570.50, TP: $577.00 – $578.00.
Plan 2 (Short): Scalp short upon a clear bearish reversal at $577.50 – $578.50, SL: $580.00, TP: $574.00.
⚠️ Disclaimer: For informational purposes only. Manage your own risk.
$BNB #BinanceSquare #CryptoTrading #TechnicalAnalysis
133
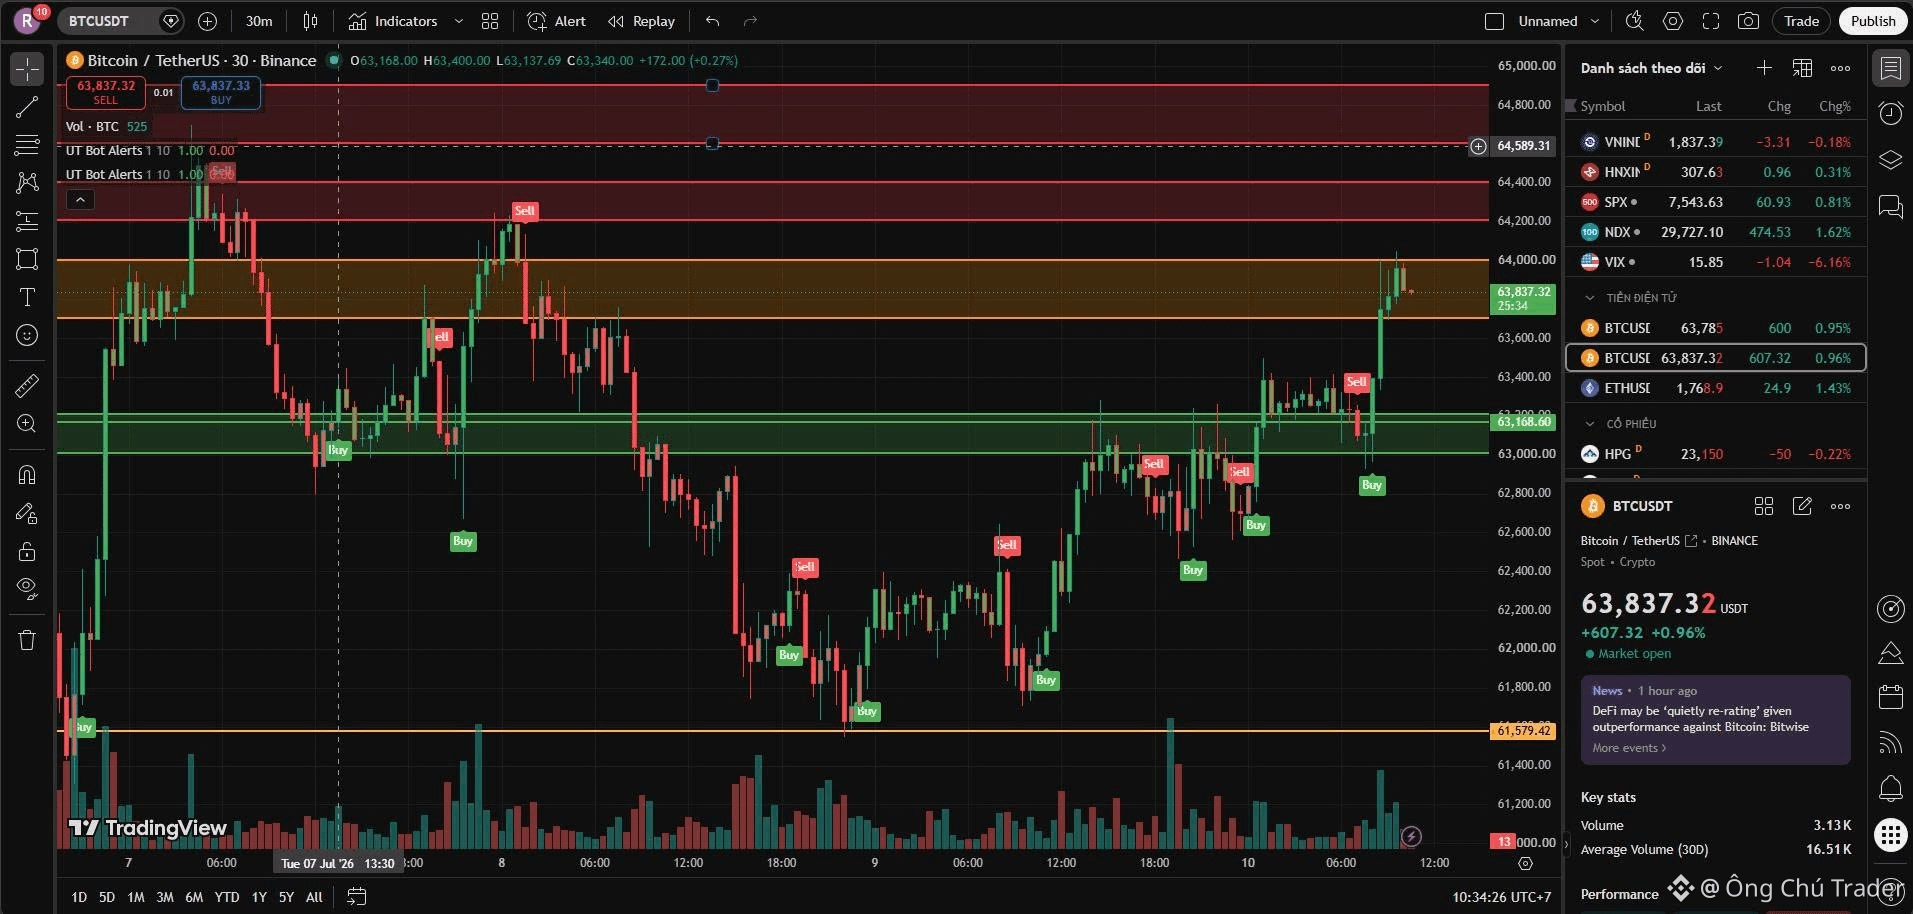
#BTC/USDT
📈 Trend: Strong Recovery.
The price is stalling around $63,800 to absorb profit-taking pressure following an extended upward move.
🔹 Support:
$63,000 – $63,200 (Solid floor / flipped resistance zone)
🔸 Resistance:
$63,700 – $64,000 (Short-term consolidation range)
$64,200 – $64,400 (Strong resistance / local peak)
$64,600 – $64,900 (Macro resistance / old distribution zone)
✅ Continuation: A decisive close above $64,000 will quickly push the price to challenge the $64,200 – $64,400 overhead targets.
❌ Pullback: Losing the $63,700 mark risks a retreat to retest the solid support base at $63,000 – $63,200.
📊 Strategy:
The current area carries elevated risk; avoid FOMO chasing. Prioritize two execution plans:
Wait for a clean breakout above $64,000 to trade the continuation momentum.
Patiently wait for a healthy pullback into the $63,000 – $63,200 support zone to secure a position with a tighter, safer stop loss.
⚠️ Disclaimer: For informational purposes only. Manage your own risk.
$BTC #BinanceSquare #CryptoTrading #TechnicalAnalysis
#BTC/USDT
📈 Trend: Strong Recovery.
The price is stalling around $63,800 to absorb profit-taking pressure following an extended upward move.
🔹 Support:
$63,000 – $63,200 (Solid floor / flipped resistance zone)
🔸 Resistance:
$63,700 – $64,000 (Short-term consolidation range)
$64,200 – $64,400 (Strong resistance / local peak)
$64,600 – $64,900 (Macro resistance / old distribution zone)
✅ Continuation: A decisive close above $64,000 will quickly push the price to challenge the $64,200 – $64,400 overhead targets.
❌ Pullback: Losing the $63,700 mark risks a retreat to retest the solid support base at $63,000 – $63,200.
📊 Strategy:
The current area carries elevated risk; avoid FOMO chasing. Prioritize two execution plans:
Wait for a clean breakout above $64,000 to trade the continuation momentum.
Patiently wait for a healthy pullback into the $63,000 – $63,200 support zone to secure a position with a tighter, safer stop loss.
⚠️ Disclaimer: For informational purposes only. Manage your own risk.
$BTC #BinanceSquare #CryptoTrading #TechnicalAnalysis
📈 Trend: Strong Recovery.
The price is stalling around $63,800 to absorb profit-taking pressure following an extended upward move.
🔹 Support:
$63,000 – $63,200 (Solid floor / flipped resistance zone)
🔸 Resistance:
$63,700 – $64,000 (Short-term consolidation range)
$64,200 – $64,400 (Strong resistance / local peak)
$64,600 – $64,900 (Macro resistance / old distribution zone)
✅ Continuation: A decisive close above $64,000 will quickly push the price to challenge the $64,200 – $64,400 overhead targets.
❌ Pullback: Losing the $63,700 mark risks a retreat to retest the solid support base at $63,000 – $63,200.
📊 Strategy:
The current area carries elevated risk; avoid FOMO chasing. Prioritize two execution plans:
Wait for a clean breakout above $64,000 to trade the continuation momentum.
Patiently wait for a healthy pullback into the $63,000 – $63,200 support zone to secure a position with a tighter, safer stop loss.
⚠️ Disclaimer: For informational purposes only. Manage your own risk.
$BTC #BinanceSquare #CryptoTrading #TechnicalAnalysis
81
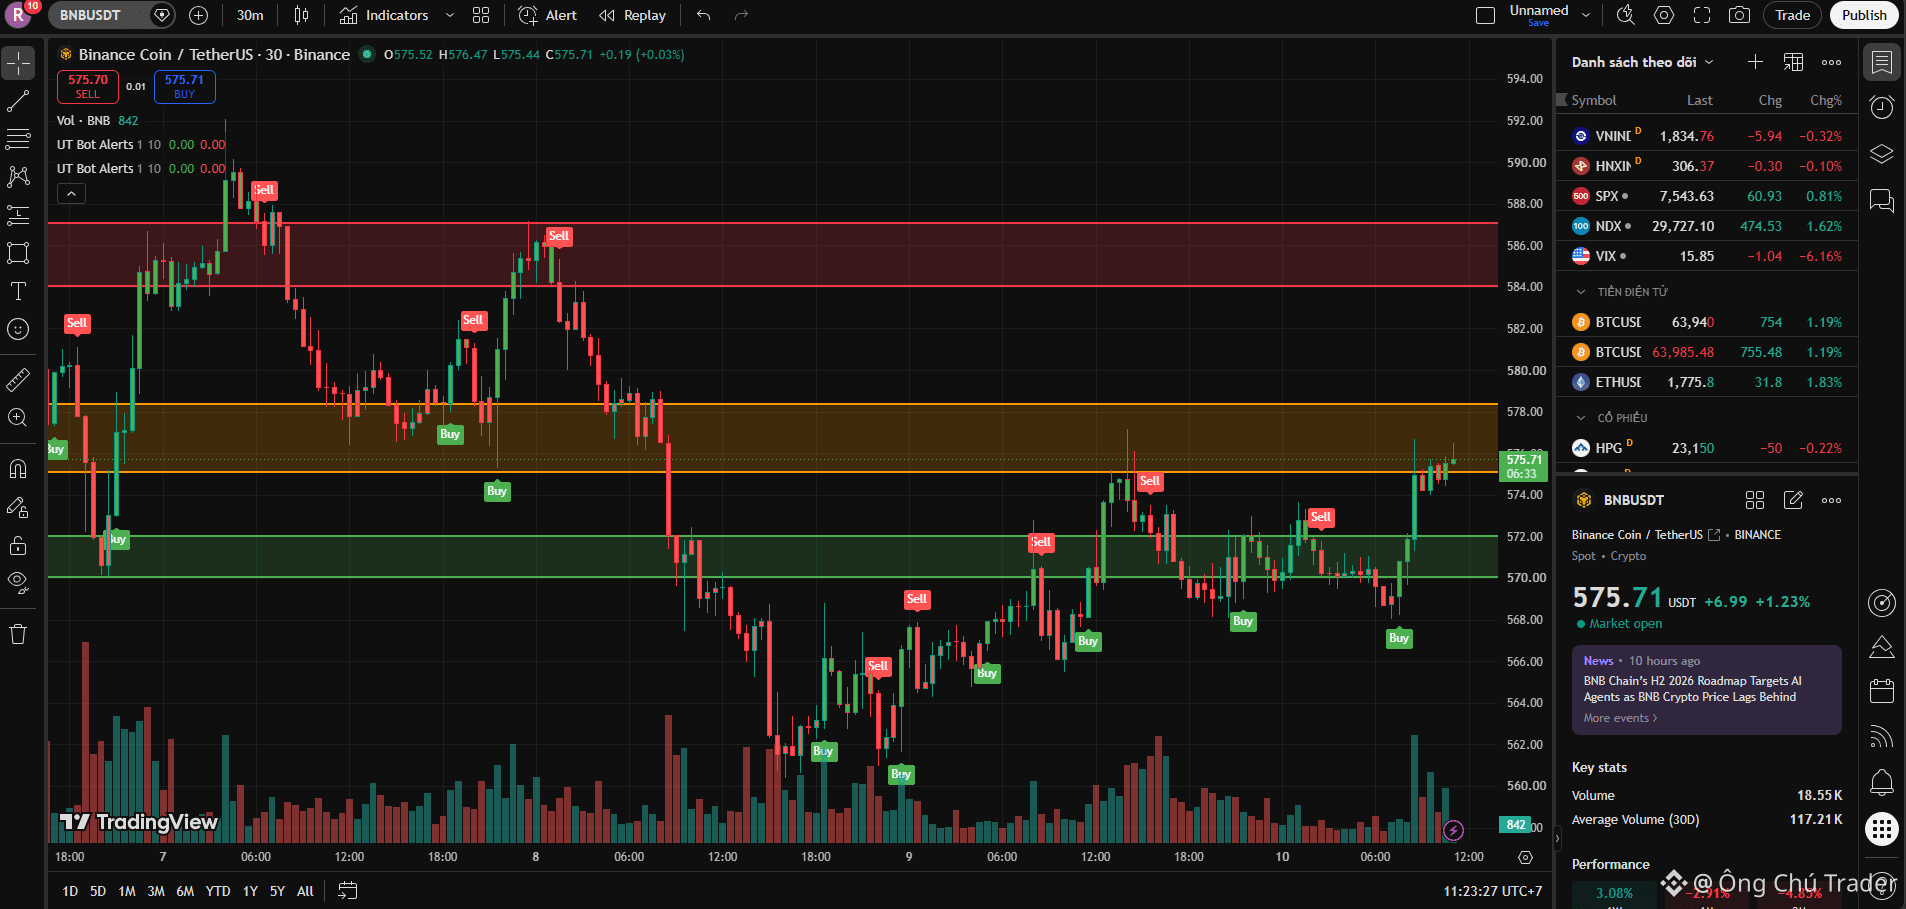
#BNB/USDT
📈 Trend: Bullish Breakout.
Aggressive buying volume has lifted BNB from its local bottom, allowing the price to reclaim key structural levels.
🔹 Support:
$570 – $572 (Solid immediate floor / flipped resistance)
🔸 Resistance:
$575 – $578 (Local hurdle / profit-taking zone)
$584 – $587 (Major macro structural Supply Zone)
✅ Continuation: A decisive close above $578 clears a path through thin liquidity to challenge the $584 – $587 supply cluster.
❌ Pullback: If momentum fades and breaks below $575, the price will retreat to the $570 – $572 support pocket to build a new base.
📊 Strategy:
BNB is trading directly inside the mid-range resistance area ($575 – $578), offering an unfavorable Risk-to-Reward (R:R) ratio for chasing the price here.
Priority 1: Await a clean candle close above $578 to safely buy the breakout momentum.
Priority 2: Patiently wait for a healthy pullback into the $570 – $572 support zone to establish trend-following long setups with optimized risk parameters.
⚠️ Disclaimer: For informational purposes only. Manage your own risk.
$BNB #BinanceSquare #CryptoTrading #TechnicalAnalysis
#BNB/USDT
📈 Trend: Bullish Breakout.
Aggressive buying volume has lifted BNB from its local bottom, allowing the price to reclaim key structural levels.
🔹 Support:
$570 – $572 (Solid immediate floor / flipped resistance)
🔸 Resistance:
$575 – $578 (Local hurdle / profit-taking zone)
$584 – $587 (Major macro structural Supply Zone)
✅ Continuation: A decisive close above $578 clears a path through thin liquidity to challenge the $584 – $587 supply cluster.
❌ Pullback: If momentum fades and breaks below $575, the price will retreat to the $570 – $572 support pocket to build a new base.
📊 Strategy:
BNB is trading directly inside the mid-range resistance area ($575 – $578), offering an unfavorable Risk-to-Reward (R:R) ratio for chasing the price here.
Priority 1: Await a clean candle close above $578 to safely buy the breakout momentum.
Priority 2: Patiently wait for a healthy pullback into the $570 – $572 support zone to establish trend-following long setups with optimized risk parameters.
⚠️ Disclaimer: For informational purposes only. Manage your own risk.
$BNB #BinanceSquare #CryptoTrading #TechnicalAnalysis
📈 Trend: Bullish Breakout.
Aggressive buying volume has lifted BNB from its local bottom, allowing the price to reclaim key structural levels.
🔹 Support:
$570 – $572 (Solid immediate floor / flipped resistance)
🔸 Resistance:
$575 – $578 (Local hurdle / profit-taking zone)
$584 – $587 (Major macro structural Supply Zone)
✅ Continuation: A decisive close above $578 clears a path through thin liquidity to challenge the $584 – $587 supply cluster.
❌ Pullback: If momentum fades and breaks below $575, the price will retreat to the $570 – $572 support pocket to build a new base.
📊 Strategy:
BNB is trading directly inside the mid-range resistance area ($575 – $578), offering an unfavorable Risk-to-Reward (R:R) ratio for chasing the price here.
Priority 1: Await a clean candle close above $578 to safely buy the breakout momentum.
Priority 2: Patiently wait for a healthy pullback into the $570 – $572 support zone to establish trend-following long setups with optimized risk parameters.
⚠️ Disclaimer: For informational purposes only. Manage your own risk.
$BNB #BinanceSquare #CryptoTrading #TechnicalAnalysis
115
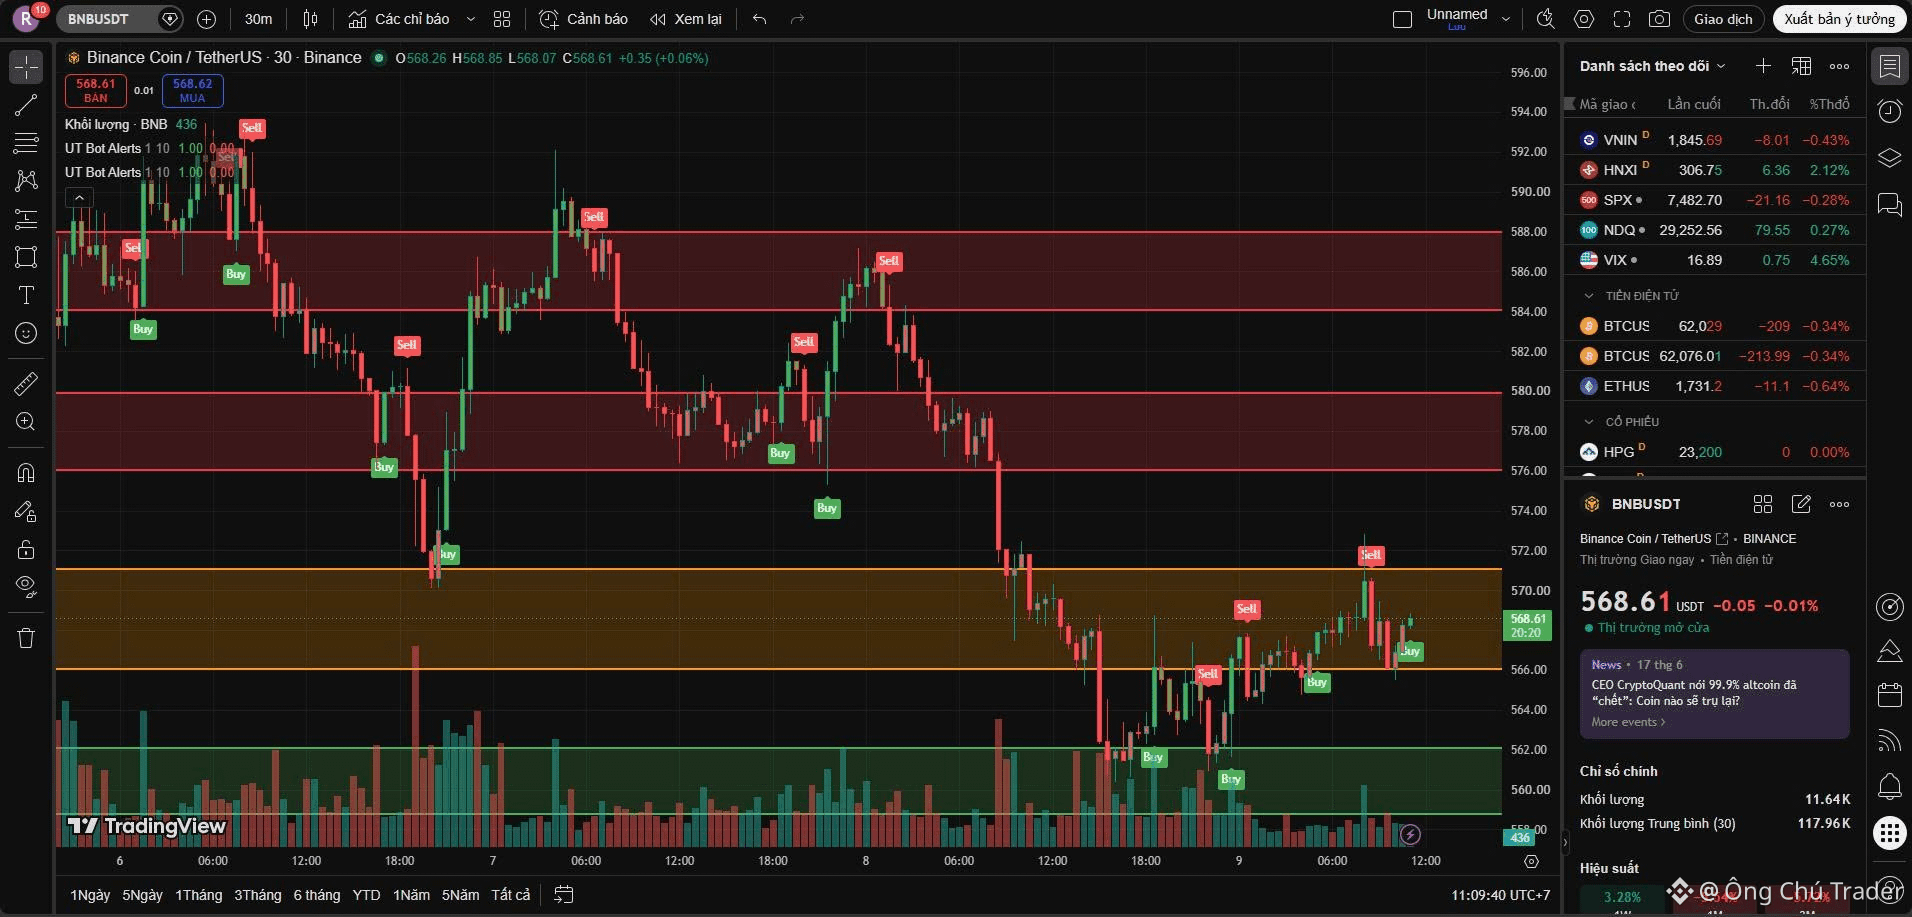
#BNB/USDT
📉 Trend: Bearish / Bottom Consolidation.
BNB broke prior support levels to establish new local lows. The decline has temporarily stalled, with the price trading around $568.54 inside a tight, sideways Decision Zone as it attempts to absorb overhead supply.
🔹 Support:
$566 (Immediate consolidation floor)
$558 – $562 (Very strong deep wick-low floor)
🔸 Resistance:
$571 (Immediate consolidation cap)
$576 – $579 (Strong flipped resistance)
$584 – $587 (Major breakdown structure peak)
✅ Bullish: Closing decisively above $571 releases the price compression, opening a clear path to recover toward the $576 – $579 base.
❌ Bearish: Breaking below $566 invalidates the local recovery structure, risking a direct slide down to the final $558 – $562 defensive line.
📊 Strategy:
BNB is moving sideways in a bottom-seeking phase. Trading inside the choppy $566 – $571 range carries high 50/50 noise.
The optimal plan is to await clear confirmation: either follow a clean breakout above $571 to trade a short-term bounce, or remain patient for a deep retest near the solid $558 – $562 support floor to evaluate buyers' strength before executing.
⚠️ Disclaimer: For informational purposes only. Manage your own risk.
$BNB #BinanceSquare #CryptoTrading #TechnicalAnalysis
#BNB/USDT
📉 Trend: Bearish / Bottom Consolidation.
BNB broke prior support levels to establish new local lows. The decline has temporarily stalled, with the price trading around $568.54 inside a tight, sideways Decision Zone as it attempts to absorb overhead supply.
🔹 Support:
$566 (Immediate consolidation floor)
$558 – $562 (Very strong deep wick-low floor)
🔸 Resistance:
$571 (Immediate consolidation cap)
$576 – $579 (Strong flipped resistance)
$584 – $587 (Major breakdown structure peak)
✅ Bullish: Closing decisively above $571 releases the price compression, opening a clear path to recover toward the $576 – $579 base.
❌ Bearish: Breaking below $566 invalidates the local recovery structure, risking a direct slide down to the final $558 – $562 defensive line.
📊 Strategy:
BNB is moving sideways in a bottom-seeking phase. Trading inside the choppy $566 – $571 range carries high 50/50 noise.
The optimal plan is to await clear confirmation: either follow a clean breakout above $571 to trade a short-term bounce, or remain patient for a deep retest near the solid $558 – $562 support floor to evaluate buyers' strength before executing.
⚠️ Disclaimer: For informational purposes only. Manage your own risk.
$BNB #BinanceSquare #CryptoTrading #TechnicalAnalysis
📉 Trend: Bearish / Bottom Consolidation.
BNB broke prior support levels to establish new local lows. The decline has temporarily stalled, with the price trading around $568.54 inside a tight, sideways Decision Zone as it attempts to absorb overhead supply.
🔹 Support:
$566 (Immediate consolidation floor)
$558 – $562 (Very strong deep wick-low floor)
🔸 Resistance:
$571 (Immediate consolidation cap)
$576 – $579 (Strong flipped resistance)
$584 – $587 (Major breakdown structure peak)
✅ Bullish: Closing decisively above $571 releases the price compression, opening a clear path to recover toward the $576 – $579 base.
❌ Bearish: Breaking below $566 invalidates the local recovery structure, risking a direct slide down to the final $558 – $562 defensive line.
📊 Strategy:
BNB is moving sideways in a bottom-seeking phase. Trading inside the choppy $566 – $571 range carries high 50/50 noise.
The optimal plan is to await clear confirmation: either follow a clean breakout above $571 to trade a short-term bounce, or remain patient for a deep retest near the solid $558 – $562 support floor to evaluate buyers' strength before executing.
⚠️ Disclaimer: For informational purposes only. Manage your own risk.
$BNB #BinanceSquare #CryptoTrading #TechnicalAnalysis
1
97
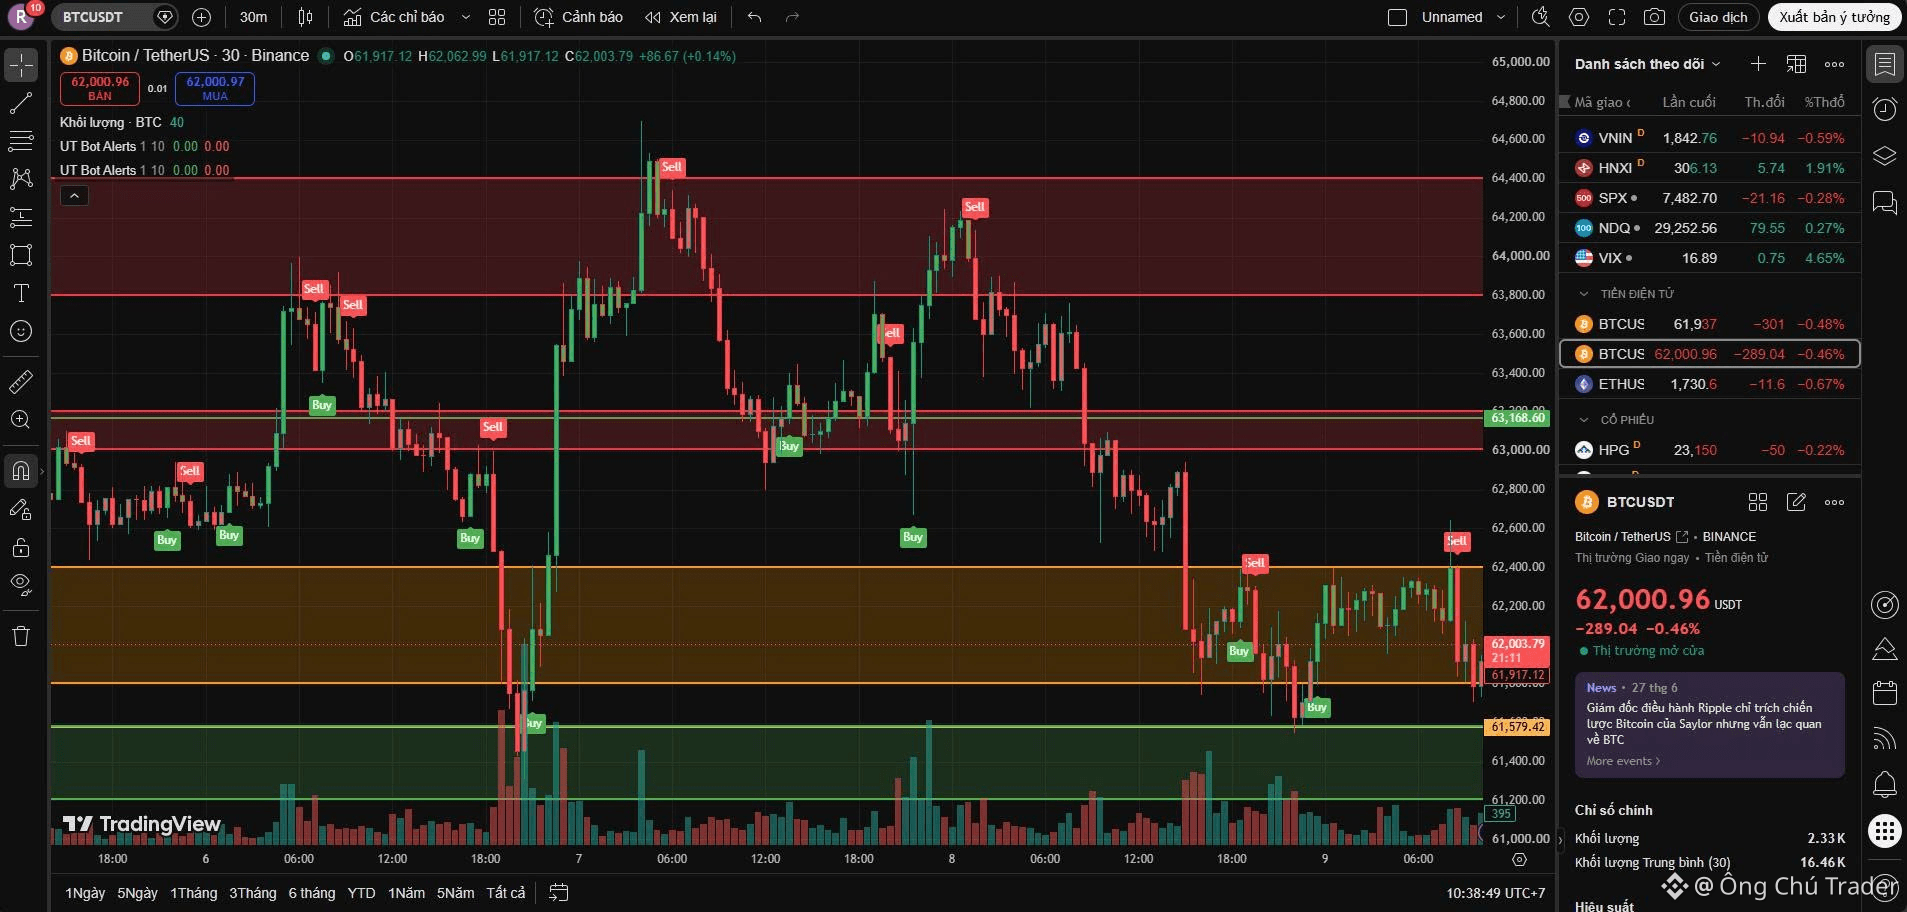
#BTC/USDT
📉 Trend: Short-term Bearish / Local Bottom Consolidation.
BTC remains under selling pressure, making lower highs after a peak distribution. The price is currently trading around $61,994, hovering within a crucial Decision Zone.
🔹 Support:
$61,200 – $61,580 (Very strong previous wick-low floor)
🔸 Resistance:
$61,800 – $62,400 (Immediate trend-defining zone)
$63,000 – $63,200 (Strong flipped resistance)
$63,800 – $64,400 (Major peak supply)
✅ Bullish: Decisively clearing $62,400 breaks the bearish structure, opening a path for a strong recovery toward $63,000 – $63,200.
❌ Bearish: Closing below $61,800 risks a direct slide to the final defense line at $61,200 – $61,580. Breaching $61,200 triggers broader panic selling.
📊 Strategy:
BTC is in a defensive posture with cautious buying interest. Trading inside the choppy $61,800 – $62,400 zone carries high risk.
Safer to wait for a clean breakout above $62,400 to buy the recovery momentum, or monitor price action closely for a dip-buying setup if it drops near $61,200 – $61,500.
⚠️ Disclaimer: For informational purposes only. Manage your own risk.
$BTC #BinanceSquare #CryptoTrading #TechnicalAnalysis
#BTC/USDT
📉 Trend: Short-term Bearish / Local Bottom Consolidation.
BTC remains under selling pressure, making lower highs after a peak distribution. The price is currently trading around $61,994, hovering within a crucial Decision Zone.
🔹 Support:
$61,200 – $61,580 (Very strong previous wick-low floor)
🔸 Resistance:
$61,800 – $62,400 (Immediate trend-defining zone)
$63,000 – $63,200 (Strong flipped resistance)
$63,800 – $64,400 (Major peak supply)
✅ Bullish: Decisively clearing $62,400 breaks the bearish structure, opening a path for a strong recovery toward $63,000 – $63,200.
❌ Bearish: Closing below $61,800 risks a direct slide to the final defense line at $61,200 – $61,580. Breaching $61,200 triggers broader panic selling.
📊 Strategy:
BTC is in a defensive posture with cautious buying interest. Trading inside the choppy $61,800 – $62,400 zone carries high risk.
Safer to wait for a clean breakout above $62,400 to buy the recovery momentum, or monitor price action closely for a dip-buying setup if it drops near $61,200 – $61,500.
⚠️ Disclaimer: For informational purposes only. Manage your own risk.
$BTC #BinanceSquare #CryptoTrading #TechnicalAnalysis
📉 Trend: Short-term Bearish / Local Bottom Consolidation.
BTC remains under selling pressure, making lower highs after a peak distribution. The price is currently trading around $61,994, hovering within a crucial Decision Zone.
🔹 Support:
$61,200 – $61,580 (Very strong previous wick-low floor)
🔸 Resistance:
$61,800 – $62,400 (Immediate trend-defining zone)
$63,000 – $63,200 (Strong flipped resistance)
$63,800 – $64,400 (Major peak supply)
✅ Bullish: Decisively clearing $62,400 breaks the bearish structure, opening a path for a strong recovery toward $63,000 – $63,200.
❌ Bearish: Closing below $61,800 risks a direct slide to the final defense line at $61,200 – $61,580. Breaching $61,200 triggers broader panic selling.
📊 Strategy:
BTC is in a defensive posture with cautious buying interest. Trading inside the choppy $61,800 – $62,400 zone carries high risk.
Safer to wait for a clean breakout above $62,400 to buy the recovery momentum, or monitor price action closely for a dip-buying setup if it drops near $61,200 – $61,500.
⚠️ Disclaimer: For informational purposes only. Manage your own risk.
$BTC #BinanceSquare #CryptoTrading #TechnicalAnalysis
90
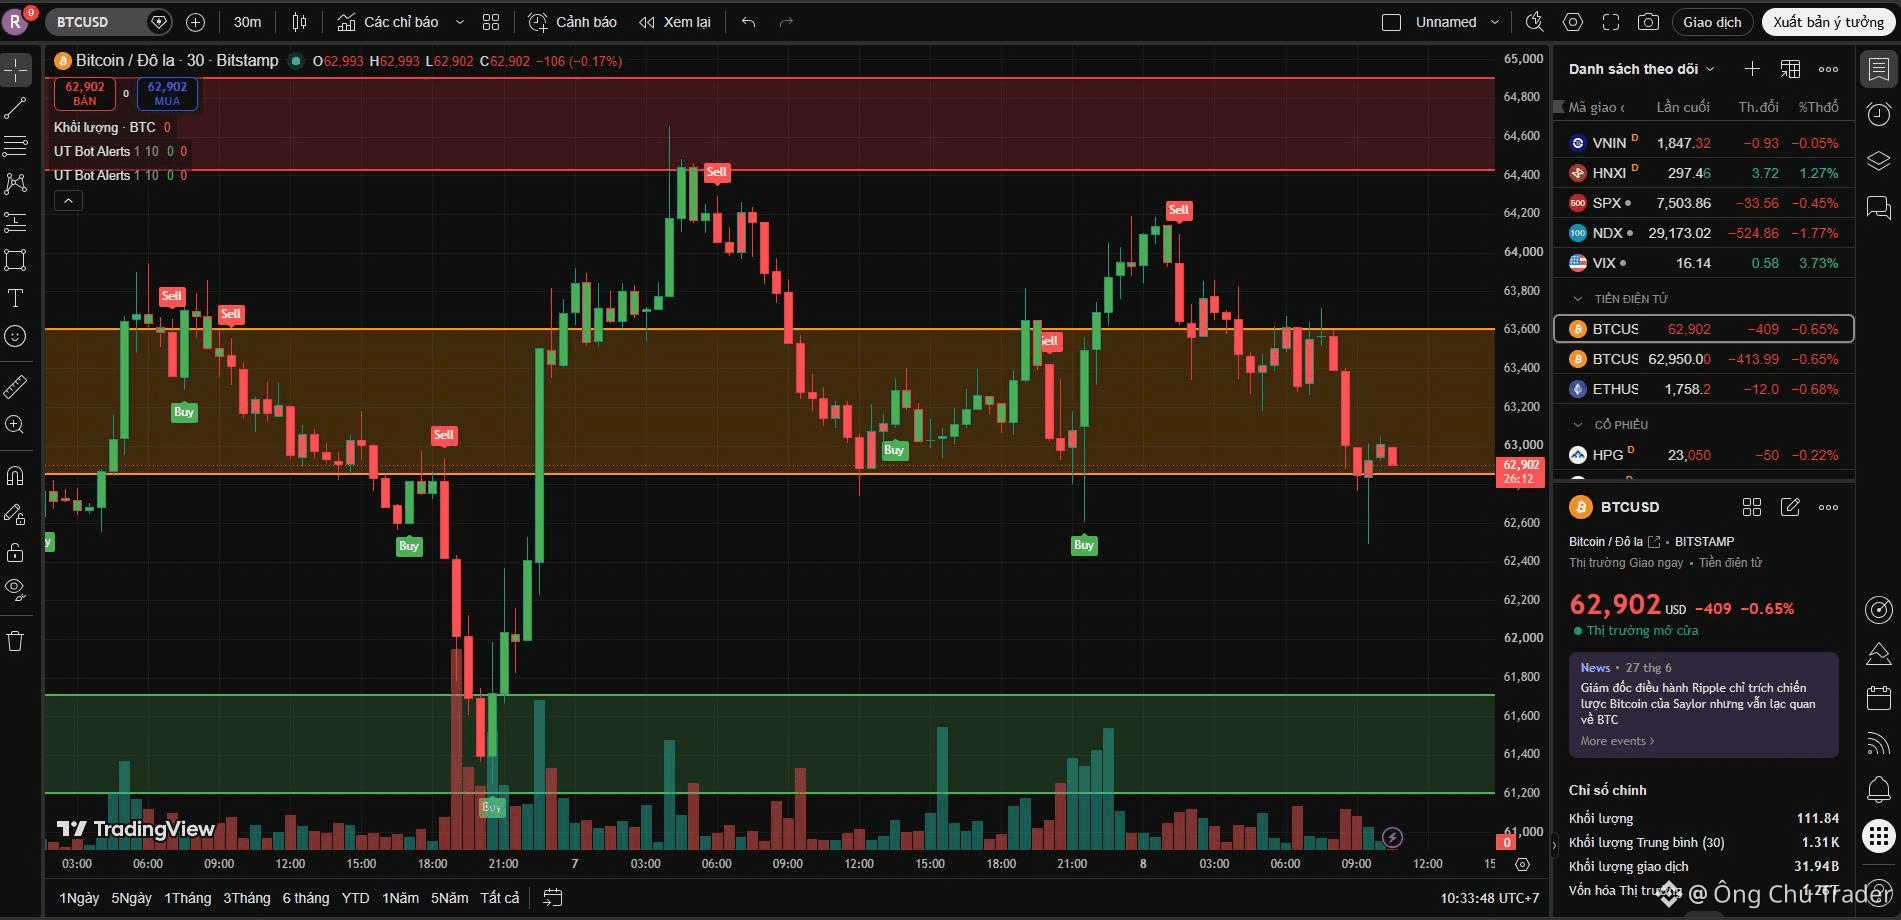
#BTC/USDT
📉 Trend: Sideways / Testing Demand at Short-Term Support.
BTC stabilized after a decline but remains under pressure, trading around $62,902 at the lower boundary of the decision zone.
🔹 Support:
$61,200 – $61,712 (Very strong previous dip-buying floor)
🔸 Resistance:
$63,600 (Immediate decision zone cap)
$64,427 – $64,900 (Major macro peak supply)
✅ Bullish: Closing above $63,600 breaks the bearish structure, opening a clear path to retest the $64,427 – $64,900 peaks.
❌ Bearish: Breaking below $62,850 risks a direct slide down to the deepest support at $61,200 – $61,712.
📊 Strategy:
BTC sits at a sensitive pivot point as sellers press down. Avoid trading in this mid-range zone. Safer to wait for a clean breakout above $63,600 to follow momentum, or wait for a deep discount into the solid $61,700 support to establish buy positions with tight risk control.
⚠️ Disclaimer: For informational purposes only. Manage your own risk.
$BTC #BinanceSquare #CryptoTrading #TechnicalAnalysis
#BTC/USDT
📉 Trend: Sideways / Testing Demand at Short-Term Support.
BTC stabilized after a decline but remains under pressure, trading around $62,902 at the lower boundary of the decision zone.
🔹 Support:
$61,200 – $61,712 (Very strong previous dip-buying floor)
🔸 Resistance:
$63,600 (Immediate decision zone cap)
$64,427 – $64,900 (Major macro peak supply)
✅ Bullish: Closing above $63,600 breaks the bearish structure, opening a clear path to retest the $64,427 – $64,900 peaks.
❌ Bearish: Breaking below $62,850 risks a direct slide down to the deepest support at $61,200 – $61,712.
📊 Strategy:
BTC sits at a sensitive pivot point as sellers press down. Avoid trading in this mid-range zone. Safer to wait for a clean breakout above $63,600 to follow momentum, or wait for a deep discount into the solid $61,700 support to establish buy positions with tight risk control.
⚠️ Disclaimer: For informational purposes only. Manage your own risk.
$BTC #BinanceSquare #CryptoTrading #TechnicalAnalysis
📉 Trend: Sideways / Testing Demand at Short-Term Support.
BTC stabilized after a decline but remains under pressure, trading around $62,902 at the lower boundary of the decision zone.
🔹 Support:
$61,200 – $61,712 (Very strong previous dip-buying floor)
🔸 Resistance:
$63,600 (Immediate decision zone cap)
$64,427 – $64,900 (Major macro peak supply)
✅ Bullish: Closing above $63,600 breaks the bearish structure, opening a clear path to retest the $64,427 – $64,900 peaks.
❌ Bearish: Breaking below $62,850 risks a direct slide down to the deepest support at $61,200 – $61,712.
📊 Strategy:
BTC sits at a sensitive pivot point as sellers press down. Avoid trading in this mid-range zone. Safer to wait for a clean breakout above $63,600 to follow momentum, or wait for a deep discount into the solid $61,700 support to establish buy positions with tight risk control.
⚠️ Disclaimer: For informational purposes only. Manage your own risk.
$BTC #BinanceSquare #CryptoTrading #TechnicalAnalysis
79
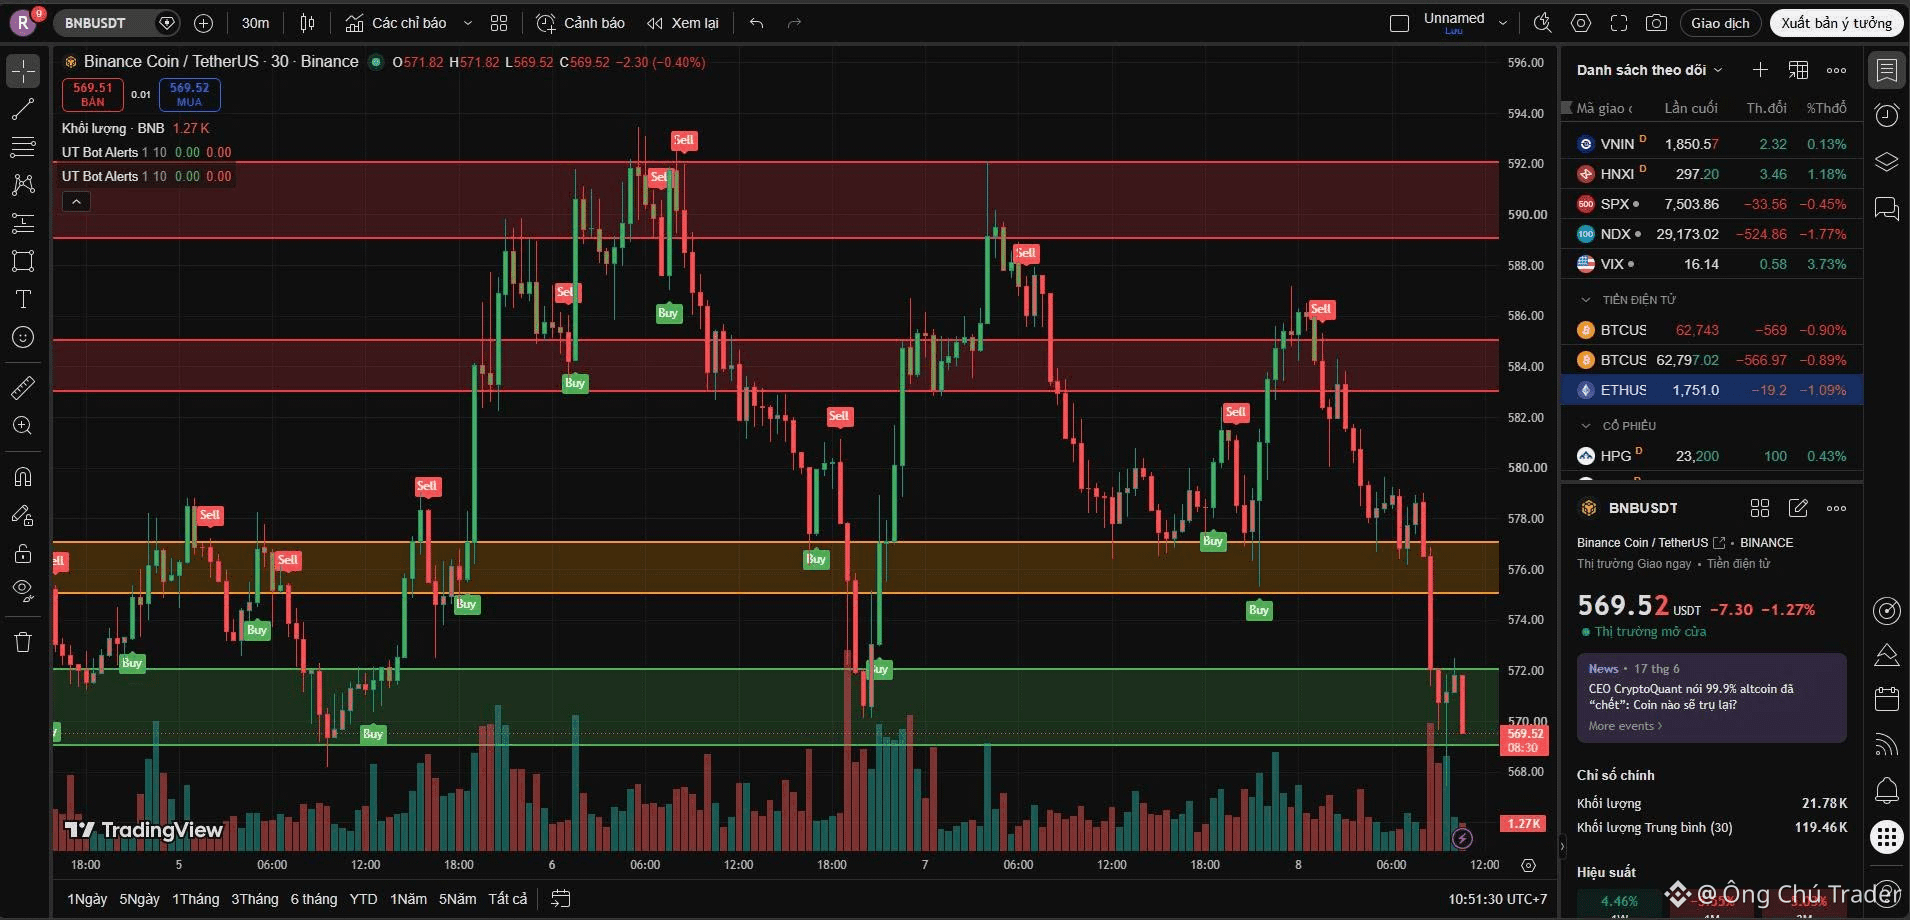
#BNB/USDT
📉 Trend: Short-term Bearish / Testing Key Support.
BNB broke its consolidation base, dropping to previous lows. Currently trading around $570.82 within a vital defensive zone.
🔹 Support:
$569 – $572 (Critical make-or-break floor)
🔸 Resistance:
$575 – $577 (Immediate flipped resistance)
$583 – $585 (Strong lower high zone)
$589 – $592 (Major peak supply)
✅ Bullish: Holding $569 – $572 triggers a bounce to $575. Defeating $577 eases bearish pressure.
❌ Bearish: Closing below $569 triggers panic selling into a deeper free fall.
📊 Strategy:
BNB shows a risky lower-high structure. Buying the dip offers good R:R but carries high risk as sellers dominate. Safer to wait for a confirmed base at $569 – $572 with rising volume, or a rejection at $575 – $577 to short.
⚠️ Disclaimer: For informational purposes only. Manage your own risk.
$BNB #BinanceSquare #CryptoTrading #TechnicalAnalysis
#BNB/USDT
📉 Trend: Short-term Bearish / Testing Key Support.
BNB broke its consolidation base, dropping to previous lows. Currently trading around $570.82 within a vital defensive zone.
🔹 Support:
$569 – $572 (Critical make-or-break floor)
🔸 Resistance:
$575 – $577 (Immediate flipped resistance)
$583 – $585 (Strong lower high zone)
$589 – $592 (Major peak supply)
✅ Bullish: Holding $569 – $572 triggers a bounce to $575. Defeating $577 eases bearish pressure.
❌ Bearish: Closing below $569 triggers panic selling into a deeper free fall.
📊 Strategy:
BNB shows a risky lower-high structure. Buying the dip offers good R:R but carries high risk as sellers dominate. Safer to wait for a confirmed base at $569 – $572 with rising volume, or a rejection at $575 – $577 to short.
⚠️ Disclaimer: For informational purposes only. Manage your own risk.
$BNB #BinanceSquare #CryptoTrading #TechnicalAnalysis
📉 Trend: Short-term Bearish / Testing Key Support.
BNB broke its consolidation base, dropping to previous lows. Currently trading around $570.82 within a vital defensive zone.
🔹 Support:
$569 – $572 (Critical make-or-break floor)
🔸 Resistance:
$575 – $577 (Immediate flipped resistance)
$583 – $585 (Strong lower high zone)
$589 – $592 (Major peak supply)
✅ Bullish: Holding $569 – $572 triggers a bounce to $575. Defeating $577 eases bearish pressure.
❌ Bearish: Closing below $569 triggers panic selling into a deeper free fall.
📊 Strategy:
BNB shows a risky lower-high structure. Buying the dip offers good R:R but carries high risk as sellers dominate. Safer to wait for a confirmed base at $569 – $572 with rising volume, or a rejection at $575 – $577 to short.
⚠️ Disclaimer: For informational purposes only. Manage your own risk.
$BNB #BinanceSquare #CryptoTrading #TechnicalAnalysis
81
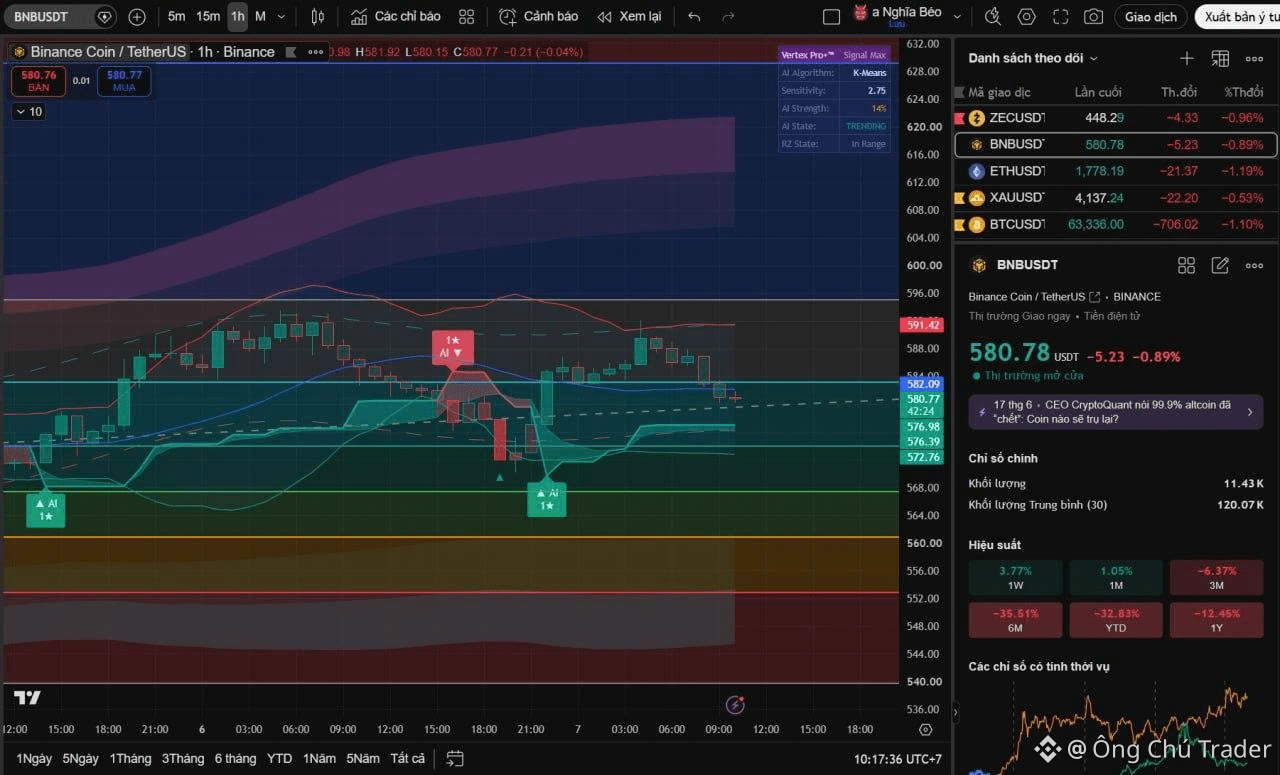
#BNB/USDT
📉 Trend: Short-term Bearish / Sideways Down.
The price is facing selling pressure after a clear rejection from the overhead supply zone. Currently, BNB is drifting below its moving averages, consolidating within an increasingly tight range.
🔹 Support:
$576.98 (Immediate cushion, price is currently hesitating and retesting this milestone)
$572.76 (Critical previous low from the last shakeout, where strong buying interest stepped in)
$568.00 (Solid structural support lower down, protecting against broader panic selling)
🔸 Resistance:
$582.09 (Dynamic overhead resistance, currently capping recovery attempts)
$591.42 (Recent peak, a dense supply zone loaded with resting sell orders)
✅ Bullish Scenario:
If a full-bodied candle closes decisively above $582.50 on high volume, the downward correction will break, opening the path to retest the liquidity pool around $591.
❌ Bearish Scenario:
Losing the $576.00 support milestone will solidify the bearish momentum, paving the way for a slide down to sweep the $572.76 bottom in search of dip-buying liquidity.
📊 Trading Strategy:
While the structure leans slightly in favor of the sellers, the price is sitting right next to support, making the risk of a bear trap highly elevated. The optimal move right now is to stay on the sidelines and observe. Patiently wait for the price to clearly interact with key milestones (either a bounce back to $582 or a drop into $572).
Once there, look for confirmation setups showing smart money stepping in (such as CRT + TBS setups) before considering an entry. As always, calculate your position size meticulously to keep your drawdown within an absolutely safe threshold.
⚠️ Disclaimer: For informational purposes only. Investors should conduct their own risk assessment.
💡 Want to dive deeper into this signal? Check out my profile bio for more updates!
$BNB #BinanceSquare #CryptoTrading #TechnicalAnalysis #MarketUpdate
#BNB/USDT
📉 Trend: Short-term Bearish / Sideways Down.
The price is facing selling pressure after a clear rejection from the overhead supply zone. Currently, BNB is drifting below its moving averages, consolidating within an increasingly tight range.
🔹 Support:
$576.98 (Immediate cushion, price is currently hesitating and retesting this milestone)
$572.76 (Critical previous low from the last shakeout, where strong buying interest stepped in)
$568.00 (Solid structural support lower down, protecting against broader panic selling)
🔸 Resistance:
$582.09 (Dynamic overhead resistance, currently capping recovery attempts)
$591.42 (Recent peak, a dense supply zone loaded with resting sell orders)
✅ Bullish Scenario:
If a full-bodied candle closes decisively above $582.50 on high volume, the downward correction will break, opening the path to retest the liquidity pool around $591.
❌ Bearish Scenario:
Losing the $576.00 support milestone will solidify the bearish momentum, paving the way for a slide down to sweep the $572.76 bottom in search of dip-buying liquidity.
📊 Trading Strategy:
While the structure leans slightly in favor of the sellers, the price is sitting right next to support, making the risk of a bear trap highly elevated. The optimal move right now is to stay on the sidelines and observe. Patiently wait for the price to clearly interact with key milestones (either a bounce back to $582 or a drop into $572).
Once there, look for confirmation setups showing smart money stepping in (such as CRT + TBS setups) before considering an entry. As always, calculate your position size meticulously to keep your drawdown within an absolutely safe threshold.
⚠️ Disclaimer: For informational purposes only. Investors should conduct their own risk assessment.
💡 Want to dive deeper into this signal? Check out my profile bio for more updates!
$BNB #BinanceSquare #CryptoTrading #TechnicalAnalysis #MarketUpdate
📉 Trend: Short-term Bearish / Sideways Down.
The price is facing selling pressure after a clear rejection from the overhead supply zone. Currently, BNB is drifting below its moving averages, consolidating within an increasingly tight range.
🔹 Support:
$576.98 (Immediate cushion, price is currently hesitating and retesting this milestone)
$572.76 (Critical previous low from the last shakeout, where strong buying interest stepped in)
$568.00 (Solid structural support lower down, protecting against broader panic selling)
🔸 Resistance:
$582.09 (Dynamic overhead resistance, currently capping recovery attempts)
$591.42 (Recent peak, a dense supply zone loaded with resting sell orders)
✅ Bullish Scenario:
If a full-bodied candle closes decisively above $582.50 on high volume, the downward correction will break, opening the path to retest the liquidity pool around $591.
❌ Bearish Scenario:
Losing the $576.00 support milestone will solidify the bearish momentum, paving the way for a slide down to sweep the $572.76 bottom in search of dip-buying liquidity.
📊 Trading Strategy:
While the structure leans slightly in favor of the sellers, the price is sitting right next to support, making the risk of a bear trap highly elevated. The optimal move right now is to stay on the sidelines and observe. Patiently wait for the price to clearly interact with key milestones (either a bounce back to $582 or a drop into $572).
Once there, look for confirmation setups showing smart money stepping in (such as CRT + TBS setups) before considering an entry. As always, calculate your position size meticulously to keep your drawdown within an absolutely safe threshold.
⚠️ Disclaimer: For informational purposes only. Investors should conduct their own risk assessment.
💡 Want to dive deeper into this signal? Check out my profile bio for more updates!
$BNB #BinanceSquare #CryptoTrading #TechnicalAnalysis #MarketUpdate
73
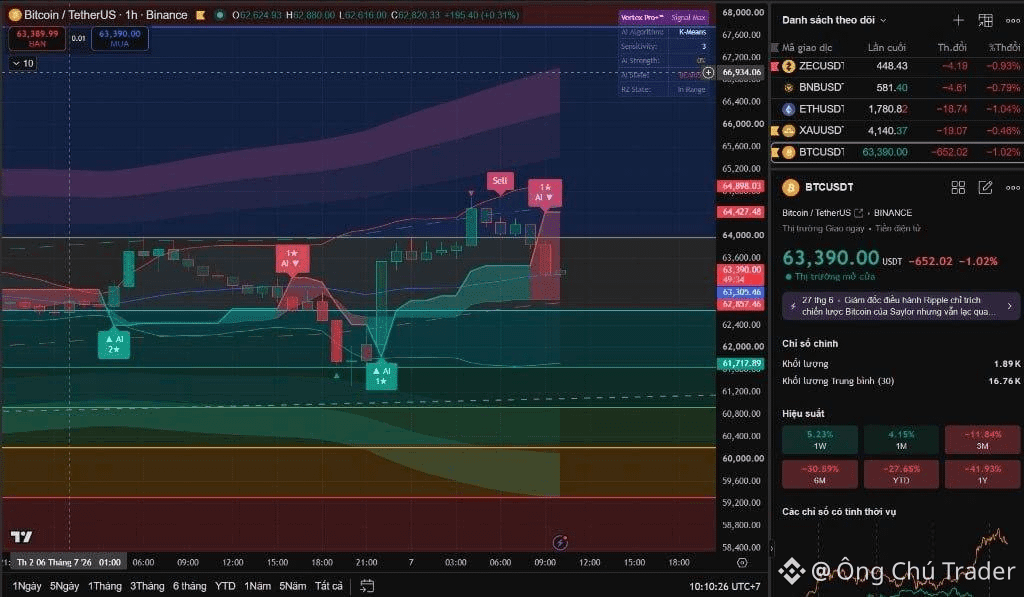
#BTC/USDT
📉 Trend: Strong Decline / Under Heavy Selling Pressure.
The price is experiencing a sudden, aggressive sell-off with overwhelming volume following short-term distribution signals at the local peak.
🔹 Support:
$63,305 (Dynamic price floor directly at the current position)
$62,857 (The wick low recently swept during the dump)
$61,712 (Highly critical structural support where major institutional order flow previously stepped in)
🔸 Resistance:
$64,427 (Immediate resistance, where the upward structure initially broke down)
$64,898 (Recently established peak, a strong supply zone firmly controlled by sellers)
✅ Bullish Scenario:
If a full-bodied candle closes decisively back above the $64,400 milestone, the recent sell-off will be invalidated. Buying volume could return to push the price for a retest of the $64,898 mark.
❌ Bearish Scenario:
If the price breaks below the $62,850 wick low, the downward momentum will persist, forcing a rapid slide toward the lower liquidity pocket at $61,712.
📊 Trading Strategy:
Selling pressure is completely dominant. Catching a falling knife in unstable price territory is strictly discouraged; remaining on the sidelines is the safest approach. Be patient and wait for the price to find an equilibrium base at the $62,857 zone or deeper at $61,712.
Only consider prioritizing BUY setups when smart money leaves a clear footprint (such as CRT + TBS setups). Always adhere strictly to risk management discipline to keep drawdowns within a safe parameters.
⚠️ Disclaimer: For informational purposes only. Investors should conduct their own risk assessment.
💡 Want to dive deeper into this signal? Check out my profile bio for more updates!
$BTC #BinanceSquare #CryptoTrading #TechnicalAnalysis #MarketUpdate
#BTC/USDT
📉 Trend: Strong Decline / Under Heavy Selling Pressure.
The price is experiencing a sudden, aggressive sell-off with overwhelming volume following short-term distribution signals at the local peak.
🔹 Support:
$63,305 (Dynamic price floor directly at the current position)
$62,857 (The wick low recently swept during the dump)
$61,712 (Highly critical structural support where major institutional order flow previously stepped in)
🔸 Resistance:
$64,427 (Immediate resistance, where the upward structure initially broke down)
$64,898 (Recently established peak, a strong supply zone firmly controlled by sellers)
✅ Bullish Scenario:
If a full-bodied candle closes decisively back above the $64,400 milestone, the recent sell-off will be invalidated. Buying volume could return to push the price for a retest of the $64,898 mark.
❌ Bearish Scenario:
If the price breaks below the $62,850 wick low, the downward momentum will persist, forcing a rapid slide toward the lower liquidity pocket at $61,712.
📊 Trading Strategy:
Selling pressure is completely dominant. Catching a falling knife in unstable price territory is strictly discouraged; remaining on the sidelines is the safest approach. Be patient and wait for the price to find an equilibrium base at the $62,857 zone or deeper at $61,712.
Only consider prioritizing BUY setups when smart money leaves a clear footprint (such as CRT + TBS setups). Always adhere strictly to risk management discipline to keep drawdowns within a safe parameters.
⚠️ Disclaimer: For informational purposes only. Investors should conduct their own risk assessment.
💡 Want to dive deeper into this signal? Check out my profile bio for more updates!
$BTC #BinanceSquare #CryptoTrading #TechnicalAnalysis #MarketUpdate
📉 Trend: Strong Decline / Under Heavy Selling Pressure.
The price is experiencing a sudden, aggressive sell-off with overwhelming volume following short-term distribution signals at the local peak.
🔹 Support:
$63,305 (Dynamic price floor directly at the current position)
$62,857 (The wick low recently swept during the dump)
$61,712 (Highly critical structural support where major institutional order flow previously stepped in)
🔸 Resistance:
$64,427 (Immediate resistance, where the upward structure initially broke down)
$64,898 (Recently established peak, a strong supply zone firmly controlled by sellers)
✅ Bullish Scenario:
If a full-bodied candle closes decisively back above the $64,400 milestone, the recent sell-off will be invalidated. Buying volume could return to push the price for a retest of the $64,898 mark.
❌ Bearish Scenario:
If the price breaks below the $62,850 wick low, the downward momentum will persist, forcing a rapid slide toward the lower liquidity pocket at $61,712.
📊 Trading Strategy:
Selling pressure is completely dominant. Catching a falling knife in unstable price territory is strictly discouraged; remaining on the sidelines is the safest approach. Be patient and wait for the price to find an equilibrium base at the $62,857 zone or deeper at $61,712.
Only consider prioritizing BUY setups when smart money leaves a clear footprint (such as CRT + TBS setups). Always adhere strictly to risk management discipline to keep drawdowns within a safe parameters.
⚠️ Disclaimer: For informational purposes only. Investors should conduct their own risk assessment.
💡 Want to dive deeper into this signal? Check out my profile bio for more updates!
$BTC #BinanceSquare #CryptoTrading #TechnicalAnalysis #MarketUpdate
139
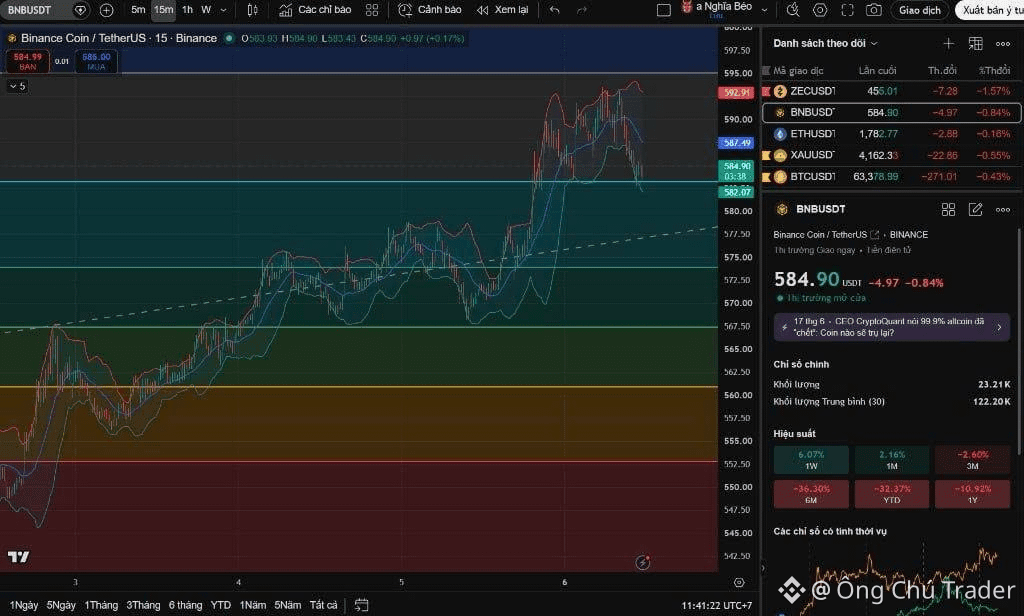
#BNB/USDT
📉 Trend: Downward Correction (Pullback) within an overall uptrend.
The price is under short-term selling pressure after hitting a supply zone overhead. It has broken below the moving average and is now approaching the lower boundary of its consolidation range.
🔹 Support:
+ $582.07 (Structural support right next to the current price, currently showing signs of stabilization)
+ $572.50 (Liquidity cushion in case selling pressure continues to dominate)
+ $567.50 (Critical previous low, the final defense line to maintain the medium-term bullish structure)
🔸 Resistance:
+ $587.49 (Dynamic resistance, where sellers may continue to press the price on any bounce)
+ $592.91 (Recently established peak, a strong supply zone showing heavy profit-taking pressure)
✅ Bullish Scenario:
If a full-bodied candle closes back above the $587.50 mark, buyers will regain control. This will break the short-term bearish structure and open the path to retest the $592.91 peak.
❌ Bearish Scenario:
If the price closes decisively below the $582.00 support level, panic selling could accelerate, posing a high risk of a deeper retreat toward the $572.50 zone.
📊 Trading Strategy:
Short-term sellers are dominant with sharp downward moves; therefore, catching a falling knife here is highly discouraged. The optimal action is to remain on the sidelines and monitor price action at the $582.07 support.
Remain patient and only prioritize BUY setups if clear volume/order flow confirmation signals (such as CRT + TBS setups) print at this support zone. Whether catching a rebound or trading with the trend, always maintain strict risk management discipline and enforce Stop Losses to keep drawdowns at a safe level.
⚠️ Disclaimer: For informational purposes only. Investors should conduct their own risk assessment.
💡 Want to dive deeper into this signal? Check out my profile bio for more updates!
$BNB #BinanceSquare #CryptoTrading #TechnicalAnalysis #MarketUpdate
#BNB/USDT
📉 Trend: Downward Correction (Pullback) within an overall uptrend.
The price is under short-term selling pressure after hitting a supply zone overhead. It has broken below the moving average and is now approaching the lower boundary of its consolidation range.
🔹 Support:
+ $582.07 (Structural support right next to the current price, currently showing signs of stabilization)
+ $572.50 (Liquidity cushion in case selling pressure continues to dominate)
+ $567.50 (Critical previous low, the final defense line to maintain the medium-term bullish structure)
🔸 Resistance:
+ $587.49 (Dynamic resistance, where sellers may continue to press the price on any bounce)
+ $592.91 (Recently established peak, a strong supply zone showing heavy profit-taking pressure)
✅ Bullish Scenario:
If a full-bodied candle closes back above the $587.50 mark, buyers will regain control. This will break the short-term bearish structure and open the path to retest the $592.91 peak.
❌ Bearish Scenario:
If the price closes decisively below the $582.00 support level, panic selling could accelerate, posing a high risk of a deeper retreat toward the $572.50 zone.
📊 Trading Strategy:
Short-term sellers are dominant with sharp downward moves; therefore, catching a falling knife here is highly discouraged. The optimal action is to remain on the sidelines and monitor price action at the $582.07 support.
Remain patient and only prioritize BUY setups if clear volume/order flow confirmation signals (such as CRT + TBS setups) print at this support zone. Whether catching a rebound or trading with the trend, always maintain strict risk management discipline and enforce Stop Losses to keep drawdowns at a safe level.
⚠️ Disclaimer: For informational purposes only. Investors should conduct their own risk assessment.
💡 Want to dive deeper into this signal? Check out my profile bio for more updates!
$BNB #BinanceSquare #CryptoTrading #TechnicalAnalysis #MarketUpdate
📉 Trend: Downward Correction (Pullback) within an overall uptrend.
The price is under short-term selling pressure after hitting a supply zone overhead. It has broken below the moving average and is now approaching the lower boundary of its consolidation range.
🔹 Support:
+ $582.07 (Structural support right next to the current price, currently showing signs of stabilization)
+ $572.50 (Liquidity cushion in case selling pressure continues to dominate)
+ $567.50 (Critical previous low, the final defense line to maintain the medium-term bullish structure)
🔸 Resistance:
+ $587.49 (Dynamic resistance, where sellers may continue to press the price on any bounce)
+ $592.91 (Recently established peak, a strong supply zone showing heavy profit-taking pressure)
✅ Bullish Scenario:
If a full-bodied candle closes back above the $587.50 mark, buyers will regain control. This will break the short-term bearish structure and open the path to retest the $592.91 peak.
❌ Bearish Scenario:
If the price closes decisively below the $582.00 support level, panic selling could accelerate, posing a high risk of a deeper retreat toward the $572.50 zone.
📊 Trading Strategy:
Short-term sellers are dominant with sharp downward moves; therefore, catching a falling knife here is highly discouraged. The optimal action is to remain on the sidelines and monitor price action at the $582.07 support.
Remain patient and only prioritize BUY setups if clear volume/order flow confirmation signals (such as CRT + TBS setups) print at this support zone. Whether catching a rebound or trading with the trend, always maintain strict risk management discipline and enforce Stop Losses to keep drawdowns at a safe level.
⚠️ Disclaimer: For informational purposes only. Investors should conduct their own risk assessment.
💡 Want to dive deeper into this signal? Check out my profile bio for more updates!
$BNB #BinanceSquare #CryptoTrading #TechnicalAnalysis #MarketUpdate
73
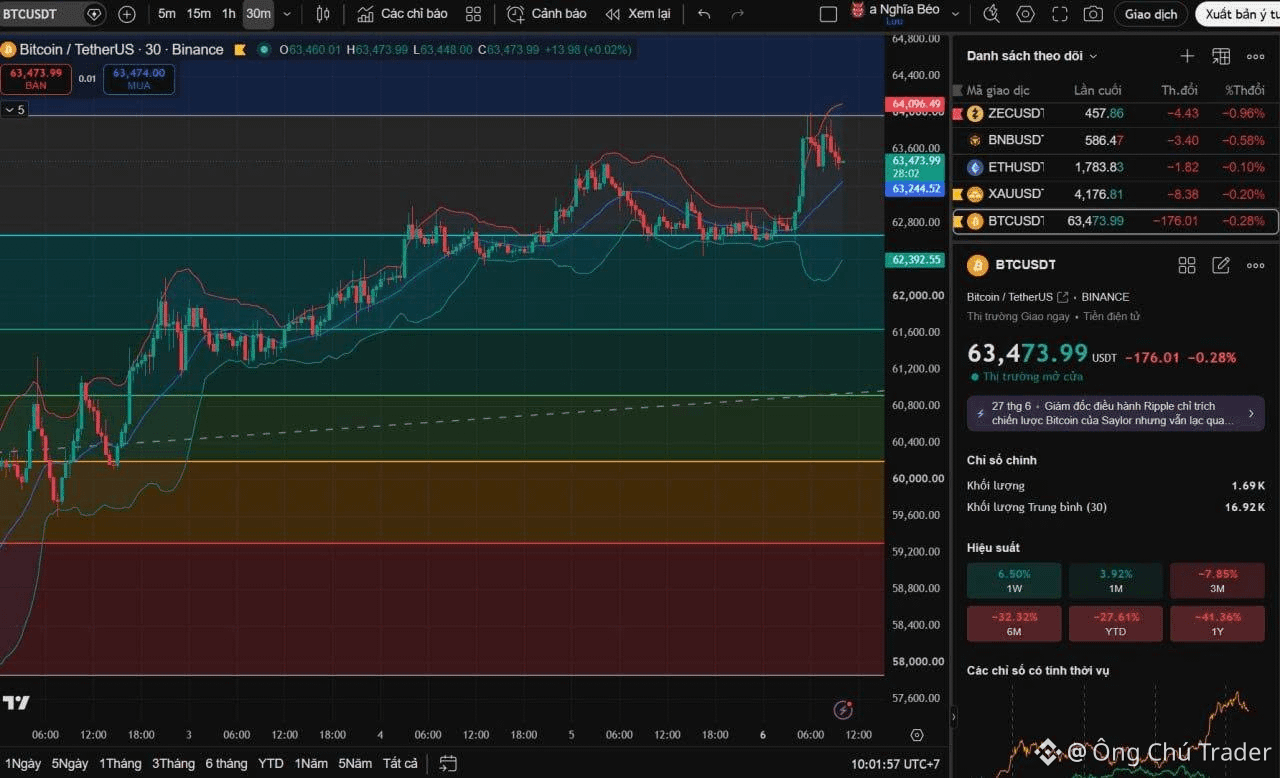
#BTC/USDT
📈 Trend: Short-term Bullish / Pullback.
The price recently hit a local peak and is undergoing a minor downward correction toward the moving average.
🔹 Support:
$63,244 (Immediate price floor)
$62,392 (Solid lower support zone)
🔸 Resistance:
$64,096 (Recently established peak / profit-taking zone)
$64,500 (Next psychological resistance)
✅ Bullish Scenario:
A decisive breakout above the $64,100 mark will sustain the upward momentum, clearing a direct path toward $64,500.
❌ Bearish Scenario:
Losing the $63,200 level will temporarily disrupt the short-term bullish structure, risking a slide back into the $62,392 territory.
📊 Trading Strategy:
The overall market structure remains bullish, but chasing the price here is highly discouraged due to active short-term selling pressure.
The safest approach is to remain on the sidelines and monitor the retest of the $63,244 immediate support. If a bullish reversal signal prints at this level, prioritize BUY setups. Always maintain strict stop-loss discipline to protect capital and keep drawdowns within safe limits.
⚠️ Disclaimer: For informational purposes only. Investors should conduct their own risk assessment.
💡 Want to dive deeper into this signal? Check out my profile bio for more updates!
$BTC #BinanceSquare #CryptoTrading #TechnicalAnalysis #MarketUpdate
#BTC/USDT
📈 Trend: Short-term Bullish / Pullback.
The price recently hit a local peak and is undergoing a minor downward correction toward the moving average.
🔹 Support:
$63,244 (Immediate price floor)
$62,392 (Solid lower support zone)
🔸 Resistance:
$64,096 (Recently established peak / profit-taking zone)
$64,500 (Next psychological resistance)
✅ Bullish Scenario:
A decisive breakout above the $64,100 mark will sustain the upward momentum, clearing a direct path toward $64,500.
❌ Bearish Scenario:
Losing the $63,200 level will temporarily disrupt the short-term bullish structure, risking a slide back into the $62,392 territory.
📊 Trading Strategy:
The overall market structure remains bullish, but chasing the price here is highly discouraged due to active short-term selling pressure.
The safest approach is to remain on the sidelines and monitor the retest of the $63,244 immediate support. If a bullish reversal signal prints at this level, prioritize BUY setups. Always maintain strict stop-loss discipline to protect capital and keep drawdowns within safe limits.
⚠️ Disclaimer: For informational purposes only. Investors should conduct their own risk assessment.
💡 Want to dive deeper into this signal? Check out my profile bio for more updates!
$BTC #BinanceSquare #CryptoTrading #TechnicalAnalysis #MarketUpdate
📈 Trend: Short-term Bullish / Pullback.
The price recently hit a local peak and is undergoing a minor downward correction toward the moving average.
🔹 Support:
$63,244 (Immediate price floor)
$62,392 (Solid lower support zone)
🔸 Resistance:
$64,096 (Recently established peak / profit-taking zone)
$64,500 (Next psychological resistance)
✅ Bullish Scenario:
A decisive breakout above the $64,100 mark will sustain the upward momentum, clearing a direct path toward $64,500.
❌ Bearish Scenario:
Losing the $63,200 level will temporarily disrupt the short-term bullish structure, risking a slide back into the $62,392 territory.
📊 Trading Strategy:
The overall market structure remains bullish, but chasing the price here is highly discouraged due to active short-term selling pressure.
The safest approach is to remain on the sidelines and monitor the retest of the $63,244 immediate support. If a bullish reversal signal prints at this level, prioritize BUY setups. Always maintain strict stop-loss discipline to protect capital and keep drawdowns within safe limits.
⚠️ Disclaimer: For informational purposes only. Investors should conduct their own risk assessment.
💡 Want to dive deeper into this signal? Check out my profile bio for more updates!
$BTC #BinanceSquare #CryptoTrading #TechnicalAnalysis #MarketUpdate
118
#BTC/USDT
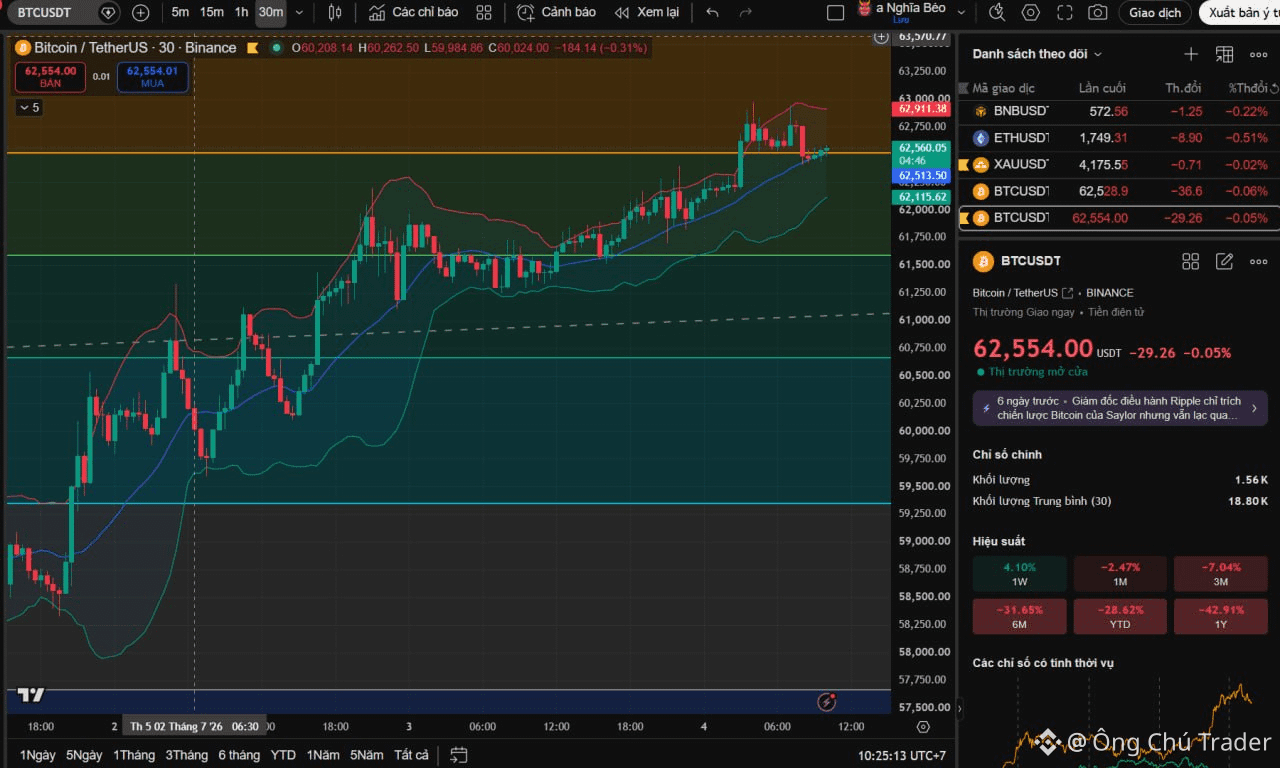
📈 Trend: Short-term Bullish / High-Level Consolidation.
BTC maintains its upward trajectory following a strong rally from the $58,500 zone to around $62,500.
The price is currently stalling near its local peak, displaying signs of consolidation and minor volatility.
🔹 Support:
$62,513 (Immediate support)
$62,115 (Strong support)
$61,500 (Deeper support in case of a correction)
🔸 Resistance:
$62,911 (Immediate resistance)
$63,000 (Psychological resistance)
$63,500 (Major overhead resistance zone)
✅ Bullish Scenario:
If BTC clears and holds above the $62,911 area, the price could continue its advance toward the $63,000 – $63,500 target range.
❌ Bearish Scenario:
Losing the $62,513 level could trigger a technical correction back to $62,115, with deeper potential extensions down to $61,500.
📊 Trading Strategy:
The overall bias remains tilted toward BUY setups, but because the price is trading at a high level, short-term profit-taking is highly expected.
Avoid FOMO buying at these elevated prices. Priority is to wait for the price to firmly defend the $62,115 – $62,513 support cluster or execute a clean, high-volume breakout above $62,911 before looking for entry positions.
⚠️ Disclaimer: For informational purposes only. Investors should conduct their own risk assessment.
💡 Want to dive deeper into this signal? Check out my profile bio for more updates!
$BTC #BinanceSquare #CryptoTrading #TechnicalAnalysis #MarketUpdate
#BTC/USDT
📈 Trend: Short-term Bullish / High-Level Consolidation.
BTC maintains its upward trajectory following a strong rally from the $58,500 zone to around $62,500.
The price is currently stalling near its local peak, displaying signs of consolidation and minor volatility.
🔹 Support:
$62,513 (Immediate support)
$62,115 (Strong support)
$61,500 (Deeper support in case of a correction)
🔸 Resistance:
$62,911 (Immediate resistance)
$63,000 (Psychological resistance)
$63,500 (Major overhead resistance zone)
✅ Bullish Scenario:
If BTC clears and holds above the $62,911 area, the price could continue its advance toward the $63,000 – $63,500 target range.
❌ Bearish Scenario:
Losing the $62,513 level could trigger a technical correction back to $62,115, with deeper potential extensions down to $61,500.
📊 Trading Strategy:
The overall bias remains tilted toward BUY setups, but because the price is trading at a high level, short-term profit-taking is highly expected.
Avoid FOMO buying at these elevated prices. Priority is to wait for the price to firmly defend the $62,115 – $62,513 support cluster or execute a clean, high-volume breakout above $62,911 before looking for entry positions.
⚠️ Disclaimer: For informational purposes only. Investors should conduct their own risk assessment.
💡 Want to dive deeper into this signal? Check out my profile bio for more updates!
$BTC #BinanceSquare #CryptoTrading #TechnicalAnalysis #MarketUpdate
📈 Trend: Short-term Bullish / High-Level Consolidation.
BTC maintains its upward trajectory following a strong rally from the $58,500 zone to around $62,500.
The price is currently stalling near its local peak, displaying signs of consolidation and minor volatility.
🔹 Support:
$62,513 (Immediate support)
$62,115 (Strong support)
$61,500 (Deeper support in case of a correction)
🔸 Resistance:
$62,911 (Immediate resistance)
$63,000 (Psychological resistance)
$63,500 (Major overhead resistance zone)
✅ Bullish Scenario:
If BTC clears and holds above the $62,911 area, the price could continue its advance toward the $63,000 – $63,500 target range.
❌ Bearish Scenario:
Losing the $62,513 level could trigger a technical correction back to $62,115, with deeper potential extensions down to $61,500.
📊 Trading Strategy:
The overall bias remains tilted toward BUY setups, but because the price is trading at a high level, short-term profit-taking is highly expected.
Avoid FOMO buying at these elevated prices. Priority is to wait for the price to firmly defend the $62,115 – $62,513 support cluster or execute a clean, high-volume breakout above $62,911 before looking for entry positions.
⚠️ Disclaimer: For informational purposes only. Investors should conduct their own risk assessment.
💡 Want to dive deeper into this signal? Check out my profile bio for more updates!
$BTC #BinanceSquare #CryptoTrading #TechnicalAnalysis #MarketUpdate
80
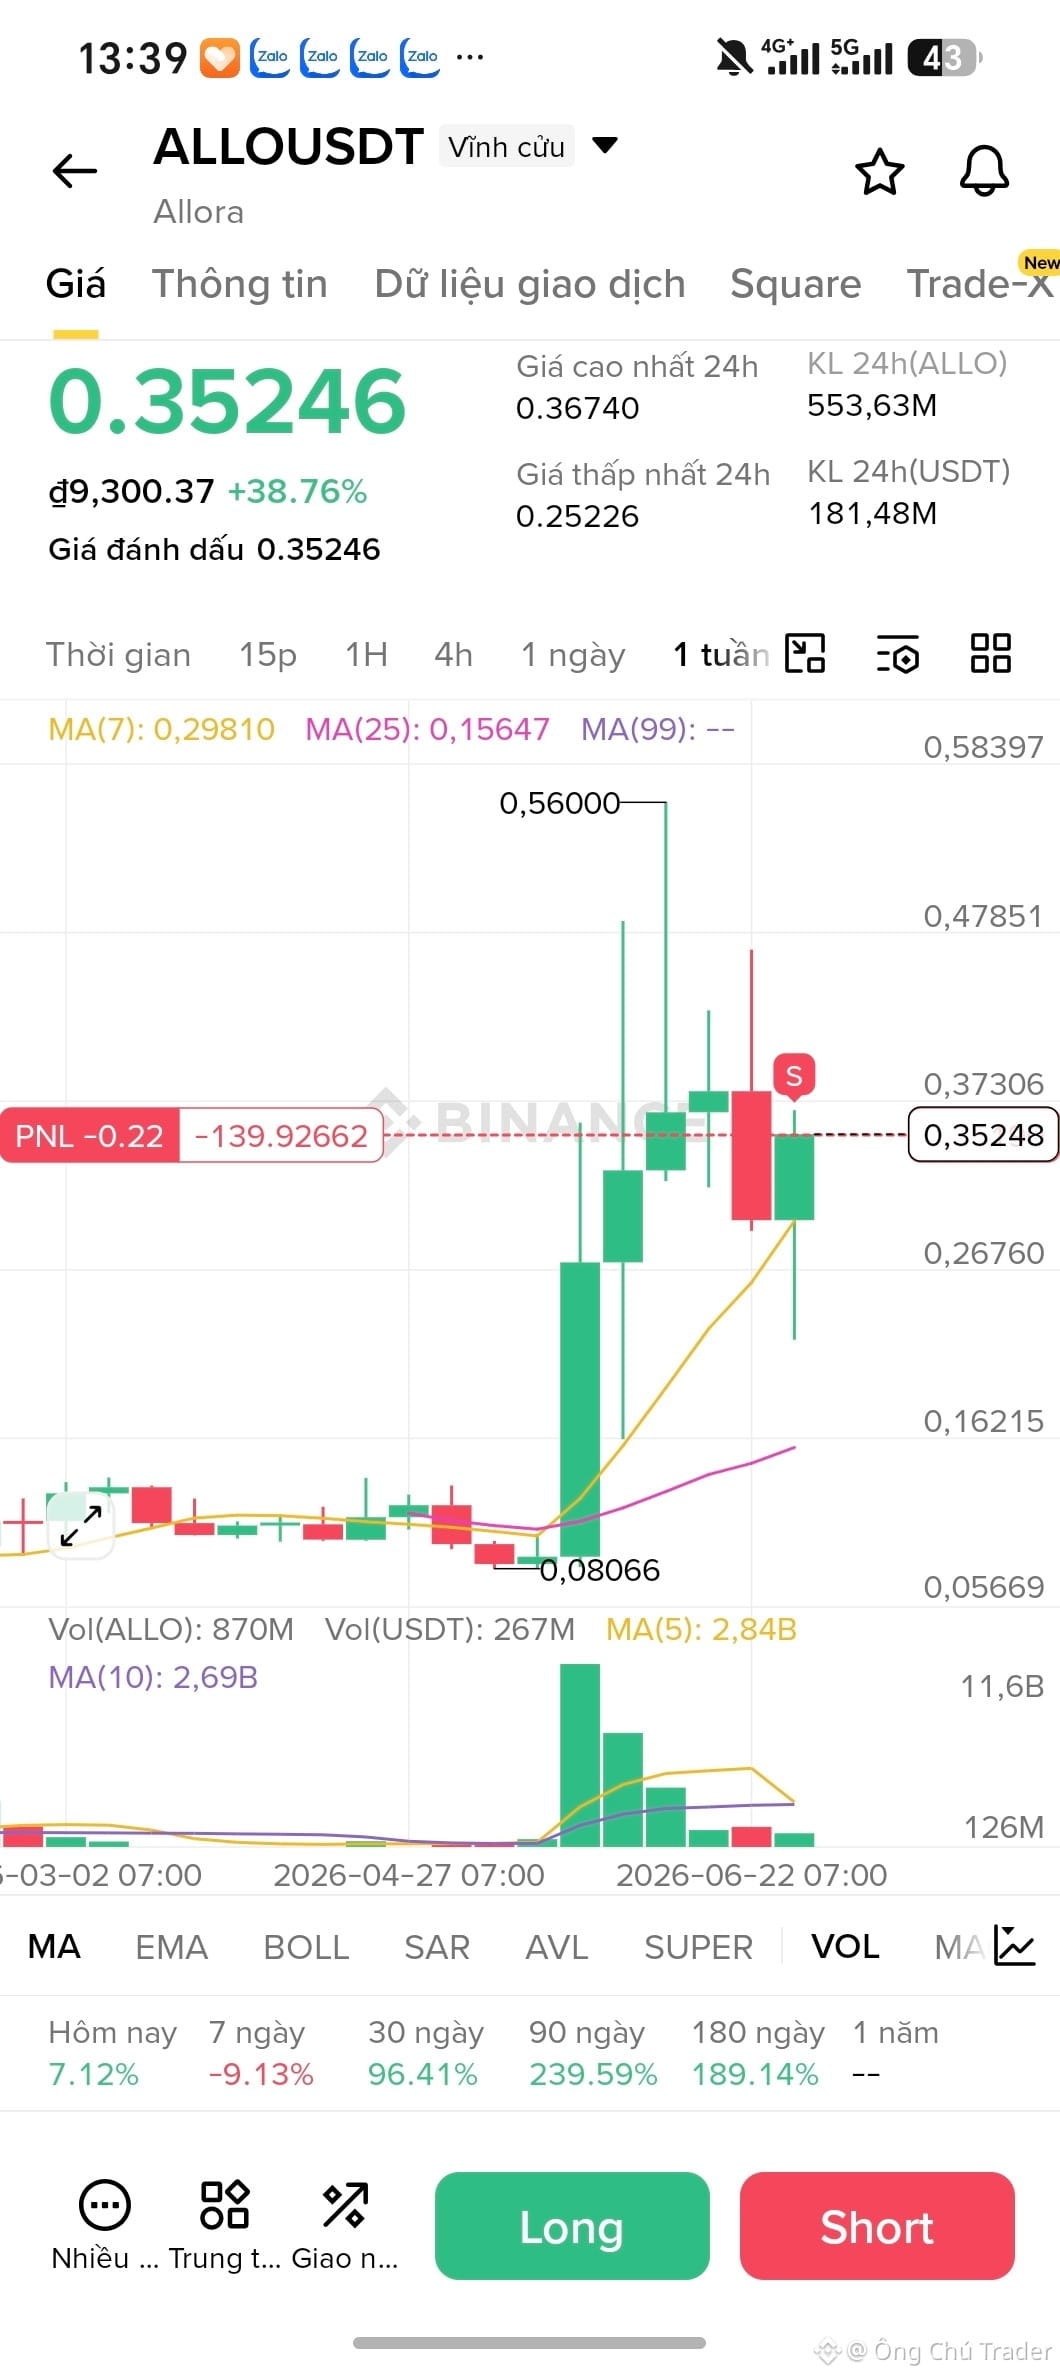
📉 ALLO/USDT - Quick SELL setup | M30 timeframe
Current trend: the price is rebounding toward the resistance zone 0.3516 – 0.3562 USDT, but it hasn’t broken through clearly yet. You can look for a short-term SELL if a rejection signal appears.
🔴 SELL Entry:
0.3510 – 0.3560 USDT
🎯 TP1: 0.3409 USDT
🎯 TP2: 0.3256 USDT
🎯 TP3: 0.3120 USDT
🟢 SL: 0.3660 USDT
✅ Nice SELL conditions:
Price cannot break above 0.3562 USDT
A red M30 candle confirms selling pressure
Or it breaks back below the 0.3409 USDT zone
⚠️ Note:
This is a short-term SELL setup, so prioritize entries when there is a confirming signal; don’t chase a SELL after the candle has already moved too far.
#ALLOUSDT #BTC☀️ #BinanceSquare #TradeCrypto $ALLO
📉 ALLO/USDT - Quick SELL setup | M30 timeframe
Current trend: the price is rebounding toward the resistance zone 0.3516 – 0.3562 USDT, but it hasn’t broken through clearly yet. You can look for a short-term SELL if a rejection signal appears.
🔴 SELL Entry:
0.3510 – 0.3560 USDT
🎯 TP1: 0.3409 USDT
🎯 TP2: 0.3256 USDT
🎯 TP3: 0.3120 USDT
🟢 SL: 0.3660 USDT
✅ Nice SELL conditions:
Price cannot break above 0.3562 USDT
A red M30 candle confirms selling pressure
Or it breaks back below the 0.3409 USDT zone
⚠️ Note:
This is a short-term SELL setup, so prioritize entries when there is a confirming signal; don’t chase a SELL after the candle has already moved too far.
#ALLOUSDT #BTC☀️ #BinanceSquare #TradeCrypto $ALLO
Current trend: the price is rebounding toward the resistance zone 0.3516 – 0.3562 USDT, but it hasn’t broken through clearly yet. You can look for a short-term SELL if a rejection signal appears.
🔴 SELL Entry:
0.3510 – 0.3560 USDT
🎯 TP1: 0.3409 USDT
🎯 TP2: 0.3256 USDT
🎯 TP3: 0.3120 USDT
🟢 SL: 0.3660 USDT
✅ Nice SELL conditions:
Price cannot break above 0.3562 USDT
A red M30 candle confirms selling pressure
Or it breaks back below the 0.3409 USDT zone
⚠️ Note:
This is a short-term SELL setup, so prioritize entries when there is a confirming signal; don’t chase a SELL after the candle has already moved too far.
#ALLOUSDT #BTC☀️ #BinanceSquare #TradeCrypto $ALLO
1
162
#BTC/USDT
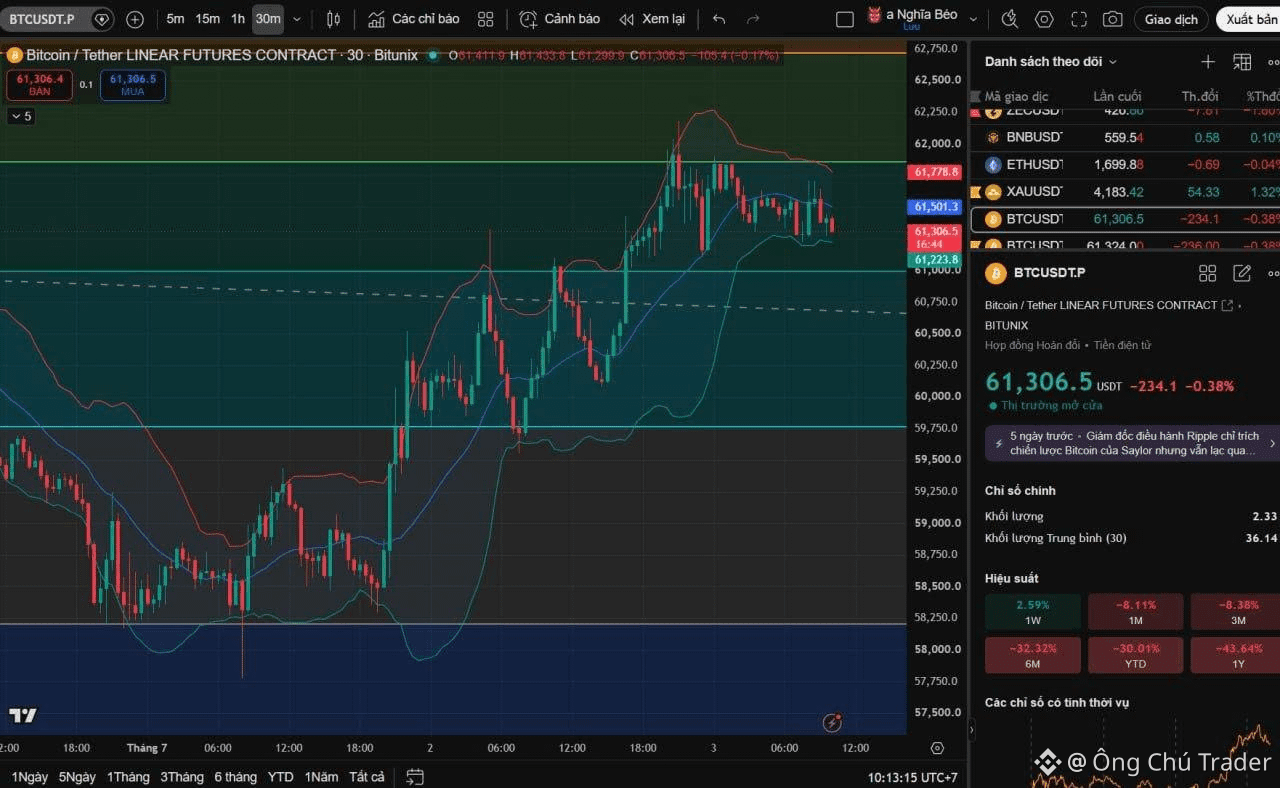
📈 Trend: Short-term Bullish / Pullback after a Rally.
The BTC/USDT pair recently recorded a strong upward move from the $58,200 zone to near $62,200. Currently, the market has entered a minor consolidation phase, trading around $61,306. While buyers still retain the upper hand, short-term profit-taking pressure has begun to emerge.
🔹 Support:
$61,223 (Immediate support)
$60,750 (Strong support)
$59,750 (Deep support in a severe correction scenario)
🔸 Resistance:
$61,501 (Immediate resistance)
$61,778 (Strong resistance)
$62,200 (Major peak / resistance zone)
✅ Above $61,501:
If BTC breaks out and successfully maintains its footing above this level, the upward momentum could extend, targeting the $61,778 – $62,200 cluster.
❌ Below $61,223:
In the event that this immediate support level is lost, the price is highly likely to retreat further toward $60,750, or deeper into the $59,750 zone.
📊 Market Outlook:
Although BTC preserves its short-term bullish structure, the current pullback is a signal that demands caution. Investors should avoid FOMO by chasing the price here.
The priority strategy is to remain patient and monitor price action: either look for a solid defense at $61,223 or wait for a confirmed breakout above the $61,501 threshold before exploring entry positions.
⚠️ Disclaimer: For informational purposes only. Investors should conduct their own risk assessment.
💡 Want to dive deeper into this signal? Check out my profile bio for more updates!
$BTC #BinanceSquare #CryptoTrading #TechnicalAnalysis #MarketUpdate
#BTC/USDT
📈 Trend: Short-term Bullish / Pullback after a Rally.
The BTC/USDT pair recently recorded a strong upward move from the $58,200 zone to near $62,200. Currently, the market has entered a minor consolidation phase, trading around $61,306. While buyers still retain the upper hand, short-term profit-taking pressure has begun to emerge.
🔹 Support:
$61,223 (Immediate support)
$60,750 (Strong support)
$59,750 (Deep support in a severe correction scenario)
🔸 Resistance:
$61,501 (Immediate resistance)
$61,778 (Strong resistance)
$62,200 (Major peak / resistance zone)
✅ Above $61,501:
If BTC breaks out and successfully maintains its footing above this level, the upward momentum could extend, targeting the $61,778 – $62,200 cluster.
❌ Below $61,223:
In the event that this immediate support level is lost, the price is highly likely to retreat further toward $60,750, or deeper into the $59,750 zone.
📊 Market Outlook:
Although BTC preserves its short-term bullish structure, the current pullback is a signal that demands caution. Investors should avoid FOMO by chasing the price here.
The priority strategy is to remain patient and monitor price action: either look for a solid defense at $61,223 or wait for a confirmed breakout above the $61,501 threshold before exploring entry positions.
⚠️ Disclaimer: For informational purposes only. Investors should conduct their own risk assessment.
💡 Want to dive deeper into this signal? Check out my profile bio for more updates!
$BTC #BinanceSquare #CryptoTrading #TechnicalAnalysis #MarketUpdate
📈 Trend: Short-term Bullish / Pullback after a Rally.
The BTC/USDT pair recently recorded a strong upward move from the $58,200 zone to near $62,200. Currently, the market has entered a minor consolidation phase, trading around $61,306. While buyers still retain the upper hand, short-term profit-taking pressure has begun to emerge.
🔹 Support:
$61,223 (Immediate support)
$60,750 (Strong support)
$59,750 (Deep support in a severe correction scenario)
🔸 Resistance:
$61,501 (Immediate resistance)
$61,778 (Strong resistance)
$62,200 (Major peak / resistance zone)
✅ Above $61,501:
If BTC breaks out and successfully maintains its footing above this level, the upward momentum could extend, targeting the $61,778 – $62,200 cluster.
❌ Below $61,223:
In the event that this immediate support level is lost, the price is highly likely to retreat further toward $60,750, or deeper into the $59,750 zone.
📊 Market Outlook:
Although BTC preserves its short-term bullish structure, the current pullback is a signal that demands caution. Investors should avoid FOMO by chasing the price here.
The priority strategy is to remain patient and monitor price action: either look for a solid defense at $61,223 or wait for a confirmed breakout above the $61,501 threshold before exploring entry positions.
⚠️ Disclaimer: For informational purposes only. Investors should conduct their own risk assessment.
💡 Want to dive deeper into this signal? Check out my profile bio for more updates!
$BTC #BinanceSquare #CryptoTrading #TechnicalAnalysis #MarketUpdate
89
#BNB/USDT
{spot}(BNBUSDT)
📉 Trend: Short-term Rebound within a Bearish Trend.
The M30 timeframe indicates BNB has recovered from the $540 bottom to around $560.
However, the price has yet to clear major overhead resistance, meaning the broader trend remains under selling pressure.
🔹 Support:
$556.15 (Immediate support)
$552.00 (Mid-range support)
$540.00 – $544.00 (Strong support)
🔸 Resistance:
$562.03 (Immediate resistance)
$564.00 – $568.00 (Strong resistance zone)
$572.00 (Next overhead resistance)
✅ Above $562.03:
If BNB clears and sustains this level, the price could continue its recovery toward $564 – $568, with extended targets at $572.
❌ Below $556.15:
Losing this area risks a pullback to $552, with deeper potential extensions targeting the $544 – $540 zone.
📊 Market Outlook:
BNB exhibits recovery interest but has not yet confirmed a strong structural reversal. Priority remains to wait for either a clean breakout above the $562 – $564 cluster or a healthy pullback that firmly defends $556 before considering entries. Avoid FOMO buying as the price trades close to resistance.
⚠️ Disclaimer: For informational purposes only. Investors should conduct their own risk assessment.
💡 Want to dive deeper into this signal? Check out my profile bio for more updates!
$BNB #BinanceSquare #CryptoTrading #TechnicalAnalysis #MarketUpdate
#BNB/USDT
📉 Trend: Short-term Rebound within a Bearish Trend.
The M30 timeframe indicates BNB has recovered from the $540 bottom to around $560.
However, the price has yet to clear major overhead resistance, meaning the broader trend remains under selling pressure.
🔹 Support:
$556.15 (Immediate support)
$552.00 (Mid-range support)
$540.00 – $544.00 (Strong support)
🔸 Resistance:
$562.03 (Immediate resistance)
$564.00 – $568.00 (Strong resistance zone)
$572.00 (Next overhead resistance)
✅ Above $562.03:
If BNB clears and sustains this level, the price could continue its recovery toward $564 – $568, with extended targets at $572.
❌ Below $556.15:
Losing this area risks a pullback to $552, with deeper potential extensions targeting the $544 – $540 zone.
📊 Market Outlook:
BNB exhibits recovery interest but has not yet confirmed a strong structural reversal. Priority remains to wait for either a clean breakout above the $562 – $564 cluster or a healthy pullback that firmly defends $556 before considering entries. Avoid FOMO buying as the price trades close to resistance.
⚠️ Disclaimer: For informational purposes only. Investors should conduct their own risk assessment.
💡 Want to dive deeper into this signal? Check out my profile bio for more updates!
$BNB #BinanceSquare #CryptoTrading #TechnicalAnalysis #MarketUpdate
📉 Trend: Short-term Rebound within a Bearish Trend.
The M30 timeframe indicates BNB has recovered from the $540 bottom to around $560.
However, the price has yet to clear major overhead resistance, meaning the broader trend remains under selling pressure.
🔹 Support:
$556.15 (Immediate support)
$552.00 (Mid-range support)
$540.00 – $544.00 (Strong support)
🔸 Resistance:
$562.03 (Immediate resistance)
$564.00 – $568.00 (Strong resistance zone)
$572.00 (Next overhead resistance)
✅ Above $562.03:
If BNB clears and sustains this level, the price could continue its recovery toward $564 – $568, with extended targets at $572.
❌ Below $556.15:
Losing this area risks a pullback to $552, with deeper potential extensions targeting the $544 – $540 zone.
📊 Market Outlook:
BNB exhibits recovery interest but has not yet confirmed a strong structural reversal. Priority remains to wait for either a clean breakout above the $562 – $564 cluster or a healthy pullback that firmly defends $556 before considering entries. Avoid FOMO buying as the price trades close to resistance.
⚠️ Disclaimer: For informational purposes only. Investors should conduct their own risk assessment.
💡 Want to dive deeper into this signal? Check out my profile bio for more updates!
$BNB #BinanceSquare #CryptoTrading #TechnicalAnalysis #MarketUpdate
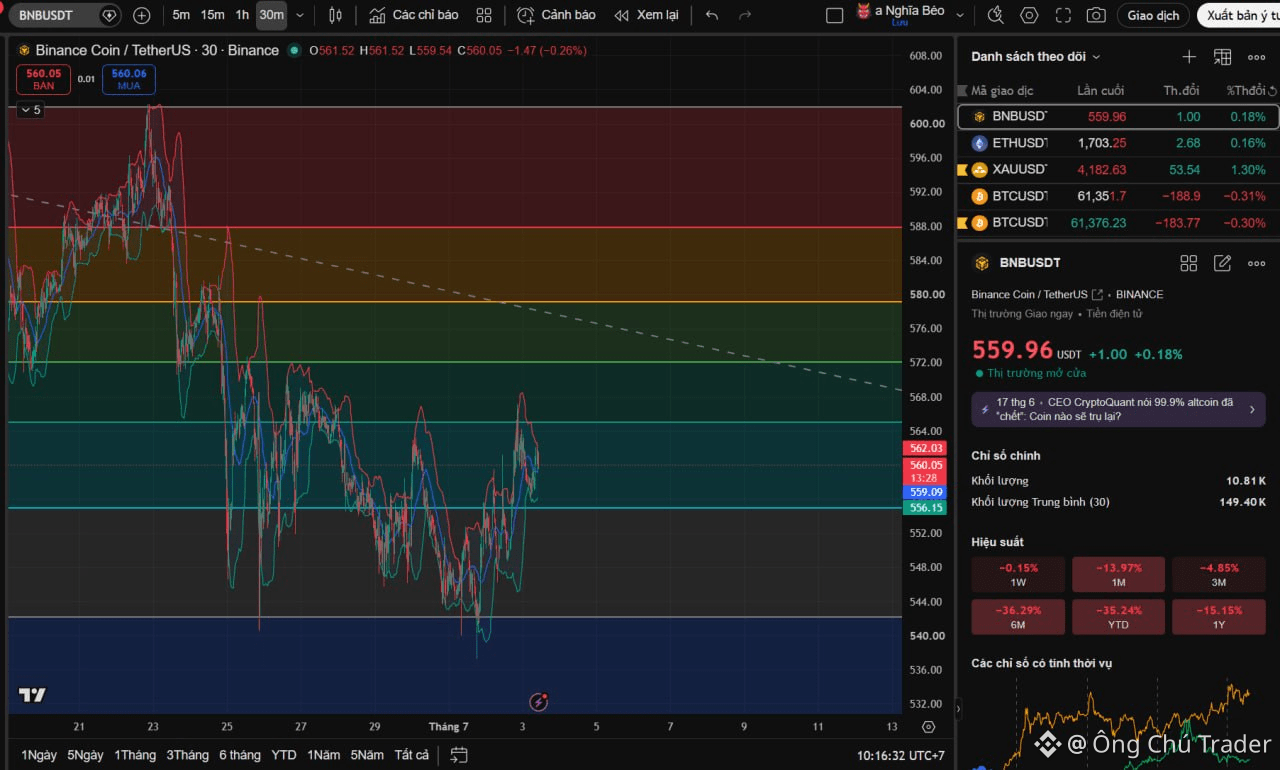
83
Log in to explore more content
Join global crypto users on Binance Square
⚡️ Get latest and useful information about crypto.
💬 Trusted by the world’s largest crypto exchange.
👍 Discover real insights from verified creators.
Email / Phone number
Trending Topics
BinanceLaunchesBinanceIntelligence
389,315 views
3,053 Discussing
#BinanceLaunchesBinanceIntelligence
⚡ AI Meets Crypto Trading: Binance Intelligence is Live! ⚡
Trading just got a massive upgrade with Binance's new AI suite:
1️⃣ Binance AI: Personalized market dashboards & 4-hour macro market audio briefings.
2️⃣ Binance AI Pro: Build and run automated strategies using simple natural language prompts.
3️⃣ Binance Agent OS: Developer framework for autonomous financial AI agents.
Describe your strategy ➔ Paper test ➔ Execute 24/7.
Are you building your next trading strategy with AI? Drop your thoughts below! 👇
#BinanceLaunchesBinanceIntelligence #BinanceSquare #CryptoAI #Trading $EDEN
Hazi BNB
·0 Likes
·848 views
BitcoinTargets2026OpenAt$87570
2,186 views
74 Discussing
BitcoinRejectedAt$87KThirdTime
2,228 views
62 Discussing