

财道
4.6k Posts

财道
Report
Block User
Web3自媒体博主、两情相悦体系缔造者!退休计划发起人!长期定投BTC和纳指!136交易体系教学!微脉:cdkevin B站:财道先生 推特:@VC_kxs 币安邀请码:C32IRJK0
Open Trade
Occasional Trader
5.6 Years
6 Following
4.6K+ Followers
10.0K+ Liked
Posts
Portfolio
All
Quotes
Videos
Live
·
--
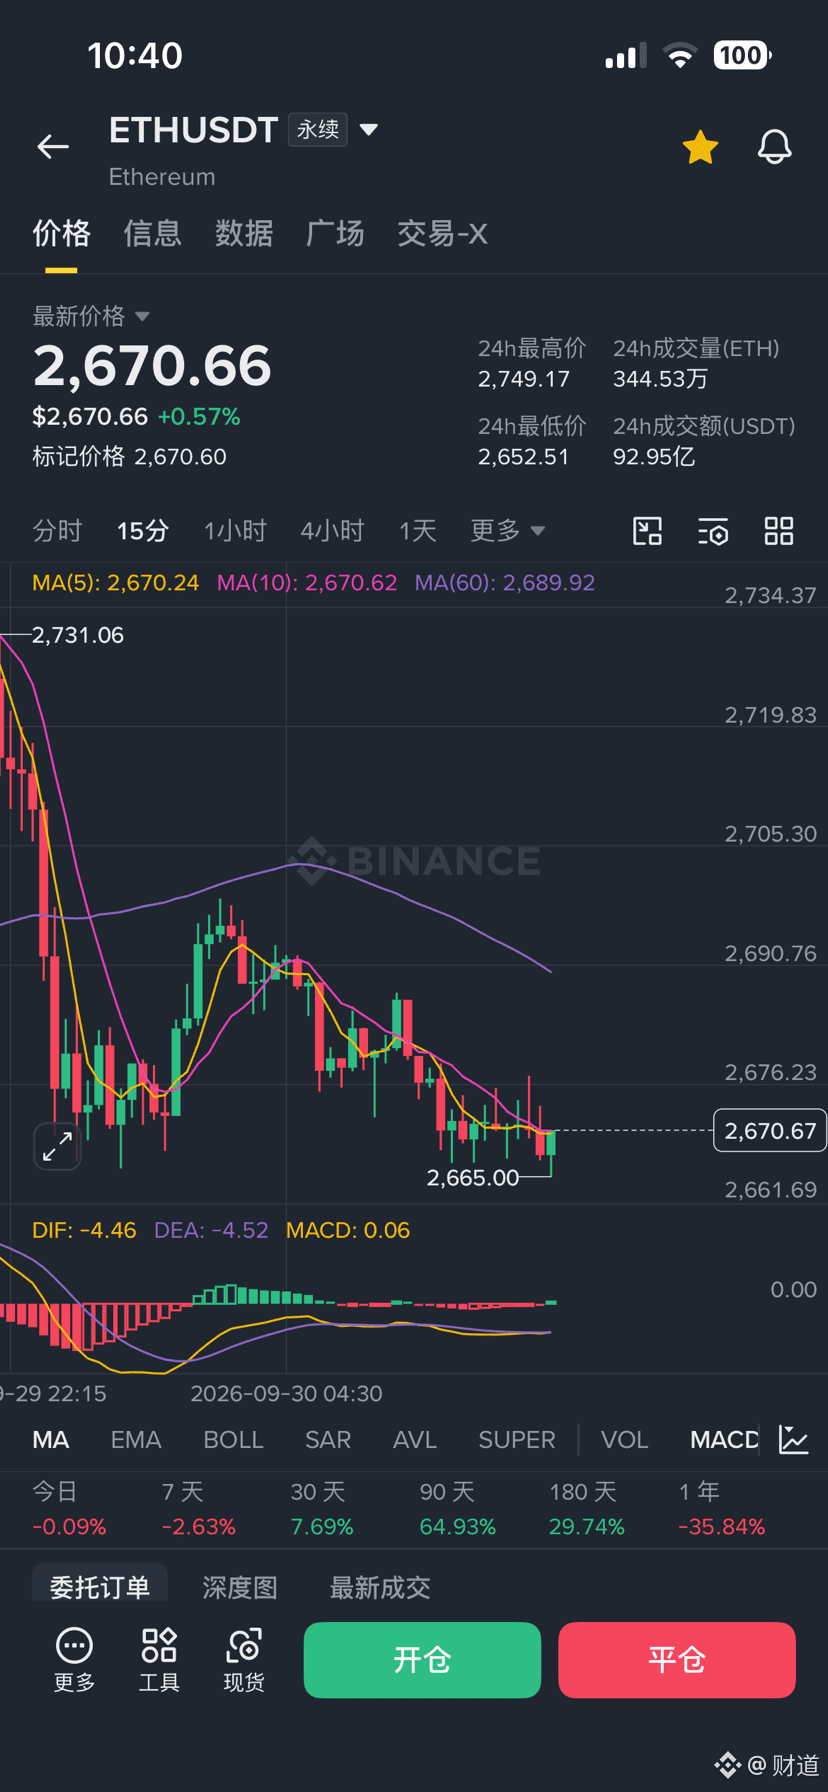
More signals are coming out. After confirming the close, you can add another layer of position. The upper lifeline pressure level is the first target. Once it reaches there, set a trailing stop, then watch to see whether it breaks above. On the one-hour timeframe, three green candles have formed. After three green candles appear, lock in profits. This time, if it can break the pressure level, take profit at 2735!
More signals are coming out. After confirming the close, you can add another layer of position. The upper lifeline pressure level is the first target. Once it reaches there, set a trailing stop, then watch to see whether it breaks above. On the one-hour timeframe, three green candles have formed. After three green candles appear, lock in profits. This time, if it can break the pressure level, take profit at 2735!
476
·
--
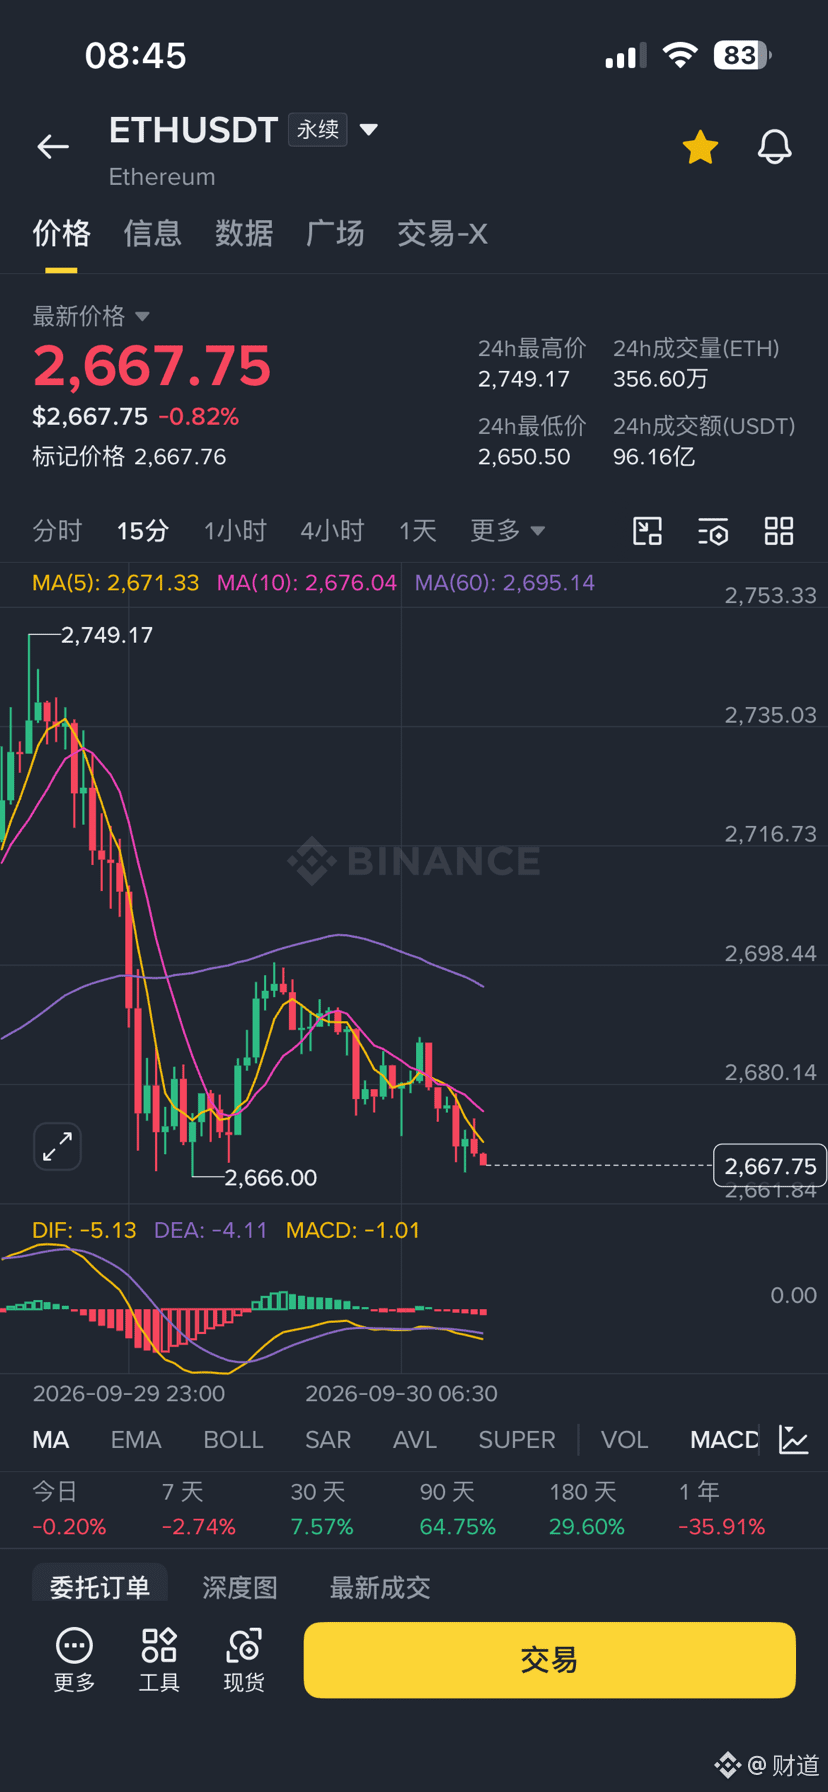
Next, when we come out again and two feelings are like love at the golden cross confirmation, that is when it's a one-layer position and you add more entries. Wait patiently for the signal to be confirmed. Don’t enter before it’s confirmed. If it can drop, let it drop a bit more. The resistance level for the bounce today is 2695. Once it reaches there, lock in profits. If it breaks upward and holds for an hour, it will turn green; pull it up more!
Next, when we come out again and two feelings are like love at the golden cross confirmation, that is when it's a one-layer position and you add more entries. Wait patiently for the signal to be confirmed. Don’t enter before it’s confirmed. If it can drop, let it drop a bit more. The resistance level for the bounce today is 2695. Once it reaches there, lock in profits. If it breaks upward and holds for an hour, it will turn green; pull it up more!
716
·
--
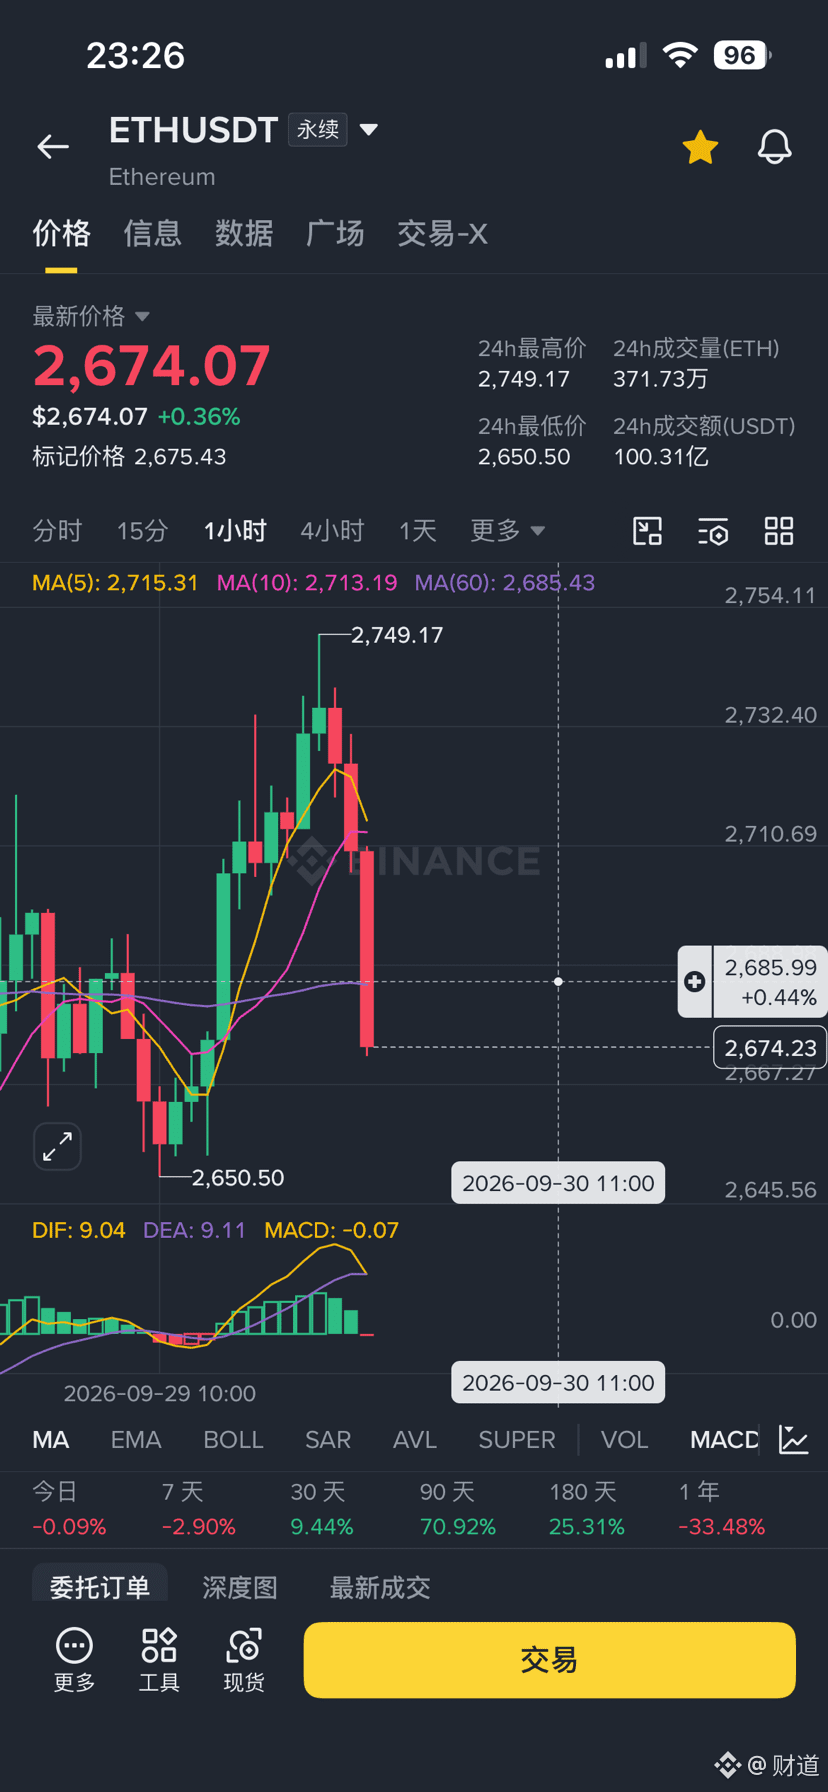
Didn’t hold up for the aerial refueling; after the long position profit got cut, wait for another opportunity. If this pullback has been eaten, you can lock in profits now as well, because it hasn’t reached 2770 yet—it's just a bit short. If it hasn’t been eaten, then wait for the bottom rebound and go long. When the 15-minute timeframe meets the signal, you need to skip one signal first; only then can you enter long according to the 136 entry. Also note: you should wait for an hour to end with three consecutive red candles; only after the second 15-minute signal meets the “two hearts in harmony” Golden Cross confirmation can you go long. If it rallies straight up and doesn’t give you a chance, then don’t enter!
Didn’t hold up for the aerial refueling; after the long position profit got cut, wait for another opportunity. If this pullback has been eaten, you can lock in profits now as well, because it hasn’t reached 2770 yet—it's just a bit short. If it hasn’t been eaten, then wait for the bottom rebound and go long. When the 15-minute timeframe meets the signal, you need to skip one signal first; only then can you enter long according to the 136 entry. Also note: you should wait for an hour to end with three consecutive red candles; only after the second 15-minute signal meets the “two hearts in harmony” Golden Cross confirmation can you go long. If it rallies straight up and doesn’t give you a chance, then don’t enter!
685
·
--
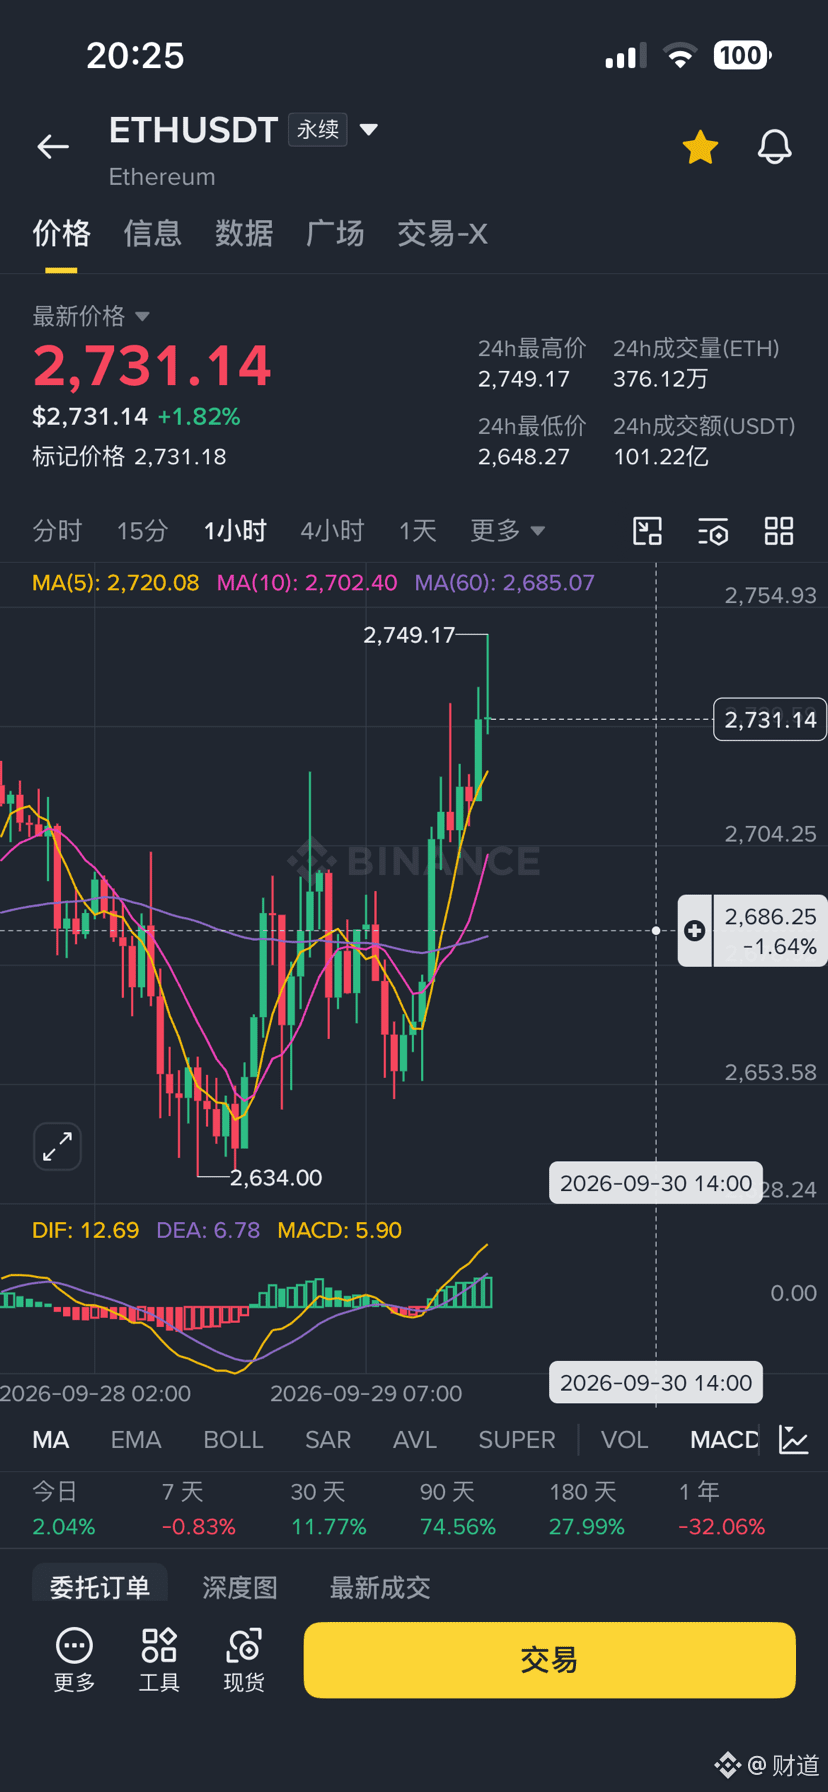
Trailing stop not triggered—keep locking in profit. The already stopped-out position—wait for the next signal again. The pressure level 2770 hasn’t been reached yet, so don’t take the pullback. If it can be pulled up to around 2770 and the turning point confirms (bearish crossover), then proceed with the 136 short; otherwise, if it doesn’t reach that level, keep the short open—don’t do anything else. Let it drop down to the 2685 support level without breaking it, then add shorts. If it still turns into a ‘fuel up for long’ situation, add for long—fuel up for long!
Trailing stop not triggered—keep locking in profit. The already stopped-out position—wait for the next signal again. The pressure level 2770 hasn’t been reached yet, so don’t take the pullback. If it can be pulled up to around 2770 and the turning point confirms (bearish crossover), then proceed with the 136 short; otherwise, if it doesn’t reach that level, keep the short open—don’t do anything else. Let it drop down to the 2685 support level without breaking it, then add shorts. If it still turns into a ‘fuel up for long’ situation, add for long—fuel up for long!
2
1k
·
--
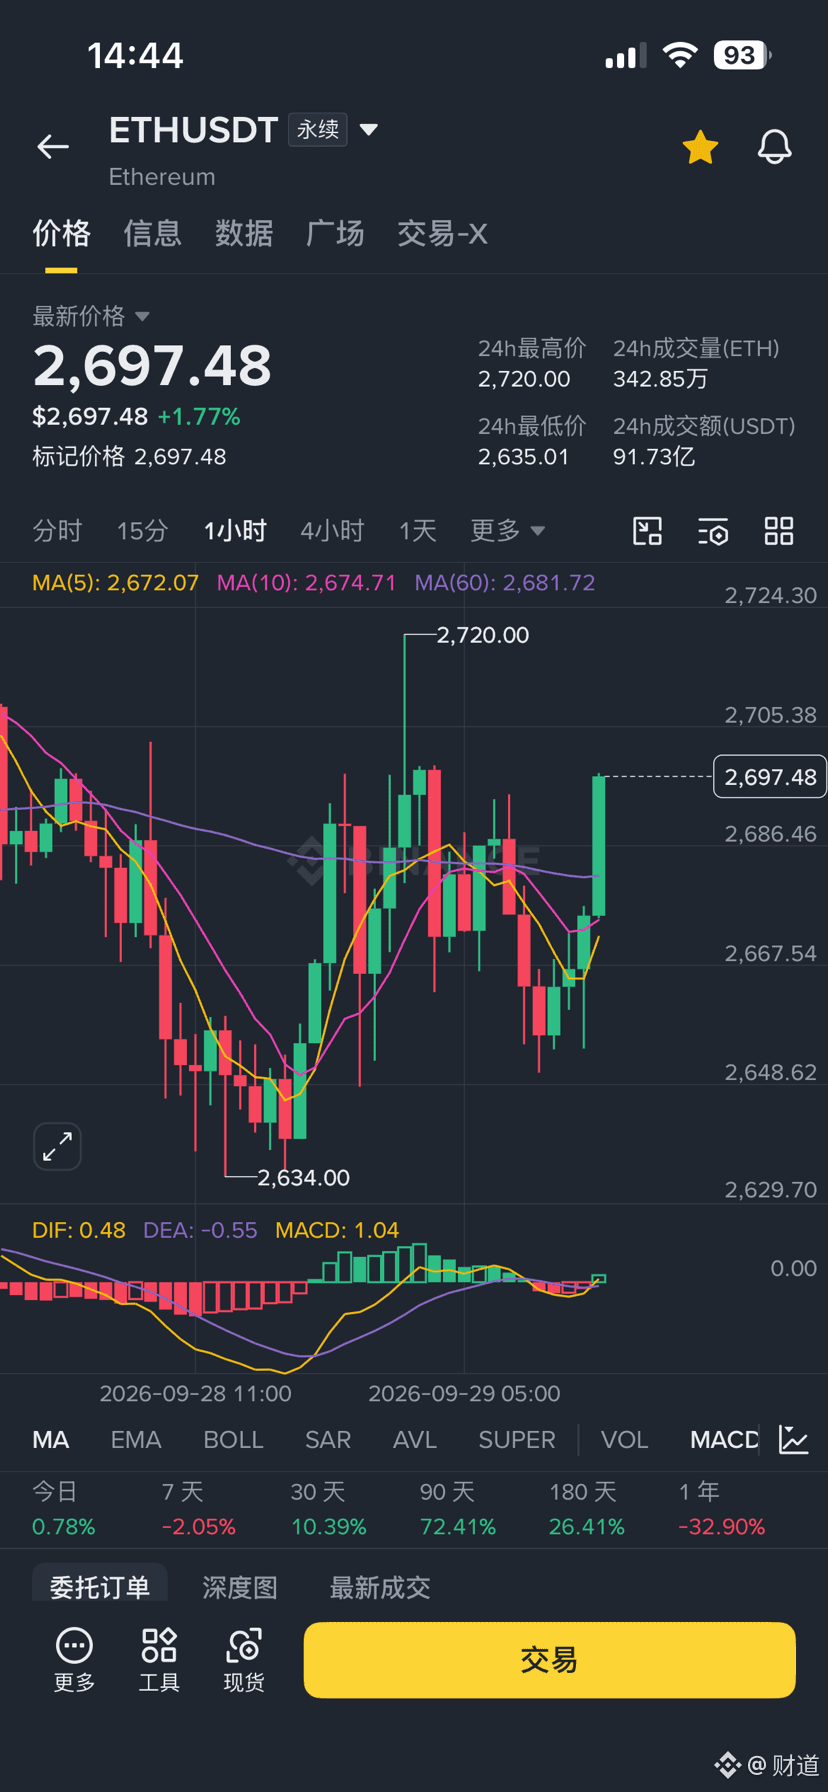
Even on a one-hour cycle it started turning green. Without giving the chance to add to the position, profits from a long position in a single layer were also directly locked. Then it started breaking above 2680—so we’ll look at the previous high of 2720. Once it reaches there, lock in more profit and keep it; same as before. No shorts for now, because the next four-hour cycle still needs to work harder for more. So if we can reach 2770, take profit! There hasn’t been a one-time clear opportunity. If there’s a pullback and it’s at a loss on your profit, then let it come down—wait for fresh long signals before entering again!
Even on a one-hour cycle it started turning green. Without giving the chance to add to the position, profits from a long position in a single layer were also directly locked. Then it started breaking above 2680—so we’ll look at the previous high of 2720. Once it reaches there, lock in more profit and keep it; same as before. No shorts for now, because the next four-hour cycle still needs to work harder for more. So if we can reach 2770, take profit! There hasn’t been a one-time clear opportunity. If there’s a pullback and it’s at a loss on your profit, then let it come down—wait for fresh long signals before entering again!
1
1.4k
·
--
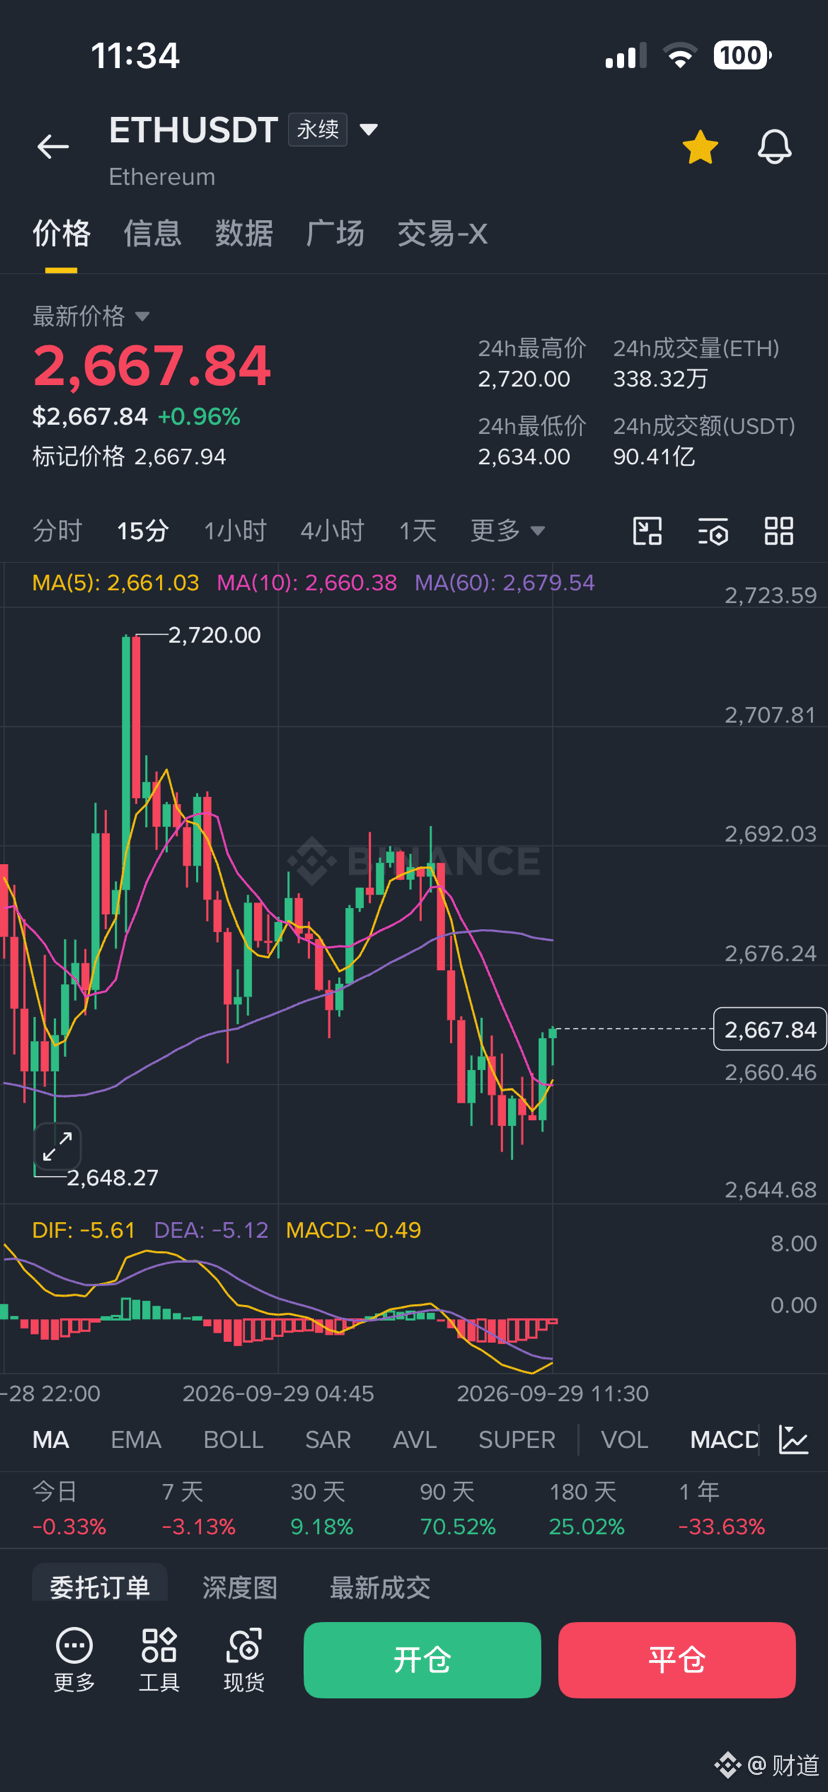
After the signal is confirmed, you can enter with the first layer of position. After a morning of consolidation and sideways volatility, once it successfully moves out of a red downward move and the trends across the various timeframes come back into alignment, the intraday pressure level is still 2680. Only when price breaks upward past this level is it a better time to go long for more profit. After entering with one layer, if it doesn’t push up, wait for the next pullback—then, when it again meets the criteria, add to the position with a stop loss and take profit!
After the signal is confirmed, you can enter with the first layer of position. After a morning of consolidation and sideways volatility, once it successfully moves out of a red downward move and the trends across the various timeframes come back into alignment, the intraday pressure level is still 2680. Only when price breaks upward past this level is it a better time to go long for more profit. After entering with one layer, if it doesn’t push up, wait for the next pullback—then, when it again meets the criteria, add to the position with a stop loss and take profit!
602
·
--
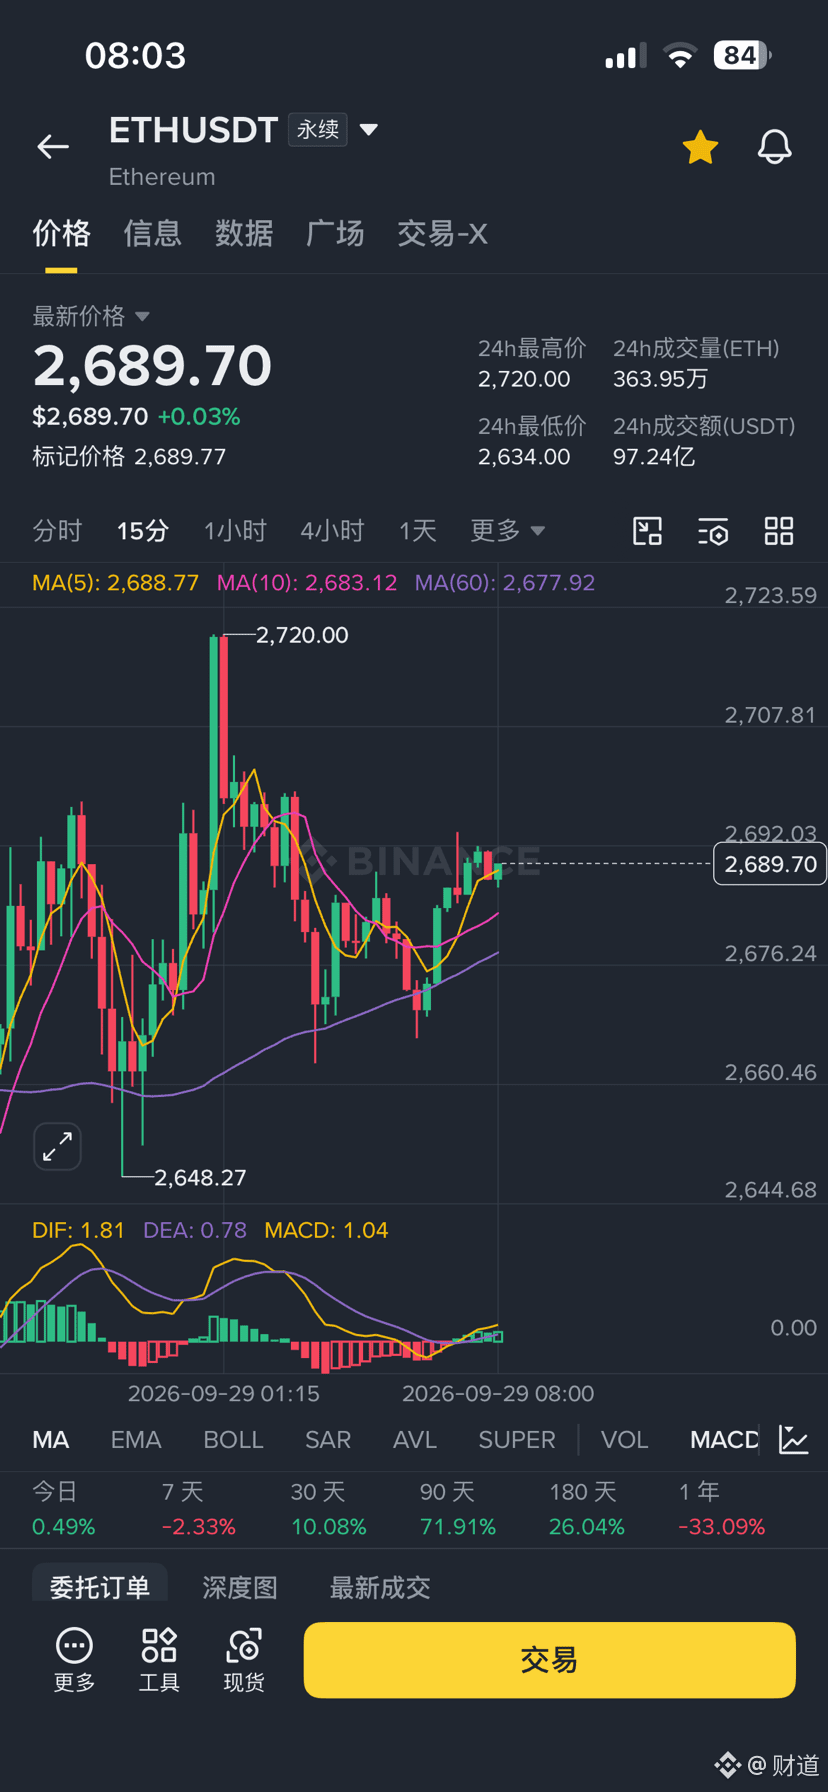
At present, the multi-level cycles are inconsistent. Let it continue consolidating; if there’s a pullback, and then it turns red, only enter when a renewed golden cross is confirmed—when our conditions are met. When market conditions across different timeframes are inconsistent, let the market oscillate and repair itself. Only act again after it has repaired to the position and signals we want!
At present, the multi-level cycles are inconsistent. Let it continue consolidating; if there’s a pullback, and then it turns red, only enter when a renewed golden cross is confirmed—when our conditions are met. When market conditions across different timeframes are inconsistent, let the market oscillate and repair itself. Only act again after it has repaired to the position and signals we want!
2
795
·
--
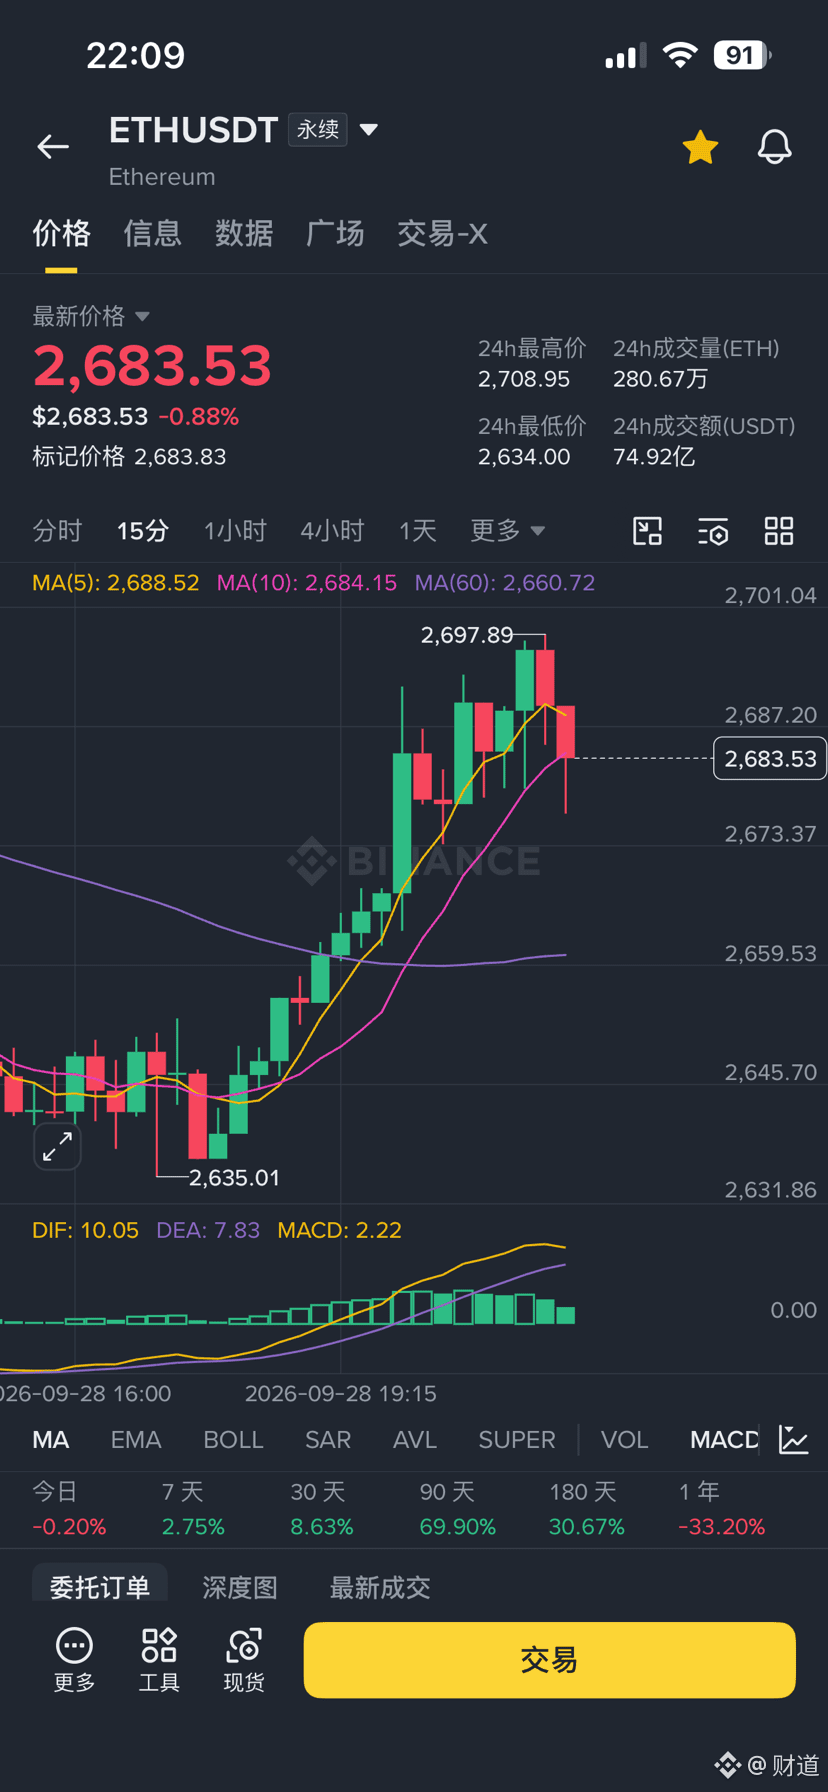
Lock in the profit with long positions. If price doesn’t continue to rise, when it reaches the profit-taking point for longs, exit. For those who are flat (no position), be patient and wait 15 minutes for a turn. Take the “two-candle mutual affection” dead-cross confirmation signal, then eat (enter) at 136 for a one-hour cycle’s death dead-cross. If the signal isn’t formed, don’t rush in early—prevent getting caught as price continues to break above the resistance level!
Lock in the profit with long positions. If price doesn’t continue to rise, when it reaches the profit-taking point for longs, exit. For those who are flat (no position), be patient and wait 15 minutes for a turn. Take the “two-candle mutual affection” dead-cross confirmation signal, then eat (enter) at 136 for a one-hour cycle’s death dead-cross. If the signal isn’t formed, don’t rush in early—prevent getting caught as price continues to break above the resistance level!
770
·
--
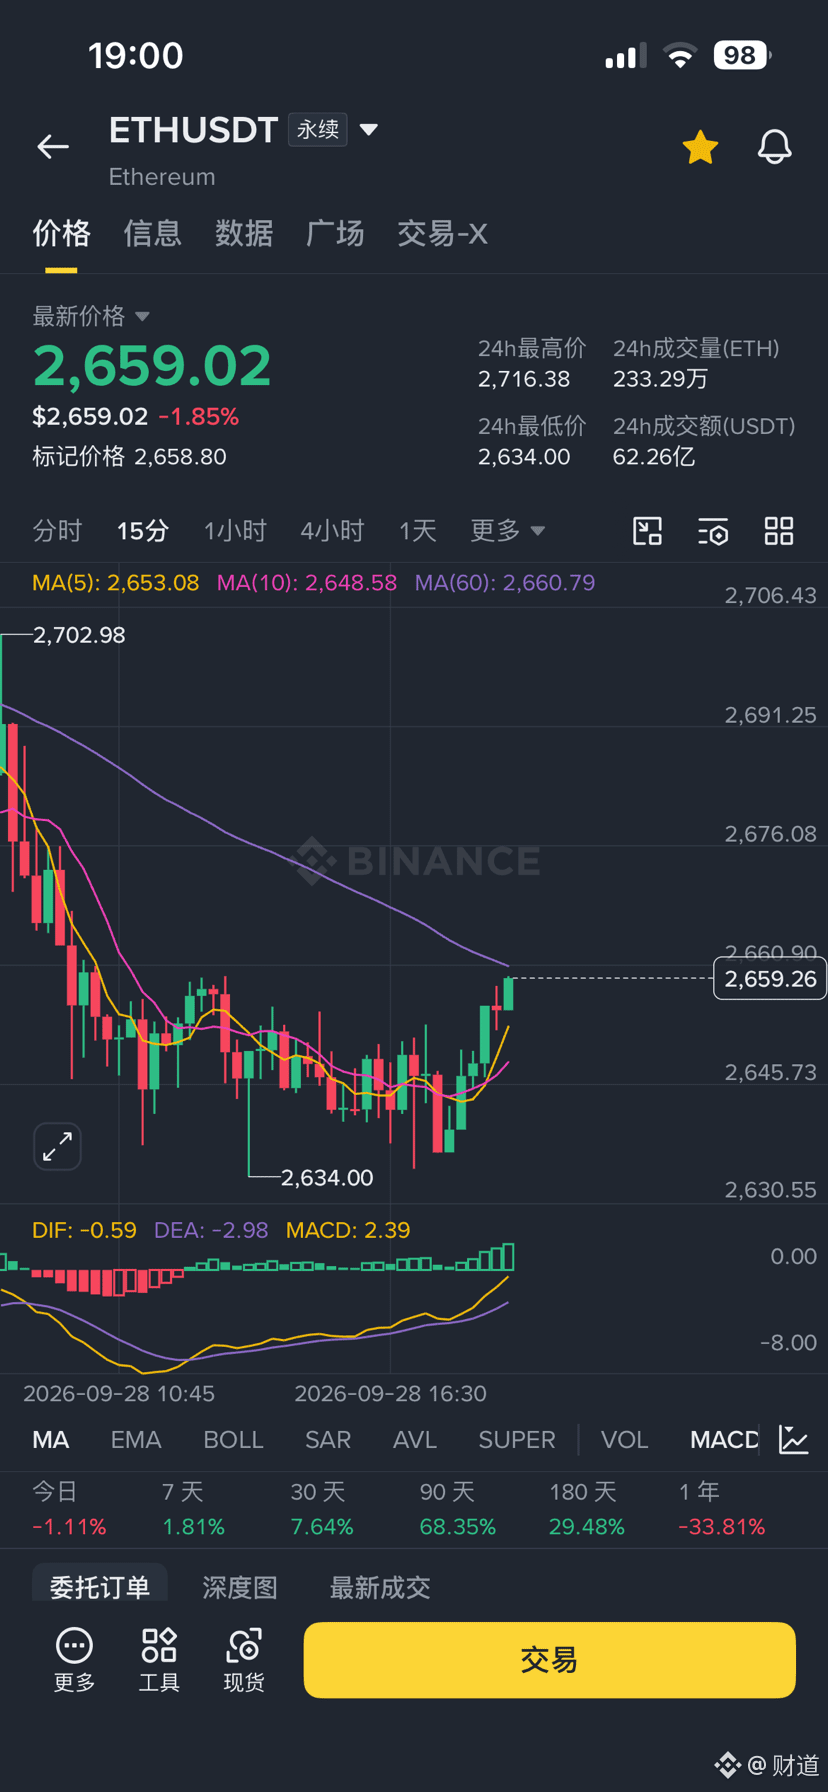
Now we’re approaching the first pressure level. Take your time to do your trailing stop and be ready. Next, we wait for a breakout—then you’ll profit by taking three green candles in about an hour. 2684 is today’s intraday resistance. When price reaches this level, lock in more profit. If it doesn’t break and hold above it, the bullish move is over. So if you want to short first and then go long, to reverse the行情, you must break 2684!
Now we’re approaching the first pressure level. Take your time to do your trailing stop and be ready. Next, we wait for a breakout—then you’ll profit by taking three green candles in about an hour. 2684 is today’s intraday resistance. When price reaches this level, lock in more profit. If it doesn’t break and hold above it, the bullish move is over. So if you want to short first and then go long, to reverse the行情, you must break 2684!
1
1.1k
·
--
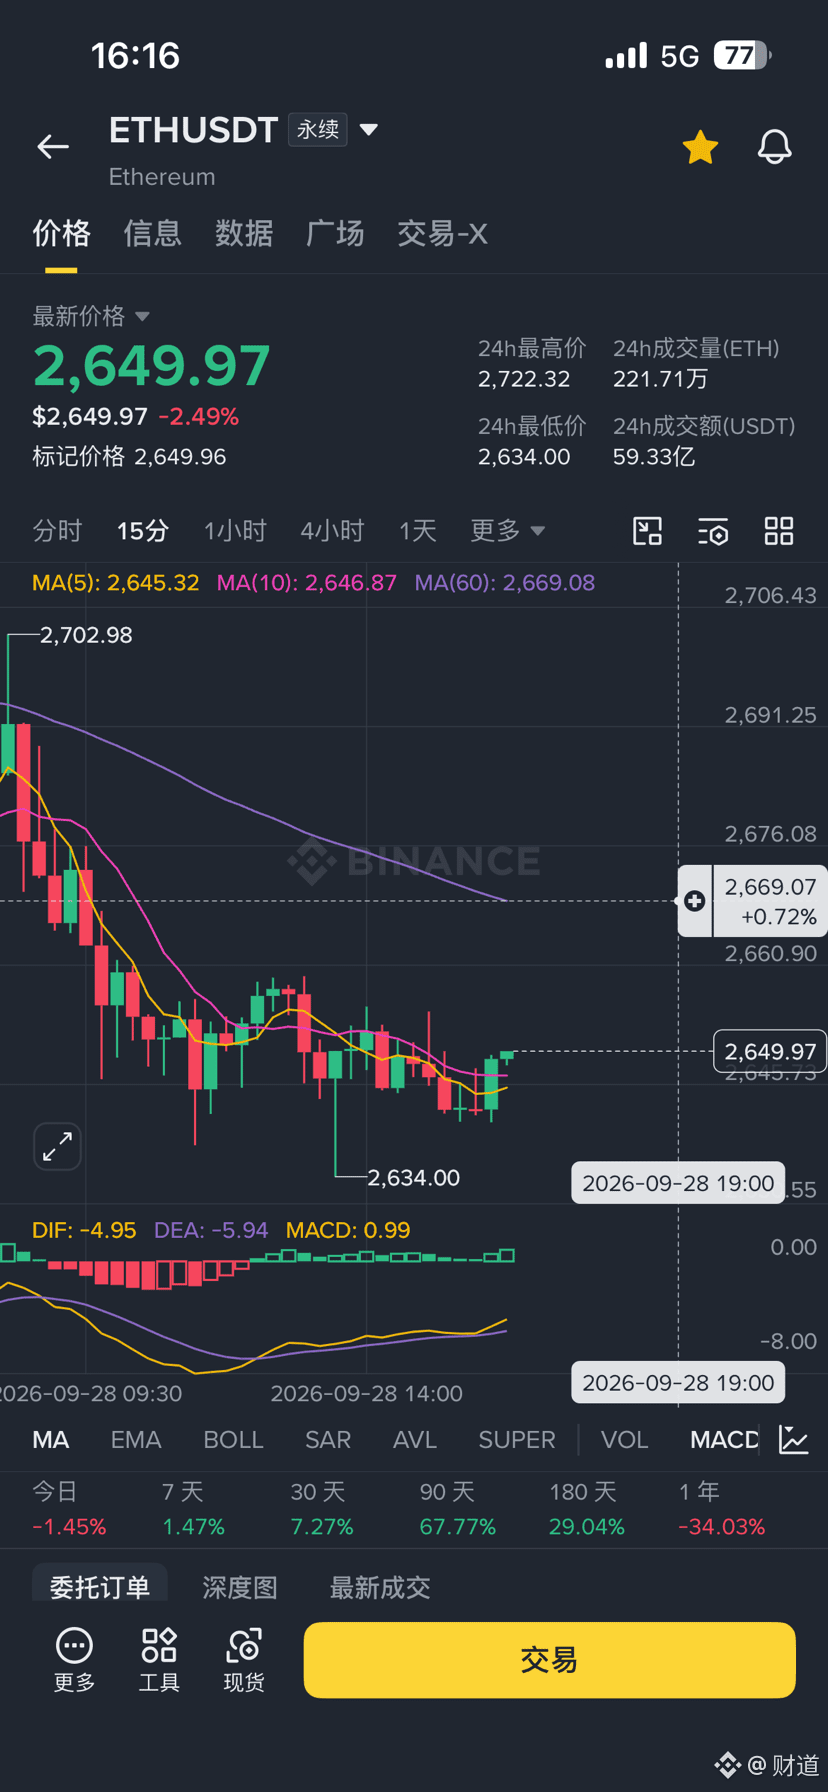
Still another layer of warehouse stocking for more gains. At the moment, there’s no signal for adding positions. The pressure level has eased, and we’ve come to 2670. Once price reaches this level, it’s time to lock in profits. Only if it breaks higher will it show an exit with an hour of green action—especially watch the scenario where after the next consolidation, within the following hour we see three consecutive green candles. If it manages three greens but still doesn’t have a big rally, you must activate a break-even stop-loss. If it fails to reach the intraday pressure area near 2680 in that attempt, then once it’s farther away it will drop again. Then, after it bounces up from the bottom for a while, we can re-enter for more upside!
Still another layer of warehouse stocking for more gains. At the moment, there’s no signal for adding positions. The pressure level has eased, and we’ve come to 2670. Once price reaches this level, it’s time to lock in profits. Only if it breaks higher will it show an exit with an hour of green action—especially watch the scenario where after the next consolidation, within the following hour we see three consecutive green candles. If it manages three greens but still doesn’t have a big rally, you must activate a break-even stop-loss. If it fails to reach the intraday pressure area near 2680 in that attempt, then once it’s farther away it will drop again. Then, after it bounces up from the bottom for a while, we can re-enter for more upside!
797
·
--
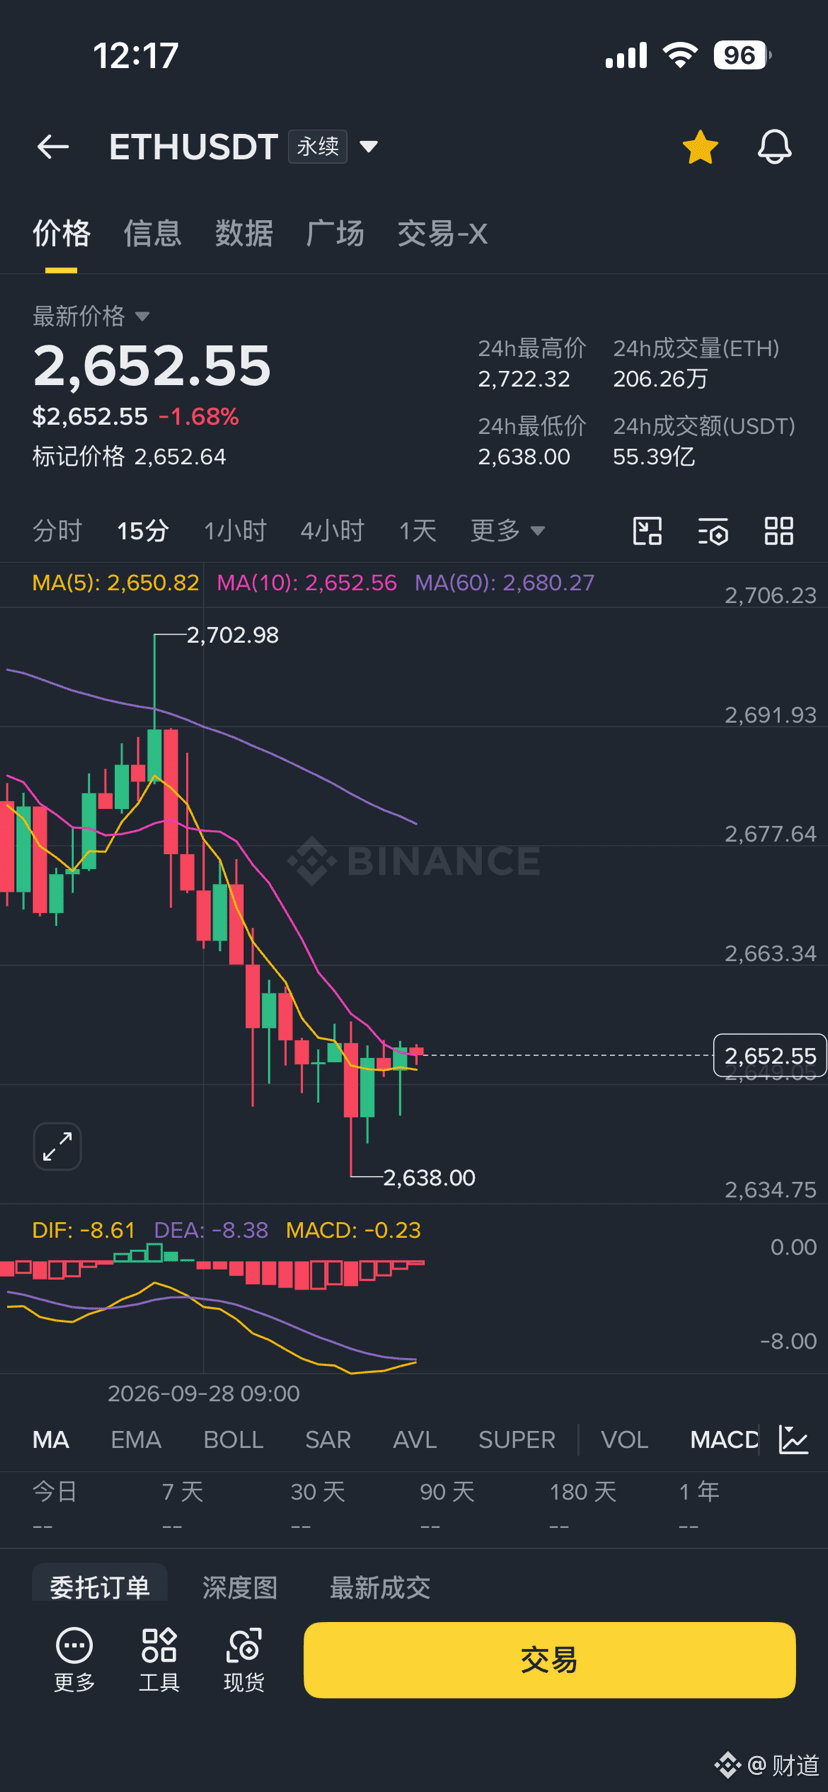
More signals with a 15-minute cycle are about to come out. Just pay attention: when confirming a signal, you don't need to enter on a surge with increasing volume—it's enough to enter an additional layer of position. If you encounter a price spike (a pin), it may be a bull trap, so don't rush to enter. The overhead resistance level is 2680. Around this area, be sure to lock in profits, then continue waiting to see whether price can break and hold above it. If, after an hour cycle, you get three green candles and it still can't move up, you can directly take profit and then wait again for the death cross to short.
More signals with a 15-minute cycle are about to come out. Just pay attention: when confirming a signal, you don't need to enter on a surge with increasing volume—it's enough to enter an additional layer of position. If you encounter a price spike (a pin), it may be a bull trap, so don't rush to enter. The overhead resistance level is 2680. Around this area, be sure to lock in profits, then continue waiting to see whether price can break and hold above it. If, after an hour cycle, you get three green candles and it still can't move up, you can directly take profit and then wait again for the death cross to short.
665
·
--
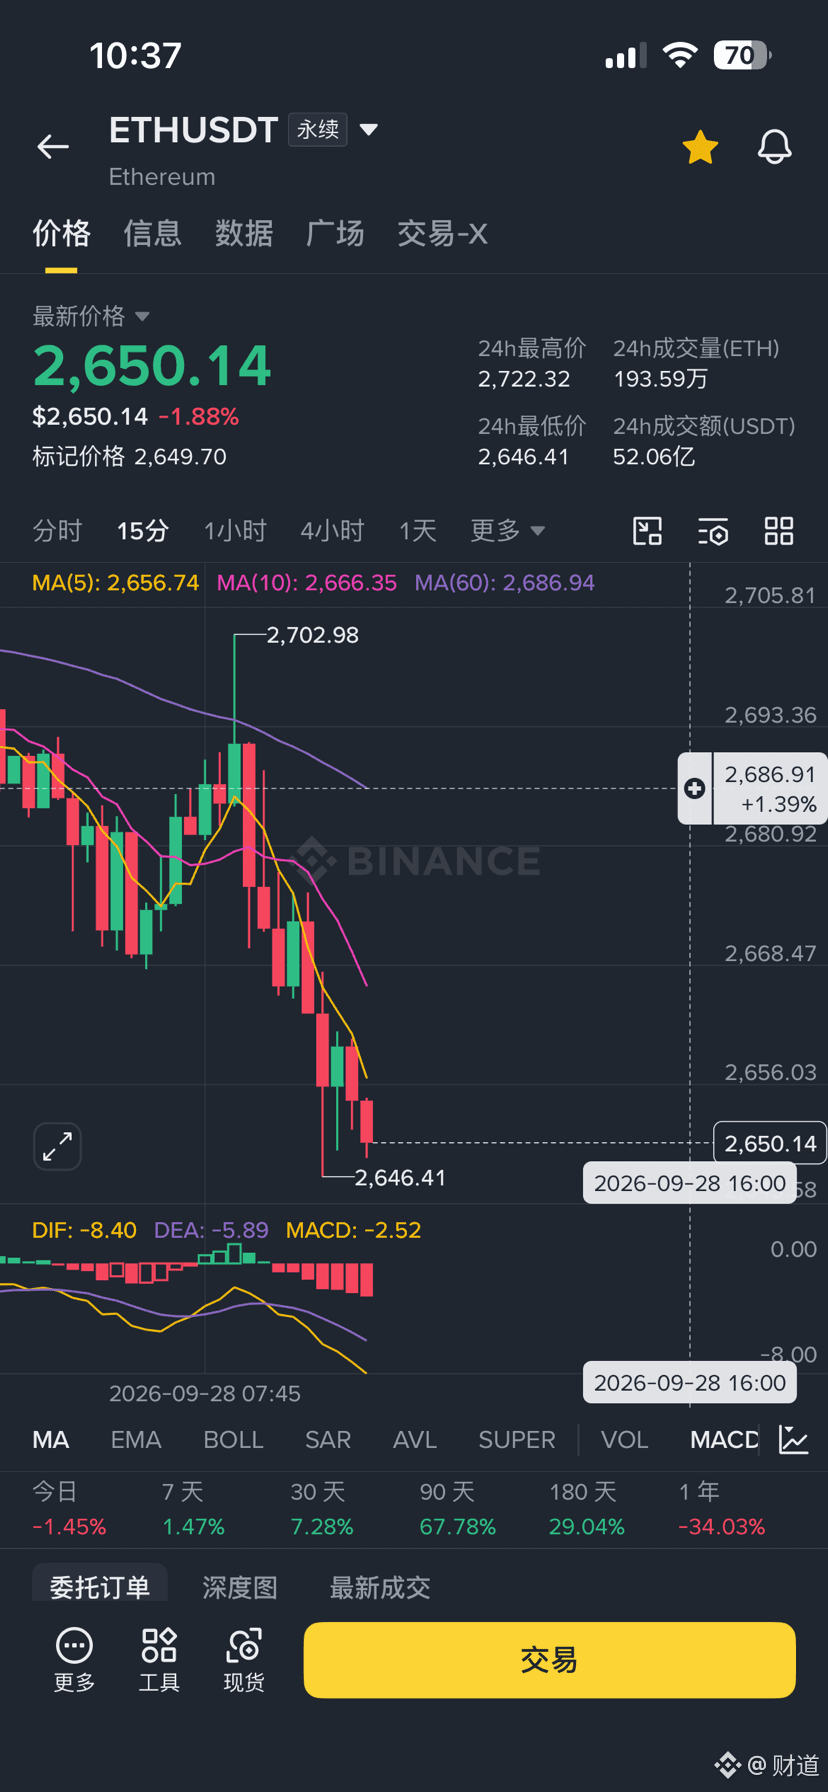
The current position is a bottom rebound with a multi-position setup. Over the next 15 minutes, once two-lines-in-love cross is confirmed, you can enter according to the 136 entry. After entering, the target is 2686. Once the rebound moves up, set a trailing stop and take profit with a moving stop. If 2686 is not broken, pay attention to the potential death cross from a turn and a bearish setup. Only if it breaks will the profits from the bottom rebound long be greater!
The current position is a bottom rebound with a multi-position setup. Over the next 15 minutes, once two-lines-in-love cross is confirmed, you can enter according to the 136 entry. After entering, the target is 2686. Once the rebound moves up, set a trailing stop and take profit with a moving stop. If 2686 is not broken, pay attention to the potential death cross from a turn and a bearish setup. Only if it breaks will the profits from the bottom rebound long be greater!
721
·
--
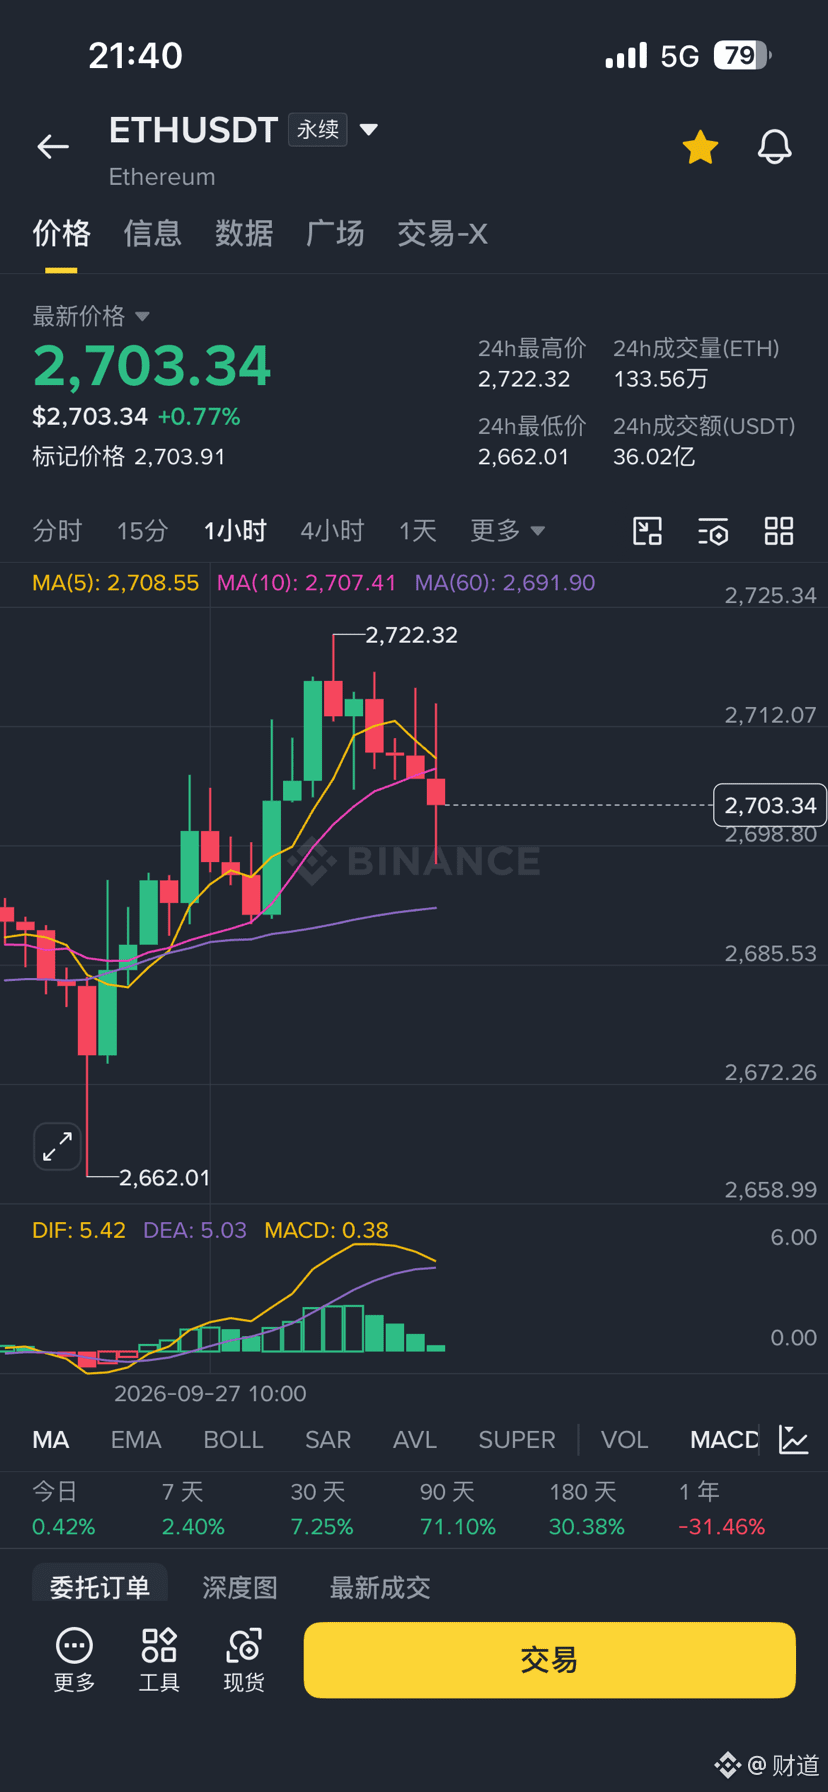
After the trailing stop is triggered and knocked out, first exit and observe. Since no signal was given near the 2740 area, don’t rush to go after this pullback. Keep watching for one more hour; once a red signal appears, see whether 2690 can hold. If it can’t hold, then when going long later, be staggered by one cycle, and then follow the second time to go long at 136! For short positions: either wait for a push up that breaks above 2740, then buy the pullback, or else after a death cross, short again. Otherwise, just wait for a long!
After the trailing stop is triggered and knocked out, first exit and observe. Since no signal was given near the 2740 area, don’t rush to go after this pullback. Keep watching for one more hour; once a red signal appears, see whether 2690 can hold. If it can’t hold, then when going long later, be staggered by one cycle, and then follow the second time to go long at 136! For short positions: either wait for a push up that breaks above 2740, then buy the pullback, or else after a death cross, short again. Otherwise, just wait for a long!
1
927
·
--
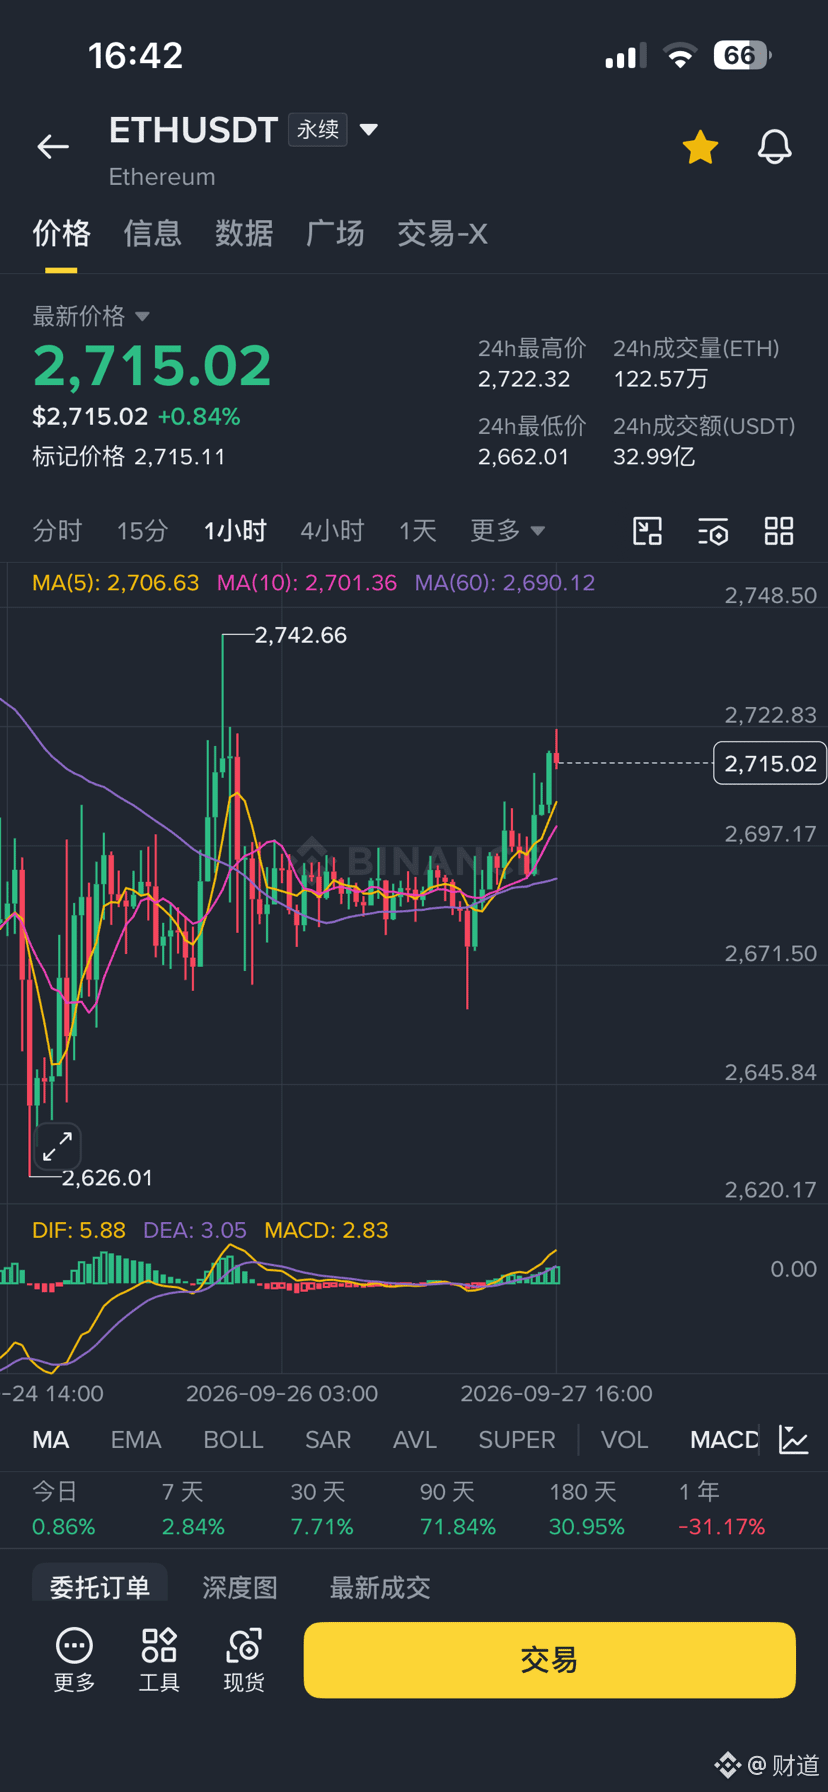
Do a long position well and move your stop to lock in gains; at worst, lock in the principal. If you can push up again quickly, you can take profit. Remember: if you want to take even more, lock in profits and take profit—even if some profits are taken, it’s fine. When a pullback comes, wait again for the long signal to “fuel up” in the air. You can temporarily skip taking profits on the short; if you can break above 2740, then after a pullback from the high area into the short entry, wait for the signal—because the response must be above 2800!
Do a long position well and move your stop to lock in gains; at worst, lock in the principal. If you can push up again quickly, you can take profit. Remember: if you want to take even more, lock in profits and take profit—even if some profits are taken, it’s fine. When a pullback comes, wait again for the long signal to “fuel up” in the air. You can temporarily skip taking profits on the short; if you can break above 2740, then after a pullback from the high area into the short entry, wait for the signal—because the response must be above 2800!
1
923
·
--
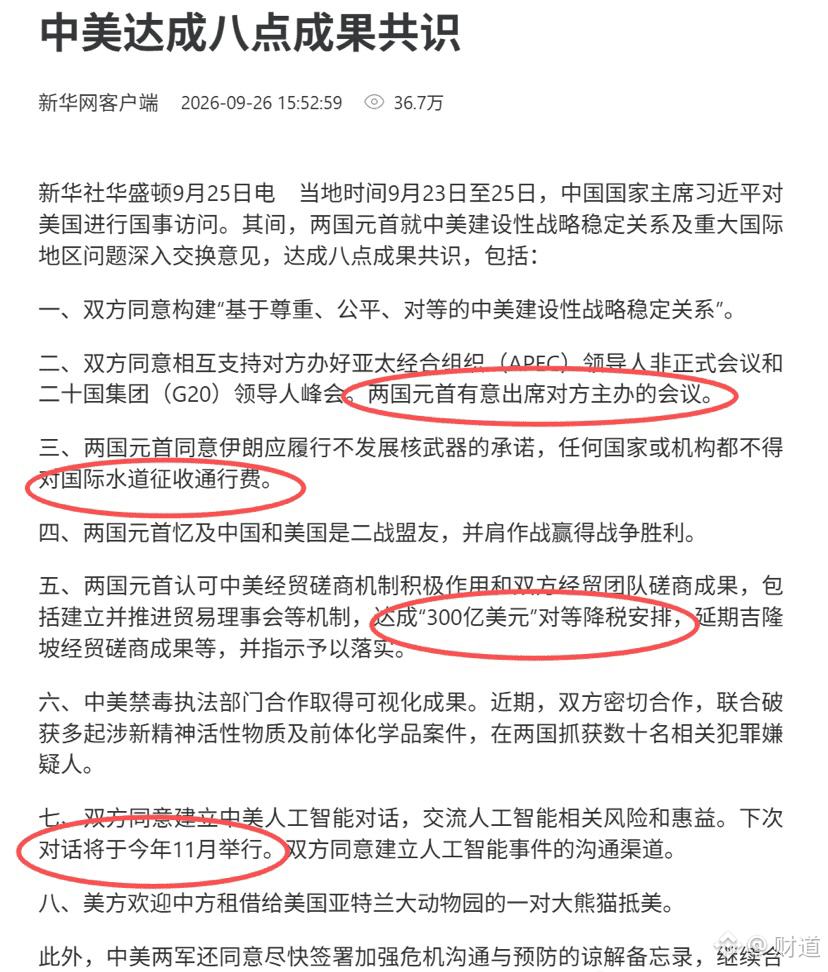
Achieving good cooperation is good news for the capital in the industry!
Achieving good cooperation is good news for the capital in the industry!
1.1k
·
--
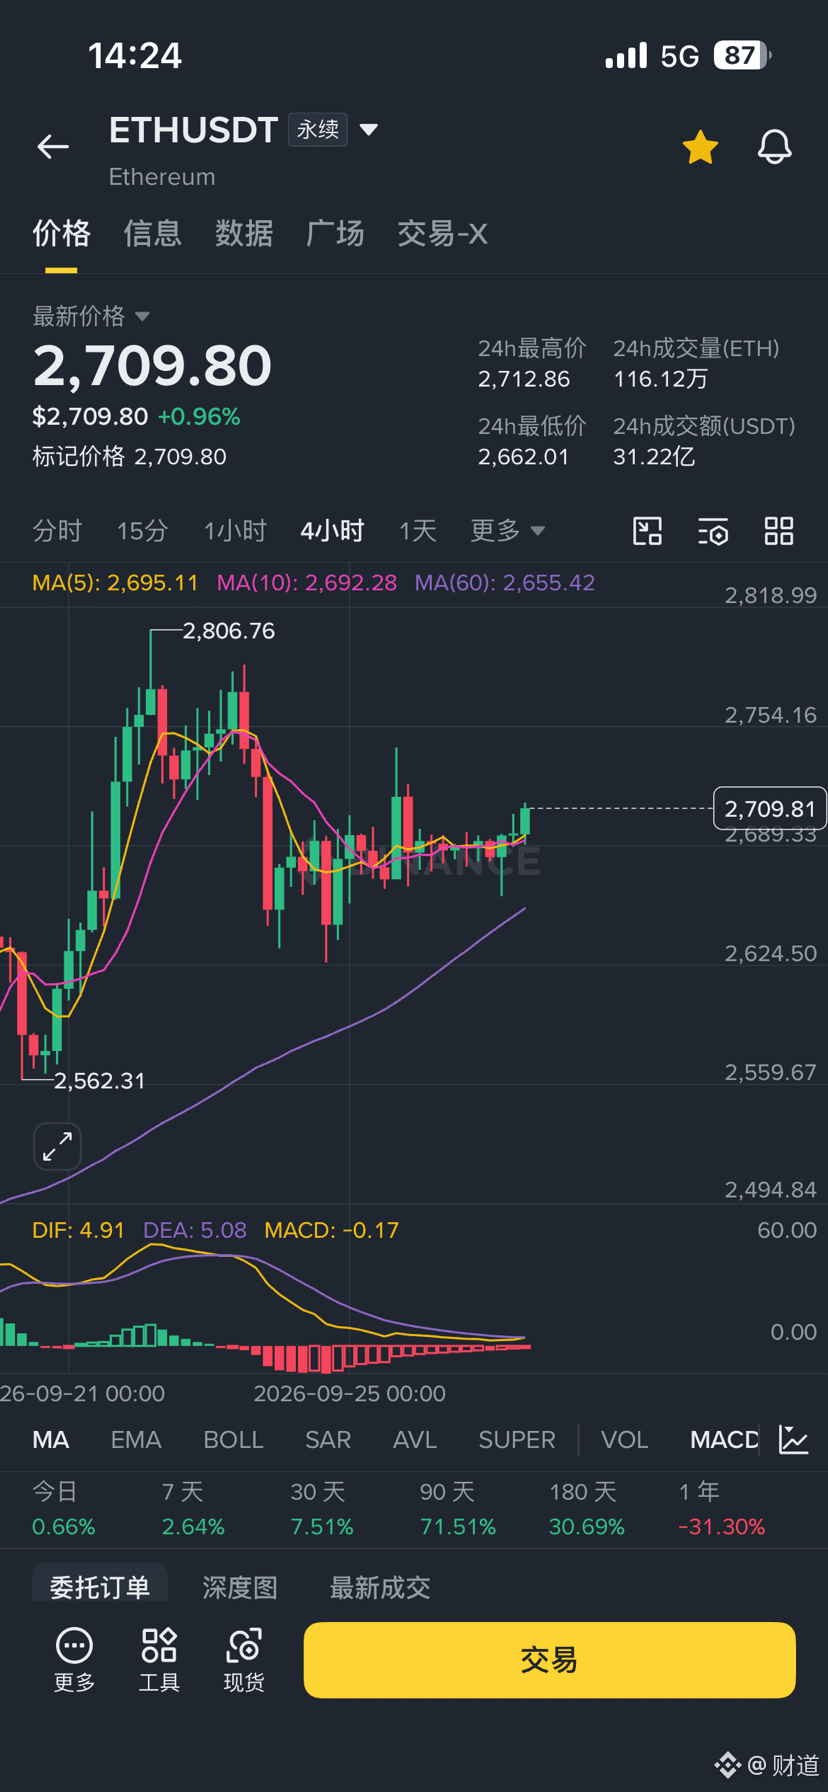
The price is slowly starting to rise. The four-hour green candle hasn’t come out yet, so there’s still room. When it reaches a certain point shortly, if you don’t want to take profit, you can lock in your profits and hold. But if it can rise to 2800, then you must take profit. After the pullback, wait for another opportunity again. The daily chart is at a higher level, but the price is still relatively not very steady. This is a consolidation phase—the daily chart hasn’t spent enough time in consolidation yet. If it can give it a few more days, later there will be opportunities to catch a breakout and a one-way move.
The price is slowly starting to rise. The four-hour green candle hasn’t come out yet, so there’s still room. When it reaches a certain point shortly, if you don’t want to take profit, you can lock in your profits and hold. But if it can rise to 2800, then you must take profit. After the pullback, wait for another opportunity again. The daily chart is at a higher level, but the price is still relatively not very steady. This is a consolidation phase—the daily chart hasn’t spent enough time in consolidation yet. If it can give it a few more days, later there will be opportunities to catch a breakout and a one-way move.
638
·
--
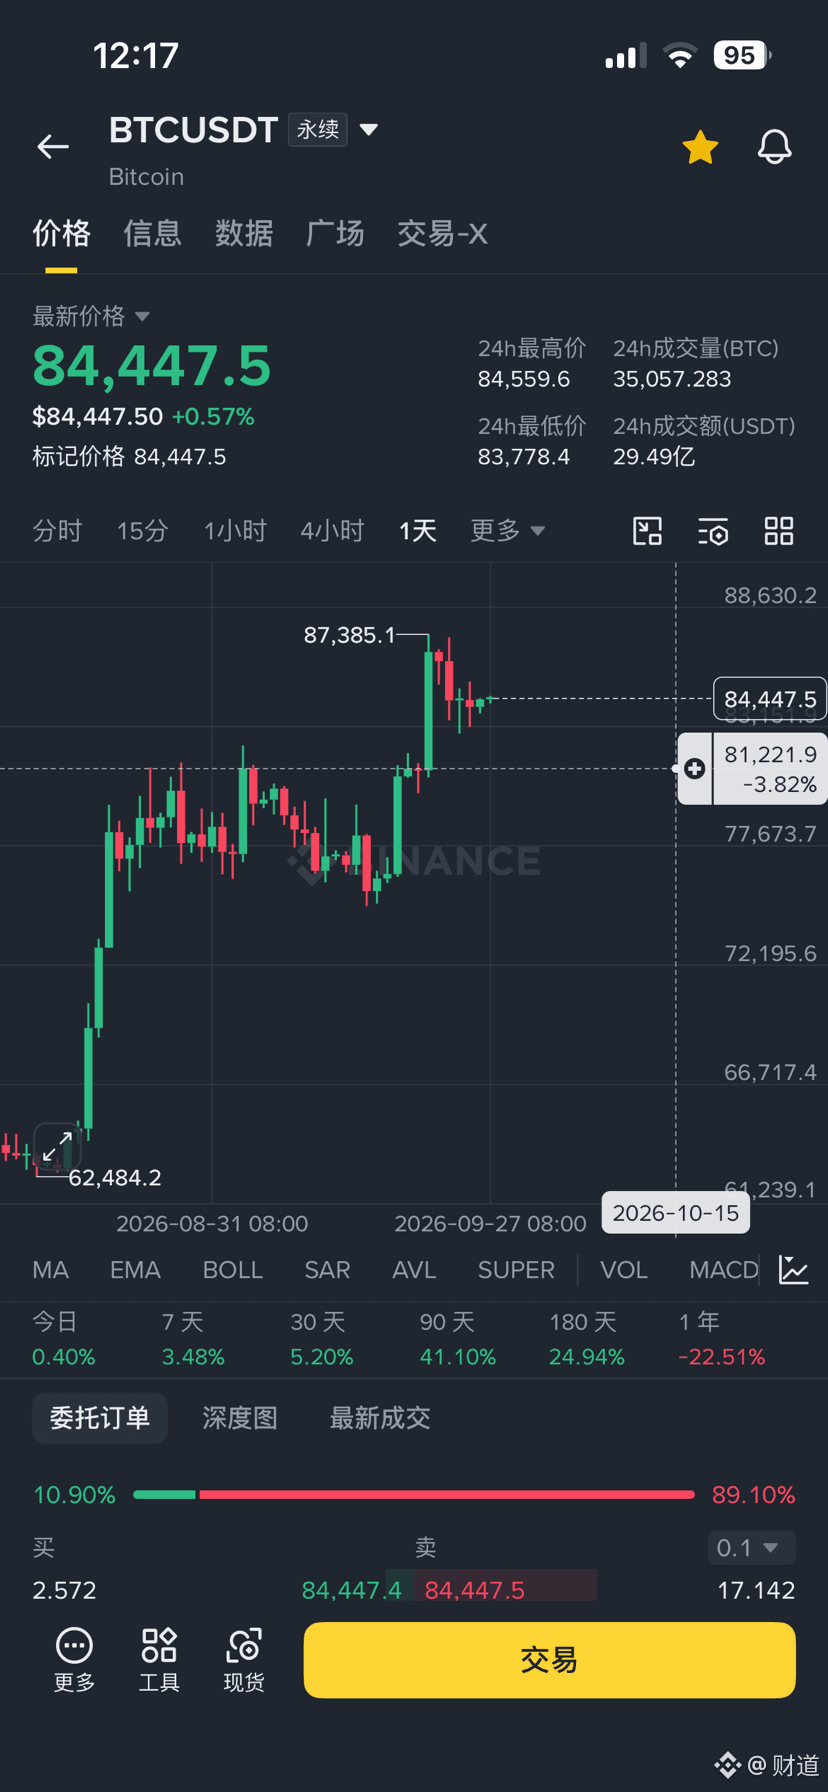
The current attack level is 81,200. Right now, Bitcoin is consolidating around this level. As long as it doesn’t break below 81,200, the uptrend still holds. Ideally, it can keep consolidating for a few more days, moving sideways to allow a pullback, so later there’s another chance for the price to break the previous high!
The current attack level is 81,200. Right now, Bitcoin is consolidating around this level. As long as it doesn’t break below 81,200, the uptrend still holds. Ideally, it can keep consolidating for a few more days, moving sideways to allow a pullback, so later there’s another chance for the price to break the previous high!
1
848
·
--
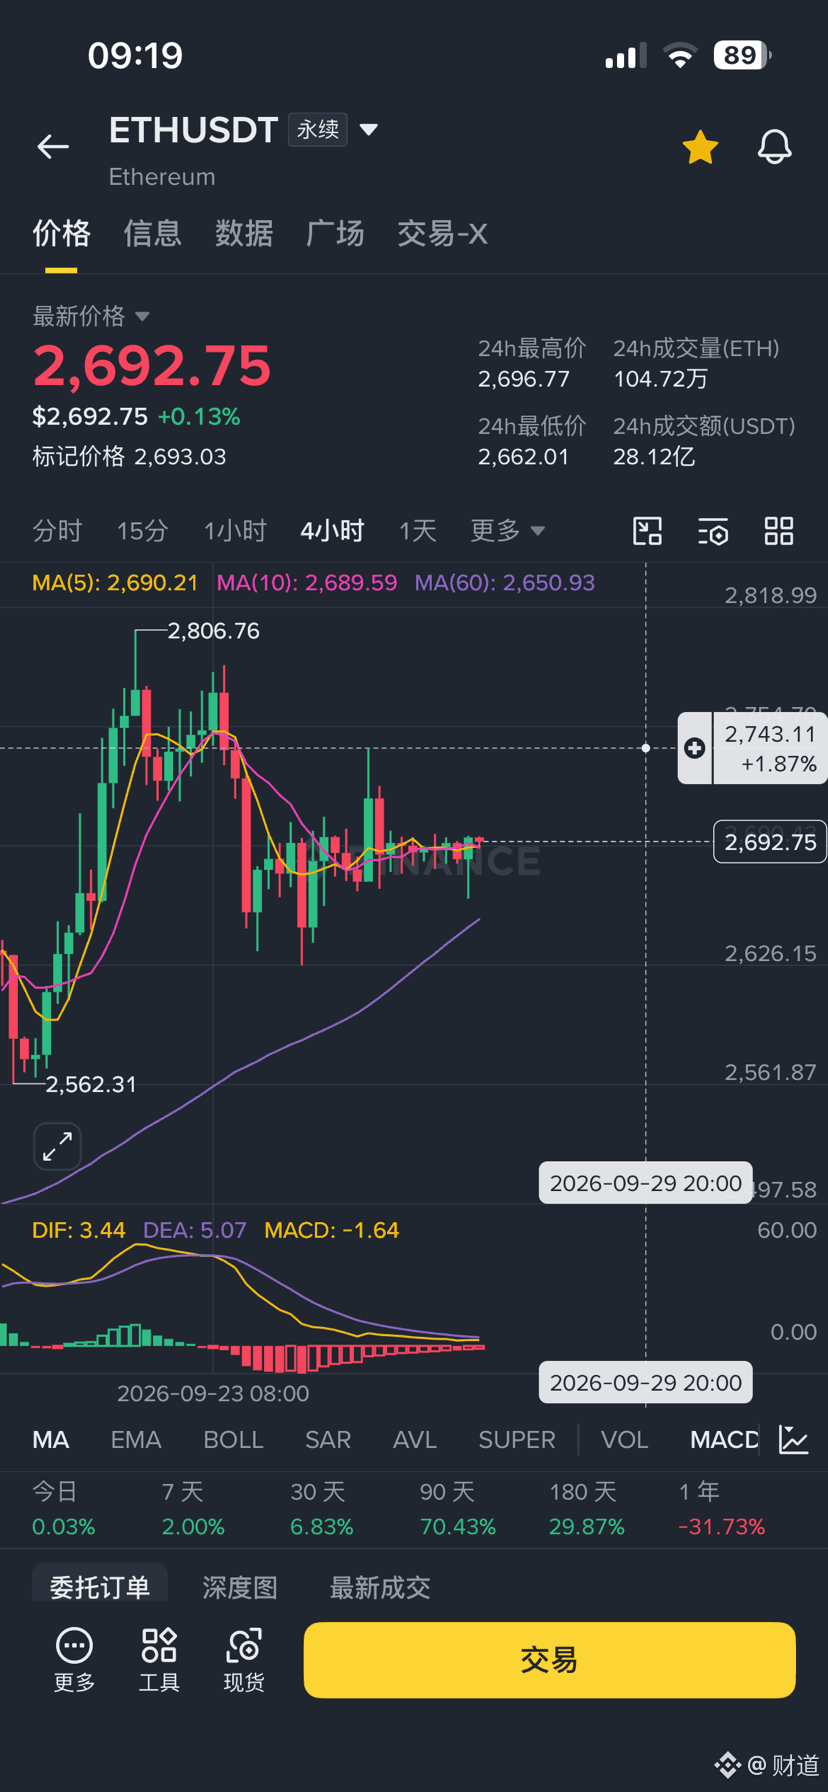
The four-hour cycle moves quickly, and there’s more air refueling, but it doesn’t necessarily mean the pullback will be large. So we still need to look first at 2740. Long positions with a moved stop loss have been taken out; now we wait for a signal at 136. At the current position, it’s a “buy-the-dip” scenario—wait for long signals on pullbacks. Only after the price rises above 2740 will it reach the high-level pullback area where a short setup is possible. As long as the price hasn’t reached that level, we wait for it to get there; once the position is reached and the signal appears, then it’s effective! And over these days: if Bitcoin can stay in this area for a few more days, trade sideways, and hold 82800 without breaking down, then there will still be a one-way bullish move!
The four-hour cycle moves quickly, and there’s more air refueling, but it doesn’t necessarily mean the pullback will be large. So we still need to look first at 2740. Long positions with a moved stop loss have been taken out; now we wait for a signal at 136. At the current position, it’s a “buy-the-dip” scenario—wait for long signals on pullbacks. Only after the price rises above 2740 will it reach the high-level pullback area where a short setup is possible. As long as the price hasn’t reached that level, we wait for it to get there; once the position is reached and the signal appears, then it’s effective! And over these days: if Bitcoin can stay in this area for a few more days, trade sideways, and hold 82800 without breaking down, then there will still be a one-way bullish move!
805
·
--
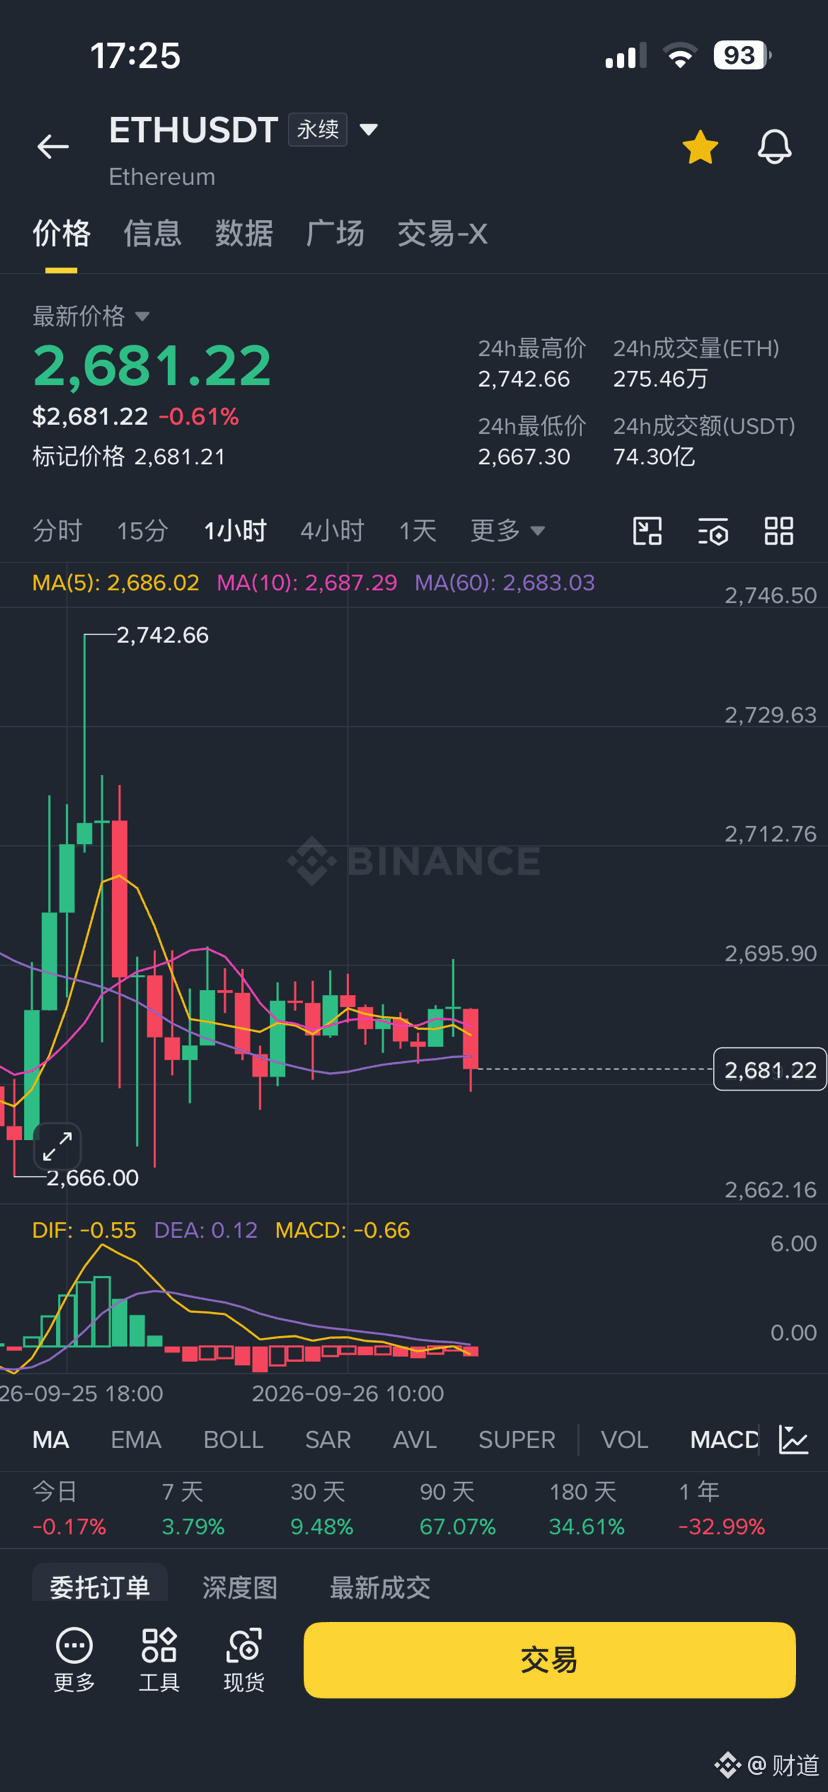
There is one layer of long positions holding; currently hold that first layer. It is now breaking below an hourly-cycle life line. When the 15-minute cycle again meets the “two-couples in harmony” golden cross confirmation, do not add to the position—skip once. When the second time it meets the signal, then add to the position and include a stop loss to exit with discipline. For now, if you are still in a flat position, wait until the second signal meets, then go long according to 136. The support level has not held; often this turns into a counter-trend position, so you must skip once!
There is one layer of long positions holding; currently hold that first layer. It is now breaking below an hourly-cycle life line. When the 15-minute cycle again meets the “two-couples in harmony” golden cross confirmation, do not add to the position—skip once. When the second time it meets the signal, then add to the position and include a stop loss to exit with discipline. For now, if you are still in a flat position, wait until the second signal meets, then go long according to 136. The support level has not held; often this turns into a counter-trend position, so you must skip once!
902
·
--
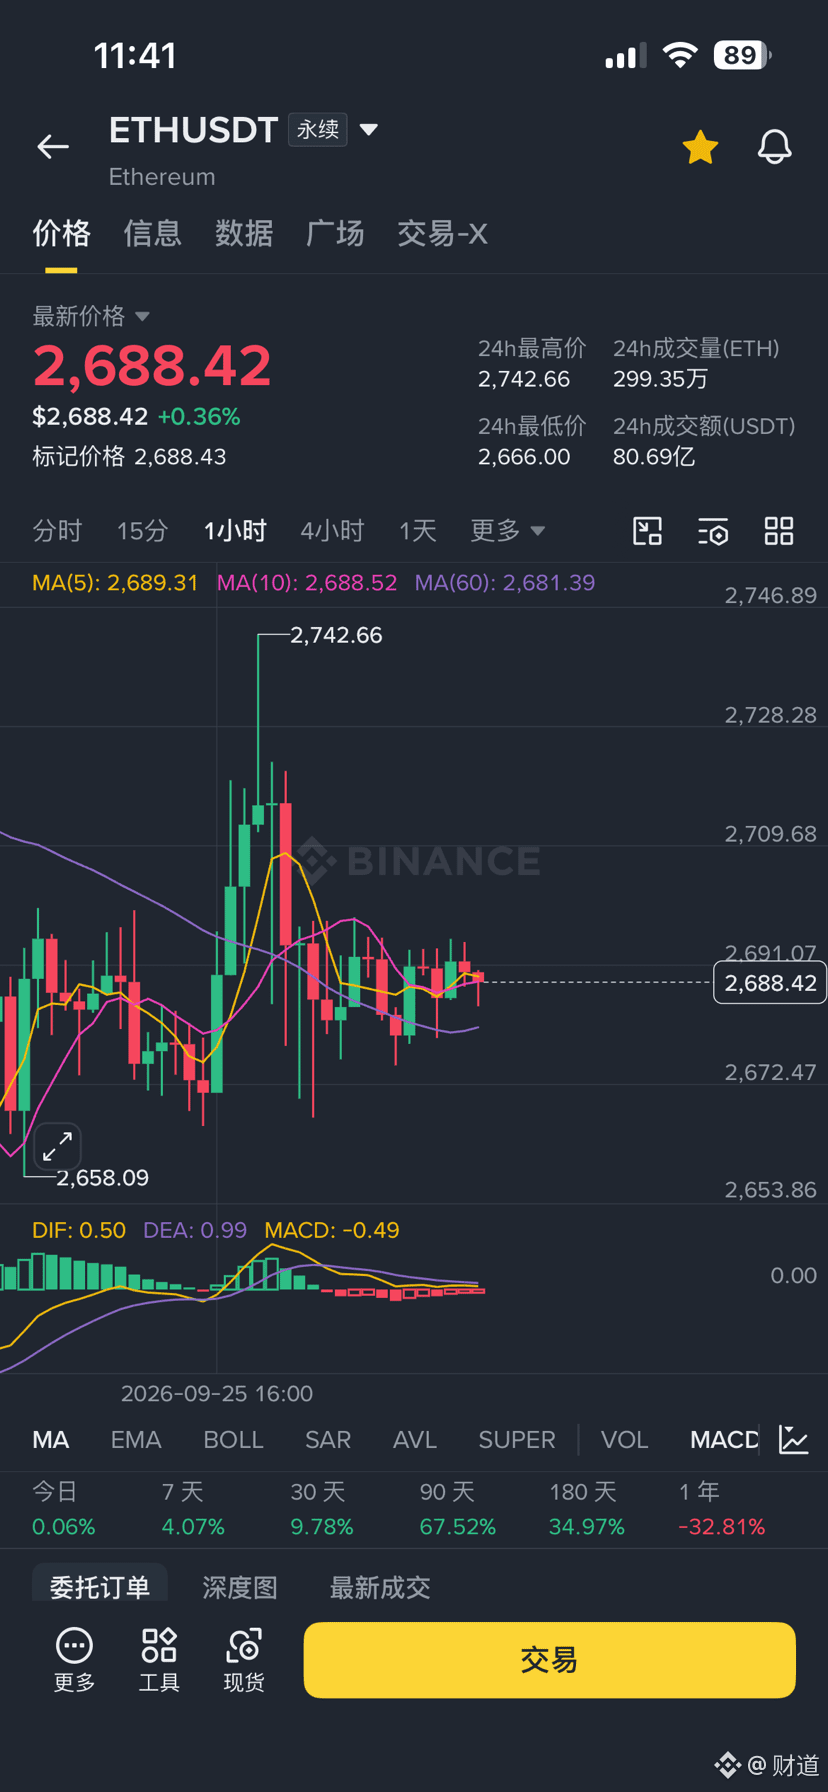
Consolidated for the whole morning—if the one-hour life line hasn’t been broken in the morning, then when the 15-minute timeframe meets the conditions, you can enter more. Take profits by riding the one-hour cycle’s “air refueling.” Target level: 2740. After you’re in profit, use a trailing stop. Once you get three consecutive green candles, lock in the profits and take them. If it can reach 2740, you can take profit first!
Consolidated for the whole morning—if the one-hour life line hasn’t been broken in the morning, then when the 15-minute timeframe meets the conditions, you can enter more. Take profits by riding the one-hour cycle’s “air refueling.” Target level: 2740. After you’re in profit, use a trailing stop. Once you get three consecutive green candles, lock in the profits and take them. If it can reach 2740, you can take profit first!
1
725
Log in to explore more content
Join global crypto users on Binance Square
⚡️ Get latest and useful information about crypto.
💬 Trusted by the world’s largest crypto exchange.
👍 Discover real insights from verified creators.
Email / Phone number
Trending Topics
TrumpRejectsAIRulesForVoluntaryAudits
0 views
11 Discussing
📊 AI Regulation Debate Continues
New federal AI rules were rejected in favor of a voluntary industry framework involving safety reviews and outside audits.
With AI capabilities advancing quickly, transparency and accountability remain central issues.
$BTC $ETH $ADA
#trumprejectsairulesforvoluntaryaudits
CryptoMahibaloch
·0 Likes
·15 views
BitgetHotWalletBreachTiedToThirdPartySecurityFlaw
1 views
13 Discussing
OpenAIUnveilsAlwaysOnAgentDots
938 views
56 Discussing