
CryptoPandaヅ
8.3k Posts

CryptoPandaヅ
 Square Verified+
Report
Block User
Been into contracts since I was 16.
Open Trade
High-Frequency Trader
4.3 Years
0 Following
38.6K+ Followers
25.7K Liked
Posts
Portfolio
All
Quotes
Live
PINNED
·
--
🧑💻 Subscription Room- [🫅QueenBees🗿](https://app.binance.com/uni-qr/group-chat-landing?channelToken=C3ggt1bS8WgOCkPO6PVgHA&type=1&entrySource=sharing_link)
(Free 7 day Trial at First afterwards a One time Payment of $10 is charged for Lifetime, Only for those who want to take my Trades Manually and Want to learn Trading)
------------- × ------ × --------------
🧑💻 Copy Trading: [https://app.binance.com/uni-qr/LsWQziqp](https://app.binance.com/uni-qr/LsWQziqp)
☣️ Copy with *FIXED RATIO* ✅ not FIXED amount ❌
(Copy with Minimum $100 to Avoid Slippage 🔄)
💆 Focus on Realized PNL rather than whats happening to Your Margin or Unrealized Loss
------------× ------- × ----------------
🧑💻 Subscription Room- 🫅QueenBees🗿
(Free 7 day Trial at First afterwards a One time Payment of $10 is charged for Lifetime, Only for those who want to take my Trades Manually and Want to learn Trading)
------------- × ------ × --------------
🧑💻 Copy Trading: https://app.binance.com/uni-qr/LsWQziqp
☣️ Copy with *FIXED RATIO* ✅ not FIXED amount ❌
(Copy with Minimum $100 to Avoid Slippage 🔄)
💆 Focus on Realized PNL rather than whats happening to Your Margin or Unrealized Loss
------------× ------- × ----------------
(Free 7 day Trial at First afterwards a One time Payment of $10 is charged for Lifetime, Only for those who want to take my Trades Manually and Want to learn Trading)
------------- × ------ × --------------
🧑💻 Copy Trading: https://app.binance.com/uni-qr/LsWQziqp
☣️ Copy with *FIXED RATIO* ✅ not FIXED amount ❌
(Copy with Minimum $100 to Avoid Slippage 🔄)
💆 Focus on Realized PNL rather than whats happening to Your Margin or Unrealized Loss
------------× ------- × ----------------
2
7
358
·
--
Bearish
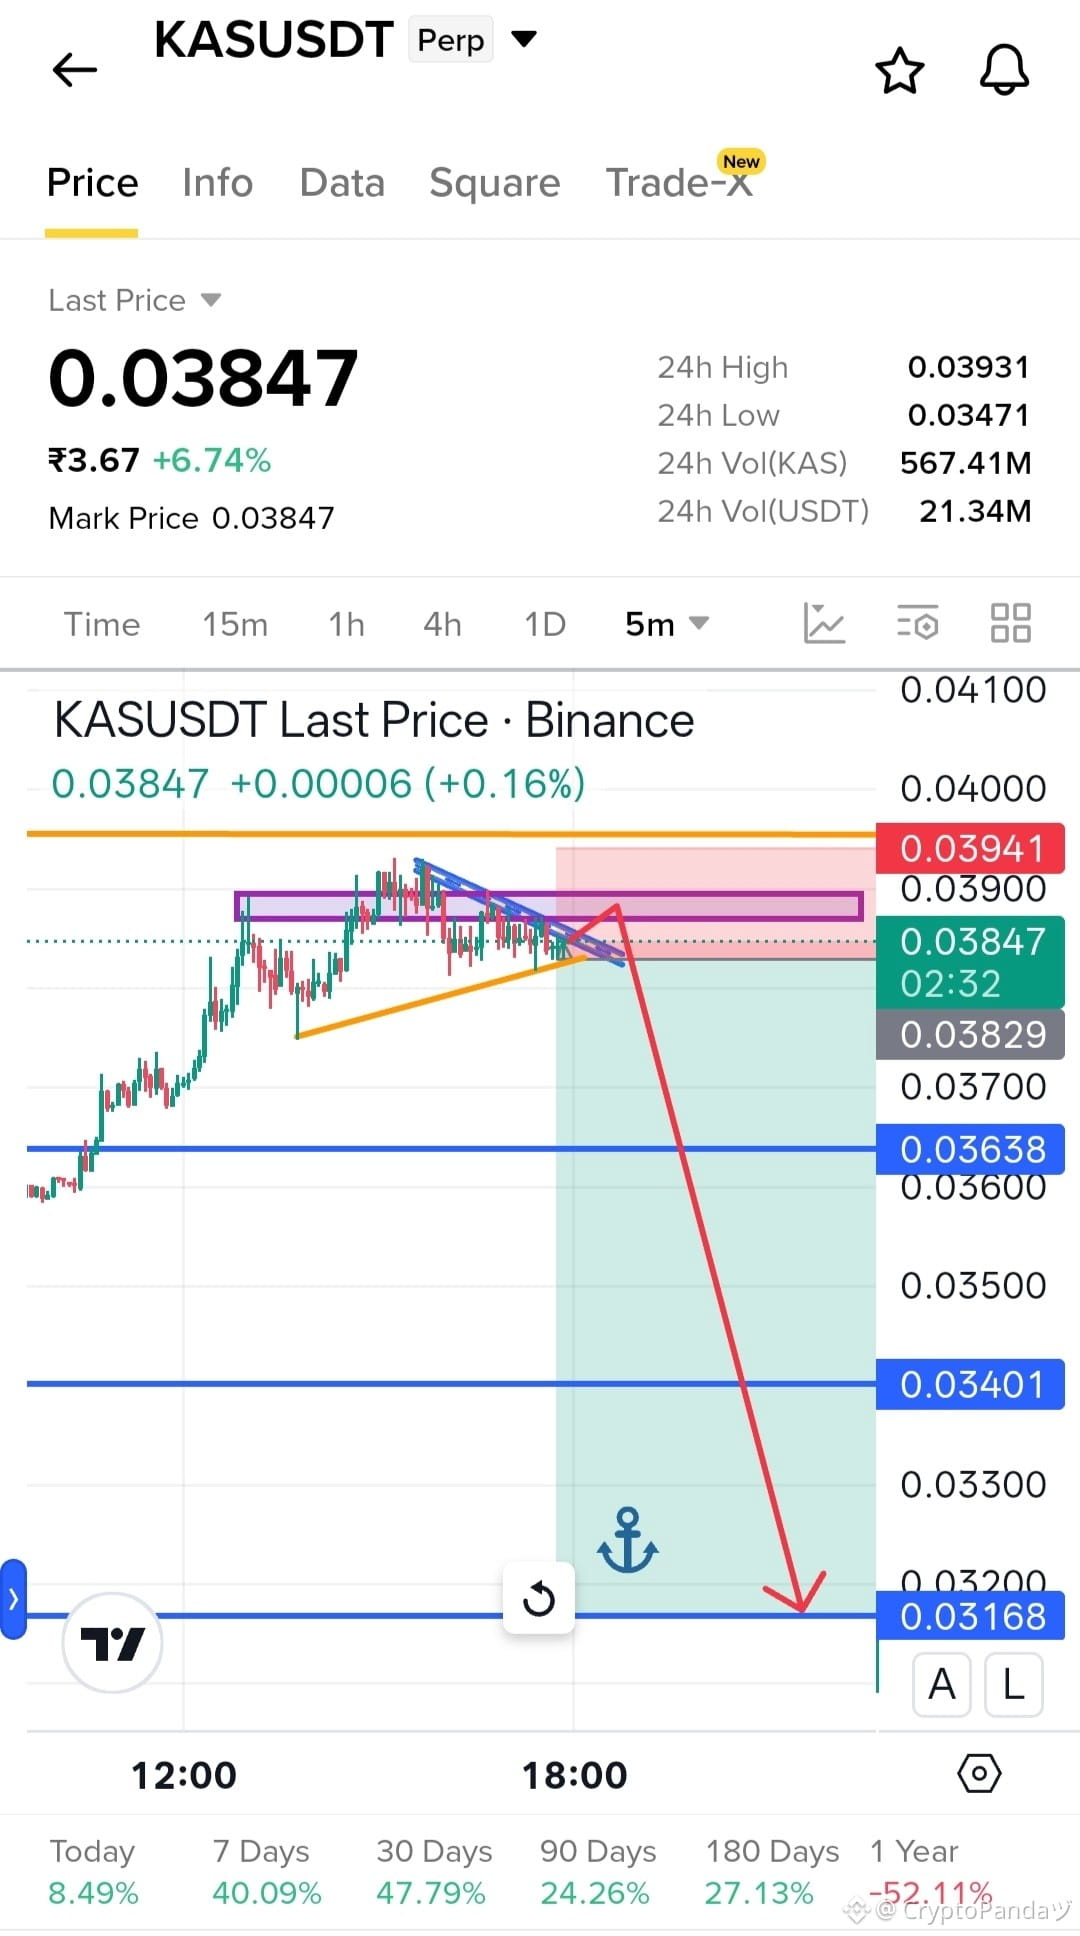
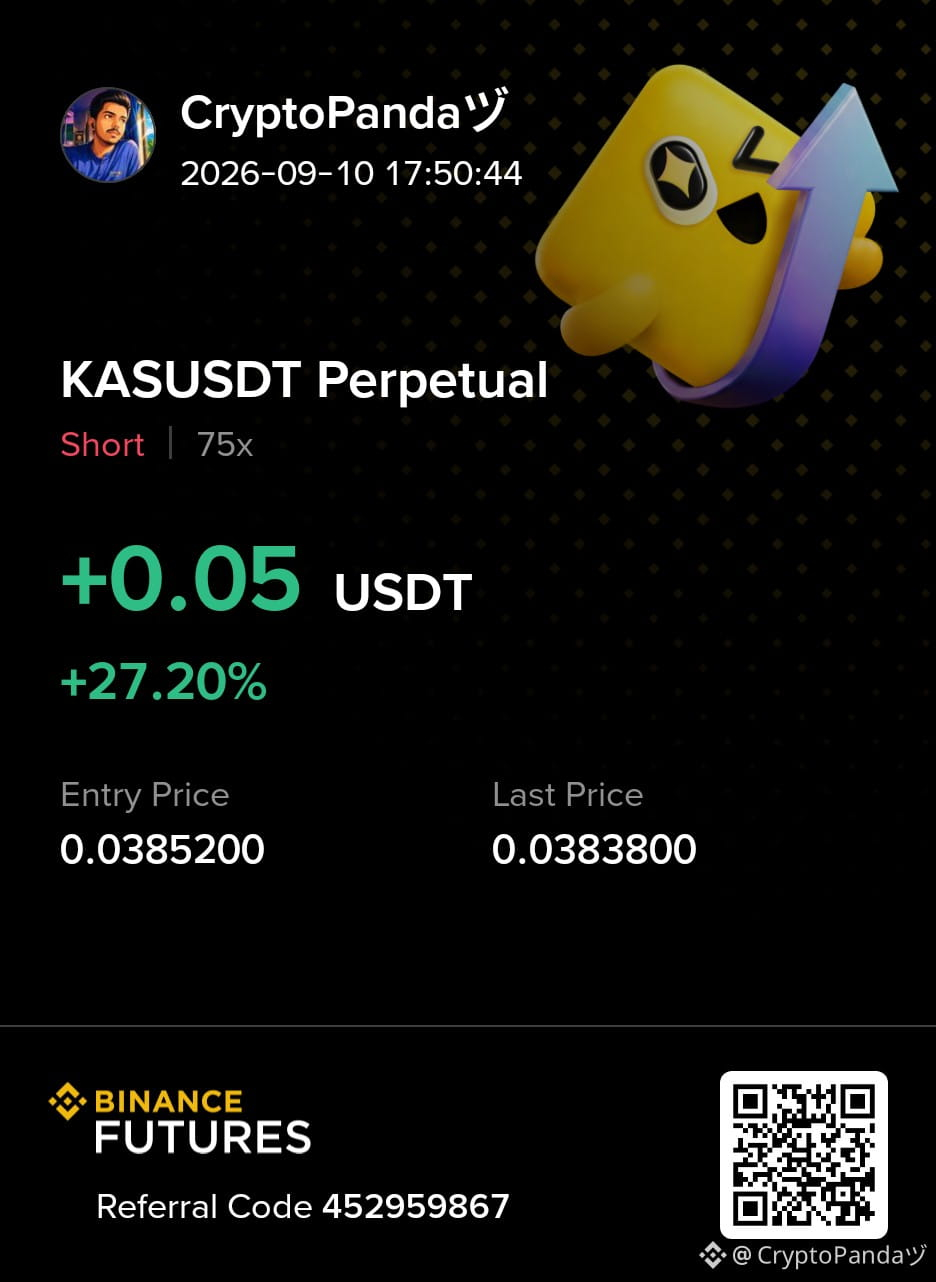
$KAS — Strong rejections from 0.039 Order Block. About to empty soon.....
Trade Plan: Short $KAS
Entry: 0.038 - 0.039
SL: 0.03941
TP: 0.03638 | 0.03401 | 0.03168
Why this Setup?
Price is facing strong rejection from the 0.039 order block, showing sellers defending the zone. A failure to reclaim this resistance could trigger the next downside move toward 0.03638, 0.03401 and 0.03168. As long as 0.03941 holds, the bearish setup remains valid.
Click here to Trade 👇 $KAS
{future}(KASUSDT)
$KAS — Strong rejections from 0.039 Order Block. About to empty soon.....
Trade Plan: Short $KAS
Entry: 0.038 - 0.039
SL: 0.03941
TP: 0.03638 | 0.03401 | 0.03168
Why this Setup?
Price is facing strong rejection from the 0.039 order block, showing sellers defending the zone. A failure to reclaim this resistance could trigger the next downside move toward 0.03638, 0.03401 and 0.03168. As long as 0.03941 holds, the bearish setup remains valid.
Click here to Trade 👇 $KAS
Trade Plan: Short $KAS
Entry: 0.038 - 0.039
SL: 0.03941
TP: 0.03638 | 0.03401 | 0.03168
Why this Setup?
Price is facing strong rejection from the 0.039 order block, showing sellers defending the zone. A failure to reclaim this resistance could trigger the next downside move toward 0.03638, 0.03401 and 0.03168. As long as 0.03941 holds, the bearish setup remains valid.
Click here to Trade 👇 $KAS
1
4
·
--
Bullish
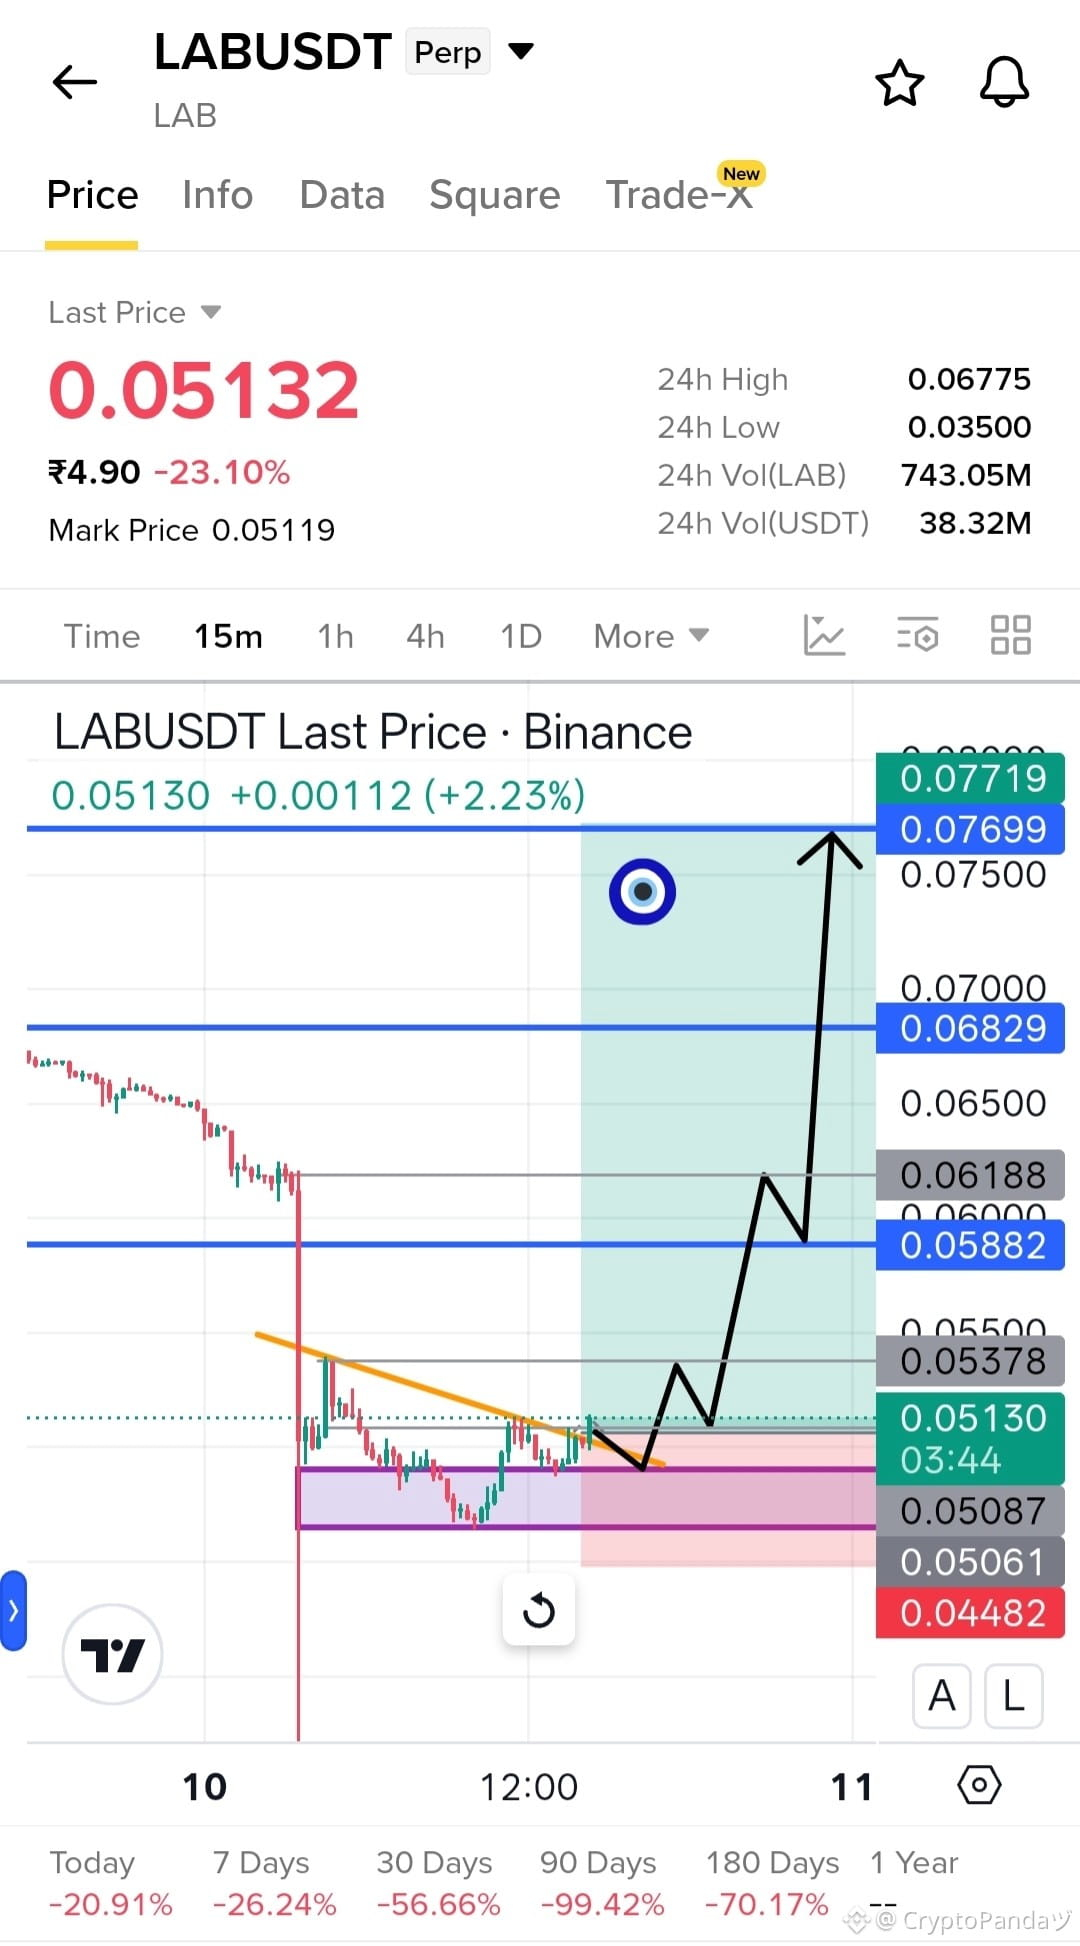
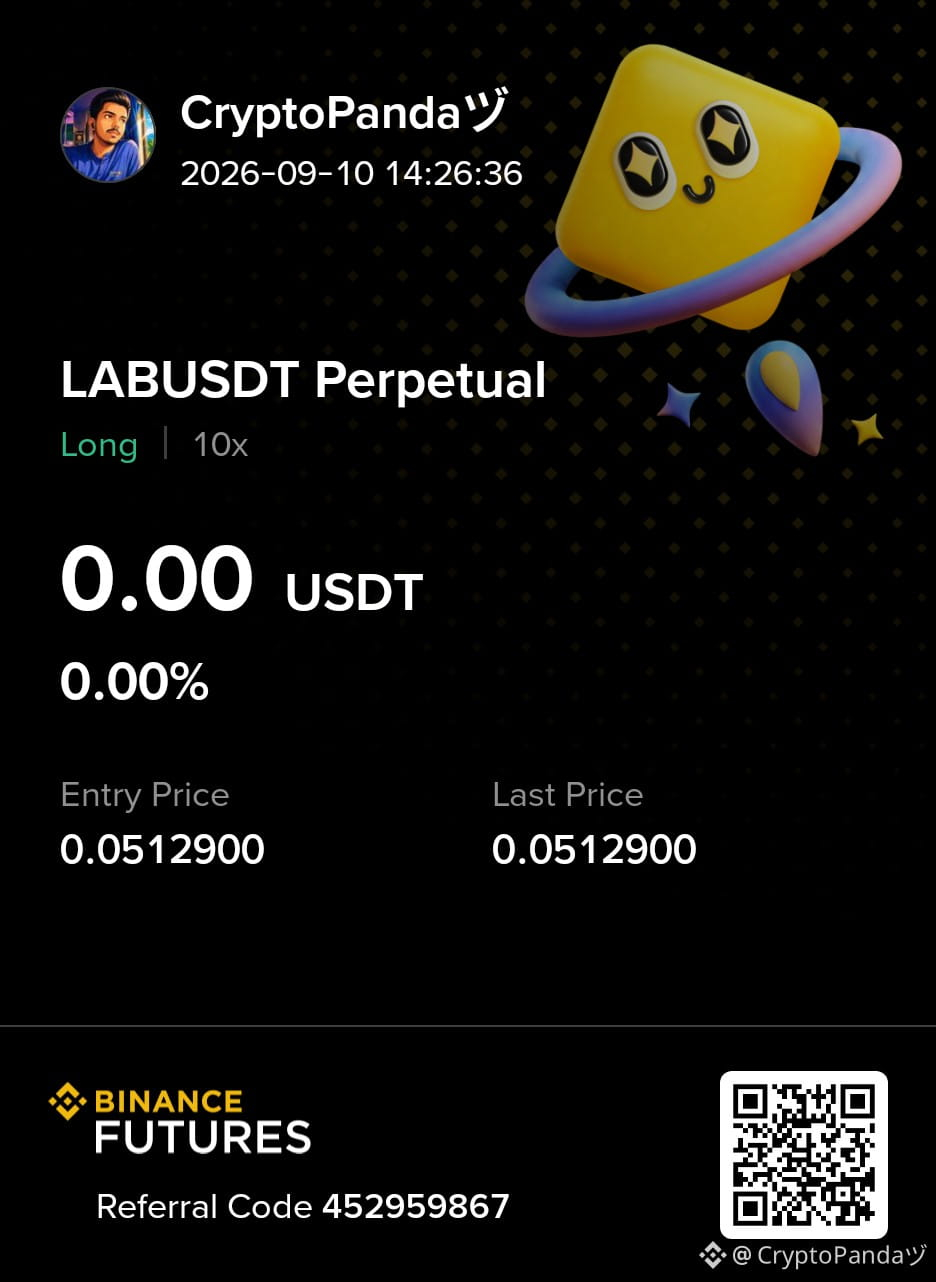
$LAB — Price stalling after flush at 0.05061 OB. Strong breakout incoming.....
Trade Plan: Long $LAB
Entry: 0.050 - 0.052
SL: 0.04482
TP: 0.05882 | 0.06829 | 0.07699
Why this Setup?
Price is stalling after the flush around the 0.05061 order block, showing buyers defending the zone. A successful hold here could fuel a strong breakout toward 0.05882, 0.06829 and 0.07699. As long as 0.04482 holds, the bullish setup remains valid.
Click here to Trade 👇 $LAB
{future}(LABUSDT)
$LAB — Price stalling after flush at 0.05061 OB. Strong breakout incoming.....
Trade Plan: Long $LAB
Entry: 0.050 - 0.052
SL: 0.04482
TP: 0.05882 | 0.06829 | 0.07699
Why this Setup?
Price is stalling after the flush around the 0.05061 order block, showing buyers defending the zone. A successful hold here could fuel a strong breakout toward 0.05882, 0.06829 and 0.07699. As long as 0.04482 holds, the bullish setup remains valid.
Click here to Trade 👇 $LAB
Trade Plan: Long $LAB
Entry: 0.050 - 0.052
SL: 0.04482
TP: 0.05882 | 0.06829 | 0.07699
Why this Setup?
Price is stalling after the flush around the 0.05061 order block, showing buyers defending the zone. A successful hold here could fuel a strong breakout toward 0.05882, 0.06829 and 0.07699. As long as 0.04482 holds, the bullish setup remains valid.
Click here to Trade 👇 $LAB
2
453
·
--
Bullish
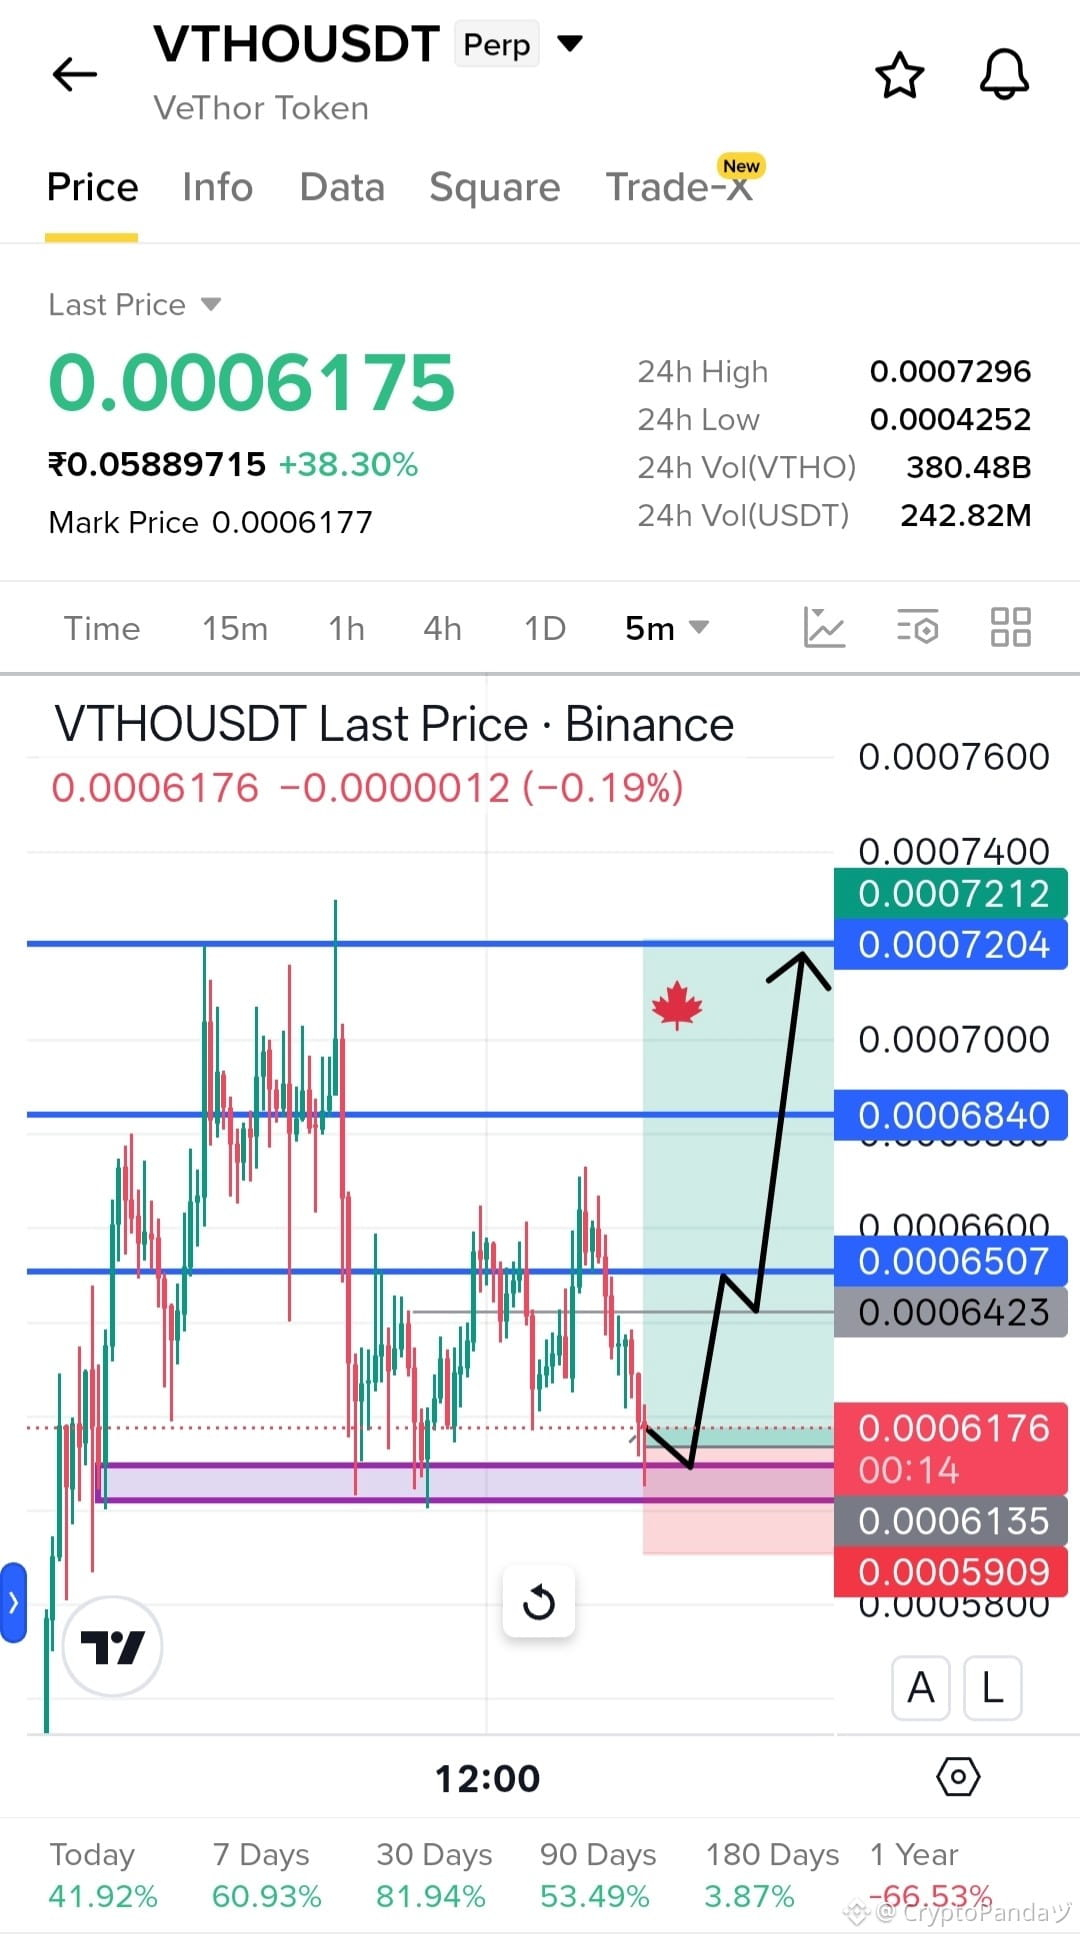
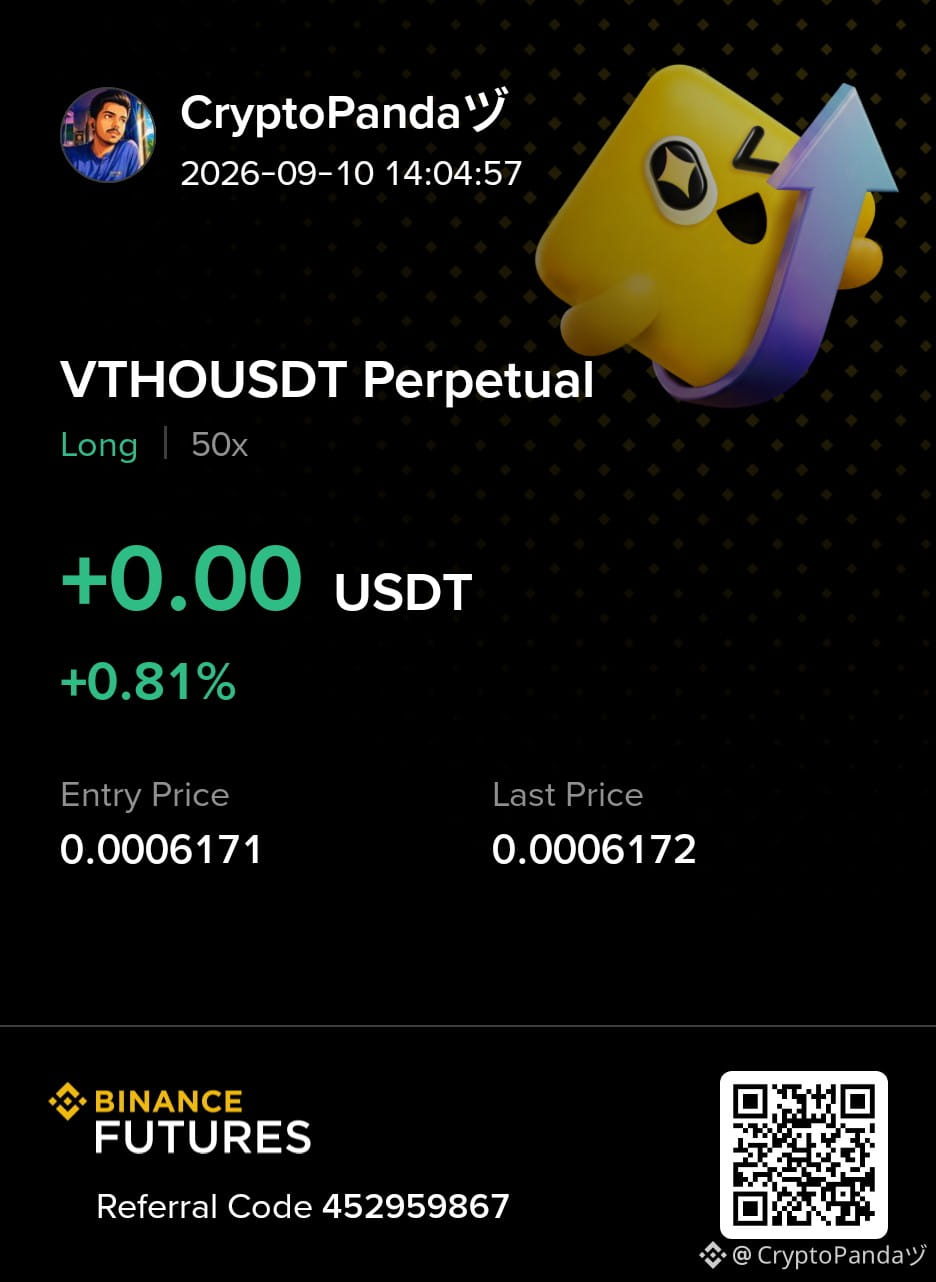
$VTHO — Supply Absorbed at 0.00061 Demand OB. Upside Leg Loading....
Trade Plan: Long $VTHO
Entry: 0.00060 - 0.00062
SL: 0.0005909
TP: 0.0006507 | 0.0006840 | 0.0007204
Why this Setup?
Supply has been absorbed around the 0.00061 demand order block, showing buyers defending the zone. A successful hold above this area could trigger the next upside leg toward 0.0006507, 0.0006840 and 0.0007204. As long as 0.0005909 holds, the bullish setup remains valid.
Click here to Trade 👇 $VTHO
{future}(VTHOUSDT)
$VTHO — Supply Absorbed at 0.00061 Demand OB. Upside Leg Loading....
Trade Plan: Long $VTHO
Entry: 0.00060 - 0.00062
SL: 0.0005909
TP: 0.0006507 | 0.0006840 | 0.0007204
Why this Setup?
Supply has been absorbed around the 0.00061 demand order block, showing buyers defending the zone. A successful hold above this area could trigger the next upside leg toward 0.0006507, 0.0006840 and 0.0007204. As long as 0.0005909 holds, the bullish setup remains valid.
Click here to Trade 👇 $VTHO
Trade Plan: Long $VTHO
Entry: 0.00060 - 0.00062
SL: 0.0005909
TP: 0.0006507 | 0.0006840 | 0.0007204
Why this Setup?
Supply has been absorbed around the 0.00061 demand order block, showing buyers defending the zone. A successful hold above this area could trigger the next upside leg toward 0.0006507, 0.0006840 and 0.0007204. As long as 0.0005909 holds, the bullish setup remains valid.
Click here to Trade 👇 $VTHO
1
2
463
·
--
Bearish
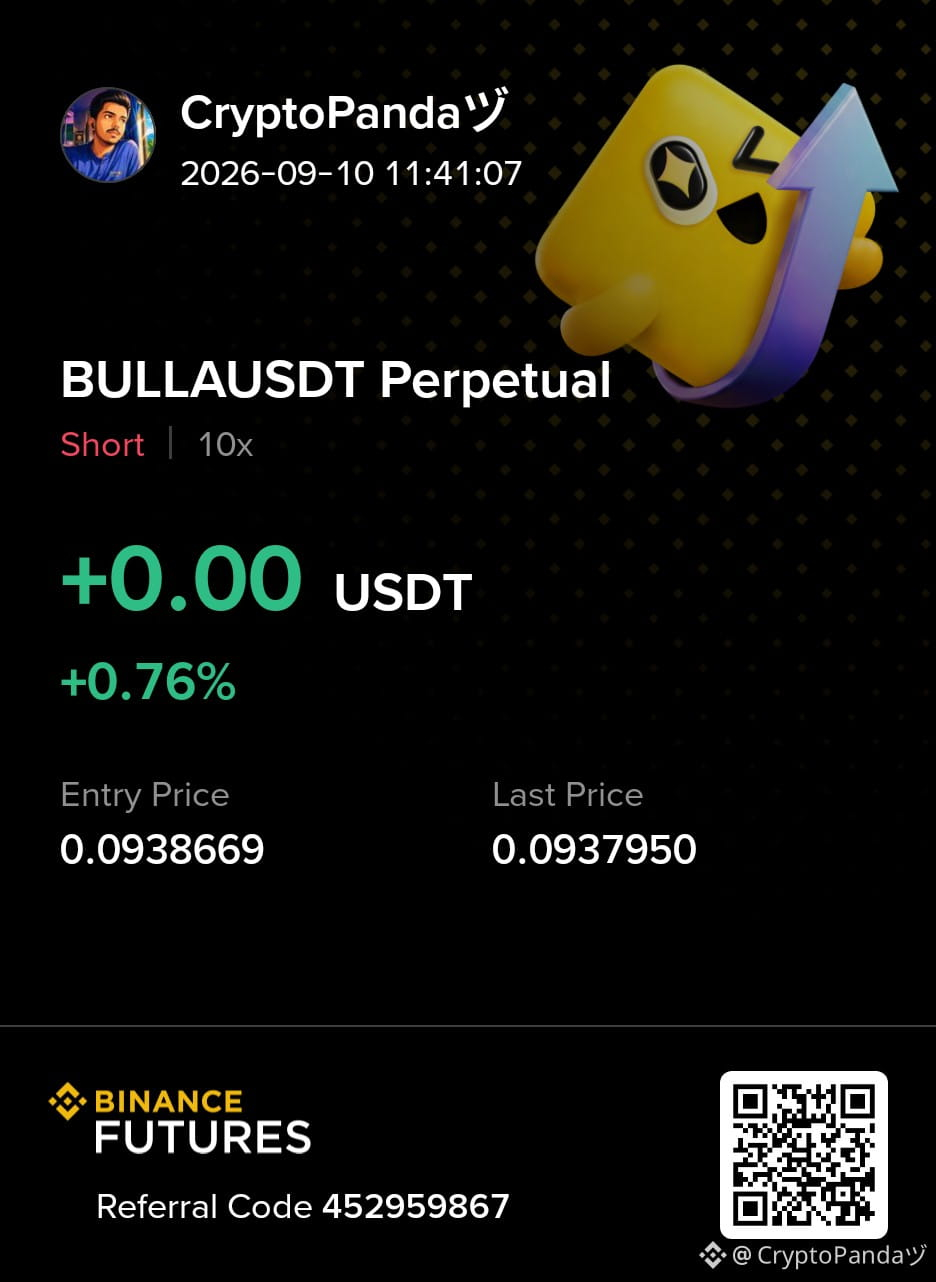
30D trade $BULLA 386.7 USDT
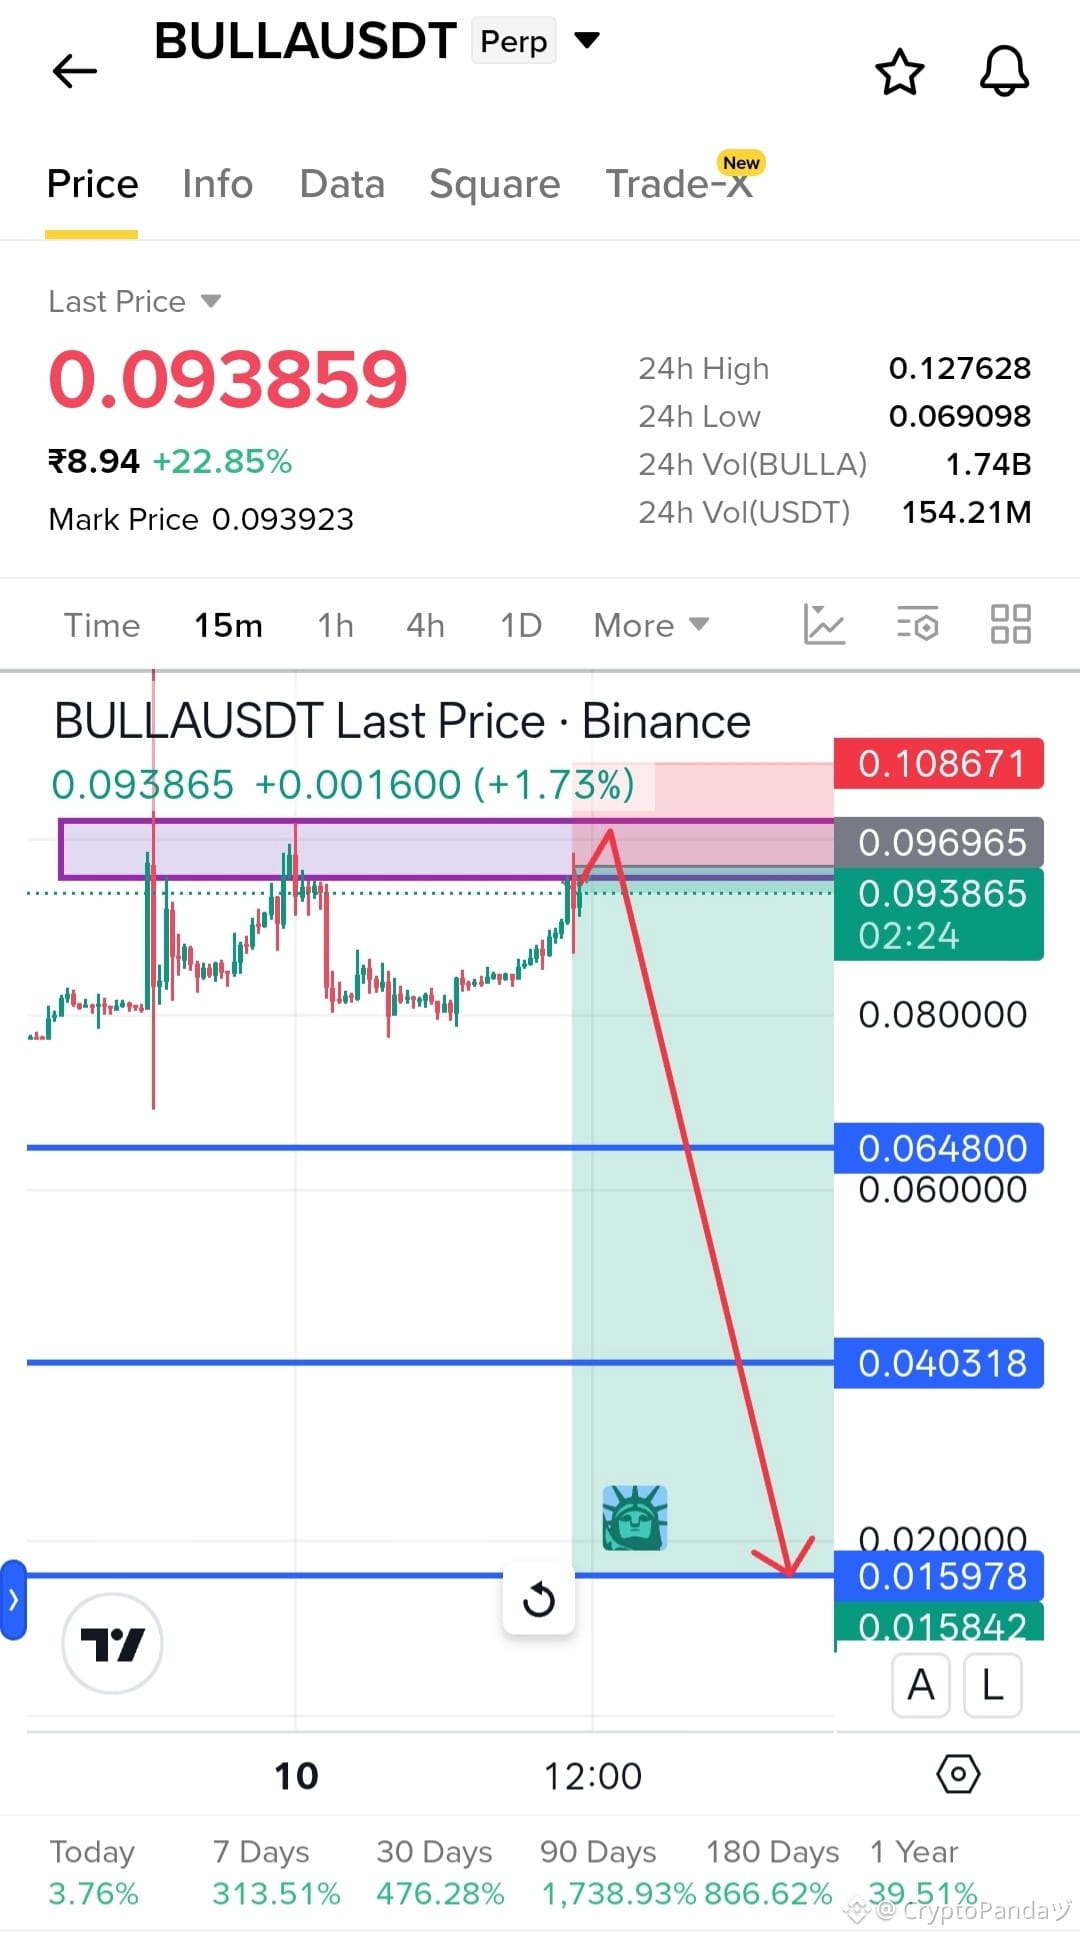
$BULLA — Slammed sell wall near 0.096. Downside liquidity sweep pending....
Trade Plan: Short $BULLA
Entry: 0.093 - 0.095
SL: 0.108671
TP: 0.064800 | 0.040318 | 0.015978
Why this Setup?
Price has slammed into the sell wall near 0.096, showing strong resistance as sellers defend the upper zone. A rejection from here could trigger a downside liquidity sweep toward 0.064800, followed by 0.040318 and potentially 0.015978. As long as 0.108671 holds, the bearish setup remains valid.
Click here to Trade 👇 $BULLA
{future}(BULLAUSDT)
$BULLA — Slammed sell wall near 0.096. Downside liquidity sweep pending....
Trade Plan: Short $BULLA
Entry: 0.093 - 0.095
SL: 0.108671
TP: 0.064800 | 0.040318 | 0.015978
Why this Setup?
Price has slammed into the sell wall near 0.096, showing strong resistance as sellers defend the upper zone. A rejection from here could trigger a downside liquidity sweep toward 0.064800, followed by 0.040318 and potentially 0.015978. As long as 0.108671 holds, the bearish setup remains valid.
Click here to Trade 👇 $BULLA
Trade Plan: Short $BULLA
Entry: 0.093 - 0.095
SL: 0.108671
TP: 0.064800 | 0.040318 | 0.015978
Why this Setup?
Price has slammed into the sell wall near 0.096, showing strong resistance as sellers defend the upper zone. A rejection from here could trigger a downside liquidity sweep toward 0.064800, followed by 0.040318 and potentially 0.015978. As long as 0.108671 holds, the bearish setup remains valid.
Click here to Trade 👇 $BULLA
3
455
·
--
Bearish
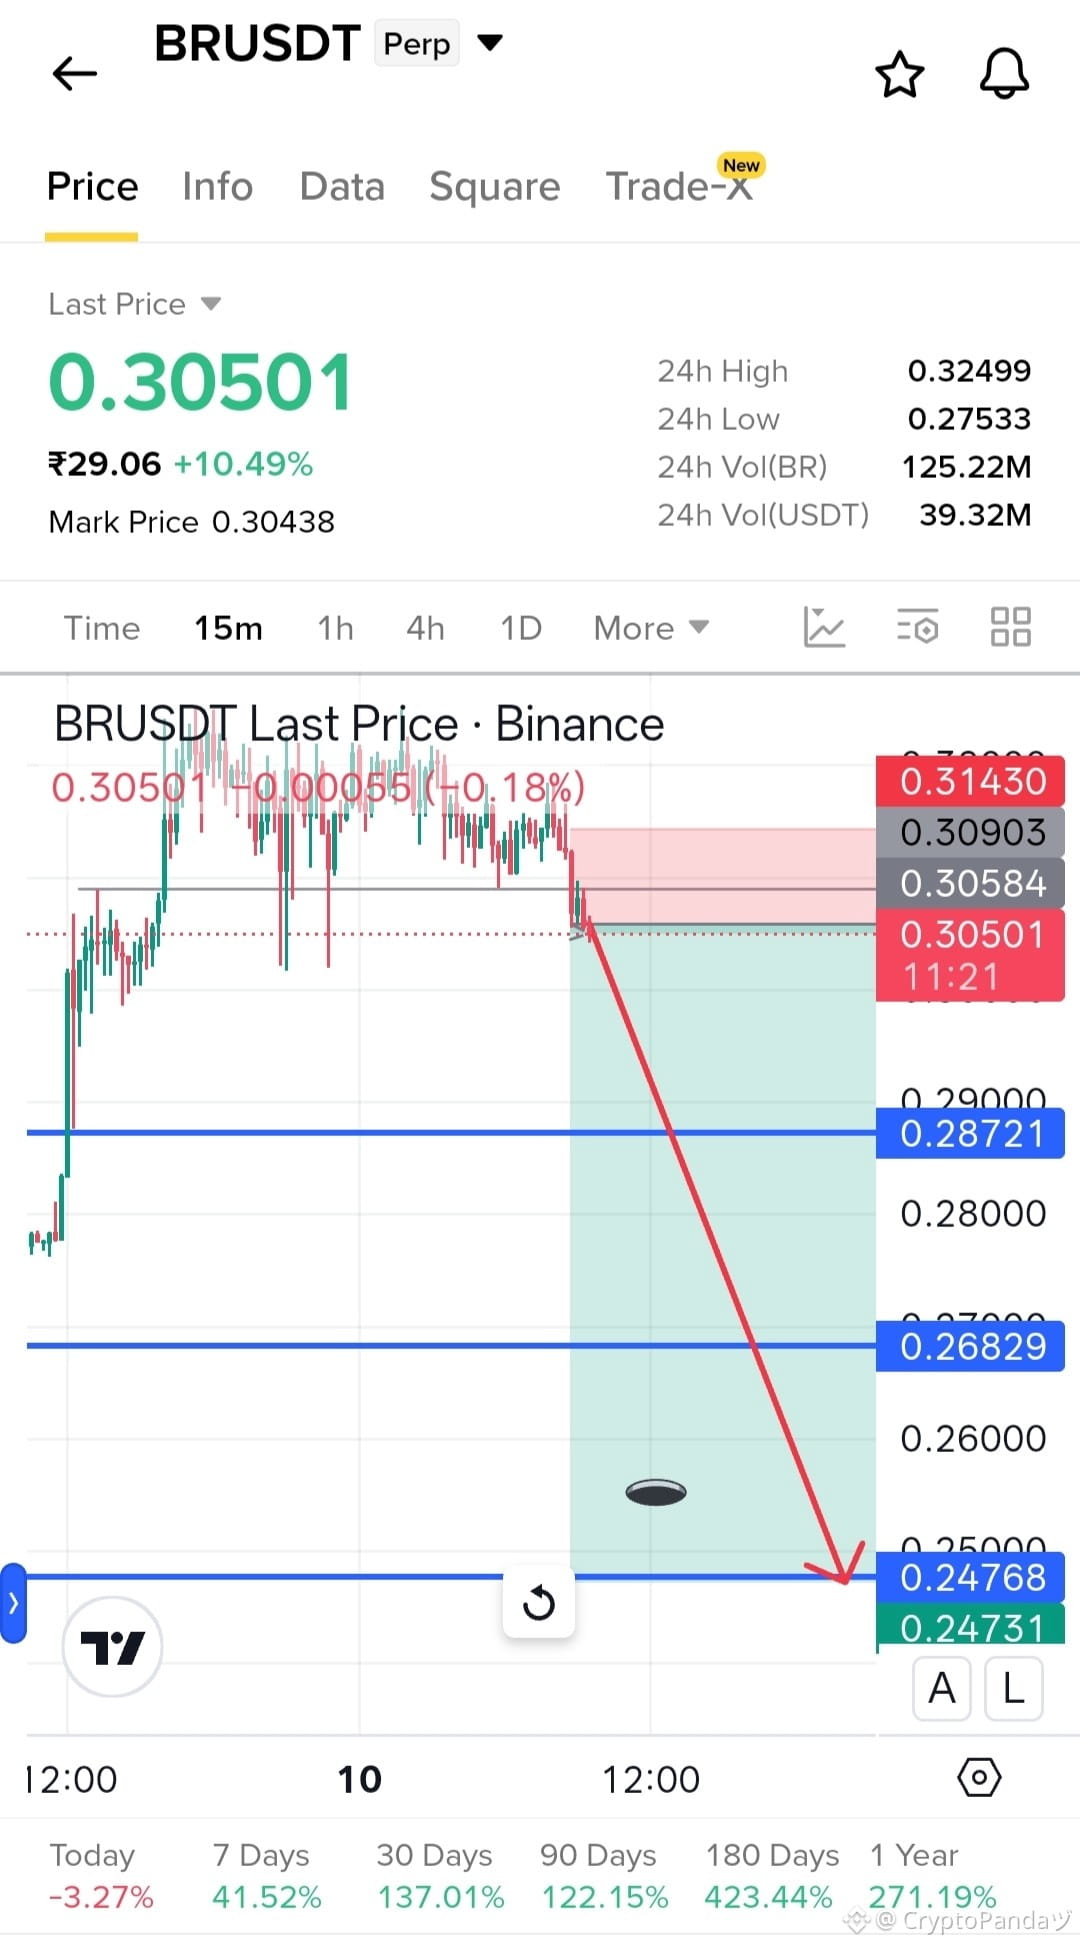
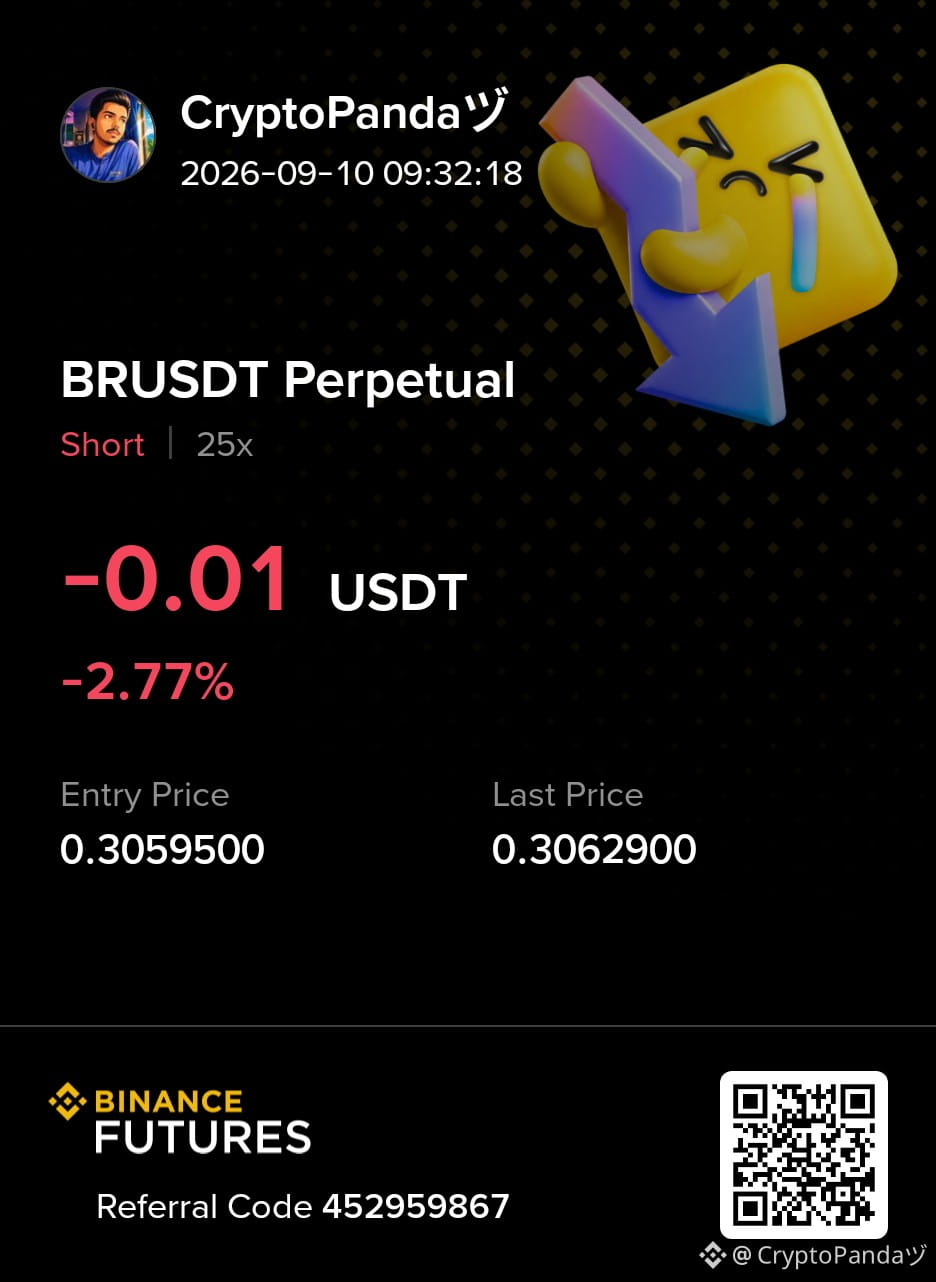
$BR — Major Demand at 0.30903 Broken. Downside Expansion Building....
Trade Plan: Short $BR
Entry: 0.305 - 0.310
SL: 0.31430
TP: 0.28721 | 0.26829 | 0.24768
Why this Setup?
The major 0.30903 demand zone has been broken, signaling that sellers are taking control and opening room for further downside. A continuation below this level could expand the move toward 0.28721, followed by 0.26829 and potentially 0.24768. As long as 0.31430 holds, the bearish setup remains valid.
Click here to Trade 👇 $BR
{future}(BRUSDT)
$BR — Major Demand at 0.30903 Broken. Downside Expansion Building....
Trade Plan: Short $BR
Entry: 0.305 - 0.310
SL: 0.31430
TP: 0.28721 | 0.26829 | 0.24768
Why this Setup?
The major 0.30903 demand zone has been broken, signaling that sellers are taking control and opening room for further downside. A continuation below this level could expand the move toward 0.28721, followed by 0.26829 and potentially 0.24768. As long as 0.31430 holds, the bearish setup remains valid.
Click here to Trade 👇 $BR
Trade Plan: Short $BR
Entry: 0.305 - 0.310
SL: 0.31430
TP: 0.28721 | 0.26829 | 0.24768
Why this Setup?
The major 0.30903 demand zone has been broken, signaling that sellers are taking control and opening room for further downside. A continuation below this level could expand the move toward 0.28721, followed by 0.26829 and potentially 0.24768. As long as 0.31430 holds, the bearish setup remains valid.
Click here to Trade 👇 $BR
1
3
565
·
--
Bearish
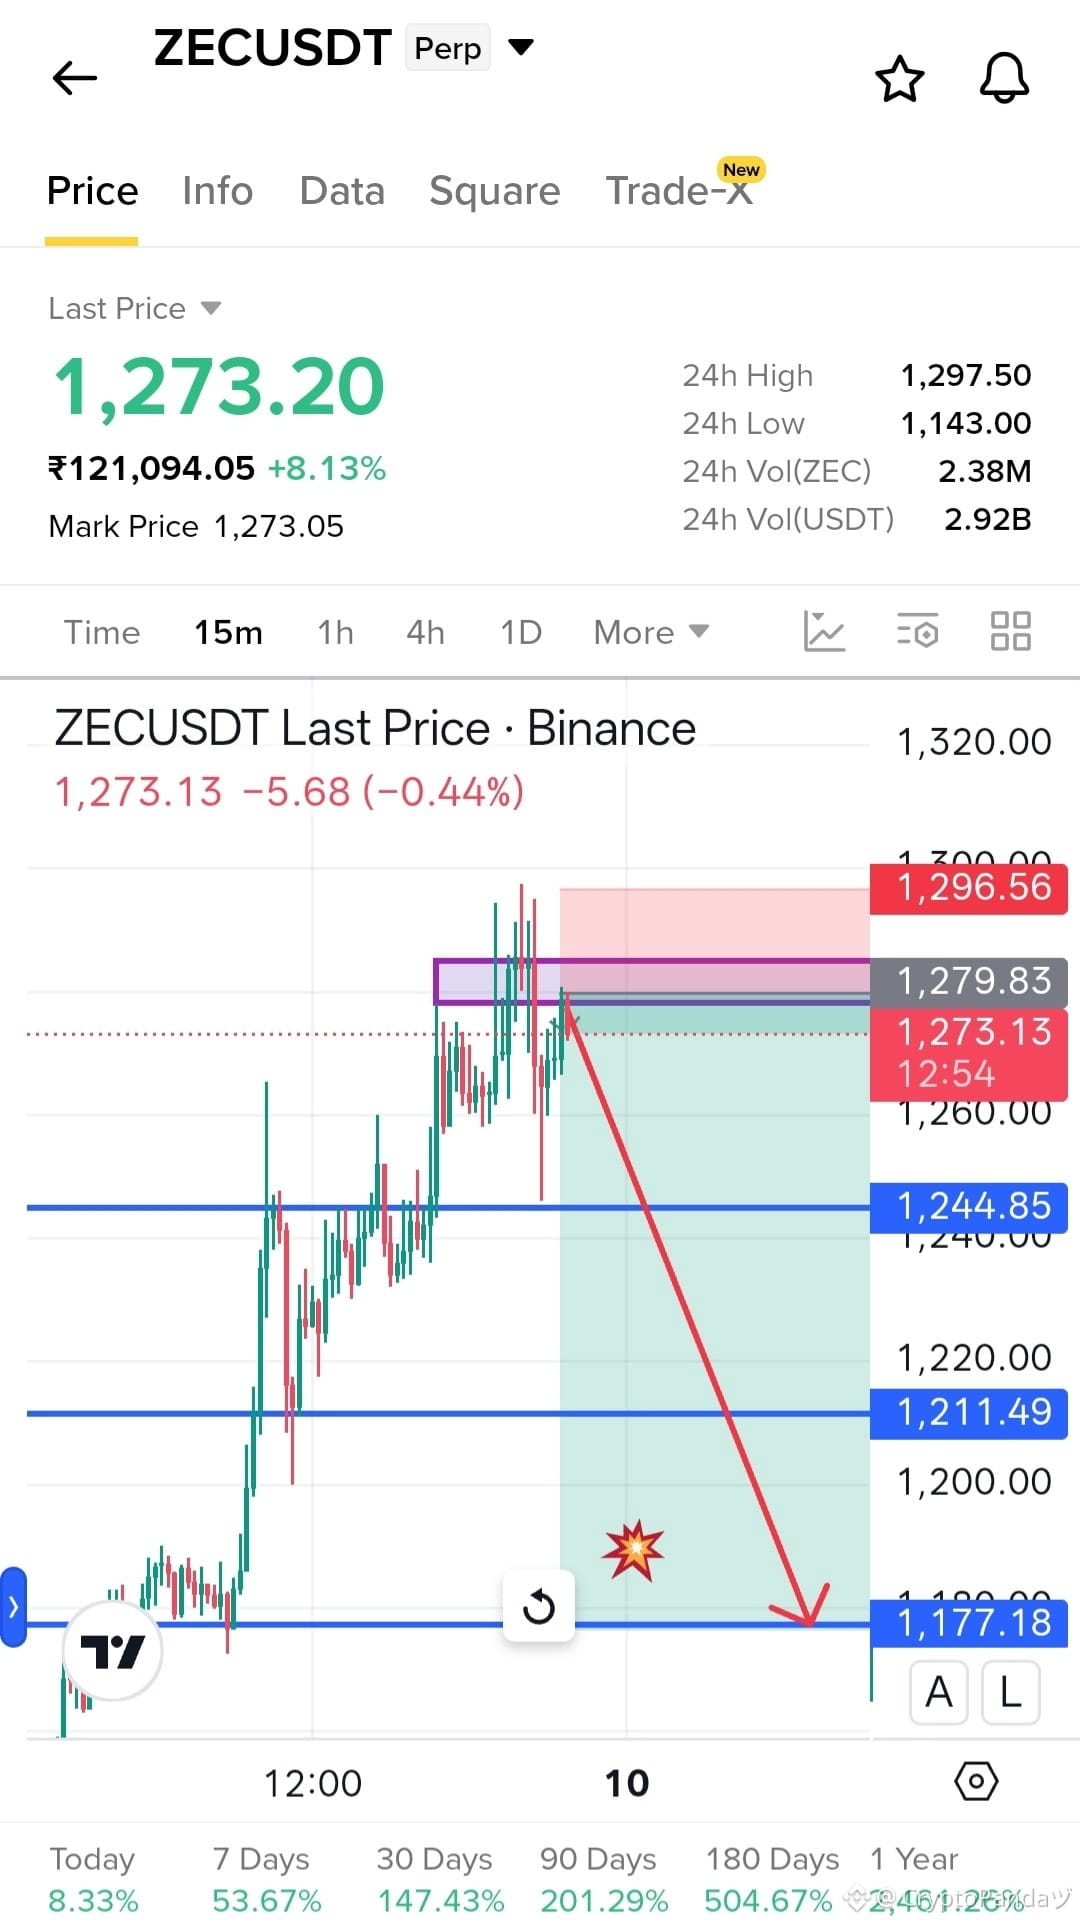
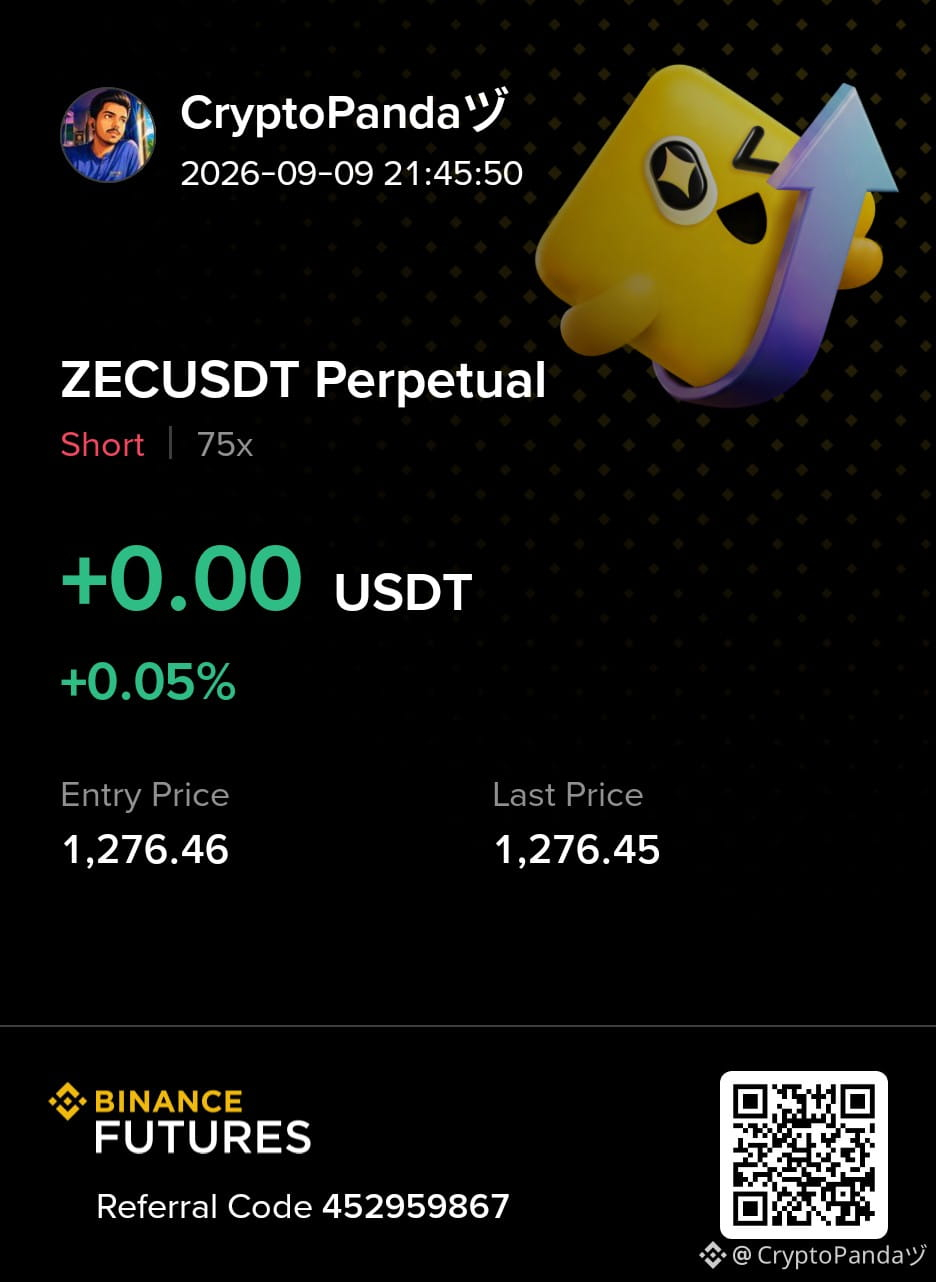
$ZEC — Upside momentum fading below 1279.83 OB. Massive cascade alert....
Trade Plan: Short $ZEC
Entry: 1270 - 1280
SL: 1296.56
TP: 1244.85 | 1211.49 | 1177.18
Why this Setup?
Upside momentum is fading beneath the 1279.83 sell wall, showing sellers defending the upper zone. A rejection here could trigger a cascade toward 1244.85, followed by 1211.49 and potentially 1177.18. As long as 1296.56 holds, the bearish setup remains valid.
Click here to Trade 👇 $ZEC
{future}(ZECUSDT)
$ZEC — Upside momentum fading below 1279.83 OB. Massive cascade alert....
Trade Plan: Short $ZEC
Entry: 1270 - 1280
SL: 1296.56
TP: 1244.85 | 1211.49 | 1177.18
Why this Setup?
Upside momentum is fading beneath the 1279.83 sell wall, showing sellers defending the upper zone. A rejection here could trigger a cascade toward 1244.85, followed by 1211.49 and potentially 1177.18. As long as 1296.56 holds, the bearish setup remains valid.
Click here to Trade 👇 $ZEC
Trade Plan: Short $ZEC
Entry: 1270 - 1280
SL: 1296.56
TP: 1244.85 | 1211.49 | 1177.18
Why this Setup?
Upside momentum is fading beneath the 1279.83 sell wall, showing sellers defending the upper zone. A rejection here could trigger a cascade toward 1244.85, followed by 1211.49 and potentially 1177.18. As long as 1296.56 holds, the bearish setup remains valid.
Click here to Trade 👇 $ZEC
2
489
·
--
Bullish
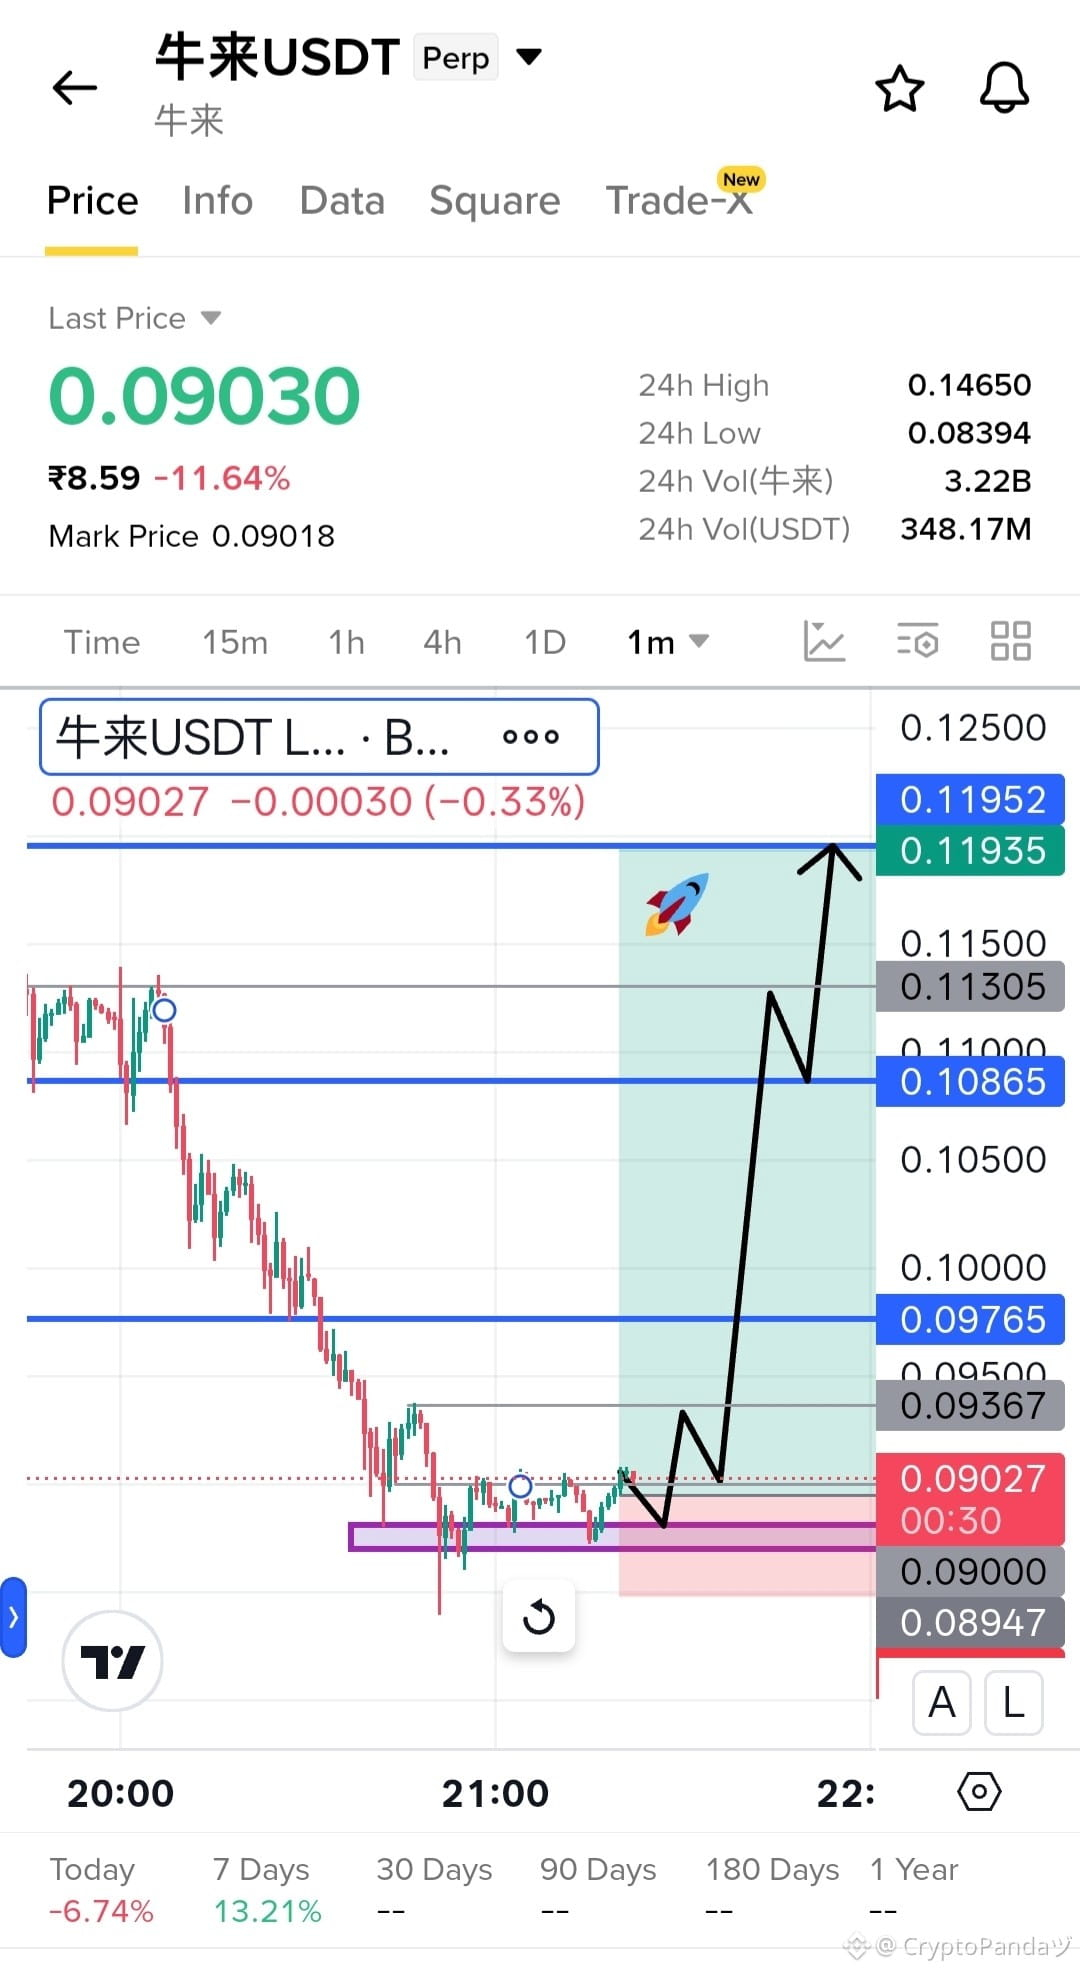
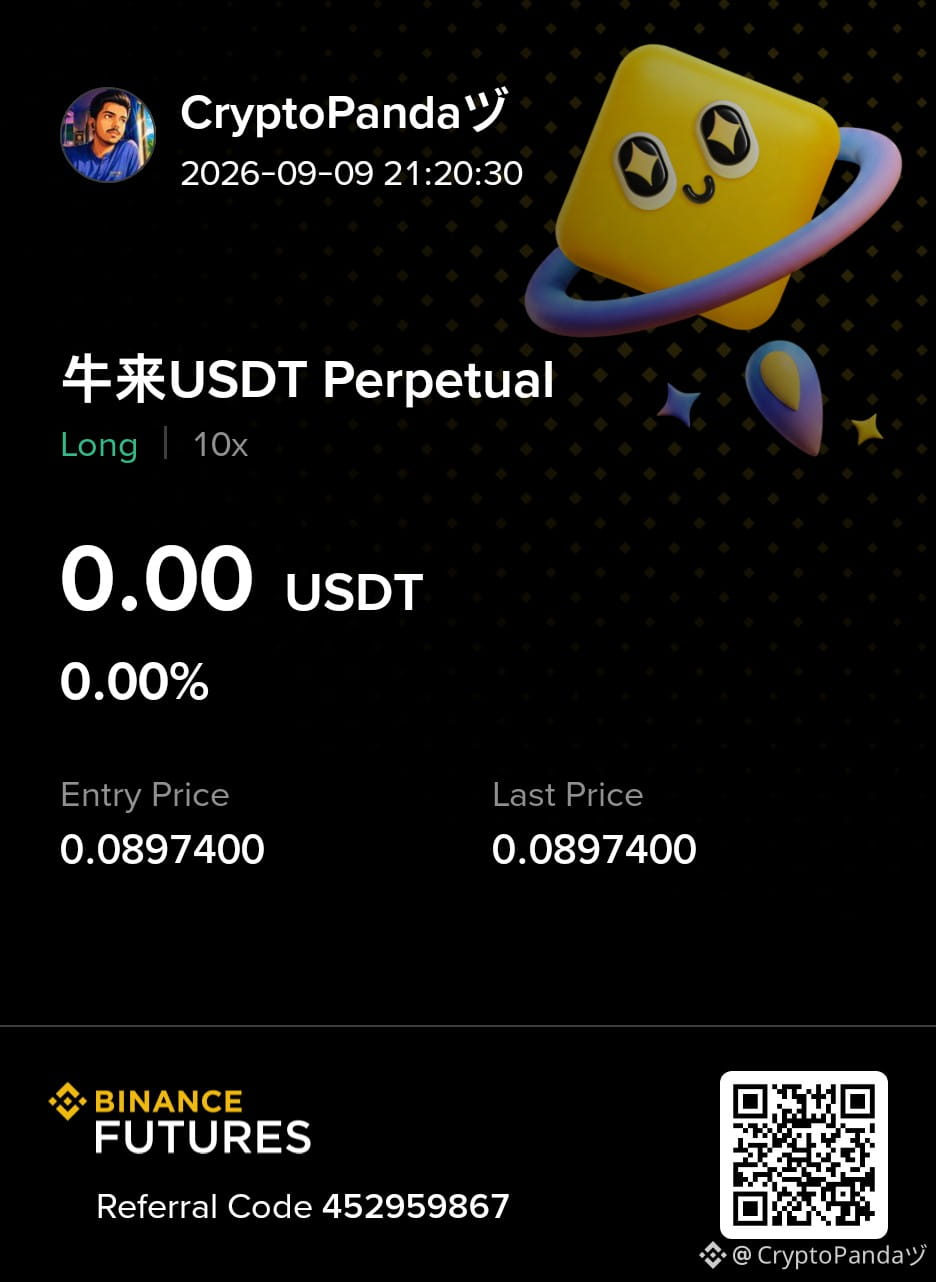
$牛来 — Price stalling after flush at 0.08947 support. Next upside leg soon....
Trade Plan: Long $牛来
Entry: 0.090 - 0.092
SL: 0.08484
TP: 0.09765 | 0.10865 | 0.11952
Why this Setup?
Price is stalling after the recent flush into the 0.08947 support area, showing buyers defending the zone. A recovery from this support could trigger the next upside leg toward 0.09765, followed by 0.10865 and potentially 0.11952. As long as 0.08484 holds, the bullish setup remains valid.
Click here to Trade 👇 $牛来
{future}(牛来USDT)
$牛来 — Price stalling after flush at 0.08947 support. Next upside leg soon....
Trade Plan: Long $牛来
Entry: 0.090 - 0.092
SL: 0.08484
TP: 0.09765 | 0.10865 | 0.11952
Why this Setup?
Price is stalling after the recent flush into the 0.08947 support area, showing buyers defending the zone. A recovery from this support could trigger the next upside leg toward 0.09765, followed by 0.10865 and potentially 0.11952. As long as 0.08484 holds, the bullish setup remains valid.
Click here to Trade 👇 $牛来
Trade Plan: Long $牛来
Entry: 0.090 - 0.092
SL: 0.08484
TP: 0.09765 | 0.10865 | 0.11952
Why this Setup?
Price is stalling after the recent flush into the 0.08947 support area, showing buyers defending the zone. A recovery from this support could trigger the next upside leg toward 0.09765, followed by 0.10865 and potentially 0.11952. As long as 0.08484 holds, the bullish setup remains valid.
Click here to Trade 👇 $牛来
2
935
·
--
Bearish
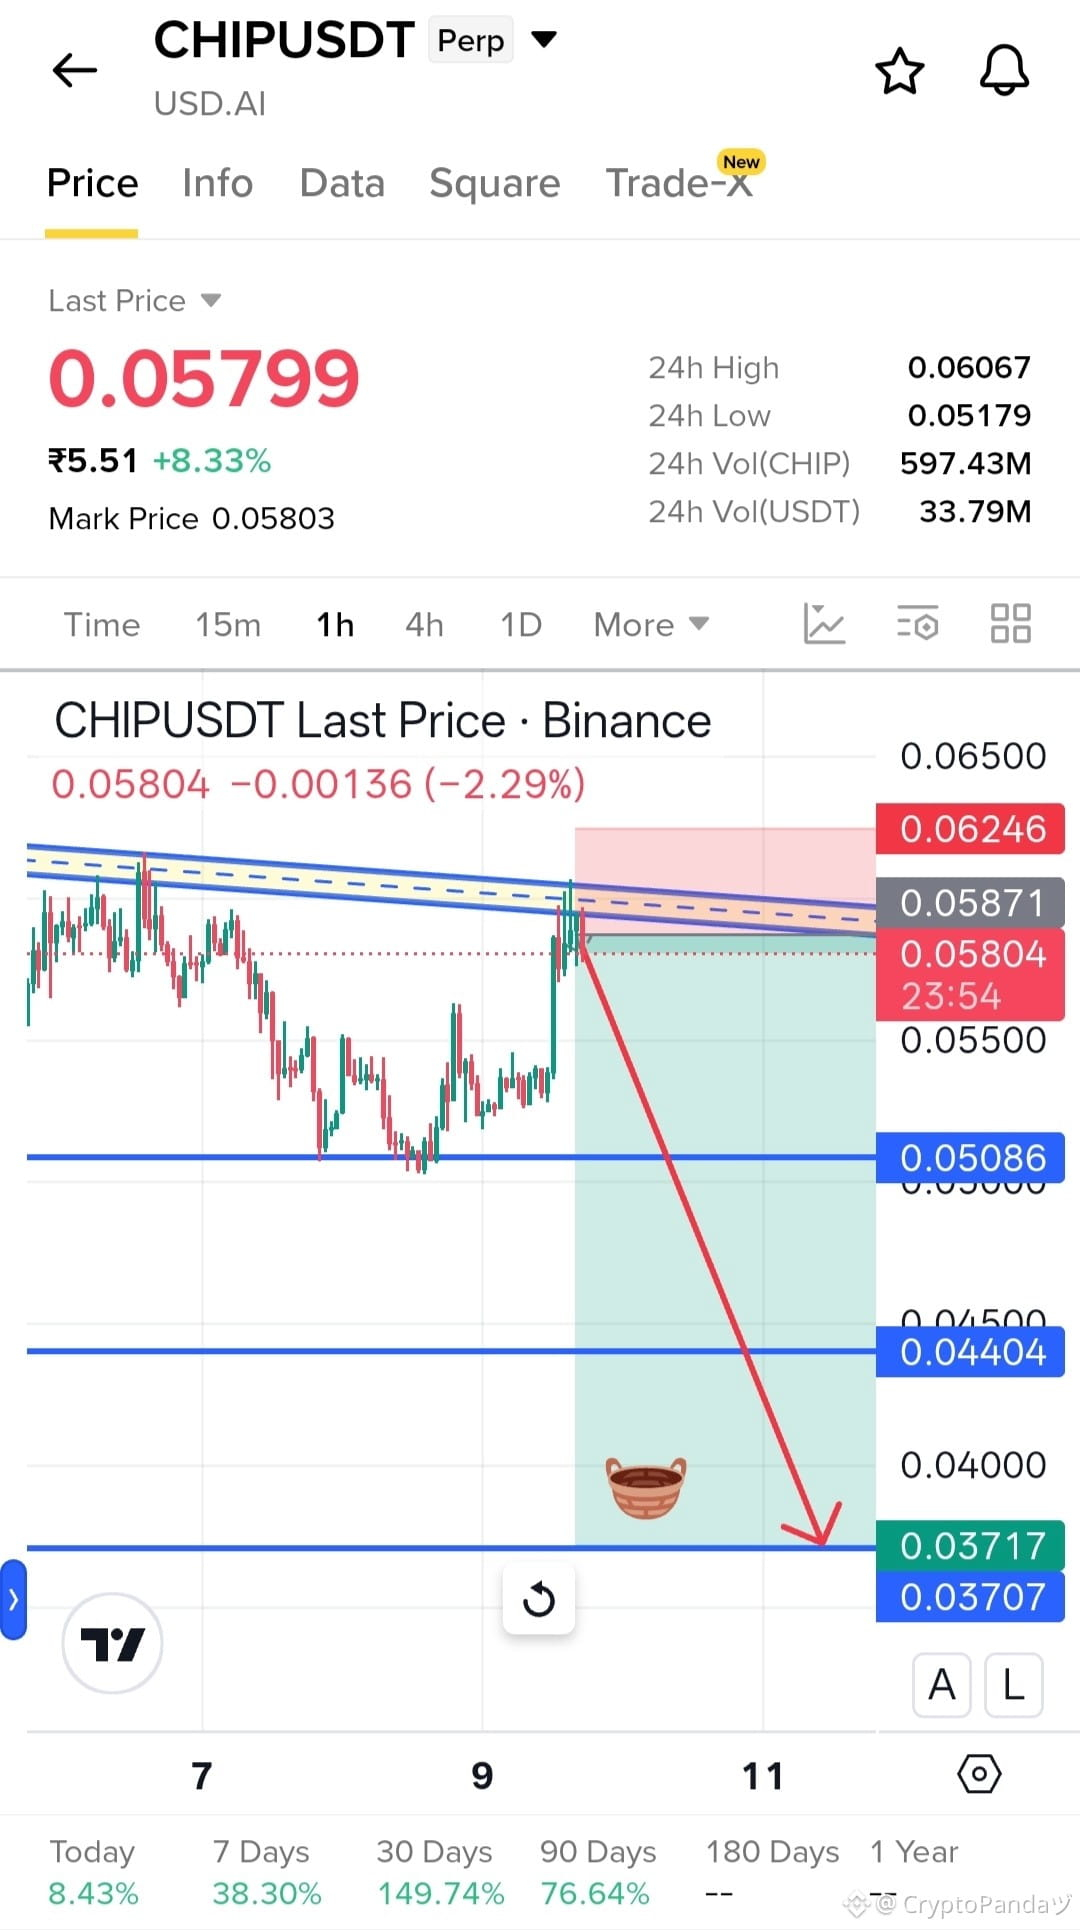
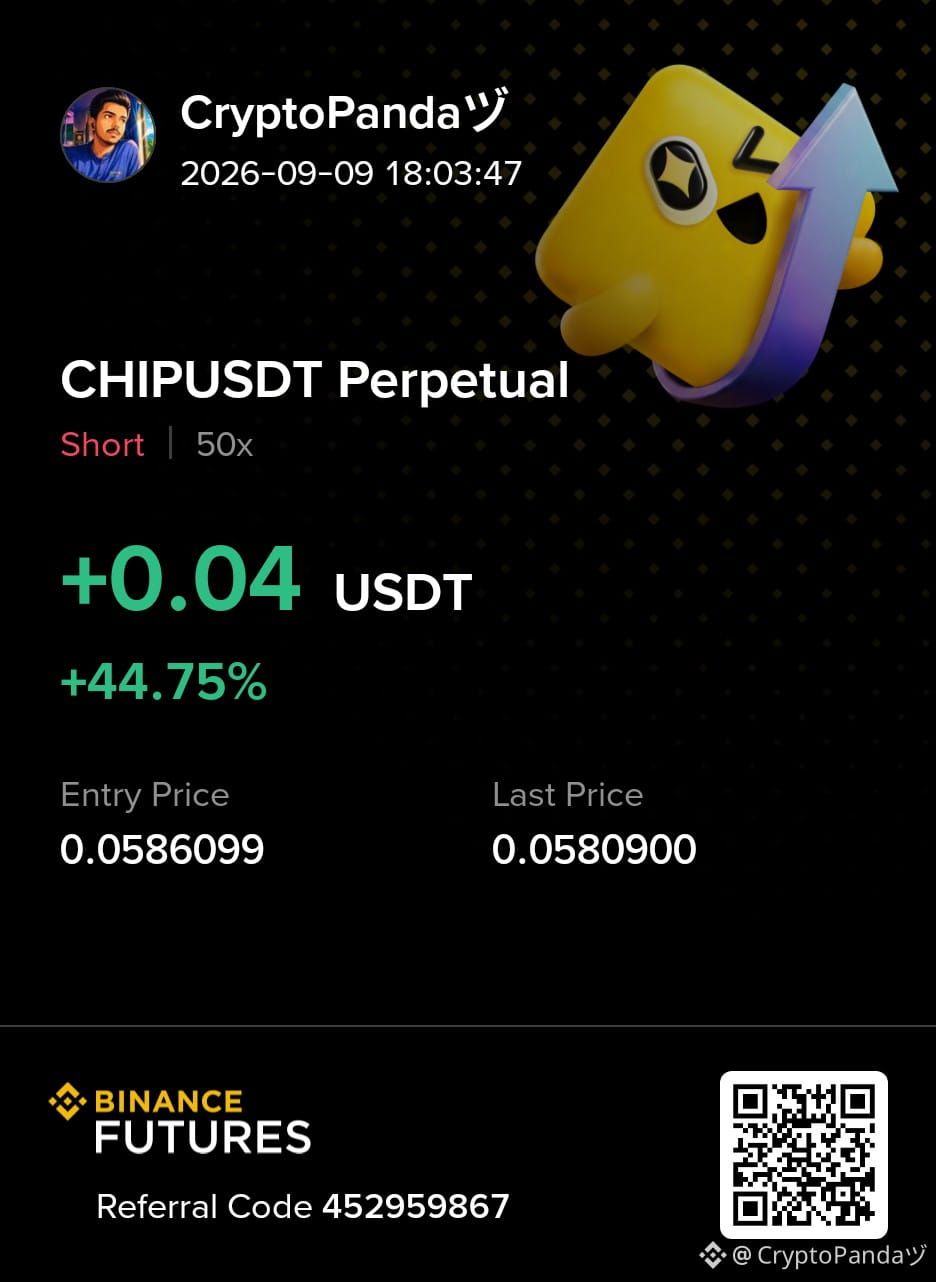
$CHIP — Whales unloading the top at 0.05871 supply. Pullback likely soon...
Trade Plan: Short $CHIP
Entry: 0.057 - 0.059
SL: 0.06246
TP: 0.05086 | 0.04404 | 0.03717
Why this Setup?
Whales are unloading near the 0.05871 supply zone, signaling exhaustion after the upside move. A rejection from this area could trigger a pullback toward 0.05086, followed by 0.04404 and potentially 0.03717. As long as 0.06246 holds, the bearish setup remains valid.
Click here to Trade 👇 $CHIP
{future}(CHIPUSDT)
$CHIP — Whales unloading the top at 0.05871 supply. Pullback likely soon...
Trade Plan: Short $CHIP
Entry: 0.057 - 0.059
SL: 0.06246
TP: 0.05086 | 0.04404 | 0.03717
Why this Setup?
Whales are unloading near the 0.05871 supply zone, signaling exhaustion after the upside move. A rejection from this area could trigger a pullback toward 0.05086, followed by 0.04404 and potentially 0.03717. As long as 0.06246 holds, the bearish setup remains valid.
Click here to Trade 👇 $CHIP
Trade Plan: Short $CHIP
Entry: 0.057 - 0.059
SL: 0.06246
TP: 0.05086 | 0.04404 | 0.03717
Why this Setup?
Whales are unloading near the 0.05871 supply zone, signaling exhaustion after the upside move. A rejection from this area could trigger a pullback toward 0.05086, followed by 0.04404 and potentially 0.03717. As long as 0.06246 holds, the bearish setup remains valid.
Click here to Trade 👇 $CHIP
5
600
·
--
Bearish
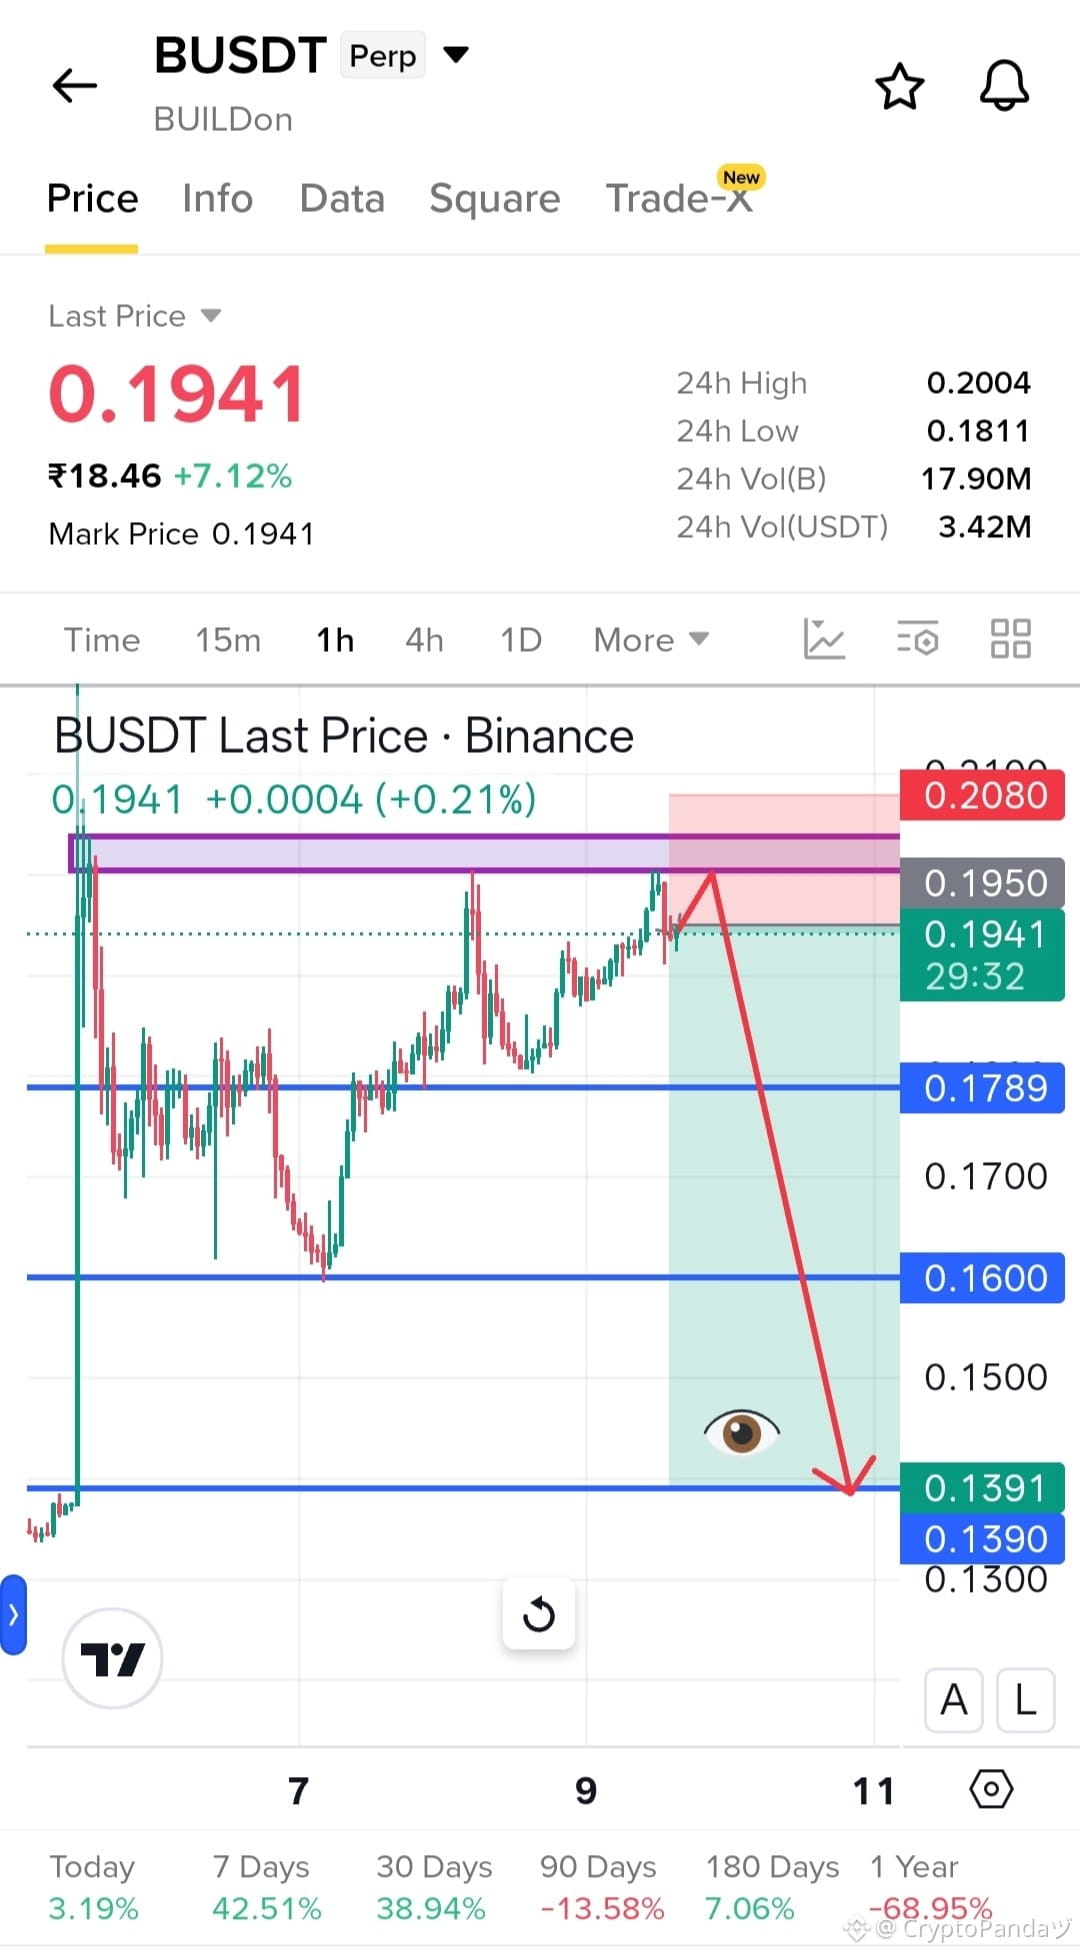
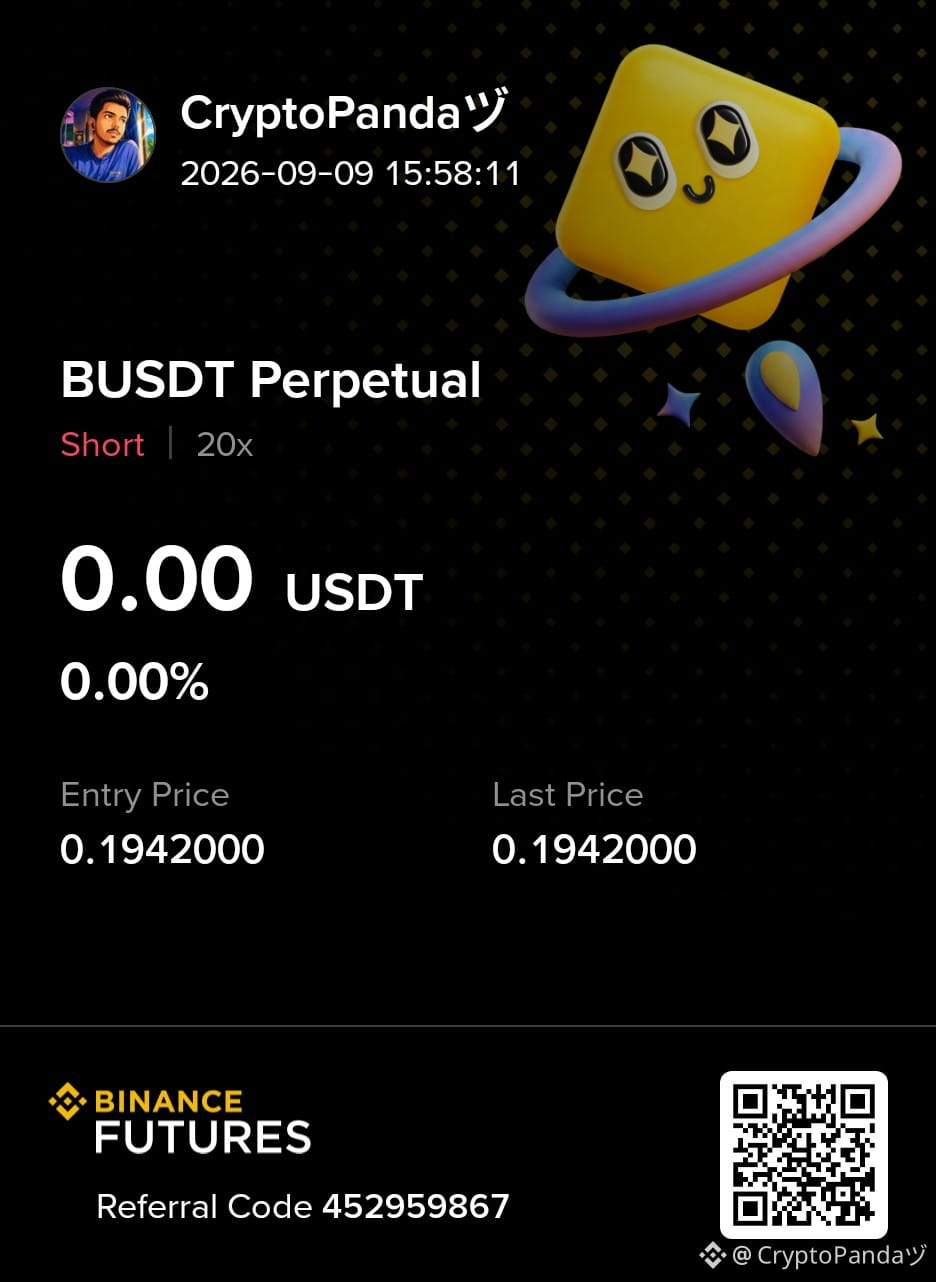
$B — Upside liquidity swept at 0.20 OB level. Downside rally begins soon...
Trade Plan: Short $B
Entry: 0.192 - 0.202
SL: 0.2080
TP: 0.1789 | 0.1600 | 0.1390
Why this Setup?
Upside liquidity has been swept around the 0.20 OB level, creating a potential rejection zone as sellers step in. A move lower from here could accelerate toward 0.1789, followed by 0.1600 and potentially 0.1390. As long as 0.2080 holds, the bearish setup remains valid.
Click here to Trade 👇 $B
{future}(BUSDT)
$B — Upside liquidity swept at 0.20 OB level. Downside rally begins soon...
Trade Plan: Short $B
Entry: 0.192 - 0.202
SL: 0.2080
TP: 0.1789 | 0.1600 | 0.1390
Why this Setup?
Upside liquidity has been swept around the 0.20 OB level, creating a potential rejection zone as sellers step in. A move lower from here could accelerate toward 0.1789, followed by 0.1600 and potentially 0.1390. As long as 0.2080 holds, the bearish setup remains valid.
Click here to Trade 👇 $B
Trade Plan: Short $B
Entry: 0.192 - 0.202
SL: 0.2080
TP: 0.1789 | 0.1600 | 0.1390
Why this Setup?
Upside liquidity has been swept around the 0.20 OB level, creating a potential rejection zone as sellers step in. A move lower from here could accelerate toward 0.1789, followed by 0.1600 and potentially 0.1390. As long as 0.2080 holds, the bearish setup remains valid.
Click here to Trade 👇 $B
3
493
·
--
Bearish
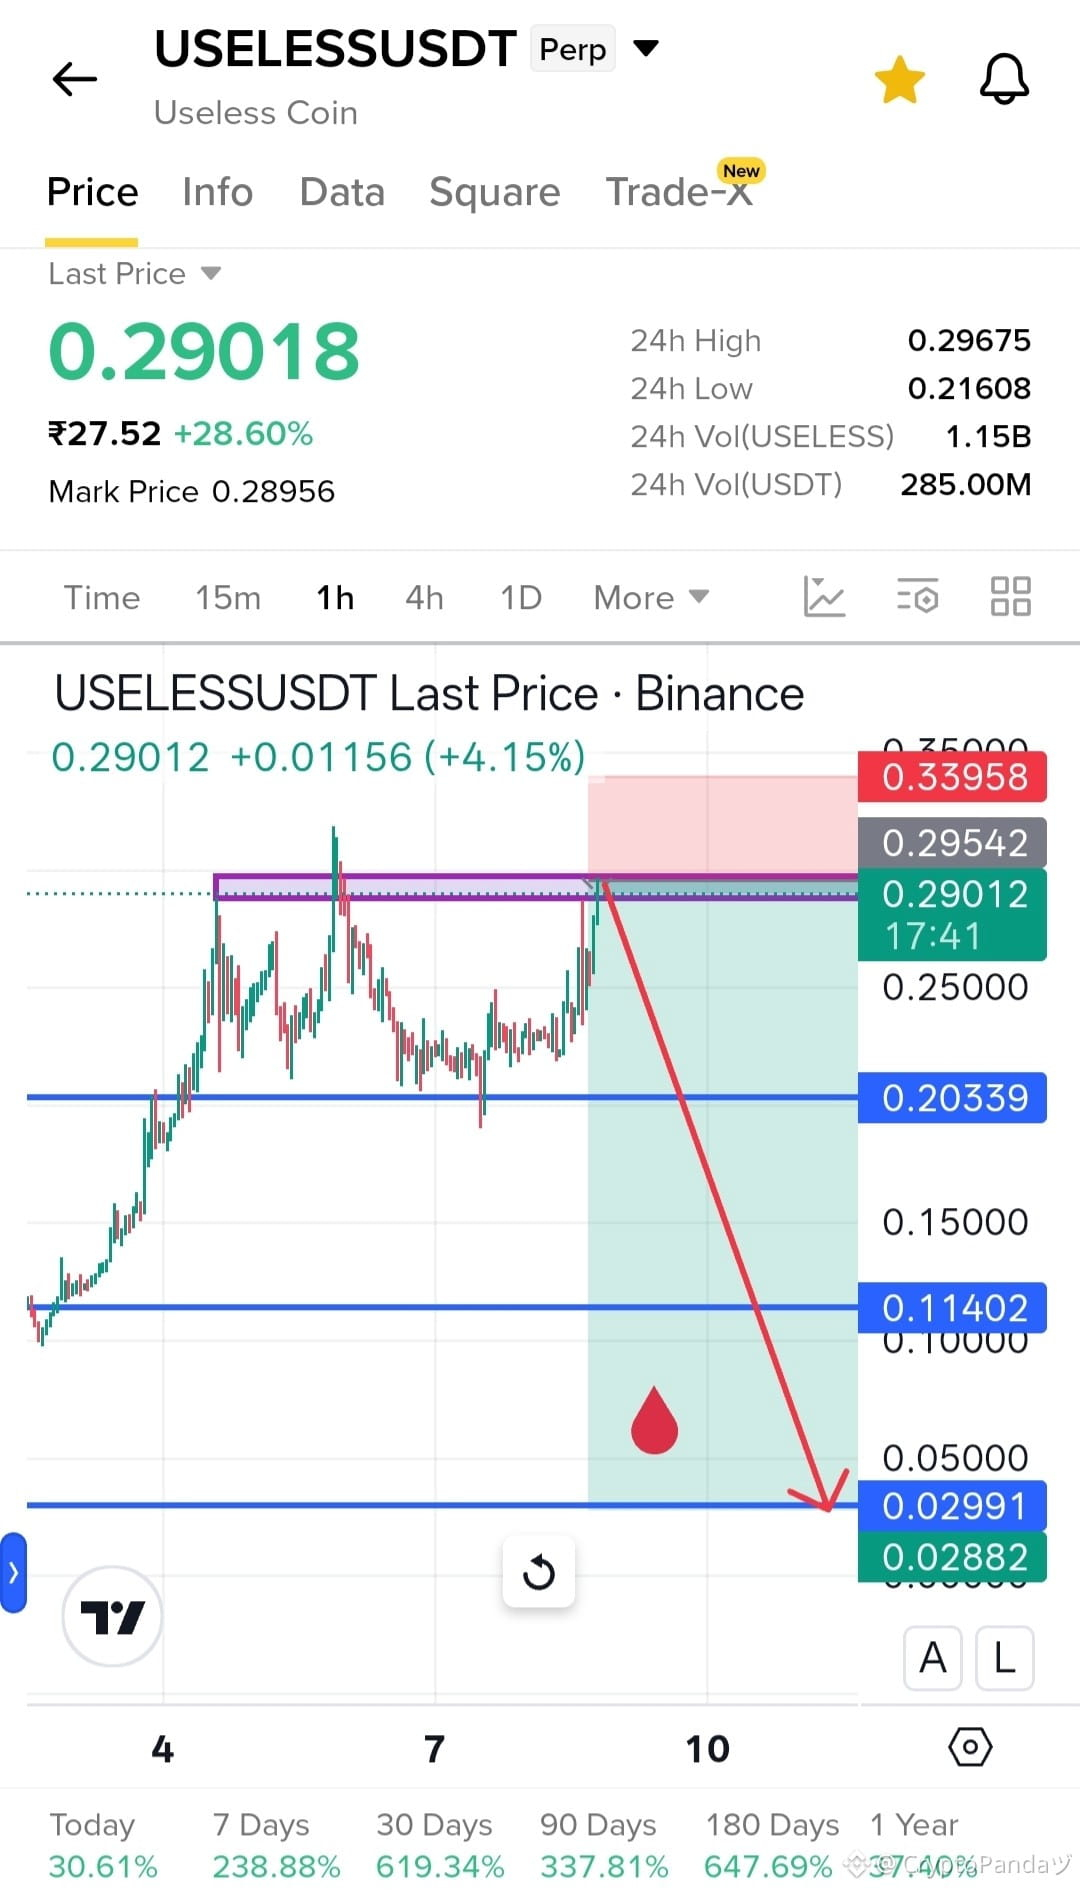
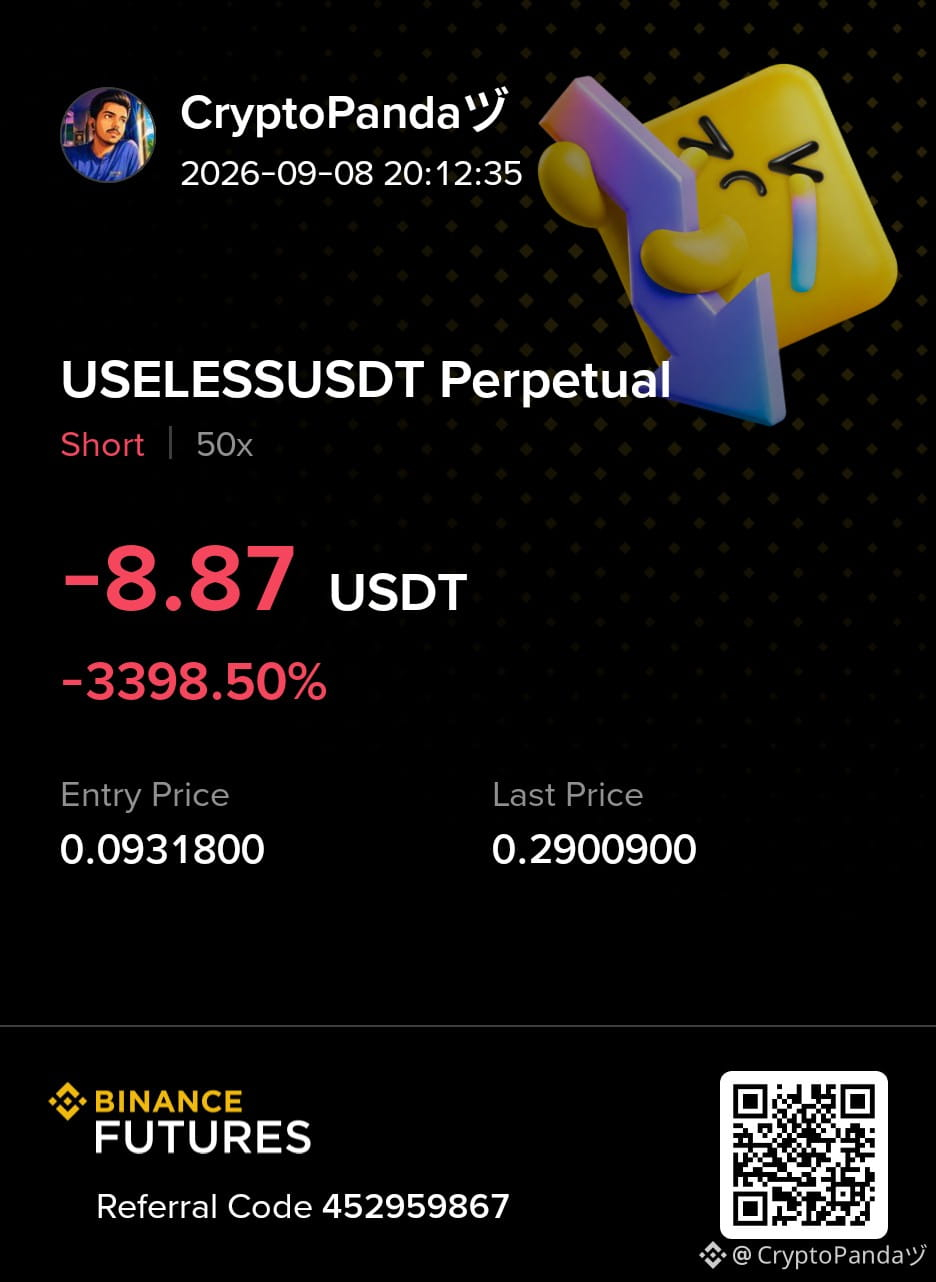
$USELESS - Reclaimed sellers' block at 0.29542. Liquidation wave coming...
Trade Plan: Short $USELESS
Entry: 0.29 - 0.30
SL: 0.33958
TP: 0.20339 | 0.11402 | 0.02991
Why this Setup?
Price has reclaimed the same sellers’ block around 0.29542, creating another potential rejection zone for bears to take control. A rejection here could trigger a liquidation wave toward 0.20339, followed by 0.11402 and potentially 0.02991. As long as 0.33958 holds, the bearish setup remains valid.
Click here to Trade 👇 $USELESS
{future}(USELESSUSDT)
$USELESS - Reclaimed sellers' block at 0.29542. Liquidation wave coming...
Trade Plan: Short $USELESS
Entry: 0.29 - 0.30
SL: 0.33958
TP: 0.20339 | 0.11402 | 0.02991
Why this Setup?
Price has reclaimed the same sellers’ block around 0.29542, creating another potential rejection zone for bears to take control. A rejection here could trigger a liquidation wave toward 0.20339, followed by 0.11402 and potentially 0.02991. As long as 0.33958 holds, the bearish setup remains valid.
Click here to Trade 👇 $USELESS
Trade Plan: Short $USELESS
Entry: 0.29 - 0.30
SL: 0.33958
TP: 0.20339 | 0.11402 | 0.02991
Why this Setup?
Price has reclaimed the same sellers’ block around 0.29542, creating another potential rejection zone for bears to take control. A rejection here could trigger a liquidation wave toward 0.20339, followed by 0.11402 and potentially 0.02991. As long as 0.33958 holds, the bearish setup remains valid.
Click here to Trade 👇 $USELESS
2
2
749
·
--
Bearish
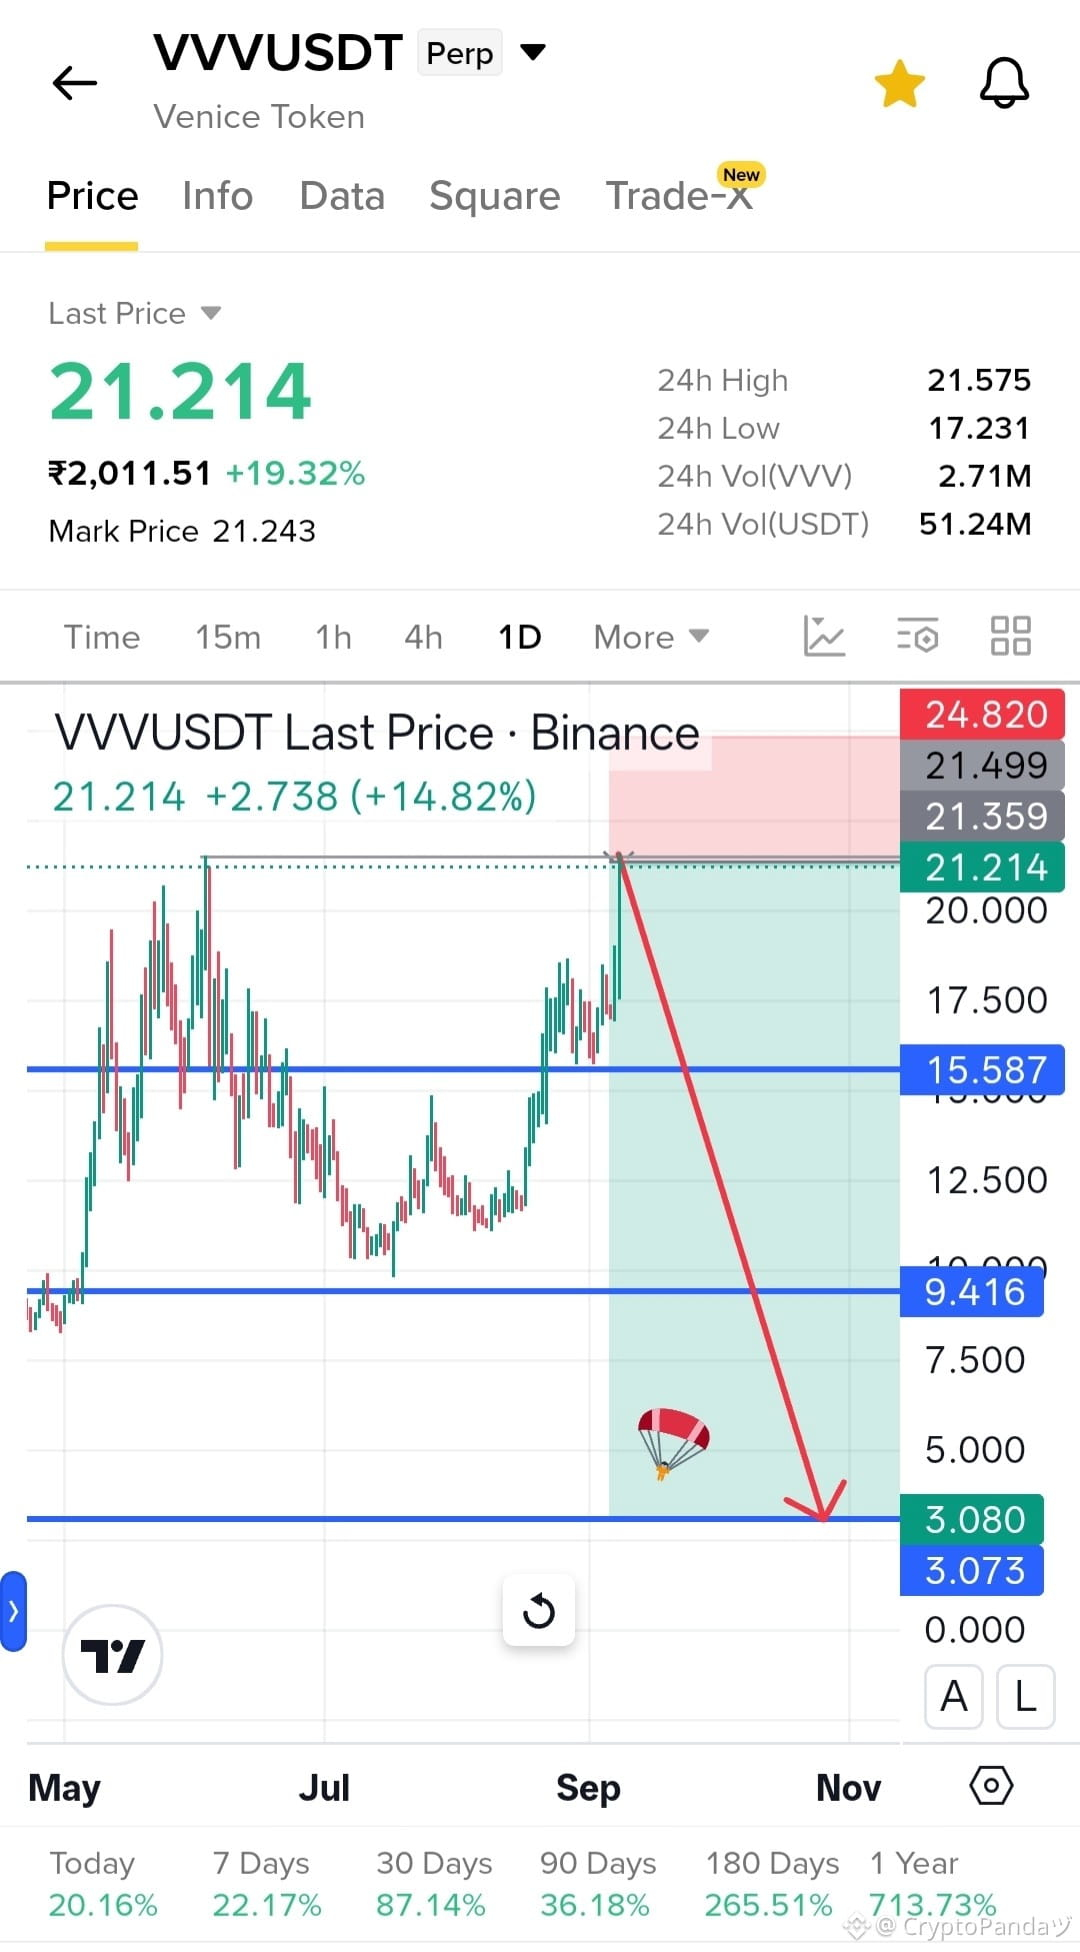
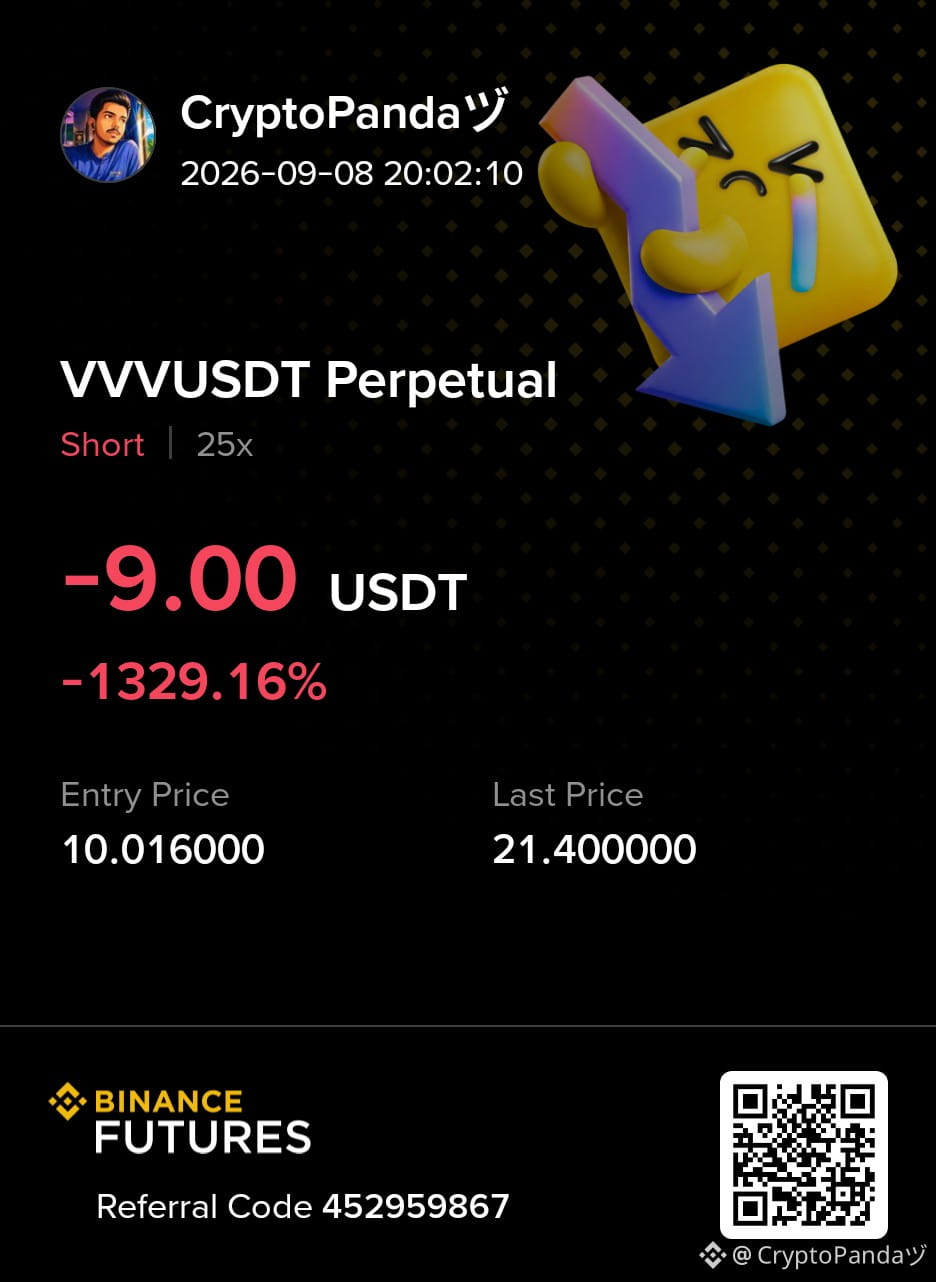
$VVV — Final upside needle getting poked into 23 Supply zone. Pullback likely....
Trade Plan: Short $VVV
Entry: 21.00 - 22.00
SL: 24.820
TP: 15.587 | 9.416 | 3.080
Why this Setup?
Price is making a final upside push into the 21.499 supply zone, where sellers could step in and trigger a sharp rejection. A pullback from this area could drive it toward 15.587, followed by 9.416 and potentially 3.080. As long as 24.820 holds, the bearish setup remains valid.
Click here to Trade 👇 $VVV
{future}(VVVUSDT)
$VVV — Final upside needle getting poked into 23 Supply zone. Pullback likely....
Trade Plan: Short $VVV
Entry: 21.00 - 22.00
SL: 24.820
TP: 15.587 | 9.416 | 3.080
Why this Setup?
Price is making a final upside push into the 21.499 supply zone, where sellers could step in and trigger a sharp rejection. A pullback from this area could drive it toward 15.587, followed by 9.416 and potentially 3.080. As long as 24.820 holds, the bearish setup remains valid.
Click here to Trade 👇 $VVV
Trade Plan: Short $VVV
Entry: 21.00 - 22.00
SL: 24.820
TP: 15.587 | 9.416 | 3.080
Why this Setup?
Price is making a final upside push into the 21.499 supply zone, where sellers could step in and trigger a sharp rejection. A pullback from this area could drive it toward 15.587, followed by 9.416 and potentially 3.080. As long as 24.820 holds, the bearish setup remains valid.
Click here to Trade 👇 $VVV
1
2
825
·
--
Bearish
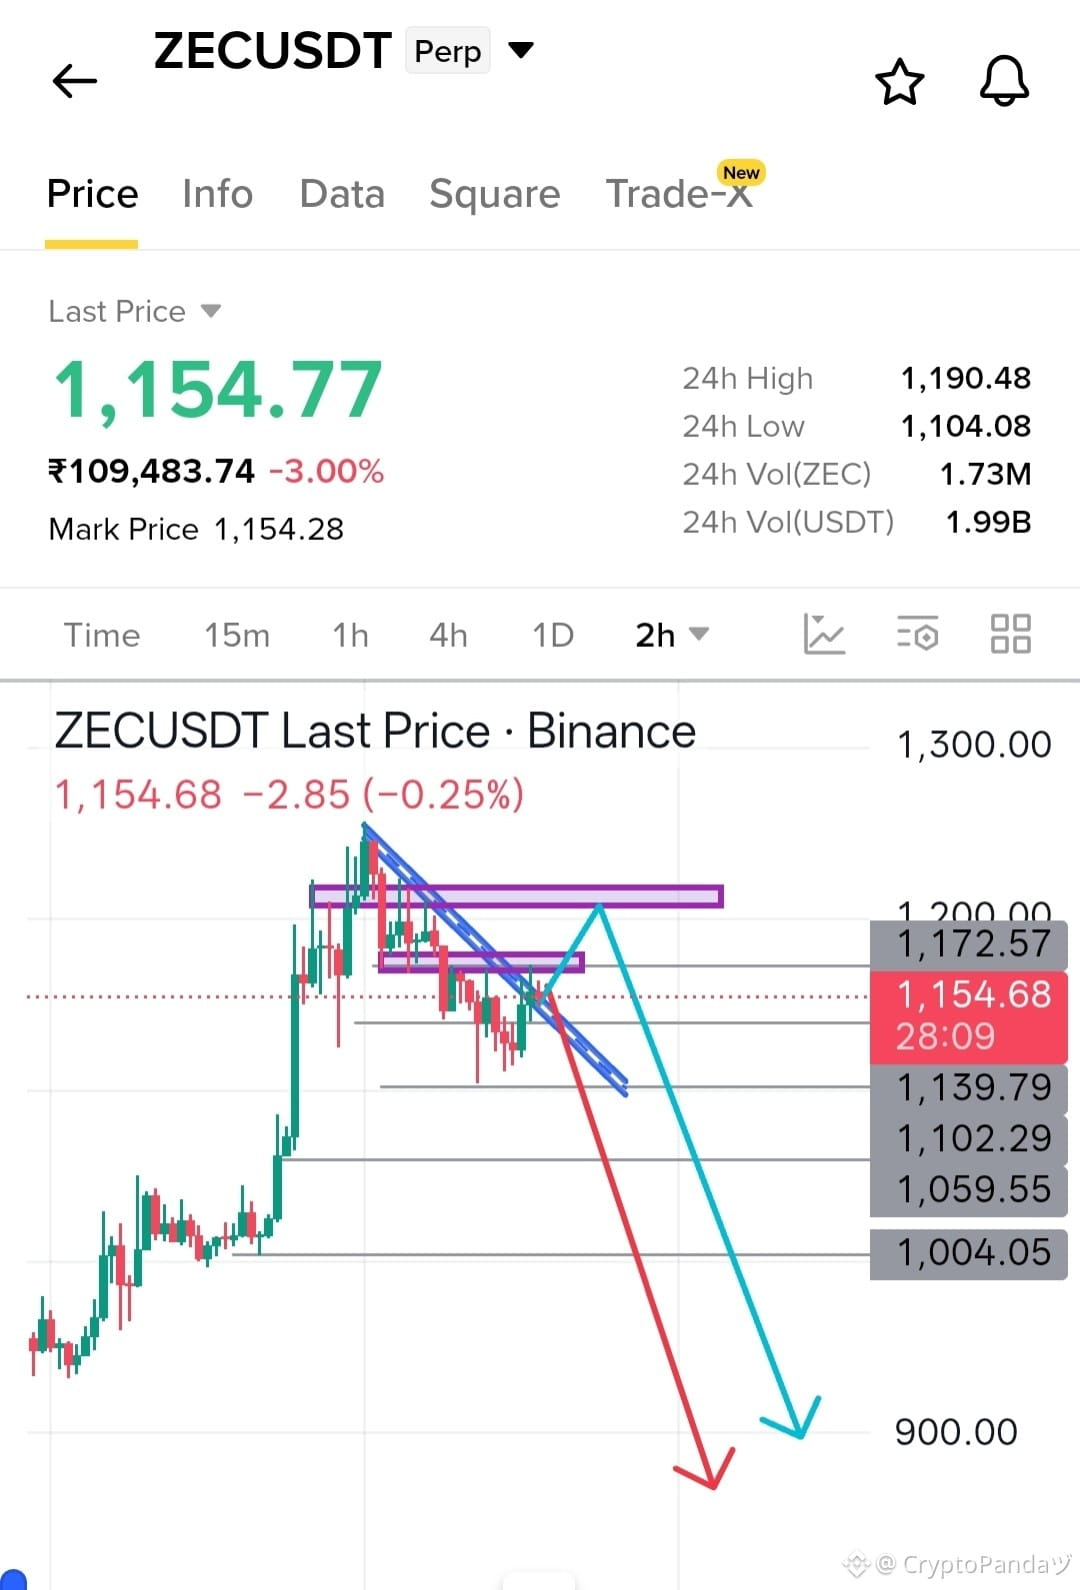
💬 Literally Everyone on the Square is panicked about $ZEC Mostly the Short Holders. So In Order to reduce the Panic I created this Analysis (Just a View) to❗
Scenerio 1️⃣: If It rises theres a Sell Wall at 1172 Level, and From there I am expecting a Massive dump
Scenerio 2️⃣: Lets suppose It gets extended even more towards the top theres another Order Block near 1200 level...
Above that I am not able to spot any healthy Liquidity So My View is in Coming days We can see ZEC below 1000 and even 800....
My Opinion Only, NFA Dyor....
#ZcashRises45%WeeklyToHighestSince2016
Trade $ZEC here 👇
{future}(ZECUSDT)
💬 Literally Everyone on the Square is panicked about $ZEC Mostly the Short Holders. So In Order to reduce the Panic I created this Analysis (Just a View) to❗
Scenerio 1️⃣: If It rises theres a Sell Wall at 1172 Level, and From there I am expecting a Massive dump
Scenerio 2️⃣: Lets suppose It gets extended even more towards the top theres another Order Block near 1200 level...
Above that I am not able to spot any healthy Liquidity So My View is in Coming days We can see ZEC below 1000 and even 800....
My Opinion Only, NFA Dyor....
#ZcashRises45%WeeklyToHighestSince2016
Trade $ZEC here 👇
Scenerio 1️⃣: If It rises theres a Sell Wall at 1172 Level, and From there I am expecting a Massive dump
Scenerio 2️⃣: Lets suppose It gets extended even more towards the top theres another Order Block near 1200 level...
Above that I am not able to spot any healthy Liquidity So My View is in Coming days We can see ZEC below 1000 and even 800....
My Opinion Only, NFA Dyor....
#ZcashRises45%WeeklyToHighestSince2016
Trade $ZEC here 👇
2
372
·
--
Bullish
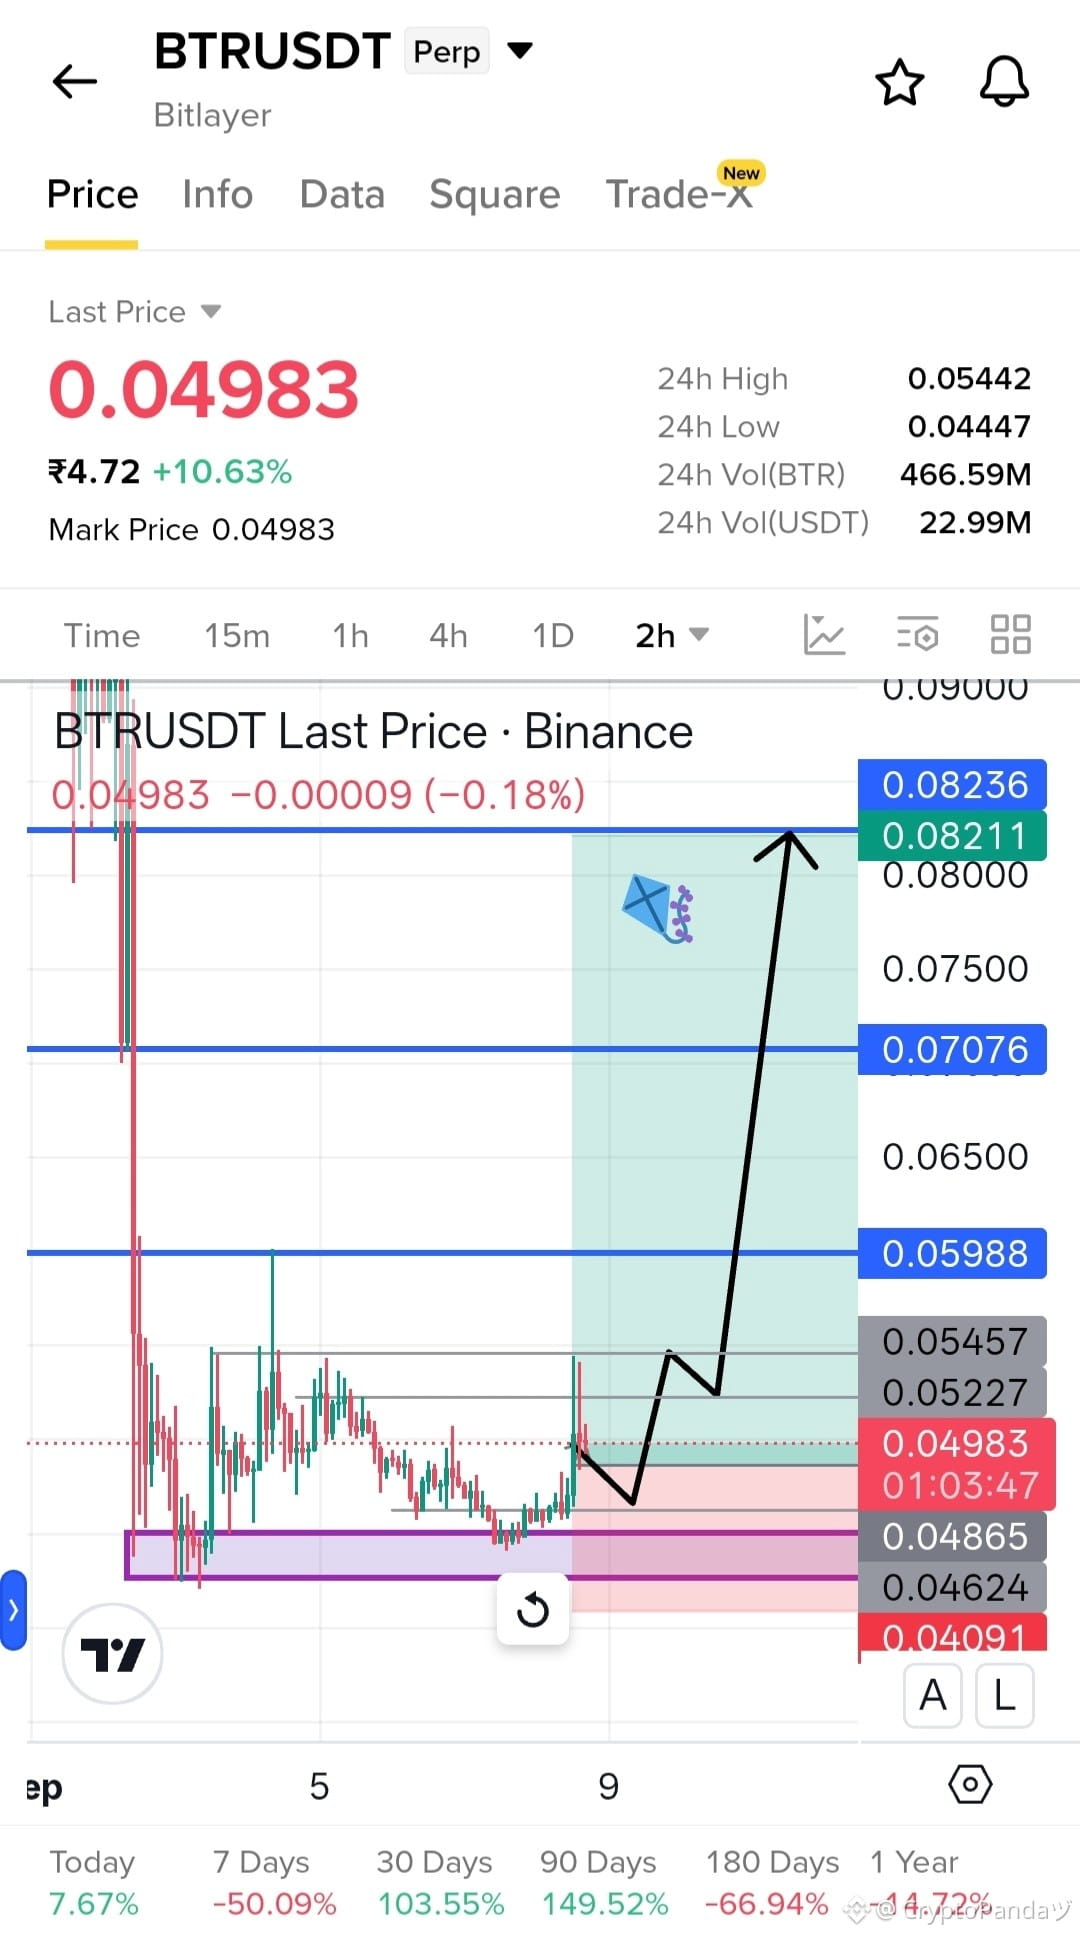
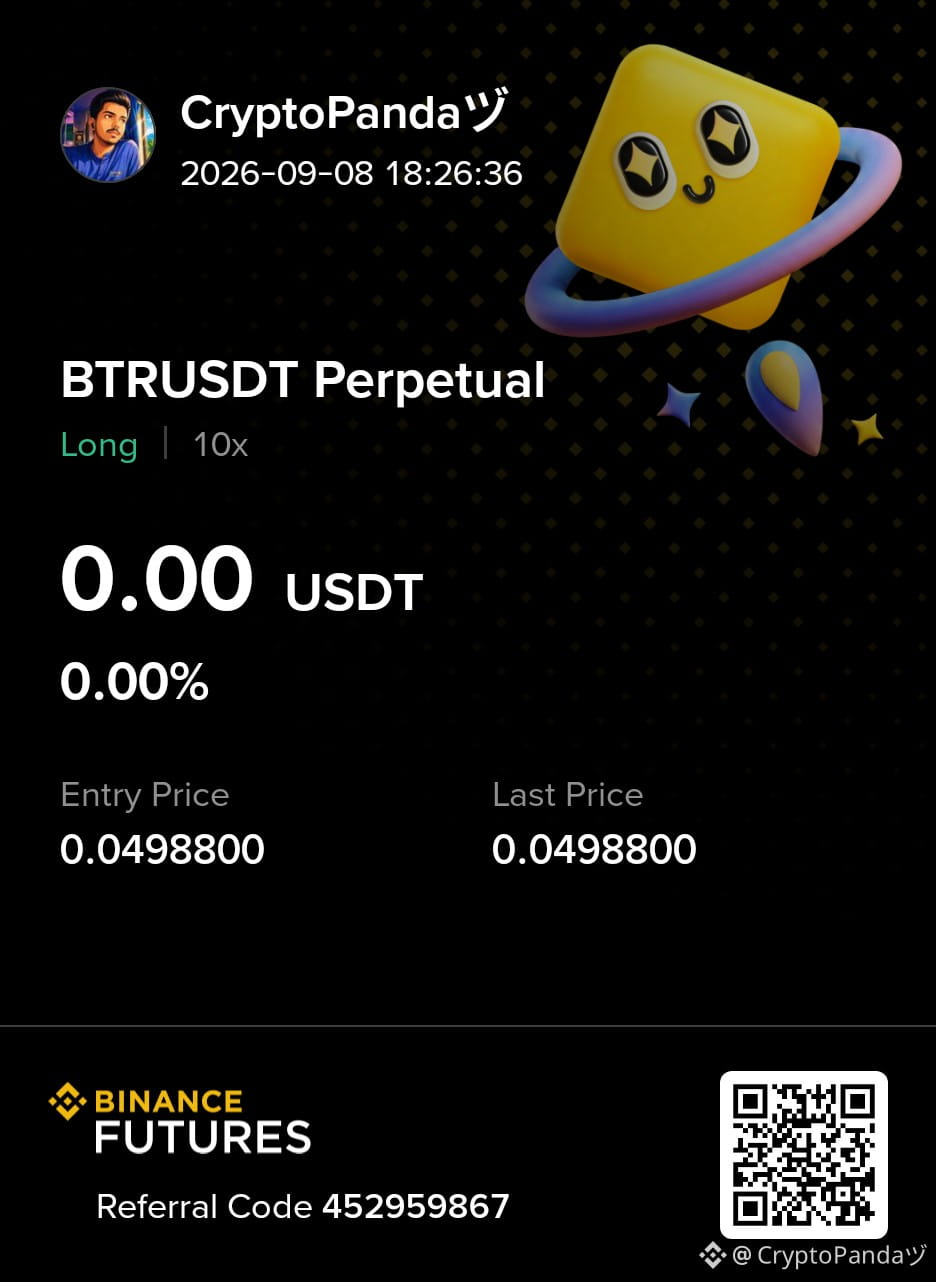
$BTR — Tight consolidation above 0.04624 support OB. Upside rally loading....
Trade Plan: Long $BTR
Entry: 0.048 - 0.050
SL: 0.04091
TP: 0.05988 | 0.07076 | 0.08236
Why this Setup?
Price is coiling tightly above the 0.04624 support OB, showing buyers defending the area while volatility compresses. A breakout from this accumulation zone could trigger a massive upside rally toward 0.05988, followed by 0.07076 and potentially 0.08236. As long as 0.04091 holds, the bullish setup remains valid.
Click here to Trade 👇 $BTR
{future}(BTRUSDT)
$BTR — Tight consolidation above 0.04624 support OB. Upside rally loading....
Trade Plan: Long $BTR
Entry: 0.048 - 0.050
SL: 0.04091
TP: 0.05988 | 0.07076 | 0.08236
Why this Setup?
Price is coiling tightly above the 0.04624 support OB, showing buyers defending the area while volatility compresses. A breakout from this accumulation zone could trigger a massive upside rally toward 0.05988, followed by 0.07076 and potentially 0.08236. As long as 0.04091 holds, the bullish setup remains valid.
Click here to Trade 👇 $BTR
Trade Plan: Long $BTR
Entry: 0.048 - 0.050
SL: 0.04091
TP: 0.05988 | 0.07076 | 0.08236
Why this Setup?
Price is coiling tightly above the 0.04624 support OB, showing buyers defending the area while volatility compresses. A breakout from this accumulation zone could trigger a massive upside rally toward 0.05988, followed by 0.07076 and potentially 0.08236. As long as 0.04091 holds, the bullish setup remains valid.
Click here to Trade 👇 $BTR
2
282
·
--
Bearish
30D trade $FF 68.5 USDT
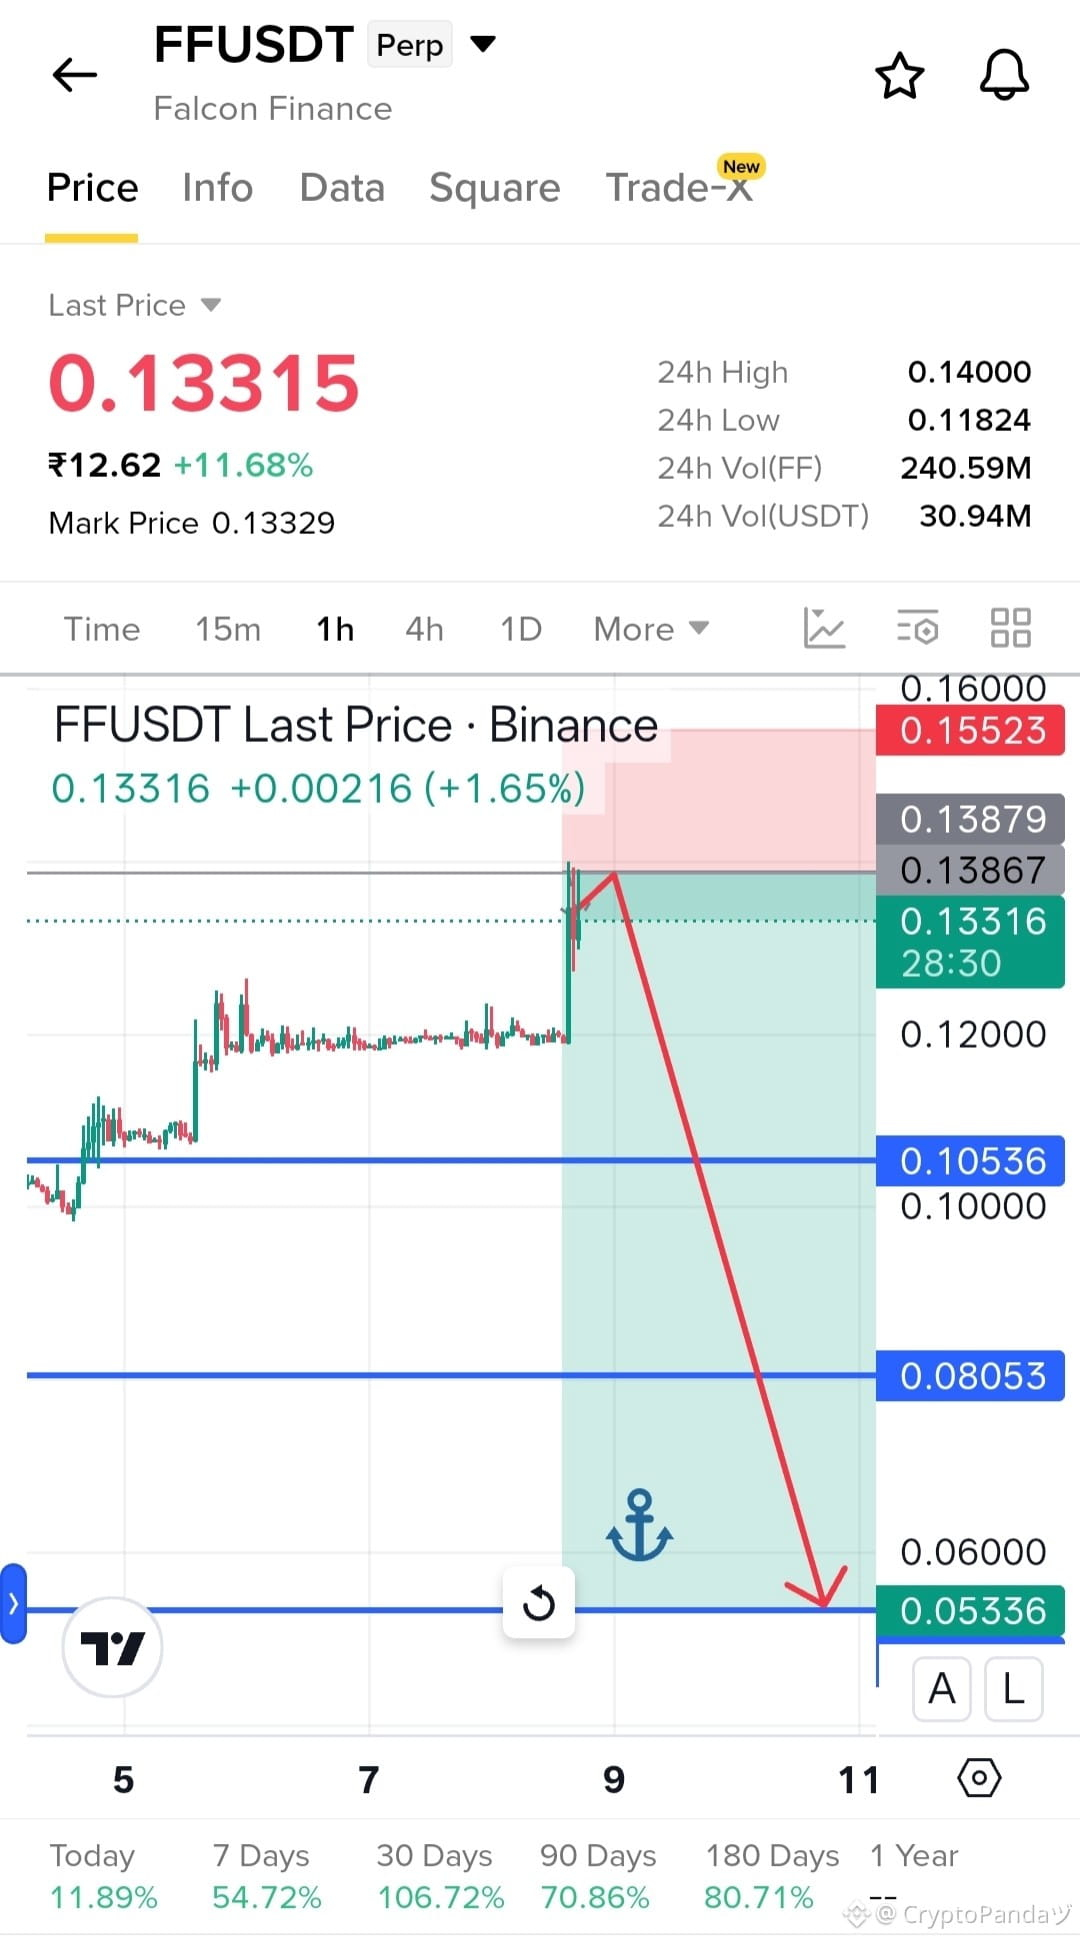
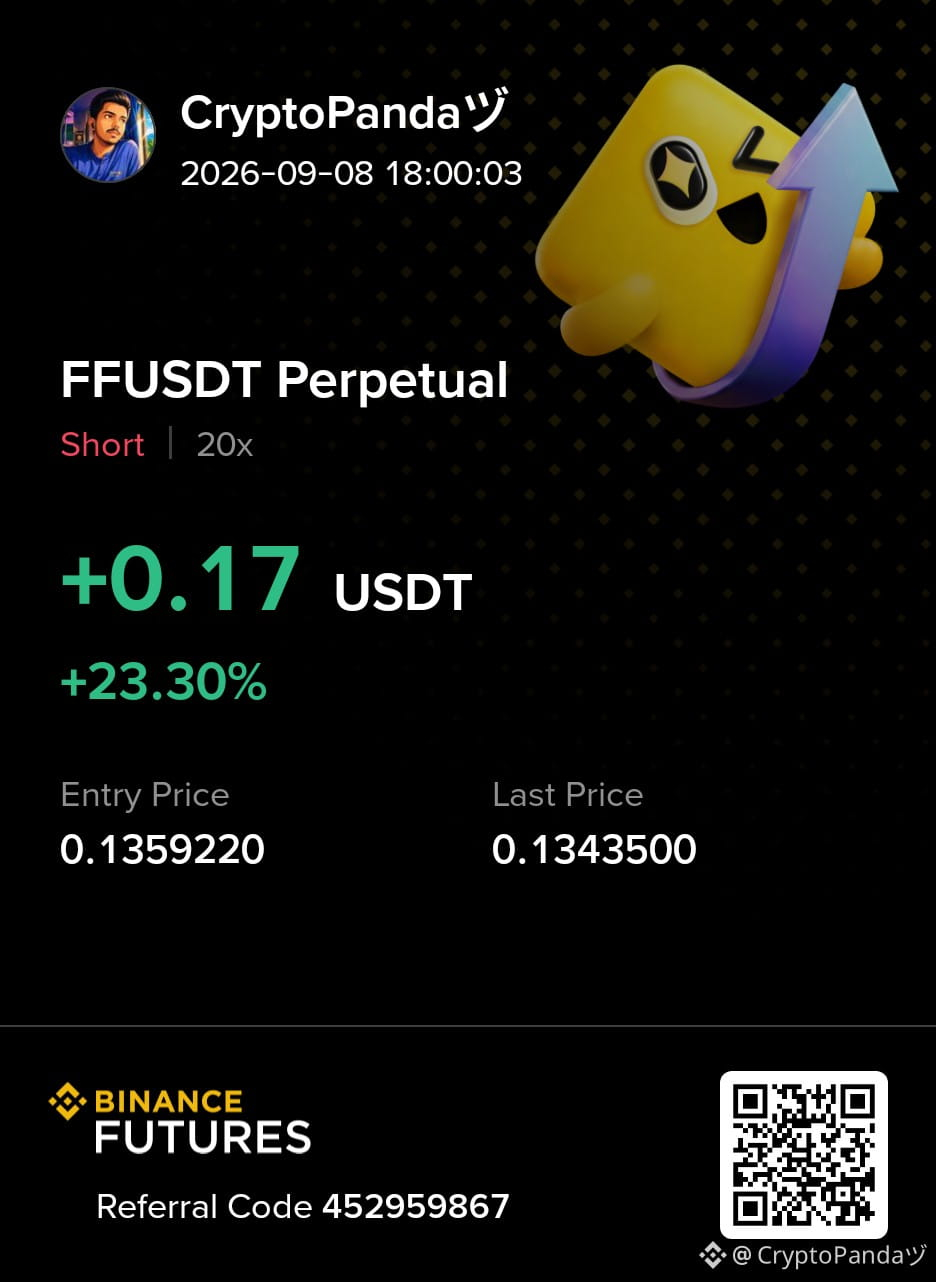
$FF — Double top forming at 0.13879 supply ceiling. Downside rally soon....
Trade Plan: Short $FF
Entry: 0.132 - 0.138
SL: 0.15523
TP: 0.10536 | 0.08053 | 0.05336
Why this Setup?
A double top is forming beneath the 0.13879 supply ceiling, showing repeated rejection as buyers struggle to push higher. A breakdown from this area could trigger a downside rally toward 0.10536, followed by 0.08053 and potentially 0.05336. As long as 0.15523 holds, the bearish setup remains valid.
Click here to Trade 👇 $FF
{future}(FFUSDT)
$FF — Double top forming at 0.13879 supply ceiling. Downside rally soon....
Trade Plan: Short $FF
Entry: 0.132 - 0.138
SL: 0.15523
TP: 0.10536 | 0.08053 | 0.05336
Why this Setup?
A double top is forming beneath the 0.13879 supply ceiling, showing repeated rejection as buyers struggle to push higher. A breakdown from this area could trigger a downside rally toward 0.10536, followed by 0.08053 and potentially 0.05336. As long as 0.15523 holds, the bearish setup remains valid.
Click here to Trade 👇 $FF
Trade Plan: Short $FF
Entry: 0.132 - 0.138
SL: 0.15523
TP: 0.10536 | 0.08053 | 0.05336
Why this Setup?
A double top is forming beneath the 0.13879 supply ceiling, showing repeated rejection as buyers struggle to push higher. A breakdown from this area could trigger a downside rally toward 0.10536, followed by 0.08053 and potentially 0.05336. As long as 0.15523 holds, the bearish setup remains valid.
Click here to Trade 👇 $FF
2
456
·
--
Bearish
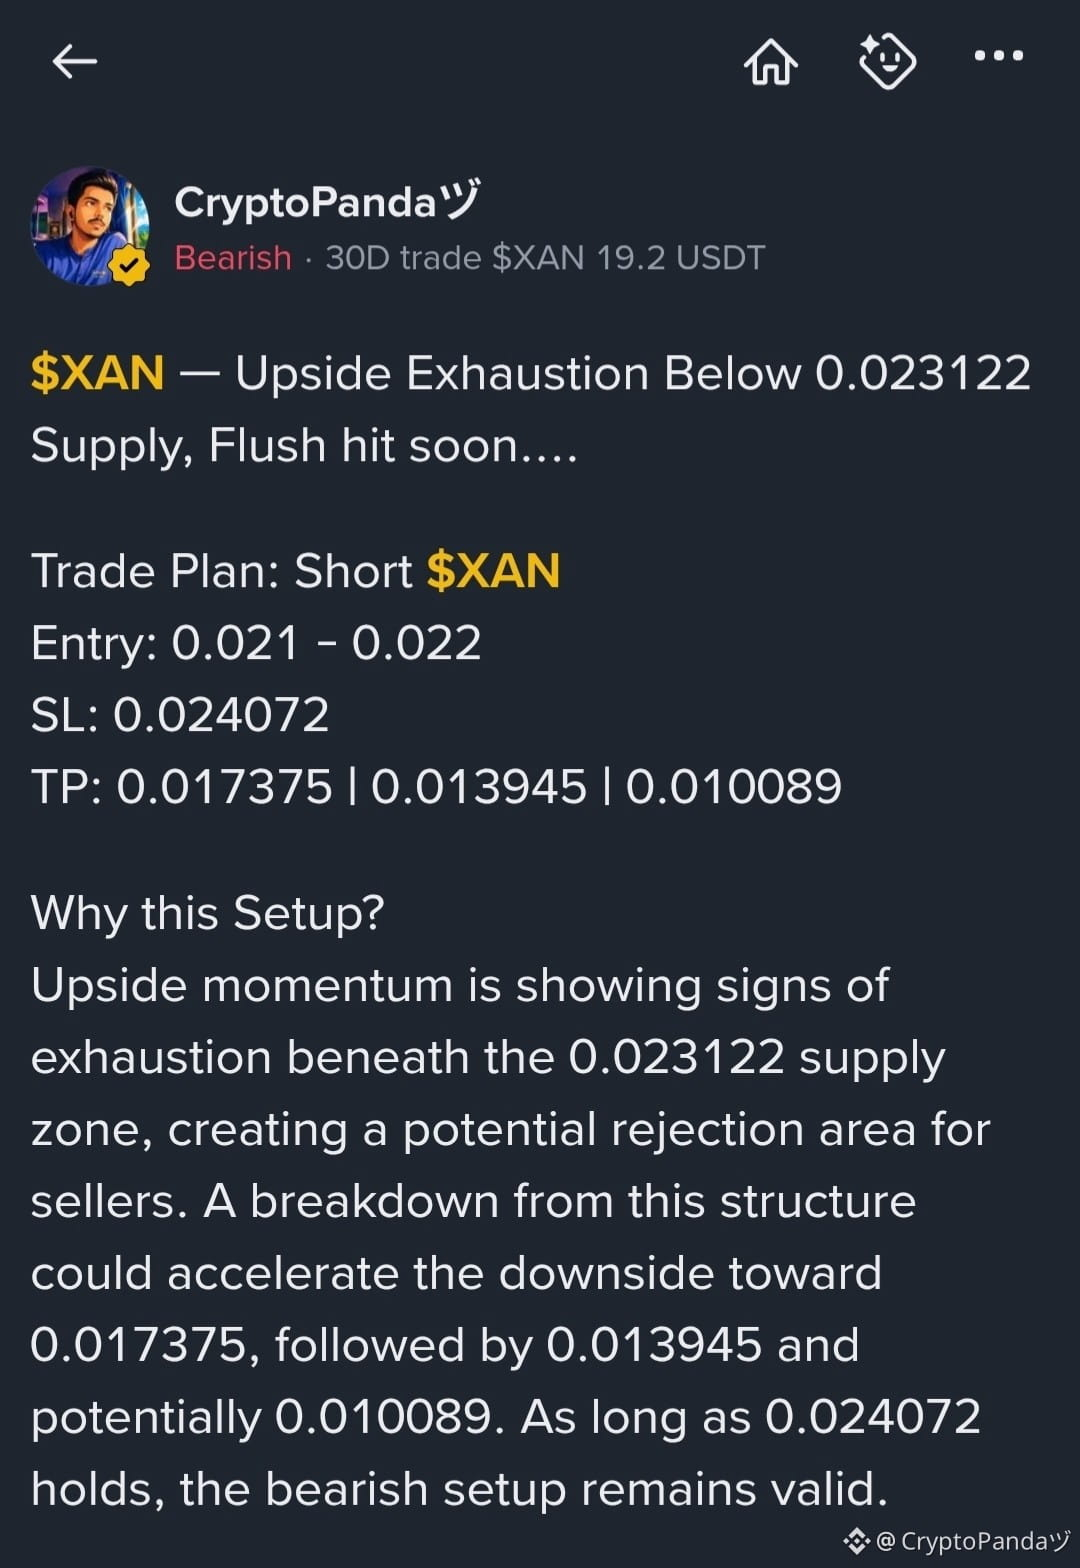
30D trade $XAN 19.2 USDT
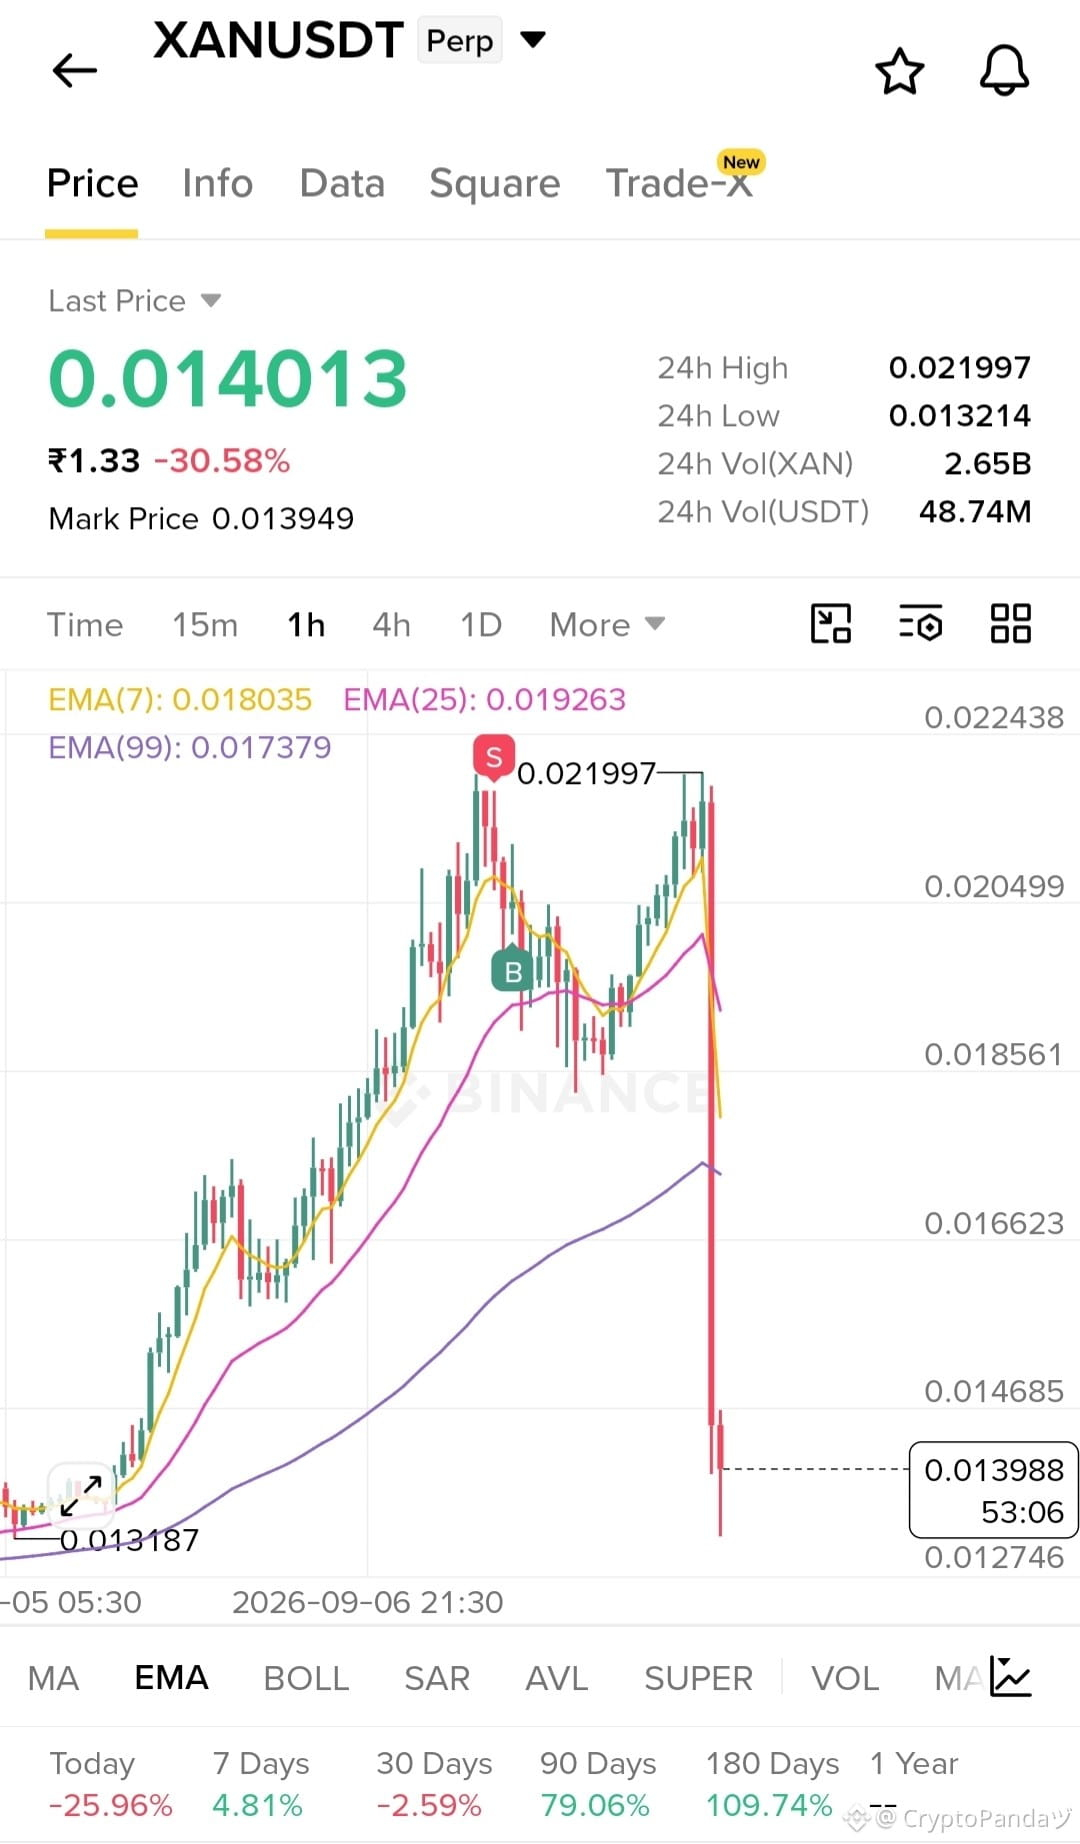
👀 Guys Our $XAN Trade Signal smashed through All the TPs 🤗. A huge Congratulations to Everyone who kept holding the trade till now... You can book Your profits... I have actually booked a Bit early... And now a reversal can be expected...
Trade $XAN here 👇
{future}(XANUSDT)
👀 Guys Our $XAN Trade Signal smashed through All the TPs 🤗. A huge Congratulations to Everyone who kept holding the trade till now... You can book Your profits... I have actually booked a Bit early... And now a reversal can be expected...
Trade $XAN here 👇
Trade $XAN here 👇
CryptoPandaヅ
·
--
Bearish$XAN — Upside Exhaustion Below 0.023122 Supply, Flush hit soon....
Trade Plan: Short $XAN
Entry: 0.021 - 0.022
SL: 0.024072
TP: 0.017375 | 0.013945 | 0.010089
Why this Setup?
Upside momentum is showing signs of exhaustion beneath the 0.023122 supply zone, creating a potential rejection area for sellers. A breakdown from this structure could accelerate the downside toward 0.017375, followed by 0.013945 and potentially 0.010089. As long as 0.024072 holds, the bearish setup remains valid.
Click here to Trade 👇 $XAN
Trade Plan: Short $XAN
Entry: 0.021 - 0.022
SL: 0.024072
TP: 0.017375 | 0.013945 | 0.010089
Why this Setup?
Upside momentum is showing signs of exhaustion beneath the 0.023122 supply zone, creating a potential rejection area for sellers. A breakdown from this structure could accelerate the downside toward 0.017375, followed by 0.013945 and potentially 0.010089. As long as 0.024072 holds, the bearish setup remains valid.
Click here to Trade 👇 $XAN
2
511
·
--
Bearish
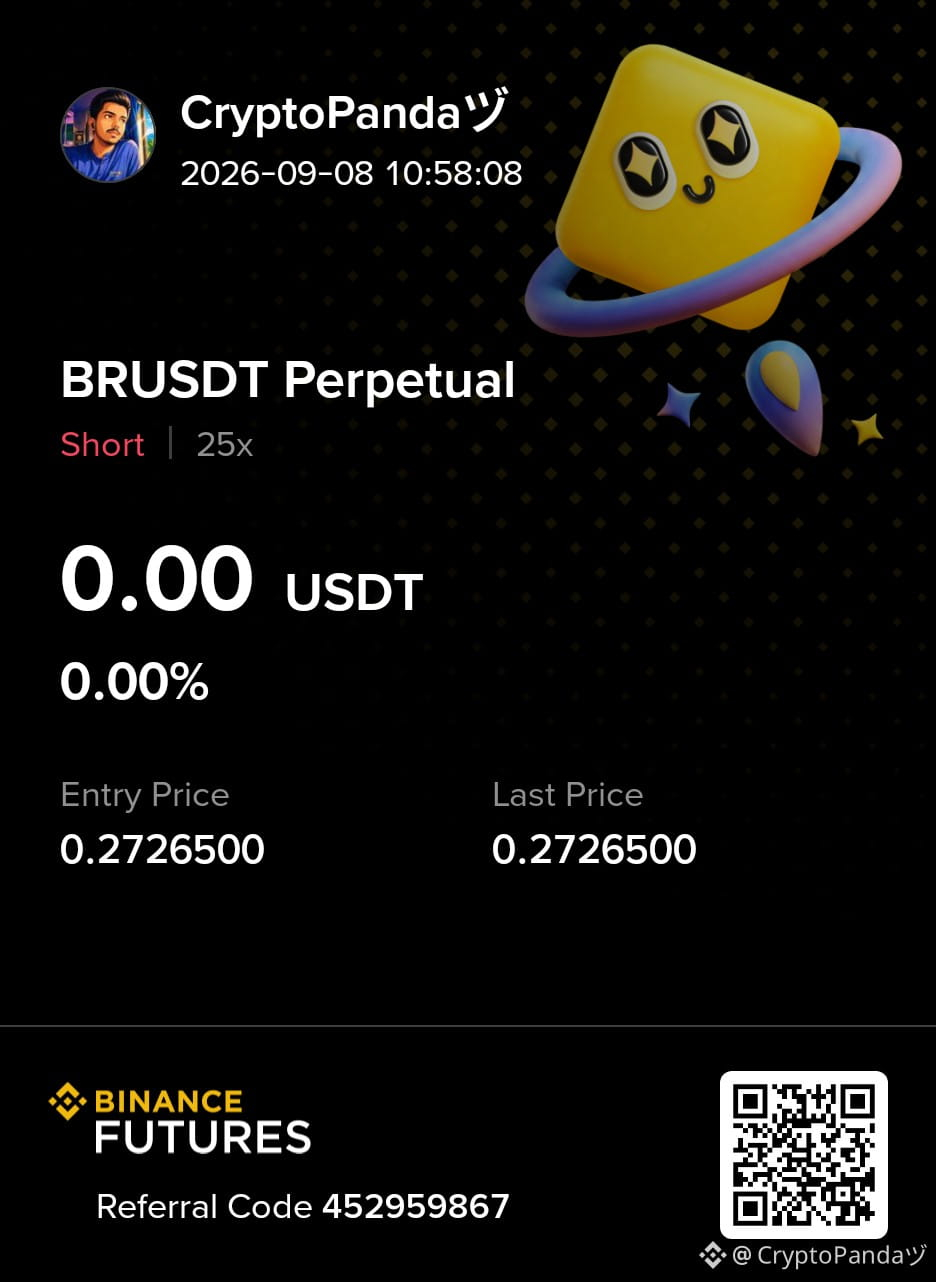
30D trade $BR 416.4 USDT
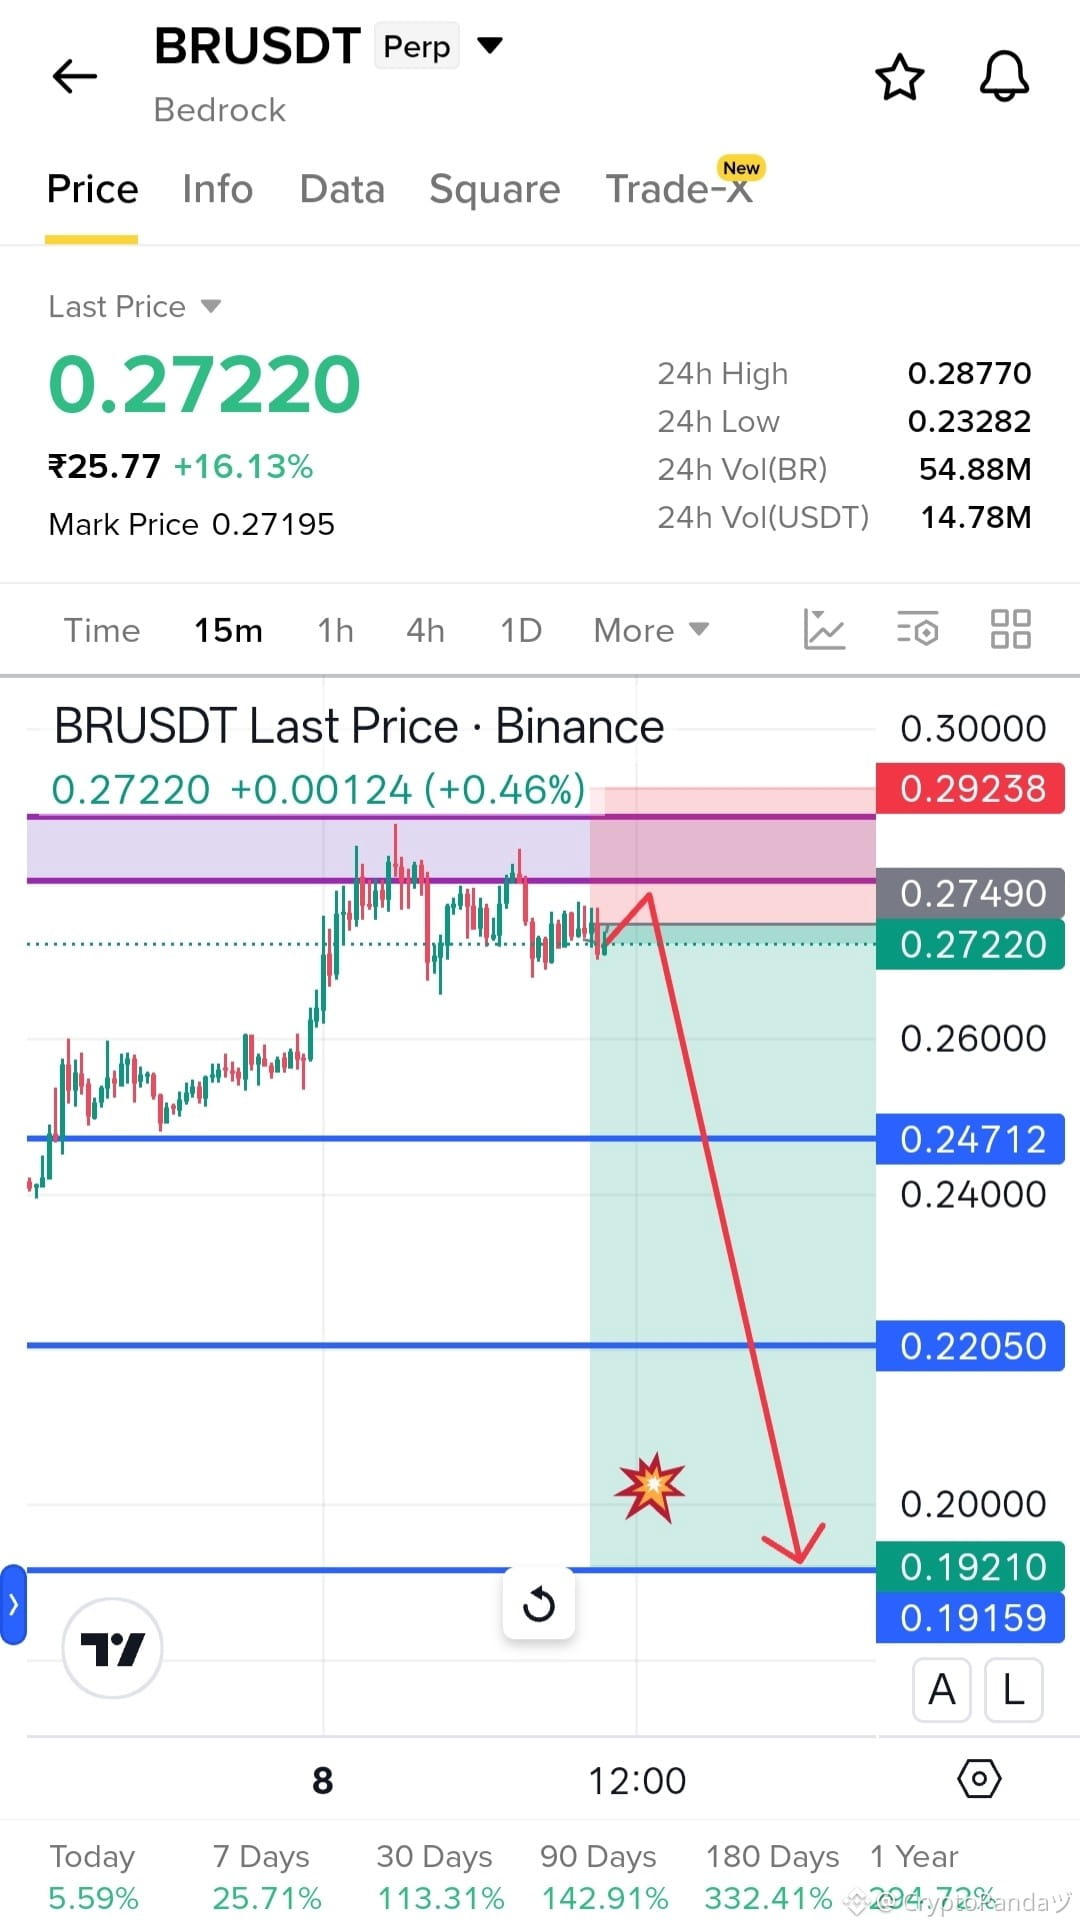
$BR — Dead cat bounce sold at 0.28 OB level. Downside rally starting soon...
Trade Plan: Short $BR
Entry: 0.27 - 0.28
SL: 0.29238
TP: 0.24712 | 0.22050 | 0.19210
Why this Setup?
The dead cat bounce has been rejected directly from the 0.28 OB level, giving sellers control as upside momentum fades. A continuation lower could drive price toward 0.24712, followed by 0.22050 and potentially 0.19210. As long as 0.29238 holds, the bearish setup remains valid.
Click here to Trade 👇 $BR
{future}(BRUSDT)
$BR — Dead cat bounce sold at 0.28 OB level. Downside rally starting soon...
Trade Plan: Short $BR
Entry: 0.27 - 0.28
SL: 0.29238
TP: 0.24712 | 0.22050 | 0.19210
Why this Setup?
The dead cat bounce has been rejected directly from the 0.28 OB level, giving sellers control as upside momentum fades. A continuation lower could drive price toward 0.24712, followed by 0.22050 and potentially 0.19210. As long as 0.29238 holds, the bearish setup remains valid.
Click here to Trade 👇 $BR
Trade Plan: Short $BR
Entry: 0.27 - 0.28
SL: 0.29238
TP: 0.24712 | 0.22050 | 0.19210
Why this Setup?
The dead cat bounce has been rejected directly from the 0.28 OB level, giving sellers control as upside momentum fades. A continuation lower could drive price toward 0.24712, followed by 0.22050 and potentially 0.19210. As long as 0.29238 holds, the bearish setup remains valid.
Click here to Trade 👇 $BR
3
573
·
--
Bearish
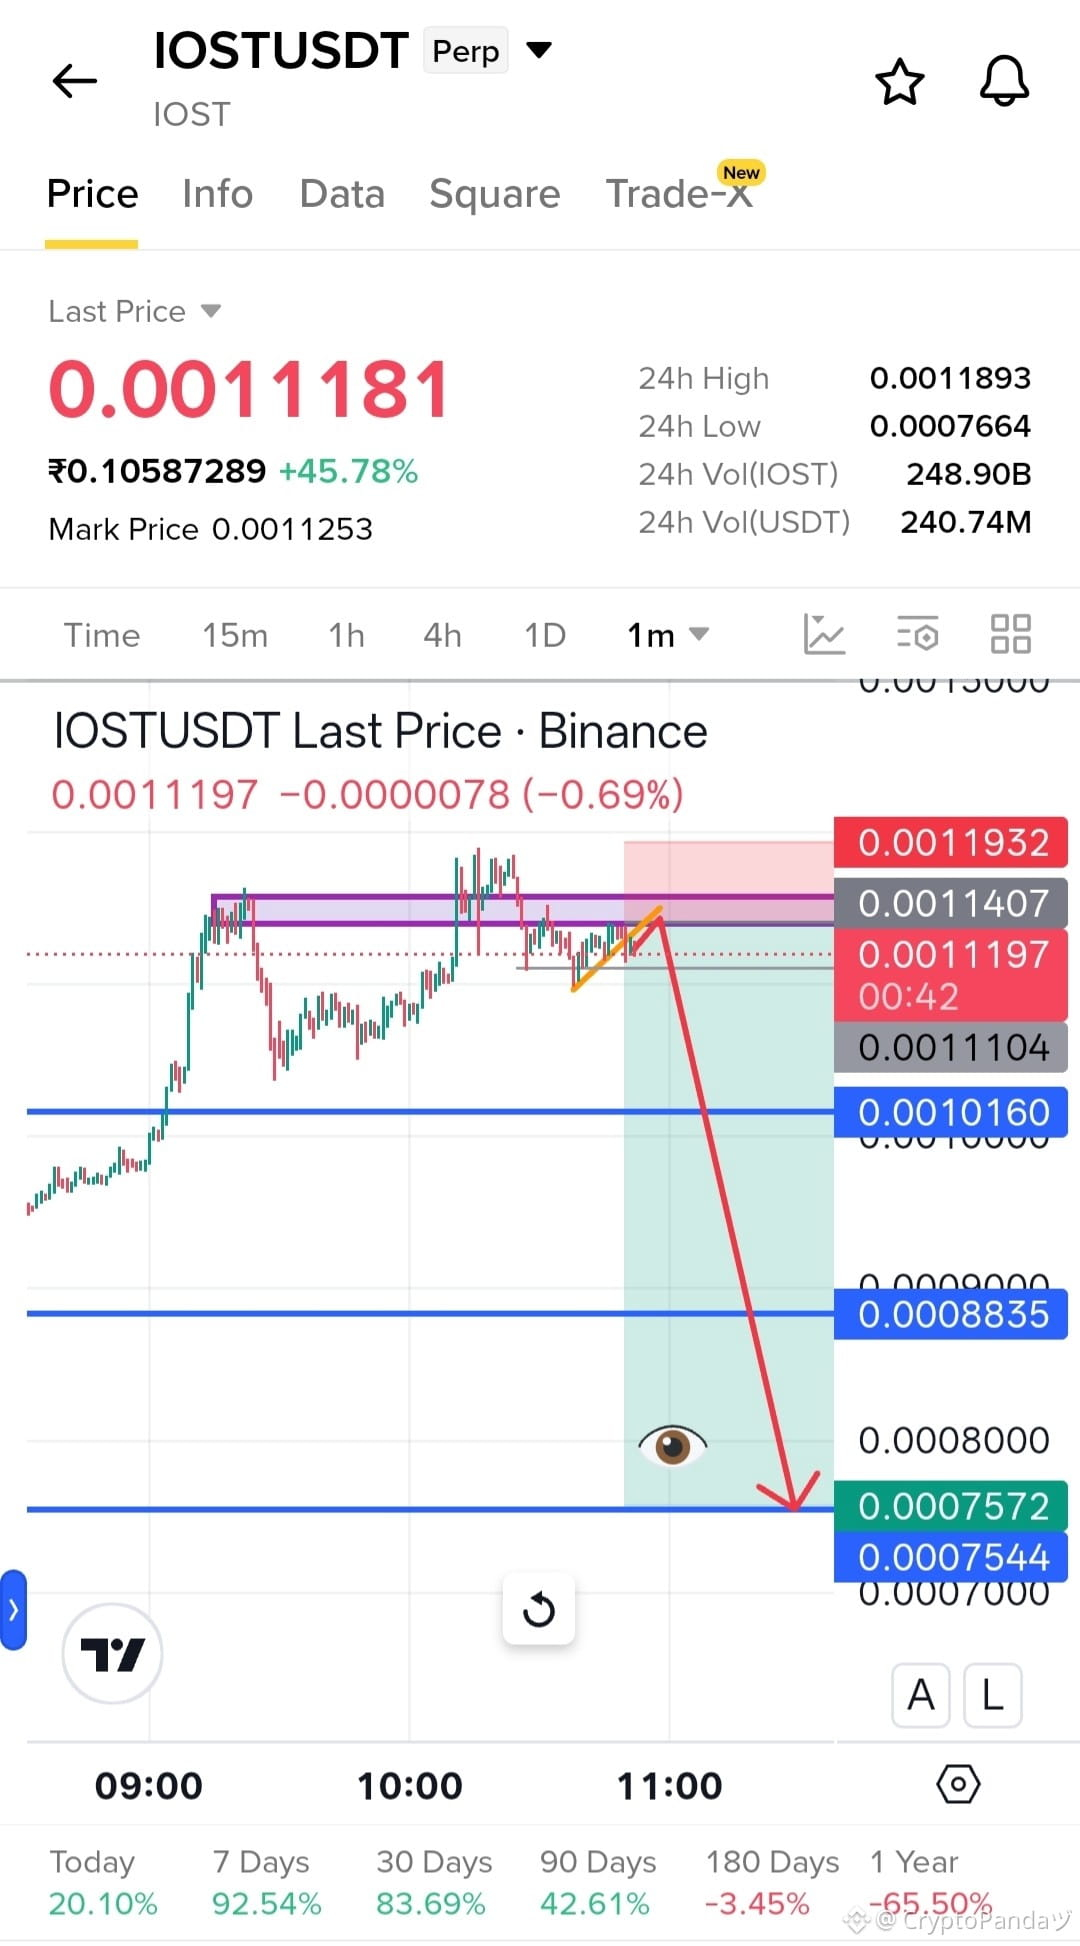
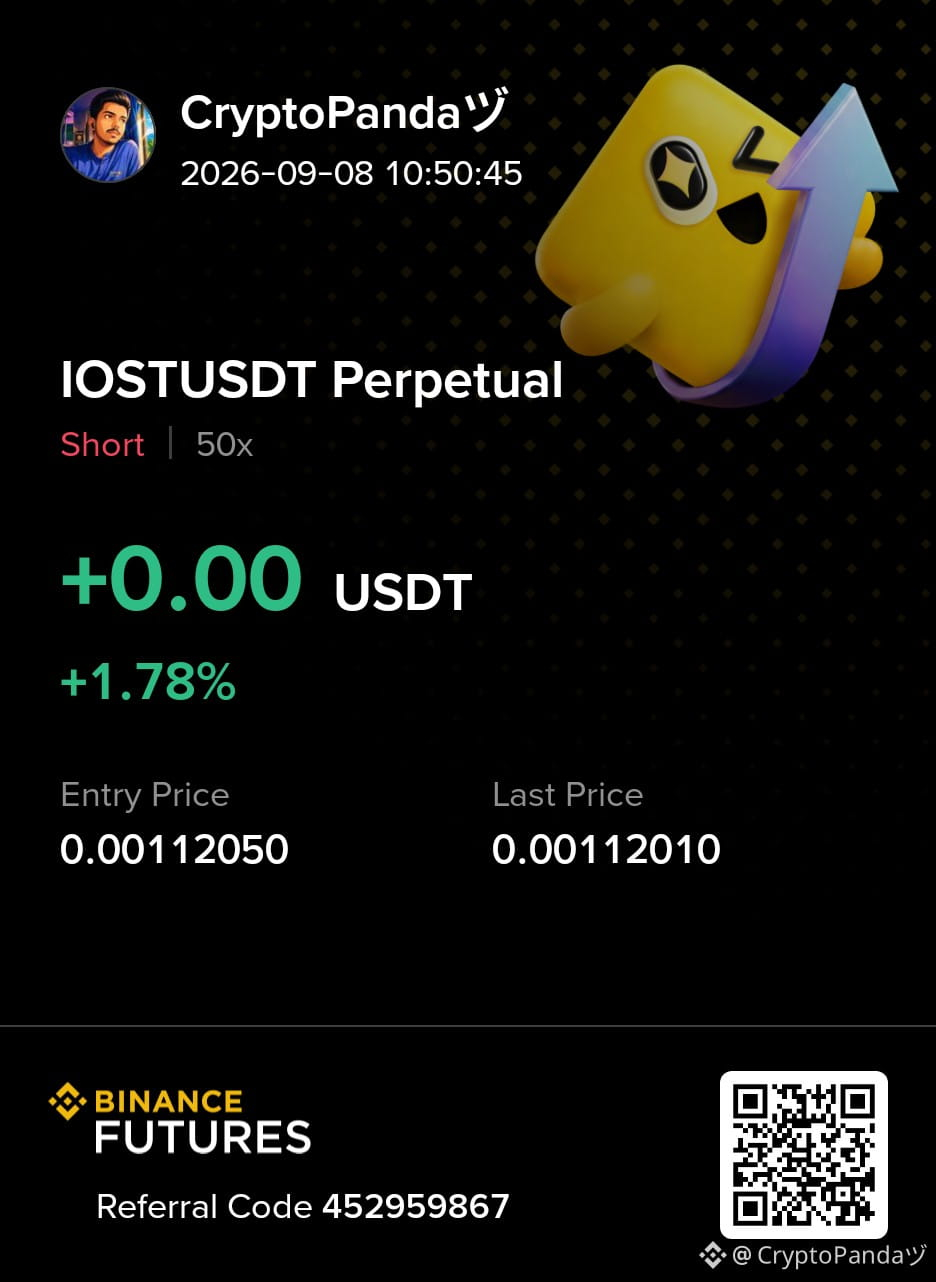
$IOST — Sellers gaining control over 0.0011407 neckline. Downside rally soon...
Trade Plan: Short $IOST
Entry: 0.00110 - 0.00114
SL: 0.0011932
TP: 0.0010160 | 0.0008835 | 0.0007544
Why this Setup?
Sellers are gaining control around the 0.0011407 neckline, signaling weakness after the recent push. A clean rejection here could trigger a downside rally toward 0.0010160, followed by 0.0008835 and potentially 0.0007544. As long as 0.0011932 holds, the bearish setup remains valid.
Click here to Trade 👇 $IOST
{future}(IOSTUSDT)
$IOST — Sellers gaining control over 0.0011407 neckline. Downside rally soon...
Trade Plan: Short $IOST
Entry: 0.00110 - 0.00114
SL: 0.0011932
TP: 0.0010160 | 0.0008835 | 0.0007544
Why this Setup?
Sellers are gaining control around the 0.0011407 neckline, signaling weakness after the recent push. A clean rejection here could trigger a downside rally toward 0.0010160, followed by 0.0008835 and potentially 0.0007544. As long as 0.0011932 holds, the bearish setup remains valid.
Click here to Trade 👇 $IOST
Trade Plan: Short $IOST
Entry: 0.00110 - 0.00114
SL: 0.0011932
TP: 0.0010160 | 0.0008835 | 0.0007544
Why this Setup?
Sellers are gaining control around the 0.0011407 neckline, signaling weakness after the recent push. A clean rejection here could trigger a downside rally toward 0.0010160, followed by 0.0008835 and potentially 0.0007544. As long as 0.0011932 holds, the bearish setup remains valid.
Click here to Trade 👇 $IOST
3
402
·
--
Bearish
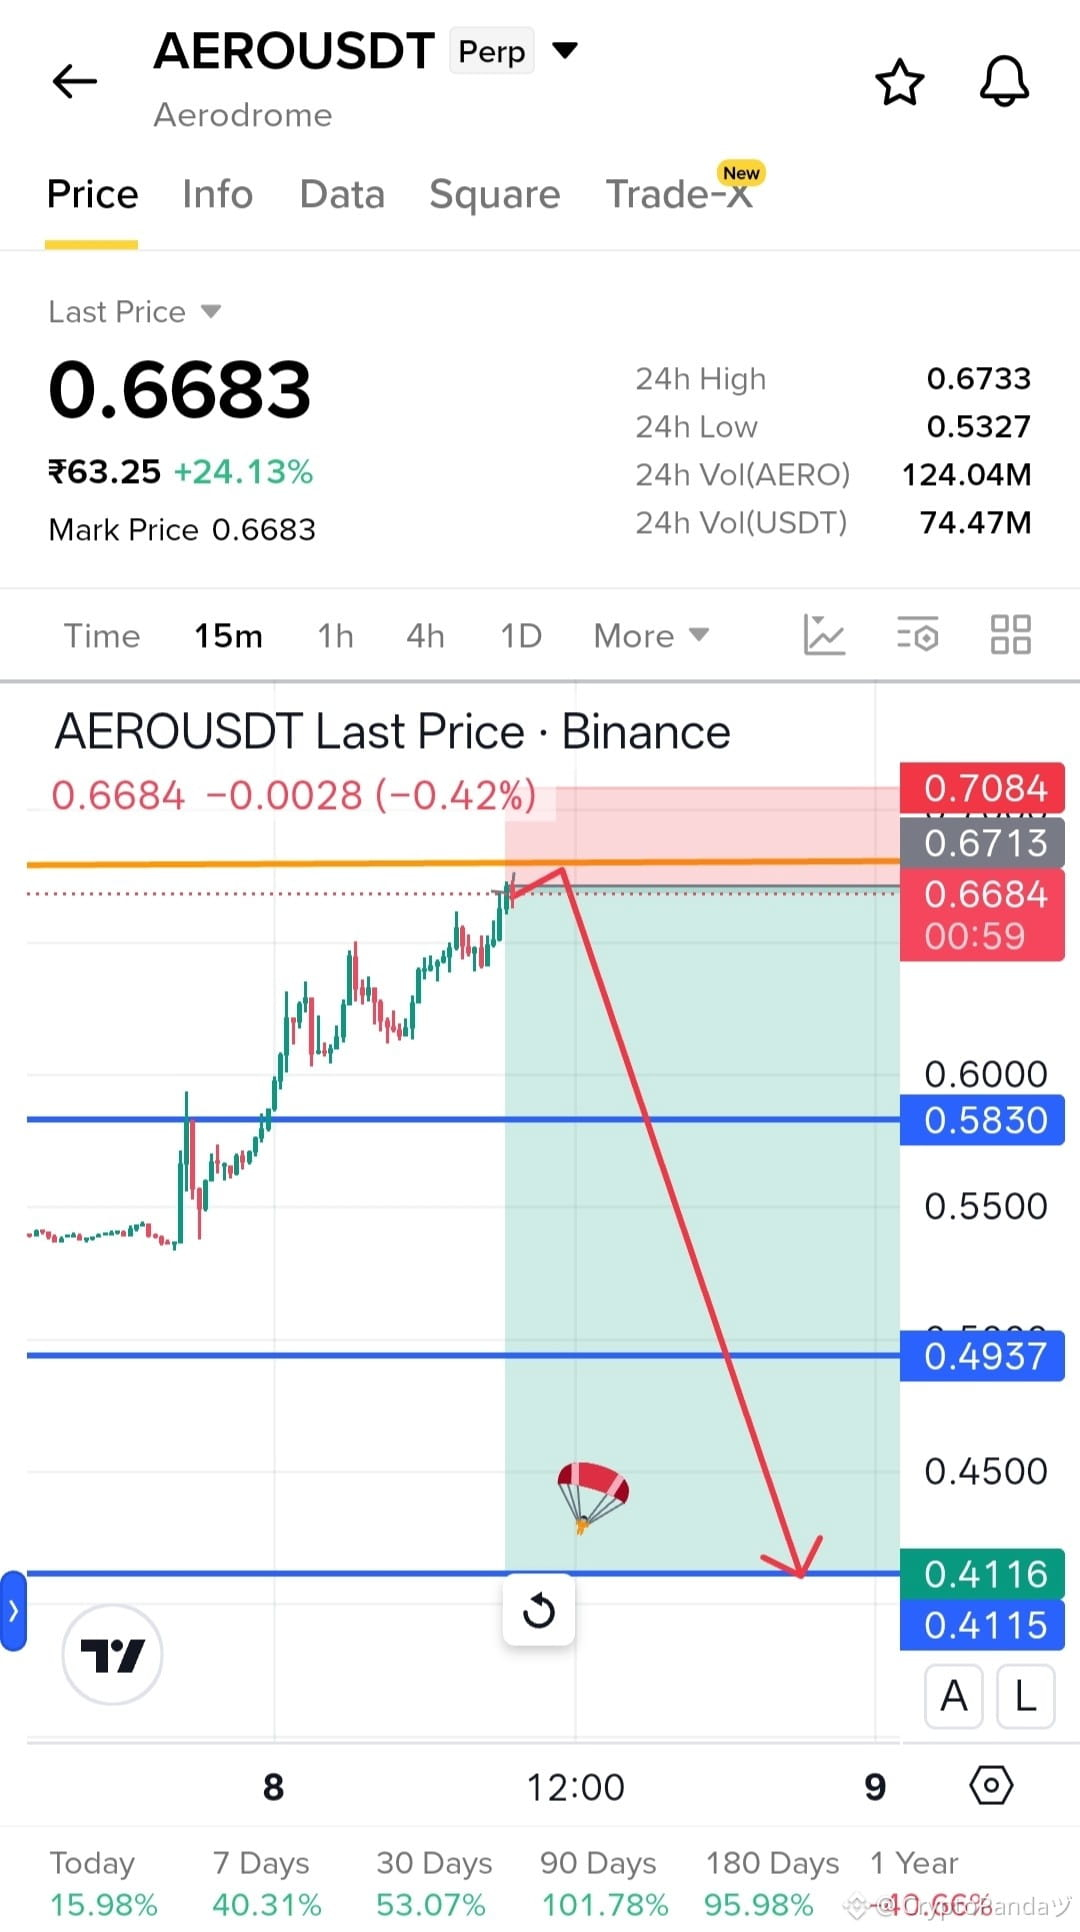
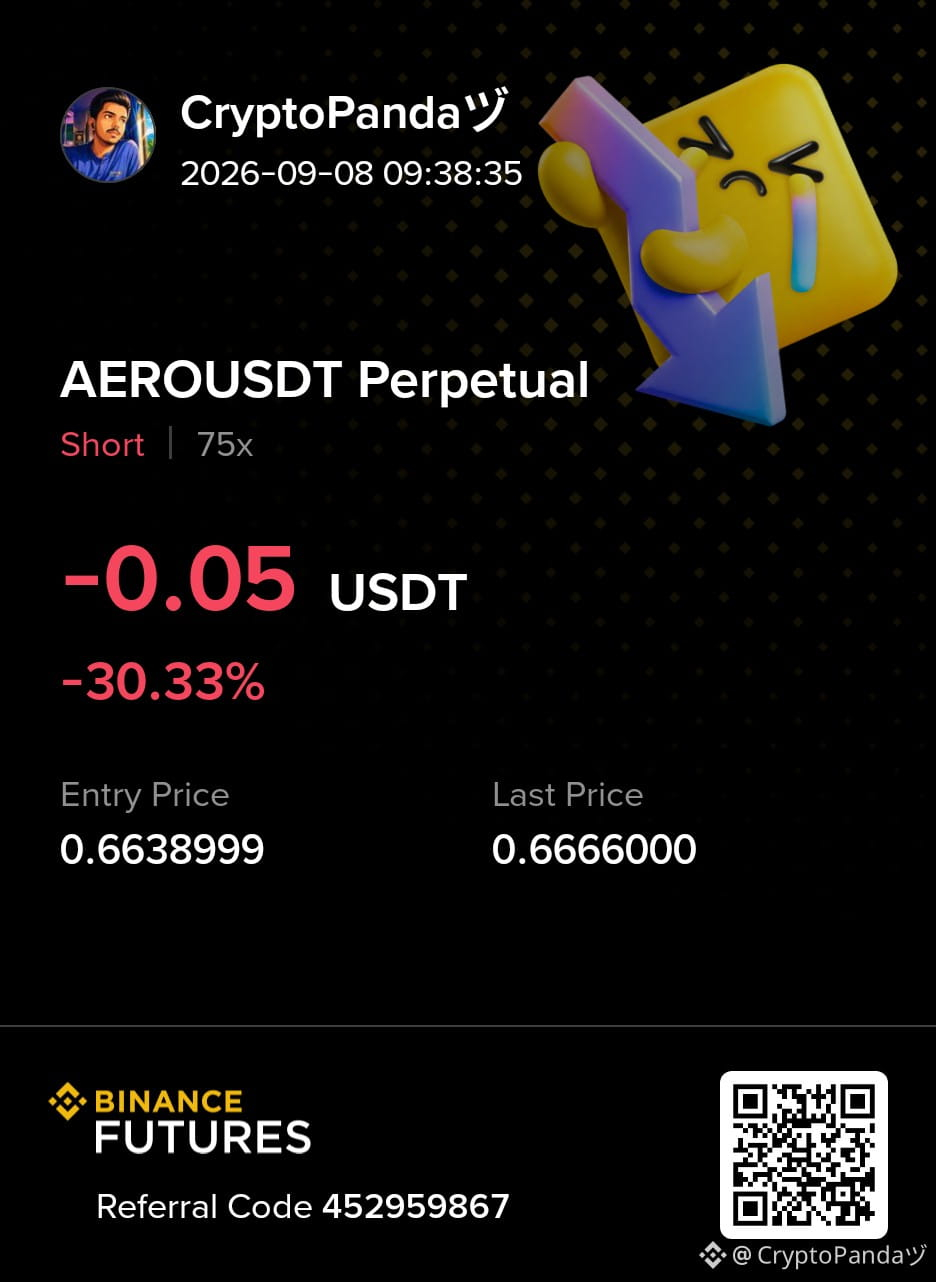
$AERO — Overextended to the upside at 0.6713 supply zone. Pullback likely soon...
Trade Plan: Short $AERO
Entry: 0.66 - 0.68
SL: 0.7084
TP: 0.5830 | 0.4937 | 0.4116
Why this Setup?
Price is overextended to the upside around the 0.6713 supply zone, creating a potential exhaustion area for sellers. A rejection from this zone could trigger a pullback toward 0.5830, followed by 0.4937 and potentially 0.4116. As long as 0.7084 holds, the bearish setup remains valid.
Click here to Trade 👇 $AERO
{future}(AEROUSDT)
$AERO — Overextended to the upside at 0.6713 supply zone. Pullback likely soon...
Trade Plan: Short $AERO
Entry: 0.66 - 0.68
SL: 0.7084
TP: 0.5830 | 0.4937 | 0.4116
Why this Setup?
Price is overextended to the upside around the 0.6713 supply zone, creating a potential exhaustion area for sellers. A rejection from this zone could trigger a pullback toward 0.5830, followed by 0.4937 and potentially 0.4116. As long as 0.7084 holds, the bearish setup remains valid.
Click here to Trade 👇 $AERO
Trade Plan: Short $AERO
Entry: 0.66 - 0.68
SL: 0.7084
TP: 0.5830 | 0.4937 | 0.4116
Why this Setup?
Price is overextended to the upside around the 0.6713 supply zone, creating a potential exhaustion area for sellers. A rejection from this zone could trigger a pullback toward 0.5830, followed by 0.4937 and potentially 0.4116. As long as 0.7084 holds, the bearish setup remains valid.
Click here to Trade 👇 $AERO
2
317
·
--
Bearish
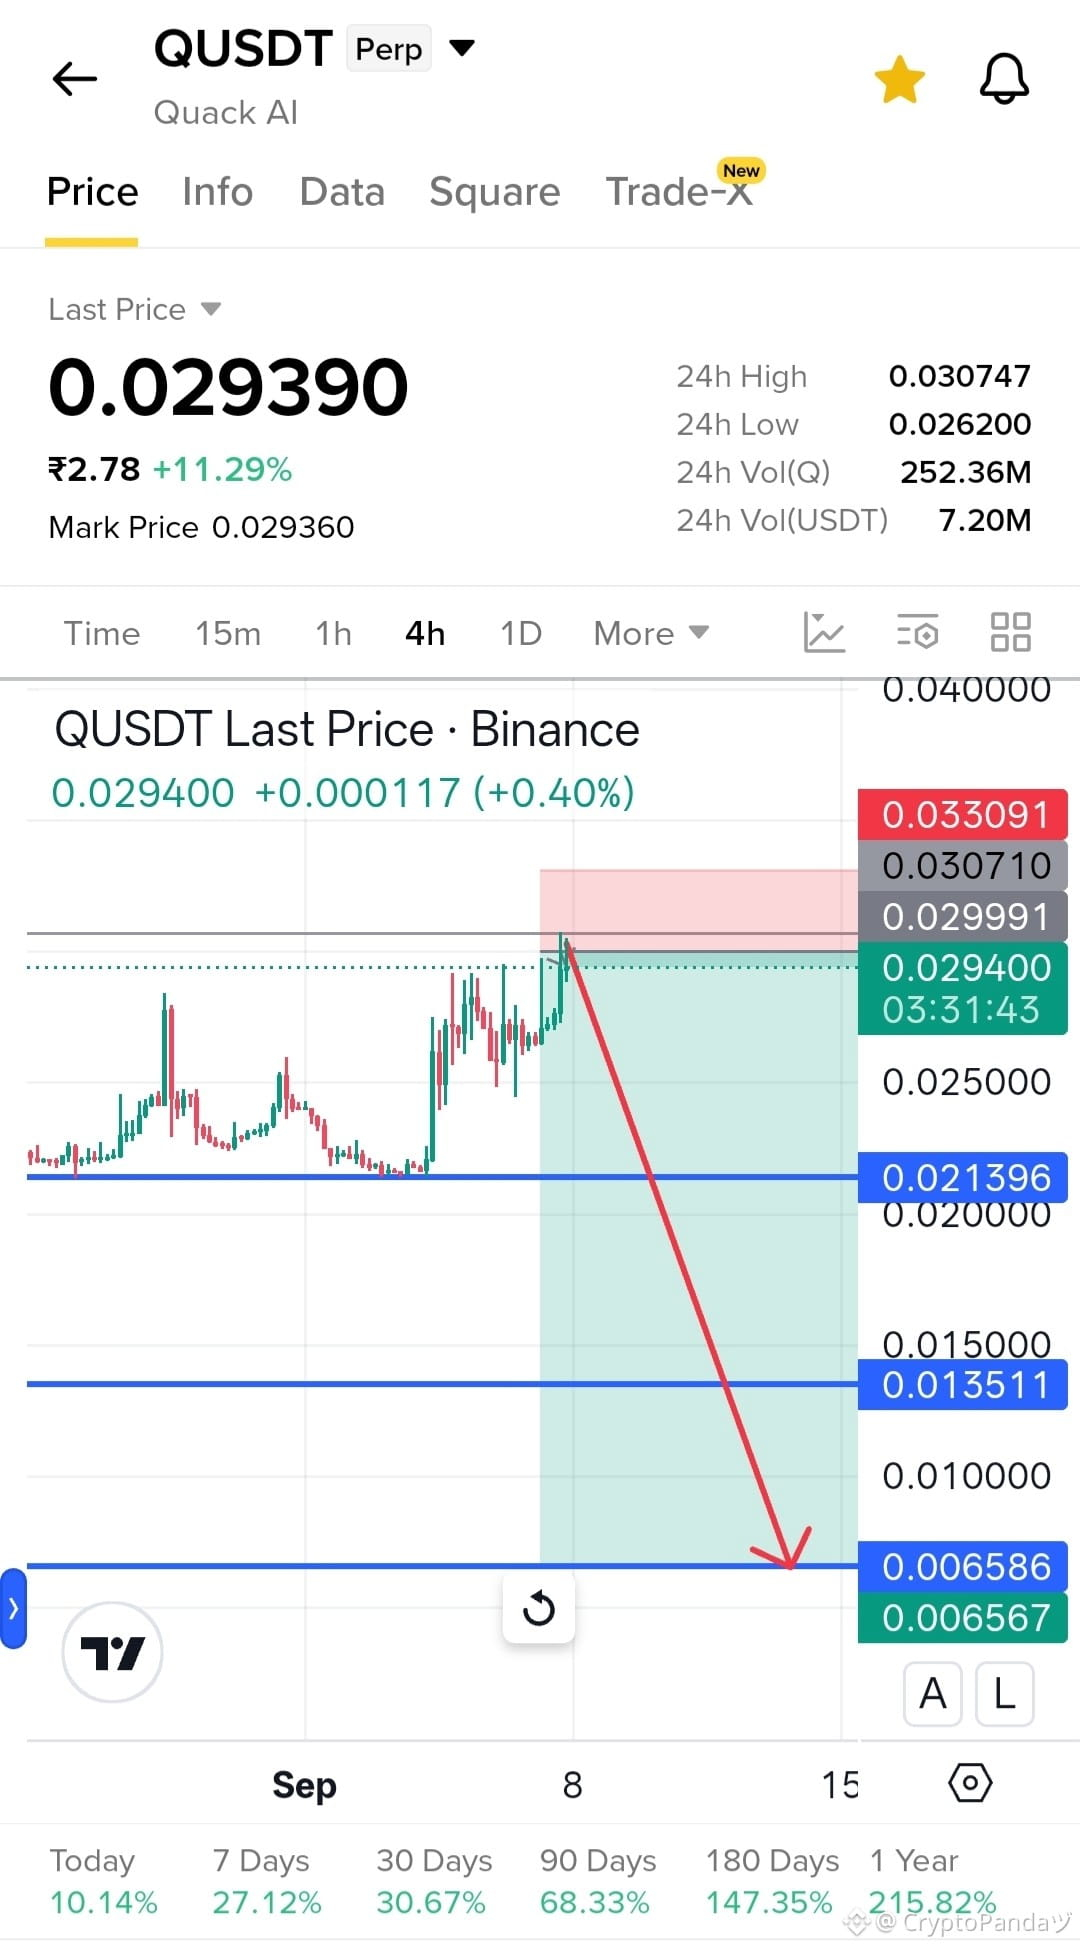
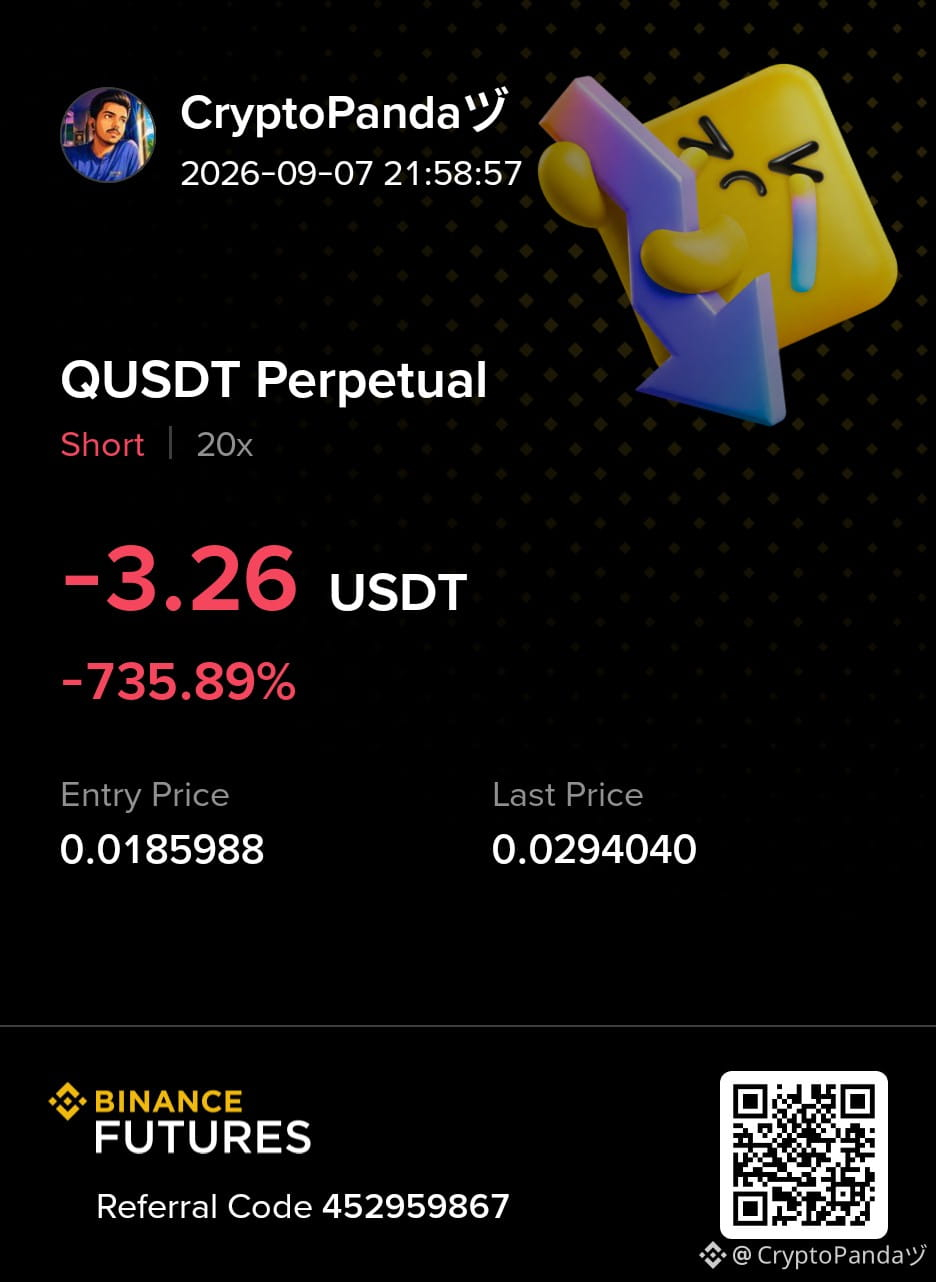
$Q — Sellers’ POI at 0.030710 Rejecting the Push, Pullback Setup Ready...
Trade Plan: Short $Q
Entry: 0.029 - 0.030
SL: 0.033091
TP: 0.021396 | 0.013511 | 0.006586
Why this Setup?
Price has slammed into the sellers’ POI around 0.030710, creating a potential rejection zone after the upside push. A pullback from this area could drive it toward 0.021396, followed by 0.013511 and potentially 0.006586. As long as 0.033091 holds, the bearish setup remains valid.
Click here to Trade 👇 $Q
{future}(QUSDT)
$Q — Sellers’ POI at 0.030710 Rejecting the Push, Pullback Setup Ready...
Trade Plan: Short $Q
Entry: 0.029 - 0.030
SL: 0.033091
TP: 0.021396 | 0.013511 | 0.006586
Why this Setup?
Price has slammed into the sellers’ POI around 0.030710, creating a potential rejection zone after the upside push. A pullback from this area could drive it toward 0.021396, followed by 0.013511 and potentially 0.006586. As long as 0.033091 holds, the bearish setup remains valid.
Click here to Trade 👇 $Q
Trade Plan: Short $Q
Entry: 0.029 - 0.030
SL: 0.033091
TP: 0.021396 | 0.013511 | 0.006586
Why this Setup?
Price has slammed into the sellers’ POI around 0.030710, creating a potential rejection zone after the upside push. A pullback from this area could drive it toward 0.021396, followed by 0.013511 and potentially 0.006586. As long as 0.033091 holds, the bearish setup remains valid.
Click here to Trade 👇 $Q
4
432
Log in to explore more content
Join global crypto users on Binance Square
⚡️ Get latest and useful information about crypto.
💬 Trusted by the world’s largest crypto exchange.
👍 Discover real insights from verified creators.
Email / Phone number
Trending Topics
AppleDebutsFoldablePhone
51,215 views
999 Discussing
Apple just dropped the foldable iPhone — and the market is paying attention. This isn't just another product cycle; it's a new product category, a new CEO on stage, and a $1,999 price tag that pushes $AAPL further into ultra-premium territory. Foldables are the narrative, and Apple is now the headline.
#appledebutsfoldablephone #EUExtendsCentralContactPointToCASPs #US10YTreasuryYieldHitsHighestSinceNov2023 #BrentCrudeTops$100 #USTreasuryToBuyBackUpTo$6BLongDatedDebt
KimHotbae
·2 Likes
·3k views
TSMCAugustRevenueUp53.3%YoY
12,563 views
356 Discussing
IranSaysReadyToEscalateWarWithUS
16,139 views
359 Discussing