
圈弟
22.7k Posts

圈弟
Report
Block User
甜甜圈真好吃,哈哈哈哈
Frequent Trader
6.1 Years
136 Following
5.5K+ Followers
17.9K+ Liked
Posts
All
Quotes
Videos
·
--
Bearish
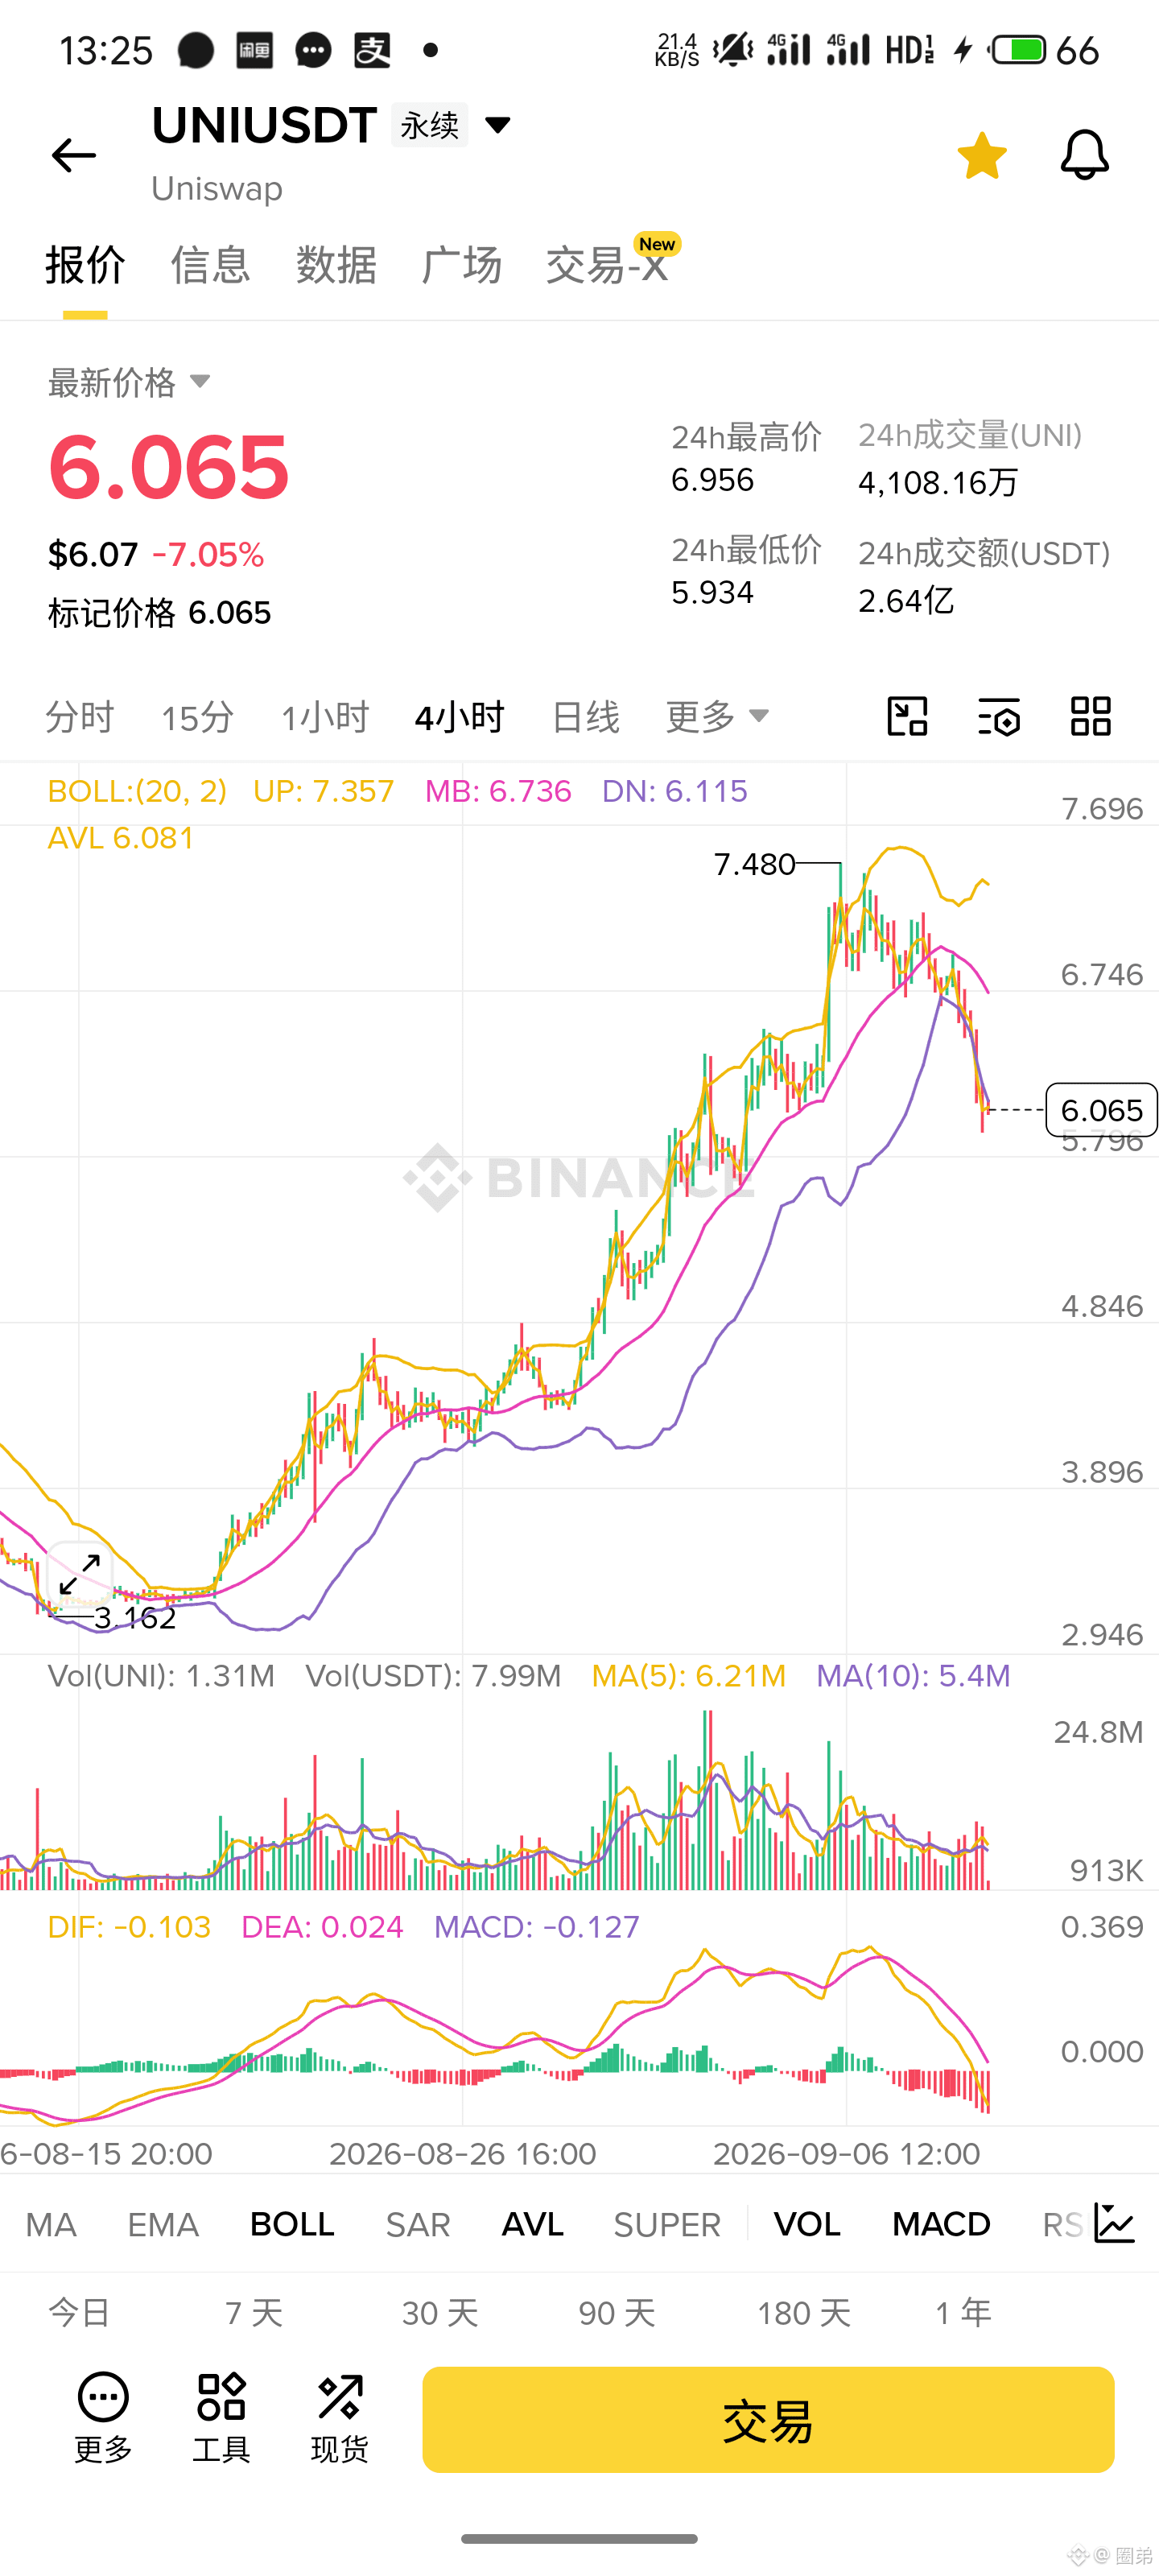
$UNI A little over six blocks in this area is really pathetic. The bid side is like it disappeared—just give it a little push and it gets shoved back, with no decent struggle at all. This price action is clearly saying it hasn’t finished messing around yet. Don’t rush to be a hero—follow the rhythm of continuing to smash downward.👇
{future}(UNIUSDT)
$UNI A little over six blocks in this area is really pathetic. The bid side is like it disappeared—just give it a little push and it gets shoved back, with no decent struggle at all. This price action is clearly saying it hasn’t finished messing around yet. Don’t rush to be a hero—follow the rhythm of continuing to smash downward.👇
54
·
--
Bearish
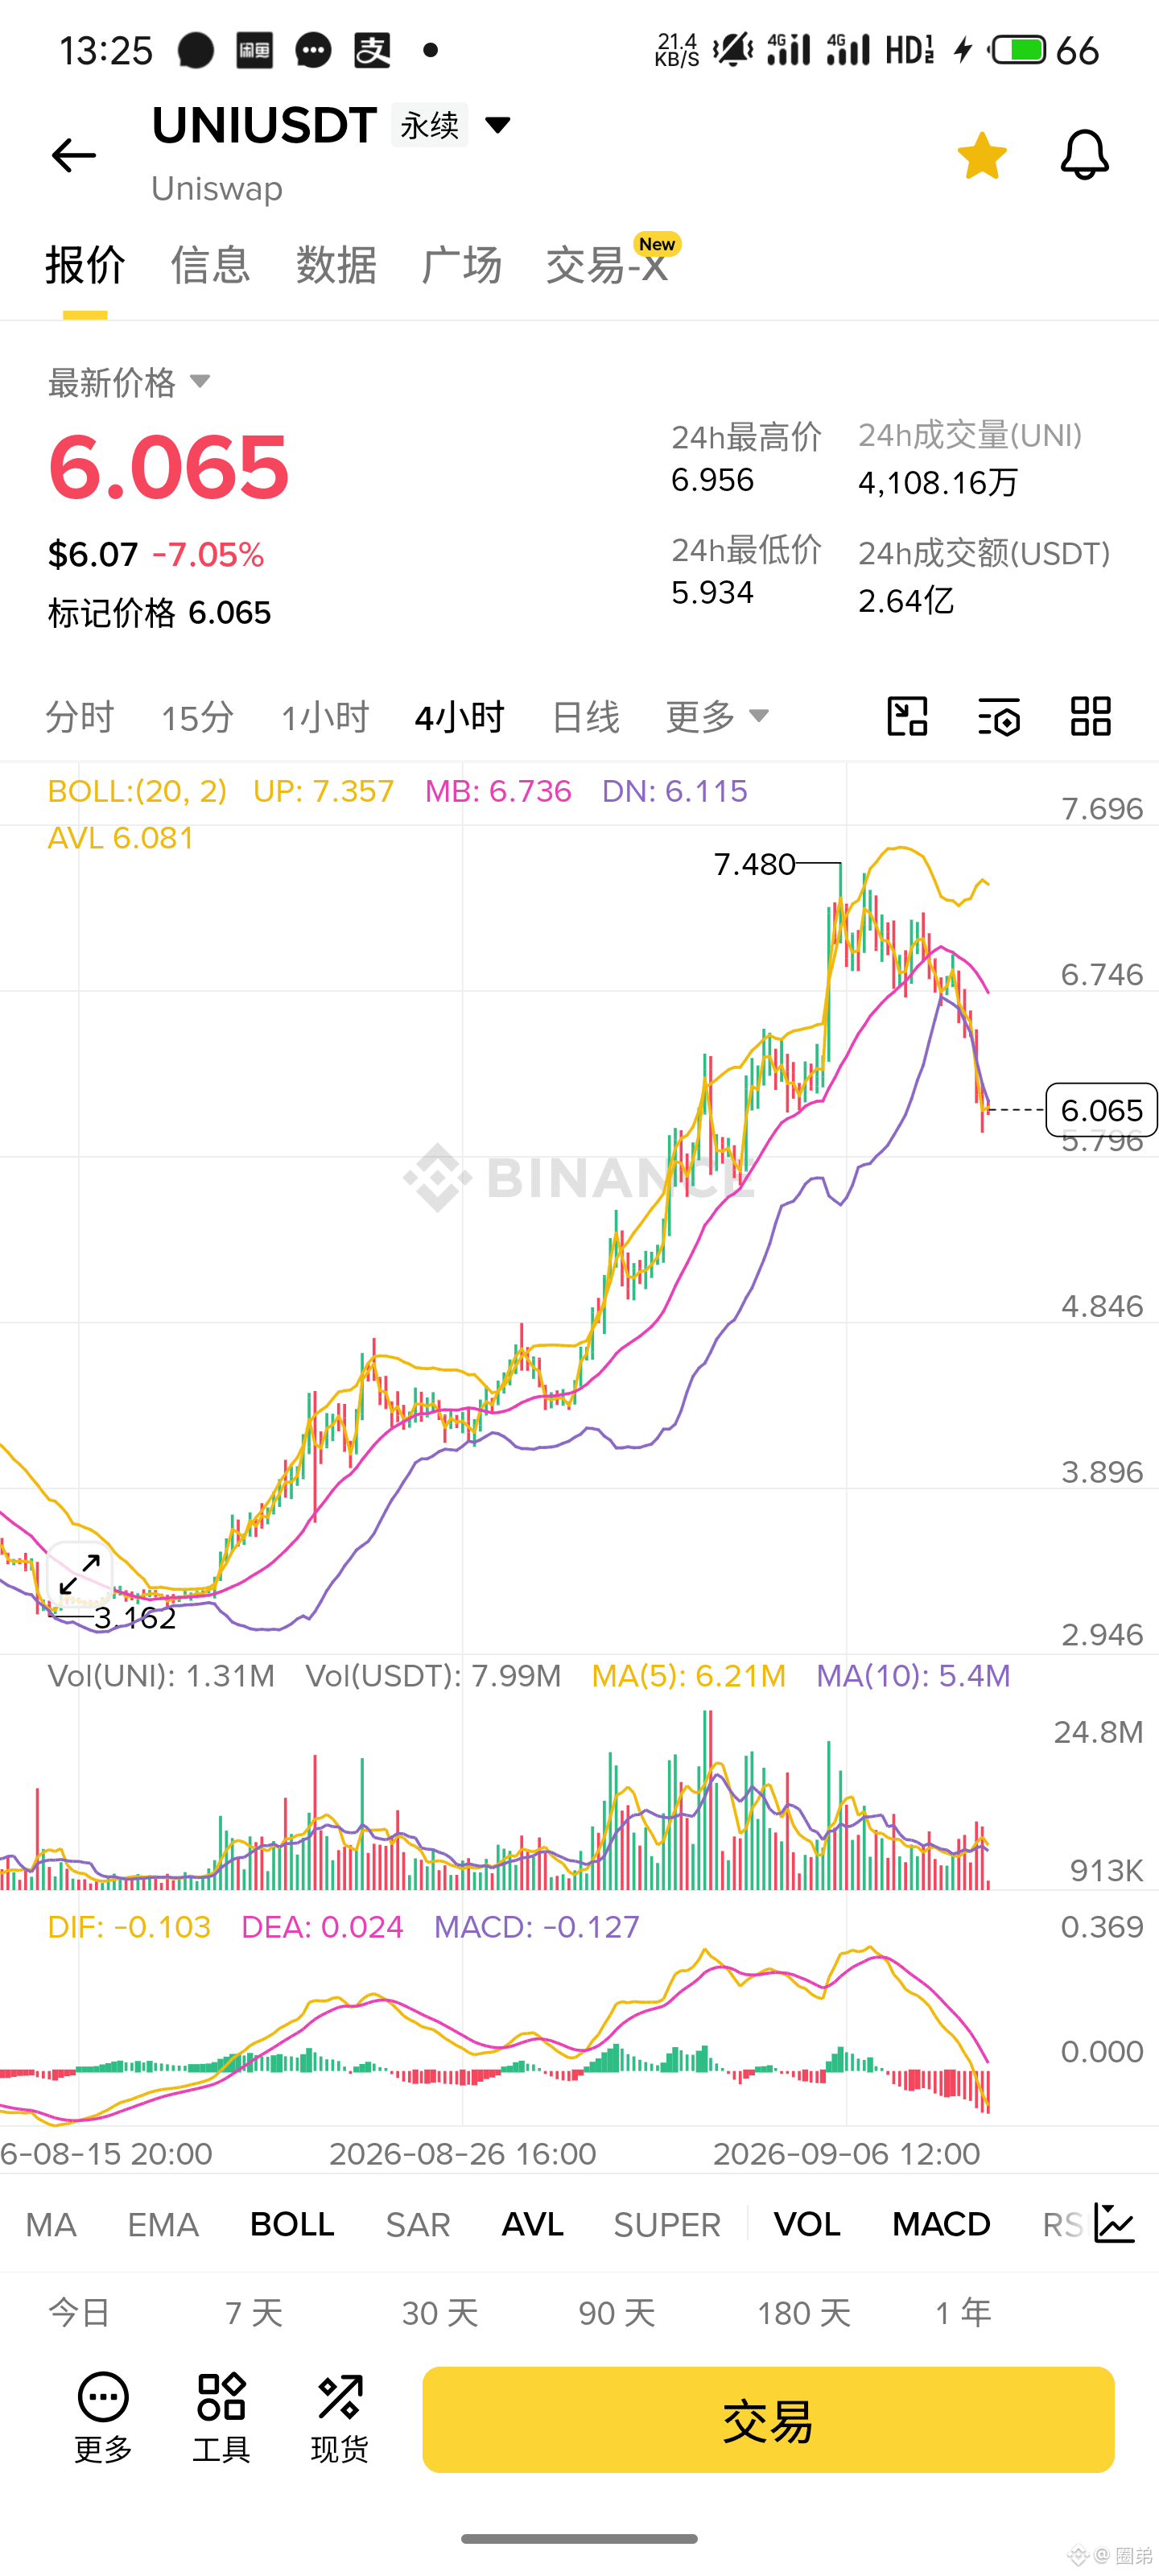
$UNI Just over six blocks—this position is really pathetic. The buy side is like it’s disappeared; you tap it and it gets pinned back immediately—no decent struggle at all. This price action clearly isn’t done messing around yet. Don’t rush to be a hero. Just follow the rhythm of continuing to drive it down.👇
{future}(UNIUSDT)
$UNI Just over six blocks—this position is really pathetic. The buy side is like it’s disappeared; you tap it and it gets pinned back immediately—no decent struggle at all. This price action clearly isn’t done messing around yet. Don’t rush to be a hero. Just follow the rhythm of continuing to drive it down.👇
188
·
--
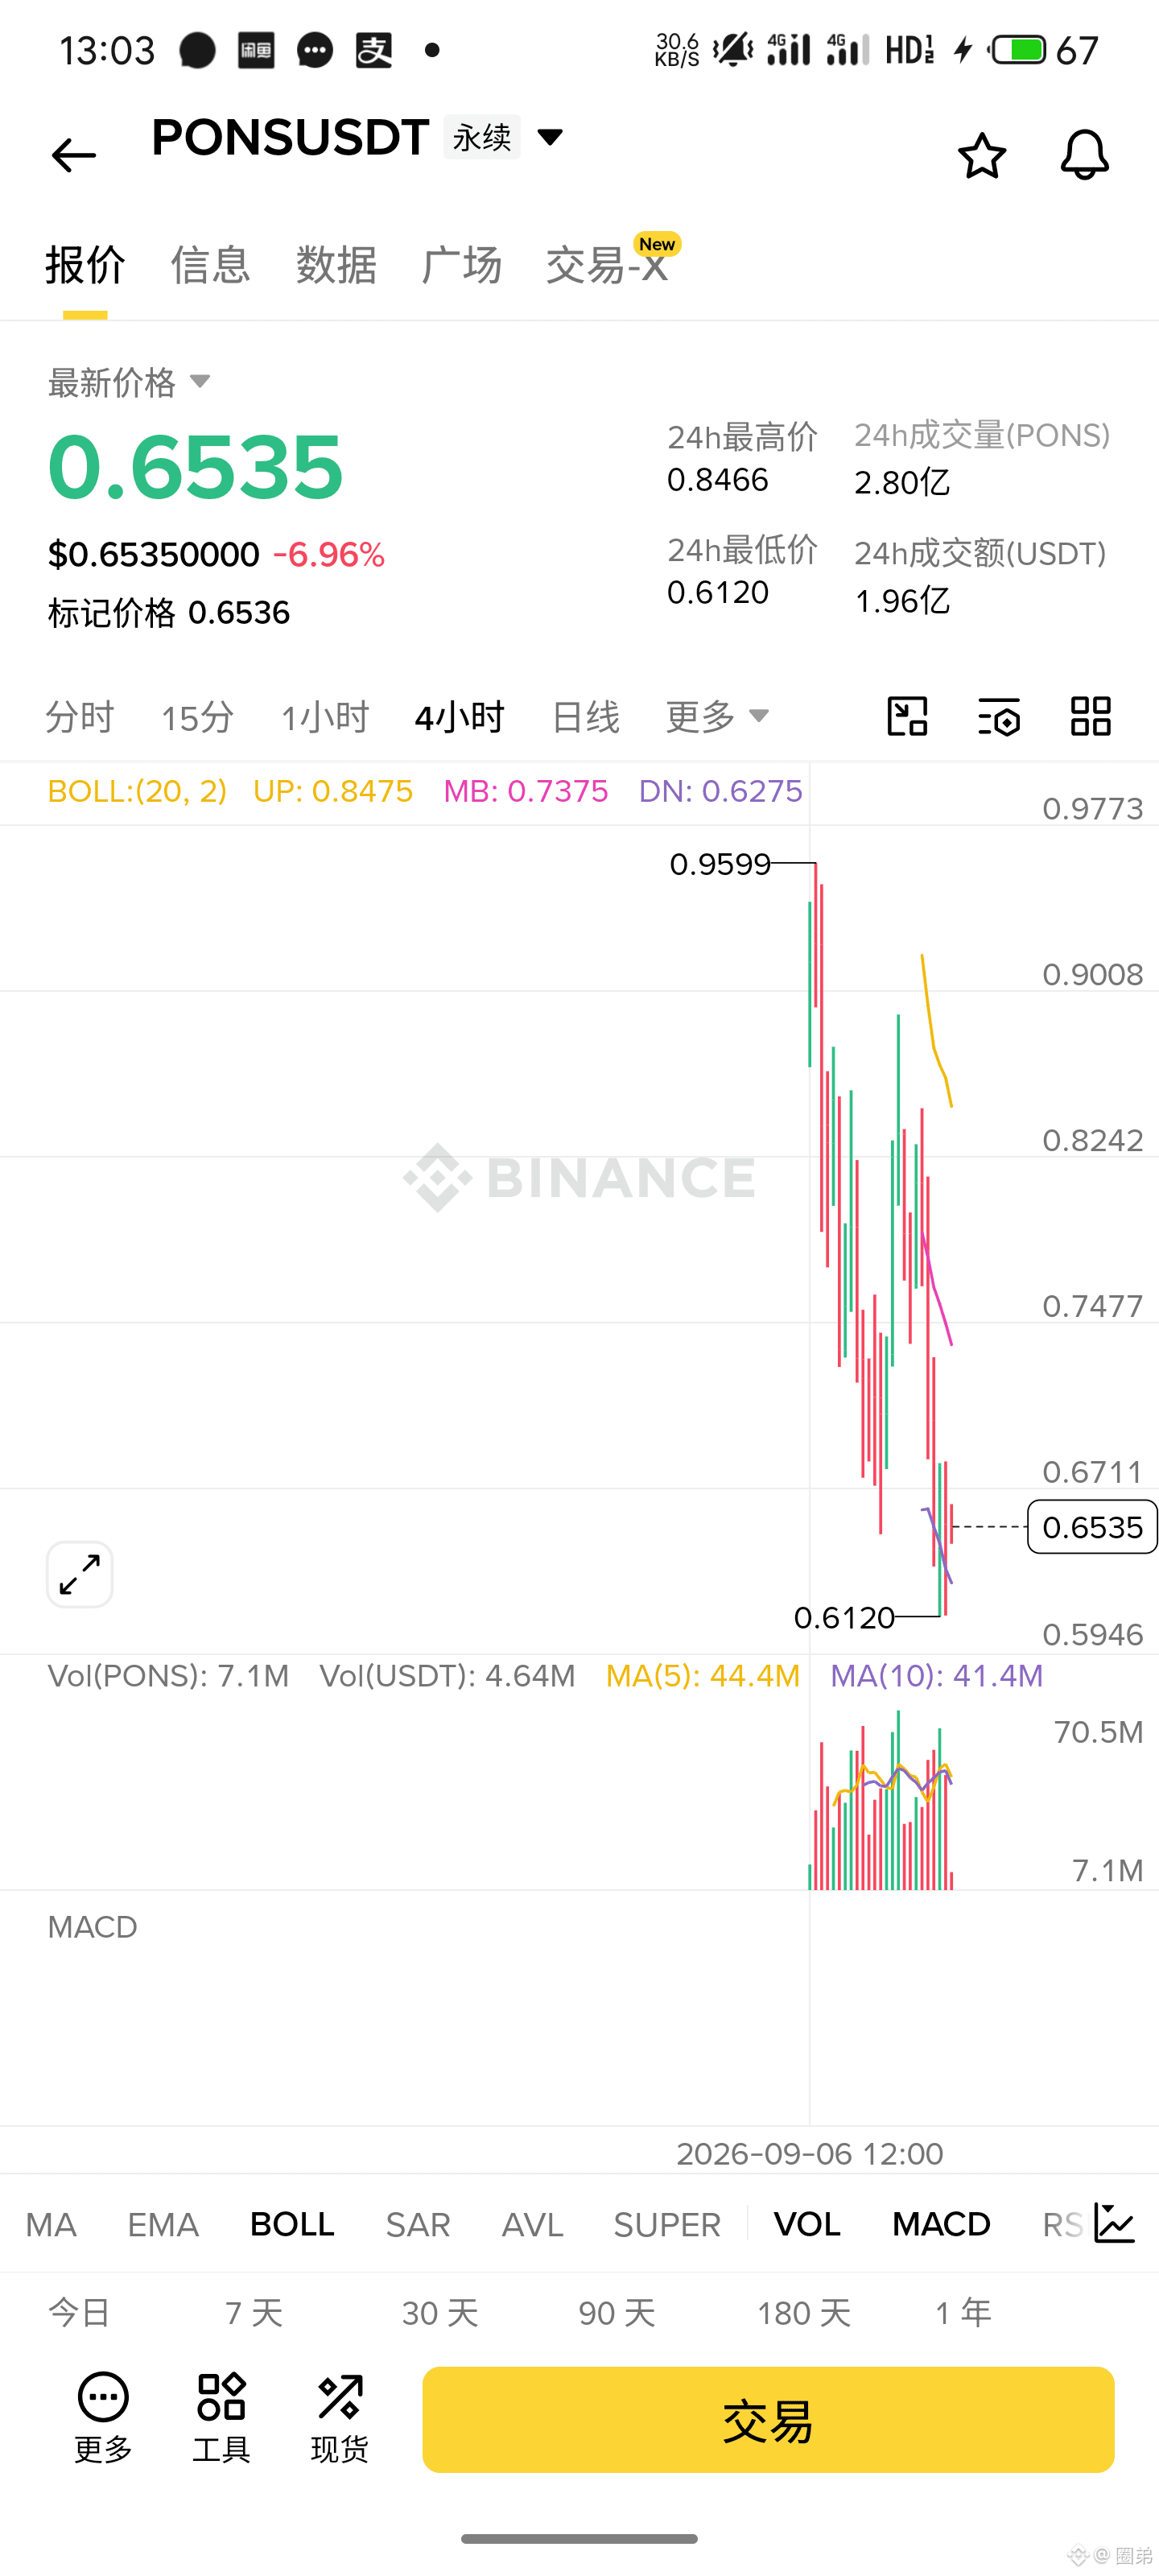
$PONS PONS This wave really beats people up to the point of death; riding the move from 0.9 straight to 0.6, anyone who chased the price is probably all stuck on standby at the gate. Right now the rebound is kind of limp—bears? the bulls don’t even dare to fart. Don’t get itchy and go bottom-fishing; the air force isn’t planning to stop. Ride the momentum and short again—let’s see it keep searching for the bottom.👇
{future}(PONSUSDT)
$PONS PONS This wave really beats people up to the point of death; riding the move from 0.9 straight to 0.6, anyone who chased the price is probably all stuck on standby at the gate. Right now the rebound is kind of limp—bears? the bulls don’t even dare to fart. Don’t get itchy and go bottom-fishing; the air force isn’t planning to stop. Ride the momentum and short again—let’s see it keep searching for the bottom.👇
1
230
·
--
$ADA
{future}(ADAUSDT)
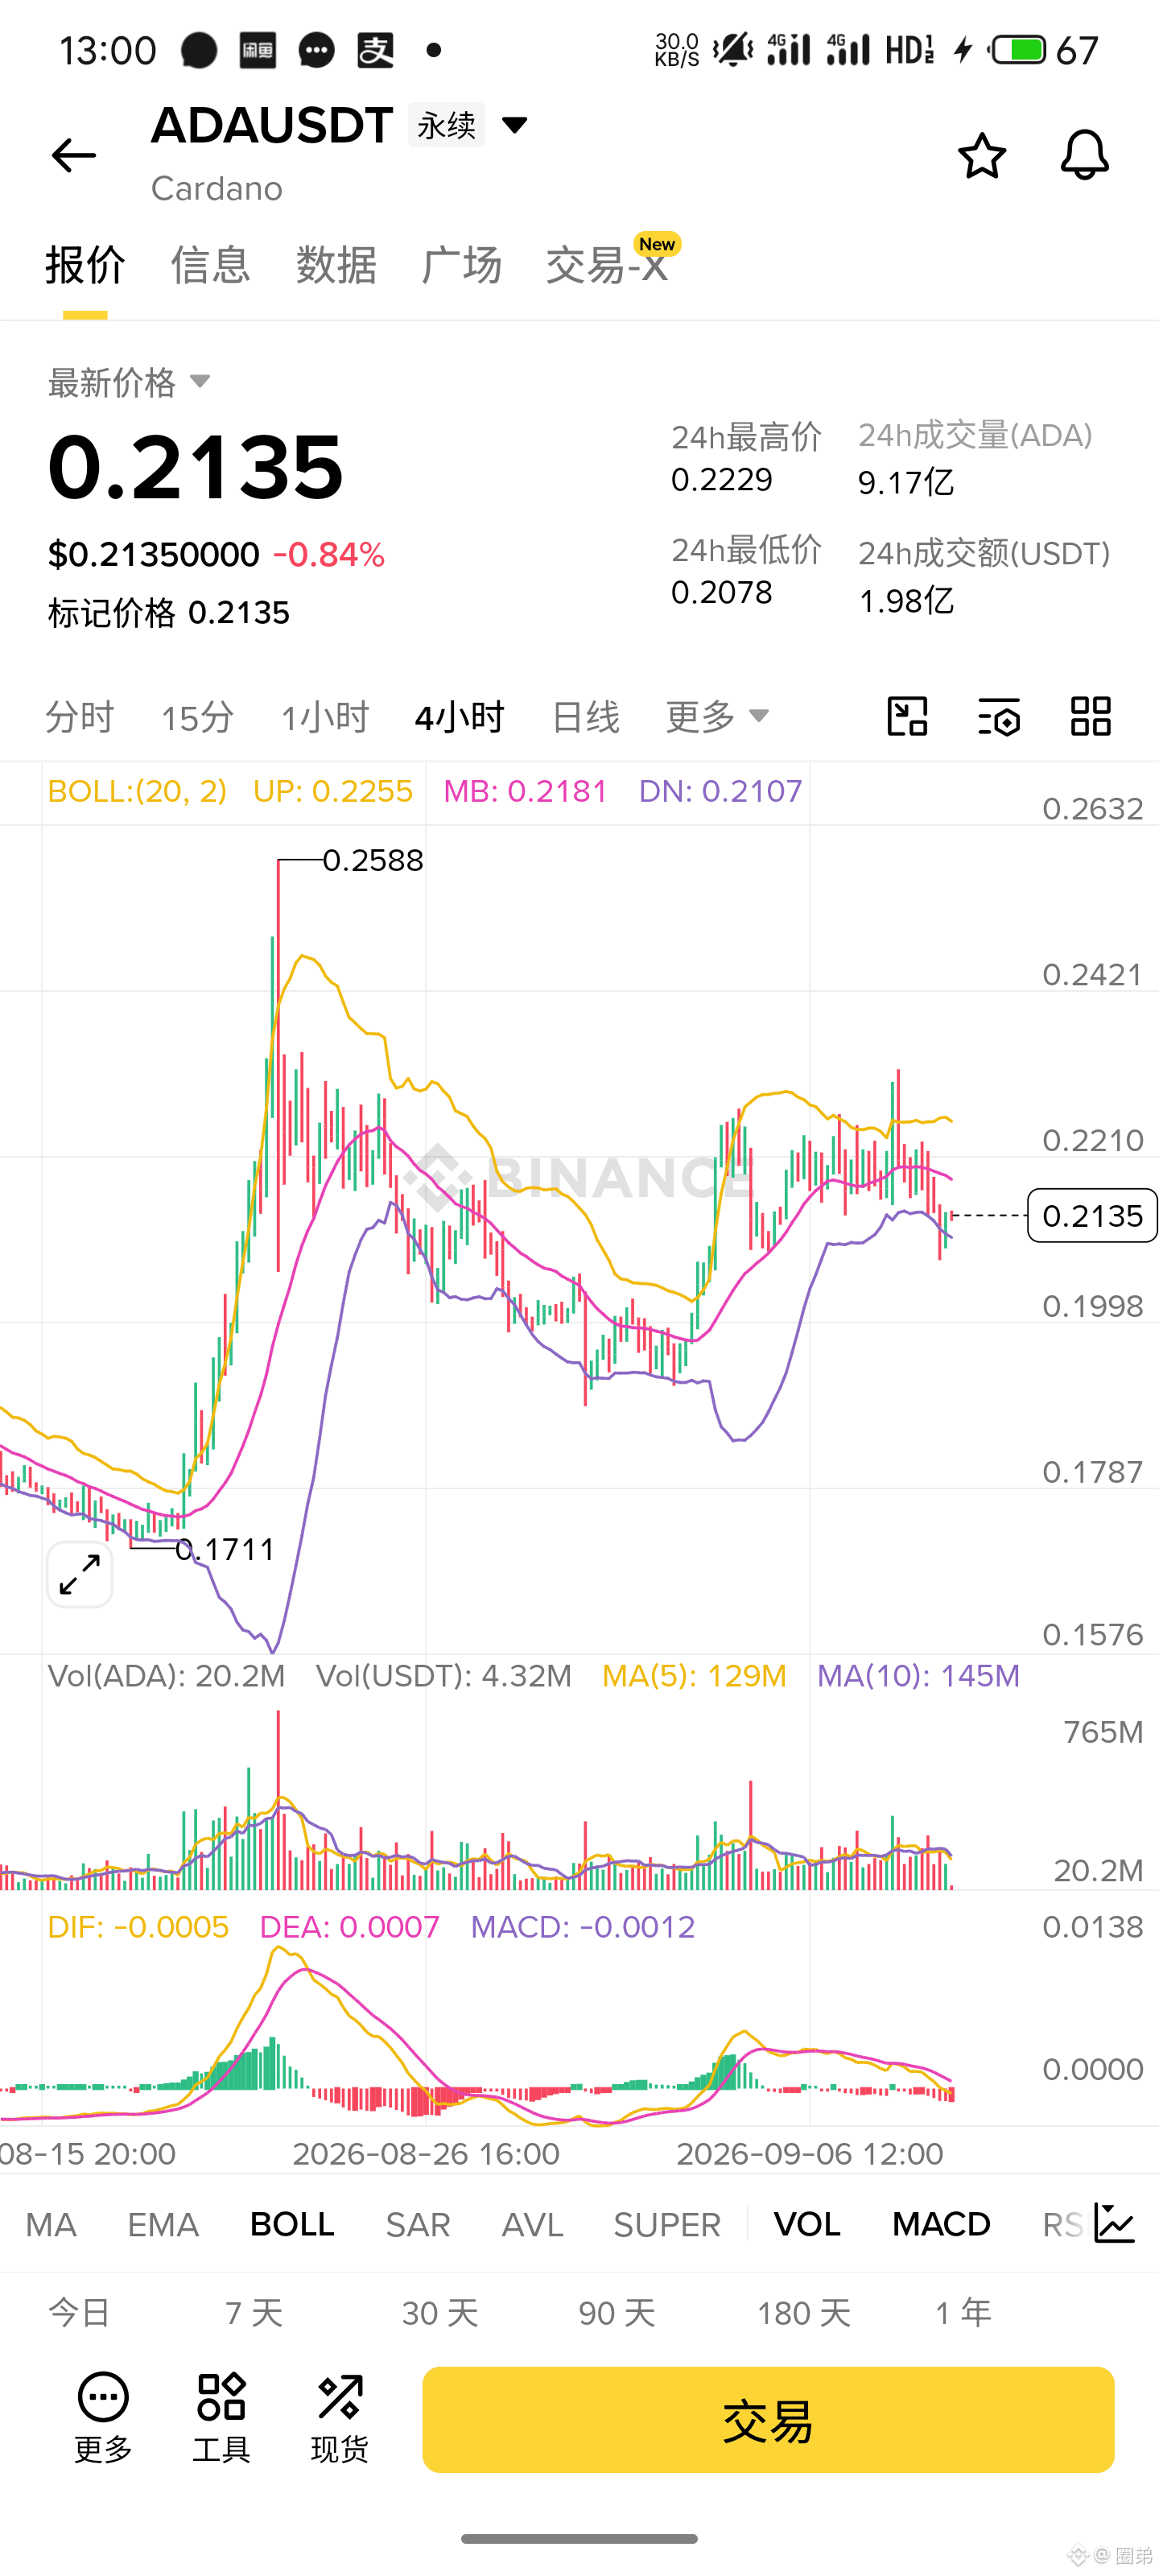
ADA fell from 0.25 to 0.20, and it just wilted. Now it’s working at 0.20, but it bounces back with no strength—soft and limp. The bids don’t step up, the sellers/“air force” haven’t let go, and the longs are too timid. Don’t think about buying the dip—each rebound is a chance to go short. Watch it keep sliding lower.👇
$ADA
ADA fell from 0.25 to 0.20, and it just wilted. Now it’s working at 0.20, but it bounces back with no strength—soft and limp. The bids don’t step up, the sellers/“air force” haven’t let go, and the longs are too timid. Don’t think about buying the dip—each rebound is a chance to go short. Watch it keep sliding lower.👇
ADA fell from 0.25 to 0.20, and it just wilted. Now it’s working at 0.20, but it bounces back with no strength—soft and limp. The bids don’t step up, the sellers/“air force” haven’t let go, and the longs are too timid. Don’t think about buying the dip—each rebound is a chance to go short. Watch it keep sliding lower.👇
1
74
·
--
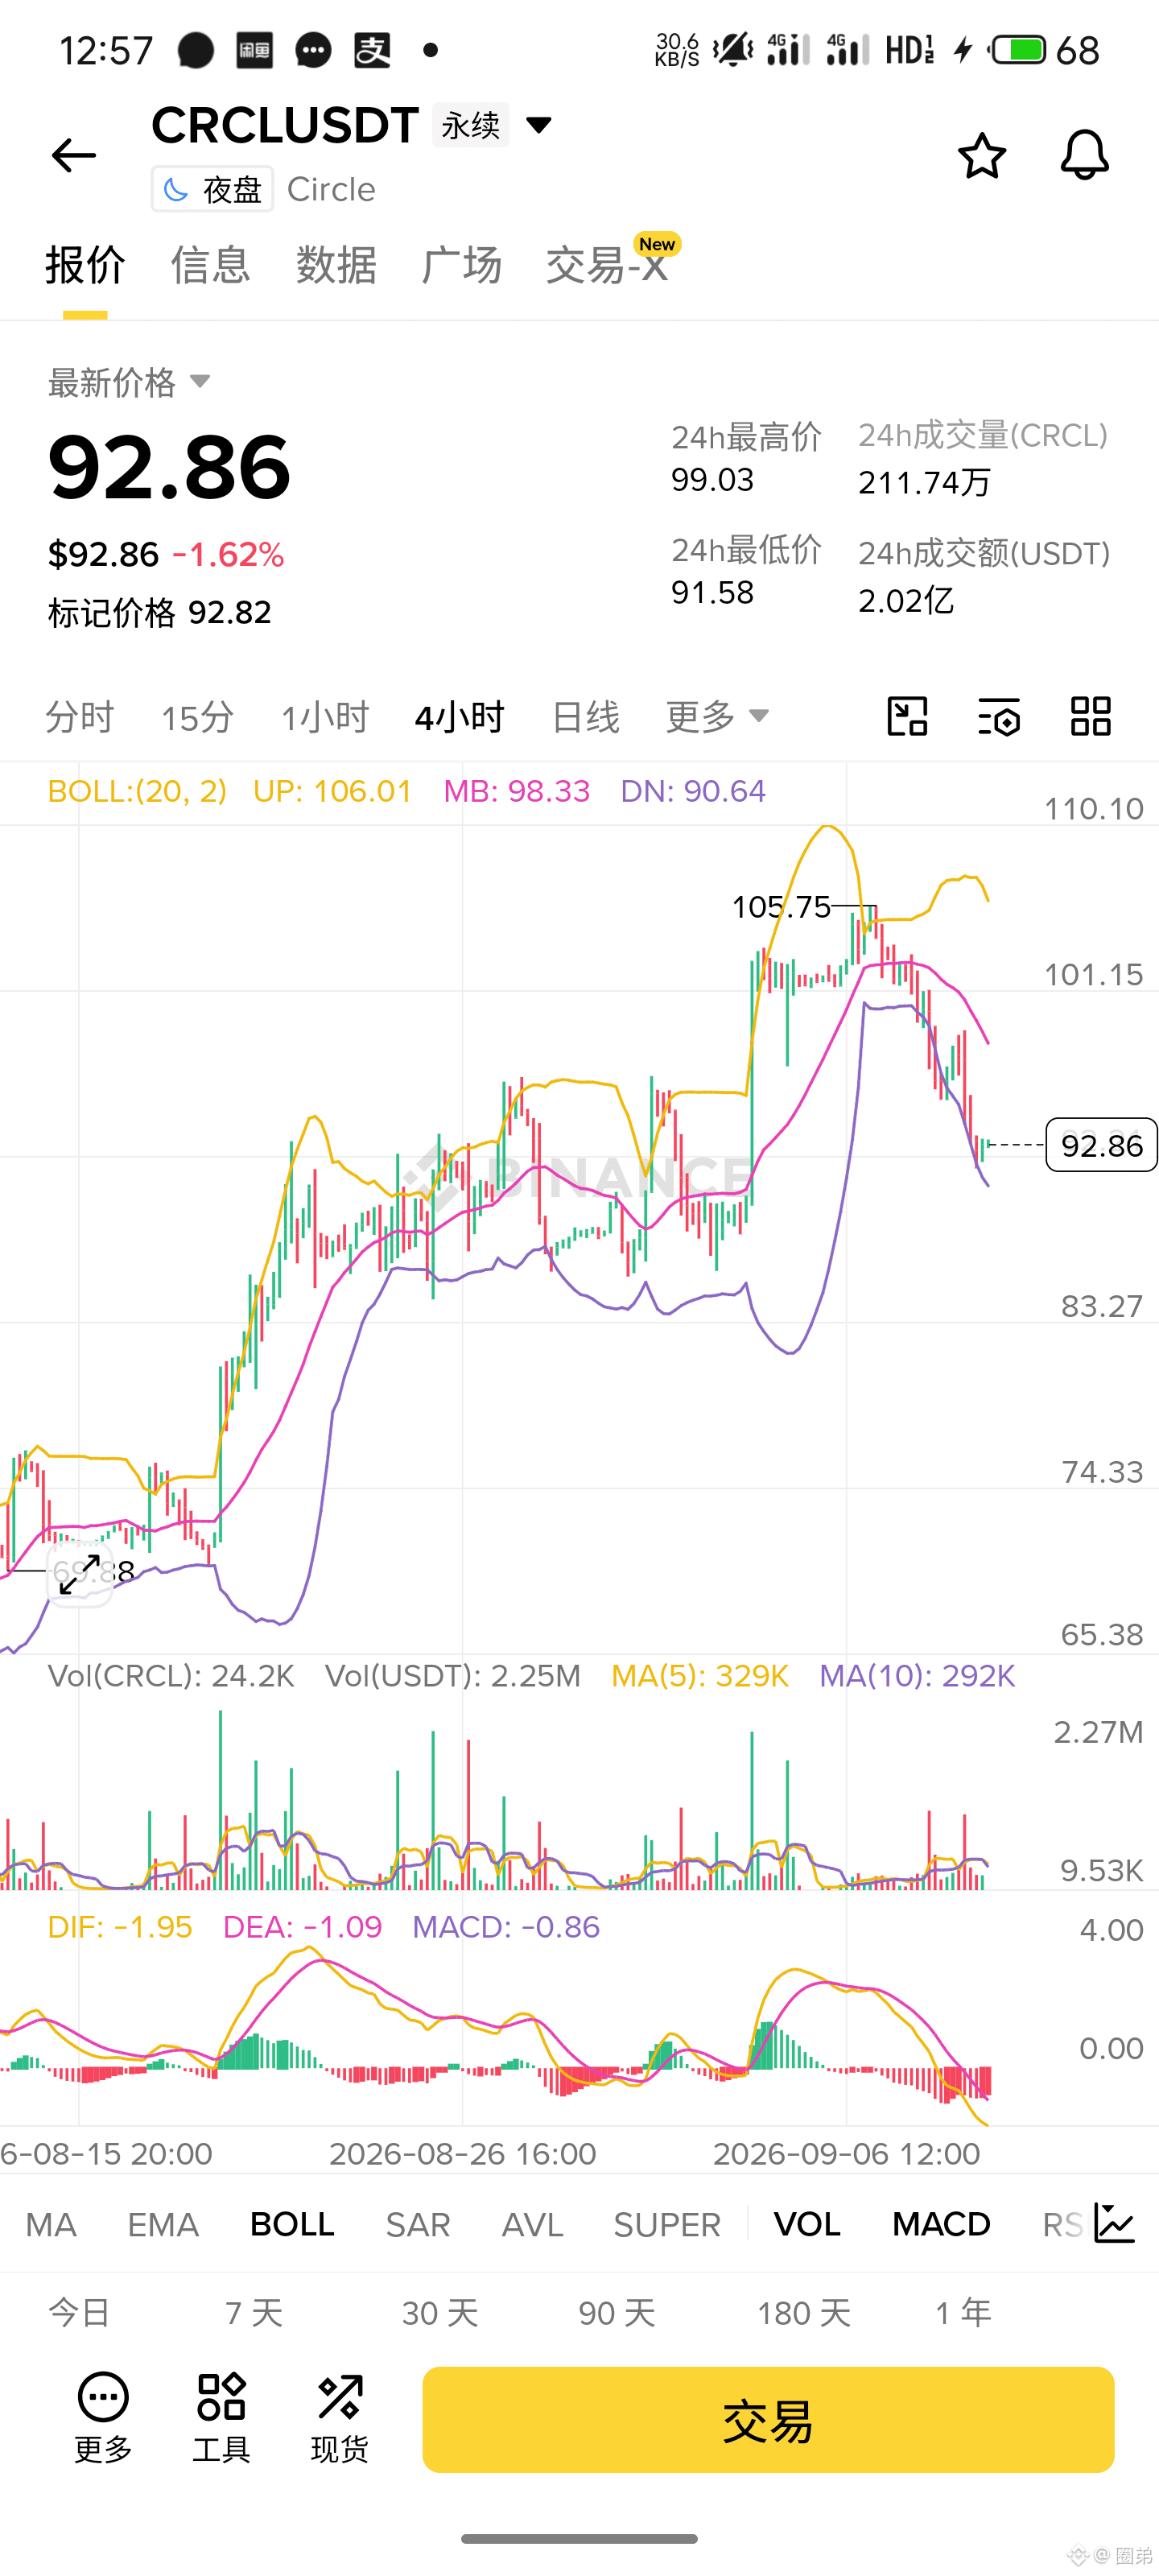
$CRCL This stuff fell from 105 to 92, and its face hit the ground. Now it’s barely alive, lying there. The buy orders are limp and weak—there’s no strength to take it, and the air force is still roaming around in the arena. Don’t get tempted and try to snipe the dip—every rebound is an opportunity for the shorts. Ride the momentum and watch it keep sliding down.👇
{future}(CRCLUSDT)
$CRCL This stuff fell from 105 to 92, and its face hit the ground. Now it’s barely alive, lying there. The buy orders are limp and weak—there’s no strength to take it, and the air force is still roaming around in the arena. Don’t get tempted and try to snipe the dip—every rebound is an opportunity for the shorts. Ride the momentum and watch it keep sliding down.👇
1
68
·
--
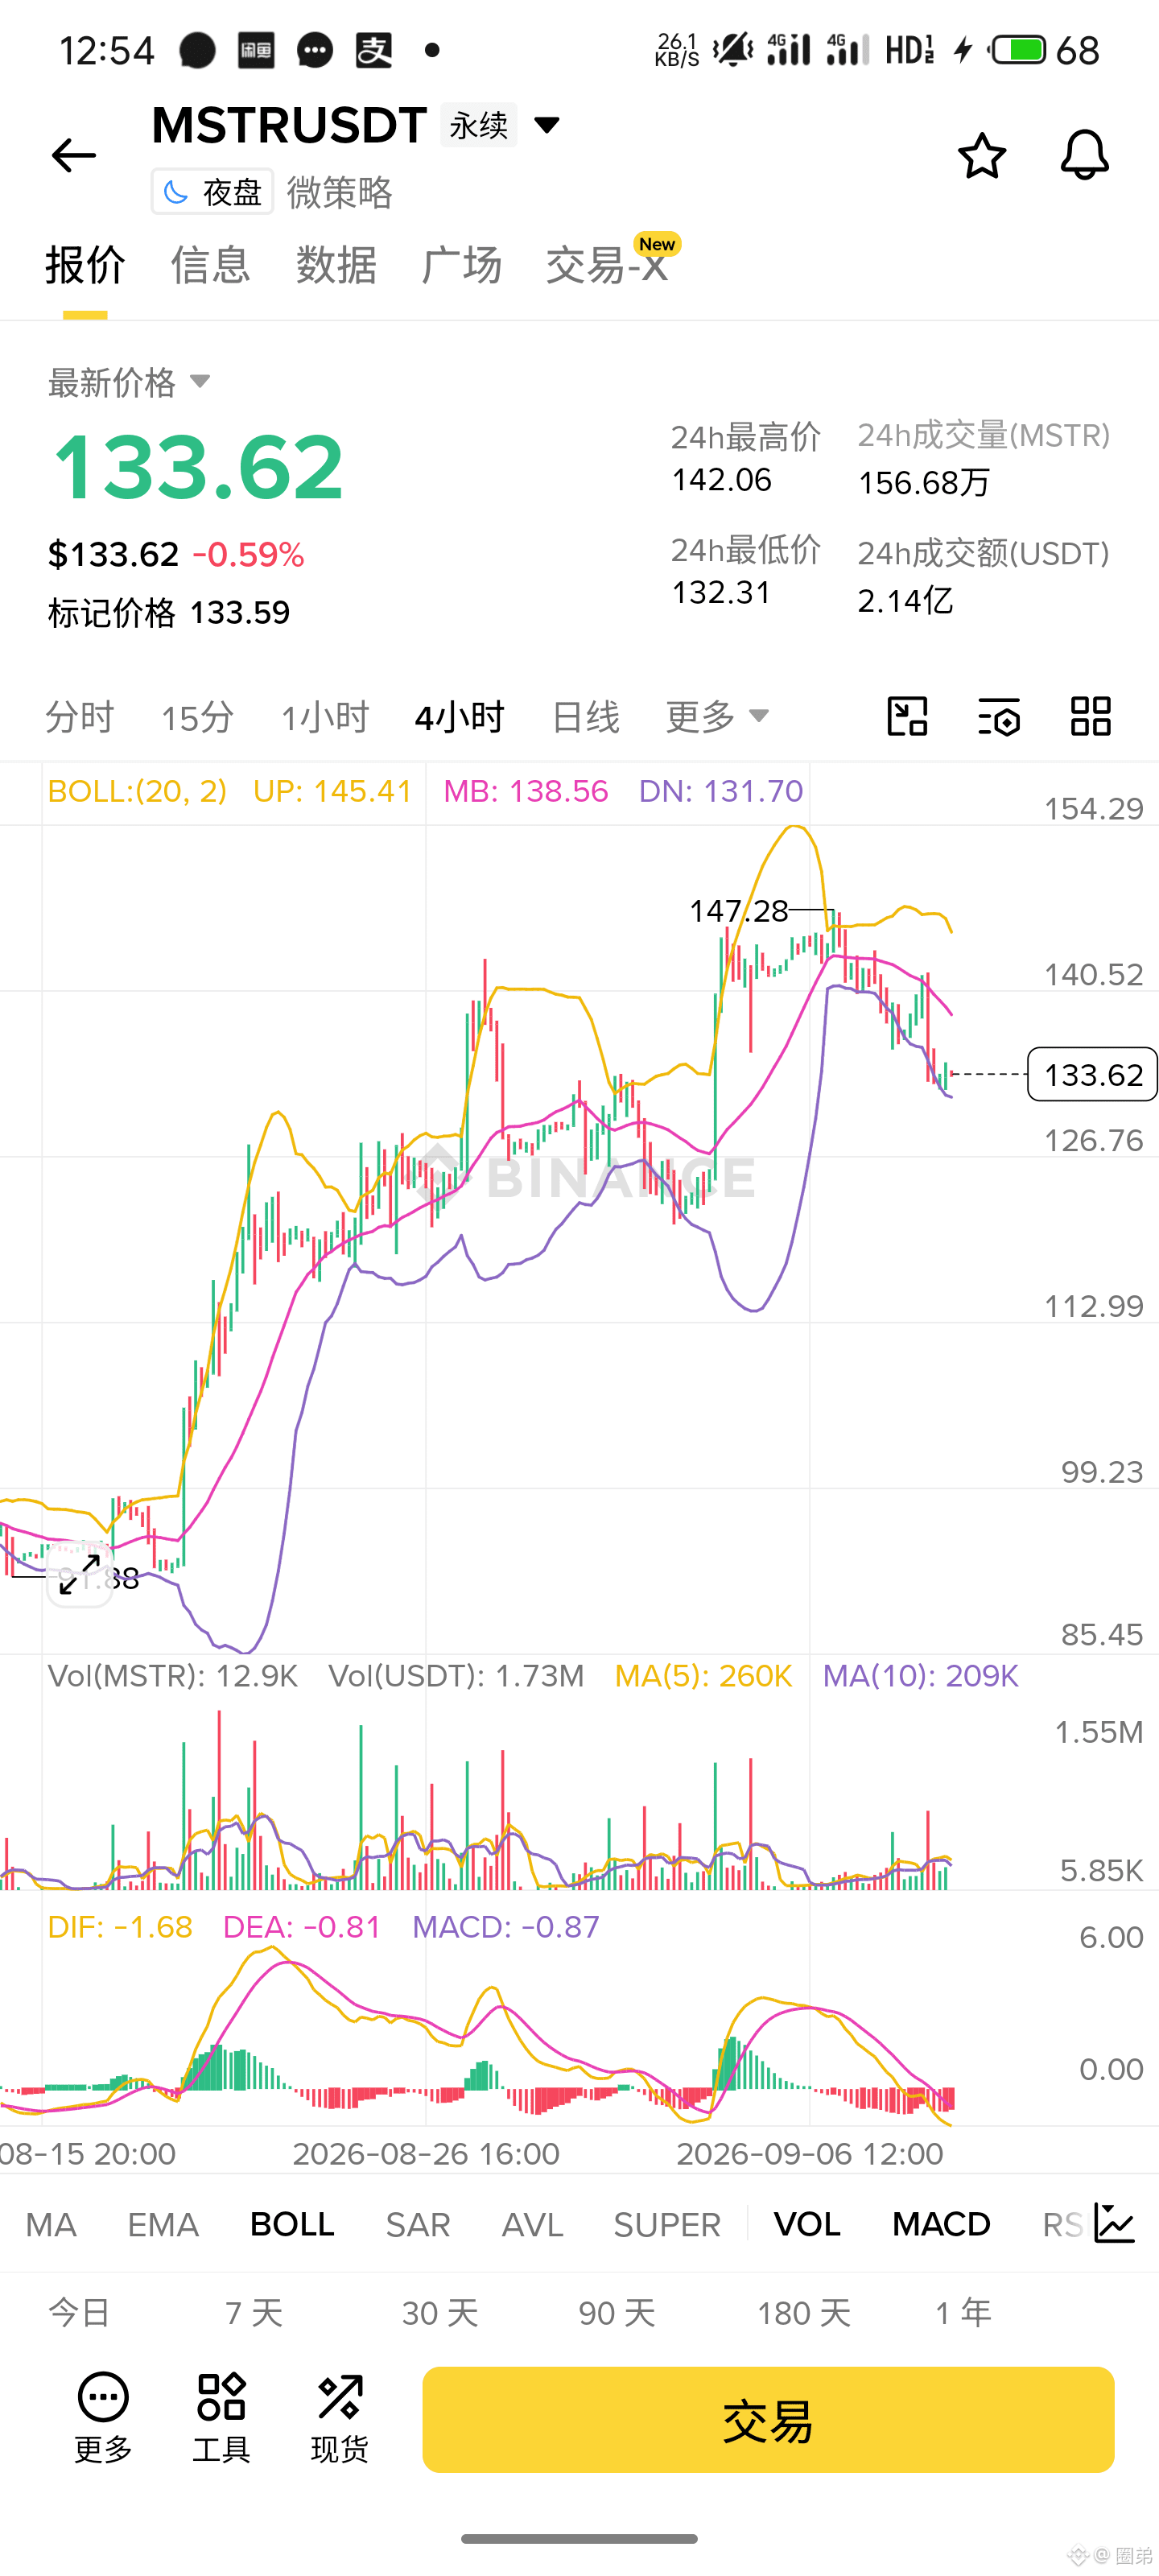
$MSTR Oh wow, MSTR has been dropping nonstop from 147, and it’s even gotten the face smashed green. Now it’s been hovering around the 133 area for a while and still can’t lift its head. The buy-side is soft and limp; the bears clearly haven’t let go yet. Don’t rush to catch the falling knife—this is an opportunity to look for a rebound. Then, going along with the trend to go short is the safer bet.👇
{future}(MSTRUSDT)
$MSTR Oh wow, MSTR has been dropping nonstop from 147, and it’s even gotten the face smashed green. Now it’s been hovering around the 133 area for a while and still can’t lift its head. The buy-side is soft and limp; the bears clearly haven’t let go yet. Don’t rush to catch the falling knife—this is an opportunity to look for a rebound. Then, going along with the trend to go short is the safer bet.👇
54
·
--
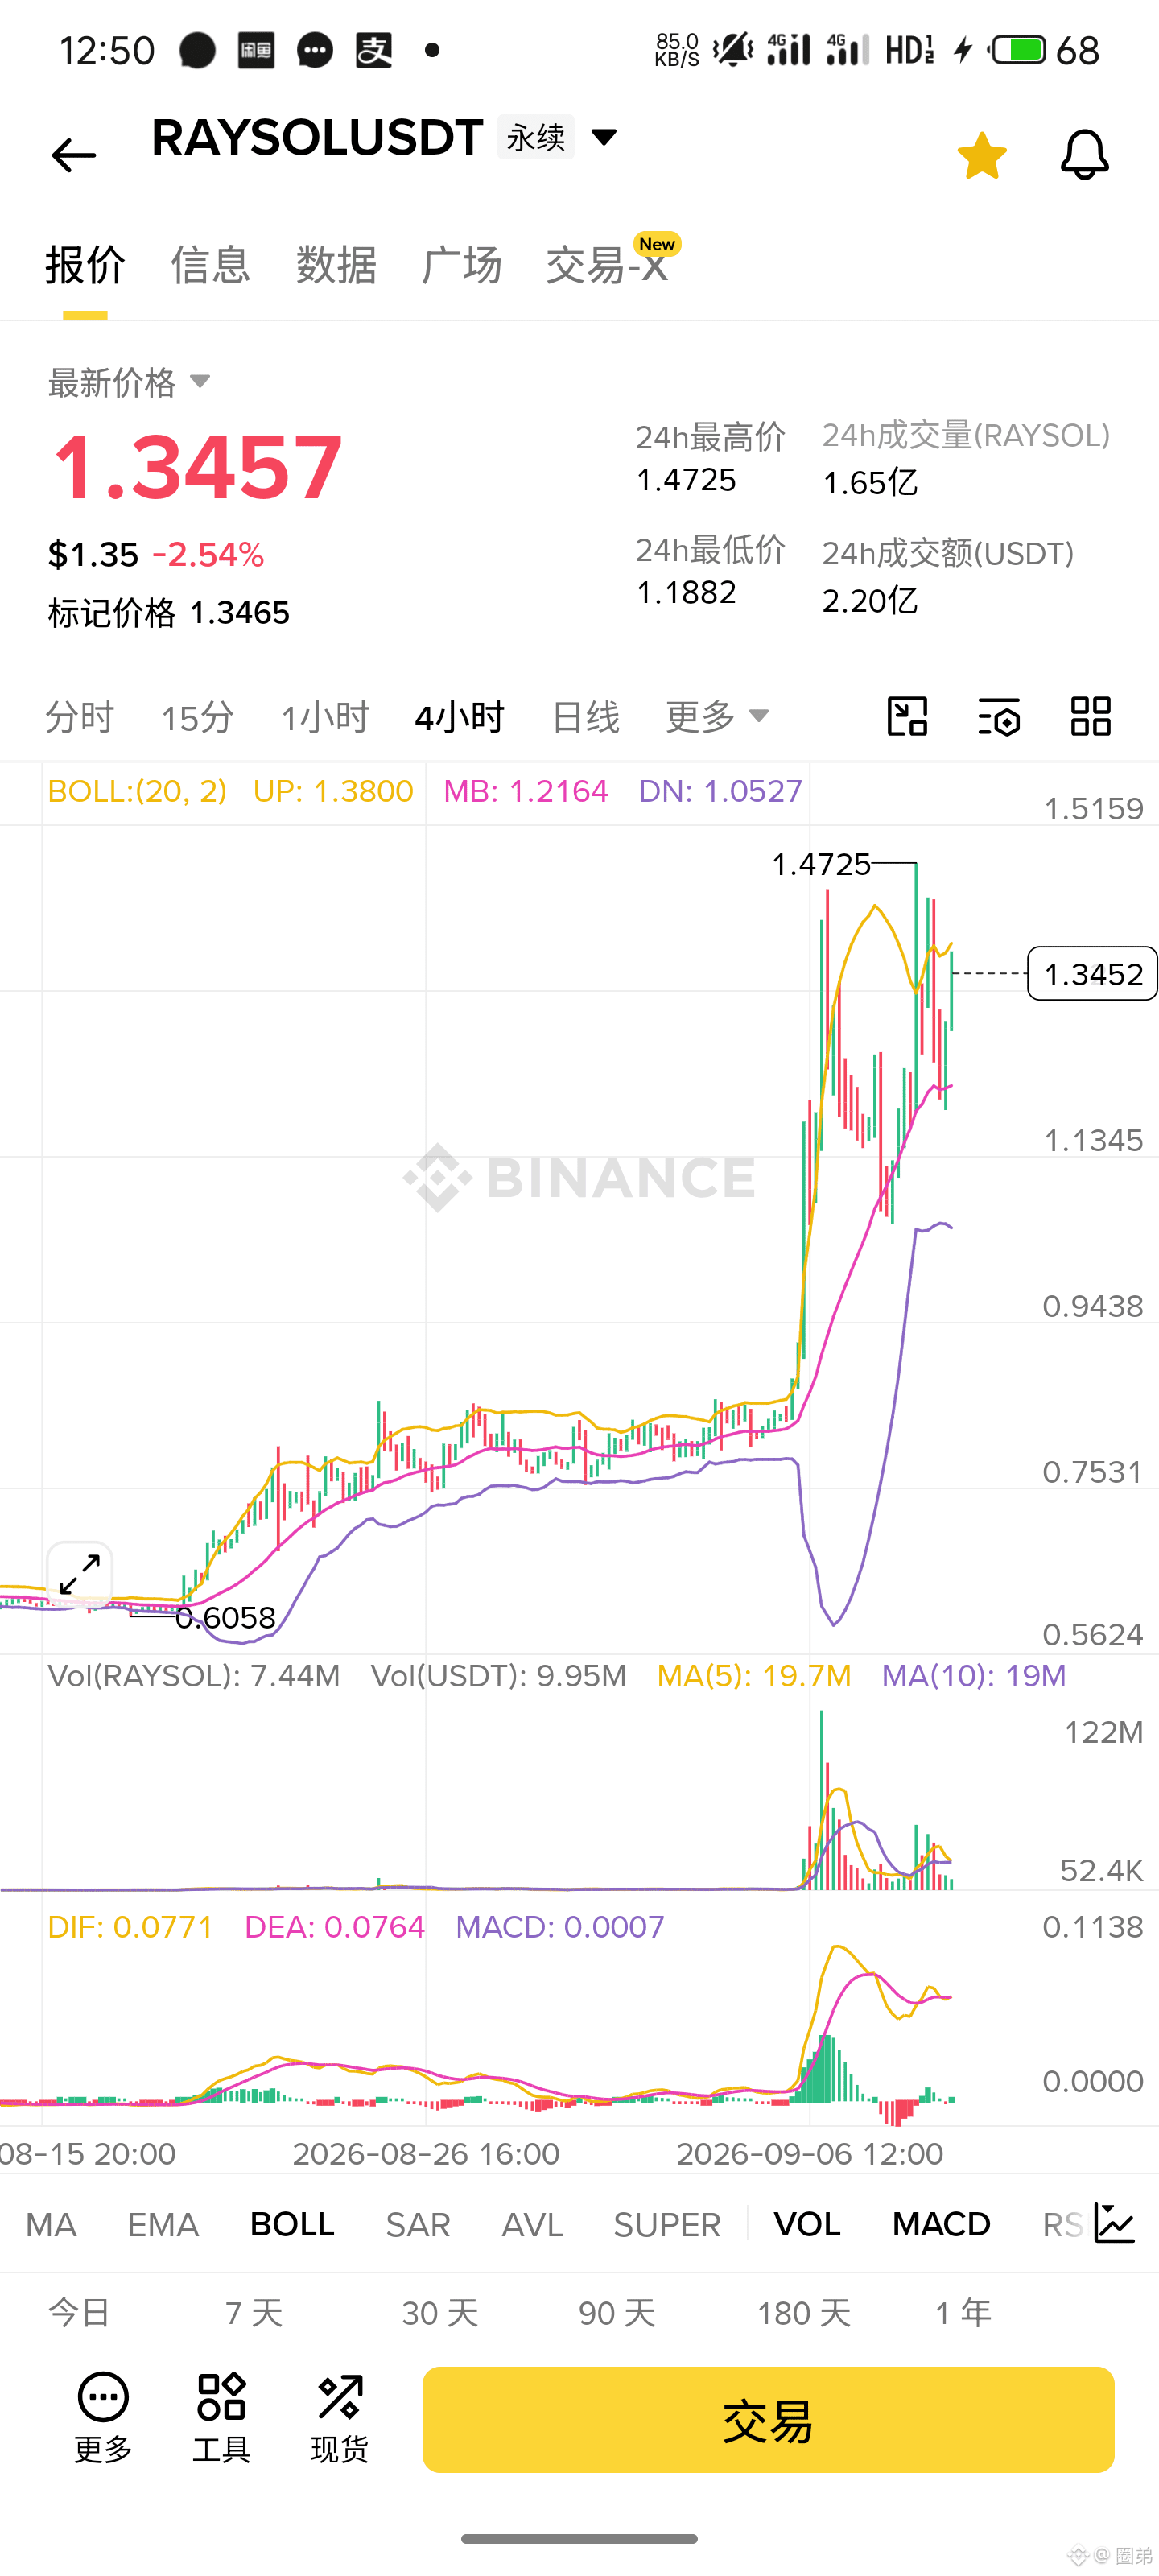
$RAYSOL RAY fell from a block of four; the top spiked but no one stepped in to buy. Now it’s hovering around the 3.4 area, and it just looks shaky. The bulls can’t push it higher anymore, and sell pressure is still quite heavy. Don’t rush to catch a falling knife—going short in line with the move is more solid. Watch it pull back to the 2.1 level.👇
{future}(RAYSOLUSDT)
$RAYSOL RAY fell from a block of four; the top spiked but no one stepped in to buy. Now it’s hovering around the 3.4 area, and it just looks shaky. The bulls can’t push it higher anymore, and sell pressure is still quite heavy. Don’t rush to catch a falling knife—going short in line with the move is more solid. Watch it pull back to the 2.1 level.👇
1
107
·
--
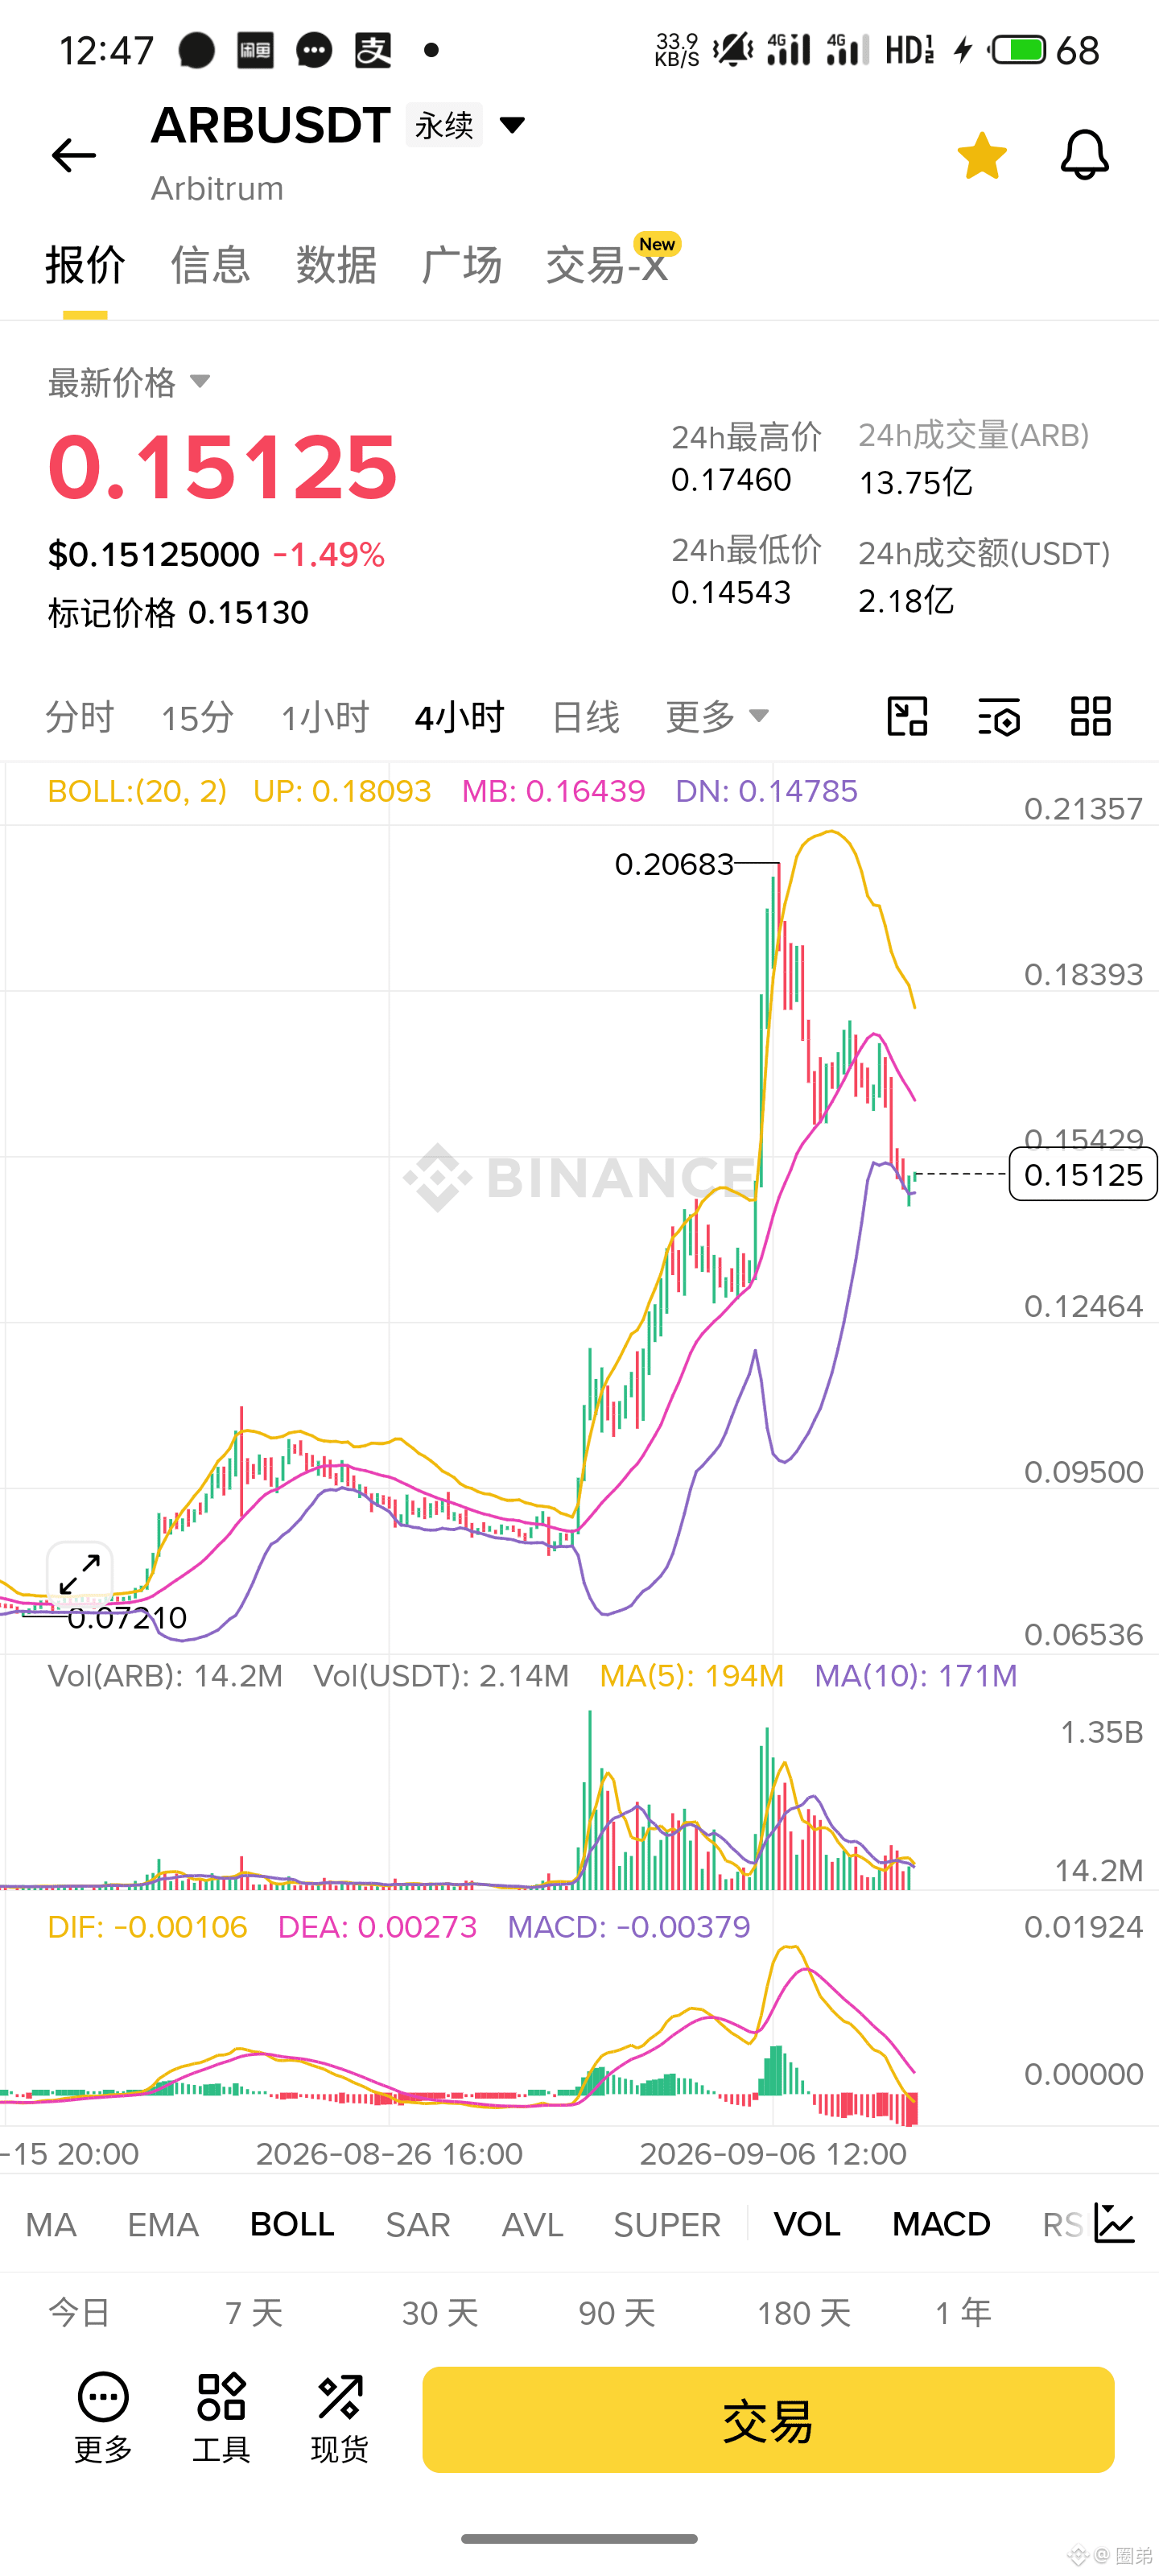
$ARB Ouch, ARB has been smashed from a little over two cents down to one and a half cents. It hit the ground face-first with no cushioning—now it’s lying here pretending to be dead for half a day and can’t lift its head. The buy orders are as lifeless as if they haven’t eaten. Don’t get itchy and try to bottom-pick; the air force is still out roaming the field. If it rebounds, that’s your chance to get on the ride—watch it keep slipping lower.👇
{future}(ARBUSDT)
$ARB Ouch, ARB has been smashed from a little over two cents down to one and a half cents. It hit the ground face-first with no cushioning—now it’s lying here pretending to be dead for half a day and can’t lift its head. The buy orders are as lifeless as if they haven’t eaten. Don’t get itchy and try to bottom-pick; the air force is still out roaming the field. If it rebounds, that’s your chance to get on the ride—watch it keep slipping lower.👇
1
109
·
--
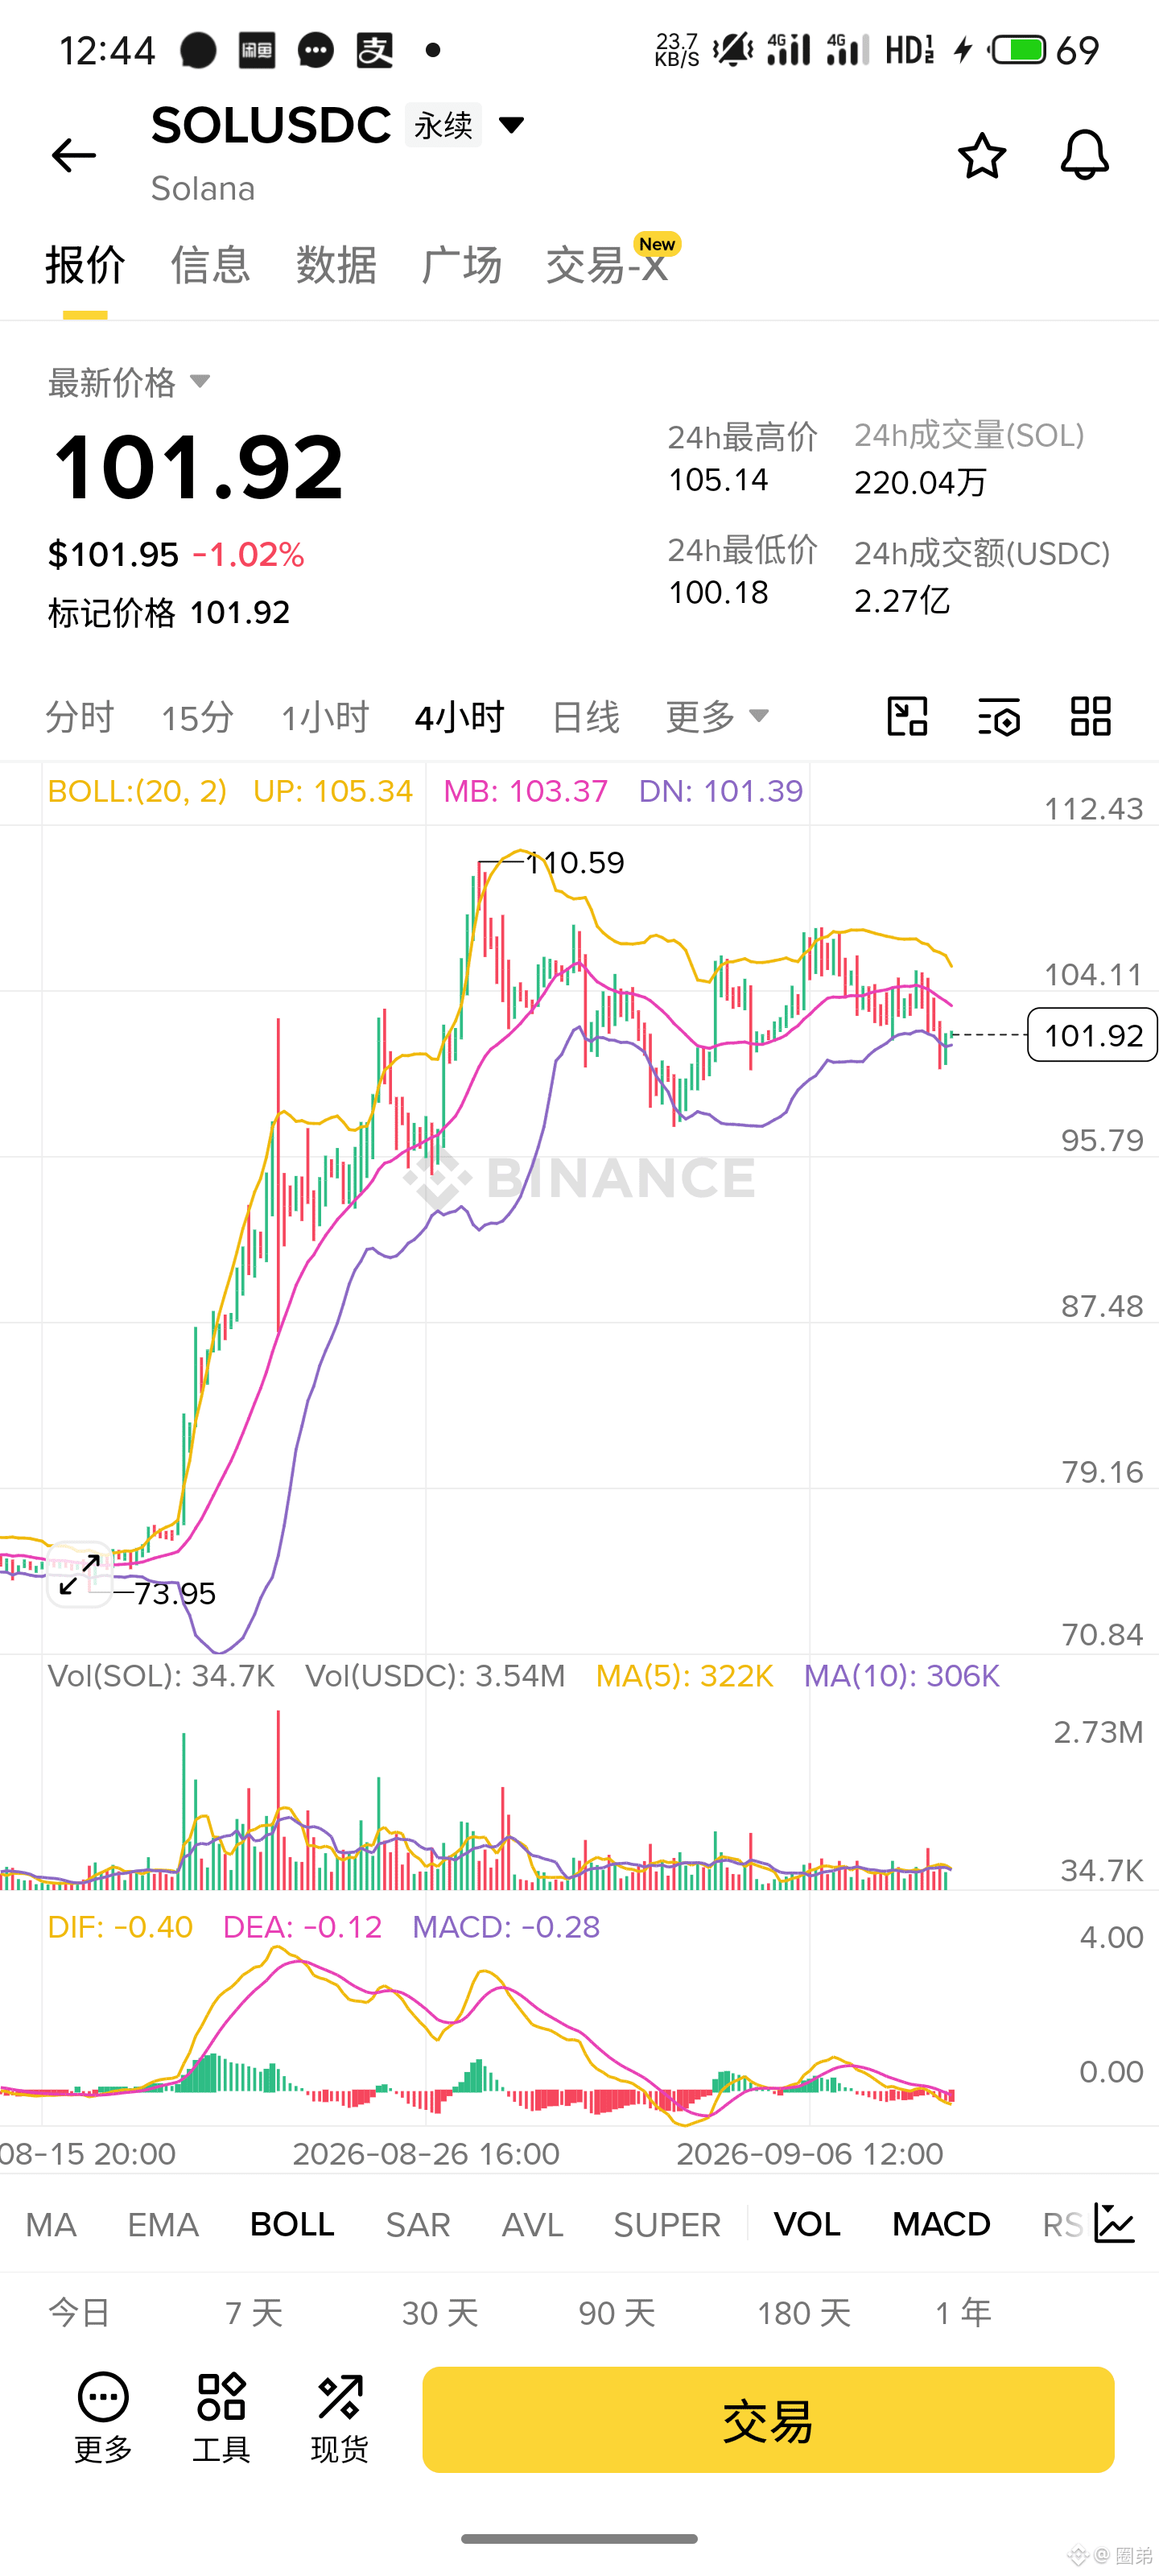
$SOL After this SOL dropped from 110, it hasn’t recovered ever since. Now it’s hovering around 101. The bid is like squeezing toothpaste—small upticks get hammered. It still looks like it’s likely to slide lower; follow the momentum and stay slightly bearish. But since the previous low at 100 isn’t far, don’t chase shorts too aggressively. 👇
{future}(SOLUSDT)
$SOL After this SOL dropped from 110, it hasn’t recovered ever since. Now it’s hovering around 101. The bid is like squeezing toothpaste—small upticks get hammered. It still looks like it’s likely to slide lower; follow the momentum and stay slightly bearish. But since the previous low at 100 isn’t far, don’t chase shorts too aggressively. 👇
1
99
·
--
$LINK
{future}(LINKUSDT)
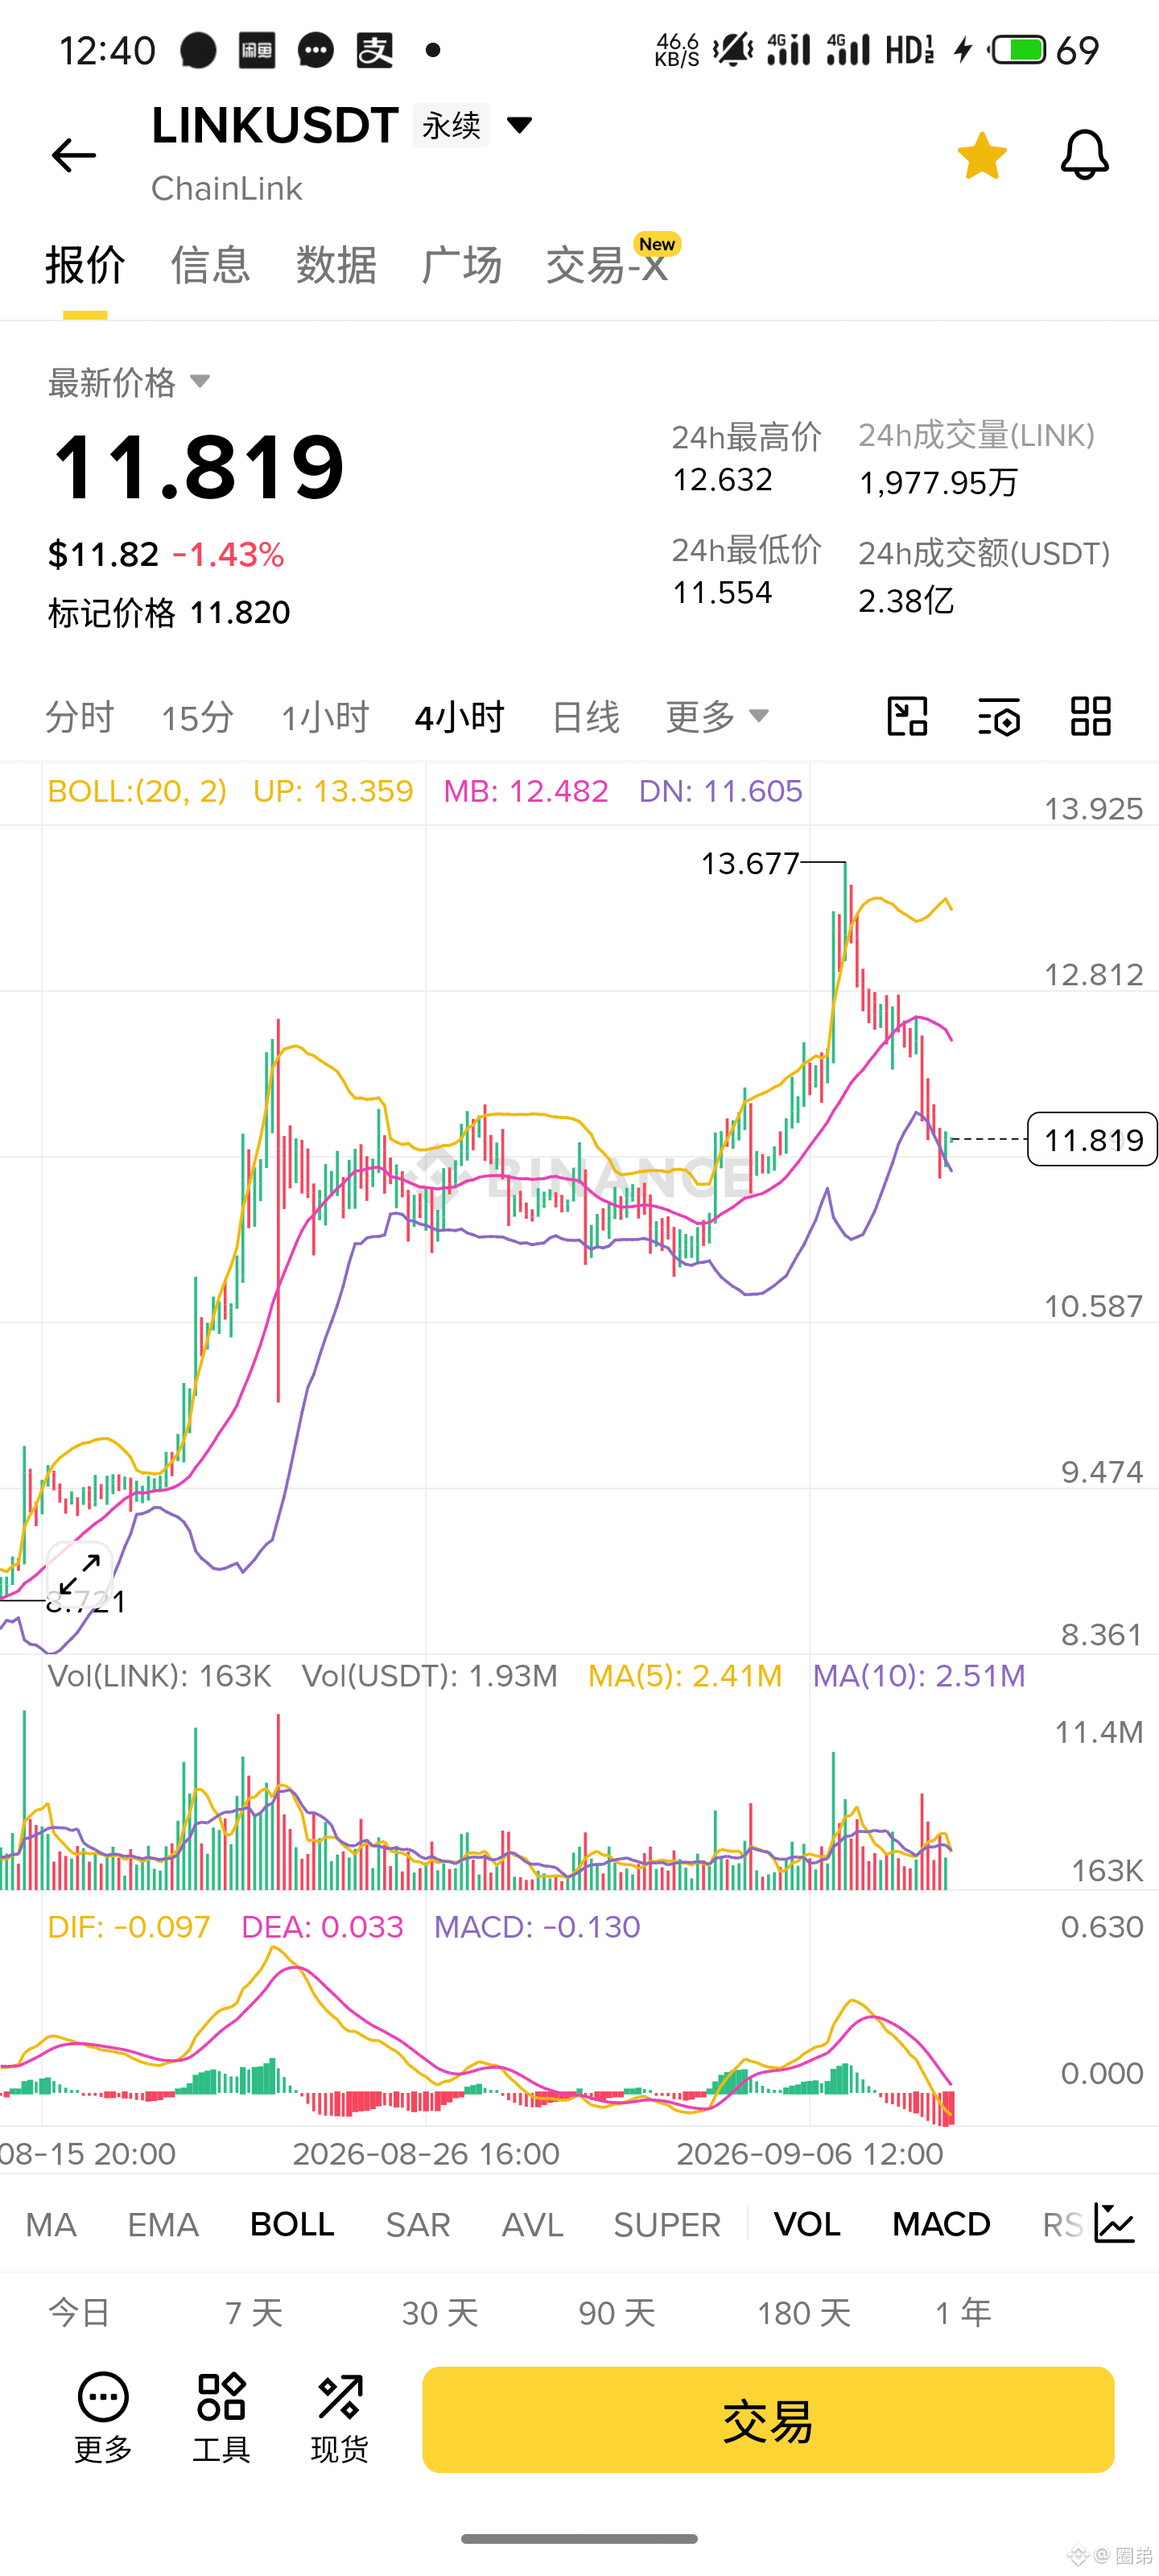
LINK This journey down from 13.6 to 11.8—there wasn’t even a decent resistance to be seen, and the longs have all fully gone flat. Now it’s hovering around 11.6, and any rebound is weak and limp. The air force clearly isn’t planning to stop—just follow the selloff and be done with it; don’t try to bottom-fish.👇
$LINK
LINK This journey down from 13.6 to 11.8—there wasn’t even a decent resistance to be seen, and the longs have all fully gone flat. Now it’s hovering around 11.6, and any rebound is weak and limp. The air force clearly isn’t planning to stop—just follow the selloff and be done with it; don’t try to bottom-fish.👇
LINK This journey down from 13.6 to 11.8—there wasn’t even a decent resistance to be seen, and the longs have all fully gone flat. Now it’s hovering around 11.6, and any rebound is weak and limp. The air force clearly isn’t planning to stop—just follow the selloff and be done with it; don’t try to bottom-fish.👇
1
93
·
--
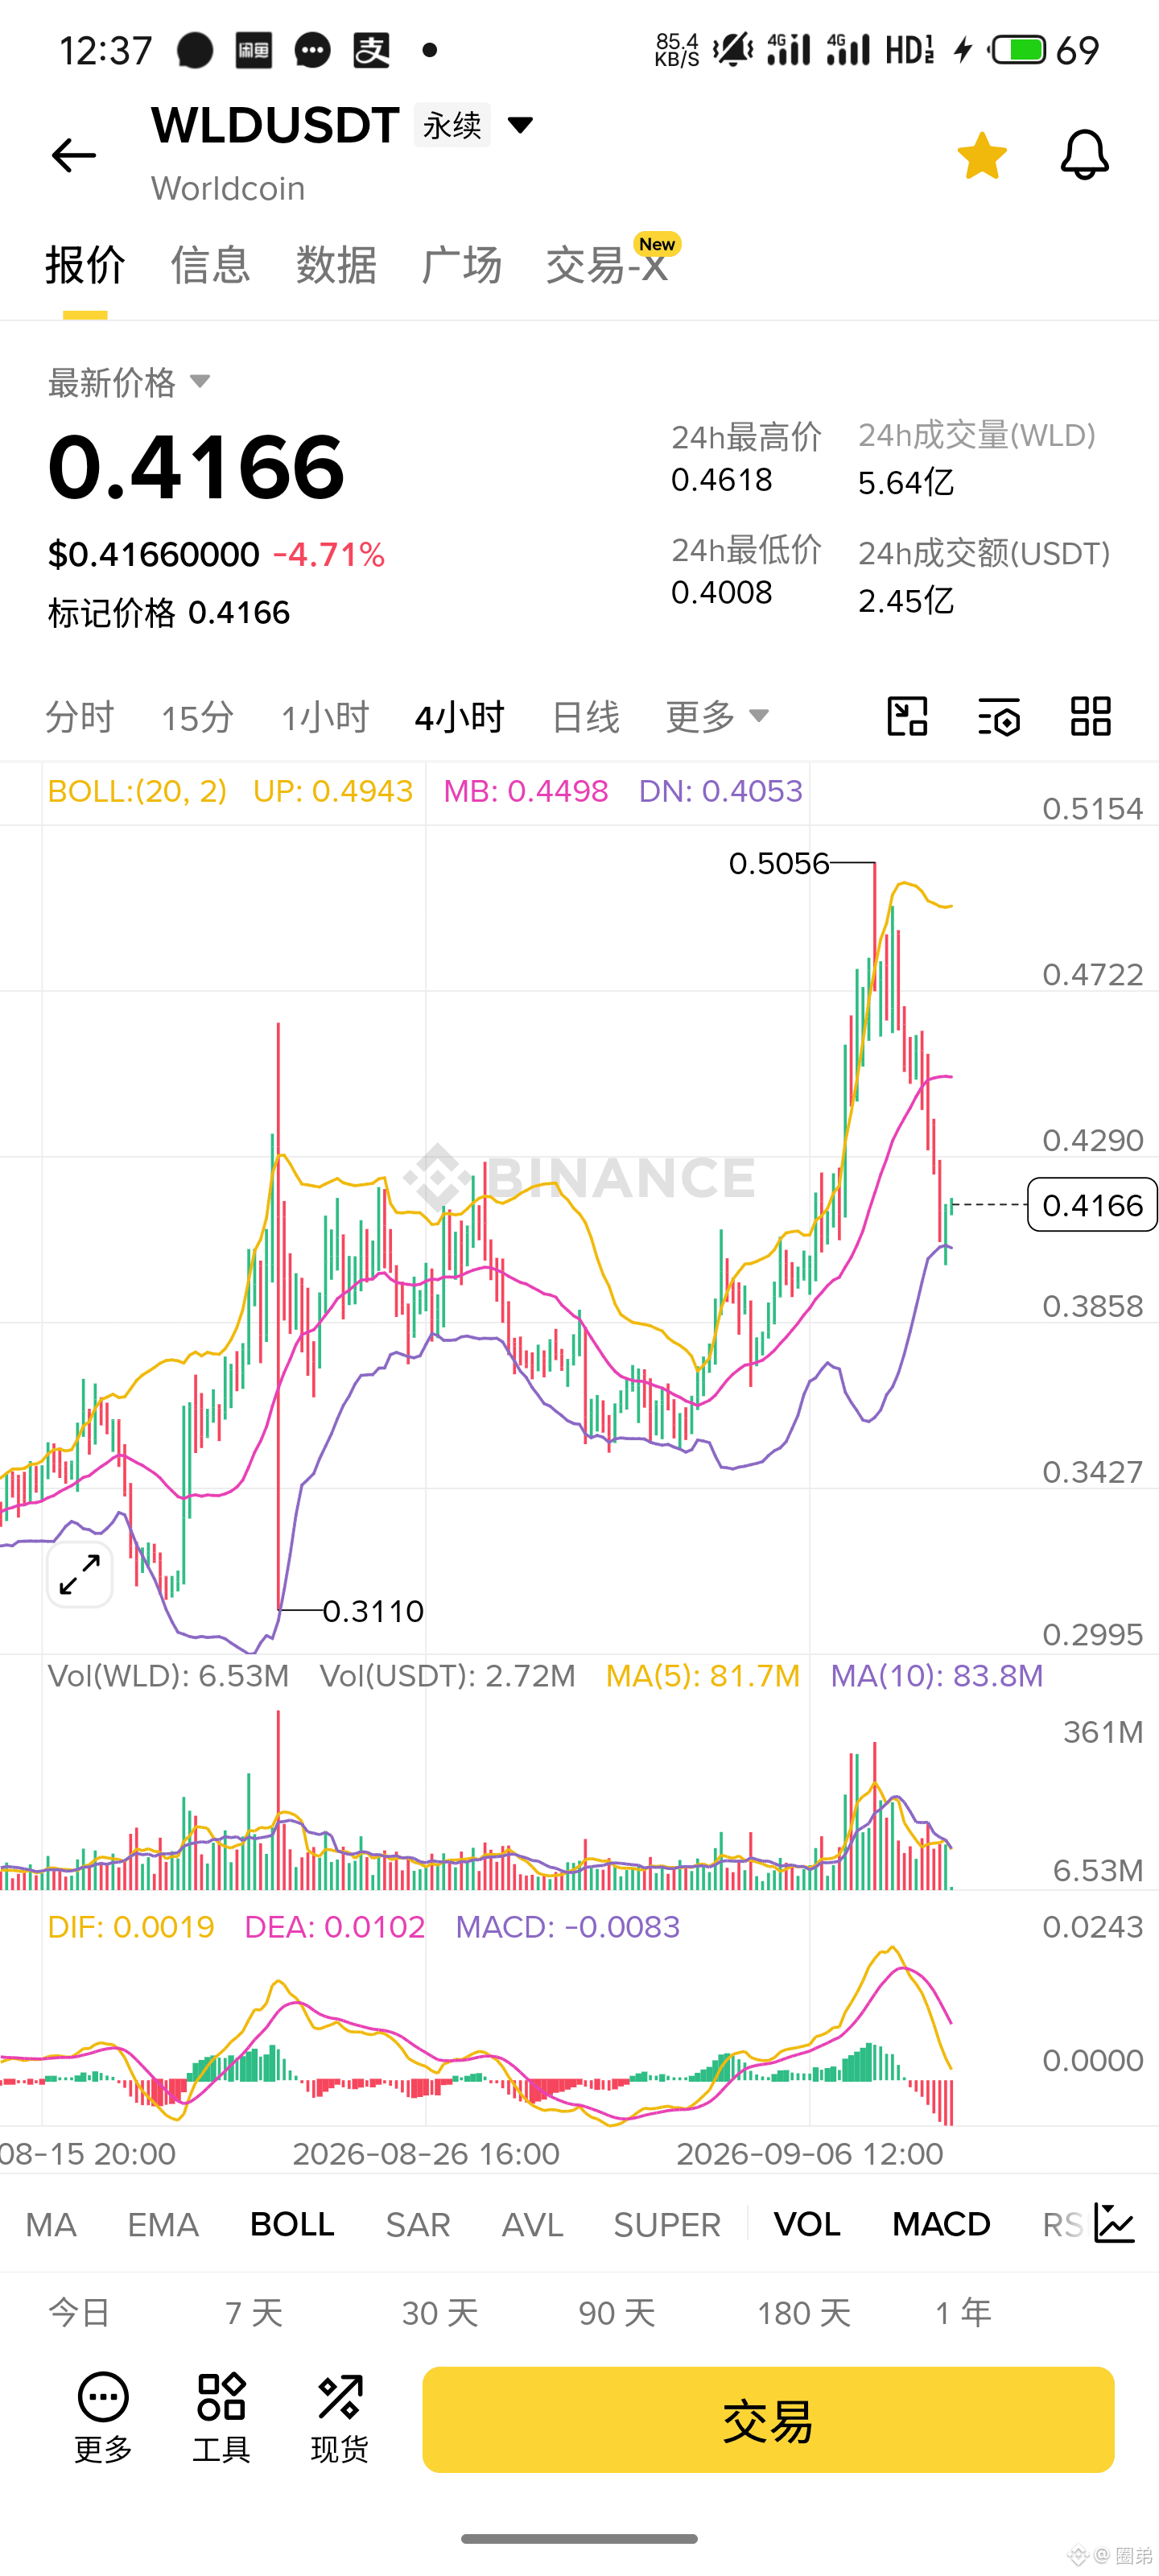
$WLD WLD Sold from 0.5 down and my face turned green. Now it’s struggling around 0.41; the longs can’t even lift their heads. The buy orders can’t get any support at all, while the bears are still forcefully hammering it down. Don’t be stubborn and catch a falling knife—go with the trend and lean slightly bearish. There’s also a pit underneath.👇
{future}(WLDUSDT)
$WLD WLD Sold from 0.5 down and my face turned green. Now it’s struggling around 0.41; the longs can’t even lift their heads. The buy orders can’t get any support at all, while the bears are still forcefully hammering it down. Don’t be stubborn and catch a falling knife—go with the trend and lean slightly bearish. There’s also a pit underneath.👇
1
135
·
--
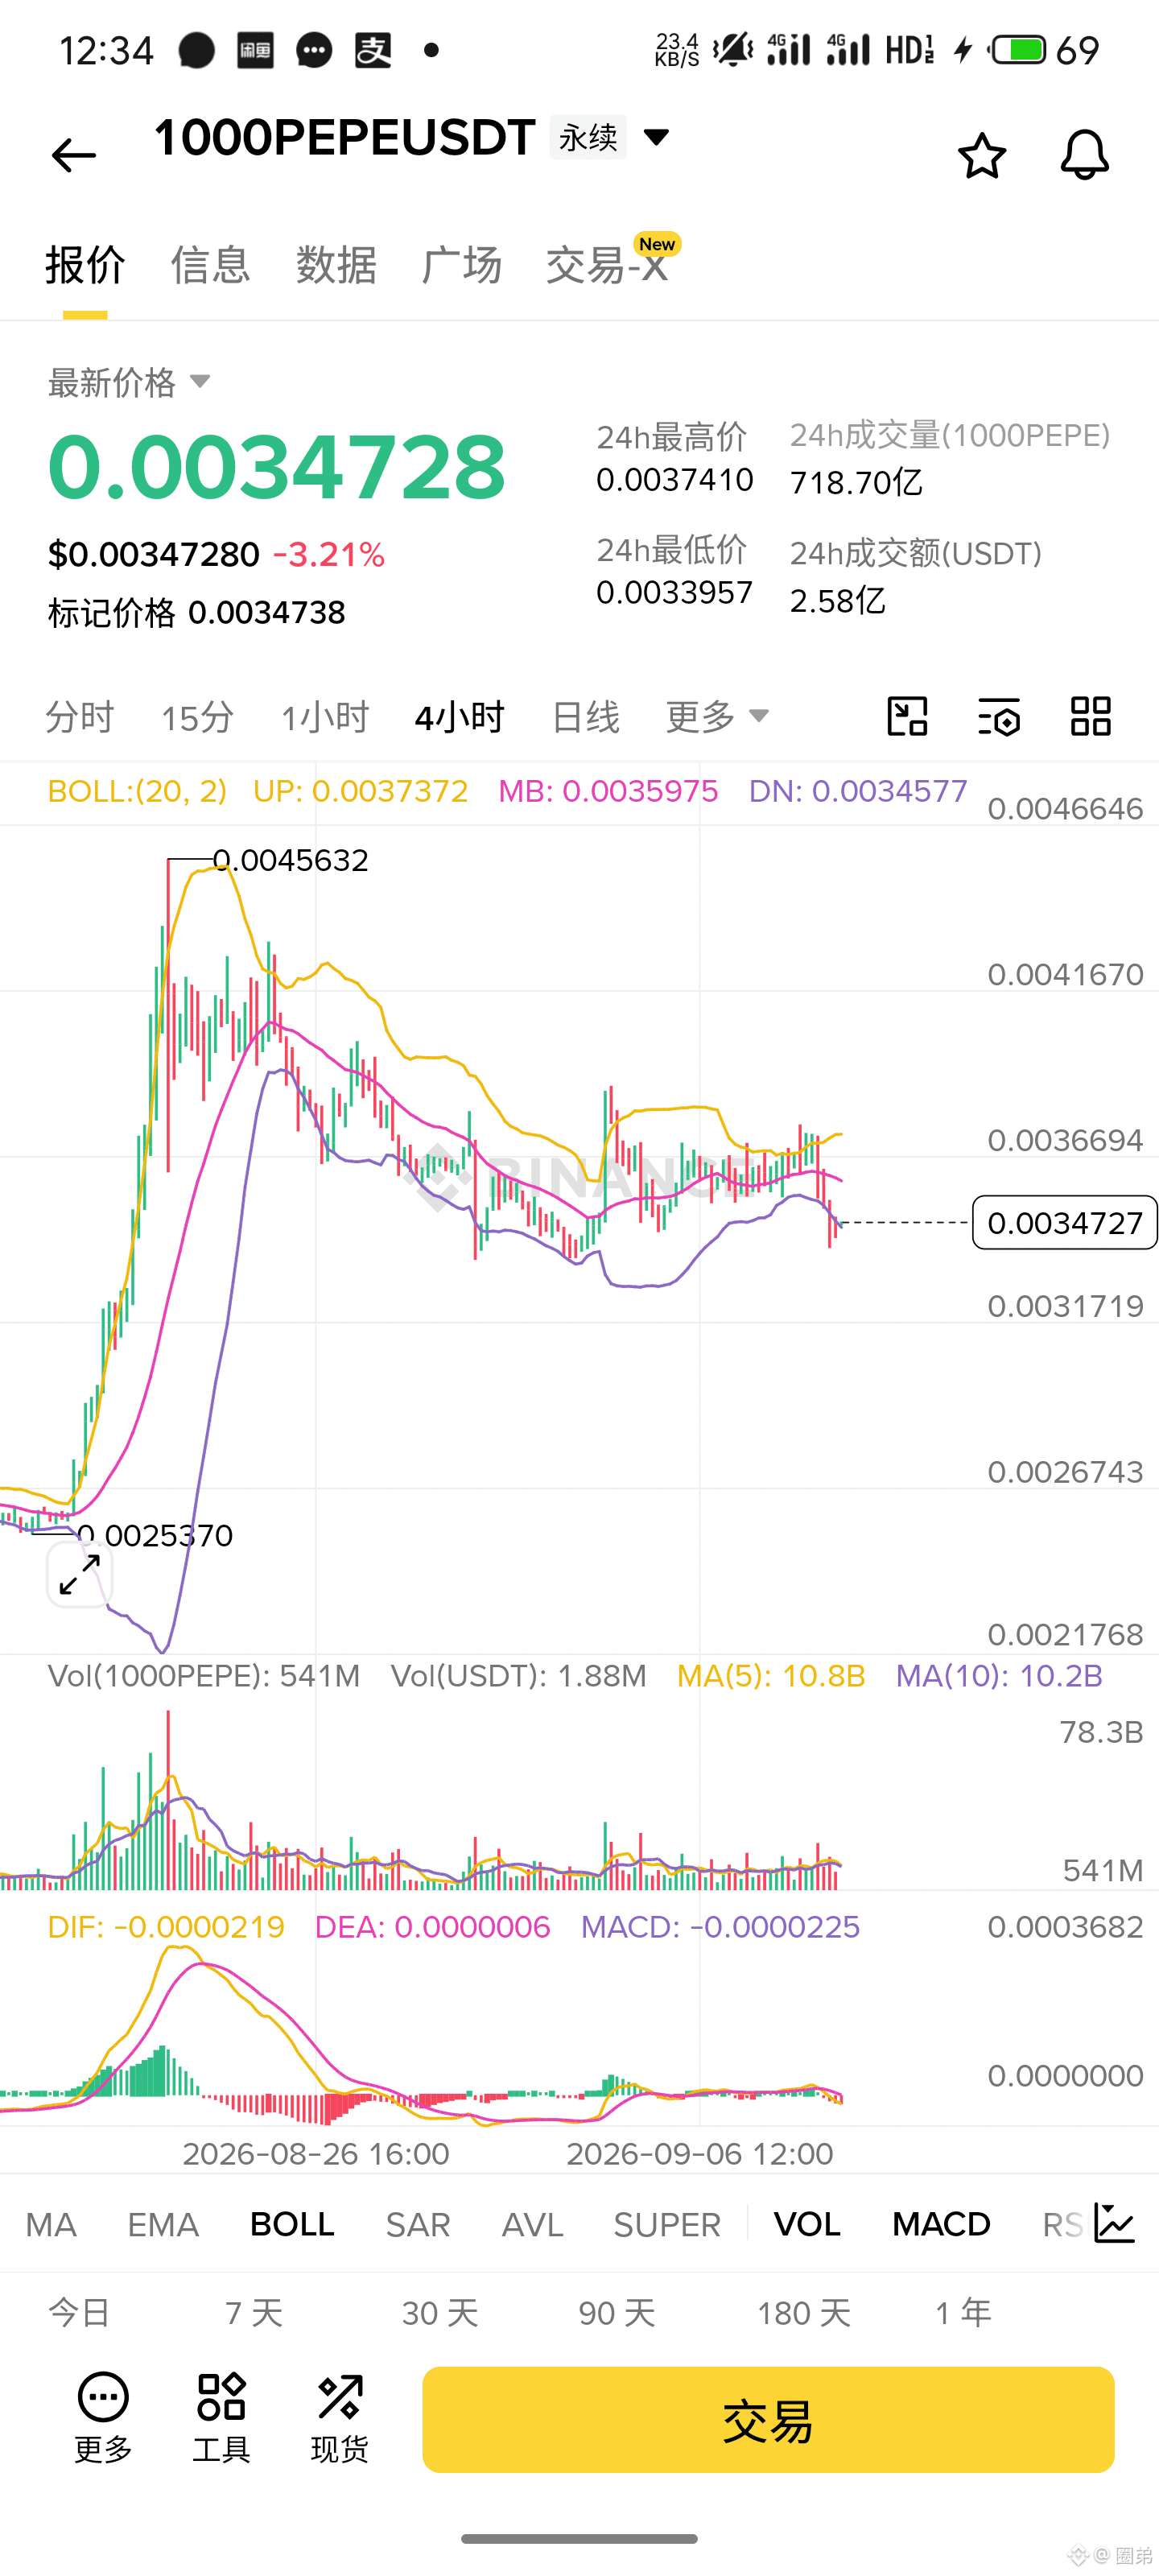
$1000PEPE PEPE fell from 0.0045 and just flatlined; the rebound was soft and lifeless. The bid side didn’t even take the cue—bulls are already nowhere to be seen. Don’t be itchy and try to catch a falling knife; the air force is still holding the field. Follow the move and look short—it’s steadier.👇
{future}(1000PEPEUSDT)
$1000PEPE PEPE fell from 0.0045 and just flatlined; the rebound was soft and lifeless. The bid side didn’t even take the cue—bulls are already nowhere to be seen. Don’t be itchy and try to catch a falling knife; the air force is still holding the field. Follow the move and look short—it’s steadier.👇
84
·
--
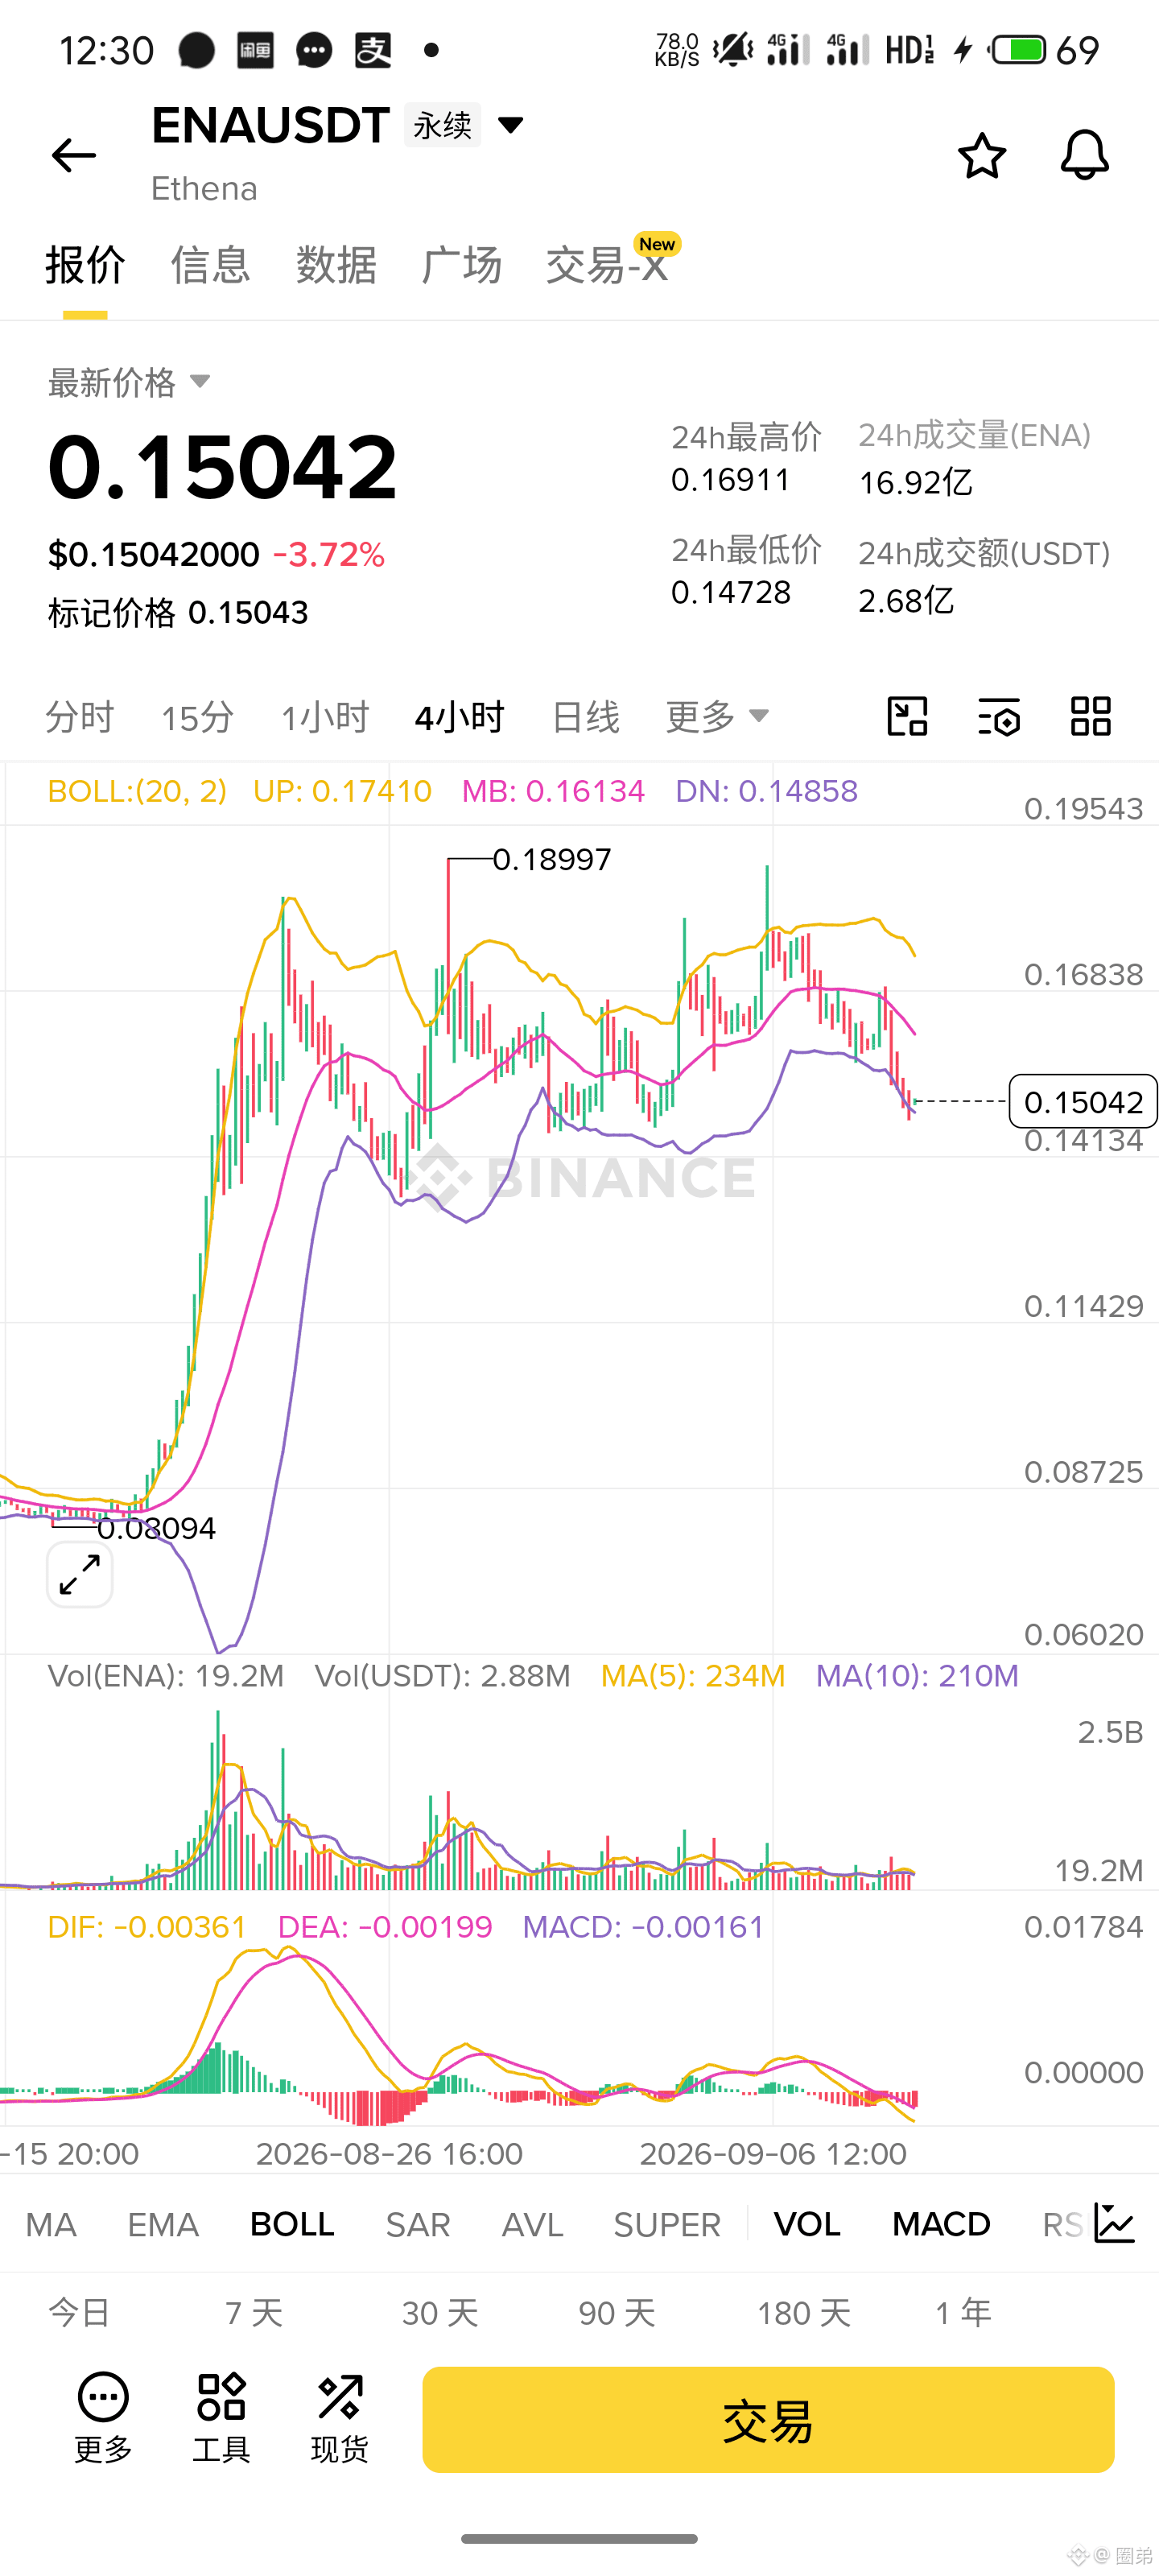
$ENA ENA fell to around 0.15, and then started to grind around lazily—can't go up or down. Trading volume is miserably small. But that doesn't mean it's bottomed out. With such weak rebounds, the bears could kick again at any moment. Don’t rush to buy the dip; stay cautiously bearish. If it can’t bounce, keep watching as it moves lower.👇
{future}(ENAUSDT)
$ENA ENA fell to around 0.15, and then started to grind around lazily—can't go up or down. Trading volume is miserably small. But that doesn't mean it's bottomed out. With such weak rebounds, the bears could kick again at any moment. Don’t rush to buy the dip; stay cautiously bearish. If it can’t bounce, keep watching as it moves lower.👇
1
102
·
--
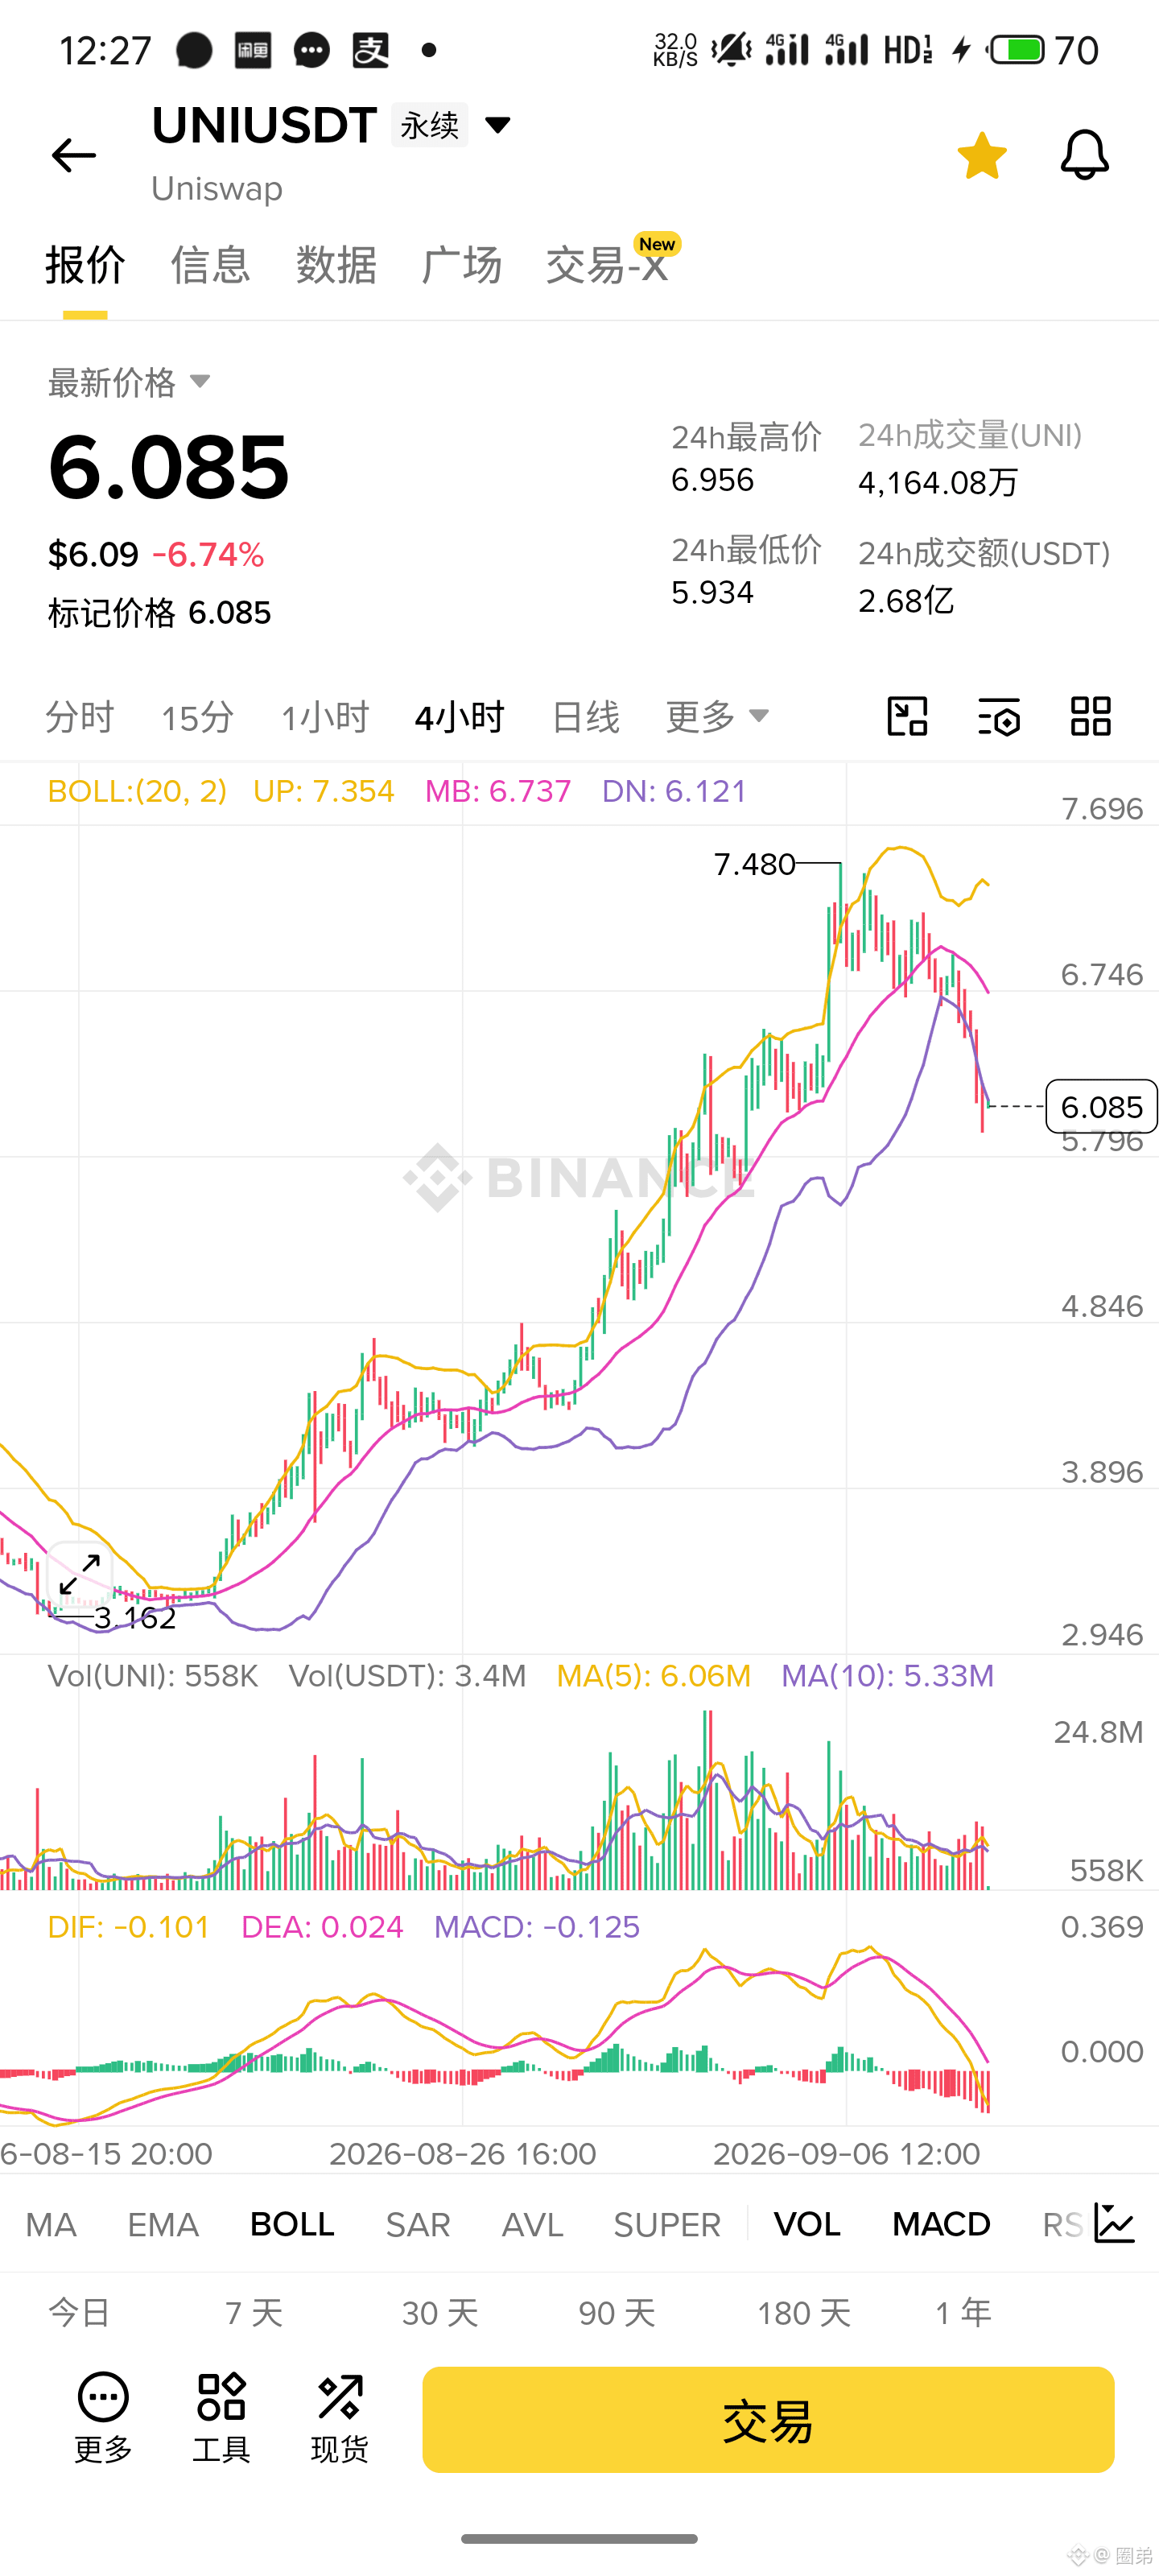
$UNI This plate looks bad luck. It took around 6 blocks worth of time to fuss around and still couldn’t even get a fart out of it. The bulls already got out early. Don’t go thinking about picking up a bargain—fighter pilots haven’t stopped yet either. Just keep smashing along while you have the momentum. If it bounces, then carry on; there’s still a lot of room underneath.👇
{future}(UNIUSDT)
$UNI This plate looks bad luck. It took around 6 blocks worth of time to fuss around and still couldn’t even get a fart out of it. The bulls already got out early. Don’t go thinking about picking up a bargain—fighter pilots haven’t stopped yet either. Just keep smashing along while you have the momentum. If it bounces, then carry on; there’s still a lot of room underneath.👇
1
213
·
--
$ENA
{future}(ENAUSDT)
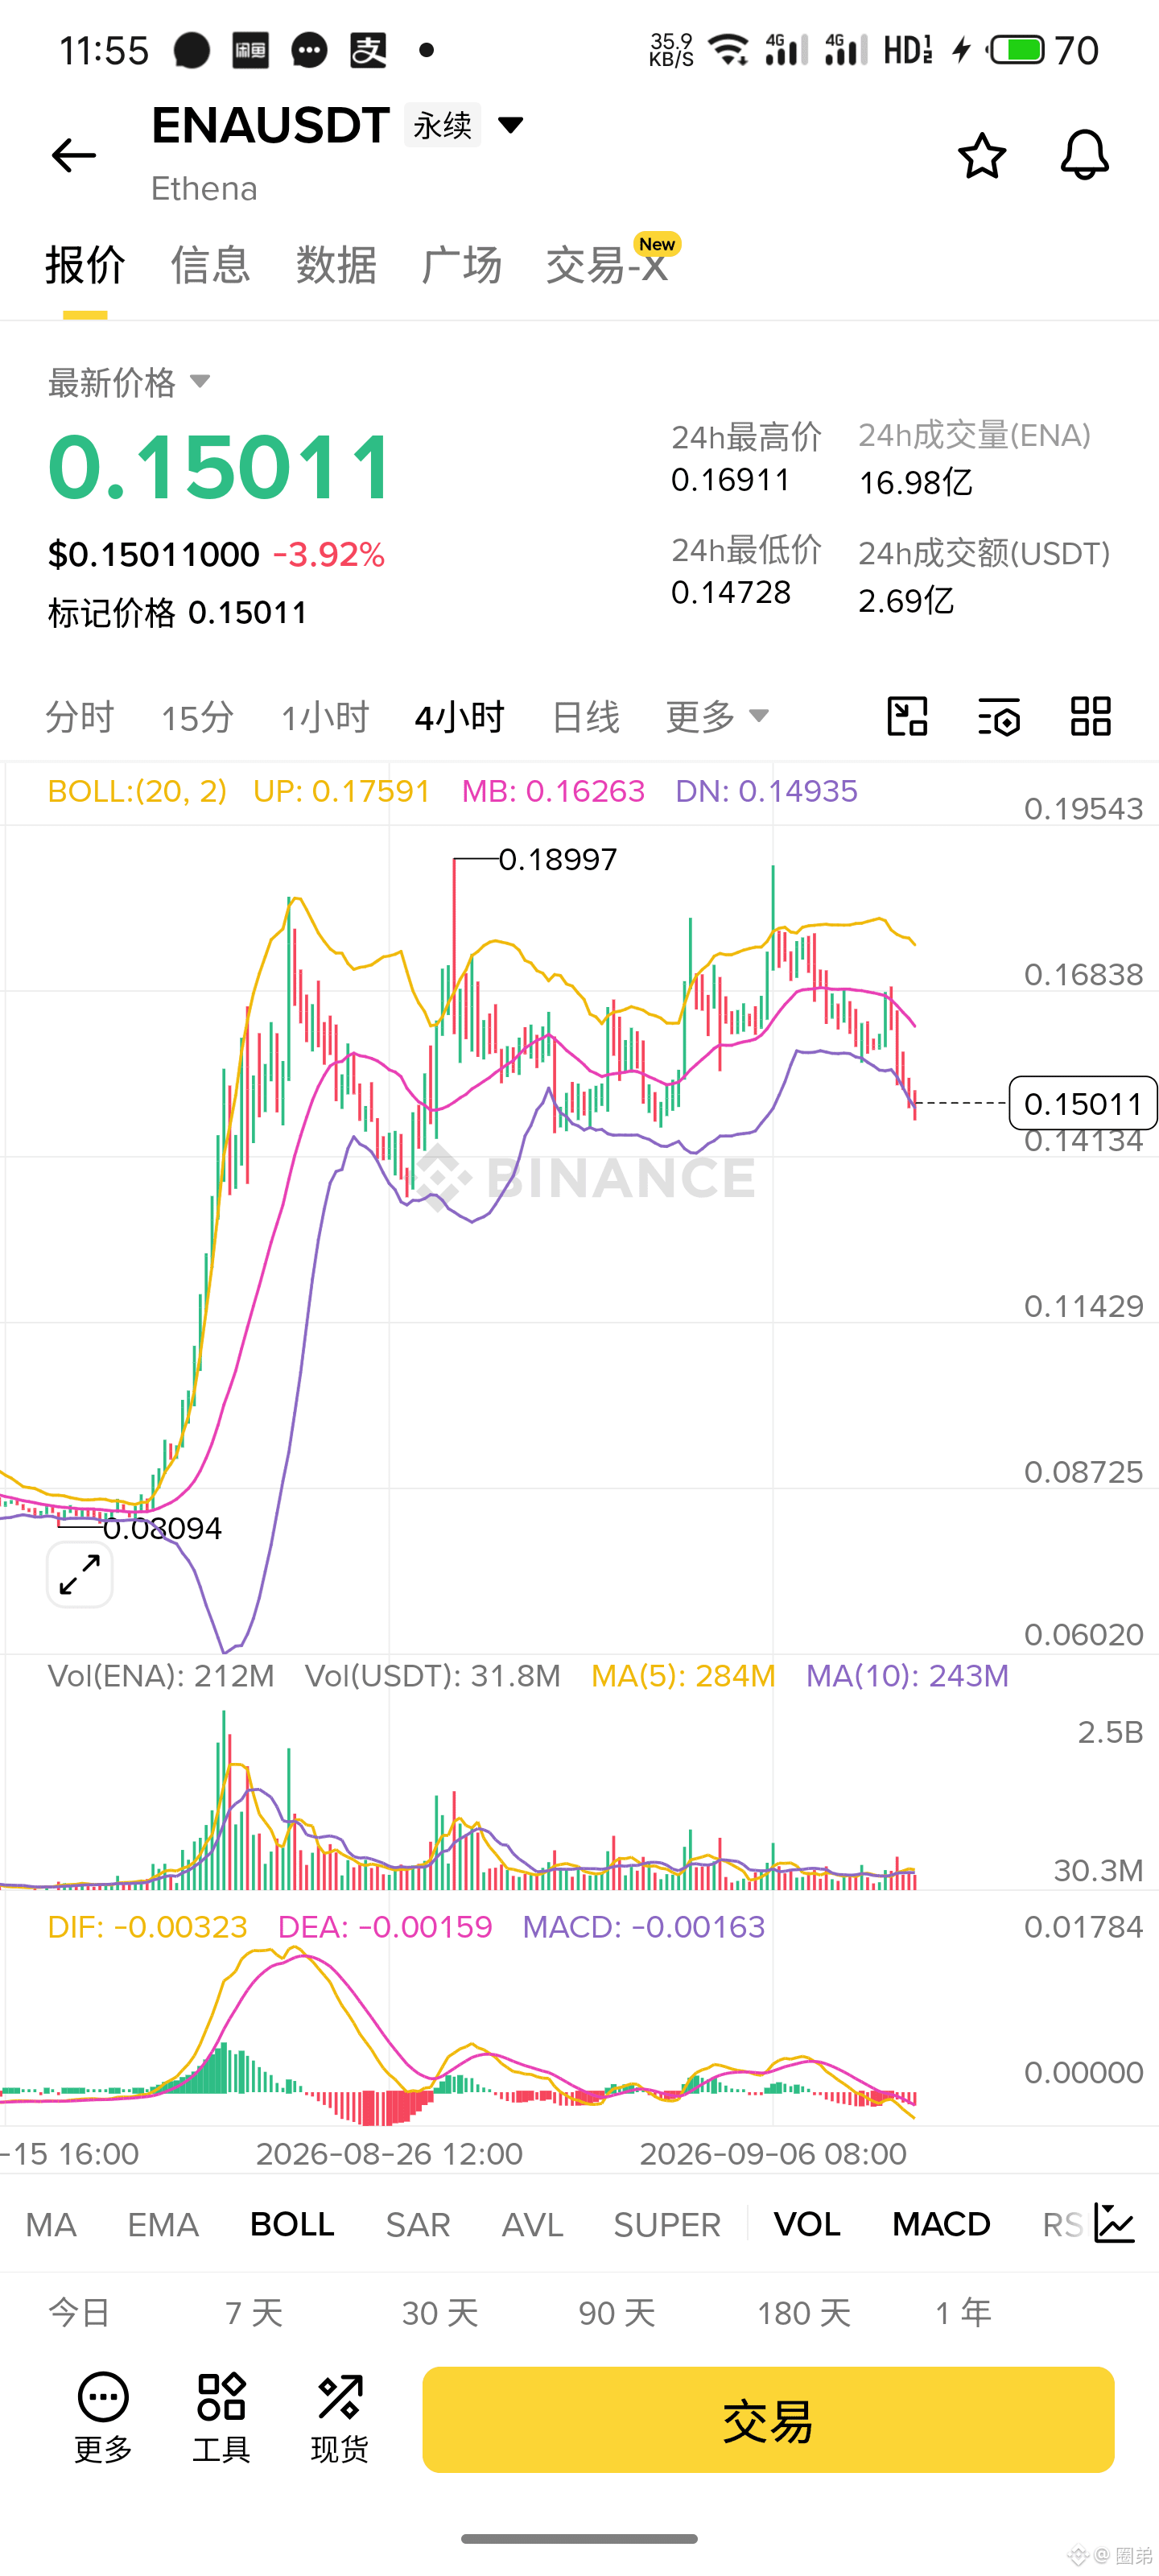
ENA has been steadily drifting down from 0.19, with no decent resistance at all. Now it's barely hanging on around 0.15—buy orders are as flimsy as paper. Don't rush to bottom-fish; go with the downtrend and stay bearish. A rebound will just give you an opportunity—there's still room lower underneath.👇
$ENA
ENA has been steadily drifting down from 0.19, with no decent resistance at all. Now it's barely hanging on around 0.15—buy orders are as flimsy as paper. Don't rush to bottom-fish; go with the downtrend and stay bearish. A rebound will just give you an opportunity—there's still room lower underneath.👇
ENA has been steadily drifting down from 0.19, with no decent resistance at all. Now it's barely hanging on around 0.15—buy orders are as flimsy as paper. Don't rush to bottom-fish; go with the downtrend and stay bearish. A rebound will just give you an opportunity—there's still room lower underneath.👇
1
46
·
--
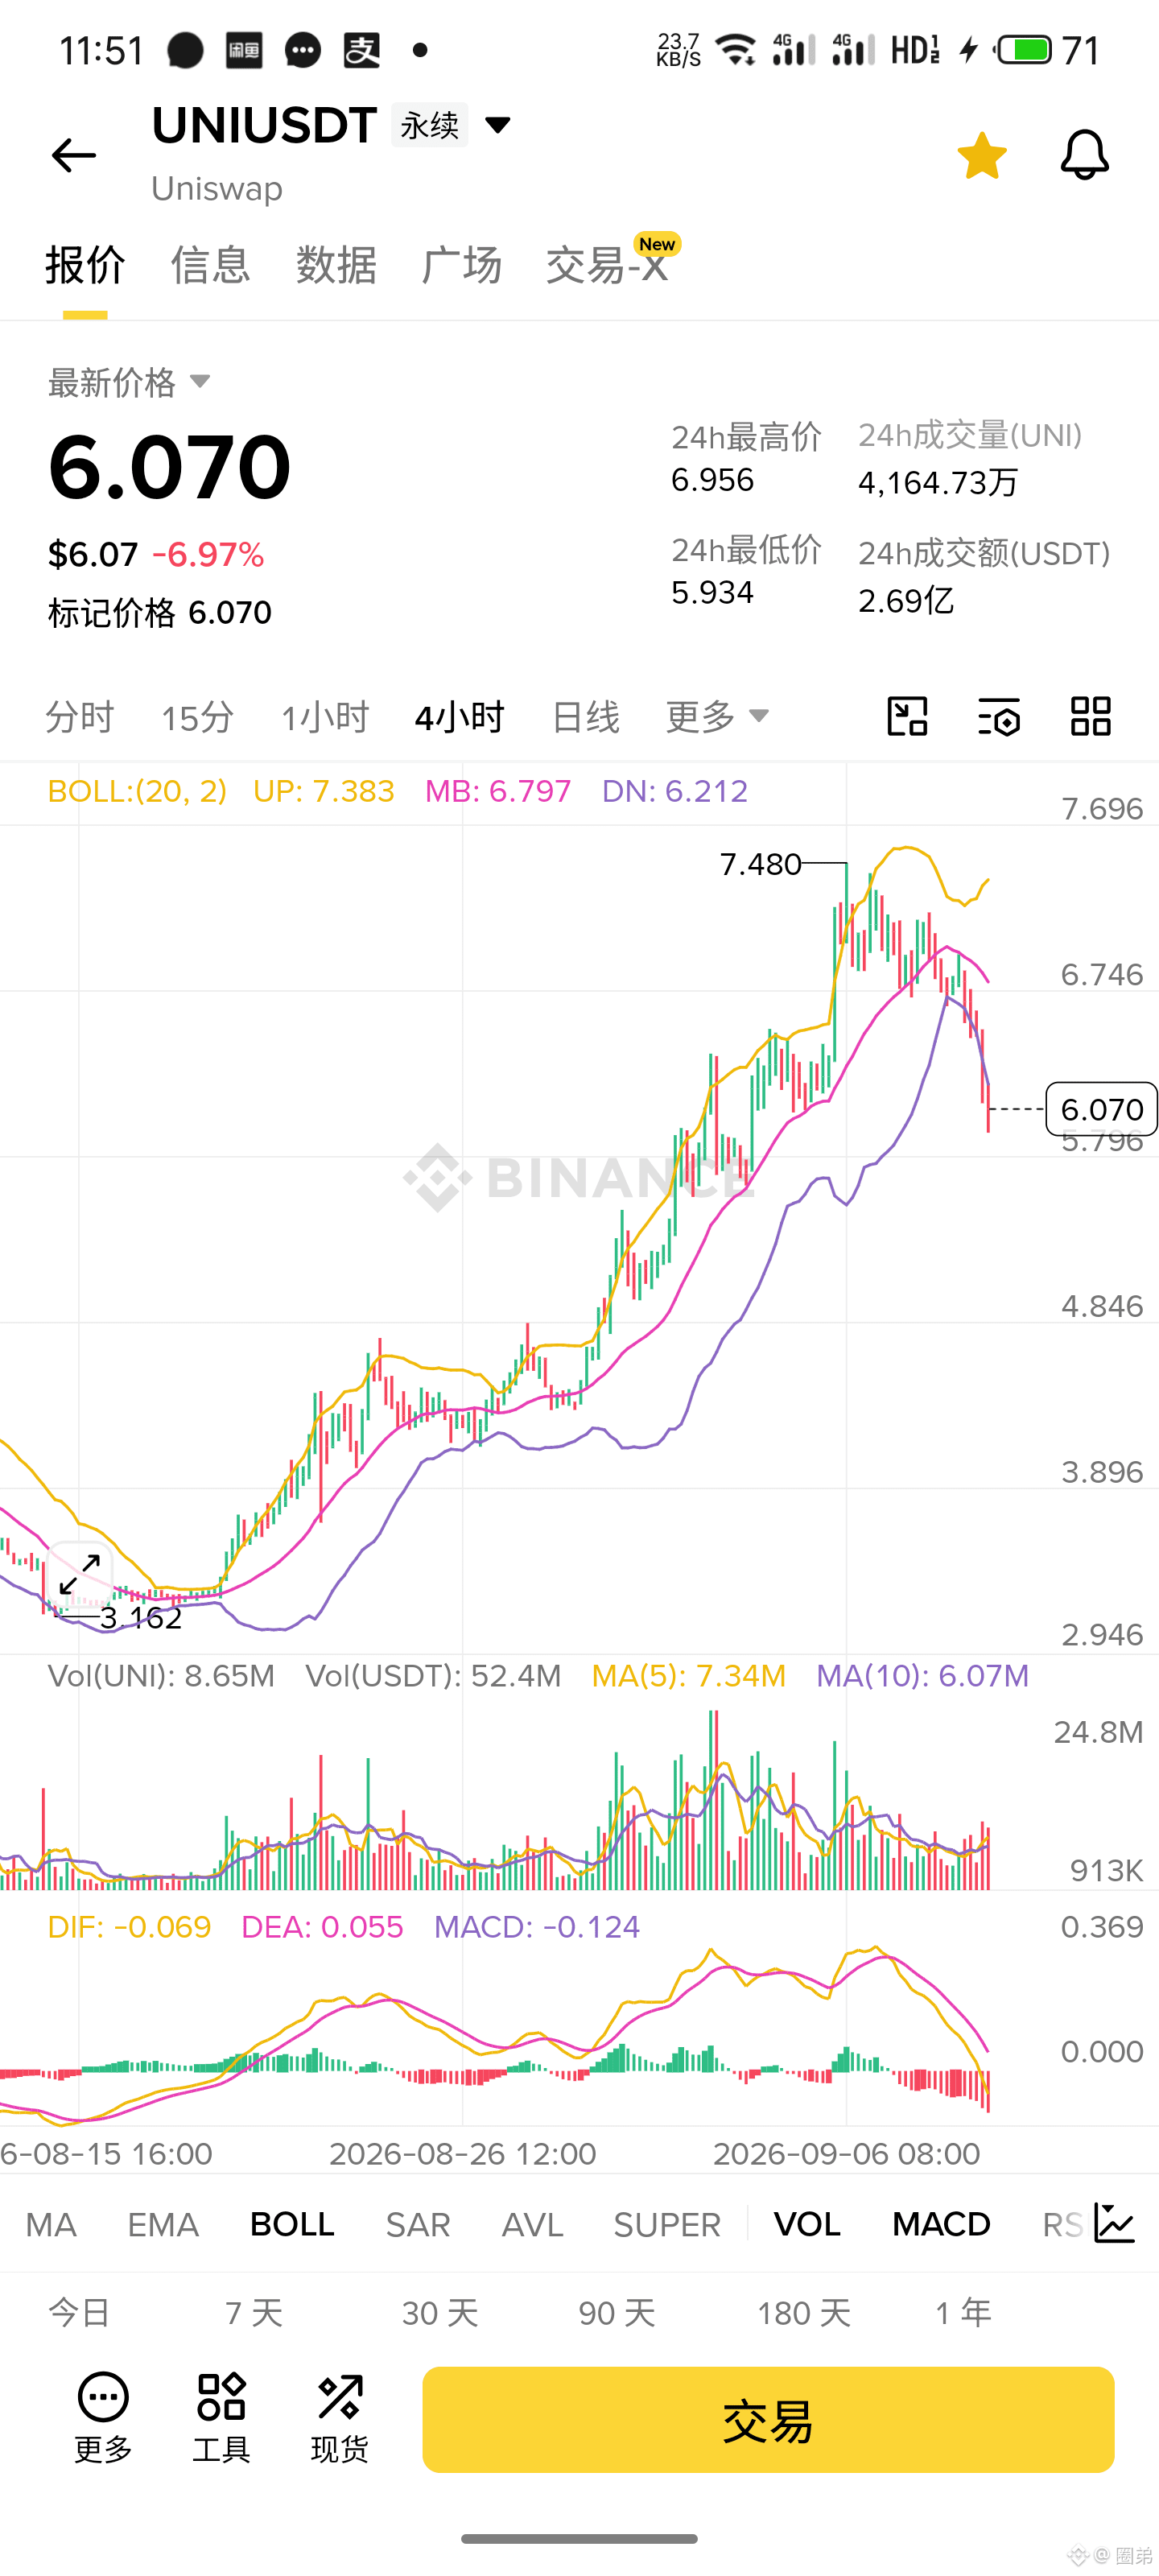
$UNI UNI from 7.48 to 6.07, a steady grind lower all the way—there hasn’t even been a decent rebound in between. The bulls have been completely knocked down. Just because price is getting close to the lower band doesn’t mean it can hold up. With this kind of one-way slide, going short in line with the trend makes sense; any bounce is a chance to get in.👇
{future}(UNIUSDT)
$UNI UNI from 7.48 to 6.07, a steady grind lower all the way—there hasn’t even been a decent rebound in between. The bulls have been completely knocked down. Just because price is getting close to the lower band doesn’t mean it can hold up. With this kind of one-way slide, going short in line with the trend makes sense; any bounce is a chance to get in.👇
1
20
·
--
$SUI
{future}(SUIUSDT)
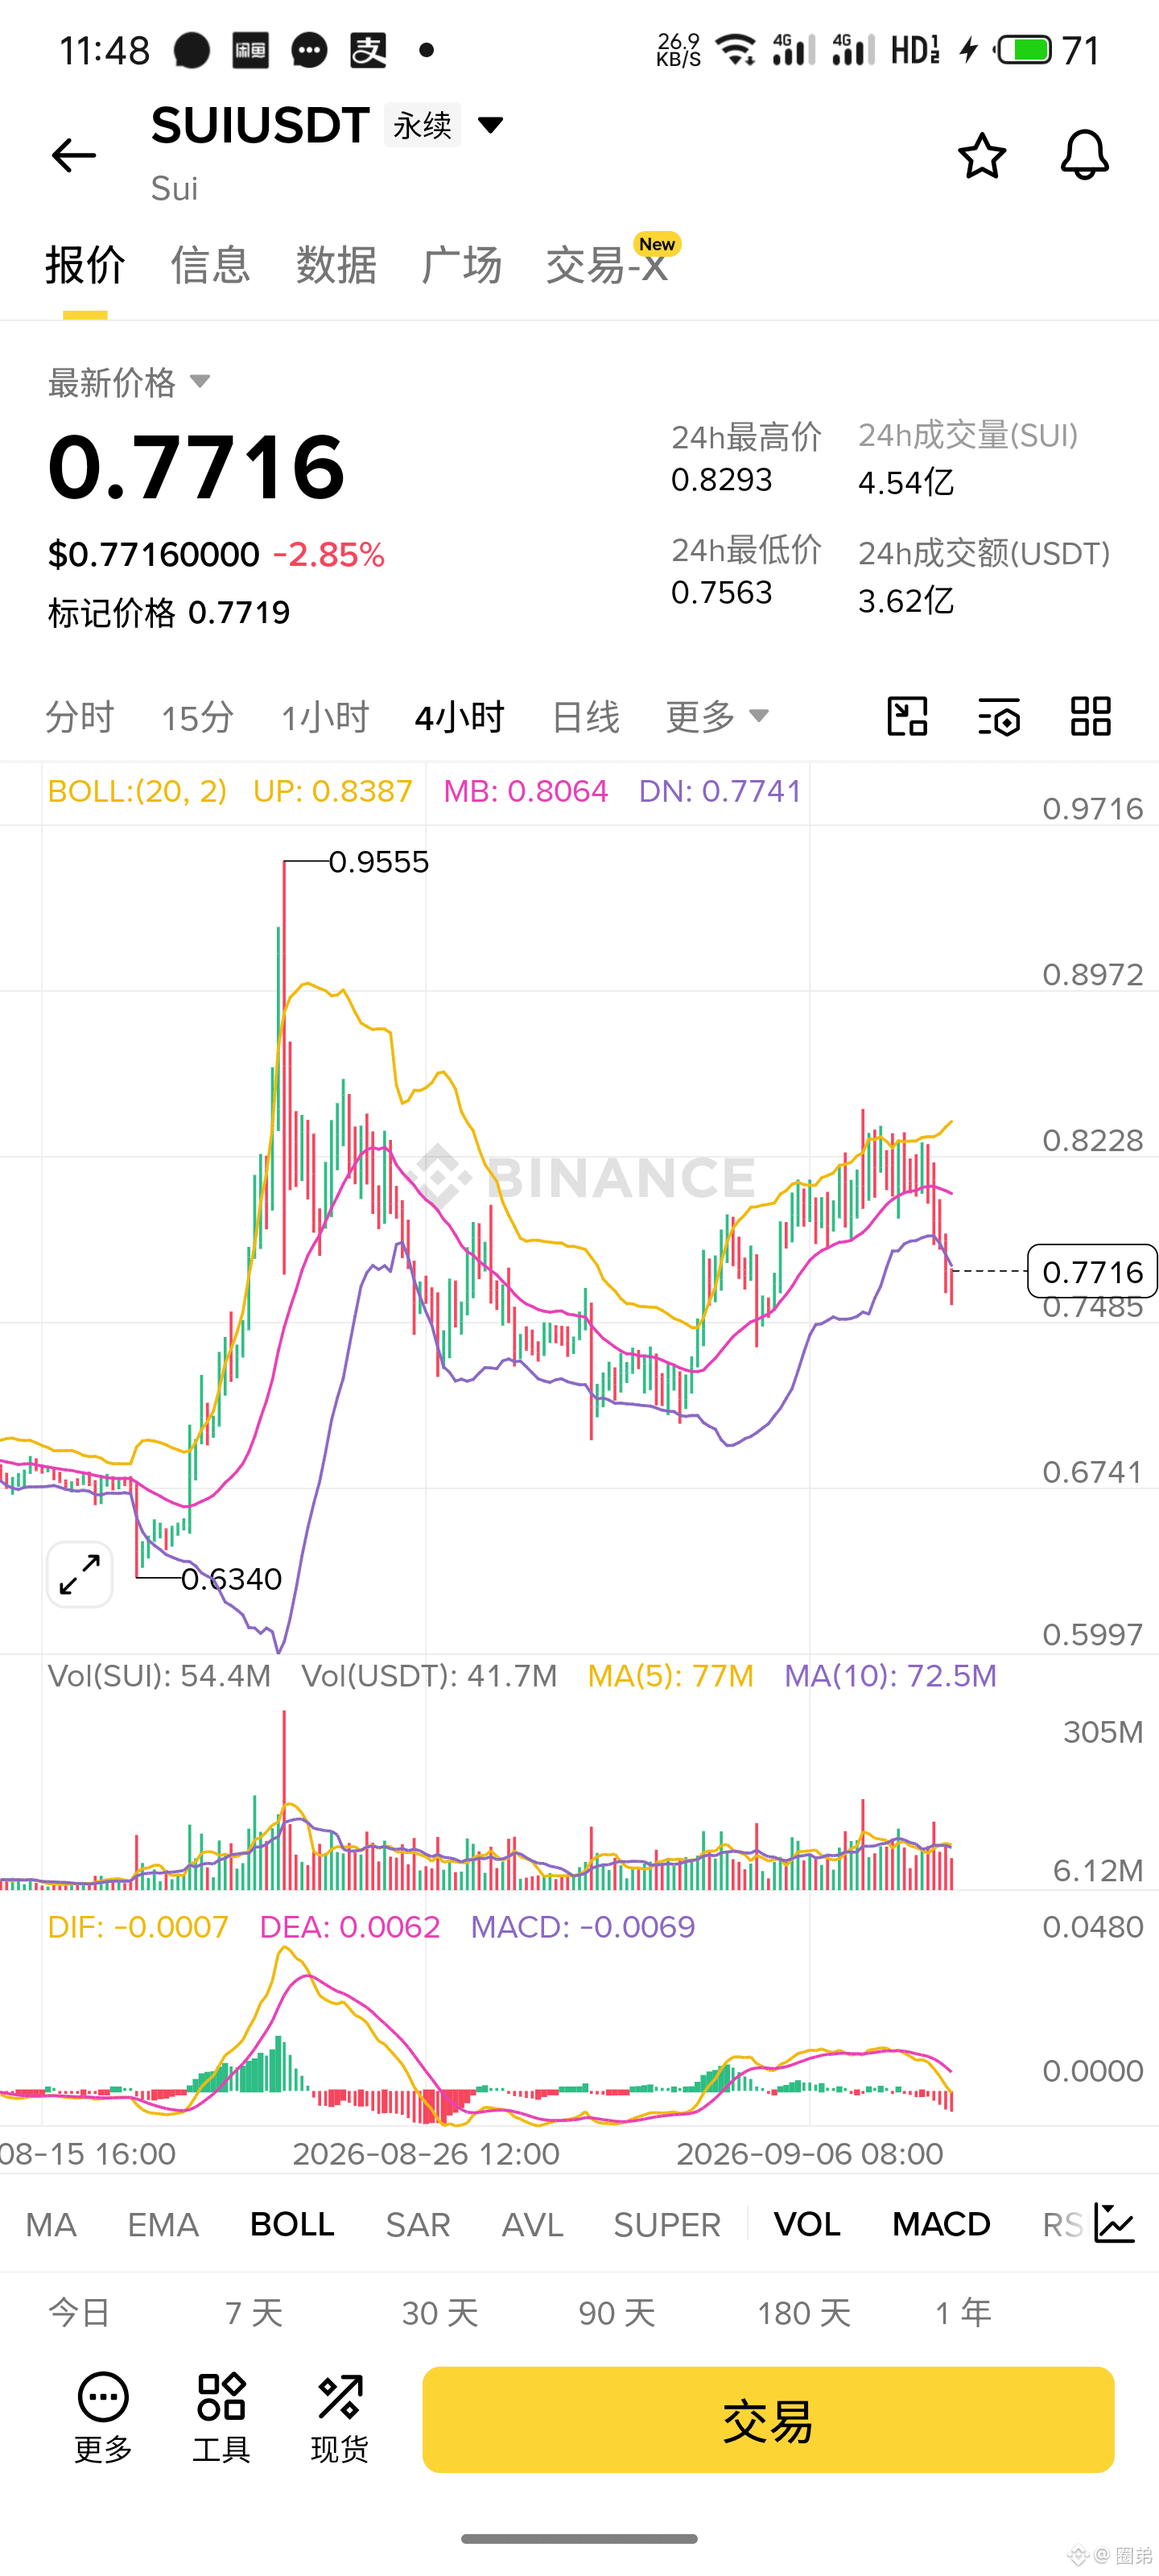
SUI surged up 0.83 but didn’t hold—then it fell back. The longs are clearly weak; every rebound gets pressed down. Now it’s wobbling around 0.77—judging by this, it still looks like it’s going lower. Go short in line, with the first target at 0.75. Don’t rush to buy the dip.👇
$SUI
SUI surged up 0.83 but didn’t hold—then it fell back. The longs are clearly weak; every rebound gets pressed down. Now it’s wobbling around 0.77—judging by this, it still looks like it’s going lower. Go short in line, with the first target at 0.75. Don’t rush to buy the dip.👇
SUI surged up 0.83 but didn’t hold—then it fell back. The longs are clearly weak; every rebound gets pressed down. Now it’s wobbling around 0.77—judging by this, it still looks like it’s going lower. Go short in line, with the first target at 0.75. Don’t rush to buy the dip.👇
2
228
·
--
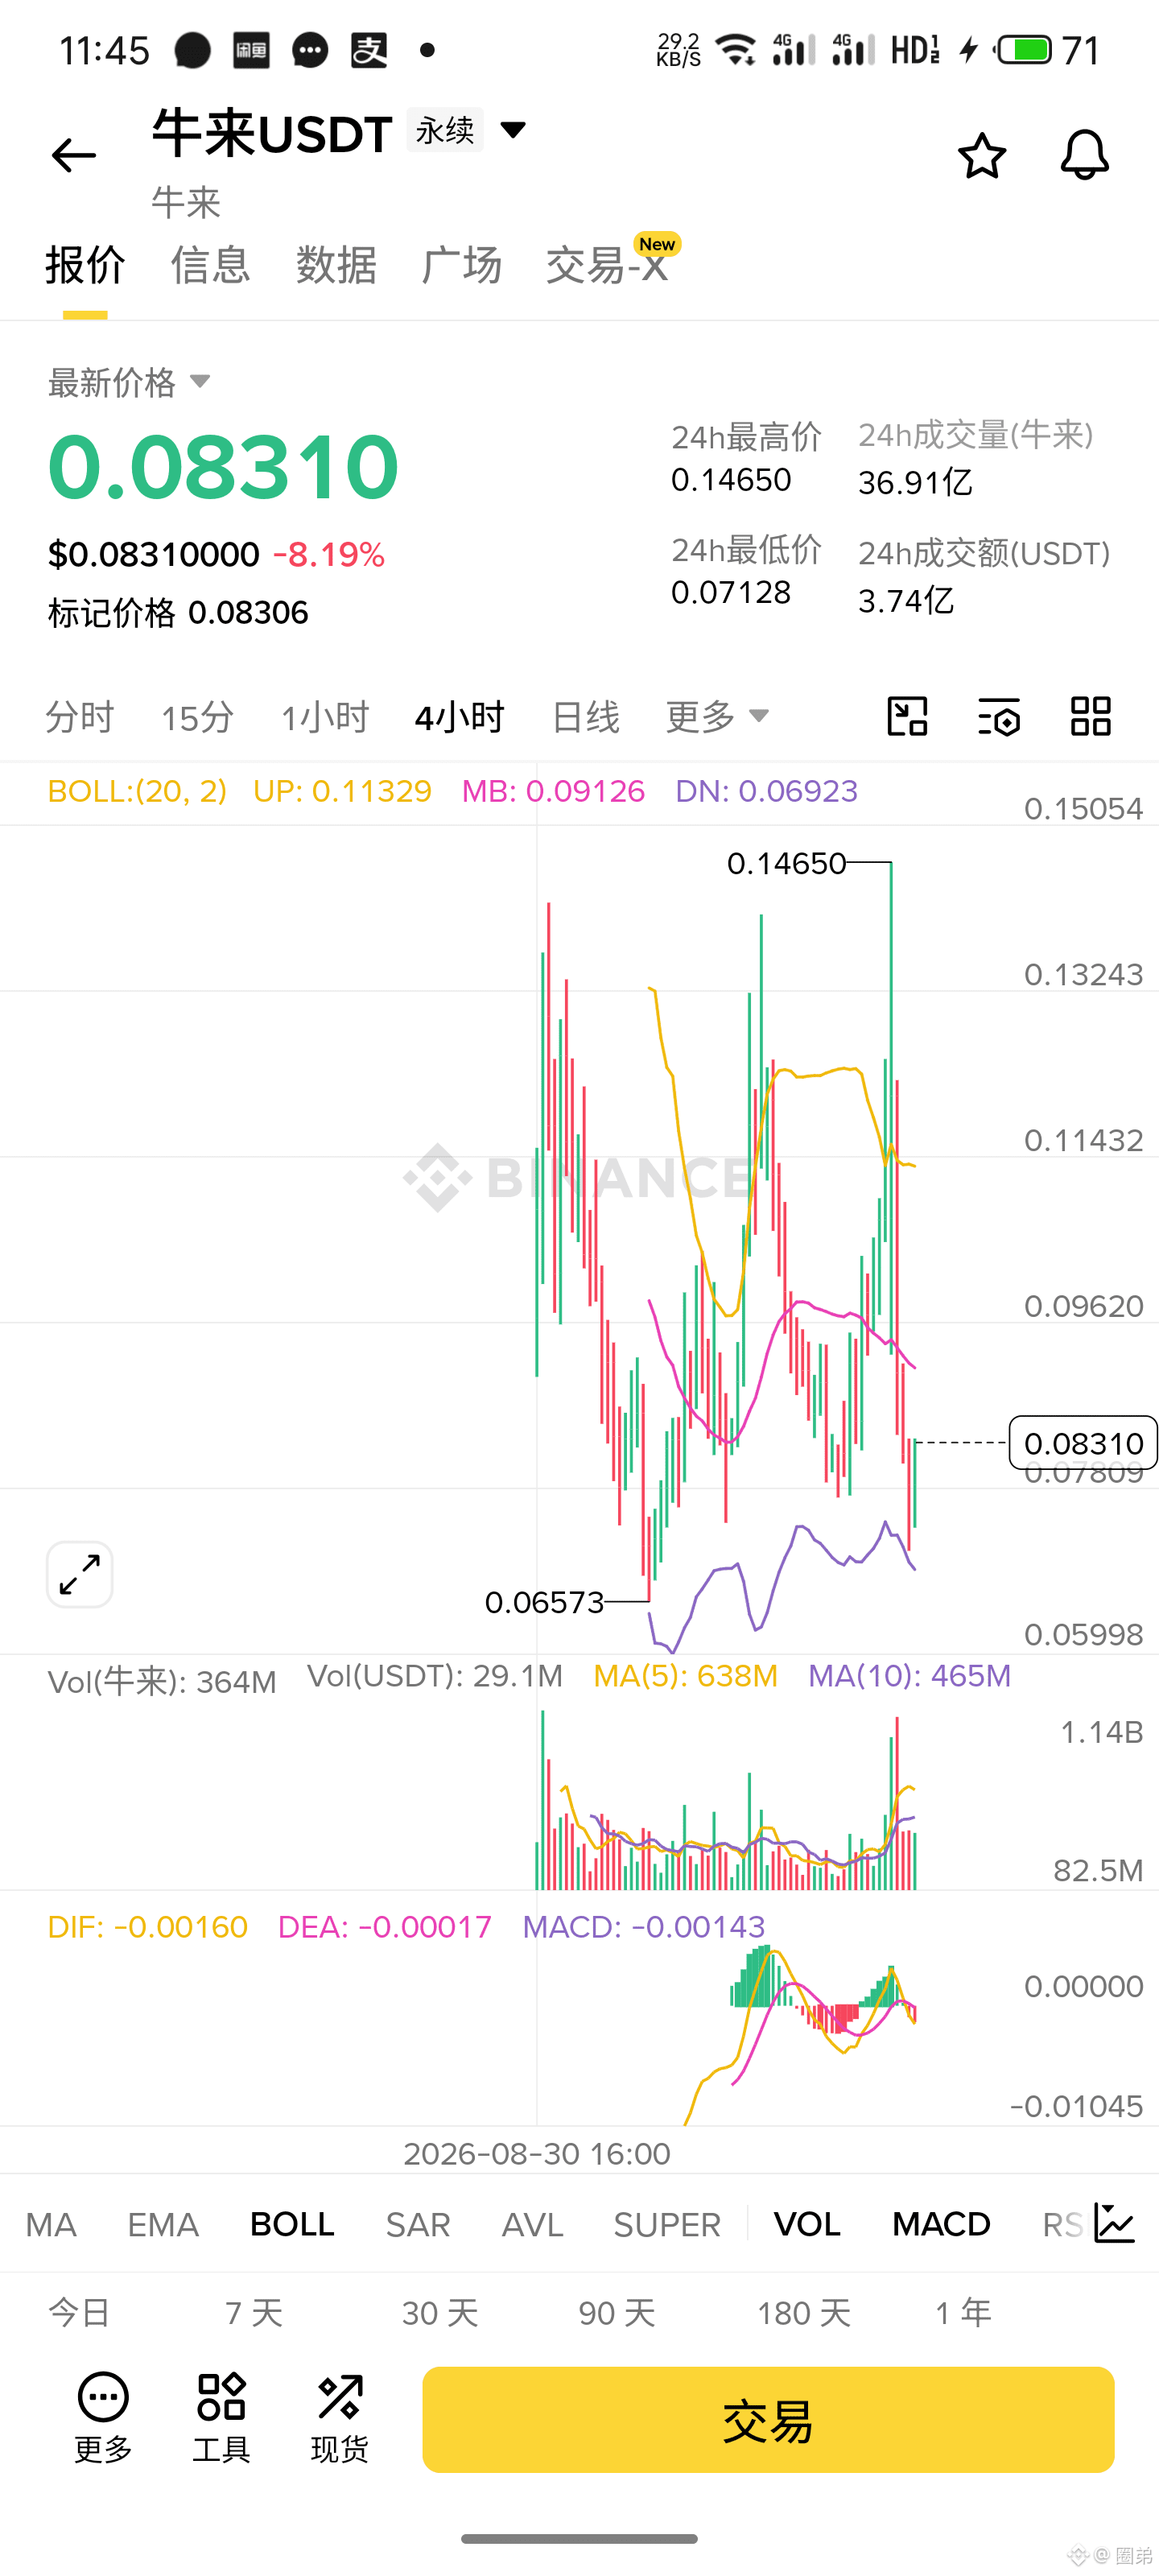
$牛来 This bull really is a crazy one. 0.1465 charges in and doesn’t even get its footing, then turns around and smashes you down to 0.083. Anyone who chased the high is probably buried. From here it looks like it might catch its breath, but the rebound is weak and limp—it's not like the bears are planning to stop. Don’t rush to bottom-fish. If it bounces back near 0.09, continue shorting, with the target at 0.075. Follow the move steadily and you’ll be on safer ground.👇
{future}(牛来USDT)
$牛来 This bull really is a crazy one. 0.1465 charges in and doesn’t even get its footing, then turns around and smashes you down to 0.083. Anyone who chased the high is probably buried. From here it looks like it might catch its breath, but the rebound is weak and limp—it's not like the bears are planning to stop. Don’t rush to bottom-fish. If it bounces back near 0.09, continue shorting, with the target at 0.075. Follow the move steadily and you’ll be on safer ground.👇
1
305
·
--
$SNXX
{future}(SNXXUSDT)
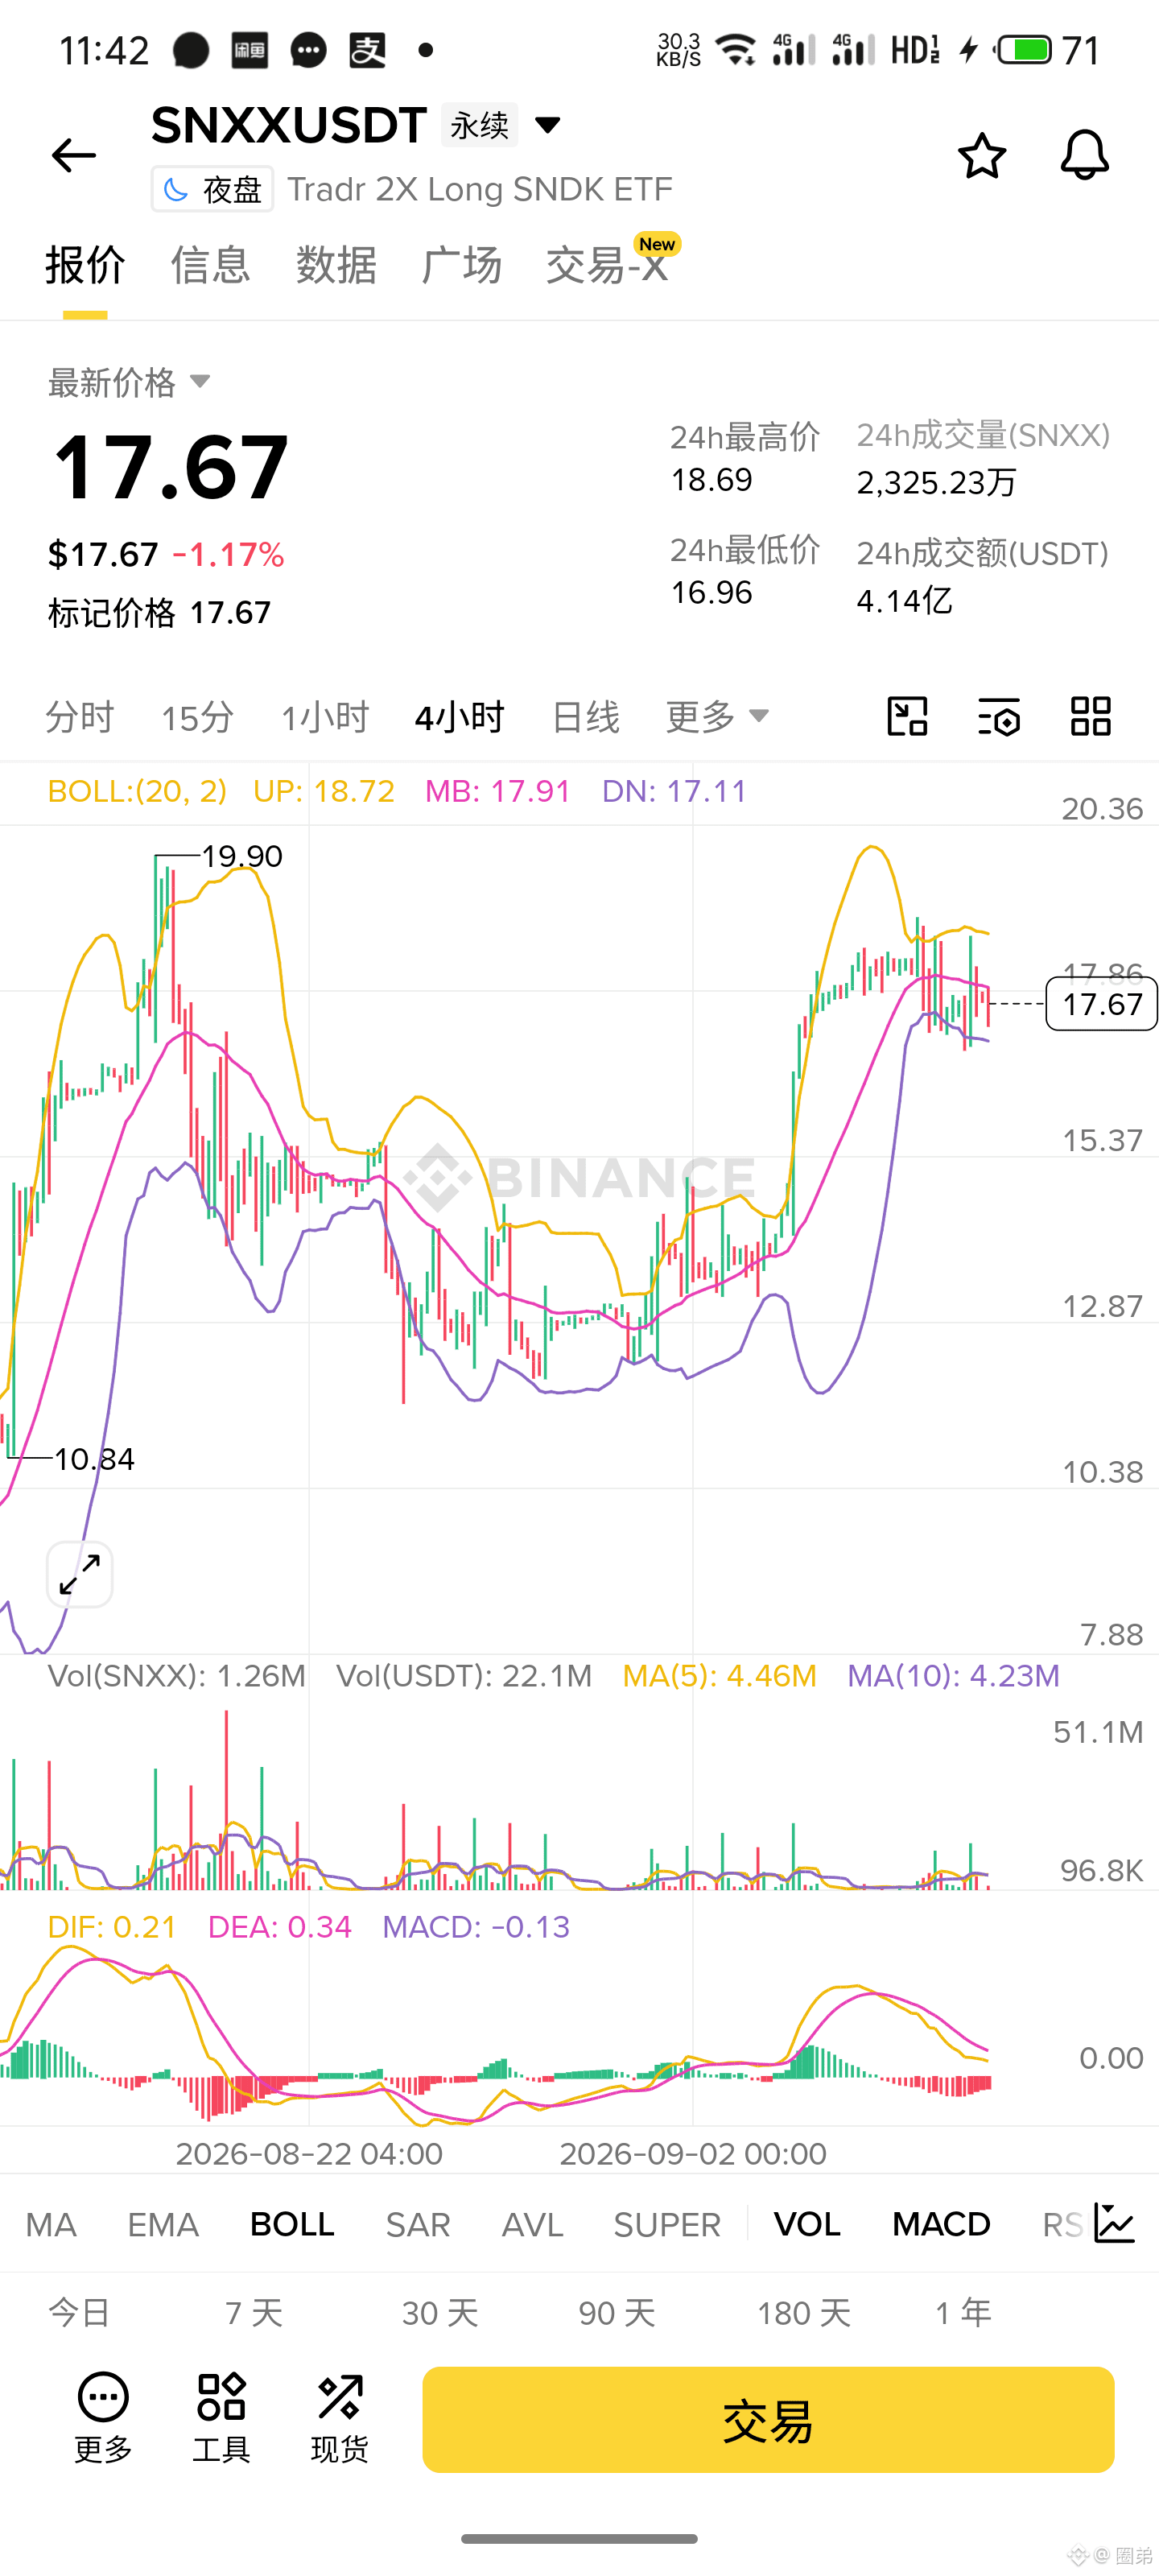
This trend is like it hasn’t woken up—push up a bit and it turns soft, drop down and it can’t be pulled back. It’s pretty clear the bulls don’t have the strength anymore. Don’t get fooled by this small rebound. Look for opportunities to go short; there’s still room below. Wait patiently to pick up a bargain.👇
$SNXX
This trend is like it hasn’t woken up—push up a bit and it turns soft, drop down and it can’t be pulled back. It’s pretty clear the bulls don’t have the strength anymore. Don’t get fooled by this small rebound. Look for opportunities to go short; there’s still room below. Wait patiently to pick up a bargain.👇
This trend is like it hasn’t woken up—push up a bit and it turns soft, drop down and it can’t be pulled back. It’s pretty clear the bulls don’t have the strength anymore. Don’t get fooled by this small rebound. Look for opportunities to go short; there’s still room below. Wait patiently to pick up a bargain.👇
1
58
·
--
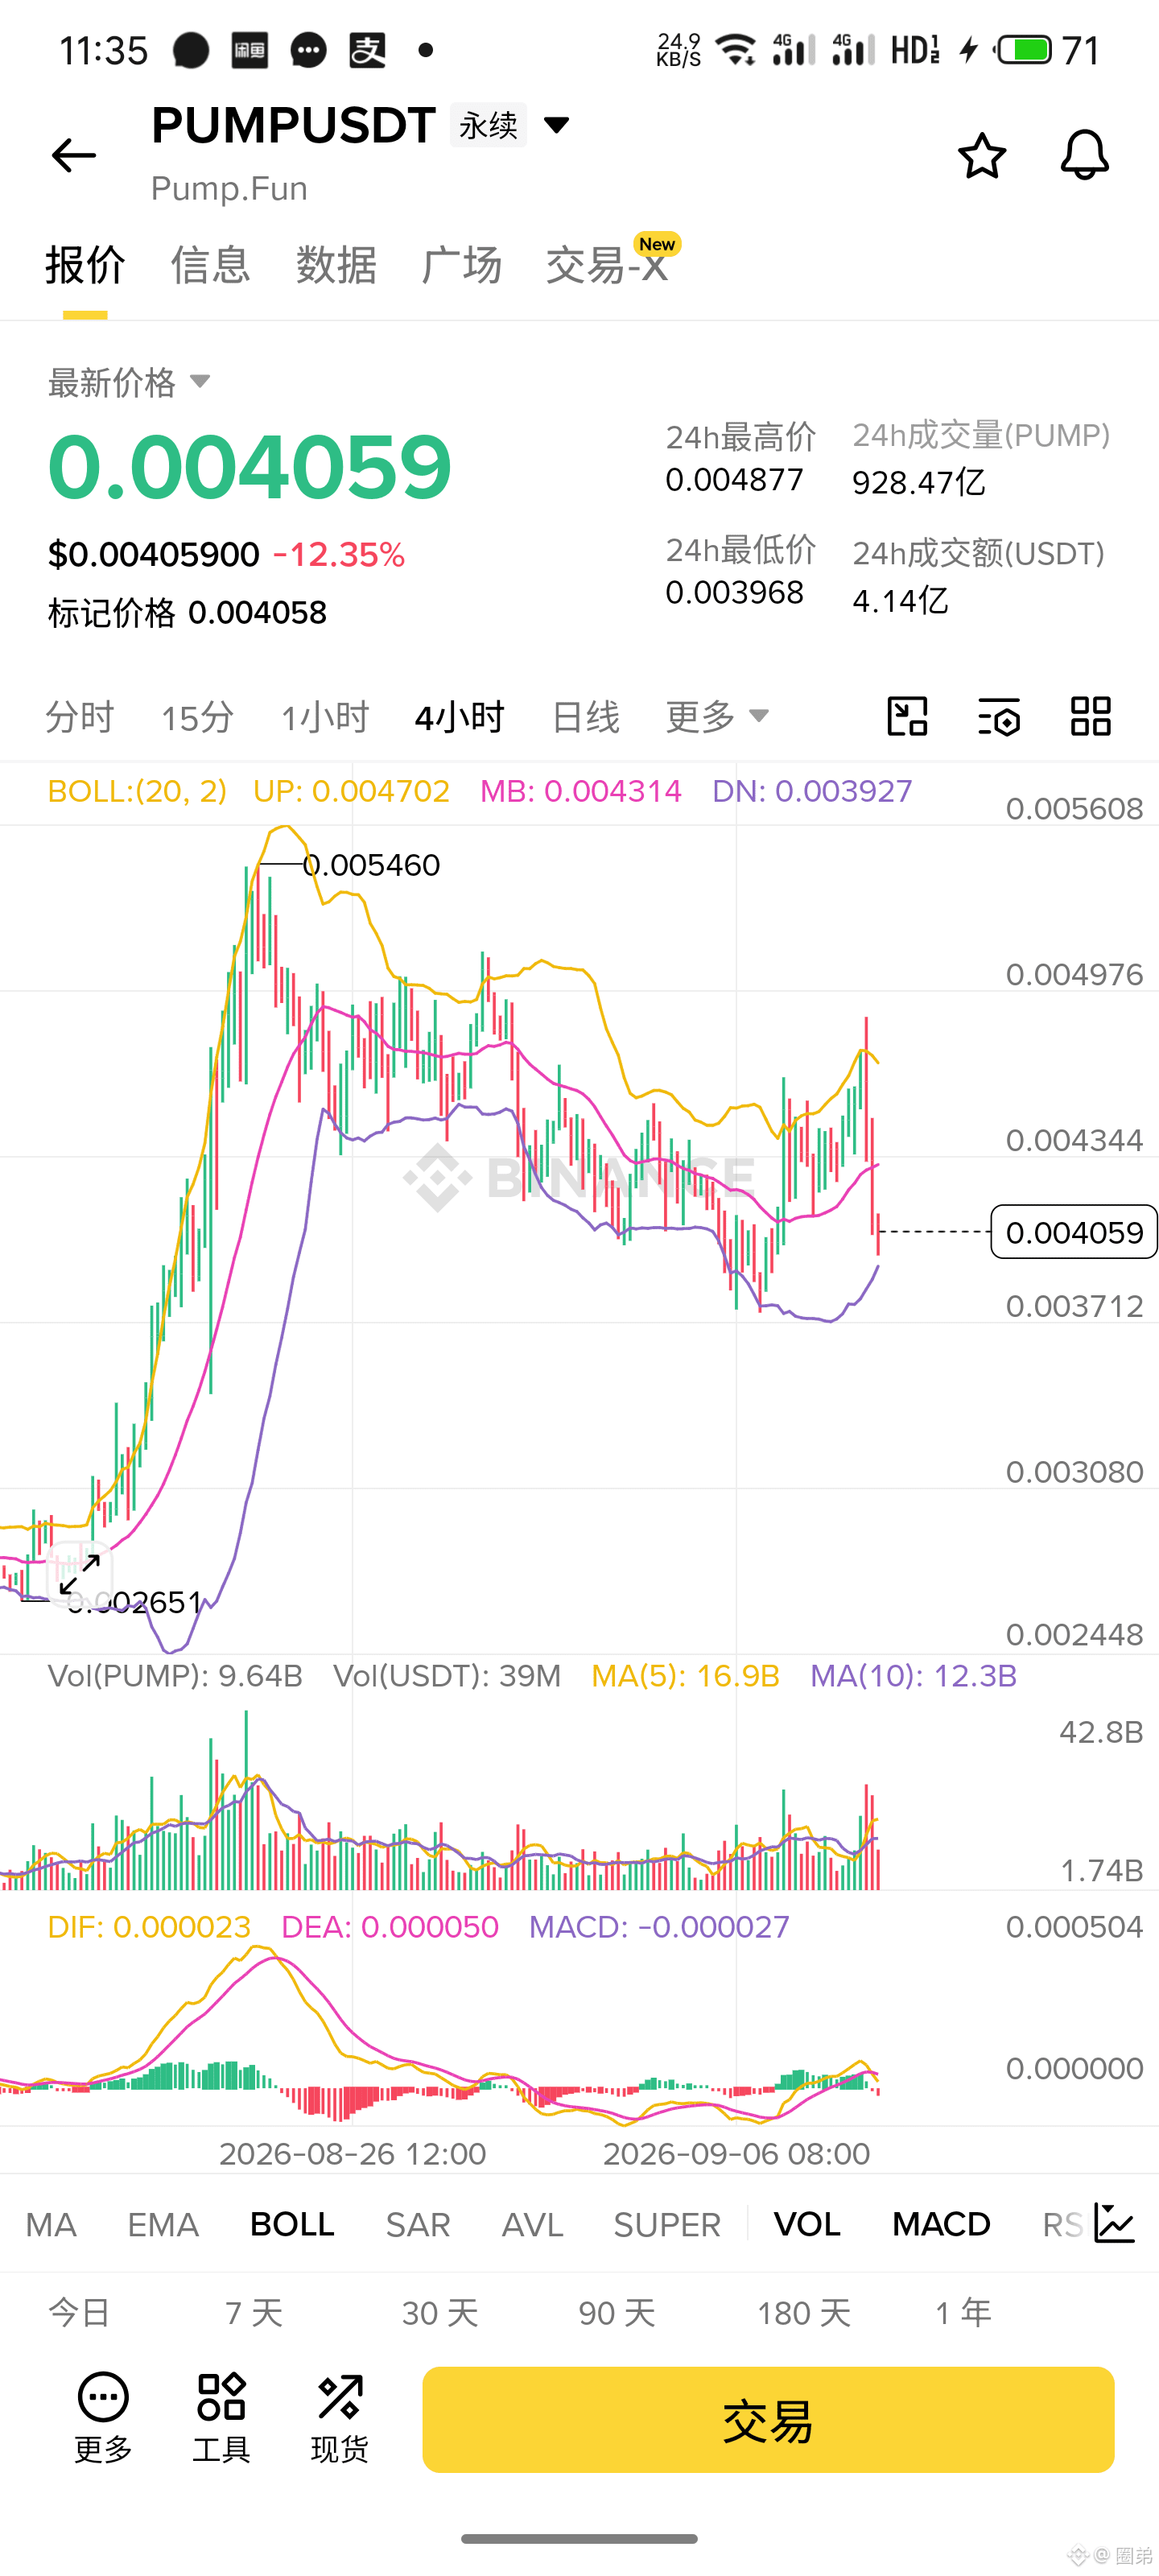
$PUMP Pump fell all the way from 0.0055, and the brothers who chased after it—didn’t you end up meeting on the rooftop? Now it’s playing dead around 0.004; just a little bounce and you get smashed. No one’s willing to carry the sedan. Don’t always think about trying to bottom-pick—if you feel there’s still room lower, then go with the short and wait until it has completely cooled off.👇
{future}(PUMPUSDT)
$PUMP Pump fell all the way from 0.0055, and the brothers who chased after it—didn’t you end up meeting on the rooftop? Now it’s playing dead around 0.004; just a little bounce and you get smashed. No one’s willing to carry the sedan. Don’t always think about trying to bottom-pick—if you feel there’s still room lower, then go with the short and wait until it has completely cooled off.👇
1
102
Log in to explore more content
Join global crypto users on Binance Square
⚡️ Get latest and useful information about crypto.
💬 Trusted by the world’s largest crypto exchange.
👍 Discover real insights from verified creators.
Email / Phone number
Trending Topics
AppleDebutsFoldablePhone
50,512 views
984 Discussing
Apple just dropped the foldable iPhone — and the market is paying attention. This isn't just another product cycle; it's a new product category, a new CEO on stage, and a $1,999 price tag that pushes $AAPL further into ultra-premium territory. Foldables are the narrative, and Apple is now the headline.
#appledebutsfoldablephone #EUExtendsCentralContactPointToCASPs #US10YTreasuryYieldHitsHighestSinceNov2023 #BrentCrudeTops$100 #USTreasuryToBuyBackUpTo$6BLongDatedDebt
KimHotbae
·2 Likes
·3k views
TSMCAugustRevenueUp53.3%YoY
12,303 views
347 Discussing
IranSaysReadyToEscalateWarWithUS
15,655 views
351 Discussing