

D-CODER
2.4k Posts

D-CODER
Report
Block User
Decoding The Crypto Market Charts | Market Moves | Signals | Public Surveys | Watch the market. Think for yourself.
Open Trade
Occasional Trader
5 Years
6 Following
1.0K+ Followers
869 Liked
Posts
Portfolio
All
Quotes
·
--
Bullish
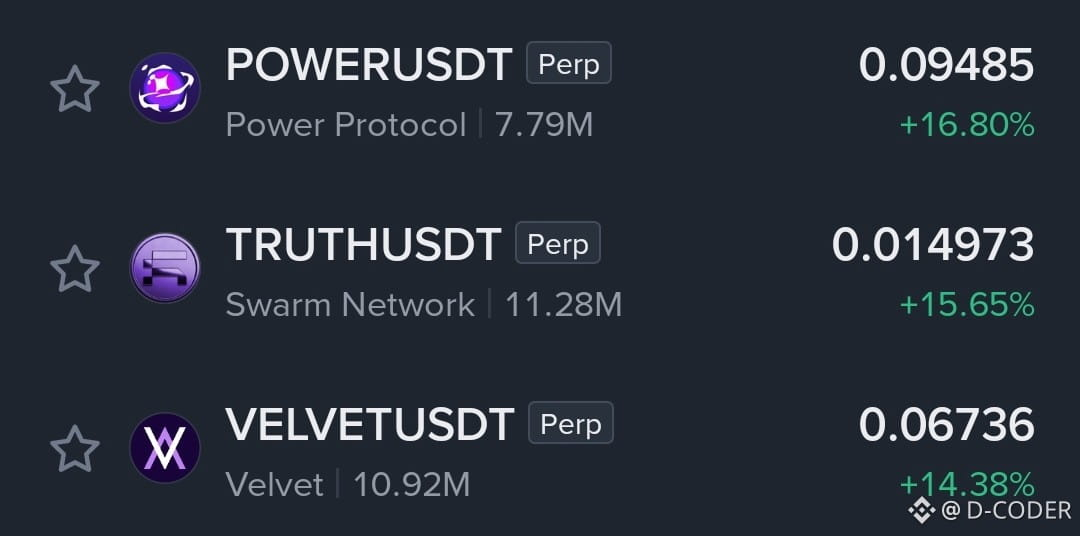
$POWER — +16.80% with 7.79M volume shows strong momentum, but the volume is still relatively light for a move this size. If buyers keep stepping in, the push can continue, but a volume drop could bring a sharp pullback.
{future}(POWERUSDT)
$TRUTH — +15.65% with 11.28M volume shows decent buying pressure behind the move. The momentum looks healthy, but after a strong green move, the key is whether buyers can hold the gains instead of letting profit-taking take over.
{future}(TRUTHUSDT)
$VELVET — +14.38% with 10.92M volume is also showing solid momentum. It has enough activity to keep the move interesting, but sustained volume will be important if bulls want to push it higher.
{future}(VELVETUSDT)
$POWER — +16.80% with 7.79M volume shows strong momentum, but the volume is still relatively light for a move this size. If buyers keep stepping in, the push can continue, but a volume drop could bring a sharp pullback.
$TRUTH — +15.65% with 11.28M volume shows decent buying pressure behind the move. The momentum looks healthy, but after a strong green move, the key is whether buyers can hold the gains instead of letting profit-taking take over.
$VELVET — +14.38% with 10.92M volume is also showing solid momentum. It has enough activity to keep the move interesting, but sustained volume will be important if bulls want to push it higher.
$TRUTH — +15.65% with 11.28M volume shows decent buying pressure behind the move. The momentum looks healthy, but after a strong green move, the key is whether buyers can hold the gains instead of letting profit-taking take over.
$VELVET — +14.38% with 10.92M volume is also showing solid momentum. It has enough activity to keep the move interesting, but sustained volume will be important if bulls want to push it higher.
651
·
--
Bullish
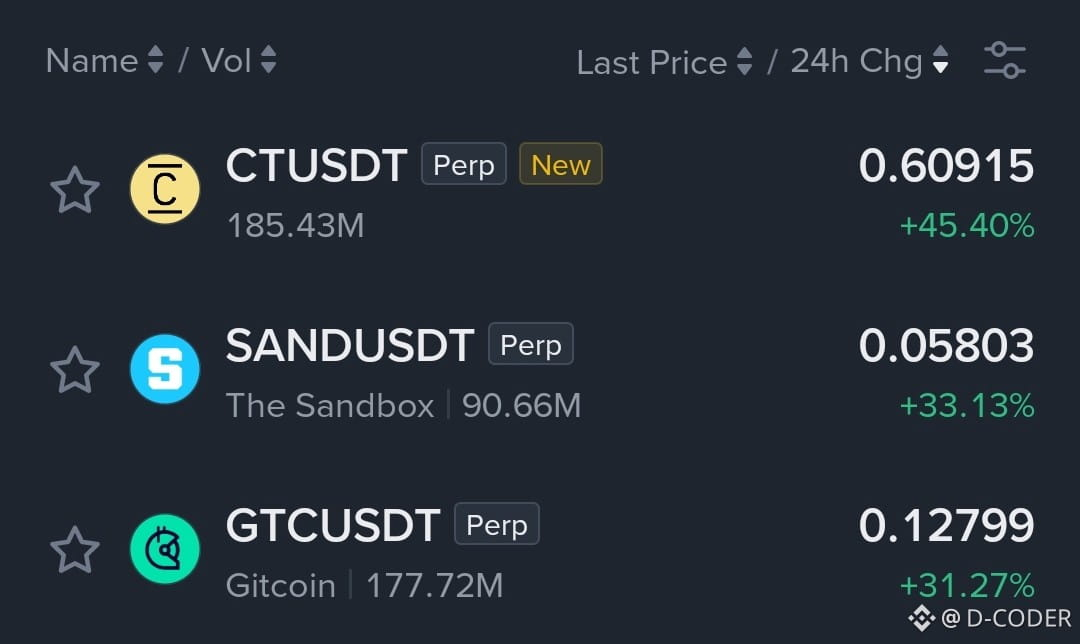
$CT — +45.40% with 185.43M volume is a serious momentum move. The volume is strong enough to show real participation, but after a 45%+ pump, volatility can become extreme and chasing becomes risky.
{future}(CTUSDT)
$SAND — +33.13% with 90.66M volume shows strong buying pressure behind the move. The momentum is clear, but the next move needs continued volume to avoid turning into a sharp profit-taking pullback.
{future}(SANDUSDT)
$GTC — +31.27% with 177.72M volume looks strong from both price action and participation. If buyers keep the volume elevated, the move can continue, but a sudden drop in volume could signal that momentum is starting to fade.
{future}(GTCUSDT)
$CT — +45.40% with 185.43M volume is a serious momentum move. The volume is strong enough to show real participation, but after a 45%+ pump, volatility can become extreme and chasing becomes risky.
$SAND — +33.13% with 90.66M volume shows strong buying pressure behind the move. The momentum is clear, but the next move needs continued volume to avoid turning into a sharp profit-taking pullback.
$GTC — +31.27% with 177.72M volume looks strong from both price action and participation. If buyers keep the volume elevated, the move can continue, but a sudden drop in volume could signal that momentum is starting to fade.
$SAND — +33.13% with 90.66M volume shows strong buying pressure behind the move. The momentum is clear, but the next move needs continued volume to avoid turning into a sharp profit-taking pullback.
$GTC — +31.27% with 177.72M volume looks strong from both price action and participation. If buyers keep the volume elevated, the move can continue, but a sudden drop in volume could signal that momentum is starting to fade.
565
·
--
Bullish
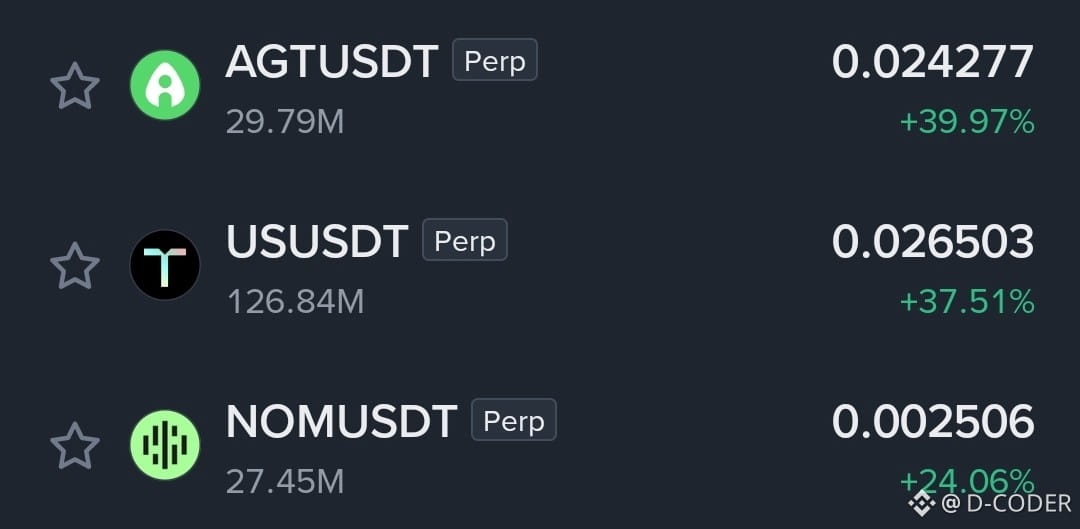
$AGT — +39.97% with 29.79M volume shows aggressive buying pressure. The move is strong, but nearly 40% in a day also means volatility is high and profit-taking can hit quickly.
{future}(AGTUSDT)
$US — +37.51% with 126.84M volume is a strong momentum move with serious participation. If buyers keep supporting the price, momentum can continue, but chasing after such a sharp run carries higher pullback risk.
{future}(USUSDT)
$NOM — +24.06% with 27.45M volume is showing a solid breakout-style move. The volume is decent, but the next push needs fresh buyers; otherwise, this can easily turn into a short-term pump and retracement.
{future}(NOMUSDT)
$AGT — +39.97% with 29.79M volume shows aggressive buying pressure. The move is strong, but nearly 40% in a day also means volatility is high and profit-taking can hit quickly.
$US — +37.51% with 126.84M volume is a strong momentum move with serious participation. If buyers keep supporting the price, momentum can continue, but chasing after such a sharp run carries higher pullback risk.
$NOM — +24.06% with 27.45M volume is showing a solid breakout-style move. The volume is decent, but the next push needs fresh buyers; otherwise, this can easily turn into a short-term pump and retracement.
$US — +37.51% with 126.84M volume is a strong momentum move with serious participation. If buyers keep supporting the price, momentum can continue, but chasing after such a sharp run carries higher pullback risk.
$NOM — +24.06% with 27.45M volume is showing a solid breakout-style move. The volume is decent, but the next push needs fresh buyers; otherwise, this can easily turn into a short-term pump and retracement.
421
·
--
Bullish
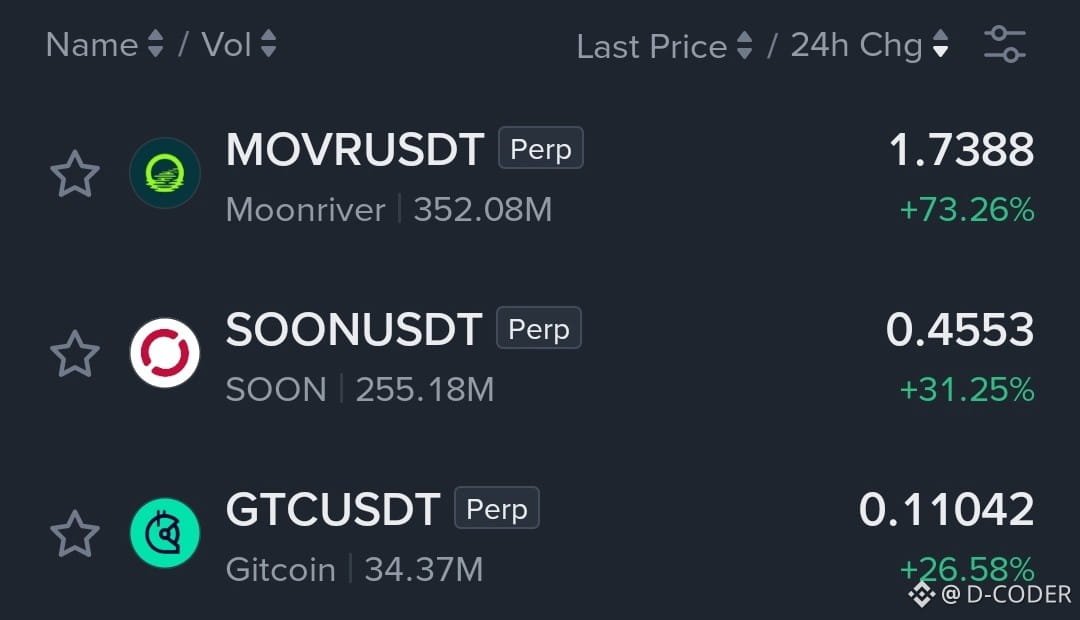
$MOVR — +73.26% with 352.08M volume is a serious momentum move. The volume confirms heavy participation, but after a jump this large, volatility can become extreme and profit-taking can hit hard.
{future}(MOVRUSDT)
$SOON — +31.25% with 255.18M volume shows strong buying pressure behind the move. The combination of price expansion and high volume is notable, but the next move depends on whether buyers can maintain this activity.
{future}(SOONUSDT)
$GTC — +26.58% with 34.37M volume is gaining solid momentum, though its volume is much lower than MOVR and SOON. Fresh buying would be important for continuation; otherwise, the move could cool quickly.
{future}(GTCUSDT)
$MOVR — +73.26% with 352.08M volume is a serious momentum move. The volume confirms heavy participation, but after a jump this large, volatility can become extreme and profit-taking can hit hard.
$SOON — +31.25% with 255.18M volume shows strong buying pressure behind the move. The combination of price expansion and high volume is notable, but the next move depends on whether buyers can maintain this activity.
$GTC — +26.58% with 34.37M volume is gaining solid momentum, though its volume is much lower than MOVR and SOON. Fresh buying would be important for continuation; otherwise, the move could cool quickly.
$SOON — +31.25% with 255.18M volume shows strong buying pressure behind the move. The combination of price expansion and high volume is notable, but the next move depends on whether buyers can maintain this activity.
$GTC — +26.58% with 34.37M volume is gaining solid momentum, though its volume is much lower than MOVR and SOON. Fresh buying would be important for continuation; otherwise, the move could cool quickly.
509
·
--
Bullish
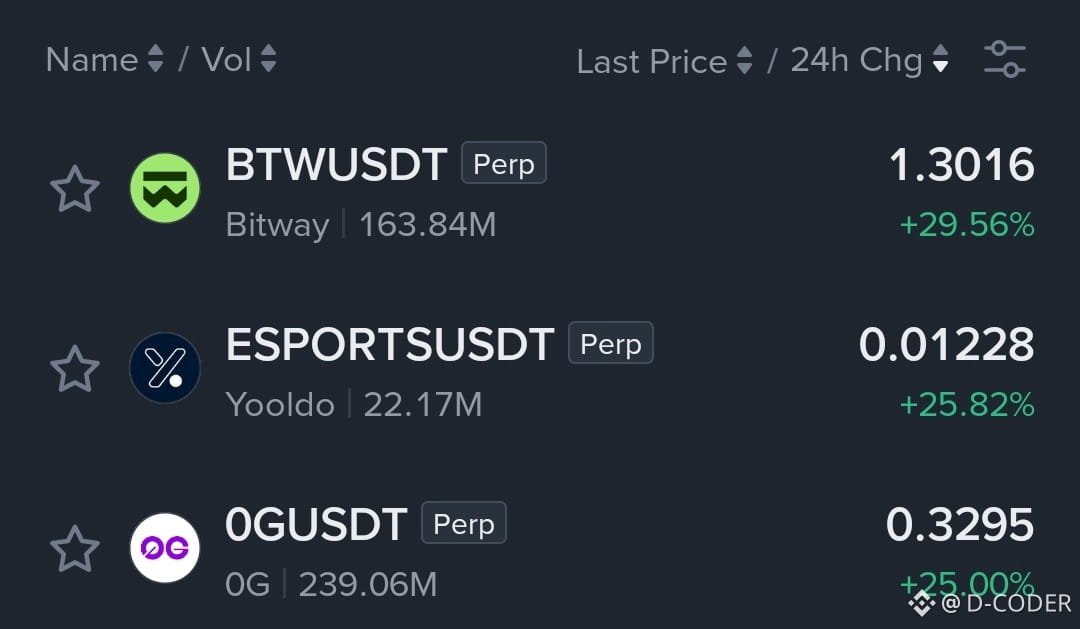
$BTW — +29.56% with 163.84M volume shows strong momentum and serious buying activity. The move is already extended, so the big question is whether fresh volume can keep pushing it higher or profit-taking starts taking over.
{future}(BTWUSDT)
$ESPORTS — +25.82% with 22.17M volume is making a sharp move, but the volume is much lighter than BTW. If buying interest keeps building, momentum can continue; otherwise, this type of move can reverse quickly.
{future}(ESPORTSUSDT)
$0G — +25.00% with 239.06M volume stands out with strong participation behind the move. The price action is aggressive, but after a 25% jump, maintaining volume will be important to avoid a fast cooldown.
{future}(0GUSDT)
$BTW — +29.56% with 163.84M volume shows strong momentum and serious buying activity. The move is already extended, so the big question is whether fresh volume can keep pushing it higher or profit-taking starts taking over.
$ESPORTS — +25.82% with 22.17M volume is making a sharp move, but the volume is much lighter than BTW. If buying interest keeps building, momentum can continue; otherwise, this type of move can reverse quickly.
$0G — +25.00% with 239.06M volume stands out with strong participation behind the move. The price action is aggressive, but after a 25% jump, maintaining volume will be important to avoid a fast cooldown.
$ESPORTS — +25.82% with 22.17M volume is making a sharp move, but the volume is much lighter than BTW. If buying interest keeps building, momentum can continue; otherwise, this type of move can reverse quickly.
$0G — +25.00% with 239.06M volume stands out with strong participation behind the move. The price action is aggressive, but after a 25% jump, maintaining volume will be important to avoid a fast cooldown.
552
·
--
Bullish
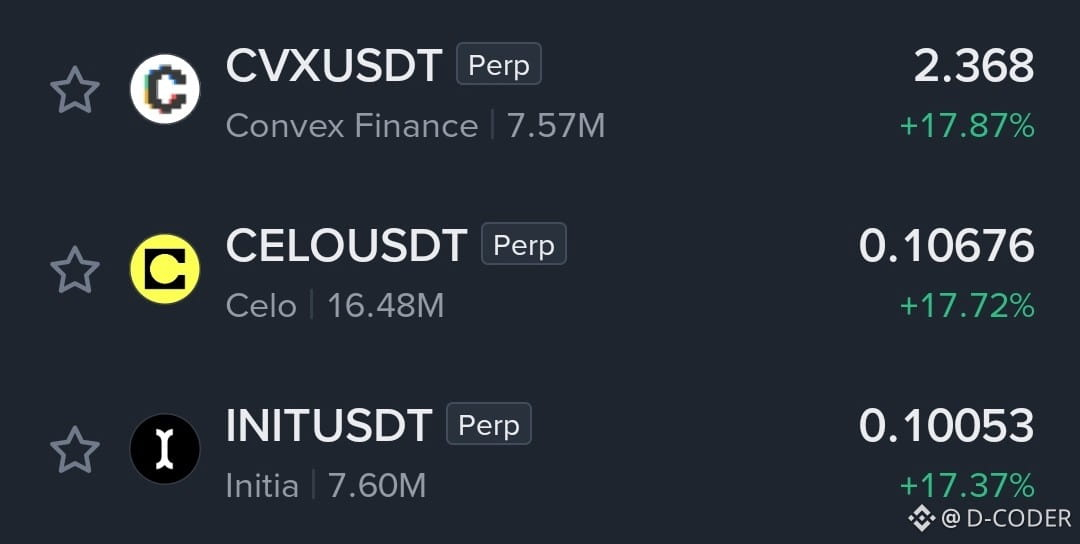
$CVX — +17.87% with 7.57M volume shows strong momentum, but the relatively light volume means the move needs fresh buyers to keep going. If volume fades, this can turn into a quick pullback.
{future}(CVXUSDT)
$CELO — +17.72% with 16.48M volume looks like a decent momentum push. Buyers are clearly active, but after a move this size, holding the momentum matters more than simply chasing the green candle.
{future}(CELOUSDT)
$INIT — +17.37% with 7.60M volume is another strong move, but volume is still relatively light. If buying pressure keeps increasing, continuation is possible; otherwise, profit-taking could hit quickly.
{future}(INITUSDT)
$CVX — +17.87% with 7.57M volume shows strong momentum, but the relatively light volume means the move needs fresh buyers to keep going. If volume fades, this can turn into a quick pullback.
$CELO — +17.72% with 16.48M volume looks like a decent momentum push. Buyers are clearly active, but after a move this size, holding the momentum matters more than simply chasing the green candle.
$INIT — +17.37% with 7.60M volume is another strong move, but volume is still relatively light. If buying pressure keeps increasing, continuation is possible; otherwise, profit-taking could hit quickly.
$CELO — +17.72% with 16.48M volume looks like a decent momentum push. Buyers are clearly active, but after a move this size, holding the momentum matters more than simply chasing the green candle.
$INIT — +17.37% with 7.60M volume is another strong move, but volume is still relatively light. If buying pressure keeps increasing, continuation is possible; otherwise, profit-taking could hit quickly.
1
437
·
--
Bullish
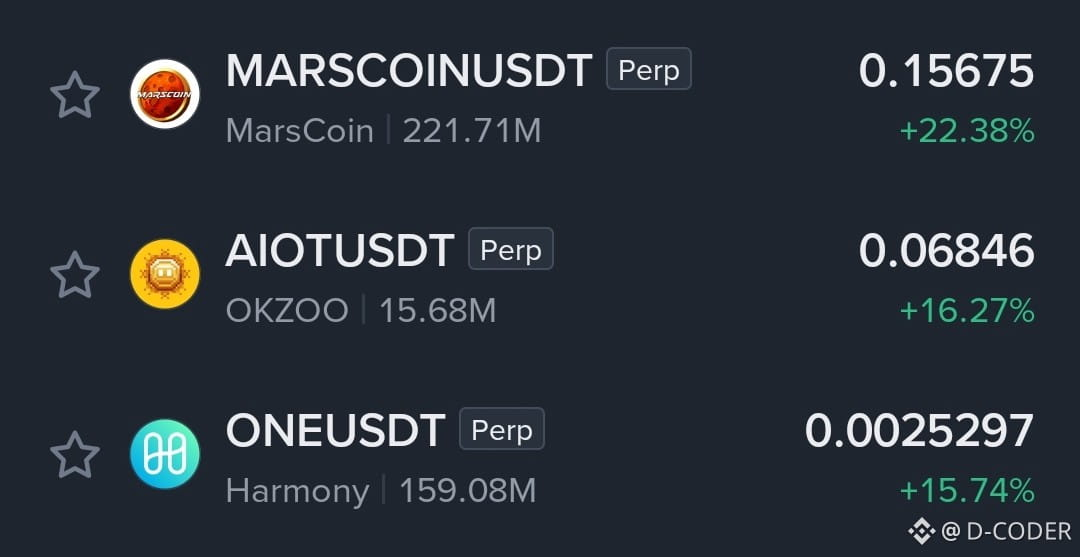
$MARSCOIN — +22.38% with 221.71M volume shows strong buying interest behind the move. The momentum is clearly there, but after a 20%+ rally, profit-taking can hit fast. The key is whether buyers can keep the volume flowing.
{future}(MARSCOINUSDT)
$AIOT — +16.27% is a solid move, but the 15.68M volume is much smaller than the other two. If buyers continue stepping in, the move can extend; otherwise, this kind of pump can cool down quickly.
{future}(AIOTUSDT)
$ONE — +15.74% with 159.08M volume looks like a healthier momentum move. There’s meaningful activity behind the price action, but the next push needs fresh volume to avoid turning into another short-lived pump.
{future}(ONEUSDT)
$MARSCOIN — +22.38% with 221.71M volume shows strong buying interest behind the move. The momentum is clearly there, but after a 20%+ rally, profit-taking can hit fast. The key is whether buyers can keep the volume flowing.
$AIOT — +16.27% is a solid move, but the 15.68M volume is much smaller than the other two. If buyers continue stepping in, the move can extend; otherwise, this kind of pump can cool down quickly.
$ONE — +15.74% with 159.08M volume looks like a healthier momentum move. There’s meaningful activity behind the price action, but the next push needs fresh volume to avoid turning into another short-lived pump.
$AIOT — +16.27% is a solid move, but the 15.68M volume is much smaller than the other two. If buyers continue stepping in, the move can extend; otherwise, this kind of pump can cool down quickly.
$ONE — +15.74% with 159.08M volume looks like a healthier momentum move. There’s meaningful activity behind the price action, but the next push needs fresh volume to avoid turning into another short-lived pump.
843
·
--
Bullish
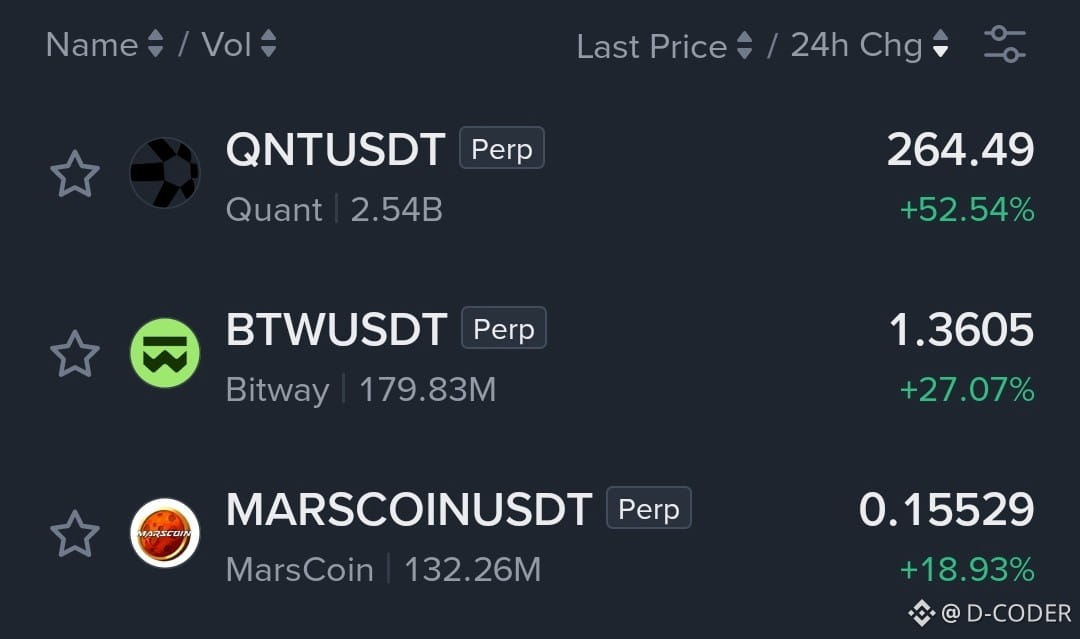
$QNT — +52.54% with 2.54B volume is still showing serious momentum. But after such a large move, the bigger question is whether buyers can keep pushing or start taking profits. This is the kind of move where chasing can get expensive quickly.
{future}(QNTUSDT)
$BTW — +27.07% with 179.83M volume shows solid buying interest without the extreme spike seen in QNT. If volume continues building, the move can stay interesting, but losing momentum after this jump could trigger a quick retracement.
{future}(BTWUSDT)
$MARSCOIN — +18.93% with 132.26M volume looks more controlled compared with the other two. The move has decent participation, but it still needs sustained volume to turn this push into a stronger continuation rather than just a short-term bounce.
{future}(MARSCOINUSDT)
$QNT — +52.54% with 2.54B volume is still showing serious momentum. But after such a large move, the bigger question is whether buyers can keep pushing or start taking profits. This is the kind of move where chasing can get expensive quickly.
$BTW — +27.07% with 179.83M volume shows solid buying interest without the extreme spike seen in QNT. If volume continues building, the move can stay interesting, but losing momentum after this jump could trigger a quick retracement.
$MARSCOIN — +18.93% with 132.26M volume looks more controlled compared with the other two. The move has decent participation, but it still needs sustained volume to turn this push into a stronger continuation rather than just a short-term bounce.
$BTW — +27.07% with 179.83M volume shows solid buying interest without the extreme spike seen in QNT. If volume continues building, the move can stay interesting, but losing momentum after this jump could trigger a quick retracement.
$MARSCOIN — +18.93% with 132.26M volume looks more controlled compared with the other two. The move has decent participation, but it still needs sustained volume to turn this push into a stronger continuation rather than just a short-term bounce.
728
·
--
Bullish
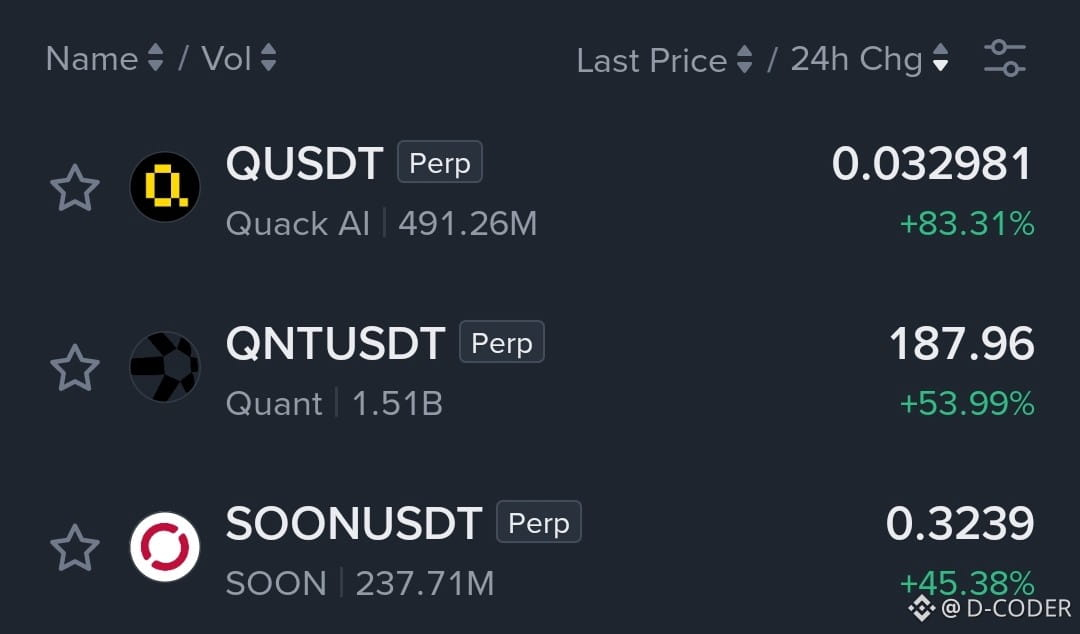
$Q — The move is already aggressive at +83.31%, with volume near 491M. That kind of expansion can attract late buyers quickly, but it also increases the risk of sharp pullbacks if momentum starts fading.
{future}(QUSDT)
$QNT — +53.99% with about 1.51B volume shows strong participation behind the move. The key now is whether buyers can keep absorbing profit-taking after such a large rally; chasing after the spike can become risky.
{future}(QNTUSDT)
$SOON — +45.38% and roughly 237.71M volume puts it firmly in momentum territory. The move looks strong, but after a 45%+ surge, volatility can increase fast, so the next consolidation or pullback may reveal whether the move has real follow-through.
{future}(SOONUSDT)
$Q — The move is already aggressive at +83.31%, with volume near 491M. That kind of expansion can attract late buyers quickly, but it also increases the risk of sharp pullbacks if momentum starts fading.
$QNT — +53.99% with about 1.51B volume shows strong participation behind the move. The key now is whether buyers can keep absorbing profit-taking after such a large rally; chasing after the spike can become risky.
$SOON — +45.38% and roughly 237.71M volume puts it firmly in momentum territory. The move looks strong, but after a 45%+ surge, volatility can increase fast, so the next consolidation or pullback may reveal whether the move has real follow-through.
$QNT — +53.99% with about 1.51B volume shows strong participation behind the move. The key now is whether buyers can keep absorbing profit-taking after such a large rally; chasing after the spike can become risky.
$SOON — +45.38% and roughly 237.71M volume puts it firmly in momentum territory. The move looks strong, but after a 45%+ surge, volatility can increase fast, so the next consolidation or pullback may reveal whether the move has real follow-through.
592
·
--
Bullish
$HYPE near $93.
This is where the crowd gets dangerous.
When everyone around you is making money, staying out starts feeling like you're losing money.
So you enter not because the setup improved...
but because watching other people win became unbearable.
That's not conviction.
That's FOMO wearing a suit.
{future}(HYPEUSDT)
$HYPE near $93.
This is where the crowd gets dangerous.
When everyone around you is making money, staying out starts feeling like you're losing money.
So you enter not because the setup improved...
but because watching other people win became unbearable.
That's not conviction.
That's FOMO wearing a suit.
This is where the crowd gets dangerous.
When everyone around you is making money, staying out starts feeling like you're losing money.
So you enter not because the setup improved...
but because watching other people win became unbearable.
That's not conviction.
That's FOMO wearing a suit.
70
·
--
Bullish
$AAVE is moving again.
Here's the uncomfortable part:
A trader can be completely right about the direction...
and still lose money by entering at the wrong time.
Being bullish isn't an entry strategy.
Sometimes the hardest trade is watching a coin go higher without you.
{future}(AAVEUSDT)
$AAVE is moving again.
Here's the uncomfortable part:
A trader can be completely right about the direction...
and still lose money by entering at the wrong time.
Being bullish isn't an entry strategy.
Sometimes the hardest trade is watching a coin go higher without you.
Here's the uncomfortable part:
A trader can be completely right about the direction...
and still lose money by entering at the wrong time.
Being bullish isn't an entry strategy.
Sometimes the hardest trade is watching a coin go higher without you.
52
·
--
Bullish
$UNI near $9.
Everyone loves the idea of catching a coin before the “real move.”
But once the move actually starts, the psychology changes.
You stop asking, “Is this a good entry?”
You start asking, “What if I miss it?”
That second question has emptied a lot of wallets.
{future}(UNIUSDT)
$UNI near $9.
Everyone loves the idea of catching a coin before the “real move.”
But once the move actually starts, the psychology changes.
You stop asking, “Is this a good entry?”
You start asking, “What if I miss it?”
That second question has emptied a lot of wallets.
Everyone loves the idea of catching a coin before the “real move.”
But once the move actually starts, the psychology changes.
You stop asking, “Is this a good entry?”
You start asking, “What if I miss it?”
That second question has emptied a lot of wallets.
74
·
--
Bearish
$NEAR is pushing higher again.
And this is where traders can become prisoners of their own prediction.
They call the first move a breakout.
Then they need the second move to prove they're right.
Then they start defending the coin instead of analyzing it.
At some point, you're not trading the market anymore.
You're defending your ego.
{future}(NEARUSDT)
$NEAR is pushing higher again.
And this is where traders can become prisoners of their own prediction.
They call the first move a breakout.
Then they need the second move to prove they're right.
Then they start defending the coin instead of analyzing it.
At some point, you're not trading the market anymore.
You're defending your ego.
And this is where traders can become prisoners of their own prediction.
They call the first move a breakout.
Then they need the second move to prove they're right.
Then they start defending the coin instead of analyzing it.
At some point, you're not trading the market anymore.
You're defending your ego.
104
·
--
Bullish
$TAO at $268 is exactly where greed starts getting interesting.
At $100, people wanted a reason to buy.
At $268, people suddenly start finding reasons it can reach $500.
The chart didn't create that belief.
The profit already in front of them did.
{future}(TAOUSDT)
$TAO at $268 is exactly where greed starts getting interesting.
At $100, people wanted a reason to buy.
At $268, people suddenly start finding reasons it can reach $500.
The chart didn't create that belief.
The profit already in front of them did.
At $100, people wanted a reason to buy.
At $268, people suddenly start finding reasons it can reach $500.
The chart didn't create that belief.
The profit already in front of them did.
154
·
--
Bullish
$BR around $0.66 is interesting.
But watch the crowd.
If everyone starts believing the next move is obvious, the trade stops being about analysis.
It becomes a race to find someone willing to buy after you.
That's the part nobody thinks about when they're dreaming about the next pump.
Trade From Here (DYOR) 👇
{future}(BRUSDT)
$BR around $0.66 is interesting.
But watch the crowd.
If everyone starts believing the next move is obvious, the trade stops being about analysis.
It becomes a race to find someone willing to buy after you.
That's the part nobody thinks about when they're dreaming about the next pump.
Trade From Here (DYOR) 👇
But watch the crowd.
If everyone starts believing the next move is obvious, the trade stops being about analysis.
It becomes a race to find someone willing to buy after you.
That's the part nobody thinks about when they're dreaming about the next pump.
Trade From Here (DYOR) 👇
261
·
--
Bullish
$ONE is back on traders' radar.
A tiny price makes people think in multiples.
“$0.0018 can easily become $0.01.”
Maybe.
But once your brain starts focusing on the dream target instead of the actual risk, you're no longer looking at the market objectively.
You're looking at the outcome you want.
Trade From Here (DYOR) 👇
{future}(ONEUSDT)
$ONE is back on traders' radar.
A tiny price makes people think in multiples.
“$0.0018 can easily become $0.01.”
Maybe.
But once your brain starts focusing on the dream target instead of the actual risk, you're no longer looking at the market objectively.
You're looking at the outcome you want.
Trade From Here (DYOR) 👇
A tiny price makes people think in multiples.
“$0.0018 can easily become $0.01.”
Maybe.
But once your brain starts focusing on the dream target instead of the actual risk, you're no longer looking at the market objectively.
You're looking at the outcome you want.
Trade From Here (DYOR) 👇
131
·
--
Bullish
$NEAR is getting attention again.
And here's the uncomfortable part:
The higher it goes, the easier it becomes to find people explaining why it should go even higher.
That's confirmation bias.
First comes the position.
Then comes the story.
Trade From Here (DYOR) 👇
{future}(NEARUSDT)
$NEAR is getting attention again.
And here's the uncomfortable part:
The higher it goes, the easier it becomes to find people explaining why it should go even higher.
That's confirmation bias.
First comes the position.
Then comes the story.
Trade From Here (DYOR) 👇
And here's the uncomfortable part:
The higher it goes, the easier it becomes to find people explaining why it should go even higher.
That's confirmation bias.
First comes the position.
Then comes the story.
Trade From Here (DYOR) 👇
1
42
·
--
Bullish
$UNI is around $9.
Notice how quickly “I missed it” turns into “I need to get in now.”
That's one of the most expensive thoughts in crypto.
Missing a move hurts.
Chasing one can hurt much more.
Trade From Here (DYOR) 👇
{future}(UNIUSDT)
$UNI is around $9.
Notice how quickly “I missed it” turns into “I need to get in now.”
That's one of the most expensive thoughts in crypto.
Missing a move hurts.
Chasing one can hurt much more.
Trade From Here (DYOR) 👇
Notice how quickly “I missed it” turns into “I need to get in now.”
That's one of the most expensive thoughts in crypto.
Missing a move hurts.
Chasing one can hurt much more.
Trade From Here (DYOR) 👇
51
·
--
Bullish
$ZEC at $1,478 looks very different from $ZEC at $500.
That's the trap.
When a coin moves this far, people stop asking whether the move is sustainable.
They start calculating how much more they could make.
Greed doesn't need permission. It just needs another green candle.
Trade From Here (DYOR) 👇
{future}(ZECUSDT)
$ZEC at $1,478 looks very different from $ZEC at $500.
That's the trap.
When a coin moves this far, people stop asking whether the move is sustainable.
They start calculating how much more they could make.
Greed doesn't need permission. It just needs another green candle.
Trade From Here (DYOR) 👇
That's the trap.
When a coin moves this far, people stop asking whether the move is sustainable.
They start calculating how much more they could make.
Greed doesn't need permission. It just needs another green candle.
Trade From Here (DYOR) 👇
152
·
--
Bullish
$FIL - 8% 📈
$FIL keeps testing traders' patience.
And that's where the sunk-cost trap begins.
“I've already held this long.”
“I'll just wait.”
“I don't want to sell before the recovery.”
At some point, you're not holding because you believe in the trade.
You're holding because admitting you were wrong hurts.
Trade From Here (DYOR) 👇
{spot}(FILUSDT)
$FIL - 8% 📈
$FIL keeps testing traders' patience.
And that's where the sunk-cost trap begins.
“I've already held this long.”
“I'll just wait.”
“I don't want to sell before the recovery.”
At some point, you're not holding because you believe in the trade.
You're holding because admitting you were wrong hurts.
Trade From Here (DYOR) 👇
$FIL keeps testing traders' patience.
And that's where the sunk-cost trap begins.
“I've already held this long.”
“I'll just wait.”
“I don't want to sell before the recovery.”
At some point, you're not holding because you believe in the trade.
You're holding because admitting you were wrong hurts.
Trade From Here (DYOR) 👇
153
Log in to explore more content
Join global crypto users on Binance Square
⚡️ Get latest and useful information about crypto.
💬 Trusted by the world’s largest crypto exchange.
👍 Discover real insights from verified creators.
Email / Phone number