

CryptoPandaヅ
8.6k Posts

CryptoPandaヅ
 Square Verified+
Report
Block User
Support My Analysis, I thank You All. Hoping for your profitable journey!
Open Trade
High-Frequency Trader
4.4 Years
12 Following
38.7K+ Followers
26.4K+ Liked
Posts
Portfolio
All
Quotes
Live
·
--
Bullish
See translation
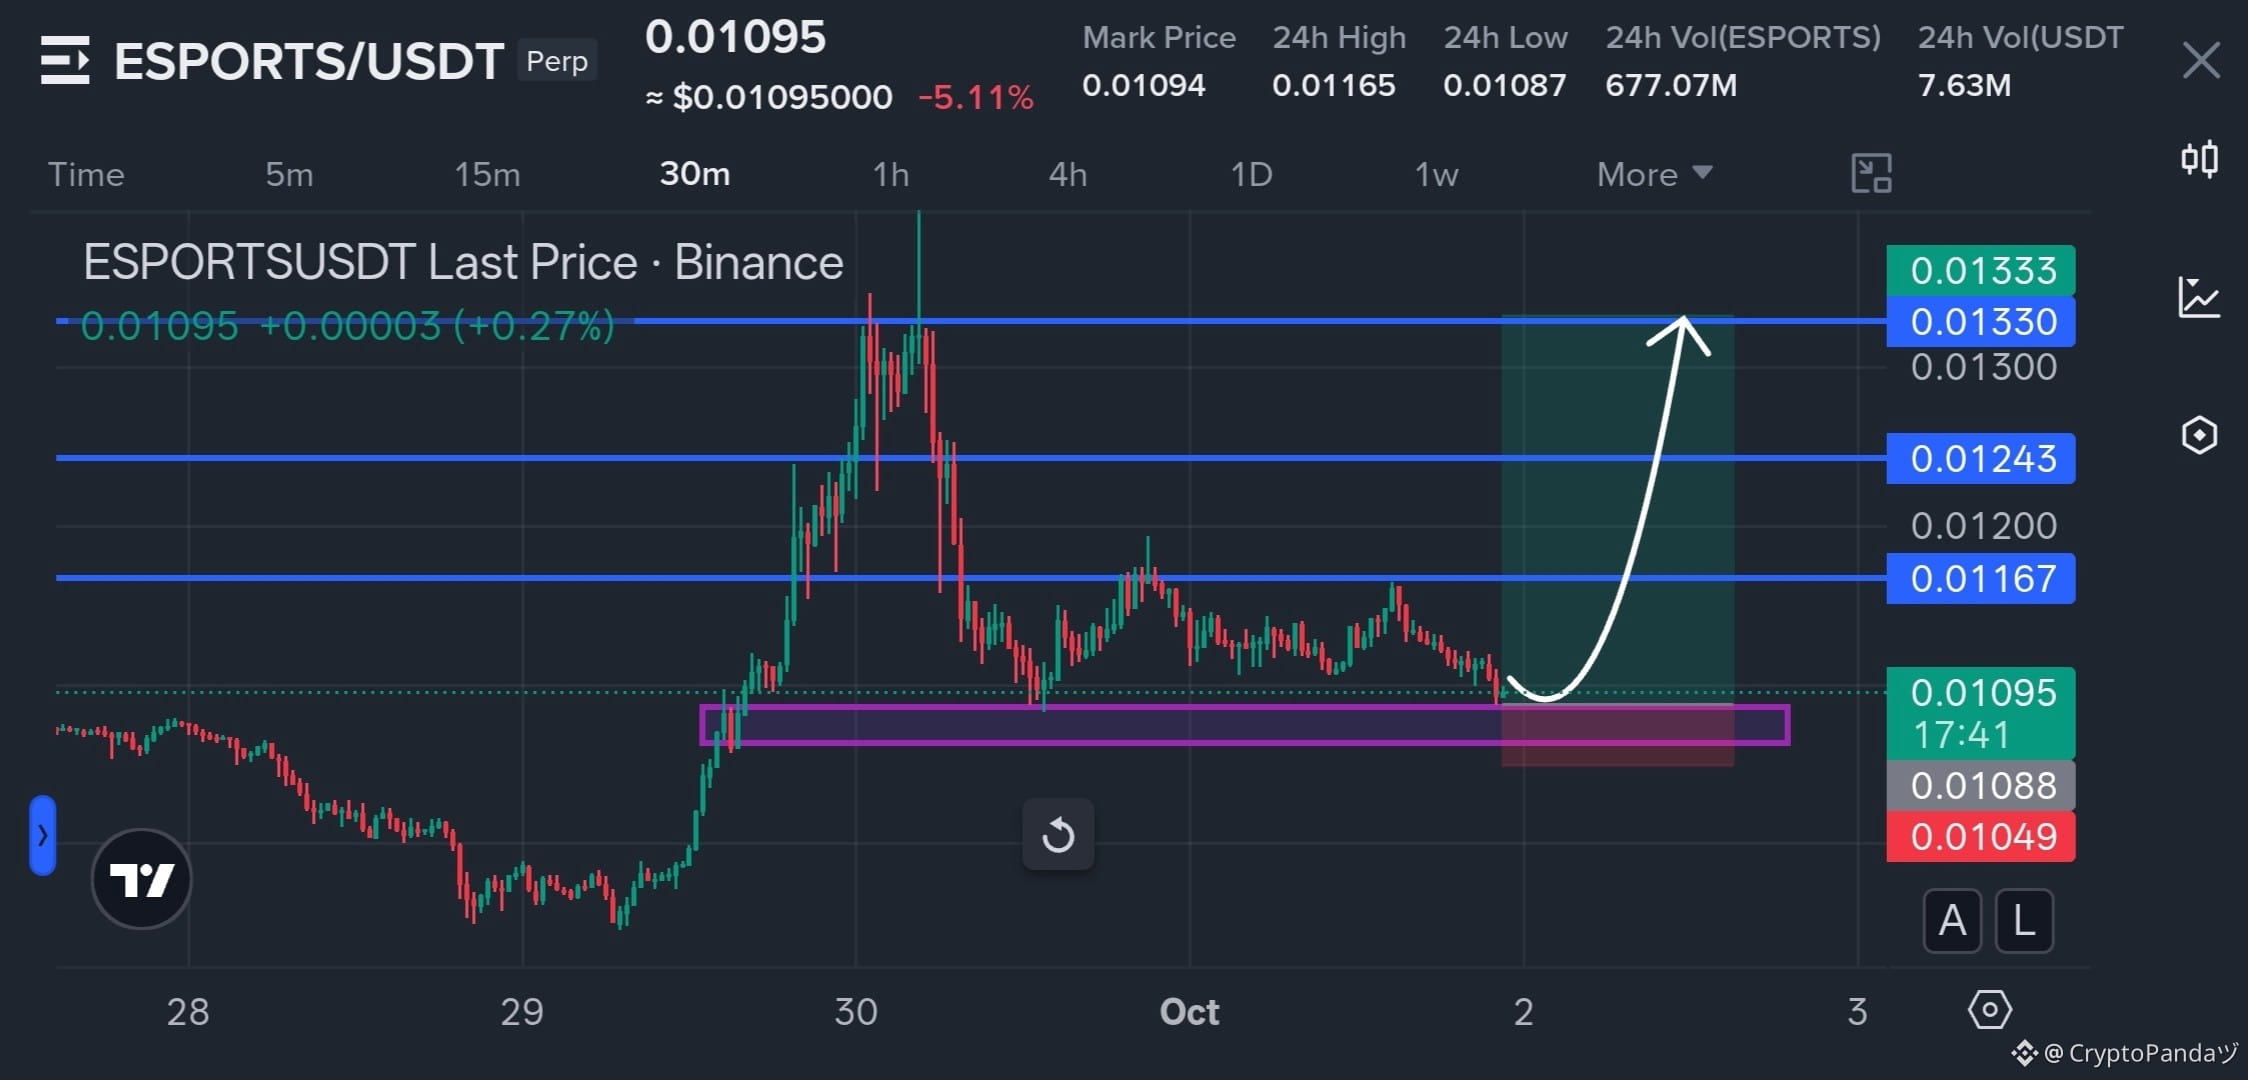
$ESPORTS — Liquidity Sweep Done Into 0.0108 Demand, Upside Hunt Loading 📈
Trade Plan: Long $ESPORTS
Entry: 0.0108 - 0.0110
SL: 0.01049
TP: 0.01167 | 0.01243 | 0.01330
Why this Setup?
ESPORTS has been swept liquidity into the 0.0108 demand zone, with price now stabilizing above the marked support area. If buyers defend this sweep and reclaim 0.01167, the next liquidity targets sit around 0.01243 and 0.01330. As long as 0.01049 holds, the bullish setup remains valid.
Trade $ESPORTS here 👇
{future}(ESPORTSUSDT)
$ESPORTS — Liquidity Sweep Done Into 0.0108 Demand, Upside Hunt Loading 📈
Trade Plan: Long $ESPORTS
Entry: 0.0108 - 0.0110
SL: 0.01049
TP: 0.01167 | 0.01243 | 0.01330
Why this Setup?
ESPORTS has been swept liquidity into the 0.0108 demand zone, with price now stabilizing above the marked support area. If buyers defend this sweep and reclaim 0.01167, the next liquidity targets sit around 0.01243 and 0.01330. As long as 0.01049 holds, the bullish setup remains valid.
Trade $ESPORTS here 👇
Trade Plan: Long $ESPORTS
Entry: 0.0108 - 0.0110
SL: 0.01049
TP: 0.01167 | 0.01243 | 0.01330
Why this Setup?
ESPORTS has been swept liquidity into the 0.0108 demand zone, with price now stabilizing above the marked support area. If buyers defend this sweep and reclaim 0.01167, the next liquidity targets sit around 0.01243 and 0.01330. As long as 0.01049 holds, the bullish setup remains valid.
Trade $ESPORTS here 👇
2
202
·
--
Bearish
See translation
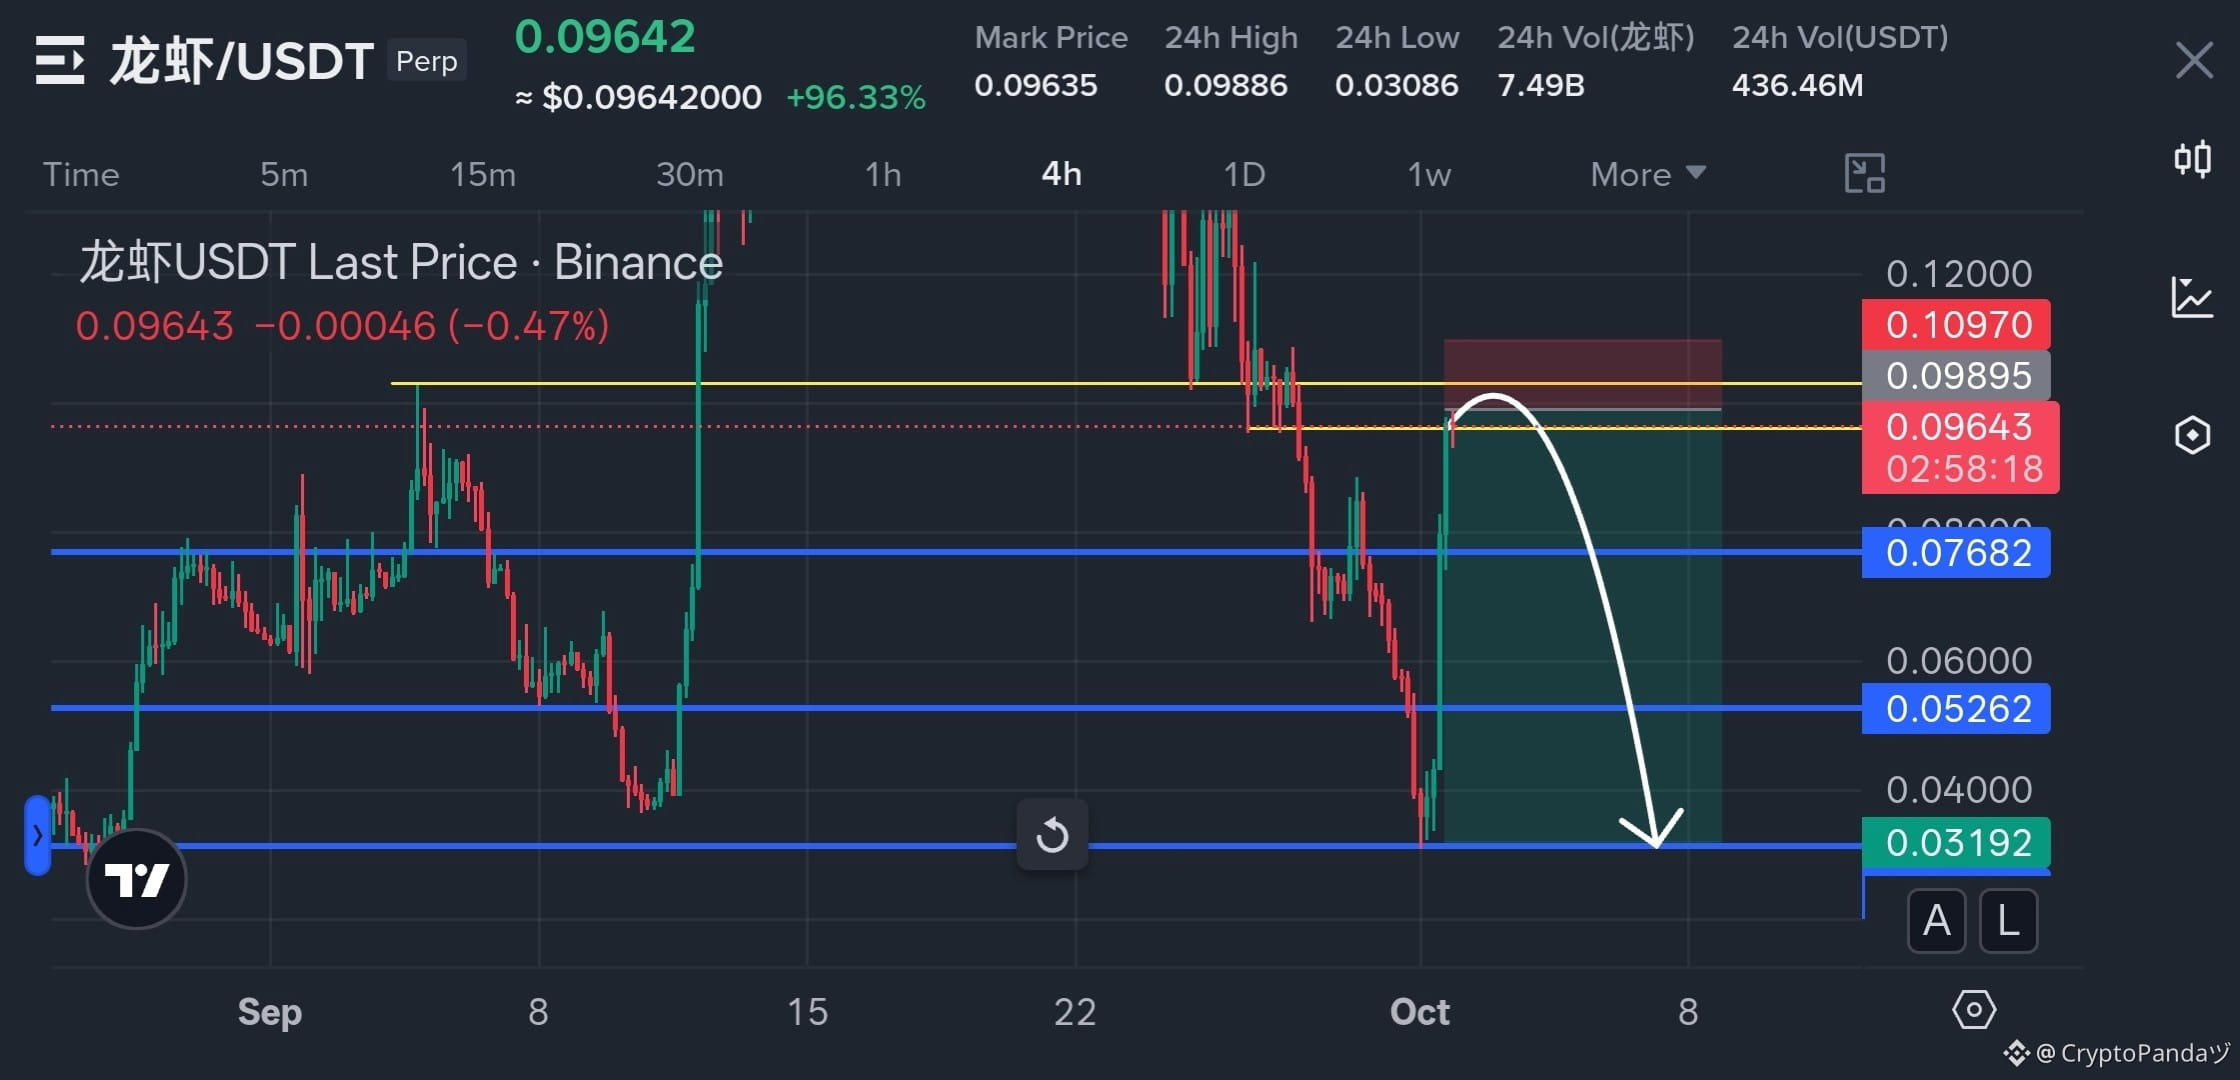
$龙虾 — Parabolic Extension Fading At 0.09895 Supply, Collapse Incoming 📉
Trade Plan: Short $龙虾
Entry: 0.095 - 0.100
SL: 0.10970
TP: 0.07682 | 0.05262 | 0.03192
Why this Setup?
龙虾 a massive parabolic extension, price is now pushing back into the 0.09895 supply zone, creating a potential exhaustion-and-collapse setup. A rejection from this area could unwind the entire extension, with downside targets lining up at 0.07682, 0.05262 and 0.03192. As long as 0.10970 holds, the bearish setup remains valid.
Trade $龙虾 here 👇
{future}(龙虾USDT)
$龙虾 — Parabolic Extension Fading At 0.09895 Supply, Collapse Incoming 📉
Trade Plan: Short $龙虾
Entry: 0.095 - 0.100
SL: 0.10970
TP: 0.07682 | 0.05262 | 0.03192
Why this Setup?
龙虾 a massive parabolic extension, price is now pushing back into the 0.09895 supply zone, creating a potential exhaustion-and-collapse setup. A rejection from this area could unwind the entire extension, with downside targets lining up at 0.07682, 0.05262 and 0.03192. As long as 0.10970 holds, the bearish setup remains valid.
Trade $龙虾 here 👇
Trade Plan: Short $龙虾
Entry: 0.095 - 0.100
SL: 0.10970
TP: 0.07682 | 0.05262 | 0.03192
Why this Setup?
龙虾 a massive parabolic extension, price is now pushing back into the 0.09895 supply zone, creating a potential exhaustion-and-collapse setup. A rejection from this area could unwind the entire extension, with downside targets lining up at 0.07682, 0.05262 and 0.03192. As long as 0.10970 holds, the bearish setup remains valid.
Trade $龙虾 here 👇
2
472
·
--
Bearish
See translation
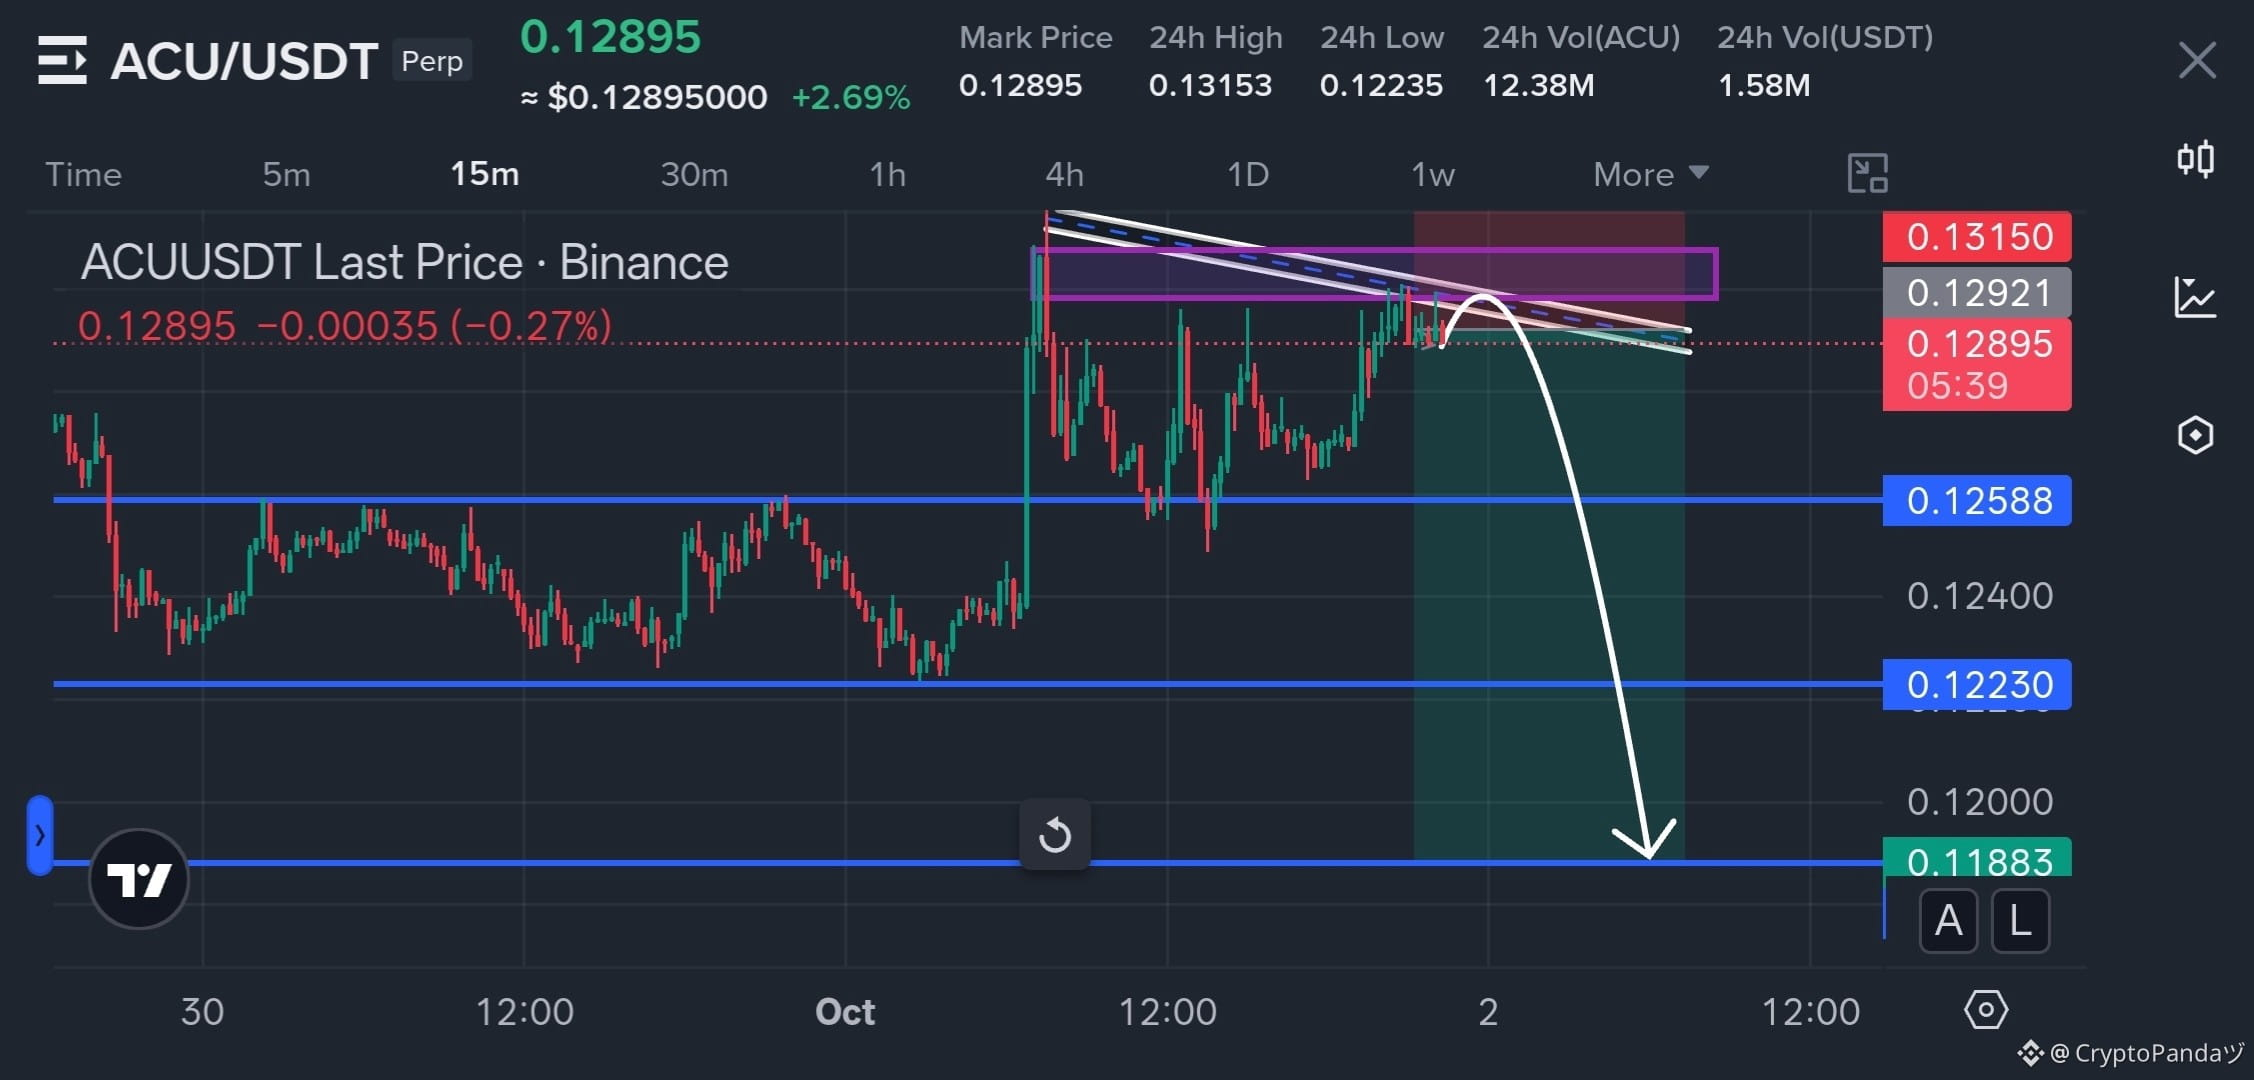
$ACU — Supply Trap Loaded Above 0.12921, Full Collapse Incoming 📉
Trade Plan: Short $ACU
Entry: 0.128 - 0.130
SL: 0.13150
TP: 0.12588 | 0.12230 | 0.11883
Why this Setup?
ACU is trapped beneath the 0.12921 - 0.13150 supply zone while the descending trendline keeps pressing lower. A rejection from this overhead supply could turn the current bounce into a violent flush, with 0.12588 as the first breakdown trigger and deeper liquidity sitting at 0.12230 and 0.11883. As long as 0.13150 holds, the bearish setup remains valid.
Trade $ACU here 👇
{future}(ACUUSDT)
$ACU — Supply Trap Loaded Above 0.12921, Full Collapse Incoming 📉
Trade Plan: Short $ACU
Entry: 0.128 - 0.130
SL: 0.13150
TP: 0.12588 | 0.12230 | 0.11883
Why this Setup?
ACU is trapped beneath the 0.12921 - 0.13150 supply zone while the descending trendline keeps pressing lower. A rejection from this overhead supply could turn the current bounce into a violent flush, with 0.12588 as the first breakdown trigger and deeper liquidity sitting at 0.12230 and 0.11883. As long as 0.13150 holds, the bearish setup remains valid.
Trade $ACU here 👇
Trade Plan: Short $ACU
Entry: 0.128 - 0.130
SL: 0.13150
TP: 0.12588 | 0.12230 | 0.11883
Why this Setup?
ACU is trapped beneath the 0.12921 - 0.13150 supply zone while the descending trendline keeps pressing lower. A rejection from this overhead supply could turn the current bounce into a violent flush, with 0.12588 as the first breakdown trigger and deeper liquidity sitting at 0.12230 and 0.11883. As long as 0.13150 holds, the bearish setup remains valid.
Trade $ACU here 👇
2
178
·
--
Bullish
See translation
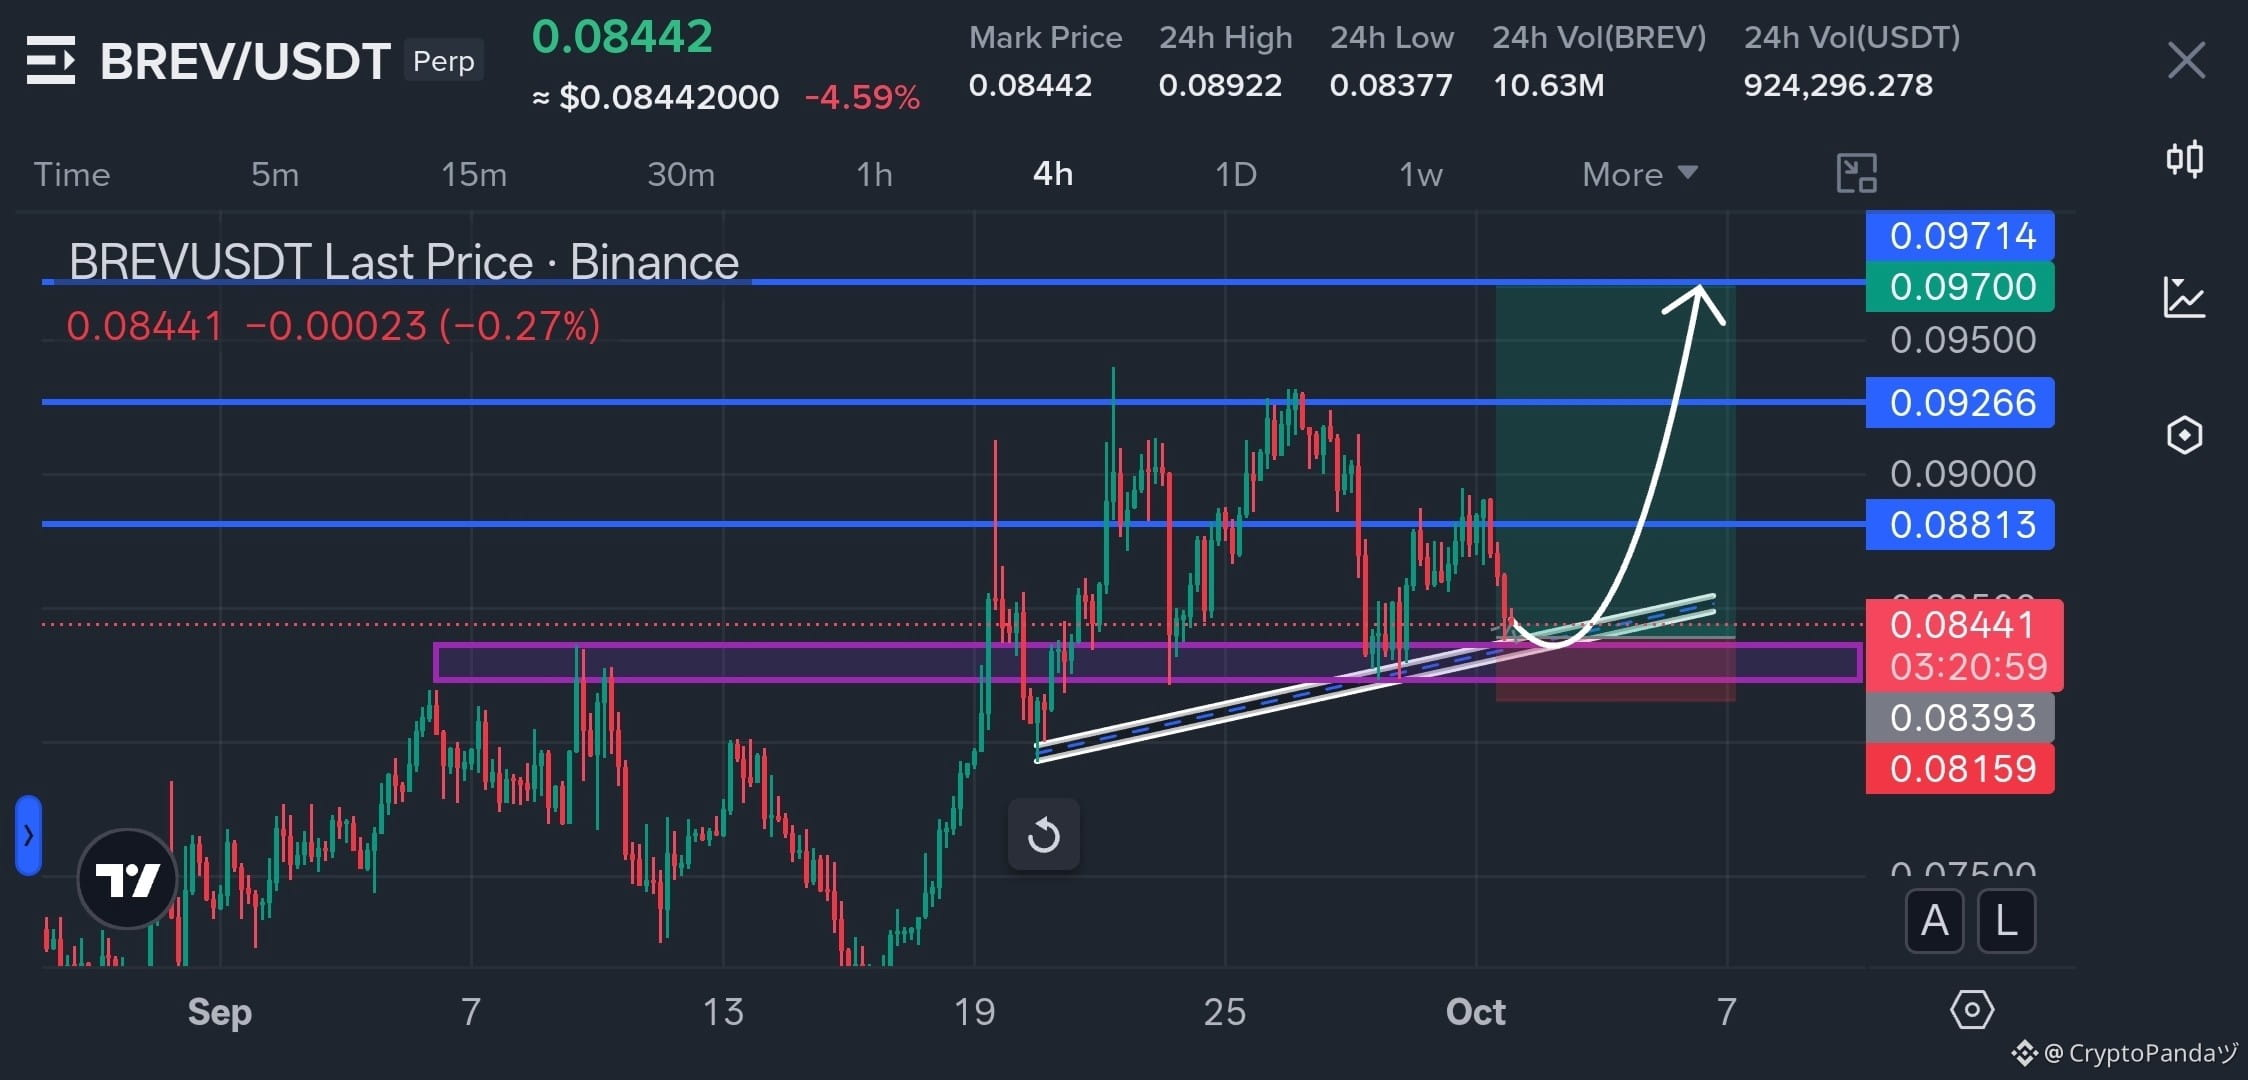
$BREV — Buyers Accumulating The Discount at 0.084 OB, Reversal Loading 📈
Trade Plan: Long $BREV
Entry: 0.083 - 0.085
SL: 0.08159
TP: 0.08813 | 0.09266 | 0.09714
Why this Setup?
BREV is retesting the 0.084 demand area while holding the rising trendline, creating a tight confluence for a potential continuation move. If buyers defend this zone and reclaim 0.08813, the next upside levels are 0.09266 and 0.09714. As long as 0.08159 holds, the bullish setup remains valid.
Trade $BREV here 👇
{future}(BREVUSDT)
$BREV — Buyers Accumulating The Discount at 0.084 OB, Reversal Loading 📈
Trade Plan: Long $BREV
Entry: 0.083 - 0.085
SL: 0.08159
TP: 0.08813 | 0.09266 | 0.09714
Why this Setup?
BREV is retesting the 0.084 demand area while holding the rising trendline, creating a tight confluence for a potential continuation move. If buyers defend this zone and reclaim 0.08813, the next upside levels are 0.09266 and 0.09714. As long as 0.08159 holds, the bullish setup remains valid.
Trade $BREV here 👇
Trade Plan: Long $BREV
Entry: 0.083 - 0.085
SL: 0.08159
TP: 0.08813 | 0.09266 | 0.09714
Why this Setup?
BREV is retesting the 0.084 demand area while holding the rising trendline, creating a tight confluence for a potential continuation move. If buyers defend this zone and reclaim 0.08813, the next upside levels are 0.09266 and 0.09714. As long as 0.08159 holds, the bullish setup remains valid.
Trade $BREV here 👇
3
221
·
--
Bullish
See translation
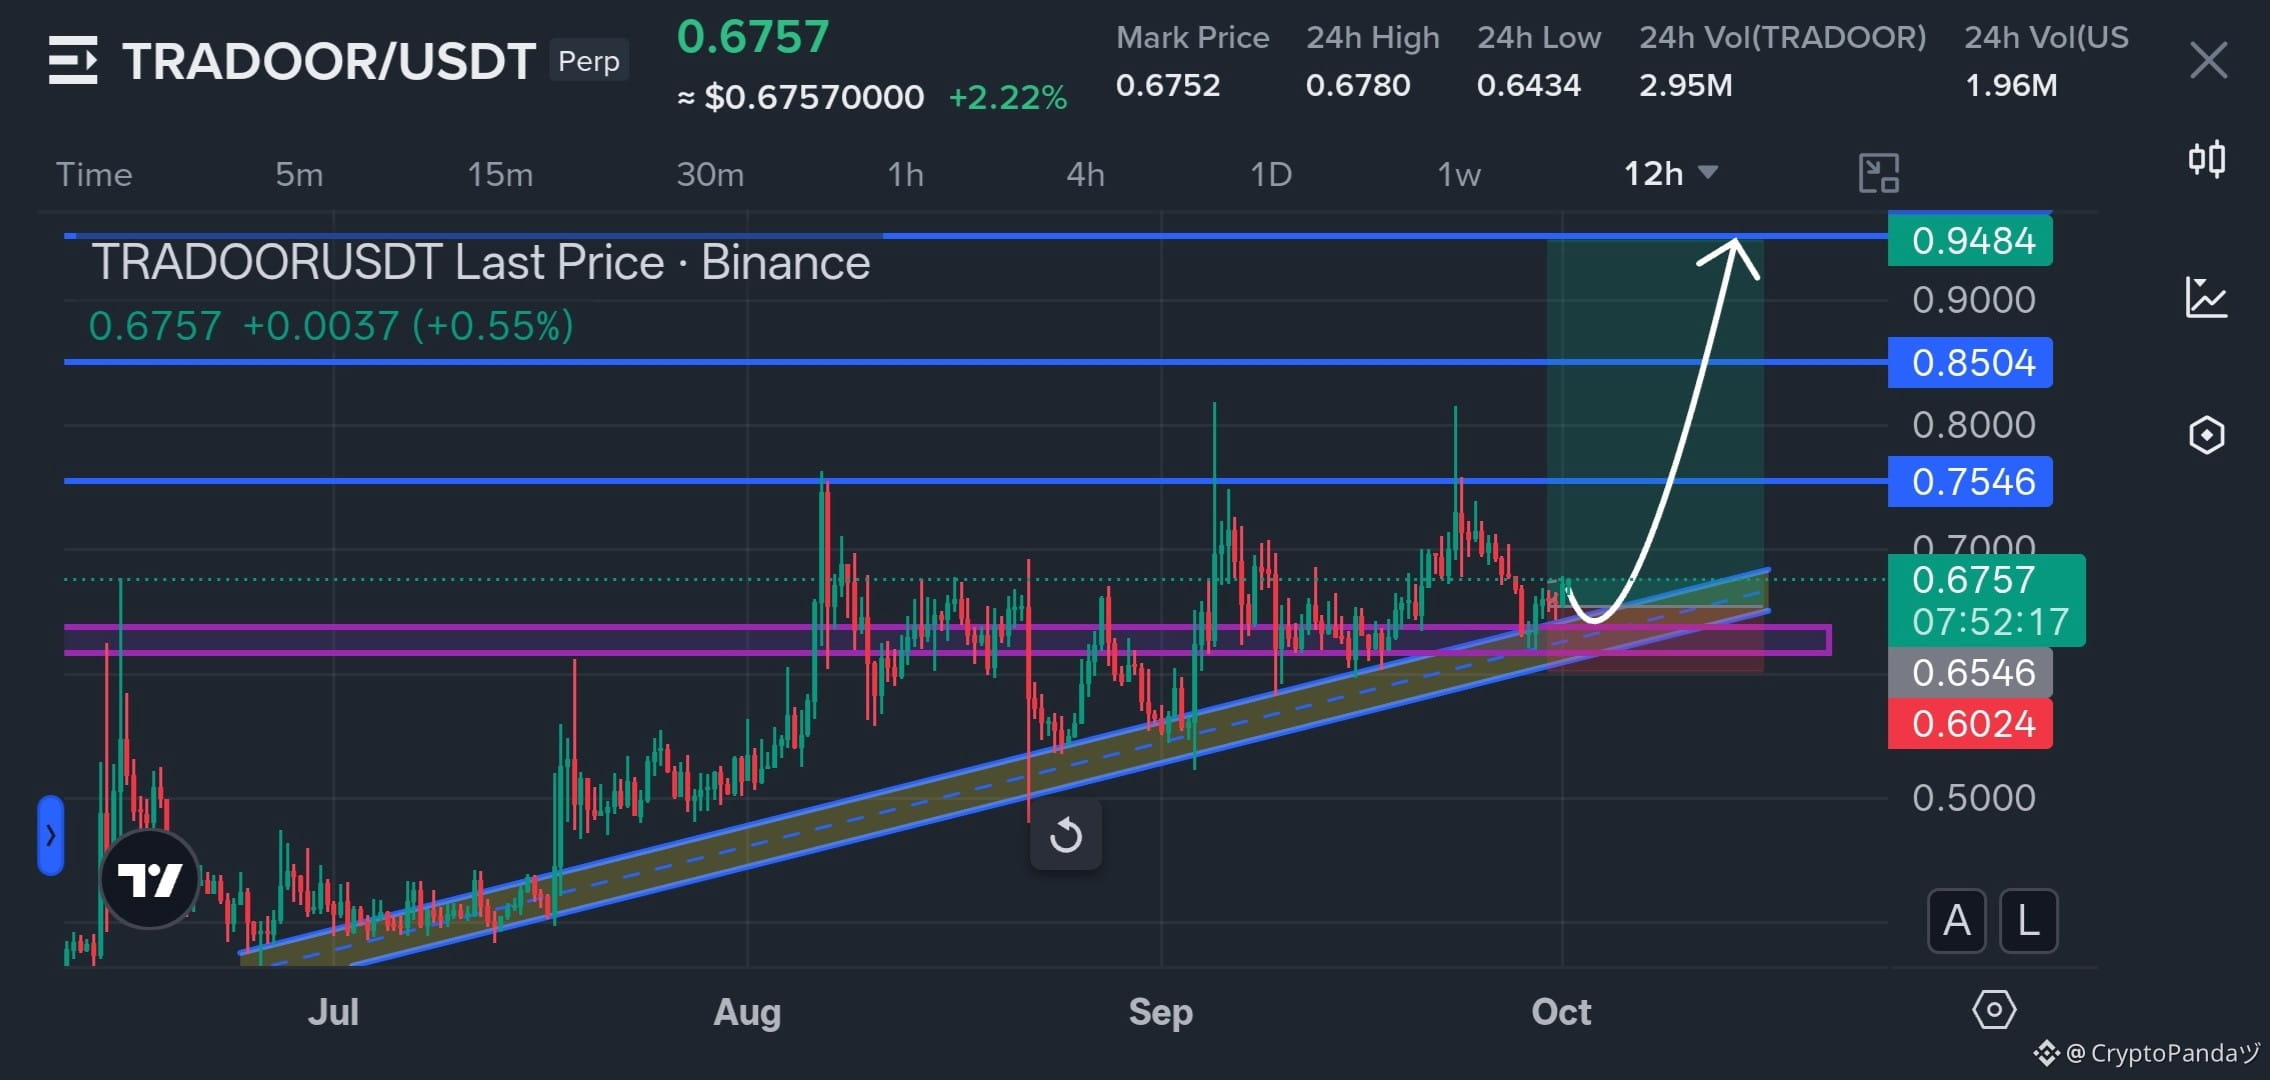
$TRADOOR — Ascending Channel Support At 0.6546, About To Explode 📈
Trade Plan: Long $TRADOOR
Entry: 0.65 - 0.68
SL: 0.6024
TP: 0.7546 | 0.8504 | 0.9484
Why this Setup?
TRADOOR is coiling above the rising trendline while repeatedly holding the 0.65 - 0.68 demand area. The structure leaves price pressing directly beneath 0.7546 resistance; a clean reclaim of this level could open the next expansion toward 0.8504 and 0.9484. As long as 0.6024 holds, the bullish setup remains valid.
Trade $TRADOOR here 👇
{future}(TRADOORUSDT)
$TRADOOR — Ascending Channel Support At 0.6546, About To Explode 📈
Trade Plan: Long $TRADOOR
Entry: 0.65 - 0.68
SL: 0.6024
TP: 0.7546 | 0.8504 | 0.9484
Why this Setup?
TRADOOR is coiling above the rising trendline while repeatedly holding the 0.65 - 0.68 demand area. The structure leaves price pressing directly beneath 0.7546 resistance; a clean reclaim of this level could open the next expansion toward 0.8504 and 0.9484. As long as 0.6024 holds, the bullish setup remains valid.
Trade $TRADOOR here 👇
Trade Plan: Long $TRADOOR
Entry: 0.65 - 0.68
SL: 0.6024
TP: 0.7546 | 0.8504 | 0.9484
Why this Setup?
TRADOOR is coiling above the rising trendline while repeatedly holding the 0.65 - 0.68 demand area. The structure leaves price pressing directly beneath 0.7546 resistance; a clean reclaim of this level could open the next expansion toward 0.8504 and 0.9484. As long as 0.6024 holds, the bullish setup remains valid.
Trade $TRADOOR here 👇
2
149
·
--
Bearish
See translation
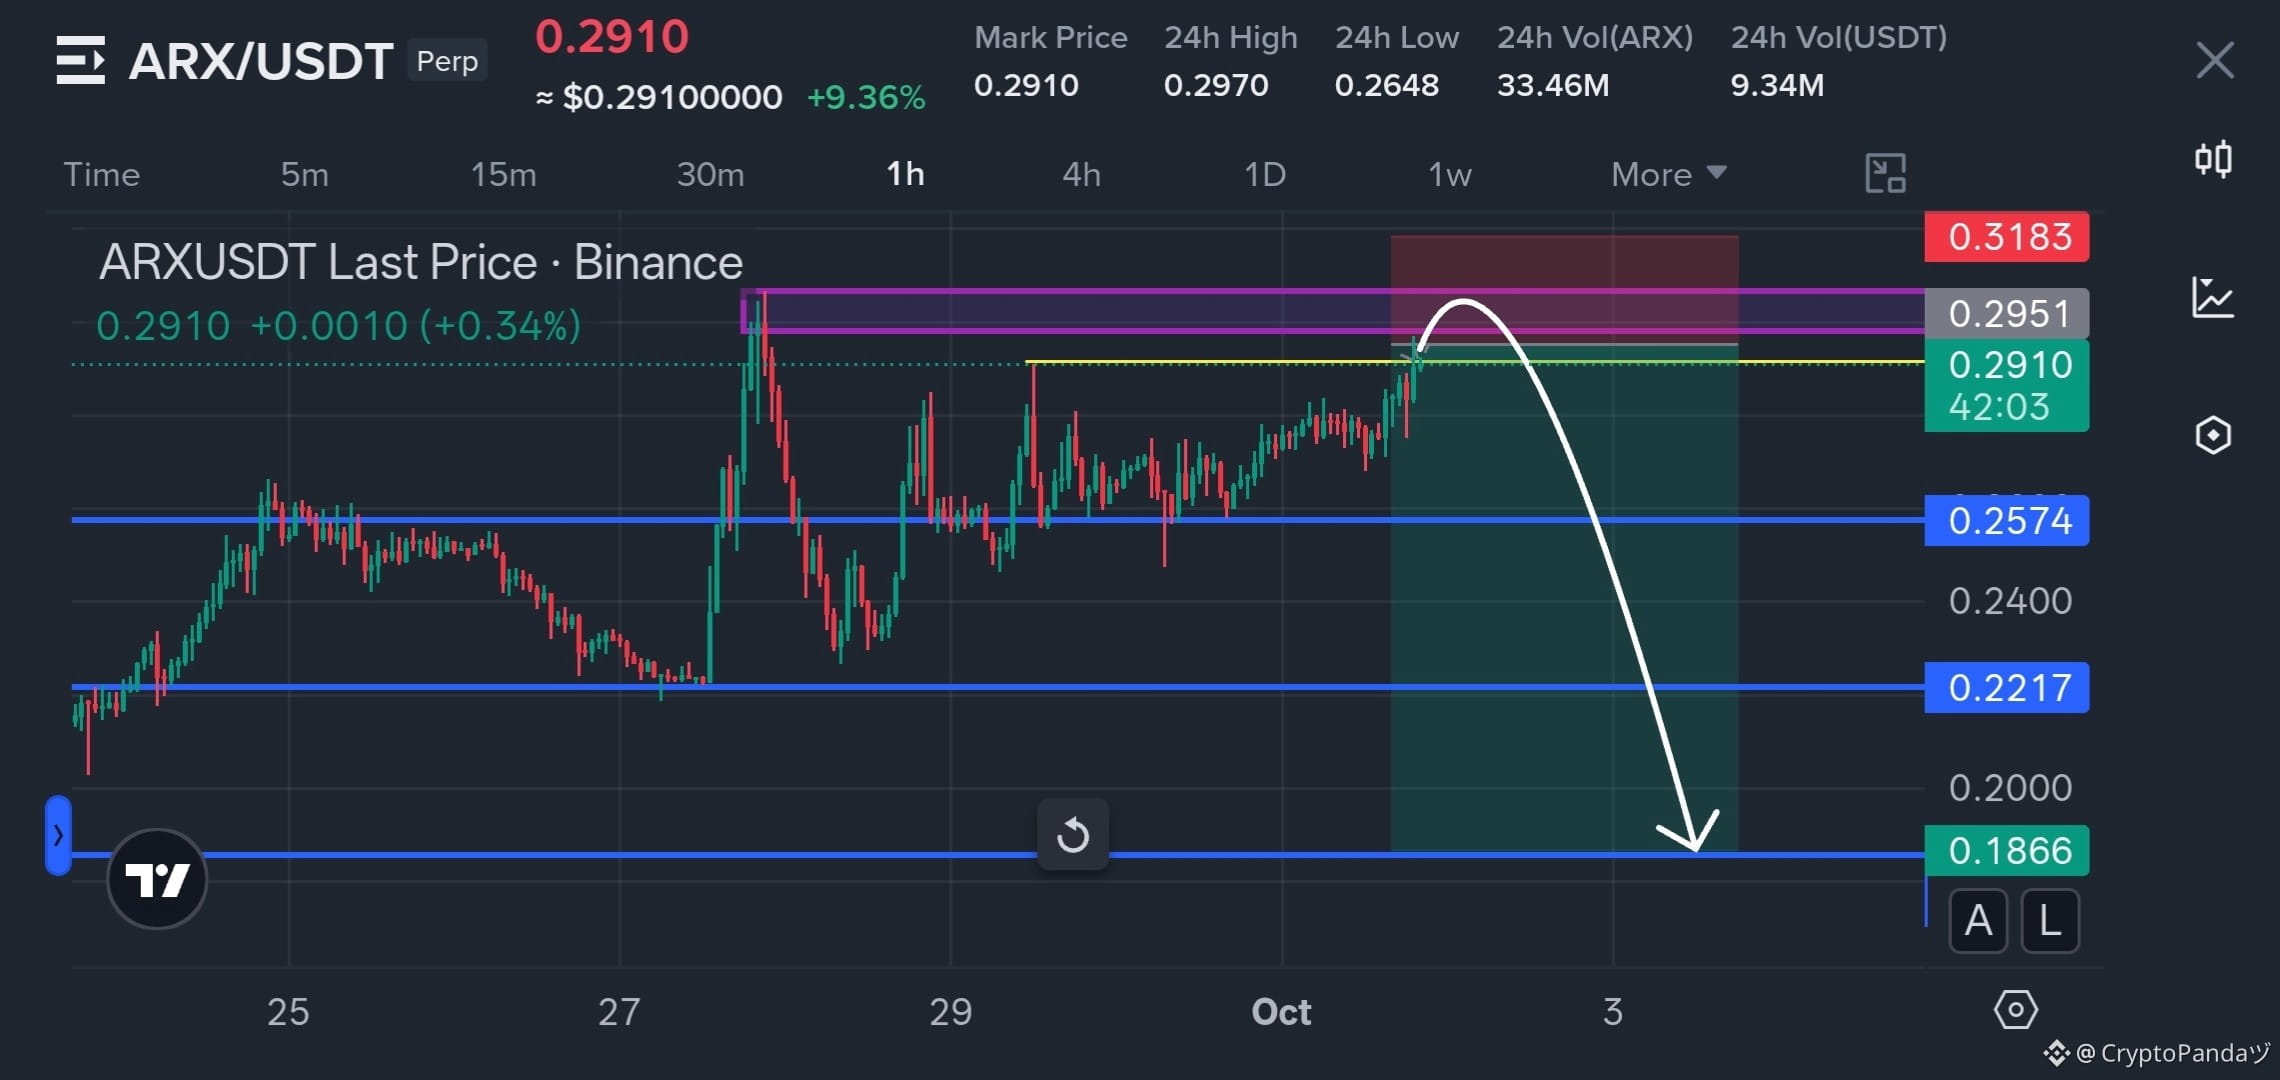
$ARX — Highs Getting Heavy Near 0.2951 Supply, Gravity Pull Loading 📉
Trade Plan: Short $ARX
Entry: 0.29 - 0.30
SL: 0.3183
TP: 0.2574 | 0.2217 | 0.1866
Why this Setup?
ARX is pressing into the upper supply band around 0.2951 after a strong upside run, showing signs of exhaustion at the highs. If this rejection gains momentum, the move could unwind through 0.2574 and 0.2217 before reaching the deeper 0.1866 target. As long as 0.3183 holds, the bearish setup remains valid.
Trade $ARX here 👇
{future}(ARXUSDT)
$ARX — Highs Getting Heavy Near 0.2951 Supply, Gravity Pull Loading 📉
Trade Plan: Short $ARX
Entry: 0.29 - 0.30
SL: 0.3183
TP: 0.2574 | 0.2217 | 0.1866
Why this Setup?
ARX is pressing into the upper supply band around 0.2951 after a strong upside run, showing signs of exhaustion at the highs. If this rejection gains momentum, the move could unwind through 0.2574 and 0.2217 before reaching the deeper 0.1866 target. As long as 0.3183 holds, the bearish setup remains valid.
Trade $ARX here 👇
Trade Plan: Short $ARX
Entry: 0.29 - 0.30
SL: 0.3183
TP: 0.2574 | 0.2217 | 0.1866
Why this Setup?
ARX is pressing into the upper supply band around 0.2951 after a strong upside run, showing signs of exhaustion at the highs. If this rejection gains momentum, the move could unwind through 0.2574 and 0.2217 before reaching the deeper 0.1866 target. As long as 0.3183 holds, the bearish setup remains valid.
Trade $ARX here 👇
3
203
·
--
Bearish
See translation
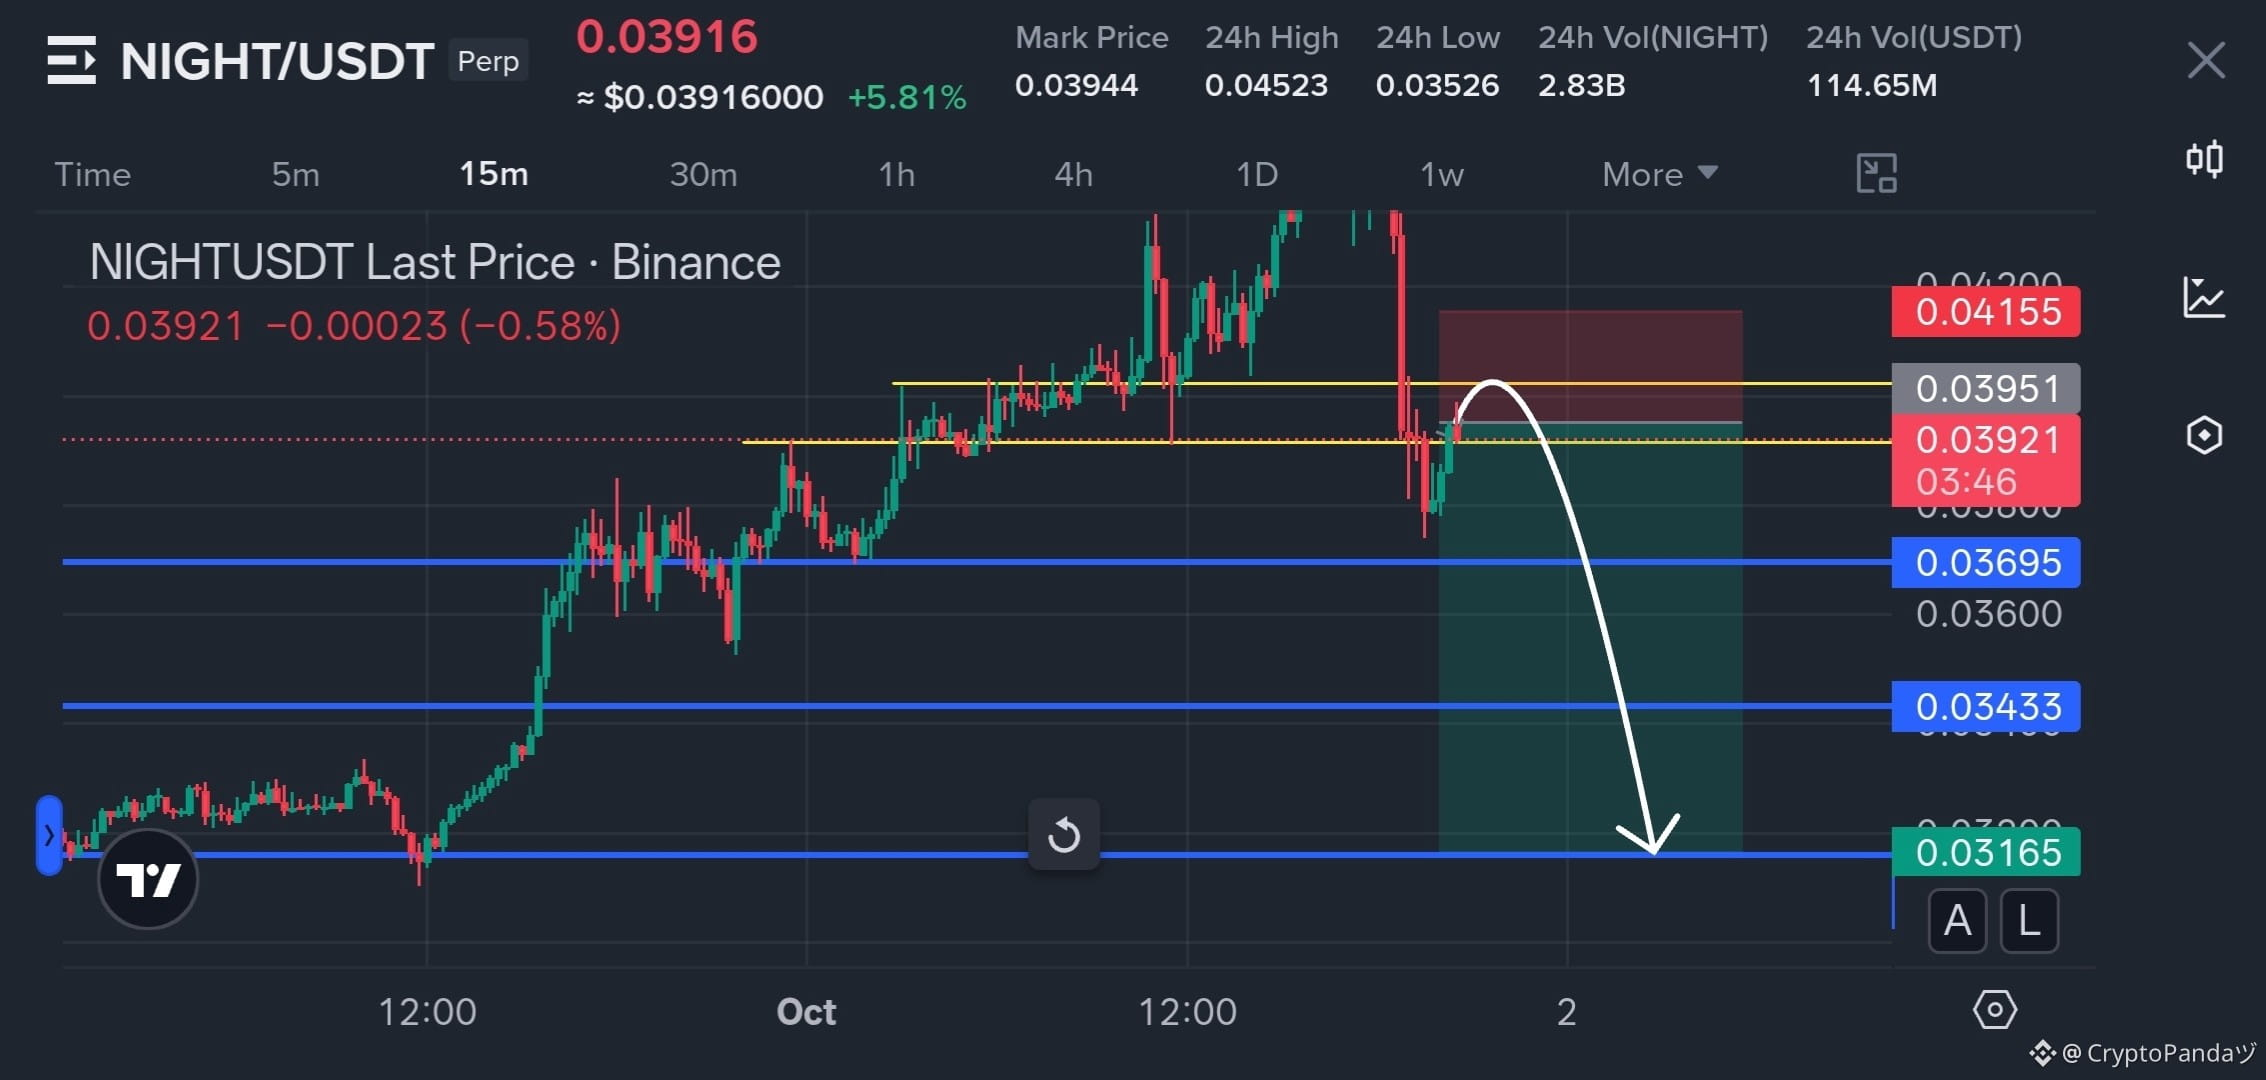
$NIGHT — Retest Rejection Below 0.03951 Resistance, Breakdown Loading Soon 📉
Trade Plan: Short $NIGHT
Entry: 0.039 - 0.040
SL: 0.04155
TP: 0.03695 | 0.03433 | 0.03165
Why this Setup?
NIGHT suffered a sharp rejection from the highs and is now struggling to reclaim the 0.03951 resistance zone. The current structure shows a potential breakdown-retest setup, with sellers defending the reclaimed resistance area. A rejection here could drive price toward 0.03695, followed by 0.03433 and 0.03165. As long as 0.04155 holds, the bearish setup remains valid.
Trade $NIGHT here 👇
{future}(NIGHTUSDT)
$NIGHT — Retest Rejection Below 0.03951 Resistance, Breakdown Loading Soon 📉
Trade Plan: Short $NIGHT
Entry: 0.039 - 0.040
SL: 0.04155
TP: 0.03695 | 0.03433 | 0.03165
Why this Setup?
NIGHT suffered a sharp rejection from the highs and is now struggling to reclaim the 0.03951 resistance zone. The current structure shows a potential breakdown-retest setup, with sellers defending the reclaimed resistance area. A rejection here could drive price toward 0.03695, followed by 0.03433 and 0.03165. As long as 0.04155 holds, the bearish setup remains valid.
Trade $NIGHT here 👇
Trade Plan: Short $NIGHT
Entry: 0.039 - 0.040
SL: 0.04155
TP: 0.03695 | 0.03433 | 0.03165
Why this Setup?
NIGHT suffered a sharp rejection from the highs and is now struggling to reclaim the 0.03951 resistance zone. The current structure shows a potential breakdown-retest setup, with sellers defending the reclaimed resistance area. A rejection here could drive price toward 0.03695, followed by 0.03433 and 0.03165. As long as 0.04155 holds, the bearish setup remains valid.
Trade $NIGHT here 👇
2
180
·
--
Bearish
See translation
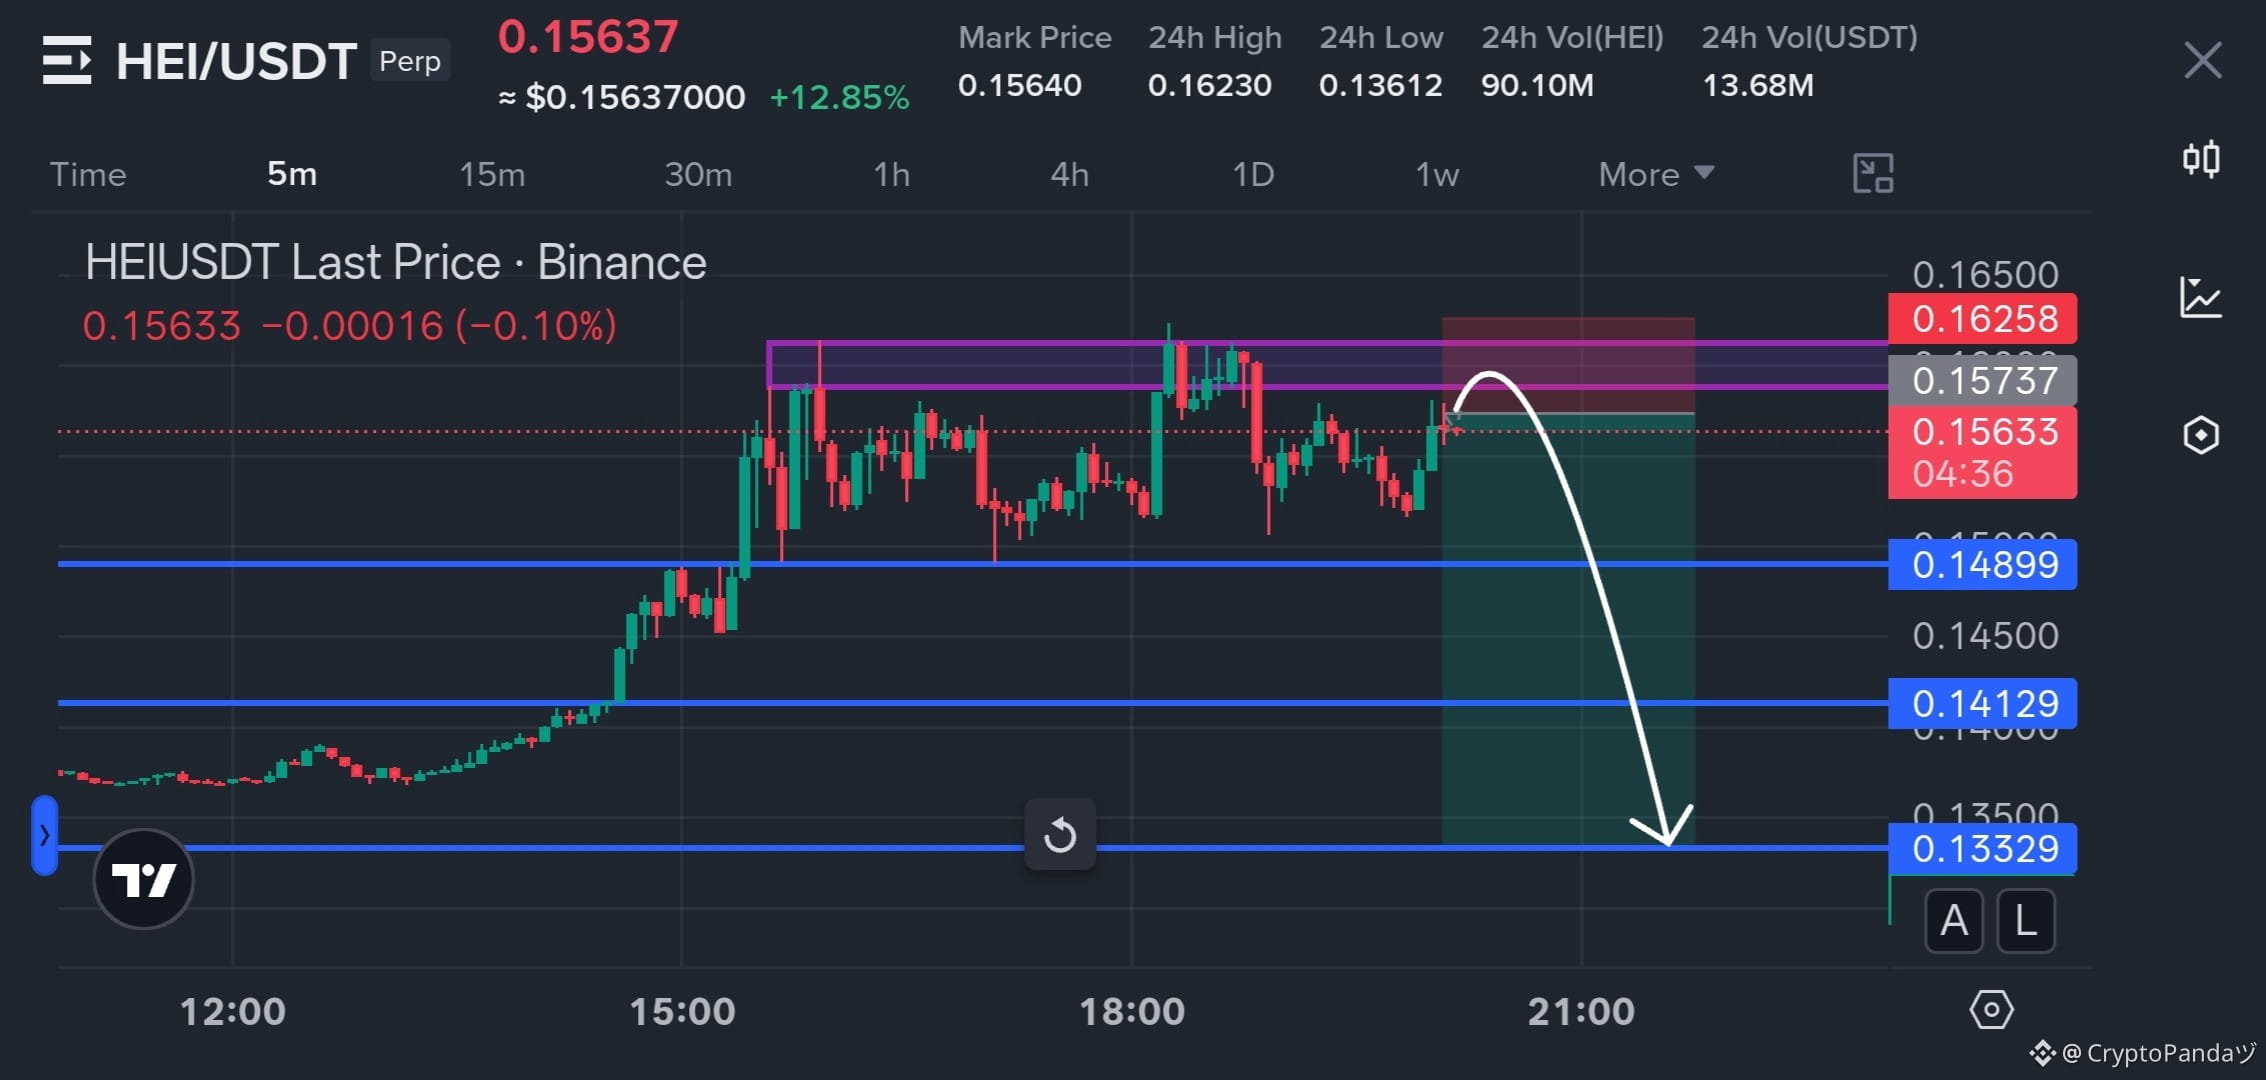
$HEI — Failed Push Into 0.15737 Supply, Reversal Igniting Soon 📉
Trade Plan: Short $HEI
Entry: 0.155 - 0.158
SL: 0.16258
TP: 0.14899 | 0.14129 | 0.13329
Why this Setup?
HEI is repeatedly struggling beneath the 0.15737 - 0.16258 supply band after failing to sustain the upside push. A rejection from this overhead zone could trigger a liquidity unwind through 0.14899, followed by deeper moves toward 0.14129 and 0.13329. As long as 0.16258 holds, the bearish setup remains valid.
Trade $HEI here 👇
{future}(HEIUSDT)
$HEI — Failed Push Into 0.15737 Supply, Reversal Igniting Soon 📉
Trade Plan: Short $HEI
Entry: 0.155 - 0.158
SL: 0.16258
TP: 0.14899 | 0.14129 | 0.13329
Why this Setup?
HEI is repeatedly struggling beneath the 0.15737 - 0.16258 supply band after failing to sustain the upside push. A rejection from this overhead zone could trigger a liquidity unwind through 0.14899, followed by deeper moves toward 0.14129 and 0.13329. As long as 0.16258 holds, the bearish setup remains valid.
Trade $HEI here 👇
Trade Plan: Short $HEI
Entry: 0.155 - 0.158
SL: 0.16258
TP: 0.14899 | 0.14129 | 0.13329
Why this Setup?
HEI is repeatedly struggling beneath the 0.15737 - 0.16258 supply band after failing to sustain the upside push. A rejection from this overhead zone could trigger a liquidity unwind through 0.14899, followed by deeper moves toward 0.14129 and 0.13329. As long as 0.16258 holds, the bearish setup remains valid.
Trade $HEI here 👇
4
176
·
--
Bullish
See translation
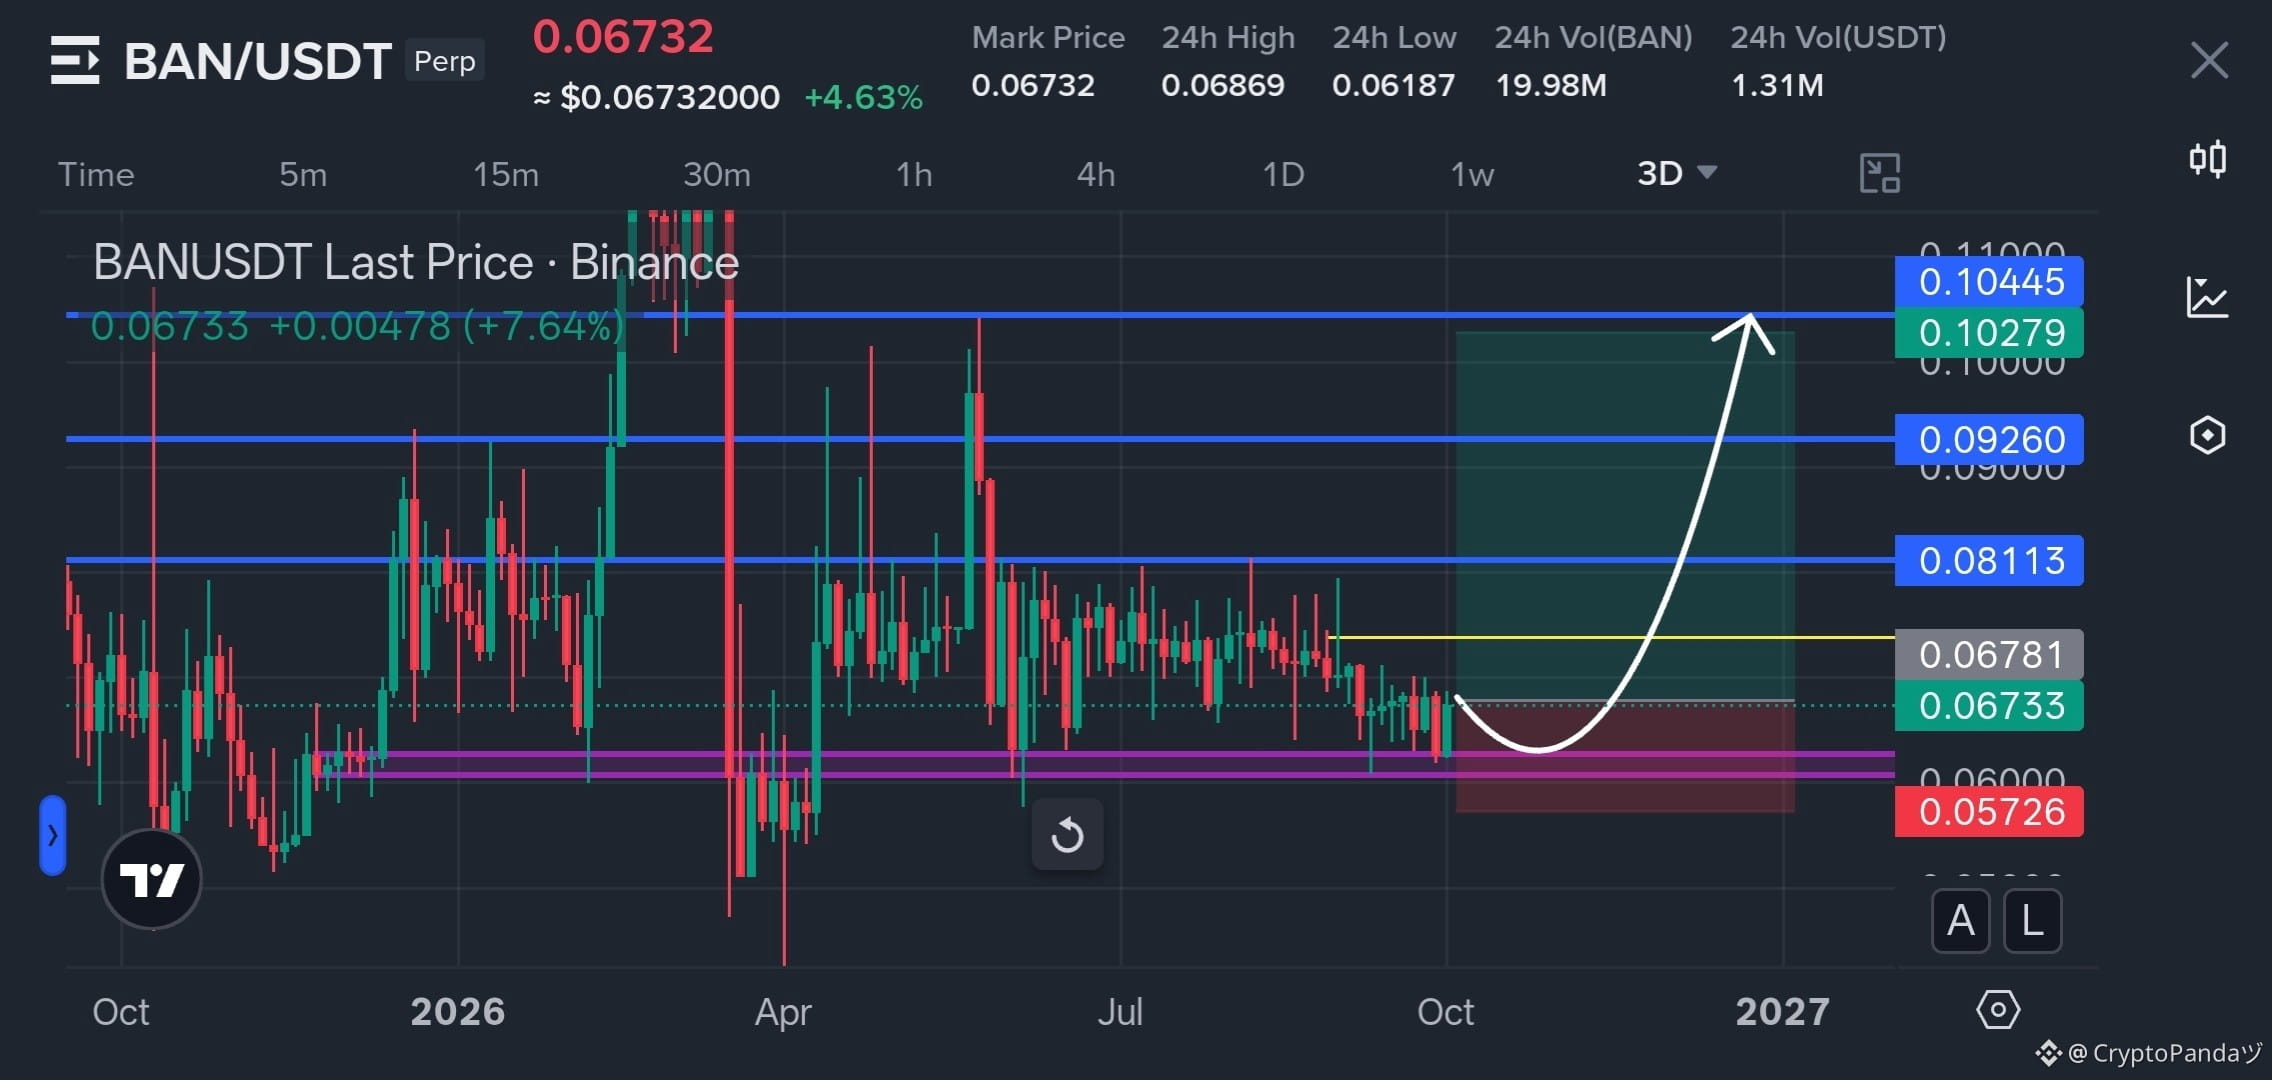
$BAN — Weeks Of Coil Above 0.06 Demand, Rocket Ignition Loading 📈
Trade Plan: Long $BAN
Entry: 0.062 - 0.068
SL: 0.05726
TP: 0.08113 | 0.09260 | 0.10445
Why this Setup?
BAN is tightly coiled above the 0.06 demand zone after an extended period of compression, with the 0.06781 area acting as the immediate trigger zone. A breakout from this long-held range could unleash a sharp expansion toward 0.08113, 0.09260 and 0.10445. As long as 0.05726 holds, the bullish setup remains valid.
Trade $BAN here 👇
{future}(BANUSDT)
$BAN — Weeks Of Coil Above 0.06 Demand, Rocket Ignition Loading 📈
Trade Plan: Long $BAN
Entry: 0.062 - 0.068
SL: 0.05726
TP: 0.08113 | 0.09260 | 0.10445
Why this Setup?
BAN is tightly coiled above the 0.06 demand zone after an extended period of compression, with the 0.06781 area acting as the immediate trigger zone. A breakout from this long-held range could unleash a sharp expansion toward 0.08113, 0.09260 and 0.10445. As long as 0.05726 holds, the bullish setup remains valid.
Trade $BAN here 👇
Trade Plan: Long $BAN
Entry: 0.062 - 0.068
SL: 0.05726
TP: 0.08113 | 0.09260 | 0.10445
Why this Setup?
BAN is tightly coiled above the 0.06 demand zone after an extended period of compression, with the 0.06781 area acting as the immediate trigger zone. A breakout from this long-held range could unleash a sharp expansion toward 0.08113, 0.09260 and 0.10445. As long as 0.05726 holds, the bullish setup remains valid.
Trade $BAN here 👇
2
199
·
--
Bullish
See translation
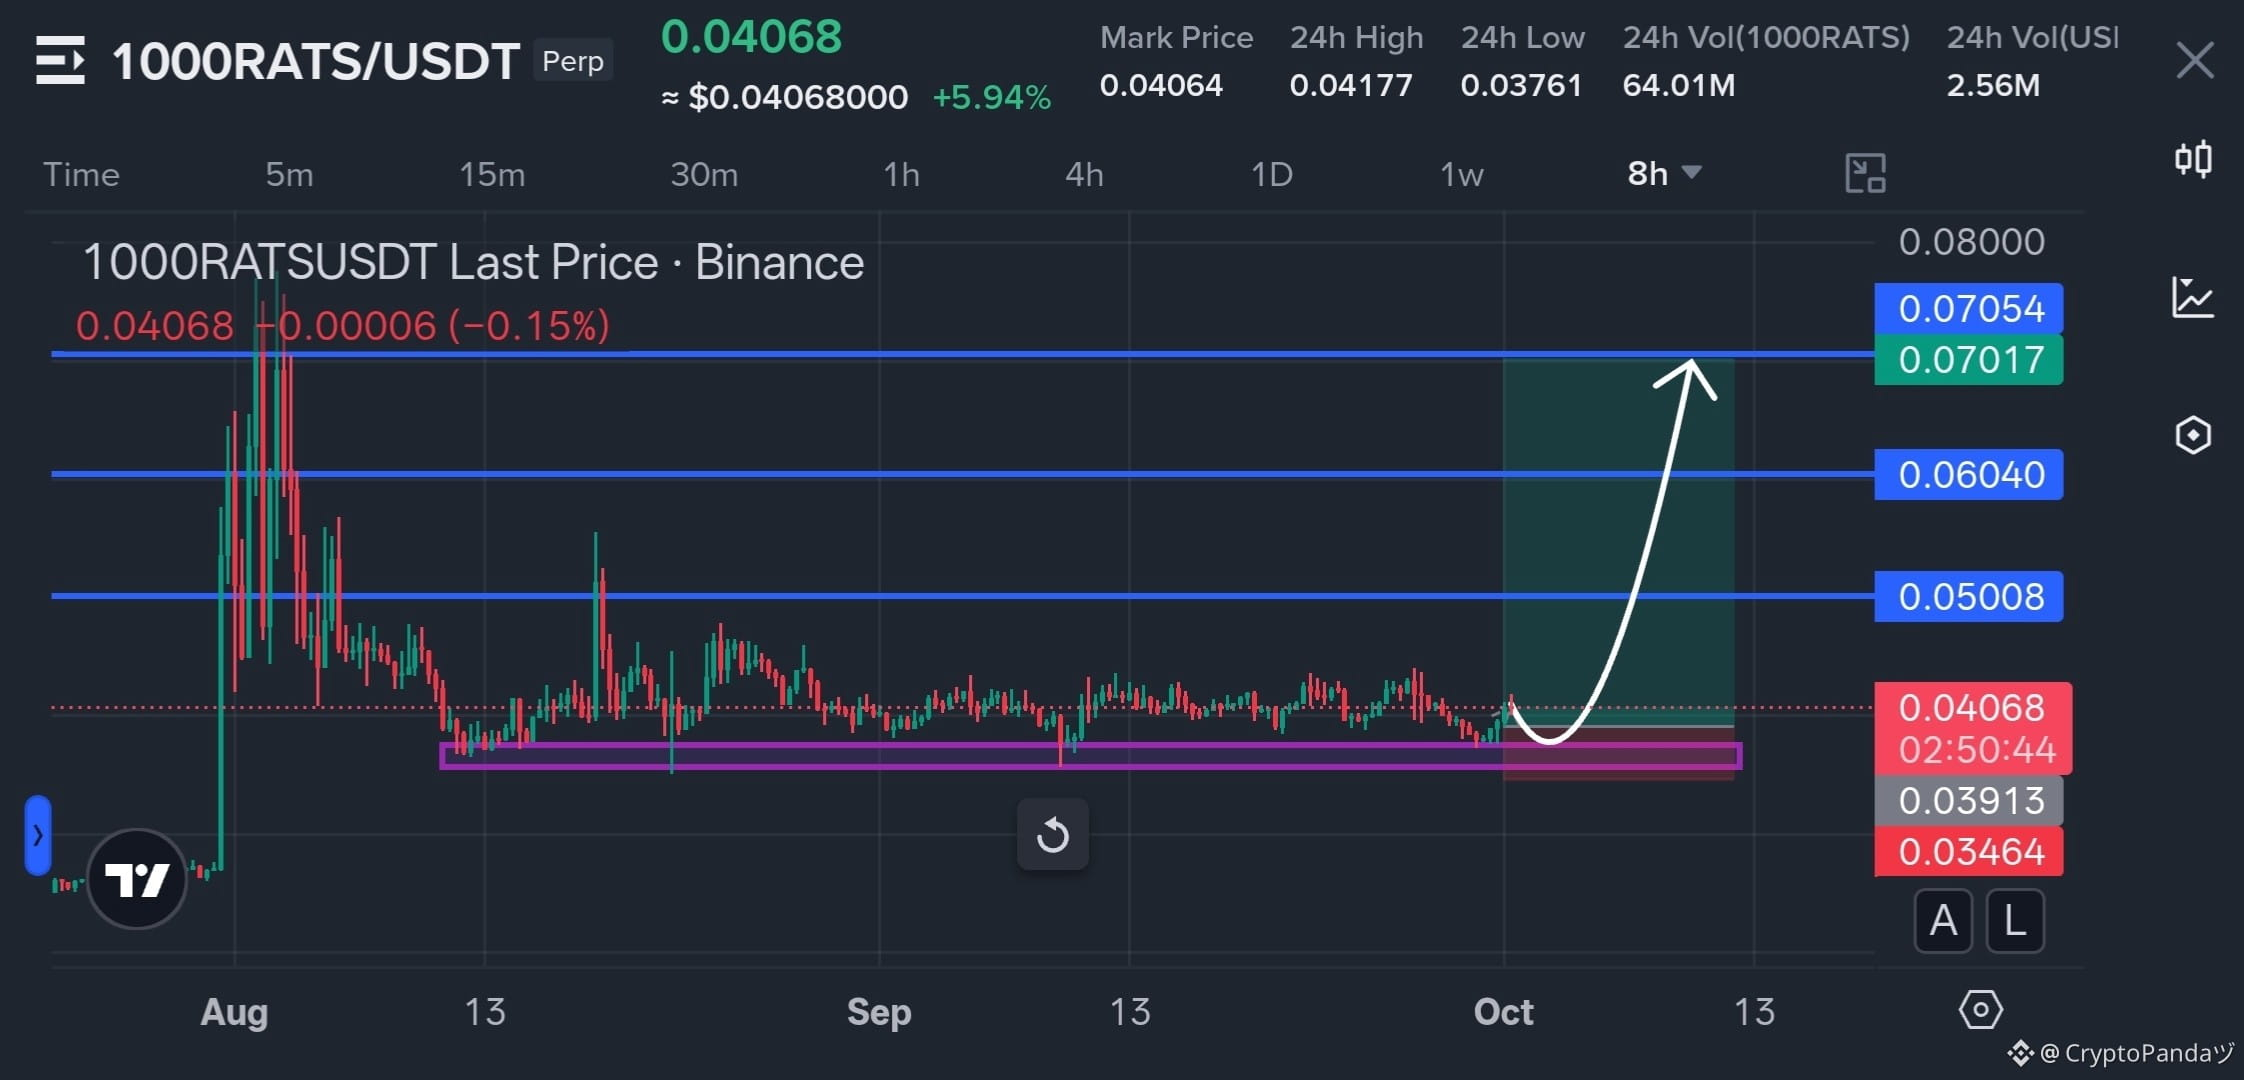
$1000RATS — Long Base Holding Near 0.03913 Support, Expansion Incoming 📈
Trade Plan: Long $1000RATS
Entry: 0.039 - 0.041
SL: 0.03464
TP: 0.05008 | 0.06040 | 0.07054
Why this Setup?
1000RATS has spent weeks compressing above the 0.03913 support zone, forming a tight accumulation base after the earlier selloff. A reclaim from this range could trigger a larger expansion, with 0.05008 as the first major breakout level followed by 0.06040 and 0.07054. As long as 0.03464 holds, the bullish setup remains valid.
Trade $1000RATS here 👇
{future}(1000RATSUSDT)
$1000RATS — Long Base Holding Near 0.03913 Support, Expansion Incoming 📈
Trade Plan: Long $1000RATS
Entry: 0.039 - 0.041
SL: 0.03464
TP: 0.05008 | 0.06040 | 0.07054
Why this Setup?
1000RATS has spent weeks compressing above the 0.03913 support zone, forming a tight accumulation base after the earlier selloff. A reclaim from this range could trigger a larger expansion, with 0.05008 as the first major breakout level followed by 0.06040 and 0.07054. As long as 0.03464 holds, the bullish setup remains valid.
Trade $1000RATS here 👇
Trade Plan: Long $1000RATS
Entry: 0.039 - 0.041
SL: 0.03464
TP: 0.05008 | 0.06040 | 0.07054
Why this Setup?
1000RATS has spent weeks compressing above the 0.03913 support zone, forming a tight accumulation base after the earlier selloff. A reclaim from this range could trigger a larger expansion, with 0.05008 as the first major breakout level followed by 0.06040 and 0.07054. As long as 0.03464 holds, the bullish setup remains valid.
Trade $1000RATS here 👇
3
226
·
--
Bearish
See translation
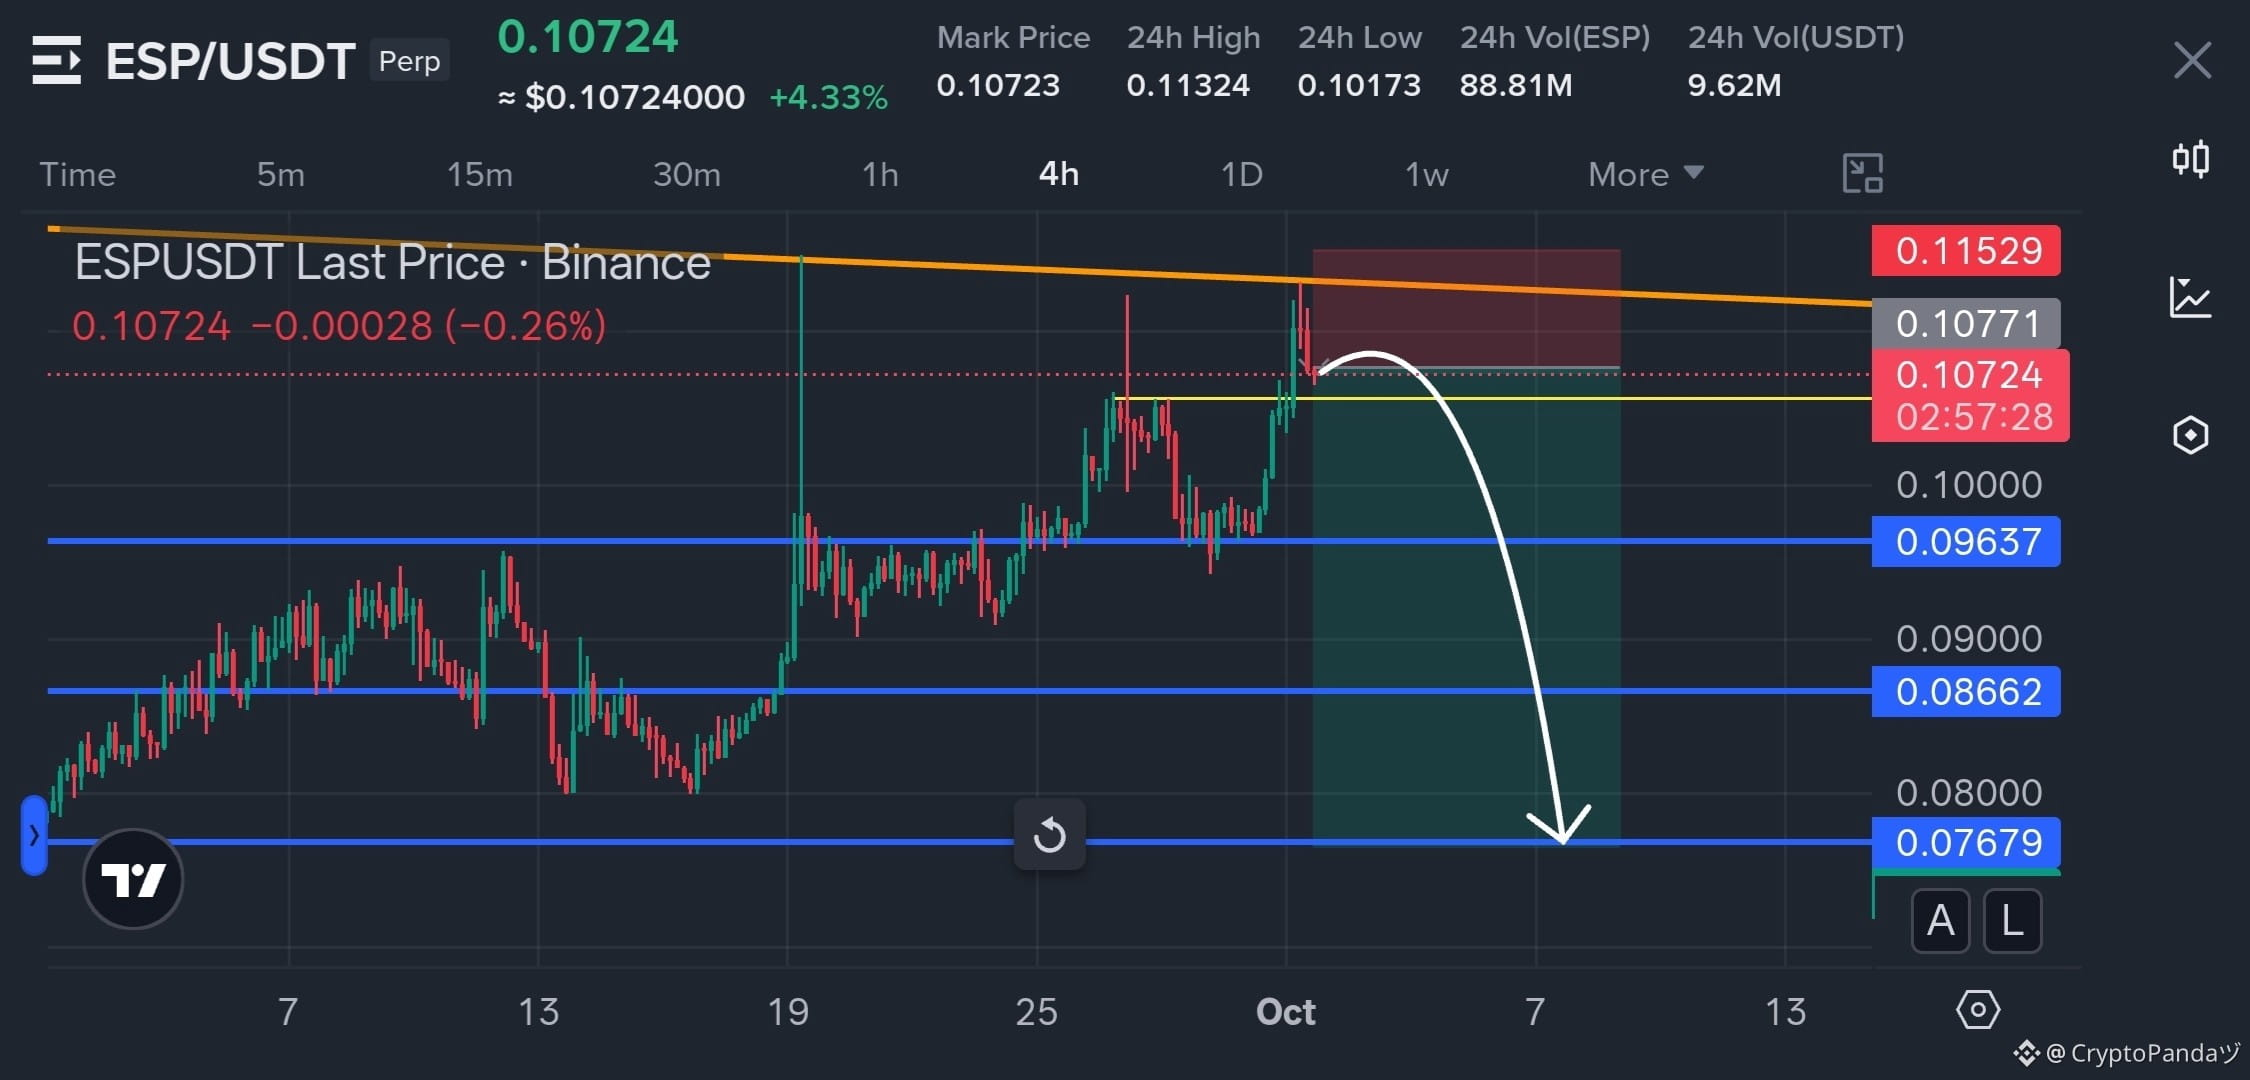
$ESP — Rejected Beneath Falling Trendline, Liquidity Flush Setup Loading 📉
Trade Plan: Short $ESP
Entry: 0.105 - 0.110
SL: 0.11529
TP: 0.09637 | 0.08662 | 0.07679
Why this Setup?
ESP is pressing into a major overhead supply pocket beneath the descending trendline, with the 0.1077 area acting as the immediate rejection zone. A failure to reclaim this structure could trigger a cascading flush through 0.09637, then open the path toward 0.08662 and 0.07679. As long as 0.11529 holds, the bearish setup remains valid.
Trade $ESP here 👇
{future}(ESPUSDT)
$ESP — Rejected Beneath Falling Trendline, Liquidity Flush Setup Loading 📉
Trade Plan: Short $ESP
Entry: 0.105 - 0.110
SL: 0.11529
TP: 0.09637 | 0.08662 | 0.07679
Why this Setup?
ESP is pressing into a major overhead supply pocket beneath the descending trendline, with the 0.1077 area acting as the immediate rejection zone. A failure to reclaim this structure could trigger a cascading flush through 0.09637, then open the path toward 0.08662 and 0.07679. As long as 0.11529 holds, the bearish setup remains valid.
Trade $ESP here 👇
Trade Plan: Short $ESP
Entry: 0.105 - 0.110
SL: 0.11529
TP: 0.09637 | 0.08662 | 0.07679
Why this Setup?
ESP is pressing into a major overhead supply pocket beneath the descending trendline, with the 0.1077 area acting as the immediate rejection zone. A failure to reclaim this structure could trigger a cascading flush through 0.09637, then open the path toward 0.08662 and 0.07679. As long as 0.11529 holds, the bearish setup remains valid.
Trade $ESP here 👇
2
127
·
--
Bullish
30D trade $龙虾 81.8K USDT
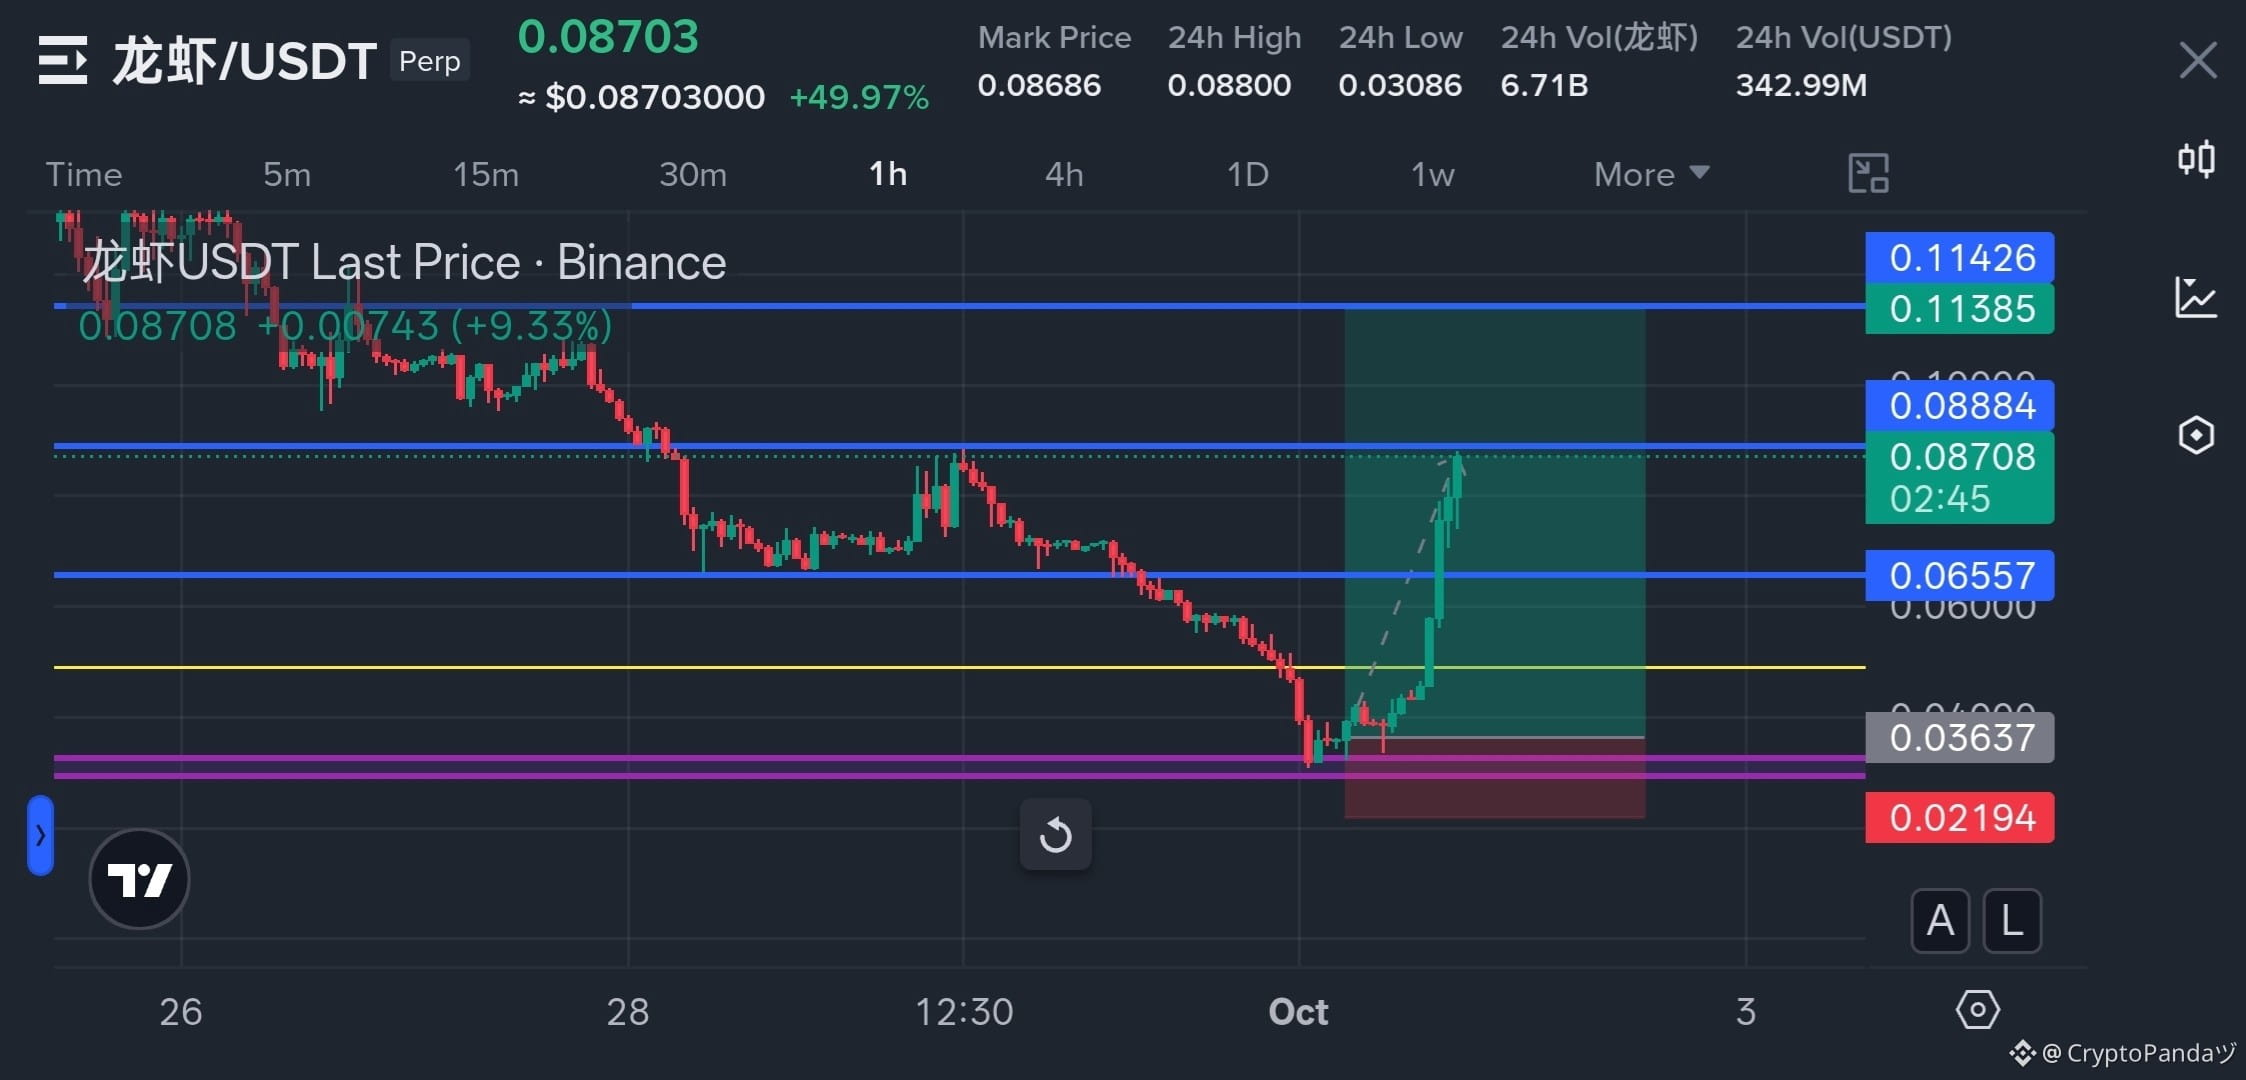
$龙虾 TP 2 Done 🚀 Easy Run 🙂↔️
{future}(龙虾USDT)
$龙虾 TP 2 Done 🚀 Easy Run 🙂↔️
CryptoPandaヅ
·
--
Bullish$龙虾 — 6H Flush Into 0.03763 Demand, Reversal Path Loading 📈
Trade Plan: Long $龙虾
Entry: 0.038 - 0.042
SL: 0.031974
TP: 0.06557 | 0.08884 | 0.11385
Why this Setup?
龙虾 is now pressing into the 0.03763 demand base after 6 hours of straight flushing, where buyers previously stepped in. The chart shows a clear recovery path above this zone, with 0.06557 as the first major reclaim followed by 0.08884 and 0.11385. Holding the demand area could turn this deep pullback into a strong reversal setup. As long as 0.031974 holds, the bullish setup remains valid.
Trade $龙虾 here 👇
Trade Plan: Long $龙虾
Entry: 0.038 - 0.042
SL: 0.031974
TP: 0.06557 | 0.08884 | 0.11385
Why this Setup?
龙虾 is now pressing into the 0.03763 demand base after 6 hours of straight flushing, where buyers previously stepped in. The chart shows a clear recovery path above this zone, with 0.06557 as the first major reclaim followed by 0.08884 and 0.11385. Holding the demand area could turn this deep pullback into a strong reversal setup. As long as 0.031974 holds, the bullish setup remains valid.
Trade $龙虾 here 👇
2
810
·
--
Bearish
See translation
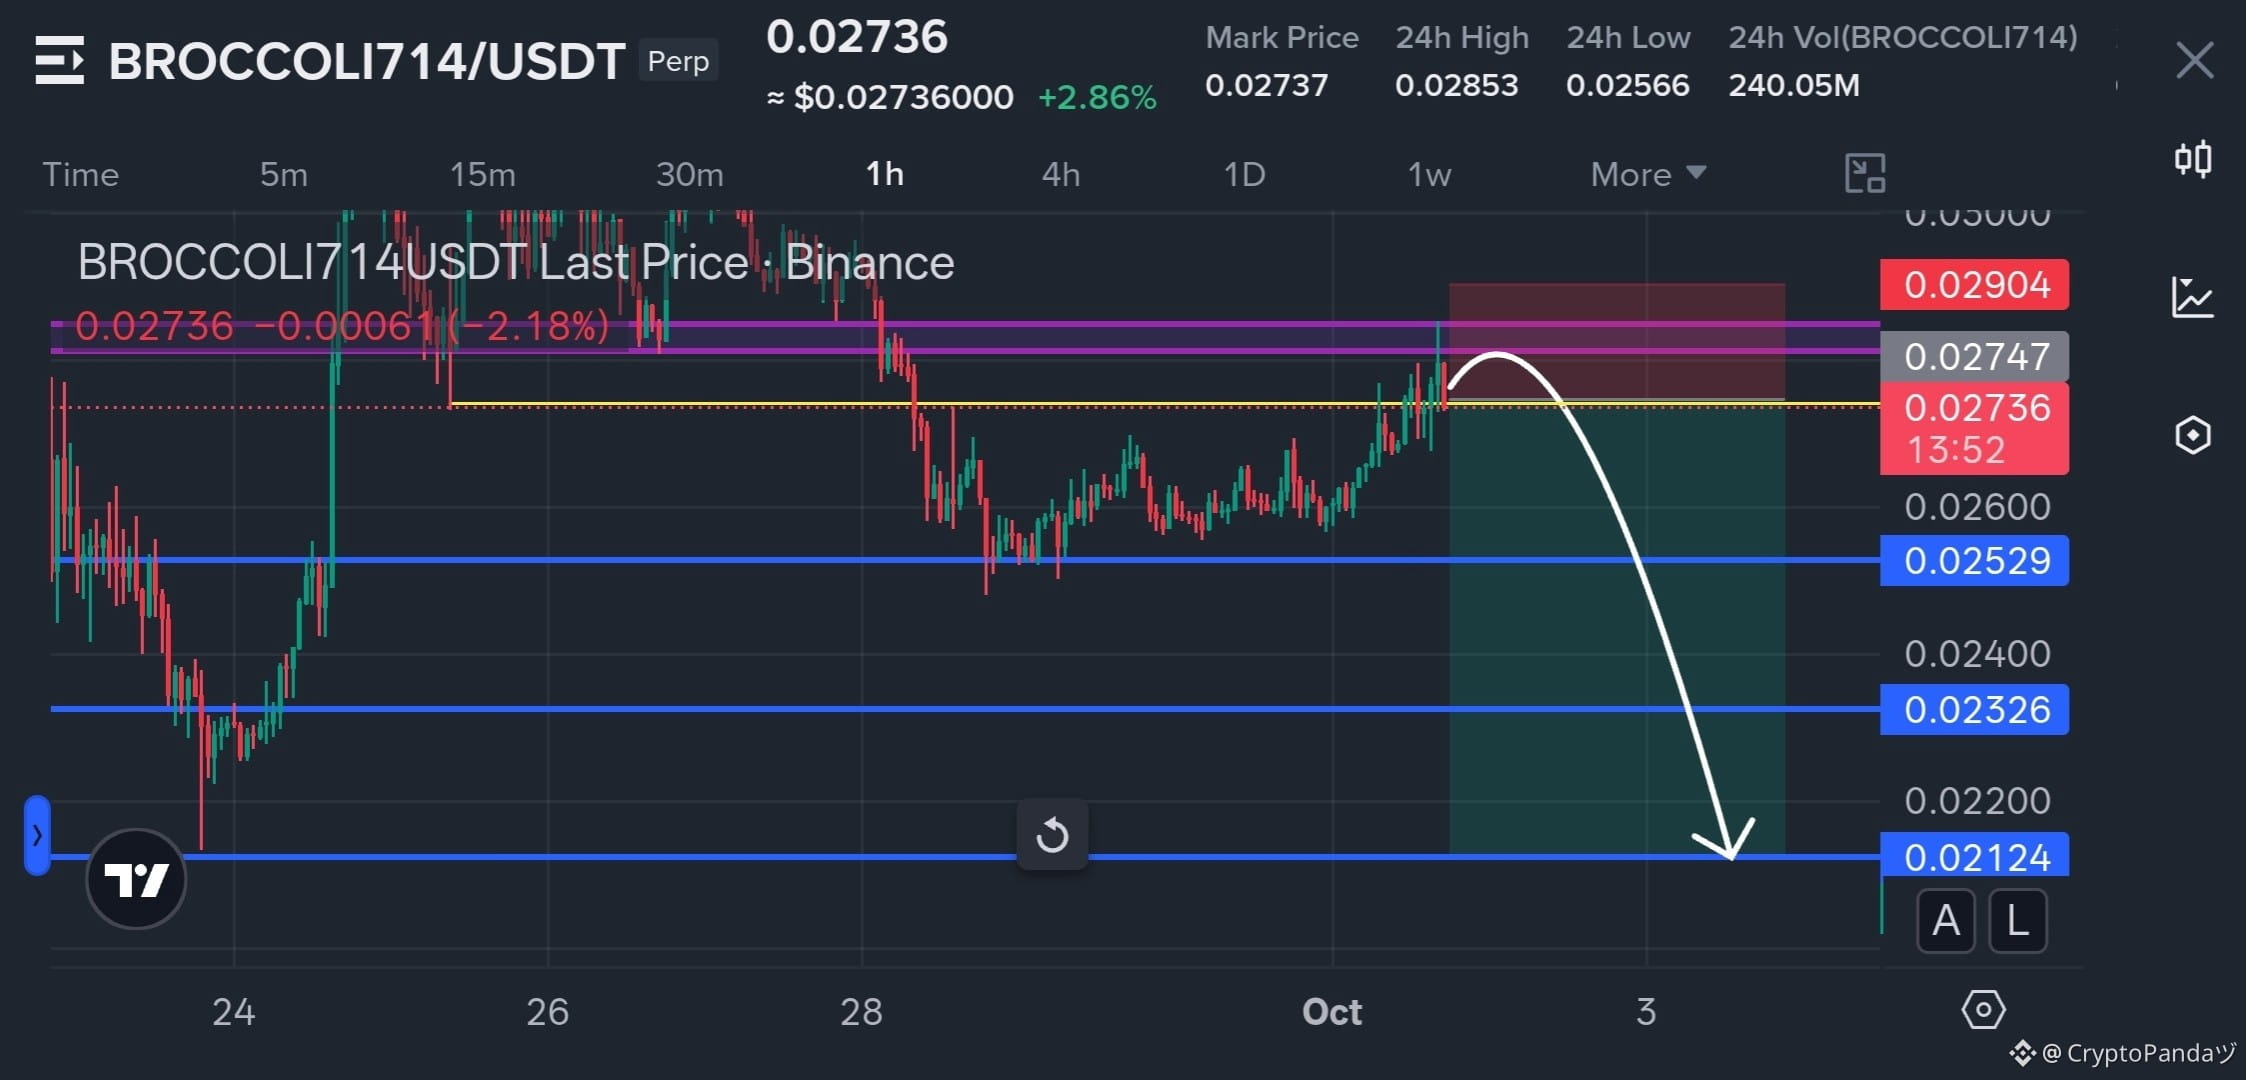
$BROCCOLI714 — 0.02747 Supply Retest Rejecting, Downside Cascade Loading 📉
Trade Plan: Short $BROCCOLI714
Entry: 0.0270 - 0.0275
SL: 0.02904
TP: 0.02529 | 0.02326 | 0.02124
Why this Setup?
BROCCOLI714 1H structure is retesting the 0.02747 supply band after the earlier breakdown, with price struggling to reclaim the purple resistance zone. A rejection here could send price through the 0.02529 support first, followed by deeper liquidity at 0.02326 and 0.02124. As long as 0.02904 holds, the bearish setup remains valid.
Trade $BROCCOLI714 here 👇
{future}(BROCCOLI714USDT)
$BROCCOLI714 — 0.02747 Supply Retest Rejecting, Downside Cascade Loading 📉
Trade Plan: Short $BROCCOLI714
Entry: 0.0270 - 0.0275
SL: 0.02904
TP: 0.02529 | 0.02326 | 0.02124
Why this Setup?
BROCCOLI714 1H structure is retesting the 0.02747 supply band after the earlier breakdown, with price struggling to reclaim the purple resistance zone. A rejection here could send price through the 0.02529 support first, followed by deeper liquidity at 0.02326 and 0.02124. As long as 0.02904 holds, the bearish setup remains valid.
Trade $BROCCOLI714 here 👇
Trade Plan: Short $BROCCOLI714
Entry: 0.0270 - 0.0275
SL: 0.02904
TP: 0.02529 | 0.02326 | 0.02124
Why this Setup?
BROCCOLI714 1H structure is retesting the 0.02747 supply band after the earlier breakdown, with price struggling to reclaim the purple resistance zone. A rejection here could send price through the 0.02529 support first, followed by deeper liquidity at 0.02326 and 0.02124. As long as 0.02904 holds, the bearish setup remains valid.
Trade $BROCCOLI714 here 👇
2
301
·
--
Bullish
See translation
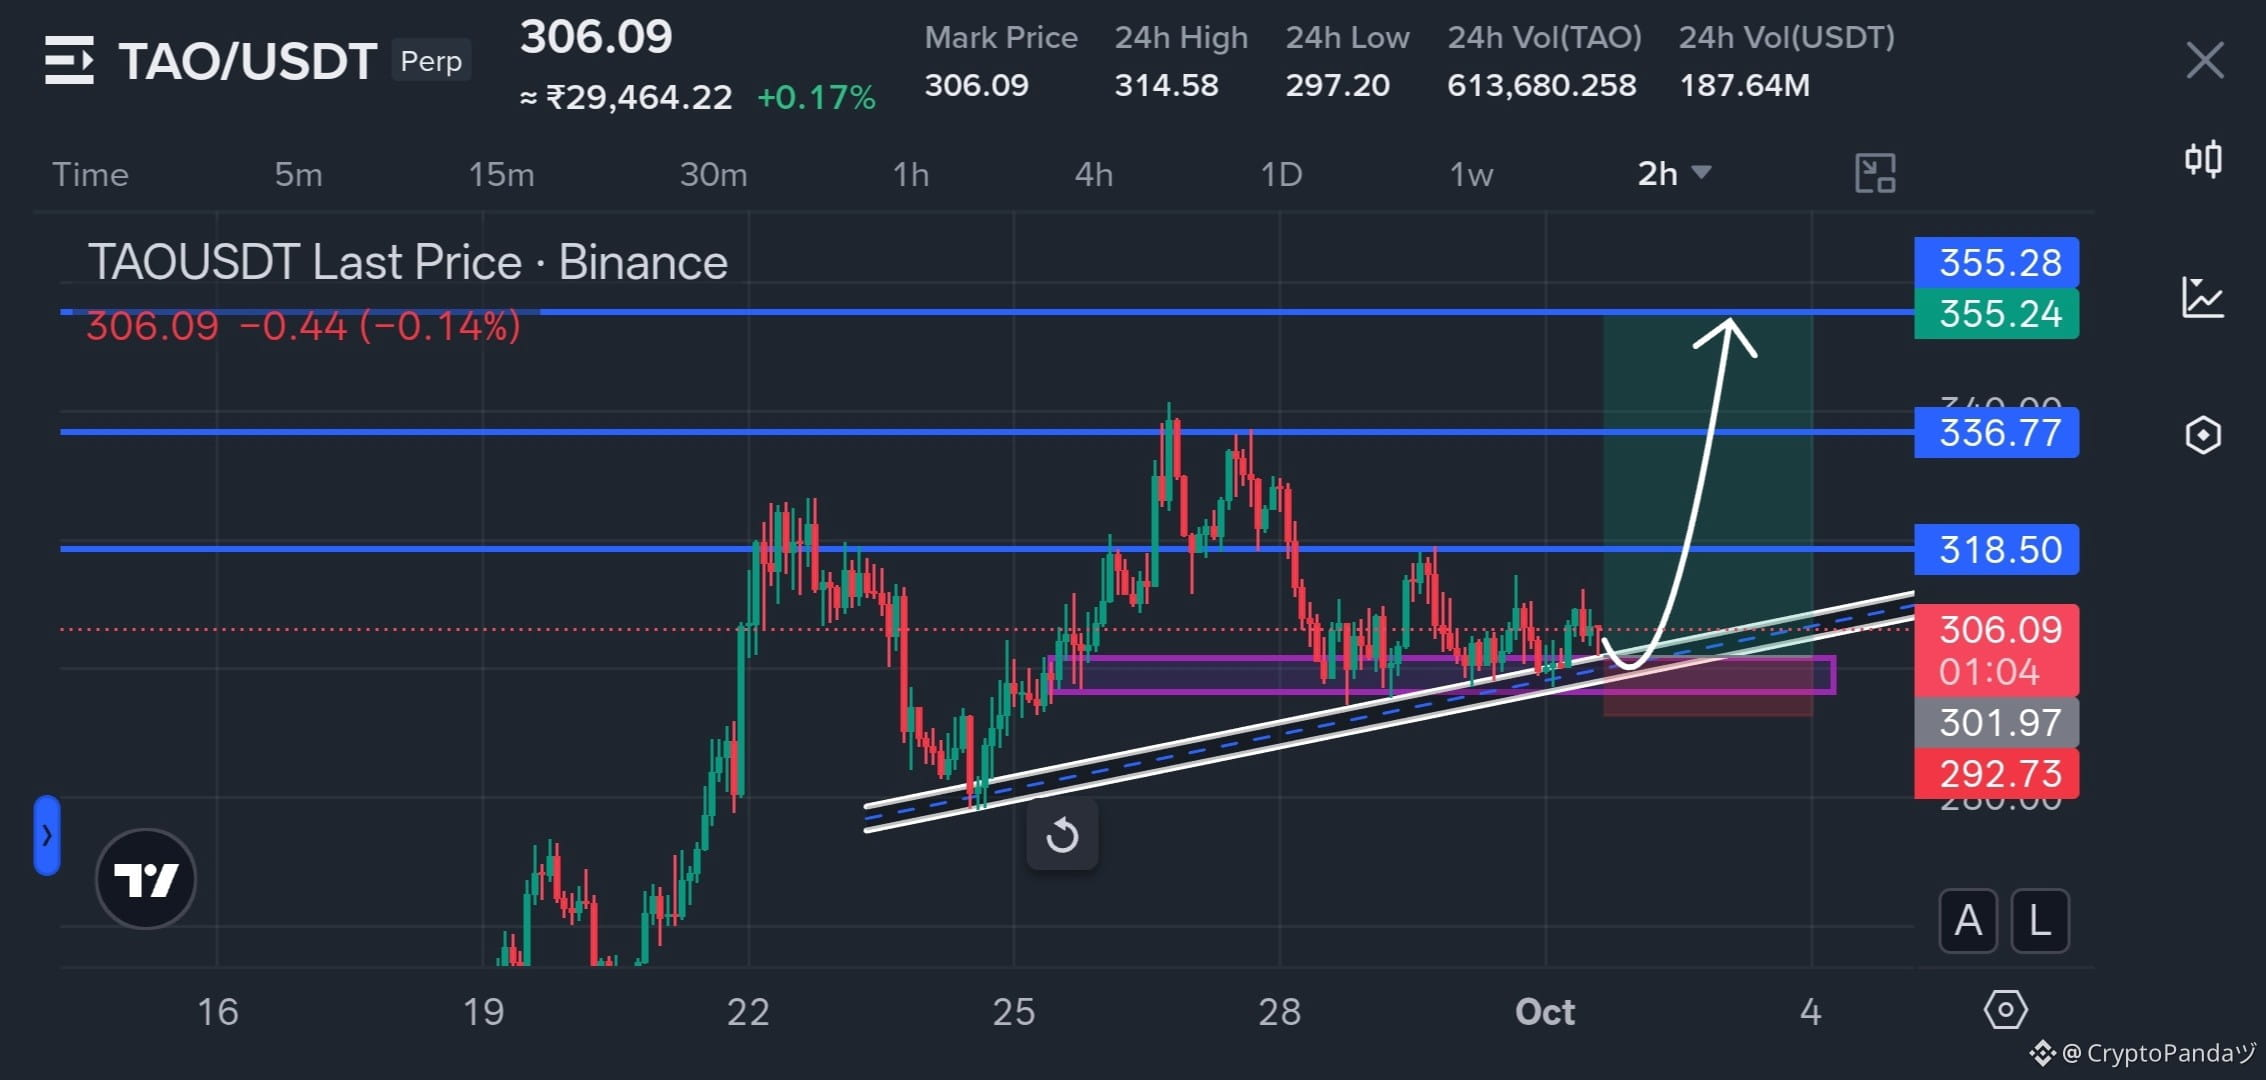
$TAO — Ascending Trendline Meets 302 Demand, Breakout Ignition Loading 📈
Trade Plan: Long $TAO
Entry: 302 - 306
SL: 292.73
TP: 318.50 | 336.77 | 355.28
Why this Setup?
Price is compressing above the 302 demand zone while respecting the rising trendline, creating a tight base beneath the 318.50 resistance. A successful defense of this structure could trigger an upside expansion through the nearby resistance and toward the higher TP levels. As long as 292.73 holds, the bullish setup remains valid.
Trade $TAO here 👇
{future}(TAOUSDT)
$TAO — Ascending Trendline Meets 302 Demand, Breakout Ignition Loading 📈
Trade Plan: Long $TAO
Entry: 302 - 306
SL: 292.73
TP: 318.50 | 336.77 | 355.28
Why this Setup?
Price is compressing above the 302 demand zone while respecting the rising trendline, creating a tight base beneath the 318.50 resistance. A successful defense of this structure could trigger an upside expansion through the nearby resistance and toward the higher TP levels. As long as 292.73 holds, the bullish setup remains valid.
Trade $TAO here 👇
Trade Plan: Long $TAO
Entry: 302 - 306
SL: 292.73
TP: 318.50 | 336.77 | 355.28
Why this Setup?
Price is compressing above the 302 demand zone while respecting the rising trendline, creating a tight base beneath the 318.50 resistance. A successful defense of this structure could trigger an upside expansion through the nearby resistance and toward the higher TP levels. As long as 292.73 holds, the bullish setup remains valid.
Trade $TAO here 👇
2
134
·
--
Bearish
See translation
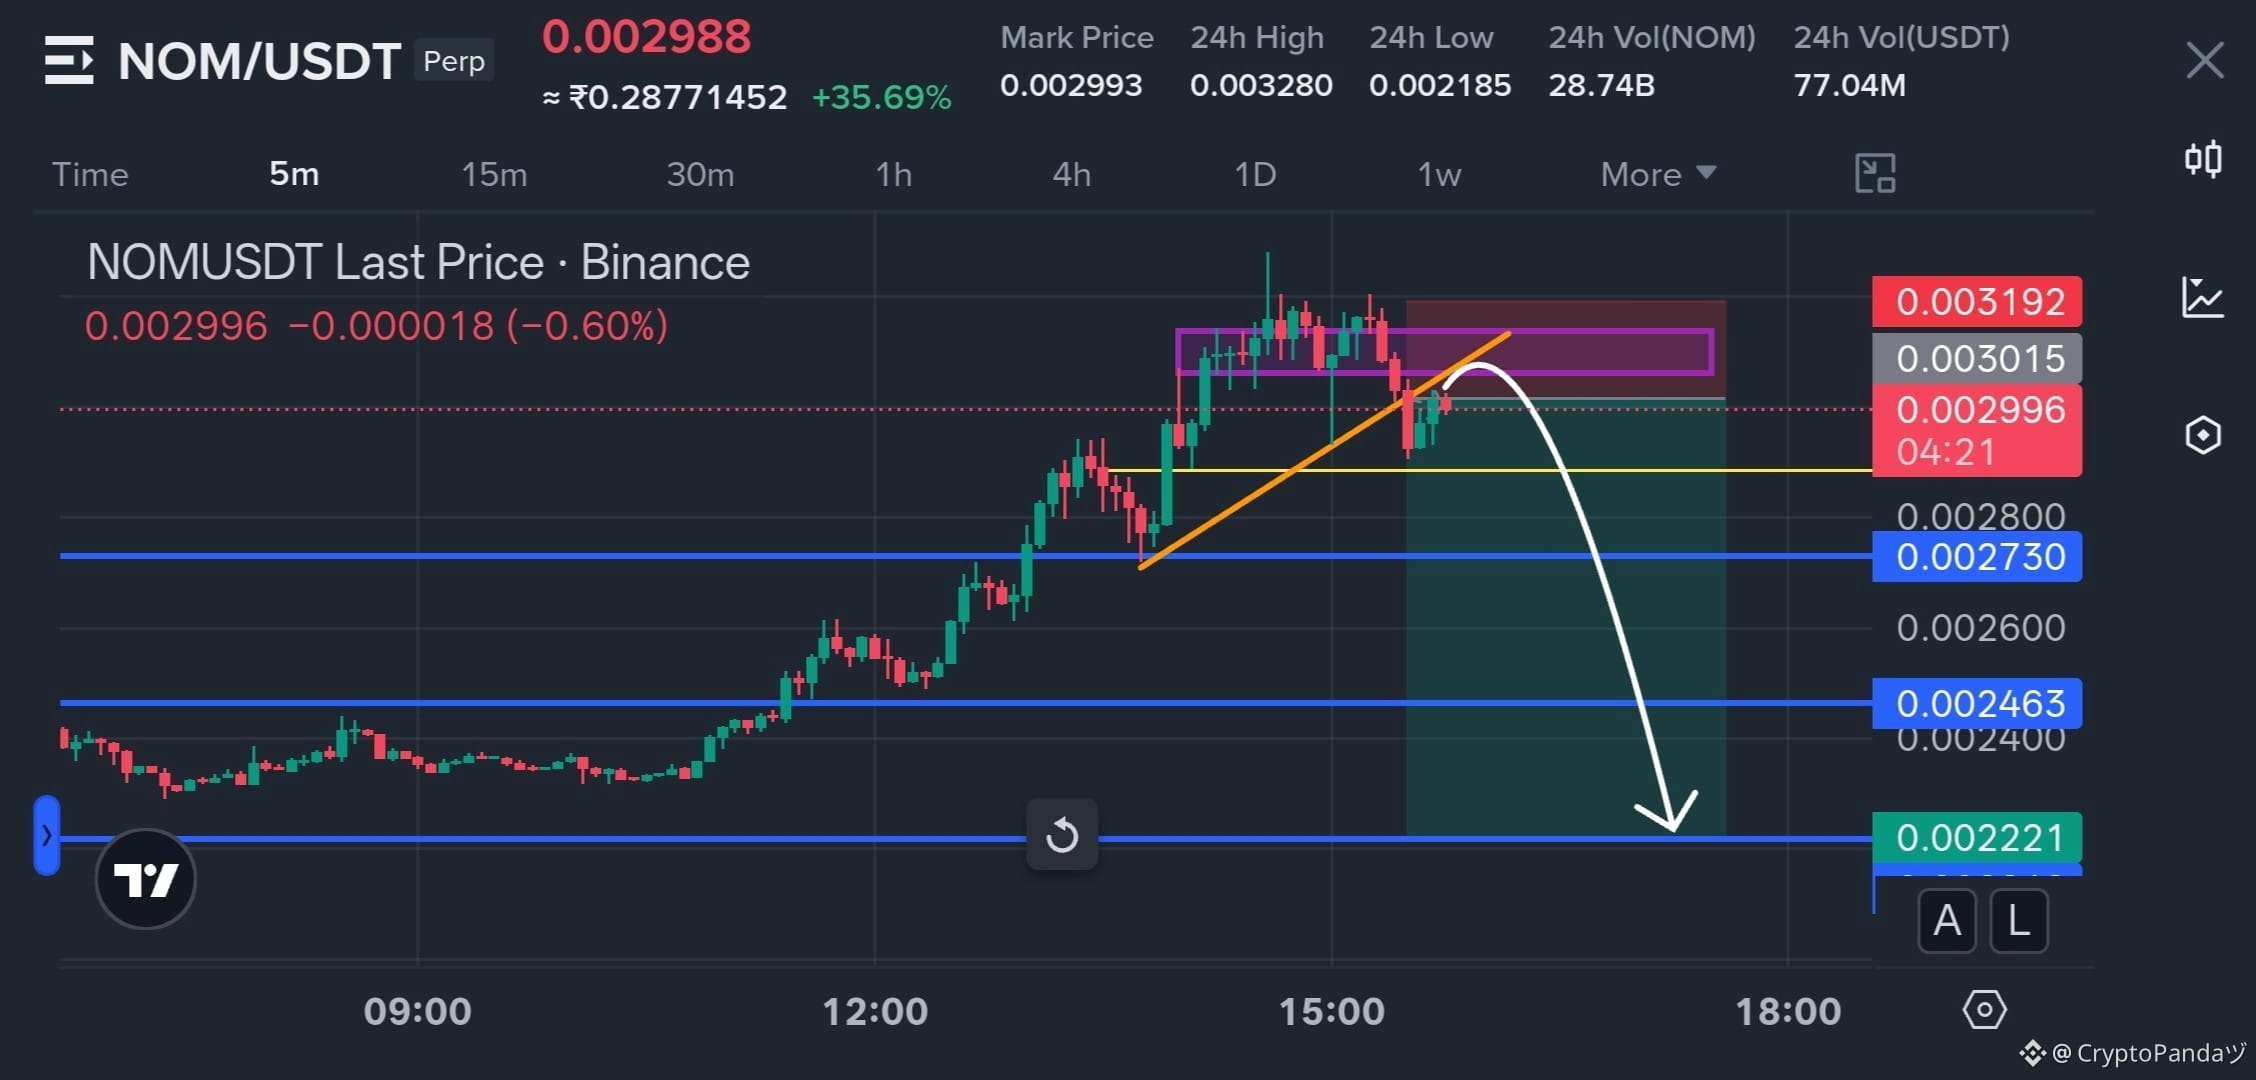
$NOM — Failed Retest of 0.003015 Trendline Supply, Pullback Likely 📉
Trade Plan: Short $NOM
Entry: 0.00295 - 0.00305
SL: 0.003192
TP: 0.002730 | 0.002463 | 0.002221
Why this Setup?
NOM pushed into the 0.003015 supply zone after riding the rising trendline, but failed to reclaim the upper resistance and is now showing rejection from the purple supply block. A breakdown of the nearby 0.00290 support could accelerate the move toward 0.002730, 0.002463 and eventually 0.002221. As long as 0.003192 holds, the bearish setup remains valid.
Trade $NOM here 👇
{future}(NOMUSDT)
$NOM — Failed Retest of 0.003015 Trendline Supply, Pullback Likely 📉
Trade Plan: Short $NOM
Entry: 0.00295 - 0.00305
SL: 0.003192
TP: 0.002730 | 0.002463 | 0.002221
Why this Setup?
NOM pushed into the 0.003015 supply zone after riding the rising trendline, but failed to reclaim the upper resistance and is now showing rejection from the purple supply block. A breakdown of the nearby 0.00290 support could accelerate the move toward 0.002730, 0.002463 and eventually 0.002221. As long as 0.003192 holds, the bearish setup remains valid.
Trade $NOM here 👇
Trade Plan: Short $NOM
Entry: 0.00295 - 0.00305
SL: 0.003192
TP: 0.002730 | 0.002463 | 0.002221
Why this Setup?
NOM pushed into the 0.003015 supply zone after riding the rising trendline, but failed to reclaim the upper resistance and is now showing rejection from the purple supply block. A breakdown of the nearby 0.00290 support could accelerate the move toward 0.002730, 0.002463 and eventually 0.002221. As long as 0.003192 holds, the bearish setup remains valid.
Trade $NOM here 👇
2
188
·
--
Bearish
See translation
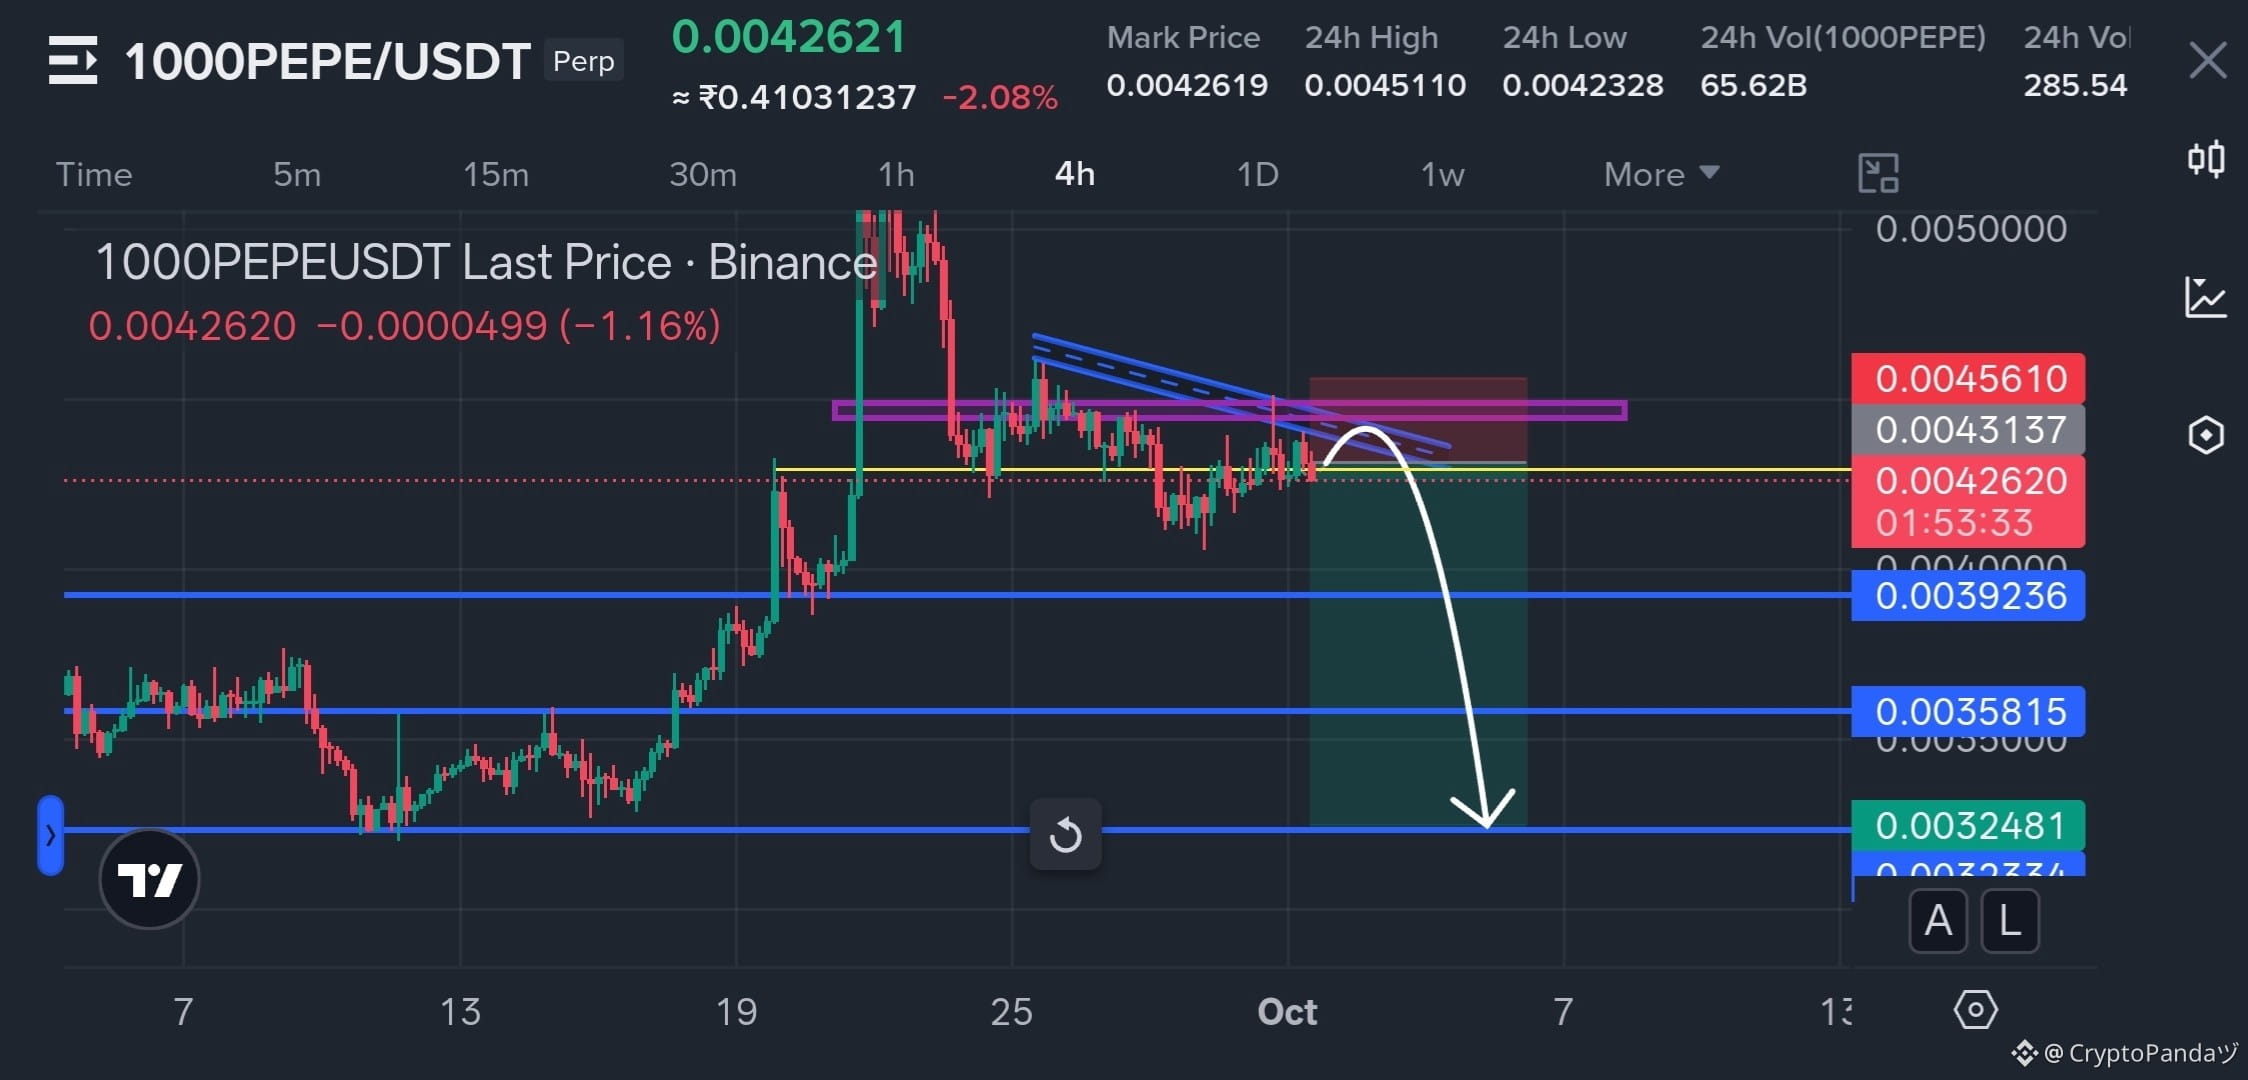
$1000PEPE — Bear Flag Pressing Into 0.00431 Supply, Dump Loading 📉
Trade Plan: Short $1000PEPE
Entry: 0.0042 - 0.0044
SL: 0.0045610
TP: 0.0039236 | 0.0035815 | 0.0032481
Why this Setup?
1000PEPE is compressing beneath the descending trendline while repeatedly struggling around the 0.00431 supply area. A rejection from this confluence could trigger the next downside leg, with 0.0039236 acting as the first key support before the move opens toward 0.0035815 and 0.0032481. As long as 0.0045610 holds, the bearish setup remains valid.
Trade $PEPE here 👇
{future}(1000PEPEUSDT)
{spot}(PEPEUSDT)
$1000PEPE — Bear Flag Pressing Into 0.00431 Supply, Dump Loading 📉
Trade Plan: Short $1000PEPE
Entry: 0.0042 - 0.0044
SL: 0.0045610
TP: 0.0039236 | 0.0035815 | 0.0032481
Why this Setup?
1000PEPE is compressing beneath the descending trendline while repeatedly struggling around the 0.00431 supply area. A rejection from this confluence could trigger the next downside leg, with 0.0039236 acting as the first key support before the move opens toward 0.0035815 and 0.0032481. As long as 0.0045610 holds, the bearish setup remains valid.
Trade $PEPE here 👇
Trade Plan: Short $1000PEPE
Entry: 0.0042 - 0.0044
SL: 0.0045610
TP: 0.0039236 | 0.0035815 | 0.0032481
Why this Setup?
1000PEPE is compressing beneath the descending trendline while repeatedly struggling around the 0.00431 supply area. A rejection from this confluence could trigger the next downside leg, with 0.0039236 acting as the first key support before the move opens toward 0.0035815 and 0.0032481. As long as 0.0045610 holds, the bearish setup remains valid.
Trade $PEPE here 👇
2
178
·
--
Bullish
30D trade $UAI 9.6K USDT
See translation
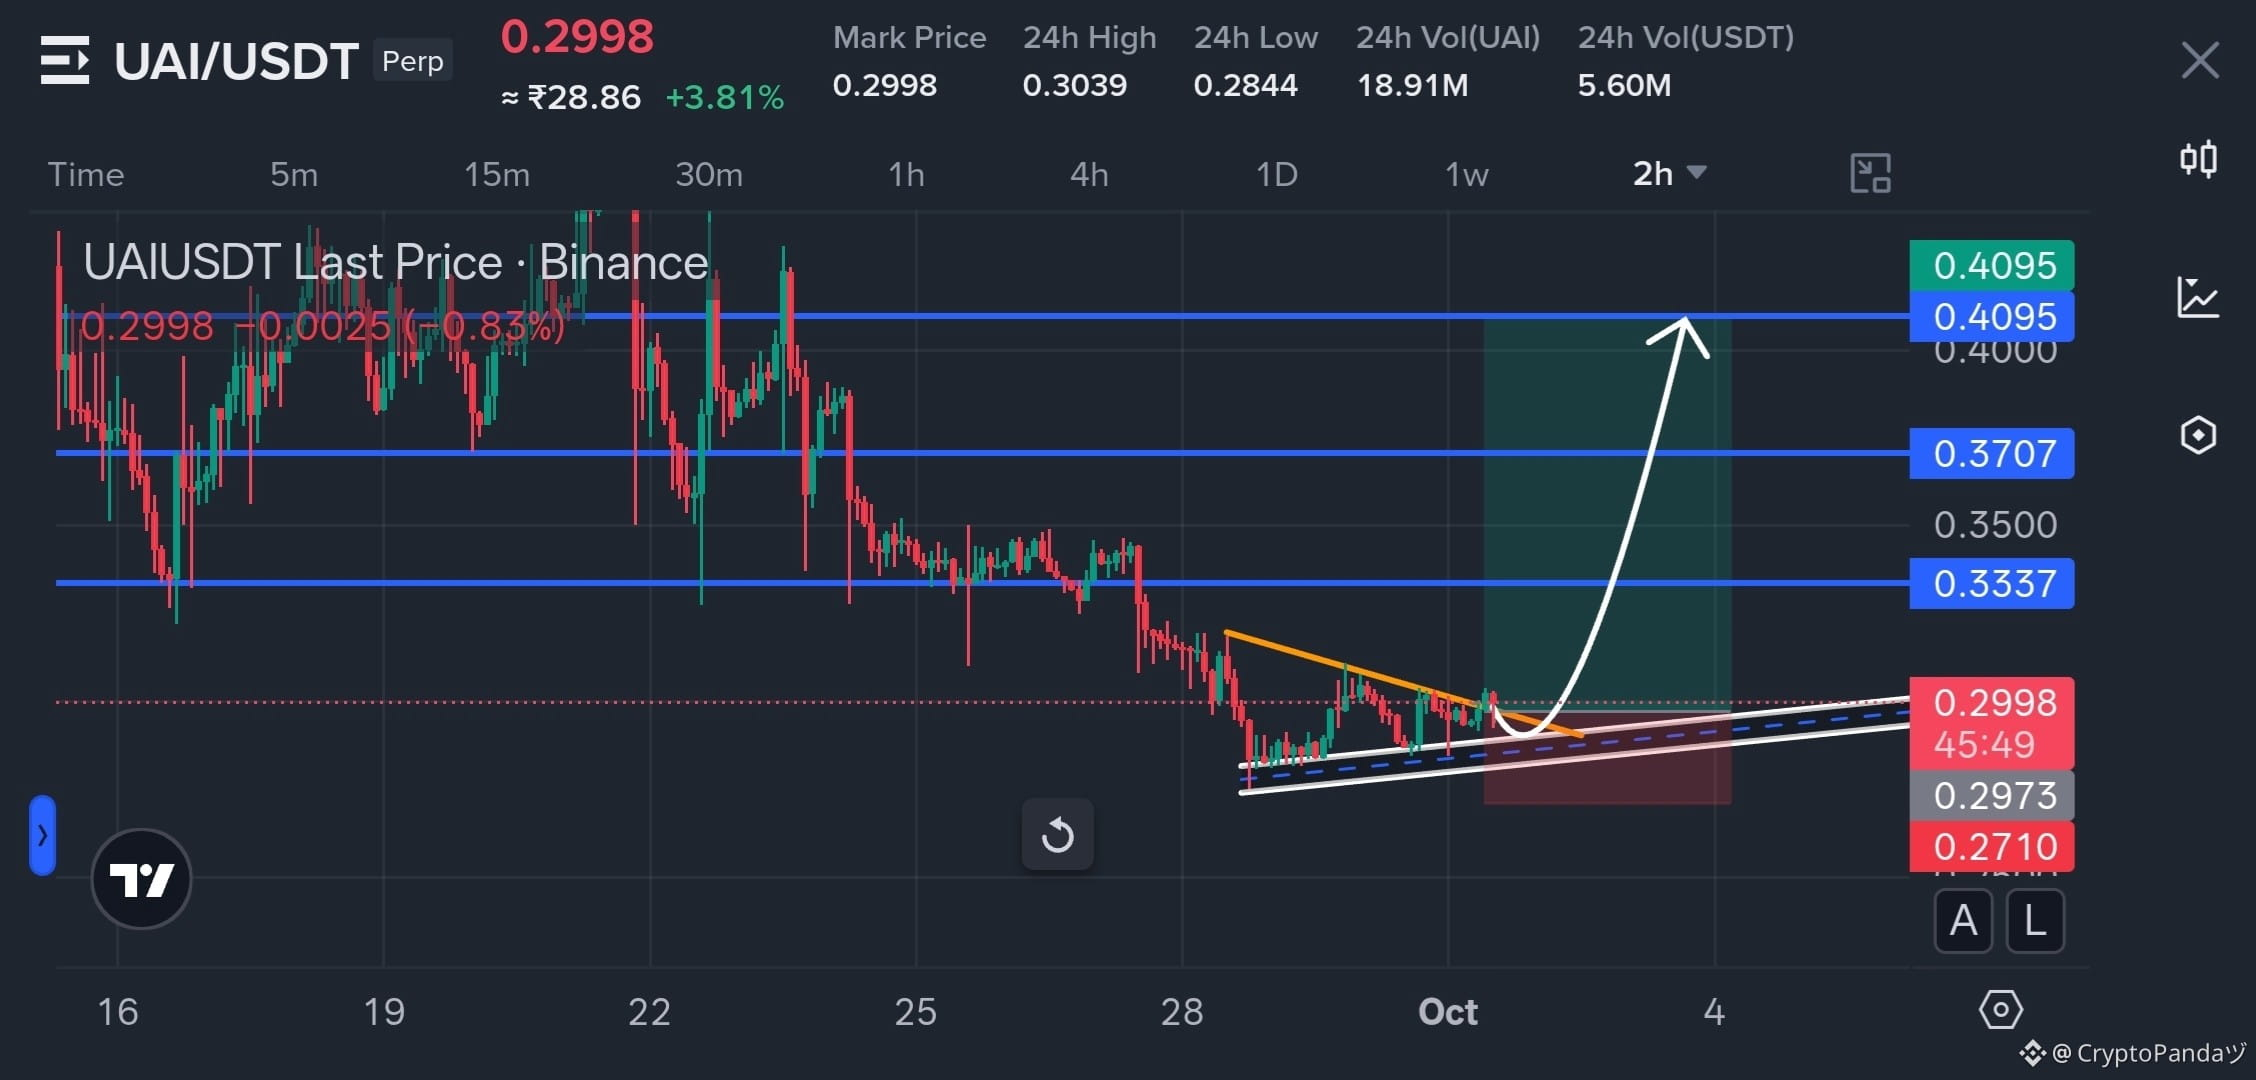
$UAI — Breakout Retest Above Rising Support, Upside Explosion Loading 📈
Trade Plan: Long $UAI
Entry: 0.28 - 0.30
SL: 0.2710
TP: 0.3337 | 0.3707 | 0.4095
Why this Setup?
UAI is compressing inside a tightening structure above rising support, with the breakout zone being retested around the 0.28 - 0.30 area. A successful breakout retest could trigger a strong upside expansion toward the 0.3337, 0.3707 and 0.4095 levels. As long as 0.2710 holds, the bullish setup remains valid.
Trade $UAI here 👇
{future}(UAIUSDT)
$UAI — Breakout Retest Above Rising Support, Upside Explosion Loading 📈
Trade Plan: Long $UAI
Entry: 0.28 - 0.30
SL: 0.2710
TP: 0.3337 | 0.3707 | 0.4095
Why this Setup?
UAI is compressing inside a tightening structure above rising support, with the breakout zone being retested around the 0.28 - 0.30 area. A successful breakout retest could trigger a strong upside expansion toward the 0.3337, 0.3707 and 0.4095 levels. As long as 0.2710 holds, the bullish setup remains valid.
Trade $UAI here 👇
Trade Plan: Long $UAI
Entry: 0.28 - 0.30
SL: 0.2710
TP: 0.3337 | 0.3707 | 0.4095
Why this Setup?
UAI is compressing inside a tightening structure above rising support, with the breakout zone being retested around the 0.28 - 0.30 area. A successful breakout retest could trigger a strong upside expansion toward the 0.3337, 0.3707 and 0.4095 levels. As long as 0.2710 holds, the bullish setup remains valid.
Trade $UAI here 👇
2
118
·
--
Bullish
See translation
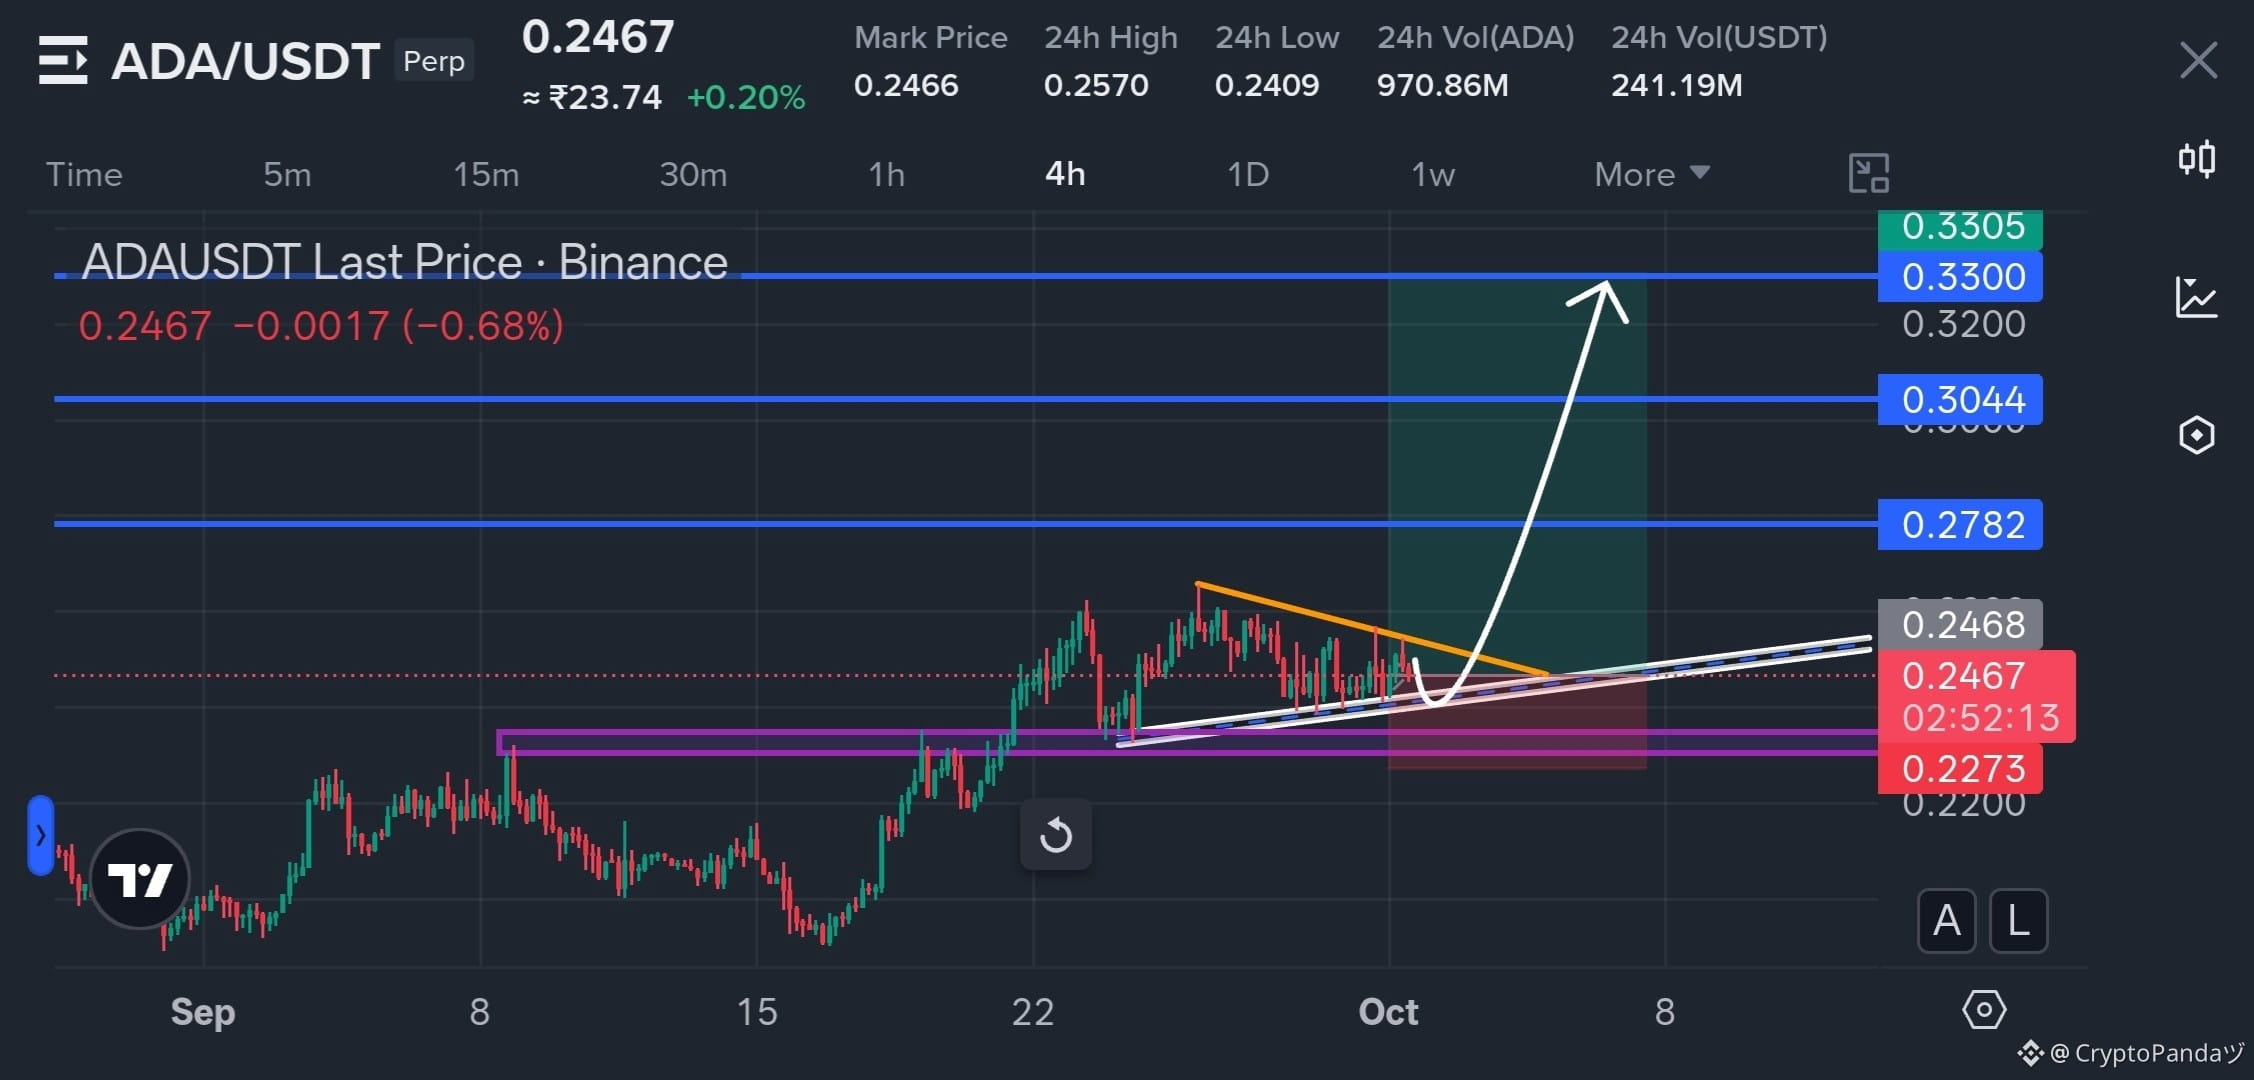
$ADA — Tight Wedge Fuse Near 0.2468 Demand, Strong Breakout Igniting 📈
Trade Plan: Long $ADA
Entry: 0.24 - 0.25
SL: 0.2273
TP: 0.2782 | 0.3044 | 0.3300
Why this Setup?
ADA is tightening inside a wedge above the 0.2273 demand zone, with the descending resistance compressing against rising support. This kind of coil can turn explosive once the upper trendline gives way, opening the path toward 0.2782, 0.3044 and potentially 0.3300. As long as 0.2273 holds, the bullish setup remains valid.
Trade $ADA here 👇
{future}(ADAUSDT)
$ADA — Tight Wedge Fuse Near 0.2468 Demand, Strong Breakout Igniting 📈
Trade Plan: Long $ADA
Entry: 0.24 - 0.25
SL: 0.2273
TP: 0.2782 | 0.3044 | 0.3300
Why this Setup?
ADA is tightening inside a wedge above the 0.2273 demand zone, with the descending resistance compressing against rising support. This kind of coil can turn explosive once the upper trendline gives way, opening the path toward 0.2782, 0.3044 and potentially 0.3300. As long as 0.2273 holds, the bullish setup remains valid.
Trade $ADA here 👇
Trade Plan: Long $ADA
Entry: 0.24 - 0.25
SL: 0.2273
TP: 0.2782 | 0.3044 | 0.3300
Why this Setup?
ADA is tightening inside a wedge above the 0.2273 demand zone, with the descending resistance compressing against rising support. This kind of coil can turn explosive once the upper trendline gives way, opening the path toward 0.2782, 0.3044 and potentially 0.3300. As long as 0.2273 holds, the bullish setup remains valid.
Trade $ADA here 👇
2
121
·
--
Bearish
See translation
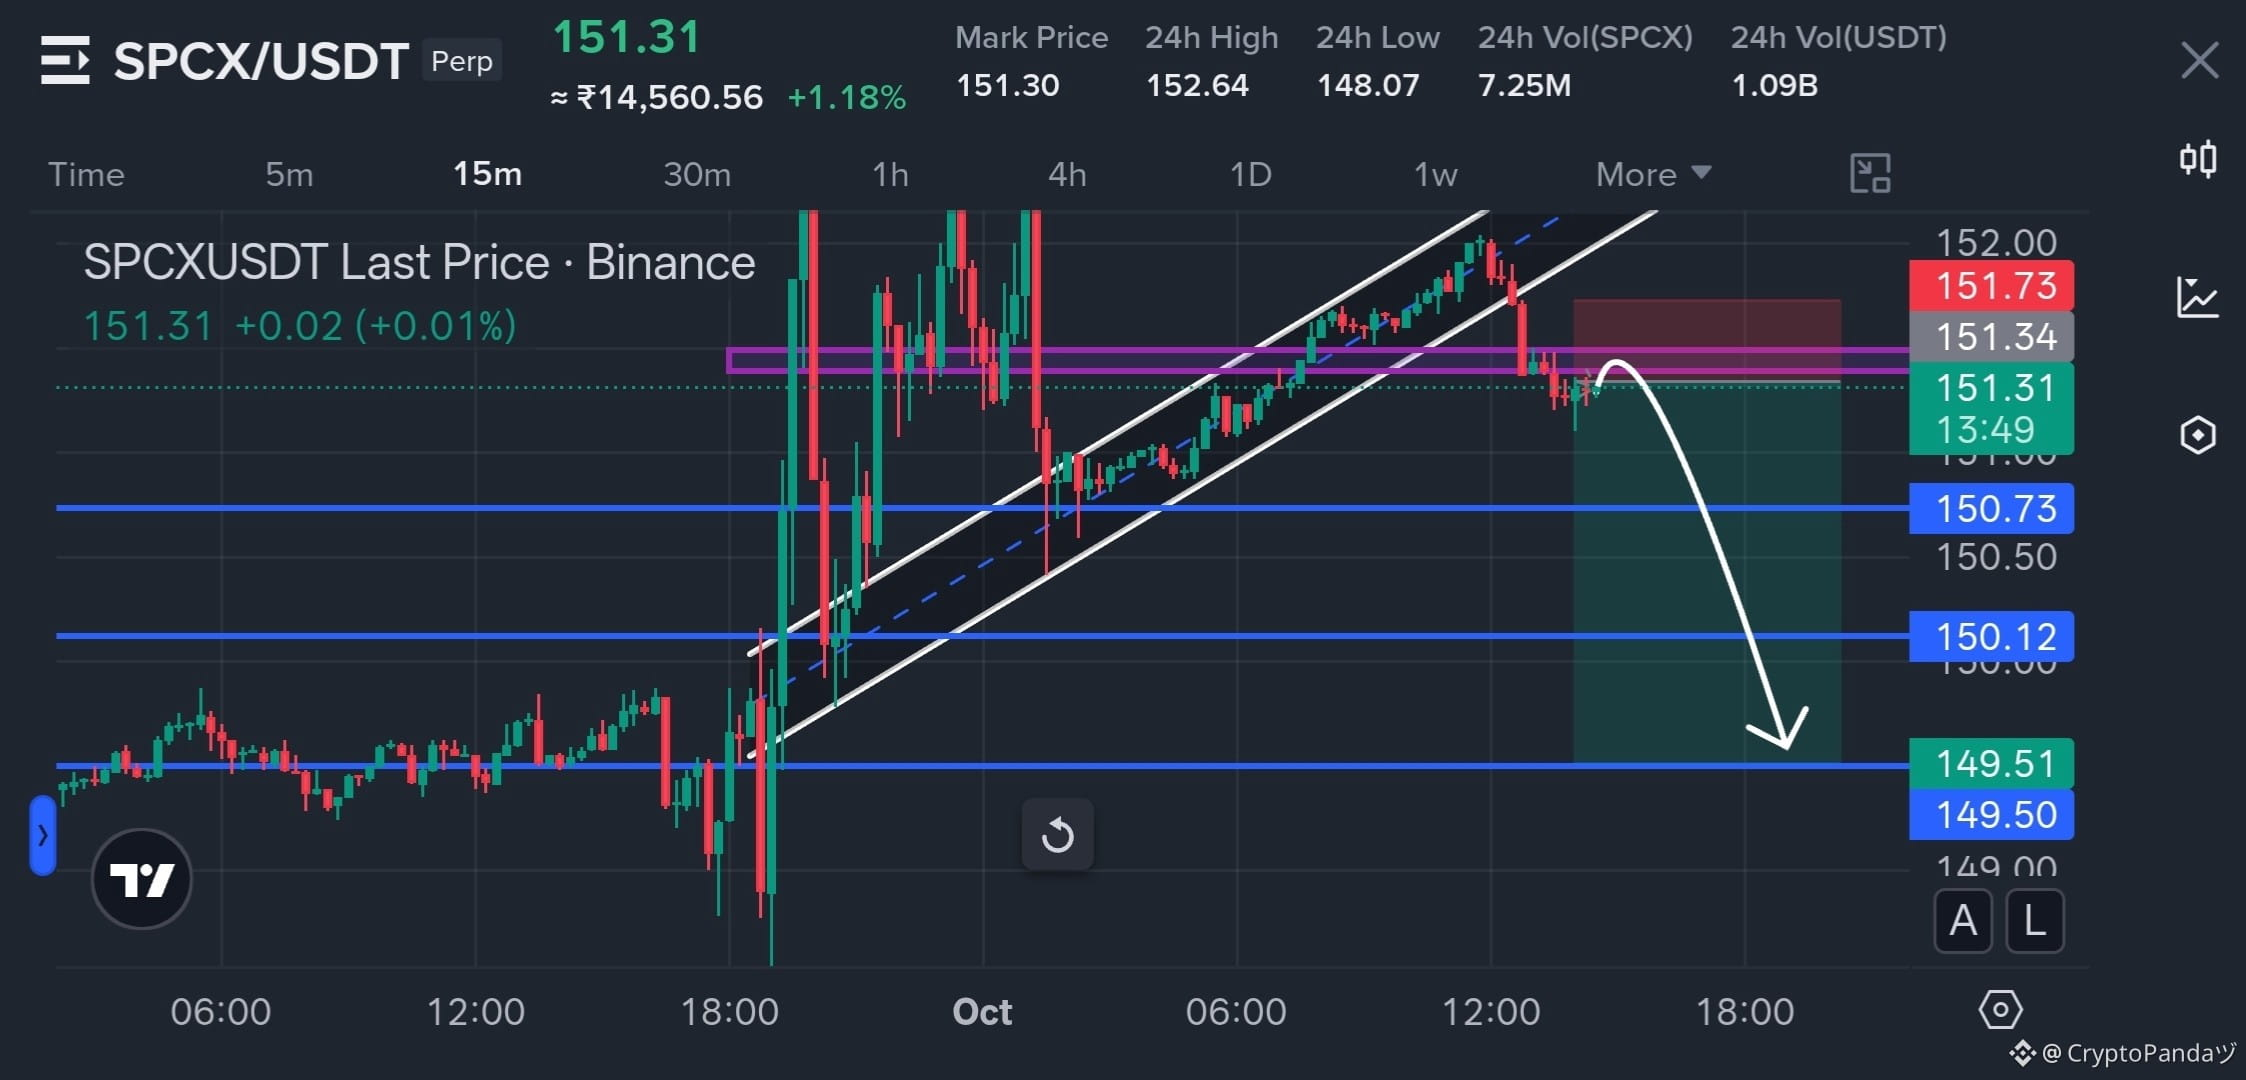
$SPCX — Rising Channel Breakdown Retesting 151.34 Supply, Dump Soon 📉
Trade Plan: Short $SPCX
Entry: 151.20 - 151.50
SL: 151.73
TP: 150.73 | 150.12 | 149.51
Why this Setup?
SPCX has broken down from the rising channel and is now retesting the 151.34 supply band from below. The failed reclaim keeps the short structure intact, with 150.73 as the first downside level followed by 150.12 and the 149.51 base. As long as 151.73 holds, the bearish setup remains valid.
Trade $SPCX here 👇
{future}(SPCXUSDT)
$SPCX — Rising Channel Breakdown Retesting 151.34 Supply, Dump Soon 📉
Trade Plan: Short $SPCX
Entry: 151.20 - 151.50
SL: 151.73
TP: 150.73 | 150.12 | 149.51
Why this Setup?
SPCX has broken down from the rising channel and is now retesting the 151.34 supply band from below. The failed reclaim keeps the short structure intact, with 150.73 as the first downside level followed by 150.12 and the 149.51 base. As long as 151.73 holds, the bearish setup remains valid.
Trade $SPCX here 👇
Trade Plan: Short $SPCX
Entry: 151.20 - 151.50
SL: 151.73
TP: 150.73 | 150.12 | 149.51
Why this Setup?
SPCX has broken down from the rising channel and is now retesting the 151.34 supply band from below. The failed reclaim keeps the short structure intact, with 150.73 as the first downside level followed by 150.12 and the 149.51 base. As long as 151.73 holds, the bearish setup remains valid.
Trade $SPCX here 👇
2
165
·
--
Bearish
See translation
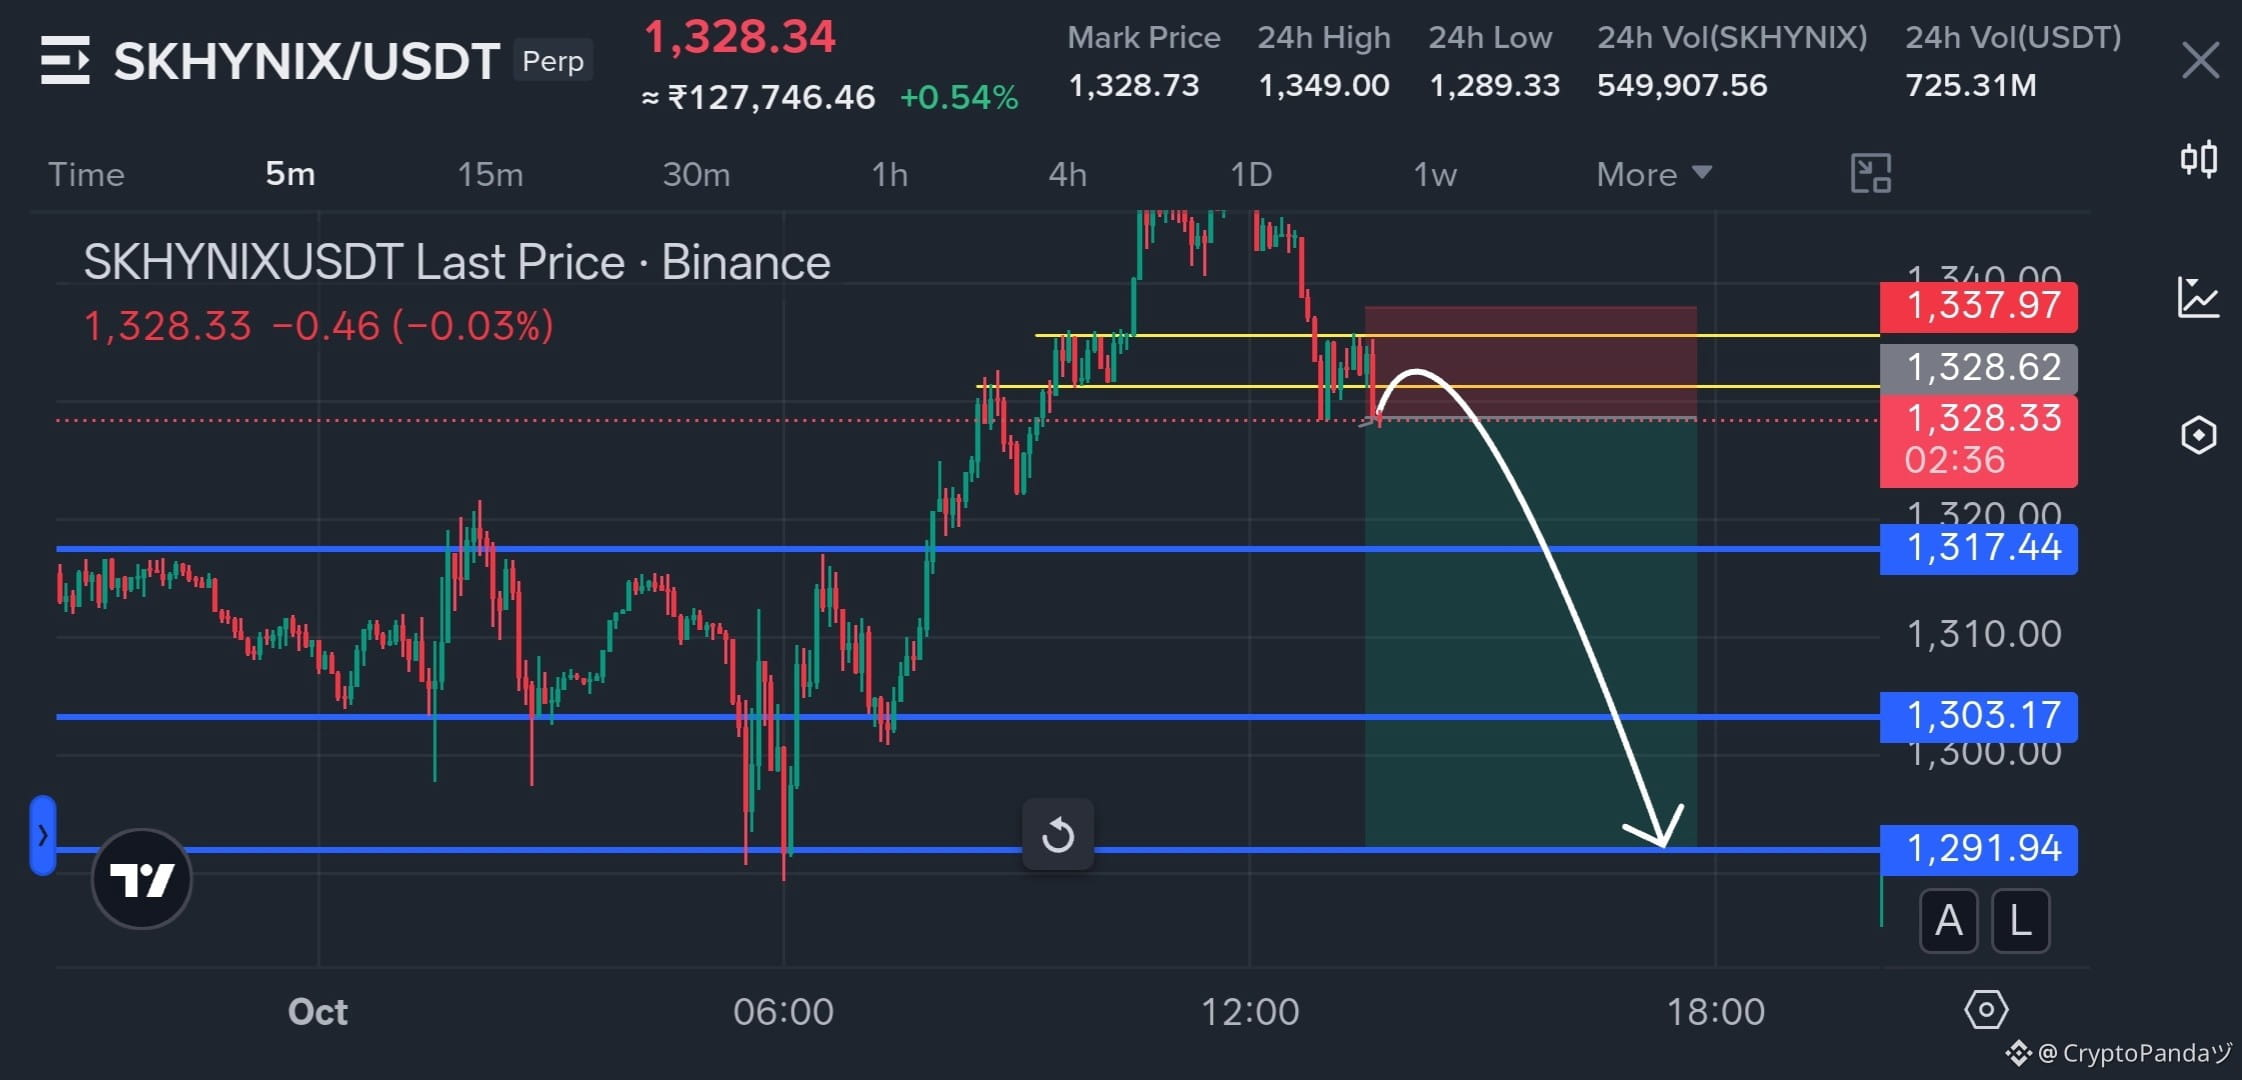
$SKHYNIX — Repeated Rejection Beneath 1330 Supply, Deeper Flush Loading 📉
Trade Plan: Short $SKHYNIX
Entry: 1325 - 1330
SL: 1337.97
TP: 1317.44 | 1303.17 | 1291.94
Why this Setup?
SKHYNIX is rejecting the 1328 - 1330 supply area after failing to reclaim the upper resistance zone, creating a clear downside setup. A break below the nearby 1317.44 support could accelerate the move toward 1303.17 and eventually 1291.94. As long as 1337.97 holds, the bearish setup remains valid.
Trade $SKHYNIX here 👇
{future}(SKHYNIXUSDT)
$SKHYNIX — Repeated Rejection Beneath 1330 Supply, Deeper Flush Loading 📉
Trade Plan: Short $SKHYNIX
Entry: 1325 - 1330
SL: 1337.97
TP: 1317.44 | 1303.17 | 1291.94
Why this Setup?
SKHYNIX is rejecting the 1328 - 1330 supply area after failing to reclaim the upper resistance zone, creating a clear downside setup. A break below the nearby 1317.44 support could accelerate the move toward 1303.17 and eventually 1291.94. As long as 1337.97 holds, the bearish setup remains valid.
Trade $SKHYNIX here 👇
Trade Plan: Short $SKHYNIX
Entry: 1325 - 1330
SL: 1337.97
TP: 1317.44 | 1303.17 | 1291.94
Why this Setup?
SKHYNIX is rejecting the 1328 - 1330 supply area after failing to reclaim the upper resistance zone, creating a clear downside setup. A break below the nearby 1317.44 support could accelerate the move toward 1303.17 and eventually 1291.94. As long as 1337.97 holds, the bearish setup remains valid.
Trade $SKHYNIX here 👇
3
141
Log in to explore more content
Join global crypto users on Binance Square
⚡️ Get latest and useful information about crypto.
💬 Trusted by the world’s largest crypto exchange.
👍 Discover real insights from verified creators.
Email / Phone number
Trending Topics
EtherGains70.9%InQ3
167,531 views
1,171 Discussing
One of the best third quarters in history 💰
September closed out last night, and with it, the quarter. For the quarter, BTC is up 42%—the second-best Q3 on record. ETH had a record-breaking Q3 overall, up 70%.
Looking at the chart, things are still looking good: we’re holding support, but we’re testing it more and more often. Plus, ETF momentum is weakening — inflows are gradually declining, and yesterday saw outflows for the first time in a long while.
Yes, historically, October has been a good month for crypto — it’s not called “Uptober” for nothing. But it’s also one of the most volatile months. Last year, for example, we managed to hit a new all-time high (ATH) and experience a flash crash.
🚀 High Accuracy Trades.
$BTC
$ETH
$SOL
#EtherGains70.9%InQ3 #DollarIndexHitsHighestSinceMay2025 #CFTCSubmitsTwoEventContractRulesToWhiteHouse #MicronBeatsEarningsLiftsGuidance
Knowledge is Power
·0 Likes
·248 views
TreasuryLetsStatesFileStablecoinCertificationsEarly
10,539 views
89 Discussing
US10YearYieldNears5.3%
156,354 views
1,150 Discussing