
Stormfol
4.1k Posts

Stormfol
Торгую Smart Money. Аналитика каждый день. Без воды.
SMC & Price Action | Ежедневная аналитика | Структурный анализ рынка.
52 Following
194 Followers
494 Liked
Posts
All
Quotes
Videos
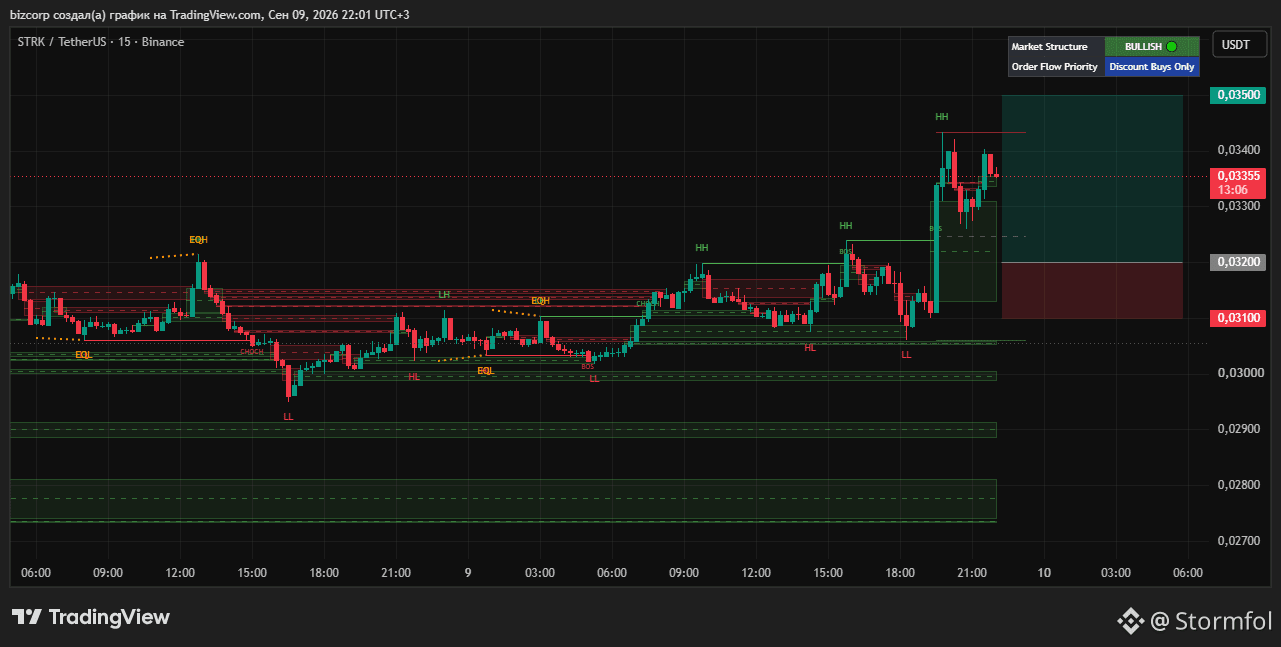
⚡️ $STRK is flying to new goals: where to grab the impulse?
The STRK coin shows a strong uptrend on the 4h, 1h, and 15m timeframes.
The price executed an impulsive breakout (BOS) with an update to the highs (HH) and maintained Order Flow priority in the buy zone.
Now the asset has moved into a local technical correction to balance orders before the next surge.
🧠 Trading setup:
Entry Zone: 0,0310 – 0,0320 (building a position on a pullback to the local Order Block zone).
TP: 0,0350 (taking liquidity from the local high).
SL: Below 0,0300 (a close below would invalidate the bullish scenario).
💬 Do you trade the trend after a breakout, or do you wait for deeper pullbacks? Share your thoughts in the comments!
📈 Trade professionally and track the best quotes on the Binance exchange. 👇
#strk #smartmoney #BinanceSquare
The STRK coin shows a strong uptrend on the 4h, 1h, and 15m timeframes.
The price executed an impulsive breakout (BOS) with an update to the highs (HH) and maintained Order Flow priority in the buy zone.
Now the asset has moved into a local technical correction to balance orders before the next surge.
🧠 Trading setup:
Entry Zone: 0,0310 – 0,0320 (building a position on a pullback to the local Order Block zone).
TP: 0,0350 (taking liquidity from the local high).
SL: Below 0,0300 (a close below would invalidate the bullish scenario).
💬 Do you trade the trend after a breakout, or do you wait for deeper pullbacks? Share your thoughts in the comments!
📈 Trade professionally and track the best quotes on the Binance exchange. 👇
#strk #smartmoney #BinanceSquare
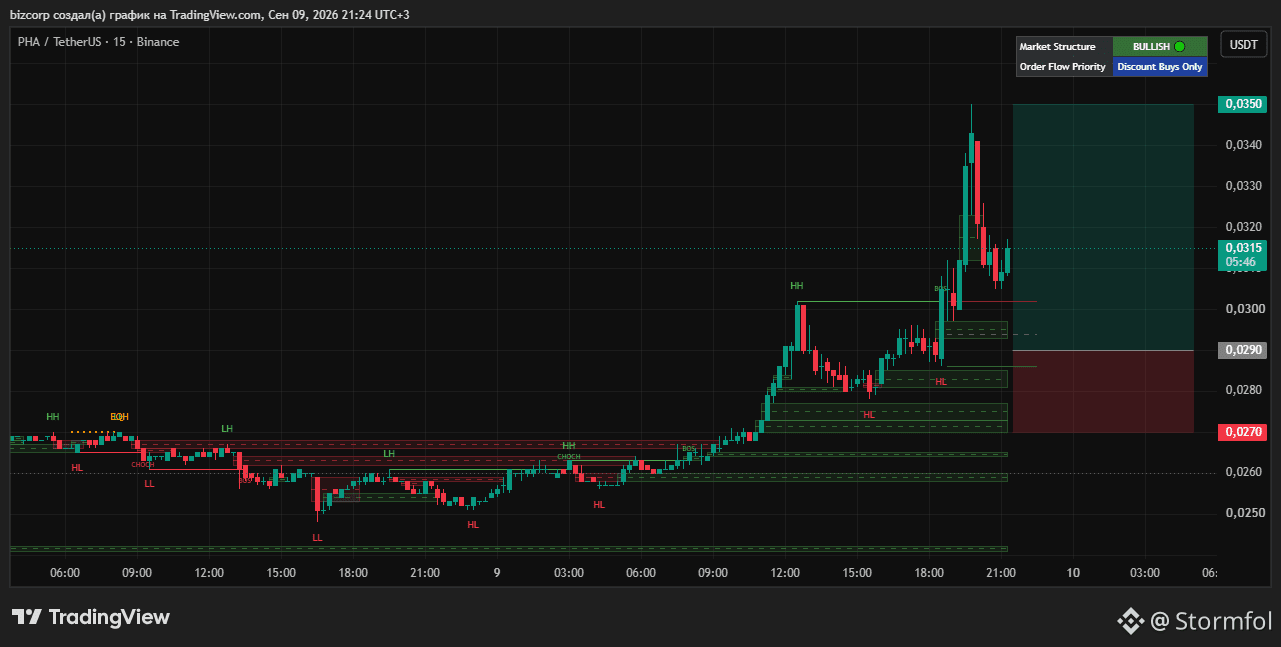
⚡️ $PHA shoots upward: where to find the entry point after the impulse?
The PHA coin breaks through resistance and is flying higher with a strong bullish structure on the 4h / 1h / 15m timeframes. After an aggressive impulsive move (BOS), the price shifted into a phase of local correction to test levels and rebalance orders.
🧠 Trading setup:
Entry Zone: 0,0280 – 0,0290 (position entry on the pullback into the local Order Block zone).
TP: 0,0350 (liquidity grab of the local high).
SL: Below 0,0270 (a close beneath it will break the uptrend structure).
💬 Do you catch impulses on the breakout, or do you wait for a pullback into the discount zone? Share your thoughts in the comments! 👇
📈 Trade professionally and monitor quotes on the Binance exchange. 👇
#PHA #smartmoney #BinanceSquare
The PHA coin breaks through resistance and is flying higher with a strong bullish structure on the 4h / 1h / 15m timeframes. After an aggressive impulsive move (BOS), the price shifted into a phase of local correction to test levels and rebalance orders.
🧠 Trading setup:
Entry Zone: 0,0280 – 0,0290 (position entry on the pullback into the local Order Block zone).
TP: 0,0350 (liquidity grab of the local high).
SL: Below 0,0270 (a close beneath it will break the uptrend structure).
💬 Do you catch impulses on the breakout, or do you wait for a pullback into the discount zone? Share your thoughts in the comments! 👇
📈 Trade professionally and monitor quotes on the Binance exchange. 👇
#PHA #smartmoney #BinanceSquare
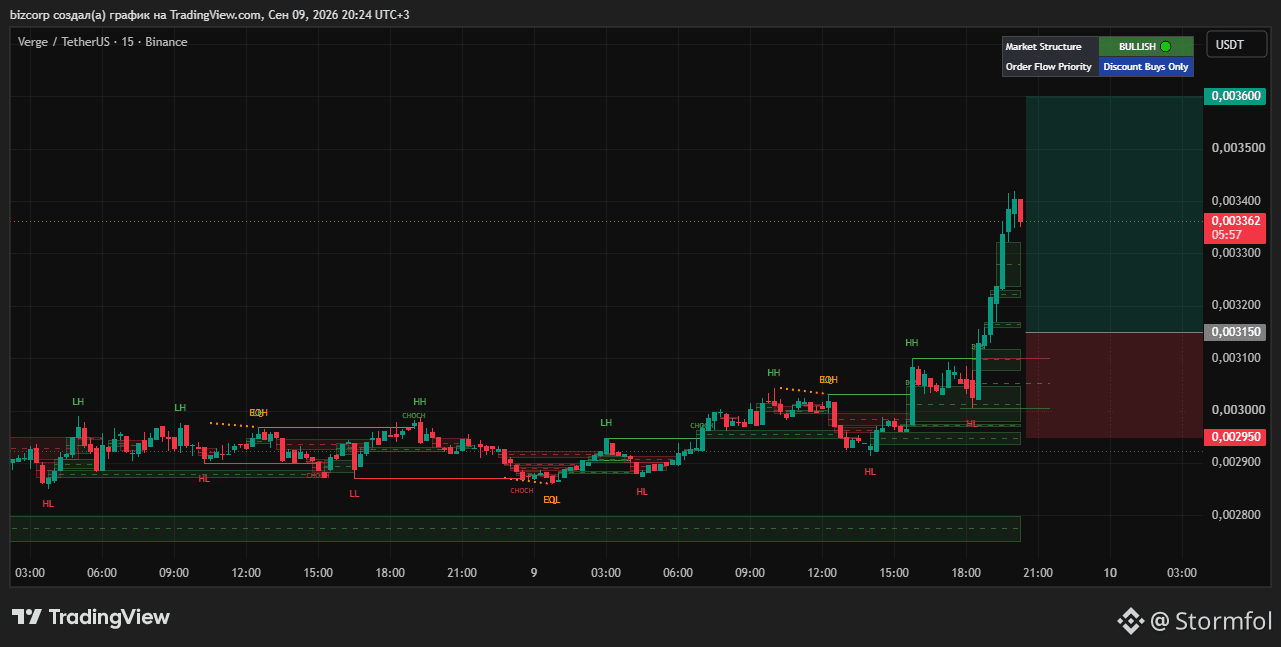
⚡️ $XVG breaks through resistance: where to catch the impulse?
Verge (XVG) shows a strong bullish impulse on all timeframes (4h / 1h / 15m), confidently updating highs (HH).
After the structure break (BOS), the price moved into a phase of local correction to rebalance orders.
This is a classic moment to look for long entry points according to the trend.
🧠 Trading setup:
Entry Zone: 0.00305 – 0.00315 (build position on a retest of the local Order Block).
TP: 0.00360 (take liquidity off the high and continue the uptrend).
SL: Below 0.00295 (break of the upward structure).
💬 Do you jump into altcoins on the breakout or wait for a deep pullback? Share your thoughts in the comments!
📈 Trade professionally and track the best quotes on the Binance exchange. 👇
#xvg #smartmoney #BinanceSquare
Verge (XVG) shows a strong bullish impulse on all timeframes (4h / 1h / 15m), confidently updating highs (HH).
After the structure break (BOS), the price moved into a phase of local correction to rebalance orders.
This is a classic moment to look for long entry points according to the trend.
🧠 Trading setup:
Entry Zone: 0.00305 – 0.00315 (build position on a retest of the local Order Block).
TP: 0.00360 (take liquidity off the high and continue the uptrend).
SL: Below 0.00295 (break of the upward structure).
💬 Do you jump into altcoins on the breakout or wait for a deep pullback? Share your thoughts in the comments!
📈 Trade professionally and track the best quotes on the Binance exchange. 👇
#xvg #smartmoney #BinanceSquare
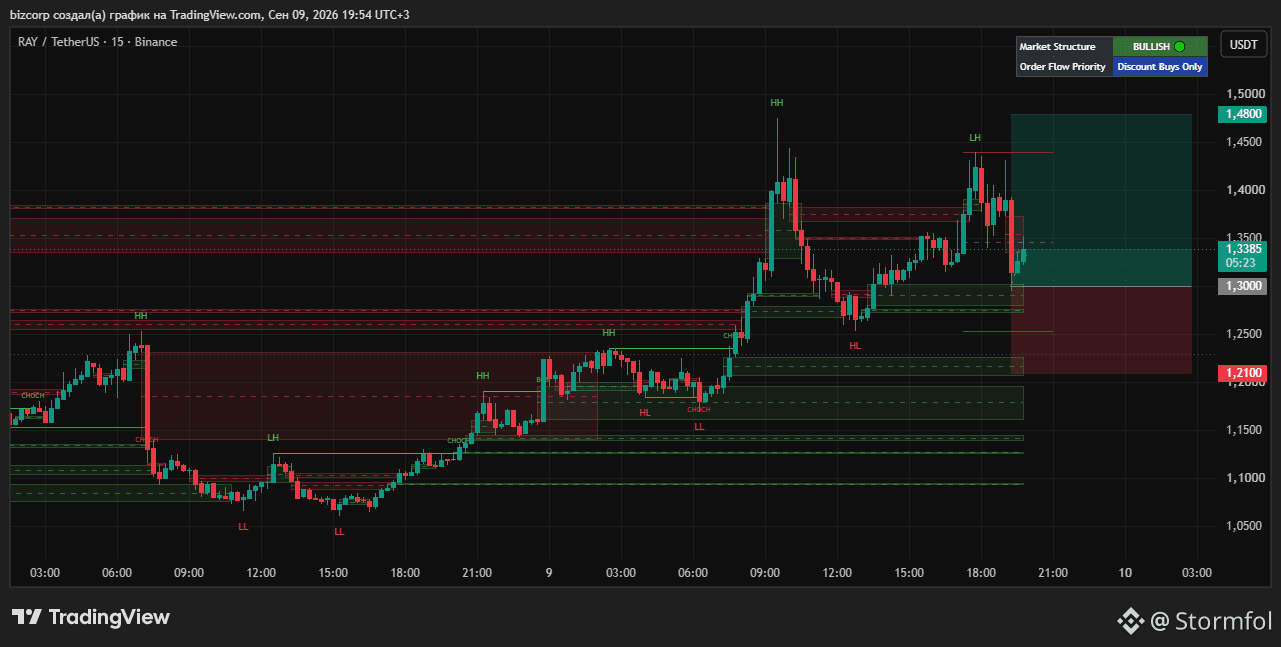
🚀 $RAY stays on course for new highs: where to enter?
RAY coin shows a strong impulse rally with updated highs and maintaining the Order Flow priority in the buy zone across 4h / 1h / 15m timeframes.
After the break of structure (BOS), the price moved into a local correction to accumulate liquidity.
🧠 Trading setup:
Entry Zone: 1,260 – 1,300 (build your position during the local pullback toward supports and when testing the Order Block).
TP: 1,480 (liquidity grab of the local high).
SL: Below 1,210 (break of the uptrend impulse structure).
💬 Do you trade altcoins following the trend or do you wait for deep pullbacks? Share in the comments!
📈 Trade professionally 👇
#Ray #smartmoney #BinanceSquare
RAY coin shows a strong impulse rally with updated highs and maintaining the Order Flow priority in the buy zone across 4h / 1h / 15m timeframes.
After the break of structure (BOS), the price moved into a local correction to accumulate liquidity.
🧠 Trading setup:
Entry Zone: 1,260 – 1,300 (build your position during the local pullback toward supports and when testing the Order Block).
TP: 1,480 (liquidity grab of the local high).
SL: Below 1,210 (break of the uptrend impulse structure).
💬 Do you trade altcoins following the trend or do you wait for deep pullbacks? Share in the comments!
📈 Trade professionally 👇
#Ray #smartmoney #BinanceSquare
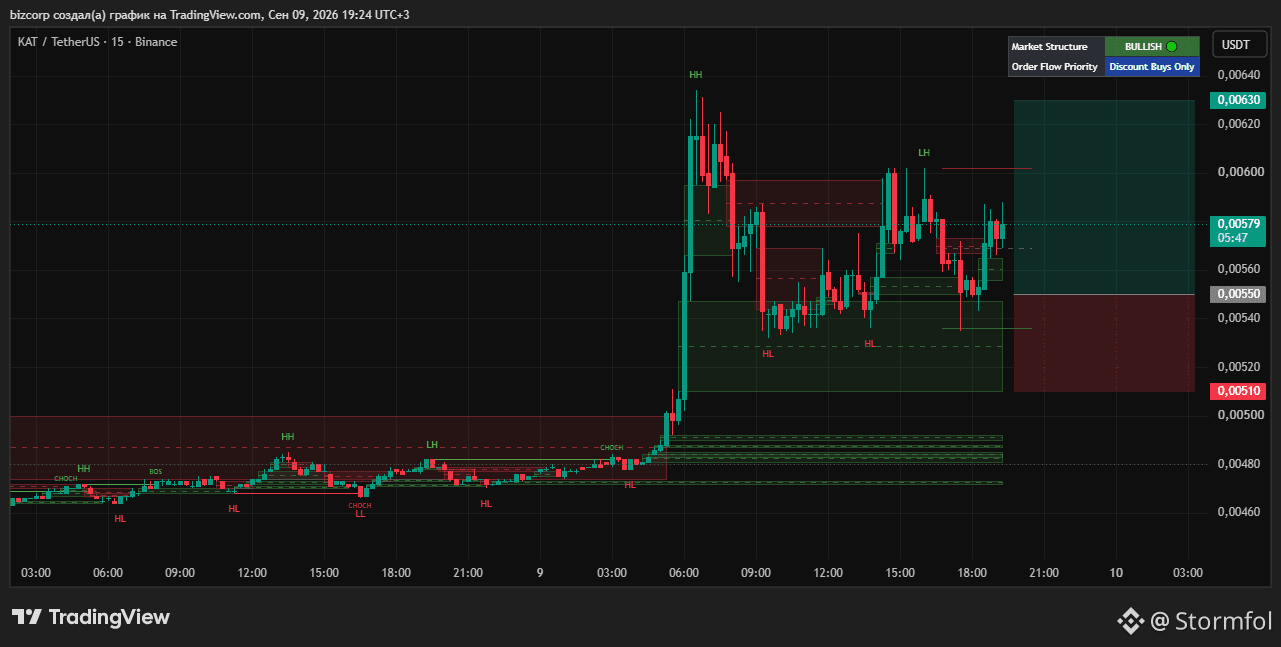
🚀 $KAT takes off following the market: where to find an entry point?
The KAT coin breaks through resistance levels and shows a strong bullish structure on the 4h, 1h, and 15m timeframes.
After a powerful impulsive breakout (BOS), the price moved into a local correction to sweep imbalances and accumulate liquidity.
🧠 Trading setup:
Entry Zone: 0,00530 – 0,00550 (build a position when testing the local Order Block and the broken structure).
TP: 0,00630 (liquidity sweep from the local high and continuation of the impulse).
SL: Below 0,00510 (a close below will break the upward structure).
💬 Do you like jumping into rockets at the very top, or do you prefer calm retests in the discount zone? Share your thoughts in the comments!
📈 Trade professionally and track the best quotes on Binance. 👇
#kat #smartmoney #BinanceSquare
The KAT coin breaks through resistance levels and shows a strong bullish structure on the 4h, 1h, and 15m timeframes.
After a powerful impulsive breakout (BOS), the price moved into a local correction to sweep imbalances and accumulate liquidity.
🧠 Trading setup:
Entry Zone: 0,00530 – 0,00550 (build a position when testing the local Order Block and the broken structure).
TP: 0,00630 (liquidity sweep from the local high and continuation of the impulse).
SL: Below 0,00510 (a close below will break the upward structure).
💬 Do you like jumping into rockets at the very top, or do you prefer calm retests in the discount zone? Share your thoughts in the comments!
📈 Trade professionally and track the best quotes on Binance. 👇
#kat #smartmoney #BinanceSquare
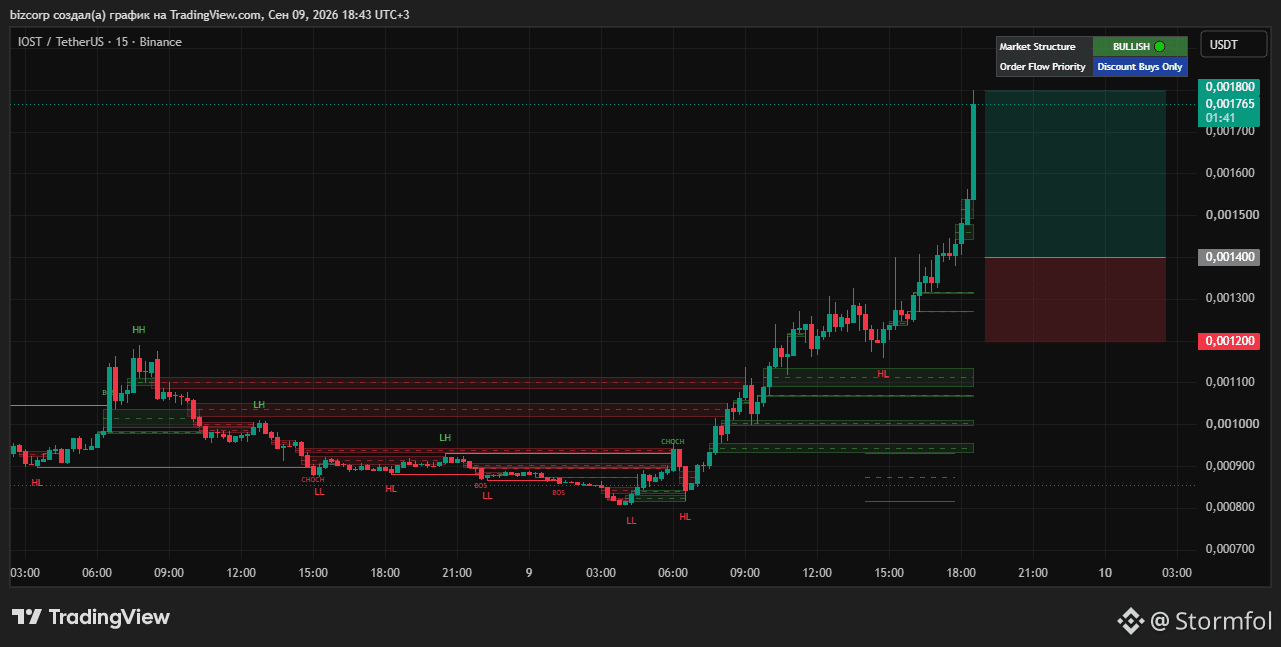
🚀 $IOST delivers a powerful rally-pump: where to find an entry point?
IOST shows aggressive growth, breaking key resistances amid a strong bullish structure (4h / 1h / 15m).
After an impulsive upside move (BOS), the price formed potential zones for a technical correction and the covering of the imbalances created.
🧠 Trading setup:
Entry Zone: 0.001300 – 0.001400 (accumulating a position when the price locally corrects back to the broken Order Block zone).
TP: 0.001800 (liquidity sweep of the current extreme).
SL: Below 0.001200 (break of the local impulse structure).
💬 Do you enter on the breakout, or wait for a deeper retest? Share your thoughts in the comments!
📈 Trade professionally and track the best quotes on the Binance exchange. 👇
#IOST #smartmoney #BinanceSquare
IOST shows aggressive growth, breaking key resistances amid a strong bullish structure (4h / 1h / 15m).
After an impulsive upside move (BOS), the price formed potential zones for a technical correction and the covering of the imbalances created.
🧠 Trading setup:
Entry Zone: 0.001300 – 0.001400 (accumulating a position when the price locally corrects back to the broken Order Block zone).
TP: 0.001800 (liquidity sweep of the current extreme).
SL: Below 0.001200 (break of the local impulse structure).
💬 Do you enter on the breakout, or wait for a deeper retest? Share your thoughts in the comments!
📈 Trade professionally and track the best quotes on the Binance exchange. 👇
#IOST #smartmoney #BinanceSquare
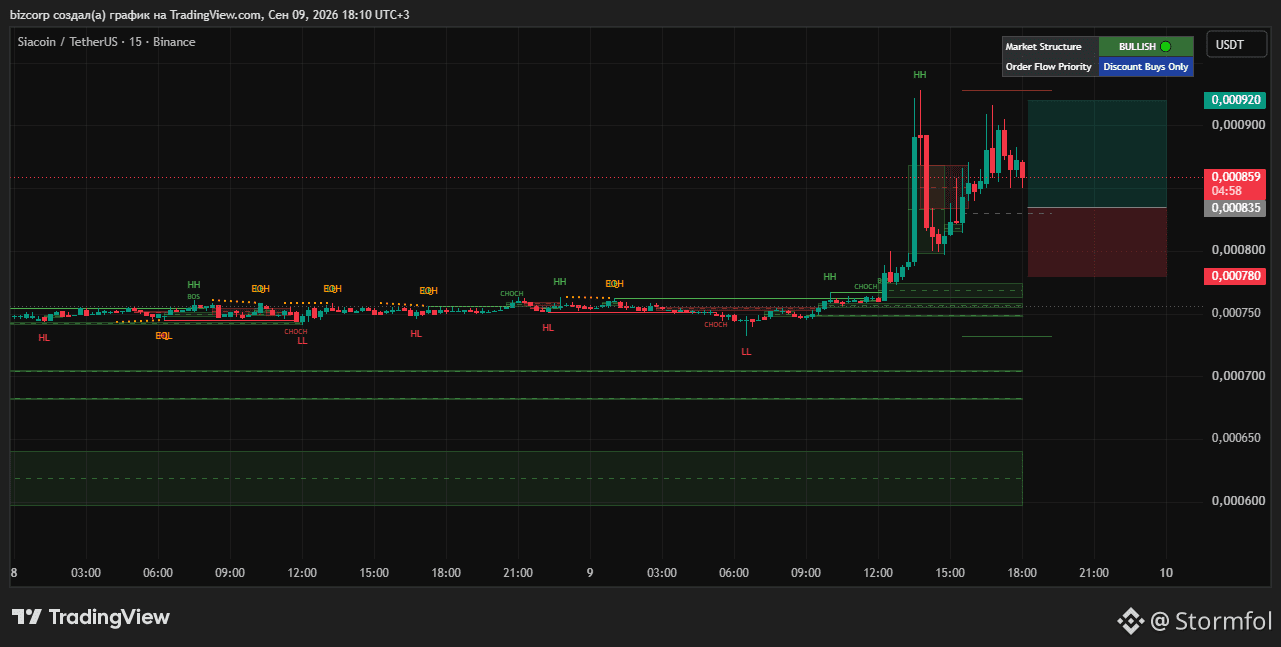
⚡️ $SC takes off: where to catch the impulse?
SC breaks through resistance levels and shows a strong bullish structure across all timeframes (4h / 1h / 15m). After the impulsive breakout, the price moves into a local correction to gather liquidity.
🧠 Trading plan:
Entry Zone: 0,000810 – 0,000835 (we expect a test of the local Order Block and the broken structure).
Take Profit: 0,000920 (liquidity sweep from the high and continuation of the pump).
Stop Loss: Below 0,000780 (breakdown of the upward structure).
💬 Do you enter altcoins on the breakout, or do you wait for a deep pullback? Write in the comments!
📈 Trade safely and monitor quotes on the Binance exchange. 👇
#Siacoin #smartmoney #cryptotrading
SC breaks through resistance levels and shows a strong bullish structure across all timeframes (4h / 1h / 15m). After the impulsive breakout, the price moves into a local correction to gather liquidity.
🧠 Trading plan:
Entry Zone: 0,000810 – 0,000835 (we expect a test of the local Order Block and the broken structure).
Take Profit: 0,000920 (liquidity sweep from the high and continuation of the pump).
Stop Loss: Below 0,000780 (breakdown of the upward structure).
💬 Do you enter altcoins on the breakout, or do you wait for a deep pullback? Write in the comments!
📈 Trade safely and monitor quotes on the Binance exchange. 👇
#Siacoin #smartmoney #cryptotrading
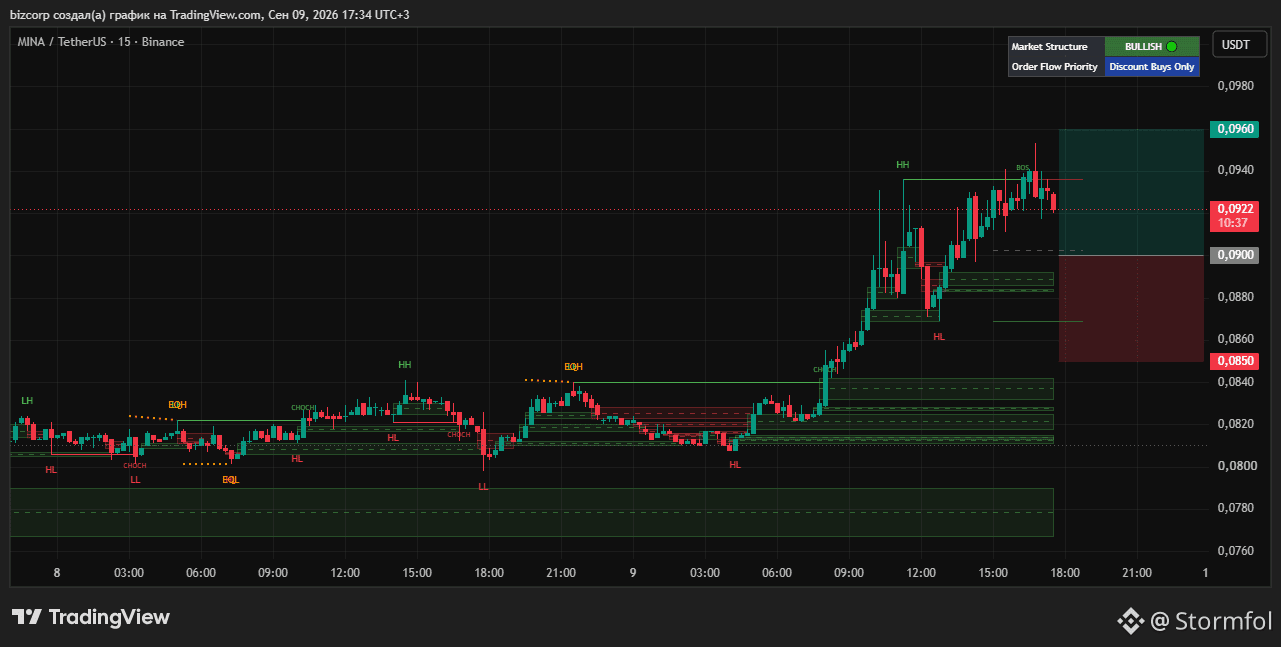
⚡️ $MINA shoots upward: where to catch the entry point after the impulse?
MINA continues to confidently storm the market, showing strong bullish momentum.
On higher and lower timeframes (4h / 1h / 15m), the structure is solidly bullish, with active Order Flow priority for buys in the discount zone.
After the impulse breakout of the BOS levels on higher timeframes, price naturally moved into a phase of local correction.
This is the ideal moment to accumulate liquidity—not to blindly enter at market at the very top.
🧠 Trading setup:
Entry Zone: 0,0880 – 0,0900 (build a position on the correction toward the local Order Block and a test of the broken structure).
TP: 0,0960 (liquidity grab of the local maximum and continuation of the global impulse).
SL: Below 0,0850 (a close below the key level will break the uptrend structure).
💬 Do you enter these rockets on the pullback, or do you wait for a deep retest? Share in the comments!
📈 Trade professionally and track the best quotes on the Binance exchange. 👇
#mina #smartmoney #BinanceSquare
MINA continues to confidently storm the market, showing strong bullish momentum.
On higher and lower timeframes (4h / 1h / 15m), the structure is solidly bullish, with active Order Flow priority for buys in the discount zone.
After the impulse breakout of the BOS levels on higher timeframes, price naturally moved into a phase of local correction.
This is the ideal moment to accumulate liquidity—not to blindly enter at market at the very top.
🧠 Trading setup:
Entry Zone: 0,0880 – 0,0900 (build a position on the correction toward the local Order Block and a test of the broken structure).
TP: 0,0960 (liquidity grab of the local maximum and continuation of the global impulse).
SL: Below 0,0850 (a close below the key level will break the uptrend structure).
💬 Do you enter these rockets on the pullback, or do you wait for a deep retest? Share in the comments!
📈 Trade professionally and track the best quotes on the Binance exchange. 👇
#mina #smartmoney #BinanceSquare
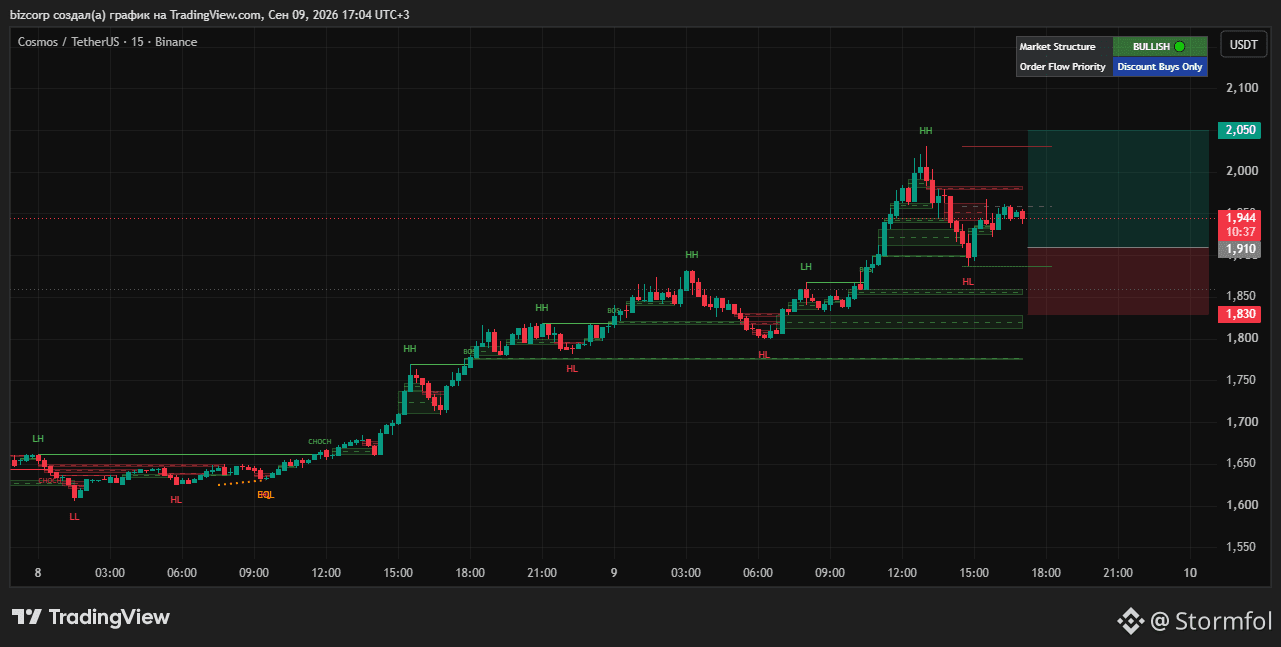
⚡️ $ATOM storms the heights: catching a pullback by the trend!
An impulsive surge in ATOM got the whole market talking. But where to enter if you missed the rocket?
On higher and lower timeframes (4h / 1h / 15m), the structure is solidly bullish.
After breaking the BOS levels upward, the asset entered into a healthy correction. A large player is building positions in the local demand zone, confirming the priority of longs.
🧠 Trading setup:
Entry Zone: 1,880 – 1,910 (accumulation on a test of the local support zone and an Order Block).
TP: 2,050 (updating the high and taking out the upper liquidity).
SL: Below 1,830 (breaking the local bullish structure).
💬 Are you trying to catch a reversal at the highs, or do you enter longs on every healthy correction? Share your thoughts in the comments!
📈 Trade safely and get the best quotes on the Binance exchange. 👇
#BinanceSquare #smartmoney #ATOM
An impulsive surge in ATOM got the whole market talking. But where to enter if you missed the rocket?
On higher and lower timeframes (4h / 1h / 15m), the structure is solidly bullish.
After breaking the BOS levels upward, the asset entered into a healthy correction. A large player is building positions in the local demand zone, confirming the priority of longs.
🧠 Trading setup:
Entry Zone: 1,880 – 1,910 (accumulation on a test of the local support zone and an Order Block).
TP: 2,050 (updating the high and taking out the upper liquidity).
SL: Below 1,830 (breaking the local bullish structure).
💬 Are you trying to catch a reversal at the highs, or do you enter longs on every healthy correction? Share your thoughts in the comments!
📈 Trade safely and get the best quotes on the Binance exchange. 👇
#BinanceSquare #smartmoney #ATOM
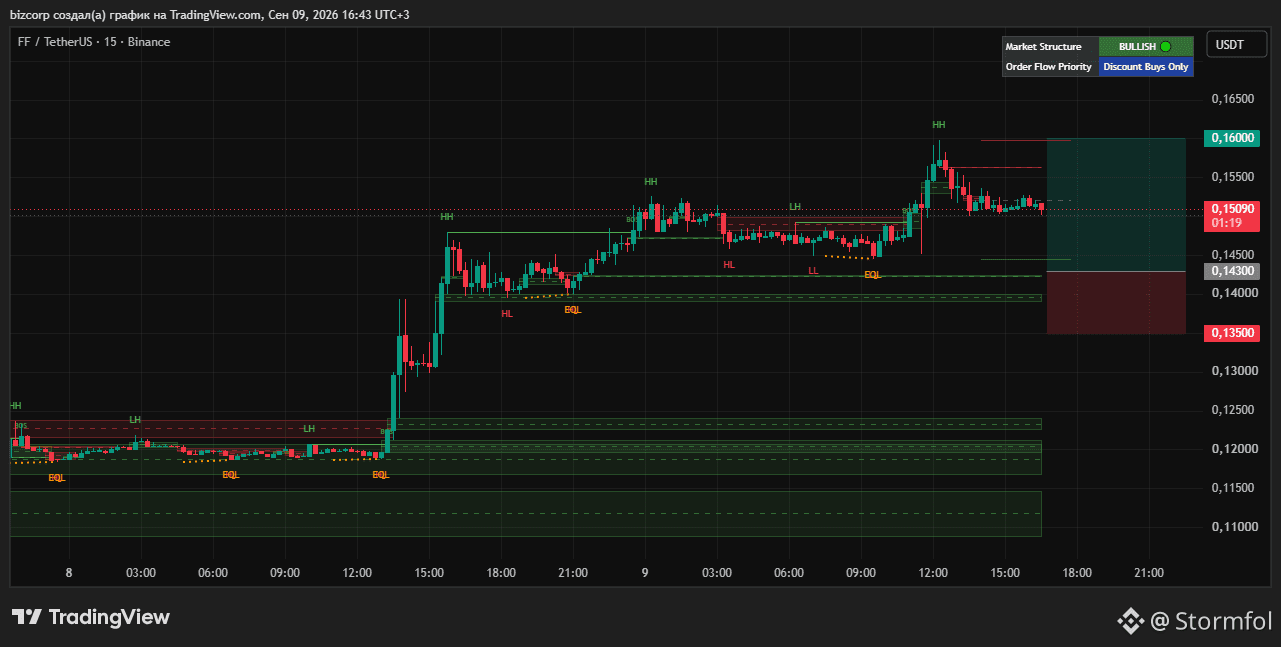
⚡️ Explosive growth to $FF : where to find the entry point after the impulse?
FF continues to show strong bullish momentum, pushing into new highs. On the 4h and 1h timeframes, the structure remains confidently bullish, with constant updates to highs (HH) and lows (HL).
On lower timeframes (15m), after the impulse breakout, the price moved into a healthy local correction and consolidation.
We are forming liquidity zones and approaching key buyer order blocks, from which a large player can resume movement along the trend.
🧠 Trading plan:
Entry Zone: 0,1400 – 0,1430 (building a position when testing the local Order Block and the higher imbalance).
TP: 0,1600 (updating the local high and collecting liquidity).
SL: Below 0,1350 (breaking the local structure of the bullish impulse).
💬 Do you trade impulse coins during the correction, or do you enter only after a breakout of highs? Share your thoughts in the comments!
📈 Follow the charts and open trades reliably together with Binance. 👇
#BinanceSquare #smartmoney #cryptotrading
FF continues to show strong bullish momentum, pushing into new highs. On the 4h and 1h timeframes, the structure remains confidently bullish, with constant updates to highs (HH) and lows (HL).
On lower timeframes (15m), after the impulse breakout, the price moved into a healthy local correction and consolidation.
We are forming liquidity zones and approaching key buyer order blocks, from which a large player can resume movement along the trend.
🧠 Trading plan:
Entry Zone: 0,1400 – 0,1430 (building a position when testing the local Order Block and the higher imbalance).
TP: 0,1600 (updating the local high and collecting liquidity).
SL: Below 0,1350 (breaking the local structure of the bullish impulse).
💬 Do you trade impulse coins during the correction, or do you enter only after a breakout of highs? Share your thoughts in the comments!
📈 Follow the charts and open trades reliably together with Binance. 👇
#BinanceSquare #smartmoney #cryptotrading
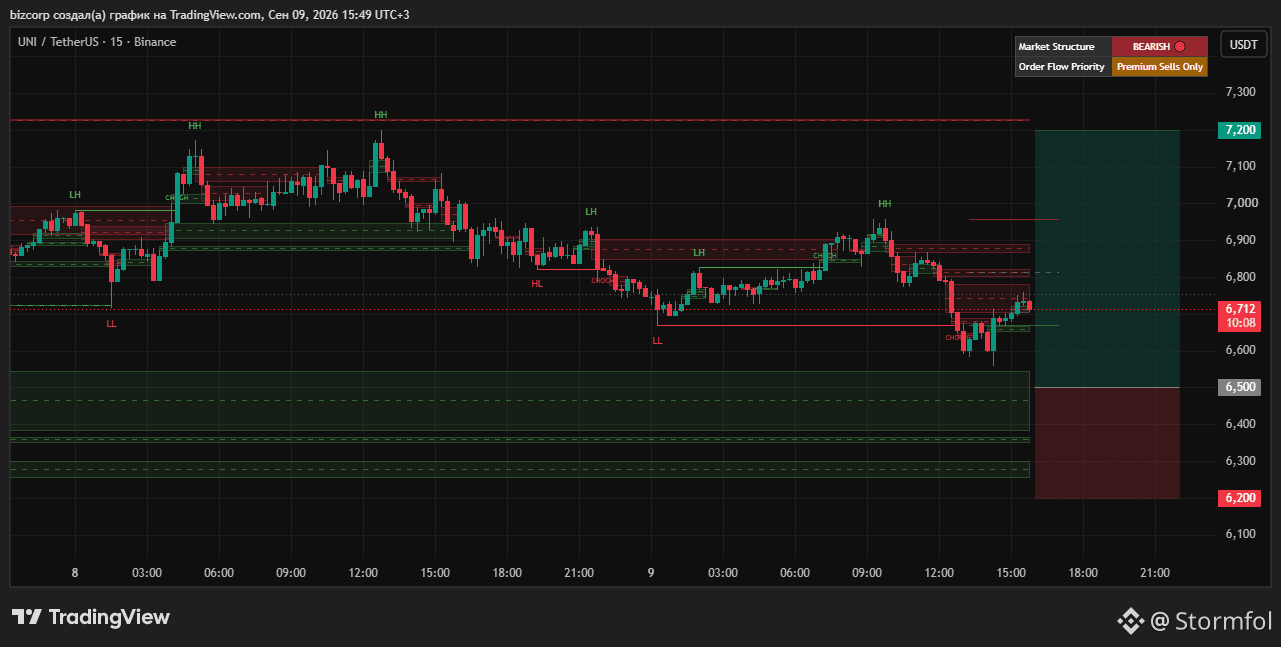
⚡️ $UNI Local dump vs global bullish trend
📉 What’s on the chart?
On the 15m and 1h timeframes, the structure is confidently bearish: price is forming lower highs (LH) and lower lows (LL), breaking levels down with BOS.
But if you open the 4h, you see a completely different picture there— the strong bullish trend remains intact, and the current drop is a healthy correction into the discount zone.
🧠 Work plan:
Price smoothly moves down into a major support area (Order Block) on 4h in the 6.350 – 6.500 range, while also covering imbalances along the way. Shorting here at the bottom is a one-way ticket. Priority one: wait for a retest of the zone of interest and for buyer reaction on the lower timeframes to build positions in line with the trend.
🎯 Trading setup:
Entry Zone: 6.350 – 6.500
Take Profit: 6.900 / 7.200 (return to the upper boundary and removal of liquidity)
Stop Loss: Below 6.200 (break of the global structure)
📉 Trade smart, use stop-losses, and get the best prices on the Binance exchange.👇
#uniswap #TechnicalAnalysis #smartmoney
📉 What’s on the chart?
On the 15m and 1h timeframes, the structure is confidently bearish: price is forming lower highs (LH) and lower lows (LL), breaking levels down with BOS.
But if you open the 4h, you see a completely different picture there— the strong bullish trend remains intact, and the current drop is a healthy correction into the discount zone.
🧠 Work plan:
Price smoothly moves down into a major support area (Order Block) on 4h in the 6.350 – 6.500 range, while also covering imbalances along the way. Shorting here at the bottom is a one-way ticket. Priority one: wait for a retest of the zone of interest and for buyer reaction on the lower timeframes to build positions in line with the trend.
🎯 Trading setup:
Entry Zone: 6.350 – 6.500
Take Profit: 6.900 / 7.200 (return to the upper boundary and removal of liquidity)
Stop Loss: Below 6.200 (break of the global structure)
📉 Trade smart, use stop-losses, and get the best prices on the Binance exchange.👇
#uniswap #TechnicalAnalysis #smartmoney
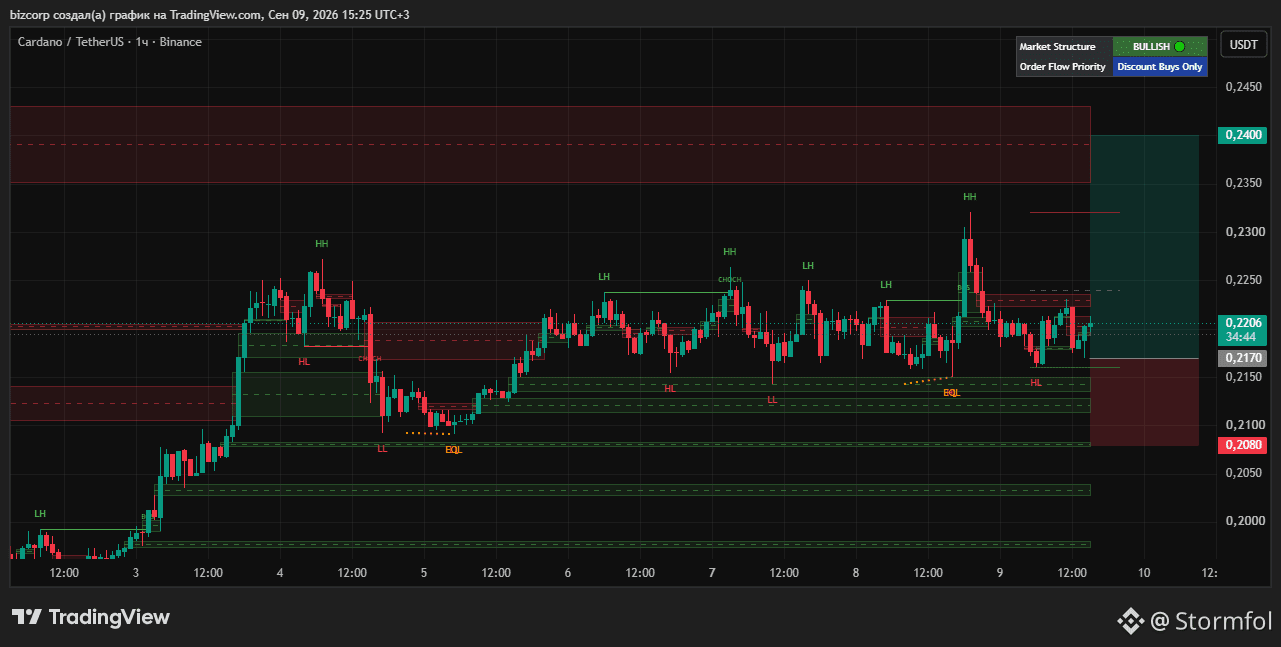
⚡️ $ADA where to take the long according to the trend?
🎯 Trading plan:
Entry Zone: 0,2120 – 0,2170 (building a position in the local Order Block zone and support within the corrective pullback).
TP: 0,2280 – 0,2400 (removing liquidity of the local high and testing the upper resistance boundary).
SL: 0,2080 (below the key support zone and the last formed Higher Low; breaking it will violate the uptrend structure).
⚠️ The market doesn’t forgive rushing—wait for the price in the calculated entry zone and strictly control your risk. 👇
#ADA #smartmoney #cryptotrading #BinanceSquare
🎯 Trading plan:
Entry Zone: 0,2120 – 0,2170 (building a position in the local Order Block zone and support within the corrective pullback).
TP: 0,2280 – 0,2400 (removing liquidity of the local high and testing the upper resistance boundary).
SL: 0,2080 (below the key support zone and the last formed Higher Low; breaking it will violate the uptrend structure).
⚠️ The market doesn’t forgive rushing—wait for the price in the calculated entry zone and strictly control your risk. 👇
#ADA #smartmoney #cryptotrading #BinanceSquare
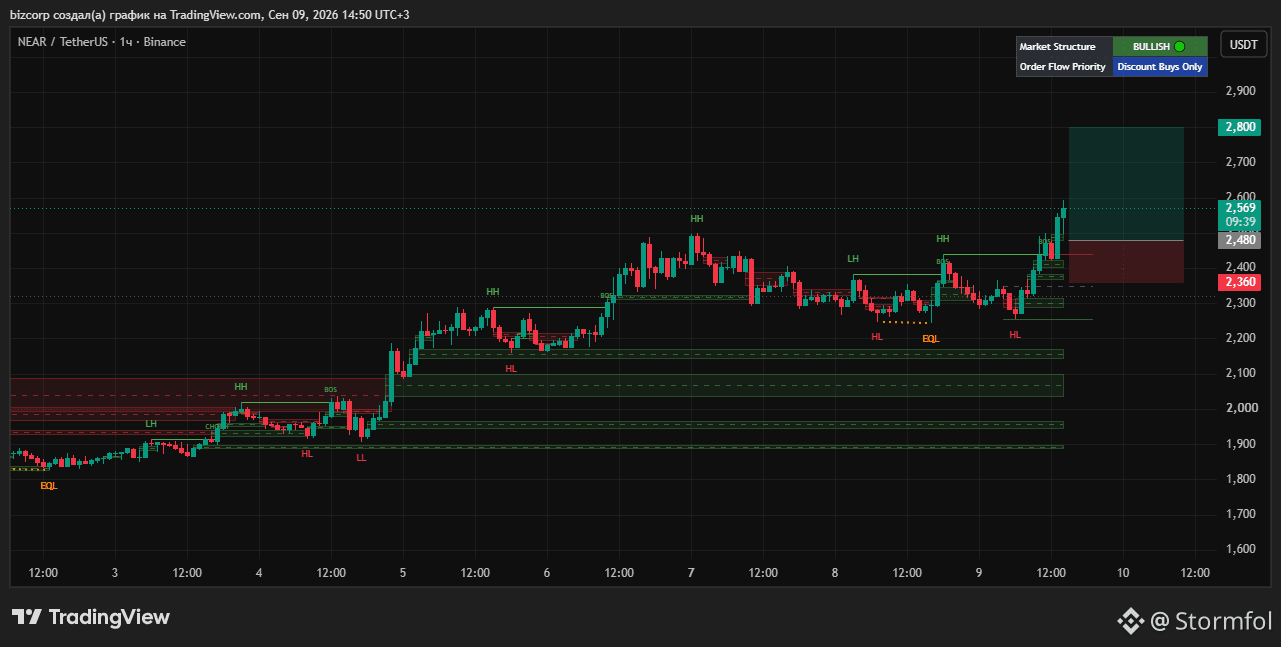
⚡️ $NEAR long according to the trend.
🎯 Trading plan:
Entry Zone: 2,420 – 2,480 (position entry in the local Order Block zone and support within the corrective pullback).
TP: 2,650 – 2,800 (liquidation of the local maximum and a test of the upper resistance boundary).
SL: 2,360 (below the key support zone and the last formed Higher Low; its break will disrupt the bullish structure).👇
#Near #smartmoney #cryptotrading #BinanceSquare
🎯 Trading plan:
Entry Zone: 2,420 – 2,480 (position entry in the local Order Block zone and support within the corrective pullback).
TP: 2,650 – 2,800 (liquidation of the local maximum and a test of the upper resistance boundary).
SL: 2,360 (below the key support zone and the last formed Higher Low; its break will disrupt the bullish structure).👇
#Near #smartmoney #cryptotrading #BinanceSquare
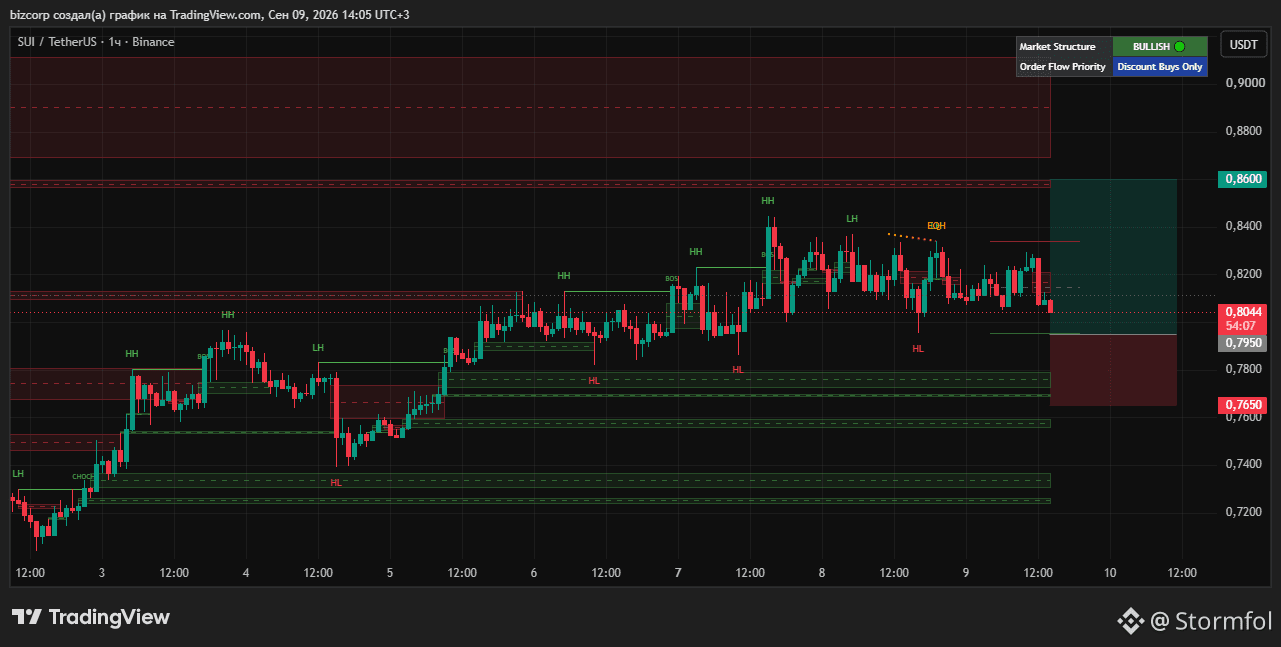
⚡️ $SUI where to pick up the long according to the trend, trading plan?
While the local correction cools the market after the impulse, a large player is providing a great opportunity to enter at a favorable price.
We break down a working setup for SUI/USDT without extra fluff. 🧠
📈 The global trend for this instrument on the 4-hour timeframe remains bullish.
On the 1-hour timeframe, a local pullback is visible, and on the 15-minute chart the price is testing the buyers’ zone and a potential Order Block as part of the continuation of the upward structure.
🎯 Trading plan:
Entry Zone: 0,7750 – 0,7950 (accumulate position in the local Order Block zone and at support during the corrective downswing).
TP: 0,8300 – 0,8600 (sweep liquidity at the local high and test the upper resistance boundary).
SL: 0,7650 (below the key support zone and the last formed Higher Low—if it’s broken, the bullish structure will be invalidated).
👇
#sui #smartmoney #cryptotrading #BinanceSquare
While the local correction cools the market after the impulse, a large player is providing a great opportunity to enter at a favorable price.
We break down a working setup for SUI/USDT without extra fluff. 🧠
📈 The global trend for this instrument on the 4-hour timeframe remains bullish.
On the 1-hour timeframe, a local pullback is visible, and on the 15-minute chart the price is testing the buyers’ zone and a potential Order Block as part of the continuation of the upward structure.
🎯 Trading plan:
Entry Zone: 0,7750 – 0,7950 (accumulate position in the local Order Block zone and at support during the corrective downswing).
TP: 0,8300 – 0,8600 (sweep liquidity at the local high and test the upper resistance boundary).
SL: 0,7650 (below the key support zone and the last formed Higher Low—if it’s broken, the bullish structure will be invalidated).
👇
#sui #smartmoney #cryptotrading #BinanceSquare
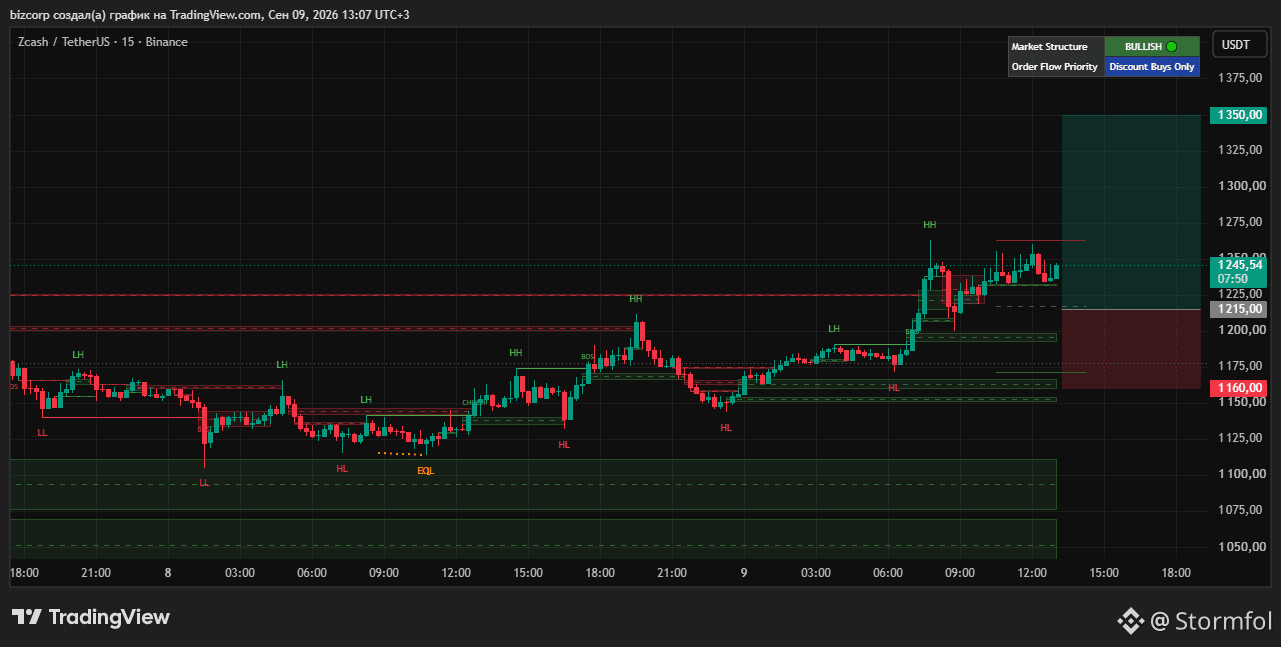
⚡️ $ZEC where to take the long according to the trend?
📈 The global trend for the instrument on the 4-hour timeframe remains bullish.
On the hourly timeframe, there is a local pullback, and on the 15-minute chart the price is testing the buyers’ zone and a potential Order Block as part of the continuation of the uptrend structure.
🎯 Trading plan:
Entry Zone: 1180.0 – 1215.0 (build the position in the local Order Block zone and support during the corrective decline).
TP: 1280.0 – 1350.0 (liquidity sweep of the local maximum and retest of the upper resistance boundary).
SL: 1160.0 (below the key support zone and the last formed Higher Low; a break below it would invalidate the bullish structure).
👇
#zec #smartmoney #cryptotrading #BinanceSquare
📈 The global trend for the instrument on the 4-hour timeframe remains bullish.
On the hourly timeframe, there is a local pullback, and on the 15-minute chart the price is testing the buyers’ zone and a potential Order Block as part of the continuation of the uptrend structure.
🎯 Trading plan:
Entry Zone: 1180.0 – 1215.0 (build the position in the local Order Block zone and support during the corrective decline).
TP: 1280.0 – 1350.0 (liquidity sweep of the local maximum and retest of the upper resistance boundary).
SL: 1160.0 (below the key support zone and the last formed Higher Low; a break below it would invalidate the bullish structure).
👇
#zec #smartmoney #cryptotrading #BinanceSquare
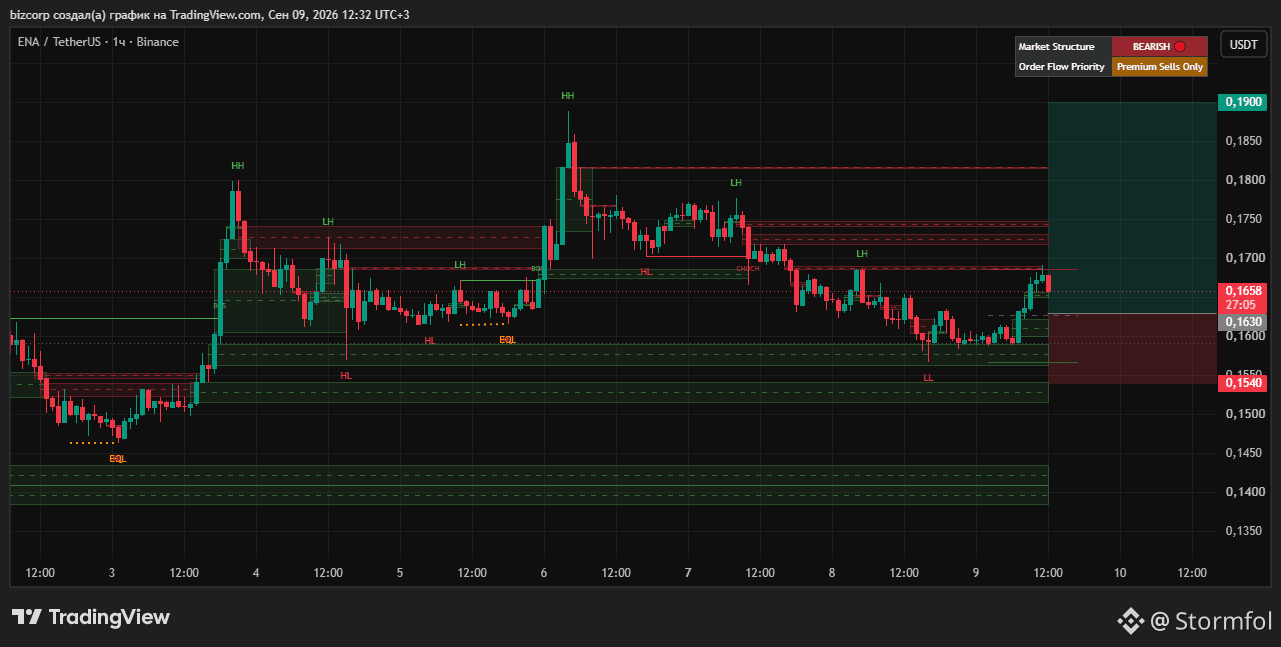
⚡️ $ENA on retracement: where to take the long according to the trend?
📈 The global trend for the instrument on the 4-hour timeframe remains bullish.
On the 1-hour timeframe, a local pullback is being observed, and on the 15-minute chart, the price is testing the buyers’ zone and a potential Order Block as part of the continuation of the uptrend structure.
🎯 Trading plan:
Entry Zone: 0,1580 – 0,1630 (building a position in the local Order Block zone and support within the corrective decline).
TP: 0,1750 – 0,1900 (liquidity sweep of the local high and a test of the upper resistance boundary).
SL: 0,1540 (below the key support zone and the last formed Higher Low—its break will invalidate the uptrend structure).
⚠️ The market doesn’t forgive haste—wait for the price in the planned entry zone and strictly manage your risk. 👇
#ENA #smartmoney #cryptotrading #BinanceSquare
📈 The global trend for the instrument on the 4-hour timeframe remains bullish.
On the 1-hour timeframe, a local pullback is being observed, and on the 15-minute chart, the price is testing the buyers’ zone and a potential Order Block as part of the continuation of the uptrend structure.
🎯 Trading plan:
Entry Zone: 0,1580 – 0,1630 (building a position in the local Order Block zone and support within the corrective decline).
TP: 0,1750 – 0,1900 (liquidity sweep of the local high and a test of the upper resistance boundary).
SL: 0,1540 (below the key support zone and the last formed Higher Low—its break will invalidate the uptrend structure).
⚠️ The market doesn’t forgive haste—wait for the price in the planned entry zone and strictly manage your risk. 👇
#ENA #smartmoney #cryptotrading #BinanceSquare
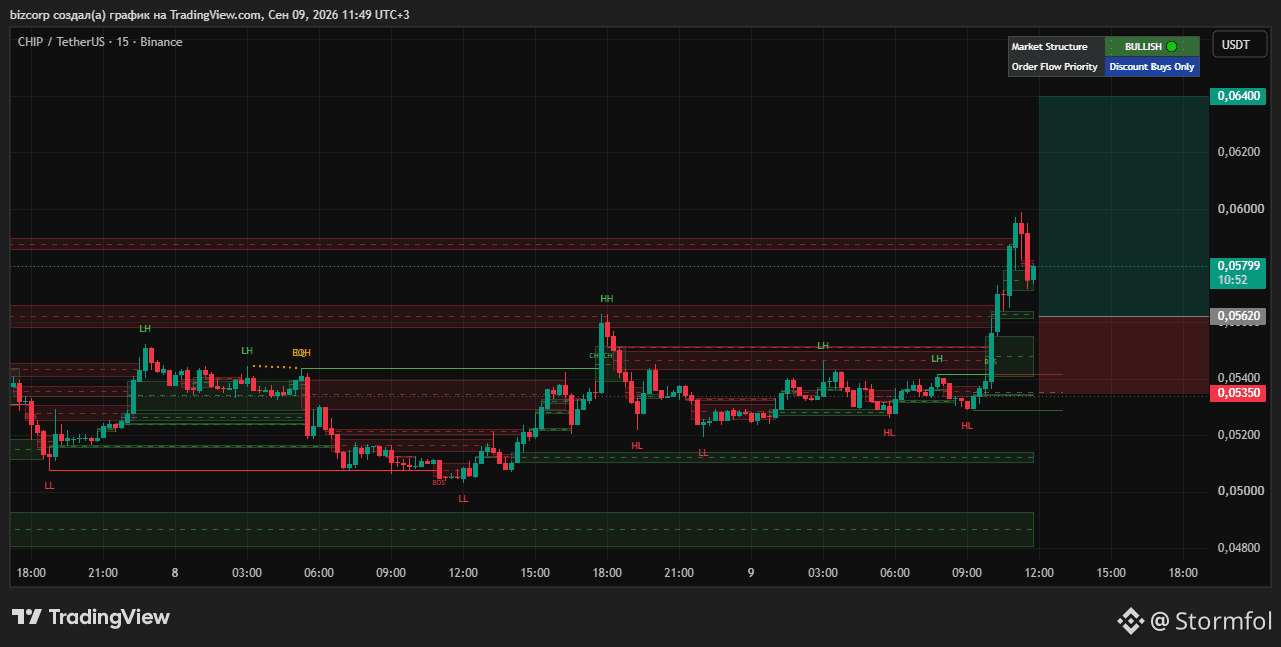
⚡️ $CHIP on the retest: where to take the long according to the trend?
While a local correction is cooling the market after the impulse, a big player is giving a great opportunity to enter at a favorable price. We break down a working setup for CHIP/USDT without any extra fluff. 🧠
📈 The global trend for the instrument on the 4-hour timeframe remains bullish.
On the 1-hour timeframe, there’s a local pullback, and on the 15-minute chart, the price is testing the buyers’ zone and a potential Order Block as part of the continuation of the upward structure.
🎯 Trading plan:
Entry Zone: 0,05450 – 0,05620 (accumulate a position in the local Order Block zone and support within the corrective dip).
TP: 0,06000 – 0,06400 (liquidity sweep of the local high and a test of the upper resistance boundary).
SL: 0,05350 (below the key support zone and the last formed Higher Low; breaking it would invalidate the bullish structure).
⚠️ The market doesn’t forgive haste—wait for the price in the planned entry zone and strictly control your risk. 👇
#chip #smartmoney #cryptotrading #BinanceSquare
While a local correction is cooling the market after the impulse, a big player is giving a great opportunity to enter at a favorable price. We break down a working setup for CHIP/USDT without any extra fluff. 🧠
📈 The global trend for the instrument on the 4-hour timeframe remains bullish.
On the 1-hour timeframe, there’s a local pullback, and on the 15-minute chart, the price is testing the buyers’ zone and a potential Order Block as part of the continuation of the upward structure.
🎯 Trading plan:
Entry Zone: 0,05450 – 0,05620 (accumulate a position in the local Order Block zone and support within the corrective dip).
TP: 0,06000 – 0,06400 (liquidity sweep of the local high and a test of the upper resistance boundary).
SL: 0,05350 (below the key support zone and the last formed Higher Low; breaking it would invalidate the bullish structure).
⚠️ The market doesn’t forgive haste—wait for the price in the planned entry zone and strictly control your risk. 👇
#chip #smartmoney #cryptotrading #BinanceSquare
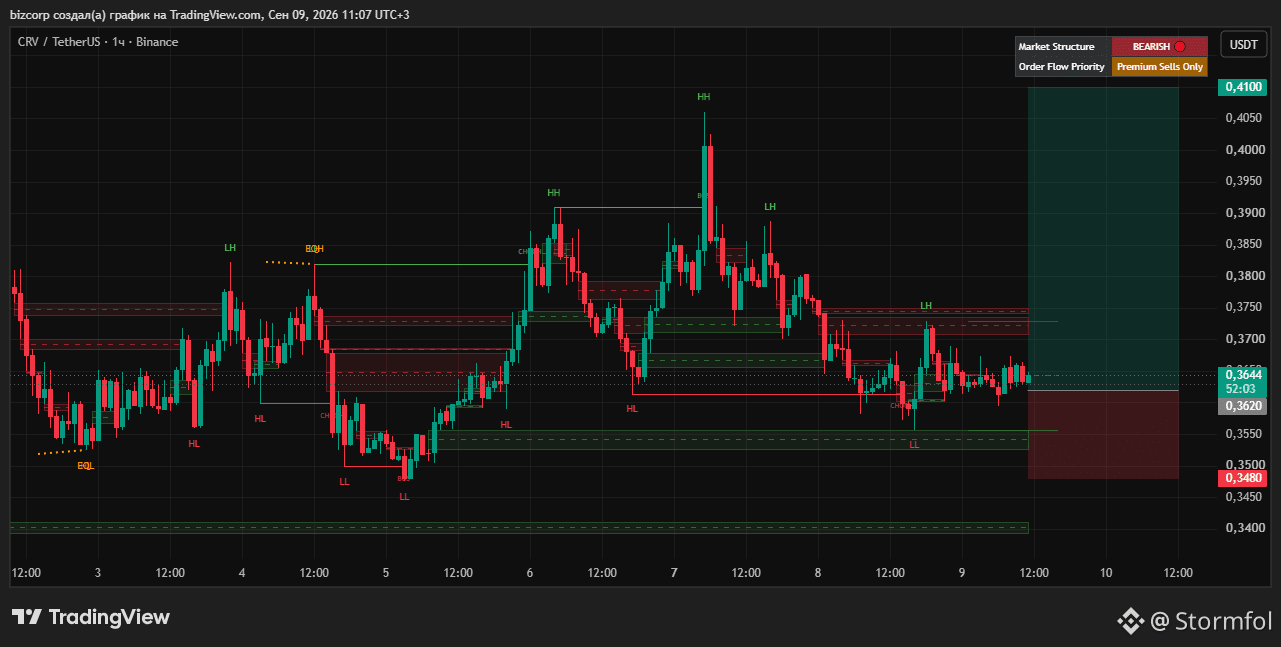
⚡️ $CRV where to take the long according to the trend?
While a local correction is cooling the market after the impulse, a big player is offering a great opportunity to enter at a favorable price.
We break down a working setup for CRV/USDT without any unnecessary fluff. 🧠
📈 The global trend for this instrument on the 4-hour timeframe remains bullish.
On the 1-hour and 15-minute timeframes, a local pullback is developing, and the price is just testing the buyers’ zone and a potential Order Block within the continuation of the overall structure.
🎯 Trading plan:
Entry Zone: 0.3550 – 0.3620 (building the position in the local Order Block zone and support during the corrective drop).
TP: 0.3850 – 0.4100 (sweeping liquidity from the local high and testing the upper resistance boundary).
SL: 0.3480 (below the key support zone and the last formed Higher Low; its break will invalidate the bullish structure).
⚠️ The market doesn’t forgive haste—wait for the price in the planned entry zone and strictly manage your risk. 👇
#crv #smartmoney #cryptotrading #BinanceSquare
While a local correction is cooling the market after the impulse, a big player is offering a great opportunity to enter at a favorable price.
We break down a working setup for CRV/USDT without any unnecessary fluff. 🧠
📈 The global trend for this instrument on the 4-hour timeframe remains bullish.
On the 1-hour and 15-minute timeframes, a local pullback is developing, and the price is just testing the buyers’ zone and a potential Order Block within the continuation of the overall structure.
🎯 Trading plan:
Entry Zone: 0.3550 – 0.3620 (building the position in the local Order Block zone and support during the corrective drop).
TP: 0.3850 – 0.4100 (sweeping liquidity from the local high and testing the upper resistance boundary).
SL: 0.3480 (below the key support zone and the last formed Higher Low; its break will invalidate the bullish structure).
⚠️ The market doesn’t forgive haste—wait for the price in the planned entry zone and strictly manage your risk. 👇
#crv #smartmoney #cryptotrading #BinanceSquare
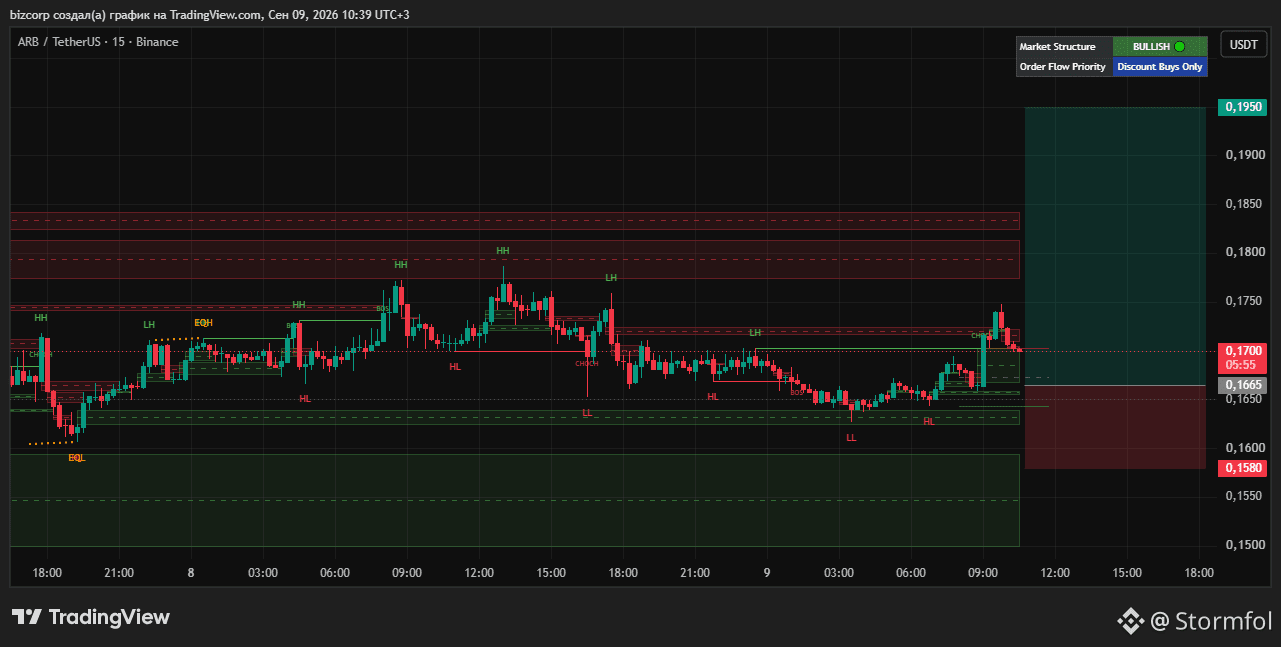
⚡️ $ARB repost: where to take the long?
While the local correction cools the market after a strong impulse, a large player is offering a great opportunity to enter at a favorable price.
We break down a working ARB/USDT setup without any extra fluff. 🧠
📈 The global trend for the instrument on the 4-hour timeframe remains bullish.
On the 1-hour timeframe, there is a local pullback, and on the 15-minute chart price is testing the buyers’ zone and a potential Order Block as part of the continuation of the upward structure.
🎯 Trading plan:
Entry Zone: 0,1620 – 0,1665 (adding a position in the local Order Block zone and support within the corrective downside).
TP: 0,1800 – 0,1950 (removing liquidity from the local high and testing the upper resistance boundary).
SL: 0,1580 (below the key support zone and the last formed Higher Low; breaking it would invalidate the bullish structure).
⚠️ The market doesn’t forgive haste—wait for the price in the planned entry zone and strictly control your risk.! 👇
#ARB #smartmoney #cryptotrading #BinanceSquare
While the local correction cools the market after a strong impulse, a large player is offering a great opportunity to enter at a favorable price.
We break down a working ARB/USDT setup without any extra fluff. 🧠
📈 The global trend for the instrument on the 4-hour timeframe remains bullish.
On the 1-hour timeframe, there is a local pullback, and on the 15-minute chart price is testing the buyers’ zone and a potential Order Block as part of the continuation of the upward structure.
🎯 Trading plan:
Entry Zone: 0,1620 – 0,1665 (adding a position in the local Order Block zone and support within the corrective downside).
TP: 0,1800 – 0,1950 (removing liquidity from the local high and testing the upper resistance boundary).
SL: 0,1580 (below the key support zone and the last formed Higher Low; breaking it would invalidate the bullish structure).
⚠️ The market doesn’t forgive haste—wait for the price in the planned entry zone and strictly control your risk.! 👇
#ARB #smartmoney #cryptotrading #BinanceSquare
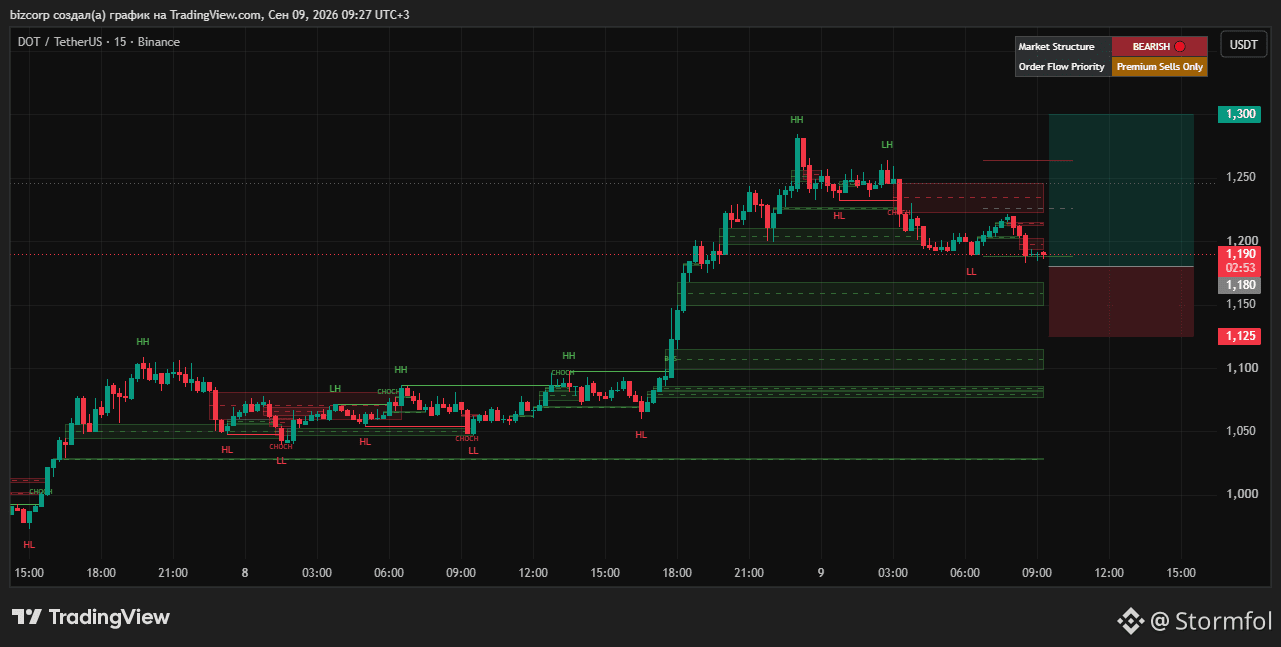
⚡️ $DOT is going back for a retest: where to take the long according to the trend?
While the local correction cools the market down after a strong impulse, a major player is offering a great opportunity to enter at a favorable price.
🎯 Trading plan:
Entry Zone: 1,150 – 1,180 (build a position in the local Order Block zone and at support within the correction).
TP: 1,250 – 1,300 (liquidate the local high liquidity and test the upper resistance boundary).
SL: 1,125 (below the key support zone and the last formed Higher Low—breaking it will invalidate the upward structure).
⚠️ The market doesn’t forgive rushing—wait for the price in the calculated entry zone and strictly control your risk. 👇
#dot #cryptotrading #BinanceSquare
While the local correction cools the market down after a strong impulse, a major player is offering a great opportunity to enter at a favorable price.
🎯 Trading plan:
Entry Zone: 1,150 – 1,180 (build a position in the local Order Block zone and at support within the correction).
TP: 1,250 – 1,300 (liquidate the local high liquidity and test the upper resistance boundary).
SL: 1,125 (below the key support zone and the last formed Higher Low—breaking it will invalidate the upward structure).
⚠️ The market doesn’t forgive rushing—wait for the price in the calculated entry zone and strictly control your risk. 👇
#dot #cryptotrading #BinanceSquare
Log in to explore more content