
Bull Master Official
2k Posts

Bull Master Official
Crypto Expert - Trader - Sharing Market Insights, Trends || crypto matrix
Open Trade
Frequent Trader
11.7 Months
7 Following
3.2K+ Followers
3.9K+ Liked
Posts
Portfolio
All
Quotes
Live
See translation
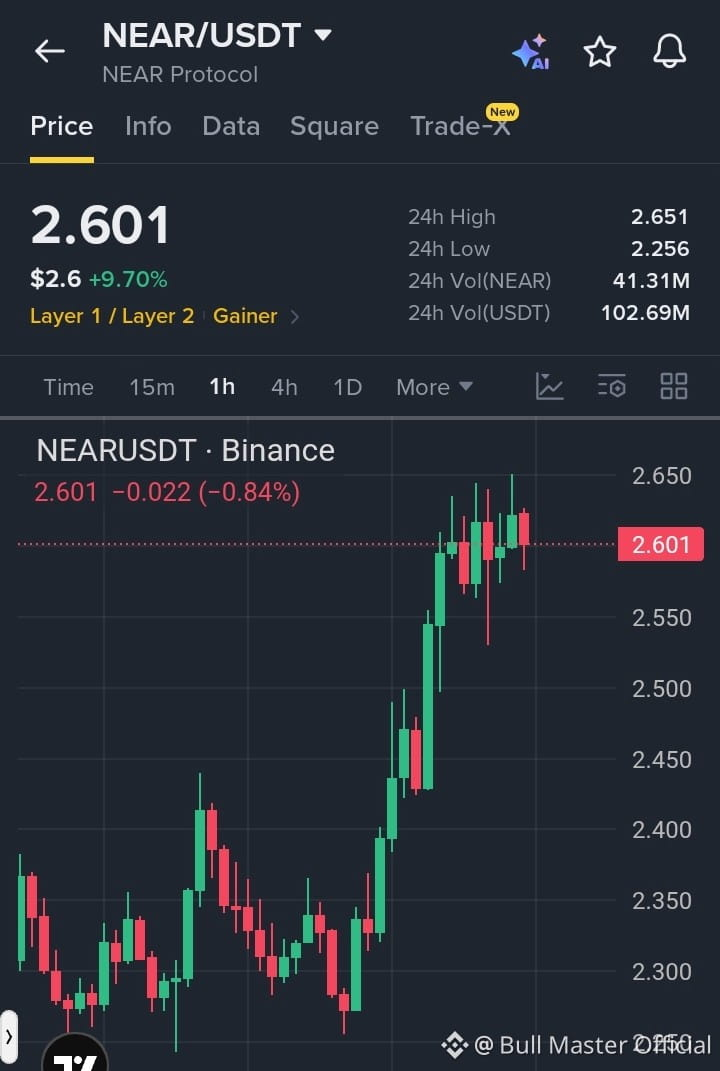
Traders, I’m monitoring $NEAR closely as it pushes into a crucial resistance barrier, setting up a potential short setup. 📉⚡
The bullish momentum has been strong, but price is entering a heavy supply level where sell orders could step in. A clear rejection from this range could initiate a solid correction down, so waiting for signal confirmation is key. 🚀💰
📍 Entry: 2.620 – 2.650 🎯 TP1: 2.520 🎯 TP2: 2.440 🎯 TP3: 2.320 🛑 SL: 2.695
$ZEC
$LA
The bullish momentum has been strong, but price is entering a heavy supply level where sell orders could step in. A clear rejection from this range could initiate a solid correction down, so waiting for signal confirmation is key. 🚀💰
📍 Entry: 2.620 – 2.650 🎯 TP1: 2.520 🎯 TP2: 2.440 🎯 TP3: 2.320 🛑 SL: 2.695
$ZEC
$LA
See translation
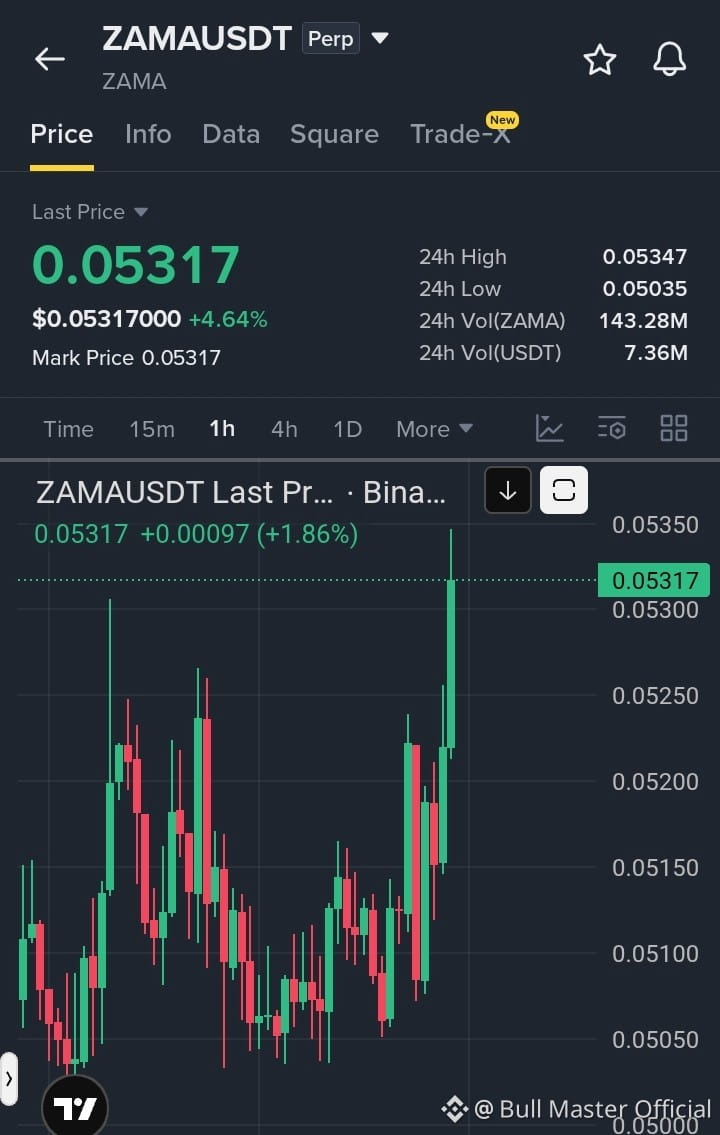
ZAMA just printed a massive vertical green candle, breaking straight out of bottom range consolidation. Volume is surging fast as buyers take complete control. If this momentum holds through resistance, we could see an explosive follow-through rally very soon.
Target: 0.06800ZAMA just printed a massive vertical green candle, breaking straight out of bottom range consolidation. Volume is surging fast as buyers take complete control. If this momentum holds through resistance, we could see an explosive follow-through rally very soon.
Target: 0.06800
$ZEC
$LA
Target: 0.06800ZAMA just printed a massive vertical green candle, breaking straight out of bottom range consolidation. Volume is surging fast as buyers take complete control. If this momentum holds through resistance, we could see an explosive follow-through rally very soon.
Target: 0.06800
$ZEC
$LA
See translation
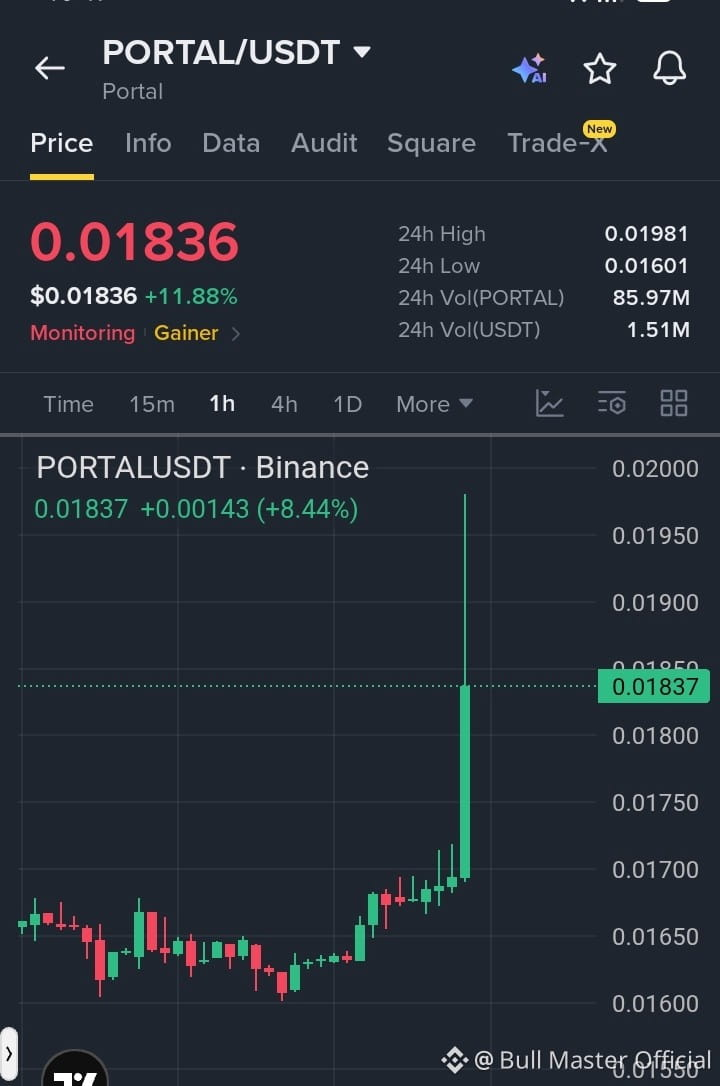
🚨 URGENT: $PORTAL IS SURGING! OVER 11%+ PUMP IN PROGRESS! 🚀
Massive volume just exploded into PORTAL/USDT, sparking a massive green candle straight through key local resistance as buyers step in heavily.
Why this news matters for the market: This sudden breakout signals high buyer demand returning to gaming ecosystem tokens on massive trading volume. Clearing this key level sparks heavy momentum, signaling strong potential for a sustained multi-day rally across the sector.
🎯 Target:
0.02450
$ZEC
$LA
Massive volume just exploded into PORTAL/USDT, sparking a massive green candle straight through key local resistance as buyers step in heavily.
Why this news matters for the market: This sudden breakout signals high buyer demand returning to gaming ecosystem tokens on massive trading volume. Clearing this key level sparks heavy momentum, signaling strong potential for a sustained multi-day rally across the sector.
🎯 Target:
0.02450
$ZEC
$LA
See translation
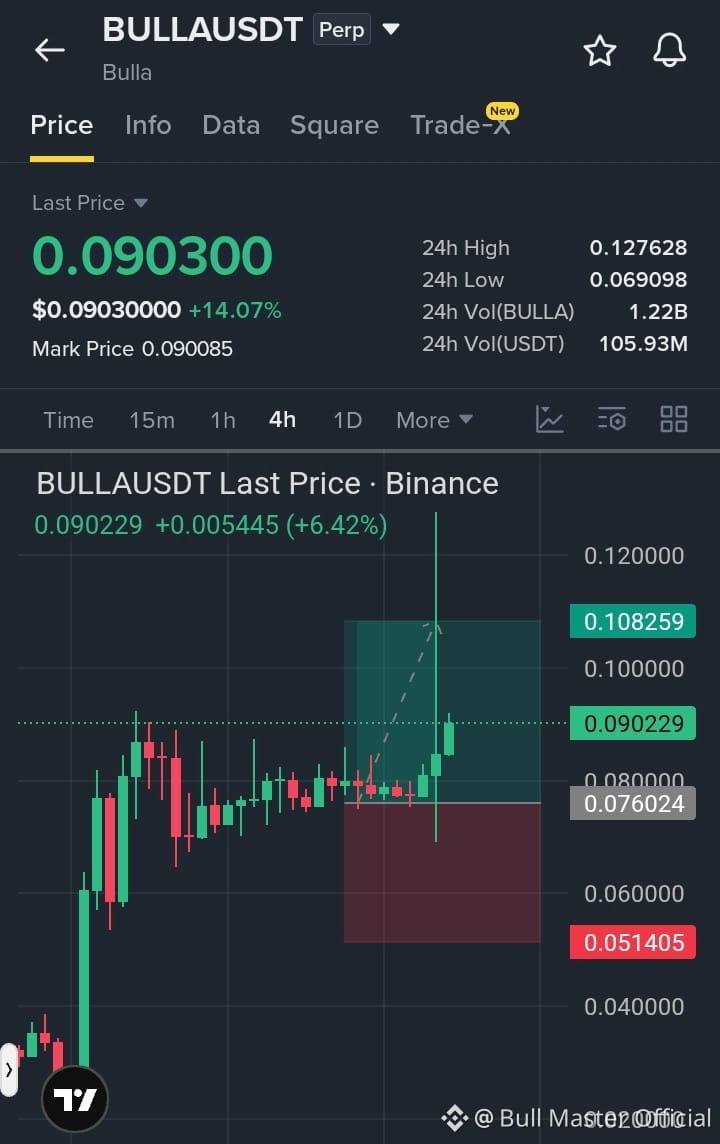
$BULLA is showing serious strength after that massive volume spike. Price held the pullback nicely and buyers are already stepping back in for another leg up. If this pressure stays locked in, we test higher levels fast.
Target: 0.12500
$ZEC
$LA
Target: 0.12500
$ZEC
$LA
See translation
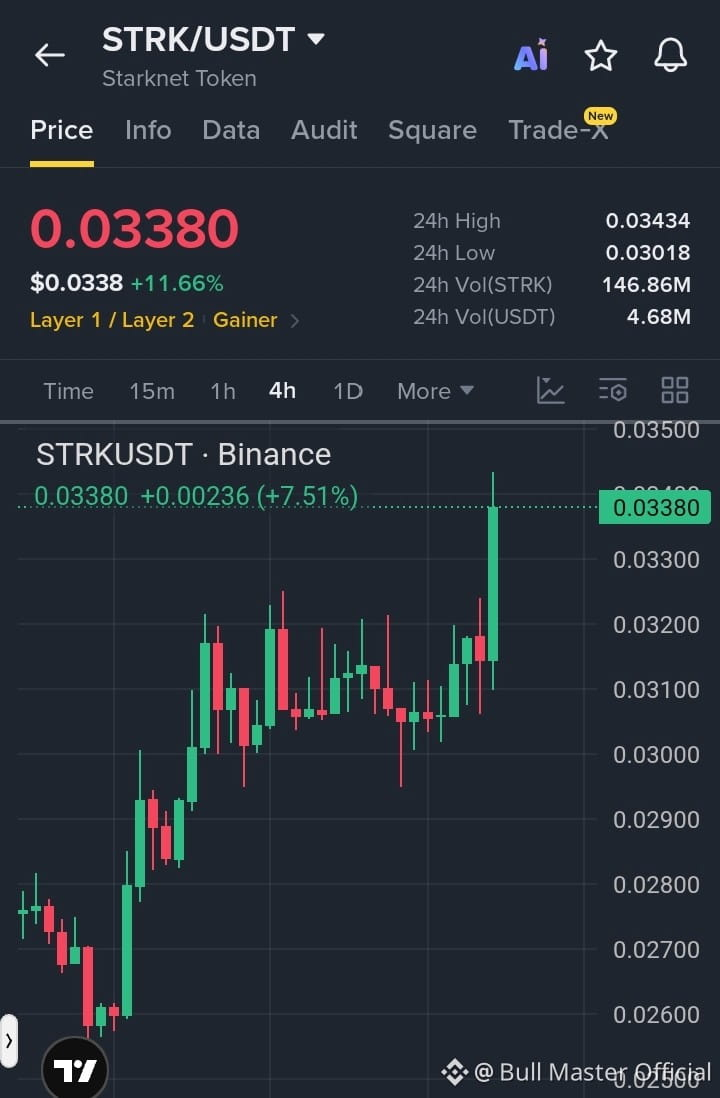
$STRK is printing a strong impulse wave after breaking out from a tight accumulation base. Massive volume is stepping in, and momentum looks ready to carry this move higher before hitting significant overhead resistance.
Target: 0.04100
$ZEC
$LA
Target: 0.04100
$ZEC
$LA
See translation
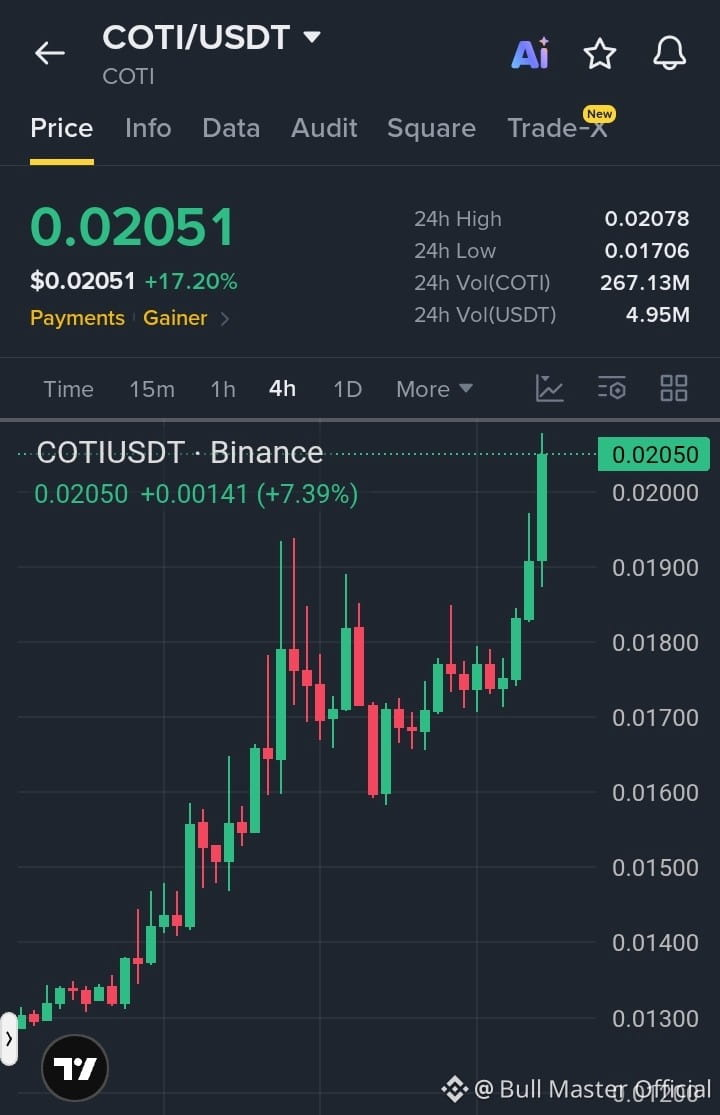
$COTI is breaking out with high volume, ripping past recent highs as buyers take over. Payment tokens are heating up, and this momentum could quickly send price into a macro expansion phase.
Target: 0.02650
$ZEC
$DUSK
Target: 0.02650
$ZEC
$DUSK
See translation
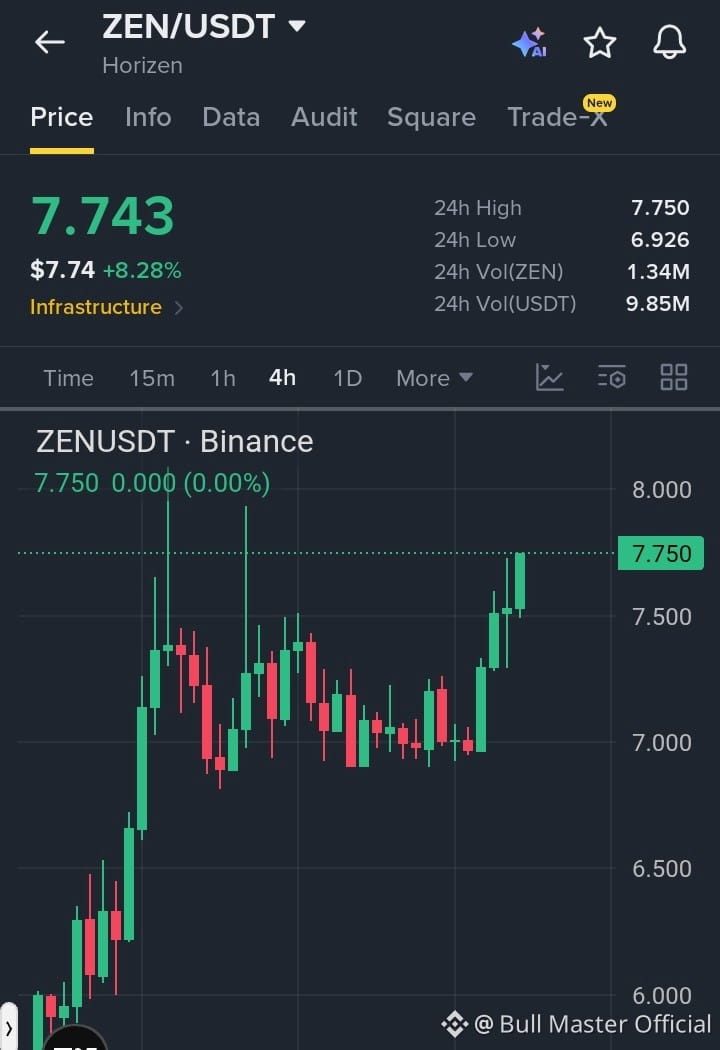
$ZEN is silently printing massive green candles and nobody is talking about it yet.
Price is up over +8% today, pushing hard to retest the 7.75 resistance zone on steady buying volume. If we break past 8.00, the expansion up to 9.20 could happen extremely fast.
Keep this one on your watchlist before the rest of Square notices.
Next Target: 8.50 - 9.20
$ZEC
$DUSK
Price is up over +8% today, pushing hard to retest the 7.75 resistance zone on steady buying volume. If we break past 8.00, the expansion up to 9.20 could happen extremely fast.
Keep this one on your watchlist before the rest of Square notices.
Next Target: 8.50 - 9.20
$ZEC
$DUSK
See translation
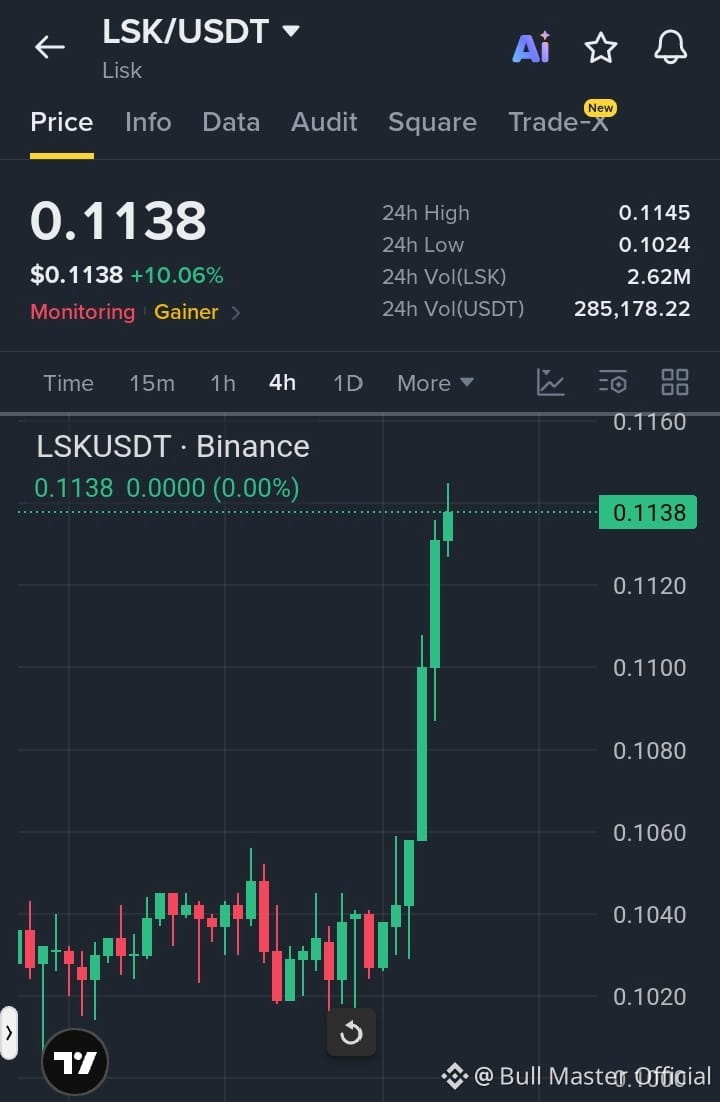
Setup Analysis: $LSK (Long) 🚀
Price has broken out from a base level with strong buyer momentum, pushing above recent resistance around 0.1130.
📍 Entry: 0.1130 – 0.1140 🎯 TP1: 0.1180 🎯 TP2: 0.1230 🎯 TP3: 0.1300 🛑 SL: 0.1090
$ZEC
$DUSK
Price has broken out from a base level with strong buyer momentum, pushing above recent resistance around 0.1130.
📍 Entry: 0.1130 – 0.1140 🎯 TP1: 0.1180 🎯 TP2: 0.1230 🎯 TP3: 0.1300 🛑 SL: 0.1090
$ZEC
$DUSK
See translation
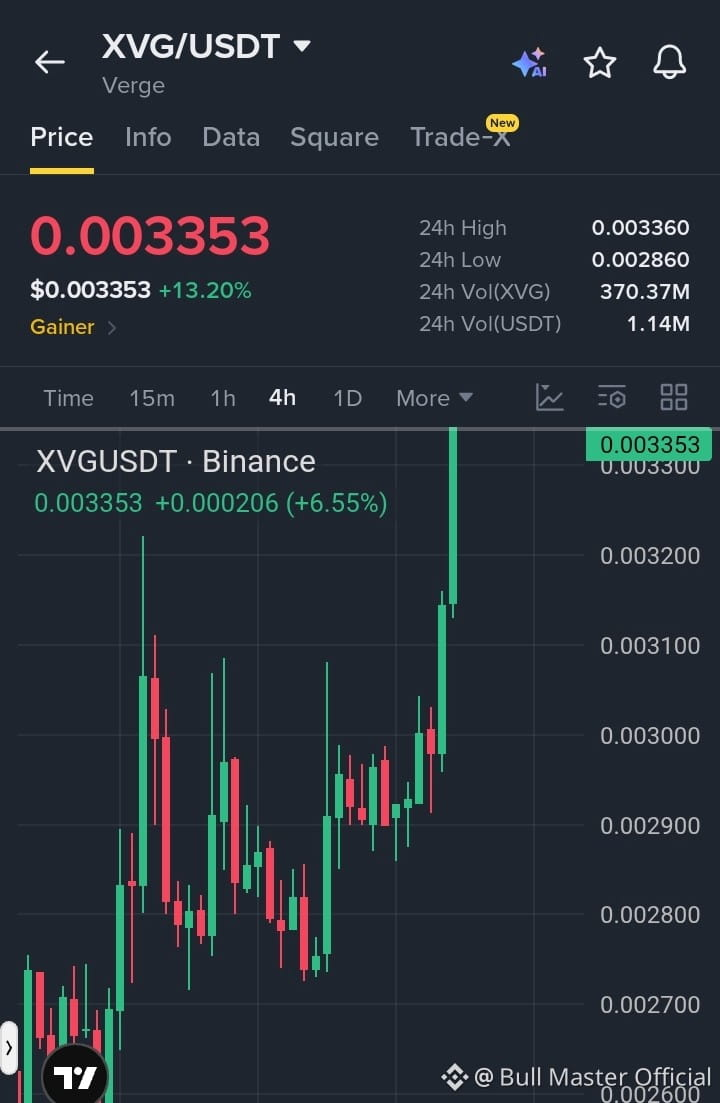
🚨 URGENT: $XVG IS BREAKING OUT! 13%+ PUMP IN PROGRESS! 🚀
Massive volume just spiked into XVG/USDT, pushing prices to a 24h high of $0.003360 as buyers take full control on the 4H chart.
Why this news matters for the market: This sudden bullish breakout clears key overhead resistance on high volume, signaling strong momentum continuation across privacy and legacy payment tokens. Aggressive buyer interest points to further upside before seller pressure kicks in.
🎯 Target:
0.003950
$ZEC
$DUSK
Massive volume just spiked into XVG/USDT, pushing prices to a 24h high of $0.003360 as buyers take full control on the 4H chart.
Why this news matters for the market: This sudden bullish breakout clears key overhead resistance on high volume, signaling strong momentum continuation across privacy and legacy payment tokens. Aggressive buyer interest points to further upside before seller pressure kicks in.
🎯 Target:
0.003950
$ZEC
$DUSK
See translation
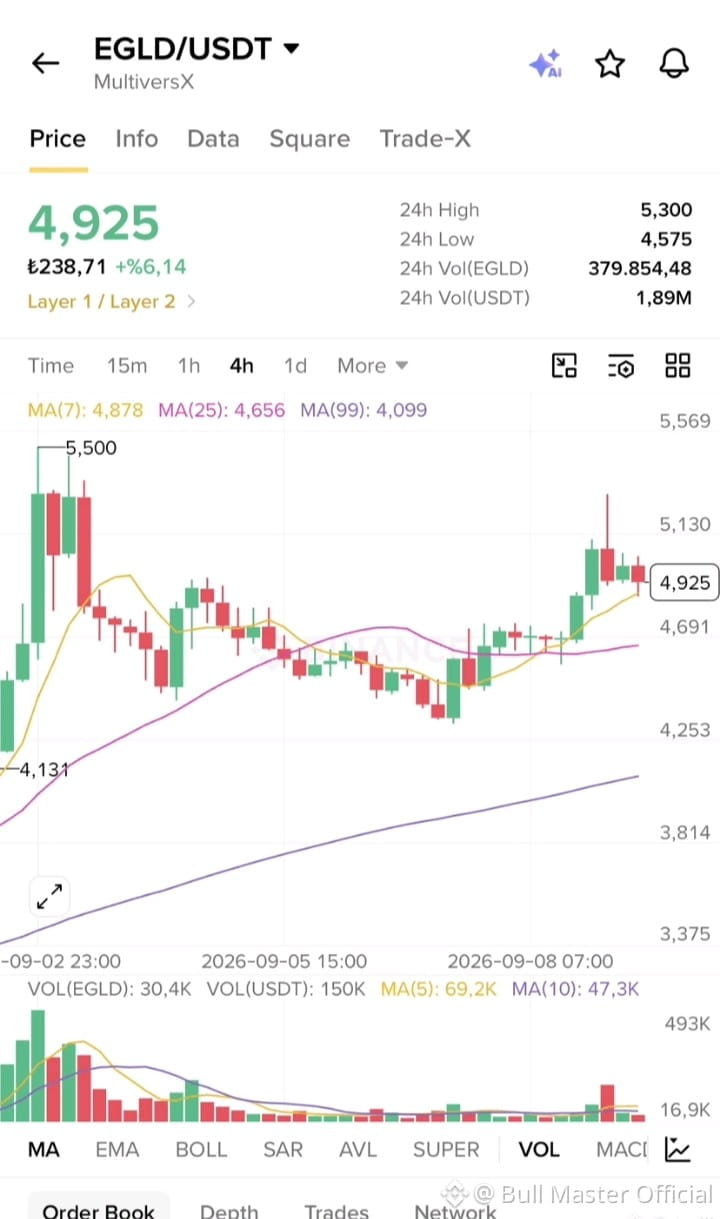
$EGLD is coiling up right above key moving averages on the 4H chart. Buyers are steadily stepping in and holding higher lows. A clean break over local resistance could send this flying as momentum expands fast.
Target: 5.500
$ZEC
$DUSK
Target: 5.500
$ZEC
$DUSK
See translation
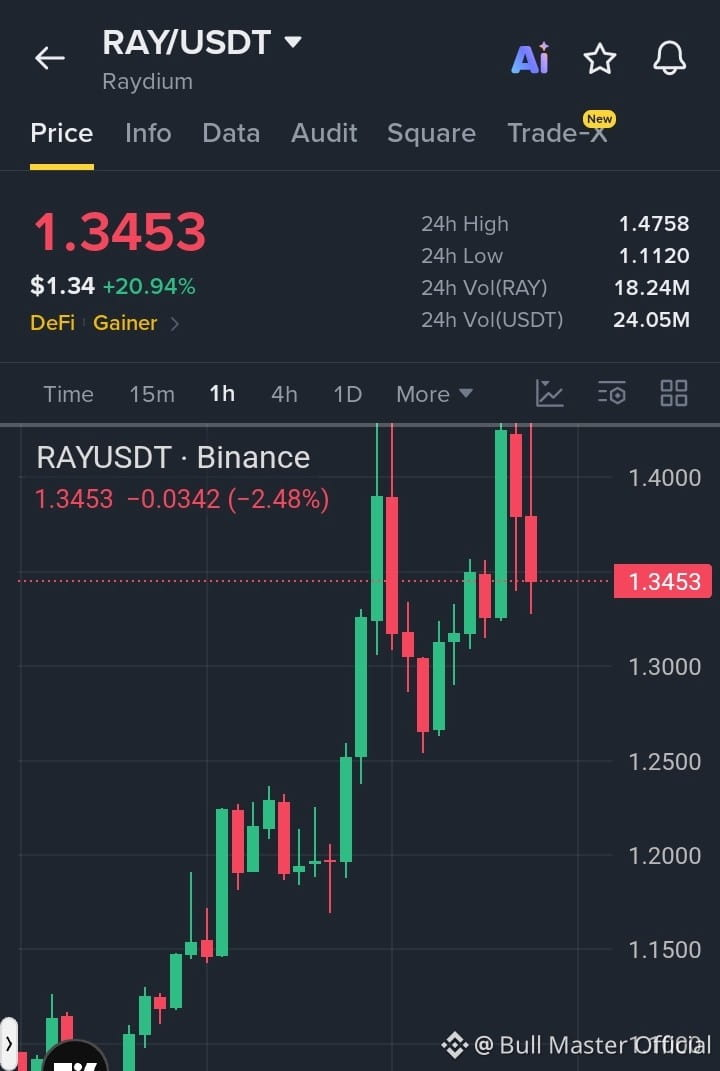
Traders, I’m closely watching $RAY right now as it tests a key resistance range, setting up a prime short signal. 📉⚡
The recent bullish move has been solid, but price action is hitting overhead supply where sellers are likely to step in heavy. A rejection here can trigger a rapid retrace, so waiting for confirmation is crucial. 🚨🎯
📍 Entry: 1.3450 – 1.3800 🎯 TP1: 1.3000 🎯 TP2: 1.2500 🎯 TP3: 1.1800 🛑 SL: 1.4250
$ZEC
$DUSK
The recent bullish move has been solid, but price action is hitting overhead supply where sellers are likely to step in heavy. A rejection here can trigger a rapid retrace, so waiting for confirmation is crucial. 🚨🎯
📍 Entry: 1.3450 – 1.3800 🎯 TP1: 1.3000 🎯 TP2: 1.2500 🎯 TP3: 1.1800 🛑 SL: 1.4250
$ZEC
$DUSK
See translation
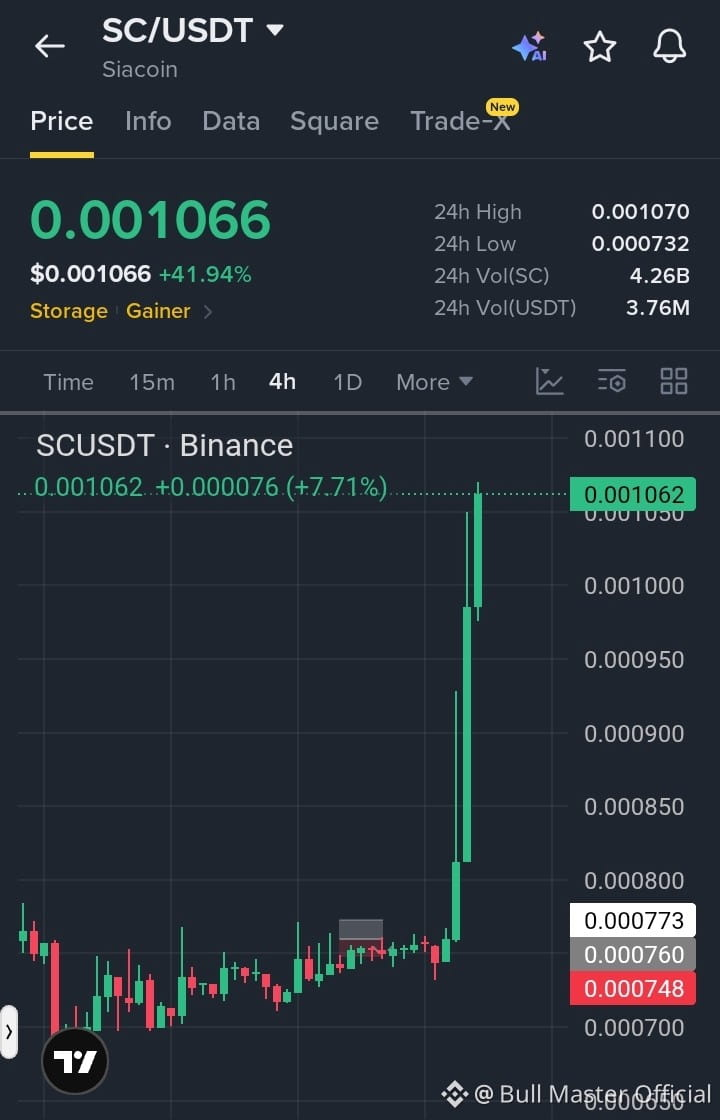
$SC is waking up fast. Up over 40% today with massive volume breaking out from bottom accumulation. Storage coins are starting to rotate, and this momentum looks ready to push much higher before any real resistance hits.
Target:
0.001450
$ZEC
$DUSK
Target:
0.001450
$ZEC
$DUSK
See translation
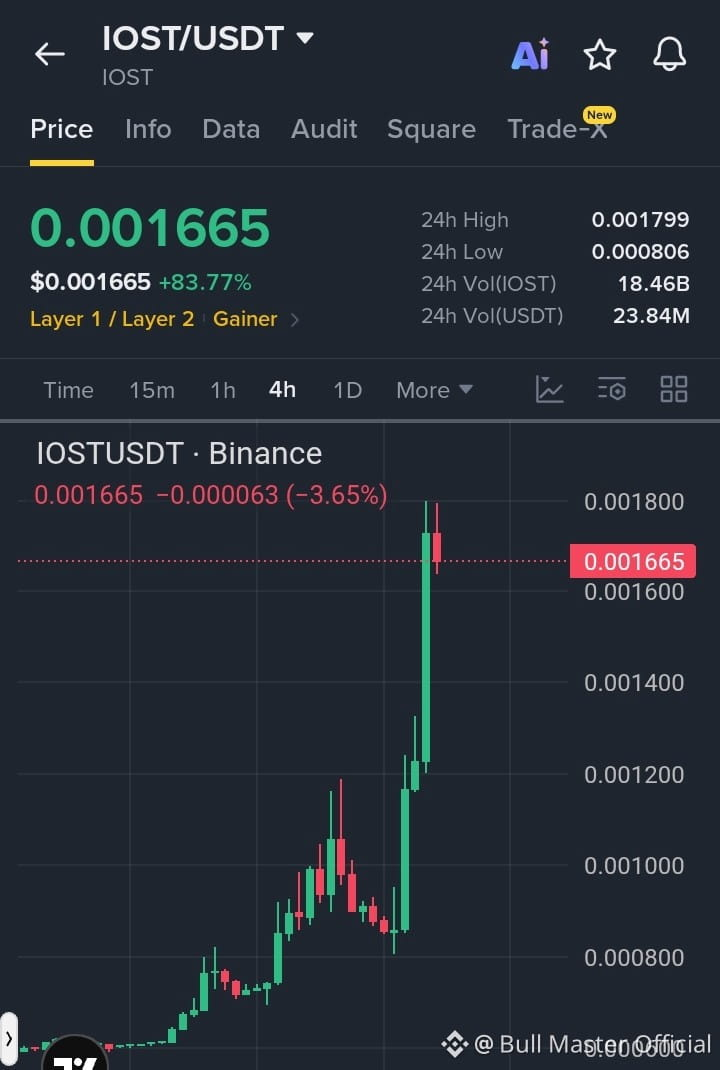
🚨 URGENT: $IOST
IS EXPLODING! +83% PUMP IN PROGRESS! 🚀
Massive volume just flooded into IOST/USDT, driving a colossal breakout with over 18.4 Billion IOST traded in 24 hours. The Layer 1/Layer 2 sector is heating up, and IOST is leading the momentum.
Why this matters: This vertical surge breaks weeks of consolidation, signaling powerful institutional buying and immense retail FOMO. Massive trading volume confirms strong continuation potential, making IOST the top-trending gainer on the market right now. Don't sleep on this momentum!
🎯 Next Target: $0.002000 📈
$ZEC
$DUSK
IS EXPLODING! +83% PUMP IN PROGRESS! 🚀
Massive volume just flooded into IOST/USDT, driving a colossal breakout with over 18.4 Billion IOST traded in 24 hours. The Layer 1/Layer 2 sector is heating up, and IOST is leading the momentum.
Why this matters: This vertical surge breaks weeks of consolidation, signaling powerful institutional buying and immense retail FOMO. Massive trading volume confirms strong continuation potential, making IOST the top-trending gainer on the market right now. Don't sleep on this momentum!
🎯 Next Target: $0.002000 📈
$ZEC
$DUSK
See translation
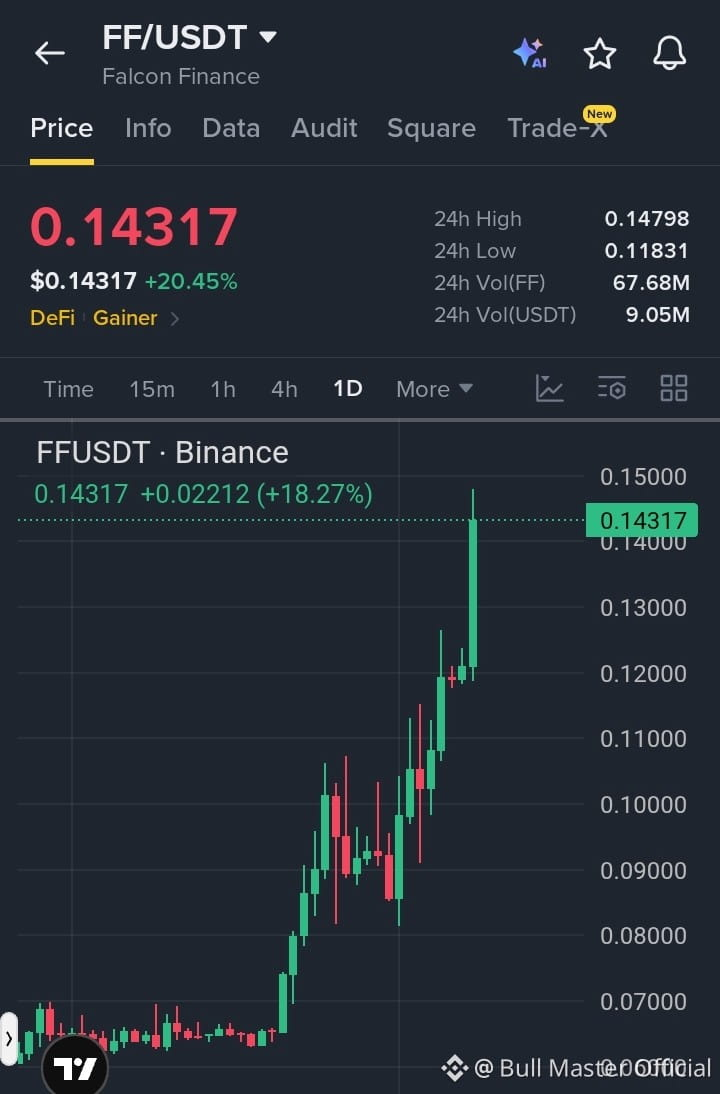
$FF is waking up with explosive volume and a massive break out of its accumulation structure. Whales are aggressive here, and DeFi money is rotating fast. If momentum holds, the next leg higher will be swift.
Target:
0.1850
$ZEC
$BULLA
Target:
0.1850
$ZEC
$BULLA
See translation
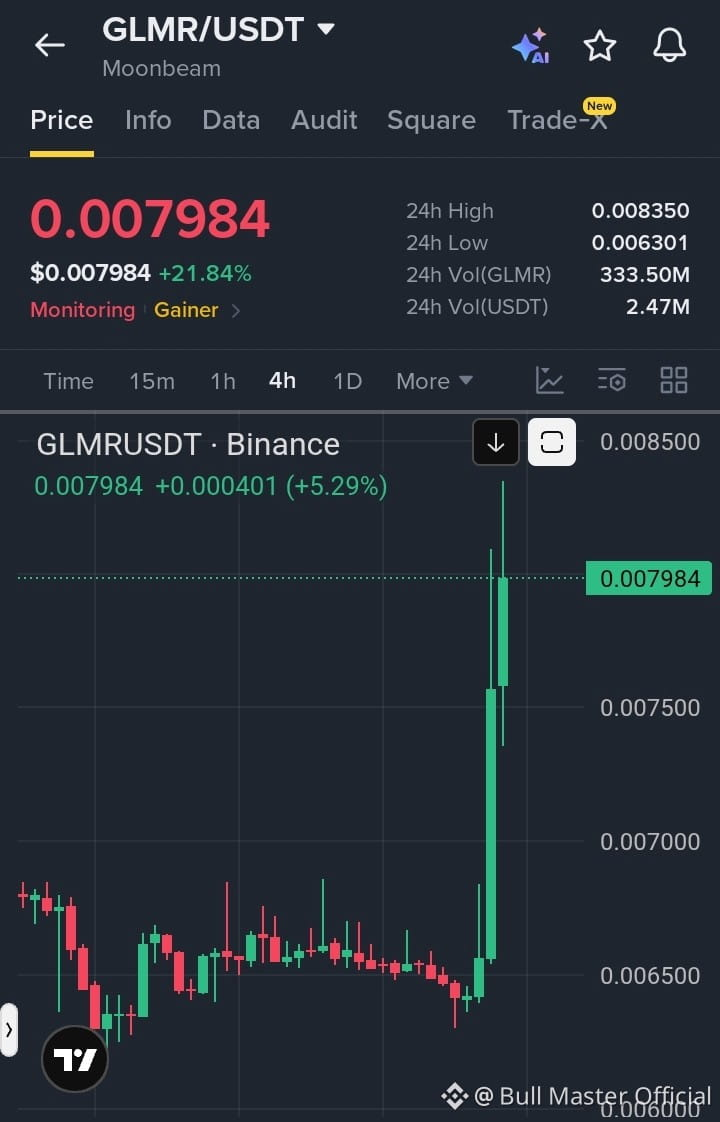
🚨 BREAKING: $GLMR SURGES OVER 21%! 🚀
Huge momentum step in GLMR! The massive volume breakout signals heavy whale accumulation and strong bullish reversal after squeezing bottom support.
Why this matters: This sharp volume surge signals high institutional buying pressure and momentum reversal. Smashed key resistance levels point toward massive short squeezes and explosive continuation ahead.
🎯 Next Target: $0.00950 🎯 Major Target:
$0.01050
$ZEC
$BULLA
Huge momentum step in GLMR! The massive volume breakout signals heavy whale accumulation and strong bullish reversal after squeezing bottom support.
Why this matters: This sharp volume surge signals high institutional buying pressure and momentum reversal. Smashed key resistance levels point toward massive short squeezes and explosive continuation ahead.
🎯 Next Target: $0.00950 🎯 Major Target:
$0.01050
$ZEC
$BULLA
See translation
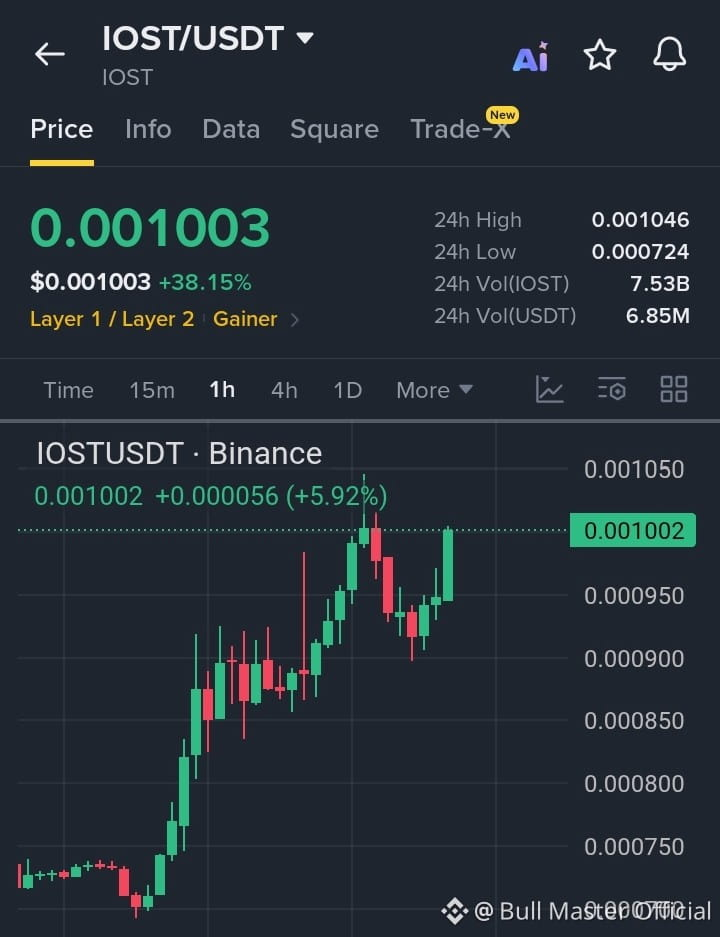
Watching $IOST
closely as it approaches a key resistance region following a massive bullish surge, setting up a potential short trade scenario. 📉⚡
While the recent upward momentum has been strong, price action is hovering near a heavy supply level where sellers are likely to step in. A clean rejection from this supply block could trigger a solid downside retracement, so waiting for proper confirmation is crucial here. 🎯👀
📍 Entry: 0.001010 – 0.001045 🎯 TP1: 0.000950 🎯 TP2: 0.000880 🎯 TP3: 0.000800 🛑 SL: 0.001070$ZEC
$BULLA
closely as it approaches a key resistance region following a massive bullish surge, setting up a potential short trade scenario. 📉⚡
While the recent upward momentum has been strong, price action is hovering near a heavy supply level where sellers are likely to step in. A clean rejection from this supply block could trigger a solid downside retracement, so waiting for proper confirmation is crucial here. 🎯👀
📍 Entry: 0.001010 – 0.001045 🎯 TP1: 0.000950 🎯 TP2: 0.000880 🎯 TP3: 0.000800 🛑 SL: 0.001070$ZEC
$BULLA
See translation
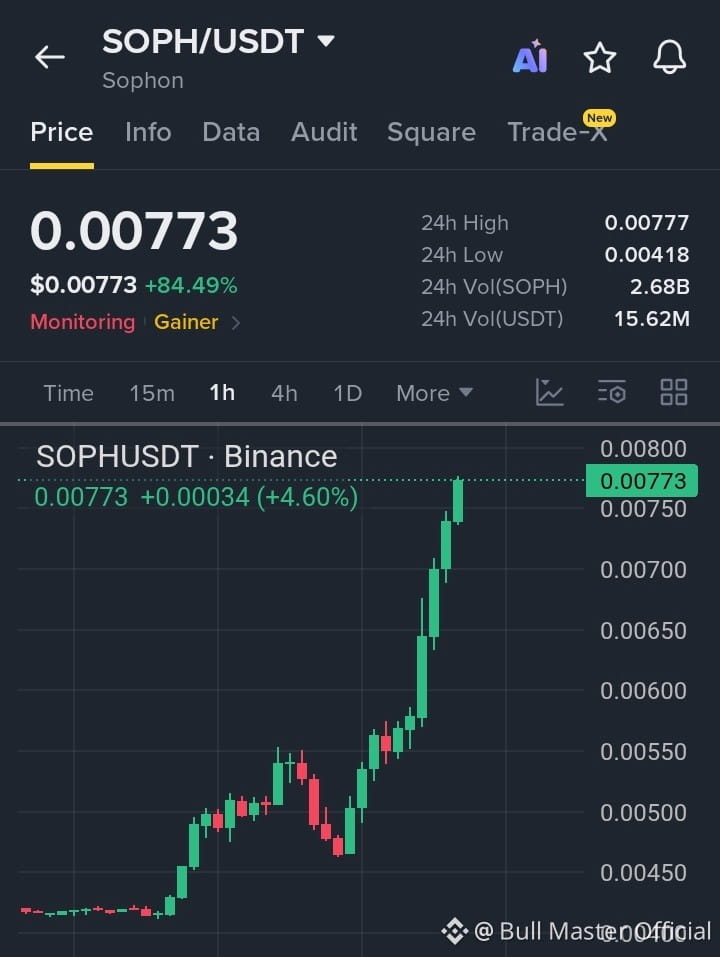
🚨 URGENT: $SOPH IS BREAKING OUT! 🚨
just surged over +84% today, smashing through previous resistance levels with explosive trading volume! Massive buying momentum is driving a powerful vertical pump as bulls take complete control of the market order book.
Why it matters: Massive volume surges and parabolic price action signal strong institutional accumulation and intense retail momentum. When a high-gainer breaks critical psychological resistance levels during a pump like this, it frequently triggers heavy FOMO and drives rapid price continuation.
🎯 Target 1: $0.00850 🎯 Target 2:
$0.01000
$ZEC
$BULLA
just surged over +84% today, smashing through previous resistance levels with explosive trading volume! Massive buying momentum is driving a powerful vertical pump as bulls take complete control of the market order book.
Why it matters: Massive volume surges and parabolic price action signal strong institutional accumulation and intense retail momentum. When a high-gainer breaks critical psychological resistance levels during a pump like this, it frequently triggers heavy FOMO and drives rapid price continuation.
🎯 Target 1: $0.00850 🎯 Target 2:
$0.01000
$ZEC
$BULLA
See translation
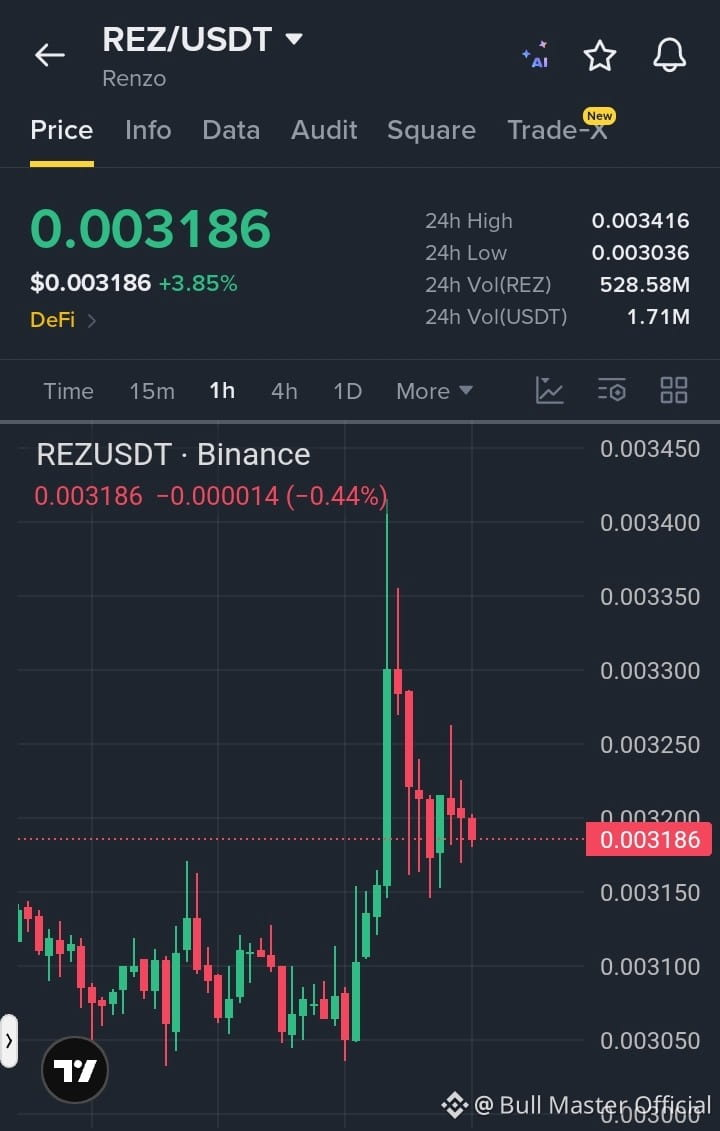
$REZ is loading up at 0.003186 after testing 0.003416. Buyers are holding ground above 0.003150 and volume is quietly stacking up. Restaking narratives are gaining heat and this dip is prime loading material before the next leg up.
Target: 0.004200
$ZEC
$BULLA
Target: 0.004200
$ZEC
$BULLA
See translation
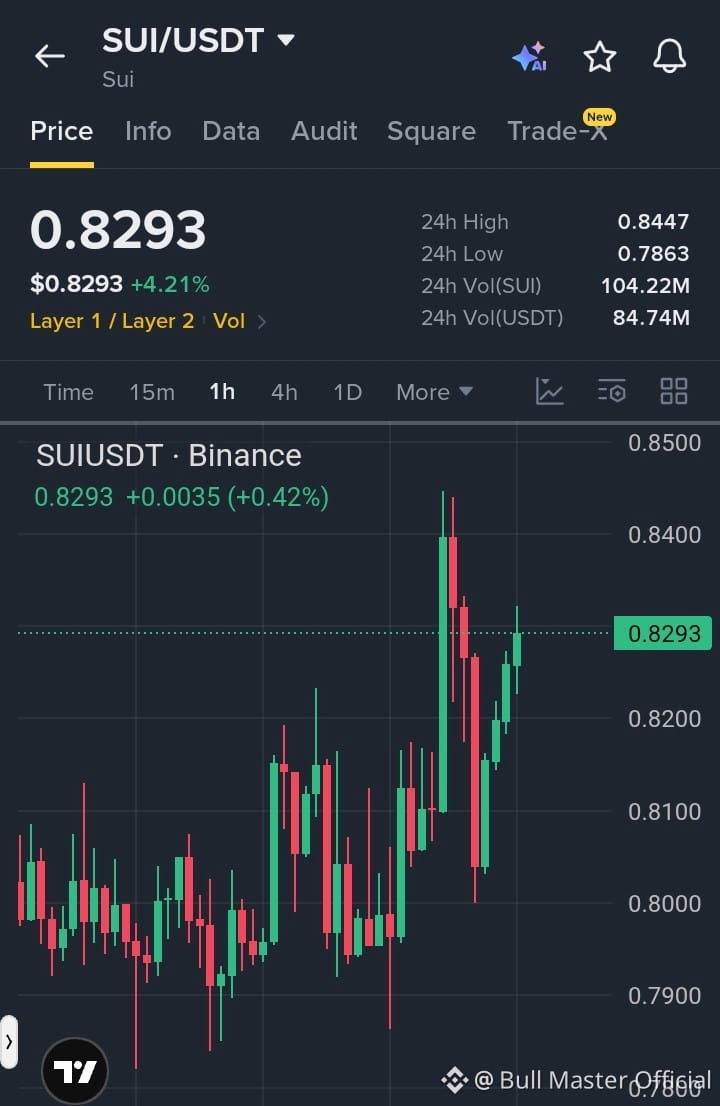
$SUI is breaking back up to 0.8293 after holding strong above local demand. Layer 1 momentum is rotating back into high-performance chains, triggering heavy spot buying and short liquidations across major exchanges. The next expansion leg is officially underway.
Target: 0.9850
$ZEC
$BULLA
Target: 0.9850
$ZEC
$BULLA
Log in to explore more content