
asiftahsin
2.4k Posts

asiftahsin
Report
Block User
Share Crypto Related Market Analysis, Share Crypto Related knowledge for my follower(brother and Sister) contact: @theatplayz
41 Following
466 Followers
1.4K+ Liked
Posts
All
Quotes
Live
·
--
Article
See translation
ETH Technical Outlook: Ethereum Struggles Below $2,385 as Key Support Remains Under PressureETH Technical Outlook: Ethereum Struggles Below $2,385 as Key Support Remains Under Pressure
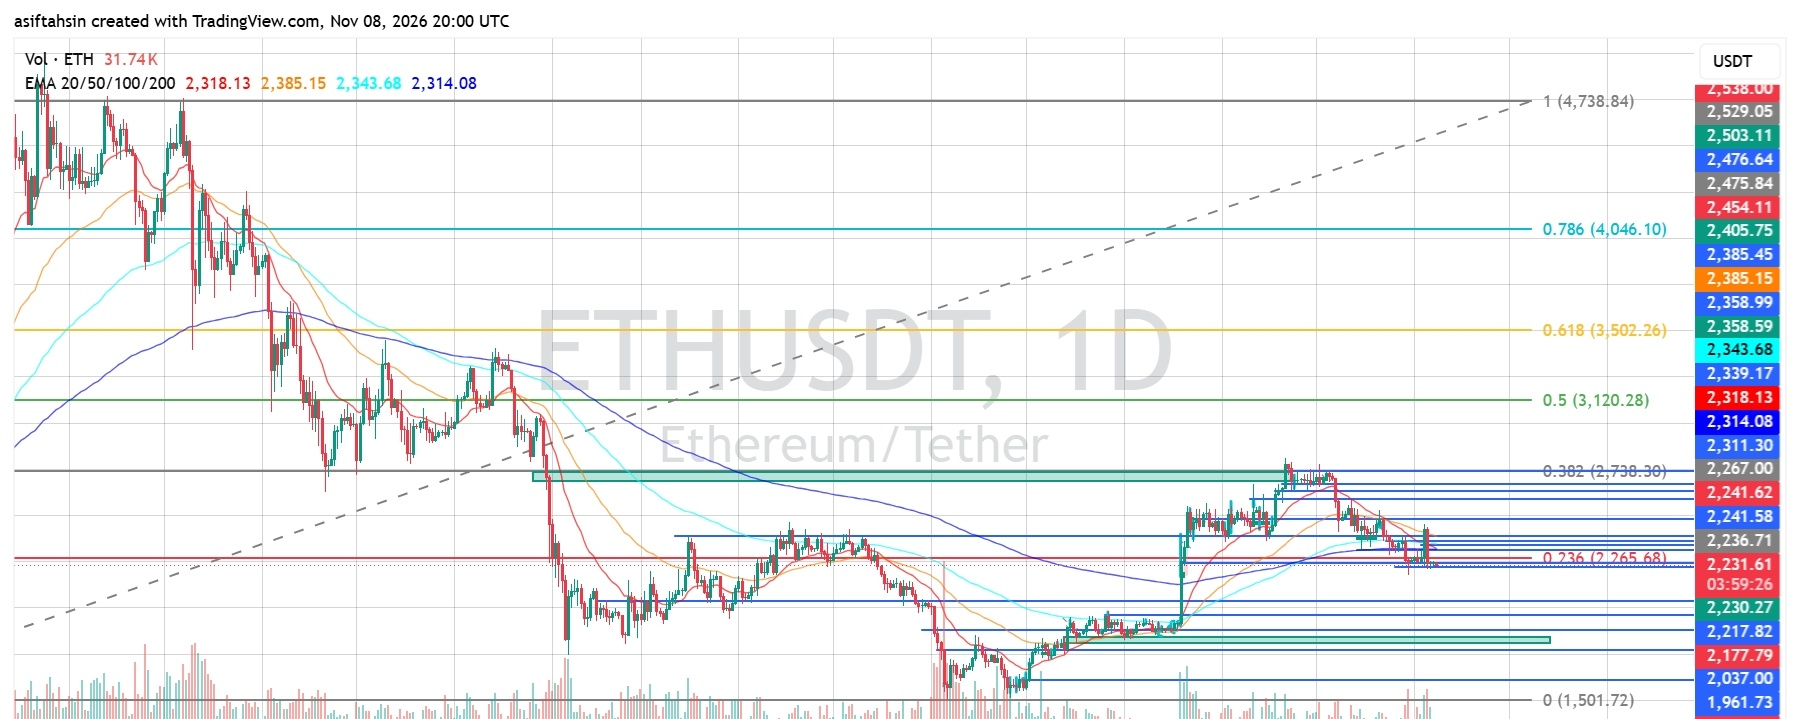
Ethereum is showing a weak daily structure after facing rejection from the $2,700 area. Price is currently trading near $2,232, below all four major EMAs. Although buyers are attempting to stabilize the market around $2,230, momentum remains relatively weak.
The next move will depend on whether ETH can reclaim its EMA resistance zone or whether sellers push price toward lower support levels.
1. EMA Structure: Sellers Maintain Control
Current ETH price: $2,231–$2,233
- EMA 20: $2,318.22
- EMA 50: $2,385.19
- EMA 100: $2,343.70
- EMA 200: $2,314.09
ETH is trading below all four major EMAs, keeping the daily trend under bearish pressure.
The $2,314–$2,385 region is a significant resistance zone. A sustained recovery above this area would be necessary to improve the short-term market structure.
2. Fibonacci Levels: Important Recovery Targets
Based on the chart:
- 0.236: $2,265.68
- 0.382: $2,738.30
- 0.5: $3,120.28
- 0.618: $3,502.26
- 0.786: $4,046.10
- 1.0: $4,738.84
ETH is currently trading below the 0.236 Fibonacci level at $2,265.68, making this an important level to reclaim.
A sustained move above $2,265 could provide an initial recovery signal, but stronger confirmation would require reclaiming the EMA resistance cluster.
3. Bearish Scenario: Support Levels to Watch
The recent price action shows continued weakness following rejection near the $2,700 region.
If ETH fails to recover above $2,265–$2,318, sellers could maintain control.
Important downside levels:
- $2,230: Immediate support area
- $2,217: Nearby technical support
- $2,177: Important support zone
- $2,037: Major lower support
- $1,961: Additional downside level
- $1,501.72: Major Fibonacci baseline
A confirmed daily breakdown below $2,177 would increase the risk of a deeper correction toward $2,037.
4. Bullish Scenario: What Buyers Need to Reclaim
For a meaningful bullish recovery, ETH needs to reclaim the following levels:
- $2,265.68: Fibonacci 0.236
- $2,314.09: EMA 200
- $2,318.22: EMA 20
- $2,343.70: EMA 100
- $2,385.19: EMA 50
A daily close above $2,385, followed by a successful retest, would provide stronger evidence of a trend recovery.
If momentum improves further, the $2,538 and $2,679 areas could become subsequent resistance targets.
5. RSI Momentum: Weak but Improving Slightly
RSI (14): 39.04
RSI Moving Average: 37.05
RSI remains below the neutral 50 level, indicating that bearish momentum still dominates.
However, RSI is slightly above its moving average, suggesting a modest improvement in short-term momentum.
A sustained move above 40–50 would strengthen the recovery outlook. A decline below 30 would indicate renewed downside momentum.
6. Key Support and Resistance
Support
- $2,230: Immediate support
- $2,217: Nearby technical support
- $2,177: Major short-term support
- $2,037: Lower support zone
- $1,961: Additional support
Resistance
- $2,265: Fibonacci 0.236
- $2,314–$2,318: EMA 200 and EMA 20
- $2,343: EMA 100
- $2,385: EMA 50
- $2,538–$2,679: Higher resistance zone
Final Outlook
Ethereum remains under bearish pressure on the daily timeframe. Price is below all four major EMAs and has not yet reclaimed the $2,265 Fibonacci level.
The $2,230–$2,217 region is important for buyers. Holding this area could support a relief bounce, while a confirmed breakdown below $2,177 may expose ETH to $2,037.
For bulls, reclaiming $2,265 is the first step, followed by the $2,314–$2,385 EMA resistance cluster.
Current Bias: Bearish below $2,385, with potential for a relief bounce if support holds.
The market needs a confirmed breakout and sustained buying pressure before a stronger bullish reversal can be considered.
$ETH
{future}(ETHUSDT)
ETH Technical Outlook: Ethereum Struggles Below $2,385 as Key Support Remains Under Pressure
ETH Technical Outlook: Ethereum Struggles Below $2,385 as Key Support Remains Under Pressure
Ethereum is showing a weak daily structure after facing rejection from the $2,700 area. Price is currently trading near $2,232, below all four major EMAs. Although buyers are attempting to stabilize the market around $2,230, momentum remains relatively weak.
The next move will depend on whether ETH can reclaim its EMA resistance zone or whether sellers push price toward lower support levels.
1. EMA Structure: Sellers Maintain Control
Current ETH price: $2,231–$2,233
- EMA 20: $2,318.22
- EMA 50: $2,385.19
- EMA 100: $2,343.70
- EMA 200: $2,314.09
ETH is trading below all four major EMAs, keeping the daily trend under bearish pressure.
The $2,314–$2,385 region is a significant resistance zone. A sustained recovery above this area would be necessary to improve the short-term market structure.
2. Fibonacci Levels: Important Recovery Targets
Based on the chart:
- 0.236: $2,265.68
- 0.382: $2,738.30
- 0.5: $3,120.28
- 0.618: $3,502.26
- 0.786: $4,046.10
- 1.0: $4,738.84
ETH is currently trading below the 0.236 Fibonacci level at $2,265.68, making this an important level to reclaim.
A sustained move above $2,265 could provide an initial recovery signal, but stronger confirmation would require reclaiming the EMA resistance cluster.
3. Bearish Scenario: Support Levels to Watch
The recent price action shows continued weakness following rejection near the $2,700 region.
If ETH fails to recover above $2,265–$2,318, sellers could maintain control.
Important downside levels:
- $2,230: Immediate support area
- $2,217: Nearby technical support
- $2,177: Important support zone
- $2,037: Major lower support
- $1,961: Additional downside level
- $1,501.72: Major Fibonacci baseline
A confirmed daily breakdown below $2,177 would increase the risk of a deeper correction toward $2,037.
4. Bullish Scenario: What Buyers Need to Reclaim
For a meaningful bullish recovery, ETH needs to reclaim the following levels:
- $2,265.68: Fibonacci 0.236
- $2,314.09: EMA 200
- $2,318.22: EMA 20
- $2,343.70: EMA 100
- $2,385.19: EMA 50
A daily close above $2,385, followed by a successful retest, would provide stronger evidence of a trend recovery.
If momentum improves further, the $2,538 and $2,679 areas could become subsequent resistance targets.
5. RSI Momentum: Weak but Improving Slightly
RSI (14): 39.04
RSI Moving Average: 37.05
RSI remains below the neutral 50 level, indicating that bearish momentum still dominates.
However, RSI is slightly above its moving average, suggesting a modest improvement in short-term momentum.
A sustained move above 40–50 would strengthen the recovery outlook. A decline below 30 would indicate renewed downside momentum.
6. Key Support and Resistance
Support
- $2,230: Immediate support
- $2,217: Nearby technical support
- $2,177: Major short-term support
- $2,037: Lower support zone
- $1,961: Additional support
Resistance
- $2,265: Fibonacci 0.236
- $2,314–$2,318: EMA 200 and EMA 20
- $2,343: EMA 100
- $2,385: EMA 50
- $2,538–$2,679: Higher resistance zone
Final Outlook
Ethereum remains under bearish pressure on the daily timeframe. Price is below all four major EMAs and has not yet reclaimed the $2,265 Fibonacci level.
The $2,230–$2,217 region is important for buyers. Holding this area could support a relief bounce, while a confirmed breakdown below $2,177 may expose ETH to $2,037.
For bulls, reclaiming $2,265 is the first step, followed by the $2,314–$2,385 EMA resistance cluster.
Current Bias: Bearish below $2,385, with potential for a relief bounce if support holds.
The market needs a confirmed breakout and sustained buying pressure before a stronger bullish reversal can be considered.
$ETH
Ethereum is showing a weak daily structure after facing rejection from the $2,700 area. Price is currently trading near $2,232, below all four major EMAs. Although buyers are attempting to stabilize the market around $2,230, momentum remains relatively weak.
The next move will depend on whether ETH can reclaim its EMA resistance zone or whether sellers push price toward lower support levels.
1. EMA Structure: Sellers Maintain Control
Current ETH price: $2,231–$2,233
- EMA 20: $2,318.22
- EMA 50: $2,385.19
- EMA 100: $2,343.70
- EMA 200: $2,314.09
ETH is trading below all four major EMAs, keeping the daily trend under bearish pressure.
The $2,314–$2,385 region is a significant resistance zone. A sustained recovery above this area would be necessary to improve the short-term market structure.
2. Fibonacci Levels: Important Recovery Targets
Based on the chart:
- 0.236: $2,265.68
- 0.382: $2,738.30
- 0.5: $3,120.28
- 0.618: $3,502.26
- 0.786: $4,046.10
- 1.0: $4,738.84
ETH is currently trading below the 0.236 Fibonacci level at $2,265.68, making this an important level to reclaim.
A sustained move above $2,265 could provide an initial recovery signal, but stronger confirmation would require reclaiming the EMA resistance cluster.
3. Bearish Scenario: Support Levels to Watch
The recent price action shows continued weakness following rejection near the $2,700 region.
If ETH fails to recover above $2,265–$2,318, sellers could maintain control.
Important downside levels:
- $2,230: Immediate support area
- $2,217: Nearby technical support
- $2,177: Important support zone
- $2,037: Major lower support
- $1,961: Additional downside level
- $1,501.72: Major Fibonacci baseline
A confirmed daily breakdown below $2,177 would increase the risk of a deeper correction toward $2,037.
4. Bullish Scenario: What Buyers Need to Reclaim
For a meaningful bullish recovery, ETH needs to reclaim the following levels:
- $2,265.68: Fibonacci 0.236
- $2,314.09: EMA 200
- $2,318.22: EMA 20
- $2,343.70: EMA 100
- $2,385.19: EMA 50
A daily close above $2,385, followed by a successful retest, would provide stronger evidence of a trend recovery.
If momentum improves further, the $2,538 and $2,679 areas could become subsequent resistance targets.
5. RSI Momentum: Weak but Improving Slightly
RSI (14): 39.04
RSI Moving Average: 37.05
RSI remains below the neutral 50 level, indicating that bearish momentum still dominates.
However, RSI is slightly above its moving average, suggesting a modest improvement in short-term momentum.
A sustained move above 40–50 would strengthen the recovery outlook. A decline below 30 would indicate renewed downside momentum.
6. Key Support and Resistance
Support
- $2,230: Immediate support
- $2,217: Nearby technical support
- $2,177: Major short-term support
- $2,037: Lower support zone
- $1,961: Additional support
Resistance
- $2,265: Fibonacci 0.236
- $2,314–$2,318: EMA 200 and EMA 20
- $2,343: EMA 100
- $2,385: EMA 50
- $2,538–$2,679: Higher resistance zone
Final Outlook
Ethereum remains under bearish pressure on the daily timeframe. Price is below all four major EMAs and has not yet reclaimed the $2,265 Fibonacci level.
The $2,230–$2,217 region is important for buyers. Holding this area could support a relief bounce, while a confirmed breakdown below $2,177 may expose ETH to $2,037.
For bulls, reclaiming $2,265 is the first step, followed by the $2,314–$2,385 EMA resistance cluster.
Current Bias: Bearish below $2,385, with potential for a relief bounce if support holds.
The market needs a confirmed breakout and sustained buying pressure before a stronger bullish reversal can be considered.
$ETH
1
·
--
Article
See translation
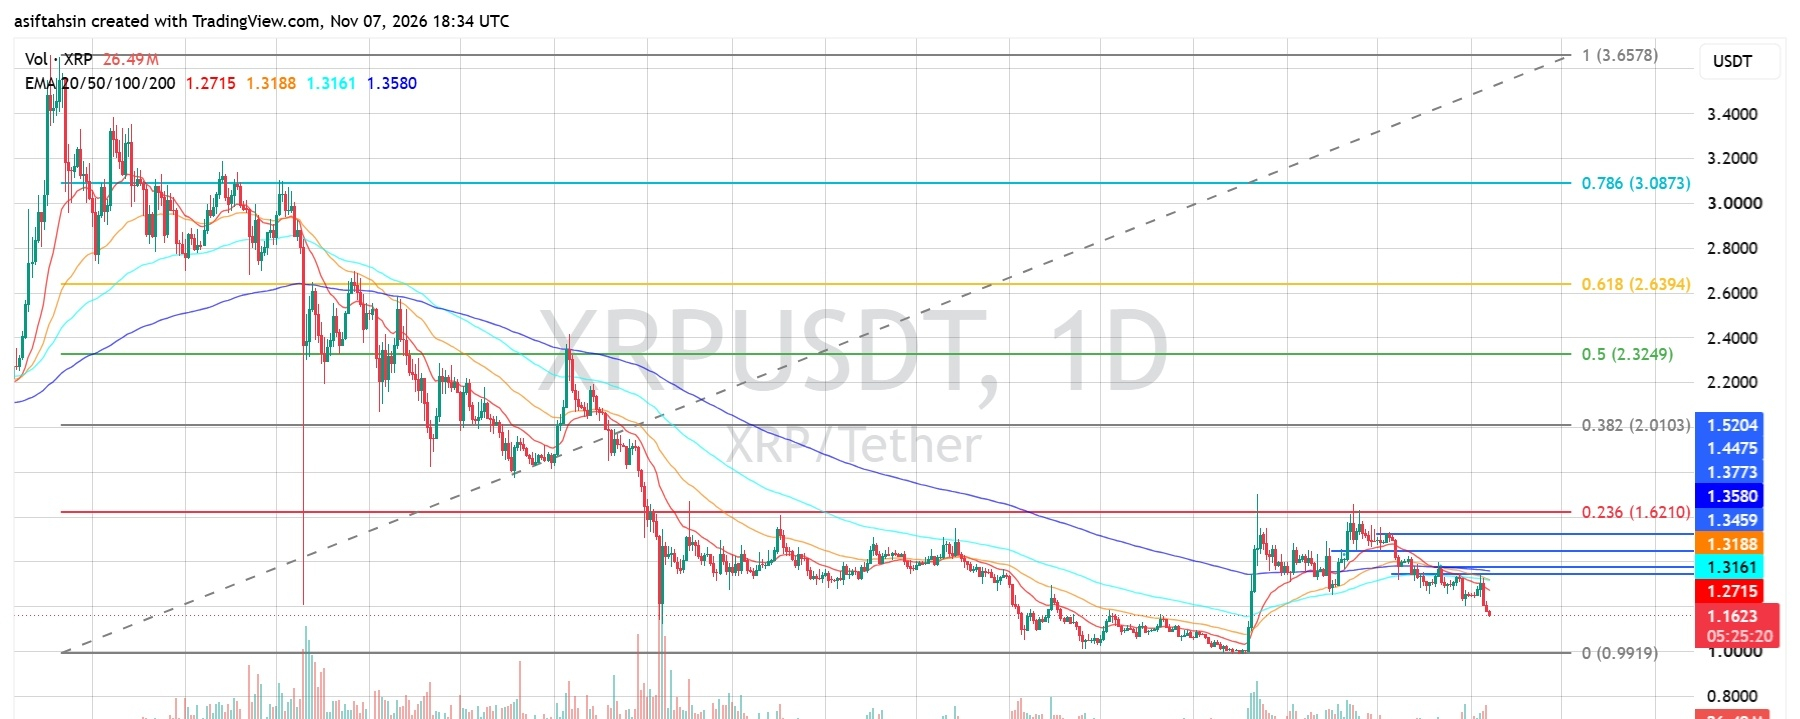
XRP Technical Outlook: Ripple Breaks Lower as Selling Pressure Pushes Price Toward $1.00 SupportXRP is showing renewed bearish momentum on the daily chart after losing its recent consolidation structure. Price has dropped below all four major EMAs, while RSI is approaching oversold territory. The key question now is whether buyers can defend the current area or whether XRP will continue toward its previous major low near $0.99.
1. EMA Structure: Bearish Alignment
Current XRP price: $1.1623
- EMA 20: $1.2714
- EMA 50: $1.3188
- EMA 100: $1.3161
- EMA 200: $1.3580
XRP is trading below all four EMAs. The short-term EMA is also below the longer-term averages, confirming that sellers currently have control.
The $1.27–$1.36 region is now an important resistance zone. A recovery above this area would be needed to improve the daily technical structure.
2. Fibonacci Levels: Major Recovery Targets
Based on the chart's Fibonacci structure:
- 0.236: $1.6210
- 0.382: $2.0103
- 0.5: $2.3249
- 0.618: $2.6394
- 0.786: $3.0873
- 1.0: $3.6578
XRP remains significantly below the 0.236 Fibonacci level at $1.6210. This highlights the weakness of the broader recovery structure.
A sustained move above $1.36 could be the first step toward a larger recovery, with $1.62 acting as a major Fibonacci resistance.
3. Bearish Scenario: $1.00 Comes Into Focus
The latest price action shows a bearish market structure break (BOS), suggesting that downside pressure remains active.
If XRP fails to reclaim the $1.20–$1.27 region, sellers could continue pushing price lower.
Key downside levels:
- $1.16: Immediate price area
- $1.10: Potential psychological support
- $0.9919: Major Fibonacci baseline and previous low
A confirmed daily breakdown below $0.9919 would expose XRP to further downside risk.
4. Bullish Scenario: What Buyers Need to Recover
For a meaningful bullish reversal, XRP needs to reclaim several resistance levels.
Important recovery levels:
- $1.2714: EMA 20
- $1.3161–$1.3188: EMA 100 and EMA 50
- $1.3580: EMA 200
- $1.6210: Fibonacci 0.236
A daily close above $1.3580, followed by a successful retest, would provide stronger evidence that buyers are regaining control.
Until then, any upward movement may remain a relief bounce within a broader bearish structure.
5. RSI Momentum: Near Oversold Territory
RSI (14): 31.46
RSI Moving Average: 38.90
RSI is close to the oversold threshold of 30, indicating significant selling pressure.
Although this condition can create opportunities for a short-term bounce, it does not automatically confirm a reversal. A recovery above 40 would be an early sign of improving momentum.
6. Key Support and Resistance
Support
- $1.16: Current trading area
- $1.10: Psychological support
- $0.9919: Major structural support
Resistance
- $1.2714: EMA 20
- $1.3161–$1.3188: EMA 100/50
- $1.3580: EMA 200
- $1.6210: Fibonacci 0.236
Final Outlook
XRP's daily structure remains bearish. Price is trading below all major EMAs, the latest market structure shows a bearish break, and RSI reflects weak momentum.
The $1.16 area is important in the short term. If buyers cannot stabilize the price, the $1.10 psychological level and $0.9919 major support could come into focus.
However, RSI near oversold territory means a temporary relief bounce is possible. A sustained recovery above $1.3580 would be an important first signal of improving market conditions.
Current Bias: Bearish below $1.3580.
The next major move will depend on whether buyers can defend support or sellers continue to control the daily structure.
$XRP
{future}(XRPUSDT)
XRP Technical Outlook: Ripple Breaks Lower as Selling Pressure Pushes Price Toward $1.00 Support
XRP is showing renewed bearish momentum on the daily chart after losing its recent consolidation structure. Price has dropped below all four major EMAs, while RSI is approaching oversold territory. The key question now is whether buyers can defend the current area or whether XRP will continue toward its previous major low near $0.99.
1. EMA Structure: Bearish Alignment
Current XRP price: $1.1623
- EMA 20: $1.2714
- EMA 50: $1.3188
- EMA 100: $1.3161
- EMA 200: $1.3580
XRP is trading below all four EMAs. The short-term EMA is also below the longer-term averages, confirming that sellers currently have control.
The $1.27–$1.36 region is now an important resistance zone. A recovery above this area would be needed to improve the daily technical structure.
2. Fibonacci Levels: Major Recovery Targets
Based on the chart's Fibonacci structure:
- 0.236: $1.6210
- 0.382: $2.0103
- 0.5: $2.3249
- 0.618: $2.6394
- 0.786: $3.0873
- 1.0: $3.6578
XRP remains significantly below the 0.236 Fibonacci level at $1.6210. This highlights the weakness of the broader recovery structure.
A sustained move above $1.36 could be the first step toward a larger recovery, with $1.62 acting as a major Fibonacci resistance.
3. Bearish Scenario: $1.00 Comes Into Focus
The latest price action shows a bearish market structure break (BOS), suggesting that downside pressure remains active.
If XRP fails to reclaim the $1.20–$1.27 region, sellers could continue pushing price lower.
Key downside levels:
- $1.16: Immediate price area
- $1.10: Potential psychological support
- $0.9919: Major Fibonacci baseline and previous low
A confirmed daily breakdown below $0.9919 would expose XRP to further downside risk.
4. Bullish Scenario: What Buyers Need to Recover
For a meaningful bullish reversal, XRP needs to reclaim several resistance levels.
Important recovery levels:
- $1.2714: EMA 20
- $1.3161–$1.3188: EMA 100 and EMA 50
- $1.3580: EMA 200
- $1.6210: Fibonacci 0.236
A daily close above $1.3580, followed by a successful retest, would provide stronger evidence that buyers are regaining control.
Until then, any upward movement may remain a relief bounce within a broader bearish structure.
5. RSI Momentum: Near Oversold Territory
RSI (14): 31.46
RSI Moving Average: 38.90
RSI is close to the oversold threshold of 30, indicating significant selling pressure.
Although this condition can create opportunities for a short-term bounce, it does not automatically confirm a reversal. A recovery above 40 would be an early sign of improving momentum.
6. Key Support and Resistance
Support
- $1.16: Current trading area
- $1.10: Psychological support
- $0.9919: Major structural support
Resistance
- $1.2714: EMA 20
- $1.3161–$1.3188: EMA 100/50
- $1.3580: EMA 200
- $1.6210: Fibonacci 0.236
Final Outlook
XRP's daily structure remains bearish. Price is trading below all major EMAs, the latest market structure shows a bearish break, and RSI reflects weak momentum.
The $1.16 area is important in the short term. If buyers cannot stabilize the price, the $1.10 psychological level and $0.9919 major support could come into focus.
However, RSI near oversold territory means a temporary relief bounce is possible. A sustained recovery above $1.3580 would be an important first signal of improving market conditions.
Current Bias: Bearish below $1.3580.
The next major move will depend on whether buyers can defend support or sellers continue to control the daily structure.
$XRP
1. EMA Structure: Bearish Alignment
Current XRP price: $1.1623
- EMA 20: $1.2714
- EMA 50: $1.3188
- EMA 100: $1.3161
- EMA 200: $1.3580
XRP is trading below all four EMAs. The short-term EMA is also below the longer-term averages, confirming that sellers currently have control.
The $1.27–$1.36 region is now an important resistance zone. A recovery above this area would be needed to improve the daily technical structure.
2. Fibonacci Levels: Major Recovery Targets
Based on the chart's Fibonacci structure:
- 0.236: $1.6210
- 0.382: $2.0103
- 0.5: $2.3249
- 0.618: $2.6394
- 0.786: $3.0873
- 1.0: $3.6578
XRP remains significantly below the 0.236 Fibonacci level at $1.6210. This highlights the weakness of the broader recovery structure.
A sustained move above $1.36 could be the first step toward a larger recovery, with $1.62 acting as a major Fibonacci resistance.
3. Bearish Scenario: $1.00 Comes Into Focus
The latest price action shows a bearish market structure break (BOS), suggesting that downside pressure remains active.
If XRP fails to reclaim the $1.20–$1.27 region, sellers could continue pushing price lower.
Key downside levels:
- $1.16: Immediate price area
- $1.10: Potential psychological support
- $0.9919: Major Fibonacci baseline and previous low
A confirmed daily breakdown below $0.9919 would expose XRP to further downside risk.
4. Bullish Scenario: What Buyers Need to Recover
For a meaningful bullish reversal, XRP needs to reclaim several resistance levels.
Important recovery levels:
- $1.2714: EMA 20
- $1.3161–$1.3188: EMA 100 and EMA 50
- $1.3580: EMA 200
- $1.6210: Fibonacci 0.236
A daily close above $1.3580, followed by a successful retest, would provide stronger evidence that buyers are regaining control.
Until then, any upward movement may remain a relief bounce within a broader bearish structure.
5. RSI Momentum: Near Oversold Territory
RSI (14): 31.46
RSI Moving Average: 38.90
RSI is close to the oversold threshold of 30, indicating significant selling pressure.
Although this condition can create opportunities for a short-term bounce, it does not automatically confirm a reversal. A recovery above 40 would be an early sign of improving momentum.
6. Key Support and Resistance
Support
- $1.16: Current trading area
- $1.10: Psychological support
- $0.9919: Major structural support
Resistance
- $1.2714: EMA 20
- $1.3161–$1.3188: EMA 100/50
- $1.3580: EMA 200
- $1.6210: Fibonacci 0.236
Final Outlook
XRP's daily structure remains bearish. Price is trading below all major EMAs, the latest market structure shows a bearish break, and RSI reflects weak momentum.
The $1.16 area is important in the short term. If buyers cannot stabilize the price, the $1.10 psychological level and $0.9919 major support could come into focus.
However, RSI near oversold territory means a temporary relief bounce is possible. A sustained recovery above $1.3580 would be an important first signal of improving market conditions.
Current Bias: Bearish below $1.3580.
The next major move will depend on whether buyers can defend support or sellers continue to control the daily structure.
$XRP
1
2
1.1k
·
--
Article
See translation
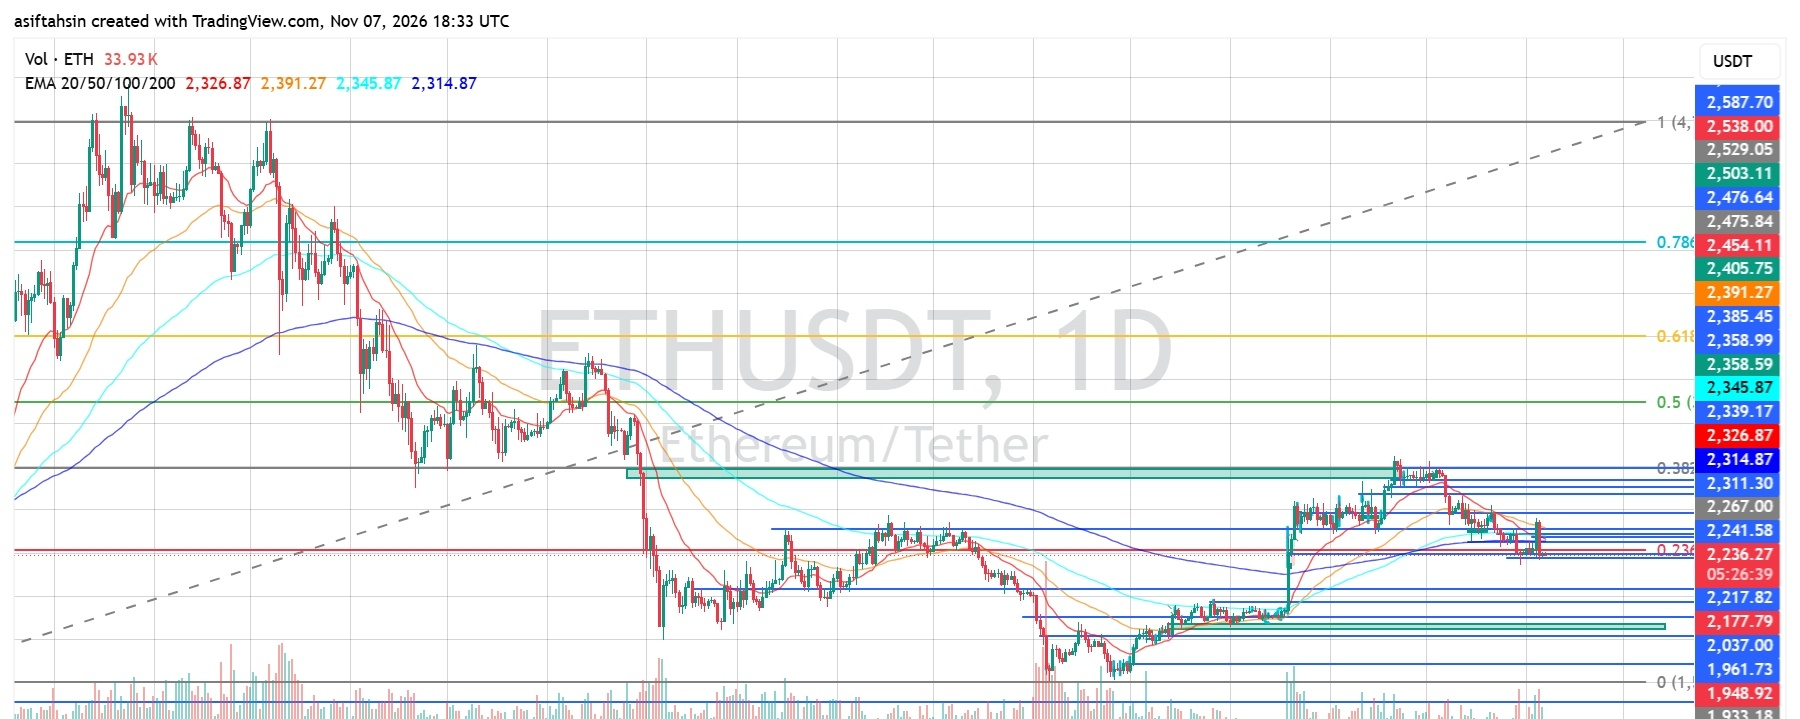
ETH Technical Outlook: Ethereum Struggles Below $2,400 as Sellers Maintain ControlEthereum remains under pressure on the daily timeframe after failing to sustain its recovery above the $2,300–$2,400 region. Price is currently trading around $2,236, below all four major EMAs, keeping the short-term structure cautious.
The key question is whether buyers can defend the $2,217–$2,177 support area or whether ETH will extend its correction toward lower demand zones.
1. EMA Structure
Current EMA levels:
- EMA 20: $2,326.87
- EMA 50: $2,391.27
- EMA 100: $2,345.87
- EMA 200: $2,314.87
ETH is trading below all four moving averages. The EMA structure indicates that sellers currently have the advantage.
The $2,314–$2,346 region is the first major resistance cluster. A sustained move above this zone would be an important sign of recovery. The EMA 50 near $2,391 remains a higher resistance level.
2. Fibonacci Levels
Key Fibonacci retracement levels:
- 0: $1,933.18
- 0.236: $2,241.58
- 0.382: $2,314.87
- 0.5: $2,358.59
- 0.618: $2,391.27
- 0.786: $2,503.11
- 1.0: $2,729.68
ETH is trading around the 0.236 Fibonacci region. Reclaiming $2,241.58 and holding above it could help buyers regain short-term momentum.
3. Market Structure & Liquidity
ETH previously recovered strongly from its June–July lows and rallied through August and September. However, the recent rejection around $2,300–$2,320 has weakened the recovery structure.
Price is now consolidating near local support, with several liquidity levels positioned above and below the current range.
A breakdown below the recent support zone could expose lower liquidity, while a reclaim of the nearby resistance cluster would improve the recovery setup.
4. RSI Momentum
- RSI: 39.33
- RSI Moving Average: 36.67
RSI remains below the neutral 50 level, indicating that bullish momentum is still limited.
However, RSI is trading above its moving average, suggesting a modest improvement in short-term momentum. A sustained recovery above 50 would provide stronger confirmation that buyers are returning.
5. Key Support Levels
Important downside levels to monitor:
- $2,217.82 – Immediate support
- $2,177.79 – Next support
- $2,037.00 – Major demand zone
- $1,961.73 – Lower support
- $1,948.92 – Additional support
- $1,933.18 – Major Fibonacci baseline
- $1,904.24–$1,888.58 – Deeper support region
A daily close below $2,217.82 could increase the probability of a move toward $2,177.79. Losing that level would put the $2,037 region into focus.
6. Key Resistance Levels
For a bullish recovery, ETH needs to reclaim:
- $2,241.58 – Immediate resistance
- $2,267.00 – Short-term resistance
- $2,311.30–$2,314.87 – Important resistance and EMA cluster
- $2,326.87 – EMA 20
- $2,345.87 – EMA 100
- $2,358.59 – Fibonacci 0.5
- $2,391.27 – EMA 50 and Fibonacci 0.618
- $2,405.75 – Higher resistance
- $2,503.11 – Fibonacci 0.786
A sustained move above $2,358.59 would strengthen the recovery structure, while reclaiming $2,391.27 could open the way toward higher resistance.
7. Bullish Scenario
If ETH holds the $2,217–$2,177 support zone and buyers regain control, a recovery toward $2,241.58 and $2,267 could develop.
A breakout above $2,267 may bring the $2,311–$2,346 resistance cluster into focus.
A stronger bullish recovery would require ETH to reclaim $2,358 and eventually $2,391 with convincing momentum.
8. Bearish Scenario
If ETH fails to hold $2,217.82 and breaks below $2,177.79, selling pressure could increase.
The next important downside area would be around $2,037. A deeper correction could bring $1,961–$1,933 into focus.
Final Outlook
Ethereum remains technically weak on the daily chart, trading below all four major EMAs. RSI shows a modest improvement, but bullish momentum has not yet been confirmed.
The $2,217–$2,177 zone is critical for buyers. Reclaiming $2,267 would be the first positive signal, while a move above the $2,314–$2,346 EMA cluster would provide stronger evidence of recovery.
For now, ETH is at an important decision zone. Watch the daily candle close, support reaction, and momentum before assuming a trend reversal.
Short-term outlook: Bearish below $2,314–$2,346.
$ETH
{future}(ETHUSDT)
ETH Technical Outlook: Ethereum Struggles Below $2,400 as Sellers Maintain Control
Ethereum remains under pressure on the daily timeframe after failing to sustain its recovery above the $2,300–$2,400 region. Price is currently trading around $2,236, below all four major EMAs, keeping the short-term structure cautious.
The key question is whether buyers can defend the $2,217–$2,177 support area or whether ETH will extend its correction toward lower demand zones.
1. EMA Structure
Current EMA levels:
- EMA 20: $2,326.87
- EMA 50: $2,391.27
- EMA 100: $2,345.87
- EMA 200: $2,314.87
ETH is trading below all four moving averages. The EMA structure indicates that sellers currently have the advantage.
The $2,314–$2,346 region is the first major resistance cluster. A sustained move above this zone would be an important sign of recovery. The EMA 50 near $2,391 remains a higher resistance level.
2. Fibonacci Levels
Key Fibonacci retracement levels:
- 0: $1,933.18
- 0.236: $2,241.58
- 0.382: $2,314.87
- 0.5: $2,358.59
- 0.618: $2,391.27
- 0.786: $2,503.11
- 1.0: $2,729.68
ETH is trading around the 0.236 Fibonacci region. Reclaiming $2,241.58 and holding above it could help buyers regain short-term momentum.
3. Market Structure & Liquidity
ETH previously recovered strongly from its June–July lows and rallied through August and September. However, the recent rejection around $2,300–$2,320 has weakened the recovery structure.
Price is now consolidating near local support, with several liquidity levels positioned above and below the current range.
A breakdown below the recent support zone could expose lower liquidity, while a reclaim of the nearby resistance cluster would improve the recovery setup.
4. RSI Momentum
- RSI: 39.33
- RSI Moving Average: 36.67
RSI remains below the neutral 50 level, indicating that bullish momentum is still limited.
However, RSI is trading above its moving average, suggesting a modest improvement in short-term momentum. A sustained recovery above 50 would provide stronger confirmation that buyers are returning.
5. Key Support Levels
Important downside levels to monitor:
- $2,217.82 – Immediate support
- $2,177.79 – Next support
- $2,037.00 – Major demand zone
- $1,961.73 – Lower support
- $1,948.92 – Additional support
- $1,933.18 – Major Fibonacci baseline
- $1,904.24–$1,888.58 – Deeper support region
A daily close below $2,217.82 could increase the probability of a move toward $2,177.79. Losing that level would put the $2,037 region into focus.
6. Key Resistance Levels
For a bullish recovery, ETH needs to reclaim:
- $2,241.58 – Immediate resistance
- $2,267.00 – Short-term resistance
- $2,311.30–$2,314.87 – Important resistance and EMA cluster
- $2,326.87 – EMA 20
- $2,345.87 – EMA 100
- $2,358.59 – Fibonacci 0.5
- $2,391.27 – EMA 50 and Fibonacci 0.618
- $2,405.75 – Higher resistance
- $2,503.11 – Fibonacci 0.786
A sustained move above $2,358.59 would strengthen the recovery structure, while reclaiming $2,391.27 could open the way toward higher resistance.
7. Bullish Scenario
If ETH holds the $2,217–$2,177 support zone and buyers regain control, a recovery toward $2,241.58 and $2,267 could develop.
A breakout above $2,267 may bring the $2,311–$2,346 resistance cluster into focus.
A stronger bullish recovery would require ETH to reclaim $2,358 and eventually $2,391 with convincing momentum.
8. Bearish Scenario
If ETH fails to hold $2,217.82 and breaks below $2,177.79, selling pressure could increase.
The next important downside area would be around $2,037. A deeper correction could bring $1,961–$1,933 into focus.
Final Outlook
Ethereum remains technically weak on the daily chart, trading below all four major EMAs. RSI shows a modest improvement, but bullish momentum has not yet been confirmed.
The $2,217–$2,177 zone is critical for buyers. Reclaiming $2,267 would be the first positive signal, while a move above the $2,314–$2,346 EMA cluster would provide stronger evidence of recovery.
For now, ETH is at an important decision zone. Watch the daily candle close, support reaction, and momentum before assuming a trend reversal.
Short-term outlook: Bearish below $2,314–$2,346.
$ETH
The key question is whether buyers can defend the $2,217–$2,177 support area or whether ETH will extend its correction toward lower demand zones.
1. EMA Structure
Current EMA levels:
- EMA 20: $2,326.87
- EMA 50: $2,391.27
- EMA 100: $2,345.87
- EMA 200: $2,314.87
ETH is trading below all four moving averages. The EMA structure indicates that sellers currently have the advantage.
The $2,314–$2,346 region is the first major resistance cluster. A sustained move above this zone would be an important sign of recovery. The EMA 50 near $2,391 remains a higher resistance level.
2. Fibonacci Levels
Key Fibonacci retracement levels:
- 0: $1,933.18
- 0.236: $2,241.58
- 0.382: $2,314.87
- 0.5: $2,358.59
- 0.618: $2,391.27
- 0.786: $2,503.11
- 1.0: $2,729.68
ETH is trading around the 0.236 Fibonacci region. Reclaiming $2,241.58 and holding above it could help buyers regain short-term momentum.
3. Market Structure & Liquidity
ETH previously recovered strongly from its June–July lows and rallied through August and September. However, the recent rejection around $2,300–$2,320 has weakened the recovery structure.
Price is now consolidating near local support, with several liquidity levels positioned above and below the current range.
A breakdown below the recent support zone could expose lower liquidity, while a reclaim of the nearby resistance cluster would improve the recovery setup.
4. RSI Momentum
- RSI: 39.33
- RSI Moving Average: 36.67
RSI remains below the neutral 50 level, indicating that bullish momentum is still limited.
However, RSI is trading above its moving average, suggesting a modest improvement in short-term momentum. A sustained recovery above 50 would provide stronger confirmation that buyers are returning.
5. Key Support Levels
Important downside levels to monitor:
- $2,217.82 – Immediate support
- $2,177.79 – Next support
- $2,037.00 – Major demand zone
- $1,961.73 – Lower support
- $1,948.92 – Additional support
- $1,933.18 – Major Fibonacci baseline
- $1,904.24–$1,888.58 – Deeper support region
A daily close below $2,217.82 could increase the probability of a move toward $2,177.79. Losing that level would put the $2,037 region into focus.
6. Key Resistance Levels
For a bullish recovery, ETH needs to reclaim:
- $2,241.58 – Immediate resistance
- $2,267.00 – Short-term resistance
- $2,311.30–$2,314.87 – Important resistance and EMA cluster
- $2,326.87 – EMA 20
- $2,345.87 – EMA 100
- $2,358.59 – Fibonacci 0.5
- $2,391.27 – EMA 50 and Fibonacci 0.618
- $2,405.75 – Higher resistance
- $2,503.11 – Fibonacci 0.786
A sustained move above $2,358.59 would strengthen the recovery structure, while reclaiming $2,391.27 could open the way toward higher resistance.
7. Bullish Scenario
If ETH holds the $2,217–$2,177 support zone and buyers regain control, a recovery toward $2,241.58 and $2,267 could develop.
A breakout above $2,267 may bring the $2,311–$2,346 resistance cluster into focus.
A stronger bullish recovery would require ETH to reclaim $2,358 and eventually $2,391 with convincing momentum.
8. Bearish Scenario
If ETH fails to hold $2,217.82 and breaks below $2,177.79, selling pressure could increase.
The next important downside area would be around $2,037. A deeper correction could bring $1,961–$1,933 into focus.
Final Outlook
Ethereum remains technically weak on the daily chart, trading below all four major EMAs. RSI shows a modest improvement, but bullish momentum has not yet been confirmed.
The $2,217–$2,177 zone is critical for buyers. Reclaiming $2,267 would be the first positive signal, while a move above the $2,314–$2,346 EMA cluster would provide stronger evidence of recovery.
For now, ETH is at an important decision zone. Watch the daily candle close, support reaction, and momentum before assuming a trend reversal.
Short-term outlook: Bearish below $2,314–$2,346.
$ETH
1
98
·
--
Article
See translation
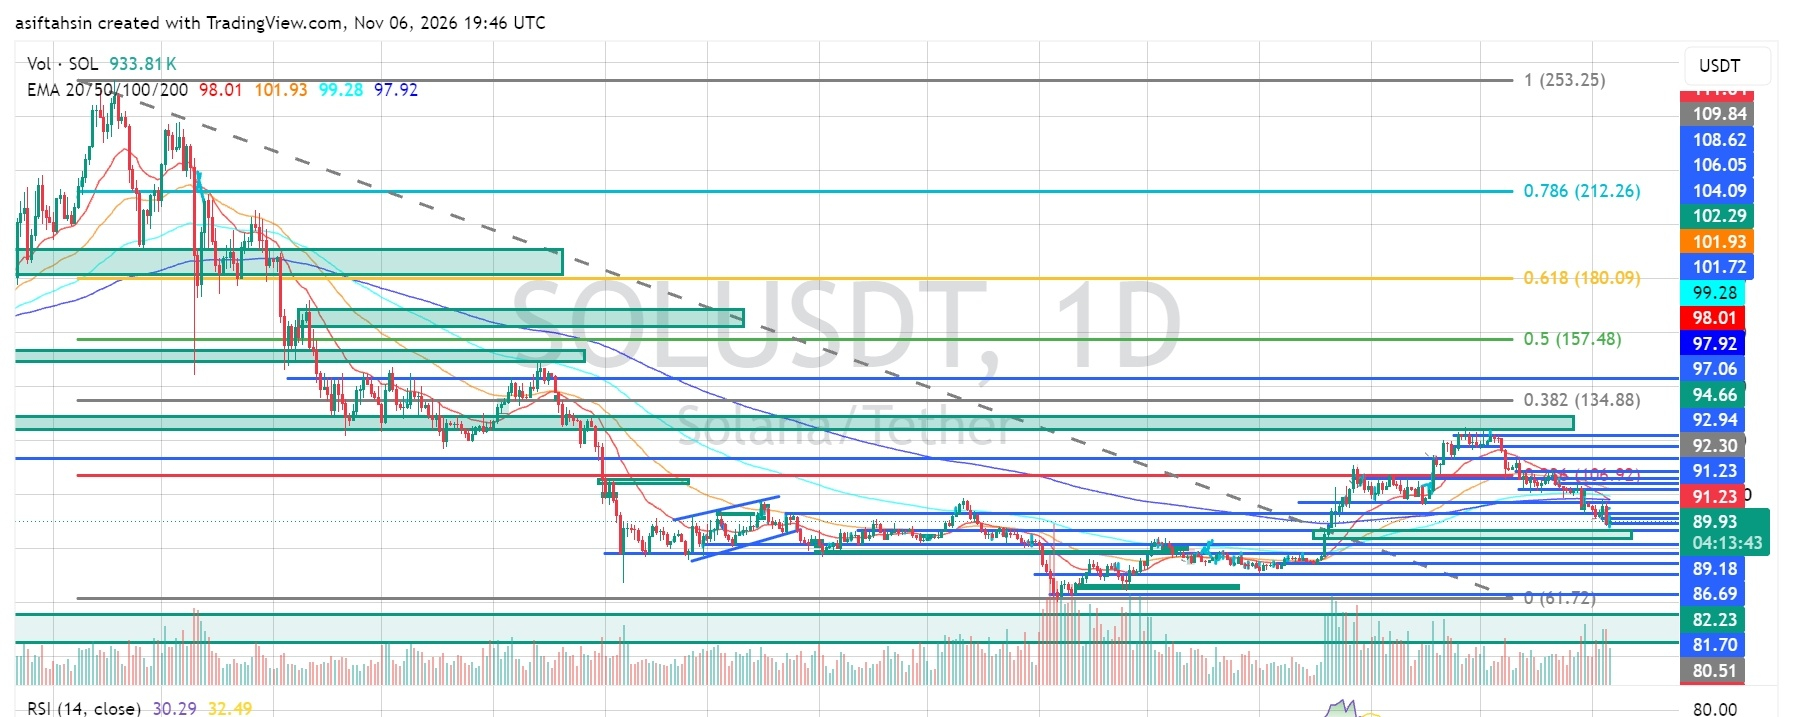
SOL Technical Outlook: Solana Tests Key Support Near $90 as Selling Pressure IntensifiesSolana is showing renewed weakness on the daily chart after being rejected from the $92–$94 resistance region. Price has moved below the short-term moving averages, while RSI is approaching oversold territory.
The key question now is whether buyers can defend the $89–$86 support zone or whether SOL will extend its correction.
1. EMA Structure
Current EMA levels:
- EMA 20: $98.01
- EMA 50: $101.93
- EMA 100: $99.28
- EMA 200: $97.92
SOL is trading below all four major EMAs. This indicates that sellers currently have control of the daily structure.
The $97.92–$99.28 region is the first major EMA resistance zone. A recovery above this area would be an early sign of improving momentum.
2. Fibonacci Levels
Key Fibonacci retracement levels:
- 0: $61.72
- 0.236: $106.92
- 0.382: $134.88
- 0.5: $157.48
- 0.618: $180.09
- 0.786: $212.26
- 1.0: $253.25
SOL is trading well below the 0.236 Fibonacci level at $106.92, highlighting the weakness of the broader recovery.
3. Current Market Structure
After rallying from the June–July lows, SOL advanced strongly during August and September. However, the recent rejection near $92–$94 has weakened the structure.
The chart shows lower highs and renewed selling pressure. Price is now testing an important support region around $89–$90.
A sustained move below this zone could expose lower liquidity levels.
4. RSI Momentum
- RSI: 30.29
- RSI Moving Average: 32.49
RSI is close to the oversold threshold of 30, indicating strong selling pressure.
A short-term relief bounce is possible if buyers defend support. However, oversold conditions alone do not confirm a reversal. RSI needs to recover above 40 to show improving momentum.
5. Key Support Levels
The important downside levels to monitor are:
- $89.18 – Immediate support
- $86.69 – Next support zone
- $82.23 – Major support
- $81.70 – Additional downside level
- $80.51 – Lower support region
A daily close below $89.18 could increase the probability of a move toward $86.69. Losing that level may expose the $82.23–$81.70 region.
6. Key Resistance Levels
For a recovery, SOL needs to reclaim:
- $91.23 – Immediate resistance
- $92.30 – Short-term resistance
- $92.94 – Local supply zone
- $94.66 – Important resistance
- $97.06 – Key recovery level
- $97.92–$99.28 – Major EMA resistance
- $101.93–$102.29 – Higher resistance zone
A sustained daily recovery above $94.66 would improve the short-term outlook. Reclaiming the EMA cluster around $98–$102 would provide stronger evidence of a bullish recovery.
7. Bullish Scenario
If SOL holds the $89.18 support area and buyers regain control, a relief bounce toward $91.23–$92.94 could develop.
A breakout above $94.66 may open the way toward $97.06 and the $98–$102 EMA resistance cluster.
However, buyers need to reclaim these levels with convincing momentum before a stronger trend reversal can be considered.
8. Bearish Scenario
If SOL fails to hold $89.18 and continues trading below immediate support, the next downside areas are $86.69 and $82.23.
A breakdown below $81.70 would expose the lower $80.51 region and could increase selling pressure.
Final Outlook
Solana remains under pressure on the daily timeframe. Trading below all four major EMAs, combined with RSI near 30, suggests that sellers currently maintain the advantage.
The $89.18–$86.69 region is important for buyers to defend. A recovery above $94.66 would be the first meaningful improvement, while reclaiming $98–$102 would strengthen the bullish case.
For now, SOL is at a critical support area. Watch the daily candle close and momentum before assuming a reversal.
Short-term outlook: Bearish below $94.66.
$SOL
{future}(SOLUSDT)
#JobsReportRaisesHikeOdds
SOL Technical Outlook: Solana Tests Key Support Near $90 as Selling Pressure Intensifies
Solana is showing renewed weakness on the daily chart after being rejected from the $92–$94 resistance region. Price has moved below the short-term moving averages, while RSI is approaching oversold territory.
The key question now is whether buyers can defend the $89–$86 support zone or whether SOL will extend its correction.
1. EMA Structure
Current EMA levels:
- EMA 20: $98.01
- EMA 50: $101.93
- EMA 100: $99.28
- EMA 200: $97.92
SOL is trading below all four major EMAs. This indicates that sellers currently have control of the daily structure.
The $97.92–$99.28 region is the first major EMA resistance zone. A recovery above this area would be an early sign of improving momentum.
2. Fibonacci Levels
Key Fibonacci retracement levels:
- 0: $61.72
- 0.236: $106.92
- 0.382: $134.88
- 0.5: $157.48
- 0.618: $180.09
- 0.786: $212.26
- 1.0: $253.25
SOL is trading well below the 0.236 Fibonacci level at $106.92, highlighting the weakness of the broader recovery.
3. Current Market Structure
After rallying from the June–July lows, SOL advanced strongly during August and September. However, the recent rejection near $92–$94 has weakened the structure.
The chart shows lower highs and renewed selling pressure. Price is now testing an important support region around $89–$90.
A sustained move below this zone could expose lower liquidity levels.
4. RSI Momentum
- RSI: 30.29
- RSI Moving Average: 32.49
RSI is close to the oversold threshold of 30, indicating strong selling pressure.
A short-term relief bounce is possible if buyers defend support. However, oversold conditions alone do not confirm a reversal. RSI needs to recover above 40 to show improving momentum.
5. Key Support Levels
The important downside levels to monitor are:
- $89.18 – Immediate support
- $86.69 – Next support zone
- $82.23 – Major support
- $81.70 – Additional downside level
- $80.51 – Lower support region
A daily close below $89.18 could increase the probability of a move toward $86.69. Losing that level may expose the $82.23–$81.70 region.
6. Key Resistance Levels
For a recovery, SOL needs to reclaim:
- $91.23 – Immediate resistance
- $92.30 – Short-term resistance
- $92.94 – Local supply zone
- $94.66 – Important resistance
- $97.06 – Key recovery level
- $97.92–$99.28 – Major EMA resistance
- $101.93–$102.29 – Higher resistance zone
A sustained daily recovery above $94.66 would improve the short-term outlook. Reclaiming the EMA cluster around $98–$102 would provide stronger evidence of a bullish recovery.
7. Bullish Scenario
If SOL holds the $89.18 support area and buyers regain control, a relief bounce toward $91.23–$92.94 could develop.
A breakout above $94.66 may open the way toward $97.06 and the $98–$102 EMA resistance cluster.
However, buyers need to reclaim these levels with convincing momentum before a stronger trend reversal can be considered.
8. Bearish Scenario
If SOL fails to hold $89.18 and continues trading below immediate support, the next downside areas are $86.69 and $82.23.
A breakdown below $81.70 would expose the lower $80.51 region and could increase selling pressure.
Final Outlook
Solana remains under pressure on the daily timeframe. Trading below all four major EMAs, combined with RSI near 30, suggests that sellers currently maintain the advantage.
The $89.18–$86.69 region is important for buyers to defend. A recovery above $94.66 would be the first meaningful improvement, while reclaiming $98–$102 would strengthen the bullish case.
For now, SOL is at a critical support area. Watch the daily candle close and momentum before assuming a reversal.
Short-term outlook: Bearish below $94.66.
$SOL
#JobsReportRaisesHikeOdds
The key question now is whether buyers can defend the $89–$86 support zone or whether SOL will extend its correction.
1. EMA Structure
Current EMA levels:
- EMA 20: $98.01
- EMA 50: $101.93
- EMA 100: $99.28
- EMA 200: $97.92
SOL is trading below all four major EMAs. This indicates that sellers currently have control of the daily structure.
The $97.92–$99.28 region is the first major EMA resistance zone. A recovery above this area would be an early sign of improving momentum.
2. Fibonacci Levels
Key Fibonacci retracement levels:
- 0: $61.72
- 0.236: $106.92
- 0.382: $134.88
- 0.5: $157.48
- 0.618: $180.09
- 0.786: $212.26
- 1.0: $253.25
SOL is trading well below the 0.236 Fibonacci level at $106.92, highlighting the weakness of the broader recovery.
3. Current Market Structure
After rallying from the June–July lows, SOL advanced strongly during August and September. However, the recent rejection near $92–$94 has weakened the structure.
The chart shows lower highs and renewed selling pressure. Price is now testing an important support region around $89–$90.
A sustained move below this zone could expose lower liquidity levels.
4. RSI Momentum
- RSI: 30.29
- RSI Moving Average: 32.49
RSI is close to the oversold threshold of 30, indicating strong selling pressure.
A short-term relief bounce is possible if buyers defend support. However, oversold conditions alone do not confirm a reversal. RSI needs to recover above 40 to show improving momentum.
5. Key Support Levels
The important downside levels to monitor are:
- $89.18 – Immediate support
- $86.69 – Next support zone
- $82.23 – Major support
- $81.70 – Additional downside level
- $80.51 – Lower support region
A daily close below $89.18 could increase the probability of a move toward $86.69. Losing that level may expose the $82.23–$81.70 region.
6. Key Resistance Levels
For a recovery, SOL needs to reclaim:
- $91.23 – Immediate resistance
- $92.30 – Short-term resistance
- $92.94 – Local supply zone
- $94.66 – Important resistance
- $97.06 – Key recovery level
- $97.92–$99.28 – Major EMA resistance
- $101.93–$102.29 – Higher resistance zone
A sustained daily recovery above $94.66 would improve the short-term outlook. Reclaiming the EMA cluster around $98–$102 would provide stronger evidence of a bullish recovery.
7. Bullish Scenario
If SOL holds the $89.18 support area and buyers regain control, a relief bounce toward $91.23–$92.94 could develop.
A breakout above $94.66 may open the way toward $97.06 and the $98–$102 EMA resistance cluster.
However, buyers need to reclaim these levels with convincing momentum before a stronger trend reversal can be considered.
8. Bearish Scenario
If SOL fails to hold $89.18 and continues trading below immediate support, the next downside areas are $86.69 and $82.23.
A breakdown below $81.70 would expose the lower $80.51 region and could increase selling pressure.
Final Outlook
Solana remains under pressure on the daily timeframe. Trading below all four major EMAs, combined with RSI near 30, suggests that sellers currently maintain the advantage.
The $89.18–$86.69 region is important for buyers to defend. A recovery above $94.66 would be the first meaningful improvement, while reclaiming $98–$102 would strengthen the bullish case.
For now, SOL is at a critical support area. Watch the daily candle close and momentum before assuming a reversal.
Short-term outlook: Bearish below $94.66.
$SOL
#JobsReportRaisesHikeOdds
1
992
·
--
Article
See translation
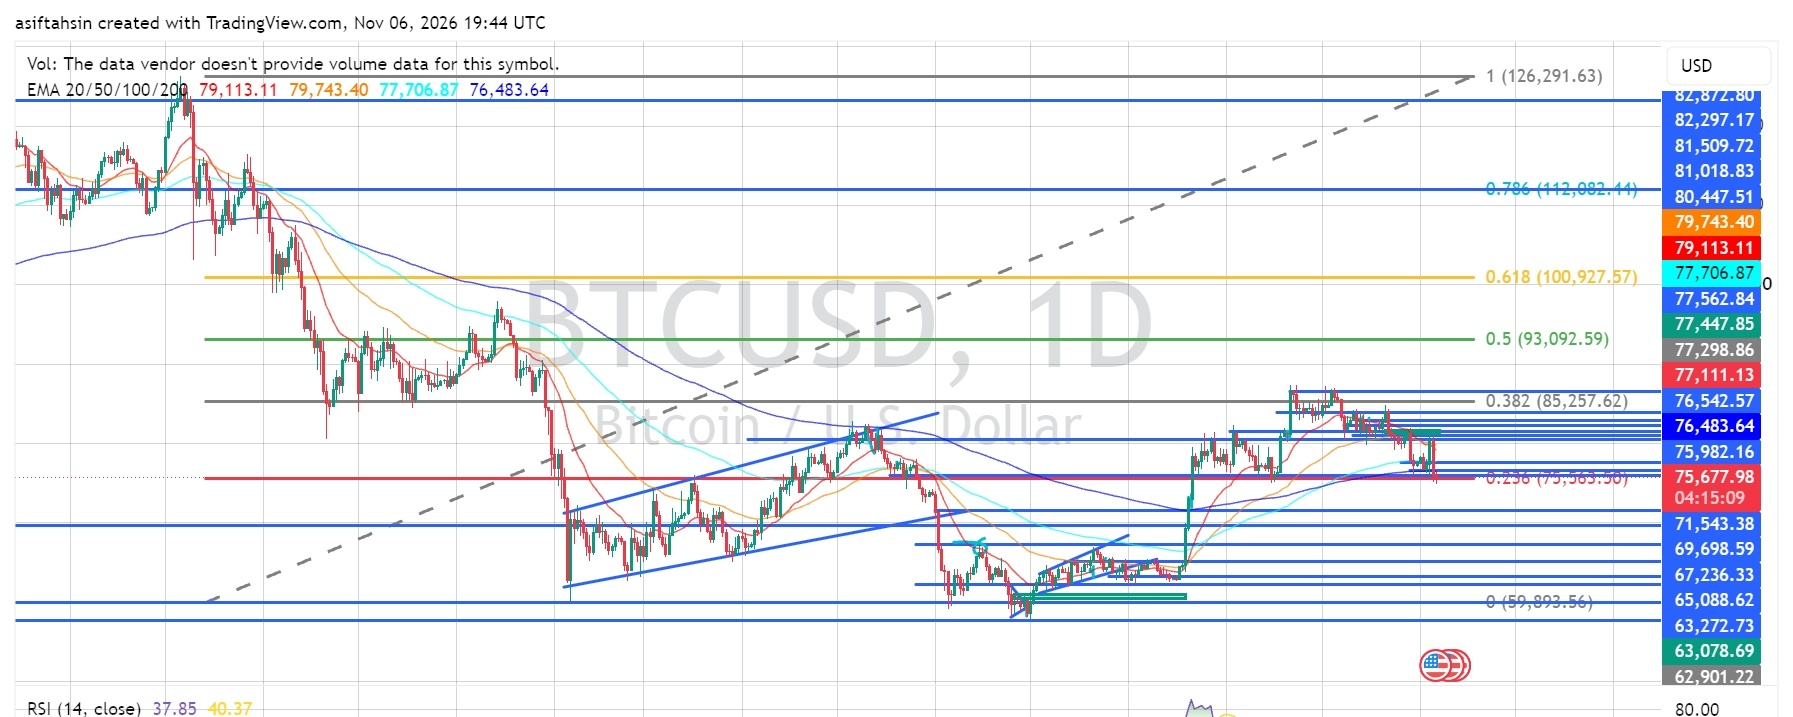
BTC Technical Outlook: Bitcoin Breaks Lower Toward $75.6K as Bearish Momentum StrengthensBTC Technical Outlook: Bitcoin Breaks Lower Toward $75.6K as Bearish Momentum Strengthens
Bitcoin is facing renewed selling pressure after failing to maintain its position above the $76K–$77K support region. BTC is currently trading around $75,678, with the daily chart showing a bearish structure as price moves below all four major EMAs.
The key question now is whether buyers can defend the $75,563 Fibonacci support or whether another breakdown will expose lower demand zones.
1. EMA Structure
Current EMA levels:
- EMA 20: $79,113.51
- EMA 50: $79,743.56
- EMA 100: $77,706.95
- EMA 200: $76,483.68
BTC is trading below all four EMAs, indicating significant weakness in the daily structure.
The $76,483–$79,743 region represents a major resistance area. Buyers need to reclaim these moving averages to improve the recovery outlook.
2. Fibonacci Levels
Key Fibonacci levels from the chart:
- 0.236: $75,563.50
- 0.382: $85,257.62
- 0.5: $93,092.59
- 0.618: $100,927.57
- 0.786: $112,082.44
BTC is currently testing the 0.236 Fibonacci retracement level around $75,563. A sustained hold could provide an opportunity for a relief bounce, while a confirmed breakdown may accelerate selling pressure.
3. Bullish Scenario
For buyers to regain control, BTC needs to defend the current support and reclaim nearby resistance levels.
- First resistance: $76,483
- Next resistance: $77,111–$77,707
- Major resistance: $79,113–$79,743
- Momentum confirmation: A sustained move above $79,743
A successful recovery above the EMA cluster could improve market sentiment and open the way toward higher resistance levels.
However, a temporary bounce without a daily reclaim of these levels may simply be a relief rally.
4. Bearish Scenario
The daily structure currently favors sellers because BTC remains below all major moving averages.
Important downside levels:
- Immediate support: $75,563
- Next support: $71,543
- Lower support: $69,698
- Additional demand: $67,236
- Major support zone: $65,088–$63,078
A confirmed daily close below $75,563 could expose BTC to the $71,543 area. If that level fails, further downside toward $69,698 and $67,236 becomes possible.
5. Market Structure & Liquidity
Bitcoin's recent recovery toward the $80K region has weakened, with price now showing lower levels and a bearish break of structure on the daily chart.
The chart highlights liquidity around recent swing highs and lows. The current price action suggests sellers are attempting to maintain control, while the $75.5K area is an important level for buyers to defend.
A liquidity sweep followed by a strong reclaim could create a short-term recovery opportunity. A breakdown without recovery would strengthen the bearish case.
6. RSI Momentum
- RSI: 37.85
- RSI Moving Average: 40.37
The RSI is below 40 and remains under its moving average, indicating weak momentum.
BTC is approaching oversold territory, but there is no confirmed bullish reversal signal yet. A recovery above 50 would provide stronger evidence that buying momentum is returning.
7. Key Levels to Watch
Resistance
- $76,483
- $77,111–$77,707
- $79,113–$79,743
- $81,018–$82,297
Support
- $75,563
- $71,543
- $69,698
- $67,236
- $65,088–$63,078
Final Outlook
Bitcoin's daily structure has turned increasingly bearish, with price trading below EMA 20, EMA 50, EMA 100, and EMA 200. RSI also confirms weakening momentum.
The $75,563 support level is critical in the near term. Holding this area could trigger a relief bounce, while a confirmed breakdown may expose $71,543 and potentially $69,698.
For bulls to regain confidence, BTC needs to reclaim $76,483 first, followed by the $77,700–$79,700 resistance region.
Short-term bias: Bearish below $79,743, with $75,563 as the immediate support to watch.
$BTC
{future}(BTCUSDT)
BTC Technical Outlook: Bitcoin Breaks Lower Toward $75.6K as Bearish Momentum Strengthens
BTC Technical Outlook: Bitcoin Breaks Lower Toward $75.6K as Bearish Momentum Strengthens
Bitcoin is facing renewed selling pressure after failing to maintain its position above the $76K–$77K support region. BTC is currently trading around $75,678, with the daily chart showing a bearish structure as price moves below all four major EMAs.
The key question now is whether buyers can defend the $75,563 Fibonacci support or whether another breakdown will expose lower demand zones.
1. EMA Structure
Current EMA levels:
- EMA 20: $79,113.51
- EMA 50: $79,743.56
- EMA 100: $77,706.95
- EMA 200: $76,483.68
BTC is trading below all four EMAs, indicating significant weakness in the daily structure.
The $76,483–$79,743 region represents a major resistance area. Buyers need to reclaim these moving averages to improve the recovery outlook.
2. Fibonacci Levels
Key Fibonacci levels from the chart:
- 0.236: $75,563.50
- 0.382: $85,257.62
- 0.5: $93,092.59
- 0.618: $100,927.57
- 0.786: $112,082.44
BTC is currently testing the 0.236 Fibonacci retracement level around $75,563. A sustained hold could provide an opportunity for a relief bounce, while a confirmed breakdown may accelerate selling pressure.
3. Bullish Scenario
For buyers to regain control, BTC needs to defend the current support and reclaim nearby resistance levels.
- First resistance: $76,483
- Next resistance: $77,111–$77,707
- Major resistance: $79,113–$79,743
- Momentum confirmation: A sustained move above $79,743
A successful recovery above the EMA cluster could improve market sentiment and open the way toward higher resistance levels.
However, a temporary bounce without a daily reclaim of these levels may simply be a relief rally.
4. Bearish Scenario
The daily structure currently favors sellers because BTC remains below all major moving averages.
Important downside levels:
- Immediate support: $75,563
- Next support: $71,543
- Lower support: $69,698
- Additional demand: $67,236
- Major support zone: $65,088–$63,078
A confirmed daily close below $75,563 could expose BTC to the $71,543 area. If that level fails, further downside toward $69,698 and $67,236 becomes possible.
5. Market Structure & Liquidity
Bitcoin's recent recovery toward the $80K region has weakened, with price now showing lower levels and a bearish break of structure on the daily chart.
The chart highlights liquidity around recent swing highs and lows. The current price action suggests sellers are attempting to maintain control, while the $75.5K area is an important level for buyers to defend.
A liquidity sweep followed by a strong reclaim could create a short-term recovery opportunity. A breakdown without recovery would strengthen the bearish case.
6. RSI Momentum
- RSI: 37.85
- RSI Moving Average: 40.37
The RSI is below 40 and remains under its moving average, indicating weak momentum.
BTC is approaching oversold territory, but there is no confirmed bullish reversal signal yet. A recovery above 50 would provide stronger evidence that buying momentum is returning.
7. Key Levels to Watch
Resistance
- $76,483
- $77,111–$77,707
- $79,113–$79,743
- $81,018–$82,297
Support
- $75,563
- $71,543
- $69,698
- $67,236
- $65,088–$63,078
Final Outlook
Bitcoin's daily structure has turned increasingly bearish, with price trading below EMA 20, EMA 50, EMA 100, and EMA 200. RSI also confirms weakening momentum.
The $75,563 support level is critical in the near term. Holding this area could trigger a relief bounce, while a confirmed breakdown may expose $71,543 and potentially $69,698.
For bulls to regain confidence, BTC needs to reclaim $76,483 first, followed by the $77,700–$79,700 resistance region.
Short-term bias: Bearish below $79,743, with $75,563 as the immediate support to watch.
$BTC
Bitcoin is facing renewed selling pressure after failing to maintain its position above the $76K–$77K support region. BTC is currently trading around $75,678, with the daily chart showing a bearish structure as price moves below all four major EMAs.
The key question now is whether buyers can defend the $75,563 Fibonacci support or whether another breakdown will expose lower demand zones.
1. EMA Structure
Current EMA levels:
- EMA 20: $79,113.51
- EMA 50: $79,743.56
- EMA 100: $77,706.95
- EMA 200: $76,483.68
BTC is trading below all four EMAs, indicating significant weakness in the daily structure.
The $76,483–$79,743 region represents a major resistance area. Buyers need to reclaim these moving averages to improve the recovery outlook.
2. Fibonacci Levels
Key Fibonacci levels from the chart:
- 0.236: $75,563.50
- 0.382: $85,257.62
- 0.5: $93,092.59
- 0.618: $100,927.57
- 0.786: $112,082.44
BTC is currently testing the 0.236 Fibonacci retracement level around $75,563. A sustained hold could provide an opportunity for a relief bounce, while a confirmed breakdown may accelerate selling pressure.
3. Bullish Scenario
For buyers to regain control, BTC needs to defend the current support and reclaim nearby resistance levels.
- First resistance: $76,483
- Next resistance: $77,111–$77,707
- Major resistance: $79,113–$79,743
- Momentum confirmation: A sustained move above $79,743
A successful recovery above the EMA cluster could improve market sentiment and open the way toward higher resistance levels.
However, a temporary bounce without a daily reclaim of these levels may simply be a relief rally.
4. Bearish Scenario
The daily structure currently favors sellers because BTC remains below all major moving averages.
Important downside levels:
- Immediate support: $75,563
- Next support: $71,543
- Lower support: $69,698
- Additional demand: $67,236
- Major support zone: $65,088–$63,078
A confirmed daily close below $75,563 could expose BTC to the $71,543 area. If that level fails, further downside toward $69,698 and $67,236 becomes possible.
5. Market Structure & Liquidity
Bitcoin's recent recovery toward the $80K region has weakened, with price now showing lower levels and a bearish break of structure on the daily chart.
The chart highlights liquidity around recent swing highs and lows. The current price action suggests sellers are attempting to maintain control, while the $75.5K area is an important level for buyers to defend.
A liquidity sweep followed by a strong reclaim could create a short-term recovery opportunity. A breakdown without recovery would strengthen the bearish case.
6. RSI Momentum
- RSI: 37.85
- RSI Moving Average: 40.37
The RSI is below 40 and remains under its moving average, indicating weak momentum.
BTC is approaching oversold territory, but there is no confirmed bullish reversal signal yet. A recovery above 50 would provide stronger evidence that buying momentum is returning.
7. Key Levels to Watch
Resistance
- $76,483
- $77,111–$77,707
- $79,113–$79,743
- $81,018–$82,297
Support
- $75,563
- $71,543
- $69,698
- $67,236
- $65,088–$63,078
Final Outlook
Bitcoin's daily structure has turned increasingly bearish, with price trading below EMA 20, EMA 50, EMA 100, and EMA 200. RSI also confirms weakening momentum.
The $75,563 support level is critical in the near term. Holding this area could trigger a relief bounce, while a confirmed breakdown may expose $71,543 and potentially $69,698.
For bulls to regain confidence, BTC needs to reclaim $76,483 first, followed by the $77,700–$79,700 resistance region.
Short-term bias: Bearish below $79,743, with $75,563 as the immediate support to watch.
$BTC
2
1
887
·
--
Article
See translation
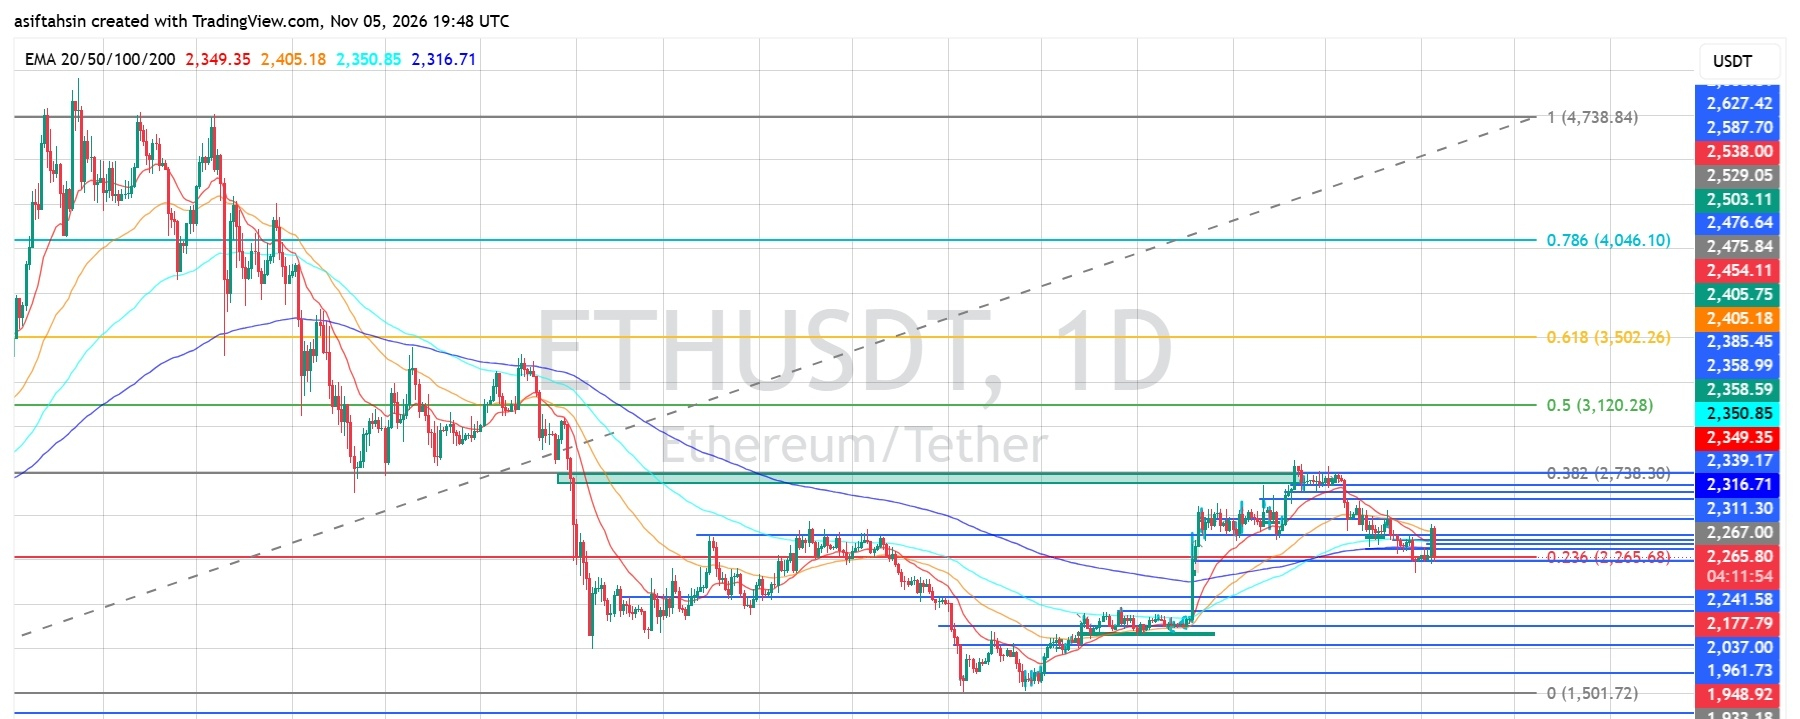
ETH Technical Outlook: Ethereum Tests Critical Support as Bearish Pressure RemainsEthereum is trading around $2,265–$2,267, testing the 0.236 Fibonacci level near $2,265.68 after pulling back from its recent recovery high around $2,358–$2,385.
The latest daily chart shows ETH trading below all four major EMAs. Although RSI has started to recover, the broader structure remains under pressure. Holding the $2,241–$2,265 support area is important for preventing another move lower.
EMA Structure
ETH is currently trading below all four major moving averages:
- 20 EMA: $2,349.35
- 50 EMA: $2,405.18
- 100 EMA: $2,350.85
- 200 EMA: $2,316.71
The 20 EMA is below the 50 EMA, while price remains below the entire EMA structure. This keeps the broader trend bearish and makes the $2,316–$2,405 region an important resistance area.
A sustained recovery above the 200 EMA near $2,316 would be an initial improvement, but reclaiming the $2,350–$2,405 zone would provide stronger bullish confirmation.
Fibonacci Levels
Based on the chart:
- 0.236: $2,265.68
- 0.382: $2,738.30
- 0.5: $3,120.28
- 0.618: $3,502.26
- 0.786: $4,046.10
ETH is currently testing the 0.236 Fibonacci level. A sustained move below this area could increase downside pressure, while holding it may help establish a short-term recovery.
Bullish Recovery Scenario
If ETH maintains support around $2,241–$2,265 and buyers regain momentum, the first challenge will be the $2,316–$2,350 resistance zone.
A successful breakout could open the way toward:
- $2,385
- $2,405
- $2,454–$2,476
- $2,503–$2,538
A stronger recovery would require ETH to reclaim the major EMA resistance cluster and build acceptance above it.
Bearish Continuation Scenario
If ETH fails to hold the $2,241 support area and breaks below it with strong selling pressure, the next downside zones are:
- $2,177
- $2,037
- $1,961–$1,948
- $1,904–$1,888
A daily close below $2,177 would weaken the recovery structure further and increase the possibility of a deeper correction toward the $2,037 demand area.
RSI Momentum
The daily RSI is around 41.09, with its signal line near 36.50.
RSI remains below the neutral 50 level, indicating that bullish momentum is still limited. However, the RSI moving above its signal line suggests some improvement in short-term momentum.
A sustained move above 50 would provide stronger evidence of a bullish momentum shift.
Market Structure & Liquidity
ETH recovered strongly from its June–July lows and advanced toward the $2,385 region. However, the recent rejection has brought price back toward the $2,265 support zone.
The market is now attempting to stabilize around the 0.236 Fibonacci level. The immediate direction will likely depend on whether buyers can defend $2,241–$2,265 or sellers force a breakdown.
Key Levels
Resistance:
- $2,316–$2,350
- $2,385–$2,405
- $2,454–$2,476
- $2,503–$2,538
Support:
- $2,265–$2,241
- $2,177
- $2,037
- $1,961–$1,948
- $1,904–$1,888
Final Outlook
ETH remains under bearish pressure while trading below its major EMAs. The $2,241–$2,265 region is the immediate support zone to watch.
Holding this area could support a recovery toward $2,316–$2,350 and potentially $2,405. However, a confirmed breakdown below $2,241 could expose $2,177 and $2,037.
Current Bias: Bearish-to-Neutral
A sustained reclaim of $2,405 would improve the bullish outlook, while losing $2,241 would increase downside risk.
$ETH
{future}(ETHUSDT)
ETH Technical Outlook: Ethereum Tests Critical Support as Bearish Pressure Remains
Ethereum is trading around $2,265–$2,267, testing the 0.236 Fibonacci level near $2,265.68 after pulling back from its recent recovery high around $2,358–$2,385.
The latest daily chart shows ETH trading below all four major EMAs. Although RSI has started to recover, the broader structure remains under pressure. Holding the $2,241–$2,265 support area is important for preventing another move lower.
EMA Structure
ETH is currently trading below all four major moving averages:
- 20 EMA: $2,349.35
- 50 EMA: $2,405.18
- 100 EMA: $2,350.85
- 200 EMA: $2,316.71
The 20 EMA is below the 50 EMA, while price remains below the entire EMA structure. This keeps the broader trend bearish and makes the $2,316–$2,405 region an important resistance area.
A sustained recovery above the 200 EMA near $2,316 would be an initial improvement, but reclaiming the $2,350–$2,405 zone would provide stronger bullish confirmation.
Fibonacci Levels
Based on the chart:
- 0.236: $2,265.68
- 0.382: $2,738.30
- 0.5: $3,120.28
- 0.618: $3,502.26
- 0.786: $4,046.10
ETH is currently testing the 0.236 Fibonacci level. A sustained move below this area could increase downside pressure, while holding it may help establish a short-term recovery.
Bullish Recovery Scenario
If ETH maintains support around $2,241–$2,265 and buyers regain momentum, the first challenge will be the $2,316–$2,350 resistance zone.
A successful breakout could open the way toward:
- $2,385
- $2,405
- $2,454–$2,476
- $2,503–$2,538
A stronger recovery would require ETH to reclaim the major EMA resistance cluster and build acceptance above it.
Bearish Continuation Scenario
If ETH fails to hold the $2,241 support area and breaks below it with strong selling pressure, the next downside zones are:
- $2,177
- $2,037
- $1,961–$1,948
- $1,904–$1,888
A daily close below $2,177 would weaken the recovery structure further and increase the possibility of a deeper correction toward the $2,037 demand area.
RSI Momentum
The daily RSI is around 41.09, with its signal line near 36.50.
RSI remains below the neutral 50 level, indicating that bullish momentum is still limited. However, the RSI moving above its signal line suggests some improvement in short-term momentum.
A sustained move above 50 would provide stronger evidence of a bullish momentum shift.
Market Structure & Liquidity
ETH recovered strongly from its June–July lows and advanced toward the $2,385 region. However, the recent rejection has brought price back toward the $2,265 support zone.
The market is now attempting to stabilize around the 0.236 Fibonacci level. The immediate direction will likely depend on whether buyers can defend $2,241–$2,265 or sellers force a breakdown.
Key Levels
Resistance:
- $2,316–$2,350
- $2,385–$2,405
- $2,454–$2,476
- $2,503–$2,538
Support:
- $2,265–$2,241
- $2,177
- $2,037
- $1,961–$1,948
- $1,904–$1,888
Final Outlook
ETH remains under bearish pressure while trading below its major EMAs. The $2,241–$2,265 region is the immediate support zone to watch.
Holding this area could support a recovery toward $2,316–$2,350 and potentially $2,405. However, a confirmed breakdown below $2,241 could expose $2,177 and $2,037.
Current Bias: Bearish-to-Neutral
A sustained reclaim of $2,405 would improve the bullish outlook, while losing $2,241 would increase downside risk.
$ETH
The latest daily chart shows ETH trading below all four major EMAs. Although RSI has started to recover, the broader structure remains under pressure. Holding the $2,241–$2,265 support area is important for preventing another move lower.
EMA Structure
ETH is currently trading below all four major moving averages:
- 20 EMA: $2,349.35
- 50 EMA: $2,405.18
- 100 EMA: $2,350.85
- 200 EMA: $2,316.71
The 20 EMA is below the 50 EMA, while price remains below the entire EMA structure. This keeps the broader trend bearish and makes the $2,316–$2,405 region an important resistance area.
A sustained recovery above the 200 EMA near $2,316 would be an initial improvement, but reclaiming the $2,350–$2,405 zone would provide stronger bullish confirmation.
Fibonacci Levels
Based on the chart:
- 0.236: $2,265.68
- 0.382: $2,738.30
- 0.5: $3,120.28
- 0.618: $3,502.26
- 0.786: $4,046.10
ETH is currently testing the 0.236 Fibonacci level. A sustained move below this area could increase downside pressure, while holding it may help establish a short-term recovery.
Bullish Recovery Scenario
If ETH maintains support around $2,241–$2,265 and buyers regain momentum, the first challenge will be the $2,316–$2,350 resistance zone.
A successful breakout could open the way toward:
- $2,385
- $2,405
- $2,454–$2,476
- $2,503–$2,538
A stronger recovery would require ETH to reclaim the major EMA resistance cluster and build acceptance above it.
Bearish Continuation Scenario
If ETH fails to hold the $2,241 support area and breaks below it with strong selling pressure, the next downside zones are:
- $2,177
- $2,037
- $1,961–$1,948
- $1,904–$1,888
A daily close below $2,177 would weaken the recovery structure further and increase the possibility of a deeper correction toward the $2,037 demand area.
RSI Momentum
The daily RSI is around 41.09, with its signal line near 36.50.
RSI remains below the neutral 50 level, indicating that bullish momentum is still limited. However, the RSI moving above its signal line suggests some improvement in short-term momentum.
A sustained move above 50 would provide stronger evidence of a bullish momentum shift.
Market Structure & Liquidity
ETH recovered strongly from its June–July lows and advanced toward the $2,385 region. However, the recent rejection has brought price back toward the $2,265 support zone.
The market is now attempting to stabilize around the 0.236 Fibonacci level. The immediate direction will likely depend on whether buyers can defend $2,241–$2,265 or sellers force a breakdown.
Key Levels
Resistance:
- $2,316–$2,350
- $2,385–$2,405
- $2,454–$2,476
- $2,503–$2,538
Support:
- $2,265–$2,241
- $2,177
- $2,037
- $1,961–$1,948
- $1,904–$1,888
Final Outlook
ETH remains under bearish pressure while trading below its major EMAs. The $2,241–$2,265 region is the immediate support zone to watch.
Holding this area could support a recovery toward $2,316–$2,350 and potentially $2,405. However, a confirmed breakdown below $2,241 could expose $2,177 and $2,037.
Current Bias: Bearish-to-Neutral
A sustained reclaim of $2,405 would improve the bullish outlook, while losing $2,241 would increase downside risk.
$ETH
2
174
·
--
Article
See translation
XRP Technical Outlook: XRP Weakens Below Key EMAs as Bearish Pressure BuildsXRP Technical Outlook: XRP Weakens Below Key EMAs as Bearish Pressure Builds
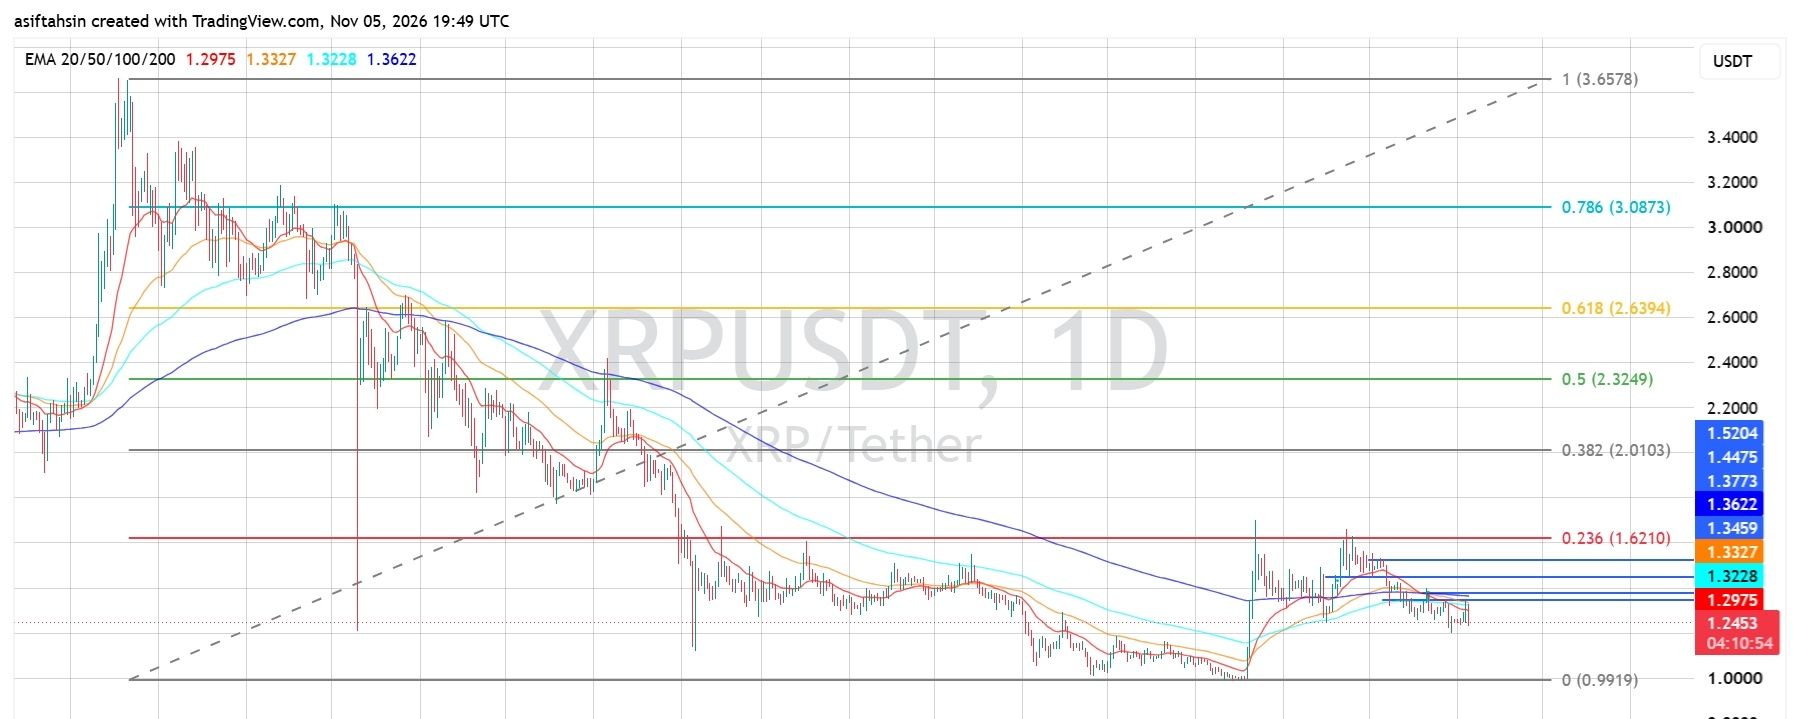
XRP is trading around $1.245, facing continued selling pressure after being rejected from the $1.35–$1.36 resistance area. The price has moved below all four major EMAs, while RSI remains below 40, indicating that bearish momentum is still dominant.
The immediate focus is whether buyers can defend the $1.22–$1.24 support area. A breakdown could expose XRP to further downside, while a recovery above the EMA cluster would be the first sign of improving momentum.
EMA Structure
XRP is trading below all four major moving averages:
- 20 EMA: $1.2975
- 50 EMA: $1.3327
- 100 EMA: $1.3228
- 200 EMA: $1.3622
The 20 EMA is below the 50, 100, and 200 EMAs, reflecting weakening short-term momentum. The entire EMA cluster between $1.2975 and $1.3622 now acts as overhead resistance.
XRP needs to reclaim $1.30 first, followed by $1.32–$1.36, to establish a stronger recovery structure.
Fibonacci Levels
Based on the chart's Fibonacci retracement:
- 0.236: $1.6210
- 0.382: $2.0103
- 0.5: $2.3249
- 0.618: $2.6394
- 0.786: $3.0873
These are broader recovery targets rather than immediate price objectives. XRP would first need to reclaim the nearby EMA resistance zone before these Fibonacci levels become relevant.
Bullish Recovery Scenario
If XRP holds the $1.22–$1.24 support area and buying pressure returns, the first recovery target is $1.2975, followed by the $1.3228–$1.3327 EMA zone.
A sustained move above $1.36 could improve the broader structure and open the way toward $1.3773, $1.4475, and $1.5204.
A stronger bullish reversal would require a clear breakout and sustained trading above these resistance levels.
Bearish Continuation Scenario
If XRP fails to defend the $1.22–$1.24 area, selling pressure could increase and push the price toward lower demand zones.
A sustained breakdown would weaken the recent recovery structure and bring the broader $1.00–$0.99 support area into focus.
Until XRP reclaims the EMA cluster, downside risks remain elevated.
RSI Momentum
RSI is currently around 39.51, while its signal average is near 40.19.
Momentum remains below the neutral 50 level, showing that sellers still have the advantage. Although RSI is approaching oversold territory, this alone does not confirm a bullish reversal.
A move back above 50 would provide a stronger indication that buying momentum is returning.
Market Structure & Liquidity
XRP previously recovered sharply from the $1.00 area and moved toward the $1.35–$1.36 region. However, that recovery faced rejection, followed by lower highs and renewed selling pressure.
The price is now consolidating near $1.245, below all four major EMAs. This keeps the short-term structure weak.
Buyers need to defend the current support area and reclaim $1.30 to prevent further deterioration.
Key Levels
Resistance:
- $1.2975
- $1.3228–$1.3327
- $1.3459–$1.3622
- $1.3773
- $1.4475
- $1.5204
Support:
- $1.22–$1.24
- $1.20 psychological area
- $1.00–$0.9919
Final Outlook
XRP remains bearish-to-neutral while trading below the $1.30–$1.36 EMA resistance zone.
A successful recovery above $1.30 could provide short-term relief, while a breakout above $1.36 would strengthen the bullish recovery outlook.
However, losing the $1.22–$1.24 support area could expose XRP to another downside move toward lower demand.
Current Bias: Bearish below $1.30 | Recovery confirmation above $1.36 | Downside risk below $1.22.
$XRP
{future}(XRPUSDT)
XRP Technical Outlook: XRP Weakens Below Key EMAs as Bearish Pressure Builds
XRP Technical Outlook: XRP Weakens Below Key EMAs as Bearish Pressure Builds
XRP is trading around $1.245, facing continued selling pressure after being rejected from the $1.35–$1.36 resistance area. The price has moved below all four major EMAs, while RSI remains below 40, indicating that bearish momentum is still dominant.
The immediate focus is whether buyers can defend the $1.22–$1.24 support area. A breakdown could expose XRP to further downside, while a recovery above the EMA cluster would be the first sign of improving momentum.
EMA Structure
XRP is trading below all four major moving averages:
- 20 EMA: $1.2975
- 50 EMA: $1.3327
- 100 EMA: $1.3228
- 200 EMA: $1.3622
The 20 EMA is below the 50, 100, and 200 EMAs, reflecting weakening short-term momentum. The entire EMA cluster between $1.2975 and $1.3622 now acts as overhead resistance.
XRP needs to reclaim $1.30 first, followed by $1.32–$1.36, to establish a stronger recovery structure.
Fibonacci Levels
Based on the chart's Fibonacci retracement:
- 0.236: $1.6210
- 0.382: $2.0103
- 0.5: $2.3249
- 0.618: $2.6394
- 0.786: $3.0873
These are broader recovery targets rather than immediate price objectives. XRP would first need to reclaim the nearby EMA resistance zone before these Fibonacci levels become relevant.
Bullish Recovery Scenario
If XRP holds the $1.22–$1.24 support area and buying pressure returns, the first recovery target is $1.2975, followed by the $1.3228–$1.3327 EMA zone.
A sustained move above $1.36 could improve the broader structure and open the way toward $1.3773, $1.4475, and $1.5204.
A stronger bullish reversal would require a clear breakout and sustained trading above these resistance levels.
Bearish Continuation Scenario
If XRP fails to defend the $1.22–$1.24 area, selling pressure could increase and push the price toward lower demand zones.
A sustained breakdown would weaken the recent recovery structure and bring the broader $1.00–$0.99 support area into focus.
Until XRP reclaims the EMA cluster, downside risks remain elevated.
RSI Momentum
RSI is currently around 39.51, while its signal average is near 40.19.
Momentum remains below the neutral 50 level, showing that sellers still have the advantage. Although RSI is approaching oversold territory, this alone does not confirm a bullish reversal.
A move back above 50 would provide a stronger indication that buying momentum is returning.
Market Structure & Liquidity
XRP previously recovered sharply from the $1.00 area and moved toward the $1.35–$1.36 region. However, that recovery faced rejection, followed by lower highs and renewed selling pressure.
The price is now consolidating near $1.245, below all four major EMAs. This keeps the short-term structure weak.
Buyers need to defend the current support area and reclaim $1.30 to prevent further deterioration.
Key Levels
Resistance:
- $1.2975
- $1.3228–$1.3327
- $1.3459–$1.3622
- $1.3773
- $1.4475
- $1.5204
Support:
- $1.22–$1.24
- $1.20 psychological area
- $1.00–$0.9919
Final Outlook
XRP remains bearish-to-neutral while trading below the $1.30–$1.36 EMA resistance zone.
A successful recovery above $1.30 could provide short-term relief, while a breakout above $1.36 would strengthen the bullish recovery outlook.
However, losing the $1.22–$1.24 support area could expose XRP to another downside move toward lower demand.
Current Bias: Bearish below $1.30 | Recovery confirmation above $1.36 | Downside risk below $1.22.
$XRP
XRP is trading around $1.245, facing continued selling pressure after being rejected from the $1.35–$1.36 resistance area. The price has moved below all four major EMAs, while RSI remains below 40, indicating that bearish momentum is still dominant.
The immediate focus is whether buyers can defend the $1.22–$1.24 support area. A breakdown could expose XRP to further downside, while a recovery above the EMA cluster would be the first sign of improving momentum.
EMA Structure
XRP is trading below all four major moving averages:
- 20 EMA: $1.2975
- 50 EMA: $1.3327
- 100 EMA: $1.3228
- 200 EMA: $1.3622
The 20 EMA is below the 50, 100, and 200 EMAs, reflecting weakening short-term momentum. The entire EMA cluster between $1.2975 and $1.3622 now acts as overhead resistance.
XRP needs to reclaim $1.30 first, followed by $1.32–$1.36, to establish a stronger recovery structure.
Fibonacci Levels
Based on the chart's Fibonacci retracement:
- 0.236: $1.6210
- 0.382: $2.0103
- 0.5: $2.3249
- 0.618: $2.6394
- 0.786: $3.0873
These are broader recovery targets rather than immediate price objectives. XRP would first need to reclaim the nearby EMA resistance zone before these Fibonacci levels become relevant.
Bullish Recovery Scenario
If XRP holds the $1.22–$1.24 support area and buying pressure returns, the first recovery target is $1.2975, followed by the $1.3228–$1.3327 EMA zone.
A sustained move above $1.36 could improve the broader structure and open the way toward $1.3773, $1.4475, and $1.5204.
A stronger bullish reversal would require a clear breakout and sustained trading above these resistance levels.
Bearish Continuation Scenario
If XRP fails to defend the $1.22–$1.24 area, selling pressure could increase and push the price toward lower demand zones.
A sustained breakdown would weaken the recent recovery structure and bring the broader $1.00–$0.99 support area into focus.
Until XRP reclaims the EMA cluster, downside risks remain elevated.
RSI Momentum
RSI is currently around 39.51, while its signal average is near 40.19.
Momentum remains below the neutral 50 level, showing that sellers still have the advantage. Although RSI is approaching oversold territory, this alone does not confirm a bullish reversal.
A move back above 50 would provide a stronger indication that buying momentum is returning.
Market Structure & Liquidity
XRP previously recovered sharply from the $1.00 area and moved toward the $1.35–$1.36 region. However, that recovery faced rejection, followed by lower highs and renewed selling pressure.
The price is now consolidating near $1.245, below all four major EMAs. This keeps the short-term structure weak.
Buyers need to defend the current support area and reclaim $1.30 to prevent further deterioration.
Key Levels
Resistance:
- $1.2975
- $1.3228–$1.3327
- $1.3459–$1.3622
- $1.3773
- $1.4475
- $1.5204
Support:
- $1.22–$1.24
- $1.20 psychological area
- $1.00–$0.9919
Final Outlook
XRP remains bearish-to-neutral while trading below the $1.30–$1.36 EMA resistance zone.
A successful recovery above $1.30 could provide short-term relief, while a breakout above $1.36 would strengthen the bullish recovery outlook.
However, losing the $1.22–$1.24 support area could expose XRP to another downside move toward lower demand.
Current Bias: Bearish below $1.30 | Recovery confirmation above $1.36 | Downside risk below $1.22.
$XRP
1.2k
·
--
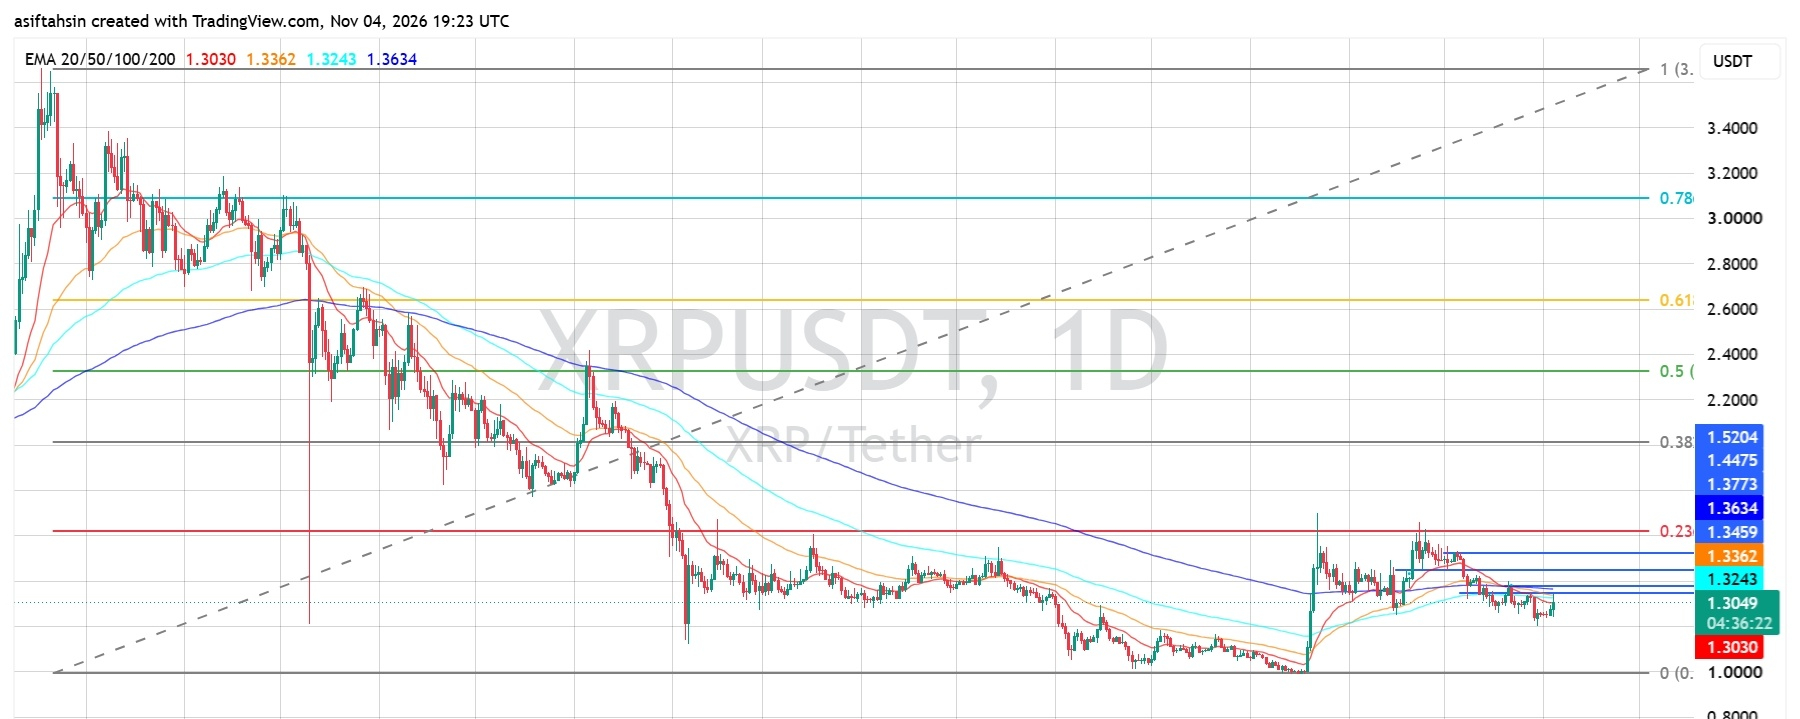
Article
See translation
XRP Technical Outlook: XRP Consolidates Near $1.30 as Bulls Attempt to Defend SupportXRP Technical Outlook: XRP Consolidates Near $1.30 as Bulls Attempt to Defend Support
XRP is currently trading around $1.3049–$1.3051, consolidating after its recovery from the $1.00 region. The recent rally pushed price toward the $1.37 area, but XRP faced rejection and has since moved into a corrective phase.
The broader recovery has lost some momentum, with price trading below the 50, 100, and 200 EMAs. However, XRP is holding near the 20 EMA and attempting to stabilize around $1.30.
The immediate focus is whether buyers can defend the $1.30 area and reclaim the $1.3243–$1.3362 resistance zone. A sustained move above this zone would improve the recovery outlook, while a breakdown below support could expose XRP to further downside.
EMA Structure
* 20 EMA: $1.3030
* 50 EMA: $1.3362
* 100 EMA: $1.3243
* 200 EMA: $1.3634
XRP is trading slightly above the 20 EMA but remains below the 50, 100, and 200 EMAs. This indicates that short-term price action is attempting to stabilize, while the broader trend still faces significant overhead resistance.
The $1.3243–$1.3362 region is the first important resistance zone. Reclaiming the 50 EMA at $1.3362 would strengthen the short-term recovery, while the 200 EMA near $1.3634 remains a major barrier.
Fibonacci Levels
Based on the visible chart levels:
* 0.236: Around $1.3459
* 0.382: Around $2.00
* 0.5: Around $2.32
* 0.618: Around $2.64
* 0.786: Around $3.08
XRP is trading below the visible 0.236 Fibonacci resistance area. A sustained recovery above $1.3459 would be an early sign of improving momentum. The higher Fibonacci levels represent broader recovery objectives rather than immediate targets.
Bullish Scenario
If XRP holds the $1.30 support area and buyers manage to reclaim the nearby EMA resistance zone, the price could attempt a recovery toward:
* $1.3243
* $1.3362
* $1.3459
* $1.3634
* $1.3773
* $1.4475
* $1.5204
A decisive move above $1.3459 would improve the bullish outlook. Reclaiming $1.3634–$1.3773 could open the way toward the $1.4475 resistance area.
Pullback Scenario
If XRP fails to hold above $1.30 and selling pressure increases, the following support areas deserve attention:
* $1.3030 — 20 EMA
* $1.30 — Immediate psychological support
* $1.27–$1.25 — Potential lower support area
* $1.00 — Major historical support region
A sustained breakdown below $1.30 would weaken the current consolidation structure and increase the possibility of a deeper correction. The $1.00 region remains an important broader support reference on the chart.
RSI Momentum
* RSI: 47.82
* RSI Signal Average: 40.26
RSI is below the neutral 50 level, showing that bullish momentum remains limited. However, the RSI is above its signal average, suggesting a modest improvement in short-term momentum.
A move above 50–55 would provide stronger confirmation of a recovery attempt. If RSI turns lower and falls below 40, downside pressure could increase.
Market Structure & Liquidity
XRP has experienced a prolonged decline from its previous highs before finding support around the $1.00 region. The subsequent recovery pushed price toward the $1.37 area, but buyers have struggled to maintain that upward momentum.
The latest price action shows lower highs and consolidation around $1.30–$1.34. The market is currently testing whether the $1.30 region can hold as support.
The broader structure remains under pressure while XRP trades below the 50, 100, and 200 EMAs. A confirmed reclaim of the $1.3459–$1.3773 zone would be needed to establish a stronger bullish recovery.
Key Levels
Resistance
* $1.3243
* $1.3362
* $1.3459
* $1.3634
* $1.3773
* $1.4475
* $1.5204
Support
* $1.3030
* $1.30
* $1.27–$1.25
* $1.00
Final Outlook
XRP remains neutral-to-bearish while trading below the $1.3362–$1.3634 resistance zone. The price is attempting to stabilize around $1.30, but the broader recovery still needs confirmation.
A sustained breakout above $1.3459 could open the path toward $1.3773, followed by $1.4475. On the downside, losing $1.30 would increase the risk of a deeper correction.
Bias: Neutral-to-bearish below $1.3459 | Breakout above $1.3773 could strengthen recovery toward $1.4475–$1.5204.
Analysis based on the provided XRP/USDT 1D chart dated November 4, 2026. These levels represent technical scenarios, not guaranteed outcomes.
$XRP
{future}(XRPUSDT)
XRP Technical Outlook: XRP Consolidates Near $1.30 as Bulls Attempt to Defend Support
XRP Technical Outlook: XRP Consolidates Near $1.30 as Bulls Attempt to Defend Support
XRP is currently trading around $1.3049–$1.3051, consolidating after its recovery from the $1.00 region. The recent rally pushed price toward the $1.37 area, but XRP faced rejection and has since moved into a corrective phase.
The broader recovery has lost some momentum, with price trading below the 50, 100, and 200 EMAs. However, XRP is holding near the 20 EMA and attempting to stabilize around $1.30.
The immediate focus is whether buyers can defend the $1.30 area and reclaim the $1.3243–$1.3362 resistance zone. A sustained move above this zone would improve the recovery outlook, while a breakdown below support could expose XRP to further downside.
EMA Structure
* 20 EMA: $1.3030
* 50 EMA: $1.3362
* 100 EMA: $1.3243
* 200 EMA: $1.3634
XRP is trading slightly above the 20 EMA but remains below the 50, 100, and 200 EMAs. This indicates that short-term price action is attempting to stabilize, while the broader trend still faces significant overhead resistance.
The $1.3243–$1.3362 region is the first important resistance zone. Reclaiming the 50 EMA at $1.3362 would strengthen the short-term recovery, while the 200 EMA near $1.3634 remains a major barrier.
Fibonacci Levels
Based on the visible chart levels:
* 0.236: Around $1.3459
* 0.382: Around $2.00
* 0.5: Around $2.32
* 0.618: Around $2.64
* 0.786: Around $3.08
XRP is trading below the visible 0.236 Fibonacci resistance area. A sustained recovery above $1.3459 would be an early sign of improving momentum. The higher Fibonacci levels represent broader recovery objectives rather than immediate targets.
Bullish Scenario
If XRP holds the $1.30 support area and buyers manage to reclaim the nearby EMA resistance zone, the price could attempt a recovery toward:
* $1.3243
* $1.3362
* $1.3459
* $1.3634
* $1.3773
* $1.4475
* $1.5204
A decisive move above $1.3459 would improve the bullish outlook. Reclaiming $1.3634–$1.3773 could open the way toward the $1.4475 resistance area.
Pullback Scenario
If XRP fails to hold above $1.30 and selling pressure increases, the following support areas deserve attention:
* $1.3030 — 20 EMA
* $1.30 — Immediate psychological support
* $1.27–$1.25 — Potential lower support area
* $1.00 — Major historical support region
A sustained breakdown below $1.30 would weaken the current consolidation structure and increase the possibility of a deeper correction. The $1.00 region remains an important broader support reference on the chart.
RSI Momentum
* RSI: 47.82
* RSI Signal Average: 40.26
RSI is below the neutral 50 level, showing that bullish momentum remains limited. However, the RSI is above its signal average, suggesting a modest improvement in short-term momentum.
A move above 50–55 would provide stronger confirmation of a recovery attempt. If RSI turns lower and falls below 40, downside pressure could increase.
Market Structure & Liquidity
XRP has experienced a prolonged decline from its previous highs before finding support around the $1.00 region. The subsequent recovery pushed price toward the $1.37 area, but buyers have struggled to maintain that upward momentum.
The latest price action shows lower highs and consolidation around $1.30–$1.34. The market is currently testing whether the $1.30 region can hold as support.
The broader structure remains under pressure while XRP trades below the 50, 100, and 200 EMAs. A confirmed reclaim of the $1.3459–$1.3773 zone would be needed to establish a stronger bullish recovery.
Key Levels
Resistance
* $1.3243
* $1.3362
* $1.3459
* $1.3634
* $1.3773
* $1.4475
* $1.5204
Support
* $1.3030
* $1.30
* $1.27–$1.25
* $1.00
Final Outlook
XRP remains neutral-to-bearish while trading below the $1.3362–$1.3634 resistance zone. The price is attempting to stabilize around $1.30, but the broader recovery still needs confirmation.
A sustained breakout above $1.3459 could open the path toward $1.3773, followed by $1.4475. On the downside, losing $1.30 would increase the risk of a deeper correction.
Bias: Neutral-to-bearish below $1.3459 | Breakout above $1.3773 could strengthen recovery toward $1.4475–$1.5204.
Analysis based on the provided XRP/USDT 1D chart dated November 4, 2026. These levels represent technical scenarios, not guaranteed outcomes.
$XRP
XRP is currently trading around $1.3049–$1.3051, consolidating after its recovery from the $1.00 region. The recent rally pushed price toward the $1.37 area, but XRP faced rejection and has since moved into a corrective phase.
The broader recovery has lost some momentum, with price trading below the 50, 100, and 200 EMAs. However, XRP is holding near the 20 EMA and attempting to stabilize around $1.30.
The immediate focus is whether buyers can defend the $1.30 area and reclaim the $1.3243–$1.3362 resistance zone. A sustained move above this zone would improve the recovery outlook, while a breakdown below support could expose XRP to further downside.
EMA Structure
* 20 EMA: $1.3030
* 50 EMA: $1.3362
* 100 EMA: $1.3243
* 200 EMA: $1.3634
XRP is trading slightly above the 20 EMA but remains below the 50, 100, and 200 EMAs. This indicates that short-term price action is attempting to stabilize, while the broader trend still faces significant overhead resistance.
The $1.3243–$1.3362 region is the first important resistance zone. Reclaiming the 50 EMA at $1.3362 would strengthen the short-term recovery, while the 200 EMA near $1.3634 remains a major barrier.
Fibonacci Levels
Based on the visible chart levels:
* 0.236: Around $1.3459
* 0.382: Around $2.00
* 0.5: Around $2.32
* 0.618: Around $2.64
* 0.786: Around $3.08
XRP is trading below the visible 0.236 Fibonacci resistance area. A sustained recovery above $1.3459 would be an early sign of improving momentum. The higher Fibonacci levels represent broader recovery objectives rather than immediate targets.
Bullish Scenario
If XRP holds the $1.30 support area and buyers manage to reclaim the nearby EMA resistance zone, the price could attempt a recovery toward:
* $1.3243
* $1.3362
* $1.3459
* $1.3634
* $1.3773
* $1.4475
* $1.5204
A decisive move above $1.3459 would improve the bullish outlook. Reclaiming $1.3634–$1.3773 could open the way toward the $1.4475 resistance area.
Pullback Scenario
If XRP fails to hold above $1.30 and selling pressure increases, the following support areas deserve attention:
* $1.3030 — 20 EMA
* $1.30 — Immediate psychological support
* $1.27–$1.25 — Potential lower support area
* $1.00 — Major historical support region
A sustained breakdown below $1.30 would weaken the current consolidation structure and increase the possibility of a deeper correction. The $1.00 region remains an important broader support reference on the chart.
RSI Momentum
* RSI: 47.82
* RSI Signal Average: 40.26
RSI is below the neutral 50 level, showing that bullish momentum remains limited. However, the RSI is above its signal average, suggesting a modest improvement in short-term momentum.
A move above 50–55 would provide stronger confirmation of a recovery attempt. If RSI turns lower and falls below 40, downside pressure could increase.
Market Structure & Liquidity
XRP has experienced a prolonged decline from its previous highs before finding support around the $1.00 region. The subsequent recovery pushed price toward the $1.37 area, but buyers have struggled to maintain that upward momentum.
The latest price action shows lower highs and consolidation around $1.30–$1.34. The market is currently testing whether the $1.30 region can hold as support.
The broader structure remains under pressure while XRP trades below the 50, 100, and 200 EMAs. A confirmed reclaim of the $1.3459–$1.3773 zone would be needed to establish a stronger bullish recovery.
Key Levels
Resistance
* $1.3243
* $1.3362
* $1.3459
* $1.3634
* $1.3773
* $1.4475
* $1.5204
Support
* $1.3030
* $1.30
* $1.27–$1.25
* $1.00
Final Outlook
XRP remains neutral-to-bearish while trading below the $1.3362–$1.3634 resistance zone. The price is attempting to stabilize around $1.30, but the broader recovery still needs confirmation.
A sustained breakout above $1.3459 could open the path toward $1.3773, followed by $1.4475. On the downside, losing $1.30 would increase the risk of a deeper correction.
Bias: Neutral-to-bearish below $1.3459 | Breakout above $1.3773 could strengthen recovery toward $1.4475–$1.5204.
Analysis based on the provided XRP/USDT 1D chart dated November 4, 2026. These levels represent technical scenarios, not guaranteed outcomes.
$XRP
1
849
·
--
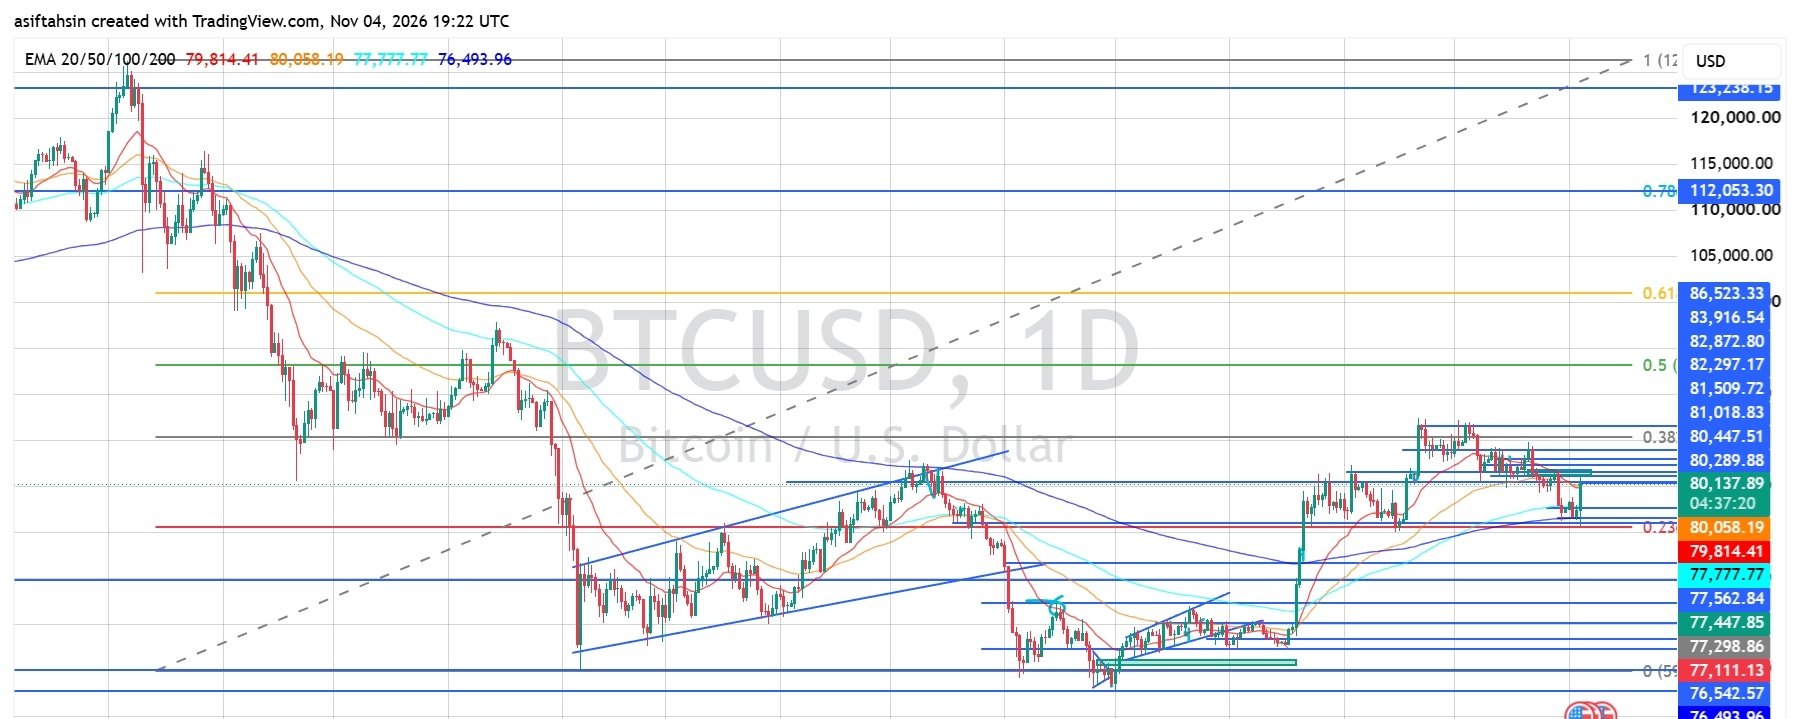
Article
See translation
BTC Technical Outlook: Bitcoin Attempts Recovery Near $80K as Bulls Defend Key SupportBitcoin is currently trading around $80,137, attempting to recover after a recent pullback from the $81,000–$81,500 region. Price has moved back toward the short-term moving averages, but BTC is still facing resistance around $80,300–$80,450.
The market is showing signs of stabilization after the recent decline. However, buyers need to reclaim the $81,000–$81,500 zone to strengthen the recovery. Holding above the $79,800 area is important to prevent further downside pressure.
EMA Structure
* 20 EMA: $79,814.41
* 50 EMA: $80,058.19
* 100 EMA: $77,777.77
* 200 EMA: $76,493.96
BTC is trading slightly above all four EMAs, suggesting that the broader recovery structure remains intact. However, the 20 and 50 EMAs are close to the current price, making the $79,800–$80,100 region an important short-term support area.
A sustained move above the $80,450 resistance zone would improve the immediate bullish outlook.
Fibonacci Levels
Based on the chart:
* 0.236: Around $79,800
* 0.382: $80,447.51
* 0.5: $82,872.80
* 0.618: Around $100,000
* 0.786: $112,053.30
* 1.0: $123,238.15
BTC is currently trading around the lower Fibonacci retracement area. Reclaiming $80,447 would be an important step toward a recovery, while the next major Fibonacci resistance is near $82,872.
Bullish Scenario
If BTC maintains support above $79,800 and breaks through the nearby resistance zone, buyers could attempt a move toward:
$80,289–$80,447
$81,018
$81,509
$82,297
$82,872
$83,916
$86,523
A sustained breakout above $81,509 would strengthen the short-term recovery structure. A move above $82,872 could open the path toward the $83,916–$86,523 resistance region.
Pullback Scenario
If BTC fails to hold above $79,800 and selling pressure increases, the following support levels become important:
* $79,814 — 20 EMA
* $80,058 — 50 EMA
* $77,777 — 100 EMA
* $77,562
* $77,447
* $77,298–$77,111
* $76,542–$76,493 — 200 EMA area
* $75,982
* $71,543
A sustained move below $79,800 would weaken the immediate recovery and could expose the $77,777–$77,100 support region. Losing that area would increase the risk of a deeper correction toward the $76,500 zone.
RSI Momentum
* RSI: 49.74
* RSI Signal Average: 41.38
RSI has recovered toward the neutral 50 level and is currently above its signal average. This indicates improving momentum, although bullish strength is not yet firmly established.
A sustained move above 50–55 would support further recovery, while a drop below 45 could indicate renewed selling pressure.
Market Structure & Liquidity
BTC has recovered from the $76,000–$77,000 region and previously rallied toward the $81,000 area. However, the latest price action shows a pullback and consolidation around $80,000.
The current price is trading near the 20 and 50 EMAs, with resistance building around $80,300–$80,450. Buyers need to reclaim the recent resistance levels to confirm that bullish momentum is returning.
The broader recovery remains constructive while BTC holds above the $77,100–$77,700 support region. However, a decisive breakout above $81,509 is needed to strengthen the bullish continuation scenario.
Key Levels
Resistance
* $80,289–$80,447
* $81,018
* $81,509
* $82,297
* $82,872
* $83,916
* $86,523
Support
* $79,814
* $80,058
* $77,777
* $77,562–$77,447
* $77,298–$77,111
* $76,542–$76,493
* $75,982
* $71,543
Final Outlook
BTC is showing early signs of stabilization around $80K, with RSI recovering toward neutral and price trading slightly above its major EMAs.
A sustained move above $80,447 could open the way toward $81,509, followed by $82,872 and $83,916. On the downside, losing $79,814 would increase the risk of a correction toward $77,777–$77,100.
Bias: Neutral to cautiously bullish while holding above $79,800 | Breakout above $81,509 could open the path toward $82,872–$83,916.
These levels are based on the November 4, 2026 chart and represent potential scenarios, not guaranteed price movements.
$BTC
{future}(BTCUSDT)
BTC Technical Outlook: Bitcoin Attempts Recovery Near $80K as Bulls Defend Key Support
Bitcoin is currently trading around $80,137, attempting to recover after a recent pullback from the $81,000–$81,500 region. Price has moved back toward the short-term moving averages, but BTC is still facing resistance around $80,300–$80,450.
The market is showing signs of stabilization after the recent decline. However, buyers need to reclaim the $81,000–$81,500 zone to strengthen the recovery. Holding above the $79,800 area is important to prevent further downside pressure.
EMA Structure
* 20 EMA: $79,814.41
* 50 EMA: $80,058.19
* 100 EMA: $77,777.77
* 200 EMA: $76,493.96
BTC is trading slightly above all four EMAs, suggesting that the broader recovery structure remains intact. However, the 20 and 50 EMAs are close to the current price, making the $79,800–$80,100 region an important short-term support area.
A sustained move above the $80,450 resistance zone would improve the immediate bullish outlook.
Fibonacci Levels
Based on the chart:
* 0.236: Around $79,800
* 0.382: $80,447.51
* 0.5: $82,872.80
* 0.618: Around $100,000
* 0.786: $112,053.30
* 1.0: $123,238.15
BTC is currently trading around the lower Fibonacci retracement area. Reclaiming $80,447 would be an important step toward a recovery, while the next major Fibonacci resistance is near $82,872.
Bullish Scenario
If BTC maintains support above $79,800 and breaks through the nearby resistance zone, buyers could attempt a move toward:
$80,289–$80,447
$81,018
$81,509
$82,297
$82,872
$83,916
$86,523
A sustained breakout above $81,509 would strengthen the short-term recovery structure. A move above $82,872 could open the path toward the $83,916–$86,523 resistance region.
Pullback Scenario
If BTC fails to hold above $79,800 and selling pressure increases, the following support levels become important:
* $79,814 — 20 EMA
* $80,058 — 50 EMA
* $77,777 — 100 EMA
* $77,562
* $77,447
* $77,298–$77,111
* $76,542–$76,493 — 200 EMA area
* $75,982
* $71,543
A sustained move below $79,800 would weaken the immediate recovery and could expose the $77,777–$77,100 support region. Losing that area would increase the risk of a deeper correction toward the $76,500 zone.
RSI Momentum
* RSI: 49.74
* RSI Signal Average: 41.38
RSI has recovered toward the neutral 50 level and is currently above its signal average. This indicates improving momentum, although bullish strength is not yet firmly established.
A sustained move above 50–55 would support further recovery, while a drop below 45 could indicate renewed selling pressure.
Market Structure & Liquidity
BTC has recovered from the $76,000–$77,000 region and previously rallied toward the $81,000 area. However, the latest price action shows a pullback and consolidation around $80,000.
The current price is trading near the 20 and 50 EMAs, with resistance building around $80,300–$80,450. Buyers need to reclaim the recent resistance levels to confirm that bullish momentum is returning.
The broader recovery remains constructive while BTC holds above the $77,100–$77,700 support region. However, a decisive breakout above $81,509 is needed to strengthen the bullish continuation scenario.
Key Levels
Resistance
* $80,289–$80,447
* $81,018
* $81,509
* $82,297
* $82,872
* $83,916
* $86,523
Support
* $79,814
* $80,058
* $77,777
* $77,562–$77,447
* $77,298–$77,111
* $76,542–$76,493
* $75,982
* $71,543
Final Outlook
BTC is showing early signs of stabilization around $80K, with RSI recovering toward neutral and price trading slightly above its major EMAs.
A sustained move above $80,447 could open the way toward $81,509, followed by $82,872 and $83,916. On the downside, losing $79,814 would increase the risk of a correction toward $77,777–$77,100.
Bias: Neutral to cautiously bullish while holding above $79,800 | Breakout above $81,509 could open the path toward $82,872–$83,916.
These levels are based on the November 4, 2026 chart and represent potential scenarios, not guaranteed price movements.
$BTC
The market is showing signs of stabilization after the recent decline. However, buyers need to reclaim the $81,000–$81,500 zone to strengthen the recovery. Holding above the $79,800 area is important to prevent further downside pressure.
EMA Structure
* 20 EMA: $79,814.41
* 50 EMA: $80,058.19
* 100 EMA: $77,777.77
* 200 EMA: $76,493.96
BTC is trading slightly above all four EMAs, suggesting that the broader recovery structure remains intact. However, the 20 and 50 EMAs are close to the current price, making the $79,800–$80,100 region an important short-term support area.
A sustained move above the $80,450 resistance zone would improve the immediate bullish outlook.
Fibonacci Levels
Based on the chart:
* 0.236: Around $79,800
* 0.382: $80,447.51
* 0.5: $82,872.80
* 0.618: Around $100,000
* 0.786: $112,053.30
* 1.0: $123,238.15
BTC is currently trading around the lower Fibonacci retracement area. Reclaiming $80,447 would be an important step toward a recovery, while the next major Fibonacci resistance is near $82,872.
Bullish Scenario
If BTC maintains support above $79,800 and breaks through the nearby resistance zone, buyers could attempt a move toward:
$80,289–$80,447
$81,018
$81,509
$82,297
$82,872
$83,916
$86,523
A sustained breakout above $81,509 would strengthen the short-term recovery structure. A move above $82,872 could open the path toward the $83,916–$86,523 resistance region.
Pullback Scenario
If BTC fails to hold above $79,800 and selling pressure increases, the following support levels become important:
* $79,814 — 20 EMA
* $80,058 — 50 EMA
* $77,777 — 100 EMA
* $77,562
* $77,447
* $77,298–$77,111
* $76,542–$76,493 — 200 EMA area
* $75,982
* $71,543
A sustained move below $79,800 would weaken the immediate recovery and could expose the $77,777–$77,100 support region. Losing that area would increase the risk of a deeper correction toward the $76,500 zone.
RSI Momentum
* RSI: 49.74
* RSI Signal Average: 41.38
RSI has recovered toward the neutral 50 level and is currently above its signal average. This indicates improving momentum, although bullish strength is not yet firmly established.
A sustained move above 50–55 would support further recovery, while a drop below 45 could indicate renewed selling pressure.
Market Structure & Liquidity
BTC has recovered from the $76,000–$77,000 region and previously rallied toward the $81,000 area. However, the latest price action shows a pullback and consolidation around $80,000.
The current price is trading near the 20 and 50 EMAs, with resistance building around $80,300–$80,450. Buyers need to reclaim the recent resistance levels to confirm that bullish momentum is returning.
The broader recovery remains constructive while BTC holds above the $77,100–$77,700 support region. However, a decisive breakout above $81,509 is needed to strengthen the bullish continuation scenario.
Key Levels
Resistance
* $80,289–$80,447
* $81,018
* $81,509
* $82,297
* $82,872
* $83,916
* $86,523
Support
* $79,814
* $80,058
* $77,777
* $77,562–$77,447
* $77,298–$77,111
* $76,542–$76,493
* $75,982
* $71,543
Final Outlook
BTC is showing early signs of stabilization around $80K, with RSI recovering toward neutral and price trading slightly above its major EMAs.
A sustained move above $80,447 could open the way toward $81,509, followed by $82,872 and $83,916. On the downside, losing $79,814 would increase the risk of a correction toward $77,777–$77,100.
Bias: Neutral to cautiously bullish while holding above $79,800 | Breakout above $81,509 could open the path toward $82,872–$83,916.
These levels are based on the November 4, 2026 chart and represent potential scenarios, not guaranteed price movements.
$BTC
491
·
--
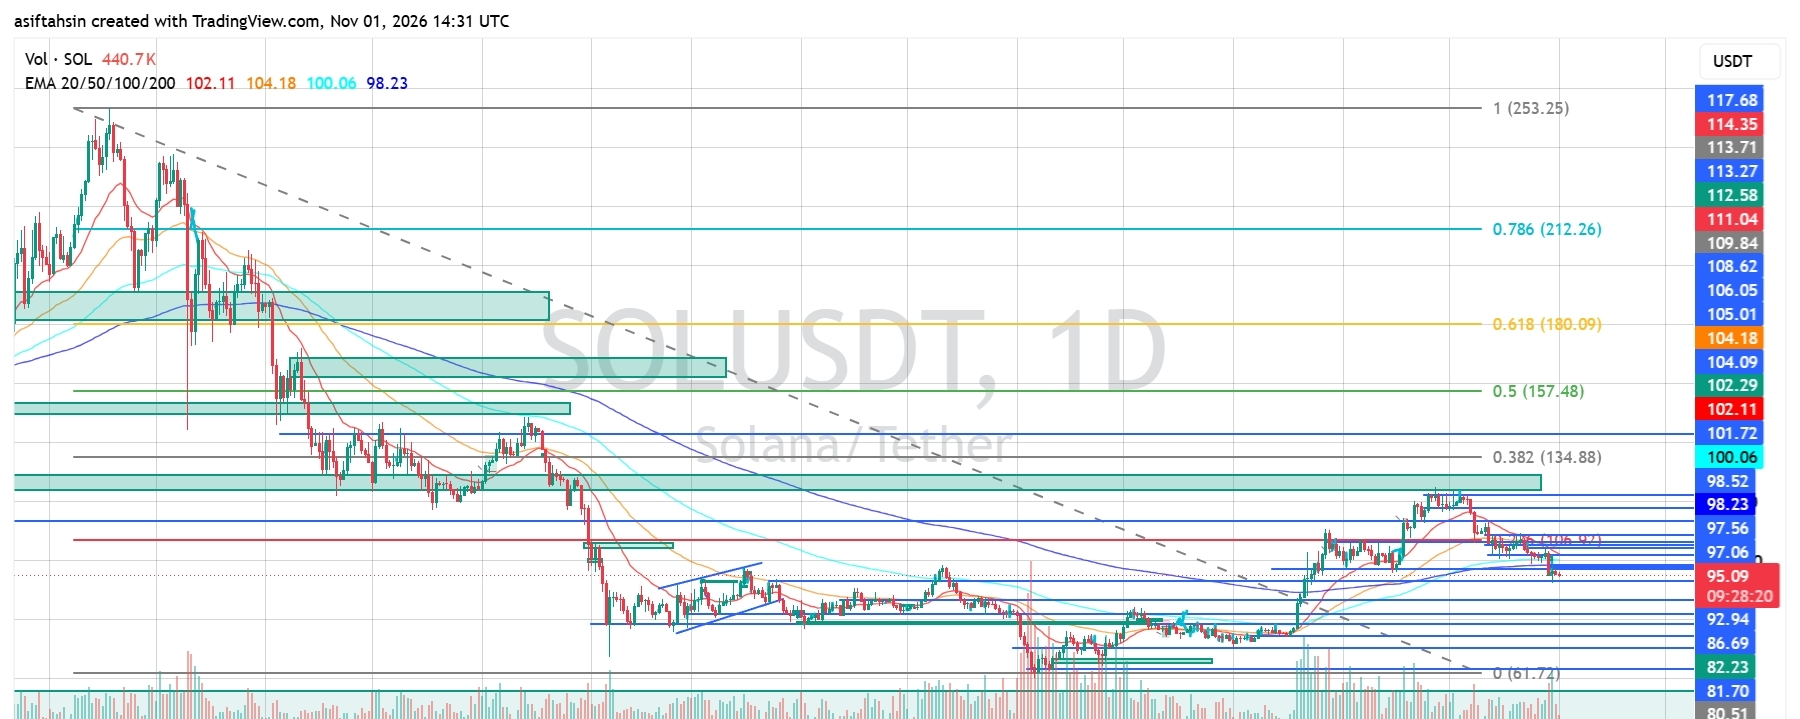
Article
See translation
SOL Technical Outlook: Solana Drops Below Major EMAs as Selling Pressure Pushes Price Toward $92 SupSolana is currently trading around $95.07, facing renewed selling pressure after failing to sustain its recovery toward the $98.50–$100 resistance zone. SOL has pulled back from its recent highs and is now trading below all four major EMAs, indicating that short-term momentum has shifted in favor of sellers.
The immediate support area is around $92.94, while RSI has dropped to 29.64, showing that SOL is approaching oversold territory. Buyers need to reclaim the $97.06–$100.06 resistance region to improve the outlook, while losing $92.94 could expose lower support zones.
EMA Structure
* 20 EMA: $102.11
* 50 EMA: $104.18
* 100 EMA: $100.06
* 200 EMA: $98.23
SOL is trading below all four EMAs, indicating a bearish short-term structure.
The 200 EMA near $98.23 is the first important moving-average resistance. Above that, the $100.06–$102.11 region represents another major barrier, followed by the 50 EMA near $104.18.
A sustained recovery above the $100–$104 EMA cluster would be needed to restore stronger bullish momentum.
Fibonacci Levels
Based on your chart:
* 0: $61.72
* 0.236: $106.02
* 0.382: $134.88
* 0.5: $157.48
* 0.618: $180.09
* 0.786: $212.26
* 1.0: $253.25
SOL is trading below the 0.236 Fibonacci region near $106.02, showing that the broader recovery still faces significant resistance.
The first objective for buyers is to reclaim the nearby EMA cluster. A sustained move above $106.02 would provide a stronger recovery signal and potentially open the path toward higher Fibonacci levels.
Bullish Scenario
If SOL holds the $92.94 support area and buyers regain momentum, a recovery could develop toward:
- $97.06–$98.23
- $100.06–$102.11
- $104.18–$106.02
- $108.62–$109.84
- $112.58–$114.35
- $117.68–$121.96
A sustained move above $98.23 would be the first sign of short-term recovery. Reclaiming the $100.06–$104.18 EMA region would strengthen the bullish outlook, while a breakout above $106.02 could open the path toward $112.58–$117.68.
Pullback Scenario
If SOL fails to reclaim the $97.06–$100.06 resistance region and selling pressure continues, watch these support areas:
* $92.94
* $86.69
* $82.23
* $81.70
* $80.51–$79.06
* $61.72 — broader Fibonacci base
A decisive breakdown below $92.94 could expose the $86.69 area first. If selling pressure accelerates and this support fails, the $82.23–$80.51 region could become the next important downside area.
The $61.72 level represents the broader Fibonacci base, not an immediate downside target.
RSI Momentum
* RSI: 29.64
* RSI Signal Average: 36.74
RSI has dropped below 30, indicating that SOL is approaching oversold territory. It is also trading below its signal average, confirming that bearish momentum remains dominant.
A recovery above 30–35 could be an early indication that selling pressure is easing. A sustained move above 40–50 would provide stronger evidence of improving momentum.
However, oversold conditions alone do not guarantee an immediate reversal.
Market Structure & Liquidity
SOL previously recovered from the June low near $61.72 and gradually moved higher, eventually reaching the $98.52–$100 region in October.
However, the latest rejection has pushed price below the major EMA cluster and weakened the recovery structure. The market is now testing whether the $92.94 area can attract buyers and prevent another leg down.
The $97.06–$100.06 region is an important resistance zone that buyers need to reclaim. Until SOL recovers above this area, sellers retain the short-term advantage.
A confirmed breakdown below $92.94 would increase the risk of a deeper correction toward $86.69 and potentially $82.23.
Key Levels
Resistance
* $97.06–$98.23
* $100.06–$102.11
* $104.18–$106.02
* $108.62–$109.84
* $112.58–$114.35
* $117.68–$121.96
Support
* $92.94
* $86.69
* $82.23–$81.70
* $80.51–$79.06
* $61.72
Final Outlook
SOL remains bearish in the short term while trading below the $98.23–$100.06 resistance region. Price is approaching an important support area near $92.94, while RSI indicates that selling pressure is elevated.
A sustained recovery above $100.06 could open the path toward $102.11–$104.18, followed by $106.02. On the downside, losing $92.94 would increase the risk of a deeper correction toward $86.69 and $82.23.
Bias: Bearish below $100.06 | Recovery above $104.18 → $106.02 → $112.58
Analysis based on the SOL/USDT 1D chart dated November 1, 2026. These are technical scenarios, not guaranteed outcomes or financial advice.
SOL Technical Outlook: Solana Drops Below Major EMAs as Selling Pressure Pushes Price Toward $92 Sup
Solana is currently trading around $95.07, facing renewed selling pressure after failing to sustain its recovery toward the $98.50–$100 resistance zone. SOL has pulled back from its recent highs and is now trading below all four major EMAs, indicating that short-term momentum has shifted in favor of sellers.
The immediate support area is around $92.94, while RSI has dropped to 29.64, showing that SOL is approaching oversold territory. Buyers need to reclaim the $97.06–$100.06 resistance region to improve the outlook, while losing $92.94 could expose lower support zones.
EMA Structure
* 20 EMA: $102.11
* 50 EMA: $104.18
* 100 EMA: $100.06
* 200 EMA: $98.23
SOL is trading below all four EMAs, indicating a bearish short-term structure.
The 200 EMA near $98.23 is the first important moving-average resistance. Above that, the $100.06–$102.11 region represents another major barrier, followed by the 50 EMA near $104.18.
A sustained recovery above the $100–$104 EMA cluster would be needed to restore stronger bullish momentum.
Fibonacci Levels
Based on your chart:
* 0: $61.72
* 0.236: $106.02
* 0.382: $134.88
* 0.5: $157.48
* 0.618: $180.09
* 0.786: $212.26
* 1.0: $253.25
SOL is trading below the 0.236 Fibonacci region near $106.02, showing that the broader recovery still faces significant resistance.
The first objective for buyers is to reclaim the nearby EMA cluster. A sustained move above $106.02 would provide a stronger recovery signal and potentially open the path toward higher Fibonacci levels.
Bullish Scenario
If SOL holds the $92.94 support area and buyers regain momentum, a recovery could develop toward:
- $97.06–$98.23
- $100.06–$102.11
- $104.18–$106.02
- $108.62–$109.84
- $112.58–$114.35
- $117.68–$121.96
A sustained move above $98.23 would be the first sign of short-term recovery. Reclaiming the $100.06–$104.18 EMA region would strengthen the bullish outlook, while a breakout above $106.02 could open the path toward $112.58–$117.68.
Pullback Scenario
If SOL fails to reclaim the $97.06–$100.06 resistance region and selling pressure continues, watch these support areas:
* $92.94
* $86.69
* $82.23
* $81.70
* $80.51–$79.06
* $61.72 — broader Fibonacci base
A decisive breakdown below $92.94 could expose the $86.69 area first. If selling pressure accelerates and this support fails, the $82.23–$80.51 region could become the next important downside area.
The $61.72 level represents the broader Fibonacci base, not an immediate downside target.
RSI Momentum
* RSI: 29.64
* RSI Signal Average: 36.74
RSI has dropped below 30, indicating that SOL is approaching oversold territory. It is also trading below its signal average, confirming that bearish momentum remains dominant.
A recovery above 30–35 could be an early indication that selling pressure is easing. A sustained move above 40–50 would provide stronger evidence of improving momentum.
However, oversold conditions alone do not guarantee an immediate reversal.
Market Structure & Liquidity
SOL previously recovered from the June low near $61.72 and gradually moved higher, eventually reaching the $98.52–$100 region in October.
However, the latest rejection has pushed price below the major EMA cluster and weakened the recovery structure. The market is now testing whether the $92.94 area can attract buyers and prevent another leg down.
The $97.06–$100.06 region is an important resistance zone that buyers need to reclaim. Until SOL recovers above this area, sellers retain the short-term advantage.
A confirmed breakdown below $92.94 would increase the risk of a deeper correction toward $86.69 and potentially $82.23.
Key Levels
Resistance
* $97.06–$98.23
* $100.06–$102.11
* $104.18–$106.02
* $108.62–$109.84
* $112.58–$114.35
* $117.68–$121.96
Support
* $92.94
* $86.69
* $82.23–$81.70
* $80.51–$79.06
* $61.72
Final Outlook
SOL remains bearish in the short term while trading below the $98.23–$100.06 resistance region. Price is approaching an important support area near $92.94, while RSI indicates that selling pressure is elevated.
A sustained recovery above $100.06 could open the path toward $102.11–$104.18, followed by $106.02. On the downside, losing $92.94 would increase the risk of a deeper correction toward $86.69 and $82.23.
Bias: Bearish below $100.06 | Recovery above $104.18 → $106.02 → $112.58
Analysis based on the SOL/USDT 1D chart dated November 1, 2026. These are technical scenarios, not guaranteed outcomes or financial advice.
The immediate support area is around $92.94, while RSI has dropped to 29.64, showing that SOL is approaching oversold territory. Buyers need to reclaim the $97.06–$100.06 resistance region to improve the outlook, while losing $92.94 could expose lower support zones.
EMA Structure
* 20 EMA: $102.11
* 50 EMA: $104.18
* 100 EMA: $100.06
* 200 EMA: $98.23
SOL is trading below all four EMAs, indicating a bearish short-term structure.
The 200 EMA near $98.23 is the first important moving-average resistance. Above that, the $100.06–$102.11 region represents another major barrier, followed by the 50 EMA near $104.18.
A sustained recovery above the $100–$104 EMA cluster would be needed to restore stronger bullish momentum.
Fibonacci Levels
Based on your chart:
* 0: $61.72
* 0.236: $106.02
* 0.382: $134.88
* 0.5: $157.48
* 0.618: $180.09
* 0.786: $212.26
* 1.0: $253.25
SOL is trading below the 0.236 Fibonacci region near $106.02, showing that the broader recovery still faces significant resistance.
The first objective for buyers is to reclaim the nearby EMA cluster. A sustained move above $106.02 would provide a stronger recovery signal and potentially open the path toward higher Fibonacci levels.
Bullish Scenario
If SOL holds the $92.94 support area and buyers regain momentum, a recovery could develop toward:
- $97.06–$98.23
- $100.06–$102.11
- $104.18–$106.02
- $108.62–$109.84
- $112.58–$114.35
- $117.68–$121.96
A sustained move above $98.23 would be the first sign of short-term recovery. Reclaiming the $100.06–$104.18 EMA region would strengthen the bullish outlook, while a breakout above $106.02 could open the path toward $112.58–$117.68.
Pullback Scenario
If SOL fails to reclaim the $97.06–$100.06 resistance region and selling pressure continues, watch these support areas:
* $92.94
* $86.69
* $82.23
* $81.70
* $80.51–$79.06
* $61.72 — broader Fibonacci base
A decisive breakdown below $92.94 could expose the $86.69 area first. If selling pressure accelerates and this support fails, the $82.23–$80.51 region could become the next important downside area.
The $61.72 level represents the broader Fibonacci base, not an immediate downside target.
RSI Momentum
* RSI: 29.64
* RSI Signal Average: 36.74
RSI has dropped below 30, indicating that SOL is approaching oversold territory. It is also trading below its signal average, confirming that bearish momentum remains dominant.
A recovery above 30–35 could be an early indication that selling pressure is easing. A sustained move above 40–50 would provide stronger evidence of improving momentum.
However, oversold conditions alone do not guarantee an immediate reversal.
Market Structure & Liquidity
SOL previously recovered from the June low near $61.72 and gradually moved higher, eventually reaching the $98.52–$100 region in October.
However, the latest rejection has pushed price below the major EMA cluster and weakened the recovery structure. The market is now testing whether the $92.94 area can attract buyers and prevent another leg down.
The $97.06–$100.06 region is an important resistance zone that buyers need to reclaim. Until SOL recovers above this area, sellers retain the short-term advantage.
A confirmed breakdown below $92.94 would increase the risk of a deeper correction toward $86.69 and potentially $82.23.
Key Levels
Resistance
* $97.06–$98.23
* $100.06–$102.11
* $104.18–$106.02
* $108.62–$109.84
* $112.58–$114.35
* $117.68–$121.96
Support
* $92.94
* $86.69
* $82.23–$81.70
* $80.51–$79.06
* $61.72
Final Outlook
SOL remains bearish in the short term while trading below the $98.23–$100.06 resistance region. Price is approaching an important support area near $92.94, while RSI indicates that selling pressure is elevated.
A sustained recovery above $100.06 could open the path toward $102.11–$104.18, followed by $106.02. On the downside, losing $92.94 would increase the risk of a deeper correction toward $86.69 and $82.23.
Bias: Bearish below $100.06 | Recovery above $104.18 → $106.02 → $112.58
Analysis based on the SOL/USDT 1D chart dated November 1, 2026. These are technical scenarios, not guaranteed outcomes or financial advice.
1
1
1.8k
·
--
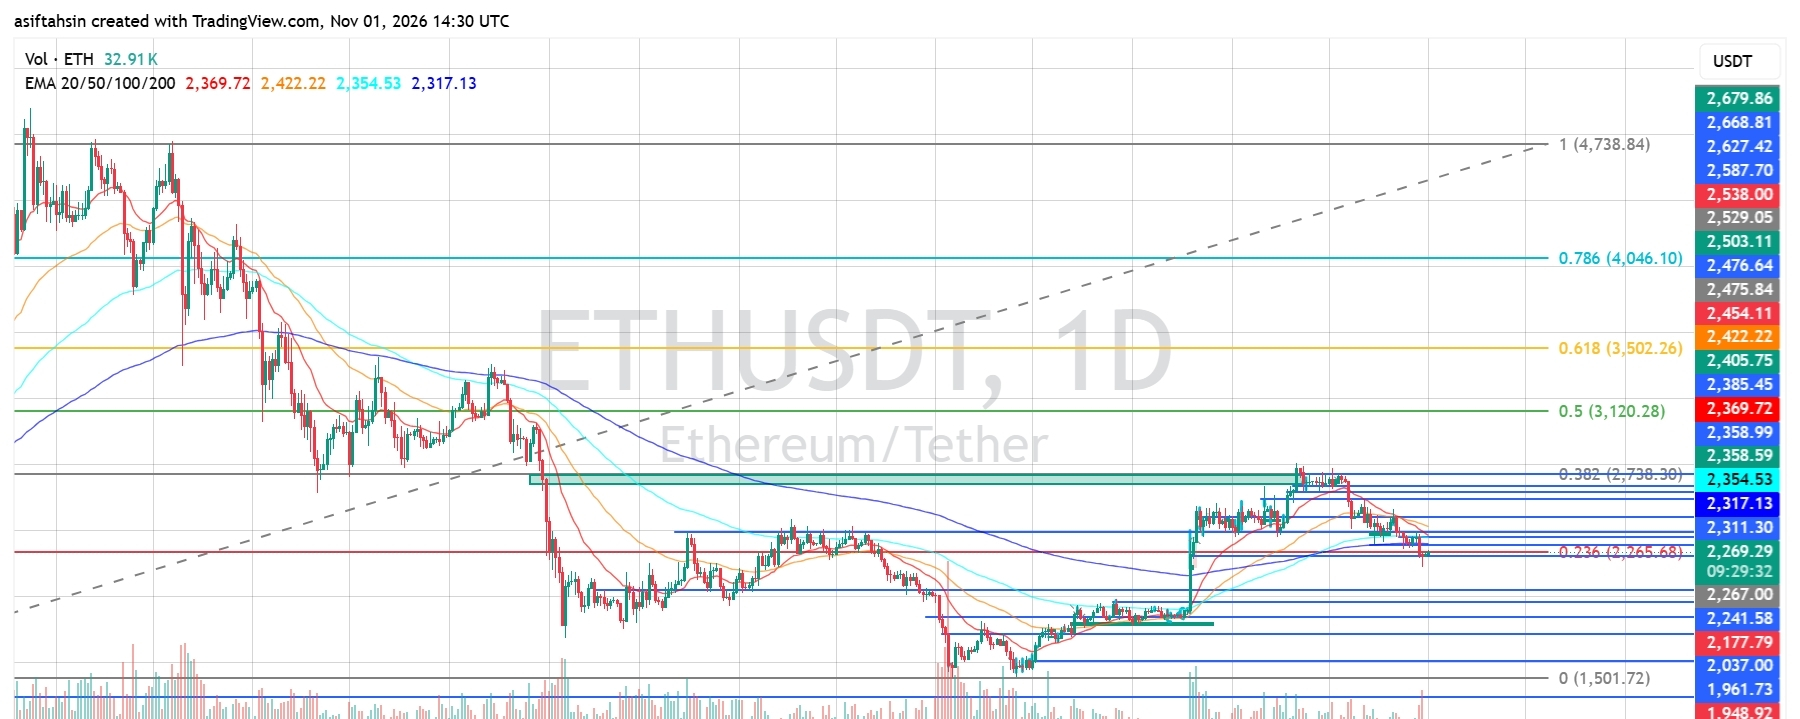
Article
See translation
ETH Technical Outlook: Ethereum Breaks Below Key EMAs as Bears Pressure $2,265 SupportEthereum is currently trading around $2,269, facing renewed selling pressure after failing to sustain its recovery toward the $2,475–$2,500 resistance zone. ETH has pulled back from its recent highs and is now testing the important $2,265–$2,267 support area, close to the 0.236 Fibonacci level.
The short-term structure has weakened significantly, with ETH trading below all four major EMAs. RSI has also dropped to 33.92, indicating strong bearish momentum. Buyers need to reclaim the $2,311–$2,370 resistance region to improve the outlook, while losing $2,265 could expose lower support zones.
EMA Structure
* 20 EMA: $2,369.69
* 50 EMA: $2,422.21
* 100 EMA: $2,354.53
* 200 EMA: $2,317.13
ETH is trading below all four EMAs, indicating that sellers currently have control of the short-term structure.
The 200 EMA near $2,317 is the first important moving-average resistance. Above that, the $2,354–$2,370 zone represents another major barrier, followed by the 50 EMA near $2,422.
A sustained recovery above these moving averages would be needed to restore bullish momentum.
Fibonacci Levels
Based on your chart:
* 0: $1,501.72
* 0.236: $2,265.68
* 0.382: $2,738.30
* 0.5: $3,120.28
* 0.618: $3,502.26
* 0.786: $4,046.10
* 1.0: $4,738.84
ETH is currently trading just above the 0.236 Fibonacci level near $2,265.68. This is an important support area to watch.
If buyers defend this level, a relief bounce could develop. However, a confirmed breakdown below it would weaken the broader recovery and increase the risk of further downside.
Bullish Scenario
If ETH holds the $2,265–$2,267 support zone and buyers regain momentum, a recovery could develop toward:
- $2,311–$2,317
- $2,354–$2,370
- $2,385
- $2,422–$2,454
- $2,476–$2,503
- $2,538
A sustained move above $2,317 would be the first sign of recovery. Reclaiming the $2,354–$2,370 EMA zone would strengthen the bullish outlook, while a breakout above $2,422 could open the path toward $2,475–$2,503.
Pullback Scenario
If ETH fails to defend $2,265 and selling pressure continues, watch these support areas:
* $2,265–$2,267 — 0.236 Fibonacci support
* $2,241
* $2,177
* $2,037
* $1,961–$1,948
* $1,904
A decisive breakdown below $2,265 could expose the $2,241 area first, followed by $2,177.
If selling pressure accelerates and these supports fail, the $2,037–$1,961 region could become the next major downside area.
RSI Momentum
* RSI: 33.92
* RSI Signal Average: 36.50
RSI is below the neutral 50 level and remains under its signal average, confirming bearish momentum.
The indicator is approaching oversold territory. A move back above 40 would be an early sign of improving momentum, while a sustained recovery above 50 would provide stronger confirmation of a bullish shift.
However, oversold conditions alone do not guarantee an immediate reversal.
Market Structure & Liquidity
ETH previously recovered from the June low near $1,501 and rallied toward the $2,475–$2,500 region. However, the latest rejection has resulted in a series of lower highs and a loss of several important moving averages.
Price is now testing the $2,265–$2,267 area, which aligns with the 0.236 Fibonacci level. This is a critical point for the current recovery structure.
The market needs to defend this support and reclaim the $2,317–$2,370 region to improve its short-term outlook. A confirmed breakdown below $2,265 would increase the possibility of another leg down toward $2,177 and potentially lower support zones.
Key Levels
Resistance
* $2,311–$2,317
* $2,354–$2,370
* $2,385
* $2,422–$2,454
* $2,476–$2,503
* $2,538
Support
* $2,265–$2,267
* $2,241
* $2,177
* $2,037
* $1,961–$1,948
* $1,904
Final Outlook
ETH remains bearish in the short term while trading below the $2,317–$2,370 resistance region. Price is testing the important $2,265 Fibonacci support, and RSI confirms that selling pressure remains elevated.
A sustained recovery above $2,370 could open the path toward $2,422–$2,454, followed by $2,476–$2,503. On the downside, losing $2,265 would increase the risk of a deeper correction toward $2,241, $2,177, and potentially $2,037.
Bias: Bearish below $2,370 | Recovery above $2,422 → $2,476 → $2,503
$ETH
{future}(ETHUSDT)
ETH Technical Outlook: Ethereum Breaks Below Key EMAs as Bears Pressure $2,265 Support
Ethereum is currently trading around $2,269, facing renewed selling pressure after failing to sustain its recovery toward the $2,475–$2,500 resistance zone. ETH has pulled back from its recent highs and is now testing the important $2,265–$2,267 support area, close to the 0.236 Fibonacci level.
The short-term structure has weakened significantly, with ETH trading below all four major EMAs. RSI has also dropped to 33.92, indicating strong bearish momentum. Buyers need to reclaim the $2,311–$2,370 resistance region to improve the outlook, while losing $2,265 could expose lower support zones.
EMA Structure
* 20 EMA: $2,369.69
* 50 EMA: $2,422.21
* 100 EMA: $2,354.53
* 200 EMA: $2,317.13
ETH is trading below all four EMAs, indicating that sellers currently have control of the short-term structure.
The 200 EMA near $2,317 is the first important moving-average resistance. Above that, the $2,354–$2,370 zone represents another major barrier, followed by the 50 EMA near $2,422.
A sustained recovery above these moving averages would be needed to restore bullish momentum.
Fibonacci Levels
Based on your chart:
* 0: $1,501.72
* 0.236: $2,265.68
* 0.382: $2,738.30
* 0.5: $3,120.28
* 0.618: $3,502.26
* 0.786: $4,046.10
* 1.0: $4,738.84
ETH is currently trading just above the 0.236 Fibonacci level near $2,265.68. This is an important support area to watch.
If buyers defend this level, a relief bounce could develop. However, a confirmed breakdown below it would weaken the broader recovery and increase the risk of further downside.
Bullish Scenario
If ETH holds the $2,265–$2,267 support zone and buyers regain momentum, a recovery could develop toward:
- $2,311–$2,317
- $2,354–$2,370
- $2,385
- $2,422–$2,454
- $2,476–$2,503
- $2,538
A sustained move above $2,317 would be the first sign of recovery. Reclaiming the $2,354–$2,370 EMA zone would strengthen the bullish outlook, while a breakout above $2,422 could open the path toward $2,475–$2,503.
Pullback Scenario
If ETH fails to defend $2,265 and selling pressure continues, watch these support areas:
* $2,265–$2,267 — 0.236 Fibonacci support
* $2,241
* $2,177
* $2,037
* $1,961–$1,948
* $1,904
A decisive breakdown below $2,265 could expose the $2,241 area first, followed by $2,177.
If selling pressure accelerates and these supports fail, the $2,037–$1,961 region could become the next major downside area.
RSI Momentum
* RSI: 33.92
* RSI Signal Average: 36.50
RSI is below the neutral 50 level and remains under its signal average, confirming bearish momentum.
The indicator is approaching oversold territory. A move back above 40 would be an early sign of improving momentum, while a sustained recovery above 50 would provide stronger confirmation of a bullish shift.
However, oversold conditions alone do not guarantee an immediate reversal.
Market Structure & Liquidity
ETH previously recovered from the June low near $1,501 and rallied toward the $2,475–$2,500 region. However, the latest rejection has resulted in a series of lower highs and a loss of several important moving averages.
Price is now testing the $2,265–$2,267 area, which aligns with the 0.236 Fibonacci level. This is a critical point for the current recovery structure.
The market needs to defend this support and reclaim the $2,317–$2,370 region to improve its short-term outlook. A confirmed breakdown below $2,265 would increase the possibility of another leg down toward $2,177 and potentially lower support zones.
Key Levels
Resistance
* $2,311–$2,317
* $2,354–$2,370
* $2,385
* $2,422–$2,454
* $2,476–$2,503
* $2,538
Support
* $2,265–$2,267
* $2,241
* $2,177
* $2,037
* $1,961–$1,948
* $1,904
Final Outlook
ETH remains bearish in the short term while trading below the $2,317–$2,370 resistance region. Price is testing the important $2,265 Fibonacci support, and RSI confirms that selling pressure remains elevated.
A sustained recovery above $2,370 could open the path toward $2,422–$2,454, followed by $2,476–$2,503. On the downside, losing $2,265 would increase the risk of a deeper correction toward $2,241, $2,177, and potentially $2,037.
Bias: Bearish below $2,370 | Recovery above $2,422 → $2,476 → $2,503
$ETH
The short-term structure has weakened significantly, with ETH trading below all four major EMAs. RSI has also dropped to 33.92, indicating strong bearish momentum. Buyers need to reclaim the $2,311–$2,370 resistance region to improve the outlook, while losing $2,265 could expose lower support zones.
EMA Structure
* 20 EMA: $2,369.69
* 50 EMA: $2,422.21
* 100 EMA: $2,354.53
* 200 EMA: $2,317.13
ETH is trading below all four EMAs, indicating that sellers currently have control of the short-term structure.
The 200 EMA near $2,317 is the first important moving-average resistance. Above that, the $2,354–$2,370 zone represents another major barrier, followed by the 50 EMA near $2,422.
A sustained recovery above these moving averages would be needed to restore bullish momentum.
Fibonacci Levels
Based on your chart:
* 0: $1,501.72
* 0.236: $2,265.68
* 0.382: $2,738.30
* 0.5: $3,120.28
* 0.618: $3,502.26
* 0.786: $4,046.10
* 1.0: $4,738.84
ETH is currently trading just above the 0.236 Fibonacci level near $2,265.68. This is an important support area to watch.
If buyers defend this level, a relief bounce could develop. However, a confirmed breakdown below it would weaken the broader recovery and increase the risk of further downside.
Bullish Scenario
If ETH holds the $2,265–$2,267 support zone and buyers regain momentum, a recovery could develop toward:
- $2,311–$2,317
- $2,354–$2,370
- $2,385
- $2,422–$2,454
- $2,476–$2,503
- $2,538
A sustained move above $2,317 would be the first sign of recovery. Reclaiming the $2,354–$2,370 EMA zone would strengthen the bullish outlook, while a breakout above $2,422 could open the path toward $2,475–$2,503.
Pullback Scenario
If ETH fails to defend $2,265 and selling pressure continues, watch these support areas:
* $2,265–$2,267 — 0.236 Fibonacci support
* $2,241
* $2,177
* $2,037
* $1,961–$1,948
* $1,904
A decisive breakdown below $2,265 could expose the $2,241 area first, followed by $2,177.
If selling pressure accelerates and these supports fail, the $2,037–$1,961 region could become the next major downside area.
RSI Momentum
* RSI: 33.92
* RSI Signal Average: 36.50
RSI is below the neutral 50 level and remains under its signal average, confirming bearish momentum.
The indicator is approaching oversold territory. A move back above 40 would be an early sign of improving momentum, while a sustained recovery above 50 would provide stronger confirmation of a bullish shift.
However, oversold conditions alone do not guarantee an immediate reversal.
Market Structure & Liquidity
ETH previously recovered from the June low near $1,501 and rallied toward the $2,475–$2,500 region. However, the latest rejection has resulted in a series of lower highs and a loss of several important moving averages.
Price is now testing the $2,265–$2,267 area, which aligns with the 0.236 Fibonacci level. This is a critical point for the current recovery structure.
The market needs to defend this support and reclaim the $2,317–$2,370 region to improve its short-term outlook. A confirmed breakdown below $2,265 would increase the possibility of another leg down toward $2,177 and potentially lower support zones.
Key Levels
Resistance
* $2,311–$2,317
* $2,354–$2,370
* $2,385
* $2,422–$2,454
* $2,476–$2,503
* $2,538
Support
* $2,265–$2,267
* $2,241
* $2,177
* $2,037
* $1,961–$1,948
* $1,904
Final Outlook
ETH remains bearish in the short term while trading below the $2,317–$2,370 resistance region. Price is testing the important $2,265 Fibonacci support, and RSI confirms that selling pressure remains elevated.
A sustained recovery above $2,370 could open the path toward $2,422–$2,454, followed by $2,476–$2,503. On the downside, losing $2,265 would increase the risk of a deeper correction toward $2,241, $2,177, and potentially $2,037.
Bias: Bearish below $2,370 | Recovery above $2,422 → $2,476 → $2,503
$ETH
1
1
253
Log in to explore more content
Join global crypto users on Binance Square
⚡️ Get latest and useful information about crypto.
💬 Trusted by the world’s largest crypto exchange.
👍 Discover real insights from verified creators.
Email / Phone number
Trending Topics
BinanceReopensWithdrawalsForHYPE&APT
92,819 views
997 Discussing
Binance Re-Enables Withdrawals for HYPE and APT, Extends List of Restored Assets
Binance News
·32 Likes
·27.5k views
SouthKoreaDraftLawTargets15To20%ShareholderCap
90,768 views
660 Discussing
TradFiForBeginners
185,267 views
1,862 Discussing