
Yuuki Trading
3.4k Posts

Yuuki Trading
I’m Yuuki | Futures Signals | Market Structure | Risk First | Precision Execution | No FOMO | DM Marketing: @Yuuki_Fi
643 Following
2.2K+ Followers
13.0K+ Liked
Posts
All
Quotes
Videos
Live
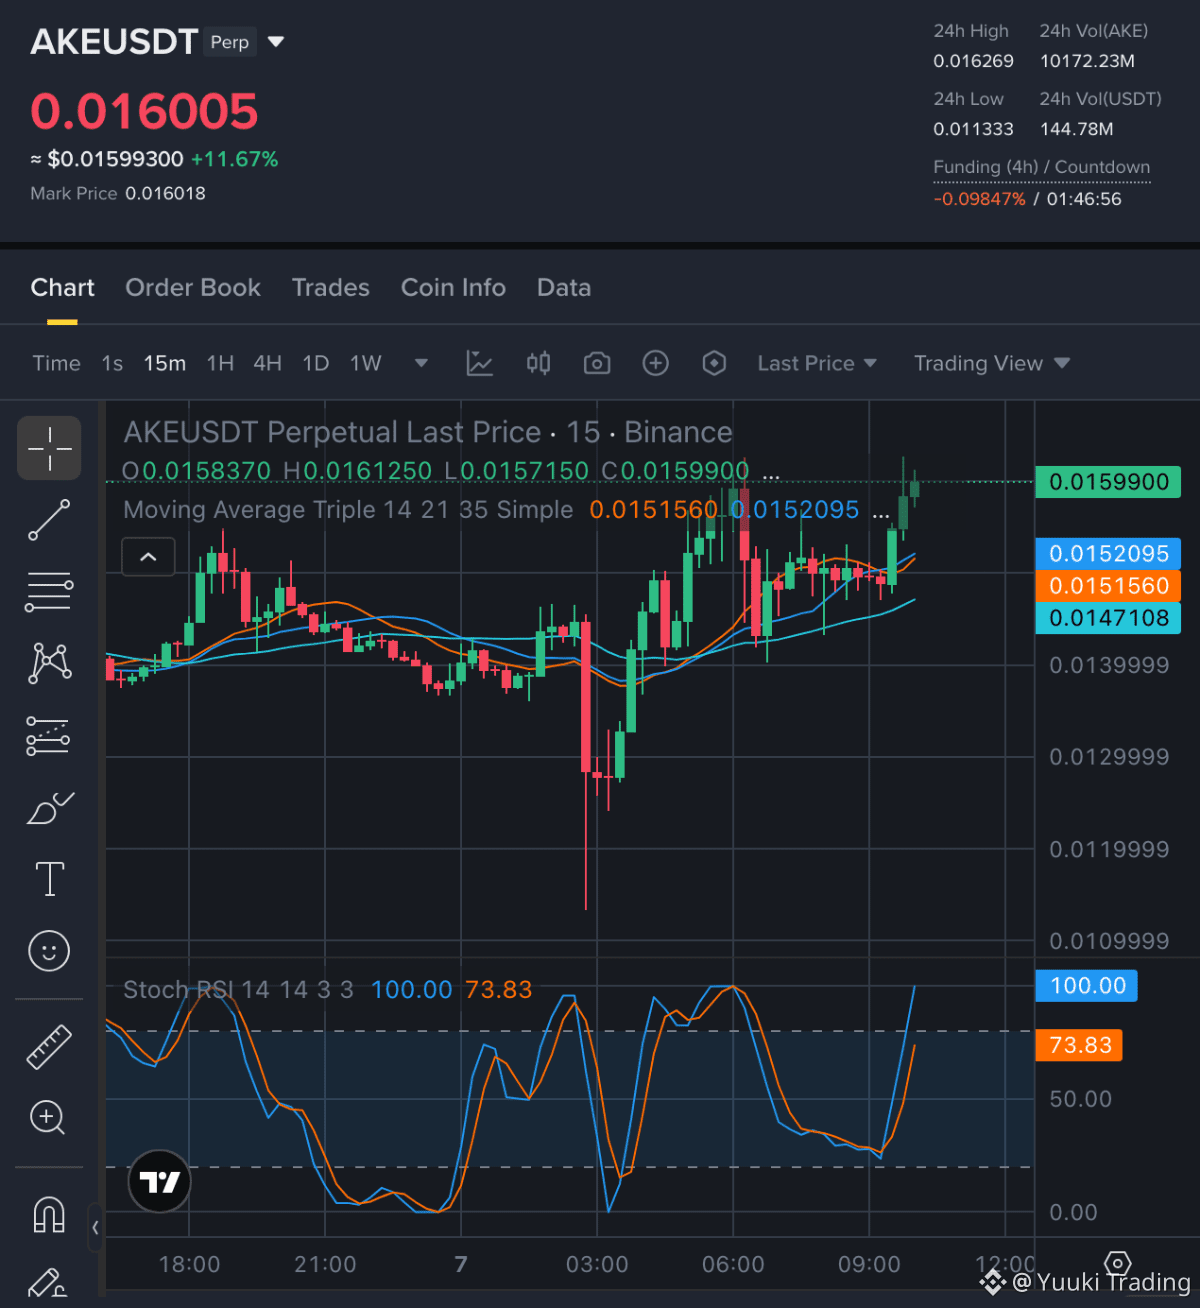
AKE — Buyers hold the 15m advantage as price accelerates above its moving averages, while Smart Money positioning reinforces continuation potential.
AKE - LONG NOW
Entry Zone: 0.015923 — 0.016083
• TP1: 0.017128
• TP2: 0.017878
• TP3: 0.019002
Stop Loss: 0.014503
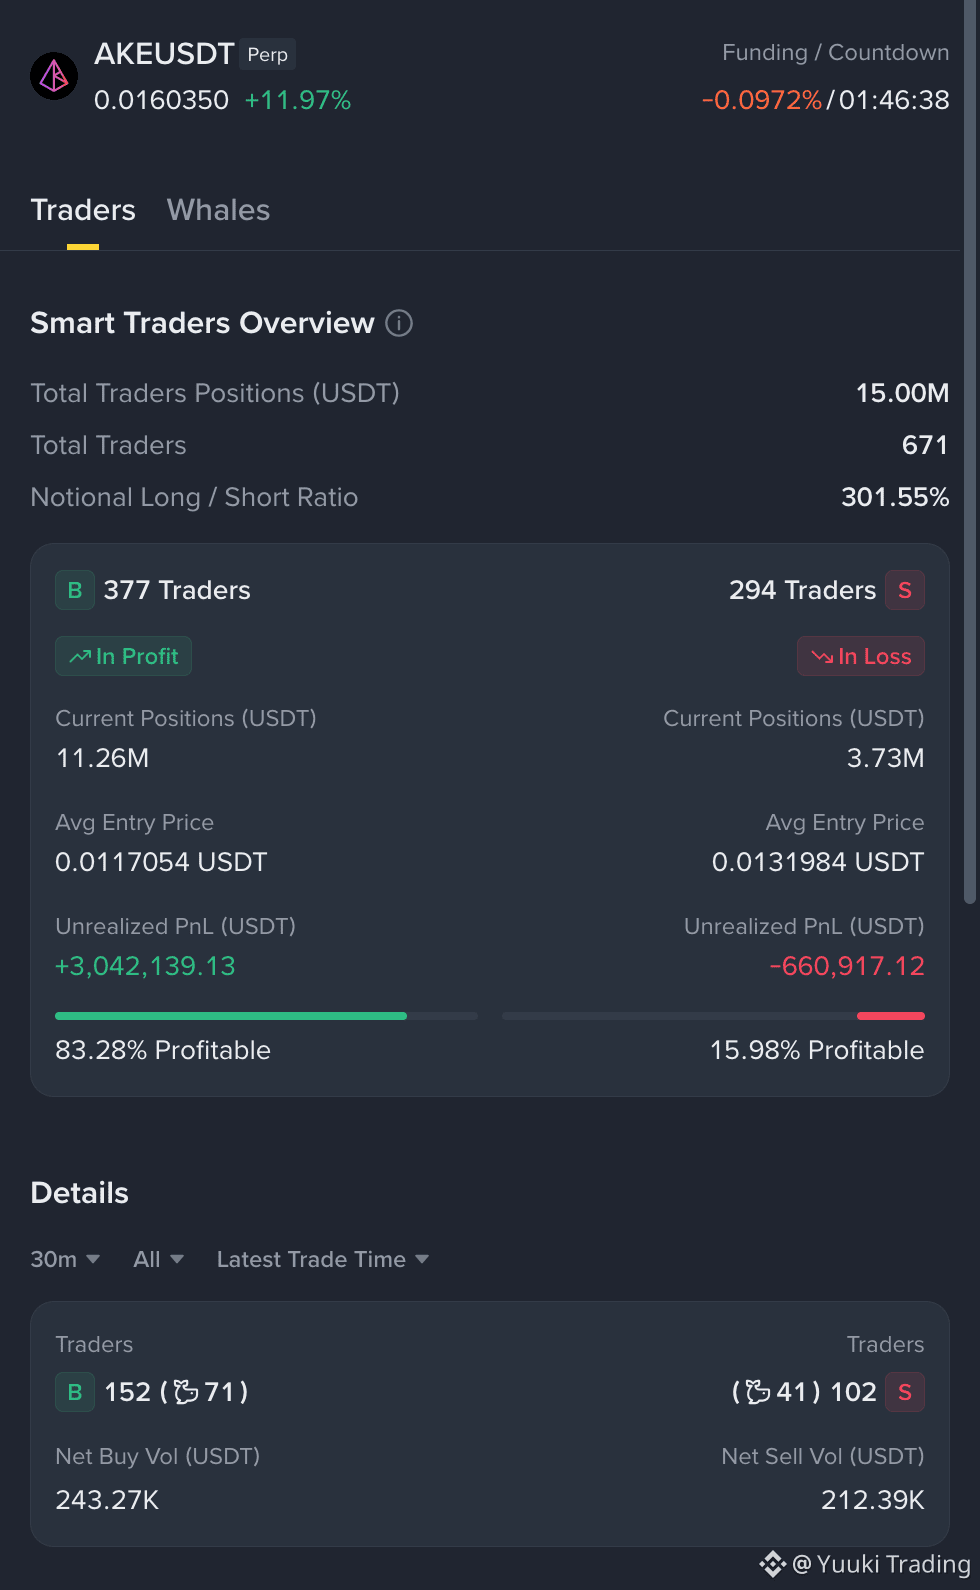
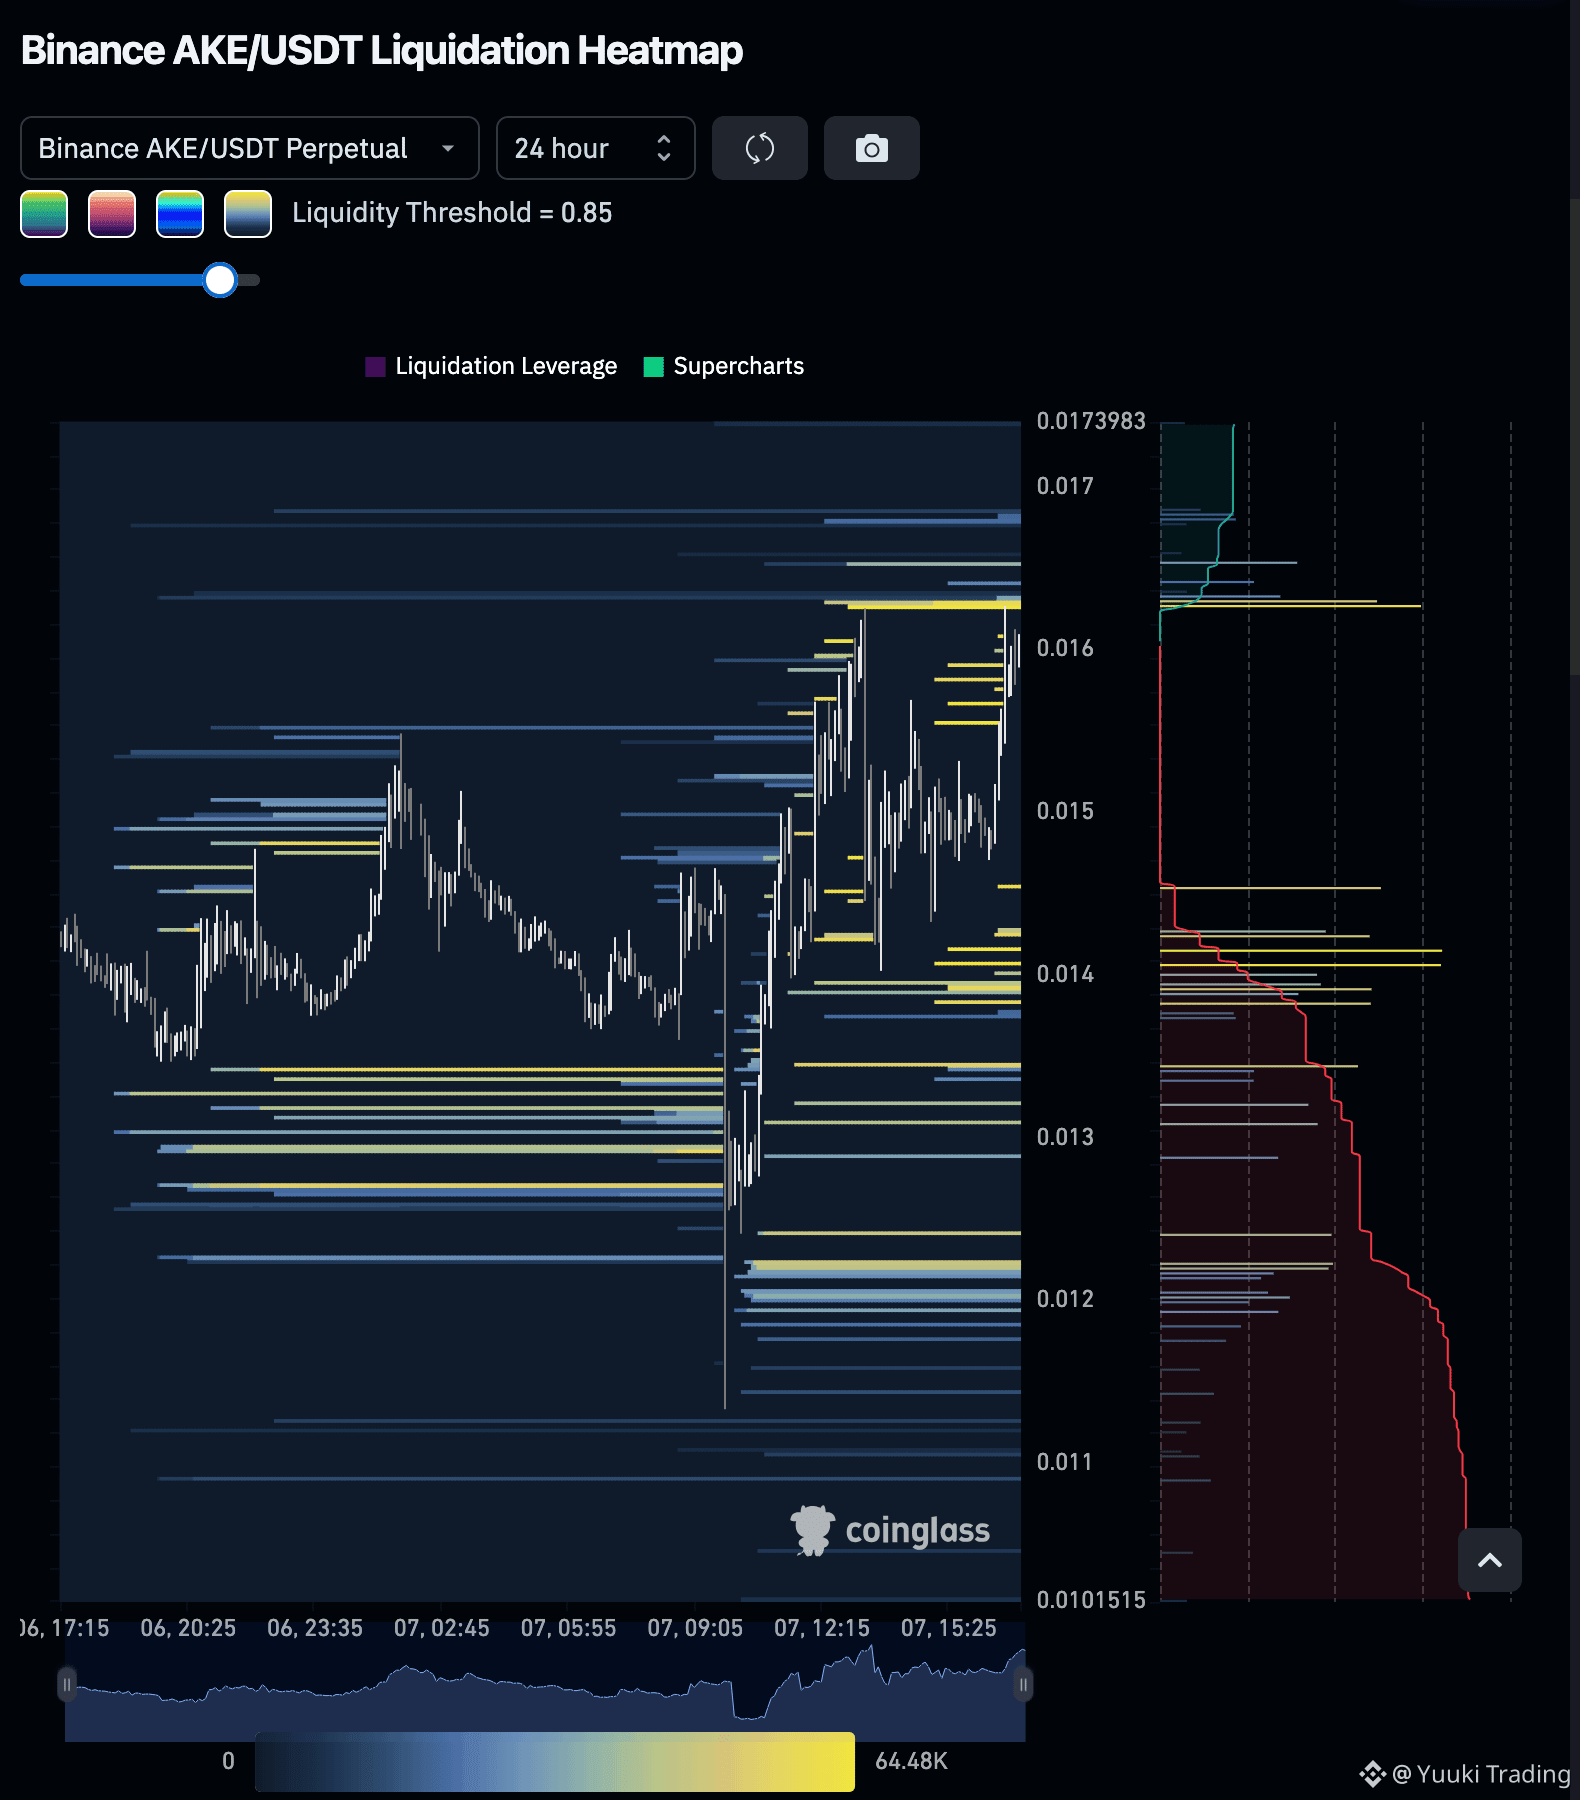
Price holds above the 15m moving-average stack, though overbought Stoch RSI raises pullback risk. Smart Money profitability favors longs over shorts. Nearby upside liquidity supports continuation, while concentrated longs make strict invalidation essential.
Disclaimer: This is not financial advice. Always do your own research and take full responsibility for your trading decisions and assets.
Trade $AKE here:
AKE - LONG NOW
Entry Zone: 0.015923 — 0.016083
• TP1: 0.017128
• TP2: 0.017878
• TP3: 0.019002
Stop Loss: 0.014503
Price holds above the 15m moving-average stack, though overbought Stoch RSI raises pullback risk. Smart Money profitability favors longs over shorts. Nearby upside liquidity supports continuation, while concentrated longs make strict invalidation essential.
Disclaimer: This is not financial advice. Always do your own research and take full responsibility for your trading decisions and assets.
Trade $AKE here:
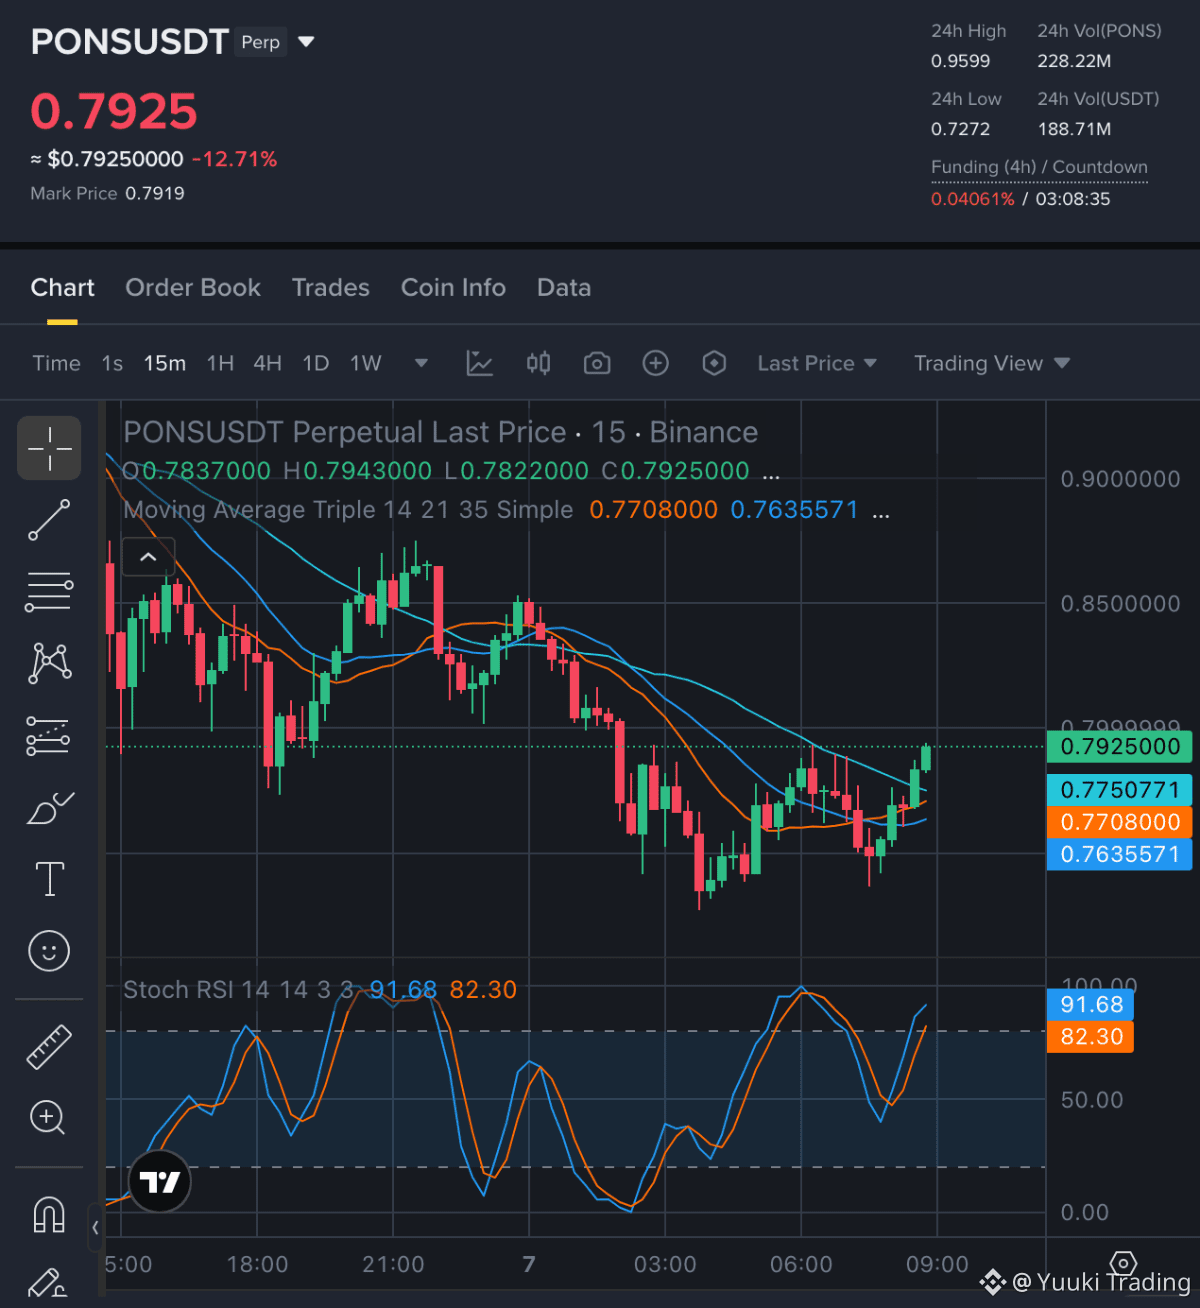
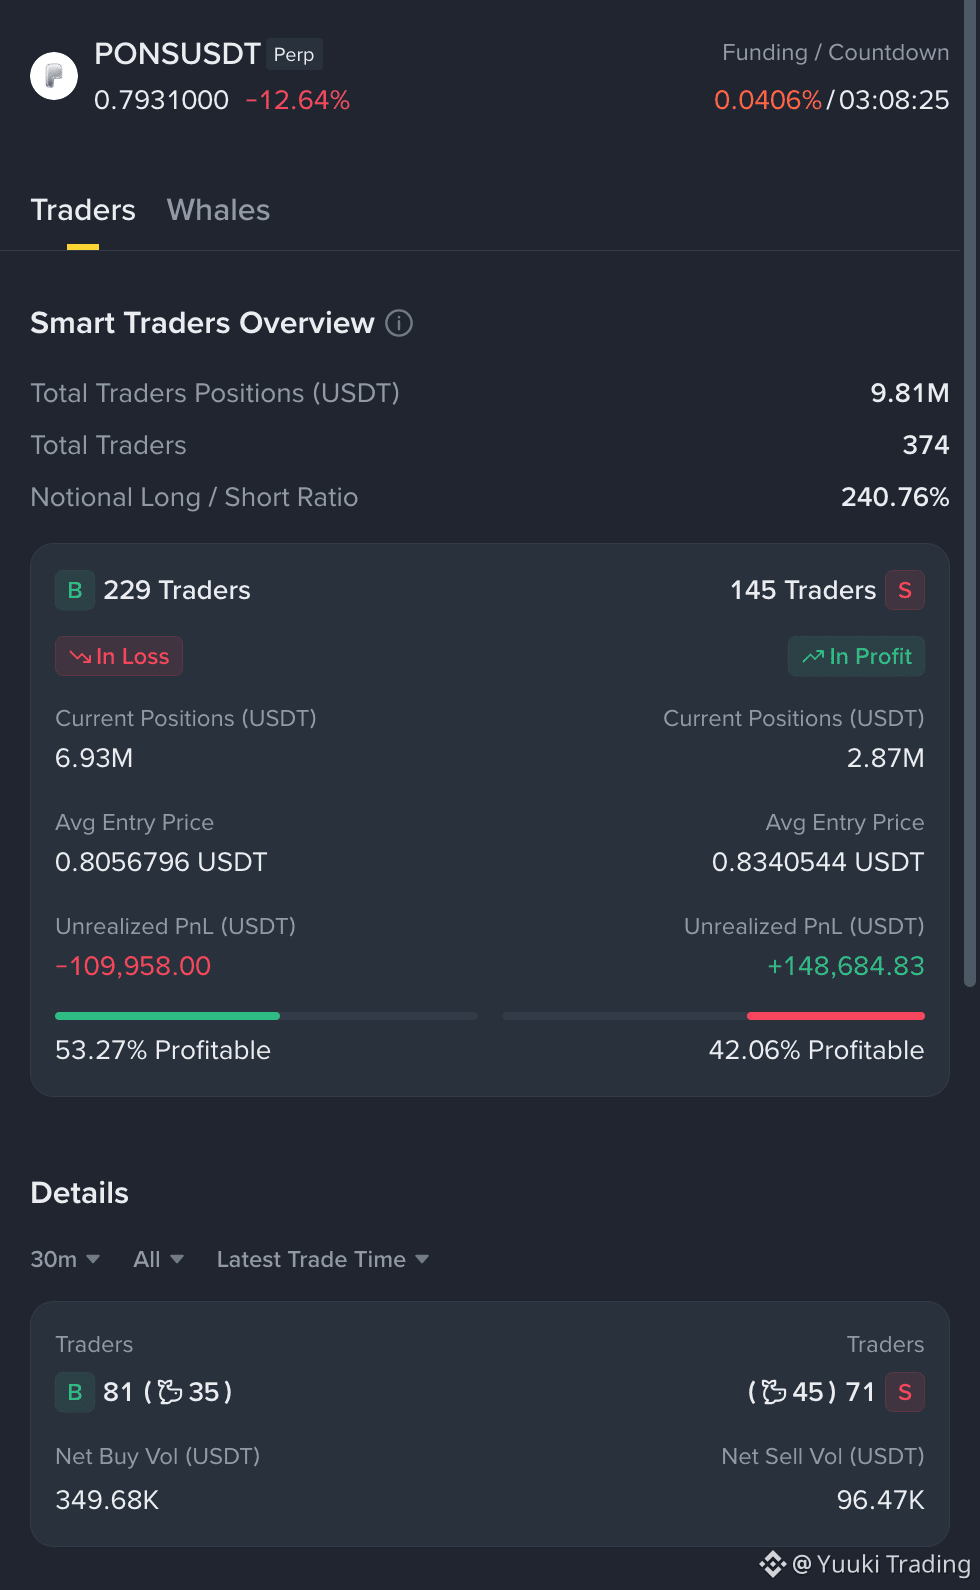
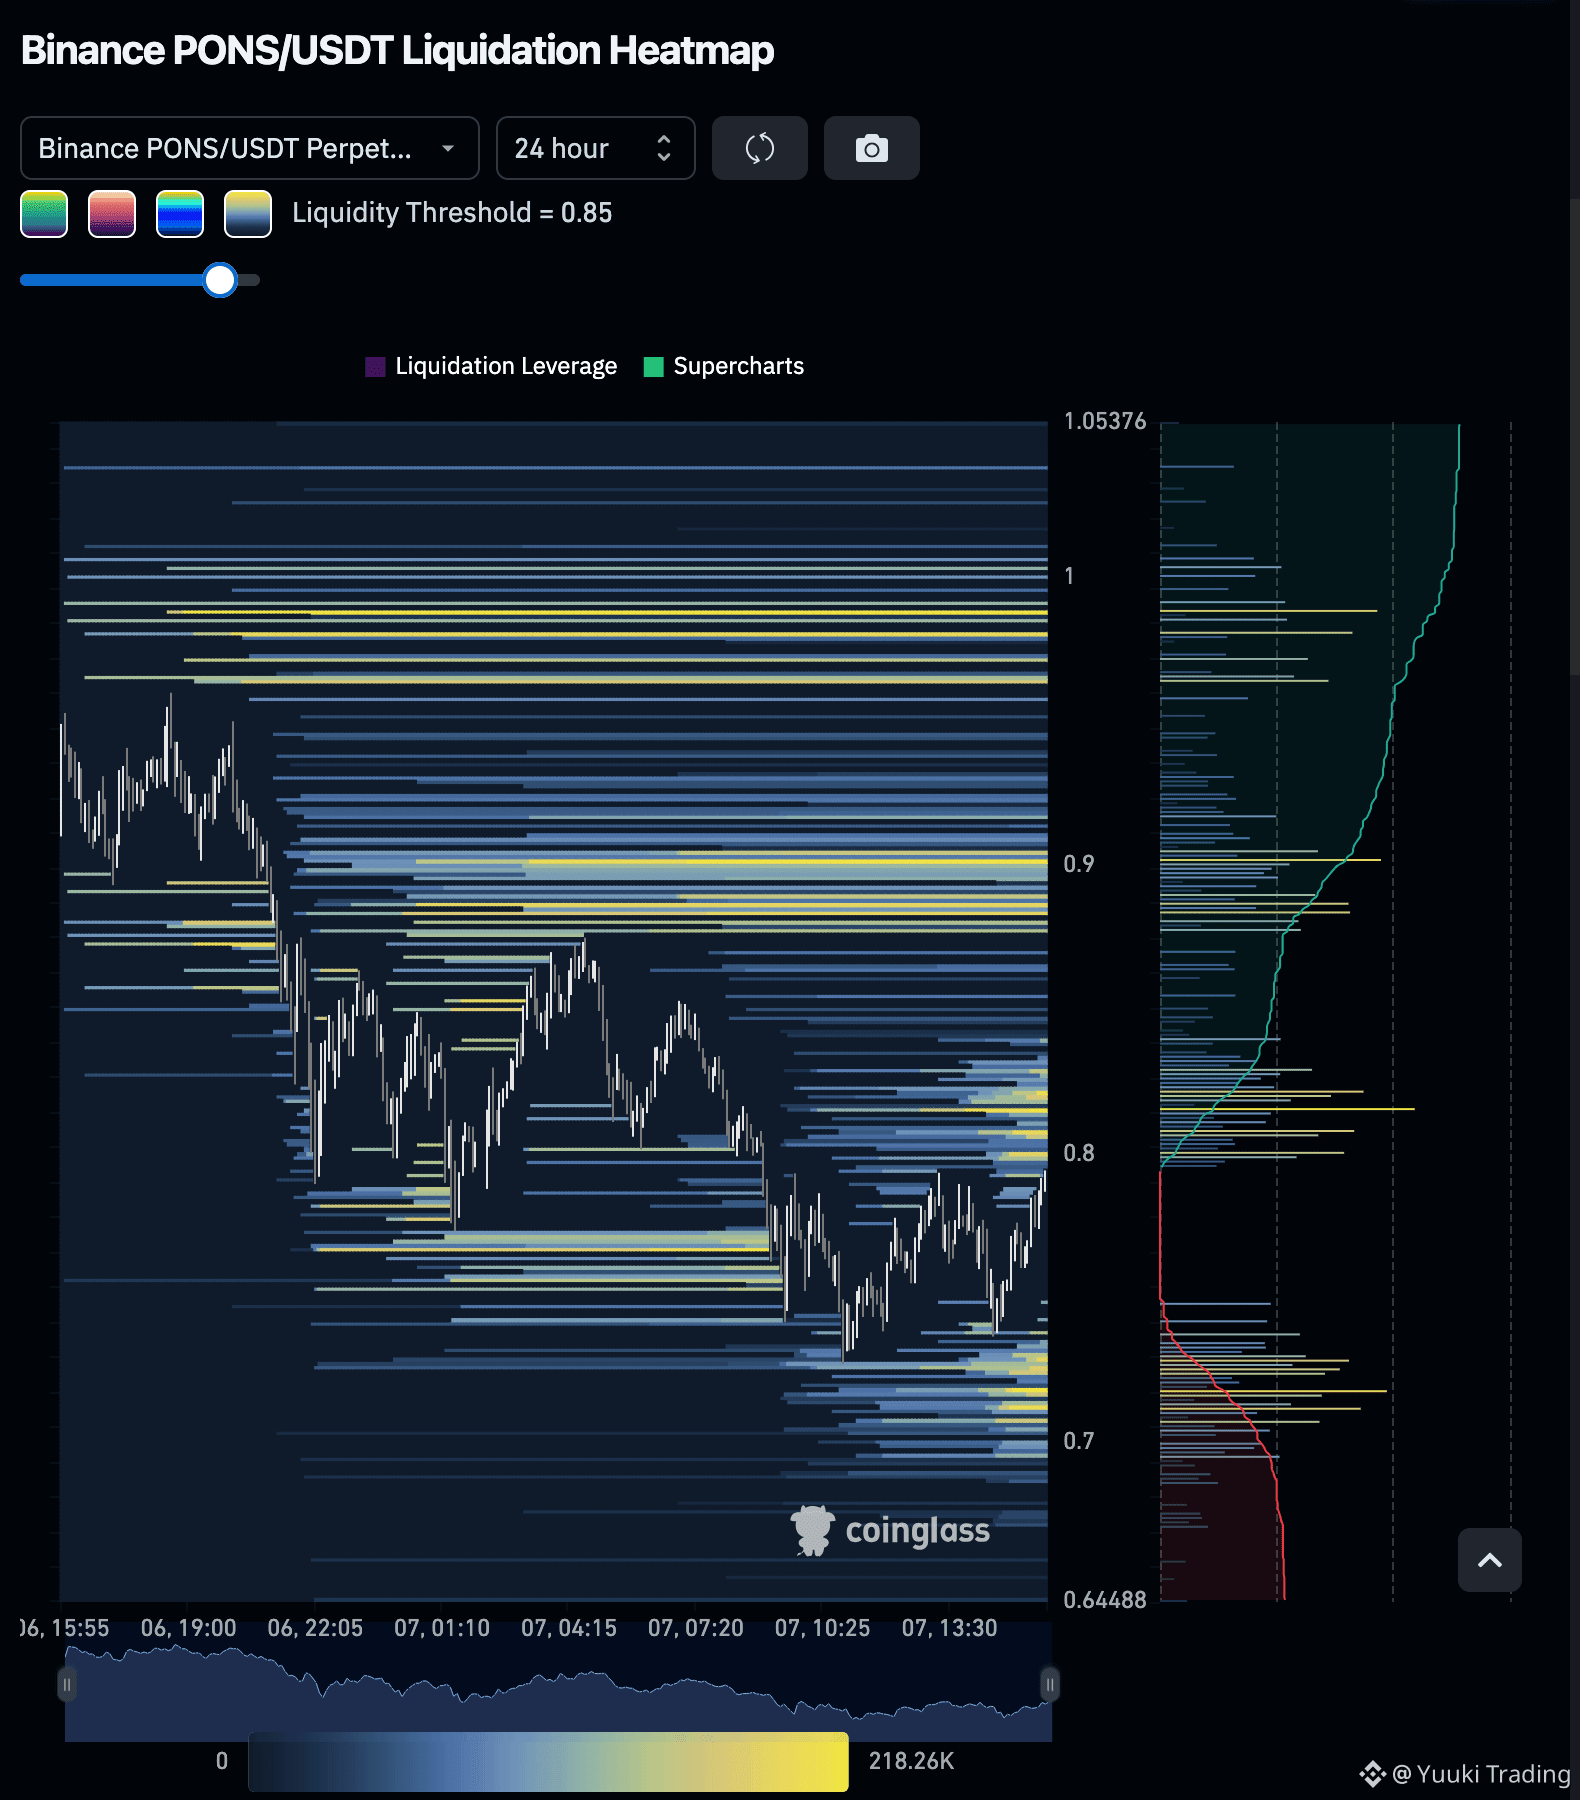
PONS — PONS buyers hold the near-term advantage as 15m price recovers above key moving averages, with upside liquidity reinforcing continuation.
PONS - LONG NOW
Entry Zone: 0.7878 — 0.7954
• TP1: 0.8319
• TP2: 0.8637
• TP3: 0.8991
Stop Loss: 0.7379
15m price has reclaimed the visible moving averages, but elevated Stoch RSI warns of exhaustion. Smart Money is mixed: aggregate longs are underwater while shorts hold gains. Heavier upside liquidity supports the LONG bias, though lower clusters preserve pullback risk.
Disclaimer: This is not financial advice. Always do your own research and take full responsibility for your trading decisions and assets.
Trade $PONS here:
PONS - LONG NOW
Entry Zone: 0.7878 — 0.7954
• TP1: 0.8319
• TP2: 0.8637
• TP3: 0.8991
Stop Loss: 0.7379
15m price has reclaimed the visible moving averages, but elevated Stoch RSI warns of exhaustion. Smart Money is mixed: aggregate longs are underwater while shorts hold gains. Heavier upside liquidity supports the LONG bias, though lower clusters preserve pullback risk.
Disclaimer: This is not financial advice. Always do your own research and take full responsibility for your trading decisions and assets.
Trade $PONS here:
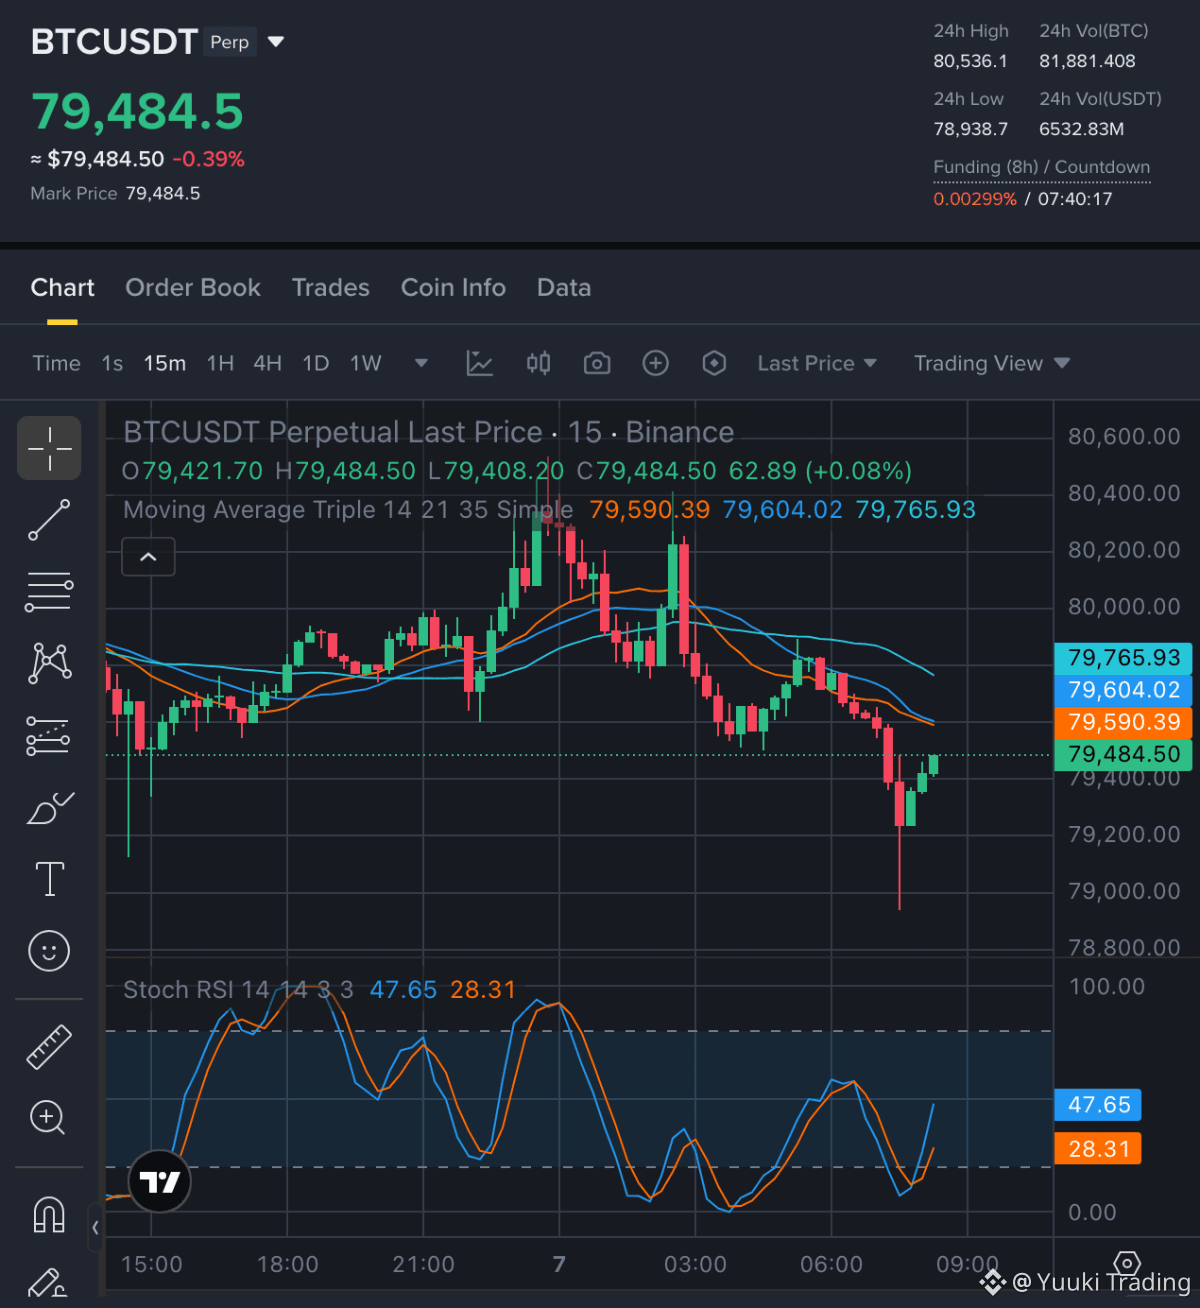
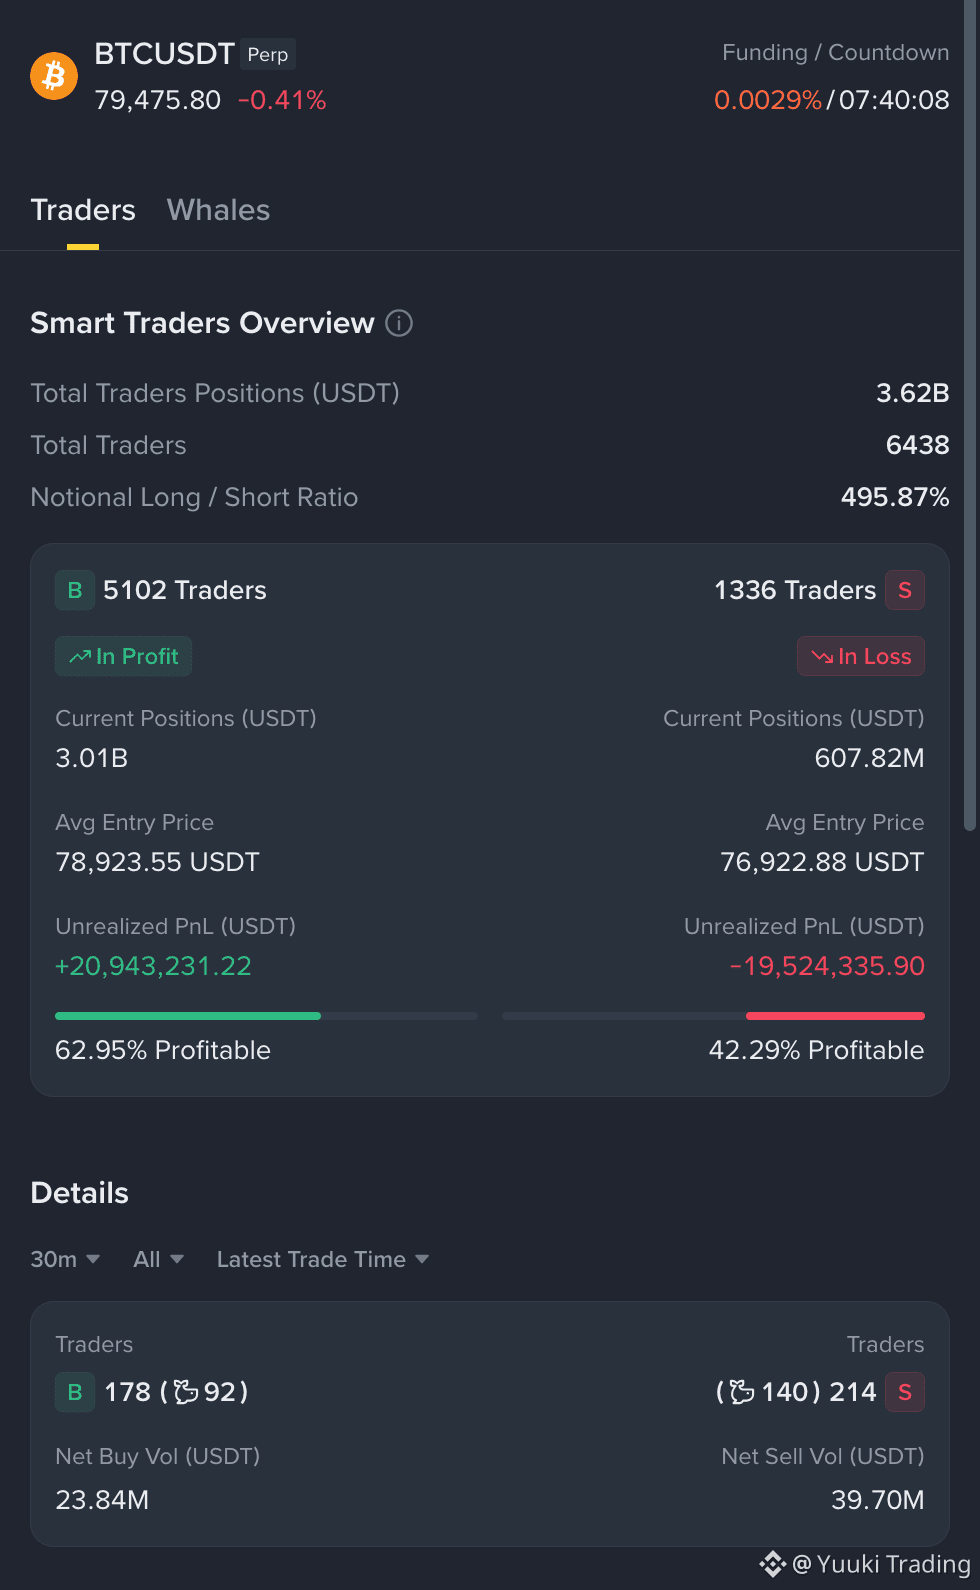
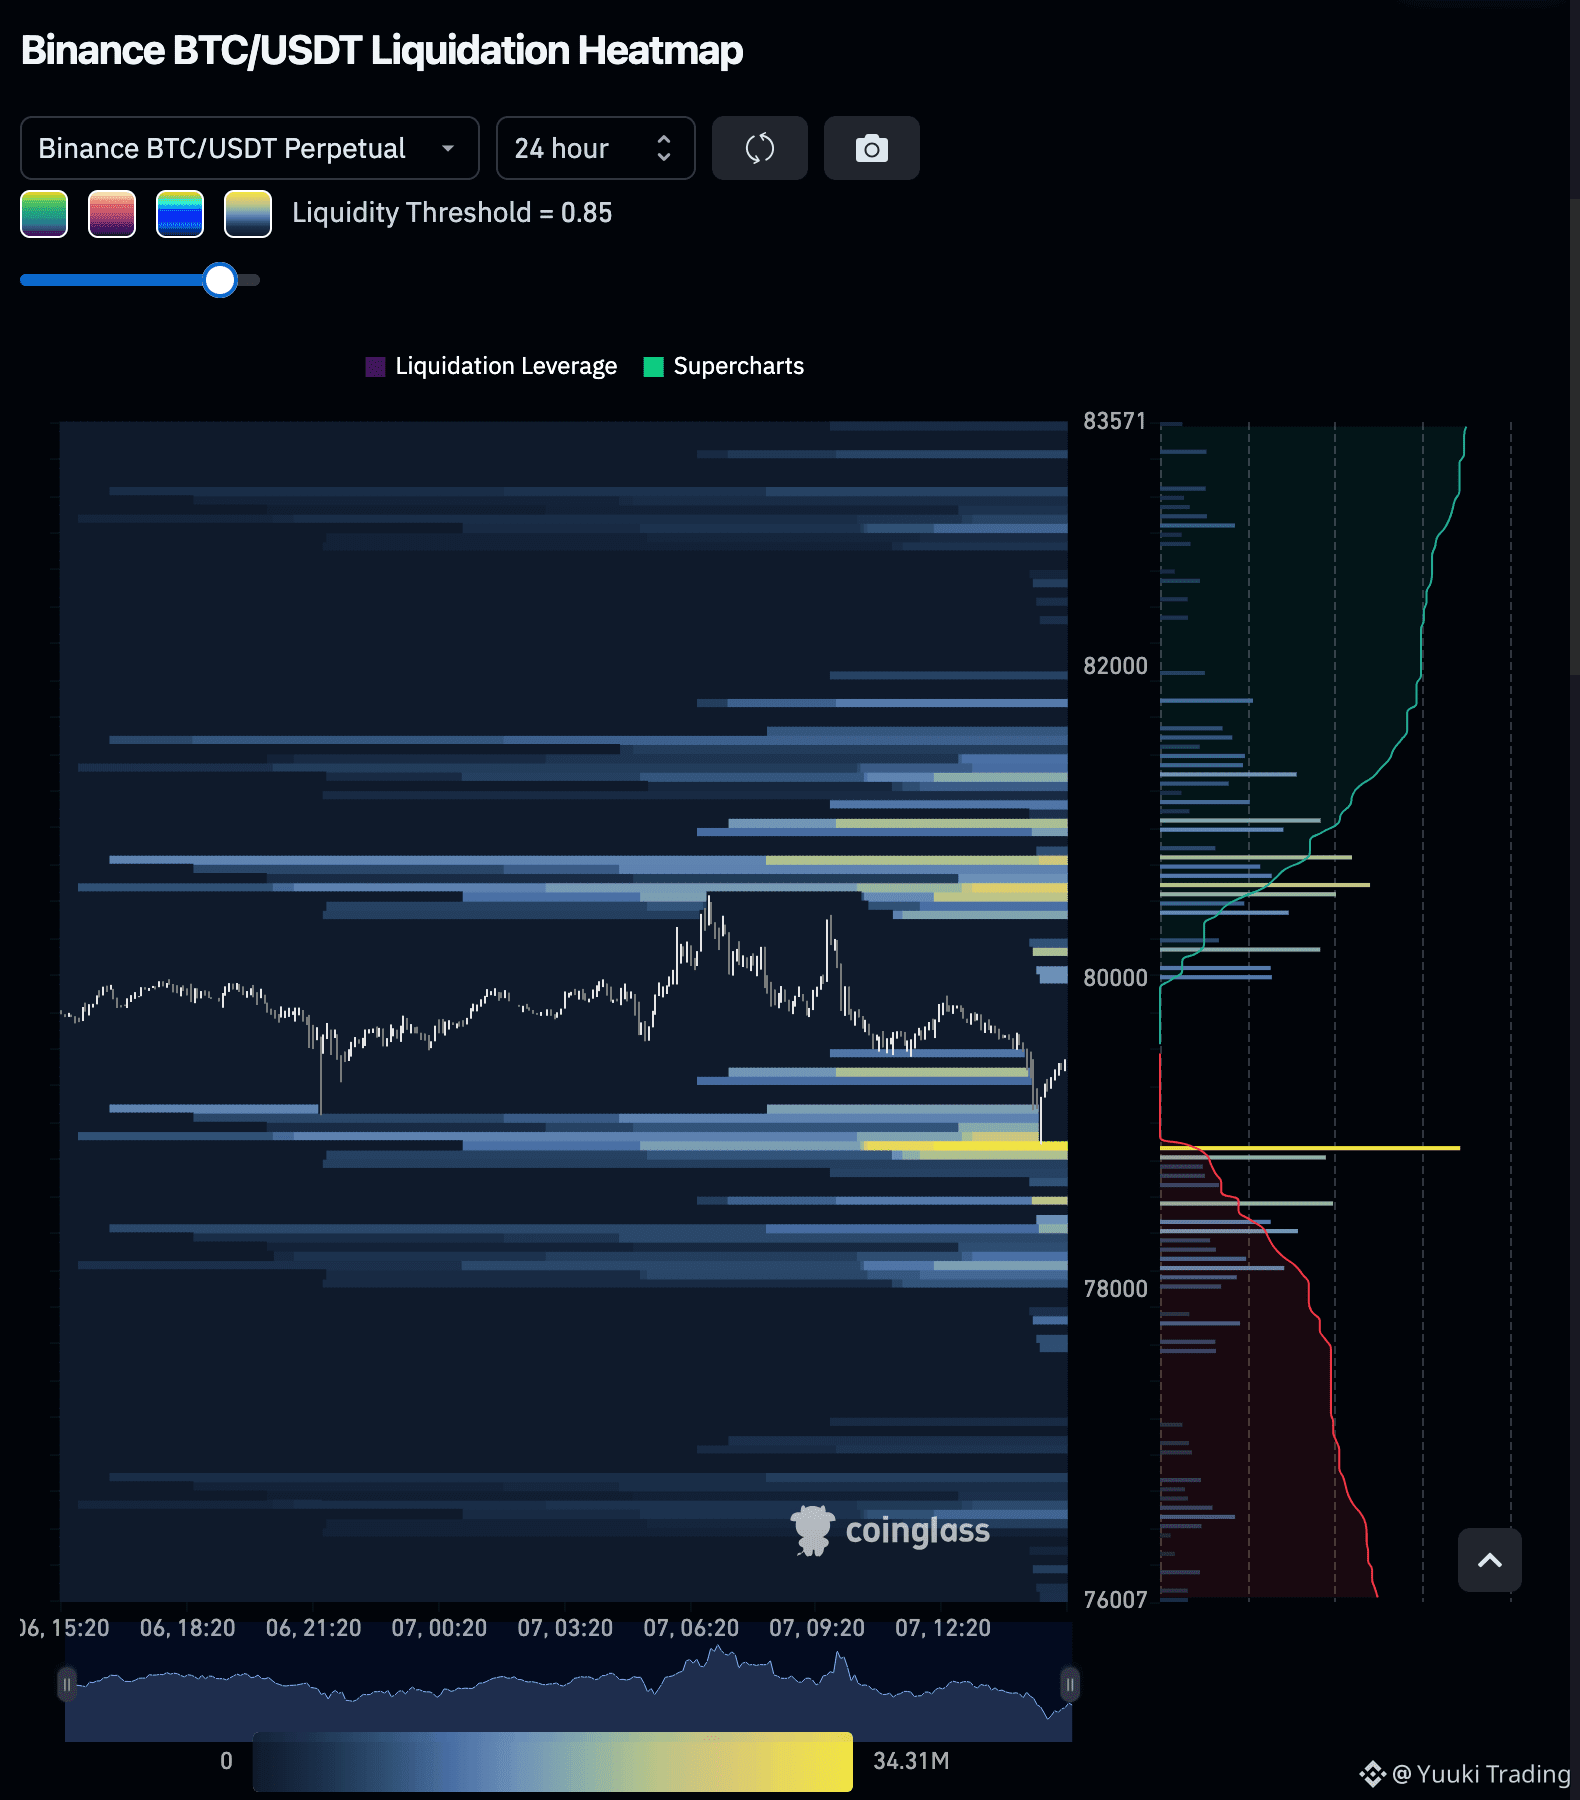
BTC — BTC sellers retain the 15m advantage after a lower swing and sharp rejection, with downside liquidity favoring continued pressure.
BTC - SHORT NOW
Entry Zone: 79,388.23 — 79,547.17
• TP1: 79,125.30
• TP2: 79,045.83
• TP3: 78,795.03
Stop Loss: 79,804.03
On 15m, price remains below the moving-average stack, and the latest bounce looks corrective as Stoch RSI recovers. Smart Money leans toward profitable longs, weakening confirmation, but the nearest meaningful liquidity remains below, keeping the short bias intact.
Disclaimer: This is not financial advice. Always do your own research and take full responsibility for your trading decisions and assets.
Trade $BTC here:
BTC - SHORT NOW
Entry Zone: 79,388.23 — 79,547.17
• TP1: 79,125.30
• TP2: 79,045.83
• TP3: 78,795.03
Stop Loss: 79,804.03
On 15m, price remains below the moving-average stack, and the latest bounce looks corrective as Stoch RSI recovers. Smart Money leans toward profitable longs, weakening confirmation, but the nearest meaningful liquidity remains below, keeping the short bias intact.
Disclaimer: This is not financial advice. Always do your own research and take full responsibility for your trading decisions and assets.
Trade $BTC here:
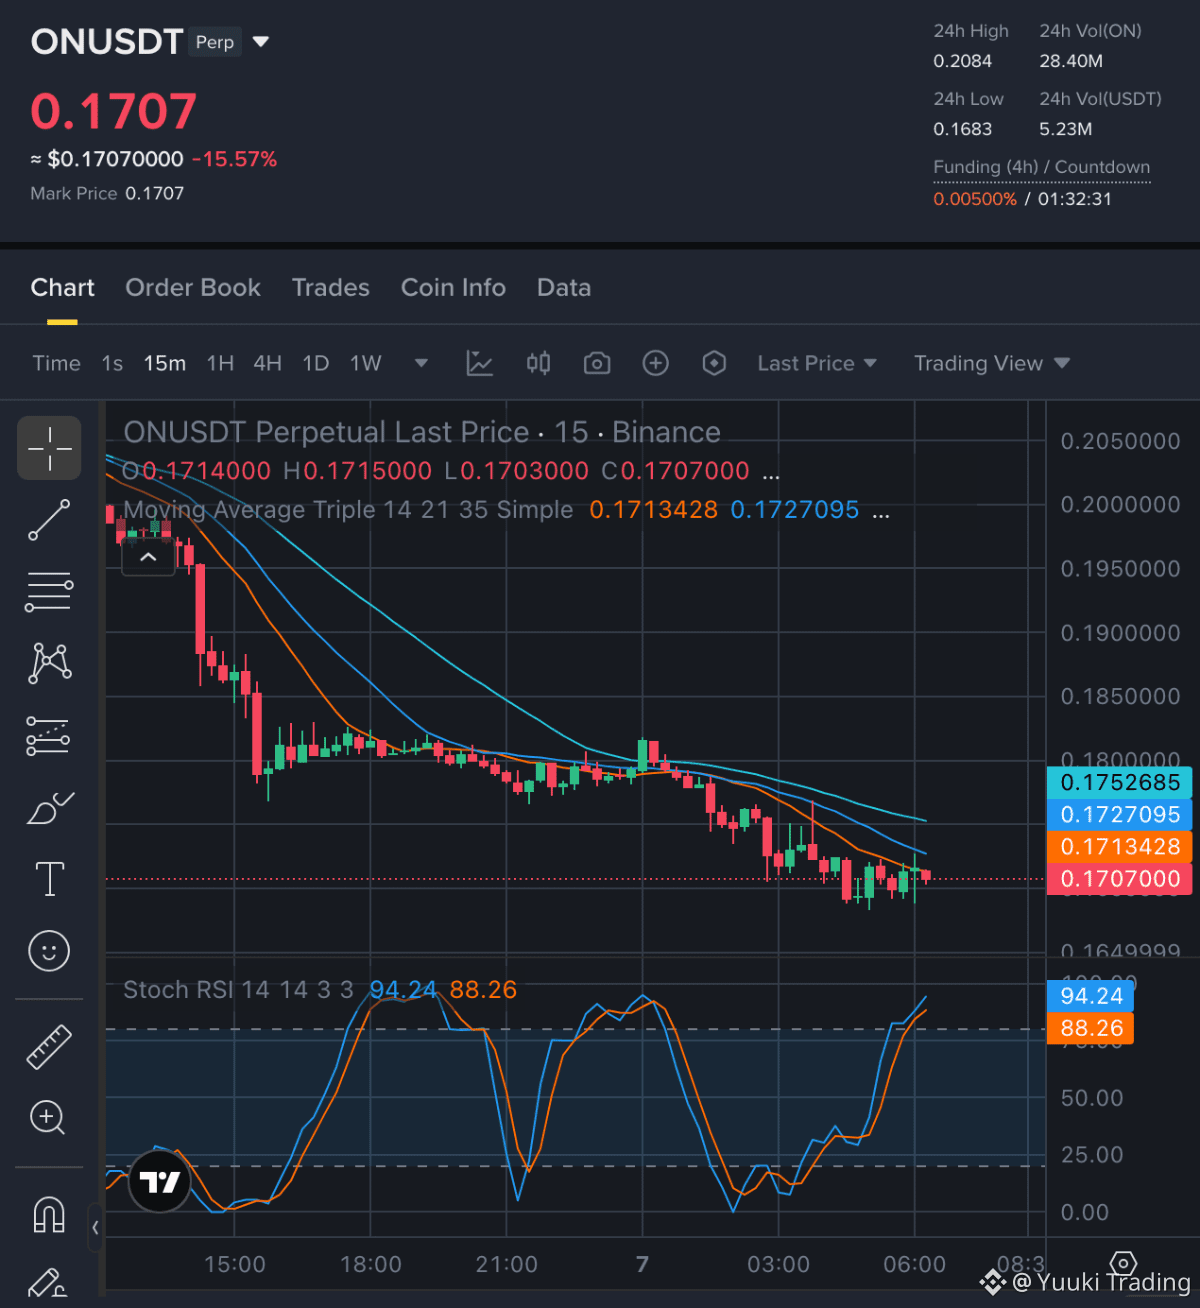
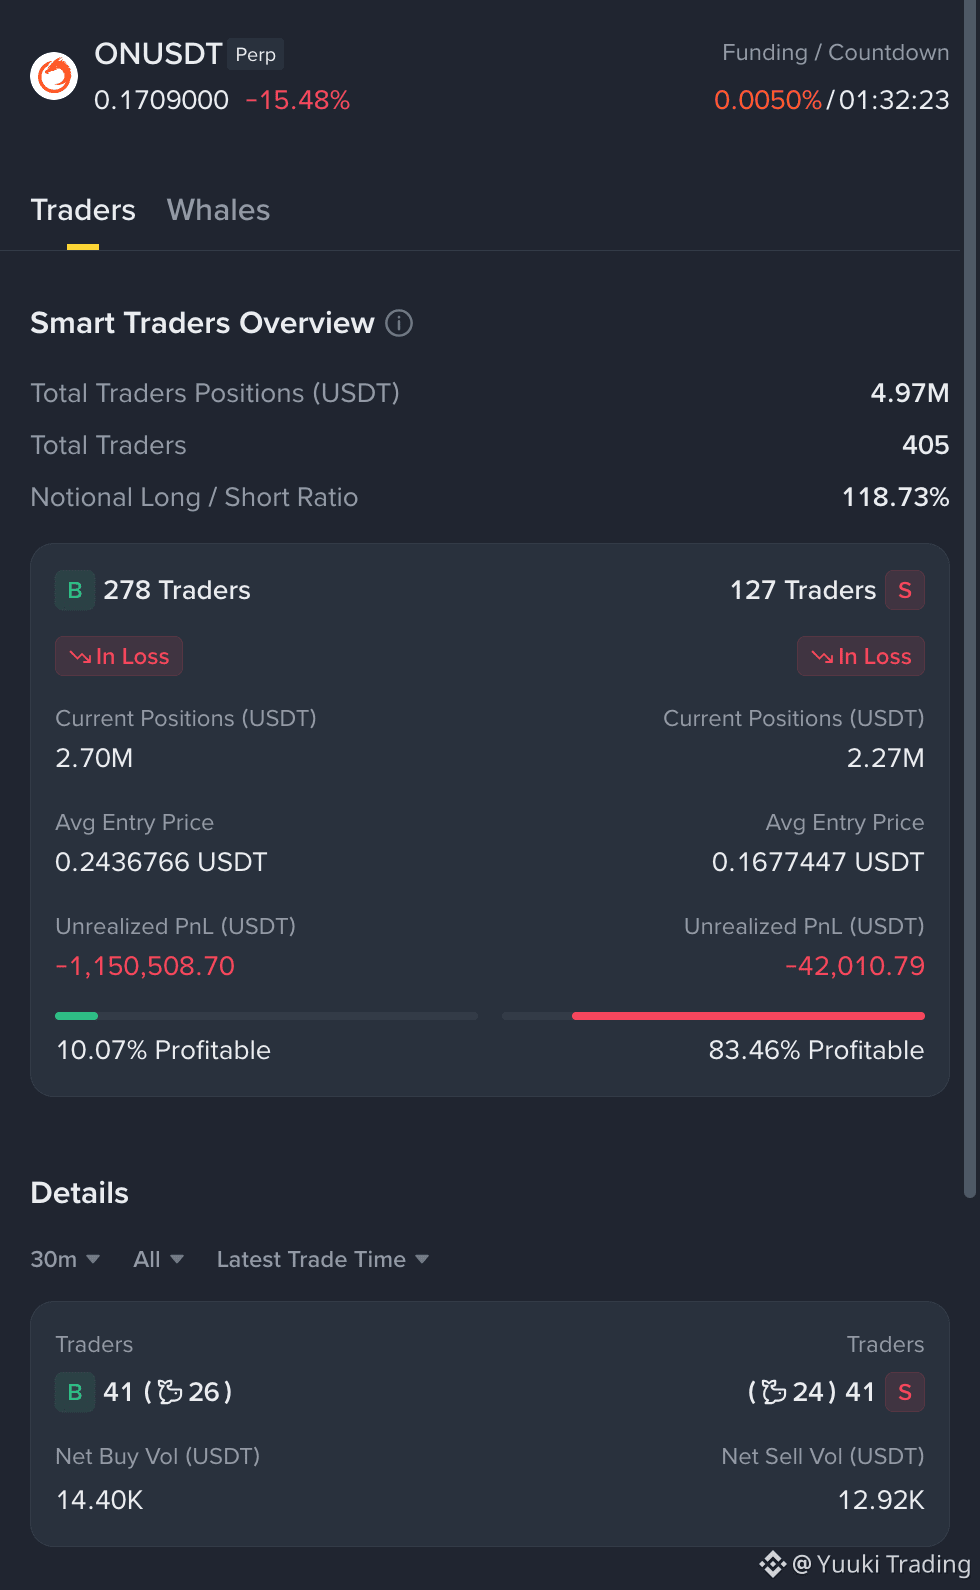
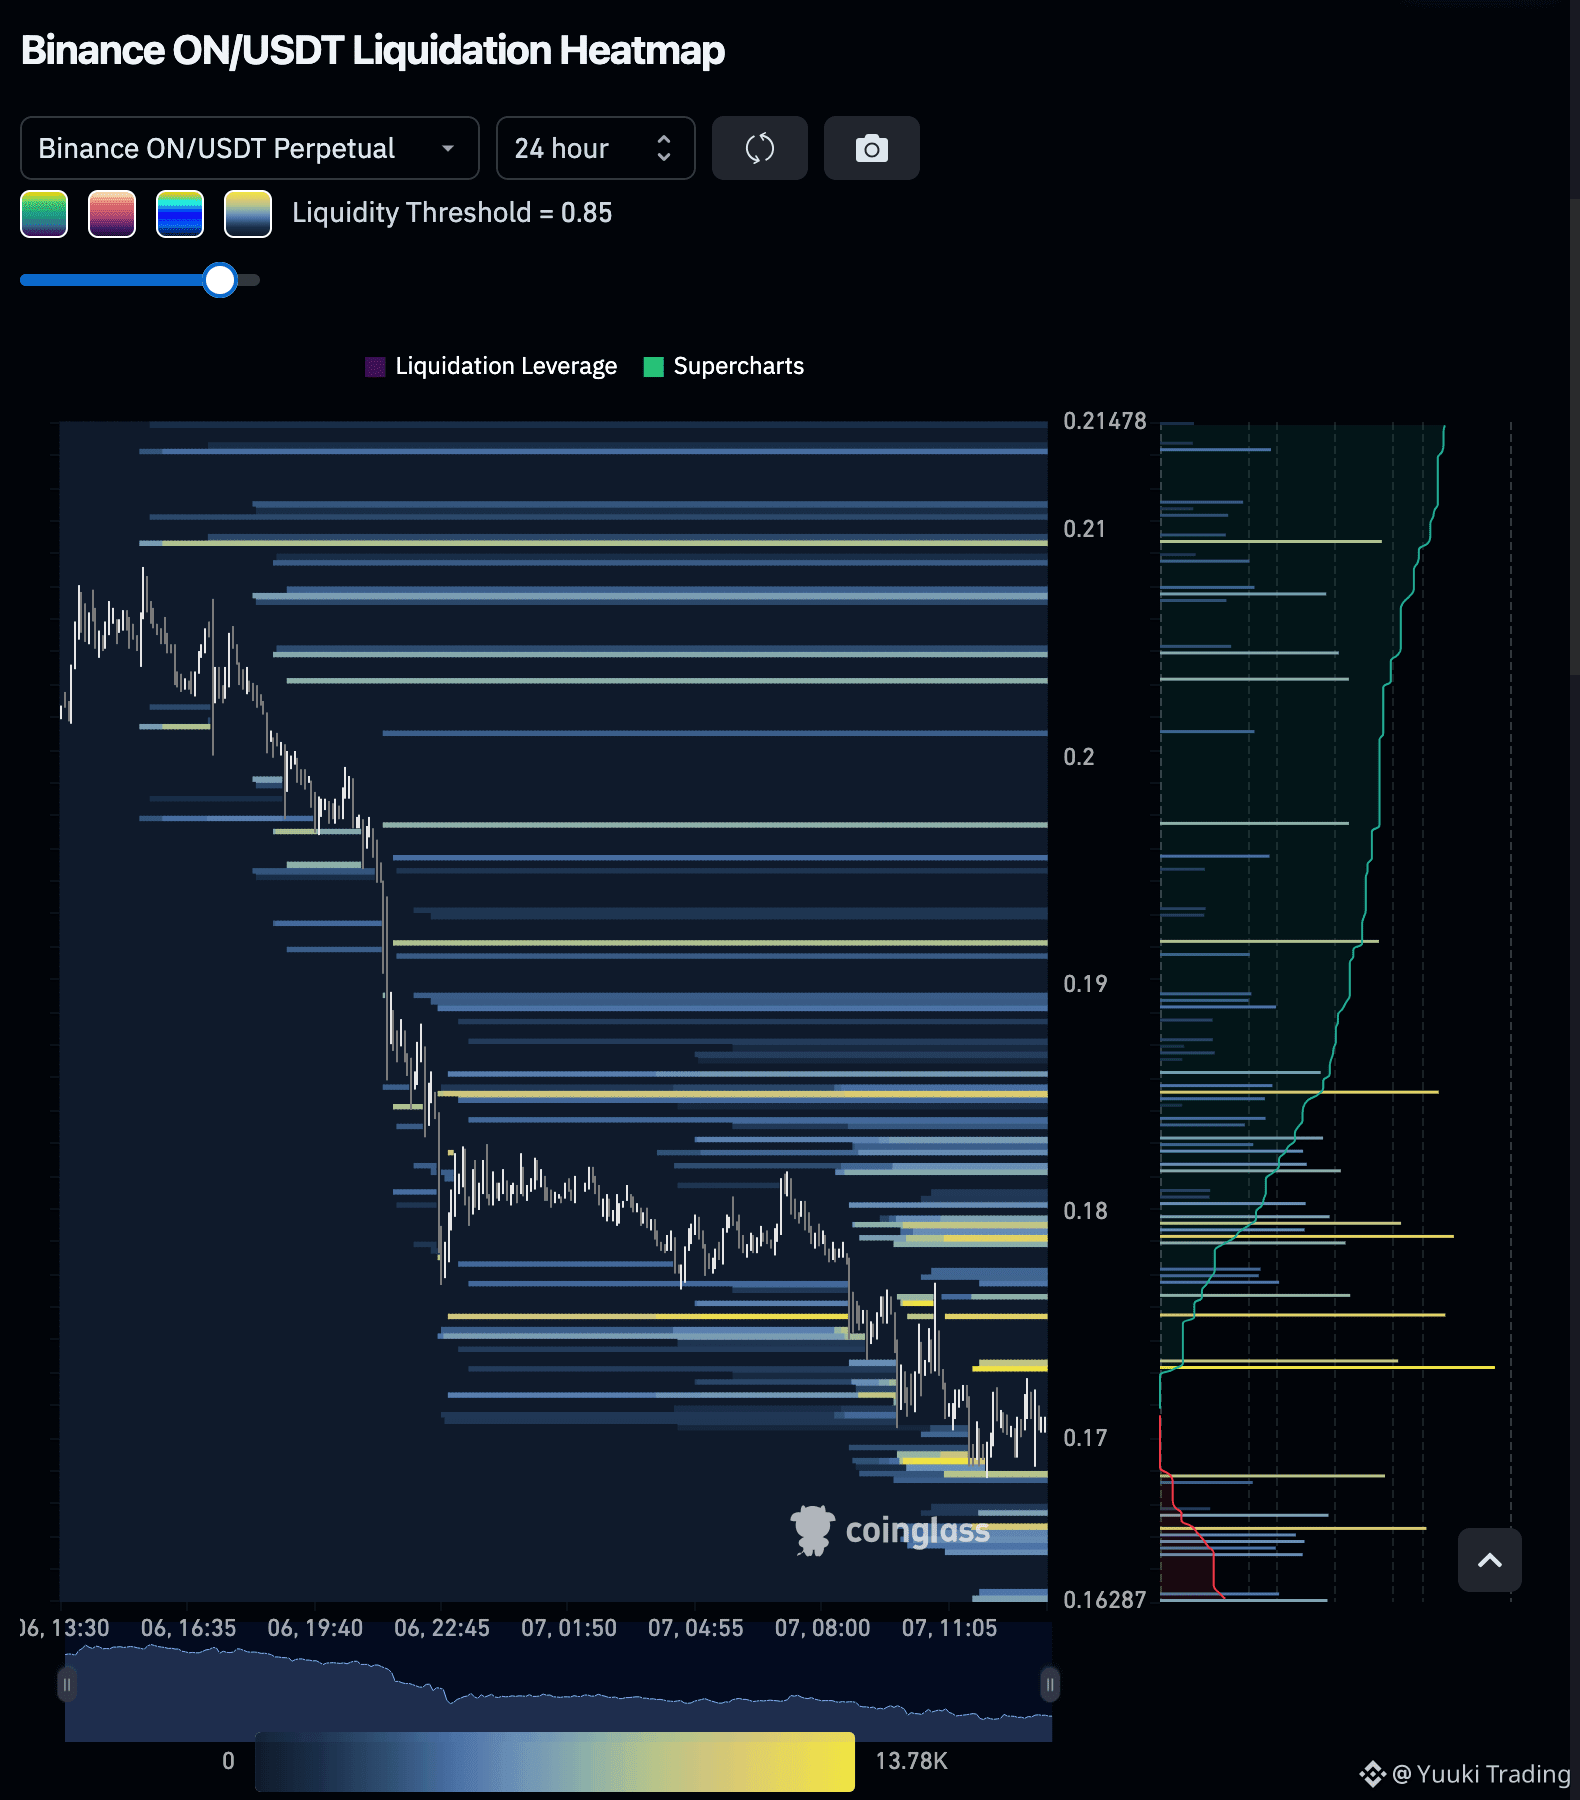
ON — Sellers retain the 15m advantage as price stays beneath declining averages, though dense overhead liquidity leaves room for a squeeze.
ON - SHORT NOW
Entry Zone: 0.170309 — 0.171491
• TP1: 0.165956
• TP2: 0.162661
• TP3: 0.157717
Stop Loss: 0.177491
On 15m, overbought Stoch RSI contrasts with price below declining averages, keeping the rebound corrective. Smart Money is mixed but relatively favors sellers as crowded longs remain less profitable. Downside liquidity supports continuation, while overhead clusters add squeeze risk.
Disclaimer: This is not financial advice. Always do your own research and take full responsibility for your trading decisions and assets.
Trade $ON here:
ON - SHORT NOW
Entry Zone: 0.170309 — 0.171491
• TP1: 0.165956
• TP2: 0.162661
• TP3: 0.157717
Stop Loss: 0.177491
On 15m, overbought Stoch RSI contrasts with price below declining averages, keeping the rebound corrective. Smart Money is mixed but relatively favors sellers as crowded longs remain less profitable. Downside liquidity supports continuation, while overhead clusters add squeeze risk.
Disclaimer: This is not financial advice. Always do your own research and take full responsibility for your trading decisions and assets.
Trade $ON here:
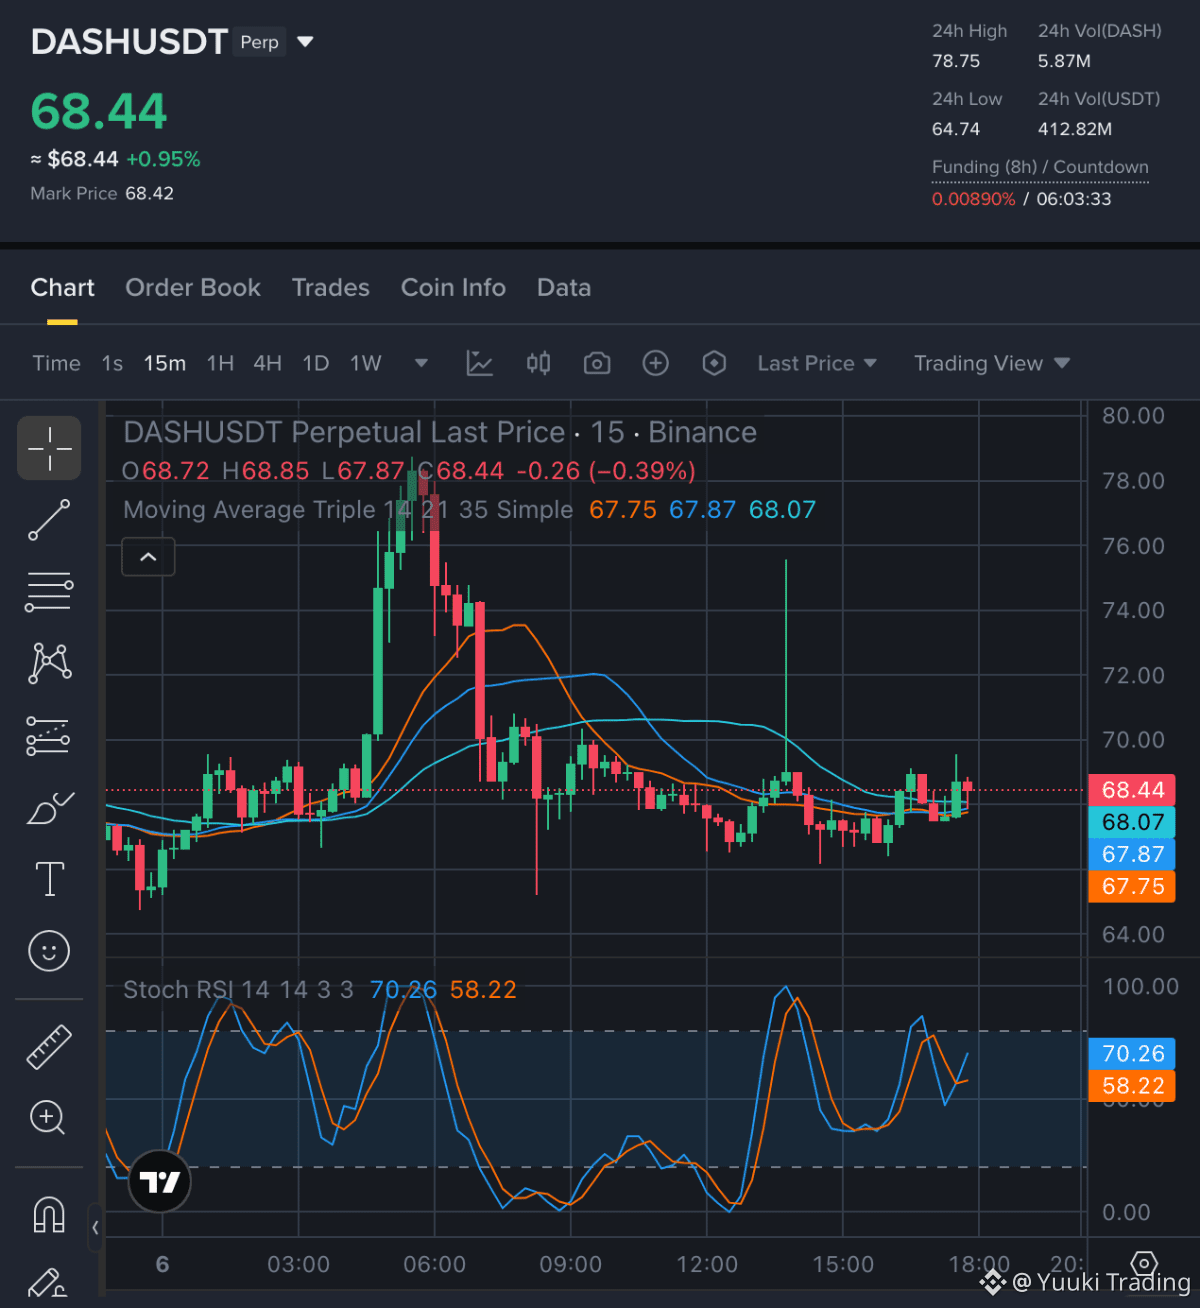
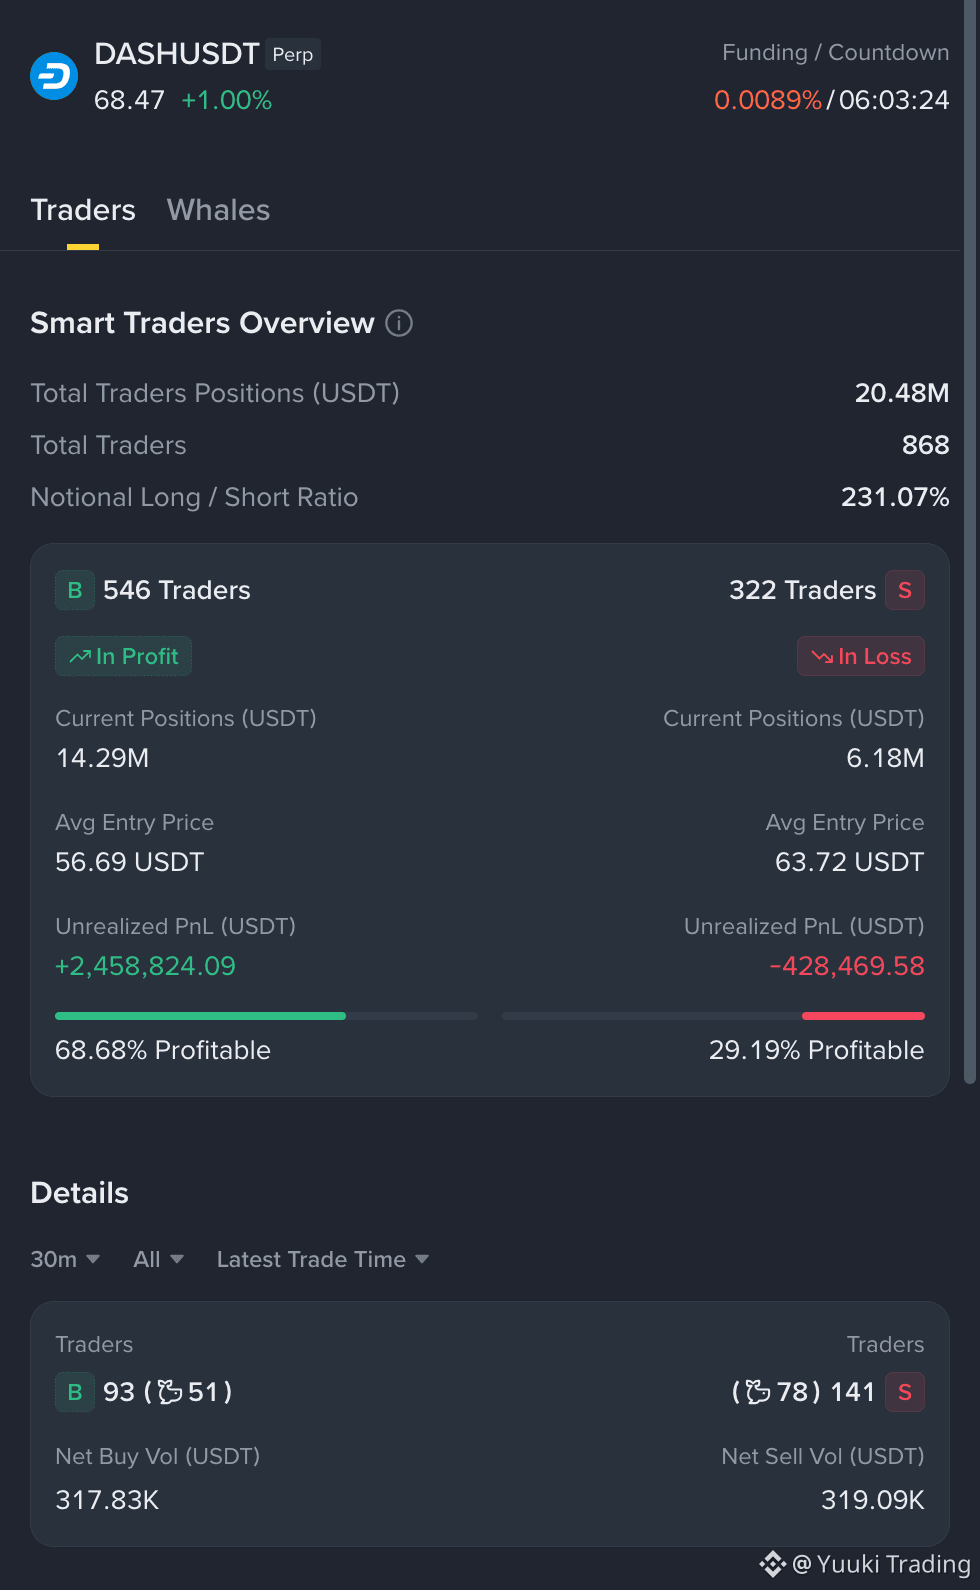
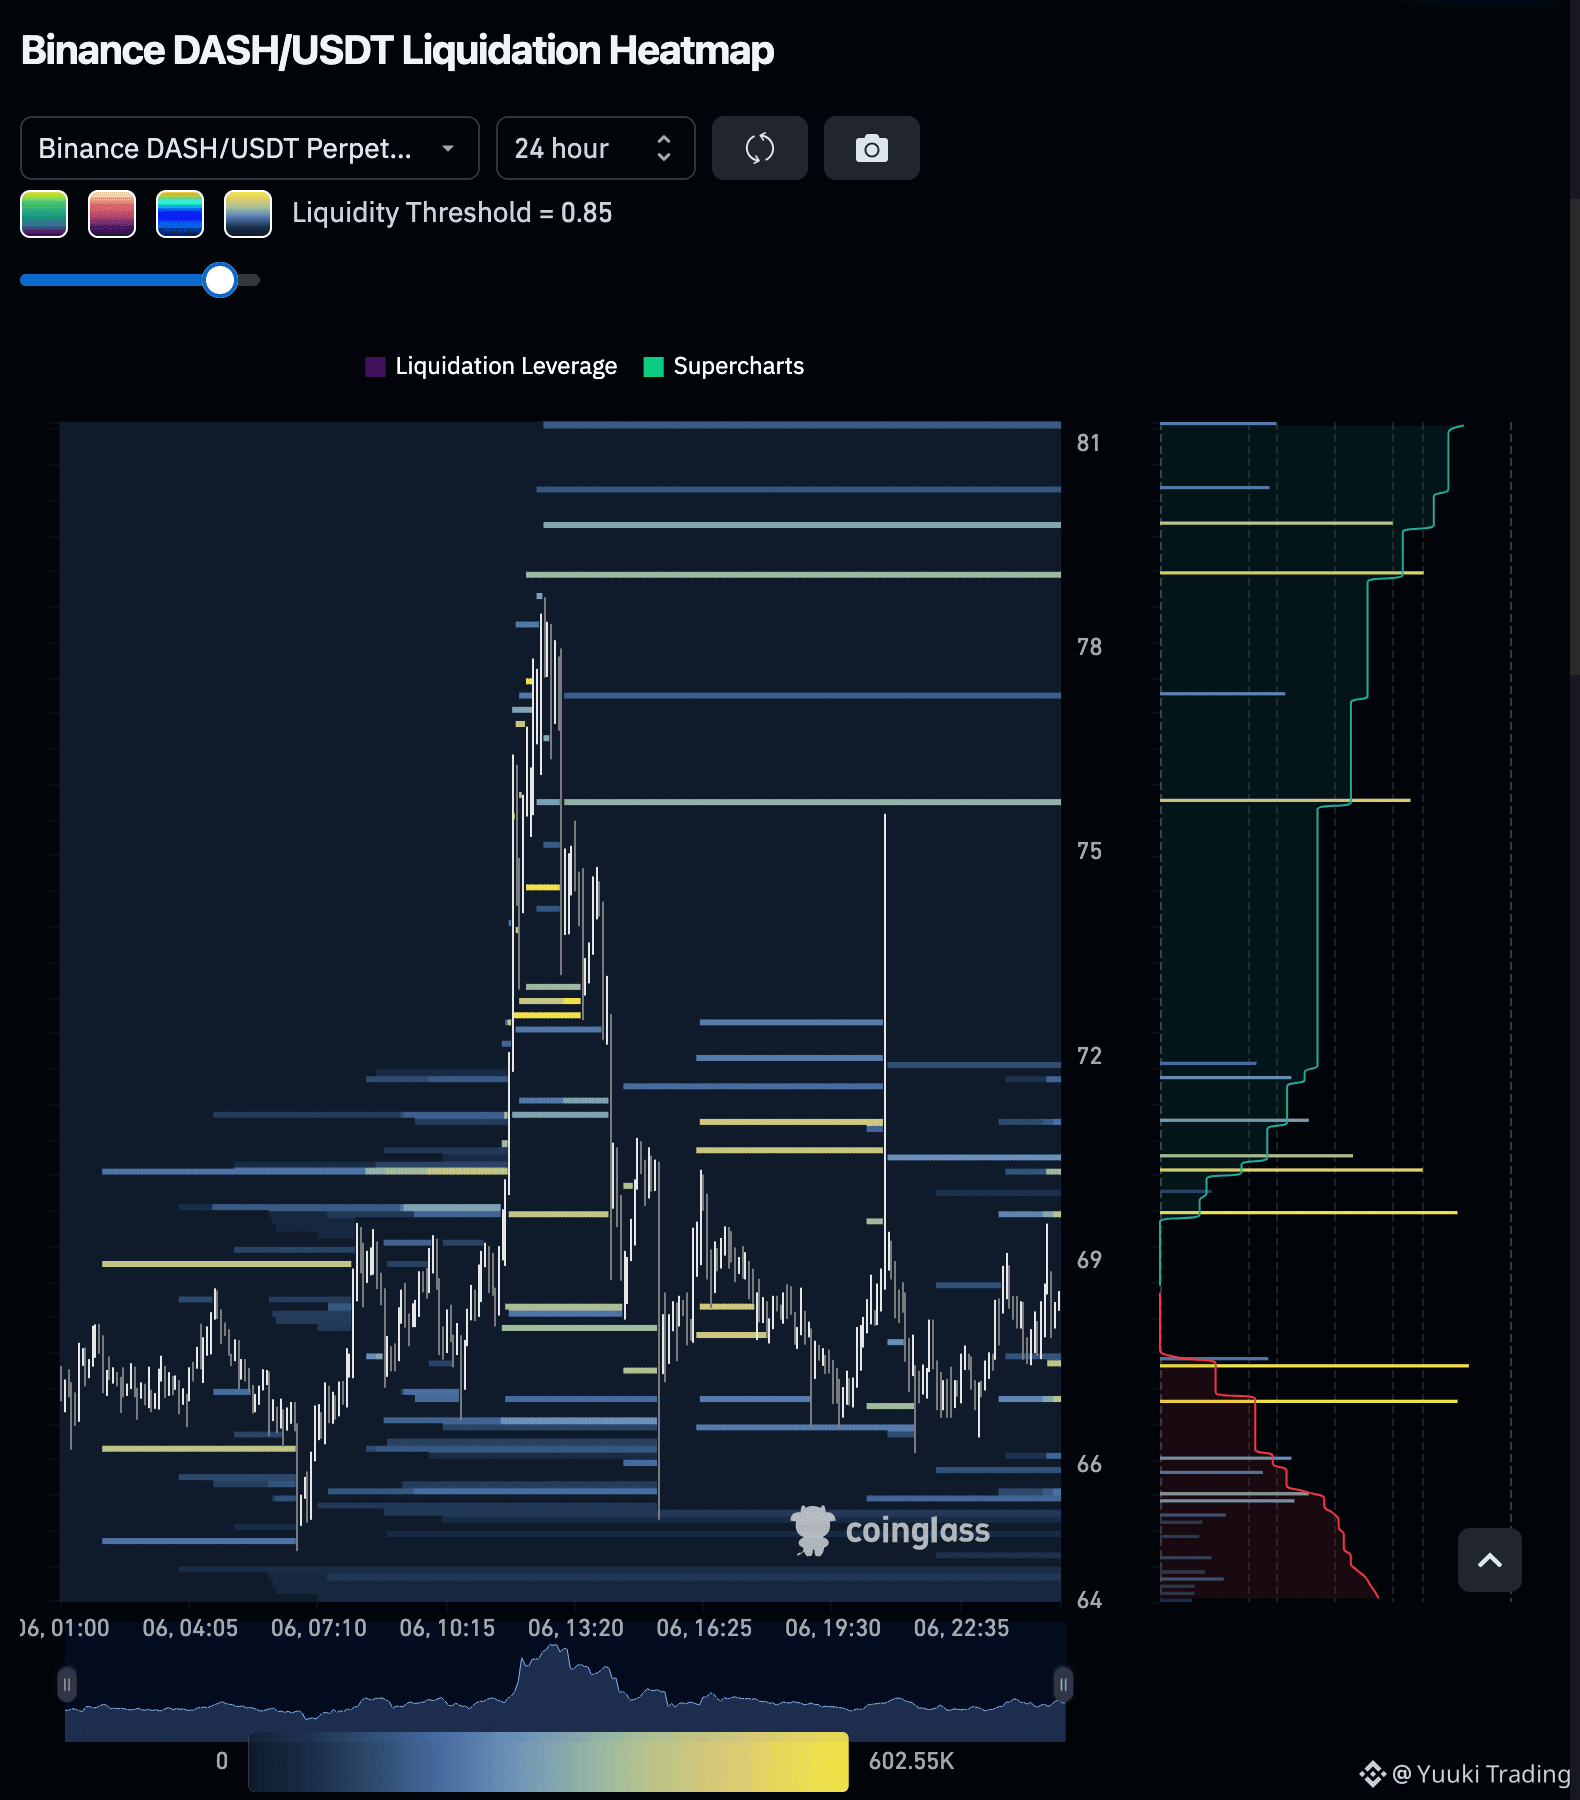
DASH — Sellers retain a tactical edge as the 15m rebound compresses, while nearby downside liquidity offsets strong long-side positioning.
DASH - SHORT NOW
Entry Zone: 68.189 — 68.631
• TP1: 67.14
• TP2: 66.18
• TP3: 64.108
Stop Loss: 70.561
The 15m rebound holds above the average cluster with elevated momentum, so the short needs rejection. Smart Money favors profitable longs, but downside liquidity supports the bias while upside pools preserve squeeze risk.
Disclaimer: This is not financial advice. Always do your own research and take full responsibility for your trading decisions and assets.
Trade $DASH here:
DASH - SHORT NOW
Entry Zone: 68.189 — 68.631
• TP1: 67.14
• TP2: 66.18
• TP3: 64.108
Stop Loss: 70.561
The 15m rebound holds above the average cluster with elevated momentum, so the short needs rejection. Smart Money favors profitable longs, but downside liquidity supports the bias while upside pools preserve squeeze risk.
Disclaimer: This is not financial advice. Always do your own research and take full responsibility for your trading decisions and assets.
Trade $DASH here:
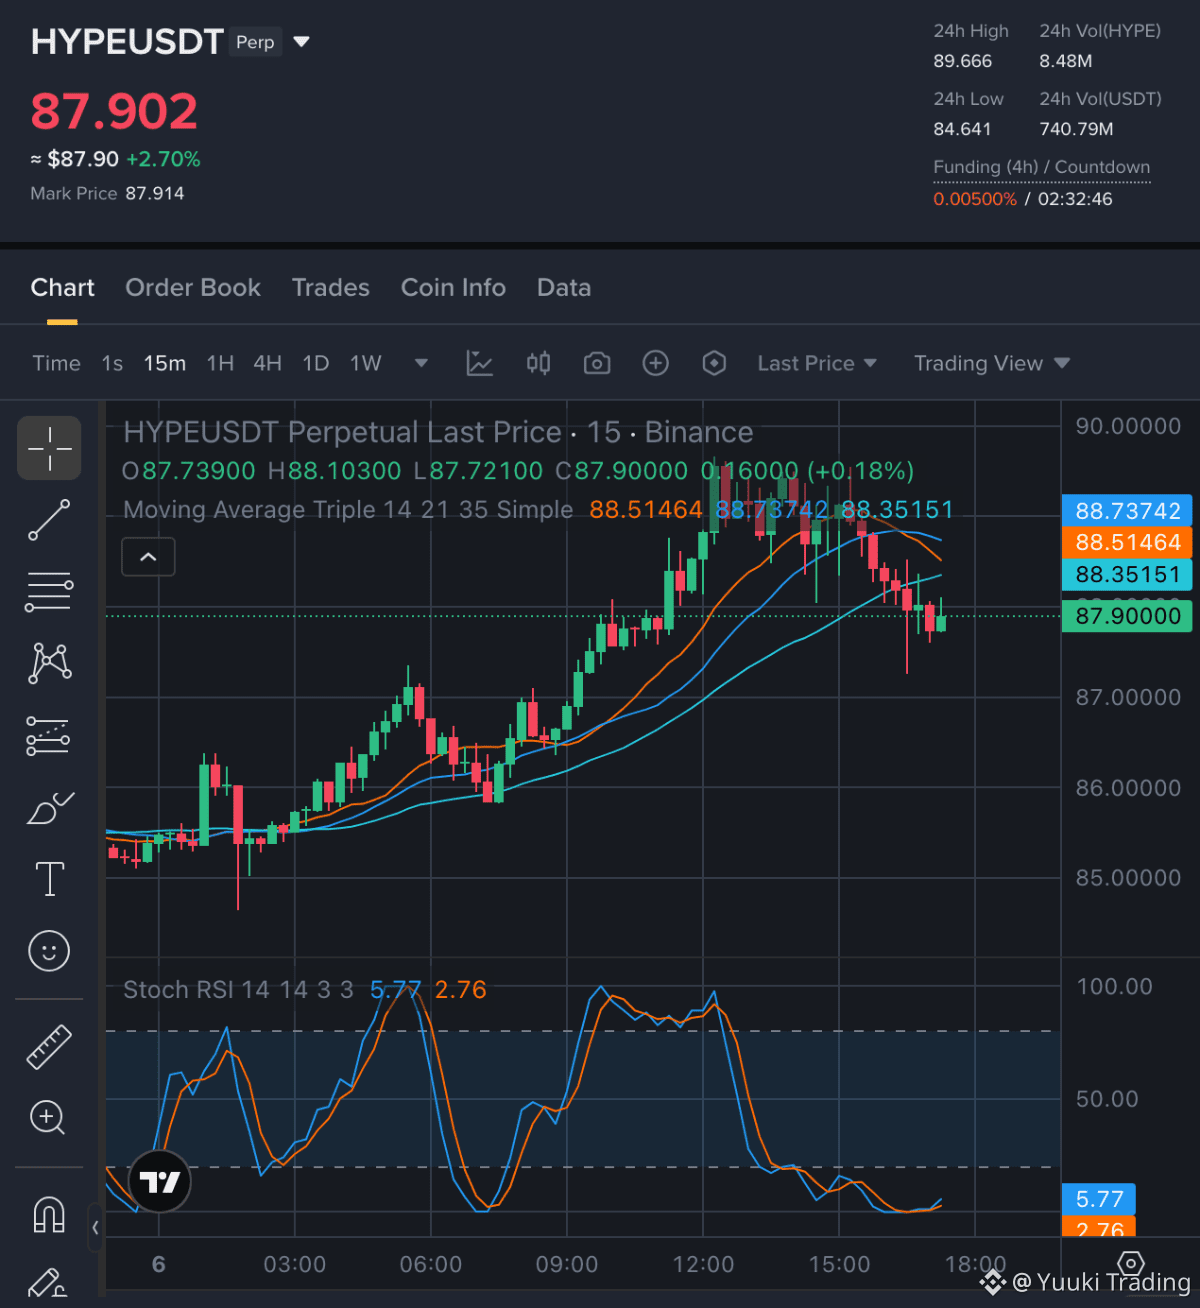
HYPE — Sellers hold the 15m edge below the moving averages, while nearby downside liquidity reinforces continuation despite rebound risk.
HYPE - SHORT NOW
Entry Zone: 87.768 — 88.04
• TP1: 86.354
• TP2: 85.82
• TP3: 84.44
Stop Loss: 89.636
The 15m pullback remains below all three moving averages, while oversold Stoch RSI warns that downside momentum may be tiring. Smart Money favors profitable longs, weakening short confirmation; downside liquidity supports continuation, but heavier upside pools add squeeze risk.
Disclaimer: This is not financial advice. Always do your own research and take full responsibility for your trading decisions and assets.
Trade $HYPE here:
HYPE - SHORT NOW
Entry Zone: 87.768 — 88.04
• TP1: 86.354
• TP2: 85.82
• TP3: 84.44
Stop Loss: 89.636
The 15m pullback remains below all three moving averages, while oversold Stoch RSI warns that downside momentum may be tiring. Smart Money favors profitable longs, weakening short confirmation; downside liquidity supports continuation, but heavier upside pools add squeeze risk.
Disclaimer: This is not financial advice. Always do your own research and take full responsibility for your trading decisions and assets.
Trade $HYPE here:
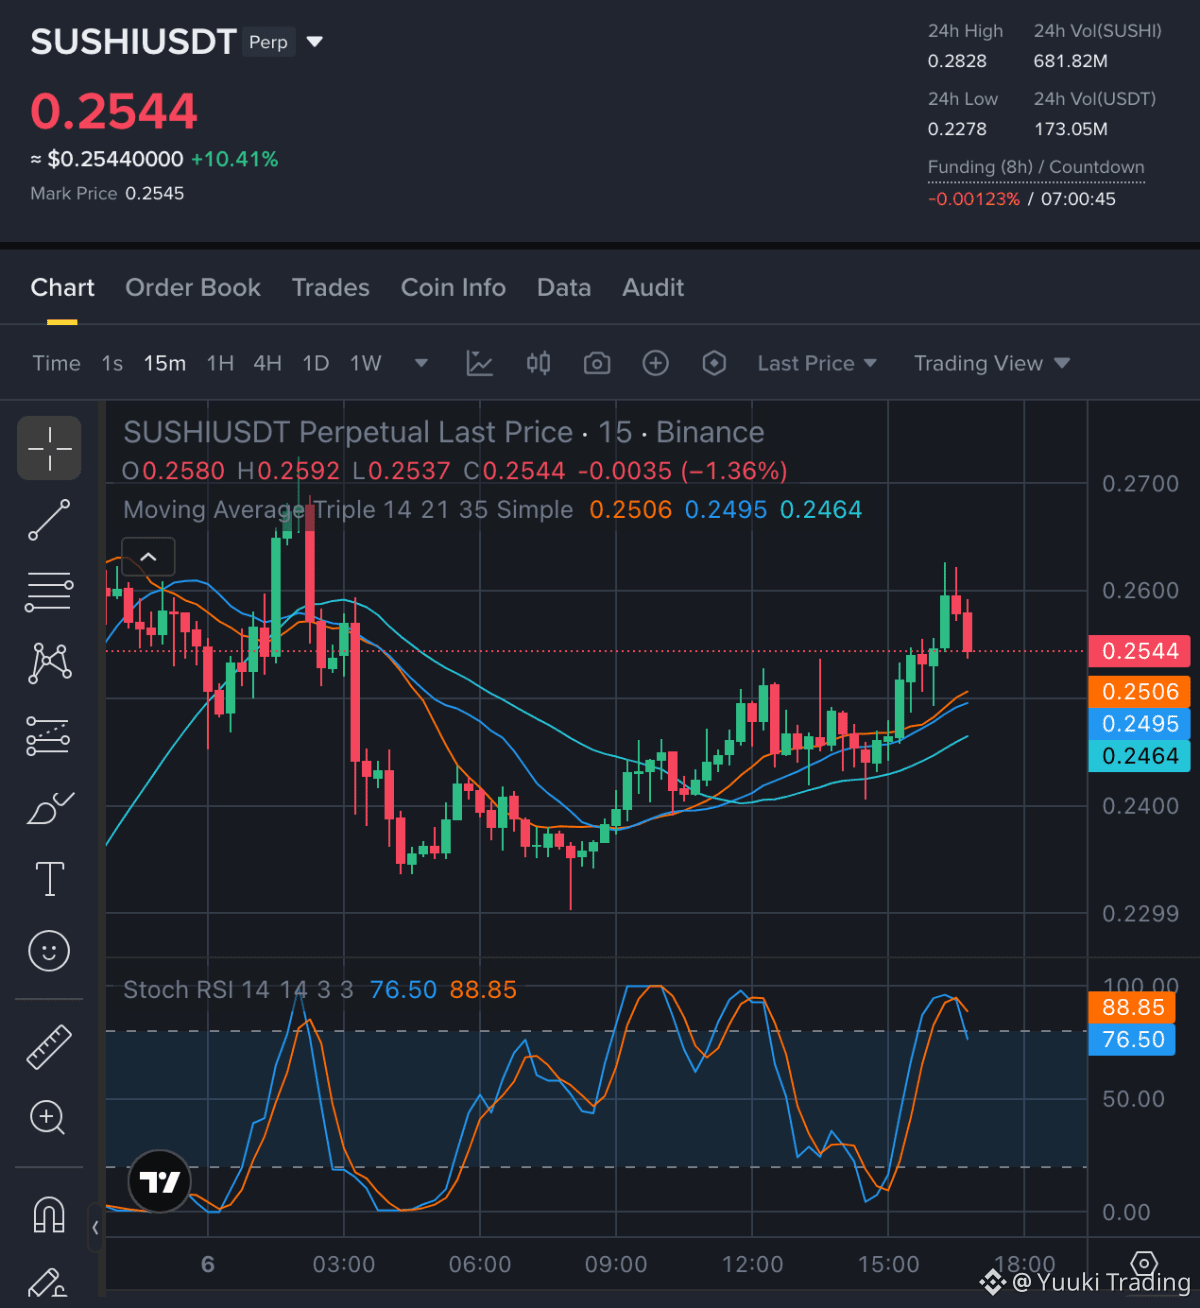
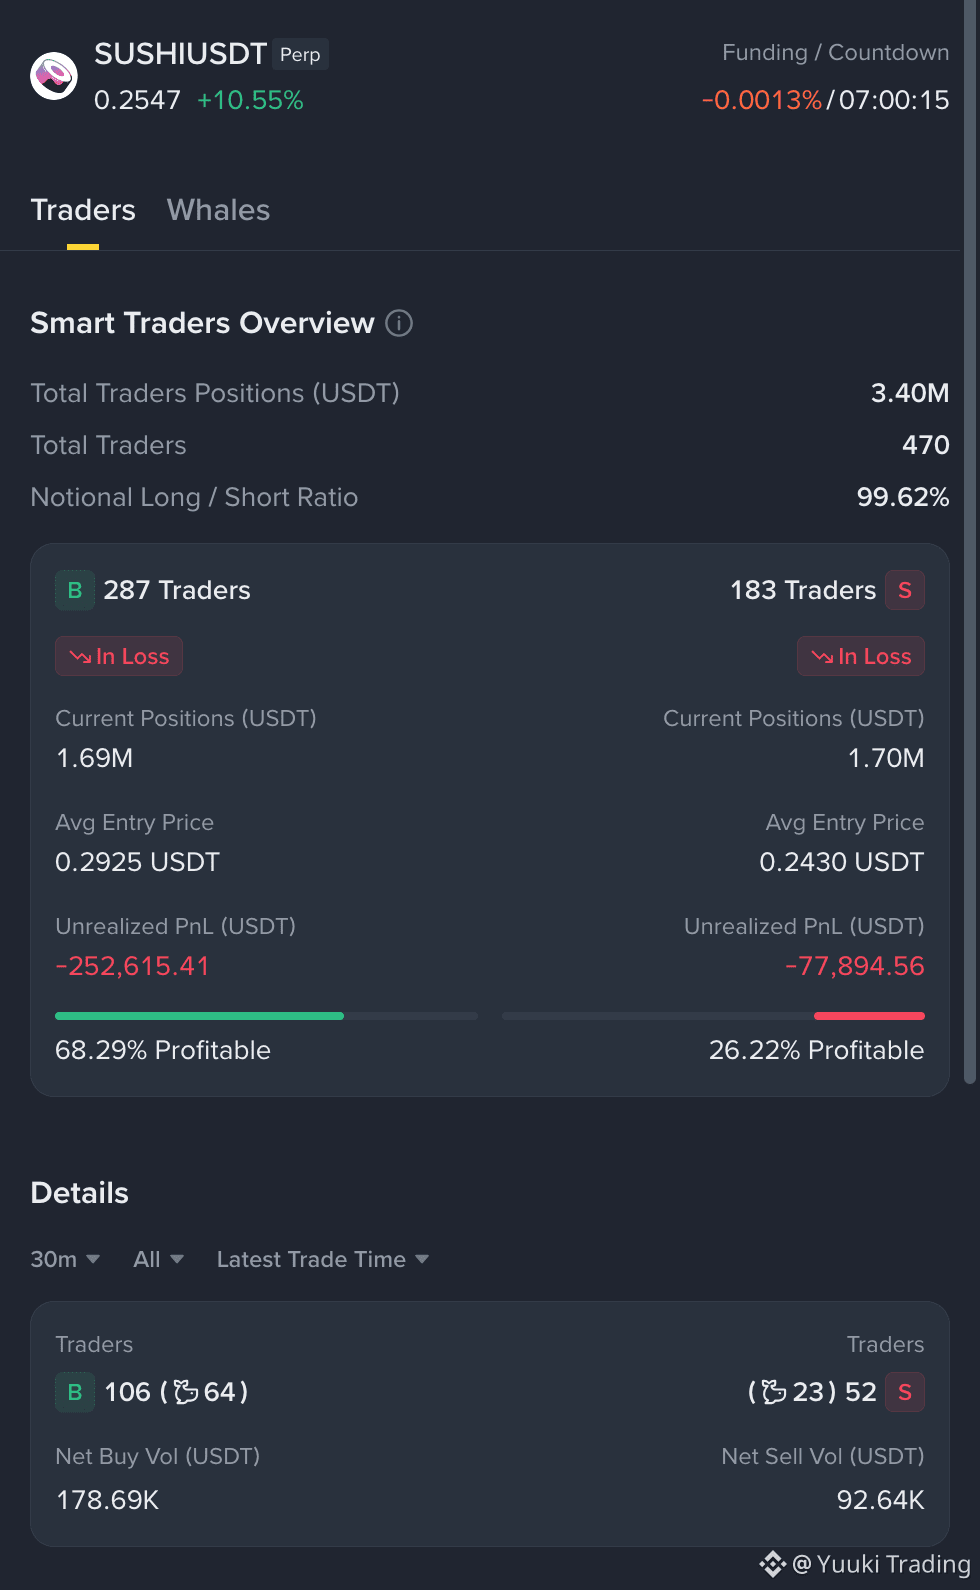
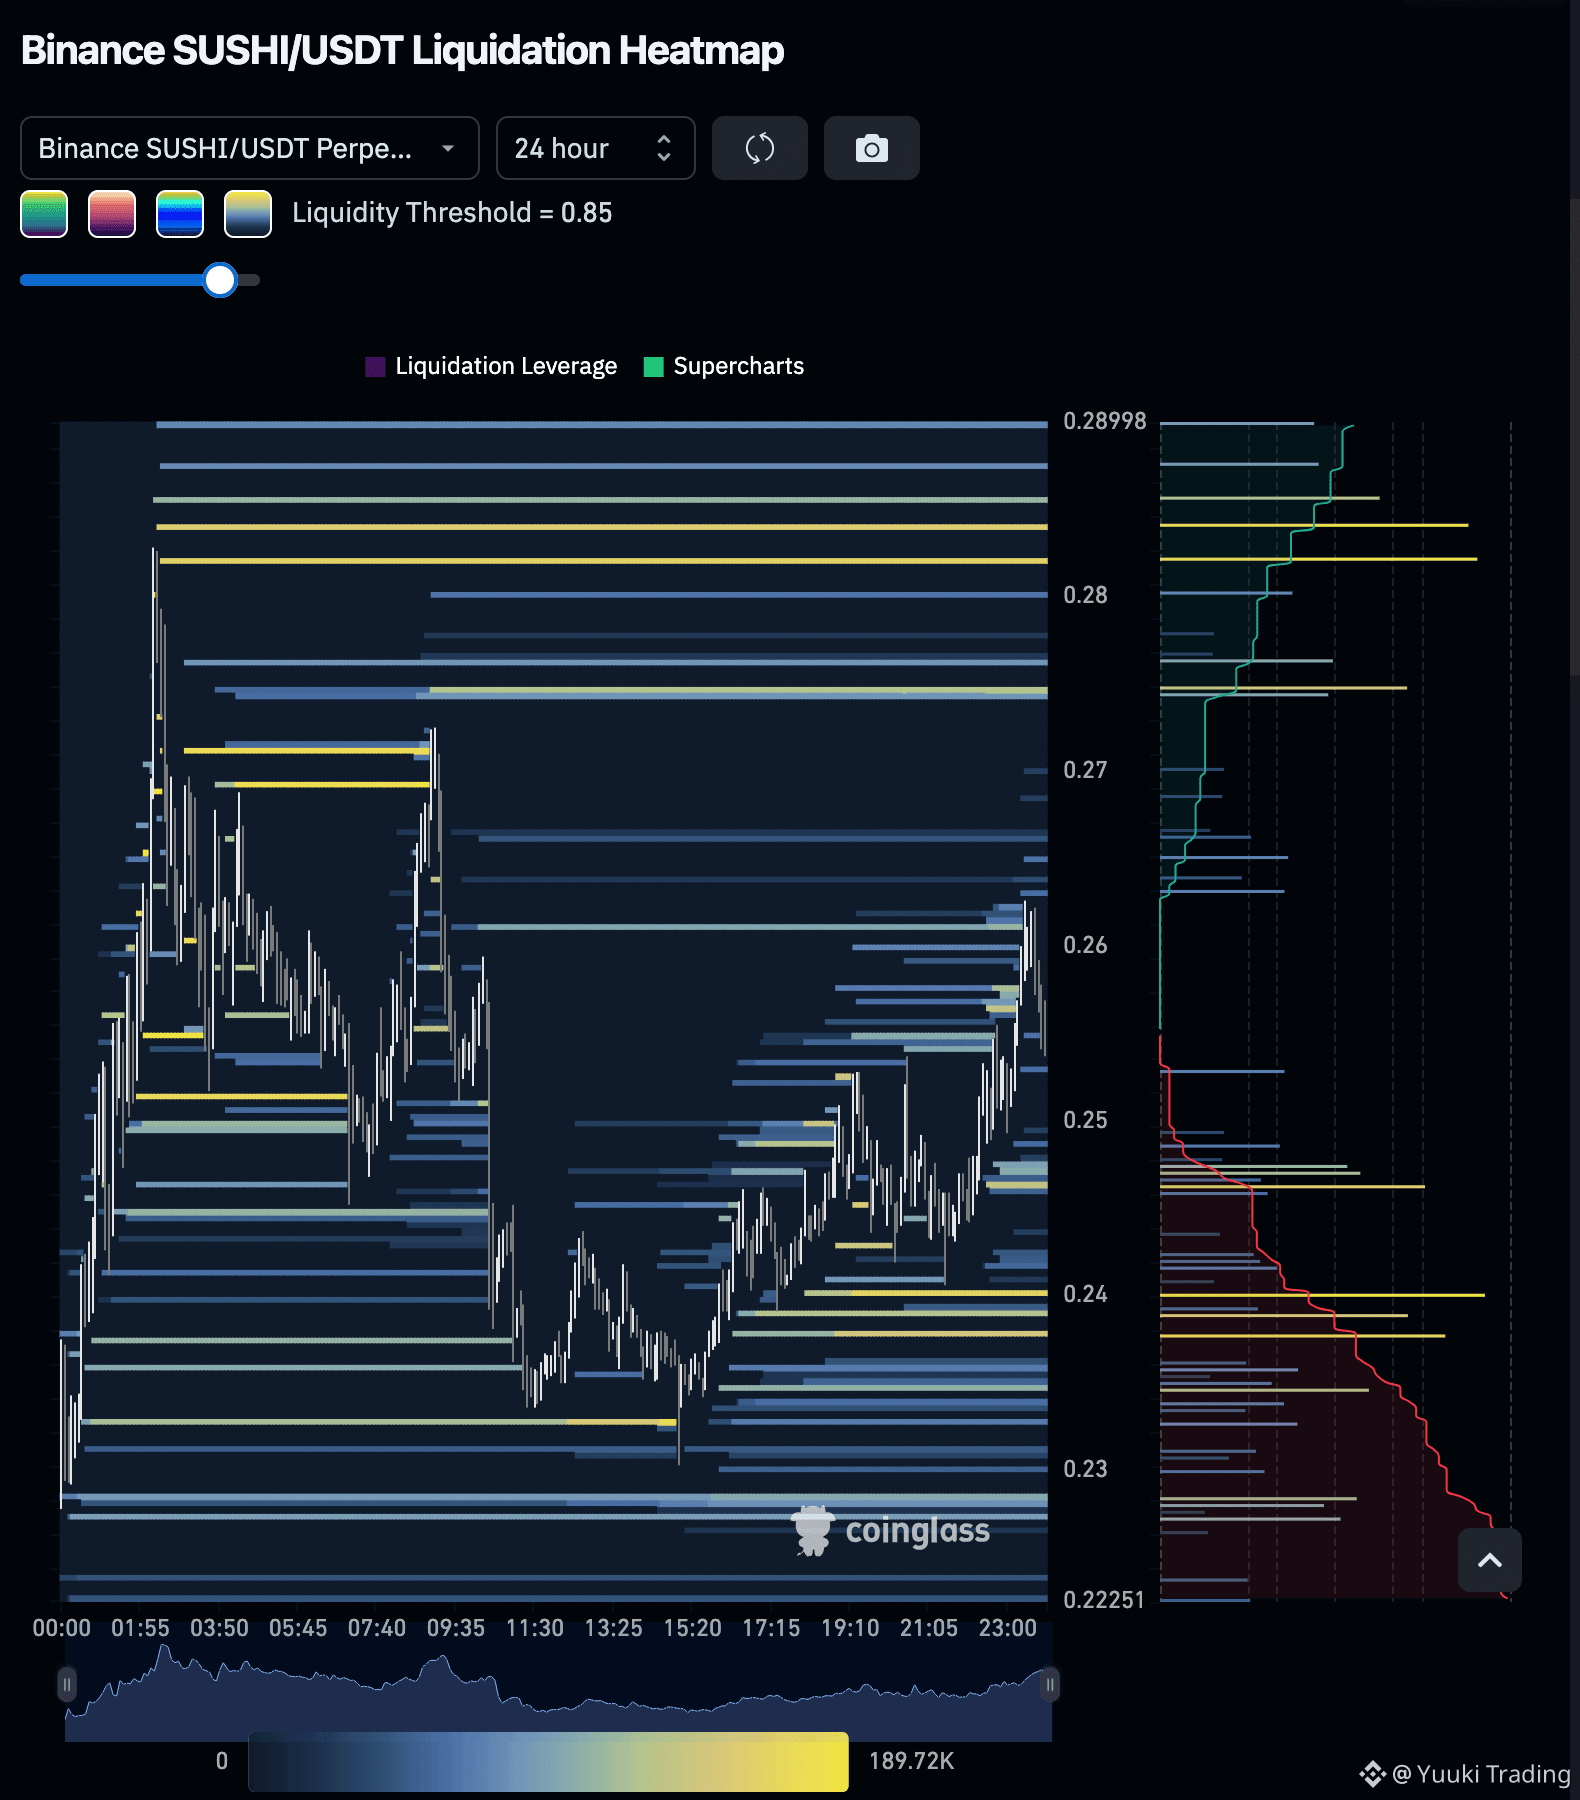
SUSHI — buyers retain the 15m advantage above rising averages, despite mixed Smart Money positioning tempering near-term continuation conviction.
SUSHI - LONG NOW
Entry Zone: 0.253583 — 0.255817
• TP1: 0.2626
• TP2: 0.2725
• TP3: 0.282534
Stop Loss: 0.240783
On 15m, price holds above rising averages, though the latest rejection and elevated Stoch RSI warn of cooling momentum. Smart Money is mixed but relatively favors longs; heavier upside liquidity supports continuation, while lower clusters preserve pullback risk.
Disclaimer: This is not financial advice. Always do your own research and take full responsibility for your trading decisions and assets.
Trade $SUSHI here:
SUSHI - LONG NOW
Entry Zone: 0.253583 — 0.255817
• TP1: 0.2626
• TP2: 0.2725
• TP3: 0.282534
Stop Loss: 0.240783
On 15m, price holds above rising averages, though the latest rejection and elevated Stoch RSI warn of cooling momentum. Smart Money is mixed but relatively favors longs; heavier upside liquidity supports continuation, while lower clusters preserve pullback risk.
Disclaimer: This is not financial advice. Always do your own research and take full responsibility for your trading decisions and assets.
Trade $SUSHI here:
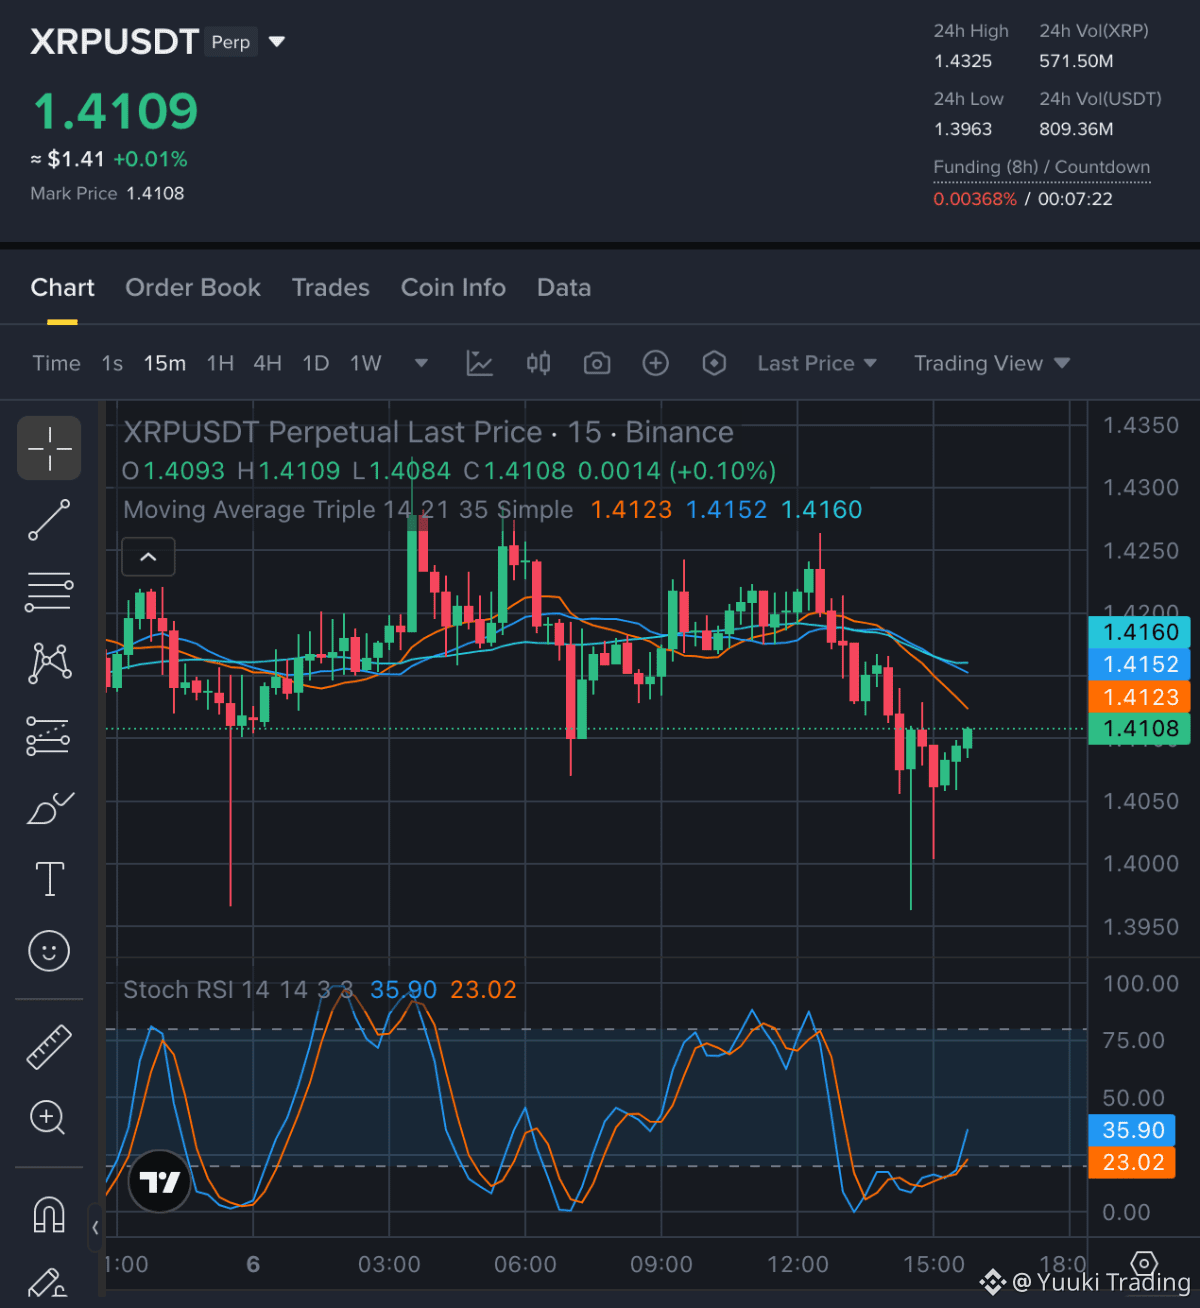
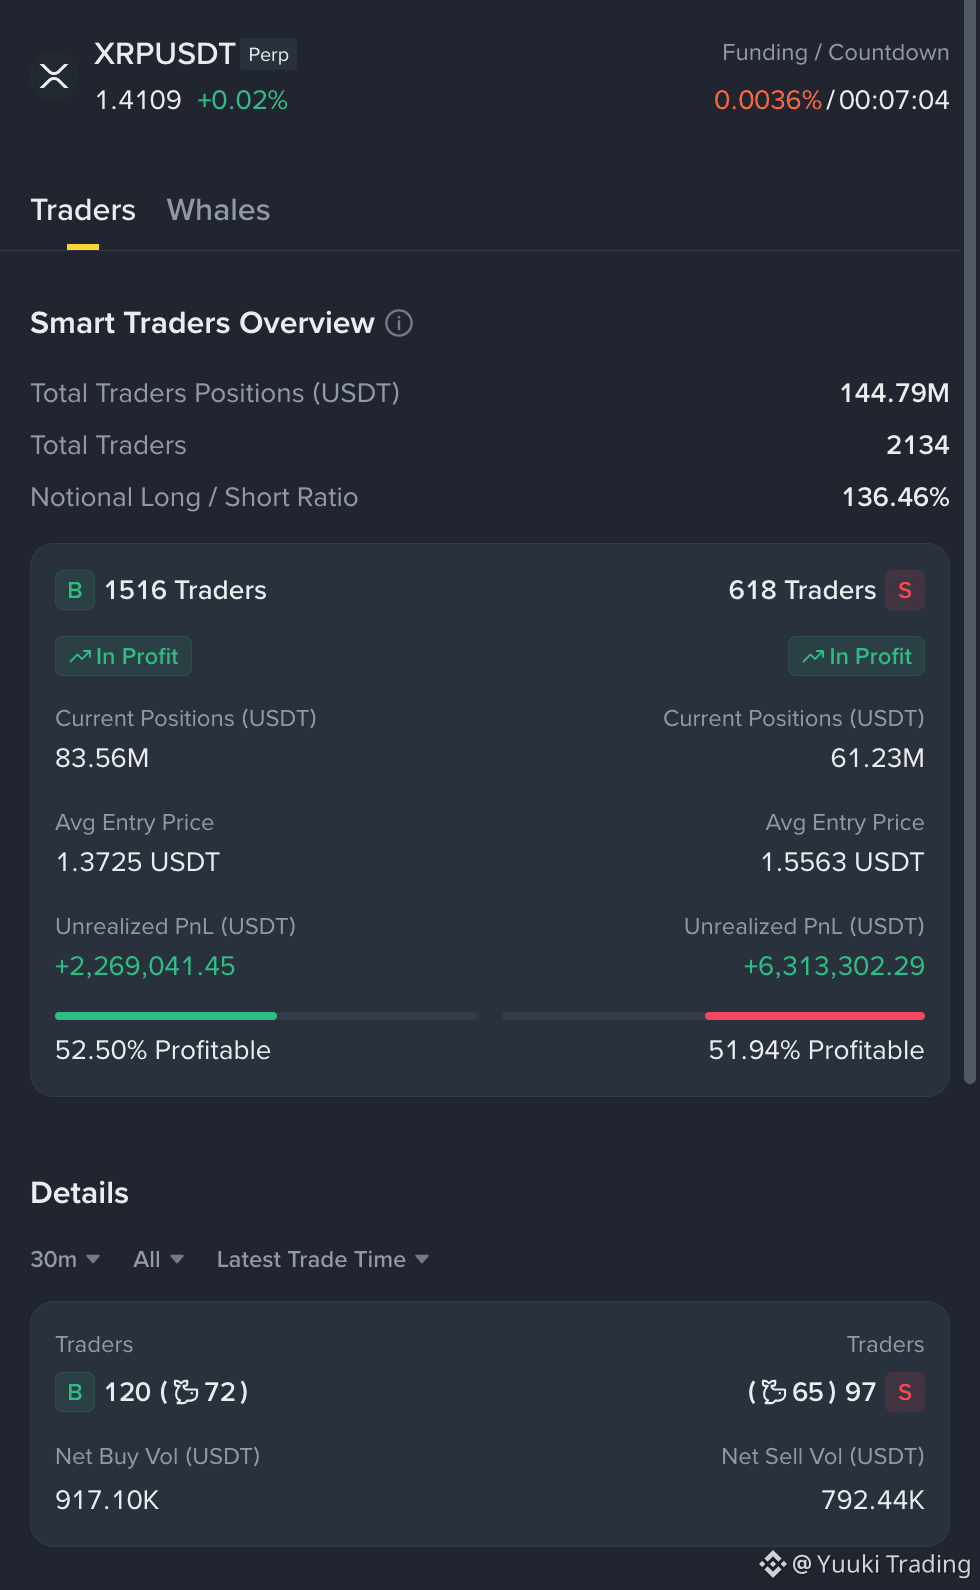
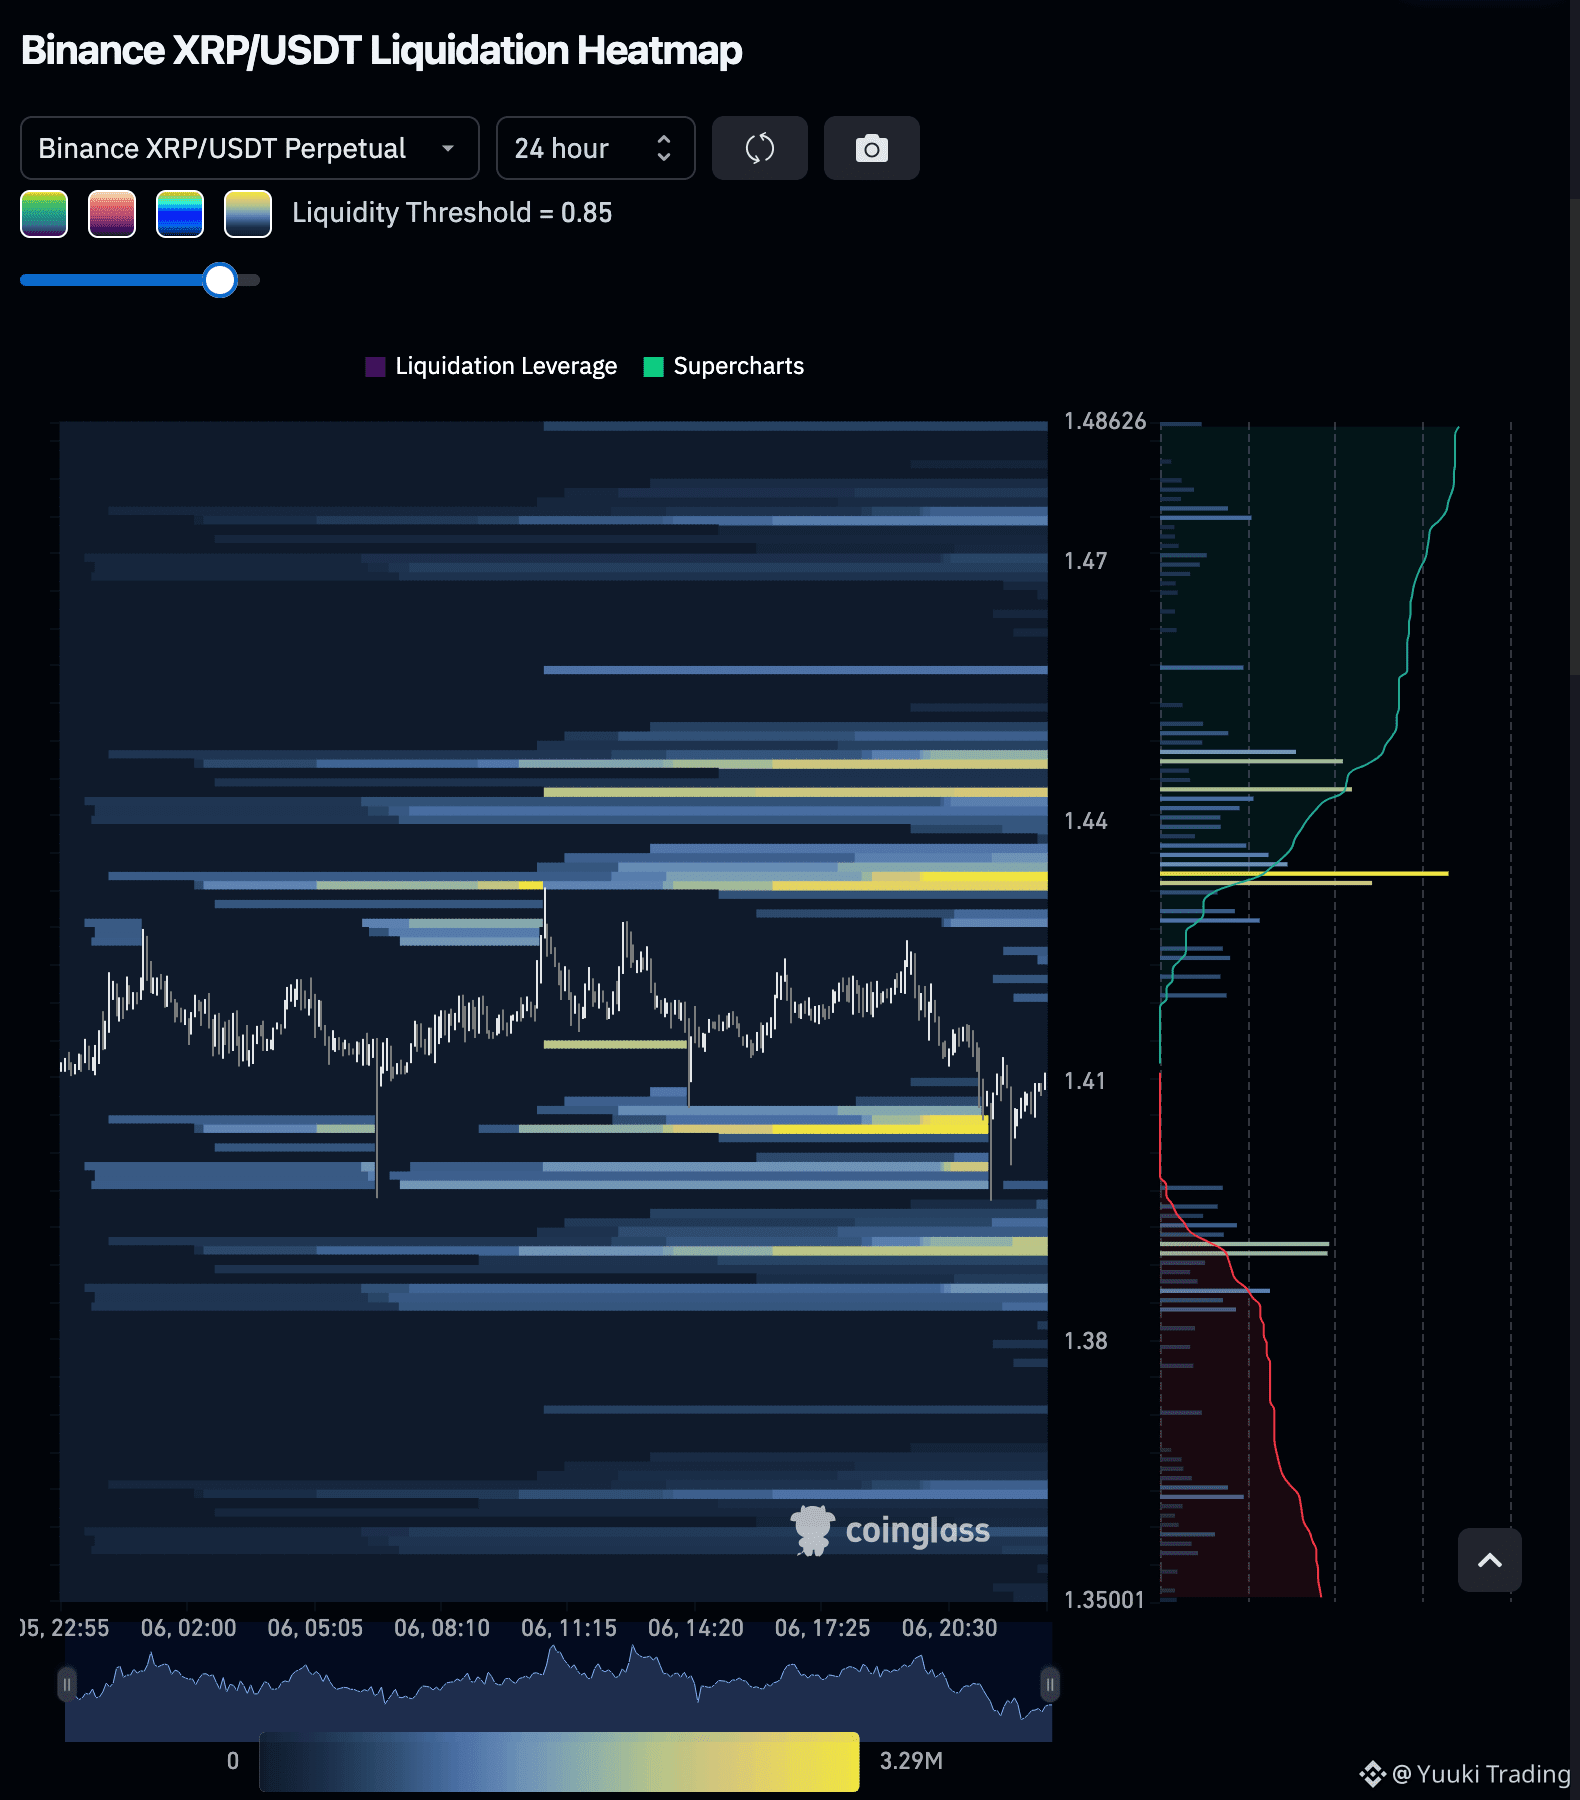
XRP — XRP sellers retain the 15m advantage as the rebound remains structurally weak, with Smart Money positioning offering only partial support.
XRP - SHORT NOW
Entry Zone: 1.4088 — 1.4116
• TP1: 1.3963
• TP2: 1.3936
• TP3: 1.3836
Stop Loss: 1.4235
The 15m rebound remains corrective beneath the moving-average cluster, with Stoch RSI recovering from oversold levels. Smart Money is mixed but relatively favors sellers through stronger short unrealized PnL. Nearby downside liquidity supports continuation, though heavier upside pools add squeeze risk.
Disclaimer: This is not financial advice. Always do your own research and take full responsibility for your trading decisions and assets.
Trade $XRP here:
XRP - SHORT NOW
Entry Zone: 1.4088 — 1.4116
• TP1: 1.3963
• TP2: 1.3936
• TP3: 1.3836
Stop Loss: 1.4235
The 15m rebound remains corrective beneath the moving-average cluster, with Stoch RSI recovering from oversold levels. Smart Money is mixed but relatively favors sellers through stronger short unrealized PnL. Nearby downside liquidity supports continuation, though heavier upside pools add squeeze risk.
Disclaimer: This is not financial advice. Always do your own research and take full responsibility for your trading decisions and assets.
Trade $XRP here:
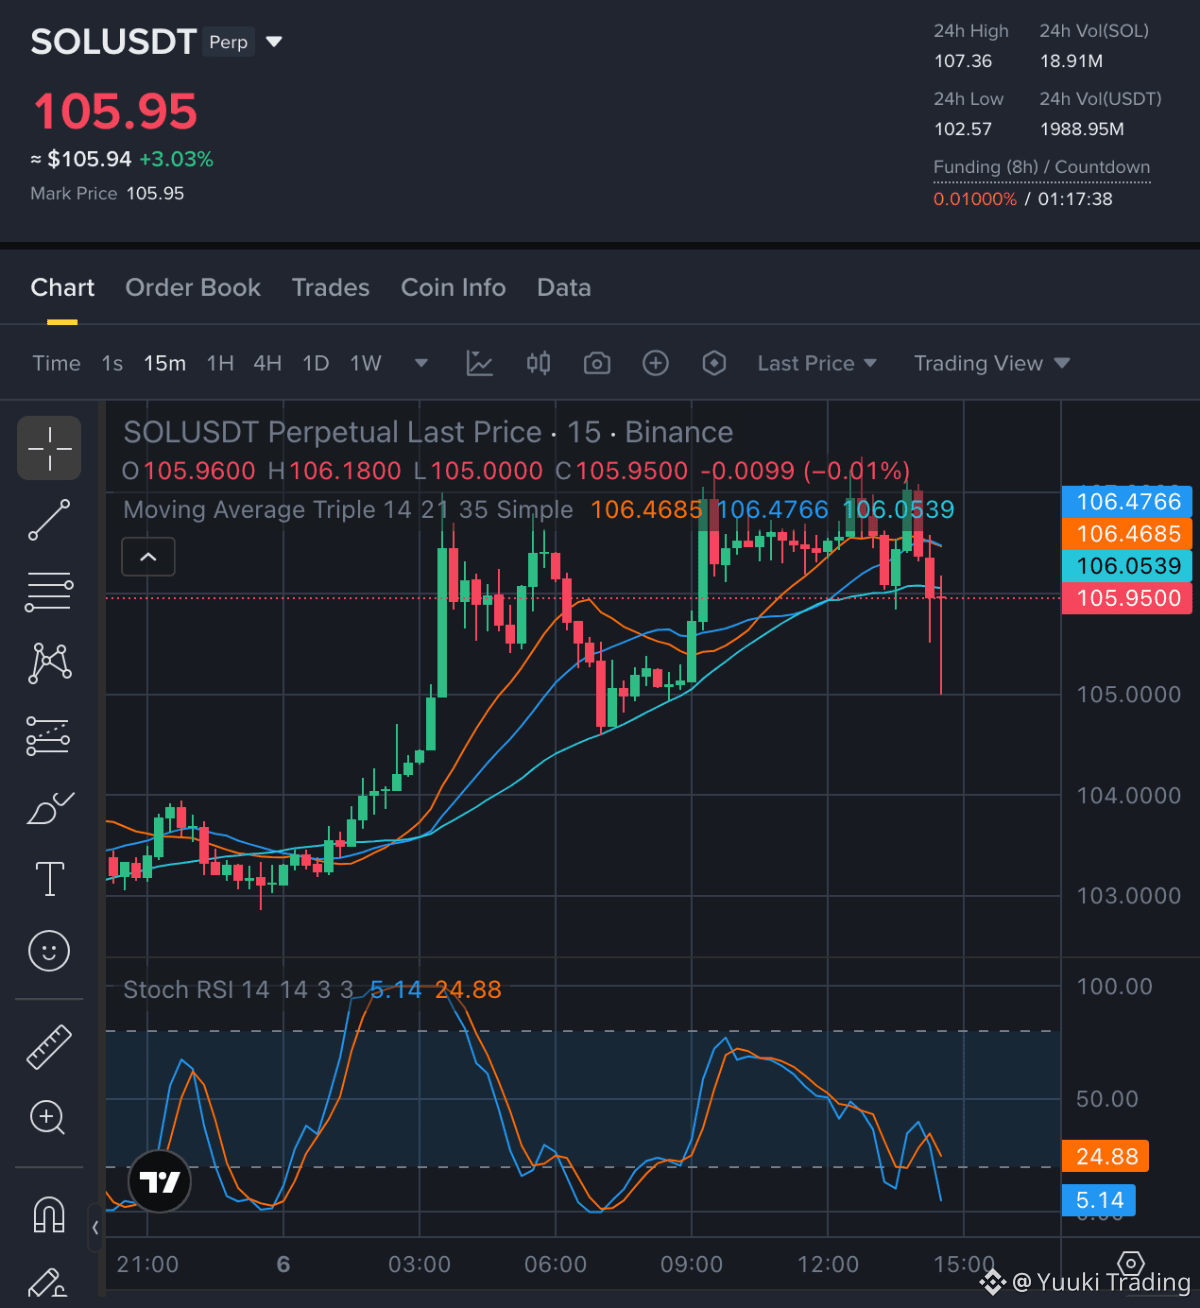
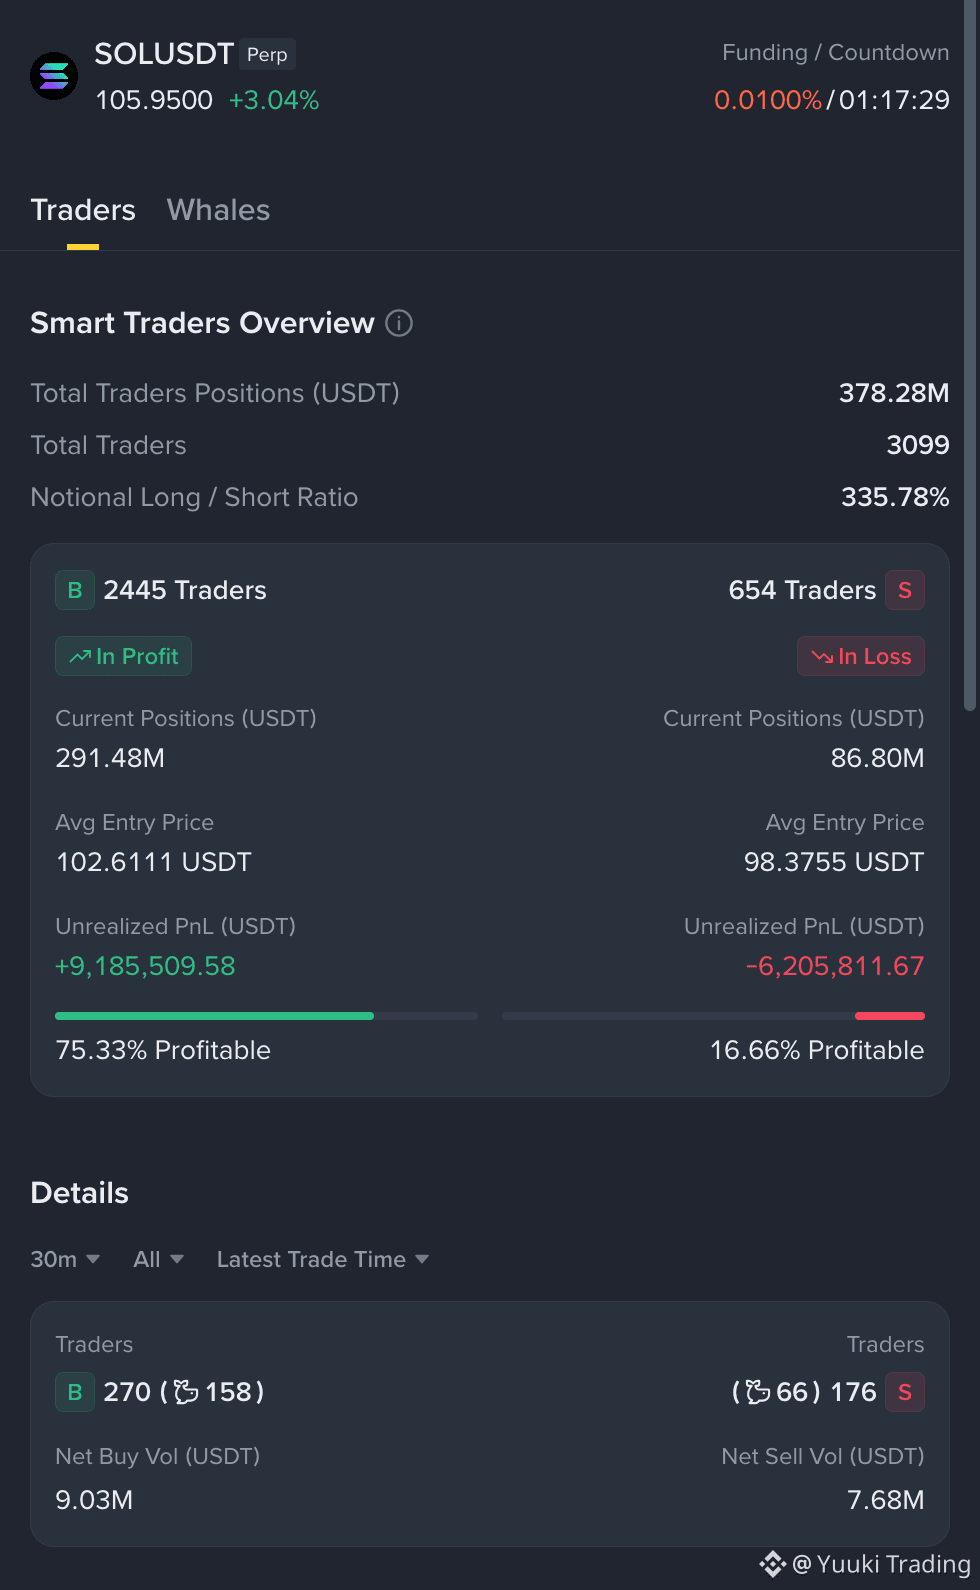
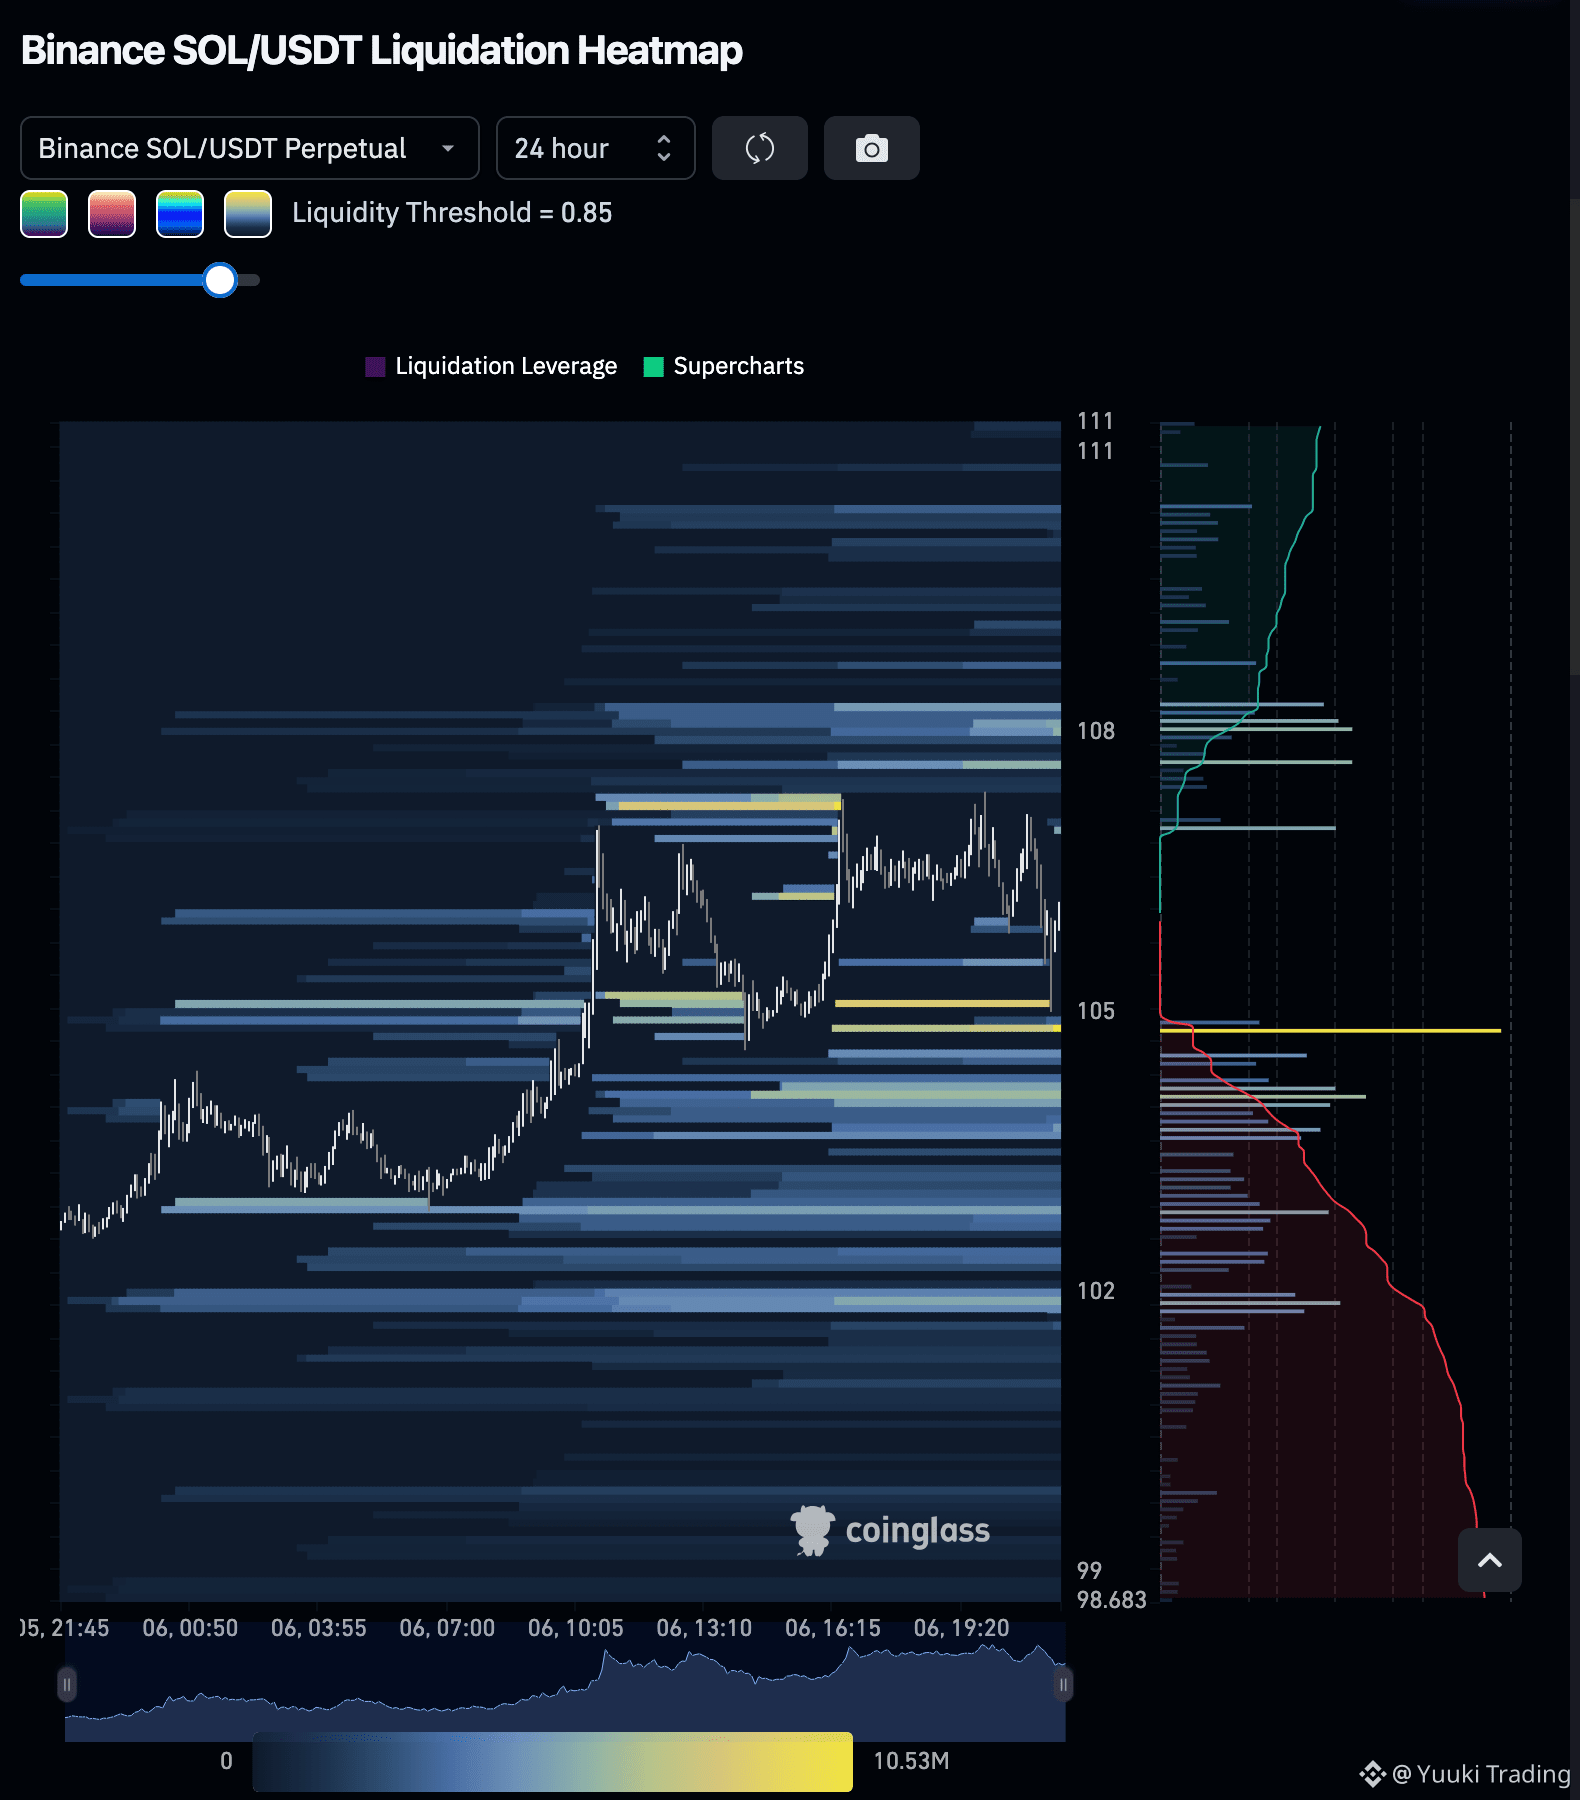
SOL — Sellers hold the 15m edge after rejection beneath clustered averages, with nearby downside liquidity reinforcing continuation despite oversold momentum.
SOL - SHORT NOW
Entry Zone: 105.87 — 106.09
• TP1: 104.59
• TP2: 104.2175
• TP3: 103.06
Stop Loss: 107.39
The latest 15m drop pushed price below all three moving averages, though oversold Stoch RSI cautions against chasing. Smart Money remains buyer-favorable and weakens short confirmation; lower liquidity offers a downside magnet, while overhead clusters preserve squeeze risk.
Disclaimer: This is not financial advice. Always do your own research and take full responsibility for your trading decisions and assets.
Trade $SOL here:
SOL - SHORT NOW
Entry Zone: 105.87 — 106.09
• TP1: 104.59
• TP2: 104.2175
• TP3: 103.06
Stop Loss: 107.39
The latest 15m drop pushed price below all three moving averages, though oversold Stoch RSI cautions against chasing. Smart Money remains buyer-favorable and weakens short confirmation; lower liquidity offers a downside magnet, while overhead clusters preserve squeeze risk.
Disclaimer: This is not financial advice. Always do your own research and take full responsibility for your trading decisions and assets.
Trade $SOL here:
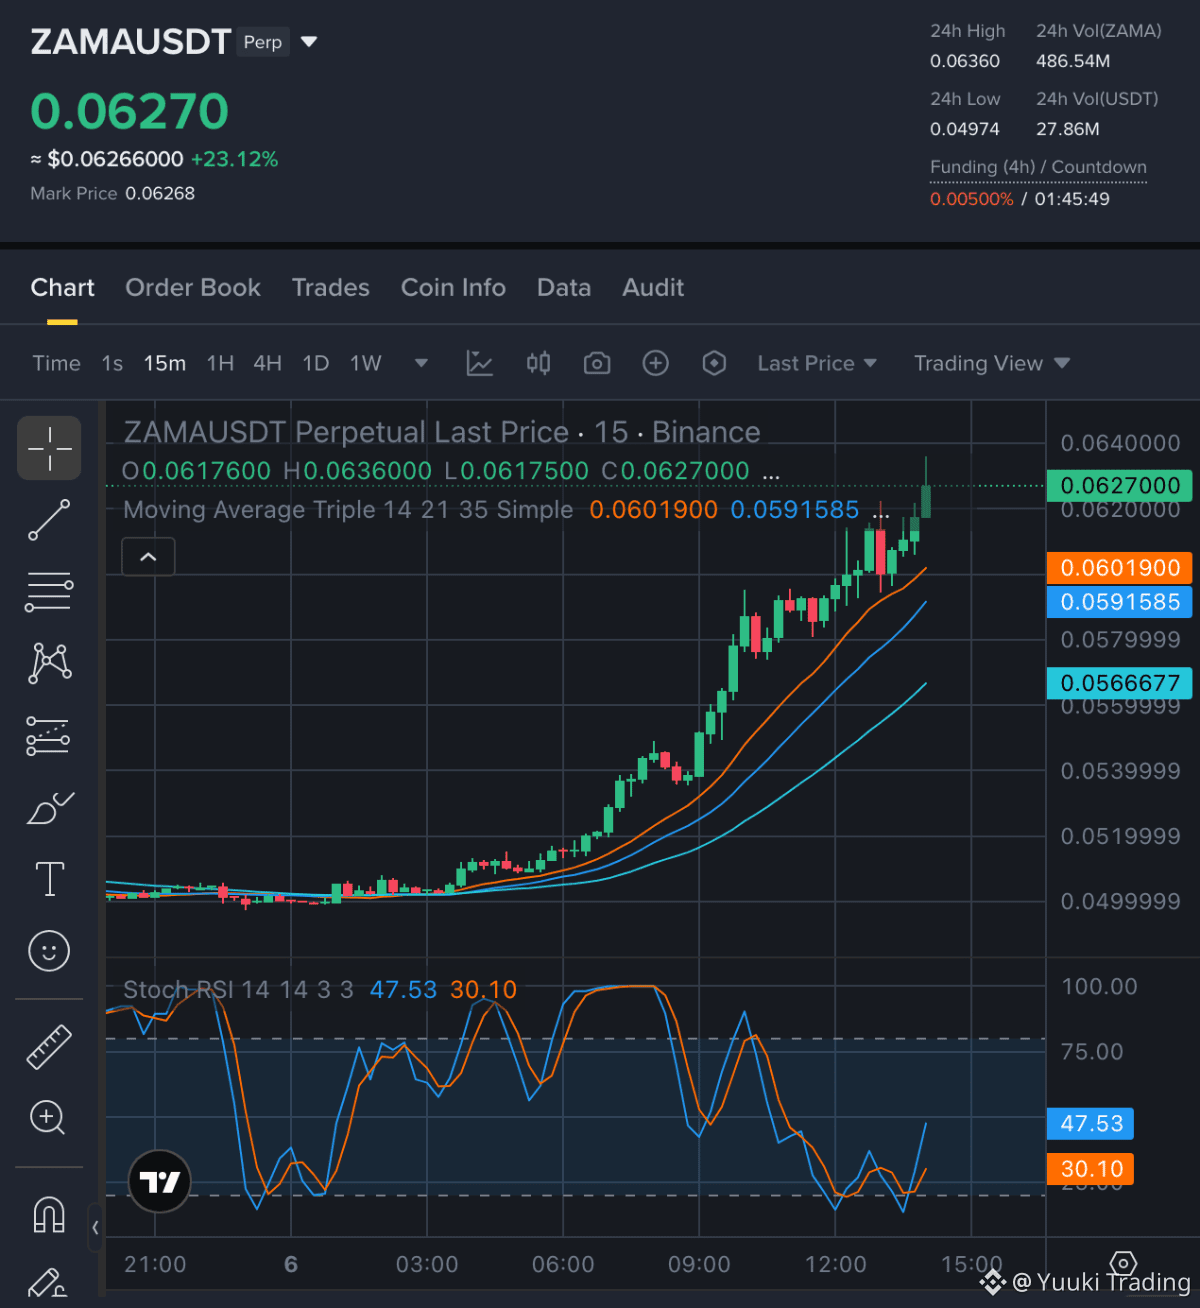
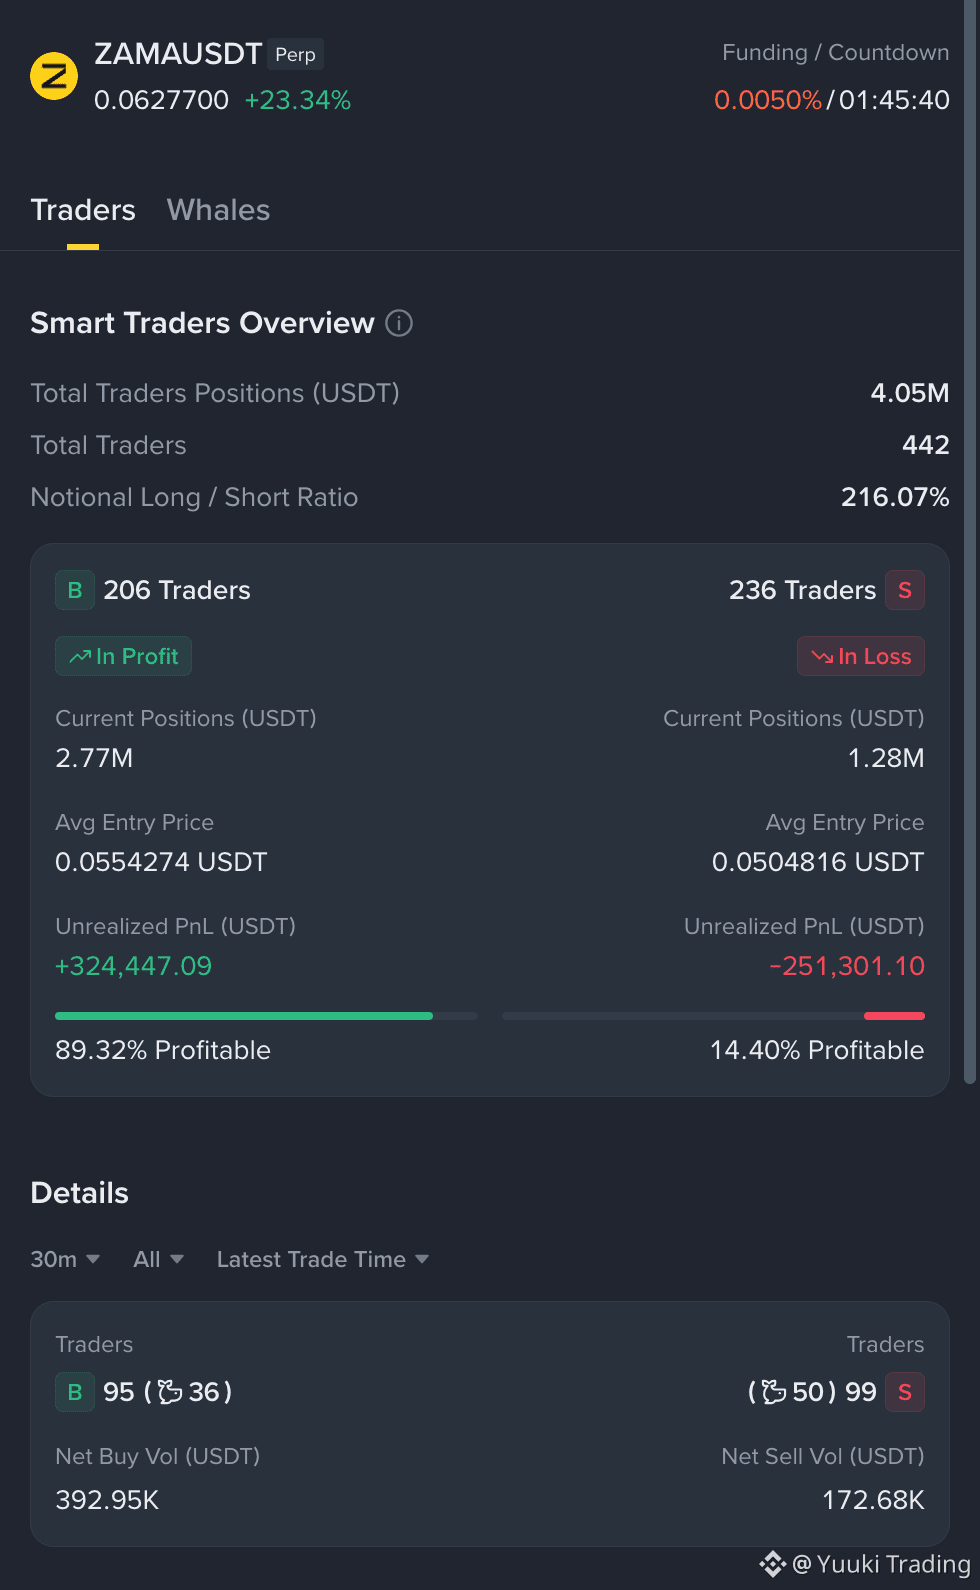
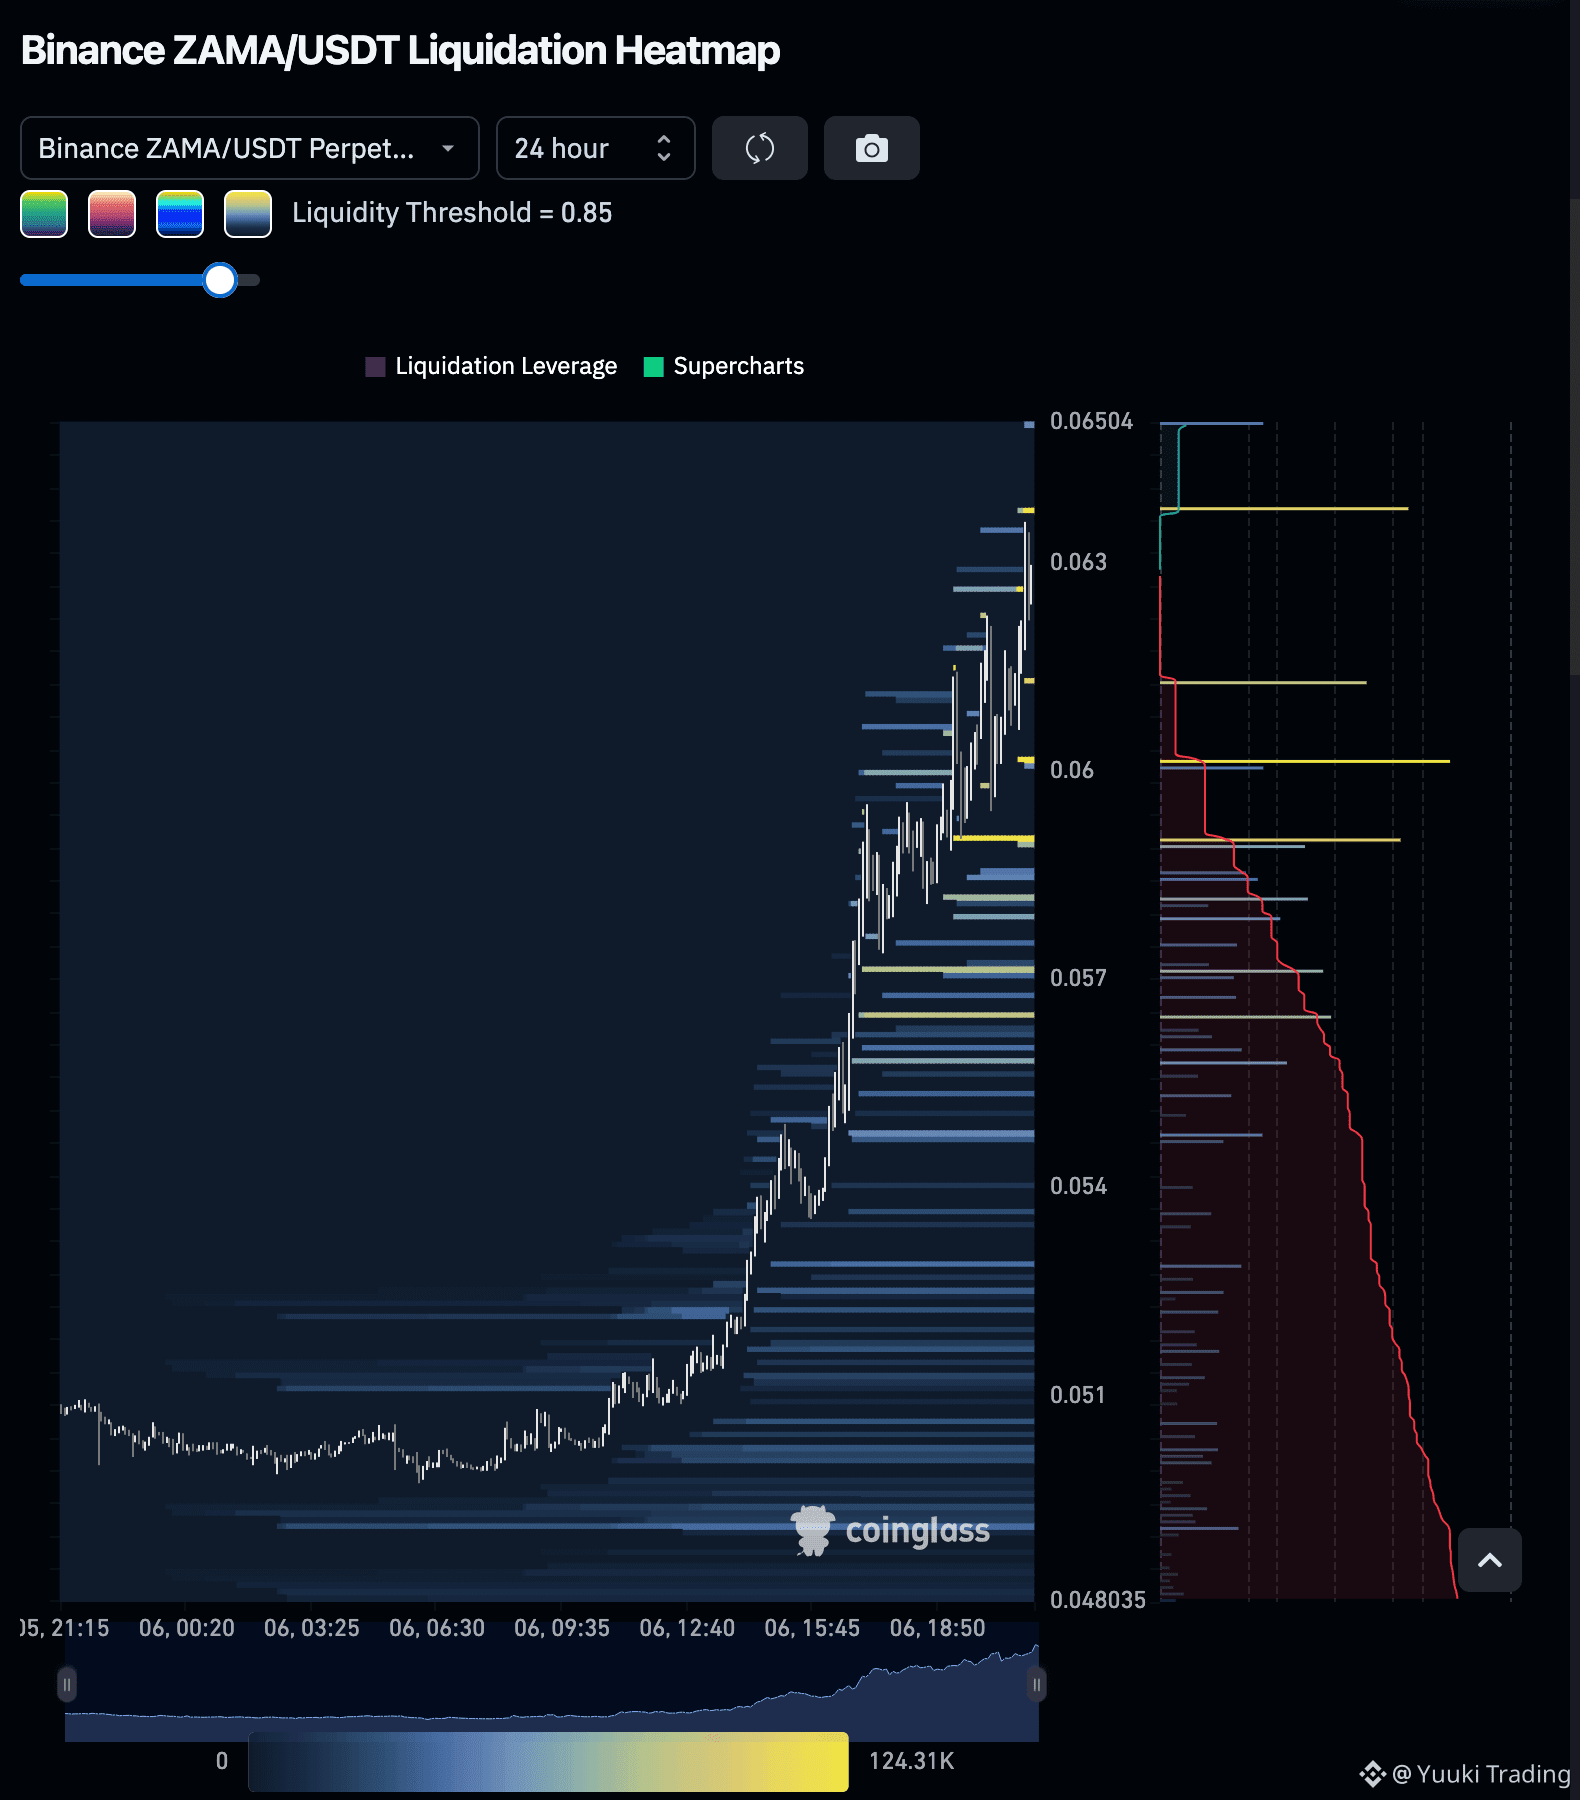
ZAMA — Buyers hold the 15m advantage as price extends above rising averages, while overhead liquidity keeps continuation attractive despite volatility risk.
ZAMA - LONG NOW
Entry Zone: 0.062438 — 0.062982
• TP1: 0.065162
• TP2: 0.066796
• TP3: 0.069248
Stop Loss: 0.059441
Price holds above three rising averages, and Stoch RSI is turning higher from a reset, favoring 15m continuation. Smart Money longs carry larger profitable exposure while shorts remain underwater. Upside liquidity supports the bias, though nearby clusters may trigger volatility.
Disclaimer: This is not financial advice. Always do your own research and take full responsibility for your trading decisions and assets.
Trade $ZAMA here:
ZAMA - LONG NOW
Entry Zone: 0.062438 — 0.062982
• TP1: 0.065162
• TP2: 0.066796
• TP3: 0.069248
Stop Loss: 0.059441
Price holds above three rising averages, and Stoch RSI is turning higher from a reset, favoring 15m continuation. Smart Money longs carry larger profitable exposure while shorts remain underwater. Upside liquidity supports the bias, though nearby clusters may trigger volatility.
Disclaimer: This is not financial advice. Always do your own research and take full responsibility for your trading decisions and assets.
Trade $ZAMA here:
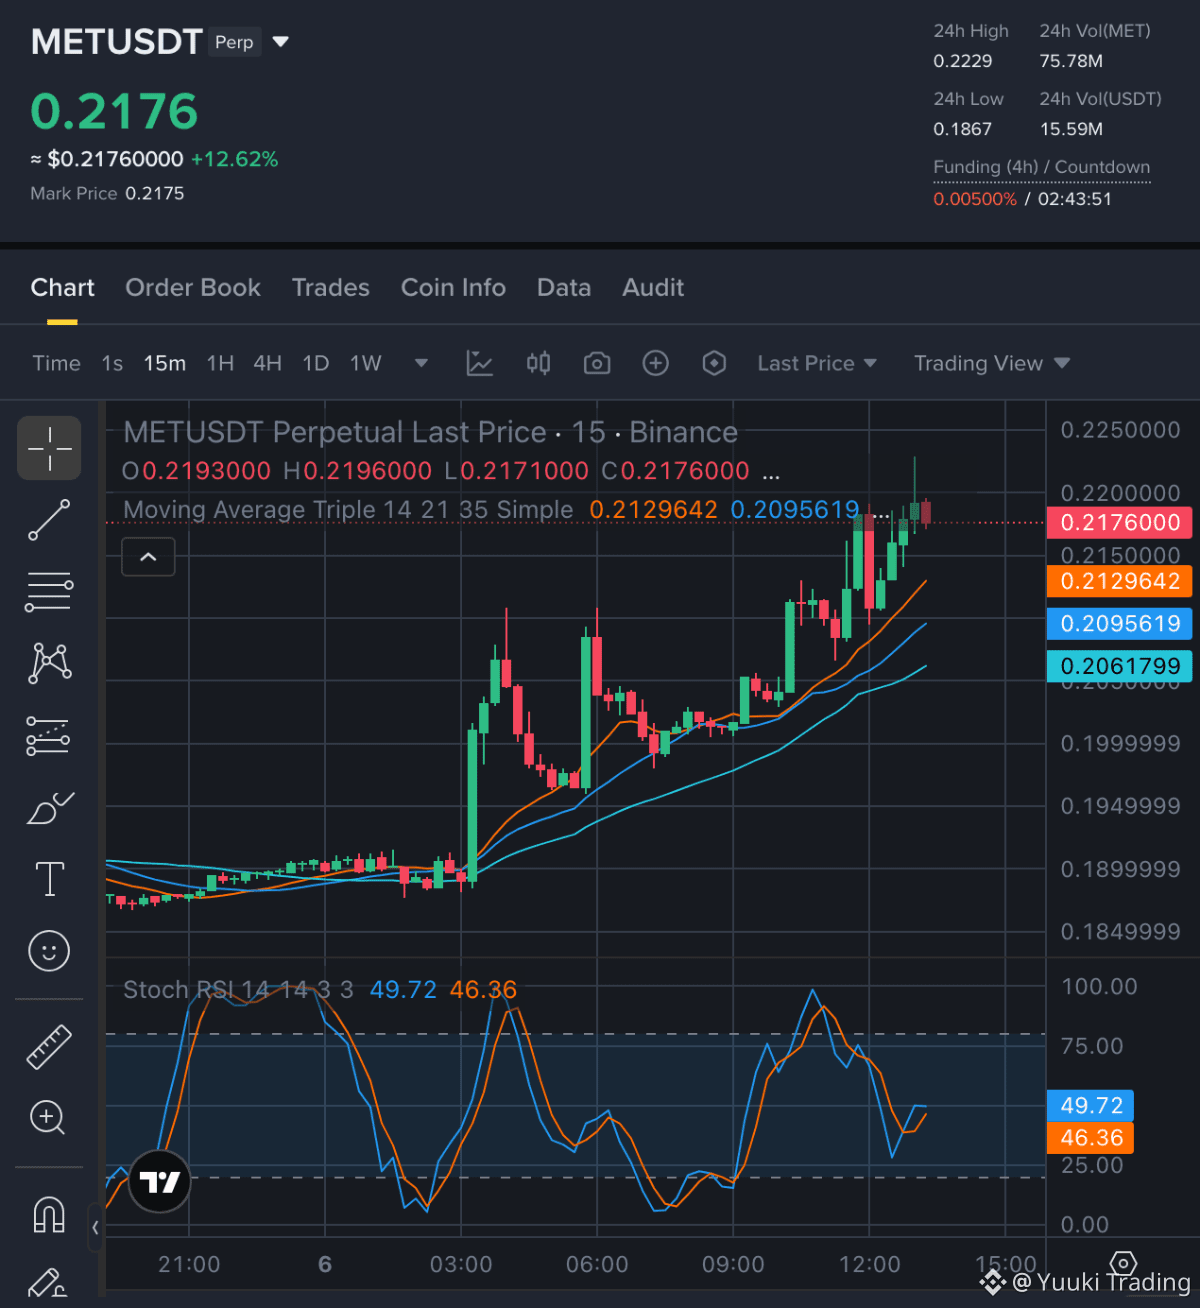
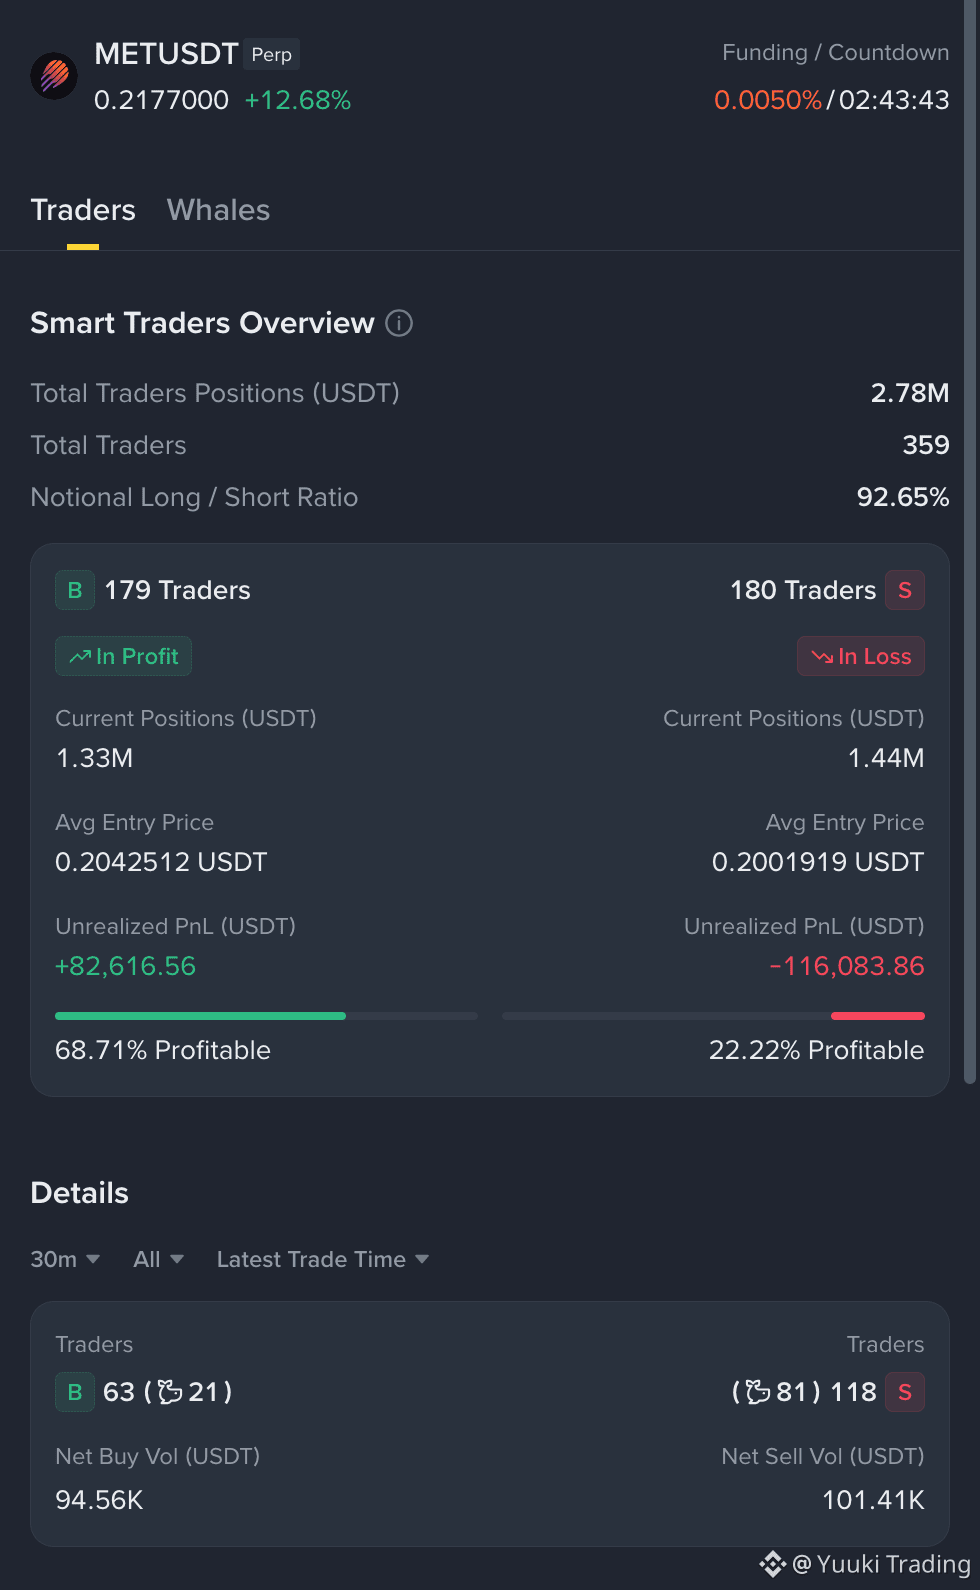
MET — Buyers retain the 15m advantage as rising structure and recovering momentum align with Smart Money profitability tilted toward longs.
MET - LONG NOW
Entry Zone: 0.216939 — 0.218861
• TP1: 0.227096
• TP2: 0.233227
• TP3: 0.242423
Stop Loss: 0.205639
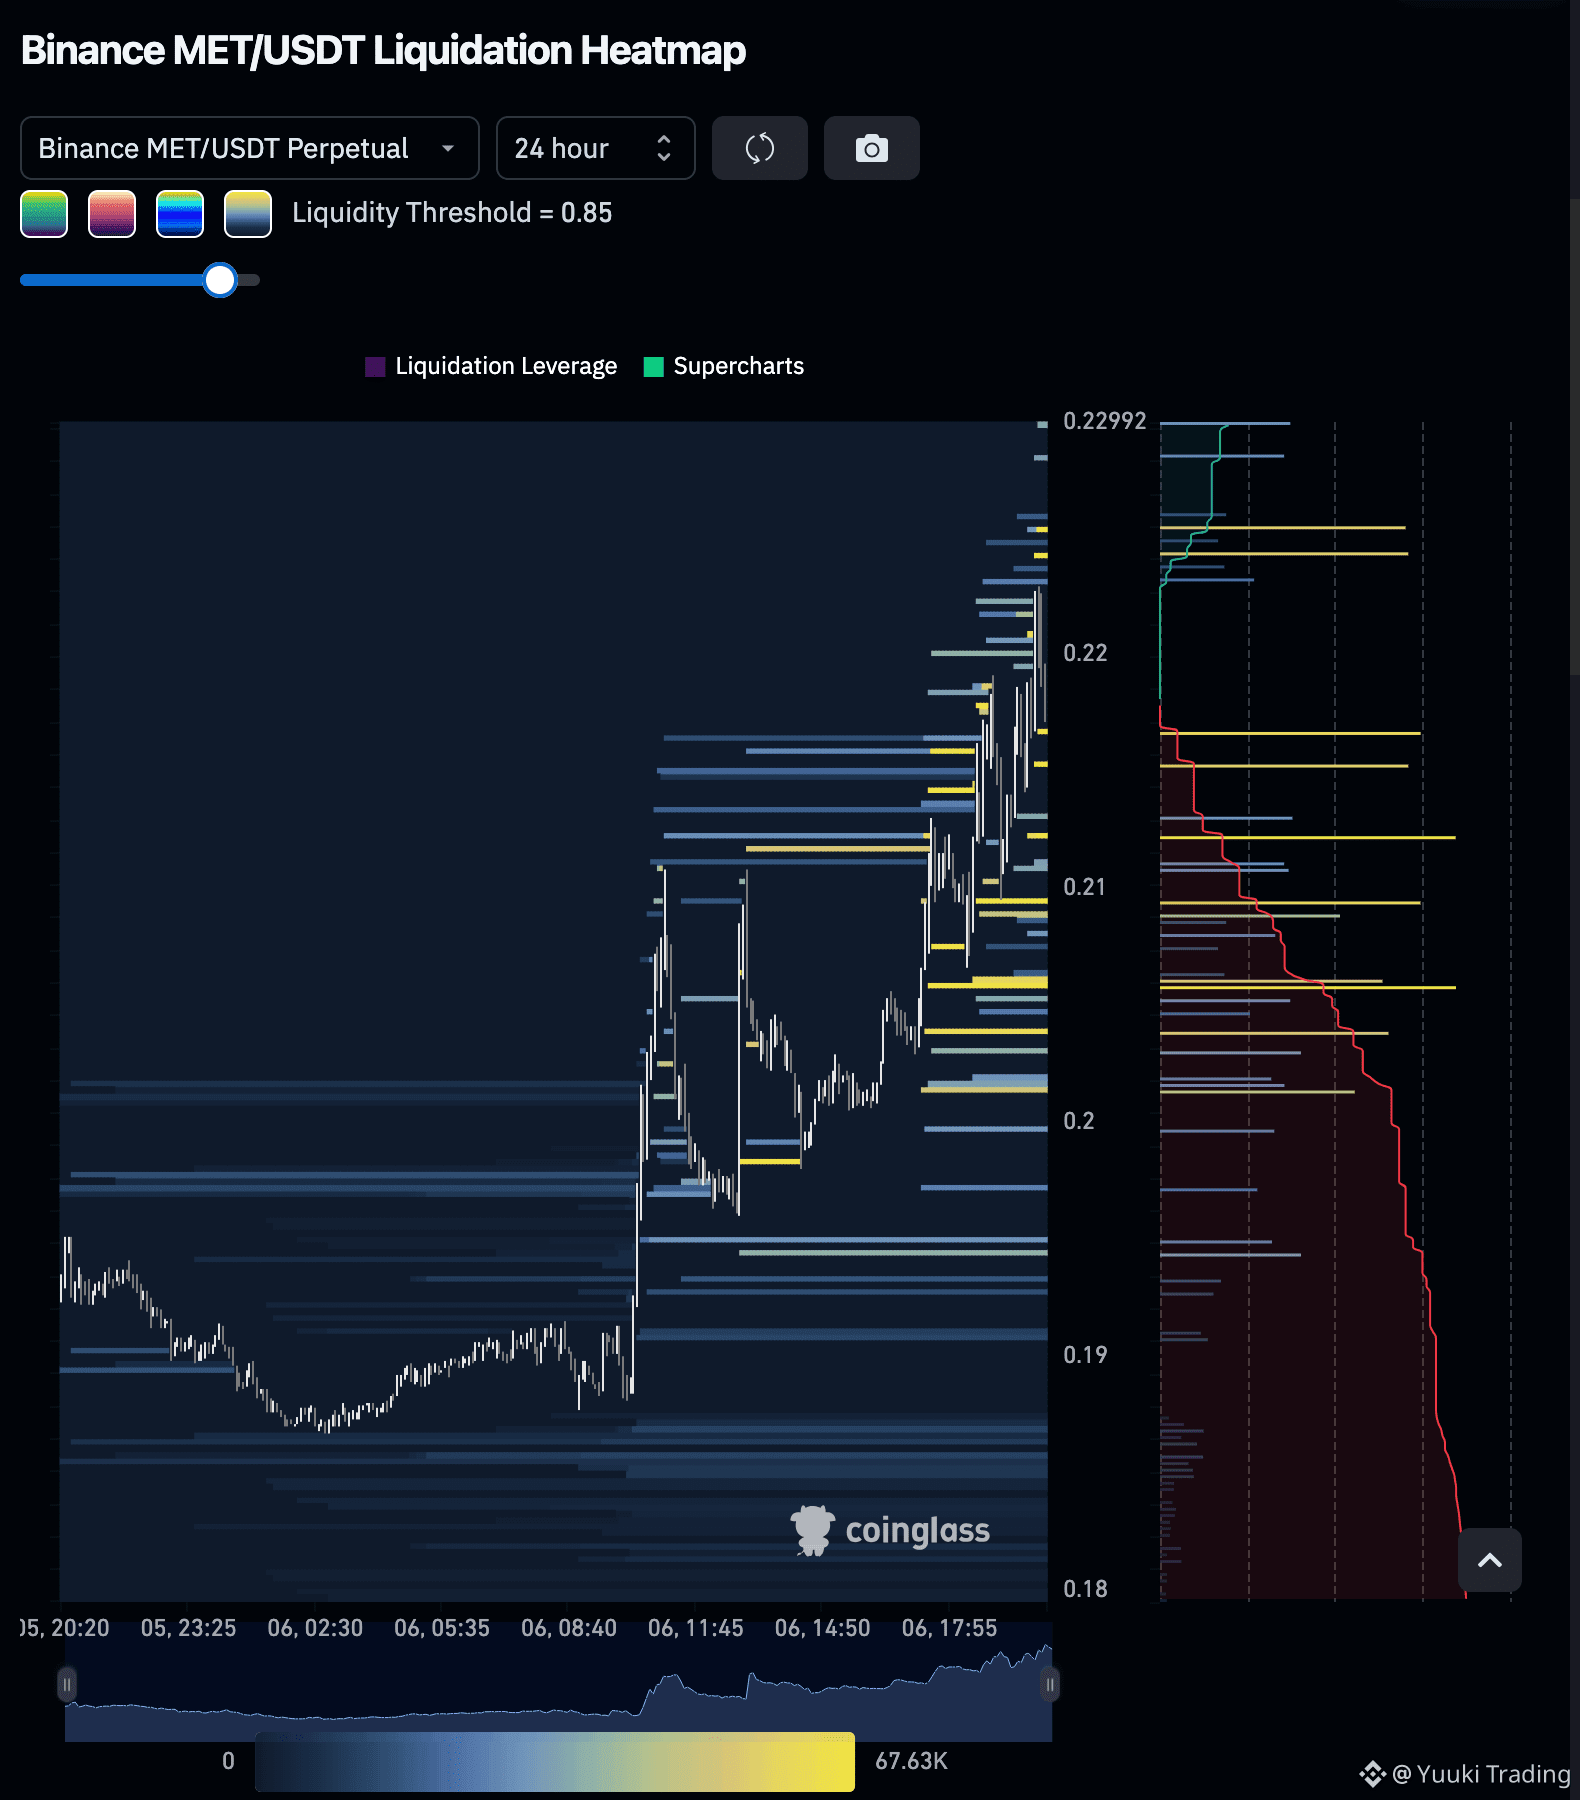
Price holds above the rising 15m average stack, while Stoch RSI recovery supports continuation rather than immediate exhaustion. Positioning favors profitable longs over underwater shorts, and nearby upside liquidity offers a magnet, though dense lower bands preserve pullback risk.
Disclaimer: This is not financial advice. Always do your own research and take full responsibility for your trading decisions and assets.
Trade $MET here:
MET - LONG NOW
Entry Zone: 0.216939 — 0.218861
• TP1: 0.227096
• TP2: 0.233227
• TP3: 0.242423
Stop Loss: 0.205639
Price holds above the rising 15m average stack, while Stoch RSI recovery supports continuation rather than immediate exhaustion. Positioning favors profitable longs over underwater shorts, and nearby upside liquidity offers a magnet, though dense lower bands preserve pullback risk.
Disclaimer: This is not financial advice. Always do your own research and take full responsibility for your trading decisions and assets.
Trade $MET here:
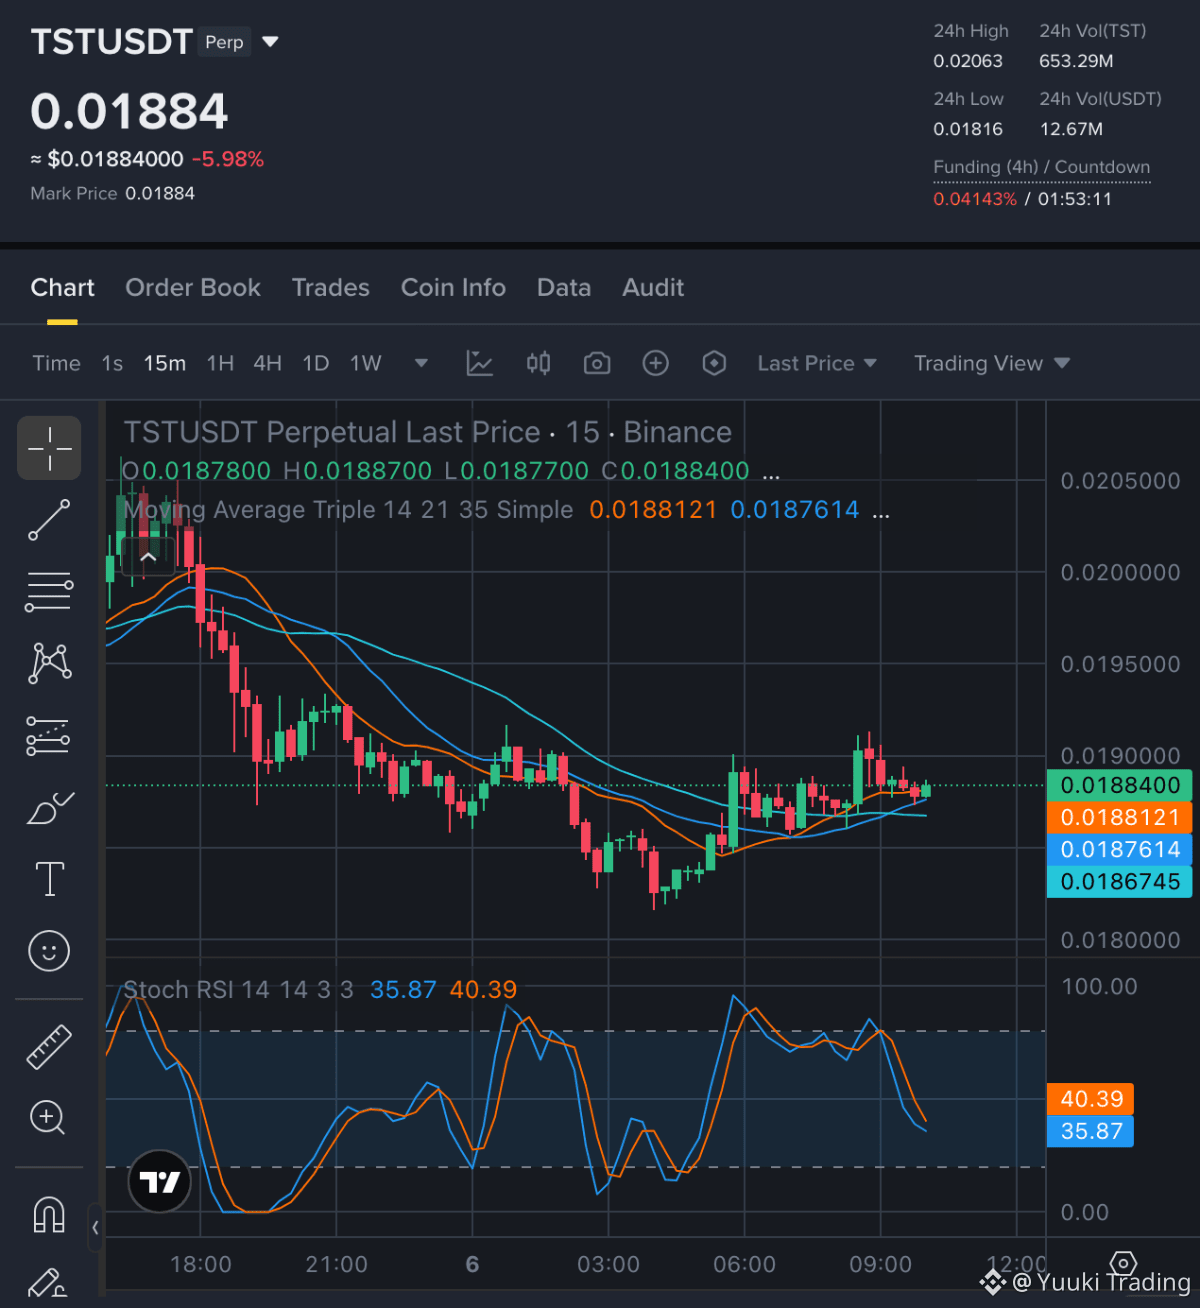
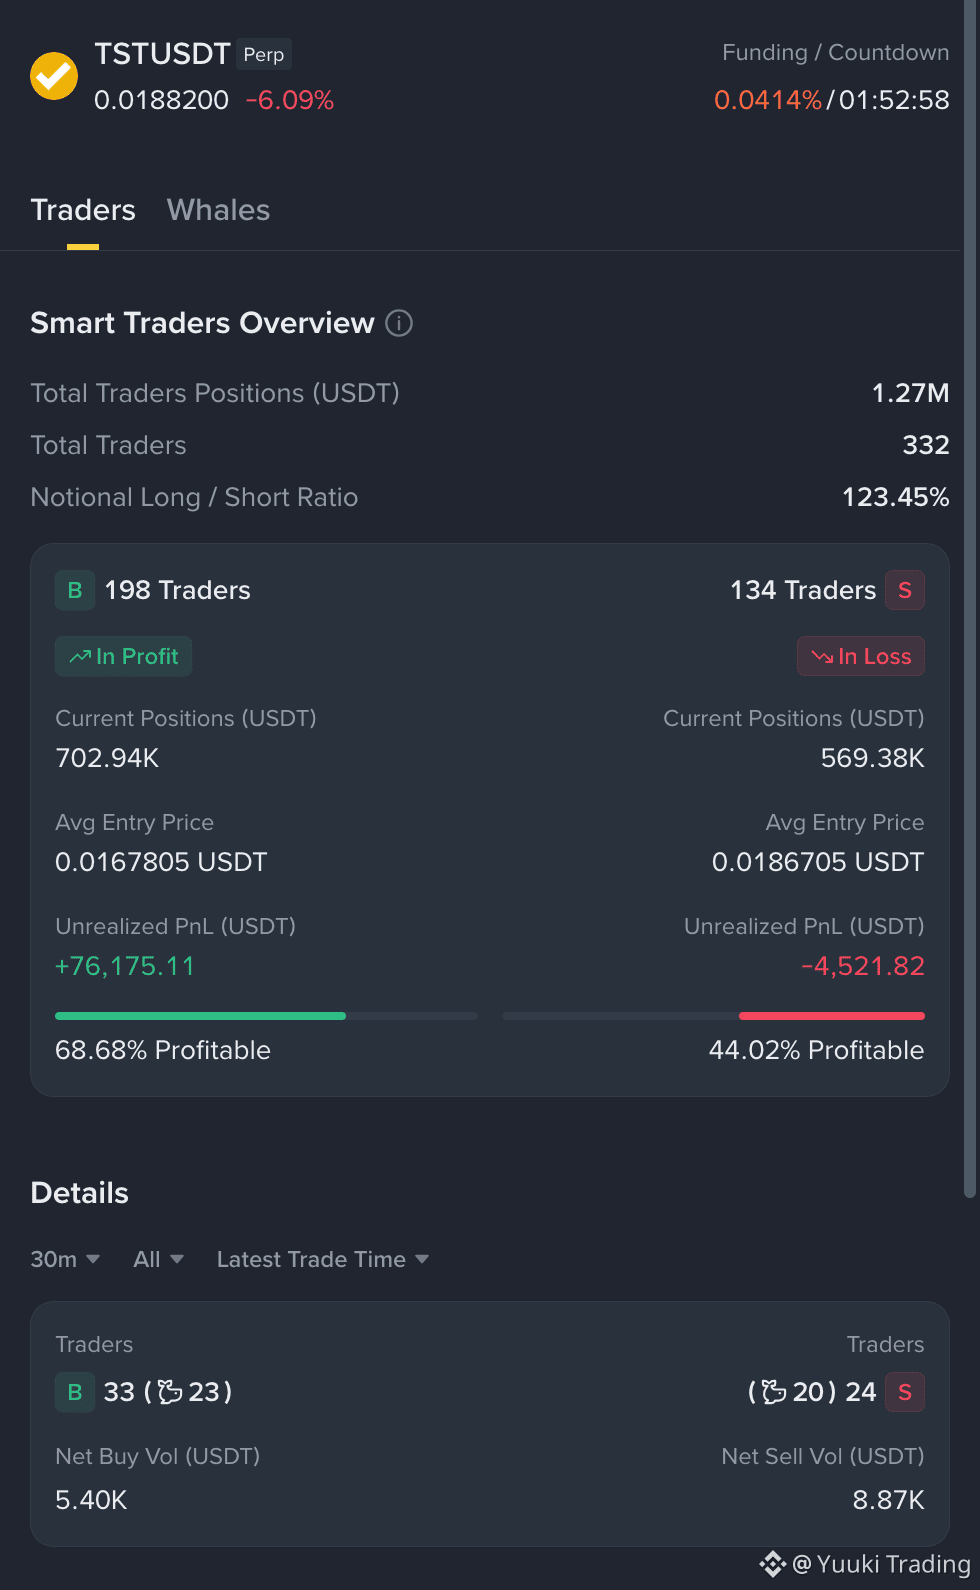
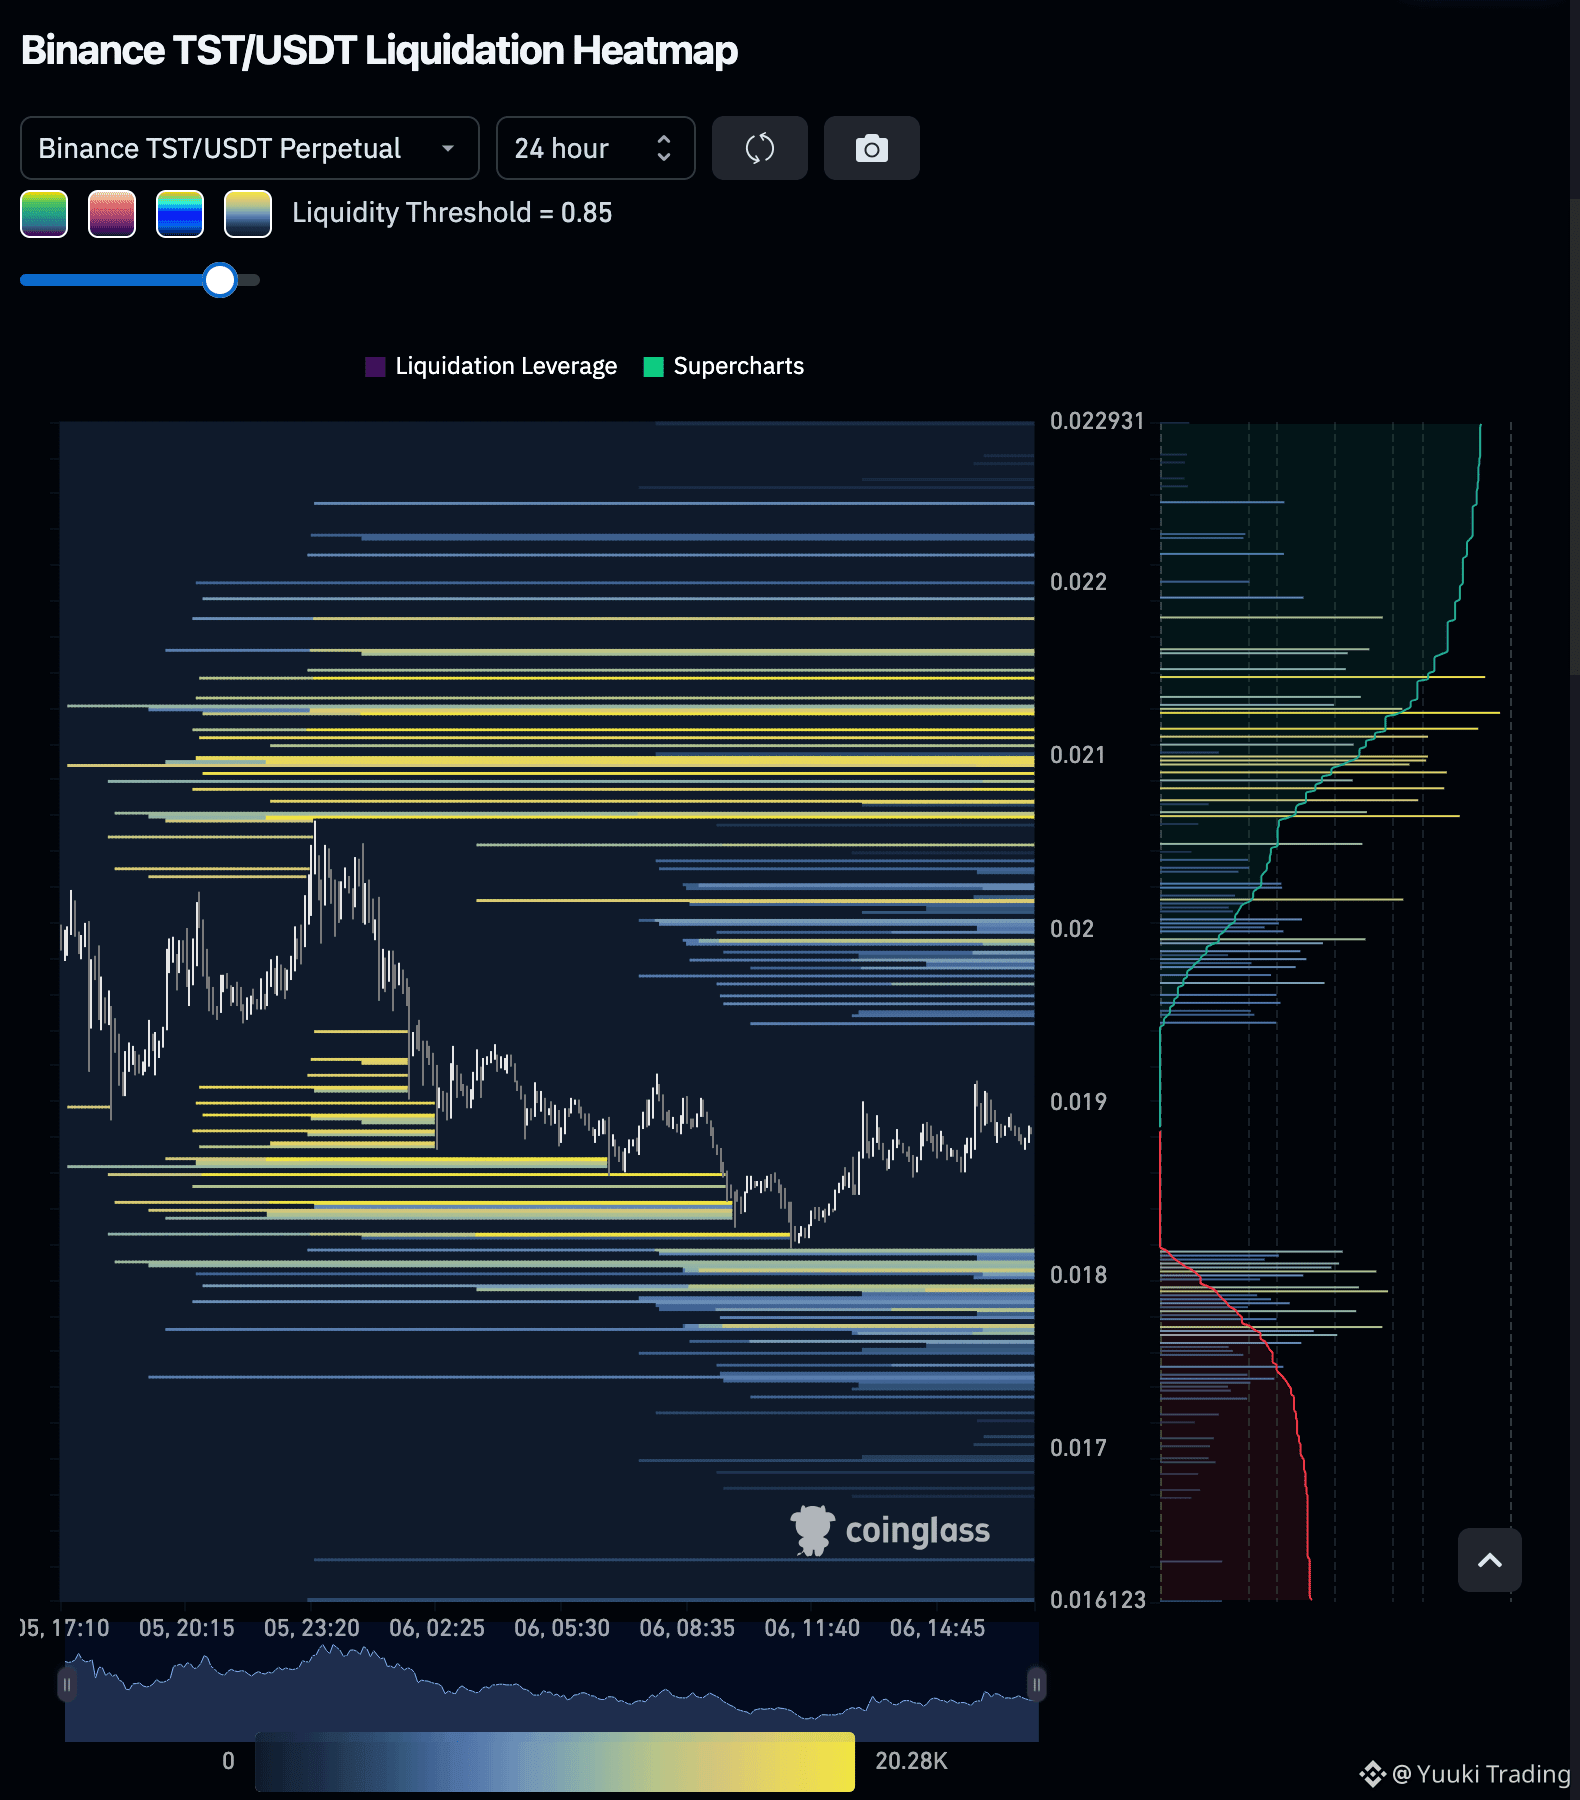
TST — Sellers retain a narrow 15m edge as rebound momentum fades, while profitable Smart Money longs challenge the bearish setup.
TST - SHORT NOW
Entry Zone: 0.018801 — 0.018879
• TP1: 0.01857
• TP2: 0.01816
• TP3: 0.017762
Stop Loss: 0.019379
The 15m rebound is compressing below its recent swing high as Stoch RSI rolls lower, favoring renewed selling. Smart Money leans against the short, with longs more profitable, while heavier upside liquidity adds squeeze risk and limits confirmation.
Disclaimer: This is not financial advice. Always do your own research and take full responsibility for your trading decisions and assets.
Trade $TST here:
TST - SHORT NOW
Entry Zone: 0.018801 — 0.018879
• TP1: 0.01857
• TP2: 0.01816
• TP3: 0.017762
Stop Loss: 0.019379
The 15m rebound is compressing below its recent swing high as Stoch RSI rolls lower, favoring renewed selling. Smart Money leans against the short, with longs more profitable, while heavier upside liquidity adds squeeze risk and limits confirmation.
Disclaimer: This is not financial advice. Always do your own research and take full responsibility for your trading decisions and assets.
Trade $TST here:
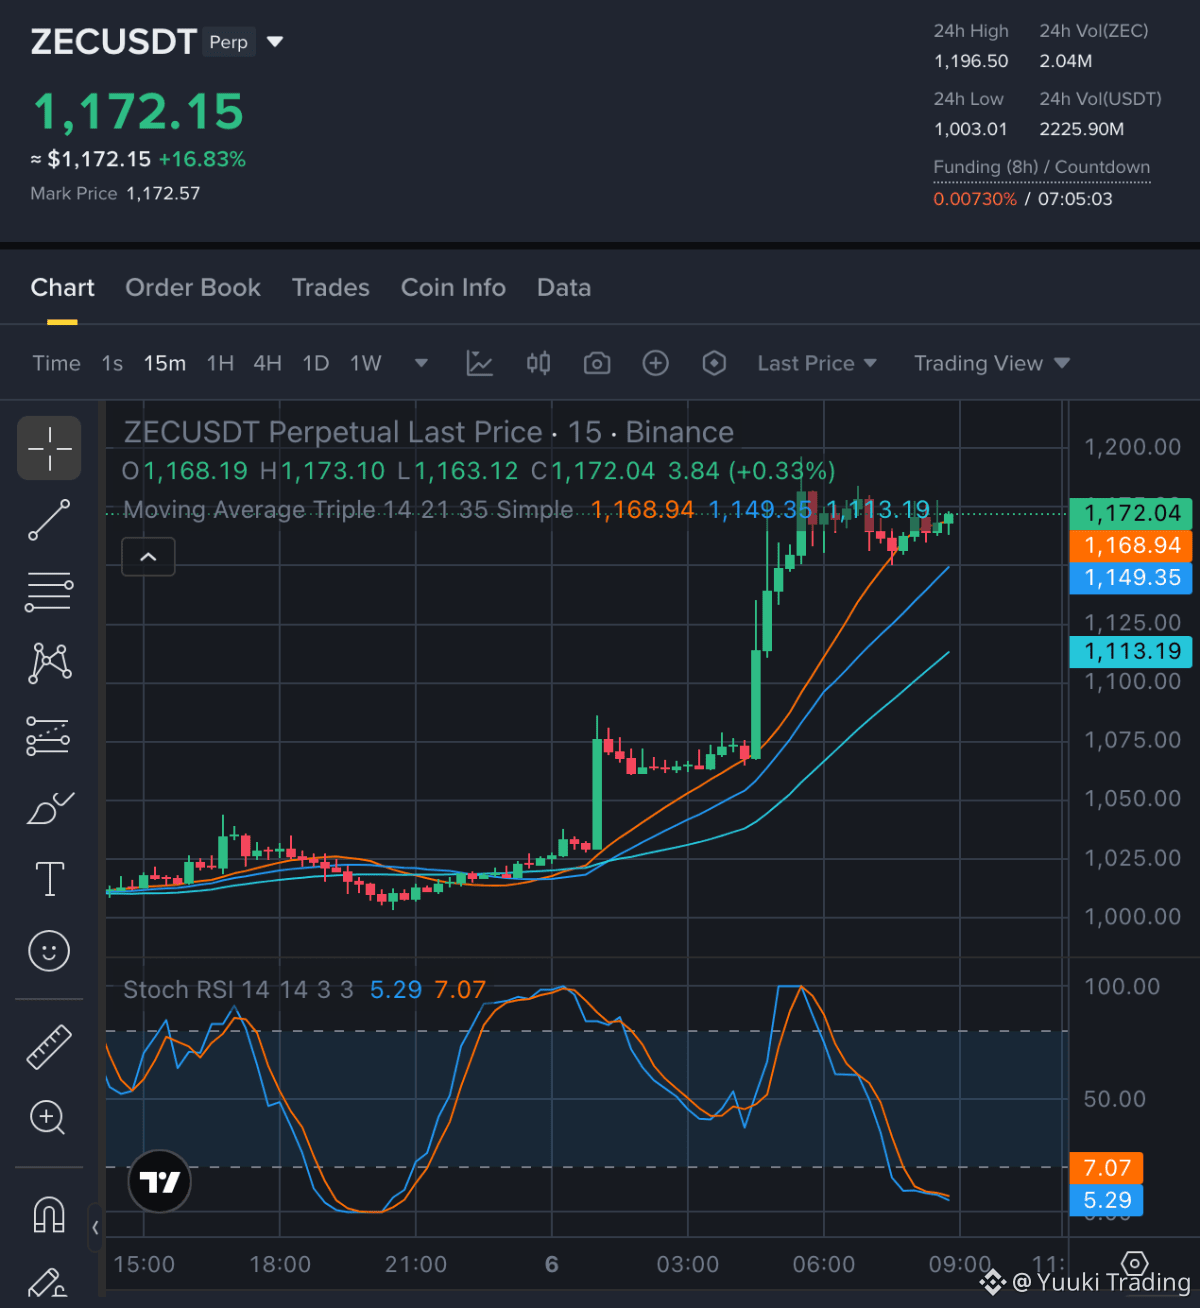
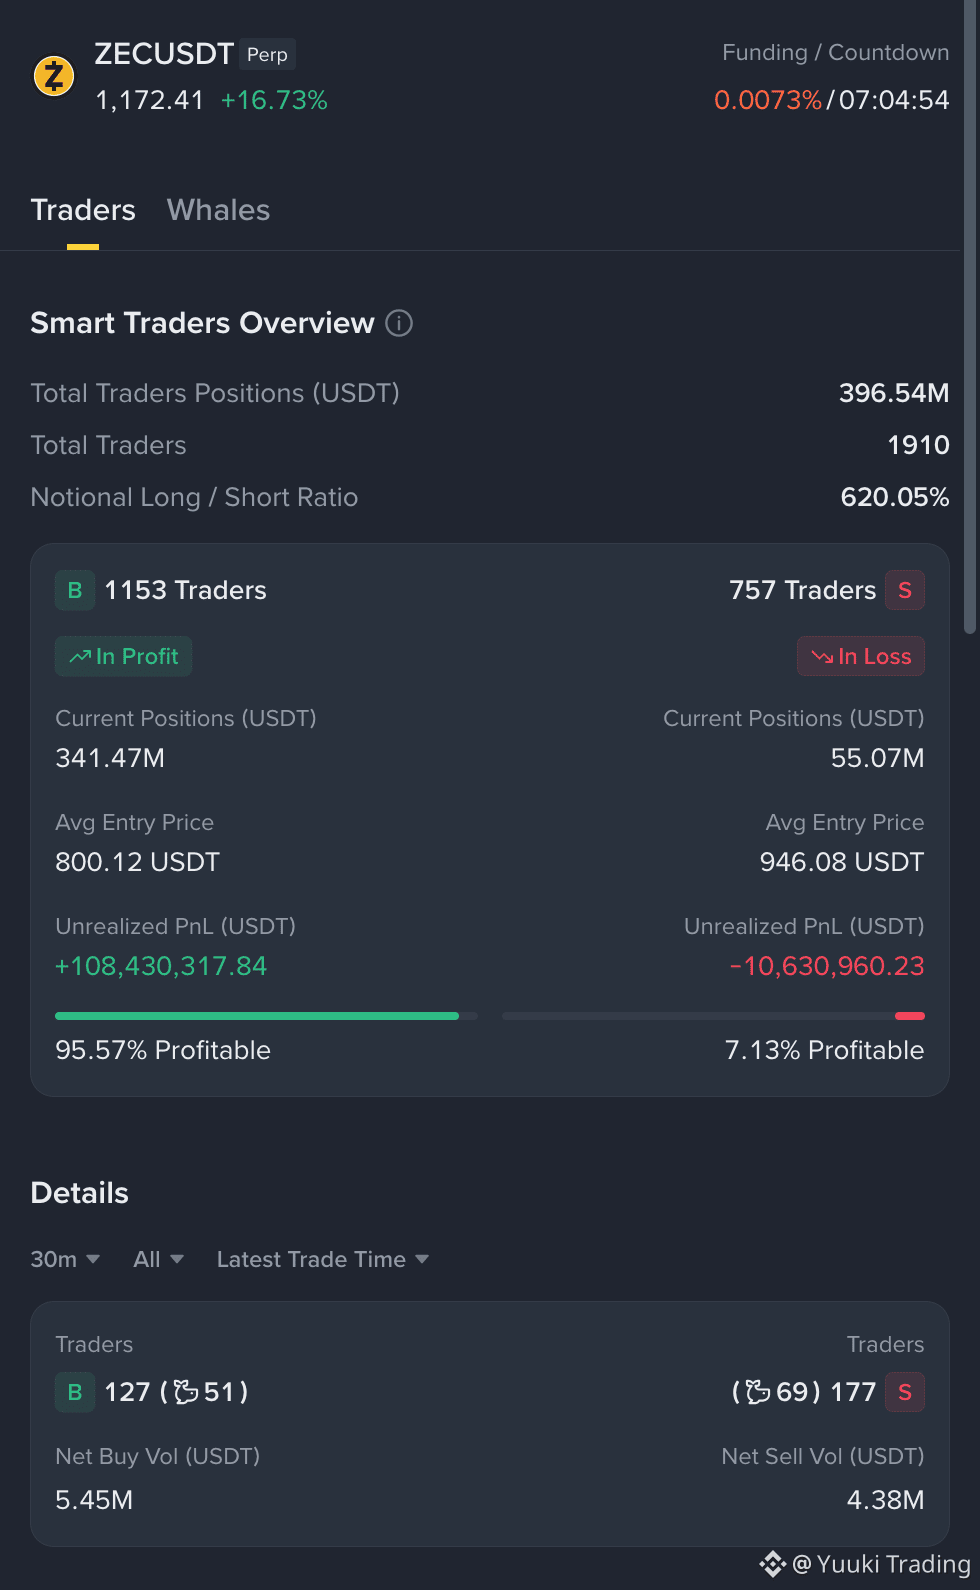
ZEC — Buyers retain the 15m advantage as bullish structure and profitable Smart Money longs outweigh near-term consolidation risk.
ZEC - LONG NOW
Entry Zone: 1,146.77 — 1,153.81
• TP1: 1,183.99
• TP2: 1,196.50
• TP3: 1,234.68
Stop Loss: 1,108.09
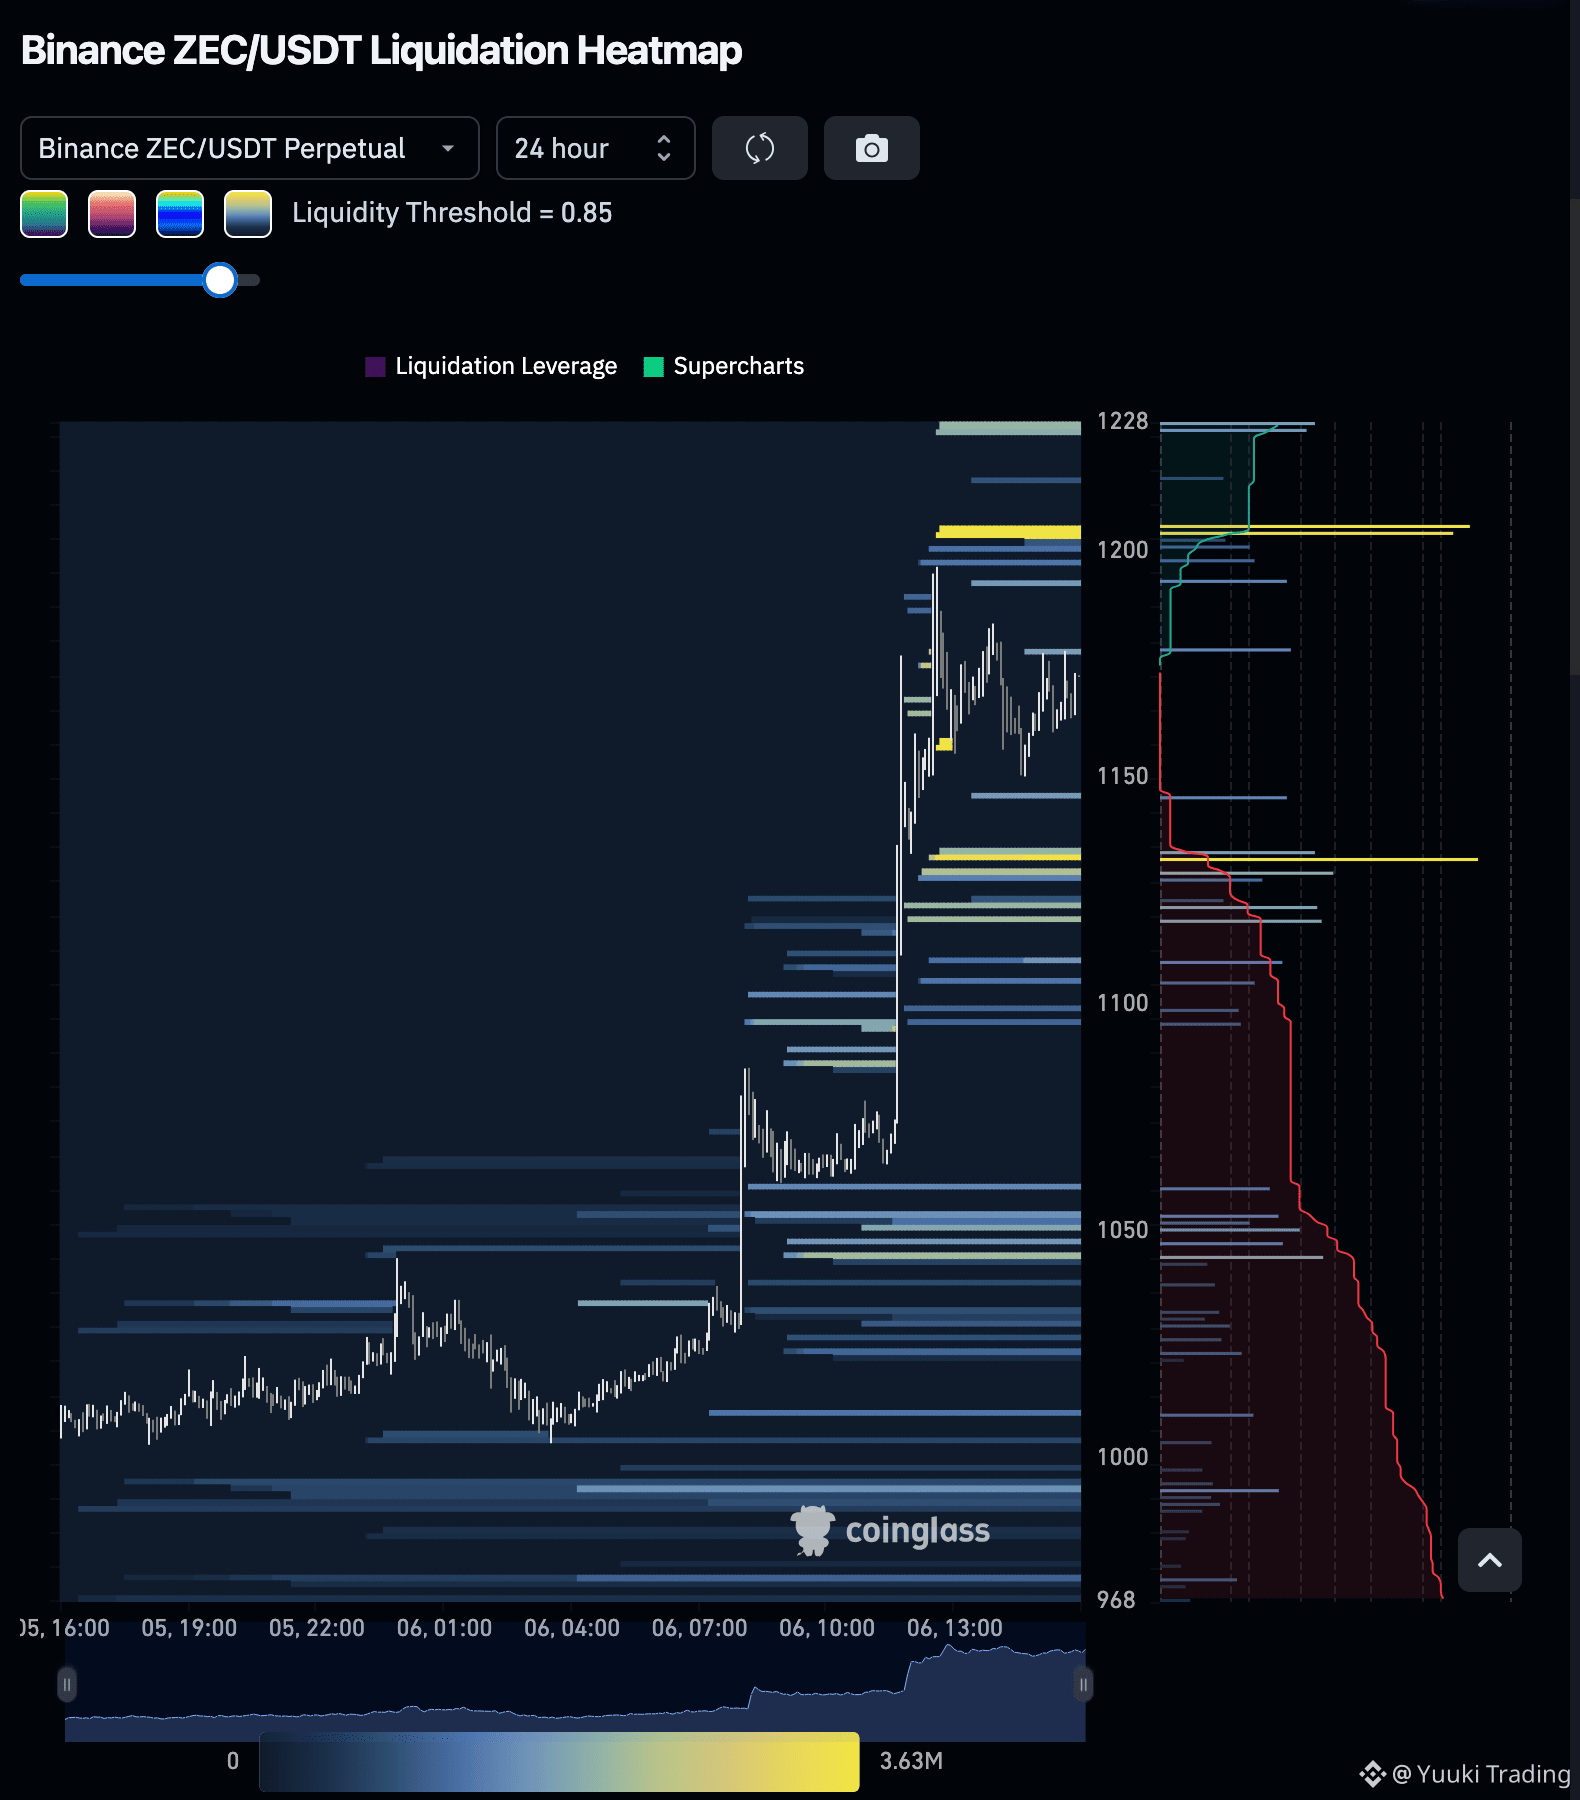
Price holds above rising moving averages after an impulsive 15m advance, while cooled momentum favors a pullback entry rather than chasing. Smart Money favors profitable longs over losing shorts, and heavier upside liquidity supports continuation, though consolidation risk remains.
Disclaimer: This is not financial advice. Always do your own research and take full responsibility for your trading decisions and assets.
Trade $ZEC here:
ZEC - LONG NOW
Entry Zone: 1,146.77 — 1,153.81
• TP1: 1,183.99
• TP2: 1,196.50
• TP3: 1,234.68
Stop Loss: 1,108.09
Price holds above rising moving averages after an impulsive 15m advance, while cooled momentum favors a pullback entry rather than chasing. Smart Money favors profitable longs over losing shorts, and heavier upside liquidity supports continuation, though consolidation risk remains.
Disclaimer: This is not financial advice. Always do your own research and take full responsibility for your trading decisions and assets.
Trade $ZEC here:
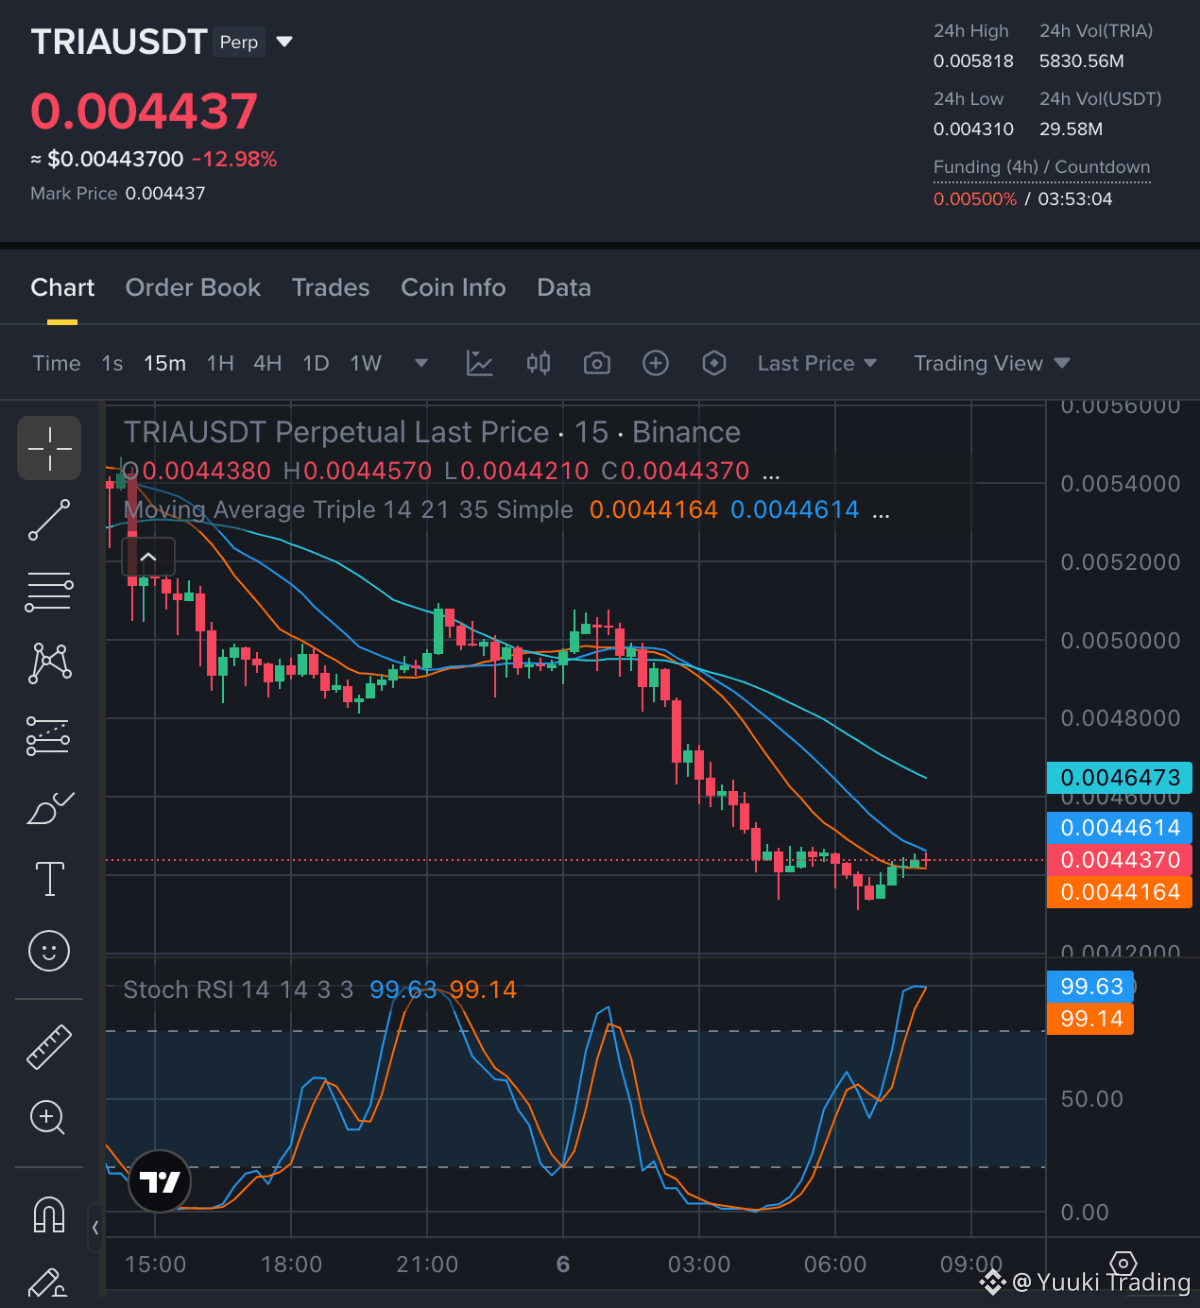
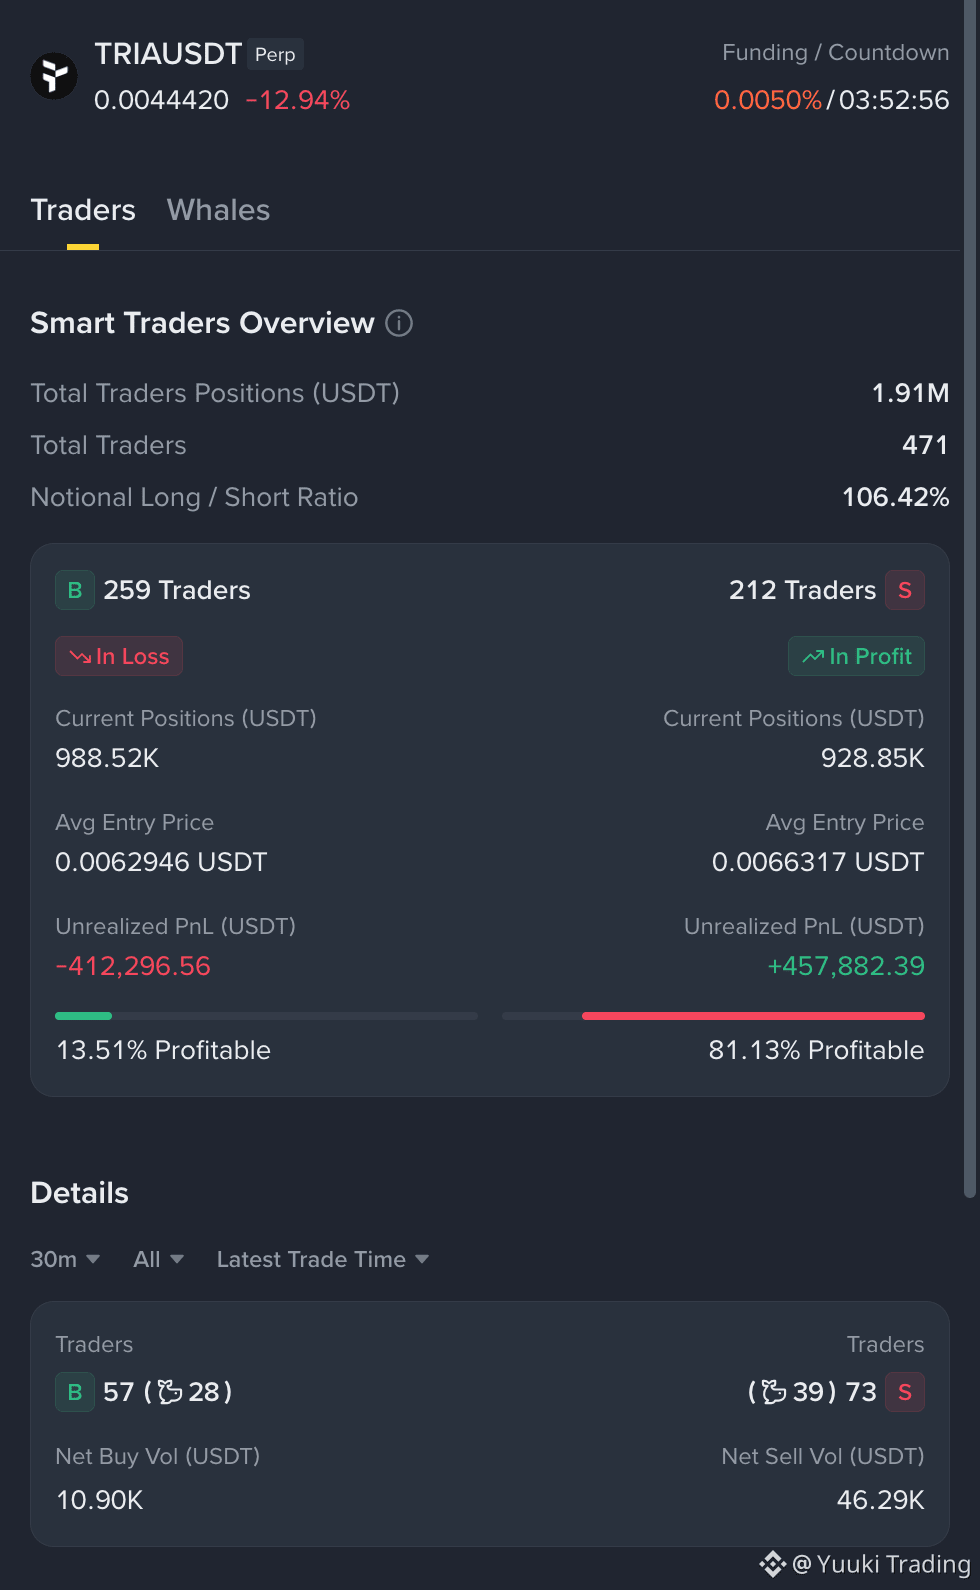
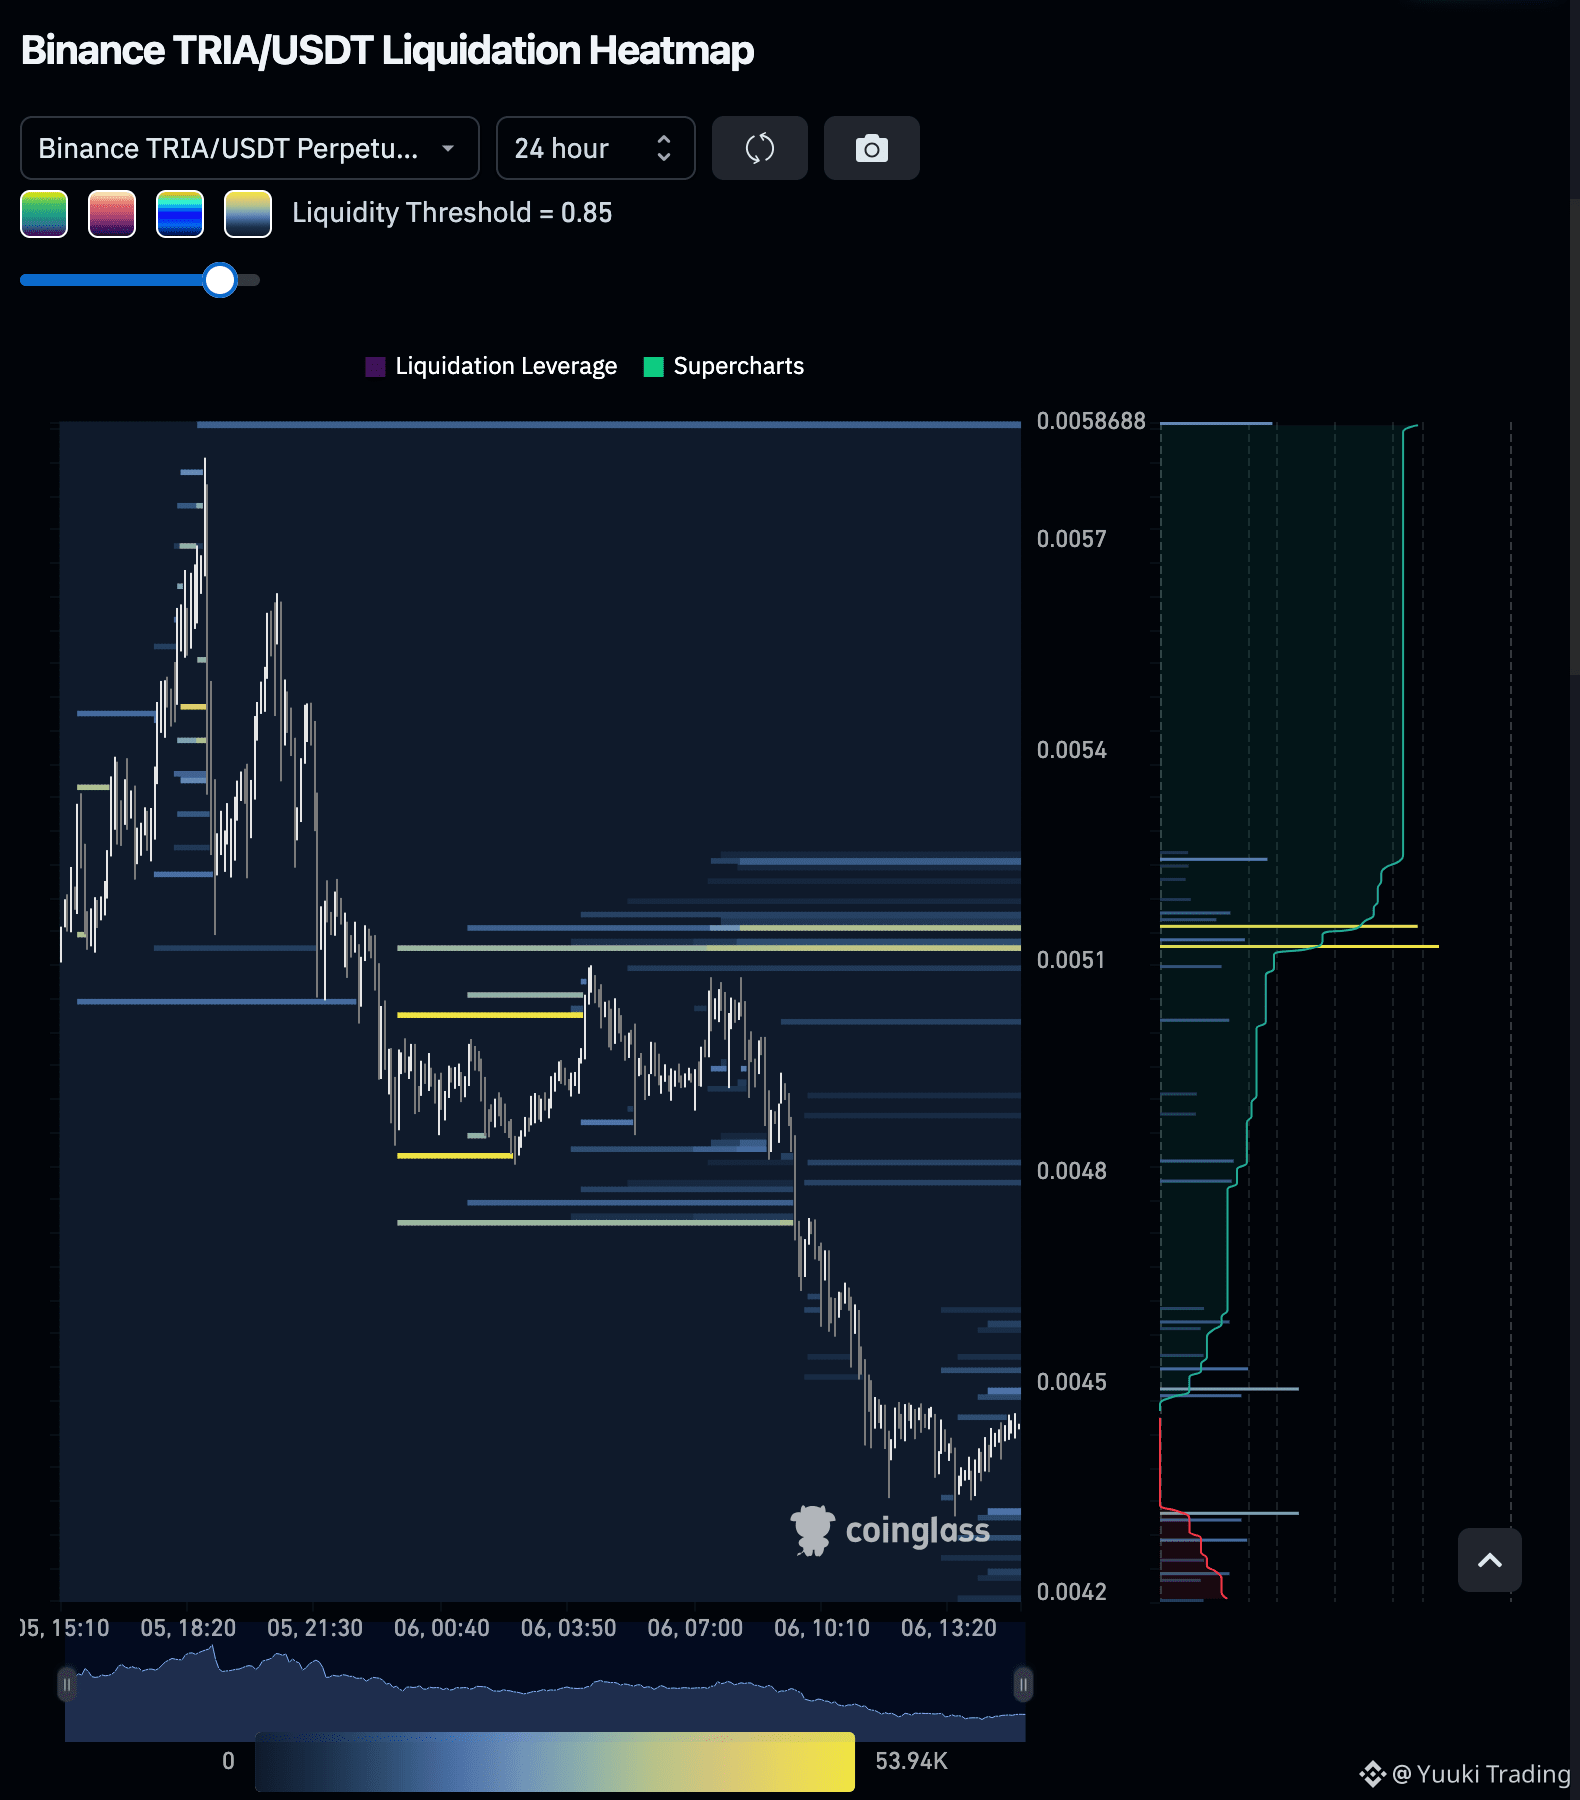
TRIA — On 15m, sellers hold the edge as bearish structure combines with weaker aggressive buying, keeping the latest rebound vulnerable to renewed pressure.
TRIA - SHORT NOW
Entry Zone: 0.0044837718 — 0.0045094861
• TP1: 0.004336
• TP2: 0.00431
• TP3: 0.0041880575
Stop Loss: 0.0046509146
Although price is up +0.43% on 15m, the structure remains bearish. The taker buy/sell ratio of 0.8522 favors aggressive sellers, while 0.70x relative volume limits the rebound’s conviction.
Disclaimer: This is not financial advice. Always do your own research and take full responsibility for your trading decisions and assets.
Trade $TRIA here:
TRIA - SHORT NOW
Entry Zone: 0.0044837718 — 0.0045094861
• TP1: 0.004336
• TP2: 0.00431
• TP3: 0.0041880575
Stop Loss: 0.0046509146
Although price is up +0.43% on 15m, the structure remains bearish. The taker buy/sell ratio of 0.8522 favors aggressive sellers, while 0.70x relative volume limits the rebound’s conviction.
Disclaimer: This is not financial advice. Always do your own research and take full responsibility for your trading decisions and assets.
Trade $TRIA here:
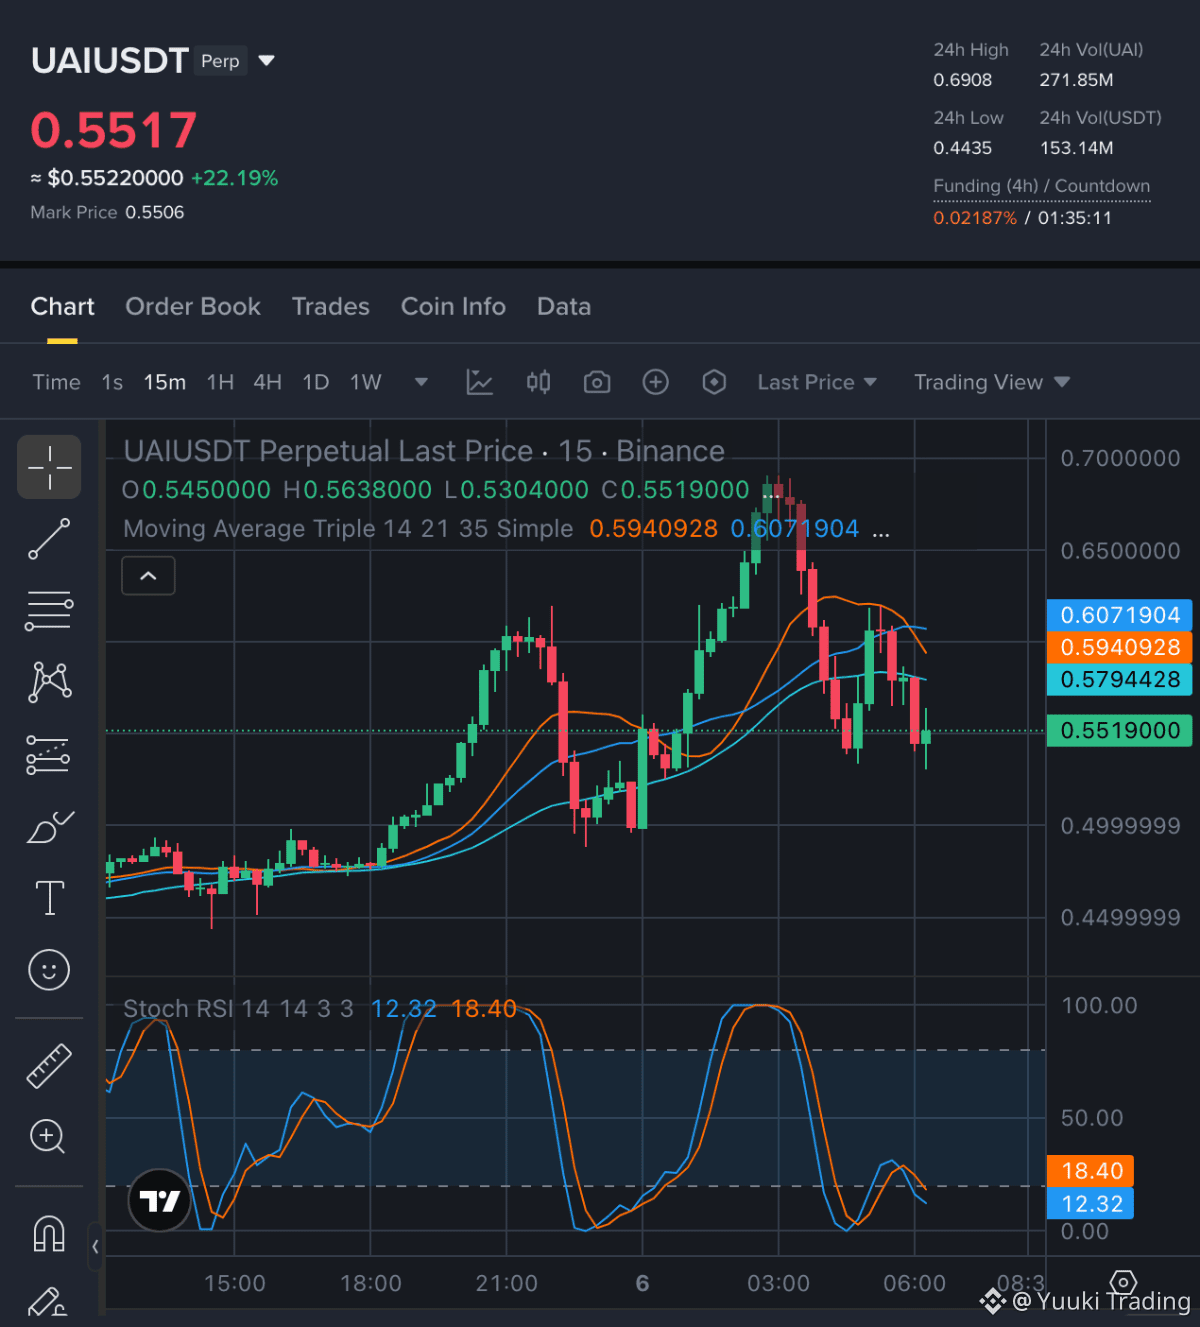
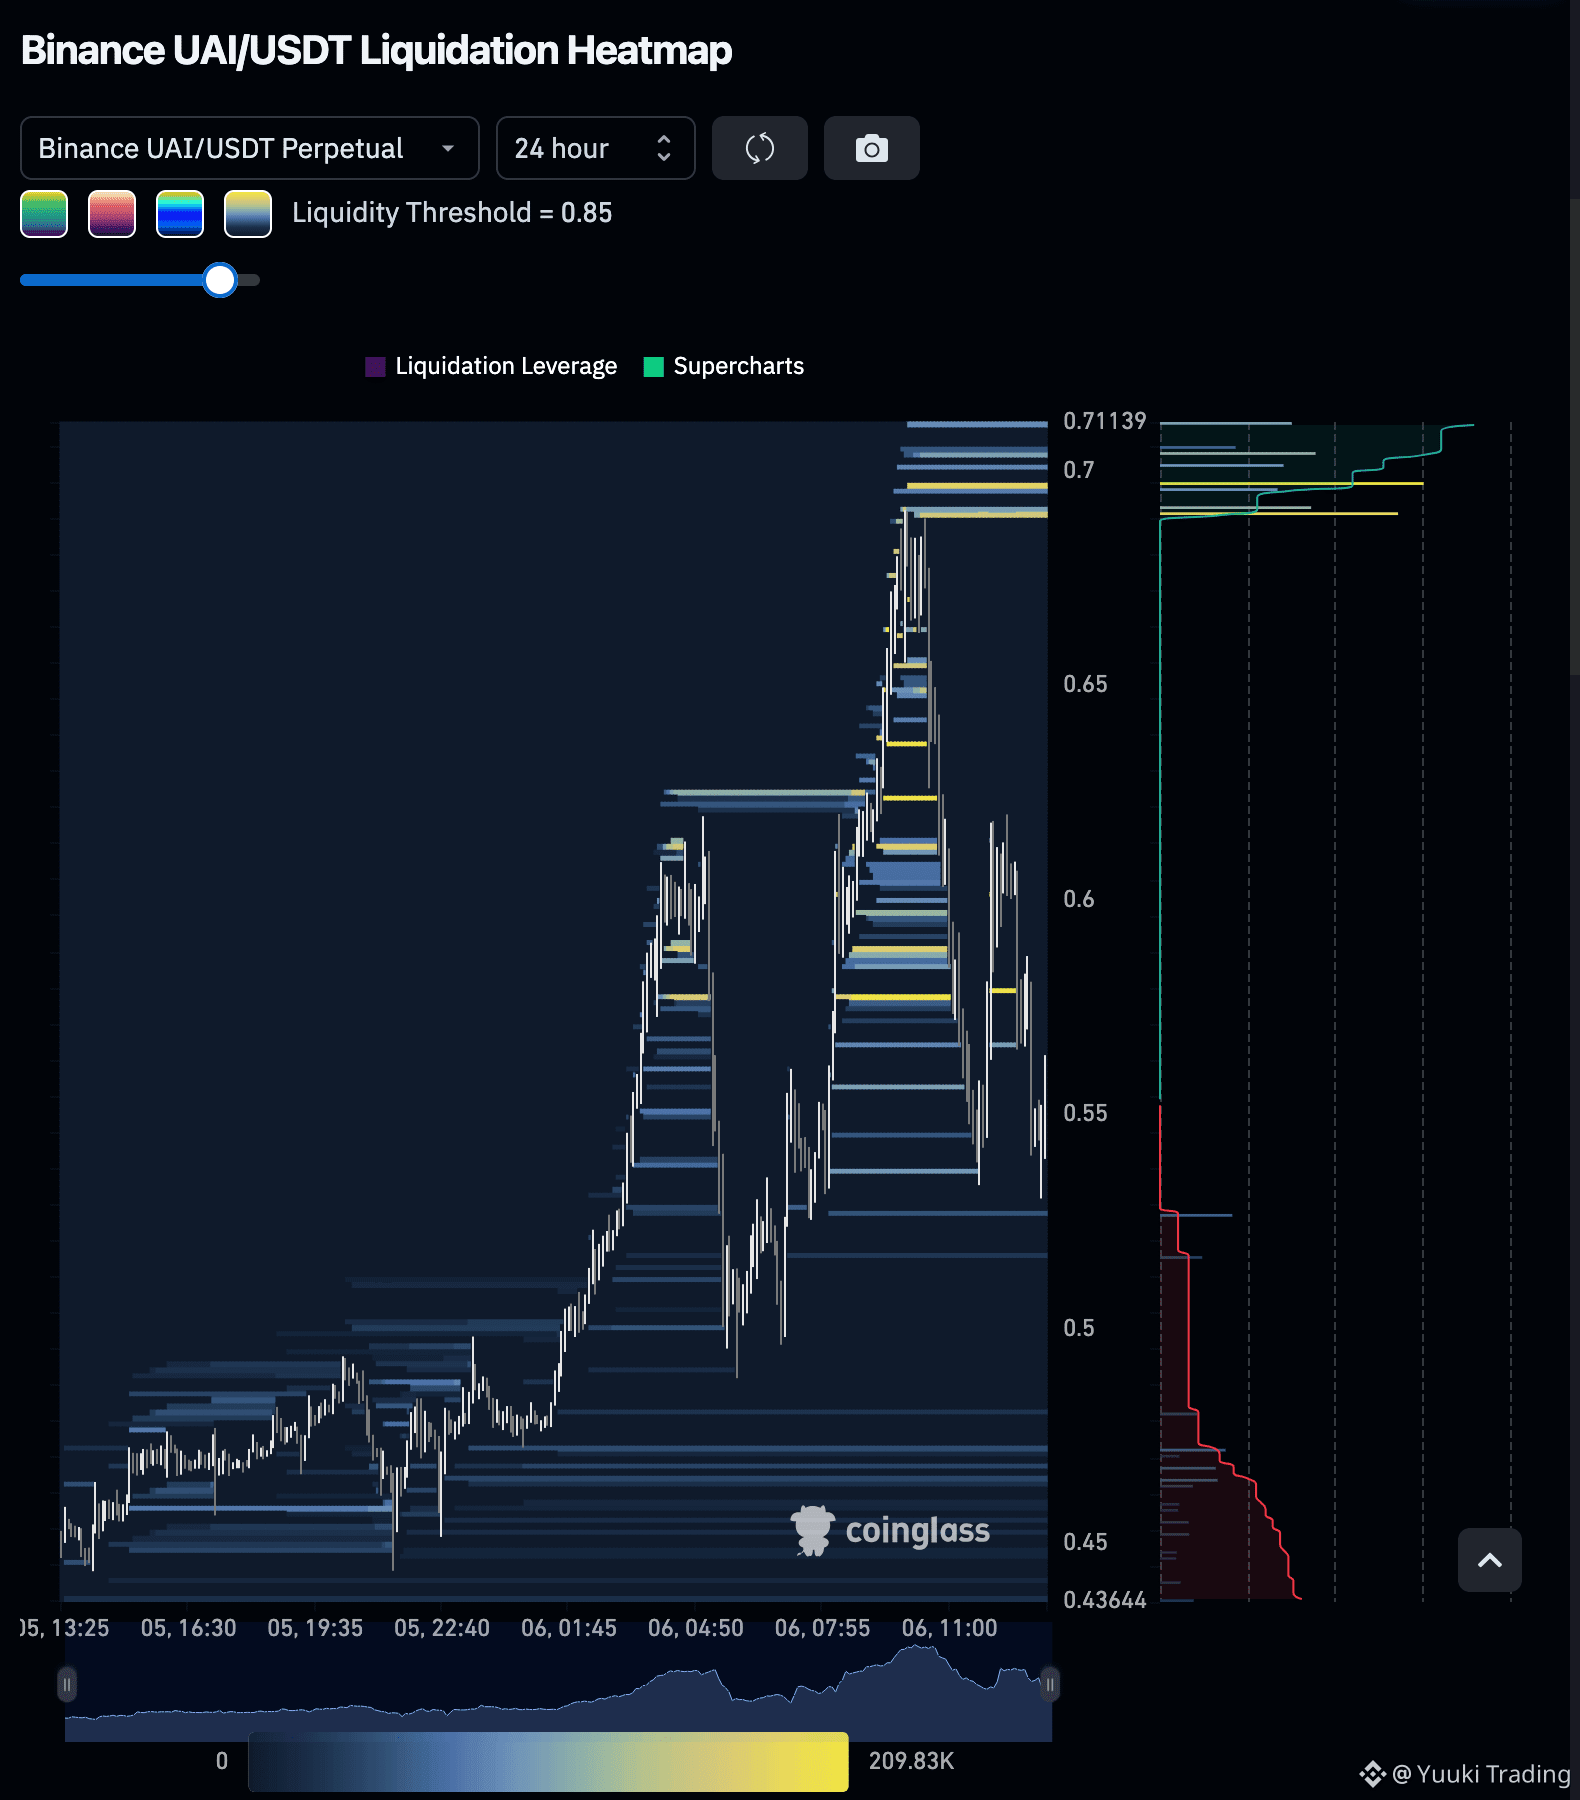
UAI — Sharp 15m downside momentum gives sellers the advantage, driven by aggressive selling pressure even as oversold conditions raise rebound risk.
UAI - SHORT NOW
Entry Zone: 0.557843 — 0.563357
• TP1: 0.4885
• TP2: 0.4436
• TP3: 0.381937
Stop Loss: 0.649931
The 15m decline of -6.13% is backed by a taker buy/sell ratio of 0.8631, showing executed sell aggression outweighing buys. RSI at 28.1 signals stretched downside momentum, so sellers retain the edge, but rebound risk supports waiting for the entry zone instead of chasing weakness.
Disclaimer: This is not financial advice. Always do your own research and take full responsibility for your trading decisions and assets.
Trade $UAI here:
UAI - SHORT NOW
Entry Zone: 0.557843 — 0.563357
• TP1: 0.4885
• TP2: 0.4436
• TP3: 0.381937
Stop Loss: 0.649931
The 15m decline of -6.13% is backed by a taker buy/sell ratio of 0.8631, showing executed sell aggression outweighing buys. RSI at 28.1 signals stretched downside momentum, so sellers retain the edge, but rebound risk supports waiting for the entry zone instead of chasing weakness.
Disclaimer: This is not financial advice. Always do your own research and take full responsibility for your trading decisions and assets.
Trade $UAI here:
CATI — Bearish 15m momentum keeps sellers in control, with weaker aggressive buying and soft oscillator pressure driving the immediate advantage.
CATI - SHORT NOW
Entry Zone: 0.049884 — 0.050156
• TP1: 0.04871
• TP2: 0.04781
• TP3: 0.046787
Stop Loss: 0.051636
The 15m structure remains bearish, while the 0.8876 taker buy/sell ratio shows aggressive selling outweighing buying. RSI at 35.8 reinforces weak momentum, though the entry zone requires patience before considering the short.
Disclaimer: This is not financial advice. Always do your own research and take full responsibility for your trading decisions and assets.
Trade $CATI here:
CATI - SHORT NOW
Entry Zone: 0.049884 — 0.050156
• TP1: 0.04871
• TP2: 0.04781
• TP3: 0.046787
Stop Loss: 0.051636
The 15m structure remains bearish, while the 0.8876 taker buy/sell ratio shows aggressive selling outweighing buying. RSI at 35.8 reinforces weak momentum, though the entry zone requires patience before considering the short.
Disclaimer: This is not financial advice. Always do your own research and take full responsibility for your trading decisions and assets.
Trade $CATI here:
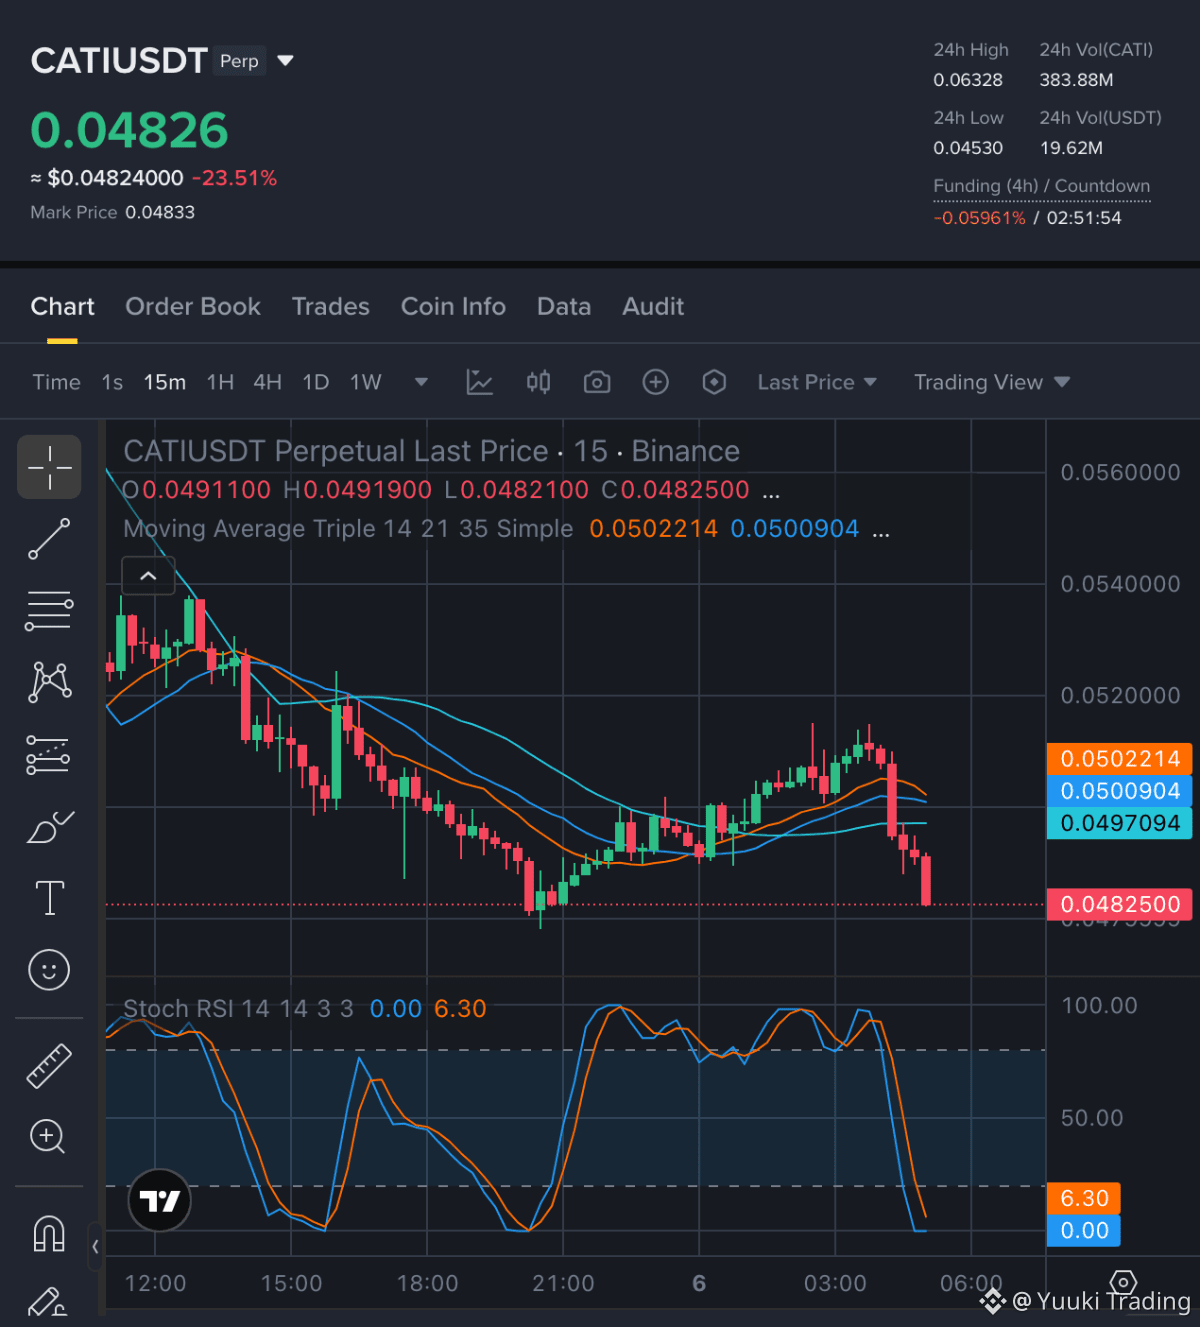
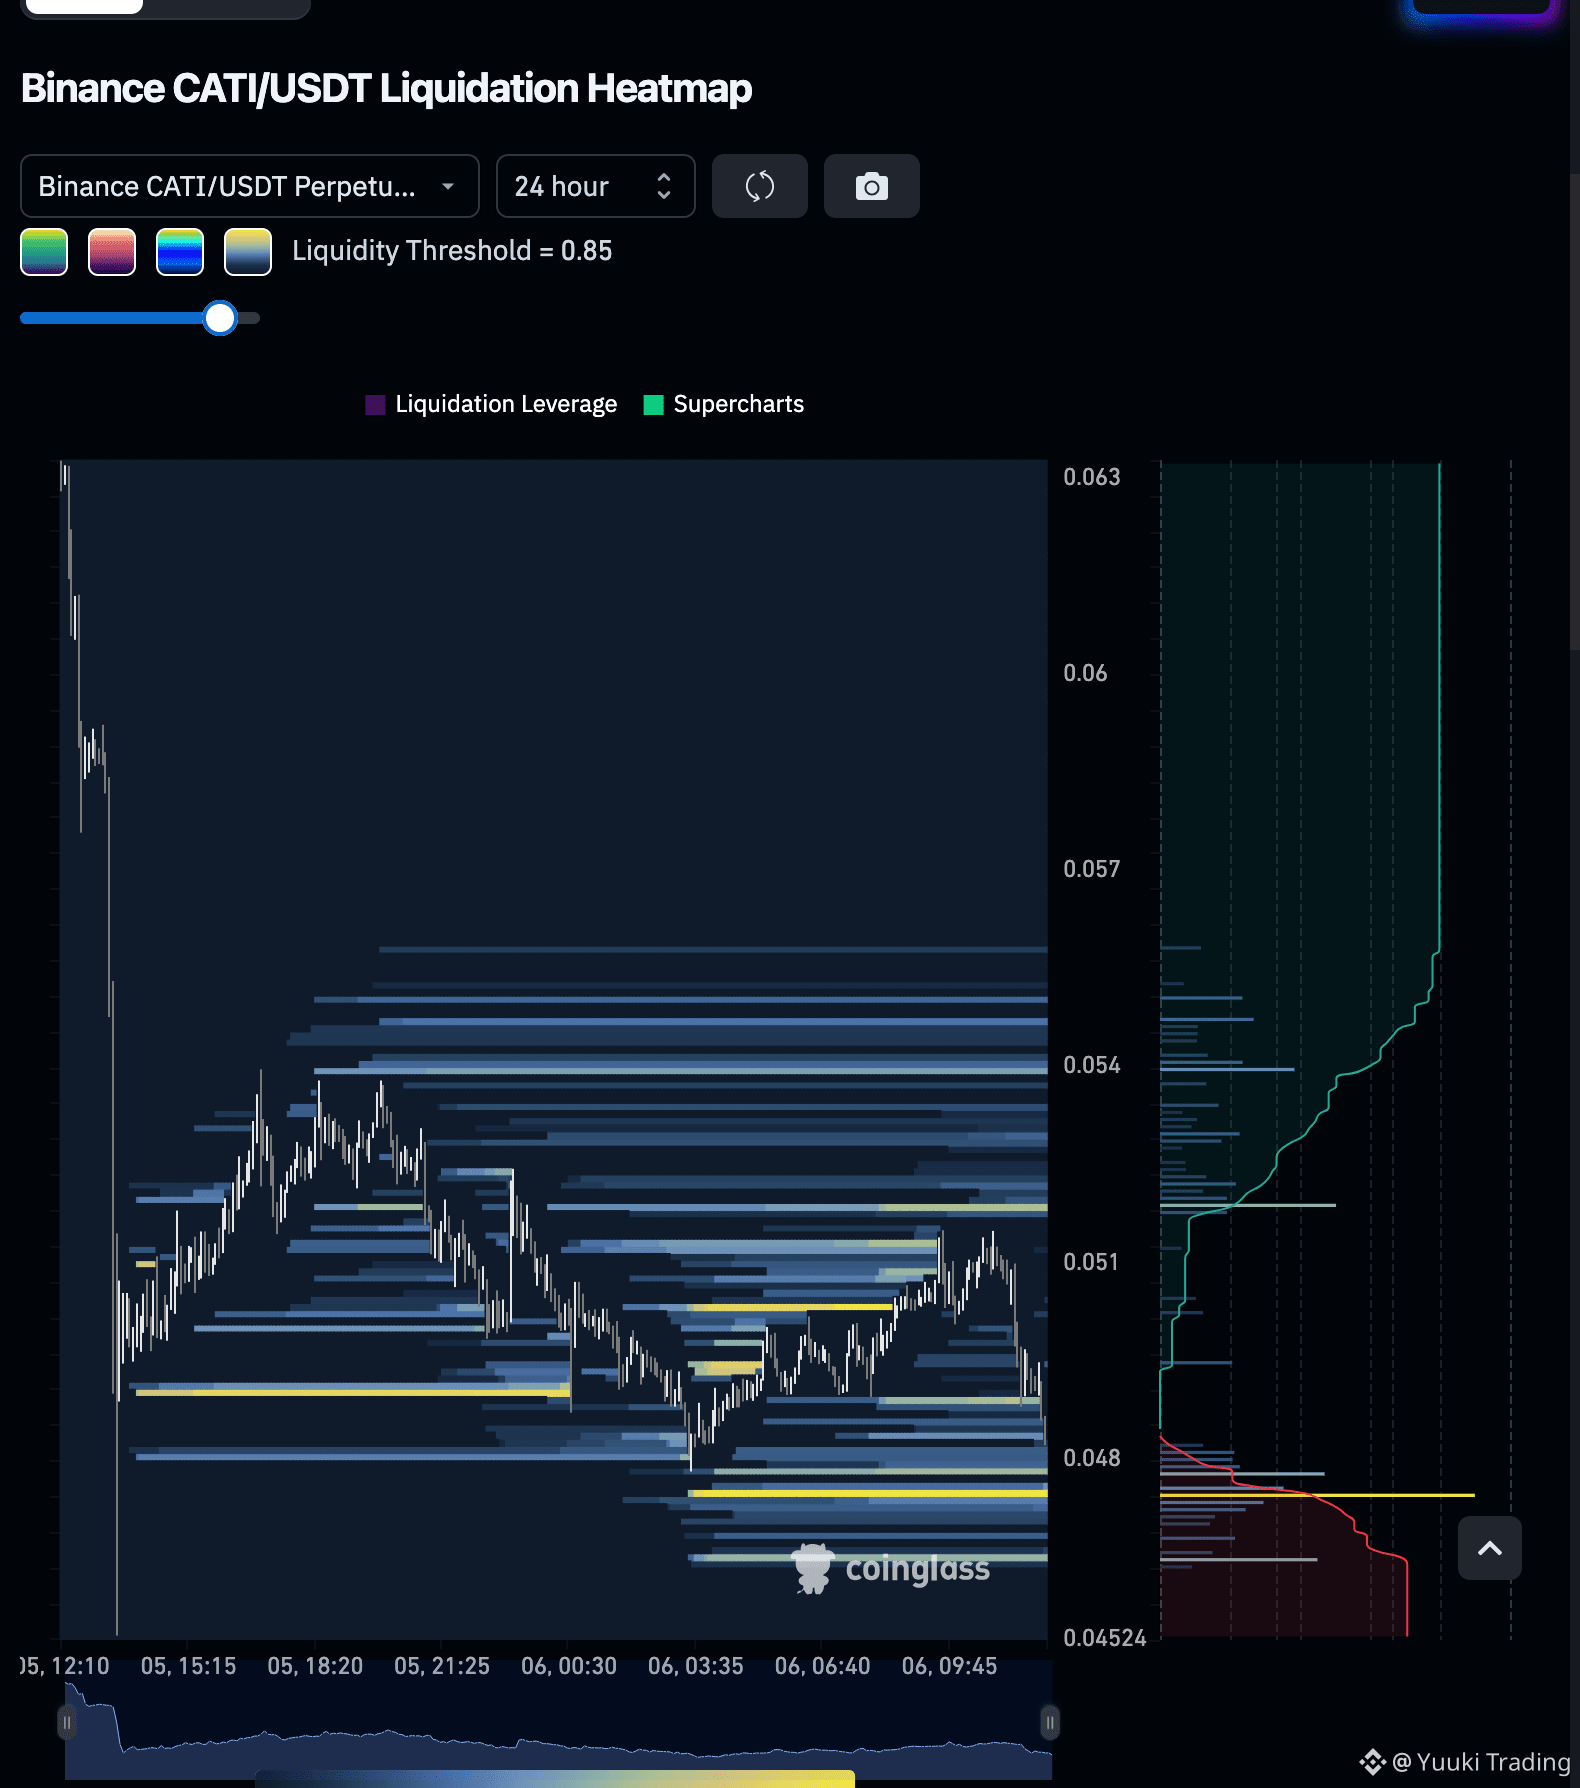
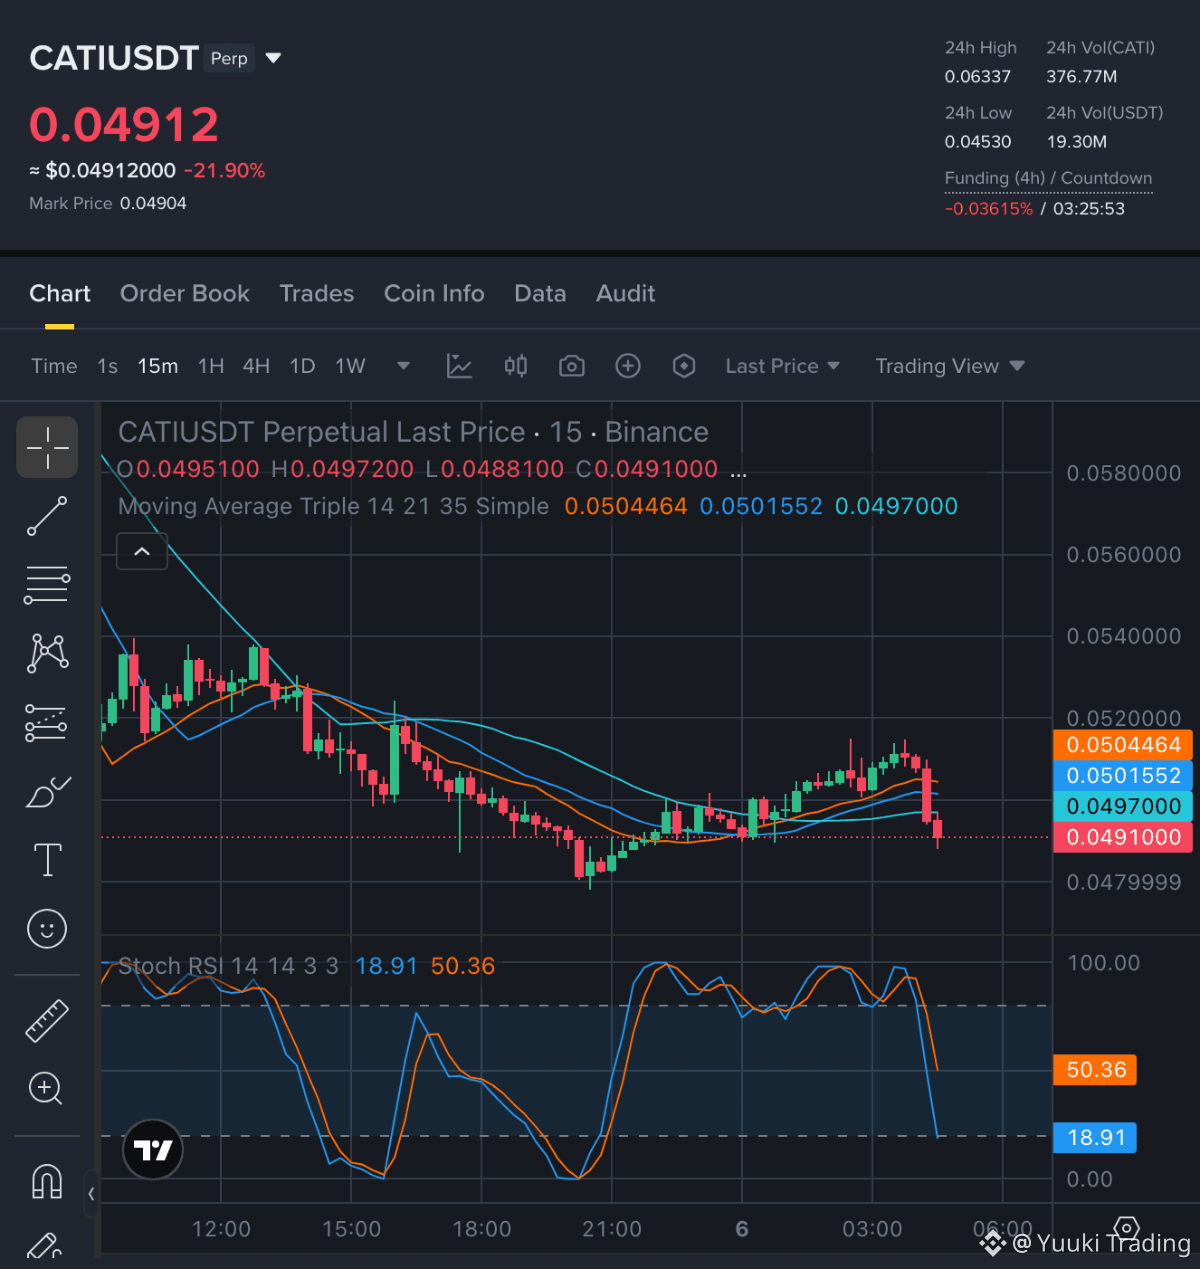
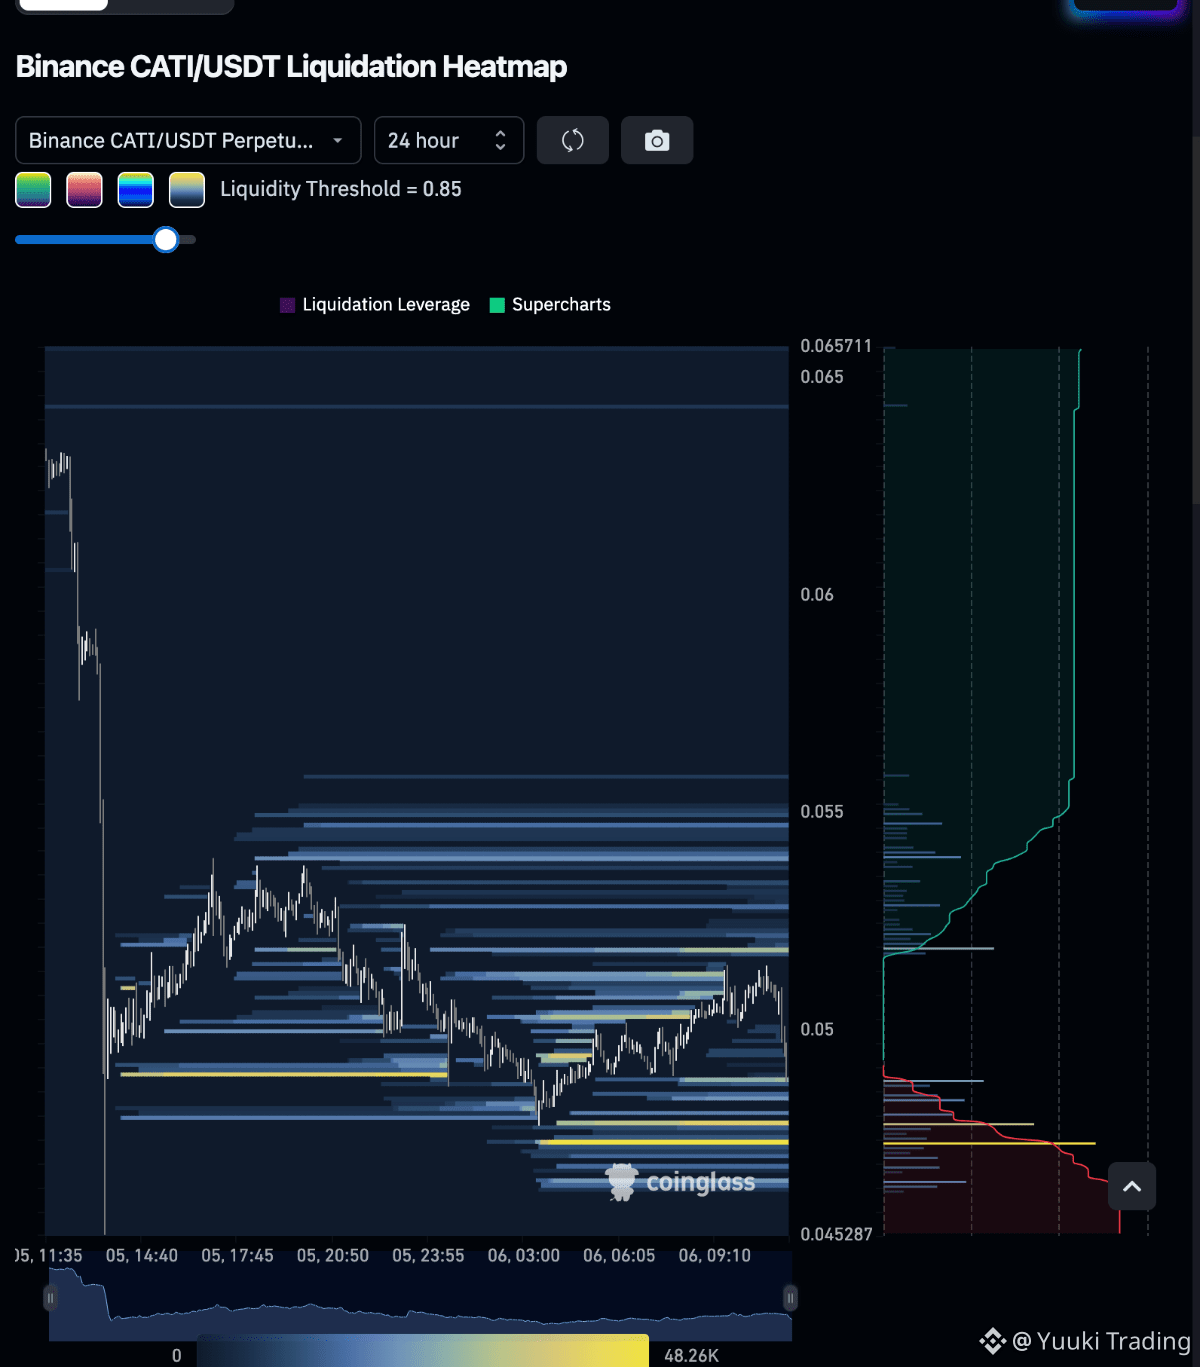
CATI — Strong bearish 15m momentum gives sellers the advantage, with elevated activity and aggressive sell flow reinforcing the ongoing downside pressure.
CATI - SHORT NOW
Entry Zone: 0.049885 — 0.050155
• TP1: 0.04871
• TP2: 0.04781
• TP3: 0.046789
Stop Loss: 0.051635
Price has declined -2.60% on 2.32x relative volume, while the 0.6703 taker buy/sell ratio shows aggressive sellers controlling 15m execution. This supports waiting for a rebound into the entry zone rather than chasing the move lower.
Disclaimer: This is not financial advice. Always do your own research and take full responsibility for your trading decisions and assets.
Trade $CATI here:
CATI - SHORT NOW
Entry Zone: 0.049885 — 0.050155
• TP1: 0.04871
• TP2: 0.04781
• TP3: 0.046789
Stop Loss: 0.051635
Price has declined -2.60% on 2.32x relative volume, while the 0.6703 taker buy/sell ratio shows aggressive sellers controlling 15m execution. This supports waiting for a rebound into the entry zone rather than chasing the move lower.
Disclaimer: This is not financial advice. Always do your own research and take full responsibility for your trading decisions and assets.
Trade $CATI here:
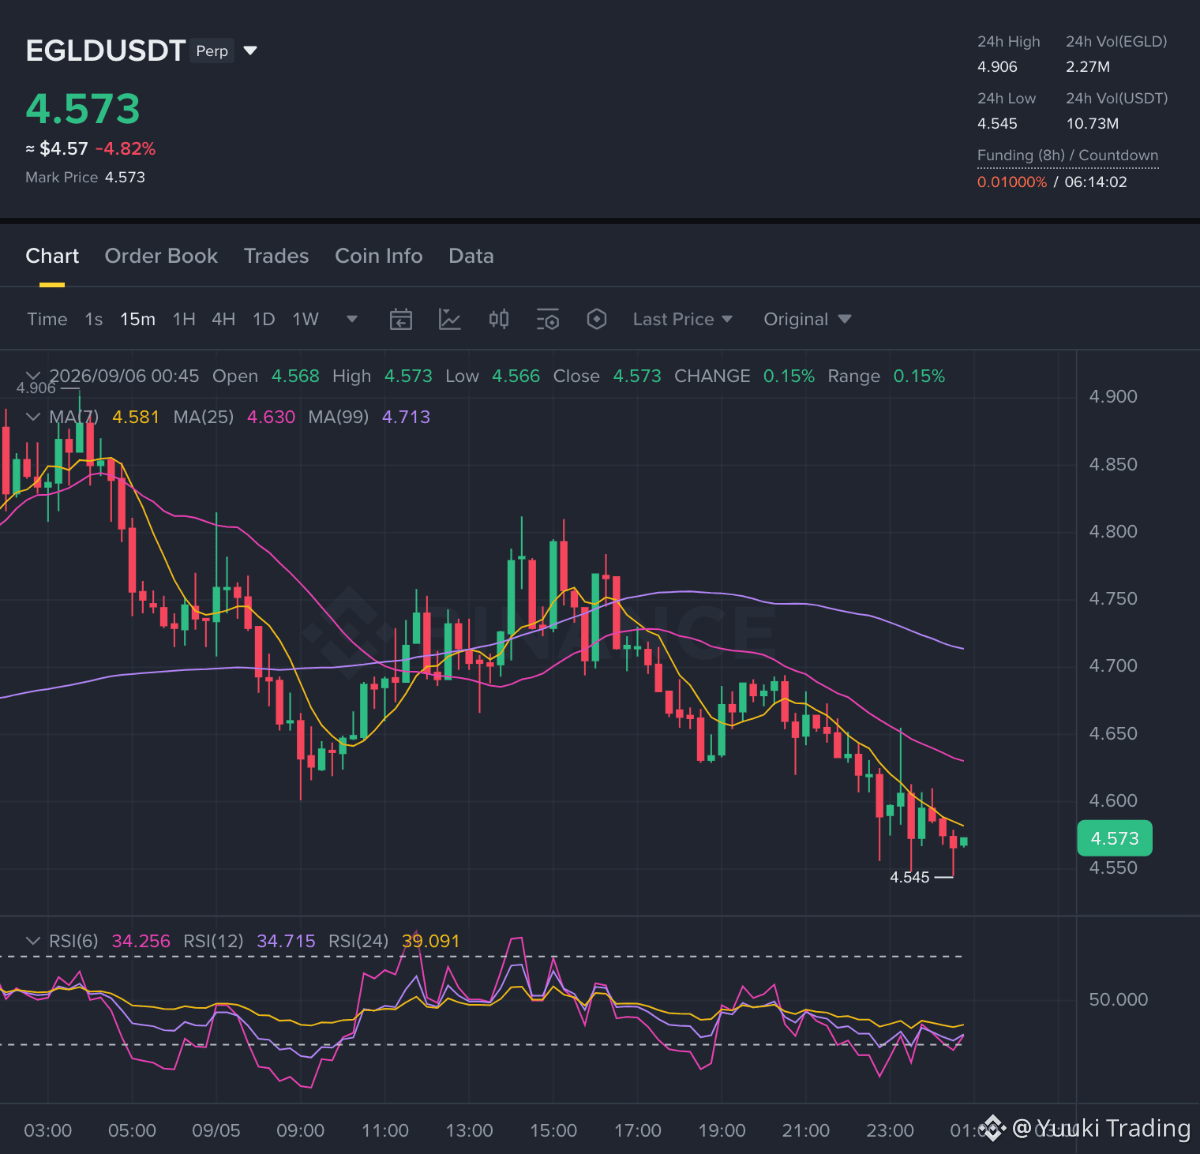
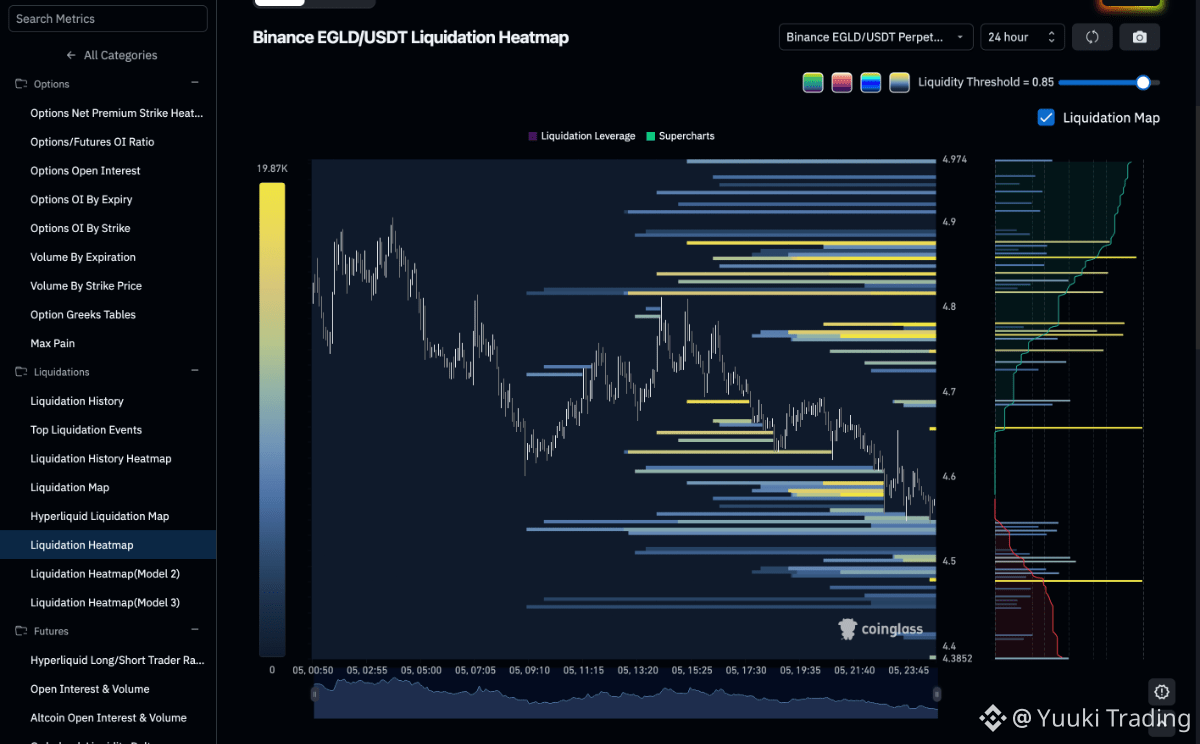
EGLD — Sellers control the 15m move as bearish momentum and stronger aggressive sell flow keep buyers defensive despite stretched conditions.
EGLD - SHORT NOW
Entry Zone: 4.6104 — 4.6248
• TP1: 4.545
• TP2: 4.5132
• TP3: 4.4505
Stop Loss: 4.7012
Price action remains bearish on 15m, with momentum at -0.20% and the taker buy/sell ratio at 0.7209 confirming stronger aggressive selling. RSI at 22.8 shows the move is stretched, so the short plan favors waiting for a rebound into the entry zone rather than chasing weakness.
Disclaimer: This is not financial advice. Always do your own research and take full responsibility for your trading decisions and assets.
Trade $EGLD here:
EGLD - SHORT NOW
Entry Zone: 4.6104 — 4.6248
• TP1: 4.545
• TP2: 4.5132
• TP3: 4.4505
Stop Loss: 4.7012
Price action remains bearish on 15m, with momentum at -0.20% and the taker buy/sell ratio at 0.7209 confirming stronger aggressive selling. RSI at 22.8 shows the move is stretched, so the short plan favors waiting for a rebound into the entry zone rather than chasing weakness.
Disclaimer: This is not financial advice. Always do your own research and take full responsibility for your trading decisions and assets.
Trade $EGLD here:
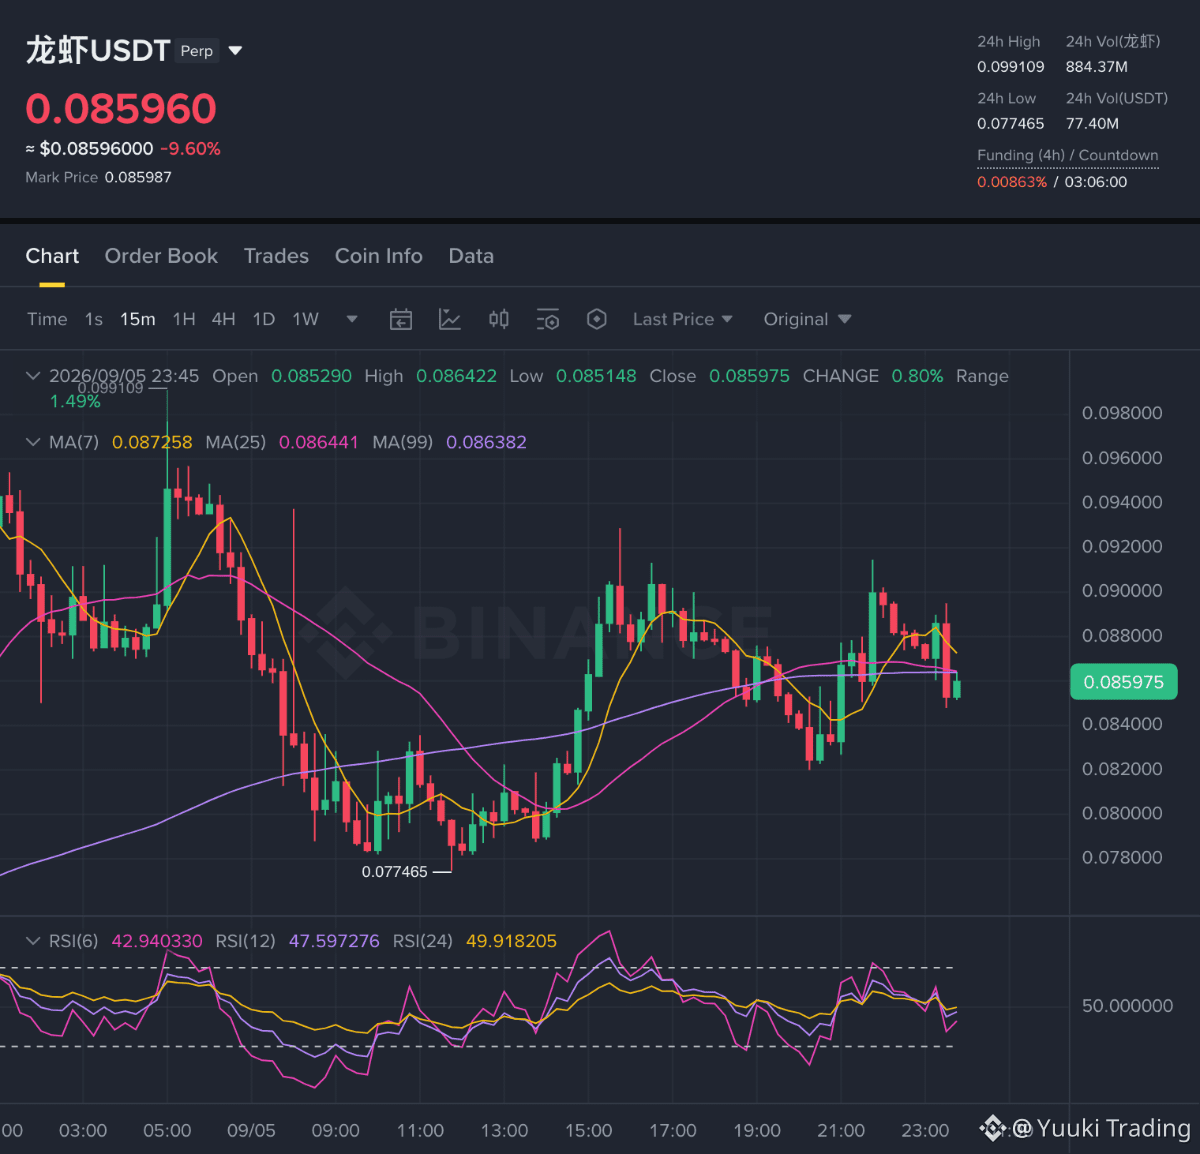
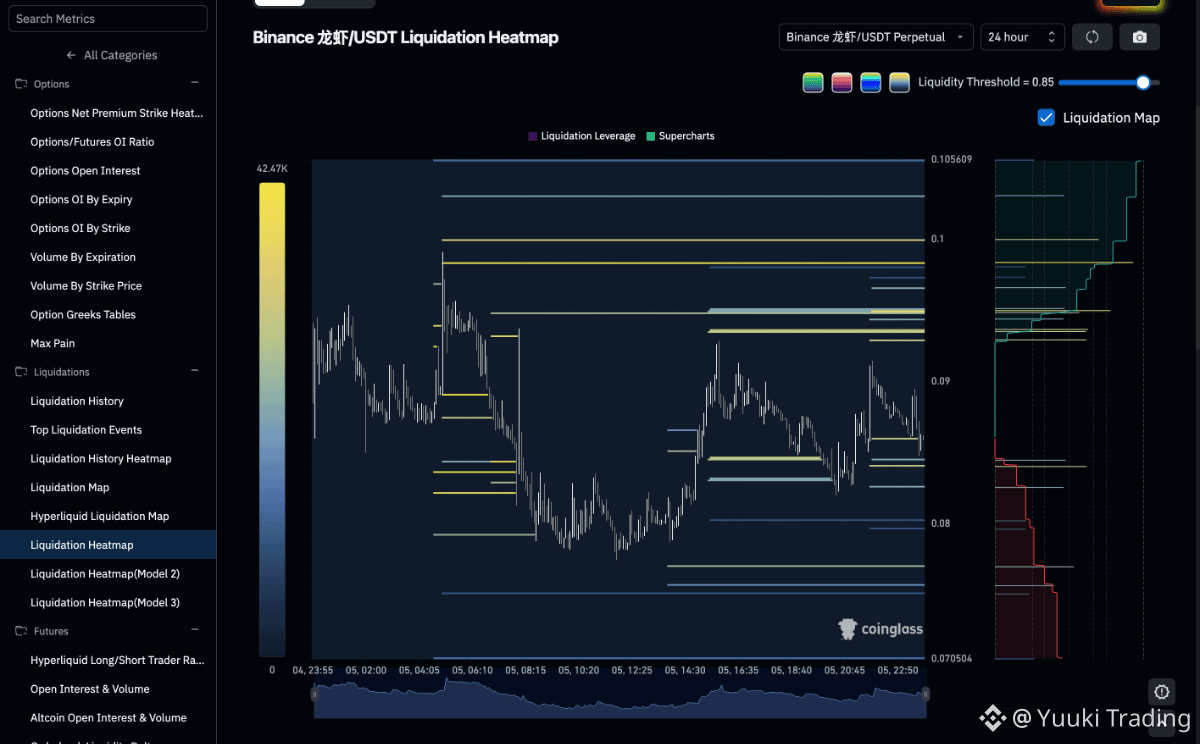
龙虾 — Buyers retain a tentative 15m structural advantage as the bullish retest holds, though elevated activity and aggressive selling keep the rebound contested.
龙虾 - LONG NOW
Entry Zone: 0.085499 — 0.086359
• TP1: 0.0876
• TP2: 0.091465
• TP3: 0.094859
Stop Loss: 0.081464
The 15m BULLISH_RETEST structure gives buyers a tentative edge, with 1.92x relative volume showing active participation. Still, the 0.7566 taker buy/sell ratio confirms aggressive sellers remain present, so the long thesis depends on the retest holding rather than clean buy-side control.
Disclaimer: This is not financial advice. Always do your own research and take full responsibility for your trading decisions and assets.
Trade $龙虾 here:
龙虾 - LONG NOW
Entry Zone: 0.085499 — 0.086359
• TP1: 0.0876
• TP2: 0.091465
• TP3: 0.094859
Stop Loss: 0.081464
The 15m BULLISH_RETEST structure gives buyers a tentative edge, with 1.92x relative volume showing active participation. Still, the 0.7566 taker buy/sell ratio confirms aggressive sellers remain present, so the long thesis depends on the retest holding rather than clean buy-side control.
Disclaimer: This is not financial advice. Always do your own research and take full responsibility for your trading decisions and assets.
Trade $龙虾 here:
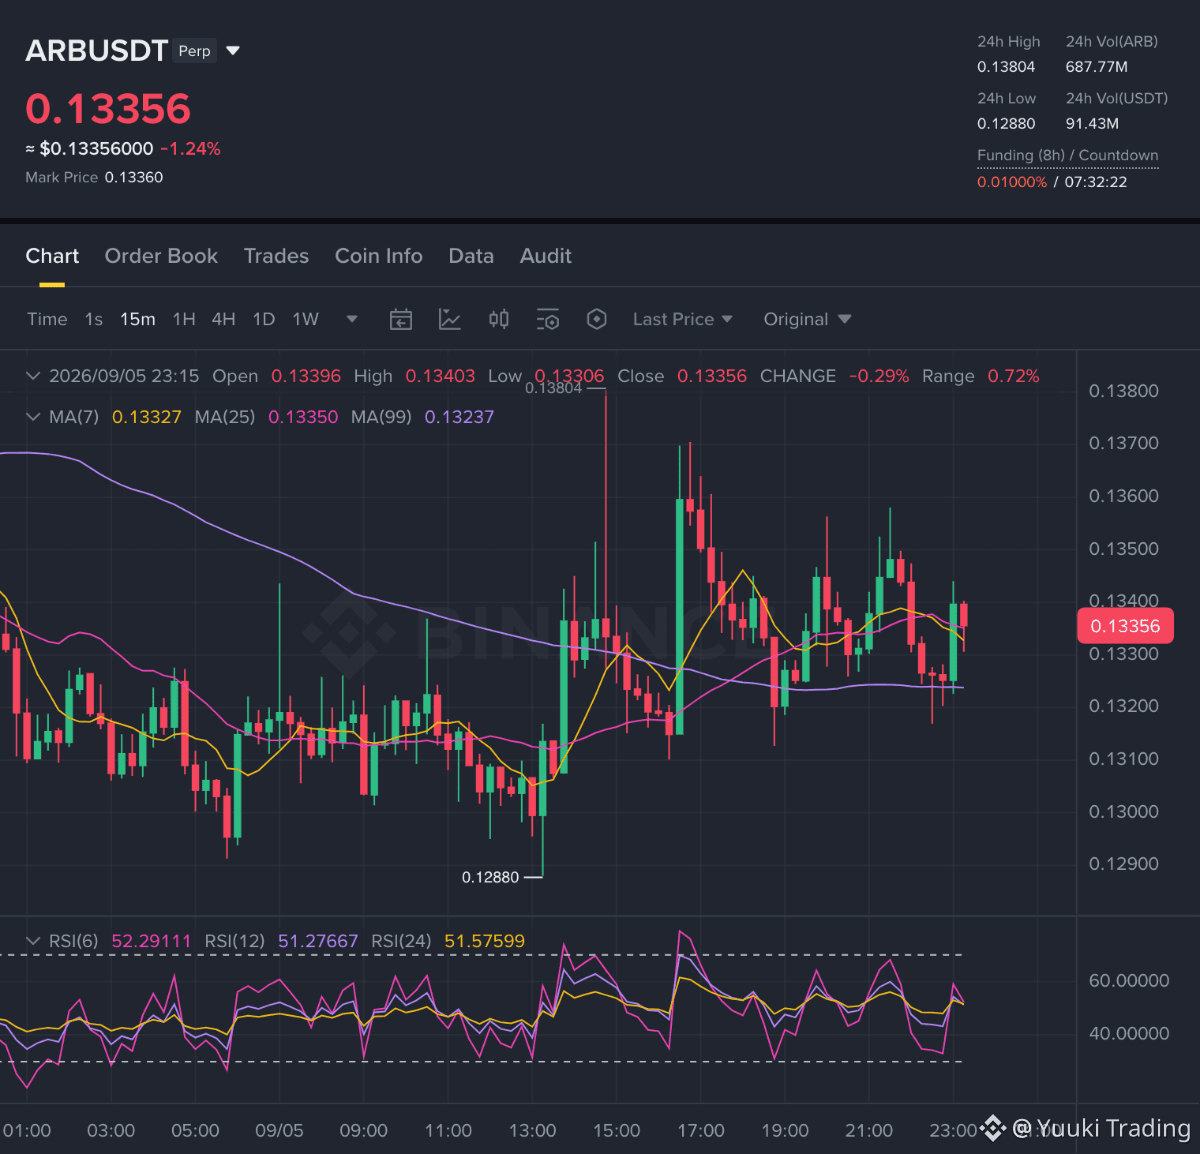
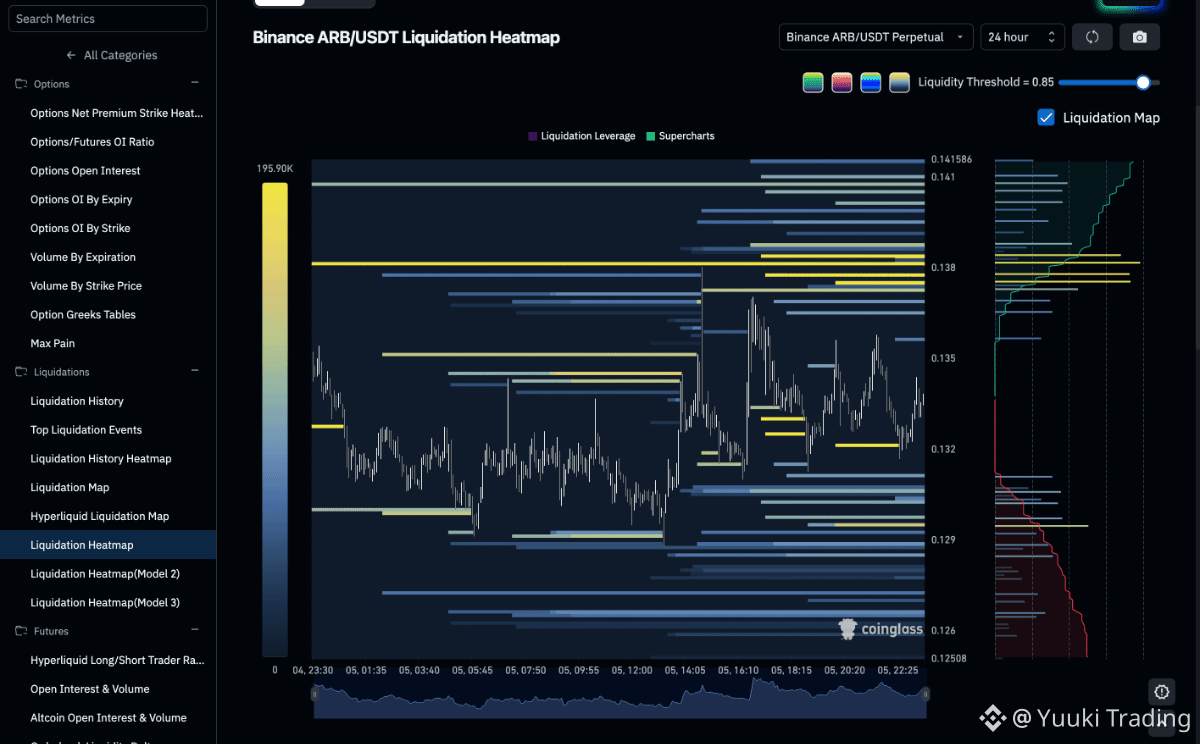
ARB — On 15m, bullish momentum gives buyers the edge as firm taker demand and elevated participation support the current advance.
ARB - LONG NOW
Entry Zone: 0.133143 — 0.133666
• TP1: 0.1358
• TP2: 0.13705
• TP3: 0.139618
Stop Loss: 0.130298
Price action remains bullish on 15m, with a 1.2403 taker buy/sell ratio showing aggressive buying and 1.50x relative volume confirming stronger participation. RSI at 53.2 supports positive momentum without appearing overheated, while heavier visible ask depth favors waiting for the stated entry rather than chasing.
Disclaimer: This is not financial advice. Always do your own research and take full responsibility for your trading decisions and assets.
Trade $ARB here:
ARB - LONG NOW
Entry Zone: 0.133143 — 0.133666
• TP1: 0.1358
• TP2: 0.13705
• TP3: 0.139618
Stop Loss: 0.130298
Price action remains bullish on 15m, with a 1.2403 taker buy/sell ratio showing aggressive buying and 1.50x relative volume confirming stronger participation. RSI at 53.2 supports positive momentum without appearing overheated, while heavier visible ask depth favors waiting for the stated entry rather than chasing.
Disclaimer: This is not financial advice. Always do your own research and take full responsibility for your trading decisions and assets.
Trade $ARB here:
Log in to explore more content