
spot_traders1
304 Posts

spot_traders1
Report
Block User
14 Following
6 Followers
66 Liked
Posts
All
Quotes
Videos
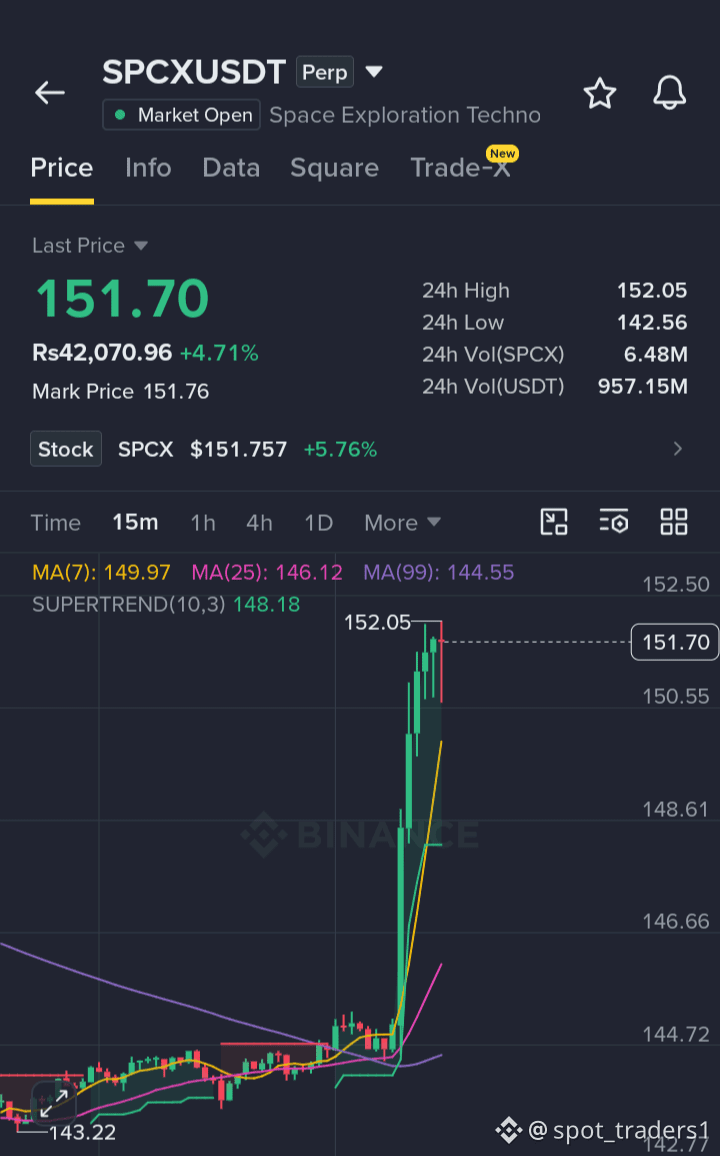
📈 $SPCX — LONG WATCH
$SPCX is making another attempt to break above the key $150 resistance. Buyers are testing this level again, so the reaction around the breakout zone is crucial.
A clean breakout and hold above $150 could confirm further upside, while rejection may send price back into the range.
Current Price: 151.5
Market: SPCXUSDT Perp
Wait for confirmation rather than chasing the breakout. Manage position size and risk carefully.
DYOR — Do Your Own Research
{future}(SPCXUSDT)
$SPCX
📈 $SPCX — LONG WATCH
$SPCX is making another attempt to break above the key $150 resistance. Buyers are testing this level again, so the reaction around the breakout zone is crucial.
A clean breakout and hold above $150 could confirm further upside, while rejection may send price back into the range.
Current Price: 151.5
Market: SPCXUSDT Perp
Wait for confirmation rather than chasing the breakout. Manage position size and risk carefully.
DYOR — Do Your Own Research
$SPCX
$SPCX is making another attempt to break above the key $150 resistance. Buyers are testing this level again, so the reaction around the breakout zone is crucial.
A clean breakout and hold above $150 could confirm further upside, while rejection may send price back into the range.
Current Price: 151.5
Market: SPCXUSDT Perp
Wait for confirmation rather than chasing the breakout. Manage position size and risk carefully.
DYOR — Do Your Own Research
$SPCX
2
·
--
Bearish
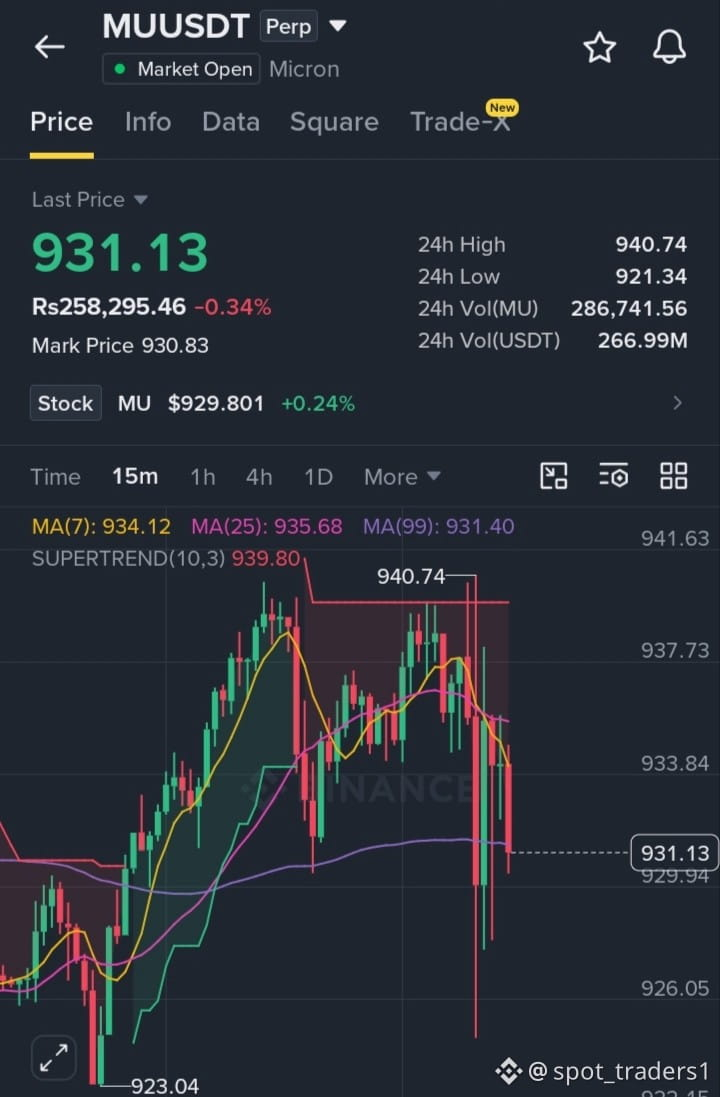
📉 $MU — SHORT SETUP
$MU is showing signs of fading momentum after its latest push. If the current structure breaks down and sellers take control, a deeper downside move could potentially develop.
Trading Idea: SHORT $MU
Entry: 935–960
SL: 1,015
TP1: 920
TP2: 890
TP3: 850
Wait for confirmation, avoid chasing sudden moves, and consider securing partial gains at TP1. Manage the remaining position with disciplined risk control.
DYOR — Do Your Own Research
{future}(MUUSDT)
$MU
📉 $MU — SHORT SETUP
$MU is showing signs of fading momentum after its latest push. If the current structure breaks down and sellers take control, a deeper downside move could potentially develop.
Trading Idea: SHORT $MU
Entry: 935–960
SL: 1,015
TP1: 920
TP2: 890
TP3: 850
Wait for confirmation, avoid chasing sudden moves, and consider securing partial gains at TP1. Manage the remaining position with disciplined risk control.
DYOR — Do Your Own Research
$MU
$MU is showing signs of fading momentum after its latest push. If the current structure breaks down and sellers take control, a deeper downside move could potentially develop.
Trading Idea: SHORT $MU
Entry: 935–960
SL: 1,015
TP1: 920
TP2: 890
TP3: 850
Wait for confirmation, avoid chasing sudden moves, and consider securing partial gains at TP1. Manage the remaining position with disciplined risk control.
DYOR — Do Your Own Research
$MU

14
·
--
Bullish
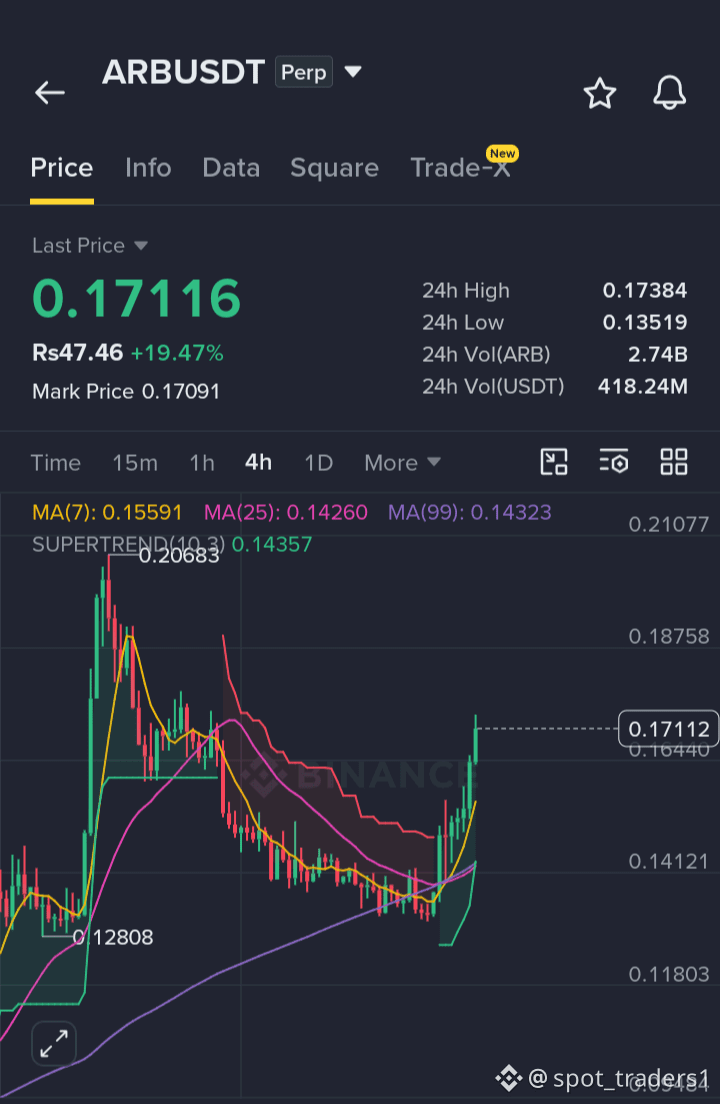
📈 $ARB — LONG SETUP
$ARB is showing strength, but there’s no need to FOMO into the move. A pullback toward the $0.155–$0.16 zone could offer a potential long setup if buyers confirm support.
Entry: $0.155–$0.16
TP: $0.165 / $0.17 / $0.18 / $0.20 / $0.22
SL: $0.144
Wait for confirmation, avoid chasing, and manage position size and risk carefully.
DYOR — Do Your Own Research.
{future}(ARBUSDT)
$ARB
📈 $ARB — LONG SETUP
$ARB is showing strength, but there’s no need to FOMO into the move. A pullback toward the $0.155–$0.16 zone could offer a potential long setup if buyers confirm support.
Entry: $0.155–$0.16
TP: $0.165 / $0.17 / $0.18 / $0.20 / $0.22
SL: $0.144
Wait for confirmation, avoid chasing, and manage position size and risk carefully.
DYOR — Do Your Own Research.
$ARB
$ARB is showing strength, but there’s no need to FOMO into the move. A pullback toward the $0.155–$0.16 zone could offer a potential long setup if buyers confirm support.
Entry: $0.155–$0.16
TP: $0.165 / $0.17 / $0.18 / $0.20 / $0.22
SL: $0.144
Wait for confirmation, avoid chasing, and manage position size and risk carefully.
DYOR — Do Your Own Research.
$ARB
spot_traders1
·
--
Bearish $ARB — SHORT UPDATE
The first target has been hit as expected!
TP1 secured — consider closing around 30% of the position here and moving your SL to breakeven to protect the trade.
Bearish momentum remains active for now, so the remaining short can be managed toward the next targets while monitoring price action closely.
Also keep a close watch on $SIREN and $BEAT for potential upcoming moves.
Stay disciplined and manage risk carefully.
The first target has been hit as expected!
TP1 secured — consider closing around 30% of the position here and moving your SL to breakeven to protect the trade.
Bearish momentum remains active for now, so the remaining short can be managed toward the next targets while monitoring price action closely.
Also keep a close watch on $SIREN and $BEAT for potential upcoming moves.
Stay disciplined and manage risk carefully.
45
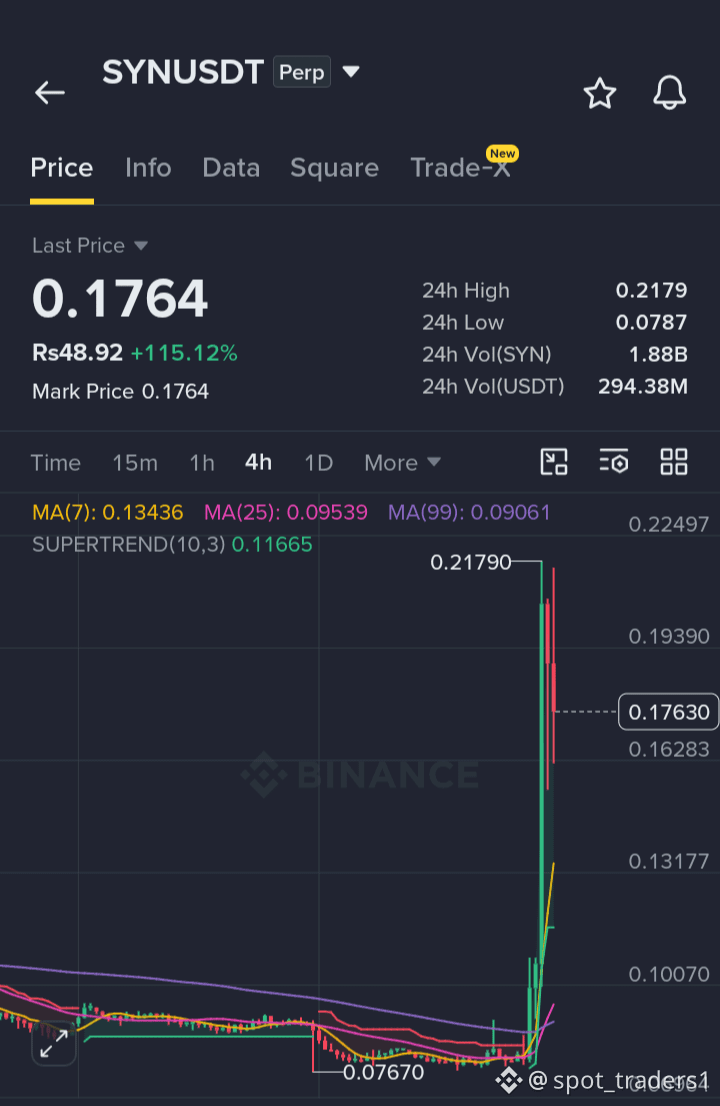
📈 $SYN — CAN IT REACH A NEW ATH?
$SYN has been one of today’s strongest performers, surging nearly 120% and quickly moving into the spotlight.
The key question now: Can this momentum continue?
After such a sharp rally, a corrective pullback becomes a possibility. While
could still push higher, the move may need to cool off and establish support before another sustained leg up.
For now, I’m watching for signs of exhaustion, rejection, or a healthy pullback rather than chasing the rally.
DYOR — Do Your Own Research
{future}(SYNUSDT)
$SYN
📈 $SYN — CAN IT REACH A NEW ATH?
$SYN has been one of today’s strongest performers, surging nearly 120% and quickly moving into the spotlight.
The key question now: Can this momentum continue?
After such a sharp rally, a corrective pullback becomes a possibility. While
could still push higher, the move may need to cool off and establish support before another sustained leg up.
For now, I’m watching for signs of exhaustion, rejection, or a healthy pullback rather than chasing the rally.
DYOR — Do Your Own Research
$SYN
$SYN has been one of today’s strongest performers, surging nearly 120% and quickly moving into the spotlight.
The key question now: Can this momentum continue?
After such a sharp rally, a corrective pullback becomes a possibility. While
could still push higher, the move may need to cool off and establish support before another sustained leg up.
For now, I’m watching for signs of exhaustion, rejection, or a healthy pullback rather than chasing the rally.
DYOR — Do Your Own Research
$SYN
50
·
--
Bearish
📉 $BULLA — SHORT UPDATE
TP1 HIT!
The first target has been reached successfully. Consider securing 30% of the position and moving the SL to breakeven to reduce downside risk on the remaining trade.
The rest of the position can be monitored toward the next targets while keeping a close eye on momentum and price action.
Stay patient, manage risk carefully, and wait for the next update.
DYOR — Do Your Own Research
{future}(BULLAUSDT)
$BULLA
📉 $BULLA — SHORT UPDATE
TP1 HIT!
The first target has been reached successfully. Consider securing 30% of the position and moving the SL to breakeven to reduce downside risk on the remaining trade.
The rest of the position can be monitored toward the next targets while keeping a close eye on momentum and price action.
Stay patient, manage risk carefully, and wait for the next update.
DYOR — Do Your Own Research
$BULLA
TP1 HIT!
The first target has been reached successfully. Consider securing 30% of the position and moving the SL to breakeven to reduce downside risk on the remaining trade.
The rest of the position can be monitored toward the next targets while keeping a close eye on momentum and price action.
Stay patient, manage risk carefully, and wait for the next update.
DYOR — Do Your Own Research
$BULLA

spot_traders1
·
--
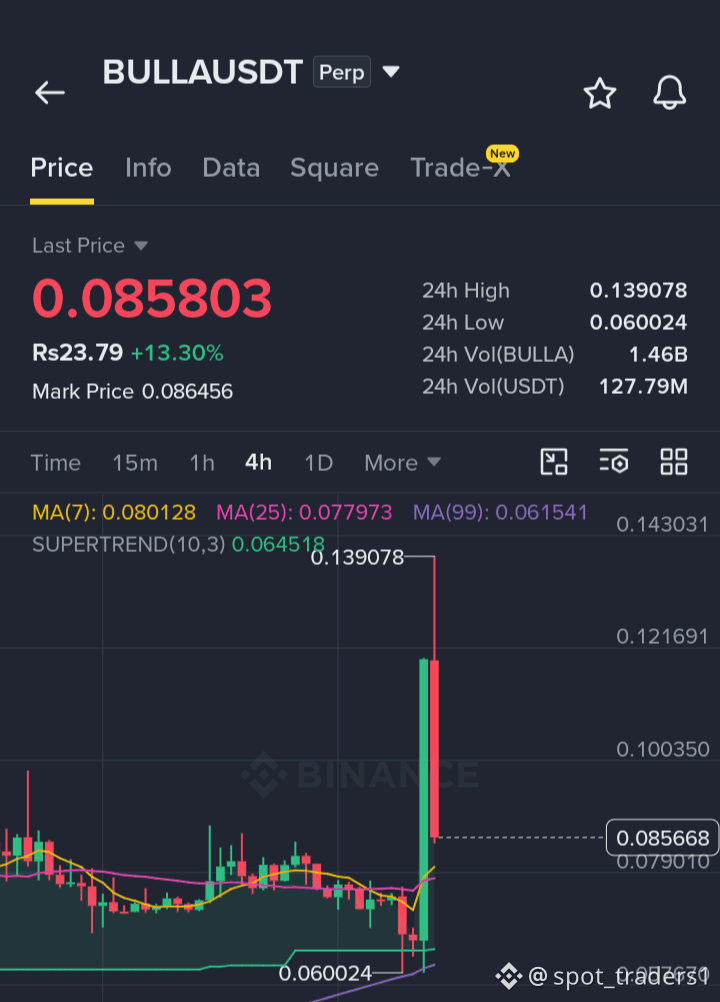
What’s happening with $BULLA ?
Take a look at that massive upper wick. Price pushed higher but faced strong rejection near the top, suggesting sellers are becoming more active at elevated levels.
This type of rejection can indicate weakening bullish momentum and the possibility of increasing downside pressure. Watch the next few candles for confirmation before considering any position.
Stay patient, manage risk, and DYOR — Do Your Own Research
$BULLA
Take a look at that massive upper wick. Price pushed higher but faced strong rejection near the top, suggesting sellers are becoming more active at elevated levels.
This type of rejection can indicate weakening bullish momentum and the possibility of increasing downside pressure. Watch the next few candles for confirmation before considering any position.
Stay patient, manage risk, and DYOR — Do Your Own Research
$BULLA
6
·
--
Bearish
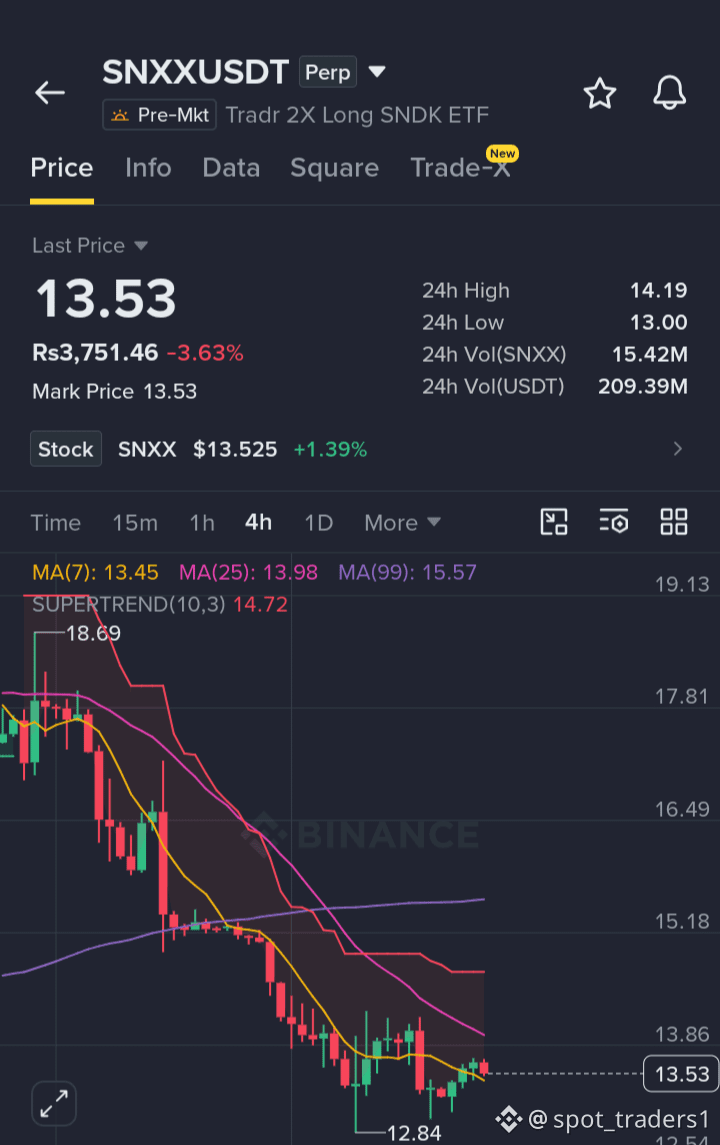
📉 $SNXX — SHORT SETUP
$SNXX is showing signs of fading momentum after its recent upside push. If price faces rejection around the current zone, a deeper pullback could potentially develop toward lower levels.
Trading Idea: SHORT $SNXX
Entry: 13.55–13.90
SL: 14.75
TP1: 13.25
TP2: 12.95
TP3: 12.50
Wait for confirmation, avoid chasing the move, and keep position size and leverage controlled. Respect the invalidation level if price moves against the setup.
DYOR — Do Your Own Research
{future}(SNXXUSDT)
$SNXX
📉 $SNXX — SHORT SETUP
$SNXX is showing signs of fading momentum after its recent upside push. If price faces rejection around the current zone, a deeper pullback could potentially develop toward lower levels.
Trading Idea: SHORT $SNXX
Entry: 13.55–13.90
SL: 14.75
TP1: 13.25
TP2: 12.95
TP3: 12.50
Wait for confirmation, avoid chasing the move, and keep position size and leverage controlled. Respect the invalidation level if price moves against the setup.
DYOR — Do Your Own Research
$SNXX
$SNXX is showing signs of fading momentum after its recent upside push. If price faces rejection around the current zone, a deeper pullback could potentially develop toward lower levels.
Trading Idea: SHORT $SNXX
Entry: 13.55–13.90
SL: 14.75
TP1: 13.25
TP2: 12.95
TP3: 12.50
Wait for confirmation, avoid chasing the move, and keep position size and leverage controlled. Respect the invalidation level if price moves against the setup.
DYOR — Do Your Own Research
$SNXX

26
·
--
Bearish
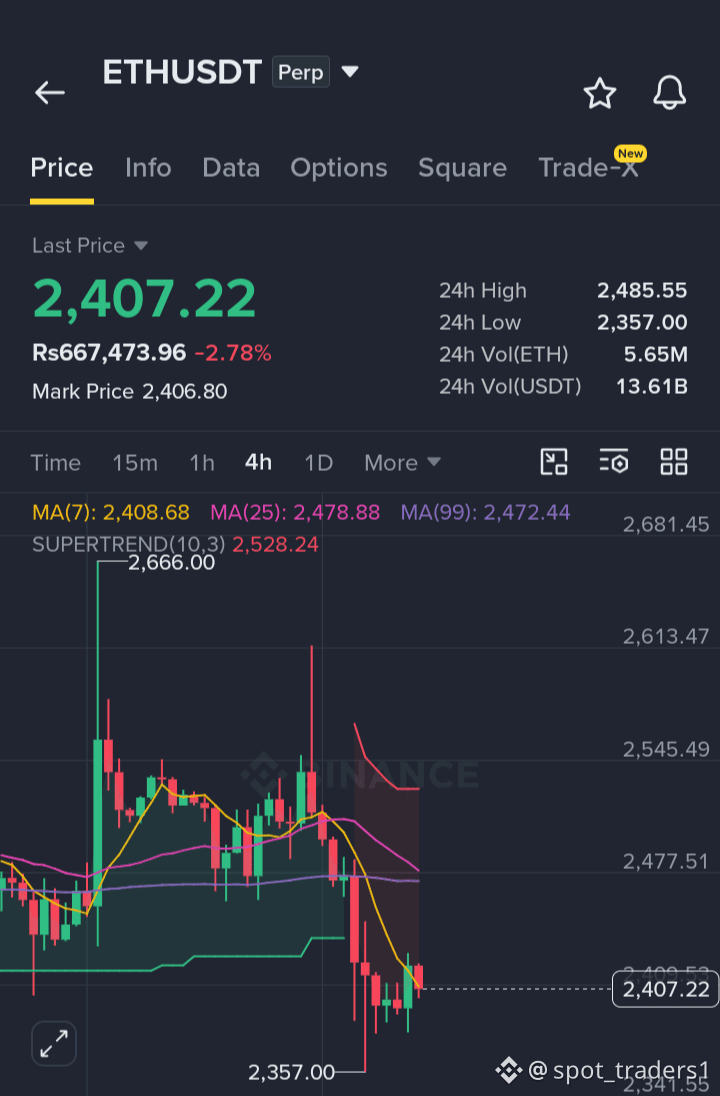
📈 $ETH — LONG SETUP
$ETH is trading around $2,400 after a sharp pullback from the recent $2,500+ area. Price is attempting to stabilize around the current zone, with a potential recovery setup if buyers regain control.
TP1: $2,430
TP2: $2,470
TP3: $2,510
Next Target: $2,550+
Invalidation: Below $2,360
Stay disciplined, wait for confirmation, manage risk carefully, and avoid chasing the move.
DYOR — Do Your Own Research
{future}(ETHUSDT)
$ETH
📈 $ETH — LONG SETUP
$ETH is trading around $2,400 after a sharp pullback from the recent $2,500+ area. Price is attempting to stabilize around the current zone, with a potential recovery setup if buyers regain control.
TP1: $2,430
TP2: $2,470
TP3: $2,510
Next Target: $2,550+
Invalidation: Below $2,360
Stay disciplined, wait for confirmation, manage risk carefully, and avoid chasing the move.
DYOR — Do Your Own Research
$ETH
$ETH is trading around $2,400 after a sharp pullback from the recent $2,500+ area. Price is attempting to stabilize around the current zone, with a potential recovery setup if buyers regain control.
TP1: $2,430
TP2: $2,470
TP3: $2,510
Next Target: $2,550+
Invalidation: Below $2,360
Stay disciplined, wait for confirmation, manage risk carefully, and avoid chasing the move.
DYOR — Do Your Own Research
$ETH

1
·
--
Bullish
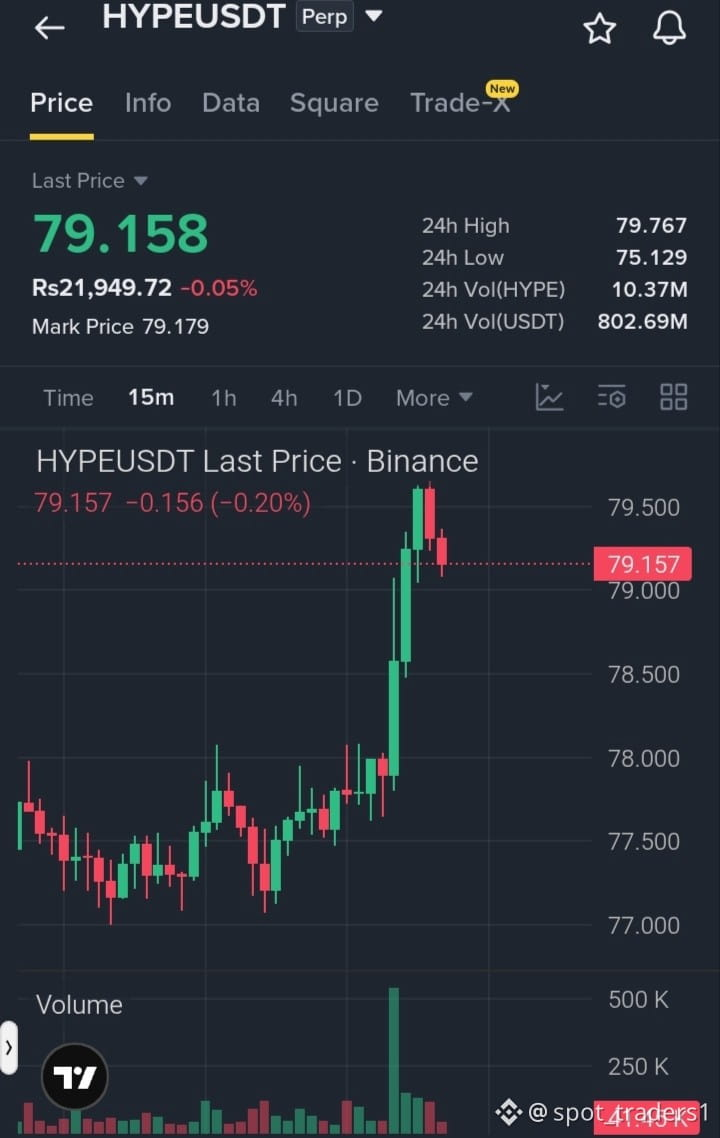
📈 $HYPE — LONG SETUP
Hyperliquid’s HIP-3 is developing infrastructure aimed at expanding into the U.S. market. This could be a notable catalyst for $HYPE as the ecosystem continues to evolve.
Trading Idea: LONG $HYPE
Entry: $78–$80
TP: $82 / $84 / $87 / $90 / $95 / $100
SL: $74
Wait for confirmation, avoid chasing the move, and manage position size and risk carefully.
DYOR — Do Your Own Research
{future}(HYPEUSDT)
$HYPE
📈 $HYPE — LONG SETUP
Hyperliquid’s HIP-3 is developing infrastructure aimed at expanding into the U.S. market. This could be a notable catalyst for $HYPE as the ecosystem continues to evolve.
Trading Idea: LONG $HYPE
Entry: $78–$80
TP: $82 / $84 / $87 / $90 / $95 / $100
SL: $74
Wait for confirmation, avoid chasing the move, and manage position size and risk carefully.
DYOR — Do Your Own Research
$HYPE
Hyperliquid’s HIP-3 is developing infrastructure aimed at expanding into the U.S. market. This could be a notable catalyst for $HYPE as the ecosystem continues to evolve.
Trading Idea: LONG $HYPE
Entry: $78–$80
TP: $82 / $84 / $87 / $90 / $95 / $100
SL: $74
Wait for confirmation, avoid chasing the move, and manage position size and risk carefully.
DYOR — Do Your Own Research
$HYPE
32
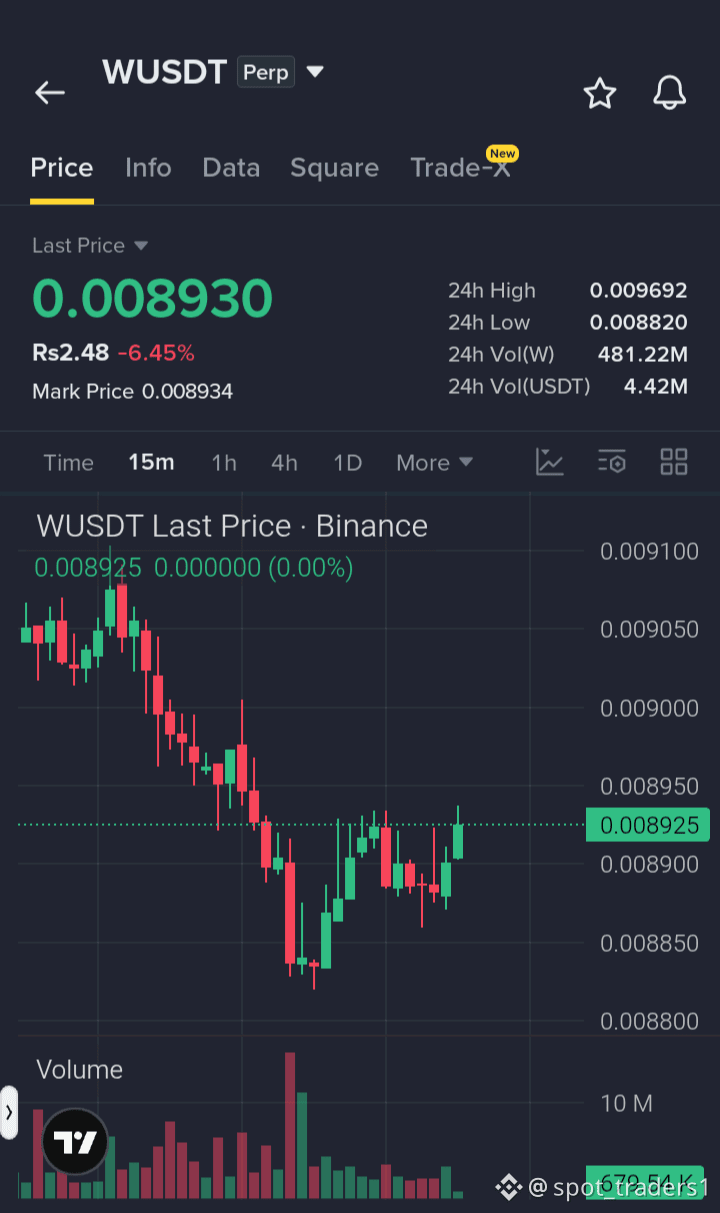
📉 $W — BIG SHORT SETUP
$W is showing signs of weakness after the recent bounce, with selling pressure building around the current range. If rejection confirms, a deeper pullback toward lower support levels could develop.
Trading Idea: SHORT $W
Entry: $0.0088–$0.0092
SL: $0.0097
TP1: $0.0086
TP2: $0.0084
TP3: $0.0081
Stay patient, avoid chasing the move, and manage position size and leverage carefully according to your risk tolerance.
DYOR — Do Your Own Research
{future}(WUSDT)
$W
📉 $W — BIG SHORT SETUP
$W is showing signs of weakness after the recent bounce, with selling pressure building around the current range. If rejection confirms, a deeper pullback toward lower support levels could develop.
Trading Idea: SHORT $W
Entry: $0.0088–$0.0092
SL: $0.0097
TP1: $0.0086
TP2: $0.0084
TP3: $0.0081
Stay patient, avoid chasing the move, and manage position size and leverage carefully according to your risk tolerance.
DYOR — Do Your Own Research
$W
$W is showing signs of weakness after the recent bounce, with selling pressure building around the current range. If rejection confirms, a deeper pullback toward lower support levels could develop.
Trading Idea: SHORT $W
Entry: $0.0088–$0.0092
SL: $0.0097
TP1: $0.0086
TP2: $0.0084
TP3: $0.0081
Stay patient, avoid chasing the move, and manage position size and leverage carefully according to your risk tolerance.
DYOR — Do Your Own Research
$W

6
·
--
Bearish
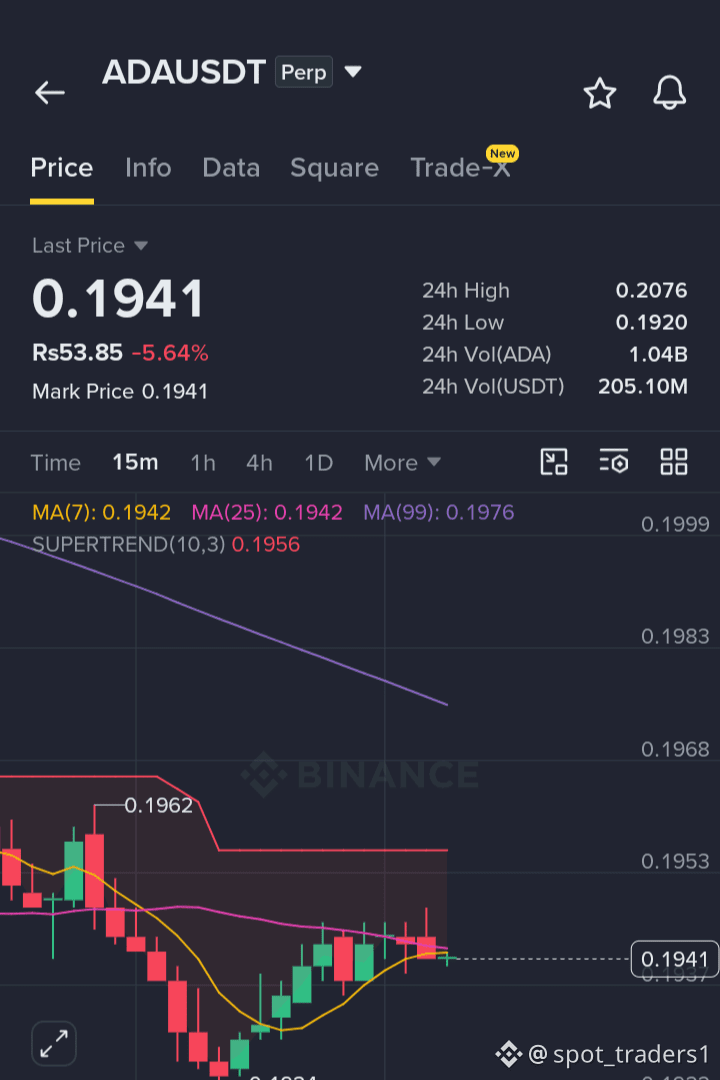
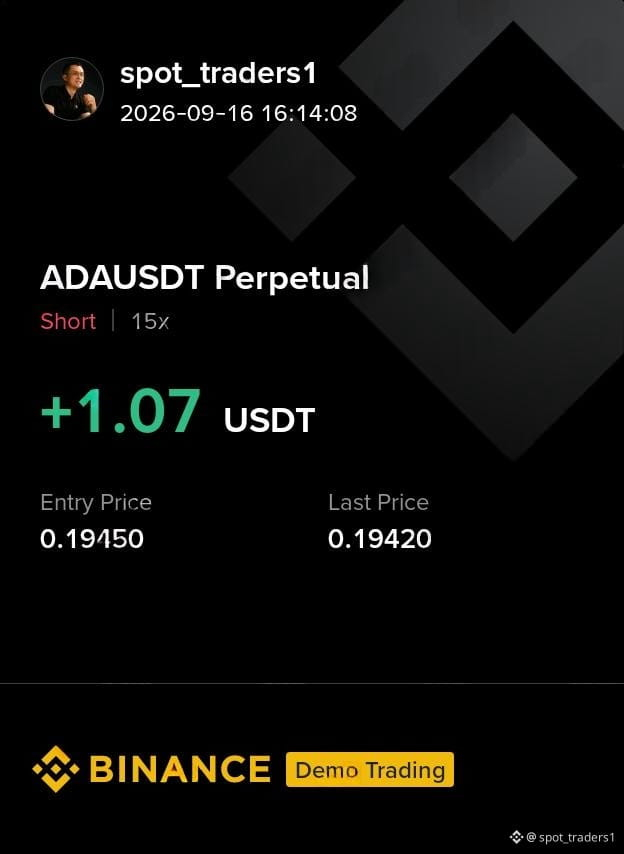
📉 $ADA — SHORT SETUP
$ADA continues to face rejection from higher levels, with buyers struggling to regain control. If weakness persists and sellers remain active, further downside from the current zone could develop.
Trading Idea: SHORT $ADA
Entry: $0.193–$0.202
SL: $0.211
TP1: $0.185
TP2: $0.180
TP3: $0.175
Wait for confirmation, avoid chasing the move, and keep leverage controlled. Manage position size carefully and respect the SL if the setup becomes invalid.
DYOR — Do Your Own Research
{future}(ADAUSDT)
$ADA
📉 $ADA — SHORT SETUP
$ADA continues to face rejection from higher levels, with buyers struggling to regain control. If weakness persists and sellers remain active, further downside from the current zone could develop.
Trading Idea: SHORT $ADA
Entry: $0.193–$0.202
SL: $0.211
TP1: $0.185
TP2: $0.180
TP3: $0.175
Wait for confirmation, avoid chasing the move, and keep leverage controlled. Manage position size carefully and respect the SL if the setup becomes invalid.
DYOR — Do Your Own Research
$ADA
$ADA continues to face rejection from higher levels, with buyers struggling to regain control. If weakness persists and sellers remain active, further downside from the current zone could develop.
Trading Idea: SHORT $ADA
Entry: $0.193–$0.202
SL: $0.211
TP1: $0.185
TP2: $0.180
TP3: $0.175
Wait for confirmation, avoid chasing the move, and keep leverage controlled. Manage position size carefully and respect the SL if the setup becomes invalid.
DYOR — Do Your Own Research
$ADA
10
·
--
Bearish
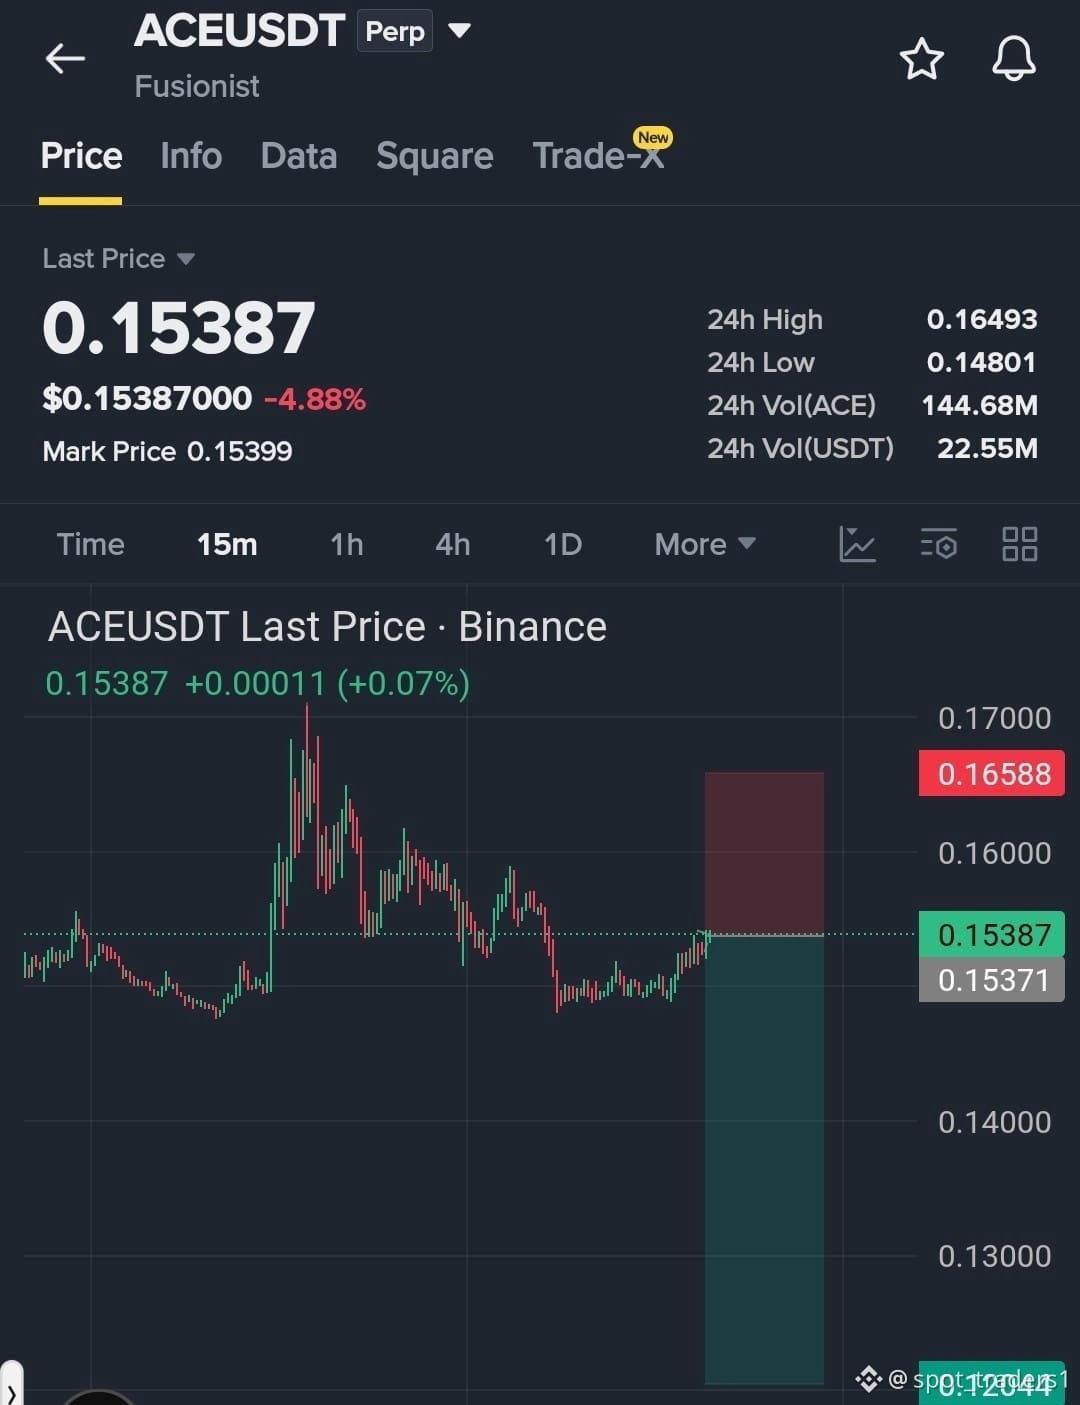
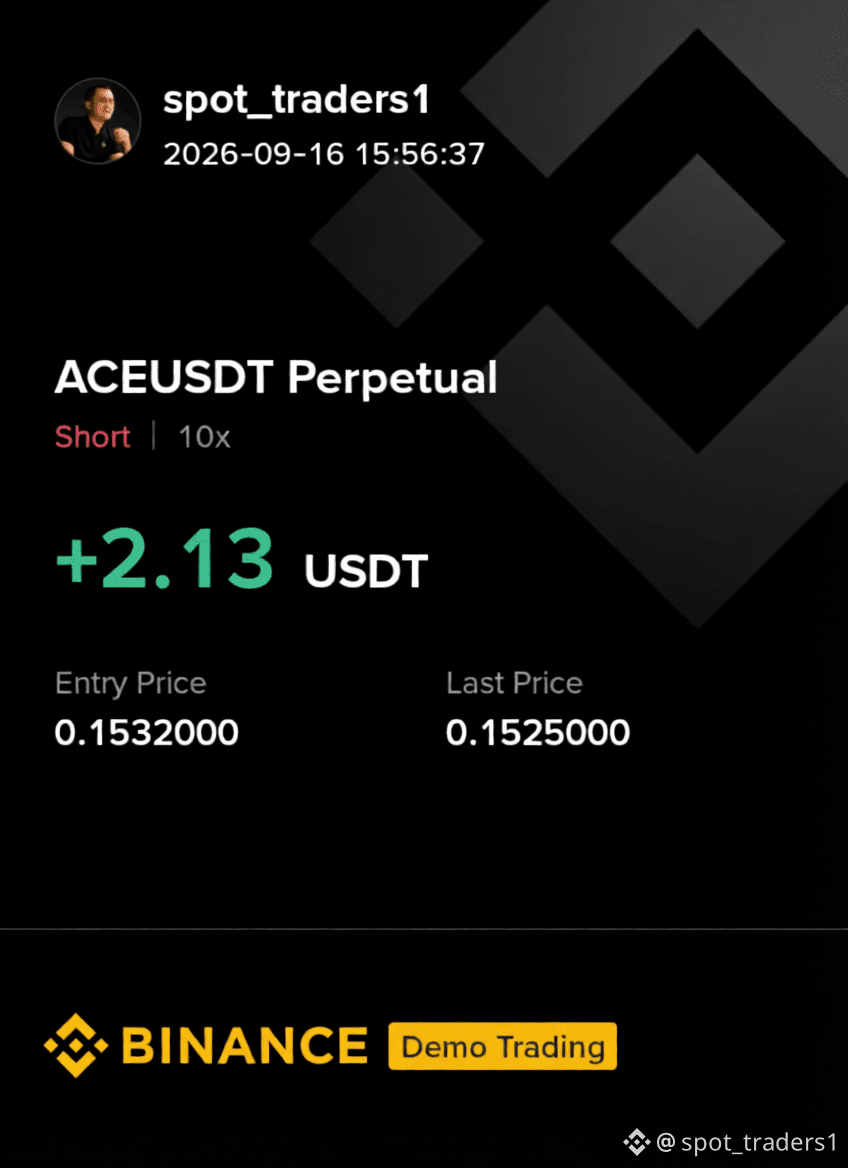
📉 $ACE — SHORT SETUP
$ACE is facing rejection around the current zone, while recent momentum shows signs of weakening. If sellers remain in control and rejection is confirmed, a further pullback toward lower support levels could develop.
Trading Idea: SHORT $ACE
Entry: $0.155–$0.175
SL: $0.185
TP1: $0.140
TP2: $0.130
TP3: $0.120
Wait for confirmation, avoid chasing sudden moves, and manage position size and leverage carefully. Respect the SL if the setup becomes invalid.
DYOR — Do Your Own Research
{future}(ACEUSDT)
$ACE
📉 $ACE — SHORT SETUP
$ACE is facing rejection around the current zone, while recent momentum shows signs of weakening. If sellers remain in control and rejection is confirmed, a further pullback toward lower support levels could develop.
Trading Idea: SHORT $ACE
Entry: $0.155–$0.175
SL: $0.185
TP1: $0.140
TP2: $0.130
TP3: $0.120
Wait for confirmation, avoid chasing sudden moves, and manage position size and leverage carefully. Respect the SL if the setup becomes invalid.
DYOR — Do Your Own Research
$ACE
$ACE is facing rejection around the current zone, while recent momentum shows signs of weakening. If sellers remain in control and rejection is confirmed, a further pullback toward lower support levels could develop.
Trading Idea: SHORT $ACE
Entry: $0.155–$0.175
SL: $0.185
TP1: $0.140
TP2: $0.130
TP3: $0.120
Wait for confirmation, avoid chasing sudden moves, and manage position size and leverage carefully. Respect the SL if the setup becomes invalid.
DYOR — Do Your Own Research
$ACE
5
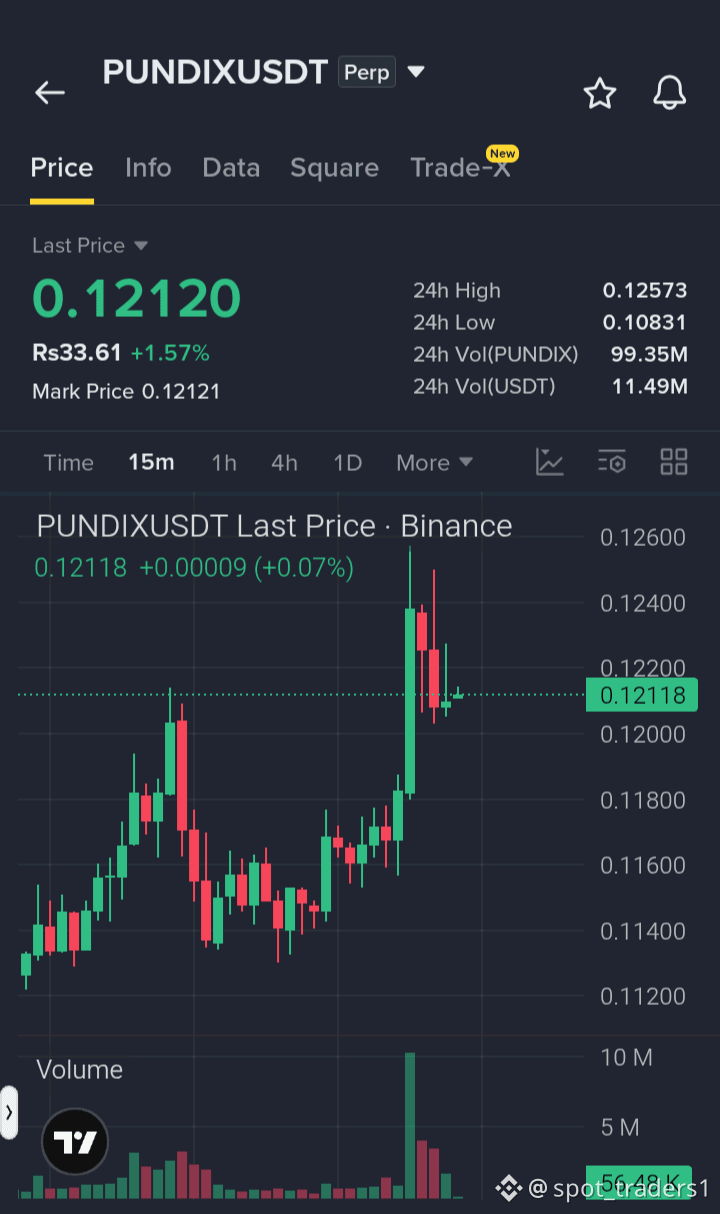
📉 $PUNDIX — SHORT WATCH
$PUNDIX is showing signs of fading momentum, with buyers losing strength around the current zone.
A potential short setup is developing as selling pressure increases. Watch price action for confirmation and avoid chasing the move.
Manage risk carefully and keep position size controlled.
DYOR — Do Your Own Research
{future}(PUNDIXUSDT)
$PUNDIX
📉 $PUNDIX — SHORT WATCH
$PUNDIX is showing signs of fading momentum, with buyers losing strength around the current zone.
A potential short setup is developing as selling pressure increases. Watch price action for confirmation and avoid chasing the move.
Manage risk carefully and keep position size controlled.
DYOR — Do Your Own Research
$PUNDIX
$PUNDIX is showing signs of fading momentum, with buyers losing strength around the current zone.
A potential short setup is developing as selling pressure increases. Watch price action for confirmation and avoid chasing the move.
Manage risk carefully and keep position size controlled.
DYOR — Do Your Own Research
$PUNDIX
2
1
57
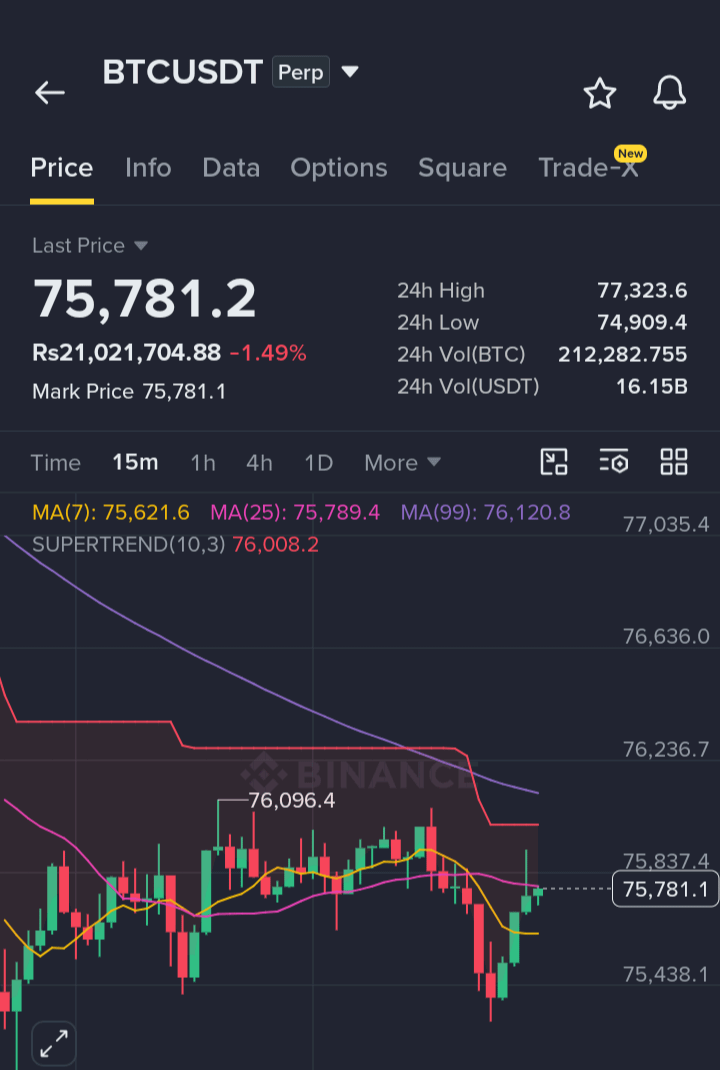
📊 $BTC — KEY SUPPORT WATCH
$BTC continues to hold above the key support zone, keeping the current structure intact for now.
As long as 4H candles continue closing above this level, buyers have an important area to defend. A clean 4H close below support could signal a momentum shift and potentially open the door to another downside move.
For now, this support remains the key level to watch. The reaction here could provide the next clue for BTC’s short-term direction.
Trade with a plan, manage risk carefully, and avoid chasing volatility.
DYOR — Do Your Own Research
{future}(BTCUSDT)
$BTC
📊 $BTC — KEY SUPPORT WATCH
$BTC continues to hold above the key support zone, keeping the current structure intact for now.
As long as 4H candles continue closing above this level, buyers have an important area to defend. A clean 4H close below support could signal a momentum shift and potentially open the door to another downside move.
For now, this support remains the key level to watch. The reaction here could provide the next clue for BTC’s short-term direction.
Trade with a plan, manage risk carefully, and avoid chasing volatility.
DYOR — Do Your Own Research
$BTC
$BTC continues to hold above the key support zone, keeping the current structure intact for now.
As long as 4H candles continue closing above this level, buyers have an important area to defend. A clean 4H close below support could signal a momentum shift and potentially open the door to another downside move.
For now, this support remains the key level to watch. The reaction here could provide the next clue for BTC’s short-term direction.
Trade with a plan, manage risk carefully, and avoid chasing volatility.
DYOR — Do Your Own Research
$BTC
1
5
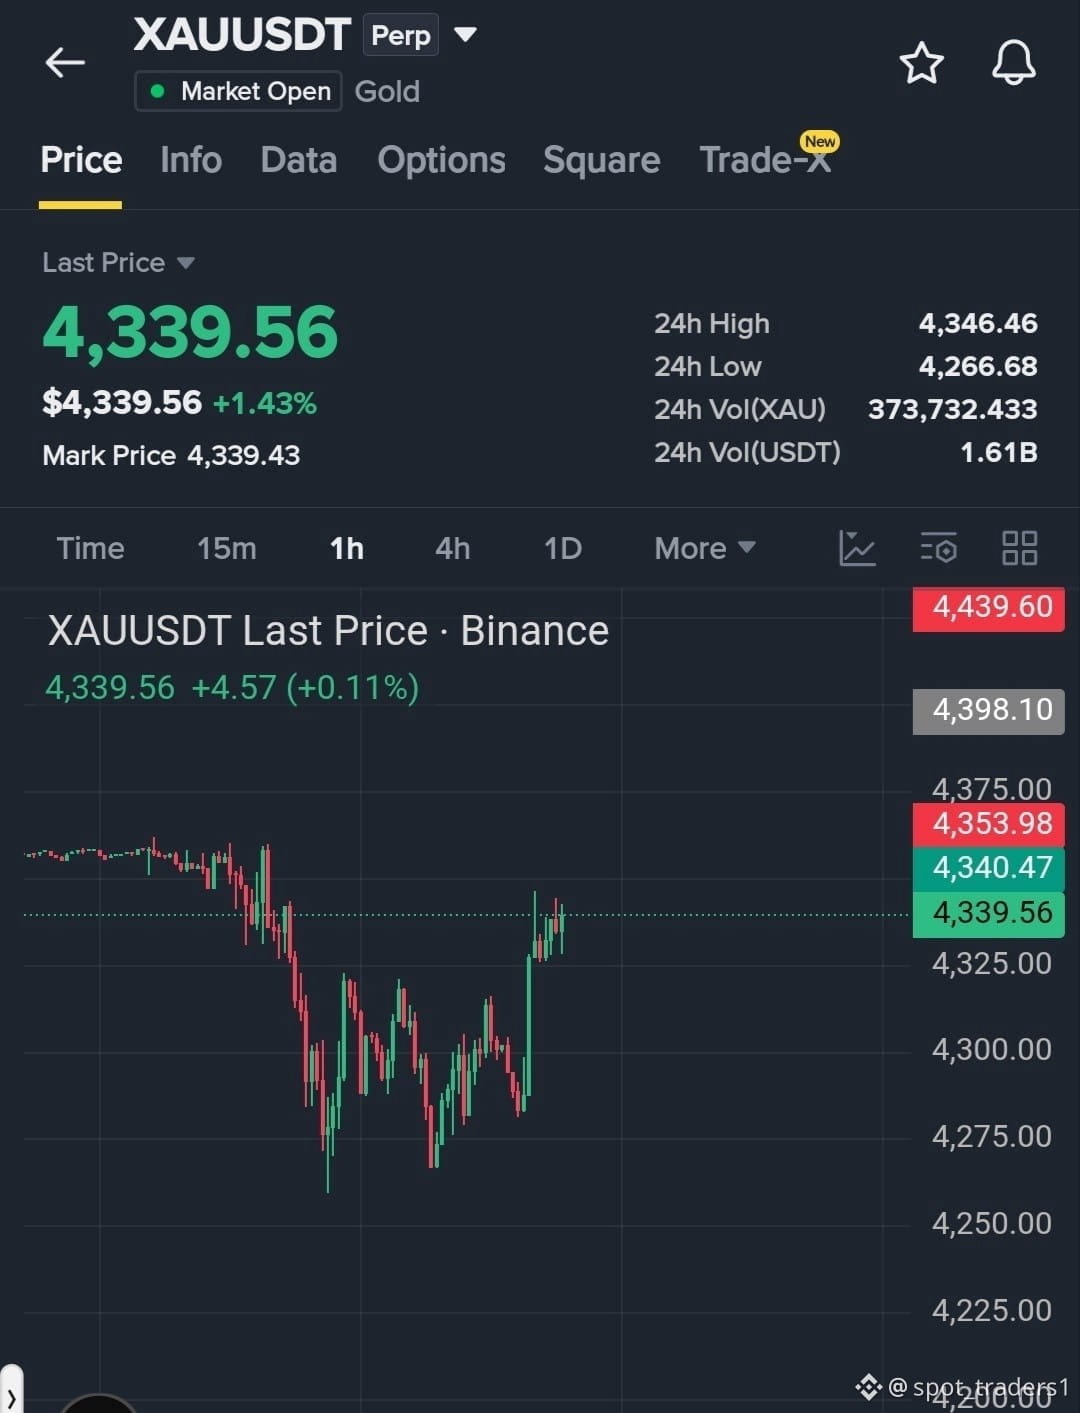
🪙 $XAU — MARKET WATCH
$XAU is trading around $4,340 after rebounding from the $4,280 support zone.
The key area to monitor is $4,350–$4,370. A clear rejection from this zone could potentially bring $4,280 and then $4,200 back into focus.
For now, I’m waiting for confirmation rather than chasing the move. The Fed decision, USD, and Treasury yields could trigger sharp volatility.
Manage risk carefully and DYOR — Do Your Own Research
{future}(XAUUSDT)
$XAU
🪙 $XAU — MARKET WATCH
$XAU is trading around $4,340 after rebounding from the $4,280 support zone.
The key area to monitor is $4,350–$4,370. A clear rejection from this zone could potentially bring $4,280 and then $4,200 back into focus.
For now, I’m waiting for confirmation rather than chasing the move. The Fed decision, USD, and Treasury yields could trigger sharp volatility.
Manage risk carefully and DYOR — Do Your Own Research
$XAU
$XAU is trading around $4,340 after rebounding from the $4,280 support zone.
The key area to monitor is $4,350–$4,370. A clear rejection from this zone could potentially bring $4,280 and then $4,200 back into focus.
For now, I’m waiting for confirmation rather than chasing the move. The Fed decision, USD, and Treasury yields could trigger sharp volatility.
Manage risk carefully and DYOR — Do Your Own Research
$XAU
1
2
·
--
Bearish
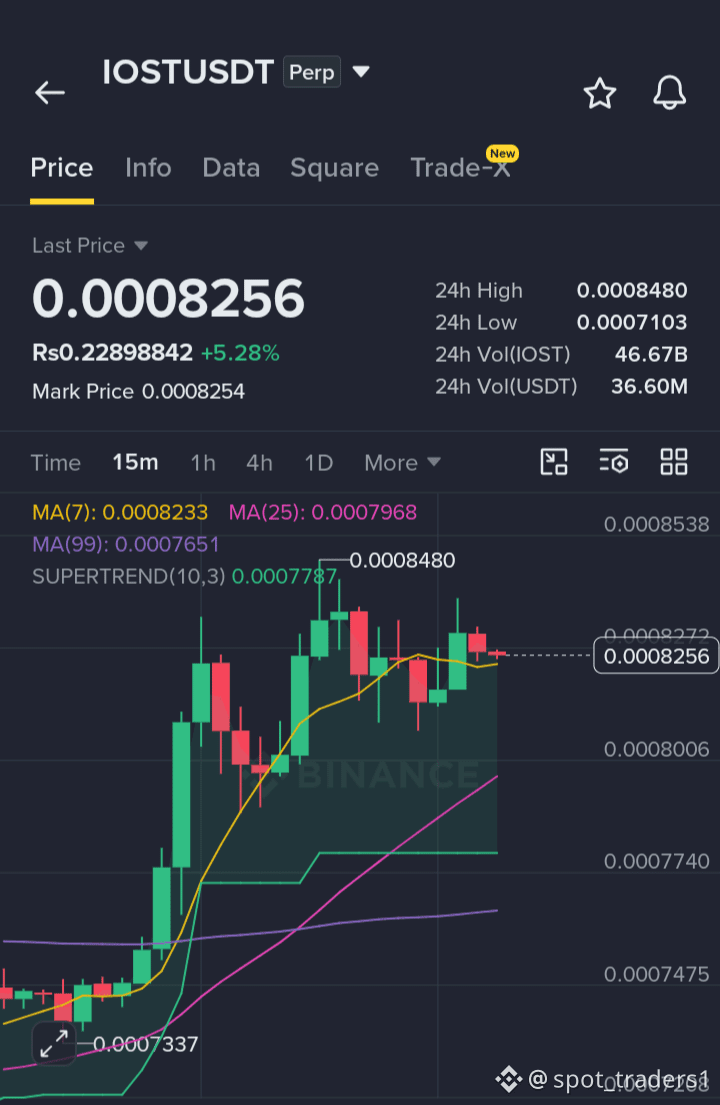
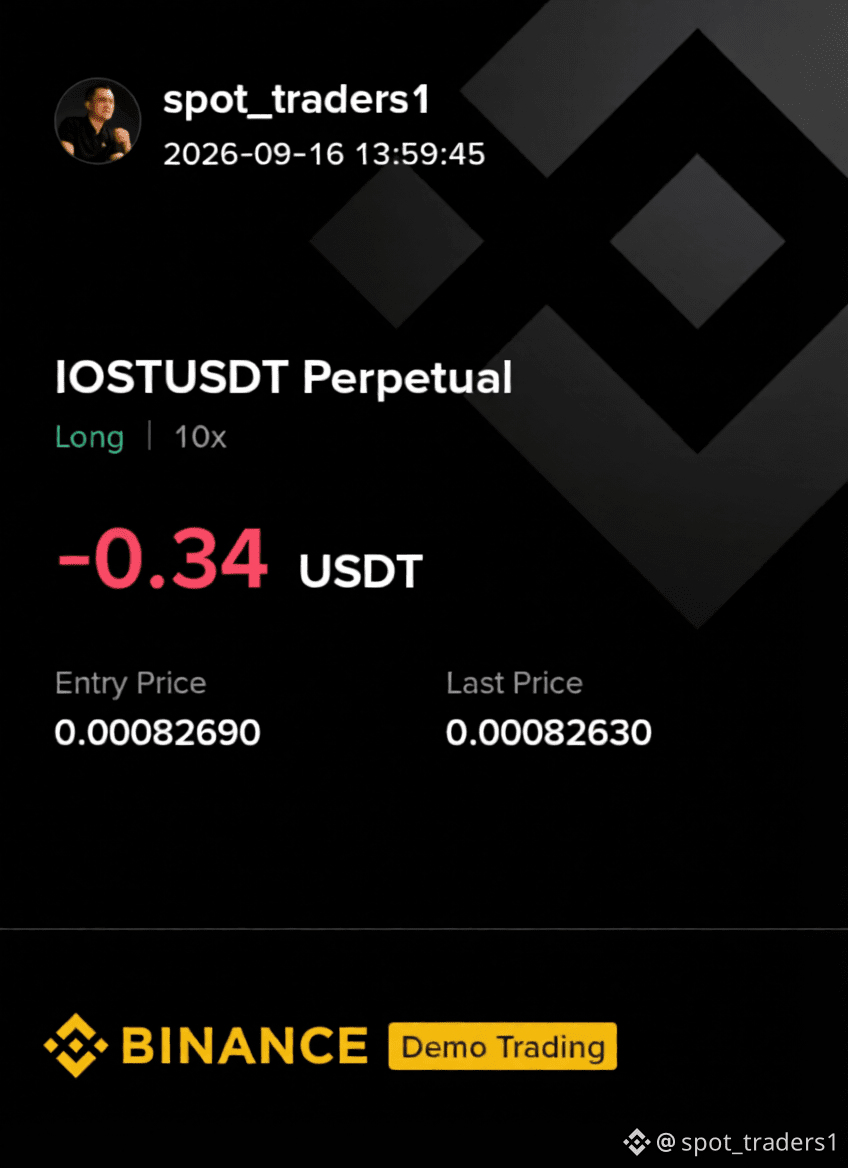
📉 $IOST — SHORT SETUP
$IOST is showing rejection near resistance. If sellers maintain control, another downside move could potentially develop.
Entry: $0.00081–$0.00084
SL: $0.00088
TP1: $0.00079
TP2: $0.00075
TP3: $0.00072
Wait for confirmation, avoid chasing, and manage position size and risk carefully. Consider securing partial gains as targets are reached.
DYOR.
{future}(IOSTUSDT)
$IOST
📉 $IOST — SHORT SETUP
$IOST is showing rejection near resistance. If sellers maintain control, another downside move could potentially develop.
Entry: $0.00081–$0.00084
SL: $0.00088
TP1: $0.00079
TP2: $0.00075
TP3: $0.00072
Wait for confirmation, avoid chasing, and manage position size and risk carefully. Consider securing partial gains as targets are reached.
DYOR.
$IOST
$IOST is showing rejection near resistance. If sellers maintain control, another downside move could potentially develop.
Entry: $0.00081–$0.00084
SL: $0.00088
TP1: $0.00079
TP2: $0.00075
TP3: $0.00072
Wait for confirmation, avoid chasing, and manage position size and risk carefully. Consider securing partial gains as targets are reached.
DYOR.
$IOST
1
2
·
--
Bearish
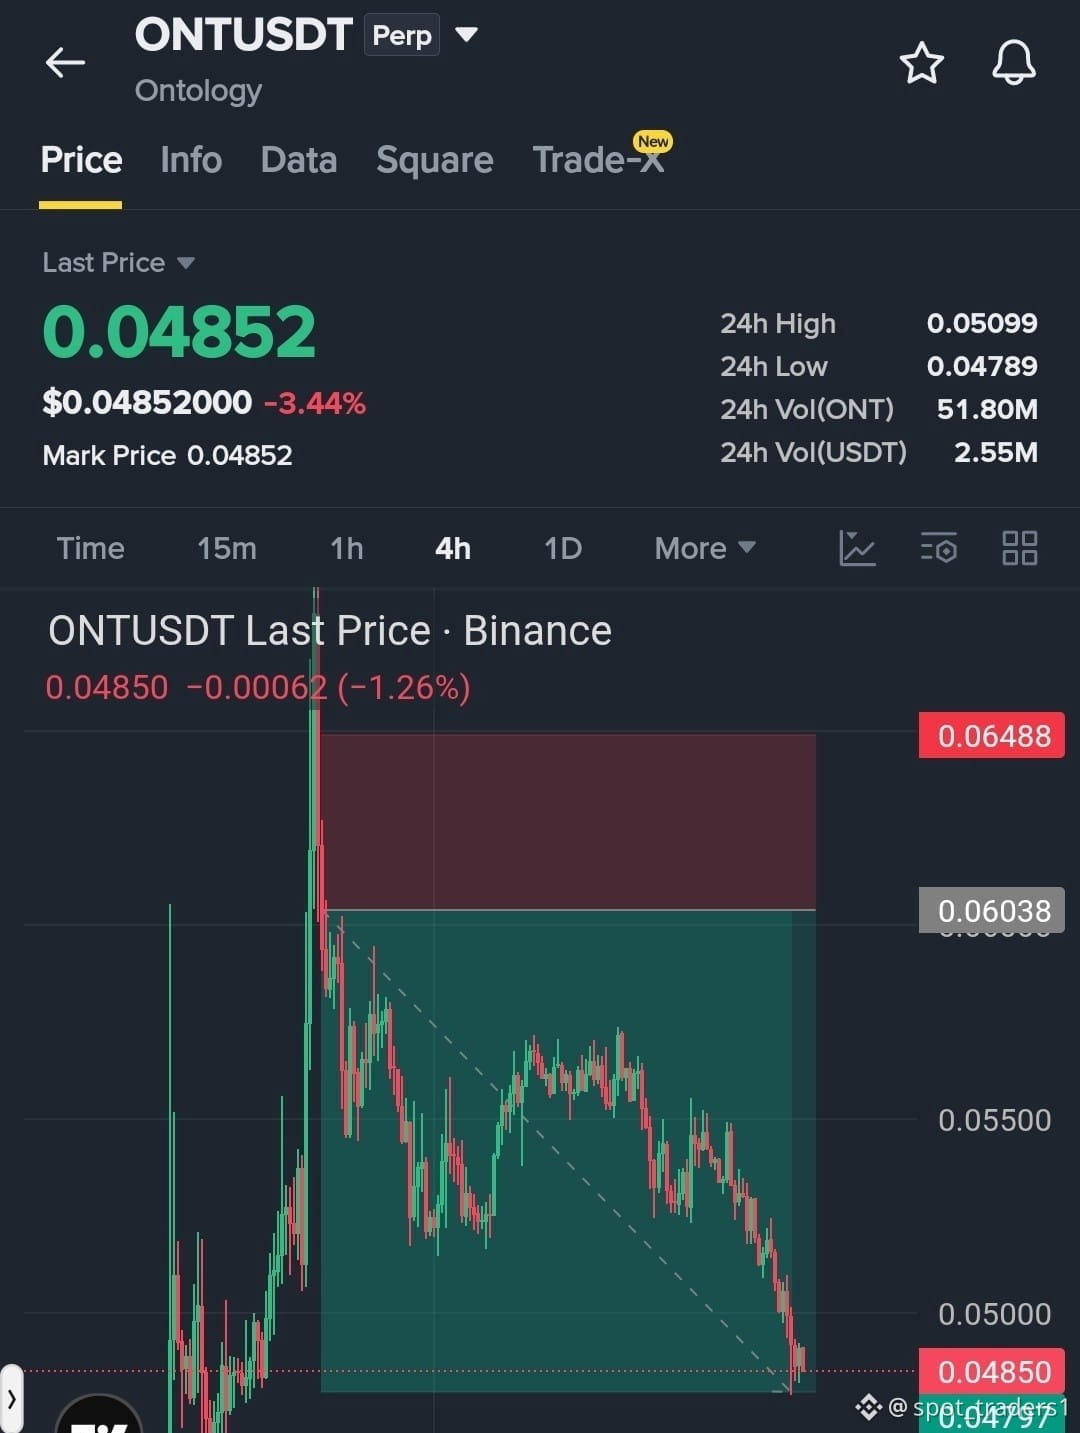
📉The $ONT short setup has successfully reached all targets as planned. Patience and disciplined execution remain key when managing any setup.
If you’re still holding, consider closing and securing gains rather than overstaying after the targets have been reached.
Stay tuned for the next update and watch $LAB and $BICO for potential upcoming setups.
Manage risk carefully, avoid chasing entries, and use proper position sizing.
DYOR — Do Your Own Research
{future}(BICOUSDT)
{future}(LABUSDT)
{future}(ONTUSDT)
📉The $ONT short setup has successfully reached all targets as planned. Patience and disciplined execution remain key when managing any setup.
If you’re still holding, consider closing and securing gains rather than overstaying after the targets have been reached.
Stay tuned for the next update and watch $LAB and $BICO for potential upcoming setups.
Manage risk carefully, avoid chasing entries, and use proper position sizing.
DYOR — Do Your Own Research
If you’re still holding, consider closing and securing gains rather than overstaying after the targets have been reached.
Stay tuned for the next update and watch $LAB and $BICO for potential upcoming setups.
Manage risk carefully, avoid chasing entries, and use proper position sizing.
DYOR — Do Your Own Research
1
7
·
--
Bearish
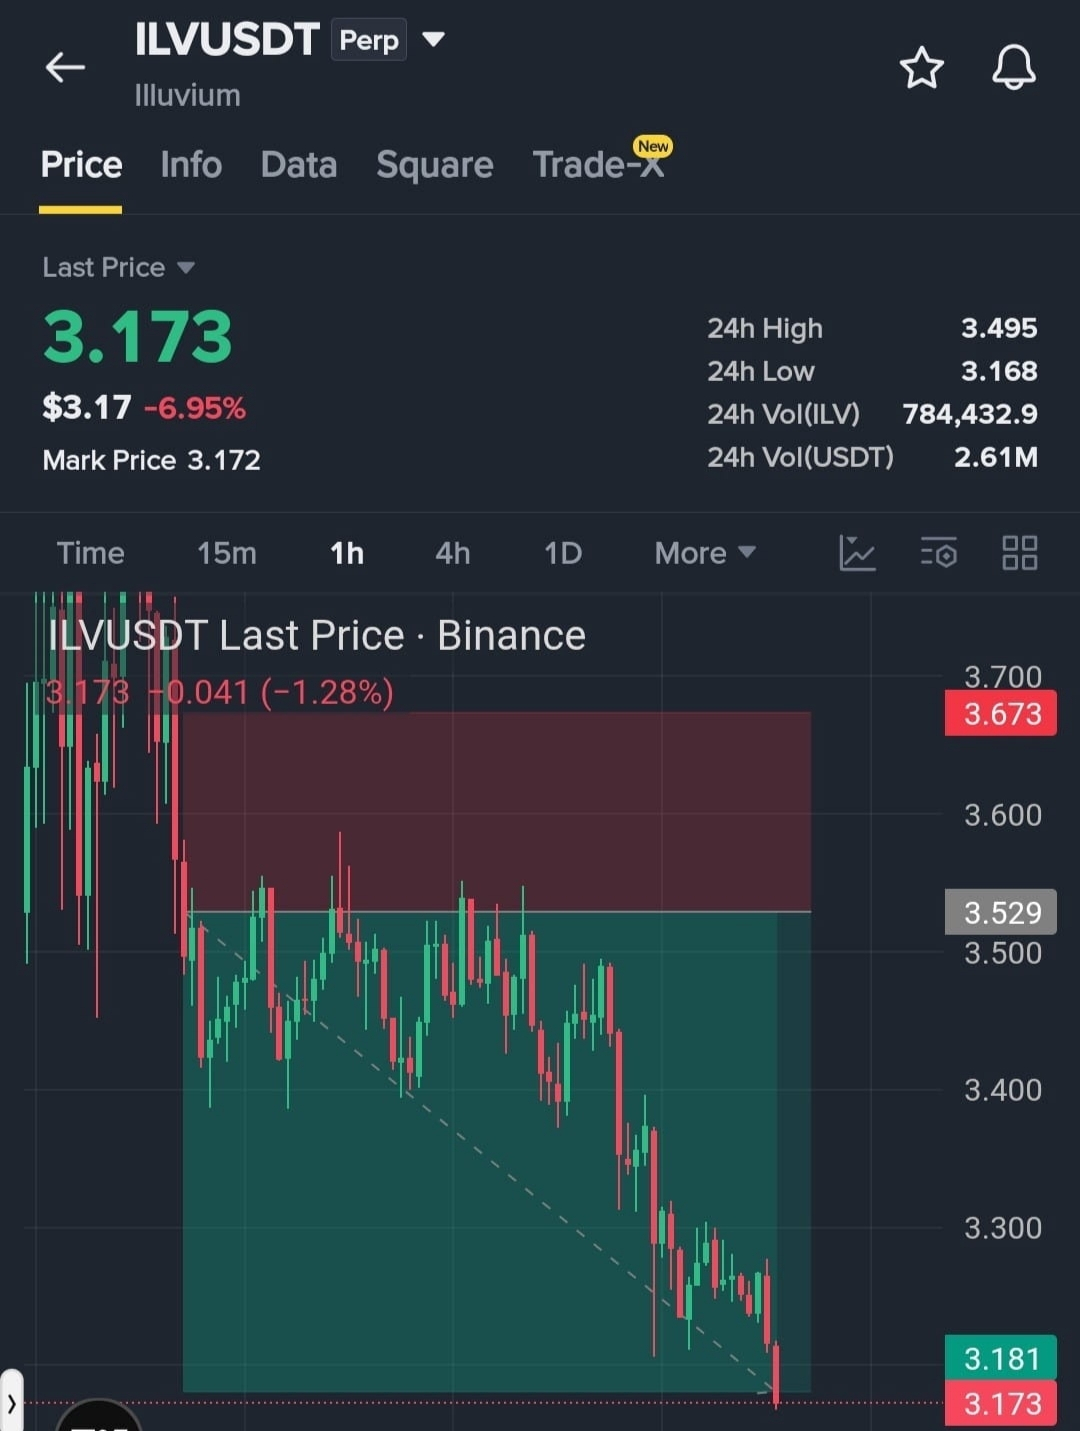
📉 $ILV — ALL TPs HIT!
The short setup has successfully reached all targets as mentioned. Another clean move completed.
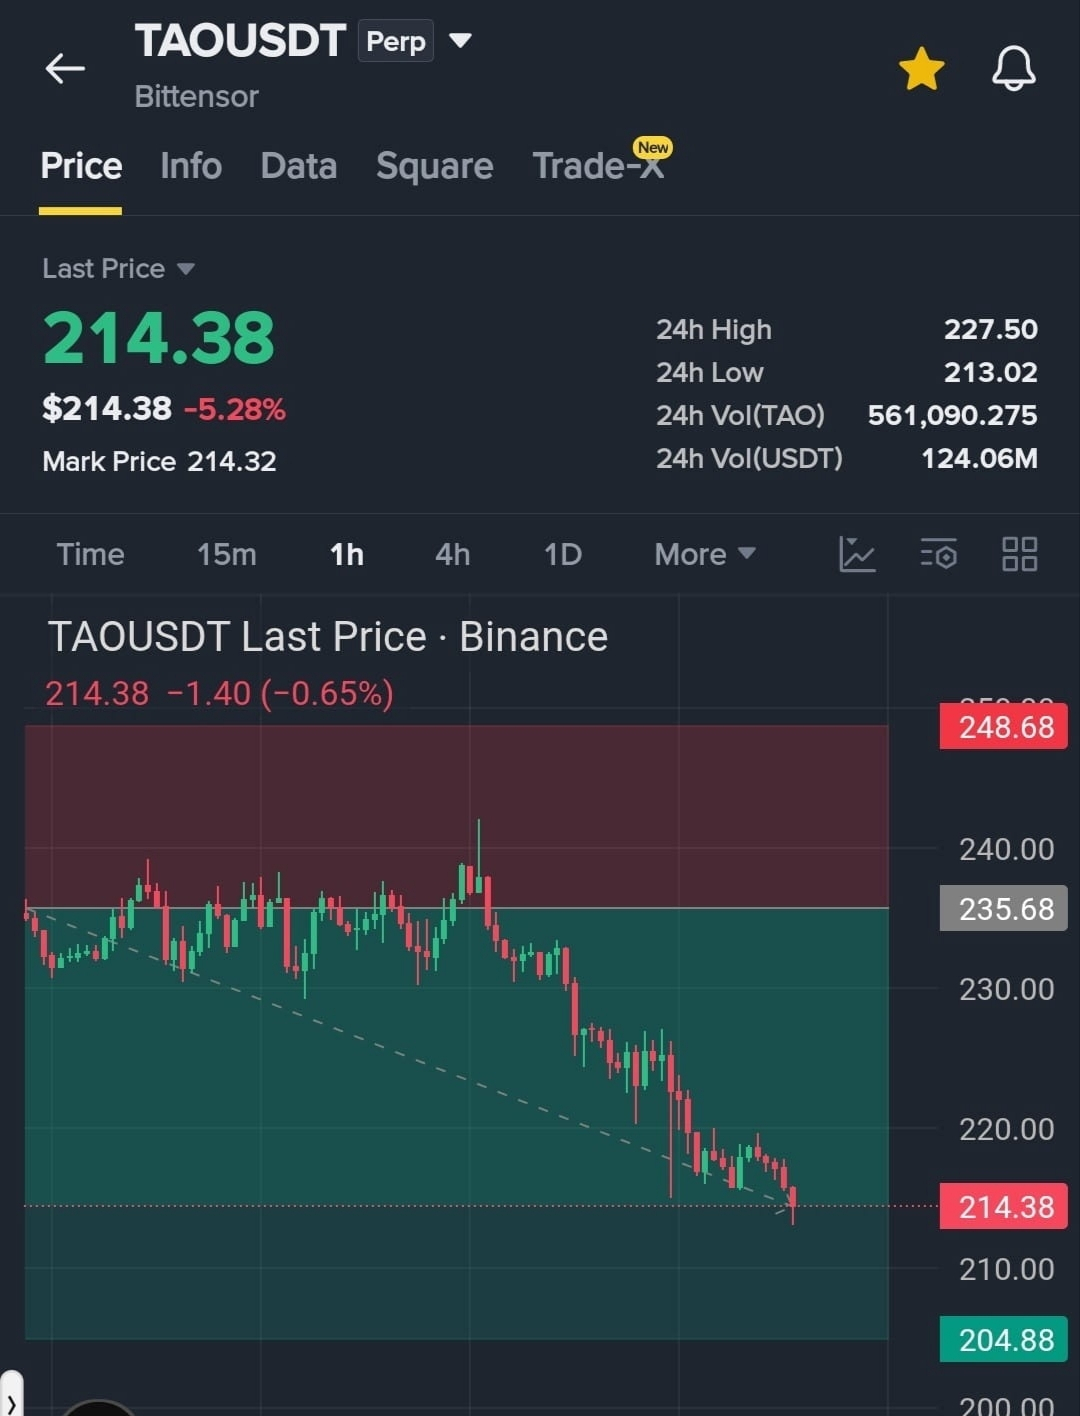
📉 $TAO — TP2 HIT!
TP2 has been reached. Consider securing around 50% of the position and moving the SL to breakeven to protect the remaining trade while watching for the next target.
Stay disciplined, manage risk carefully, and avoid chasing the move.
DYOR — Do Your Own Research
$H
{future}(HUSDT)
{future}(TAOUSDT)
{future}(ILVUSDT)
📉 $ILV — ALL TPs HIT!
The short setup has successfully reached all targets as mentioned. Another clean move completed.
📉 $TAO — TP2 HIT!
TP2 has been reached. Consider securing around 50% of the position and moving the SL to breakeven to protect the remaining trade while watching for the next target.
Stay disciplined, manage risk carefully, and avoid chasing the move.
DYOR — Do Your Own Research
$H
The short setup has successfully reached all targets as mentioned. Another clean move completed.
📉 $TAO — TP2 HIT!
TP2 has been reached. Consider securing around 50% of the position and moving the SL to breakeven to protect the remaining trade while watching for the next target.
Stay disciplined, manage risk carefully, and avoid chasing the move.
DYOR — Do Your Own Research
$H
spot_traders1
·
--
Bearish $TAO — STRONG LONG SETUP
While the broader market is experiencing a correction, $TAO continues to hold firmly above the $250 level, showing resilience and continued buying interest.
If bullish momentum returns, TAO could be positioned for a stronger move higher. Stay patient and wait for confirmation.
Long Setup
Entry: $250–$260
TP1: $280
TP2: $300
TP3: $400
TP4: $500
SL: $234
Manage risk carefully, avoid excessive leverage, and secure partial profits as targets are reached.
DYOR
$TAO
While the broader market is experiencing a correction, $TAO continues to hold firmly above the $250 level, showing resilience and continued buying interest.
If bullish momentum returns, TAO could be positioned for a stronger move higher. Stay patient and wait for confirmation.
Long Setup
Entry: $250–$260
TP1: $280
TP2: $300
TP3: $400
TP4: $500
SL: $234
Manage risk carefully, avoid excessive leverage, and secure partial profits as targets are reached.
DYOR
$TAO
1
141
·
--
Bearish
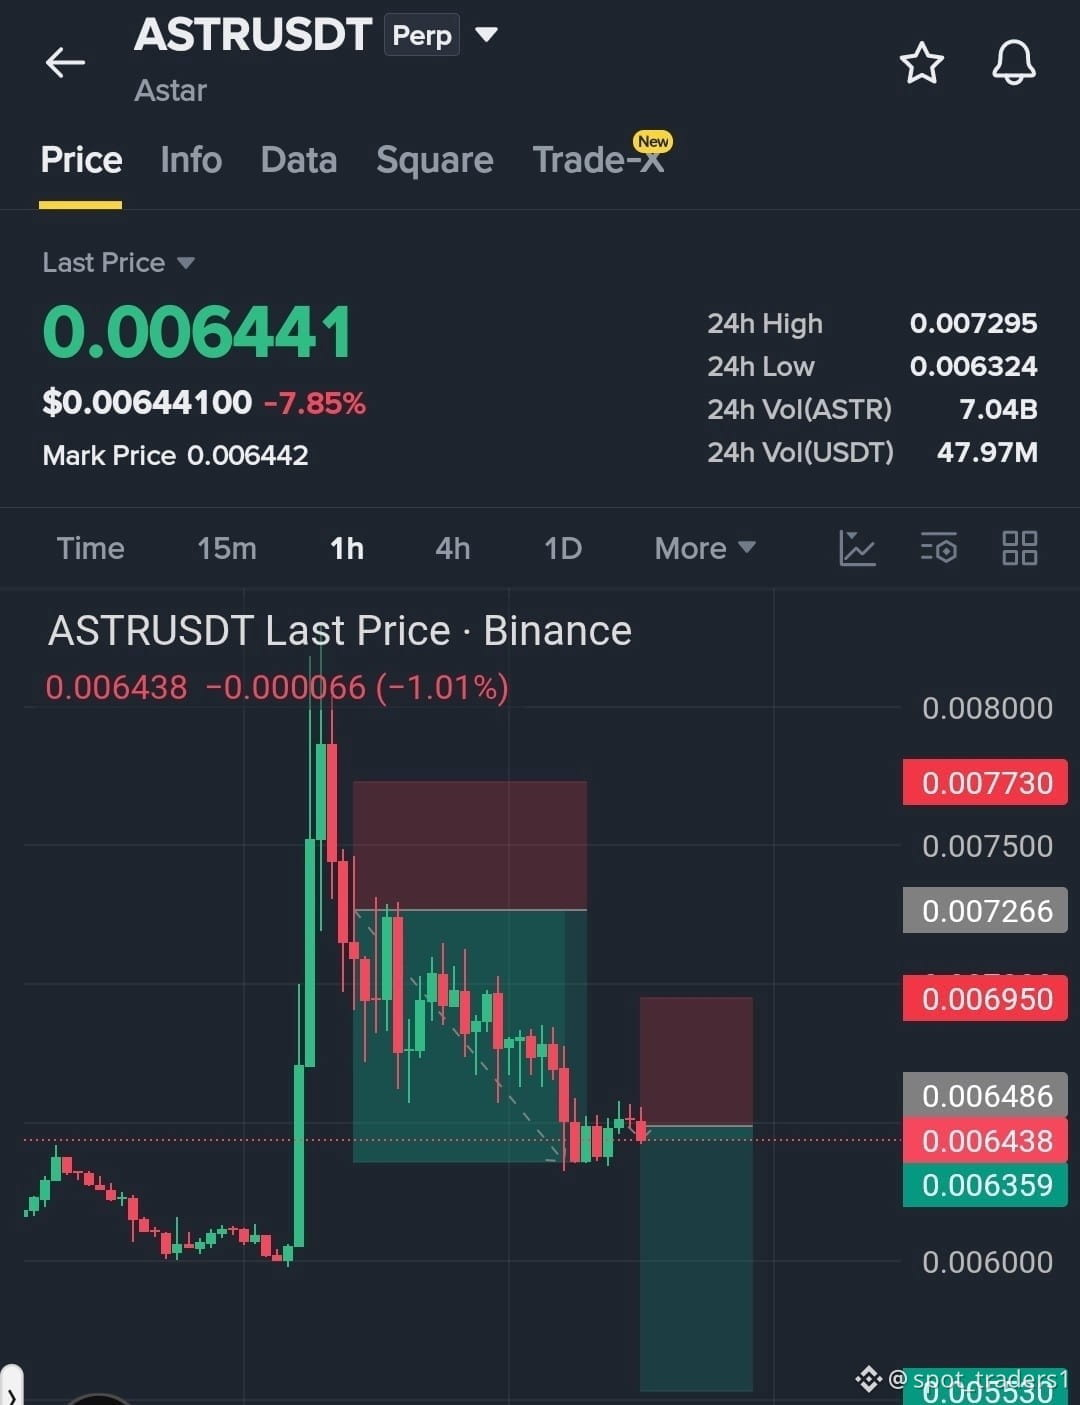
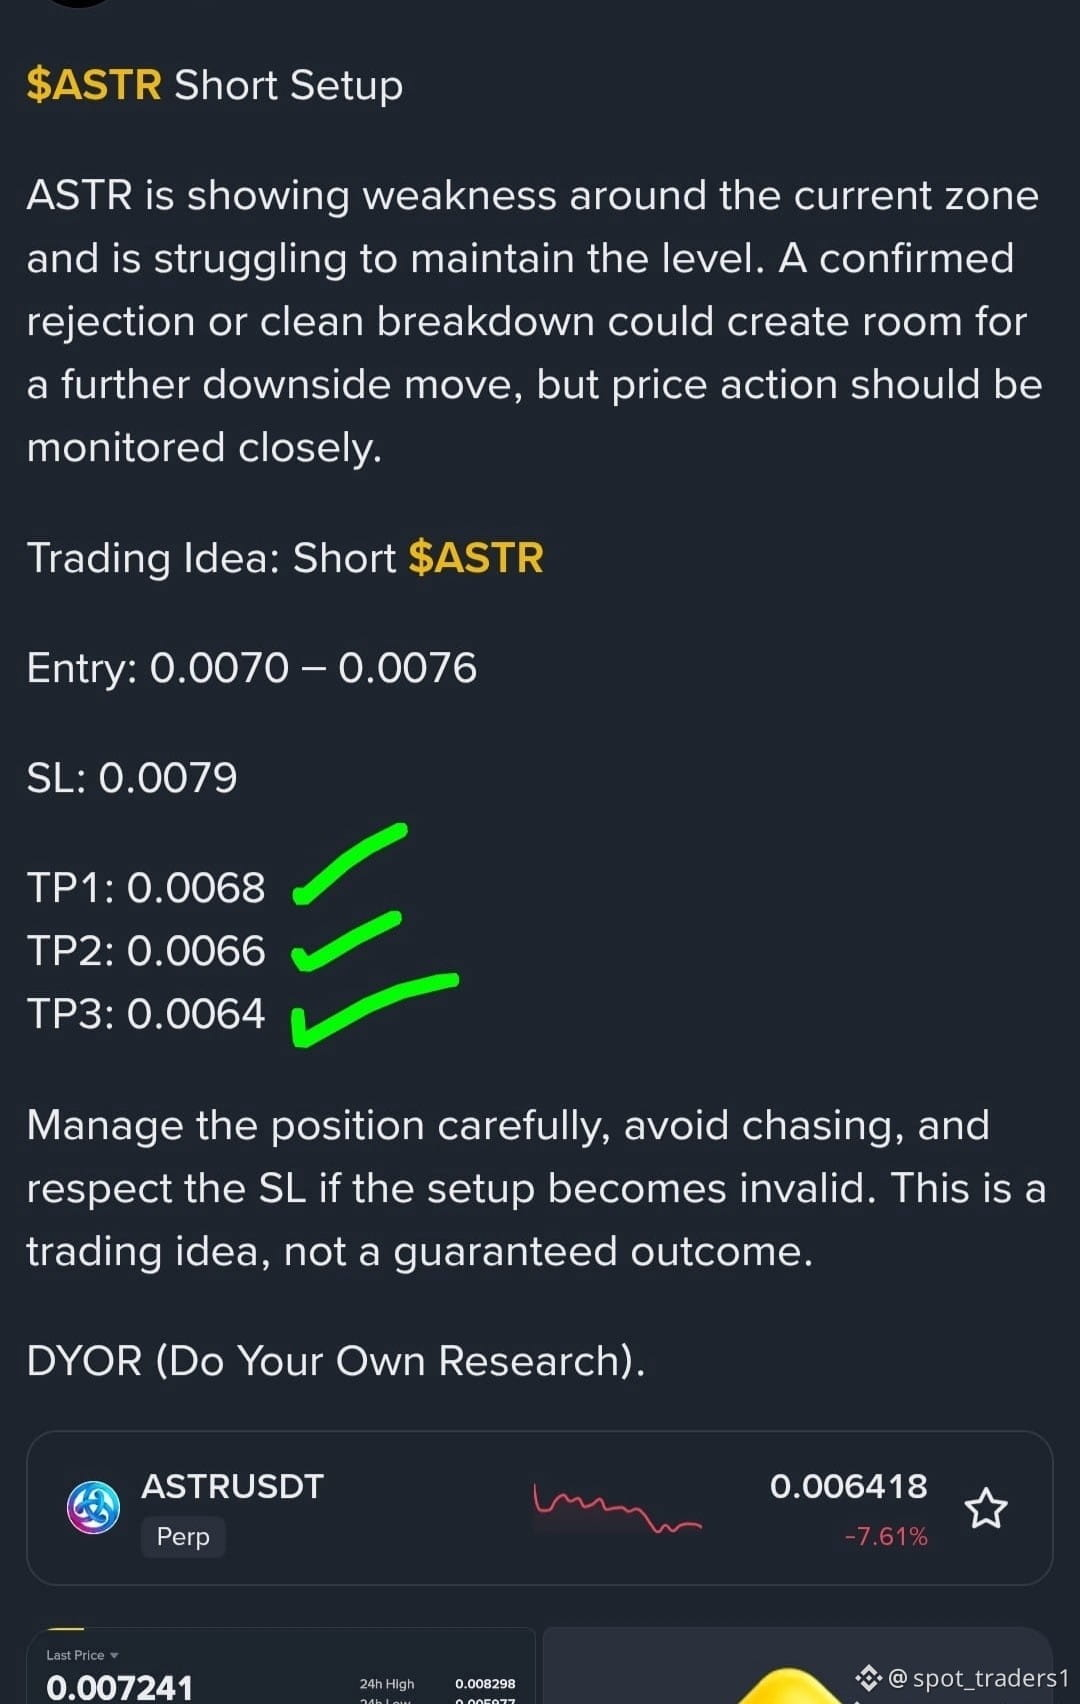
📉 $ASTR — ALL TPs HIT!
The $ASTR short setup has successfully reached all previously mentioned targets. Bearish momentum remains in focus, with price action still showing weakness.
If you’re still holding, manage the position carefully and consider securing gains as the move develops.
Next Levels to Watch:
$0.0060
$0.0055
Stay patient, avoid chasing, and keep risk management under control.
DYOR — Do Your Own Research
{future}(ASTRUSDT)
$ASTR
📉 $ASTR — ALL TPs HIT!
The $ASTR short setup has successfully reached all previously mentioned targets. Bearish momentum remains in focus, with price action still showing weakness.
If you’re still holding, manage the position carefully and consider securing gains as the move develops.
Next Levels to Watch:
$0.0060
$0.0055
Stay patient, avoid chasing, and keep risk management under control.
DYOR — Do Your Own Research
$ASTR
The $ASTR short setup has successfully reached all previously mentioned targets. Bearish momentum remains in focus, with price action still showing weakness.
If you’re still holding, manage the position carefully and consider securing gains as the move develops.
Next Levels to Watch:
$0.0060
$0.0055
Stay patient, avoid chasing, and keep risk management under control.
DYOR — Do Your Own Research
$ASTR
1
1
·
--
Bearish
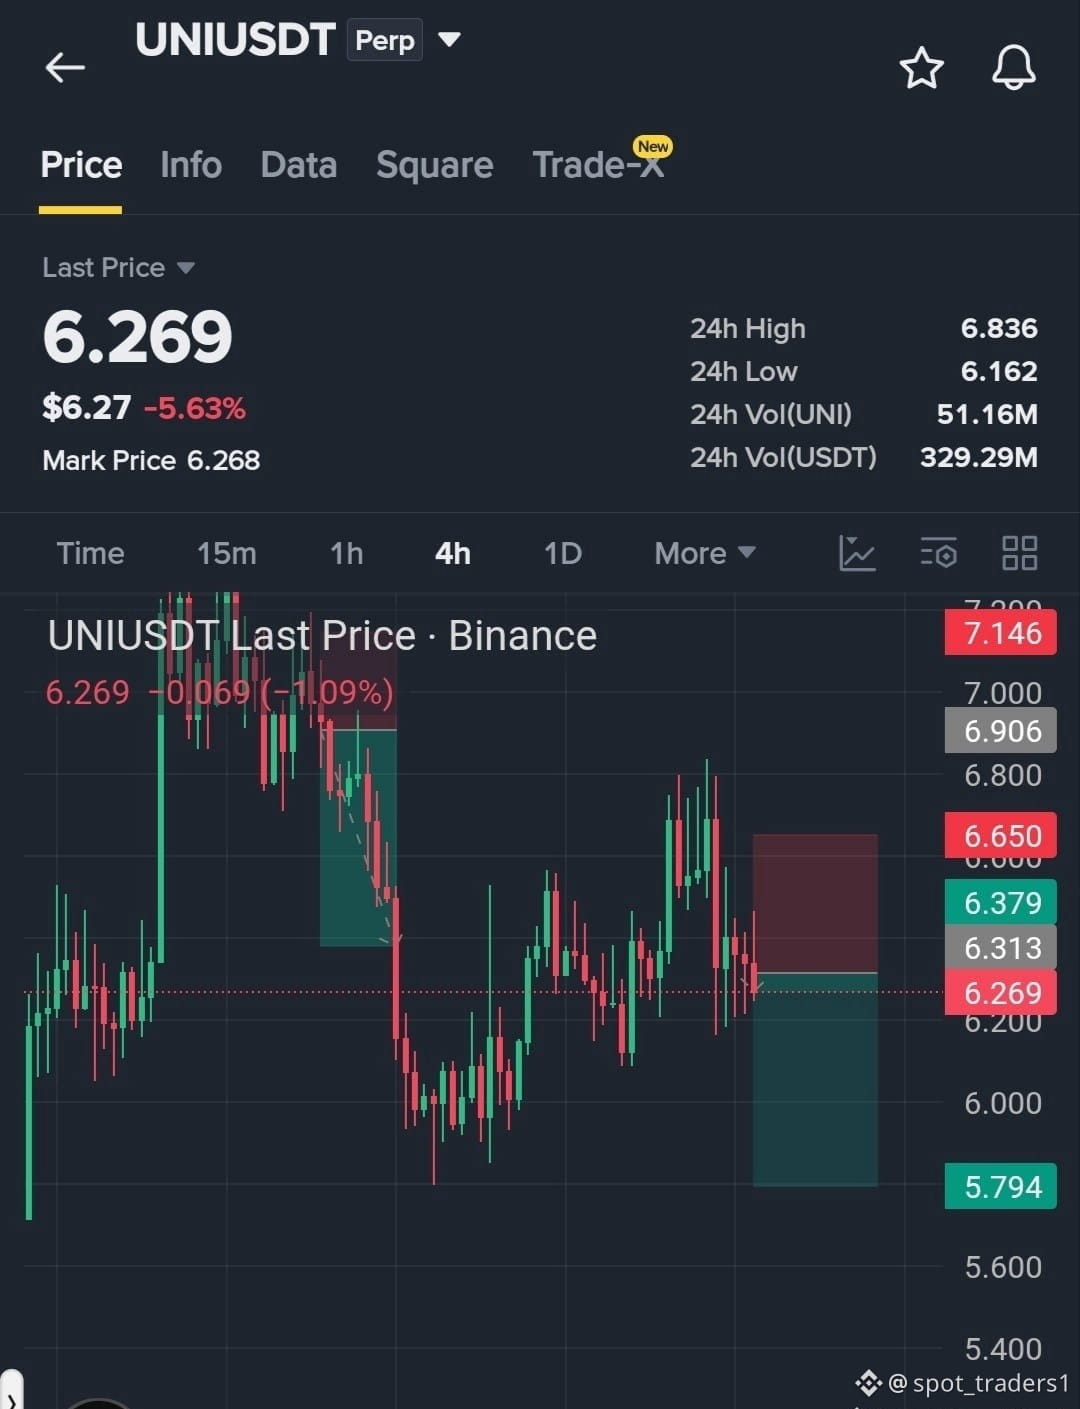
📉 $UNI — SHORT SETUP
$UNI is showing signs of weakening momentum near resistance. If price fails to reclaim the zone and sellers regain control, further downside toward lower support levels could potentially develop.
Entry: 6.20–6.44
SL: 6.75
TP1: 6.05
TP2: 5.95
TP3: 5.80
Watch the resistance zone for confirmation, avoid chasing, and manage position size and leverage carefully. Respect the invalidation level if the setup fails.
DYOR — Do Your Own Research
{future}(UNIUSDT)
$UNI
📉 $UNI — SHORT SETUP
$UNI is showing signs of weakening momentum near resistance. If price fails to reclaim the zone and sellers regain control, further downside toward lower support levels could potentially develop.
Entry: 6.20–6.44
SL: 6.75
TP1: 6.05
TP2: 5.95
TP3: 5.80
Watch the resistance zone for confirmation, avoid chasing, and manage position size and leverage carefully. Respect the invalidation level if the setup fails.
DYOR — Do Your Own Research
$UNI
$UNI is showing signs of weakening momentum near resistance. If price fails to reclaim the zone and sellers regain control, further downside toward lower support levels could potentially develop.
Entry: 6.20–6.44
SL: 6.75
TP1: 6.05
TP2: 5.95
TP3: 5.80
Watch the resistance zone for confirmation, avoid chasing, and manage position size and leverage carefully. Respect the invalidation level if the setup fails.
DYOR — Do Your Own Research
$UNI
1
24
·
--
Bearish
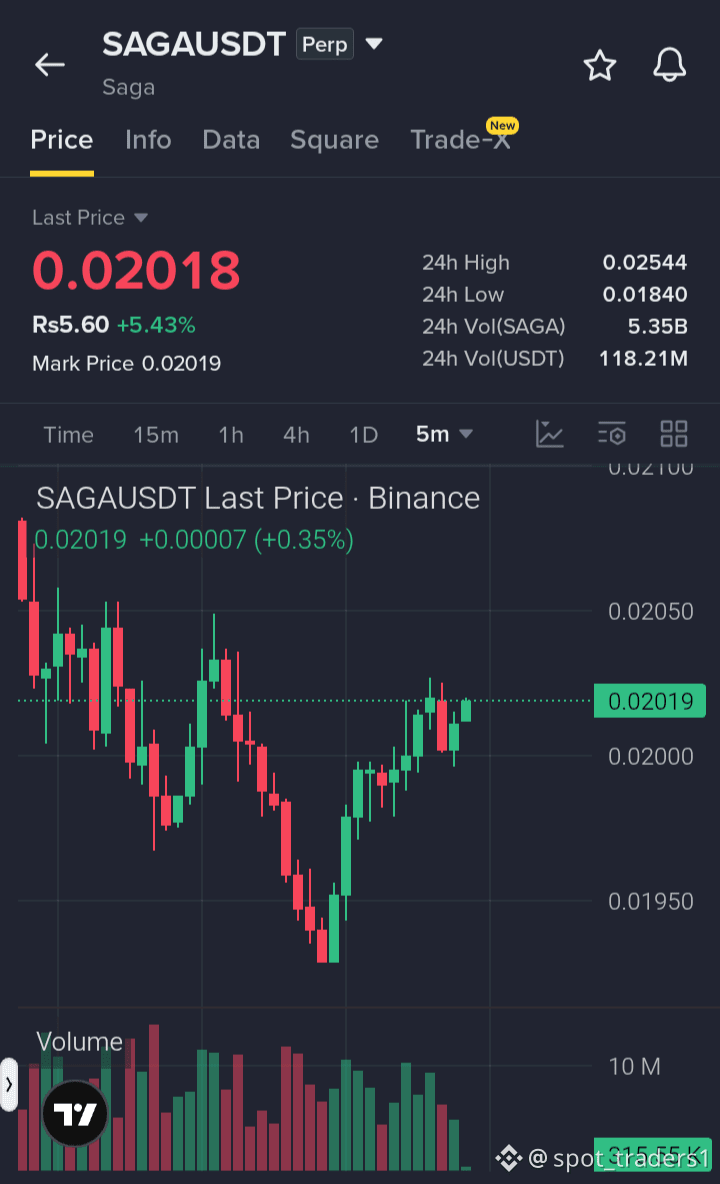
📉 $SAGA — SHORT SETUP
$SAGA is showing a rebound, but price is approaching a key resistance zone where sellers could step in if momentum starts to fade.
Entry: $0.020–$0.024
SL: $0.0250
TP1: $0.018
TP2: $0.017
TP3: $0.016
Watch the reaction around the entry zone and wait for confirmation. Avoid chasing, keep position size and leverage controlled, and respect the invalidation level.
DYOR — Do Your Own Research
{future}(SAGAUSDT)
$SAGA
📉 $SAGA — SHORT SETUP
$SAGA is showing a rebound, but price is approaching a key resistance zone where sellers could step in if momentum starts to fade.
Entry: $0.020–$0.024
SL: $0.0250
TP1: $0.018
TP2: $0.017
TP3: $0.016
Watch the reaction around the entry zone and wait for confirmation. Avoid chasing, keep position size and leverage controlled, and respect the invalidation level.
DYOR — Do Your Own Research
$SAGA
$SAGA is showing a rebound, but price is approaching a key resistance zone where sellers could step in if momentum starts to fade.
Entry: $0.020–$0.024
SL: $0.0250
TP1: $0.018
TP2: $0.017
TP3: $0.016
Watch the reaction around the entry zone and wait for confirmation. Avoid chasing, keep position size and leverage controlled, and respect the invalidation level.
DYOR — Do Your Own Research
$SAGA

1
7
Log in to explore more content
Join global crypto users on Binance Square
⚡️ Get latest and useful information about crypto.
💬 Trusted by the world’s largest crypto exchange.
👍 Discover real insights from verified creators.
Email / Phone number
Trending Topics
FedRateWatch
1.1M views
5,478 Discussing
Share & Win Traffic Reward in our Trending Hashtag Campaign
✨Topic: FOMC September, What's The Fed's Next Move?
👉How to Join:
Publish a short post or article with hashtag #FedRateWatch
Create content based on the below angles:
- August core CPI rose 0.3% month-over-month, and the odds of a 25bp hike this week are now close to 90%. Do you anticipate a rate hike this week? Is it a one-off, or the start of a longer hiking cycle?
- If the hike lands, how does it play out for BTC, tech stocks, and gold? Bullish or bearish?
- How are you planning to trade next? Share your BTC, stocks or gold trade/holdings with our trade sharing widget.
⏰Campaign Period:
- 2026-09-15 11:00 - 2026-09-17 3:00 UTC
🎁Reward:
- Qualified posts that comply with the above guidelines and contain more than 100 words will be reviewed and may receive a random traffic boost of 500 to 3,000 views. You will receive a notification from your feed secretary if your post is selected.
- Get a chance to have your article featured on Binance Square Official
Need ideas for your post? Visit the topic page #FedRateWatch or the Square Guide on How to Post for Better Reach.
Binance Square Official
·586 Likes
·1.4M views
ZcashRises6%
4,143 views
123 Discussing
XRPSinks10%
1,633 views
82 Discussing