

SNouzen
760 Posts

SNouzen
Report
Block User
My posts and analyses are not financial advice. DYOR/NFA!
High-Frequency Trader
1.9 Years
12 Following
68 Followers
584 Liked
Posts
All
Quotes
·
--
Bearish
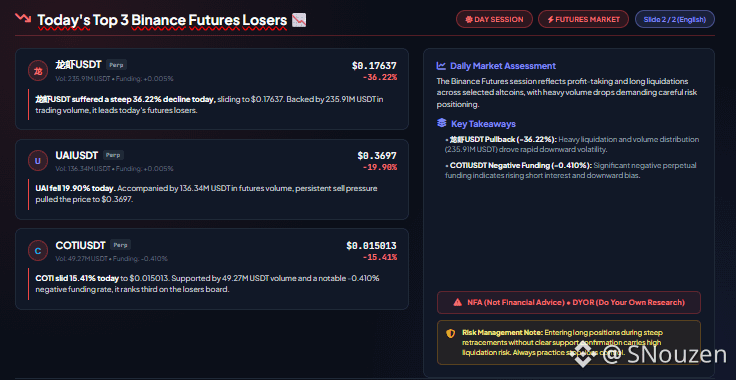
Today's Top 3 Binance Futures Losers!
$龙虾 $UAI $COTI
{future}(COTIUSDT)
{future}(UAIUSDT)
{future}(龙虾USDT)
Today's Top 3 Binance Futures Losers!
$龙虾 $UAI $COTI
$龙虾 $UAI $COTI
1
798
·
--
Bullish
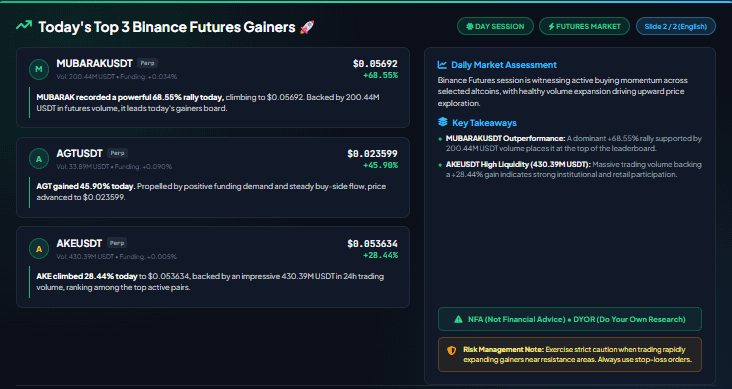
Today's Top 3 Binance Futures Gainers!
$MUBARAK $AGT $AKE
{future}(AKEUSDT)
{future}(AGTUSDT)
{future}(MUBARAKUSDT)
Today's Top 3 Binance Futures Gainers!
$MUBARAK $AGT $AKE
$MUBARAK $AGT $AKE
488
·
--
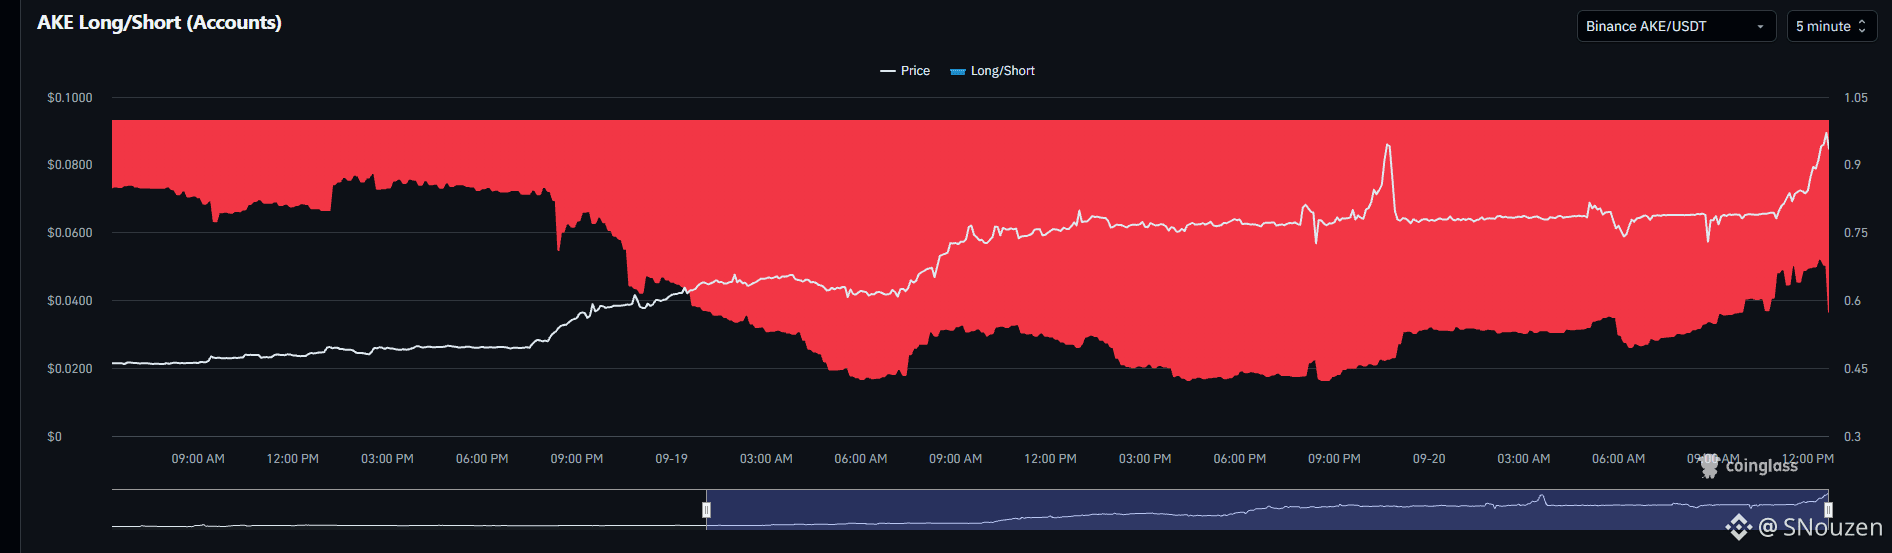
Opening a short on AKE with this many short positions is nonsense.
$AKE
{future}(AKEUSDT)
Opening a short on AKE with this many short positions is nonsense.
$AKE
$AKE
394
·
--
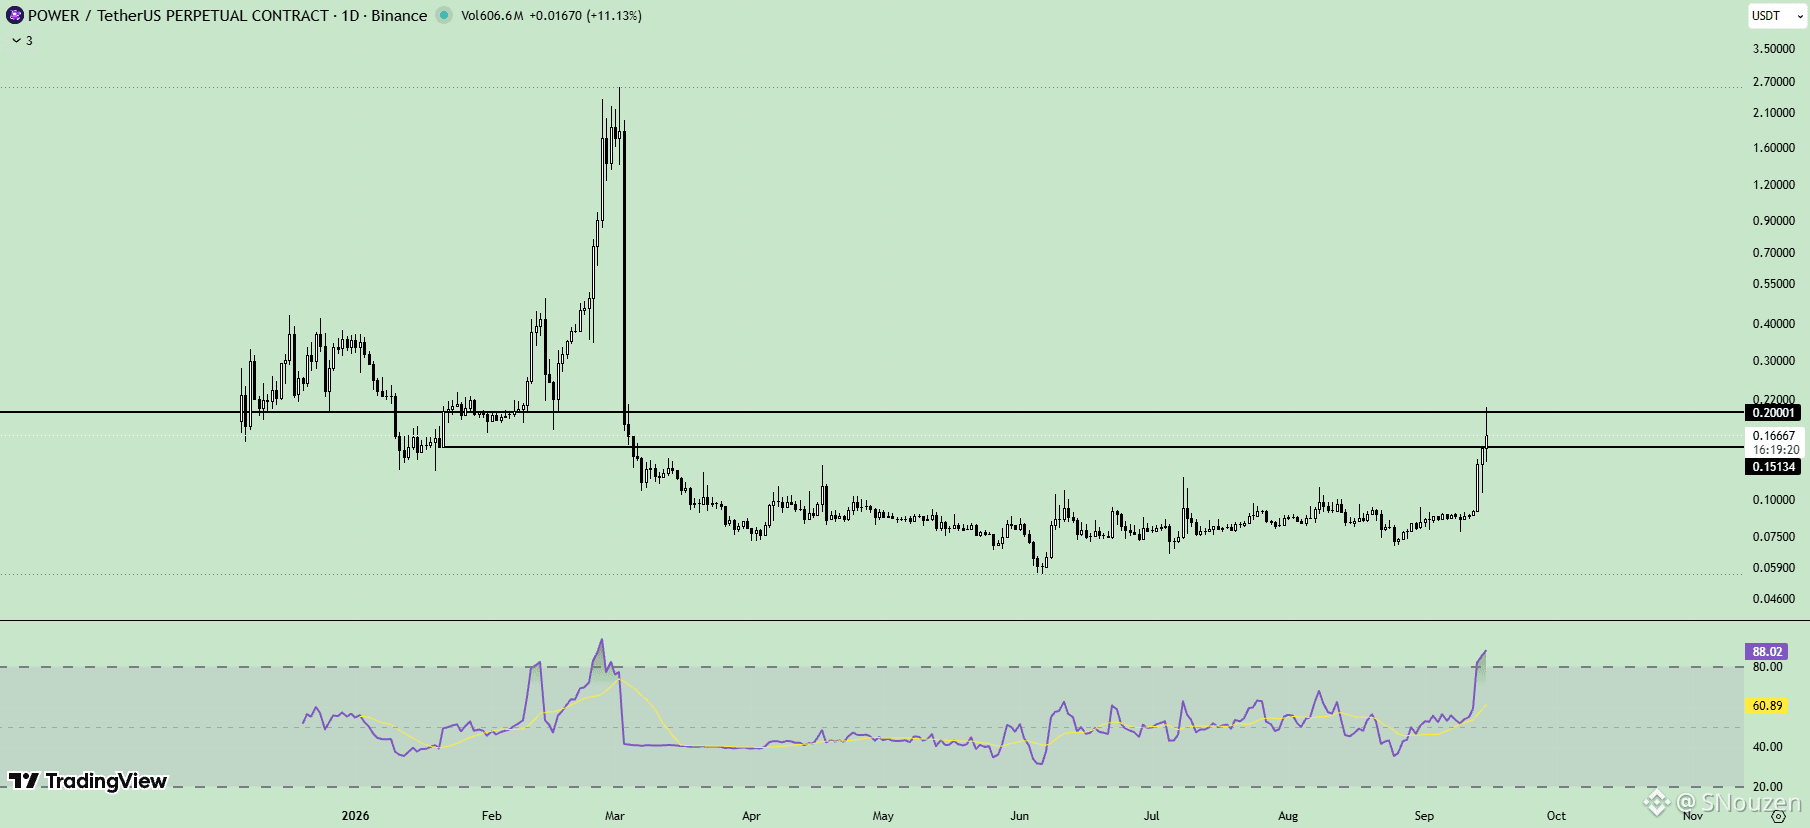
Selling pressure emerges as $POWER taps the critical 0.20 psychological barrier and sweeps local liquidity, pulling back to trade around 0.166.
• Bullish Trigger: Defending the 0.151 support floor and achieving a sustained breakout above the 0.20 ceiling clears the path toward the 0.30 and 0.40 extension zones.
• Bearish Threat: Sustained rejection from the 0.20 peak combined with a breakdown below the 0.151 support risks accelerating the correction back toward the 0.08 - 0.10 consolidation base.
Click to Trade👇$POWER
{future}(POWERUSDT)
Selling pressure emerges as $POWER taps the critical 0.20 psychological barrier and sweeps local liquidity, pulling back to trade around 0.166.
• Bullish Trigger: Defending the 0.151 support floor and achieving a sustained breakout above the 0.20 ceiling clears the path toward the 0.30 and 0.40 extension zones.
• Bearish Threat: Sustained rejection from the 0.20 peak combined with a breakdown below the 0.151 support risks accelerating the correction back toward the 0.08 - 0.10 consolidation base.
Click to Trade👇$POWER
• Bullish Trigger: Defending the 0.151 support floor and achieving a sustained breakout above the 0.20 ceiling clears the path toward the 0.30 and 0.40 extension zones.
• Bearish Threat: Sustained rejection from the 0.20 peak combined with a breakdown below the 0.151 support risks accelerating the correction back toward the 0.08 - 0.10 consolidation base.
Click to Trade👇$POWER
128
·
--
Bearish
Today's Top 3 Binance Futures Losers!
$LSK $UAI $CVC
{future}(CVCUSDT)
{future}(UAIUSDT)
{future}(LSKUSDT)
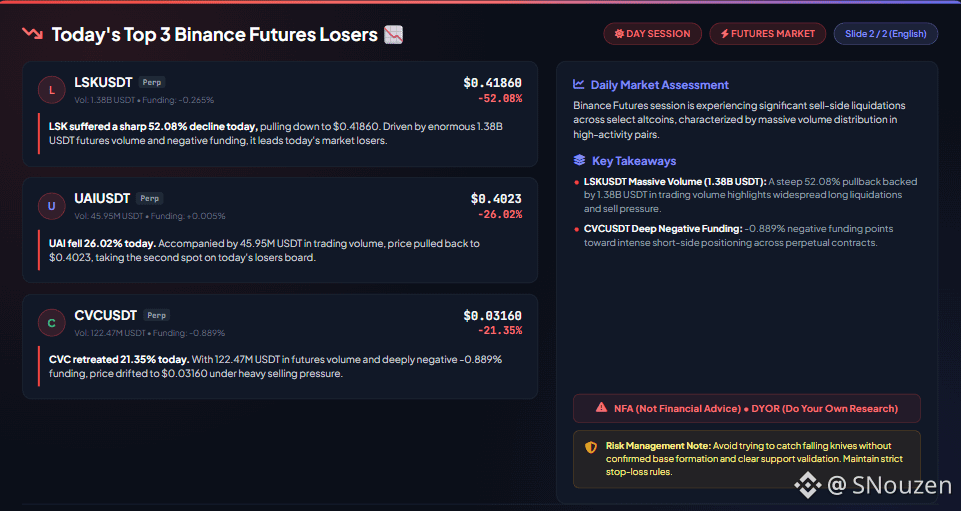
Today's Top 3 Binance Futures Losers!
$LSK $UAI $CVC
$LSK $UAI $CVC
320
·
--
Bullish
Today's Top 3 Binance Futures Gainers!
$AIN $POWER $CAP
{future}(CAPUSDT)
{future}(POWERUSDT)
{future}(AINUSDT)
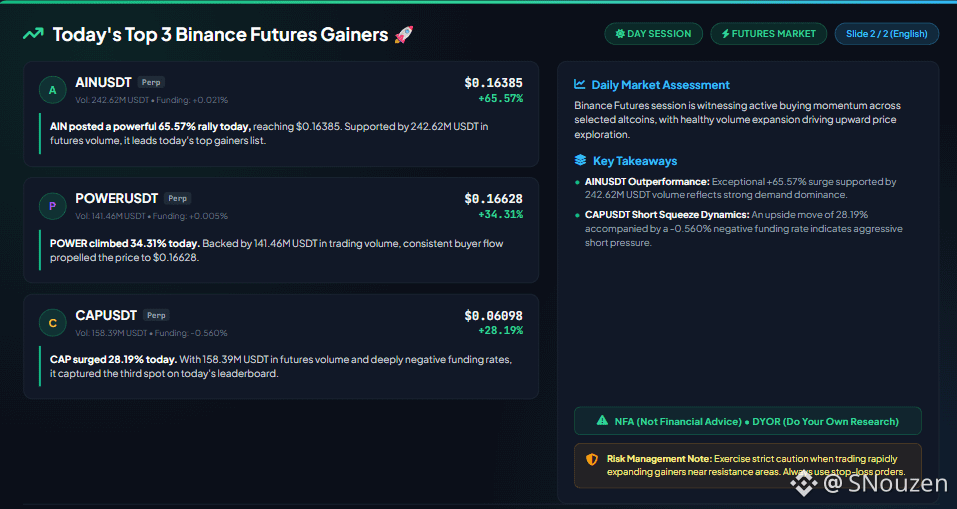
Today's Top 3 Binance Futures Gainers!
$AIN $POWER $CAP
$AIN $POWER $CAP
304
·
--
Bullish
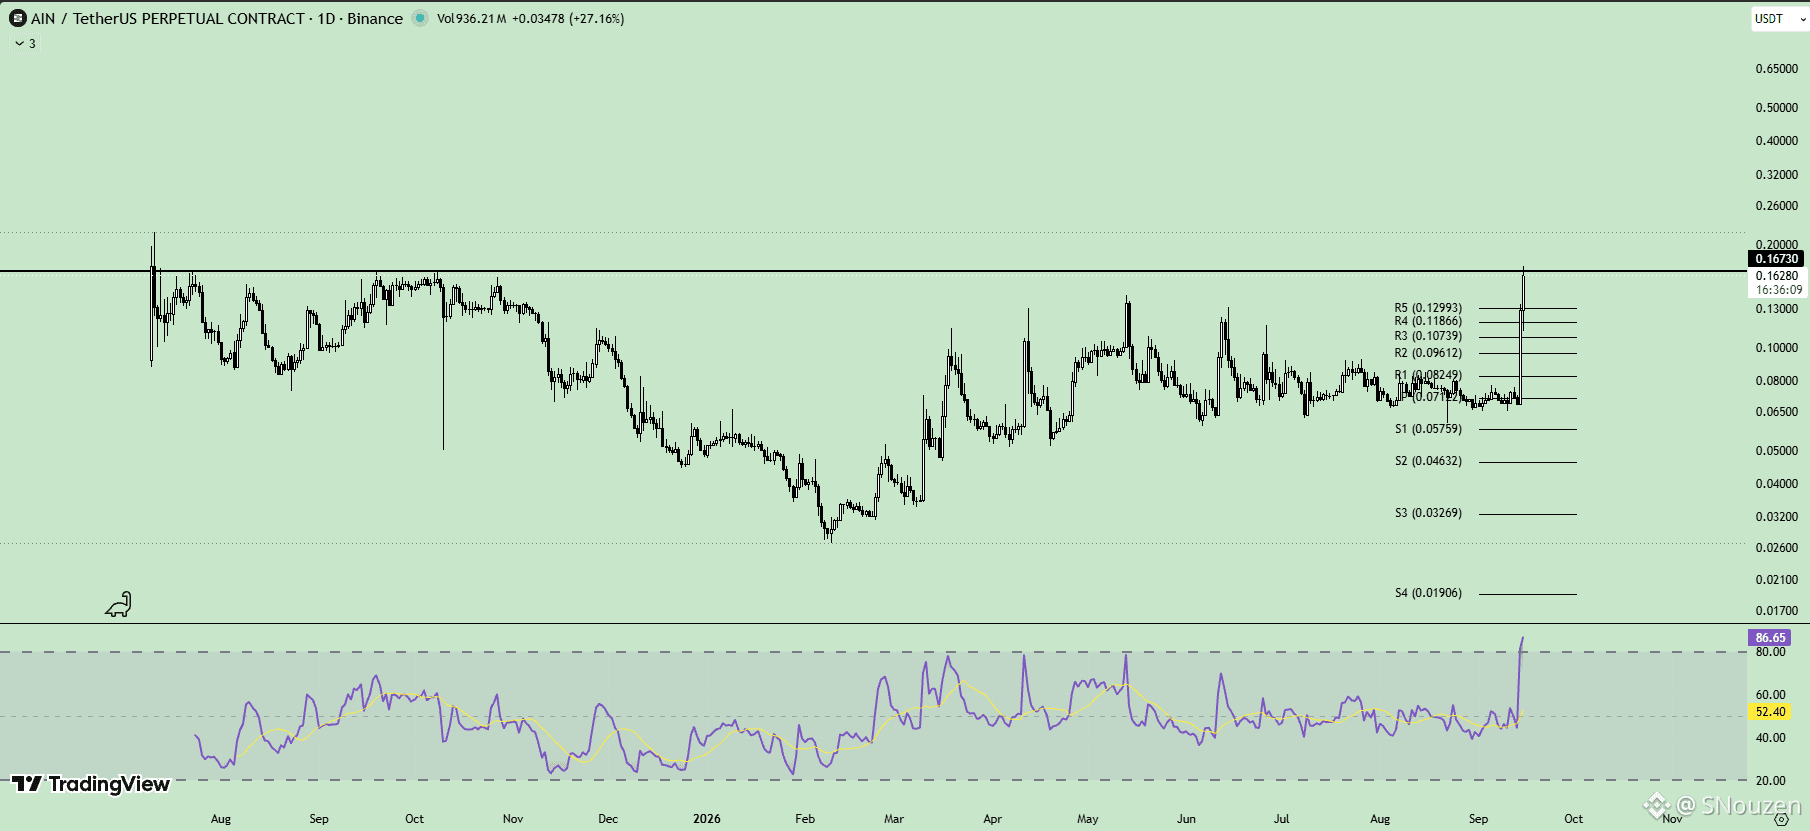
Following an aggressive breakout above its multi-month consolidation range, $AIN is trading around 0.1628 - 0.1673, pressing directly into the 0.17 major resistance line.
• LONG (Bullish Trigger): A decisive breakout and sustained hold above the 0.17 resistance level opens the path toward accelerating upside momentum targeting the 0.20 key psychological barrier.
Click to Trade👇$AIN
{future}(AINUSDT)
Following an aggressive breakout above its multi-month consolidation range, $AIN is trading around 0.1628 - 0.1673, pressing directly into the 0.17 major resistance line.
• LONG (Bullish Trigger): A decisive breakout and sustained hold above the 0.17 resistance level opens the path toward accelerating upside momentum targeting the 0.20 key psychological barrier.
Click to Trade👇$AIN
• LONG (Bullish Trigger): A decisive breakout and sustained hold above the 0.17 resistance level opens the path toward accelerating upside momentum targeting the 0.20 key psychological barrier.
Click to Trade👇$AIN
207
·
--
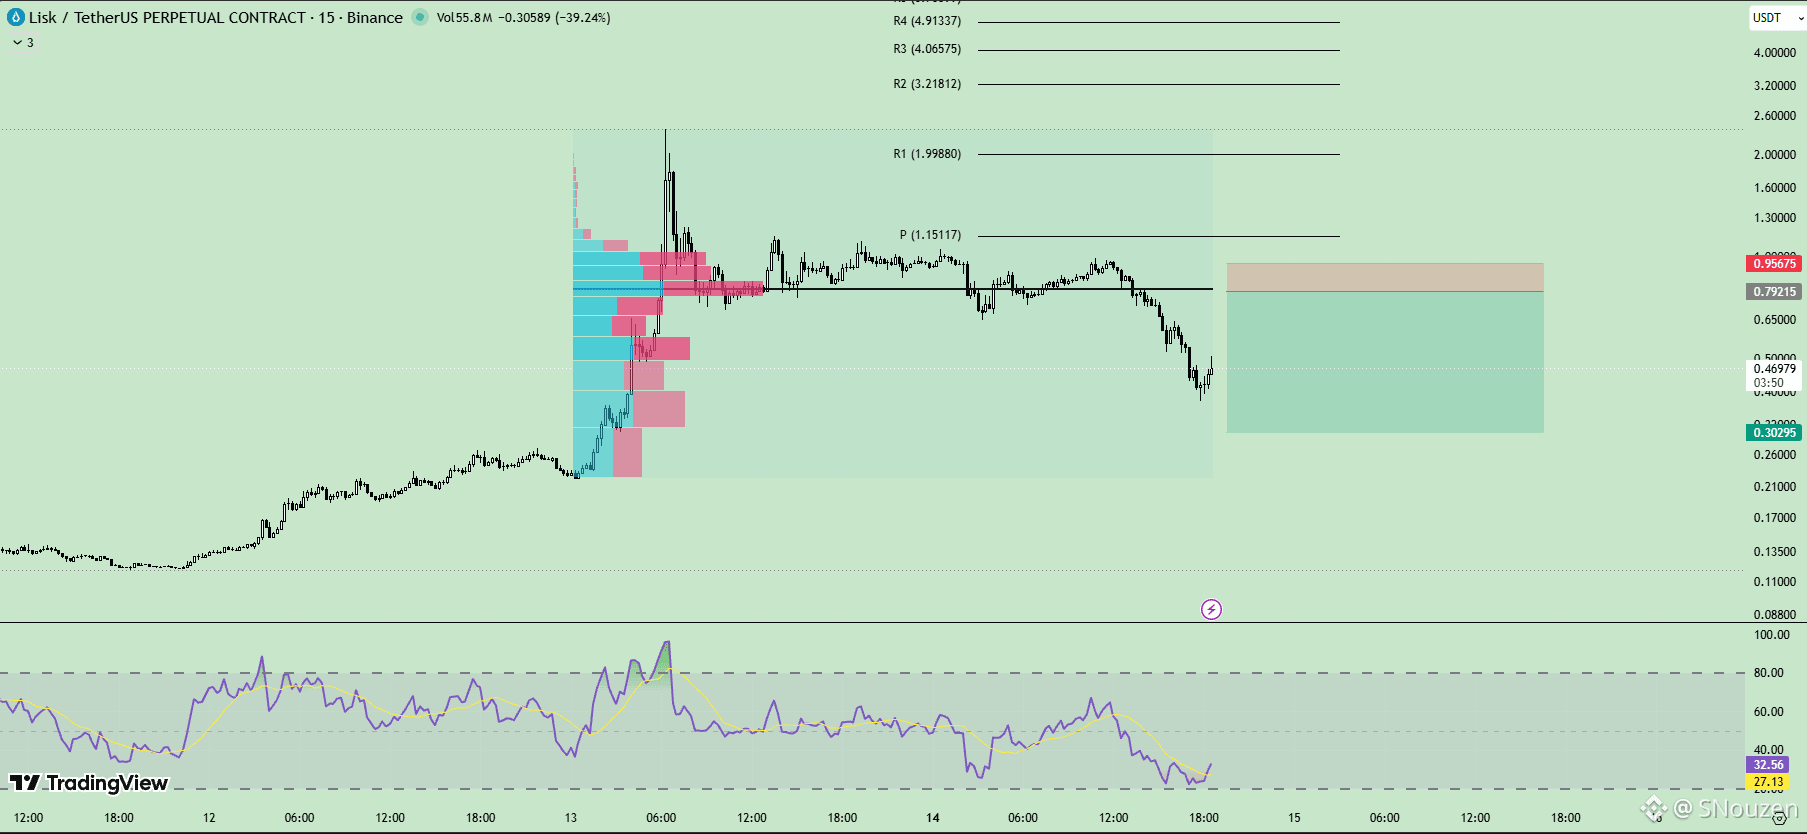
Following an aggressive breakdown below the 1.00 psychological level, the 0.86 POC (Point of Control), and the 0.77 support floor, $LSK has dropped toward the 0.49 area.
• Bearish Threat: In the event of a relief bounce potentially testing the 0.77 resistance area and the 0.86 POC level, confirmed rejection from this zone could offer a short entry opportunity, keeping the broader downside continuation active. NFA/DYOR
Click to Trade👇$LSK
{future}(LSKUSDT)
Following an aggressive breakdown below the 1.00 psychological level, the 0.86 POC (Point of Control), and the 0.77 support floor, $LSK has dropped toward the 0.49 area.
• Bearish Threat: In the event of a relief bounce potentially testing the 0.77 resistance area and the 0.86 POC level, confirmed rejection from this zone could offer a short entry opportunity, keeping the broader downside continuation active. NFA/DYOR
Click to Trade👇$LSK
• Bearish Threat: In the event of a relief bounce potentially testing the 0.77 resistance area and the 0.86 POC level, confirmed rejection from this zone could offer a short entry opportunity, keeping the broader downside continuation active. NFA/DYOR
Click to Trade👇$LSK
275
·
--
Bearish
$SAGA is undergoing a corrective bounce off its 0.01558 local low after facing aggressive rejection from the 0.02 peak.
• Bearish Threat: A relief rally into the 0.01781 - 0.01833 Golden Zone (0.5 - 0.618) presents a prime high-probability resistance zone for sellers. A clear rejection from this area risks retesting the 0.01558 local support floor, where a breakdown could resume the broader downtrend.
Click to Trade👇$SAGA
{future}(SAGAUSDT)
$SAGA is undergoing a corrective bounce off its 0.01558 local low after facing aggressive rejection from the 0.02 peak.
• Bearish Threat: A relief rally into the 0.01781 - 0.01833 Golden Zone (0.5 - 0.618) presents a prime high-probability resistance zone for sellers. A clear rejection from this area risks retesting the 0.01558 local support floor, where a breakdown could resume the broader downtrend.
Click to Trade👇$SAGA
• Bearish Threat: A relief rally into the 0.01781 - 0.01833 Golden Zone (0.5 - 0.618) presents a prime high-probability resistance zone for sellers. A clear rejection from this area risks retesting the 0.01558 local support floor, where a breakdown could resume the broader downtrend.
Click to Trade👇$SAGA

117
·
--
Bearish
Today's Top 3 Binance Futures Losers!
$RVN $VTHO $BULLA
{future}(BULLAUSDT)
{future}(VTHOUSDT)
{future}(RVNUSDT)
Today's Top 3 Binance Futures Losers!
$RVN $VTHO $BULLA
$RVN $VTHO $BULLA

430
·
--
Bullish
Today's Top 3 Binance Futures Gainers!
$牛来 $RAYSOL $LSK
{future}(LSKUSDT)
{future}(RAYSOLUSDT)
{future}(牛来USDT)
Today's Top 3 Binance Futures Gainers!
$牛来 $RAYSOL $LSK
$牛来 $RAYSOL $LSK

259
·
--
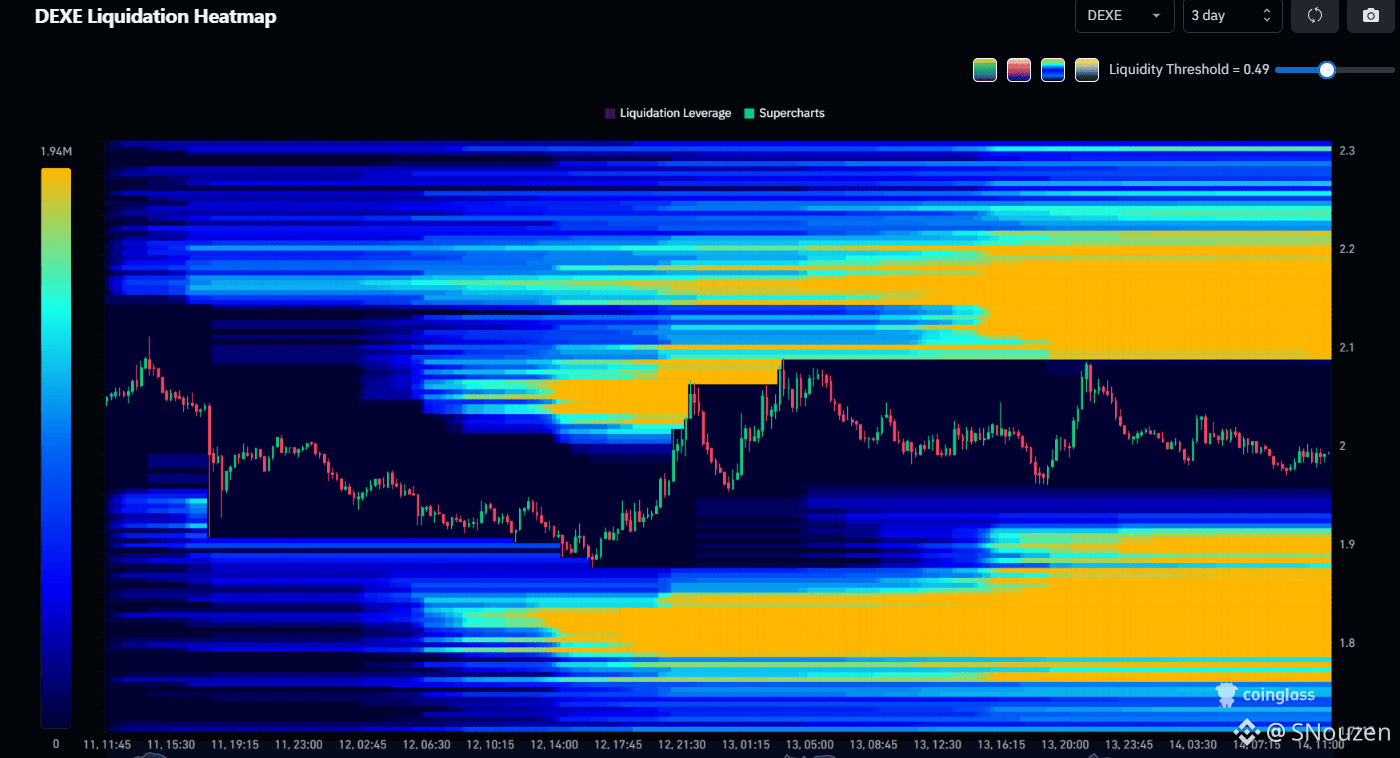
$DEXE is consolidating around 1.98 - 2.02, actively defending the 2.00 key psychological level while trapped between two dense liquidation pools.
• Bullish Trigger: Holding above the 2.00 base and breaking over the 2.08 - 2.10 intermediate resistance opens the path toward the bright Short liquidation clusters stacked between 2.15 and 2.22, extending up toward the 2.30 major target.
• Bearish Threat: A sustained loss of the 2.00 psychological support risks accelerating sell pressure toward the 1.90 - 1.95 area, with further downside potential toward the 1.78 - 1.84 liquidation pool below.
Click to Trade👇$DEXE
{future}(DEXEUSDT)
$DEXE is consolidating around 1.98 - 2.02, actively defending the 2.00 key psychological level while trapped between two dense liquidation pools.
• Bullish Trigger: Holding above the 2.00 base and breaking over the 2.08 - 2.10 intermediate resistance opens the path toward the bright Short liquidation clusters stacked between 2.15 and 2.22, extending up toward the 2.30 major target.
• Bearish Threat: A sustained loss of the 2.00 psychological support risks accelerating sell pressure toward the 1.90 - 1.95 area, with further downside potential toward the 1.78 - 1.84 liquidation pool below.
Click to Trade👇$DEXE
• Bullish Trigger: Holding above the 2.00 base and breaking over the 2.08 - 2.10 intermediate resistance opens the path toward the bright Short liquidation clusters stacked between 2.15 and 2.22, extending up toward the 2.30 major target.
• Bearish Threat: A sustained loss of the 2.00 psychological support risks accelerating sell pressure toward the 1.90 - 1.95 area, with further downside potential toward the 1.78 - 1.84 liquidation pool below.
Click to Trade👇$DEXE
66
·
--
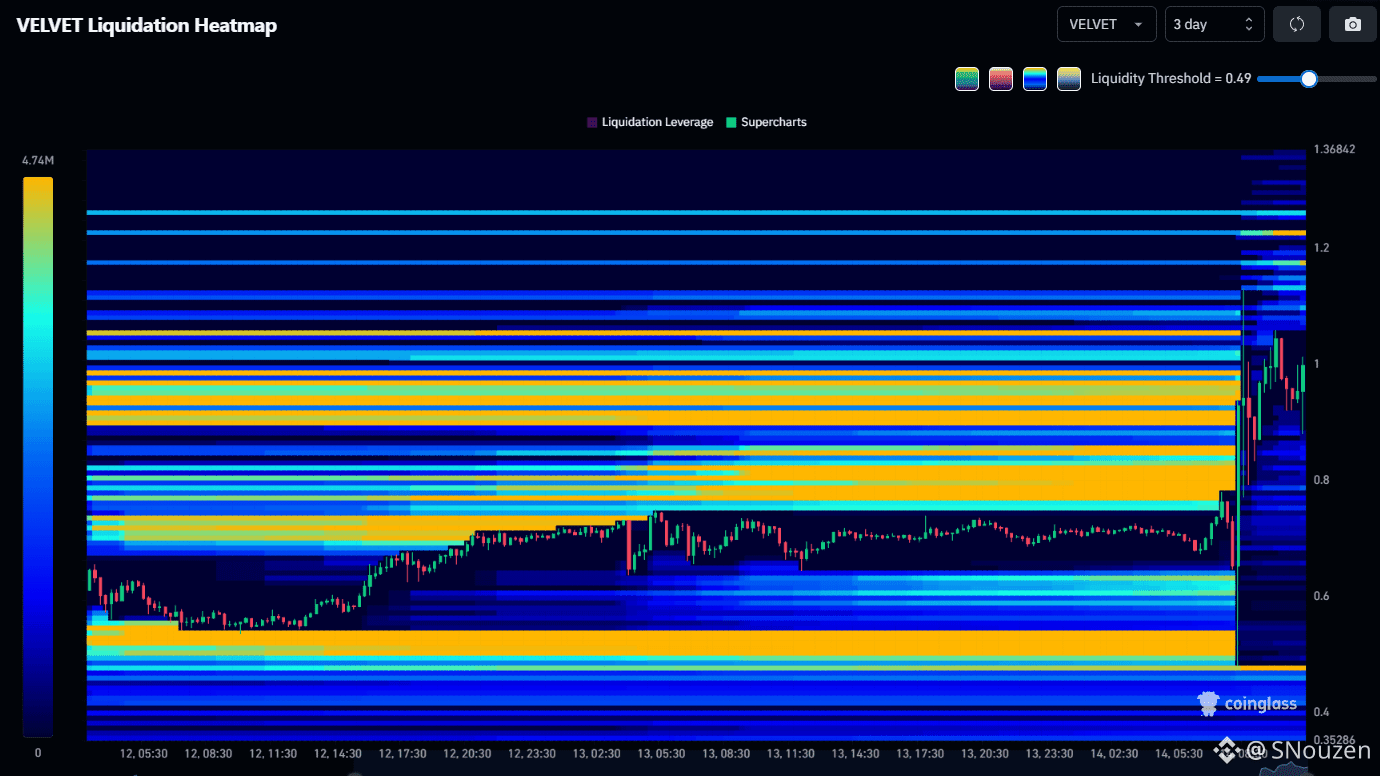
$VELVET is consolidating around 0.95 - 1.05 following a vertical expansion, battling directly at the 1.00 key psychological level while trapped between major liquidation pools.
• Bullish Trigger: Sustaining above the 1.00 psychological support and breaking over the 1.08 - 1.10 intermediate resistance opens the path toward the bright Short liquidation clusters stacked between 1.15 and 1.25, extending up toward the 1.35 peak liquidity target.
• Bearish Threat: A breakdown below the 1.00 level risks accelerating sell pressure toward the 0.78 - 0.85 area, with further downside potential toward the deeper 0.45 - 0.52 liquidation floor below.
Click to Trade👇$VELVET
{future}(VELVETUSDT)
$VELVET is consolidating around 0.95 - 1.05 following a vertical expansion, battling directly at the 1.00 key psychological level while trapped between major liquidation pools.
• Bullish Trigger: Sustaining above the 1.00 psychological support and breaking over the 1.08 - 1.10 intermediate resistance opens the path toward the bright Short liquidation clusters stacked between 1.15 and 1.25, extending up toward the 1.35 peak liquidity target.
• Bearish Threat: A breakdown below the 1.00 level risks accelerating sell pressure toward the 0.78 - 0.85 area, with further downside potential toward the deeper 0.45 - 0.52 liquidation floor below.
Click to Trade👇$VELVET
• Bullish Trigger: Sustaining above the 1.00 psychological support and breaking over the 1.08 - 1.10 intermediate resistance opens the path toward the bright Short liquidation clusters stacked between 1.15 and 1.25, extending up toward the 1.35 peak liquidity target.
• Bearish Threat: A breakdown below the 1.00 level risks accelerating sell pressure toward the 0.78 - 0.85 area, with further downside potential toward the deeper 0.45 - 0.52 liquidation floor below.
Click to Trade👇$VELVET
156
·
--
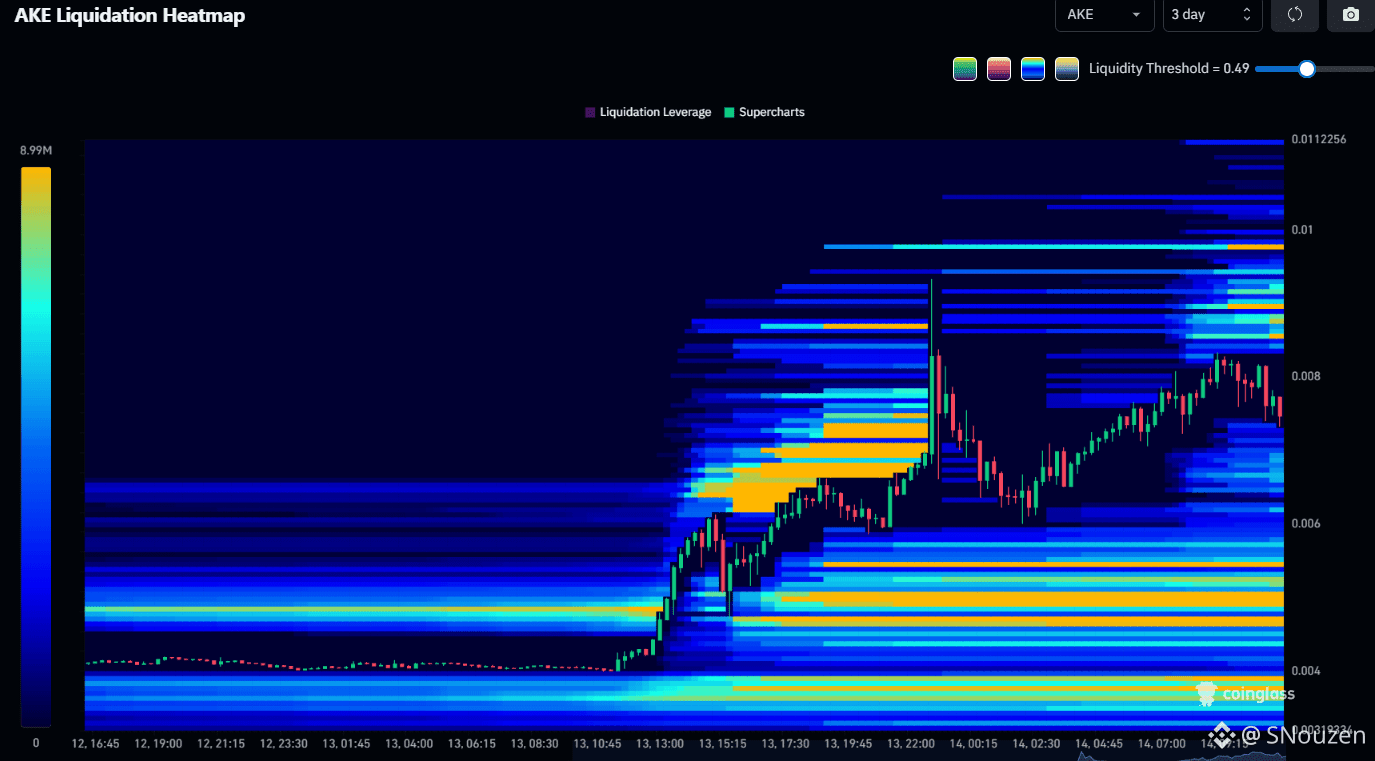
$AKE is attempting to stabilize around 0.0075 following a localized retracement, looking to build a fresh support base.
• Bullish Trigger: Holding above 0.0075 and breaking over the 0.0080 intermediate resistance opens the path toward the bright Short liquidation clusters stacked between 0.0088 and 0.0095, extending up toward the 0.0100 key psychological level.
• Bearish Threat: A breakdown below the 0.0072 - 0.0075 support base risks accelerating sell pressure, leading to a deeper correction toward the 0.0055 - 0.0062 liquidation pool below.
Click to Trade👇$AKE
{future}(AKEUSDT)
$AKE is attempting to stabilize around 0.0075 following a localized retracement, looking to build a fresh support base.
• Bullish Trigger: Holding above 0.0075 and breaking over the 0.0080 intermediate resistance opens the path toward the bright Short liquidation clusters stacked between 0.0088 and 0.0095, extending up toward the 0.0100 key psychological level.
• Bearish Threat: A breakdown below the 0.0072 - 0.0075 support base risks accelerating sell pressure, leading to a deeper correction toward the 0.0055 - 0.0062 liquidation pool below.
Click to Trade👇$AKE
• Bullish Trigger: Holding above 0.0075 and breaking over the 0.0080 intermediate resistance opens the path toward the bright Short liquidation clusters stacked between 0.0088 and 0.0095, extending up toward the 0.0100 key psychological level.
• Bearish Threat: A breakdown below the 0.0072 - 0.0075 support base risks accelerating sell pressure, leading to a deeper correction toward the 0.0055 - 0.0062 liquidation pool below.
Click to Trade👇$AKE
140
·
--
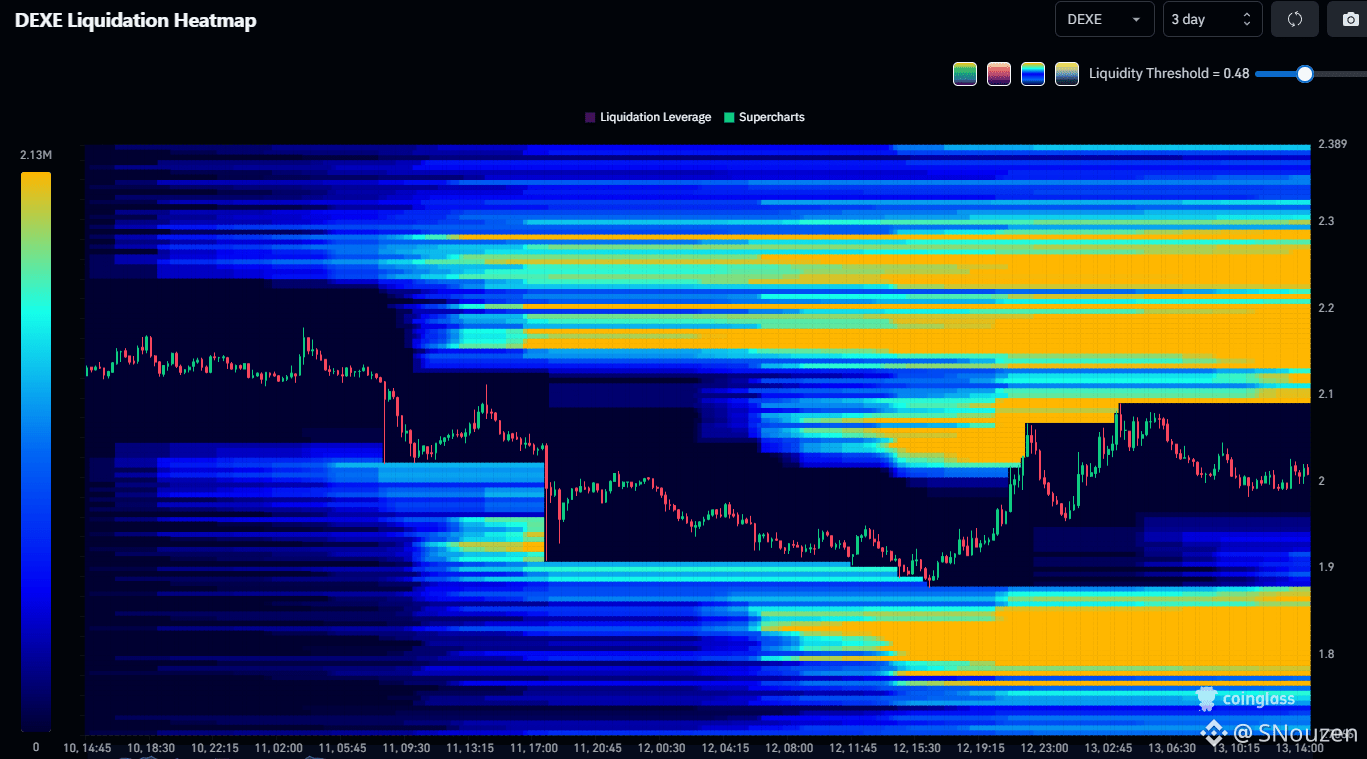
$DEXE is consolidating around 1.98 - 2.02 following a bounce off local lows, holding above key support while building strength between major liquidation pools.
• Bullish Trigger: Sustaining above the 2.00 support base and achieving a decisive breakout over the 2.08 - 2.10 intermediate resistance opens the path toward the bright Short liquidation clusters stacked between 2.15 and 2.20, extending up toward the 2.30 major target.
• Bearish Threat: Rejection at current levels followed by a loss of the 2.00 support risks a retracement targeting the 1.90 - 1.95 area, with further downside potential toward the 1.78 - 1.83 liquidation pool below.
Click to Trade👇$DEXE
{future}(DEXEUSDT)
$DEXE is consolidating around 1.98 - 2.02 following a bounce off local lows, holding above key support while building strength between major liquidation pools.
• Bullish Trigger: Sustaining above the 2.00 support base and achieving a decisive breakout over the 2.08 - 2.10 intermediate resistance opens the path toward the bright Short liquidation clusters stacked between 2.15 and 2.20, extending up toward the 2.30 major target.
• Bearish Threat: Rejection at current levels followed by a loss of the 2.00 support risks a retracement targeting the 1.90 - 1.95 area, with further downside potential toward the 1.78 - 1.83 liquidation pool below.
Click to Trade👇$DEXE
• Bullish Trigger: Sustaining above the 2.00 support base and achieving a decisive breakout over the 2.08 - 2.10 intermediate resistance opens the path toward the bright Short liquidation clusters stacked between 2.15 and 2.20, extending up toward the 2.30 major target.
• Bearish Threat: Rejection at current levels followed by a loss of the 2.00 support risks a retracement targeting the 1.90 - 1.95 area, with further downside potential toward the 1.78 - 1.83 liquidation pool below.
Click to Trade👇$DEXE
146
·
--
Bullish
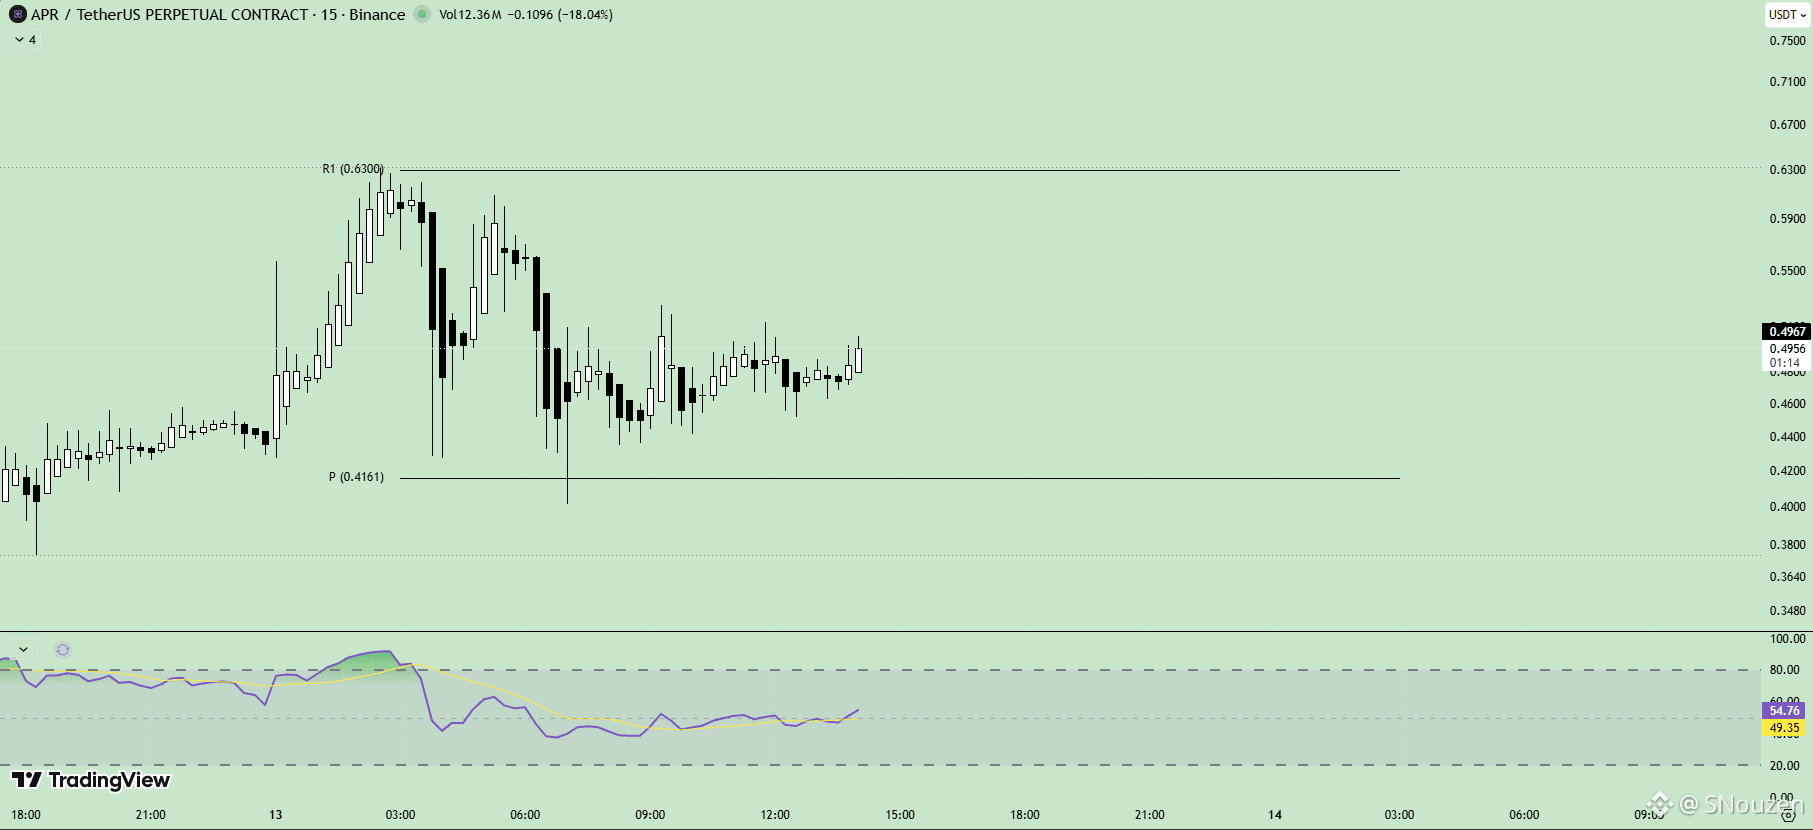
Backed by high trading volume, $APR is maintaining its bullish structure above the 0.4161 support floor, pushing directly against the 0.50 key psychological resistance level around 0.4956 - 0.4967.
• LONG (Bullish Trigger): As long as the price holds above 0.41, the overall bias remains positive. A decisive breakout over the 0.50 psychological resistance sustained by strong volume opens the path toward 0.55 and 0.60, extending up toward the 0.63 major peak target. DYOR/NFA
Click to Trade👇$APR
{future}(APRUSDT)
Backed by high trading volume, $APR is maintaining its bullish structure above the 0.4161 support floor, pushing directly against the 0.50 key psychological resistance level around 0.4956 - 0.4967.
• LONG (Bullish Trigger): As long as the price holds above 0.41, the overall bias remains positive. A decisive breakout over the 0.50 psychological resistance sustained by strong volume opens the path toward 0.55 and 0.60, extending up toward the 0.63 major peak target. DYOR/NFA
Click to Trade👇$APR
• LONG (Bullish Trigger): As long as the price holds above 0.41, the overall bias remains positive. A decisive breakout over the 0.50 psychological resistance sustained by strong volume opens the path toward 0.55 and 0.60, extending up toward the 0.63 major peak target. DYOR/NFA
Click to Trade👇$APR
184
·
--
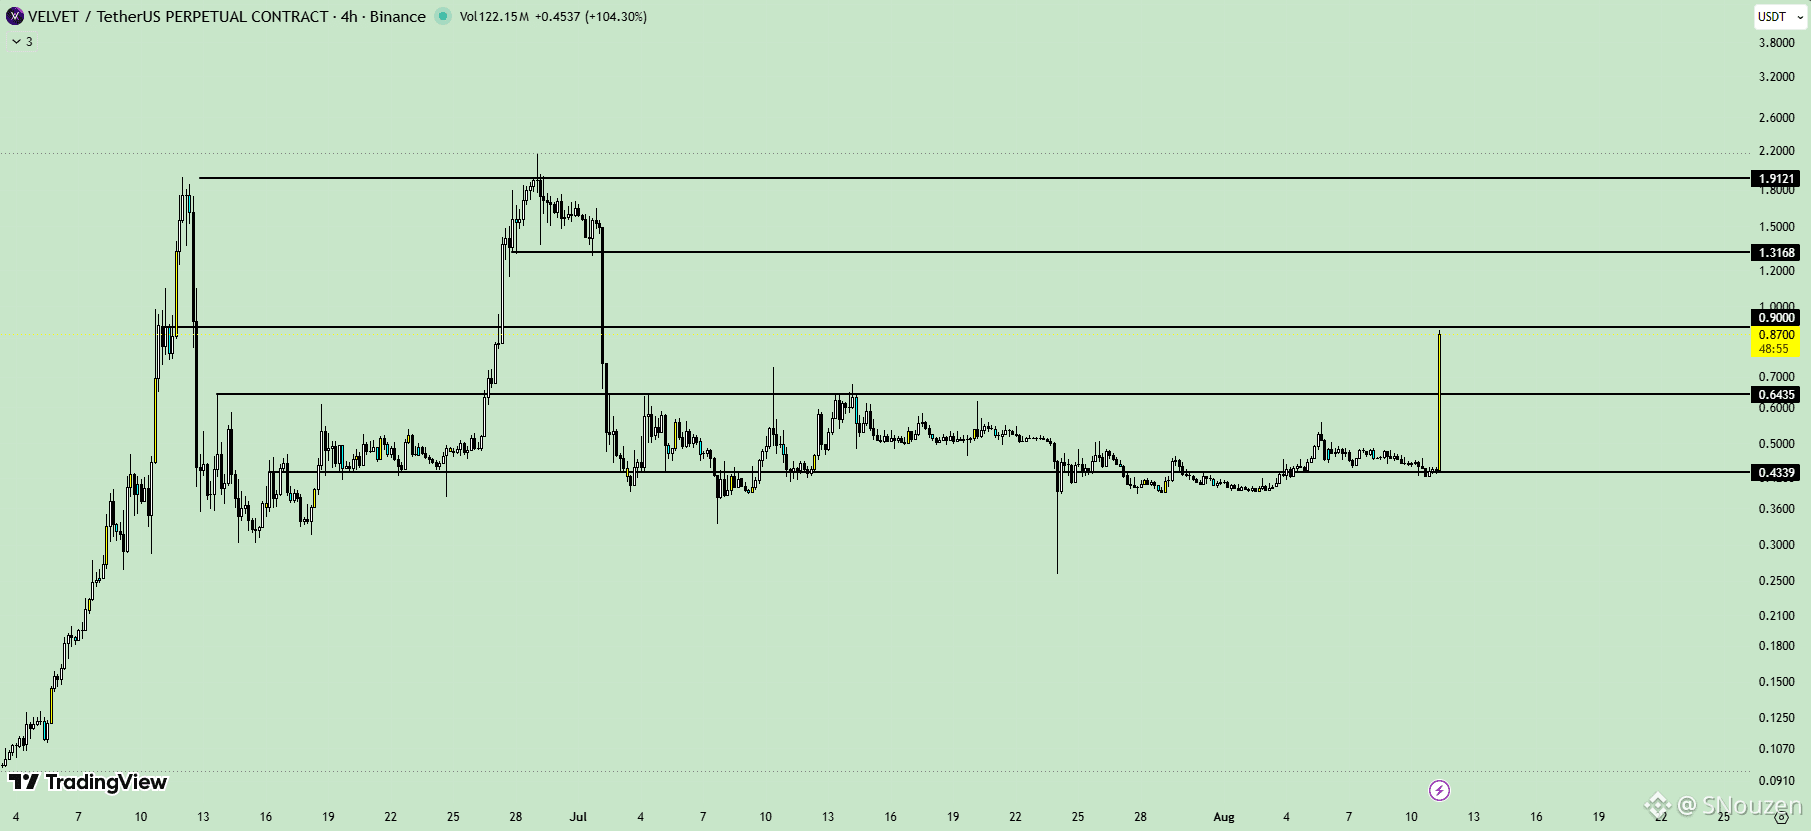
$VELVET is consolidating near $0.87 following a vertical daily expansion wick that retested the $0.90 major resistance level, backed by massive volume.
• Bullish Trigger: A sustained hold above $0.87 followed by a breakout over $0.90 opens the path toward testing the $1.00 key psychological resistance, with further upside potential extending toward $1.3168 and the major peak target at $1.9121.
• Bearish Threat: Rejection at the $0.90 resistance risks a retest targeting the $0.6435 major support base, where a breakdown could extend the correction toward the $0.4339 demand floor.
Click to Trade👇$VELVET
{future}(VELVETUSDT)
$VELVET is consolidating near $0.87 following a vertical daily expansion wick that retested the $0.90 major resistance level, backed by massive volume.
• Bullish Trigger: A sustained hold above $0.87 followed by a breakout over $0.90 opens the path toward testing the $1.00 key psychological resistance, with further upside potential extending toward $1.3168 and the major peak target at $1.9121.
• Bearish Threat: Rejection at the $0.90 resistance risks a retest targeting the $0.6435 major support base, where a breakdown could extend the correction toward the $0.4339 demand floor.
Click to Trade👇$VELVET
• Bullish Trigger: A sustained hold above $0.87 followed by a breakout over $0.90 opens the path toward testing the $1.00 key psychological resistance, with further upside potential extending toward $1.3168 and the major peak target at $1.9121.
• Bearish Threat: Rejection at the $0.90 resistance risks a retest targeting the $0.6435 major support base, where a breakdown could extend the correction toward the $0.4339 demand floor.
Click to Trade👇$VELVET
133
·
--
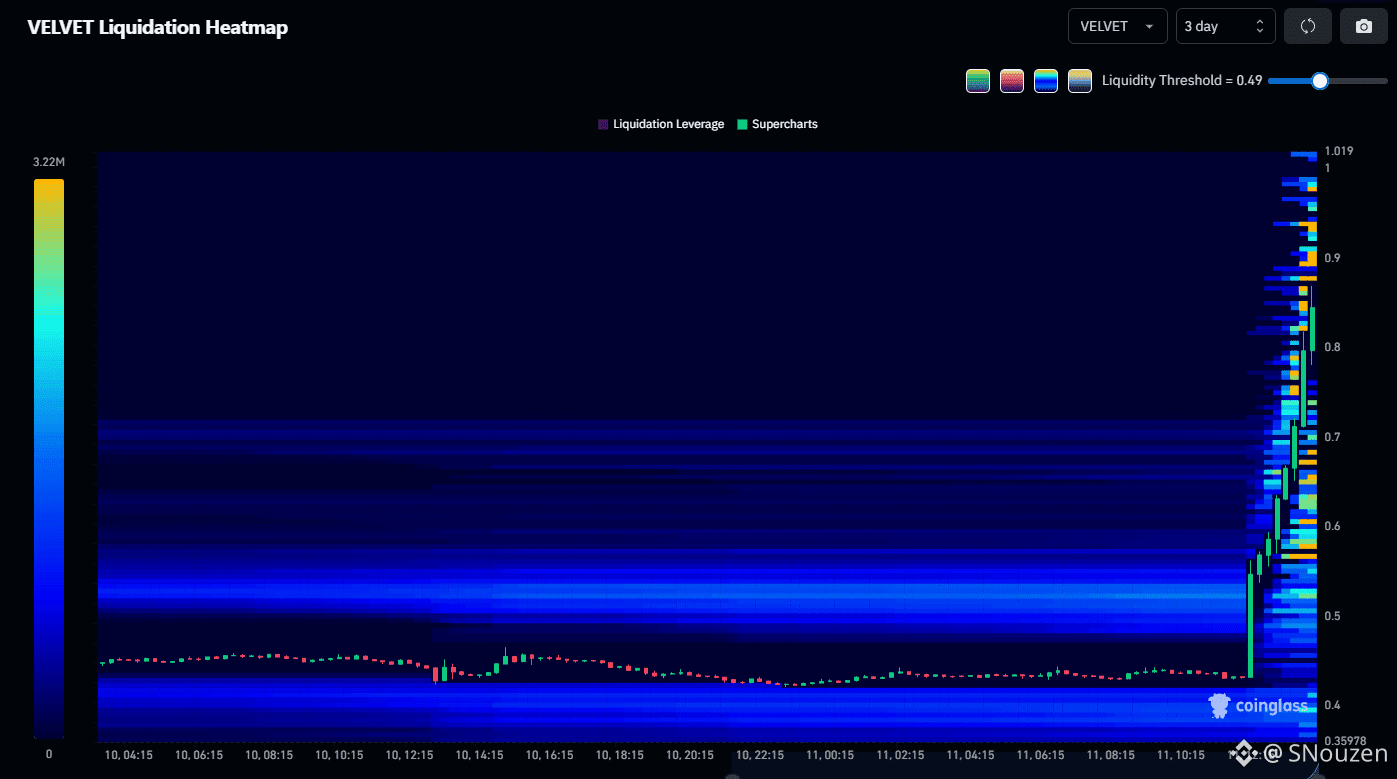
$VELVET is consolidating between $0.78 - $0.83 following a vertical pump that swept liquidations above $0.85, holding below dense overhead Short clusters.
• Bullish Trigger: A decisive breakout above the $0.85 immediate resistance opens the path toward the Short liquidation clusters stacked between $0.88 and $0.95, extending up toward the $1.00 key psychological level.
• Bearish Threat: Losing the $0.78 support base risks a retracement targeting the $0.65 - $0.70 area, with further downside potential toward the $0.40 - $0.45 demand base below.
Click to Trade👇$VELVET
{future}(VELVETUSDT)
$VELVET is consolidating between $0.78 - $0.83 following a vertical pump that swept liquidations above $0.85, holding below dense overhead Short clusters.
• Bullish Trigger: A decisive breakout above the $0.85 immediate resistance opens the path toward the Short liquidation clusters stacked between $0.88 and $0.95, extending up toward the $1.00 key psychological level.
• Bearish Threat: Losing the $0.78 support base risks a retracement targeting the $0.65 - $0.70 area, with further downside potential toward the $0.40 - $0.45 demand base below.
Click to Trade👇$VELVET
• Bullish Trigger: A decisive breakout above the $0.85 immediate resistance opens the path toward the Short liquidation clusters stacked between $0.88 and $0.95, extending up toward the $1.00 key psychological level.
• Bearish Threat: Losing the $0.78 support base risks a retracement targeting the $0.65 - $0.70 area, with further downside potential toward the $0.40 - $0.45 demand base below.
Click to Trade👇$VELVET
217
·
--
Bearish
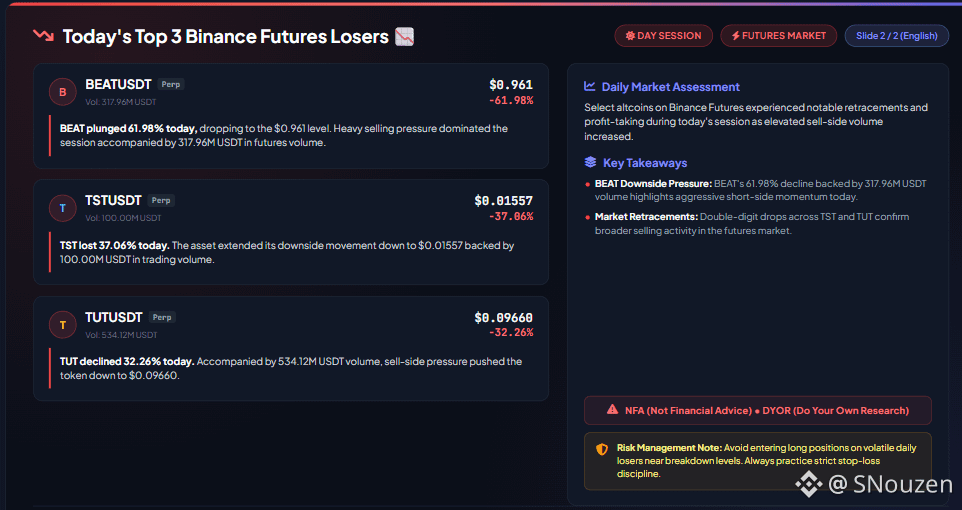
Today's Top 3 Binance Futures Losers!
$BEAT $TST $TUT
{future}(TUTUSDT)
{future}(TSTUSDT)
{future}(BEATUSDT)
Today's Top 3 Binance Futures Losers!
$BEAT $TST $TUT
$BEAT $TST $TUT
561
·
--
Bullish
Today's Top 3 Binance Futures Gainers!
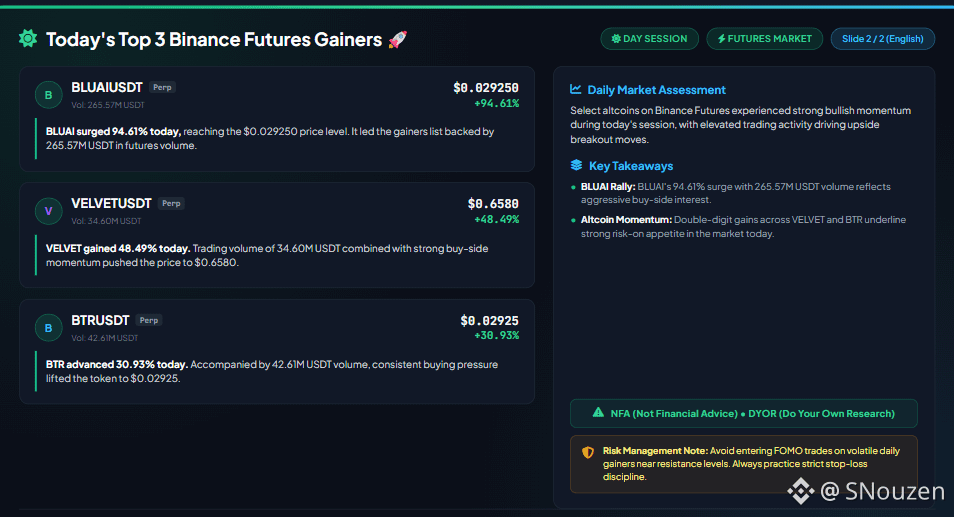
$BLUAI $VELVET $BTR
{future}(BTRUSDT)
{future}(VELVETUSDT)
{future}(BLUAIUSDT)
Today's Top 3 Binance Futures Gainers!
$BLUAI $VELVET $BTR
$BLUAI $VELVET $BTR
302
Log in to explore more content
Join global crypto users on Binance Square
⚡️ Get latest and useful information about crypto.
💬 Trusted by the world’s largest crypto exchange.
👍 Discover real insights from verified creators.
Email / Phone number
Trending Topics
BitcoinRejectedAt$87K
16,453 views
47 Discussing
$BTC Update 🚨 🐼 Skip THIS Warning at Your Own Risk ⚠️
BTC is knocking on 87K like it already owns the place 😂Bulls are awake… but BTC usually likes to shake a few people out before the real move.
Overall, BTC is breaking out and the higher-timeframe picture is still bullish. The 4H and daily structure are strong, price is holding above the major averages, and momentum is still supporting the move.
83K was honestly a beautiful buy location. That was the area where risk/reward made sense. Anyone who bought there is already sitting enjoying profit
Now come to main
BTC is sitting right under the previous high around 87K. So I would not be surprised if we first see a little downside liquidity grab, flush some late longs, and then BTC decides whether it wants the real breakout.
For today’s scalp, This is my Plan 👇
BTC SHORT scalp Entry: 86,550–86,900
TP1: 85,650
TP2: 84,850
TP3: 84,050
SL: 87,800
I only like this if we get a proper rejection near the highs. No blind shorting.
For the bigger picture, I’m still bullish as long as the 82.5K–83K area keeps holding. If BTC gets a clean breakout and starts accepting above 87.4K, then this whole short idea is invalid and the next bullish leg becomes much more interesting.
SO BASICALLY OCTOBER HISTORICAL IS BULLISH MONTH FOR BITCOIN.
ALWAYS DYOR
Panda Traders
·30 Likes
·12.8k views
FedOctoberRateHikeOddsFallTo17%
13,261 views
248 Discussing
NvidiaHitsRecordHighUp2.4%
2,542 views
152 Discussing