

lleonard
196 Posts

lleonard
Report
Block User
34 Following
17 Followers
11 Liked
Posts
All
Quotes
·
--
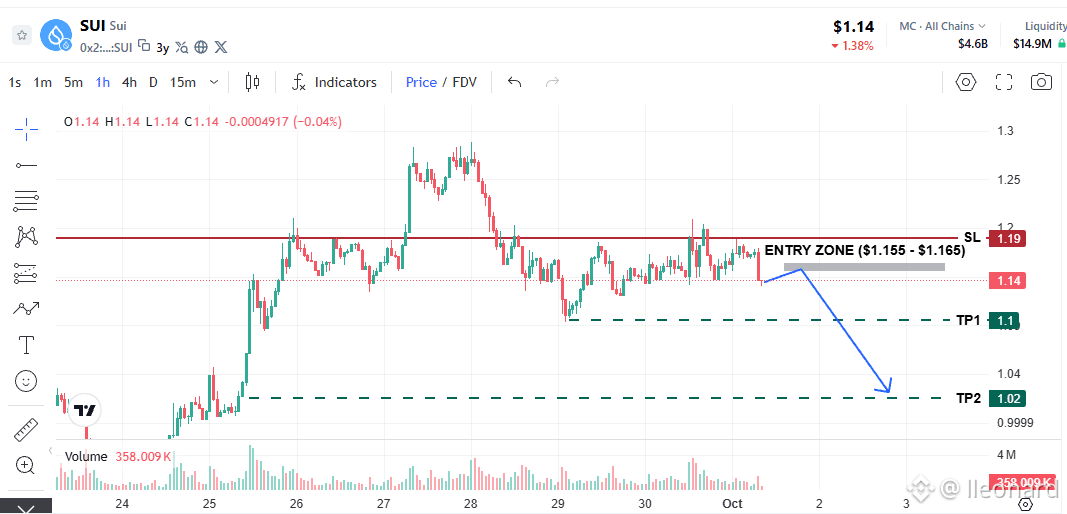
$SUI just experienced a sharp drop on the 15m chart, cleanly breaking down below the $1.15 short-term support level.
Since price is currently floating in no man's land above the major bottom support, we are waiting for a technical retest to secure a favorable Risk/Reward ratio and avoid getting caught in a bottom-bounce trap.
– Entry Zone: $1.155 – $1.165
– Stop Loss: $1.190
– Targets: $1.105 | $1.025
⚠️ If price dumps straight to $1.10 without retesting, let it go (DO NOT FOMO Short).
{future}(SUIUSDT)
$SUI just experienced a sharp drop on the 15m chart, cleanly breaking down below the $1.15 short-term support level.
Since price is currently floating in no man's land above the major bottom support, we are waiting for a technical retest to secure a favorable Risk/Reward ratio and avoid getting caught in a bottom-bounce trap.
– Entry Zone: $1.155 – $1.165
– Stop Loss: $1.190
– Targets: $1.105 | $1.025
⚠️ If price dumps straight to $1.10 without retesting, let it go (DO NOT FOMO Short).
Since price is currently floating in no man's land above the major bottom support, we are waiting for a technical retest to secure a favorable Risk/Reward ratio and avoid getting caught in a bottom-bounce trap.
– Entry Zone: $1.155 – $1.165
– Stop Loss: $1.190
– Targets: $1.105 | $1.025
⚠️ If price dumps straight to $1.10 without retesting, let it go (DO NOT FOMO Short).
75
·
--
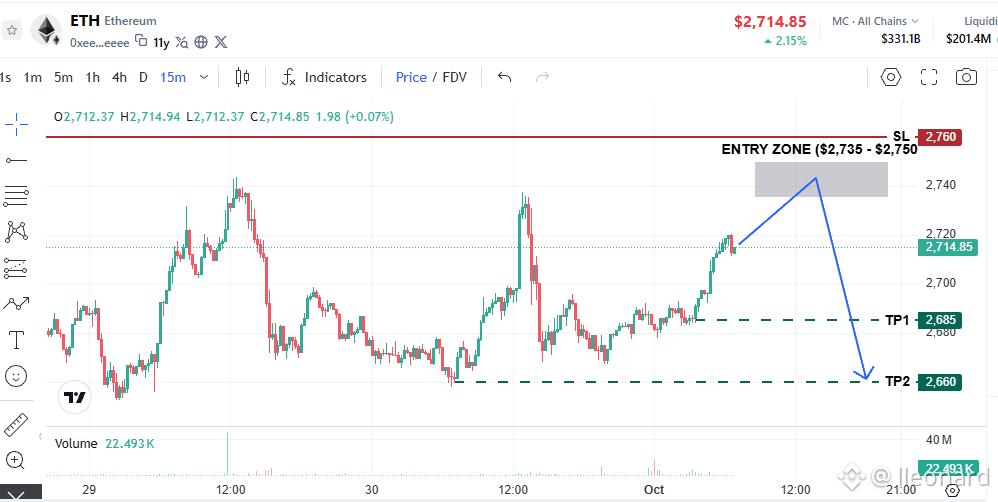
$ETH is pumping towards key resistance levels on the 15m chart. Instead of shorting the momentum early, patience is key for a better Risk/Reward setup.
📊 Short Plan
– Entry Zone: $2,735 - $2,750
– Stop Loss: $2,760
– Targets: $2,685 | $2,660
{future}(ETHUSDT)
$ETH is pumping towards key resistance levels on the 15m chart. Instead of shorting the momentum early, patience is key for a better Risk/Reward setup.
📊 Short Plan
– Entry Zone: $2,735 - $2,750
– Stop Loss: $2,760
– Targets: $2,685 | $2,660
📊 Short Plan
– Entry Zone: $2,735 - $2,750
– Stop Loss: $2,760
– Targets: $2,685 | $2,660
44
·
--
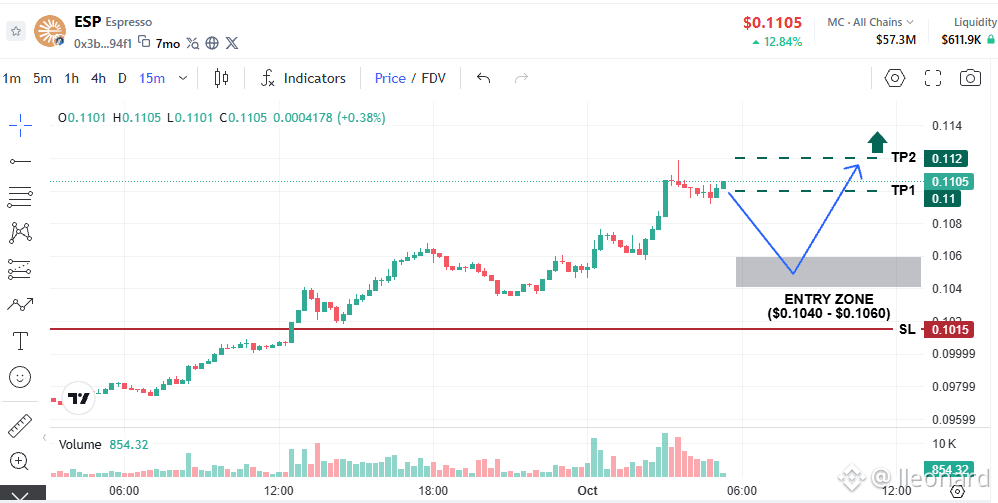
Following a strong move to its local high around $0.112, $ESP is currently consolidating sideways around $0.1105 on the 15m timeframe, accompanied by a sharp drop in trading volume. Higher timeframe structure (4H) remains in a solid uptrend.
📊 LONG SETUP
– Entry Zone: $0.1040 – $0.1060
– Stop Loss: $0.1015
– Targets: $0.1105 | $0.1120+
⚠️ DO NOT PLACE LIMIT BUY ORDERS. If price dumps to $0.106 on heavy red volume, wait for volume exhaustion or a reversal candle before entering.
{future}(ESPUSDT)
Following a strong move to its local high around $0.112, $ESP is currently consolidating sideways around $0.1105 on the 15m timeframe, accompanied by a sharp drop in trading volume. Higher timeframe structure (4H) remains in a solid uptrend.
📊 LONG SETUP
– Entry Zone: $0.1040 – $0.1060
– Stop Loss: $0.1015
– Targets: $0.1105 | $0.1120+
⚠️ DO NOT PLACE LIMIT BUY ORDERS. If price dumps to $0.106 on heavy red volume, wait for volume exhaustion or a reversal candle before entering.
📊 LONG SETUP
– Entry Zone: $0.1040 – $0.1060
– Stop Loss: $0.1015
– Targets: $0.1105 | $0.1120+
⚠️ DO NOT PLACE LIMIT BUY ORDERS. If price dumps to $0.106 on heavy red volume, wait for volume exhaustion or a reversal candle before entering.
1
204
·
--
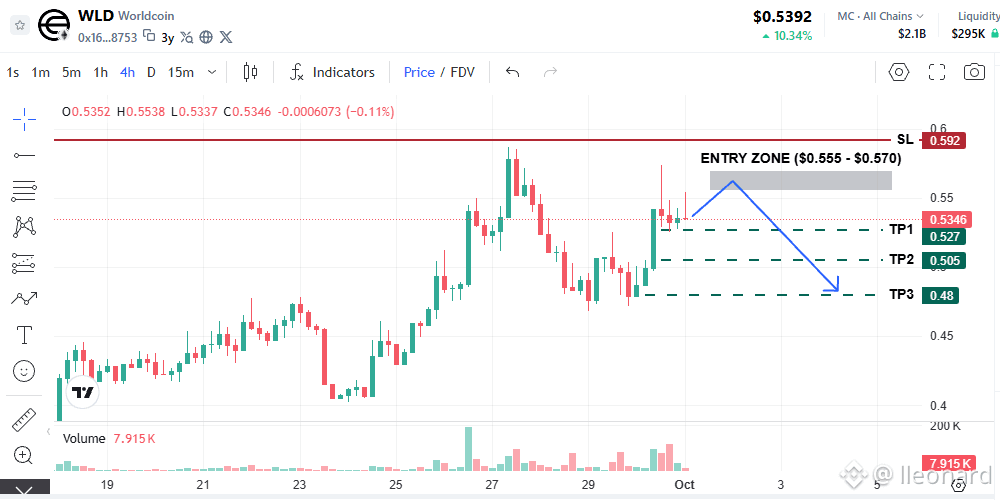
Selling pressure on $WLD has reacted aggressively around the $0.565–$0.570 region, leaving long upper wicks. The recovery structure is showing signs of weakening. Favoring a Sell-on-Rallies approach.
📊 Short Plan
– Entry Zone: $0.555 – $0.570
– Stop Loss: $0.592
– Targets: $0.527 | $0.505 | $0.480
⚠️ Stick to the SL strictly.
{future}(WLDUSDT)
Selling pressure on $WLD has reacted aggressively around the $0.565–$0.570 region, leaving long upper wicks. The recovery structure is showing signs of weakening. Favoring a Sell-on-Rallies approach.
📊 Short Plan
– Entry Zone: $0.555 – $0.570
– Stop Loss: $0.592
– Targets: $0.527 | $0.505 | $0.480
⚠️ Stick to the SL strictly.
📊 Short Plan
– Entry Zone: $0.555 – $0.570
– Stop Loss: $0.592
– Targets: $0.527 | $0.505 | $0.480
⚠️ Stick to the SL strictly.
264
·
--
Bullish
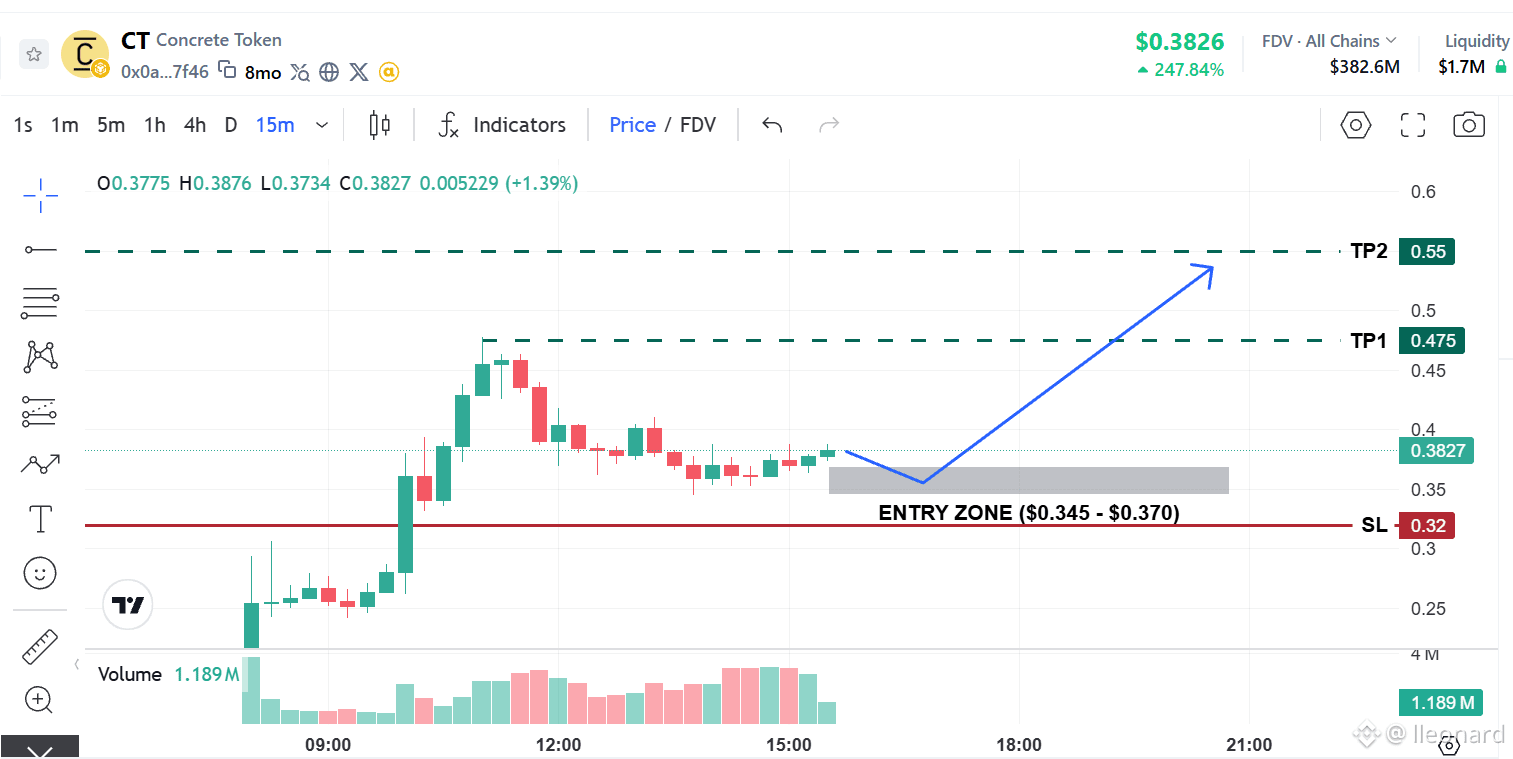
The $CT 15m chart is forming a solid rounding bottom/curve recovery off the $0.35 bottom. Active buying volume is showing up again.
📊 Trade Plan
– Entry: $0.345 - $0.370
– Stop Loss (SL): $0.320
– Targets: $0.475 | $0.550
⚠️ This token is newly listed with extreme volatility! Always adhere strictly to your Stop Loss.
{alpha}(560x0a092e544da31150b439a1aaa1a3a2214a867f46)
The $CT 15m chart is forming a solid rounding bottom/curve recovery off the $0.35 bottom. Active buying volume is showing up again.
📊 Trade Plan
– Entry: $0.345 - $0.370
– Stop Loss (SL): $0.320
– Targets: $0.475 | $0.550
⚠️ This token is newly listed with extreme volatility! Always adhere strictly to your Stop Loss.
📊 Trade Plan
– Entry: $0.345 - $0.370
– Stop Loss (SL): $0.320
– Targets: $0.475 | $0.550
⚠️ This token is newly listed with extreme volatility! Always adhere strictly to your Stop Loss.
1
756
·
--
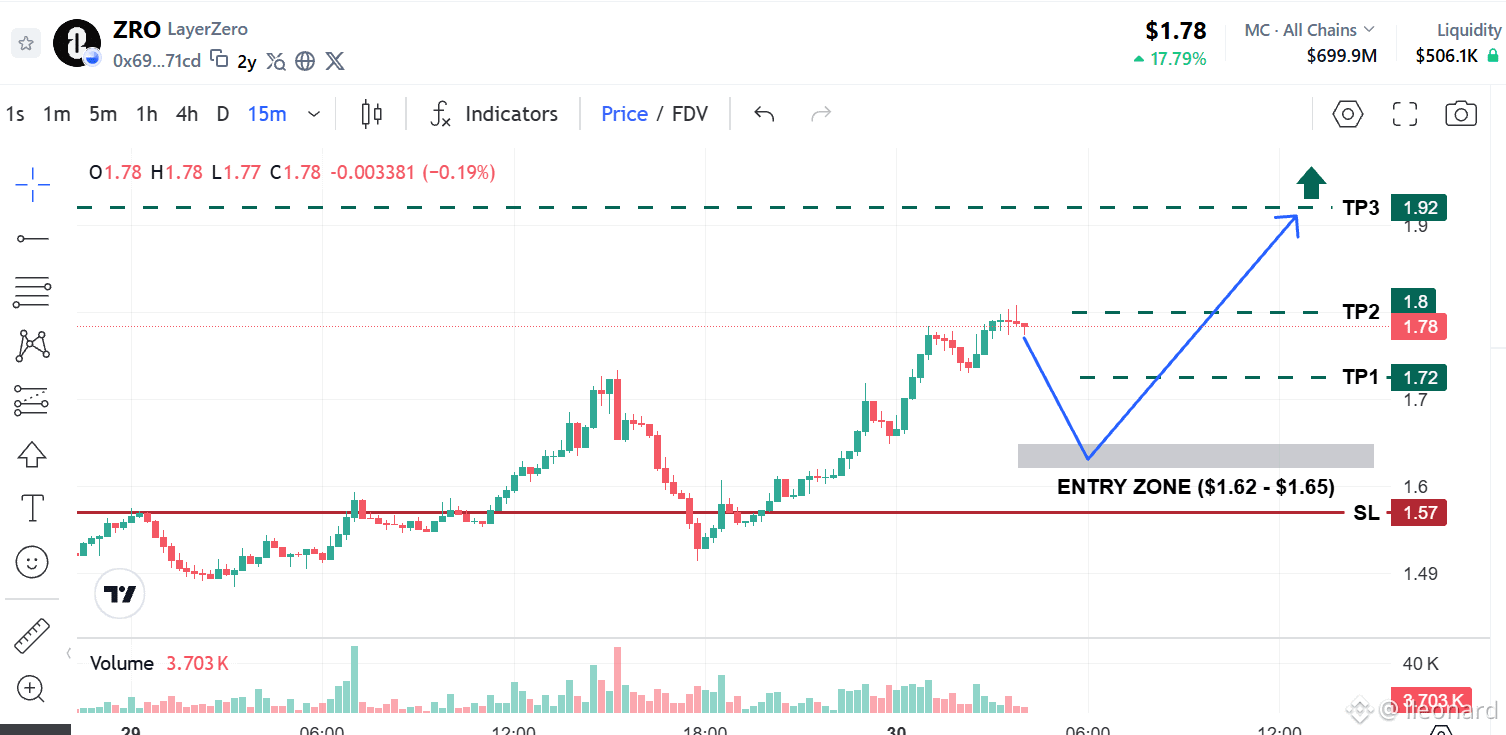
$ZRO hit $1.80, but low volume on 4H/15m and heavy upper wicks signal weak breakout momentum and incoming pullback risk. Avoid chasing top or counter-trending—patience for a support retest ($1.62–$1.65) is the key play here.
📊 Long Setup
– Entry Zone: $1.62 – $1.65
– Stop Loss: $1.57
– Targets: $1.72 | $1.80 | $1.92+
⚠️ Do NOT counter-trend short at the top ($1.80+) if price doesn't hit the setup or show clear rejection signals.
{future}(ZROUSDT)
$ZRO hit $1.80, but low volume on 4H/15m and heavy upper wicks signal weak breakout momentum and incoming pullback risk. Avoid chasing top or counter-trending—patience for a support retest ($1.62–$1.65) is the key play here.
📊 Long Setup
– Entry Zone: $1.62 – $1.65
– Stop Loss: $1.57
– Targets: $1.72 | $1.80 | $1.92+
⚠️ Do NOT counter-trend short at the top ($1.80+) if price doesn't hit the setup or show clear rejection signals.
📊 Long Setup
– Entry Zone: $1.62 – $1.65
– Stop Loss: $1.57
– Targets: $1.72 | $1.80 | $1.92+
⚠️ Do NOT counter-trend short at the top ($1.80+) if price doesn't hit the setup or show clear rejection signals.
113
·
--
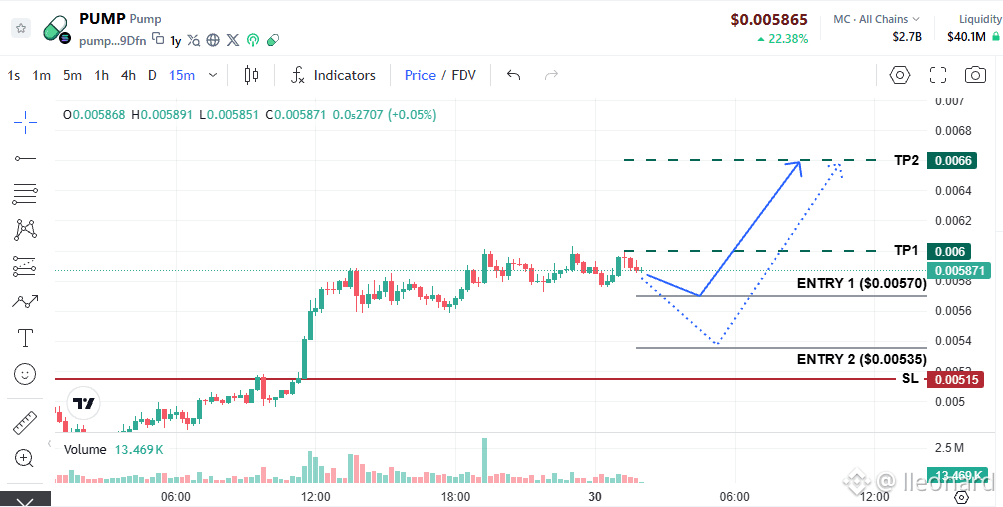
Following an impressive rally on the 4H timeframe breaking above $0.0055, $PUMP is currently in a tight bullish consolidation phase between $0.0058 - $0.0060 on the 15M chart.
Low sell volume during this range combined with lower wick rejections indicates buyers are actively defending the high levels.
📊 Trading Plan
– Entry (2-Step DCA): $0.00570 | $0.00535
– Stop Loss: $0.00515
– Targets: $0.00600 | $0.00660
{future}(PUMPUSDT)
Following an impressive rally on the 4H timeframe breaking above $0.0055, $PUMP is currently in a tight bullish consolidation phase between $0.0058 - $0.0060 on the 15M chart.
Low sell volume during this range combined with lower wick rejections indicates buyers are actively defending the high levels.
📊 Trading Plan
– Entry (2-Step DCA): $0.00570 | $0.00535
– Stop Loss: $0.00515
– Targets: $0.00600 | $0.00660
Low sell volume during this range combined with lower wick rejections indicates buyers are actively defending the high levels.
📊 Trading Plan
– Entry (2-Step DCA): $0.00570 | $0.00535
– Stop Loss: $0.00515
– Targets: $0.00600 | $0.00660
175
·
--
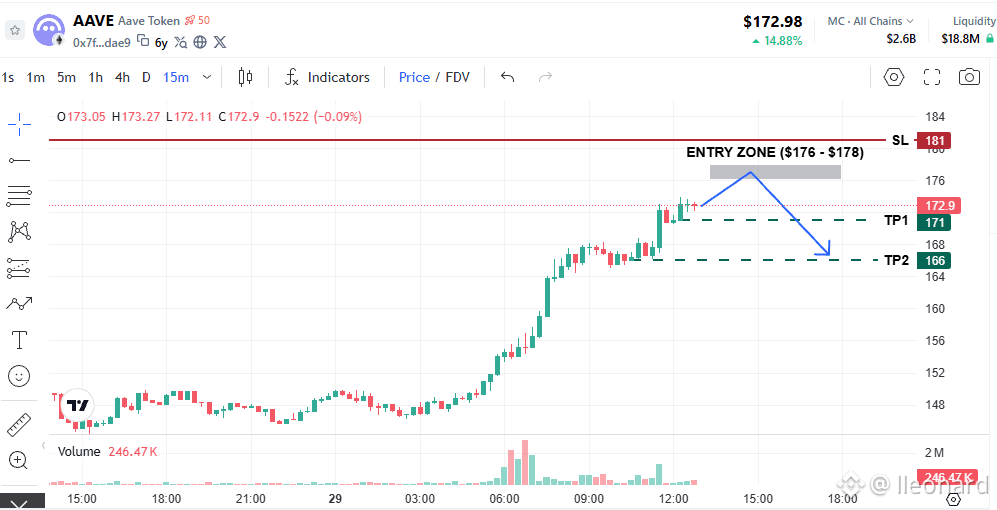
$AAVE is currently consolidating around $172–$173 after a steep parabolic pump. The major resistance cluster at $176–$178 holds heavy liquidity from Short stop-losses and Breakout buy-stops.
📊 Short Setup (Counter-Trend Play)
– Entry Zone: $176.0 – $178.0
– Stop Loss (Strict): $181.0
– Targets: $171.0 | $166.0
⚠️ Counter-trend setups carry higher risk.
{future}(AAVEUSDT)
$AAVE is currently consolidating around $172–$173 after a steep parabolic pump. The major resistance cluster at $176–$178 holds heavy liquidity from Short stop-losses and Breakout buy-stops.
📊 Short Setup (Counter-Trend Play)
– Entry Zone: $176.0 – $178.0
– Stop Loss (Strict): $181.0
– Targets: $171.0 | $166.0
⚠️ Counter-trend setups carry higher risk.
📊 Short Setup (Counter-Trend Play)
– Entry Zone: $176.0 – $178.0
– Stop Loss (Strict): $181.0
– Targets: $171.0 | $166.0
⚠️ Counter-trend setups carry higher risk.
49
·
--
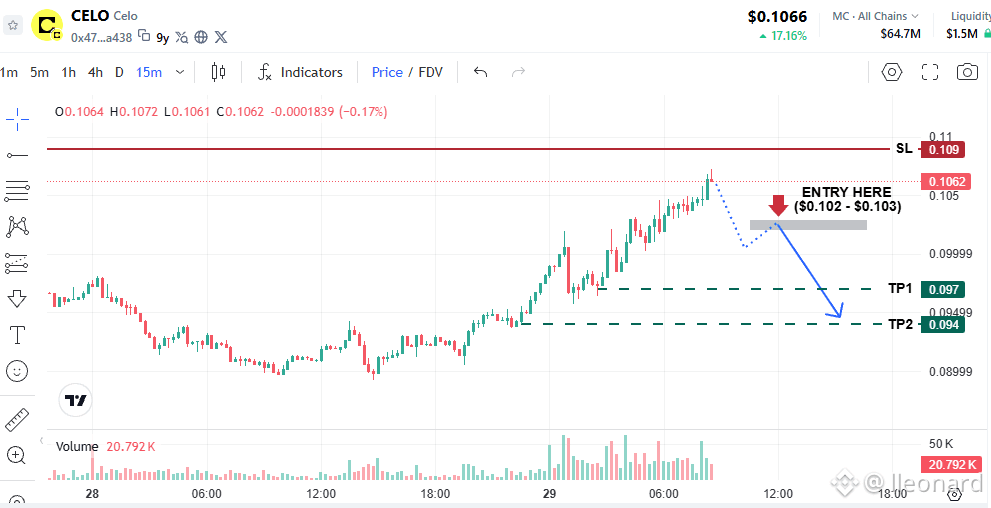
Following a steep rally that touched $0.108, $CELO momentum shows signs of slowing down near short-term resistance. While the higher-timeframe trend remains bullish, failing to hold key support could trigger a local structural breakdown.
📊 Trade Setup (Short Limit)
– Trigger Condition: 15m/1h candle closes decisively below $0.102.
– Entry: $0.102 - $0.103
– Stop Loss: $0.109
– Targets: $0.097 | $0.094
⚠️ If buying volume surges and pushes price above $0.115, CANCEL THIS SETUP.
{future}(CELOUSDT)
Following a steep rally that touched $0.108, $CELO momentum shows signs of slowing down near short-term resistance. While the higher-timeframe trend remains bullish, failing to hold key support could trigger a local structural breakdown.
📊 Trade Setup (Short Limit)
– Trigger Condition: 15m/1h candle closes decisively below $0.102.
– Entry: $0.102 - $0.103
– Stop Loss: $0.109
– Targets: $0.097 | $0.094
⚠️ If buying volume surges and pushes price above $0.115, CANCEL THIS SETUP.
📊 Trade Setup (Short Limit)
– Trigger Condition: 15m/1h candle closes decisively below $0.102.
– Entry: $0.102 - $0.103
– Stop Loss: $0.109
– Targets: $0.097 | $0.094
⚠️ If buying volume surges and pushes price above $0.115, CANCEL THIS SETUP.
143
·
--
Bullish
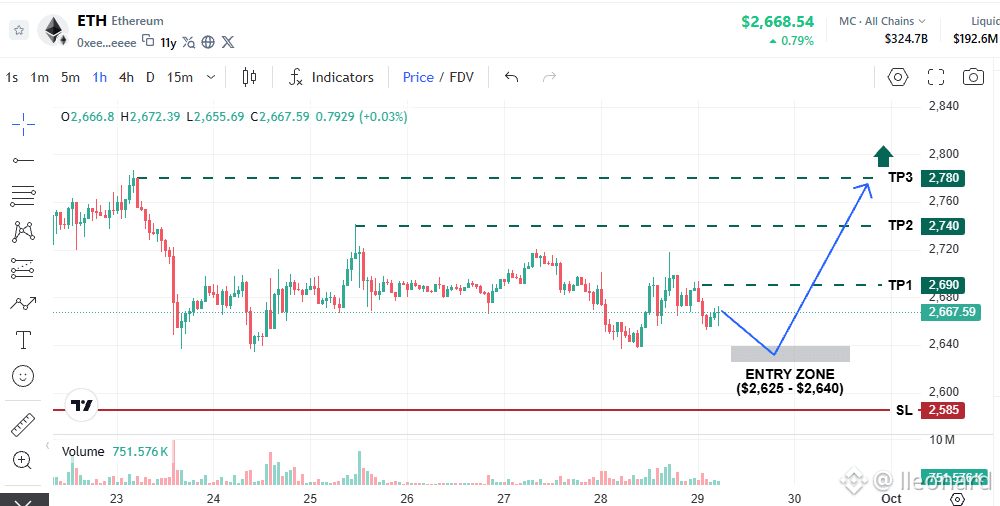
$ETH is showing signs of cooling off after failing to break above the $2,770–$2,780 resistance zone. Price is currently retracing toward key support on the 4H timeframe.
📊 Trade Plan
– Entry Zone: $2,625 – $2,640
– Stop Loss: $2,585
– Targets: $2,690 | $2,740 | $2,780
⚠️ If a 4H candle closes decisively below $2,620 with high sell volume, expect deeper support around $2,500 – $2,550.
{future}(ETHUSDT)
$ETH is showing signs of cooling off after failing to break above the $2,770–$2,780 resistance zone. Price is currently retracing toward key support on the 4H timeframe.
📊 Trade Plan
– Entry Zone: $2,625 – $2,640
– Stop Loss: $2,585
– Targets: $2,690 | $2,740 | $2,780
⚠️ If a 4H candle closes decisively below $2,620 with high sell volume, expect deeper support around $2,500 – $2,550.
📊 Trade Plan
– Entry Zone: $2,625 – $2,640
– Stop Loss: $2,585
– Targets: $2,690 | $2,740 | $2,780
⚠️ If a 4H candle closes decisively below $2,620 with high sell volume, expect deeper support around $2,500 – $2,550.
54
·
--
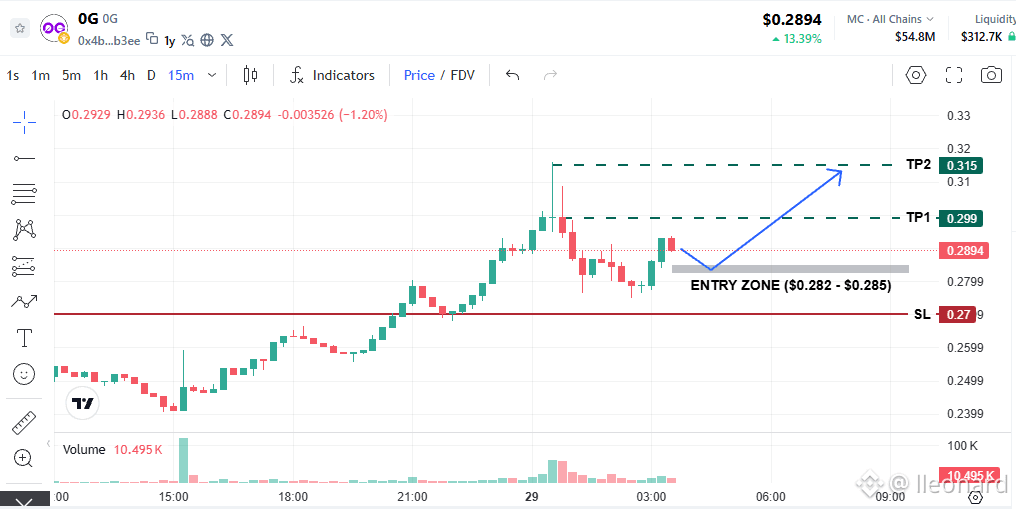
After a heavy wick rejection at the $0.32 local top, $0G found strong buying support around the $0.275 – $0.280 zone on the 15m chart, establishing a higher low.
While recovery volume remains modest, this higher low structure opens up a solid short-term scalp/intraday setup.
– Entry Zone: $0.282 – $0.285
– Stop Loss: $0.270
– Targets: $0.299 | $0.315
⚠️ Strict SL.
{future}(0GUSDT)
After a heavy wick rejection at the $0.32 local top, $0G found strong buying support around the $0.275 – $0.280 zone on the 15m chart, establishing a higher low.
While recovery volume remains modest, this higher low structure opens up a solid short-term scalp/intraday setup.
– Entry Zone: $0.282 – $0.285
– Stop Loss: $0.270
– Targets: $0.299 | $0.315
⚠️ Strict SL.
While recovery volume remains modest, this higher low structure opens up a solid short-term scalp/intraday setup.
– Entry Zone: $0.282 – $0.285
– Stop Loss: $0.270
– Targets: $0.299 | $0.315
⚠️ Strict SL.
384
·
--
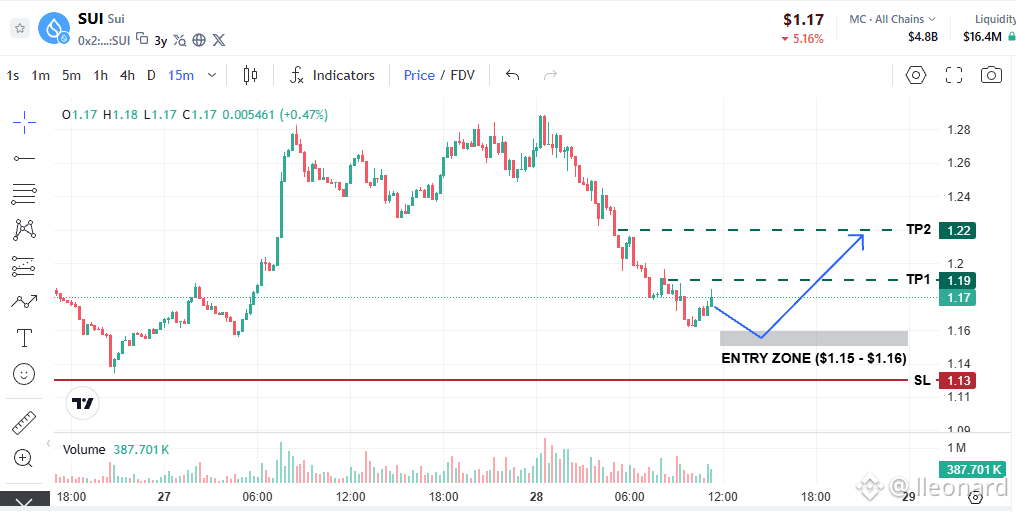
$SUI 15m timeframe is seeing a minor bounce off the $1.16 low, but recovery volume remains light. The $1.18 - $1.20 zone is acting as immediate short-term resistance.
📊 Long Setup
– Entry Zone: $1.15 - $1.16
– Stop Loss: $1.13
– Targets: $1.19 - $1.22
⚠️ If 4H profit-taking pressure persists, the $1.15 support could break easily, exposing lower support levels at $1.10 - $1.12 or $1.00.
{future}(SUIUSDT)
$SUI 15m timeframe is seeing a minor bounce off the $1.16 low, but recovery volume remains light. The $1.18 - $1.20 zone is acting as immediate short-term resistance.
📊 Long Setup
– Entry Zone: $1.15 - $1.16
– Stop Loss: $1.13
– Targets: $1.19 - $1.22
⚠️ If 4H profit-taking pressure persists, the $1.15 support could break easily, exposing lower support levels at $1.10 - $1.12 or $1.00.
📊 Long Setup
– Entry Zone: $1.15 - $1.16
– Stop Loss: $1.13
– Targets: $1.19 - $1.22
⚠️ If 4H profit-taking pressure persists, the $1.15 support could break easily, exposing lower support levels at $1.10 - $1.12 or $1.00.
90
·
--
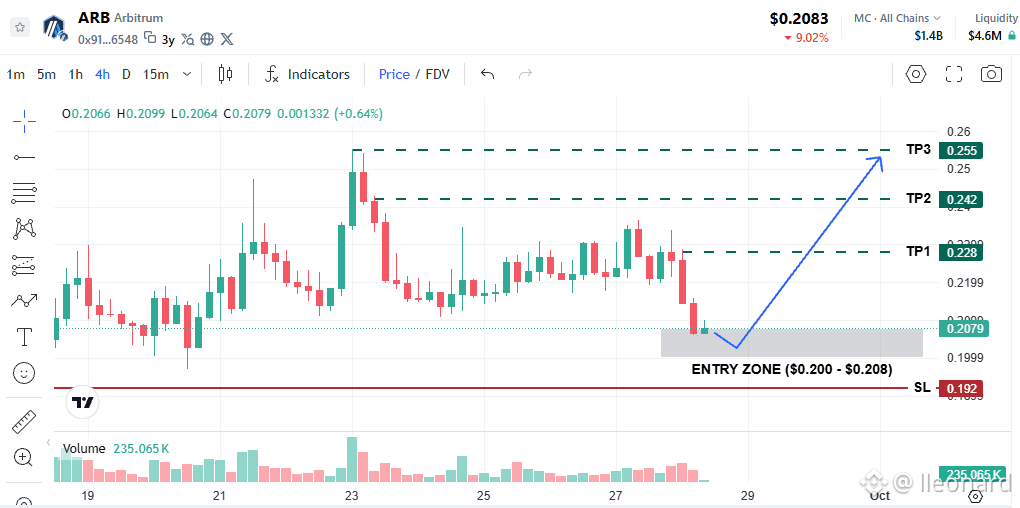
Following a pullback from the local peak at $0.24 – $0.25, $ARB has dropped back to test its key horizontal support around $0.208.
This level serves as crucial baseline support; if bulls can defend this range, a technical rebound is highly likely.
📊 Long Trade Plan
– Entry Zone: $0.200 – $0.208
– Stop Loss: $0.192
– Targets: $0.228 | $0.242 | $0.255
⚠️ Strict SL execution: If ARB loses the $0.20 level on high volume, price could drift lower toward $0.180 or previous lows at $0.140.
{future}(ARBUSDT)
Following a pullback from the local peak at $0.24 – $0.25, $ARB has dropped back to test its key horizontal support around $0.208.
This level serves as crucial baseline support; if bulls can defend this range, a technical rebound is highly likely.
📊 Long Trade Plan
– Entry Zone: $0.200 – $0.208
– Stop Loss: $0.192
– Targets: $0.228 | $0.242 | $0.255
⚠️ Strict SL execution: If ARB loses the $0.20 level on high volume, price could drift lower toward $0.180 or previous lows at $0.140.
This level serves as crucial baseline support; if bulls can defend this range, a technical rebound is highly likely.
📊 Long Trade Plan
– Entry Zone: $0.200 – $0.208
– Stop Loss: $0.192
– Targets: $0.228 | $0.242 | $0.255
⚠️ Strict SL execution: If ARB loses the $0.20 level on high volume, price could drift lower toward $0.180 or previous lows at $0.140.
1
290
·
--
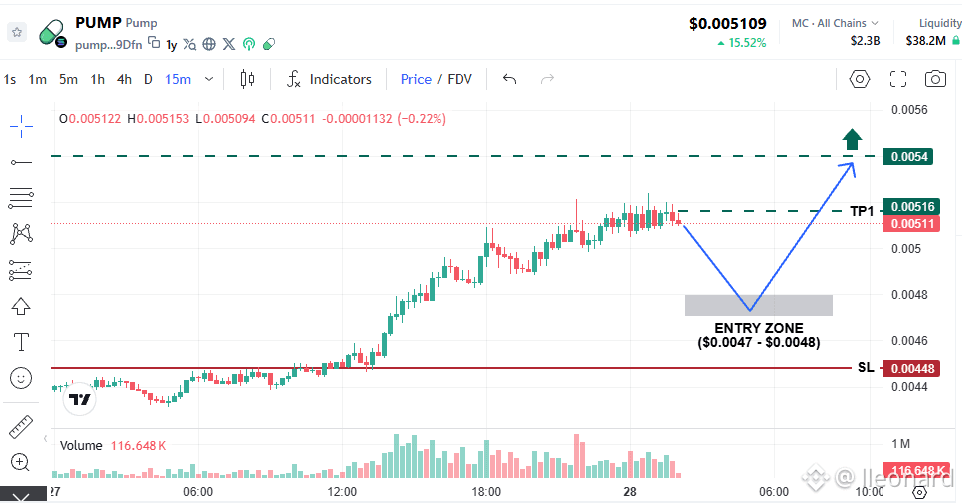
After a decisive rally pushing the price to 0.00520, $PUMP is currently pausing and consolidating around 0.00510.
Buying volume near the peak is slowing down with upper shadows indicating short-term profit-taking — suggesting the market needs a healthy pullback before declaring its next direction!
📊 LONG SETUP
– Entry Zone:0.00470 - 0.00480
– Stop Loss: 0.00448
– Targets: 0.00516 | 0.00540+
💡 Split into 2 DCA limit orders at 0.00480 and 0.00470 to optimize entry.
{future}(PUMPUSDT)
After a decisive rally pushing the price to 0.00520, $PUMP is currently pausing and consolidating around 0.00510.
Buying volume near the peak is slowing down with upper shadows indicating short-term profit-taking — suggesting the market needs a healthy pullback before declaring its next direction!
📊 LONG SETUP
– Entry Zone:0.00470 - 0.00480
– Stop Loss: 0.00448
– Targets: 0.00516 | 0.00540+
💡 Split into 2 DCA limit orders at 0.00480 and 0.00470 to optimize entry.
Buying volume near the peak is slowing down with upper shadows indicating short-term profit-taking — suggesting the market needs a healthy pullback before declaring its next direction!
📊 LONG SETUP
– Entry Zone:0.00470 - 0.00480
– Stop Loss: 0.00448
– Targets: 0.00516 | 0.00540+
💡 Split into 2 DCA limit orders at 0.00480 and 0.00470 to optimize entry.
199
·
--
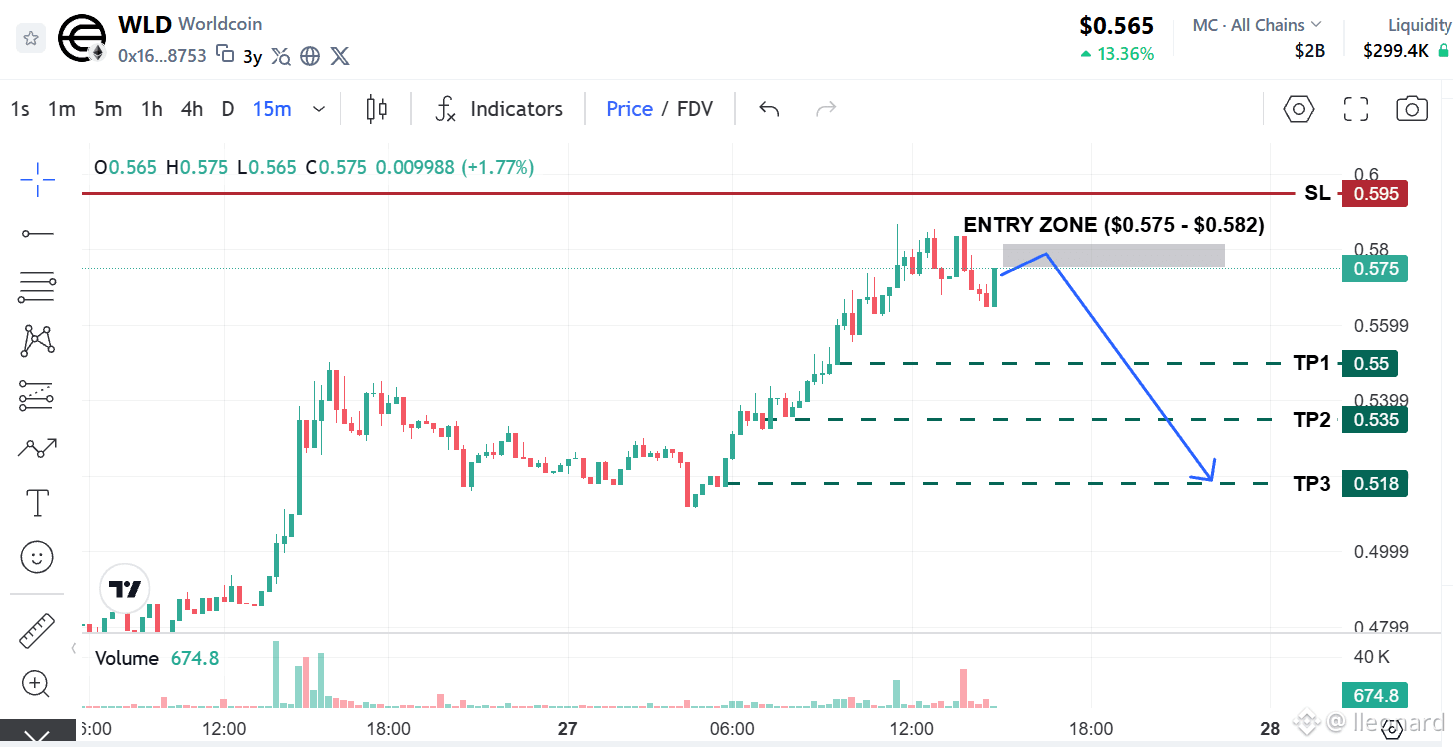
$WLD executed a liquidity sweep up to $0.586+ followed immediately by a sharp rejection with a high-volume red candle. The current minor pullback presents a favorable Risk/Reward Short opportunity as sellers regain control.
📊 Trading Plan
– Entry Zone: $0.5780 – $0.5820
– Stop Loss: $0.5950
– Targets: $0.5550 | $0.5350 | $0.5180
⚠️ Strict SL.
{future}(WLDUSDT)
$WLD executed a liquidity sweep up to $0.586+ followed immediately by a sharp rejection with a high-volume red candle. The current minor pullback presents a favorable Risk/Reward Short opportunity as sellers regain control.
📊 Trading Plan
– Entry Zone: $0.5780 – $0.5820
– Stop Loss: $0.5950
– Targets: $0.5550 | $0.5350 | $0.5180
⚠️ Strict SL.
📊 Trading Plan
– Entry Zone: $0.5780 – $0.5820
– Stop Loss: $0.5950
– Targets: $0.5550 | $0.5350 | $0.5180
⚠️ Strict SL.
241
·
--
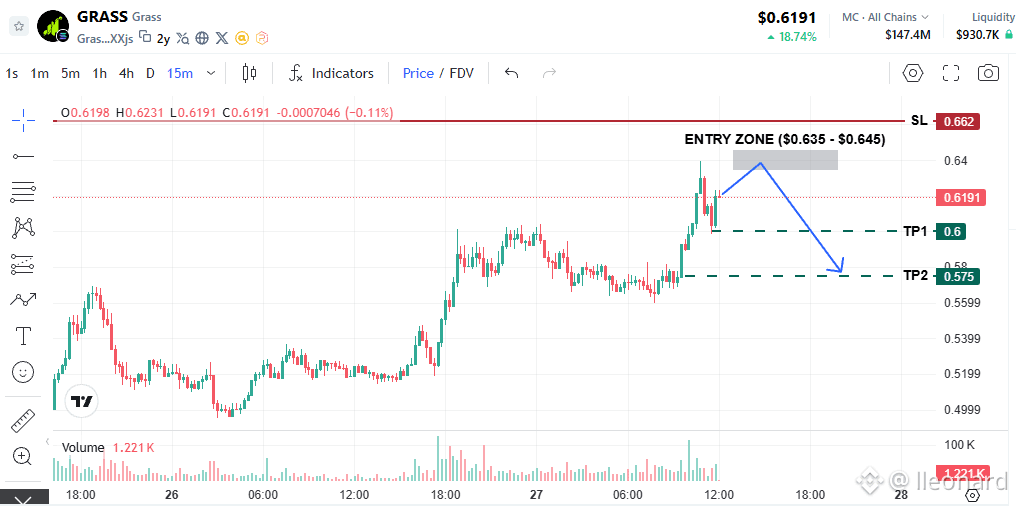
$GRASS is showing a steep parabolic run on the 4H chart, with long upper wicks appearing around $0.64 (15m chart), signaling profit-taking pressure.
📊 SHORT PLAN (Scalp)
– Entry Zone: $0.635 – $0.645
– Stop Loss: $0.662
– Targets: $0.600 | $0.575
⚠️ Cancel this setup if the price has not reached the Entry zone but closes a candle below $0.600.
{future}(GRASSUSDT)
$GRASS is showing a steep parabolic run on the 4H chart, with long upper wicks appearing around $0.64 (15m chart), signaling profit-taking pressure.
📊 SHORT PLAN (Scalp)
– Entry Zone: $0.635 – $0.645
– Stop Loss: $0.662
– Targets: $0.600 | $0.575
⚠️ Cancel this setup if the price has not reached the Entry zone but closes a candle below $0.600.
📊 SHORT PLAN (Scalp)
– Entry Zone: $0.635 – $0.645
– Stop Loss: $0.662
– Targets: $0.600 | $0.575
⚠️ Cancel this setup if the price has not reached the Entry zone but closes a candle below $0.600.
235
·
--
Bearish
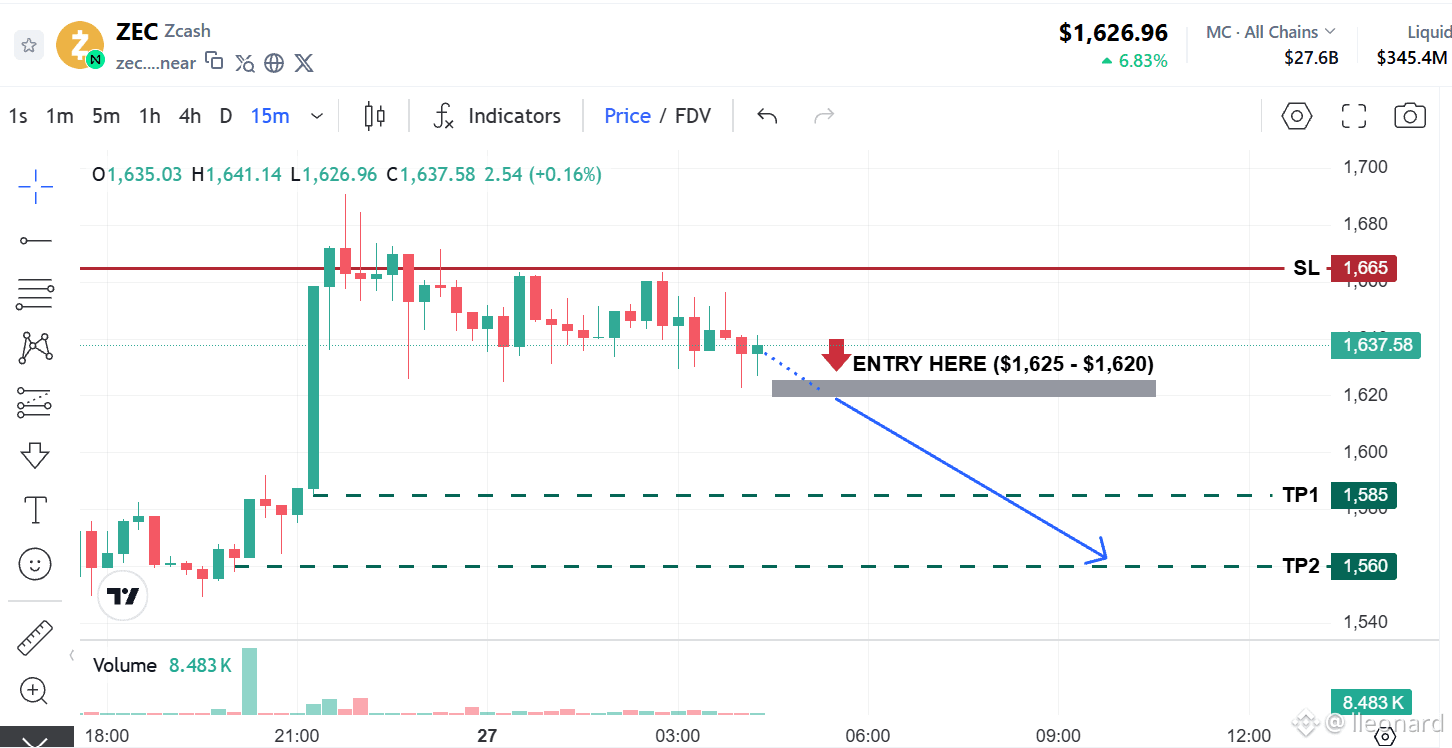
$ZEC previous bull flag structure is showing signs of exhaustion as buying pressure near the $1,675–$1,690 peak fades.
The $1,625 support level currently serves as the key line in the sand for short-term momentum ➔ If bulls lose this level, a breakdown to fill the lower price gap becomes the high-probability path.
🎯 TRADE SETUP
– Entry Zone: $1,620 – $1,625
– Stop Loss: $1,665
– Targets: $1,585 | $1,560
💡 Wait for a 15m candle close below $1,625 or set a Sell Stop/Limit on the retest.
{future}(ZECUSDT)
$ZEC previous bull flag structure is showing signs of exhaustion as buying pressure near the $1,675–$1,690 peak fades.
The $1,625 support level currently serves as the key line in the sand for short-term momentum ➔ If bulls lose this level, a breakdown to fill the lower price gap becomes the high-probability path.
🎯 TRADE SETUP
– Entry Zone: $1,620 – $1,625
– Stop Loss: $1,665
– Targets: $1,585 | $1,560
💡 Wait for a 15m candle close below $1,625 or set a Sell Stop/Limit on the retest.
The $1,625 support level currently serves as the key line in the sand for short-term momentum ➔ If bulls lose this level, a breakdown to fill the lower price gap becomes the high-probability path.
🎯 TRADE SETUP
– Entry Zone: $1,620 – $1,625
– Stop Loss: $1,665
– Targets: $1,585 | $1,560
💡 Wait for a 15m candle close below $1,625 or set a Sell Stop/Limit on the retest.
144
·
--
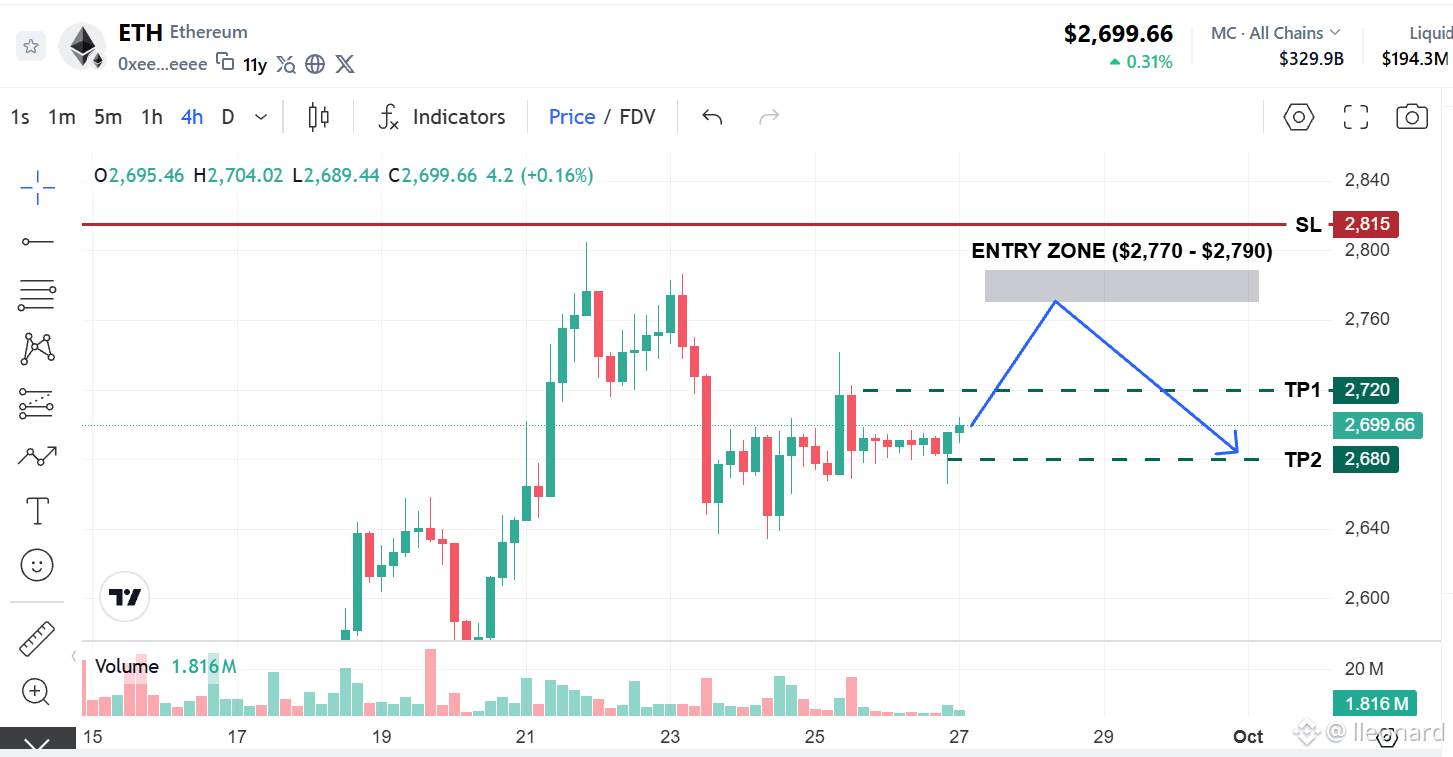
$ETH is pushing into a key short-term resistance zone. Profit-taking pressure is starting to show on lower timeframes (15m/1h), creating a tight Scalp opportunity to trade the rejection.
🎯 Scalp Setup
– Entry: $2,770 – $2,790
– Stop Loss: $2,815
– Targets: $2,710 | $2,680
⚠️ Cancel this setup if price breaks below $2,650 from current levels.
{future}(ETHUSDT)
$ETH is pushing into a key short-term resistance zone. Profit-taking pressure is starting to show on lower timeframes (15m/1h), creating a tight Scalp opportunity to trade the rejection.
🎯 Scalp Setup
– Entry: $2,770 – $2,790
– Stop Loss: $2,815
– Targets: $2,710 | $2,680
⚠️ Cancel this setup if price breaks below $2,650 from current levels.
🎯 Scalp Setup
– Entry: $2,770 – $2,790
– Stop Loss: $2,815
– Targets: $2,710 | $2,680
⚠️ Cancel this setup if price breaks below $2,650 from current levels.
71
·
--
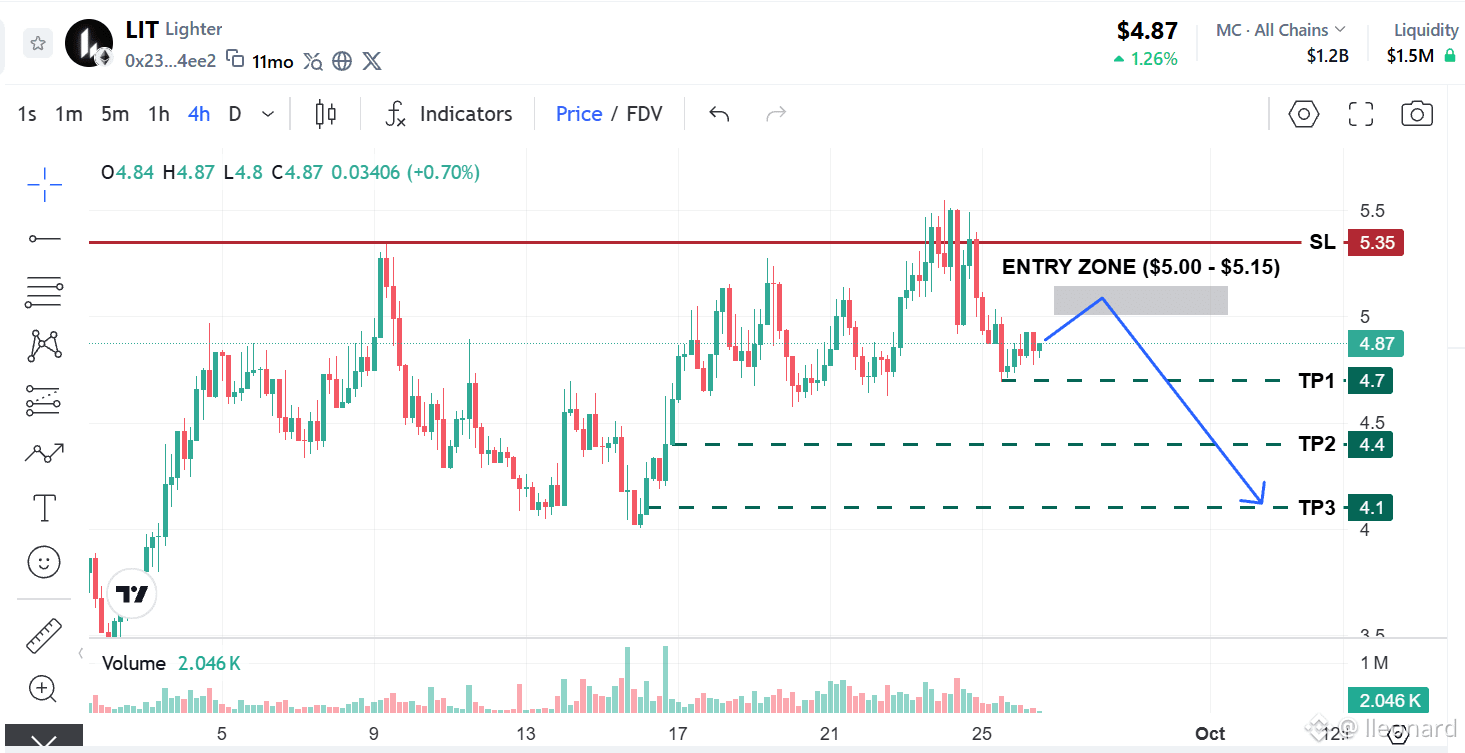
Upside momentum for $LIT has faded significantly after hitting the $5.50 peak. A short-term reversal structure is forming with exhausted buying volume at the $4.80 level.
📊 Short Plan
– Entry Zone: $5.00 – $5.15
– Stop Loss: $5.35
– Take Profit: $4.70 | $4.40 | $4.10
⚠️ Respect your SL!
{future}(LITUSDT)
Upside momentum for $LIT has faded significantly after hitting the $5.50 peak. A short-term reversal structure is forming with exhausted buying volume at the $4.80 level.
📊 Short Plan
– Entry Zone: $5.00 – $5.15
– Stop Loss: $5.35
– Take Profit: $4.70 | $4.40 | $4.10
⚠️ Respect your SL!
📊 Short Plan
– Entry Zone: $5.00 – $5.15
– Stop Loss: $5.35
– Take Profit: $4.70 | $4.40 | $4.10
⚠️ Respect your SL!
327
·
--
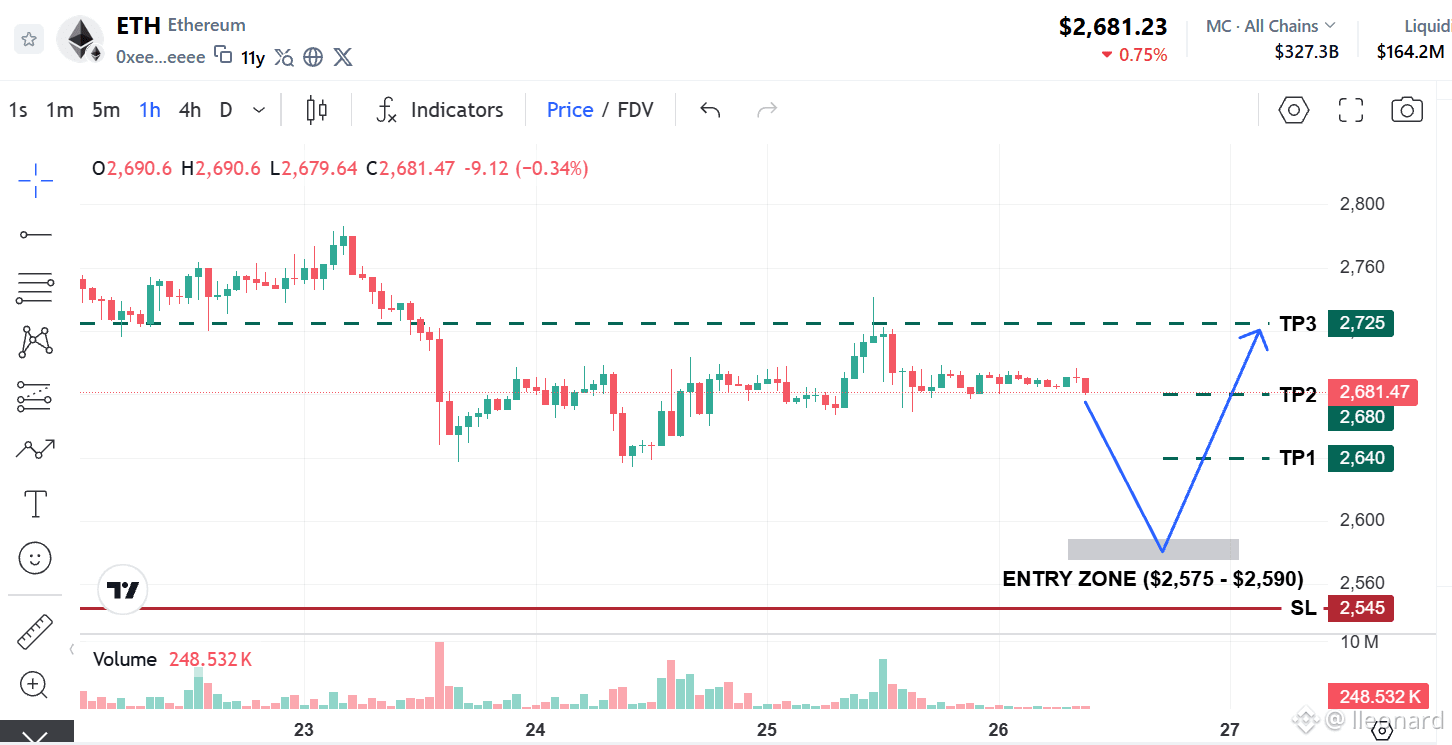
After testing the $2,650 support with weak momentum, $ETH is currently pulling back to find a stronger equilibrium zone. The lower technical support range around $2,575 – $2,590 presents an ideal entry point for a favorable Risk/Reward ratio.
📊 Trading Setup
– Entry: $2,575 – $2,590
– Stop Loss: $2,545
– Targets: $2,640 | $2,680 | $2,725
⚠️ As this is a limit buy on a pullback, always set your automatic SL simultaneously with the limit entry!
{future}(ETHUSDT)
After testing the $2,650 support with weak momentum, $ETH is currently pulling back to find a stronger equilibrium zone. The lower technical support range around $2,575 – $2,590 presents an ideal entry point for a favorable Risk/Reward ratio.
📊 Trading Setup
– Entry: $2,575 – $2,590
– Stop Loss: $2,545
– Targets: $2,640 | $2,680 | $2,725
⚠️ As this is a limit buy on a pullback, always set your automatic SL simultaneously with the limit entry!
📊 Trading Setup
– Entry: $2,575 – $2,590
– Stop Loss: $2,545
– Targets: $2,640 | $2,680 | $2,725
⚠️ As this is a limit buy on a pullback, always set your automatic SL simultaneously with the limit entry!
32
Log in to explore more content
Join global crypto users on Binance Square
⚡️ Get latest and useful information about crypto.
💬 Trusted by the world’s largest crypto exchange.
👍 Discover real insights from verified creators.
Email / Phone number
Trending Topics
KoreaProposesTokenizingStocksAndBonds
9,852 views
227 Discussing
As of October 1, 2026, this is more advanced than a mere proposal, but the tokenization of ordinary stocks and bonds has not yet gone live in South Korea.
Legislation has passed. On January 15, 2026, South Korea's National Assembly passed amendments to the Electronic Registration Act and Capital Markets Act creating the legal framework for security tokens.
The law takes effect February 4, 2027. Until then, Korea does not yet have the legal basis to use a distributed ledger as the securities registry for domestic tokenized securities. The government announced the implementation roadmap on September 4, 2026. It explicitly covers stocks, bonds and funds, rather than limiting tokenization to fractional-investment products.
Phase 1 begins February 2027. Initially, tokenization will cover institutional-only privately placed MMFs and bonds, unlisted stocks through trust structures, and publicly offered fractional-investment securities.
Broader public securities come later. Phase 2 is intended to expand tokenization to publicly offered securities generally, while Phase 3 envisions on-chain payment/settlement infrastructure, potentially involving stablecoins. The timing of those later phases is still flexible.
As of today, detailed implementing rules are still being finalized. The FSC said it planned amendments to subordinate regulations, while today's Yonhap report says the revised rules are being prepared to allow stocks and bonds to serve as the underlying assets of tokenized securities.
So the accurate headline is:
🇰🇷 South Korea has legislated a framework for security tokens and is preparing a phased rollout that will eventually encompass conventional stocks and bonds. The first legal rollout starts February 4, 2027; it is not a blanket tokenization of all Korean stocks and bonds today.
That distinction matters because saying “South Korea is tokenizing stocks and bonds now” would overstate the current status.
#koreaproposestokenizingstocksandbonds
#BTC $BTC
ASHFAQ NAEEM
·0 Likes
·3.3k views
MetaMaskExitsLidoValidatorsAfterSecurityIncident
75,590 views
961 Discussing
MicronBeatsEarningsLiftsGuidance
44,662 views
742 Discussing