

TheChartQueen
4.4k Posts

TheChartQueen
Report
Block User
Trading raw data so you don't have to 📊 A girl, her charts & daily setups. Tips are never expected, but they fuel my 3AM analysis!
High-Frequency Trader
5 Years
12 Following
570 Followers
743 Liked
Posts
All
Quotes
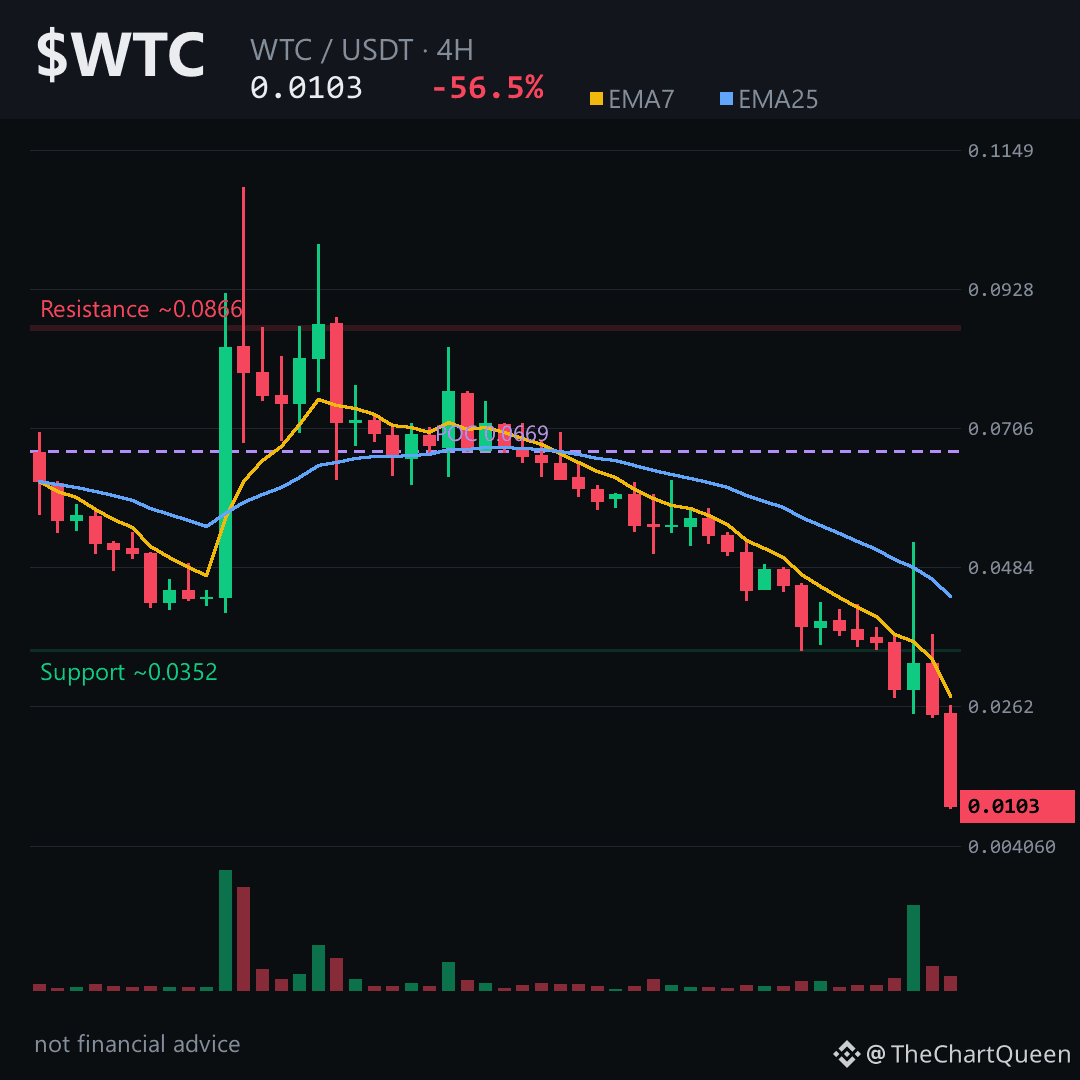
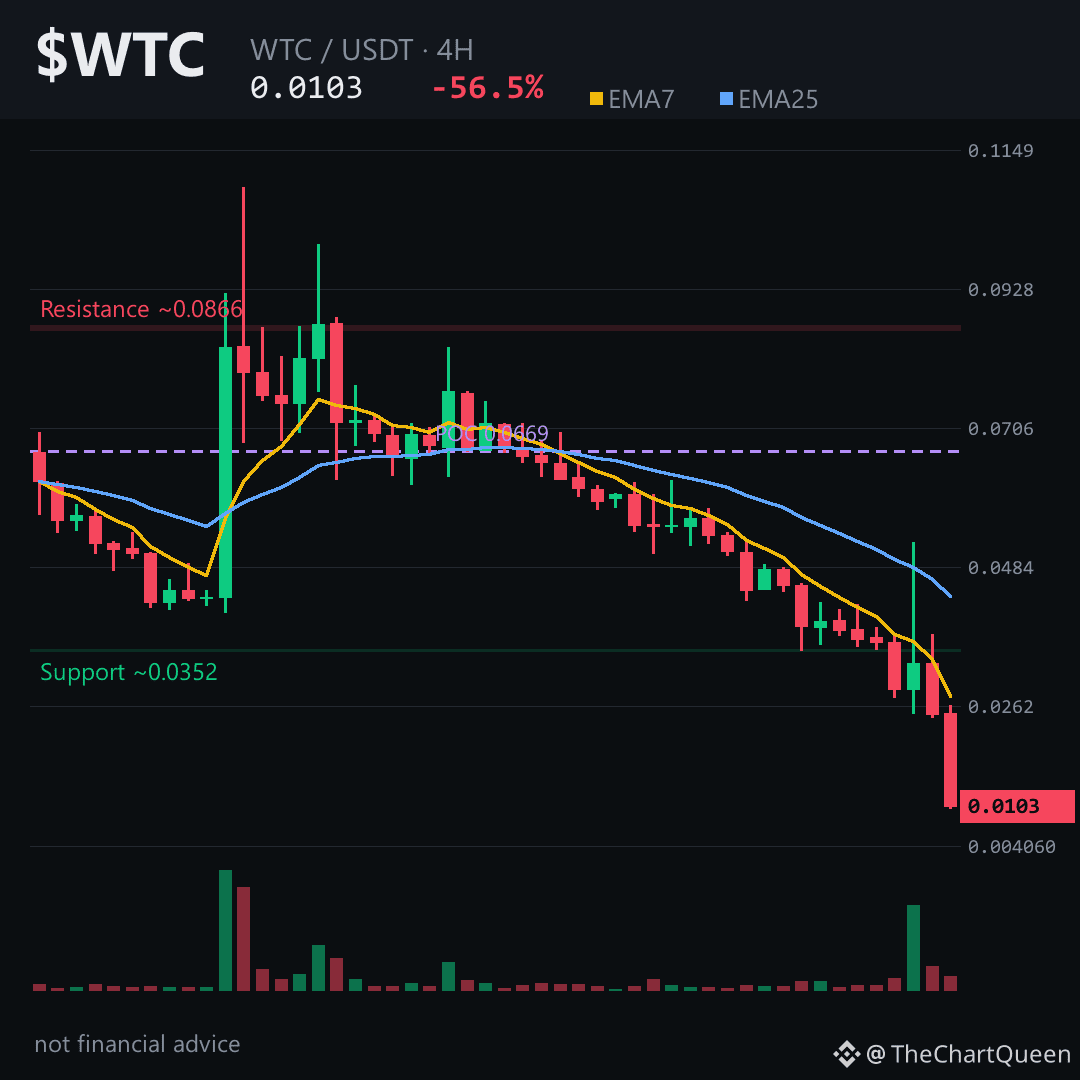
What do you do when a coin loses 56% in a single day and still looks heavy? That’s the exact question $WTC is forcing right now, and the answer is hiding in one simple level most people ignore.
Price just printed a brutal red candle straight into the 0.010 area — a zone now acting like a magnet. The 4H chart is the cleanest read, and it’s not subtle.
Trend is down. Hard. Momentum is stretched to the floor — oversold used to mean “bounce,” now it means “weak.” Volume Profile’s heaviest zone sits up near 0.067, showing how far below fair value this has fallen.
The level that matters on $WTC is around 0.0104. As long as price stays below the 0.0109 invalidation area, path of least resistance leans lower — toward 0.0094. Lose that, and the daily chart points to 0.0088 next.
My read: a falling knife with no real bid support yet. Oversold can stay oversold when fear is this thick. Risk sits with anyone trying to catch it early.
Tap $WTC to pull up the chart and see how cleanly it’s respecting these zones. I’ll update this read if price reclaims the invalidation or breaks the objective — follow so it lands on your feed.
What’s the first sign you look for when a coin gets this oversold — a reclaim, a flush, or a volume spike? Drop your read on WTC 👇
⚠️ Not financial advice. DYOR.
#WTC #Crypto #Altcoins #BinanceSquare
What do you do when a coin loses 56% in a single day and still looks heavy? That’s the exact question $WTC is forcing right now, and the answer is hiding in one simple level most people ignore.
Price just printed a brutal red candle straight into the 0.010 area — a zone now acting like a magnet. The 4H chart is the cleanest read, and it’s not subtle.
Trend is down. Hard. Momentum is stretched to the floor — oversold used to mean “bounce,” now it means “weak.” Volume Profile’s heaviest zone sits up near 0.067, showing how far below fair value this has fallen.
The level that matters on $WTC is around 0.0104. As long as price stays below the 0.0109 invalidation area, path of least resistance leans lower — toward 0.0094. Lose that, and the daily chart points to 0.0088 next.
My read: a falling knife with no real bid support yet. Oversold can stay oversold when fear is this thick. Risk sits with anyone trying to catch it early.
Tap $WTC to pull up the chart and see how cleanly it’s respecting these zones. I’ll update this read if price reclaims the invalidation or breaks the objective — follow so it lands on your feed.
What’s the first sign you look for when a coin gets this oversold — a reclaim, a flush, or a volume spike? Drop your read on WTC 👇
⚠️ Not financial advice. DYOR.
#WTC #Crypto #Altcoins #BinanceSquare
Price just printed a brutal red candle straight into the 0.010 area — a zone now acting like a magnet. The 4H chart is the cleanest read, and it’s not subtle.
Trend is down. Hard. Momentum is stretched to the floor — oversold used to mean “bounce,” now it means “weak.” Volume Profile’s heaviest zone sits up near 0.067, showing how far below fair value this has fallen.
The level that matters on $WTC is around 0.0104. As long as price stays below the 0.0109 invalidation area, path of least resistance leans lower — toward 0.0094. Lose that, and the daily chart points to 0.0088 next.
My read: a falling knife with no real bid support yet. Oversold can stay oversold when fear is this thick. Risk sits with anyone trying to catch it early.
Tap $WTC to pull up the chart and see how cleanly it’s respecting these zones. I’ll update this read if price reclaims the invalidation or breaks the objective — follow so it lands on your feed.
What’s the first sign you look for when a coin gets this oversold — a reclaim, a flush, or a volume spike? Drop your read on WTC 👇
⚠️ Not financial advice. DYOR.
#WTC #Crypto #Altcoins #BinanceSquare
51
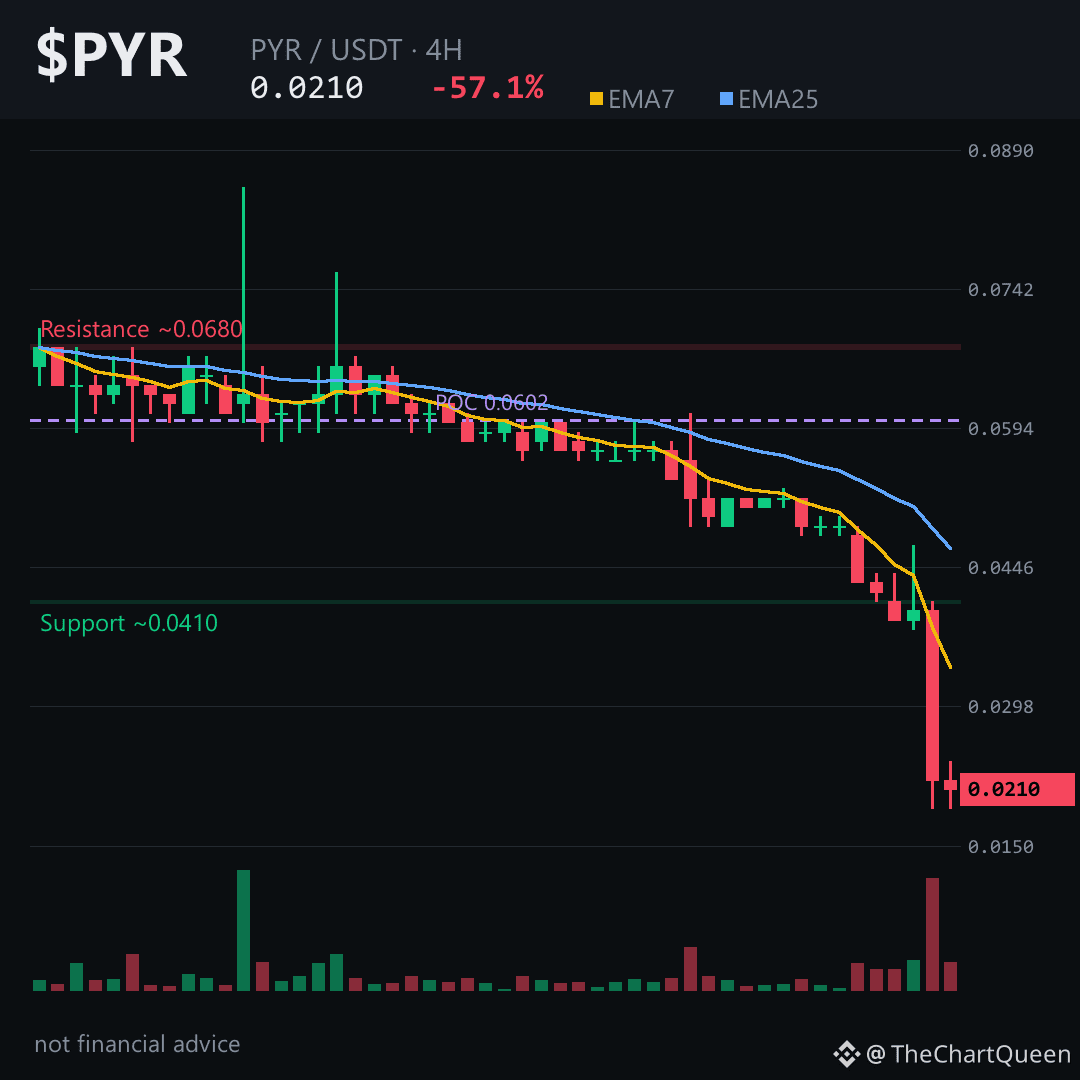
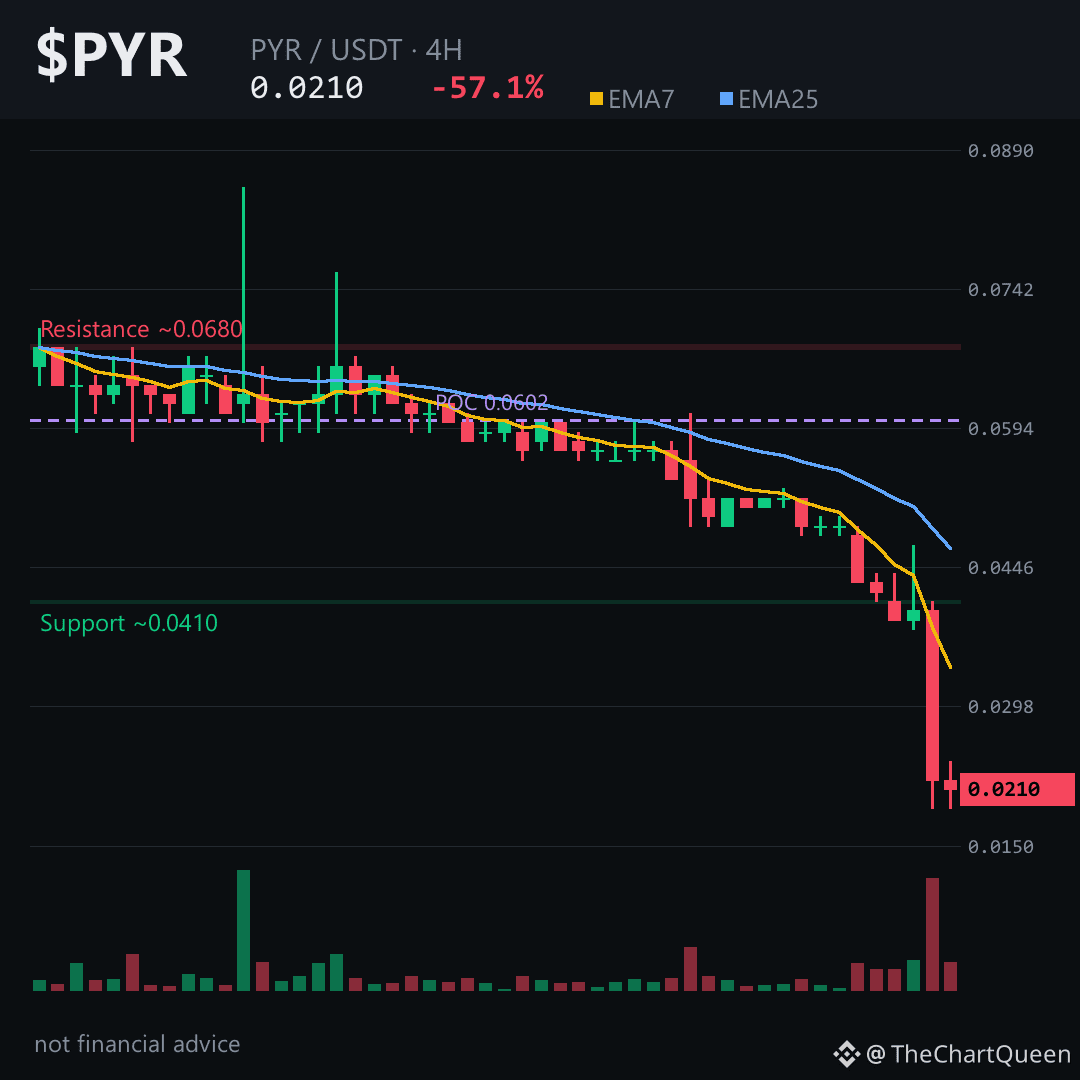
-57.14% in a single day.
That is not a dip. That is a structural break.
Price cascaded from 0.052 straight through the 0.044–0.048 bearish gap — now overhead supply. RSI at 12 is extreme, but in a freefall it can stay pinned longer than logic suggests.
The 1D is heavier: 70% below the 7-day average, daily RSI at 24. Volume profile’s point of control sits far above at 0.069. Every bounce toward 0.023–0.024 meets trapped sellers.
The level that matters on the 4H is 0.022. As long as $PYR stays below it, path of least resistance points toward 0.019 — the lower bound of yesterday’s capitulation wick.
Lose 0.019 on a 4H close, and there’s no meaningful support until 0.013. Another 35% lower.
My read: decisively bearish across every timeframe. The only real risk to shorts is a violent oversold snap — but with no funding or open interest to squeeze, there’s no fuel for a sustained reversal. Dead cat bounces, not recoveries.
I will update this read if the 0.022–0.024 supply zone gets reclaimed. Follow me here so you see it.
Which level are you watching more closely on $PYR — the 0.019 floor or the 0.022 ceiling? 👇
⚠️ Not financial advice. DYOR.
#PYR #Crypto #BinanceSquare #Altcoins
-57.14% in a single day.
That is not a dip. That is a structural break.
Price cascaded from 0.052 straight through the 0.044–0.048 bearish gap — now overhead supply. RSI at 12 is extreme, but in a freefall it can stay pinned longer than logic suggests.
The 1D is heavier: 70% below the 7-day average, daily RSI at 24. Volume profile’s point of control sits far above at 0.069. Every bounce toward 0.023–0.024 meets trapped sellers.
The level that matters on the 4H is 0.022. As long as $PYR stays below it, path of least resistance points toward 0.019 — the lower bound of yesterday’s capitulation wick.
Lose 0.019 on a 4H close, and there’s no meaningful support until 0.013. Another 35% lower.
My read: decisively bearish across every timeframe. The only real risk to shorts is a violent oversold snap — but with no funding or open interest to squeeze, there’s no fuel for a sustained reversal. Dead cat bounces, not recoveries.
I will update this read if the 0.022–0.024 supply zone gets reclaimed. Follow me here so you see it.
Which level are you watching more closely on $PYR — the 0.019 floor or the 0.022 ceiling? 👇
⚠️ Not financial advice. DYOR.
#PYR #Crypto #BinanceSquare #Altcoins
That is not a dip. That is a structural break.
Price cascaded from 0.052 straight through the 0.044–0.048 bearish gap — now overhead supply. RSI at 12 is extreme, but in a freefall it can stay pinned longer than logic suggests.
The 1D is heavier: 70% below the 7-day average, daily RSI at 24. Volume profile’s point of control sits far above at 0.069. Every bounce toward 0.023–0.024 meets trapped sellers.
The level that matters on the 4H is 0.022. As long as $PYR stays below it, path of least resistance points toward 0.019 — the lower bound of yesterday’s capitulation wick.
Lose 0.019 on a 4H close, and there’s no meaningful support until 0.013. Another 35% lower.
My read: decisively bearish across every timeframe. The only real risk to shorts is a violent oversold snap — but with no funding or open interest to squeeze, there’s no fuel for a sustained reversal. Dead cat bounces, not recoveries.
I will update this read if the 0.022–0.024 supply zone gets reclaimed. Follow me here so you see it.
Which level are you watching more closely on $PYR — the 0.019 floor or the 0.022 ceiling? 👇
⚠️ Not financial advice. DYOR.
#PYR #Crypto #BinanceSquare #Altcoins
39
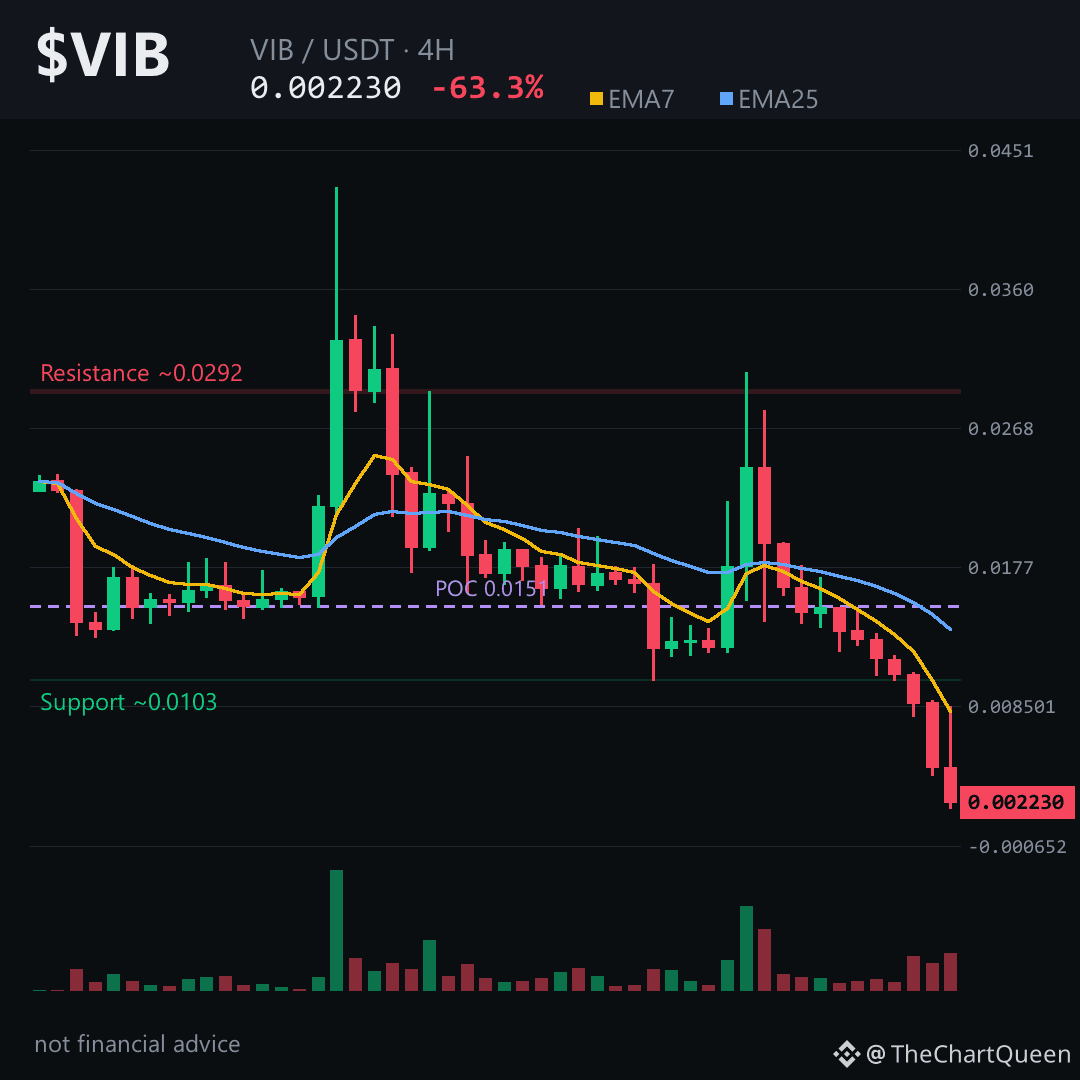
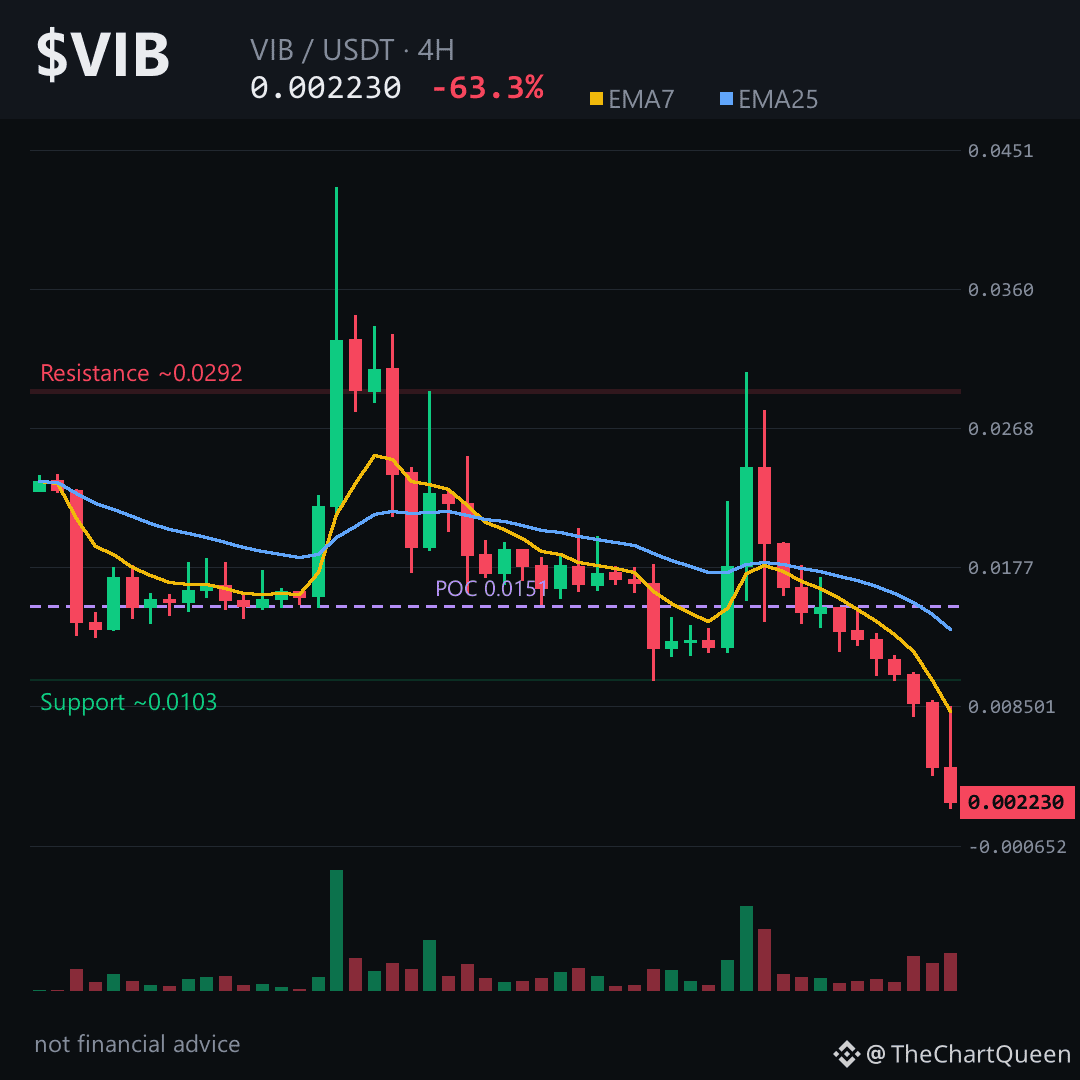
The 24h chart lost 63% and still hasn't found a floor. That is not a dip — that is a structural break.
Ten of the last twelve 4H candles are red, with the last two down 49% and 50%. Price sits near 0.0022 after tagging 0.0018. RSI is buried under 30, but oversold is a condition, not a signal. EMA7 is less than half the EMA25 — that's a liquidation cascade, not a trend.
Funding is flat at zero and open interest is empty. No leveraged crowd left to squeeze. Any bounce is spot-driven and likely shallow. The bearish FVG between 0.0089 and 0.0102 is the overhead gap that must fill before this looks anything but heavy.
The level that matters is 0.00235. If $VIB can't reclaim that zone on a 4H close, path of least resistance stays down toward 0.0020 and potentially lower. Tap $VIB to see how cleanly it rejected every attempt to hold above 0.004.
My read: a falling knife with no futures support underneath. The risk is not missing a bounce — it's catching one before volume confirms.
I'll revisit if price closes back above 0.00235 — follow so that analysis lands on your feed.
What level are you watching on $VIB right now 👇
Not financial advice. DYOR.
#VIB #Viberate #Crypto #BinanceSquare
The 24h chart lost 63% and still hasn't found a floor. That is not a dip — that is a structural break.
Ten of the last twelve 4H candles are red, with the last two down 49% and 50%. Price sits near 0.0022 after tagging 0.0018. RSI is buried under 30, but oversold is a condition, not a signal. EMA7 is less than half the EMA25 — that's a liquidation cascade, not a trend.
Funding is flat at zero and open interest is empty. No leveraged crowd left to squeeze. Any bounce is spot-driven and likely shallow. The bearish FVG between 0.0089 and 0.0102 is the overhead gap that must fill before this looks anything but heavy.
The level that matters is 0.00235. If $VIB can't reclaim that zone on a 4H close, path of least resistance stays down toward 0.0020 and potentially lower. Tap $VIB to see how cleanly it rejected every attempt to hold above 0.004.
My read: a falling knife with no futures support underneath. The risk is not missing a bounce — it's catching one before volume confirms.
I'll revisit if price closes back above 0.00235 — follow so that analysis lands on your feed.
What level are you watching on $VIB right now 👇
Not financial advice. DYOR.
#VIB #Viberate #Crypto #BinanceSquare
Ten of the last twelve 4H candles are red, with the last two down 49% and 50%. Price sits near 0.0022 after tagging 0.0018. RSI is buried under 30, but oversold is a condition, not a signal. EMA7 is less than half the EMA25 — that's a liquidation cascade, not a trend.
Funding is flat at zero and open interest is empty. No leveraged crowd left to squeeze. Any bounce is spot-driven and likely shallow. The bearish FVG between 0.0089 and 0.0102 is the overhead gap that must fill before this looks anything but heavy.
The level that matters is 0.00235. If $VIB can't reclaim that zone on a 4H close, path of least resistance stays down toward 0.0020 and potentially lower. Tap $VIB to see how cleanly it rejected every attempt to hold above 0.004.
My read: a falling knife with no futures support underneath. The risk is not missing a bounce — it's catching one before volume confirms.
I'll revisit if price closes back above 0.00235 — follow so that analysis lands on your feed.
What level are you watching on $VIB right now 👇
Not financial advice. DYOR.
#VIB #Viberate #Crypto #BinanceSquare
75
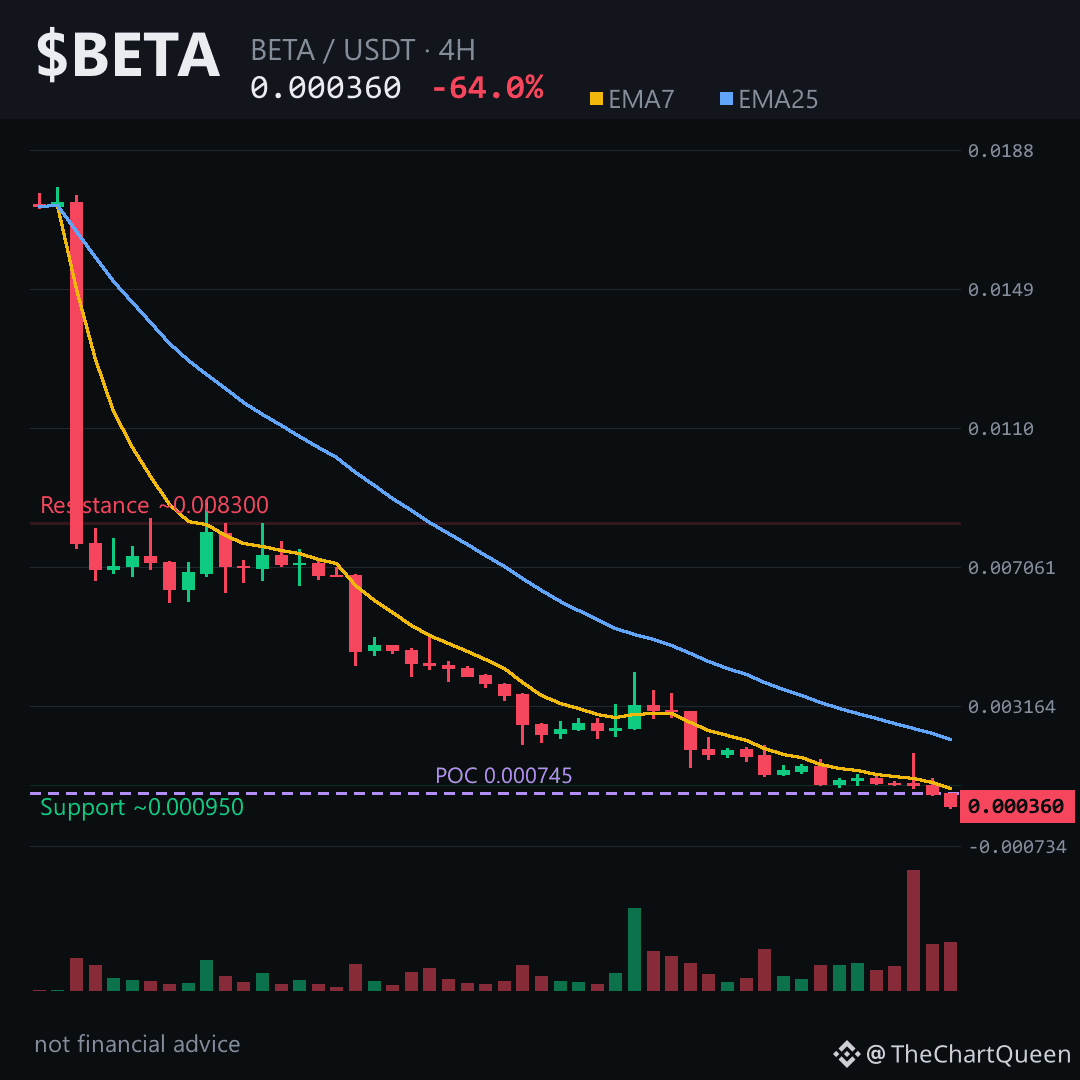
What actually happens when a coin loses 64% in a single day?
The chart looks destroyed — but the internals whisper something stranger.
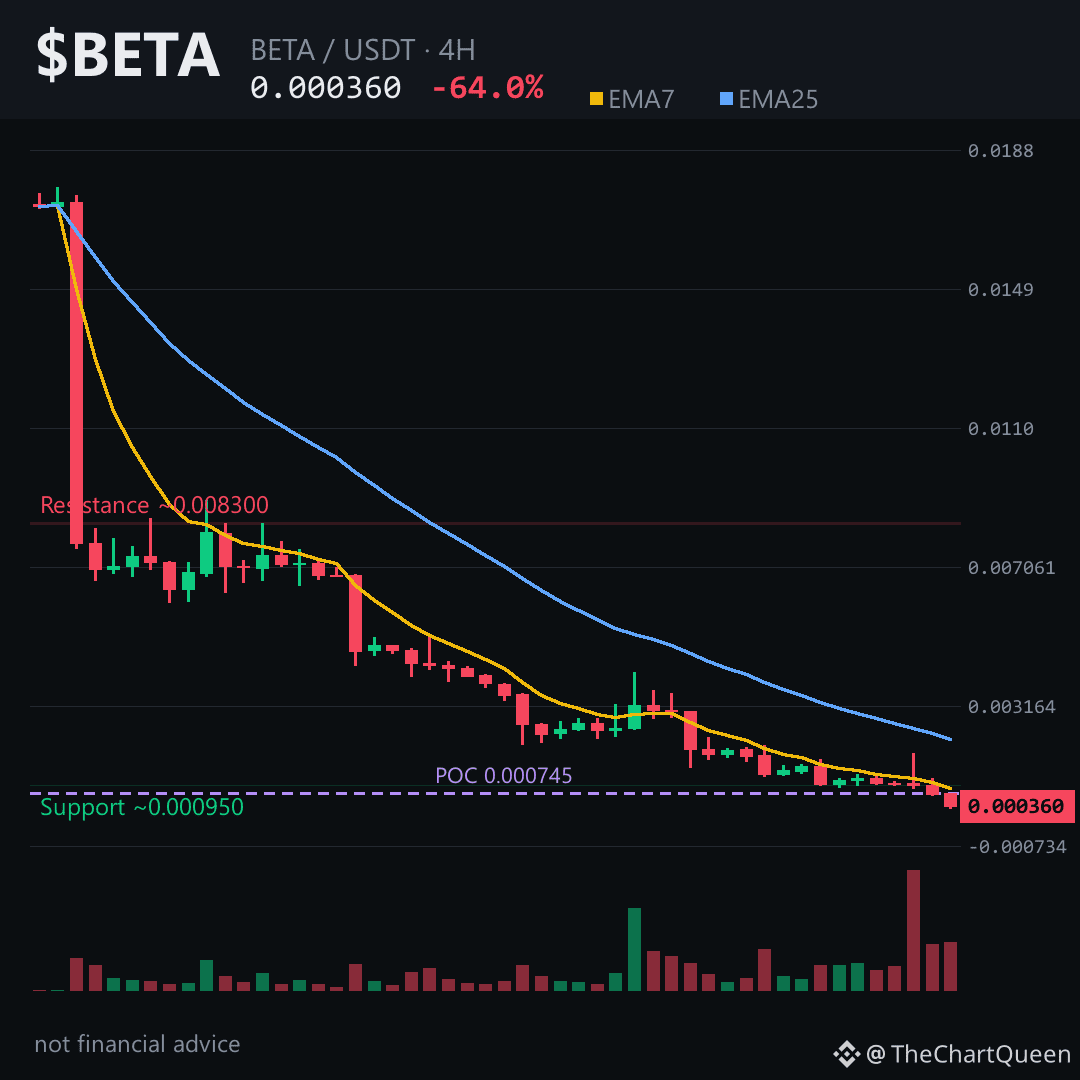
$BETA is trading around the 0.00036 area after a brutal 24 hours. Price gapped from 0.00074 down to 0.00031 in one 4-hour candle. That's not a dip. That's a liquidation event.
RSI on the 4H is near 17. On the daily, around 15. Below 20 is rare. Below 15 is the kind of exhaustion you see right before violent bounces.
But here's the trap.
There's an unfilled bearish gap between 0.00230 and 0.00286. Markets often revisit those gaps. Not today. But eventually.
The heaviest traded level sits around 0.000745 — nearly double the current price. That's now overhead resistance. Any bounce into the 0.00070s likely meets sellers who want out at breakeven.
The bearish case stays intact while price holds below roughly 0.00038. That's the line in the sand — a 4H close above it and the "continuation down" story weakens fast. Below it, the objective zone sits near 0.00033, with a deeper macro target around 0.00023 if momentum refuses to cool.
Tap $BETA to pull up the chart.
My read: this is a falling knife with a coiled spring underneath. Oversold doesn't mean "done dropping." The real risk is catching a bounce before price reclaims the 0.00038 area.
Where do you think $BETA finds its first real floor? 👇
Follow for the next read on this chart.
⚠️ Not financial advice. DYOR.
#BETA #Crypto #BinanceSquare #Altcoins
What actually happens when a coin loses 64% in a single day?
The chart looks destroyed — but the internals whisper something stranger.
$BETA is trading around the 0.00036 area after a brutal 24 hours. Price gapped from 0.00074 down to 0.00031 in one 4-hour candle. That's not a dip. That's a liquidation event.
RSI on the 4H is near 17. On the daily, around 15. Below 20 is rare. Below 15 is the kind of exhaustion you see right before violent bounces.
But here's the trap.
There's an unfilled bearish gap between 0.00230 and 0.00286. Markets often revisit those gaps. Not today. But eventually.
The heaviest traded level sits around 0.000745 — nearly double the current price. That's now overhead resistance. Any bounce into the 0.00070s likely meets sellers who want out at breakeven.
The bearish case stays intact while price holds below roughly 0.00038. That's the line in the sand — a 4H close above it and the "continuation down" story weakens fast. Below it, the objective zone sits near 0.00033, with a deeper macro target around 0.00023 if momentum refuses to cool.
Tap $BETA to pull up the chart.
My read: this is a falling knife with a coiled spring underneath. Oversold doesn't mean "done dropping." The real risk is catching a bounce before price reclaims the 0.00038 area.
Where do you think $BETA finds its first real floor? 👇
Follow for the next read on this chart.
⚠️ Not financial advice. DYOR.
#BETA #Crypto #BinanceSquare #Altcoins
The chart looks destroyed — but the internals whisper something stranger.
$BETA is trading around the 0.00036 area after a brutal 24 hours. Price gapped from 0.00074 down to 0.00031 in one 4-hour candle. That's not a dip. That's a liquidation event.
RSI on the 4H is near 17. On the daily, around 15. Below 20 is rare. Below 15 is the kind of exhaustion you see right before violent bounces.
But here's the trap.
There's an unfilled bearish gap between 0.00230 and 0.00286. Markets often revisit those gaps. Not today. But eventually.
The heaviest traded level sits around 0.000745 — nearly double the current price. That's now overhead resistance. Any bounce into the 0.00070s likely meets sellers who want out at breakeven.
The bearish case stays intact while price holds below roughly 0.00038. That's the line in the sand — a 4H close above it and the "continuation down" story weakens fast. Below it, the objective zone sits near 0.00033, with a deeper macro target around 0.00023 if momentum refuses to cool.
Tap $BETA to pull up the chart.
My read: this is a falling knife with a coiled spring underneath. Oversold doesn't mean "done dropping." The real risk is catching a bounce before price reclaims the 0.00038 area.
Where do you think $BETA finds its first real floor? 👇
Follow for the next read on this chart.
⚠️ Not financial advice. DYOR.
#BETA #Crypto #BinanceSquare #Altcoins
70
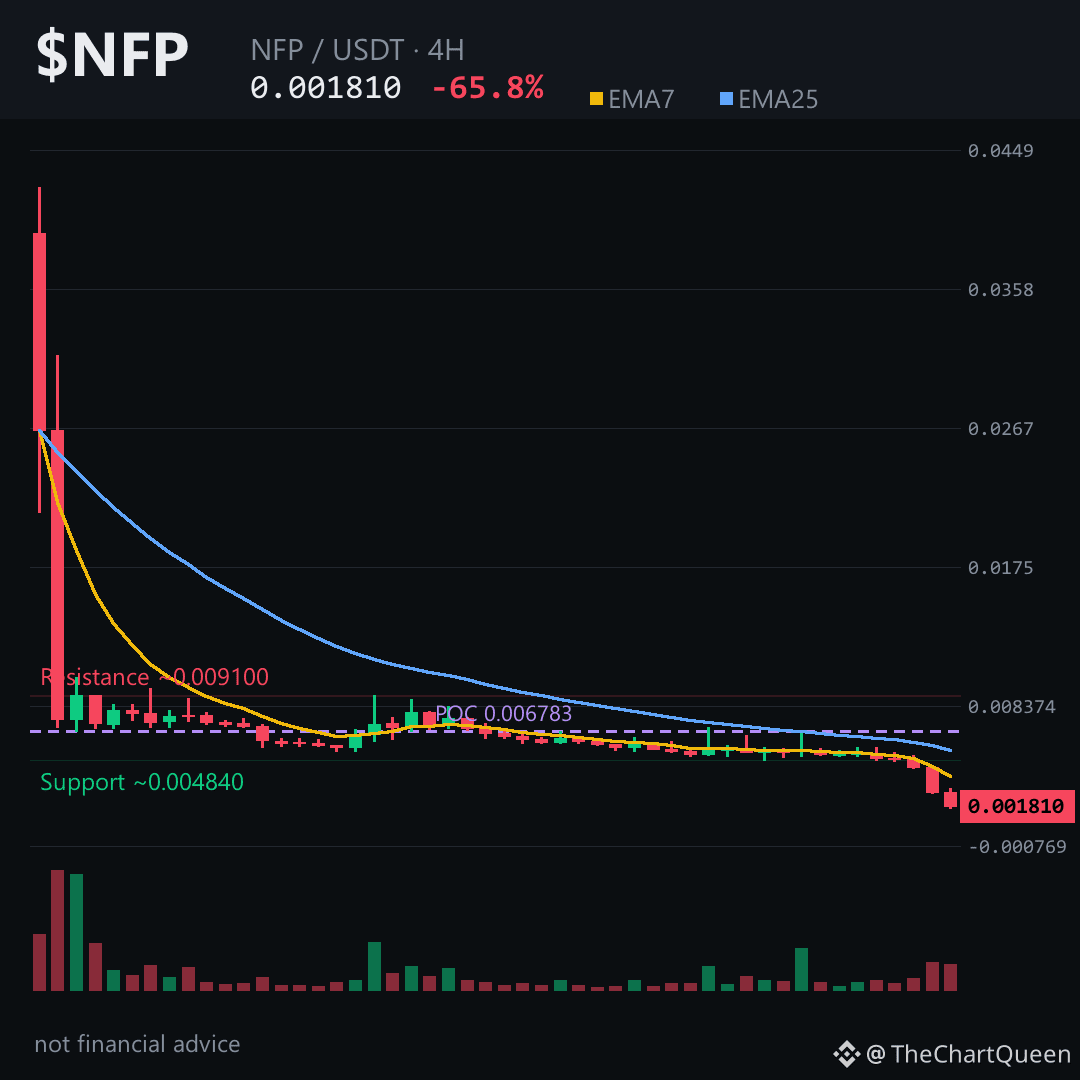
What just happened to $NFP?
A 65% single-day collapse, with the last two candles alone shedding over 70% of their value. That's not a correction. That's a liquidation cascade in real time — and the chart is asking one uncomfortable question: is there any floor left?
The 4-hour RSI is near 12.9 — heavily oversold, but in a true breakdown, oversold can stay oversold for days. The short-term moving average has collapsed far below the longer one; momentum is still pointing straight down.
Futures data reads like a ghost town — zero funding, zero open interest. Liquidity has evaporated. This isn't a crowded short; it's a market abandoned mid-crash.
The level that matters now is around 0.0019. That's the invalidation zone — the line in the sand where this bearish read would simply be wrong. As long as price stays below that area on the 4-hour chart, the path of least resistance points toward the 0.00165 zone, and potentially lower if momentum persists.
My read: this is a falling knife with no visible hand to catch it yet. The real risk isn't missing a bounce — it's mistaking a dead-cat twitch for a reversal. Tap $NFP to pull up the chart and see how far price is from that 0.0019 line.
Follow me here — when this level breaks or holds, I'll be breaking down what it means before the next candle closes.
What's the first sign you'd want to see before trusting any bounce in $NFP? 👇
⚠️ Not financial advice. DYOR.
#NFP #Crypto #BinanceSquare #Altcoins
What just happened to $NFP?
A 65% single-day collapse, with the last two candles alone shedding over 70% of their value. That's not a correction. That's a liquidation cascade in real time — and the chart is asking one uncomfortable question: is there any floor left?
The 4-hour RSI is near 12.9 — heavily oversold, but in a true breakdown, oversold can stay oversold for days. The short-term moving average has collapsed far below the longer one; momentum is still pointing straight down.
Futures data reads like a ghost town — zero funding, zero open interest. Liquidity has evaporated. This isn't a crowded short; it's a market abandoned mid-crash.
The level that matters now is around 0.0019. That's the invalidation zone — the line in the sand where this bearish read would simply be wrong. As long as price stays below that area on the 4-hour chart, the path of least resistance points toward the 0.00165 zone, and potentially lower if momentum persists.
My read: this is a falling knife with no visible hand to catch it yet. The real risk isn't missing a bounce — it's mistaking a dead-cat twitch for a reversal. Tap $NFP to pull up the chart and see how far price is from that 0.0019 line.
Follow me here — when this level breaks or holds, I'll be breaking down what it means before the next candle closes.
What's the first sign you'd want to see before trusting any bounce in $NFP? 👇
⚠️ Not financial advice. DYOR.
#NFP #Crypto #BinanceSquare #Altcoins
A 65% single-day collapse, with the last two candles alone shedding over 70% of their value. That's not a correction. That's a liquidation cascade in real time — and the chart is asking one uncomfortable question: is there any floor left?
The 4-hour RSI is near 12.9 — heavily oversold, but in a true breakdown, oversold can stay oversold for days. The short-term moving average has collapsed far below the longer one; momentum is still pointing straight down.
Futures data reads like a ghost town — zero funding, zero open interest. Liquidity has evaporated. This isn't a crowded short; it's a market abandoned mid-crash.
The level that matters now is around 0.0019. That's the invalidation zone — the line in the sand where this bearish read would simply be wrong. As long as price stays below that area on the 4-hour chart, the path of least resistance points toward the 0.00165 zone, and potentially lower if momentum persists.
My read: this is a falling knife with no visible hand to catch it yet. The real risk isn't missing a bounce — it's mistaking a dead-cat twitch for a reversal. Tap $NFP to pull up the chart and see how far price is from that 0.0019 line.
Follow me here — when this level breaks or holds, I'll be breaking down what it means before the next candle closes.
What's the first sign you'd want to see before trusting any bounce in $NFP? 👇
⚠️ Not financial advice. DYOR.
#NFP #Crypto #BinanceSquare #Altcoins
86
Everyone sees a 56% crash and assumes the bottom is in.
Flip that: this chart looks like a falling knife that hasn’t touched the floor yet.
RSI is pinned near 20 on the daily and weekly alike — deeply oversold, but oversold can stay oversold while price keeps sliding.
The 4H tells the cleanest story. Price is hovering just above the 0.010 area after a -59% single candle — the kind of flush that usually needs time to base, not an instant V-reversal.
If $WTC can’t reclaim the 0.011 zone soon, there’s little structural support until the 0.0094 area. Lose that, and the macro picture points toward the mid-0.006s.
But here’s the trap: funding is flat and open interest is essentially zero. No crowded short to squeeze, no leveraged longs left to flush. This is a low-liquidity drift, not a high-conviction breakdown.
My read: the trend is clearly down, but the easy money on the short side may already be gone. The real risk now is chasing a bounce that never comes.
Tap $WTC to pull up the chart and judge the 0.010–0.011 zone yourself.
Follow me if you want the updated read when price actually tests 0.0094 — that’s the level that decides whether this is a base or just a pause.
Which level are you watching on $WTC right now? 👇
⚠️ Not financial advice. DYOR.
#WTC #Crypto #BinanceSquare
Everyone sees a 56% crash and assumes the bottom is in.
Flip that: this chart looks like a falling knife that hasn’t touched the floor yet.
RSI is pinned near 20 on the daily and weekly alike — deeply oversold, but oversold can stay oversold while price keeps sliding.
The 4H tells the cleanest story. Price is hovering just above the 0.010 area after a -59% single candle — the kind of flush that usually needs time to base, not an instant V-reversal.
If $WTC can’t reclaim the 0.011 zone soon, there’s little structural support until the 0.0094 area. Lose that, and the macro picture points toward the mid-0.006s.
But here’s the trap: funding is flat and open interest is essentially zero. No crowded short to squeeze, no leveraged longs left to flush. This is a low-liquidity drift, not a high-conviction breakdown.
My read: the trend is clearly down, but the easy money on the short side may already be gone. The real risk now is chasing a bounce that never comes.
Tap $WTC to pull up the chart and judge the 0.010–0.011 zone yourself.
Follow me if you want the updated read when price actually tests 0.0094 — that’s the level that decides whether this is a base or just a pause.
Which level are you watching on $WTC right now? 👇
⚠️ Not financial advice. DYOR.
#WTC #Crypto #BinanceSquare
Flip that: this chart looks like a falling knife that hasn’t touched the floor yet.
RSI is pinned near 20 on the daily and weekly alike — deeply oversold, but oversold can stay oversold while price keeps sliding.
The 4H tells the cleanest story. Price is hovering just above the 0.010 area after a -59% single candle — the kind of flush that usually needs time to base, not an instant V-reversal.
If $WTC can’t reclaim the 0.011 zone soon, there’s little structural support until the 0.0094 area. Lose that, and the macro picture points toward the mid-0.006s.
But here’s the trap: funding is flat and open interest is essentially zero. No crowded short to squeeze, no leveraged longs left to flush. This is a low-liquidity drift, not a high-conviction breakdown.
My read: the trend is clearly down, but the easy money on the short side may already be gone. The real risk now is chasing a bounce that never comes.
Tap $WTC to pull up the chart and judge the 0.010–0.011 zone yourself.
Follow me if you want the updated read when price actually tests 0.0094 — that’s the level that decides whether this is a base or just a pause.
Which level are you watching on $WTC right now? 👇
⚠️ Not financial advice. DYOR.
#WTC #Crypto #BinanceSquare
3
A 45% single-candle flush on the 4H chart.
That’s the kind of move that makes you wonder: is this a knife worth catching, or a falling safe?
$PYR just printed a 4H candle that opened near 0.041 and closed near 0.022 — a brutal, liquidity-draining collapse. And here’s the part most people miss: after a flush like that, the next few candles don’t usually decide the trend. They decide who survives it.
The 4H chart is as bearish as it gets. The EMA7 sits around 0.034, the EMA25 near 0.047 — sellers are in control. RSI is at 12, deeply oversold. But oversold doesn’t mean “about to reverse.” It means “already fell a lot.” A falling knife can stay sharp.
There’s also an unfilled bearish FVG between 0.048 and 0.044. Until that gap gets revisited, the path of least resistance leans lower.
Now, the levels that matter.
The current area around 0.021 is the pivot — the battleground where buyers either step in or step aside. If price loses the 0.019 area on a 4H close, the next objective zone sits near 0.0192 and then potentially lower, toward macro support around 0.013. That’s the “if it keeps bleeding” scenario.
The invalidation — the level where this bearish read is simply wrong — is around 0.0222. If $PYR can reclaim and hold above that zone, it would be the first real sign that buyers are fighting back. Tap $PYR to pull up the chart and see how price reacts to that line.
My read: this is a broken chart in freefall, and the only thing that matters right now is whether 0.019 holds as a floor. If it doesn’t, the next support is far below.
Follow me for the updated read on this level — I’ll break down whether the bounce is real or just a dead-cat bounce. What’s your read on PYR right now — do you trust the 0.019 floor, or are you waiting for a higher low to form? 👇
Not financial advice. DYOR.
#PYR #VulcanForged #Crypto #BinanceSquare
A 45% single-candle flush on the 4H chart.
That’s the kind of move that makes you wonder: is this a knife worth catching, or a falling safe?
$PYR just printed a 4H candle that opened near 0.041 and closed near 0.022 — a brutal, liquidity-draining collapse. And here’s the part most people miss: after a flush like that, the next few candles don’t usually decide the trend. They decide who survives it.
The 4H chart is as bearish as it gets. The EMA7 sits around 0.034, the EMA25 near 0.047 — sellers are in control. RSI is at 12, deeply oversold. But oversold doesn’t mean “about to reverse.” It means “already fell a lot.” A falling knife can stay sharp.
There’s also an unfilled bearish FVG between 0.048 and 0.044. Until that gap gets revisited, the path of least resistance leans lower.
Now, the levels that matter.
The current area around 0.021 is the pivot — the battleground where buyers either step in or step aside. If price loses the 0.019 area on a 4H close, the next objective zone sits near 0.0192 and then potentially lower, toward macro support around 0.013. That’s the “if it keeps bleeding” scenario.
The invalidation — the level where this bearish read is simply wrong — is around 0.0222. If $PYR can reclaim and hold above that zone, it would be the first real sign that buyers are fighting back. Tap $PYR to pull up the chart and see how price reacts to that line.
My read: this is a broken chart in freefall, and the only thing that matters right now is whether 0.019 holds as a floor. If it doesn’t, the next support is far below.
Follow me for the updated read on this level — I’ll break down whether the bounce is real or just a dead-cat bounce. What’s your read on PYR right now — do you trust the 0.019 floor, or are you waiting for a higher low to form? 👇
Not financial advice. DYOR.
#PYR #VulcanForged #Crypto #BinanceSquare
That’s the kind of move that makes you wonder: is this a knife worth catching, or a falling safe?
$PYR just printed a 4H candle that opened near 0.041 and closed near 0.022 — a brutal, liquidity-draining collapse. And here’s the part most people miss: after a flush like that, the next few candles don’t usually decide the trend. They decide who survives it.
The 4H chart is as bearish as it gets. The EMA7 sits around 0.034, the EMA25 near 0.047 — sellers are in control. RSI is at 12, deeply oversold. But oversold doesn’t mean “about to reverse.” It means “already fell a lot.” A falling knife can stay sharp.
There’s also an unfilled bearish FVG between 0.048 and 0.044. Until that gap gets revisited, the path of least resistance leans lower.
Now, the levels that matter.
The current area around 0.021 is the pivot — the battleground where buyers either step in or step aside. If price loses the 0.019 area on a 4H close, the next objective zone sits near 0.0192 and then potentially lower, toward macro support around 0.013. That’s the “if it keeps bleeding” scenario.
The invalidation — the level where this bearish read is simply wrong — is around 0.0222. If $PYR can reclaim and hold above that zone, it would be the first real sign that buyers are fighting back. Tap $PYR to pull up the chart and see how price reacts to that line.
My read: this is a broken chart in freefall, and the only thing that matters right now is whether 0.019 holds as a floor. If it doesn’t, the next support is far below.
Follow me for the updated read on this level — I’ll break down whether the bounce is real or just a dead-cat bounce. What’s your read on PYR right now — do you trust the 0.019 floor, or are you waiting for a higher low to form? 👇
Not financial advice. DYOR.
#PYR #VulcanForged #Crypto #BinanceSquare
3
-63.26% in a single day. That number alone tells you $VIB isn't in a dip — it's in a structural collapse.
The 4H chart shows twelve candles of nearly uninterrupted selling. Two green. Ten red. The last four candles alone carved out a -49% and -50% move back-to-back. This is a market repricing the asset with zero bid underneath.
RSI sits at 28 on the 4H — technically oversold, but in a freefall like this, oversold can stay oversold for days. The EMA7 has utterly detached from the EMA25, with price trading far below both. That's not a setup. That's a falling knife with no handle.
And here's the trap: the unfilled bearish gap between the 0.0102 and 0.0089 area on the 4H. Price blew through it with such velocity that it never paused to fill. Gaps like that often act as magnets on any relief bounce — but only after momentum exhausts. We're not there yet.
The 4H level that matters most is the invalidation zone around 0.00235. As long as $VIB stays below that area, the path of least resistance remains lower. The next objective sits near the 0.00204 zone, which is the last meaningful pivot before the prior low structure gives way entirely. Tap $VIB to pull up the chart and verify these zones yourself.
My read: the trend is decisively bearish, but the real risk isn't more downside — it's a violent dead-cat bounce that punishes anyone chasing the breakdown. Patience beats heroics here.
I'll revisit this chart once price either reclaims the 0.00235 area or breaks the 0.00204 zone — follow so you catch that update.
What level are you watching most closely on VIB right now? 👇
⚠️ Not financial advice. DYOR.
#VIB #Crypto #Altcoins #BinanceSquare
-63.26% in a single day. That number alone tells you $VIB isn't in a dip — it's in a structural collapse.
The 4H chart shows twelve candles of nearly uninterrupted selling. Two green. Ten red. The last four candles alone carved out a -49% and -50% move back-to-back. This is a market repricing the asset with zero bid underneath.
RSI sits at 28 on the 4H — technically oversold, but in a freefall like this, oversold can stay oversold for days. The EMA7 has utterly detached from the EMA25, with price trading far below both. That's not a setup. That's a falling knife with no handle.
And here's the trap: the unfilled bearish gap between the 0.0102 and 0.0089 area on the 4H. Price blew through it with such velocity that it never paused to fill. Gaps like that often act as magnets on any relief bounce — but only after momentum exhausts. We're not there yet.
The 4H level that matters most is the invalidation zone around 0.00235. As long as $VIB stays below that area, the path of least resistance remains lower. The next objective sits near the 0.00204 zone, which is the last meaningful pivot before the prior low structure gives way entirely. Tap $VIB to pull up the chart and verify these zones yourself.
My read: the trend is decisively bearish, but the real risk isn't more downside — it's a violent dead-cat bounce that punishes anyone chasing the breakdown. Patience beats heroics here.
I'll revisit this chart once price either reclaims the 0.00235 area or breaks the 0.00204 zone — follow so you catch that update.
What level are you watching most closely on VIB right now? 👇
⚠️ Not financial advice. DYOR.
#VIB #Crypto #Altcoins #BinanceSquare
The 4H chart shows twelve candles of nearly uninterrupted selling. Two green. Ten red. The last four candles alone carved out a -49% and -50% move back-to-back. This is a market repricing the asset with zero bid underneath.
RSI sits at 28 on the 4H — technically oversold, but in a freefall like this, oversold can stay oversold for days. The EMA7 has utterly detached from the EMA25, with price trading far below both. That's not a setup. That's a falling knife with no handle.
And here's the trap: the unfilled bearish gap between the 0.0102 and 0.0089 area on the 4H. Price blew through it with such velocity that it never paused to fill. Gaps like that often act as magnets on any relief bounce — but only after momentum exhausts. We're not there yet.
The 4H level that matters most is the invalidation zone around 0.00235. As long as $VIB stays below that area, the path of least resistance remains lower. The next objective sits near the 0.00204 zone, which is the last meaningful pivot before the prior low structure gives way entirely. Tap $VIB to pull up the chart and verify these zones yourself.
My read: the trend is decisively bearish, but the real risk isn't more downside — it's a violent dead-cat bounce that punishes anyone chasing the breakdown. Patience beats heroics here.
I'll revisit this chart once price either reclaims the 0.00235 area or breaks the 0.00204 zone — follow so you catch that update.
What level are you watching most closely on VIB right now? 👇
⚠️ Not financial advice. DYOR.
#VIB #Crypto #Altcoins #BinanceSquare
5
Here's the ugly truth about a -64% day: the fall isn't the story. It's what happens after the knife stops bouncing that separates the survivors from the spectators.
$BETA didn't just bleed out — it collapsed through every level that used to mean something. The 4H chart shows a 51% red candle in the last 00:00 close alone. Price went from 0.000740 to 0.000360 in one four-hour window. That's not a correction. That's a structural break.
RSI on the 4H is sitting at 17.5. On the daily, it's 15.4. Both are deep in oversold territory, but oversold in a downtrend like this usually means "paused," not "bottomed." The EMA7 is trading more than 60% below the EMA25 on the daily — that's not a dip, that's a coin that lost its bid entirely.
The 4H picture is the only one that matters right now. Price is hovering around 0.000360, and the invalidation zone sits just above at roughly 0.000380. If $BETA can't reclaim that area on a 4H close, the path of least resistance points toward 0.000329 and potentially lower.
What concerns me most isn't the red candles. It's the silence. Funding rate is flat at zero. Open interest is effectively nonexistent. That means no one is left to fight over this coin — no leverage, no positioning, no real interest. A dead market can drift lower for a long time without a bounce, because there's no fuel for a short squeeze.
My read: the chart is bearish until proven otherwise, and the only proof that matters is a 4H close back above 0.000380. Until then, every pop is suspect. The real risk isn't missing the bottom — it's catching a falling knife that hasn't finished falling.
Tap $BETA to pull up the chart and see how cleanly price rejected the 0.000380 area on the last push.
I'll be watching whether 0.000329 holds or folds in the next 24 hours — follow along if you want the read as it develops, not after it's already happened.
What level are you watching on BETA right now? 👇
Not financial advice. DYOR.
#BETA #Crypto #BinanceSquare #MarketAnalysis #Altcoins
Here's the ugly truth about a -64% day: the fall isn't the story. It's what happens after the knife stops bouncing that separates the survivors from the spectators.
$BETA didn't just bleed out — it collapsed through every level that used to mean something. The 4H chart shows a 51% red candle in the last 00:00 close alone. Price went from 0.000740 to 0.000360 in one four-hour window. That's not a correction. That's a structural break.
RSI on the 4H is sitting at 17.5. On the daily, it's 15.4. Both are deep in oversold territory, but oversold in a downtrend like this usually means "paused," not "bottomed." The EMA7 is trading more than 60% below the EMA25 on the daily — that's not a dip, that's a coin that lost its bid entirely.
The 4H picture is the only one that matters right now. Price is hovering around 0.000360, and the invalidation zone sits just above at roughly 0.000380. If $BETA can't reclaim that area on a 4H close, the path of least resistance points toward 0.000329 and potentially lower.
What concerns me most isn't the red candles. It's the silence. Funding rate is flat at zero. Open interest is effectively nonexistent. That means no one is left to fight over this coin — no leverage, no positioning, no real interest. A dead market can drift lower for a long time without a bounce, because there's no fuel for a short squeeze.
My read: the chart is bearish until proven otherwise, and the only proof that matters is a 4H close back above 0.000380. Until then, every pop is suspect. The real risk isn't missing the bottom — it's catching a falling knife that hasn't finished falling.
Tap $BETA to pull up the chart and see how cleanly price rejected the 0.000380 area on the last push.
I'll be watching whether 0.000329 holds or folds in the next 24 hours — follow along if you want the read as it develops, not after it's already happened.
What level are you watching on BETA right now? 👇
Not financial advice. DYOR.
#BETA #Crypto #BinanceSquare #MarketAnalysis #Altcoins
$BETA didn't just bleed out — it collapsed through every level that used to mean something. The 4H chart shows a 51% red candle in the last 00:00 close alone. Price went from 0.000740 to 0.000360 in one four-hour window. That's not a correction. That's a structural break.
RSI on the 4H is sitting at 17.5. On the daily, it's 15.4. Both are deep in oversold territory, but oversold in a downtrend like this usually means "paused," not "bottomed." The EMA7 is trading more than 60% below the EMA25 on the daily — that's not a dip, that's a coin that lost its bid entirely.
The 4H picture is the only one that matters right now. Price is hovering around 0.000360, and the invalidation zone sits just above at roughly 0.000380. If $BETA can't reclaim that area on a 4H close, the path of least resistance points toward 0.000329 and potentially lower.
What concerns me most isn't the red candles. It's the silence. Funding rate is flat at zero. Open interest is effectively nonexistent. That means no one is left to fight over this coin — no leverage, no positioning, no real interest. A dead market can drift lower for a long time without a bounce, because there's no fuel for a short squeeze.
My read: the chart is bearish until proven otherwise, and the only proof that matters is a 4H close back above 0.000380. Until then, every pop is suspect. The real risk isn't missing the bottom — it's catching a falling knife that hasn't finished falling.
Tap $BETA to pull up the chart and see how cleanly price rejected the 0.000380 area on the last push.
I'll be watching whether 0.000329 holds or folds in the next 24 hours — follow along if you want the read as it develops, not after it's already happened.
What level are you watching on BETA right now? 👇
Not financial advice. DYOR.
#BETA #Crypto #BinanceSquare #MarketAnalysis #Altcoins
4
−65.85% in 24 hours.
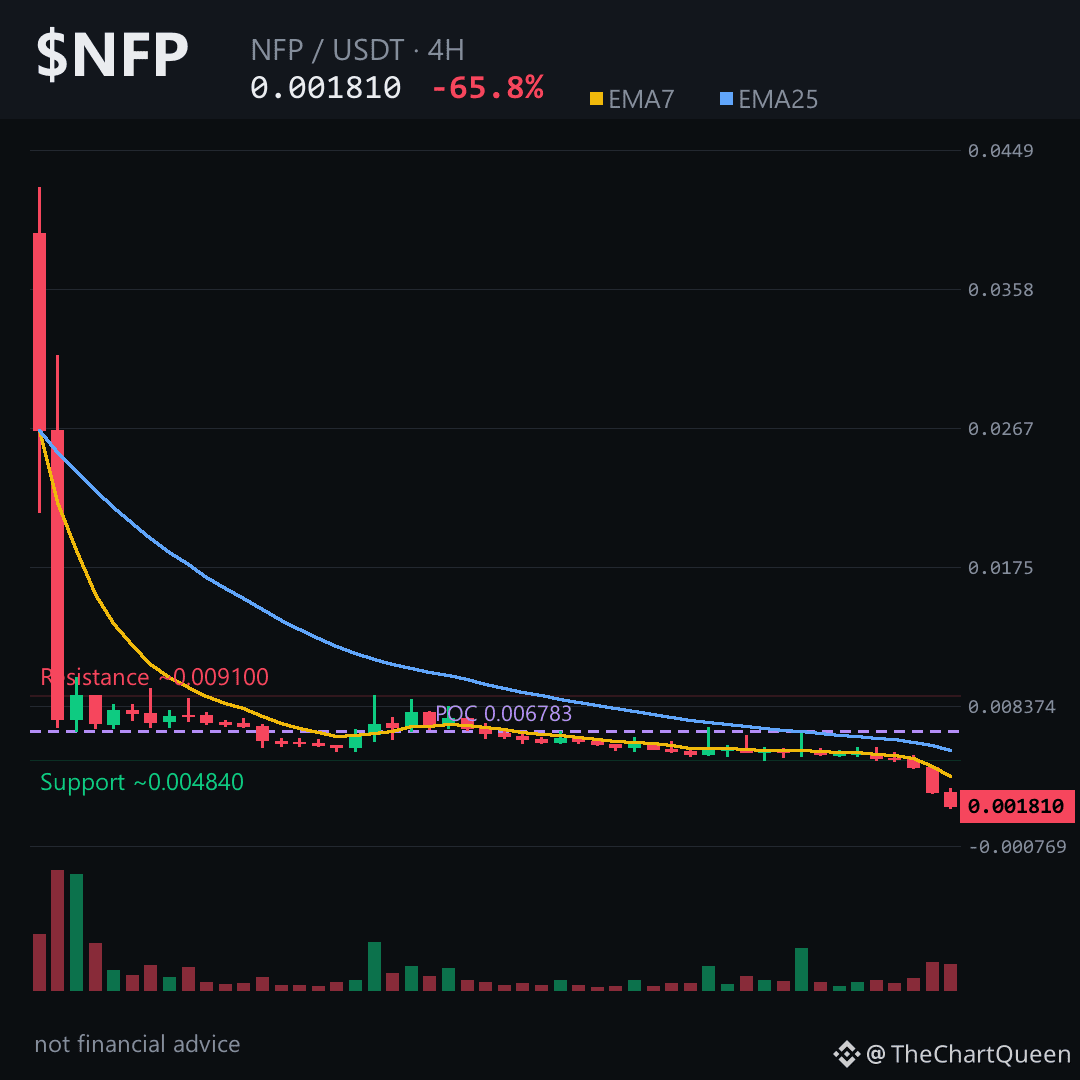
That number alone should make you pause before calling a bottom. The 4H chart shows price collapsed through a bearish gap between 0.00479 and 0.00445 — an unfilled void that now acts as overhead resistance. RSI on the 4H sits at 12.89, deeply oversold, but oversold in a downtrend often just means the selling isn't finished. Momentum is accelerating.
On the 4H, $NFP is trading near 0.00181. The invalidation zone sits around 0.00191 — a 4H close back above that and the immediate bearish read weakens. Below, the objective area stretches toward 0.00165, aligning with the 24H low of 0.00168. That's the line in the sand. Lose it, and there's no structural support until much lower.
This is a falling knife with no futures liquidity behind it — funding is flat and open interest is effectively zero, meaning there's no crowded short to squeeze. The risk sits in catching a bounce that has no structural backing yet. Tap $NFP to pull up the chart and see the gap yourself.
Follow for the follow-up once the 0.00165 zone gets tested or rejected. What level are you watching on $NFP 👇
⚠️ Not financial advice. DYOR.
#NFP #Altcoins #Crypto #BinanceSquare
−65.85% in 24 hours.
That number alone should make you pause before calling a bottom. The 4H chart shows price collapsed through a bearish gap between 0.00479 and 0.00445 — an unfilled void that now acts as overhead resistance. RSI on the 4H sits at 12.89, deeply oversold, but oversold in a downtrend often just means the selling isn't finished. Momentum is accelerating.
On the 4H, $NFP is trading near 0.00181. The invalidation zone sits around 0.00191 — a 4H close back above that and the immediate bearish read weakens. Below, the objective area stretches toward 0.00165, aligning with the 24H low of 0.00168. That's the line in the sand. Lose it, and there's no structural support until much lower.
This is a falling knife with no futures liquidity behind it — funding is flat and open interest is effectively zero, meaning there's no crowded short to squeeze. The risk sits in catching a bounce that has no structural backing yet. Tap $NFP to pull up the chart and see the gap yourself.
Follow for the follow-up once the 0.00165 zone gets tested or rejected. What level are you watching on $NFP 👇
⚠️ Not financial advice. DYOR.
#NFP #Altcoins #Crypto #BinanceSquare
That number alone should make you pause before calling a bottom. The 4H chart shows price collapsed through a bearish gap between 0.00479 and 0.00445 — an unfilled void that now acts as overhead resistance. RSI on the 4H sits at 12.89, deeply oversold, but oversold in a downtrend often just means the selling isn't finished. Momentum is accelerating.
On the 4H, $NFP is trading near 0.00181. The invalidation zone sits around 0.00191 — a 4H close back above that and the immediate bearish read weakens. Below, the objective area stretches toward 0.00165, aligning with the 24H low of 0.00168. That's the line in the sand. Lose it, and there's no structural support until much lower.
This is a falling knife with no futures liquidity behind it — funding is flat and open interest is effectively zero, meaning there's no crowded short to squeeze. The risk sits in catching a bounce that has no structural backing yet. Tap $NFP to pull up the chart and see the gap yourself.
Follow for the follow-up once the 0.00165 zone gets tested or rejected. What level are you watching on $NFP 👇
⚠️ Not financial advice. DYOR.
#NFP #Altcoins #Crypto #BinanceSquare
14
Imagine opening a water tap that hadn’t run for months — that’s $ALT right now, a +25% gush in a single day.
But here’s the part worth leaning into: the tap didn’t just burst randomly. There’s a story under the surface.
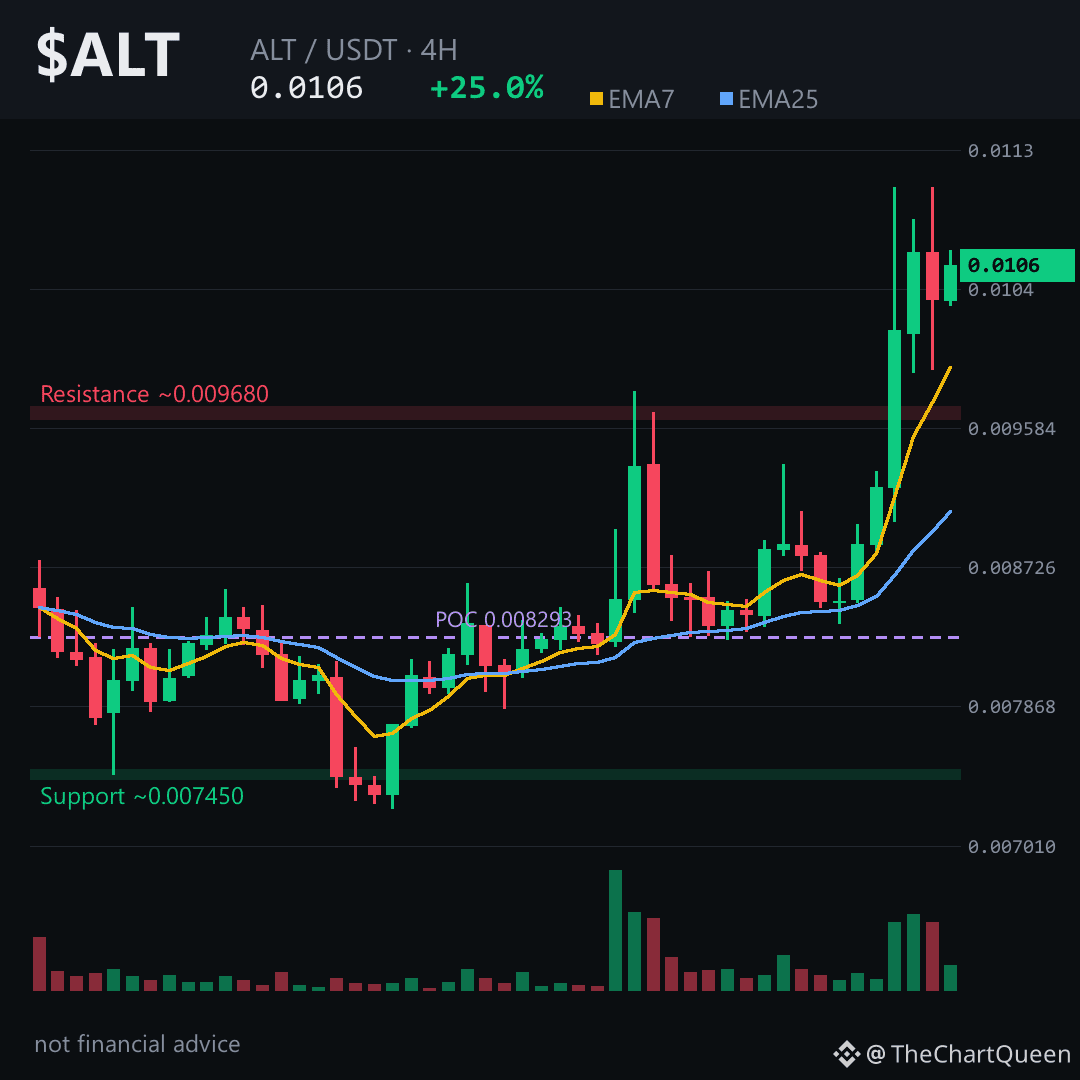
The 4H chart shows a clean bullish gap — an unfilled price window around the 0.0093 to 0.0099 area — the kind of pocket that often acts like a magnet if momentum pauses.
Momentum, though, is stretched.
RSI is hovering above 70 on both the 4H and daily picture. That’s not a sell signal by itself, but it tells you the easy part of this move may already be behind us.
Funding is slightly positive and the crowd is leaning long — nothing extreme, but it suggests the market is paying up for optimism.
So here’s the level that matters most: the ~0.0100 zone on the 4H. As long as $ALT holds above that floor, the path of least resistance still points toward the 0.0115 area. Lose it on a 4H close, and the whole short-term read gets shaky fast.
My read: the trend is up, but the risk is chasing.
Tap $ALT to pull up the live chart and see how price is treating that 0.0100 floor.
I’ll keep an eye on whether this level holds or folds — follow along so the next update isn’t a surprise.
What’s the one level you’re watching on ALT right now? 👇
⚠️ Not financial advice. DYOR.
#ALT #Crypto #BinanceSquare
Imagine opening a water tap that hadn’t run for months — that’s $ALT right now, a +25% gush in a single day.
But here’s the part worth leaning into: the tap didn’t just burst randomly. There’s a story under the surface.
The 4H chart shows a clean bullish gap — an unfilled price window around the 0.0093 to 0.0099 area — the kind of pocket that often acts like a magnet if momentum pauses.
Momentum, though, is stretched.
RSI is hovering above 70 on both the 4H and daily picture. That’s not a sell signal by itself, but it tells you the easy part of this move may already be behind us.
Funding is slightly positive and the crowd is leaning long — nothing extreme, but it suggests the market is paying up for optimism.
So here’s the level that matters most: the ~0.0100 zone on the 4H. As long as $ALT holds above that floor, the path of least resistance still points toward the 0.0115 area. Lose it on a 4H close, and the whole short-term read gets shaky fast.
My read: the trend is up, but the risk is chasing.
Tap $ALT to pull up the live chart and see how price is treating that 0.0100 floor.
I’ll keep an eye on whether this level holds or folds — follow along so the next update isn’t a surprise.
What’s the one level you’re watching on ALT right now? 👇
⚠️ Not financial advice. DYOR.
#ALT #Crypto #BinanceSquare
But here’s the part worth leaning into: the tap didn’t just burst randomly. There’s a story under the surface.
The 4H chart shows a clean bullish gap — an unfilled price window around the 0.0093 to 0.0099 area — the kind of pocket that often acts like a magnet if momentum pauses.
Momentum, though, is stretched.
RSI is hovering above 70 on both the 4H and daily picture. That’s not a sell signal by itself, but it tells you the easy part of this move may already be behind us.
Funding is slightly positive and the crowd is leaning long — nothing extreme, but it suggests the market is paying up for optimism.
So here’s the level that matters most: the ~0.0100 zone on the 4H. As long as $ALT holds above that floor, the path of least resistance still points toward the 0.0115 area. Lose it on a 4H close, and the whole short-term read gets shaky fast.
My read: the trend is up, but the risk is chasing.
Tap $ALT to pull up the live chart and see how price is treating that 0.0100 floor.
I’ll keep an eye on whether this level holds or folds — follow along so the next update isn’t a surprise.
What’s the one level you’re watching on ALT right now? 👇
⚠️ Not financial advice. DYOR.
#ALT #Crypto #BinanceSquare
103
Is that +26% move just the beginning, or is the easy money already gone?
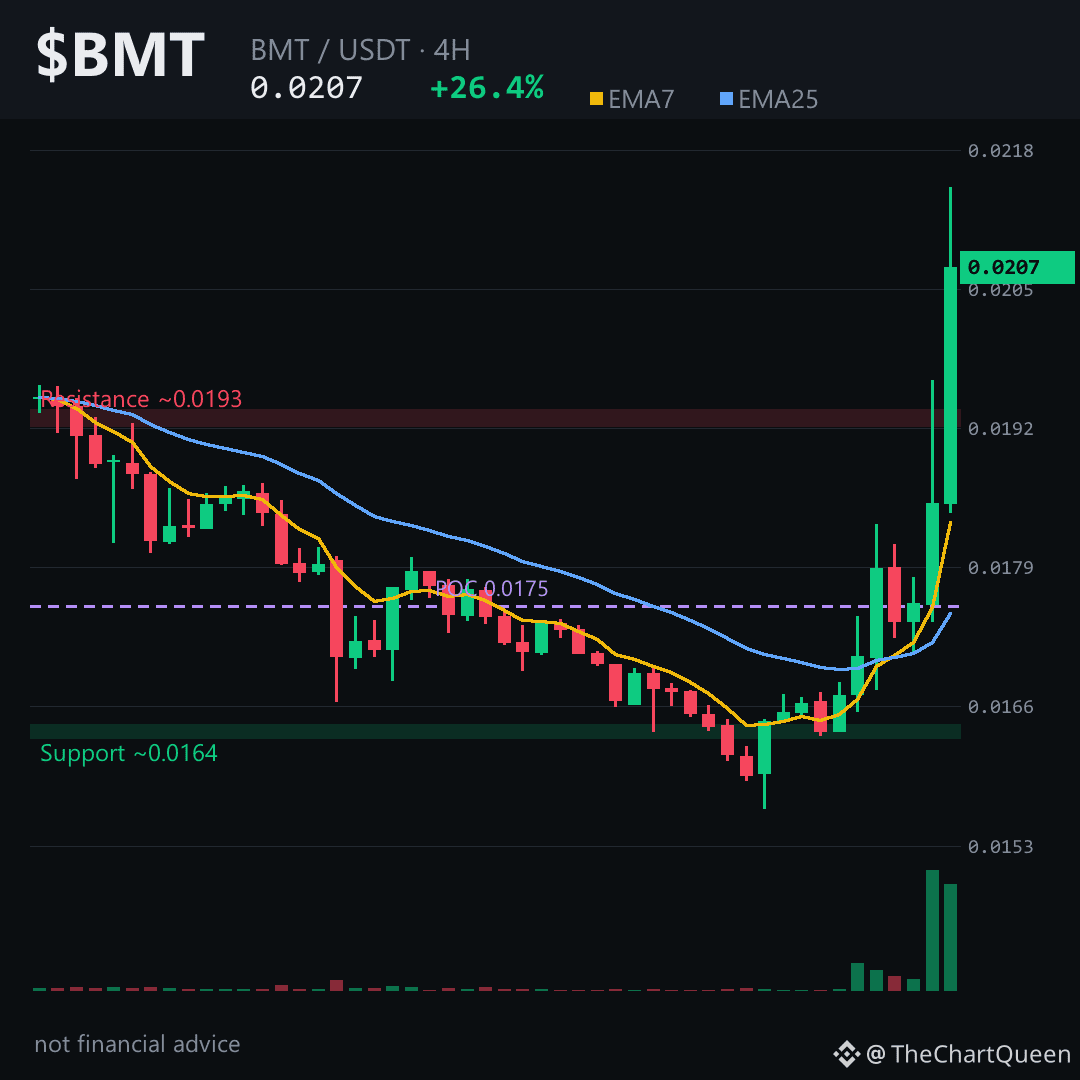
$BMT ripped from the low 0.016s to nearly 0.021 in two days — but funding is deeply negative. Shorts are paying longs. During an uptrend, that often signals fuel for continuation, not exhaustion.
The 4H chart is the cleanest read. Price holds above rising EMA7 and EMA25. RSI is hot at 76, so a pause wouldn't shock anyone. But structure remains intact: higher lows, higher highs, and a bullish FVG at 0.0162–0.0165 that buyers defended.
The level that matters most is ~0.0196. A 4H close below invalidates momentum. As long as $BMT holds above it, the path toward ~0.0225 stays open. Lose it, and the short-term thesis cools off fast.
My read: trend is up, but chasing a 26% candle without respecting the 0.0196 floor turns good setups into sloppy entries. The risk isn't the upside — it's the entry location.
Which level are you watching more closely on $BMT — the 0.0196 floor or the 0.0225 ceiling? 👇
Follow for the next read on this chart.
⚠️ Not financial advice. DYOR.
#BMT #Crypto #BinanceSquare #Altcoins
Is that +26% move just the beginning, or is the easy money already gone?
$BMT ripped from the low 0.016s to nearly 0.021 in two days — but funding is deeply negative. Shorts are paying longs. During an uptrend, that often signals fuel for continuation, not exhaustion.
The 4H chart is the cleanest read. Price holds above rising EMA7 and EMA25. RSI is hot at 76, so a pause wouldn't shock anyone. But structure remains intact: higher lows, higher highs, and a bullish FVG at 0.0162–0.0165 that buyers defended.
The level that matters most is ~0.0196. A 4H close below invalidates momentum. As long as $BMT holds above it, the path toward ~0.0225 stays open. Lose it, and the short-term thesis cools off fast.
My read: trend is up, but chasing a 26% candle without respecting the 0.0196 floor turns good setups into sloppy entries. The risk isn't the upside — it's the entry location.
Which level are you watching more closely on $BMT — the 0.0196 floor or the 0.0225 ceiling? 👇
Follow for the next read on this chart.
⚠️ Not financial advice. DYOR.
#BMT #Crypto #BinanceSquare #Altcoins
$BMT ripped from the low 0.016s to nearly 0.021 in two days — but funding is deeply negative. Shorts are paying longs. During an uptrend, that often signals fuel for continuation, not exhaustion.
The 4H chart is the cleanest read. Price holds above rising EMA7 and EMA25. RSI is hot at 76, so a pause wouldn't shock anyone. But structure remains intact: higher lows, higher highs, and a bullish FVG at 0.0162–0.0165 that buyers defended.
The level that matters most is ~0.0196. A 4H close below invalidates momentum. As long as $BMT holds above it, the path toward ~0.0225 stays open. Lose it, and the short-term thesis cools off fast.
My read: trend is up, but chasing a 26% candle without respecting the 0.0196 floor turns good setups into sloppy entries. The risk isn't the upside — it's the entry location.
Which level are you watching more closely on $BMT — the 0.0196 floor or the 0.0225 ceiling? 👇
Follow for the next read on this chart.
⚠️ Not financial advice. DYOR.
#BMT #Crypto #BinanceSquare #Altcoins
66
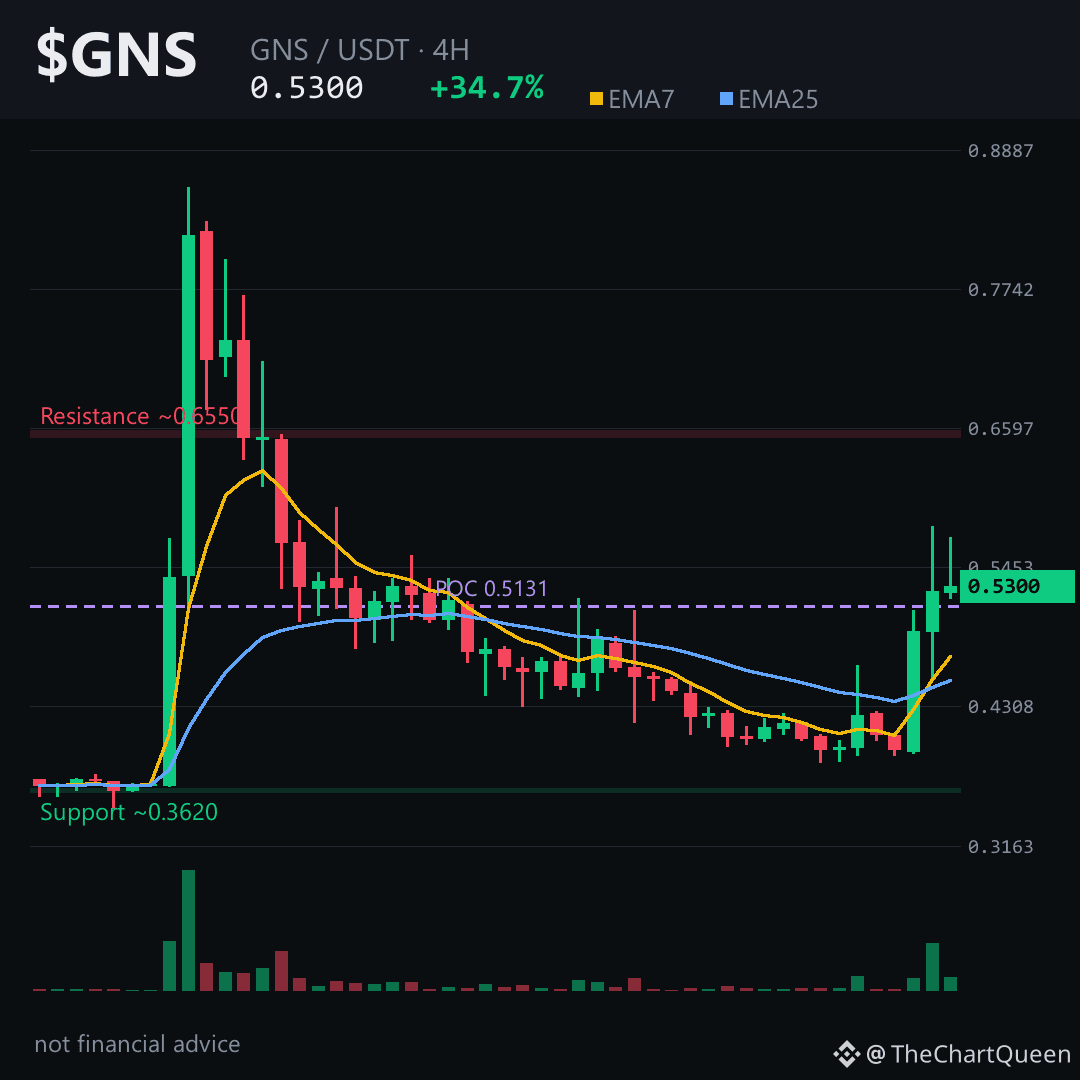
Imagine waking up to a 25% single-candle surge and realizing the move didn't start with leverage — it started with spot demand. That's the story $GNS just told on the 4-hour chart, and it's why this pump feels different from the usual Top Gainer noise.
Futures metrics are a ghost town: zero funding, zero open interest. No crowded derivative trade. When a coin rips 34% in a day without a leveraged crowd chasing it, the buying is likely genuine spot accumulation — the kind that doesn't evaporate in one red candle.
Price is near 0.528, holding above short-term EMAs, with RSI at 65 — strong, not stretched. The 4-hour candles show a two-stage breakout: quiet grind, then that explosive green candle from 0.394 to 0.493, followed by continuation. The unfilled bullish gap below, roughly 0.407–0.455, is the hidden engine — gaps like that often act as magnets before the next leg.
The level that matters most is 0.499. As long as $GNS stays above that zone, the 4-hour structure leans bullish, with room toward 0.572. Lose that level on a 4-hour close, and the read shifts — the gap below becomes the next destination. Tap $GNS and pull up the chart to see how cleanly it's respecting these levels.
My read: spot-driven breakout with real momentum, but the wide 50% daily range means volatility cuts both ways. The risk isn't the trend — it's the speed.
I'll be watching whether the 0.499 zone holds as support or gets revisited — follow so you see that update when it matters. Where do you think GNS finds its next footing? 👇
⚠️ Not financial advice. DYOR.
#GNS #Crypto #BinanceSquare
Imagine waking up to a 25% single-candle surge and realizing the move didn't start with leverage — it started with spot demand. That's the story $GNS just told on the 4-hour chart, and it's why this pump feels different from the usual Top Gainer noise.
Futures metrics are a ghost town: zero funding, zero open interest. No crowded derivative trade. When a coin rips 34% in a day without a leveraged crowd chasing it, the buying is likely genuine spot accumulation — the kind that doesn't evaporate in one red candle.
Price is near 0.528, holding above short-term EMAs, with RSI at 65 — strong, not stretched. The 4-hour candles show a two-stage breakout: quiet grind, then that explosive green candle from 0.394 to 0.493, followed by continuation. The unfilled bullish gap below, roughly 0.407–0.455, is the hidden engine — gaps like that often act as magnets before the next leg.
The level that matters most is 0.499. As long as $GNS stays above that zone, the 4-hour structure leans bullish, with room toward 0.572. Lose that level on a 4-hour close, and the read shifts — the gap below becomes the next destination. Tap $GNS and pull up the chart to see how cleanly it's respecting these levels.
My read: spot-driven breakout with real momentum, but the wide 50% daily range means volatility cuts both ways. The risk isn't the trend — it's the speed.
I'll be watching whether the 0.499 zone holds as support or gets revisited — follow so you see that update when it matters. Where do you think GNS finds its next footing? 👇
⚠️ Not financial advice. DYOR.
#GNS #Crypto #BinanceSquare
Futures metrics are a ghost town: zero funding, zero open interest. No crowded derivative trade. When a coin rips 34% in a day without a leveraged crowd chasing it, the buying is likely genuine spot accumulation — the kind that doesn't evaporate in one red candle.
Price is near 0.528, holding above short-term EMAs, with RSI at 65 — strong, not stretched. The 4-hour candles show a two-stage breakout: quiet grind, then that explosive green candle from 0.394 to 0.493, followed by continuation. The unfilled bullish gap below, roughly 0.407–0.455, is the hidden engine — gaps like that often act as magnets before the next leg.
The level that matters most is 0.499. As long as $GNS stays above that zone, the 4-hour structure leans bullish, with room toward 0.572. Lose that level on a 4-hour close, and the read shifts — the gap below becomes the next destination. Tap $GNS and pull up the chart to see how cleanly it's respecting these levels.
My read: spot-driven breakout with real momentum, but the wide 50% daily range means volatility cuts both ways. The risk isn't the trend — it's the speed.
I'll be watching whether the 0.499 zone holds as support or gets revisited — follow so you see that update when it matters. Where do you think GNS finds its next footing? 👇
⚠️ Not financial advice. DYOR.
#GNS #Crypto #BinanceSquare
40
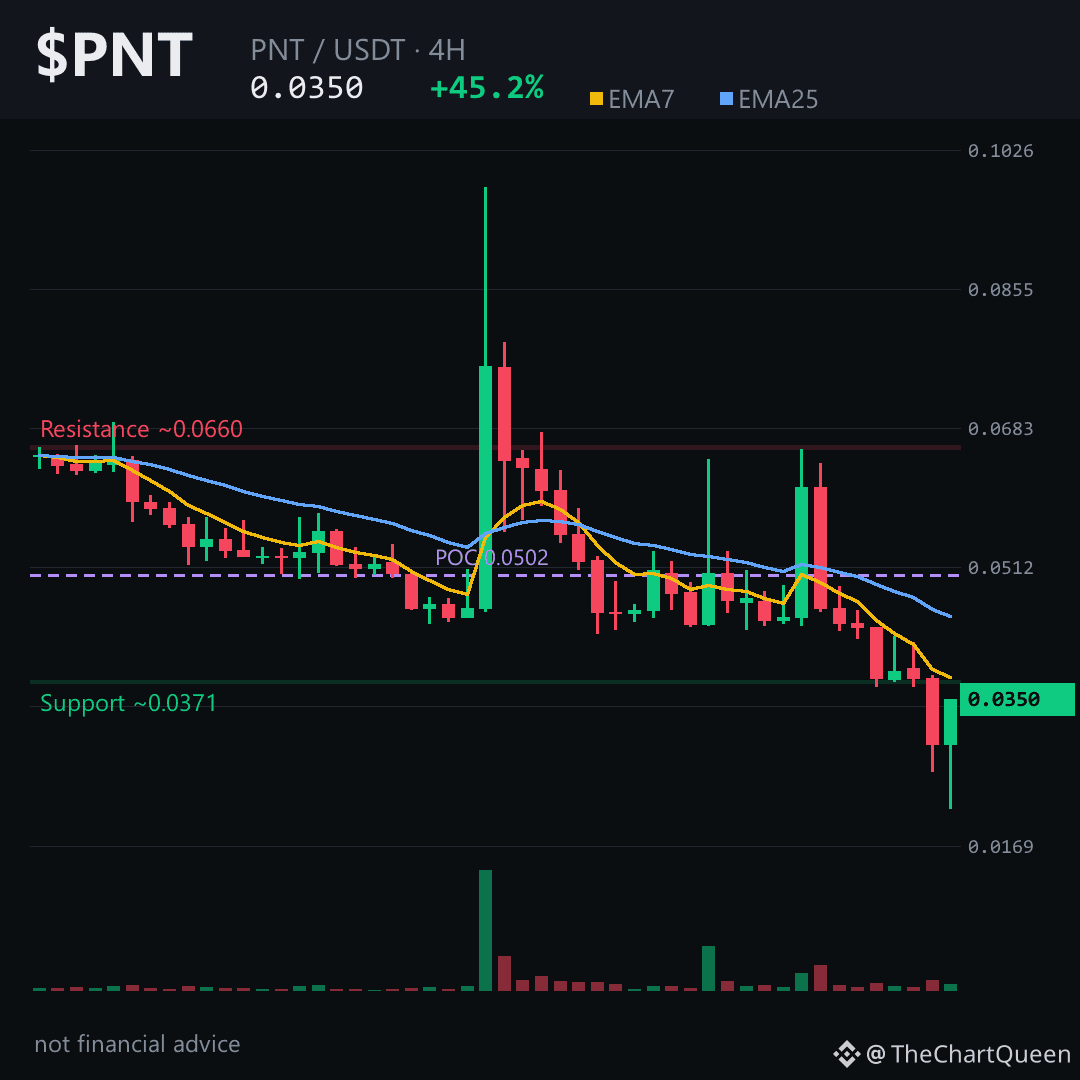
+45% in 24 hours.
But the 4-hour chart tells a different story — a 62% range where the only thing consistent is lower highs.
$PNT is currently sitting near the 0.035 area, right where the last green candle closed. The structure on the 4H remains bearish. Price is below both short-term EMAs, RSI is hovering near 40 — not oversold, just weak. The volume spike came early, then faded. That’s distribution, not accumulation.
The cleanest read is the 4H picture. The pivot sits around the 0.035 zone. If that holds as resistance, the path of least resistance points toward the low 0.032 area. Invalidation is simple: a 4H close back above roughly 0.037 and the bearish structure starts to break down.
The daily is even heavier — RSI at 27, price trading miles below the 0.096 area. Bounces here are sharp but short-lived. The broader trend hasn’t turned.
My read: this is a momentum fade, not a trend reversal. The real risk is assuming the green 24-hour number means strength. It’s a bounce inside a downtrend.
Tap $PNT to pull up the chart and check the 0.035 pivot yourself. I’ll keep tracking whether that level rejects or flips — follow for the updated read.
Which level are you watching on $PNT — the 0.035 pivot or the 0.032 extension? 👇
⚠️ Not financial advice. DYOR.
#PNT #Crypto #BinanceSquare
+45% in 24 hours.
But the 4-hour chart tells a different story — a 62% range where the only thing consistent is lower highs.
$PNT is currently sitting near the 0.035 area, right where the last green candle closed. The structure on the 4H remains bearish. Price is below both short-term EMAs, RSI is hovering near 40 — not oversold, just weak. The volume spike came early, then faded. That’s distribution, not accumulation.
The cleanest read is the 4H picture. The pivot sits around the 0.035 zone. If that holds as resistance, the path of least resistance points toward the low 0.032 area. Invalidation is simple: a 4H close back above roughly 0.037 and the bearish structure starts to break down.
The daily is even heavier — RSI at 27, price trading miles below the 0.096 area. Bounces here are sharp but short-lived. The broader trend hasn’t turned.
My read: this is a momentum fade, not a trend reversal. The real risk is assuming the green 24-hour number means strength. It’s a bounce inside a downtrend.
Tap $PNT to pull up the chart and check the 0.035 pivot yourself. I’ll keep tracking whether that level rejects or flips — follow for the updated read.
Which level are you watching on $PNT — the 0.035 pivot or the 0.032 extension? 👇
⚠️ Not financial advice. DYOR.
#PNT #Crypto #BinanceSquare
But the 4-hour chart tells a different story — a 62% range where the only thing consistent is lower highs.
$PNT is currently sitting near the 0.035 area, right where the last green candle closed. The structure on the 4H remains bearish. Price is below both short-term EMAs, RSI is hovering near 40 — not oversold, just weak. The volume spike came early, then faded. That’s distribution, not accumulation.
The cleanest read is the 4H picture. The pivot sits around the 0.035 zone. If that holds as resistance, the path of least resistance points toward the low 0.032 area. Invalidation is simple: a 4H close back above roughly 0.037 and the bearish structure starts to break down.
The daily is even heavier — RSI at 27, price trading miles below the 0.096 area. Bounces here are sharp but short-lived. The broader trend hasn’t turned.
My read: this is a momentum fade, not a trend reversal. The real risk is assuming the green 24-hour number means strength. It’s a bounce inside a downtrend.
Tap $PNT to pull up the chart and check the 0.035 pivot yourself. I’ll keep tracking whether that level rejects or flips — follow for the updated read.
Which level are you watching on $PNT — the 0.035 pivot or the 0.032 extension? 👇
⚠️ Not financial advice. DYOR.
#PNT #Crypto #BinanceSquare
1
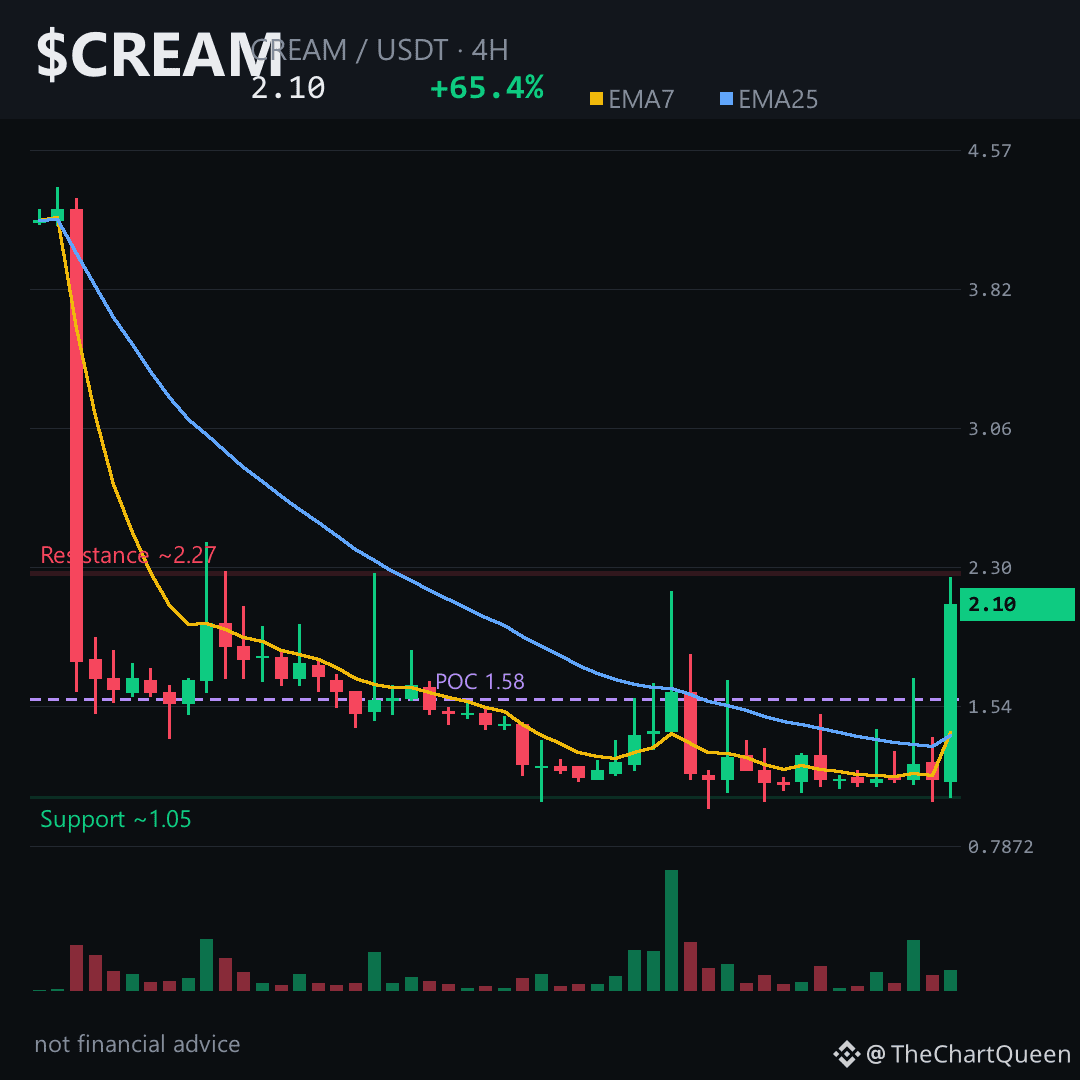
+65% in 24 hours.
That’s the number. It’s not a breakout — it’s a reawakening after months of compression.
The 4-hour picture is the only one that matters right now. Price has reclaimed its short-term moving averages with force — momentum sits comfortably bullish without being stretched. That’s a healthy push, not exhaustion.
But the higher timeframes are still heavy. The daily trend remains firmly bearish, and there’s a large unfilled gap overhead spanning roughly the 2.4 to 3.6 zone. That’s where overhead supply lives.
The levels that matter: price is pivoting around the 2.05–2.10 area. The invalidation sits near 1.98 — lose that on a 4-hour close and the momentum narrative breaks. If it holds, the next measured objective is the 2.27–2.30 zone, right where the 24-hour high already tapped.
Volume tells the real story: thin. With only ~276K in 24-hour turnover, this move can stretch further than logic says — in both directions.
My read: the short-term structure favors continuation while price stays above 1.98, but chasing strength into a 65% daily candle without fresh volume is how momentum trades go silent. The real risk isn’t direction — it’s liquidity.
Tap $CREAM to pull up the chart and trace the 2.27 objective against that 24-hour high.
Follow for the follow-up when the 4-hour structure either confirms or fails this zone. Which level are you watching more closely — 1.98 or 2.30? 👇
⚠️ Not financial advice. DYOR.
#CREAM #DeFi #Crypto #BinanceSquare
+65% in 24 hours.
That’s the number. It’s not a breakout — it’s a reawakening after months of compression.
The 4-hour picture is the only one that matters right now. Price has reclaimed its short-term moving averages with force — momentum sits comfortably bullish without being stretched. That’s a healthy push, not exhaustion.
But the higher timeframes are still heavy. The daily trend remains firmly bearish, and there’s a large unfilled gap overhead spanning roughly the 2.4 to 3.6 zone. That’s where overhead supply lives.
The levels that matter: price is pivoting around the 2.05–2.10 area. The invalidation sits near 1.98 — lose that on a 4-hour close and the momentum narrative breaks. If it holds, the next measured objective is the 2.27–2.30 zone, right where the 24-hour high already tapped.
Volume tells the real story: thin. With only ~276K in 24-hour turnover, this move can stretch further than logic says — in both directions.
My read: the short-term structure favors continuation while price stays above 1.98, but chasing strength into a 65% daily candle without fresh volume is how momentum trades go silent. The real risk isn’t direction — it’s liquidity.
Tap $CREAM to pull up the chart and trace the 2.27 objective against that 24-hour high.
Follow for the follow-up when the 4-hour structure either confirms or fails this zone. Which level are you watching more closely — 1.98 or 2.30? 👇
⚠️ Not financial advice. DYOR.
#CREAM #DeFi #Crypto #BinanceSquare
That’s the number. It’s not a breakout — it’s a reawakening after months of compression.
The 4-hour picture is the only one that matters right now. Price has reclaimed its short-term moving averages with force — momentum sits comfortably bullish without being stretched. That’s a healthy push, not exhaustion.
But the higher timeframes are still heavy. The daily trend remains firmly bearish, and there’s a large unfilled gap overhead spanning roughly the 2.4 to 3.6 zone. That’s where overhead supply lives.
The levels that matter: price is pivoting around the 2.05–2.10 area. The invalidation sits near 1.98 — lose that on a 4-hour close and the momentum narrative breaks. If it holds, the next measured objective is the 2.27–2.30 zone, right where the 24-hour high already tapped.
Volume tells the real story: thin. With only ~276K in 24-hour turnover, this move can stretch further than logic says — in both directions.
My read: the short-term structure favors continuation while price stays above 1.98, but chasing strength into a 65% daily candle without fresh volume is how momentum trades go silent. The real risk isn’t direction — it’s liquidity.
Tap $CREAM to pull up the chart and trace the 2.27 objective against that 24-hour high.
Follow for the follow-up when the 4-hour structure either confirms or fails this zone. Which level are you watching more closely — 1.98 or 2.30? 👇
⚠️ Not financial advice. DYOR.
#CREAM #DeFi #Crypto #BinanceSquare
3
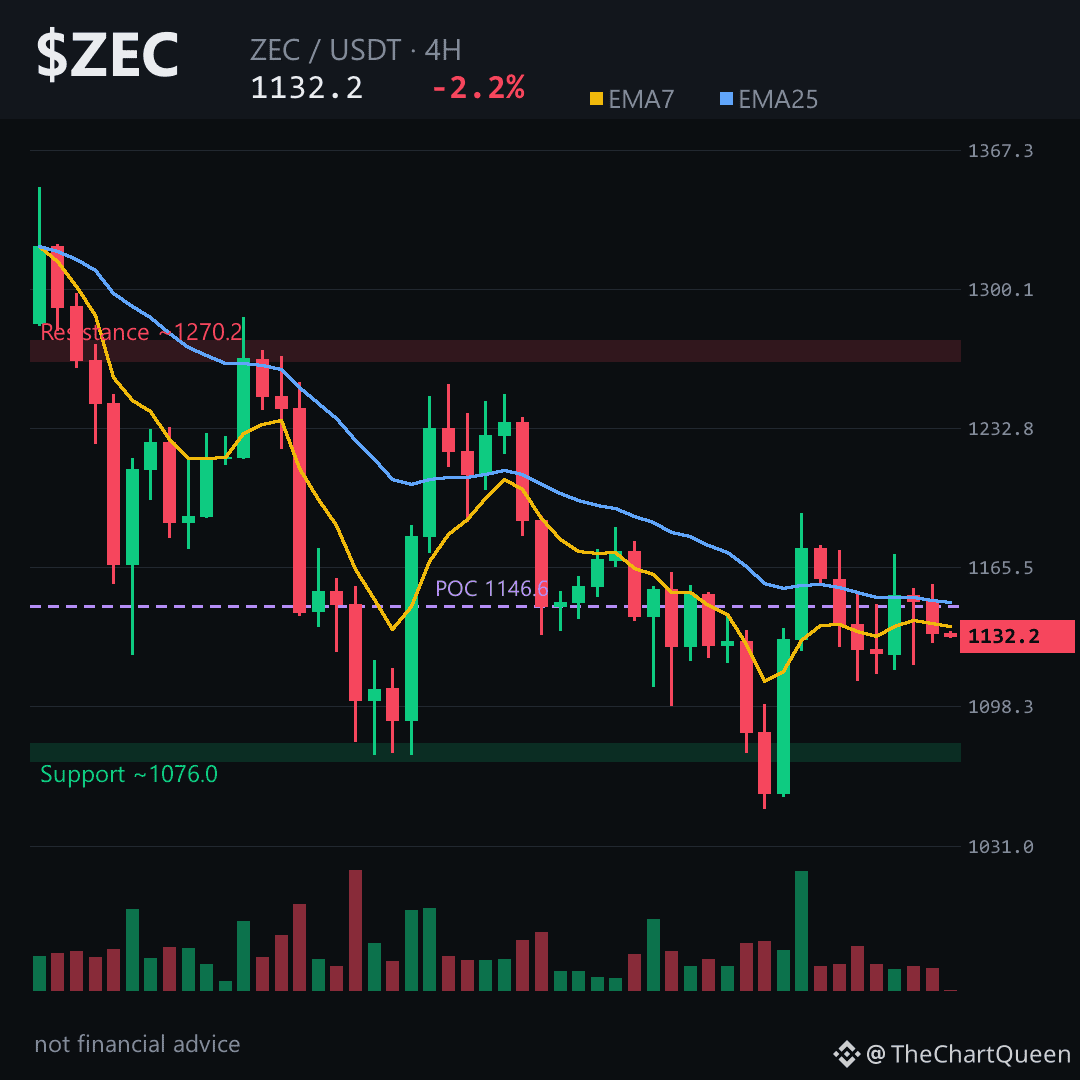
ZEC just printed a 7% single-candle pump two days ago — and has already given most of it back. That kind of failed thrust usually means trapped momentum, not a launchpad.
The 4-hour picture is where the honesty lives. Price sits under both key moving averages, and an unfilled gap near 1100 is still open — those gaps act like magnets. The volume-weighted anchor around 1146 is now overhead, not support. That's a chart leaning heavy.
Futures internals add a wrinkle. Funding is barely positive, OI is thin, and long/short sits at 0.76 — shorts outnumber longs. When the crowd is already leaning short and price grinds sideways, the easy drop often doesn't come. That's the trap.
If $ZEC loses ~1110 on a 4-hour close, the next zone of interest is around 1034 — where the last impulse found real buyers. The read only breaks if price reclaims ~1194; above that, bearish structure starts to crack. Tap $ZEC and walk these levels on the chart yourself.
My read: momentum is fading into overhead supply, but positioning says don't get greedy on the downside. The risk sits in chasing a breakdown everyone already expects.
Follow for the follow-up when this structure confirms or fails — I'll update the read, not the hype.
Where are you watching $ZEC next — the gap fill near 1100 or the reclaim back above 1146? 👇
⚠️ Not financial advice. DYOR.
#ZEC #Zcash #Crypto #BinanceSquare
ZEC just printed a 7% single-candle pump two days ago — and has already given most of it back. That kind of failed thrust usually means trapped momentum, not a launchpad.
The 4-hour picture is where the honesty lives. Price sits under both key moving averages, and an unfilled gap near 1100 is still open — those gaps act like magnets. The volume-weighted anchor around 1146 is now overhead, not support. That's a chart leaning heavy.
Futures internals add a wrinkle. Funding is barely positive, OI is thin, and long/short sits at 0.76 — shorts outnumber longs. When the crowd is already leaning short and price grinds sideways, the easy drop often doesn't come. That's the trap.
If $ZEC loses ~1110 on a 4-hour close, the next zone of interest is around 1034 — where the last impulse found real buyers. The read only breaks if price reclaims ~1194; above that, bearish structure starts to crack. Tap $ZEC and walk these levels on the chart yourself.
My read: momentum is fading into overhead supply, but positioning says don't get greedy on the downside. The risk sits in chasing a breakdown everyone already expects.
Follow for the follow-up when this structure confirms or fails — I'll update the read, not the hype.
Where are you watching $ZEC next — the gap fill near 1100 or the reclaim back above 1146? 👇
⚠️ Not financial advice. DYOR.
#ZEC #Zcash #Crypto #BinanceSquare
The 4-hour picture is where the honesty lives. Price sits under both key moving averages, and an unfilled gap near 1100 is still open — those gaps act like magnets. The volume-weighted anchor around 1146 is now overhead, not support. That's a chart leaning heavy.
Futures internals add a wrinkle. Funding is barely positive, OI is thin, and long/short sits at 0.76 — shorts outnumber longs. When the crowd is already leaning short and price grinds sideways, the easy drop often doesn't come. That's the trap.
If $ZEC loses ~1110 on a 4-hour close, the next zone of interest is around 1034 — where the last impulse found real buyers. The read only breaks if price reclaims ~1194; above that, bearish structure starts to crack. Tap $ZEC and walk these levels on the chart yourself.
My read: momentum is fading into overhead supply, but positioning says don't get greedy on the downside. The risk sits in chasing a breakdown everyone already expects.
Follow for the follow-up when this structure confirms or fails — I'll update the read, not the hype.
Where are you watching $ZEC next — the gap fill near 1100 or the reclaim back above 1146? 👇
⚠️ Not financial advice. DYOR.
#ZEC #Zcash #Crypto #BinanceSquare
61
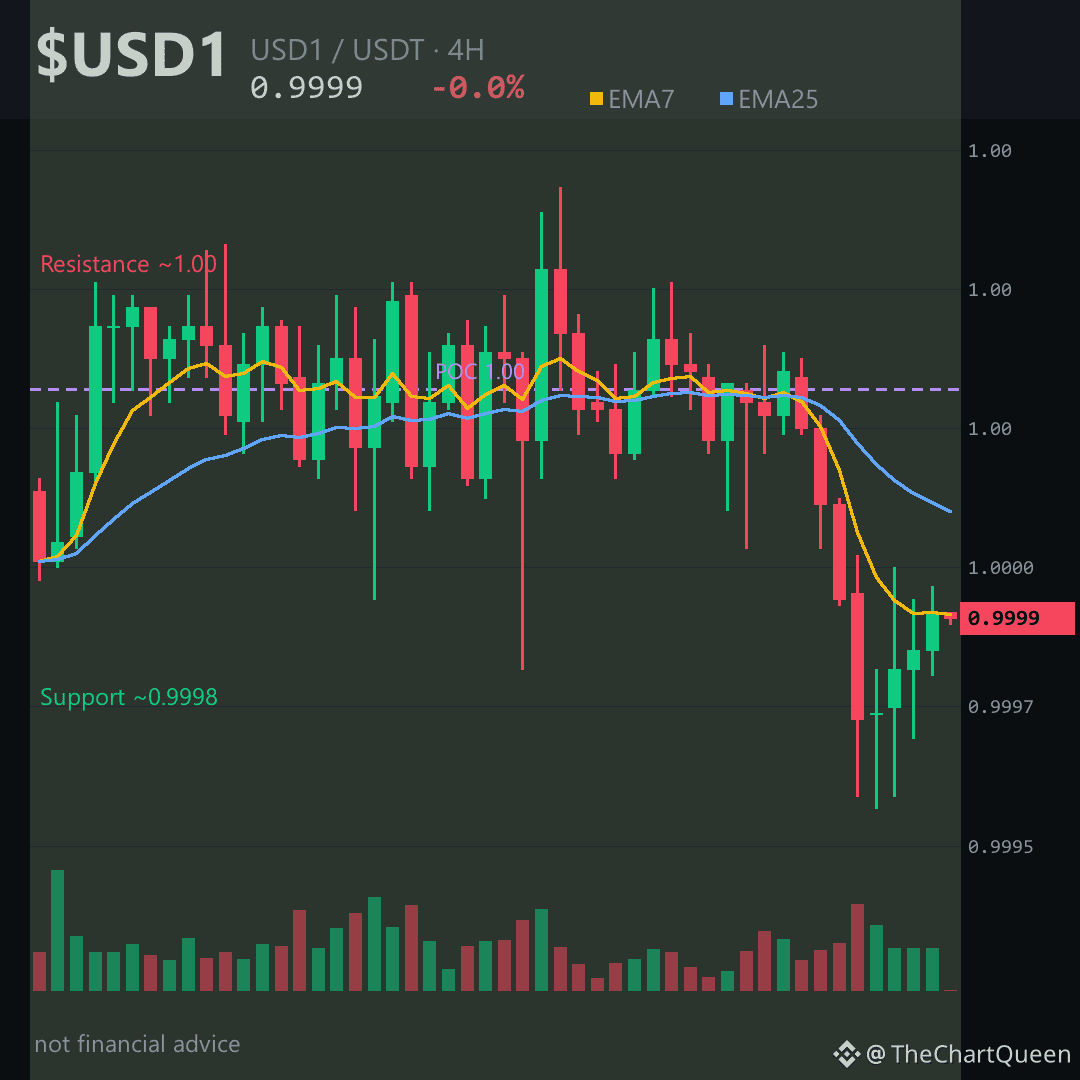
The peg is bending, not breaking. $USD1 just printed its tightest coil in weeks — and that quiet range is louder than any pump.
Price is sitting a hair below the 1.0000 gravity line. 4H EMAs flattening into each other. RSI stuck in the low 40s — not oversold, just uninterested. ATR is microscopic. This is a stablecoin holding its breath.
The bearish lean comes from structure, not drama: multiple rejections at 1.0002, a slow bleed lower, and an unfilled bearish gap near 0.99997. Price has been hovering above it without filling it — a classic "pause before the drop."
The levels that matter on $USD1 are brutally simple. Pivot: 1.0000. Invalidation: around 1.02 on a 4H close — lose that and the downside thesis is off. If the peg keeps slipping, the objective sits near 0.978 — a full depeg scare zone.
Tap $USD1 to see how price is respecting that gap.
My read: the 4H chart is whispering depeg risk, not screaming it. The real danger isn't a crash — it's complacency.
Follow me here — I'll drop an updated read if this 1.0000 zone flips from floor to ceiling.
What level are you watching closer: the 0.978 objective or the 1.02 invalidation on USD1 👇
⚠️ Not financial advice. DYOR.
#USD1 #Stablecoin #Crypto #BinanceSquare
The peg is bending, not breaking. $USD1 just printed its tightest coil in weeks — and that quiet range is louder than any pump.
Price is sitting a hair below the 1.0000 gravity line. 4H EMAs flattening into each other. RSI stuck in the low 40s — not oversold, just uninterested. ATR is microscopic. This is a stablecoin holding its breath.
The bearish lean comes from structure, not drama: multiple rejections at 1.0002, a slow bleed lower, and an unfilled bearish gap near 0.99997. Price has been hovering above it without filling it — a classic "pause before the drop."
The levels that matter on $USD1 are brutally simple. Pivot: 1.0000. Invalidation: around 1.02 on a 4H close — lose that and the downside thesis is off. If the peg keeps slipping, the objective sits near 0.978 — a full depeg scare zone.
Tap $USD1 to see how price is respecting that gap.
My read: the 4H chart is whispering depeg risk, not screaming it. The real danger isn't a crash — it's complacency.
Follow me here — I'll drop an updated read if this 1.0000 zone flips from floor to ceiling.
What level are you watching closer: the 0.978 objective or the 1.02 invalidation on USD1 👇
⚠️ Not financial advice. DYOR.
#USD1 #Stablecoin #Crypto #BinanceSquare
Price is sitting a hair below the 1.0000 gravity line. 4H EMAs flattening into each other. RSI stuck in the low 40s — not oversold, just uninterested. ATR is microscopic. This is a stablecoin holding its breath.
The bearish lean comes from structure, not drama: multiple rejections at 1.0002, a slow bleed lower, and an unfilled bearish gap near 0.99997. Price has been hovering above it without filling it — a classic "pause before the drop."
The levels that matter on $USD1 are brutally simple. Pivot: 1.0000. Invalidation: around 1.02 on a 4H close — lose that and the downside thesis is off. If the peg keeps slipping, the objective sits near 0.978 — a full depeg scare zone.
Tap $USD1 to see how price is respecting that gap.
My read: the 4H chart is whispering depeg risk, not screaming it. The real danger isn't a crash — it's complacency.
Follow me here — I'll drop an updated read if this 1.0000 zone flips from floor to ceiling.
What level are you watching closer: the 0.978 objective or the 1.02 invalidation on USD1 👇
⚠️ Not financial advice. DYOR.
#USD1 #Stablecoin #Crypto #BinanceSquare
68
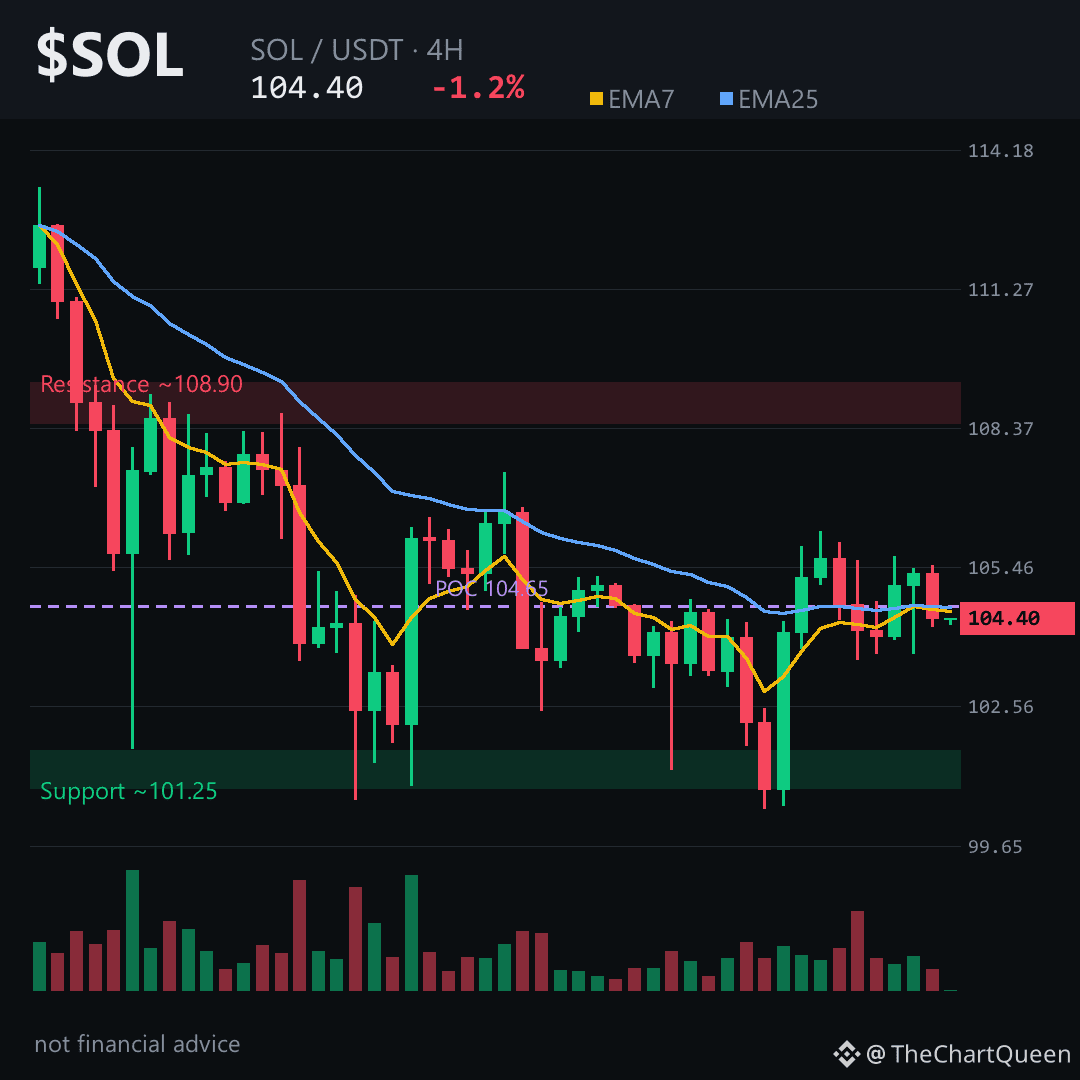
A hard truth: that 24h range is barely 2.4% and the last twelve candles couldn’t hold a direction for more than six hours. $SOL is not trending right now. It’s chopping, and choppy markets are where accounts bleed out slow.
The 4H chart is the cleanest read here. EMAs are flat — the 7 around 104.5, the 25 just above it. RSI is stuck in the low 40s, and that 2.41 long/short ratio tells me the leveraged crowd is still leaning long while price grinds lower. Funding is slightly positive — longs paying to hold. That usually signals a slow squeeze, not a violent one.
The unfilled gap below matters most. There’s a bullish imbalance between roughly 103.8 and 102.5 — price ripped through it and never revisited. It’s hovering at the upper edge now. If that zone fills, the next magnet is 98–99. That’s the 4H objective, and it lines up with the daily picture.
My read: path of least resistance is down, but it’s a grind, not a crash. The invalidation is clean — if $SOL reclaims the 108 area on a 4H close, the bearish structure breaks and this read is off the table. Tap $SOL to pull up the chart and check these levels against your own marks.
Follow me here — I’ll update this read if the 98 zone gets tested or if 108 gets reclaimed. Which level are you watching more closely on SOL right now 👇
⚠️ Not financial advice. DYOR.
#SOL #Solana #Crypto #BinanceSquare
A hard truth: that 24h range is barely 2.4% and the last twelve candles couldn’t hold a direction for more than six hours. $SOL is not trending right now. It’s chopping, and choppy markets are where accounts bleed out slow.
The 4H chart is the cleanest read here. EMAs are flat — the 7 around 104.5, the 25 just above it. RSI is stuck in the low 40s, and that 2.41 long/short ratio tells me the leveraged crowd is still leaning long while price grinds lower. Funding is slightly positive — longs paying to hold. That usually signals a slow squeeze, not a violent one.
The unfilled gap below matters most. There’s a bullish imbalance between roughly 103.8 and 102.5 — price ripped through it and never revisited. It’s hovering at the upper edge now. If that zone fills, the next magnet is 98–99. That’s the 4H objective, and it lines up with the daily picture.
My read: path of least resistance is down, but it’s a grind, not a crash. The invalidation is clean — if $SOL reclaims the 108 area on a 4H close, the bearish structure breaks and this read is off the table. Tap $SOL to pull up the chart and check these levels against your own marks.
Follow me here — I’ll update this read if the 98 zone gets tested or if 108 gets reclaimed. Which level are you watching more closely on SOL right now 👇
⚠️ Not financial advice. DYOR.
#SOL #Solana #Crypto #BinanceSquare
The 4H chart is the cleanest read here. EMAs are flat — the 7 around 104.5, the 25 just above it. RSI is stuck in the low 40s, and that 2.41 long/short ratio tells me the leveraged crowd is still leaning long while price grinds lower. Funding is slightly positive — longs paying to hold. That usually signals a slow squeeze, not a violent one.
The unfilled gap below matters most. There’s a bullish imbalance between roughly 103.8 and 102.5 — price ripped through it and never revisited. It’s hovering at the upper edge now. If that zone fills, the next magnet is 98–99. That’s the 4H objective, and it lines up with the daily picture.
My read: path of least resistance is down, but it’s a grind, not a crash. The invalidation is clean — if $SOL reclaims the 108 area on a 4H close, the bearish structure breaks and this read is off the table. Tap $SOL to pull up the chart and check these levels against your own marks.
Follow me here — I’ll update this read if the 98 zone gets tested or if 108 gets reclaimed. Which level are you watching more closely on SOL right now 👇
⚠️ Not financial advice. DYOR.
#SOL #Solana #Crypto #BinanceSquare
89
The hardest thing to accept in this market is that quiet volume kills more accounts than violent crashes. Right now, $ETH is bleeding slowly — down 1.62% on the day, not because of panic, but because nobody is stepping in to catch it. That’s the kind of tape that grinds bulls into dust.
Price is hovering near 2,390, pinned below the 7-day average around 2,420 and miles under the 25-day near 2,505. RSI sits at 36 — weak, but not washed out. And here’s the uncomfortable part: futures are still overwhelmingly long. Long/short ratio is over 3 to 1, funding positive. Price isn’t falling because sellers are aggressive. It’s falling because longs keep getting liquidated in slow motion.
If $ETH loses the 2,370 area on a daily close, there’s little structural support until the low 2,300s, then the path opens toward 2,035. The invalidation is clear: reclaim the 2,616 area on a daily close and this bearish thesis is simply wrong. Until then, every bounce into 2,450–2,470 has been sold. That’s not coincidence, that’s supply.
My read: path of least resistance stays lower until funding resets or price reclaims the daily average. The real risk isn’t a sudden crash — it’s the slow bleed that makes people hold too long. I’ll update if 2,370 breaks or 2,450 is reclaimed — follow so that lands in your feed. Which level are you trusting more on $ETH right now 👇
⚠️ Not financial advice. DYOR.
#ETH #Ethereum #Crypto #BinanceSquare
The hardest thing to accept in this market is that quiet volume kills more accounts than violent crashes. Right now, $ETH is bleeding slowly — down 1.62% on the day, not because of panic, but because nobody is stepping in to catch it. That’s the kind of tape that grinds bulls into dust.
Price is hovering near 2,390, pinned below the 7-day average around 2,420 and miles under the 25-day near 2,505. RSI sits at 36 — weak, but not washed out. And here’s the uncomfortable part: futures are still overwhelmingly long. Long/short ratio is over 3 to 1, funding positive. Price isn’t falling because sellers are aggressive. It’s falling because longs keep getting liquidated in slow motion.
If $ETH loses the 2,370 area on a daily close, there’s little structural support until the low 2,300s, then the path opens toward 2,035. The invalidation is clear: reclaim the 2,616 area on a daily close and this bearish thesis is simply wrong. Until then, every bounce into 2,450–2,470 has been sold. That’s not coincidence, that’s supply.
My read: path of least resistance stays lower until funding resets or price reclaims the daily average. The real risk isn’t a sudden crash — it’s the slow bleed that makes people hold too long. I’ll update if 2,370 breaks or 2,450 is reclaimed — follow so that lands in your feed. Which level are you trusting more on $ETH right now 👇
⚠️ Not financial advice. DYOR.
#ETH #Ethereum #Crypto #BinanceSquare
Price is hovering near 2,390, pinned below the 7-day average around 2,420 and miles under the 25-day near 2,505. RSI sits at 36 — weak, but not washed out. And here’s the uncomfortable part: futures are still overwhelmingly long. Long/short ratio is over 3 to 1, funding positive. Price isn’t falling because sellers are aggressive. It’s falling because longs keep getting liquidated in slow motion.
If $ETH loses the 2,370 area on a daily close, there’s little structural support until the low 2,300s, then the path opens toward 2,035. The invalidation is clear: reclaim the 2,616 area on a daily close and this bearish thesis is simply wrong. Until then, every bounce into 2,450–2,470 has been sold. That’s not coincidence, that’s supply.
My read: path of least resistance stays lower until funding resets or price reclaims the daily average. The real risk isn’t a sudden crash — it’s the slow bleed that makes people hold too long. I’ll update if 2,370 breaks or 2,450 is reclaimed — follow so that lands in your feed. Which level are you trusting more on $ETH right now 👇
⚠️ Not financial advice. DYOR.
#ETH #Ethereum #Crypto #BinanceSquare
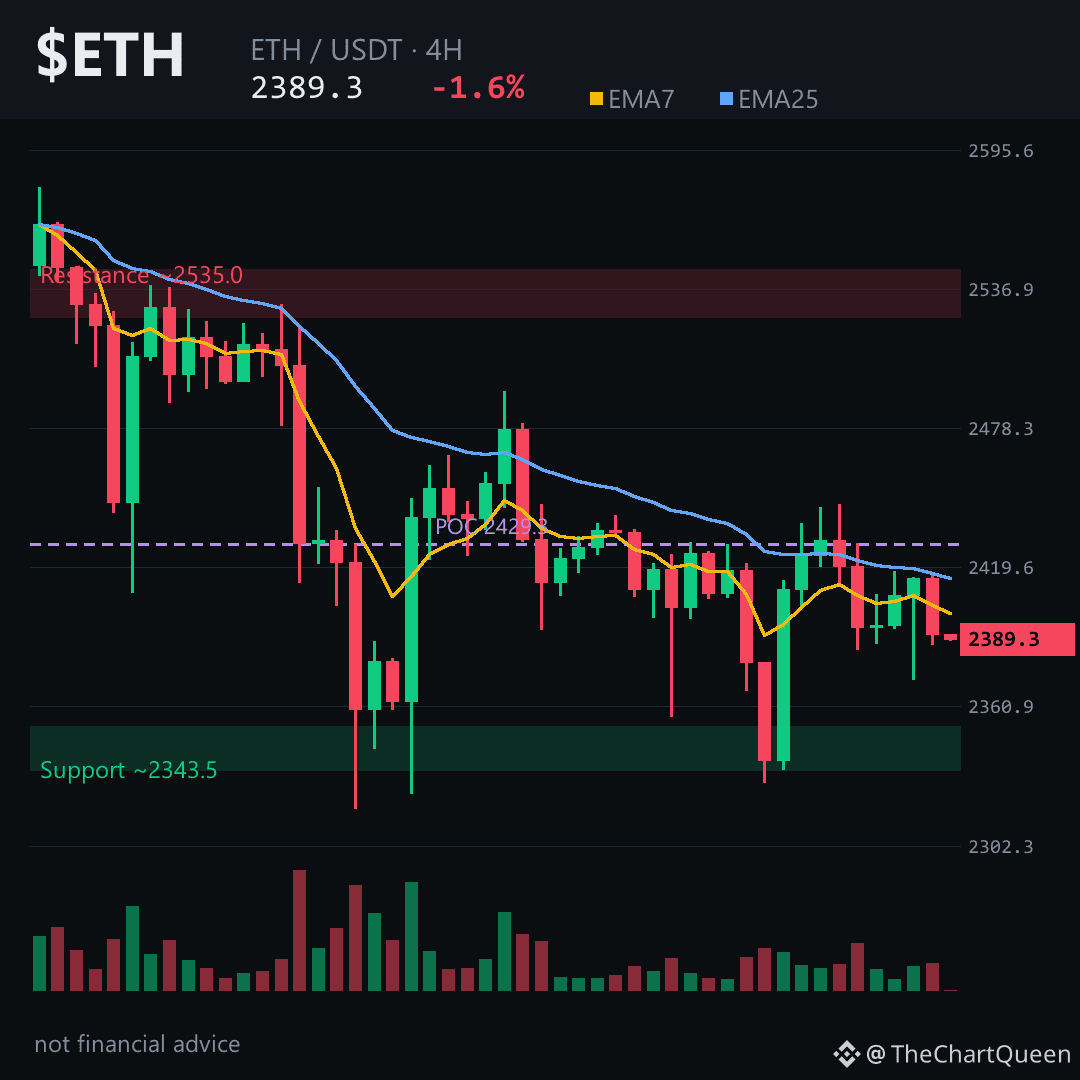
78
Here’s the hard truth nobody wants to sit with: this bounce has no structural conviction behind it. Twenty-four hours ago we were trading near the high 82s. Now we’re grinding below the 82K area, and the 4H chart keeps printing lower highs into a flat-to-declining trend. The early strength was a relief move, not a reclaim.
Funding is positive, longs are quietly paying to stay in, and the long/short ratio is tilted heavily to one side — a setup that often shakes out late optimists. Volume is thin just above current price. The 81.7K area is the volume-heavy pivot where most of the last two days’ business got done, and losing it matters.
As long as $BTC holds below the 82.4K area, the path of least resistance stays lower. Lose 81.7K on a decisive 4H close and the door opens toward the 79K area. The read only flips if $BTC reclaims the 83.3K zone with momentum. Tap $BTC to pull up the chart and see how clean that structure looks.
My read: the chart is still respecting the downtrend, and the deeper risk sits below 81.7K, not above 83K. I’d rather fade strength than chase this chop.
If this level-by-level read helps you see the chart clearly, follow along — I’ll update the read if the 81.7K floor gives way or if buyers finally defend it.
What level are you watching on BTC right now 👇
⚠️ Not financial advice. DYOR.
#BTC #Bitcoin #Crypto #BinanceSquare
Here’s the hard truth nobody wants to sit with: this bounce has no structural conviction behind it. Twenty-four hours ago we were trading near the high 82s. Now we’re grinding below the 82K area, and the 4H chart keeps printing lower highs into a flat-to-declining trend. The early strength was a relief move, not a reclaim.
Funding is positive, longs are quietly paying to stay in, and the long/short ratio is tilted heavily to one side — a setup that often shakes out late optimists. Volume is thin just above current price. The 81.7K area is the volume-heavy pivot where most of the last two days’ business got done, and losing it matters.
As long as $BTC holds below the 82.4K area, the path of least resistance stays lower. Lose 81.7K on a decisive 4H close and the door opens toward the 79K area. The read only flips if $BTC reclaims the 83.3K zone with momentum. Tap $BTC to pull up the chart and see how clean that structure looks.
My read: the chart is still respecting the downtrend, and the deeper risk sits below 81.7K, not above 83K. I’d rather fade strength than chase this chop.
If this level-by-level read helps you see the chart clearly, follow along — I’ll update the read if the 81.7K floor gives way or if buyers finally defend it.
What level are you watching on BTC right now 👇
⚠️ Not financial advice. DYOR.
#BTC #Bitcoin #Crypto #BinanceSquare
Funding is positive, longs are quietly paying to stay in, and the long/short ratio is tilted heavily to one side — a setup that often shakes out late optimists. Volume is thin just above current price. The 81.7K area is the volume-heavy pivot where most of the last two days’ business got done, and losing it matters.
As long as $BTC holds below the 82.4K area, the path of least resistance stays lower. Lose 81.7K on a decisive 4H close and the door opens toward the 79K area. The read only flips if $BTC reclaims the 83.3K zone with momentum. Tap $BTC to pull up the chart and see how clean that structure looks.
My read: the chart is still respecting the downtrend, and the deeper risk sits below 81.7K, not above 83K. I’d rather fade strength than chase this chop.
If this level-by-level read helps you see the chart clearly, follow along — I’ll update the read if the 81.7K floor gives way or if buyers finally defend it.
What level are you watching on BTC right now 👇
⚠️ Not financial advice. DYOR.
#BTC #Bitcoin #Crypto #BinanceSquare
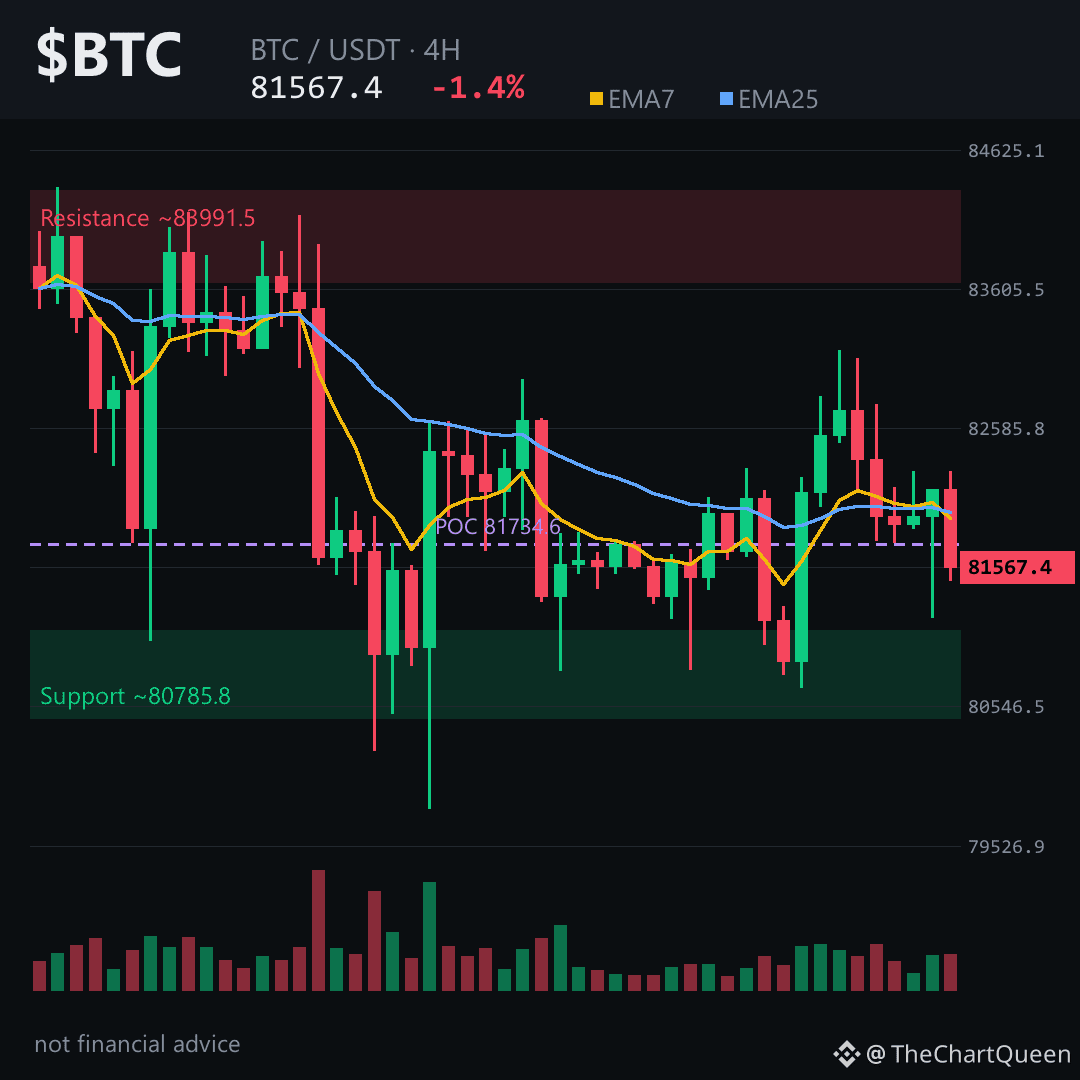
70
Log in to explore more content
Join global crypto users on Binance Square
⚡️ Get latest and useful information about crypto.
💬 Trusted by the world’s largest crypto exchange.
👍 Discover real insights from verified creators.
Email / Phone number