

CRYPTO EXPERT KASHI
306 Posts

CRYPTO EXPERT KASHI
Report
Block User
Frequent Trader
2.1 Years
49 Following
110 Followers
192 Liked
Posts
All
Quotes
Live
·
--
Bullish
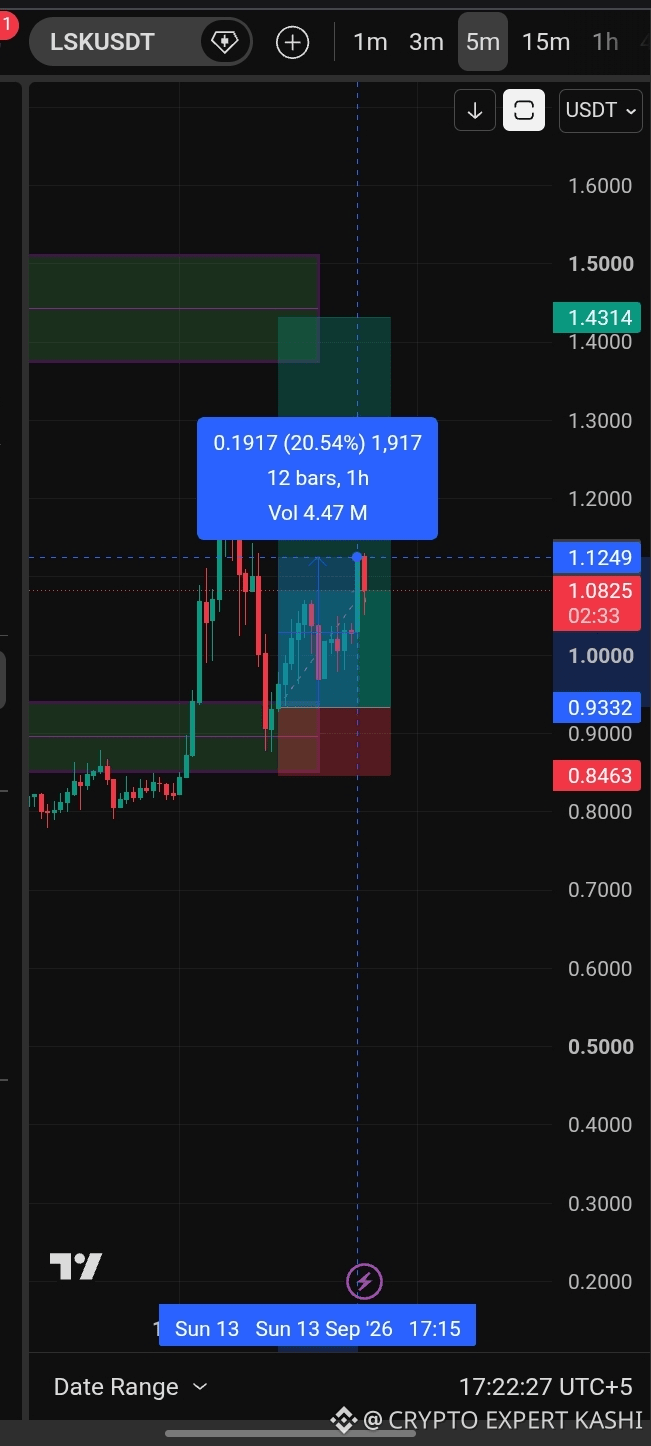
20% on just one horse. ☺️💸 $LSK
{future}(LSKUSDT)
20% on just one horse. ☺️💸 $LSK

Feed-Creator-e17475454
·
--
и? стоп лосс сработал 😂
62
·
--
Bullish
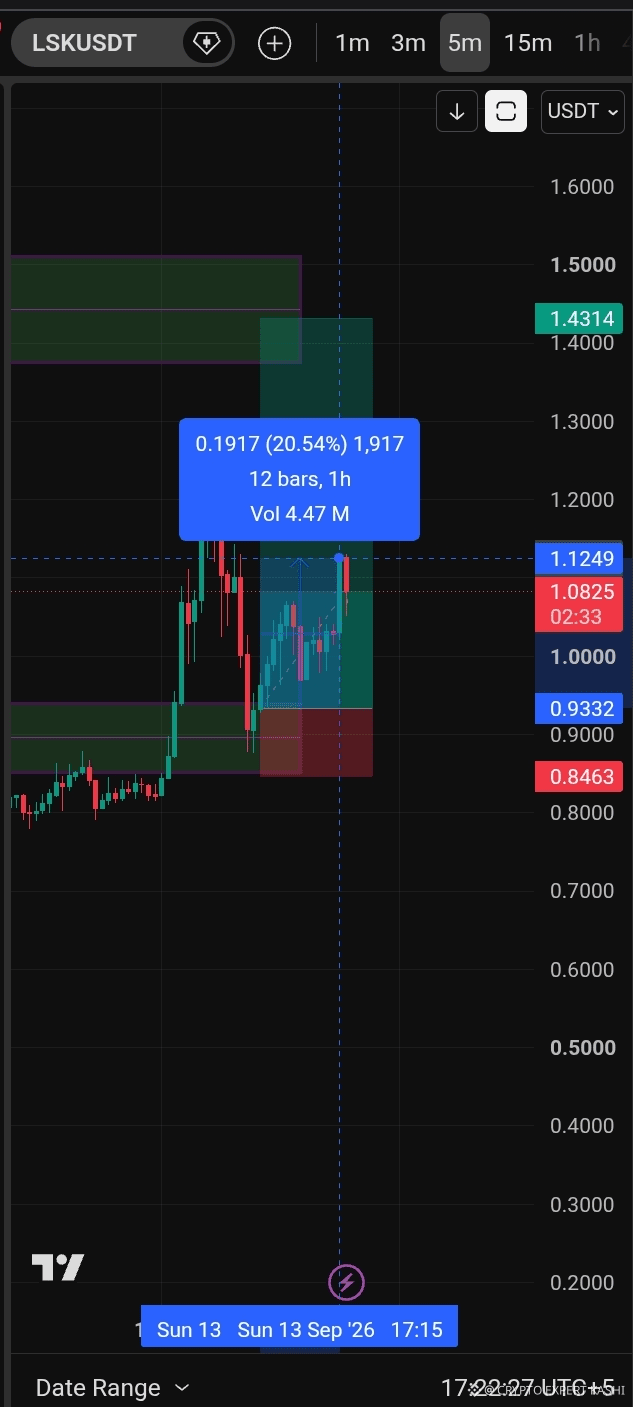
20% on just one horse. ☺️ $LSK
{future}(LSKUSDT)
20% on just one horse. ☺️ $LSK

Royal Crypto Tiger
·
--
Lol 1.51
157
·
--
Bullish
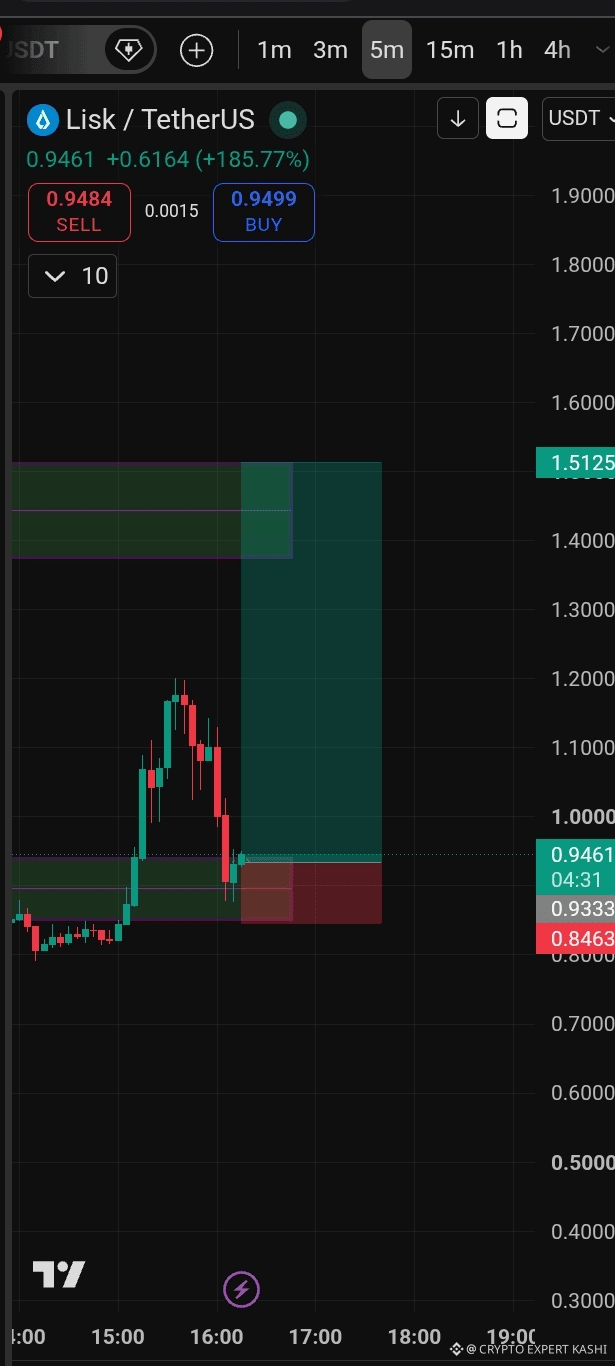
🟢 LISK/USDT — Full 5-Minute Analysis
Current Price: 0.9461 USDT
Timeframe: 5 Minutes
Setup: LONG / BUY 📈
🎯 Trade Plan
Entry: 0.9333
Stop Loss: 0.8463
Take Profit: 1.5125
Risk per LISK: 0.0870 USDT
Potential Profit per LISK: 0.5792 USDT
Approx. Risk/Reward: 1 : 6.66
📊 Technical Analysis
LISK showed a strong bullish pump on the short-term chart, moving from around the 0.80 area to above 1.18. After this sharp move, price entered a correction/pullback and is now trying to stabilize around the 0.93 area.
The 0.9333 zone is an important support/entry area. If price holds this level and gives bullish candle confirmation, the probability of a recovery move increases.
📈 Bullish Scenario
If:
Price holds above 0.9333
5-minute candles show bullish confirmation
Buying volume starts increasing again
then price could potentially retest:
1.00 → 1.10 → 1.18
If strong bullish momentum returns, the move could potentially continue toward the 1.5125 target zone.
🔴 Bearish / Invalid Scenario
If price loses 0.9333 with strong selling pressure, the LONG setup becomes weaker.
The 0.8463 SL is the key invalidation level. Sustained price action below this level would invalidate the bullish setup.
🧮 Example Risk Calculation
For a $50 account, if you risk a maximum of 5%:
$50 × 5% = $2.50 maximum risk
Entry-to-SL distance:
0.9333 − 0.8463 = 0.0870
Approximate position size:
$2.50 ÷ 0.0870 ≈ 28.7 LISK
Actual position sizing and execution can vary depending on the exchange and contract specifications.
⚠️ Important
The 5-minute timeframe is highly volatile, especially after a major pump. Do not enter solely because the target looks attractive. A more cautious approach is to wait for candle close + retest + volume confirmation.
🔥 Overall View
Short-term: Bullish recovery attempt 📈
Key Support: 0.9333
Invalidation: 0.8463
Target: 1.5125
Risk/Reward: Approximately 1:6.66
Note: This is technical analysis, not financial advice. Crypto trading carries a high risk of loss. $LSK
{future}(LSKUSDT)
$STEEM
{future}(STEEMUSDT)
🟢 LISK/USDT — Full 5-Minute Analysis
Current Price: 0.9461 USDT
Timeframe: 5 Minutes
Setup: LONG / BUY 📈
🎯 Trade Plan
Entry: 0.9333
Stop Loss: 0.8463
Take Profit: 1.5125
Risk per LISK: 0.0870 USDT
Potential Profit per LISK: 0.5792 USDT
Approx. Risk/Reward: 1 : 6.66
📊 Technical Analysis
LISK showed a strong bullish pump on the short-term chart, moving from around the 0.80 area to above 1.18. After this sharp move, price entered a correction/pullback and is now trying to stabilize around the 0.93 area.
The 0.9333 zone is an important support/entry area. If price holds this level and gives bullish candle confirmation, the probability of a recovery move increases.
📈 Bullish Scenario
If:
Price holds above 0.9333
5-minute candles show bullish confirmation
Buying volume starts increasing again
then price could potentially retest:
1.00 → 1.10 → 1.18
If strong bullish momentum returns, the move could potentially continue toward the 1.5125 target zone.
🔴 Bearish / Invalid Scenario
If price loses 0.9333 with strong selling pressure, the LONG setup becomes weaker.
The 0.8463 SL is the key invalidation level. Sustained price action below this level would invalidate the bullish setup.
🧮 Example Risk Calculation
For a $50 account, if you risk a maximum of 5%:
$50 × 5% = $2.50 maximum risk
Entry-to-SL distance:
0.9333 − 0.8463 = 0.0870
Approximate position size:
$2.50 ÷ 0.0870 ≈ 28.7 LISK
Actual position sizing and execution can vary depending on the exchange and contract specifications.
⚠️ Important
The 5-minute timeframe is highly volatile, especially after a major pump. Do not enter solely because the target looks attractive. A more cautious approach is to wait for candle close + retest + volume confirmation.
🔥 Overall View
Short-term: Bullish recovery attempt 📈
Key Support: 0.9333
Invalidation: 0.8463
Target: 1.5125
Risk/Reward: Approximately 1:6.66
Note: This is technical analysis, not financial advice. Crypto trading carries a high risk of loss. $LSK
$STEEM
Current Price: 0.9461 USDT
Timeframe: 5 Minutes
Setup: LONG / BUY 📈
🎯 Trade Plan
Entry: 0.9333
Stop Loss: 0.8463
Take Profit: 1.5125
Risk per LISK: 0.0870 USDT
Potential Profit per LISK: 0.5792 USDT
Approx. Risk/Reward: 1 : 6.66
📊 Technical Analysis
LISK showed a strong bullish pump on the short-term chart, moving from around the 0.80 area to above 1.18. After this sharp move, price entered a correction/pullback and is now trying to stabilize around the 0.93 area.
The 0.9333 zone is an important support/entry area. If price holds this level and gives bullish candle confirmation, the probability of a recovery move increases.
📈 Bullish Scenario
If:
Price holds above 0.9333
5-minute candles show bullish confirmation
Buying volume starts increasing again
then price could potentially retest:
1.00 → 1.10 → 1.18
If strong bullish momentum returns, the move could potentially continue toward the 1.5125 target zone.
🔴 Bearish / Invalid Scenario
If price loses 0.9333 with strong selling pressure, the LONG setup becomes weaker.
The 0.8463 SL is the key invalidation level. Sustained price action below this level would invalidate the bullish setup.
🧮 Example Risk Calculation
For a $50 account, if you risk a maximum of 5%:
$50 × 5% = $2.50 maximum risk
Entry-to-SL distance:
0.9333 − 0.8463 = 0.0870
Approximate position size:
$2.50 ÷ 0.0870 ≈ 28.7 LISK
Actual position sizing and execution can vary depending on the exchange and contract specifications.
⚠️ Important
The 5-minute timeframe is highly volatile, especially after a major pump. Do not enter solely because the target looks attractive. A more cautious approach is to wait for candle close + retest + volume confirmation.
🔥 Overall View
Short-term: Bullish recovery attempt 📈
Key Support: 0.9333
Invalidation: 0.8463
Target: 1.5125
Risk/Reward: Approximately 1:6.66
Note: This is technical analysis, not financial advice. Crypto trading carries a high risk of loss. $LSK
$STEEM
2
889
·
--
Bearish
$SIREN CHECK NOW 💸
{future}(SIRENUSDT)
$SIREN CHECK NOW 💸
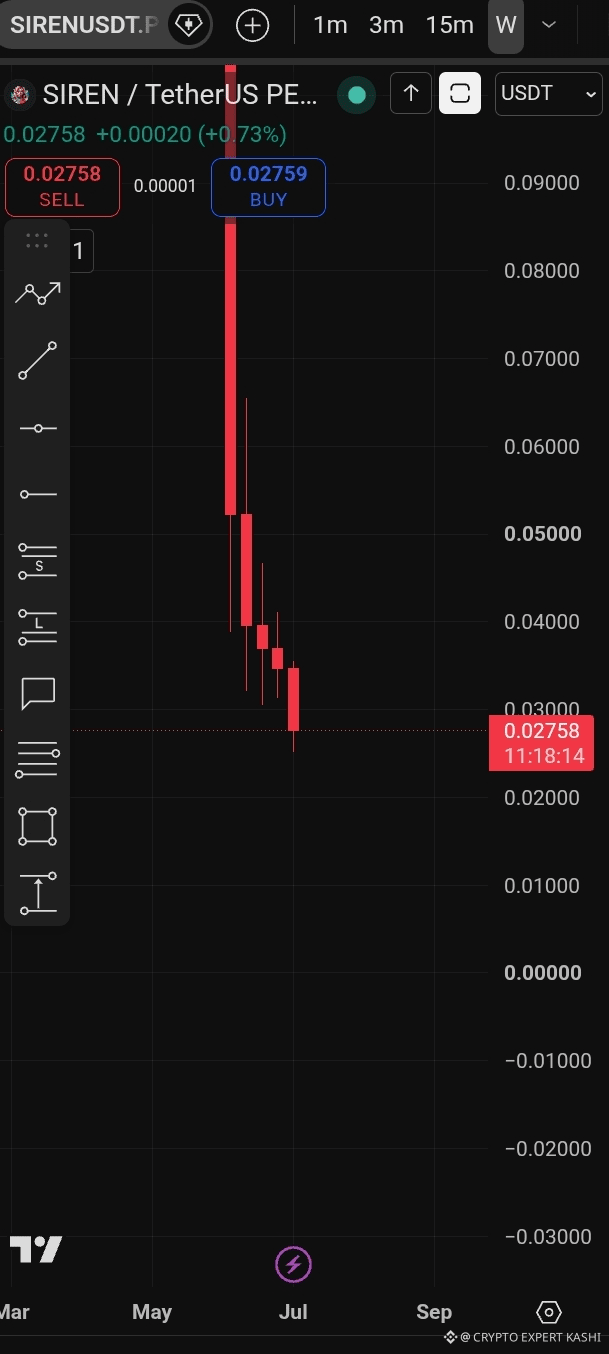
CRYPTO EXPERT KASHI
·
--
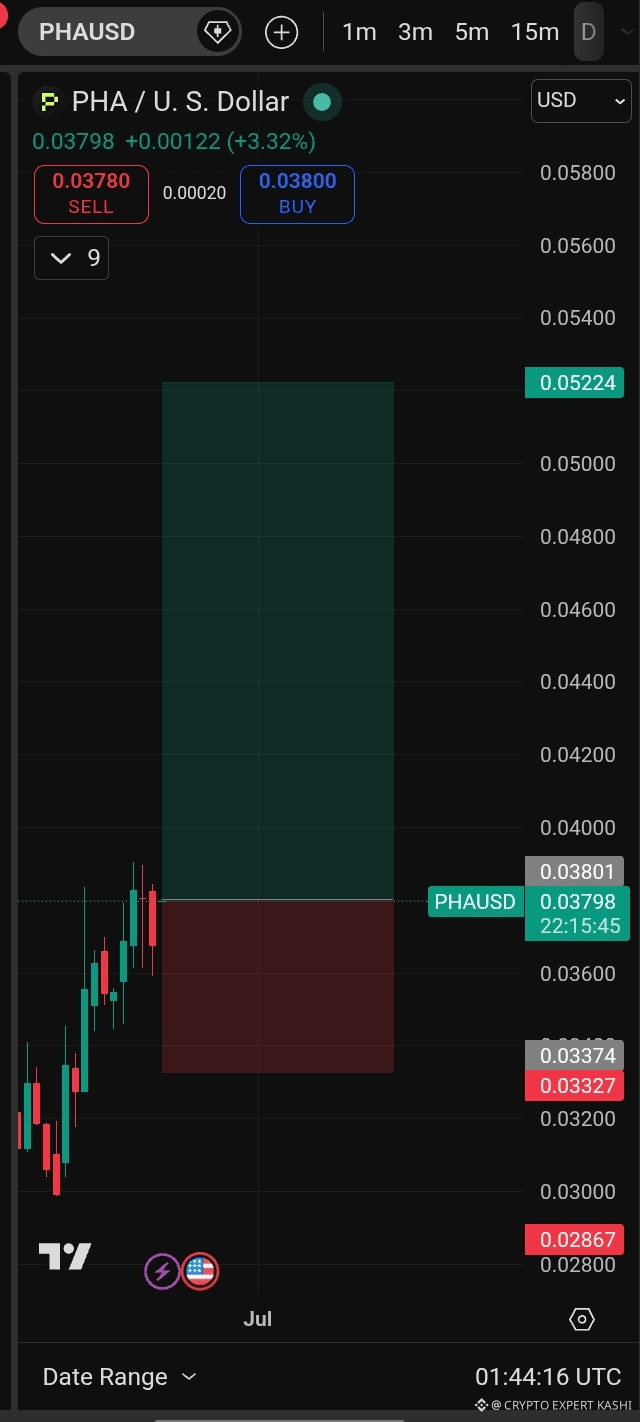
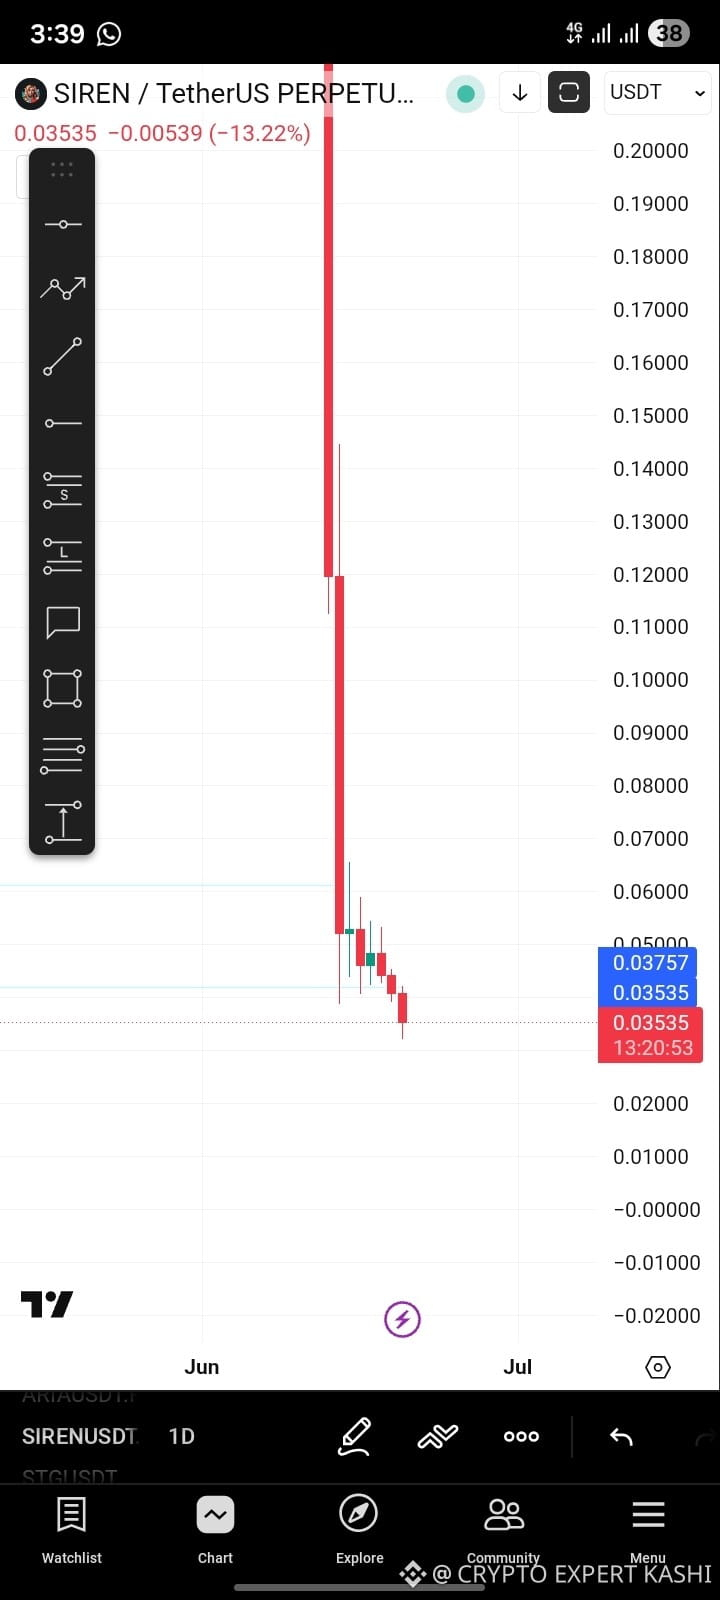
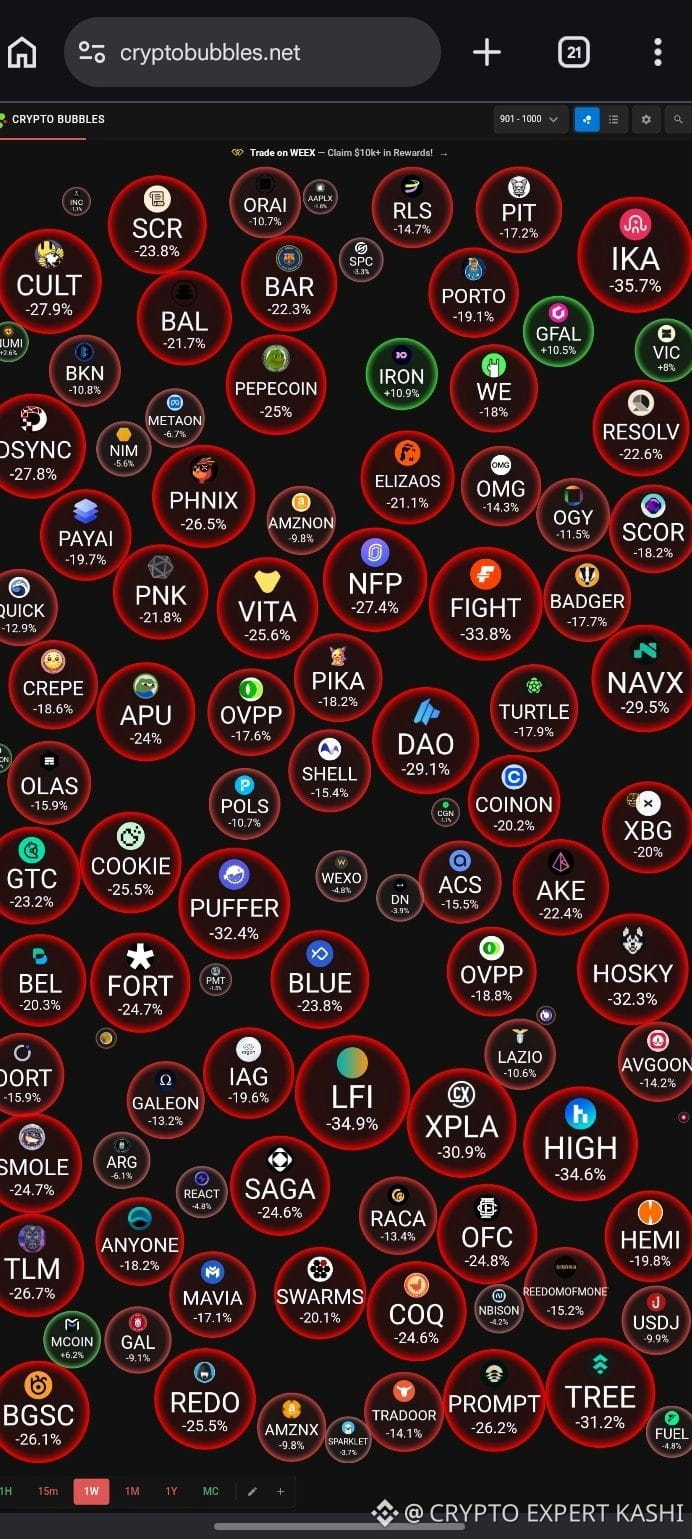
Bearish$SIREN Short Now Fast Siren Go To Down Side 💸
#siren
#siren
1
233
·
--
Bullish
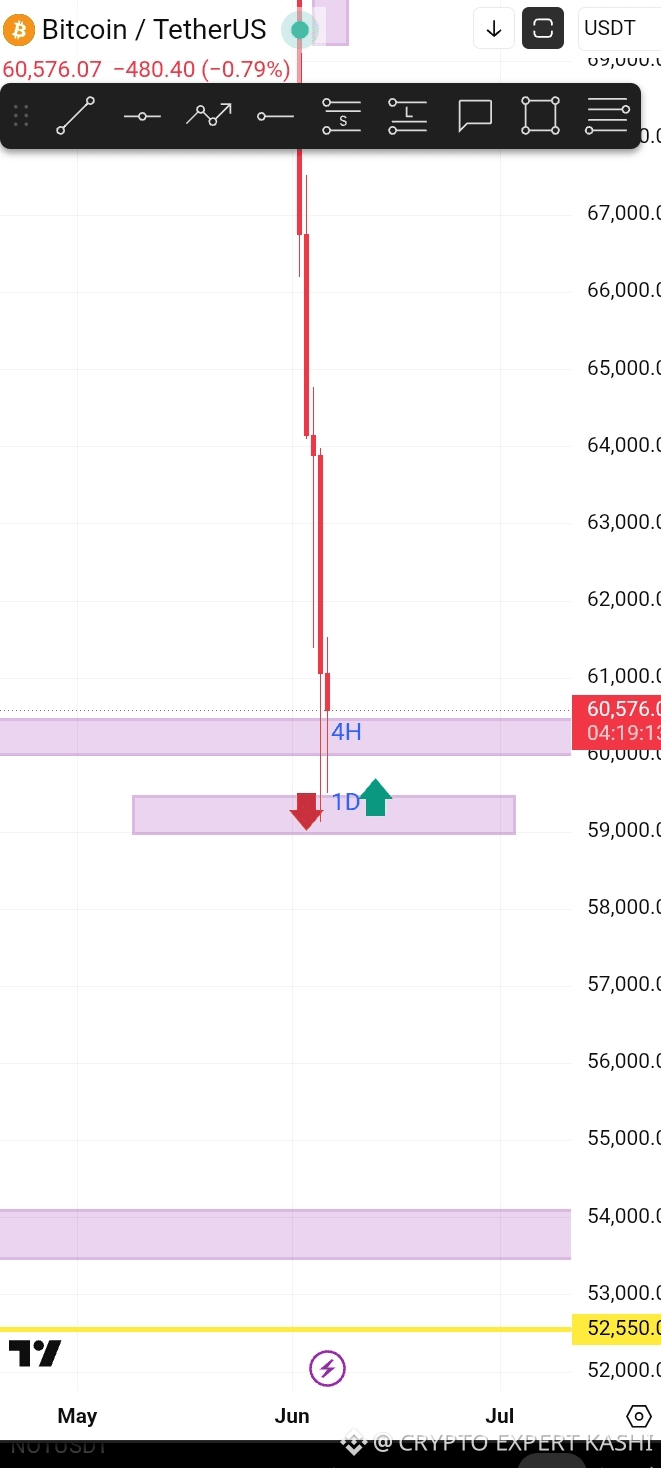
$BTC Painfully Crash 🤨
{future}(BTCUSDT)
$ETH
{future}(ETHUSDT)
$BTC Painfully Crash 🤨
$ETH
$ETH
1
29
·
--
Bullish
All TP Done ☄️
All TP Done ☄️
CRYPTO EXPERT KASHI
·
--
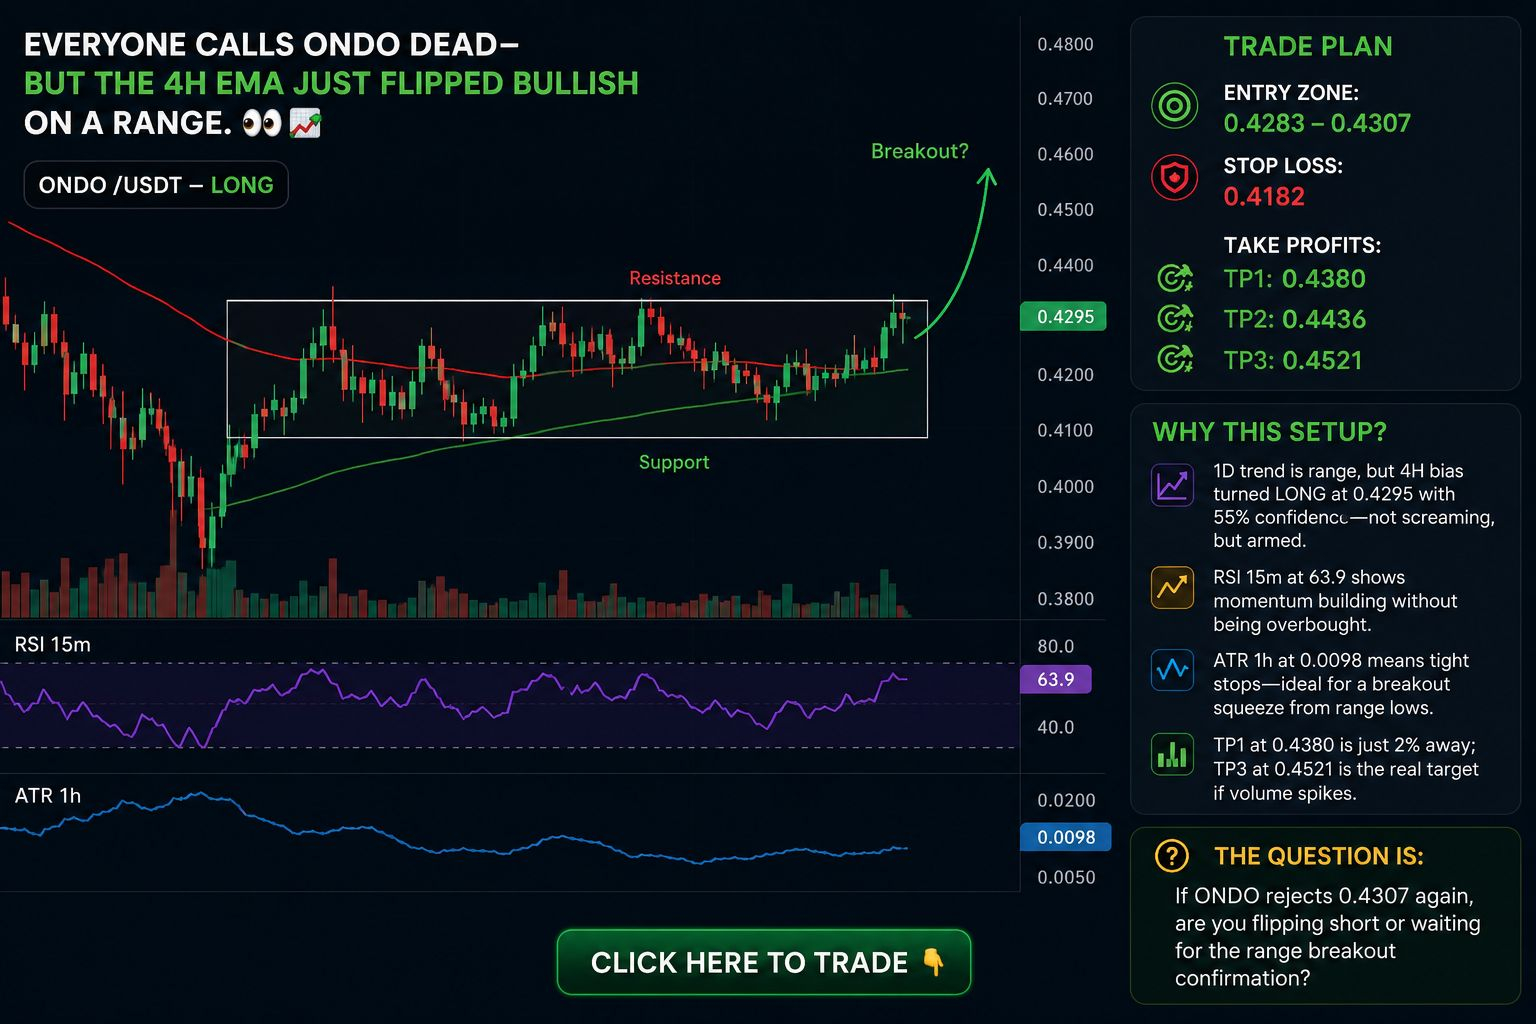
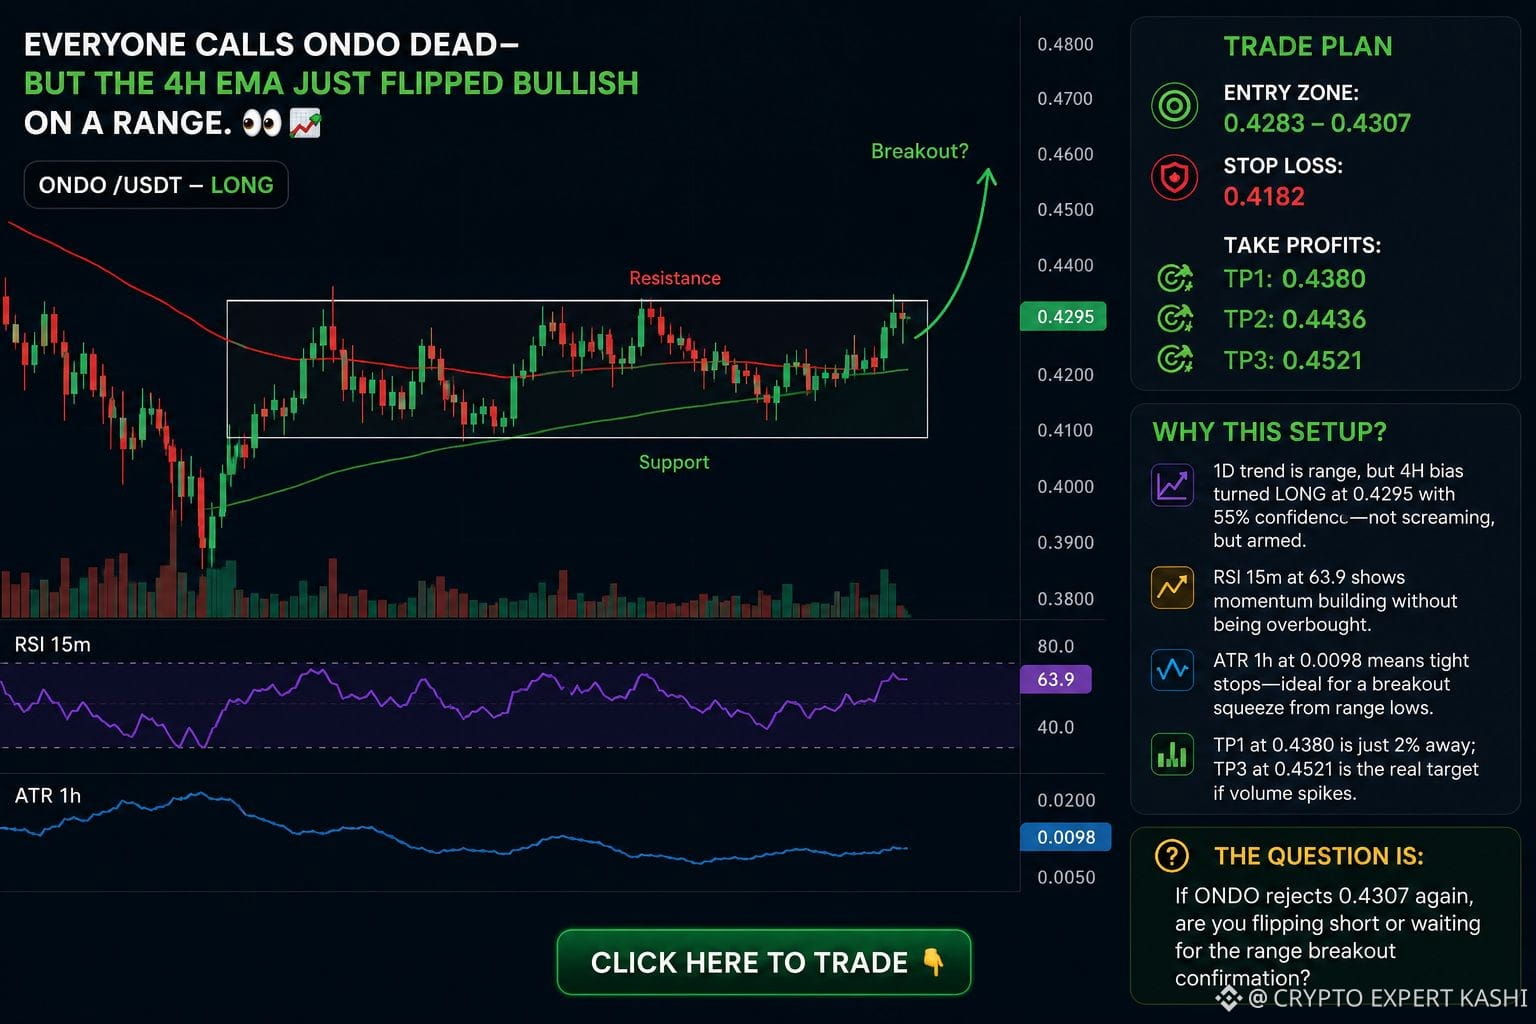
BullishEveryone’s calling ONDO dead — meanwhile the 4H EMA just flipped bullish inside the range. 👀📈
$ONDO /USDT — LONG 🟢
📍 Entry Zone: 0.4283 – 0.4307
🛑 Stop Loss: 0.4182
🎯 TP1: 0.4380
🎯 TP2: 0.4436
🎯 TP3: 0.4521
Why this setup?
• The 1D trend remains range-bound, but the 4H structure has shifted bullish around 0.4295 with moderate confidence.
• RSI on the 15m timeframe sits at 63.9 — momentum is building without entering overbought territory.
• ATR on the 1H timeframe is only 0.0098, keeping risk tight and creating potential for a breakout squeeze from range lows.
• TP1 offers a quick move of nearly 2%, while TP3 becomes realistic if volume starts accelerating.
Now the question is 👇
If ONDO gets rejected at 0.4307 again, are you flipping short or waiting for the range breakout confirmation?
Click here to Trade 👇️
#ONDO
$ONDO /USDT — LONG 🟢
📍 Entry Zone: 0.4283 – 0.4307
🛑 Stop Loss: 0.4182
🎯 TP1: 0.4380
🎯 TP2: 0.4436
🎯 TP3: 0.4521
Why this setup?
• The 1D trend remains range-bound, but the 4H structure has shifted bullish around 0.4295 with moderate confidence.
• RSI on the 15m timeframe sits at 63.9 — momentum is building without entering overbought territory.
• ATR on the 1H timeframe is only 0.0098, keeping risk tight and creating potential for a breakout squeeze from range lows.
• TP1 offers a quick move of nearly 2%, while TP3 becomes realistic if volume starts accelerating.
Now the question is 👇
If ONDO gets rejected at 0.4307 again, are you flipping short or waiting for the range breakout confirmation?
Click here to Trade 👇️
#ONDO
1
9
·
--
Bullish
Everyone’s calling ONDO dead — meanwhile the 4H EMA just flipped bullish inside the range. 👀📈
$ONDO /USDT — LONG 🟢
📍 Entry Zone: 0.4283 – 0.4307
🛑 Stop Loss: 0.4182
🎯 TP1: 0.4380
🎯 TP2: 0.4436
🎯 TP3: 0.4521
Why this setup?
• The 1D trend remains range-bound, but the 4H structure has shifted bullish around 0.4295 with moderate confidence.
• RSI on the 15m timeframe sits at 63.9 — momentum is building without entering overbought territory.
• ATR on the 1H timeframe is only 0.0098, keeping risk tight and creating potential for a breakout squeeze from range lows.
• TP1 offers a quick move of nearly 2%, while TP3 becomes realistic if volume starts accelerating.
Now the question is 👇
If ONDO gets rejected at 0.4307 again, are you flipping short or waiting for the range breakout confirmation?
Click here to Trade 👇️
{future}(ONDOUSDT)
#ONDO
Everyone’s calling ONDO dead — meanwhile the 4H EMA just flipped bullish inside the range. 👀📈
$ONDO /USDT — LONG 🟢
📍 Entry Zone: 0.4283 – 0.4307
🛑 Stop Loss: 0.4182
🎯 TP1: 0.4380
🎯 TP2: 0.4436
🎯 TP3: 0.4521
Why this setup?
• The 1D trend remains range-bound, but the 4H structure has shifted bullish around 0.4295 with moderate confidence.
• RSI on the 15m timeframe sits at 63.9 — momentum is building without entering overbought territory.
• ATR on the 1H timeframe is only 0.0098, keeping risk tight and creating potential for a breakout squeeze from range lows.
• TP1 offers a quick move of nearly 2%, while TP3 becomes realistic if volume starts accelerating.
Now the question is 👇
If ONDO gets rejected at 0.4307 again, are you flipping short or waiting for the range breakout confirmation?
Click here to Trade 👇️
#ONDO
$ONDO /USDT — LONG 🟢
📍 Entry Zone: 0.4283 – 0.4307
🛑 Stop Loss: 0.4182
🎯 TP1: 0.4380
🎯 TP2: 0.4436
🎯 TP3: 0.4521
Why this setup?
• The 1D trend remains range-bound, but the 4H structure has shifted bullish around 0.4295 with moderate confidence.
• RSI on the 15m timeframe sits at 63.9 — momentum is building without entering overbought territory.
• ATR on the 1H timeframe is only 0.0098, keeping risk tight and creating potential for a breakout squeeze from range lows.
• TP1 offers a quick move of nearly 2%, while TP3 becomes realistic if volume starts accelerating.
Now the question is 👇
If ONDO gets rejected at 0.4307 again, are you flipping short or waiting for the range breakout confirmation?
Click here to Trade 👇️
#ONDO
1
160
·
--
Bullish
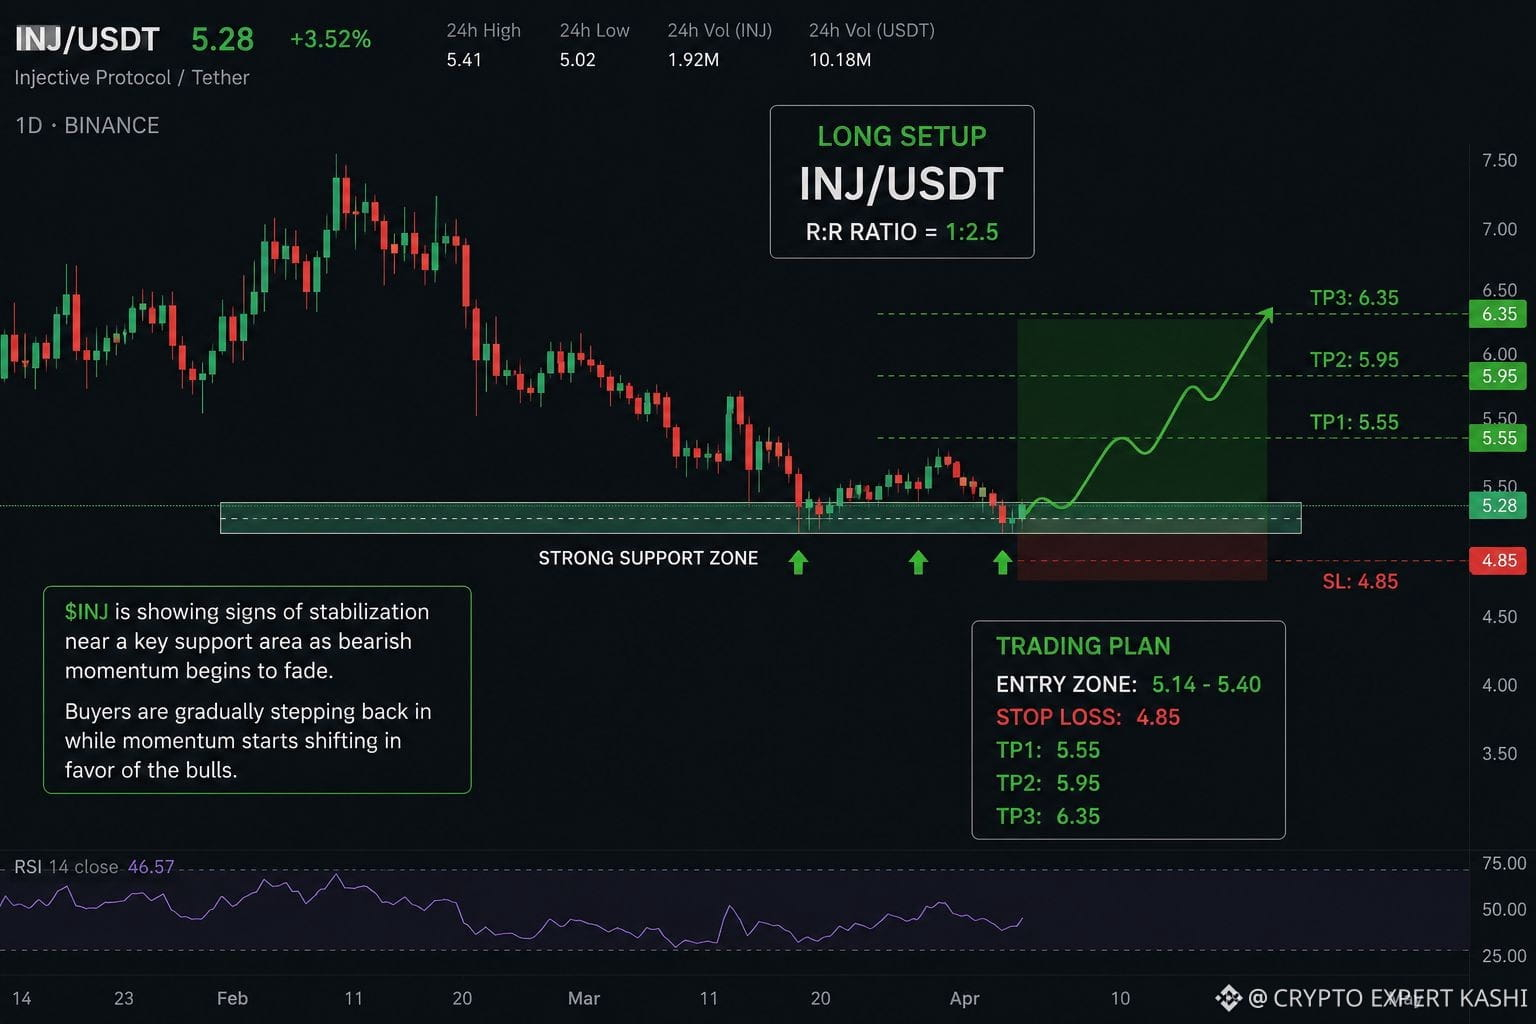
$INJ is showing signs of stabilization near a key support area as bearish momentum begins to fade. 📈
Trading Plan — LONG $INJ
📍 Entry Zone: 5.14 – 5.40
🛑 Stop Loss: 4.85
🎯 TP1: 5.55
🎯 TP2: 5.95
🎯 TP3: 6.35
The latest correction appears healthy rather than panic-driven, with sellers losing strength as price holds firmly around support. Buyers are gradually stepping back in while momentum starts shifting in favor of the bulls. If this level remains protected, $INJ could see a stronger upside continuation with increasing momentum.
Trade $INJ here 👇
{future}(INJUSDT)
#inj
$INJ is showing signs of stabilization near a key support area as bearish momentum begins to fade. 📈
Trading Plan — LONG $INJ
📍 Entry Zone: 5.14 – 5.40
🛑 Stop Loss: 4.85
🎯 TP1: 5.55
🎯 TP2: 5.95
🎯 TP3: 6.35
The latest correction appears healthy rather than panic-driven, with sellers losing strength as price holds firmly around support. Buyers are gradually stepping back in while momentum starts shifting in favor of the bulls. If this level remains protected, $INJ could see a stronger upside continuation with increasing momentum.
Trade $INJ here 👇
#inj
Trading Plan — LONG $INJ
📍 Entry Zone: 5.14 – 5.40
🛑 Stop Loss: 4.85
🎯 TP1: 5.55
🎯 TP2: 5.95
🎯 TP3: 6.35
The latest correction appears healthy rather than panic-driven, with sellers losing strength as price holds firmly around support. Buyers are gradually stepping back in while momentum starts shifting in favor of the bulls. If this level remains protected, $INJ could see a stronger upside continuation with increasing momentum.
Trade $INJ here 👇
#inj
7
·
--
Bullish
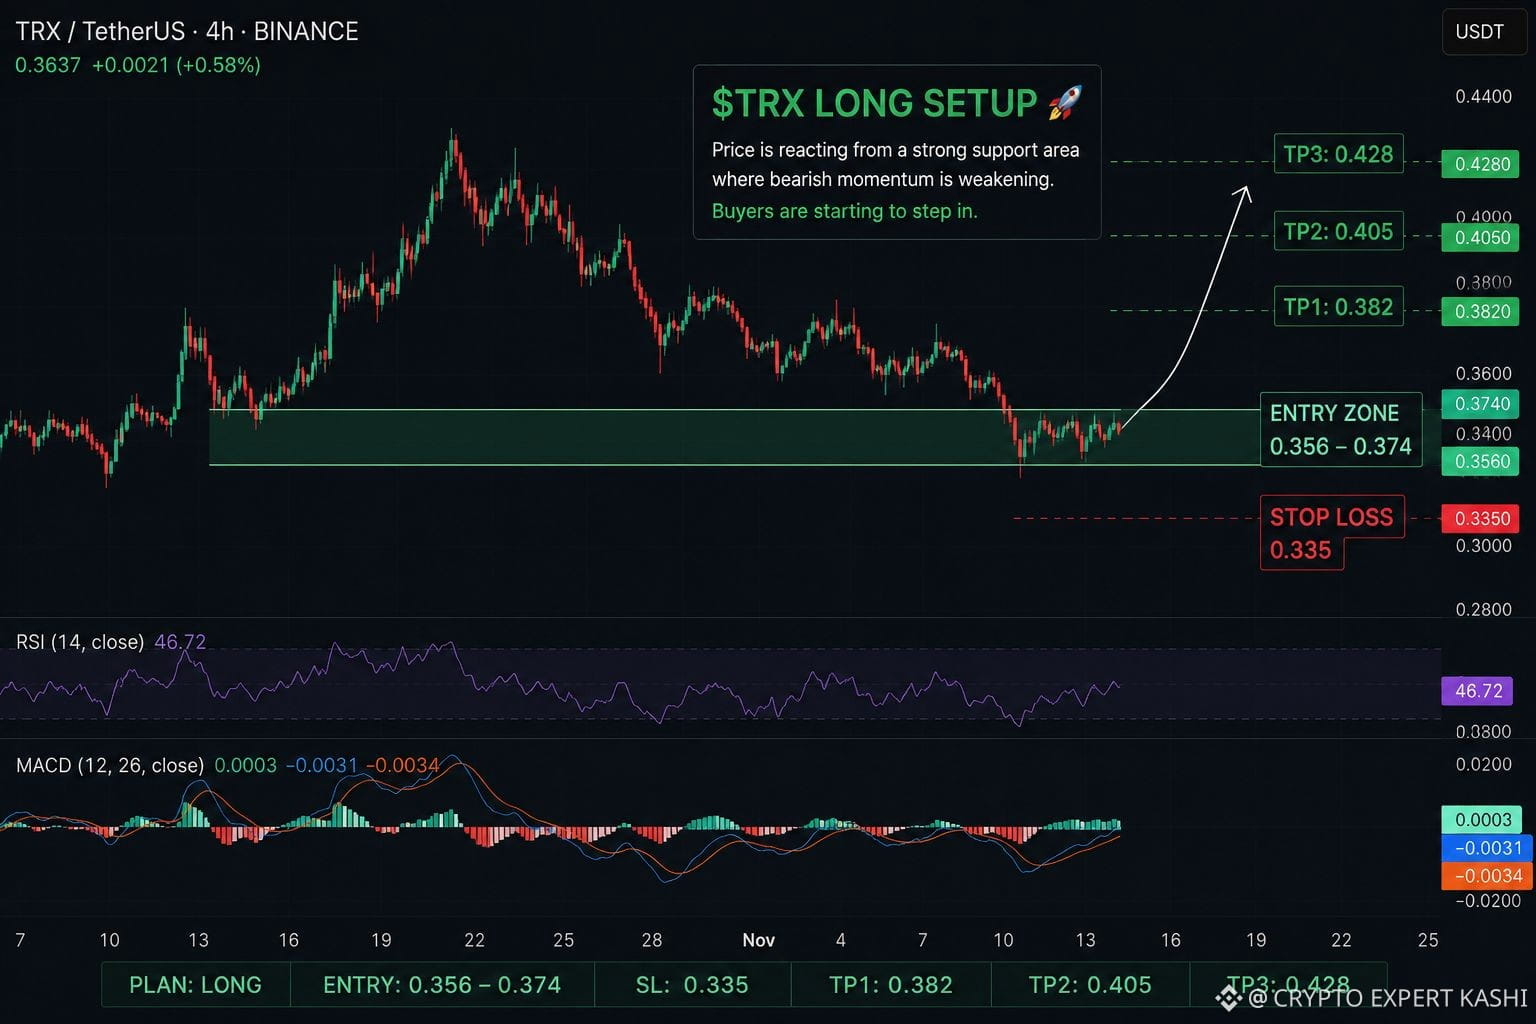
$TRX is showing signs of stabilization as price reacts from a strong support area where bearish momentum appears to be weakening. 📈
Trading Plan — LONG $TRX
📍 Entry Zone: 0.356 – 0.374
🛑 Stop Loss: 0.335
🎯 TP1: 0.382
🎯 TP2: 0.405
🎯 TP3: 0.428
The recent correction appears measured rather than panic-driven, with selling pressure gradually fading as price holds above support. Buyers are beginning to step back in while momentum slowly shifts in favor of the bulls. If this support zone remains intact, $TRX could build enough strength for a continuation move toward higher targets.
Trade $TRX here 👇
{future}(TRXUSDT)
#TRX #TRX✅
$TRX is showing signs of stabilization as price reacts from a strong support area where bearish momentum appears to be weakening. 📈
Trading Plan — LONG $TRX
📍 Entry Zone: 0.356 – 0.374
🛑 Stop Loss: 0.335
🎯 TP1: 0.382
🎯 TP2: 0.405
🎯 TP3: 0.428
The recent correction appears measured rather than panic-driven, with selling pressure gradually fading as price holds above support. Buyers are beginning to step back in while momentum slowly shifts in favor of the bulls. If this support zone remains intact, $TRX could build enough strength for a continuation move toward higher targets.
Trade $TRX here 👇
#TRX #TRX✅
Trading Plan — LONG $TRX
📍 Entry Zone: 0.356 – 0.374
🛑 Stop Loss: 0.335
🎯 TP1: 0.382
🎯 TP2: 0.405
🎯 TP3: 0.428
The recent correction appears measured rather than panic-driven, with selling pressure gradually fading as price holds above support. Buyers are beginning to step back in while momentum slowly shifts in favor of the bulls. If this support zone remains intact, $TRX could build enough strength for a continuation move toward higher targets.
Trade $TRX here 👇
#TRX #TRX✅
1
1
76
·
--
Bullish
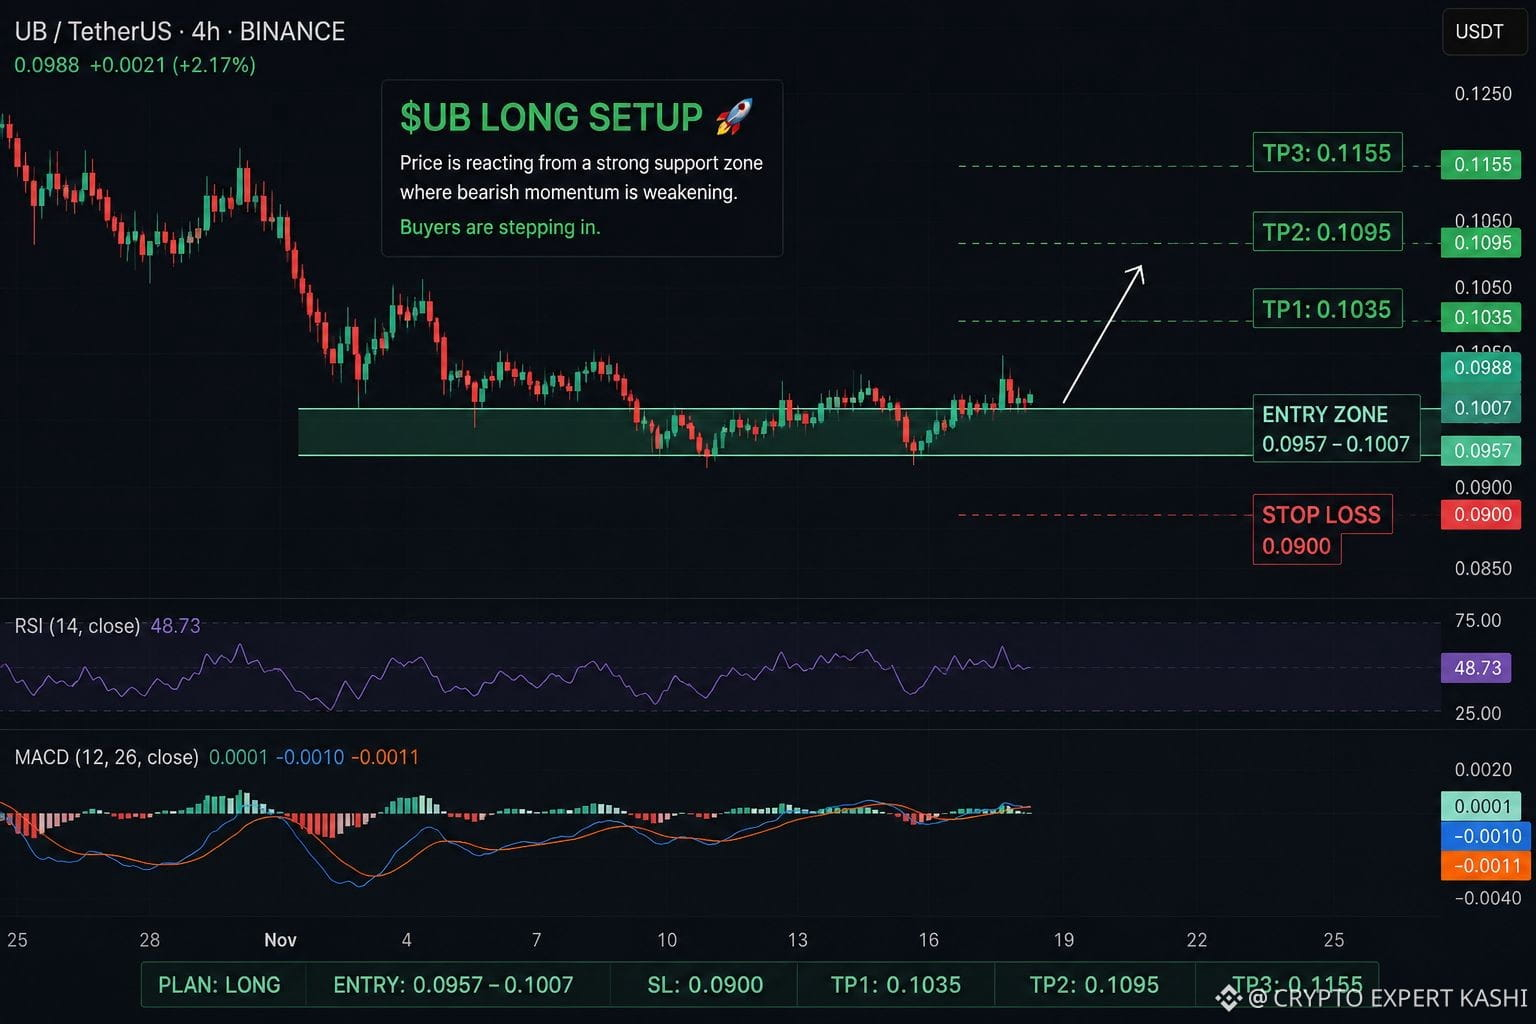
$UB is showing signs of strength as price reacts from a key support zone where bearish momentum appears to be fading. 📈
Trading Plan — LONG $UB
📍 Entry Zone: 0.0957 – 0.1007
🛑 Stop Loss: 0.0900
🎯 TP1: 0.1035
🎯 TP2: 0.1095
🎯 TP3: 0.1155
The latest correction appears healthy rather than impulsive, with sellers gradually losing control as price stabilizes around support. Buying interest is starting to increase beneath this area while momentum slowly shifts back in favor of the bulls. If support remains intact, $UB could see a stronger continuation move toward higher targets.
Trade $UB here 👇
{future}(UBUSDT)
#ub
$UB is showing signs of strength as price reacts from a key support zone where bearish momentum appears to be fading. 📈
Trading Plan — LONG $UB
📍 Entry Zone: 0.0957 – 0.1007
🛑 Stop Loss: 0.0900
🎯 TP1: 0.1035
🎯 TP2: 0.1095
🎯 TP3: 0.1155
The latest correction appears healthy rather than impulsive, with sellers gradually losing control as price stabilizes around support. Buying interest is starting to increase beneath this area while momentum slowly shifts back in favor of the bulls. If support remains intact, $UB could see a stronger continuation move toward higher targets.
Trade $UB here 👇
#ub
Trading Plan — LONG $UB
📍 Entry Zone: 0.0957 – 0.1007
🛑 Stop Loss: 0.0900
🎯 TP1: 0.1035
🎯 TP2: 0.1095
🎯 TP3: 0.1155
The latest correction appears healthy rather than impulsive, with sellers gradually losing control as price stabilizes around support. Buying interest is starting to increase beneath this area while momentum slowly shifts back in favor of the bulls. If support remains intact, $UB could see a stronger continuation move toward higher targets.
Trade $UB here 👇
#ub
199
·
--
Bullish
$2Z — The Signal That Exploded 🚀
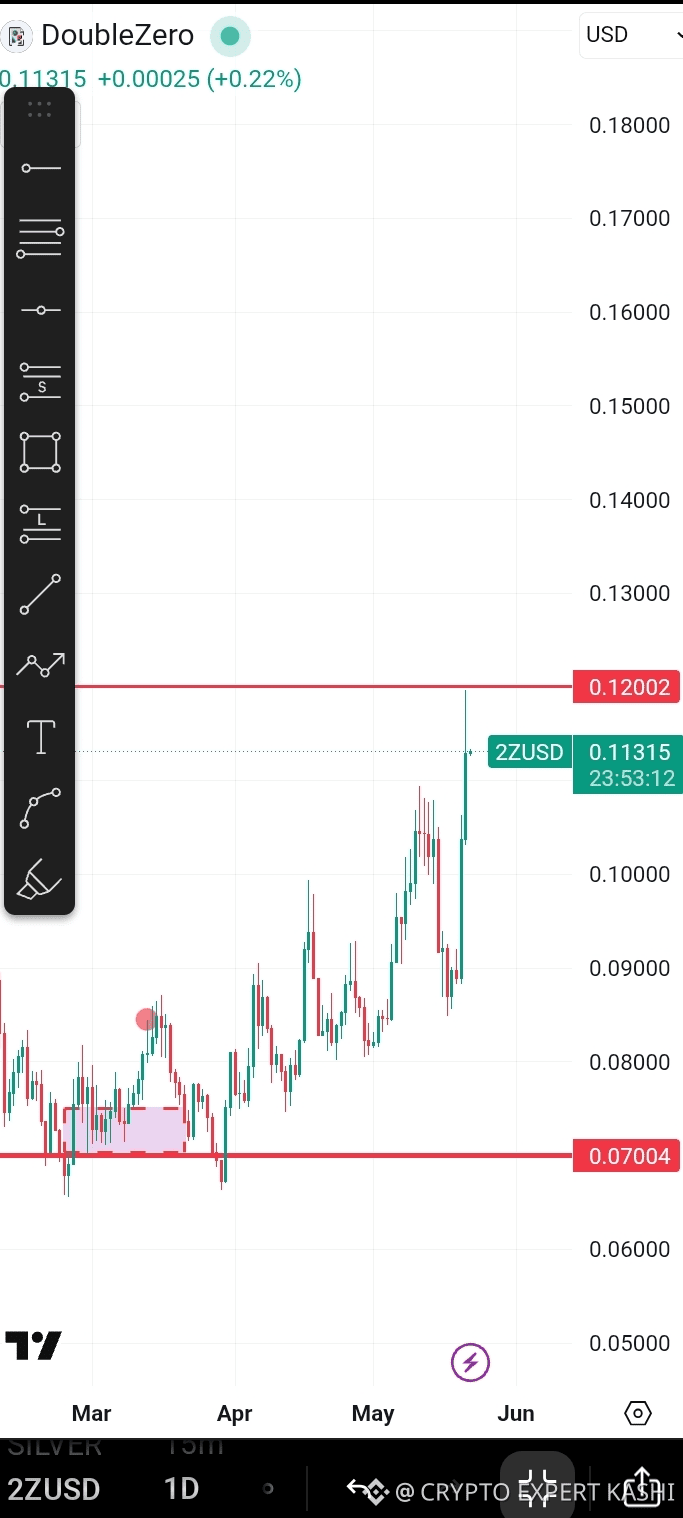
A few days ago, I shared a signal on $2ZUSD (DoubleZero) when the chart structure was quietly building strength inside a strong accumulation range. Today, the market delivered exactly what the setup was hinting at — a powerful breakout with massive bullish momentum. 📈
Why the Setup Was Important
The chart was showing several bullish signs before the move:
Strong support holding near the 0.070 zone
Higher lows forming consistently
Buyers slowly gaining control
Momentum building beneath key resistance
Once price broke above resistance, the move accelerated quickly and entered a strong expansion phase. Traders who followed the setup early are now sitting in a solid move.
What Happened Next?
After the breakout confirmation:
Volume increased sharply 📊
Momentum candles appeared one after another
Sellers failed to push price back down
Market sentiment turned aggressively bullish
Price surged toward the major resistance area near 0.120, delivering a huge move in a short time.
Lesson From This Trade
The biggest opportunities often appear when:
The market is quiet
Price is consolidating
Smart money is accumulating before expansion
Patience and proper analysis matter more than chasing pumps after they already happen.
Final Thoughts
$2ZUSD proved once again that disciplined technical analysis can identify explosive moves before the crowd notices them. The signal was clean, the structure was strong, and the breakout delivered exactly as expected. 🔥
Sometimes the best trades are the ones everyone ignores — until they suddenly become the biggest movers in the market.
{future}(2ZUSDT)
#2Z
$2Z — The Signal That Exploded 🚀
A few days ago, I shared a signal on $2ZUSD (DoubleZero) when the chart structure was quietly building strength inside a strong accumulation range. Today, the market delivered exactly what the setup was hinting at — a powerful breakout with massive bullish momentum. 📈
Why the Setup Was Important
The chart was showing several bullish signs before the move:
Strong support holding near the 0.070 zone
Higher lows forming consistently
Buyers slowly gaining control
Momentum building beneath key resistance
Once price broke above resistance, the move accelerated quickly and entered a strong expansion phase. Traders who followed the setup early are now sitting in a solid move.
What Happened Next?
After the breakout confirmation:
Volume increased sharply 📊
Momentum candles appeared one after another
Sellers failed to push price back down
Market sentiment turned aggressively bullish
Price surged toward the major resistance area near 0.120, delivering a huge move in a short time.
Lesson From This Trade
The biggest opportunities often appear when:
The market is quiet
Price is consolidating
Smart money is accumulating before expansion
Patience and proper analysis matter more than chasing pumps after they already happen.
Final Thoughts
$2ZUSD proved once again that disciplined technical analysis can identify explosive moves before the crowd notices them. The signal was clean, the structure was strong, and the breakout delivered exactly as expected. 🔥
Sometimes the best trades are the ones everyone ignores — until they suddenly become the biggest movers in the market.
#2Z
A few days ago, I shared a signal on $2ZUSD (DoubleZero) when the chart structure was quietly building strength inside a strong accumulation range. Today, the market delivered exactly what the setup was hinting at — a powerful breakout with massive bullish momentum. 📈
Why the Setup Was Important
The chart was showing several bullish signs before the move:
Strong support holding near the 0.070 zone
Higher lows forming consistently
Buyers slowly gaining control
Momentum building beneath key resistance
Once price broke above resistance, the move accelerated quickly and entered a strong expansion phase. Traders who followed the setup early are now sitting in a solid move.
What Happened Next?
After the breakout confirmation:
Volume increased sharply 📊
Momentum candles appeared one after another
Sellers failed to push price back down
Market sentiment turned aggressively bullish
Price surged toward the major resistance area near 0.120, delivering a huge move in a short time.
Lesson From This Trade
The biggest opportunities often appear when:
The market is quiet
Price is consolidating
Smart money is accumulating before expansion
Patience and proper analysis matter more than chasing pumps after they already happen.
Final Thoughts
$2ZUSD proved once again that disciplined technical analysis can identify explosive moves before the crowd notices them. The signal was clean, the structure was strong, and the breakout delivered exactly as expected. 🔥
Sometimes the best trades are the ones everyone ignores — until they suddenly become the biggest movers in the market.
#2Z
CRYPTO EXPERT KASHI
·
--
Bullish$2Z USDT is going to pump well, so everyone should buy at the support trade.
TRADING PLAN : SPOT BUYING
ENTRY PRICE : 0.072 : 0.073
TP : 0.12
Along with spot buying, you can also do future buying.
$2Z 👇
TRADING PLAN : SPOT BUYING
ENTRY PRICE : 0.072 : 0.073
TP : 0.12
Along with spot buying, you can also do future buying.
$2Z 👇
1
187
·
--
Bearish
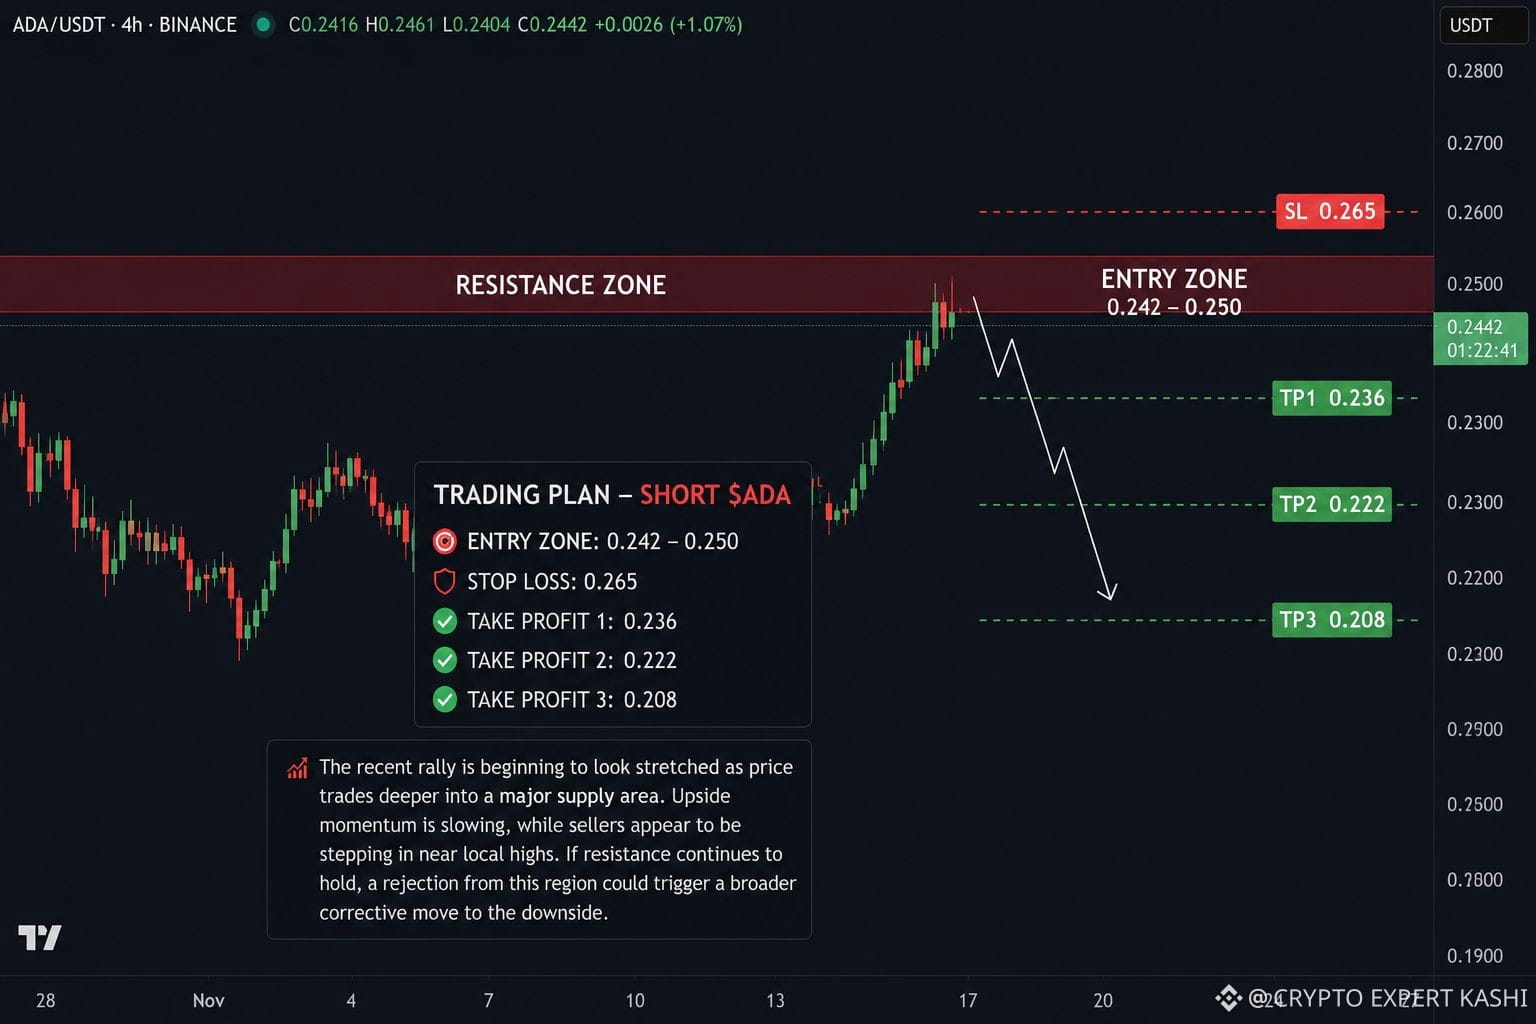
$ADA is moving into a key resistance zone where bullish momentum may be starting to weaken. 📉
Trading Plan — SHORT $ADA
📍 Entry Zone: 0.242 – 0.250
🛑 Stop Loss: 0.265
🎯 TP1: 0.236
🎯 TP2: 0.222
🎯 TP3: 0.208
The recent rally is beginning to look stretched as price trades deeper into a major supply area. Upside momentum is slowing, while sellers appear to be stepping in near local highs. If resistance continues to hold, a rejection from this region could trigger a broader corrective move to the downside.
Trade $ADA here 👇 $BANANAS31
{future}(ADAUSDT)
#ada
$ADA is moving into a key resistance zone where bullish momentum may be starting to weaken. 📉
Trading Plan — SHORT $ADA
📍 Entry Zone: 0.242 – 0.250
🛑 Stop Loss: 0.265
🎯 TP1: 0.236
🎯 TP2: 0.222
🎯 TP3: 0.208
The recent rally is beginning to look stretched as price trades deeper into a major supply area. Upside momentum is slowing, while sellers appear to be stepping in near local highs. If resistance continues to hold, a rejection from this region could trigger a broader corrective move to the downside.
Trade $ADA here 👇 $BANANAS31
#ada
Trading Plan — SHORT $ADA
📍 Entry Zone: 0.242 – 0.250
🛑 Stop Loss: 0.265
🎯 TP1: 0.236
🎯 TP2: 0.222
🎯 TP3: 0.208
The recent rally is beginning to look stretched as price trades deeper into a major supply area. Upside momentum is slowing, while sellers appear to be stepping in near local highs. If resistance continues to hold, a rejection from this region could trigger a broader corrective move to the downside.
Trade $ADA here 👇 $BANANAS31
#ada
33
·
--
Bearish
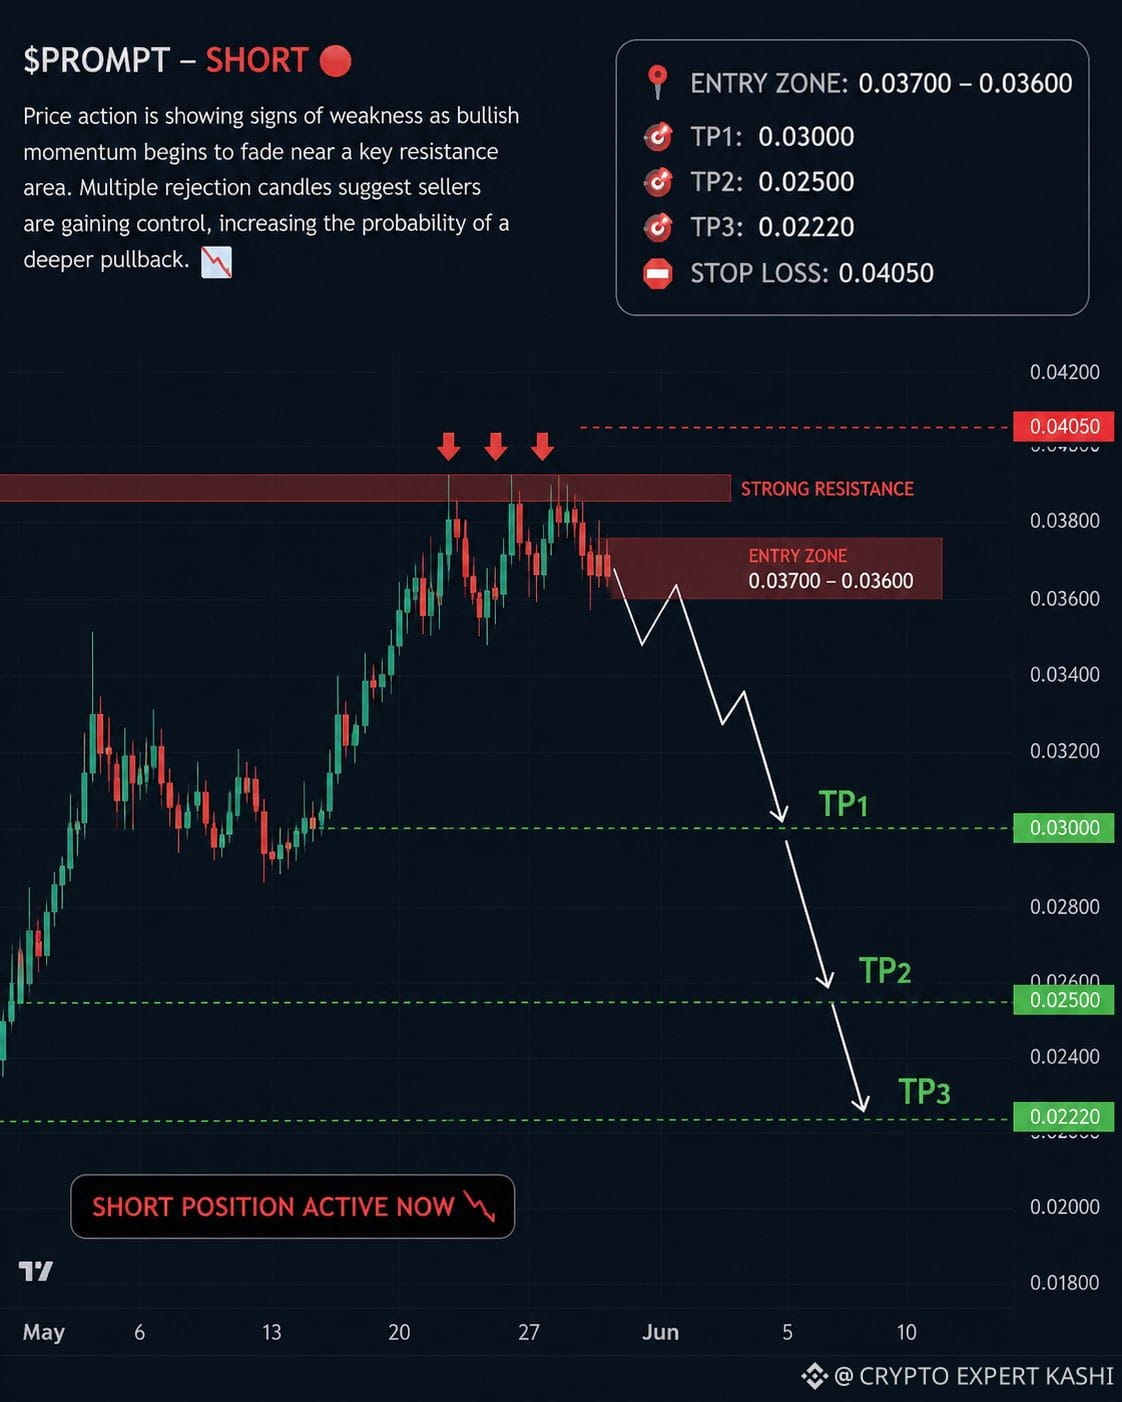
$PROMPT — SHORT 🔴
Price action is showing signs of weakness as bullish momentum begins to fade near a key resistance area. Multiple rejection candles suggest sellers are gaining control, increasing the probability of a deeper pullback. 📉
📍 ENTRY ZONE: 0.03700 – 0.03600
🎯 TP1: 0.03000
🎯 TP2: 0.02500
🎯 TP3: 0.02220
🛑 STOP LOSS: 0.04050
$PROMPT — SHORT POSITION ACTIVE NOW 👇 $BNB
{future}(PROMPTUSDT)
#PROMPT
$PROMPT — SHORT 🔴
Price action is showing signs of weakness as bullish momentum begins to fade near a key resistance area. Multiple rejection candles suggest sellers are gaining control, increasing the probability of a deeper pullback. 📉
📍 ENTRY ZONE: 0.03700 – 0.03600
🎯 TP1: 0.03000
🎯 TP2: 0.02500
🎯 TP3: 0.02220
🛑 STOP LOSS: 0.04050
$PROMPT — SHORT POSITION ACTIVE NOW 👇 $BNB
#PROMPT
Price action is showing signs of weakness as bullish momentum begins to fade near a key resistance area. Multiple rejection candles suggest sellers are gaining control, increasing the probability of a deeper pullback. 📉
📍 ENTRY ZONE: 0.03700 – 0.03600
🎯 TP1: 0.03000
🎯 TP2: 0.02500
🎯 TP3: 0.02220
🛑 STOP LOSS: 0.04050
$PROMPT — SHORT POSITION ACTIVE NOW 👇 $BNB
#PROMPT
137
·
--
Bearish
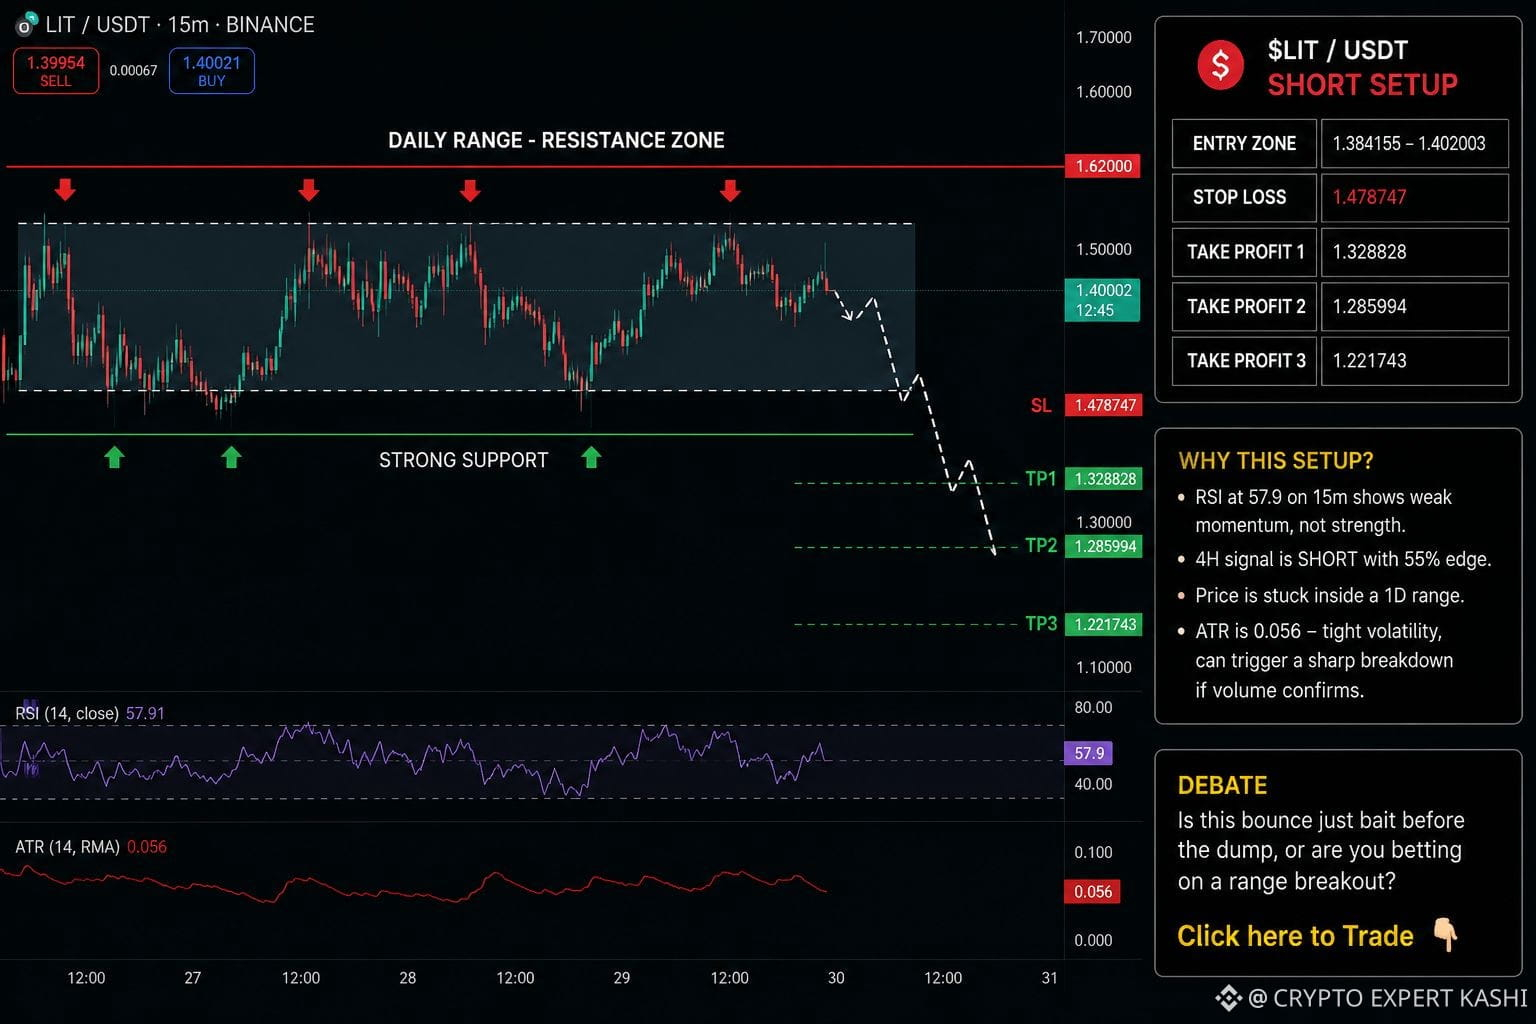
Insiders may be fading this $LIT/USDT bounce — and the move could be setting up a trap many traders are missing 👀
🔴 $LIT — SHORT
📍 Entry Zone: 1.384155 – 1.402003
🛑 Stop Loss: 1.478747
🎯 TP1: 1.328828
🎯 TP2: 1.285994
🎯 TP3: 1.221743
📊 Why this setup?
RSI sits at 57.9 on the 15m timeframe, showing momentum that looks moderate rather than strongly bullish. The 4H bias remains SHORT with a reported 55% edge, while price continues trading inside a broader daily range.
The current setup focuses on the 1.384–1.402 entry area, with downside targets positioned below current price action. ATR at 0.056 suggests volatility is compressed, which can sometimes lead to a sharp move if volume begins supporting a breakdown.
💭 Debate:
Is this bounce simply a temporary move before another drop, or are buyers preparing for a breakout beyond the range?
Click here to Trade 👇️ $LIT $BTC
{future}(LITUSDT)
#Lıt
Insiders may be fading this $LIT /USDT bounce — and the move could be setting up a trap many traders are missing 👀
🔴 $LIT — SHORT
📍 Entry Zone: 1.384155 – 1.402003
🛑 Stop Loss: 1.478747
🎯 TP1: 1.328828
🎯 TP2: 1.285994
🎯 TP3: 1.221743
📊 Why this setup?
RSI sits at 57.9 on the 15m timeframe, showing momentum that looks moderate rather than strongly bullish. The 4H bias remains SHORT with a reported 55% edge, while price continues trading inside a broader daily range.
The current setup focuses on the 1.384–1.402 entry area, with downside targets positioned below current price action. ATR at 0.056 suggests volatility is compressed, which can sometimes lead to a sharp move if volume begins supporting a breakdown.
💭 Debate:
Is this bounce simply a temporary move before another drop, or are buyers preparing for a breakout beyond the range?
Click here to Trade 👇️ $LIT $BTC
#Lıt
🔴 $LIT — SHORT
📍 Entry Zone: 1.384155 – 1.402003
🛑 Stop Loss: 1.478747
🎯 TP1: 1.328828
🎯 TP2: 1.285994
🎯 TP3: 1.221743
📊 Why this setup?
RSI sits at 57.9 on the 15m timeframe, showing momentum that looks moderate rather than strongly bullish. The 4H bias remains SHORT with a reported 55% edge, while price continues trading inside a broader daily range.
The current setup focuses on the 1.384–1.402 entry area, with downside targets positioned below current price action. ATR at 0.056 suggests volatility is compressed, which can sometimes lead to a sharp move if volume begins supporting a breakdown.
💭 Debate:
Is this bounce simply a temporary move before another drop, or are buyers preparing for a breakout beyond the range?
Click here to Trade 👇️ $LIT $BTC
#Lıt
1
2
166
·
--
Bullish
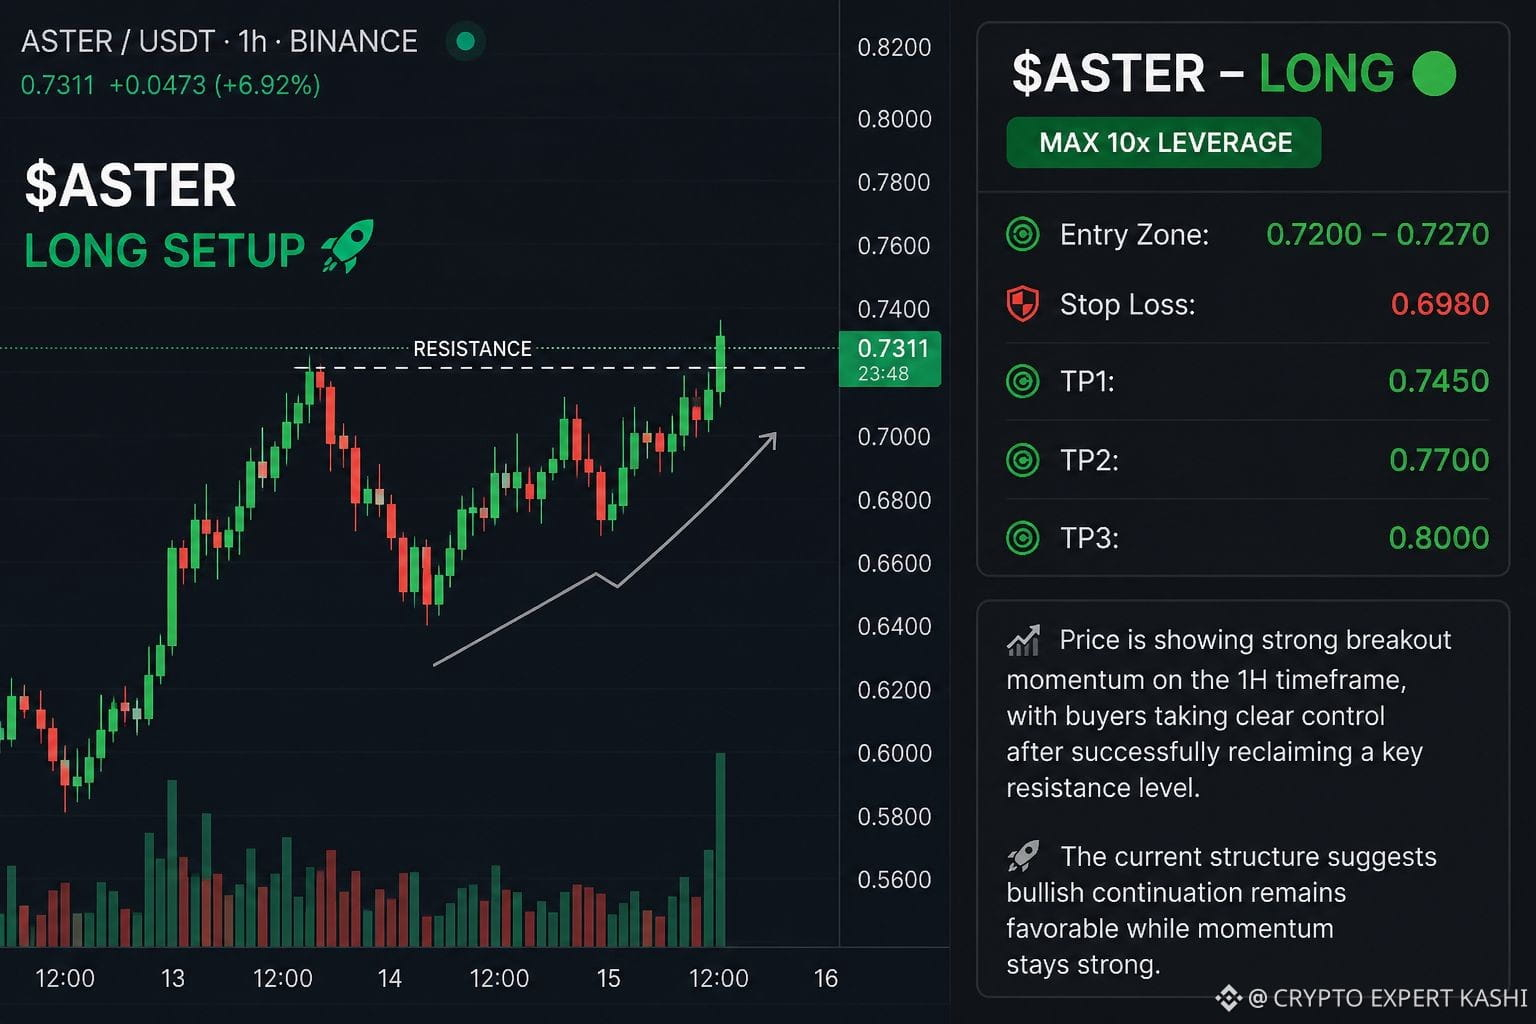
Did I mention $ASTER before? I was calling it multiple times around $0.60 👀
$ASTER — LONG 🟢 (Max 10x Leverage)
📍 Entry Zone: 0.7200 – 0.7270
🛑 Stop Loss: 0.6980
🎯 TP1: 0.7450
🎯 TP2: 0.7700
🎯 TP3: 0.8000
Price is showing strong breakout momentum on the 1H timeframe, with buyers taking clear control after successfully reclaiming a key resistance level. The current structure suggests bullish continuation remains favorable while momentum stays strong. 🚀📈 $ETH
{future}(ASTERUSDT)
#aster #btc
Did I mention $ASTER before? I was calling it multiple times around $0.60 👀
$ASTER — LONG 🟢 (Max 10x Leverage)
📍 Entry Zone: 0.7200 – 0.7270
🛑 Stop Loss: 0.6980
🎯 TP1: 0.7450
🎯 TP2: 0.7700
🎯 TP3: 0.8000
Price is showing strong breakout momentum on the 1H timeframe, with buyers taking clear control after successfully reclaiming a key resistance level. The current structure suggests bullish continuation remains favorable while momentum stays strong. 🚀📈 $ETH
#aster #btc
$ASTER — LONG 🟢 (Max 10x Leverage)
📍 Entry Zone: 0.7200 – 0.7270
🛑 Stop Loss: 0.6980
🎯 TP1: 0.7450
🎯 TP2: 0.7700
🎯 TP3: 0.8000
Price is showing strong breakout momentum on the 1H timeframe, with buyers taking clear control after successfully reclaiming a key resistance level. The current structure suggests bullish continuation remains favorable while momentum stays strong. 🚀📈 $ETH
#aster #btc
233
Log in to explore more content
Join global crypto users on Binance Square
⚡️ Get latest and useful information about crypto.
💬 Trusted by the world’s largest crypto exchange.
👍 Discover real insights from verified creators.
Email / Phone number
Trending Topics
BinanceLaunchesBinanceIntelligence
197,245 views
1,796 Discussing
#BinanceLaunchesBinanceIntelligence
👉 WHEN AI STOPS JUST TALKING
For years, AI in crypto felt like a smart voice beside the chart. Useful, fast, sometimes impressive, but still separate from the actual machinery of trading.
Binance Intelligence feels like a different chapter.🧠
Binance AI brings market research closer to the user, while AI Pro can turn a plain-language trading idea into a structured workflow that can be tested before deployment. Agent OS pushes the idea further, connecting AI agents with market data, account information and supported trading capabilities. It has already passed 280,000 daily calls.
That creates a new sequence:
Think → research → design → test → approve → execute.
And that final word matters most.
Because the moment AI moves from explaining a market to interacting with it, the conversation changes from intelligence to trust.
A good AI can process information faster than I can. But faster does not automatically mean wiser.
Markets punish mistakes in real time.
So the question I find more interesting than “Can AI trade?” is:
How much authority should we ever give an algorithm over our money? 🤖📊
MoonlitQueen
·1 Likes
·280 views
StriveBuys2000BTCFor$169M
8,697 views
88 Discussing
EvernorthXRPTreasuryCompletesSPACMerger
108,916 views
1,075 Discussing