
Genny Cruz 1
605 Posts

Genny Cruz 1
Report
Block User
Sharing market moves, memes & mindset.
0 Following
3 Followers
1 Liked
Posts
·
--
STARK just gave the chart a little twist 👀
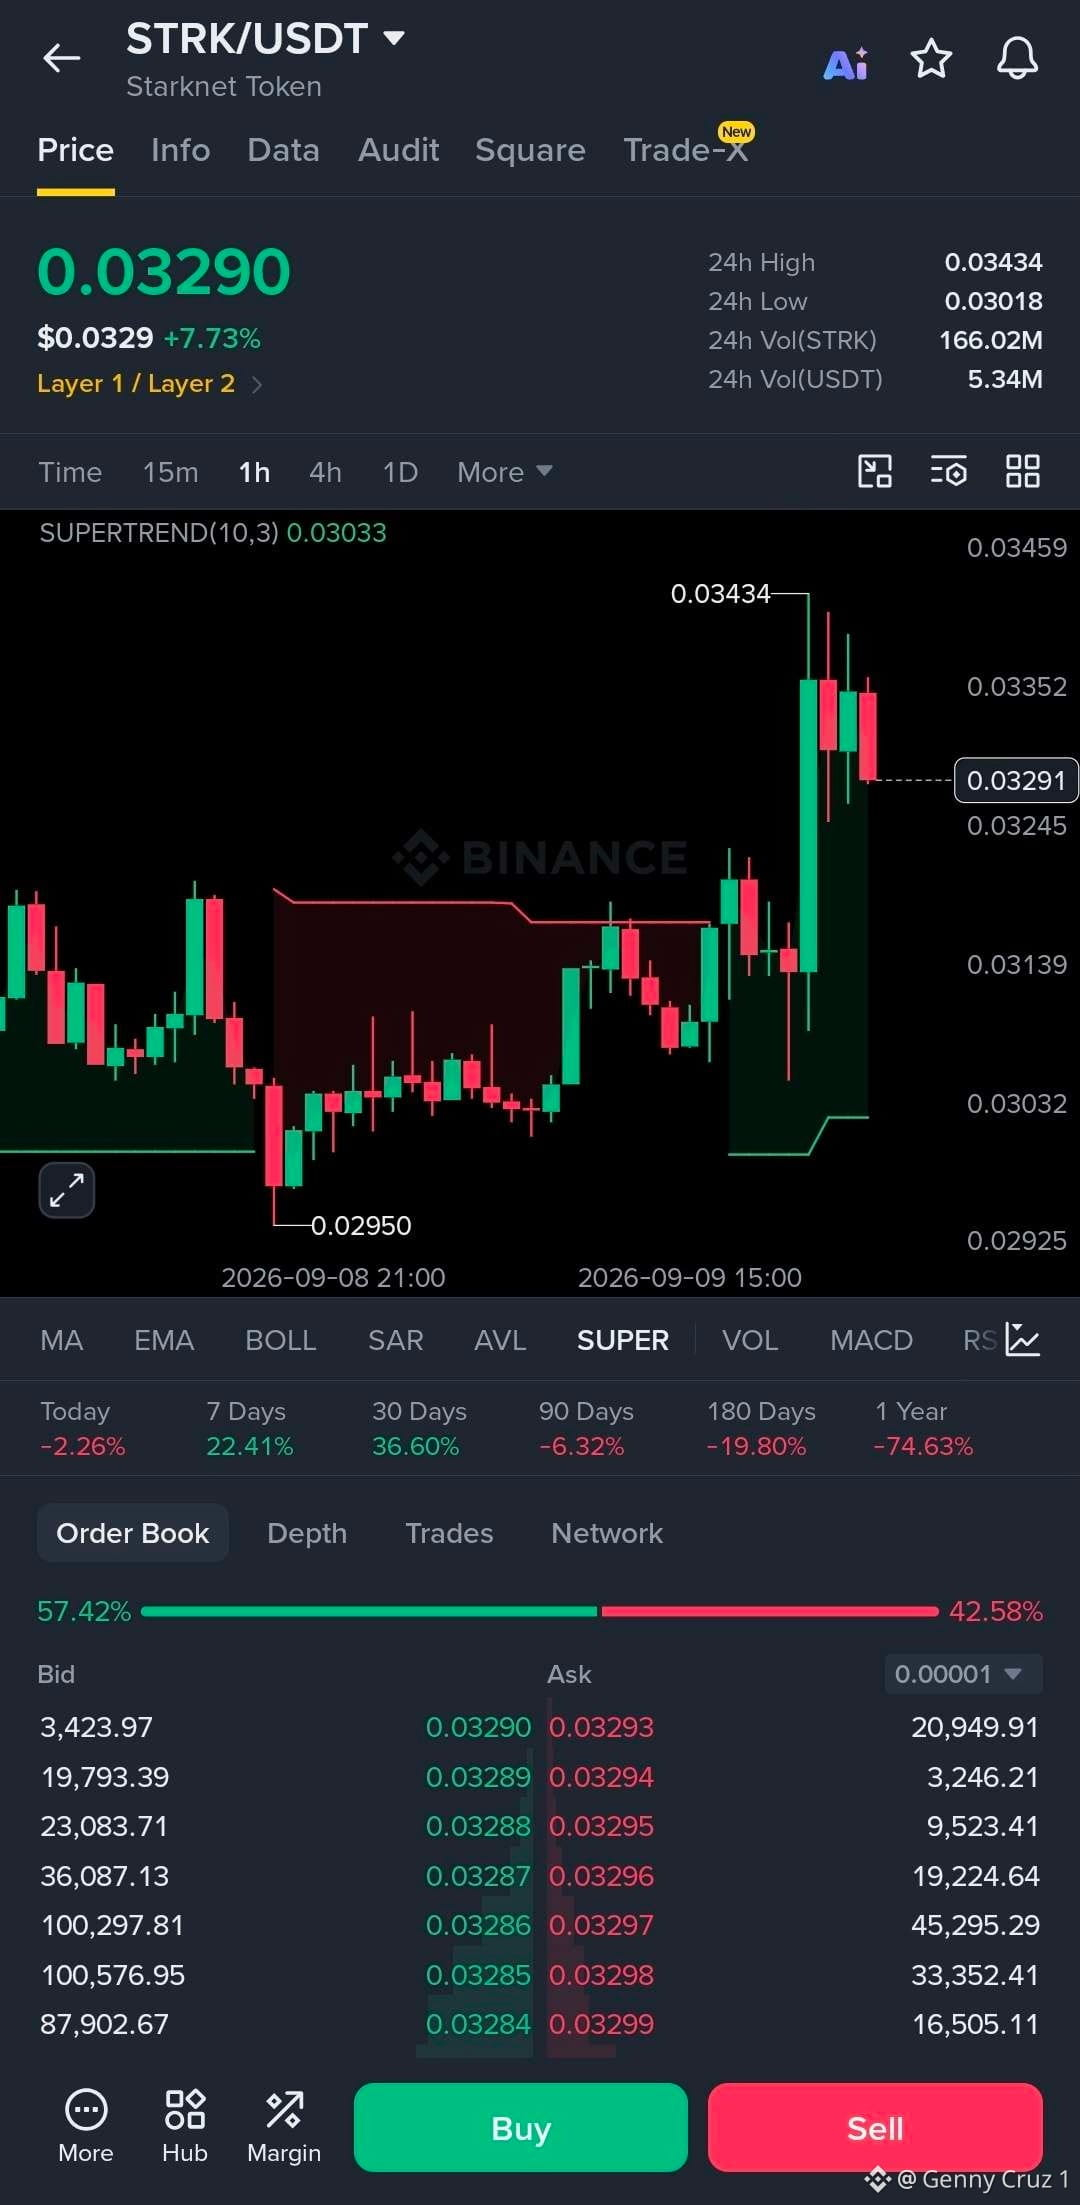
$STRK pushed through $0.0314 and printed $0.03434 before cooling off. The price is still above the Supertrend at $0.03033, so the short term structure remains bullish.
Support: $0.03245 and $0.03033
Resistance: $0.03352 and $0.03434
TP1: $0.03352
TP2: $0.03434
TP3: $0.03550
The order book is still slightly heavy, but I’d want to see volume return before chasing.
If $0.03245 holds, another test of $0.03434 looks possible. Lose $0.03033 and the setup changes quickly.
#STRK
STARK just gave the chart a little twist 👀
$STRK pushed through $0.0314 and printed $0.03434 before cooling off. The price is still above the Supertrend at $0.03033, so the short term structure remains bullish.
Support: $0.03245 and $0.03033
Resistance: $0.03352 and $0.03434
TP1: $0.03352
TP2: $0.03434
TP3: $0.03550
The order book is still slightly heavy, but I’d want to see volume return before chasing.
If $0.03245 holds, another test of $0.03434 looks possible. Lose $0.03033 and the setup changes quickly.
#STRK
$STRK pushed through $0.0314 and printed $0.03434 before cooling off. The price is still above the Supertrend at $0.03033, so the short term structure remains bullish.
Support: $0.03245 and $0.03033
Resistance: $0.03352 and $0.03434
TP1: $0.03352
TP2: $0.03434
TP3: $0.03550
The order book is still slightly heavy, but I’d want to see volume return before chasing.
If $0.03245 holds, another test of $0.03434 looks possible. Lose $0.03033 and the setup changes quickly.
#STRK
18
·
--
$LINK looks like it’s at a decision point 👀
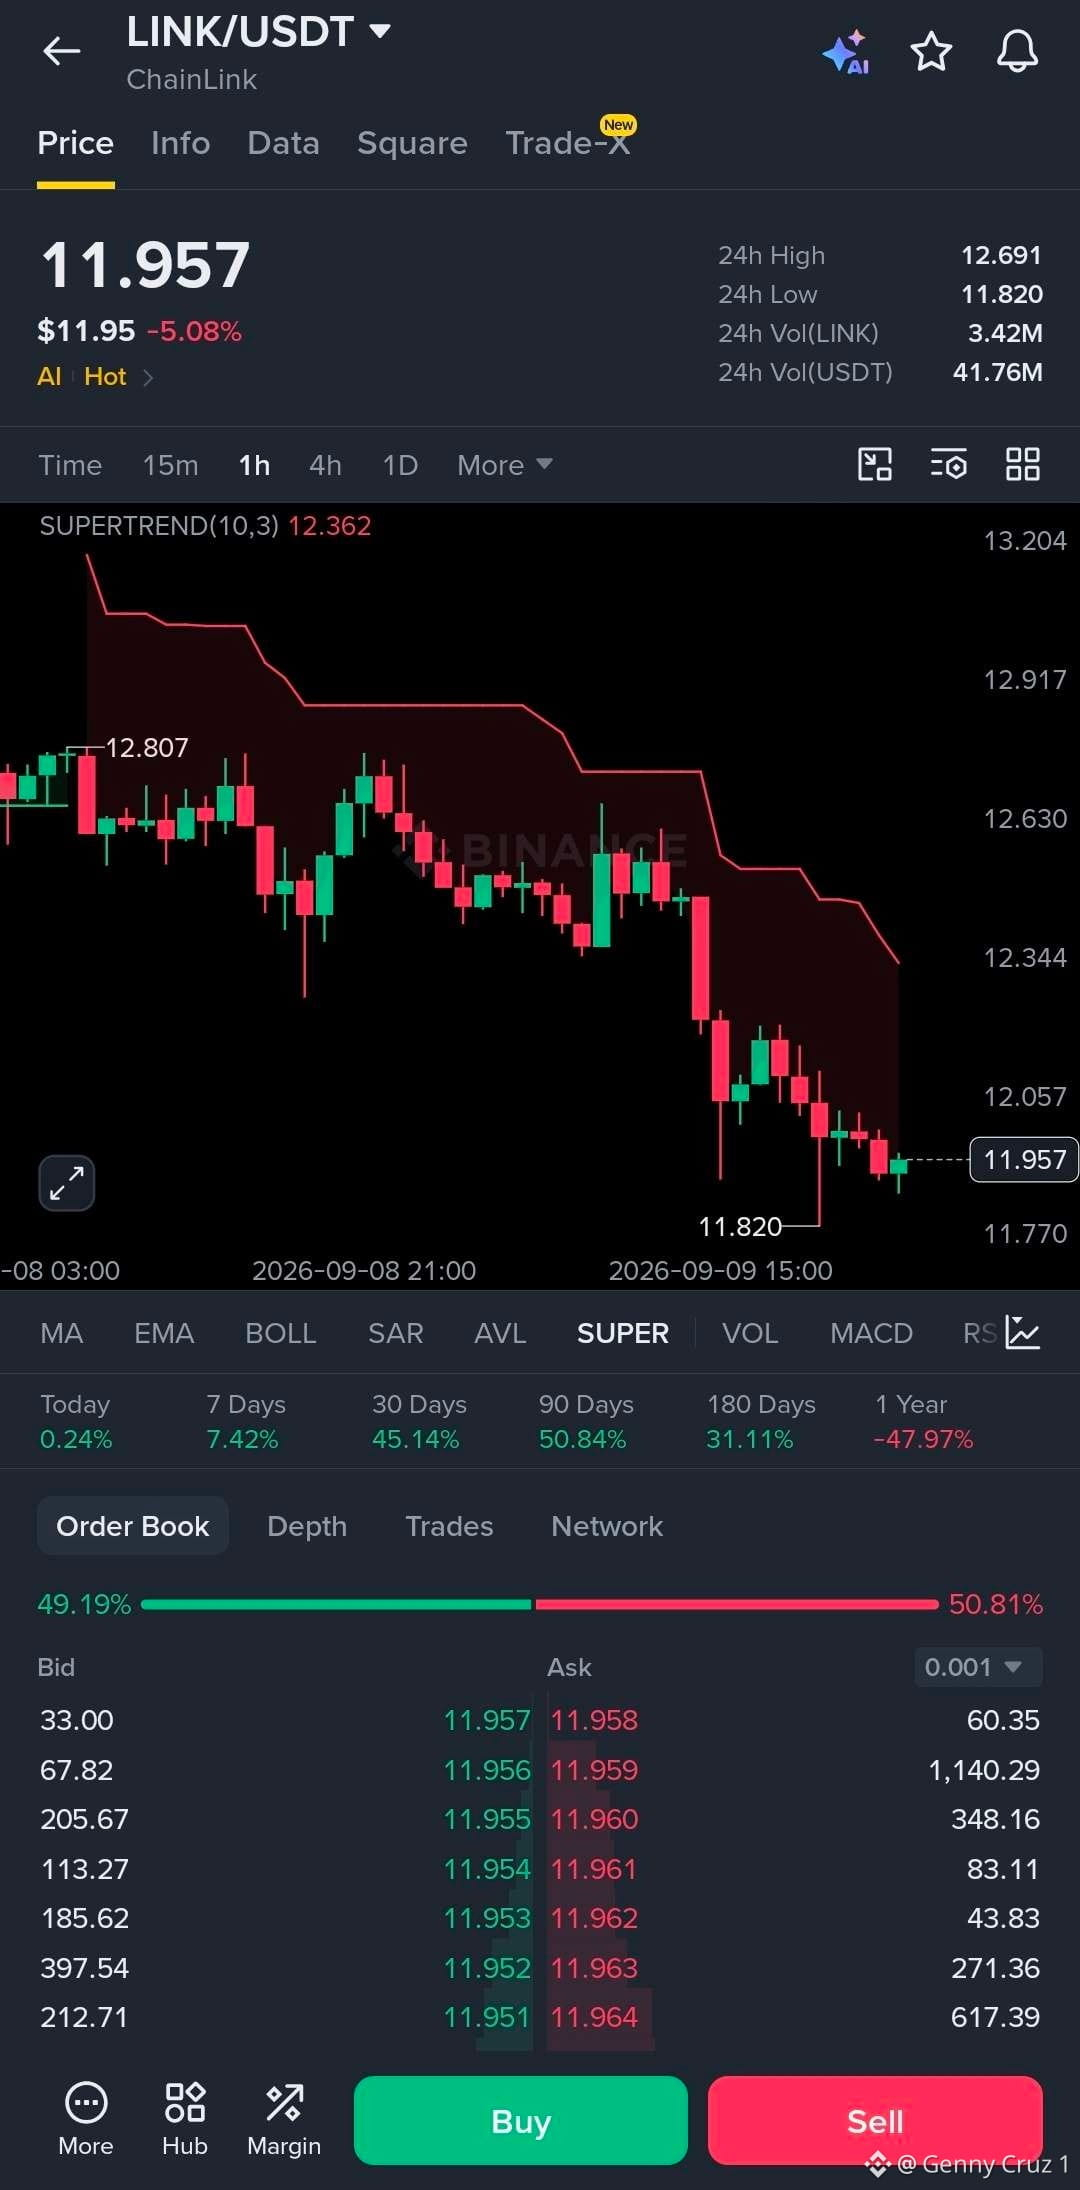
Price is still making lower highs on the 1H chart, while $11.82 is the key support holding the recent drop.
The bounce looks weak so far. Sellers still have the edge until LINK reclaims the $12.34 Supertrend area.
Support: $11.82
Resistance: $12.06 and $12.34
TP1: $11.82
TP2: $11.60
TP3: $11.35
If $11.82 breaks with volume, I’d expect another leg down. A reclaim of $12.06 would be the first sign buyers are coming back.
#LINK
$LINK looks like it’s at a decision point 👀
Price is still making lower highs on the 1H chart, while $11.82 is the key support holding the recent drop.
The bounce looks weak so far. Sellers still have the edge until LINK reclaims the $12.34 Supertrend area.
Support: $11.82
Resistance: $12.06 and $12.34
TP1: $11.82
TP2: $11.60
TP3: $11.35
If $11.82 breaks with volume, I’d expect another leg down. A reclaim of $12.06 would be the first sign buyers are coming back.
#LINK
Price is still making lower highs on the 1H chart, while $11.82 is the key support holding the recent drop.
The bounce looks weak so far. Sellers still have the edge until LINK reclaims the $12.34 Supertrend area.
Support: $11.82
Resistance: $12.06 and $12.34
TP1: $11.82
TP2: $11.60
TP3: $11.35
If $11.82 breaks with volume, I’d expect another leg down. A reclaim of $12.06 would be the first sign buyers are coming back.
#LINK
23
·
--
Something is brewing around this level 👀
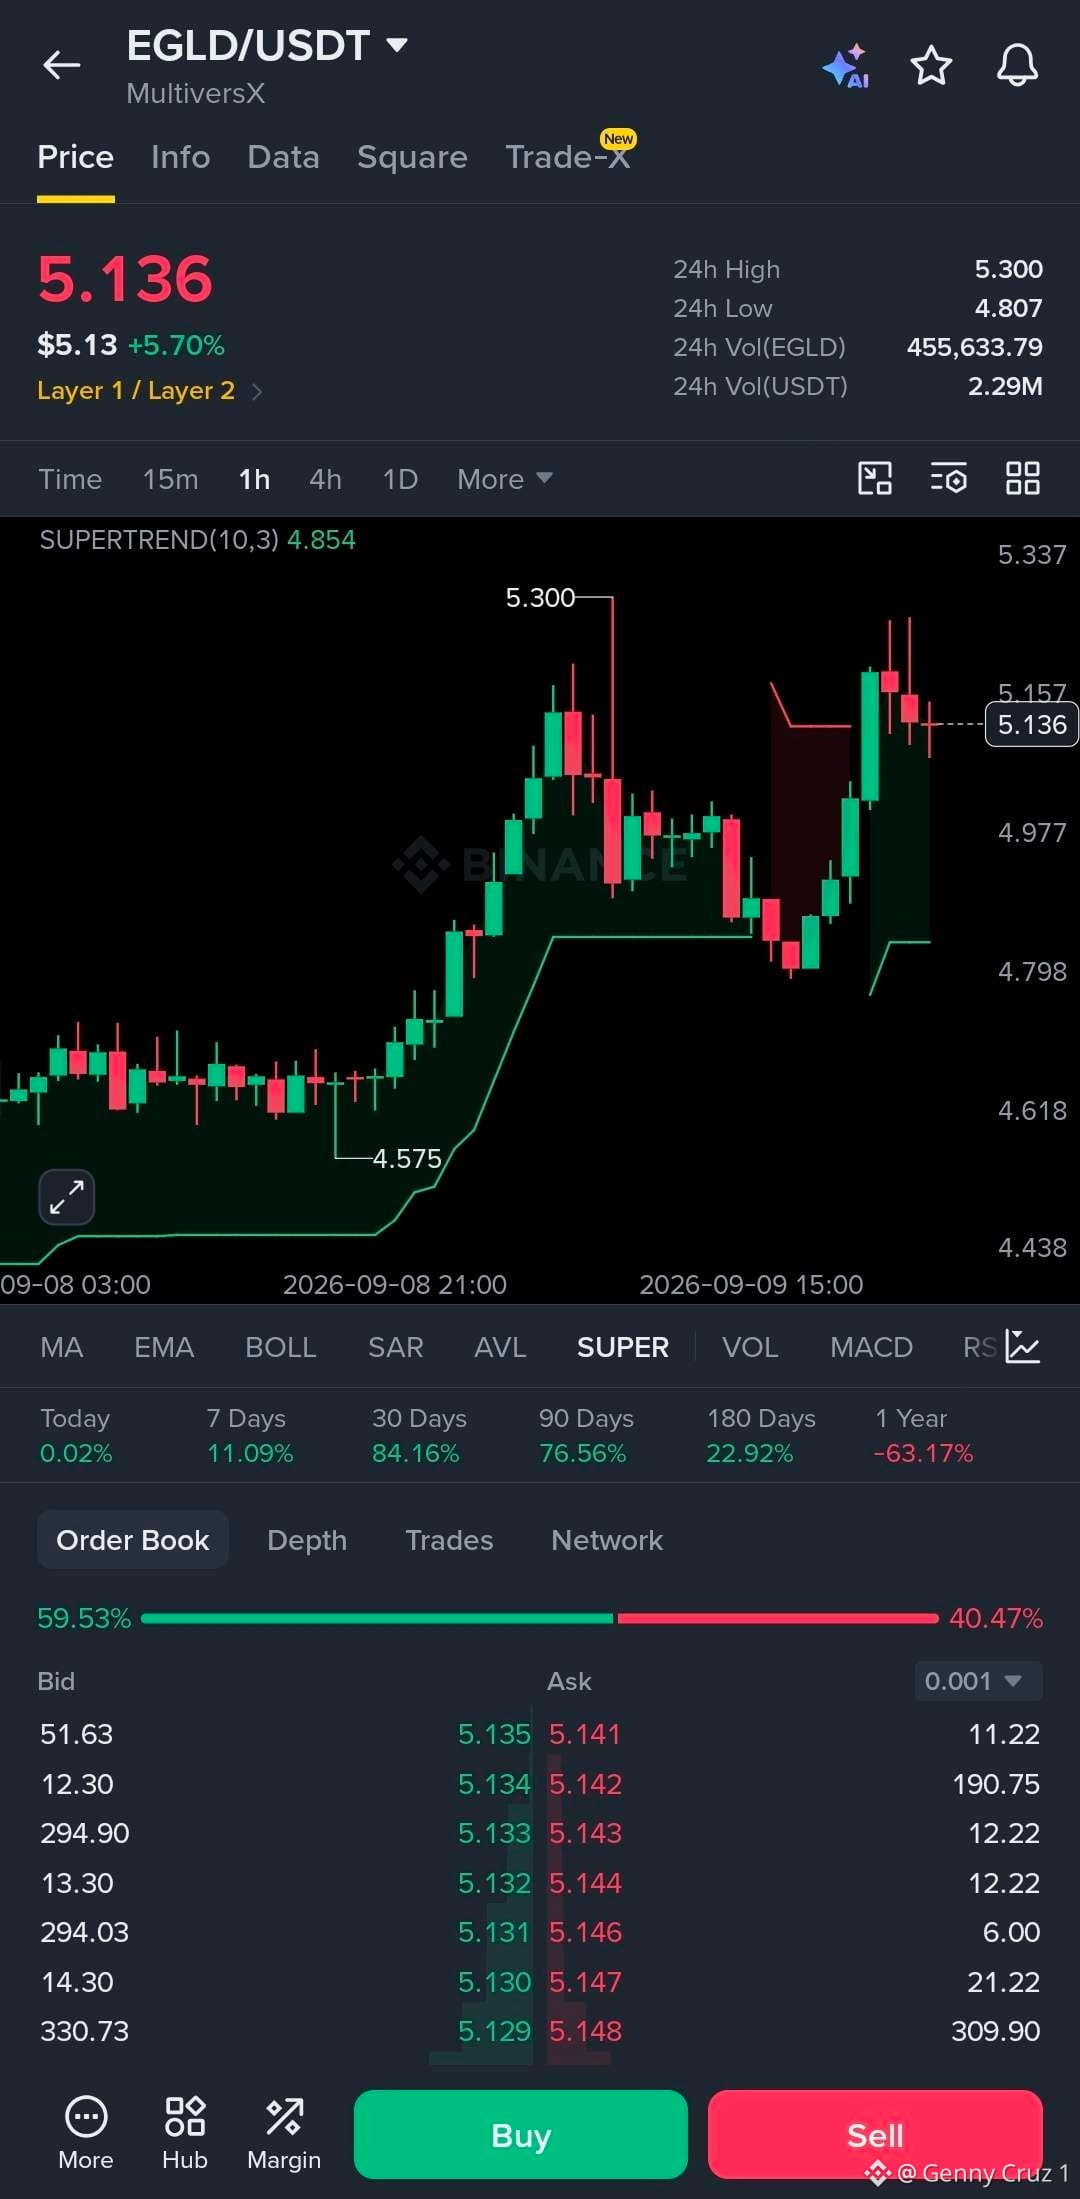
$EGLD is holding above $5.00 after a strong push from the $4.80 area.
Price is now cooling near $5.13, with $5.15 acting as the first hurdle. A clean break above $5.30 could open more room.
Support: $5.00 and $4.85
TP1: $5.30
TP2: $5.50
TP3: $5.75
The supertrend is still bullish at $4.85.
If buyers reclaim $5.15 with strength, I’d watch for another test of $5.30. Lose $5.00 and the setup starts looking weaker.
#EGLD
Something is brewing around this level 👀
$EGLD is holding above $5.00 after a strong push from the $4.80 area.
Price is now cooling near $5.13, with $5.15 acting as the first hurdle. A clean break above $5.30 could open more room.
Support: $5.00 and $4.85
TP1: $5.30
TP2: $5.50
TP3: $5.75
The supertrend is still bullish at $4.85.
If buyers reclaim $5.15 with strength, I’d watch for another test of $5.30. Lose $5.00 and the setup starts looking weaker.
#EGLD
$EGLD is holding above $5.00 after a strong push from the $4.80 area.
Price is now cooling near $5.13, with $5.15 acting as the first hurdle. A clean break above $5.30 could open more room.
Support: $5.00 and $4.85
TP1: $5.30
TP2: $5.50
TP3: $5.75
The supertrend is still bullish at $4.85.
If buyers reclaim $5.15 with strength, I’d watch for another test of $5.30. Lose $5.00 and the setup starts looking weaker.
#EGLD
33
·
--
$ZEN looks like it’s cooling off, but the structure is still worth watching 👀
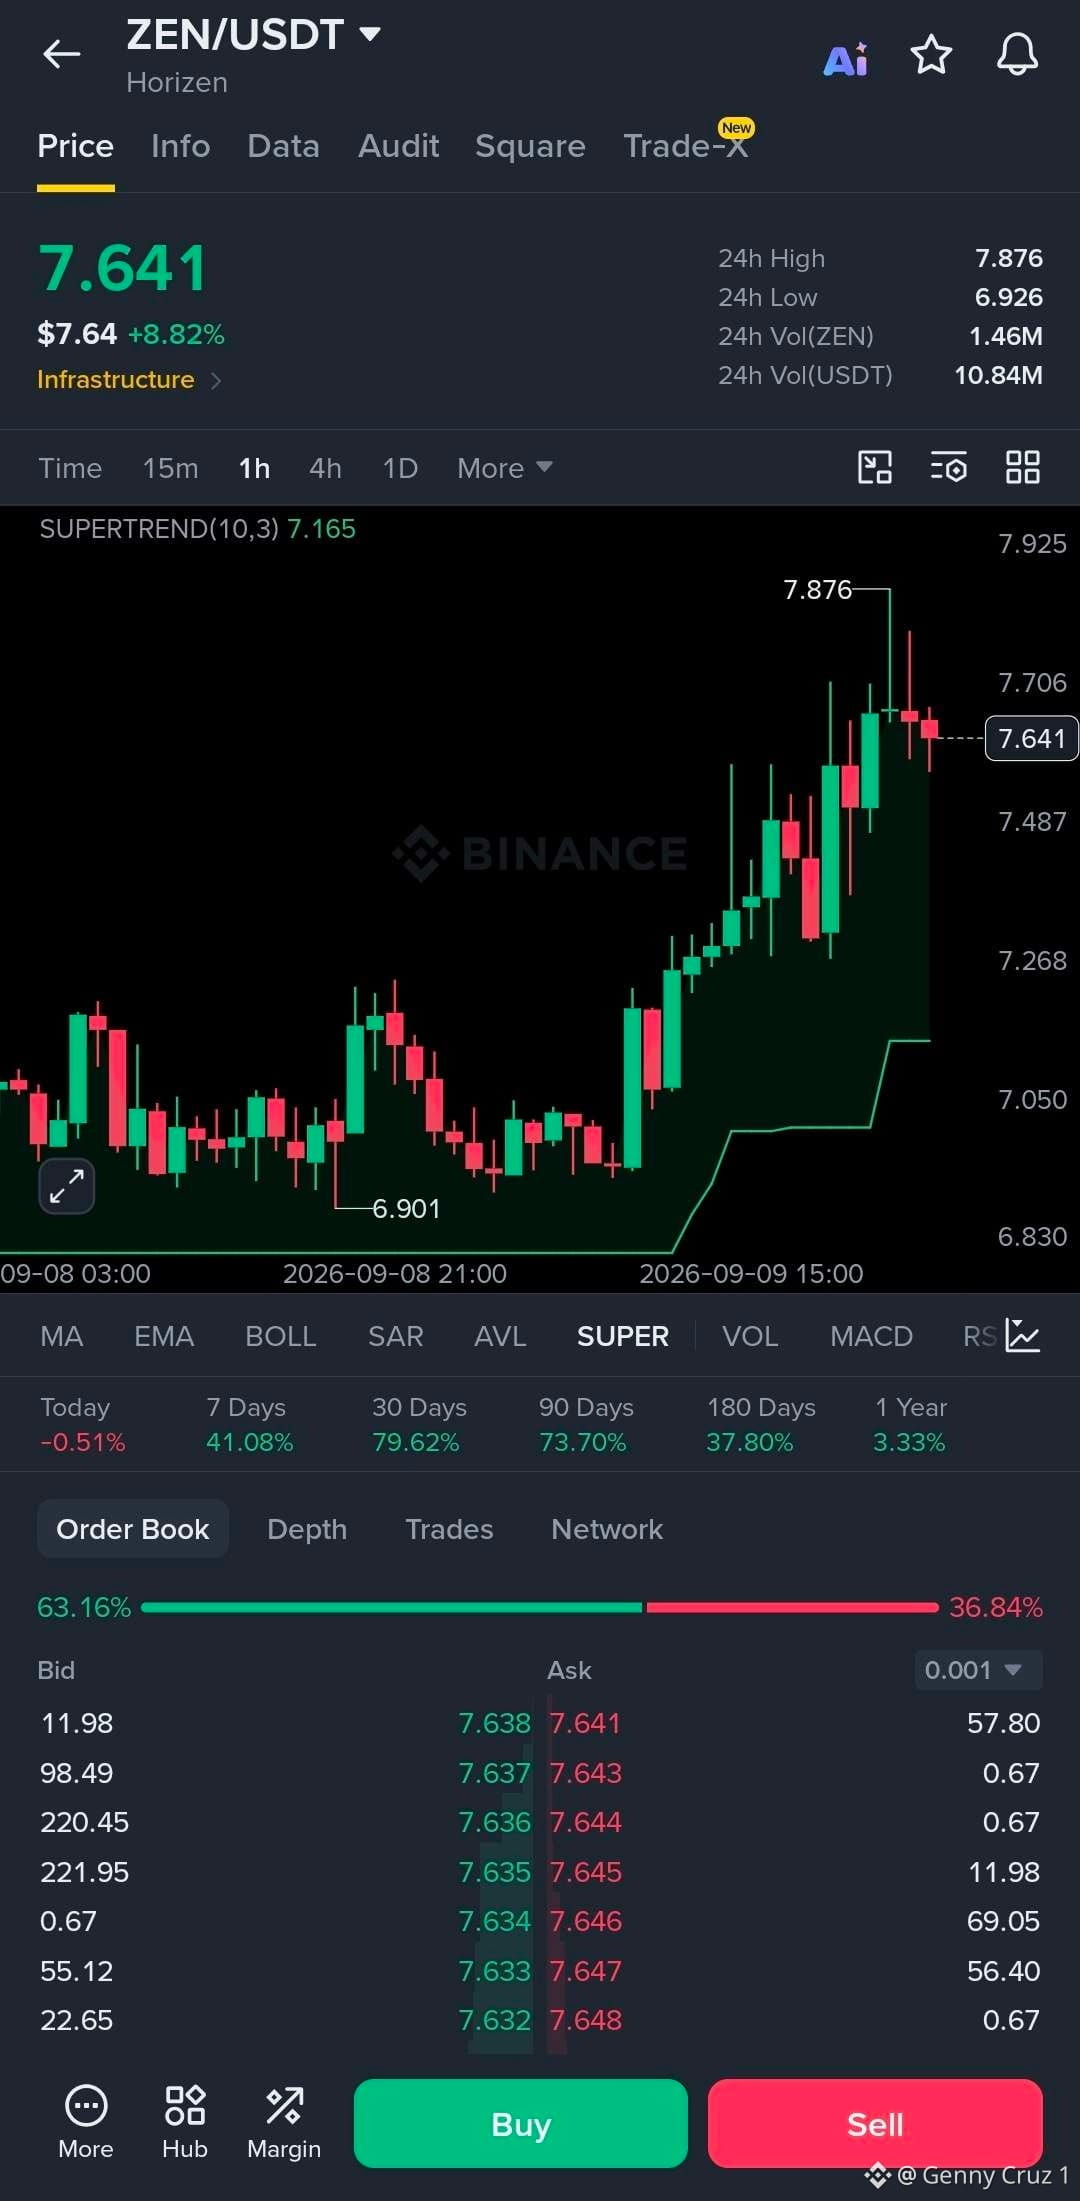
Price pushed from $6.90 to $7.87 and is now holding around $7.64.
Support: $7.48, then $7.16
Resistance: $7.87
TP1: $7.87
TP2: $8.10
TP3: $8.40
The supertrend is still bullish at $7.16, so I’d watch how the price reacts around $7.48.
A clean break above $7.87 could bring the next leg up. If $7.48 fails, a deeper pullback is possible.
#ZEN
$ZEN looks like it’s cooling off, but the structure is still worth watching 👀
Price pushed from $6.90 to $7.87 and is now holding around $7.64.
Support: $7.48, then $7.16
Resistance: $7.87
TP1: $7.87
TP2: $8.10
TP3: $8.40
The supertrend is still bullish at $7.16, so I’d watch how the price reacts around $7.48.
A clean break above $7.87 could bring the next leg up. If $7.48 fails, a deeper pullback is possible.
#ZEN
Price pushed from $6.90 to $7.87 and is now holding around $7.64.
Support: $7.48, then $7.16
Resistance: $7.87
TP1: $7.87
TP2: $8.10
TP3: $8.40
The supertrend is still bullish at $7.16, so I’d watch how the price reacts around $7.48.
A clean break above $7.87 could bring the next leg up. If $7.48 fails, a deeper pullback is possible.
#ZEN
41
·
--
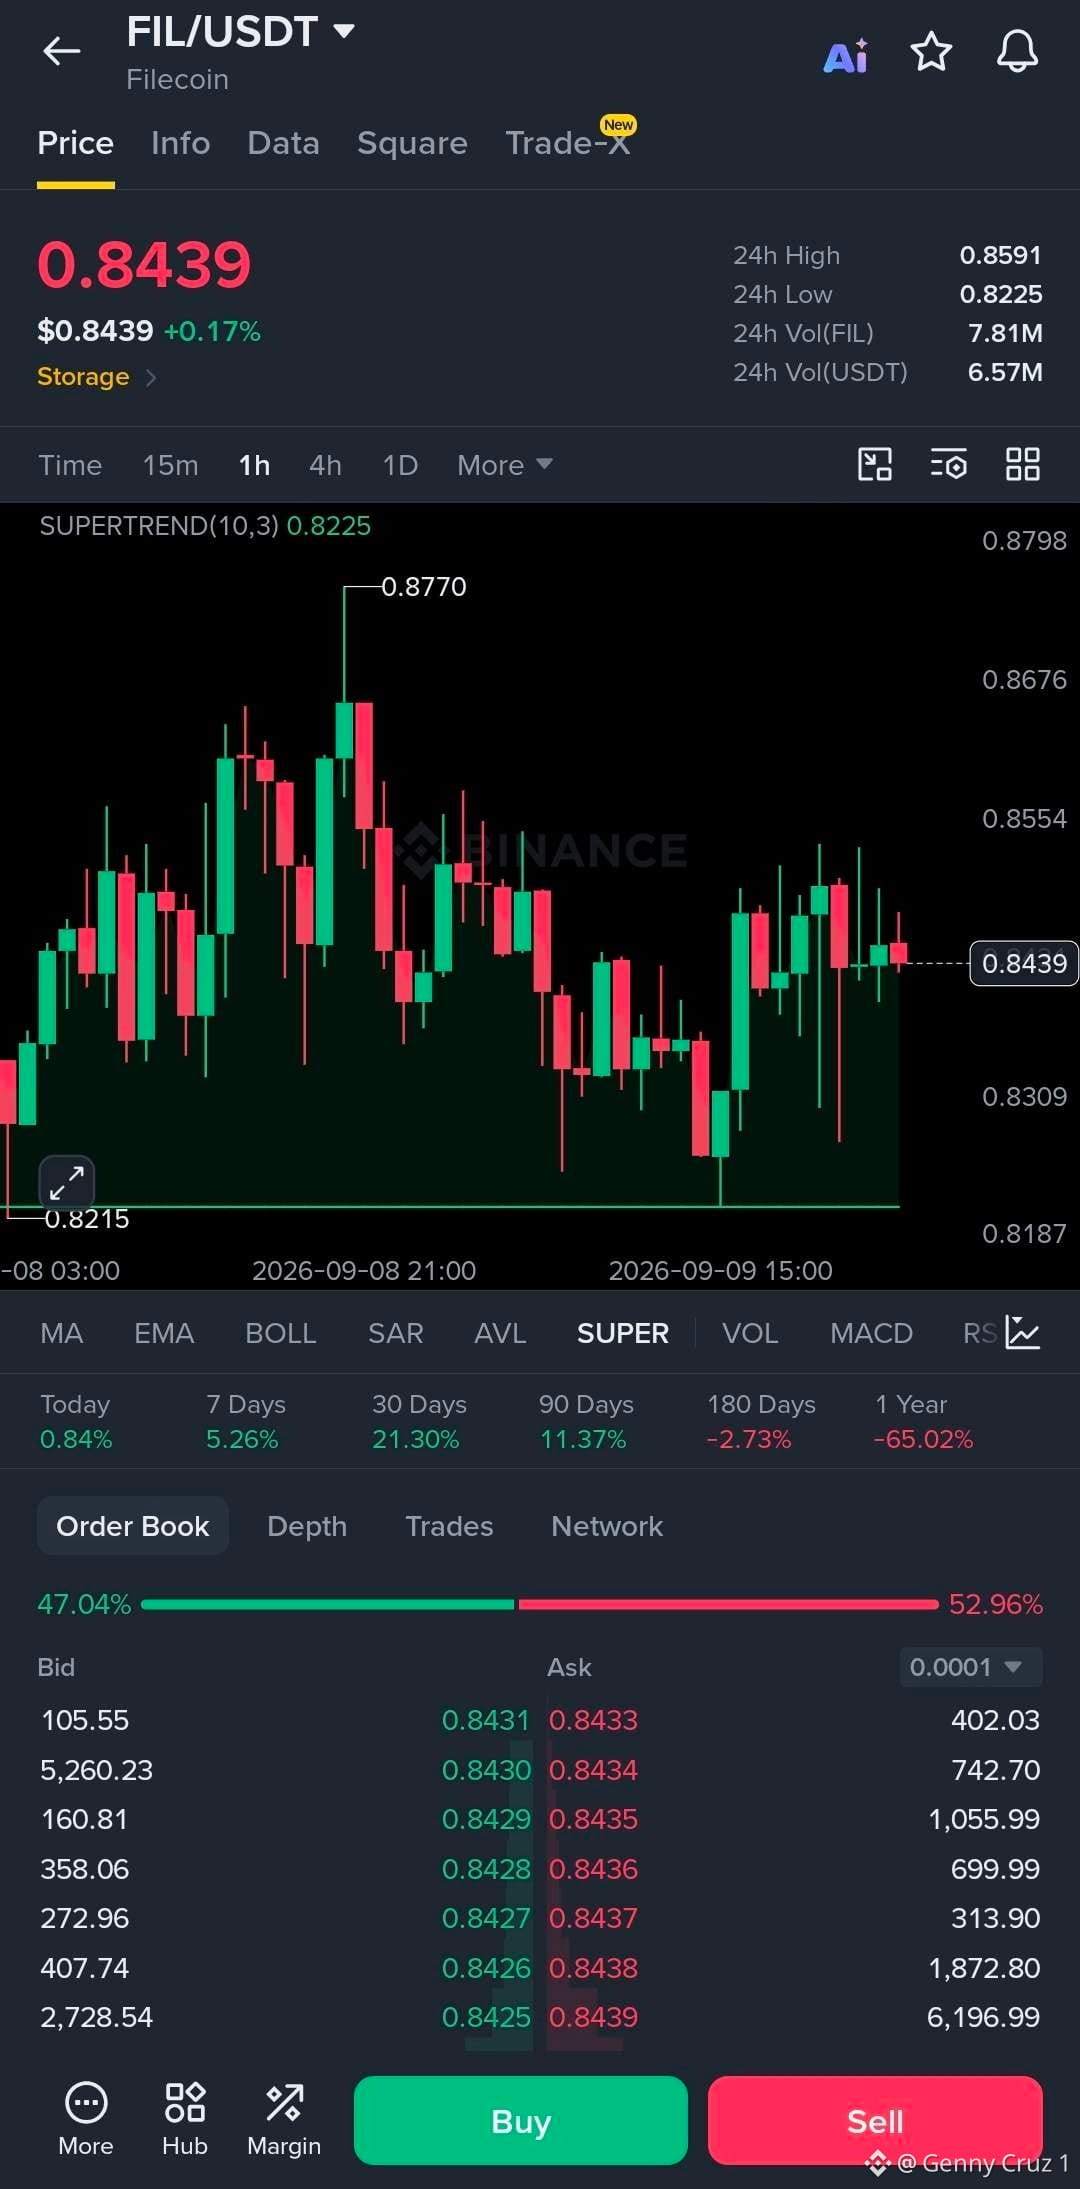
$FIL looks quiet, but this range is getting interesting 👀
Price is holding around $0.844 after bouncing from $0.8215, with Supertrend still bullish at $0.8225.
Support: $0.8300 to $0.8225
Resistance: $0.8590, then $0.8770
TP1: $0.8590
TP2: $0.8770
TP3: $0.9000
The next move likely comes from the range break. A clean push above $0.8590 with volume could open the higher levels.
If $0.8225 breaks, I’d step back and wait.
#FIL
$FIL looks quiet, but this range is getting interesting 👀
Price is holding around $0.844 after bouncing from $0.8215, with Supertrend still bullish at $0.8225.
Support: $0.8300 to $0.8225
Resistance: $0.8590, then $0.8770
TP1: $0.8590
TP2: $0.8770
TP3: $0.9000
The next move likely comes from the range break. A clean push above $0.8590 with volume could open the higher levels.
If $0.8225 breaks, I’d step back and wait.
#FIL
Price is holding around $0.844 after bouncing from $0.8215, with Supertrend still bullish at $0.8225.
Support: $0.8300 to $0.8225
Resistance: $0.8590, then $0.8770
TP1: $0.8590
TP2: $0.8770
TP3: $0.9000
The next move likely comes from the range break. A clean push above $0.8590 with volume could open the higher levels.
If $0.8225 breaks, I’d step back and wait.
#FIL
65
·
--
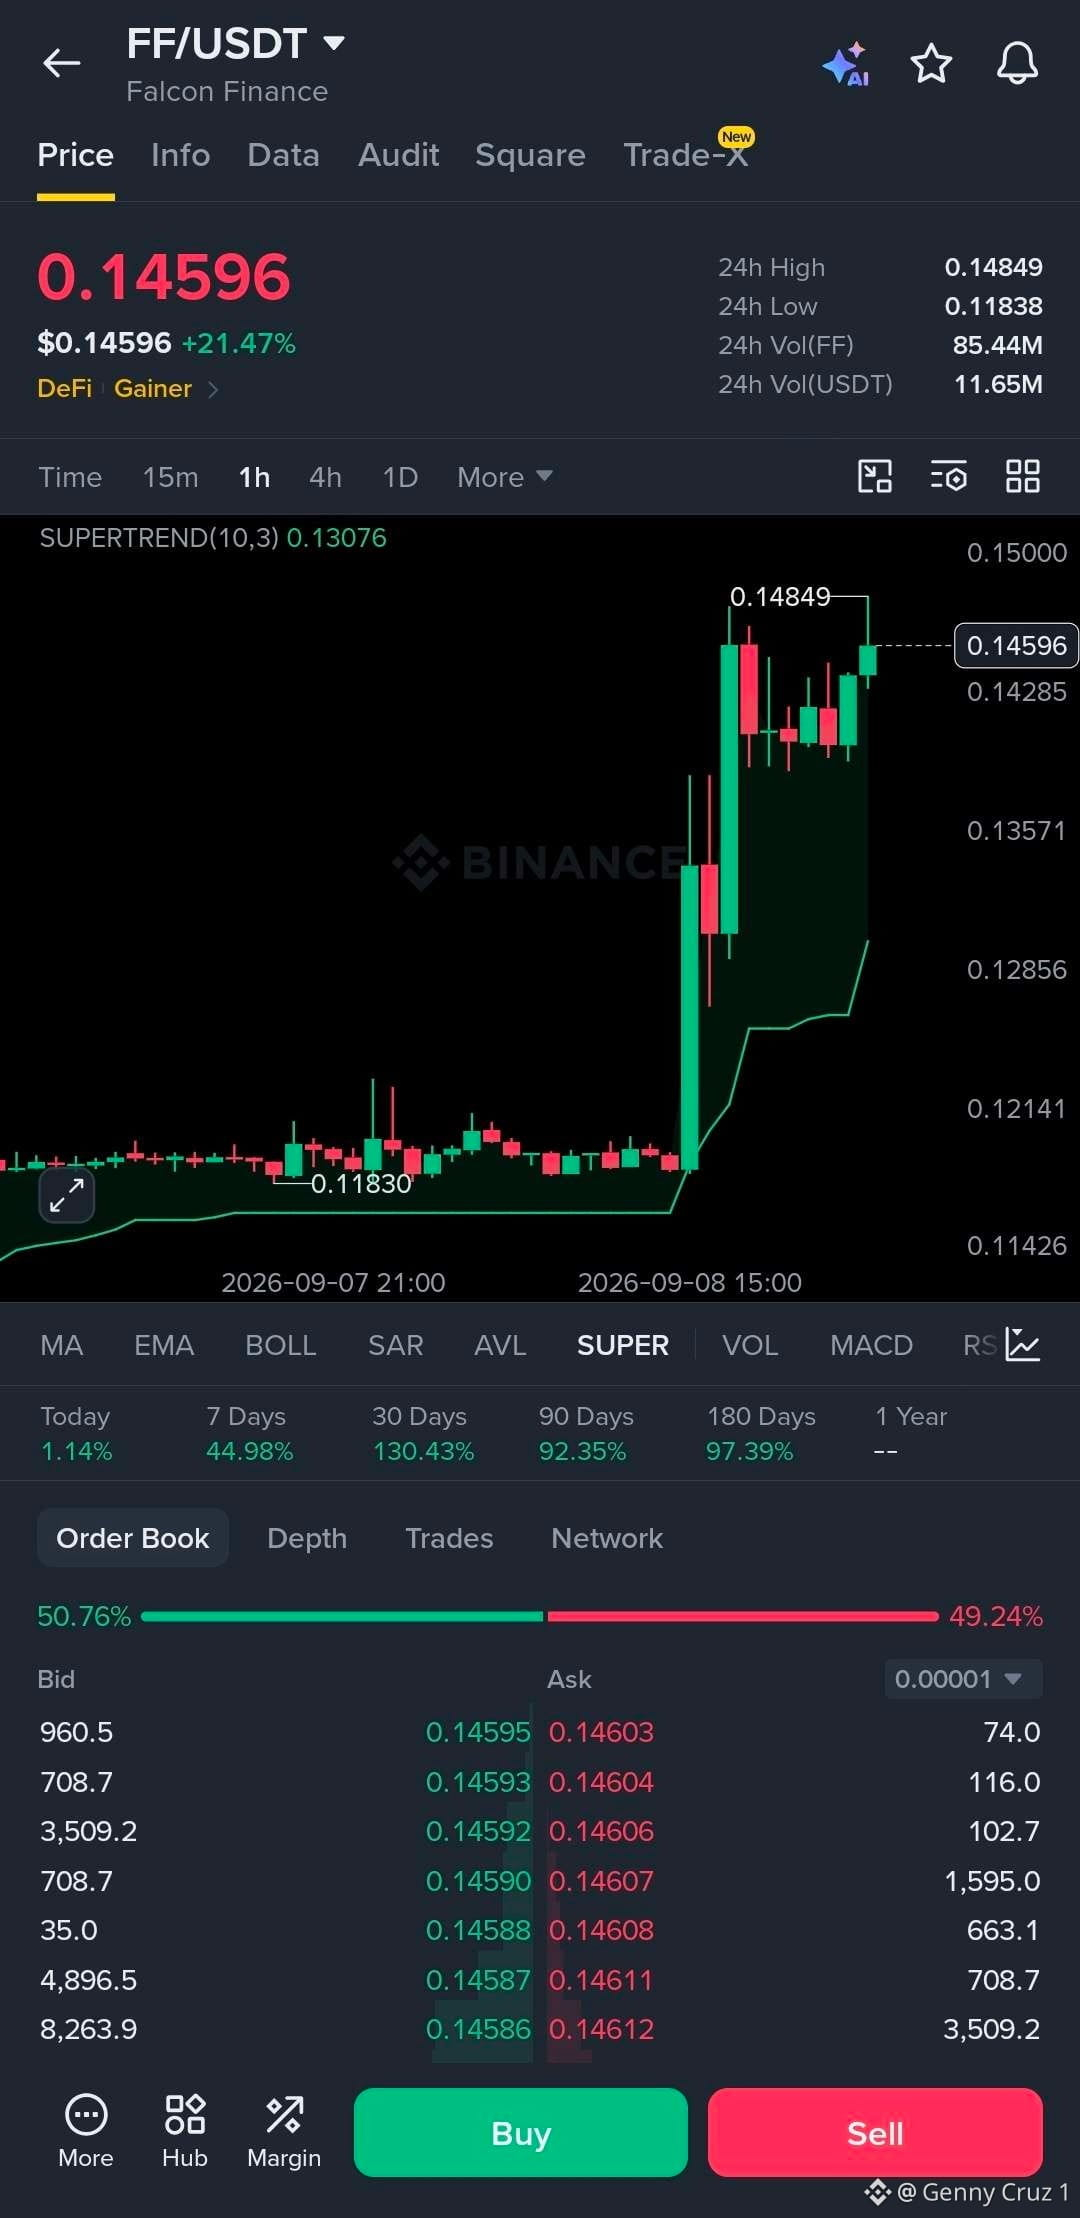
$FF 1H 📊
Bias: LONG 🟢
• Current: 0.14596
• Supertrend: 0.13076 → bullish
• Resistance: 0.14849
• Support: 0.1428–0.1400
• Major support: 0.13076
The structure is clearly bullish after the explosive move from around 0.1183. Price is holding above the Supertrend and consolidating near the 0.1485 high.
Preferred LONG: 0.1428–0.1440 on a pullback
SL: 0.1398
TP1: 0.1485
TP2: 0.1520
TP3: 0.1580
⚠️ I would not chase at 0.146+. A clean 1H breakout and close above 0.1485 would also be a valid momentum entry.
If 0.1400 breaks, the bullish setup weakens significantly.
#ff
$FF 1H 📊
Bias: LONG 🟢
• Current: 0.14596
• Supertrend: 0.13076 → bullish
• Resistance: 0.14849
• Support: 0.1428–0.1400
• Major support: 0.13076
The structure is clearly bullish after the explosive move from around 0.1183. Price is holding above the Supertrend and consolidating near the 0.1485 high.
Preferred LONG: 0.1428–0.1440 on a pullback
SL: 0.1398
TP1: 0.1485
TP2: 0.1520
TP3: 0.1580
⚠️ I would not chase at 0.146+. A clean 1H breakout and close above 0.1485 would also be a valid momentum entry.
If 0.1400 breaks, the bullish setup weakens significantly.
#ff
Bias: LONG 🟢
• Current: 0.14596
• Supertrend: 0.13076 → bullish
• Resistance: 0.14849
• Support: 0.1428–0.1400
• Major support: 0.13076
The structure is clearly bullish after the explosive move from around 0.1183. Price is holding above the Supertrend and consolidating near the 0.1485 high.
Preferred LONG: 0.1428–0.1440 on a pullback
SL: 0.1398
TP1: 0.1485
TP2: 0.1520
TP3: 0.1580
⚠️ I would not chase at 0.146+. A clean 1H breakout and close above 0.1485 would also be a valid momentum entry.
If 0.1400 breaks, the bullish setup weakens significantly.
#ff
26
·
--
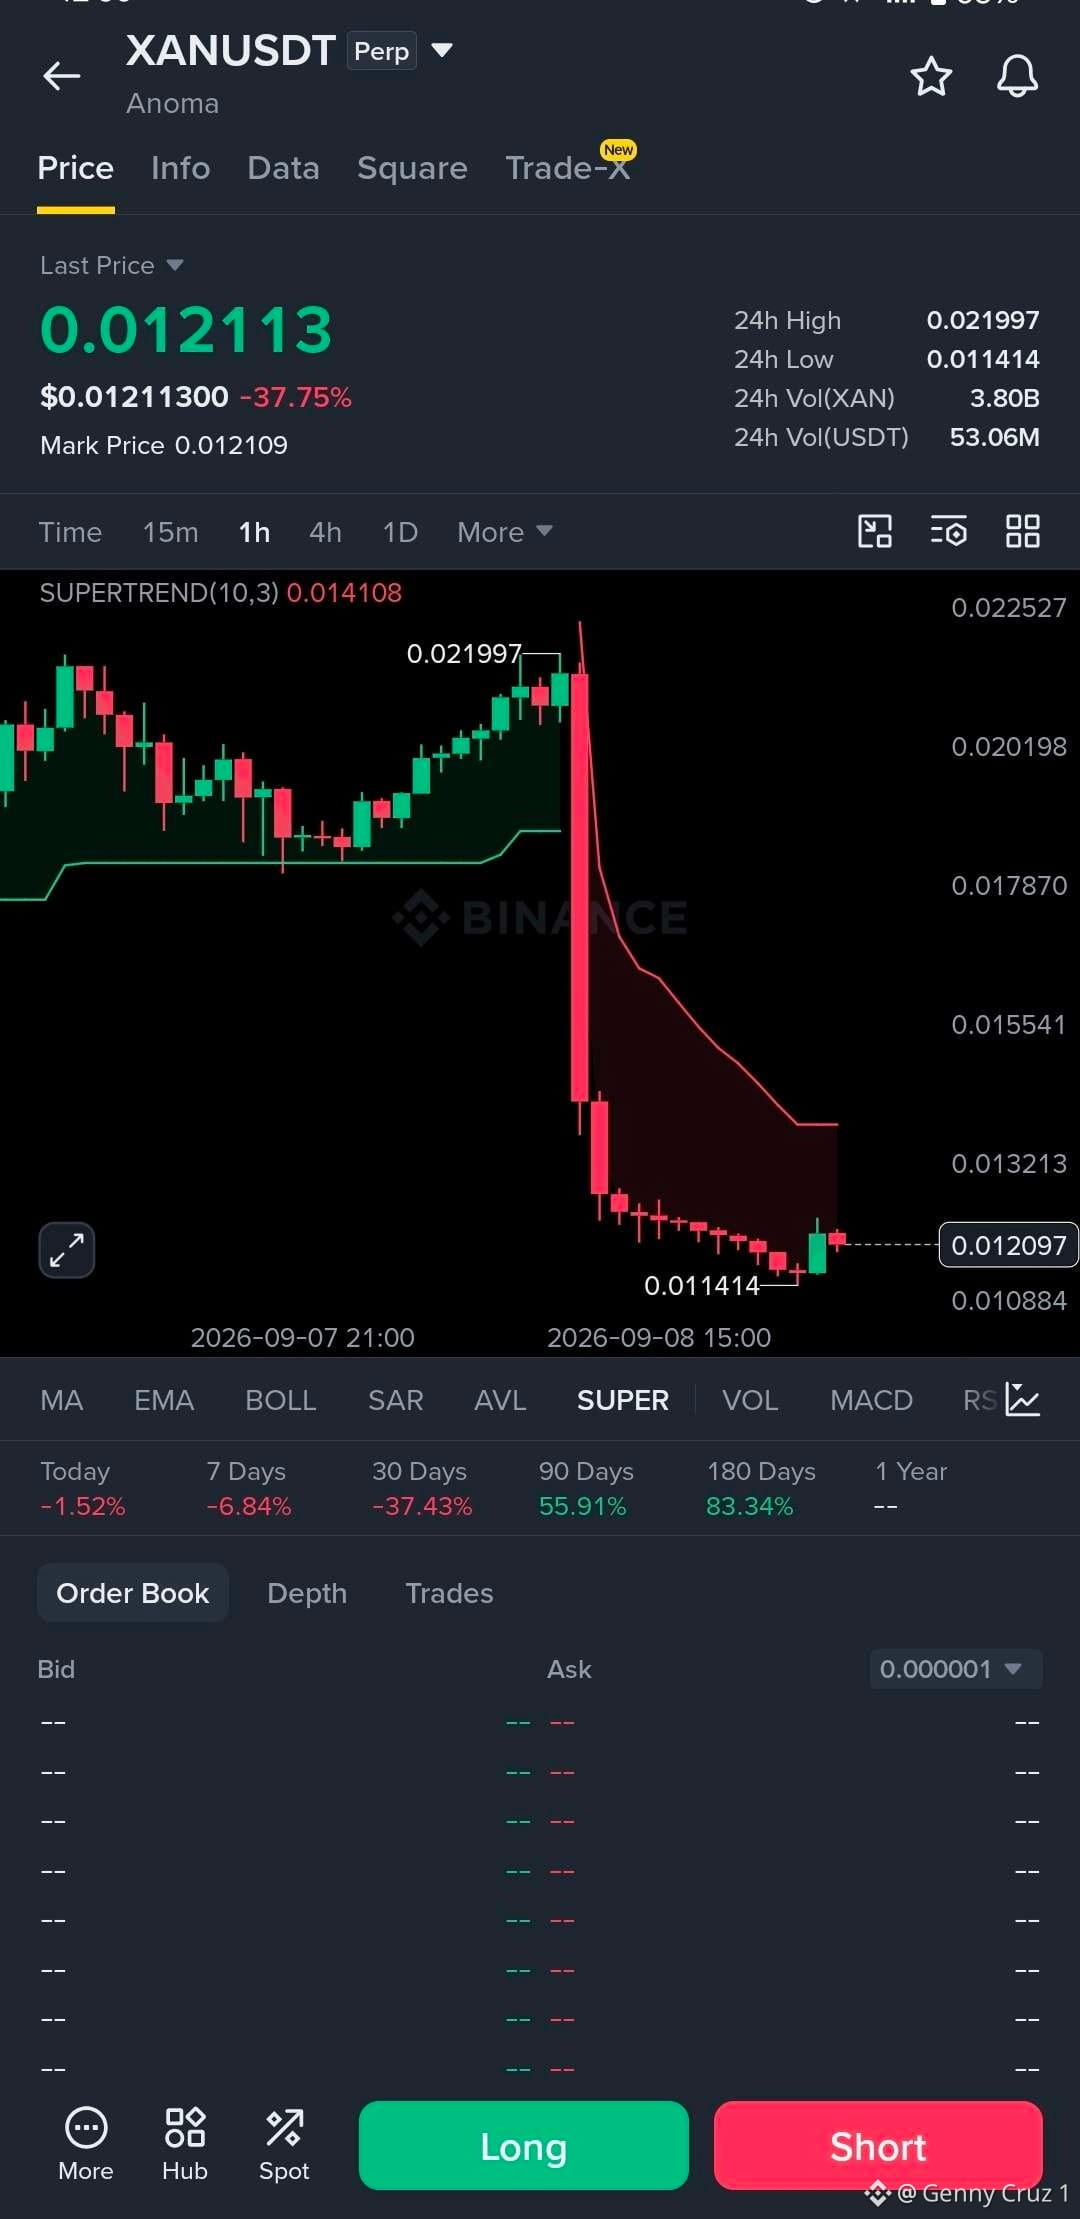
$XAN 1H 📊
Bias: SHORT ⚠️, but this is a high-risk setup because XAN has already dumped 37.75% in 24H.
Price is around 0.01211, far below the 1H Supertrend at 0.014108. The chart shows a massive breakdown from 0.021997 followed by continuous lower highs and a fresh low at 0.011414.
Preferred SHORT setup
• Entry: 0.0128–0.0133 on a weak bounce/rejection
• SL: 0.01415
• TP1: 0.01170
• TP2: 0.01142
• TP3: 0.01090
Key levels
🔴 0.01410 → Supertrend / major resistance
🔴 0.01320–0.01350 → first important recovery zone
🟡 0.01280 → potential short retest
🟢 0.01141 → current major support/low
🟢 0.01090 → next downside area
I would NOT chase a short at 0.0121. After such a violent liquidation, a sharp relief bounce can happen even while the overall trend remains bearish.
The biggest warning is the empty order book shown in your screenshot. That means liquidity appears extremely thin at that moment, so slippage and sudden wicks can be brutal.
Best setup: let XAN bounce toward 0.0128–0.0133, then look for rejection. If it breaks and holds above 0.0141, the short thesis is invalidated.
Not financial advice; leverage makes this particularly risky.
#xan
$XAN 1H 📊
Bias: SHORT ⚠️, but this is a high-risk setup because XAN has already dumped 37.75% in 24H.
Price is around 0.01211, far below the 1H Supertrend at 0.014108. The chart shows a massive breakdown from 0.021997 followed by continuous lower highs and a fresh low at 0.011414.
Preferred SHORT setup
• Entry: 0.0128–0.0133 on a weak bounce/rejection
• SL: 0.01415
• TP1: 0.01170
• TP2: 0.01142
• TP3: 0.01090
Key levels
🔴 0.01410 → Supertrend / major resistance
🔴 0.01320–0.01350 → first important recovery zone
🟡 0.01280 → potential short retest
🟢 0.01141 → current major support/low
🟢 0.01090 → next downside area
I would NOT chase a short at 0.0121. After such a violent liquidation, a sharp relief bounce can happen even while the overall trend remains bearish.
The biggest warning is the empty order book shown in your screenshot. That means liquidity appears extremely thin at that moment, so slippage and sudden wicks can be brutal.
Best setup: let XAN bounce toward 0.0128–0.0133, then look for rejection. If it breaks and holds above 0.0141, the short thesis is invalidated.
Not financial advice; leverage makes this particularly risky.
#xan
Bias: SHORT ⚠️, but this is a high-risk setup because XAN has already dumped 37.75% in 24H.
Price is around 0.01211, far below the 1H Supertrend at 0.014108. The chart shows a massive breakdown from 0.021997 followed by continuous lower highs and a fresh low at 0.011414.
Preferred SHORT setup
• Entry: 0.0128–0.0133 on a weak bounce/rejection
• SL: 0.01415
• TP1: 0.01170
• TP2: 0.01142
• TP3: 0.01090
Key levels
🔴 0.01410 → Supertrend / major resistance
🔴 0.01320–0.01350 → first important recovery zone
🟡 0.01280 → potential short retest
🟢 0.01141 → current major support/low
🟢 0.01090 → next downside area
I would NOT chase a short at 0.0121. After such a violent liquidation, a sharp relief bounce can happen even while the overall trend remains bearish.
The biggest warning is the empty order book shown in your screenshot. That means liquidity appears extremely thin at that moment, so slippage and sudden wicks can be brutal.
Best setup: let XAN bounce toward 0.0128–0.0133, then look for rejection. If it breaks and holds above 0.0141, the short thesis is invalidated.
Not financial advice; leverage makes this particularly risky.
#xan
23
·
--
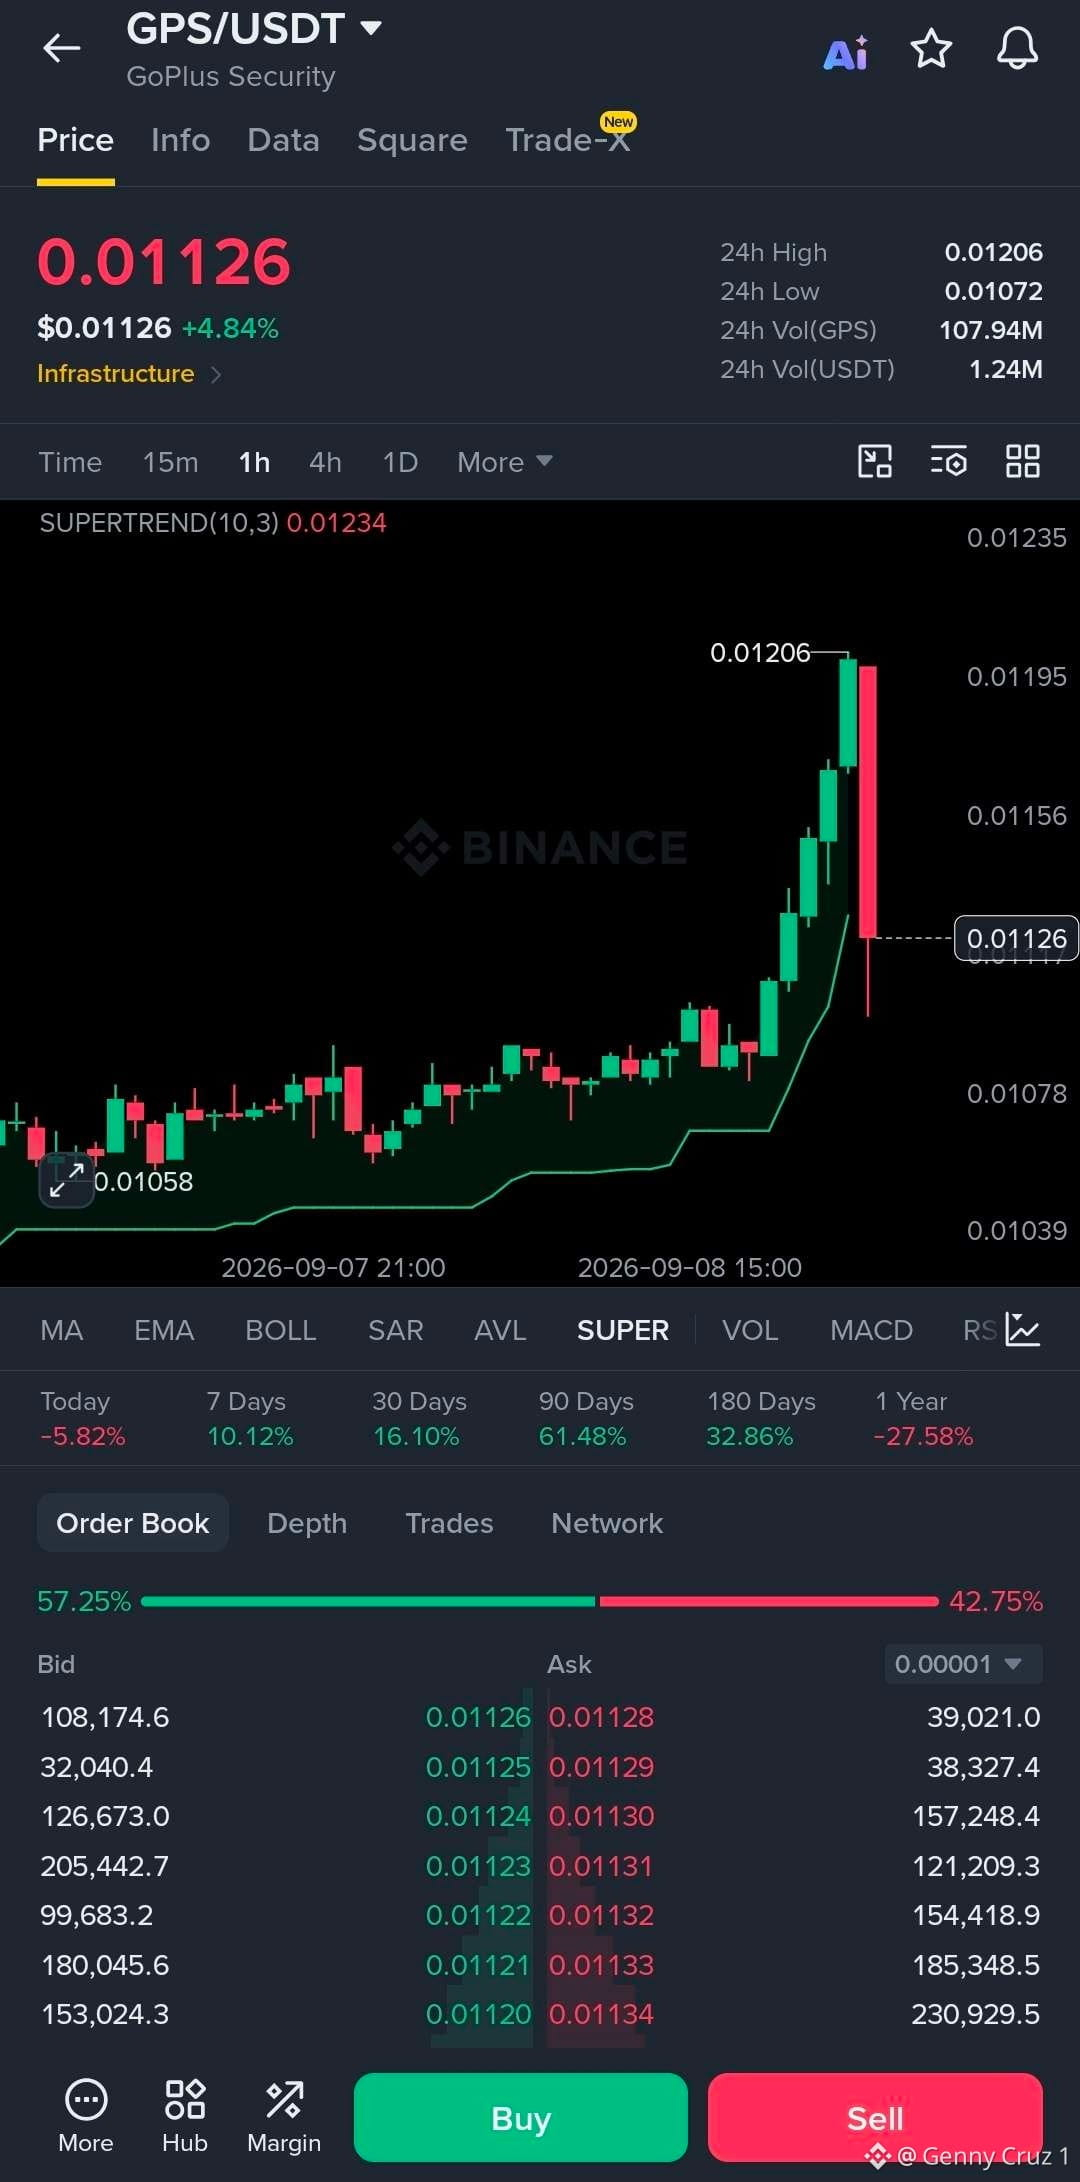
$GPS 1H 📊
Bias: SHORT, but wait for confirmation rather than chasing the dump.
Price is 0.01126, while the 1H Supertrend sits at 0.01234 and remains bearish. GPS rejected strongly from 0.01206, followed by a large red candle, showing aggressive selling pressure.
Preferred Setup: SHORT
• Entry: 0.01125–0.01150
• SL: 0.01195
• TP1: 0.01100
• TP2: 0.01078
• TP3: 0.01072
Key levels
🔴 0.01206 → recent rejection/high
🔴 0.01195–0.01206 → major resistance zone
🟡 0.01150 → recovery/retest area
🟢 0.01100 → first downside target
🟢 0.01072 → 24H low/support
The order book shows 57.25% bids vs 42.75% asks, so a short here isn't completely risk-free. If buyers reclaim 0.01150 and especially 0.01195, the bearish setup weakens.
Best move: wait for a weak bounce/retest around 0.0114–0.0115 and rejection before entering.
Invalidation: sustained 1H move back above 0.01206.
#gps
$GPS 1H 📊
Bias: SHORT, but wait for confirmation rather than chasing the dump.
Price is 0.01126, while the 1H Supertrend sits at 0.01234 and remains bearish. GPS rejected strongly from 0.01206, followed by a large red candle, showing aggressive selling pressure.
Preferred Setup: SHORT
• Entry: 0.01125–0.01150
• SL: 0.01195
• TP1: 0.01100
• TP2: 0.01078
• TP3: 0.01072
Key levels
🔴 0.01206 → recent rejection/high
🔴 0.01195–0.01206 → major resistance zone
🟡 0.01150 → recovery/retest area
🟢 0.01100 → first downside target
🟢 0.01072 → 24H low/support
The order book shows 57.25% bids vs 42.75% asks, so a short here isn't completely risk-free. If buyers reclaim 0.01150 and especially 0.01195, the bearish setup weakens.
Best move: wait for a weak bounce/retest around 0.0114–0.0115 and rejection before entering.
Invalidation: sustained 1H move back above 0.01206.
#gps
Bias: SHORT, but wait for confirmation rather than chasing the dump.
Price is 0.01126, while the 1H Supertrend sits at 0.01234 and remains bearish. GPS rejected strongly from 0.01206, followed by a large red candle, showing aggressive selling pressure.
Preferred Setup: SHORT
• Entry: 0.01125–0.01150
• SL: 0.01195
• TP1: 0.01100
• TP2: 0.01078
• TP3: 0.01072
Key levels
🔴 0.01206 → recent rejection/high
🔴 0.01195–0.01206 → major resistance zone
🟡 0.01150 → recovery/retest area
🟢 0.01100 → first downside target
🟢 0.01072 → 24H low/support
The order book shows 57.25% bids vs 42.75% asks, so a short here isn't completely risk-free. If buyers reclaim 0.01150 and especially 0.01195, the bearish setup weakens.
Best move: wait for a weak bounce/retest around 0.0114–0.0115 and rejection before entering.
Invalidation: sustained 1H move back above 0.01206.
#gps
32
·
--
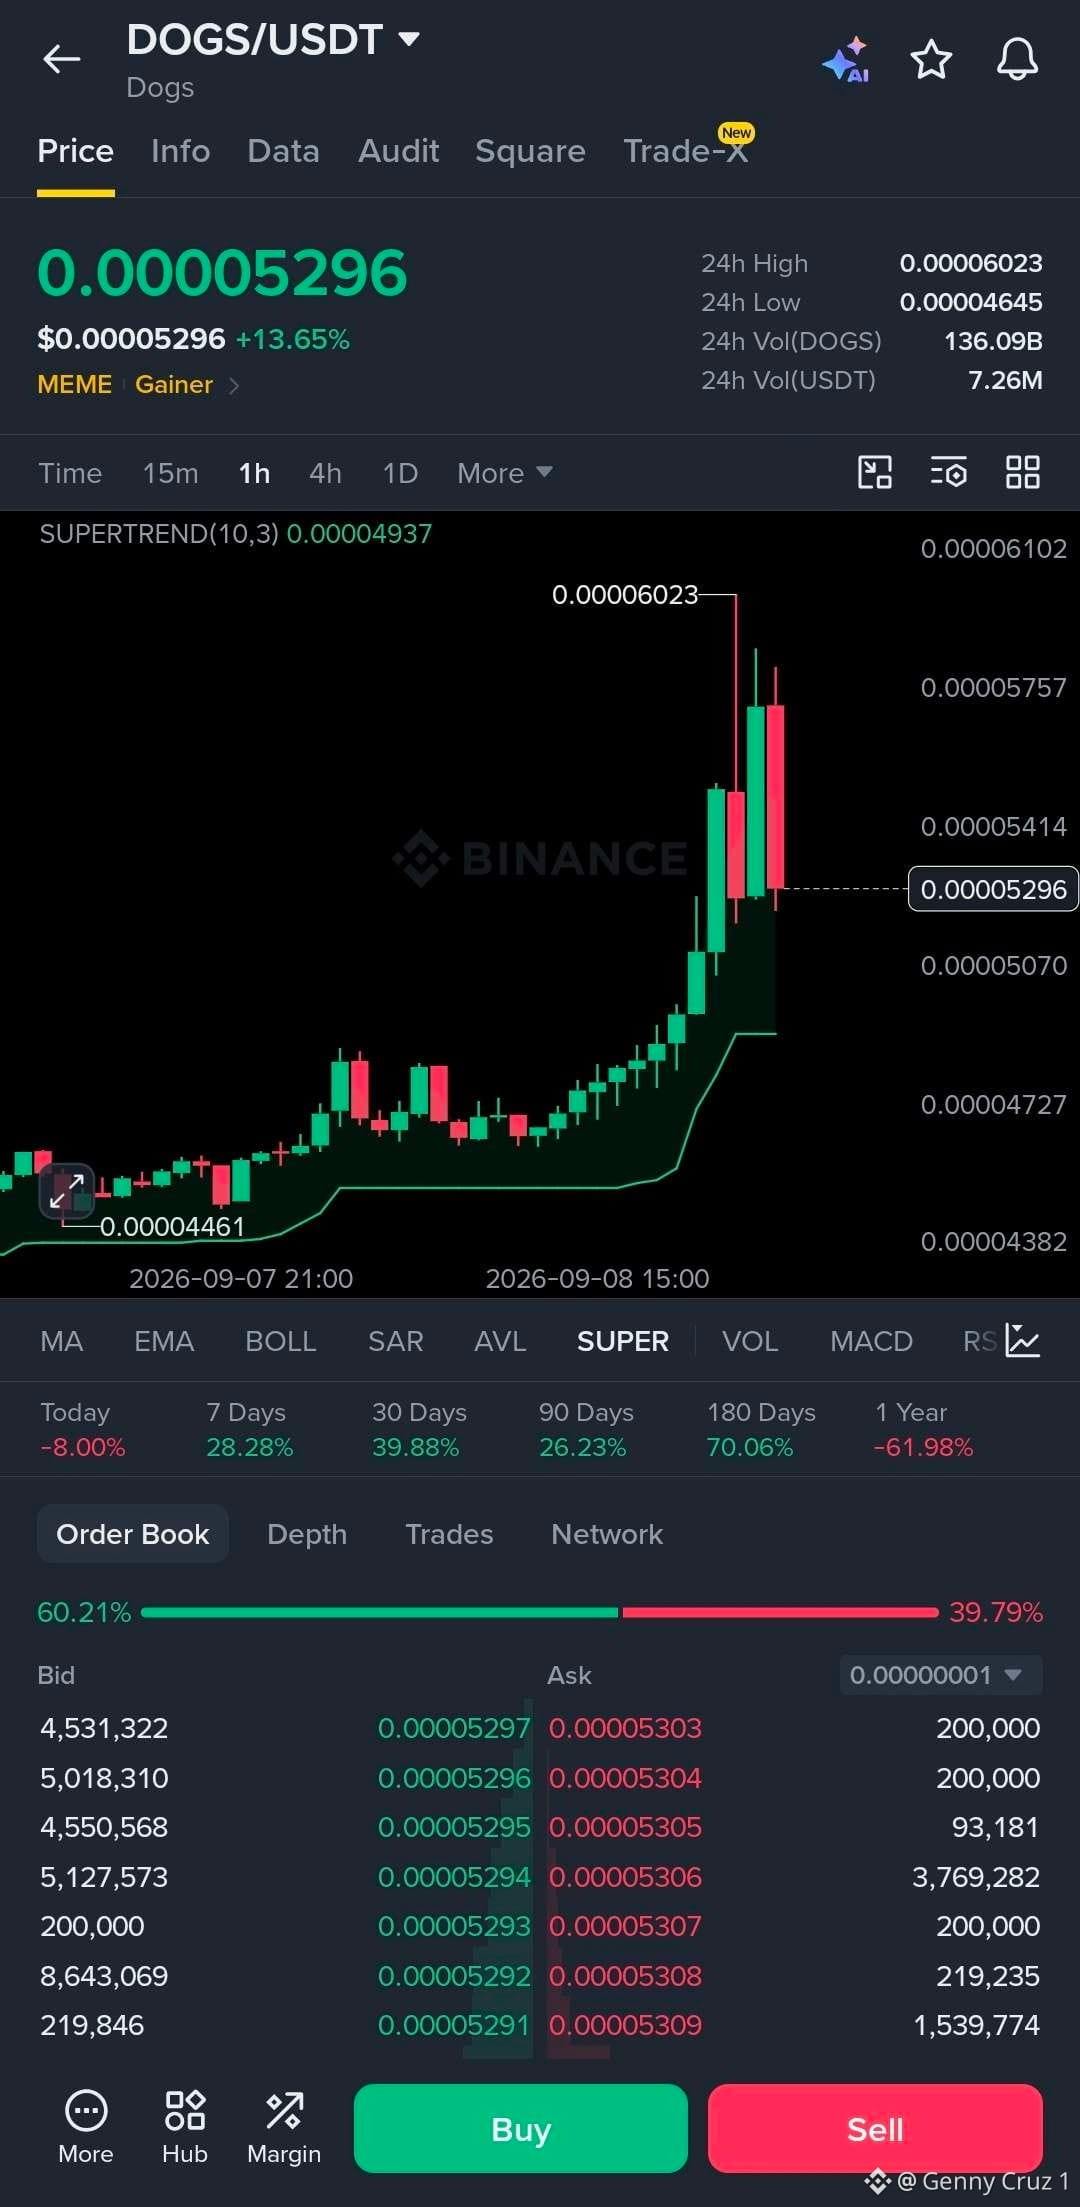
$DOGS 1H 📊
Bias: LONG, but this is a high volatility setup after a sharp move.
Price is at 0.00005296, with the 1H Supertrend at 0.00004937. The chart remains bullish, but the rejection from 0.00006023 means chasing here carries more risk.
Preferred Setup: LONG
• Entry: 0.0000510–0.0000530
• SL: 0.0000490
• TP1: 0.0000558
• TP2: 0.0000580
• TP3: 0.0000602
Key levels
🟢 0.00004937 → Supertrend support
🟢 0.0000510 → pullback support
🔴 0.0000575–0.0000580 → near-term resistance
🔴 0.00006023 → recent high
The order book is currently 60.21% bid vs 39.79% ask, which supports the bullish bias, but DOGS has already made a strong intraday move.
The best entry is on a pullback and holds around 0.000051–0.000053, not by chasing the spike.
Invalidation: 1H close below 0.00004937.
Not financial advice. Leverage can amplify losses.
#DOGS
$DOGS 1H 📊
Bias: LONG, but this is a high volatility setup after a sharp move.
Price is at 0.00005296, with the 1H Supertrend at 0.00004937. The chart remains bullish, but the rejection from 0.00006023 means chasing here carries more risk.
Preferred Setup: LONG
• Entry: 0.0000510–0.0000530
• SL: 0.0000490
• TP1: 0.0000558
• TP2: 0.0000580
• TP3: 0.0000602
Key levels
🟢 0.00004937 → Supertrend support
🟢 0.0000510 → pullback support
🔴 0.0000575–0.0000580 → near-term resistance
🔴 0.00006023 → recent high
The order book is currently 60.21% bid vs 39.79% ask, which supports the bullish bias, but DOGS has already made a strong intraday move.
The best entry is on a pullback and holds around 0.000051–0.000053, not by chasing the spike.
Invalidation: 1H close below 0.00004937.
Not financial advice. Leverage can amplify losses.
#DOGS
Bias: LONG, but this is a high volatility setup after a sharp move.
Price is at 0.00005296, with the 1H Supertrend at 0.00004937. The chart remains bullish, but the rejection from 0.00006023 means chasing here carries more risk.
Preferred Setup: LONG
• Entry: 0.0000510–0.0000530
• SL: 0.0000490
• TP1: 0.0000558
• TP2: 0.0000580
• TP3: 0.0000602
Key levels
🟢 0.00004937 → Supertrend support
🟢 0.0000510 → pullback support
🔴 0.0000575–0.0000580 → near-term resistance
🔴 0.00006023 → recent high
The order book is currently 60.21% bid vs 39.79% ask, which supports the bullish bias, but DOGS has already made a strong intraday move.
The best entry is on a pullback and holds around 0.000051–0.000053, not by chasing the spike.
Invalidation: 1H close below 0.00004937.
Not financial advice. Leverage can amplify losses.
#DOGS
40
·
--
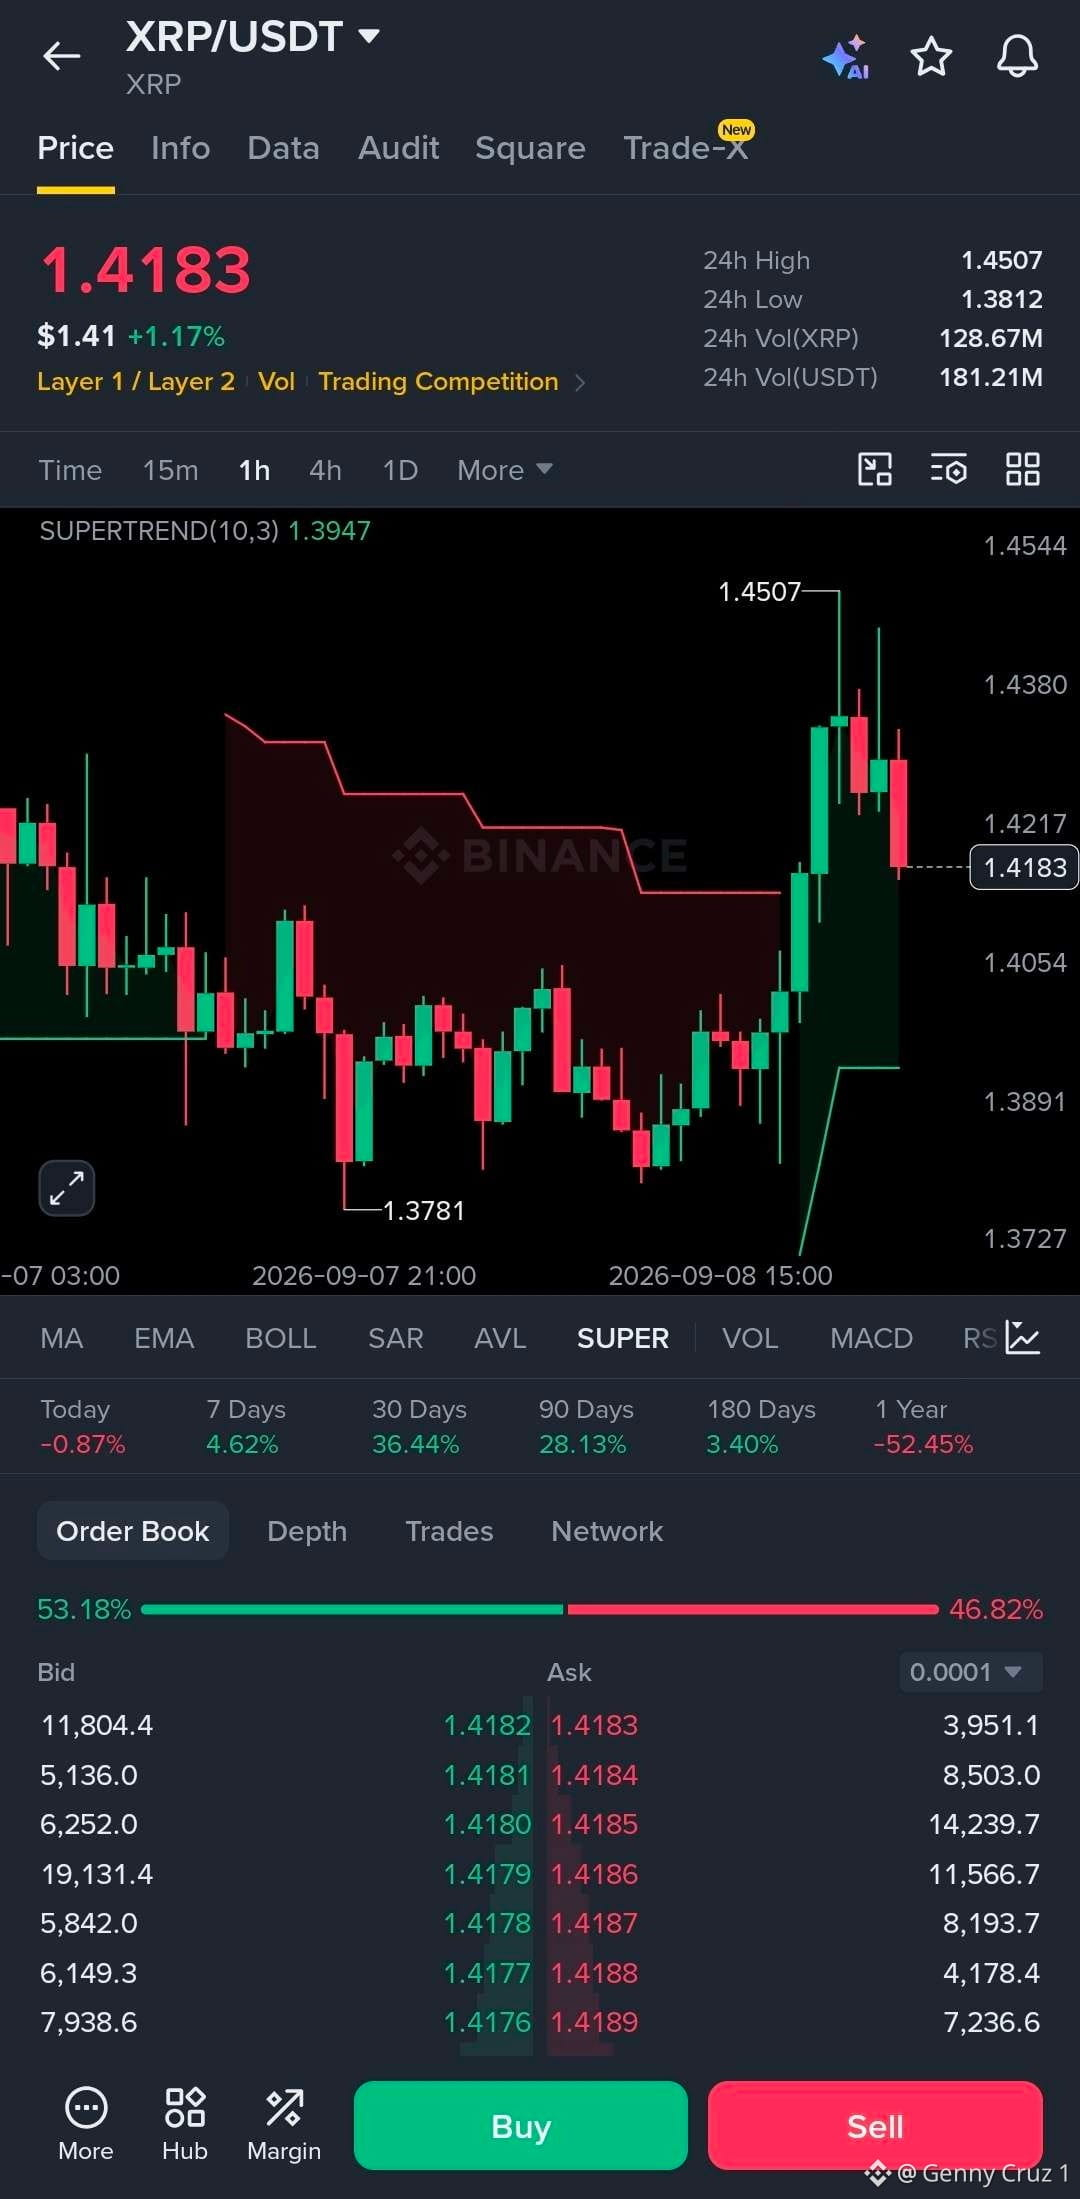
$XRP 1H 📊
Bias: LONG, but I’d avoid chasing the current candle.
• Entry: $1.405–$1.420
• SL: $1.389
• TP1: $1.438
• TP2: $1.451
• TP3: $1.480
Key support: $1.3947 Supertrend
Resistance: $1.438 → $1.4507
XRP flipped bullish on the 1H and pushed to $1.4507, but the rejection from that high shows sellers are active. The cleaner setup is a pullback that holds $1.405–$1.420.
If $1.3947 breaks on a 1H close, I’d cancel the long setup and wait for a new structure.
Not financial advice. Leverage can amplify losses.
#XRP
$XRP 1H 📊
Bias: LONG, but I’d avoid chasing the current candle.
• Entry: $1.405–$1.420
• SL: $1.389
• TP1: $1.438
• TP2: $1.451
• TP3: $1.480
Key support: $1.3947 Supertrend
Resistance: $1.438 → $1.4507
XRP flipped bullish on the 1H and pushed to $1.4507, but the rejection from that high shows sellers are active. The cleaner setup is a pullback that holds $1.405–$1.420.
If $1.3947 breaks on a 1H close, I’d cancel the long setup and wait for a new structure.
Not financial advice. Leverage can amplify losses.
#XRP
Bias: LONG, but I’d avoid chasing the current candle.
• Entry: $1.405–$1.420
• SL: $1.389
• TP1: $1.438
• TP2: $1.451
• TP3: $1.480
Key support: $1.3947 Supertrend
Resistance: $1.438 → $1.4507
XRP flipped bullish on the 1H and pushed to $1.4507, but the rejection from that high shows sellers are active. The cleaner setup is a pullback that holds $1.405–$1.420.
If $1.3947 breaks on a 1H close, I’d cancel the long setup and wait for a new structure.
Not financial advice. Leverage can amplify losses.
#XRP
60
·
--
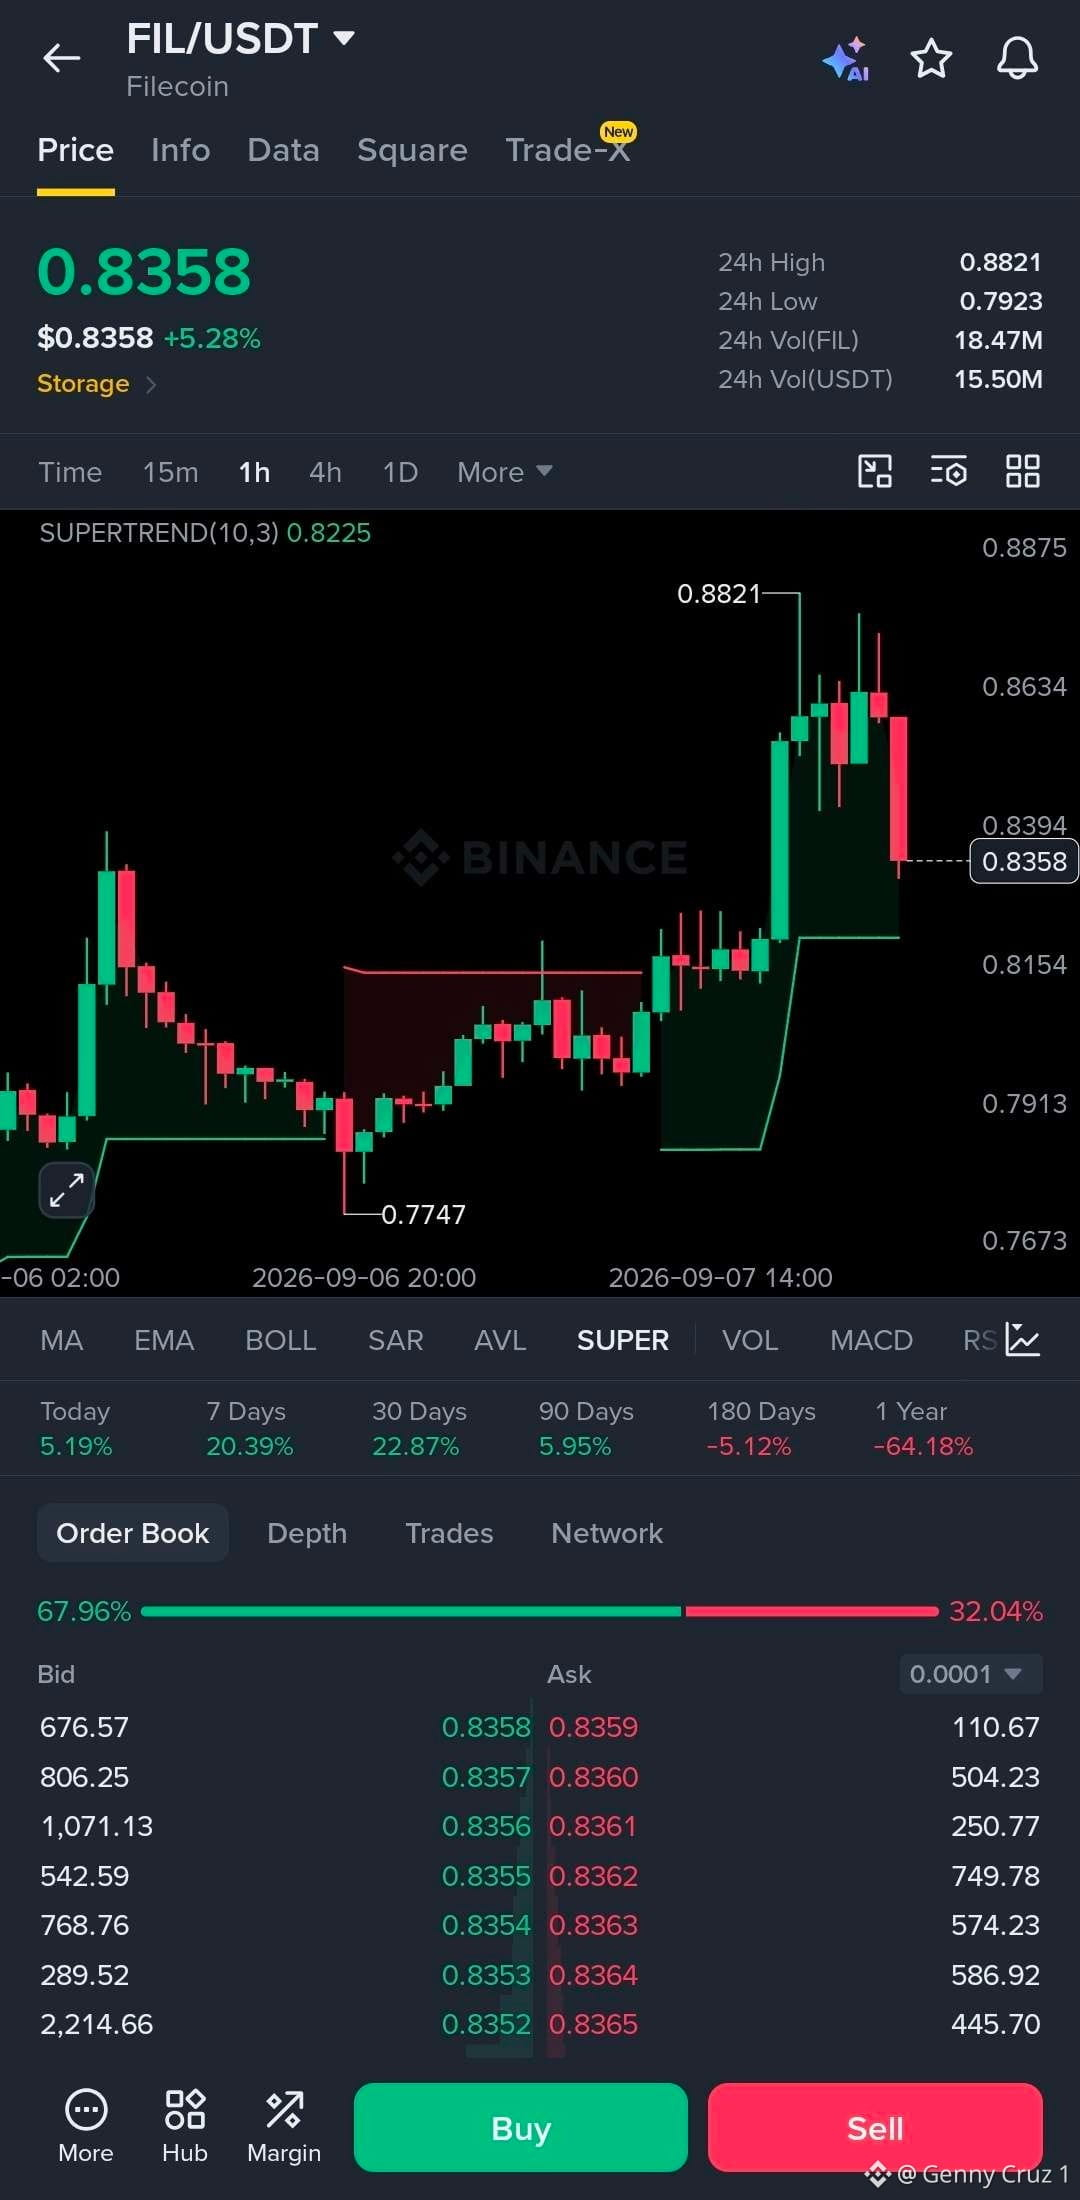
$FIL 1H 📈
FIL still looks bullish, but the latest candle shows some profit-taking after the push to $0.8821.
Price is holding above the Supertrend at $0.8225, while the order book is strongly bid-heavy. The key is whether buyers can defend the recent breakout area.
Preferred Setup: LONG
Entry: $0.828–$0.838
SL: $0.814
TP1: $0.865
TP2: $0.882
TP3: $0.910
Key levels
• $0.8225 → Supertrend support
• $0.815–$0.822 → stronger pullback zone
• $0.8821 → recent high / breakout level
• $0.910 → next upside area
I’d prefer a retest and hold around $0.83 rather than chasing after the previous spike.
Invalidation: 1H close below $0.8225.
Overall, FIL remains constructive while it holds above the Supertrend.
#FIL
$FIL 1H 📈
FIL still looks bullish, but the latest candle shows some profit-taking after the push to $0.8821.
Price is holding above the Supertrend at $0.8225, while the order book is strongly bid-heavy. The key is whether buyers can defend the recent breakout area.
Preferred Setup: LONG
Entry: $0.828–$0.838
SL: $0.814
TP1: $0.865
TP2: $0.882
TP3: $0.910
Key levels
• $0.8225 → Supertrend support
• $0.815–$0.822 → stronger pullback zone
• $0.8821 → recent high / breakout level
• $0.910 → next upside area
I’d prefer a retest and hold around $0.83 rather than chasing after the previous spike.
Invalidation: 1H close below $0.8225.
Overall, FIL remains constructive while it holds above the Supertrend.
#FIL
FIL still looks bullish, but the latest candle shows some profit-taking after the push to $0.8821.
Price is holding above the Supertrend at $0.8225, while the order book is strongly bid-heavy. The key is whether buyers can defend the recent breakout area.
Preferred Setup: LONG
Entry: $0.828–$0.838
SL: $0.814
TP1: $0.865
TP2: $0.882
TP3: $0.910
Key levels
• $0.8225 → Supertrend support
• $0.815–$0.822 → stronger pullback zone
• $0.8821 → recent high / breakout level
• $0.910 → next upside area
I’d prefer a retest and hold around $0.83 rather than chasing after the previous spike.
Invalidation: 1H close below $0.8225.
Overall, FIL remains constructive while it holds above the Supertrend.
#FIL
16
·
--
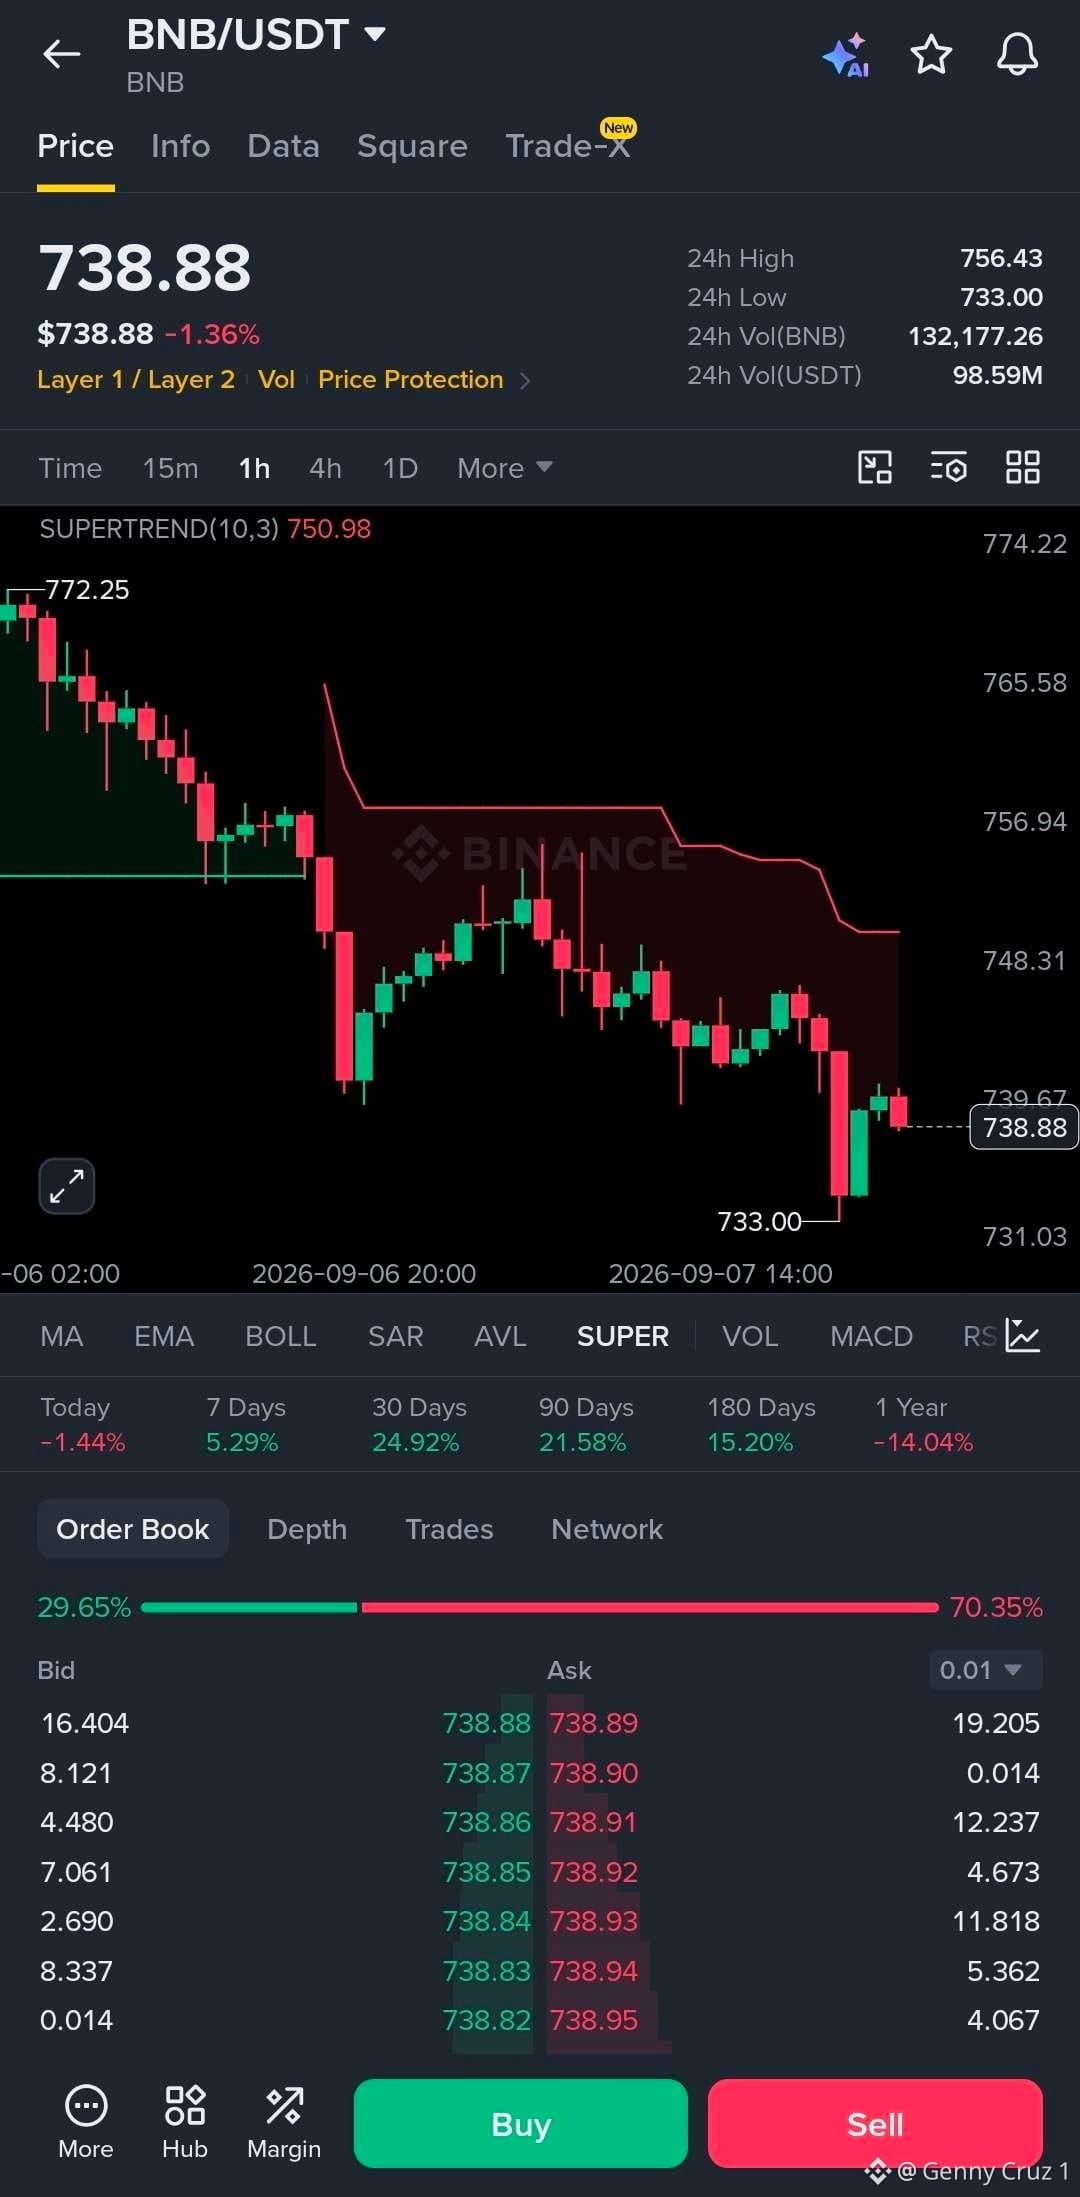
$BNB 1H 📉
BNB is currently showing a bearish structure on the one hour chart. Price is below the Supertrend at $750.98, and the recent move from $756+ has been making lower highs and lower lows.
The bounce from $733 is worth watching, but it hasn’t flipped the trend yet.
Preferred Setup: SHORT
Entry: $740–$745
SL: $751.50
TP1: $733
TP2: $728
TP3: $722
Key levels
• $750.98 → Supertrend resistance
• $745–$748 → rejection zone
• $733 → immediate support
• $728–$722 → downside targets
The order book is heavily ask-weighted, which adds some pressure to the bearish setup.
I’d avoid shorting directly into $733. A bounce toward $740–$745 followed by rejection would offer the cleaner entry.
Invalidation: 1H close above $751.
Overall, BNB stays bearish below the Supertrend; reclaiming $751 would be the first sign that sellers are losing control.
#BNB
$BNB 1H 📉
BNB is currently showing a bearish structure on the one hour chart. Price is below the Supertrend at $750.98, and the recent move from $756+ has been making lower highs and lower lows.
The bounce from $733 is worth watching, but it hasn’t flipped the trend yet.
Preferred Setup: SHORT
Entry: $740–$745
SL: $751.50
TP1: $733
TP2: $728
TP3: $722
Key levels
• $750.98 → Supertrend resistance
• $745–$748 → rejection zone
• $733 → immediate support
• $728–$722 → downside targets
The order book is heavily ask-weighted, which adds some pressure to the bearish setup.
I’d avoid shorting directly into $733. A bounce toward $740–$745 followed by rejection would offer the cleaner entry.
Invalidation: 1H close above $751.
Overall, BNB stays bearish below the Supertrend; reclaiming $751 would be the first sign that sellers are losing control.
#BNB
BNB is currently showing a bearish structure on the one hour chart. Price is below the Supertrend at $750.98, and the recent move from $756+ has been making lower highs and lower lows.
The bounce from $733 is worth watching, but it hasn’t flipped the trend yet.
Preferred Setup: SHORT
Entry: $740–$745
SL: $751.50
TP1: $733
TP2: $728
TP3: $722
Key levels
• $750.98 → Supertrend resistance
• $745–$748 → rejection zone
• $733 → immediate support
• $728–$722 → downside targets
The order book is heavily ask-weighted, which adds some pressure to the bearish setup.
I’d avoid shorting directly into $733. A bounce toward $740–$745 followed by rejection would offer the cleaner entry.
Invalidation: 1H close above $751.
Overall, BNB stays bearish below the Supertrend; reclaiming $751 would be the first sign that sellers are losing control.
#BNB
15
·
--
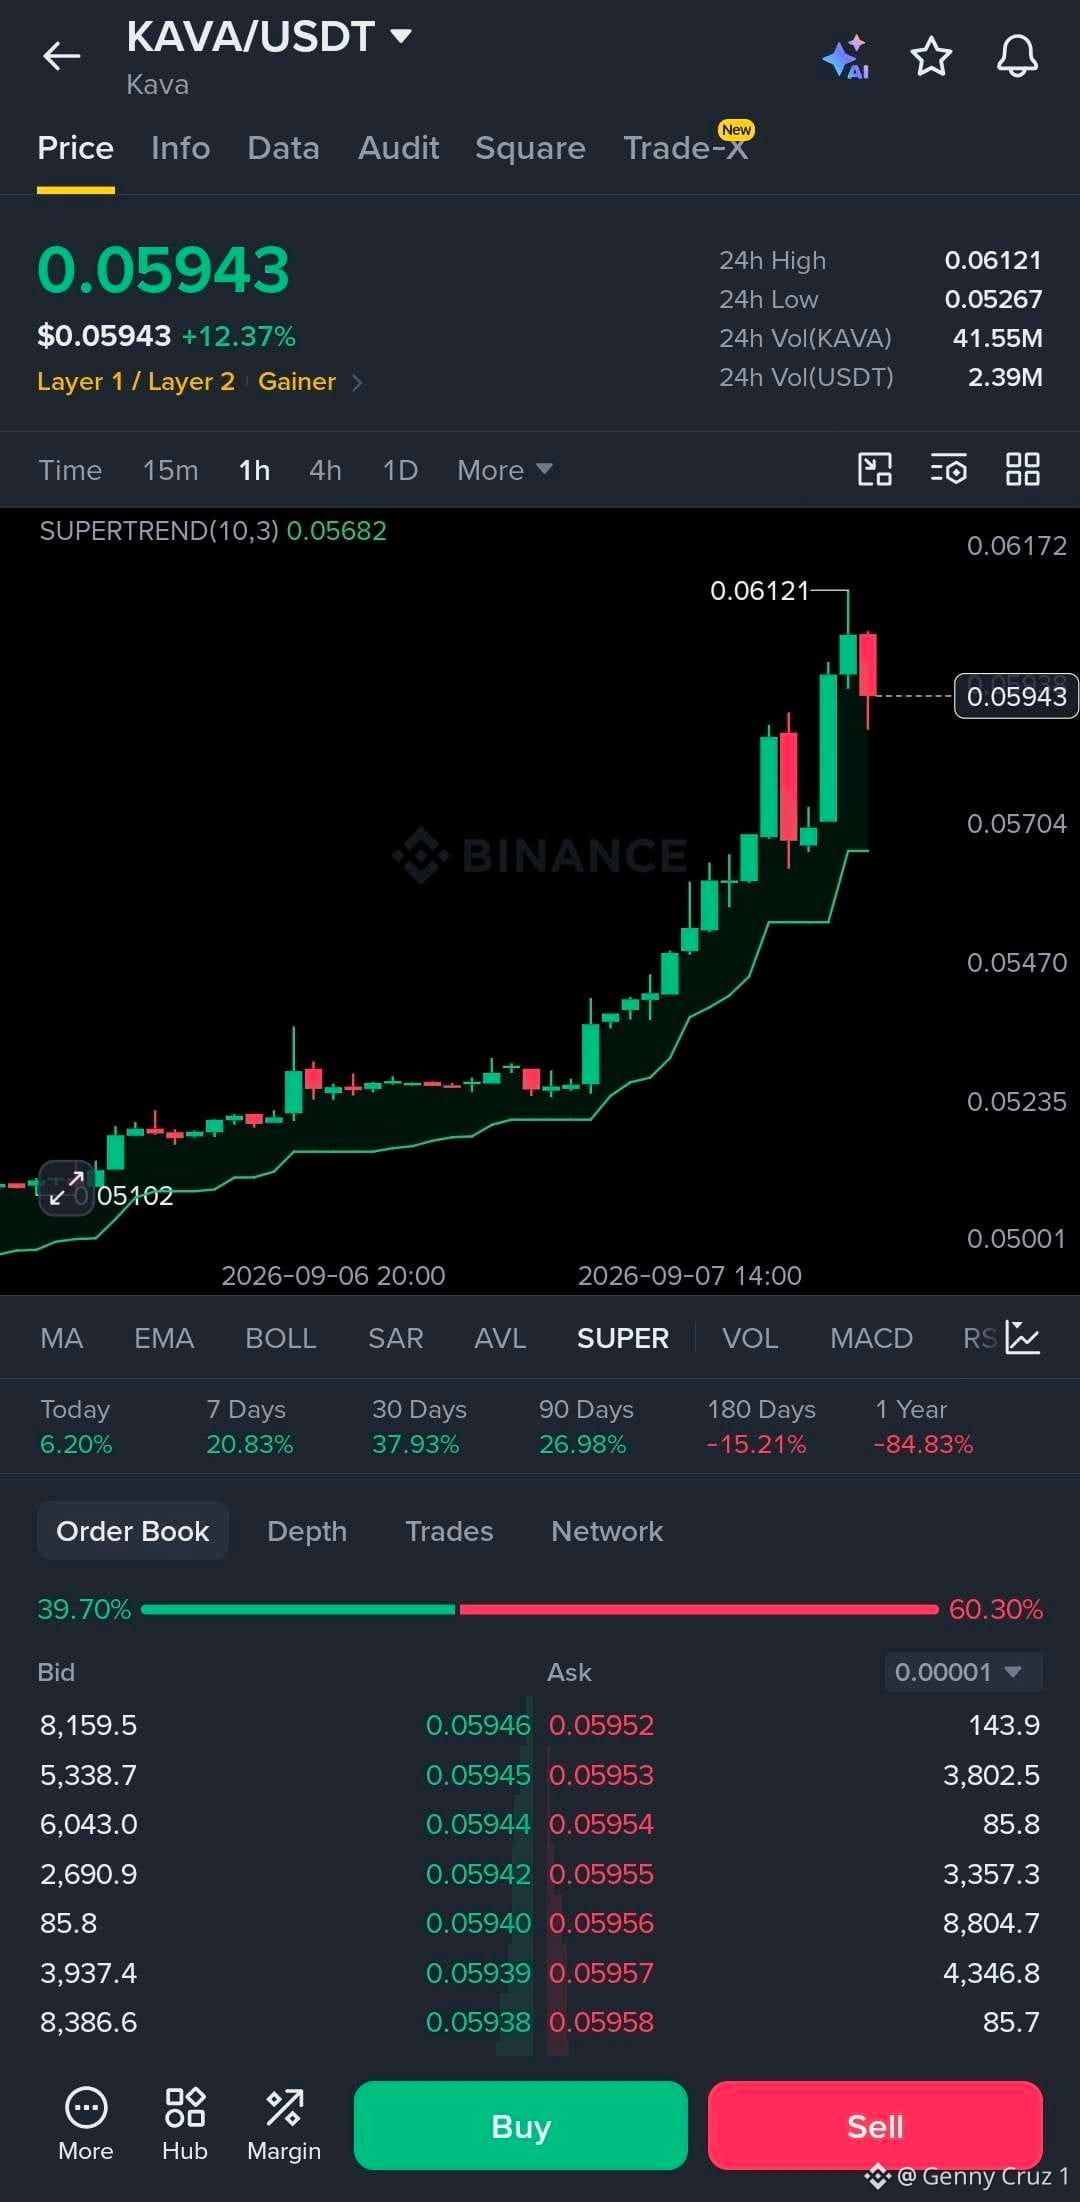
$KAVA 1H 📈
KAVA is showing a strong bullish structure, with the price comfortably above the Supertrend at $0.05682. The move from the $0.05102 area has been consistent, with clear higher highs and higher lows.
Price just pulled back from $0.06121, so I’d avoid chasing here.
Preferred Setup: LONG
Entry: $0.05880–$0.05930
SL: $0.05670
TP1: $0.06120
TP2: $0.06300
TP3: $0.06500
Key levels
• $0.05682 → Supertrend support
• $0.05880–$0.05930 → potential retest zone
• $0.06121 → recent high / breakout level
• $0.06300–$0.06500 → next upside areas
The main thing I’d watch is whether $0.0588–$0.0593 holds on a pullback. A clean 1H close above $0.06121 would strengthen the continuation setup.
The order book is currently ask-heavy, so patience makes more sense than chasing the move.
Overall: bullish bias remains intact while $0.05682 holds.
#KAVA
$KAVA 1H 📈
KAVA is showing a strong bullish structure, with the price comfortably above the Supertrend at $0.05682. The move from the $0.05102 area has been consistent, with clear higher highs and higher lows.
Price just pulled back from $0.06121, so I’d avoid chasing here.
Preferred Setup: LONG
Entry: $0.05880–$0.05930
SL: $0.05670
TP1: $0.06120
TP2: $0.06300
TP3: $0.06500
Key levels
• $0.05682 → Supertrend support
• $0.05880–$0.05930 → potential retest zone
• $0.06121 → recent high / breakout level
• $0.06300–$0.06500 → next upside areas
The main thing I’d watch is whether $0.0588–$0.0593 holds on a pullback. A clean 1H close above $0.06121 would strengthen the continuation setup.
The order book is currently ask-heavy, so patience makes more sense than chasing the move.
Overall: bullish bias remains intact while $0.05682 holds.
#KAVA
KAVA is showing a strong bullish structure, with the price comfortably above the Supertrend at $0.05682. The move from the $0.05102 area has been consistent, with clear higher highs and higher lows.
Price just pulled back from $0.06121, so I’d avoid chasing here.
Preferred Setup: LONG
Entry: $0.05880–$0.05930
SL: $0.05670
TP1: $0.06120
TP2: $0.06300
TP3: $0.06500
Key levels
• $0.05682 → Supertrend support
• $0.05880–$0.05930 → potential retest zone
• $0.06121 → recent high / breakout level
• $0.06300–$0.06500 → next upside areas
The main thing I’d watch is whether $0.0588–$0.0593 holds on a pullback. A clean 1H close above $0.06121 would strengthen the continuation setup.
The order book is currently ask-heavy, so patience makes more sense than chasing the move.
Overall: bullish bias remains intact while $0.05682 holds.
#KAVA
23
·
--
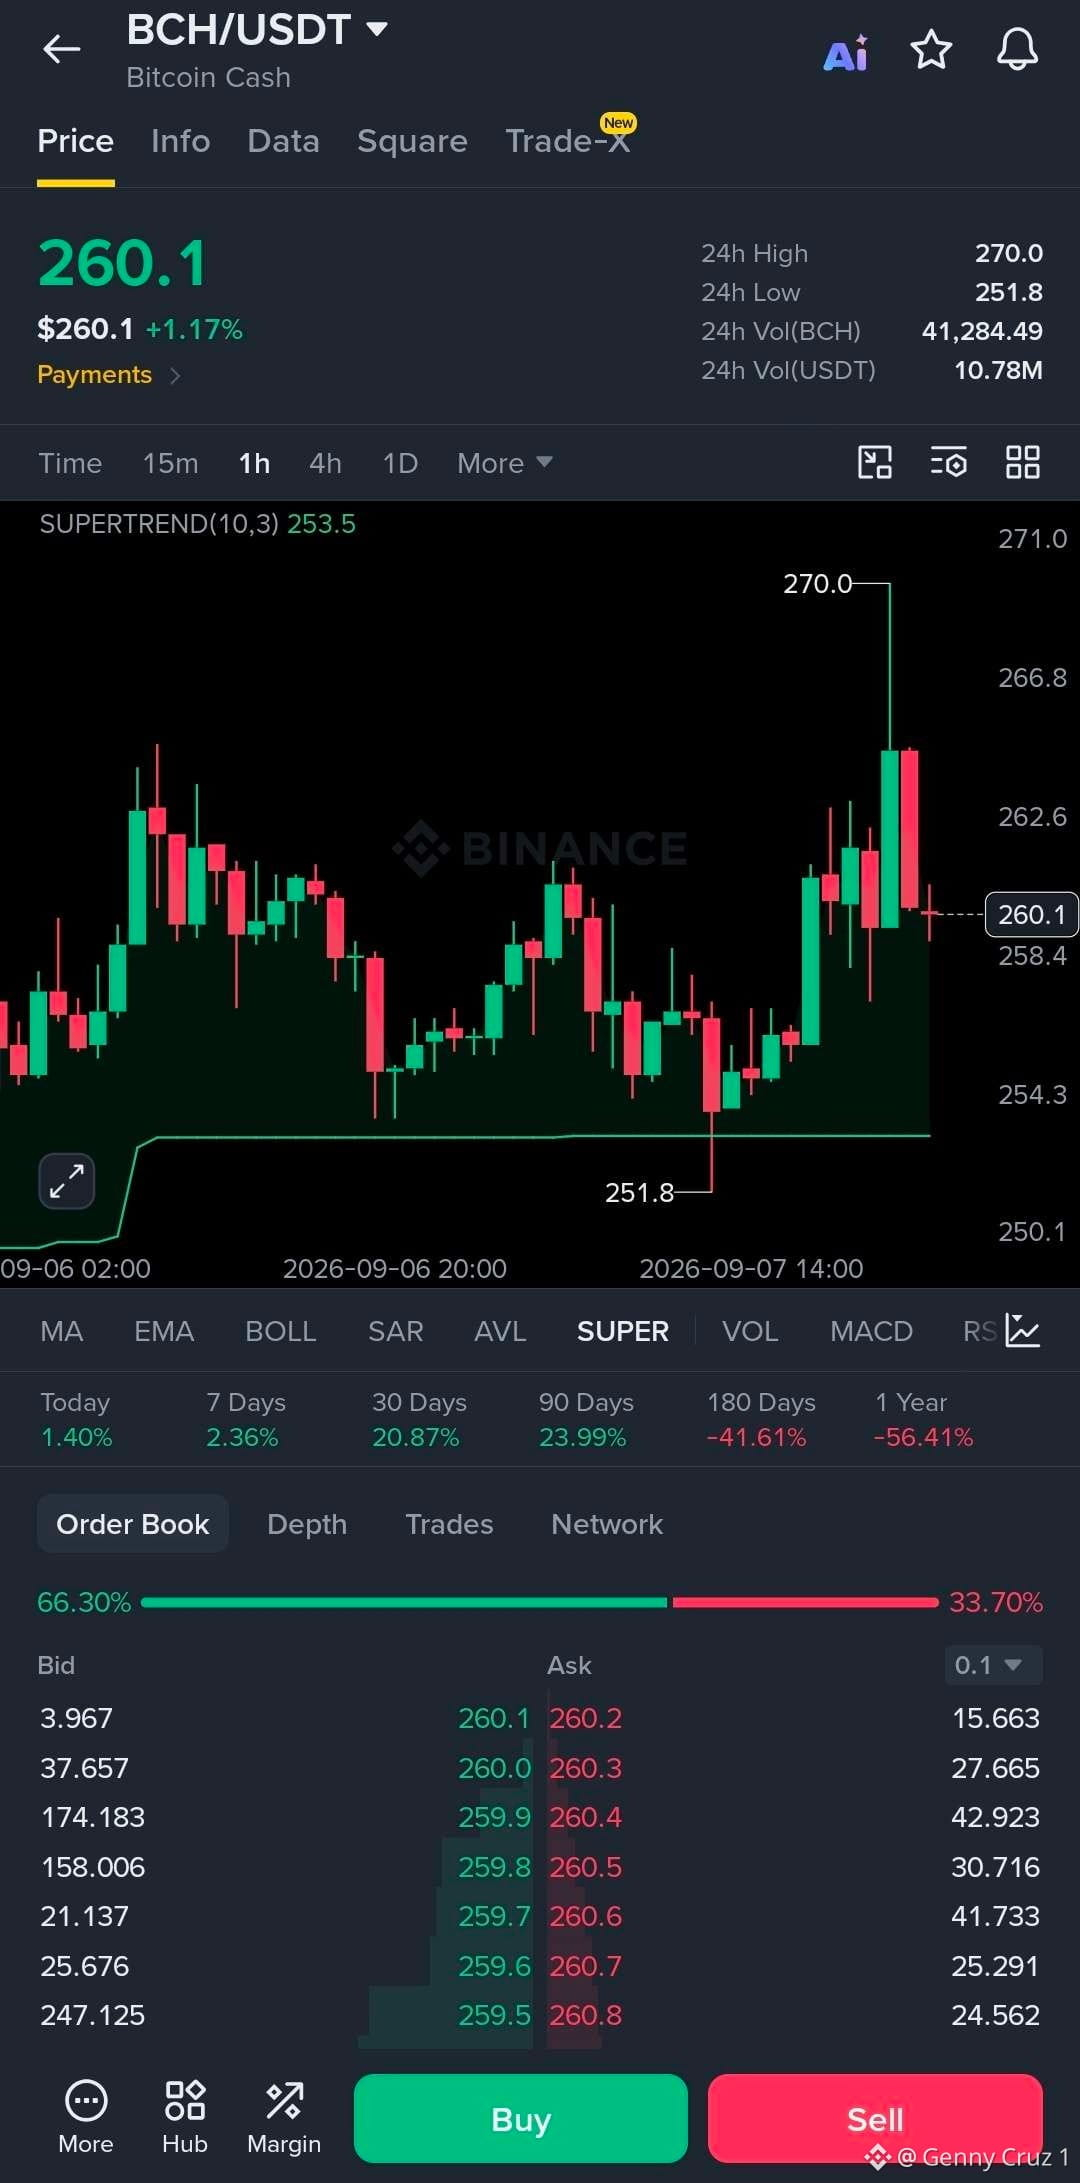
$BCH 1H 📈
BCH is still holding a bullish structure, with the price above the Supertrend at $253.5. The recent push to $270 was rejected sharply, so this looks more like a pullback after resistance than a confirmed trend reversal.
Preferred Setup: LONG
Entry: $257–$260
SL: $253
TP1: $270
TP2: $276
TP3: $282
Key levels
• $253.5 → Supertrend support
• $260 → current pivot
• $270 → major breakout level
• $276–$282 → upside targets
The order book is noticeably bid-heavy, which gives the setup some support.
I’d avoid chasing the move. A hold above $257–$260 followed by a reclaim of $270 would give the cleaner continuation setup.
Invalidation: 1H close below $253.
Overall, BCH remains constructive while the Supertrend holds, but $270 needs to be reclaimed for the next leg higher.
#BCH
$BCH 1H 📈
BCH is still holding a bullish structure, with the price above the Supertrend at $253.5. The recent push to $270 was rejected sharply, so this looks more like a pullback after resistance than a confirmed trend reversal.
Preferred Setup: LONG
Entry: $257–$260
SL: $253
TP1: $270
TP2: $276
TP3: $282
Key levels
• $253.5 → Supertrend support
• $260 → current pivot
• $270 → major breakout level
• $276–$282 → upside targets
The order book is noticeably bid-heavy, which gives the setup some support.
I’d avoid chasing the move. A hold above $257–$260 followed by a reclaim of $270 would give the cleaner continuation setup.
Invalidation: 1H close below $253.
Overall, BCH remains constructive while the Supertrend holds, but $270 needs to be reclaimed for the next leg higher.
#BCH
BCH is still holding a bullish structure, with the price above the Supertrend at $253.5. The recent push to $270 was rejected sharply, so this looks more like a pullback after resistance than a confirmed trend reversal.
Preferred Setup: LONG
Entry: $257–$260
SL: $253
TP1: $270
TP2: $276
TP3: $282
Key levels
• $253.5 → Supertrend support
• $260 → current pivot
• $270 → major breakout level
• $276–$282 → upside targets
The order book is noticeably bid-heavy, which gives the setup some support.
I’d avoid chasing the move. A hold above $257–$260 followed by a reclaim of $270 would give the cleaner continuation setup.
Invalidation: 1H close below $253.
Overall, BCH remains constructive while the Supertrend holds, but $270 needs to be reclaimed for the next leg higher.
#BCH
31
·
--
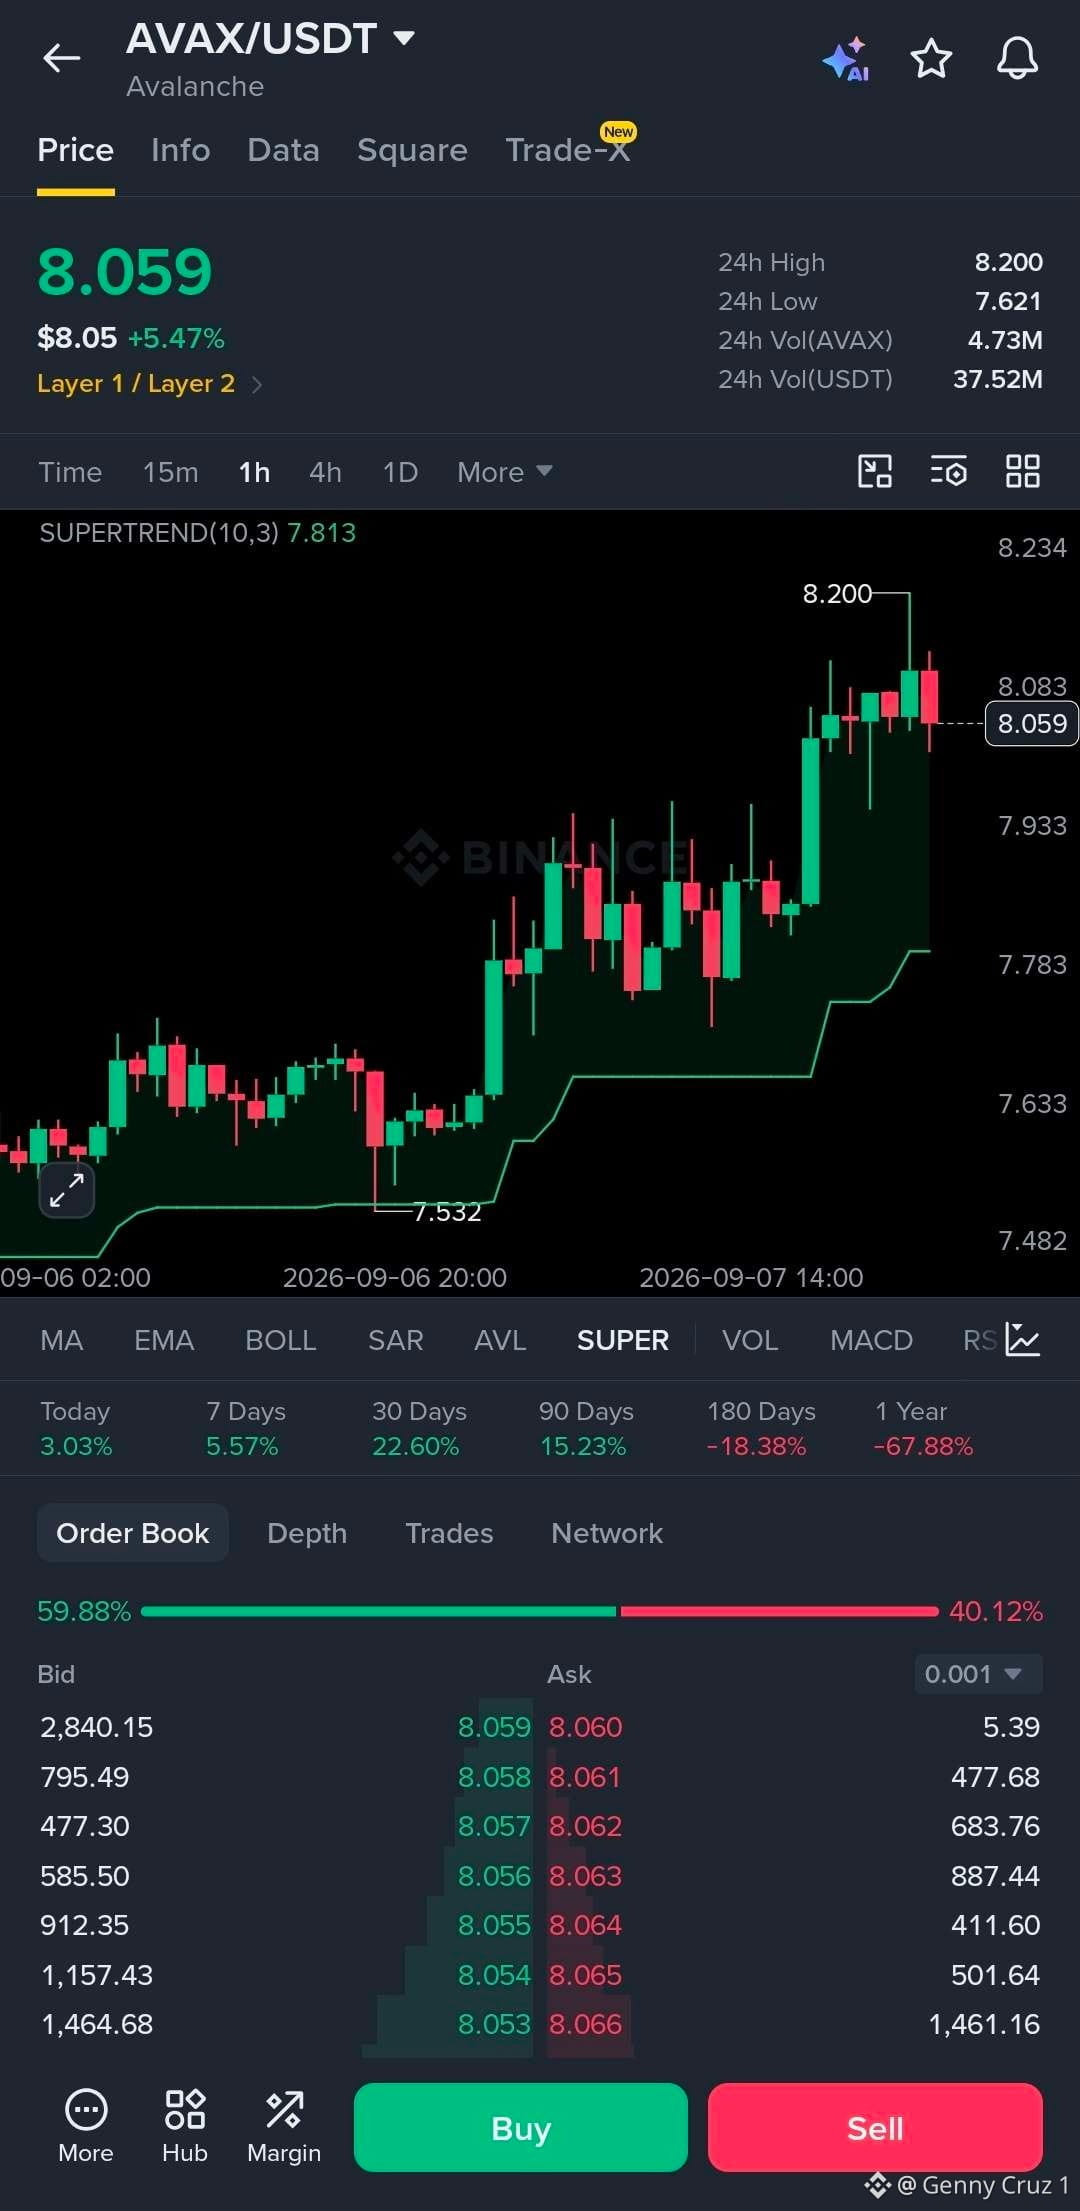
$AVAX 1H 📈
AVAX is showing a clean bullish structure on the one hour chart. Price is holding above the Supertrend at $7.813, while the recent breakout pushed it into the $8.20 resistance zone.
I’d favor a LONG on a controlled pullback, rather than chasing the current candle.
Preferred Setup: LONG
Entry: $8.00–$8.06
SL: $7.88
TP1: $8.20
TP2: $8.35
TP3: $8.50
Key levels
• $7.813 → Supertrend support
• $8.00 → psychological support
• $8.20 → immediate resistance / recent high
• $8.35–$8.50 → next upside areas
The order book is also tilted toward bids, adding some support to the setup.
A clean 1H close above $8.20 would be the strongest continuation signal. If the price loses $7.88, I’d step aside and wait for a fresh structure.
Overall: bullish bias, but the best entry is on a retest rather than chasing the breakout.
#AVAX
$AVAX 1H 📈
AVAX is showing a clean bullish structure on the one hour chart. Price is holding above the Supertrend at $7.813, while the recent breakout pushed it into the $8.20 resistance zone.
I’d favor a LONG on a controlled pullback, rather than chasing the current candle.
Preferred Setup: LONG
Entry: $8.00–$8.06
SL: $7.88
TP1: $8.20
TP2: $8.35
TP3: $8.50
Key levels
• $7.813 → Supertrend support
• $8.00 → psychological support
• $8.20 → immediate resistance / recent high
• $8.35–$8.50 → next upside areas
The order book is also tilted toward bids, adding some support to the setup.
A clean 1H close above $8.20 would be the strongest continuation signal. If the price loses $7.88, I’d step aside and wait for a fresh structure.
Overall: bullish bias, but the best entry is on a retest rather than chasing the breakout.
#AVAX
AVAX is showing a clean bullish structure on the one hour chart. Price is holding above the Supertrend at $7.813, while the recent breakout pushed it into the $8.20 resistance zone.
I’d favor a LONG on a controlled pullback, rather than chasing the current candle.
Preferred Setup: LONG
Entry: $8.00–$8.06
SL: $7.88
TP1: $8.20
TP2: $8.35
TP3: $8.50
Key levels
• $7.813 → Supertrend support
• $8.00 → psychological support
• $8.20 → immediate resistance / recent high
• $8.35–$8.50 → next upside areas
The order book is also tilted toward bids, adding some support to the setup.
A clean 1H close above $8.20 would be the strongest continuation signal. If the price loses $7.88, I’d step aside and wait for a fresh structure.
Overall: bullish bias, but the best entry is on a retest rather than chasing the breakout.
#AVAX
49
·
--
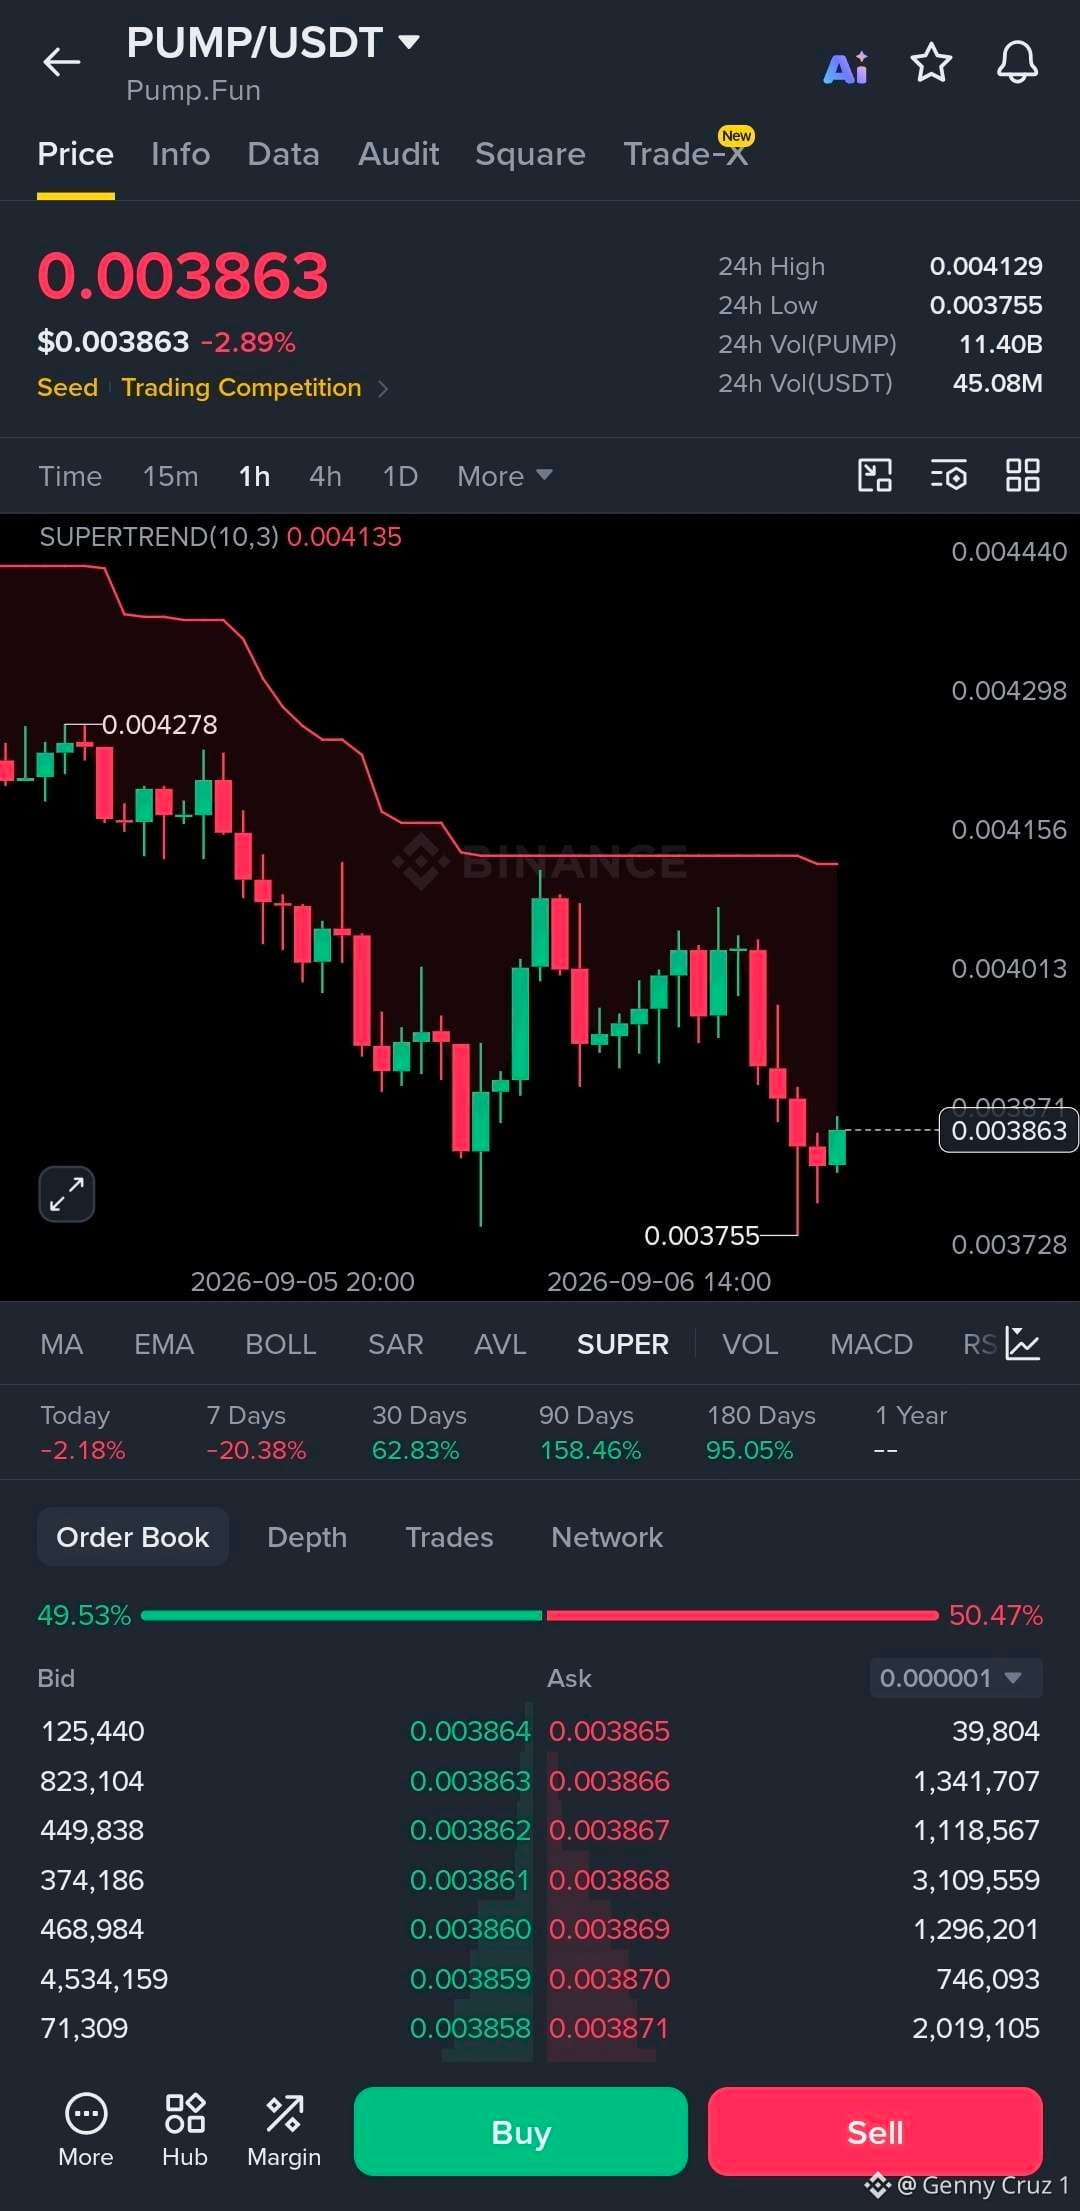
$PUMP 1H 📊
PUMP is currently bearish on the one hour structure. Price is sitting below the Supertrend at $0.004135, while the recent rejection from the $0.004013 area pushed it back toward the local low at $0.003755.
I wouldn’t chase a long here.
Preferred Setup: SHORT
Entry: $0.00388–$0.00398
SL: $0.00414
TP1: $0.00376
TP2: $0.00365
TP3: $0.00355
Key levels
• $0.004135 → major trend resistance / Supertrend
• $0.004013 → near-term resistance
• $0.003755 → immediate support
• $0.00365 → next downside area
The order book is almost balanced, but the chart structure is the bigger concern. A reclaim and 1H close above $0.004135 would invalidate the bearish setup and could shift momentum back toward the upside.
For now, shorts look cleaner on a rejection, while longs need a proper trend flip first.
#PUMP
$PUMP 1H 📊
PUMP is currently bearish on the one hour structure. Price is sitting below the Supertrend at $0.004135, while the recent rejection from the $0.004013 area pushed it back toward the local low at $0.003755.
I wouldn’t chase a long here.
Preferred Setup: SHORT
Entry: $0.00388–$0.00398
SL: $0.00414
TP1: $0.00376
TP2: $0.00365
TP3: $0.00355
Key levels
• $0.004135 → major trend resistance / Supertrend
• $0.004013 → near-term resistance
• $0.003755 → immediate support
• $0.00365 → next downside area
The order book is almost balanced, but the chart structure is the bigger concern. A reclaim and 1H close above $0.004135 would invalidate the bearish setup and could shift momentum back toward the upside.
For now, shorts look cleaner on a rejection, while longs need a proper trend flip first.
#PUMP
PUMP is currently bearish on the one hour structure. Price is sitting below the Supertrend at $0.004135, while the recent rejection from the $0.004013 area pushed it back toward the local low at $0.003755.
I wouldn’t chase a long here.
Preferred Setup: SHORT
Entry: $0.00388–$0.00398
SL: $0.00414
TP1: $0.00376
TP2: $0.00365
TP3: $0.00355
Key levels
• $0.004135 → major trend resistance / Supertrend
• $0.004013 → near-term resistance
• $0.003755 → immediate support
• $0.00365 → next downside area
The order book is almost balanced, but the chart structure is the bigger concern. A reclaim and 1H close above $0.004135 would invalidate the bearish setup and could shift momentum back toward the upside.
For now, shorts look cleaner on a rejection, while longs need a proper trend flip first.
#PUMP
28
·
--
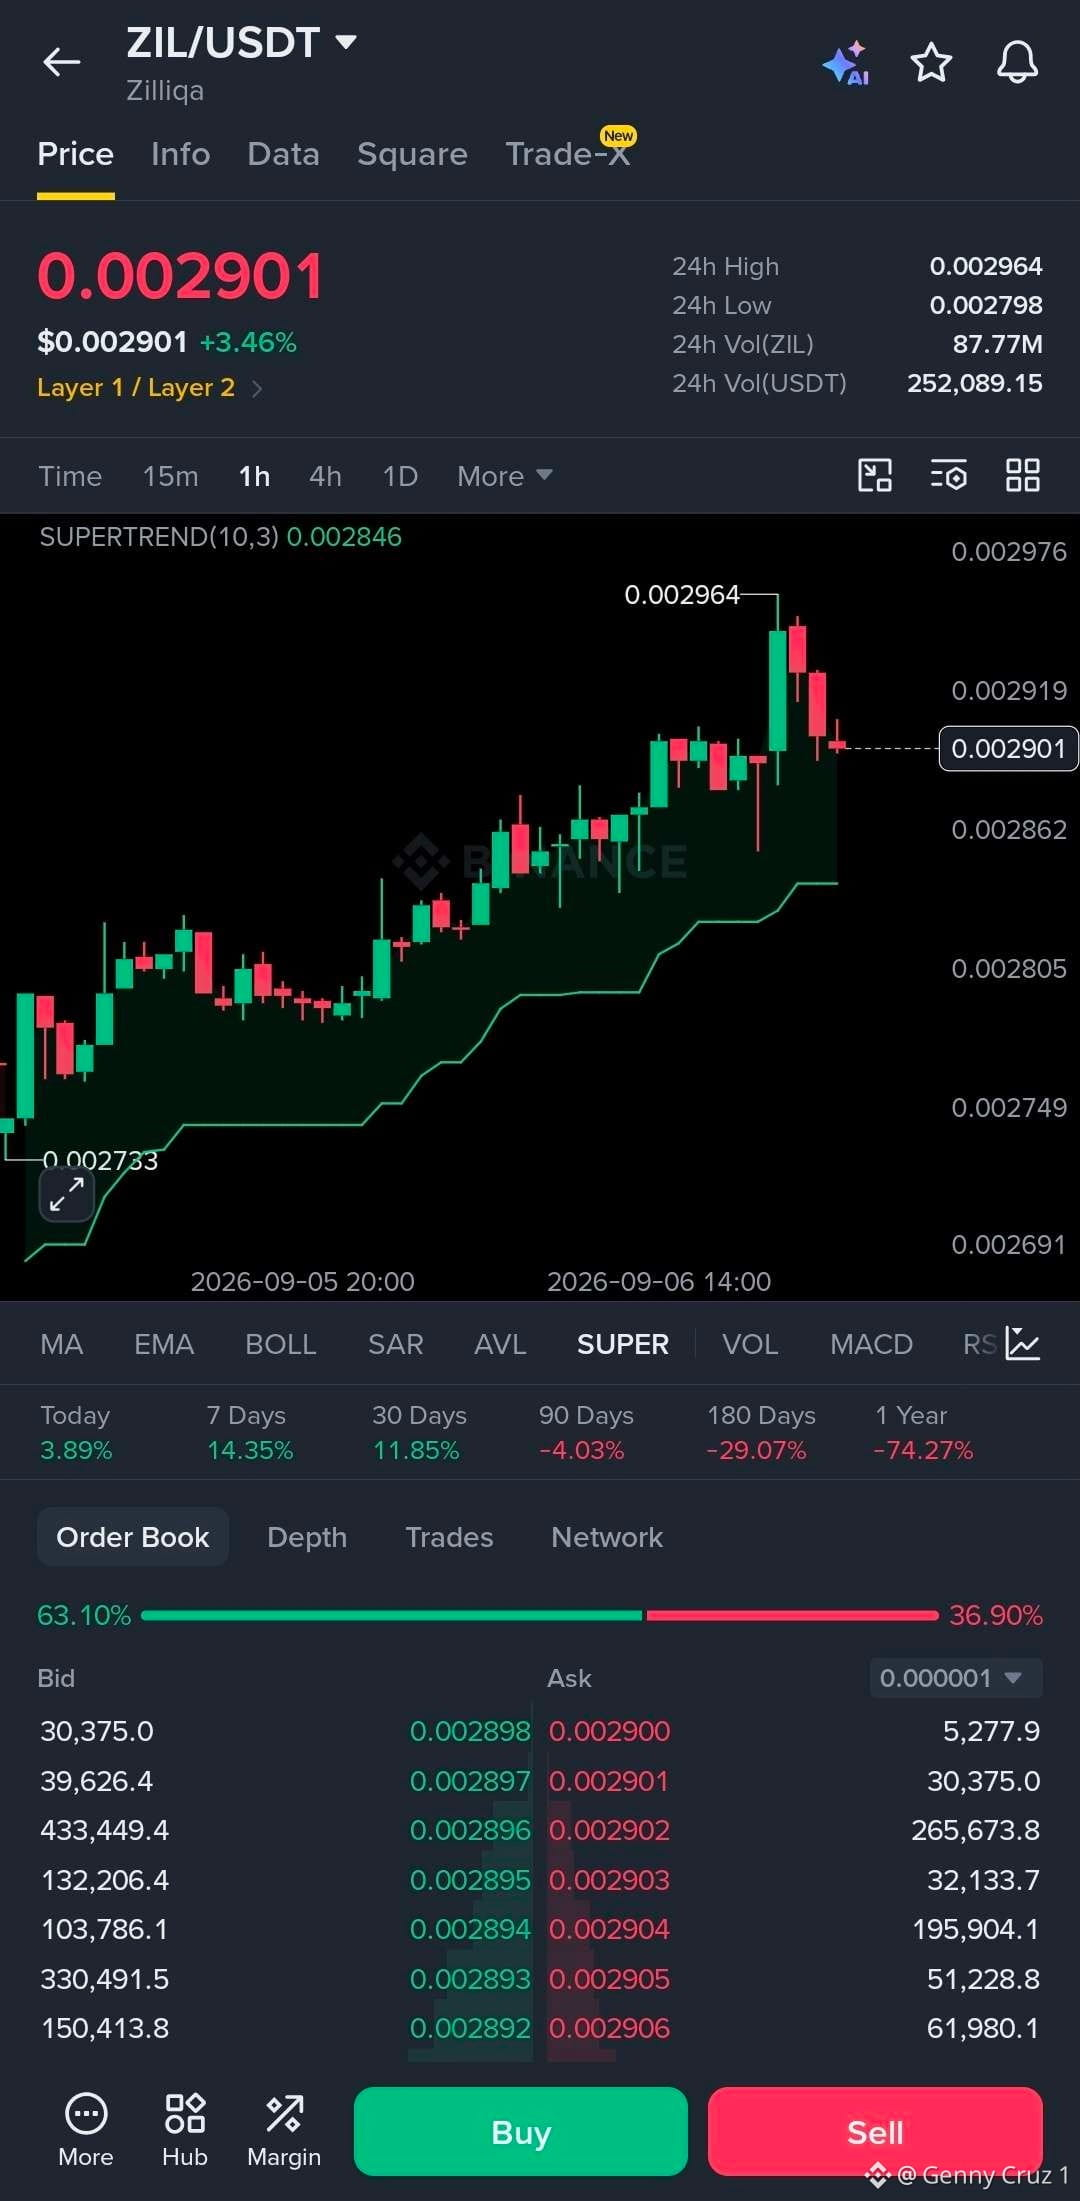
$ZIL 1H 📈
ZIL is holding a clean bullish structure after steadily building higher highs and higher lows.
The price is currently around $0.002901, with the Supertrend still bullish at $0.002846. The recent rejection from $0.002964 looks more like a pullback than a trend breakdown for now.
Preferred Setup: LONG
Entry: $0.002875–$0.002895
SL: $0.002835
TP1: $0.002965
TP2: $0.003020
TP3: $0.003080
Key levels
• $0.002846 → Supertrend support
• $0.002964 → immediate breakout level
• $0.003020 → next upside area
• $0.003080 → extended target
The order book also shows stronger bid-side positioning, which supports the bullish setup, but I’d still prefer a retest and hold around the entry zone rather than chasing the current candle.
Invalidation: 1H close below $0.002835.
Overall, ZIL looks constructive here. A clean reclaim of $0.002964 would make the continuation setup much stronger.
#ZIL
$ZIL 1H 📈
ZIL is holding a clean bullish structure after steadily building higher highs and higher lows.
The price is currently around $0.002901, with the Supertrend still bullish at $0.002846. The recent rejection from $0.002964 looks more like a pullback than a trend breakdown for now.
Preferred Setup: LONG
Entry: $0.002875–$0.002895
SL: $0.002835
TP1: $0.002965
TP2: $0.003020
TP3: $0.003080
Key levels
• $0.002846 → Supertrend support
• $0.002964 → immediate breakout level
• $0.003020 → next upside area
• $0.003080 → extended target
The order book also shows stronger bid-side positioning, which supports the bullish setup, but I’d still prefer a retest and hold around the entry zone rather than chasing the current candle.
Invalidation: 1H close below $0.002835.
Overall, ZIL looks constructive here. A clean reclaim of $0.002964 would make the continuation setup much stronger.
#ZIL
ZIL is holding a clean bullish structure after steadily building higher highs and higher lows.
The price is currently around $0.002901, with the Supertrend still bullish at $0.002846. The recent rejection from $0.002964 looks more like a pullback than a trend breakdown for now.
Preferred Setup: LONG
Entry: $0.002875–$0.002895
SL: $0.002835
TP1: $0.002965
TP2: $0.003020
TP3: $0.003080
Key levels
• $0.002846 → Supertrend support
• $0.002964 → immediate breakout level
• $0.003020 → next upside area
• $0.003080 → extended target
The order book also shows stronger bid-side positioning, which supports the bullish setup, but I’d still prefer a retest and hold around the entry zone rather than chasing the current candle.
Invalidation: 1H close below $0.002835.
Overall, ZIL looks constructive here. A clean reclaim of $0.002964 would make the continuation setup much stronger.
#ZIL
28
·
--
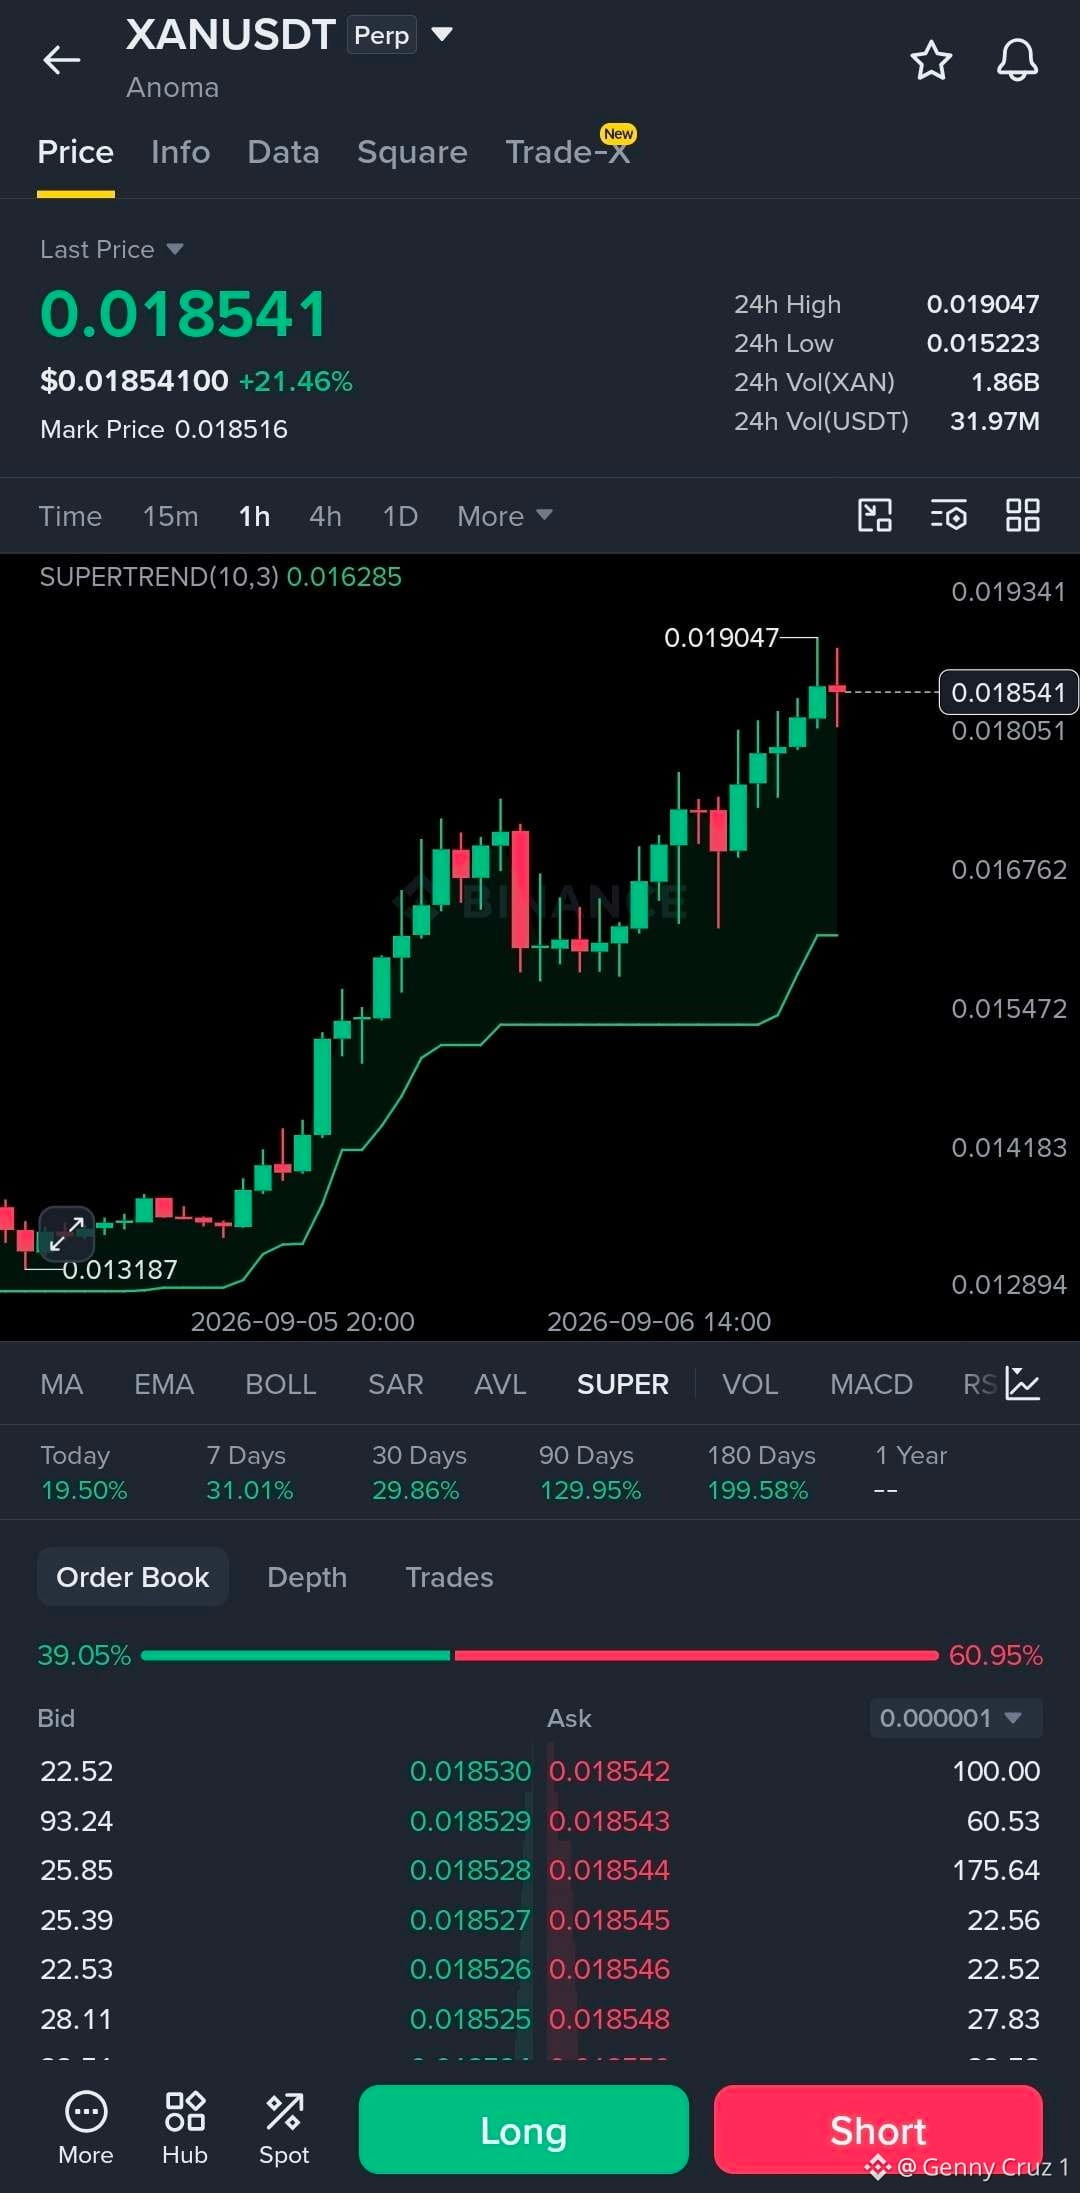
$XAN 1H 📈
XAN is looking cleanly bullish on the one hour chart. The structure is strong, with higher highs and higher lows, while price is holding well above the Supertrend at $0.016285.
But after a 21% move today, I’d rather wait for confirmation than chase.
Preferred Setup: LONG
Entry: $0.01790–$0.01820
SL: $0.01735
TP1: $0.01905
TP2: $0.01980
TP3: $0.02050
What I like
• Strong continuation structure
• Supertrend remains bullish
• Price is consolidating close to the local high
• $0.019047 is the key breakout level
• A clean break and 1H close above that high could open the next leg
The ideal setup would be a pullback toward $0.01790–$0.01820, followed by a strong reclaim.
If XAN gets a convincing 1H close above $0.019047, the breakout becomes much cleaner, with $0.01980 → $0.02050 as the next areas to watch.
Invalidation: 1H close below $0.01735.
Overall, XAN has one of the cleaner bullish structures among the charts you’ve shared, but the entry matters here.
#xan
$XAN 1H 📈
XAN is looking cleanly bullish on the one hour chart. The structure is strong, with higher highs and higher lows, while price is holding well above the Supertrend at $0.016285.
But after a 21% move today, I’d rather wait for confirmation than chase.
Preferred Setup: LONG
Entry: $0.01790–$0.01820
SL: $0.01735
TP1: $0.01905
TP2: $0.01980
TP3: $0.02050
What I like
• Strong continuation structure
• Supertrend remains bullish
• Price is consolidating close to the local high
• $0.019047 is the key breakout level
• A clean break and 1H close above that high could open the next leg
The ideal setup would be a pullback toward $0.01790–$0.01820, followed by a strong reclaim.
If XAN gets a convincing 1H close above $0.019047, the breakout becomes much cleaner, with $0.01980 → $0.02050 as the next areas to watch.
Invalidation: 1H close below $0.01735.
Overall, XAN has one of the cleaner bullish structures among the charts you’ve shared, but the entry matters here.
#xan
XAN is looking cleanly bullish on the one hour chart. The structure is strong, with higher highs and higher lows, while price is holding well above the Supertrend at $0.016285.
But after a 21% move today, I’d rather wait for confirmation than chase.
Preferred Setup: LONG
Entry: $0.01790–$0.01820
SL: $0.01735
TP1: $0.01905
TP2: $0.01980
TP3: $0.02050
What I like
• Strong continuation structure
• Supertrend remains bullish
• Price is consolidating close to the local high
• $0.019047 is the key breakout level
• A clean break and 1H close above that high could open the next leg
The ideal setup would be a pullback toward $0.01790–$0.01820, followed by a strong reclaim.
If XAN gets a convincing 1H close above $0.019047, the breakout becomes much cleaner, with $0.01980 → $0.02050 as the next areas to watch.
Invalidation: 1H close below $0.01735.
Overall, XAN has one of the cleaner bullish structures among the charts you’ve shared, but the entry matters here.
#xan
80
·
--
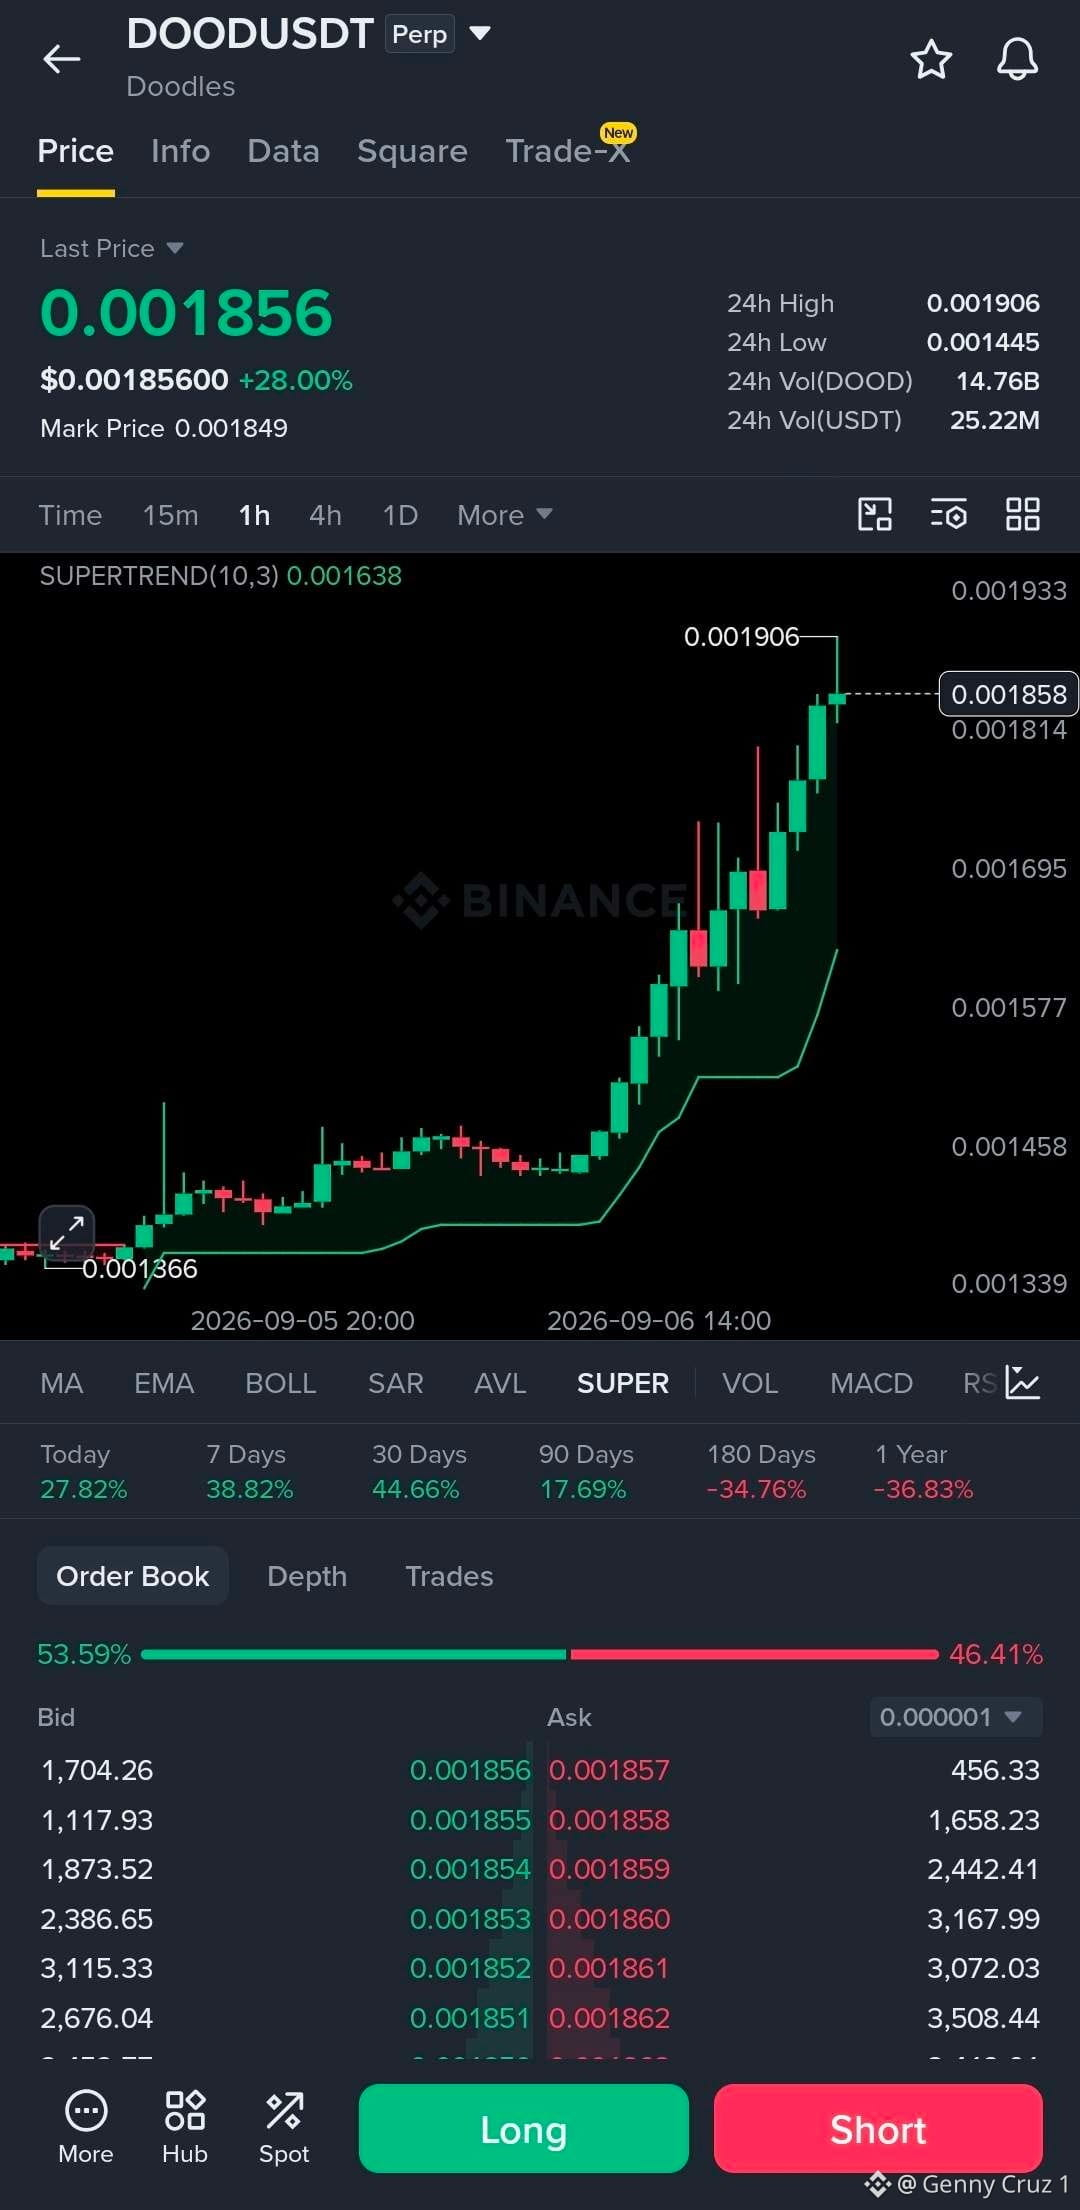
$DOOD 1H 📈
DOOD is showing a really clean bullish structure right now. The breakout from the $0.00145 area has developed into a strong sequence of higher highs and higher lows, with the Supertrend firmly bullish at $0.001638.
After a move of nearly 28% today, though, I wouldn't chase the current candle.
Preferred Setup: LONG
Entry: $0.00178–$0.00182
SL: $0.00170
TP1: $0.00191
TP2: $0.00200
TP3: $0.00215
What stands out
• Strong breakout from the previous consolidation
• Momentum has remained consistent rather than giving back the move
• Supertrend is bullish at $0.001638
• $0.001906 is the immediate resistance and current high
• The latest candles are holding close to the highs, which keeps the structure constructive
The cleaner play is to wait for a pullback into $0.00178–$0.00182 and see whether that area flips into support.
If DOOD gets a solid 1H close above $0.001906, followed by a clean retest, the continuation setup becomes much more interesting toward $0.00200 → $0.00215.
Invalidation: 1H close below $0.00170.
Overall, DOOD looks strong here. The trend is clean, momentum is healthy, and the main thing now is getting a good entry instead of chasing the move.
#dood
$DOOD 1H 📈
DOOD is showing a really clean bullish structure right now. The breakout from the $0.00145 area has developed into a strong sequence of higher highs and higher lows, with the Supertrend firmly bullish at $0.001638.
After a move of nearly 28% today, though, I wouldn't chase the current candle.
Preferred Setup: LONG
Entry: $0.00178–$0.00182
SL: $0.00170
TP1: $0.00191
TP2: $0.00200
TP3: $0.00215
What stands out
• Strong breakout from the previous consolidation
• Momentum has remained consistent rather than giving back the move
• Supertrend is bullish at $0.001638
• $0.001906 is the immediate resistance and current high
• The latest candles are holding close to the highs, which keeps the structure constructive
The cleaner play is to wait for a pullback into $0.00178–$0.00182 and see whether that area flips into support.
If DOOD gets a solid 1H close above $0.001906, followed by a clean retest, the continuation setup becomes much more interesting toward $0.00200 → $0.00215.
Invalidation: 1H close below $0.00170.
Overall, DOOD looks strong here. The trend is clean, momentum is healthy, and the main thing now is getting a good entry instead of chasing the move.
#dood
DOOD is showing a really clean bullish structure right now. The breakout from the $0.00145 area has developed into a strong sequence of higher highs and higher lows, with the Supertrend firmly bullish at $0.001638.
After a move of nearly 28% today, though, I wouldn't chase the current candle.
Preferred Setup: LONG
Entry: $0.00178–$0.00182
SL: $0.00170
TP1: $0.00191
TP2: $0.00200
TP3: $0.00215
What stands out
• Strong breakout from the previous consolidation
• Momentum has remained consistent rather than giving back the move
• Supertrend is bullish at $0.001638
• $0.001906 is the immediate resistance and current high
• The latest candles are holding close to the highs, which keeps the structure constructive
The cleaner play is to wait for a pullback into $0.00178–$0.00182 and see whether that area flips into support.
If DOOD gets a solid 1H close above $0.001906, followed by a clean retest, the continuation setup becomes much more interesting toward $0.00200 → $0.00215.
Invalidation: 1H close below $0.00170.
Overall, DOOD looks strong here. The trend is clean, momentum is healthy, and the main thing now is getting a good entry instead of chasing the move.
#dood
64
·
--
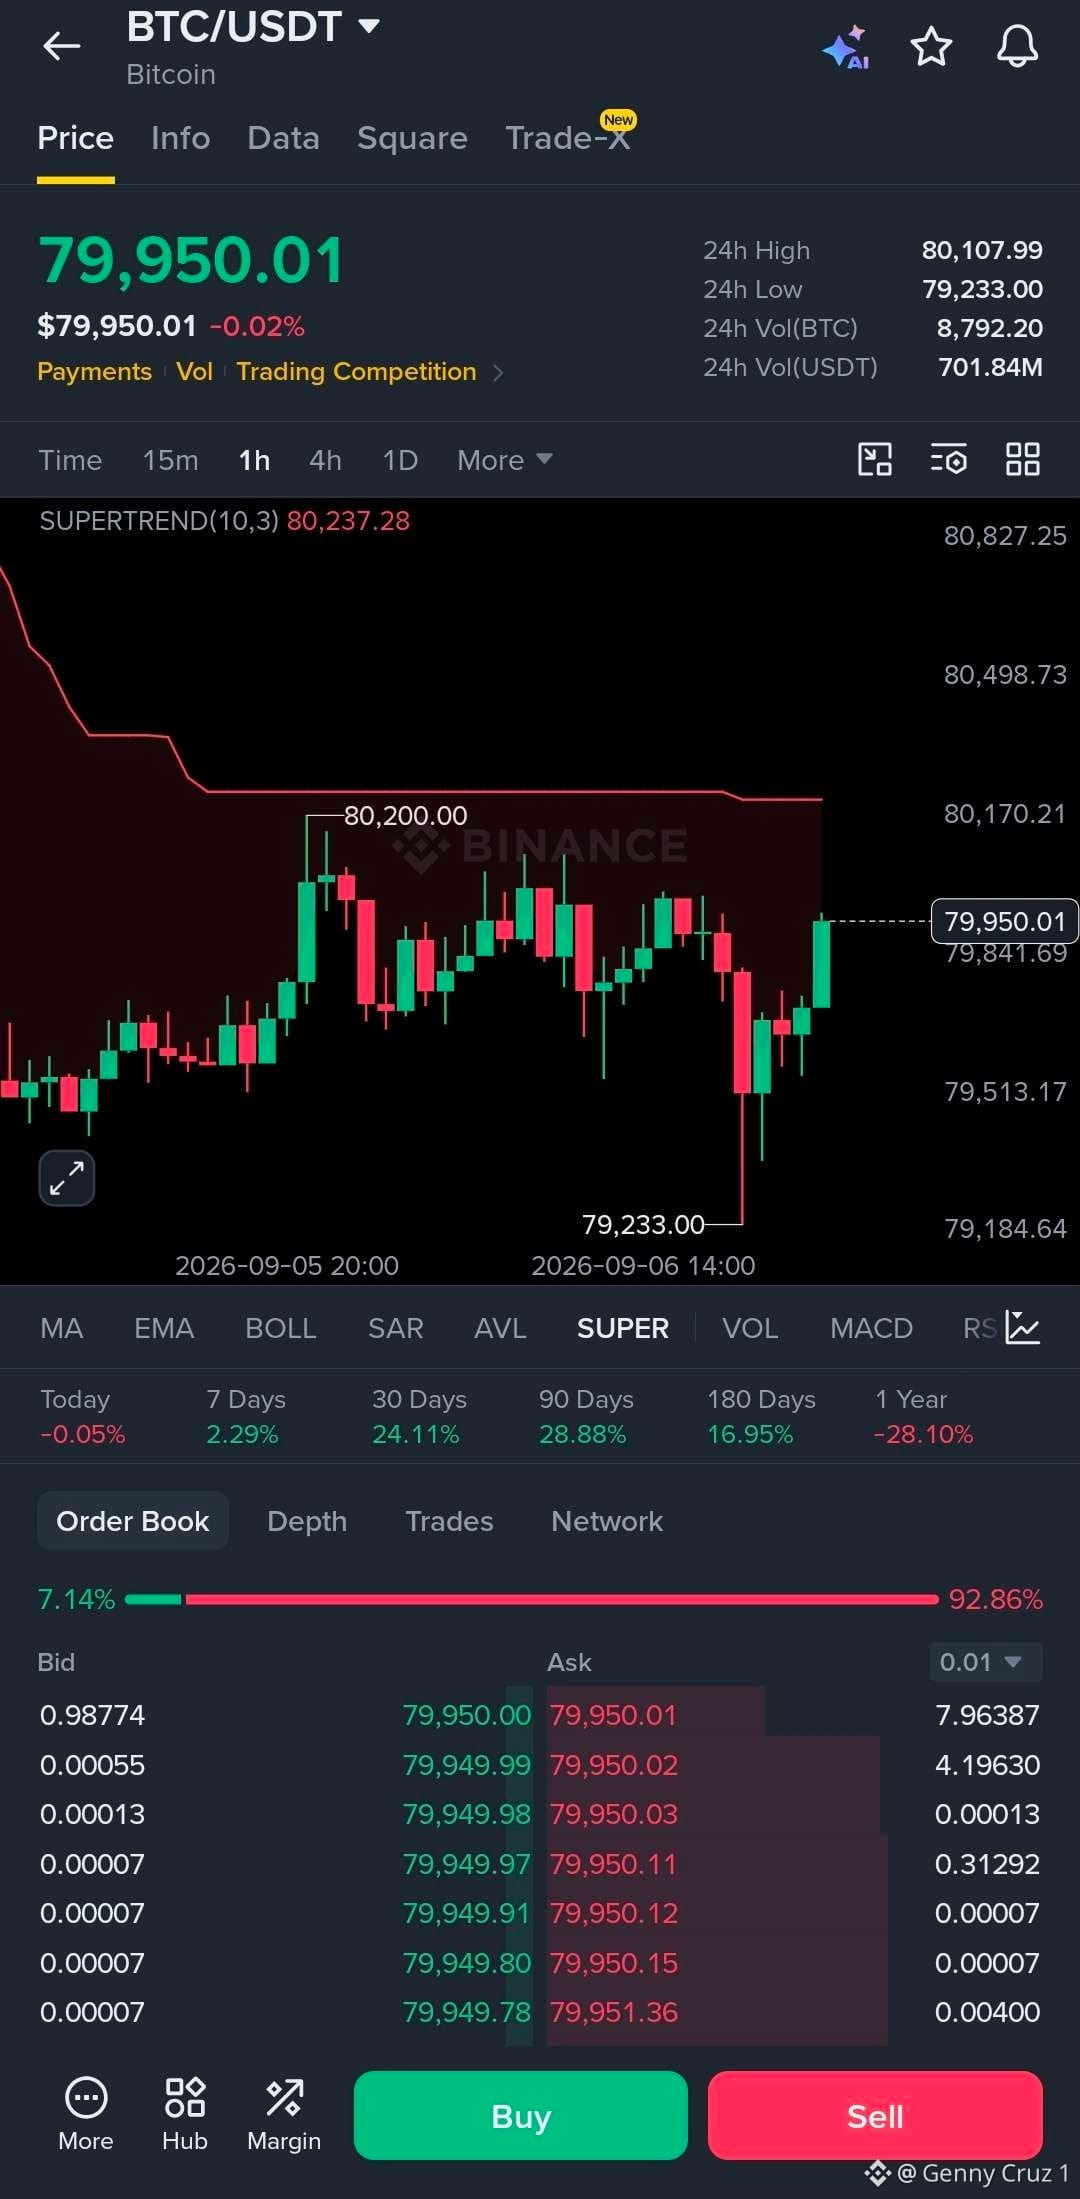
$BTC 1H 📉
BTC is still slightly bearish on the 1H, and this chart is showing a pretty clear range after the sharp rejection from $80,200.
Price is currently around $79,950, while the Supertrend remains bearish at $80,237. So for now, I’d favor a short on a rejection rather than forcing a long inside the range.
Preferred Setup: SHORT
Entry: $80,050–$80,200
SL: $80,550
TP1: $79,500
TP2: $79,230
TP3: $78,700
What I'm watching
• $80.20K is the key resistance from the recent swing high
• Supertrend at $80.24K keeps the 1H bias bearish
• BTC has repeatedly struggled to establish above the $80K–$80.2K area
• $79.23K is the important downside level and recent low
• The current bounce from $79.23K is decent, but it hasn't flipped the structure yet
I wouldn't short at $79.95K right here. The cleaner setup is a push back into $80.05K–$80.20K followed by rejection.
If BTC gets a strong 1H close above $80.25K and holds that level on a retest, the short thesis starts losing its edge. In that case, I'd look for a bullish continuation instead.
Invalidation: 1H close above $80,550.
Overall, BTC is sitting in a decision zone. The setup favors patience here — let resistance confirm the trade rather than chasing the middle of the range.
#BTC
$BTC 1H 📉
BTC is still slightly bearish on the 1H, and this chart is showing a pretty clear range after the sharp rejection from $80,200.
Price is currently around $79,950, while the Supertrend remains bearish at $80,237. So for now, I’d favor a short on a rejection rather than forcing a long inside the range.
Preferred Setup: SHORT
Entry: $80,050–$80,200
SL: $80,550
TP1: $79,500
TP2: $79,230
TP3: $78,700
What I'm watching
• $80.20K is the key resistance from the recent swing high
• Supertrend at $80.24K keeps the 1H bias bearish
• BTC has repeatedly struggled to establish above the $80K–$80.2K area
• $79.23K is the important downside level and recent low
• The current bounce from $79.23K is decent, but it hasn't flipped the structure yet
I wouldn't short at $79.95K right here. The cleaner setup is a push back into $80.05K–$80.20K followed by rejection.
If BTC gets a strong 1H close above $80.25K and holds that level on a retest, the short thesis starts losing its edge. In that case, I'd look for a bullish continuation instead.
Invalidation: 1H close above $80,550.
Overall, BTC is sitting in a decision zone. The setup favors patience here — let resistance confirm the trade rather than chasing the middle of the range.
#BTC
BTC is still slightly bearish on the 1H, and this chart is showing a pretty clear range after the sharp rejection from $80,200.
Price is currently around $79,950, while the Supertrend remains bearish at $80,237. So for now, I’d favor a short on a rejection rather than forcing a long inside the range.
Preferred Setup: SHORT
Entry: $80,050–$80,200
SL: $80,550
TP1: $79,500
TP2: $79,230
TP3: $78,700
What I'm watching
• $80.20K is the key resistance from the recent swing high
• Supertrend at $80.24K keeps the 1H bias bearish
• BTC has repeatedly struggled to establish above the $80K–$80.2K area
• $79.23K is the important downside level and recent low
• The current bounce from $79.23K is decent, but it hasn't flipped the structure yet
I wouldn't short at $79.95K right here. The cleaner setup is a push back into $80.05K–$80.20K followed by rejection.
If BTC gets a strong 1H close above $80.25K and holds that level on a retest, the short thesis starts losing its edge. In that case, I'd look for a bullish continuation instead.
Invalidation: 1H close above $80,550.
Overall, BTC is sitting in a decision zone. The setup favors patience here — let resistance confirm the trade rather than chasing the middle of the range.
#BTC
75
Log in to explore more content
Join global crypto users on Binance Square
⚡️ Get latest and useful information about crypto.
💬 Trusted by the world’s largest crypto exchange.
👍 Discover real insights from verified creators.
Email / Phone number
Trending Topics
AppleDebutsFoldablePhone
18,892 views
377 Discussing
Apple just dropped the foldable iPhone — and the market is paying attention. This isn't just another product cycle; it's a new product category, a new CEO on stage, and a $1,999 price tag that pushes $AAPL further into ultra-premium territory. Foldables are the narrative, and Apple is now the headline.
#appledebutsfoldablephone #EUExtendsCentralContactPointToCASPs #US10YTreasuryYieldHitsHighestSinceNov2023 #BrentCrudeTops$100 #USTreasuryToBuyBackUpTo$6BLongDatedDebt
KimHotbae
·1 Likes
·1.9k views
IranSaysReadyToEscalateWarWithUS
147 views
13 Discussing
EUExtendsCentralContactPointToCASPs
3,733 views
116 Discussing