

lleonard
196 Posts

lleonard
Report
Block User
35 Following
17 Followers
11 Liked
Posts
All
Quotes
·
--
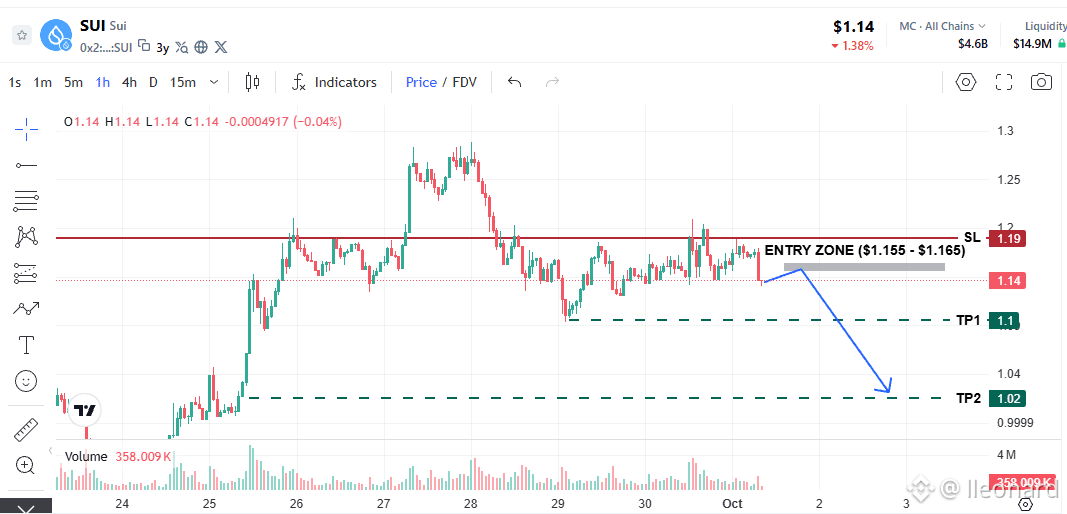
$SUI just experienced a sharp drop on the 15m chart, cleanly breaking down below the $1.15 short-term support level.
Since price is currently floating in no man's land above the major bottom support, we are waiting for a technical retest to secure a favorable Risk/Reward ratio and avoid getting caught in a bottom-bounce trap.
– Entry Zone: $1.155 – $1.165
– Stop Loss: $1.190
– Targets: $1.105 | $1.025
⚠️ If price dumps straight to $1.10 without retesting, let it go (DO NOT FOMO Short).
{future}(SUIUSDT)
$SUI just experienced a sharp drop on the 15m chart, cleanly breaking down below the $1.15 short-term support level.
Since price is currently floating in no man's land above the major bottom support, we are waiting for a technical retest to secure a favorable Risk/Reward ratio and avoid getting caught in a bottom-bounce trap.
– Entry Zone: $1.155 – $1.165
– Stop Loss: $1.190
– Targets: $1.105 | $1.025
⚠️ If price dumps straight to $1.10 without retesting, let it go (DO NOT FOMO Short).
Since price is currently floating in no man's land above the major bottom support, we are waiting for a technical retest to secure a favorable Risk/Reward ratio and avoid getting caught in a bottom-bounce trap.
– Entry Zone: $1.155 – $1.165
– Stop Loss: $1.190
– Targets: $1.105 | $1.025
⚠️ If price dumps straight to $1.10 without retesting, let it go (DO NOT FOMO Short).
77
·
--
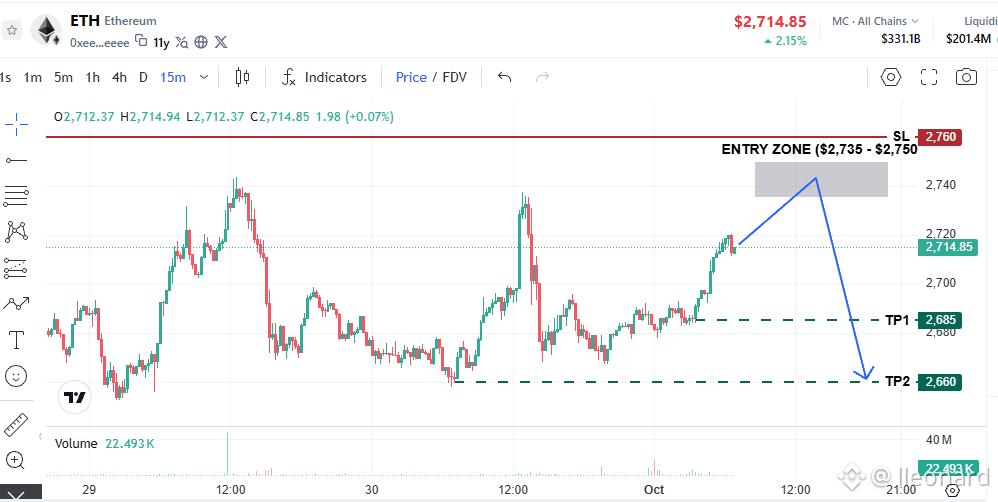
$ETH is pumping towards key resistance levels on the 15m chart. Instead of shorting the momentum early, patience is key for a better Risk/Reward setup.
📊 Short Plan
– Entry Zone: $2,735 - $2,750
– Stop Loss: $2,760
– Targets: $2,685 | $2,660
{future}(ETHUSDT)
$ETH is pumping towards key resistance levels on the 15m chart. Instead of shorting the momentum early, patience is key for a better Risk/Reward setup.
📊 Short Plan
– Entry Zone: $2,735 - $2,750
– Stop Loss: $2,760
– Targets: $2,685 | $2,660
📊 Short Plan
– Entry Zone: $2,735 - $2,750
– Stop Loss: $2,760
– Targets: $2,685 | $2,660
44
·
--
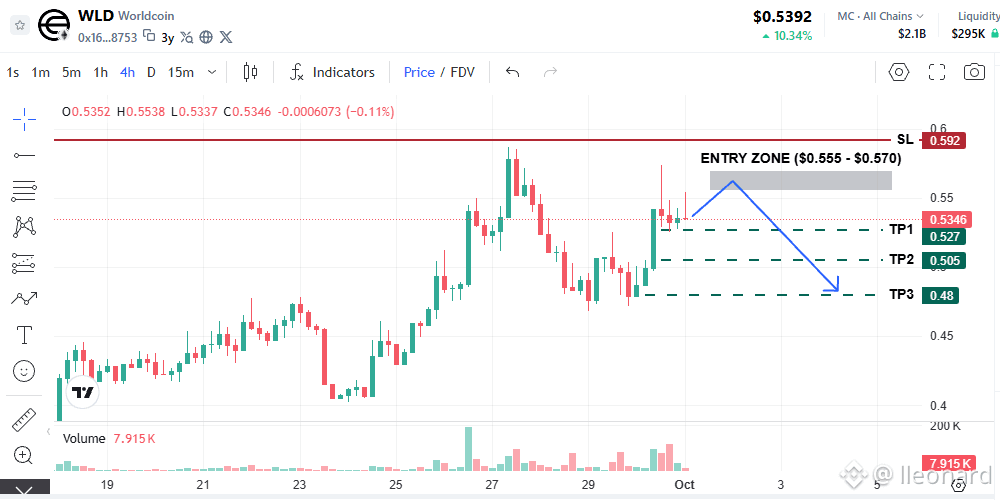
Selling pressure on $WLD has reacted aggressively around the $0.565–$0.570 region, leaving long upper wicks. The recovery structure is showing signs of weakening. Favoring a Sell-on-Rallies approach.
📊 Short Plan
– Entry Zone: $0.555 – $0.570
– Stop Loss: $0.592
– Targets: $0.527 | $0.505 | $0.480
⚠️ Stick to the SL strictly.
{future}(WLDUSDT)
Selling pressure on $WLD has reacted aggressively around the $0.565–$0.570 region, leaving long upper wicks. The recovery structure is showing signs of weakening. Favoring a Sell-on-Rallies approach.
📊 Short Plan
– Entry Zone: $0.555 – $0.570
– Stop Loss: $0.592
– Targets: $0.527 | $0.505 | $0.480
⚠️ Stick to the SL strictly.
📊 Short Plan
– Entry Zone: $0.555 – $0.570
– Stop Loss: $0.592
– Targets: $0.527 | $0.505 | $0.480
⚠️ Stick to the SL strictly.
268
·
--
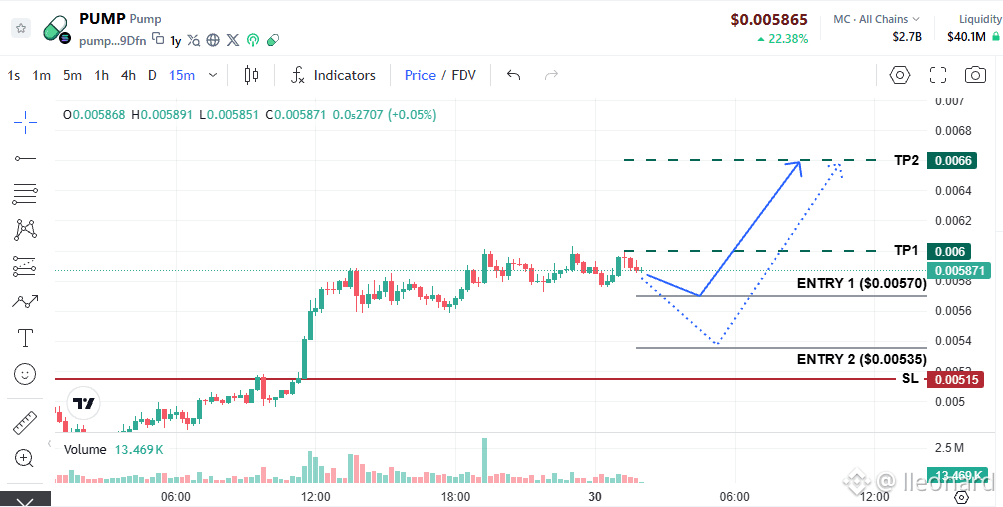
Following an impressive rally on the 4H timeframe breaking above $0.0055, $PUMP is currently in a tight bullish consolidation phase between $0.0058 - $0.0060 on the 15M chart.
Low sell volume during this range combined with lower wick rejections indicates buyers are actively defending the high levels.
📊 Trading Plan
– Entry (2-Step DCA): $0.00570 | $0.00535
– Stop Loss: $0.00515
– Targets: $0.00600 | $0.00660
{future}(PUMPUSDT)
Following an impressive rally on the 4H timeframe breaking above $0.0055, $PUMP is currently in a tight bullish consolidation phase between $0.0058 - $0.0060 on the 15M chart.
Low sell volume during this range combined with lower wick rejections indicates buyers are actively defending the high levels.
📊 Trading Plan
– Entry (2-Step DCA): $0.00570 | $0.00535
– Stop Loss: $0.00515
– Targets: $0.00600 | $0.00660
Low sell volume during this range combined with lower wick rejections indicates buyers are actively defending the high levels.
📊 Trading Plan
– Entry (2-Step DCA): $0.00570 | $0.00535
– Stop Loss: $0.00515
– Targets: $0.00600 | $0.00660
175
·
--
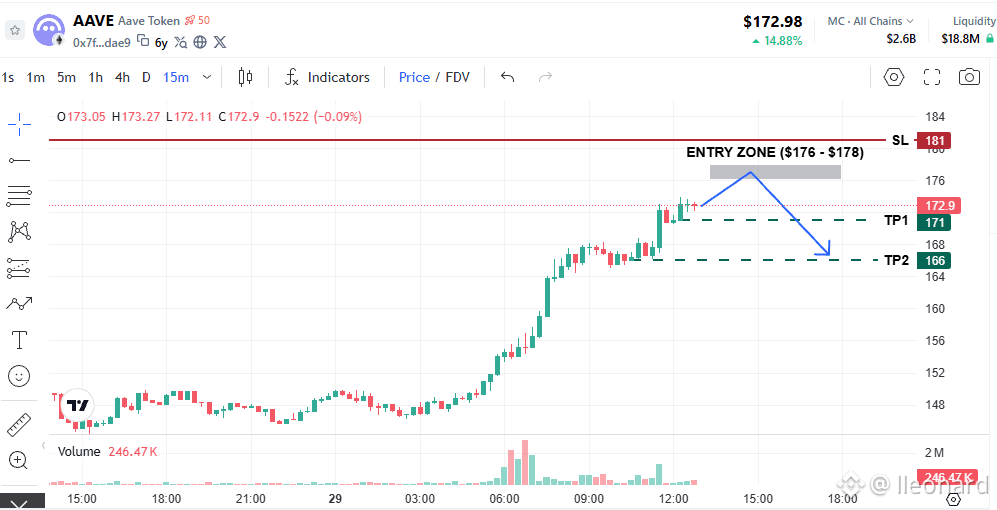
$AAVE is currently consolidating around $172–$173 after a steep parabolic pump. The major resistance cluster at $176–$178 holds heavy liquidity from Short stop-losses and Breakout buy-stops.
📊 Short Setup (Counter-Trend Play)
– Entry Zone: $176.0 – $178.0
– Stop Loss (Strict): $181.0
– Targets: $171.0 | $166.0
⚠️ Counter-trend setups carry higher risk.
{future}(AAVEUSDT)
$AAVE is currently consolidating around $172–$173 after a steep parabolic pump. The major resistance cluster at $176–$178 holds heavy liquidity from Short stop-losses and Breakout buy-stops.
📊 Short Setup (Counter-Trend Play)
– Entry Zone: $176.0 – $178.0
– Stop Loss (Strict): $181.0
– Targets: $171.0 | $166.0
⚠️ Counter-trend setups carry higher risk.
📊 Short Setup (Counter-Trend Play)
– Entry Zone: $176.0 – $178.0
– Stop Loss (Strict): $181.0
– Targets: $171.0 | $166.0
⚠️ Counter-trend setups carry higher risk.
49
·
--
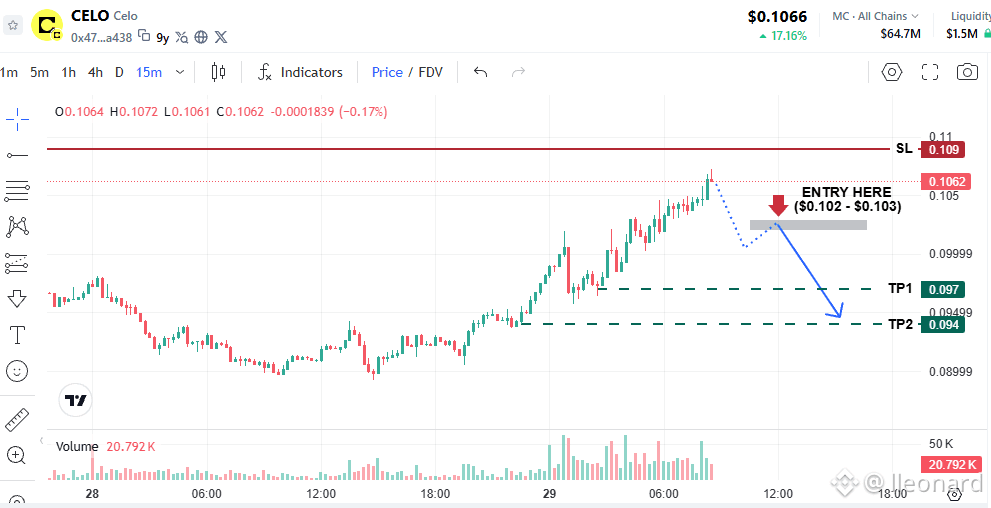
Following a steep rally that touched $0.108, $CELO momentum shows signs of slowing down near short-term resistance. While the higher-timeframe trend remains bullish, failing to hold key support could trigger a local structural breakdown.
📊 Trade Setup (Short Limit)
– Trigger Condition: 15m/1h candle closes decisively below $0.102.
– Entry: $0.102 - $0.103
– Stop Loss: $0.109
– Targets: $0.097 | $0.094
⚠️ If buying volume surges and pushes price above $0.115, CANCEL THIS SETUP.
{future}(CELOUSDT)
Following a steep rally that touched $0.108, $CELO momentum shows signs of slowing down near short-term resistance. While the higher-timeframe trend remains bullish, failing to hold key support could trigger a local structural breakdown.
📊 Trade Setup (Short Limit)
– Trigger Condition: 15m/1h candle closes decisively below $0.102.
– Entry: $0.102 - $0.103
– Stop Loss: $0.109
– Targets: $0.097 | $0.094
⚠️ If buying volume surges and pushes price above $0.115, CANCEL THIS SETUP.
📊 Trade Setup (Short Limit)
– Trigger Condition: 15m/1h candle closes decisively below $0.102.
– Entry: $0.102 - $0.103
– Stop Loss: $0.109
– Targets: $0.097 | $0.094
⚠️ If buying volume surges and pushes price above $0.115, CANCEL THIS SETUP.
143
·
--
Bullish
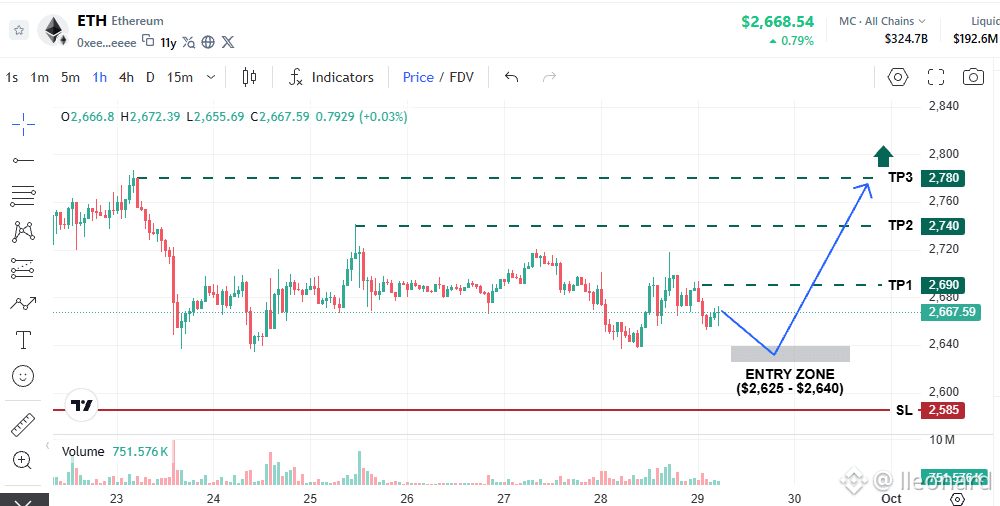
$ETH is showing signs of cooling off after failing to break above the $2,770–$2,780 resistance zone. Price is currently retracing toward key support on the 4H timeframe.
📊 Trade Plan
– Entry Zone: $2,625 – $2,640
– Stop Loss: $2,585
– Targets: $2,690 | $2,740 | $2,780
⚠️ If a 4H candle closes decisively below $2,620 with high sell volume, expect deeper support around $2,500 – $2,550.
{future}(ETHUSDT)
$ETH is showing signs of cooling off after failing to break above the $2,770–$2,780 resistance zone. Price is currently retracing toward key support on the 4H timeframe.
📊 Trade Plan
– Entry Zone: $2,625 – $2,640
– Stop Loss: $2,585
– Targets: $2,690 | $2,740 | $2,780
⚠️ If a 4H candle closes decisively below $2,620 with high sell volume, expect deeper support around $2,500 – $2,550.
📊 Trade Plan
– Entry Zone: $2,625 – $2,640
– Stop Loss: $2,585
– Targets: $2,690 | $2,740 | $2,780
⚠️ If a 4H candle closes decisively below $2,620 with high sell volume, expect deeper support around $2,500 – $2,550.
54
·
--
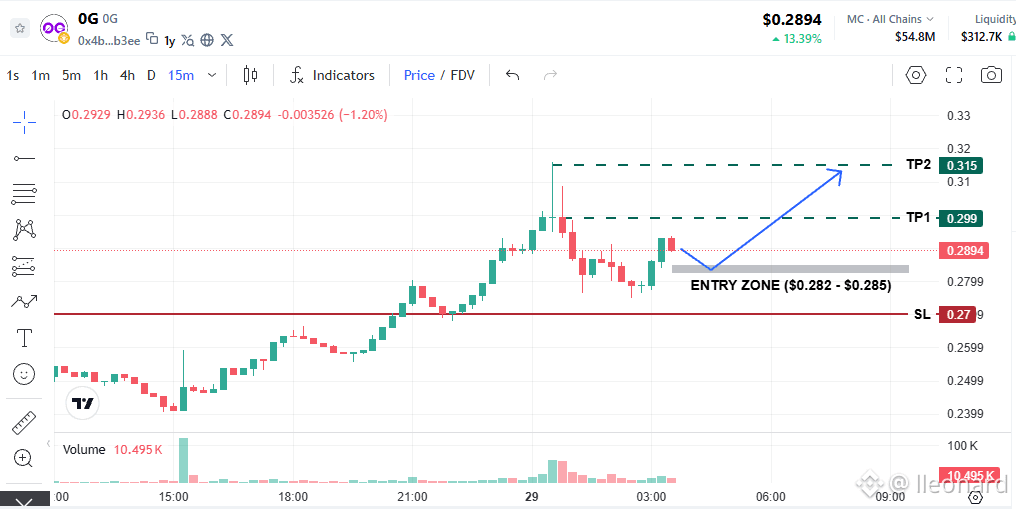
After a heavy wick rejection at the $0.32 local top, $0G found strong buying support around the $0.275 – $0.280 zone on the 15m chart, establishing a higher low.
While recovery volume remains modest, this higher low structure opens up a solid short-term scalp/intraday setup.
– Entry Zone: $0.282 – $0.285
– Stop Loss: $0.270
– Targets: $0.299 | $0.315
⚠️ Strict SL.
{future}(0GUSDT)
After a heavy wick rejection at the $0.32 local top, $0G found strong buying support around the $0.275 – $0.280 zone on the 15m chart, establishing a higher low.
While recovery volume remains modest, this higher low structure opens up a solid short-term scalp/intraday setup.
– Entry Zone: $0.282 – $0.285
– Stop Loss: $0.270
– Targets: $0.299 | $0.315
⚠️ Strict SL.
While recovery volume remains modest, this higher low structure opens up a solid short-term scalp/intraday setup.
– Entry Zone: $0.282 – $0.285
– Stop Loss: $0.270
– Targets: $0.299 | $0.315
⚠️ Strict SL.
384
·
--
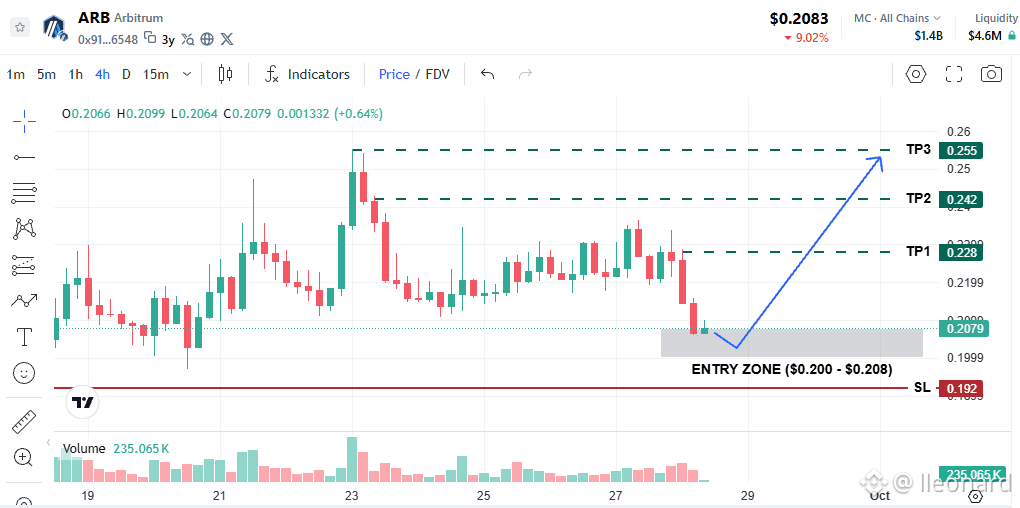
Following a pullback from the local peak at $0.24 – $0.25, $ARB has dropped back to test its key horizontal support around $0.208.
This level serves as crucial baseline support; if bulls can defend this range, a technical rebound is highly likely.
📊 Long Trade Plan
– Entry Zone: $0.200 – $0.208
– Stop Loss: $0.192
– Targets: $0.228 | $0.242 | $0.255
⚠️ Strict SL execution: If ARB loses the $0.20 level on high volume, price could drift lower toward $0.180 or previous lows at $0.140.
{future}(ARBUSDT)
Following a pullback from the local peak at $0.24 – $0.25, $ARB has dropped back to test its key horizontal support around $0.208.
This level serves as crucial baseline support; if bulls can defend this range, a technical rebound is highly likely.
📊 Long Trade Plan
– Entry Zone: $0.200 – $0.208
– Stop Loss: $0.192
– Targets: $0.228 | $0.242 | $0.255
⚠️ Strict SL execution: If ARB loses the $0.20 level on high volume, price could drift lower toward $0.180 or previous lows at $0.140.
This level serves as crucial baseline support; if bulls can defend this range, a technical rebound is highly likely.
📊 Long Trade Plan
– Entry Zone: $0.200 – $0.208
– Stop Loss: $0.192
– Targets: $0.228 | $0.242 | $0.255
⚠️ Strict SL execution: If ARB loses the $0.20 level on high volume, price could drift lower toward $0.180 or previous lows at $0.140.
1
290
·
--
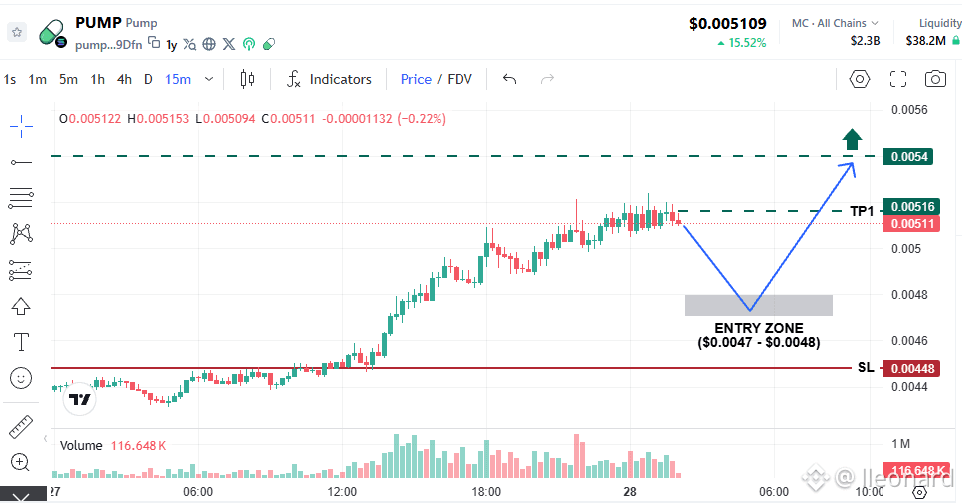
After a decisive rally pushing the price to 0.00520, $PUMP is currently pausing and consolidating around 0.00510.
Buying volume near the peak is slowing down with upper shadows indicating short-term profit-taking — suggesting the market needs a healthy pullback before declaring its next direction!
📊 LONG SETUP
– Entry Zone:0.00470 - 0.00480
– Stop Loss: 0.00448
– Targets: 0.00516 | 0.00540+
💡 Split into 2 DCA limit orders at 0.00480 and 0.00470 to optimize entry.
{future}(PUMPUSDT)
After a decisive rally pushing the price to 0.00520, $PUMP is currently pausing and consolidating around 0.00510.
Buying volume near the peak is slowing down with upper shadows indicating short-term profit-taking — suggesting the market needs a healthy pullback before declaring its next direction!
📊 LONG SETUP
– Entry Zone:0.00470 - 0.00480
– Stop Loss: 0.00448
– Targets: 0.00516 | 0.00540+
💡 Split into 2 DCA limit orders at 0.00480 and 0.00470 to optimize entry.
Buying volume near the peak is slowing down with upper shadows indicating short-term profit-taking — suggesting the market needs a healthy pullback before declaring its next direction!
📊 LONG SETUP
– Entry Zone:0.00470 - 0.00480
– Stop Loss: 0.00448
– Targets: 0.00516 | 0.00540+
💡 Split into 2 DCA limit orders at 0.00480 and 0.00470 to optimize entry.
199
·
--
Bearish
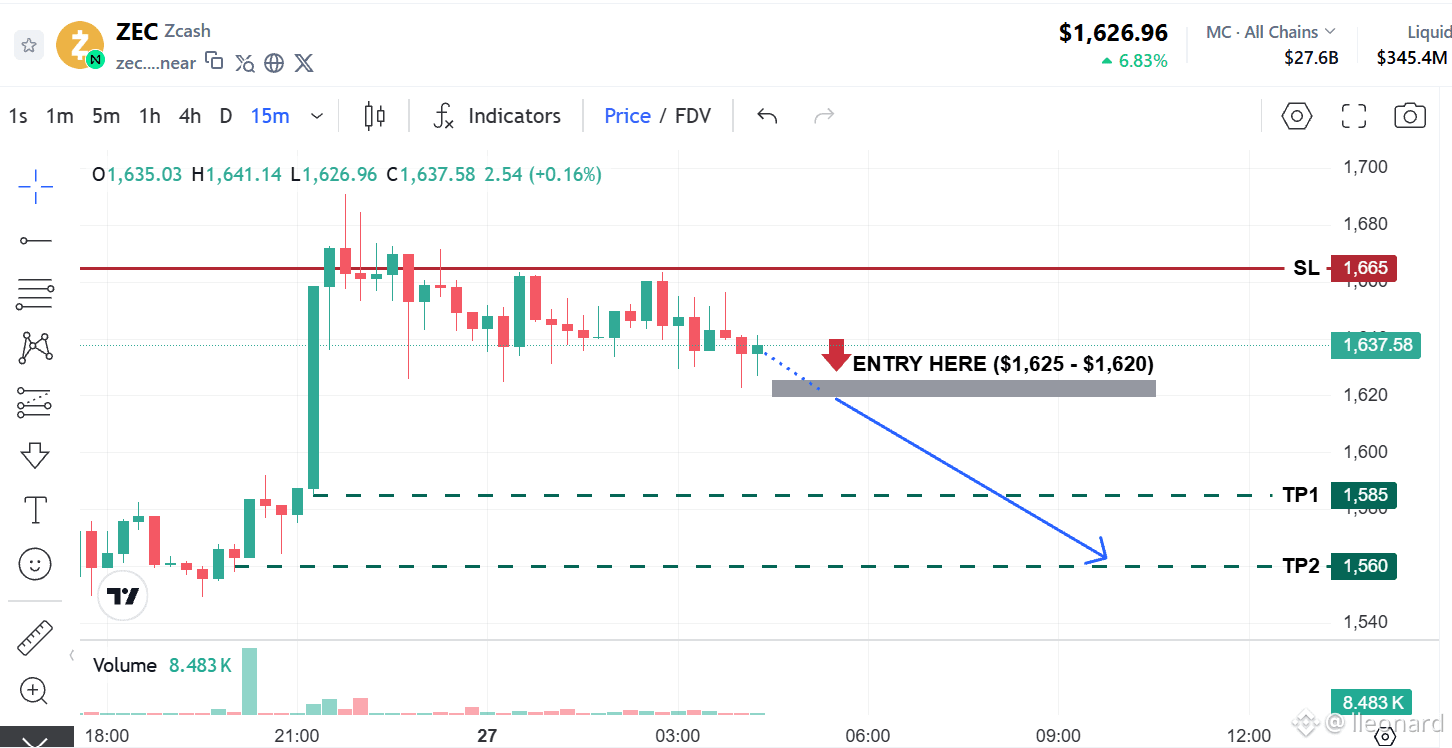
$ZEC previous bull flag structure is showing signs of exhaustion as buying pressure near the $1,675–$1,690 peak fades.
The $1,625 support level currently serves as the key line in the sand for short-term momentum ➔ If bulls lose this level, a breakdown to fill the lower price gap becomes the high-probability path.
🎯 TRADE SETUP
– Entry Zone: $1,620 – $1,625
– Stop Loss: $1,665
– Targets: $1,585 | $1,560
💡 Wait for a 15m candle close below $1,625 or set a Sell Stop/Limit on the retest.
{future}(ZECUSDT)
$ZEC previous bull flag structure is showing signs of exhaustion as buying pressure near the $1,675–$1,690 peak fades.
The $1,625 support level currently serves as the key line in the sand for short-term momentum ➔ If bulls lose this level, a breakdown to fill the lower price gap becomes the high-probability path.
🎯 TRADE SETUP
– Entry Zone: $1,620 – $1,625
– Stop Loss: $1,665
– Targets: $1,585 | $1,560
💡 Wait for a 15m candle close below $1,625 or set a Sell Stop/Limit on the retest.
The $1,625 support level currently serves as the key line in the sand for short-term momentum ➔ If bulls lose this level, a breakdown to fill the lower price gap becomes the high-probability path.
🎯 TRADE SETUP
– Entry Zone: $1,620 – $1,625
– Stop Loss: $1,665
– Targets: $1,585 | $1,560
💡 Wait for a 15m candle close below $1,625 or set a Sell Stop/Limit on the retest.
144
·
--
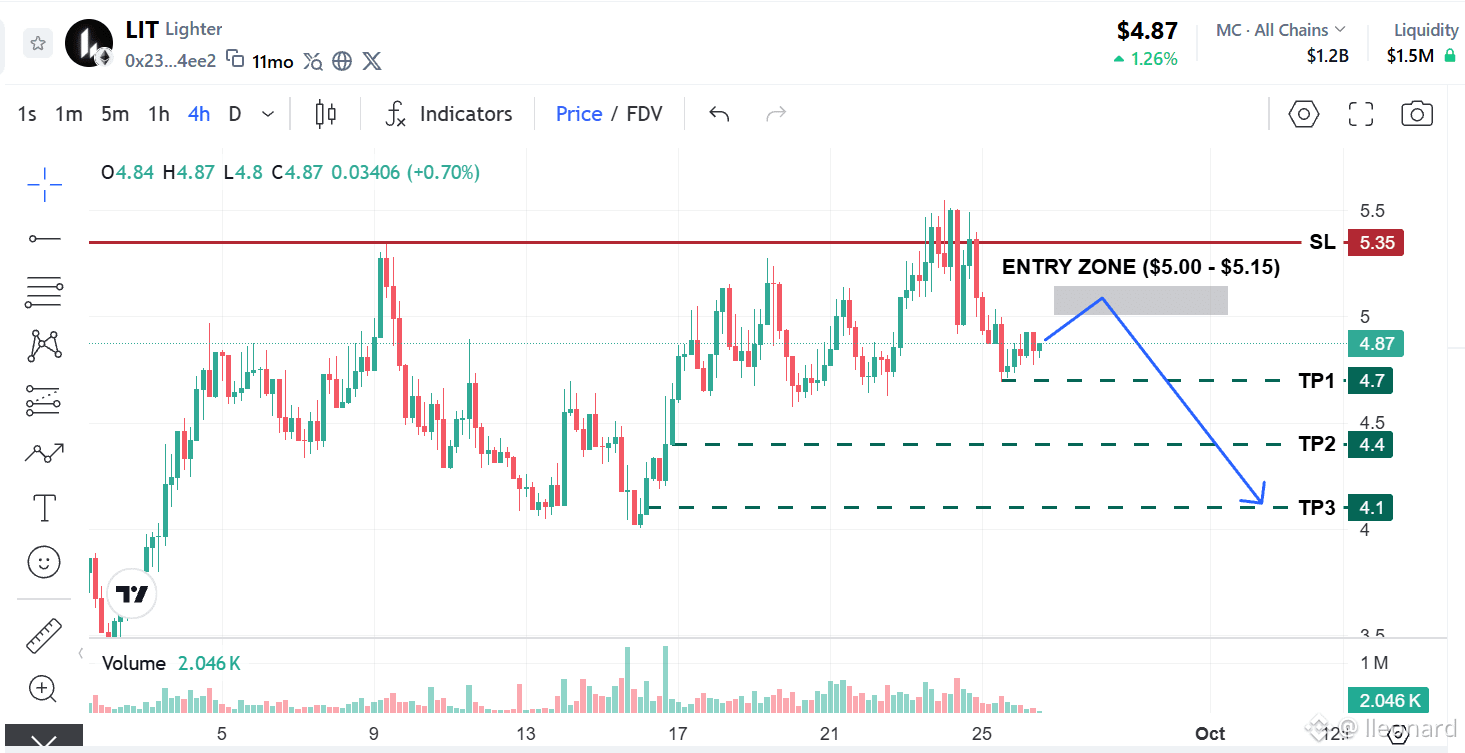
Upside momentum for $LIT has faded significantly after hitting the $5.50 peak. A short-term reversal structure is forming with exhausted buying volume at the $4.80 level.
📊 Short Plan
– Entry Zone: $5.00 – $5.15
– Stop Loss: $5.35
– Take Profit: $4.70 | $4.40 | $4.10
⚠️ Respect your SL!
{future}(LITUSDT)
Upside momentum for $LIT has faded significantly after hitting the $5.50 peak. A short-term reversal structure is forming with exhausted buying volume at the $4.80 level.
📊 Short Plan
– Entry Zone: $5.00 – $5.15
– Stop Loss: $5.35
– Take Profit: $4.70 | $4.40 | $4.10
⚠️ Respect your SL!
📊 Short Plan
– Entry Zone: $5.00 – $5.15
– Stop Loss: $5.35
– Take Profit: $4.70 | $4.40 | $4.10
⚠️ Respect your SL!
327
·
--
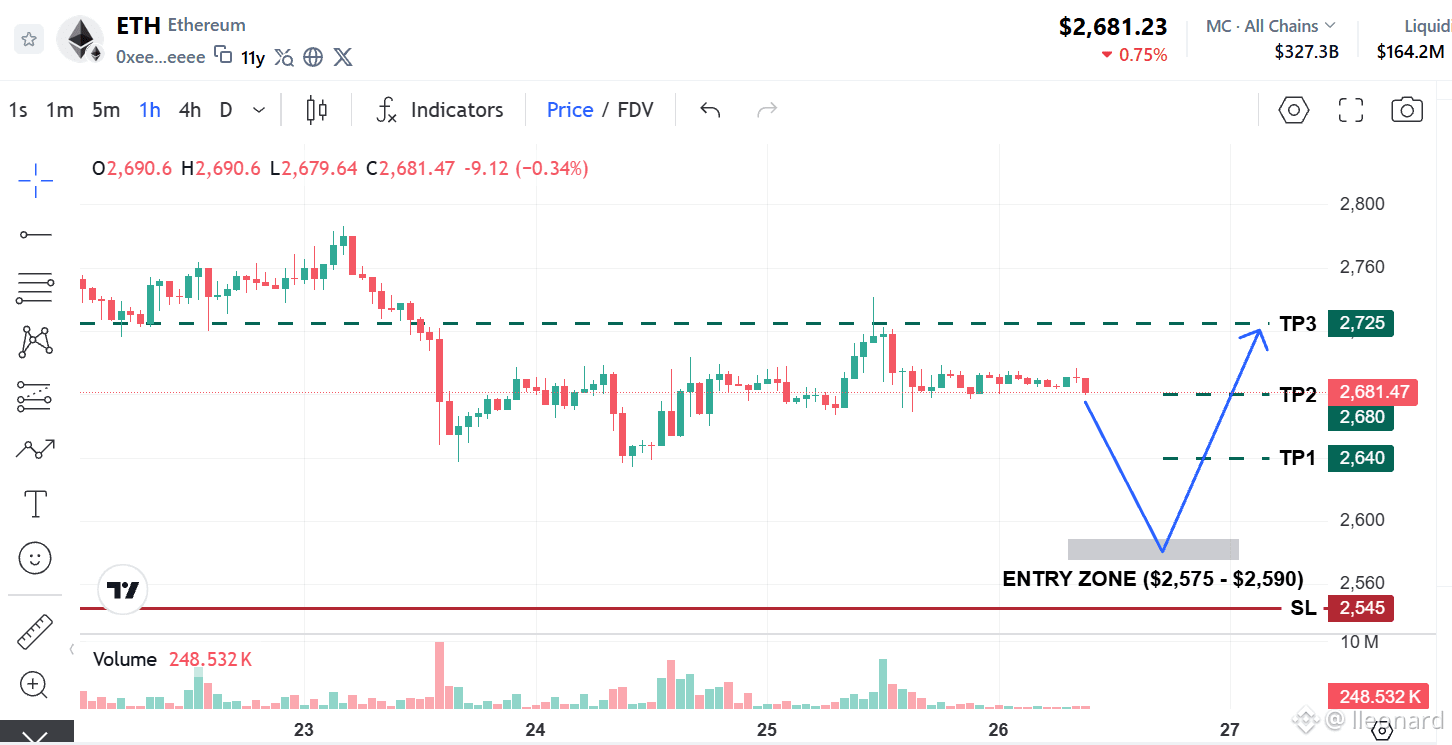
After testing the $2,650 support with weak momentum, $ETH is currently pulling back to find a stronger equilibrium zone. The lower technical support range around $2,575 – $2,590 presents an ideal entry point for a favorable Risk/Reward ratio.
📊 Trading Setup
– Entry: $2,575 – $2,590
– Stop Loss: $2,545
– Targets: $2,640 | $2,680 | $2,725
⚠️ As this is a limit buy on a pullback, always set your automatic SL simultaneously with the limit entry!
{future}(ETHUSDT)
After testing the $2,650 support with weak momentum, $ETH is currently pulling back to find a stronger equilibrium zone. The lower technical support range around $2,575 – $2,590 presents an ideal entry point for a favorable Risk/Reward ratio.
📊 Trading Setup
– Entry: $2,575 – $2,590
– Stop Loss: $2,545
– Targets: $2,640 | $2,680 | $2,725
⚠️ As this is a limit buy on a pullback, always set your automatic SL simultaneously with the limit entry!
📊 Trading Setup
– Entry: $2,575 – $2,590
– Stop Loss: $2,545
– Targets: $2,640 | $2,680 | $2,725
⚠️ As this is a limit buy on a pullback, always set your automatic SL simultaneously with the limit entry!
32
·
--
Bullish
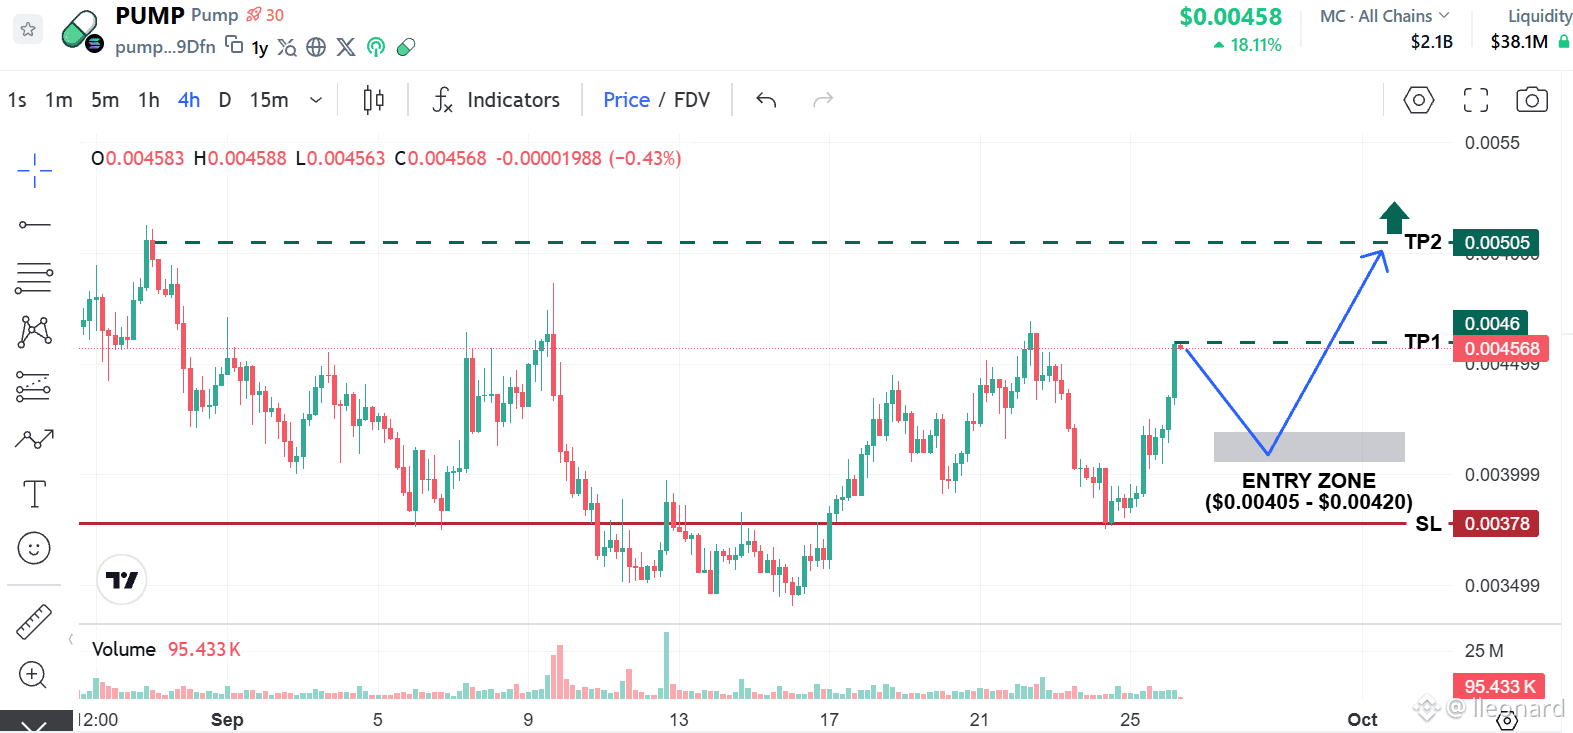
$PUMP is currently testing a crucial short-term resistance zone at $0.00456 – $0.00465 (the local peak from Sept 22–23).
Instead of chasing the price into resistance, we are looking for a healthy pullback to a strong support zone to set up a high R:R trend-following trade.
– Entry Zone: $0.00405 – $0.00420
– Stop Loss: $0.00378
– Targets: $0.00460 | $0.00505
📌 Patiently wait for price to retest $0.00405 – $0.00420.
{future}(PUMPUSDT)
$PUMP is currently testing a crucial short-term resistance zone at $0.00456 – $0.00465 (the local peak from Sept 22–23).
Instead of chasing the price into resistance, we are looking for a healthy pullback to a strong support zone to set up a high R:R trend-following trade.
– Entry Zone: $0.00405 – $0.00420
– Stop Loss: $0.00378
– Targets: $0.00460 | $0.00505
📌 Patiently wait for price to retest $0.00405 – $0.00420.
Instead of chasing the price into resistance, we are looking for a healthy pullback to a strong support zone to set up a high R:R trend-following trade.
– Entry Zone: $0.00405 – $0.00420
– Stop Loss: $0.00378
– Targets: $0.00460 | $0.00505
📌 Patiently wait for price to retest $0.00405 – $0.00420.
145
·
--
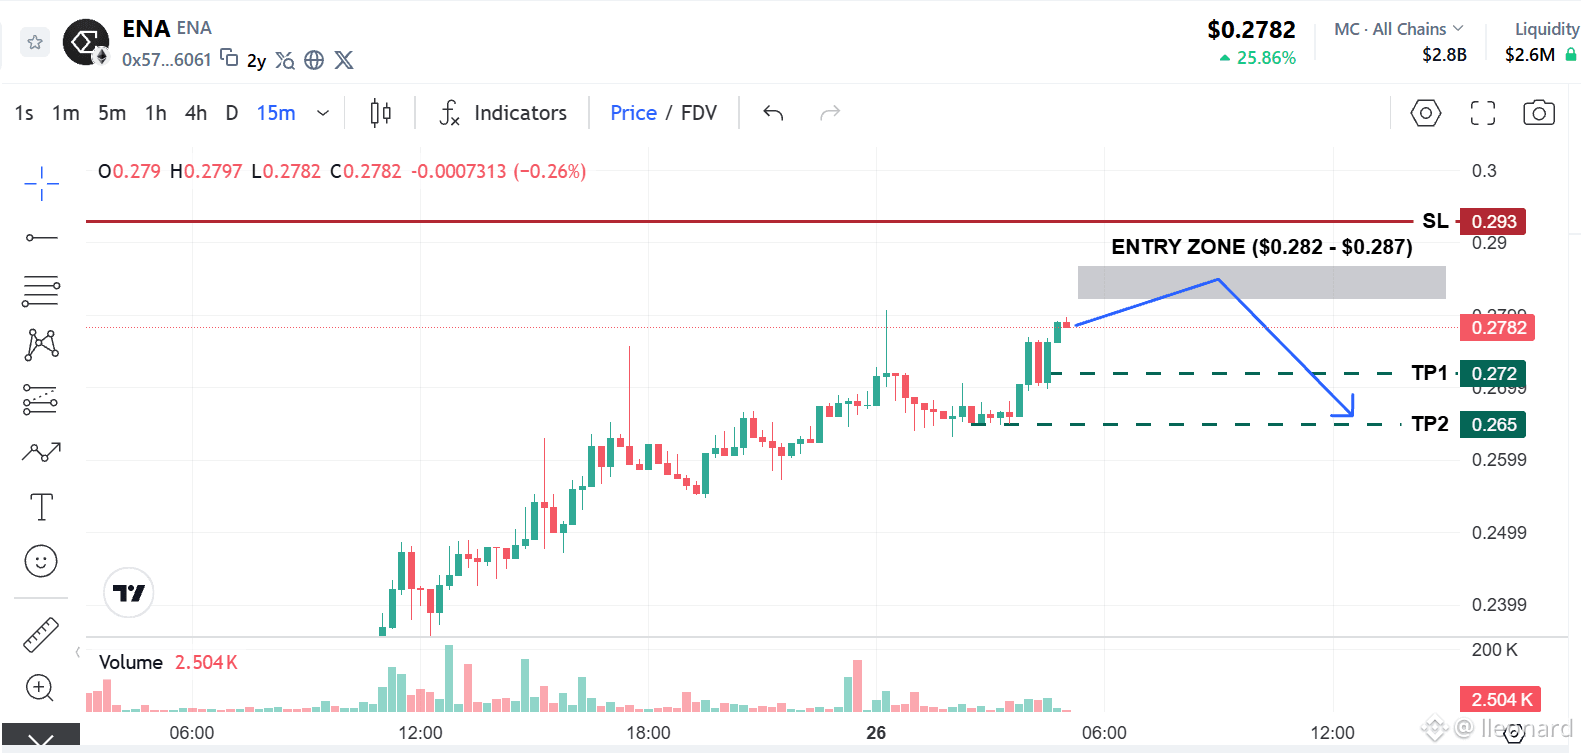
$ENA is currently on a strong steep run-up (+26% today), with buying pressure still fairly dominant. However, price is stretching back up into the previous high resistance zone around $0.280.
📊 Trade Setup
– Entry: $0.282 – $0.287
– Stop Loss: $0.293
– Targets: $0.272 | $0.265
⚠️ This is a Counter-Trend Short designed for a quick scalp. Strict SL discipline and reduced position sizing are mandatory.
{future}(ENAUSDT)
$ENA is currently on a strong steep run-up (+26% today), with buying pressure still fairly dominant. However, price is stretching back up into the previous high resistance zone around $0.280.
📊 Trade Setup
– Entry: $0.282 – $0.287
– Stop Loss: $0.293
– Targets: $0.272 | $0.265
⚠️ This is a Counter-Trend Short designed for a quick scalp. Strict SL discipline and reduced position sizing are mandatory.
📊 Trade Setup
– Entry: $0.282 – $0.287
– Stop Loss: $0.293
– Targets: $0.272 | $0.265
⚠️ This is a Counter-Trend Short designed for a quick scalp. Strict SL discipline and reduced position sizing are mandatory.
172
·
--
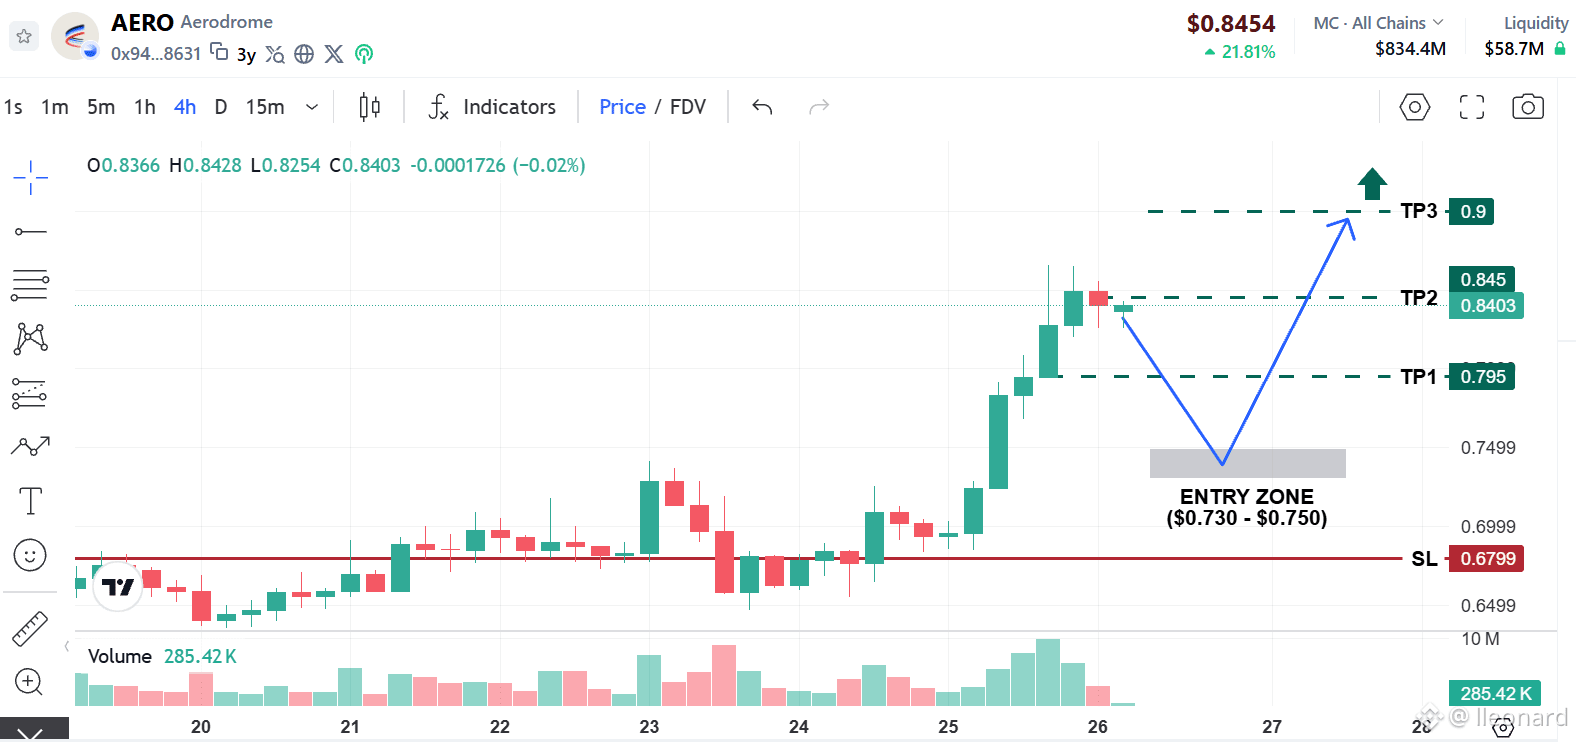
On the H4 chart, $AERO recently delivered a strong bullish impulse, surging from $0.65 up to $0.86 with heavy buying volume.
Instead of chasing (FOMO) near the local peak at $0.84 – $0.86 where short-term profit-taking is underway, the safest approach with the best Risk-to-Reward ratio is to patiently wait for a retest of the key H4 Demand Zone — the origin of the previous strong breakout move.
📌 TRADE PLAN
– Entry Zone: $0.730 – $0.750
– Stop Loss:$0.698
– Targets: $0.795 | $0.855 | $0.900+
{future}(AEROUSDT)
On the H4 chart, $AERO recently delivered a strong bullish impulse, surging from $0.65 up to $0.86 with heavy buying volume.
Instead of chasing (FOMO) near the local peak at $0.84 – $0.86 where short-term profit-taking is underway, the safest approach with the best Risk-to-Reward ratio is to patiently wait for a retest of the key H4 Demand Zone — the origin of the previous strong breakout move.
📌 TRADE PLAN
– Entry Zone: $0.730 – $0.750
– Stop Loss:$0.698
– Targets: $0.795 | $0.855 | $0.900+
Instead of chasing (FOMO) near the local peak at $0.84 – $0.86 where short-term profit-taking is underway, the safest approach with the best Risk-to-Reward ratio is to patiently wait for a retest of the key H4 Demand Zone — the origin of the previous strong breakout move.
📌 TRADE PLAN
– Entry Zone: $0.730 – $0.750
– Stop Loss:$0.698
– Targets: $0.795 | $0.855 | $0.900+
153
·
--
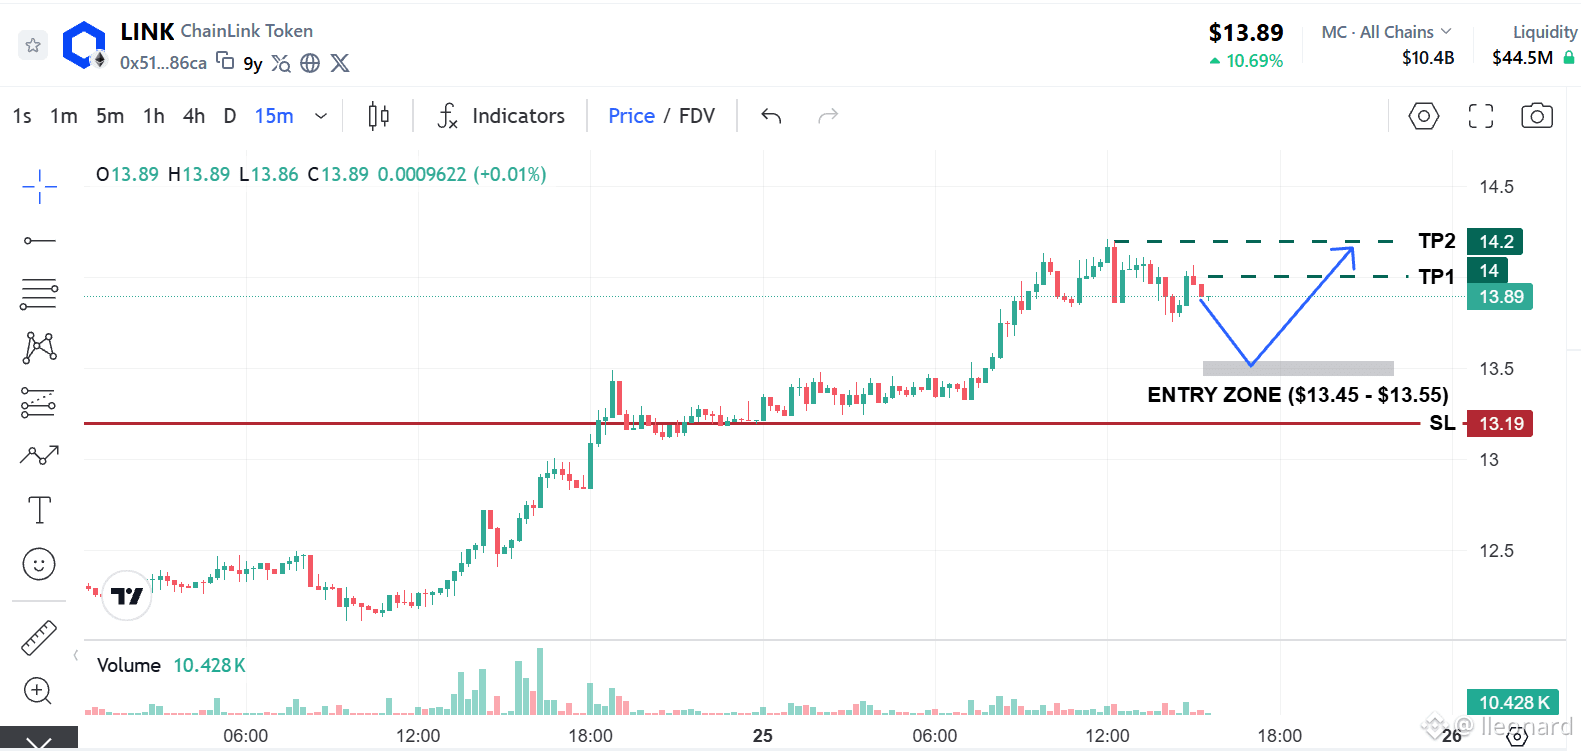
$LINK just made a strong breakout from $12.0 straight to the $14.0 – $14.1 psychological resistance zone. Prices are currently consolidating right below the recent high.
📊 Trade Plan
– Entry Zone: $13.45 – $13.55
– Stop Loss: $13.20
– Targets: $14.00 | $14.20
⚠️ Avoiding both FOMO buying at the top and shorting against the momentum.
{future}(LINKUSDT)
$LINK just made a strong breakout from $12.0 straight to the $14.0 – $14.1 psychological resistance zone. Prices are currently consolidating right below the recent high.
📊 Trade Plan
– Entry Zone: $13.45 – $13.55
– Stop Loss: $13.20
– Targets: $14.00 | $14.20
⚠️ Avoiding both FOMO buying at the top and shorting against the momentum.
📊 Trade Plan
– Entry Zone: $13.45 – $13.55
– Stop Loss: $13.20
– Targets: $14.00 | $14.20
⚠️ Avoiding both FOMO buying at the top and shorting against the momentum.
67
·
--
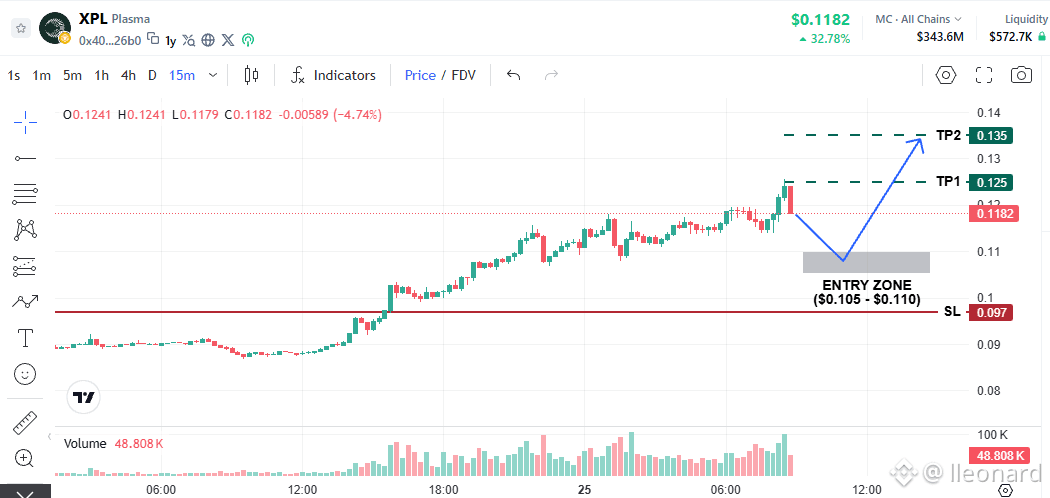
While the $XPL 15m/1h momentum remains strong, price is currently hovering around a short-term pump peak.
➔ Do NOT FOMO buy at current levels. Be patient and wait for a healthy pullback to support levels for a better Risk/Reward ratio.
🎯 Trade Setup:
– Entry Zone: $0.105 - $0.110
– Take Profit: $0.125 | $0.135+
– Stop Loss: $0.097
⚠️ If price dumps aggressively and breaks below $1.05 on high sell volume, CANCEL THIS ORDER.
{future}(XPLUSDT)
While the $XPL 15m/1h momentum remains strong, price is currently hovering around a short-term pump peak.
➔ Do NOT FOMO buy at current levels. Be patient and wait for a healthy pullback to support levels for a better Risk/Reward ratio.
🎯 Trade Setup:
– Entry Zone: $0.105 - $0.110
– Take Profit: $0.125 | $0.135+
– Stop Loss: $0.097
⚠️ If price dumps aggressively and breaks below $1.05 on high sell volume, CANCEL THIS ORDER.
➔ Do NOT FOMO buy at current levels. Be patient and wait for a healthy pullback to support levels for a better Risk/Reward ratio.
🎯 Trade Setup:
– Entry Zone: $0.105 - $0.110
– Take Profit: $0.125 | $0.135+
– Stop Loss: $0.097
⚠️ If price dumps aggressively and breaks below $1.05 on high sell volume, CANCEL THIS ORDER.
138
·
--
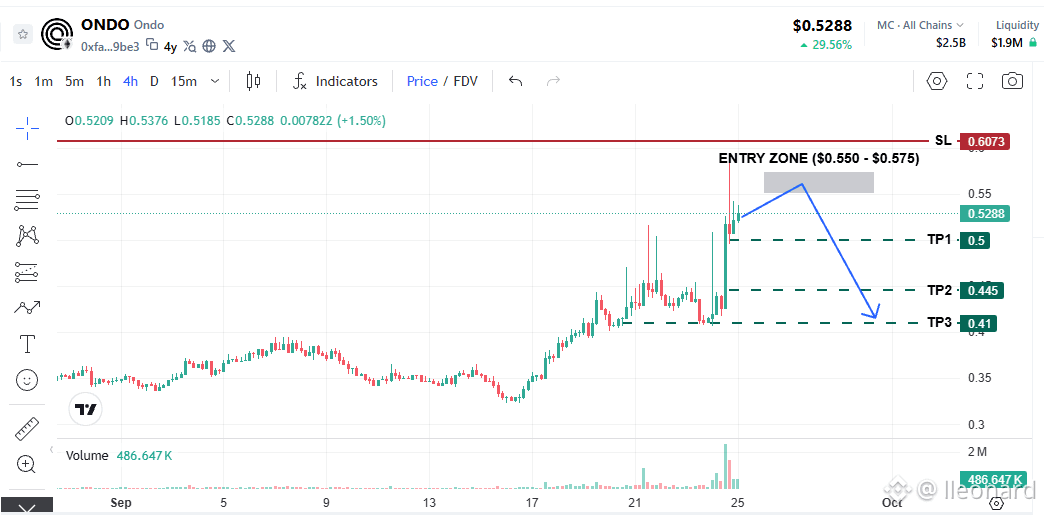
After an impressive pump of nearly +28%, $ONDO is showing clear signs of aggressive profit-taking at higher levels. The short-term trend remains BULLISH, but it is currently undergoing a sharp technical correction.
📊 Short Setup
– Entry Zone: $0.550 - $0.575
– Stop Loss: $0.607
– Targets: $0.500 | $0.445 | $0.410
⚠️ This short setup is a counter-trend trade playing the pullback. Manage risk carefully!
{future}(ONDOUSDT)
After an impressive pump of nearly +28%, $ONDO is showing clear signs of aggressive profit-taking at higher levels. The short-term trend remains BULLISH, but it is currently undergoing a sharp technical correction.
📊 Short Setup
– Entry Zone: $0.550 - $0.575
– Stop Loss: $0.607
– Targets: $0.500 | $0.445 | $0.410
⚠️ This short setup is a counter-trend trade playing the pullback. Manage risk carefully!
📊 Short Setup
– Entry Zone: $0.550 - $0.575
– Stop Loss: $0.607
– Targets: $0.500 | $0.445 | $0.410
⚠️ This short setup is a counter-trend trade playing the pullback. Manage risk carefully!
130
·
--
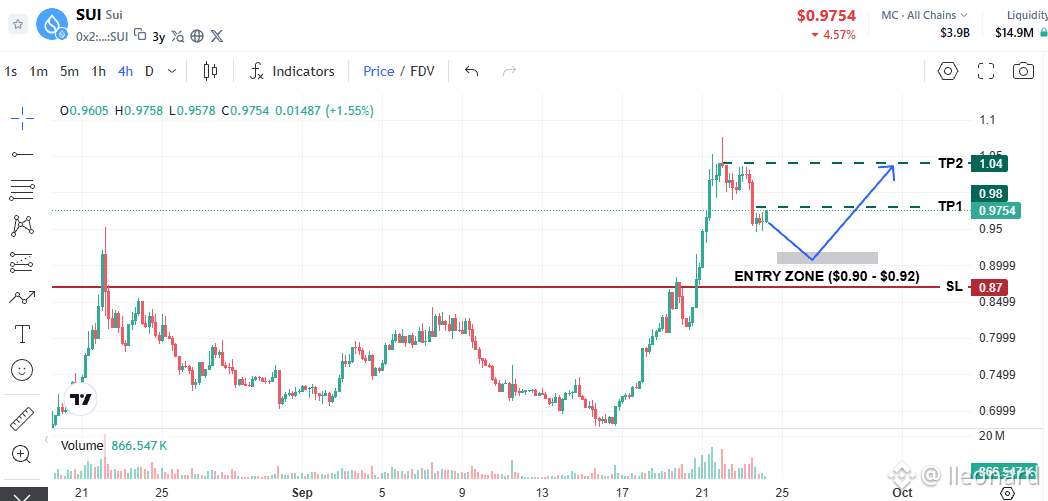
After a strong rally toward the $1.08 region, $SUI is currently in a pullback/consolidation phase. Selling volume has significantly dried up, indicating weakening bearish momentum.
The $0.90 – $0.92 zone serves as a key former resistance turned support (Role Reversal), offering an excellent area to build a Long position.
🎯 Long Setup:
– Entry Zone: $0.90 – $0.92
– Stop Loss: $0.87
– Targets: $0.98 – $1.04
⚠️ Invalid if price breaks above $1.05 before hitting the Entry Zone.
{future}(SUIUSDT)
After a strong rally toward the $1.08 region, $SUI is currently in a pullback/consolidation phase. Selling volume has significantly dried up, indicating weakening bearish momentum.
The $0.90 – $0.92 zone serves as a key former resistance turned support (Role Reversal), offering an excellent area to build a Long position.
🎯 Long Setup:
– Entry Zone: $0.90 – $0.92
– Stop Loss: $0.87
– Targets: $0.98 – $1.04
⚠️ Invalid if price breaks above $1.05 before hitting the Entry Zone.
The $0.90 – $0.92 zone serves as a key former resistance turned support (Role Reversal), offering an excellent area to build a Long position.
🎯 Long Setup:
– Entry Zone: $0.90 – $0.92
– Stop Loss: $0.87
– Targets: $0.98 – $1.04
⚠️ Invalid if price breaks above $1.05 before hitting the Entry Zone.
139
Log in to explore more content
Join global crypto users on Binance Square
⚡️ Get latest and useful information about crypto.
💬 Trusted by the world’s largest crypto exchange.
👍 Discover real insights from verified creators.
Email / Phone number
Trending Topics
US10YearYieldNears5.3%
1,054 views
63 Discussing
#US10YearYieldNears5.3%
📊 BOND YIELDS AT MULTI-YEAR HIGHS!
The US 10-year Treasury yield approaching 5.3% is creating a major talking point across global financial markets. Rising yields reflect changing expectations around inflation, economic growth, and government borrowing.
🌍 What makes this situation particularly interesting is the impact on crypto sentiment. Higher bond yields may reduce demand for riskier assets, while persistent institutional interest could provide some support to crypto markets.
₿ The real question is: Can Bitcoin maintain its strength while traditional financial markets face rising borrowing costs?
💡 Sometimes, the biggest market signals come from outside the crypto market.
#Bitcoin #CryptoMarket #US10YearYield #TreasuryYields #BTC $BTC
PALASH5
·0 Likes
·475 views
BitcoinETFsTake$6.34BillionInQ3
127 views
14 Discussing
KoreaProposesTokenizingStocksAndBonds
23,126 views
341 Discussing