
9ice De Enigma
315 Posts

9ice De Enigma
Report
Block User
Professional crypto future trader
74 Following
115 Followers
166 Liked
Posts
All
Quotes
·
--
Bullish
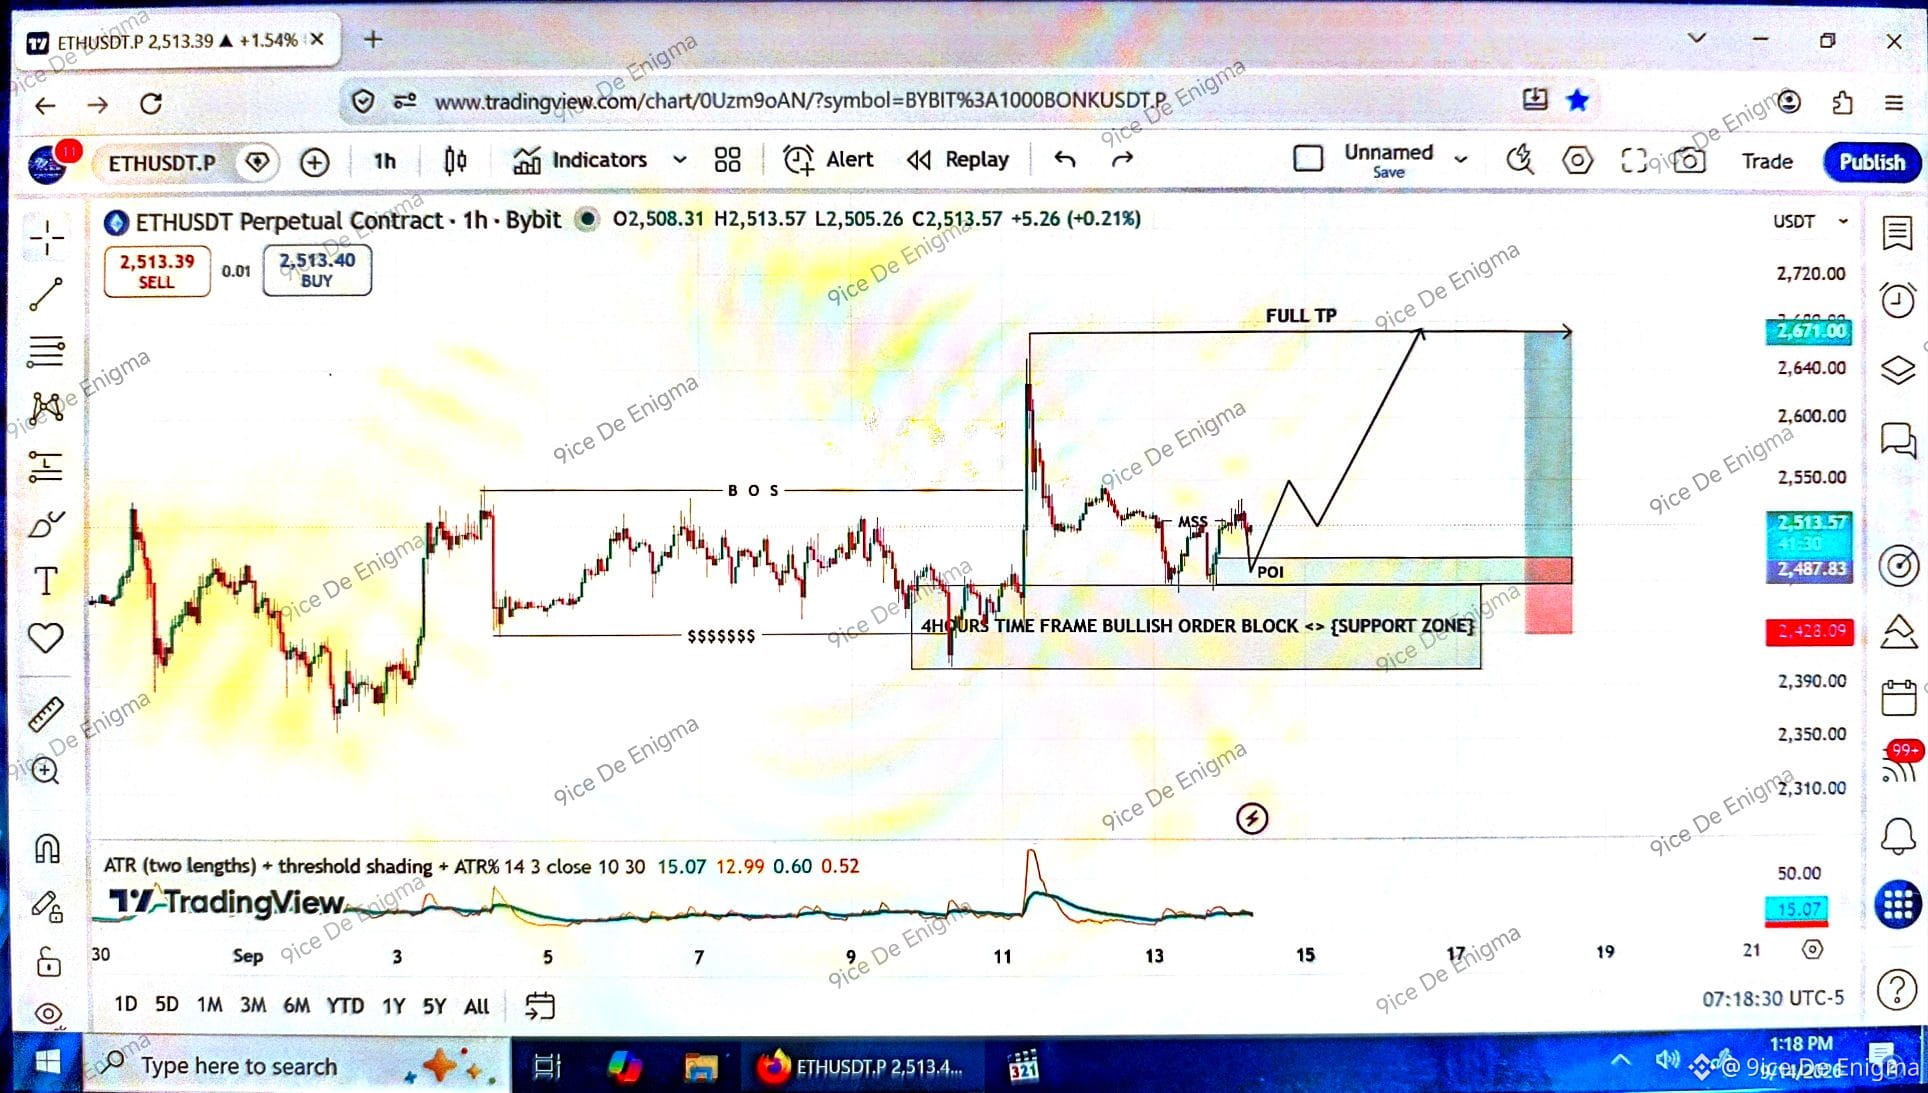
🚨 ETHUSDT — BULLISH SETUP 🚨
📈 Bias: Bullis
🟢 Entry Zone: 2,485.90 – 2,487.83 (Retracement into 1h POI)
🛑 SL: 2,428.09 (Below Market Structure)
💰Take Profit Targets:
🎯 TP1: 2,550.00
🎯 TP2: 2,600.00
🎯 TP3 / FULL TP: 2,671.00
ALM Analysis:
4H bullish Order Block + BOS + liquidity sweep + 1H MSS gives us bullish confirmation. We’re waiting for price to retrace into our POI before execution.
⚠️ No retracement = No trade. No chasing.
Straight ALM execution. 🚀
$ETH
Share your thoughts below 👇
🚨 ETHUSDT — BULLISH SETUP 🚨
📈 Bias: Bullis
🟢 Entry Zone: 2,485.90 – 2,487.83 (Retracement into 1h POI)
🛑 SL: 2,428.09 (Below Market Structure)
💰Take Profit Targets:
🎯 TP1: 2,550.00
🎯 TP2: 2,600.00
🎯 TP3 / FULL TP: 2,671.00
ALM Analysis:
4H bullish Order Block + BOS + liquidity sweep + 1H MSS gives us bullish confirmation. We’re waiting for price to retrace into our POI before execution.
⚠️ No retracement = No trade. No chasing.
Straight ALM execution. 🚀
$ETH
Share your thoughts below 👇
📈 Bias: Bullis
🟢 Entry Zone: 2,485.90 – 2,487.83 (Retracement into 1h POI)
🛑 SL: 2,428.09 (Below Market Structure)
💰Take Profit Targets:
🎯 TP1: 2,550.00
🎯 TP2: 2,600.00
🎯 TP3 / FULL TP: 2,671.00
ALM Analysis:
4H bullish Order Block + BOS + liquidity sweep + 1H MSS gives us bullish confirmation. We’re waiting for price to retrace into our POI before execution.
⚠️ No retracement = No trade. No chasing.
Straight ALM execution. 🚀
$ETH
Share your thoughts below 👇
94
·
--
Bullish
🔥 BMTUSDT.P — BULLISH SETUP 🔥
Timeframe: 1H
Bias: 🟢 LONG
📍 Entry Zone: 0.017395 – 0.017841 (Retracement into 1h POI)
🛑 Stop Loss: 0.016755 (Below Liquidity Sweep)
💰Take Profit Targets:
🎯 TP1: 0.019000
🎯 TP2: 0.020000
🎯 TP3 / FULL TP: 0.021330 (Resistance Zone)
Analysis:
Price is showing a bullish MSS after sweeping downside liquidity around the IDM/BSL area. We also have a POI sitting inside the Daily FVG/support zone, giving us a strong area to look for a bullish reaction.
I’m expecting a retracement into the POI before continuation toward the higher liquidity and resistance zone.
⚠️ Invalidation: If price breaks and closes below the 0.01675 SL area, the bullish setup is invalid.
Trade smart. Don't chase the entry if price runs without retracing. 🚀
$BMT
{future}(BMTUSDT)
Share your thoughts below 👇
🔥 BMTUSDT.P — BULLISH SETUP 🔥
Timeframe: 1H
Bias: 🟢 LONG
📍 Entry Zone: 0.017395 – 0.017841 (Retracement into 1h POI)
🛑 Stop Loss: 0.016755 (Below Liquidity Sweep)
💰Take Profit Targets:
🎯 TP1: 0.019000
🎯 TP2: 0.020000
🎯 TP3 / FULL TP: 0.021330 (Resistance Zone)
Analysis:
Price is showing a bullish MSS after sweeping downside liquidity around the IDM/BSL area. We also have a POI sitting inside the Daily FVG/support zone, giving us a strong area to look for a bullish reaction.
I’m expecting a retracement into the POI before continuation toward the higher liquidity and resistance zone.
⚠️ Invalidation: If price breaks and closes below the 0.01675 SL area, the bullish setup is invalid.
Trade smart. Don't chase the entry if price runs without retracing. 🚀
$BMT
Share your thoughts below 👇
Timeframe: 1H
Bias: 🟢 LONG
📍 Entry Zone: 0.017395 – 0.017841 (Retracement into 1h POI)
🛑 Stop Loss: 0.016755 (Below Liquidity Sweep)
💰Take Profit Targets:
🎯 TP1: 0.019000
🎯 TP2: 0.020000
🎯 TP3 / FULL TP: 0.021330 (Resistance Zone)
Analysis:
Price is showing a bullish MSS after sweeping downside liquidity around the IDM/BSL area. We also have a POI sitting inside the Daily FVG/support zone, giving us a strong area to look for a bullish reaction.
I’m expecting a retracement into the POI before continuation toward the higher liquidity and resistance zone.
⚠️ Invalidation: If price breaks and closes below the 0.01675 SL area, the bullish setup is invalid.
Trade smart. Don't chase the entry if price runs without retracing. 🚀
$BMT
Share your thoughts below 👇

80
·
--
Bullish
🔥🚀 FIRST & SECOND TP SMASHED! 🚀🔥
Another one playing out exactly as planned! 🎯
The market has smashed TP1 & TP2 — now we stay disciplined and ride this setup toward FULL TP. 💰📈
No greed. No emotions. Just follow the plan and let the market do the rest. 🧠⚡
FULL TP loading… 🔥🚀
#CryptoTrading #TradingSignals #SMC #ICTTrading #Forex
🔥🚀 FIRST & SECOND TP SMASHED! 🚀🔥
Another one playing out exactly as planned! 🎯
The market has smashed TP1 & TP2 — now we stay disciplined and ride this setup toward FULL TP. 💰📈
No greed. No emotions. Just follow the plan and let the market do the rest. 🧠⚡
FULL TP loading… 🔥🚀
#CryptoTrading #TradingSignals #SMC #ICTTrading #Forex
Another one playing out exactly as planned! 🎯
The market has smashed TP1 & TP2 — now we stay disciplined and ride this setup toward FULL TP. 💰📈
No greed. No emotions. Just follow the plan and let the market do the rest. 🧠⚡
FULL TP loading… 🔥🚀
#CryptoTrading #TradingSignals #SMC #ICTTrading #Forex

9ice De Enigma
·
--
Bullish🔥 JCTUSDT — BULLISH SETUP 🔥
Timeframe: 1H
Bias: LONG 📈
🔥Entry Zone: 0.001713 – 0.001750 (Retest 1h FVG)
🛑Stop Loss: 0.001665 (Below Liquidity Sweep)
💰Take Profit Targets:
TP1: 0.001900
TP2: 0.002000
TP3: 0.002130 🎯 (Resistance Zone)
📊 Analysis
Price is reacting from the 4H bullish Order Block / support zone.
Sell-side liquidity ($SS) has been swept.
We have a bullish MSS, showing a potential shift in short-term market structure.
The FVG provides a potential retracement/entry area.
Major resistance sits around 0.00210–0.00213, making it the final target zone.
⚠️ Trade Management: Wait for price to retrace into the entry/FVG zone and confirm before entering. Do not chase if price runs without giving the retracement.
Invalidation: A strong breakdown below the 4H bullish OB invalidates the bullish idea.
🚀 JCTUSDT LONG — LET THE SETUP COME TO YOU.
$JCT
Share your thoughts below 👇
Timeframe: 1H
Bias: LONG 📈
🔥Entry Zone: 0.001713 – 0.001750 (Retest 1h FVG)
🛑Stop Loss: 0.001665 (Below Liquidity Sweep)
💰Take Profit Targets:
TP1: 0.001900
TP2: 0.002000
TP3: 0.002130 🎯 (Resistance Zone)
📊 Analysis
Price is reacting from the 4H bullish Order Block / support zone.
Sell-side liquidity ($SS) has been swept.
We have a bullish MSS, showing a potential shift in short-term market structure.
The FVG provides a potential retracement/entry area.
Major resistance sits around 0.00210–0.00213, making it the final target zone.
⚠️ Trade Management: Wait for price to retrace into the entry/FVG zone and confirm before entering. Do not chase if price runs without giving the retracement.
Invalidation: A strong breakdown below the 4H bullish OB invalidates the bullish idea.
🚀 JCTUSDT LONG — LET THE SETUP COME TO YOU.
$JCT
Share your thoughts below 👇
146
·
--
Bullish
🔥 JCTUSDT — BULLISH SETUP 🔥
Timeframe: 1H
Bias: LONG 📈
🔥Entry Zone: 0.001713 – 0.001750 (Retest 1h FVG)
🛑Stop Loss: 0.001665 (Below Liquidity Sweep)
💰Take Profit Targets:
TP1: 0.001900
TP2: 0.002000
TP3: 0.002130 🎯 (Resistance Zone)
📊 Analysis
Price is reacting from the 4H bullish Order Block / support zone.
Sell-side liquidity ($SS) has been swept.
We have a bullish MSS, showing a potential shift in short-term market structure.
The FVG provides a potential retracement/entry area.
Major resistance sits around 0.00210–0.00213, making it the final target zone.
⚠️ Trade Management: Wait for price to retrace into the entry/FVG zone and confirm before entering. Do not chase if price runs without giving the retracement.
Invalidation: A strong breakdown below the 4H bullish OB invalidates the bullish idea.
🚀 JCTUSDT LONG — LET THE SETUP COME TO YOU.
$JCT
{future}(JCTUSDT)
Share your thoughts below 👇
🔥 JCTUSDT — BULLISH SETUP 🔥
Timeframe: 1H
Bias: LONG 📈
🔥Entry Zone: 0.001713 – 0.001750 (Retest 1h FVG)
🛑Stop Loss: 0.001665 (Below Liquidity Sweep)
💰Take Profit Targets:
TP1: 0.001900
TP2: 0.002000
TP3: 0.002130 🎯 (Resistance Zone)
📊 Analysis
Price is reacting from the 4H bullish Order Block / support zone.
Sell-side liquidity ($SS) has been swept.
We have a bullish MSS, showing a potential shift in short-term market structure.
The FVG provides a potential retracement/entry area.
Major resistance sits around 0.00210–0.00213, making it the final target zone.
⚠️ Trade Management: Wait for price to retrace into the entry/FVG zone and confirm before entering. Do not chase if price runs without giving the retracement.
Invalidation: A strong breakdown below the 4H bullish OB invalidates the bullish idea.
🚀 JCTUSDT LONG — LET THE SETUP COME TO YOU.
$JCT
Share your thoughts below 👇
Timeframe: 1H
Bias: LONG 📈
🔥Entry Zone: 0.001713 – 0.001750 (Retest 1h FVG)
🛑Stop Loss: 0.001665 (Below Liquidity Sweep)
💰Take Profit Targets:
TP1: 0.001900
TP2: 0.002000
TP3: 0.002130 🎯 (Resistance Zone)
📊 Analysis
Price is reacting from the 4H bullish Order Block / support zone.
Sell-side liquidity ($SS) has been swept.
We have a bullish MSS, showing a potential shift in short-term market structure.
The FVG provides a potential retracement/entry area.
Major resistance sits around 0.00210–0.00213, making it the final target zone.
⚠️ Trade Management: Wait for price to retrace into the entry/FVG zone and confirm before entering. Do not chase if price runs without giving the retracement.
Invalidation: A strong breakdown below the 4H bullish OB invalidates the bullish idea.
🚀 JCTUSDT LONG — LET THE SETUP COME TO YOU.
$JCT
Share your thoughts below 👇

2
388
·
--
Bullish
🟢 APTUSDT — BULLISH LONG SETUP
Pair: APTUSDT.P
Timeframe: 30M
Direction: LONG 🟢
Entry Zone: 0.5328 – 0.5377 (Retracement into 30m OB)
🛑Stop Loss: 0.5278 (Below Liquidity Sweep)
🎯Take Profit Targets;
TP1: 0.5500
TP2: 0.5700
TP3 / FULL TP: 0.5875 (Resistance Zone)
💰Approx. RR to Full TP: 5:1
📊 ANALYSIS
APT is showing a bullish reaction from the Daily Bullish Order Block / Support Zone. Price has swept lower liquidity and subsequently printed a Market Structure Shift (MSS) on the 30M timeframe, suggesting a potential transition from bearish to bullish order flow.
We are looking for price to retrace into the marked bullish OB/POI around 0.5377–0.5385 before entering the long. If the zone holds, the next major objective is the 0.5875 resistance zone.
🎯 TRADE PLAN
Patiently wait for the retracement and confirmation at our POI.
No retracement = NO TRADE. Don't chase price.
If SL is hit, the bullish setup is invalidated and we move on to the next opportunity.
$APT
Share your thoughts below 👇
🟢 APTUSDT — BULLISH LONG SETUP
Pair: APTUSDT.P
Timeframe: 30M
Direction: LONG 🟢
Entry Zone: 0.5328 – 0.5377 (Retracement into 30m OB)
🛑Stop Loss: 0.5278 (Below Liquidity Sweep)
🎯Take Profit Targets;
TP1: 0.5500
TP2: 0.5700
TP3 / FULL TP: 0.5875 (Resistance Zone)
💰Approx. RR to Full TP: 5:1
📊 ANALYSIS
APT is showing a bullish reaction from the Daily Bullish Order Block / Support Zone. Price has swept lower liquidity and subsequently printed a Market Structure Shift (MSS) on the 30M timeframe, suggesting a potential transition from bearish to bullish order flow.
We are looking for price to retrace into the marked bullish OB/POI around 0.5377–0.5385 before entering the long. If the zone holds, the next major objective is the 0.5875 resistance zone.
🎯 TRADE PLAN
Patiently wait for the retracement and confirmation at our POI.
No retracement = NO TRADE. Don't chase price.
If SL is hit, the bullish setup is invalidated and we move on to the next opportunity.
$APT
Share your thoughts below 👇
Pair: APTUSDT.P
Timeframe: 30M
Direction: LONG 🟢
Entry Zone: 0.5328 – 0.5377 (Retracement into 30m OB)
🛑Stop Loss: 0.5278 (Below Liquidity Sweep)
🎯Take Profit Targets;
TP1: 0.5500
TP2: 0.5700
TP3 / FULL TP: 0.5875 (Resistance Zone)
💰Approx. RR to Full TP: 5:1
📊 ANALYSIS
APT is showing a bullish reaction from the Daily Bullish Order Block / Support Zone. Price has swept lower liquidity and subsequently printed a Market Structure Shift (MSS) on the 30M timeframe, suggesting a potential transition from bearish to bullish order flow.
We are looking for price to retrace into the marked bullish OB/POI around 0.5377–0.5385 before entering the long. If the zone holds, the next major objective is the 0.5875 resistance zone.
🎯 TRADE PLAN
Patiently wait for the retracement and confirmation at our POI.
No retracement = NO TRADE. Don't chase price.
If SL is hit, the bullish setup is invalidated and we move on to the next opportunity.
$APT
Share your thoughts below 👇

1
226
·
--
Bullish
🚨 APTUSDT.P APTUSDT.P — BULLISH SETUP 🚨
📊 Timeframe: 15M
🟢 Direction: LONG
🎯 Entry Zone: 0.6040 – 0.6092 (Retracement into 15m POI)
🛑 Stop Loss: 0.5952 (Below Liquidity Sweep)
🚀Take Profit Targets:
🎯 TP1: 0.6200
🎯 TP2: 0.6330
🎯 TP3: 0.6515
📌 SETUP REASON:
• Price reacted from the 4H Fair Value Gap / support zone
• 15M bullish Market Structure Shift confirmed
• Price is showing bullish intent after the liquidity sweep
• Our target is the Buy-Side Liquidity above
⚠️ IMPORTANT:
Wait patiently for price to retrace into our entry zone.
If the market does not come back to our entry, DO NOT CHASE THE TRADE. ❌
No FOMO. No emotional entries.
If we miss this setup, we simply wait for our next ALM setup. 🎯
Trade the plan. Trust the process. 📈
$APT
{future}(APTUSDT)
Share your thoughts below 👇
🚨 APTUSDT.P APTUSDT.P — BULLISH SETUP 🚨
📊 Timeframe: 15M
🟢 Direction: LONG
🎯 Entry Zone: 0.6040 – 0.6092 (Retracement into 15m POI)
🛑 Stop Loss: 0.5952 (Below Liquidity Sweep)
🚀Take Profit Targets:
🎯 TP1: 0.6200
🎯 TP2: 0.6330
🎯 TP3: 0.6515
📌 SETUP REASON:
• Price reacted from the 4H Fair Value Gap / support zone
• 15M bullish Market Structure Shift confirmed
• Price is showing bullish intent after the liquidity sweep
• Our target is the Buy-Side Liquidity above
⚠️ IMPORTANT:
Wait patiently for price to retrace into our entry zone.
If the market does not come back to our entry, DO NOT CHASE THE TRADE. ❌
No FOMO. No emotional entries.
If we miss this setup, we simply wait for our next ALM setup. 🎯
Trade the plan. Trust the process. 📈
$APT
Share your thoughts below 👇
📊 Timeframe: 15M
🟢 Direction: LONG
🎯 Entry Zone: 0.6040 – 0.6092 (Retracement into 15m POI)
🛑 Stop Loss: 0.5952 (Below Liquidity Sweep)
🚀Take Profit Targets:
🎯 TP1: 0.6200
🎯 TP2: 0.6330
🎯 TP3: 0.6515
📌 SETUP REASON:
• Price reacted from the 4H Fair Value Gap / support zone
• 15M bullish Market Structure Shift confirmed
• Price is showing bullish intent after the liquidity sweep
• Our target is the Buy-Side Liquidity above
⚠️ IMPORTANT:
Wait patiently for price to retrace into our entry zone.
If the market does not come back to our entry, DO NOT CHASE THE TRADE. ❌
No FOMO. No emotional entries.
If we miss this setup, we simply wait for our next ALM setup. 🎯
Trade the plan. Trust the process. 📈
$APT
Share your thoughts below 👇

1
2
176
·
--
Bullish
DYDXUSDT — BULLISH SETUP 📈
Pair: DYDX/USDT
Timeframe: 2H
🟢 Bias: Bullish
Price is reacting around the higher-timeframe bullish order block/support zone near 0.098–0.101.
If this zone continues to hold and price confirms bullish structure on the 2H, the next major area of interest is the 0.122–0.123 resistance zone.
Key levels:
• Entry zone; Retracement into 2h OB 0.10119 - 0.09912
• Stop-loss; Below Liquidity Sweep 0.09534
• Take Profit Target
TP1; 0.10760
TP2; 0.11500
TP3 Major resistance: 0.12282 – 0.12300
📌 Confirmation matters: Don't assume the projected move will happen—wait for price action to confirm the bullish structure.
⚠️ Educational technical analysis only. Not financial advice. Trade responsibly and never risk money you can't afford to lose.
$DYDX
{future}(DYDXUSDT)
Share your thoughts below 👇
DYDXUSDT — BULLISH SETUP 📈
Pair: DYDX/USDT
Timeframe: 2H
🟢 Bias: Bullish
Price is reacting around the higher-timeframe bullish order block/support zone near 0.098–0.101.
If this zone continues to hold and price confirms bullish structure on the 2H, the next major area of interest is the 0.122–0.123 resistance zone.
Key levels:
• Entry zone; Retracement into 2h OB 0.10119 - 0.09912
• Stop-loss; Below Liquidity Sweep 0.09534
• Take Profit Target
TP1; 0.10760
TP2; 0.11500
TP3 Major resistance: 0.12282 – 0.12300
📌 Confirmation matters: Don't assume the projected move will happen—wait for price action to confirm the bullish structure.
⚠️ Educational technical analysis only. Not financial advice. Trade responsibly and never risk money you can't afford to lose.
$DYDX
Share your thoughts below 👇
Pair: DYDX/USDT
Timeframe: 2H
🟢 Bias: Bullish
Price is reacting around the higher-timeframe bullish order block/support zone near 0.098–0.101.
If this zone continues to hold and price confirms bullish structure on the 2H, the next major area of interest is the 0.122–0.123 resistance zone.
Key levels:
• Entry zone; Retracement into 2h OB 0.10119 - 0.09912
• Stop-loss; Below Liquidity Sweep 0.09534
• Take Profit Target
TP1; 0.10760
TP2; 0.11500
TP3 Major resistance: 0.12282 – 0.12300
📌 Confirmation matters: Don't assume the projected move will happen—wait for price action to confirm the bullish structure.
⚠️ Educational technical analysis only. Not financial advice. Trade responsibly and never risk money you can't afford to lose.
$DYDX
Share your thoughts below 👇

1
1
182
·
--
Bearish
🚨 BTCUSDT SHORT SETUP | 1H
🔴 Bias: BEARISH
📍 Entry Zone: 64,133 – 64,300 (Retracement into 1h OB)
🛑 Stop Loss: 64,534.7 (Above Buy Side Liquidity)
🎯 TP1: 63,500
🎯 TP2: 63,100
🎯 TP3: 62,800
💰 FULL TP: 62,510
📌 SETUP LOGIC:
• Price is approaching a 4H Fair Value Gap / resistance zone.
• 1H Order Block sits inside the resistance area.
• Buy-side liquidity above the recent highs can be swept before rejection.
• Looking for bearish confirmation/rejection inside the zone.
• Downside target is the sell-side liquidity around 62,510.
⚠️ Don't chase the short. Wait for price to tap the zone and confirm rejection.
Trade safe. Manage your risk. 🧠📉
$BTC
{future}(BTCUSDT)
Share your thoughts below 👇
🚨 BTCUSDT SHORT SETUP | 1H
🔴 Bias: BEARISH
📍 Entry Zone: 64,133 – 64,300 (Retracement into 1h OB)
🛑 Stop Loss: 64,534.7 (Above Buy Side Liquidity)
🎯 TP1: 63,500
🎯 TP2: 63,100
🎯 TP3: 62,800
💰 FULL TP: 62,510
📌 SETUP LOGIC:
• Price is approaching a 4H Fair Value Gap / resistance zone.
• 1H Order Block sits inside the resistance area.
• Buy-side liquidity above the recent highs can be swept before rejection.
• Looking for bearish confirmation/rejection inside the zone.
• Downside target is the sell-side liquidity around 62,510.
⚠️ Don't chase the short. Wait for price to tap the zone and confirm rejection.
Trade safe. Manage your risk. 🧠📉
$BTC
Share your thoughts below 👇
🔴 Bias: BEARISH
📍 Entry Zone: 64,133 – 64,300 (Retracement into 1h OB)
🛑 Stop Loss: 64,534.7 (Above Buy Side Liquidity)
🎯 TP1: 63,500
🎯 TP2: 63,100
🎯 TP3: 62,800
💰 FULL TP: 62,510
📌 SETUP LOGIC:
• Price is approaching a 4H Fair Value Gap / resistance zone.
• 1H Order Block sits inside the resistance area.
• Buy-side liquidity above the recent highs can be swept before rejection.
• Looking for bearish confirmation/rejection inside the zone.
• Downside target is the sell-side liquidity around 62,510.
⚠️ Don't chase the short. Wait for price to tap the zone and confirm rejection.
Trade safe. Manage your risk. 🧠📉
$BTC
Share your thoughts below 👇

67
·
--
Bullish
BTCUSDT Counter-Trade Setup (15M)
Bias: Bullish (Counter Trend)
Entry Zone:
63,355.8 – 63,488.8 (inside the FVG/support area)
Confirmation Before Entry:
Wait for a bullish engulfing candle or strong bullish displacement from the FVG.
A 1m/5m market structure shift (MSS) to the upside adds confirmation.
Stop Loss:
63,177.0 (below the support/liquidity sweep)
Take Profit 1:
63,900
Take Profit 2:
64,250
Final Take Profit:
64,545 (Buy-side liquidity)
Trade Idea
Price has swept liquidity and is reacting from a Fair Value Gap (FVG). If buyers defend this zone and create a bullish MSS, the market could rally to grab the buy-side liquidity around 64,545.
Invalidation: If a 15m candle closes decisively below 63,240, the bullish setup is invalid and BTC could continue lower.
This is a counter-trend trade, so manage risk carefully and consider taking partial profits at TP1 and moving your stop to breakeven if price continues in your favor.
$BTC
{future}(BTCUSDT)
Share your thoughts below 👇
BTCUSDT Counter-Trade Setup (15M)
Bias: Bullish (Counter Trend)
Entry Zone:
63,355.8 – 63,488.8 (inside the FVG/support area)
Confirmation Before Entry:
Wait for a bullish engulfing candle or strong bullish displacement from the FVG.
A 1m/5m market structure shift (MSS) to the upside adds confirmation.
Stop Loss:
63,177.0 (below the support/liquidity sweep)
Take Profit 1:
63,900
Take Profit 2:
64,250
Final Take Profit:
64,545 (Buy-side liquidity)
Trade Idea
Price has swept liquidity and is reacting from a Fair Value Gap (FVG). If buyers defend this zone and create a bullish MSS, the market could rally to grab the buy-side liquidity around 64,545.
Invalidation: If a 15m candle closes decisively below 63,240, the bullish setup is invalid and BTC could continue lower.
This is a counter-trend trade, so manage risk carefully and consider taking partial profits at TP1 and moving your stop to breakeven if price continues in your favor.
$BTC
Share your thoughts below 👇
Bias: Bullish (Counter Trend)
Entry Zone:
63,355.8 – 63,488.8 (inside the FVG/support area)
Confirmation Before Entry:
Wait for a bullish engulfing candle or strong bullish displacement from the FVG.
A 1m/5m market structure shift (MSS) to the upside adds confirmation.
Stop Loss:
63,177.0 (below the support/liquidity sweep)
Take Profit 1:
63,900
Take Profit 2:
64,250
Final Take Profit:
64,545 (Buy-side liquidity)
Trade Idea
Price has swept liquidity and is reacting from a Fair Value Gap (FVG). If buyers defend this zone and create a bullish MSS, the market could rally to grab the buy-side liquidity around 64,545.
Invalidation: If a 15m candle closes decisively below 63,240, the bullish setup is invalid and BTC could continue lower.
This is a counter-trend trade, so manage risk carefully and consider taking partial profits at TP1 and moving your stop to breakeven if price continues in your favor.
$BTC
Share your thoughts below 👇

1
61
Log in to explore more content
Join global crypto users on Binance Square
⚡️ Get latest and useful information about crypto.
💬 Trusted by the world’s largest crypto exchange.
👍 Discover real insights from verified creators.
Email / Phone number
Trending Topics
ElSalvadorBTCHoldingsRiseTo7777
1,237 views
46 Discussing
#ElSalvadorBTCHoldingsRiseTo7777
#ElSalvadorBTCHoldingsRiseTo7777 — Detailed Discussion
According to the latest report from September 17, 2026, El Salvador’s Bitcoin holdings have reportedly reached 7,777 BTC. A report published today valued the holdings at approximately $594 million.
🇸🇻 1. Why is 7,777 BTC important?
7,777 is also a symbolic number, so it is understandable that discussions around #ElSalvadorBTCHoldingsRiseTo7777 are gaining attention on social media.
At the beginning of September, government-tracker-based reports showed holdings of approximately 7,763.37 BTC.
This means that reaching 7,777 BTC represents an additional 13.63 BTC accumulated since the beginning of September.
📈 2. How did the holdings increase so much?
El Salvador adopted Bitcoin as legal tender in 2021. Later, in November 2022, the government announced a policy of purchasing 1 BTC per day.
This accumulation strategy gradually increased the country’s Bitcoin holdings:
Period Reported Holdings
IMF report in 2025 ~6,070 BTC
March 9, 2026 7,585.37 BTC
May 15, 2026 7,653.37 BTC
September 2, 2026 7,763.37 BTC
September 17, 2026 7,777 BTC
The earlier figures were reported based on government trackers and related reports.
💰 3. How much is it worth now?
The reported value of 7,777 BTC is approximately $594 million.
However, Bitcoin’s price changes rapidly, so the dollar value of the holdings can change from day to day—even hour to hour.
Using a hypothetical BTC price:
7,777 × BTC price = Total portfolio value
If BTC were $80,000:
7,777 × $80,000 ≈ $622.16 million
If BTC were $100,000:
7,777 × $100,000 ≈ $777.7 million
Therefore, Bitcoin’s price movements can have a significant direct impact on the USD value of El Salvador’s reserve.
📊 4. How much profit has El Salvador made?
A report published today stated that El Salvador’s average purchase price was approximately $55,718 per BTC, with an unrealized gain of around $162 million, or approximately a 37% return.
From 7,777 BTC to 8,000 BTC:
8,000 − 7,777 = 223 BTC
📌
arpon ahmed
·0 Likes
·38 views
MemeLaunchpads82%OfArcDayOneVolume
9,512 views
277 Discussing
OstiumLoanDisputeHearingSetInNYFederalCourt
8,972 views
230 Discussing