
CryptoDeGraite
210 Posts

CryptoDeGraite
Blending strategy, precision, and market insight to unlock trading opportunities. Focused on smart risk management and consistent, profit-driven decisions.
Open Trade
Occasional Trader
5 Years
5 Following
559 Followers
758 Liked
Posts
Portfolio
All
Quotes
Videos
PINNED
Don't Invest in Crypto Without Learning First!
Many people jump into crypto investing or trading just because they see others making money. But without proper knowledge, they end up losing more than they gain.
Before you invest in crypto, take time to learn:
✅ How the market works
✅ Risks involved
✅ Security measures
✅ Trading strategies
Smart investors educate themselves first. Don't let FOMO cost you—learn before you earn!
#learn2earn #educational_post #cryptouniverseofficial #CryptoHorizon #Learn
$BTC $XRP $SOL
Many people jump into crypto investing or trading just because they see others making money. But without proper knowledge, they end up losing more than they gain.
Before you invest in crypto, take time to learn:
✅ How the market works
✅ Risks involved
✅ Security measures
✅ Trading strategies
Smart investors educate themselves first. Don't let FOMO cost you—learn before you earn!
#learn2earn #educational_post #cryptouniverseofficial #CryptoHorizon #Learn
$BTC $XRP $SOL
Stand a Chance to Win 19999 $A2Z Now!!!
Claim Your A2Z Now!!!
#TradeCryptosOnX #MarketRebound #CPIWatch #TrumpCanadaTariffsOverturned #USRetailSalesMissForecast
Claim Your A2Z Now!!!
#TradeCryptosOnX #MarketRebound #CPIWatch #TrumpCanadaTariffsOverturned #USRetailSalesMissForecast
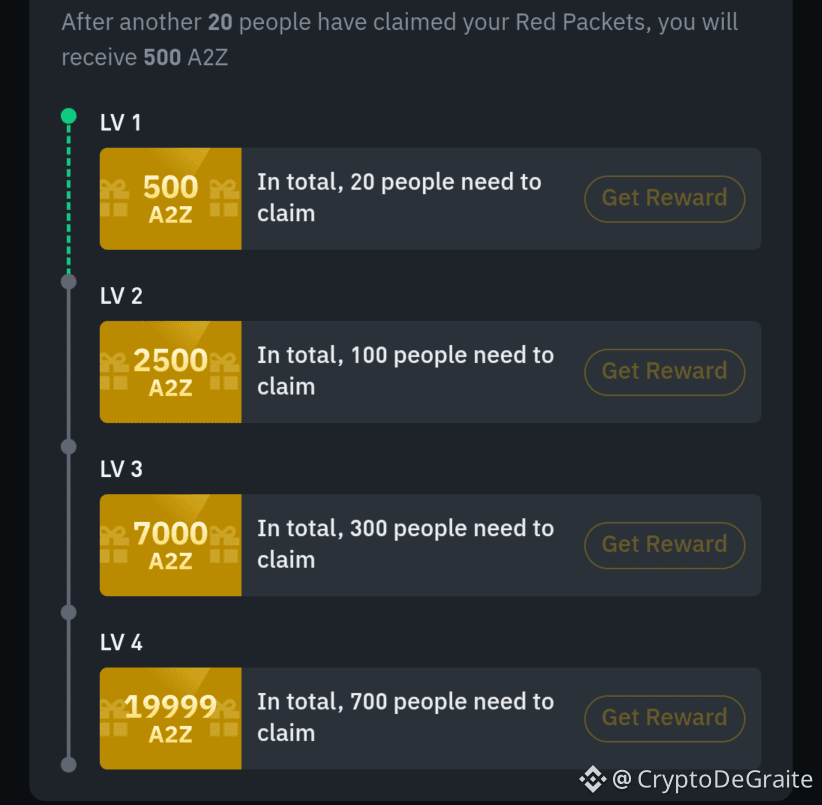
Claim $SOON , Click Here!!!<@
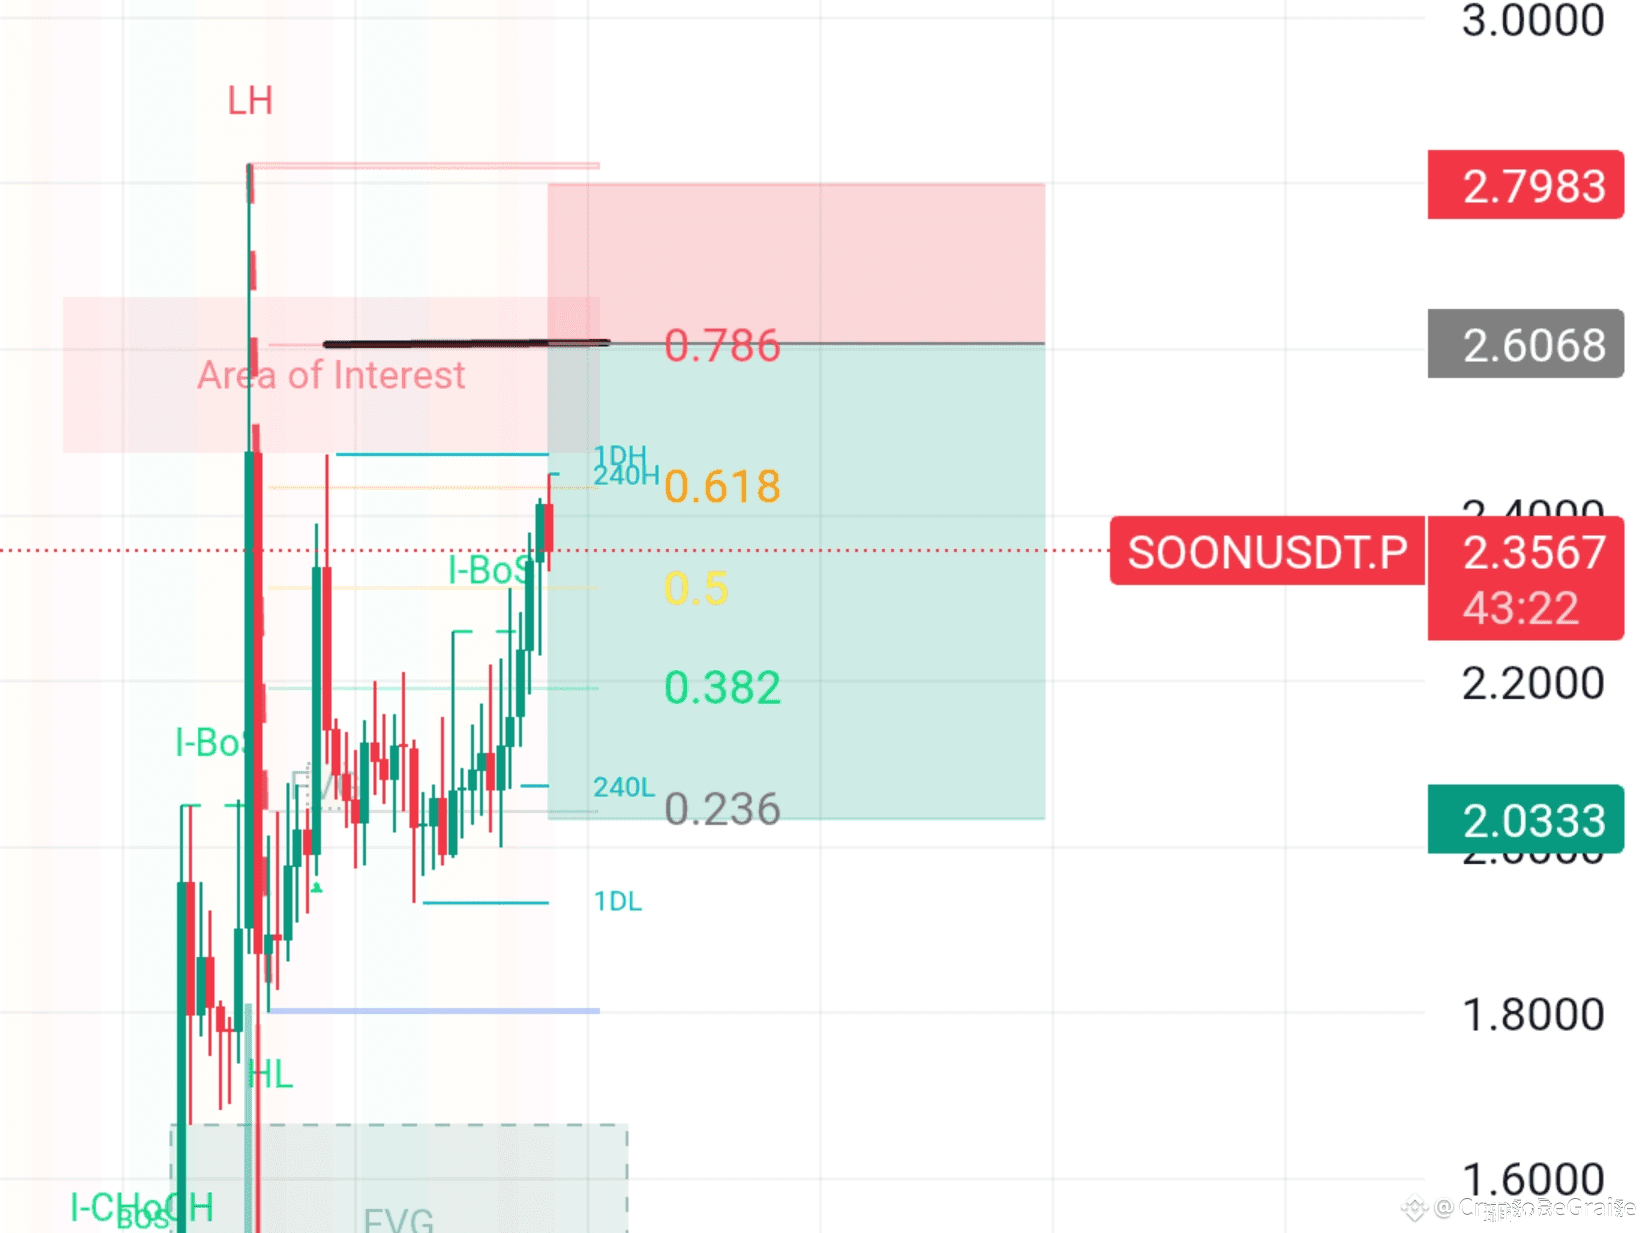
🚨 $SOON/USDT — CRITICAL LEVEL REACHED! 🚨
Price has perfectly tapped the 0.618–0.786 fib retracement zone, right inside the Area of Interest from the previous Lower High (LH) 👀
This is the exact zone where smart money could be eyeing a short setup after liquidity grab!
💥 SHORT SETUP IDEA:
🔸 Entry Zone: 2.60 – 2.79 (0.618–0.786 fib zone)
🔸 Stop Loss: Above 2.80 (Previous LH Break)
🎯 Targets:
TP1: 2.33
TP2: 2.03
TP3: 1.80
⚠️ If price closes above 2.80, structure shifts bullish — possible continuation toward 3.20–3.40 range.
📊 Currently testing fib golden pocket with momentum — watch for rejection candles or liquidity sweep signs before confirming entry.
🔥 Big move loading — patience here could pay massively! 💣
#ADPJobsSurge
🚨 $SOON/USDT — CRITICAL LEVEL REACHED! 🚨
Price has perfectly tapped the 0.618–0.786 fib retracement zone, right inside the Area of Interest from the previous Lower High (LH) 👀
This is the exact zone where smart money could be eyeing a short setup after liquidity grab!
💥 SHORT SETUP IDEA:
🔸 Entry Zone: 2.60 – 2.79 (0.618–0.786 fib zone)
🔸 Stop Loss: Above 2.80 (Previous LH Break)
🎯 Targets:
TP1: 2.33
TP2: 2.03
TP3: 1.80
⚠️ If price closes above 2.80, structure shifts bullish — possible continuation toward 3.20–3.40 range.
📊 Currently testing fib golden pocket with momentum — watch for rejection candles or liquidity sweep signs before confirming entry.
🔥 Big move loading — patience here could pay massively! 💣
#ADPJobsSurge
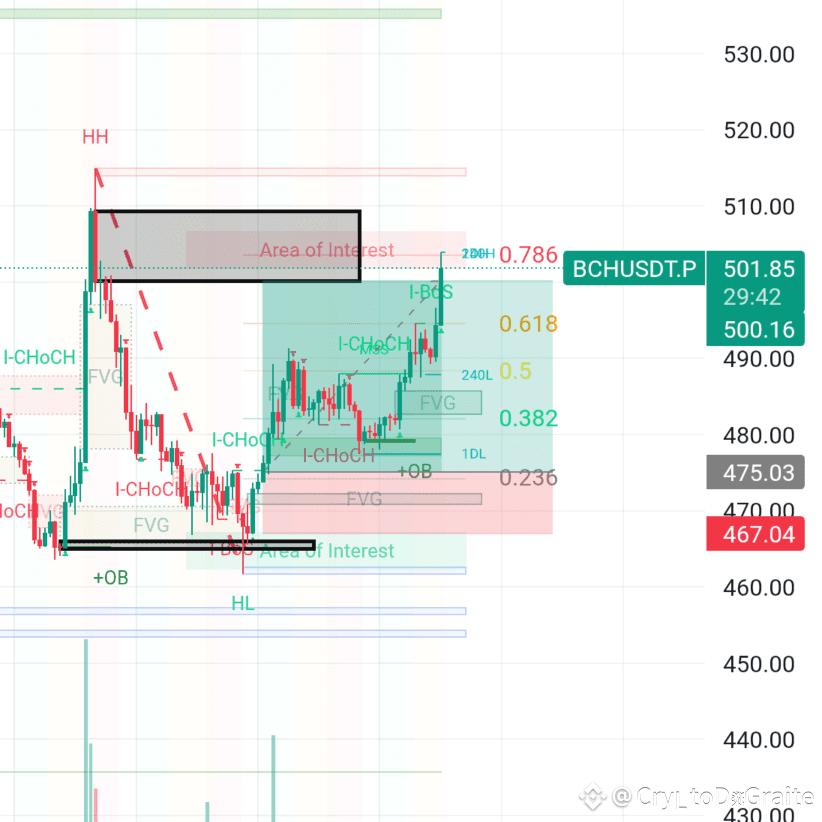
🚀 BCH/USDT HIT ALL LONG TARGETS — PERFECT CALL! 🔥
📊 Bitcoin Cash (1H Chart Analysis)
As predicted earlier, our long setup delivered flawlessly! 🎯
From the $472–$475 entry zone, BCH surged straight past every target, reaching $500+ with strong bullish momentum — exactly as planned! 💪
✅ Entry: $472 – $475
✅ TP1: $482 ✅
✅ TP2: $490 ✅
✅ TP3: $500+ ✅ (All Targets Achieved Perfectly!)
💥 Beautiful breakout, clear structure shift, and perfect precision — our analysis played out step by step!
Now BCH is showing strong momentum, but a healthy retracement may occur soon before the next major move. Nothing confirmed yet — just keep your eyes on price action for the next opportunity. 👀
🔥 Once again, pure accuracy — all longs smashed!
👉 Follow for more top-tier setups & real-time market updates!
$BCH
#MarketRebound
📊 Bitcoin Cash (1H Chart Analysis)
As predicted earlier, our long setup delivered flawlessly! 🎯
From the $472–$475 entry zone, BCH surged straight past every target, reaching $500+ with strong bullish momentum — exactly as planned! 💪
✅ Entry: $472 – $475
✅ TP1: $482 ✅
✅ TP2: $490 ✅
✅ TP3: $500+ ✅ (All Targets Achieved Perfectly!)
💥 Beautiful breakout, clear structure shift, and perfect precision — our analysis played out step by step!
Now BCH is showing strong momentum, but a healthy retracement may occur soon before the next major move. Nothing confirmed yet — just keep your eyes on price action for the next opportunity. 👀
🔥 Once again, pure accuracy — all longs smashed!
👉 Follow for more top-tier setups & real-time market updates!
$BCH
#MarketRebound
CryptoDeGraite
·
--
Bullish🚨 BCH/USDT (30M CHART ANALYSIS) 🚨
💥 Massive Move Loading — Don’t Miss This One! 💥
📊 Current Price: $475
🔥 Pair: Bitcoin Cash / USDT (Perpetual Futures)
---
🟩 LONG SETUP (Bullish Scenario)
If bulls manage to hold above $470–$472 support zone (Area of Interest), we could see strong upside continuation!
Entry Zone: $472 – $475
Targets:
🎯 TP1: $482
🎯 TP2: $490
🎯 TP3: $500 – $505 (0.786 FVG zone — strong resistance)
Stop Loss: $467 (below liquidity grab zone)
⚠️ Watch for breakout with volume confirmation and bullish CHoCH on 30M!
---
🟥 SHORT SETUP (Bearish Scenario)
If price rejects from $490–$505 zone (FVG & 0.786 Fib), expect a potential retracement!
Entry Zone: $495 – $505
Targets:
🎯 TP1: $480
🎯 TP2: $470
🎯 TP3: $460 (previous low / liquidity zone)
Stop Loss: $510 (above FVG zone)
⚠️ Look for rejection candle + shift in structure before entry!
---
💡 Market Outlook:
BCH is consolidating between key imbalance zones — a breakout above $480 could spark a strong bullish leg, but failure at $500 may drag it back to $460.
🚀 Stay sharp, set alerts, and follow for more high-accuracy signals like this!
$BCH
💥 Massive Move Loading — Don’t Miss This One! 💥
📊 Current Price: $475
🔥 Pair: Bitcoin Cash / USDT (Perpetual Futures)
---
🟩 LONG SETUP (Bullish Scenario)
If bulls manage to hold above $470–$472 support zone (Area of Interest), we could see strong upside continuation!
Entry Zone: $472 – $475
Targets:
🎯 TP1: $482
🎯 TP2: $490
🎯 TP3: $500 – $505 (0.786 FVG zone — strong resistance)
Stop Loss: $467 (below liquidity grab zone)
⚠️ Watch for breakout with volume confirmation and bullish CHoCH on 30M!
---
🟥 SHORT SETUP (Bearish Scenario)
If price rejects from $490–$505 zone (FVG & 0.786 Fib), expect a potential retracement!
Entry Zone: $495 – $505
Targets:
🎯 TP1: $480
🎯 TP2: $470
🎯 TP3: $460 (previous low / liquidity zone)
Stop Loss: $510 (above FVG zone)
⚠️ Look for rejection candle + shift in structure before entry!
---
💡 Market Outlook:
BCH is consolidating between key imbalance zones — a breakout above $480 could spark a strong bullish leg, but failure at $500 may drag it back to $460.
🚀 Stay sharp, set alerts, and follow for more high-accuracy signals like this!
$BCH
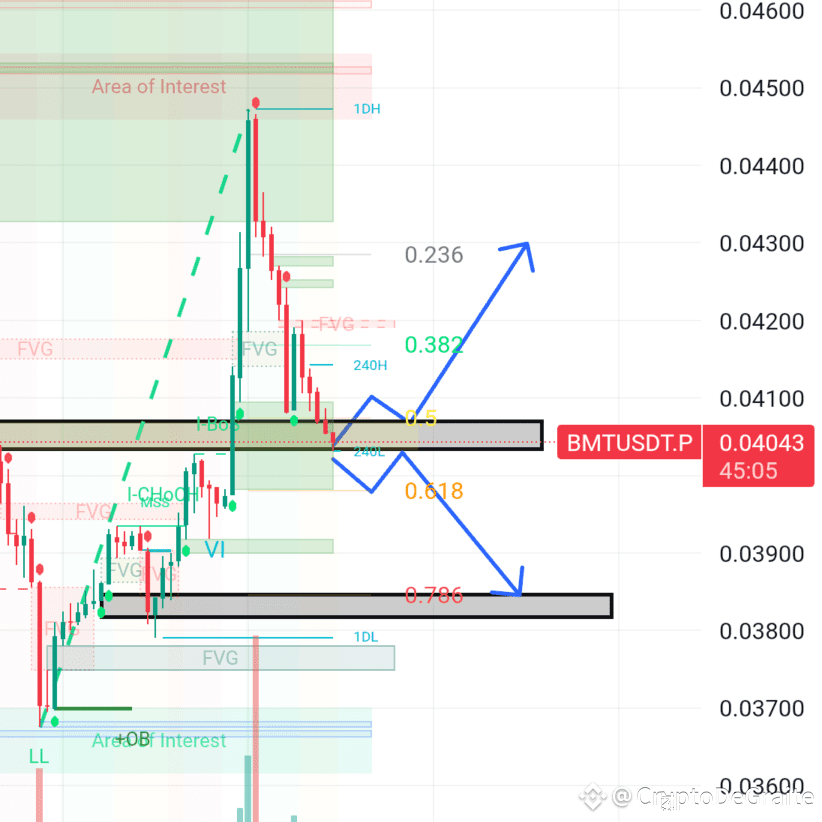
🚨 BMT/USDT (1H Chart Analysis) 🚨
💥 Market has completed a clean retracement after a strong bullish impulse — and is now sitting right at a critical decision zone where the next big move could begin!
📉 Current Price: 0.0404
📊 Timeframe: 1H
⚡ Volatility Building — Major Move Incoming!
---
🟩 Bullish Scenario (Potential Long Setup)
If the current support zone holds strong and we get bullish confirmation (rejection candle or volume spike):
🎯 TP1: 0.0418
🎯 TP2: 0.0429
🎯 TP3: 0.0440 (Major Target)
🛑 SL: Below 0.0396
➡️ Break and close above 0.0415 could ignite momentum towards higher Fibonacci levels and potentially continue the bullish leg.
---
🟥 Bearish Scenario (Potential Short Setup)
If price breaks and closes below 0.0396 with volume confirmation:
🎯 TP1: 0.0389
🎯 TP2: 0.0380
🎯 TP3: 0.0368 (Major Target)
🛑 SL: Above 0.0410
➡️ Failure to hold current support could trigger a deeper retracement into lower liquidity zones.
---
⚔️ Price is at a make-or-break point — expect a strong reaction soon!
Whichever direction confirms first could decide the short-term trend of BMT.
📈 Stay alert, manage risk, and follow for high-accuracy crypto setups, chart breakdowns, and live market insights! 🚀
$BMT #BMT
💥 Market has completed a clean retracement after a strong bullish impulse — and is now sitting right at a critical decision zone where the next big move could begin!
📉 Current Price: 0.0404
📊 Timeframe: 1H
⚡ Volatility Building — Major Move Incoming!
---
🟩 Bullish Scenario (Potential Long Setup)
If the current support zone holds strong and we get bullish confirmation (rejection candle or volume spike):
🎯 TP1: 0.0418
🎯 TP2: 0.0429
🎯 TP3: 0.0440 (Major Target)
🛑 SL: Below 0.0396
➡️ Break and close above 0.0415 could ignite momentum towards higher Fibonacci levels and potentially continue the bullish leg.
---
🟥 Bearish Scenario (Potential Short Setup)
If price breaks and closes below 0.0396 with volume confirmation:
🎯 TP1: 0.0389
🎯 TP2: 0.0380
🎯 TP3: 0.0368 (Major Target)
🛑 SL: Above 0.0410
➡️ Failure to hold current support could trigger a deeper retracement into lower liquidity zones.
---
⚔️ Price is at a make-or-break point — expect a strong reaction soon!
Whichever direction confirms first could decide the short-term trend of BMT.
📈 Stay alert, manage risk, and follow for high-accuracy crypto setups, chart breakdowns, and live market insights! 🚀
$BMT #BMT
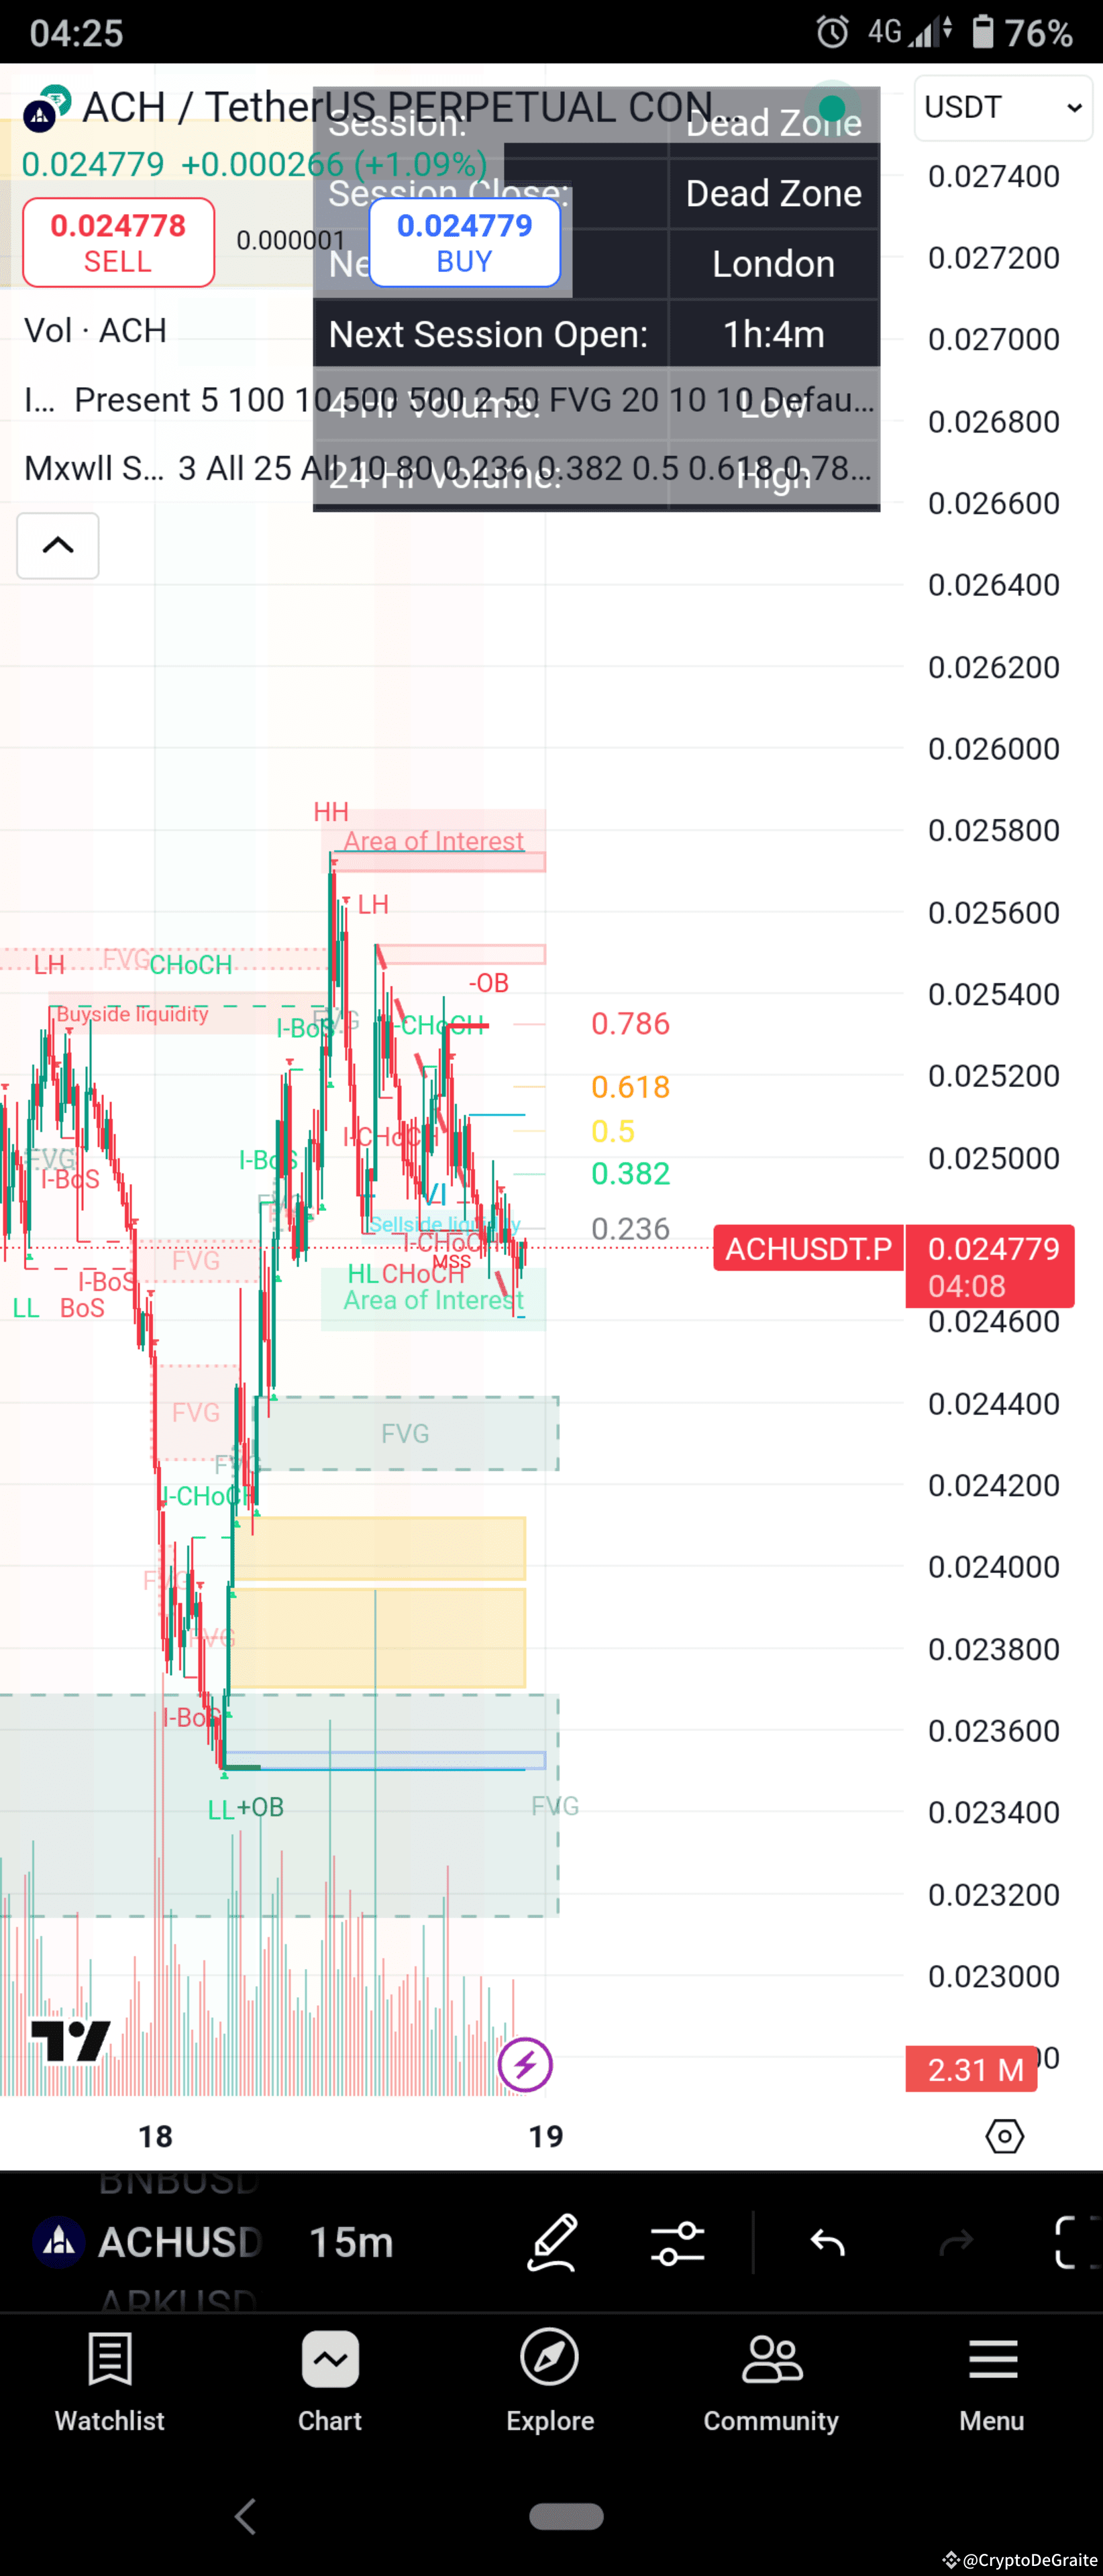
📊 ACH/USDT – Trade Setup & Analysis (15m TF)
Price: $0.024779
Trend Bias: 🔻 Bearish-to-Neutral (Short-term)
Session: London (Opens in ~1h)
---
📉 Market Structure Update:
ACH has shown bearish structure recently, forming a series of Lower Highs (LH) and CHoCHs down. However, it’s now hovering around a key Area of Interest aligned with the 0.236 Fib and a previous HL + CHoCH, signaling a possible bullish reversal zone.
---
📌 Key Technical Zones:
Resistance (Sell Zone):
0.02500 – 0.02540 (Order Block + 0.618-0.786 Fib)
Support (Buy Zone):
0.02440
0.02400 (FVG + Demand Zone)
Breakout Level:
🔼 Strong break above 0.02520 = Bullish confirmation
Breakdown Risk:
🔽 Drop below 0.02440 = Bearish continuation
---
🧠 Trade Idea #1 – Long (Reversal Play):
Looking for a bounce from the area of interest.
Entry: 0.02460–0.02470
Stop Loss: 0.02430
Targets:
🎯 TP1: 0.02500
🎯 TP2: 0.02540
🎯 TP3: 0.02580 (if breakout confirmed)
⚠️ Watch for: Volume spike + bullish candle near 0.02460
---
🔻 Trade Idea #2 – Short (OB Rejection):
If price rejects from the supply zone (0.02520–0.02540)
Entry: 0.02520–0.02540
Stop Loss: 0.02560
Targets:
🎯 TP1: 0.02460
🎯 TP2: 0.02420
---
🧩 Summary:
Currently ranging. Scalp opportunities exist both sides.
Wait for confirmation before entry. Best trades will come from reactions at key zones.
$ACH
#ACHUSDT #ACH #ACH/USDT #Signal🚥.
Price: $0.024779
Trend Bias: 🔻 Bearish-to-Neutral (Short-term)
Session: London (Opens in ~1h)
---
📉 Market Structure Update:
ACH has shown bearish structure recently, forming a series of Lower Highs (LH) and CHoCHs down. However, it’s now hovering around a key Area of Interest aligned with the 0.236 Fib and a previous HL + CHoCH, signaling a possible bullish reversal zone.
---
📌 Key Technical Zones:
Resistance (Sell Zone):
0.02500 – 0.02540 (Order Block + 0.618-0.786 Fib)
Support (Buy Zone):
0.02440
0.02400 (FVG + Demand Zone)
Breakout Level:
🔼 Strong break above 0.02520 = Bullish confirmation
Breakdown Risk:
🔽 Drop below 0.02440 = Bearish continuation
---
🧠 Trade Idea #1 – Long (Reversal Play):
Looking for a bounce from the area of interest.
Entry: 0.02460–0.02470
Stop Loss: 0.02430
Targets:
🎯 TP1: 0.02500
🎯 TP2: 0.02540
🎯 TP3: 0.02580 (if breakout confirmed)
⚠️ Watch for: Volume spike + bullish candle near 0.02460
---
🔻 Trade Idea #2 – Short (OB Rejection):
If price rejects from the supply zone (0.02520–0.02540)
Entry: 0.02520–0.02540
Stop Loss: 0.02560
Targets:
🎯 TP1: 0.02460
🎯 TP2: 0.02420
---
🧩 Summary:
Currently ranging. Scalp opportunities exist both sides.
Wait for confirmation before entry. Best trades will come from reactions at key zones.
$ACH
#ACHUSDT #ACH #ACH/USDT #Signal🚥.
🚨 BULLISH ALERT: TARGETS HIT! 🚨
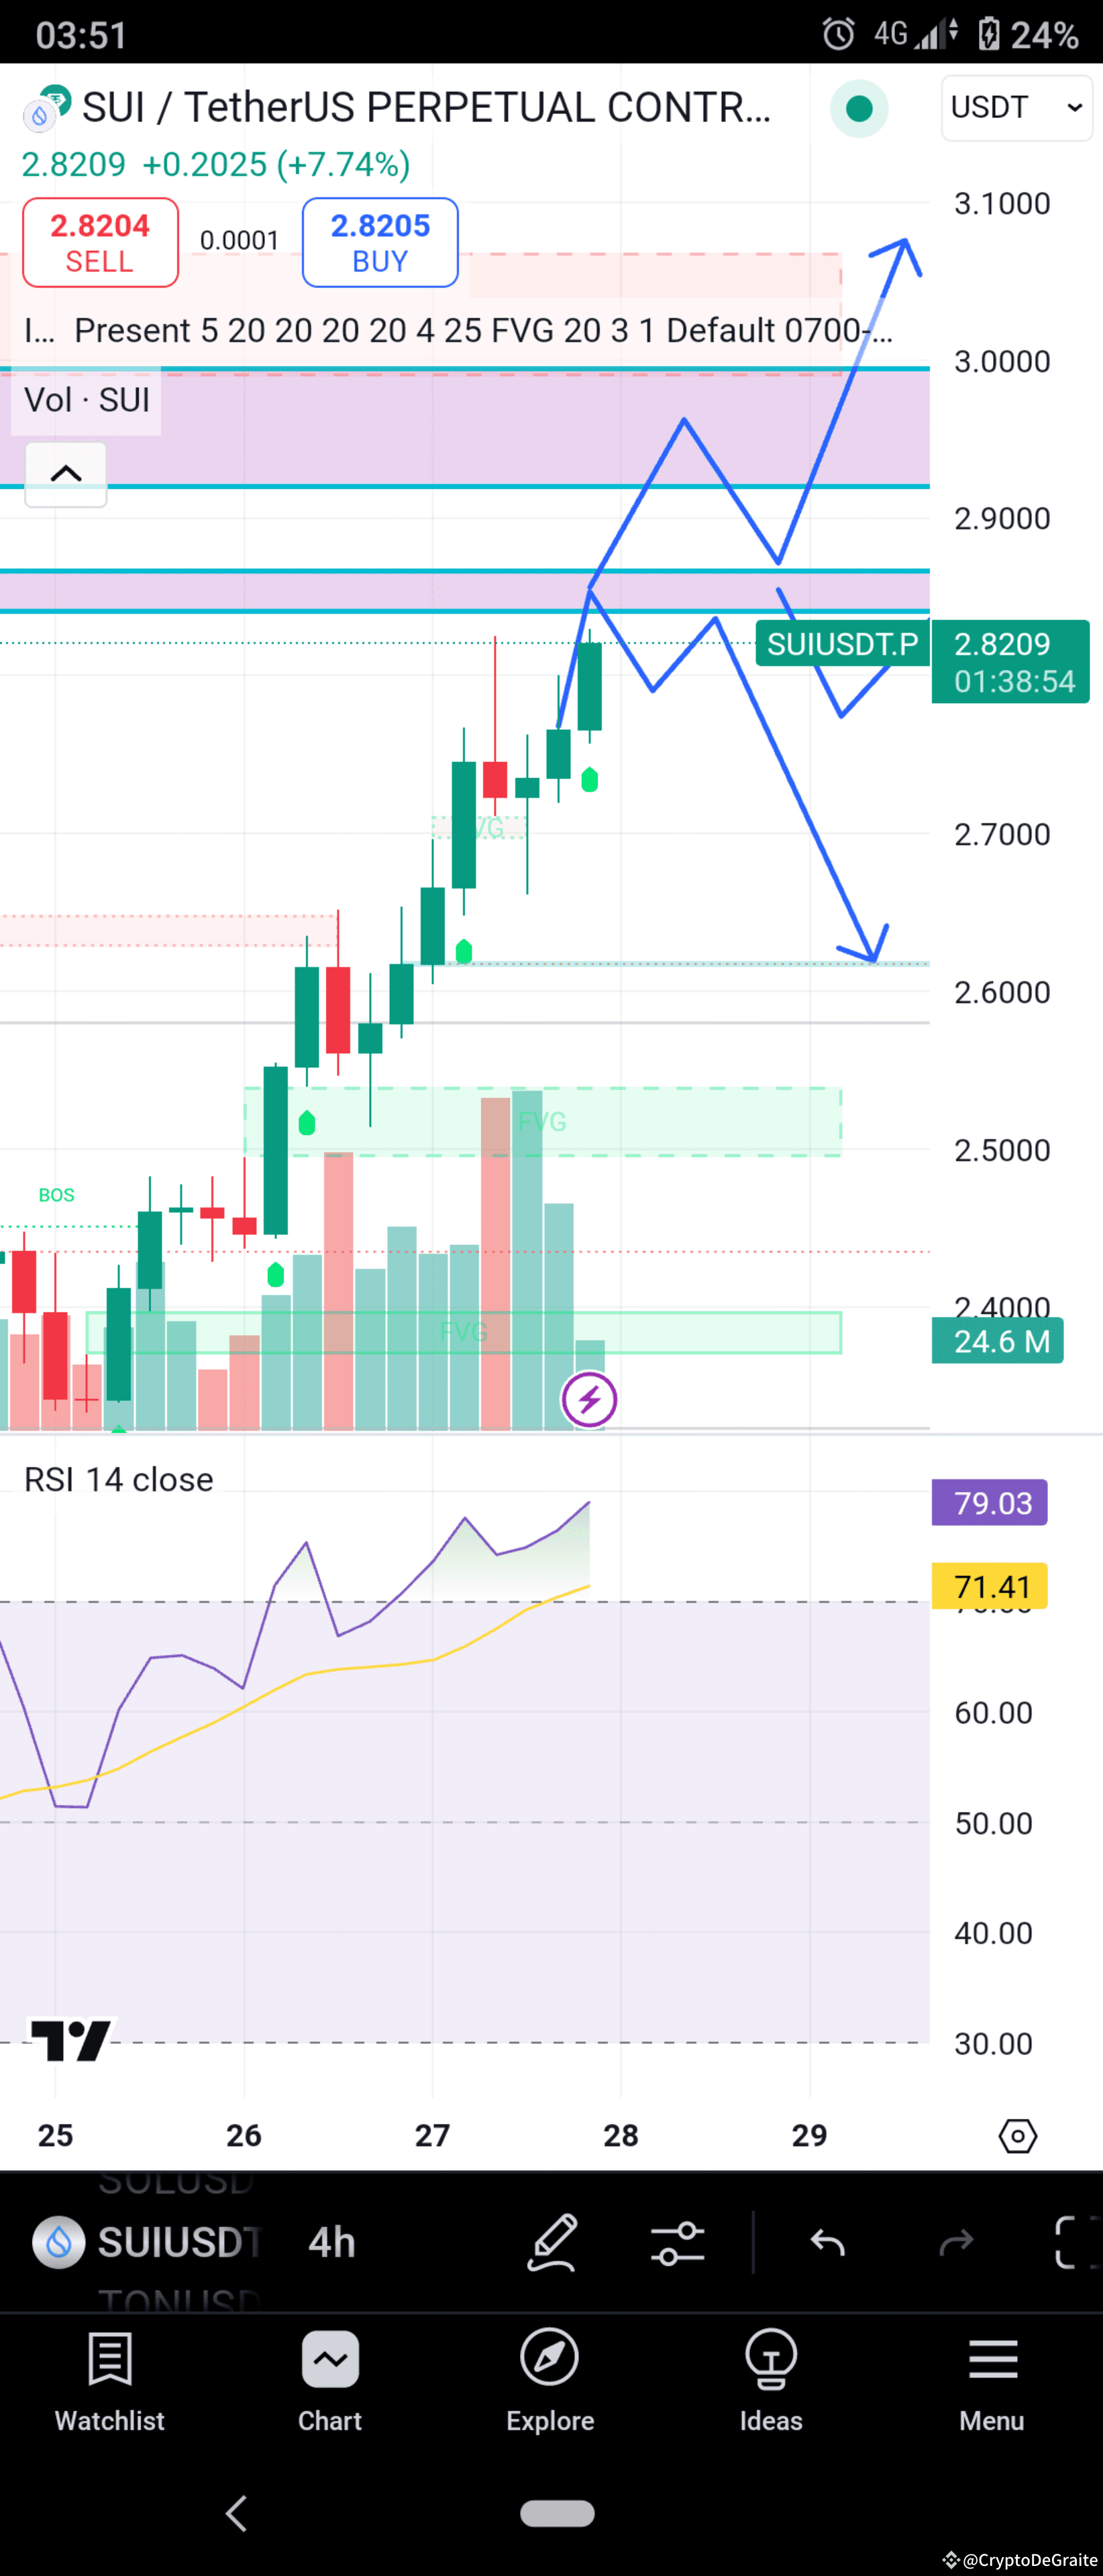
✅ Target 1: 2.75 ✅ ✅ Target 2: 2.80+ ✅
💥 SUI/USDT hits a massive 2.80+ as predicted! 💥
The bulls dominated, pushing past key levels and smashing our first two targets! If you followed the plan, congratulations – your profits are in the bag. 📈🔥
👀 Keep an eye on the market for what’s next – but for now, those who got in early are reaping the rewards! 💰🚀
Stay tuned and stay ahead of the market!
$SUI
#targethit #SUİ #SUI🔥 #sui #SUIPricePrediction
✅ Target 1: 2.75 ✅ ✅ Target 2: 2.80+ ✅
💥 SUI/USDT hits a massive 2.80+ as predicted! 💥
The bulls dominated, pushing past key levels and smashing our first two targets! If you followed the plan, congratulations – your profits are in the bag. 📈🔥
👀 Keep an eye on the market for what’s next – but for now, those who got in early are reaping the rewards! 💰🚀
Stay tuned and stay ahead of the market!
$SUI
#targethit #SUİ #SUI🔥 #sui #SUIPricePrediction
CryptoDeGraite
·
--
Bullish🚀 SUI/USDT Trade Signal – 1H Timeframe
📊 Current Price: 2.7211 (+3.99%)
🔥 Trend: Bullish Momentum with Possible Pullback
---
🔹 Market Overview
SUI has been on a strong uptrend, with price action forming higher highs and higher lows. Buyers have dominated, pushing the price close to 2.80, but recent rejection suggests a potential retracement before the next leg up.
Volume remains strong, and Fair Value Gaps (FVGs) below could act as re-entry points for bulls. However, RSI is creeping toward overbought territory, meaning we could see some consolidation or a dip before the next move.
---
📈 Long Setup (Bullish Bias)
🎯 Ideal Entry Zone: 2.64 – 2.68 (FVG Retest)
🚀 Target 1: 2.75
🚀 Target 2: 2.80+ (Breakout Retest)
🛑 Stop Loss: Below 2.60 (Structure Invalidation)
📌 Strategy:
Look for a strong bounce from 2.68 – 2.72, confirming bullish intent.
If price consolidates above 2.70, expect a push toward 2.80 and beyond.
---
📉 Short Setup (High-Risk Reversal Play)
🎯 Entry Zone: 2.78 – 2.80 (If Rejection Persists)
📉 Target 1: 2.70
📉 Target 2: 2.60
🛑 Stop Loss: Above 2.85
📌 Strategy:
Only consider shorts if clear rejection forms near 2.80, signaling a potential local top.
Volume confirmation is key—without strong sell pressure, bulls will likely regain control.
---
📊 Technical Breakdown
✅ RSI: 68.54 – Strong but nearing overbought territory.
✅ Volume: Bullish dominance, but some sell wicks appearing.
✅ Key Support: 2.60 – 2.65 (FVG Zone)
✅ Key Resistance: 2.80 – 2.85 (Breakout Level)
---
🚨 Conclusion & Trade Plan
SUI/USDT remains bullish, but a short-term retrace is likely before continuation. Ideal long entries are around the FVG zone (2.64 – 2.68), while aggressive shorts could look for a rejection at 2.80.
📢 Stay patient, watch volume, and trade smart! 🚀
$SUI
#SUİ #SUI🔥 #SUIPricePrediction #Signal🚥.
📊 Current Price: 2.7211 (+3.99%)
🔥 Trend: Bullish Momentum with Possible Pullback
---
🔹 Market Overview
SUI has been on a strong uptrend, with price action forming higher highs and higher lows. Buyers have dominated, pushing the price close to 2.80, but recent rejection suggests a potential retracement before the next leg up.
Volume remains strong, and Fair Value Gaps (FVGs) below could act as re-entry points for bulls. However, RSI is creeping toward overbought territory, meaning we could see some consolidation or a dip before the next move.
---
📈 Long Setup (Bullish Bias)
🎯 Ideal Entry Zone: 2.64 – 2.68 (FVG Retest)
🚀 Target 1: 2.75
🚀 Target 2: 2.80+ (Breakout Retest)
🛑 Stop Loss: Below 2.60 (Structure Invalidation)
📌 Strategy:
Look for a strong bounce from 2.68 – 2.72, confirming bullish intent.
If price consolidates above 2.70, expect a push toward 2.80 and beyond.
---
📉 Short Setup (High-Risk Reversal Play)
🎯 Entry Zone: 2.78 – 2.80 (If Rejection Persists)
📉 Target 1: 2.70
📉 Target 2: 2.60
🛑 Stop Loss: Above 2.85
📌 Strategy:
Only consider shorts if clear rejection forms near 2.80, signaling a potential local top.
Volume confirmation is key—without strong sell pressure, bulls will likely regain control.
---
📊 Technical Breakdown
✅ RSI: 68.54 – Strong but nearing overbought territory.
✅ Volume: Bullish dominance, but some sell wicks appearing.
✅ Key Support: 2.60 – 2.65 (FVG Zone)
✅ Key Resistance: 2.80 – 2.85 (Breakout Level)
---
🚨 Conclusion & Trade Plan
SUI/USDT remains bullish, but a short-term retrace is likely before continuation. Ideal long entries are around the FVG zone (2.64 – 2.68), while aggressive shorts could look for a rejection at 2.80.
📢 Stay patient, watch volume, and trade smart! 🚀
$SUI
#SUİ #SUI🔥 #SUIPricePrediction #Signal🚥.
🚀 Join Our Crypto Market Discussion! 📊
Looking for a space to discuss market trends, share insights, and learn from fellow traders? We’ve built a community for Tamil and English-speaking crypto enthusiasts to explore the market together!
🔹 What You’ll Find Here:
✅ Market insights & discussions
✅ Learning resources & trading strategies
✅ A supportive community for knowledge sharing
❌ What We Avoid:
🚫 No financial advice or paid signals
🚫 No guaranteed profit schemes
If you're interested in discussing crypto market trends and expanding your knowledge, this is the right place for you! 📈✨
📩 Comment or reach out to join the conversation! (Serious learners only.)
$BTC
$ETH
$BNB
#growtogether #TradersAnalysis #traders #knowledge #BinanceAlphaAlert
Looking for a space to discuss market trends, share insights, and learn from fellow traders? We’ve built a community for Tamil and English-speaking crypto enthusiasts to explore the market together!
🔹 What You’ll Find Here:
✅ Market insights & discussions
✅ Learning resources & trading strategies
✅ A supportive community for knowledge sharing
❌ What We Avoid:
🚫 No financial advice or paid signals
🚫 No guaranteed profit schemes
If you're interested in discussing crypto market trends and expanding your knowledge, this is the right place for you! 📈✨
📩 Comment or reach out to join the conversation! (Serious learners only.)
$BTC
$ETH
$BNB
#growtogether #TradersAnalysis #traders #knowledge #BinanceAlphaAlert

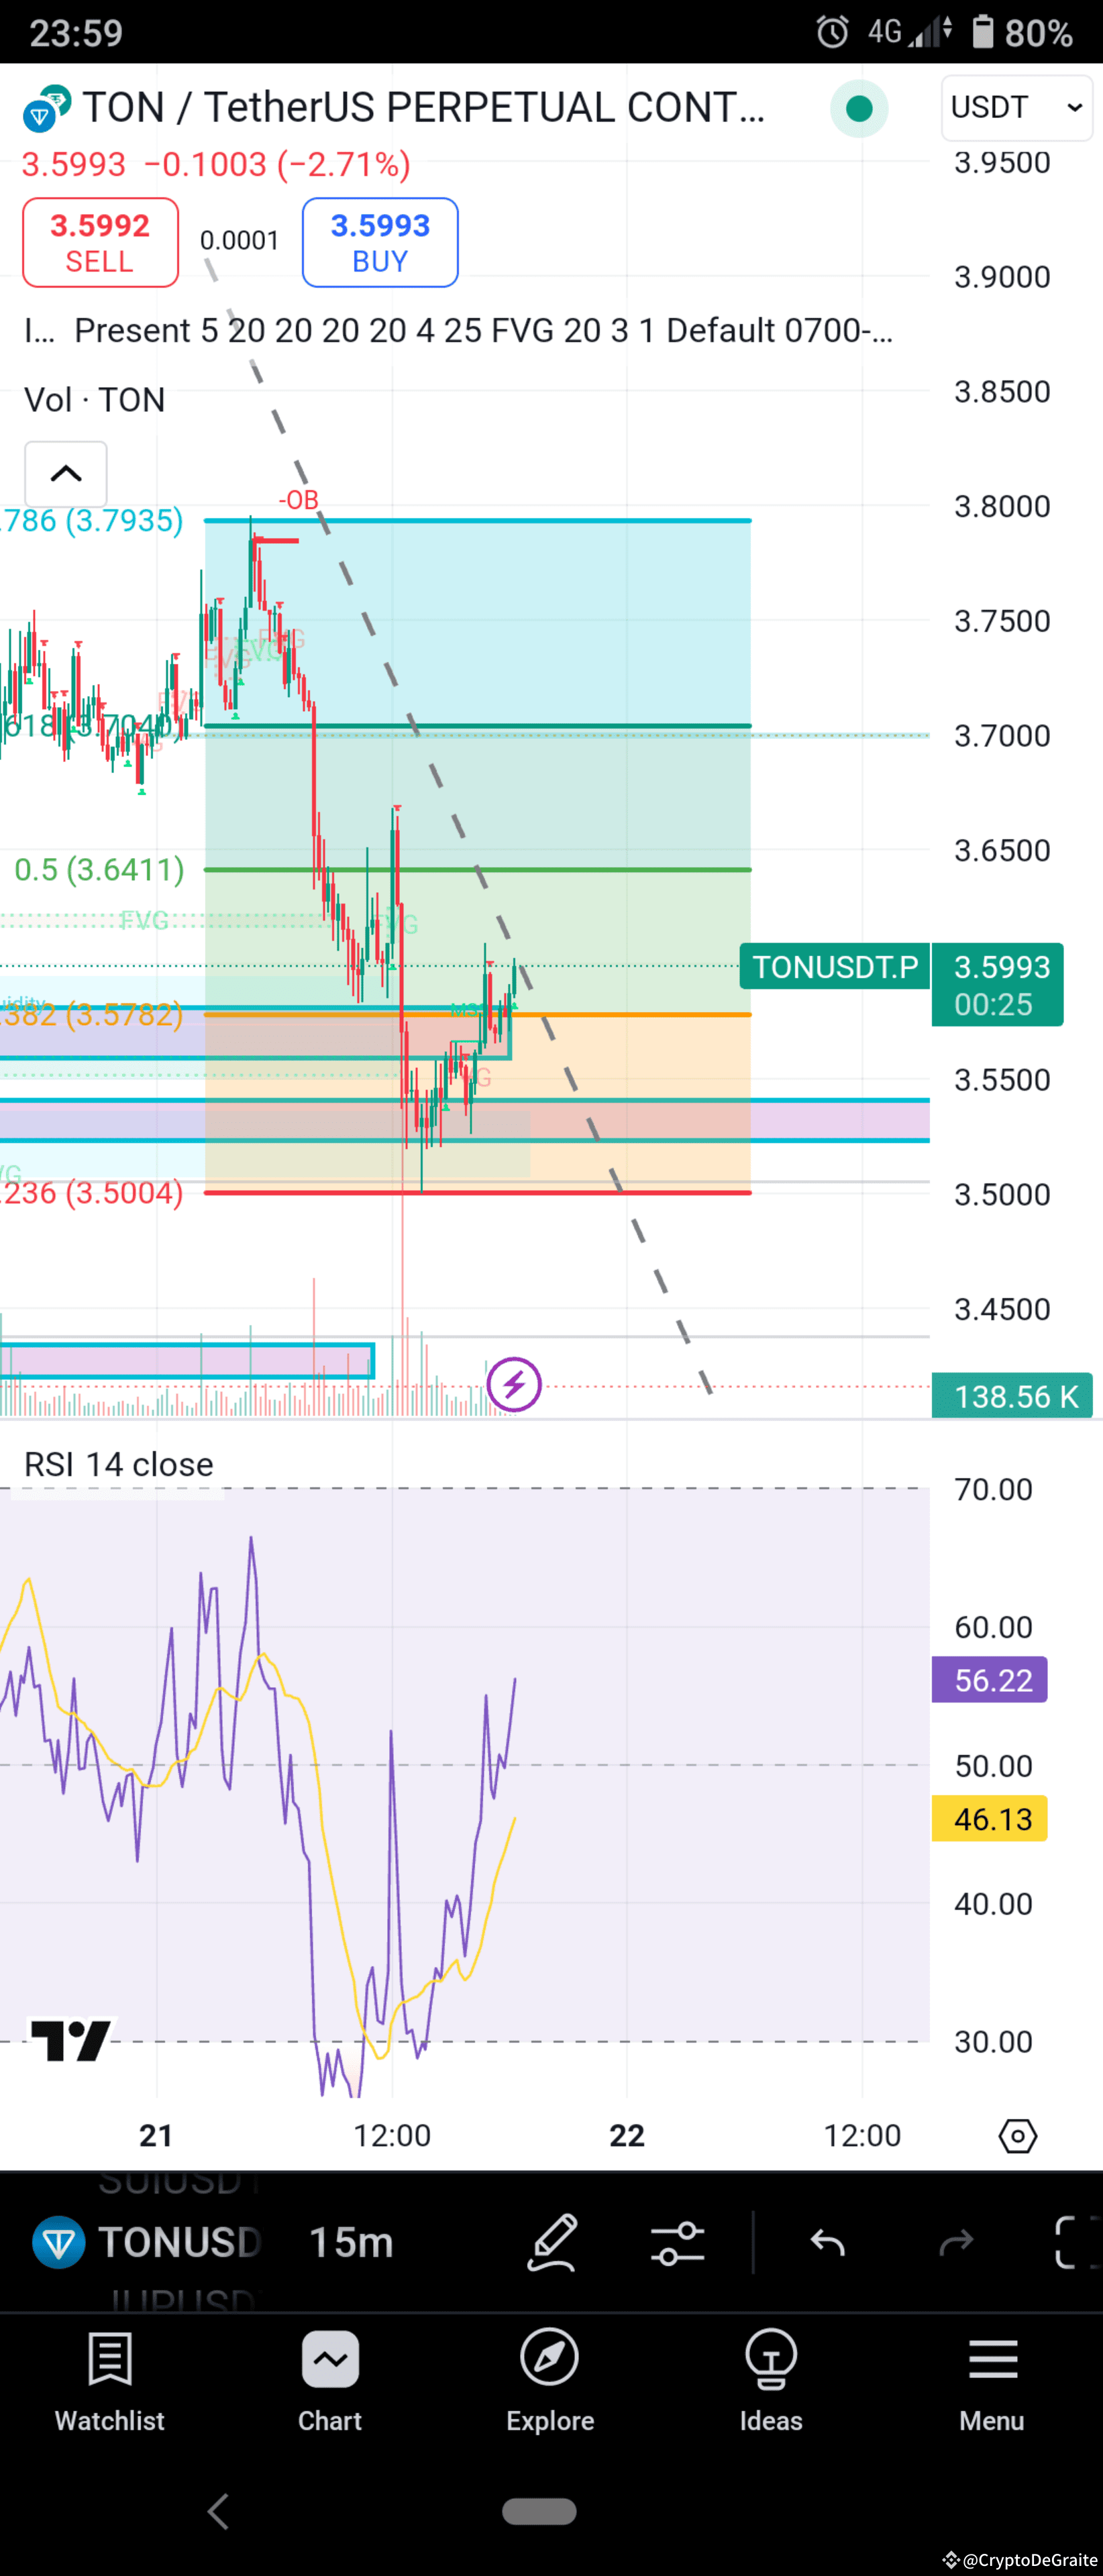
TON/USDT – Trade Setup (15m Chart)
Pair: TON/USDT
Timeframe: 15-Minute
Trend Bias: Mixed – Awaiting Confirmation
---
🔻 Bearish Setup – Trend Continuation in Play
Entry Zone: $3.58 – $3.64
Stop-Loss: Above $3.70 (Key resistance / 0.618 Fib level)
Targets:
🎯 TP1: $3.52
🎯 TP2: $3.50
🎯 TP3: $3.45 (if breakdown accelerates)
Bearish Confluence:
Price respecting descending trendline
Rejection from 0.5–0.618 Fibonacci zone
Overhead OB + FVG = heavy resistance
Volume spike during previous sell-off
RSI turning from near-overbought territory
Bias: Short-term correction may be ending; watch for rejection + volume confirmation.
---
🚀 Bullish Setup – Potential Breakout Opportunity
Entry Trigger: Break and 15m close above $3.70 with volume
Stop-Loss: Below $3.58 (invalidates breakout)
Targets:
🎯 TP1: $3.76 (OB/FVG entry zone)
🎯 TP2: $3.79 (Previous high)
🎯 TP3: $3.85+ (if momentum builds)
Bullish Confluence:
Strong RSI recovery (now above 50)
Higher low formation near $3.50
Break above trendline would signal momentum shift
Clean liquidity zone above = magnet
Bias: Watch for breakout candle + volume spike – that’s your go signal.
---
🧠 Pro Tip: Let the market confirm the move. Don’t chase – react to confirmation.
$TON
#TON #Toncoin #Signal🚥. #TONUSDT
Pair: TON/USDT
Timeframe: 15-Minute
Trend Bias: Mixed – Awaiting Confirmation
---
🔻 Bearish Setup – Trend Continuation in Play
Entry Zone: $3.58 – $3.64
Stop-Loss: Above $3.70 (Key resistance / 0.618 Fib level)
Targets:
🎯 TP1: $3.52
🎯 TP2: $3.50
🎯 TP3: $3.45 (if breakdown accelerates)
Bearish Confluence:
Price respecting descending trendline
Rejection from 0.5–0.618 Fibonacci zone
Overhead OB + FVG = heavy resistance
Volume spike during previous sell-off
RSI turning from near-overbought territory
Bias: Short-term correction may be ending; watch for rejection + volume confirmation.
---
🚀 Bullish Setup – Potential Breakout Opportunity
Entry Trigger: Break and 15m close above $3.70 with volume
Stop-Loss: Below $3.58 (invalidates breakout)
Targets:
🎯 TP1: $3.76 (OB/FVG entry zone)
🎯 TP2: $3.79 (Previous high)
🎯 TP3: $3.85+ (if momentum builds)
Bullish Confluence:
Strong RSI recovery (now above 50)
Higher low formation near $3.50
Break above trendline would signal momentum shift
Clean liquidity zone above = magnet
Bias: Watch for breakout candle + volume spike – that’s your go signal.
---
🧠 Pro Tip: Let the market confirm the move. Don’t chase – react to confirmation.
$TON
#TON #Toncoin #Signal🚥. #TONUSDT
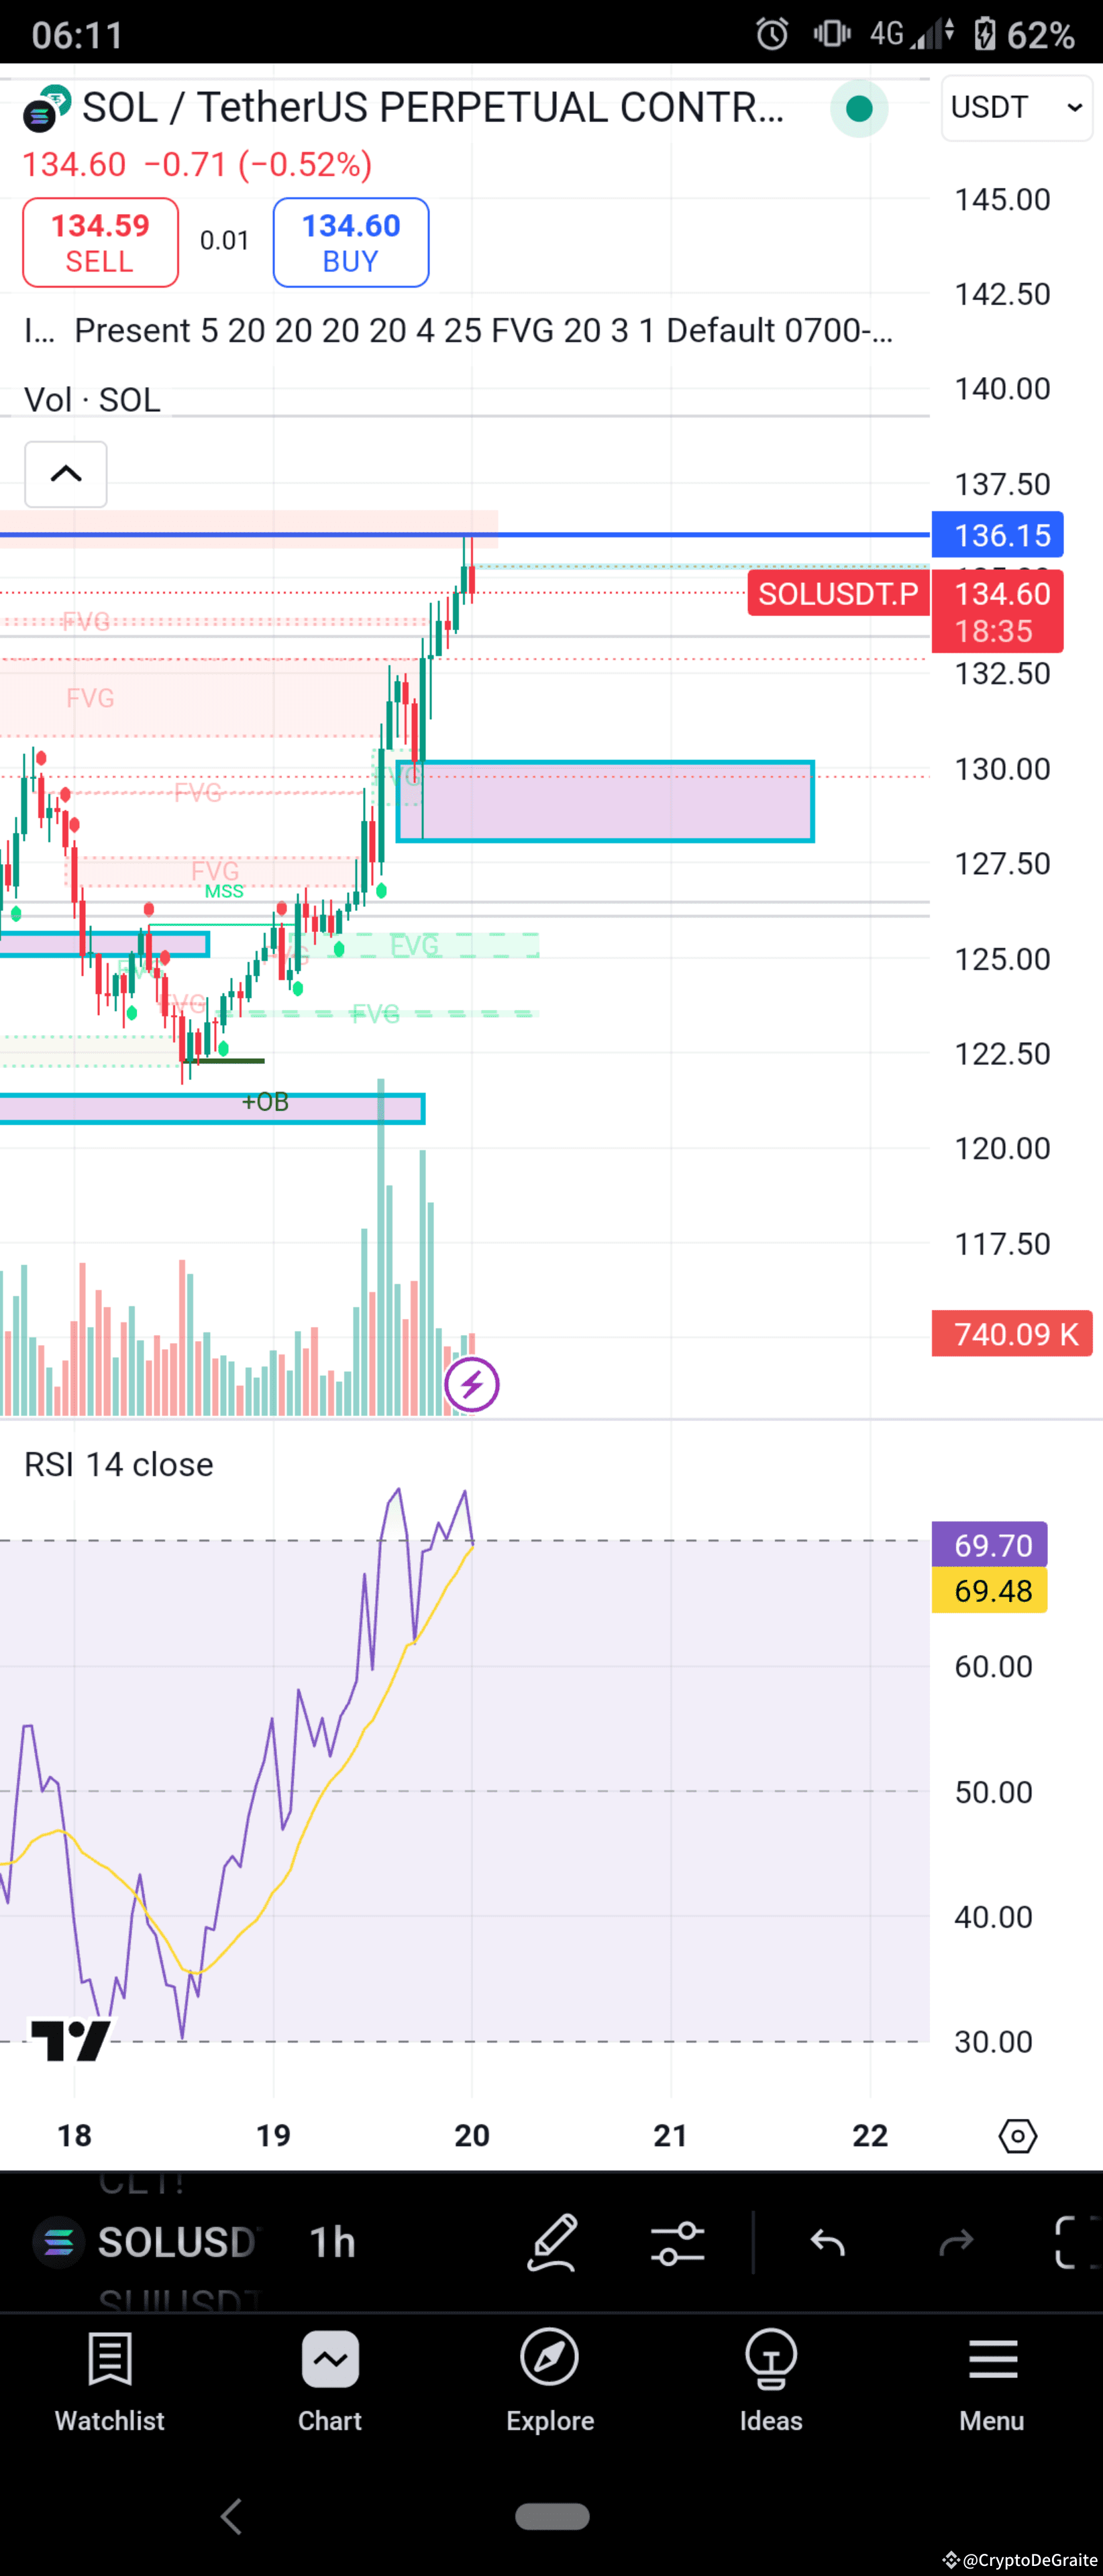
SOL/USDT – Trade Setup (1H TF)
Current Price: 134.60 USDT
Last Updated: March 20, 2025
---
🔻 Bearish Setup – Rejection from Key Supply
Market Reaction: Price tapped into resistance at 136.15 (FVG + supply zone) and sharply rejected.
Indicators:
RSI: 69.7 – flirting with overbought
Candle Structure: Long upper wick shows strong seller presence
Entry Zone: 134.50 – 135.50
Target 1: 130.00 (demand/FVG zone)
Target 2: 127.50
Stop Loss: Above 136.50 (invalidate bearish structure)
Confirmation:
Failure to reclaim 136.15
Bearish candle close below 133.50
Bias: Short-term pullback expected
Risk Level: Moderate
---
🔺 Bullish Setup – Breakout Watch
If SOL manages to break and close above 136.15 with volume, the bears lose control and a breakout could be underway.
Entry Trigger: Break + retest of 136.15
Target 1: 139.50
Target 2: 143.00
Stop Loss: Below 134.50 (structure breakdown)
Confirmation:
Volume spike + clean 1H candle close above 136.15
Holding above previous resistance turned support
Bias: Momentum continuation
Risk Level: Higher, breakout trade
---
⚠️ Key Levels to Watch
Resistance: 136.15
Support: 130.00 – 129.50
Breakout Zone: 136.15+
Bearish Breakdown Level: Below 129.00
$SOL
#Signal🚥. #solana #sol #solonapumping #solanAnalysis
Current Price: 134.60 USDT
Last Updated: March 20, 2025
---
🔻 Bearish Setup – Rejection from Key Supply
Market Reaction: Price tapped into resistance at 136.15 (FVG + supply zone) and sharply rejected.
Indicators:
RSI: 69.7 – flirting with overbought
Candle Structure: Long upper wick shows strong seller presence
Entry Zone: 134.50 – 135.50
Target 1: 130.00 (demand/FVG zone)
Target 2: 127.50
Stop Loss: Above 136.50 (invalidate bearish structure)
Confirmation:
Failure to reclaim 136.15
Bearish candle close below 133.50
Bias: Short-term pullback expected
Risk Level: Moderate
---
🔺 Bullish Setup – Breakout Watch
If SOL manages to break and close above 136.15 with volume, the bears lose control and a breakout could be underway.
Entry Trigger: Break + retest of 136.15
Target 1: 139.50
Target 2: 143.00
Stop Loss: Below 134.50 (structure breakdown)
Confirmation:
Volume spike + clean 1H candle close above 136.15
Holding above previous resistance turned support
Bias: Momentum continuation
Risk Level: Higher, breakout trade
---
⚠️ Key Levels to Watch
Resistance: 136.15
Support: 130.00 – 129.50
Breakout Zone: 136.15+
Bearish Breakdown Level: Below 129.00
$SOL
#Signal🚥. #solana #sol #solonapumping #solanAnalysis
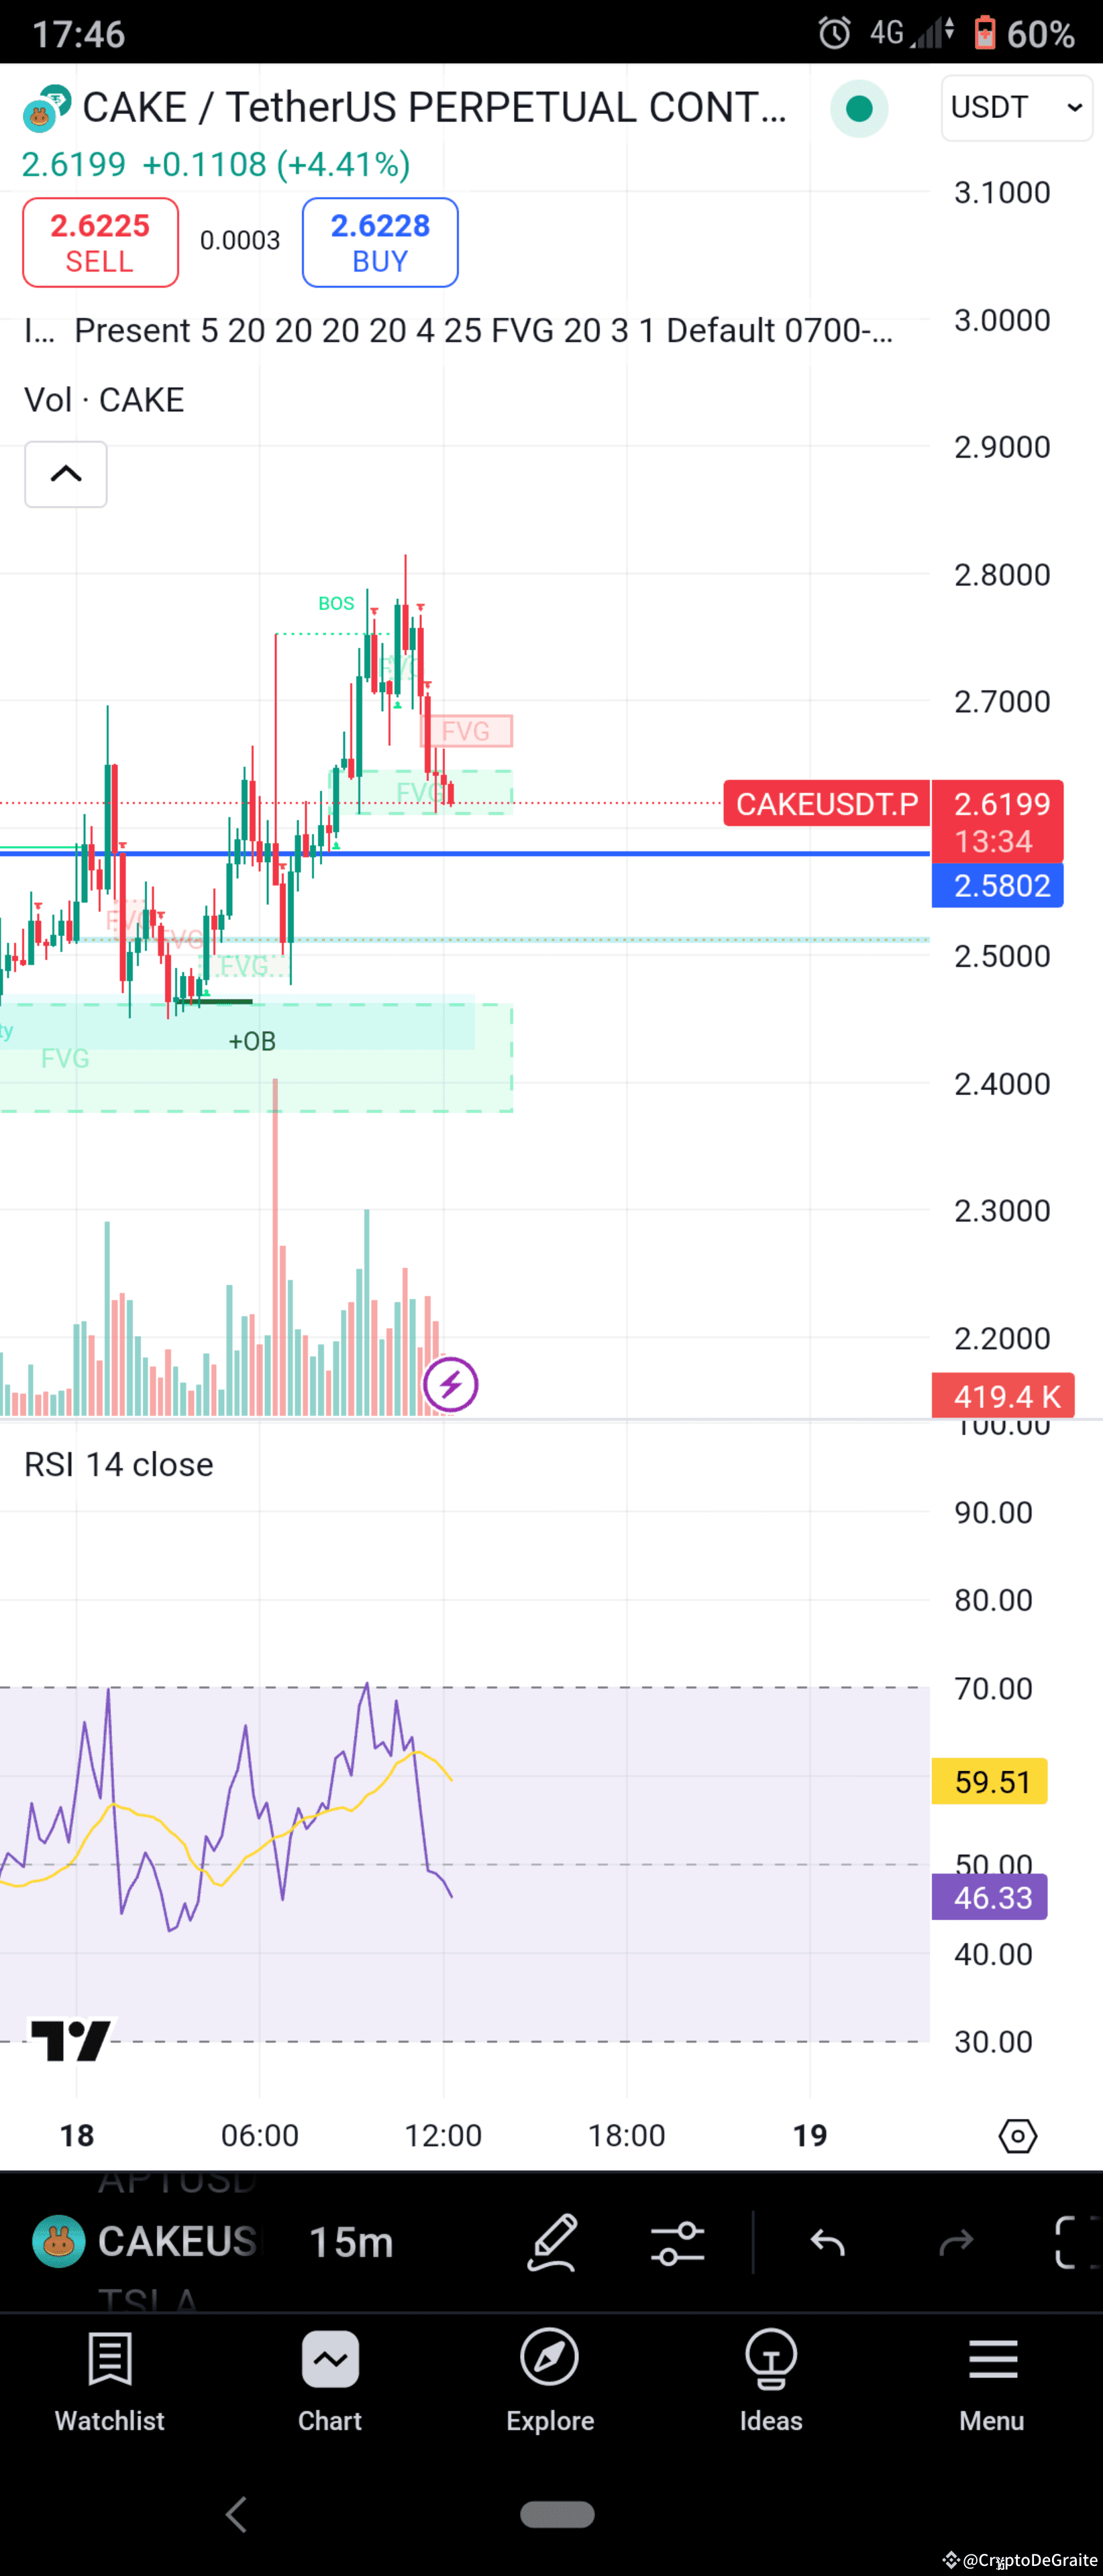
🚨 CAKE/USDT 15-Min Analysis – Trade Signal Alert 🚨
Current Price: $2.6199
Timeframe: 15m
Bias: Mixed – Watching for Breakout or Breakdown
---
🔻 Bearish Setup (Short Play)
Market Context:
BOS (Break of Structure) confirmed downward shift.
Rejection from Fair Value Gap (FVG) near $2.66.
RSI: Dropping below 50 (currently 46.33), showing weakening bullish strength.
Volume is fading after bullish momentum — signs of distribution.
Setup:
Entry Zone: $2.63 – $2.66 (retest of rejected FVG)
Stop Loss: Above $2.685
Targets:
🎯 TP1: $2.58
🎯 TP2: $2.52 (First strong demand reaction zone)
🎯 TP3: $2.48 (Major confluence zone – OB + FVG)
Risk-to-Reward (R:R): Excellent (avg. 1:2.5)
---
🔼 Bullish Setup (Bounce Play)
Scenario:
Price could dip into the strong demand zone between $2.48 – $2.52 and find a bullish reversal.
OB + FVG + Psychological Round Level Support = High confluence.
Watch RSI for a bullish divergence or crossover near the zone.
Setup:
Entry Zone: $2.48 – $2.52
Stop Loss: Below $2.45
Targets:
🎯 TP1: $2.58
🎯 TP2: $2.63 (Fair Value Gap retest)
🎯 TP3: $2.66 – $2.68 (local high / breakout level)
Bonus Setup:
If $2.68 is broken with volume, prepare for breakout longs targeting $2.74 and beyond.
---
⚠️ Reminder:
Use proper risk management (1-2% risk per trade)
Scalp/intraday setups – Don’t hold overnight without confirmation
Watch for news events or sudden volume spikes that could shift bias quickly
$CAKE
Current Price: $2.6199
Timeframe: 15m
Bias: Mixed – Watching for Breakout or Breakdown
---
🔻 Bearish Setup (Short Play)
Market Context:
BOS (Break of Structure) confirmed downward shift.
Rejection from Fair Value Gap (FVG) near $2.66.
RSI: Dropping below 50 (currently 46.33), showing weakening bullish strength.
Volume is fading after bullish momentum — signs of distribution.
Setup:
Entry Zone: $2.63 – $2.66 (retest of rejected FVG)
Stop Loss: Above $2.685
Targets:
🎯 TP1: $2.58
🎯 TP2: $2.52 (First strong demand reaction zone)
🎯 TP3: $2.48 (Major confluence zone – OB + FVG)
Risk-to-Reward (R:R): Excellent (avg. 1:2.5)
---
🔼 Bullish Setup (Bounce Play)
Scenario:
Price could dip into the strong demand zone between $2.48 – $2.52 and find a bullish reversal.
OB + FVG + Psychological Round Level Support = High confluence.
Watch RSI for a bullish divergence or crossover near the zone.
Setup:
Entry Zone: $2.48 – $2.52
Stop Loss: Below $2.45
Targets:
🎯 TP1: $2.58
🎯 TP2: $2.63 (Fair Value Gap retest)
🎯 TP3: $2.66 – $2.68 (local high / breakout level)
Bonus Setup:
If $2.68 is broken with volume, prepare for breakout longs targeting $2.74 and beyond.
---
⚠️ Reminder:
Use proper risk management (1-2% risk per trade)
Scalp/intraday setups – Don’t hold overnight without confirmation
Watch for news events or sudden volume spikes that could shift bias quickly
$CAKE
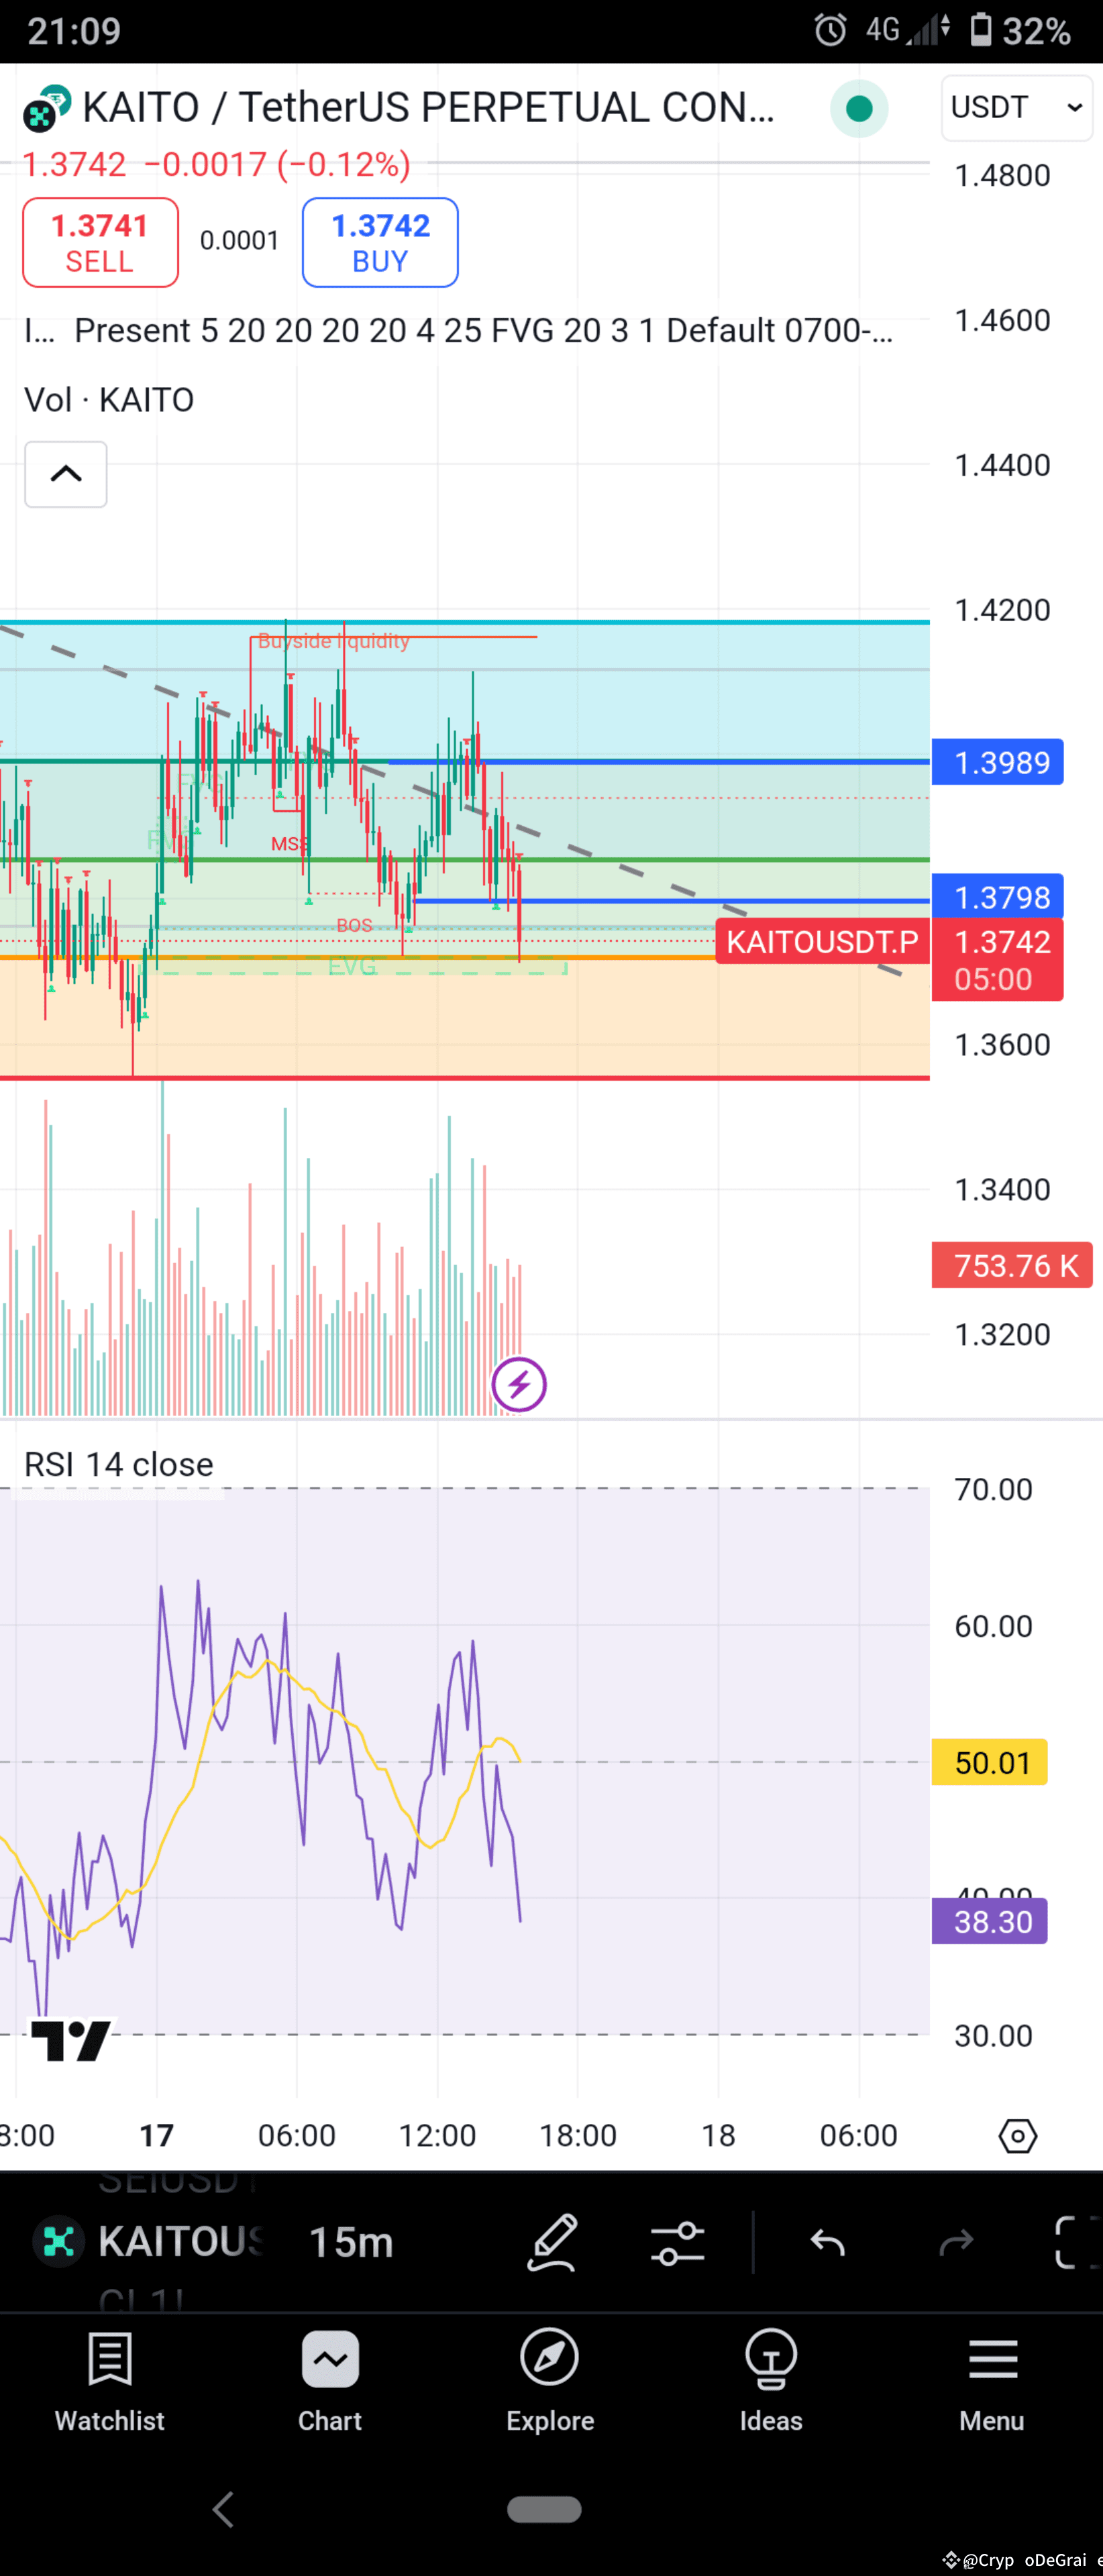
BOOM! KAITO/USDT Bearish Targets SMASHED!
TP1 & TP2 Hit Like a Sniper – Who Caught the Drop?
🔥💰
---
Market Recap (15m Chart):
As anticipated, KAITO/USDT broke below key support at 1.3798, triggering our bearish setup right on cue.
✅ TP1: 1.3790 – HIT
✅ TP2: 1.3720 – HIT
Current Lows: Testing demand zone & FVG area
Bear Pressure Came in HOT after rejection at the 1.3989 supply zone, with heavy volume confirming sellers in control.
---
What’s Next?
Eyes now on the golden demand box:
If bulls defend 1.3720–1.3650, we could see a clean reversal play (bullish setup loading…)
If we break below with strength, prepare for a deeper flush
---
Drop a "KAITO KILLER" below if you caught the short!
Stay sharp — the market’s playing by the book!
$KAITO
#KAITO #KAİTO #kaitosignal #targethit
TP1 & TP2 Hit Like a Sniper – Who Caught the Drop?
🔥💰
---
Market Recap (15m Chart):
As anticipated, KAITO/USDT broke below key support at 1.3798, triggering our bearish setup right on cue.
✅ TP1: 1.3790 – HIT
✅ TP2: 1.3720 – HIT
Current Lows: Testing demand zone & FVG area
Bear Pressure Came in HOT after rejection at the 1.3989 supply zone, with heavy volume confirming sellers in control.
---
What’s Next?
Eyes now on the golden demand box:
If bulls defend 1.3720–1.3650, we could see a clean reversal play (bullish setup loading…)
If we break below with strength, prepare for a deeper flush
---
Drop a "KAITO KILLER" below if you caught the short!
Stay sharp — the market’s playing by the book!
$KAITO
#KAITO #KAİTO #kaitosignal #targethit
CryptoDeGraite
·
--
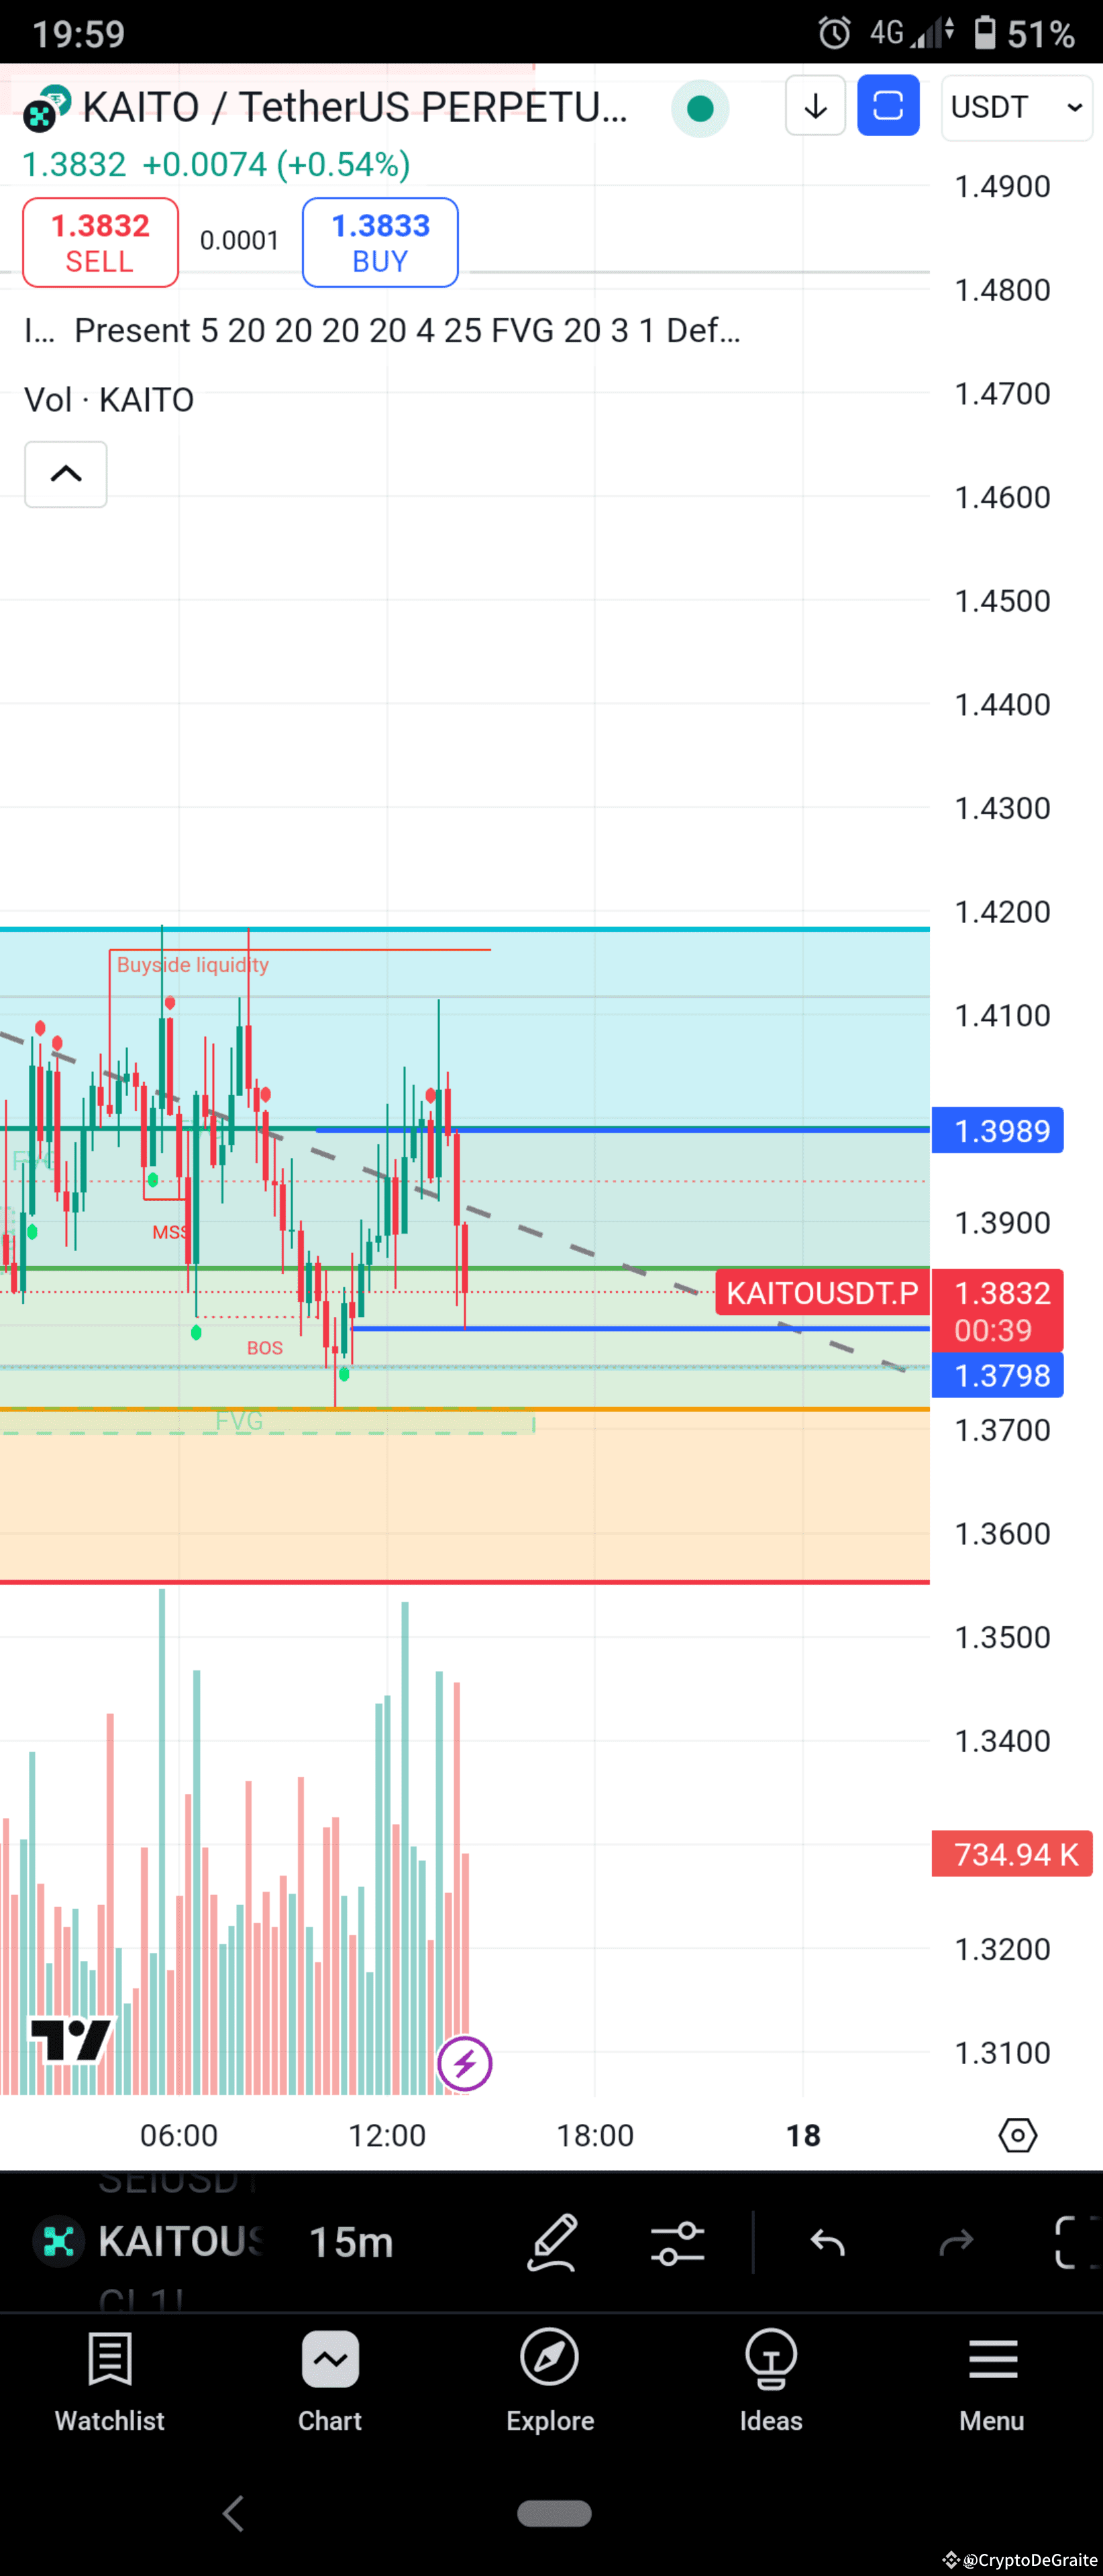
BearishKAITO/USDT 15Min – Trade Setup Alert 🚨
Price Action Heating Up! Here's what to watch next…
---
Current Price: 1.3832 USDT
Bias: Neutral (Leaning Bearish short-term, Bullish potential at demand)
---
🔻 Bearish Setup – "Fade the Pump"
KAITO rejected hard from the supply zone near 1.3989, sweeping buyside liquidity before a strong dump. Structure broke down with a BOS and increasing sell volume.
This could mean more downside incoming!
Bearish Plan:
Entry Zone: 1.3830–1.3840 (Current Market)
SL: 1.3985 (Above supply zone)
TP1: 1.3790
TP2: 1.3720
TP3: 1.3650 (FVG & Demand)
Confirmation Trigger: 15m candle close below 1.3798 with volume
---
🟢 Bullish Setup – "Buy the Dip"
There's a Fair Value Gap (FVG) and demand zone resting between 1.3720–1.3650. If price sweeps this area and shows a solid reaction (e.g. bullish engulfing / volume spike), we could see a reversal back toward the previous range.
Bullish Plan:
Entry Zone: 1.3720–1.3650 (Watch for bullish reaction)
SL: 1.3580 (Below demand zone)
TP1: 1.3830
TP2: 1.3980
TP3: 1.4100 (Buyside liquidity re-target)
Confirmation Trigger: Price shows strong bullish reaction inside demand (e.g. bullish candle + volume)
---
Final Thoughts:
Currently favoring the bearish setup unless bulls defend the FVG/demand zone. Be patient and let the levels speak.
Trade smart, manage risk, and don’t chase candles!
Keep eyes on the 1.3798 level — it’s the key for next move.
$KAITO
#KAİTO #KAITO #kaitosignal #Signal🚥.
Price Action Heating Up! Here's what to watch next…
---
Current Price: 1.3832 USDT
Bias: Neutral (Leaning Bearish short-term, Bullish potential at demand)
---
🔻 Bearish Setup – "Fade the Pump"
KAITO rejected hard from the supply zone near 1.3989, sweeping buyside liquidity before a strong dump. Structure broke down with a BOS and increasing sell volume.
This could mean more downside incoming!
Bearish Plan:
Entry Zone: 1.3830–1.3840 (Current Market)
SL: 1.3985 (Above supply zone)
TP1: 1.3790
TP2: 1.3720
TP3: 1.3650 (FVG & Demand)
Confirmation Trigger: 15m candle close below 1.3798 with volume
---
🟢 Bullish Setup – "Buy the Dip"
There's a Fair Value Gap (FVG) and demand zone resting between 1.3720–1.3650. If price sweeps this area and shows a solid reaction (e.g. bullish engulfing / volume spike), we could see a reversal back toward the previous range.
Bullish Plan:
Entry Zone: 1.3720–1.3650 (Watch for bullish reaction)
SL: 1.3580 (Below demand zone)
TP1: 1.3830
TP2: 1.3980
TP3: 1.4100 (Buyside liquidity re-target)
Confirmation Trigger: Price shows strong bullish reaction inside demand (e.g. bullish candle + volume)
---
Final Thoughts:
Currently favoring the bearish setup unless bulls defend the FVG/demand zone. Be patient and let the levels speak.
Trade smart, manage risk, and don’t chase candles!
Keep eyes on the 1.3798 level — it’s the key for next move.
$KAITO
#KAİTO #KAITO #kaitosignal #Signal🚥.
KAITO/USDT 15Min – Trade Setup Alert 🚨
Price Action Heating Up! Here's what to watch next…
---
Current Price: 1.3832 USDT
Bias: Neutral (Leaning Bearish short-term, Bullish potential at demand)
---
🔻 Bearish Setup – "Fade the Pump"
KAITO rejected hard from the supply zone near 1.3989, sweeping buyside liquidity before a strong dump. Structure broke down with a BOS and increasing sell volume.
This could mean more downside incoming!
Bearish Plan:
Entry Zone: 1.3830–1.3840 (Current Market)
SL: 1.3985 (Above supply zone)
TP1: 1.3790
TP2: 1.3720
TP3: 1.3650 (FVG & Demand)
Confirmation Trigger: 15m candle close below 1.3798 with volume
---
🟢 Bullish Setup – "Buy the Dip"
There's a Fair Value Gap (FVG) and demand zone resting between 1.3720–1.3650. If price sweeps this area and shows a solid reaction (e.g. bullish engulfing / volume spike), we could see a reversal back toward the previous range.
Bullish Plan:
Entry Zone: 1.3720–1.3650 (Watch for bullish reaction)
SL: 1.3580 (Below demand zone)
TP1: 1.3830
TP2: 1.3980
TP3: 1.4100 (Buyside liquidity re-target)
Confirmation Trigger: Price shows strong bullish reaction inside demand (e.g. bullish candle + volume)
---
Final Thoughts:
Currently favoring the bearish setup unless bulls defend the FVG/demand zone. Be patient and let the levels speak.
Trade smart, manage risk, and don’t chase candles!
Keep eyes on the 1.3798 level — it’s the key for next move.
$KAITO
#KAİTO #KAITO #kaitosignal #Signal🚥.
Price Action Heating Up! Here's what to watch next…
---
Current Price: 1.3832 USDT
Bias: Neutral (Leaning Bearish short-term, Bullish potential at demand)
---
🔻 Bearish Setup – "Fade the Pump"
KAITO rejected hard from the supply zone near 1.3989, sweeping buyside liquidity before a strong dump. Structure broke down with a BOS and increasing sell volume.
This could mean more downside incoming!
Bearish Plan:
Entry Zone: 1.3830–1.3840 (Current Market)
SL: 1.3985 (Above supply zone)
TP1: 1.3790
TP2: 1.3720
TP3: 1.3650 (FVG & Demand)
Confirmation Trigger: 15m candle close below 1.3798 with volume
---
🟢 Bullish Setup – "Buy the Dip"
There's a Fair Value Gap (FVG) and demand zone resting between 1.3720–1.3650. If price sweeps this area and shows a solid reaction (e.g. bullish engulfing / volume spike), we could see a reversal back toward the previous range.
Bullish Plan:
Entry Zone: 1.3720–1.3650 (Watch for bullish reaction)
SL: 1.3580 (Below demand zone)
TP1: 1.3830
TP2: 1.3980
TP3: 1.4100 (Buyside liquidity re-target)
Confirmation Trigger: Price shows strong bullish reaction inside demand (e.g. bullish candle + volume)
---
Final Thoughts:
Currently favoring the bearish setup unless bulls defend the FVG/demand zone. Be patient and let the levels speak.
Trade smart, manage risk, and don’t chase candles!
Keep eyes on the 1.3798 level — it’s the key for next move.
$KAITO
#KAİTO #KAITO #kaitosignal #Signal🚥.
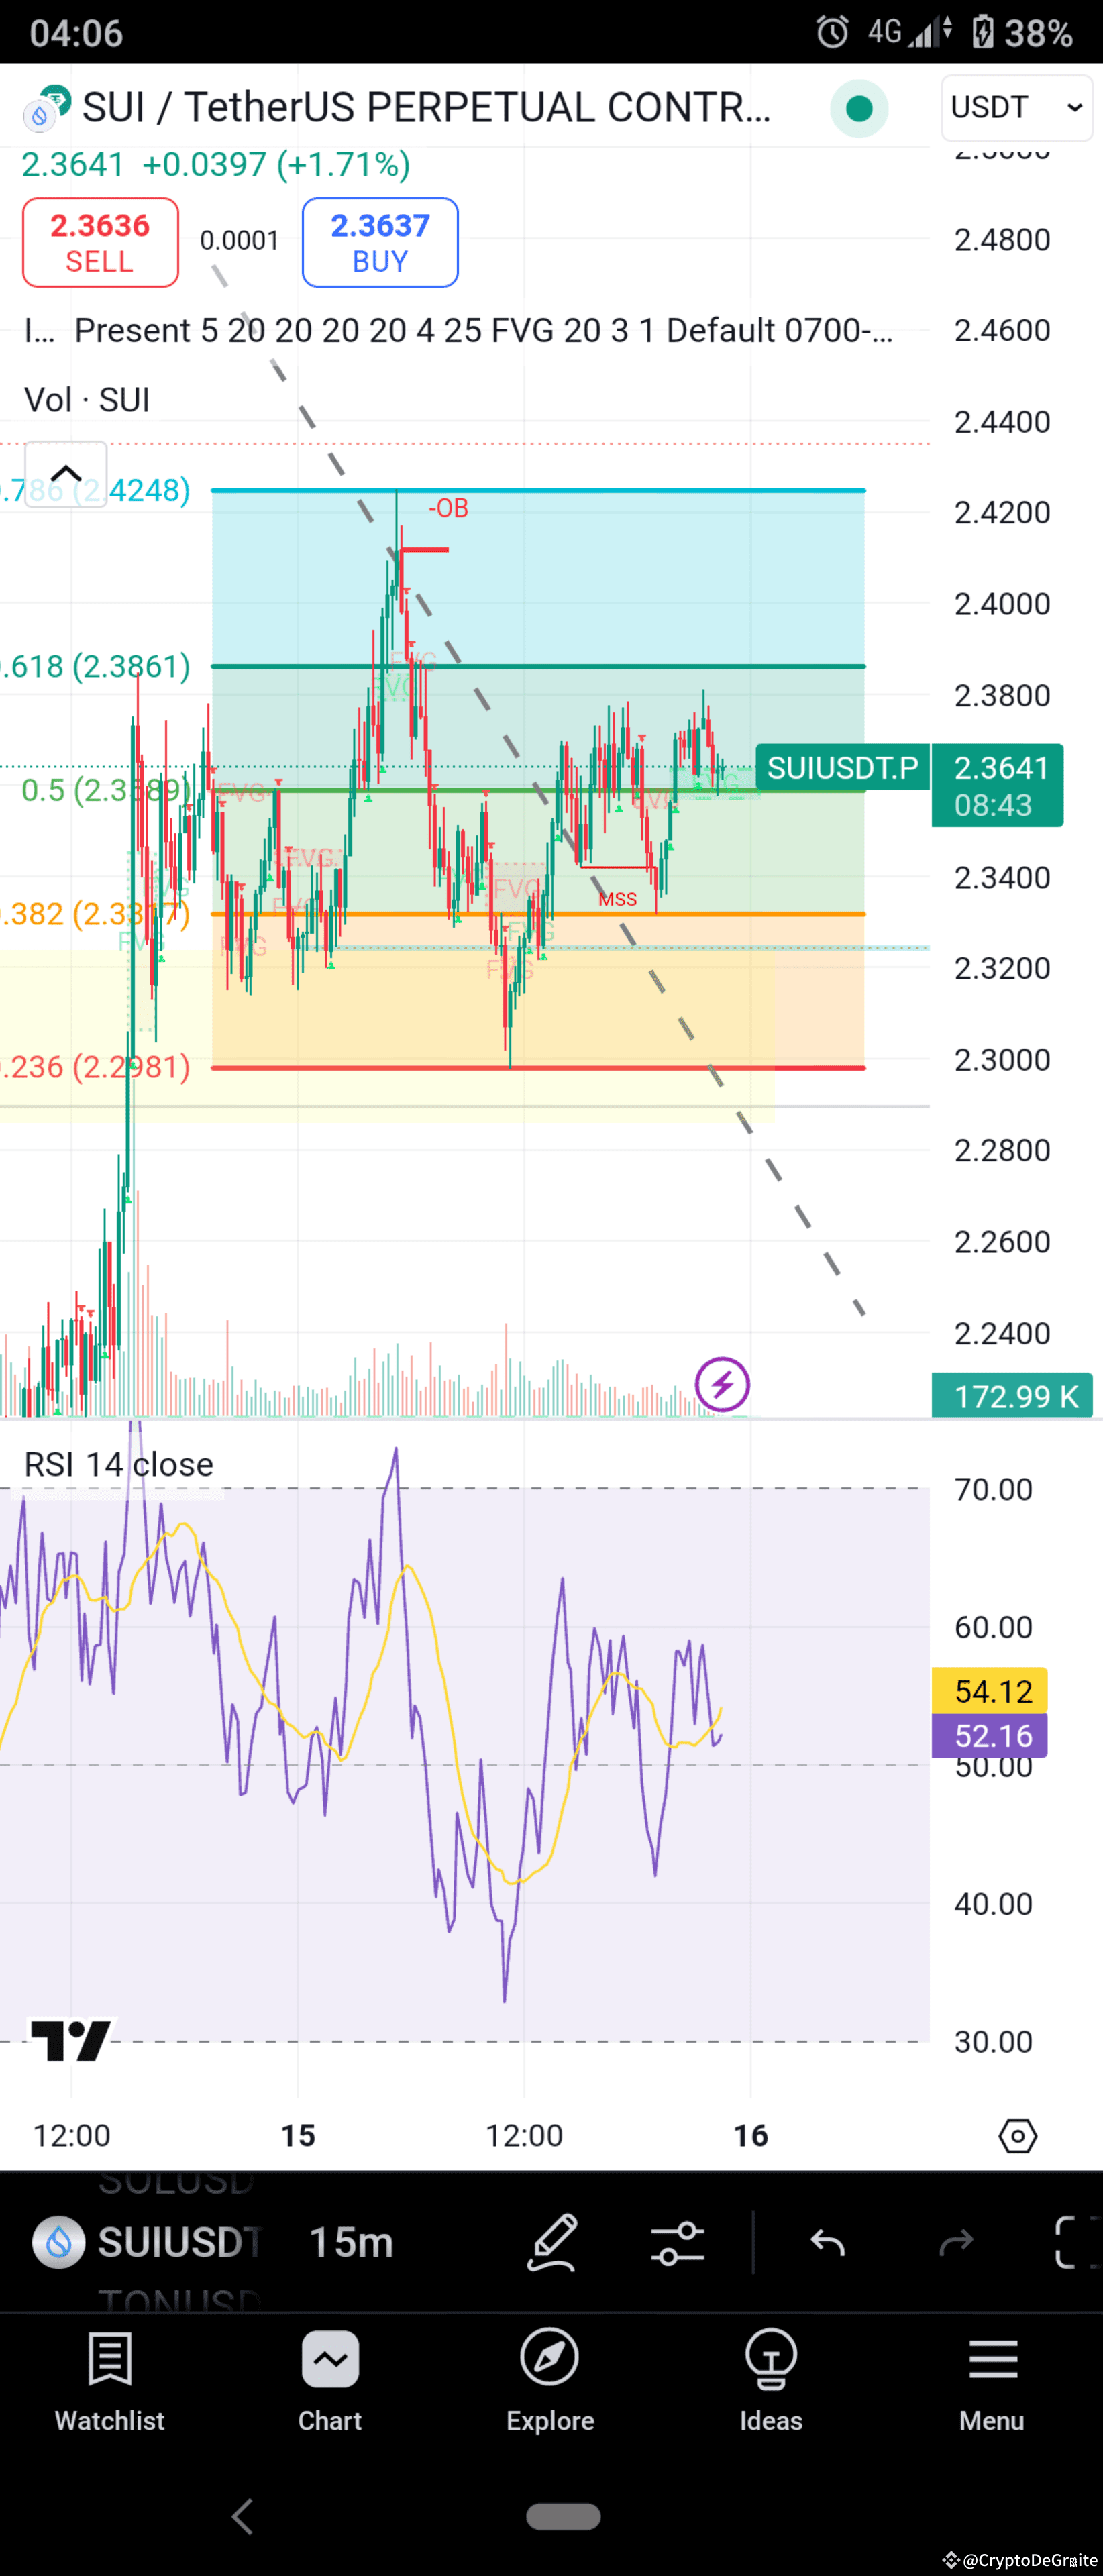
🚨 SUI/USDT – Trade Setup Alert (15m TF) 🚨
🧭 Market Bias: Neutral → Slightly Bullish
📍 Current Price: 2.3641
📊 Timeframe: 15 Minutes
🔍 Updated: 08:43 (UTC)
🔎 Technical Outlook:
SUI is currently hovering above the 0.5 Fibonacci level (2.3361) and holding support well after a market structure shift (MSS). This gives early signs of accumulation, with RSI trending up (currently ~54) and price reclaiming key intraday levels.
Price is now challenging the 0.618 Fib resistance (2.3860), and a breakout could ignite a rally back into the order block supply zone at 2.4200+.
📌 Key Levels:
Support Zones:
✅ 2.3360 – 2.3317 (Fib 0.5 to 0.382)
✅ 2.3000 (Golden pocket / demand)
Resistance Zones:
⚠️ 2.3860 (0.618 Fib - First test)
🔴 2.4200 (Order Block – Strong rejection point)
🚀 2.4480 (Clean breakout target)
📈 Trade Setups:
📘 Bullish Breakout Scenario:
If price breaks and closes above 2.3860 with strong volume, look for momentum continuation.
Entry: 2.3870 – 2.3920 (after breakout confirmation)
TP1: 2.4200
TP2: 2.4480
SL: 2.3350 (below 0.5 Fib support)
Confidence: ⭐⭐⭐⭐
🟢 Note: Ideal setup if RSI pushes above 60 & volume confirms breakout.
📕 Bearish Rejection Scenario:
If price fails to break above 2.3860 or gets rejected at 2.4200 (OB), a short opportunity could emerge.
Entry: 2.4180 – 2.4200 (signs of rejection/wick)
TP1: 2.3360
TP2: 2.3000
SL: 2.4270 (above OB)
Confidence: ⭐⭐⭐
🔴 Watch for fakeouts above 2.4200 and quick rejection candles.
📉 RSI & Momentum Watch:
RSI at 54.12: Still has room to grow before overbought
If RSI breaks above 60 with price pushing 2.3860 → strong bull signal
📣 Summary:
SUI/USDT is coiling just below major resistance. Bulls are defending support well, and the next move depends on whether we break through 2.3860 or get rejected at 2.42.
This is a critical pivot zone, and both breakout buyers and rejection scalpers should be on high alert!
Stay sharp. React fast. Manage risk.
$SUI
#SUİ #SUI🔥 #sui #Signal🚥.
🧭 Market Bias: Neutral → Slightly Bullish
📍 Current Price: 2.3641
📊 Timeframe: 15 Minutes
🔍 Updated: 08:43 (UTC)
🔎 Technical Outlook:
SUI is currently hovering above the 0.5 Fibonacci level (2.3361) and holding support well after a market structure shift (MSS). This gives early signs of accumulation, with RSI trending up (currently ~54) and price reclaiming key intraday levels.
Price is now challenging the 0.618 Fib resistance (2.3860), and a breakout could ignite a rally back into the order block supply zone at 2.4200+.
📌 Key Levels:
Support Zones:
✅ 2.3360 – 2.3317 (Fib 0.5 to 0.382)
✅ 2.3000 (Golden pocket / demand)
Resistance Zones:
⚠️ 2.3860 (0.618 Fib - First test)
🔴 2.4200 (Order Block – Strong rejection point)
🚀 2.4480 (Clean breakout target)
📈 Trade Setups:
📘 Bullish Breakout Scenario:
If price breaks and closes above 2.3860 with strong volume, look for momentum continuation.
Entry: 2.3870 – 2.3920 (after breakout confirmation)
TP1: 2.4200
TP2: 2.4480
SL: 2.3350 (below 0.5 Fib support)
Confidence: ⭐⭐⭐⭐
🟢 Note: Ideal setup if RSI pushes above 60 & volume confirms breakout.
📕 Bearish Rejection Scenario:
If price fails to break above 2.3860 or gets rejected at 2.4200 (OB), a short opportunity could emerge.
Entry: 2.4180 – 2.4200 (signs of rejection/wick)
TP1: 2.3360
TP2: 2.3000
SL: 2.4270 (above OB)
Confidence: ⭐⭐⭐
🔴 Watch for fakeouts above 2.4200 and quick rejection candles.
📉 RSI & Momentum Watch:
RSI at 54.12: Still has room to grow before overbought
If RSI breaks above 60 with price pushing 2.3860 → strong bull signal
📣 Summary:
SUI/USDT is coiling just below major resistance. Bulls are defending support well, and the next move depends on whether we break through 2.3860 or get rejected at 2.42.
This is a critical pivot zone, and both breakout buyers and rejection scalpers should be on high alert!
Stay sharp. React fast. Manage risk.
$SUI
#SUİ #SUI🔥 #sui #Signal🚥.
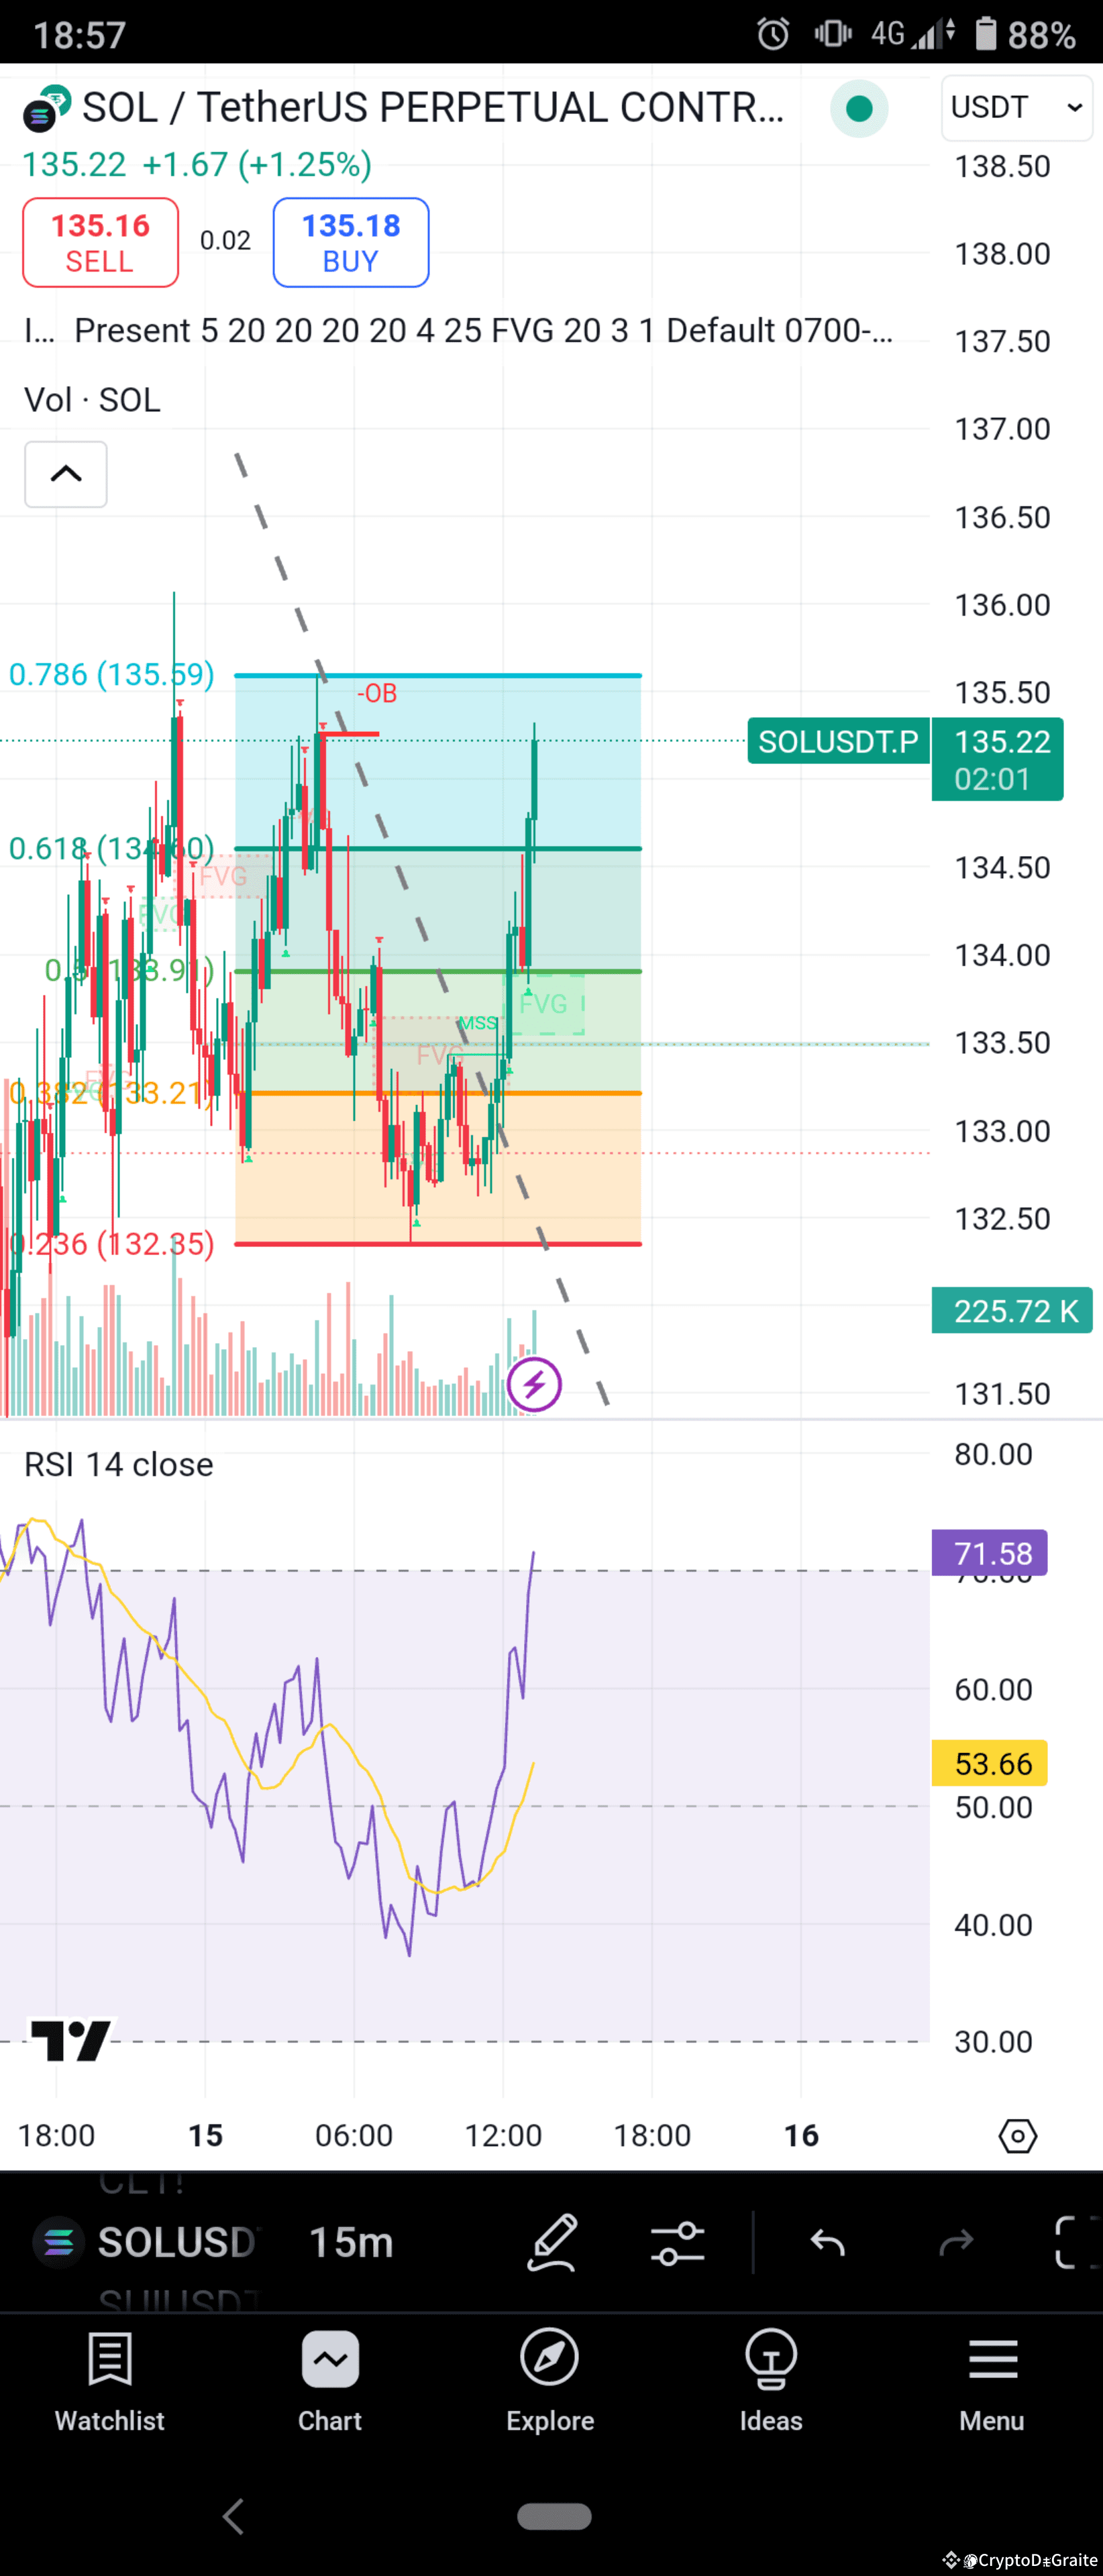
📊 Flawless Execution: Bearish Rejection to Bullish Breakout!
The market played out perfectly—Bearish TP1 hit, triggering a strong rejection at a key level. But that rejection wasn’t just a pause; it was a shift in momentum. Bulls took control, activating a bullish setup that unfolded with precision.
The result? Bullish TP1 & TP2 both achieved, proving once again the power of smart trading—capitalizing on both sides of the move.
Did you catch this setup? Drop your insights below! 📈🚀
$SOL
#solana #solonapumping #sol #targethit #solanAnalysis
The market played out perfectly—Bearish TP1 hit, triggering a strong rejection at a key level. But that rejection wasn’t just a pause; it was a shift in momentum. Bulls took control, activating a bullish setup that unfolded with precision.
The result? Bullish TP1 & TP2 both achieved, proving once again the power of smart trading—capitalizing on both sides of the move.
Did you catch this setup? Drop your insights below! 📈🚀
$SOL
#solana #solonapumping #sol #targethit #solanAnalysis
CryptoDeGraite
·
--
Bearish🚀 SOL/USDT - Pro Trading Signal & Setup 🚀
⏳ Timeframe: 15m
📉 Current Price: 132.99 USDT
📊 Market Bias: Bearish, but potential bullish setup if key levels break.
---
📉 Bearish Setup (Short Trade) 🚨
🔻 Entry: 133.5 - 134 USDT (Retest of resistance)
🔻 Stop-Loss (SL): 136 USDT (Above the order block)
🔻 Take-Profit (TP) Targets:
✅ TP1: 132 USDT
✅ TP2: 130 USDT
✅ TP3: 128 USDT (If selling pressure increases)
🔎 Bearish Confirmation Checklist:
✅ Bearish Order Block (OB) at 135-136 USDT – Expect rejection! 🚫
✅ Market Structure Shift (MSS) – Sellers in control 📉
✅ Fair Value Gap (FVG) Nearby – Price could drop to fill gaps 🕳️
✅ RSI Below 50 (43.09) – Weak momentum, favoring sellers 🔴
📌 Ideal Execution: Wait for a fake-out above 133.5-134, then enter short when price shows rejection (e.g., bearish engulfing candle).
---
📈 Bullish Setup (Long Trade) 🚀
🟢 Entry: 130-132 USDT (Demand zone)
🟢 Stop-Loss (SL): 128.5 USDT (Below support)
🟢 Take-Profit (TP) Targets:
✅ TP1: 134 USDT
✅ TP2: 135 USDT
✅ TP3: 137 USDT (Breakout target)
🔎 Bullish Confirmation Checklist:
✅ Strong Support at 130-132 USDT – Buyers may step in! 🛡️
✅ RSI Recovery Above 45 – Early signs of a reversal 🔄
✅ Volume Increase at Support – Watch for a green candle with high volume! 📊
✅ Fair Value Gap (FVG) Above – Possible bullish imbalance filling 🟢
📌 Ideal Execution: Wait for price to test 130-132 USDT, confirm bullish strength with a higher low or bullish engulfing candle, then enter long.
---
⚡ Risk Management & Strategy
💰 Trade with 1-2% Risk Per Trade – Protect your capital!
📉 Short Position (Bearish Bias) – If rejection happens at 134-135 USDT, expect downside.
📈 Long Position (Bullish Bias) – If price holds above 130-132 USDT, expect upside.
🚨 Final Verdict: Bearish unless SOL reclaims 134 USDT – Trade carefully & follow confirmations! 🔥
$SOL
#sol #solana #SolanaUSTD #Signal🚥. #Signal.
⏳ Timeframe: 15m
📉 Current Price: 132.99 USDT
📊 Market Bias: Bearish, but potential bullish setup if key levels break.
---
📉 Bearish Setup (Short Trade) 🚨
🔻 Entry: 133.5 - 134 USDT (Retest of resistance)
🔻 Stop-Loss (SL): 136 USDT (Above the order block)
🔻 Take-Profit (TP) Targets:
✅ TP1: 132 USDT
✅ TP2: 130 USDT
✅ TP3: 128 USDT (If selling pressure increases)
🔎 Bearish Confirmation Checklist:
✅ Bearish Order Block (OB) at 135-136 USDT – Expect rejection! 🚫
✅ Market Structure Shift (MSS) – Sellers in control 📉
✅ Fair Value Gap (FVG) Nearby – Price could drop to fill gaps 🕳️
✅ RSI Below 50 (43.09) – Weak momentum, favoring sellers 🔴
📌 Ideal Execution: Wait for a fake-out above 133.5-134, then enter short when price shows rejection (e.g., bearish engulfing candle).
---
📈 Bullish Setup (Long Trade) 🚀
🟢 Entry: 130-132 USDT (Demand zone)
🟢 Stop-Loss (SL): 128.5 USDT (Below support)
🟢 Take-Profit (TP) Targets:
✅ TP1: 134 USDT
✅ TP2: 135 USDT
✅ TP3: 137 USDT (Breakout target)
🔎 Bullish Confirmation Checklist:
✅ Strong Support at 130-132 USDT – Buyers may step in! 🛡️
✅ RSI Recovery Above 45 – Early signs of a reversal 🔄
✅ Volume Increase at Support – Watch for a green candle with high volume! 📊
✅ Fair Value Gap (FVG) Above – Possible bullish imbalance filling 🟢
📌 Ideal Execution: Wait for price to test 130-132 USDT, confirm bullish strength with a higher low or bullish engulfing candle, then enter long.
---
⚡ Risk Management & Strategy
💰 Trade with 1-2% Risk Per Trade – Protect your capital!
📉 Short Position (Bearish Bias) – If rejection happens at 134-135 USDT, expect downside.
📈 Long Position (Bullish Bias) – If price holds above 130-132 USDT, expect upside.
🚨 Final Verdict: Bearish unless SOL reclaims 134 USDT – Trade carefully & follow confirmations! 🔥
$SOL
#sol #solana #SolanaUSTD #Signal🚥. #Signal.
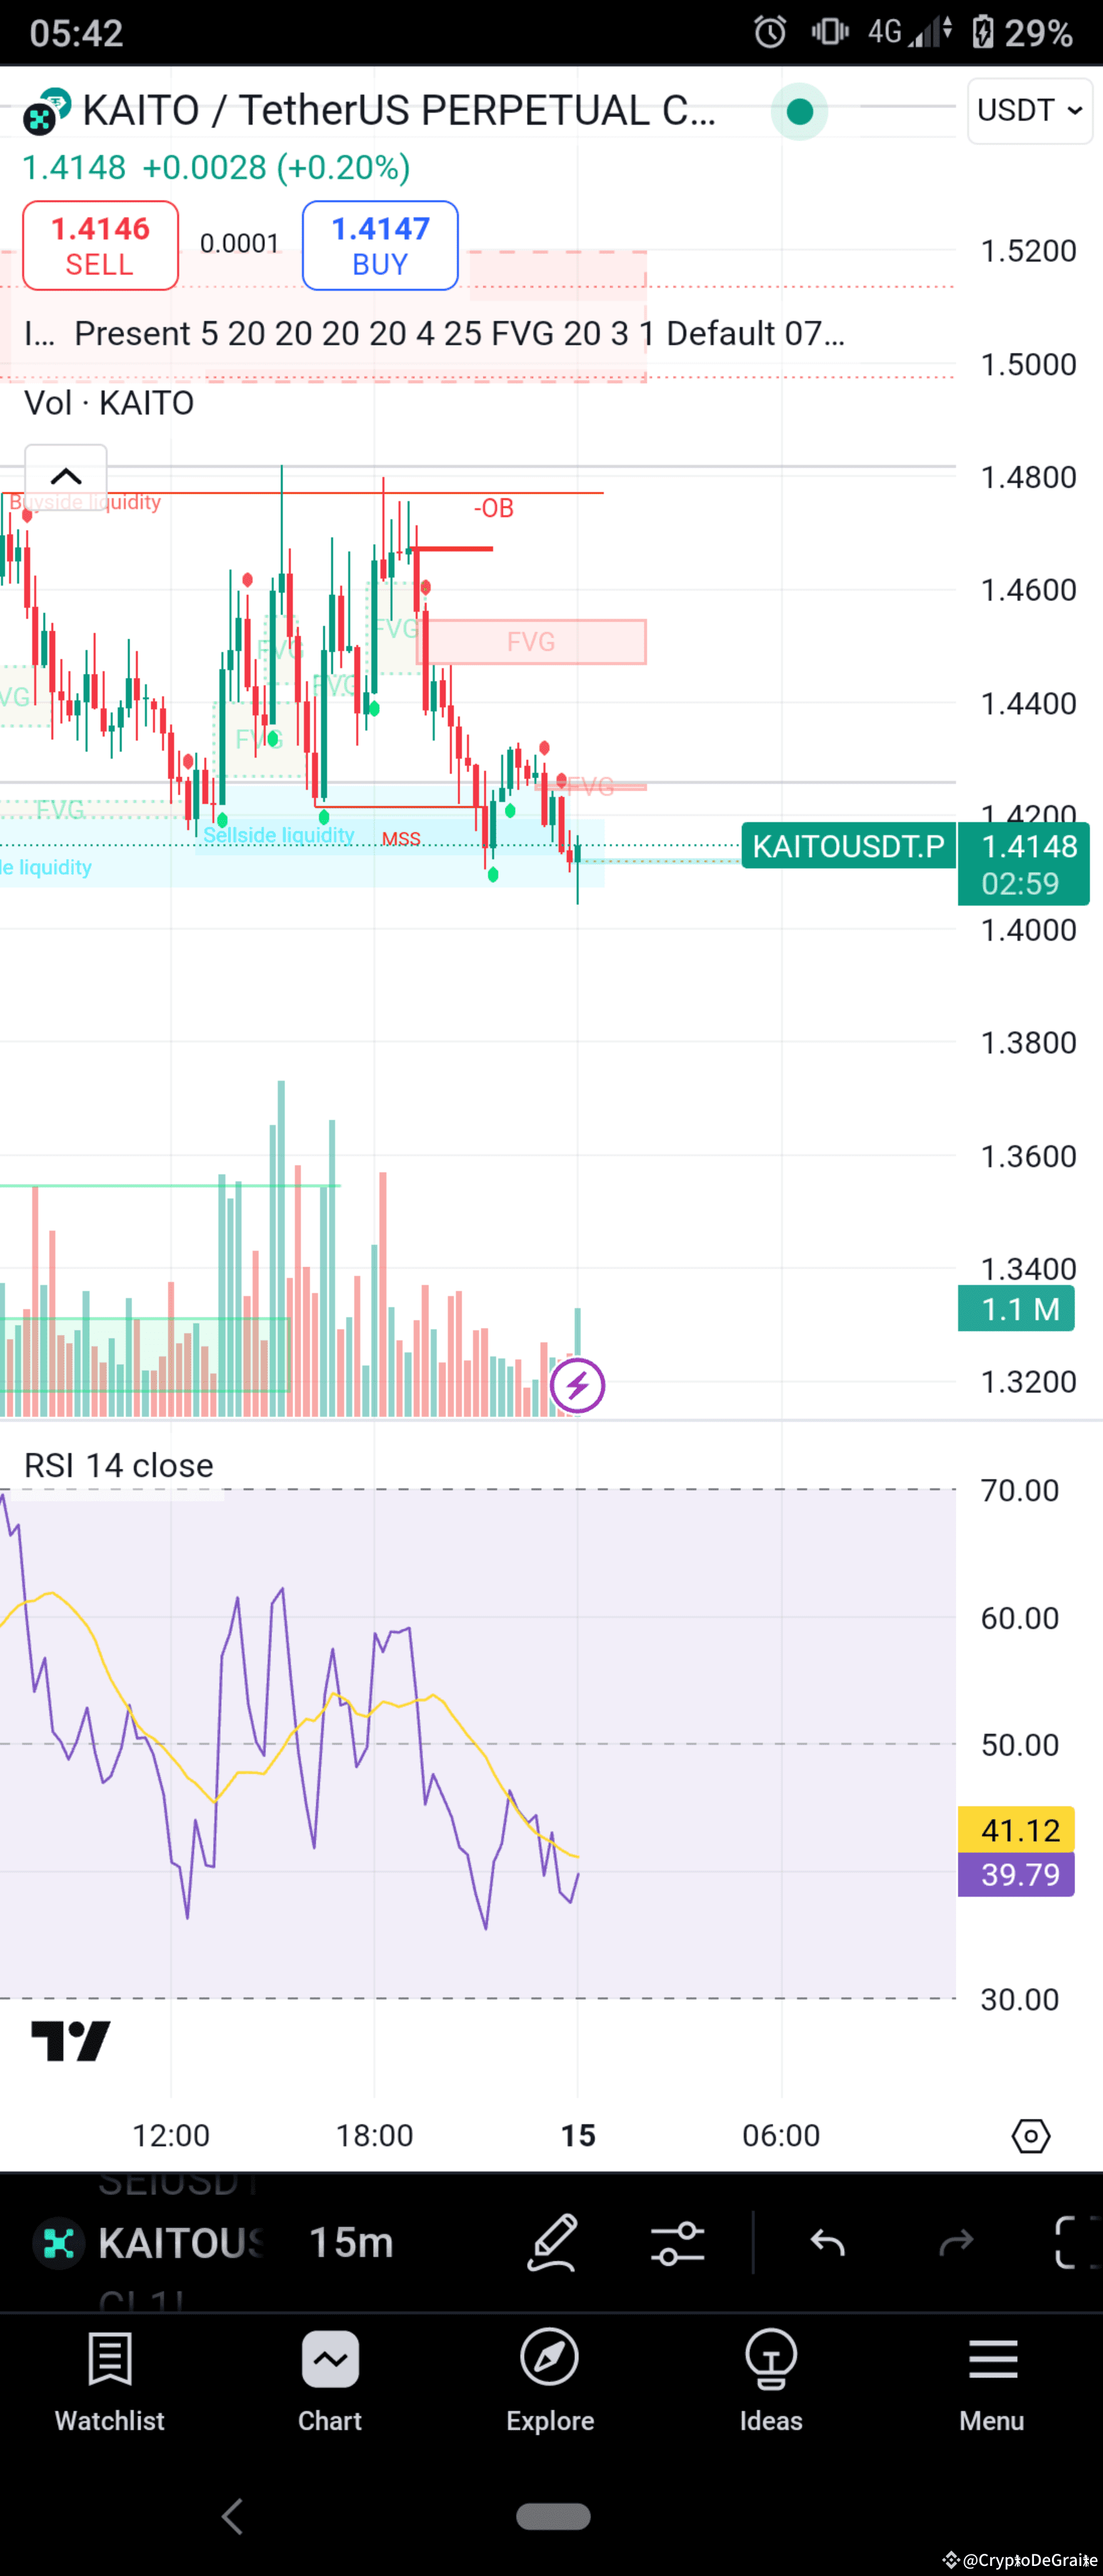
🚀 KAITO/USDT - HIGH VOLATILITY ALERT! ⚠️ MASSIVE MOVE INCOMING! 🔥
📉 Bearish or Bullish? Let's Break It Down!
KAITO/USDT is at a critical level, and the next move could be HUGE! 📊 Traders, get ready! 🧐
---
🔻 BEARISH SCENARIO (SHORT ENTRY) 📉
🔴 Entry: 1.415 - 1.420 USDT (Wait for rejection at resistance/FVG zone)
🎯 Targets:
✅ TP1: 1.400 USDT
✅ TP2: 1.380 USDT
✅ TP3: 1.350 USDT (if heavy sell-off continues)
⛔ Stop Loss (SL): Above 1.430 USDT (Protect capital!)
📌 Confirmation for Entry:
RSI stays below 50 ✅
Price gets rejected at resistance ✅
Volume remains low on bounces ✅
💀 If price breaks below 1.380 → Expect further dump to 1.350 or lower! 💥
---
🟢 BULLISH SCENARIO (LONG ENTRY) 🚀
🟢 Entry: 1.405 - 1.410 USDT (Look for bullish candle confirmation or RSI crossing above 50)
🎯 Targets:
✅ TP1: 1.430 USDT
✅ TP2: 1.450 USDT
✅ TP3: 1.480 USDT (if bulls take control!)
⛔ Stop Loss (SL): Below 1.390 USDT (Minimize risk!)
📌 Confirmation for Entry:
RSI breaking above 50 ✅
Strong volume surge ✅
Break and retest of 1.415 ✅
⚠️ Final Verdict:
📉 BEARISH unless bulls reclaim 1.420!
📊 LOW-RISK traders: Wait for clear breakout before entering!
🚀 What’s YOUR move? Going SHORT or LONG? Let’s discuss! ⬇️🔥
$KAITO
#KAİTO #KAITO #KAITOBullish #KAITOUSD #Signal🚥.
📉 Bearish or Bullish? Let's Break It Down!
KAITO/USDT is at a critical level, and the next move could be HUGE! 📊 Traders, get ready! 🧐
---
🔻 BEARISH SCENARIO (SHORT ENTRY) 📉
🔴 Entry: 1.415 - 1.420 USDT (Wait for rejection at resistance/FVG zone)
🎯 Targets:
✅ TP1: 1.400 USDT
✅ TP2: 1.380 USDT
✅ TP3: 1.350 USDT (if heavy sell-off continues)
⛔ Stop Loss (SL): Above 1.430 USDT (Protect capital!)
📌 Confirmation for Entry:
RSI stays below 50 ✅
Price gets rejected at resistance ✅
Volume remains low on bounces ✅
💀 If price breaks below 1.380 → Expect further dump to 1.350 or lower! 💥
---
🟢 BULLISH SCENARIO (LONG ENTRY) 🚀
🟢 Entry: 1.405 - 1.410 USDT (Look for bullish candle confirmation or RSI crossing above 50)
🎯 Targets:
✅ TP1: 1.430 USDT
✅ TP2: 1.450 USDT
✅ TP3: 1.480 USDT (if bulls take control!)
⛔ Stop Loss (SL): Below 1.390 USDT (Minimize risk!)
📌 Confirmation for Entry:
RSI breaking above 50 ✅
Strong volume surge ✅
Break and retest of 1.415 ✅
⚠️ Final Verdict:
📉 BEARISH unless bulls reclaim 1.420!
📊 LOW-RISK traders: Wait for clear breakout before entering!
🚀 What’s YOUR move? Going SHORT or LONG? Let’s discuss! ⬇️🔥
$KAITO
#KAİTO #KAITO #KAITOBullish #KAITOUSD #Signal🚥.
Log in to explore more content