
Crypto_king730
705 Posts

Crypto_king730
treding king
102 Following
845 Followers
1.5K+ Liked
Posts
Portfolio
All
Quotes
Live
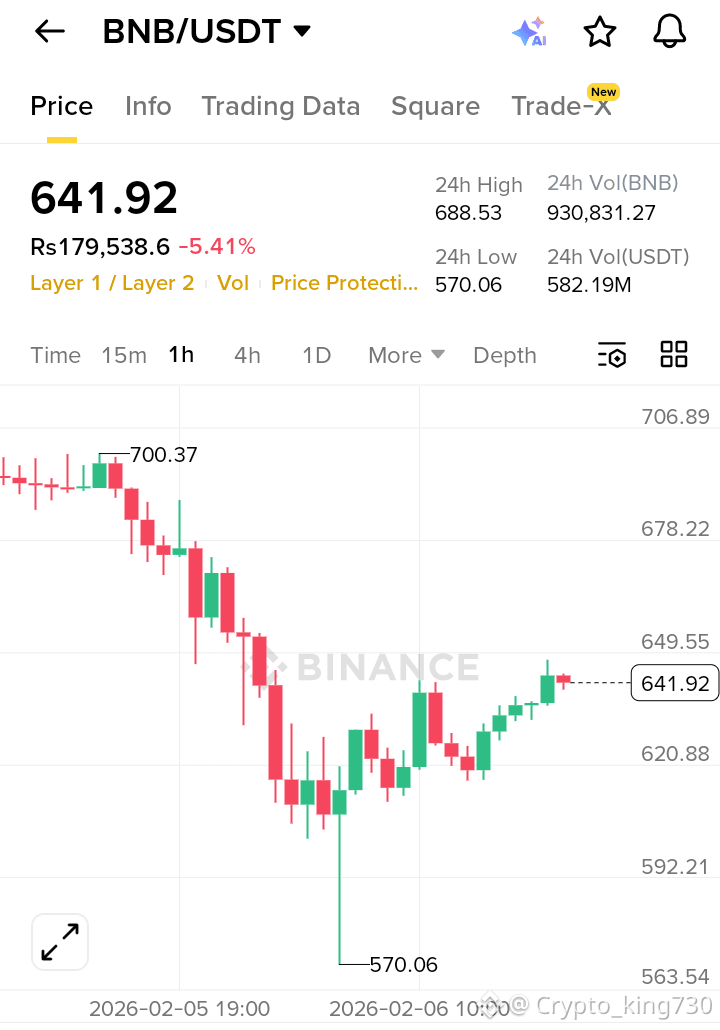
$BNB /USDT BEARISH CONTINUATION – SELL THE RALLIES
MARKET STRUCTURE:
$BNB has broken below a key demand zone after a strong rejection from the upper range, confirming a lower high & lower low structure. Selling pressure remains dominant, and price is trading below major short-term moving averages, indicating continuation of bearish momentum.
TECHNICAL OUTLOOK:
Strong resistance formed near the previous breakdown zone
Weak bullish retracements showing lack of buying strength
Momentum favors sellers with downside liquidity still open
TRADE SETUP (SHORT):
Entry: Short on pullback into resistance zone
TP1: 620
TP2: 592
TP3: 570
SL: Above 690 (daily structure invalidation)
RISK MANAGEMENT:
Risk only 1–2% per trade. Trail stop after TP1 is hit and avoid over-leveraging in high volatility conditions.
#BNBUSDT
#CryptoAnalysis
#TechnicalAnalysis
#ShortSetup
#RiskManagement
MARKET STRUCTURE:
$BNB has broken below a key demand zone after a strong rejection from the upper range, confirming a lower high & lower low structure. Selling pressure remains dominant, and price is trading below major short-term moving averages, indicating continuation of bearish momentum.
TECHNICAL OUTLOOK:
Strong resistance formed near the previous breakdown zone
Weak bullish retracements showing lack of buying strength
Momentum favors sellers with downside liquidity still open
TRADE SETUP (SHORT):
Entry: Short on pullback into resistance zone
TP1: 620
TP2: 592
TP3: 570
SL: Above 690 (daily structure invalidation)
RISK MANAGEMENT:
Risk only 1–2% per trade. Trail stop after TP1 is hit and avoid over-leveraging in high volatility conditions.
#BNBUSDT
#CryptoAnalysis
#TechnicalAnalysis
#ShortSetup
#RiskManagement
$ETH /USDT BEARISH TECHNICAL OUTLOOK
$ETH /USDT is showing strong bearish momentum after a sharp rejection from the upper supply zone. The market structure remains weak, with price failing to hold above key resistance levels. Continuous selling pressure and lack of bullish follow-through indicate a higher probability of further downside toward lower demand zones.
Market Structure: Bearish
Trend Bias: Downside continuation
Key Resistance Zone: 2,740 – 2,780
Major Support Zone: 2,550 – 2,500
SHORT ENTRY SETUP
Entry Zone: Pullback toward resistance with bearish confirmation
Target 1 (TP1): 2,550
Target 2 (TP2): 2,500
Target 3 (TP3): 2,420
Stop Loss (SL): Above 2,800
Rejection from resistance and continuation below intraday support strengthens the bearish scenario.
RISK MANAGEMENT Risk only a small portion of total capital per trade, maintain proper position sizing, and move stop loss to breakeven after the first target is achieved.
#ETHUSDT #EthereumAnalysis #TechnicalAnalysis #CryptoMarket #ShortSetup
$ETH /USDT is showing strong bearish momentum after a sharp rejection from the upper supply zone. The market structure remains weak, with price failing to hold above key resistance levels. Continuous selling pressure and lack of bullish follow-through indicate a higher probability of further downside toward lower demand zones.
Market Structure: Bearish
Trend Bias: Downside continuation
Key Resistance Zone: 2,740 – 2,780
Major Support Zone: 2,550 – 2,500
SHORT ENTRY SETUP
Entry Zone: Pullback toward resistance with bearish confirmation
Target 1 (TP1): 2,550
Target 2 (TP2): 2,500
Target 3 (TP3): 2,420
Stop Loss (SL): Above 2,800
Rejection from resistance and continuation below intraday support strengthens the bearish scenario.
RISK MANAGEMENT Risk only a small portion of total capital per trade, maintain proper position sizing, and move stop loss to breakeven after the first target is achieved.
#ETHUSDT #EthereumAnalysis #TechnicalAnalysis #CryptoMarket #ShortSetup
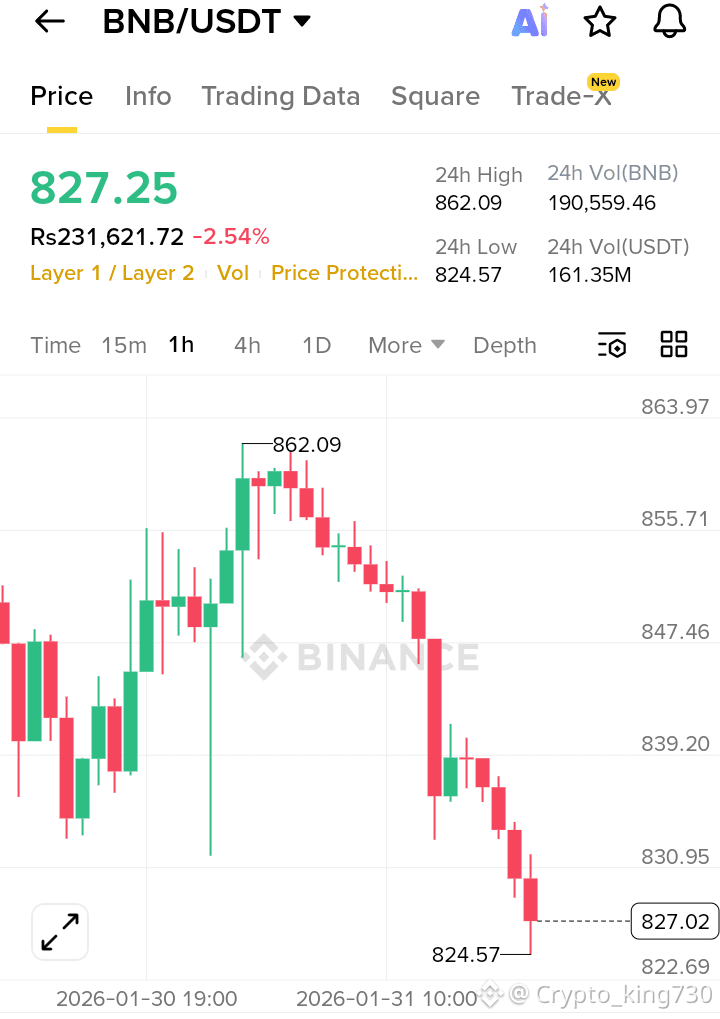
$BNB /USDT BEARISH TECHNICAL OUTLOOK
$BNB /USDT is showing clear bearish pressure after failing to sustain above the recent resistance zone. Price action remains below key supply levels, indicating that sellers are still in control. Lower highs and weak recovery attempts suggest a continuation toward lower demand areas.
Market Structure: Bearish
Trend Bias: Short-term downside continuation
Liquidity Zone: Above recent highs (sell-side protection intact)
SHORT ENTRY SETUP
Entry Zone: Near resistance pullback
Target 1 (TP1): 815
Target 2 (TP2): 800
Target 3 (TP3): 780
Stop Loss (SL): Above 865
A rejection from resistance with confirmation on lower timeframes strengthens the probability of further downside expansion.
RISK MANAGEMENT Risk only a small portion of capital per trade, maintain a minimum 1:2 risk-to-reward ratio, and trail stop loss once the first target is secured.
#BNBUSDT #CryptoAnalysis #TechnicalAnalysis #AltcoinTrading #ShortSetup
$BNB /USDT is showing clear bearish pressure after failing to sustain above the recent resistance zone. Price action remains below key supply levels, indicating that sellers are still in control. Lower highs and weak recovery attempts suggest a continuation toward lower demand areas.
Market Structure: Bearish
Trend Bias: Short-term downside continuation
Liquidity Zone: Above recent highs (sell-side protection intact)
SHORT ENTRY SETUP
Entry Zone: Near resistance pullback
Target 1 (TP1): 815
Target 2 (TP2): 800
Target 3 (TP3): 780
Stop Loss (SL): Above 865
A rejection from resistance with confirmation on lower timeframes strengthens the probability of further downside expansion.
RISK MANAGEMENT Risk only a small portion of capital per trade, maintain a minimum 1:2 risk-to-reward ratio, and trail stop loss once the first target is secured.
#BNBUSDT #CryptoAnalysis #TechnicalAnalysis #AltcoinTrading #ShortSetup
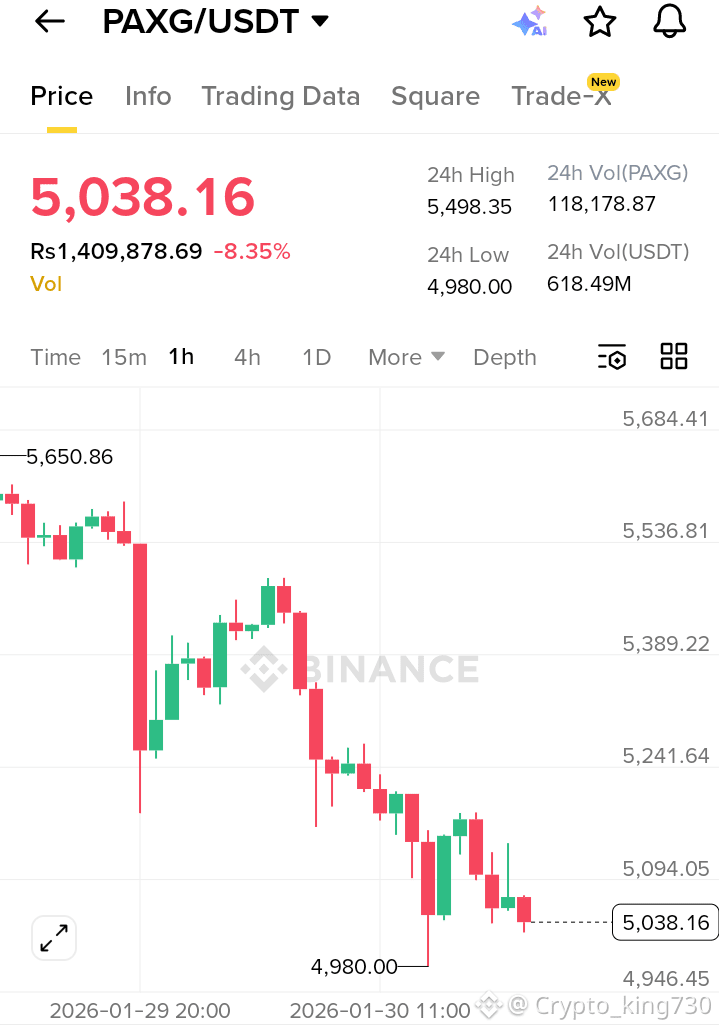
$PAXG /USDT BEARISH TECHNICAL OUTLOOK – SELL THE RALLIES
Market Structure:
Price has broken down from a key supply zone and is trading below major resistance levels, confirming bearish control. The recent sharp rejection from the upper range signals strong selling pressure and continuation weakness.
$PAXG
Trend & Momentum:
Lower highs and lower lows visible on intraday and higher timeframes
Bearish momentum dominates with failed recovery attempts
Volume expansion on downside supports further decline
Trade Setup: SHORT
Entry Zone:
Sell on pullback into the resistance area
Targets (TP):
TP1: 4,950
TP2: 4,820
TP3: 4,650
Stop Loss (SL):
Above the major resistance zone at 5,550
Expectation:
As long as price remains below resistance, bearish continuation is favored. Any weak bounce is likely to be a selling opportunity.
Risk Management:
Risk only 1–2% of capital per trade, wait for confirmation before entry, and trail stop loss after TP1 is achieved to protect profits.
#PAXG #PAXGUSDT #CryptoAnalysis #TechnicalAnalysis #ShortSetup
Market Structure:
Price has broken down from a key supply zone and is trading below major resistance levels, confirming bearish control. The recent sharp rejection from the upper range signals strong selling pressure and continuation weakness.
$PAXG
Trend & Momentum:
Lower highs and lower lows visible on intraday and higher timeframes
Bearish momentum dominates with failed recovery attempts
Volume expansion on downside supports further decline
Trade Setup: SHORT
Entry Zone:
Sell on pullback into the resistance area
Targets (TP):
TP1: 4,950
TP2: 4,820
TP3: 4,650
Stop Loss (SL):
Above the major resistance zone at 5,550
Expectation:
As long as price remains below resistance, bearish continuation is favored. Any weak bounce is likely to be a selling opportunity.
Risk Management:
Risk only 1–2% of capital per trade, wait for confirmation before entry, and trail stop loss after TP1 is achieved to protect profits.
#PAXG #PAXGUSDT #CryptoAnalysis #TechnicalAnalysis #ShortSetup
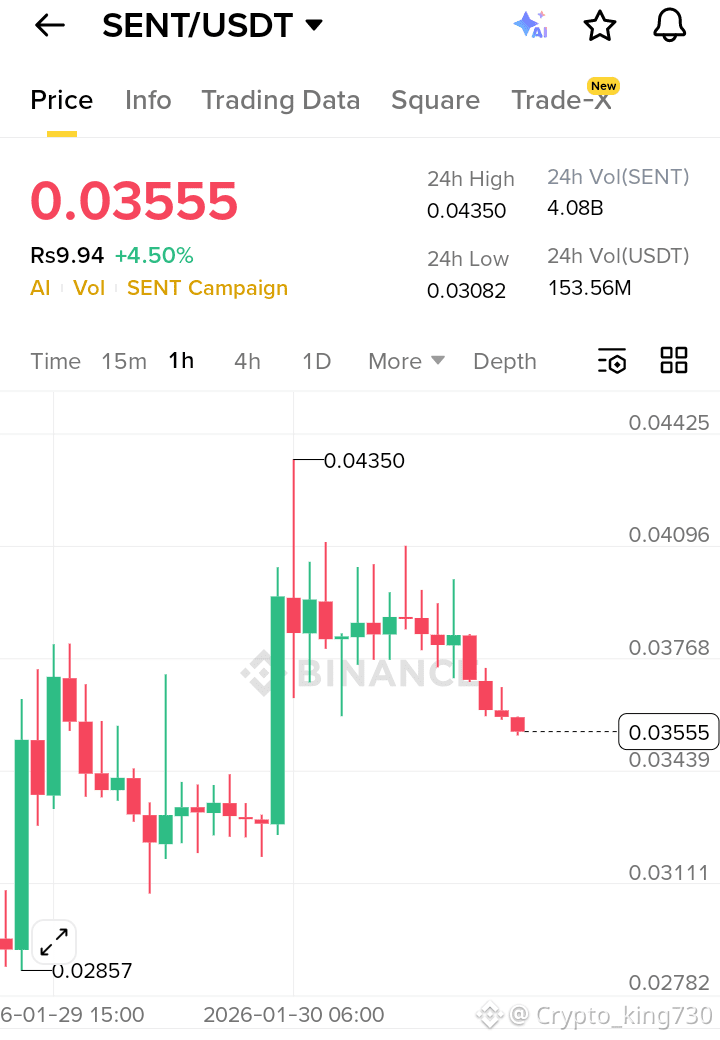
$SENT /USDT BULLISH STRUCTURE CONTINUATION
Market Structure:
$SENT is maintaining a bullish structure after a strong recovery from the demand zone. Price action shows higher lows with sustained acceptance above key support, while volume expansion signals active participation. The overall structure favors continuation as long as support remains intact.
Trade Idea: LONG POSITION
Entry Zone:
• Buy on pullback into the support and consolidation area
Targets (TP):
• TP1: Immediate resistance from recent rejection
• TP2: Upper resistance zone near the previous high
• TP3: Liquidity sweep above the major resistance level
Stop Loss (SL):
• Below the recent higher low / demand zone
Bias Confirmation:
• Higher highs and higher lows intact
• Strong bullish candles after pullbacks
• Support holding with volume confirmation
Risk Management:
Limit risk to 1–2% per trade, secure partial profits at TP1, and trail stop loss to protect gains.
#SENTUSDT #BullishTrend #TechnicalAnalysis #CryptoSetup #RiskManagement
Market Structure:
$SENT is maintaining a bullish structure after a strong recovery from the demand zone. Price action shows higher lows with sustained acceptance above key support, while volume expansion signals active participation. The overall structure favors continuation as long as support remains intact.
Trade Idea: LONG POSITION
Entry Zone:
• Buy on pullback into the support and consolidation area
Targets (TP):
• TP1: Immediate resistance from recent rejection
• TP2: Upper resistance zone near the previous high
• TP3: Liquidity sweep above the major resistance level
Stop Loss (SL):
• Below the recent higher low / demand zone
Bias Confirmation:
• Higher highs and higher lows intact
• Strong bullish candles after pullbacks
• Support holding with volume confirmation
Risk Management:
Limit risk to 1–2% per trade, secure partial profits at TP1, and trail stop loss to protect gains.
#SENTUSDT #BullishTrend #TechnicalAnalysis #CryptoSetup #RiskManagement
$ENSO /USDT BULLISH BREAKOUT CONTINUATION
Market Structure:
$ENSO has shown a strong impulsive move from the lower demand zone, breaking above key resistance with expanding volume. Higher highs and higher lows indicate a shift in structure to bullish. The current consolidation above the breakout level suggests strength and potential continuation.
Trade Idea: LONG POSITION
Entry Zone:
• Buy on pullback towards the breakout support zone
Targets (TP):
• TP1: Previous resistance level
• TP2: Upper supply zone near recent highs
• TP3: Extended bullish target after resistance breakout
Stop Loss (SL):
• Below the breakout base / recent higher low
Bias Confirmation:
• Structure flipped to bullish
• Strong momentum candles with shallow pullbacks
• Support holding above former resistance
Risk Management:
Risk only 1–2% per trade, move stop loss to breakeven after TP1, and avoid chasing price.
#ENSOUSDT #BullishSetup #TechnicalAnalysis #CryptoTrading #Breakout
Market Structure:
$ENSO has shown a strong impulsive move from the lower demand zone, breaking above key resistance with expanding volume. Higher highs and higher lows indicate a shift in structure to bullish. The current consolidation above the breakout level suggests strength and potential continuation.
Trade Idea: LONG POSITION
Entry Zone:
• Buy on pullback towards the breakout support zone
Targets (TP):
• TP1: Previous resistance level
• TP2: Upper supply zone near recent highs
• TP3: Extended bullish target after resistance breakout
Stop Loss (SL):
• Below the breakout base / recent higher low
Bias Confirmation:
• Structure flipped to bullish
• Strong momentum candles with shallow pullbacks
• Support holding above former resistance
Risk Management:
Risk only 1–2% per trade, move stop loss to breakeven after TP1, and avoid chasing price.
#ENSOUSDT #BullishSetup #TechnicalAnalysis #CryptoTrading #Breakout
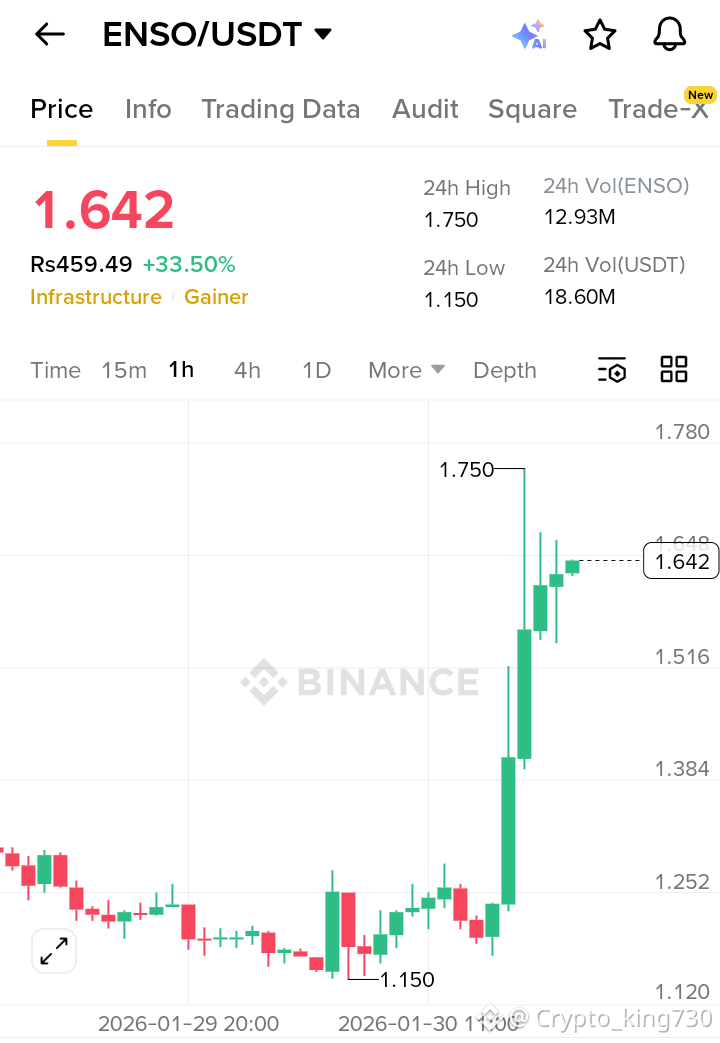
$XRP /USDT BEARISH MOMENTUM CONTINUATION
Market Structure:
$XRP is showing clear weakness after rejection from the upper resistance zone. Price action is forming lower highs while support levels are being tested repeatedly, indicating strong selling pressure. Failure to reclaim the key resistance keeps the bearish structure intact and favors continuation to the downside.
Trade Idea: SHORT POSITION
Entry Zone:
• Short on pullback towards the broken support turned resistance
Targets (TP):
• TP1: Nearest intraday support
• TP2: Major demand zone from previous consolidation
• TP3: Liquidity sweep near lower support range
Stop Loss (SL):
• Above the recent swing high / resistance zone
Bias Confirmation:
• Sustained trading below resistance
• Weak bullish retracements
• Bearish structure remains valid unless resistance is broken
Risk Management:
Risk a maximum of 1–2% per trade, wait for confirmation before entry, and secure profits by trailing stop after TP1.
#XRPUSDT #TechnicalAnalysis #CryptoTrading #ShortSetup #MarketStructure
Market Structure:
$XRP is showing clear weakness after rejection from the upper resistance zone. Price action is forming lower highs while support levels are being tested repeatedly, indicating strong selling pressure. Failure to reclaim the key resistance keeps the bearish structure intact and favors continuation to the downside.
Trade Idea: SHORT POSITION
Entry Zone:
• Short on pullback towards the broken support turned resistance
Targets (TP):
• TP1: Nearest intraday support
• TP2: Major demand zone from previous consolidation
• TP3: Liquidity sweep near lower support range
Stop Loss (SL):
• Above the recent swing high / resistance zone
Bias Confirmation:
• Sustained trading below resistance
• Weak bullish retracements
• Bearish structure remains valid unless resistance is broken
Risk Management:
Risk a maximum of 1–2% per trade, wait for confirmation before entry, and secure profits by trailing stop after TP1.
#XRPUSDT #TechnicalAnalysis #CryptoTrading #ShortSetup #MarketStructure
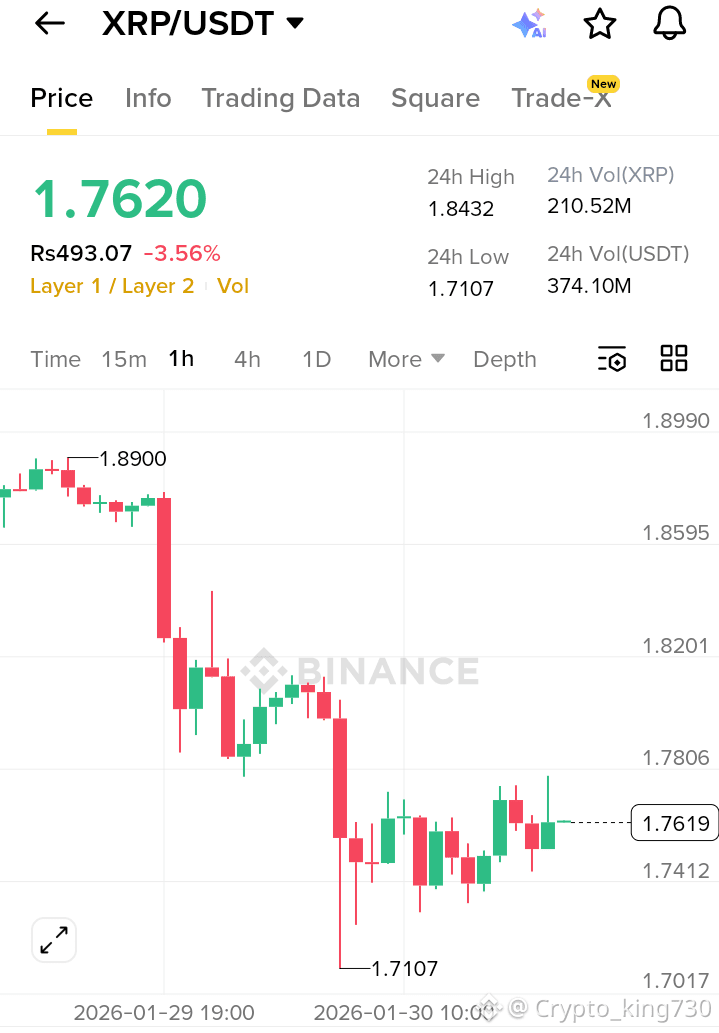
$SOL /USDT BEARISH CONTINUATION SETUP
Market Structure:
$SOL is trading below key intraday resistances with consistent lower highs and lower lows, confirming bearish control. Rejection from the upper supply zone and weak bounce attempts suggest sellers are still dominant. Volume behavior supports continuation rather than reversal.
Trade Idea: SHORT POSITION
Entry Zone:
• Short on pullback into the resistance zone
Targets (TP):
• TP1: Previous minor support
• TP2: Demand zone near recent lows
• TP3: Extended target at lower support sweep
Stop Loss (SL):
• Above the nearest strong resistance / invalidation level
Bias Confirmation:
• Price holding below resistance
• Weak bullish candles and strong bearish follow-through
• Structure remains bearish unless resistance is reclaimed
Risk Management:
Risk only 1–2% per trade, wait for confirmation before entry, and trail stop loss after TP1 is hit.
#SOLUSDT #CryptoTrading #TechnicalAnalysis #ShortTrade #RiskManagement
Market Structure:
$SOL is trading below key intraday resistances with consistent lower highs and lower lows, confirming bearish control. Rejection from the upper supply zone and weak bounce attempts suggest sellers are still dominant. Volume behavior supports continuation rather than reversal.
Trade Idea: SHORT POSITION
Entry Zone:
• Short on pullback into the resistance zone
Targets (TP):
• TP1: Previous minor support
• TP2: Demand zone near recent lows
• TP3: Extended target at lower support sweep
Stop Loss (SL):
• Above the nearest strong resistance / invalidation level
Bias Confirmation:
• Price holding below resistance
• Weak bullish candles and strong bearish follow-through
• Structure remains bearish unless resistance is reclaimed
Risk Management:
Risk only 1–2% per trade, wait for confirmation before entry, and trail stop loss after TP1 is hit.
#SOLUSDT #CryptoTrading #TechnicalAnalysis #ShortTrade #RiskManagement
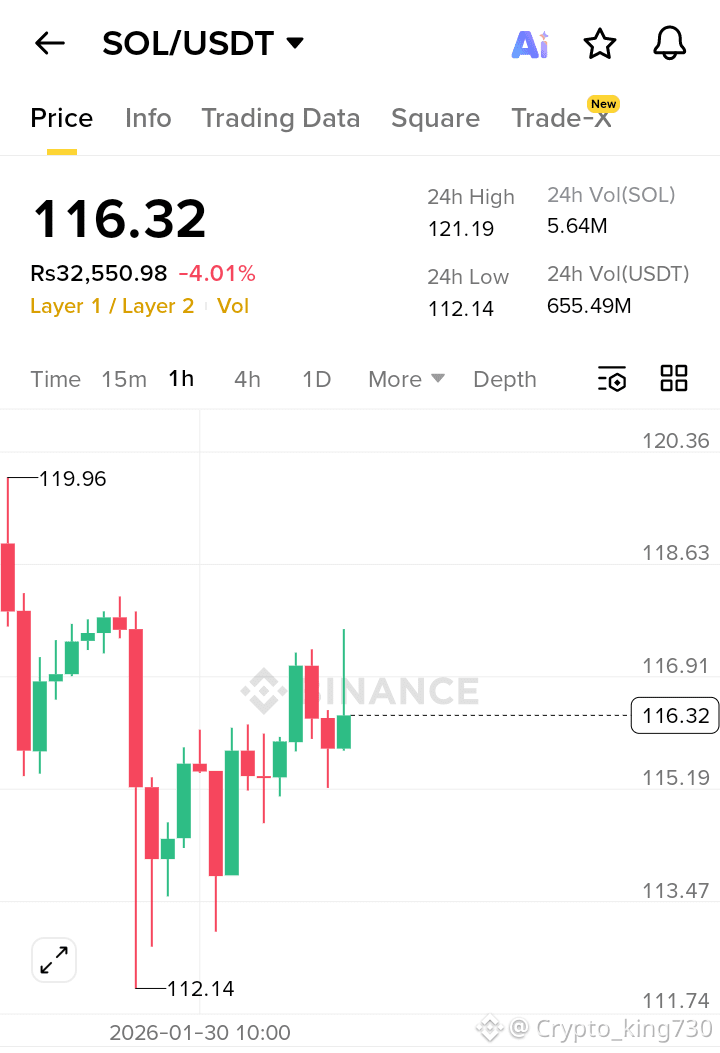
$WLFI /USDT BEARISH CONTINUATION SETUP
$WLFI /USDT is trading under a bearish market structure after repeated rejection from the upper resistance zone. Price has failed to hold key intraday support and is forming lower highs, signaling sustained selling pressure. Weak bounce attempts and declining momentum suggest the next move favors the downside.
Trade Idea: SHORT
Entry Zone: 0.1530 – 0.1565
Targets:
TP1: 0.1460
TP2: 0.1420
TP3: 0.1380
Stop Loss: 0.1638 (above major resistance and trend invalidation)
Market Outlook:
As long as price remains below the supply zone, sellers are expected to control the trend. A confirmed breakdown below the current demand area may trigger accelerated downside continuation.
Risk Management:
Use strict position sizing with 1–2% risk per trade, wait for rejection confirmation near the entry zone, and move stop loss to breakeven after TP1.
#WLFIUSDT #TechnicalAnalysis #BearishSetup #MarketStructure #RiskManagement
$WLFI /USDT is trading under a bearish market structure after repeated rejection from the upper resistance zone. Price has failed to hold key intraday support and is forming lower highs, signaling sustained selling pressure. Weak bounce attempts and declining momentum suggest the next move favors the downside.
Trade Idea: SHORT
Entry Zone: 0.1530 – 0.1565
Targets:
TP1: 0.1460
TP2: 0.1420
TP3: 0.1380
Stop Loss: 0.1638 (above major resistance and trend invalidation)
Market Outlook:
As long as price remains below the supply zone, sellers are expected to control the trend. A confirmed breakdown below the current demand area may trigger accelerated downside continuation.
Risk Management:
Use strict position sizing with 1–2% risk per trade, wait for rejection confirmation near the entry zone, and move stop loss to breakeven after TP1.
#WLFIUSDT #TechnicalAnalysis #BearishSetup #MarketStructure #RiskManagement
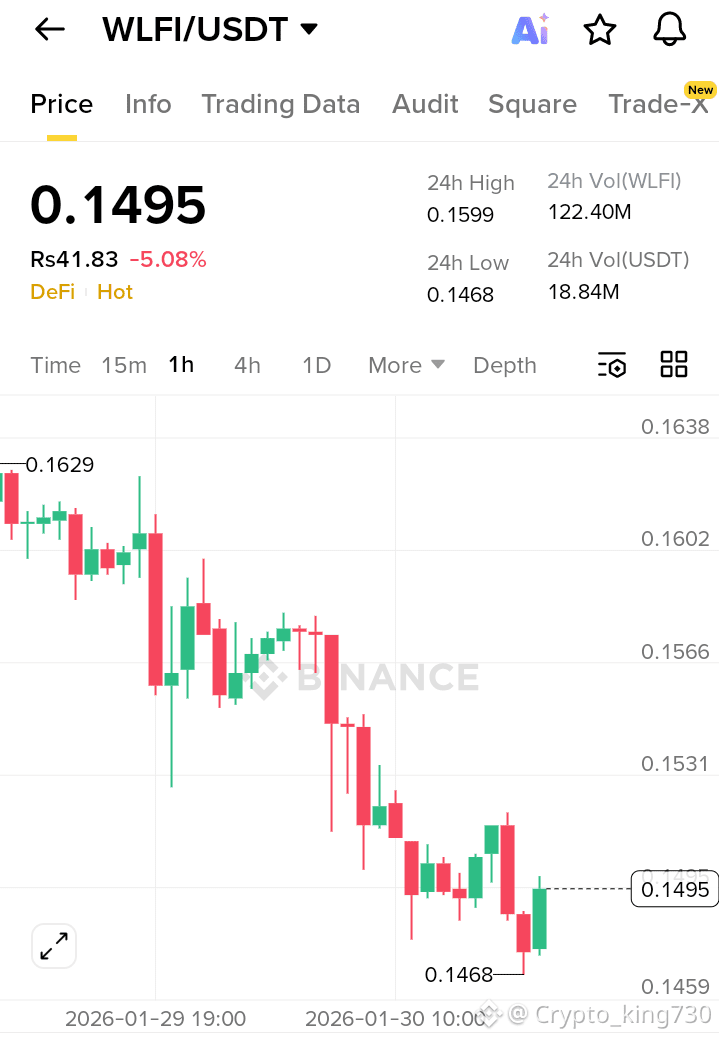
$ETH /USDT BEARISH BREAKDOWN SETUP
$ETH /USDT is showing a clear bearish continuation after strong rejection from the upper resistance zone. Price has broken below a key support area and is forming lower highs and lower lows, confirming seller dominance. Increased downside volume and weak pullbacks suggest further decline toward lower demand zones.
Trade Idea: SHORT
Entry Zone: 2,820 – 2,880
Targets:
TP1: 2,720
TP2: 2,690
TP3: 2,650
Stop Loss: 2,970 (above major resistance and structure invalidation)
Market Outlook:
As long as price remains below the broken support-turned-resistance zone, bearish momentum is expected to persist. Any pullback into resistance may offer short-selling opportunities.
Risk Management:
Risk only 1–2% per trade, wait for confirmation near the entry zone, and trail stop loss after TP1 to lock in gains.
#ETHUSDT #TechnicalAnalysis #BearishTrend #SupportResistance #RiskManagement
$ETH /USDT is showing a clear bearish continuation after strong rejection from the upper resistance zone. Price has broken below a key support area and is forming lower highs and lower lows, confirming seller dominance. Increased downside volume and weak pullbacks suggest further decline toward lower demand zones.
Trade Idea: SHORT
Entry Zone: 2,820 – 2,880
Targets:
TP1: 2,720
TP2: 2,690
TP3: 2,650
Stop Loss: 2,970 (above major resistance and structure invalidation)
Market Outlook:
As long as price remains below the broken support-turned-resistance zone, bearish momentum is expected to persist. Any pullback into resistance may offer short-selling opportunities.
Risk Management:
Risk only 1–2% per trade, wait for confirmation near the entry zone, and trail stop loss after TP1 to lock in gains.
#ETHUSDT #TechnicalAnalysis #BearishTrend #SupportResistance #RiskManagement
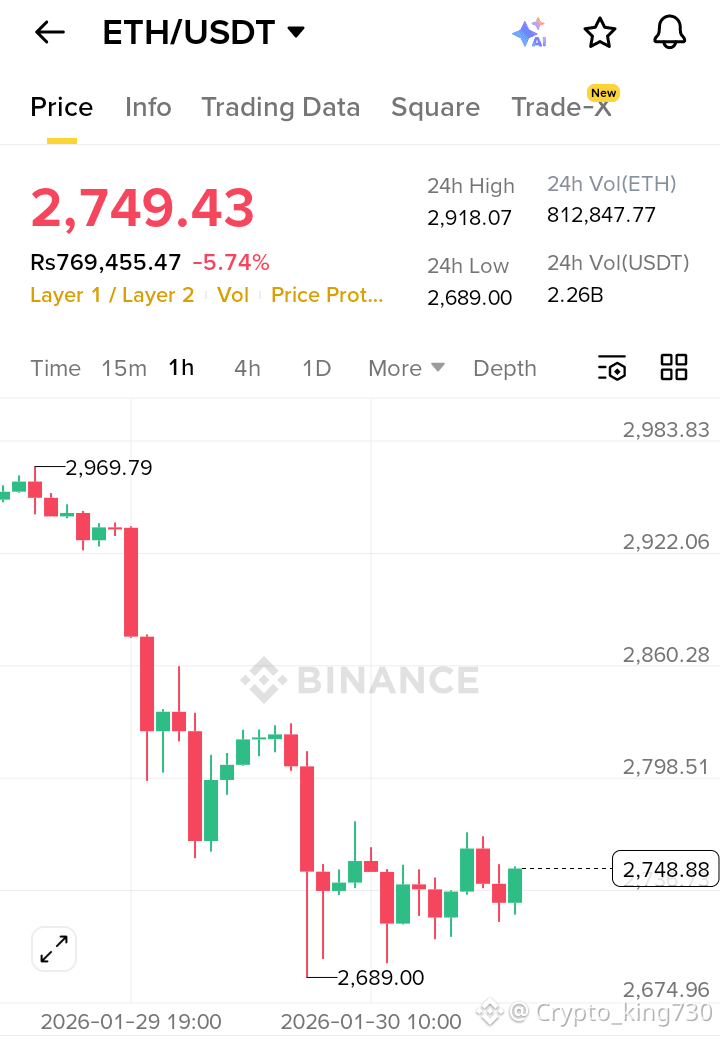
$BNB /USDT BEARISH CONTINUATION SETUP
$BNB /USDT is showing clear bearish structure after facing strong rejection from the upper resistance zone. Price failed to sustain above the supply area and formed lower highs, indicating sellers are in control. Volume expansion on the downside and weak recovery attempts suggest further downside pressure in the next sessions.
Trade Idea: SHORT
Entry Zone: 860 – 870
Targets:
TP1: 845
TP2: 833
TP3: 820
Stop Loss: 895 (above major resistance & invalidation level)
Market Outlook:
As long as price remains below the highlighted resistance band, bearish momentum is expected to continue. A breakdown below the recent support zone can accelerate selling towards lower demand levels.
Risk Management:
Risk only 1–2% of capital per trade, wait for confirmation near the entry zone, and trail stop loss after TP1 to protect profits.
#BNBUSDT #TechnicalAnalysis #CryptoTrading #PriceAction #RiskManagement
$BNB /USDT is showing clear bearish structure after facing strong rejection from the upper resistance zone. Price failed to sustain above the supply area and formed lower highs, indicating sellers are in control. Volume expansion on the downside and weak recovery attempts suggest further downside pressure in the next sessions.
Trade Idea: SHORT
Entry Zone: 860 – 870
Targets:
TP1: 845
TP2: 833
TP3: 820
Stop Loss: 895 (above major resistance & invalidation level)
Market Outlook:
As long as price remains below the highlighted resistance band, bearish momentum is expected to continue. A breakdown below the recent support zone can accelerate selling towards lower demand levels.
Risk Management:
Risk only 1–2% of capital per trade, wait for confirmation near the entry zone, and trail stop loss after TP1 to protect profits.
#BNBUSDT #TechnicalAnalysis #CryptoTrading #PriceAction #RiskManagement
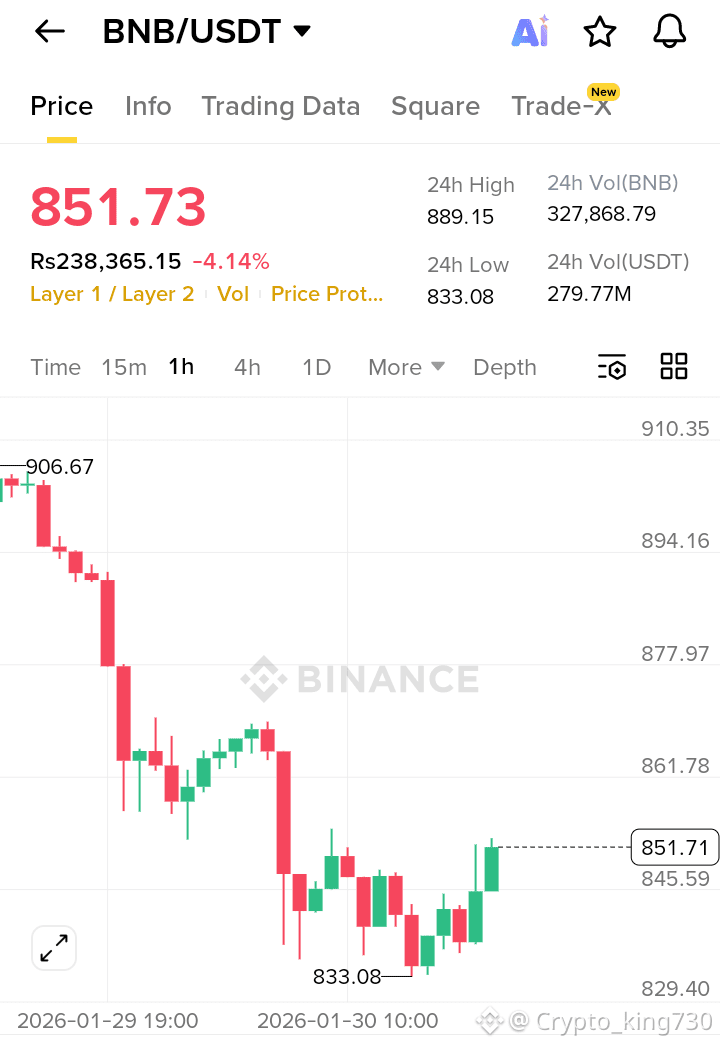
$BNB /USDT BULLISH CONTINUATION SETUP – BUY THE BREAKOUT
Market Structure:
$BNB /USDT is holding above a strong intraday support zone and forming higher lows on lower timeframes, indicating accumulation. Price rejection from the lows shows buyers stepping in aggressively, while the range compression hints at an upcoming expansion to the upside.
Trend & Momentum:
The short-term trend remains bullish as price respects key demand levels. Volume stability near support suggests smart money interest, and a breakout above the recent resistance zone can trigger fresh upside momentum.
Trade Plan (LONG):
Entry: On a confirmed breakout and close above the resistance zone
Targets (TP):
TP1: Previous intraday high
TP2: Upper liquidity zone near recent range top
TP3: Extension towards the next psychological resistance
Stop Loss (SL): Below the major support and recent swing low
Risk Management:
Risk only a small portion of capital per trade, wait for confirmation before entry, and trail stop loss as targets are achieved to protect profits.
#BNBUSDT #TechnicalAnalysis #CryptoTrading #PriceAction #RiskManagement
Market Structure:
$BNB /USDT is holding above a strong intraday support zone and forming higher lows on lower timeframes, indicating accumulation. Price rejection from the lows shows buyers stepping in aggressively, while the range compression hints at an upcoming expansion to the upside.
Trend & Momentum:
The short-term trend remains bullish as price respects key demand levels. Volume stability near support suggests smart money interest, and a breakout above the recent resistance zone can trigger fresh upside momentum.
Trade Plan (LONG):
Entry: On a confirmed breakout and close above the resistance zone
Targets (TP):
TP1: Previous intraday high
TP2: Upper liquidity zone near recent range top
TP3: Extension towards the next psychological resistance
Stop Loss (SL): Below the major support and recent swing low
Risk Management:
Risk only a small portion of capital per trade, wait for confirmation before entry, and trail stop loss as targets are achieved to protect profits.
#BNBUSDT #TechnicalAnalysis #CryptoTrading #PriceAction #RiskManagement
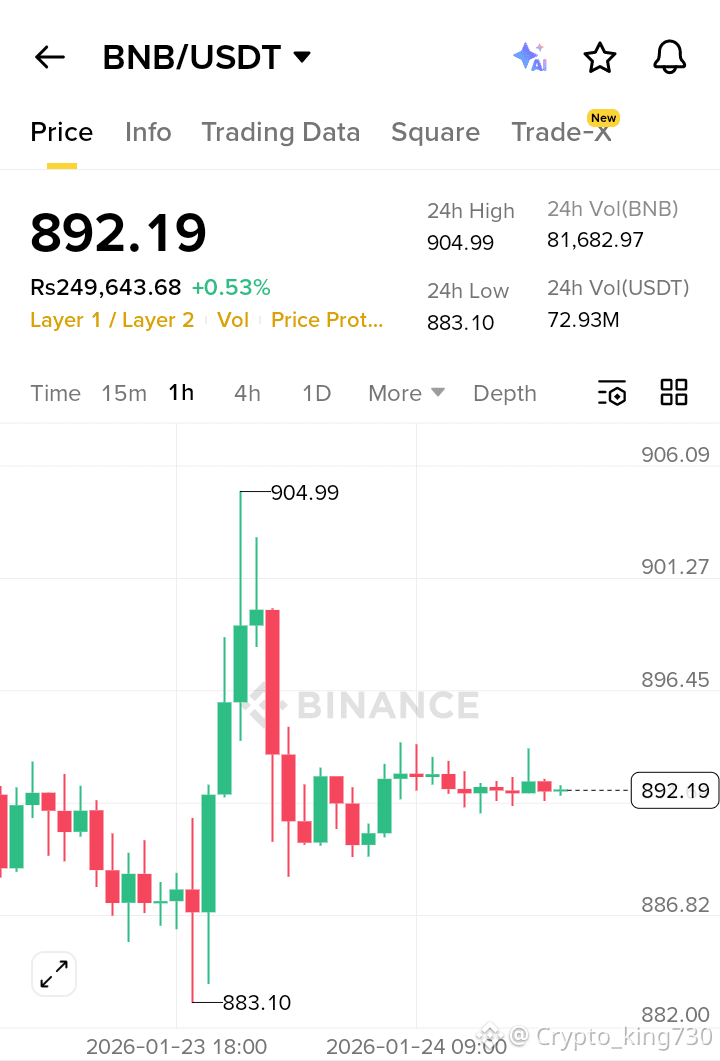
$SXT /USDC BULLISH CONTINUATION SETUP
$SXT /USDC has shown strong bullish momentum after an impulsive move from the lower demand zone, supported by high volume expansion. Price has broken above previous resistance and is now forming a healthy structure, indicating a possible continuation after consolidation. As long as price holds above the key support zone, bulls remain in control and the next leg up is likely.
Bias: Bullish
Position: Long
Long Entry Zone: 0.0380 – 0.0410
Target 1: 0.0475
Target 2: 0.0520
Target 3: 0.0580
Stop Loss: 0.0335 (below key support and structure low)
Risk Management:
Risk only 1–2% of capital per trade, wait for confirmation near the entry zone, and secure profits by trailing stop after Target 1 is achieved.
#RSI #PriceAction #SupportResistance #TrendAnalysis #CryptoTrading
$SXT /USDC has shown strong bullish momentum after an impulsive move from the lower demand zone, supported by high volume expansion. Price has broken above previous resistance and is now forming a healthy structure, indicating a possible continuation after consolidation. As long as price holds above the key support zone, bulls remain in control and the next leg up is likely.
Bias: Bullish
Position: Long
Long Entry Zone: 0.0380 – 0.0410
Target 1: 0.0475
Target 2: 0.0520
Target 3: 0.0580
Stop Loss: 0.0335 (below key support and structure low)
Risk Management:
Risk only 1–2% of capital per trade, wait for confirmation near the entry zone, and secure profits by trailing stop after Target 1 is achieved.
#RSI #PriceAction #SupportResistance #TrendAnalysis #CryptoTrading
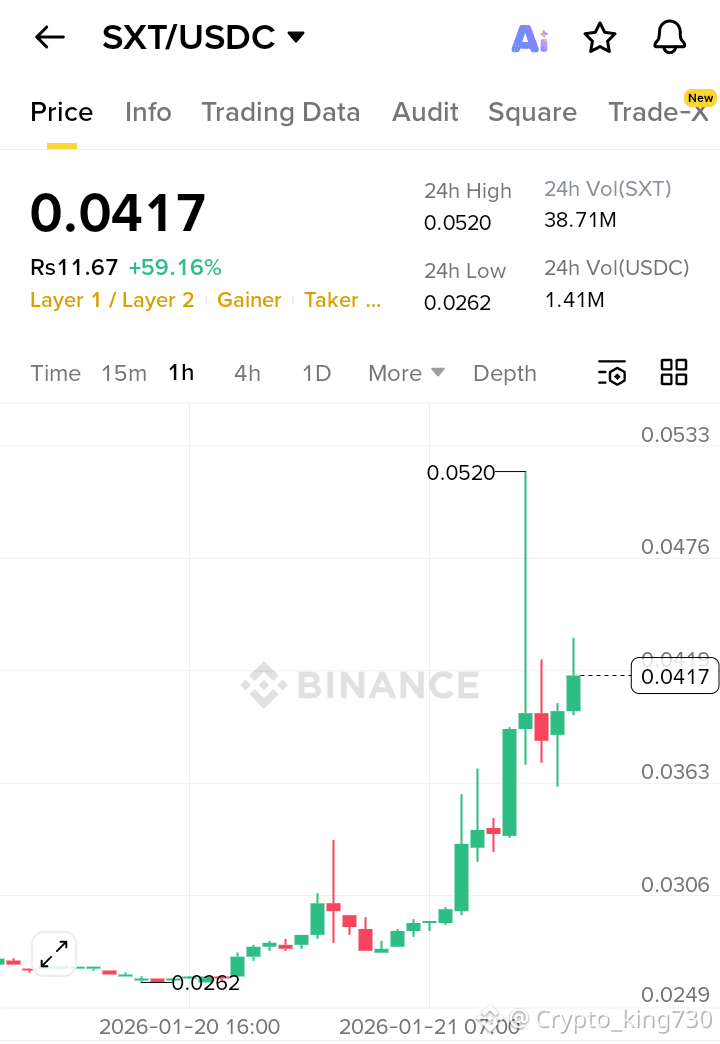
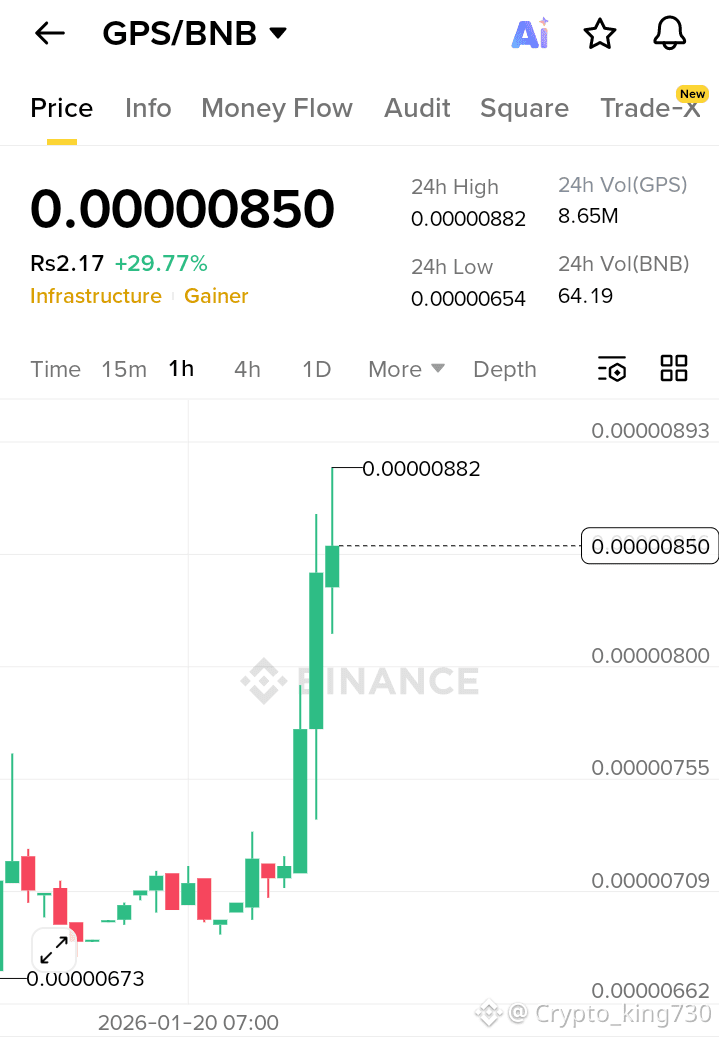
$GPS /$BNB BULLISH CONTINUATION SETUP – BUY THE BREAKOUT
$GPS /BNB has shown strong bullish momentum after a sharp impulsive move, supported by increasing volume and strong buying pressure. Price has successfully broken above its previous consolidation zone and is now holding above a key support area, indicating continuation strength rather than exhaustion. The structure remains bullish as long as higher lows are maintained, suggesting the next leg up is likely after minor pullbacks.
Trade Plan (LONG)
Entry: On pullback above the strong support zone
Targets:
TP1: 0.00000920
TP2: 0.00000980
TP3: 0.00001060
Stop Loss: Below 0.00000700
The breakout zone has now turned into support, and momentum indicators favor further upside if buyers keep defending this level.
Risk Management:
Use only a small portion of capital per trade, strictly follow stop loss, and consider booking partial profits at each target to reduce risk.
#RSI #Breakout #BullishTrend #CryptoTA #AltcoinAnalysis
$GPS /BNB has shown strong bullish momentum after a sharp impulsive move, supported by increasing volume and strong buying pressure. Price has successfully broken above its previous consolidation zone and is now holding above a key support area, indicating continuation strength rather than exhaustion. The structure remains bullish as long as higher lows are maintained, suggesting the next leg up is likely after minor pullbacks.
Trade Plan (LONG)
Entry: On pullback above the strong support zone
Targets:
TP1: 0.00000920
TP2: 0.00000980
TP3: 0.00001060
Stop Loss: Below 0.00000700
The breakout zone has now turned into support, and momentum indicators favor further upside if buyers keep defending this level.
Risk Management:
Use only a small portion of capital per trade, strictly follow stop loss, and consider booking partial profits at each target to reduce risk.
#RSI #Breakout #BullishTrend #CryptoTA #AltcoinAnalysis
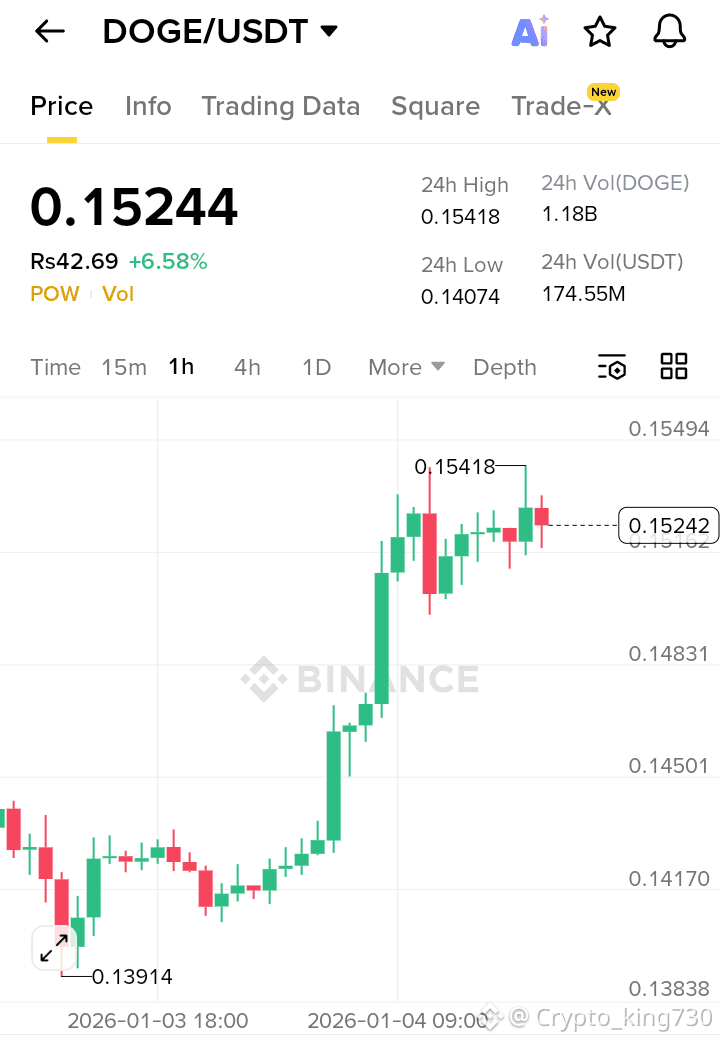
$DOGE /USDT BULLISH BREAKOUT SETUP
$DOGE is showing strong upward momentum after reclaiming key support levels and testing upper resistance areas. Buyers are maintaining control with higher lows forming, indicating strength and potential continuation. A clean break and hold above resistance can open room for an extended upside move.
Long Entry: Above 0.1490 – 0.1500
Targets:
TP1: 0.1550
TP2: 0.1620
TP3: 0.1700
Stop Loss: Below 0.1410 – 0.1390 support zone
Risk Management: Risk only 1–2% per trade, trail SL after TP1, avoid over-leveraging, and stick to plan with discipline.
#DOGE #CryptoAnalysis #TradingSetup #Altcoins #TechnicalAnalysis
$DOGE is showing strong upward momentum after reclaiming key support levels and testing upper resistance areas. Buyers are maintaining control with higher lows forming, indicating strength and potential continuation. A clean break and hold above resistance can open room for an extended upside move.
Long Entry: Above 0.1490 – 0.1500
Targets:
TP1: 0.1550
TP2: 0.1620
TP3: 0.1700
Stop Loss: Below 0.1410 – 0.1390 support zone
Risk Management: Risk only 1–2% per trade, trail SL after TP1, avoid over-leveraging, and stick to plan with discipline.
#DOGE #CryptoAnalysis #TradingSetup #Altcoins #TechnicalAnalysis
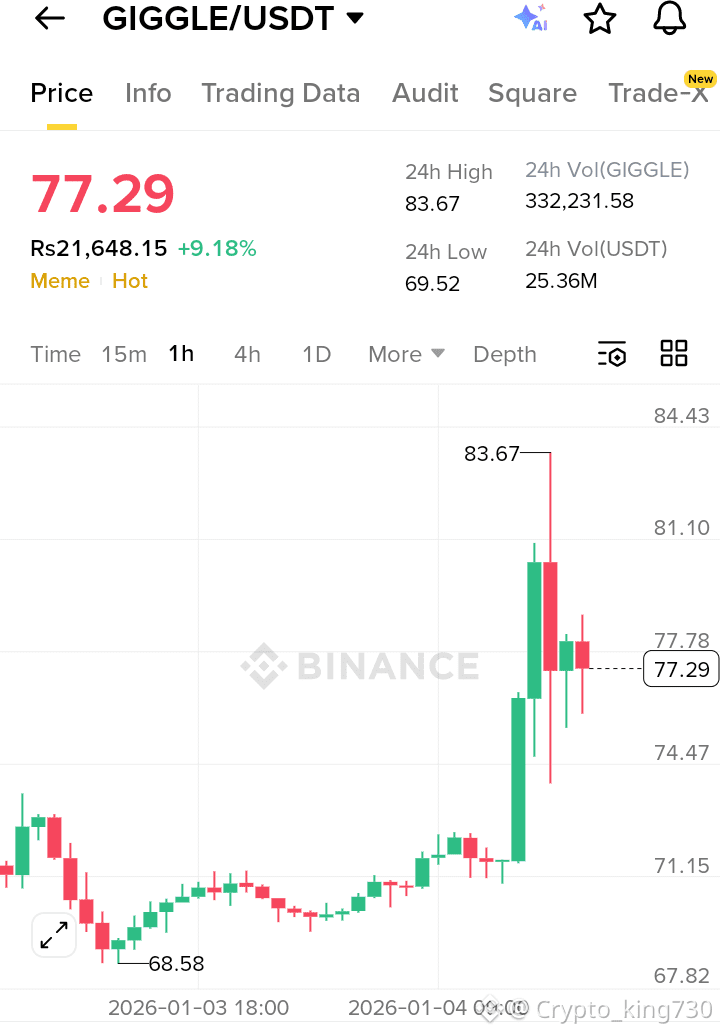
$GIGGLE /USDT BULLISH MOMENTUM CONTINUES AS PRICE HOLDS ABOVE KEY SUPPORT WITH STRONG BUYING PRESSURE
$GIGGLE is showing strong bullish momentum after recovering from its recent dip and pushing toward resistance with increasing volume. The market structure is forming higher lows, indicating sustained buyer dominance. If price holds above the breakout region, continuation toward upper resistance levels is highly likely.
LONG ENTRY: On sustained strength above breakout resistance
TP1: 86.00
TP2: 92.00
TP3: 100.00
SL: Below the strong support zone
Risk Management: Trade with controlled lot size, keep SL disciplined, and secure partial profits on each target to manage volatility.
#GIGGLE #CryptoTrading #TechnicalAnalysisb #AltcoinSetup #USDT
$GIGGLE is showing strong bullish momentum after recovering from its recent dip and pushing toward resistance with increasing volume. The market structure is forming higher lows, indicating sustained buyer dominance. If price holds above the breakout region, continuation toward upper resistance levels is highly likely.
LONG ENTRY: On sustained strength above breakout resistance
TP1: 86.00
TP2: 92.00
TP3: 100.00
SL: Below the strong support zone
Risk Management: Trade with controlled lot size, keep SL disciplined, and secure partial profits on each target to manage volatility.
#GIGGLE #CryptoTrading #TechnicalAnalysisb #AltcoinSetup #USDT
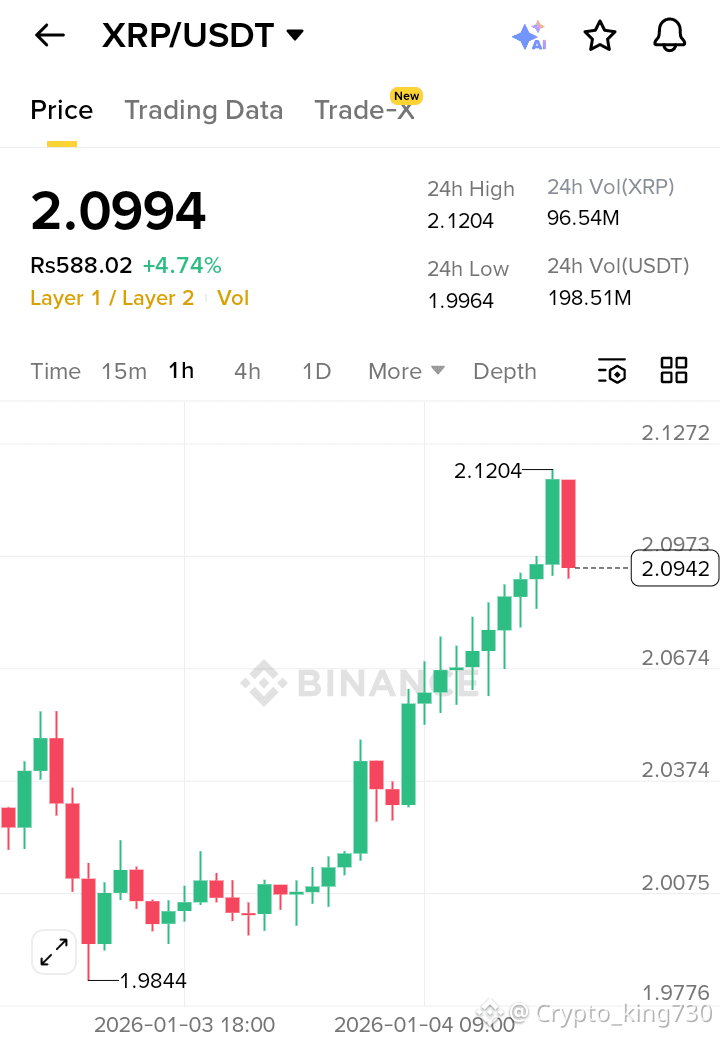
$XRP /USDT BULLISH CONTINUATION AS PRICE HOLDS ABOVE KEY SUPPORT AND MOMENTUM REMAINS STRONG
$XRP is maintaining a strong bullish structure after reclaiming higher levels and sustaining momentum with solid buying pressure. The chart shows higher lows formation with resistance testing, indicating potential upside continuation if strength sustains above the breakout area. Any consolidation above support favors further bullish expansion.
LONG ENTRY: On sustained strength above the resistance zone
TP1: 2.1800
TP2: 2.2500
TP3: 2.3500
SL: Below the key support zone
Risk Management: Enter with calculated position size, keep SL strict, book partial profits at targets to secure gains.
#XRP #CryptoAnalysis #TechnicalTrading #Altcoins #USDT
$XRP is maintaining a strong bullish structure after reclaiming higher levels and sustaining momentum with solid buying pressure. The chart shows higher lows formation with resistance testing, indicating potential upside continuation if strength sustains above the breakout area. Any consolidation above support favors further bullish expansion.
LONG ENTRY: On sustained strength above the resistance zone
TP1: 2.1800
TP2: 2.2500
TP3: 2.3500
SL: Below the key support zone
Risk Management: Enter with calculated position size, keep SL strict, book partial profits at targets to secure gains.
#XRP #CryptoAnalysis #TechnicalTrading #Altcoins #USDT
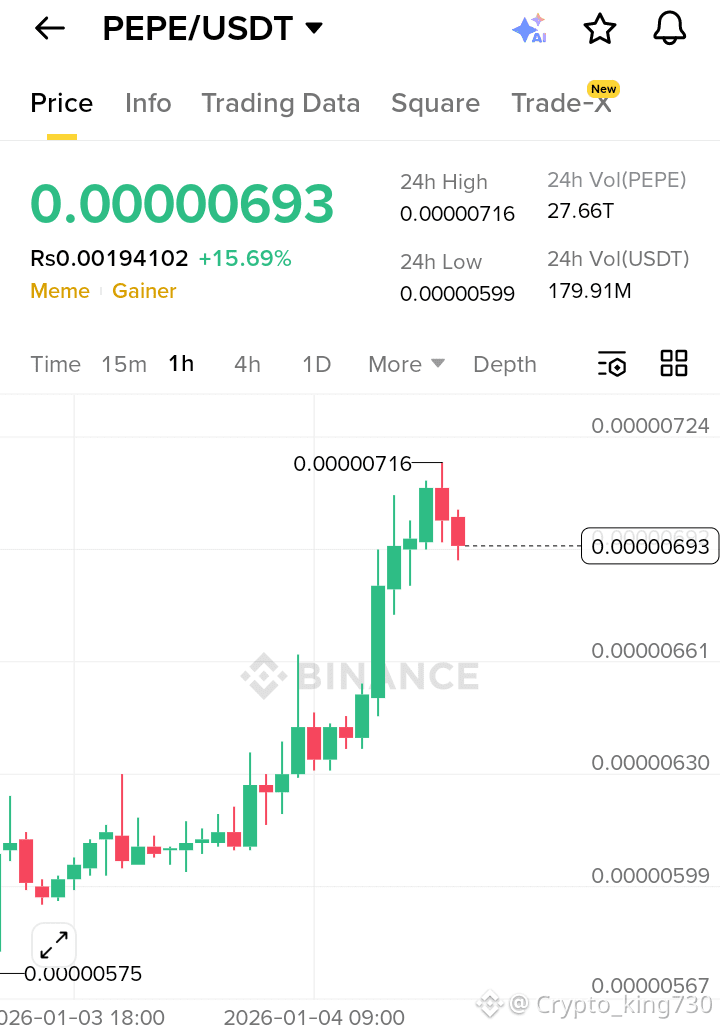
$PEPE /USDT BULLISH BREAKOUT SETUP CONFIRMS FURTHER UPSIDE MOMENTUM
$PEPE has broken above recent consolidation and sustained strength with increasing trading volume, showing momentum continuation signals. A bullish structure is developing with higher highs and strong recovery from support, indicating potential upside extension if price sustains above breakout levels.
LONG ENTRY: Above the breakout zone confirmation
TP1: 0.00000760
TP2: 0.00000820
TP3: 0.00000900
SL: Below the recent support zone
Risk Management: Use proper position sizing, avoid over-leveraging, trail stops as price moves in profit.
#PEPE #CryptoTrading #TechnicalAnalysis #Altcoins #USDT
$PEPE has broken above recent consolidation and sustained strength with increasing trading volume, showing momentum continuation signals. A bullish structure is developing with higher highs and strong recovery from support, indicating potential upside extension if price sustains above breakout levels.
LONG ENTRY: Above the breakout zone confirmation
TP1: 0.00000760
TP2: 0.00000820
TP3: 0.00000900
SL: Below the recent support zone
Risk Management: Use proper position sizing, avoid over-leveraging, trail stops as price moves in profit.
#PEPE #CryptoTrading #TechnicalAnalysis #Altcoins #USDT
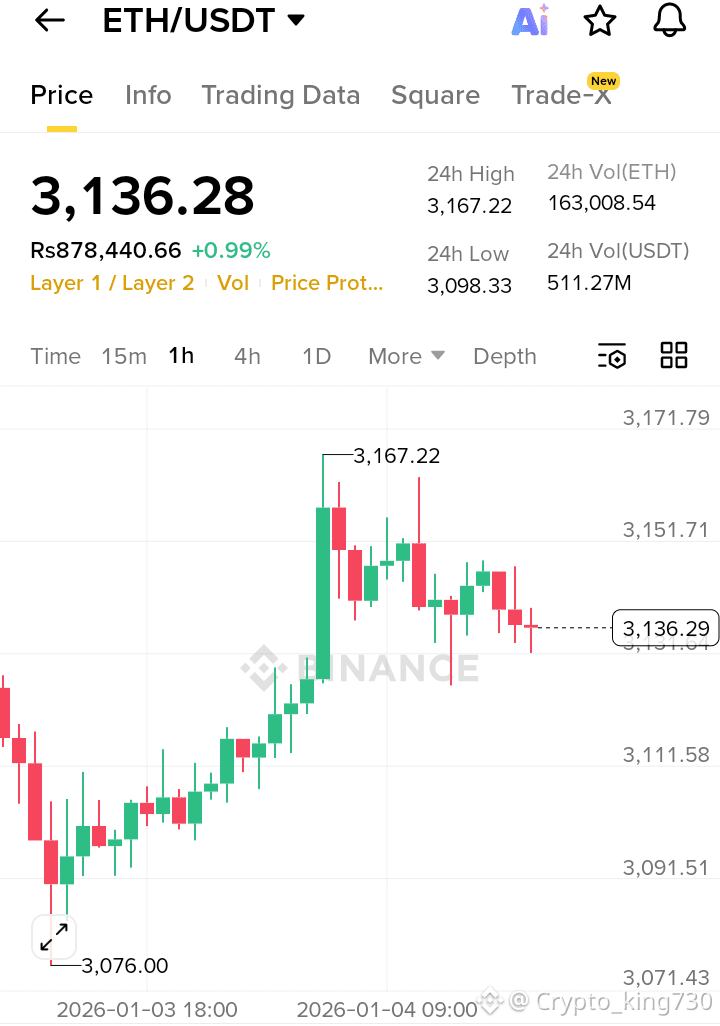
$ETH /USDT BULLISH CONTINUATION SETUP
$ETH is maintaining strong structure with higher lows and sustained buying momentum. Price is consolidating near resistance, indicating accumulation and potential upside continuation if breakout sustains. Market sentiment favors bulls as support zones are consistently protected.
Long Entry: On breakout and hold above resistance
TP1: 3,220
TP2: 3,280
TP3: 3,350
SL: Below key support zone
Risk Management: Use proper position sizing, respect SL, secure partial profits, and avoid overexposure.
#ETH #CryptoAnalysis #BullishSetup #TechnicalTrading #PriceAction
$ETH is maintaining strong structure with higher lows and sustained buying momentum. Price is consolidating near resistance, indicating accumulation and potential upside continuation if breakout sustains. Market sentiment favors bulls as support zones are consistently protected.
Long Entry: On breakout and hold above resistance
TP1: 3,220
TP2: 3,280
TP3: 3,350
SL: Below key support zone
Risk Management: Use proper position sizing, respect SL, secure partial profits, and avoid overexposure.
#ETH #CryptoAnalysis #BullishSetup #TechnicalTrading #PriceAction
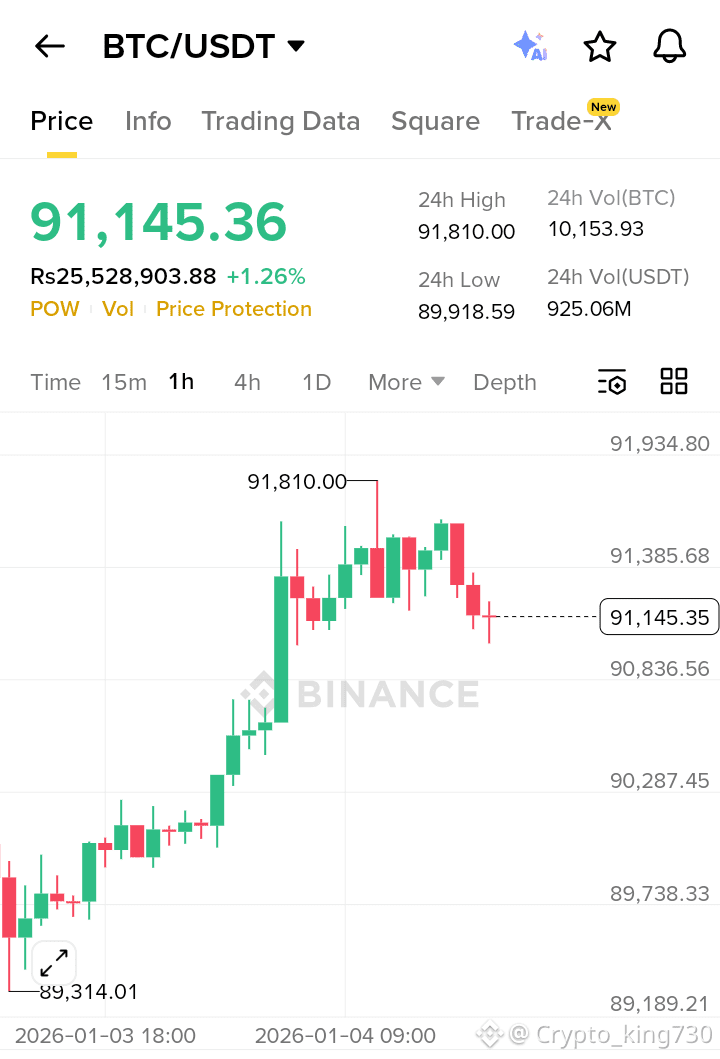
$BTC /USDT BULLISH CONTINUATION SETUP
Market structure remains strong with higher lows and sustained upward momentum, indicating buyers are still in control. Successful defense of recent support levels along with strength near resistance suggests potential continuation toward higher levels if breakout confirms.
Long Entry: On confirmed breakout above resistance
TP1: 92,800
TP2: 94,500
TP3: 96,200
SL: Below key support zone
Risk Management: Trade with discipline, use strict SL, manage position size wisely, and secure partial profits at targets.
#BTC #CryptoAnalysis #BullishTrend #TechnicalTrading #PriceAction
Market structure remains strong with higher lows and sustained upward momentum, indicating buyers are still in control. Successful defense of recent support levels along with strength near resistance suggests potential continuation toward higher levels if breakout confirms.
Long Entry: On confirmed breakout above resistance
TP1: 92,800
TP2: 94,500
TP3: 96,200
SL: Below key support zone
Risk Management: Trade with discipline, use strict SL, manage position size wisely, and secure partial profits at targets.
#BTC #CryptoAnalysis #BullishTrend #TechnicalTrading #PriceAction
Log in to explore more content