

ByronS
11 Posts

ByronS
Report
Block User
emprendedor entusiasta de los mercados bursátiles y criptograficos
Open Trade
Frequent Trader
8.7 Years
87 Following
61 Followers
26 Liked
Posts
Portfolio
·
--
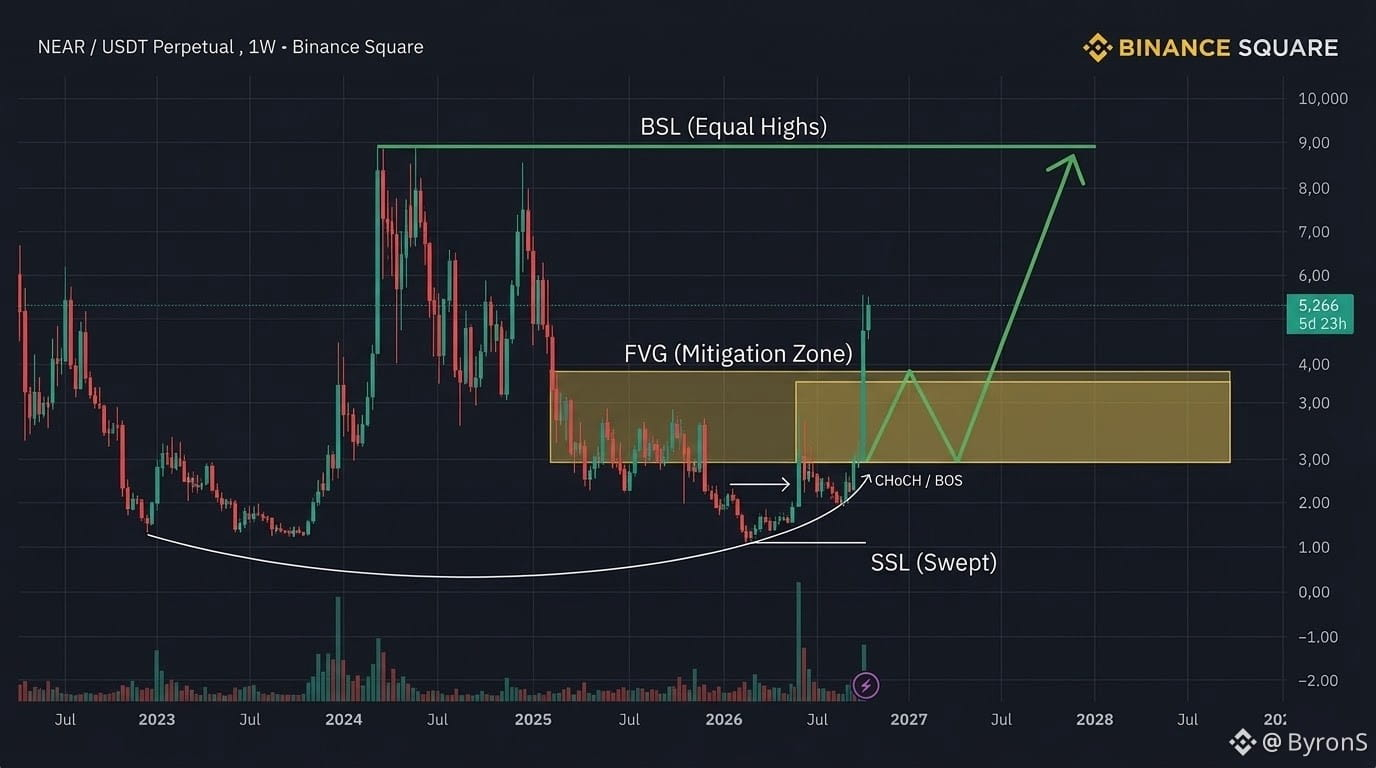
$NEAR / USDT (Weekly) | Institutional SMC Outlook
#SMCStrategy #SMCTrader
🔹 Liquidity Sweep (SSL): After clearing the lows at $1.00, price generated an institutional displacement with strong bullish volume.
🔹 Area of Interest / Mitigation (FVG): The impulse left a large weekly inefficiency (Fair Value Gap) between $2.50 and $3.80. Entering long directly at the current peak ($5.20+) carries high risk; the optimal entry (Discount Pricing) would be to wait for a mitigation into the FVG.
🔹 Primary Target (BSL): The final target of the bullish structure is at the $8.00–$9.00 highs, where Buy-Side Liquidity orders are resting.
$NEAR / USDT (Weekly) | Institutional SMC Outlook
#SMCStrategy #SMCTrader
🔹 Liquidity Sweep (SSL): After clearing the lows at $1.00, price generated an institutional displacement with strong bullish volume.
🔹 Area of Interest / Mitigation (FVG): The impulse left a large weekly inefficiency (Fair Value Gap) between $2.50 and $3.80. Entering long directly at the current peak ($5.20+) carries high risk; the optimal entry (Discount Pricing) would be to wait for a mitigation into the FVG.
🔹 Primary Target (BSL): The final target of the bullish structure is at the $8.00–$9.00 highs, where Buy-Side Liquidity orders are resting.
#SMCStrategy #SMCTrader
🔹 Liquidity Sweep (SSL): After clearing the lows at $1.00, price generated an institutional displacement with strong bullish volume.
🔹 Area of Interest / Mitigation (FVG): The impulse left a large weekly inefficiency (Fair Value Gap) between $2.50 and $3.80. Entering long directly at the current peak ($5.20+) carries high risk; the optimal entry (Discount Pricing) would be to wait for a mitigation into the FVG.
🔹 Primary Target (BSL): The final target of the bullish structure is at the $8.00–$9.00 highs, where Buy-Side Liquidity orders are resting.
204
·
--
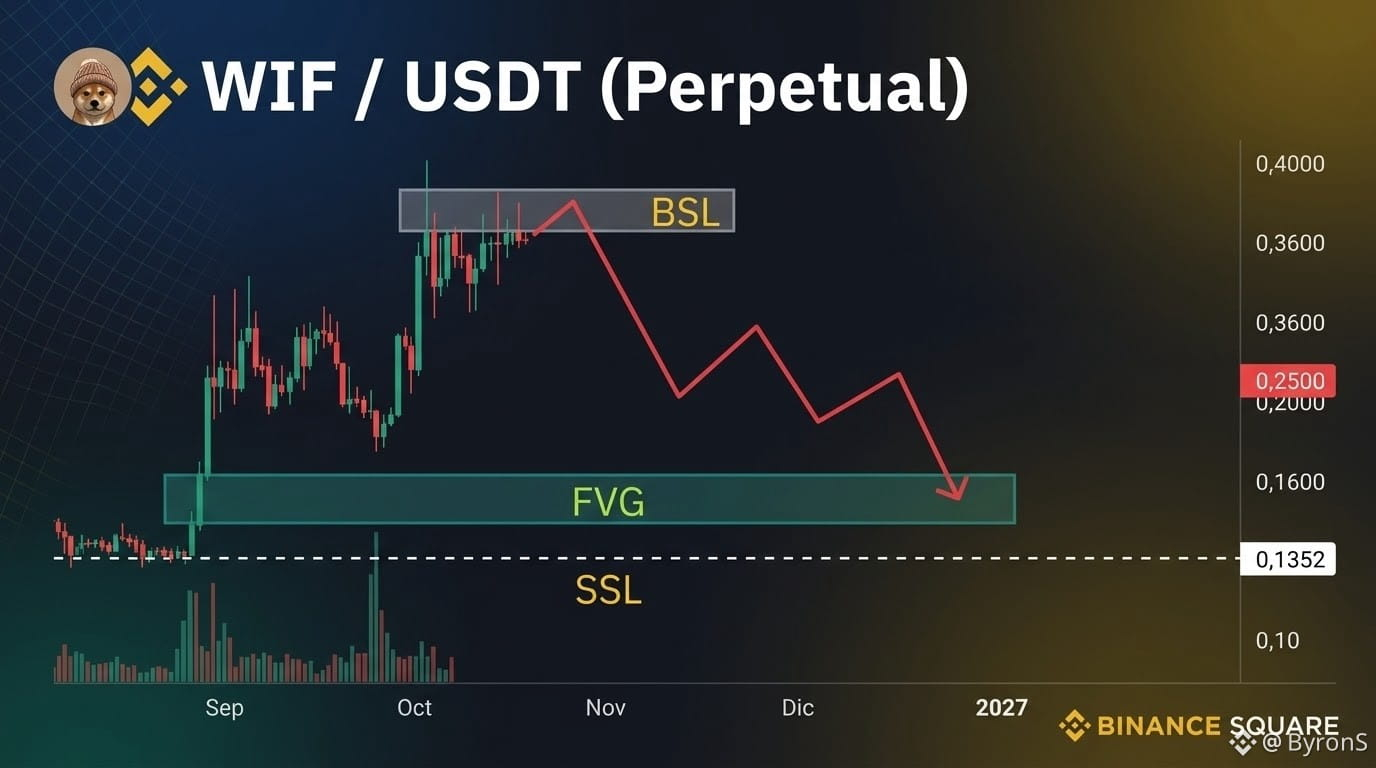
$WIF
#SMCTrader
Buy-Side Liquidity Sweep (BSL)
Price swept the previous highs within the 0.2600–0.2700 zone, capturing buy-side liquidity above resistance before showing rejection.
A bounce or corrective pullback toward 0.2100–0.2200 to confirm the bearish structure and trap liquidity.
Target / Support Zone (FVG) The inefficiency zone marked between 0.1500 and 0.1650 acts as the main take-profit target and potential institutional support.
$WIF
#SMCTrader
Buy-Side Liquidity Sweep (BSL)
Price swept the previous highs within the 0.2600–0.2700 zone, capturing buy-side liquidity above resistance before showing rejection.
A bounce or corrective pullback toward 0.2100–0.2200 to confirm the bearish structure and trap liquidity.
Target / Support Zone (FVG) The inefficiency zone marked between 0.1500 and 0.1650 acts as the main take-profit target and potential institutional support.
#SMCTrader
Buy-Side Liquidity Sweep (BSL)
Price swept the previous highs within the 0.2600–0.2700 zone, capturing buy-side liquidity above resistance before showing rejection.
A bounce or corrective pullback toward 0.2100–0.2200 to confirm the bearish structure and trap liquidity.
Target / Support Zone (FVG) The inefficiency zone marked between 0.1500 and 0.1650 acts as the main take-profit target and potential institutional support.
155
·
--
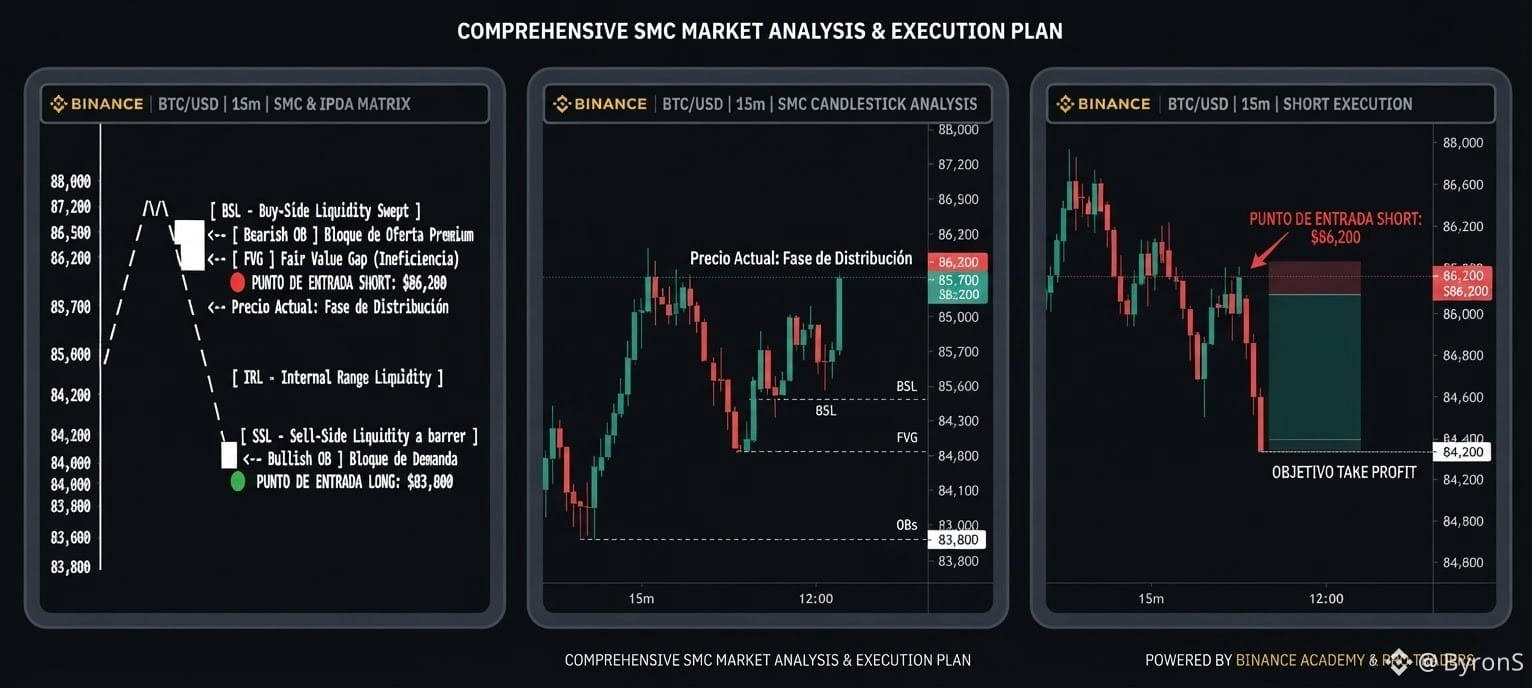
$BTC
Waiting for a short on BTC at $86200
do you have any analysis for this trade?
$BTC
Waiting for a short on BTC at $86200
do you have any analysis for this trade?
Waiting for a short on BTC at $86200
do you have any analysis for this trade?
186
·
--
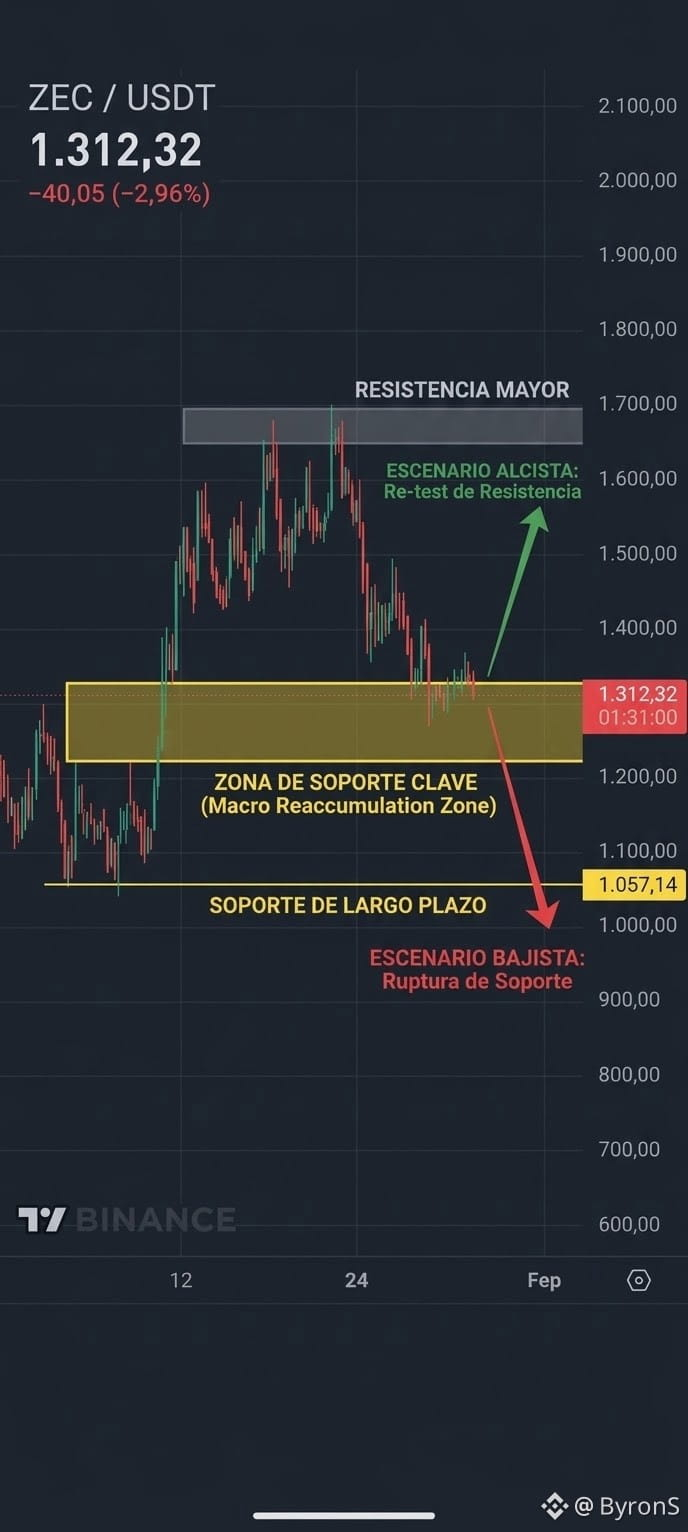
$ZEC
Bullish (Green) If support holds, the bulls could target resistance in the 1.650–1.700 area. A break above 1.400 would confirm it.
Bearish (Red): A decisive break below 1.050 would invalidate the bullish structure and could lead to a search for new lows.
Do you think support will hold?
$ZEC
Bullish (Green) If support holds, the bulls could target resistance in the 1.650–1.700 area. A break above 1.400 would confirm it.
Bearish (Red): A decisive break below 1.050 would invalidate the bullish structure and could lead to a search for new lows.
Do you think support will hold?
Bullish (Green) If support holds, the bulls could target resistance in the 1.650–1.700 area. A break above 1.400 would confirm it.
Bearish (Red): A decisive break below 1.050 would invalidate the bullish structure and could lead to a search for new lows.
Do you think support will hold?
369
·
--
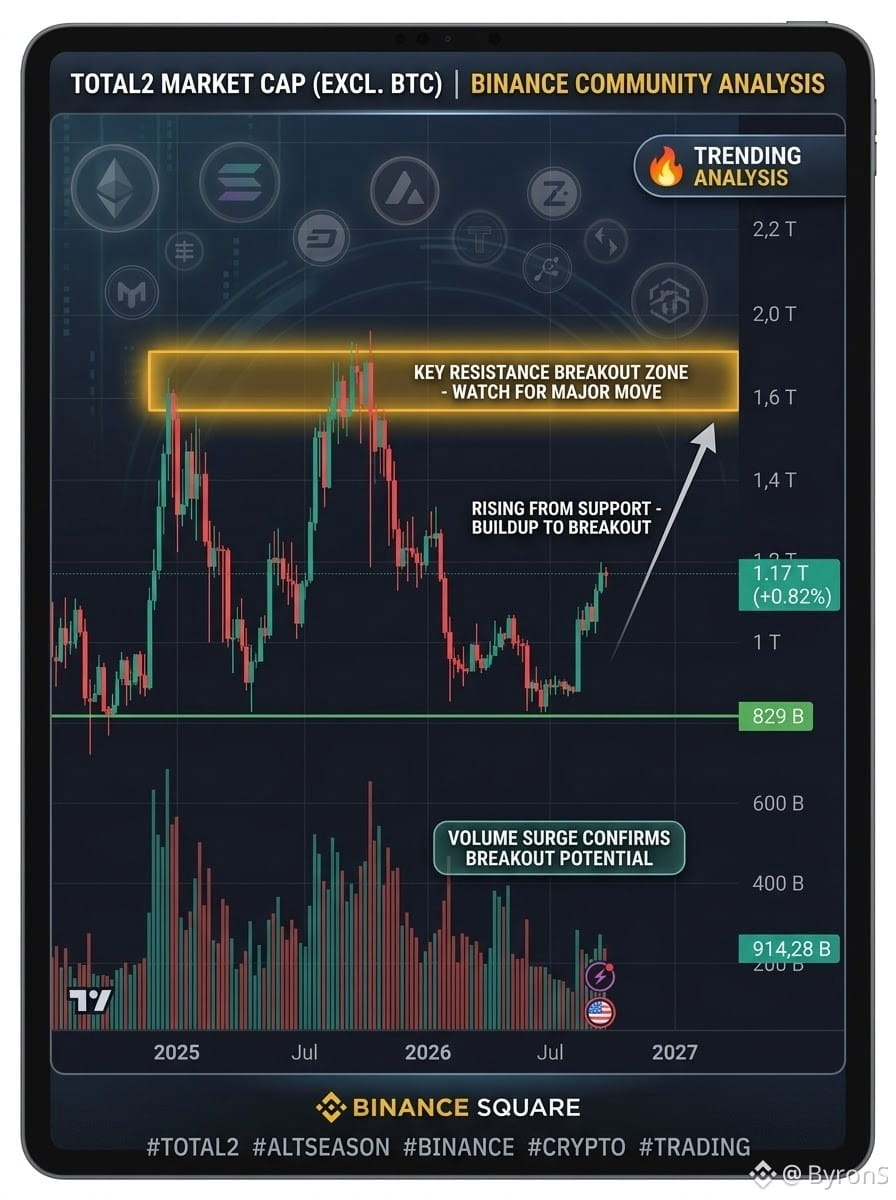
When analyzing the TOTAL2 chart (total crypto market capitalization excluding Bitcoin) using the SMC (Smart Money Concepts) methodology, the price entering the highlighted zone between $1.6T and $1.75T indicates the following key structural and liquidity events.
Capital Injection Phase: For TOTAL2 to reach $1.6T, the altcoin market must experience a massive expansion (Altseason).
Distribution Zone: Reaching this liquidity level does not suggest late FOMO buying, but rather the optimal zone for taking profits (Take Profit) and closing bullish swing positions in altcoins.
When analyzing the TOTAL2 chart (total crypto market capitalization excluding Bitcoin) using the SMC (Smart Money Concepts) methodology, the price entering the highlighted zone between $1.6T and $1.75T indicates the following key structural and liquidity events.
Capital Injection Phase: For TOTAL2 to reach $1.6T, the altcoin market must experience a massive expansion (Altseason).
Distribution Zone: Reaching this liquidity level does not suggest late FOMO buying, but rather the optimal zone for taking profits (Take Profit) and closing bullish swing positions in altcoins.
Capital Injection Phase: For TOTAL2 to reach $1.6T, the altcoin market must experience a massive expansion (Altseason).
Distribution Zone: Reaching this liquidity level does not suggest late FOMO buying, but rather the optimal zone for taking profits (Take Profit) and closing bullish swing positions in altcoins.
85
·
--
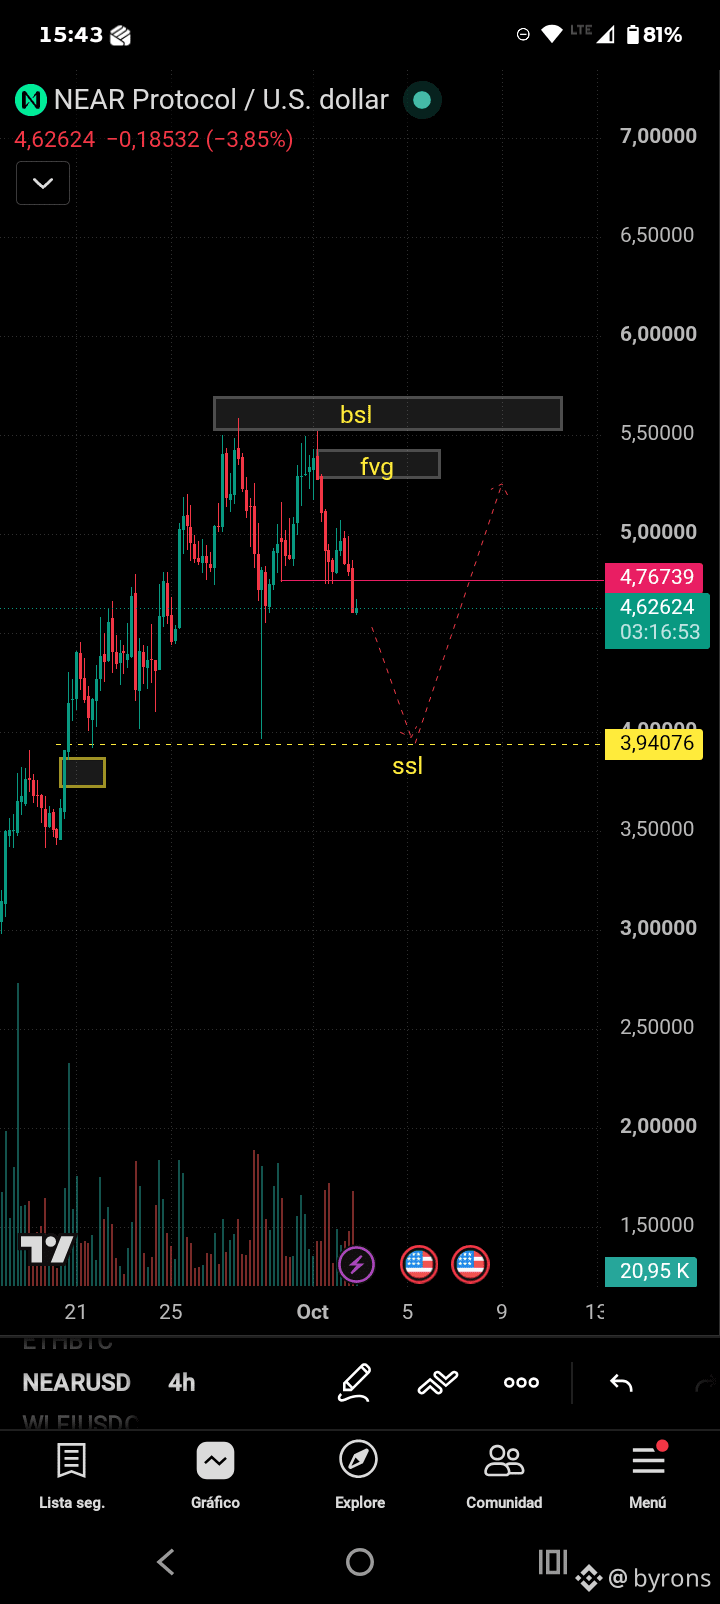
waiting for an entry on near/usdt at $4 for a long, they have another entry in this asset
waiting for an entry on near/usdt at $4 for a long, they have another entry in this asset
1
1.3k
·
--
what do you recommend I enter at $PENGU I have an entry at 0.03035 I am listening to your references for a sniper entry 🔥
what do you recommend I enter at $PENGU I have an entry at 0.03035 I am listening to your references for a sniper entry 🔥
1
1
7
1.1k
·
--
I have a purchase in haedal at 0.1265, what do you say, tarders, is my buy point at that price okay $HAEDAL
I have a purchase in haedal at 0.1265, what do you say, tarders, is my buy point at that price okay $HAEDAL
11
315
Log in to explore more content
Join global crypto users on Binance Square
⚡️ Get latest and useful information about crypto.
💬 Trusted by the world’s largest crypto exchange.
👍 Discover real insights from verified creators.
Email / Phone number
Trending Topics
BinanceLaunchesBinanceIntelligence
165,419 views
1,529 Discussing
BINANCE IS BRINGING AI INTO TRADING
A noteworthy update from Binance.
Users can now describe a trading idea in plain language, and Binance AI Pro will turn it into a complete strategy.
No coding required.
Users still have to approve a strategy before it is executed. Each live trading strategy also runs in its own separate sub-account, and the AI cannot transfer funds on its own.
Strategy previews are free.
For live trading, the Premium plan is expected to cost 19.99 USDC per month, with rollout starting in the second half of October.
What Mây finds most interesting is that Binance is making it much easier for people to build trading bots.
In the past, automating a strategy usually required coding skills. Now, you just need to describe what you want the system to do.
But AI is still AI. A strategy being generated doesn't mean it will be profitable.
Mây thinks this will be a trend worth watching closely as AI becomes more deeply involved in trading.
Follow Mây for more updates on noteworthy changes in crypto. #binancelaunchesbinanceintelligence #TinFed #TheoDõiFOMC #ETHUp70%InQ3ButLiquidityFalls $BTC $ETH $BNB
Mây Làm Crypto
·27 Likes
·36.5k views
StriveBuys2000BTCFor$169M
7,016 views
75 Discussing
EvernorthXRPTreasuryCompletesSPACMerger
97,396 views
944 Discussing