
Queen_DoLL
11.2k Posts

Queen_DoLL
Report
Block User
Crypto Trader | Market Analyst Spot & Futures Trading Sharing signals | Write to earn and Compaign expert
940 Following
10.1K+ Followers
6.8K+ Liked
Posts
All
Quotes
Videos
Live
·
--
Bullish
🚨 $NEAR /USDT BULLISH LONG SIGNAL 🚨
Signal: LONG / BUY 🟢
Entry Zone: $2.55 – $2.62
TP1: $2.70
TP2: $2.85
TP3: $3.00
TP4: $3.20
Stop Loss: $2.40
Analysis:
NEAR is showing strong bullish momentum, trading around the $2.60 area with a 24H high near $2.635 and gains of more than 14% on Binance data. The recent move has pushed NEAR significantly higher, while the broader 7-day performance is also strongly positive.
The $2.55–$2.62 zone is the key area to watch for a continuation. If buyers defend this zone and price breaks above $2.635, the next targets could be $2.70, $2.85 and eventually $3.00+. A rejection and loss of $2.40 would weaken the bullish setup.
⚠️ Risk Management: NEAR has already made a strong move, so avoid chasing the pump. Wait for a clean retest or confirmation before entering and always use a proper stop loss.
{future}(NEARUSDT)
#NEAR #NEARUSDT #CryptoSignal #altcoins #Binance
🚨 $NEAR /USDT BULLISH LONG SIGNAL 🚨
Signal: LONG / BUY 🟢
Entry Zone: $2.55 – $2.62
TP1: $2.70
TP2: $2.85
TP3: $3.00
TP4: $3.20
Stop Loss: $2.40
Analysis:
NEAR is showing strong bullish momentum, trading around the $2.60 area with a 24H high near $2.635 and gains of more than 14% on Binance data. The recent move has pushed NEAR significantly higher, while the broader 7-day performance is also strongly positive.
The $2.55–$2.62 zone is the key area to watch for a continuation. If buyers defend this zone and price breaks above $2.635, the next targets could be $2.70, $2.85 and eventually $3.00+. A rejection and loss of $2.40 would weaken the bullish setup.
⚠️ Risk Management: NEAR has already made a strong move, so avoid chasing the pump. Wait for a clean retest or confirmation before entering and always use a proper stop loss.
#NEAR #NEARUSDT #CryptoSignal #altcoins #Binance
Signal: LONG / BUY 🟢
Entry Zone: $2.55 – $2.62
TP1: $2.70
TP2: $2.85
TP3: $3.00
TP4: $3.20
Stop Loss: $2.40
Analysis:
NEAR is showing strong bullish momentum, trading around the $2.60 area with a 24H high near $2.635 and gains of more than 14% on Binance data. The recent move has pushed NEAR significantly higher, while the broader 7-day performance is also strongly positive.
The $2.55–$2.62 zone is the key area to watch for a continuation. If buyers defend this zone and price breaks above $2.635, the next targets could be $2.70, $2.85 and eventually $3.00+. A rejection and loss of $2.40 would weaken the bullish setup.
⚠️ Risk Management: NEAR has already made a strong move, so avoid chasing the pump. Wait for a clean retest or confirmation before entering and always use a proper stop loss.
#NEAR #NEARUSDT #CryptoSignal #altcoins #Binance
202
·
--
Bullish
🚨 $SC /USDT BULLISH LONG SIGNAL 🚨
Signal: LONG / BUY 🟢
Entry Zone: $0.000735 – $0.000750
TP1: $0.000780
TP2: $0.000820
TP3: $0.000900
TP4: $0.000950
Stop Loss: $0.000705
Analysis:
SC is showing strong momentum after its recent breakout, with significant volume supporting the move. The $0.000735–$0.000750 zone is the key area to defend. If buyers hold this support and price reclaims $0.000780 with strength, the next upside targets come into focus around $0.000820, $0.000900 and $0.000950. Binance’s current market data also places SC among the stronger gainers.
⚠️ Risk Management: SC is highly volatile after the recent pump, so avoid chasing green candles. Wait for a pullback or confirmation around the entry zone and always use a proper stop loss.
{spot}(SCUSDT)
#SC #SCUSDT #Siacoin #CryptoSignal #Binance
🚨 $SC /USDT BULLISH LONG SIGNAL 🚨
Signal: LONG / BUY 🟢
Entry Zone: $0.000735 – $0.000750
TP1: $0.000780
TP2: $0.000820
TP3: $0.000900
TP4: $0.000950
Stop Loss: $0.000705
Analysis:
SC is showing strong momentum after its recent breakout, with significant volume supporting the move. The $0.000735–$0.000750 zone is the key area to defend. If buyers hold this support and price reclaims $0.000780 with strength, the next upside targets come into focus around $0.000820, $0.000900 and $0.000950. Binance’s current market data also places SC among the stronger gainers.
⚠️ Risk Management: SC is highly volatile after the recent pump, so avoid chasing green candles. Wait for a pullback or confirmation around the entry zone and always use a proper stop loss.
#SC #SCUSDT #Siacoin #CryptoSignal #Binance
Signal: LONG / BUY 🟢
Entry Zone: $0.000735 – $0.000750
TP1: $0.000780
TP2: $0.000820
TP3: $0.000900
TP4: $0.000950
Stop Loss: $0.000705
Analysis:
SC is showing strong momentum after its recent breakout, with significant volume supporting the move. The $0.000735–$0.000750 zone is the key area to defend. If buyers hold this support and price reclaims $0.000780 with strength, the next upside targets come into focus around $0.000820, $0.000900 and $0.000950. Binance’s current market data also places SC among the stronger gainers.
⚠️ Risk Management: SC is highly volatile after the recent pump, so avoid chasing green candles. Wait for a pullback or confirmation around the entry zone and always use a proper stop loss.
#SC #SCUSDT #Siacoin #CryptoSignal #Binance
64
·
--
Bullish
🚨 $RAY /USDT BULLISH LONG SIGNAL 🚨
Signal: LONG / BUY 🟢
Entry Zone: $1.28 – $1.32
TP1: $1.38
TP2: $1.47
TP3: $1.60
TP4: $1.75
Stop Loss: $1.18
Analysis:
RAY is showing strong bullish momentum, with the latest market data showing the token up more than 20% over 24 hours and trading around the $1.31 area. The recent move has established $1.17–$1.20 as an important support zone, while $1.47 is the key resistance/high to watch. A clean breakout above $1.47 with strong volume could open the way toward $1.60 and $1.75.
⚠️ Risk Management: RAY has already made a strong move, so avoid chasing a sudden pump. Wait for a pullback or confirmation around the entry zone and always use a proper stop loss.
{spot}(RAYUSDT)
#RAY #RAYUSDT #Raydium #CryptoSignal #Binance
🚨 $RAY /USDT BULLISH LONG SIGNAL 🚨
Signal: LONG / BUY 🟢
Entry Zone: $1.28 – $1.32
TP1: $1.38
TP2: $1.47
TP3: $1.60
TP4: $1.75
Stop Loss: $1.18
Analysis:
RAY is showing strong bullish momentum, with the latest market data showing the token up more than 20% over 24 hours and trading around the $1.31 area. The recent move has established $1.17–$1.20 as an important support zone, while $1.47 is the key resistance/high to watch. A clean breakout above $1.47 with strong volume could open the way toward $1.60 and $1.75.
⚠️ Risk Management: RAY has already made a strong move, so avoid chasing a sudden pump. Wait for a pullback or confirmation around the entry zone and always use a proper stop loss.
#RAY #RAYUSDT #Raydium #CryptoSignal #Binance
Signal: LONG / BUY 🟢
Entry Zone: $1.28 – $1.32
TP1: $1.38
TP2: $1.47
TP3: $1.60
TP4: $1.75
Stop Loss: $1.18
Analysis:
RAY is showing strong bullish momentum, with the latest market data showing the token up more than 20% over 24 hours and trading around the $1.31 area. The recent move has established $1.17–$1.20 as an important support zone, while $1.47 is the key resistance/high to watch. A clean breakout above $1.47 with strong volume could open the way toward $1.60 and $1.75.
⚠️ Risk Management: RAY has already made a strong move, so avoid chasing a sudden pump. Wait for a pullback or confirmation around the entry zone and always use a proper stop loss.
#RAY #RAYUSDT #Raydium #CryptoSignal #Binance
144
·
--
Bearish
🚨 $ETH /USDT BEARISH SHORT SIGNAL 🚨
Signal: SHORT / SELL 🔴
Entry Zone: $2,465 – $2,480
TP1: $2,450
TP2: $2,442
TP3: $2,420
TP4: $2,400
Stop Loss: $2,505
Analysis:
ETH is showing clear bearish pressure on the 1H chart after rejecting the $2,523.30 high. Price is trading below MA(25) at $2,490 and MA(99) at $2,491, while the order book shows strong sell-side pressure. The key support is $2,442.44; a confirmed break below this level could accelerate the downside toward $2,420 and $2,400. A strong reclaim above $2,490 would weaken the bearish setup.
⚠️ Risk Management: Avoid chasing the move near support. Wait for confirmation and always use a proper stop loss.
{future}(ETHUSDT)
#ETH #ETHUSDT #CryptoSignal #Ethereum #Binance
🚨 $ETH /USDT BEARISH SHORT SIGNAL 🚨
Signal: SHORT / SELL 🔴
Entry Zone: $2,465 – $2,480
TP1: $2,450
TP2: $2,442
TP3: $2,420
TP4: $2,400
Stop Loss: $2,505
Analysis:
ETH is showing clear bearish pressure on the 1H chart after rejecting the $2,523.30 high. Price is trading below MA(25) at $2,490 and MA(99) at $2,491, while the order book shows strong sell-side pressure. The key support is $2,442.44; a confirmed break below this level could accelerate the downside toward $2,420 and $2,400. A strong reclaim above $2,490 would weaken the bearish setup.
⚠️ Risk Management: Avoid chasing the move near support. Wait for confirmation and always use a proper stop loss.
#ETH #ETHUSDT #CryptoSignal #Ethereum #Binance
Signal: SHORT / SELL 🔴
Entry Zone: $2,465 – $2,480
TP1: $2,450
TP2: $2,442
TP3: $2,420
TP4: $2,400
Stop Loss: $2,505
Analysis:
ETH is showing clear bearish pressure on the 1H chart after rejecting the $2,523.30 high. Price is trading below MA(25) at $2,490 and MA(99) at $2,491, while the order book shows strong sell-side pressure. The key support is $2,442.44; a confirmed break below this level could accelerate the downside toward $2,420 and $2,400. A strong reclaim above $2,490 would weaken the bearish setup.
⚠️ Risk Management: Avoid chasing the move near support. Wait for confirmation and always use a proper stop loss.
#ETH #ETHUSDT #CryptoSignal #Ethereum #Binance
117
·
--
Bearish
🚨 $BTC /USDT BEARISH SHORT SIGNAL 🚨
Signal: SHORT / SELL 🔴
Entry Zone: $78,150 – $78,450
TP1: $77,770
TP2: $77,400
TP3: $77,000
TP4: $76,500
Stop Loss: $79,050
Analysis:
BTC is showing bearish momentum on the 1H chart after rejecting the $79,760 resistance area. Price is trading below MA(25) at $78,794 and MA(99) at $79,187, keeping the short-term structure under seller control. The key support is $77,770; a clean breakdown below this level could trigger another move toward $77,400, $77,000 and lower liquidity zones. A recovery above $78,800 would weaken the bearish setup.
⚠️ Risk Management: Avoid chasing the move near support. Wait for confirmation and use a proper stop loss.
{future}(BTCUSDT)
#BTC #BTCUSDT #CryptoSignal #Bitcoin #Binance
🚨 $BTC /USDT BEARISH SHORT SIGNAL 🚨
Signal: SHORT / SELL 🔴
Entry Zone: $78,150 – $78,450
TP1: $77,770
TP2: $77,400
TP3: $77,000
TP4: $76,500
Stop Loss: $79,050
Analysis:
BTC is showing bearish momentum on the 1H chart after rejecting the $79,760 resistance area. Price is trading below MA(25) at $78,794 and MA(99) at $79,187, keeping the short-term structure under seller control. The key support is $77,770; a clean breakdown below this level could trigger another move toward $77,400, $77,000 and lower liquidity zones. A recovery above $78,800 would weaken the bearish setup.
⚠️ Risk Management: Avoid chasing the move near support. Wait for confirmation and use a proper stop loss.
#BTC #BTCUSDT #CryptoSignal #Bitcoin #Binance
Signal: SHORT / SELL 🔴
Entry Zone: $78,150 – $78,450
TP1: $77,770
TP2: $77,400
TP3: $77,000
TP4: $76,500
Stop Loss: $79,050
Analysis:
BTC is showing bearish momentum on the 1H chart after rejecting the $79,760 resistance area. Price is trading below MA(25) at $78,794 and MA(99) at $79,187, keeping the short-term structure under seller control. The key support is $77,770; a clean breakdown below this level could trigger another move toward $77,400, $77,000 and lower liquidity zones. A recovery above $78,800 would weaken the bearish setup.
⚠️ Risk Management: Avoid chasing the move near support. Wait for confirmation and use a proper stop loss.
#BTC #BTCUSDT #CryptoSignal #Bitcoin #Binance
139
·
--
Bearish
🚨 $BNB /USDT BEARISH SHORT SIGNAL 🚨
Signal: SHORT / SELL 🔴
Entry Zone: $722 – $726
TP1: $718
TP2: $713
TP3: $708
TP4: $700
Stop Loss: $734
Analysis:
BNB is showing strong bearish pressure on the 1H chart after a sharp rejection from $757.78. Price is trading below MA(7), MA(25), and MA(99), confirming that sellers currently have control. The recent low at $717.61 is the key support; a clean break below it could accelerate the downside toward $713 and $708. Any recovery toward the entry zone should be watched for rejection before entering.
⚠️ Risk Management: Avoid chasing the move after a large drop. Wait for confirmation and always use a proper stop loss.
{future}(BNBUSDT)
#BNB #BNBUSDT #CryptoSignal #ShortSignal #Binance
🚨 $BNB /USDT BEARISH SHORT SIGNAL 🚨
Signal: SHORT / SELL 🔴
Entry Zone: $722 – $726
TP1: $718
TP2: $713
TP3: $708
TP4: $700
Stop Loss: $734
Analysis:
BNB is showing strong bearish pressure on the 1H chart after a sharp rejection from $757.78. Price is trading below MA(7), MA(25), and MA(99), confirming that sellers currently have control. The recent low at $717.61 is the key support; a clean break below it could accelerate the downside toward $713 and $708. Any recovery toward the entry zone should be watched for rejection before entering.
⚠️ Risk Management: Avoid chasing the move after a large drop. Wait for confirmation and always use a proper stop loss.
#BNB #BNBUSDT #CryptoSignal #ShortSignal #Binance
Signal: SHORT / SELL 🔴
Entry Zone: $722 – $726
TP1: $718
TP2: $713
TP3: $708
TP4: $700
Stop Loss: $734
Analysis:
BNB is showing strong bearish pressure on the 1H chart after a sharp rejection from $757.78. Price is trading below MA(7), MA(25), and MA(99), confirming that sellers currently have control. The recent low at $717.61 is the key support; a clean break below it could accelerate the downside toward $713 and $708. Any recovery toward the entry zone should be watched for rejection before entering.
⚠️ Risk Management: Avoid chasing the move after a large drop. Wait for confirmation and always use a proper stop loss.
#BNB #BNBUSDT #CryptoSignal #ShortSignal #Binance
2
192
·
--
Bullish
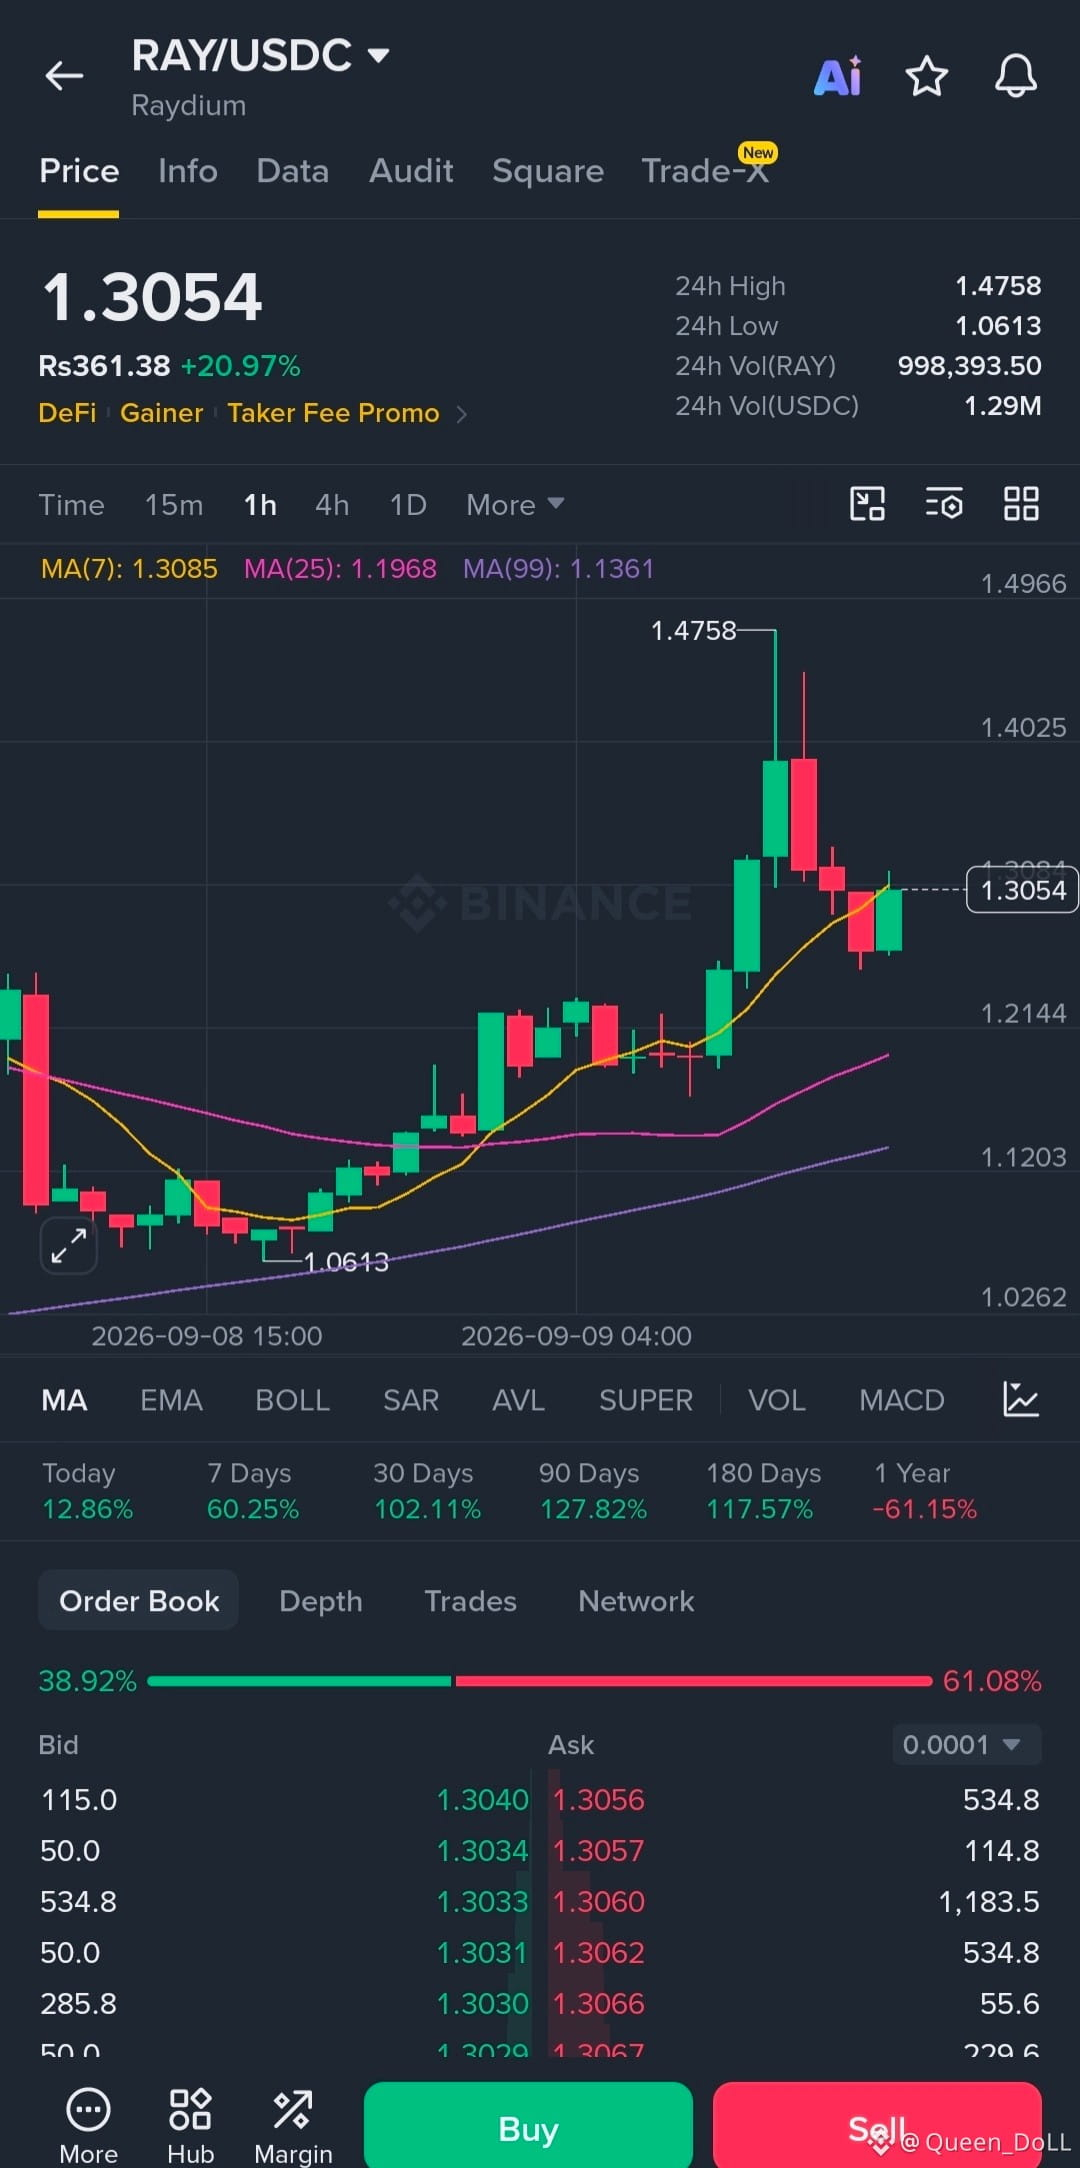
🚨 $RAY /USDC BULLISH RECOVERY SIGNAL 🚀
LONG / BUY
Entry Zone: $1.285–$1.305
TP1: $1.350
TP2: $1.405
TP3: $1.475
Stop Loss: $1.245
$RAY is showing strong bullish structure on the 1H chart after a powerful move from the $1.06 area toward $1.475. Price is now consolidating around $1.30 while holding above the key MA(25) and MA(99), suggesting buyers are still defending the trend. A reclaim of $1.35 could push RAY toward $1.40 and potentially retest the $1.475 resistance. Avoid chasing a sudden pump and manage risk carefully.
{spot}(RAYUSDT)
#Ray #RAYUSDC #CryptoSignal #Altcoins #Binance
🚨 $RAY /USDC BULLISH RECOVERY SIGNAL 🚀
LONG / BUY
Entry Zone: $1.285–$1.305
TP1: $1.350
TP2: $1.405
TP3: $1.475
Stop Loss: $1.245
$RAY is showing strong bullish structure on the 1H chart after a powerful move from the $1.06 area toward $1.475. Price is now consolidating around $1.30 while holding above the key MA(25) and MA(99), suggesting buyers are still defending the trend. A reclaim of $1.35 could push RAY toward $1.40 and potentially retest the $1.475 resistance. Avoid chasing a sudden pump and manage risk carefully.
#Ray #RAYUSDC #CryptoSignal #Altcoins #Binance
LONG / BUY
Entry Zone: $1.285–$1.305
TP1: $1.350
TP2: $1.405
TP3: $1.475
Stop Loss: $1.245
$RAY is showing strong bullish structure on the 1H chart after a powerful move from the $1.06 area toward $1.475. Price is now consolidating around $1.30 while holding above the key MA(25) and MA(99), suggesting buyers are still defending the trend. A reclaim of $1.35 could push RAY toward $1.40 and potentially retest the $1.475 resistance. Avoid chasing a sudden pump and manage risk carefully.
#Ray #RAYUSDC #CryptoSignal #Altcoins #Binance
2
202
·
--
Bullish
🚨 $SAHARA BULLS ARE STEPPING IN‼️
Entry Zone: $0.009700–$0.009730
TP1: $0.009850
TP2: $0.009980
TP3: $0.010250
Stop Loss: $0.009440
SAHARA is holding above the $0.0094 support floor, showing signs that the recent selling pressure may be starting to cool down. Buyers are gradually trying to regain control, and if the current support continues to hold, I’m looking for a move toward $0.009850 and $0.009980 first. A clean break above the $0.010 psychological level could open the way toward $0.010250.
I’d wait for confirmation and keep the risk controlled below the stop-loss level.
{future}(SAHARAUSDT)
#SAHARA #SAHARAUSDT #CryptoTrading #altcoins #Binance
🚨 $SAHARA BULLS ARE STEPPING IN‼️
Entry Zone: $0.009700–$0.009730
TP1: $0.009850
TP2: $0.009980
TP3: $0.010250
Stop Loss: $0.009440
SAHARA is holding above the $0.0094 support floor, showing signs that the recent selling pressure may be starting to cool down. Buyers are gradually trying to regain control, and if the current support continues to hold, I’m looking for a move toward $0.009850 and $0.009980 first. A clean break above the $0.010 psychological level could open the way toward $0.010250.
I’d wait for confirmation and keep the risk controlled below the stop-loss level.
#SAHARA #SAHARAUSDT #CryptoTrading #altcoins #Binance
Entry Zone: $0.009700–$0.009730
TP1: $0.009850
TP2: $0.009980
TP3: $0.010250
Stop Loss: $0.009440
SAHARA is holding above the $0.0094 support floor, showing signs that the recent selling pressure may be starting to cool down. Buyers are gradually trying to regain control, and if the current support continues to hold, I’m looking for a move toward $0.009850 and $0.009980 first. A clean break above the $0.010 psychological level could open the way toward $0.010250.
I’d wait for confirmation and keep the risk controlled below the stop-loss level.
#SAHARA #SAHARAUSDT #CryptoTrading #altcoins #Binance
2
109
·
--
Bullish
🚨 $FET BULLS ARE DEFENDING SUPPORT‼️
Entry Zone: $0.1797–$0.1810
TP1: $0.1835
TP2: $0.1873
TP3: $0.1911
Stop Loss: $0.1759
FET is starting to stabilize around the current support zone, with buyers gradually stepping in and absorbing the selling pressure. If this area holds, I’m looking for a move toward $0.1835 first, followed by $0.1873 and potentially $0.1911 if momentum continues to build. The key confirmation will be stronger buying volume and a clean hold above the entry zone.
I’d keep the risk controlled and avoid chasing if price runs too far from the entry.
{future}(FETUSDT)
#FET #FETUSDT #CryptoTrading #Altcoins #Binance
🚨 $FET BULLS ARE DEFENDING SUPPORT‼️
Entry Zone: $0.1797–$0.1810
TP1: $0.1835
TP2: $0.1873
TP3: $0.1911
Stop Loss: $0.1759
FET is starting to stabilize around the current support zone, with buyers gradually stepping in and absorbing the selling pressure. If this area holds, I’m looking for a move toward $0.1835 first, followed by $0.1873 and potentially $0.1911 if momentum continues to build. The key confirmation will be stronger buying volume and a clean hold above the entry zone.
I’d keep the risk controlled and avoid chasing if price runs too far from the entry.
#FET #FETUSDT #CryptoTrading #Altcoins #Binance
Entry Zone: $0.1797–$0.1810
TP1: $0.1835
TP2: $0.1873
TP3: $0.1911
Stop Loss: $0.1759
FET is starting to stabilize around the current support zone, with buyers gradually stepping in and absorbing the selling pressure. If this area holds, I’m looking for a move toward $0.1835 first, followed by $0.1873 and potentially $0.1911 if momentum continues to build. The key confirmation will be stronger buying volume and a clean hold above the entry zone.
I’d keep the risk controlled and avoid chasing if price runs too far from the entry.
#FET #FETUSDT #CryptoTrading #Altcoins #Binance
2
1
164
·
--
Bullish
🚨 $LTC BOUNCE SETUP IS LOOKING STRONG‼️
Entry Zone: $54.40–$54.60
TP1: $55.10
TP2: $55.80
TP3: $56.50
Stop Loss: $53.30
LTC is holding firmly around the $54.50 support zone, where buyers are starting to show interest after the recent pressure. If this area continues to hold, I’m expecting a gradual move toward $55.10 and $55.80, with $56.50 as the bigger upside target. The key here is a clean defense of support followed by stronger buying volume.
I’d avoid chasing a sudden spike and keep the risk controlled below the invalidation level.
{future}(LTCUSDT)
#LTC #LTCUSDT #CryptoTrading #Altcoins #Binance
🚨 $LTC BOUNCE SETUP IS LOOKING STRONG‼️
Entry Zone: $54.40–$54.60
TP1: $55.10
TP2: $55.80
TP3: $56.50
Stop Loss: $53.30
LTC is holding firmly around the $54.50 support zone, where buyers are starting to show interest after the recent pressure. If this area continues to hold, I’m expecting a gradual move toward $55.10 and $55.80, with $56.50 as the bigger upside target. The key here is a clean defense of support followed by stronger buying volume.
I’d avoid chasing a sudden spike and keep the risk controlled below the invalidation level.
#LTC #LTCUSDT #CryptoTrading #Altcoins #Binance
Entry Zone: $54.40–$54.60
TP1: $55.10
TP2: $55.80
TP3: $56.50
Stop Loss: $53.30
LTC is holding firmly around the $54.50 support zone, where buyers are starting to show interest after the recent pressure. If this area continues to hold, I’m expecting a gradual move toward $55.10 and $55.80, with $56.50 as the bigger upside target. The key here is a clean defense of support followed by stronger buying volume.
I’d avoid chasing a sudden spike and keep the risk controlled below the invalidation level.
#LTC #LTCUSDT #CryptoTrading #Altcoins #Binance
2
112
·
--
Bullish
🚨 $AAVE BULLS ARE BUILDING MOMENTUM‼️
Entry Zone: $129.50–$130.00
TP1: $131.50
TP2: $133.00
TP3: $134.50
Stop Loss: $127.00
AAVE is holding above the $129 pivot zone with buyers showing strong interest around the current support. The consolidation is giving bulls a chance to build momentum, and a clean breakout above the nearby resistance could push price toward $131.50, $133.00 and potentially $134.50. I’m watching for volume confirmation before expecting the next leg higher.
Manage your risk carefully and avoid chasing if price moves too far above the entry zone.
{future}(AAVEUSDT)
#AAVE #AAVEUSDT #CryptoTrading #altcoins #Binance
🚨 $AAVE BULLS ARE BUILDING MOMENTUM‼️
Entry Zone: $129.50–$130.00
TP1: $131.50
TP2: $133.00
TP3: $134.50
Stop Loss: $127.00
AAVE is holding above the $129 pivot zone with buyers showing strong interest around the current support. The consolidation is giving bulls a chance to build momentum, and a clean breakout above the nearby resistance could push price toward $131.50, $133.00 and potentially $134.50. I’m watching for volume confirmation before expecting the next leg higher.
Manage your risk carefully and avoid chasing if price moves too far above the entry zone.
#AAVE #AAVEUSDT #CryptoTrading #altcoins #Binance
Entry Zone: $129.50–$130.00
TP1: $131.50
TP2: $133.00
TP3: $134.50
Stop Loss: $127.00
AAVE is holding above the $129 pivot zone with buyers showing strong interest around the current support. The consolidation is giving bulls a chance to build momentum, and a clean breakout above the nearby resistance could push price toward $131.50, $133.00 and potentially $134.50. I’m watching for volume confirmation before expecting the next leg higher.
Manage your risk carefully and avoid chasing if price moves too far above the entry zone.
#AAVE #AAVEUSDT #CryptoTrading #altcoins #Binance
2
199
·
--
Bullish
🚨 $FDUSD RECOVERY SETUP IS BUILDING‼️
Entry Zone: $0.99870–$0.99890
TP1: $0.99950
TP2: $0.99990
TP3: $1.00030
Stop Loss: $0.99830
FDUSD is holding steady around the $0.998 support area, showing signs that buyers are gradually stepping back in. Price action is staying relatively tight near the entry zone, and if this support continues to hold, a move back toward the $1.00 area could follow. I’m watching for stronger buying volume and a clean push through the nearby resistance levels before expecting further upside.
Keep risk controlled and avoid chasing the move after a sharp pump.
{spot}(FDUSDUSDT)
#FDUSD #FDUSDUSDT #Stablecoin #cryptotrading #Binance
🚨 $FDUSD RECOVERY SETUP IS BUILDING‼️
Entry Zone: $0.99870–$0.99890
TP1: $0.99950
TP2: $0.99990
TP3: $1.00030
Stop Loss: $0.99830
FDUSD is holding steady around the $0.998 support area, showing signs that buyers are gradually stepping back in. Price action is staying relatively tight near the entry zone, and if this support continues to hold, a move back toward the $1.00 area could follow. I’m watching for stronger buying volume and a clean push through the nearby resistance levels before expecting further upside.
Keep risk controlled and avoid chasing the move after a sharp pump.
#FDUSD #FDUSDUSDT #Stablecoin #cryptotrading #Binance
Entry Zone: $0.99870–$0.99890
TP1: $0.99950
TP2: $0.99990
TP3: $1.00030
Stop Loss: $0.99830
FDUSD is holding steady around the $0.998 support area, showing signs that buyers are gradually stepping back in. Price action is staying relatively tight near the entry zone, and if this support continues to hold, a move back toward the $1.00 area could follow. I’m watching for stronger buying volume and a clean push through the nearby resistance levels before expecting further upside.
Keep risk controlled and avoid chasing the move after a sharp pump.
#FDUSD #FDUSDUSDT #Stablecoin #cryptotrading #Binance
2
113
·
--
Bullish
🚀 $INJ BULLS ARE STEPPING IN‼️
Entry Zone: $6.24–$6.26
TP1: $6.31
TP2: $6.38
TP3: $6.45
Stop Loss: $6.14
$INJ is showing strong buying interest around the $6.25 support area, and the price is starting to build a solid base. Buyers are absorbing selling pressure here, which could set up another push toward the nearby resistance and liquidity zones.
If $6.26 holds and momentum continues to improve, I’m watching $6.31 first, followed by $6.38 and $6.45. I’d prefer a confirmed move rather than chasing the price after a sudden spike.
Stay patient, manage your risk, and let the setup play out.
{future}(INJUSDT)
#INJ #Injective #cryptotrading #altcoins #Binance
🚀 $INJ BULLS ARE STEPPING IN‼️
Entry Zone: $6.24–$6.26
TP1: $6.31
TP2: $6.38
TP3: $6.45
Stop Loss: $6.14
$INJ is showing strong buying interest around the $6.25 support area, and the price is starting to build a solid base. Buyers are absorbing selling pressure here, which could set up another push toward the nearby resistance and liquidity zones.
If $6.26 holds and momentum continues to improve, I’m watching $6.31 first, followed by $6.38 and $6.45. I’d prefer a confirmed move rather than chasing the price after a sudden spike.
Stay patient, manage your risk, and let the setup play out.
#INJ #Injective #cryptotrading #altcoins #Binance
Entry Zone: $6.24–$6.26
TP1: $6.31
TP2: $6.38
TP3: $6.45
Stop Loss: $6.14
$INJ is showing strong buying interest around the $6.25 support area, and the price is starting to build a solid base. Buyers are absorbing selling pressure here, which could set up another push toward the nearby resistance and liquidity zones.
If $6.26 holds and momentum continues to improve, I’m watching $6.31 first, followed by $6.38 and $6.45. I’d prefer a confirmed move rather than chasing the price after a sudden spike.
Stay patient, manage your risk, and let the setup play out.
#INJ #Injective #cryptotrading #altcoins #Binance
2
160
·
--
Bullish
💥 $RLUSD BOUNCE SETUP IS FORMING‼️
Entry Zone: $1.0001–$1.0003
TP1: $1.0007
TP2: $1.0011
TP3: $1.0015
Stop Loss: $0.9997
$RLUSD is holding steady around the $1.00 support area, and the price action is showing signs of a possible bounce. Buyers are defending the demand zone, keeping the downside relatively tight while leaving room for a move toward the recent local highs.
If $1.0003 holds and buying pressure picks up, I’m watching $1.0007 first, followed by $1.0011 and $1.0015. I’d still wait for confirmation rather than chasing any sudden move.
Keep the risk controlled and trade the setup with patience.
{spot}(RLUSDUSDT)
#RLUSD #Ripple #CryptoTrading #stablecoin #Binance
💥 $RLUSD BOUNCE SETUP IS FORMING‼️
Entry Zone: $1.0001–$1.0003
TP1: $1.0007
TP2: $1.0011
TP3: $1.0015
Stop Loss: $0.9997
$RLUSD is holding steady around the $1.00 support area, and the price action is showing signs of a possible bounce. Buyers are defending the demand zone, keeping the downside relatively tight while leaving room for a move toward the recent local highs.
If $1.0003 holds and buying pressure picks up, I’m watching $1.0007 first, followed by $1.0011 and $1.0015. I’d still wait for confirmation rather than chasing any sudden move.
Keep the risk controlled and trade the setup with patience.
#RLUSD #Ripple #CryptoTrading #stablecoin #Binance
Entry Zone: $1.0001–$1.0003
TP1: $1.0007
TP2: $1.0011
TP3: $1.0015
Stop Loss: $0.9997
$RLUSD is holding steady around the $1.00 support area, and the price action is showing signs of a possible bounce. Buyers are defending the demand zone, keeping the downside relatively tight while leaving room for a move toward the recent local highs.
If $1.0003 holds and buying pressure picks up, I’m watching $1.0007 first, followed by $1.0011 and $1.0015. I’d still wait for confirmation rather than chasing any sudden move.
Keep the risk controlled and trade the setup with patience.
#RLUSD #Ripple #CryptoTrading #stablecoin #Binance
2
1
186
·
--
Bullish
🚀 $DOT BULLISH SETUP IS TAKING SHAPE‼️
Entry Zone: $1.188–$1.192
TP1: $1.205
TP2: $1.222
TP3: $1.240
Stop Loss: $1.154
$DOT is holding well above the key support area, and the consolidation here is starting to look interesting. Buying pressure is stabilizing while RSI still has room to move higher, which could support another push toward the nearby resistance levels.
If bulls keep defending the entry zone and volume starts picking up, I’m watching $1.205 first, followed by $1.222 and $1.240. No need to chase the move — confirmation matters.
Manage your risk and trade with a plan.
#DOT #Polkadot #CryptoTrading #Altcoins #Binance
🚀 $DOT BULLISH SETUP IS TAKING SHAPE‼️
Entry Zone: $1.188–$1.192
TP1: $1.205
TP2: $1.222
TP3: $1.240
Stop Loss: $1.154
$DOT is holding well above the key support area, and the consolidation here is starting to look interesting. Buying pressure is stabilizing while RSI still has room to move higher, which could support another push toward the nearby resistance levels.
If bulls keep defending the entry zone and volume starts picking up, I’m watching $1.205 first, followed by $1.222 and $1.240. No need to chase the move — confirmation matters.
Manage your risk and trade with a plan.
#DOT #Polkadot #CryptoTrading #Altcoins #Binance
Entry Zone: $1.188–$1.192
TP1: $1.205
TP2: $1.222
TP3: $1.240
Stop Loss: $1.154
$DOT is holding well above the key support area, and the consolidation here is starting to look interesting. Buying pressure is stabilizing while RSI still has room to move higher, which could support another push toward the nearby resistance levels.
If bulls keep defending the entry zone and volume starts picking up, I’m watching $1.205 first, followed by $1.222 and $1.240. No need to chase the move — confirmation matters.
Manage your risk and trade with a plan.
#DOT #Polkadot #CryptoTrading #Altcoins #Binance
2
240
·
--
Bullish
🚀 $AST RECOVERY MOVE IS STARTING‼️
Entry Zone: $0.7550–$0.7580
TP1: $0.7640
TP2: $0.7730
TP3: $0.7850
Stop Loss: $0.7430
$AST is starting to look stronger after holding the $0.7430 support zone. Buyers are slowly stepping back in, and the recent price action suggests that a short-term recovery could be developing.
If $AST continues to hold above the entry zone and momentum picks up, the next resistance levels could come into play one by one. I’d like to see confirmation before chasing any sudden move.
Keep the risk controlled and let the setup play out.
#AST #Altcoins #cryptotrading #Binance #trading
🚀 $AST RECOVERY MOVE IS STARTING‼️
Entry Zone: $0.7550–$0.7580
TP1: $0.7640
TP2: $0.7730
TP3: $0.7850
Stop Loss: $0.7430
$AST is starting to look stronger after holding the $0.7430 support zone. Buyers are slowly stepping back in, and the recent price action suggests that a short-term recovery could be developing.
If $AST continues to hold above the entry zone and momentum picks up, the next resistance levels could come into play one by one. I’d like to see confirmation before chasing any sudden move.
Keep the risk controlled and let the setup play out.
#AST #Altcoins #cryptotrading #Binance #trading
Entry Zone: $0.7550–$0.7580
TP1: $0.7640
TP2: $0.7730
TP3: $0.7850
Stop Loss: $0.7430
$AST is starting to look stronger after holding the $0.7430 support zone. Buyers are slowly stepping back in, and the recent price action suggests that a short-term recovery could be developing.
If $AST continues to hold above the entry zone and momentum picks up, the next resistance levels could come into play one by one. I’d like to see confirmation before chasing any sudden move.
Keep the risk controlled and let the setup play out.
#AST #Altcoins #cryptotrading #Binance #trading
2
153
·
--
Bullish
🚀 $BNB BREAKOUT SETUP IS GETTING STRONGER‼️
Entry Zone: $753.50–$754.80
TP1: $761.50
TP2: $769.50
TP3: $777.50
Stop Loss: $749.50
BNB is holding firmly above the $750 support and the price action is starting to show stronger buyer interest. The consolidation here looks like accumulation, and if buyers manage to push through the nearby resistance, we could see a clean move toward the higher targets.
I’m watching the $750 area closely. As long as BNB stays above this zone, the bullish setup remains valid. Avoid chasing the breakout blindly and keep risk under control.
Trade with a plan, not emotions. DYOR.
#BNB #Binance #CryptoTrading #altcoins #BNBUSDT
🚀 $BNB BREAKOUT SETUP IS GETTING STRONGER‼️
Entry Zone: $753.50–$754.80
TP1: $761.50
TP2: $769.50
TP3: $777.50
Stop Loss: $749.50
BNB is holding firmly above the $750 support and the price action is starting to show stronger buyer interest. The consolidation here looks like accumulation, and if buyers manage to push through the nearby resistance, we could see a clean move toward the higher targets.
I’m watching the $750 area closely. As long as BNB stays above this zone, the bullish setup remains valid. Avoid chasing the breakout blindly and keep risk under control.
Trade with a plan, not emotions. DYOR.
#BNB #Binance #CryptoTrading #altcoins #BNBUSDT
Entry Zone: $753.50–$754.80
TP1: $761.50
TP2: $769.50
TP3: $777.50
Stop Loss: $749.50
BNB is holding firmly above the $750 support and the price action is starting to show stronger buyer interest. The consolidation here looks like accumulation, and if buyers manage to push through the nearby resistance, we could see a clean move toward the higher targets.
I’m watching the $750 area closely. As long as BNB stays above this zone, the bullish setup remains valid. Avoid chasing the breakout blindly and keep risk under control.
Trade with a plan, not emotions. DYOR.
#BNB #Binance #CryptoTrading #altcoins #BNBUSDT
3
5
692
·
--
Bullish
🚨 $ATOM Bulls Are Stepping In‼️
Entry Zone: $1.820–$1.830
TP1: $1.850
TP2: $1.870
TP3: $1.900
Stop Loss: $1.780
ATOM is holding well around the current support area, and buyers are starting to show more strength here. If this zone continues to hold and momentum picks up, I’m watching for a move toward $1.850 first, followed by $1.870 and $1.900.
Don’t chase the move after a breakout — let the price confirm the setup and manage your risk properly.
#ATOM #Cosmos #CryptoTrading #Altcoin #Binance
🚨 $ATOM Bulls Are Stepping In‼️
Entry Zone: $1.820–$1.830
TP1: $1.850
TP2: $1.870
TP3: $1.900
Stop Loss: $1.780
ATOM is holding well around the current support area, and buyers are starting to show more strength here. If this zone continues to hold and momentum picks up, I’m watching for a move toward $1.850 first, followed by $1.870 and $1.900.
Don’t chase the move after a breakout — let the price confirm the setup and manage your risk properly.
#ATOM #Cosmos #CryptoTrading #Altcoin #Binance
Entry Zone: $1.820–$1.830
TP1: $1.850
TP2: $1.870
TP3: $1.900
Stop Loss: $1.780
ATOM is holding well around the current support area, and buyers are starting to show more strength here. If this zone continues to hold and momentum picks up, I’m watching for a move toward $1.850 first, followed by $1.870 and $1.900.
Don’t chase the move after a breakout — let the price confirm the setup and manage your risk properly.
#ATOM #Cosmos #CryptoTrading #Altcoin #Binance
5
1
294
·
--
Bullish
🚨 $XRP BULLS ARE DEFENDING SUPPORT‼️
Entry Zone: $1.4150–$1.4250
TP1: $1.4450
TP2: $1.4650
TP3: $1.4950
Stop Loss: $1.3850
XRP is reacting well from the current support zone, showing that buyers are stepping back in after the recent weakness. If this area continues to hold and price starts pushing above the nearby resistance, I’m expecting a move toward the higher targets.
The setup offers a clean risk-to-reward structure, but confirmation is still important. I’d avoid chasing a sudden move and keep the stop loss in place.
#XRP #XRPUSDT #CryptoTradingInsights #BinanceSquareTalks #altcoins
🚨 $XRP BULLS ARE DEFENDING SUPPORT‼️
Entry Zone: $1.4150–$1.4250
TP1: $1.4450
TP2: $1.4650
TP3: $1.4950
Stop Loss: $1.3850
XRP is reacting well from the current support zone, showing that buyers are stepping back in after the recent weakness. If this area continues to hold and price starts pushing above the nearby resistance, I’m expecting a move toward the higher targets.
The setup offers a clean risk-to-reward structure, but confirmation is still important. I’d avoid chasing a sudden move and keep the stop loss in place.
#XRP #XRPUSDT #CryptoTradingInsights #BinanceSquareTalks #altcoins
Entry Zone: $1.4150–$1.4250
TP1: $1.4450
TP2: $1.4650
TP3: $1.4950
Stop Loss: $1.3850
XRP is reacting well from the current support zone, showing that buyers are stepping back in after the recent weakness. If this area continues to hold and price starts pushing above the nearby resistance, I’m expecting a move toward the higher targets.
The setup offers a clean risk-to-reward structure, but confirmation is still important. I’d avoid chasing a sudden move and keep the stop loss in place.
#XRP #XRPUSDT #CryptoTradingInsights #BinanceSquareTalks #altcoins
4
3
1.1k
·
--
Bullish
🚨 $PEPE BREAKOUT SETUP IS GETTING INTERESTING‼️
Entry Zone: $0.00000368–$0.00000370
TP1: $0.00000376
TP2: $0.00000382
TP3: $0.00000394
Stop Loss: $0.00000356
PEPE is holding nicely above the short-term support, while buyers continue to defend the current range. If price breaks and holds above the nearby resistance, I’m expecting momentum to build toward the recent highs.
The setup looks attractive from a risk-to-reward perspective, but I’d avoid chasing a sudden pump. Let the breakout confirm first and manage your risk properly.
#PEPE #PEPEUSDT #cryptotrading #BinanceSquare #altcoins
🚨 $PEPE BREAKOUT SETUP IS GETTING INTERESTING‼️
Entry Zone: $0.00000368–$0.00000370
TP1: $0.00000376
TP2: $0.00000382
TP3: $0.00000394
Stop Loss: $0.00000356
PEPE is holding nicely above the short-term support, while buyers continue to defend the current range. If price breaks and holds above the nearby resistance, I’m expecting momentum to build toward the recent highs.
The setup looks attractive from a risk-to-reward perspective, but I’d avoid chasing a sudden pump. Let the breakout confirm first and manage your risk properly.
#PEPE #PEPEUSDT #cryptotrading #BinanceSquare #altcoins
Entry Zone: $0.00000368–$0.00000370
TP1: $0.00000376
TP2: $0.00000382
TP3: $0.00000394
Stop Loss: $0.00000356
PEPE is holding nicely above the short-term support, while buyers continue to defend the current range. If price breaks and holds above the nearby resistance, I’m expecting momentum to build toward the recent highs.
The setup looks attractive from a risk-to-reward perspective, but I’d avoid chasing a sudden pump. Let the breakout confirm first and manage your risk properly.
#PEPE #PEPEUSDT #cryptotrading #BinanceSquare #altcoins
3
1
267
Log in to explore more content
Join global crypto users on Binance Square
⚡️ Get latest and useful information about crypto.
💬 Trusted by the world’s largest crypto exchange.
👍 Discover real insights from verified creators.
Email / Phone number
Trending Topics
AppleDebutsFoldablePhone
7,600 views
193 Discussing
$BTC
Apple just released a foldable phone
Apple fans are calculating installments
Old “weak hands” are figuring out how many BTC
Brothers
Apple finally can’t hold it back anymore
Its first foldable phone
iPhone Duo
Starts at 15,999 yuan in mainland China
The top configuration goes straight up to 26,499
I swear—when I saw the price
my first reaction wasn’t “too expensive”
It was, “Quick, open the exchange and calculate.”
Based on the current coin price,
this phone is about 0.025 BTC
0.025 BTC
Doesn’t sound like much, right?
But go look at history.
When the iPhone 4s launched back then,
the price translated to 162 BTC
iPhone 6 was 1.7 BTC
iPhone 13 was 0.018 BTC
iPhone 17 was 0.007 BTC
Got the trend now?
It’s not that your money is growing
It’s Bitcoin diluting Apple’s pricing for you
What’s interesting is that at the event itself,
Apple’s stock price rode a roller coaster.
It got hit at the open—then it bounced back.
By the close, it finished down slightly.
Whether the market thinks this high-priced foldable phone can sell big—
there’s quite a split 😂😂
But brothers,
don’t see Apple releasing a new phone and start imagining that “tech bull run” is here.
The big-bag (BTC) needs to follow the trend
Apple doesn’t have a direct capital pipeline to the crypto market.
No matter how many phones it sells,
not a single automatic cent flows into crypto.
This is only a hardware tailwind on the consumer side,
not the big logic that directly pushes BTC higher.
BTC’s pricing main driver is still
the Fed cutting rates and US Treasury yields.
Apple’s new product is just a small industry hotspot.
It can only boost sector sentiment in the short term.
It can’t change the big market’s overall trend.
If you were already planning to change your phone,
and you also happen to have some spare money worth 0.025 BTC in hand
Would you buy it?
#appledebutsfoldablephone
孔大锤
·1 Likes
·1.7k views
US10YTreasuryYieldHitsHighestSinceNov2023
11,705 views
232 Discussing
USTreasuryToBuyBackUpTo$6BLongDatedDebt
10,910 views
140 Discussing