

lleonard
193 Posts

lleonard
Report
Block User
34 Following
16 Followers
10 Liked
Posts
All
Quotes
·
--
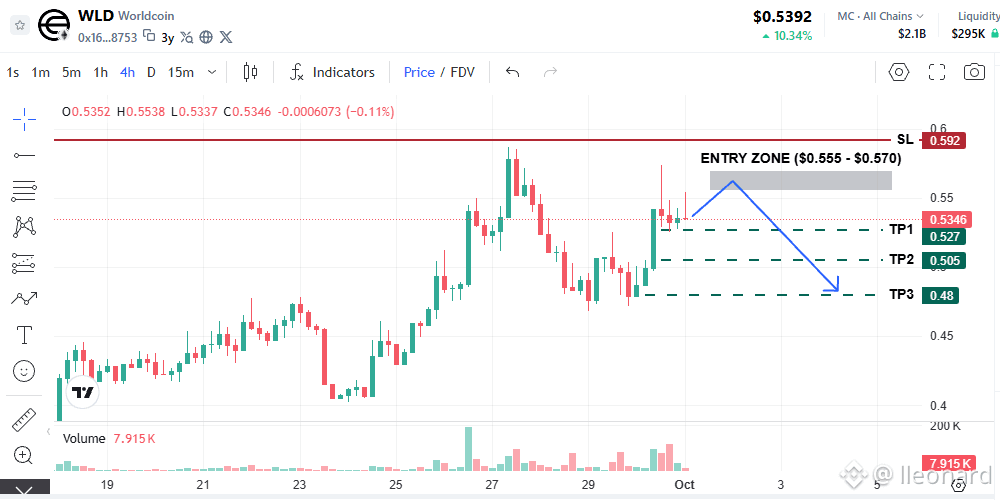
Selling pressure on $WLD has reacted aggressively around the $0.565–$0.570 region, leaving long upper wicks. The recovery structure is showing signs of weakening. Favoring a Sell-on-Rallies approach.
📊 Short Plan
– Entry Zone: $0.555 – $0.570
– Stop Loss: $0.592
– Targets: $0.527 | $0.505 | $0.480
⚠️ Stick to the SL strictly.
{future}(WLDUSDT)
Selling pressure on $WLD has reacted aggressively around the $0.565–$0.570 region, leaving long upper wicks. The recovery structure is showing signs of weakening. Favoring a Sell-on-Rallies approach.
📊 Short Plan
– Entry Zone: $0.555 – $0.570
– Stop Loss: $0.592
– Targets: $0.527 | $0.505 | $0.480
⚠️ Stick to the SL strictly.
📊 Short Plan
– Entry Zone: $0.555 – $0.570
– Stop Loss: $0.592
– Targets: $0.527 | $0.505 | $0.480
⚠️ Stick to the SL strictly.
214
·
--
Bullish
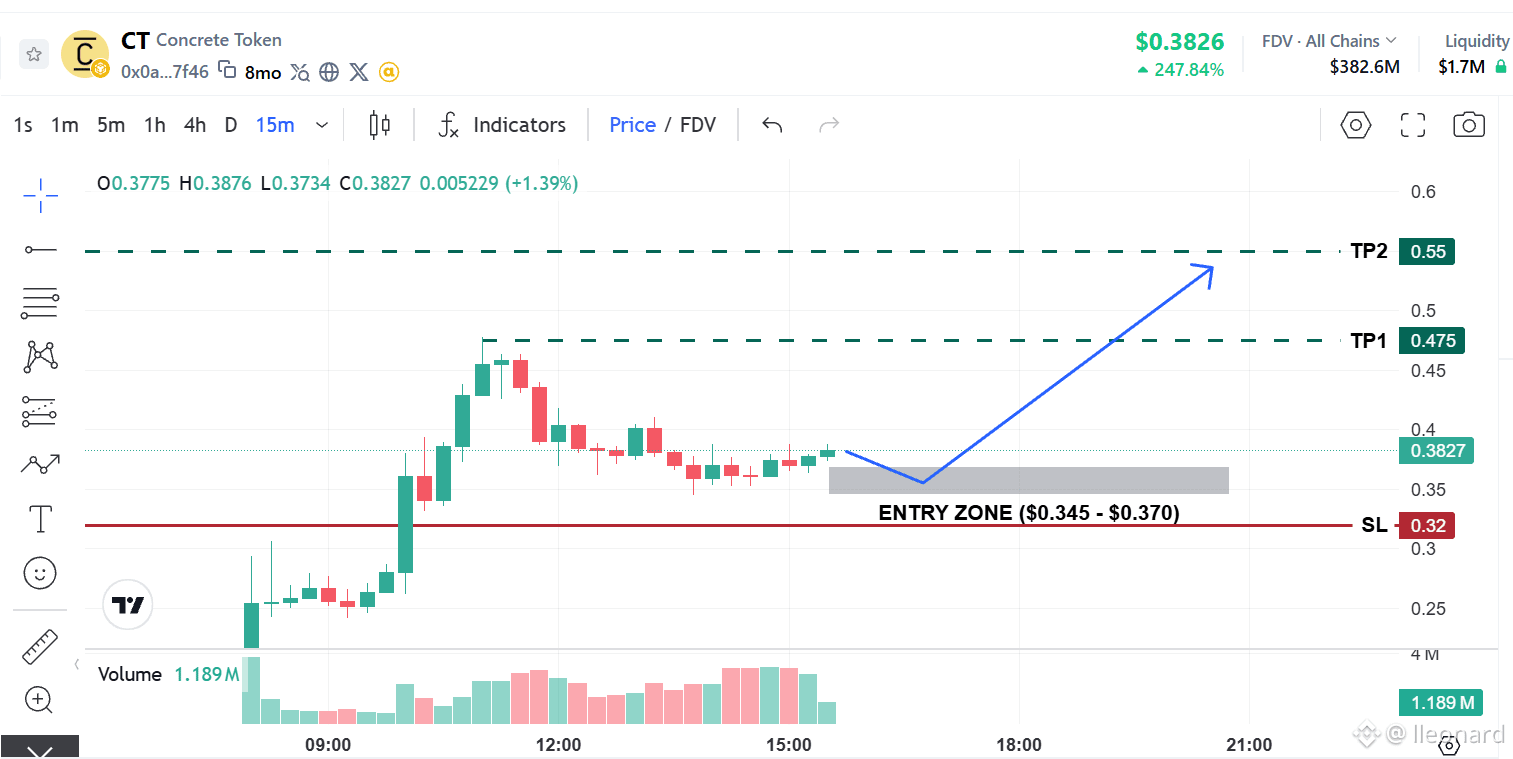
The $CT 15m chart is forming a solid rounding bottom/curve recovery off the $0.35 bottom. Active buying volume is showing up again.
📊 Trade Plan
– Entry: $0.345 - $0.370
– Stop Loss (SL): $0.320
– Targets: $0.475 | $0.550
⚠️ This token is newly listed with extreme volatility! Always adhere strictly to your Stop Loss.
{alpha}(560x0a092e544da31150b439a1aaa1a3a2214a867f46)
The $CT 15m chart is forming a solid rounding bottom/curve recovery off the $0.35 bottom. Active buying volume is showing up again.
📊 Trade Plan
– Entry: $0.345 - $0.370
– Stop Loss (SL): $0.320
– Targets: $0.475 | $0.550
⚠️ This token is newly listed with extreme volatility! Always adhere strictly to your Stop Loss.
📊 Trade Plan
– Entry: $0.345 - $0.370
– Stop Loss (SL): $0.320
– Targets: $0.475 | $0.550
⚠️ This token is newly listed with extreme volatility! Always adhere strictly to your Stop Loss.
1
733
·
--
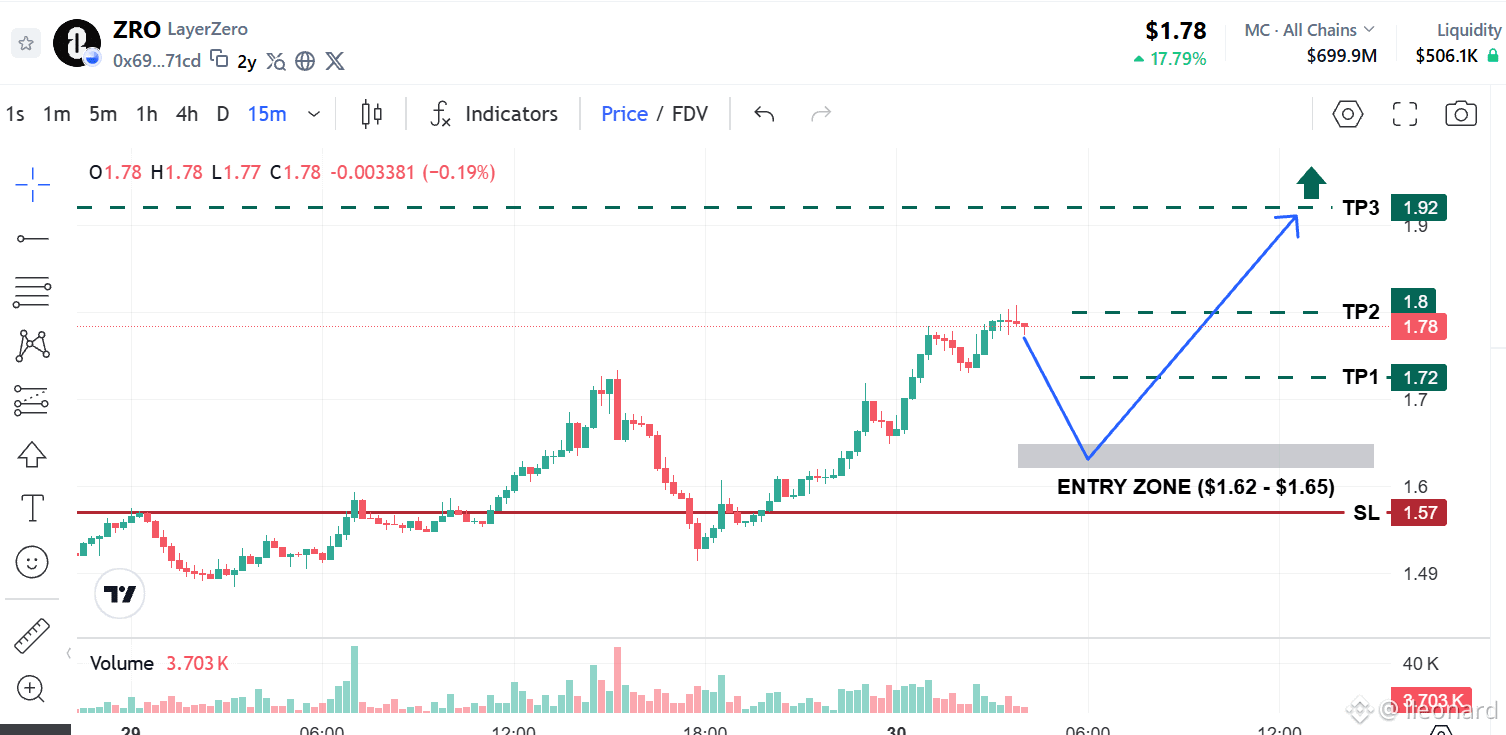
$ZRO hit $1.80, but low volume on 4H/15m and heavy upper wicks signal weak breakout momentum and incoming pullback risk. Avoid chasing top or counter-trending—patience for a support retest ($1.62–$1.65) is the key play here.
📊 Long Setup
– Entry Zone: $1.62 – $1.65
– Stop Loss: $1.57
– Targets: $1.72 | $1.80 | $1.92+
⚠️ Do NOT counter-trend short at the top ($1.80+) if price doesn't hit the setup or show clear rejection signals.
{future}(ZROUSDT)
$ZRO hit $1.80, but low volume on 4H/15m and heavy upper wicks signal weak breakout momentum and incoming pullback risk. Avoid chasing top or counter-trending—patience for a support retest ($1.62–$1.65) is the key play here.
📊 Long Setup
– Entry Zone: $1.62 – $1.65
– Stop Loss: $1.57
– Targets: $1.72 | $1.80 | $1.92+
⚠️ Do NOT counter-trend short at the top ($1.80+) if price doesn't hit the setup or show clear rejection signals.
📊 Long Setup
– Entry Zone: $1.62 – $1.65
– Stop Loss: $1.57
– Targets: $1.72 | $1.80 | $1.92+
⚠️ Do NOT counter-trend short at the top ($1.80+) if price doesn't hit the setup or show clear rejection signals.
113
·
--
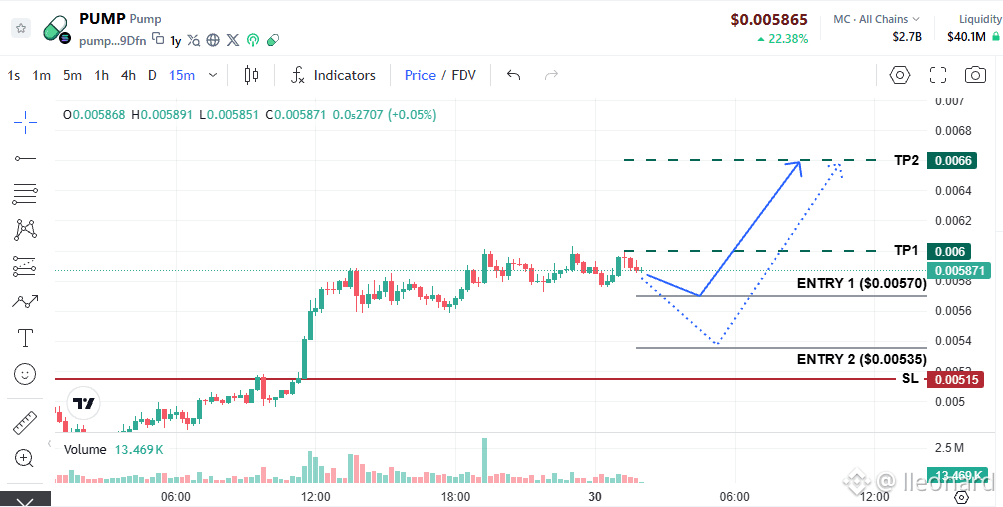
Following an impressive rally on the 4H timeframe breaking above $0.0055, $PUMP is currently in a tight bullish consolidation phase between $0.0058 - $0.0060 on the 15M chart.
Low sell volume during this range combined with lower wick rejections indicates buyers are actively defending the high levels.
📊 Trading Plan
– Entry (2-Step DCA): $0.00570 | $0.00535
– Stop Loss: $0.00515
– Targets: $0.00600 | $0.00660
{future}(PUMPUSDT)
Following an impressive rally on the 4H timeframe breaking above $0.0055, $PUMP is currently in a tight bullish consolidation phase between $0.0058 - $0.0060 on the 15M chart.
Low sell volume during this range combined with lower wick rejections indicates buyers are actively defending the high levels.
📊 Trading Plan
– Entry (2-Step DCA): $0.00570 | $0.00535
– Stop Loss: $0.00515
– Targets: $0.00600 | $0.00660
Low sell volume during this range combined with lower wick rejections indicates buyers are actively defending the high levels.
📊 Trading Plan
– Entry (2-Step DCA): $0.00570 | $0.00535
– Stop Loss: $0.00515
– Targets: $0.00600 | $0.00660
175
·
--
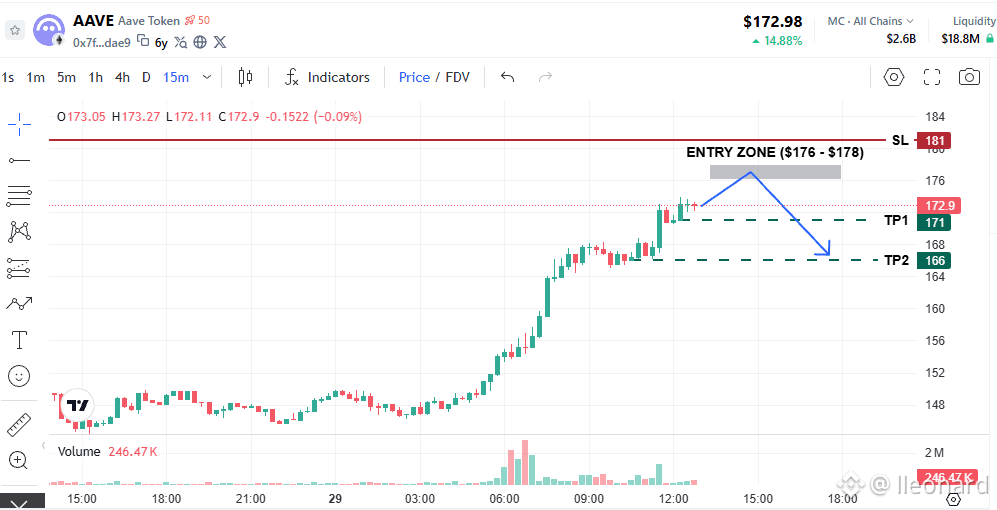
$AAVE is currently consolidating around $172–$173 after a steep parabolic pump. The major resistance cluster at $176–$178 holds heavy liquidity from Short stop-losses and Breakout buy-stops.
📊 Short Setup (Counter-Trend Play)
– Entry Zone: $176.0 – $178.0
– Stop Loss (Strict): $181.0
– Targets: $171.0 | $166.0
⚠️ Counter-trend setups carry higher risk.
{future}(AAVEUSDT)
$AAVE is currently consolidating around $172–$173 after a steep parabolic pump. The major resistance cluster at $176–$178 holds heavy liquidity from Short stop-losses and Breakout buy-stops.
📊 Short Setup (Counter-Trend Play)
– Entry Zone: $176.0 – $178.0
– Stop Loss (Strict): $181.0
– Targets: $171.0 | $166.0
⚠️ Counter-trend setups carry higher risk.
📊 Short Setup (Counter-Trend Play)
– Entry Zone: $176.0 – $178.0
– Stop Loss (Strict): $181.0
– Targets: $171.0 | $166.0
⚠️ Counter-trend setups carry higher risk.
49
·
--
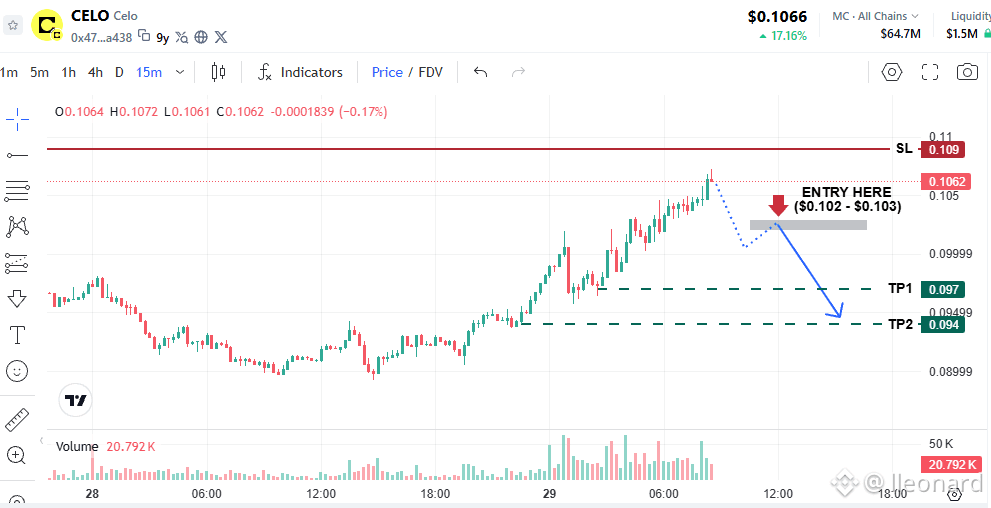
Following a steep rally that touched $0.108, $CELO momentum shows signs of slowing down near short-term resistance. While the higher-timeframe trend remains bullish, failing to hold key support could trigger a local structural breakdown.
📊 Trade Setup (Short Limit)
– Trigger Condition: 15m/1h candle closes decisively below $0.102.
– Entry: $0.102 - $0.103
– Stop Loss: $0.109
– Targets: $0.097 | $0.094
⚠️ If buying volume surges and pushes price above $0.115, CANCEL THIS SETUP.
{future}(CELOUSDT)
Following a steep rally that touched $0.108, $CELO momentum shows signs of slowing down near short-term resistance. While the higher-timeframe trend remains bullish, failing to hold key support could trigger a local structural breakdown.
📊 Trade Setup (Short Limit)
– Trigger Condition: 15m/1h candle closes decisively below $0.102.
– Entry: $0.102 - $0.103
– Stop Loss: $0.109
– Targets: $0.097 | $0.094
⚠️ If buying volume surges and pushes price above $0.115, CANCEL THIS SETUP.
📊 Trade Setup (Short Limit)
– Trigger Condition: 15m/1h candle closes decisively below $0.102.
– Entry: $0.102 - $0.103
– Stop Loss: $0.109
– Targets: $0.097 | $0.094
⚠️ If buying volume surges and pushes price above $0.115, CANCEL THIS SETUP.
143
·
--
Bullish
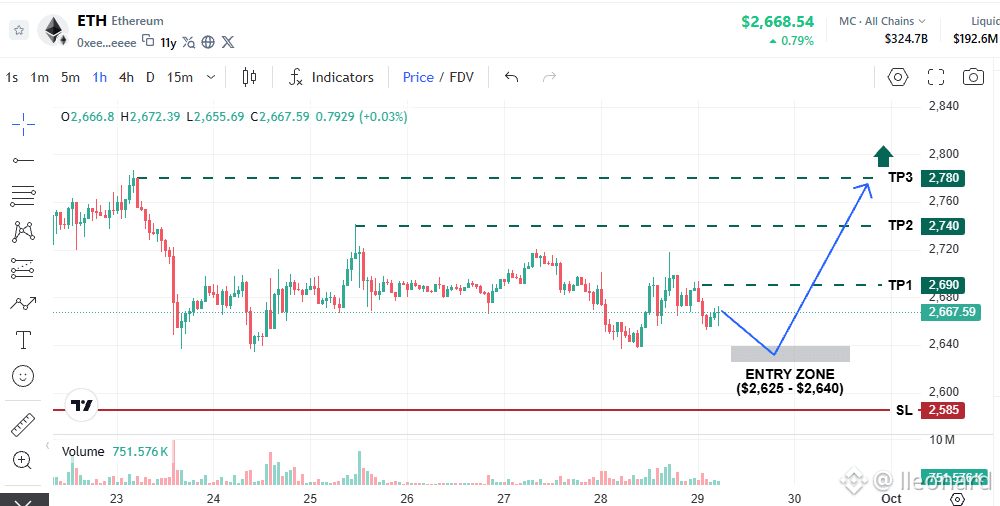
$ETH is showing signs of cooling off after failing to break above the $2,770–$2,780 resistance zone. Price is currently retracing toward key support on the 4H timeframe.
📊 Trade Plan
– Entry Zone: $2,625 – $2,640
– Stop Loss: $2,585
– Targets: $2,690 | $2,740 | $2,780
⚠️ If a 4H candle closes decisively below $2,620 with high sell volume, expect deeper support around $2,500 – $2,550.
{future}(ETHUSDT)
$ETH is showing signs of cooling off after failing to break above the $2,770–$2,780 resistance zone. Price is currently retracing toward key support on the 4H timeframe.
📊 Trade Plan
– Entry Zone: $2,625 – $2,640
– Stop Loss: $2,585
– Targets: $2,690 | $2,740 | $2,780
⚠️ If a 4H candle closes decisively below $2,620 with high sell volume, expect deeper support around $2,500 – $2,550.
📊 Trade Plan
– Entry Zone: $2,625 – $2,640
– Stop Loss: $2,585
– Targets: $2,690 | $2,740 | $2,780
⚠️ If a 4H candle closes decisively below $2,620 with high sell volume, expect deeper support around $2,500 – $2,550.
54
·
--
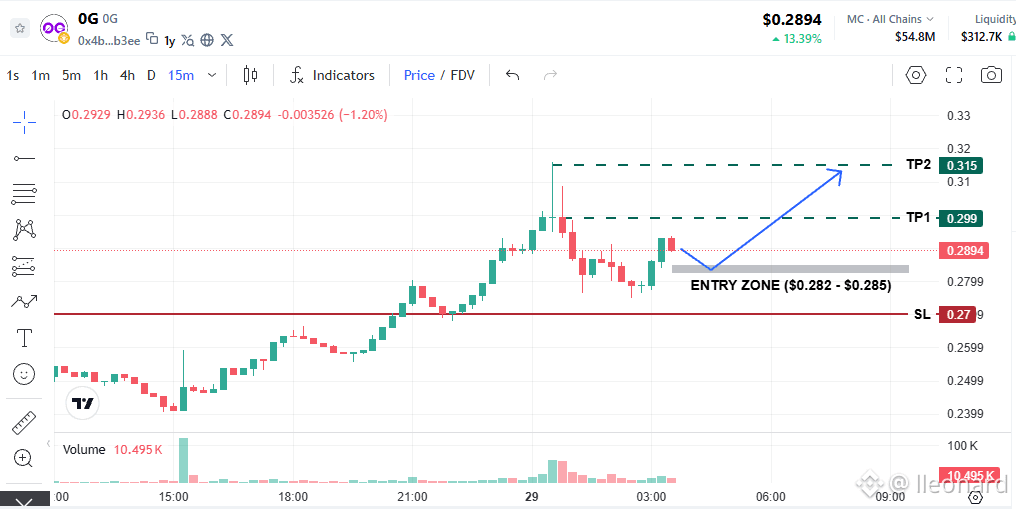
After a heavy wick rejection at the $0.32 local top, $0G found strong buying support around the $0.275 – $0.280 zone on the 15m chart, establishing a higher low.
While recovery volume remains modest, this higher low structure opens up a solid short-term scalp/intraday setup.
– Entry Zone: $0.282 – $0.285
– Stop Loss: $0.270
– Targets: $0.299 | $0.315
⚠️ Strict SL.
{future}(0GUSDT)
After a heavy wick rejection at the $0.32 local top, $0G found strong buying support around the $0.275 – $0.280 zone on the 15m chart, establishing a higher low.
While recovery volume remains modest, this higher low structure opens up a solid short-term scalp/intraday setup.
– Entry Zone: $0.282 – $0.285
– Stop Loss: $0.270
– Targets: $0.299 | $0.315
⚠️ Strict SL.
While recovery volume remains modest, this higher low structure opens up a solid short-term scalp/intraday setup.
– Entry Zone: $0.282 – $0.285
– Stop Loss: $0.270
– Targets: $0.299 | $0.315
⚠️ Strict SL.
384
·
--
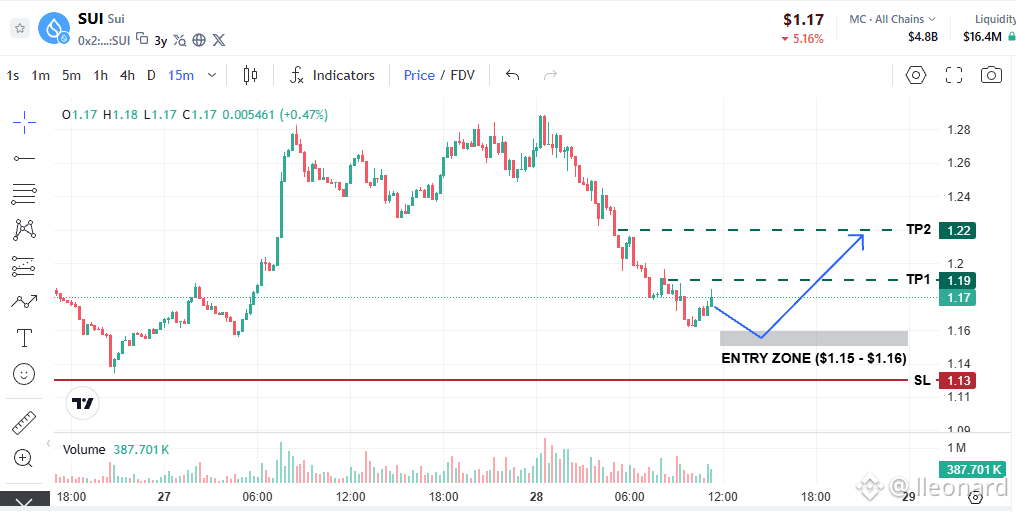
$SUI 15m timeframe is seeing a minor bounce off the $1.16 low, but recovery volume remains light. The $1.18 - $1.20 zone is acting as immediate short-term resistance.
📊 Long Setup
– Entry Zone: $1.15 - $1.16
– Stop Loss: $1.13
– Targets: $1.19 - $1.22
⚠️ If 4H profit-taking pressure persists, the $1.15 support could break easily, exposing lower support levels at $1.10 - $1.12 or $1.00.
{future}(SUIUSDT)
$SUI 15m timeframe is seeing a minor bounce off the $1.16 low, but recovery volume remains light. The $1.18 - $1.20 zone is acting as immediate short-term resistance.
📊 Long Setup
– Entry Zone: $1.15 - $1.16
– Stop Loss: $1.13
– Targets: $1.19 - $1.22
⚠️ If 4H profit-taking pressure persists, the $1.15 support could break easily, exposing lower support levels at $1.10 - $1.12 or $1.00.
📊 Long Setup
– Entry Zone: $1.15 - $1.16
– Stop Loss: $1.13
– Targets: $1.19 - $1.22
⚠️ If 4H profit-taking pressure persists, the $1.15 support could break easily, exposing lower support levels at $1.10 - $1.12 or $1.00.
90
·
--
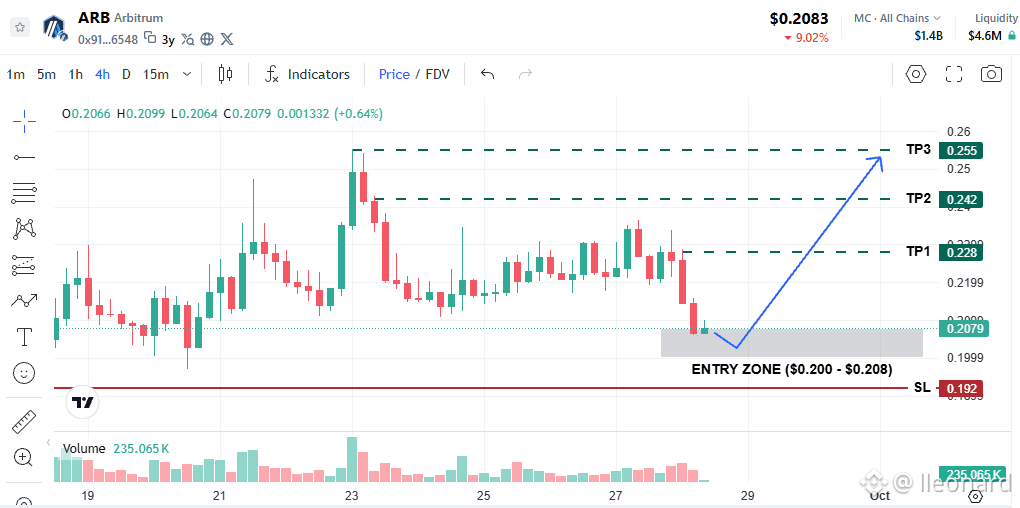
Following a pullback from the local peak at $0.24 – $0.25, $ARB has dropped back to test its key horizontal support around $0.208.
This level serves as crucial baseline support; if bulls can defend this range, a technical rebound is highly likely.
📊 Long Trade Plan
– Entry Zone: $0.200 – $0.208
– Stop Loss: $0.192
– Targets: $0.228 | $0.242 | $0.255
⚠️ Strict SL execution: If ARB loses the $0.20 level on high volume, price could drift lower toward $0.180 or previous lows at $0.140.
{future}(ARBUSDT)
Following a pullback from the local peak at $0.24 – $0.25, $ARB has dropped back to test its key horizontal support around $0.208.
This level serves as crucial baseline support; if bulls can defend this range, a technical rebound is highly likely.
📊 Long Trade Plan
– Entry Zone: $0.200 – $0.208
– Stop Loss: $0.192
– Targets: $0.228 | $0.242 | $0.255
⚠️ Strict SL execution: If ARB loses the $0.20 level on high volume, price could drift lower toward $0.180 or previous lows at $0.140.
This level serves as crucial baseline support; if bulls can defend this range, a technical rebound is highly likely.
📊 Long Trade Plan
– Entry Zone: $0.200 – $0.208
– Stop Loss: $0.192
– Targets: $0.228 | $0.242 | $0.255
⚠️ Strict SL execution: If ARB loses the $0.20 level on high volume, price could drift lower toward $0.180 or previous lows at $0.140.
1
290
·
--
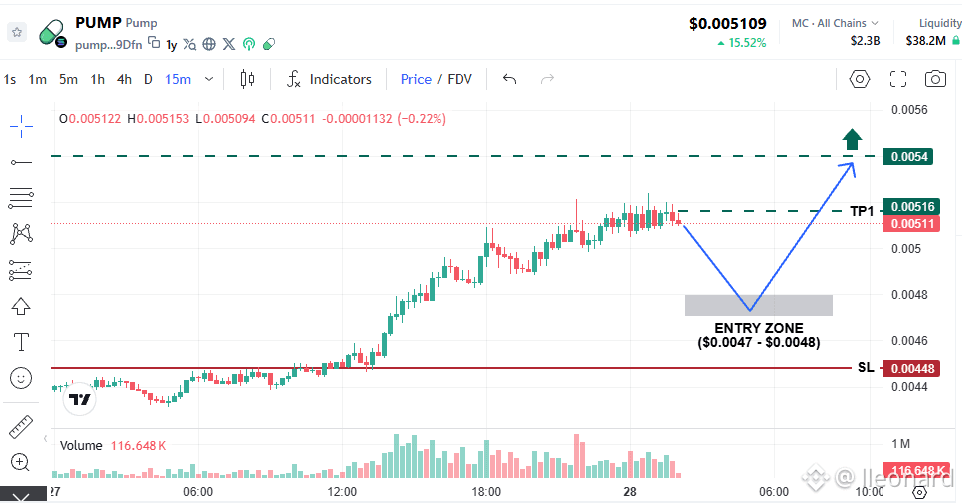
After a decisive rally pushing the price to 0.00520, $PUMP is currently pausing and consolidating around 0.00510.
Buying volume near the peak is slowing down with upper shadows indicating short-term profit-taking — suggesting the market needs a healthy pullback before declaring its next direction!
📊 LONG SETUP
– Entry Zone:0.00470 - 0.00480
– Stop Loss: 0.00448
– Targets: 0.00516 | 0.00540+
💡 Split into 2 DCA limit orders at 0.00480 and 0.00470 to optimize entry.
{future}(PUMPUSDT)
After a decisive rally pushing the price to 0.00520, $PUMP is currently pausing and consolidating around 0.00510.
Buying volume near the peak is slowing down with upper shadows indicating short-term profit-taking — suggesting the market needs a healthy pullback before declaring its next direction!
📊 LONG SETUP
– Entry Zone:0.00470 - 0.00480
– Stop Loss: 0.00448
– Targets: 0.00516 | 0.00540+
💡 Split into 2 DCA limit orders at 0.00480 and 0.00470 to optimize entry.
Buying volume near the peak is slowing down with upper shadows indicating short-term profit-taking — suggesting the market needs a healthy pullback before declaring its next direction!
📊 LONG SETUP
– Entry Zone:0.00470 - 0.00480
– Stop Loss: 0.00448
– Targets: 0.00516 | 0.00540+
💡 Split into 2 DCA limit orders at 0.00480 and 0.00470 to optimize entry.
199
·
--
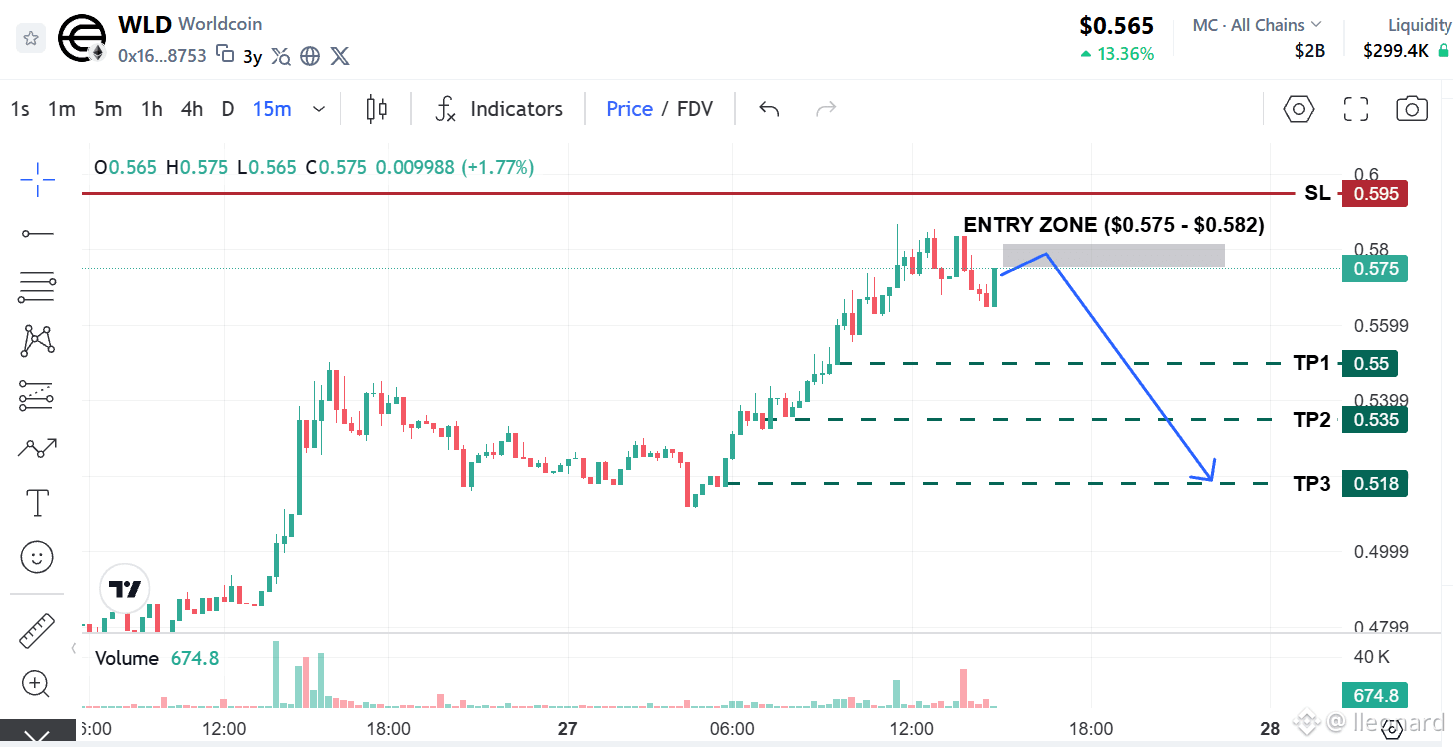
$WLD executed a liquidity sweep up to $0.586+ followed immediately by a sharp rejection with a high-volume red candle. The current minor pullback presents a favorable Risk/Reward Short opportunity as sellers regain control.
📊 Trading Plan
– Entry Zone: $0.5780 – $0.5820
– Stop Loss: $0.5950
– Targets: $0.5550 | $0.5350 | $0.5180
⚠️ Strict SL.
{future}(WLDUSDT)
$WLD executed a liquidity sweep up to $0.586+ followed immediately by a sharp rejection with a high-volume red candle. The current minor pullback presents a favorable Risk/Reward Short opportunity as sellers regain control.
📊 Trading Plan
– Entry Zone: $0.5780 – $0.5820
– Stop Loss: $0.5950
– Targets: $0.5550 | $0.5350 | $0.5180
⚠️ Strict SL.
📊 Trading Plan
– Entry Zone: $0.5780 – $0.5820
– Stop Loss: $0.5950
– Targets: $0.5550 | $0.5350 | $0.5180
⚠️ Strict SL.
241
·
--
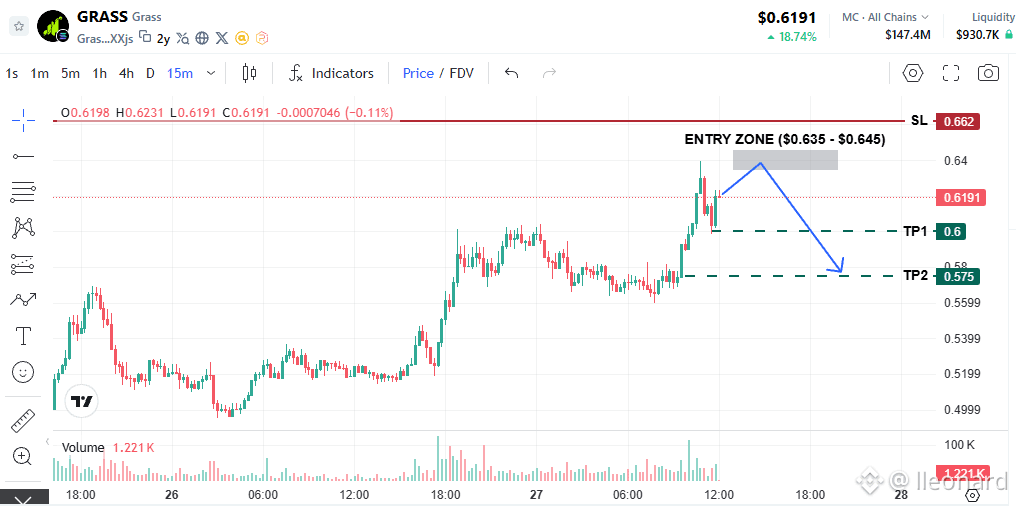
$GRASS is showing a steep parabolic run on the 4H chart, with long upper wicks appearing around $0.64 (15m chart), signaling profit-taking pressure.
📊 SHORT PLAN (Scalp)
– Entry Zone: $0.635 – $0.645
– Stop Loss: $0.662
– Targets: $0.600 | $0.575
⚠️ Cancel this setup if the price has not reached the Entry zone but closes a candle below $0.600.
{future}(GRASSUSDT)
$GRASS is showing a steep parabolic run on the 4H chart, with long upper wicks appearing around $0.64 (15m chart), signaling profit-taking pressure.
📊 SHORT PLAN (Scalp)
– Entry Zone: $0.635 – $0.645
– Stop Loss: $0.662
– Targets: $0.600 | $0.575
⚠️ Cancel this setup if the price has not reached the Entry zone but closes a candle below $0.600.
📊 SHORT PLAN (Scalp)
– Entry Zone: $0.635 – $0.645
– Stop Loss: $0.662
– Targets: $0.600 | $0.575
⚠️ Cancel this setup if the price has not reached the Entry zone but closes a candle below $0.600.
235
·
--
Bearish
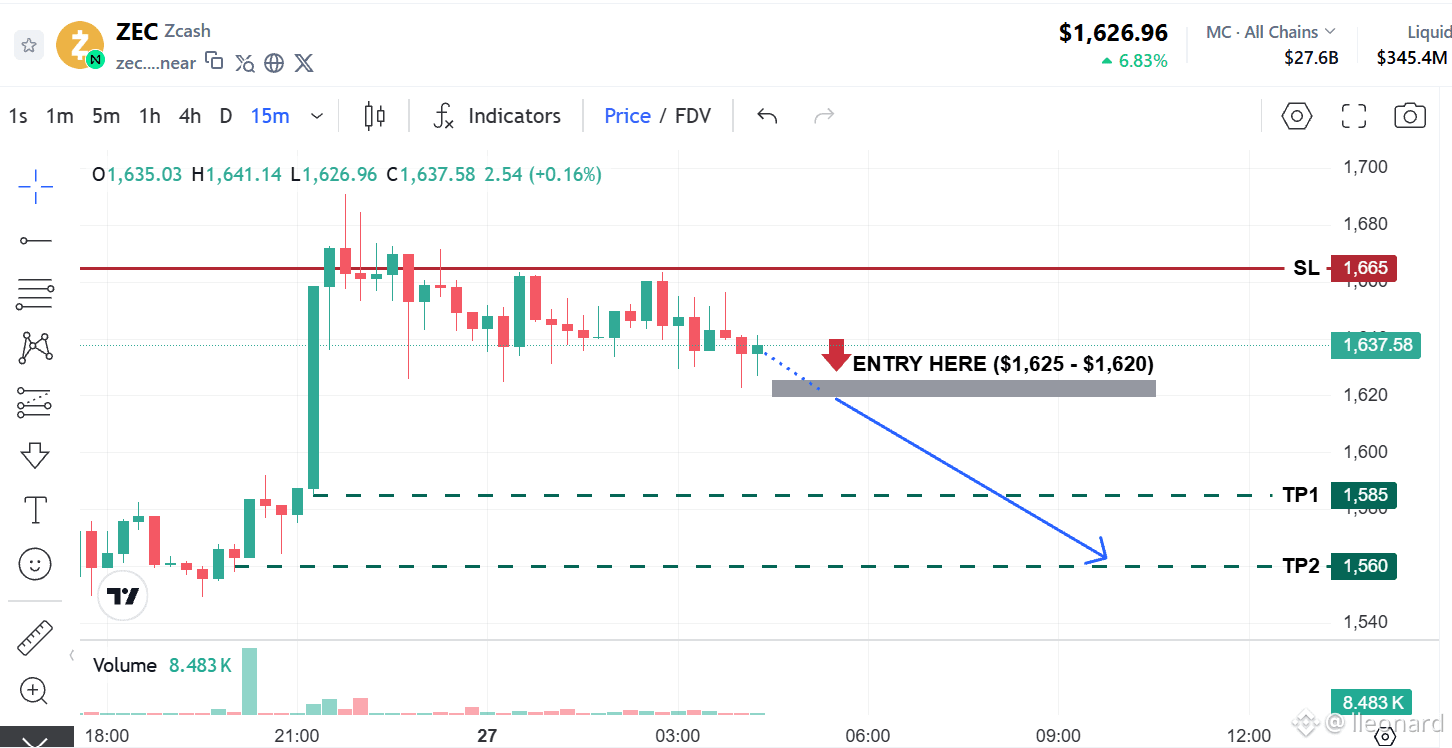
$ZEC previous bull flag structure is showing signs of exhaustion as buying pressure near the $1,675–$1,690 peak fades.
The $1,625 support level currently serves as the key line in the sand for short-term momentum ➔ If bulls lose this level, a breakdown to fill the lower price gap becomes the high-probability path.
🎯 TRADE SETUP
– Entry Zone: $1,620 – $1,625
– Stop Loss: $1,665
– Targets: $1,585 | $1,560
💡 Wait for a 15m candle close below $1,625 or set a Sell Stop/Limit on the retest.
{future}(ZECUSDT)
$ZEC previous bull flag structure is showing signs of exhaustion as buying pressure near the $1,675–$1,690 peak fades.
The $1,625 support level currently serves as the key line in the sand for short-term momentum ➔ If bulls lose this level, a breakdown to fill the lower price gap becomes the high-probability path.
🎯 TRADE SETUP
– Entry Zone: $1,620 – $1,625
– Stop Loss: $1,665
– Targets: $1,585 | $1,560
💡 Wait for a 15m candle close below $1,625 or set a Sell Stop/Limit on the retest.
The $1,625 support level currently serves as the key line in the sand for short-term momentum ➔ If bulls lose this level, a breakdown to fill the lower price gap becomes the high-probability path.
🎯 TRADE SETUP
– Entry Zone: $1,620 – $1,625
– Stop Loss: $1,665
– Targets: $1,585 | $1,560
💡 Wait for a 15m candle close below $1,625 or set a Sell Stop/Limit on the retest.
144
·
--
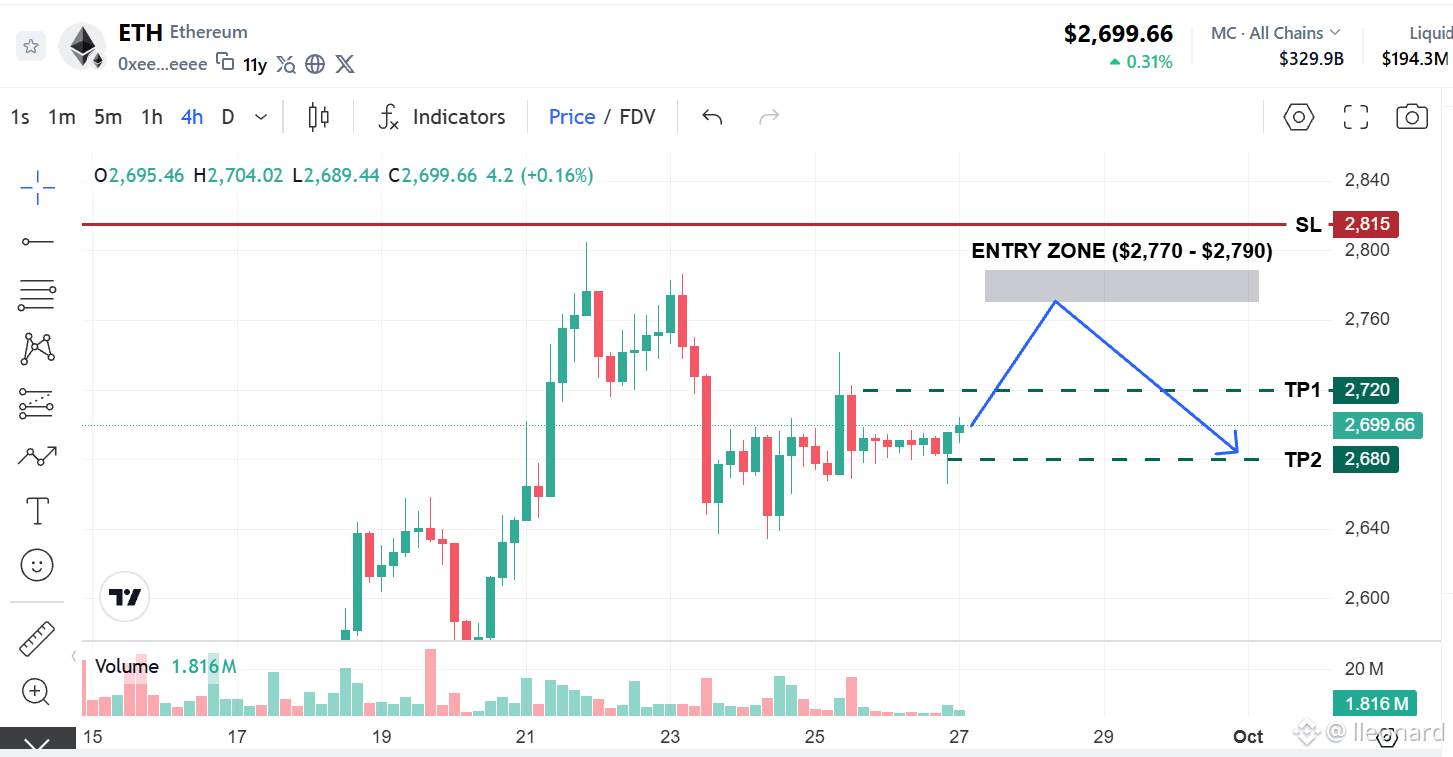
$ETH is pushing into a key short-term resistance zone. Profit-taking pressure is starting to show on lower timeframes (15m/1h), creating a tight Scalp opportunity to trade the rejection.
🎯 Scalp Setup
– Entry: $2,770 – $2,790
– Stop Loss: $2,815
– Targets: $2,710 | $2,680
⚠️ Cancel this setup if price breaks below $2,650 from current levels.
{future}(ETHUSDT)
$ETH is pushing into a key short-term resistance zone. Profit-taking pressure is starting to show on lower timeframes (15m/1h), creating a tight Scalp opportunity to trade the rejection.
🎯 Scalp Setup
– Entry: $2,770 – $2,790
– Stop Loss: $2,815
– Targets: $2,710 | $2,680
⚠️ Cancel this setup if price breaks below $2,650 from current levels.
🎯 Scalp Setup
– Entry: $2,770 – $2,790
– Stop Loss: $2,815
– Targets: $2,710 | $2,680
⚠️ Cancel this setup if price breaks below $2,650 from current levels.
71
·
--
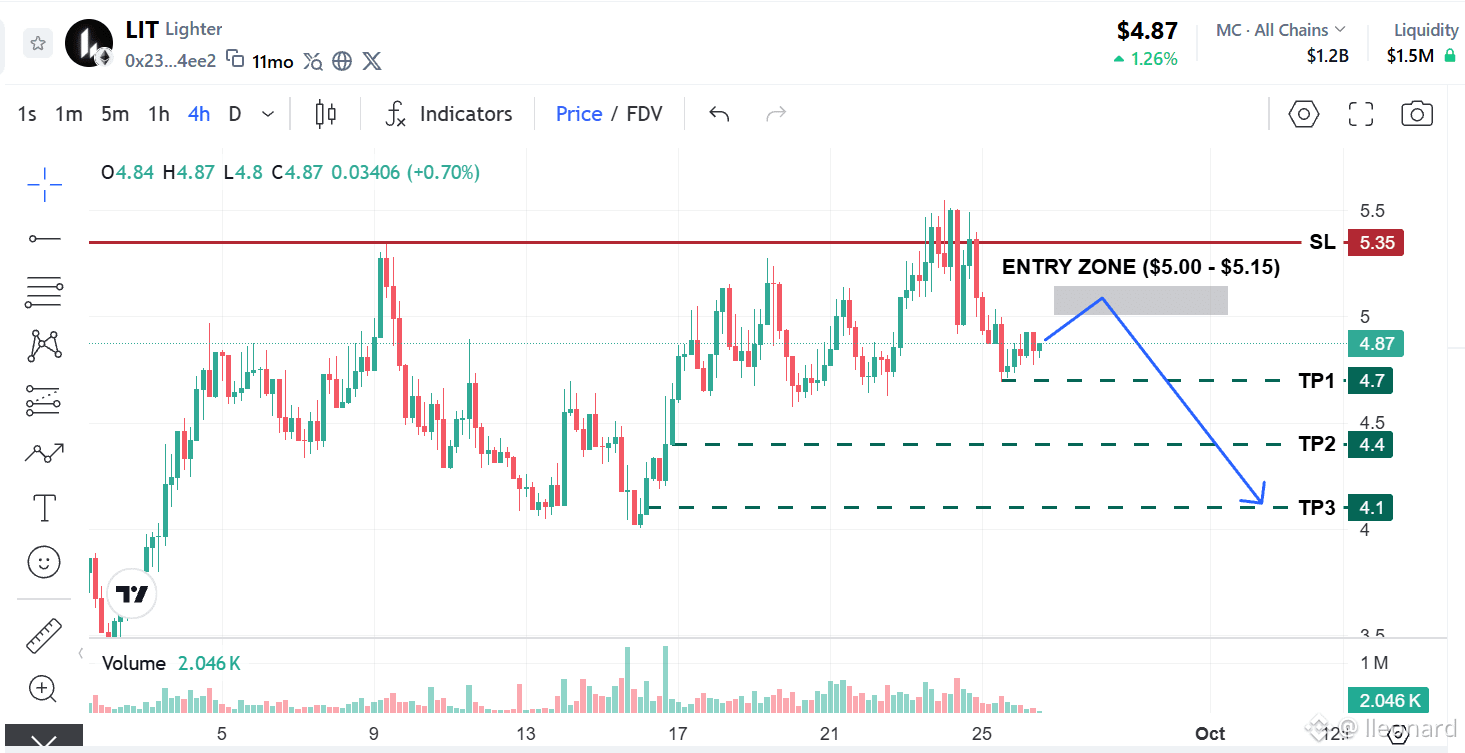
Upside momentum for $LIT has faded significantly after hitting the $5.50 peak. A short-term reversal structure is forming with exhausted buying volume at the $4.80 level.
📊 Short Plan
– Entry Zone: $5.00 – $5.15
– Stop Loss: $5.35
– Take Profit: $4.70 | $4.40 | $4.10
⚠️ Respect your SL!
{future}(LITUSDT)
Upside momentum for $LIT has faded significantly after hitting the $5.50 peak. A short-term reversal structure is forming with exhausted buying volume at the $4.80 level.
📊 Short Plan
– Entry Zone: $5.00 – $5.15
– Stop Loss: $5.35
– Take Profit: $4.70 | $4.40 | $4.10
⚠️ Respect your SL!
📊 Short Plan
– Entry Zone: $5.00 – $5.15
– Stop Loss: $5.35
– Take Profit: $4.70 | $4.40 | $4.10
⚠️ Respect your SL!
327
·
--
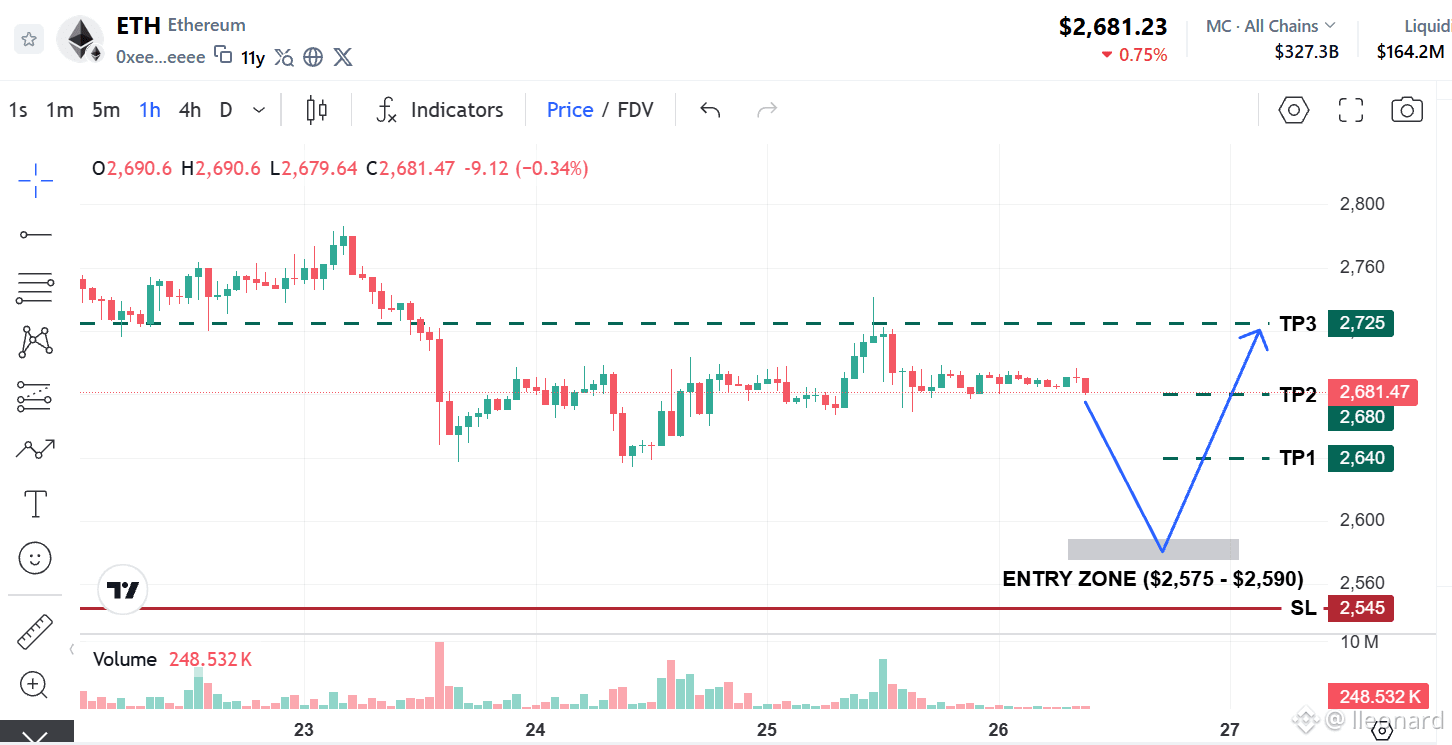
After testing the $2,650 support with weak momentum, $ETH is currently pulling back to find a stronger equilibrium zone. The lower technical support range around $2,575 – $2,590 presents an ideal entry point for a favorable Risk/Reward ratio.
📊 Trading Setup
– Entry: $2,575 – $2,590
– Stop Loss: $2,545
– Targets: $2,640 | $2,680 | $2,725
⚠️ As this is a limit buy on a pullback, always set your automatic SL simultaneously with the limit entry!
{future}(ETHUSDT)
After testing the $2,650 support with weak momentum, $ETH is currently pulling back to find a stronger equilibrium zone. The lower technical support range around $2,575 – $2,590 presents an ideal entry point for a favorable Risk/Reward ratio.
📊 Trading Setup
– Entry: $2,575 – $2,590
– Stop Loss: $2,545
– Targets: $2,640 | $2,680 | $2,725
⚠️ As this is a limit buy on a pullback, always set your automatic SL simultaneously with the limit entry!
📊 Trading Setup
– Entry: $2,575 – $2,590
– Stop Loss: $2,545
– Targets: $2,640 | $2,680 | $2,725
⚠️ As this is a limit buy on a pullback, always set your automatic SL simultaneously with the limit entry!
32
·
--
Bullish
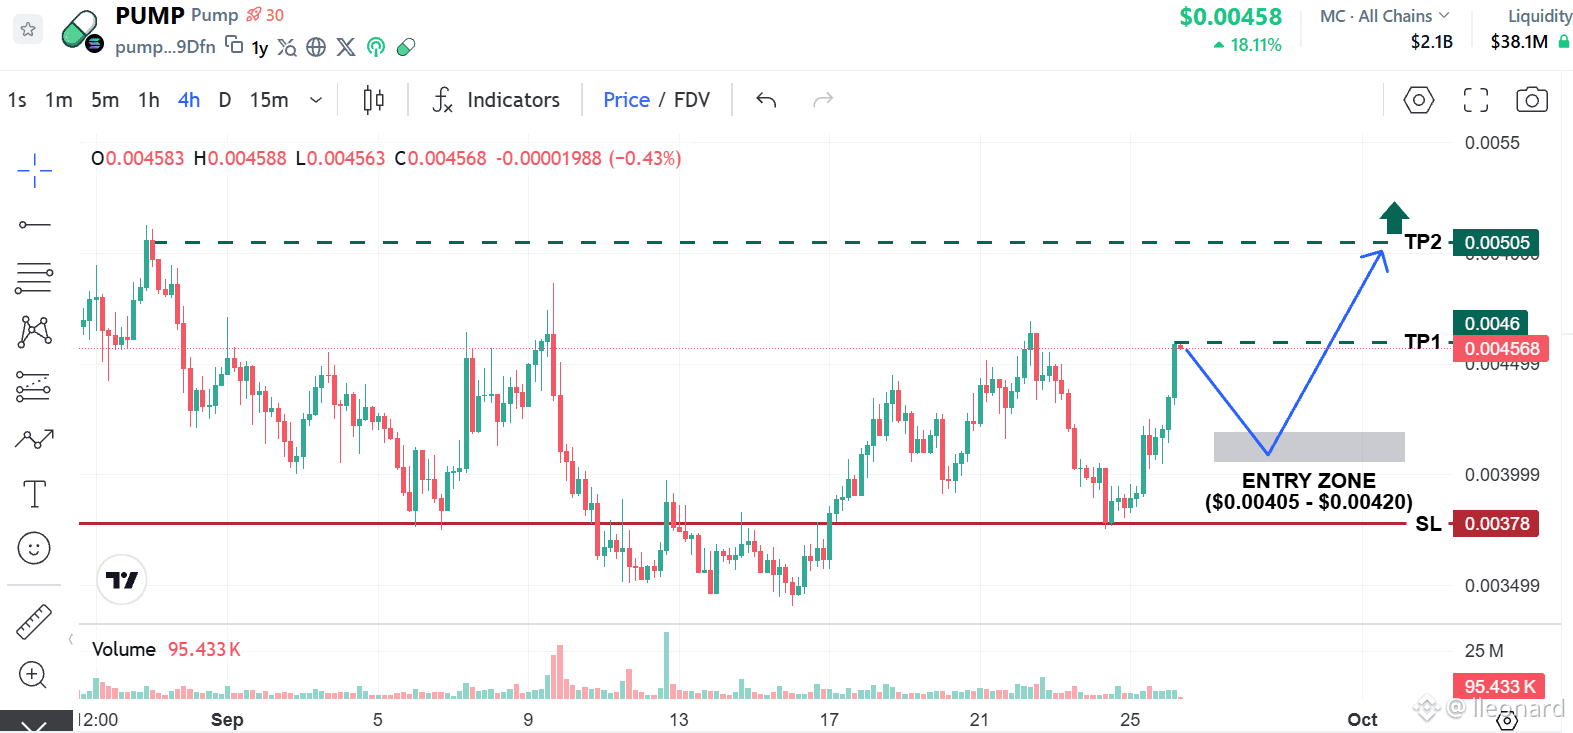
$PUMP is currently testing a crucial short-term resistance zone at $0.00456 – $0.00465 (the local peak from Sept 22–23).
Instead of chasing the price into resistance, we are looking for a healthy pullback to a strong support zone to set up a high R:R trend-following trade.
– Entry Zone: $0.00405 – $0.00420
– Stop Loss: $0.00378
– Targets: $0.00460 | $0.00505
📌 Patiently wait for price to retest $0.00405 – $0.00420.
{future}(PUMPUSDT)
$PUMP is currently testing a crucial short-term resistance zone at $0.00456 – $0.00465 (the local peak from Sept 22–23).
Instead of chasing the price into resistance, we are looking for a healthy pullback to a strong support zone to set up a high R:R trend-following trade.
– Entry Zone: $0.00405 – $0.00420
– Stop Loss: $0.00378
– Targets: $0.00460 | $0.00505
📌 Patiently wait for price to retest $0.00405 – $0.00420.
Instead of chasing the price into resistance, we are looking for a healthy pullback to a strong support zone to set up a high R:R trend-following trade.
– Entry Zone: $0.00405 – $0.00420
– Stop Loss: $0.00378
– Targets: $0.00460 | $0.00505
📌 Patiently wait for price to retest $0.00405 – $0.00420.
145
·
--
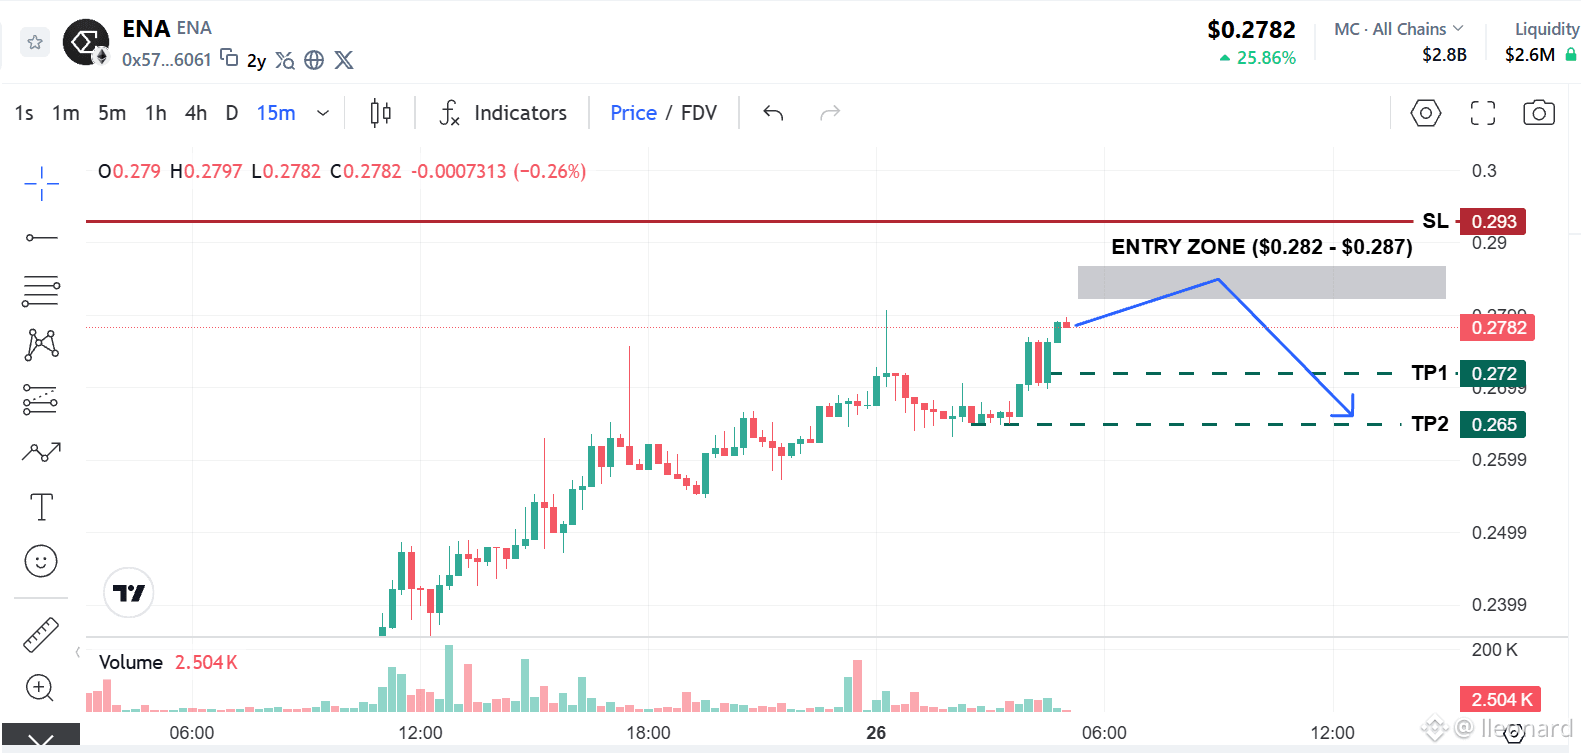
$ENA is currently on a strong steep run-up (+26% today), with buying pressure still fairly dominant. However, price is stretching back up into the previous high resistance zone around $0.280.
📊 Trade Setup
– Entry: $0.282 – $0.287
– Stop Loss: $0.293
– Targets: $0.272 | $0.265
⚠️ This is a Counter-Trend Short designed for a quick scalp. Strict SL discipline and reduced position sizing are mandatory.
{future}(ENAUSDT)
$ENA is currently on a strong steep run-up (+26% today), with buying pressure still fairly dominant. However, price is stretching back up into the previous high resistance zone around $0.280.
📊 Trade Setup
– Entry: $0.282 – $0.287
– Stop Loss: $0.293
– Targets: $0.272 | $0.265
⚠️ This is a Counter-Trend Short designed for a quick scalp. Strict SL discipline and reduced position sizing are mandatory.
📊 Trade Setup
– Entry: $0.282 – $0.287
– Stop Loss: $0.293
– Targets: $0.272 | $0.265
⚠️ This is a Counter-Trend Short designed for a quick scalp. Strict SL discipline and reduced position sizing are mandatory.
172
·
--
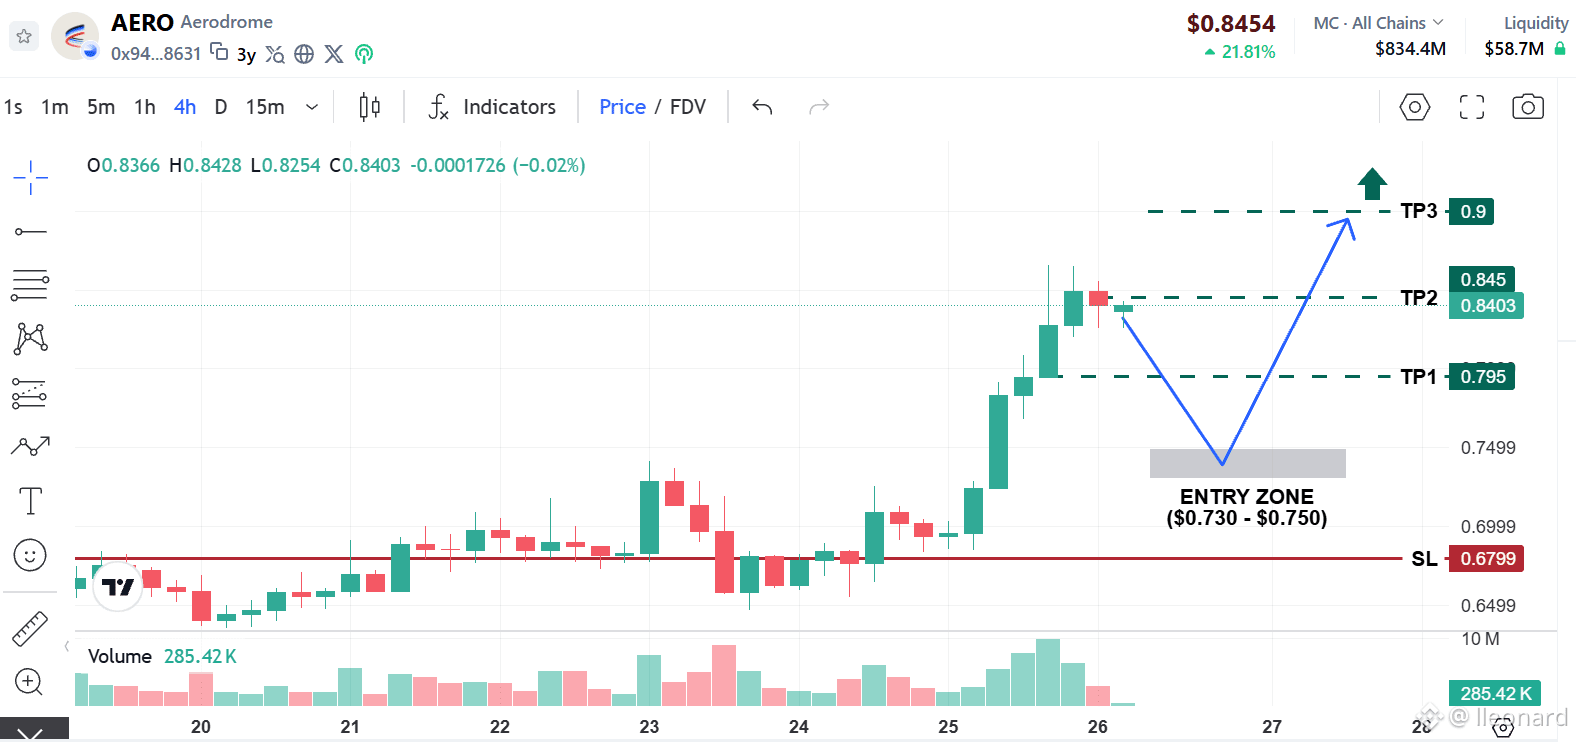
On the H4 chart, $AERO recently delivered a strong bullish impulse, surging from $0.65 up to $0.86 with heavy buying volume.
Instead of chasing (FOMO) near the local peak at $0.84 – $0.86 where short-term profit-taking is underway, the safest approach with the best Risk-to-Reward ratio is to patiently wait for a retest of the key H4 Demand Zone — the origin of the previous strong breakout move.
📌 TRADE PLAN
– Entry Zone: $0.730 – $0.750
– Stop Loss:$0.698
– Targets: $0.795 | $0.855 | $0.900+
{future}(AEROUSDT)
On the H4 chart, $AERO recently delivered a strong bullish impulse, surging from $0.65 up to $0.86 with heavy buying volume.
Instead of chasing (FOMO) near the local peak at $0.84 – $0.86 where short-term profit-taking is underway, the safest approach with the best Risk-to-Reward ratio is to patiently wait for a retest of the key H4 Demand Zone — the origin of the previous strong breakout move.
📌 TRADE PLAN
– Entry Zone: $0.730 – $0.750
– Stop Loss:$0.698
– Targets: $0.795 | $0.855 | $0.900+
Instead of chasing (FOMO) near the local peak at $0.84 – $0.86 where short-term profit-taking is underway, the safest approach with the best Risk-to-Reward ratio is to patiently wait for a retest of the key H4 Demand Zone — the origin of the previous strong breakout move.
📌 TRADE PLAN
– Entry Zone: $0.730 – $0.750
– Stop Loss:$0.698
– Targets: $0.795 | $0.855 | $0.900+
153
Log in to explore more content
Join global crypto users on Binance Square
⚡️ Get latest and useful information about crypto.
💬 Trusted by the world’s largest crypto exchange.
👍 Discover real insights from verified creators.
Email / Phone number
Trending Topics
MetaMaskExitsLidoValidatorsAfterSecurityIncident
7,477 views
271 Discussing
🚨 METAMASK JUST STARTED EXITING ETH VALIDATORS AFTER A SECURITY INCIDENT.
MetaMask says an ongoing security incident hit part of its infrastructure, forcing it to proactively exit affected validators from its non-custodial staking operations. The company says it has found no immediate threat to MetaMask wallets so far.
The key detail?
These validators are tied to Lido staking, and the exit process may temporarily remove ETH from staking while the investigation continues. Lido-related reports say the full exit, withdrawal and re-entry cycle could take up to roughly 45 days.
That means the market should separate two things:
Wallet users are not currently being told they’re at immediate risk.
But validator infrastructure clearly was serious enough to trigger an emergency exit.
And when one of Ethereum’s biggest wallet brands starts pulling validators as a precaution, traders pay attention.
Security incidents don’t need stolen funds to become market-moving.
Sometimes the reaction itself is the signal. 👀
$ETH $LDO
#metamaskexitslidovalidatorsaftersecurityincident
KimHotbae
·0 Likes
·2.4k views
MicronBeatsEarningsLiftsGuidance
9,727 views
263 Discussing
CFTCSubmitsTwoEventContractRulesToWhiteHouse
9,094 views
251 Discussing