

1. Project introduction
Shardeum is a linearly scalable EVM-based smart contract platform that offers low gas fees while maintaining true decentralization and strong security through dynamic sharding.

Investment: Nischal Shetty, co-founder of Indian cryptocurrency exchange WazirX, is behind the project. Recently, Shetty raised up to $30 million for his blockchain startup Shardeum, requesting anonymity, with sources adding that the funding round will value Shardeum at up to $200 million.
Funds: Spartan Group, Struck Crypto, Big Brain Holdings, and Cogitent Ventures.
Reward: It has not been officially announced, but officials stated that 25.4 million SHM will be used for the ecosystem and airdrops.
2. Is there any airdrop for node mining?
Shardeum recently issued an announcement saying:

What this means is that node mining will earn Betanet SHM, but these will not have any value. But officials will keep track of addresses that helped during the Betanet testing period. While a decision has not yet been made on mainnet rewards for Betanet users, we will announce if and when that will be decided in due course.
In other words, it implies an airdrop.
3. Before tutorial
So today we mainly introduce Shardeum’s node mining tutorial. The specific steps are as follows:
You can mine in two ways:
1. Mining on your own computer, the minimum configuration is as follows:
CPU:4vCore
Memory: 8 GB
SDD:60GB
Operating system: Ubuntu 20.04
2. Cloud host + SSH tool mining
This method requires you to rent a VPS or airport as a cloud host. Please switch the cloud host to Ubuntu system;
SSH tool: New users are recommended to use Xshell or Finalshell.
4. How to connect to VPS
MacOs: If you're using this operating system, you just need to SSH into your device;
Windows: If you are Win, there are many tools you can use, such as putty, MobaXterm, and Xshell
1. Download an application (this tutorial uses putty as an example. New users are recommended to use Xshell or Finalshell)
2. Copy the cloud server IP link

3. Click "Accept" and enter the username and password of the cloud server
NOTE: To paste any command you have copied, just right-click on the command you want to paste


4. Enter the password again and enter the new password.

The above are the steps for cloud server + SSH combination. All the steps below are performed in the SSH tool (novice users are recommended to use Xshell or Finalshell)
5. Preparation before mining
Remember to fill it out according to the picture, sometimes I may write the wrong code; remember to root the server.
1. Update and upgrade the server
Before starting, you need to update and upgrade the server, copy the following command line into the SSH tool, and press Enter (novice users are recommended to use Xshell or Finalshell)
sudo apt update && apt upgrade -y

2. Install Docker
We install the Shardeum node through docker here (you can also use other methods, as long as the node is installed), enter the following command in Xshell:
sudo apt-get install ca-certificates curl gnupg lsb-release

Add Docker official GPG key:
sudo mkdir -p /etc/apt/keyrings curl -fsSL https://download.docker.com/linux/ubuntu/gpg | sudo gpg --dearmor -o /etc/apt/keyrings/docker.gpg

Use the following command to set up the repository:
echo \ "deb [arch=$(dpkg --print-architecture) signed-by=/etc/apt/keyrings/docker.gpg] https://download.docker.com/linux/ubuntu \ $(lsb_release -cs) stable" | sudo tee /etc/apt/sources.list.d/docker.list > /dev/null

Before updating the index, try granting read access to the Docker public key file:
sudo chmod a+r /etc/apt/keyrings/docker.gpg sudo apt-get update

To install the latest version, run:
sudo apt-get install docker-ce docker-ce-cli containerd.io docker-compose-plugin
When the command prompt asks, enter Y and press ENTER

Install docker compose:
sudo apt install docker-compose
When prompted, enter Y and press ENTER

To verify whether the Docker engine installation is successful, you can run hello-world:
sudo docker run hello-world

Check docker compose version:
docker-compose -v
6. Install nodes
1. Download and install
Download node and install it with the following command:
curl -O https://gitlab.com/shardeum/validator/dashboard/-/raw/main/installer.sh && chmod +x installer.sh && ./installer.sh

After returning to the command prompt, enter y to set up the web-based dashboard:
Do you want to run the web based Dashboard? (y/n): y
Set access password:
Set the password to access the Dashboard:
Add a custom session port for the web-based dashboard, or press Enter to select port 8080.
Enter the port (1025-65536) to access the web based Dashboard (default 8080):8080
Add custom path or install to root: (press ENTER)
What base directory should the node use (defaults to ~/.shardeum):
Wait for the installation to complete.

2. Configure firewall
If you select the default port, then you need to open 8080 and other ports such as https, http, ssh, 443.
So please enter:
ufw allow ssh ufw allow 8080 ufw allow https ufw allow http ufw allow 443 ufw enable
When prompted by the command prompt, enter y and press ENTER

9. Running nodes
1. Move to directory
Go to the hidden Shardeum directory:
cd .shardeum

2. Start script
Start the CLI by running the following shell script:
./shell.sh

3. Start interface
operator-cli gui start

4. Dashboard
Open your browser and enter your address in place of your IP according to the example below.
https://:8080
For example, I enter my IP+8080 port in the browser: https://10.20.30.40:8080

Enter the password you set in the previous step and click Connect


5. Start Validator
Enter the "Maintenance" page and click the "Start Node" button in the white box in the upper left corner.

Refresh the page and view the time verification parameters, you will see it moving.

6. Monitoring
Go to the Performance page to view your node's hardware performance here.
You will see from the page that the node eats RAM, so you need less than 4GB RAM.

For more details about the node status, run the following command in the CLI:
operator-cli status

pm2 list

10. Connect wallet
Please prepare MetaMask wallet
1. Connect the wallet to Betanet
Use the link below
https://docs.shardeum.org/Network/Endpoints#connect-wallet

2. Get the faucet
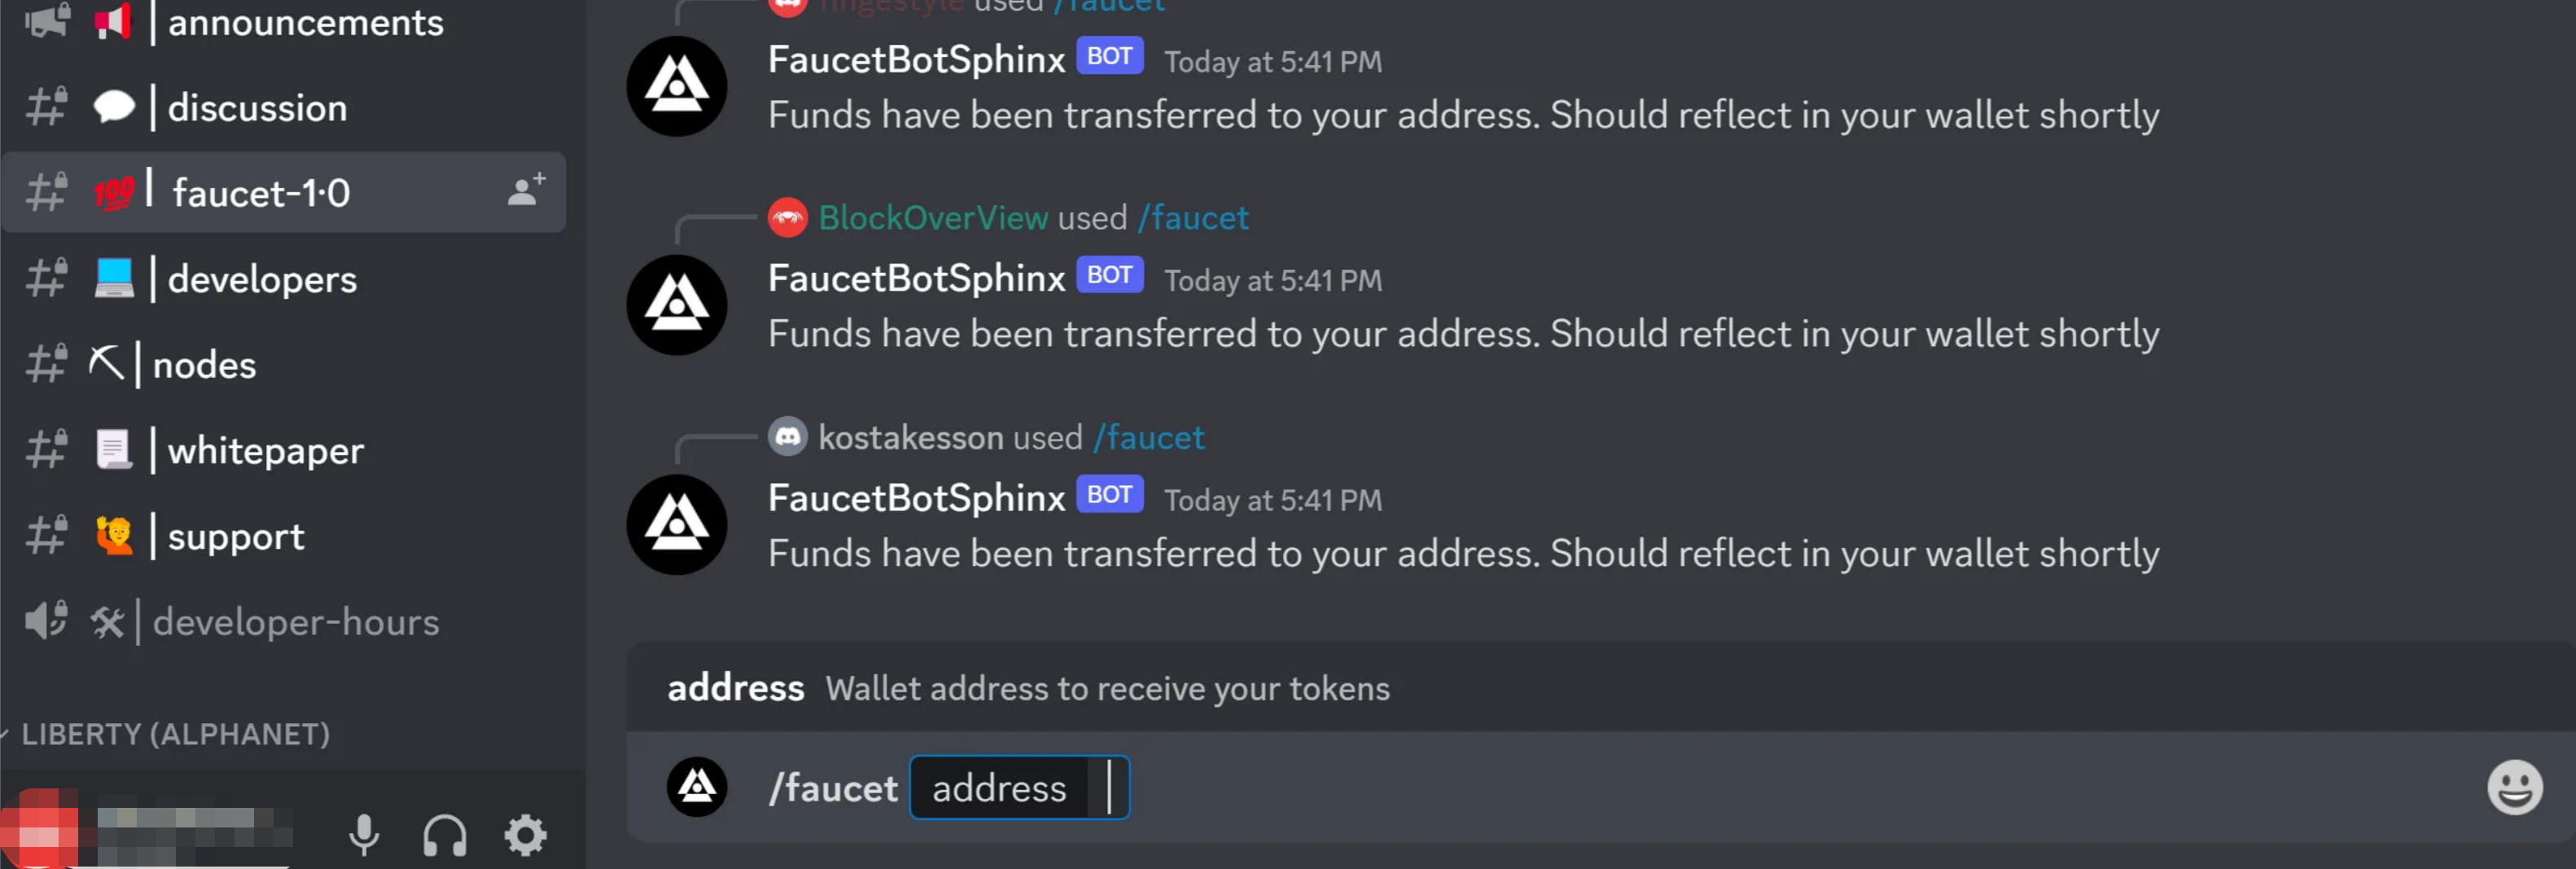
Use the link below and follow Discord's method to apply for the faucet.
Type "/faucet [sphinx address]" to claim testnet SHM on Sphinx 1.0 network#Example/faucet address 0x0000000
Faucet Discord
3. Pledge SHM
Return to the "Maintenance" page and connect your wallet:

In the picture above, I used 10 SHM tokens for staking;
After filling in all fields, click the "Stake" button;
The wallet is confirmed and the SHM token mortgage is completed.

Whenever your node mines tokens, you can follow the above operations to pledge the tokens; it is not sure whether there will be airdrops, but according to official hints, the probability of node mining to get airdrops is much higher than other interactions. .
That’s all for today. For more information, please pay attention to:

