
hs_dracula77
8 Posts

hs_dracula77
Report
Block User
1 Following
39 Followers
27 Liked
Posts
·
--
SUI/USDT — 1D Technical Analysis 📊
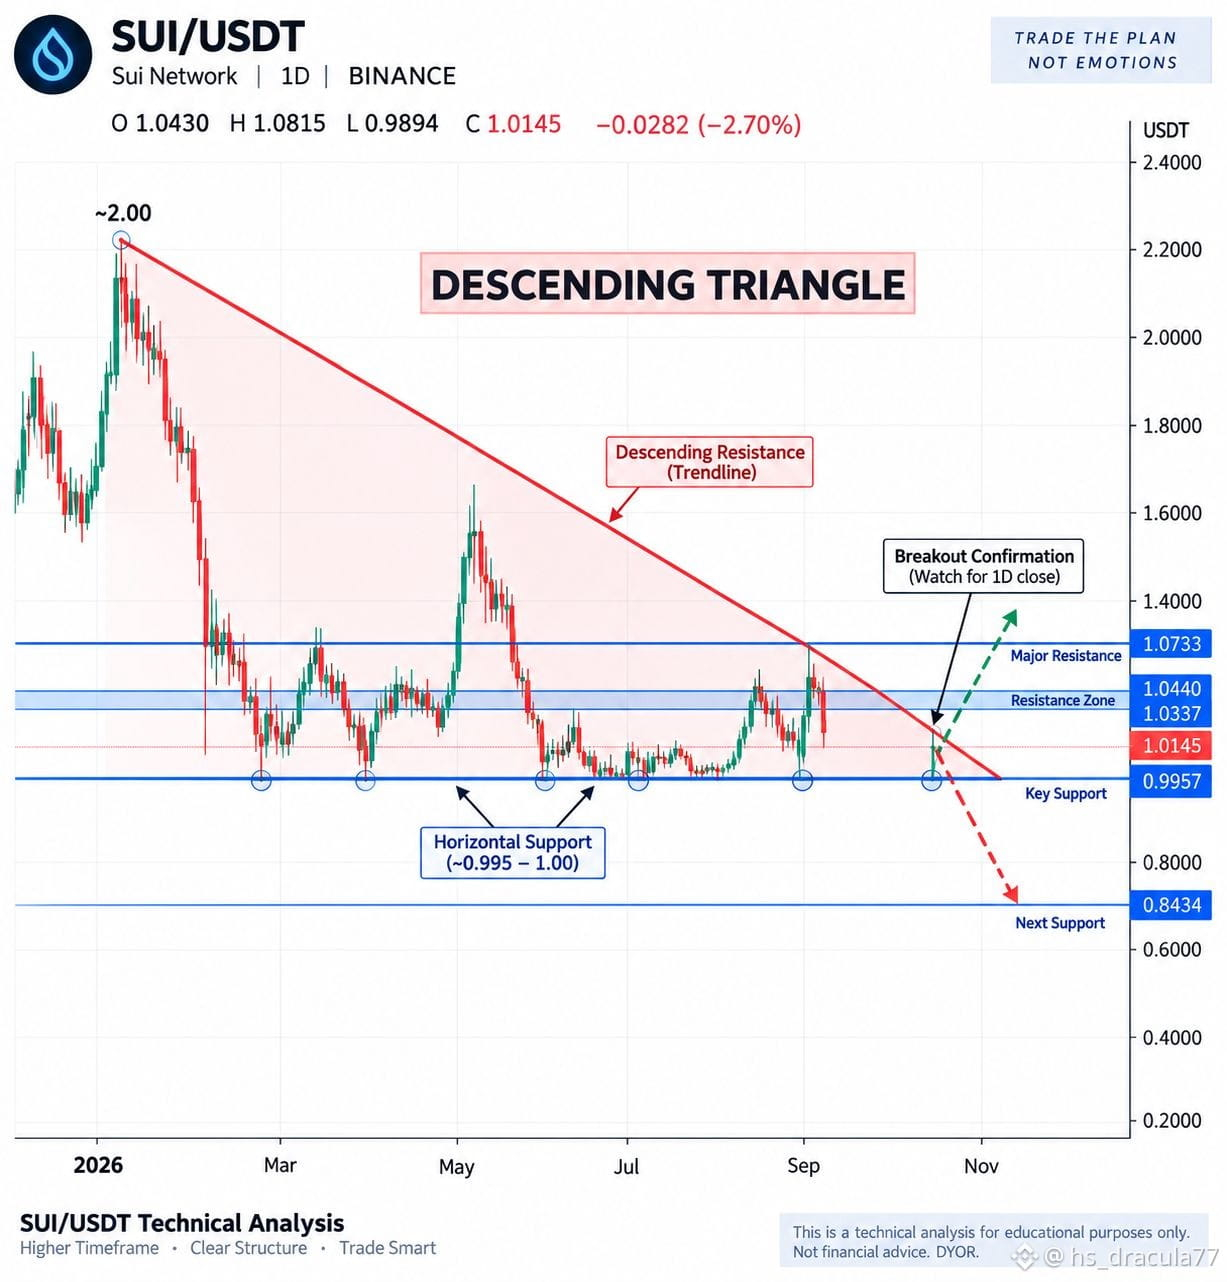
$SUI is currently trading around $1.0145 and is sitting at a critical decision zone on the daily timeframe.
The overall structure of $SUI is forming a Descending Triangle, with a clear descending resistance trendline from the ~$2.00 area and horizontal support around $0.995–$1.00.
Key Levels:
🔴 Resistance: $1.0337–$1.0440
🔴 Major resistance: $1.0733
🟡 Current price: ~$1.0145
🟢 Key support: $0.9957
🟢 Major lower support: $0.8434
Bullish scenario:
A strong daily close above the descending trendline and $1.0440 could open the way toward $1.0733 and potentially higher levels.
Bearish scenario:
If $SUI loses $0.9957 with a confirmed daily close below support, the triangle could break downward, with $0.8434 becoming an important lower support area.
For now, $0.9957–$1.0440 is the key battle zone. I would wait for confirmation rather than treating an intraday wick as a confirmed breakout/breakdown.
Technical analysis only — not financial advice. DYOR.
#SUİ #crypto #SUIAnalysis
SUI/USDT — 1D Technical Analysis 📊
$SUI is currently trading around $1.0145 and is sitting at a critical decision zone on the daily timeframe.
The overall structure of $SUI is forming a Descending Triangle, with a clear descending resistance trendline from the ~$2.00 area and horizontal support around $0.995–$1.00.
Key Levels:
🔴 Resistance: $1.0337–$1.0440
🔴 Major resistance: $1.0733
🟡 Current price: ~$1.0145
🟢 Key support: $0.9957
🟢 Major lower support: $0.8434
Bullish scenario:
A strong daily close above the descending trendline and $1.0440 could open the way toward $1.0733 and potentially higher levels.
Bearish scenario:
If $SUI loses $0.9957 with a confirmed daily close below support, the triangle could break downward, with $0.8434 becoming an important lower support area.
For now, $0.9957–$1.0440 is the key battle zone. I would wait for confirmation rather than treating an intraday wick as a confirmed breakout/breakdown.
Technical analysis only — not financial advice. DYOR.
#SUİ #crypto #SUIAnalysis
$SUI is currently trading around $1.0145 and is sitting at a critical decision zone on the daily timeframe.
The overall structure of $SUI is forming a Descending Triangle, with a clear descending resistance trendline from the ~$2.00 area and horizontal support around $0.995–$1.00.
Key Levels:
🔴 Resistance: $1.0337–$1.0440
🔴 Major resistance: $1.0733
🟡 Current price: ~$1.0145
🟢 Key support: $0.9957
🟢 Major lower support: $0.8434
Bullish scenario:
A strong daily close above the descending trendline and $1.0440 could open the way toward $1.0733 and potentially higher levels.
Bearish scenario:
If $SUI loses $0.9957 with a confirmed daily close below support, the triangle could break downward, with $0.8434 becoming an important lower support area.
For now, $0.9957–$1.0440 is the key battle zone. I would wait for confirmation rather than treating an intraday wick as a confirmed breakout/breakdown.
Technical analysis only — not financial advice. DYOR.
#SUİ #crypto #SUIAnalysis
110
·
--
📊 NEAR/USDT — 1D Technical Analysis
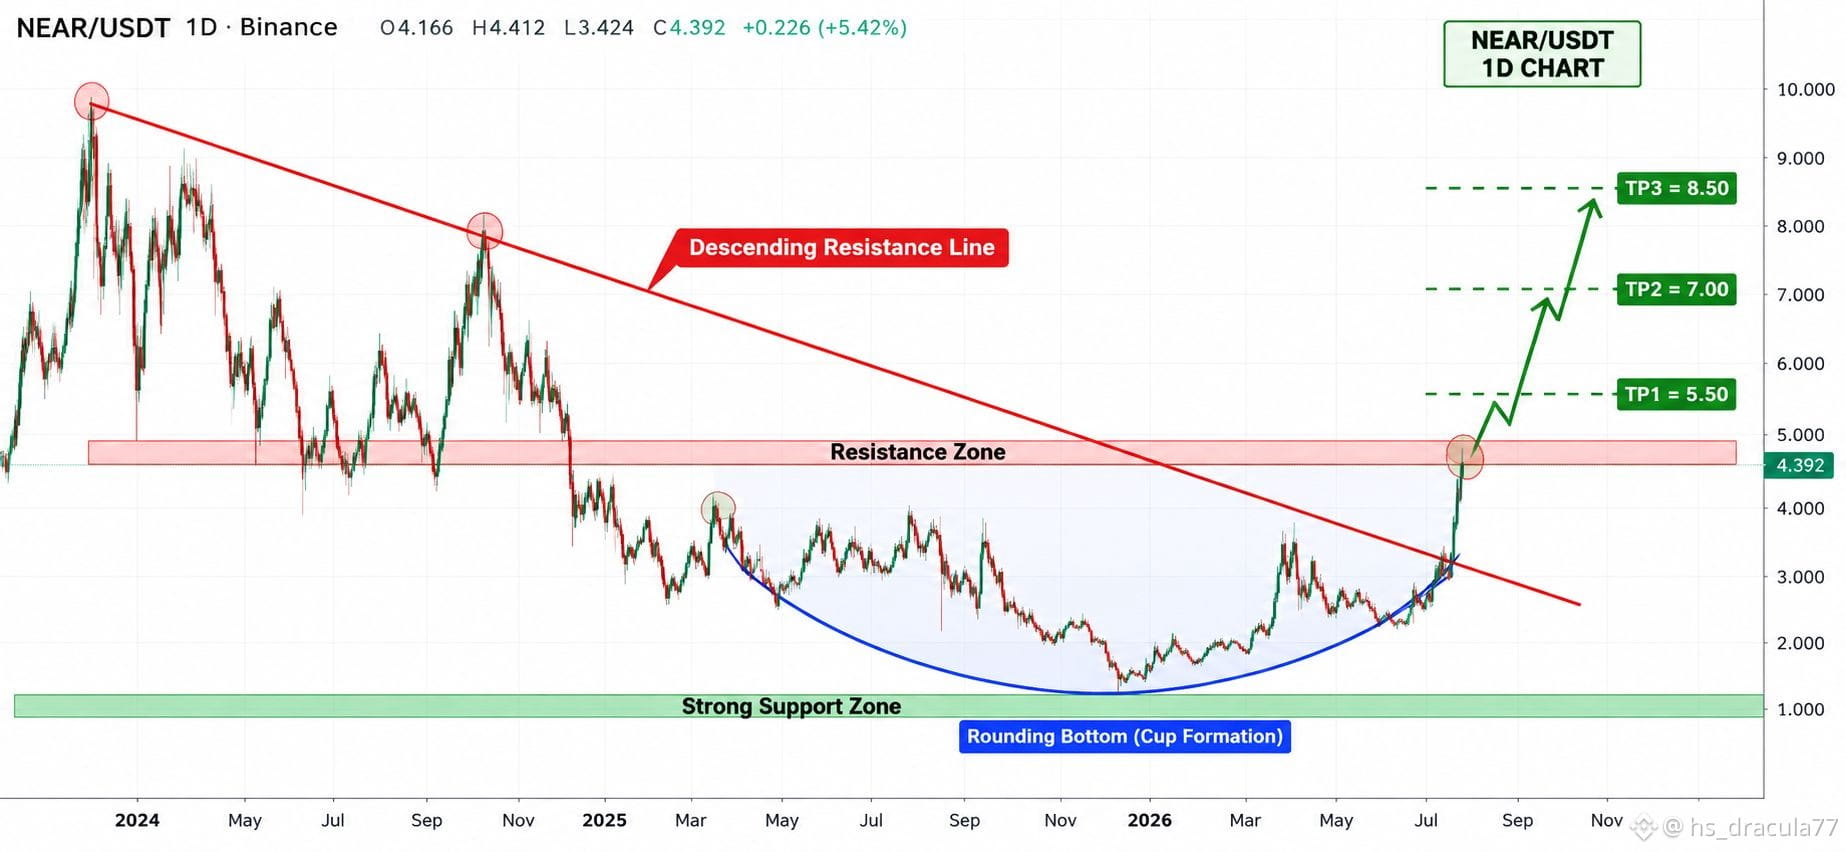
$NEAR is showing a strong bullish reversal structure on the 1D chart.
After a long period of lower highs and lower prices, $NEAR has broken above its long-term descending resistance line with strong momentum. The chart also resembles a large rounding-bottom / Cup-type formation, suggesting a potential transition from accumulation into an expansion phase.
Key levels to watch:
Current price: ~$4.39
Resistance zone: $4.60–$5.00
Breakout confirmation: Daily close above $5.00 + successful retest
Support: $3.20–$3.50
Major support: $1.00–$1.30
Upside levels: $5.50 → $7.00 → $8.50
The $4.60–$5.00 area is the critical zone. A clean breakout and hold above it could open the way toward the higher levels, while rejection could lead to a pullback toward the $3.20–$3.50 support area.
Binance Square caption:
🚀 $NEAR 1D BREAKOUT SETUP
NEAR is showing a major bullish reversal structure on the 1D timeframe.
After months of consolidation, price has broken above a long-term descending resistance trendline and is now approaching the major $4.60–$5.00 resistance zone.
📌 Key levels: Support: $3.20–$3.50
Resistance: $4.60–$5.00
Target 1: $5.50
Target 2: $7.00
Target 3: $8.50
The key confirmation will be a daily close above $5.00 followed by a successful retest.
If $5.00 becomes support, the next upside expansion could become significant. If price gets rejected, watch $3.20–$3.50 for a potential retest.
Technical analysis only — DYOR.
#NEAR🚀🚀🚀 #NEARUSDT.P #NEARProtocol #CryptoWatchMay2024 #CryptoTrading
📊 NEAR/USDT — 1D Technical Analysis
$NEAR is showing a strong bullish reversal structure on the 1D chart.
After a long period of lower highs and lower prices, $NEAR has broken above its long-term descending resistance line with strong momentum. The chart also resembles a large rounding-bottom / Cup-type formation, suggesting a potential transition from accumulation into an expansion phase.
Key levels to watch:
Current price: ~$4.39
Resistance zone: $4.60–$5.00
Breakout confirmation: Daily close above $5.00 + successful retest
Support: $3.20–$3.50
Major support: $1.00–$1.30
Upside levels: $5.50 → $7.00 → $8.50
The $4.60–$5.00 area is the critical zone. A clean breakout and hold above it could open the way toward the higher levels, while rejection could lead to a pullback toward the $3.20–$3.50 support area.
Binance Square caption:
🚀 $NEAR 1D BREAKOUT SETUP
NEAR is showing a major bullish reversal structure on the 1D timeframe.
After months of consolidation, price has broken above a long-term descending resistance trendline and is now approaching the major $4.60–$5.00 resistance zone.
📌 Key levels: Support: $3.20–$3.50
Resistance: $4.60–$5.00
Target 1: $5.50
Target 2: $7.00
Target 3: $8.50
The key confirmation will be a daily close above $5.00 followed by a successful retest.
If $5.00 becomes support, the next upside expansion could become significant. If price gets rejected, watch $3.20–$3.50 for a potential retest.
Technical analysis only — DYOR.
#NEAR🚀🚀🚀 #NEARUSDT.P #NEARProtocol #CryptoWatchMay2024 #CryptoTrading
$NEAR is showing a strong bullish reversal structure on the 1D chart.
After a long period of lower highs and lower prices, $NEAR has broken above its long-term descending resistance line with strong momentum. The chart also resembles a large rounding-bottom / Cup-type formation, suggesting a potential transition from accumulation into an expansion phase.
Key levels to watch:
Current price: ~$4.39
Resistance zone: $4.60–$5.00
Breakout confirmation: Daily close above $5.00 + successful retest
Support: $3.20–$3.50
Major support: $1.00–$1.30
Upside levels: $5.50 → $7.00 → $8.50
The $4.60–$5.00 area is the critical zone. A clean breakout and hold above it could open the way toward the higher levels, while rejection could lead to a pullback toward the $3.20–$3.50 support area.
Binance Square caption:
🚀 $NEAR 1D BREAKOUT SETUP
NEAR is showing a major bullish reversal structure on the 1D timeframe.
After months of consolidation, price has broken above a long-term descending resistance trendline and is now approaching the major $4.60–$5.00 resistance zone.
📌 Key levels: Support: $3.20–$3.50
Resistance: $4.60–$5.00
Target 1: $5.50
Target 2: $7.00
Target 3: $8.50
The key confirmation will be a daily close above $5.00 followed by a successful retest.
If $5.00 becomes support, the next upside expansion could become significant. If price gets rejected, watch $3.20–$3.50 for a potential retest.
Technical analysis only — DYOR.
#NEAR🚀🚀🚀 #NEARUSDT.P #NEARProtocol #CryptoWatchMay2024 #CryptoTrading
1.4k
·
--
📊 $BTC/USDT — 1D Chart Analysis
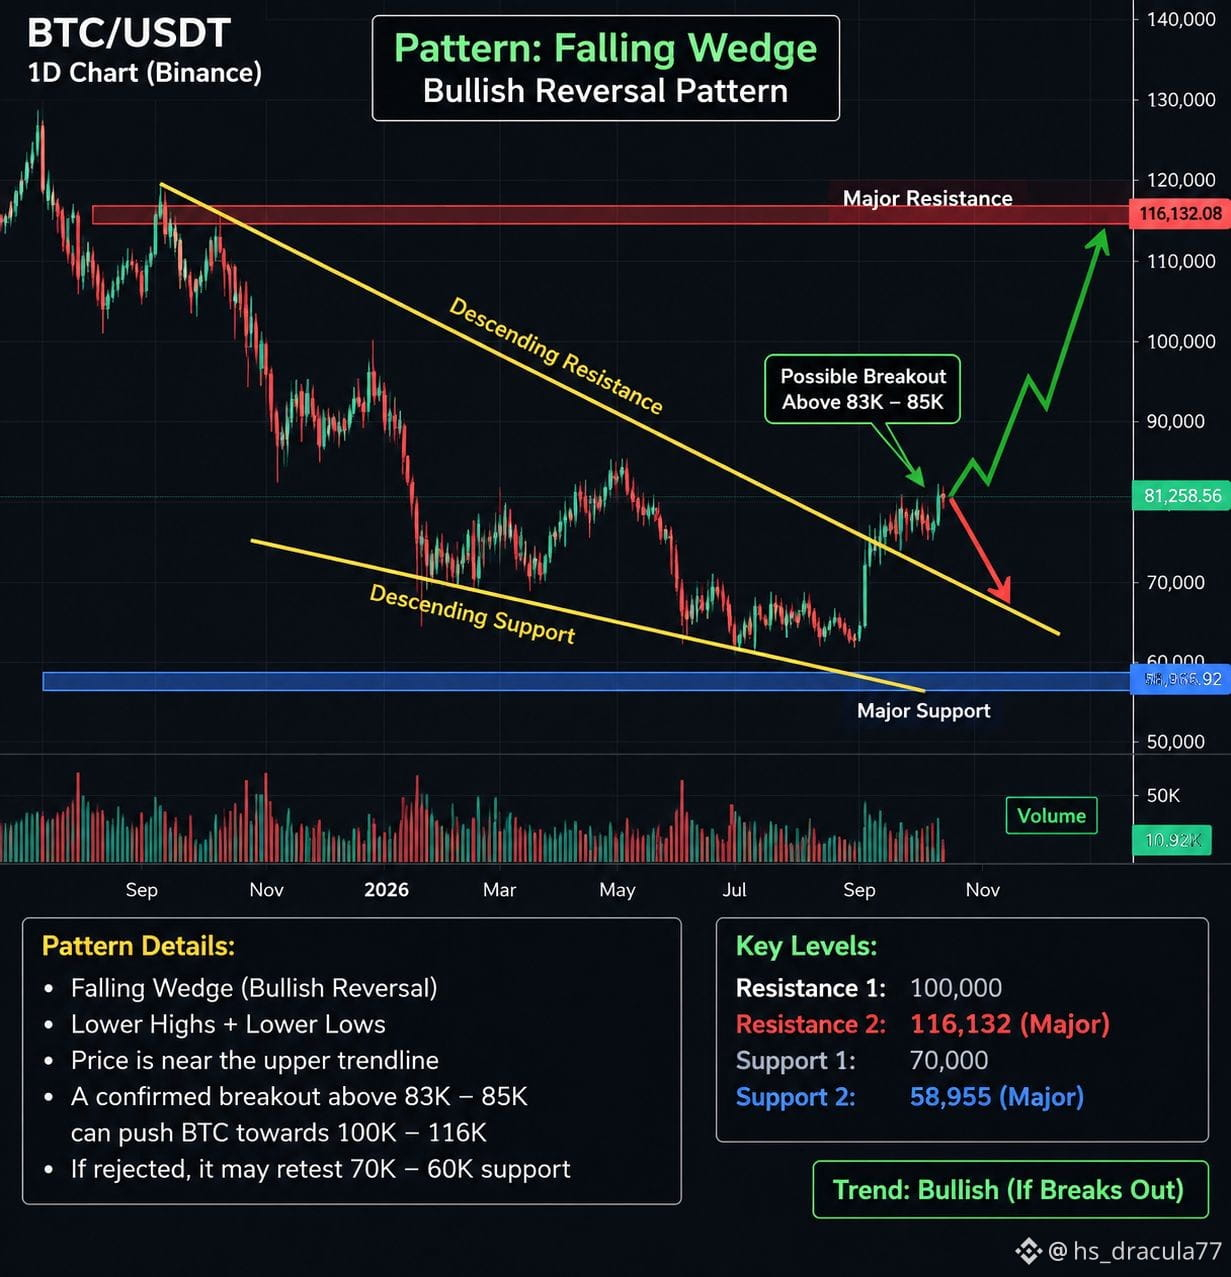
$BTC is currently trading around $81,258 and the 1D chart is showing a falling-wedge type structure after the larger decline.
The key area to watch is $83K–$85K. A daily close and confirmation above this zone would indicate a breakout from the upper trendline and could open the way toward $90K → $100K.
$BTC On the downside, rejection around $83K–$85K could bring a retest of $70K, while the major long-term support shown on the chart is around $58,955.
Key levels:
🟢 Current: $81,258
🔥 Breakout zone: $83K–$85K
🎯 Resistance: $90K → $100K
🔴 Major resistance: $116,132
🟡 Support: $70K
🔵 Major support: $58,955
Important: The falling-wedge interpretation is only confirmed if $BTC breaks and holds above the upper trendline; otherwise, the structure can still produce another rejection.
#BTCUSDT #Binance #TechnicalAnalysis #cryptotrading #BitcoinAnalysis
📊 $BTC /USDT — 1D Chart Analysis
$BTC is currently trading around $81,258 and the 1D chart is showing a falling-wedge type structure after the larger decline.
The key area to watch is $83K–$85K. A daily close and confirmation above this zone would indicate a breakout from the upper trendline and could open the way toward $90K → $100K.
$BTC On the downside, rejection around $83K–$85K could bring a retest of $70K, while the major long-term support shown on the chart is around $58,955.
Key levels:
🟢 Current: $81,258
🔥 Breakout zone: $83K–$85K
🎯 Resistance: $90K → $100K
🔴 Major resistance: $116,132
🟡 Support: $70K
🔵 Major support: $58,955
Important: The falling-wedge interpretation is only confirmed if $BTC breaks and holds above the upper trendline; otherwise, the structure can still produce another rejection.
#BTCUSDT #Binance #TechnicalAnalysis #cryptotrading #BitcoinAnalysis
$BTC is currently trading around $81,258 and the 1D chart is showing a falling-wedge type structure after the larger decline.
The key area to watch is $83K–$85K. A daily close and confirmation above this zone would indicate a breakout from the upper trendline and could open the way toward $90K → $100K.
$BTC On the downside, rejection around $83K–$85K could bring a retest of $70K, while the major long-term support shown on the chart is around $58,955.
Key levels:
🟢 Current: $81,258
🔥 Breakout zone: $83K–$85K
🎯 Resistance: $90K → $100K
🔴 Major resistance: $116,132
🟡 Support: $70K
🔵 Major support: $58,955
Important: The falling-wedge interpretation is only confirmed if $BTC breaks and holds above the upper trendline; otherwise, the structure can still produce another rejection.
#BTCUSDT #Binance #TechnicalAnalysis #cryptotrading #BitcoinAnalysis
13
·
--
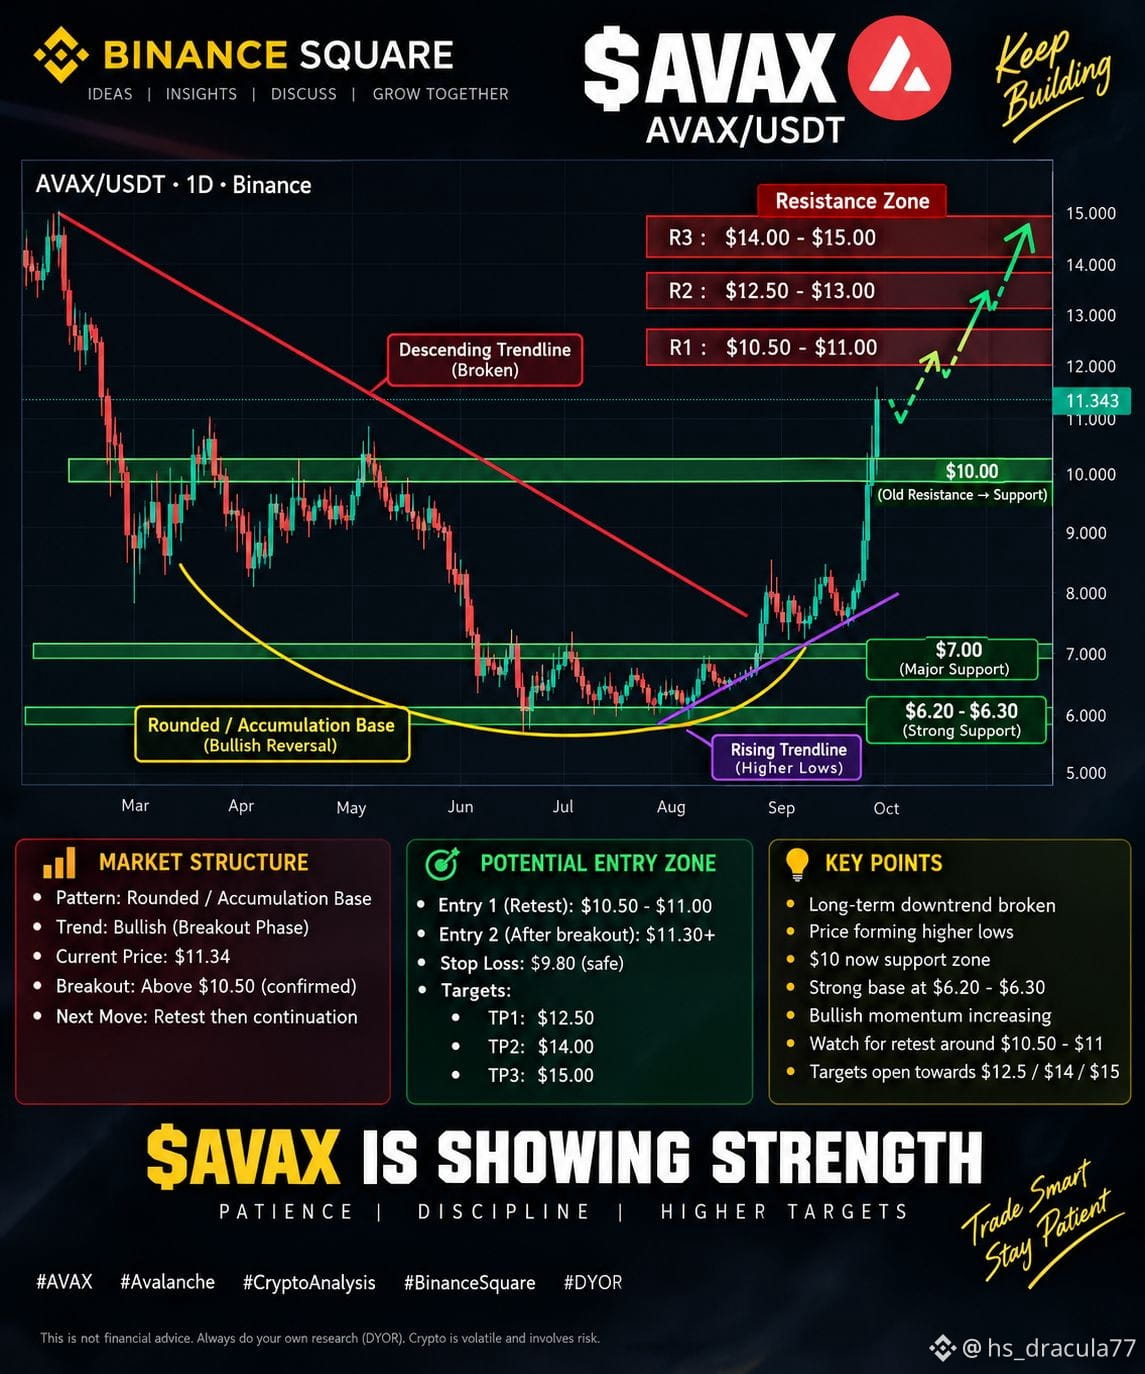
🚨 $AVAX — MAJOR BREAKOUT SETUP IS ACTIVE 🚨 AVAX is finally showing a strong breakout structure on the 1D timeframe.
After months of accumulation, price has broken above the major descending trendline and pushed through the $10 resistance area.
📊 Key Levels to Watch:
🟢 $10.00 → Previous resistance, now important support
🟢 $7.00 → Major support
🟢 $6.20–$6.30 → Strong accumulation/base zone
🔴 $10.50–$11.00 → First major resistance / retest zone
🎯 $12.50–$13.00 → Next resistance area
🎯 $14.00–$15.00 → Higher resistance zone
📈 Pattern
The 1D chart is showing a Rounded Accumulation Base + Breakout structure, with higher lows developing from the summer bottom.
The most important thing now is how $AVAX reacts around $10.50–$11.00.
If this area holds as support after a retest, the next upside levels to watch are:
➡️ $12.50
➡️ $13.00
➡️ $14.00
➡️ $15.00
But if price loses the $10 zone after the breakout, the breakout structure would need to be reassessed.
My key area right now: $10–$11 🔥
No FOMO. Let the retest confirm the move.
Trade with a plan and manage your risk.
What do you think — can $AVAX reach $15? 👀
#AVAX #Avalanche #Crypto #CryptoAnalysis #BinanceSquare #Altcoins #Trading #CryptoTrading #DYOR
🚨 $AVAX — MAJOR BREAKOUT SETUP IS ACTIVE 🚨 AVAX is finally showing a strong breakout structure on the 1D timeframe.
After months of accumulation, price has broken above the major descending trendline and pushed through the $10 resistance area.
📊 Key Levels to Watch:
🟢 $10.00 → Previous resistance, now important support
🟢 $7.00 → Major support
🟢 $6.20–$6.30 → Strong accumulation/base zone
🔴 $10.50–$11.00 → First major resistance / retest zone
🎯 $12.50–$13.00 → Next resistance area
🎯 $14.00–$15.00 → Higher resistance zone
📈 Pattern
The 1D chart is showing a Rounded Accumulation Base + Breakout structure, with higher lows developing from the summer bottom.
The most important thing now is how $AVAX reacts around $10.50–$11.00.
If this area holds as support after a retest, the next upside levels to watch are:
➡️ $12.50
➡️ $13.00
➡️ $14.00
➡️ $15.00
But if price loses the $10 zone after the breakout, the breakout structure would need to be reassessed.
My key area right now: $10–$11 🔥
No FOMO. Let the retest confirm the move.
Trade with a plan and manage your risk.
What do you think — can $AVAX reach $15? 👀
#AVAX #Avalanche #Crypto #CryptoAnalysis #BinanceSquare #Altcoins #Trading #CryptoTrading #DYOR
After months of accumulation, price has broken above the major descending trendline and pushed through the $10 resistance area.
📊 Key Levels to Watch:
🟢 $10.00 → Previous resistance, now important support
🟢 $7.00 → Major support
🟢 $6.20–$6.30 → Strong accumulation/base zone
🔴 $10.50–$11.00 → First major resistance / retest zone
🎯 $12.50–$13.00 → Next resistance area
🎯 $14.00–$15.00 → Higher resistance zone
📈 Pattern
The 1D chart is showing a Rounded Accumulation Base + Breakout structure, with higher lows developing from the summer bottom.
The most important thing now is how $AVAX reacts around $10.50–$11.00.
If this area holds as support after a retest, the next upside levels to watch are:
➡️ $12.50
➡️ $13.00
➡️ $14.00
➡️ $15.00
But if price loses the $10 zone after the breakout, the breakout structure would need to be reassessed.
My key area right now: $10–$11 🔥
No FOMO. Let the retest confirm the move.
Trade with a plan and manage your risk.
What do you think — can $AVAX reach $15? 👀
#AVAX #Avalanche #Crypto #CryptoAnalysis #BinanceSquare #Altcoins #Trading #CryptoTrading #DYOR
1
4
2.9k
·
--
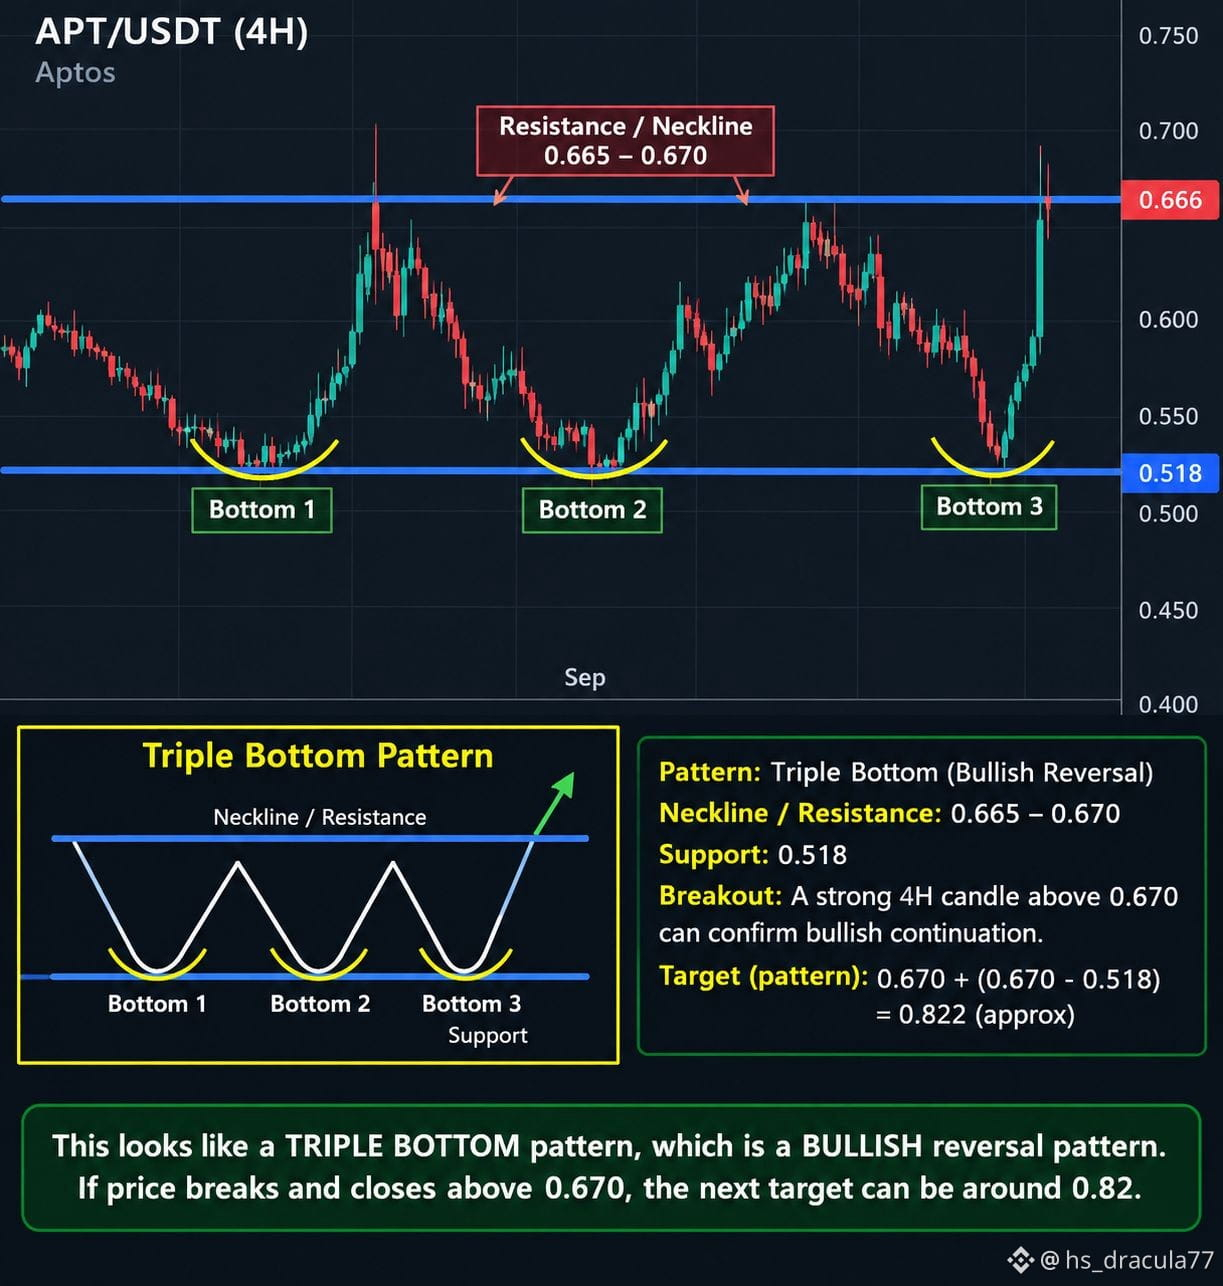
📊 APT/USDT 4H — Triple Bottom Setup
$APT is showing a potential Triple Bottom pattern on the 4H chart.
🔹 Major Support: $0.518
🔹 Neckline / Resistance: $0.665–$0.670
🔹 Current Price: around $0.666
The price has tested the $0.518 area three times and each time buyers stepped in, creating a potential Triple Bottom reversal structure.
Now the key level to watch is $0.665–$0.670.
Bullish scenario:
A strong 4H candle close above $0.670, followed by a successful retest, could confirm the breakout. The measured pattern target comes near $0.82.
Possible levels to watch:
🟢 Breakout: $0.670+
🟢 Retest zone: $0.650–$0.670
🎯 Pattern target: ~$0.82
🔴 Important support: $0.518
If $0.670 continues to reject price, APT could remain range-bound until buyers provide enough momentum for a confirmed breakout.
Key level: $0.670 — watch the 4H close, not just the wick.
$APT $APT #Aptos #APTUSDT #Crypto #BinanceSquare #CryptoAnalysis #TechnicalAnalysis #Altcoins
Not financial advice. Levels are based on the chart structure shown and can change with market conditions.
📊 APT/USDT 4H — Triple Bottom Setup
$APT is showing a potential Triple Bottom pattern on the 4H chart.
🔹 Major Support: $0.518
🔹 Neckline / Resistance: $0.665–$0.670
🔹 Current Price: around $0.666
The price has tested the $0.518 area three times and each time buyers stepped in, creating a potential Triple Bottom reversal structure.
Now the key level to watch is $0.665–$0.670.
Bullish scenario:
A strong 4H candle close above $0.670, followed by a successful retest, could confirm the breakout. The measured pattern target comes near $0.82.
Possible levels to watch:
🟢 Breakout: $0.670+
🟢 Retest zone: $0.650–$0.670
🎯 Pattern target: ~$0.82
🔴 Important support: $0.518
If $0.670 continues to reject price, APT could remain range-bound until buyers provide enough momentum for a confirmed breakout.
Key level: $0.670 — watch the 4H close, not just the wick.
$APT $APT #Aptos #APTUSDT #Crypto #BinanceSquare #CryptoAnalysis #TechnicalAnalysis #Altcoins
Not financial advice. Levels are based on the chart structure shown and can change with market conditions.
$APT is showing a potential Triple Bottom pattern on the 4H chart.
🔹 Major Support: $0.518
🔹 Neckline / Resistance: $0.665–$0.670
🔹 Current Price: around $0.666
The price has tested the $0.518 area three times and each time buyers stepped in, creating a potential Triple Bottom reversal structure.
Now the key level to watch is $0.665–$0.670.
Bullish scenario:
A strong 4H candle close above $0.670, followed by a successful retest, could confirm the breakout. The measured pattern target comes near $0.82.
Possible levels to watch:
🟢 Breakout: $0.670+
🟢 Retest zone: $0.650–$0.670
🎯 Pattern target: ~$0.82
🔴 Important support: $0.518
If $0.670 continues to reject price, APT could remain range-bound until buyers provide enough momentum for a confirmed breakout.
Key level: $0.670 — watch the 4H close, not just the wick.
$APT $APT #Aptos #APTUSDT #Crypto #BinanceSquare #CryptoAnalysis #TechnicalAnalysis #Altcoins
Not financial advice. Levels are based on the chart structure shown and can change with market conditions.
1
1.4k
·
--
Breakout Strength: $SOMI
{spot}(SOMIUSDT)
has broken above the $1.00 psychological level, confirming bullish sentiment. A +35% move in 24 hours with strong trading volume suggests real momentum rather than a weak pump.
Support Zone (Entry): The 0.97–1.00 range is a critical retest zone. If buyers hold this area, it acts as a springboard for another upward push.
Target Levels: Next resistance lies around 1.02–1.05. Breaking above 1.05 could open the door toward 1.10 or higher, depending on market sentiment.
Stop-Loss Zone: Below 0.945 structure breaks down, signaling bulls lost control. That’s a logical invalidation point.
Momentum: RSI and volume likely remain elevated after such a move — great for breakout trades but also warning of possible exhaustion.
In short: Bias is bullish above 0.97–1.00, but risk management is crucial since vertical rallies often retrace quickly.
Clean Chart (support, resistance, entry, TP, SL levels marked).
Here’s the first chart 📈 showing the SOMI/USDT trade setup:
✅ Green Zone = Ideal Entry (0.97–1.00)
🟣 Dashed Line = Target (1.05)
🔴 Dashed Line = Stop-Loss (0.945)
🟠 Resistance = 1.02
⚪ Support = 0.95
Breakout Strength: $SOMI
has broken above the $1.00 psychological level, confirming bullish sentiment. A +35% move in 24 hours with strong trading volume suggests real momentum rather than a weak pump.
Support Zone (Entry): The 0.97–1.00 range is a critical retest zone. If buyers hold this area, it acts as a springboard for another upward push.
Target Levels: Next resistance lies around 1.02–1.05. Breaking above 1.05 could open the door toward 1.10 or higher, depending on market sentiment.
Stop-Loss Zone: Below 0.945 structure breaks down, signaling bulls lost control. That’s a logical invalidation point.
Momentum: RSI and volume likely remain elevated after such a move — great for breakout trades but also warning of possible exhaustion.
In short: Bias is bullish above 0.97–1.00, but risk management is crucial since vertical rallies often retrace quickly.
Clean Chart (support, resistance, entry, TP, SL levels marked).
Here’s the first chart 📈 showing the SOMI/USDT trade setup:
✅ Green Zone = Ideal Entry (0.97–1.00)
🟣 Dashed Line = Target (1.05)
🔴 Dashed Line = Stop-Loss (0.945)
🟠 Resistance = 1.02
⚪ Support = 0.95
has broken above the $1.00 psychological level, confirming bullish sentiment. A +35% move in 24 hours with strong trading volume suggests real momentum rather than a weak pump.
Support Zone (Entry): The 0.97–1.00 range is a critical retest zone. If buyers hold this area, it acts as a springboard for another upward push.
Target Levels: Next resistance lies around 1.02–1.05. Breaking above 1.05 could open the door toward 1.10 or higher, depending on market sentiment.
Stop-Loss Zone: Below 0.945 structure breaks down, signaling bulls lost control. That’s a logical invalidation point.
Momentum: RSI and volume likely remain elevated after such a move — great for breakout trades but also warning of possible exhaustion.
In short: Bias is bullish above 0.97–1.00, but risk management is crucial since vertical rallies often retrace quickly.
Clean Chart (support, resistance, entry, TP, SL levels marked).
Here’s the first chart 📈 showing the SOMI/USDT trade setup:
✅ Green Zone = Ideal Entry (0.97–1.00)
🟣 Dashed Line = Target (1.05)
🔴 Dashed Line = Stop-Loss (0.945)
🟠 Resistance = 1.02
⚪ Support = 0.95
8
239
·
--
The increasing adoption of BTC as a settlement layer means that rather than being used for every small transaction, BTC is increasingly relied upon to record final, high-value, irreversible settlements. This shifts everyday payments to Layer-2s (like Lightning Network) or sidechains, while BTC Layer-1 serves as the ultimate arbiter of truth. However, this model creates a tradeoff BTC block space is limited to ~7 transactions per second, so as more demand concentrates on settlement, fees rise and small-value on-chain transactions may get priced out.
To address throughput without compromising $BTC decentralization, scaling improvements are being explored:
Layer-2 protocols like the Lightning Network allow instant, low-fee payments secured by $BTC BTC without congesting the base layer.
Batching & Coin Join
{spot}(BTCUSDT)
{future}(BTCUSDT)
techniques help aggregate multiple $BTC transactions into fewer block entries, improving efficiency.
$SegWit (2017) and Taproot (2021) already optimized transaction weight and script flexibility, paving the way for more complex but efficient multi-party settlements.
Future concepts like rollups, drive chains, or sidechains are under discussion to extend BTC utility while anchoring back to Layer-1 for security.
The challenge remains: increasing throughput without increasing block size too much, since larger blocks could centralize BTC by making it harder for individuals to run nodes. Thus, most scaling efforts keep BTC Layer-1 lean and conservative, while pushing innovation to off-chain or Layer-2 systems.
The increasing adoption of BTC as a settlement layer means that rather than being used for every small transaction, BTC is increasingly relied upon to record final, high-value, irreversible settlements. This shifts everyday payments to Layer-2s (like Lightning Network) or sidechains, while BTC Layer-1 serves as the ultimate arbiter of truth. However, this model creates a tradeoff BTC block space is limited to ~7 transactions per second, so as more demand concentrates on settlement, fees rise and small-value on-chain transactions may get priced out.
To address throughput without compromising $BTC decentralization, scaling improvements are being explored:
Layer-2 protocols like the Lightning Network allow instant, low-fee payments secured by $BTC BTC without congesting the base layer.
Batching & Coin Join
techniques help aggregate multiple $BTC transactions into fewer block entries, improving efficiency.
$SegWit (2017) and Taproot (2021) already optimized transaction weight and script flexibility, paving the way for more complex but efficient multi-party settlements.
Future concepts like rollups, drive chains, or sidechains are under discussion to extend BTC utility while anchoring back to Layer-1 for security.
The challenge remains: increasing throughput without increasing block size too much, since larger blocks could centralize BTC by making it harder for individuals to run nodes. Thus, most scaling efforts keep BTC Layer-1 lean and conservative, while pushing innovation to off-chain or Layer-2 systems.
To address throughput without compromising $BTC decentralization, scaling improvements are being explored:
Layer-2 protocols like the Lightning Network allow instant, low-fee payments secured by $BTC BTC without congesting the base layer.
Batching & Coin Join
techniques help aggregate multiple $BTC transactions into fewer block entries, improving efficiency.
$SegWit (2017) and Taproot (2021) already optimized transaction weight and script flexibility, paving the way for more complex but efficient multi-party settlements.
Future concepts like rollups, drive chains, or sidechains are under discussion to extend BTC utility while anchoring back to Layer-1 for security.
The challenge remains: increasing throughput without increasing block size too much, since larger blocks could centralize BTC by making it harder for individuals to run nodes. Thus, most scaling efforts keep BTC Layer-1 lean and conservative, while pushing innovation to off-chain or Layer-2 systems.
7
198
Log in to explore more content
Join global crypto users on Binance Square
⚡️ Get latest and useful information about crypto.
💬 Trusted by the world’s largest crypto exchange.
👍 Discover real insights from verified creators.
Email / Phone number
Trending Topics
AIStocksWhatNext
305,655 views
2,755 Discussing
Share & Win Traffic Reward in our Trending Hashtag Campaign
✨Topic: What Other Investment Opportunities Remain as AI Stocks Keep Rising?
👉How to Join:
Publish a short post or article with hashtag #AIStocksWhatNext
Share whether you’re bullish or bearish, and post your AI stock holdings or trade — using the trade widget may improve your eligibility.
You can also strengthen your post by sharing data or charts, and avoiding AI-generated images.
✍️Create content based on the below angles:
- Nvidia says chip sales will double next year, and top AI companies keep hitting record revenue, the compute spend behind it is just as staggering. Is AI demand really taking off? And how long can it last? AI stocks are up across the board. Is this a real breakout, or just a short-term bounce?
- Industry leaders are calling to slow down AI development, while Trump plans to build an “AI Force”, claiming AI could account for 25% of U.S. GDP in the future. Whose side are you on? Will state-level backing be a long-term win for AI stocks?
- Are you buying AI stocks? Share your AI-related trade/holdings with our trade sharing widget.
⏰Campaign Period:
- 2026-09-22 7:00 - 2026-09-24 4:00 UTC
🎁Reward:
- Qualified posts that comply with the above guidelines and contain more than 100 words will be reviewed and may receive a random traffic boost of 500 to 3,000 views. You will receive a notification from your feed secretary if your post is selected.
- Get a chance to have your article featured on Binance Square Official
Need ideas for your post? Visit the topic page #AIStocksWhatNext or the Square Guide on How to Post for Better Reach.
Binance Square Official
·341 Likes
·803.1k views
BitcoinBreaksAboveMayHighNears$86K
11,816 views
170 Discussing
DogecoinRises15%
34,845 views
891 Discussing