
masumtrades
1.7k Posts

masumtrades
Report
Block User
Crypto & Forex Trader. Precision Trading & Market Insights. Catching the trends before they explore. Follow for high-conviction signals
Open Trade
Frequent Trader
3.9 Years
1 Following
325 Followers
1.4K+ Liked
Posts
Portfolio
All
Quotes
Videos
·
--
Bullish
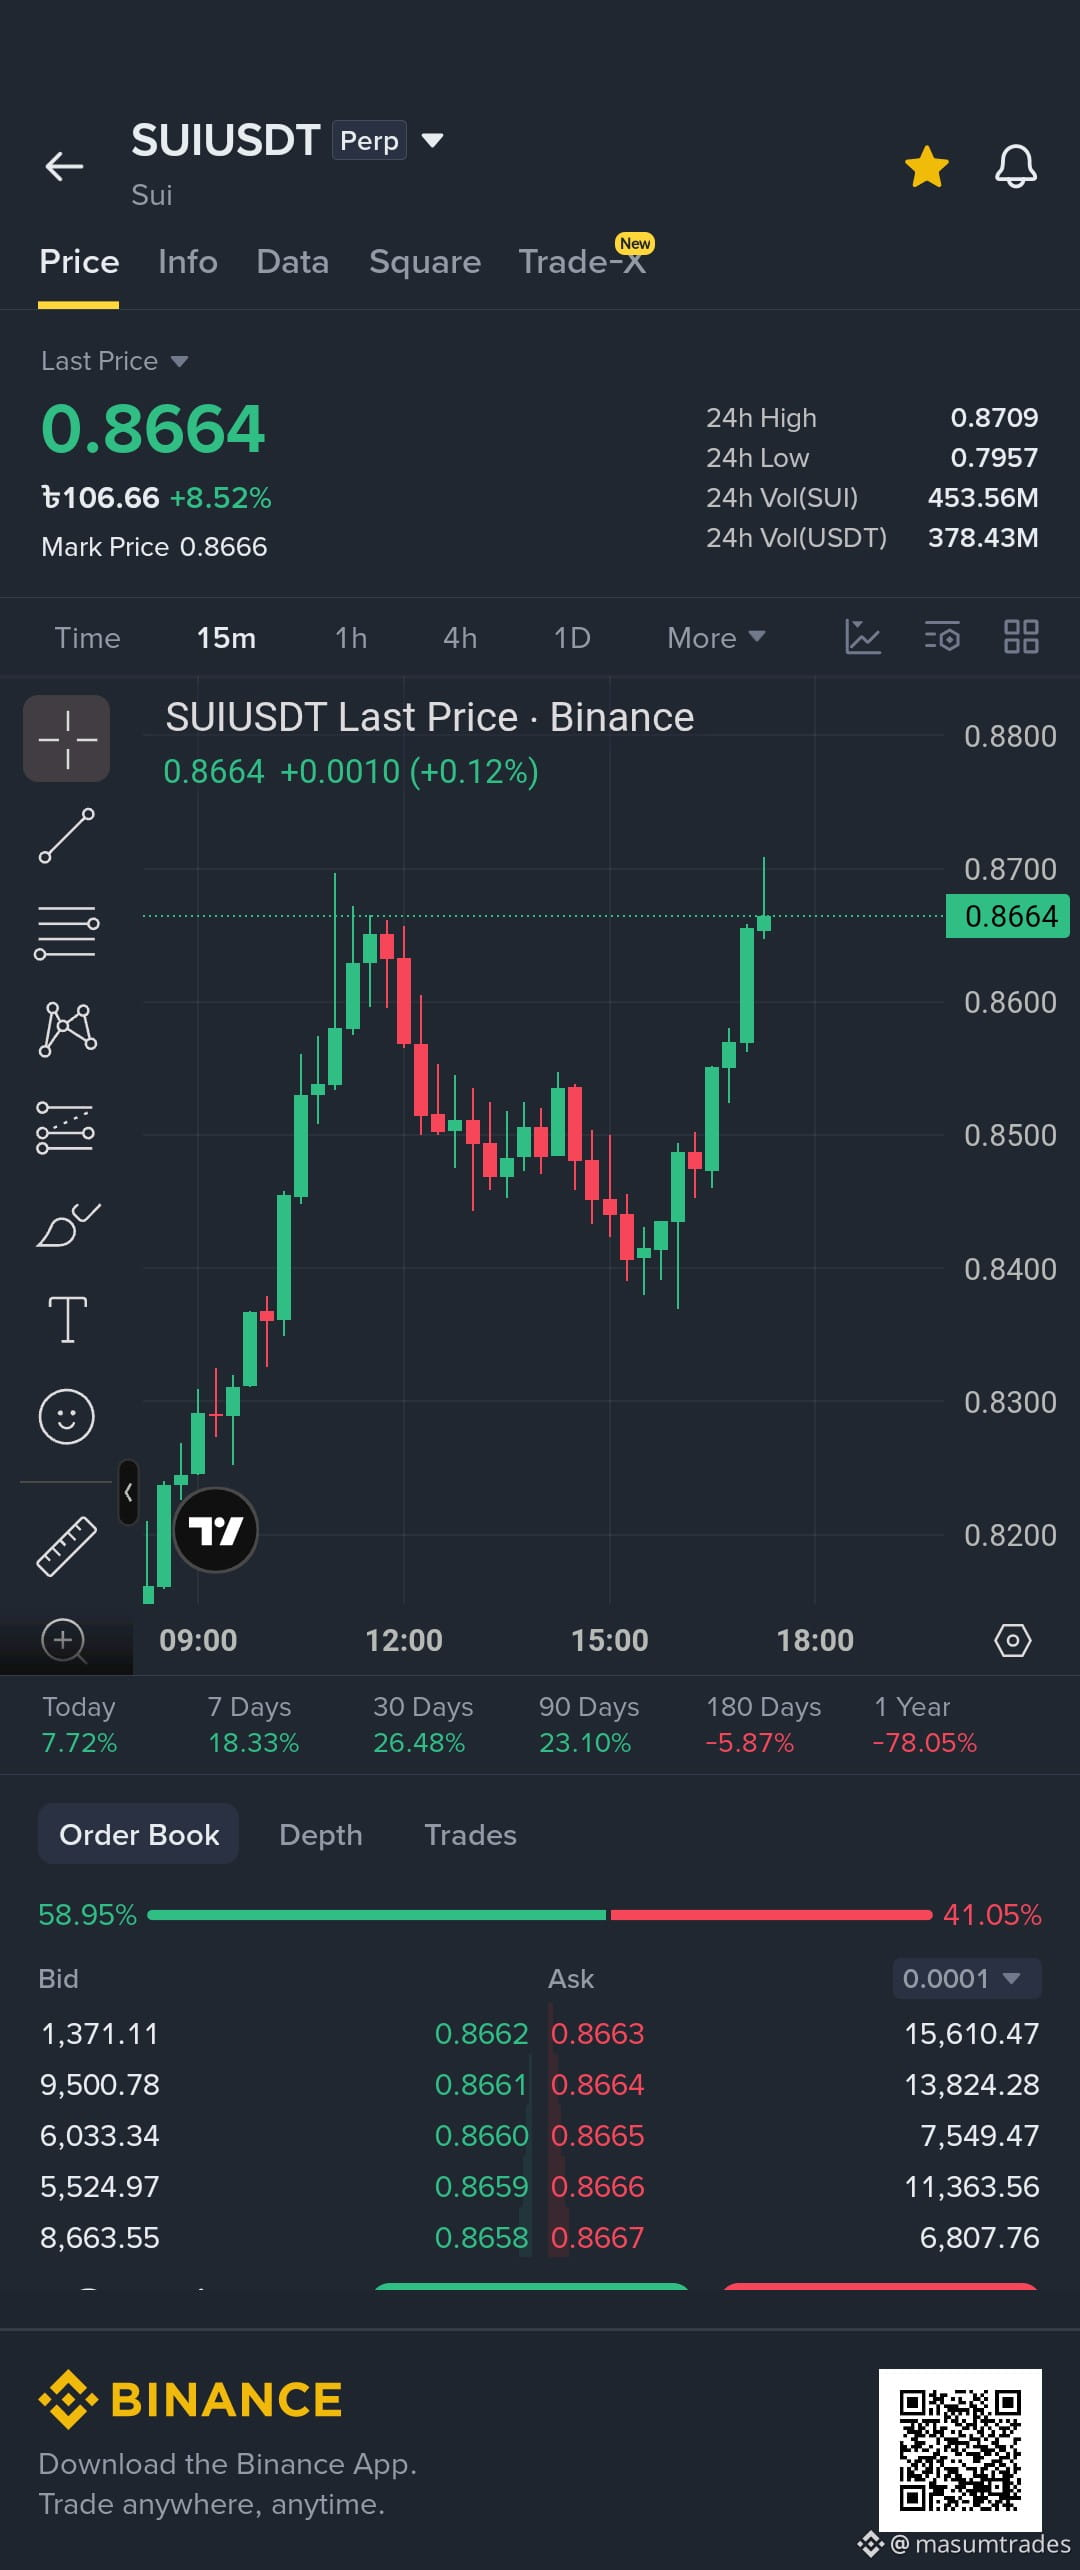
🔥 KEY RESISTANCE BREAKOUT & BULLISH EXPANSION! | SUI/USDT
$SUI is breaking higher, pushing past the resistance level to test the $0.867 zone with strong spot volume! On the 1H/4H timeframes, price action has delivered a clean Market Structure Shift (MSS) above key supply pivots, leaving behind a pristine 15m/1H Fair Value Gap (FVG) and bullish Order Block (OB) below $0.830. We are hunting a shallow pullback to ride the continuation leg higher! 🚀
🔹 Trade Type: Intraday Breakout / Retest
🔹 Direction: Long (Buy)
🔹 Entry Zone: $0.825 – $0.867
🔹 Stop Loss (SL): $0.785 (Strict SL required)
🔹 Take Profit (TP):
• TP1: $0.920 (Local Liquidity Sweep)
• TP2: $0.985 (HTF Resistance Target)
• TP3: $1.120 (Macro Expansion Zone)
📌 Trade Logic: $SUI absorbed supply near the $0.83 zone and printed sharp buying momentum. Looking for a shallow retest of the broken structural level / 1H FVG to clear late shorts before buyers drive price toward $0.98+ overhead supply.
⚠️ Risk Management: Maintain strict position sizing and do not risk more than 1-2% of your portfolio on this trade!
Are you buying $SUI
{future}(SUIUSDT)
on this retest or waiting for a breakout past $0.90? Drop your game plan below! 👇
#SUI #CryptoTrading #BinanceSquare #Foreheadburns #TradingSetup
💡 Suggestion: Wait for a solid 15m bullish candle rejection (pin bar or engulfing) inside the $0.825 – $0.867 entry zone to confirm buyer control before entering.
🔥 KEY RESISTANCE BREAKOUT & BULLISH EXPANSION! | SUI/USDT
$SUI is breaking higher, pushing past the resistance level to test the $0.867 zone with strong spot volume! On the 1H/4H timeframes, price action has delivered a clean Market Structure Shift (MSS) above key supply pivots, leaving behind a pristine 15m/1H Fair Value Gap (FVG) and bullish Order Block (OB) below $0.830. We are hunting a shallow pullback to ride the continuation leg higher! 🚀
🔹 Trade Type: Intraday Breakout / Retest
🔹 Direction: Long (Buy)
🔹 Entry Zone: $0.825 – $0.867
🔹 Stop Loss (SL): $0.785 (Strict SL required)
🔹 Take Profit (TP):
• TP1: $0.920 (Local Liquidity Sweep)
• TP2: $0.985 (HTF Resistance Target)
• TP3: $1.120 (Macro Expansion Zone)
📌 Trade Logic: $SUI absorbed supply near the $0.83 zone and printed sharp buying momentum. Looking for a shallow retest of the broken structural level / 1H FVG to clear late shorts before buyers drive price toward $0.98+ overhead supply.
⚠️ Risk Management: Maintain strict position sizing and do not risk more than 1-2% of your portfolio on this trade!
Are you buying $SUI
on this retest or waiting for a breakout past $0.90? Drop your game plan below! 👇
#SUI #CryptoTrading #BinanceSquare #Foreheadburns #TradingSetup
💡 Suggestion: Wait for a solid 15m bullish candle rejection (pin bar or engulfing) inside the $0.825 – $0.867 entry zone to confirm buyer control before entering.
$SUI is breaking higher, pushing past the resistance level to test the $0.867 zone with strong spot volume! On the 1H/4H timeframes, price action has delivered a clean Market Structure Shift (MSS) above key supply pivots, leaving behind a pristine 15m/1H Fair Value Gap (FVG) and bullish Order Block (OB) below $0.830. We are hunting a shallow pullback to ride the continuation leg higher! 🚀
🔹 Trade Type: Intraday Breakout / Retest
🔹 Direction: Long (Buy)
🔹 Entry Zone: $0.825 – $0.867
🔹 Stop Loss (SL): $0.785 (Strict SL required)
🔹 Take Profit (TP):
• TP1: $0.920 (Local Liquidity Sweep)
• TP2: $0.985 (HTF Resistance Target)
• TP3: $1.120 (Macro Expansion Zone)
📌 Trade Logic: $SUI absorbed supply near the $0.83 zone and printed sharp buying momentum. Looking for a shallow retest of the broken structural level / 1H FVG to clear late shorts before buyers drive price toward $0.98+ overhead supply.
⚠️ Risk Management: Maintain strict position sizing and do not risk more than 1-2% of your portfolio on this trade!
Are you buying $SUI
on this retest or waiting for a breakout past $0.90? Drop your game plan below! 👇
#SUI #CryptoTrading #BinanceSquare #Foreheadburns #TradingSetup
💡 Suggestion: Wait for a solid 15m bullish candle rejection (pin bar or engulfing) inside the $0.825 – $0.867 entry zone to confirm buyer control before entering.
42
·
--
Bullish
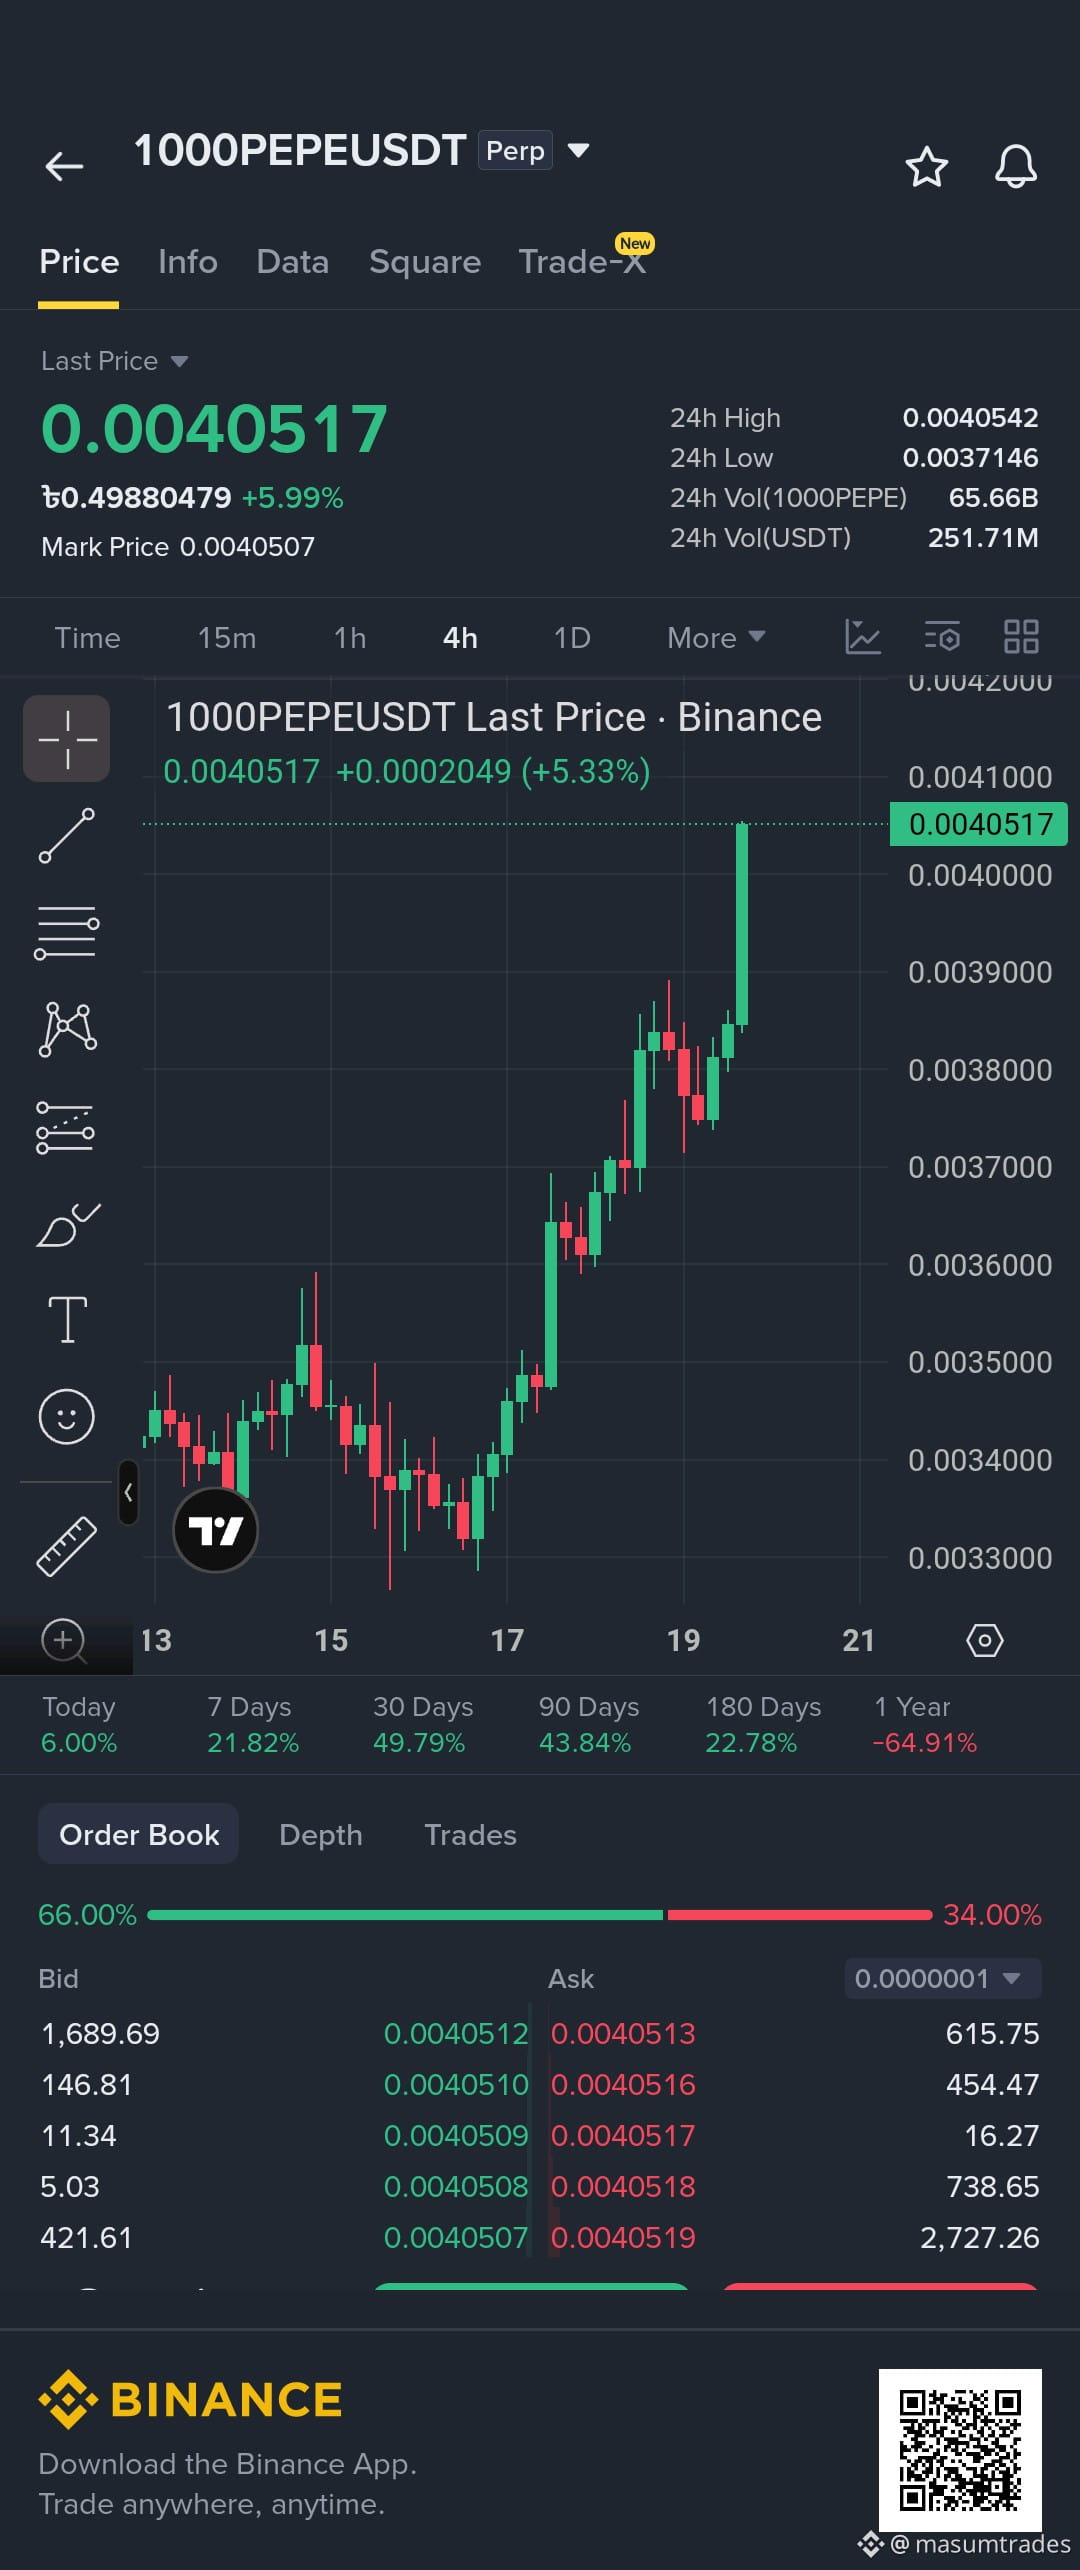
🔥 MASSIVE MOMENTUM & BREAKOUT RETEST! | 1000PEPE/USDT
$1000PEPE is printing violent expansion candles, blasting past local structure to test the $0.00400 psychological resistance zone on heavy spot volume! On the 1H/4H timeframes, price action delivered an aggressive Market Structure Shift (MSS), leaving behind a prime 15m/1H Fair Value Gap (FVG) and bullish Order Block (OB) confluence below $0.00380. We are hunting a shallow pullback to position for the next explosive leg higher! 🚀
🔹 Trade Type: Intraday Scalp / Momentum Breakout
🔹 Direction: Long (Buy)
🔹 Entry Zone: $0.00372 - $0.00400
🔹 Stop Loss (SL): $0.00345 (Strict SL required)
🔹 Take Profit (TP):
• TP1: $0.00435 (Local High Sweep)
• TP2: $0.00480 (Key Structural Supply)
• TP3: $0.00550 (HTF Expansion Target)
📌 Trade Logic: $1000PEPE cleared lower consolidation with sharp buyer displacement. Expecting a brief cooling-off period to retest the intraday FVG / broken structural level around $0.00380 to absorb remaining sell orders before buyers trigger a squeeze toward $0.00480+.
⚠️ Risk Management: High-beta meme token with rapid volatility! Maintain strict position sizing and do not risk more than 1-2% of your capital per trade.
Are you riding this $1000PEPE
{future}(1000PEPEUSDT)
breakout momentum or waiting for a pullback to $0.00375? Share your trade plan below! 👇
#1000PEPE #PEPE #CryptoTrading #BinanceSquare #Foreheadburns
💡 Suggestion: Wait for a solid 15m bullish candle rejection (pin bar or engulfing) inside the $0.00372 - $0.00400 entry zone to confirm buyer absorption before entering.
🔥 MASSIVE MOMENTUM & BREAKOUT RETEST! | 1000PEPE/USDT
$1000PEPE is printing violent expansion candles, blasting past local structure to test the $0.00400 psychological resistance zone on heavy spot volume! On the 1H/4H timeframes, price action delivered an aggressive Market Structure Shift (MSS), leaving behind a prime 15m/1H Fair Value Gap (FVG) and bullish Order Block (OB) confluence below $0.00380. We are hunting a shallow pullback to position for the next explosive leg higher! 🚀
🔹 Trade Type: Intraday Scalp / Momentum Breakout
🔹 Direction: Long (Buy)
🔹 Entry Zone: $0.00372 - $0.00400
🔹 Stop Loss (SL): $0.00345 (Strict SL required)
🔹 Take Profit (TP):
• TP1: $0.00435 (Local High Sweep)
• TP2: $0.00480 (Key Structural Supply)
• TP3: $0.00550 (HTF Expansion Target)
📌 Trade Logic: $1000PEPE cleared lower consolidation with sharp buyer displacement. Expecting a brief cooling-off period to retest the intraday FVG / broken structural level around $0.00380 to absorb remaining sell orders before buyers trigger a squeeze toward $0.00480+.
⚠️ Risk Management: High-beta meme token with rapid volatility! Maintain strict position sizing and do not risk more than 1-2% of your capital per trade.
Are you riding this $1000PEPE
breakout momentum or waiting for a pullback to $0.00375? Share your trade plan below! 👇
#1000PEPE #PEPE #CryptoTrading #BinanceSquare #Foreheadburns
💡 Suggestion: Wait for a solid 15m bullish candle rejection (pin bar or engulfing) inside the $0.00372 - $0.00400 entry zone to confirm buyer absorption before entering.
$1000PEPE is printing violent expansion candles, blasting past local structure to test the $0.00400 psychological resistance zone on heavy spot volume! On the 1H/4H timeframes, price action delivered an aggressive Market Structure Shift (MSS), leaving behind a prime 15m/1H Fair Value Gap (FVG) and bullish Order Block (OB) confluence below $0.00380. We are hunting a shallow pullback to position for the next explosive leg higher! 🚀
🔹 Trade Type: Intraday Scalp / Momentum Breakout
🔹 Direction: Long (Buy)
🔹 Entry Zone: $0.00372 - $0.00400
🔹 Stop Loss (SL): $0.00345 (Strict SL required)
🔹 Take Profit (TP):
• TP1: $0.00435 (Local High Sweep)
• TP2: $0.00480 (Key Structural Supply)
• TP3: $0.00550 (HTF Expansion Target)
📌 Trade Logic: $1000PEPE cleared lower consolidation with sharp buyer displacement. Expecting a brief cooling-off period to retest the intraday FVG / broken structural level around $0.00380 to absorb remaining sell orders before buyers trigger a squeeze toward $0.00480+.
⚠️ Risk Management: High-beta meme token with rapid volatility! Maintain strict position sizing and do not risk more than 1-2% of your capital per trade.
Are you riding this $1000PEPE
breakout momentum or waiting for a pullback to $0.00375? Share your trade plan below! 👇
#1000PEPE #PEPE #CryptoTrading #BinanceSquare #Foreheadburns
💡 Suggestion: Wait for a solid 15m bullish candle rejection (pin bar or engulfing) inside the $0.00372 - $0.00400 entry zone to confirm buyer absorption before entering.
224
·
--
Bullish
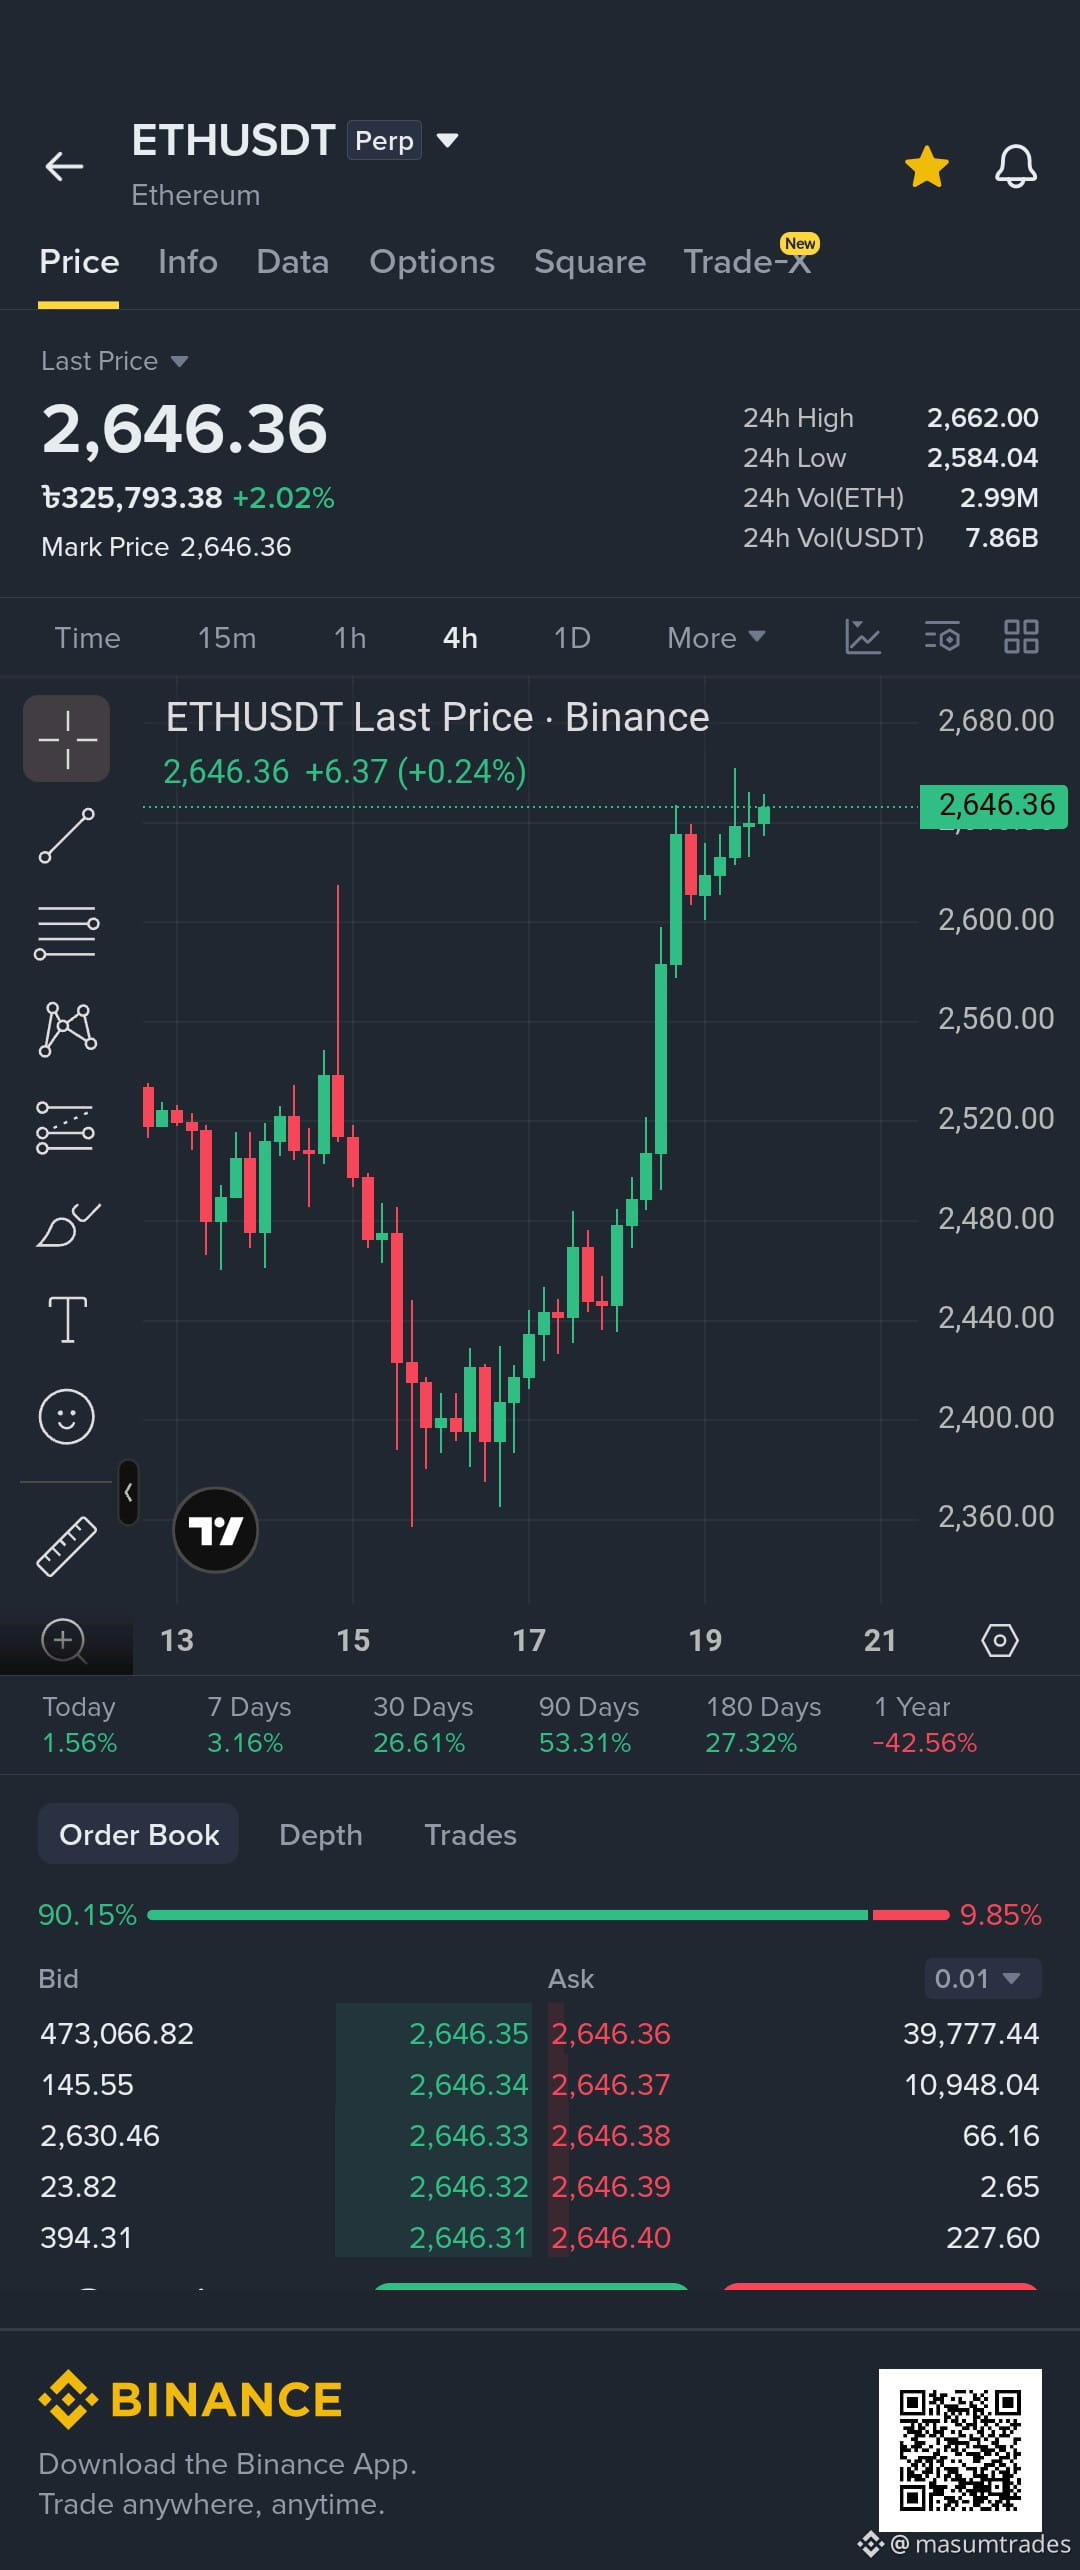
🔥 BULLISH BREAKOUT & HTF LIQUIDITY EXPANSION! | ETH/USDT
$ETH (Ethereum) has delivered a powerful bullish breakout, surging past major structural resistance to test the $2,646 level! On the 1H/4H timeframes, price action shows strong momentum following a clean Market Structure Shift (MSS), leaving behind a prime bullish Order Block (OB) and Fair Value Gap (FVG) confluence below $2,600. We are looking for a shallow retest to target overhead buy-side liquidity! 🚀
🔹 Trade Type: Intraday / Breakout Retest
🔹 Direction: Long (Buy)
🔹 Entry Zone: $2,580 - $2,630
🔹 Stop Loss (SL): $2,510 (Strict SL required)
🔹 Take Profit (TP):
• TP1: $2,720 (Local Liquidity Sweep)
• TP2: $2,850 (Key Structural Supply)
• TP3: $3,050 (HTF Expansion Target)
📌 Trade Logic: $ETH successfully defended the $2,500 HTF demand zone and broke intraday lower-high structure on accelerating buyer volume. Expecting a shallow pullback into the 1\text{H} Order Block / FVG around $2,600 to absorb remaining sell orders before buyers initiate the next leg toward $2,800+.
⚠️ Risk Management: Maintain strict position sizing and do not risk more than 1-2% of your total capital per trade!
Are you longing $ETH
{future}(ETHUSDT)
on this retest or waiting for a push past $2,700? Share your strategy below! 👇
#ETH #Ethereum #CryptoTrading #BinanceSquare #TradingSetup
💡 Suggestion: Wait for a 15m bullish rejection candle (pin bar or engulfing) inside the $2,580 - $2,630 entry zone to confirm buyer control before entering.
🔥 BULLISH BREAKOUT & HTF LIQUIDITY EXPANSION! | ETH/USDT
$ETH (Ethereum) has delivered a powerful bullish breakout, surging past major structural resistance to test the $2,646 level! On the 1H/4H timeframes, price action shows strong momentum following a clean Market Structure Shift (MSS), leaving behind a prime bullish Order Block (OB) and Fair Value Gap (FVG) confluence below $2,600. We are looking for a shallow retest to target overhead buy-side liquidity! 🚀
🔹 Trade Type: Intraday / Breakout Retest
🔹 Direction: Long (Buy)
🔹 Entry Zone: $2,580 - $2,630
🔹 Stop Loss (SL): $2,510 (Strict SL required)
🔹 Take Profit (TP):
• TP1: $2,720 (Local Liquidity Sweep)
• TP2: $2,850 (Key Structural Supply)
• TP3: $3,050 (HTF Expansion Target)
📌 Trade Logic: $ETH successfully defended the $2,500 HTF demand zone and broke intraday lower-high structure on accelerating buyer volume. Expecting a shallow pullback into the 1\text{H} Order Block / FVG around $2,600 to absorb remaining sell orders before buyers initiate the next leg toward $2,800+.
⚠️ Risk Management: Maintain strict position sizing and do not risk more than 1-2% of your total capital per trade!
Are you longing $ETH
on this retest or waiting for a push past $2,700? Share your strategy below! 👇
#ETH #Ethereum #CryptoTrading #BinanceSquare #TradingSetup
💡 Suggestion: Wait for a 15m bullish rejection candle (pin bar or engulfing) inside the $2,580 - $2,630 entry zone to confirm buyer control before entering.
$ETH (Ethereum) has delivered a powerful bullish breakout, surging past major structural resistance to test the $2,646 level! On the 1H/4H timeframes, price action shows strong momentum following a clean Market Structure Shift (MSS), leaving behind a prime bullish Order Block (OB) and Fair Value Gap (FVG) confluence below $2,600. We are looking for a shallow retest to target overhead buy-side liquidity! 🚀
🔹 Trade Type: Intraday / Breakout Retest
🔹 Direction: Long (Buy)
🔹 Entry Zone: $2,580 - $2,630
🔹 Stop Loss (SL): $2,510 (Strict SL required)
🔹 Take Profit (TP):
• TP1: $2,720 (Local Liquidity Sweep)
• TP2: $2,850 (Key Structural Supply)
• TP3: $3,050 (HTF Expansion Target)
📌 Trade Logic: $ETH successfully defended the $2,500 HTF demand zone and broke intraday lower-high structure on accelerating buyer volume. Expecting a shallow pullback into the 1\text{H} Order Block / FVG around $2,600 to absorb remaining sell orders before buyers initiate the next leg toward $2,800+.
⚠️ Risk Management: Maintain strict position sizing and do not risk more than 1-2% of your total capital per trade!
Are you longing $ETH
on this retest or waiting for a push past $2,700? Share your strategy below! 👇
#ETH #Ethereum #CryptoTrading #BinanceSquare #TradingSetup
💡 Suggestion: Wait for a 15m bullish rejection candle (pin bar or engulfing) inside the $2,580 - $2,630 entry zone to confirm buyer control before entering.
9
·
--
Bullish
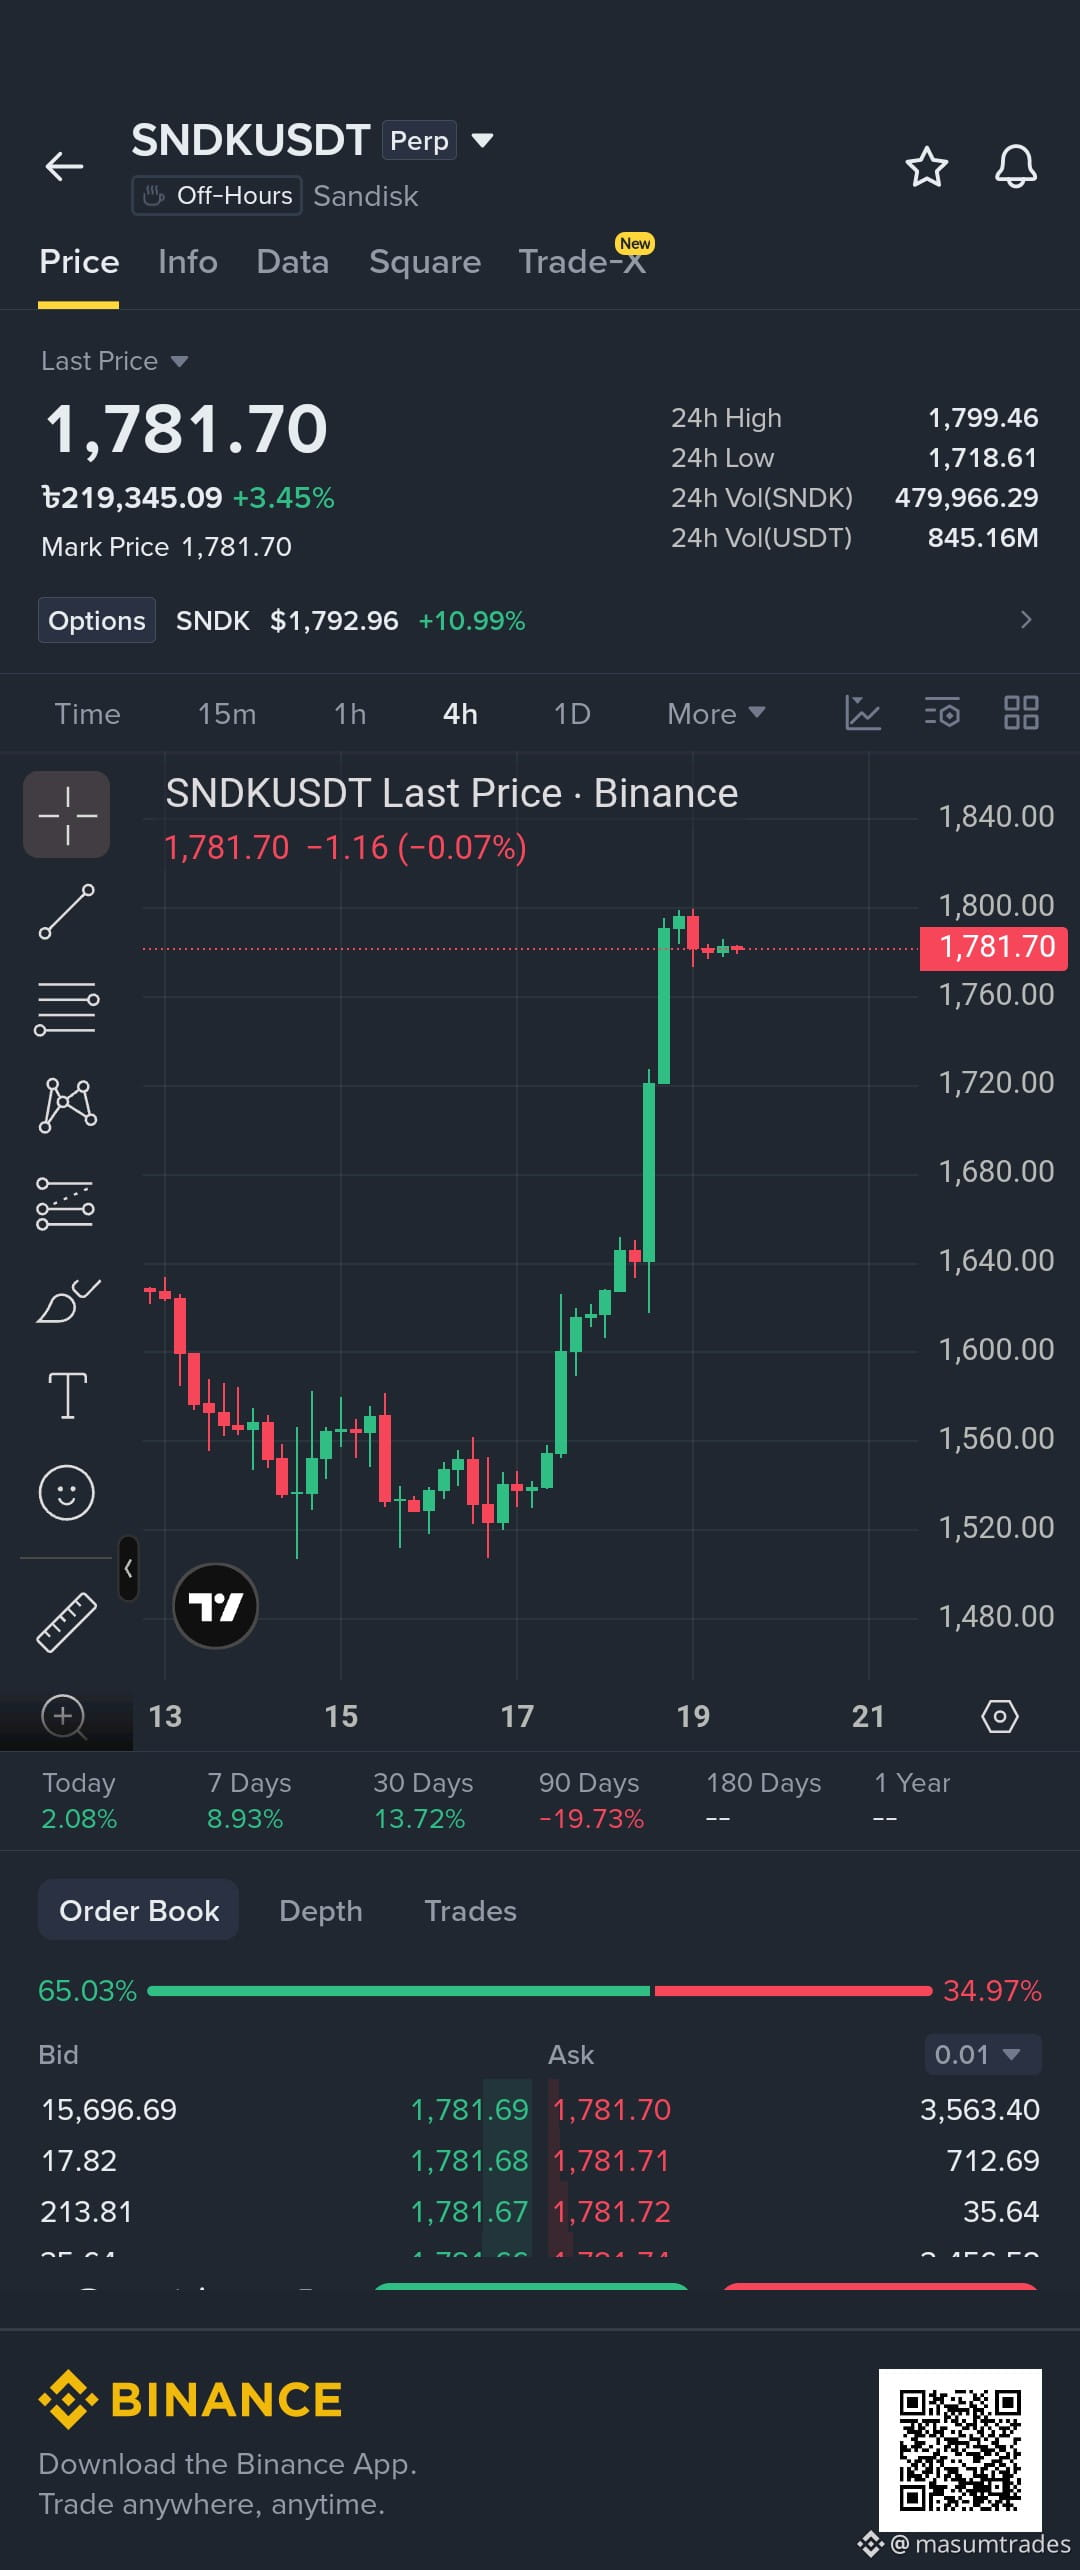
🚨 EXPLOSIVE BREAKOUT & HTF LIQUIDITY SWEEP! | SNDK/USDT
$SNDK has triggered a massive bullish expansion, blasting past local structure to hit the $1,782 zone on high surge volume! On the 1H/4H charts, price action has delivered a textbook Market Structure Shift (MSS), leaving behind a prime bullish Order Block (OB) and Fair Value Gap (FVG) below. We are hunting a shallow pullback for the next wave higher! 🚀
🔹 Trade Type: Intraday / Momentum Breakout
🔹 Direction: Long (Buy)
🔹 Entry Zone: $1,690 – $1,782
🔹 Stop Loss (SL): $1,580 (Strict SL required)
🔹 Take Profit (TP):
• TP1: $1,890 (Local High Sweep)
• TP2: $2,050 (Key Structural Supply)
• TP3: $2,280 (HTF Expansion Target)
📌 Trade Logic: $SNDK reclaimed high-timeframe supply with heavy spot volume confirmation. Expecting a brief cooling-off period to retest lower demand / 1H FVG around $1,720 before buyers trigger the next leg toward $2,000+.
⚠️ Risk Management: Extremely fast-moving asset! Maintain strict position sizing and do not risk more than 1-2% of your portfolio on this trade.
Are you riding this $SNDK
{future}(SNDKUSDT)
expansion or waiting for a pullback to $1,700? Drop your plan below! 👇
#SNDK #CryptoTrading #BinanceSquare #Foreheadburns #TradingSetup
💡 Suggestion: Wait for a solid 15m bullish candle rejection (pin bar or engulfing) inside the $1,690 – $1,782 entry zone to confirm buyer reaction before jumpinUSDT
🚨 EXPLOSIVE BREAKOUT & HTF LIQUIDITY SWEEP! | SNDK/USDT
$SNDK has triggered a massive bullish expansion, blasting past local structure to hit the $1,782 zone on high surge volume! On the 1H/4H charts, price action has delivered a textbook Market Structure Shift (MSS), leaving behind a prime bullish Order Block (OB) and Fair Value Gap (FVG) below. We are hunting a shallow pullback for the next wave higher! 🚀
🔹 Trade Type: Intraday / Momentum Breakout
🔹 Direction: Long (Buy)
🔹 Entry Zone: $1,690 – $1,782
🔹 Stop Loss (SL): $1,580 (Strict SL required)
🔹 Take Profit (TP):
• TP1: $1,890 (Local High Sweep)
• TP2: $2,050 (Key Structural Supply)
• TP3: $2,280 (HTF Expansion Target)
📌 Trade Logic: $SNDK reclaimed high-timeframe supply with heavy spot volume confirmation. Expecting a brief cooling-off period to retest lower demand / 1H FVG around $1,720 before buyers trigger the next leg toward $2,000+.
⚠️ Risk Management: Extremely fast-moving asset! Maintain strict position sizing and do not risk more than 1-2% of your portfolio on this trade.
Are you riding this $SNDK
expansion or waiting for a pullback to $1,700? Drop your plan below! 👇
#SNDK #CryptoTrading #BinanceSquare #Foreheadburns #TradingSetup
💡 Suggestion: Wait for a solid 15m bullish candle rejection (pin bar or engulfing) inside the $1,690 – $1,782 entry zone to confirm buyer reaction before jumpinUSDT
$SNDK has triggered a massive bullish expansion, blasting past local structure to hit the $1,782 zone on high surge volume! On the 1H/4H charts, price action has delivered a textbook Market Structure Shift (MSS), leaving behind a prime bullish Order Block (OB) and Fair Value Gap (FVG) below. We are hunting a shallow pullback for the next wave higher! 🚀
🔹 Trade Type: Intraday / Momentum Breakout
🔹 Direction: Long (Buy)
🔹 Entry Zone: $1,690 – $1,782
🔹 Stop Loss (SL): $1,580 (Strict SL required)
🔹 Take Profit (TP):
• TP1: $1,890 (Local High Sweep)
• TP2: $2,050 (Key Structural Supply)
• TP3: $2,280 (HTF Expansion Target)
📌 Trade Logic: $SNDK reclaimed high-timeframe supply with heavy spot volume confirmation. Expecting a brief cooling-off period to retest lower demand / 1H FVG around $1,720 before buyers trigger the next leg toward $2,000+.
⚠️ Risk Management: Extremely fast-moving asset! Maintain strict position sizing and do not risk more than 1-2% of your portfolio on this trade.
Are you riding this $SNDK
expansion or waiting for a pullback to $1,700? Drop your plan below! 👇
#SNDK #CryptoTrading #BinanceSquare #Foreheadburns #TradingSetup
💡 Suggestion: Wait for a solid 15m bullish candle rejection (pin bar or engulfing) inside the $1,690 – $1,782 entry zone to confirm buyer reaction before jumpinUSDT
163
·
--
Bullish
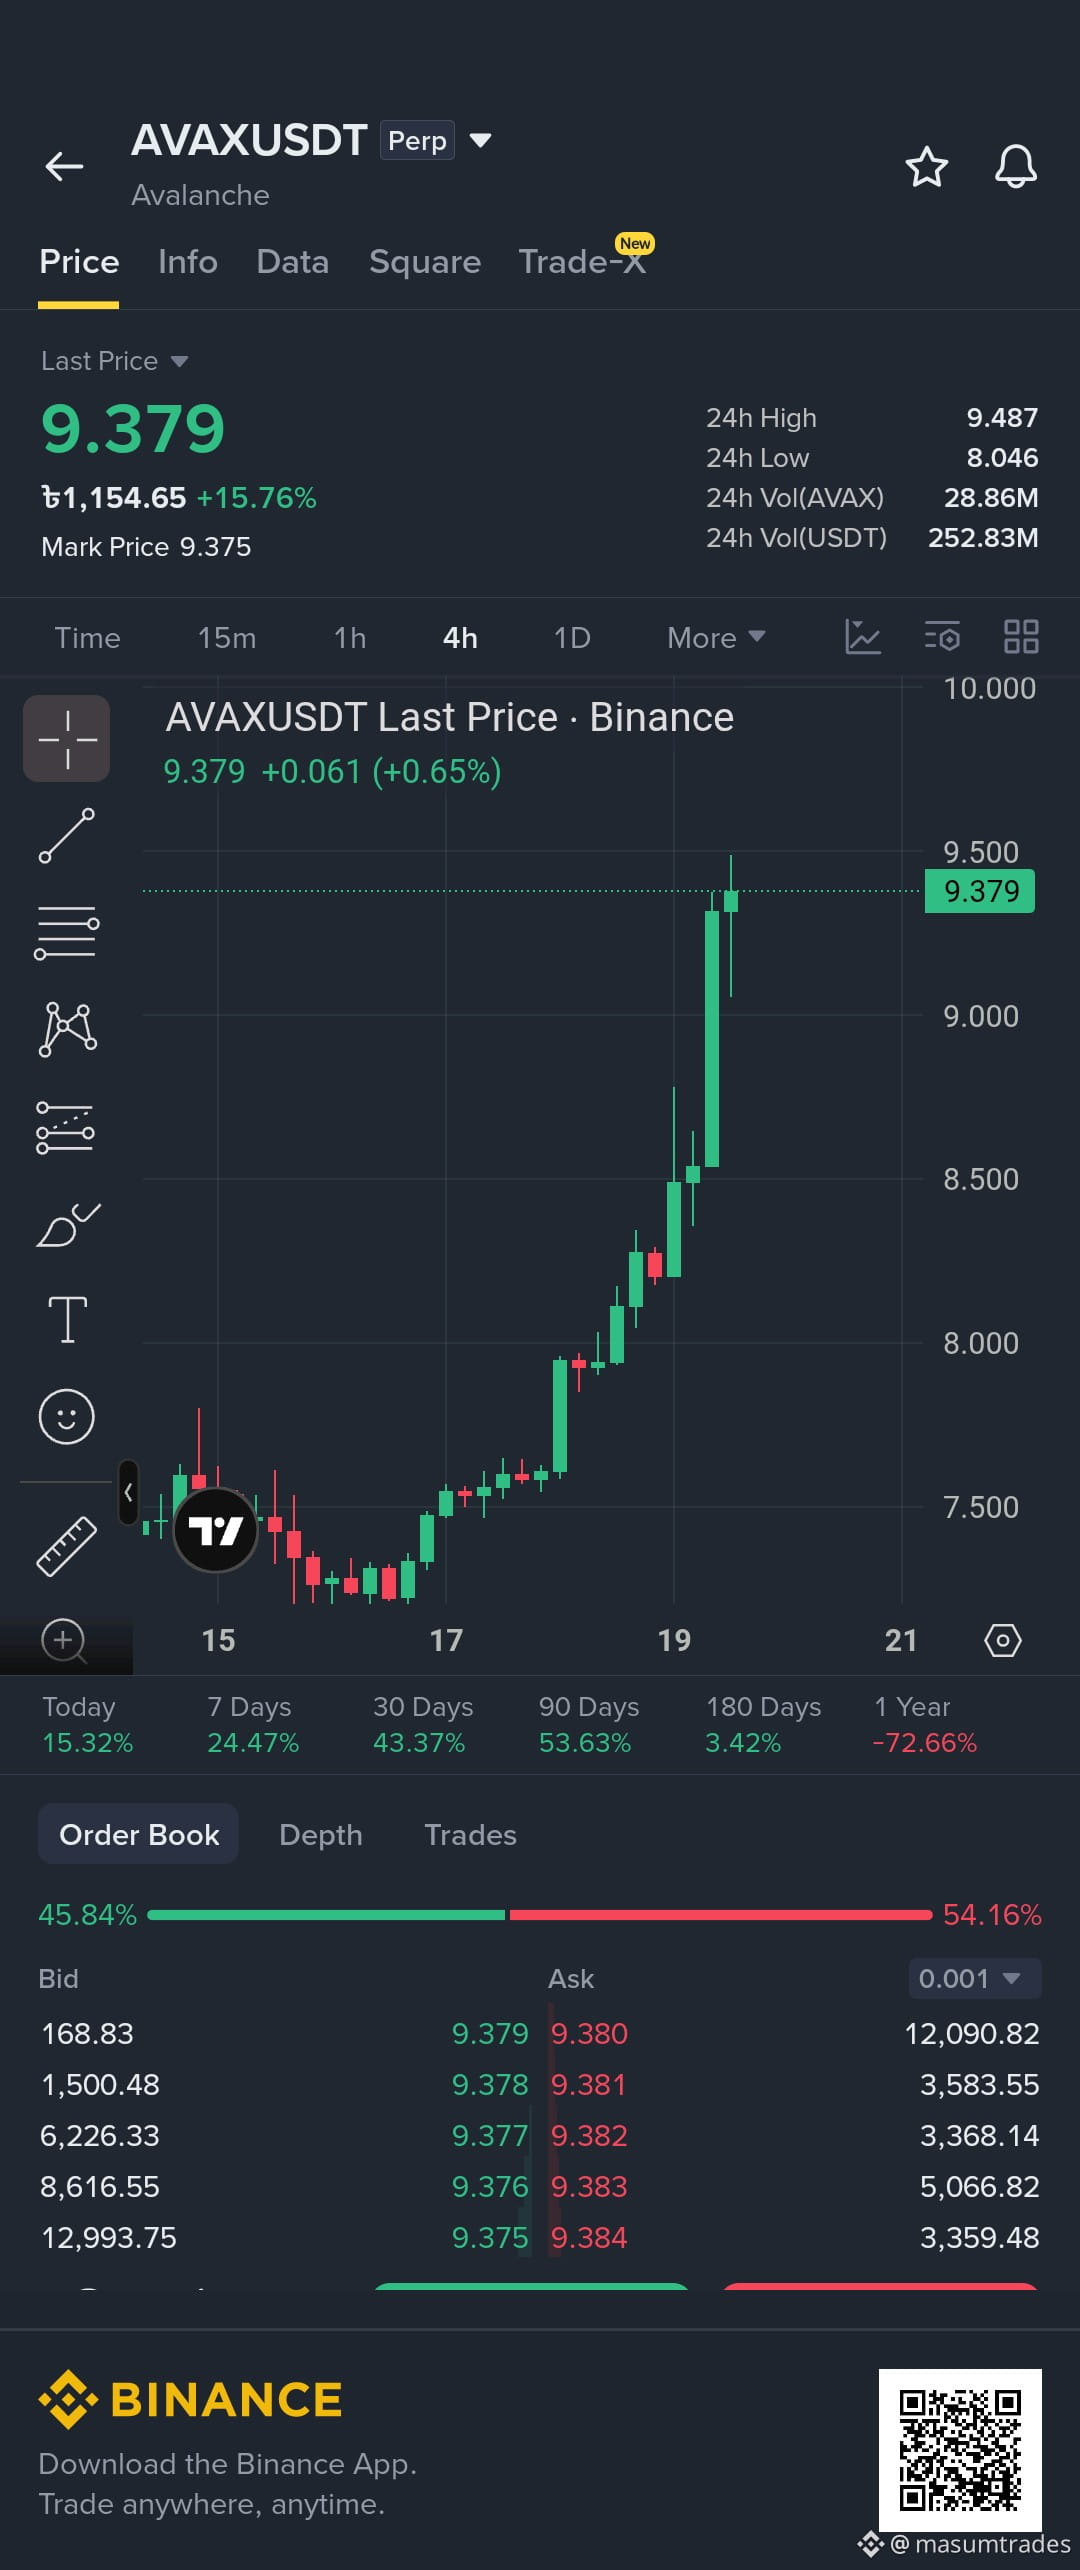
🔥 LIQUIDITY SWEEP & HTF DEMAND REJECTION! | AVAX/USDT
$AVAX (Avalanche) is showing strong buyer absorption around the $9.38 key structural level after sweeping local sell-side liquidity resting below previous support. On the 1H/4H timeframes, price action has printed a crisp Market Structure Shift (MSS) above micro-pivots, leaving behind a fresh bullish Order Block (OB) and Fair Value Gap (FVG) below. We are positioning for a high-probability continuation leg toward upper supply pools! 🚀
🔹 Trade Type: Intraday / Order Block Retest
🔹 Direction: Long (Buy)
🔹 Entry Zone: $9.15 – $9.40
🔹 Stop Loss (SL): $8.68 (Strict SL required)
🔹 Take Profit (TP):
• TP1: $10.25 (Local Liquidity Sweep)
• TP2: $11.50 (HTF Bearish Breaker Zone)
• TP3: $13.20 (Major Supply Target)
📌 Trade Logic: $AVAX defended HTF demand around $9.00 with aggressive buying volume. Expecting a brief pullback to retest the 1H Fair Value Gap to absorb remaining sell orders before buyers drive expansion toward $11.50+.
⚠️ Risk Management: Maintain strict position sizing and do not risk more than 1-2% of your total capital per trade!
Are you buying $AVAX
{future}(AVAXUSDT)
on this demand test or waiting for a breakout above $10.00? Drop your thoughts below! 👇
#AVAX #CryptoTrading #BinanceSquare #Foreheadburns #TradingSetup
💡 Suggestion: Wait for a solid 15m bullish candle rejection (pin bar or engulfing) inside the $9.15 – $9.40 entry zone to confirm buyer dominance before entering.
🔥 LIQUIDITY SWEEP & HTF DEMAND REJECTION! | AVAX/USDT
$AVAX (Avalanche) is showing strong buyer absorption around the $9.38 key structural level after sweeping local sell-side liquidity resting below previous support. On the 1H/4H timeframes, price action has printed a crisp Market Structure Shift (MSS) above micro-pivots, leaving behind a fresh bullish Order Block (OB) and Fair Value Gap (FVG) below. We are positioning for a high-probability continuation leg toward upper supply pools! 🚀
🔹 Trade Type: Intraday / Order Block Retest
🔹 Direction: Long (Buy)
🔹 Entry Zone: $9.15 – $9.40
🔹 Stop Loss (SL): $8.68 (Strict SL required)
🔹 Take Profit (TP):
• TP1: $10.25 (Local Liquidity Sweep)
• TP2: $11.50 (HTF Bearish Breaker Zone)
• TP3: $13.20 (Major Supply Target)
📌 Trade Logic: $AVAX defended HTF demand around $9.00 with aggressive buying volume. Expecting a brief pullback to retest the 1H Fair Value Gap to absorb remaining sell orders before buyers drive expansion toward $11.50+.
⚠️ Risk Management: Maintain strict position sizing and do not risk more than 1-2% of your total capital per trade!
Are you buying $AVAX
on this demand test or waiting for a breakout above $10.00? Drop your thoughts below! 👇
#AVAX #CryptoTrading #BinanceSquare #Foreheadburns #TradingSetup
💡 Suggestion: Wait for a solid 15m bullish candle rejection (pin bar or engulfing) inside the $9.15 – $9.40 entry zone to confirm buyer dominance before entering.
$AVAX (Avalanche) is showing strong buyer absorption around the $9.38 key structural level after sweeping local sell-side liquidity resting below previous support. On the 1H/4H timeframes, price action has printed a crisp Market Structure Shift (MSS) above micro-pivots, leaving behind a fresh bullish Order Block (OB) and Fair Value Gap (FVG) below. We are positioning for a high-probability continuation leg toward upper supply pools! 🚀
🔹 Trade Type: Intraday / Order Block Retest
🔹 Direction: Long (Buy)
🔹 Entry Zone: $9.15 – $9.40
🔹 Stop Loss (SL): $8.68 (Strict SL required)
🔹 Take Profit (TP):
• TP1: $10.25 (Local Liquidity Sweep)
• TP2: $11.50 (HTF Bearish Breaker Zone)
• TP3: $13.20 (Major Supply Target)
📌 Trade Logic: $AVAX defended HTF demand around $9.00 with aggressive buying volume. Expecting a brief pullback to retest the 1H Fair Value Gap to absorb remaining sell orders before buyers drive expansion toward $11.50+.
⚠️ Risk Management: Maintain strict position sizing and do not risk more than 1-2% of your total capital per trade!
Are you buying $AVAX
on this demand test or waiting for a breakout above $10.00? Drop your thoughts below! 👇
#AVAX #CryptoTrading #BinanceSquare #Foreheadburns #TradingSetup
💡 Suggestion: Wait for a solid 15m bullish candle rejection (pin bar or engulfing) inside the $9.15 – $9.40 entry zone to confirm buyer dominance before entering.
41
·
--
Bullish
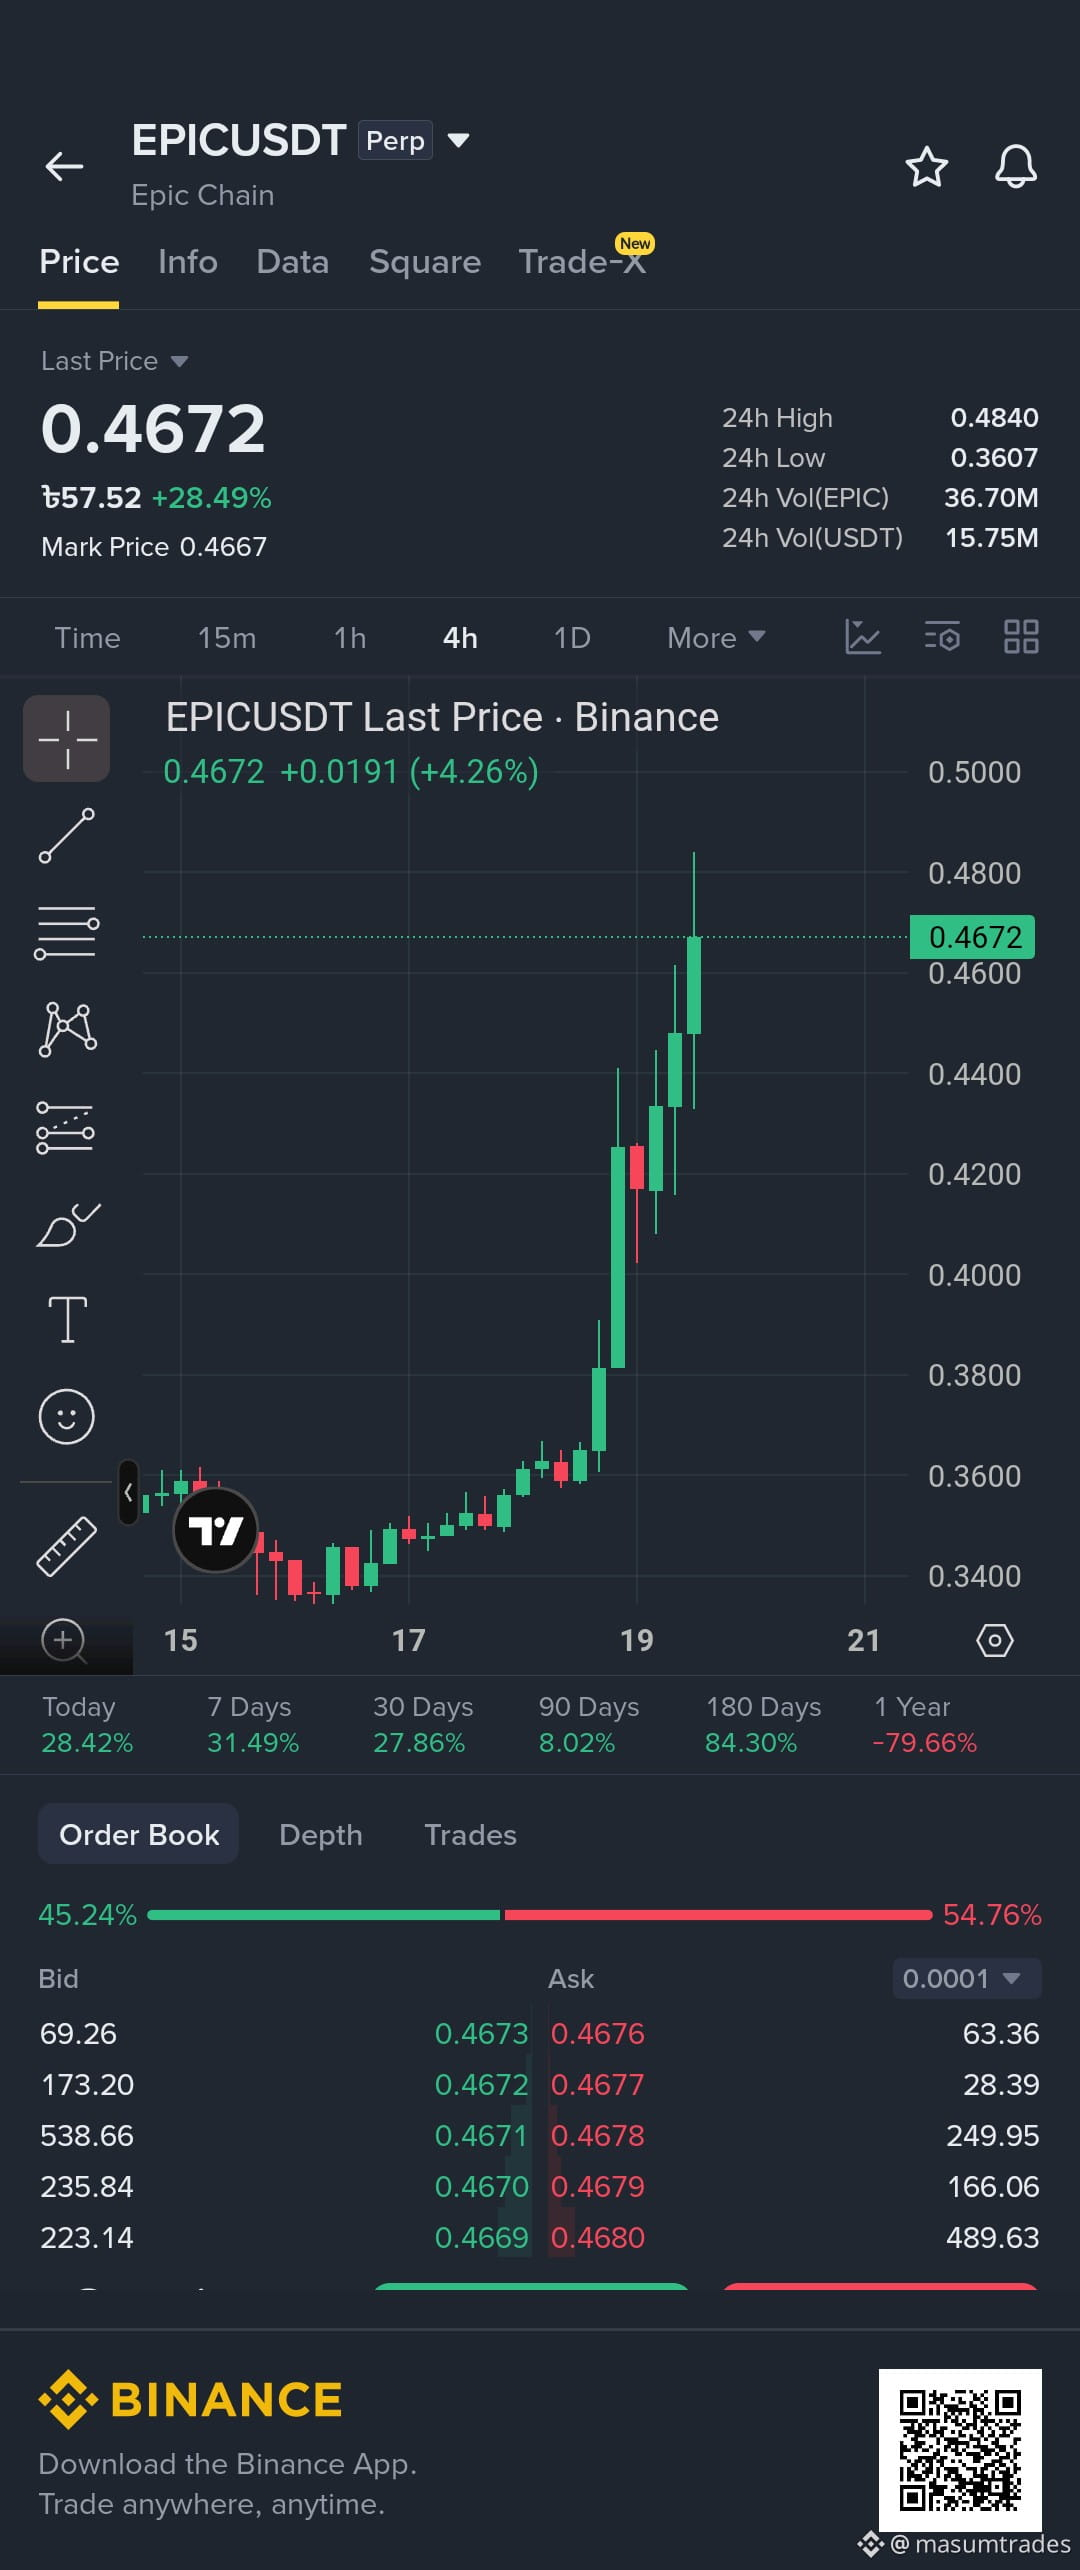
🚀 PARABOLIC EXPANSION & BREAKOUT RETEST! | EPIC/USDT
$EPIC has ignited a sharp bullish surge, pushing toward the $0.468 resistance zone on heavy spot volume! On the 1H/4H timeframes, price action has delivered a high-momentum Market Structure Shift (MSS), leaving behind a pristine bullish Order Block (OB) and Fair Value Gap (FVG) below. We are hunting a shallow pullback to position for a continuation leg toward major higher timeframe supply! 📈
🔹 Trade Type: Intraday Scalp / Momentum Retest
🔹 Direction: Long (Buy)
🔹 Entry Zone: $0.435 – $0.468
🔹 Stop Loss (SL): $0.398 (Strict SL required)
🔹 Take Profit (TP):
• TP1: $0.515 (Local High Liquidity)
• TP2: $0.575 (HTF Resistance Target)
• TP3: $0.660 (Macro Liquidity Pool)
📌 Trade Logic: $EPIC cleared its prior accumulation range with aggressive buyer displacement. We expect a brief retest of the broken structural level / 1H FVG around $0.440 to trap late shorts before the next leg up.
⚠️ Risk Management: Extremely volatile move! Keep strict position sizing and do not risk more than 1-2% of your capital per trade.
Are you riding this $EPIC
{future}(EPICUSDT)
momentum or waiting for a deeper dip to $0.43? Share your game plan below! 👇
#EPIC #CryptoTrading #BinanceSquare #Foreheadburns #TradingSetup
💡 Suggestion: Wait for a 15m bullish rejection candle (e.g., pin bar or engulfing) inside the $0.435 – $0.468 entry zone to confirm buyer absorption before entering.
🚀 PARABOLIC EXPANSION & BREAKOUT RETEST! | EPIC/USDT
$EPIC has ignited a sharp bullish surge, pushing toward the $0.468 resistance zone on heavy spot volume! On the 1H/4H timeframes, price action has delivered a high-momentum Market Structure Shift (MSS), leaving behind a pristine bullish Order Block (OB) and Fair Value Gap (FVG) below. We are hunting a shallow pullback to position for a continuation leg toward major higher timeframe supply! 📈
🔹 Trade Type: Intraday Scalp / Momentum Retest
🔹 Direction: Long (Buy)
🔹 Entry Zone: $0.435 – $0.468
🔹 Stop Loss (SL): $0.398 (Strict SL required)
🔹 Take Profit (TP):
• TP1: $0.515 (Local High Liquidity)
• TP2: $0.575 (HTF Resistance Target)
• TP3: $0.660 (Macro Liquidity Pool)
📌 Trade Logic: $EPIC cleared its prior accumulation range with aggressive buyer displacement. We expect a brief retest of the broken structural level / 1H FVG around $0.440 to trap late shorts before the next leg up.
⚠️ Risk Management: Extremely volatile move! Keep strict position sizing and do not risk more than 1-2% of your capital per trade.
Are you riding this $EPIC
momentum or waiting for a deeper dip to $0.43? Share your game plan below! 👇
#EPIC #CryptoTrading #BinanceSquare #Foreheadburns #TradingSetup
💡 Suggestion: Wait for a 15m bullish rejection candle (e.g., pin bar or engulfing) inside the $0.435 – $0.468 entry zone to confirm buyer absorption before entering.
$EPIC has ignited a sharp bullish surge, pushing toward the $0.468 resistance zone on heavy spot volume! On the 1H/4H timeframes, price action has delivered a high-momentum Market Structure Shift (MSS), leaving behind a pristine bullish Order Block (OB) and Fair Value Gap (FVG) below. We are hunting a shallow pullback to position for a continuation leg toward major higher timeframe supply! 📈
🔹 Trade Type: Intraday Scalp / Momentum Retest
🔹 Direction: Long (Buy)
🔹 Entry Zone: $0.435 – $0.468
🔹 Stop Loss (SL): $0.398 (Strict SL required)
🔹 Take Profit (TP):
• TP1: $0.515 (Local High Liquidity)
• TP2: $0.575 (HTF Resistance Target)
• TP3: $0.660 (Macro Liquidity Pool)
📌 Trade Logic: $EPIC cleared its prior accumulation range with aggressive buyer displacement. We expect a brief retest of the broken structural level / 1H FVG around $0.440 to trap late shorts before the next leg up.
⚠️ Risk Management: Extremely volatile move! Keep strict position sizing and do not risk more than 1-2% of your capital per trade.
Are you riding this $EPIC
momentum or waiting for a deeper dip to $0.43? Share your game plan below! 👇
#EPIC #CryptoTrading #BinanceSquare #Foreheadburns #TradingSetup
💡 Suggestion: Wait for a 15m bullish rejection candle (e.g., pin bar or engulfing) inside the $0.435 – $0.468 entry zone to confirm buyer absorption before entering.
59
·
--
Bullish
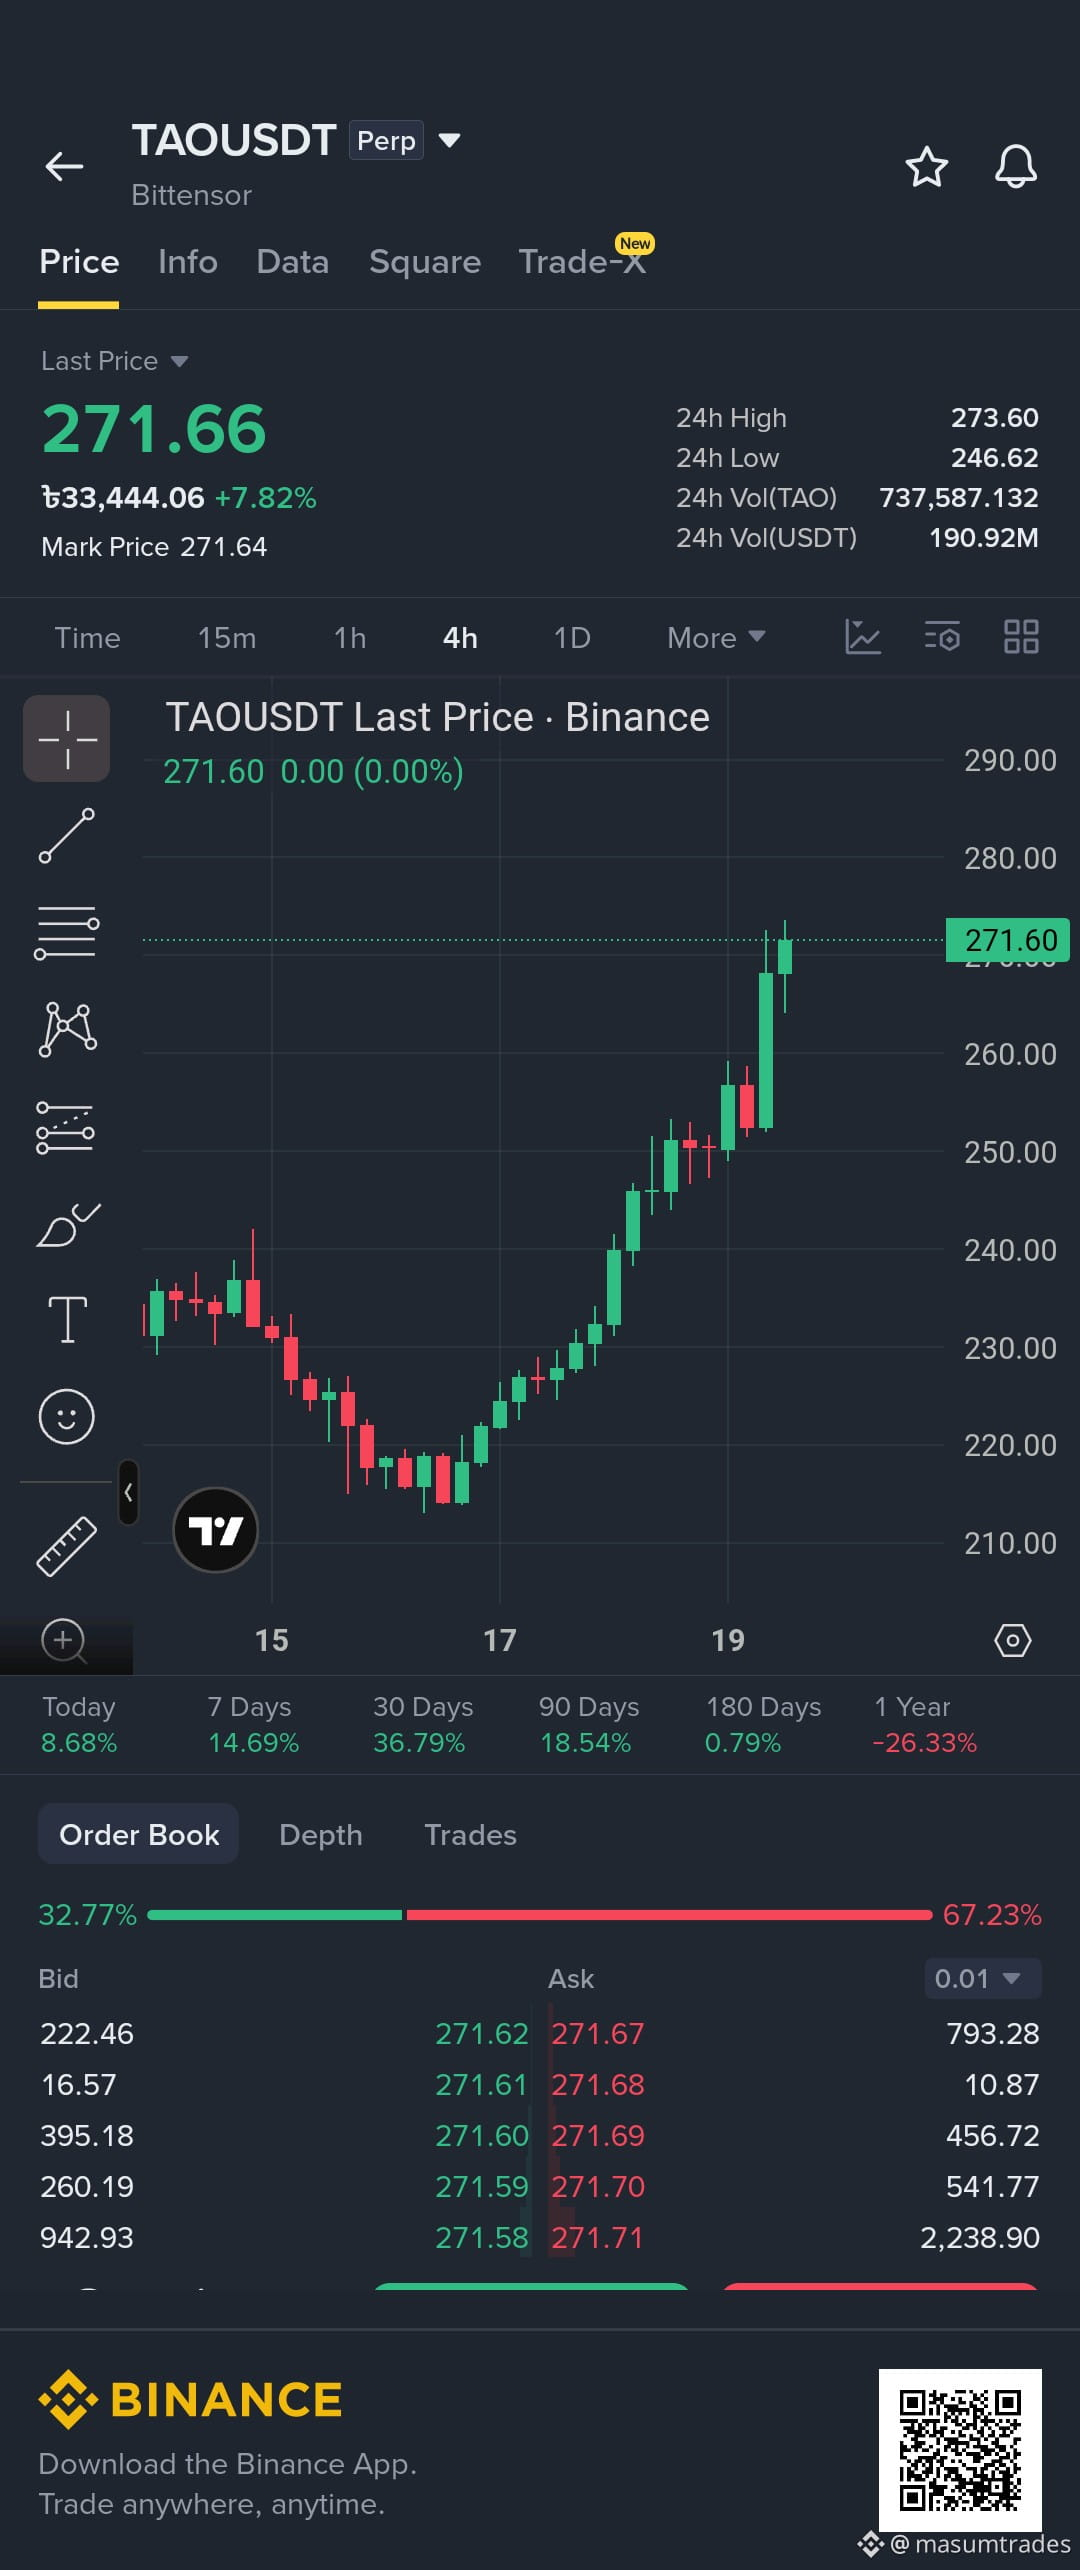
🔥 SWING DEMAND TEST & BULLISH CONTINUATION! | TAO/USDT
$TAO (Bittensor) is holding steady around the $272.2 region after a retracement into HTF demand! On the 1H/4H charts, price action is consolidating near a major bullish Order Block (OB) with a prominent Fair Value Gap (FVG) below, offering a high-R:R swing long entry as decentralized AI narrative volume builds up! 🚀
🔹 Trade Type: HTF Swing / Order Block Retest
🔹 Direction: Long (Buy)
🔹 Entry Zone: $262.0 - $275.0
🔹 Stop Loss (SL): $246.0 (Strict HTF SL required)
🔹 Take Profit (TP):
• TP1: $298.0 (Local High Sweep)
• TP2: $335.0 (Key Structural Supply)
• TP3: $385.0 (HTF Liquidity Pool)
📌 Trade Logic: $TAO swept sell-side liquidity below the $265 consolidation low and printed a clean 4H Market Structure Shift (MSS). We are looking for a retest of the $265 - $272 demand zone to position for an expansion leg toward $330+ overhead supply.
⚠️ Risk Management: High-value asset with wide swings! Manage leverage carefully and do not risk more than 1-2% of your capital.
Are you buying $TAO
{future}(TAOUSDT)
on this demand retest or waiting for a breakout above $300? Share your thoughts below! 👇
#TAO #CryptoTrading #BinanceSquare #Foreheadburns #TradingSetup
💡 Suggestion: Consider splitting your limit orders between $262 and $272 to average into the entry zone safely.
🔥 SWING DEMAND TEST & BULLISH CONTINUATION! | TAO/USDT
$TAO (Bittensor) is holding steady around the $272.2 region after a retracement into HTF demand! On the 1H/4H charts, price action is consolidating near a major bullish Order Block (OB) with a prominent Fair Value Gap (FVG) below, offering a high-R:R swing long entry as decentralized AI narrative volume builds up! 🚀
🔹 Trade Type: HTF Swing / Order Block Retest
🔹 Direction: Long (Buy)
🔹 Entry Zone: $262.0 - $275.0
🔹 Stop Loss (SL): $246.0 (Strict HTF SL required)
🔹 Take Profit (TP):
• TP1: $298.0 (Local High Sweep)
• TP2: $335.0 (Key Structural Supply)
• TP3: $385.0 (HTF Liquidity Pool)
📌 Trade Logic: $TAO swept sell-side liquidity below the $265 consolidation low and printed a clean 4H Market Structure Shift (MSS). We are looking for a retest of the $265 - $272 demand zone to position for an expansion leg toward $330+ overhead supply.
⚠️ Risk Management: High-value asset with wide swings! Manage leverage carefully and do not risk more than 1-2% of your capital.
Are you buying $TAO
on this demand retest or waiting for a breakout above $300? Share your thoughts below! 👇
#TAO #CryptoTrading #BinanceSquare #Foreheadburns #TradingSetup
💡 Suggestion: Consider splitting your limit orders between $262 and $272 to average into the entry zone safely.
$TAO (Bittensor) is holding steady around the $272.2 region after a retracement into HTF demand! On the 1H/4H charts, price action is consolidating near a major bullish Order Block (OB) with a prominent Fair Value Gap (FVG) below, offering a high-R:R swing long entry as decentralized AI narrative volume builds up! 🚀
🔹 Trade Type: HTF Swing / Order Block Retest
🔹 Direction: Long (Buy)
🔹 Entry Zone: $262.0 - $275.0
🔹 Stop Loss (SL): $246.0 (Strict HTF SL required)
🔹 Take Profit (TP):
• TP1: $298.0 (Local High Sweep)
• TP2: $335.0 (Key Structural Supply)
• TP3: $385.0 (HTF Liquidity Pool)
📌 Trade Logic: $TAO swept sell-side liquidity below the $265 consolidation low and printed a clean 4H Market Structure Shift (MSS). We are looking for a retest of the $265 - $272 demand zone to position for an expansion leg toward $330+ overhead supply.
⚠️ Risk Management: High-value asset with wide swings! Manage leverage carefully and do not risk more than 1-2% of your capital.
Are you buying $TAO
on this demand retest or waiting for a breakout above $300? Share your thoughts below! 👇
#TAO #CryptoTrading #BinanceSquare #Foreheadburns #TradingSetup
💡 Suggestion: Consider splitting your limit orders between $262 and $272 to average into the entry zone safely.
50
·
--
Bullish
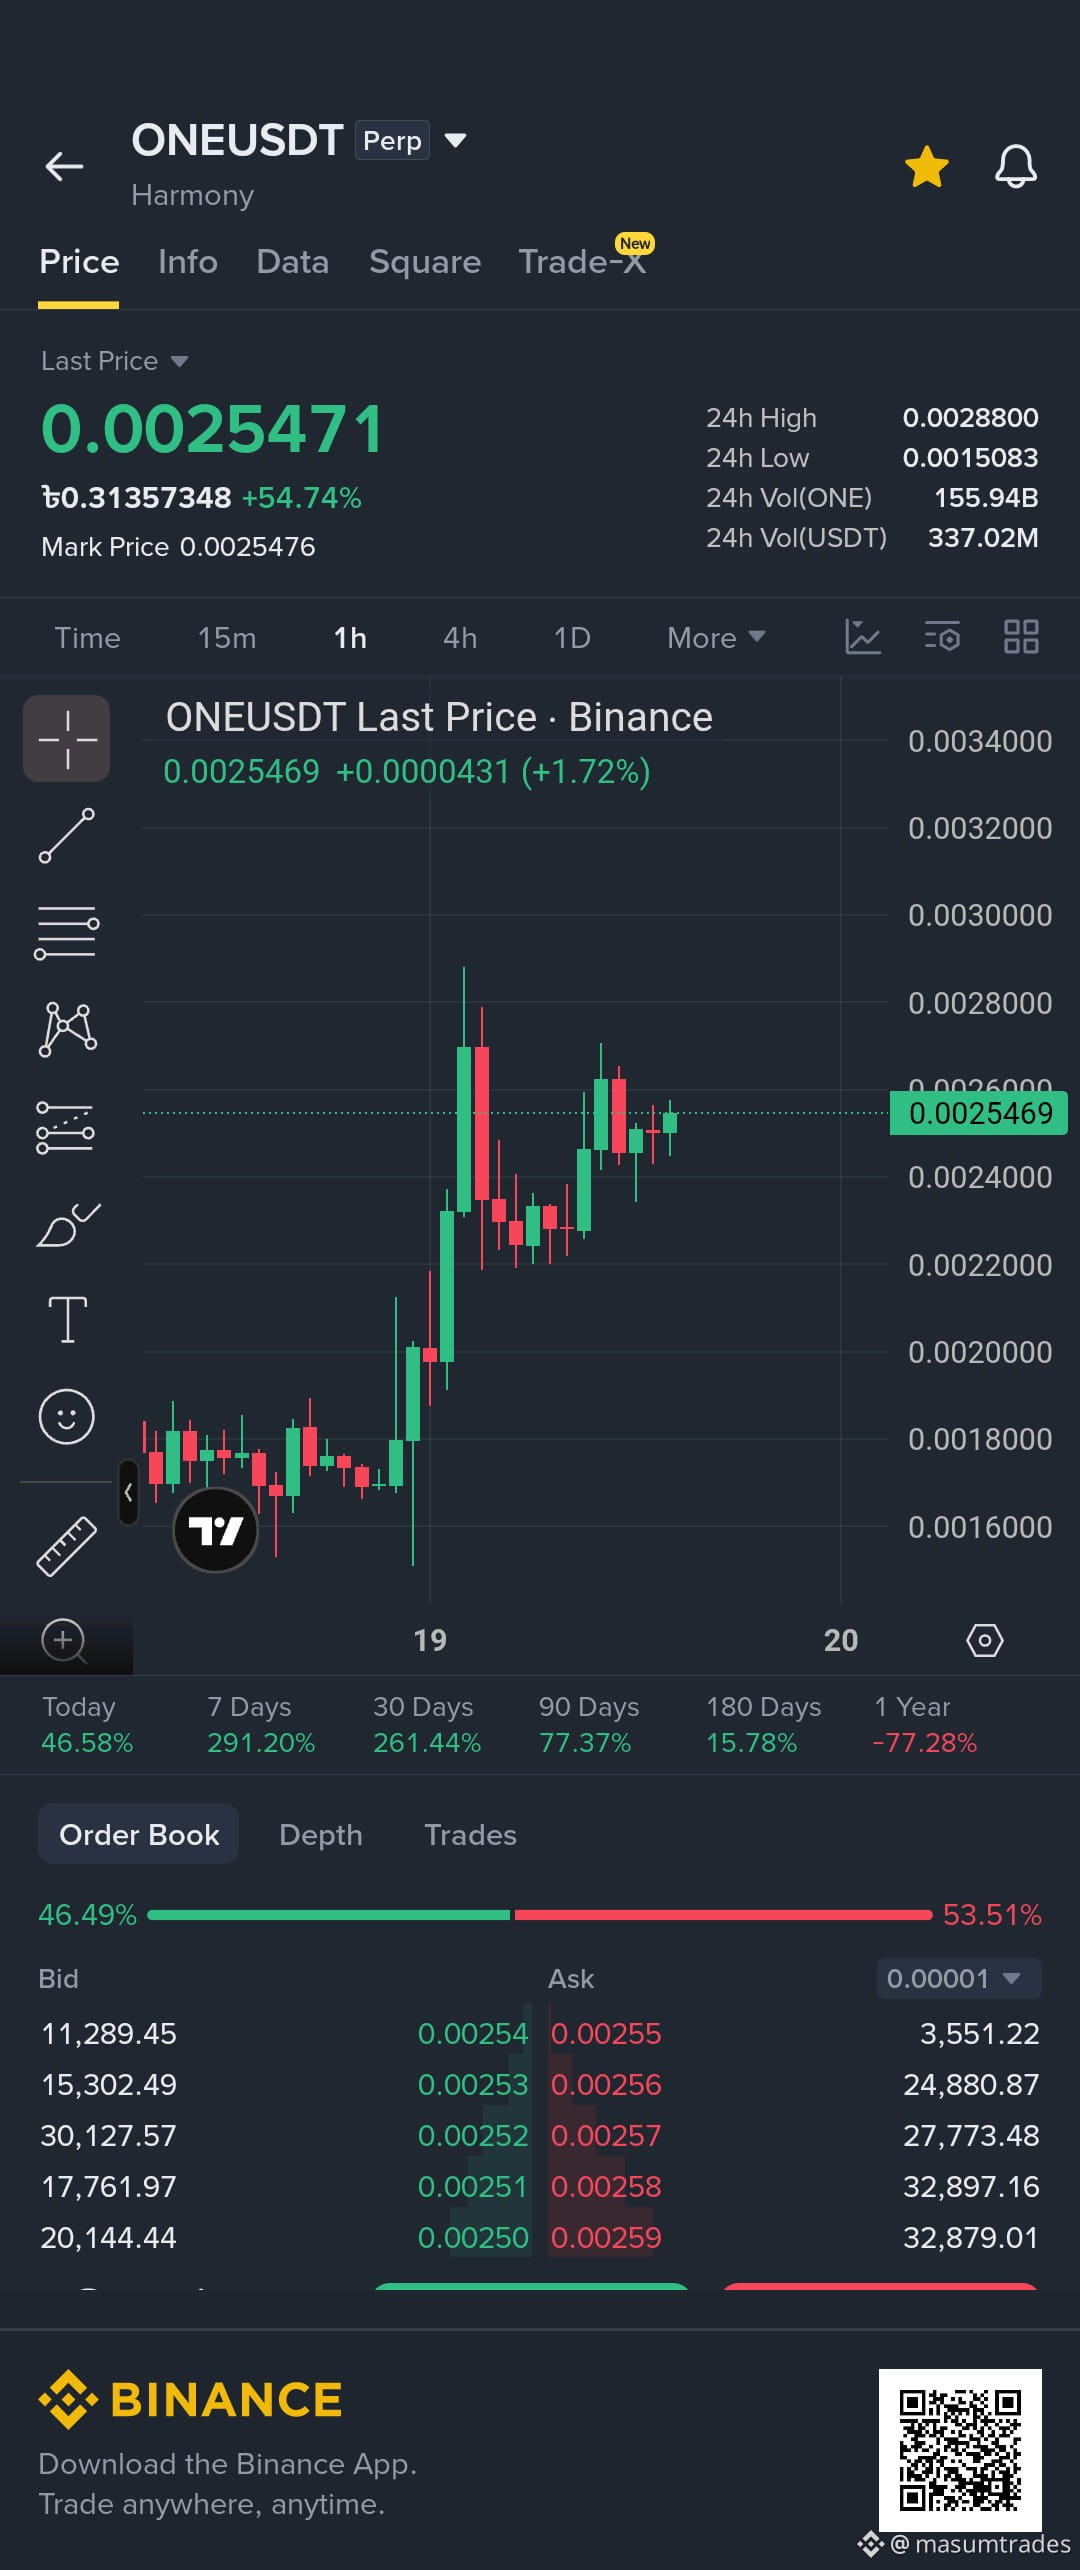
🔥 EXPLOSIVE VOLATILITY & BREAKOUT EXPANSION! | ONE/USDT
$ONE (Harmony) is printing massive expansion candles, breaking out past $0.0025 with heavy surge volume! On the 1H/4H timeframes, price action has delivered an aggressive Market Structure Shift (MSS) above micro-pivots, leaving behind a fresh 15m/1H Fair Value Gap (FVG) and bullish Order Block (OB) below. We are hunting a shallow pullback to position for the continuation leg! 🚀
🔹 Trade Type: Intraday Scalp / Momentum Breakout
🔹 Direction: Long (Buy)
🔹 Entry Zone: $0.00235 - $0.00252
🔹 Stop Loss (SL): $0.00215 (Strict SL required)
🔹 Take Profit (TP):
• TP1: $0.00288 (Local High Sweep)
• TP2: $0.00325 (HTF Supply Target)
• TP3: $0.00380 (Macro Liquidity Pool)
📌 Trade Logic: $ONE cleared lower consolidation with sharp buying pressure. Expecting a quick retest into the intraday FVG / broken pivot zone around $0.00240 to absorb late sellers before another wave toward $0.0030+.
⚠️ Risk Management: Extremely rapid micro-cap movement! Adjust your leverage and do not risk more than 1-2% of your capital on this trade.
Are you riding this $ONE
{future}(ONEUSDT)
breakout momentum or waiting for a dip into $0.0023? Share your game plan below! 👇
#ONE #CryptoTrading #BinanceSquare #Foreheadburns #TradingSetup
💡 Suggestion: Wait for a 15m bullish rejection candle (e.g., pin bar or engulfing) inside the $0.00235 - $0.00252 zone to confirm buyer support before jumping in.
🔥 EXPLOSIVE VOLATILITY & BREAKOUT EXPANSION! | ONE/USDT
$ONE (Harmony) is printing massive expansion candles, breaking out past $0.0025 with heavy surge volume! On the 1H/4H timeframes, price action has delivered an aggressive Market Structure Shift (MSS) above micro-pivots, leaving behind a fresh 15m/1H Fair Value Gap (FVG) and bullish Order Block (OB) below. We are hunting a shallow pullback to position for the continuation leg! 🚀
🔹 Trade Type: Intraday Scalp / Momentum Breakout
🔹 Direction: Long (Buy)
🔹 Entry Zone: $0.00235 - $0.00252
🔹 Stop Loss (SL): $0.00215 (Strict SL required)
🔹 Take Profit (TP):
• TP1: $0.00288 (Local High Sweep)
• TP2: $0.00325 (HTF Supply Target)
• TP3: $0.00380 (Macro Liquidity Pool)
📌 Trade Logic: $ONE cleared lower consolidation with sharp buying pressure. Expecting a quick retest into the intraday FVG / broken pivot zone around $0.00240 to absorb late sellers before another wave toward $0.0030+.
⚠️ Risk Management: Extremely rapid micro-cap movement! Adjust your leverage and do not risk more than 1-2% of your capital on this trade.
Are you riding this $ONE
breakout momentum or waiting for a dip into $0.0023? Share your game plan below! 👇
#ONE #CryptoTrading #BinanceSquare #Foreheadburns #TradingSetup
💡 Suggestion: Wait for a 15m bullish rejection candle (e.g., pin bar or engulfing) inside the $0.00235 - $0.00252 zone to confirm buyer support before jumping in.
$ONE (Harmony) is printing massive expansion candles, breaking out past $0.0025 with heavy surge volume! On the 1H/4H timeframes, price action has delivered an aggressive Market Structure Shift (MSS) above micro-pivots, leaving behind a fresh 15m/1H Fair Value Gap (FVG) and bullish Order Block (OB) below. We are hunting a shallow pullback to position for the continuation leg! 🚀
🔹 Trade Type: Intraday Scalp / Momentum Breakout
🔹 Direction: Long (Buy)
🔹 Entry Zone: $0.00235 - $0.00252
🔹 Stop Loss (SL): $0.00215 (Strict SL required)
🔹 Take Profit (TP):
• TP1: $0.00288 (Local High Sweep)
• TP2: $0.00325 (HTF Supply Target)
• TP3: $0.00380 (Macro Liquidity Pool)
📌 Trade Logic: $ONE cleared lower consolidation with sharp buying pressure. Expecting a quick retest into the intraday FVG / broken pivot zone around $0.00240 to absorb late sellers before another wave toward $0.0030+.
⚠️ Risk Management: Extremely rapid micro-cap movement! Adjust your leverage and do not risk more than 1-2% of your capital on this trade.
Are you riding this $ONE
breakout momentum or waiting for a dip into $0.0023? Share your game plan below! 👇
#ONE #CryptoTrading #BinanceSquare #Foreheadburns #TradingSetup
💡 Suggestion: Wait for a 15m bullish rejection candle (e.g., pin bar or engulfing) inside the $0.00235 - $0.00252 zone to confirm buyer support before jumping in.
81
·
--
Bullish
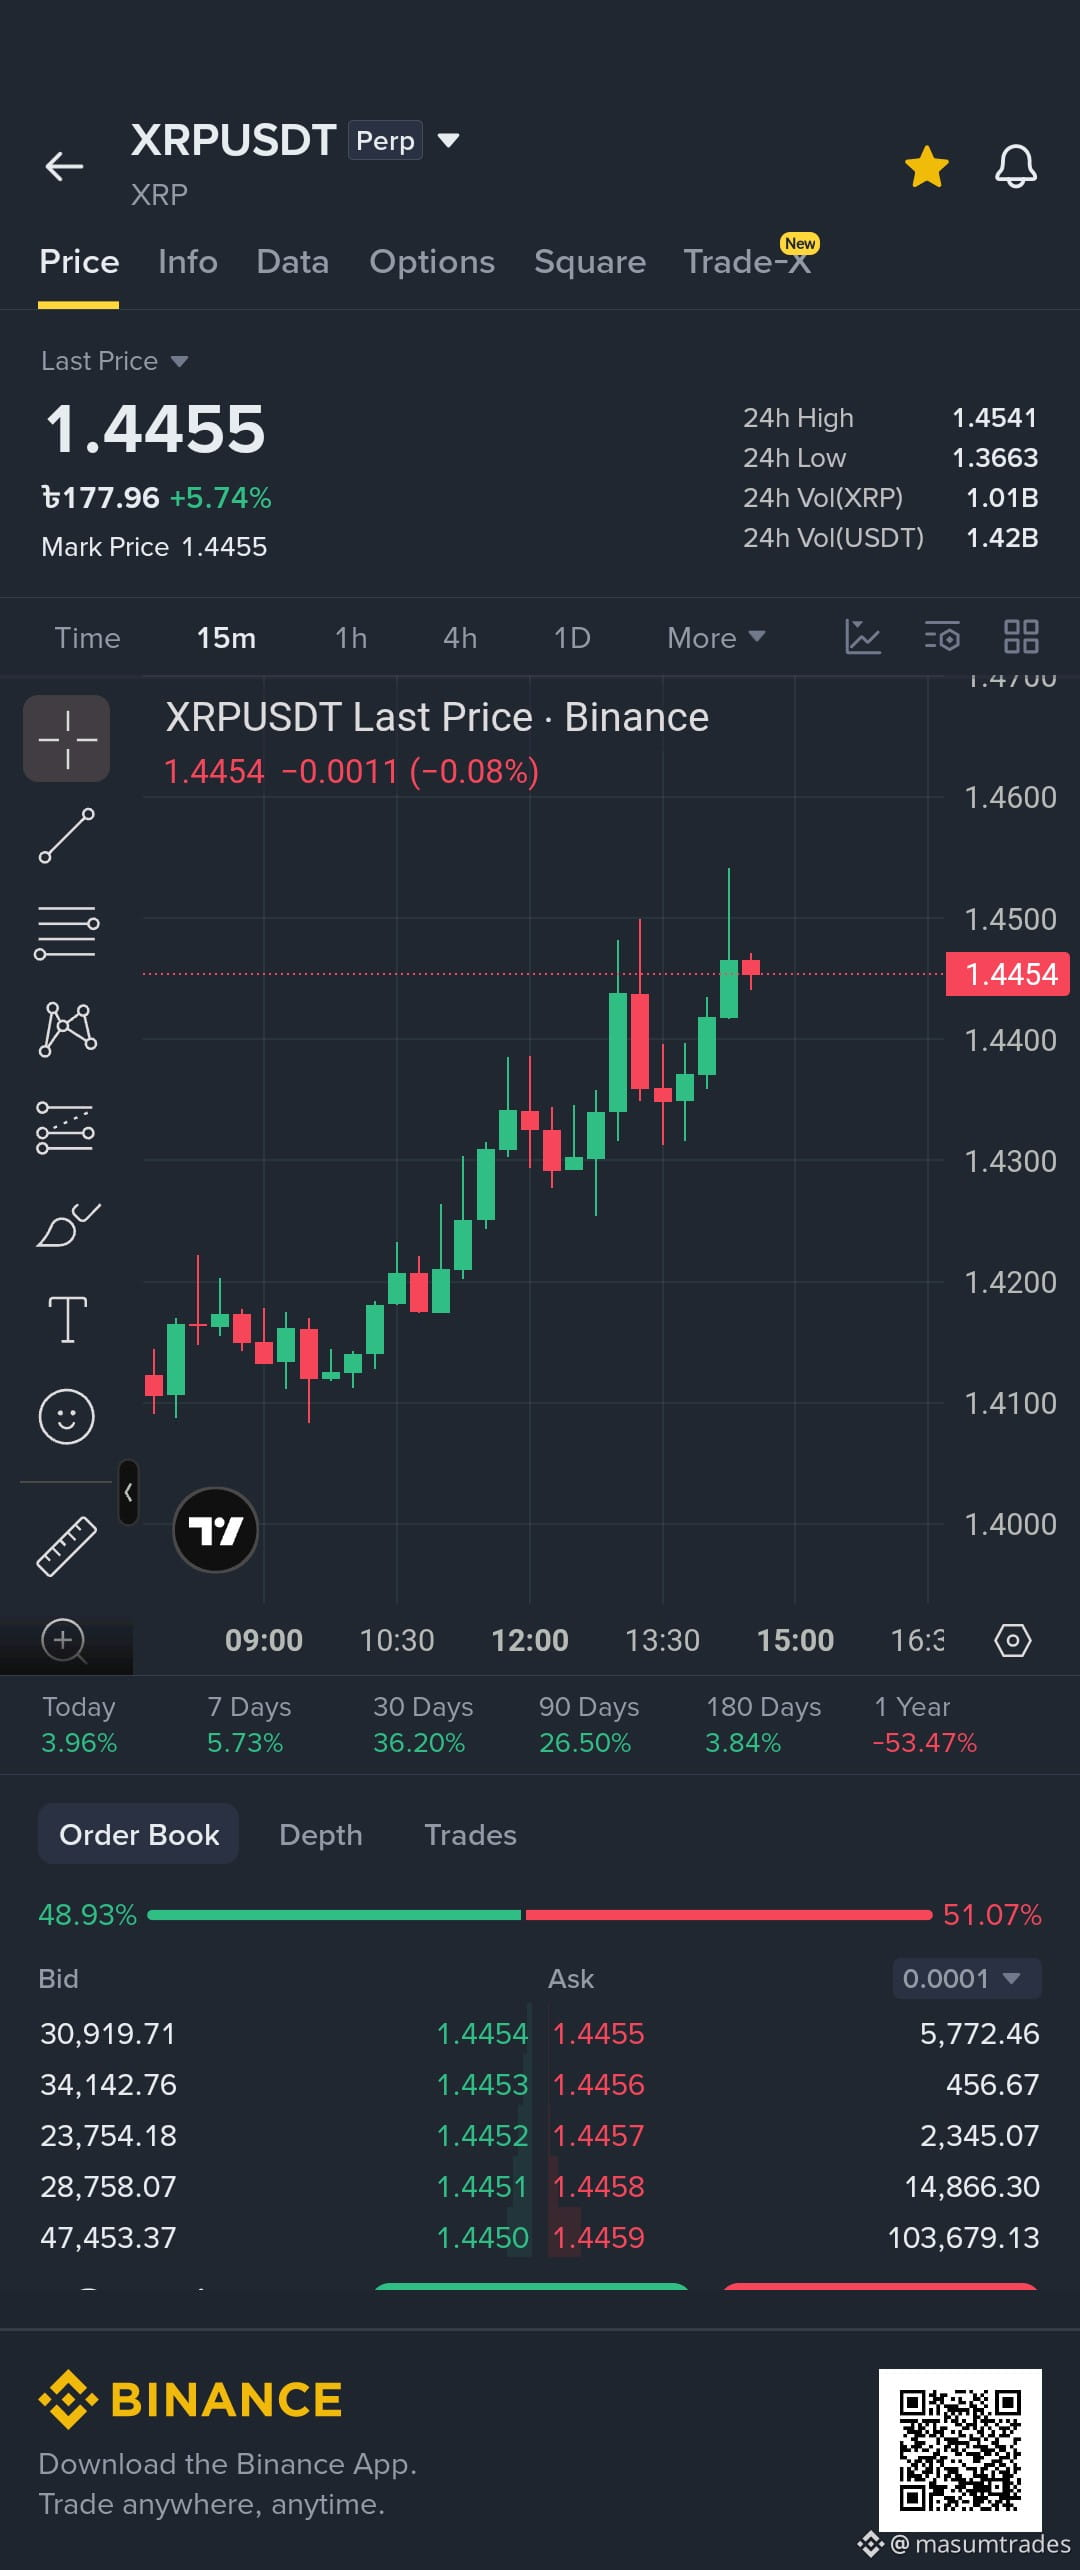
🚨 EXPLOSIVE BREAKOUT RETEST & HTF EXPANSION! | XRP/USDT
$XRP is putting on a masterclass in market structure, holding firm near the critical $1.44 resistance zone! On the 1H/4H timeframes, price action has delivered a clean Market Structure Shift (MSS) above key intraday levels, establishing a pristine bullish Order Block (OB) and Fair Value Gap (FVG) confluence. We are priming for the next massive liquidity expansion! 🚀
🔹 Trade Type: Intraday Breakout / Retest
🔹 Direction: Long (Buy)
🔹 Entry Zone: $1.38 - $1.44
🔹 Stop Loss (SL): $1.29 (Strict SL required)
🔹 Take Profit (TP):
• TP1: $1.55 (Local High Liquidity)
• TP2: $1.70 (HTF Bearish Breaker Zone)
• TP3: $1.95 (Major Supply Target)
📌 Trade Logic: $XRP swept lower sell-side liquidity near $1.32 and reclaimed the upper structure on high buying volume. Looking for a shallow retest of the 1\text{H} Order Block before the buyers trigger a squeeze toward $1.70+.
⚠️ Risk Management: Maintain strict position sizing and do not risk more than 1-2% of your total capital per trade!
Are you longing $XRP
{future}(XRPUSDT)
on this retest or waiting for a push past $1.50? Drop your thoughts below! 👇
#XRP #CryptoTrading #BinanceSquare #Foreheadburns #TradingSetup
💡 Suggestion: Wait for a solid 15m bullish candle rejection (pin bar or engulfing) inside the $1.38 - $1.44 entry zone to confirm buyer dominance before entering.
🚨 EXPLOSIVE BREAKOUT RETEST & HTF EXPANSION! | XRP/USDT
$XRP is putting on a masterclass in market structure, holding firm near the critical $1.44 resistance zone! On the 1H/4H timeframes, price action has delivered a clean Market Structure Shift (MSS) above key intraday levels, establishing a pristine bullish Order Block (OB) and Fair Value Gap (FVG) confluence. We are priming for the next massive liquidity expansion! 🚀
🔹 Trade Type: Intraday Breakout / Retest
🔹 Direction: Long (Buy)
🔹 Entry Zone: $1.38 - $1.44
🔹 Stop Loss (SL): $1.29 (Strict SL required)
🔹 Take Profit (TP):
• TP1: $1.55 (Local High Liquidity)
• TP2: $1.70 (HTF Bearish Breaker Zone)
• TP3: $1.95 (Major Supply Target)
📌 Trade Logic: $XRP swept lower sell-side liquidity near $1.32 and reclaimed the upper structure on high buying volume. Looking for a shallow retest of the 1\text{H} Order Block before the buyers trigger a squeeze toward $1.70+.
⚠️ Risk Management: Maintain strict position sizing and do not risk more than 1-2% of your total capital per trade!
Are you longing $XRP
on this retest or waiting for a push past $1.50? Drop your thoughts below! 👇
#XRP #CryptoTrading #BinanceSquare #Foreheadburns #TradingSetup
💡 Suggestion: Wait for a solid 15m bullish candle rejection (pin bar or engulfing) inside the $1.38 - $1.44 entry zone to confirm buyer dominance before entering.
$XRP is putting on a masterclass in market structure, holding firm near the critical $1.44 resistance zone! On the 1H/4H timeframes, price action has delivered a clean Market Structure Shift (MSS) above key intraday levels, establishing a pristine bullish Order Block (OB) and Fair Value Gap (FVG) confluence. We are priming for the next massive liquidity expansion! 🚀
🔹 Trade Type: Intraday Breakout / Retest
🔹 Direction: Long (Buy)
🔹 Entry Zone: $1.38 - $1.44
🔹 Stop Loss (SL): $1.29 (Strict SL required)
🔹 Take Profit (TP):
• TP1: $1.55 (Local High Liquidity)
• TP2: $1.70 (HTF Bearish Breaker Zone)
• TP3: $1.95 (Major Supply Target)
📌 Trade Logic: $XRP swept lower sell-side liquidity near $1.32 and reclaimed the upper structure on high buying volume. Looking for a shallow retest of the 1\text{H} Order Block before the buyers trigger a squeeze toward $1.70+.
⚠️ Risk Management: Maintain strict position sizing and do not risk more than 1-2% of your total capital per trade!
Are you longing $XRP
on this retest or waiting for a push past $1.50? Drop your thoughts below! 👇
#XRP #CryptoTrading #BinanceSquare #Foreheadburns #TradingSetup
💡 Suggestion: Wait for a solid 15m bullish candle rejection (pin bar or engulfing) inside the $1.38 - $1.44 entry zone to confirm buyer dominance before entering.
30
·
--
Bullish
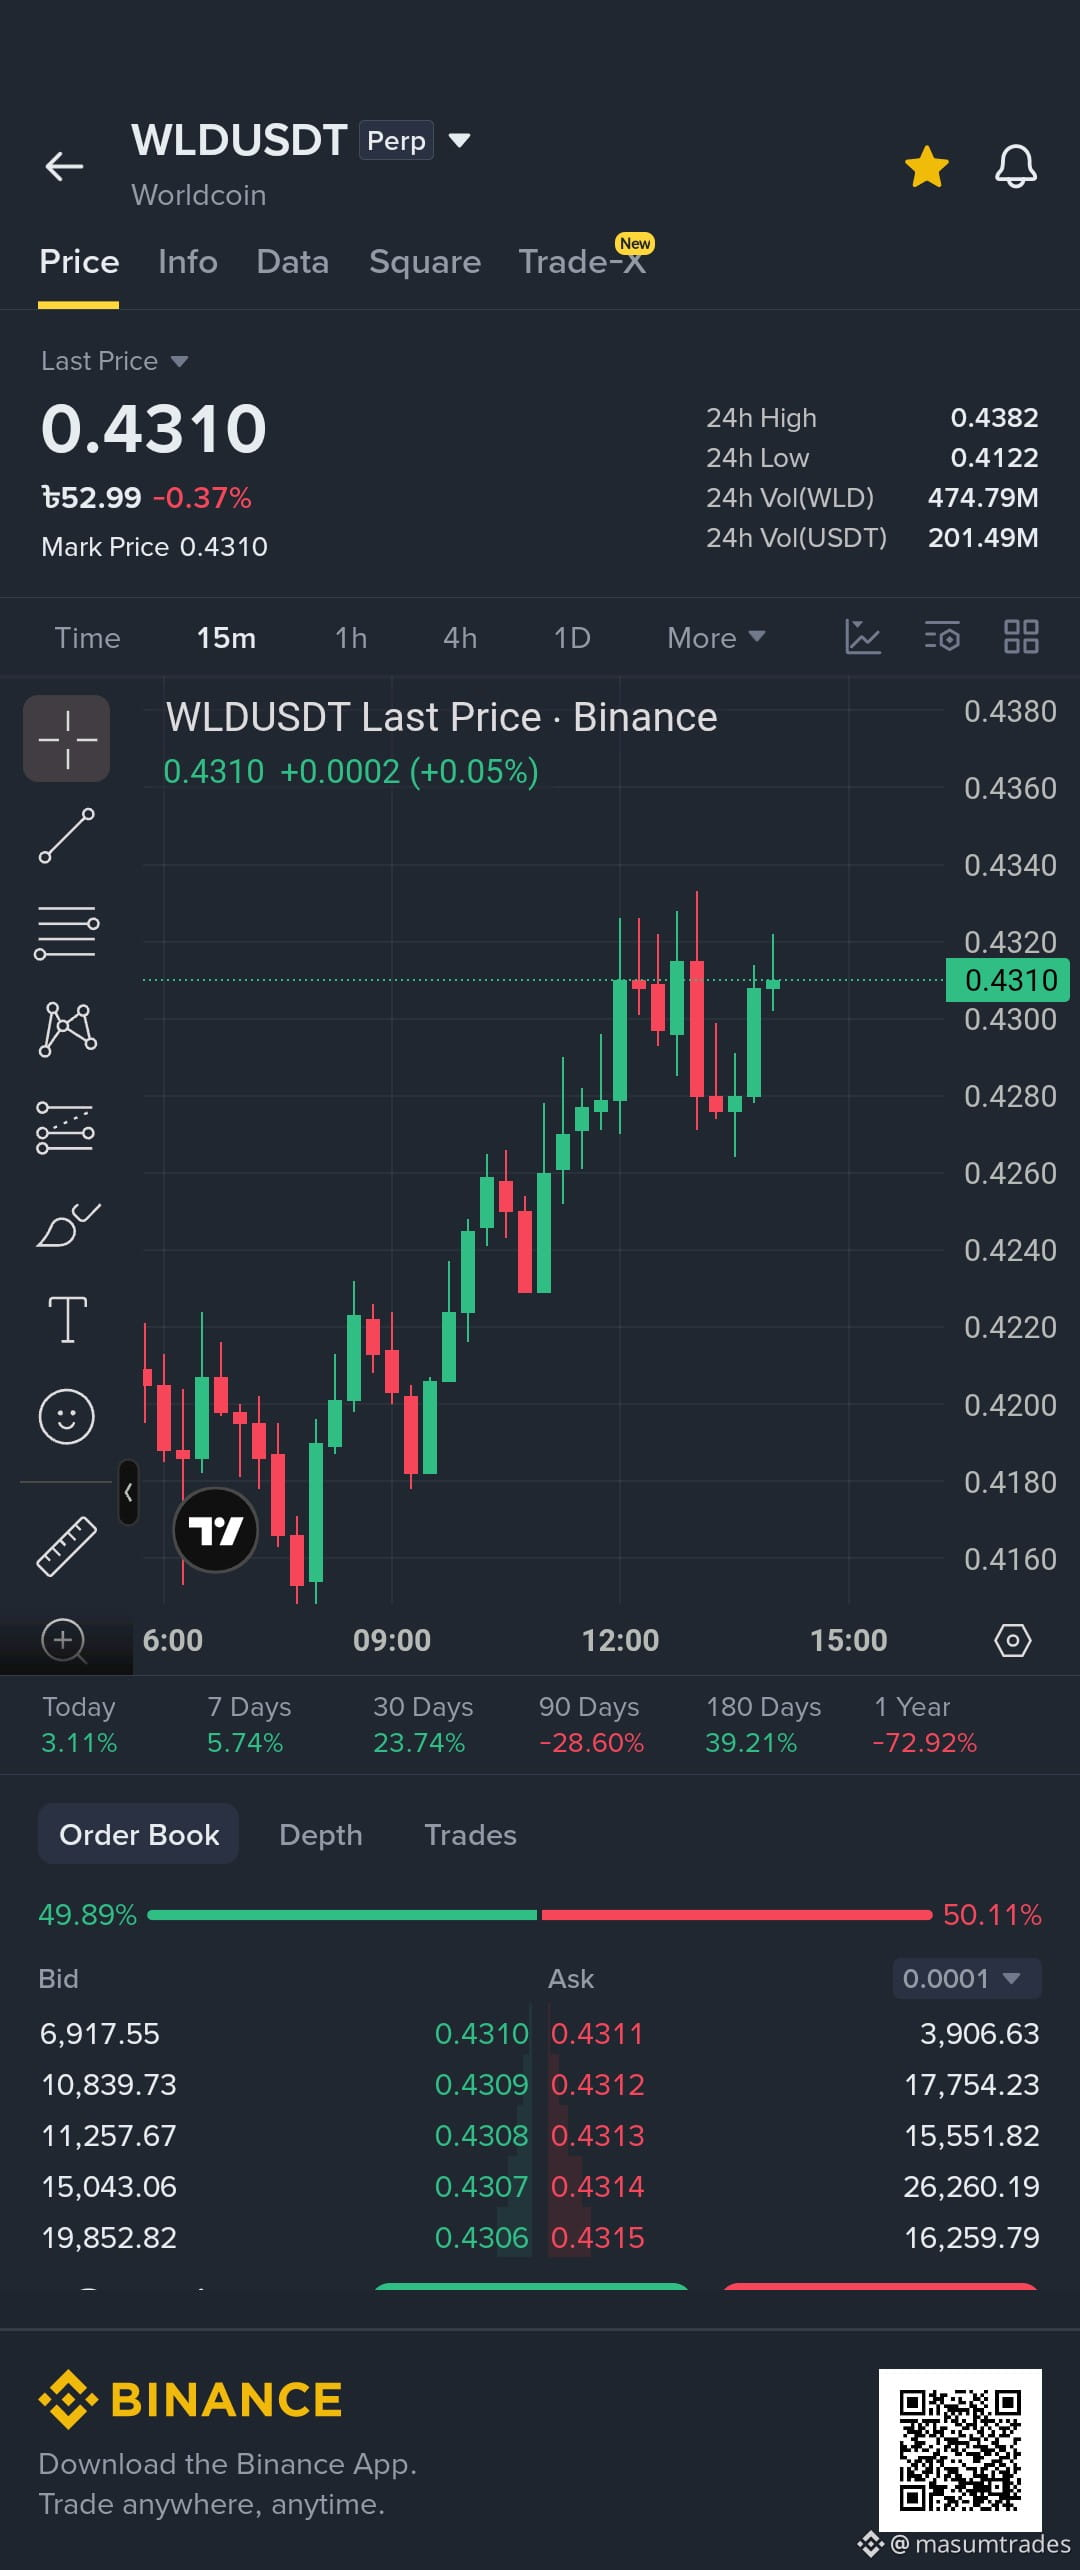
🔥 PARABOLIC MOMENTUM & BREAKOUT RETEST! | WLD/USDT
$WLD (Worldcoin) has exploded out of its lower consolidation range, reclaiming key structural resistance at $0.40 and pushing toward the $0.43 zone with strong buyer volume. On the 1H/4H timeframes, we observe a clean Market Structure Shift (MSS) accompanied by a fresh bullish Order Block (OB) and Fair Value Gap (FVG) confluence—setting up a high-probability continuation long toward higher timeframe supply! 🚀
🔹 Trade Type: Intraday / Momentum Retest
🔹 Direction: Long (Buy)
🔹 Entry Zone: $0.410 - $0.430
🔹 Stop Loss (SL): $0.385 (Strict SL required)
🔹 Take Profit (TP):
• TP1: $0.465 (Local High Liquidity)
• TP2: $0.510 (HTF Bearish Breaker Zone)
• TP3: $0.580 (Major Supply Target)
📌 Trade Logic: $WLD swept sell-side liquidity resting below $0.395 and broke local lower-high structure with aggressive spot demand. We are targeting a shallow retest of the 1\text{H} FVG before the next expansion leg toward overhead buy-side liquidity pools.
⚠️ Risk Management: Volatile AI token! Keep strict position sizing and do not risk more than 1-2% of your portfolio on this trade.
Are you longing $WLD
{future}(WLDUSDT)
on this retest or waiting for a push past $0.50? Drop your setup below! 👇
#WLD #CryptoTrading #BinanceSquare #Foreheadburns #TradingSetup
💡 Suggestion: Wait for a 15m bullish rejection candle (e.g., pin bar or engulfing) inside the $0.410 - $0.430 entry zone to confirm buyer reaction before entering.
🔥 PARABOLIC MOMENTUM & BREAKOUT RETEST! | WLD/USDT
$WLD (Worldcoin) has exploded out of its lower consolidation range, reclaiming key structural resistance at $0.40 and pushing toward the $0.43 zone with strong buyer volume. On the 1H/4H timeframes, we observe a clean Market Structure Shift (MSS) accompanied by a fresh bullish Order Block (OB) and Fair Value Gap (FVG) confluence—setting up a high-probability continuation long toward higher timeframe supply! 🚀
🔹 Trade Type: Intraday / Momentum Retest
🔹 Direction: Long (Buy)
🔹 Entry Zone: $0.410 - $0.430
🔹 Stop Loss (SL): $0.385 (Strict SL required)
🔹 Take Profit (TP):
• TP1: $0.465 (Local High Liquidity)
• TP2: $0.510 (HTF Bearish Breaker Zone)
• TP3: $0.580 (Major Supply Target)
📌 Trade Logic: $WLD swept sell-side liquidity resting below $0.395 and broke local lower-high structure with aggressive spot demand. We are targeting a shallow retest of the 1\text{H} FVG before the next expansion leg toward overhead buy-side liquidity pools.
⚠️ Risk Management: Volatile AI token! Keep strict position sizing and do not risk more than 1-2% of your portfolio on this trade.
Are you longing $WLD
on this retest or waiting for a push past $0.50? Drop your setup below! 👇
#WLD #CryptoTrading #BinanceSquare #Foreheadburns #TradingSetup
💡 Suggestion: Wait for a 15m bullish rejection candle (e.g., pin bar or engulfing) inside the $0.410 - $0.430 entry zone to confirm buyer reaction before entering.
$WLD (Worldcoin) has exploded out of its lower consolidation range, reclaiming key structural resistance at $0.40 and pushing toward the $0.43 zone with strong buyer volume. On the 1H/4H timeframes, we observe a clean Market Structure Shift (MSS) accompanied by a fresh bullish Order Block (OB) and Fair Value Gap (FVG) confluence—setting up a high-probability continuation long toward higher timeframe supply! 🚀
🔹 Trade Type: Intraday / Momentum Retest
🔹 Direction: Long (Buy)
🔹 Entry Zone: $0.410 - $0.430
🔹 Stop Loss (SL): $0.385 (Strict SL required)
🔹 Take Profit (TP):
• TP1: $0.465 (Local High Liquidity)
• TP2: $0.510 (HTF Bearish Breaker Zone)
• TP3: $0.580 (Major Supply Target)
📌 Trade Logic: $WLD swept sell-side liquidity resting below $0.395 and broke local lower-high structure with aggressive spot demand. We are targeting a shallow retest of the 1\text{H} FVG before the next expansion leg toward overhead buy-side liquidity pools.
⚠️ Risk Management: Volatile AI token! Keep strict position sizing and do not risk more than 1-2% of your portfolio on this trade.
Are you longing $WLD
on this retest or waiting for a push past $0.50? Drop your setup below! 👇
#WLD #CryptoTrading #BinanceSquare #Foreheadburns #TradingSetup
💡 Suggestion: Wait for a 15m bullish rejection candle (e.g., pin bar or engulfing) inside the $0.410 - $0.430 entry zone to confirm buyer reaction before entering.
162
·
--
Bullish
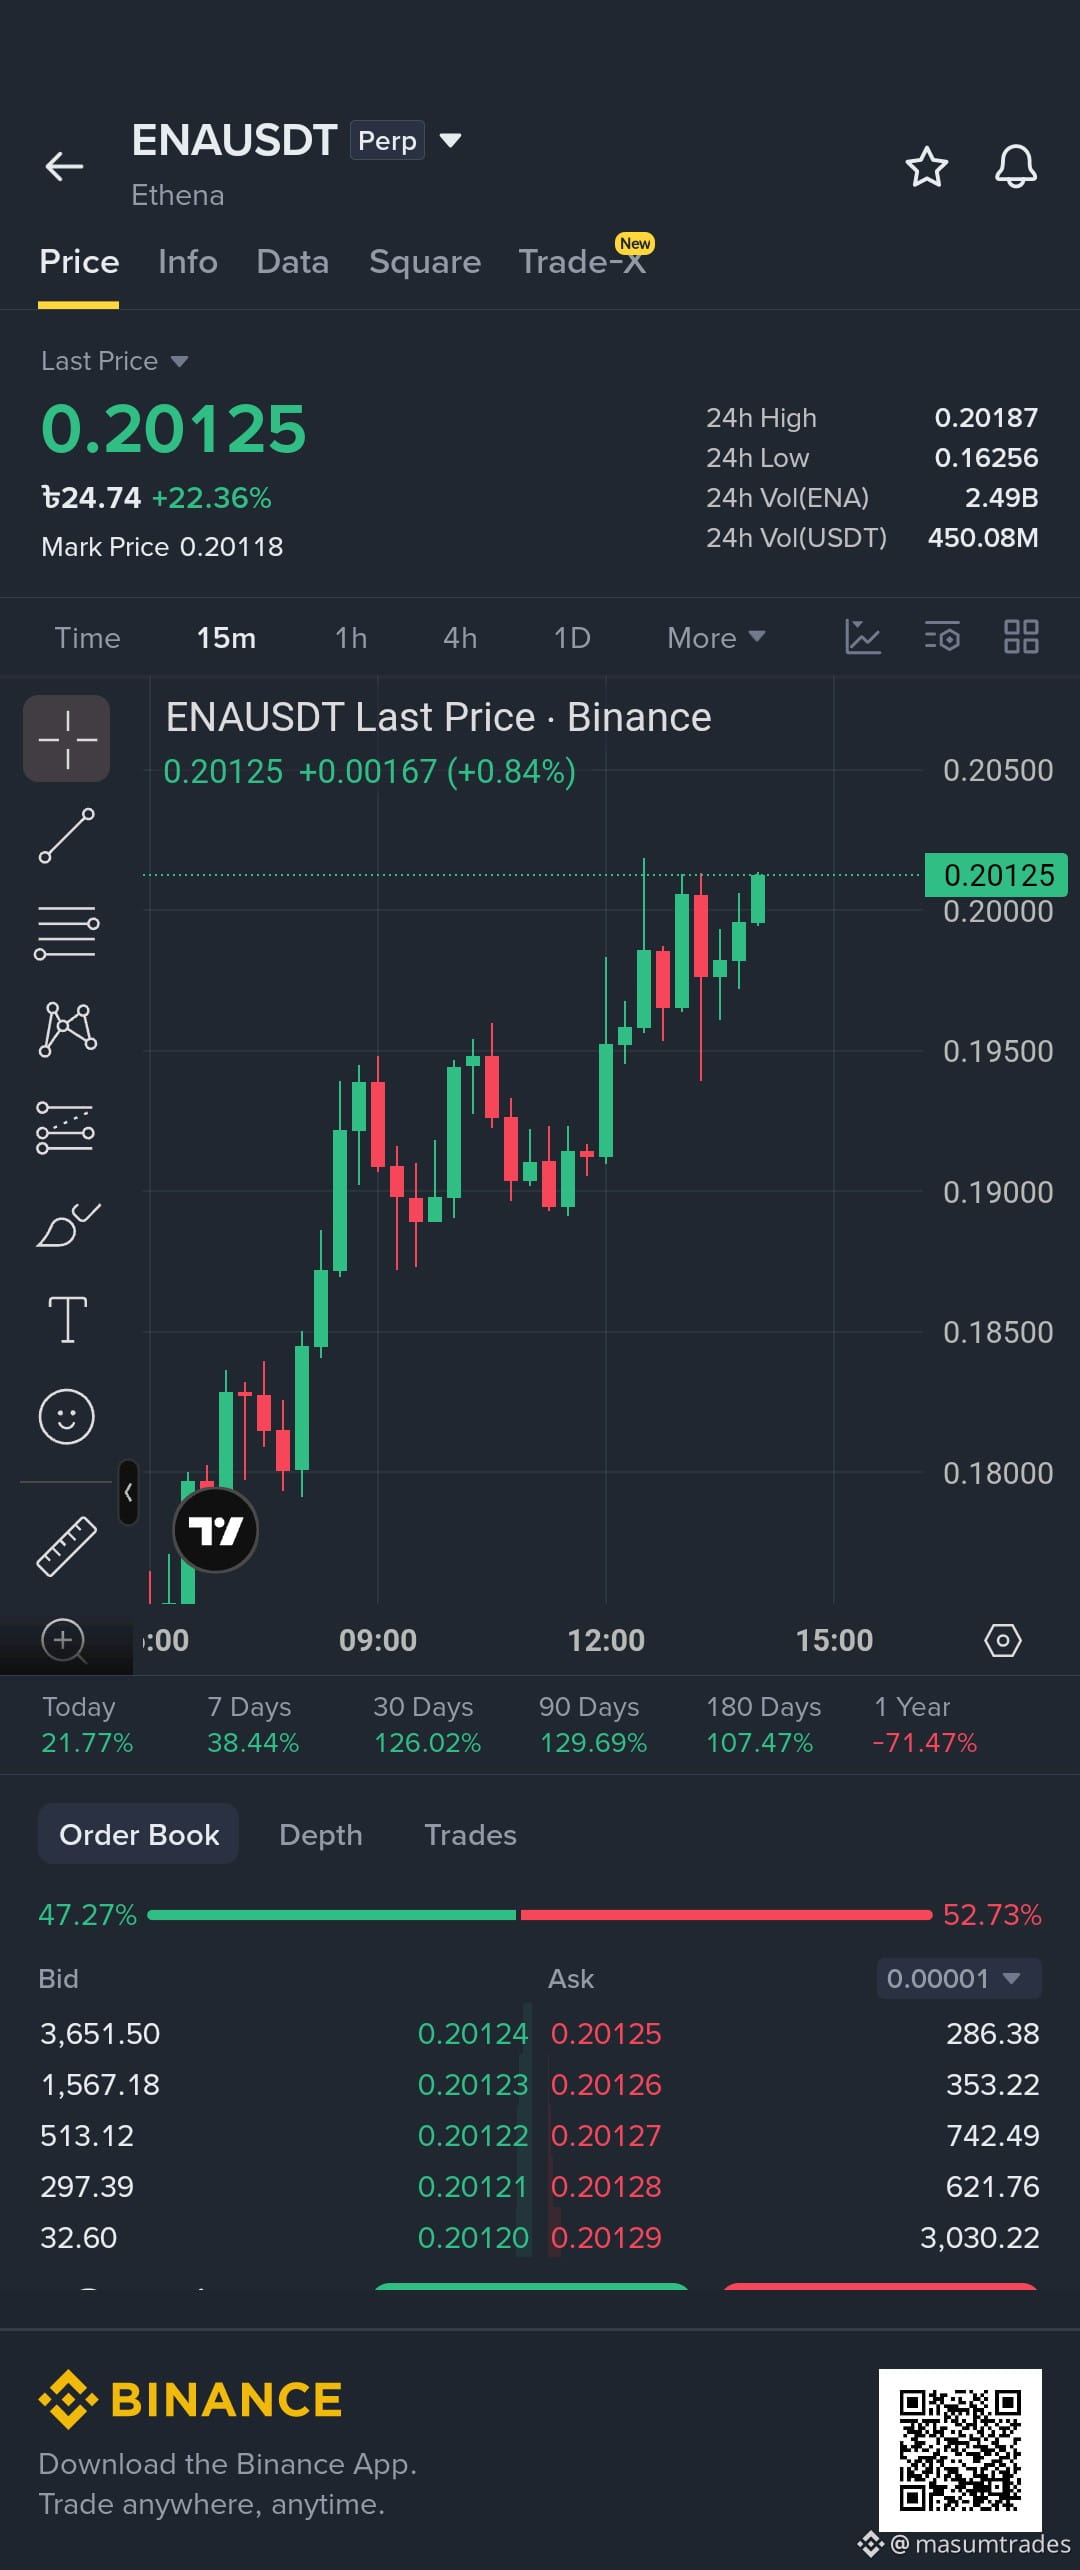
🚨 BREAKOUT RETEST & BULLISH MOMENTUM! | ENA/USDT
$ENA has broken out above local key structure and cleared short-term resistance around $0.190! On the 1H/4H timeframes, price action shows strong buyer volume with a clean retest of the broken structural level, leaving behind a prime bullish Order Block (OB) confluence. We are positioning for the next expansion leg toward major higher timeframe targets! 🚀
🔹 Trade Type: Intraday / Breakout Retest
🔹 Direction: Long (Buy)
🔹 Entry Zone: $0.188 – $0.199
🔹 Stop Loss (SL): $0.174 (Strict SL required)
🔹 Take Profit (TP):
• TP1: $0.225 (Local Liquidity Sweep)
• TP2: $0.300 (Key Structural Supply)
• TP3: $0.450 (HTF Expansion Target)
📌 Trade Logic: $ENA reclaimed $0.190 with massive volume confirmation. Looking for a shallow retest of the 1H Order Block before buyers push price toward overhead supply zones at $0.300+.
⚠️ Risk Management: Maintain strict position sizing and do not risk more than 1-2% of your total capital per trade!
Are you longing $ENA
{future}(ENAUSDT)
on this retest or waiting for a push past $0.25? Let me know in the comments below! 👇
#ENA #CryptoTrading #BinanceSquare #Foreheadburns #TradingSetup
💡 Suggestion: Wait for a solid 15m bullish candle rejection (pin bar or engulfing) inside the $0.188 – $0.199 entry zone to confirm buyer control before entering.
🚨 BREAKOUT RETEST & BULLISH MOMENTUM! | ENA/USDT
$ENA has broken out above local key structure and cleared short-term resistance around $0.190! On the 1H/4H timeframes, price action shows strong buyer volume with a clean retest of the broken structural level, leaving behind a prime bullish Order Block (OB) confluence. We are positioning for the next expansion leg toward major higher timeframe targets! 🚀
🔹 Trade Type: Intraday / Breakout Retest
🔹 Direction: Long (Buy)
🔹 Entry Zone: $0.188 – $0.199
🔹 Stop Loss (SL): $0.174 (Strict SL required)
🔹 Take Profit (TP):
• TP1: $0.225 (Local Liquidity Sweep)
• TP2: $0.300 (Key Structural Supply)
• TP3: $0.450 (HTF Expansion Target)
📌 Trade Logic: $ENA reclaimed $0.190 with massive volume confirmation. Looking for a shallow retest of the 1H Order Block before buyers push price toward overhead supply zones at $0.300+.
⚠️ Risk Management: Maintain strict position sizing and do not risk more than 1-2% of your total capital per trade!
Are you longing $ENA
on this retest or waiting for a push past $0.25? Let me know in the comments below! 👇
#ENA #CryptoTrading #BinanceSquare #Foreheadburns #TradingSetup
💡 Suggestion: Wait for a solid 15m bullish candle rejection (pin bar or engulfing) inside the $0.188 – $0.199 entry zone to confirm buyer control before entering.
$ENA has broken out above local key structure and cleared short-term resistance around $0.190! On the 1H/4H timeframes, price action shows strong buyer volume with a clean retest of the broken structural level, leaving behind a prime bullish Order Block (OB) confluence. We are positioning for the next expansion leg toward major higher timeframe targets! 🚀
🔹 Trade Type: Intraday / Breakout Retest
🔹 Direction: Long (Buy)
🔹 Entry Zone: $0.188 – $0.199
🔹 Stop Loss (SL): $0.174 (Strict SL required)
🔹 Take Profit (TP):
• TP1: $0.225 (Local Liquidity Sweep)
• TP2: $0.300 (Key Structural Supply)
• TP3: $0.450 (HTF Expansion Target)
📌 Trade Logic: $ENA reclaimed $0.190 with massive volume confirmation. Looking for a shallow retest of the 1H Order Block before buyers push price toward overhead supply zones at $0.300+.
⚠️ Risk Management: Maintain strict position sizing and do not risk more than 1-2% of your total capital per trade!
Are you longing $ENA
on this retest or waiting for a push past $0.25? Let me know in the comments below! 👇
#ENA #CryptoTrading #BinanceSquare #Foreheadburns #TradingSetup
💡 Suggestion: Wait for a solid 15m bullish candle rejection (pin bar or engulfing) inside the $0.188 – $0.199 entry zone to confirm buyer control before entering.
146
·
--
Bullish
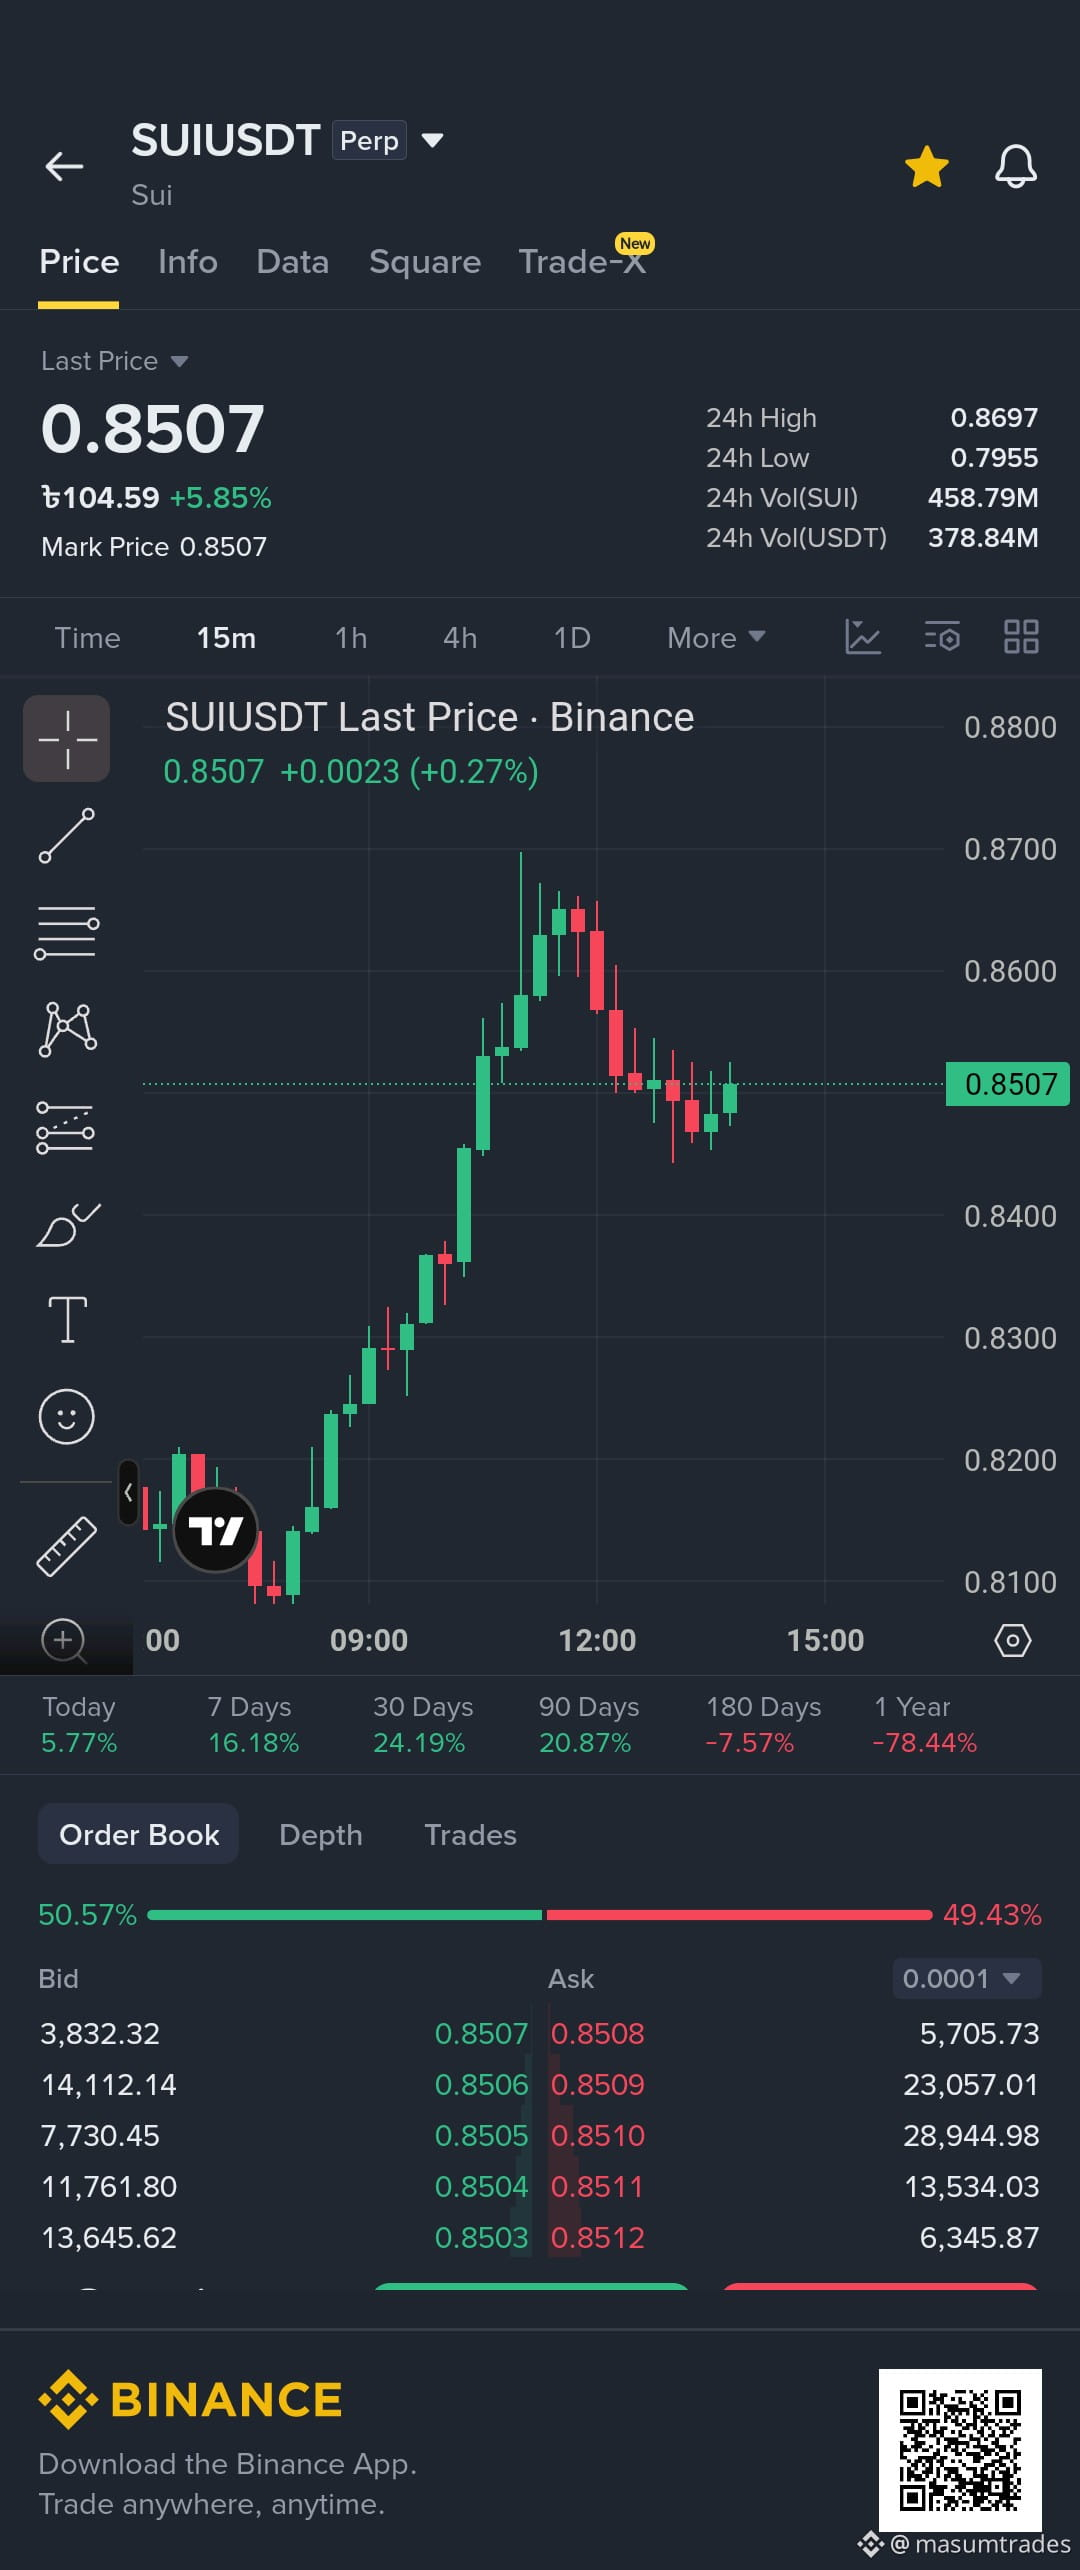
🔥 DUAL-RESISTANCE REJECTION & RETEST SETUP! | SUI/USDT
$SUI
{future}(SUIUSDT)
is currently testing key multi-timeframe resistance around $0.83 - $0.85 after a strong rally off local demand. On the 1H/4H charts, price action is showing signs of exhaustion near the 200-SMA / upper supply band, setting up a high-probability pullback to retest lower demand before attempting another leg toward $0.90!
🔹 Trade Type: Swing / Intraday Retest
🔹 Direction: Long (Buy Limit On Dip)
🔹 Entry Zone: $0.770 - $0.795
🔹 Stop Loss (SL): $0.738 (Strict SL required)
🔹 Take Profit (TP):
• TP1: $0.850 (Key Resistance Retest)
• TP2: $0.905 (Liquidity Sweep Target)
• TP3: $0.980 (HTF Expansion Zone)
📌 Trade Logic: $SUI is confronting heavy overhead supply around $0.85. Instead of buying at resistance, we are setting up a limit buy at the $0.77 - $0.79 demand confluence (1H Fair Value Gap) to capture a higher low continuation play.
⚠️ Risk Management: Keep strict position sizing and do not risk more than 1-2% of your portfolio per trade!
Are you buying the $SUI dip at $0.78 or waiting for a breakout above $0.85? Share your trade plan in the comments! 👇
#SUI #CryptoTrading #BinanceSquare #Foreheadburns #TradingSetup
💡 Suggestion: Place limit orders in the entry zone or wait for a 15m bullish reversal pattern (hammer/engulfing) inside $0.770 - $0.795 to confirm buyer support before entering.
🔥 DUAL-RESISTANCE REJECTION & RETEST SETUP! | SUI/USDT
$SUI
is currently testing key multi-timeframe resistance around $0.83 - $0.85 after a strong rally off local demand. On the 1H/4H charts, price action is showing signs of exhaustion near the 200-SMA / upper supply band, setting up a high-probability pullback to retest lower demand before attempting another leg toward $0.90!
🔹 Trade Type: Swing / Intraday Retest
🔹 Direction: Long (Buy Limit On Dip)
🔹 Entry Zone: $0.770 - $0.795
🔹 Stop Loss (SL): $0.738 (Strict SL required)
🔹 Take Profit (TP):
• TP1: $0.850 (Key Resistance Retest)
• TP2: $0.905 (Liquidity Sweep Target)
• TP3: $0.980 (HTF Expansion Zone)
📌 Trade Logic: $SUI is confronting heavy overhead supply around $0.85. Instead of buying at resistance, we are setting up a limit buy at the $0.77 - $0.79 demand confluence (1H Fair Value Gap) to capture a higher low continuation play.
⚠️ Risk Management: Keep strict position sizing and do not risk more than 1-2% of your portfolio per trade!
Are you buying the $SUI dip at $0.78 or waiting for a breakout above $0.85? Share your trade plan in the comments! 👇
#SUI #CryptoTrading #BinanceSquare #Foreheadburns #TradingSetup
💡 Suggestion: Place limit orders in the entry zone or wait for a 15m bullish reversal pattern (hammer/engulfing) inside $0.770 - $0.795 to confirm buyer support before entering.
$SUI
is currently testing key multi-timeframe resistance around $0.83 - $0.85 after a strong rally off local demand. On the 1H/4H charts, price action is showing signs of exhaustion near the 200-SMA / upper supply band, setting up a high-probability pullback to retest lower demand before attempting another leg toward $0.90!
🔹 Trade Type: Swing / Intraday Retest
🔹 Direction: Long (Buy Limit On Dip)
🔹 Entry Zone: $0.770 - $0.795
🔹 Stop Loss (SL): $0.738 (Strict SL required)
🔹 Take Profit (TP):
• TP1: $0.850 (Key Resistance Retest)
• TP2: $0.905 (Liquidity Sweep Target)
• TP3: $0.980 (HTF Expansion Zone)
📌 Trade Logic: $SUI is confronting heavy overhead supply around $0.85. Instead of buying at resistance, we are setting up a limit buy at the $0.77 - $0.79 demand confluence (1H Fair Value Gap) to capture a higher low continuation play.
⚠️ Risk Management: Keep strict position sizing and do not risk more than 1-2% of your portfolio per trade!
Are you buying the $SUI dip at $0.78 or waiting for a breakout above $0.85? Share your trade plan in the comments! 👇
#SUI #CryptoTrading #BinanceSquare #Foreheadburns #TradingSetup
💡 Suggestion: Place limit orders in the entry zone or wait for a 15m bullish reversal pattern (hammer/engulfing) inside $0.770 - $0.795 to confirm buyer support before entering.
55
·
--
Bullish
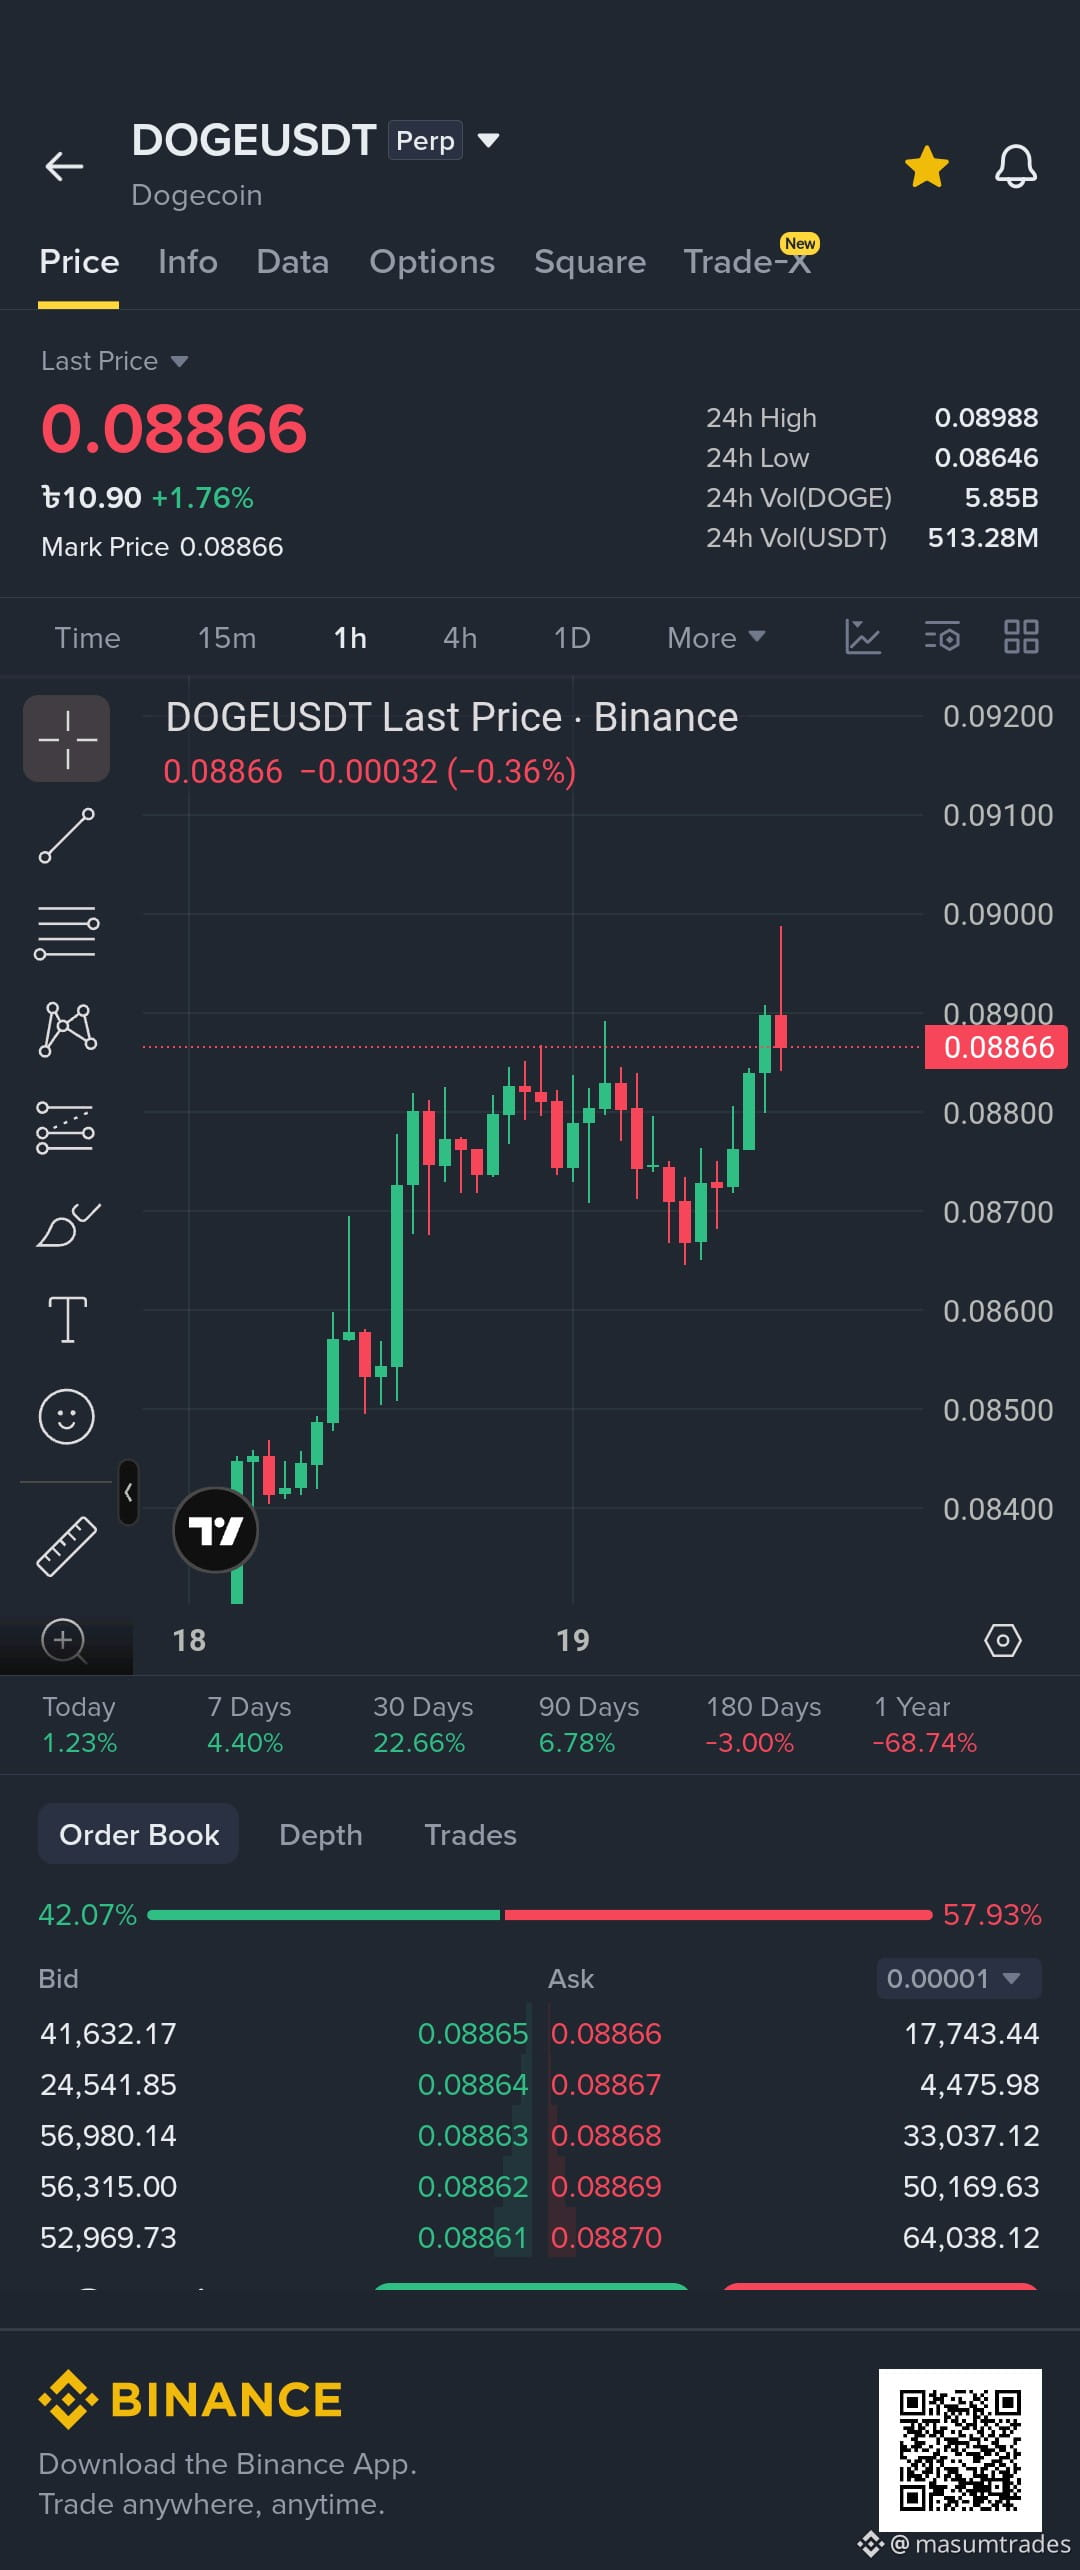
🔥 LIQUIDITY SWEEP & TRENDLINE BREAKOUT! | DOGE/USDT
$DOGE is flashing strong intraday bullish momentum after reclaiming the key $0.088 pivot and sweeping local sell-side liquidity resting below the $0.086 support zone. On lower timeframes (15m/1H), we observe a clean trendline breakout and a fresh bullish Order Block (OB) with Fair Value Gap (FVG) confluence—setting up a rapid scalp toward overhead liquidity targets! 🚀
🔹 Trade Type: Intraday Scalp / Breakout
🔹 Direction: Long (Buy)
🔹 Entry Zone: $0.0865 - $0.0885
🔹 Stop Loss (SL): $0.0838 (Strict SL required)
🔹 Take Profit (TP):
• TP1: $0.0925 (Local High Liquidity)
• TP2: $0.0960 (Key Resistance Zone)
• TP3: $0.1020 (HTF Supply Target)
📌 Trade Logic: Price aggressively absorbed short orders around $0.086, triggering a short squeeze and confirming a lower timeframe Market Structure Shift (MSS). Looking for a shallow retest of the broken trendline / 15m FVG before resuming expansion toward upper buy-side liquidity pools.
⚠️ Risk Management: High-volatility meme asset! Keep strict position sizing and do not risk more than 1-2% of your capital per trade.
Are you longing $DOGE on this retest or waiting for a push to $0.095? Let me know in the comments below! 👇
#DOGE #CryptoTrading #BinanceSquare #Foreheadburns #TradingSetup
💡 Suggestion: Wait for a 15m bullish rejection candle (e.g., pin bar or bullish engulfing) inside the $0.0865 - $0.0885 entry zone to confirm buyer absorption before entering.
🔥 LIQUIDITY SWEEP & TRENDLINE BREAKOUT! | DOGE/USDT
$DOGE is flashing strong intraday bullish momentum after reclaiming the key $0.088 pivot and sweeping local sell-side liquidity resting below the $0.086 support zone. On lower timeframes (15m/1H), we observe a clean trendline breakout and a fresh bullish Order Block (OB) with Fair Value Gap (FVG) confluence—setting up a rapid scalp toward overhead liquidity targets! 🚀
🔹 Trade Type: Intraday Scalp / Breakout
🔹 Direction: Long (Buy)
🔹 Entry Zone: $0.0865 - $0.0885
🔹 Stop Loss (SL): $0.0838 (Strict SL required)
🔹 Take Profit (TP):
• TP1: $0.0925 (Local High Liquidity)
• TP2: $0.0960 (Key Resistance Zone)
• TP3: $0.1020 (HTF Supply Target)
📌 Trade Logic: Price aggressively absorbed short orders around $0.086, triggering a short squeeze and confirming a lower timeframe Market Structure Shift (MSS). Looking for a shallow retest of the broken trendline / 15m FVG before resuming expansion toward upper buy-side liquidity pools.
⚠️ Risk Management: High-volatility meme asset! Keep strict position sizing and do not risk more than 1-2% of your capital per trade.
Are you longing $DOGE on this retest or waiting for a push to $0.095? Let me know in the comments below! 👇
#DOGE #CryptoTrading #BinanceSquare #Foreheadburns #TradingSetup
💡 Suggestion: Wait for a 15m bullish rejection candle (e.g., pin bar or bullish engulfing) inside the $0.0865 - $0.0885 entry zone to confirm buyer absorption before entering.
$DOGE is flashing strong intraday bullish momentum after reclaiming the key $0.088 pivot and sweeping local sell-side liquidity resting below the $0.086 support zone. On lower timeframes (15m/1H), we observe a clean trendline breakout and a fresh bullish Order Block (OB) with Fair Value Gap (FVG) confluence—setting up a rapid scalp toward overhead liquidity targets! 🚀
🔹 Trade Type: Intraday Scalp / Breakout
🔹 Direction: Long (Buy)
🔹 Entry Zone: $0.0865 - $0.0885
🔹 Stop Loss (SL): $0.0838 (Strict SL required)
🔹 Take Profit (TP):
• TP1: $0.0925 (Local High Liquidity)
• TP2: $0.0960 (Key Resistance Zone)
• TP3: $0.1020 (HTF Supply Target)
📌 Trade Logic: Price aggressively absorbed short orders around $0.086, triggering a short squeeze and confirming a lower timeframe Market Structure Shift (MSS). Looking for a shallow retest of the broken trendline / 15m FVG before resuming expansion toward upper buy-side liquidity pools.
⚠️ Risk Management: High-volatility meme asset! Keep strict position sizing and do not risk more than 1-2% of your capital per trade.
Are you longing $DOGE on this retest or waiting for a push to $0.095? Let me know in the comments below! 👇
#DOGE #CryptoTrading #BinanceSquare #Foreheadburns #TradingSetup
💡 Suggestion: Wait for a 15m bullish rejection candle (e.g., pin bar or bullish engulfing) inside the $0.0865 - $0.0885 entry zone to confirm buyer absorption before entering.
53
·
--
Bullish
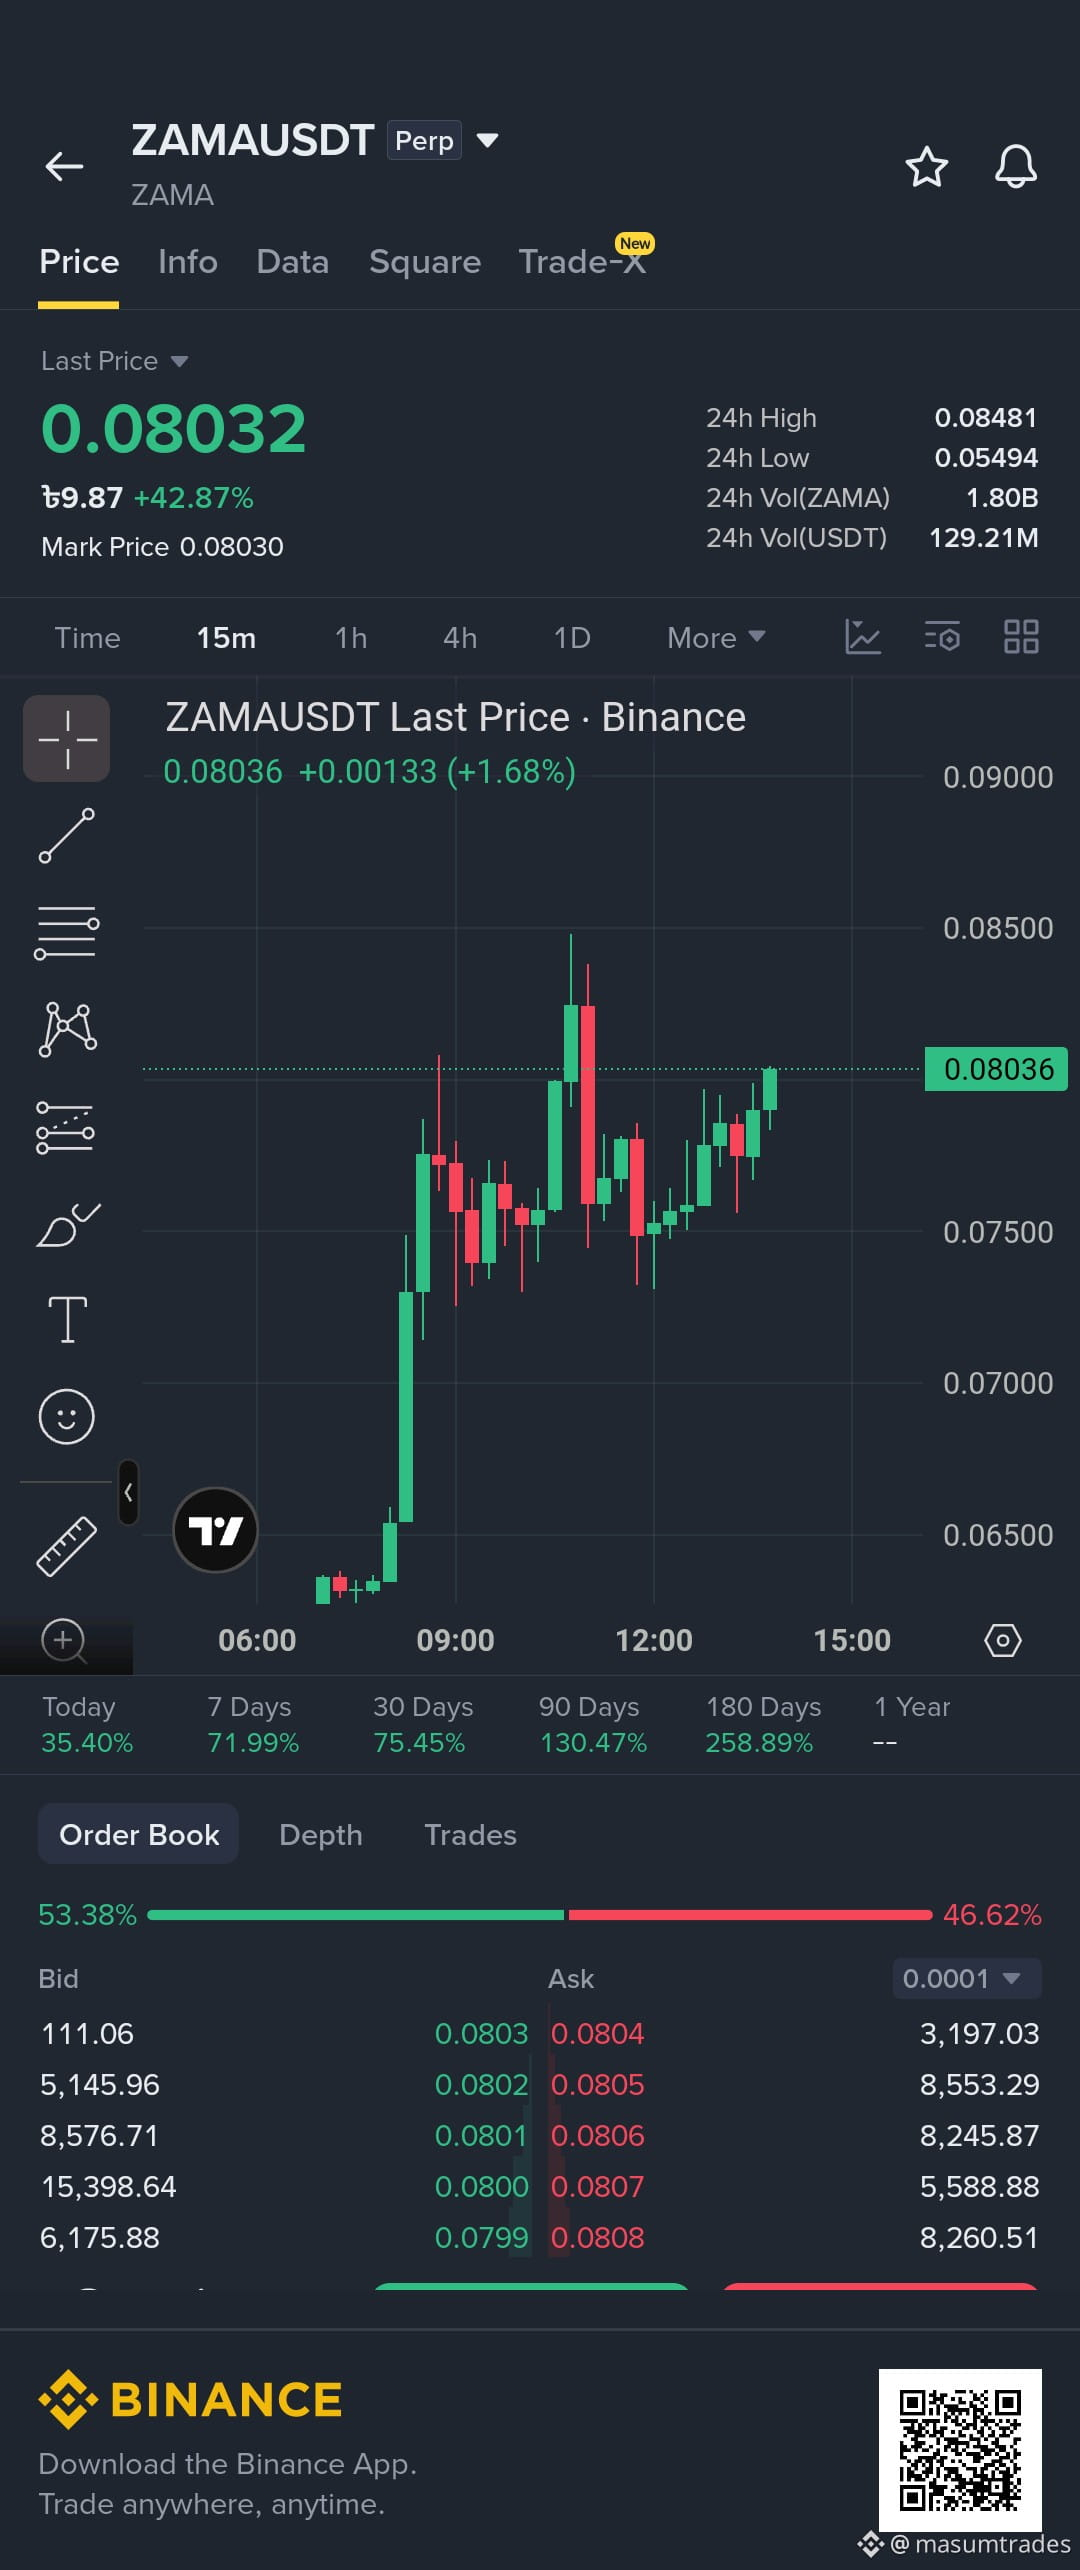
🚀 PARABOLIC BREAKOUT & HIGH-TIME FRAME MOMENTUM! | ZAMA/USDT
$ZAMA
{future}(ZAMAUSDT)
has ignited a massive bullish expansion, surging up toward $0.079 - $0.084 after clearing local consolidation levels. On the 1H/4H timeframes, price is printing strong expansion candles, establishing a solid bullish Order Block (OB) and leaving behind a large Fair Value Gap (FVG) below. We are looking for a shallow pullback into lower timeframe demand before the next leg higher! 📈
🔹 Trade Type: Momentum Breakout / Intraday
🔹 Direction: Long (Buy)
🔹 Entry Zone: $0.0725 - $0.0775
🔹 Stop Loss (SL): $0.0678 (Strict SL required)
🔹 Take Profit (TP):
• TP1: $0.0845 (Local Liquidity Sweep)
• TP2: $0.0920 (HTF Extension Target)
• TP3: $0.1050 (Psychological Resistance)
📌 Trade Logic: $ZAMA reclaimed key high-timeframe structural pivots with massive volume. Expecting a brief cooling-off period to retest internal liquidity/demand around $0.074 before continuing the macro uptrend toward new highs.
⚠️ Risk Management: Extremely high volatility token following fresh impulse moves! Adjust your leverage and do not risk more than 1-2% of your portfolio.
Are you catching this $ZAMA continuation or waiting for a deeper pullback? Share your thoughts in the comments! 👇
#ZAMA #CryptoTrading #BinanceSquare #Foreheadburns #TradingSetup
💡 Suggestion: Since Zama is moving rapidly, wait for a 15m bullish rejection candle (hammer/engulfing) inside the $0.0725 - $0.0775 entry zone before placing your entry.
🚀 PARABOLIC BREAKOUT & HIGH-TIME FRAME MOMENTUM! | ZAMA/USDT
$ZAMA
has ignited a massive bullish expansion, surging up toward $0.079 - $0.084 after clearing local consolidation levels. On the 1H/4H timeframes, price is printing strong expansion candles, establishing a solid bullish Order Block (OB) and leaving behind a large Fair Value Gap (FVG) below. We are looking for a shallow pullback into lower timeframe demand before the next leg higher! 📈
🔹 Trade Type: Momentum Breakout / Intraday
🔹 Direction: Long (Buy)
🔹 Entry Zone: $0.0725 - $0.0775
🔹 Stop Loss (SL): $0.0678 (Strict SL required)
🔹 Take Profit (TP):
• TP1: $0.0845 (Local Liquidity Sweep)
• TP2: $0.0920 (HTF Extension Target)
• TP3: $0.1050 (Psychological Resistance)
📌 Trade Logic: $ZAMA reclaimed key high-timeframe structural pivots with massive volume. Expecting a brief cooling-off period to retest internal liquidity/demand around $0.074 before continuing the macro uptrend toward new highs.
⚠️ Risk Management: Extremely high volatility token following fresh impulse moves! Adjust your leverage and do not risk more than 1-2% of your portfolio.
Are you catching this $ZAMA continuation or waiting for a deeper pullback? Share your thoughts in the comments! 👇
#ZAMA #CryptoTrading #BinanceSquare #Foreheadburns #TradingSetup
💡 Suggestion: Since Zama is moving rapidly, wait for a 15m bullish rejection candle (hammer/engulfing) inside the $0.0725 - $0.0775 entry zone before placing your entry.
$ZAMA
has ignited a massive bullish expansion, surging up toward $0.079 - $0.084 after clearing local consolidation levels. On the 1H/4H timeframes, price is printing strong expansion candles, establishing a solid bullish Order Block (OB) and leaving behind a large Fair Value Gap (FVG) below. We are looking for a shallow pullback into lower timeframe demand before the next leg higher! 📈
🔹 Trade Type: Momentum Breakout / Intraday
🔹 Direction: Long (Buy)
🔹 Entry Zone: $0.0725 - $0.0775
🔹 Stop Loss (SL): $0.0678 (Strict SL required)
🔹 Take Profit (TP):
• TP1: $0.0845 (Local Liquidity Sweep)
• TP2: $0.0920 (HTF Extension Target)
• TP3: $0.1050 (Psychological Resistance)
📌 Trade Logic: $ZAMA reclaimed key high-timeframe structural pivots with massive volume. Expecting a brief cooling-off period to retest internal liquidity/demand around $0.074 before continuing the macro uptrend toward new highs.
⚠️ Risk Management: Extremely high volatility token following fresh impulse moves! Adjust your leverage and do not risk more than 1-2% of your portfolio.
Are you catching this $ZAMA continuation or waiting for a deeper pullback? Share your thoughts in the comments! 👇
#ZAMA #CryptoTrading #BinanceSquare #Foreheadburns #TradingSetup
💡 Suggestion: Since Zama is moving rapidly, wait for a 15m bullish rejection candle (hammer/engulfing) inside the $0.0725 - $0.0775 entry zone before placing your entry.
60
·
--
Bearish
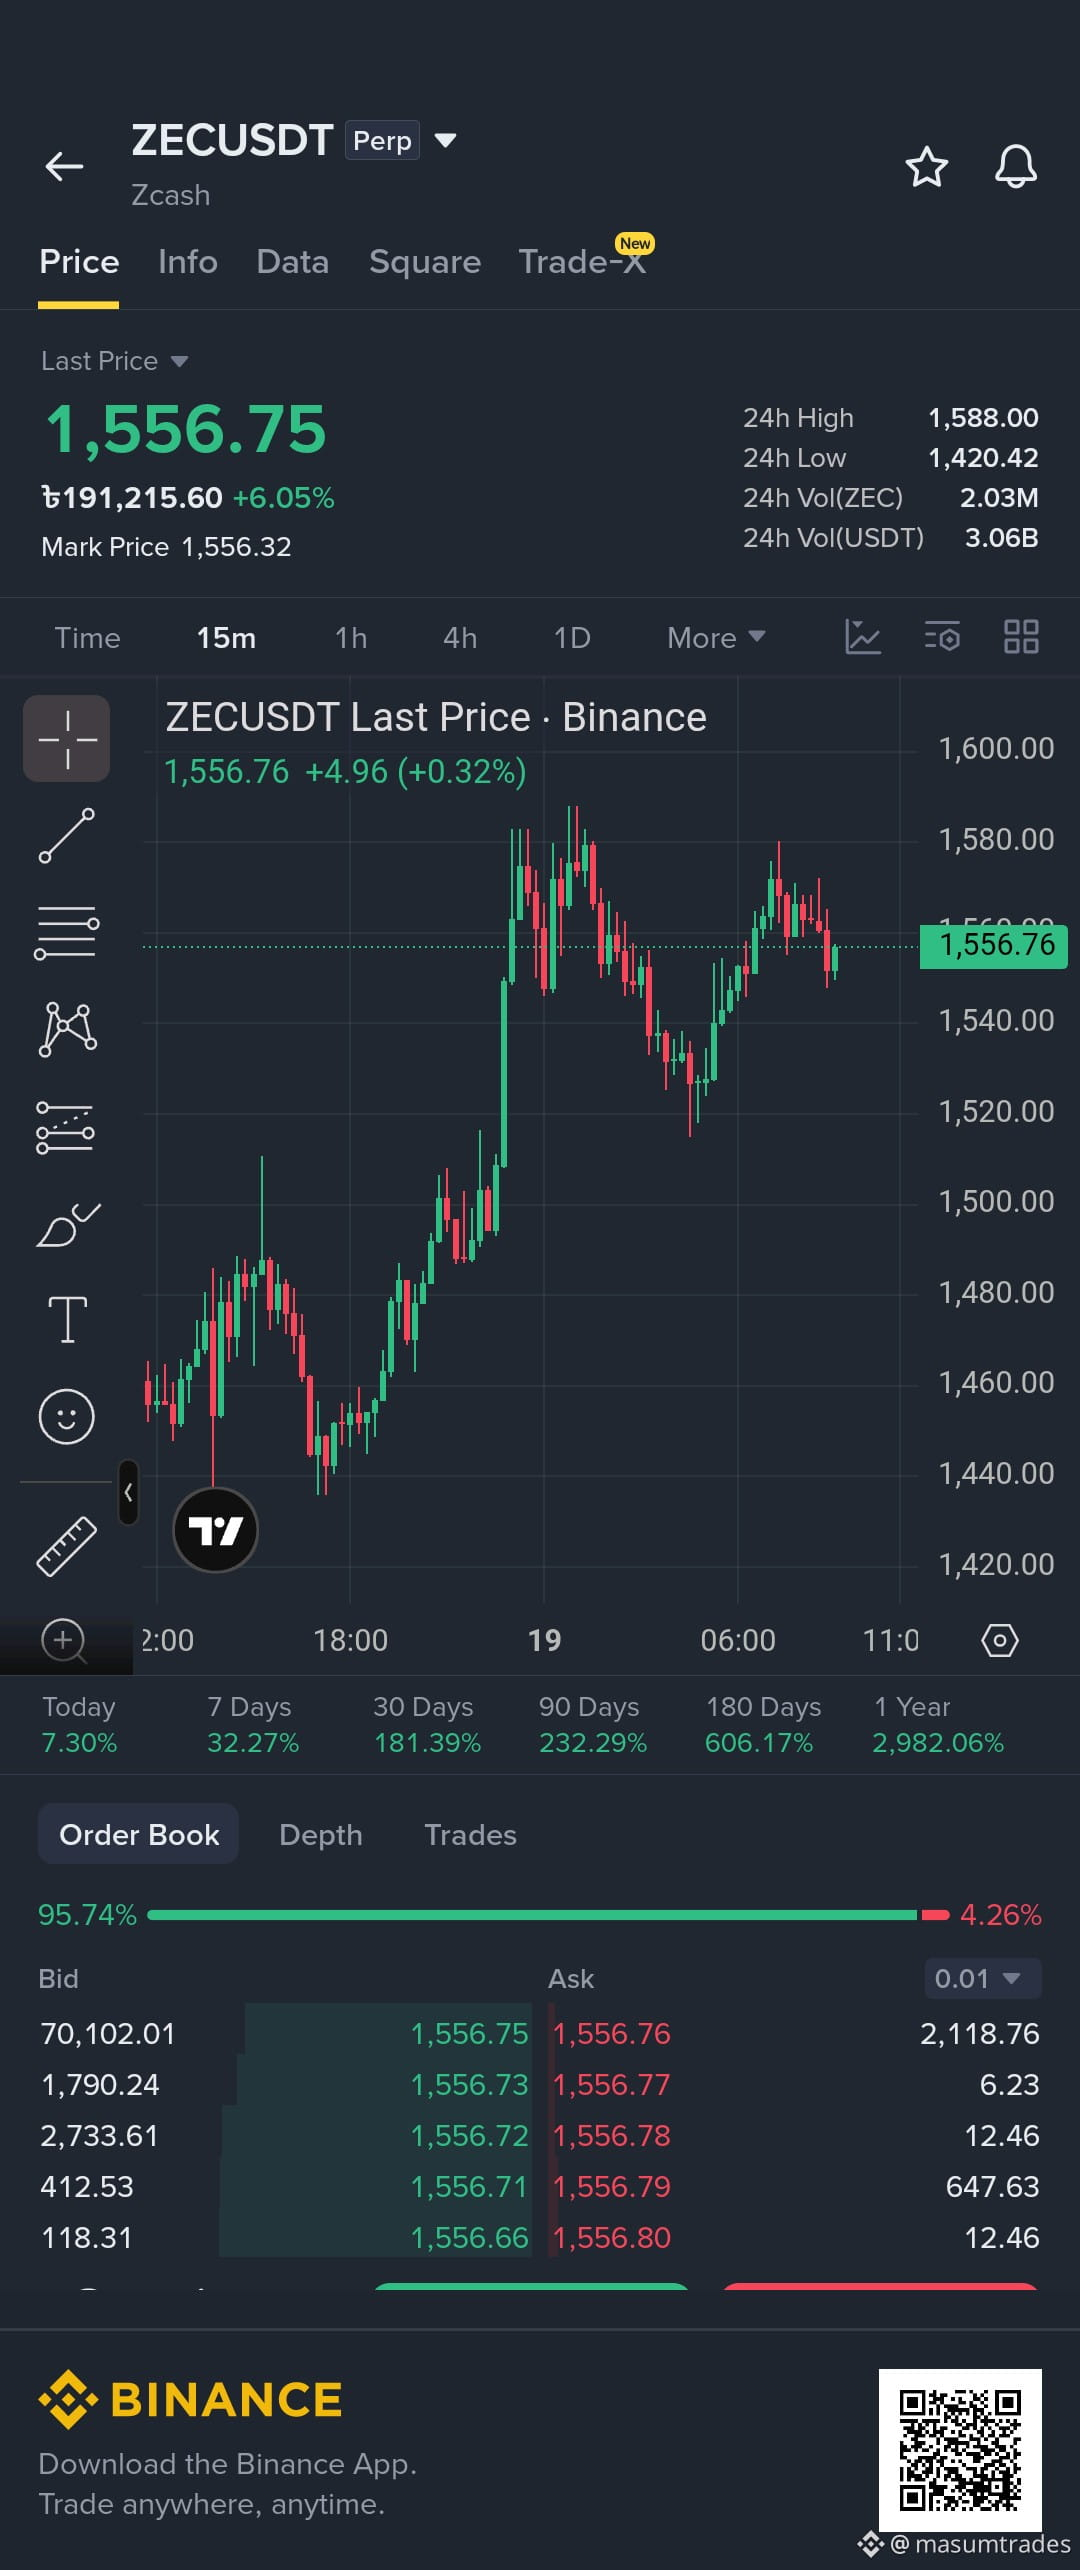
🔥 INSTITUTIONAL LIQUIDITY REJECTION! | ZEC/USDT
$ZEC is testing the critical $1,555 resistance area after sweeping local buy-side liquidity. On lower timeframes (15m/1H), price is showing a sharp rejection with a fresh bearish Fair Value Gap (FVG) forming—setting up a clean intraday short scalp back toward demand pools! 📉
🔹 Direction: Short (Sell)
🔹 Entry Zone: $1,550 - $1,565
🔹 Stop Loss (SL): $1,602 (Strict SL required)
🔹 Take Profit (TP):
• TP1: $1,505
• TP2: $1,455
• TP3: $1,380
📌 Trade Logic: Price grabbed liquidity resting above $1,560 and confirmed a lower timeframe Market Structure Shift (MSS). Looking for a retracement back toward internal sell-side liquidity pools below.
⚠️ Risk Management: Maintain strict position sizing and do not risk more than 1-2% of your capital per trade!
Are you shorting $ZEC here or expecting another push higher? Drop your setup below! 👇
#ZEC #CryptoTrading #BinanceSquare #Foreheadburns #TradingSetup
💡 Suggestion: Wait for a solid 15m bearish candle close below $1,550 before triggering your short entry to confirm seller strength.
🔥 INSTITUTIONAL LIQUIDITY REJECTION! | ZEC/USDT
$ZEC is testing the critical $1,555 resistance area after sweeping local buy-side liquidity. On lower timeframes (15m/1H), price is showing a sharp rejection with a fresh bearish Fair Value Gap (FVG) forming—setting up a clean intraday short scalp back toward demand pools! 📉
🔹 Direction: Short (Sell)
🔹 Entry Zone: $1,550 - $1,565
🔹 Stop Loss (SL): $1,602 (Strict SL required)
🔹 Take Profit (TP):
• TP1: $1,505
• TP2: $1,455
• TP3: $1,380
📌 Trade Logic: Price grabbed liquidity resting above $1,560 and confirmed a lower timeframe Market Structure Shift (MSS). Looking for a retracement back toward internal sell-side liquidity pools below.
⚠️ Risk Management: Maintain strict position sizing and do not risk more than 1-2% of your capital per trade!
Are you shorting $ZEC here or expecting another push higher? Drop your setup below! 👇
#ZEC #CryptoTrading #BinanceSquare #Foreheadburns #TradingSetup
💡 Suggestion: Wait for a solid 15m bearish candle close below $1,550 before triggering your short entry to confirm seller strength.
$ZEC is testing the critical $1,555 resistance area after sweeping local buy-side liquidity. On lower timeframes (15m/1H), price is showing a sharp rejection with a fresh bearish Fair Value Gap (FVG) forming—setting up a clean intraday short scalp back toward demand pools! 📉
🔹 Direction: Short (Sell)
🔹 Entry Zone: $1,550 - $1,565
🔹 Stop Loss (SL): $1,602 (Strict SL required)
🔹 Take Profit (TP):
• TP1: $1,505
• TP2: $1,455
• TP3: $1,380
📌 Trade Logic: Price grabbed liquidity resting above $1,560 and confirmed a lower timeframe Market Structure Shift (MSS). Looking for a retracement back toward internal sell-side liquidity pools below.
⚠️ Risk Management: Maintain strict position sizing and do not risk more than 1-2% of your capital per trade!
Are you shorting $ZEC here or expecting another push higher? Drop your setup below! 👇
#ZEC #CryptoTrading #BinanceSquare #Foreheadburns #TradingSetup
💡 Suggestion: Wait for a solid 15m bearish candle close below $1,550 before triggering your short entry to confirm seller strength.
113
·
--
Bullish
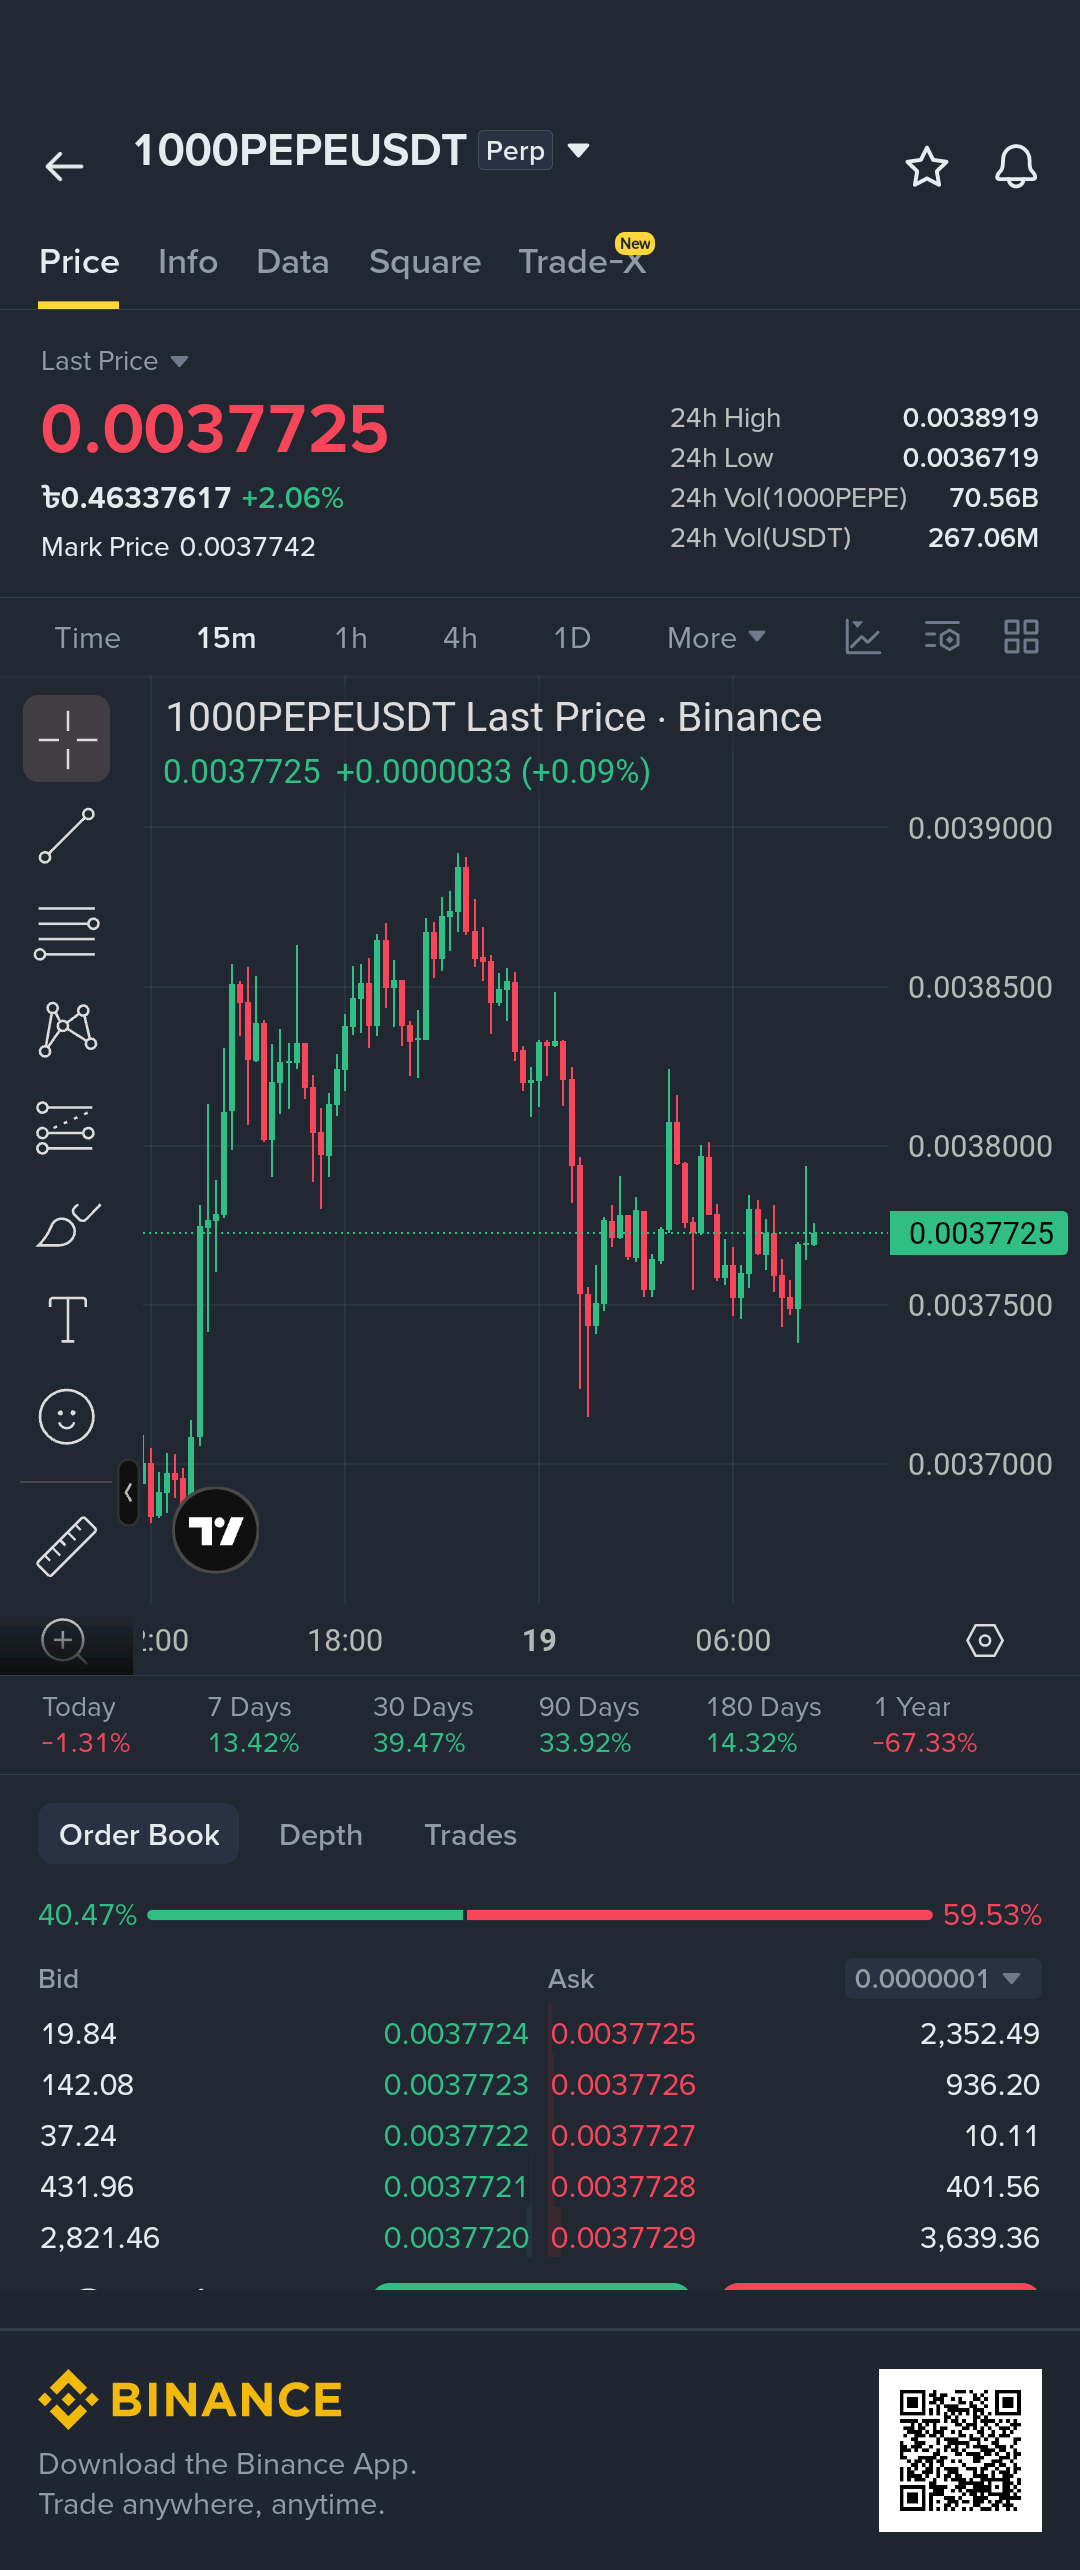
⚡ BULLISH BREAKOUT IN MOTION! | 1000PEPE/USDT
$1000PEPE is displaying strong bullish momentum after holding above key intraday support and pushing toward the $0.00377 zone. On lower timeframes (15m/1H), price action has confirmed a Market Structure Shift (MSS) with a fresh bullish Fair Value Gap (FVG) forming—pointing toward a continuation to sweep upper buy-side liquidity pools! 🚀
🔹 Direction: Long (Buy)
🔹 Entry Zone: $0.00370 - $0.00378
🔹 Stop Loss (SL): $0.00358 (Strict SL required)
🔹 Take Profit (TP):
• TP1: $0.00392
• TP2: $0.00410
• TP3: $0.00435
📌 Trade Logic: Price swept lower sell-side liquidity near $0.00365 and reclaimed short-term bullish structure. Looking for a shallow pullback into the 15m FVG before resuming expansion toward key overhead resistance levels.
⚠️ Risk Management: Meme coins move fast! Use strict position sizing and do not risk more than 1-2% of your portfolio on this trade.
Are you longing $1000PEPE here or waiting for higher confirmation? Let me know below! 👇
#1000PEPE #CryptoTrading #BinanceSquare #Foreheadburns #TradingSetup
💡 Suggestion: Wait for a solid 15m bullish candle close inside the $0.00370 - $0.00378 zone to confirm buyer control before entering.
⚡ BULLISH BREAKOUT IN MOTION! | 1000PEPE/USDT
$1000PEPE is displaying strong bullish momentum after holding above key intraday support and pushing toward the $0.00377 zone. On lower timeframes (15m/1H), price action has confirmed a Market Structure Shift (MSS) with a fresh bullish Fair Value Gap (FVG) forming—pointing toward a continuation to sweep upper buy-side liquidity pools! 🚀
🔹 Direction: Long (Buy)
🔹 Entry Zone: $0.00370 - $0.00378
🔹 Stop Loss (SL): $0.00358 (Strict SL required)
🔹 Take Profit (TP):
• TP1: $0.00392
• TP2: $0.00410
• TP3: $0.00435
📌 Trade Logic: Price swept lower sell-side liquidity near $0.00365 and reclaimed short-term bullish structure. Looking for a shallow pullback into the 15m FVG before resuming expansion toward key overhead resistance levels.
⚠️ Risk Management: Meme coins move fast! Use strict position sizing and do not risk more than 1-2% of your portfolio on this trade.
Are you longing $1000PEPE here or waiting for higher confirmation? Let me know below! 👇
#1000PEPE #CryptoTrading #BinanceSquare #Foreheadburns #TradingSetup
💡 Suggestion: Wait for a solid 15m bullish candle close inside the $0.00370 - $0.00378 zone to confirm buyer control before entering.
$1000PEPE is displaying strong bullish momentum after holding above key intraday support and pushing toward the $0.00377 zone. On lower timeframes (15m/1H), price action has confirmed a Market Structure Shift (MSS) with a fresh bullish Fair Value Gap (FVG) forming—pointing toward a continuation to sweep upper buy-side liquidity pools! 🚀
🔹 Direction: Long (Buy)
🔹 Entry Zone: $0.00370 - $0.00378
🔹 Stop Loss (SL): $0.00358 (Strict SL required)
🔹 Take Profit (TP):
• TP1: $0.00392
• TP2: $0.00410
• TP3: $0.00435
📌 Trade Logic: Price swept lower sell-side liquidity near $0.00365 and reclaimed short-term bullish structure. Looking for a shallow pullback into the 15m FVG before resuming expansion toward key overhead resistance levels.
⚠️ Risk Management: Meme coins move fast! Use strict position sizing and do not risk more than 1-2% of your portfolio on this trade.
Are you longing $1000PEPE here or waiting for higher confirmation? Let me know below! 👇
#1000PEPE #CryptoTrading #BinanceSquare #Foreheadburns #TradingSetup
💡 Suggestion: Wait for a solid 15m bullish candle close inside the $0.00370 - $0.00378 zone to confirm buyer control before entering.
82
·
--
Bullish
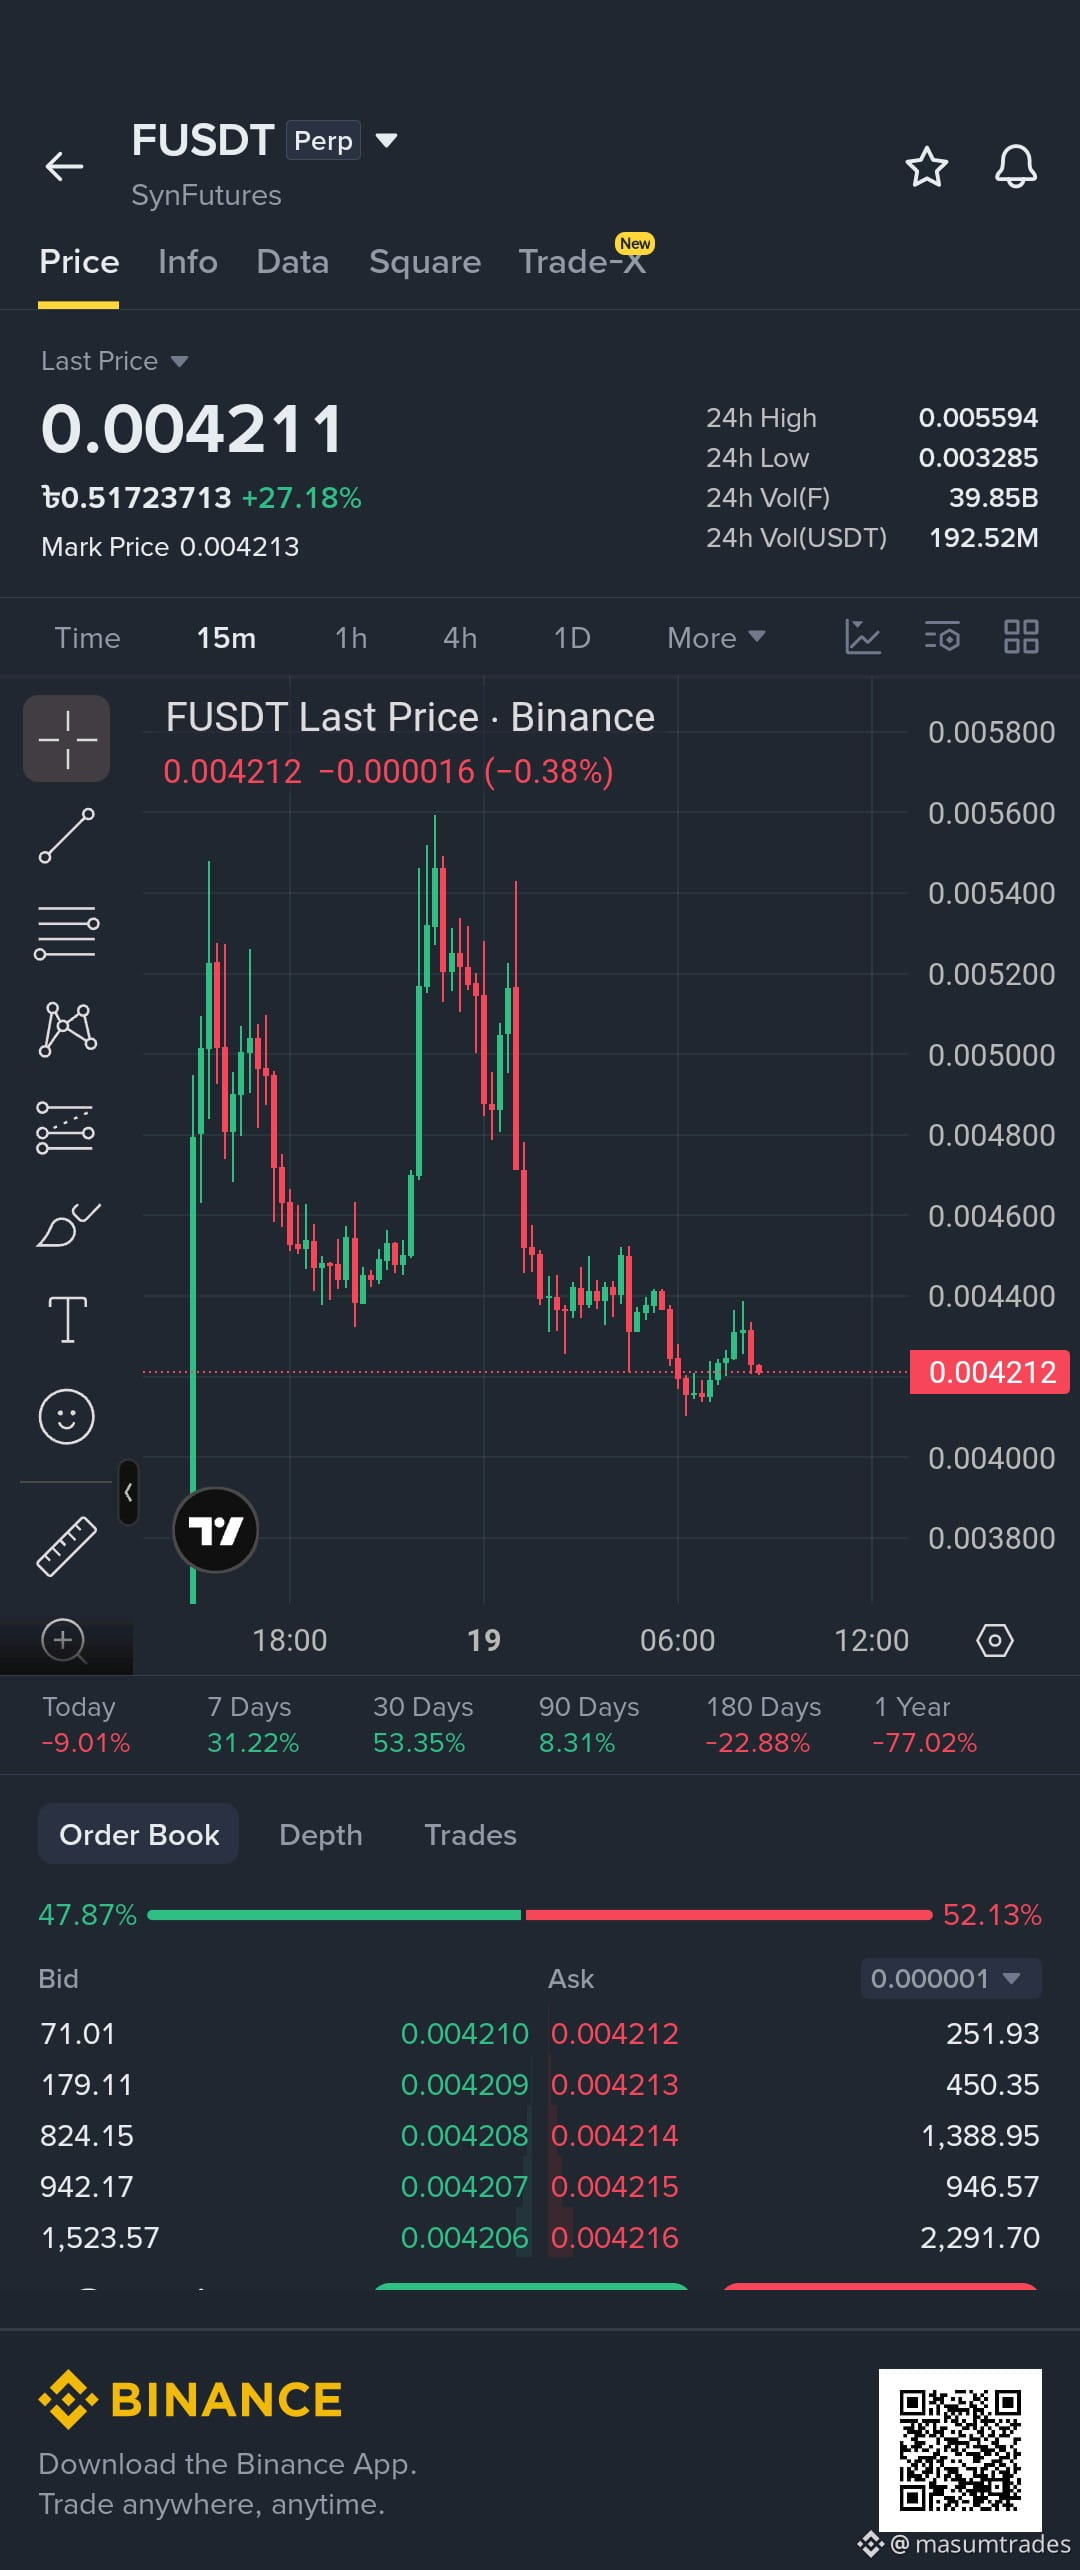
🔥 INSTITUTIONAL LIQUIDITY HUNT! | F/USDT
$F (SynFutures) is holding strong around the $0.00422 level after sweeping local sell-side liquidity. On lower timeframes (15m/1H), we observe a sharp rejection from lower demand zones with a fresh bullish Fair Value Gap (FVG) forming—setting up a clean intraday scalp for expansion toward overhead supply! 🚀
🔹 Direction: Long (Buy)
🔹 Entry Zone: $0.00410 - $0.00425
🔹 Stop Loss (SL): $0.00392 (Strict SL required)
🔹 Take Profit (TP):
• TP1: $0.00448
• TP2: $0.00475
• TP3: $0.00510
📌 Trade Logic: Price tapped key lower timeframe demand and confirmed a Market Structure Shift (MSS). Looking for a shallow retest of the 15m FVG before resuming upward expansion toward buy-side liquidity.
⚠️ Risk Management: Maintain strict position sizing and do not risk more than 1-2% of your total capital per trade!
Are you longing $F here or waiting for lower confirmation? Drop your trade plan below! 👇
#F #CryptoTrading #BinanceSquare #Foreheadburns #TradingSetup
💡 Suggestion: Wait for a solid 15m bullish candle rejection inside the $0.00410 - $0.00425 entry zone before triggering your position.
🔥 INSTITUTIONAL LIQUIDITY HUNT! | F/USDT
$F (SynFutures) is holding strong around the $0.00422 level after sweeping local sell-side liquidity. On lower timeframes (15m/1H), we observe a sharp rejection from lower demand zones with a fresh bullish Fair Value Gap (FVG) forming—setting up a clean intraday scalp for expansion toward overhead supply! 🚀
🔹 Direction: Long (Buy)
🔹 Entry Zone: $0.00410 - $0.00425
🔹 Stop Loss (SL): $0.00392 (Strict SL required)
🔹 Take Profit (TP):
• TP1: $0.00448
• TP2: $0.00475
• TP3: $0.00510
📌 Trade Logic: Price tapped key lower timeframe demand and confirmed a Market Structure Shift (MSS). Looking for a shallow retest of the 15m FVG before resuming upward expansion toward buy-side liquidity.
⚠️ Risk Management: Maintain strict position sizing and do not risk more than 1-2% of your total capital per trade!
Are you longing $F here or waiting for lower confirmation? Drop your trade plan below! 👇
#F #CryptoTrading #BinanceSquare #Foreheadburns #TradingSetup
💡 Suggestion: Wait for a solid 15m bullish candle rejection inside the $0.00410 - $0.00425 entry zone before triggering your position.
$F (SynFutures) is holding strong around the $0.00422 level after sweeping local sell-side liquidity. On lower timeframes (15m/1H), we observe a sharp rejection from lower demand zones with a fresh bullish Fair Value Gap (FVG) forming—setting up a clean intraday scalp for expansion toward overhead supply! 🚀
🔹 Direction: Long (Buy)
🔹 Entry Zone: $0.00410 - $0.00425
🔹 Stop Loss (SL): $0.00392 (Strict SL required)
🔹 Take Profit (TP):
• TP1: $0.00448
• TP2: $0.00475
• TP3: $0.00510
📌 Trade Logic: Price tapped key lower timeframe demand and confirmed a Market Structure Shift (MSS). Looking for a shallow retest of the 15m FVG before resuming upward expansion toward buy-side liquidity.
⚠️ Risk Management: Maintain strict position sizing and do not risk more than 1-2% of your total capital per trade!
Are you longing $F here or waiting for lower confirmation? Drop your trade plan below! 👇
#F #CryptoTrading #BinanceSquare #Foreheadburns #TradingSetup
💡 Suggestion: Wait for a solid 15m bullish candle rejection inside the $0.00410 - $0.00425 entry zone before triggering your position.
124
·
--
Bearish
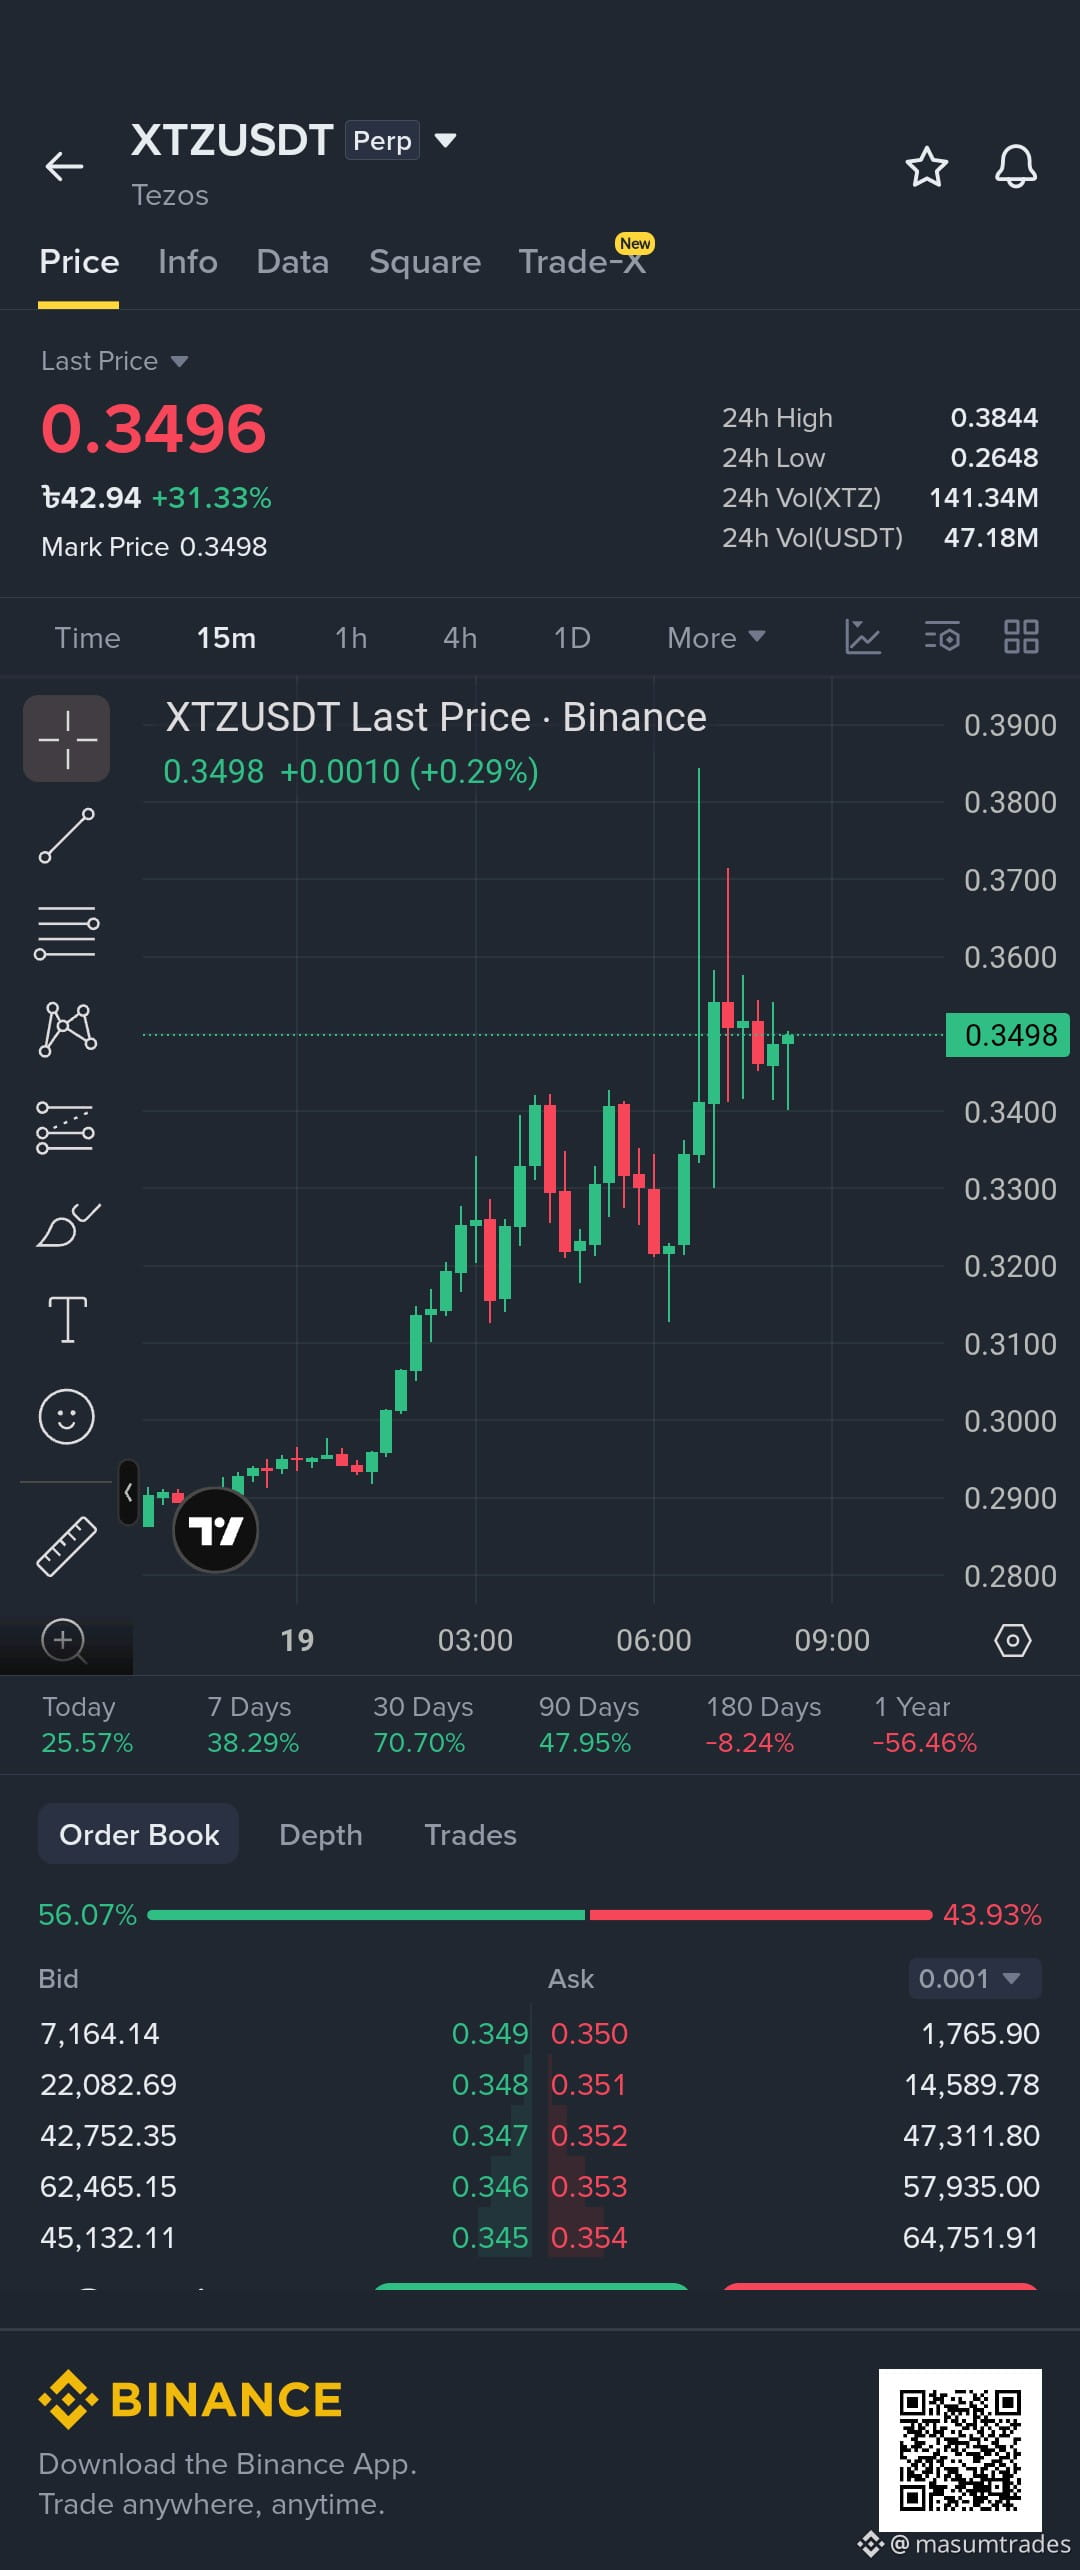
🚨 EXPLOSIVE REJECTION AT KEY RESISTANCE! | XTZ/USDT
$XTZ has swept local buy-side liquidity around the $0.30 - $0.32 resistance zone. On lower timeframes (15m/1H), price is showing a sharp rejection with a fresh bearish Fair Value Gap (FVG) forming—setting up a clean intraday short scalp back toward demand pools before any potential rally to $0.34! 📉
🔹 Direction: Short (Sell)
🔹 Entry Zone: $0.295 - $0.310
🔹 Stop Loss (SL): $0.328 (Strict SL required)
🔹 Take Profit (TP):
• TP1: $0.278
• TP2: $0.260
• TP3: $0.242
📌 Trade Logic: Price grabbed liquidity above $0.30 and failed to maintain higher timeframe momentum. Looking for a retest of lower sell-side liquidity before buyers can step in for a larger move toward $0.34.
⚠️ Risk Management: Stick to strict risk management! Do not risk more than 1-2% of your total capital per trade.
Are you shorting this $XTZ pullback or waiting for the $0.34 breakout? Let me know below! 👇
#XTZ #CryptoTrading #BinanceSquare #Foreheadburns #TradingSetup
💡 Suggestion: Wait for a solid 15m bearish candle close below $0.295 to confirm seller dominance before entering the short position
🚨 EXPLOSIVE REJECTION AT KEY RESISTANCE! | XTZ/USDT
$XTZ has swept local buy-side liquidity around the $0.30 - $0.32 resistance zone. On lower timeframes (15m/1H), price is showing a sharp rejection with a fresh bearish Fair Value Gap (FVG) forming—setting up a clean intraday short scalp back toward demand pools before any potential rally to $0.34! 📉
🔹 Direction: Short (Sell)
🔹 Entry Zone: $0.295 - $0.310
🔹 Stop Loss (SL): $0.328 (Strict SL required)
🔹 Take Profit (TP):
• TP1: $0.278
• TP2: $0.260
• TP3: $0.242
📌 Trade Logic: Price grabbed liquidity above $0.30 and failed to maintain higher timeframe momentum. Looking for a retest of lower sell-side liquidity before buyers can step in for a larger move toward $0.34.
⚠️ Risk Management: Stick to strict risk management! Do not risk more than 1-2% of your total capital per trade.
Are you shorting this $XTZ pullback or waiting for the $0.34 breakout? Let me know below! 👇
#XTZ #CryptoTrading #BinanceSquare #Foreheadburns #TradingSetup
💡 Suggestion: Wait for a solid 15m bearish candle close below $0.295 to confirm seller dominance before entering the short position
$XTZ has swept local buy-side liquidity around the $0.30 - $0.32 resistance zone. On lower timeframes (15m/1H), price is showing a sharp rejection with a fresh bearish Fair Value Gap (FVG) forming—setting up a clean intraday short scalp back toward demand pools before any potential rally to $0.34! 📉
🔹 Direction: Short (Sell)
🔹 Entry Zone: $0.295 - $0.310
🔹 Stop Loss (SL): $0.328 (Strict SL required)
🔹 Take Profit (TP):
• TP1: $0.278
• TP2: $0.260
• TP3: $0.242
📌 Trade Logic: Price grabbed liquidity above $0.30 and failed to maintain higher timeframe momentum. Looking for a retest of lower sell-side liquidity before buyers can step in for a larger move toward $0.34.
⚠️ Risk Management: Stick to strict risk management! Do not risk more than 1-2% of your total capital per trade.
Are you shorting this $XTZ pullback or waiting for the $0.34 breakout? Let me know below! 👇
#XTZ #CryptoTrading #BinanceSquare #Foreheadburns #TradingSetup
💡 Suggestion: Wait for a solid 15m bearish candle close below $0.295 to confirm seller dominance before entering the short position
57
·
--
Bullish
🚀 INSTITUTIONAL LIQUIDITY BREAKOUT! | PIEVERSE/USDT
$PIEVERSE is displaying massive bullish expansion after sweeping sell-side liquidity near lower support zones and breaking out above local key pivots! On lower timeframes (15m/1H), we observe strong market structure shifts (MSS) and a fresh bullish Fair Value Gap (FVG) forming—signaling high-probability continuation toward upper supply pools! 📈
🔹 Direction: Long (Buy)
🔹 Entry Zone: $1.52 - $1.59
🔹 Stop Loss (SL): $1.44 (Strict SL required)
🔹 Take Profit (TP):
• TP1: $1.68
• TP2: $1.79
• TP3: $1.92
📌 Trade Logic: Price aggressively swept local sell-side liquidity and held firmly above the $1.55 demand confluence. Looking for a shallow retest of the lower timeframe FVG before expanding toward overhead buy-side liquidity.
⚠️ Risk Management: Maintain strict risk management and do not risk more than 1-2% of your capital per trade!
Are you riding this $PIEVERSE wave or waiting for a deeper pullback? Share your plan below! 👇
#PIEVERSE #CryptoTrading #BinanceSquare #Foreheadburns #TradingSetup
💡 Suggestion: Wait for a 15m bullish candle rejection inside the $1.52 - $1.59 entry zone to confirm buyer control before triggering your entry.
🚀 INSTITUTIONAL LIQUIDITY BREAKOUT! | PIEVERSE/USDT
$PIEVERSE is displaying massive bullish expansion after sweeping sell-side liquidity near lower support zones and breaking out above local key pivots! On lower timeframes (15m/1H), we observe strong market structure shifts (MSS) and a fresh bullish Fair Value Gap (FVG) forming—signaling high-probability continuation toward upper supply pools! 📈
🔹 Direction: Long (Buy)
🔹 Entry Zone: $1.52 - $1.59
🔹 Stop Loss (SL): $1.44 (Strict SL required)
🔹 Take Profit (TP):
• TP1: $1.68
• TP2: $1.79
• TP3: $1.92
📌 Trade Logic: Price aggressively swept local sell-side liquidity and held firmly above the $1.55 demand confluence. Looking for a shallow retest of the lower timeframe FVG before expanding toward overhead buy-side liquidity.
⚠️ Risk Management: Maintain strict risk management and do not risk more than 1-2% of your capital per trade!
Are you riding this $PIEVERSE wave or waiting for a deeper pullback? Share your plan below! 👇
#PIEVERSE #CryptoTrading #BinanceSquare #Foreheadburns #TradingSetup
💡 Suggestion: Wait for a 15m bullish candle rejection inside the $1.52 - $1.59 entry zone to confirm buyer control before triggering your entry.
$PIEVERSE is displaying massive bullish expansion after sweeping sell-side liquidity near lower support zones and breaking out above local key pivots! On lower timeframes (15m/1H), we observe strong market structure shifts (MSS) and a fresh bullish Fair Value Gap (FVG) forming—signaling high-probability continuation toward upper supply pools! 📈
🔹 Direction: Long (Buy)
🔹 Entry Zone: $1.52 - $1.59
🔹 Stop Loss (SL): $1.44 (Strict SL required)
🔹 Take Profit (TP):
• TP1: $1.68
• TP2: $1.79
• TP3: $1.92
📌 Trade Logic: Price aggressively swept local sell-side liquidity and held firmly above the $1.55 demand confluence. Looking for a shallow retest of the lower timeframe FVG before expanding toward overhead buy-side liquidity.
⚠️ Risk Management: Maintain strict risk management and do not risk more than 1-2% of your capital per trade!
Are you riding this $PIEVERSE wave or waiting for a deeper pullback? Share your plan below! 👇
#PIEVERSE #CryptoTrading #BinanceSquare #Foreheadburns #TradingSetup
💡 Suggestion: Wait for a 15m bullish candle rejection inside the $1.52 - $1.59 entry zone to confirm buyer control before triggering your entry.
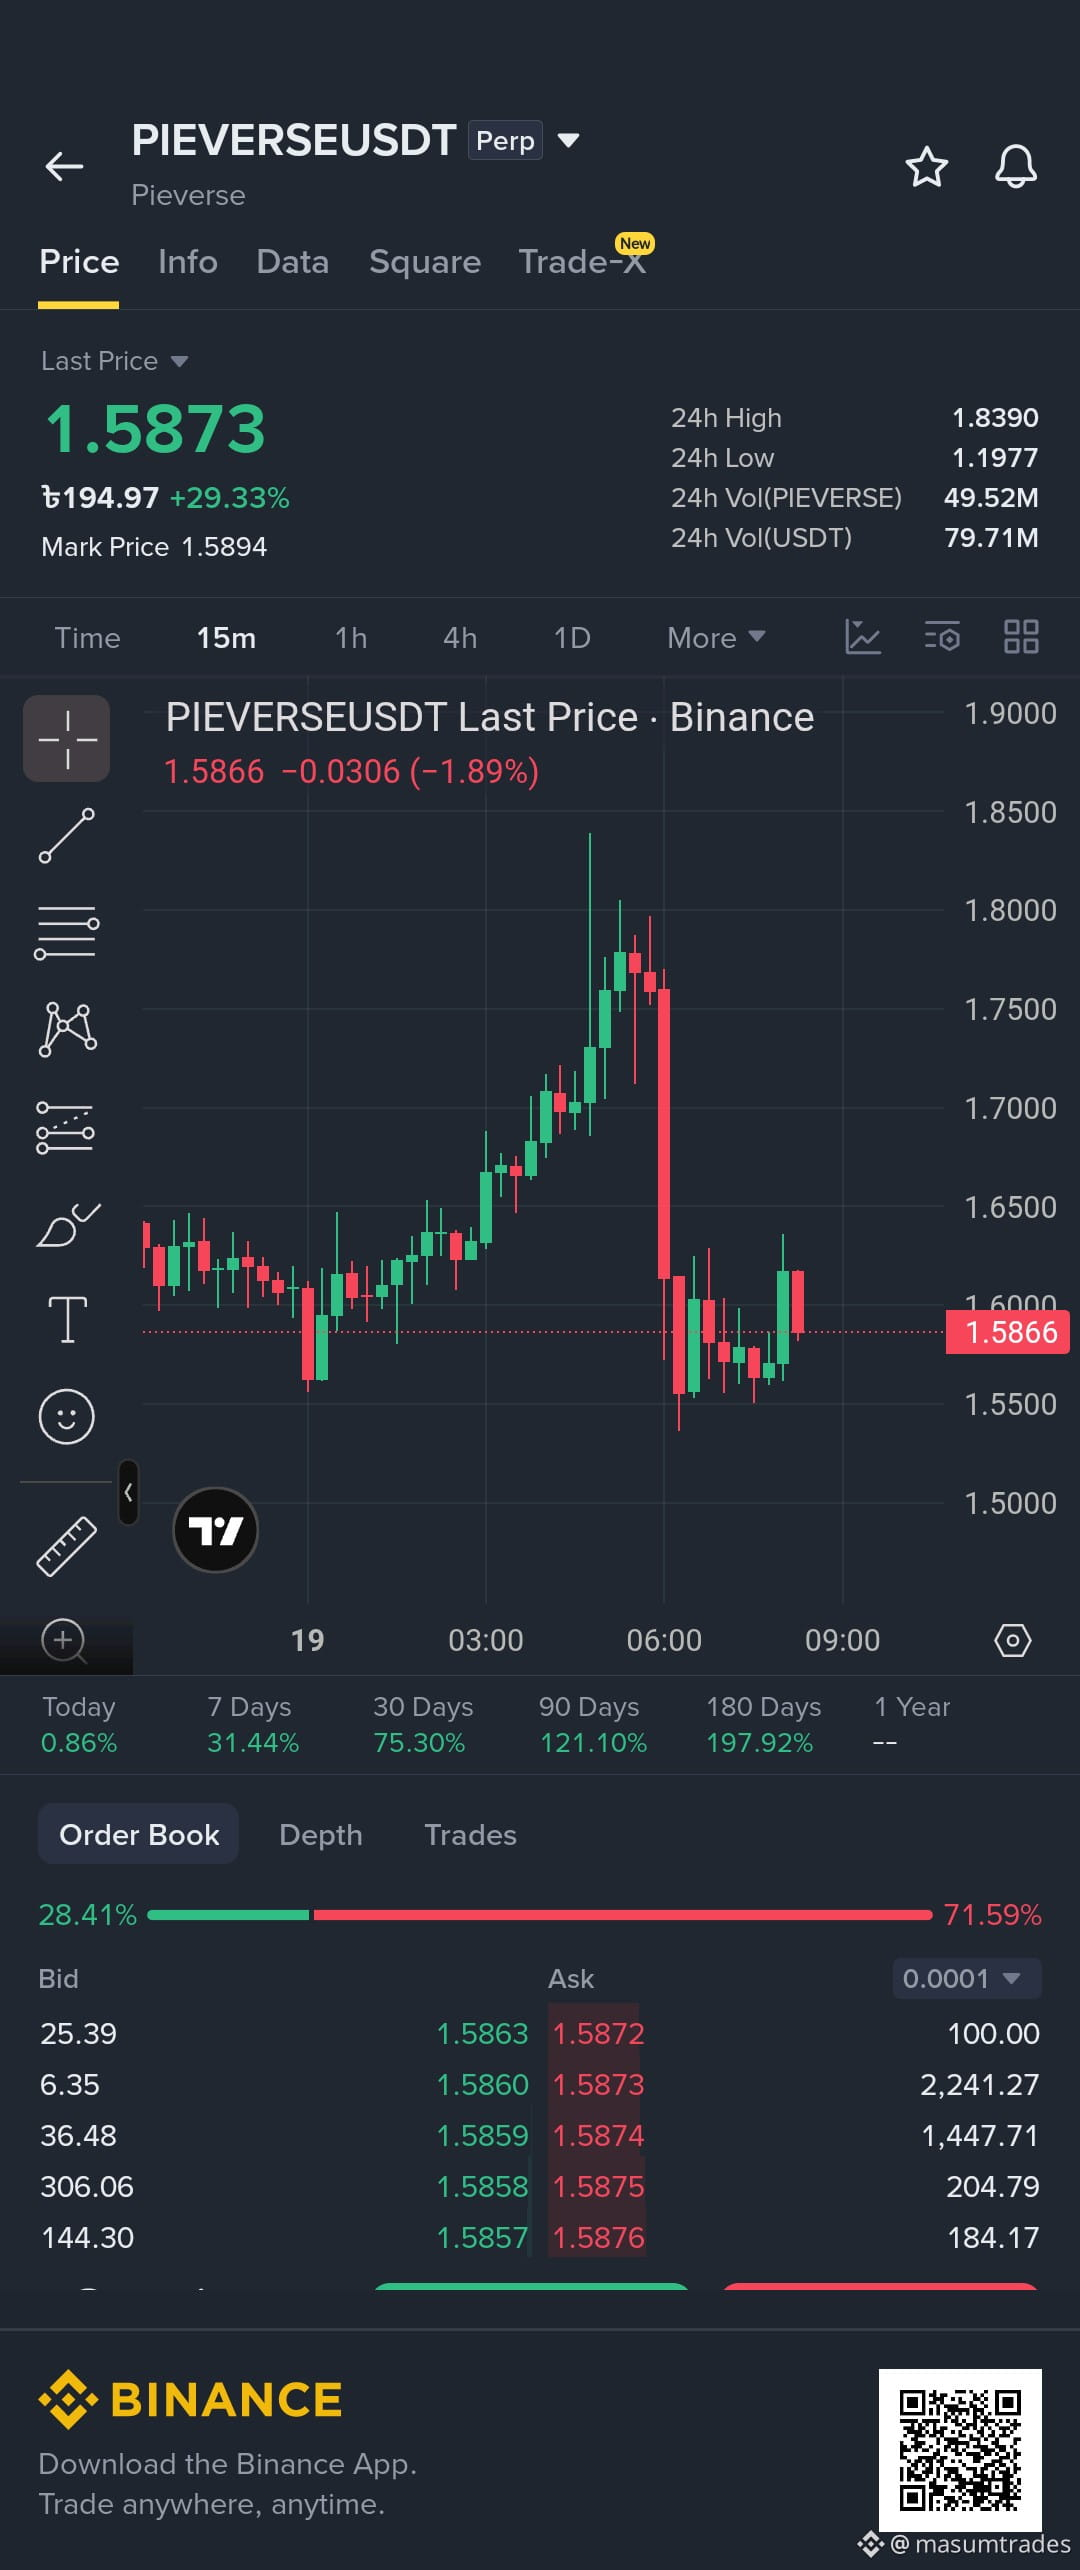
52
·
--
Bullish
🔥 BREAKOUT CONFIRMATION IN PROGRESS! | SYN/USDT
$SYN has printed a strong bullish impulse on lower timeframes (15m/1H), breaking above local structure around $0.235. We are observing a clean Market Structure Shift (MSS) leaving behind a prime Fair Value Gap (FVG), signaling high-probability continuation toward upper buy-side liquidity targets! 🚀
🔹 Direction: Long (Buy)
🔹 Entry Zone: $0.235 - $0.242
🔹 Stop Loss (SL): $0.224 (Strict SL required)
🔹 Take Profit (TP):
• TP1: $0.254
• TP2: $0.268
• TP3: $0.285
📌 Trade Logic: Price swept lower sell-side liquidity, reclaimed the $0.238 level, and established a fresh bullish order block. Looking for a shallow retest of the 15m FVG before expansion toward overhead supply zones.
⚠️ Risk Management: Maintain strict position sizing and do not risk more than 1-2% of your portfolio per trade!
Are you longing $SYN on this retest or waiting for higher confirmation? Share your setup below! 👇
#SYN #CryptoTrading #BinanceSquare #Foreheadburns #TradingSetup
💡 Suggestion: Wait for a 15m bullish candle rejection inside the $0.235 - $0.242 entry zone to confirm buyer control before entering
🔥 BREAKOUT CONFIRMATION IN PROGRESS! | SYN/USDT
$SYN has printed a strong bullish impulse on lower timeframes (15m/1H), breaking above local structure around $0.235. We are observing a clean Market Structure Shift (MSS) leaving behind a prime Fair Value Gap (FVG), signaling high-probability continuation toward upper buy-side liquidity targets! 🚀
🔹 Direction: Long (Buy)
🔹 Entry Zone: $0.235 - $0.242
🔹 Stop Loss (SL): $0.224 (Strict SL required)
🔹 Take Profit (TP):
• TP1: $0.254
• TP2: $0.268
• TP3: $0.285
📌 Trade Logic: Price swept lower sell-side liquidity, reclaimed the $0.238 level, and established a fresh bullish order block. Looking for a shallow retest of the 15m FVG before expansion toward overhead supply zones.
⚠️ Risk Management: Maintain strict position sizing and do not risk more than 1-2% of your portfolio per trade!
Are you longing $SYN on this retest or waiting for higher confirmation? Share your setup below! 👇
#SYN #CryptoTrading #BinanceSquare #Foreheadburns #TradingSetup
💡 Suggestion: Wait for a 15m bullish candle rejection inside the $0.235 - $0.242 entry zone to confirm buyer control before entering
$SYN has printed a strong bullish impulse on lower timeframes (15m/1H), breaking above local structure around $0.235. We are observing a clean Market Structure Shift (MSS) leaving behind a prime Fair Value Gap (FVG), signaling high-probability continuation toward upper buy-side liquidity targets! 🚀
🔹 Direction: Long (Buy)
🔹 Entry Zone: $0.235 - $0.242
🔹 Stop Loss (SL): $0.224 (Strict SL required)
🔹 Take Profit (TP):
• TP1: $0.254
• TP2: $0.268
• TP3: $0.285
📌 Trade Logic: Price swept lower sell-side liquidity, reclaimed the $0.238 level, and established a fresh bullish order block. Looking for a shallow retest of the 15m FVG before expansion toward overhead supply zones.
⚠️ Risk Management: Maintain strict position sizing and do not risk more than 1-2% of your portfolio per trade!
Are you longing $SYN on this retest or waiting for higher confirmation? Share your setup below! 👇
#SYN #CryptoTrading #BinanceSquare #Foreheadburns #TradingSetup
💡 Suggestion: Wait for a 15m bullish candle rejection inside the $0.235 - $0.242 entry zone to confirm buyer control before entering
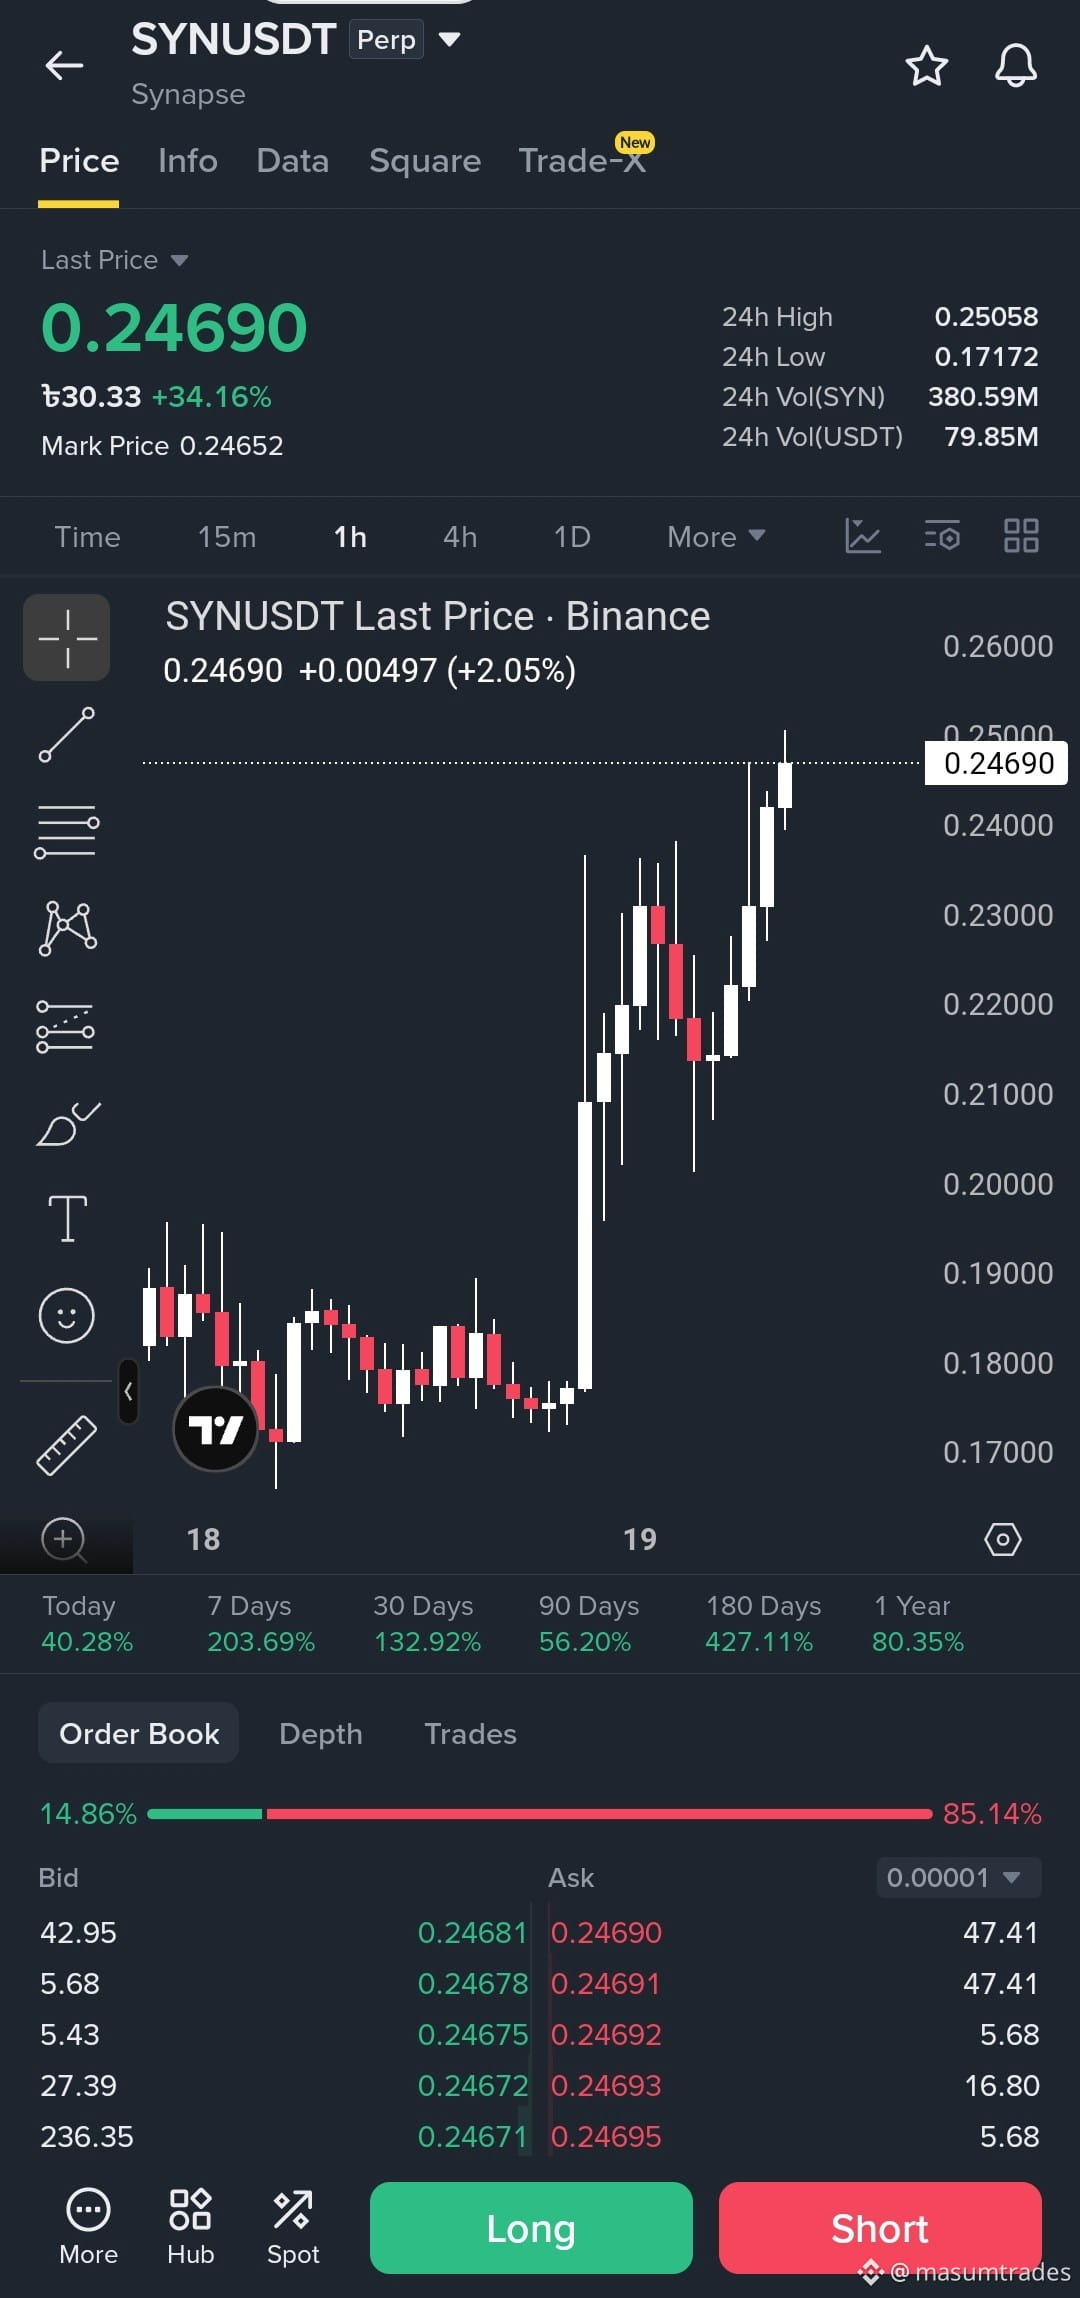
81
Log in to explore more content
Join global crypto users on Binance Square
⚡️ Get latest and useful information about crypto.
💬 Trusted by the world’s largest crypto exchange.
👍 Discover real insights from verified creators.
Email / Phone number
Trending Topics
BOJRaisesRatesTo31YearHigh
42,241 views
882 Discussing
Bitcoin Reclaims the Spotlight as Macro Pressure Fails to Break Crypto Demand
Fatima_Tariq
·11 Likes
·5.6k views
BuffettStepsDownAsBerkshireChairman
16,077 views
376 Discussing
XRPExchangeReservesHitSevenYearLow
20,743 views
382 Discussing