

#wal
wal
1.2M views
12,696 Discussing
Hot
Latest

🚨 BEARS ARE STRIKING AGAIN AS $WAL PREPARES FOR THE NEXT DOWNSIDE SWEEP! 🔻
Entry: $0.0365 - $0.0368 ⚡
Target: $0.0358 📉
Stop Loss: $0.0370 ⚠️
Seller momentum is taking full control on the short-term timeframes as $WAL continues to print a clean structure of lower highs and lower lows. 📉 Supply is overpowering demand, making every minor bounce look like prime distribution.
📌 A sharp rejection off the $0.0367–$0.0370 supply block opens the runway for order flow to slide down into lower support targets. 💡 Sellers maintain total control while structural resistance holds firm. 💬 Are you shorting this retest or waiting for support to snap first? 👇
⚠️ Not financial advice. Always manage your risk. 🛡️
🏷️ #WAL #ShortSetup #Bearish #Trading
🐻 🩸
🚨 BEARS ARE STRIKING AGAIN AS $WAL PREPARES FOR THE NEXT DOWNSIDE SWEEP! 🔻
Entry: $0.0365 - $0.0368 ⚡
Target: $0.0358 📉
Stop Loss: $0.0370 ⚠️
Seller momentum is taking full control on the short-term timeframes as $WAL continues to print a clean structure of lower highs and lower lows. 📉 Supply is overpowering demand, making every minor bounce look like prime distribution.
📌 A sharp rejection off the $0.0367–$0.0370 supply block opens the runway for order flow to slide down into lower support targets. 💡 Sellers maintain total control while structural resistance holds firm. 💬 Are you shorting this retest or waiting for support to snap first? 👇
⚠️ Not financial advice. Always manage your risk. 🛡️
🏷️ #WAL #ShortSetup #Bearish #Trading
🐻 🩸
Entry: $0.0365 - $0.0368 ⚡
Target: $0.0358 📉
Stop Loss: $0.0370 ⚠️
Seller momentum is taking full control on the short-term timeframes as $WAL continues to print a clean structure of lower highs and lower lows. 📉 Supply is overpowering demand, making every minor bounce look like prime distribution.
📌 A sharp rejection off the $0.0367–$0.0370 supply block opens the runway for order flow to slide down into lower support targets. 💡 Sellers maintain total control while structural resistance holds firm. 💬 Are you shorting this retest or waiting for support to snap first? 👇
⚠️ Not financial advice. Always manage your risk. 🛡️
🏷️ #WAL #ShortSetup #Bearish #Trading
🐻 🩸
4

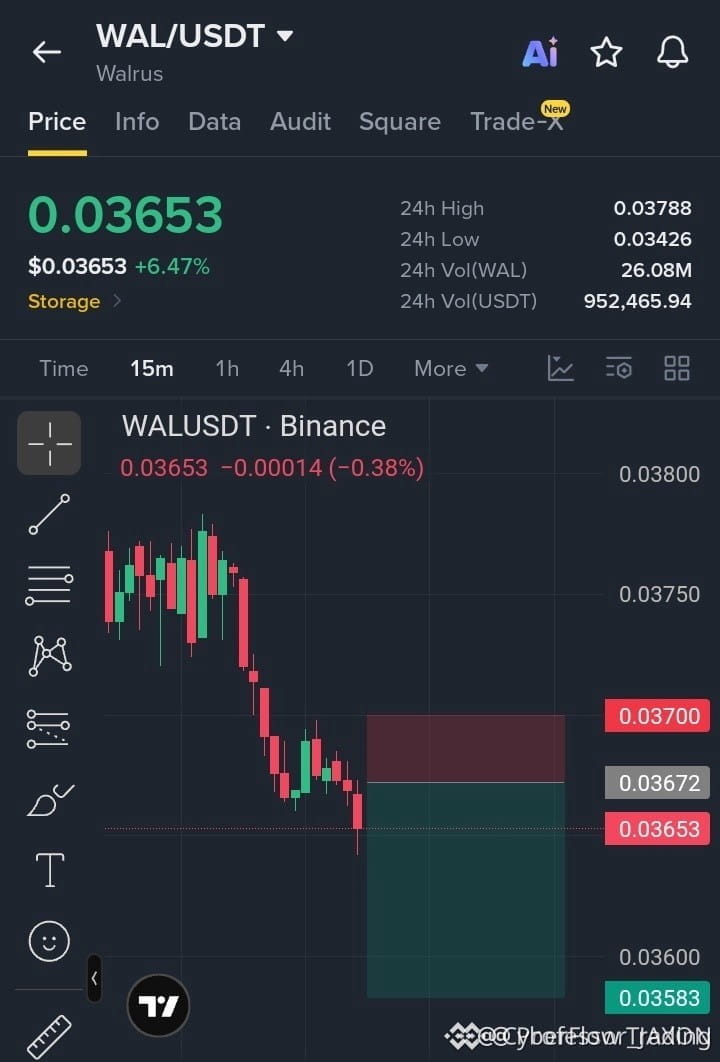
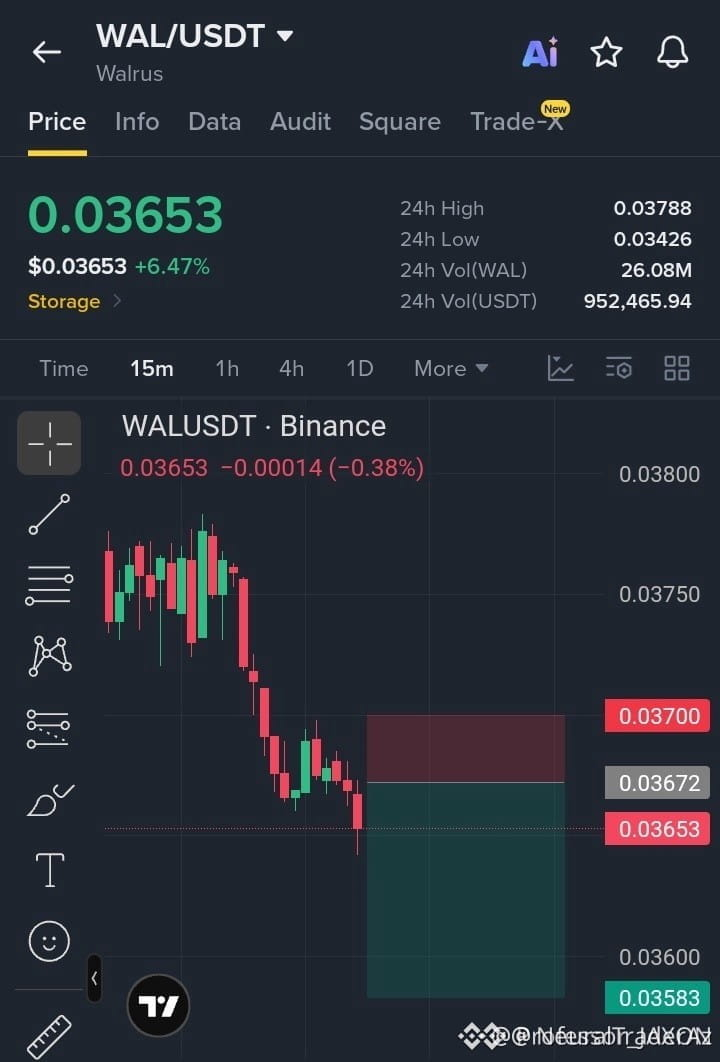
🚨 $WAL WEAKNESS CONFIRMED AS INSTITUTIONAL SELLERS DEFEND THE UPPER LIQUIDITY 🔴
Entry: 0.0365 - 0.0368 🔴
Target: 0.0362 - 0.0358 🎯
Stop Loss: 0.0370 ⚠️
📌 The 15M timeframe on $WAL continues to print sequential lower highs and lower lows, signaling persistent sell-side dominance across the internal structure. 🔍 A clear rejection within the 0.0367–0.0370 supply zone would provide institutional traders an ideal re-entry position to target sell-side liquidity resting below current levels.
📉 As buying volume fades on minor pullbacks, the path of least resistance favours lower structural support targets. 💬 Will $WAL buyers step up to defend lower support, or is a sweep of sell-side liquidity inevitable? 👇
⚠️ Not financial advice. Always manage your risk. 🛡️
🏷️ #WAL #ShortSetup #MarketStructure #Crypto #Trading
🔴 📉
🚨 $WAL WEAKNESS CONFIRMED AS INSTITUTIONAL SELLERS DEFEND THE UPPER LIQUIDITY 🔴
Entry: 0.0365 - 0.0368 🔴
Target: 0.0362 - 0.0358 🎯
Stop Loss: 0.0370 ⚠️
📌 The 15M timeframe on $WAL continues to print sequential lower highs and lower lows, signaling persistent sell-side dominance across the internal structure. 🔍 A clear rejection within the 0.0367–0.0370 supply zone would provide institutional traders an ideal re-entry position to target sell-side liquidity resting below current levels.
📉 As buying volume fades on minor pullbacks, the path of least resistance favours lower structural support targets. 💬 Will $WAL buyers step up to defend lower support, or is a sweep of sell-side liquidity inevitable? 👇
⚠️ Not financial advice. Always manage your risk. 🛡️
🏷️ #WAL #ShortSetup #MarketStructure #Crypto #Trading
🔴 📉
Entry: 0.0365 - 0.0368 🔴
Target: 0.0362 - 0.0358 🎯
Stop Loss: 0.0370 ⚠️
📌 The 15M timeframe on $WAL continues to print sequential lower highs and lower lows, signaling persistent sell-side dominance across the internal structure. 🔍 A clear rejection within the 0.0367–0.0370 supply zone would provide institutional traders an ideal re-entry position to target sell-side liquidity resting below current levels.
📉 As buying volume fades on minor pullbacks, the path of least resistance favours lower structural support targets. 💬 Will $WAL buyers step up to defend lower support, or is a sweep of sell-side liquidity inevitable? 👇
⚠️ Not financial advice. Always manage your risk. 🛡️
🏷️ #WAL #ShortSetup #MarketStructure #Crypto #Trading
🔴 📉
5

·
--
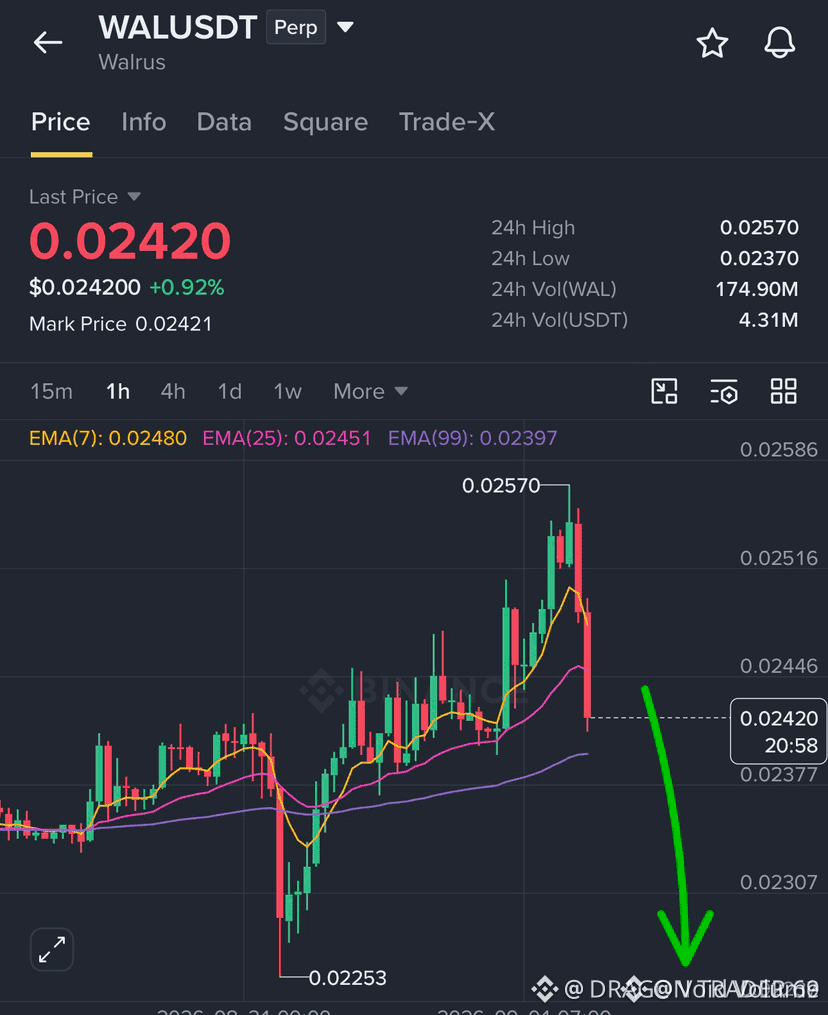
🔴 $WAL SHOWS HEAVY INSTITUTIONAL DISTRIBUTION AT KEY PREMIUM SUPPLY ZONE! 📉
Entry: 0.02434 - 0.02438 ⚡
Target: 0.02338 🚀
Stop Loss: 0.02570 ⚠️
$WAL has shifted into a clear distribution phase after failing to reclaim overhead resistance. Smart money is engineering sell-side liquidity directly into the overhead supply block. 📊
As lower-timeframe momentum rolls over, market structure favors an inefficiency fill down toward key target support. 🔍 Sell volume is quietly mounting behind this lower-high pivot. ⚡
💬 Are you positioning short for this breakdown or waiting for full validation below support? 👇
⚠️ Not financial advice. Always manage your risk. 🛡️
🏷️ #WAL #ShortSetup #Crypto #MarketStructure #Trading
📉 🐻
🔴 $WAL SHOWS HEAVY INSTITUTIONAL DISTRIBUTION AT KEY PREMIUM SUPPLY ZONE! 📉
Entry: 0.02434 - 0.02438 ⚡
Target: 0.02338 🚀
Stop Loss: 0.02570 ⚠️
$WAL has shifted into a clear distribution phase after failing to reclaim overhead resistance. Smart money is engineering sell-side liquidity directly into the overhead supply block. 📊
As lower-timeframe momentum rolls over, market structure favors an inefficiency fill down toward key target support. 🔍 Sell volume is quietly mounting behind this lower-high pivot. ⚡
💬 Are you positioning short for this breakdown or waiting for full validation below support? 👇
⚠️ Not financial advice. Always manage your risk. 🛡️
🏷️ #WAL #ShortSetup #Crypto #MarketStructure #Trading
📉 🐻
Entry: 0.02434 - 0.02438 ⚡
Target: 0.02338 🚀
Stop Loss: 0.02570 ⚠️
$WAL has shifted into a clear distribution phase after failing to reclaim overhead resistance. Smart money is engineering sell-side liquidity directly into the overhead supply block. 📊
As lower-timeframe momentum rolls over, market structure favors an inefficiency fill down toward key target support. 🔍 Sell volume is quietly mounting behind this lower-high pivot. ⚡
💬 Are you positioning short for this breakdown or waiting for full validation below support? 👇
⚠️ Not financial advice. Always manage your risk. 🛡️
🏷️ #WAL #ShortSetup #Crypto #MarketStructure #Trading
📉 🐻
4

·
--
🚨 $WAL EXPANDS INTO OVERHEAD SUPPLY AS INSTITUTIONAL SELLERS DEFEND KEY RESISTANCE 🔻
Entry: 0.02420 - 0.02550 ⚡
Target: 0.02400 - 0.02360 🎯
Stop Loss: 0.02700 ⚠️
📌 $WAL is testing a premium supply zone following a clean liquidity sweep of recent local highs. 📊 Decreasing buying volume on this retest indicates momentum exhaustion as institutional order flow shifts toward distribution.
💡 An inefficiency fill down toward lower demand targets offers a strong structural setup. 🌊 With overhead liquidity harvested, smart money is positioned to drive price into the lower range void. 💬 Are you taking the short entry here or waiting for lower timeframe confirmation? 👇
⚠️ Not financial advice. Always manage your risk. 🛡️
🏷️ #WAL #ShortSetup #MarketStructure #CryptoTrading #PriceAction
🐻 🎯
🚨 $WAL EXPANDS INTO OVERHEAD SUPPLY AS INSTITUTIONAL SELLERS DEFEND KEY RESISTANCE 🔻
Entry: 0.02420 - 0.02550 ⚡
Target: 0.02400 - 0.02360 🎯
Stop Loss: 0.02700 ⚠️
📌 $WAL is testing a premium supply zone following a clean liquidity sweep of recent local highs. 📊 Decreasing buying volume on this retest indicates momentum exhaustion as institutional order flow shifts toward distribution.
💡 An inefficiency fill down toward lower demand targets offers a strong structural setup. 🌊 With overhead liquidity harvested, smart money is positioned to drive price into the lower range void. 💬 Are you taking the short entry here or waiting for lower timeframe confirmation? 👇
⚠️ Not financial advice. Always manage your risk. 🛡️
🏷️ #WAL #ShortSetup #MarketStructure #CryptoTrading #PriceAction
🐻 🎯
Entry: 0.02420 - 0.02550 ⚡
Target: 0.02400 - 0.02360 🎯
Stop Loss: 0.02700 ⚠️
📌 $WAL is testing a premium supply zone following a clean liquidity sweep of recent local highs. 📊 Decreasing buying volume on this retest indicates momentum exhaustion as institutional order flow shifts toward distribution.
💡 An inefficiency fill down toward lower demand targets offers a strong structural setup. 🌊 With overhead liquidity harvested, smart money is positioned to drive price into the lower range void. 💬 Are you taking the short entry here or waiting for lower timeframe confirmation? 👇
⚠️ Not financial advice. Always manage your risk. 🛡️
🏷️ #WAL #ShortSetup #MarketStructure #CryptoTrading #PriceAction
🐻 🎯
4

·
--
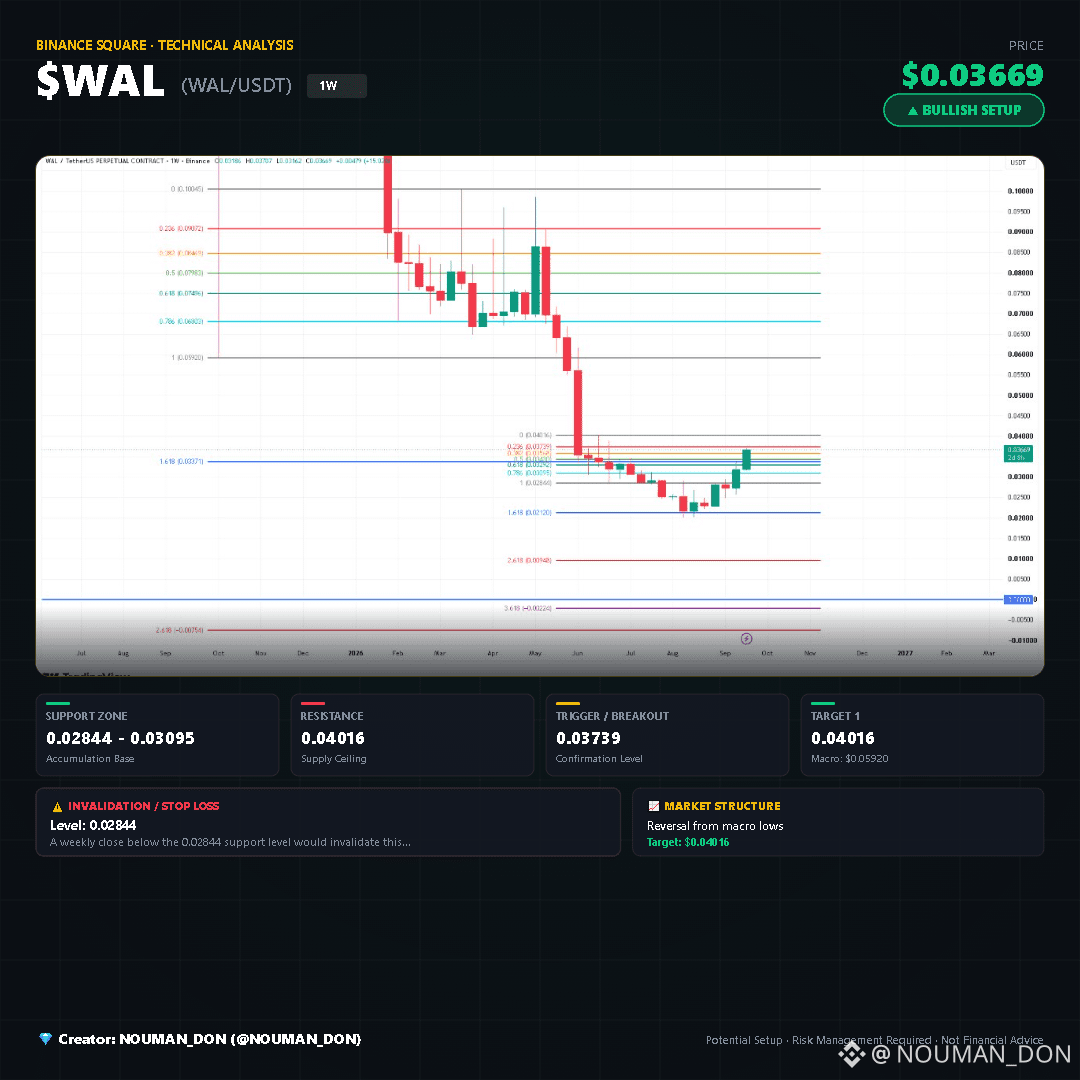
🚀 $WAL is showing a potential technical setup!
The weekly chart for WAL/USDT displays a strong recovery bounce following an extended downward impulse, currently testing key Fibonacci levels near the local range highs.
📈 The Technical Setup:
• The Pattern: Macro range consolidation and potential double bottom recovery
• Short-term Target: 0.04016
• Macro Objective: 0.05920
• Market Structure: Reversal from macro lows
🎯 Key Levels to Watch:
• Support / Accumulation Zone: 0.02844 - 0.03095
• Resistance: 0.04016
• Breakout Level: 0.03739
• Stop Loss / Invalidation: 0.02844
📊 Confirmation:
• Volume: Neutral/standard volume on recent green candles
• Momentum: Bullish recovery candles forming off the lows
• Trend: Attempting a macro trend reversal following a sharp decline
⚠️ Invalidation:
A weekly close below the 0.02844 support level would invalidate this recovery setup.
WAL is attempting a recovery bounce from macro lows, key resistance needs to be cleared for confirmation.
💎 Creator: NOUMAN_DON (@NOUMAN_DON)
#WAL #crypto #BinanceSquare #Binance #TechnicalAnalysis
{spot}(WALUSDT)
{future}(WALUSDT)
🚀 $WAL is showing a potential technical setup!
The weekly chart for WAL/USDT displays a strong recovery bounce following an extended downward impulse, currently testing key Fibonacci levels near the local range highs.
📈 The Technical Setup:
• The Pattern: Macro range consolidation and potential double bottom recovery
• Short-term Target: 0.04016
• Macro Objective: 0.05920
• Market Structure: Reversal from macro lows
🎯 Key Levels to Watch:
• Support / Accumulation Zone: 0.02844 - 0.03095
• Resistance: 0.04016
• Breakout Level: 0.03739
• Stop Loss / Invalidation: 0.02844
📊 Confirmation:
• Volume: Neutral/standard volume on recent green candles
• Momentum: Bullish recovery candles forming off the lows
• Trend: Attempting a macro trend reversal following a sharp decline
⚠️ Invalidation:
A weekly close below the 0.02844 support level would invalidate this recovery setup.
WAL is attempting a recovery bounce from macro lows, key resistance needs to be cleared for confirmation.
💎 Creator: NOUMAN_DON (@NOUMAN_DON)
#WAL #crypto #BinanceSquare #Binance #TechnicalAnalysis
The weekly chart for WAL/USDT displays a strong recovery bounce following an extended downward impulse, currently testing key Fibonacci levels near the local range highs.
📈 The Technical Setup:
• The Pattern: Macro range consolidation and potential double bottom recovery
• Short-term Target: 0.04016
• Macro Objective: 0.05920
• Market Structure: Reversal from macro lows
🎯 Key Levels to Watch:
• Support / Accumulation Zone: 0.02844 - 0.03095
• Resistance: 0.04016
• Breakout Level: 0.03739
• Stop Loss / Invalidation: 0.02844
📊 Confirmation:
• Volume: Neutral/standard volume on recent green candles
• Momentum: Bullish recovery candles forming off the lows
• Trend: Attempting a macro trend reversal following a sharp decline
⚠️ Invalidation:
A weekly close below the 0.02844 support level would invalidate this recovery setup.
WAL is attempting a recovery bounce from macro lows, key resistance needs to be cleared for confirmation.
💎 Creator: NOUMAN_DON (@NOUMAN_DON)
#WAL #crypto #BinanceSquare #Binance #TechnicalAnalysis
1
11

·
--
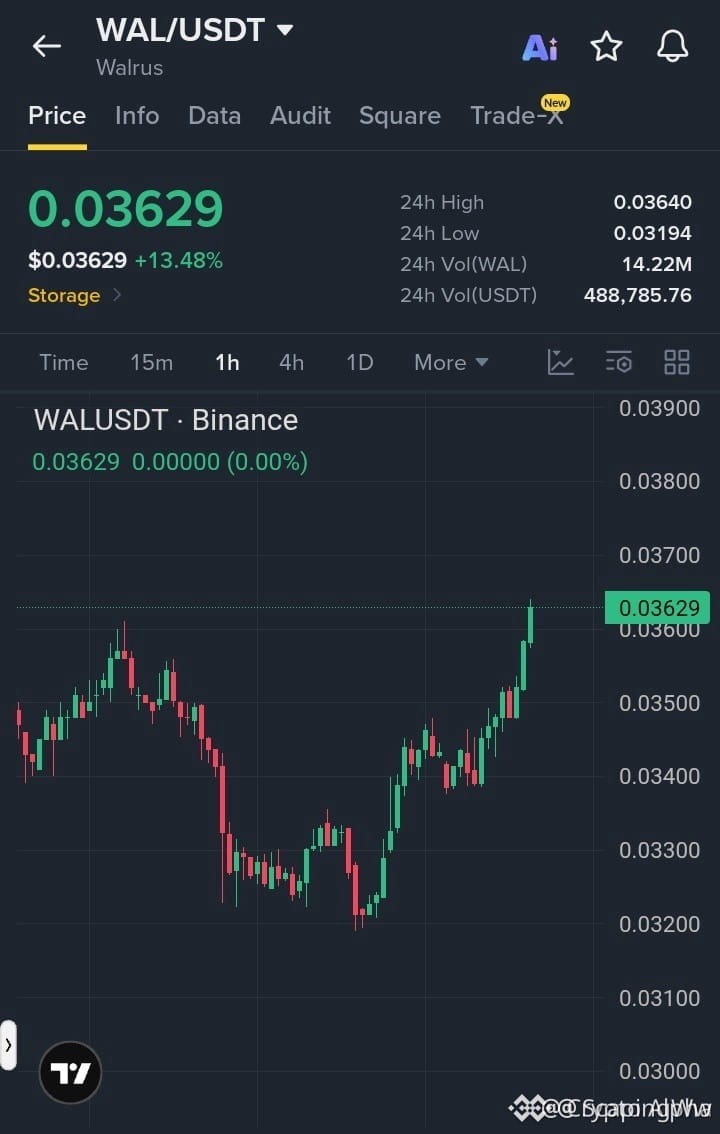
⚡ $WAL ACCELERATES PAST $0.0360 AS HEAVY BUYING POWER DRIVES BREAKOUT! 🚀
Entry: 0.03580 - 0.03630 ⚡
Target: 0.03700 / 0.03780 / 0.03860 🚀
Stop Loss: 0.03500 ⚠️
Buyers are aggressively claiming the $0.0360 level as strong hourly volume pushes $WAL out of its consolidation range. 📊 Order flow shows sustained bid intensity holding the breakout structure intact while momentum accelerates upside. ⚡
📌 The current demand zone offers a sharp setup as buyers defend higher low structures with conviction. Traders scanning altcoin momentum alongside $ZEC and $LINK will want to keep this move on their radar. 💡 Are you taking the breakout momentum here or waiting to bid a deeper sweep? 👇
⚠️ Not financial advice. Always manage your risk. 🛡️
🏷️ #WAL #LongSetup #Breakout #Crypto #Altcoins
🔥 💎
⚡ $WAL ACCELERATES PAST $0.0360 AS HEAVY BUYING POWER DRIVES BREAKOUT! 🚀
Entry: 0.03580 - 0.03630 ⚡
Target: 0.03700 / 0.03780 / 0.03860 🚀
Stop Loss: 0.03500 ⚠️
Buyers are aggressively claiming the $0.0360 level as strong hourly volume pushes $WAL out of its consolidation range. 📊 Order flow shows sustained bid intensity holding the breakout structure intact while momentum accelerates upside. ⚡
📌 The current demand zone offers a sharp setup as buyers defend higher low structures with conviction. Traders scanning altcoin momentum alongside $ZEC and $LINK will want to keep this move on their radar. 💡 Are you taking the breakout momentum here or waiting to bid a deeper sweep? 👇
⚠️ Not financial advice. Always manage your risk. 🛡️
🏷️ #WAL #LongSetup #Breakout #Crypto #Altcoins
🔥 💎
Entry: 0.03580 - 0.03630 ⚡
Target: 0.03700 / 0.03780 / 0.03860 🚀
Stop Loss: 0.03500 ⚠️
Buyers are aggressively claiming the $0.0360 level as strong hourly volume pushes $WAL out of its consolidation range. 📊 Order flow shows sustained bid intensity holding the breakout structure intact while momentum accelerates upside. ⚡
📌 The current demand zone offers a sharp setup as buyers defend higher low structures with conviction. Traders scanning altcoin momentum alongside $ZEC and $LINK will want to keep this move on their radar. 💡 Are you taking the breakout momentum here or waiting to bid a deeper sweep? 👇
⚠️ Not financial advice. Always manage your risk. 🛡️
🏷️ #WAL #LongSetup #Breakout #Crypto #Altcoins
🔥 💎
28

·
--
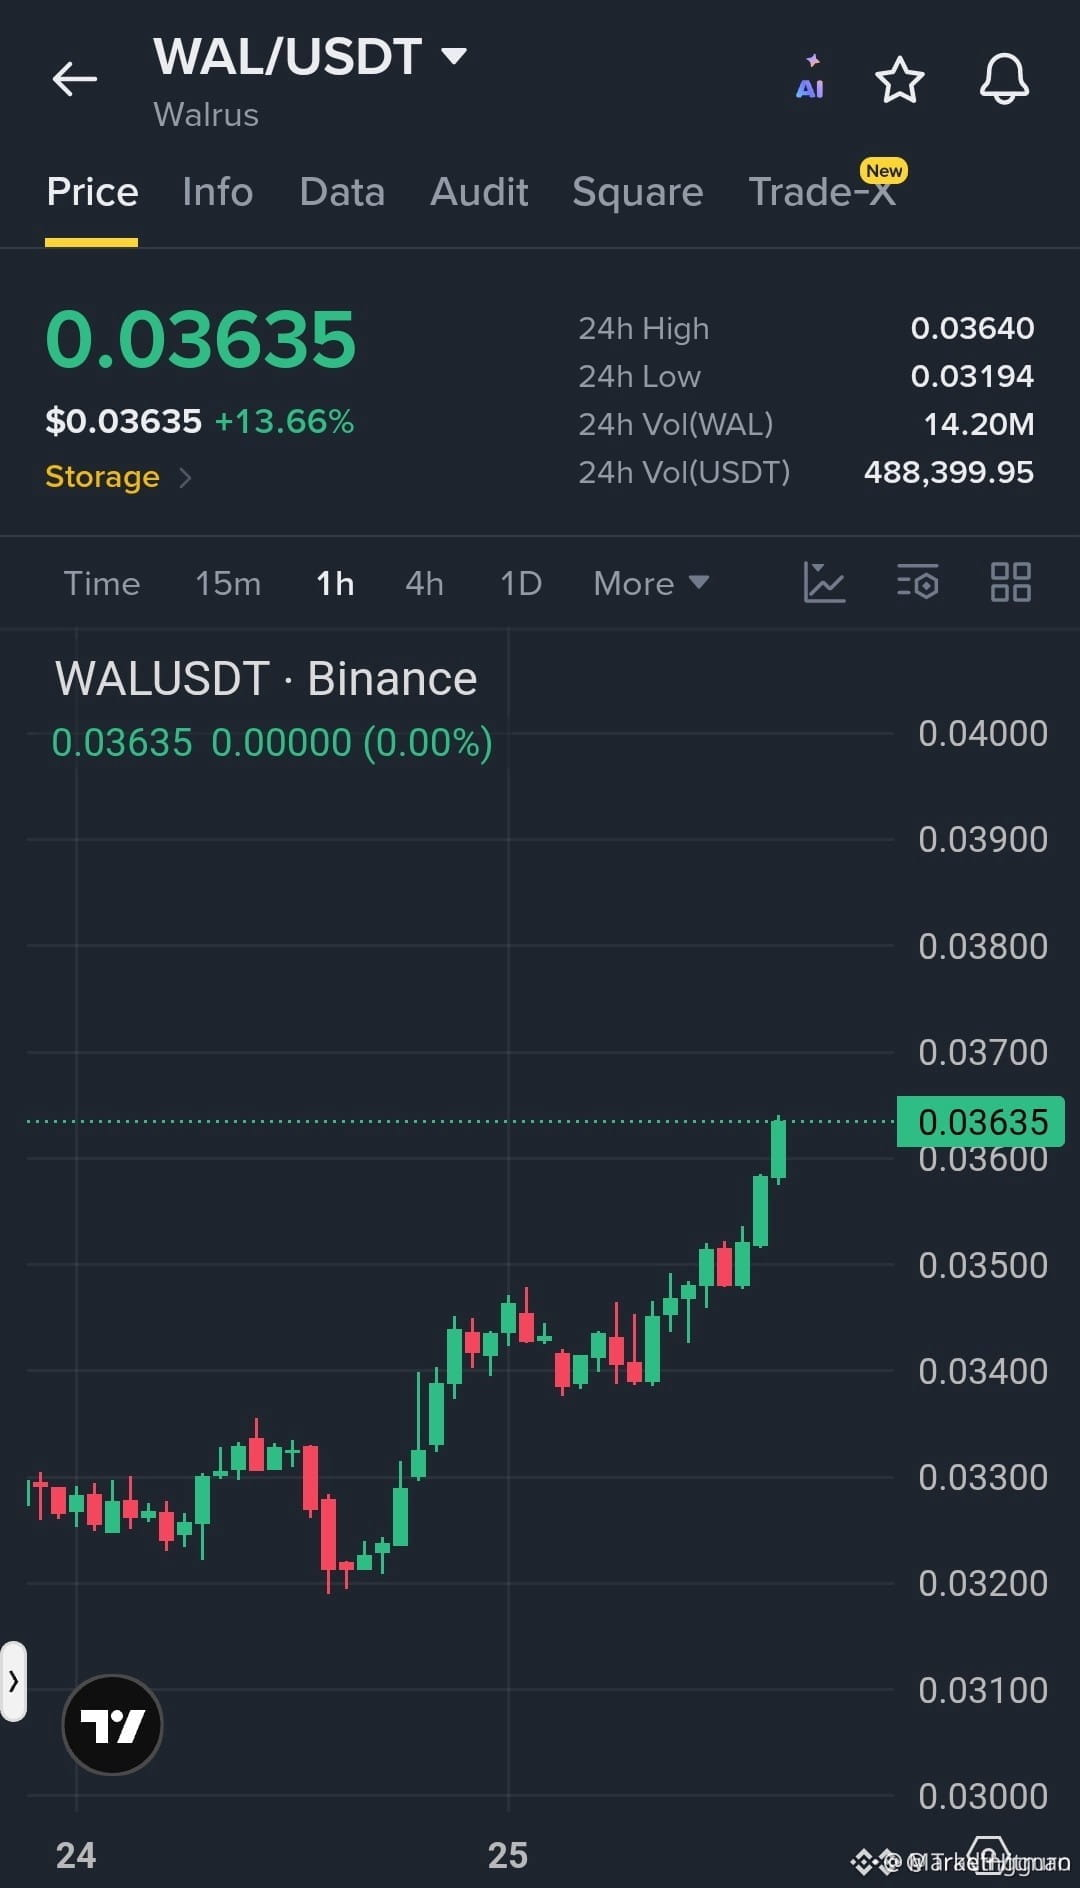
💥 $WAL FLIPS KEY RESISTANCE INTO SUPPORT AS BUYERS FLUSH OUT SELLER LIQUIDITY! 📈
Entry: 0.0345 – 0.0355 ⚡
Target: 0.0380 / 0.0400 / 0.0430 🚀
Stop Loss: 0.0320 ⚠️
After a crisp bounce off the 0.0320–0.0330 demand zone, $WAL has engineered a textbook structural shift on the 1H timeframe. Buyers stepped in with heavy volume to reclaim 0.0350, carving out a clean sequence of higher highs and higher lows. 📊
Rather than chasing the initial expansion, patience favors waiting for a structured retest of the flipped breakout level. 🔍 Defending this retest confirms institutional absorption and opens a clean runway toward upper targets as order flow remains firmly bullish. ⚡
💬 Are you waiting for the pullback confirmation at 0.0350, or scaling in on the initial bid? 👇
⚠️ Not financial advice. Always manage your risk. 🛡️
🏷️ #WAL #LongSetup #Crypto #Breakout #Altcoins
🔥 💎
💥 $WAL FLIPS KEY RESISTANCE INTO SUPPORT AS BUYERS FLUSH OUT SELLER LIQUIDITY! 📈
Entry: 0.0345 – 0.0355 ⚡
Target: 0.0380 / 0.0400 / 0.0430 🚀
Stop Loss: 0.0320 ⚠️
After a crisp bounce off the 0.0320–0.0330 demand zone, $WAL has engineered a textbook structural shift on the 1H timeframe. Buyers stepped in with heavy volume to reclaim 0.0350, carving out a clean sequence of higher highs and higher lows. 📊
Rather than chasing the initial expansion, patience favors waiting for a structured retest of the flipped breakout level. 🔍 Defending this retest confirms institutional absorption and opens a clean runway toward upper targets as order flow remains firmly bullish. ⚡
💬 Are you waiting for the pullback confirmation at 0.0350, or scaling in on the initial bid? 👇
⚠️ Not financial advice. Always manage your risk. 🛡️
🏷️ #WAL #LongSetup #Crypto #Breakout #Altcoins
🔥 💎
Entry: 0.0345 – 0.0355 ⚡
Target: 0.0380 / 0.0400 / 0.0430 🚀
Stop Loss: 0.0320 ⚠️
After a crisp bounce off the 0.0320–0.0330 demand zone, $WAL has engineered a textbook structural shift on the 1H timeframe. Buyers stepped in with heavy volume to reclaim 0.0350, carving out a clean sequence of higher highs and higher lows. 📊
Rather than chasing the initial expansion, patience favors waiting for a structured retest of the flipped breakout level. 🔍 Defending this retest confirms institutional absorption and opens a clean runway toward upper targets as order flow remains firmly bullish. ⚡
💬 Are you waiting for the pullback confirmation at 0.0350, or scaling in on the initial bid? 👇
⚠️ Not financial advice. Always manage your risk. 🛡️
🏷️ #WAL #LongSetup #Crypto #Breakout #Altcoins
🔥 💎
30
·
--
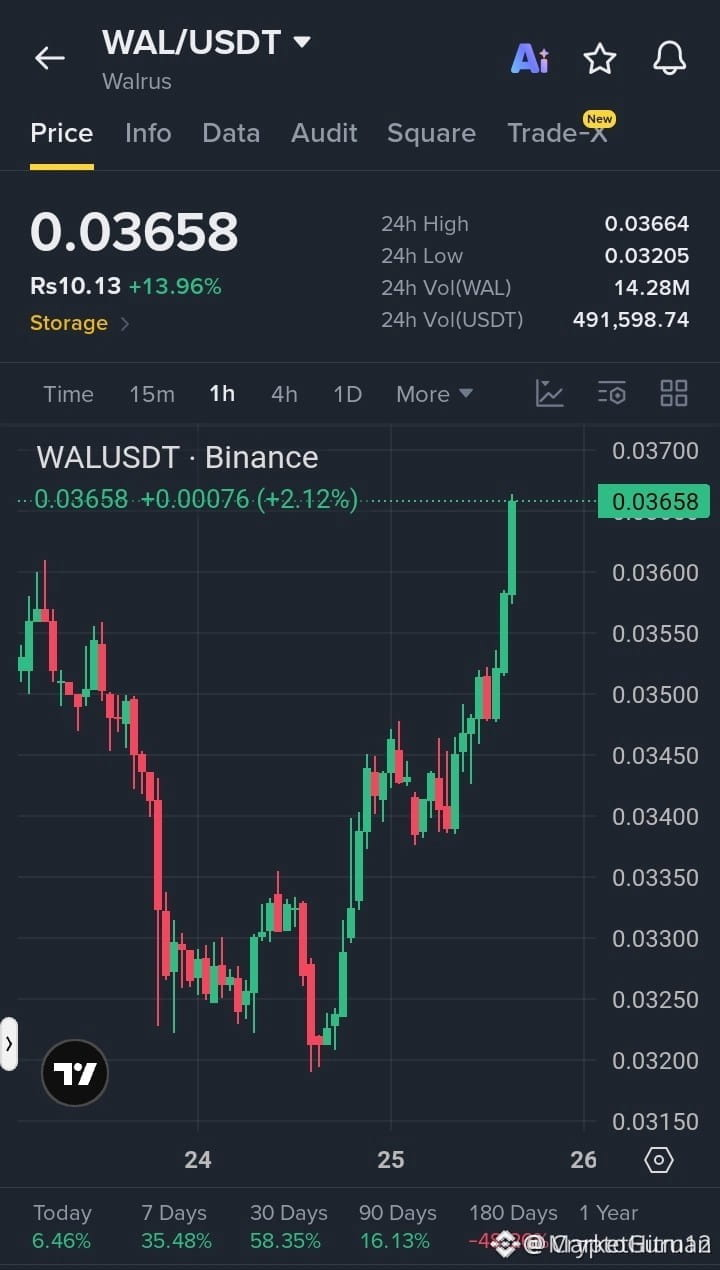
⚡ $WAL SLICES THROUGH RESISTANCE AS BULLS ACCELERATE PAST THE BREAKOUT ZONE! 💥
Entry: 0.0358 – 0.0365 ⚡
Target: 0.0388 🚀
Stop Loss: 0.0346 ⚠️
$WAL just printed a decisive bullish expansion candle on the 1H timeframe, tearing straight through the $0.0355–$0.0360 supply ceiling. 📈 Buyer pressure is stepping in aggressively to transform previous resistance into pristine demand.
Momentum remains firmly intact as long as price holds above the retest area. 📊 Smart money is clearly absorbing the remaining overhead order flow, laying the groundwork for the next leg higher. 💬 Are you riding this momentum flip higher or waiting for a deeper sweep? 👇
⚠️ Not financial advice. Always manage your risk. 🛡️
🏷️ #WAL #LongSetup #Breakout #CryptoMomentum
🔥 ⚡
⚡ $WAL SLICES THROUGH RESISTANCE AS BULLS ACCELERATE PAST THE BREAKOUT ZONE! 💥
Entry: 0.0358 – 0.0365 ⚡
Target: 0.0388 🚀
Stop Loss: 0.0346 ⚠️
$WAL just printed a decisive bullish expansion candle on the 1H timeframe, tearing straight through the $0.0355–$0.0360 supply ceiling. 📈 Buyer pressure is stepping in aggressively to transform previous resistance into pristine demand.
Momentum remains firmly intact as long as price holds above the retest area. 📊 Smart money is clearly absorbing the remaining overhead order flow, laying the groundwork for the next leg higher. 💬 Are you riding this momentum flip higher or waiting for a deeper sweep? 👇
⚠️ Not financial advice. Always manage your risk. 🛡️
🏷️ #WAL #LongSetup #Breakout #CryptoMomentum
🔥 ⚡
Entry: 0.0358 – 0.0365 ⚡
Target: 0.0388 🚀
Stop Loss: 0.0346 ⚠️
$WAL just printed a decisive bullish expansion candle on the 1H timeframe, tearing straight through the $0.0355–$0.0360 supply ceiling. 📈 Buyer pressure is stepping in aggressively to transform previous resistance into pristine demand.
Momentum remains firmly intact as long as price holds above the retest area. 📊 Smart money is clearly absorbing the remaining overhead order flow, laying the groundwork for the next leg higher. 💬 Are you riding this momentum flip higher or waiting for a deeper sweep? 👇
⚠️ Not financial advice. Always manage your risk. 🛡️
🏷️ #WAL #LongSetup #Breakout #CryptoMomentum
🔥 ⚡
17
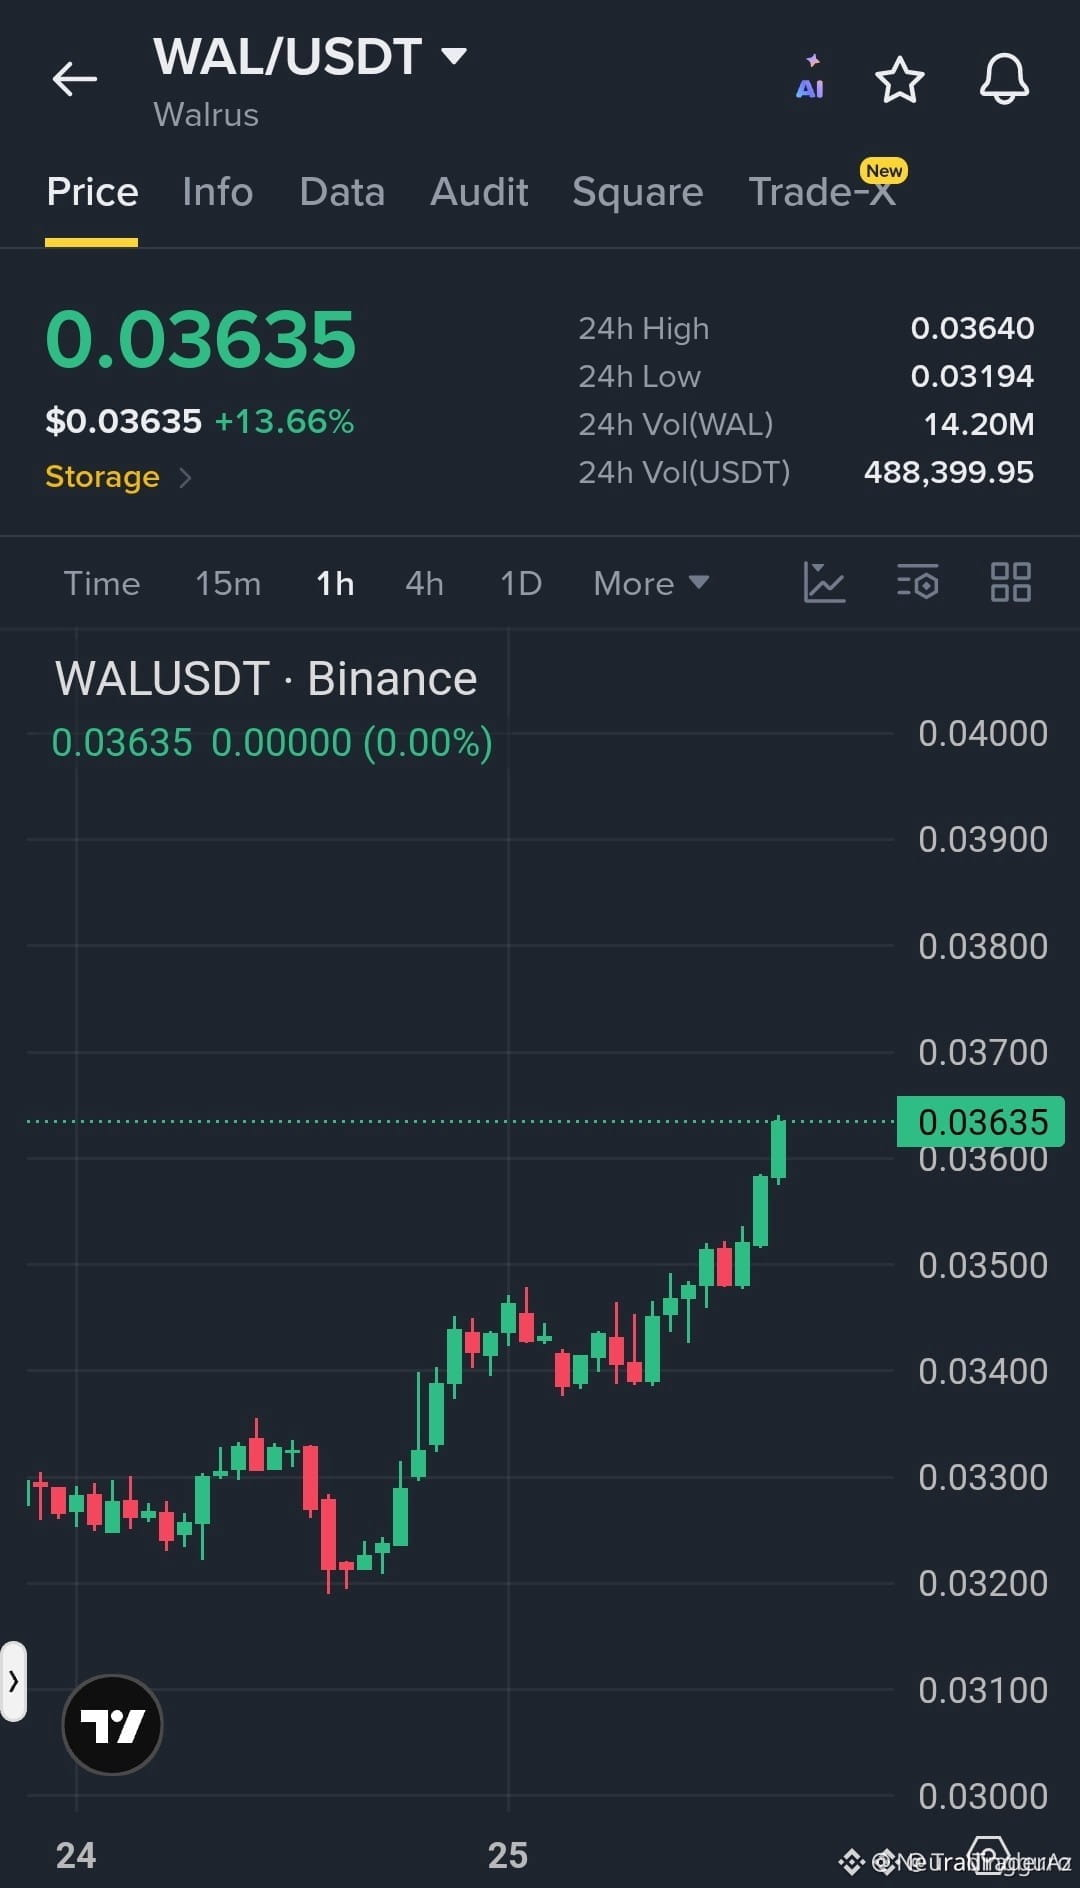
🚨 $WAL RECLAIMS KEY RESISTANCE AS SMART MONEY DRIVES 1H MARKET STRUCTURE SHIFT! ⚡
Entry: 0.0345 - 0.0355 ⚡
Target: 0.0380 - 0.0430 🚀
Stop Loss: 0.0320 ⚠️
📌 $WAL has completed a clean structural shift on the 1H timeframe, sweeping initial demand from the 0.0320–0.0330 accumulation block. The decisive reclaim of 0.0350 signals strong buying conviction, indicating institutional order flow is pushing for higher liquidity targets. 📊
💡 Instead of chasing immediate impulse moves, the optimal risk-managed entry lies within a disciplined pullback to the breakout zone. Keep an eye on secondary movers like $LSK and $ZEC as capital rotates across the board. 💬 Are you placing limit orders on the retest or watching from the sidelines? 👇
⚠️ Not financial advice. Always manage your risk. 🛡️
🏷️ #WAL #LongSetup #Crypto #Breakout #Trading
🎯 🦈
🚨 $WAL RECLAIMS KEY RESISTANCE AS SMART MONEY DRIVES 1H MARKET STRUCTURE SHIFT! ⚡
Entry: 0.0345 - 0.0355 ⚡
Target: 0.0380 - 0.0430 🚀
Stop Loss: 0.0320 ⚠️
📌 $WAL has completed a clean structural shift on the 1H timeframe, sweeping initial demand from the 0.0320–0.0330 accumulation block. The decisive reclaim of 0.0350 signals strong buying conviction, indicating institutional order flow is pushing for higher liquidity targets. 📊
💡 Instead of chasing immediate impulse moves, the optimal risk-managed entry lies within a disciplined pullback to the breakout zone. Keep an eye on secondary movers like $LSK and $ZEC as capital rotates across the board. 💬 Are you placing limit orders on the retest or watching from the sidelines? 👇
⚠️ Not financial advice. Always manage your risk. 🛡️
🏷️ #WAL #LongSetup #Crypto #Breakout #Trading
🎯 🦈
Entry: 0.0345 - 0.0355 ⚡
Target: 0.0380 - 0.0430 🚀
Stop Loss: 0.0320 ⚠️
📌 $WAL has completed a clean structural shift on the 1H timeframe, sweeping initial demand from the 0.0320–0.0330 accumulation block. The decisive reclaim of 0.0350 signals strong buying conviction, indicating institutional order flow is pushing for higher liquidity targets. 📊
💡 Instead of chasing immediate impulse moves, the optimal risk-managed entry lies within a disciplined pullback to the breakout zone. Keep an eye on secondary movers like $LSK and $ZEC as capital rotates across the board. 💬 Are you placing limit orders on the retest or watching from the sidelines? 👇
⚠️ Not financial advice. Always manage your risk. 🛡️
🏷️ #WAL #LongSetup #Crypto #Breakout #Trading
🎯 🦈
12
·
--
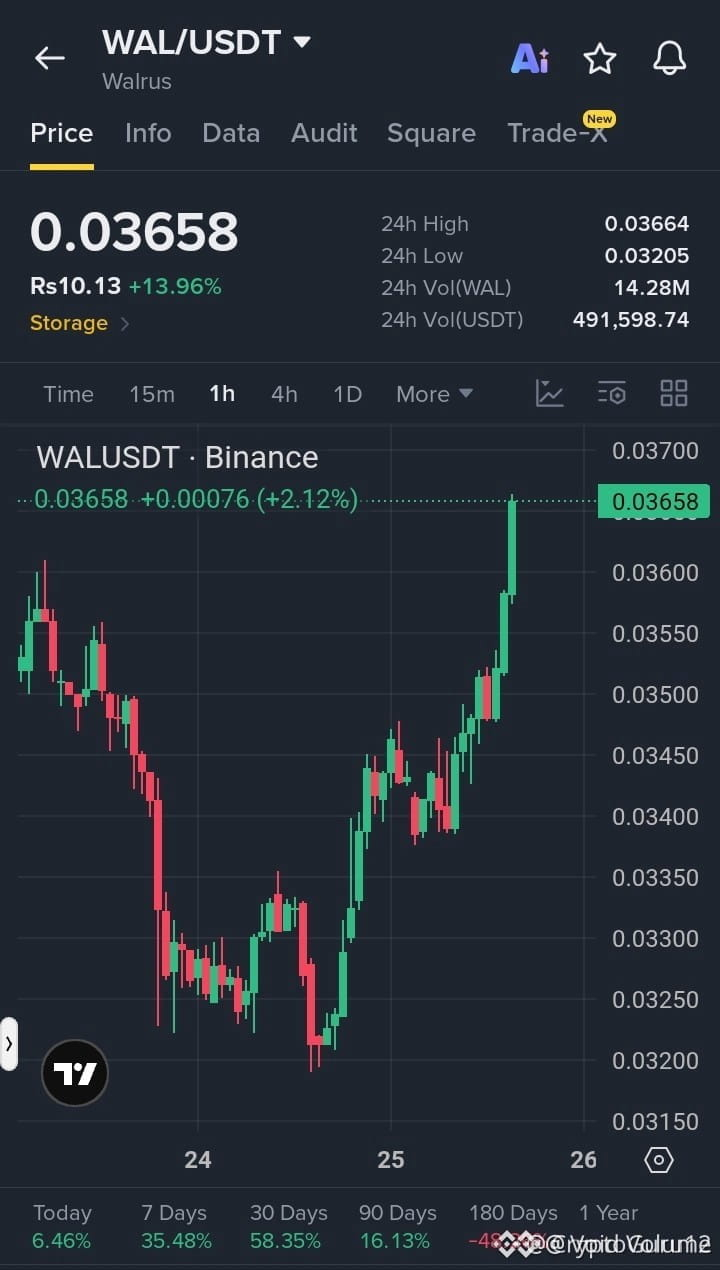
⚡ $WAL BREAKS RESISTANCE AS SMART MONEY ACCUMULATES ABOVE KEY IMPULSE LEVEL! 💥
Entry: 0.0358 - 0.0365 ⚡
Target: 0.0388 🚀
Stop Loss: 0.0346 ⚠️
📌 $WAL has delivered a decisive structural flip on the 1H timeframe, sweeping liquidations above 0.0360 with expanding buyer volume. The impulse candle confirmed an institutional shift in market structure, establishing a fresh efficiency zone for bulls to defend. 🔍
📊 As long as price preserves this newly reclaimed support floor, the expansion path toward upper liquidity pools remains intact. 💡 We are also observing rotational flow across assets like $ZEC and $LSK . 💬 Are you bidding the retest of this breakout structure or holding back for more confirmation? 👇
⚠️ Not financial advice. Always manage your risk. 🛡️
🏷️ #WAL #LongSetup #Crypto #Breakout #Altcoins
🎯 🦈
⚡ $WAL BREAKS RESISTANCE AS SMART MONEY ACCUMULATES ABOVE KEY IMPULSE LEVEL! 💥
Entry: 0.0358 - 0.0365 ⚡
Target: 0.0388 🚀
Stop Loss: 0.0346 ⚠️
📌 $WAL has delivered a decisive structural flip on the 1H timeframe, sweeping liquidations above 0.0360 with expanding buyer volume. The impulse candle confirmed an institutional shift in market structure, establishing a fresh efficiency zone for bulls to defend. 🔍
📊 As long as price preserves this newly reclaimed support floor, the expansion path toward upper liquidity pools remains intact. 💡 We are also observing rotational flow across assets like $ZEC and $LSK . 💬 Are you bidding the retest of this breakout structure or holding back for more confirmation? 👇
⚠️ Not financial advice. Always manage your risk. 🛡️
🏷️ #WAL #LongSetup #Crypto #Breakout #Altcoins
🎯 🦈
Entry: 0.0358 - 0.0365 ⚡
Target: 0.0388 🚀
Stop Loss: 0.0346 ⚠️
📌 $WAL has delivered a decisive structural flip on the 1H timeframe, sweeping liquidations above 0.0360 with expanding buyer volume. The impulse candle confirmed an institutional shift in market structure, establishing a fresh efficiency zone for bulls to defend. 🔍
📊 As long as price preserves this newly reclaimed support floor, the expansion path toward upper liquidity pools remains intact. 💡 We are also observing rotational flow across assets like $ZEC and $LSK . 💬 Are you bidding the retest of this breakout structure or holding back for more confirmation? 👇
⚠️ Not financial advice. Always manage your risk. 🛡️
🏷️ #WAL #LongSetup #Crypto #Breakout #Altcoins
🎯 🦈
27

·
--
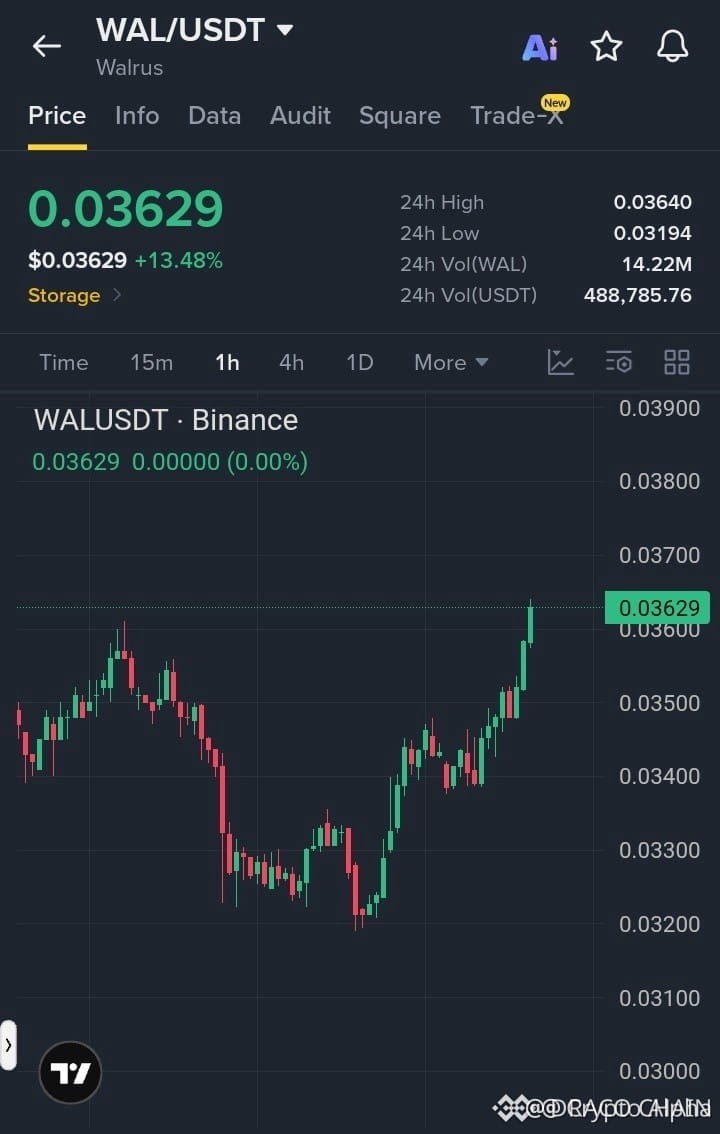
⚡ $WAL RECLAIMS KEY INEFFICIENCY LEVEL AS BUY-SIDE LIQUIDITY EXPANDS! 💥
Entry: 0.03580 - 0.03630 ⚡
Target: 0.03700 - 0.03860 🚀
Stop Loss: 0.03500 ⚠️
📌 Smart money has reclaimed the $0.0360 demand block, triggering an immediate expansion in buying volume on the lower timeframes. The persistent 1H order flow suggests sell-side liquidity above current local highs is being targeted for structural continuation. 📊
💡 Holding above this newly formed order block validates the bullish bias while $ZEC and $LINK also build structural setups across the broader market. 🌊 Are you positioning inside this consolidation zone or waiting for the sweep above $0.03700? 👇
⚠️ Not financial advice. Always manage your risk. 🛡️
🏷️ #WAL #Altcoins #Breakout #SmartMoney #Crypto
🎯 🦈
⚡ $WAL RECLAIMS KEY INEFFICIENCY LEVEL AS BUY-SIDE LIQUIDITY EXPANDS! 💥
Entry: 0.03580 - 0.03630 ⚡
Target: 0.03700 - 0.03860 🚀
Stop Loss: 0.03500 ⚠️
📌 Smart money has reclaimed the $0.0360 demand block, triggering an immediate expansion in buying volume on the lower timeframes. The persistent 1H order flow suggests sell-side liquidity above current local highs is being targeted for structural continuation. 📊
💡 Holding above this newly formed order block validates the bullish bias while $ZEC and $LINK also build structural setups across the broader market. 🌊 Are you positioning inside this consolidation zone or waiting for the sweep above $0.03700? 👇
⚠️ Not financial advice. Always manage your risk. 🛡️
🏷️ #WAL #Altcoins #Breakout #SmartMoney #Crypto
🎯 🦈
Entry: 0.03580 - 0.03630 ⚡
Target: 0.03700 - 0.03860 🚀
Stop Loss: 0.03500 ⚠️
📌 Smart money has reclaimed the $0.0360 demand block, triggering an immediate expansion in buying volume on the lower timeframes. The persistent 1H order flow suggests sell-side liquidity above current local highs is being targeted for structural continuation. 📊
💡 Holding above this newly formed order block validates the bullish bias while $ZEC and $LINK also build structural setups across the broader market. 🌊 Are you positioning inside this consolidation zone or waiting for the sweep above $0.03700? 👇
⚠️ Not financial advice. Always manage your risk. 🛡️
🏷️ #WAL #Altcoins #Breakout #SmartMoney #Crypto
🎯 🦈
6

·
--
Bullish
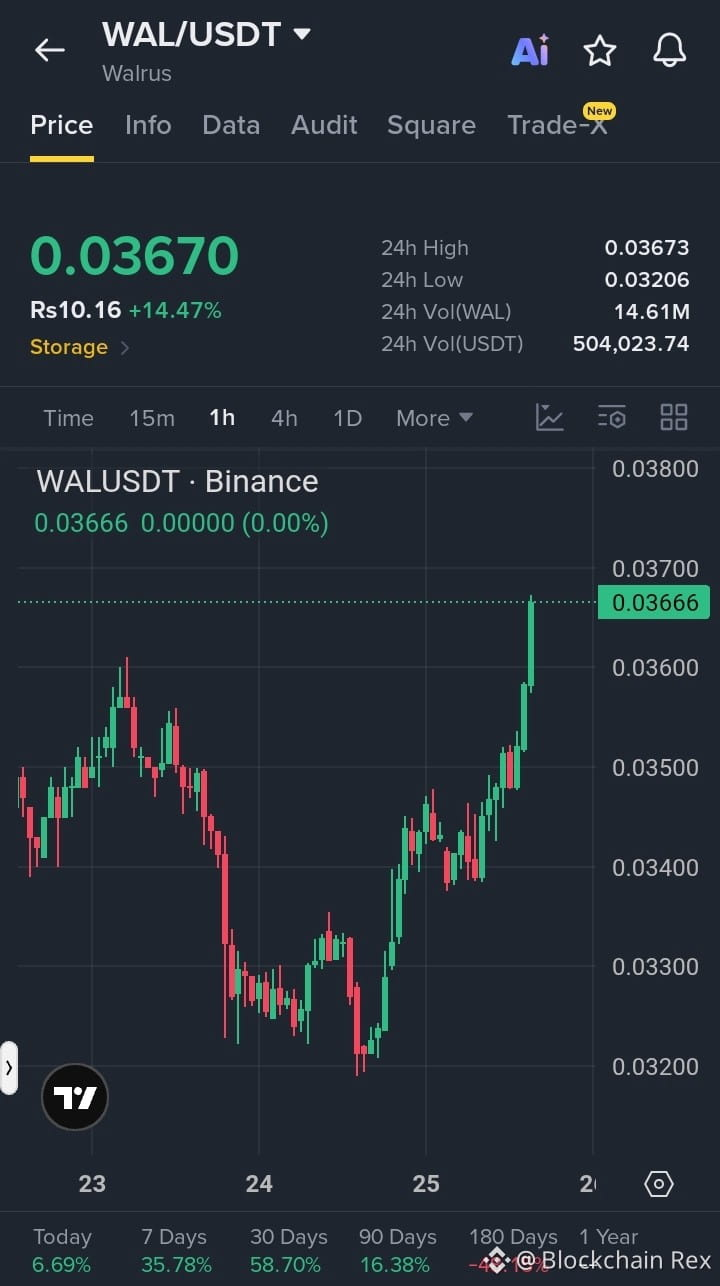
$WAL IS PUSHING INTO FRESH HIGHS
The 1H structure remains strongly bullish. #WAL has broken above the 0.0360 area with a sharp green candle and is now pressing near 0.0367 resistance.
LONG TRADE
Entry: 0.0363 – 0.0367
Target: 0.0385
Stop Loss: 0.0352
A hold above 0.0360 keeps the current breakout structure intact.
Buy & Trade
{future}(WALUSDT)
$ZEC
{future}(ZECUSDT)
$LSK
{future}(LSKUSDT)
$WAL IS PUSHING INTO FRESH HIGHS
The 1H structure remains strongly bullish. #WAL has broken above the 0.0360 area with a sharp green candle and is now pressing near 0.0367 resistance.
LONG TRADE
Entry: 0.0363 – 0.0367
Target: 0.0385
Stop Loss: 0.0352
A hold above 0.0360 keeps the current breakout structure intact.
Buy & Trade
$ZEC
$LSK
The 1H structure remains strongly bullish. #WAL has broken above the 0.0360 area with a sharp green candle and is now pressing near 0.0367 resistance.
LONG TRADE
Entry: 0.0363 – 0.0367
Target: 0.0385
Stop Loss: 0.0352
A hold above 0.0360 keeps the current breakout structure intact.
Buy & Trade
$ZEC
$LSK
1
163

·
--
Bullish
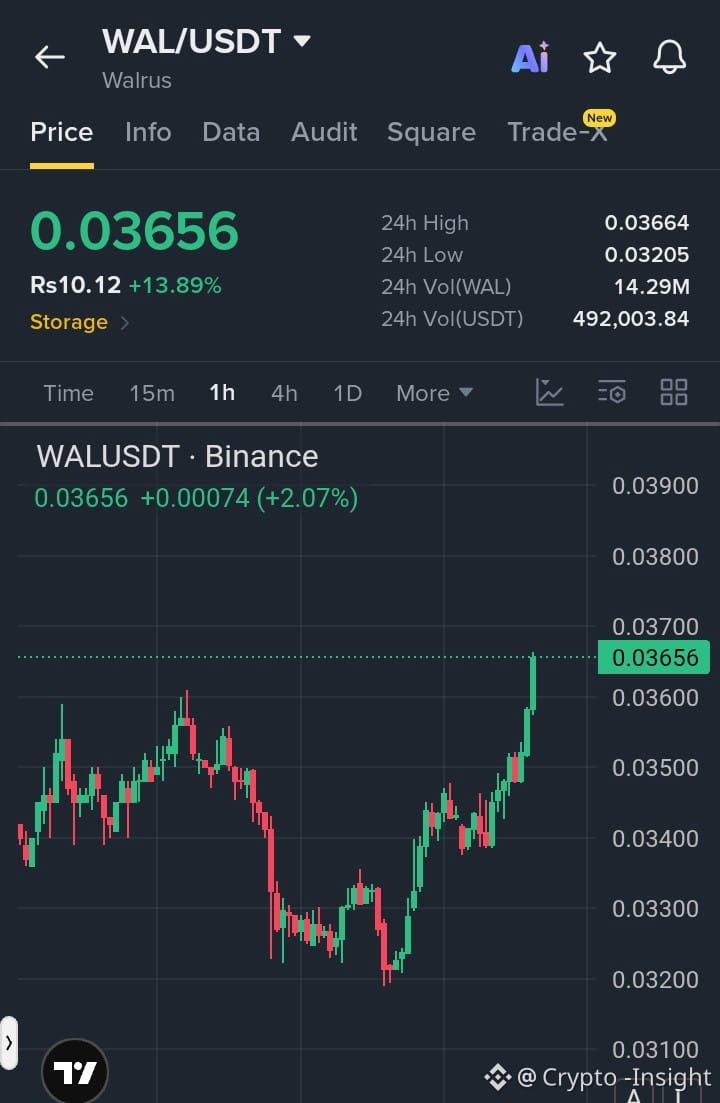
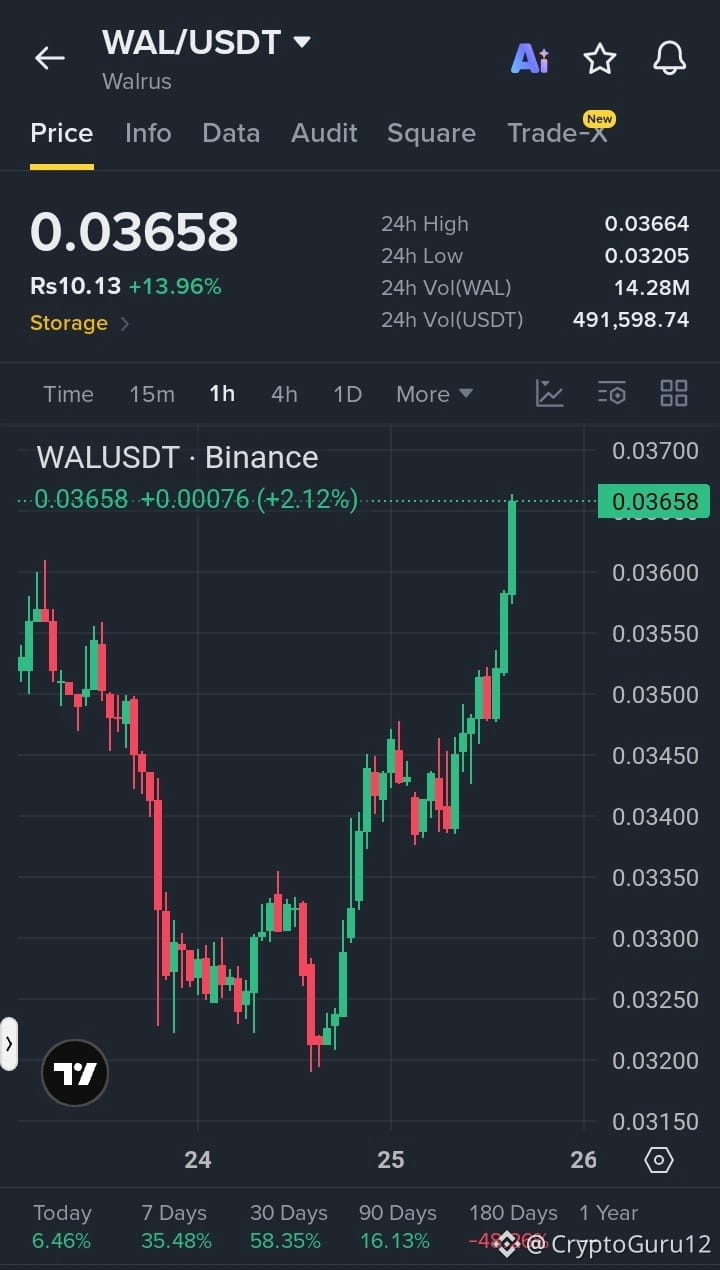
$WAL Is Pushing Into A Key Breakout Zone…!!
#WAL is showing strong bullish momentum after recovering from 0.03205 with price now holding near 0.03656 Resistance sits at 0.03664 and a clean breakout could open targets at 0.03800 and 0.03900 while 0.03500 remains the key support zone
$LINK
{spot}(LINKUSDT)
$ZEC
{spot}(ZECUSDT)
{spot}(WALUSDT)
$WAL Is Pushing Into A Key Breakout Zone…!!
#WAL is showing strong bullish momentum after recovering from 0.03205 with price now holding near 0.03656 Resistance sits at 0.03664 and a clean breakout could open targets at 0.03800 and 0.03900 while 0.03500 remains the key support zone
$LINK
$ZEC
#WAL is showing strong bullish momentum after recovering from 0.03205 with price now holding near 0.03656 Resistance sits at 0.03664 and a clean breakout could open targets at 0.03800 and 0.03900 while 0.03500 remains the key support zone
$LINK
$ZEC
1
110


·
--
Bullish
$WAL BREAKOUT MOMENTUM BUILDING
#WAL is showing a strong recovery on the 1H chart, pushing through the recent resistance zone near $0.0355–$0.0360 with a powerful bullish candle. Momentum remains positive while price holds above the breakout area.
LONG SETUP
Entry: $0.0358 – $0.0365
TP: $0.0388
SL: $0.0346
A sustained hold above $0.0360 keeps the breakout structure active.
Buy & Trade
{future}(WALUSDT)
$ZEC
{future}(ZECUSDT)
$LSK
{future}(LSKUSDT)
$WAL BREAKOUT MOMENTUM BUILDING
#WAL is showing a strong recovery on the 1H chart, pushing through the recent resistance zone near $0.0355–$0.0360 with a powerful bullish candle. Momentum remains positive while price holds above the breakout area.
LONG SETUP
Entry: $0.0358 – $0.0365
TP: $0.0388
SL: $0.0346
A sustained hold above $0.0360 keeps the breakout structure active.
Buy & Trade
$ZEC
$LSK
#WAL is showing a strong recovery on the 1H chart, pushing through the recent resistance zone near $0.0355–$0.0360 with a powerful bullish candle. Momentum remains positive while price holds above the breakout area.
LONG SETUP
Entry: $0.0358 – $0.0365
TP: $0.0388
SL: $0.0346
A sustained hold above $0.0360 keeps the breakout structure active.
Buy & Trade
$ZEC
$LSK
2
292

·
--
$MPLX
Down 14.44% to around $0.0461.
The key zone is near $0.037. Lose that, and the chart could open the door toward $0.0285.
$XCX
Around $0.00320, with $0.00264 acting as the important downside level.
A reclaim of $0.00355 could completely change the short-term structure.
$WAL RLD3:
Around $0.01126, sitting above the $0.00945 area.
Break that support and $0.00752 becomes the next zone to watch.
What makes these charts interesting isn't just their prices.
All three have relatively small market caps and limited liquidity, meaning a sudden volume spike can change the structure quickly.
Right now, I’m watching one thing across all three:
Which support breaks first — and which chart gets buyers stepping in before it happens?
{alpha}(560x75a5863a19af60ec0098d62ed8c34cc594fb470f)
{alpha}(560xe32f9e8f7f7222fcd83ee0fc68baf12118448eaf)
{spot}(WALUSDT)
#MPLX #XCX #WAL
$MPLX
Down 14.44% to around $0.0461.
The key zone is near $0.037. Lose that, and the chart could open the door toward $0.0285.
$XCX
Around $0.00320, with $0.00264 acting as the important downside level.
A reclaim of $0.00355 could completely change the short-term structure.
$WAL RLD3:
Around $0.01126, sitting above the $0.00945 area.
Break that support and $0.00752 becomes the next zone to watch.
What makes these charts interesting isn't just their prices.
All three have relatively small market caps and limited liquidity, meaning a sudden volume spike can change the structure quickly.
Right now, I’m watching one thing across all three:
Which support breaks first — and which chart gets buyers stepping in before it happens?
#MPLX #XCX #WAL
Down 14.44% to around $0.0461.
The key zone is near $0.037. Lose that, and the chart could open the door toward $0.0285.
$XCX
Around $0.00320, with $0.00264 acting as the important downside level.
A reclaim of $0.00355 could completely change the short-term structure.
$WAL RLD3:
Around $0.01126, sitting above the $0.00945 area.
Break that support and $0.00752 becomes the next zone to watch.
What makes these charts interesting isn't just their prices.
All three have relatively small market caps and limited liquidity, meaning a sudden volume spike can change the structure quickly.
Right now, I’m watching one thing across all three:
Which support breaks first — and which chart gets buyers stepping in before it happens?
#MPLX #XCX #WAL
$MPLX😗😙
0%
$XCX👑🔙
100%
$WAL🤕😷
0%
3 votes • Voting closed
2
551

·
--
$WAL / $Hakimi / $ARM 30-minute long signal, 4-hour uptrend confirmation 🔥
════════════════════
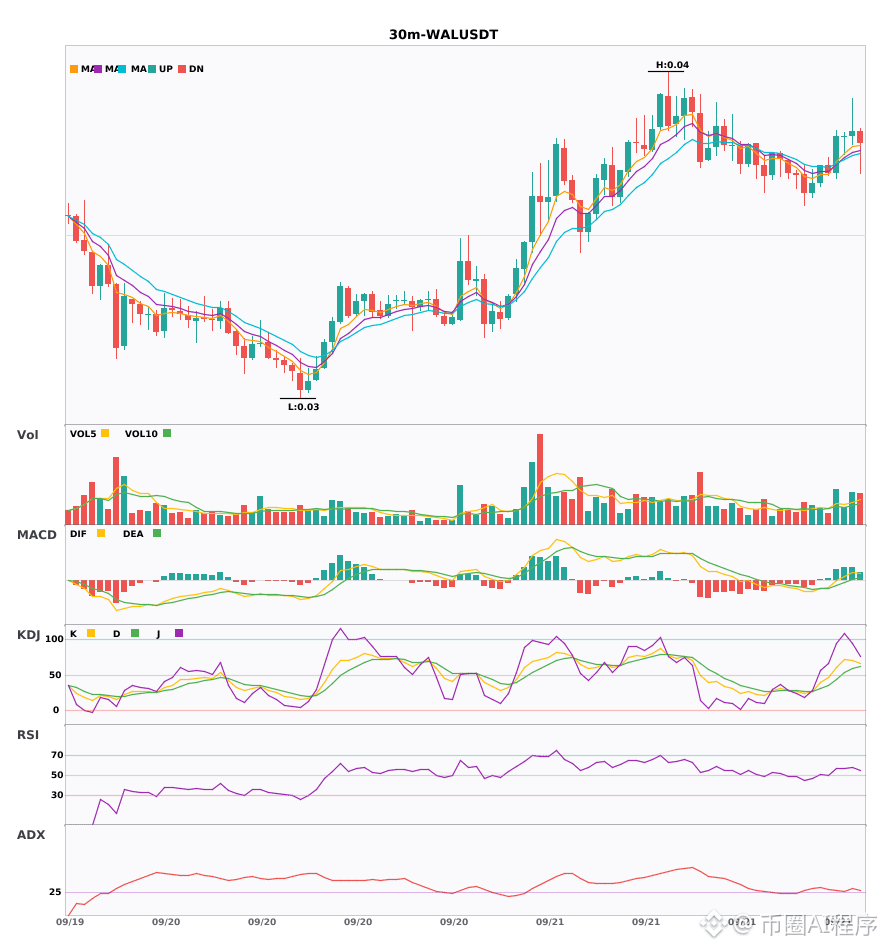
🔴 $WAL 30-minute long signal
⚠️ Technical analysis: This is a multi-timeframe resonance signal! 4-hour bullish resonance confirmed. An entry signal appears on the 30-minute chart. MACD shows an expanded red histogram as volume increases. Moving averages are in a bullish alignment. KDJ: K crosses above D without being overbought, volume up 2x.
════════════════════
🔴 $Hakimi 30-minute long signal
⚠️ Technical analysis: Multi-timeframe resonance signal! 4-hour bullish confirmation. The 30-minute chart provides entry/exit signals: after the MACD golden cross, the red histogram expands with increased volume. Moving averages are in bullish alignment. KDJ: K crosses above D but is not overbought; volume up 1.9x.
════════════════════
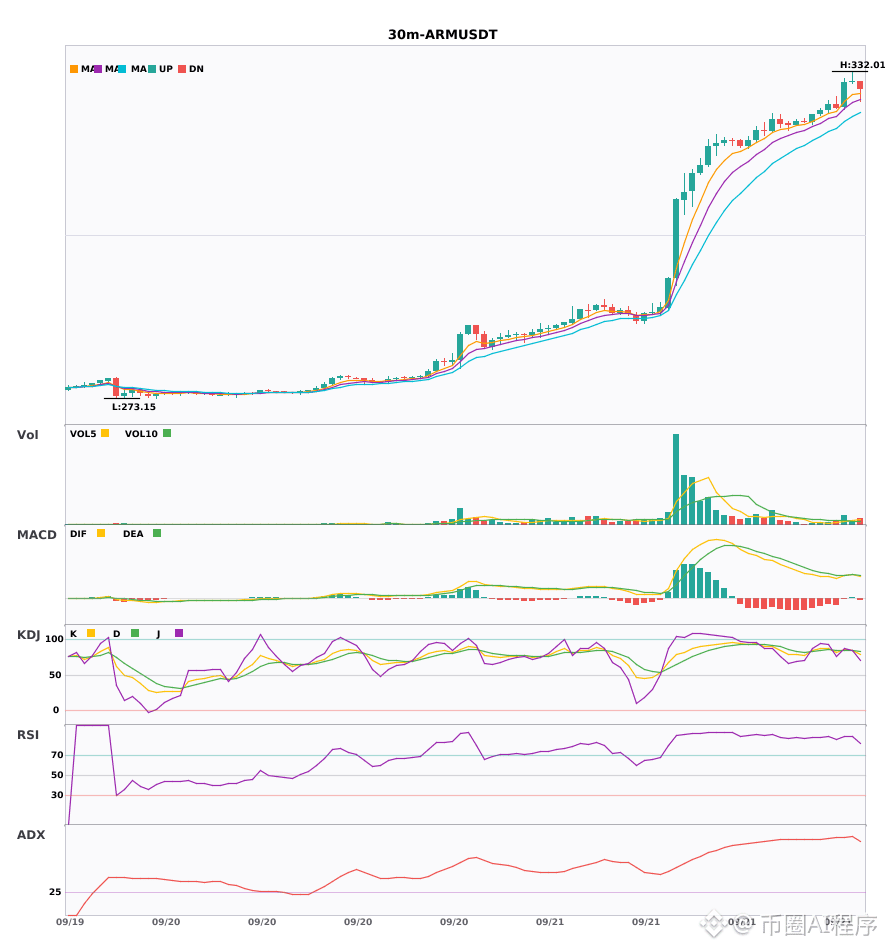
🔴 $ARM 30-minute long signal
⚠️ Technical analysis: 4-hour bullish resonance confirmed | 30-minute entry: MACD golden cross above zero; bullish momentum released | EMA5 > EMA8 > EMA13 bullish alignment | KDJ in overbought zone—watch for pullback risk (K is 84.4, D is 84.4) | Volume increased (2.1x)
════════════════════
🔔 Watch for first-hand market swings and anomalies 🔔
#多周期共振 #WAL #哈基米 #ARM
📌 When trading, pay attention to whether the candlestick patterns match
$WAL / $Hakimi / $ARM 30-minute long signal, 4-hour uptrend confirmation 🔥
════════════════════
🔴 $WAL 30-minute long signal
⚠️ Technical analysis: This is a multi-timeframe resonance signal! 4-hour bullish resonance confirmed. An entry signal appears on the 30-minute chart. MACD shows an expanded red histogram as volume increases. Moving averages are in a bullish alignment. KDJ: K crosses above D without being overbought, volume up 2x.
════════════════════
🔴 $Hakimi 30-minute long signal
⚠️ Technical analysis: Multi-timeframe resonance signal! 4-hour bullish confirmation. The 30-minute chart provides entry/exit signals: after the MACD golden cross, the red histogram expands with increased volume. Moving averages are in bullish alignment. KDJ: K crosses above D but is not overbought; volume up 1.9x.
════════════════════
🔴 $ARM 30-minute long signal
⚠️ Technical analysis: 4-hour bullish resonance confirmed | 30-minute entry: MACD golden cross above zero; bullish momentum released | EMA5 > EMA8 > EMA13 bullish alignment | KDJ in overbought zone—watch for pullback risk (K is 84.4, D is 84.4) | Volume increased (2.1x)
════════════════════
🔔 Watch for first-hand market swings and anomalies 🔔
#多周期共振 #WAL #哈基米 #ARM
📌 When trading, pay attention to whether the candlestick patterns match
════════════════════
🔴 $WAL 30-minute long signal
⚠️ Technical analysis: This is a multi-timeframe resonance signal! 4-hour bullish resonance confirmed. An entry signal appears on the 30-minute chart. MACD shows an expanded red histogram as volume increases. Moving averages are in a bullish alignment. KDJ: K crosses above D without being overbought, volume up 2x.
════════════════════
🔴 $Hakimi 30-minute long signal
⚠️ Technical analysis: Multi-timeframe resonance signal! 4-hour bullish confirmation. The 30-minute chart provides entry/exit signals: after the MACD golden cross, the red histogram expands with increased volume. Moving averages are in bullish alignment. KDJ: K crosses above D but is not overbought; volume up 1.9x.
════════════════════
🔴 $ARM 30-minute long signal
⚠️ Technical analysis: 4-hour bullish resonance confirmed | 30-minute entry: MACD golden cross above zero; bullish momentum released | EMA5 > EMA8 > EMA13 bullish alignment | KDJ in overbought zone—watch for pullback risk (K is 84.4, D is 84.4) | Volume increased (2.1x)
════════════════════
🔔 Watch for first-hand market swings and anomalies 🔔
#多周期共振 #WAL #哈基米 #ARM
📌 When trading, pay attention to whether the candlestick patterns match
69

·
--
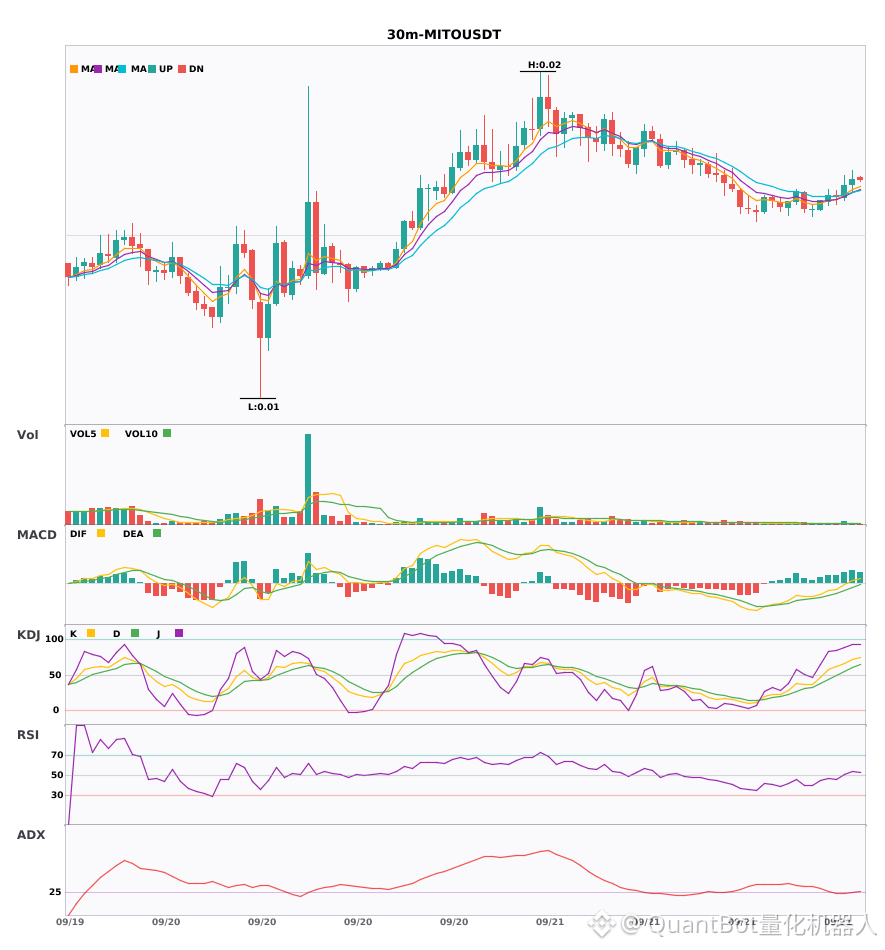
$AVA/$WAL/$MITO 30 minutes of resonance turn to upside. Bullish signals issued together 🔥
════════════════════
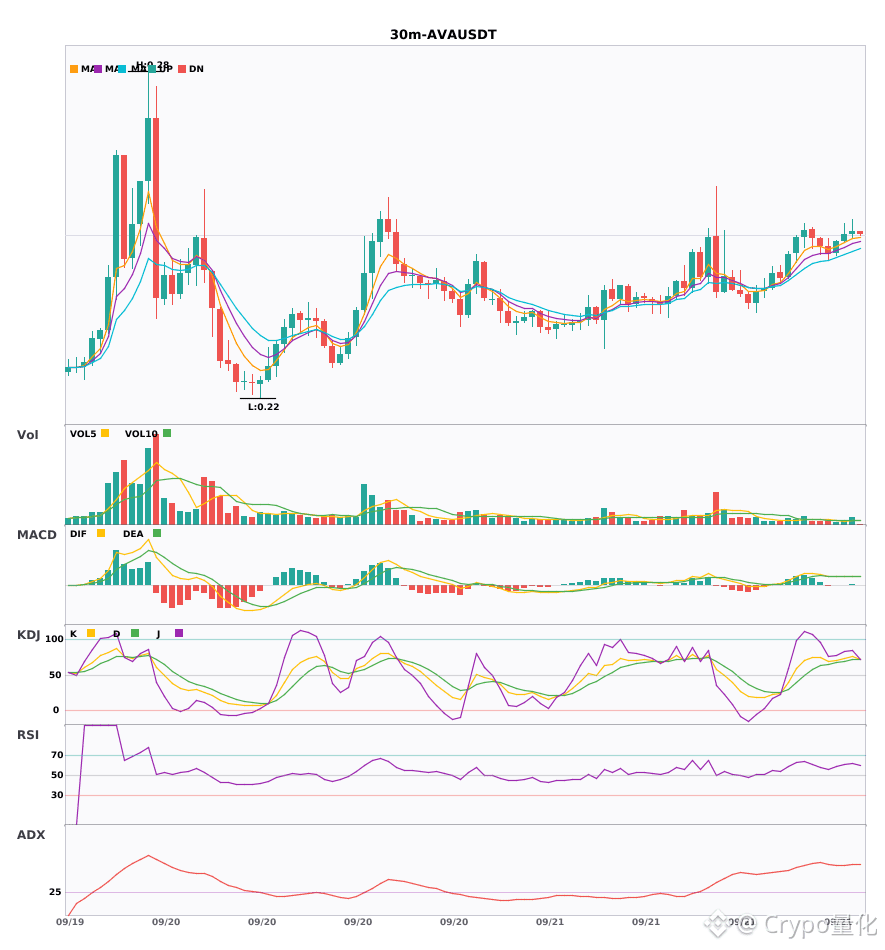
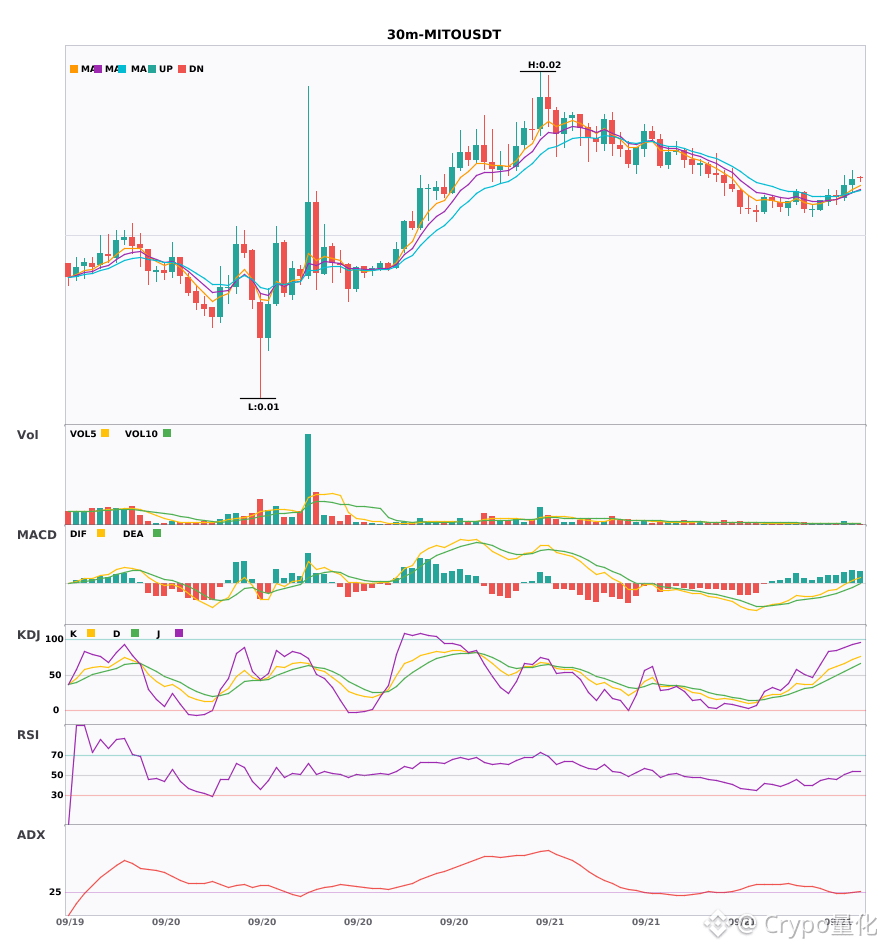
🔴 $AVA 30 minutes bullish signals
⚠️ Technical analysis: ADX(57) indicates a very strong trend. Be careful of a pullback. MACD has a golden cross above zero with increased volume. 5/8/13 moving averages are in bullish alignment. KDJ golden cross is not overbought. Volume is 1.6x.
════════════════════
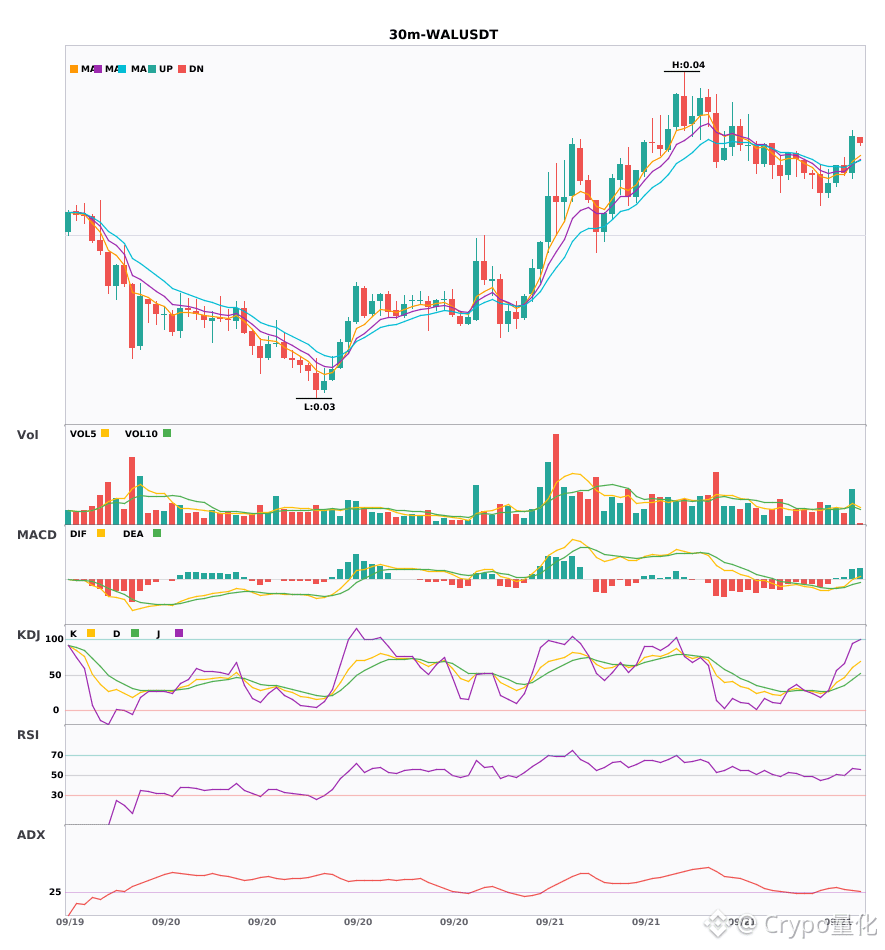
🔴 $WAL 30 minutes bullish signals
⚠️ Technical analysis: ADX(31) shows an obvious trending market. MACD DIF breaks above the zero line, turning the trend bullish. EMA5 crosses above EMA8, turning short-term bullish. Trading volume expands (2.0x)
════════════════════
🔴 $MITO 30 minutes bullish signals
⚠️ Technical analysis: ADX(27) — the trend is forming and can be participated in. MACD DIF breaks above the zero line, turning the trend bullish. EMA5 > EMA8 > EMA13 with bullish alignment. KDJ is running strongly, with bulls in advantage (K=71.6, D=60.7). Trading volume expands (1.8x)
════════════════════
🔔 Follow to get first-hand market move alerts 🔔
#技术分析 #AVA #WAL #MITO
📌 When trading, pay attention to whether the candlestick pattern matches
$AVA /$WAL /$MITO 30 minutes of resonance turn to upside. Bullish signals issued together 🔥
════════════════════
🔴 $AVA 30 minutes bullish signals
⚠️ Technical analysis: ADX(57) indicates a very strong trend. Be careful of a pullback. MACD has a golden cross above zero with increased volume. 5/8/13 moving averages are in bullish alignment. KDJ golden cross is not overbought. Volume is 1.6x.
════════════════════
🔴 $WAL 30 minutes bullish signals
⚠️ Technical analysis: ADX(31) shows an obvious trending market. MACD DIF breaks above the zero line, turning the trend bullish. EMA5 crosses above EMA8, turning short-term bullish. Trading volume expands (2.0x)
════════════════════
🔴 $MITO 30 minutes bullish signals
⚠️ Technical analysis: ADX(27) — the trend is forming and can be participated in. MACD DIF breaks above the zero line, turning the trend bullish. EMA5 > EMA8 > EMA13 with bullish alignment. KDJ is running strongly, with bulls in advantage (K=71.6, D=60.7). Trading volume expands (1.8x)
════════════════════
🔔 Follow to get first-hand market move alerts 🔔
#技术分析 #AVA #WAL #MITO
📌 When trading, pay attention to whether the candlestick pattern matches
════════════════════
🔴 $AVA 30 minutes bullish signals
⚠️ Technical analysis: ADX(57) indicates a very strong trend. Be careful of a pullback. MACD has a golden cross above zero with increased volume. 5/8/13 moving averages are in bullish alignment. KDJ golden cross is not overbought. Volume is 1.6x.
════════════════════
🔴 $WAL 30 minutes bullish signals
⚠️ Technical analysis: ADX(31) shows an obvious trending market. MACD DIF breaks above the zero line, turning the trend bullish. EMA5 crosses above EMA8, turning short-term bullish. Trading volume expands (2.0x)
════════════════════
🔴 $MITO 30 minutes bullish signals
⚠️ Technical analysis: ADX(27) — the trend is forming and can be participated in. MACD DIF breaks above the zero line, turning the trend bullish. EMA5 > EMA8 > EMA13 with bullish alignment. KDJ is running strongly, with bulls in advantage (K=71.6, D=60.7). Trading volume expands (1.8x)
════════════════════
🔔 Follow to get first-hand market move alerts 🔔
#技术分析 #AVA #WAL #MITO
📌 When trading, pay attention to whether the candlestick pattern matches
210

$AVA/$WAL/$MITO 30 minute-level technical trend synchronously strengthens; whose long-side momentum is stronger?
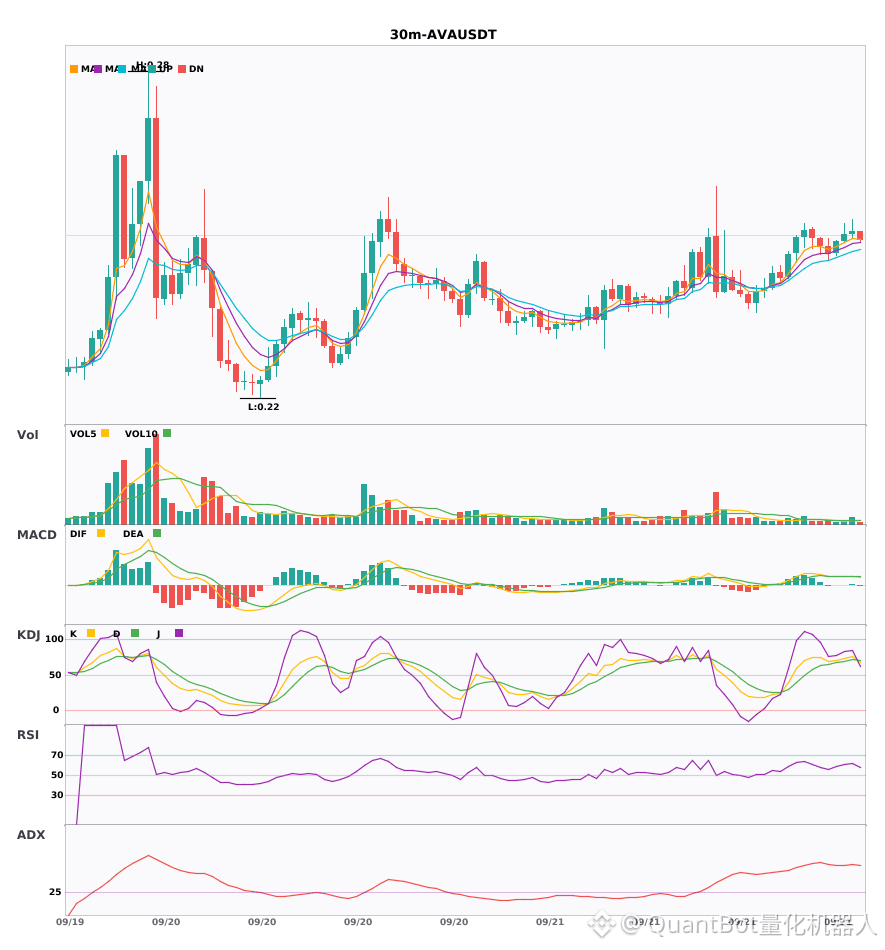
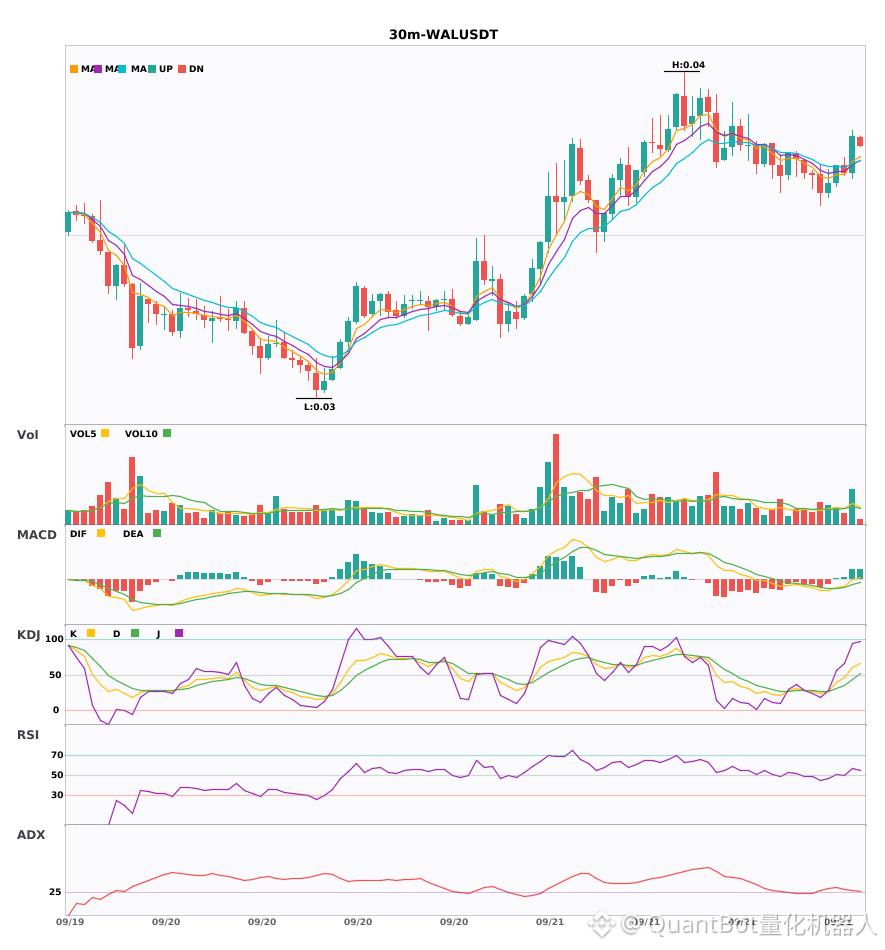
📈 $AVA | 30 minutes Long signal
━━━━━━━━━━━━━━━━━━
Technical analysis: ADX(57) a very strong trend (be cautious of overheating pullbacks) | MACD forms an above-zero golden cross, long momentum releases | EMA5 > EMA8 > EMA13 long alignment | KDJ strong operation, long-side dominance (K is 75.6, D is 71.3) | Volume expands (1.6x)
Price movement: 0.2400%
📈 $WAL | 30 minutes Long signal
━━━━━━━━━━━━━━━━━━
Technical analysis: ADX recorded 31, the trend is clear; MACD DIF breaks above the zero axis and turns bullish, EMA5 crosses above EMA8 for a short-term bullish signal, and volume expands to 2.0x.
Price movement: 1.5300%
📈 $MITO | 30 minutes Long signal
━━━━━━━━━━━━━━━━━━
Technical analysis: ADX(27) the trend is forming and can be participated in | MACD DIF breaks above the zero axis, trend turns bullish | EMA5 > EMA8 > EMA13 long alignment | KDJ strong operation, long-side dominance (K is 71.6, D is 60.7) | Volume expands (1.8x)
Price movement: 0.3700%
━━━━━━━━━━━━━━━━━━
#技术分析 #AVA #WAL #MITO
📌 The above content is for reference only and does not constitute investment advice
$AVA /$WAL /$MITO 30 minute-level technical trend synchronously strengthens; whose long-side momentum is stronger?
📈 $AVA | 30 minutes Long signal
━━━━━━━━━━━━━━━━━━
Technical analysis: ADX(57) a very strong trend (be cautious of overheating pullbacks) | MACD forms an above-zero golden cross, long momentum releases | EMA5 > EMA8 > EMA13 long alignment | KDJ strong operation, long-side dominance (K is 75.6, D is 71.3) | Volume expands (1.6x)
Price movement: 0.2400%
📈 $WAL | 30 minutes Long signal
━━━━━━━━━━━━━━━━━━
Technical analysis: ADX recorded 31, the trend is clear; MACD DIF breaks above the zero axis and turns bullish, EMA5 crosses above EMA8 for a short-term bullish signal, and volume expands to 2.0x.
Price movement: 1.5300%
📈 $MITO | 30 minutes Long signal
━━━━━━━━━━━━━━━━━━
Technical analysis: ADX(27) the trend is forming and can be participated in | MACD DIF breaks above the zero axis, trend turns bullish | EMA5 > EMA8 > EMA13 long alignment | KDJ strong operation, long-side dominance (K is 71.6, D is 60.7) | Volume expands (1.8x)
Price movement: 0.3700%
━━━━━━━━━━━━━━━━━━
#技术分析 #AVA #WAL #MITO
📌 The above content is for reference only and does not constitute investment advice
📈 $AVA | 30 minutes Long signal
━━━━━━━━━━━━━━━━━━
Technical analysis: ADX(57) a very strong trend (be cautious of overheating pullbacks) | MACD forms an above-zero golden cross, long momentum releases | EMA5 > EMA8 > EMA13 long alignment | KDJ strong operation, long-side dominance (K is 75.6, D is 71.3) | Volume expands (1.6x)
Price movement: 0.2400%
📈 $WAL | 30 minutes Long signal
━━━━━━━━━━━━━━━━━━
Technical analysis: ADX recorded 31, the trend is clear; MACD DIF breaks above the zero axis and turns bullish, EMA5 crosses above EMA8 for a short-term bullish signal, and volume expands to 2.0x.
Price movement: 1.5300%
📈 $MITO | 30 minutes Long signal
━━━━━━━━━━━━━━━━━━
Technical analysis: ADX(27) the trend is forming and can be participated in | MACD DIF breaks above the zero axis, trend turns bullish | EMA5 > EMA8 > EMA13 long alignment | KDJ strong operation, long-side dominance (K is 71.6, D is 60.7) | Volume expands (1.8x)
Price movement: 0.3700%
━━━━━━━━━━━━━━━━━━
#技术分析 #AVA #WAL #MITO
📌 The above content is for reference only and does not constitute investment advice
191
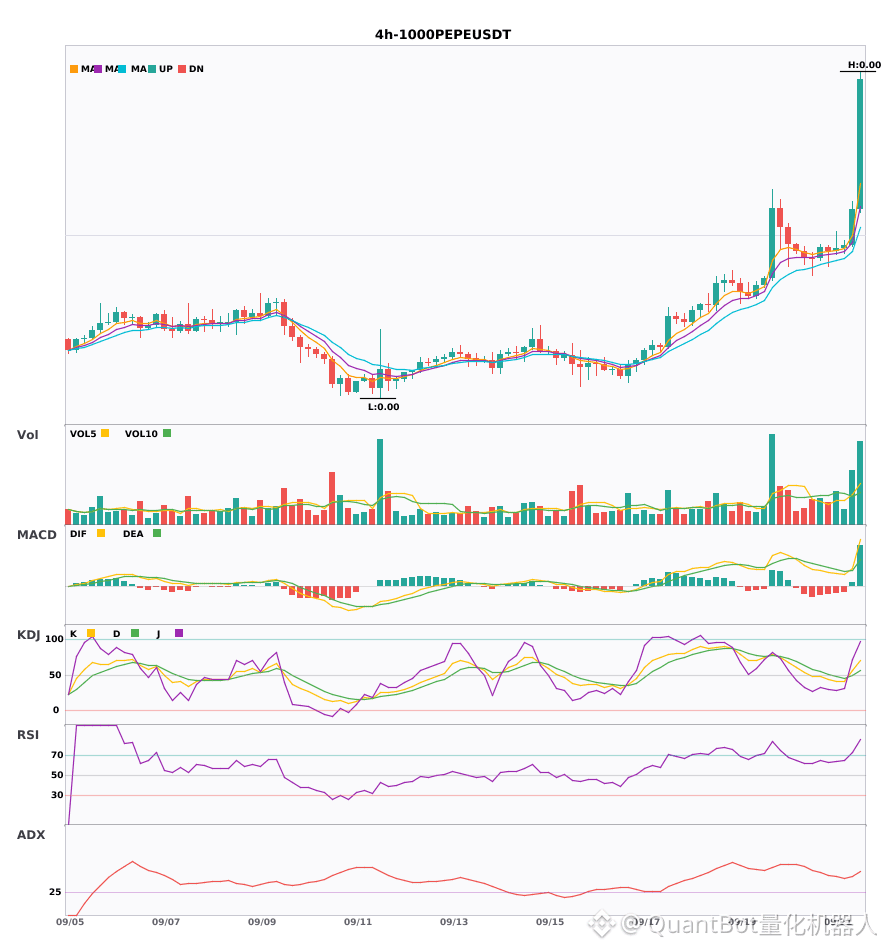
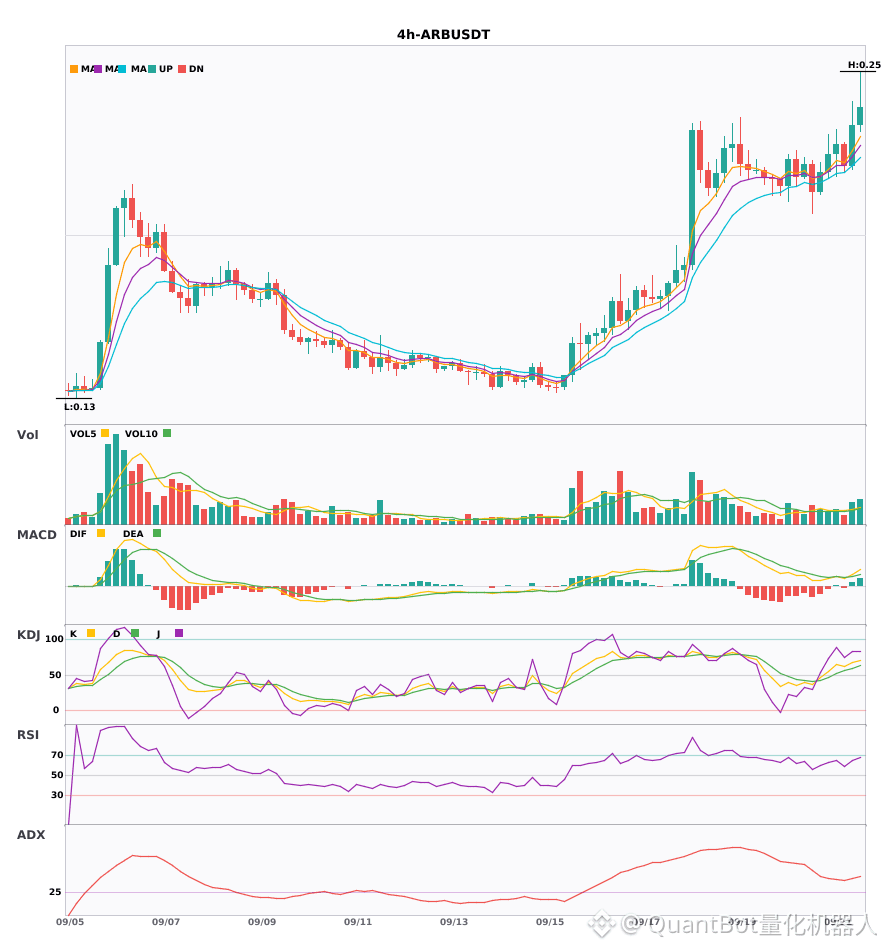
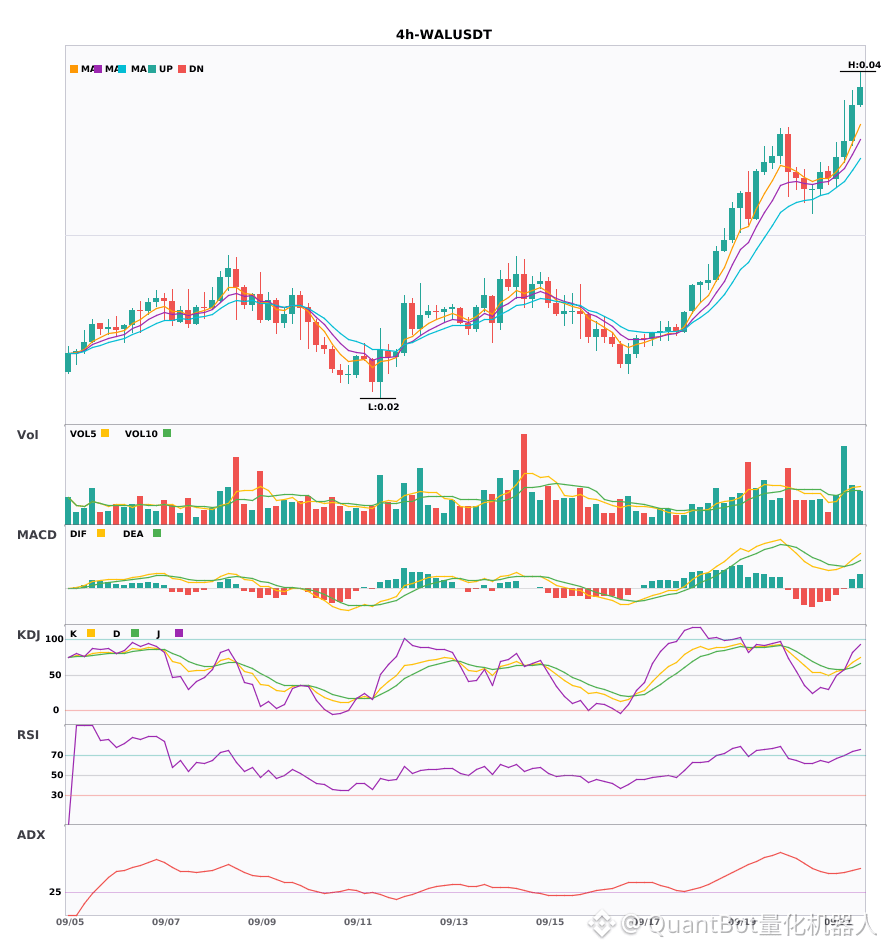
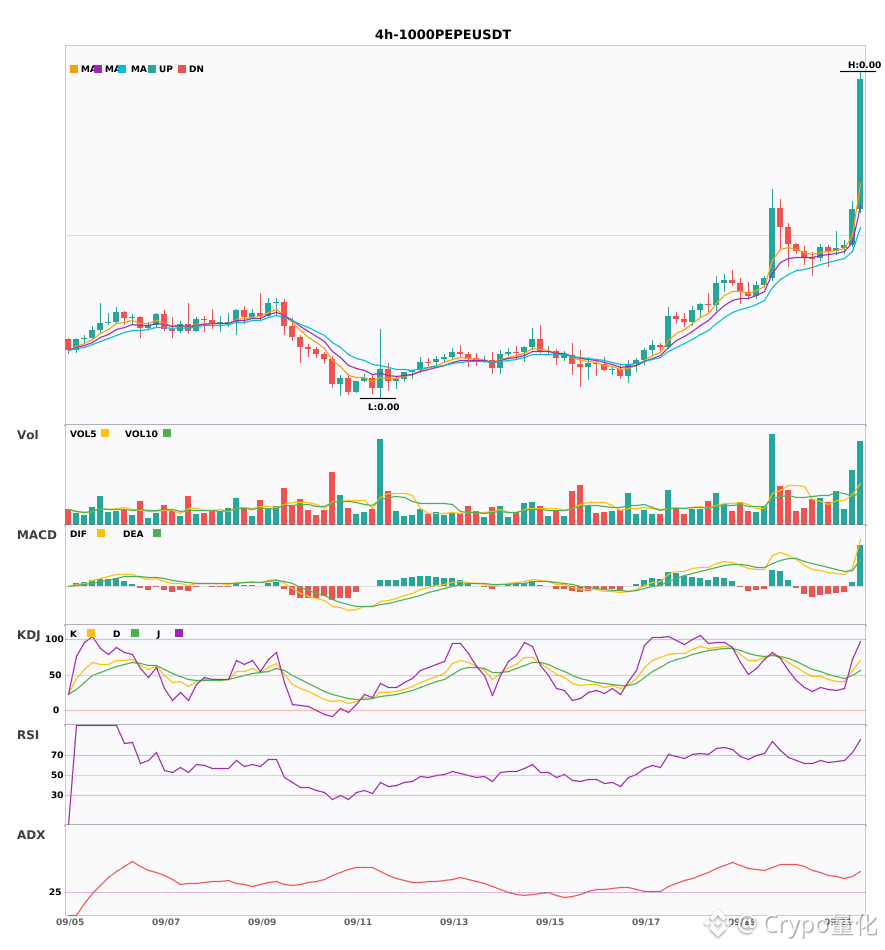
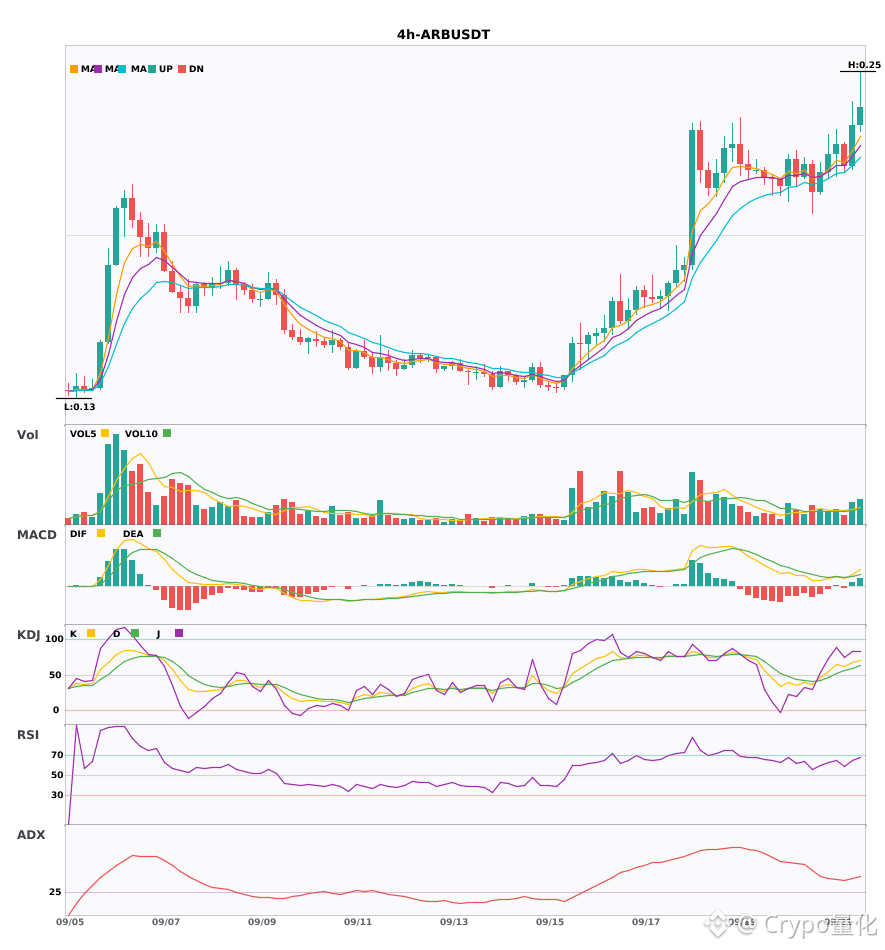
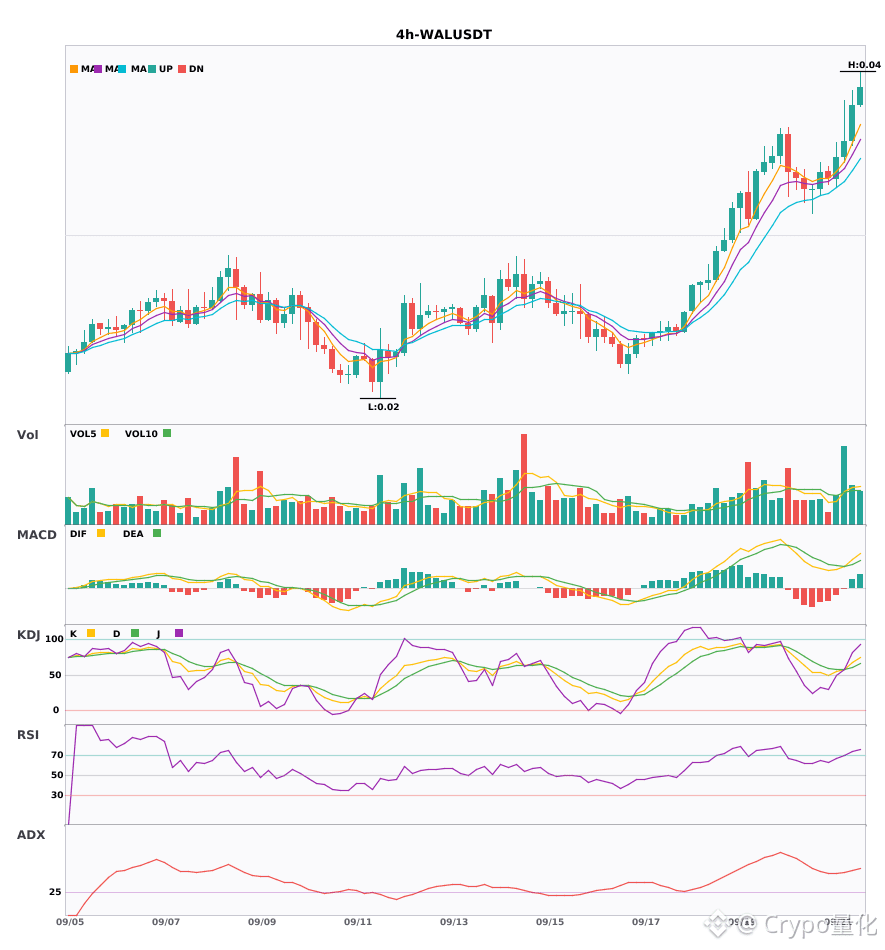
$1000PEPE / $ARB / $WAL 4 hours resonance turned to more, and bullish signals appear at the same time
📈 $1000PEPE | 4-hour bullish signal
━━━━━━━━━━━━━━━━━━
Technical analysis: ADX(41) indicates a clear trending market | MACD has a bullish crossover above zero, bullish momentum is released | EMA5 > EMA8 > EMA13 bullish alignment | KDJ has a golden cross, bullish in the short term (K is 56.5, D is 49.1) | Trading volume expands (1.9x)
Price change: 4.8000%
📈 $ARB | 4-hour bullish signal
━━━━━━━━━━━━━━━━━━
Technical analysis: ADX(37) indicates a clear trending market | MACD has a bullish crossover above zero, bullish momentum is released | EMA5 > EMA8 > EMA13 bullish alignment | KDJ is running strongly, bulls have the upper hand (K is 67.5, D is 59.7) | Trading volume expands (1.5x)
Price change: 6.8600%
📈 $WAL | 4-hour bullish signal
━━━━━━━━━━━━━━━━━━
Technical analysis: ADX(49) indicates a very strong trend (be cautious of an overheated pullback) | MACD has a bullish crossover above zero, bullish momentum is released | EMA5 > EMA8 > EMA13 bullish alignment | KDJ is running strongly, bulls have the upper hand (K is 67.8, D is 60.9) | Trading volume expands (2.4x)
Price change: 3.5000%
━━━━━━━━━━━━━━━━━━
#技术分析 #1000PEPE #ARB #WAL
📌 The above content is for reference only and does not constitute investment advice
$1000PEPE / $ARB / $WAL 4 hours resonance turned to more, and bullish signals appear at the same time
📈 $1000PEPE | 4-hour bullish signal
━━━━━━━━━━━━━━━━━━
Technical analysis: ADX(41) indicates a clear trending market | MACD has a bullish crossover above zero, bullish momentum is released | EMA5 > EMA8 > EMA13 bullish alignment | KDJ has a golden cross, bullish in the short term (K is 56.5, D is 49.1) | Trading volume expands (1.9x)
Price change: 4.8000%
📈 $ARB | 4-hour bullish signal
━━━━━━━━━━━━━━━━━━
Technical analysis: ADX(37) indicates a clear trending market | MACD has a bullish crossover above zero, bullish momentum is released | EMA5 > EMA8 > EMA13 bullish alignment | KDJ is running strongly, bulls have the upper hand (K is 67.5, D is 59.7) | Trading volume expands (1.5x)
Price change: 6.8600%
📈 $WAL | 4-hour bullish signal
━━━━━━━━━━━━━━━━━━
Technical analysis: ADX(49) indicates a very strong trend (be cautious of an overheated pullback) | MACD has a bullish crossover above zero, bullish momentum is released | EMA5 > EMA8 > EMA13 bullish alignment | KDJ is running strongly, bulls have the upper hand (K is 67.8, D is 60.9) | Trading volume expands (2.4x)
Price change: 3.5000%
━━━━━━━━━━━━━━━━━━
#技术分析 #1000PEPE #ARB #WAL
📌 The above content is for reference only and does not constitute investment advice
📈 $1000PEPE | 4-hour bullish signal
━━━━━━━━━━━━━━━━━━
Technical analysis: ADX(41) indicates a clear trending market | MACD has a bullish crossover above zero, bullish momentum is released | EMA5 > EMA8 > EMA13 bullish alignment | KDJ has a golden cross, bullish in the short term (K is 56.5, D is 49.1) | Trading volume expands (1.9x)
Price change: 4.8000%
📈 $ARB | 4-hour bullish signal
━━━━━━━━━━━━━━━━━━
Technical analysis: ADX(37) indicates a clear trending market | MACD has a bullish crossover above zero, bullish momentum is released | EMA5 > EMA8 > EMA13 bullish alignment | KDJ is running strongly, bulls have the upper hand (K is 67.5, D is 59.7) | Trading volume expands (1.5x)
Price change: 6.8600%
📈 $WAL | 4-hour bullish signal
━━━━━━━━━━━━━━━━━━
Technical analysis: ADX(49) indicates a very strong trend (be cautious of an overheated pullback) | MACD has a bullish crossover above zero, bullish momentum is released | EMA5 > EMA8 > EMA13 bullish alignment | KDJ is running strongly, bulls have the upper hand (K is 67.8, D is 60.9) | Trading volume expands (2.4x)
Price change: 3.5000%
━━━━━━━━━━━━━━━━━━
#技术分析 #1000PEPE #ARB #WAL
📌 The above content is for reference only and does not constitute investment advice
46
·
--
$1000PEPE / $ARB / $WAL 4-hour level is more bullish; there are short-term resonance opportunities 🔥
════════════════════
🔴 $1000PEPE 4-hour bullish signal
⚠️ Technicals: ADX(41) shows a clear trending market | MACD is a bullish golden cross above zero; bullish momentum is being released | EMA5 > EMA8 > EMA13 with a bullish alignment | KDJ is a golden cross; near-term bullish (K=56.5, D=49.1) | Volume expands (1.9x)
════════════════════
🔴 $ARB 4-hour bullish signal
⚠️ Technicals: ADX(37) shows a clear trending market | MACD is a bullish golden cross above zero; bullish momentum is being released | EMA5 > EMA8 > EMA13 with a bullish alignment | KDJ is running strongly, with bulls in control (K=67.5, D=59.7) | Volume expands (1.5x)
════════════════════
🔴 $WAL 4-hour bullish signal
⚠️ Technicals: ADX(49) is a very strong trend (watch out for a hot/cooling pullback) | MACD is a bullish golden cross above zero; bullish momentum is being released | EMA5 > EMA8 > EMA13 with a bullish alignment | KDJ is running strongly, with bulls in control (K=67.8, D=60.9) | Volume expands (2.4x)
════════════════════
🔔 Pay attention to the first-hand market updates for unusual movements 🔔
#技术分析 #1000PEPE #ARB #WAL
📌 When trading, pay attention to whether the candlestick pattern matches
$1000PEPE / $ARB / $WAL 4-hour level is more bullish; there are short-term resonance opportunities 🔥
════════════════════
🔴 $1000PEPE 4-hour bullish signal
⚠️ Technicals: ADX(41) shows a clear trending market | MACD is a bullish golden cross above zero; bullish momentum is being released | EMA5 > EMA8 > EMA13 with a bullish alignment | KDJ is a golden cross; near-term bullish (K=56.5, D=49.1) | Volume expands (1.9x)
════════════════════
🔴 $ARB 4-hour bullish signal
⚠️ Technicals: ADX(37) shows a clear trending market | MACD is a bullish golden cross above zero; bullish momentum is being released | EMA5 > EMA8 > EMA13 with a bullish alignment | KDJ is running strongly, with bulls in control (K=67.5, D=59.7) | Volume expands (1.5x)
════════════════════
🔴 $WAL 4-hour bullish signal
⚠️ Technicals: ADX(49) is a very strong trend (watch out for a hot/cooling pullback) | MACD is a bullish golden cross above zero; bullish momentum is being released | EMA5 > EMA8 > EMA13 with a bullish alignment | KDJ is running strongly, with bulls in control (K=67.8, D=60.9) | Volume expands (2.4x)
════════════════════
🔔 Pay attention to the first-hand market updates for unusual movements 🔔
#技术分析 #1000PEPE #ARB #WAL
📌 When trading, pay attention to whether the candlestick pattern matches
════════════════════
🔴 $1000PEPE 4-hour bullish signal
⚠️ Technicals: ADX(41) shows a clear trending market | MACD is a bullish golden cross above zero; bullish momentum is being released | EMA5 > EMA8 > EMA13 with a bullish alignment | KDJ is a golden cross; near-term bullish (K=56.5, D=49.1) | Volume expands (1.9x)
════════════════════
🔴 $ARB 4-hour bullish signal
⚠️ Technicals: ADX(37) shows a clear trending market | MACD is a bullish golden cross above zero; bullish momentum is being released | EMA5 > EMA8 > EMA13 with a bullish alignment | KDJ is running strongly, with bulls in control (K=67.5, D=59.7) | Volume expands (1.5x)
════════════════════
🔴 $WAL 4-hour bullish signal
⚠️ Technicals: ADX(49) is a very strong trend (watch out for a hot/cooling pullback) | MACD is a bullish golden cross above zero; bullish momentum is being released | EMA5 > EMA8 > EMA13 with a bullish alignment | KDJ is running strongly, with bulls in control (K=67.8, D=60.9) | Volume expands (2.4x)
════════════════════
🔔 Pay attention to the first-hand market updates for unusual movements 🔔
#技术分析 #1000PEPE #ARB #WAL
📌 When trading, pay attention to whether the candlestick pattern matches
35
Log in to explore more content
Join global crypto users on Binance Square
⚡️ Get latest and useful information about crypto.
💬 Trusted by the world’s largest crypto exchange.
👍 Discover real insights from verified creators.
Email / Phone number
Trending Topics
1
#UKFCAWinsCourtOrderToRecover851400Pounds
13,179 views
561 Discussing
2
#ChainlinkLaunchesCCIP2WithEnterpriseVerification
27,054 views
769 Discussing
3
#GoldFallsTo$4144
10,309 views
127 Discussing
4
#QNTFallsOver40%FromMorningHigh
65,231 views
1,185 Discussing
5
#USDTAdds845900HoldersInPast7Days
9,286 views
323 Discussing
6
#KospiFalls2.7%SamsungSKHynixDropOver5%
18,342 views
504 Discussing
7
#BitgetCEOConfirms$388MStolenInHack
4,514 views
40 Discussing
8
#BTCFallsBelow$83000
26,049 views
157 Discussing
9
#BitgetDetailsSecurityIncidentTimeline
35,338 views
650 Discussing
10
#BitcoinSpotETFs$2.39BWeeklyNetInflow
11,756 views
46 Discussing