
Strom Breaker
17.7k Posts

Strom Breaker
 Square Verified+
Web3 Explorer| Pro Crypto Influncer, NFTs & DeFi and crypto 👑.BNB || BTC .Pro Signal | Professional Signal Provider — Clean crypto signals based on price
Open Trade
Occasional Trader
1.8 Years
2 Following
30.4K+ Followers
24.6K+ Liked
Posts
Portfolio
All
Quotes
Live
$MARSCOIN is showing bearish momentum, and the current setup favors a short position from the marked entry zone.
Entry Zone:
0.1938151 – 0.1881700
Take Profit Levels:
TP1: 0.1872197
TP2: 0.1815464
TP3: 0.1758730
TP4: 0.1701997
TP5: 0.1645264
Stop Loss: 0.2013419
Leverage: 10x
Manage your risk carefully and consider securing partial profits as price reaches each target.
$MarsCoin
Entry Zone:
0.1938151 – 0.1881700
Take Profit Levels:
TP1: 0.1872197
TP2: 0.1815464
TP3: 0.1758730
TP4: 0.1701997
TP5: 0.1645264
Stop Loss: 0.2013419
Leverage: 10x
Manage your risk carefully and consider securing partial profits as price reaches each target.
$MarsCoin
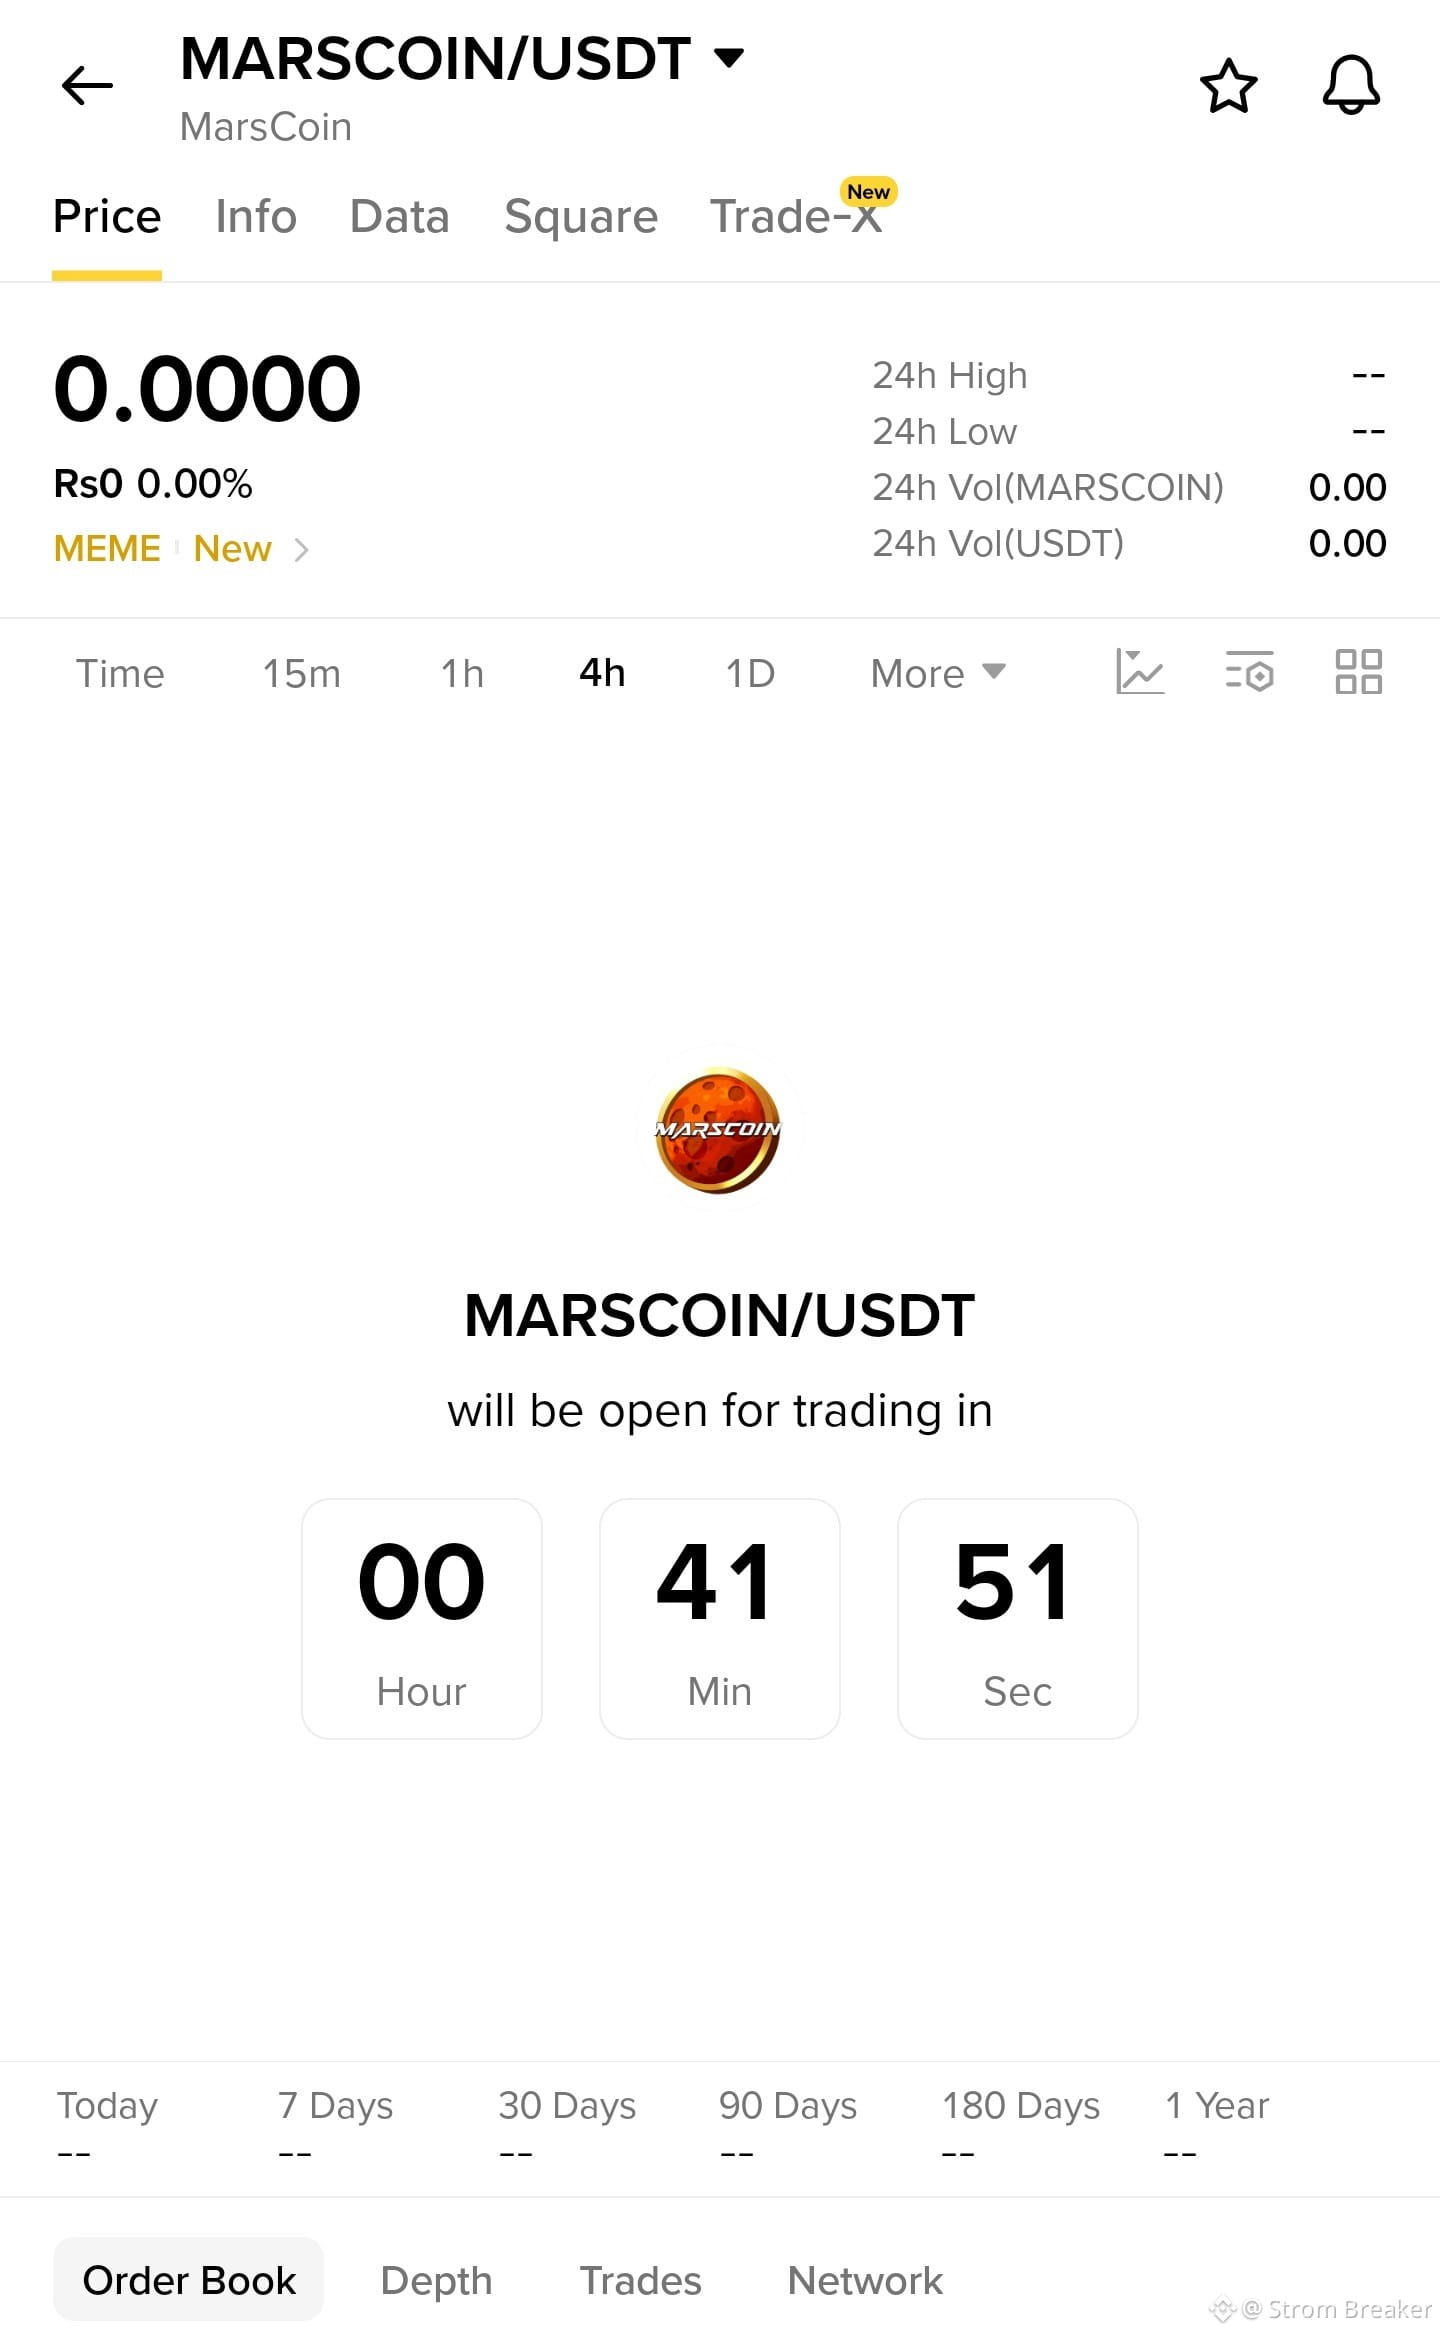
$UAI is showing a potential bullish setup on the 15-minute chart. Price is approaching the entry zone, so I’m watching for a clean reaction and confirmation before entering.
Direction: LONG
Timeframe: 15M
Leverage: 10x Isolated
Entry Zone:
0.328442 – 0.338600
Take Profit Levels:
TP1 — 0.340276
TP2 — 0.3503832
TP3 — 0.3604904
TP4 — 0.3705977
TP5 — 0.3807049
Stop Loss: 0.314898
The idea is simple: let the price respect the entry zone and confirm bullish momentum. If the setup invalidates, respect the stop loss and protect your capital. Always manage risk carefully when using leverage.
$UAI
Direction: LONG
Timeframe: 15M
Leverage: 10x Isolated
Entry Zone:
0.328442 – 0.338600
Take Profit Levels:
TP1 — 0.340276
TP2 — 0.3503832
TP3 — 0.3604904
TP4 — 0.3705977
TP5 — 0.3807049
Stop Loss: 0.314898
The idea is simple: let the price respect the entry zone and confirm bullish momentum. If the setup invalidates, respect the stop loss and protect your capital. Always manage risk carefully when using leverage.
$UAI
🔴🎁 5 SOL RED PACKET GIVEAWAY! 🎁🔴
I’m giving away 5 SOL tokens to lucky winners! 🚀💰
❤️ Like this post
🔁 Repost
👤 Follow me
💬 Comment “SOL” below
That’s it! No wallet address needed. ✅
🏆 Total Prize: 5 SOL
🔥 Join now and don’t miss it!
Good luck everyone! 🍀🚀
#sol #solana #Giveaway #Crypto #redpacket
$SOL
I’m giving away 5 SOL tokens to lucky winners! 🚀💰
❤️ Like this post
🔁 Repost
👤 Follow me
💬 Comment “SOL” below
That’s it! No wallet address needed. ✅
🏆 Total Prize: 5 SOL
🔥 Join now and don’t miss it!
Good luck everyone! 🍀🚀
#sol #solana #Giveaway #Crypto #redpacket
$SOL
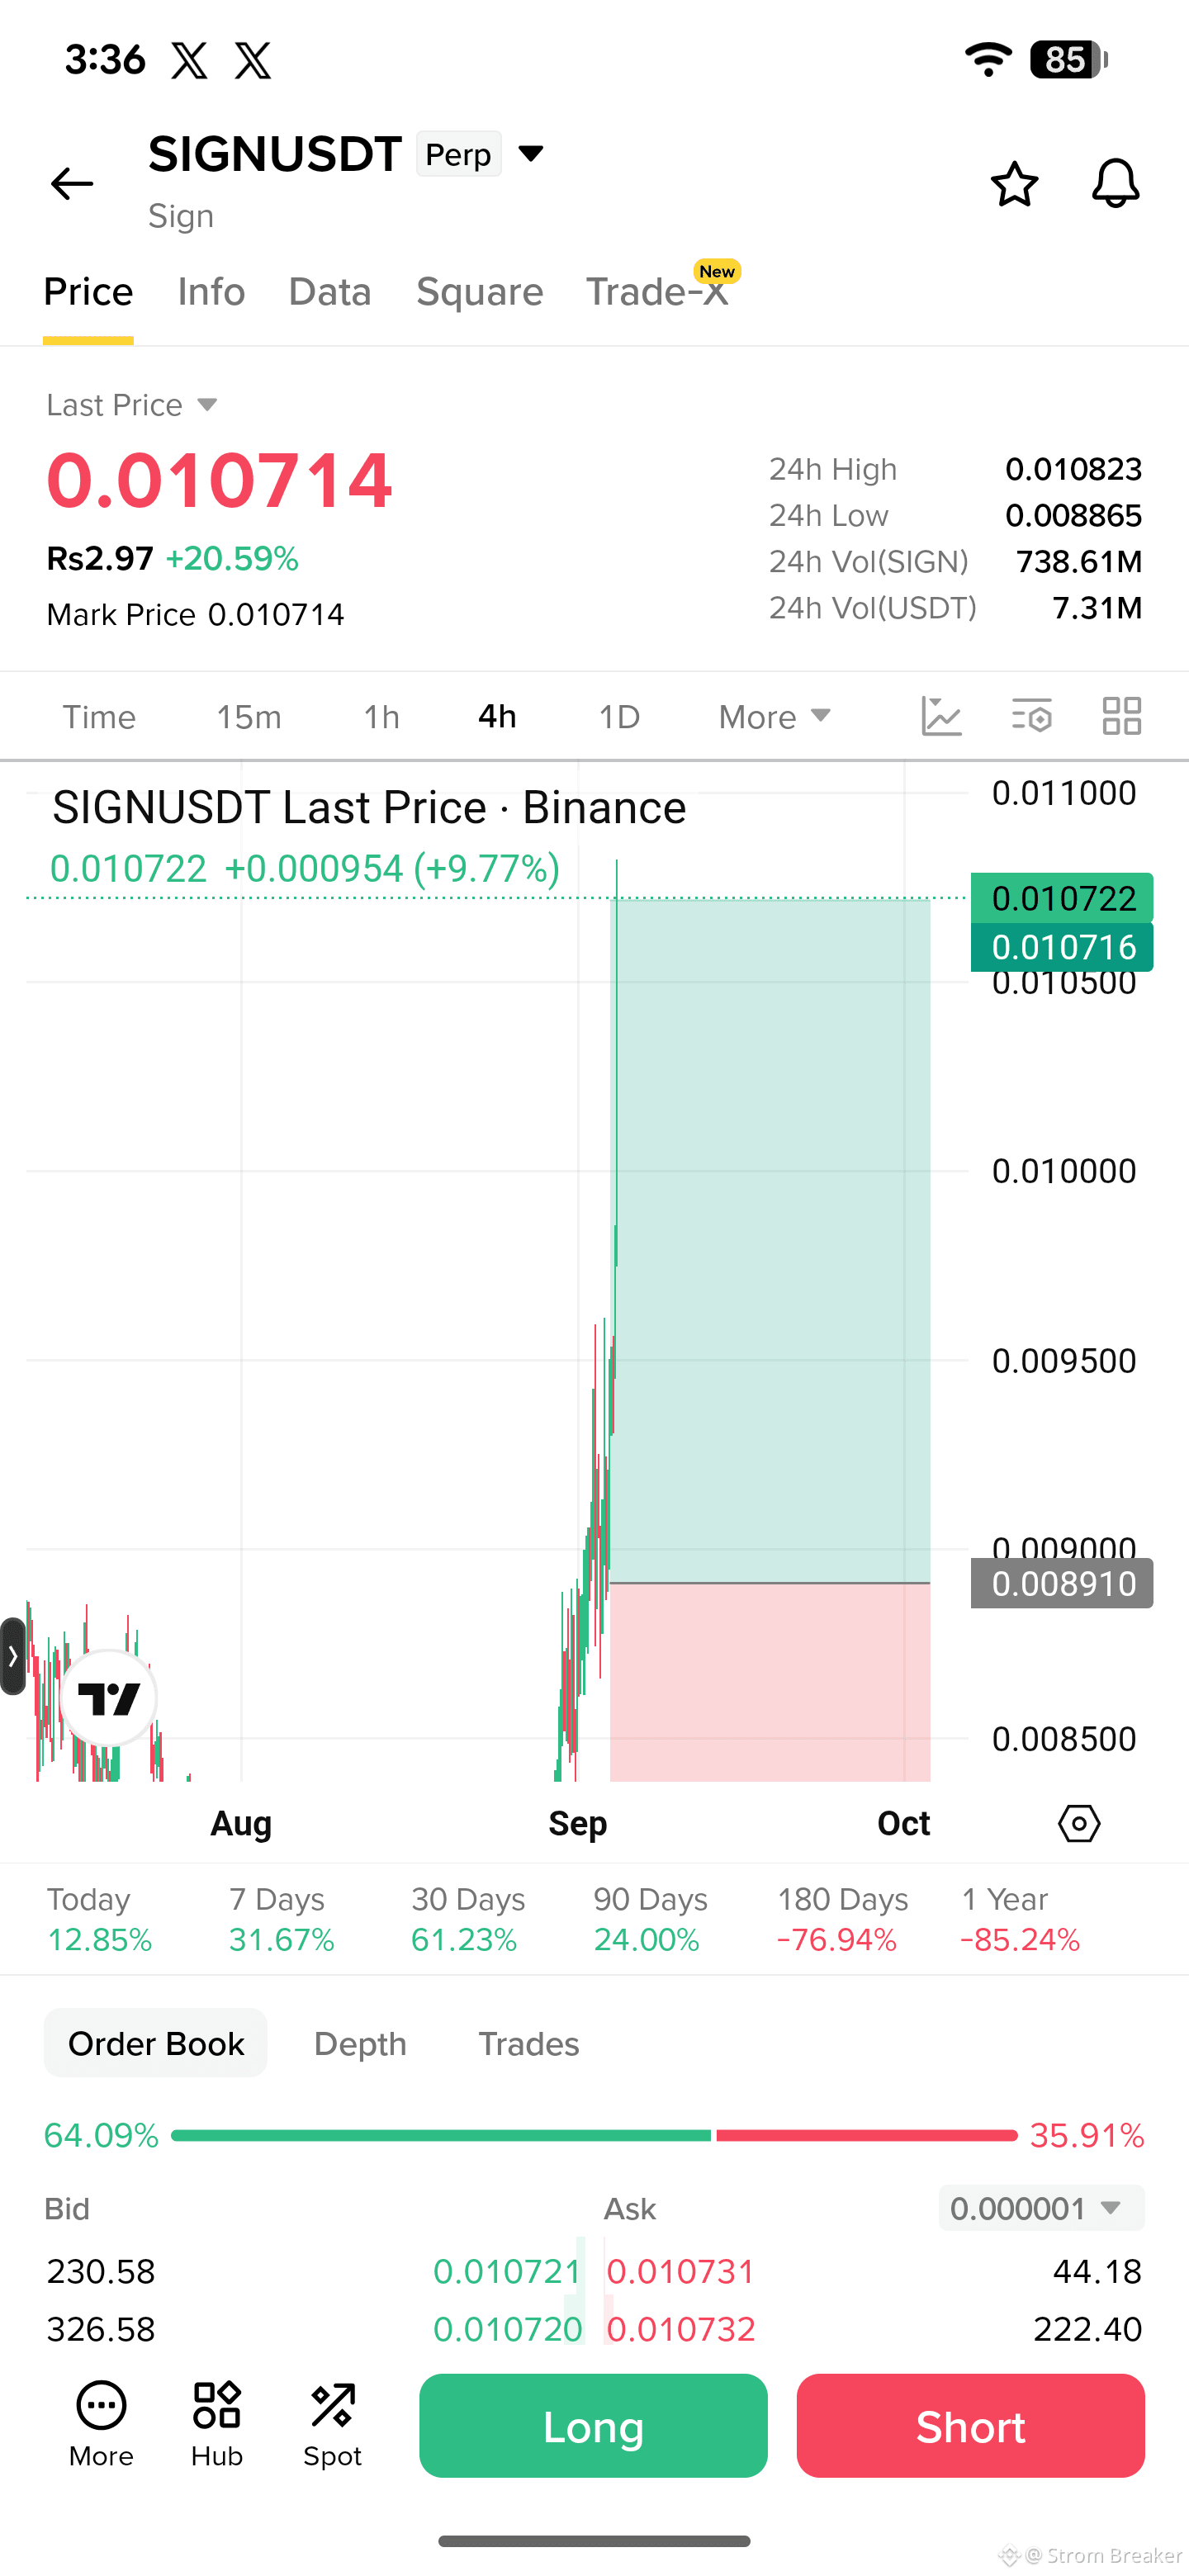
$SIGN /USDT — LONG SETUP
The Price Action: Thunder Strategy is showing a potential long opportunity on SIGN/USDT.
Entry Zone:
0.0087060
0.0084448
Take Profit Targets:
TP1 — 0.0087559
TP2 — 0.0089378
TP3 — 0.0091197
TP4 — 0.0093016
Stop Loss: 0.0081575
Leverage: 10x Isolated
Plan the trade carefully and manage your risk. Don’t over-leverage just because the setup looks attractive.
$SIGN
The Price Action: Thunder Strategy is showing a potential long opportunity on SIGN/USDT.
Entry Zone:
0.0087060
0.0084448
Take Profit Targets:
TP1 — 0.0087559
TP2 — 0.0089378
TP3 — 0.0091197
TP4 — 0.0093016
Stop Loss: 0.0081575
Leverage: 10x Isolated
Plan the trade carefully and manage your risk. Don’t over-leverage just because the setup looks attractive.
$SIGN
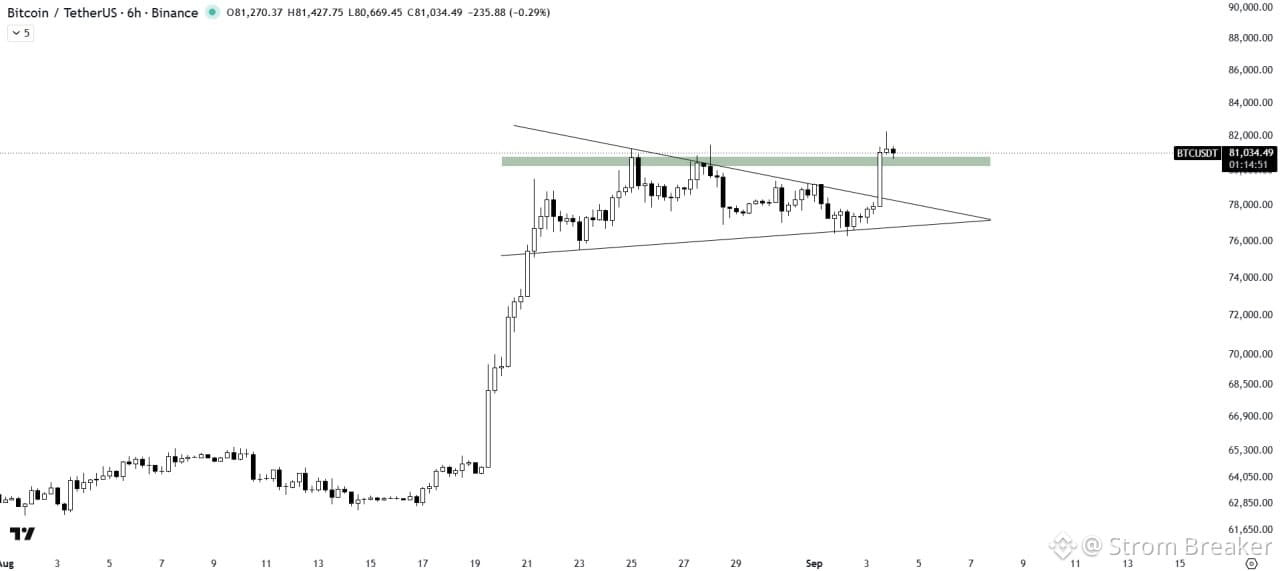
$BTC /USDT Bullish Breakout Setup
Bitcoin has finally broken out of the pennant pattern with strong volume, which is a positive sign that buyers are stepping in.
Right now, BTC is retesting a key support/resistance level. This is the area to watch closely.
Bullish Scenario:
If BTC holds above this level and confirms the retest with strong buying pressure, it could open the door for another upward move.
Invalidation:
If price gets rejected and falls back below the breakout zone, the breakout could turn into a fakeout.
For now, the structure remains bullish, but confirmation is key. Don’t chase the move—wait for the retest and watch how price reacts.
BTC is at a decision point. Keep an eye on the next candles.
$BTC
Bitcoin has finally broken out of the pennant pattern with strong volume, which is a positive sign that buyers are stepping in.
Right now, BTC is retesting a key support/resistance level. This is the area to watch closely.
Bullish Scenario:
If BTC holds above this level and confirms the retest with strong buying pressure, it could open the door for another upward move.
Invalidation:
If price gets rejected and falls back below the breakout zone, the breakout could turn into a fakeout.
For now, the structure remains bullish, but confirmation is key. Don’t chase the move—wait for the retest and watch how price reacts.
BTC is at a decision point. Keep an eye on the next candles.
$BTC
$CAP /USDT Short Setup 🔥
Timeframe: 15 Minutes
Direction: SHORT
Leverage: 10x
Entry Zone:
0.0566088 – 0.0549600
Take Profit Levels:
TP1: 0.0546824
TP2: 0.0530254
TP3: 0.0513683
TP4: 0.0497113
TP5: 0.0480542
Stop Loss: 0.0588072
The setup is targeting a downside move from the entry zone. Consider managing risk carefully and securing partial profits as price reaches each target.
Trade smart. Don’t over-leverage.
$CAP
Timeframe: 15 Minutes
Direction: SHORT
Leverage: 10x
Entry Zone:
0.0566088 – 0.0549600
Take Profit Levels:
TP1: 0.0546824
TP2: 0.0530254
TP3: 0.0513683
TP4: 0.0497113
TP5: 0.0480542
Stop Loss: 0.0588072
The setup is targeting a downside move from the entry zone. Consider managing risk carefully and securing partial profits as price reaches each target.
Trade smart. Don’t over-leverage.
$CAP
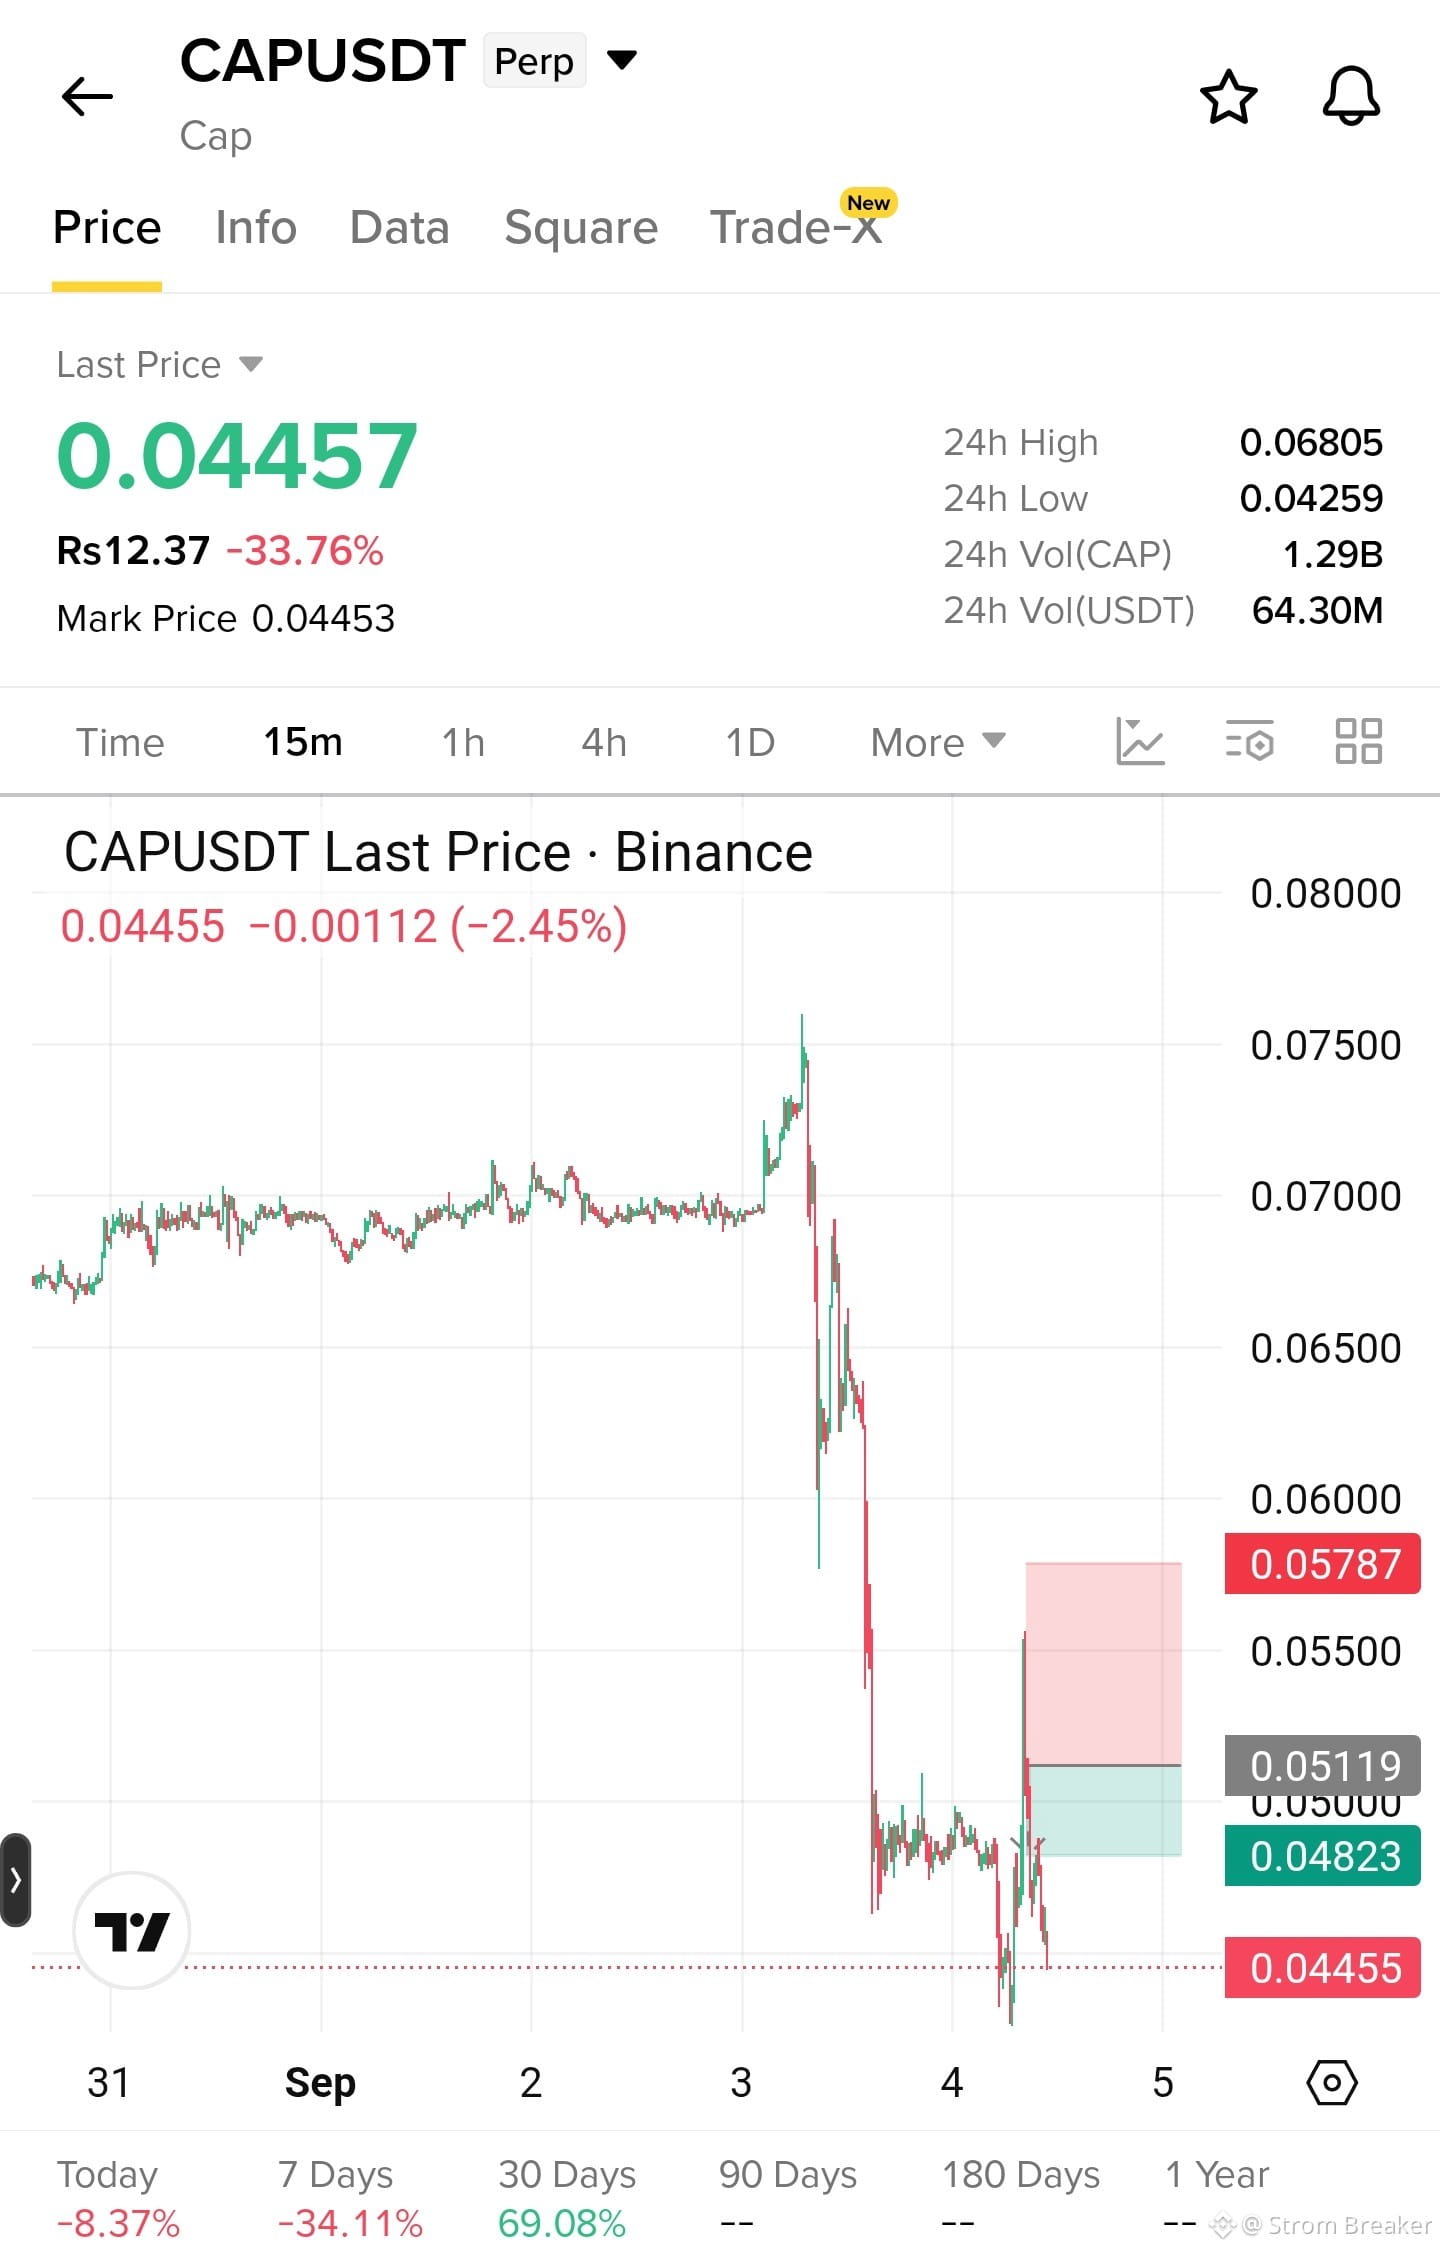
$BTR is showing a bullish setup on the 15-minute timeframe, with the current structure favoring a potential upside move.
LONG
Entry Zone: 0.0500035 – 0.0515500
Leverage: 10x
Take Profit Levels: 0.0518051
0.0533439
0.0548827
0.0564214
0.0579602
Stop Loss: 0.0479415
Manage your risk properly and avoid overleveraging. Let the price react around the entry zone before taking the trade.
$BTR
LONG
Entry Zone: 0.0500035 – 0.0515500
Leverage: 10x
Take Profit Levels: 0.0518051
0.0533439
0.0548827
0.0564214
0.0579602
Stop Loss: 0.0479415
Manage your risk properly and avoid overleveraging. Let the price react around the entry zone before taking the trade.
$BTR
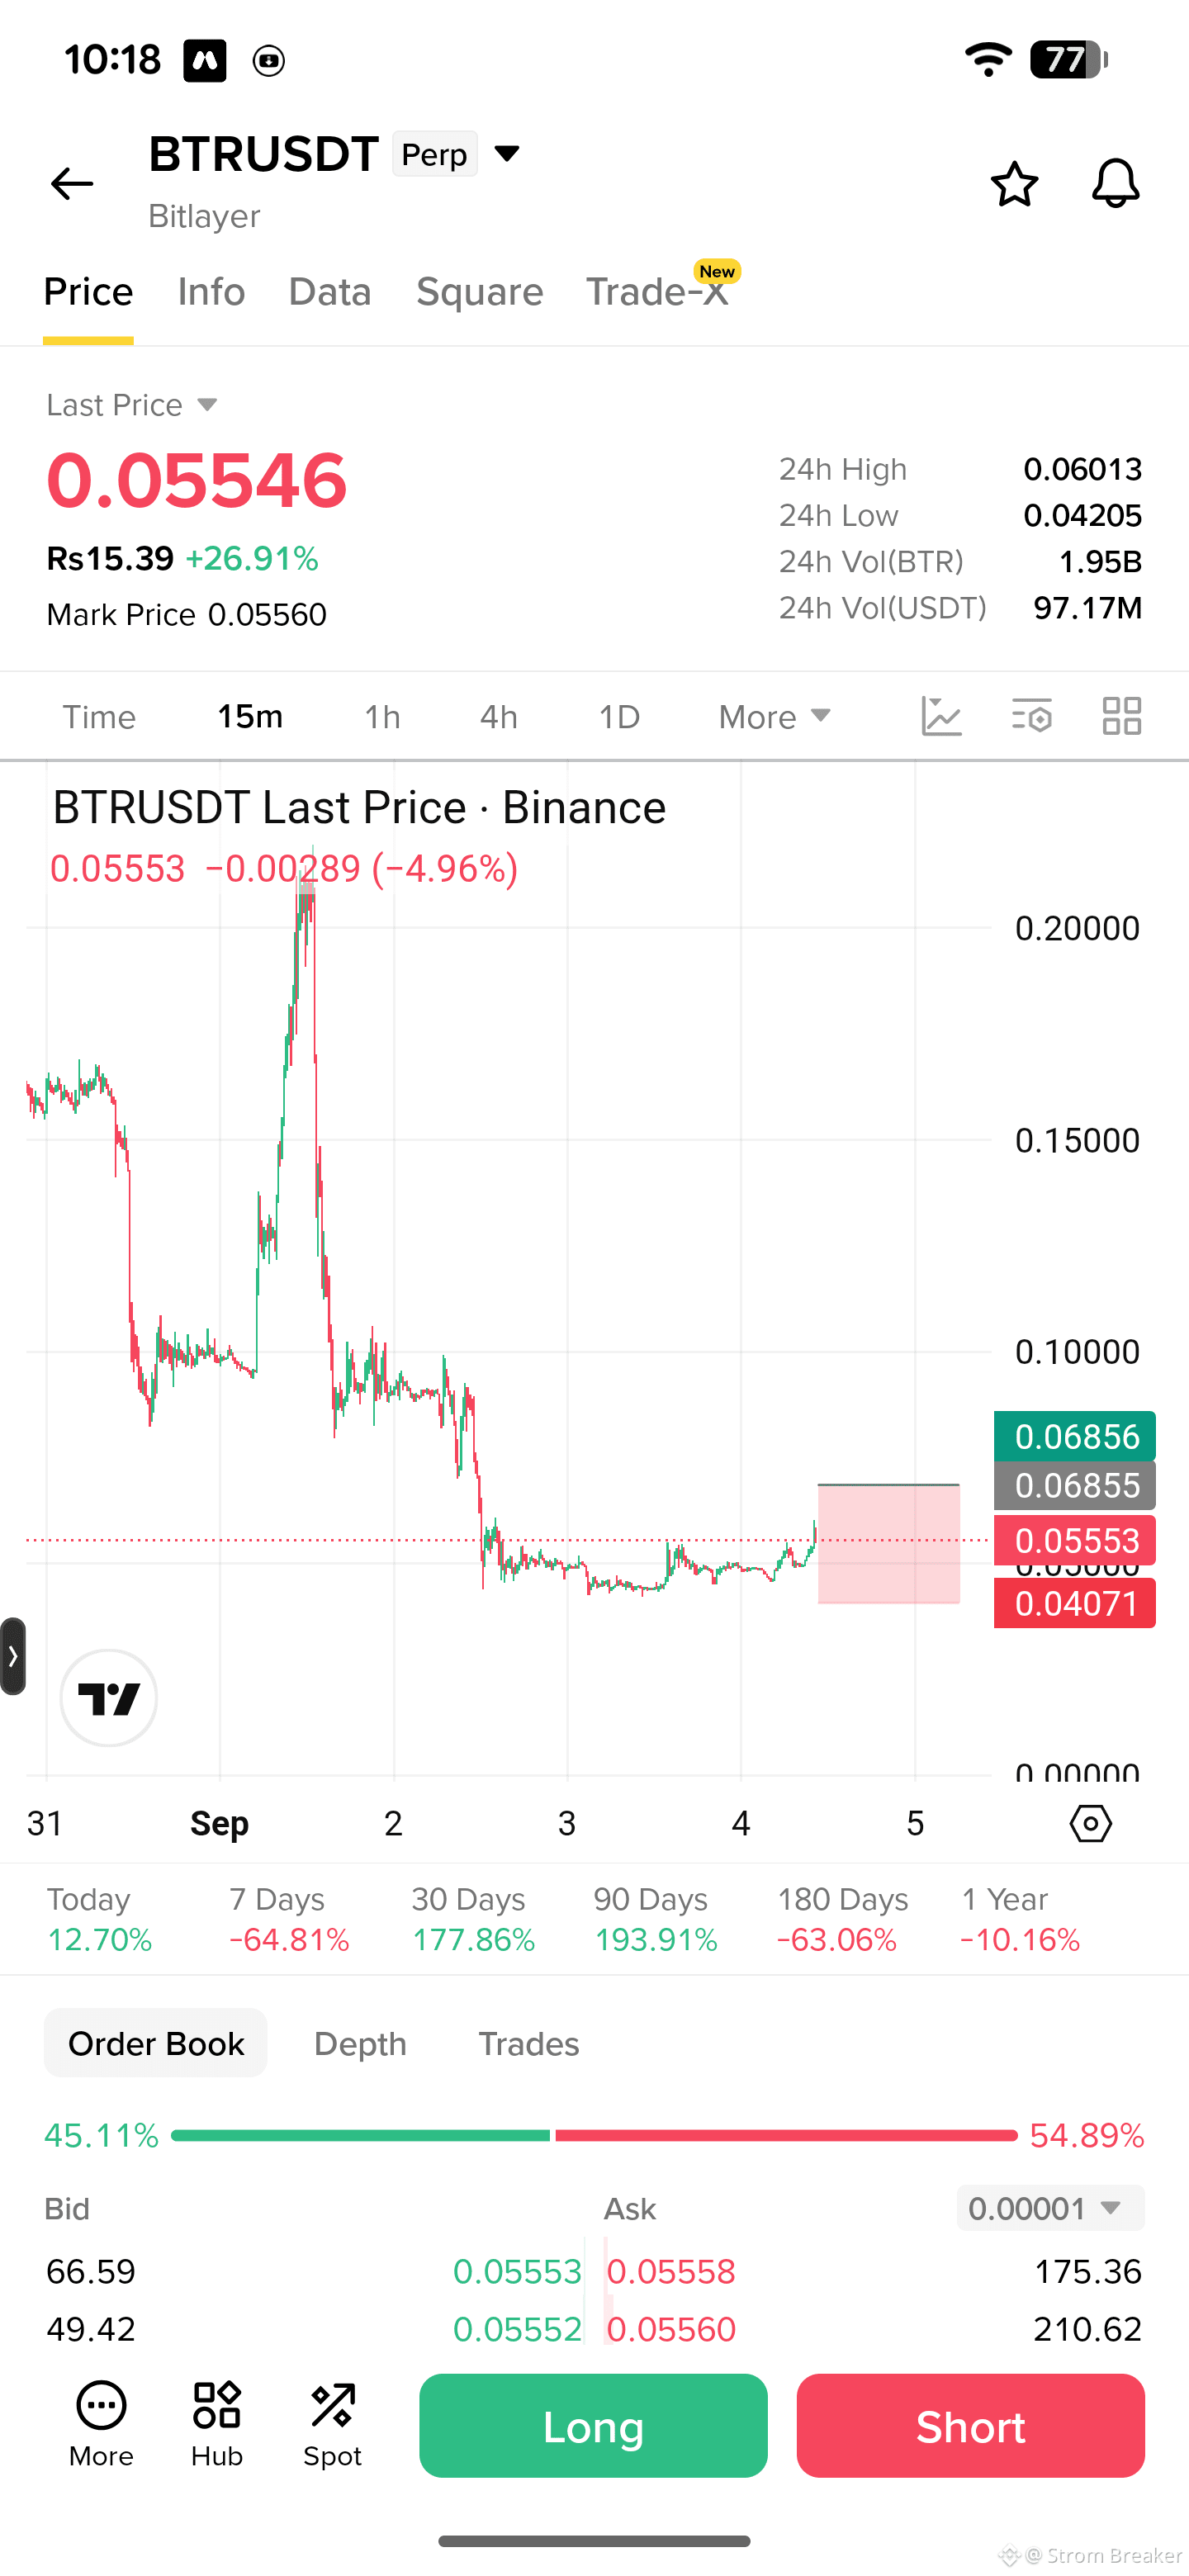
MTC Indicator | $ZEST /USDT SHORT Setup
Timeframe: 15 Minutes
Direction: SHORT
Entry Zone: 0.1707843 – 0.1658100
🎯 Take Profit Levels: 1️⃣ 0.1649726
2️⃣ 0.1599734
3️⃣ 0.1549743
4️⃣ 0.1499751
5️⃣ 0.1449759
Stop Loss: 0.1774167
Leverage: 10x
The setup is looking bearish on the 15M timeframe. If price enters the zone and confirms rejection, the downside targets come into play one by one.
Manage your risk carefully and avoid overleveraging.
$ZEST
Timeframe: 15 Minutes
Direction: SHORT
Entry Zone: 0.1707843 – 0.1658100
🎯 Take Profit Levels: 1️⃣ 0.1649726
2️⃣ 0.1599734
3️⃣ 0.1549743
4️⃣ 0.1499751
5️⃣ 0.1449759
Stop Loss: 0.1774167
Leverage: 10x
The setup is looking bearish on the 15M timeframe. If price enters the zone and confirms rejection, the downside targets come into play one by one.
Manage your risk carefully and avoid overleveraging.
$ZEST
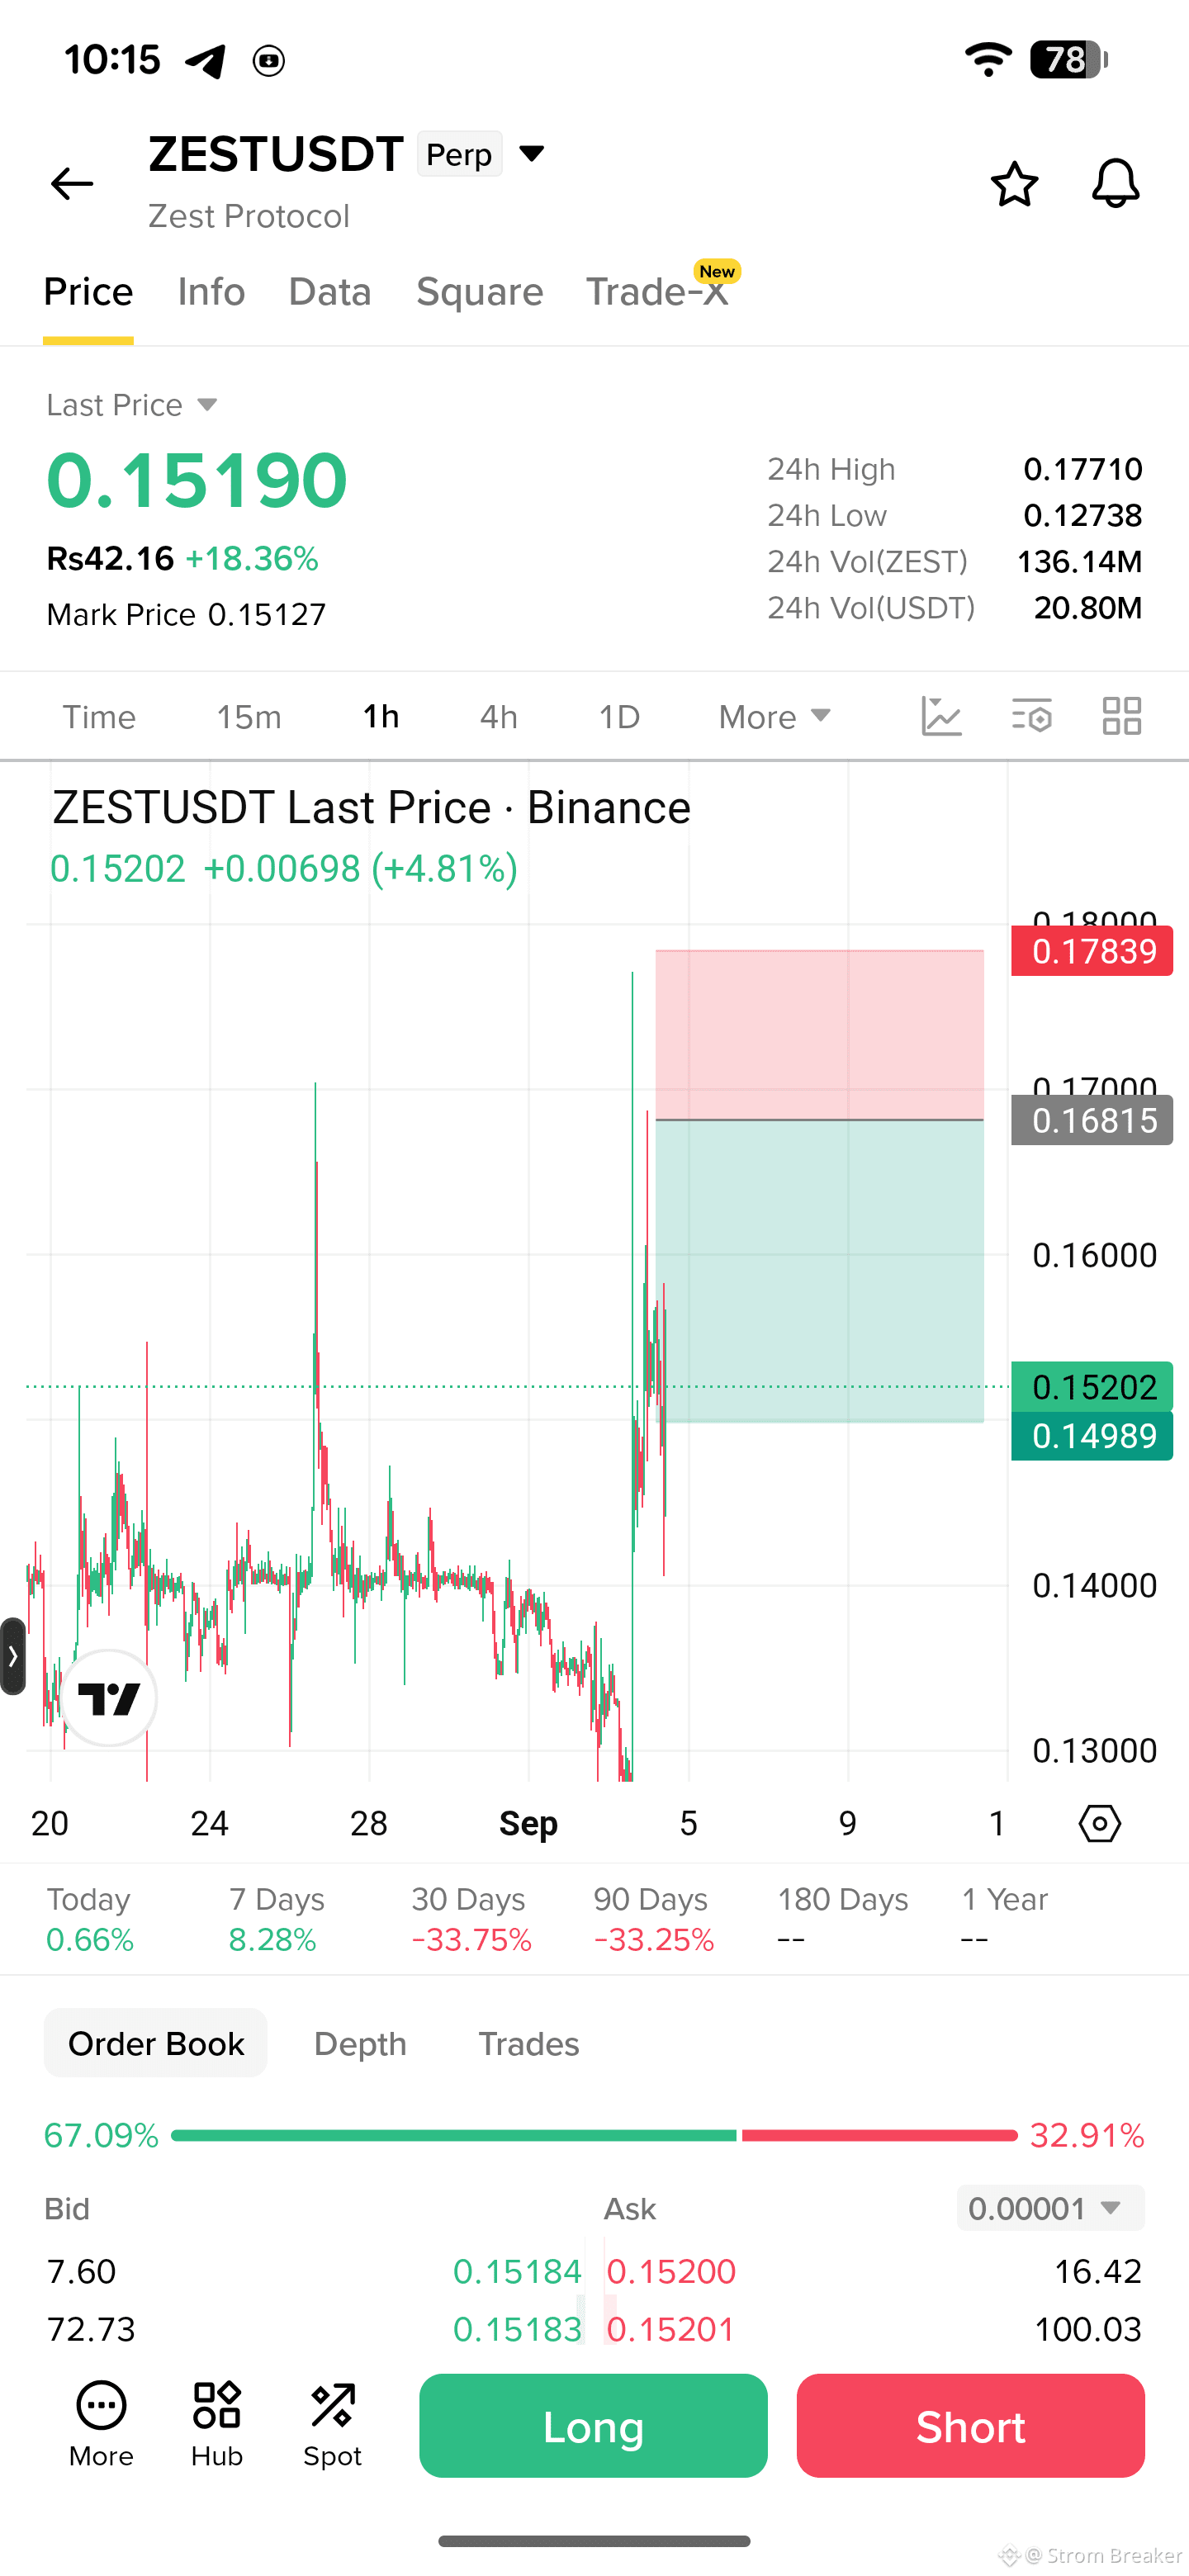
$CAP /USDT — SHORT
Timeframe: 15 Minutes
Leverage: 10x
Entry Zone:
0.0566088 – 0.0549600
Take Profit Levels:
TP1 — 0.0546824
TP2 — 0.0530254
TP3 — 0.0513683
TP4 — 0.0497113
TP5 — 0.0480542
Stop Loss: 0.0588072
The setup is looking bearish on the 15M timeframe. If price enters the zone and confirms rejection, the downside targets can be approached step by step. Consider securing partial profits along the way and keep risk under control.
10x leverage is aggressive — manage your position size carefully.
$CAP
Timeframe: 15 Minutes
Leverage: 10x
Entry Zone:
0.0566088 – 0.0549600
Take Profit Levels:
TP1 — 0.0546824
TP2 — 0.0530254
TP3 — 0.0513683
TP4 — 0.0497113
TP5 — 0.0480542
Stop Loss: 0.0588072
The setup is looking bearish on the 15M timeframe. If price enters the zone and confirms rejection, the downside targets can be approached step by step. Consider securing partial profits along the way and keep risk under control.
10x leverage is aggressive — manage your position size carefully.
$CAP
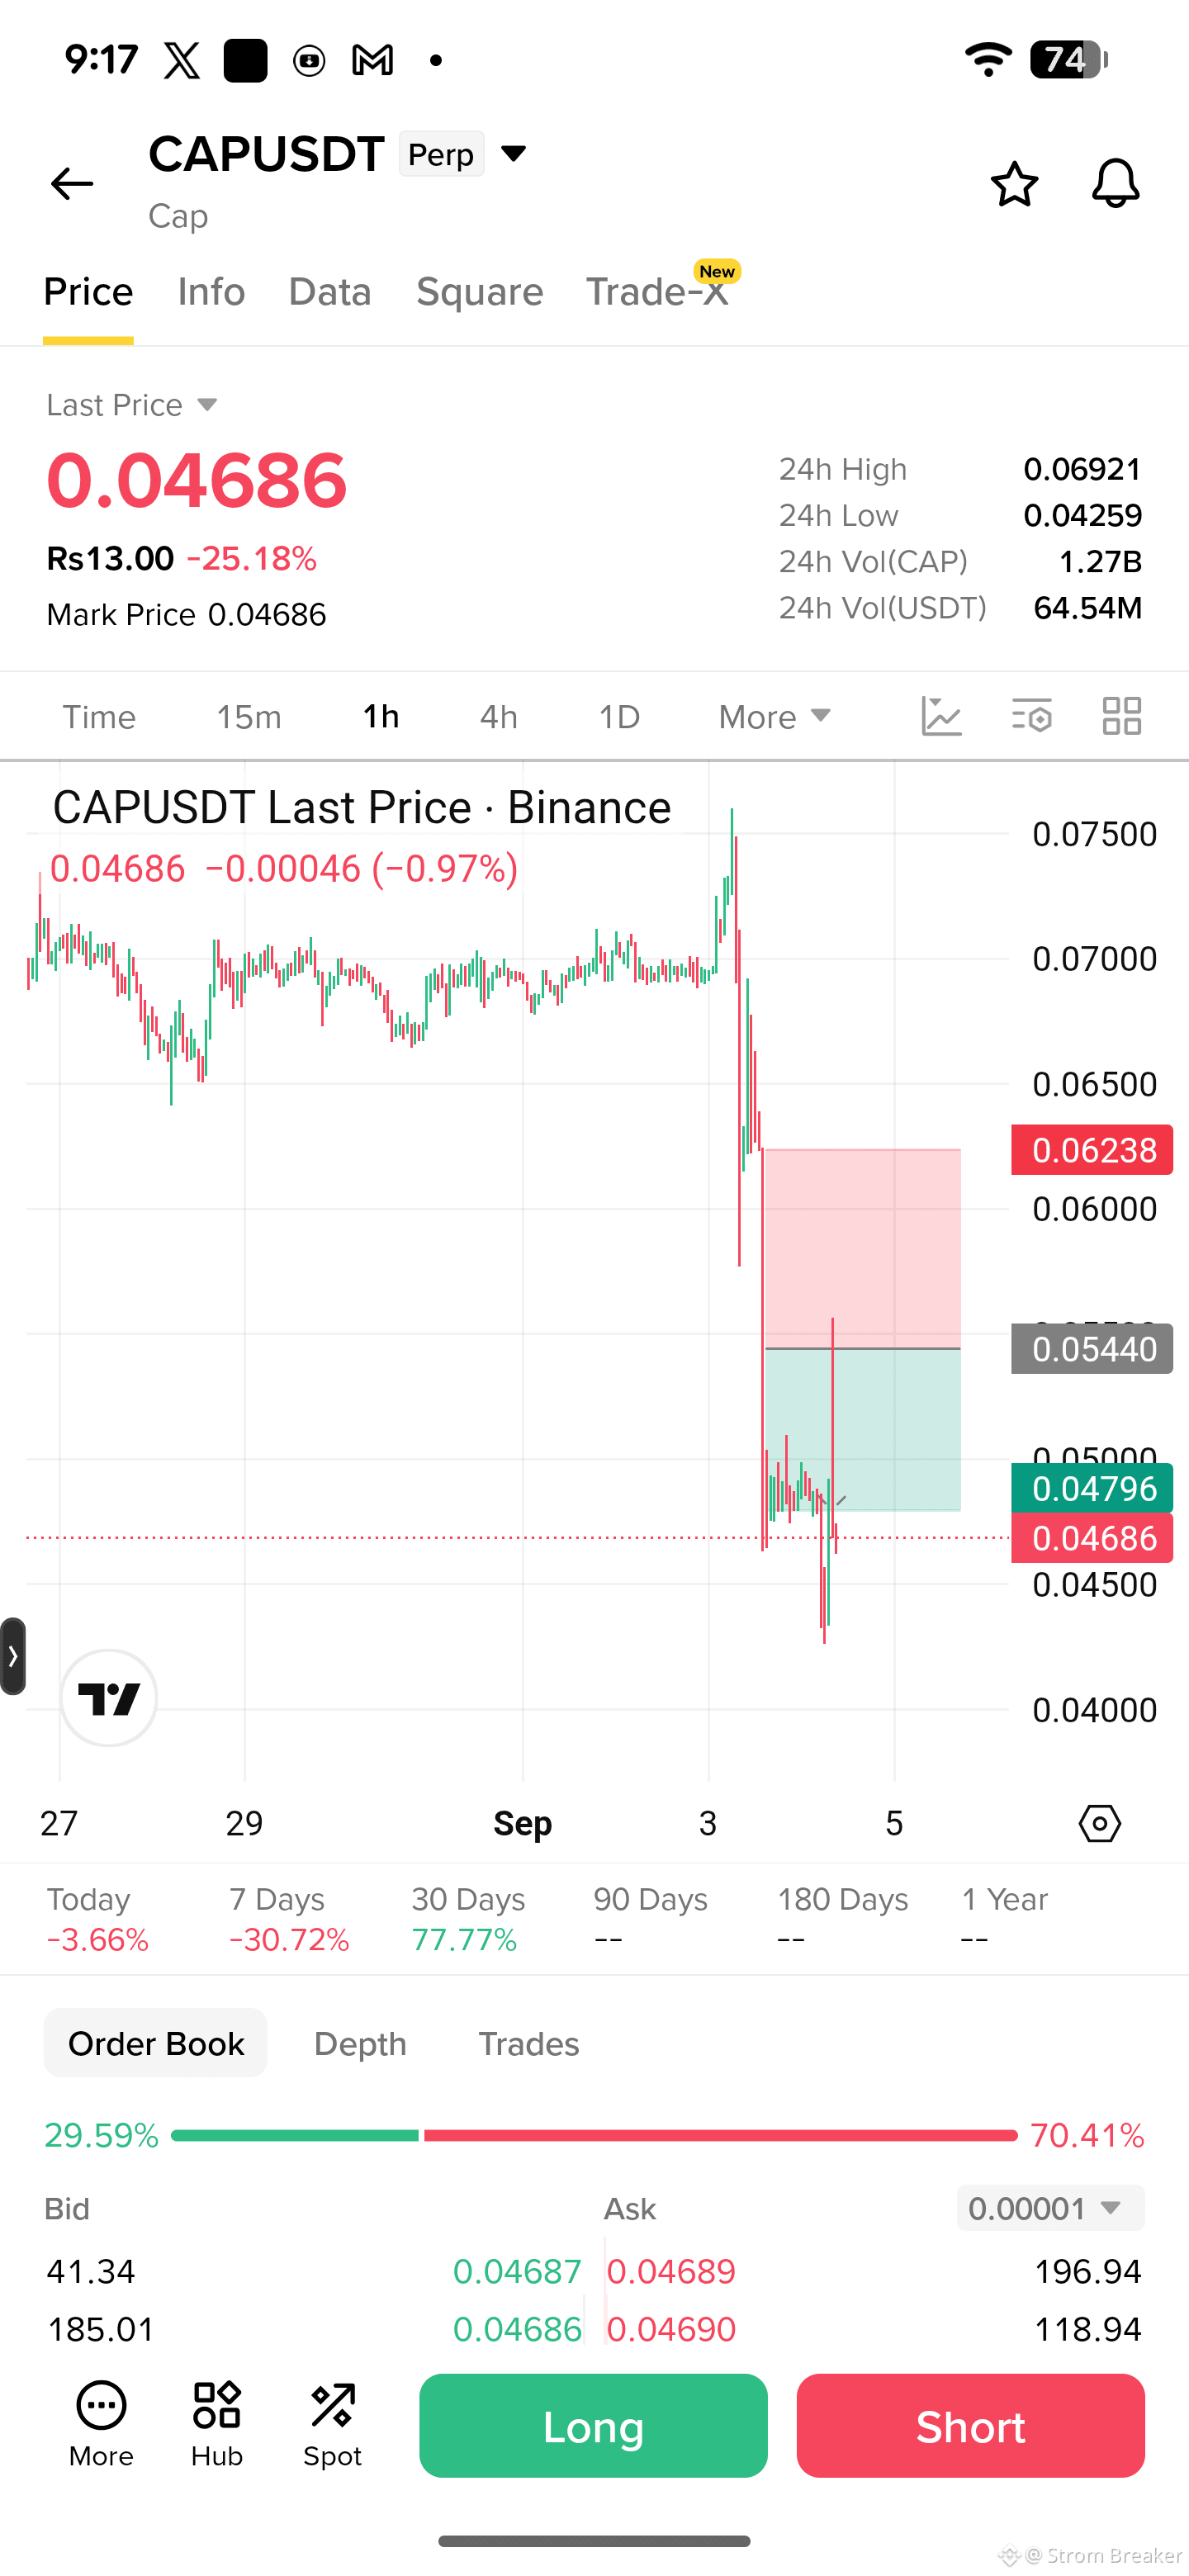
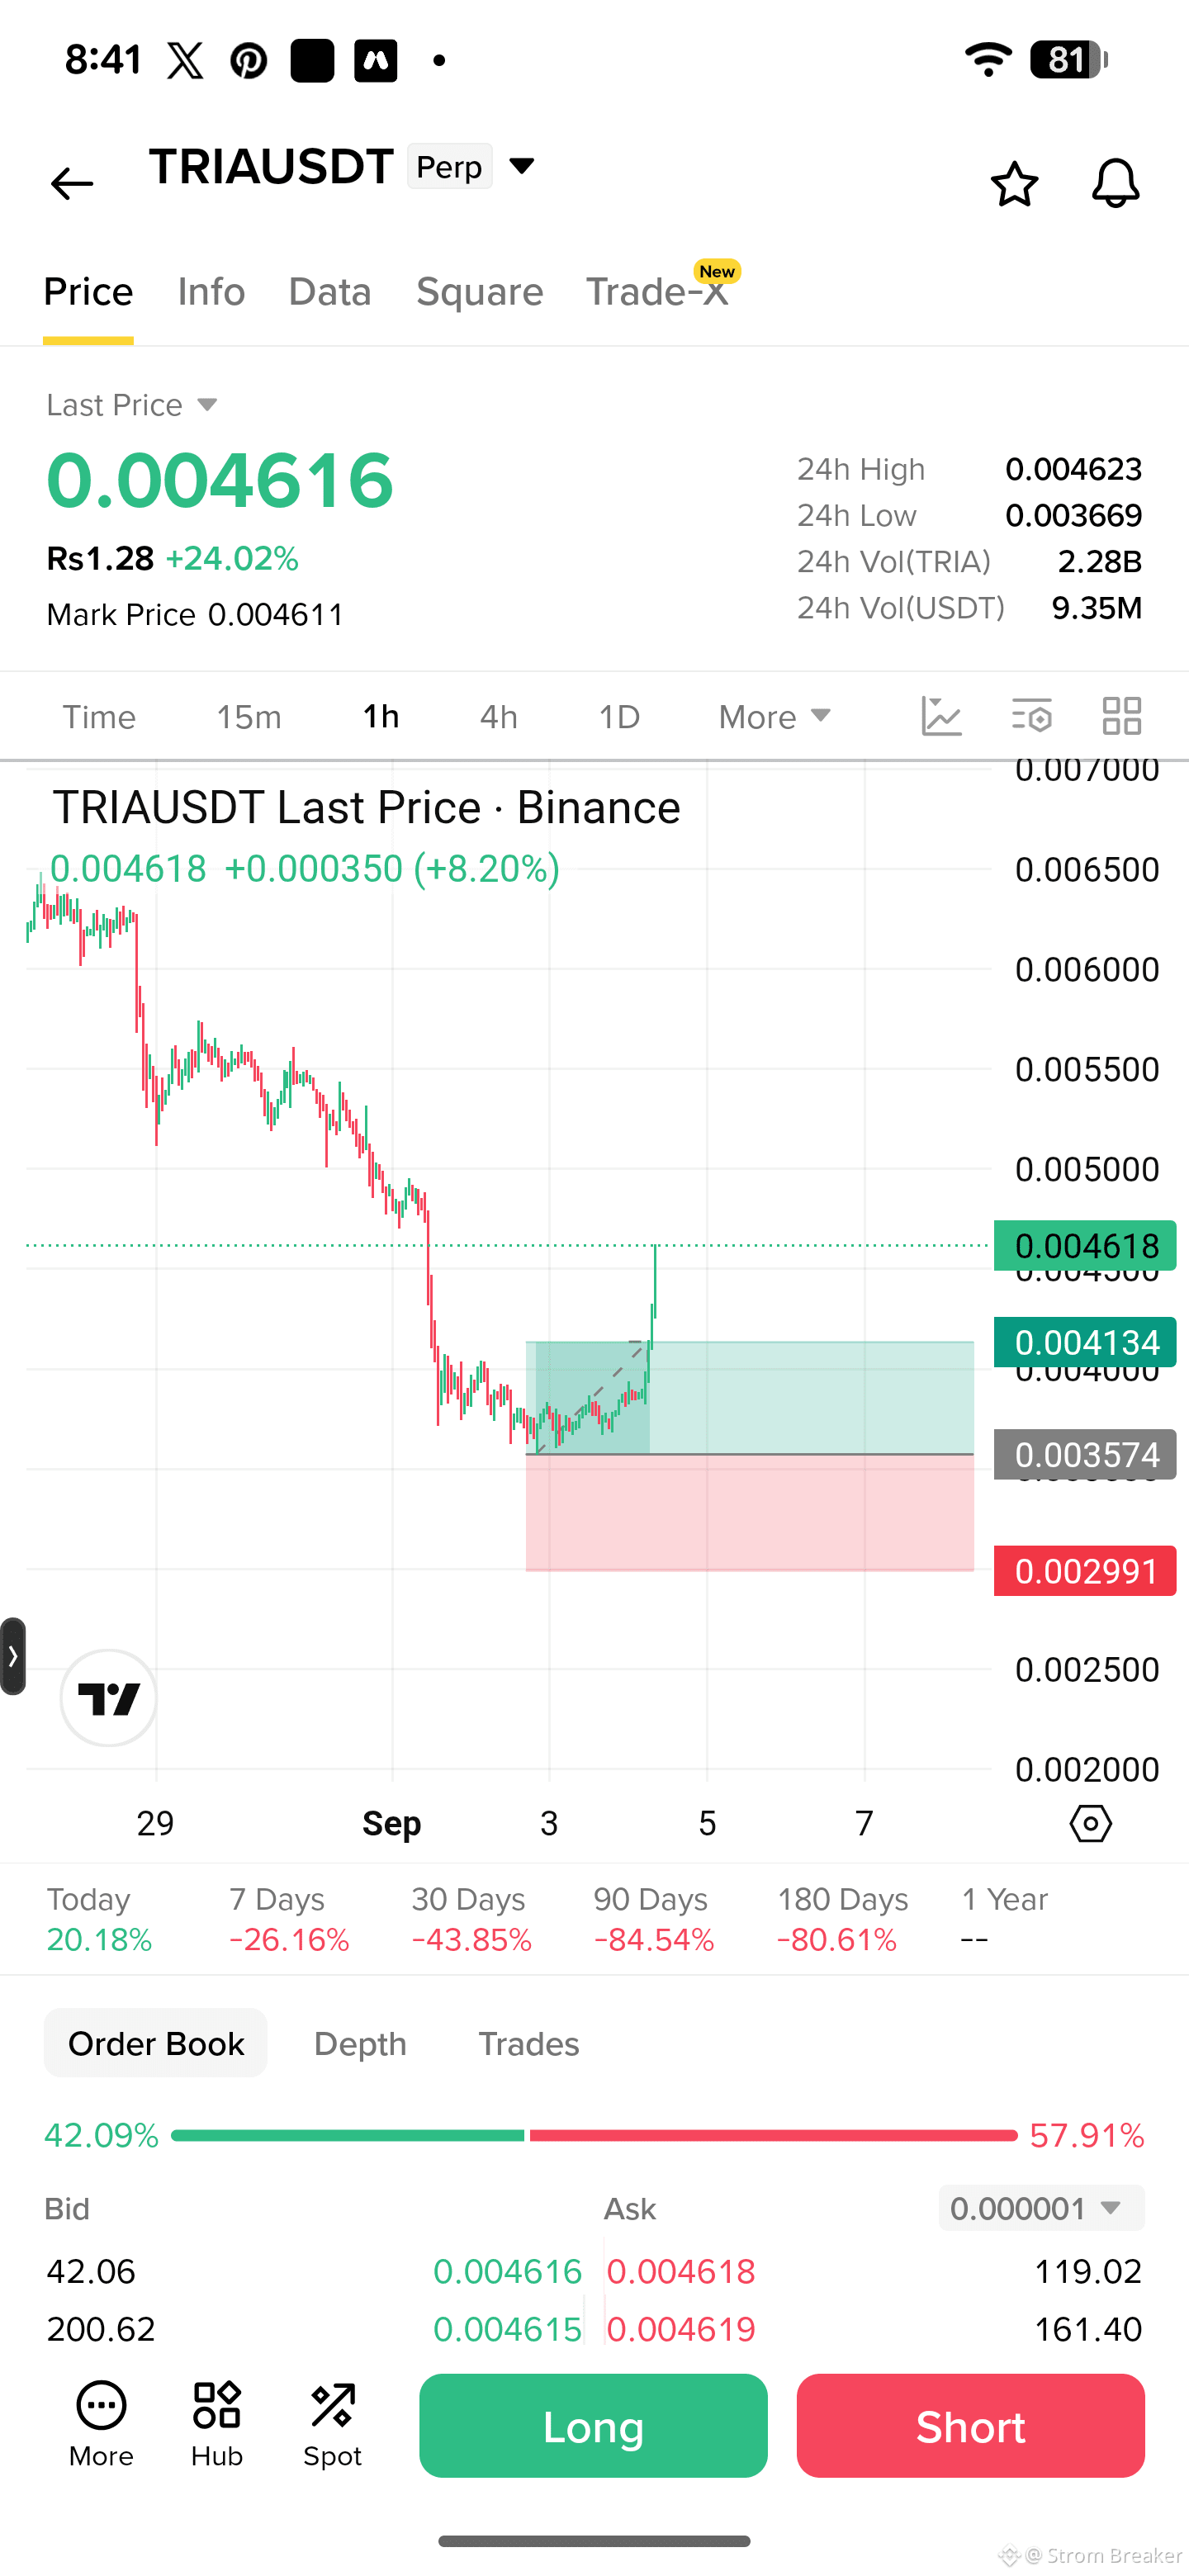
$TRIA is showing a potential bullish setup on the 15-minute timeframe. The plan is to look for entries within the marked zone and target a gradual move higher.
Direction: LONG
Entry Zone: 0.0035763 – 0.0036870
Targets: 0.0037052
0.0038153
0.0039253
0.0040354
0.0041454
Stop Loss: 0.00342891
Leverage: 10x
Manage your position carefully and consider taking partial profits as the targets are reached. Risk management comes first.
$TRIA
Direction: LONG
Entry Zone: 0.0035763 – 0.0036870
Targets: 0.0037052
0.0038153
0.0039253
0.0040354
0.0041454
Stop Loss: 0.00342891
Leverage: 10x
Manage your position carefully and consider taking partial profits as the targets are reached. Risk management comes first.
$TRIA
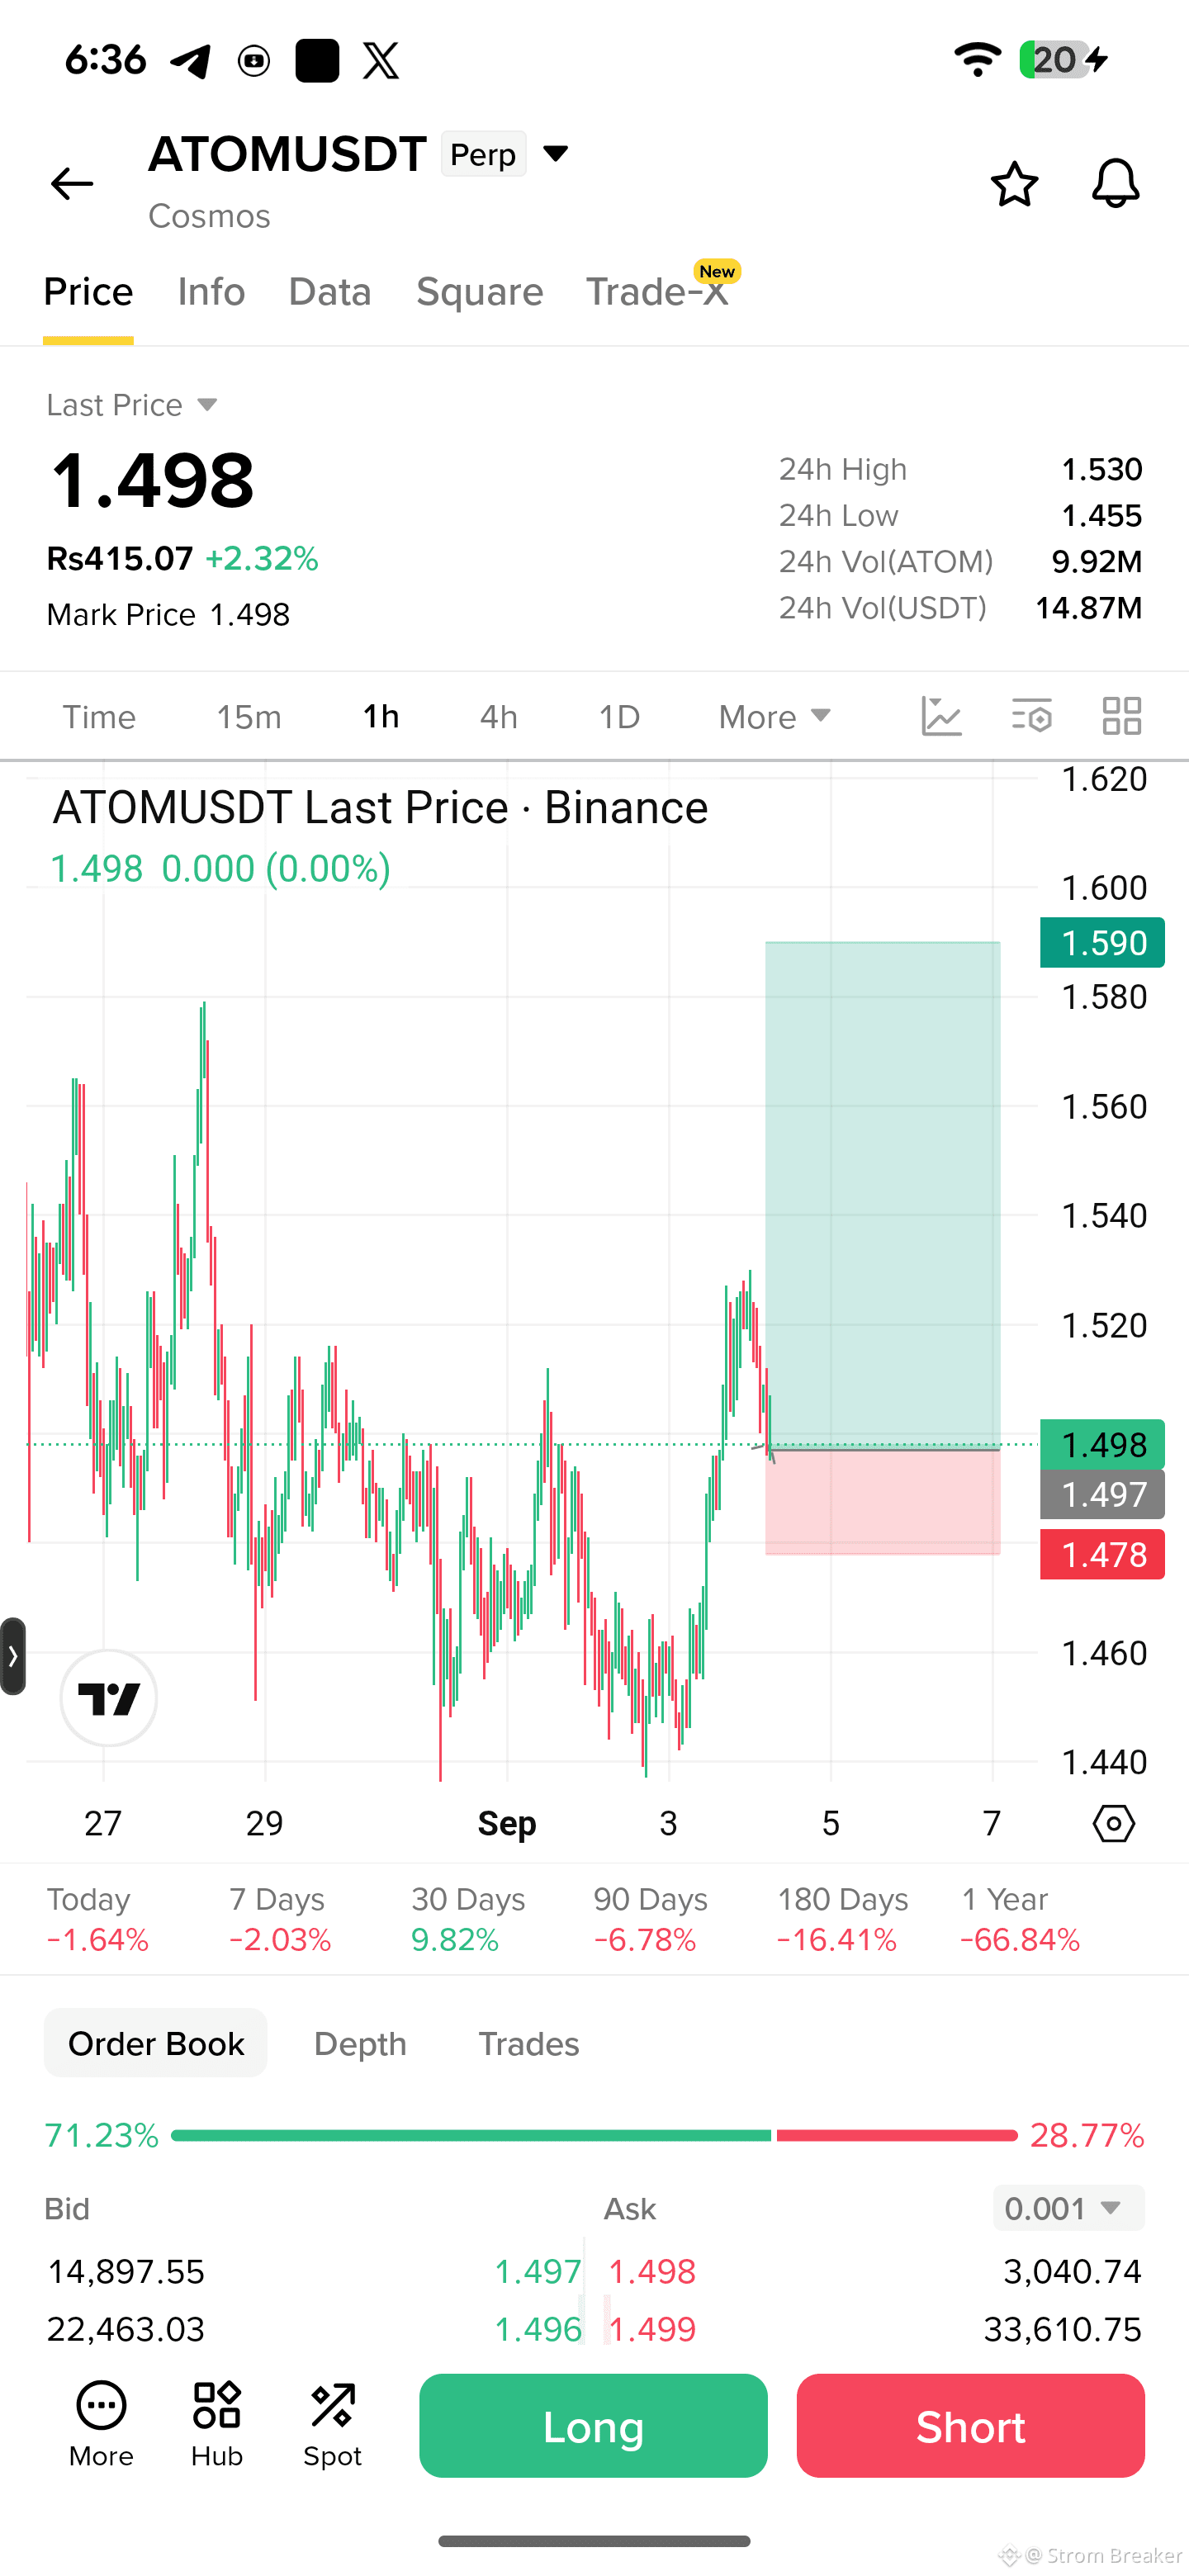
Looking for a long on $ATOM with entries split across two levels:
Entry Zone • 1.497 • 1.452
Take Profits • TP1: 1.505 • TP2: 1.536 • TP3: 1.568 • TP4: 1.599
Stop Loss: 1.402
Leverage: 10x Isolated
The idea is to build the position around the entry zone and take profits gradually as price moves higher. Keep risk controlled and don’t over-leverage.
Trade smart. Protect your capital first.
$ATOM
Entry Zone • 1.497 • 1.452
Take Profits • TP1: 1.505 • TP2: 1.536 • TP3: 1.568 • TP4: 1.599
Stop Loss: 1.402
Leverage: 10x Isolated
The idea is to build the position around the entry zone and take profits gradually as price moves higher. Keep risk controlled and don’t over-leverage.
Trade smart. Protect your capital first.
$ATOM
$BTC is showing an initial rejection from the major resistance zone, so I’ve added another short position around $82,000.
If BTC comes back to retest this resistance, I’ll be watching the 12H chart closely. A bearish divergence could develop there, which may make another breakout attempt much harder.
📌 Short Setup
• Entry: ~$82,000
• Resistance: Current resistance zone
• Confirmation: Bearish rejection / 12H bearish divergence
• Bias: Bearish
• Invalidation: Strong 12H close above resistance
• Targets: Lower support levels after confirmation
Personally, I’m leaning toward a reversal from this resistance zone, but I’ll wait for confirmation rather than blindly shorting.
Trade smart. Manage your risk.
$BTC
If BTC comes back to retest this resistance, I’ll be watching the 12H chart closely. A bearish divergence could develop there, which may make another breakout attempt much harder.
📌 Short Setup
• Entry: ~$82,000
• Resistance: Current resistance zone
• Confirmation: Bearish rejection / 12H bearish divergence
• Bias: Bearish
• Invalidation: Strong 12H close above resistance
• Targets: Lower support levels after confirmation
Personally, I’m leaning toward a reversal from this resistance zone, but I’ll wait for confirmation rather than blindly shorting.
Trade smart. Manage your risk.
$BTC
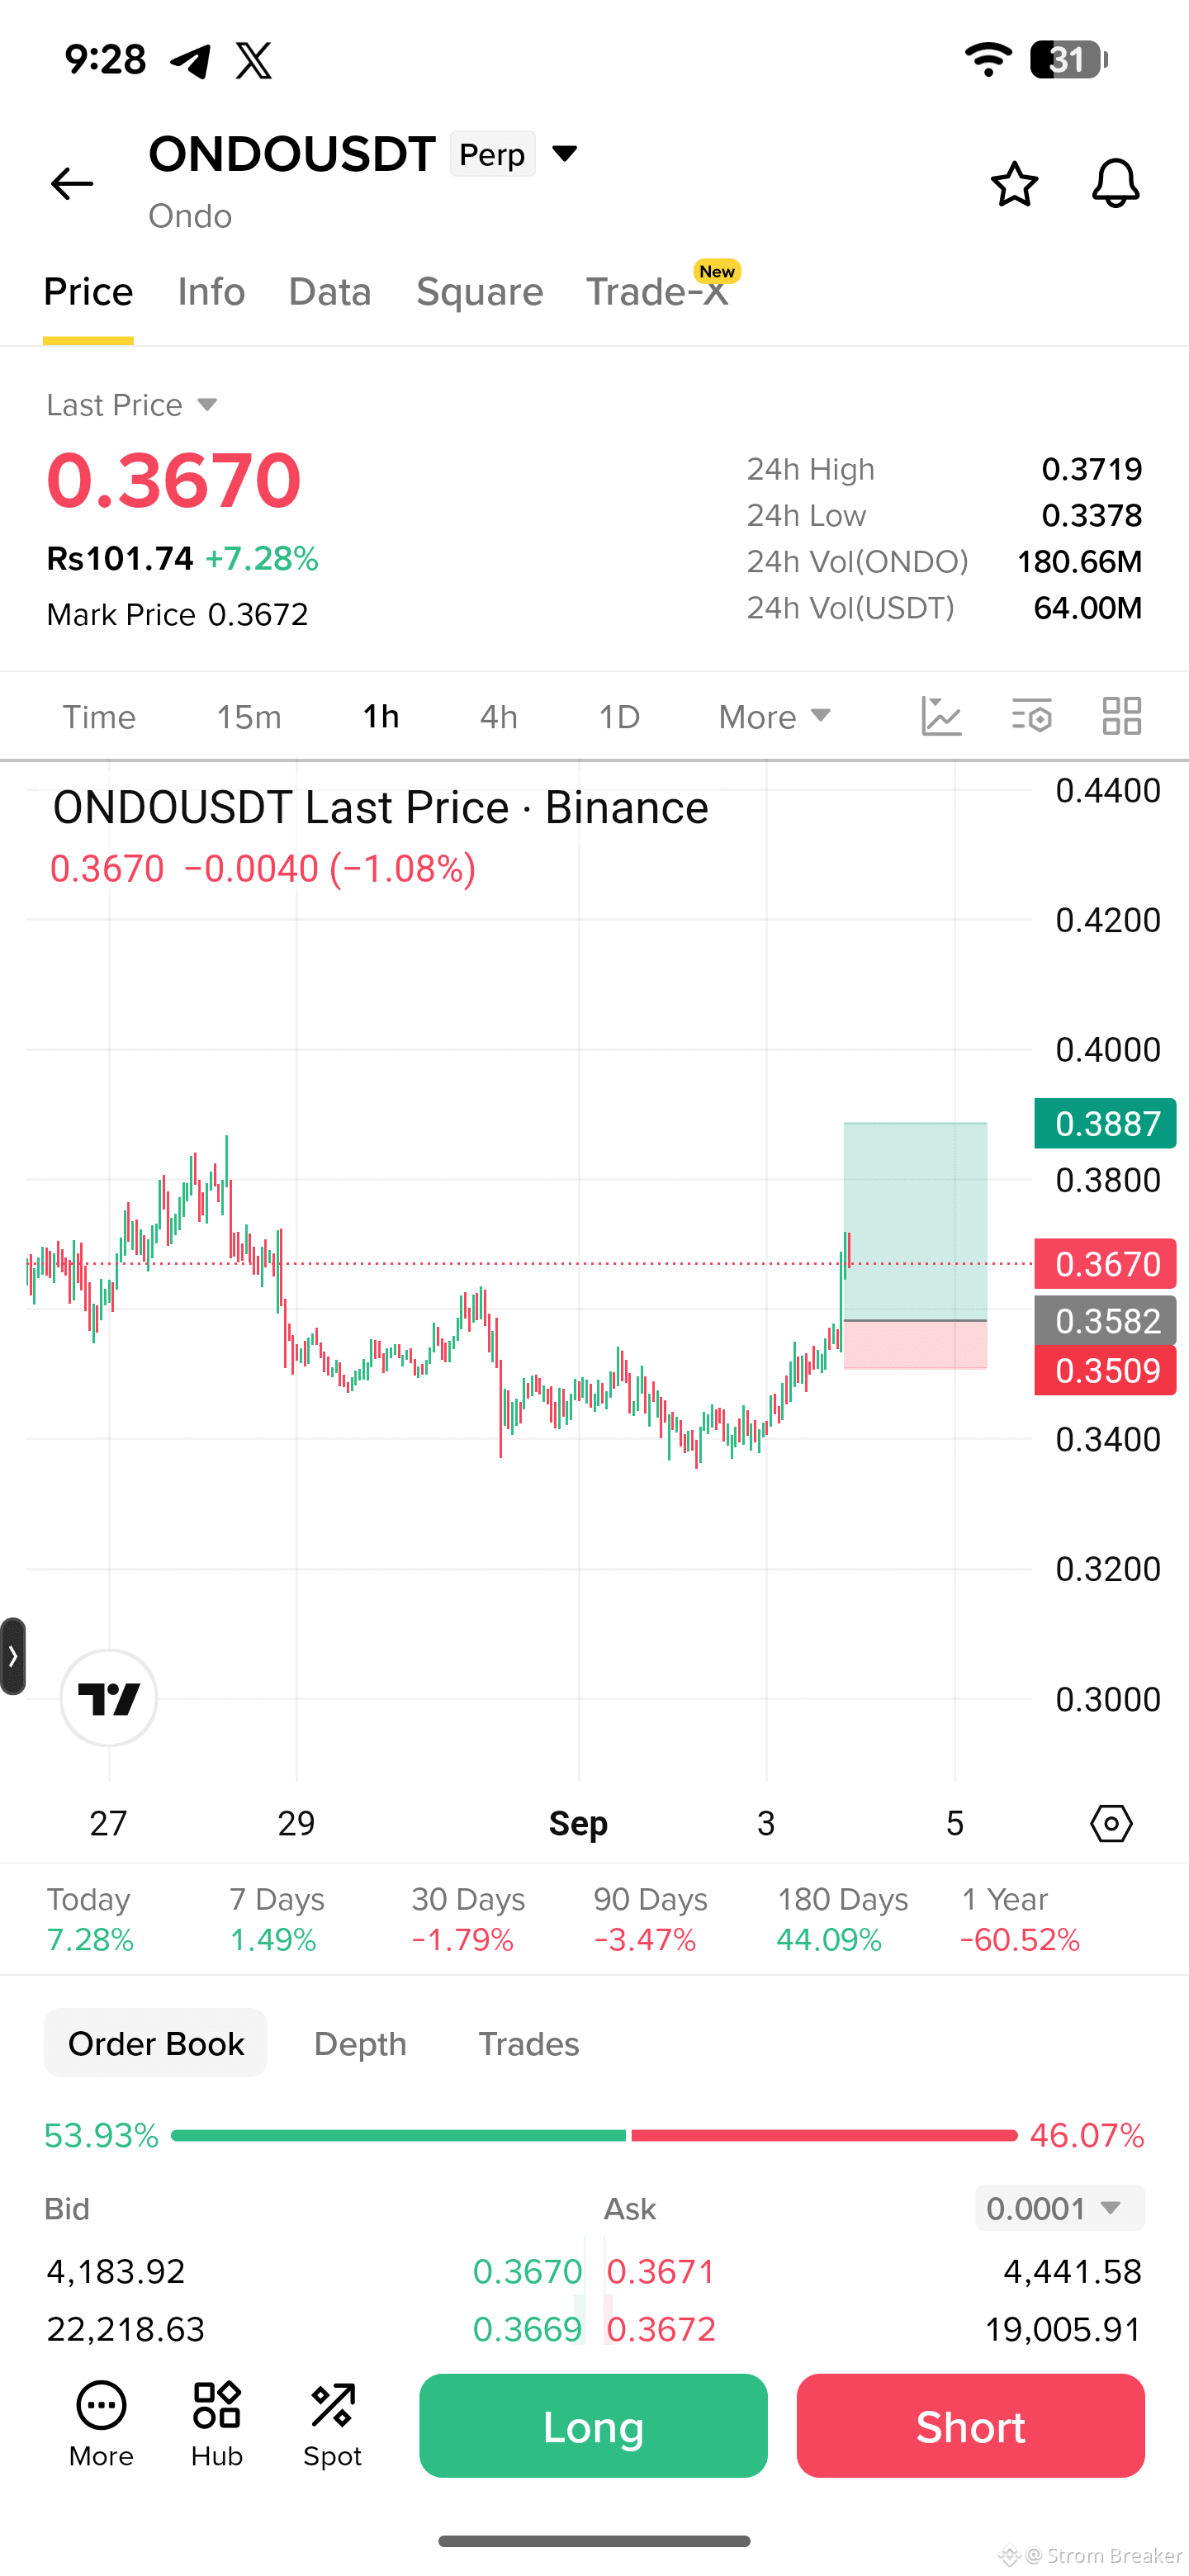
$ONDO is showing a strong recovery from the lower support zone, and buyers have pushed price back above the key $0.3500 area.
Direction: LONG
Entry Zone: $0.3500 – $0.3560
Target 1: $0.3675
Target 2: $0.3800
Target 3: $0.3900
Stop Loss: $0.3389
Leverage: 2–5x
The first target at $0.3675 has been reached , giving approximately 25% profit at 5x leverage.
Always manage your risk and avoid chasing the move after a strong pump.
Another setup could be loading — stay alert!
$ONDO
Direction: LONG
Entry Zone: $0.3500 – $0.3560
Target 1: $0.3675
Target 2: $0.3800
Target 3: $0.3900
Stop Loss: $0.3389
Leverage: 2–5x
The first target at $0.3675 has been reached , giving approximately 25% profit at 5x leverage.
Always manage your risk and avoid chasing the move after a strong pump.
Another setup could be loading — stay alert!
$ONDO
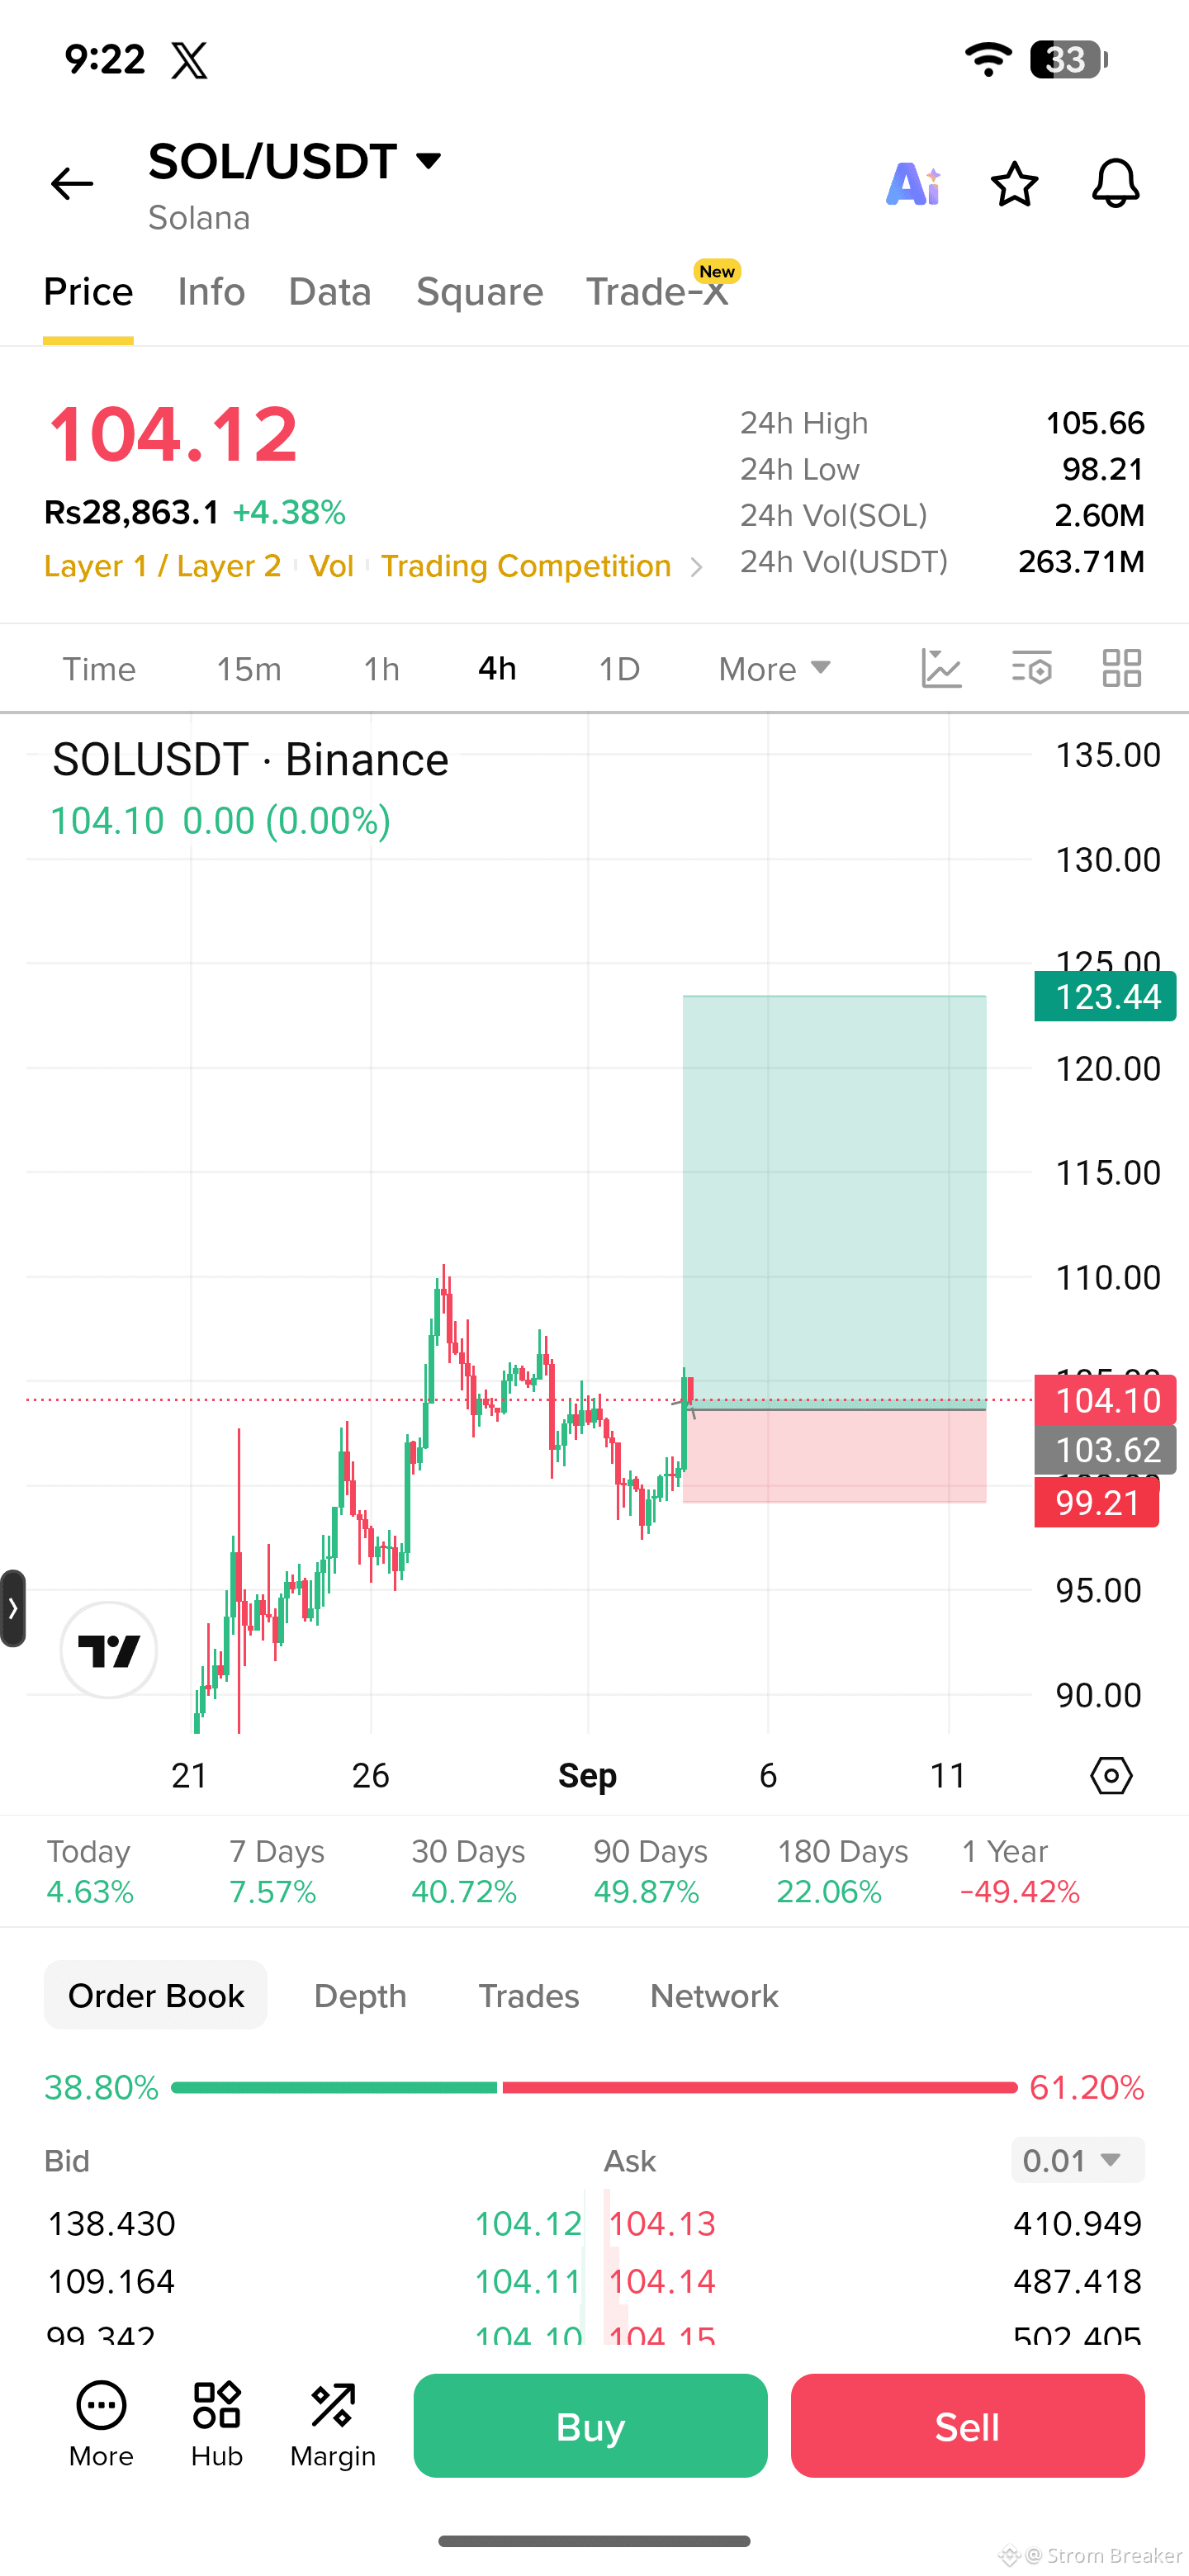
$SOL has shown a solid breakout, pushing from the $97.34 area to a high of $105.62. The momentum is clearly bullish, but after this sharp move, I’d rather wait for a clean retest than chase the candle.
Trade Setup — LONG 🟢 Entry: $102.50 – $104.00 on a successful retest
Stop Loss: $100.80
TP1: $108
TP2: $112
TP3: $118
TP4: $123
Potential ROI: up to 156% with leverage
Expected duration: around 1D–2H–3M, depending on momentum
⚠️ If SOL loses the $100.80 area, the setup becomes invalid. Manage leverage and risk carefully.
No FOMO — let the retest confirm the move.
$SOL
Trade Setup — LONG 🟢 Entry: $102.50 – $104.00 on a successful retest
Stop Loss: $100.80
TP1: $108
TP2: $112
TP3: $118
TP4: $123
Potential ROI: up to 156% with leverage
Expected duration: around 1D–2H–3M, depending on momentum
⚠️ If SOL loses the $100.80 area, the setup becomes invalid. Manage leverage and risk carefully.
No FOMO — let the retest confirm the move.
$SOL
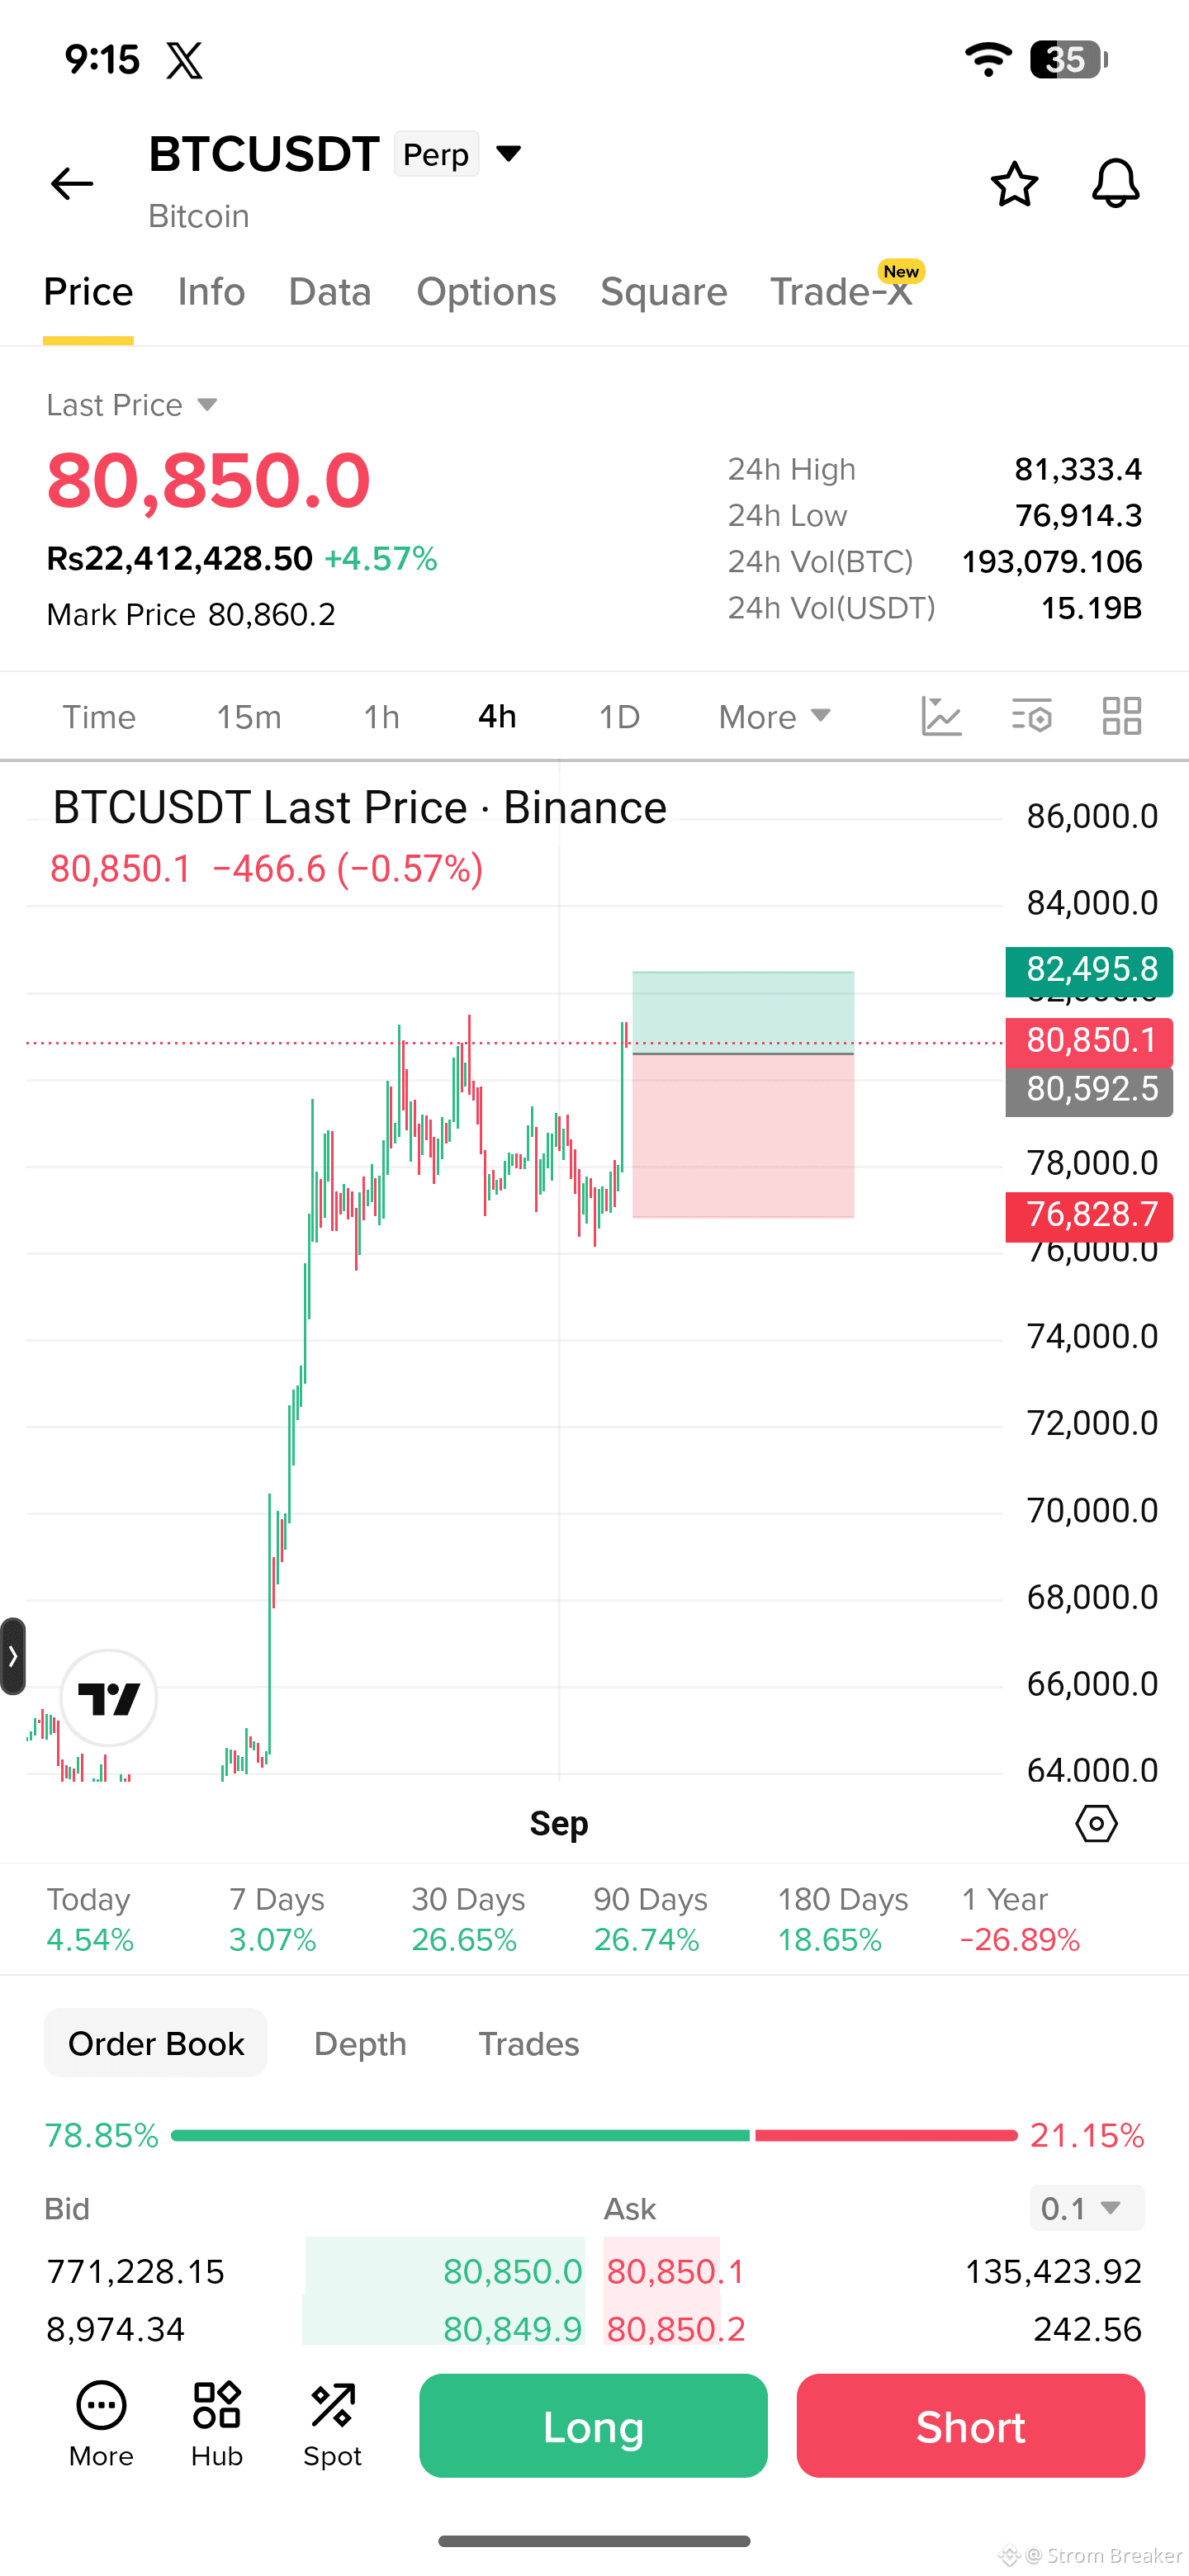
$BTC is showing a potential bullish scalp opportunity, but I’m not chasing the move here. The key is the $80,520–$80,680 zone.
If price comes back to this area, holds the level, and gives a clear bullish rejection, that’s where I’d look for the long entry.
📍 Entry: $80,520 – $80,680
Stop Loss: $80,260
TP1: $80,950
TP2: $81,180
TP3: $81,450
TP4: $81,800
Confidence: 8.4/10
The setup is simple: retest → rejection → confirmation → long.
If BTC loses the entry zone cleanly, I’d avoid forcing the trade. Let the market confirm the setup first.
Trade safe and manage your risk.
$BTC
If price comes back to this area, holds the level, and gives a clear bullish rejection, that’s where I’d look for the long entry.
📍 Entry: $80,520 – $80,680
Stop Loss: $80,260
TP1: $80,950
TP2: $81,180
TP3: $81,450
TP4: $81,800
Confidence: 8.4/10
The setup is simple: retest → rejection → confirmation → long.
If BTC loses the entry zone cleanly, I’d avoid forcing the trade. Let the market confirm the setup first.
Trade safe and manage your risk.
$BTC
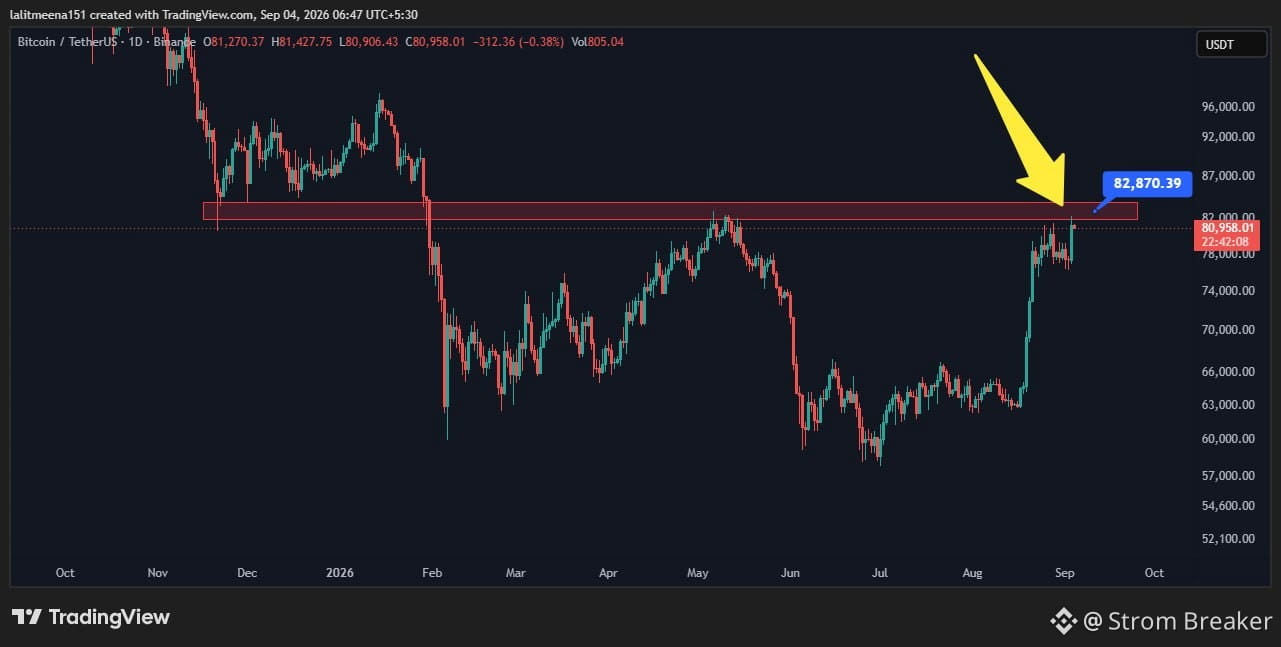
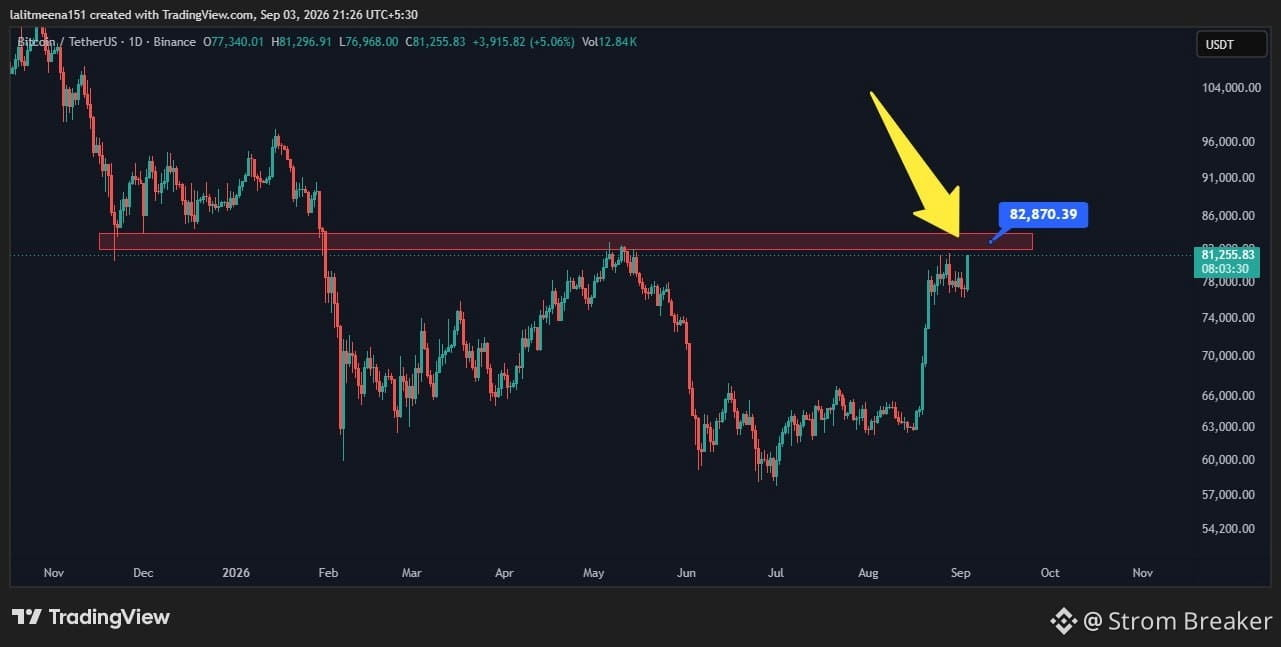
$BTC /USDT — Resistance Zone to Watch
Bitcoin is currently testing a major resistance area around $82,000–$83,000. This zone has acted as a strong barrier before, so I wouldn’t expect an easy breakout.
A quick wick above $82,870 is possible, especially if liquidity/SLs are sitting around the highs. So don’t treat a small breakout as confirmation immediately.
My setup:
Resistance: $82,000–$83,000
Key level: ~$82,870
Bullish confirmation: Strong daily/weekly close above the zone + successful retest
Rejection: Could send BTC back toward the lower support areas
Main focus: The weekly close — that will tell us much more than a single wick.
For now, I’m watching this zone closely and avoiding chasing the breakout. Let BTC confirm first.
Not financial advice. Manage risk carefully.
$BTC
Bitcoin is currently testing a major resistance area around $82,000–$83,000. This zone has acted as a strong barrier before, so I wouldn’t expect an easy breakout.
A quick wick above $82,870 is possible, especially if liquidity/SLs are sitting around the highs. So don’t treat a small breakout as confirmation immediately.
My setup:
Resistance: $82,000–$83,000
Key level: ~$82,870
Bullish confirmation: Strong daily/weekly close above the zone + successful retest
Rejection: Could send BTC back toward the lower support areas
Main focus: The weekly close — that will tell us much more than a single wick.
For now, I’m watching this zone closely and avoiding chasing the breakout. Let BTC confirm first.
Not financial advice. Manage risk carefully.
$BTC
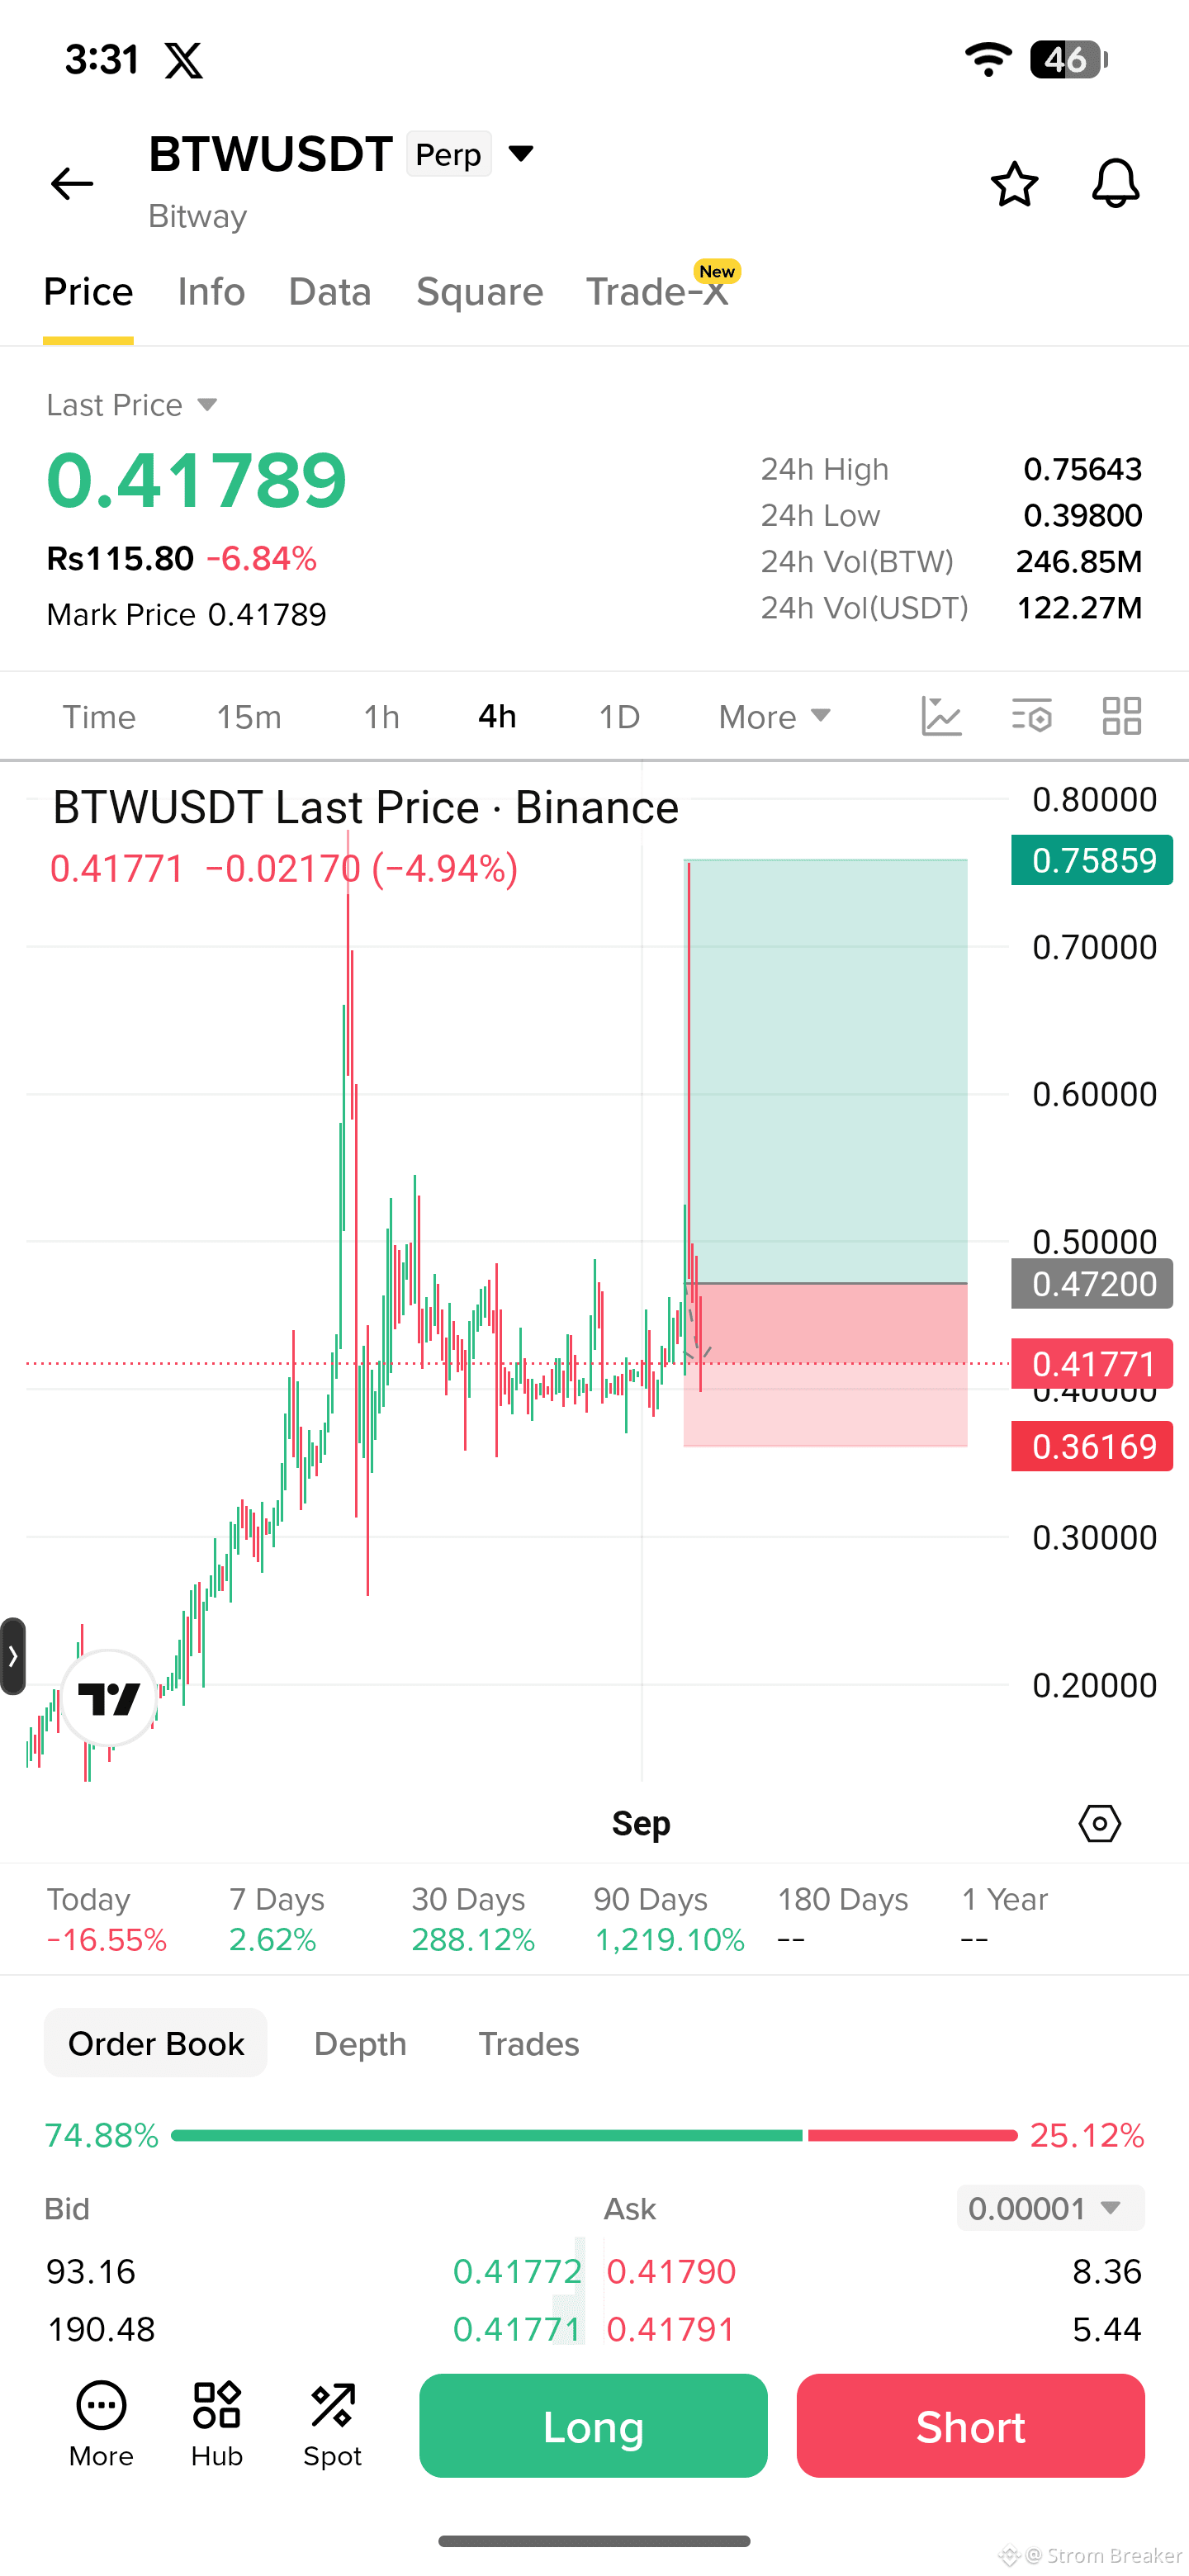
Yesterday’s $BTW setup played out exactly as expected.
Price broke above the descending trendline and reclaimed the key resistance zone around $0.48–$0.49. Once that breakout was confirmed, momentum pushed the move toward the $0.75 area, giving a quick ~68% move from the setup.
BTW/USDT Setup:
Entry: around $0.45
Breakout: $0.48–$0.49
Target: $0.75
Move: ~68%
Timeframe: 4H
The important part wasn’t chasing the green candle. The trade came from waiting for the trendline breakout + resistance reclaim and then letting price do the work.
Always manage risk—68% moves don’t come without volatility.
Next step: watch whether BTW can hold the breakout zone as support; that will tell us more than the spike itself.
$BTW
Price broke above the descending trendline and reclaimed the key resistance zone around $0.48–$0.49. Once that breakout was confirmed, momentum pushed the move toward the $0.75 area, giving a quick ~68% move from the setup.
BTW/USDT Setup:
Entry: around $0.45
Breakout: $0.48–$0.49
Target: $0.75
Move: ~68%
Timeframe: 4H
The important part wasn’t chasing the green candle. The trade came from waiting for the trendline breakout + resistance reclaim and then letting price do the work.
Always manage risk—68% moves don’t come without volatility.
Next step: watch whether BTW can hold the breakout zone as support; that will tell us more than the spike itself.
$BTW
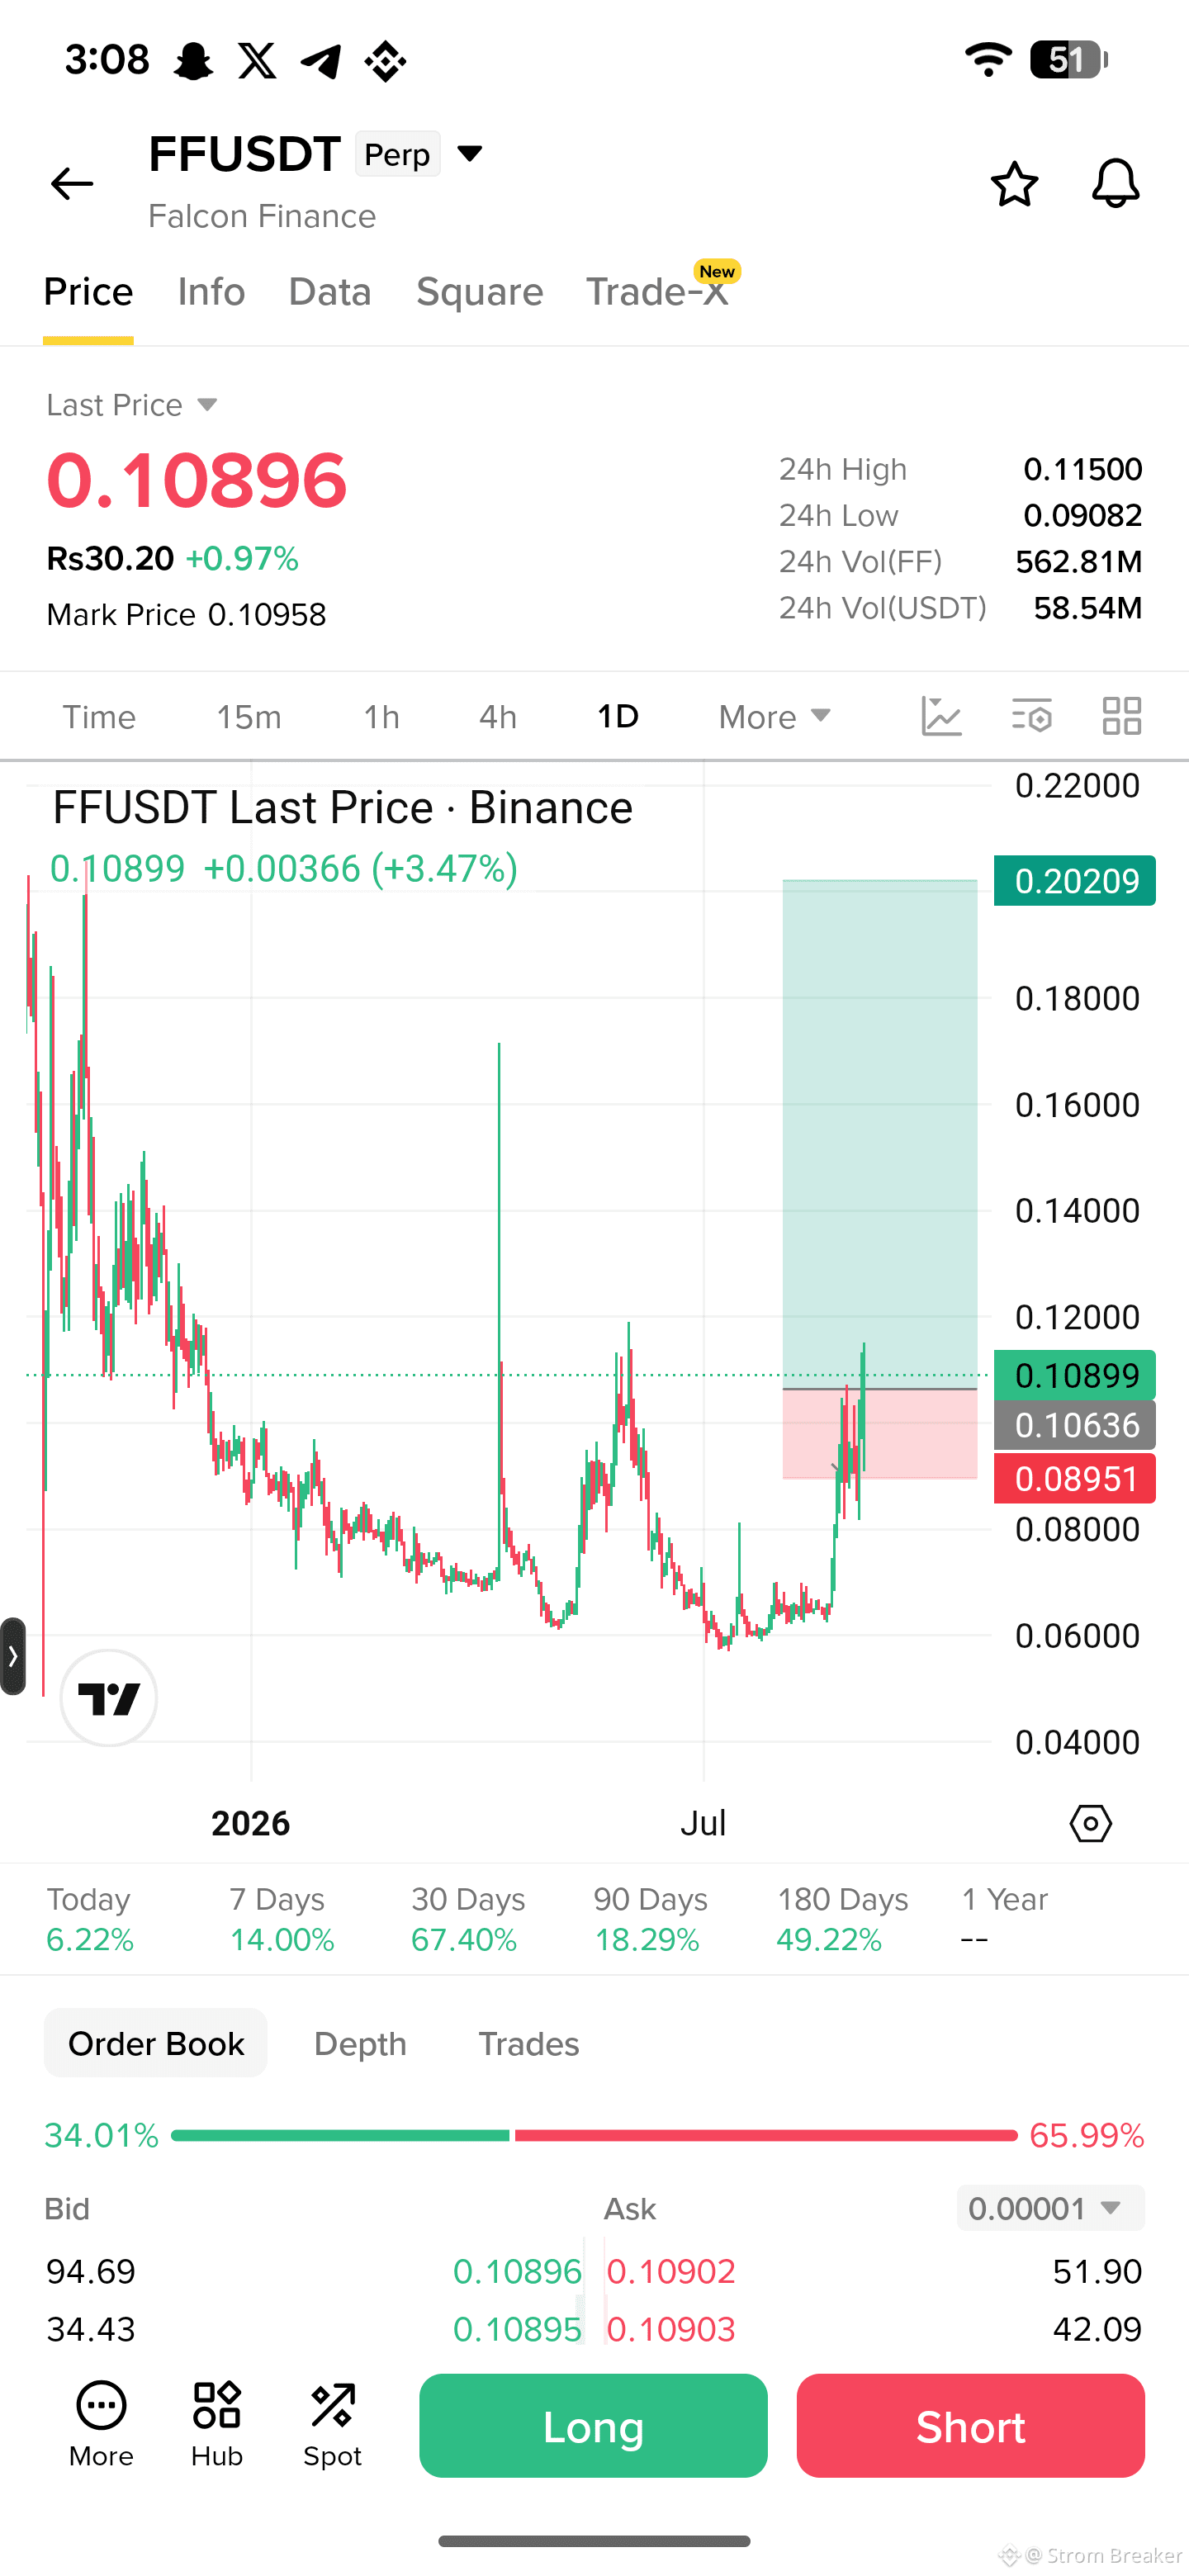
$FF delivered exactly the kind of breakout structure we were watching. After a long accumulation range around $0.058–$0.065, price broke through resistance with strong momentum and expanded toward $0.11310, marking roughly +89% from the setup.
📈 Current: $0.10924
🎯 Target Hit: $0.11310
🔥 Gain: +89%
Now the key is whether FF can hold above $0.105–$0.100. A clean hold keeps bullish structure intact; rejection here could trigger a healthy pullback before the next move.
$FF
📈 Current: $0.10924
🎯 Target Hit: $0.11310
🔥 Gain: +89%
Now the key is whether FF can hold above $0.105–$0.100. A clean hold keeps bullish structure intact; rejection here could trigger a healthy pullback before the next move.
$FF
When I look at $ETH , I see the backbone of a major smart-contract ecosystem powering DeFi, stablecoins, NFTs, and decentralized applications. Ethereum uses proof-of-stake, with validators securing the network by staking ETH. Its strengths are network effects, developers, liquidity, and ongoing scaling. Competition, smart-contract exploits, regulation, and volatility remain key risks for traders.
#BitcoinUp23%InAugustOutperformingGoldAndStocks #USCryptoLinkedEquityIndexRises8.81%InAugust #USStocksCloseLowerAmazonSuedByFTC #IranStrikesUSBasesInJordan
#BitcoinUp23%InAugustOutperformingGoldAndStocks #USCryptoLinkedEquityIndexRises8.81%InAugust #USStocksCloseLowerAmazonSuedByFTC #IranStrikesUSBasesInJordan

I see $BTC as the core asset of the crypto market—a decentralized, proof-of-work network with a capped 21 million supply. Its strengths are security, scarcity, liquidity, and growing institutional access, while scalability, regulation, energy use, and extreme volatility remain risks. Its long development has strengthened adoption, but traders should still respect BTC’s high market and leverage risk.

Log in to explore more content