
Hussein Crypto
1k Posts

Hussein Crypto
Report
Block User
Welcome to Hussein Crypto. Trading is not about guessing; it’s about data-driven decisions. I rely on strict risk management and advanced technical analysis
Frequent Trader
1 Years
80 Following
91 Followers
62 Liked
Posts
All
Quotes
Videos
PINNED
·
--

Article
🧠 Success in crypto isn’t luck... it’s accurate information and the right timing!In a world that changes every second, you need a reliable source that saves you time and effort. 📊💡
I share with you every day through the Binance Square platform:
A comprehensive view of technical and fundamental analysis of the markets.
Excellent trades and accumulation areas.
Quick news reading and its impact on the upcoming trend.
I always work on providing transparent content that puts risk management first to protect your money before achieving profits.
🧠 Success in crypto isn’t luck... it’s accurate information and the right timing!
In a world that changes every second, you need a reliable source that saves you time and effort. 📊💡
I share with you every day through the Binance Square platform:
A comprehensive view of technical and fundamental analysis of the markets.
Excellent trades and accumulation areas.
Quick news reading and its impact on the upcoming trend.
I always work on providing transparent content that puts risk management first to protect your money before achieving profits.
I share with you every day through the Binance Square platform:
A comprehensive view of technical and fundamental analysis of the markets.
Excellent trades and accumulation areas.
Quick news reading and its impact on the upcoming trend.
I always work on providing transparent content that puts risk management first to protect your money before achieving profits.
38
PINNED
·
--

Article
🚀 Trading Together, Winning Together: How You Can Support Free, High-Quality Insights!Hey Traders & Crypto Enthusiasts! 👋
Over the past few months, we’ve navigated the markets together—spotting strong chart setups, tracking market momentum, and executing highly profitable trades. Seeing so many of you take solid gains from the setups and recommendations shared here is the absolute best part of running this page!
📊 The Power of Consistent Market Analysis
Consistently delivering accurate trade calls, key resistance breakdowns, and high-probability spot setups takes hours of technical research, chart monitoring, and risk assessment daily.
My goal has always been simple: to provide transparent, actionable, and high-value crypto insights to help you grow your portfolio—100% free.
🎁 Enjoying the Wins? Consider Supporting the Channel!
If my trade setups, daily chart breakdowns, or signal alerts have helped you secure profit or avoid unnecessary losses, you can now support this page through the Binance Tipping/Reward Feature!
How your support helps us grow:
Dedicating More Time: Allows for deeper market scanning to catch high-potential daily breakouts earlier.
Keeping Content Free: Ensures premium-quality research stays accessible to every member of our community.
Boosting Motivation: Inspires continuous, high-frequency updates during fast-moving market cycles.
💡 How to Send a Reward on Binance:
Scroll to the bottom of this post (or visit my main profile page).
Tap the Yellow Tip / Reward Icon (🎁 / 💛).
Choose your preferred amount or enter a custom crypto amount.
Confirm the transaction—and you're all set!
Even the smallest gesture goes a long way in keeping this channel active and fully dedicated to finding the next winning trade for you.
Thank you to everyone who likes, shares, and supports this journey. Let’s keep riding these green candles together! 📈🚀
#BinanceSquare #CryptoTrading #TechnicalAnalysis #Altcoins #TradingTips #ProfitableTrades
🚀 Trading Together, Winning Together: How You Can Support Free, High-Quality Insights!
Hey Traders & Crypto Enthusiasts! 👋
Over the past few months, we’ve navigated the markets together—spotting strong chart setups, tracking market momentum, and executing highly profitable trades. Seeing so many of you take solid gains from the setups and recommendations shared here is the absolute best part of running this page!
📊 The Power of Consistent Market Analysis
Consistently delivering accurate trade calls, key resistance breakdowns, and high-probability spot setups takes hours of technical research, chart monitoring, and risk assessment daily.
My goal has always been simple: to provide transparent, actionable, and high-value crypto insights to help you grow your portfolio—100% free.
🎁 Enjoying the Wins? Consider Supporting the Channel!
If my trade setups, daily chart breakdowns, or signal alerts have helped you secure profit or avoid unnecessary losses, you can now support this page through the Binance Tipping/Reward Feature!
How your support helps us grow:
Dedicating More Time: Allows for deeper market scanning to catch high-potential daily breakouts earlier.
Keeping Content Free: Ensures premium-quality research stays accessible to every member of our community.
Boosting Motivation: Inspires continuous, high-frequency updates during fast-moving market cycles.
💡 How to Send a Reward on Binance:
Scroll to the bottom of this post (or visit my main profile page).
Tap the Yellow Tip / Reward Icon (🎁 / 💛).
Choose your preferred amount or enter a custom crypto amount.
Confirm the transaction—and you're all set!
Even the smallest gesture goes a long way in keeping this channel active and fully dedicated to finding the next winning trade for you.
Thank you to everyone who likes, shares, and supports this journey. Let’s keep riding these green candles together! 📈🚀
#BinanceSquare #CryptoTrading #TechnicalAnalysis #Altcoins #TradingTips #ProfitableTrades
Over the past few months, we’ve navigated the markets together—spotting strong chart setups, tracking market momentum, and executing highly profitable trades. Seeing so many of you take solid gains from the setups and recommendations shared here is the absolute best part of running this page!
📊 The Power of Consistent Market Analysis
Consistently delivering accurate trade calls, key resistance breakdowns, and high-probability spot setups takes hours of technical research, chart monitoring, and risk assessment daily.
My goal has always been simple: to provide transparent, actionable, and high-value crypto insights to help you grow your portfolio—100% free.
🎁 Enjoying the Wins? Consider Supporting the Channel!
If my trade setups, daily chart breakdowns, or signal alerts have helped you secure profit or avoid unnecessary losses, you can now support this page through the Binance Tipping/Reward Feature!
How your support helps us grow:
Dedicating More Time: Allows for deeper market scanning to catch high-potential daily breakouts earlier.
Keeping Content Free: Ensures premium-quality research stays accessible to every member of our community.
Boosting Motivation: Inspires continuous, high-frequency updates during fast-moving market cycles.
💡 How to Send a Reward on Binance:
Scroll to the bottom of this post (or visit my main profile page).
Tap the Yellow Tip / Reward Icon (🎁 / 💛).
Choose your preferred amount or enter a custom crypto amount.
Confirm the transaction—and you're all set!
Even the smallest gesture goes a long way in keeping this channel active and fully dedicated to finding the next winning trade for you.
Thank you to everyone who likes, shares, and supports this journey. Let’s keep riding these green candles together! 📈🚀
#BinanceSquare #CryptoTrading #TechnicalAnalysis #Altcoins #TradingTips #ProfitableTrades
26
·
--
🚀 **Coin:** Aave (AAVE/USDT)
⏱️ **Timeframe:** 1h
🔮 **Direction:** LONG 🟢
⚙️ **Leverage:** Isolated 5x - 10x
📊 **Technical Analysis:**
AAVE is demonstrating clean bullish momentum on the 1h timeframe, currently breaking out above its intraday resistance around $122.50 backed by substantial 24h trading volume exceeding $300M. The consistent series of higher lows pushing up from the $113.33 support base indicates aggressive buyer control. A sustained close above this consolidation point opens up a rapid expansion path toward the $128–$133 target region.
🎯 **Trade Setup:**
🔹 **Entry Zone:** $121.50 - $122.80
✅ **TP 1:** $125.50
✅ **TP 2:** $128.80
✅ **TP 3:** $133.00
🛑 **Stop Loss:** $118.50
💡 **Note:** Risk management is key. Always do your own research (DYOR)!
👇 **Support & Follow!**
If this trade setup yields profit for you, support the channel with a "Thank You" reward (tip) 💸 and hit **Follow** for daily high-probability signals!
🚀 **Coin:** Aave (AAVE/USDT)
⏱️ **Timeframe:** 1h
🔮 **Direction:** LONG 🟢
⚙️ **Leverage:** Isolated 5x - 10x
📊 **Technical Analysis:**
AAVE is demonstrating clean bullish momentum on the 1h timeframe, currently breaking out above its intraday resistance around $122.50 backed by substantial 24h trading volume exceeding $300M. The consistent series of higher lows pushing up from the $113.33 support base indicates aggressive buyer control. A sustained close above this consolidation point opens up a rapid expansion path toward the $128–$133 target region.
🎯 **Trade Setup:**
🔹 **Entry Zone:** $121.50 - $122.80
✅ **TP 1:** $125.50
✅ **TP 2:** $128.80
✅ **TP 3:** $133.00
🛑 **Stop Loss:** $118.50
💡 **Note:** Risk management is key. Always do your own research (DYOR)!
👇 **Support & Follow!**
If this trade setup yields profit for you, support the channel with a "Thank You" reward (tip) 💸 and hit **Follow** for daily high-probability signals!
⏱️ **Timeframe:** 1h
🔮 **Direction:** LONG 🟢
⚙️ **Leverage:** Isolated 5x - 10x
📊 **Technical Analysis:**
AAVE is demonstrating clean bullish momentum on the 1h timeframe, currently breaking out above its intraday resistance around $122.50 backed by substantial 24h trading volume exceeding $300M. The consistent series of higher lows pushing up from the $113.33 support base indicates aggressive buyer control. A sustained close above this consolidation point opens up a rapid expansion path toward the $128–$133 target region.
🎯 **Trade Setup:**
🔹 **Entry Zone:** $121.50 - $122.80
✅ **TP 1:** $125.50
✅ **TP 2:** $128.80
✅ **TP 3:** $133.00
🛑 **Stop Loss:** $118.50
💡 **Note:** Risk management is key. Always do your own research (DYOR)!
👇 **Support & Follow!**
If this trade setup yields profit for you, support the channel with a "Thank You" reward (tip) 💸 and hit **Follow** for daily high-probability signals!
68
·
--
🚀 **Coin:** Bitcoin (BTC/USDT)
⏱️ **Timeframe:** 4h
🔮 **Direction:** LONG 🟢
⚙️ **Leverage:** Isolated 5x - 10x
📊 **Technical Analysis:**
Bitcoin is consolidating strongly near the upper boundary of its 24-hour range, persistently retesting resistance around $76,400. On the 4h timeframe, we see a series of higher lows backed by high trading volume, signaling robust institutional buying interest above key support at $75,100. A breakout past the 24h high will likely trigger a sharp momentum squeeze toward new localized highs.
🎯 **Trade Setup:**
🔹 **Entry Zone:** $75,900 - $76,300
✅ **TP 1:** $76,850
✅ **TP 2:** $77,500
✅ **TP 3:** $78,400
🛑 **Stop Loss:** $75,050
💡 **Note:** Risk management is key. Always do your own research (DYOR)!
👇 **Support & Follow!**
If this trade setup yields profit for you, support the channel with a "Thank You" reward (tip) 💸 and hit **Follow** for daily high-probability signals!
🚀 **Coin:** Bitcoin (BTC/USDT)
⏱️ **Timeframe:** 4h
🔮 **Direction:** LONG 🟢
⚙️ **Leverage:** Isolated 5x - 10x
📊 **Technical Analysis:**
Bitcoin is consolidating strongly near the upper boundary of its 24-hour range, persistently retesting resistance around $76,400. On the 4h timeframe, we see a series of higher lows backed by high trading volume, signaling robust institutional buying interest above key support at $75,100. A breakout past the 24h high will likely trigger a sharp momentum squeeze toward new localized highs.
🎯 **Trade Setup:**
🔹 **Entry Zone:** $75,900 - $76,300
✅ **TP 1:** $76,850
✅ **TP 2:** $77,500
✅ **TP 3:** $78,400
🛑 **Stop Loss:** $75,050
💡 **Note:** Risk management is key. Always do your own research (DYOR)!
👇 **Support & Follow!**
If this trade setup yields profit for you, support the channel with a "Thank You" reward (tip) 💸 and hit **Follow** for daily high-probability signals!
⏱️ **Timeframe:** 4h
🔮 **Direction:** LONG 🟢
⚙️ **Leverage:** Isolated 5x - 10x
📊 **Technical Analysis:**
Bitcoin is consolidating strongly near the upper boundary of its 24-hour range, persistently retesting resistance around $76,400. On the 4h timeframe, we see a series of higher lows backed by high trading volume, signaling robust institutional buying interest above key support at $75,100. A breakout past the 24h high will likely trigger a sharp momentum squeeze toward new localized highs.
🎯 **Trade Setup:**
🔹 **Entry Zone:** $75,900 - $76,300
✅ **TP 1:** $76,850
✅ **TP 2:** $77,500
✅ **TP 3:** $78,400
🛑 **Stop Loss:** $75,050
💡 **Note:** Risk management is key. Always do your own research (DYOR)!
👇 **Support & Follow!**
If this trade setup yields profit for you, support the channel with a "Thank You" reward (tip) 💸 and hit **Follow** for daily high-probability signals!
92
·
--
🚀 **Coin:** Sui (SUI/USDT)
⏱️ **Timeframe:** 1h
🔮 **Direction:** LONG 🟢
⚙️ **Leverage:** Isolated 5x - 10x
📊 **Technical Analysis:**
SUI is currently consolidating tight right beneath the immediate intraday resistance level of $0.7020 after establishing a firm higher-low floor at $0.6770. With robust 24-hour trading volume exceeding $475M, momentum indicators on the 1h chart show clear signs of bullish absorption preparing for a continuation move. A sustained breakout above $0.7000 will likely trigger short liquidity and ignite a sharp push toward upper targets.
🎯 **Trade Setup:**
🔹 **Entry Zone:** $0.6940 - $0.7000
✅ **TP 1:** $0.7150
✅ **TP 2:** $0.7320
✅ **TP 3:** $0.7550
🛑 **Stop Loss:** $0.6740
💡 **Note:** Risk management is key. Always do your own research (DYOR)!
👇 **Support & Follow!**
If this trade setup yields profit for you, support the channel with a "Thank You" reward (tip) 💸 and hit **Follow** for daily high-probability signals!
🚀 **Coin:** Sui (SUI/USDT)
⏱️ **Timeframe:** 1h
🔮 **Direction:** LONG 🟢
⚙️ **Leverage:** Isolated 5x - 10x
📊 **Technical Analysis:**
SUI is currently consolidating tight right beneath the immediate intraday resistance level of $0.7020 after establishing a firm higher-low floor at $0.6770. With robust 24-hour trading volume exceeding $475M, momentum indicators on the 1h chart show clear signs of bullish absorption preparing for a continuation move. A sustained breakout above $0.7000 will likely trigger short liquidity and ignite a sharp push toward upper targets.
🎯 **Trade Setup:**
🔹 **Entry Zone:** $0.6940 - $0.7000
✅ **TP 1:** $0.7150
✅ **TP 2:** $0.7320
✅ **TP 3:** $0.7550
🛑 **Stop Loss:** $0.6740
💡 **Note:** Risk management is key. Always do your own research (DYOR)!
👇 **Support & Follow!**
If this trade setup yields profit for you, support the channel with a "Thank You" reward (tip) 💸 and hit **Follow** for daily high-probability signals!
⏱️ **Timeframe:** 1h
🔮 **Direction:** LONG 🟢
⚙️ **Leverage:** Isolated 5x - 10x
📊 **Technical Analysis:**
SUI is currently consolidating tight right beneath the immediate intraday resistance level of $0.7020 after establishing a firm higher-low floor at $0.6770. With robust 24-hour trading volume exceeding $475M, momentum indicators on the 1h chart show clear signs of bullish absorption preparing for a continuation move. A sustained breakout above $0.7000 will likely trigger short liquidity and ignite a sharp push toward upper targets.
🎯 **Trade Setup:**
🔹 **Entry Zone:** $0.6940 - $0.7000
✅ **TP 1:** $0.7150
✅ **TP 2:** $0.7320
✅ **TP 3:** $0.7550
🛑 **Stop Loss:** $0.6740
💡 **Note:** Risk management is key. Always do your own research (DYOR)!
👇 **Support & Follow!**
If this trade setup yields profit for you, support the channel with a "Thank You" reward (tip) 💸 and hit **Follow** for daily high-probability signals!
179
·
--
🚀 **Coin:** NEAR Protocol (NEAR/USDT)
⏱️ **Timeframe:** 4h
🔮 **Direction:** LONG 🟢
⚙️ **Leverage:** Isolated 5x - 10x
📊 **Technical Analysis:**
NEAR is consolidating strongly near the top of its 24-hour range ($2.30 - $2.50) on the 4H timeframe, forming a bullish accumulation structure around $2.46. Solid trading volume exceeding $399M indicates high market interest and persistent buying pressure holding the local support. A confirmed push through the $2.50 resistance zone will likely unleash powerful bullish momentum toward higher liquidity levels.
🎯 **Trade Setup:**
🔹 **Entry Zone:** $2.42 - $2.46
✅ **TP 1:** $2.52
✅ **TP 2:** $2.60
✅ **TP 3:** $2.72
🛑 **Stop Loss:** $2.35
💡 **Note:** Risk management is key. Always do your own research (DYOR)!
👇 **Support & Follow!**
If this trade setup yields profit for you, support the channel with a "Thank You" reward (tip) 💸 and hit **Follow** for daily high-probability signals!
🚀 **Coin:** NEAR Protocol (NEAR/USDT)
⏱️ **Timeframe:** 4h
🔮 **Direction:** LONG 🟢
⚙️ **Leverage:** Isolated 5x - 10x
📊 **Technical Analysis:**
NEAR is consolidating strongly near the top of its 24-hour range ($2.30 - $2.50) on the 4H timeframe, forming a bullish accumulation structure around $2.46. Solid trading volume exceeding $399M indicates high market interest and persistent buying pressure holding the local support. A confirmed push through the $2.50 resistance zone will likely unleash powerful bullish momentum toward higher liquidity levels.
🎯 **Trade Setup:**
🔹 **Entry Zone:** $2.42 - $2.46
✅ **TP 1:** $2.52
✅ **TP 2:** $2.60
✅ **TP 3:** $2.72
🛑 **Stop Loss:** $2.35
💡 **Note:** Risk management is key. Always do your own research (DYOR)!
👇 **Support & Follow!**
If this trade setup yields profit for you, support the channel with a "Thank You" reward (tip) 💸 and hit **Follow** for daily high-probability signals!
⏱️ **Timeframe:** 4h
🔮 **Direction:** LONG 🟢
⚙️ **Leverage:** Isolated 5x - 10x
📊 **Technical Analysis:**
NEAR is consolidating strongly near the top of its 24-hour range ($2.30 - $2.50) on the 4H timeframe, forming a bullish accumulation structure around $2.46. Solid trading volume exceeding $399M indicates high market interest and persistent buying pressure holding the local support. A confirmed push through the $2.50 resistance zone will likely unleash powerful bullish momentum toward higher liquidity levels.
🎯 **Trade Setup:**
🔹 **Entry Zone:** $2.42 - $2.46
✅ **TP 1:** $2.52
✅ **TP 2:** $2.60
✅ **TP 3:** $2.72
🛑 **Stop Loss:** $2.35
💡 **Note:** Risk management is key. Always do your own research (DYOR)!
👇 **Support & Follow!**
If this trade setup yields profit for you, support the channel with a "Thank You" reward (tip) 💸 and hit **Follow** for daily high-probability signals!
2
114
·
--
🚀 **Coin:** Injective (INJ/USDT)
⏱️ **Timeframe:** 4h
🔮 **Direction:** LONG 🟢
⚙️ **Leverage:** Isolated 5x - 10x
📊 **Technical Analysis:**
INJ has retraced cleanly back to test a crucial multi-touch support zone at $5.35 following a strong move up to its $6.02 daily high. Volume profile analysis shows clear selling exhaustion near the 24h low, signaling a classic high-probability bounce setup on the 4h chart. As long as buyers defend this key demand level, momentum favors a strong relief impulse back toward higher resistance targets.
🎯 **Trade Setup:**
🔹 **Entry Zone:** $5.30 - $5.38
✅ **TP 1:** $5.55
✅ **TP 2:** $5.80
✅ **TP 3:** $6.02
🛑 **Stop Loss:** $5.18
💡 **Note:** Risk management is key. Always do your own research (DYOR)!
👇 **Support & Follow!**
If this trade setup yields profit for you, support the channel with a "Thank You" reward (tip) 💸 and hit **Follow** for daily high-probability signals!
🚀 **Coin:** Injective (INJ/USDT)
⏱️ **Timeframe:** 4h
🔮 **Direction:** LONG 🟢
⚙️ **Leverage:** Isolated 5x - 10x
📊 **Technical Analysis:**
INJ has retraced cleanly back to test a crucial multi-touch support zone at $5.35 following a strong move up to its $6.02 daily high. Volume profile analysis shows clear selling exhaustion near the 24h low, signaling a classic high-probability bounce setup on the 4h chart. As long as buyers defend this key demand level, momentum favors a strong relief impulse back toward higher resistance targets.
🎯 **Trade Setup:**
🔹 **Entry Zone:** $5.30 - $5.38
✅ **TP 1:** $5.55
✅ **TP 2:** $5.80
✅ **TP 3:** $6.02
🛑 **Stop Loss:** $5.18
💡 **Note:** Risk management is key. Always do your own research (DYOR)!
👇 **Support & Follow!**
If this trade setup yields profit for you, support the channel with a "Thank You" reward (tip) 💸 and hit **Follow** for daily high-probability signals!
⏱️ **Timeframe:** 4h
🔮 **Direction:** LONG 🟢
⚙️ **Leverage:** Isolated 5x - 10x
📊 **Technical Analysis:**
INJ has retraced cleanly back to test a crucial multi-touch support zone at $5.35 following a strong move up to its $6.02 daily high. Volume profile analysis shows clear selling exhaustion near the 24h low, signaling a classic high-probability bounce setup on the 4h chart. As long as buyers defend this key demand level, momentum favors a strong relief impulse back toward higher resistance targets.
🎯 **Trade Setup:**
🔹 **Entry Zone:** $5.30 - $5.38
✅ **TP 1:** $5.55
✅ **TP 2:** $5.80
✅ **TP 3:** $6.02
🛑 **Stop Loss:** $5.18
💡 **Note:** Risk management is key. Always do your own research (DYOR)!
👇 **Support & Follow!**
If this trade setup yields profit for you, support the channel with a "Thank You" reward (tip) 💸 and hit **Follow** for daily high-probability signals!
1
200
·
--
🚀 **Coin:** Solana (SOL/USDT)
⏱️ **Timeframe:** 4h
🔮 **Direction:** SHORT 🔴
⚙️ **Leverage:** Isolated 5x - 10x
📊 **Technical Analysis:**
Solana experienced a strong rejection at the $101.50 resistance zone, forming a heavy bearish engulfing candle on the 4h chart accompanied by elevated selling volume. Price action has lost the mid-range pivot and is now printing lower highs, signaling a continuation of the short-term downside momentum towards key demand liquidity near the $96.00-$94.00 region.
🎯 **Trade Setup:**
🔹 **Entry Zone:** $97.30 - $98.20
✅ **TP 1:** $95.80
✅ **TP 2:** $94.20
✅ **TP 3:** $91.50
🛑 **Stop Loss:** $99.60
💡 **Note:** Risk management is key. Always do your own research (DYOR)!
👇 **Support & Follow!**
If this trade setup yields profit for you, support the channel with a "Thank You" reward (tip) 💸 and hit **Follow** for daily high-probability signals!
🚀 **Coin:** Solana (SOL/USDT)
⏱️ **Timeframe:** 4h
🔮 **Direction:** SHORT 🔴
⚙️ **Leverage:** Isolated 5x - 10x
📊 **Technical Analysis:**
Solana experienced a strong rejection at the $101.50 resistance zone, forming a heavy bearish engulfing candle on the 4h chart accompanied by elevated selling volume. Price action has lost the mid-range pivot and is now printing lower highs, signaling a continuation of the short-term downside momentum towards key demand liquidity near the $96.00-$94.00 region.
🎯 **Trade Setup:**
🔹 **Entry Zone:** $97.30 - $98.20
✅ **TP 1:** $95.80
✅ **TP 2:** $94.20
✅ **TP 3:** $91.50
🛑 **Stop Loss:** $99.60
💡 **Note:** Risk management is key. Always do your own research (DYOR)!
👇 **Support & Follow!**
If this trade setup yields profit for you, support the channel with a "Thank You" reward (tip) 💸 and hit **Follow** for daily high-probability signals!
⏱️ **Timeframe:** 4h
🔮 **Direction:** SHORT 🔴
⚙️ **Leverage:** Isolated 5x - 10x
📊 **Technical Analysis:**
Solana experienced a strong rejection at the $101.50 resistance zone, forming a heavy bearish engulfing candle on the 4h chart accompanied by elevated selling volume. Price action has lost the mid-range pivot and is now printing lower highs, signaling a continuation of the short-term downside momentum towards key demand liquidity near the $96.00-$94.00 region.
🎯 **Trade Setup:**
🔹 **Entry Zone:** $97.30 - $98.20
✅ **TP 1:** $95.80
✅ **TP 2:** $94.20
✅ **TP 3:** $91.50
🛑 **Stop Loss:** $99.60
💡 **Note:** Risk management is key. Always do your own research (DYOR)!
👇 **Support & Follow!**
If this trade setup yields profit for you, support the channel with a "Thank You" reward (tip) 💸 and hit **Follow** for daily high-probability signals!
93
·
--
🚀 **Coin:** Bitcoin (BTC/USDT)
⏱️ **Timeframe:** 4h
🔮 **Direction:** LONG 🟢
⚙️ **Leverage:** Isolated 5x - 10x
📊 **Technical Analysis:**
On the 4h chart, BTC recently established a local peak at $79,530 before pulling back into a critical demand order block near $76,500 - $76,800. Heavy 24-hour trading volume exceeding $35B suggests strong liquidity absorptions, maintaining the macro bullish structure well above the $75,595 swing low. As long as buyers defend this key retest zone, momentum favors a continuation rally targeting a breakout above $80,000.
🎯 **Trade Setup:**
🔹 **Entry Zone:** $76,200 - $76,900
✅ **TP 1:** $77,800
✅ **TP 2:** $78,900
✅ **TP 3:** $80,100
🛑 **Stop Loss:** $75,200
💡 **Note:** Risk management is key. Always do your own research (DYOR)!
👇 **Support & Follow!**
If this trade setup yields profit for you, support the channel with a "Thank You" reward (tip) 💸 and hit **Follow** for daily high-probability signals!
🚀 **Coin:** Bitcoin (BTC/USDT)
⏱️ **Timeframe:** 4h
🔮 **Direction:** LONG 🟢
⚙️ **Leverage:** Isolated 5x - 10x
📊 **Technical Analysis:**
On the 4h chart, BTC recently established a local peak at $79,530 before pulling back into a critical demand order block near $76,500 - $76,800. Heavy 24-hour trading volume exceeding $35B suggests strong liquidity absorptions, maintaining the macro bullish structure well above the $75,595 swing low. As long as buyers defend this key retest zone, momentum favors a continuation rally targeting a breakout above $80,000.
🎯 **Trade Setup:**
🔹 **Entry Zone:** $76,200 - $76,900
✅ **TP 1:** $77,800
✅ **TP 2:** $78,900
✅ **TP 3:** $80,100
🛑 **Stop Loss:** $75,200
💡 **Note:** Risk management is key. Always do your own research (DYOR)!
👇 **Support & Follow!**
If this trade setup yields profit for you, support the channel with a "Thank You" reward (tip) 💸 and hit **Follow** for daily high-probability signals!
⏱️ **Timeframe:** 4h
🔮 **Direction:** LONG 🟢
⚙️ **Leverage:** Isolated 5x - 10x
📊 **Technical Analysis:**
On the 4h chart, BTC recently established a local peak at $79,530 before pulling back into a critical demand order block near $76,500 - $76,800. Heavy 24-hour trading volume exceeding $35B suggests strong liquidity absorptions, maintaining the macro bullish structure well above the $75,595 swing low. As long as buyers defend this key retest zone, momentum favors a continuation rally targeting a breakout above $80,000.
🎯 **Trade Setup:**
🔹 **Entry Zone:** $76,200 - $76,900
✅ **TP 1:** $77,800
✅ **TP 2:** $78,900
✅ **TP 3:** $80,100
🛑 **Stop Loss:** $75,200
💡 **Note:** Risk management is key. Always do your own research (DYOR)!
👇 **Support & Follow!**
If this trade setup yields profit for you, support the channel with a "Thank You" reward (tip) 💸 and hit **Follow** for daily high-probability signals!
61
·
--
🚀 **Coin:** Polkadot (DOT/USDT)
⏱️ **Timeframe:** 4h
🔮 **Direction:** LONG 🟢
⚙️ **Leverage:** Isolated 5x - 10x
📊 **Technical Analysis:**
On the 4-hour chart, DOT is currently consolidating tightly near its key support zone after a pullback from the $1.036 local resistance. Volume metrics show heavy absorption around the $0.980 - $0.990 liquidity sweep region, indicating strong institutional defense. As long as buyers hold above the $0.980 floor, we expect a bullish expansion wave back toward the recent 24h highs and beyond.
🎯 **Trade Setup:**
🔹 **Entry Zone:** $0.9850 - $0.9930
✅ **TP 1:** $1.0120
✅ **TP 2:** $1.0350
✅ **TP 3:** $1.0680
🛑 **Stop Loss:** $0.9680
💡 **Note:** Risk management is key. Always do your own research (DYOR)!
👇 **Support & Follow!**
If this trade setup yields profit for you, support the channel with a "Thank You" reward (tip) 💸 and hit **Follow** for daily high-probability signals!
🚀 **Coin:** Polkadot (DOT/USDT)
⏱️ **Timeframe:** 4h
🔮 **Direction:** LONG 🟢
⚙️ **Leverage:** Isolated 5x - 10x
📊 **Technical Analysis:**
On the 4-hour chart, DOT is currently consolidating tightly near its key support zone after a pullback from the $1.036 local resistance. Volume metrics show heavy absorption around the $0.980 - $0.990 liquidity sweep region, indicating strong institutional defense. As long as buyers hold above the $0.980 floor, we expect a bullish expansion wave back toward the recent 24h highs and beyond.
🎯 **Trade Setup:**
🔹 **Entry Zone:** $0.9850 - $0.9930
✅ **TP 1:** $1.0120
✅ **TP 2:** $1.0350
✅ **TP 3:** $1.0680
🛑 **Stop Loss:** $0.9680
💡 **Note:** Risk management is key. Always do your own research (DYOR)!
👇 **Support & Follow!**
If this trade setup yields profit for you, support the channel with a "Thank You" reward (tip) 💸 and hit **Follow** for daily high-probability signals!
⏱️ **Timeframe:** 4h
🔮 **Direction:** LONG 🟢
⚙️ **Leverage:** Isolated 5x - 10x
📊 **Technical Analysis:**
On the 4-hour chart, DOT is currently consolidating tightly near its key support zone after a pullback from the $1.036 local resistance. Volume metrics show heavy absorption around the $0.980 - $0.990 liquidity sweep region, indicating strong institutional defense. As long as buyers hold above the $0.980 floor, we expect a bullish expansion wave back toward the recent 24h highs and beyond.
🎯 **Trade Setup:**
🔹 **Entry Zone:** $0.9850 - $0.9930
✅ **TP 1:** $1.0120
✅ **TP 2:** $1.0350
✅ **TP 3:** $1.0680
🛑 **Stop Loss:** $0.9680
💡 **Note:** Risk management is key. Always do your own research (DYOR)!
👇 **Support & Follow!**
If this trade setup yields profit for you, support the channel with a "Thank You" reward (tip) 💸 and hit **Follow** for daily high-probability signals!
81
·
--
🚀 **Coin:** Polkadot (DOT/USDT)
⏱️ **Timeframe:** 1h
🔮 **Direction:** LONG 🟢
⚙️ **Leverage:** Isolated 5x - 10x
📊 **Technical Analysis:**
DOT has pulled back to test a major demand floor near the $0.980 region following a liquidity sweep near the $1.036 24h high. On the 1h chart, selling pressure is depleting into this key structural support zone with volume spikes indicating strong buyer absorption. Expecting a bullish reversal off this level as buyers defend support to reclaim higher resistance zones.
🎯 **Trade Setup:**
🔹 **Entry Zone:** $0.978 - $0.988
✅ **TP 1:** $1.008
✅ **TP 2:** $1.032
✅ **TP 3:** $1.060
🛑 **Stop Loss:** $0.958
💡 **Note:** Risk management is key. Always do your own research (DYOR)!
👇 **Support & Follow!**
If this trade setup yields profit for you, support the channel with a "Thank You" reward (tip) 💸 and hit **Follow** for daily high-probability signals!
🚀 **Coin:** Polkadot (DOT/USDT)
⏱️ **Timeframe:** 1h
🔮 **Direction:** LONG 🟢
⚙️ **Leverage:** Isolated 5x - 10x
📊 **Technical Analysis:**
DOT has pulled back to test a major demand floor near the $0.980 region following a liquidity sweep near the $1.036 24h high. On the 1h chart, selling pressure is depleting into this key structural support zone with volume spikes indicating strong buyer absorption. Expecting a bullish reversal off this level as buyers defend support to reclaim higher resistance zones.
🎯 **Trade Setup:**
🔹 **Entry Zone:** $0.978 - $0.988
✅ **TP 1:** $1.008
✅ **TP 2:** $1.032
✅ **TP 3:** $1.060
🛑 **Stop Loss:** $0.958
💡 **Note:** Risk management is key. Always do your own research (DYOR)!
👇 **Support & Follow!**
If this trade setup yields profit for you, support the channel with a "Thank You" reward (tip) 💸 and hit **Follow** for daily high-probability signals!
⏱️ **Timeframe:** 1h
🔮 **Direction:** LONG 🟢
⚙️ **Leverage:** Isolated 5x - 10x
📊 **Technical Analysis:**
DOT has pulled back to test a major demand floor near the $0.980 region following a liquidity sweep near the $1.036 24h high. On the 1h chart, selling pressure is depleting into this key structural support zone with volume spikes indicating strong buyer absorption. Expecting a bullish reversal off this level as buyers defend support to reclaim higher resistance zones.
🎯 **Trade Setup:**
🔹 **Entry Zone:** $0.978 - $0.988
✅ **TP 1:** $1.008
✅ **TP 2:** $1.032
✅ **TP 3:** $1.060
🛑 **Stop Loss:** $0.958
💡 **Note:** Risk management is key. Always do your own research (DYOR)!
👇 **Support & Follow!**
If this trade setup yields profit for you, support the channel with a "Thank You" reward (tip) 💸 and hit **Follow** for daily high-probability signals!
128
·
--
🚀 **Coin:** Artificial Superintelligence Alliance (FET/USDT)
⏱️ **Timeframe:** 4h
🔮 **Direction:** LONG 🟢
⚙️ **Leverage:** Isolated 5x - 10x
📊 **Technical Analysis:**
FET is currently testing a crucial 4-hour demand zone around $0.1625 following a healthy cool-off from its recent $0.1723 high. Bearish momentum is noticeably fading as price consolidates right above key local support, indicating seller exhaustion. A bullish bounce from this region offers an exceptional Risk-to-Reward ratio as buyers prepare to reclaim the upper range.
🎯 **Trade Setup:**
🔹 **Entry Zone:** $0.1620 - $0.1635
✅ **TP 1:** $0.1670
✅ **TP 2:** $0.1710
✅ **TP 3:** $0.1760
🛑 **Stop Loss:** $0.1580
💡 **Note:** Risk management is key. Always do your own research (DYOR)!
👇 **Support & Follow!**
If this trade setup yields profit for you, support the channel with a "Thank You" reward (tip) 💸 and hit **Follow** for daily high-probability signals!
🚀 **Coin:** Artificial Superintelligence Alliance (FET/USDT)
⏱️ **Timeframe:** 4h
🔮 **Direction:** LONG 🟢
⚙️ **Leverage:** Isolated 5x - 10x
📊 **Technical Analysis:**
FET is currently testing a crucial 4-hour demand zone around $0.1625 following a healthy cool-off from its recent $0.1723 high. Bearish momentum is noticeably fading as price consolidates right above key local support, indicating seller exhaustion. A bullish bounce from this region offers an exceptional Risk-to-Reward ratio as buyers prepare to reclaim the upper range.
🎯 **Trade Setup:**
🔹 **Entry Zone:** $0.1620 - $0.1635
✅ **TP 1:** $0.1670
✅ **TP 2:** $0.1710
✅ **TP 3:** $0.1760
🛑 **Stop Loss:** $0.1580
💡 **Note:** Risk management is key. Always do your own research (DYOR)!
👇 **Support & Follow!**
If this trade setup yields profit for you, support the channel with a "Thank You" reward (tip) 💸 and hit **Follow** for daily high-probability signals!
⏱️ **Timeframe:** 4h
🔮 **Direction:** LONG 🟢
⚙️ **Leverage:** Isolated 5x - 10x
📊 **Technical Analysis:**
FET is currently testing a crucial 4-hour demand zone around $0.1625 following a healthy cool-off from its recent $0.1723 high. Bearish momentum is noticeably fading as price consolidates right above key local support, indicating seller exhaustion. A bullish bounce from this region offers an exceptional Risk-to-Reward ratio as buyers prepare to reclaim the upper range.
🎯 **Trade Setup:**
🔹 **Entry Zone:** $0.1620 - $0.1635
✅ **TP 1:** $0.1670
✅ **TP 2:** $0.1710
✅ **TP 3:** $0.1760
🛑 **Stop Loss:** $0.1580
💡 **Note:** Risk management is key. Always do your own research (DYOR)!
👇 **Support & Follow!**
If this trade setup yields profit for you, support the channel with a "Thank You" reward (tip) 💸 and hit **Follow** for daily high-probability signals!
1
223
·
--
🚀 **Coin:** Artificial Superintelligence Alliance (FET/USDT)
⏱️ **Timeframe:** 4h
🔮 **Direction:** LONG 🟢
⚙️ **Leverage:** Isolated 5x - 10x
📊 **Technical Analysis:**
FET is currently forming a strong higher-low structure on the 4-hour chart, bouncing cleanly off the $0.165 support floor. We are witnessing healthy volume absorption around the current market price, indicating that buyers are quietly building positions for the next leg up. A sustained candle closure above $0.172 will ignite bullish momentum, pushing the price toward major overhead targets.
🎯 **Trade Setup:**
🔹 **Entry Zone:** $0.1660 - $0.1685
✅ **TP 1:** $0.1720
✅ **TP 2:** $0.1765
✅ **TP 3:** $0.1820
🛑 **Stop Loss:** $0.1630
💡 **Note:** Risk management is key. Always do your own research (DYOR)!
👇 **Support & Follow!**
If this trade setup yields profit for you, support the channel with a "Thank You" reward (tip) 💸 and hit **Follow** for daily high-probability signals!
🚀 **Coin:** Artificial Superintelligence Alliance (FET/USDT)
⏱️ **Timeframe:** 4h
🔮 **Direction:** LONG 🟢
⚙️ **Leverage:** Isolated 5x - 10x
📊 **Technical Analysis:**
FET is currently forming a strong higher-low structure on the 4-hour chart, bouncing cleanly off the $0.165 support floor. We are witnessing healthy volume absorption around the current market price, indicating that buyers are quietly building positions for the next leg up. A sustained candle closure above $0.172 will ignite bullish momentum, pushing the price toward major overhead targets.
🎯 **Trade Setup:**
🔹 **Entry Zone:** $0.1660 - $0.1685
✅ **TP 1:** $0.1720
✅ **TP 2:** $0.1765
✅ **TP 3:** $0.1820
🛑 **Stop Loss:** $0.1630
💡 **Note:** Risk management is key. Always do your own research (DYOR)!
👇 **Support & Follow!**
If this trade setup yields profit for you, support the channel with a "Thank You" reward (tip) 💸 and hit **Follow** for daily high-probability signals!
⏱️ **Timeframe:** 4h
🔮 **Direction:** LONG 🟢
⚙️ **Leverage:** Isolated 5x - 10x
📊 **Technical Analysis:**
FET is currently forming a strong higher-low structure on the 4-hour chart, bouncing cleanly off the $0.165 support floor. We are witnessing healthy volume absorption around the current market price, indicating that buyers are quietly building positions for the next leg up. A sustained candle closure above $0.172 will ignite bullish momentum, pushing the price toward major overhead targets.
🎯 **Trade Setup:**
🔹 **Entry Zone:** $0.1660 - $0.1685
✅ **TP 1:** $0.1720
✅ **TP 2:** $0.1765
✅ **TP 3:** $0.1820
🛑 **Stop Loss:** $0.1630
💡 **Note:** Risk management is key. Always do your own research (DYOR)!
👇 **Support & Follow!**
If this trade setup yields profit for you, support the channel with a "Thank You" reward (tip) 💸 and hit **Follow** for daily high-probability signals!
1
131
·
--
🚀 **Coin:** Chainlink (LINK/USDT)
⏱️ **Timeframe:** 4h
🔮 **Direction:** LONG 🟢
⚙️ **Leverage:** Isolated 5x - 10x
📊 **Technical Analysis:**
LINK is currently consolidating strongly right below the $11.55 local resistance level after recovering cleanly from the $11.14 daily low. The 4h chart indicates a bullish pennant formation backed by consistent trading volume exceeding $360M, signaling accumulating buying pressure. A decisive push above $11.55 will likely trigger momentum traders, accelerating a breakout toward the higher resistance zones.
🎯 **Trade Setup:**
🔹 **Entry Zone:** $11.42 - $11.52
✅ **TP 1:** $11.75
✅ **TP 2:** $12.10
✅ **TP 3:** $12.60
🛑 **Stop Loss:** $11.08
💡 **Note:** Risk management is key. Always do your own research (DYOR)!
👇 **Support & Follow!**
If this trade setup yields profit for you, support the channel with a "Thank You" reward (tip) 💸 and hit **Follow** for daily high-probability signals!
🚀 **Coin:** Chainlink (LINK/USDT)
⏱️ **Timeframe:** 4h
🔮 **Direction:** LONG 🟢
⚙️ **Leverage:** Isolated 5x - 10x
📊 **Technical Analysis:**
LINK is currently consolidating strongly right below the $11.55 local resistance level after recovering cleanly from the $11.14 daily low. The 4h chart indicates a bullish pennant formation backed by consistent trading volume exceeding $360M, signaling accumulating buying pressure. A decisive push above $11.55 will likely trigger momentum traders, accelerating a breakout toward the higher resistance zones.
🎯 **Trade Setup:**
🔹 **Entry Zone:** $11.42 - $11.52
✅ **TP 1:** $11.75
✅ **TP 2:** $12.10
✅ **TP 3:** $12.60
🛑 **Stop Loss:** $11.08
💡 **Note:** Risk management is key. Always do your own research (DYOR)!
👇 **Support & Follow!**
If this trade setup yields profit for you, support the channel with a "Thank You" reward (tip) 💸 and hit **Follow** for daily high-probability signals!
⏱️ **Timeframe:** 4h
🔮 **Direction:** LONG 🟢
⚙️ **Leverage:** Isolated 5x - 10x
📊 **Technical Analysis:**
LINK is currently consolidating strongly right below the $11.55 local resistance level after recovering cleanly from the $11.14 daily low. The 4h chart indicates a bullish pennant formation backed by consistent trading volume exceeding $360M, signaling accumulating buying pressure. A decisive push above $11.55 will likely trigger momentum traders, accelerating a breakout toward the higher resistance zones.
🎯 **Trade Setup:**
🔹 **Entry Zone:** $11.42 - $11.52
✅ **TP 1:** $11.75
✅ **TP 2:** $12.10
✅ **TP 3:** $12.60
🛑 **Stop Loss:** $11.08
💡 **Note:** Risk management is key. Always do your own research (DYOR)!
👇 **Support & Follow!**
If this trade setup yields profit for you, support the channel with a "Thank You" reward (tip) 💸 and hit **Follow** for daily high-probability signals!
47
·
--
🚀 **Coin:** Ethereum (ETH/USDT)
⏱️ **Timeframe:** 4h
🔮 **Direction:** LONG 🟢
⚙️ **Leverage:** Isolated 10x - 20x
📊 **Technical Analysis:**
ETH is demonstrating dominant bullish momentum on the 4h timeframe, blasting up over +30% in 24 hours backed by massive institutional trading volume exceeding $11B. After sweeping liquidity near the $2,464 low, price action built a strong high-volume continuation structure holding right near local highs. As long as bulls defend the key $2,490 retest zone, a breakout past $2,531 toward higher target zones is imminent.
🎯 **Trade Setup:**
🔹 **Entry Zone:** $2,490.00 - $2,515.00
✅ **TP 1:** $2,545.00
✅ **TP 2:** $2,590.00
✅ **TP 3:** $2,650.00
🛑 **Stop Loss:** $2,450.00
💡 **Note:** Risk management is key. Always do your own research (DYOR)!
👇 **Support & Follow!**
If this trade setup yields profit for you, support the channel with a "Thank You" reward (tip) 💸 and hit **Follow** for daily high-probability signals!
🚀 **Coin:** Ethereum (ETH/USDT)
⏱️ **Timeframe:** 4h
🔮 **Direction:** LONG 🟢
⚙️ **Leverage:** Isolated 10x - 20x
📊 **Technical Analysis:**
ETH is demonstrating dominant bullish momentum on the 4h timeframe, blasting up over +30% in 24 hours backed by massive institutional trading volume exceeding $11B. After sweeping liquidity near the $2,464 low, price action built a strong high-volume continuation structure holding right near local highs. As long as bulls defend the key $2,490 retest zone, a breakout past $2,531 toward higher target zones is imminent.
🎯 **Trade Setup:**
🔹 **Entry Zone:** $2,490.00 - $2,515.00
✅ **TP 1:** $2,545.00
✅ **TP 2:** $2,590.00
✅ **TP 3:** $2,650.00
🛑 **Stop Loss:** $2,450.00
💡 **Note:** Risk management is key. Always do your own research (DYOR)!
👇 **Support & Follow!**
If this trade setup yields profit for you, support the channel with a "Thank You" reward (tip) 💸 and hit **Follow** for daily high-probability signals!
⏱️ **Timeframe:** 4h
🔮 **Direction:** LONG 🟢
⚙️ **Leverage:** Isolated 10x - 20x
📊 **Technical Analysis:**
ETH is demonstrating dominant bullish momentum on the 4h timeframe, blasting up over +30% in 24 hours backed by massive institutional trading volume exceeding $11B. After sweeping liquidity near the $2,464 low, price action built a strong high-volume continuation structure holding right near local highs. As long as bulls defend the key $2,490 retest zone, a breakout past $2,531 toward higher target zones is imminent.
🎯 **Trade Setup:**
🔹 **Entry Zone:** $2,490.00 - $2,515.00
✅ **TP 1:** $2,545.00
✅ **TP 2:** $2,590.00
✅ **TP 3:** $2,650.00
🛑 **Stop Loss:** $2,450.00
💡 **Note:** Risk management is key. Always do your own research (DYOR)!
👇 **Support & Follow!**
If this trade setup yields profit for you, support the channel with a "Thank You" reward (tip) 💸 and hit **Follow** for daily high-probability signals!
1
12

·
--
Crypto NewsBitcoin climbs to 78k as crypto sits out the AI selloff. BTC rose 1.9% since midnight UTC while Nasdaq 100 futures fell 1.65% on calls to slow AI development, and crude gained almost 4% on a Saudi pipeline closure. Follow the action with $BTC. #Bitcoin #Crypto
Crypto News
Bitcoin climbs to 78k as crypto sits out the AI selloff. BTC rose 1.9% since midnight UTC while Nasdaq 100 futures fell 1.65% on calls to slow AI development, and crude gained almost 4% on a Saudi pipeline closure. Follow the action with $BTC . #Bitcoin #Crypto

62
·
--
Crypto NewsByteDance secures a $29.6B loan to fuel a massive AI data-center push, eyeing up to $70B in AI infra. As U.S. giants call for slowing the AI race, capital keeps flowing into AI compute. For crypto markets, this surge in AI demand could reshape GPU pricing and energy dynamics, with potential knock-on effects on mining economics and cloud infrastructure. $BTC #AI #Crypto #Binance
Crypto News
ByteDance secures a $29.6B loan to fuel a massive AI data-center push, eyeing up to $70B in AI infra. As U.S. giants call for slowing the AI race, capital keeps flowing into AI compute. For crypto markets, this surge in AI demand could reshape GPU pricing and energy dynamics, with potential knock-on effects on mining economics and cloud infrastructure. $BTC #AI #Crypto #Binance

34
·
--
Crypto NewsCrypto Week Ahead: Fed, BOE, and BOJ rate decisions could spark volatility as Sept 14 approaches. Watch how $BTC and $ETH react to policy surprises, with liquidity shifts potentially driving breakouts or pullbacks. Stay nimble and manage risk. #CryptoWeek #MarketMovers
Crypto News
Crypto Week Ahead: Fed, BOE, and BOJ rate decisions could spark volatility as Sept 14 approaches. Watch how $BTC and $ETH react to policy surprises, with liquidity shifts potentially driving breakouts or pullbacks. Stay nimble and manage risk. #CryptoWeek #MarketMovers
46
·
--
Crypto NewsBitcoin climbs above $77,000 as AI-safety concerns weigh on tech stocks and rising oil prices add pressure on risk assets. $BTC #Bitcoin #Crypto
Crypto News
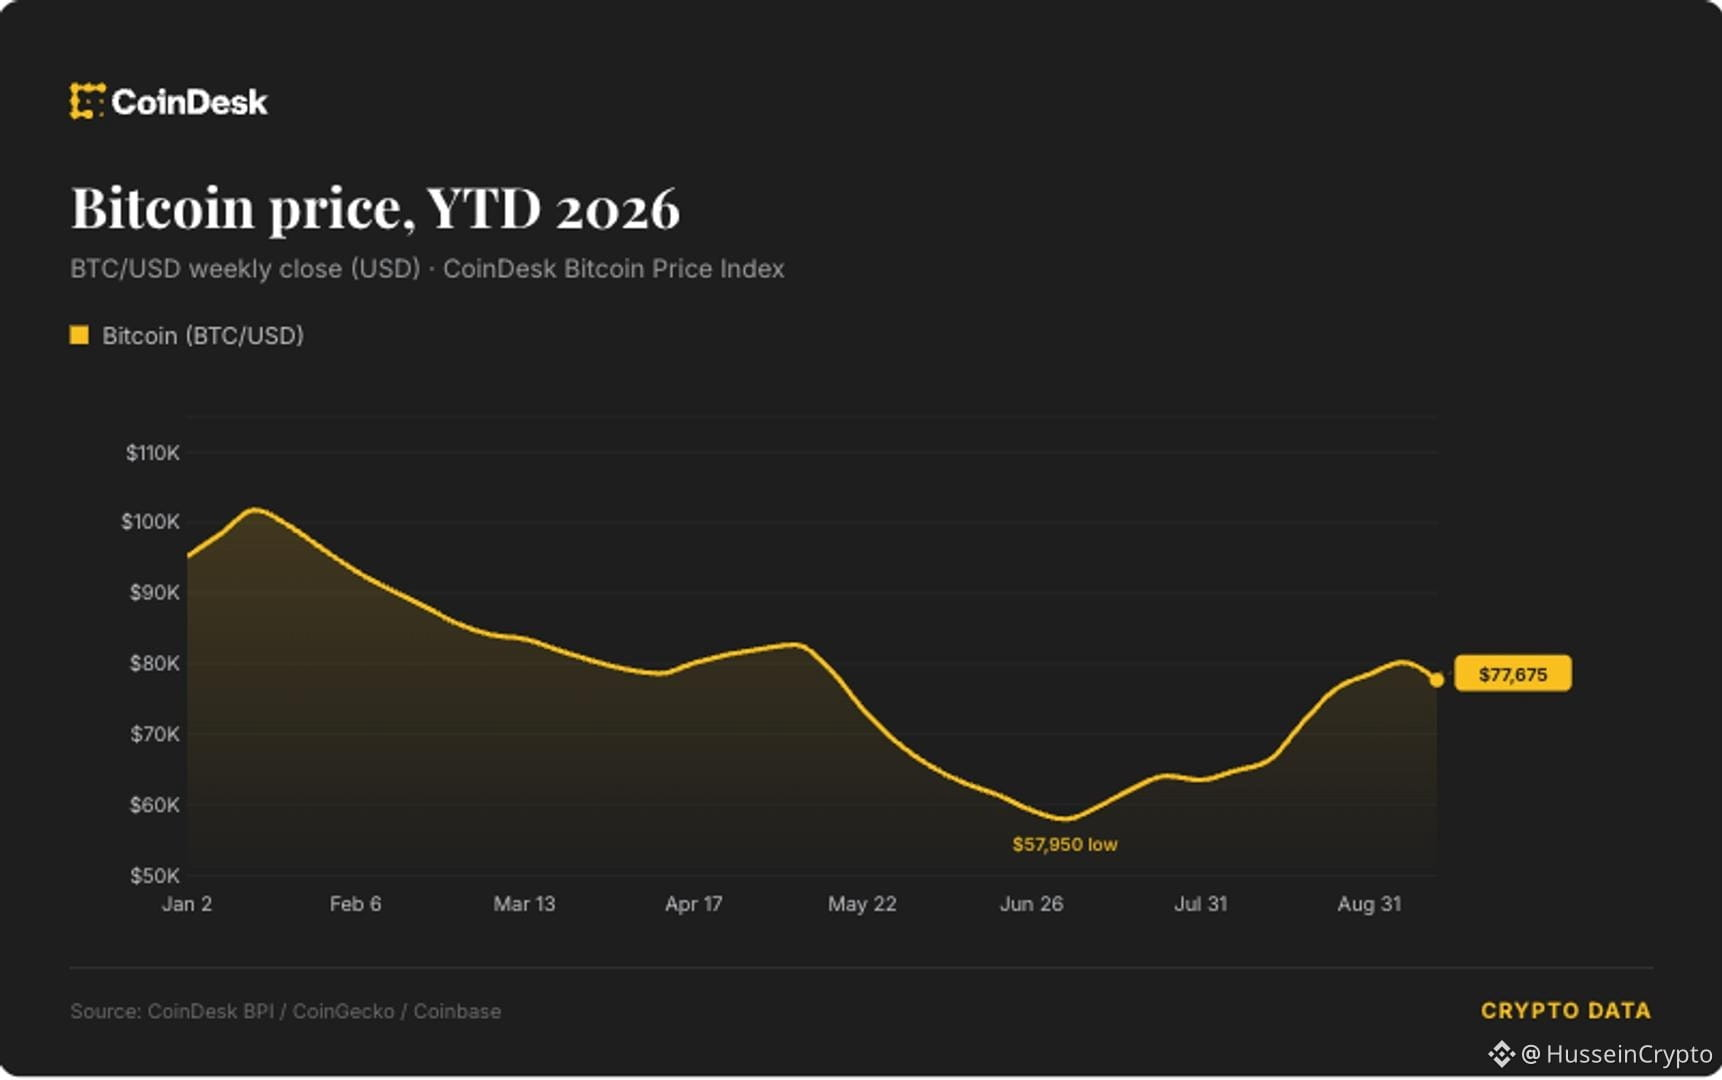
Bitcoin climbs above $77,000 as AI-safety concerns weigh on tech stocks and rising oil prices add pressure on risk assets. $BTC #Bitcoin #Crypto
43
Log in to explore more content
Join global crypto users on Binance Square
⚡️ Get latest and useful information about crypto.
💬 Trusted by the world’s largest crypto exchange.
👍 Discover real insights from verified creators.
Email / Phone number
Trending Topics
SKPoliceRefer18PolymarketUsersToProsecutors
49 views
33 Discussing
You think this is about regulation. It’s not. It’s about attention.
The police didn’t act because of market harm.
They acted because someone noticed and complained.
That’s the real trigger for any trader: visibility, not legality.
I’m watching who gets named next.
Not to trade. To see who’s still quiet.
If 18 people get charged and the market doesn’t flinch?
I was wrong.
You think it’s a threat?
Not financial advice.
#SKPoliceRefer18PolymarketUsersToProsecutors #CryptoNews
Crypto_Grace
·0 Likes
·8 views
FedSEPProjects2026RateAt4.1%
1,049 views
86 Discussing
USHouseAdvancesBitcoinReserveBill
1,934 views
88 Discussing