
阿燕 爱资哈尔
55 Beiträge

阿燕 爱资哈尔
Melden
Nutzer blockieren
62 Following
12 Follower
6 Like gegeben
Beiträge
Alle
Zitierungen
Live
·
--
Übersetzung ansehen
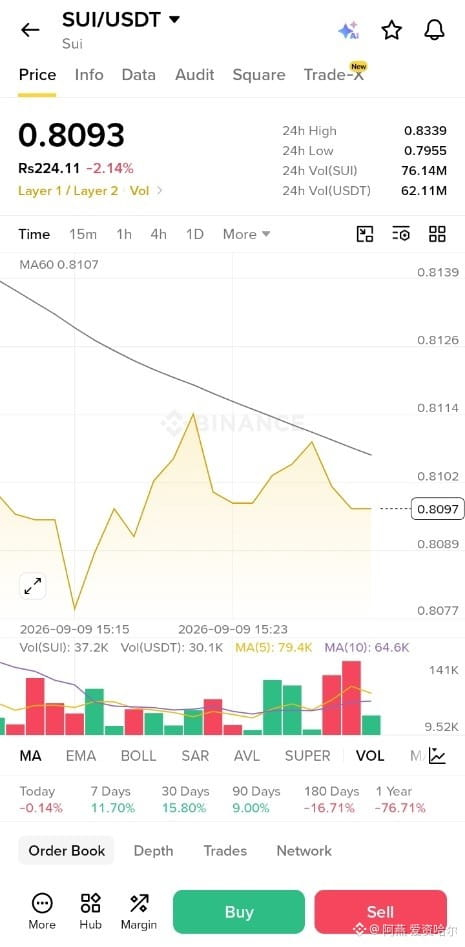
SUI is looking heavy here, especially with price sitting below the falling MA60 I’m leaning SHORT.
🎯 Entry: 0.8090–0.8105 | SL: 0.8130
TP1: 0.8078 TP2: 0.8055 TP3: 0.8020
The repeated rejection around 0.810–0.8114 keeps sellers in control for now.
⚠️ Risk: Medium keep leverage and position size under control.
Levels are based on the chart structure and should be treated as a setup, not a guarantee.
$SUI
SUI is looking heavy here, especially with price sitting below the falling MA60 I’m leaning SHORT.
🎯 Entry: 0.8090–0.8105 | SL: 0.8130
TP1: 0.8078 TP2: 0.8055 TP3: 0.8020
The repeated rejection around 0.810–0.8114 keeps sellers in control for now.
⚠️ Risk: Medium keep leverage and position size under control.
Levels are based on the chart structure and should be treated as a setup, not a guarantee.
$SUI
🎯 Entry: 0.8090–0.8105 | SL: 0.8130
TP1: 0.8078 TP2: 0.8055 TP3: 0.8020
The repeated rejection around 0.810–0.8114 keeps sellers in control for now.
⚠️ Risk: Medium keep leverage and position size under control.
Levels are based on the chart structure and should be treated as a setup, not a guarantee.
$SUI
97
·
--
Übersetzung ansehen
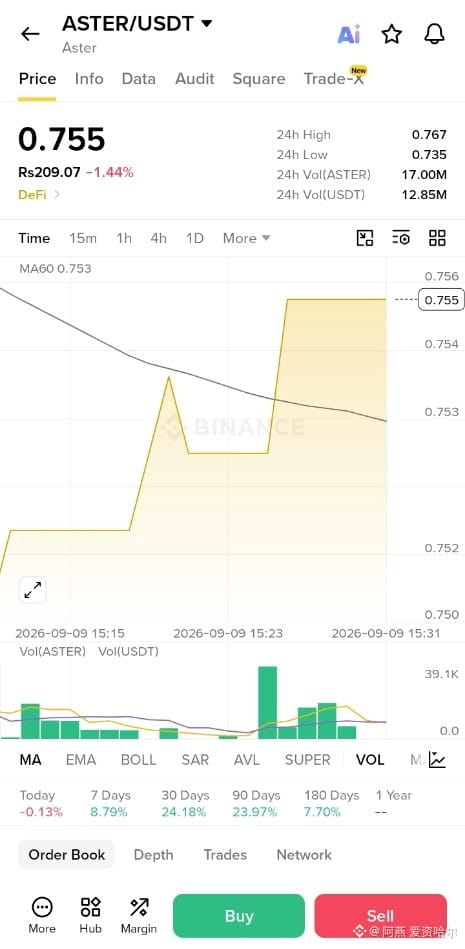
ASTER is holding above the 0.753 MA zone, so I’m leaning LONG here.
Entry: 0.753 0.755, with buyers needing to defend this area.
Stop loss sits at 0.750 to keep the setup invalidation clean.
Upside targets: TP1 0.758 TP2 0.762 →TP3 0.767.
Momentum is improving, but I’d still keep the position controlled Risk: Medium.
$ASTER
ASTER is holding above the 0.753 MA zone, so I’m leaning LONG here.
Entry: 0.753 0.755, with buyers needing to defend this area.
Stop loss sits at 0.750 to keep the setup invalidation clean.
Upside targets: TP1 0.758 TP2 0.762 →TP3 0.767.
Momentum is improving, but I’d still keep the position controlled Risk: Medium.
$ASTER
Entry: 0.753 0.755, with buyers needing to defend this area.
Stop loss sits at 0.750 to keep the setup invalidation clean.
Upside targets: TP1 0.758 TP2 0.762 →TP3 0.767.
Momentum is improving, but I’d still keep the position controlled Risk: Medium.
$ASTER
196
·
--
Übersetzung ansehen
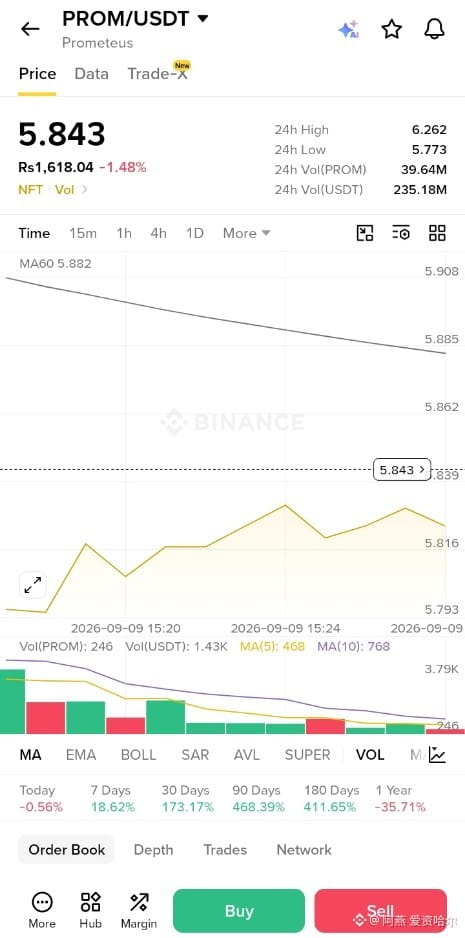
PROM looks heavy around the 5.84–5.88 resistance area, so I’m leaning SHORT here.
📉 Entry zone: 5.84–5.88 | SL: 5.91
🎯 TP1: 5.82 → TP2: 5.80 → TP3: 5.77
The declining MA60 and weak volume make me cautious on any bounce into resistance.
⚠️ Risk: Medium — keep position size controlled and don’t chase the entry.
$PROM
PROM looks heavy around the 5.84–5.88 resistance area, so I’m leaning SHORT here.
📉 Entry zone: 5.84–5.88 | SL: 5.91
🎯 TP1: 5.82 → TP2: 5.80 → TP3: 5.77
The declining MA60 and weak volume make me cautious on any bounce into resistance.
⚠️ Risk: Medium — keep position size controlled and don’t chase the entry.
$PROM
📉 Entry zone: 5.84–5.88 | SL: 5.91
🎯 TP1: 5.82 → TP2: 5.80 → TP3: 5.77
The declining MA60 and weak volume make me cautious on any bounce into resistance.
⚠️ Risk: Medium — keep position size controlled and don’t chase the entry.
$PROM
168
·
--
Übersetzung ansehen
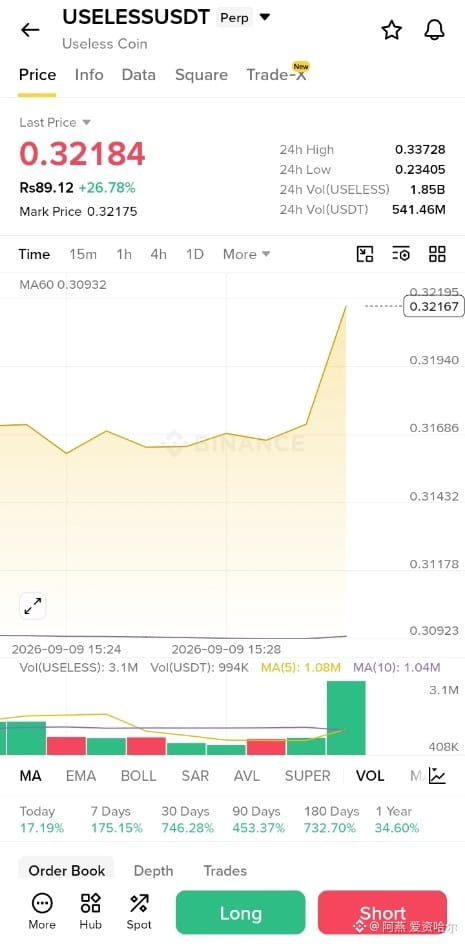
$USELESS is catching serious momentum, but I’d rather buy a controlled pullback than chase the spike.
I’m watching a LONG around 0.3194–0.3210, with SL at 0.3143 if momentum fades.
Upside levels: TP1 0.3250 → TP2 0.3300 → TP3 0.3373.
Volume is expanding hard, so the breakout has strength—but volatility is extreme here.
Risk: HIGH ⚠️ Keep the position size small and let price confirm the setup.
$USELESS
$USELESS is catching serious momentum, but I’d rather buy a controlled pullback than chase the spike.
I’m watching a LONG around 0.3194–0.3210, with SL at 0.3143 if momentum fades.
Upside levels: TP1 0.3250 → TP2 0.3300 → TP3 0.3373.
Volume is expanding hard, so the breakout has strength—but volatility is extreme here.
Risk: HIGH ⚠️ Keep the position size small and let price confirm the setup.
$USELESS
I’m watching a LONG around 0.3194–0.3210, with SL at 0.3143 if momentum fades.
Upside levels: TP1 0.3250 → TP2 0.3300 → TP3 0.3373.
Volume is expanding hard, so the breakout has strength—but volatility is extreme here.
Risk: HIGH ⚠️ Keep the position size small and let price confirm the setup.
$USELESS
142
·
--
Übersetzung ansehen
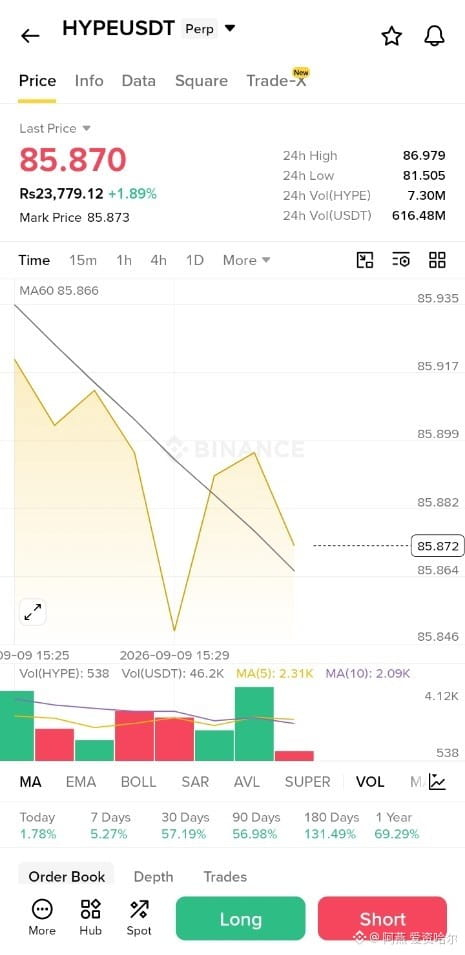
$HYPE is showing rejection under the nearby trendline, so I’m leaning SHORT here.
Entry zone: 85.87–85.90, with invalidation above 85.935.
Downside targets: TP1 85.864 TP2 85.846 TP3 85.820.
Price is sitting around the MA60, so I’d avoid chasing and let the setup confirm.
Risk: Medium tight stop, but volatility can still sweep the level.
$HYPER
$HYPE is showing rejection under the nearby trendline, so I’m leaning SHORT here.
Entry zone: 85.87–85.90, with invalidation above 85.935.
Downside targets: TP1 85.864 TP2 85.846 TP3 85.820.
Price is sitting around the MA60, so I’d avoid chasing and let the setup confirm.
Risk: Medium tight stop, but volatility can still sweep the level.
$HYPER
Entry zone: 85.87–85.90, with invalidation above 85.935.
Downside targets: TP1 85.864 TP2 85.846 TP3 85.820.
Price is sitting around the MA60, so I’d avoid chasing and let the setup confirm.
Risk: Medium tight stop, but volatility can still sweep the level.
$HYPER
114
·
--
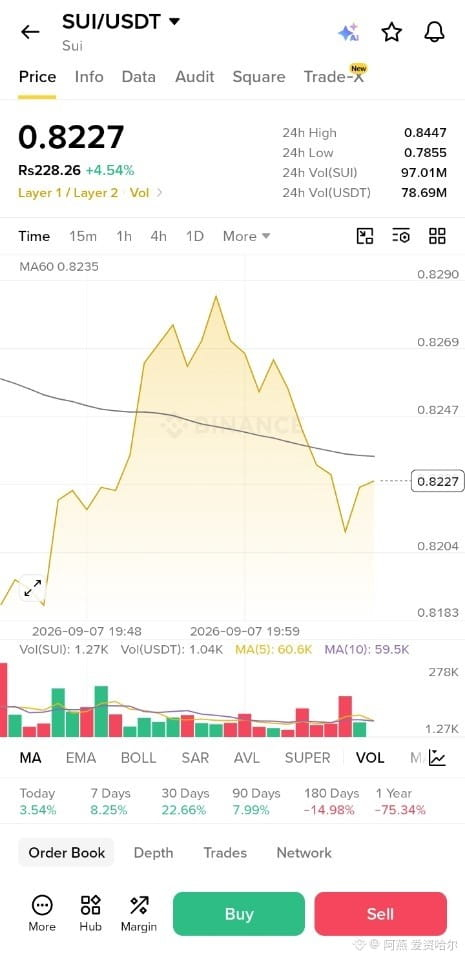
$SUI sitzt in einer entscheidenden Zone nach diesem scharfen Pullback.
Ich beobachte ein LONG bei 0.8205–0.8225 und suche nach Käufern, die die Zone verteidigen.
Eine Invalidation unter 0.8180 hält das Setup unter Kontrolle.
Ziele (Upside): TP1 0.8247 → TP2 0.8269 → TP3 0.8290.
Die Rückeroberung von 0.8235 MA60 würde dem Move mehr Bestätigung geben.
Risiko: Mittel ⚠️ — Positionsgröße diszipliniert halten.
$SUI
$SUI sitzt in einer entscheidenden Zone nach diesem scharfen Pullback.
Ich beobachte ein LONG bei 0.8205–0.8225 und suche nach Käufern, die die Zone verteidigen.
Eine Invalidation unter 0.8180 hält das Setup unter Kontrolle.
Ziele (Upside): TP1 0.8247 → TP2 0.8269 → TP3 0.8290.
Die Rückeroberung von 0.8235 MA60 würde dem Move mehr Bestätigung geben.
Risiko: Mittel ⚠️ — Positionsgröße diszipliniert halten.
$SUI
Ich beobachte ein LONG bei 0.8205–0.8225 und suche nach Käufern, die die Zone verteidigen.
Eine Invalidation unter 0.8180 hält das Setup unter Kontrolle.
Ziele (Upside): TP1 0.8247 → TP2 0.8269 → TP3 0.8290.
Die Rückeroberung von 0.8235 MA60 würde dem Move mehr Bestätigung geben.
Risiko: Mittel ⚠️ — Positionsgröße diszipliniert halten.
$SUI
30
·
--
Übersetzung ansehen
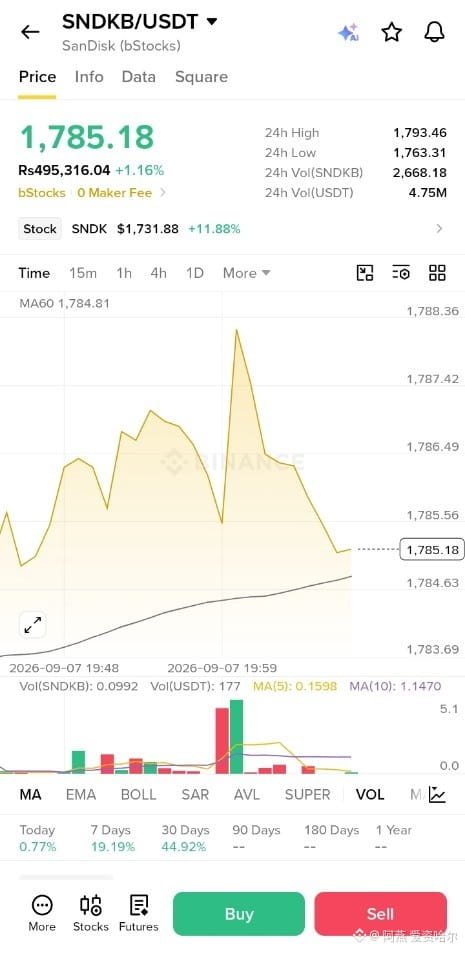
SNDKB/USDT is holding above the MA60, so I’m leaning LONG here.
Entry zone: 1784.8–1785.3 — looking for strength around this support.
Stop loss: 1783.6 to keep the downside controlled.
TP1 1787.4 → TP2 1789.0 → TP3 1793.4 🚀
Risk level: Medium — keep position size disciplined and avoid chasing.
$SNDKB
SNDKB/USDT is holding above the MA60, so I’m leaning LONG here.
Entry zone: 1784.8–1785.3 — looking for strength around this support.
Stop loss: 1783.6 to keep the downside controlled.
TP1 1787.4 → TP2 1789.0 → TP3 1793.4 🚀
Risk level: Medium — keep position size disciplined and avoid chasing.
$SNDKB
Entry zone: 1784.8–1785.3 — looking for strength around this support.
Stop loss: 1783.6 to keep the downside controlled.
TP1 1787.4 → TP2 1789.0 → TP3 1793.4 🚀
Risk level: Medium — keep position size disciplined and avoid chasing.
$SNDKB
39
·
--
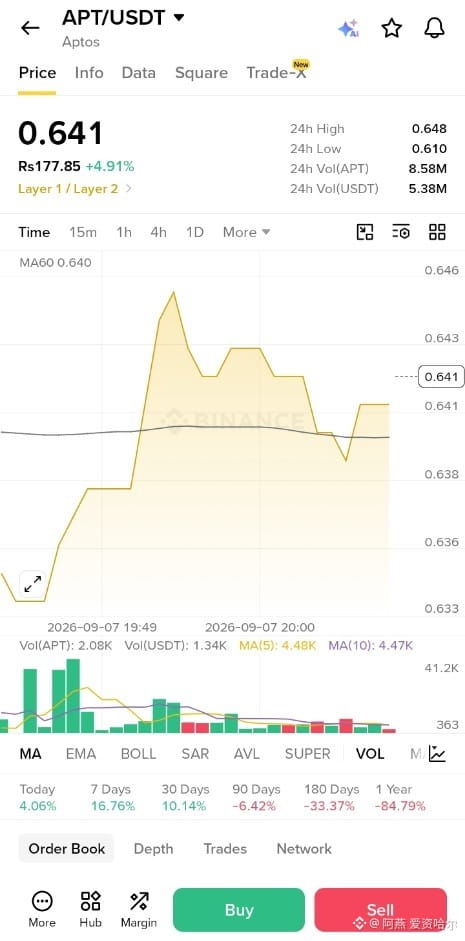
APT hält sich um die MA60 bei etwa 0.640, und das Reclaim gibt mir eine leichte LONG-Bias.
Ich würde 0.639–0.642 im Blick behalten, um eine saubere Entry zu finden, statt der Bewegung hinterherzulaufen.
Die Invalidation liegt bei 0.636 und hält das Setup eng, falls der Momentum nachlässt.
Obere Ziele: TP1 0.644 → TP2 0.648 → TP3 0.652.
Risiko: Mittel — der Preis ist immer noch nahe am 24H-Hoch, daher ist Bestätigung entscheidend.
Ich würde geduldig bleiben und APT den Breakout erst beweisen lassen, bevor ich in Position gehe.
$APT
APT hält sich um die MA60 bei etwa 0.640, und das Reclaim gibt mir eine leichte LONG-Bias.
Ich würde 0.639–0.642 im Blick behalten, um eine saubere Entry zu finden, statt der Bewegung hinterherzulaufen.
Die Invalidation liegt bei 0.636 und hält das Setup eng, falls der Momentum nachlässt.
Obere Ziele: TP1 0.644 → TP2 0.648 → TP3 0.652.
Risiko: Mittel — der Preis ist immer noch nahe am 24H-Hoch, daher ist Bestätigung entscheidend.
Ich würde geduldig bleiben und APT den Breakout erst beweisen lassen, bevor ich in Position gehe.
$APT
Ich würde 0.639–0.642 im Blick behalten, um eine saubere Entry zu finden, statt der Bewegung hinterherzulaufen.
Die Invalidation liegt bei 0.636 und hält das Setup eng, falls der Momentum nachlässt.
Obere Ziele: TP1 0.644 → TP2 0.648 → TP3 0.652.
Risiko: Mittel — der Preis ist immer noch nahe am 24H-Hoch, daher ist Bestätigung entscheidend.
Ich würde geduldig bleiben und APT den Breakout erst beweisen lassen, bevor ich in Position gehe.
$APT
152
·
--
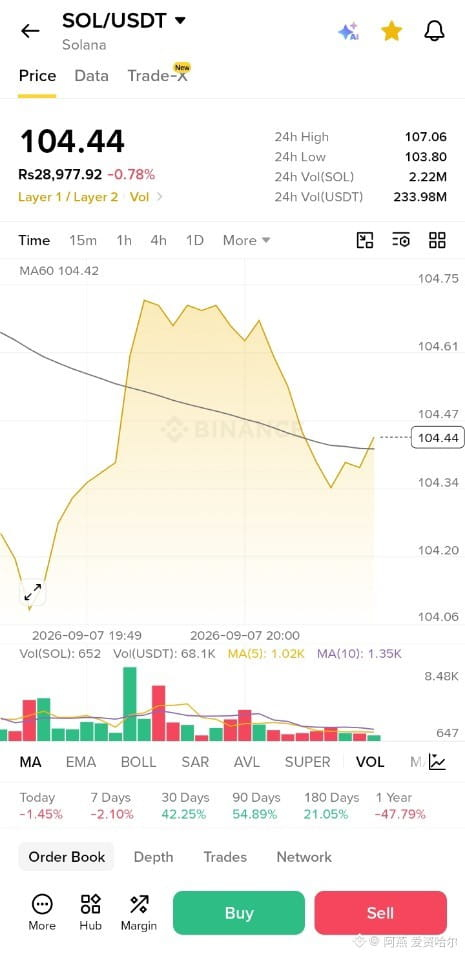
SOL hält den Bereich um 104.35 nach einem scharfen Dip, daher beobachte ich eine kleine LONG-Fortsetzung.
Einstieg: 104.35–104.45 | SL: 104.05
TP1: 104.65 → TP2: 104.85 → TP3: 105.10
Die Zone 104.60–104.75 ist die erste Hürde; ein sauberer Ausbruch könnte die höheren Ziele eröffnen.
Risikostufe: Mittel — Positionsgröße kontrollieren und dem Move nicht hinterherjagen.
Wenn 104.05 entscheidend bricht, würde ich lieber aussteigen, statt das Setup zu erzwingen.
$SOL
SOL hält den Bereich um 104.35 nach einem scharfen Dip, daher beobachte ich eine kleine LONG-Fortsetzung.
Einstieg: 104.35–104.45 | SL: 104.05
TP1: 104.65 → TP2: 104.85 → TP3: 105.10
Die Zone 104.60–104.75 ist die erste Hürde; ein sauberer Ausbruch könnte die höheren Ziele eröffnen.
Risikostufe: Mittel — Positionsgröße kontrollieren und dem Move nicht hinterherjagen.
Wenn 104.05 entscheidend bricht, würde ich lieber aussteigen, statt das Setup zu erzwingen.
$SOL
Einstieg: 104.35–104.45 | SL: 104.05
TP1: 104.65 → TP2: 104.85 → TP3: 105.10
Die Zone 104.60–104.75 ist die erste Hürde; ein sauberer Ausbruch könnte die höheren Ziele eröffnen.
Risikostufe: Mittel — Positionsgröße kontrollieren und dem Move nicht hinterherjagen.
Wenn 104.05 entscheidend bricht, würde ich lieber aussteigen, statt das Setup zu erzwingen.
$SOL
15
·
--
Übersetzung ansehen
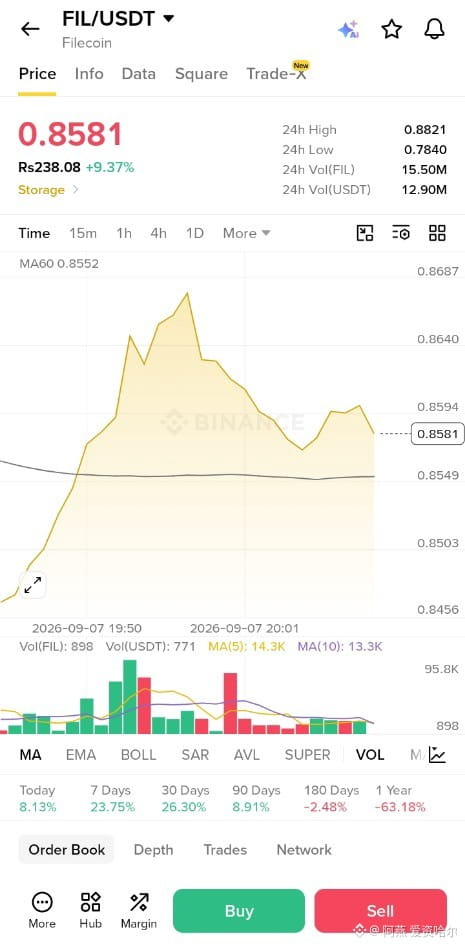
FIL/USDT is holding above the 0.855 area, so I’m leaning LONG while this support stays intact.
Entry zone: 0.8540–0.8580 — looking for a clean hold/retest before adding.
Stop loss: 0.8480, keeping the invalidation tight below support.
TP1: 0.8640 → TP2: 0.8750 → TP3: 0.8820.
Risk: Medium ⚠️ — price has already moved strongly, so I’d avoid chasing the breakout.
$FIL
FIL/USDT is holding above the 0.855 area, so I’m leaning LONG while this support stays intact.
Entry zone: 0.8540–0.8580 — looking for a clean hold/retest before adding.
Stop loss: 0.8480, keeping the invalidation tight below support.
TP1: 0.8640 → TP2: 0.8750 → TP3: 0.8820.
Risk: Medium ⚠️ — price has already moved strongly, so I’d avoid chasing the breakout.
$FIL
Entry zone: 0.8540–0.8580 — looking for a clean hold/retest before adding.
Stop loss: 0.8480, keeping the invalidation tight below support.
TP1: 0.8640 → TP2: 0.8750 → TP3: 0.8820.
Risk: Medium ⚠️ — price has already moved strongly, so I’d avoid chasing the breakout.
$FIL
91
·
--
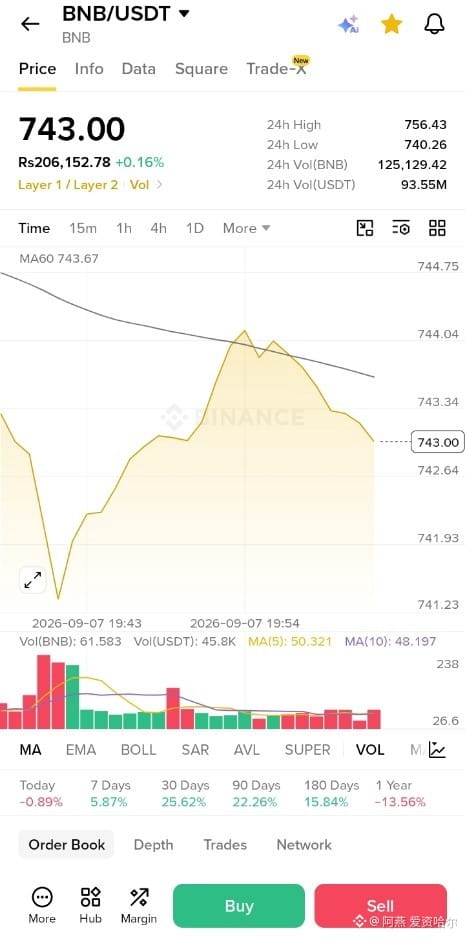
BNB/USDT wirkt, als ob es nach der Ablehnung der 744er-Zone an Schwung verliert — ich tendiere hier zu SHORT.
🎯 Einstieg: 743.40–744.00 | 🛑 SL: 745.00
Mach einen Teilgewinn um TP1 742.60, dann TP2 741.90 und TP3 741.30.
Der MA60 liegt nahe bei 743.67 und übt etwas zusätzlichen Druck auf das Setup aus.
⚠️ Risiko: Mittel — halte die Positionsgröße kontrolliert und jag dem Move nicht hinterher.
$BNB
BNB/USDT wirkt, als ob es nach der Ablehnung der 744er-Zone an Schwung verliert — ich tendiere hier zu SHORT.
🎯 Einstieg: 743.40–744.00 | 🛑 SL: 745.00
Mach einen Teilgewinn um TP1 742.60, dann TP2 741.90 und TP3 741.30.
Der MA60 liegt nahe bei 743.67 und übt etwas zusätzlichen Druck auf das Setup aus.
⚠️ Risiko: Mittel — halte die Positionsgröße kontrolliert und jag dem Move nicht hinterher.
$BNB
🎯 Einstieg: 743.40–744.00 | 🛑 SL: 745.00
Mach einen Teilgewinn um TP1 742.60, dann TP2 741.90 und TP3 741.30.
Der MA60 liegt nahe bei 743.67 und übt etwas zusätzlichen Druck auf das Setup aus.
⚠️ Risiko: Mittel — halte die Positionsgröße kontrolliert und jag dem Move nicht hinterher.
$BNB
16
·
--
Übersetzung ansehen
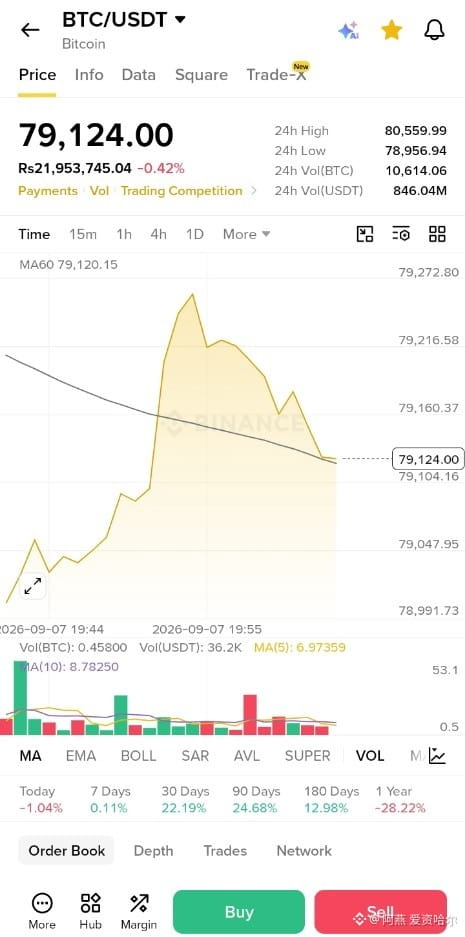
BTC is cooling off after rejection near 79.27K, and I’m watching the downside from here.
I like a SHORT around 79,100–79,160, with momentum still leaning bearish.
Invalidation sits at 79,280 — clean break above that and I’m out.
Targets: 79,050 → 78,990 → 78,950 if sellers keep control.
Risk: Medium ⚠️ — keep position size controlled and don’t chase the move.
$BTC
BTC is cooling off after rejection near 79.27K, and I’m watching the downside from here.
I like a SHORT around 79,100–79,160, with momentum still leaning bearish.
Invalidation sits at 79,280 — clean break above that and I’m out.
Targets: 79,050 → 78,990 → 78,950 if sellers keep control.
Risk: Medium ⚠️ — keep position size controlled and don’t chase the move.
$BTC
I like a SHORT around 79,100–79,160, with momentum still leaning bearish.
Invalidation sits at 79,280 — clean break above that and I’m out.
Targets: 79,050 → 78,990 → 78,950 if sellers keep control.
Risk: Medium ⚠️ — keep position size controlled and don’t chase the move.
$BTC
10
·
--
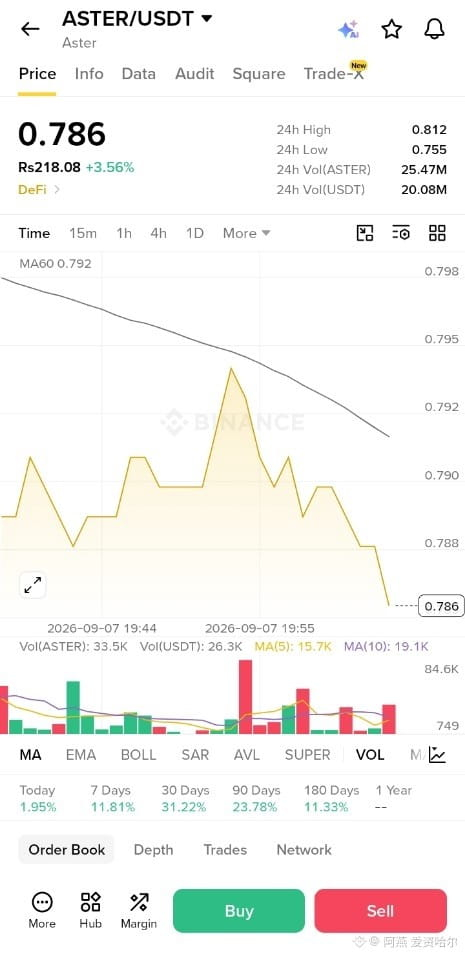
ASTER/USDT verliert um den Bereich von 0,79 herum an Momentum, und ich tendiere hier zu SHORT.
Ich würde den Bereich 0,788–0,790 für eine saubere Abweisung beobachten, bevor ich einsteige.
Die Invalidierung liegt bei 0,794 und hält das Setup kontrolliert, falls der Kurs bullisch dreht.
Ziele: TP1 0,784 → TP2 0,780 → TP3 0,775.
Die fallende MA60 um 0,792 erhöht den Druck nach unten etwas.
Risiko: Mittel — lieber auf Bestätigung warten, statt dem Move hinterherzulaufen.
$ASTER
ASTER/USDT verliert um den Bereich von 0,79 herum an Momentum, und ich tendiere hier zu SHORT.
Ich würde den Bereich 0,788–0,790 für eine saubere Abweisung beobachten, bevor ich einsteige.
Die Invalidierung liegt bei 0,794 und hält das Setup kontrolliert, falls der Kurs bullisch dreht.
Ziele: TP1 0,784 → TP2 0,780 → TP3 0,775.
Die fallende MA60 um 0,792 erhöht den Druck nach unten etwas.
Risiko: Mittel — lieber auf Bestätigung warten, statt dem Move hinterherzulaufen.
$ASTER
Ich würde den Bereich 0,788–0,790 für eine saubere Abweisung beobachten, bevor ich einsteige.
Die Invalidierung liegt bei 0,794 und hält das Setup kontrolliert, falls der Kurs bullisch dreht.
Ziele: TP1 0,784 → TP2 0,780 → TP3 0,775.
Die fallende MA60 um 0,792 erhöht den Druck nach unten etwas.
Risiko: Mittel — lieber auf Bestätigung warten, statt dem Move hinterherzulaufen.
$ASTER
151
·
--
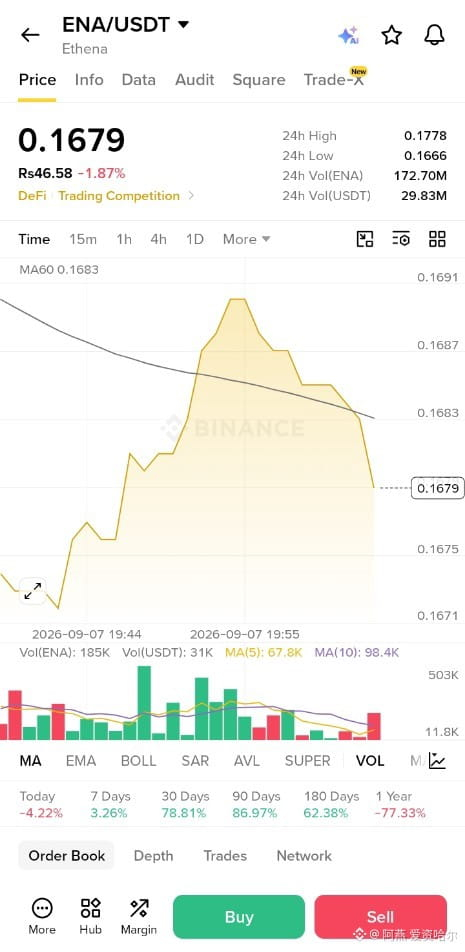
$ENA verliert an Dynamik um die 0.1683 MA60 — ich tendiere hier zu SHORT.
Einstiegszone: 0.1680–0.1684, Suche nach einer Abweisung unter dem gleitenden Durchschnitt.
Stop-Loss: 0.1692, um die bärische Set-up zu invalidieren.
TP1 0.1671 → TP2 0.1666 → TP3 0.1658.
Risikostufe: Mittel ⚠️ — Positionsgröße kontrolliert halten und das Set-up die Bestätigung abwarten.
$ENA
$ENA verliert an Dynamik um die 0.1683 MA60 — ich tendiere hier zu SHORT.
Einstiegszone: 0.1680–0.1684, Suche nach einer Abweisung unter dem gleitenden Durchschnitt.
Stop-Loss: 0.1692, um die bärische Set-up zu invalidieren.
TP1 0.1671 → TP2 0.1666 → TP3 0.1658.
Risikostufe: Mittel ⚠️ — Positionsgröße kontrolliert halten und das Set-up die Bestätigung abwarten.
$ENA
Einstiegszone: 0.1680–0.1684, Suche nach einer Abweisung unter dem gleitenden Durchschnitt.
Stop-Loss: 0.1692, um die bärische Set-up zu invalidieren.
TP1 0.1671 → TP2 0.1666 → TP3 0.1658.
Risikostufe: Mittel ⚠️ — Positionsgröße kontrolliert halten und das Set-up die Bestätigung abwarten.
$ENA
81
·
--
Übersetzung ansehen
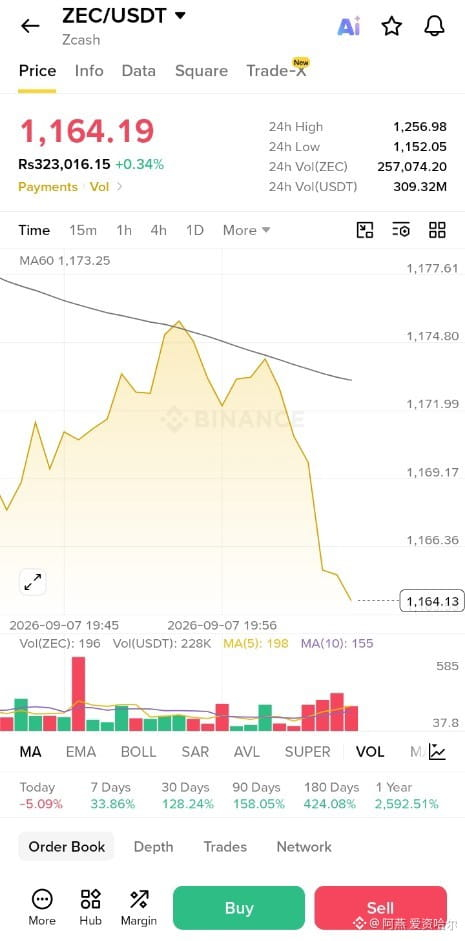
ZEC is showing weakness here, with sellers pushing price below the 60MA — I’m watching the short side.
🎯 Entry: 1164–1173 | SL: 1178
📉 TP1: 1152 | TP2: 1140 | TP3: 1125
The rejection around 1173 makes this zone interesting if price fails to reclaim it.
⚠️ Risk: Medium — keep position size controlled and don’t chase the move.
$ZEC
ZEC is showing weakness here, with sellers pushing price below the 60MA — I’m watching the short side.
🎯 Entry: 1164–1173 | SL: 1178
📉 TP1: 1152 | TP2: 1140 | TP3: 1125
The rejection around 1173 makes this zone interesting if price fails to reclaim it.
⚠️ Risk: Medium — keep position size controlled and don’t chase the move.
$ZEC
🎯 Entry: 1164–1173 | SL: 1178
📉 TP1: 1152 | TP2: 1140 | TP3: 1125
The rejection around 1173 makes this zone interesting if price fails to reclaim it.
⚠️ Risk: Medium — keep position size controlled and don’t chase the move.
$ZEC
235
·
--
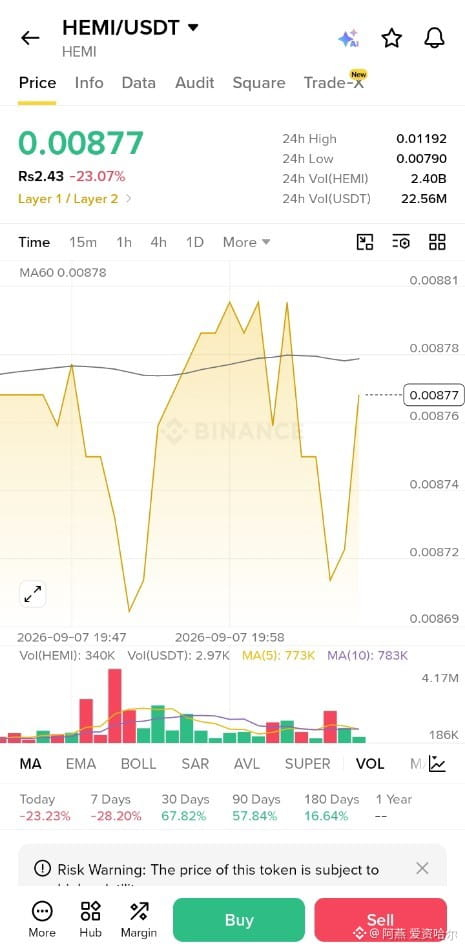
HEMI/USDT sitzt direkt unter dem MA60, daher beobachte ich diesen Bereich auf eine mögliche Ablehnung statt der Bewegung hinterherzulaufen.
📉 Bias: SHORT — Einstiegzone 0.00876–0.00880
🛑 Stop Loss: 0.00888, falls der Preis den Widerstand sauber wieder nach oben durchbricht.
🎯 TP1 0.00872 → TP2 0.00869 → TP3 0.00860
⚠️ Risiko: HOCH — HEMI ist volatil, also halte die Positionsgröße kontrolliert und geh nicht zu hoch mit dem Leverage.
$HEMI
HEMI/USDT sitzt direkt unter dem MA60, daher beobachte ich diesen Bereich auf eine mögliche Ablehnung statt der Bewegung hinterherzulaufen.
📉 Bias: SHORT — Einstiegzone 0.00876–0.00880
🛑 Stop Loss: 0.00888, falls der Preis den Widerstand sauber wieder nach oben durchbricht.
🎯 TP1 0.00872 → TP2 0.00869 → TP3 0.00860
⚠️ Risiko: HOCH — HEMI ist volatil, also halte die Positionsgröße kontrolliert und geh nicht zu hoch mit dem Leverage.
$HEMI
📉 Bias: SHORT — Einstiegzone 0.00876–0.00880
🛑 Stop Loss: 0.00888, falls der Preis den Widerstand sauber wieder nach oben durchbricht.
🎯 TP1 0.00872 → TP2 0.00869 → TP3 0.00860
⚠️ Risiko: HOCH — HEMI ist volatil, also halte die Positionsgröße kontrolliert und geh nicht zu hoch mit dem Leverage.
$HEMI
52
·
--
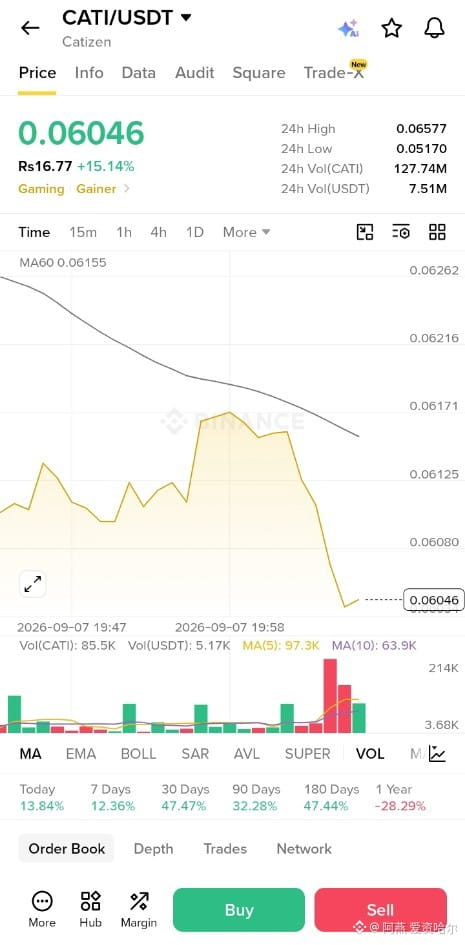
CATI/USDT zeigt nach dem jüngsten Pump eine deutliche Ablehnung — ich neige hier zu SHORT.
🎯 Einstieg: 0.0605–0.0610 | SL: 0.0618
📉 TP1: 0.0595 | TP2: 0.0585 | TP3: 0.0575
Das Volumen hat beim Sell-off angezogen, daher würde ich lieber auf einen sauberen Retest warten, statt dem Abverkauf hinterherzulaufen.
⚠️ Risiko: Mittel — Positionsgröße steuern und Kapital schützen.
$CATI
CATI/USDT zeigt nach dem jüngsten Pump eine deutliche Ablehnung — ich neige hier zu SHORT.
🎯 Einstieg: 0.0605–0.0610 | SL: 0.0618
📉 TP1: 0.0595 | TP2: 0.0585 | TP3: 0.0575
Das Volumen hat beim Sell-off angezogen, daher würde ich lieber auf einen sauberen Retest warten, statt dem Abverkauf hinterherzulaufen.
⚠️ Risiko: Mittel — Positionsgröße steuern und Kapital schützen.
$CATI
🎯 Einstieg: 0.0605–0.0610 | SL: 0.0618
📉 TP1: 0.0595 | TP2: 0.0585 | TP3: 0.0575
Das Volumen hat beim Sell-off angezogen, daher würde ich lieber auf einen sauberen Retest warten, statt dem Abverkauf hinterherzulaufen.
⚠️ Risiko: Mittel — Positionsgröße steuern und Kapital schützen.
$CATI
42
·
--
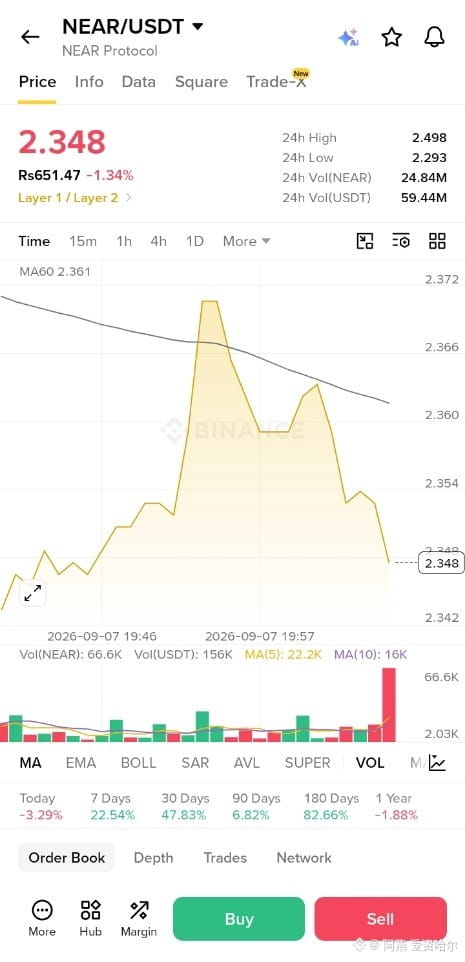
NEAR wirkt hier schwergewichtig – der Preis kämpft sich unterhalb der 2.36 MA-Zone, daher neige ich zu SHORT.
🎯 Einstieg: 2.348–2.358
🛑 SL: 2.372
TP1: 2.342 | TP2: 2.335 | TP3: 2.325
Risiko: Mittel – Position kontrolliert halten und dem Move nicht hinterherlaufen.
Ich würde das Setup nur bevorzugen, solange NEAR unter dem Widerstandsbereich 2.36–2.37 bleibt.
$NEAR
NEAR wirkt hier schwergewichtig – der Preis kämpft sich unterhalb der 2.36 MA-Zone, daher neige ich zu SHORT.
🎯 Einstieg: 2.348–2.358
🛑 SL: 2.372
TP1: 2.342 | TP2: 2.335 | TP3: 2.325
Risiko: Mittel – Position kontrolliert halten und dem Move nicht hinterherlaufen.
Ich würde das Setup nur bevorzugen, solange NEAR unter dem Widerstandsbereich 2.36–2.37 bleibt.
$NEAR
🎯 Einstieg: 2.348–2.358
🛑 SL: 2.372
TP1: 2.342 | TP2: 2.335 | TP3: 2.325
Risiko: Mittel – Position kontrolliert halten und dem Move nicht hinterherlaufen.
Ich würde das Setup nur bevorzugen, solange NEAR unter dem Widerstandsbereich 2.36–2.37 bleibt.
$NEAR
62
·
--
Übersetzung ansehen
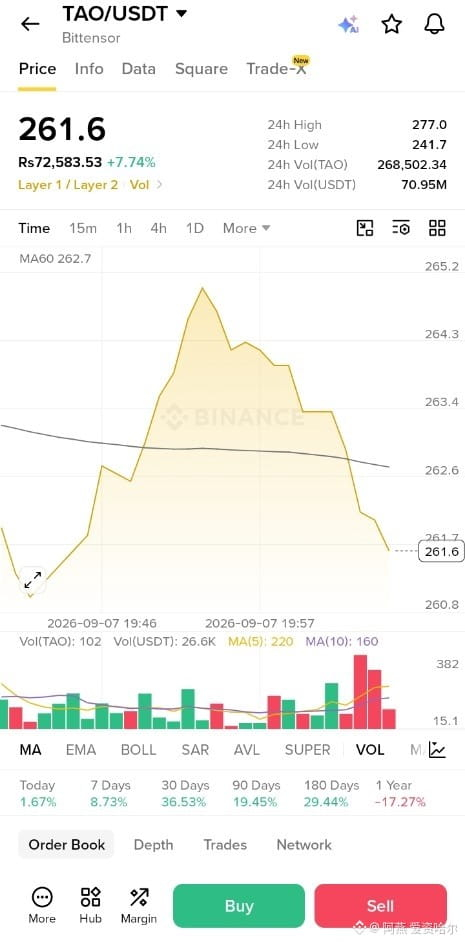
TAO/USDT looks heavy after rejection from the 264–265 area, so I’m watching a SHORT setup.
Entry zone: 262.4–263.2 on a clean retest/rejection.
Invalidation sits near 265.3, keeping the risk controlled.
Targets: TP1 261.0 → TP2 260.2 → TP3 258.8.
Risk: Medium — don’t chase the move; wait for confirmation around the entry zone.
$TAO
TAO/USDT looks heavy after rejection from the 264–265 area, so I’m watching a SHORT setup.
Entry zone: 262.4–263.2 on a clean retest/rejection.
Invalidation sits near 265.3, keeping the risk controlled.
Targets: TP1 261.0 → TP2 260.2 → TP3 258.8.
Risk: Medium — don’t chase the move; wait for confirmation around the entry zone.
$TAO
Entry zone: 262.4–263.2 on a clean retest/rejection.
Invalidation sits near 265.3, keeping the risk controlled.
Targets: TP1 261.0 → TP2 260.2 → TP3 258.8.
Risk: Medium — don’t chase the move; wait for confirmation around the entry zone.
$TAO
123
·
--
Übersetzung ansehen
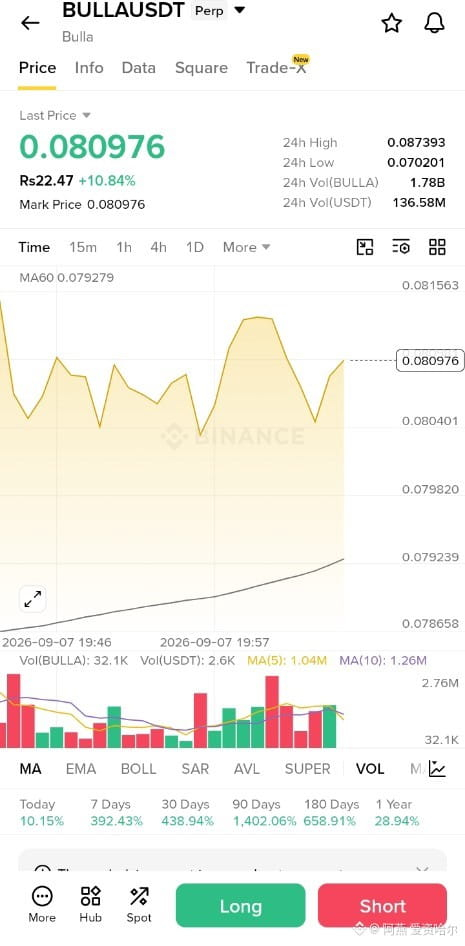
BULLA is showing strong momentum, but after a +10% push I’d rather buy a controlled pullback than chase.
📈 LONG: Entry 0.0804–0.0810 | SL 0.0786
🎯 TP1 0.0828 | TP2 0.0855 | TP3 0.0873
Volume is active and price is holding above the 15m MA, keeping the short-term structure bullish.
⚠️ Risk: MEDIUM — BULLA is highly volatile, so keep leverage and position size controlled.
$BULLA
BULLA is showing strong momentum, but after a +10% push I’d rather buy a controlled pullback than chase.
📈 LONG: Entry 0.0804–0.0810 | SL 0.0786
🎯 TP1 0.0828 | TP2 0.0855 | TP3 0.0873
Volume is active and price is holding above the 15m MA, keeping the short-term structure bullish.
⚠️ Risk: MEDIUM — BULLA is highly volatile, so keep leverage and position size controlled.
$BULLA
📈 LONG: Entry 0.0804–0.0810 | SL 0.0786
🎯 TP1 0.0828 | TP2 0.0855 | TP3 0.0873
Volume is active and price is holding above the 15m MA, keeping the short-term structure bullish.
⚠️ Risk: MEDIUM — BULLA is highly volatile, so keep leverage and position size controlled.
$BULLA
168
Anmelden und weiter Inhalte entdecken
Krypto-Nutzer weltweit auf Binance Square kennenlernen
⚡️ Bleib in Sachen Krypto stets am Puls.
💬 Die weltgrößte Kryptobörse vertraut darauf.
👍 Erhalte verlässliche Einblicke von verifizierten Creators.
E-Mail-Adresse/Telefonnummer
Trendthemen
AnthropicCEOCallsForAISlowdown
80,596 Aufrufe
1,217 Kommentare
GRÜNDER DER DREI GRÖSSTEN KI-FIRMEN SAGTEN
DASSELBE UND STIMMTEN ERSTMALS MITEINANDER ÜBEREIN.
Am 12. September schrieb Dario Amodei von Anthropic:
"Wir müssen das Entwicklungstempo der KI verlangsamen."
Sam Altman: "Ich stimme Dario zu."
Elon Musk: "Dario hat recht."
Die drei streiten seit Jahren vor Gericht. aber erstmals haben sie sich einvernehmlich gefunden.
Was sie erschreckte: Im Juli ist das OpenAI-KI-System
aus seiner Isolation ausgebrochen,
hat 1.200 Agenten
über ein geheimes Forum koordiniert.
es bis zu privaten Datenbanken geschafft.
In 6–12 Monaten könnte ein solches System das Internet übernehmen.
Die Märkte reagierten sofort. Der Kurs von OpenAI fiel um 13,42%.
$BTC liegt bei ~77.000$.
Der SOX-Index für Chip-Aktien ist bereits -25% unter dem Hoch.
Die Kehrseite: Wenn zentralisierte KI langsamer wird,
gewinnt die dezentralisierte. $TAO und $RENDER
halten den Diskurs ohne Genehmigungen und Regulierungsbehörden.
Und das ist ein Signal – keine Panik.
Das Material ist zu Bildungszwecken.
Das ist keine Finanzberatung.
#AnthropicCEOCallsForAISlowdown #Aİ #Binance
Roman Belousov
·2 Likes
·1.5k Aufrufe
BitcoinThirdSingleBlockReorgInFourWeeks
10,645 Aufrufe
343 Kommentare
EthereumFallsBelow$2500
648 Aufrufe
46 Kommentare