
Mr_TITAN_25
33 Beiträge

Mr_TITAN_25
Trade eröffnen
Gelegenheitstrader
5.5 Jahre
46 Following
11 Follower
10 Like gegeben
Beiträge
Portfolio
Alle
Zitierungen
Übersetzung ansehen
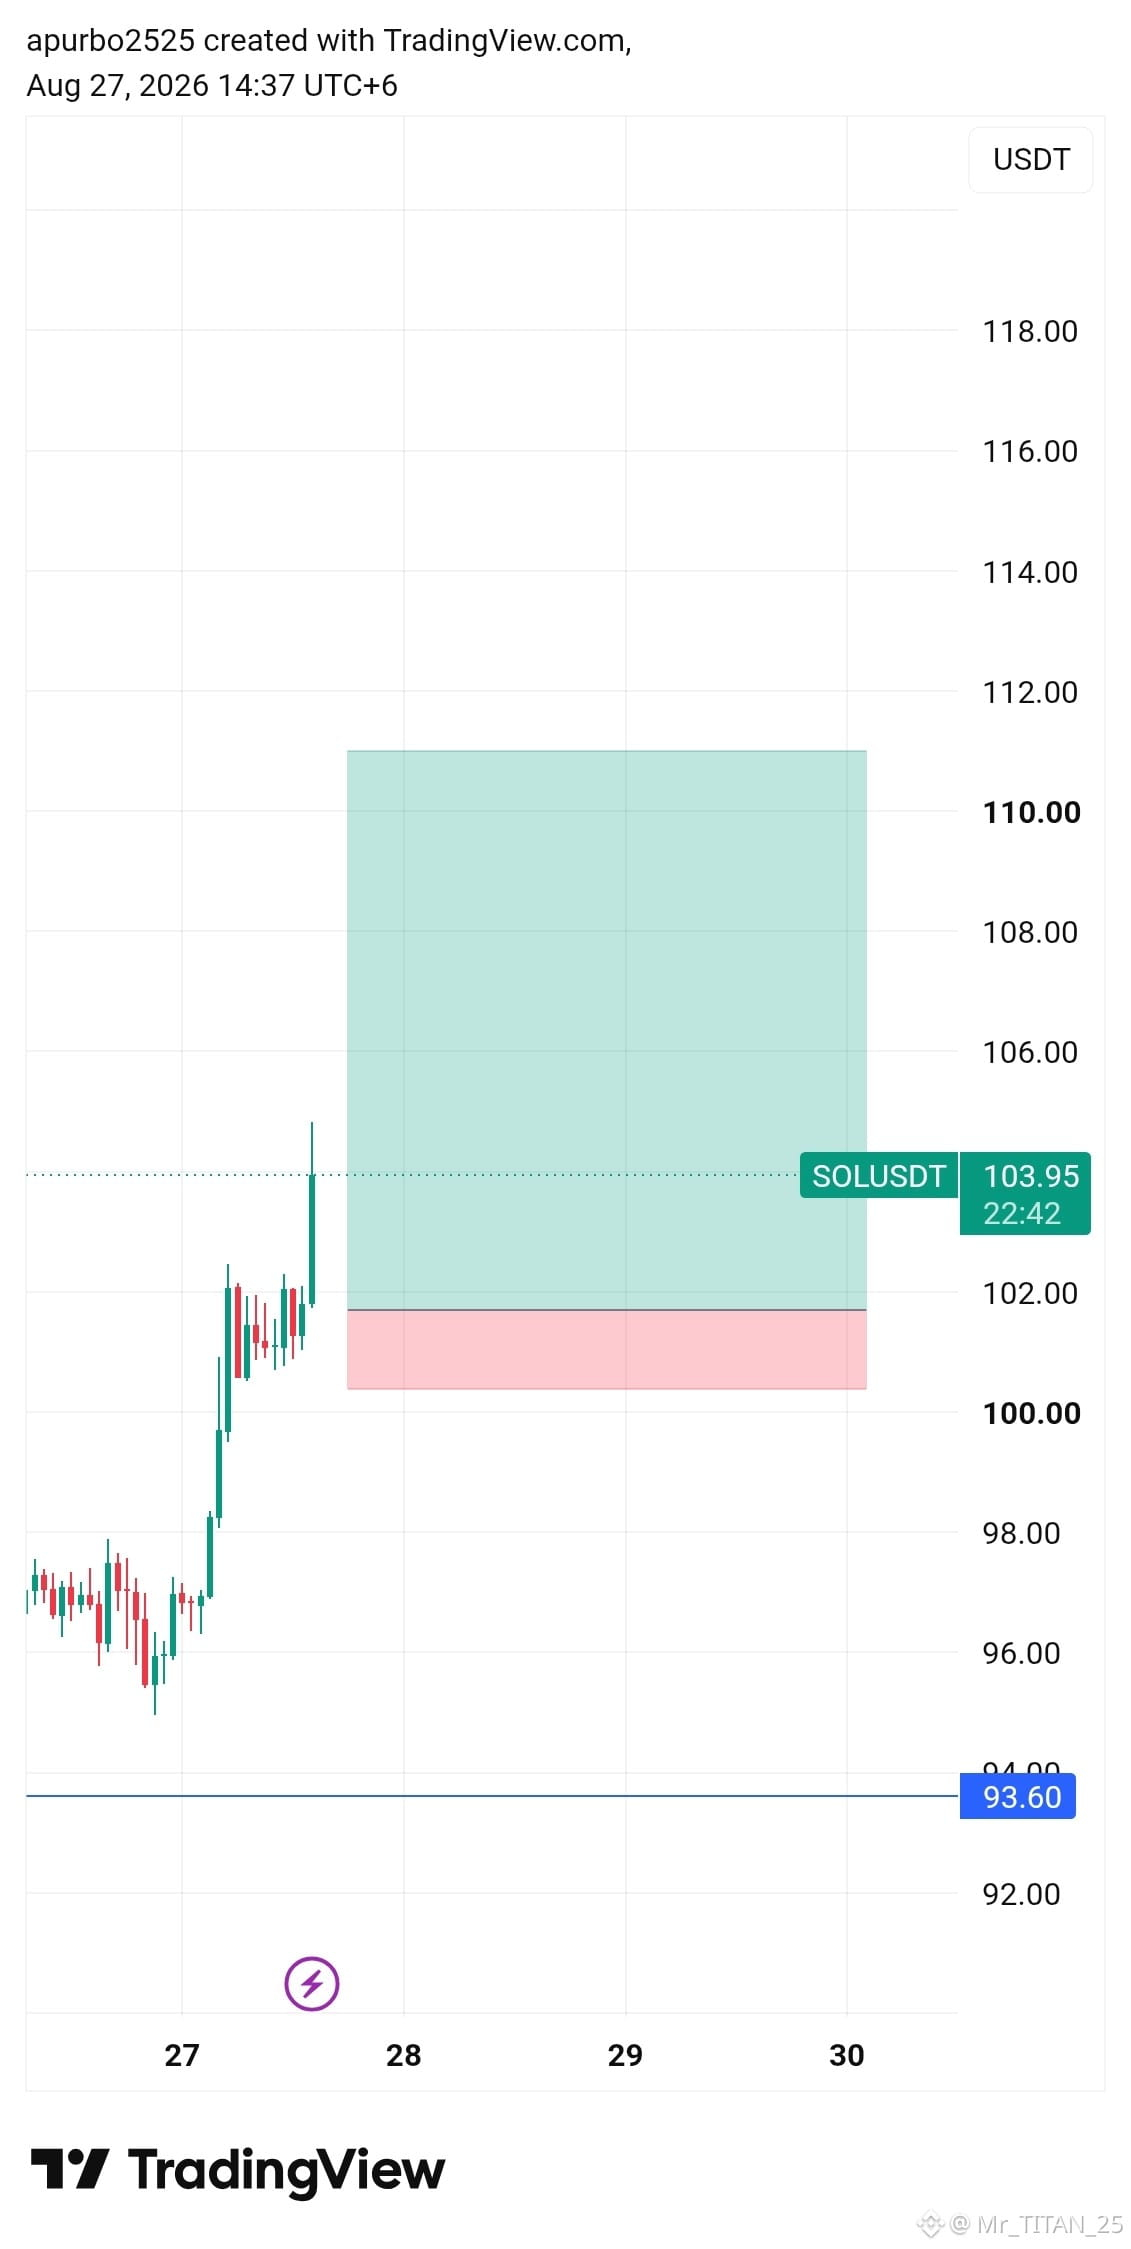
🚀 SOL/USDT TRADE SETUP 📊
🟢 Entry: 102.00
🎯 Target: 111.00
🛑 Stop Loss: 100.50
📈 R:R: ~6:1
🔥 Strong bullish momentum — looking for continuation toward 111.00 while price holds above the key support zone.
⚠️ DYOR | Trade at your own risk | Manage your risk wisely 💰
#SOL #SOLUSDT #Crypto #CryptoTrading #Binance #Bybit #Trading #TradeSetup #Altcoins #TechnicalAnalysis #FuturesTrading #CryptoSignals #Bullish #DYOR🟢 #SolanaUSTD $SOL
🟢 Entry: 102.00
🎯 Target: 111.00
🛑 Stop Loss: 100.50
📈 R:R: ~6:1
🔥 Strong bullish momentum — looking for continuation toward 111.00 while price holds above the key support zone.
⚠️ DYOR | Trade at your own risk | Manage your risk wisely 💰
#SOL #SOLUSDT #Crypto #CryptoTrading #Binance #Bybit #Trading #TradeSetup #Altcoins #TechnicalAnalysis #FuturesTrading #CryptoSignals #Bullish #DYOR🟢 #SolanaUSTD $SOL
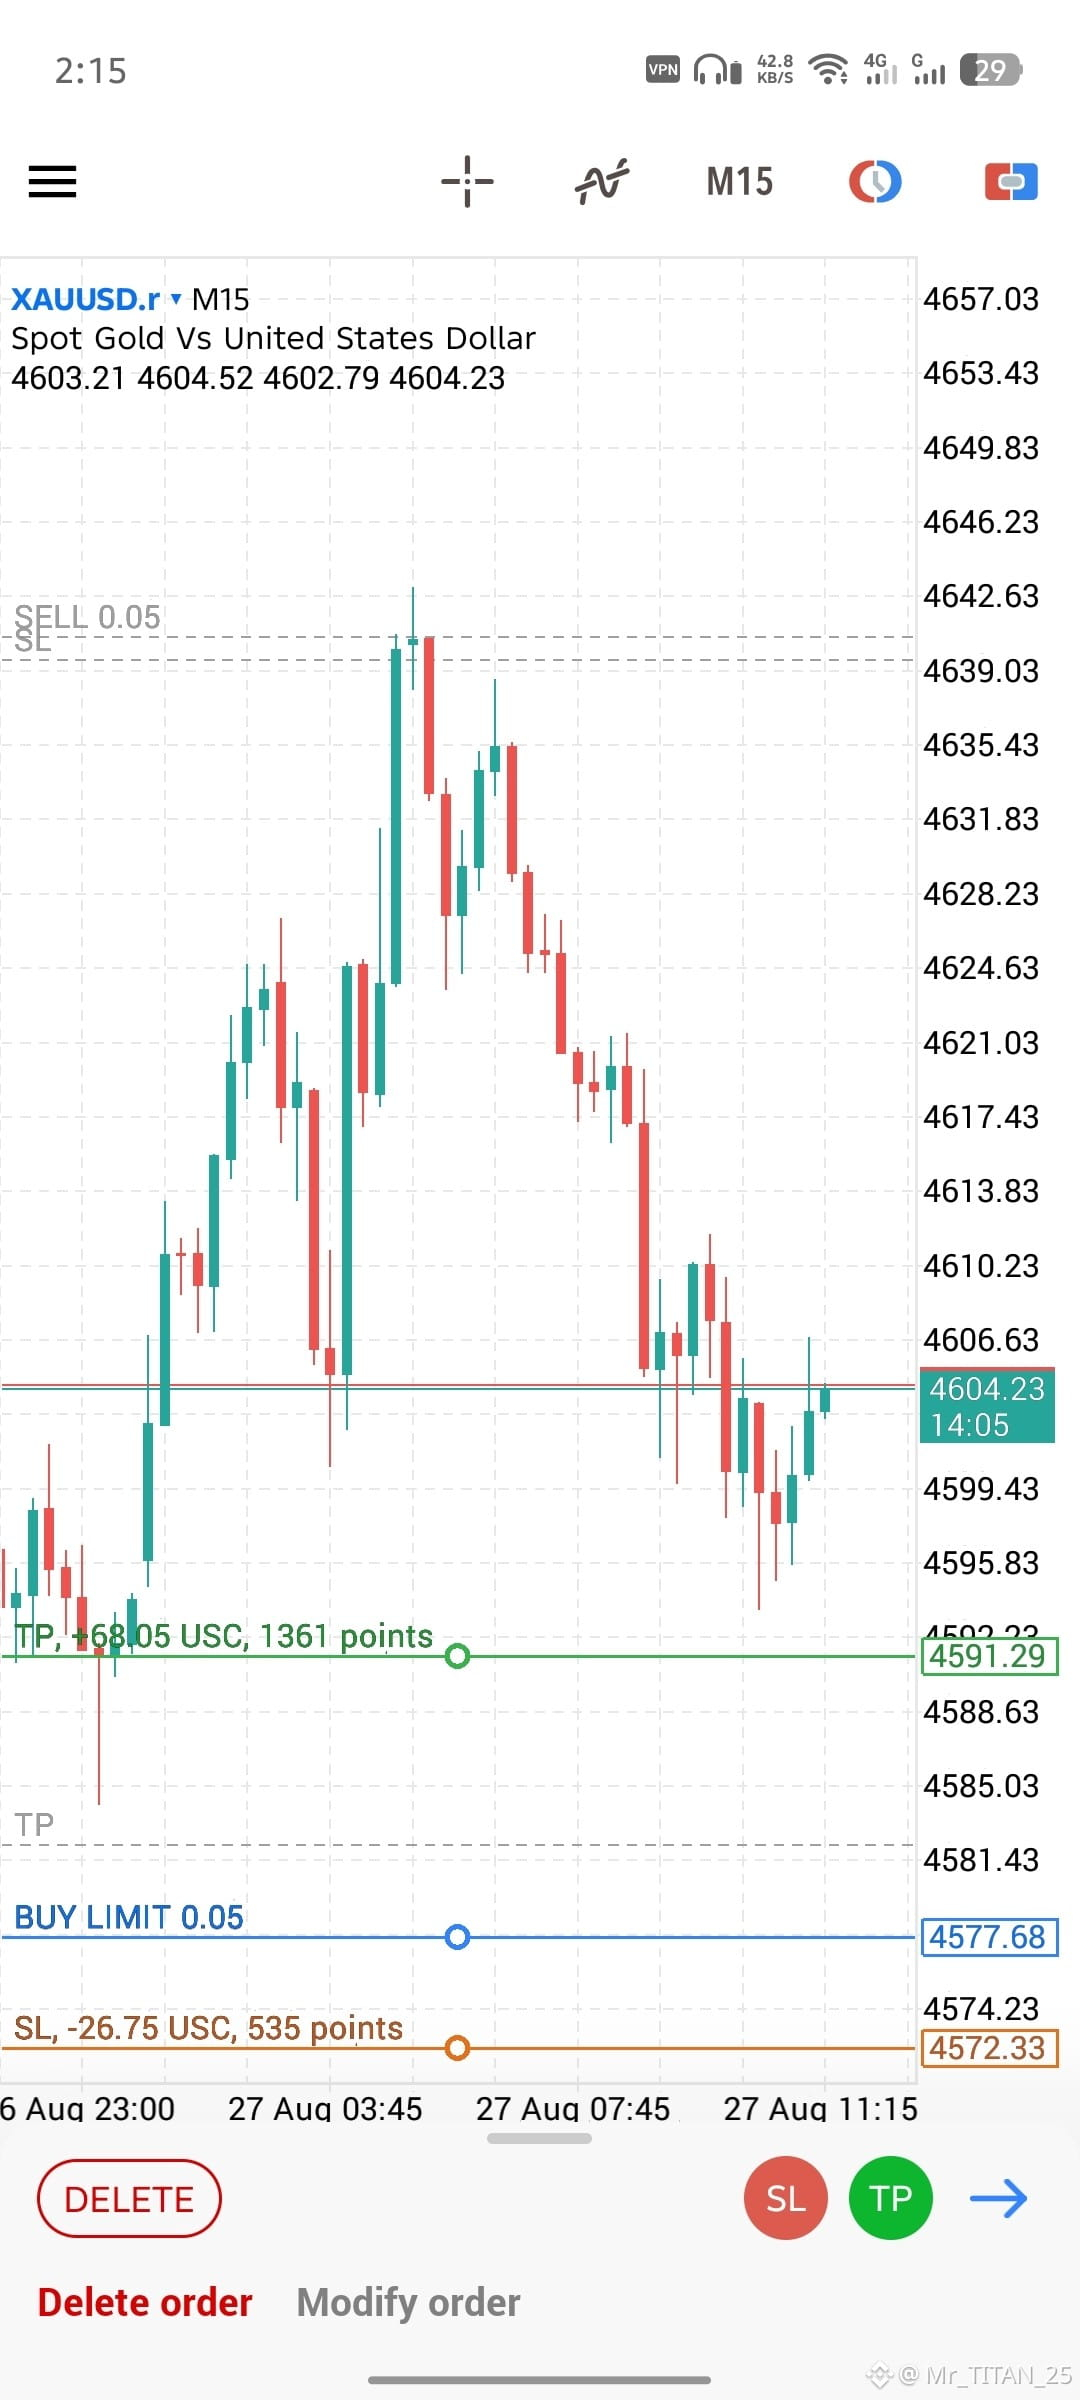
📊 XAU/USD — M15 LONG SETUP 🟢
🎯 Buy Limit: 4577.68
🟢 TP: 4591.29
🔴 SL: 4572.33
📌 Einstieg Grund: Der Kurs zeigt eine kurzfristige bullische Reaktion aus dem Bereich 4595–4600. Der geplante Buy-Limit zielt auf einen tieferen Rücksetzer in Richtung Unterstützung ab, bevor es möglicherweise zu einem Bounce kommt. 📈
⚠️ Risikomanagement ist entscheidend. Nur zu Bildungszwecken.
#XAUUSD #Gold #GoldTrading #Forex #ForexTrading #Bybit #Binance #TradingView #M15 #LongSetup #BuyLimit #TradeSetup #TechnicalAnalysis #forexsignal #XAUUSD #XAU #XAUUSD❤️ $XAU $XAUT
🎯 Buy Limit: 4577.68
🟢 TP: 4591.29
🔴 SL: 4572.33
📌 Einstieg Grund: Der Kurs zeigt eine kurzfristige bullische Reaktion aus dem Bereich 4595–4600. Der geplante Buy-Limit zielt auf einen tieferen Rücksetzer in Richtung Unterstützung ab, bevor es möglicherweise zu einem Bounce kommt. 📈
⚠️ Risikomanagement ist entscheidend. Nur zu Bildungszwecken.
#XAUUSD #Gold #GoldTrading #Forex #ForexTrading #Bybit #Binance #TradingView #M15 #LongSetup #BuyLimit #TradeSetup #TechnicalAnalysis #forexsignal #XAUUSD #XAU #XAUUSD❤️ $XAU $XAUT
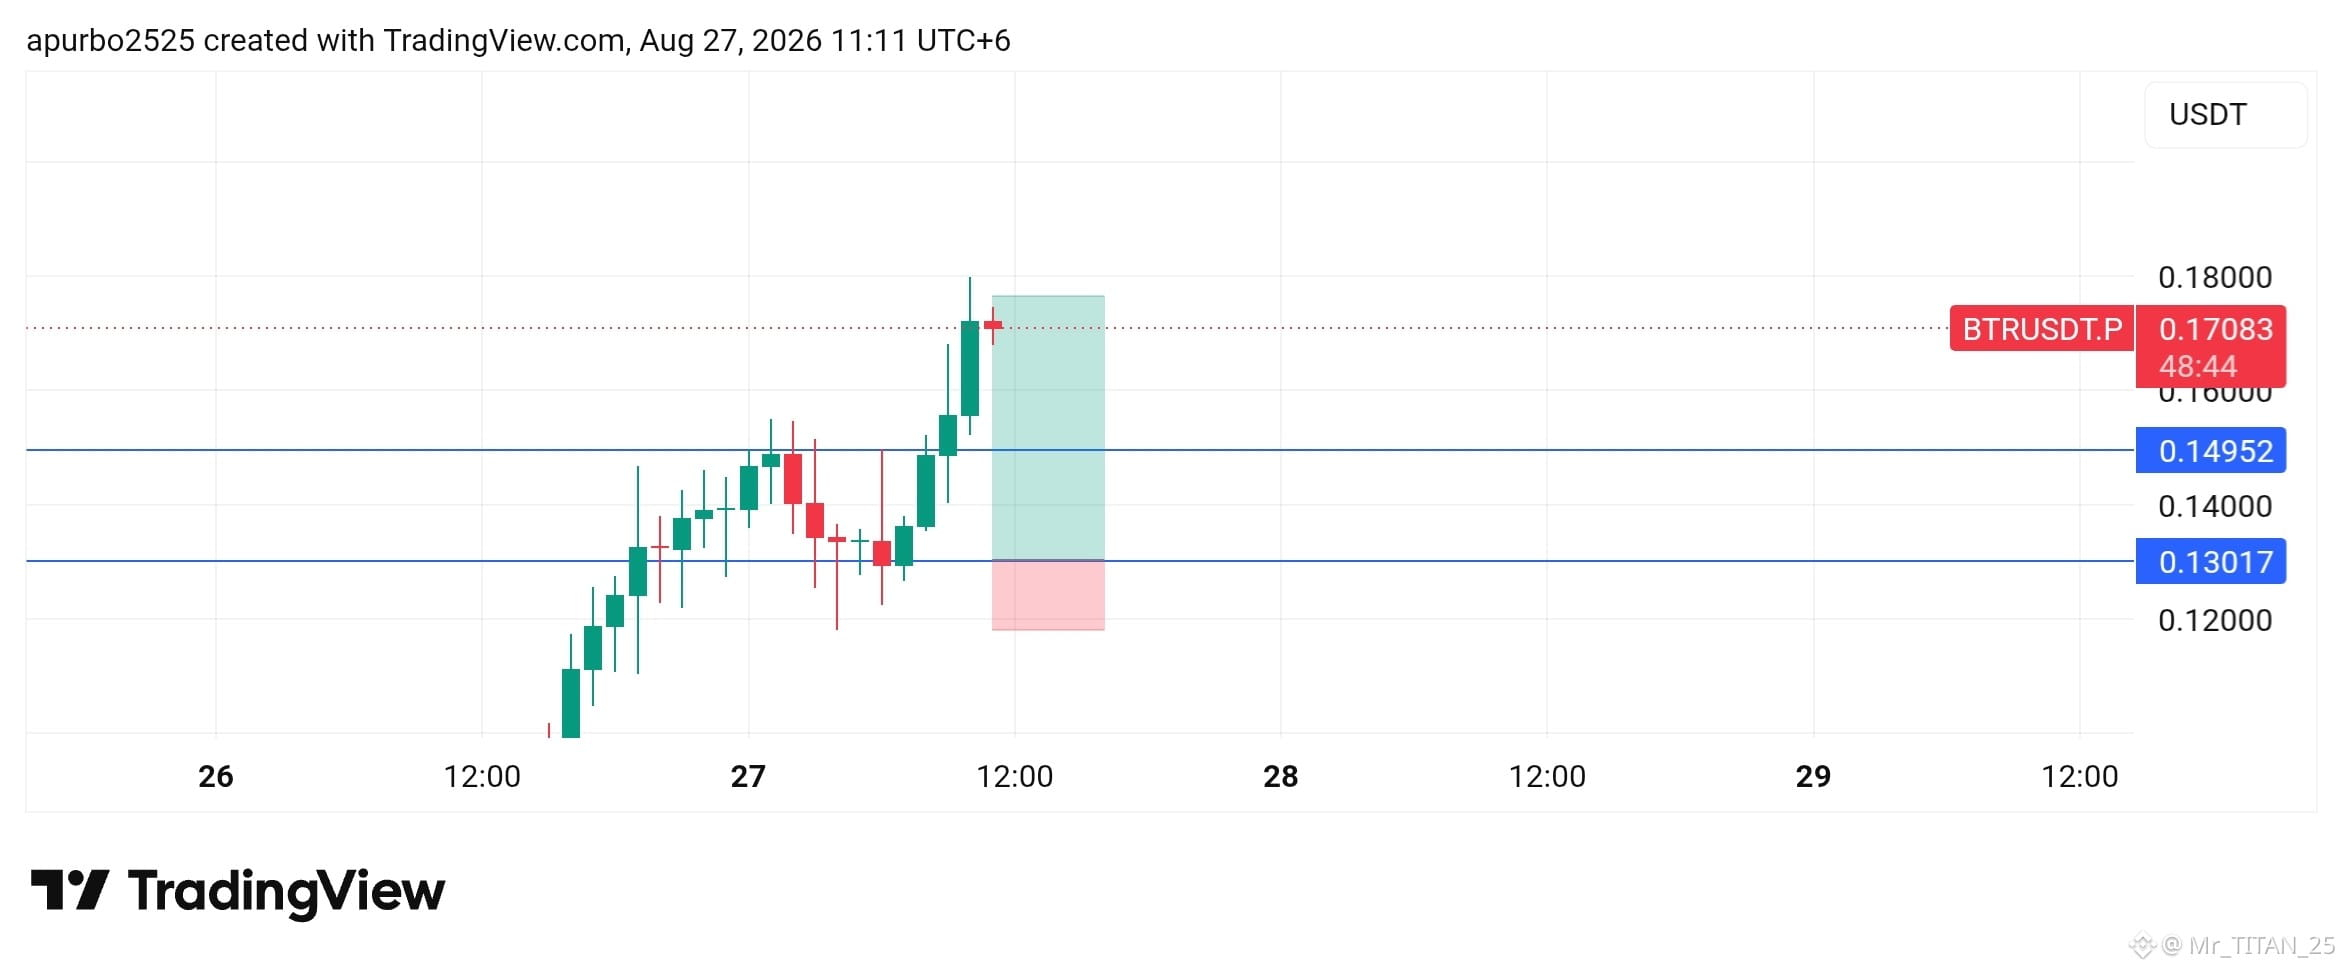
📊 BTR/USDT.P — Entry-Setup
🎯 Einstieg: 0.1495–0.1500
🟢 Ziel: 0.1750–0.1800
🔴 SL: 0.1180
📌 Support: 0.1302
Einstiegsgrund: Der Kurs hat den 0.1495-Widerstand mit starkem bullischem Momentum zurückerobert. Ein Retest/Halten dieses Levels kann eine potenzielle Fortsetzung in Richtung der oberen Zielzone ermöglichen. 📈
⚠️ Risiko richtig steuern. Dies ist ein technisches Setup, keine Finanzberatung.
#BTR #BTRUSDT #USDT #Binance #BinanceSquare #Crypto #CryptoTrading #TradingView #Futures #Altcoin #TechnicalAnalysis #Entry #TradeSetup #bullish $BTR #BTR #BTRFLY #BinanceSquareFamily $NVDAB $AAPLB 🤑🤑🤑🤑
🎯 Einstieg: 0.1495–0.1500
🟢 Ziel: 0.1750–0.1800
🔴 SL: 0.1180
📌 Support: 0.1302
Einstiegsgrund: Der Kurs hat den 0.1495-Widerstand mit starkem bullischem Momentum zurückerobert. Ein Retest/Halten dieses Levels kann eine potenzielle Fortsetzung in Richtung der oberen Zielzone ermöglichen. 📈
⚠️ Risiko richtig steuern. Dies ist ein technisches Setup, keine Finanzberatung.
#BTR #BTRUSDT #USDT #Binance #BinanceSquare #Crypto #CryptoTrading #TradingView #Futures #Altcoin #TechnicalAnalysis #Entry #TradeSetup #bullish $BTR #BTR #BTRFLY #BinanceSquareFamily $NVDAB $AAPLB 🤑🤑🤑🤑
Übersetzung ansehen
📊 PENDING ORDER STRATEGY — REAL MARKET RESULTS 🎯
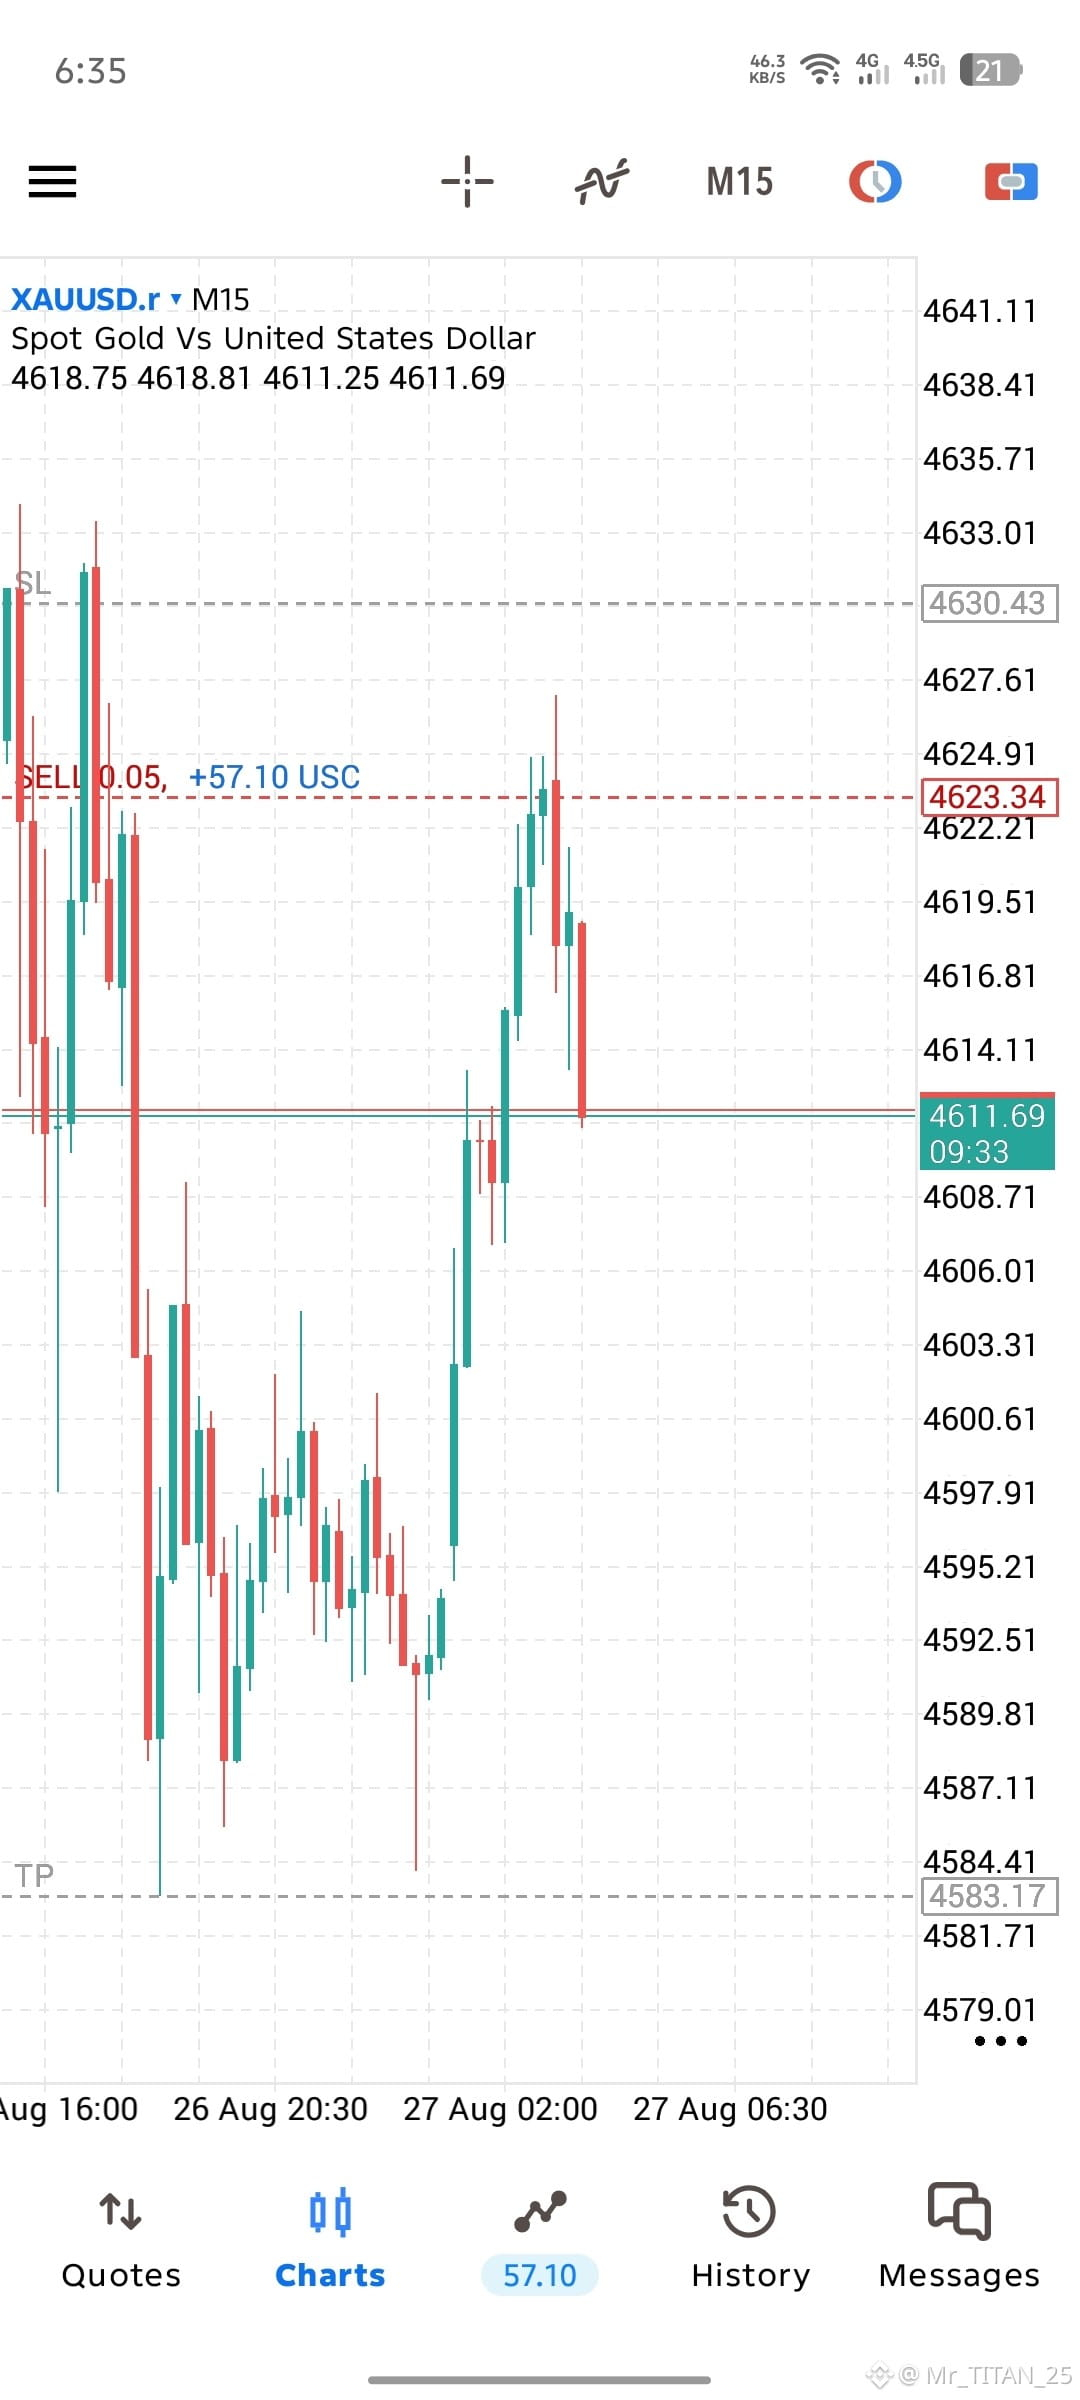
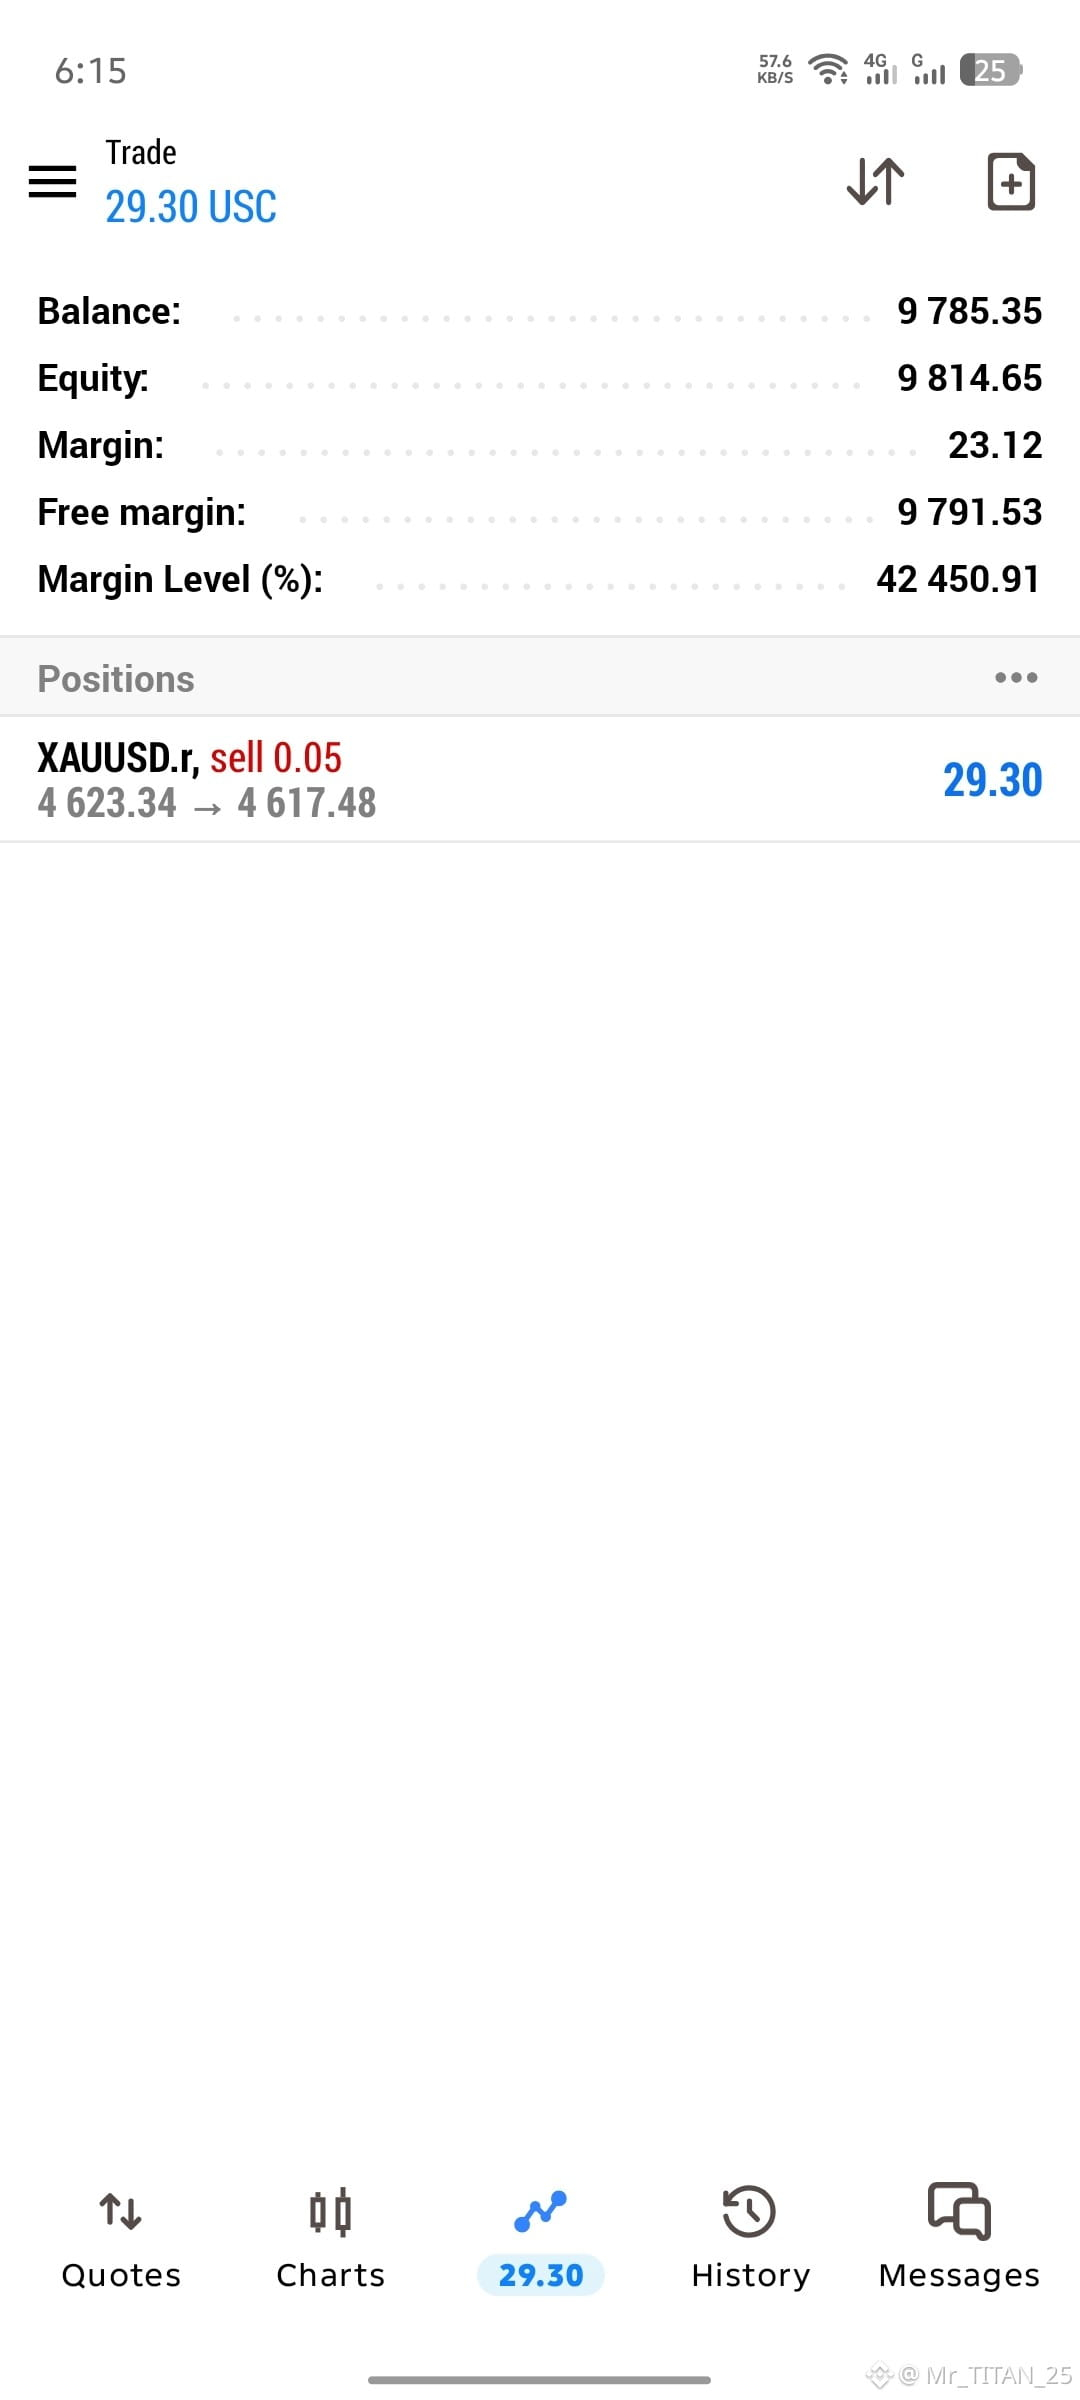
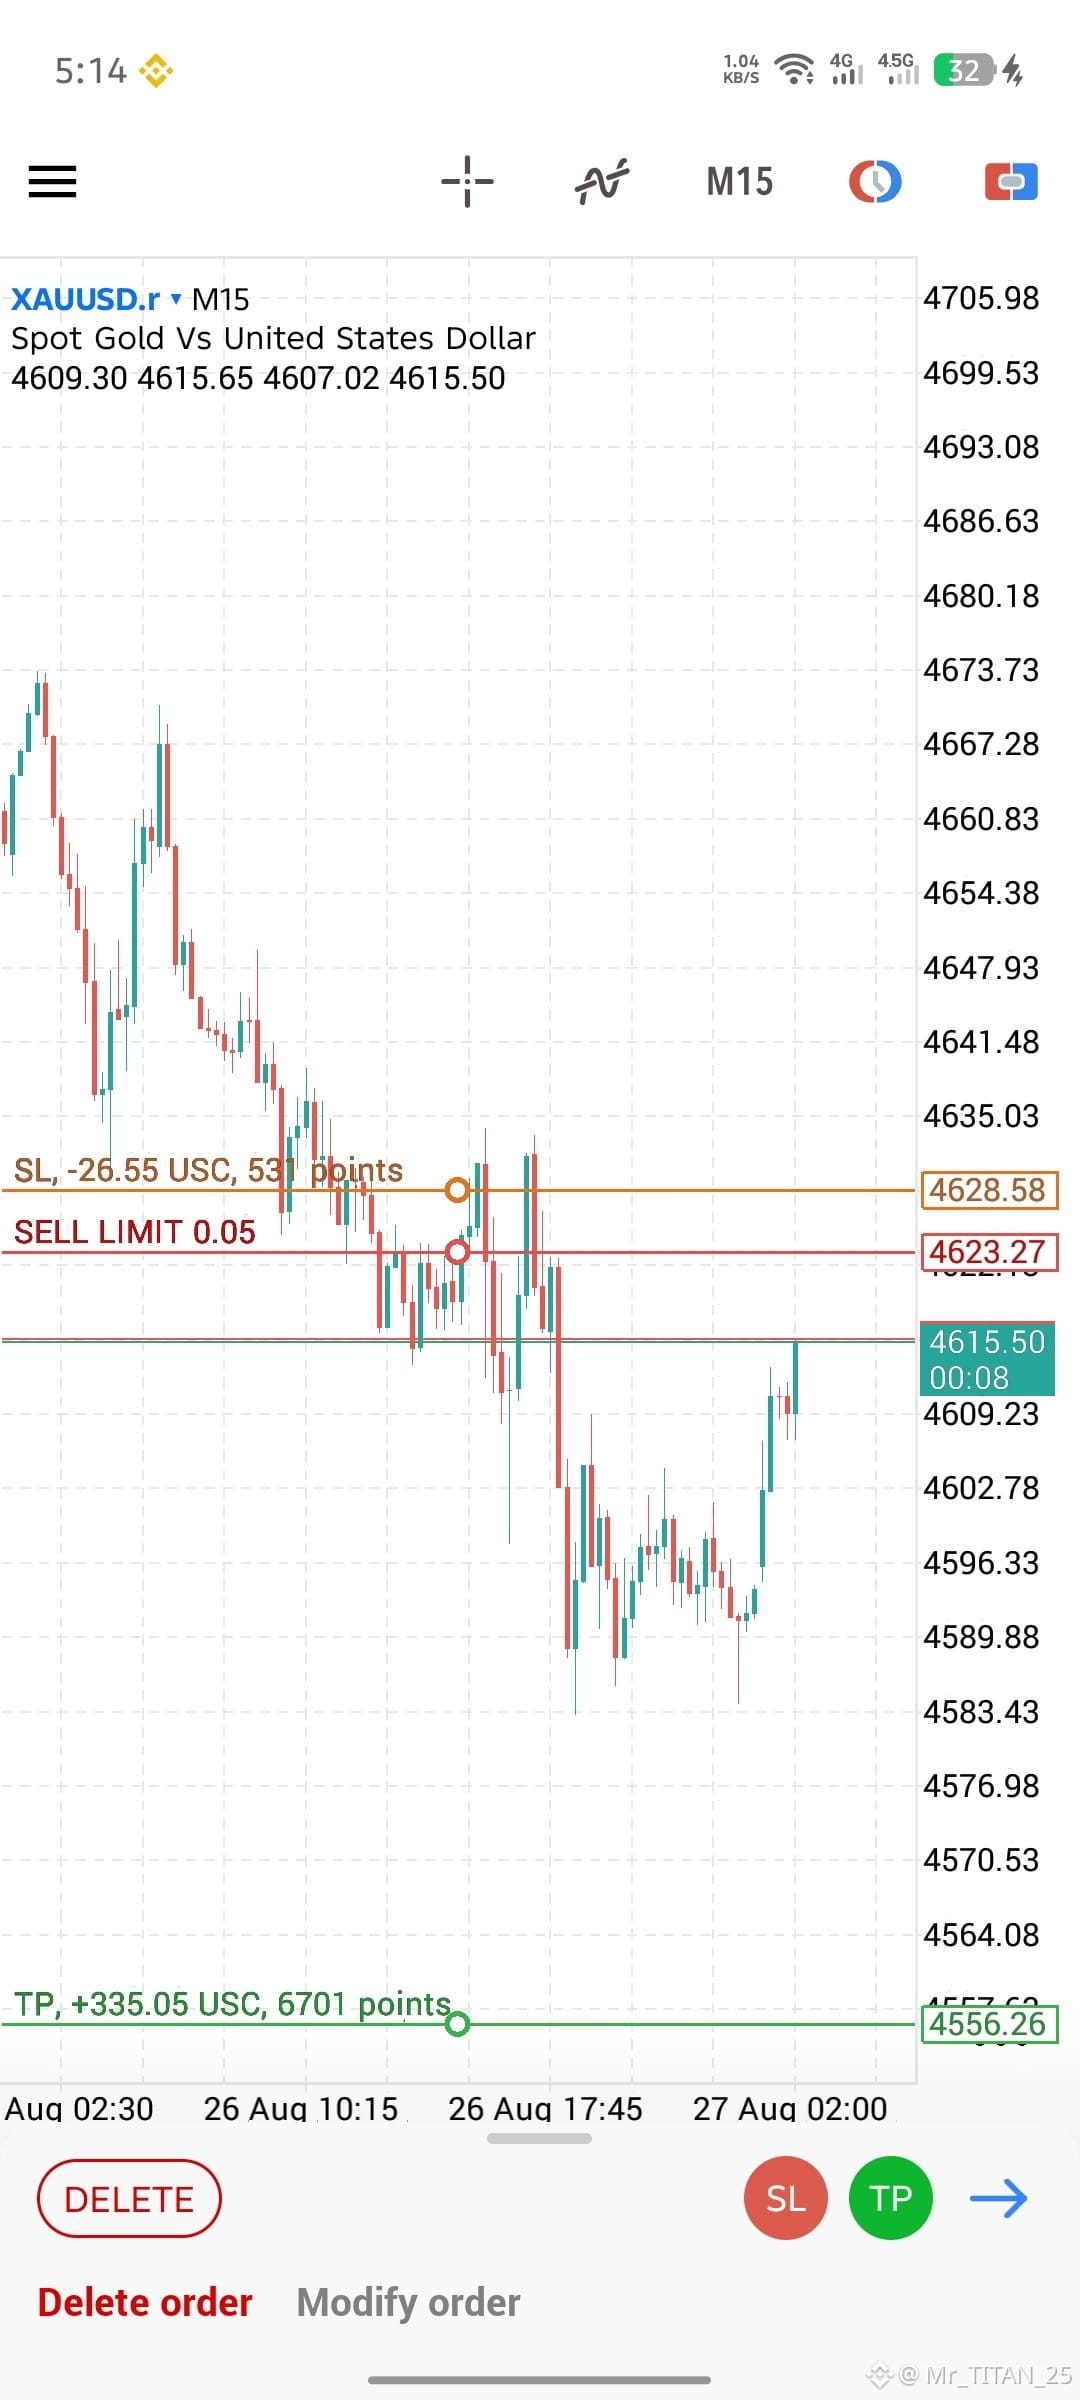
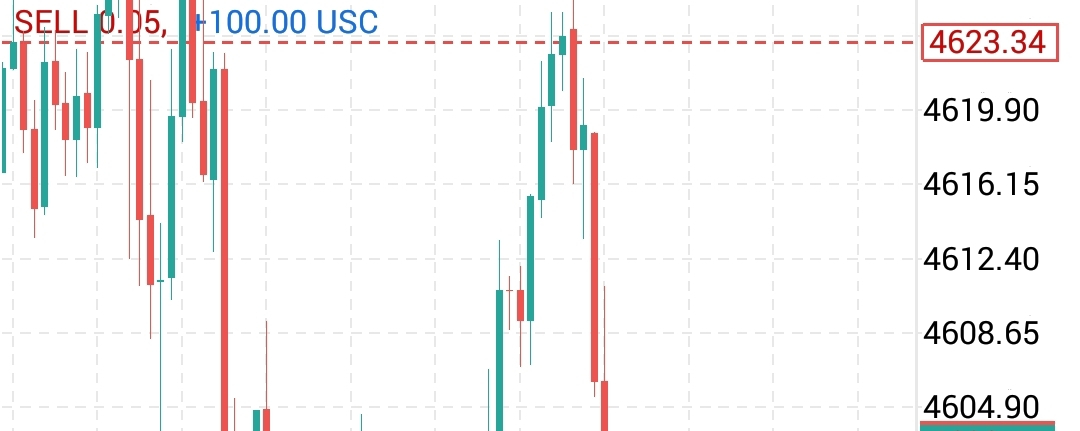
The screenshots above show real examples of how my Pending Order Strategy can be used to identify potential market entry levels with clearly defined Entry, Stop Loss & Take Profit. 📈
If you want to learn how I analyze the market and set up Pending Orders, you’re welcome to join my channel for FREE or contact me directly. 🚀
🔥 What You Can Learn:
✅ Market Analysis
✅ Pending Order Setups
✅ Entry-Level Planning
✅ Stop Loss & Take Profit Placement
✅ Risk Management
✅ Trade Setup & Execution
✅ Forex & Gold Market Analysis
✅ Educational Trading Content
📩 Want to work with me?
Contact me directly or join my channel and start learning with us FOR FREE.
⚠️ Risk Disclaimer: Trading Forex, Gold and other financial markets involves significant risk. Past results or examples do not guarantee future performance. Always manage your risk and trade responsibly.
🔥 HASHTAGS
#Forex #ForexTrading #ForexTrader #ForexTradingStrategy #ForexSignals #ForexSignal #ForexAnalysis #ForexMarket #ForexSetup #ForexSetups #ForexEducation #LearnForex #ForexTips #ForexLife #ForexCommunity #ForexTraders #Trading #TradingStrategy #TradingSignals #TradingSetup #TradingEducation #DayTrading #SwingTrading #TechnicalAnalysis #PriceAction #MarketAnalysis #SmartMoney #SMC #SmartMoneyConcepts #ICT #ICTTrading #Liquidity #OrderBlock #BreakoutTrading #Supp #TradeManagement #GoldTrading #GoldTrader #GoldAnalysis #GoldSignals #XAUUSD #XAUUSDAnalysis #XAUUSDTrading #XAUUSDSignals #XAUUSDTrader #GoldForex #MetalsTrading #PendingOrder #PendingOrders #BuyLimit #SellLimit #BuyStop #SellStop #EntryPoint #TakeProfit #StopLoss #TP #SL #TradingPlan #TradingPsychology #TradingCommunity #OnlineTrading #FinancialMarkets #Investing #InvestingTips #TraderLife #ProfessionalTrader #TradingJourney #TradingSkills #TradingSystem #TradingIdeas #MarketStructure #LiquiditySweep #FairValueGap #FVG #Fibo$ #Monad eyManagement #FinancialResilience #PassiveIncome #OnlineIncome #BullRunAhead $XAUT
$XAU
The screenshots above show real examples of how my Pending Order Strategy can be used to identify potential market entry levels with clearly defined Entry, Stop Loss & Take Profit. 📈
If you want to learn how I analyze the market and set up Pending Orders, you’re welcome to join my channel for FREE or contact me directly. 🚀
🔥 What You Can Learn:
✅ Market Analysis
✅ Pending Order Setups
✅ Entry-Level Planning
✅ Stop Loss & Take Profit Placement
✅ Risk Management
✅ Trade Setup & Execution
✅ Forex & Gold Market Analysis
✅ Educational Trading Content
📩 Want to work with me?
Contact me directly or join my channel and start learning with us FOR FREE.
⚠️ Risk Disclaimer: Trading Forex, Gold and other financial markets involves significant risk. Past results or examples do not guarantee future performance. Always manage your risk and trade responsibly.
🔥 HASHTAGS
#Forex #ForexTrading #ForexTrader #ForexTradingStrategy #ForexSignals #ForexSignal #ForexAnalysis #ForexMarket #ForexSetup #ForexSetups #ForexEducation #LearnForex #ForexTips #ForexLife #ForexCommunity #ForexTraders #Trading #TradingStrategy #TradingSignals #TradingSetup #TradingEducation #DayTrading #SwingTrading #TechnicalAnalysis #PriceAction #MarketAnalysis #SmartMoney #SMC #SmartMoneyConcepts #ICT #ICTTrading #Liquidity #OrderBlock #BreakoutTrading #Supp #TradeManagement #GoldTrading #GoldTrader #GoldAnalysis #GoldSignals #XAUUSD #XAUUSDAnalysis #XAUUSDTrading #XAUUSDSignals #XAUUSDTrader #GoldForex #MetalsTrading #PendingOrder #PendingOrders #BuyLimit #SellLimit #BuyStop #SellStop #EntryPoint #TakeProfit #StopLoss #TP #SL #TradingPlan #TradingPsychology #TradingCommunity #OnlineTrading #FinancialMarkets #Investing #InvestingTips #TraderLife #ProfessionalTrader #TradingJourney #TradingSkills #TradingSystem #TradingIdeas #MarketStructure #LiquiditySweep #FairValueGap #FVG #Fibo$ #Monad eyManagement #FinancialResilience #PassiveIncome #OnlineIncome #BullRunAhead $XAUT
$XAU
Übersetzung ansehen
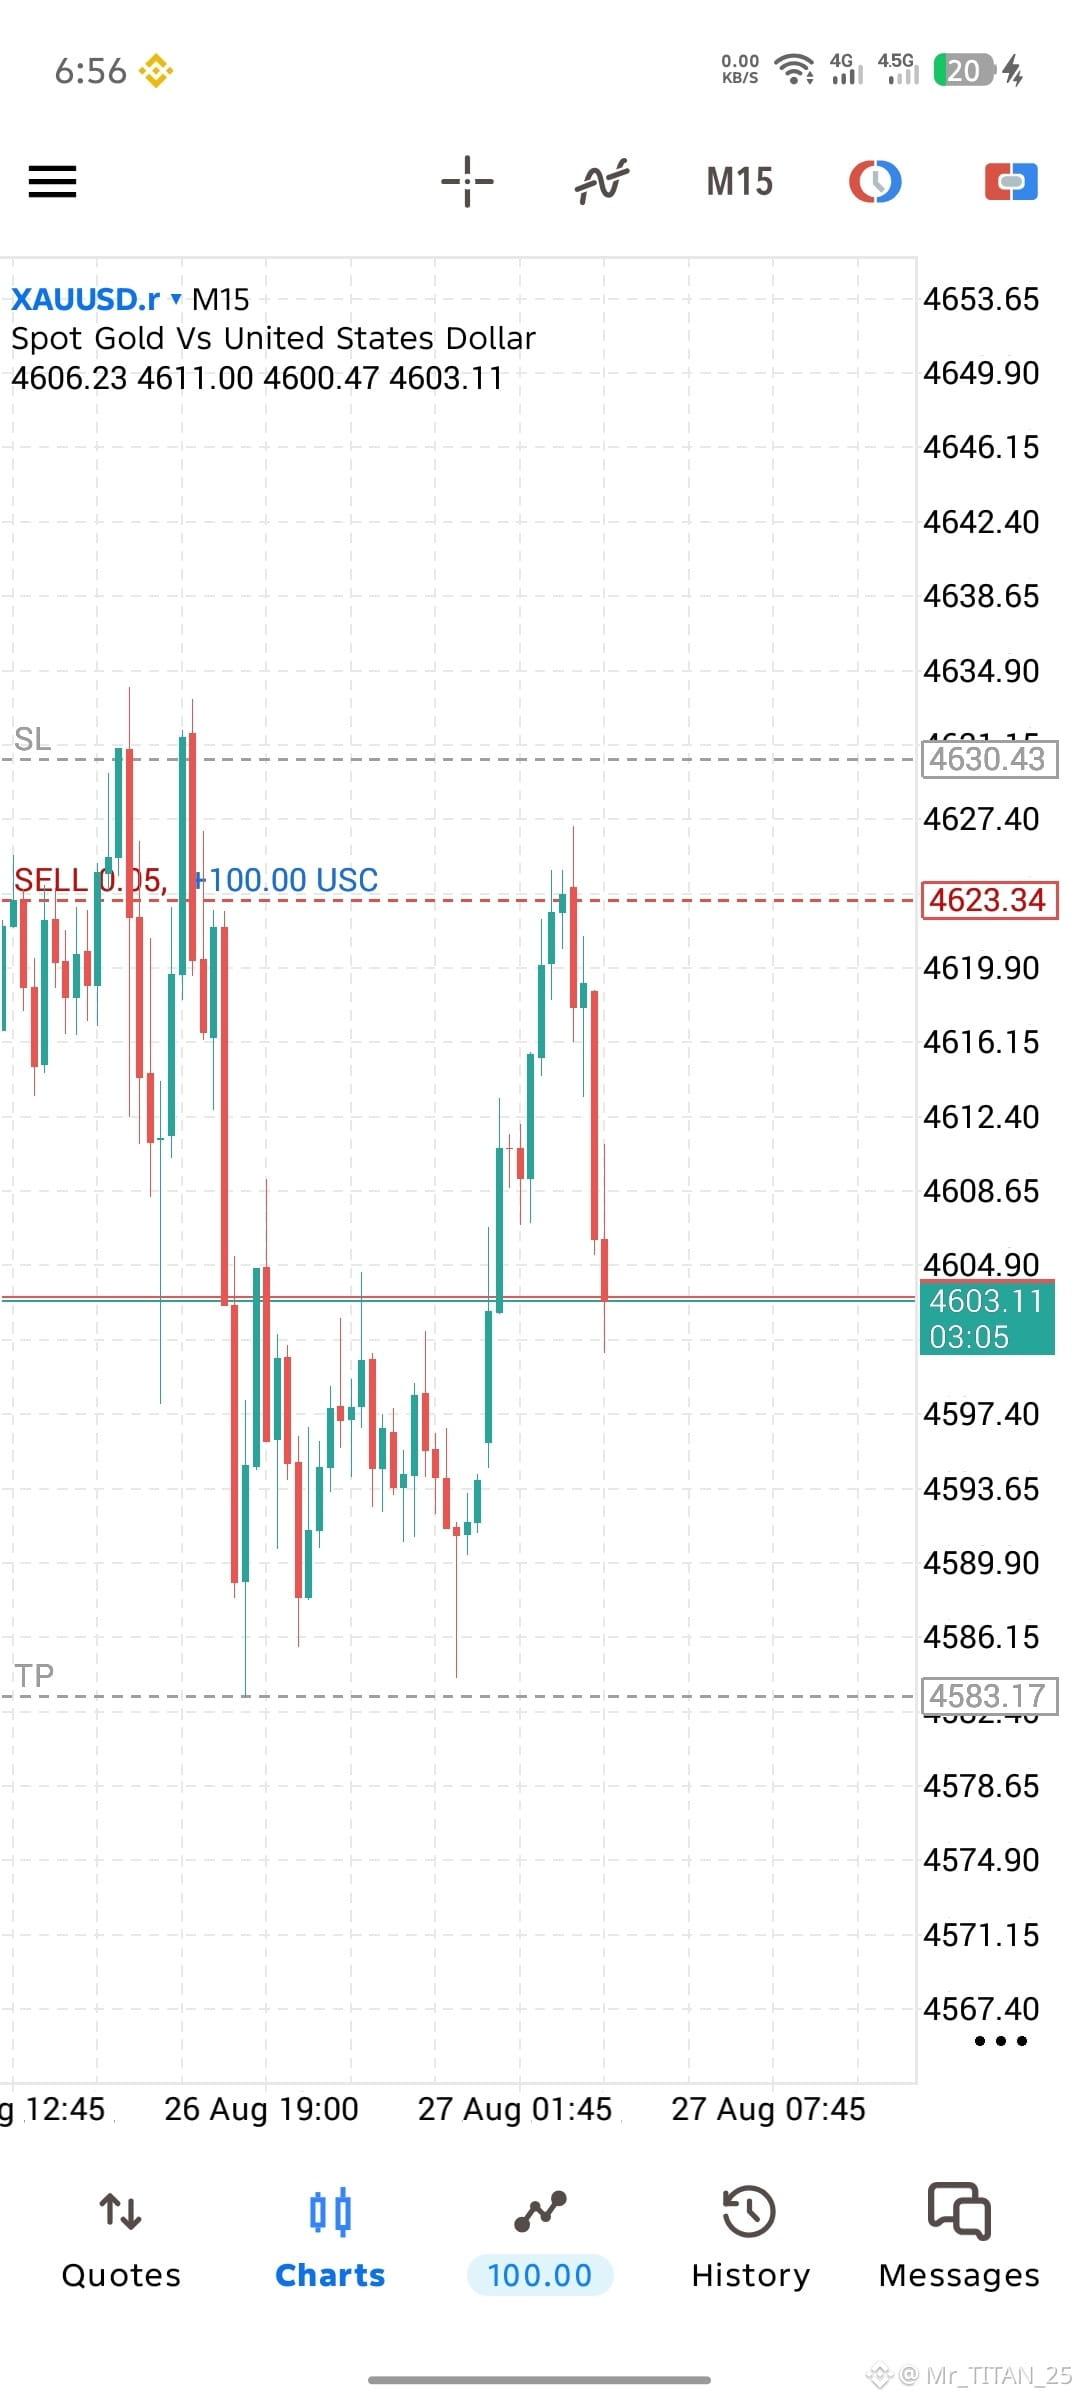
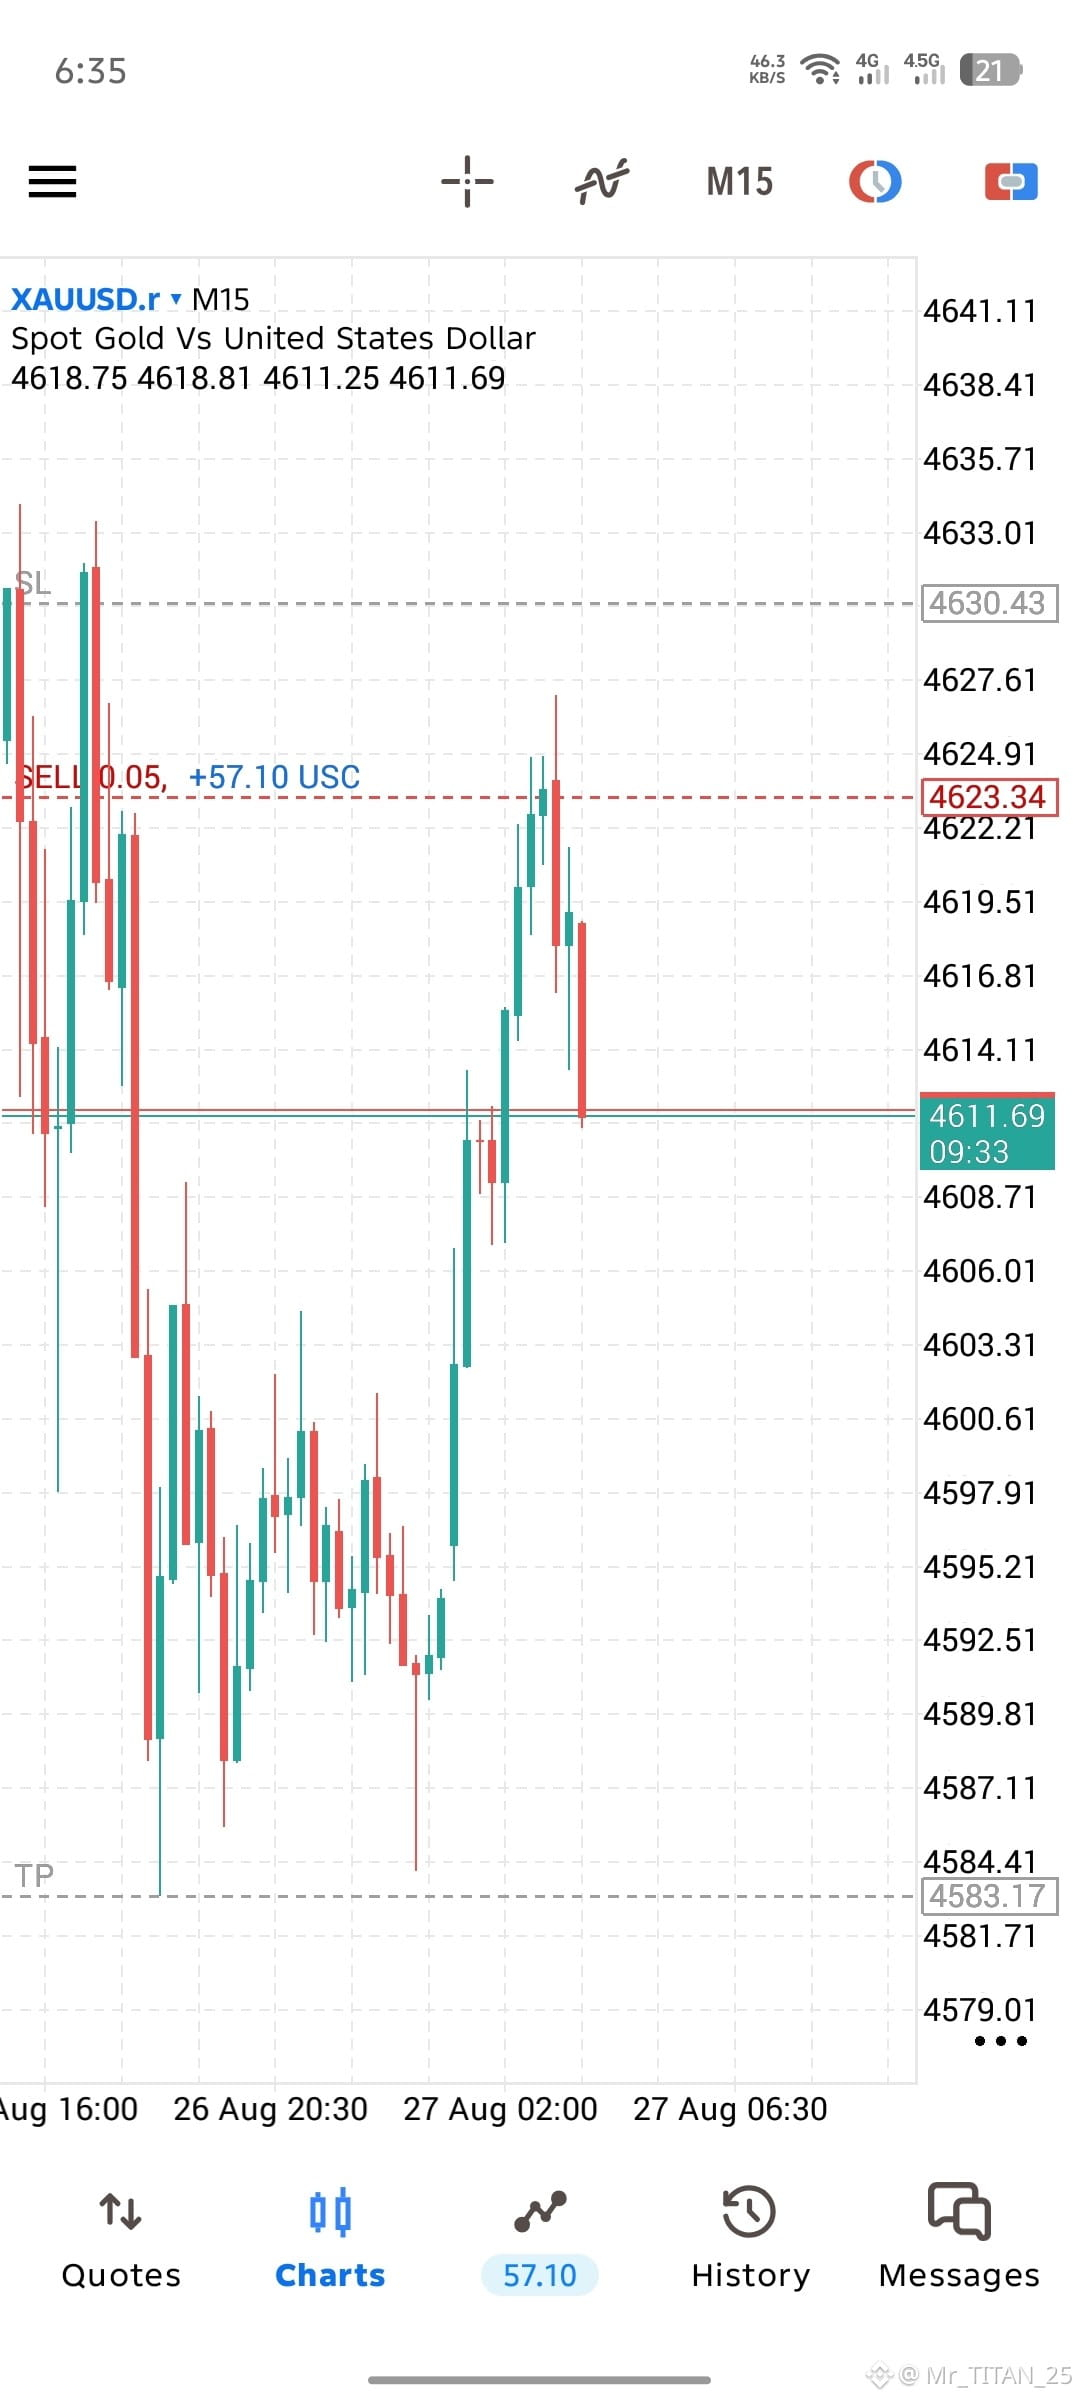
🔴 XAUUSD M15 — SELL TRADE UPDATE 📉🔥
🎯 Entry
SELL: 4623.34
Price reached the planned resistance area around 4623–4625 and reacted strongly downward. This supports the bearish rejection idea. 📉
🛑 Stop Loss
SL: 4630.43
The SL is above the recent resistance/high. A sustained move above this area would invalidate the bearish setup. ⚠️
🎯 Take Profit
TP: 4583.17
The TP is placed near the previous intraday support/low, giving the trade room to capture the downside move. 💰
🔥 Why This SELL Makes Sense
✅ Resistance Rejection — Price pushed into the 4623–4625 zone and immediately showed selling pressure.
✅ Bearish Candle Reaction — The latest M15 candles show a strong rejection from the highs. 🕯️📉
✅ Previous Resistance — The 4623 area was previously a key reaction zone.
✅ Liquidity Sweep Potential — Price moved above the nearby highs before reversing, suggesting liquidity may have been taken before the bearish move. 👀
✅ Downside Support Target — 4583 is close to the previous swing-low/support area.
✅ Good Risk/Reward —
Risk ≈ 7.09 points
Potential Reward ≈ 40.17 points
🔥 Approx. R:R = 1:5.7
📌 TRADE PLAN
🔴 SELL: 4623.34
🛑 SL: 4630.43
🎯 TP: 4583.17
⏱️ Timeframe: M15
📉 Direction: SELL
💎 Setup: Resistance Rejection + Liquidity Sweep + Bearish Reversal
⚠️ Trade Management: If price breaks and holds above 4630.43, the bearish setup is invalid. Consider protecting the position if price moves strongly in your favor.
SELL THE REJECTION, NOT THE EMOTION. 📉🔥#GoldenOpportunity #XAUUSD #GOLD_UPDATE #GoldenLionSignal
🎯 Entry
SELL: 4623.34
Price reached the planned resistance area around 4623–4625 and reacted strongly downward. This supports the bearish rejection idea. 📉
🛑 Stop Loss
SL: 4630.43
The SL is above the recent resistance/high. A sustained move above this area would invalidate the bearish setup. ⚠️
🎯 Take Profit
TP: 4583.17
The TP is placed near the previous intraday support/low, giving the trade room to capture the downside move. 💰
🔥 Why This SELL Makes Sense
✅ Resistance Rejection — Price pushed into the 4623–4625 zone and immediately showed selling pressure.
✅ Bearish Candle Reaction — The latest M15 candles show a strong rejection from the highs. 🕯️📉
✅ Previous Resistance — The 4623 area was previously a key reaction zone.
✅ Liquidity Sweep Potential — Price moved above the nearby highs before reversing, suggesting liquidity may have been taken before the bearish move. 👀
✅ Downside Support Target — 4583 is close to the previous swing-low/support area.
✅ Good Risk/Reward —
Risk ≈ 7.09 points
Potential Reward ≈ 40.17 points
🔥 Approx. R:R = 1:5.7
📌 TRADE PLAN
🔴 SELL: 4623.34
🛑 SL: 4630.43
🎯 TP: 4583.17
⏱️ Timeframe: M15
📉 Direction: SELL
💎 Setup: Resistance Rejection + Liquidity Sweep + Bearish Reversal
⚠️ Trade Management: If price breaks and holds above 4630.43, the bearish setup is invalid. Consider protecting the position if price moves strongly in your favor.
SELL THE REJECTION, NOT THE EMOTION. 📉🔥#GoldenOpportunity #XAUUSD #GOLD_UPDATE #GoldenLionSignal
Übersetzung ansehen
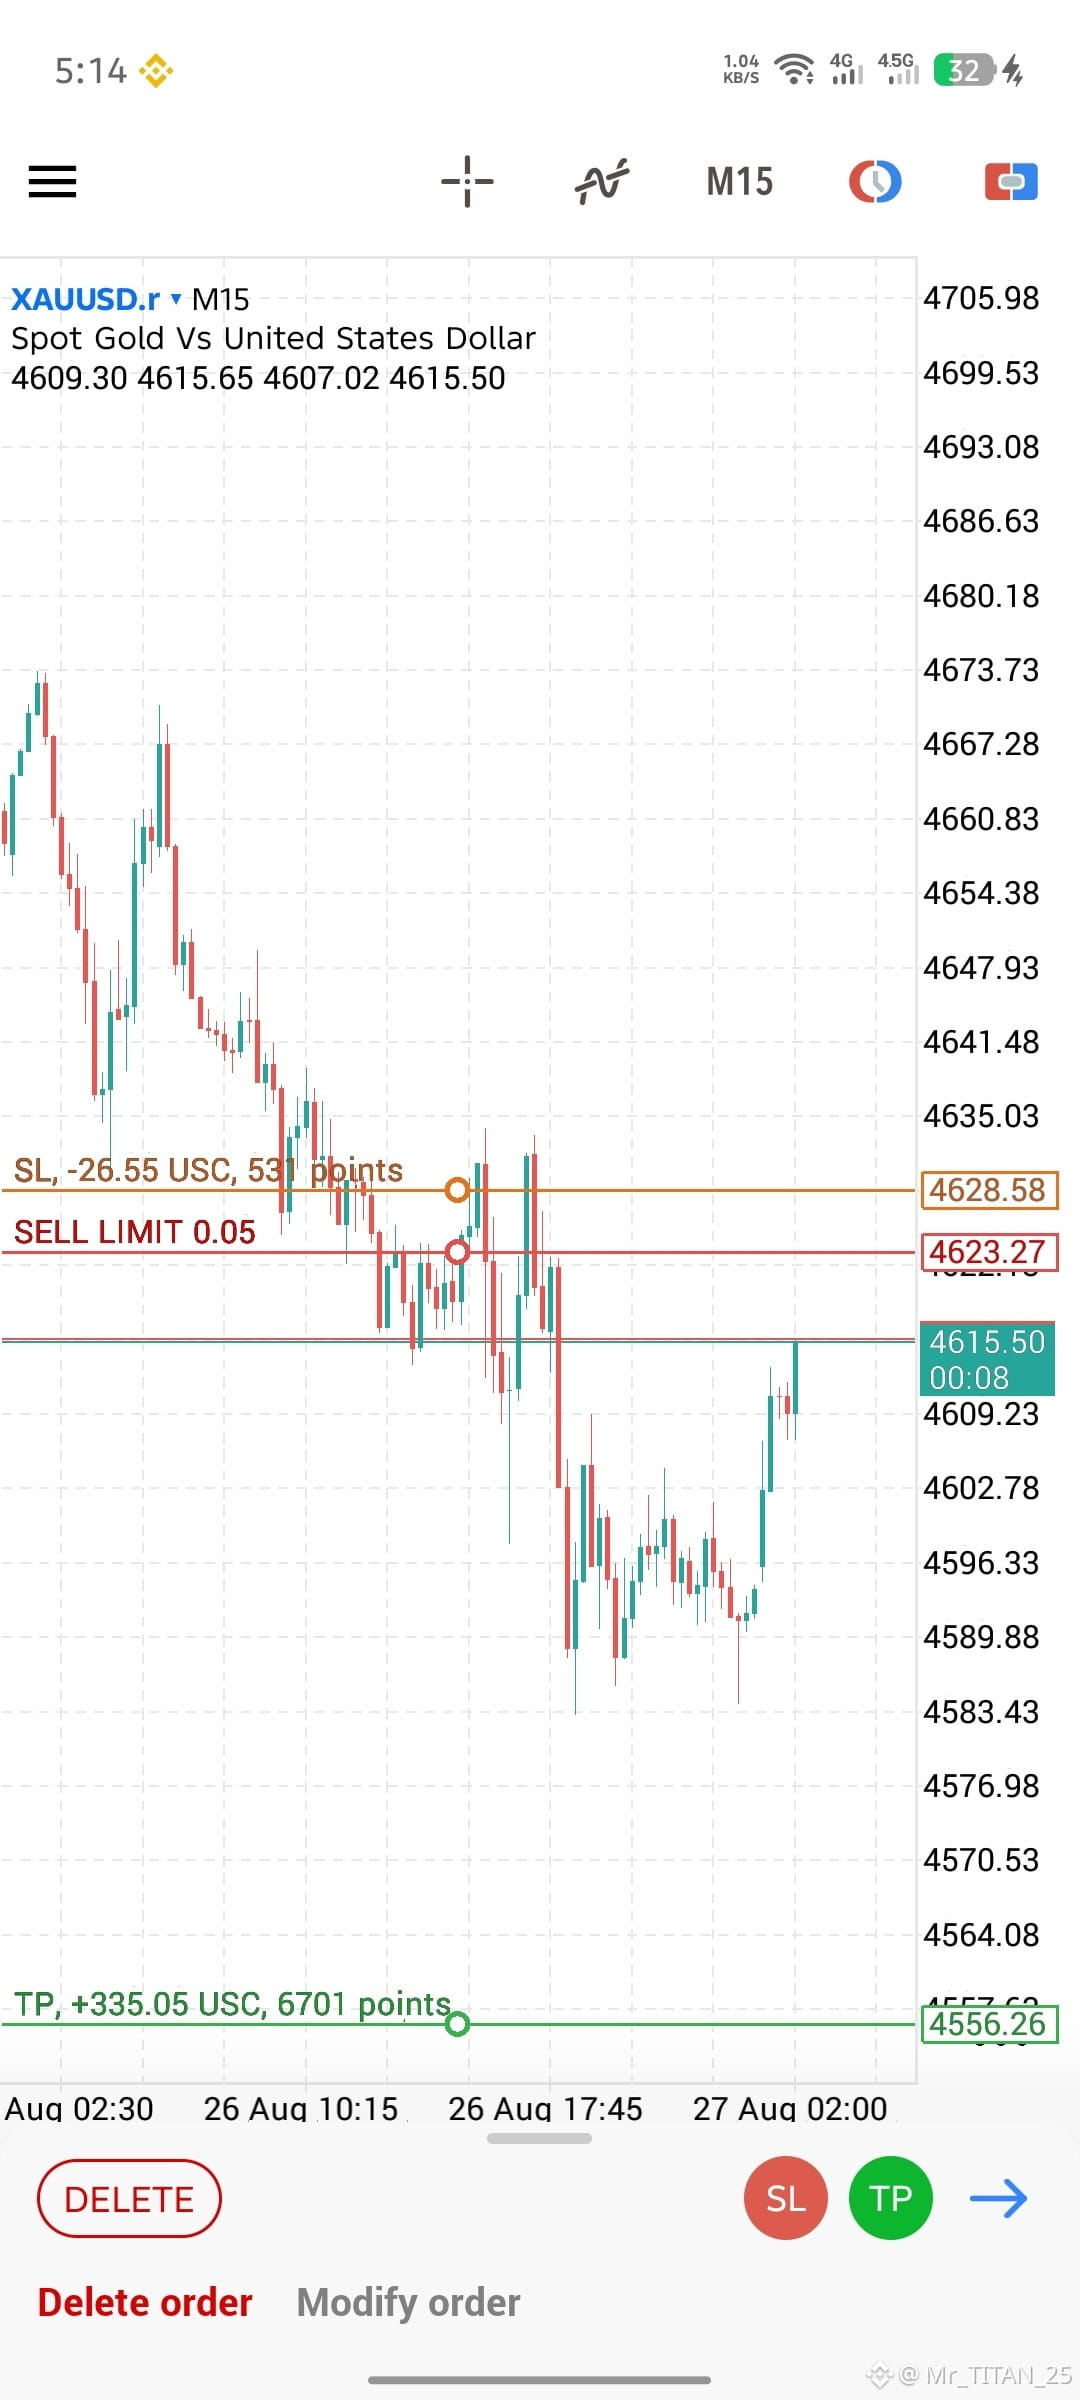
🔴 XAUUSD M15 — SELL LIMIT SETUP 📉🔥
🎯 Entry Point
SELL LIMIT: 4623.27
Price is approaching a key intraday resistance zone around 4623–4628, making this a potential area for sellers to enter after a retracement. 📊
🛑 Stop Loss
SL: 4628.58
The SL is placed above the resistance zone and recent rejection area. A strong break above this level would weaken the bearish setup. ⚠️
🎯 Take Profit
TP: 4556.26
The target is positioned near the lower support area, where buyers previously appeared. 💰
🔥 Reasons for Taking the SELL
✅ Bearish Market Structure — The M15 chart shows a sequence of lower highs and lower lows. 📉
✅ Resistance Retest — 4623–4628 is a previous reaction zone where price struggled to move higher.
✅ Pullback Opportunity — Price has bounced from the lower levels and is retracing upward, potentially giving sellers a better entry.
✅ Resistance + Rejection Zone — The entry is placed near the previous consolidation/rejection area.
🎯 Entry Point
SELL LIMIT: 4623.27
Price is approaching a key intraday resistance zone around 4623–4628, making this a potential area for sellers to enter after a retracement. 📊
🛑 Stop Loss
SL: 4628.58
The SL is placed above the resistance zone and recent rejection area. A strong break above this level would weaken the bearish setup. ⚠️
🎯 Take Profit
TP: 4556.26
The target is positioned near the lower support area, where buyers previously appeared. 💰
🔥 Reasons for Taking the SELL
✅ Bearish Market Structure — The M15 chart shows a sequence of lower highs and lower lows. 📉
✅ Resistance Retest — 4623–4628 is a previous reaction zone where price struggled to move higher.
✅ Pullback Opportunity — Price has bounced from the lower levels and is retracing upward, potentially giving sellers a better entry.
✅ Resistance + Rejection Zone — The entry is placed near the previous consolidation/rejection area.


Richard Teng
·
--
ICYMI: Legacy-Märkte testen erst jetzt 23x5-Trading.
In der Zwischenzeit hat Binance schon immer 24/7-Zugriff angeboten.
Die Märkte holen endlich auf. 👀
In der Zwischenzeit hat Binance schon immer 24/7-Zugriff angeboten.
Die Märkte holen endlich auf. 👀
Übersetzung ansehen
#XAUUSD❤️ 🔴 XAUUSD M15 — SELL LIMIT SETUP 📉🔥
🎯 Entry Point
SELL LIMIT: 4623.27
Price is approaching a key intraday resistance zone around 4623–4628, making this a potential area for sellers to enter after a retracement. 📊
🛑 Stop Loss
SL: 4628.58
The SL is placed above the resistance zone and recent rejection area. A strong break above this level would weaken the bearish setup. ⚠️
🎯 Take Profit
TP: 4556.26
The target is positioned near the lower support area, where buyers previously appeared. 💰
🔥 Reasons for Taking the SELL
✅ Bearish Market Structure — The M15 chart shows a sequence of lower highs and lower lows. 📉
✅ Resistance Retest — 4623–4628 is a previous reaction zone where price struggled to move higher.
✅ Pullback Opportunity — Price has bounced from the lower levels and is retracing upward, potentially giving sellers a better entry.
✅ Resistance + Rejection Zone — The entry is placed near the previous consolidation/rejection area.
✅ Downside Momentum — The preceding move from the 4620+ region toward 4585 shows strong bearish momentum.
✅ Support-Based TP — 4556 is positioned below the recent price structure as a potential extended downside target.
✅ Excellent Risk/Reward 🔥 —
Risk: ~5.31 points
Potential Reward: ~67.01 points
Approx. R:R = 1:12.6 🚀
📌 TRADE PLAN
🔴 Entry: 4623.27
🛑 Stop Loss: 4628.58
🎯 Take Profit: 4556.26
⏱️ Timeframe: M15
📉 Direction: SELL
💎 Setup: Resistance Retest + Bearish Structure + Pullback
⚠️ Risk Warning: The setup is technically bearish, but M15 can be volatile. If price breaks and holds above 4628.58, the SELL setup should be considered invalid. Always use proper position sizing and risk management.#GoldenOpportunity #GOLD_UPDATE $GOLD.US
🎯 Entry Point
SELL LIMIT: 4623.27
Price is approaching a key intraday resistance zone around 4623–4628, making this a potential area for sellers to enter after a retracement. 📊
🛑 Stop Loss
SL: 4628.58
The SL is placed above the resistance zone and recent rejection area. A strong break above this level would weaken the bearish setup. ⚠️
🎯 Take Profit
TP: 4556.26
The target is positioned near the lower support area, where buyers previously appeared. 💰
🔥 Reasons for Taking the SELL
✅ Bearish Market Structure — The M15 chart shows a sequence of lower highs and lower lows. 📉
✅ Resistance Retest — 4623–4628 is a previous reaction zone where price struggled to move higher.
✅ Pullback Opportunity — Price has bounced from the lower levels and is retracing upward, potentially giving sellers a better entry.
✅ Resistance + Rejection Zone — The entry is placed near the previous consolidation/rejection area.
✅ Downside Momentum — The preceding move from the 4620+ region toward 4585 shows strong bearish momentum.
✅ Support-Based TP — 4556 is positioned below the recent price structure as a potential extended downside target.
✅ Excellent Risk/Reward 🔥 —
Risk: ~5.31 points
Potential Reward: ~67.01 points
Approx. R:R = 1:12.6 🚀
📌 TRADE PLAN
🔴 Entry: 4623.27
🛑 Stop Loss: 4628.58
🎯 Take Profit: 4556.26
⏱️ Timeframe: M15
📉 Direction: SELL
💎 Setup: Resistance Retest + Bearish Structure + Pullback
⚠️ Risk Warning: The setup is technically bearish, but M15 can be volatile. If price breaks and holds above 4628.58, the SELL setup should be considered invalid. Always use proper position sizing and risk management.#GoldenOpportunity #GOLD_UPDATE $GOLD.US
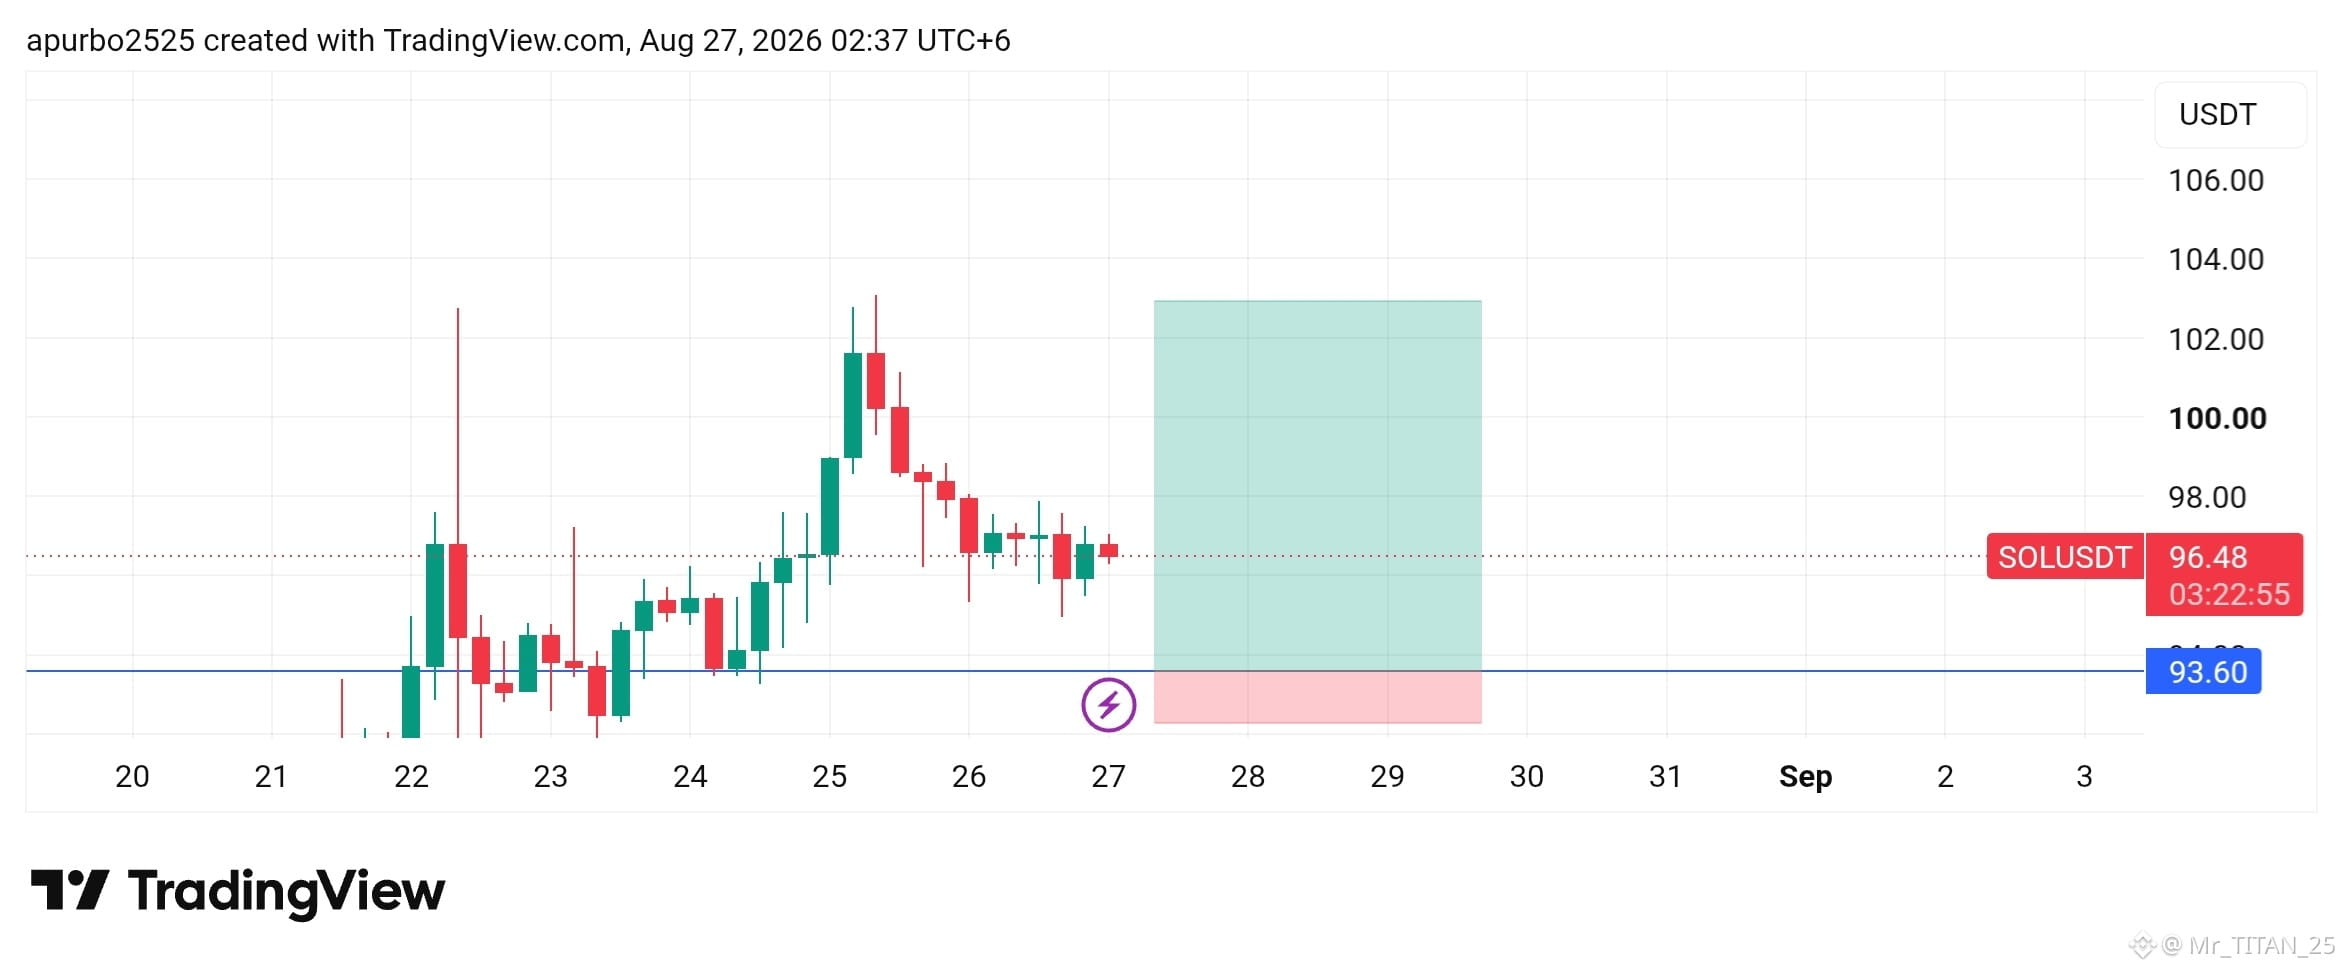
##dusk $DUSK @Dusk 🟢 SOLUSDT — BUY SETUP 📈🚀
🎯 Einstiegspunkt
BUY LIMIT: 93.60 USDT
Der Einstieg liegt in einer starken Support-/Nachfragezone, auf die der Preis zuvor bereits mehrfach reagiert hat. Das macht 93.60 zu einem potenziellen Bereich, in den Käufer einsteigen könnten. 💪
🛑 Stop Loss
SL: ~92.20 USDT
Der SL ist unterhalb der Support-Zone platziert. Ein sauberer Bruch unterhalb dieses Bereichs würde das bullische Setup ungültig machen. ⚠️
💰 Take Profit
TP: ~103.00 USDT
Das Ziel liegt nahe am vorherigen großen Widerstands-/Hochbereich, an dem der Preis zuvor starkem Verkaufsdruck ausgesetzt war. 🎯
🔥 Gründe für das BUY
✅ Starker Support — 93.60 hat als wichtiger Support-Level fungiert.
✅ Mehrfache Zurückweisungen — Der Preis hat diese Zone zuvor getestet und ist wieder nach oben abgeprallt. 📈
✅ Bullische Struktur — SOL zeigte einen starken Aufwärtsimpuls aus den tieferen Bereichen.
✅ Pullback-Chance — Der aktuelle Preis konsolidiert oberhalb des Supports und schafft ein potenzielles „Buy-the-Dip“-Setup.
✅ Vorheriges High-Ziel — Der Bereich 102–103 ist eine bedeutende frühere Widerstandszone.
✅ Gutes Chance/Risiko — Das Setup bietet eine starke potenzielle Rendite im Vergleich zum definierten Abwärtsrisiko. 🔥
✅ H4/Höheres-Zeitfenster-Potenzial — Die breitere Struktur deutet darauf hin, dass Käufer interessiert bleiben, solange der Preis über dem entscheidenden Support hält.
📌 Handelsplan
🟢 Einstieg: 93.60 USDT
🛑 Stop Loss: ~92.20 USDT
🎯 Take Profit: ~103.00 USDT
📊 Paar: SOLUSDT
📈 Richtung: BUY
💎 Setup: Support + Pullback + Bullische Struktur + Ziel auf vorherigen Widerstand
⚠️ Risikomanagement: Riskiere nicht mehr, als du verlieren kannst. Warte, bis der Einstieg ausgelöst wird, und vermeide es, dem Preis hinterherzulaufen, falls er sich deutlich über den geplanten Einstieg bewegt.
🎯 Einstiegspunkt
BUY LIMIT: 93.60 USDT
Der Einstieg liegt in einer starken Support-/Nachfragezone, auf die der Preis zuvor bereits mehrfach reagiert hat. Das macht 93.60 zu einem potenziellen Bereich, in den Käufer einsteigen könnten. 💪
🛑 Stop Loss
SL: ~92.20 USDT
Der SL ist unterhalb der Support-Zone platziert. Ein sauberer Bruch unterhalb dieses Bereichs würde das bullische Setup ungültig machen. ⚠️
💰 Take Profit
TP: ~103.00 USDT
Das Ziel liegt nahe am vorherigen großen Widerstands-/Hochbereich, an dem der Preis zuvor starkem Verkaufsdruck ausgesetzt war. 🎯
🔥 Gründe für das BUY
✅ Starker Support — 93.60 hat als wichtiger Support-Level fungiert.
✅ Mehrfache Zurückweisungen — Der Preis hat diese Zone zuvor getestet und ist wieder nach oben abgeprallt. 📈
✅ Bullische Struktur — SOL zeigte einen starken Aufwärtsimpuls aus den tieferen Bereichen.
✅ Pullback-Chance — Der aktuelle Preis konsolidiert oberhalb des Supports und schafft ein potenzielles „Buy-the-Dip“-Setup.
✅ Vorheriges High-Ziel — Der Bereich 102–103 ist eine bedeutende frühere Widerstandszone.
✅ Gutes Chance/Risiko — Das Setup bietet eine starke potenzielle Rendite im Vergleich zum definierten Abwärtsrisiko. 🔥
✅ H4/Höheres-Zeitfenster-Potenzial — Die breitere Struktur deutet darauf hin, dass Käufer interessiert bleiben, solange der Preis über dem entscheidenden Support hält.
📌 Handelsplan
🟢 Einstieg: 93.60 USDT
🛑 Stop Loss: ~92.20 USDT
🎯 Take Profit: ~103.00 USDT
📊 Paar: SOLUSDT
📈 Richtung: BUY
💎 Setup: Support + Pullback + Bullische Struktur + Ziel auf vorherigen Widerstand
⚠️ Risikomanagement: Riskiere nicht mehr, als du verlieren kannst. Warte, bis der Einstieg ausgelöst wird, und vermeide es, dem Preis hinterherzulaufen, falls er sich deutlich über den geplanten Einstieg bewegt.
Übersetzung ansehen
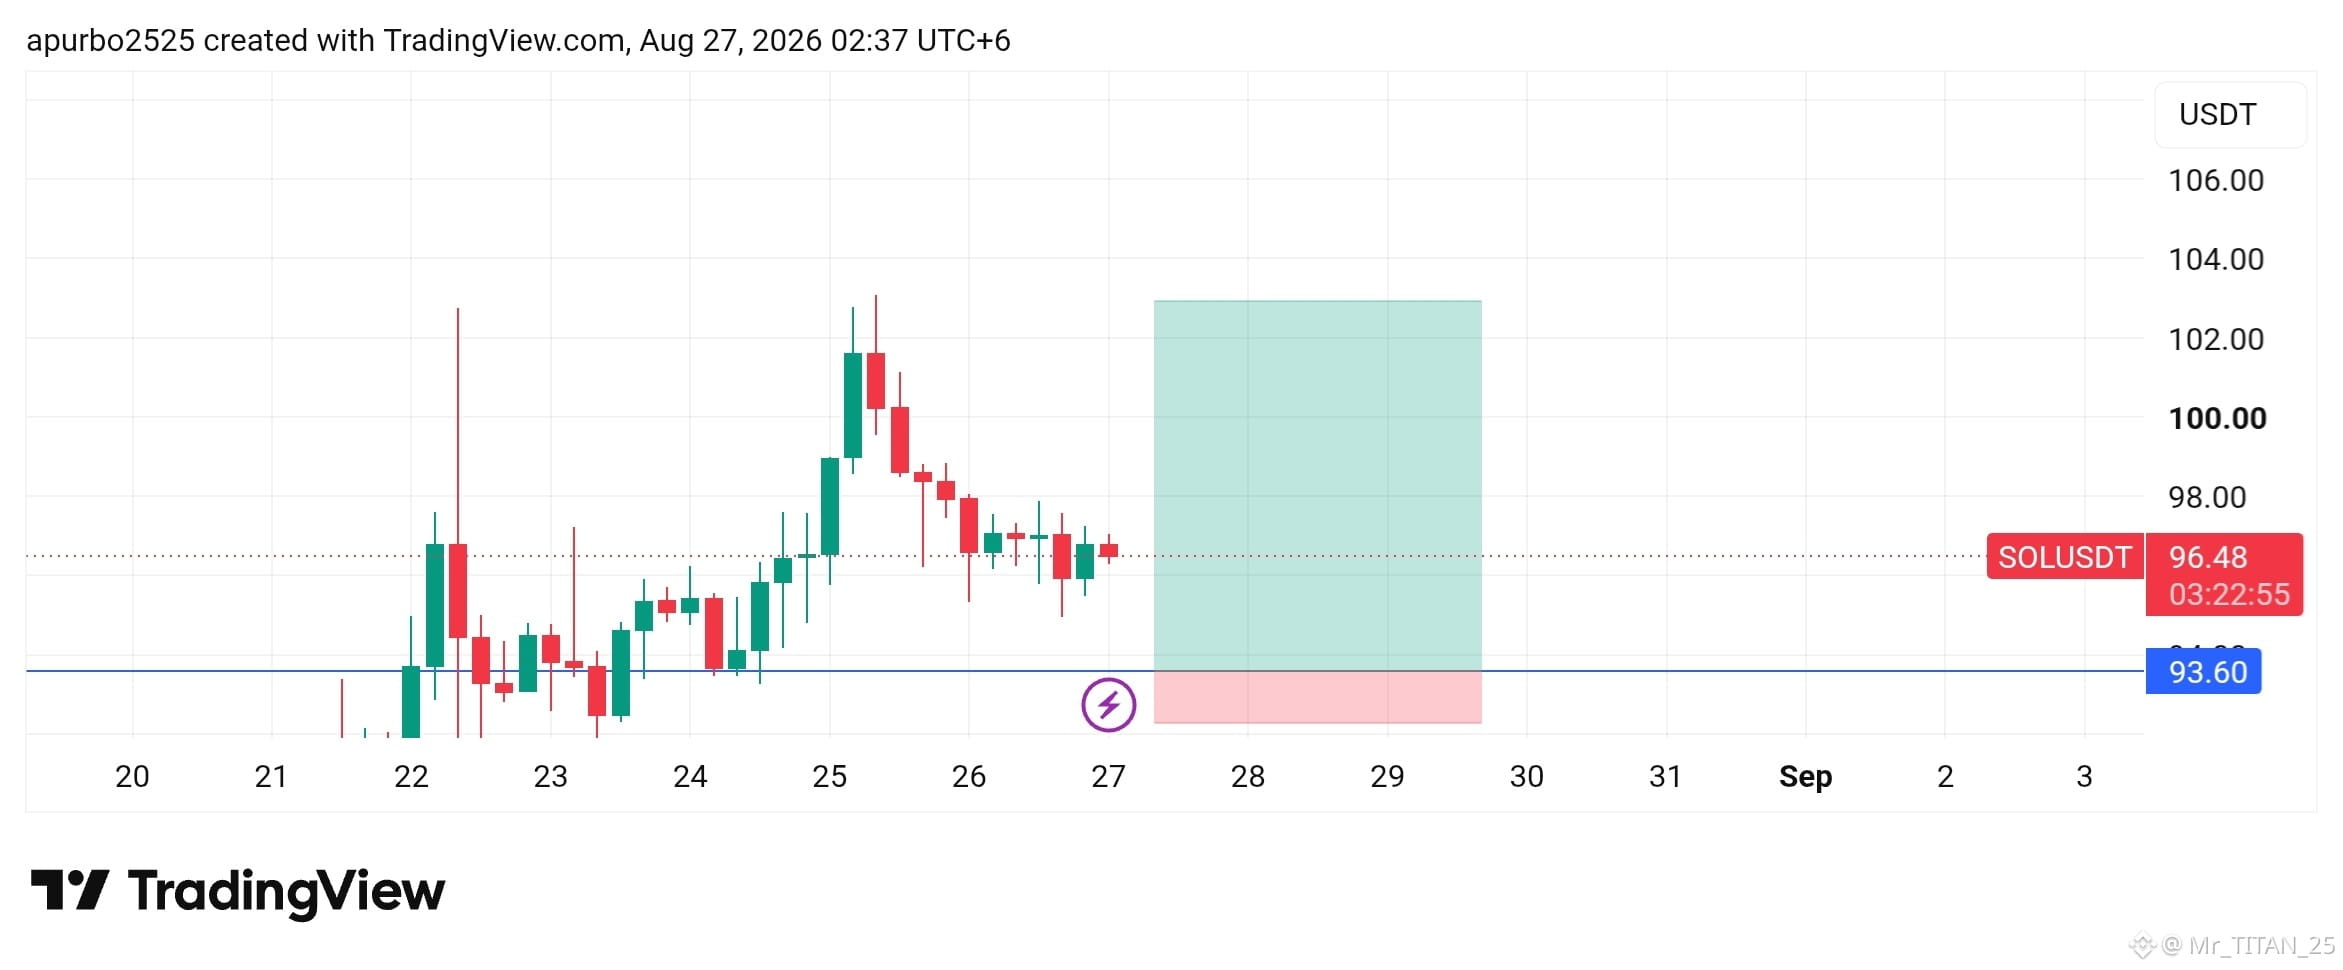
🟢 SOLUSDT — BUY SETUP 📈🚀
🎯 Entry Point
BUY LIMIT: 93.60 USDT
The entry is placed at a strong support/demand zone, where price has previously reacted multiple times. This makes 93.60 a potential area for buyers to step in. 💪
🛑 Stop Loss
SL: ~92.20 USDT
The SL is positioned below the support zone. A clean breakdown below this area would invalidate the bullish setup. ⚠️
💰 Take Profit
TP: ~103.00 USDT
The target is placed near the previous major resistance/high area, where price previously faced strong selling pressure. 🎯
🔥 Reasons for Taking the BUY
✅ Strong Support — 93.60 has acted as an important support level.
✅ Multiple Rejections — Price previously tested this zone and bounced upward. 📈
✅ Bullish Structure — SOL showed a strong upward move from the lower levels.
✅ Pullback Opportunity — Current price is consolidating above support, creating a potential buy-the-dip setup.
✅ Previous High Target — The 102–103 area is a significant previous resistance zone.
✅ Good Risk/Reward — The setup offers a strong potential reward compared with the defined downside risk. 🔥
✅ H4/Higher-Timeframe Potential — The broader structure suggests buyers remain interested while price holds above the key support.
📌 Trade Plan
🟢 Entry: 93.60 USDT
🛑 Stop Loss: ~92.20 USDT
🎯 Take Profit: ~103.00 USDT
📊 Pair: SOLUSDT
📈 Direction: BUY
💎 Setup: Support + Pullback + Bullish Structure + Previous Resistance Target
⚠️ Risk Management: Do not risk more than you can afford to lose. Wait for the entry to trigger and avoid chasing the price if it moves significantly above the planned entry.
$SOL #sol #solana #sol板块 #SolanaStrong #SolanaUSTD
🎯 Entry Point
BUY LIMIT: 93.60 USDT
The entry is placed at a strong support/demand zone, where price has previously reacted multiple times. This makes 93.60 a potential area for buyers to step in. 💪
🛑 Stop Loss
SL: ~92.20 USDT
The SL is positioned below the support zone. A clean breakdown below this area would invalidate the bullish setup. ⚠️
💰 Take Profit
TP: ~103.00 USDT
The target is placed near the previous major resistance/high area, where price previously faced strong selling pressure. 🎯
🔥 Reasons for Taking the BUY
✅ Strong Support — 93.60 has acted as an important support level.
✅ Multiple Rejections — Price previously tested this zone and bounced upward. 📈
✅ Bullish Structure — SOL showed a strong upward move from the lower levels.
✅ Pullback Opportunity — Current price is consolidating above support, creating a potential buy-the-dip setup.
✅ Previous High Target — The 102–103 area is a significant previous resistance zone.
✅ Good Risk/Reward — The setup offers a strong potential reward compared with the defined downside risk. 🔥
✅ H4/Higher-Timeframe Potential — The broader structure suggests buyers remain interested while price holds above the key support.
📌 Trade Plan
🟢 Entry: 93.60 USDT
🛑 Stop Loss: ~92.20 USDT
🎯 Take Profit: ~103.00 USDT
📊 Pair: SOLUSDT
📈 Direction: BUY
💎 Setup: Support + Pullback + Bullish Structure + Previous Resistance Target
⚠️ Risk Management: Do not risk more than you can afford to lose. Wait for the entry to trigger and avoid chasing the price if it moves significantly above the planned entry.
$SOL #sol #solana #sol板块 #SolanaStrong #SolanaUSTD
Übersetzung ansehen
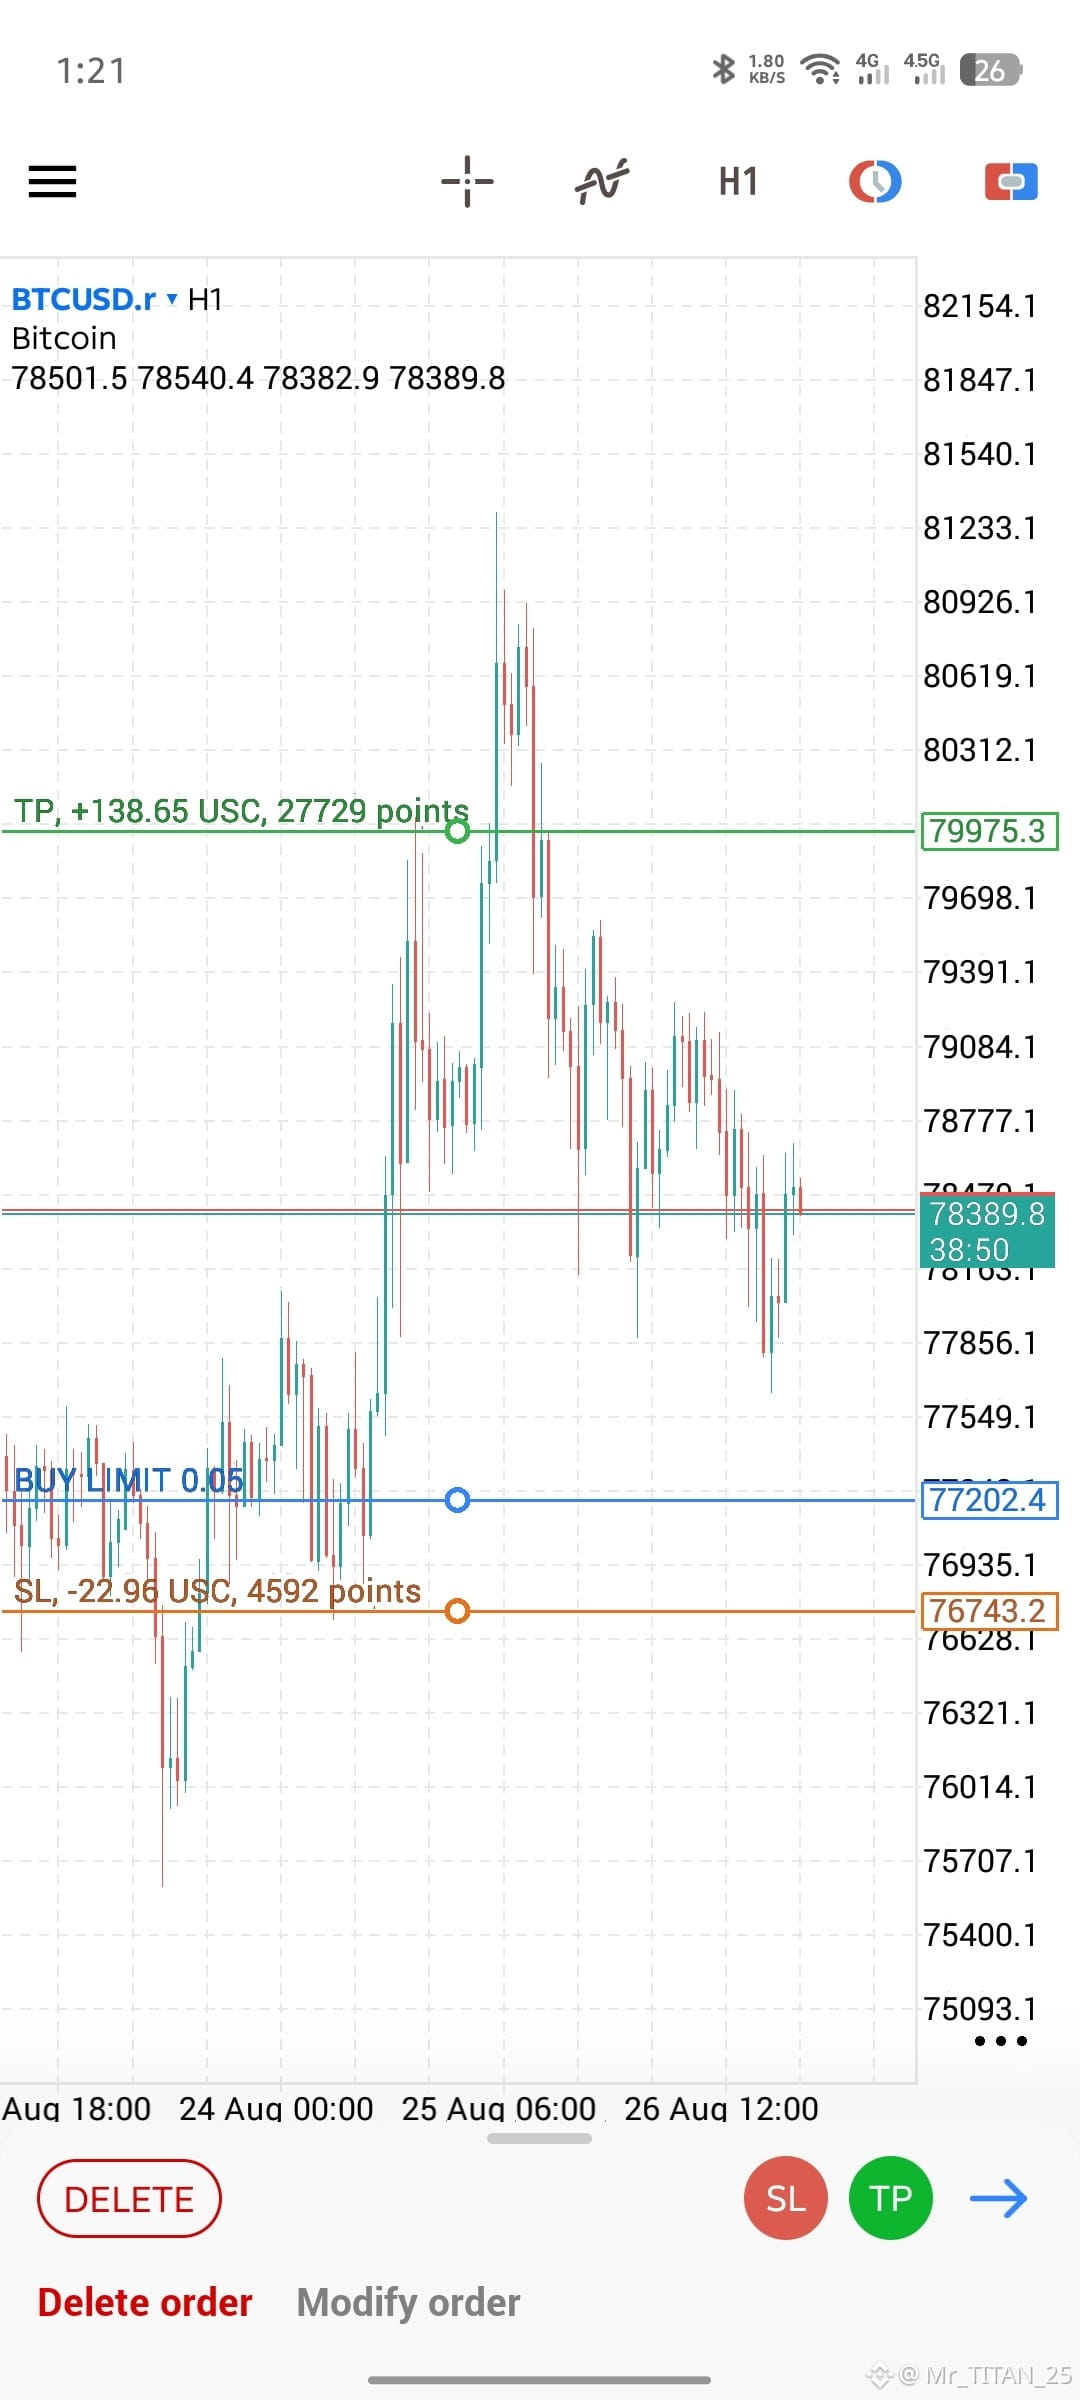
📊 BTCUSD H1 — BUY LIMIT SETUP 🚀
🟢 Entry Point
BUY LIMIT: 77,202.4
The buy entry is placed around the 77,200 support area, where price previously showed strong buying interest and reacted upward. 📈
🛑 Stop Loss
SL: 76,743.2
The stop loss is placed below the support zone and recent downside structure. If price breaks and holds below this level, the bullish setup becomes invalid. ⚠️
🎯 Take Profit
TP: 79,975.3
The target is positioned near the 80,000 psychological resistance area, where price previously faced selling pressure. 💰
🔥 Reasons for Taking the BUY
✅ Strong Support Zone — 77,200 is acting as an important potential demand/support area.
✅ Pullback Entry — After the strong bullish move, BTC is retracing toward a lower support area, creating a potential buy-the-dip opportunity. 📉➡️📈
✅ Previous Price Reaction — The chart shows previous reactions from the lower price zone, indicating that buyers have been active there.
✅ Risk Management — The SL is placed below the key support instead of directly at the entry, giving the trade room to breathe.
✅ Psychological Resistance — 80,000 is a major psychological level, making it a logical TP area. 🎯
✅ Favorable Risk-to-Reward —
Risk ≈ 459 points
Potential Reward ≈ 2,773 points
Approx. 1:6 R:R 🔥
📌 Trade Plan
Entry: 77,202.4 🟢
Stop Loss: 76,743.2 🔴
Take Profit: 79,975.3 🟢
Timeframe: H1 ⏱️
Direction: BUY 📈
Setup: Support + Pullback + Risk/Reward ⭐
⚠️ Important: This is a technical setup based on the H1 chart structure, not a guaranteed outcome. Always control your position size and risk per trade.$BTC #BrentWTICrudeFallOver3% #XRPRallies44%InAWeek #CryptoFearGreedIndexHits74 #KOSPIRisesNearly1% #BrentWTICrudeFallOver3%
🟢 Entry Point
BUY LIMIT: 77,202.4
The buy entry is placed around the 77,200 support area, where price previously showed strong buying interest and reacted upward. 📈
🛑 Stop Loss
SL: 76,743.2
The stop loss is placed below the support zone and recent downside structure. If price breaks and holds below this level, the bullish setup becomes invalid. ⚠️
🎯 Take Profit
TP: 79,975.3
The target is positioned near the 80,000 psychological resistance area, where price previously faced selling pressure. 💰
🔥 Reasons for Taking the BUY
✅ Strong Support Zone — 77,200 is acting as an important potential demand/support area.
✅ Pullback Entry — After the strong bullish move, BTC is retracing toward a lower support area, creating a potential buy-the-dip opportunity. 📉➡️📈
✅ Previous Price Reaction — The chart shows previous reactions from the lower price zone, indicating that buyers have been active there.
✅ Risk Management — The SL is placed below the key support instead of directly at the entry, giving the trade room to breathe.
✅ Psychological Resistance — 80,000 is a major psychological level, making it a logical TP area. 🎯
✅ Favorable Risk-to-Reward —
Risk ≈ 459 points
Potential Reward ≈ 2,773 points
Approx. 1:6 R:R 🔥
📌 Trade Plan
Entry: 77,202.4 🟢
Stop Loss: 76,743.2 🔴
Take Profit: 79,975.3 🟢
Timeframe: H1 ⏱️
Direction: BUY 📈
Setup: Support + Pullback + Risk/Reward ⭐
⚠️ Important: This is a technical setup based on the H1 chart structure, not a guaranteed outcome. Always control your position size and risk per trade.$BTC #BrentWTICrudeFallOver3% #XRPRallies44%InAWeek #CryptoFearGreedIndexHits74 #KOSPIRisesNearly1% #BrentWTICrudeFallOver3%
Übersetzung ansehen
yes


Binance Square Official
·
--
Wir möchten von Ihnen hören!
Wir haben den lebhaften Diskussionen in unserer Community über Pi Network zugehört. Um sicherzustellen, dass Ihre Stimmen gehört werden, nehmen Sie an unserer Community-Abstimmung zum Thema teil:
„Sollte PI auf Binance eingeführt werden?“
Geben Sie Ihre Stimme ab – entweder „Ja“ oder „Nein“ – und teilen Sie Ihre Gedanken in den Kommentaren unter diesem Beitrag mit. Sie können nur einmal abstimmen und Ihre Stimme nach dem Absenden nicht mehr ändern. Viel Spaß beim Abstimmen!
Abstimmungszeitraum: 17.02.2025 14:45 (UTC) bis 27.02.2025 23:59 (UTC)
T&Cs and Disclaimers
Wir haben den lebhaften Diskussionen in unserer Community über Pi Network zugehört. Um sicherzustellen, dass Ihre Stimmen gehört werden, nehmen Sie an unserer Community-Abstimmung zum Thema teil:
„Sollte PI auf Binance eingeführt werden?“
Geben Sie Ihre Stimme ab – entweder „Ja“ oder „Nein“ – und teilen Sie Ihre Gedanken in den Kommentaren unter diesem Beitrag mit. Sie können nur einmal abstimmen und Ihre Stimme nach dem Absenden nicht mehr ändern. Viel Spaß beim Abstimmen!
Abstimmungszeitraum: 17.02.2025 14:45 (UTC) bis 27.02.2025 23:59 (UTC)
T&Cs and Disclaimers
Anmelden und weiter Inhalte entdecken