

Berserker_09
16.6k Beiträge

Berserker_09
Melden
Nutzer blockieren
I share here important news and events happening around the crypto world. TW/X : @berserker_o9
18 Following
4.4K+ Follower
31.6K+ Like gegeben
Beiträge
Alle
Zitierungen
Videos
PINNED
·
--
„Von Null auf 1K – gebaut durch Geduld, Diagramme und unermüdliche Disziplin.“
Vor 2,4 Jahren begann ich diese Reise allein, nur mit Diagrammen, Überzeugung und viel zu lernen. Heute haben wir 1K Follower überschritten und ich bin nicht mehr allein – und ich bin ehrlich dankbar für jeden Einzelnen von euch, der meiner Analyse, meinen Ideen und meiner Perspektive auf diesen verrückten Krypto-Markt vertraut hat.
Es war nicht einfach. Es gab unzählige Stunden des Chartings, viele Gewinne und einige harte Verluste auf dem Weg. Aber jeder Handel, jede Lektion und jede Diskussion mit dieser Gemeinschaft hat mir geholfen, zu wachsen.
Dieser Meilenstein ist nicht nur eine Zahl – er ist der Beweis, dass Konsistenz, Geduld und Disziplin sich auszahlen. Danke, dass ihr Teil der Reise seid. Das Ziel ist jetzt einfach: weiter lernen, weiter verbessern und weiter gemeinsam gewinnen. Am Ende möchte ich nur sagen, dass unsere Reise gerade erst begonnen hat und es eine lange ist, also bleibt bei mir, wir werden eine wundervolle Zeit zusammen haben.
Auf zum nächsten Meilenstein. 🚀📈
#thankyou #LetsGetRichTogether
„Von Null auf 1K – gebaut durch Geduld, Diagramme und unermüdliche Disziplin.“
Vor 2,4 Jahren begann ich diese Reise allein, nur mit Diagrammen, Überzeugung und viel zu lernen. Heute haben wir 1K Follower überschritten und ich bin nicht mehr allein – und ich bin ehrlich dankbar für jeden Einzelnen von euch, der meiner Analyse, meinen Ideen und meiner Perspektive auf diesen verrückten Krypto-Markt vertraut hat.
Es war nicht einfach. Es gab unzählige Stunden des Chartings, viele Gewinne und einige harte Verluste auf dem Weg. Aber jeder Handel, jede Lektion und jede Diskussion mit dieser Gemeinschaft hat mir geholfen, zu wachsen.
Dieser Meilenstein ist nicht nur eine Zahl – er ist der Beweis, dass Konsistenz, Geduld und Disziplin sich auszahlen. Danke, dass ihr Teil der Reise seid. Das Ziel ist jetzt einfach: weiter lernen, weiter verbessern und weiter gemeinsam gewinnen. Am Ende möchte ich nur sagen, dass unsere Reise gerade erst begonnen hat und es eine lange ist, also bleibt bei mir, wir werden eine wundervolle Zeit zusammen haben.
Auf zum nächsten Meilenstein. 🚀📈
#thankyou #LetsGetRichTogether
Vor 2,4 Jahren begann ich diese Reise allein, nur mit Diagrammen, Überzeugung und viel zu lernen. Heute haben wir 1K Follower überschritten und ich bin nicht mehr allein – und ich bin ehrlich dankbar für jeden Einzelnen von euch, der meiner Analyse, meinen Ideen und meiner Perspektive auf diesen verrückten Krypto-Markt vertraut hat.
Es war nicht einfach. Es gab unzählige Stunden des Chartings, viele Gewinne und einige harte Verluste auf dem Weg. Aber jeder Handel, jede Lektion und jede Diskussion mit dieser Gemeinschaft hat mir geholfen, zu wachsen.
Dieser Meilenstein ist nicht nur eine Zahl – er ist der Beweis, dass Konsistenz, Geduld und Disziplin sich auszahlen. Danke, dass ihr Teil der Reise seid. Das Ziel ist jetzt einfach: weiter lernen, weiter verbessern und weiter gemeinsam gewinnen. Am Ende möchte ich nur sagen, dass unsere Reise gerade erst begonnen hat und es eine lange ist, also bleibt bei mir, wir werden eine wundervolle Zeit zusammen haben.
Auf zum nächsten Meilenstein. 🚀📈
#thankyou #LetsGetRichTogether

20
48
1.3k
·
--
Bullisch
Übersetzung ansehen
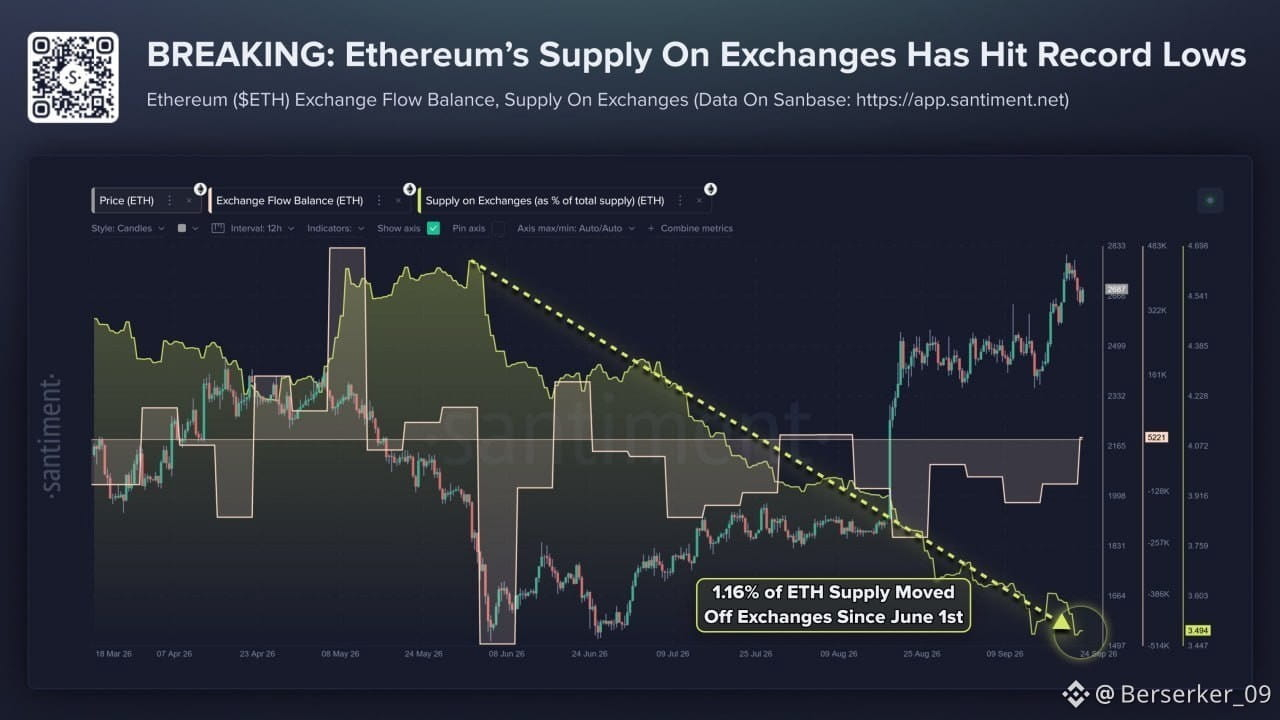
💰 Total $ETH reserves on centralized exchanges have fallen to a record low.
💰 Total $ETH reserves on centralized exchanges have fallen to a record low.
2
69
·
--
Bärisch
Übersetzung ansehen
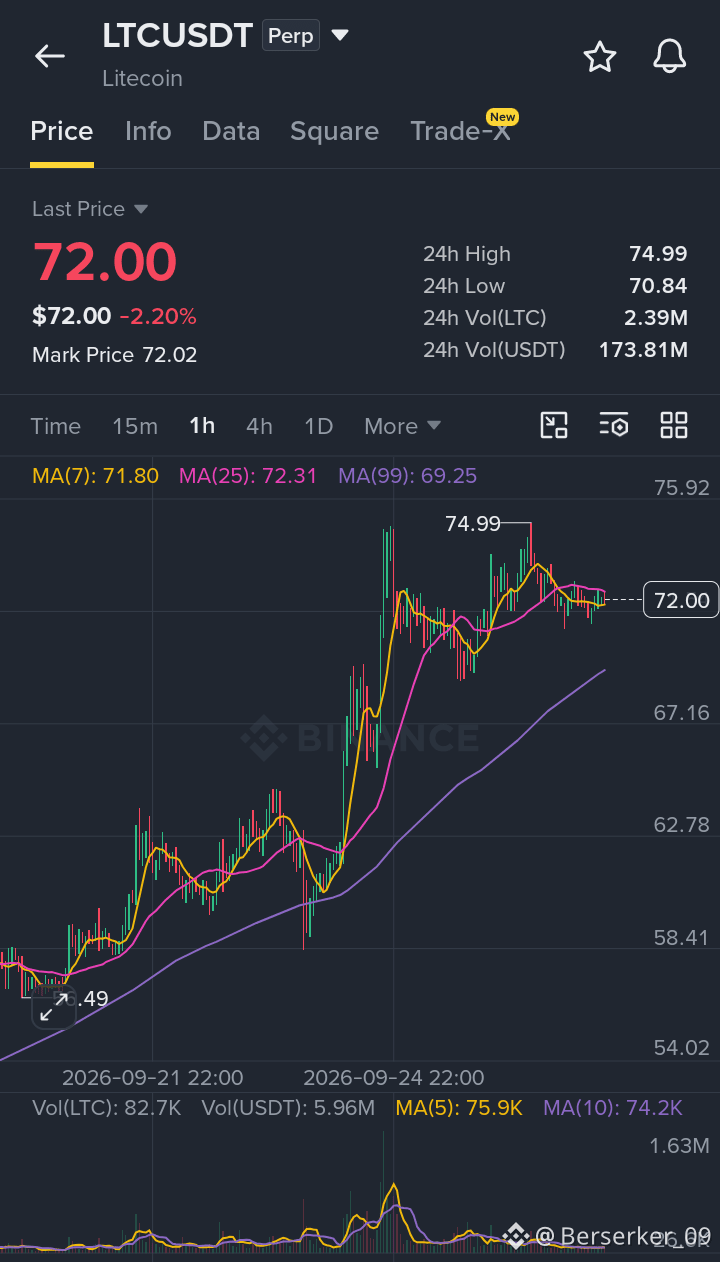
📉 $LTC — Bearish Short Setup
SHORT $LTC
Entry: $70.9–$73.1
SL: $78.0
🎯 Take Profit:
TP1: $70.0
TP2: $67.5
TP3: $65.5
Price is losing momentum near the resistance area, suggesting that buying pressure may be weakening. If sellers continue defending the upper zone and price confirms rejection, another downside move could develop toward the lower targets.
🔑 Key Level:
$73.1 — rejection from this area could keep the bearish setup active and increase the probability of a move toward the downside targets.
⚠️ Risk Note:
A move above $78.0 would invalidate the bearish setup. Wait for confirmation and use controlled position sizing with proper risk management.
Bearish bias while resistance holds. 📉
Sell and Trade $LTC here 👇
{future}(LTCUSDT)
DYOR
📉 $LTC — Bearish Short Setup
SHORT $LTC
Entry: $70.9–$73.1
SL: $78.0
🎯 Take Profit:
TP1: $70.0
TP2: $67.5
TP3: $65.5
Price is losing momentum near the resistance area, suggesting that buying pressure may be weakening. If sellers continue defending the upper zone and price confirms rejection, another downside move could develop toward the lower targets.
🔑 Key Level:
$73.1 — rejection from this area could keep the bearish setup active and increase the probability of a move toward the downside targets.
⚠️ Risk Note:
A move above $78.0 would invalidate the bearish setup. Wait for confirmation and use controlled position sizing with proper risk management.
Bearish bias while resistance holds. 📉
Sell and Trade $LTC here 👇
DYOR
SHORT $LTC
Entry: $70.9–$73.1
SL: $78.0
🎯 Take Profit:
TP1: $70.0
TP2: $67.5
TP3: $65.5
Price is losing momentum near the resistance area, suggesting that buying pressure may be weakening. If sellers continue defending the upper zone and price confirms rejection, another downside move could develop toward the lower targets.
🔑 Key Level:
$73.1 — rejection from this area could keep the bearish setup active and increase the probability of a move toward the downside targets.
⚠️ Risk Note:
A move above $78.0 would invalidate the bearish setup. Wait for confirmation and use controlled position sizing with proper risk management.
Bearish bias while resistance holds. 📉
Sell and Trade $LTC here 👇
DYOR
1
62
·
--
Bullisch
Übersetzung ansehen
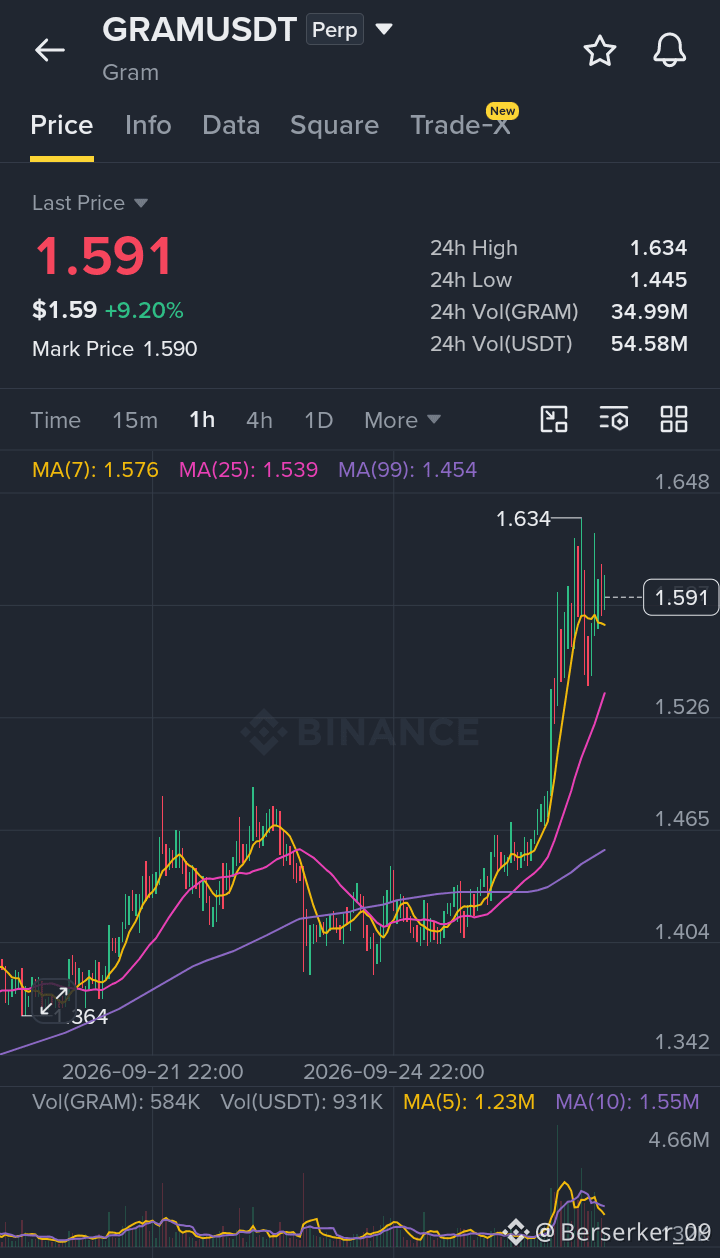
📈 $GRAM — Bullish Long Setup
LONG $GRAM
Entry: $1.566–$1.614
SL: $1.45
🎯 Take Profit:
TP1: $1.65
TP2: $1.70
TP3: $1.75
Price is building a solid support base around the current level, creating room for a potential momentum-driven upside move. If buyers continue defending the entry zone and momentum strengthens, the structure could support a move toward the higher targets.
🔑 Key Level:
$1.614 — holding above the upper entry area would support the bullish continuation setup.
⚠️ Risk Note:
A breakdown below $1.45 would invalidate the bullish setup. Wait for confirmation and use controlled position sizing with proper risk management.
Bullish bias while support holds. 📈
Buy and Trade $GRAM here 👇
{future}(GRAMUSDT)
DYOR
📈 $GRAM — Bullish Long Setup
LONG $GRAM
Entry: $1.566–$1.614
SL: $1.45
🎯 Take Profit:
TP1: $1.65
TP2: $1.70
TP3: $1.75
Price is building a solid support base around the current level, creating room for a potential momentum-driven upside move. If buyers continue defending the entry zone and momentum strengthens, the structure could support a move toward the higher targets.
🔑 Key Level:
$1.614 — holding above the upper entry area would support the bullish continuation setup.
⚠️ Risk Note:
A breakdown below $1.45 would invalidate the bullish setup. Wait for confirmation and use controlled position sizing with proper risk management.
Bullish bias while support holds. 📈
Buy and Trade $GRAM here 👇
DYOR
LONG $GRAM
Entry: $1.566–$1.614
SL: $1.45
🎯 Take Profit:
TP1: $1.65
TP2: $1.70
TP3: $1.75
Price is building a solid support base around the current level, creating room for a potential momentum-driven upside move. If buyers continue defending the entry zone and momentum strengthens, the structure could support a move toward the higher targets.
🔑 Key Level:
$1.614 — holding above the upper entry area would support the bullish continuation setup.
⚠️ Risk Note:
A breakdown below $1.45 would invalidate the bullish setup. Wait for confirmation and use controlled position sizing with proper risk management.
Bullish bias while support holds. 📈
Buy and Trade $GRAM here 👇
DYOR
1
76
·
--
Bullisch
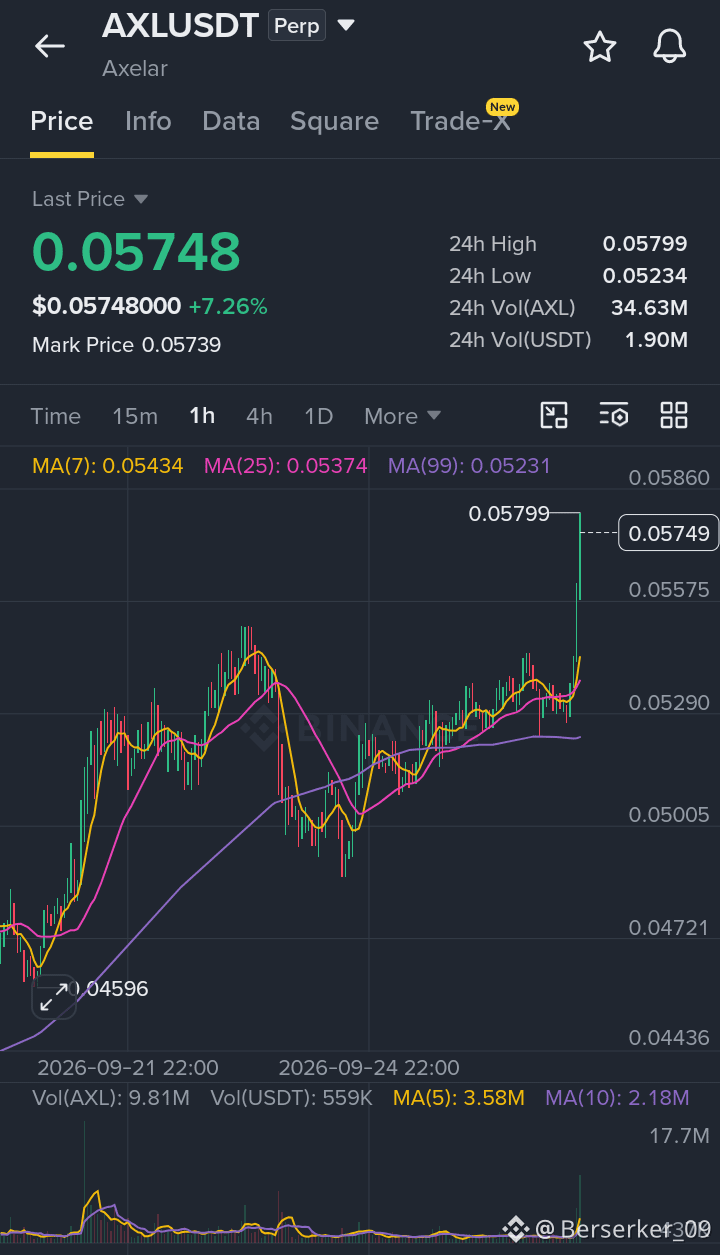
📈 $AXL — Bullishes Long-Setup
LONG $AXL
Einstieg: $0.0560–$0.0570
SL: $0.0545
🎯 Take Profit:
TP1: $0.0578
TP2: $0.0586
TP3: $0.0595
Der Kurs zeigt nach dem Ausbruch über den Widerstandsbereich bei $0.0550 starke bullische Momentum auf dem 1H-Chart. Käufer halten den Druck aufrecht, während der Kurs Richtung $0.0580 gedrückt wird, und ein bestätigter Ausbruch über dieses Niveau könnte weitere Kursgewinne hin zu den nächsten Zielen unterstützen.
🔑 Schlüsselniveau:
$0.0580 — ein bestätigter Ausbruch und ein Halt über diesem Widerstand könnte das Fortsetzungs-Setup stärken.
⚠️ Risikohinweis:
Ein Rückgang unter $0.0545 würde das bullische Setup ungültig machen. Auf Bestätigung warten und eine kontrollierte Positionsgröße mit ordentlichem Risikomanagement verwenden.
Bullischer Bias, solange der Support hält. 📈
Kaufen und Trades $AXL hier 👇
{future}(AXLUSDT)
DYOR
📈 $AXL — Bullishes Long-Setup
LONG $AXL
Einstieg: $0.0560–$0.0570
SL: $0.0545
🎯 Take Profit:
TP1: $0.0578
TP2: $0.0586
TP3: $0.0595
Der Kurs zeigt nach dem Ausbruch über den Widerstandsbereich bei $0.0550 starke bullische Momentum auf dem 1H-Chart. Käufer halten den Druck aufrecht, während der Kurs Richtung $0.0580 gedrückt wird, und ein bestätigter Ausbruch über dieses Niveau könnte weitere Kursgewinne hin zu den nächsten Zielen unterstützen.
🔑 Schlüsselniveau:
$0.0580 — ein bestätigter Ausbruch und ein Halt über diesem Widerstand könnte das Fortsetzungs-Setup stärken.
⚠️ Risikohinweis:
Ein Rückgang unter $0.0545 würde das bullische Setup ungültig machen. Auf Bestätigung warten und eine kontrollierte Positionsgröße mit ordentlichem Risikomanagement verwenden.
Bullischer Bias, solange der Support hält. 📈
Kaufen und Trades $AXL hier 👇
DYOR
LONG $AXL
Einstieg: $0.0560–$0.0570
SL: $0.0545
🎯 Take Profit:
TP1: $0.0578
TP2: $0.0586
TP3: $0.0595
Der Kurs zeigt nach dem Ausbruch über den Widerstandsbereich bei $0.0550 starke bullische Momentum auf dem 1H-Chart. Käufer halten den Druck aufrecht, während der Kurs Richtung $0.0580 gedrückt wird, und ein bestätigter Ausbruch über dieses Niveau könnte weitere Kursgewinne hin zu den nächsten Zielen unterstützen.
🔑 Schlüsselniveau:
$0.0580 — ein bestätigter Ausbruch und ein Halt über diesem Widerstand könnte das Fortsetzungs-Setup stärken.
⚠️ Risikohinweis:
Ein Rückgang unter $0.0545 würde das bullische Setup ungültig machen. Auf Bestätigung warten und eine kontrollierte Positionsgröße mit ordentlichem Risikomanagement verwenden.
Bullischer Bias, solange der Support hält. 📈
Kaufen und Trades $AXL hier 👇
DYOR
2
133
·
--
Bärisch
Übersetzung ansehen
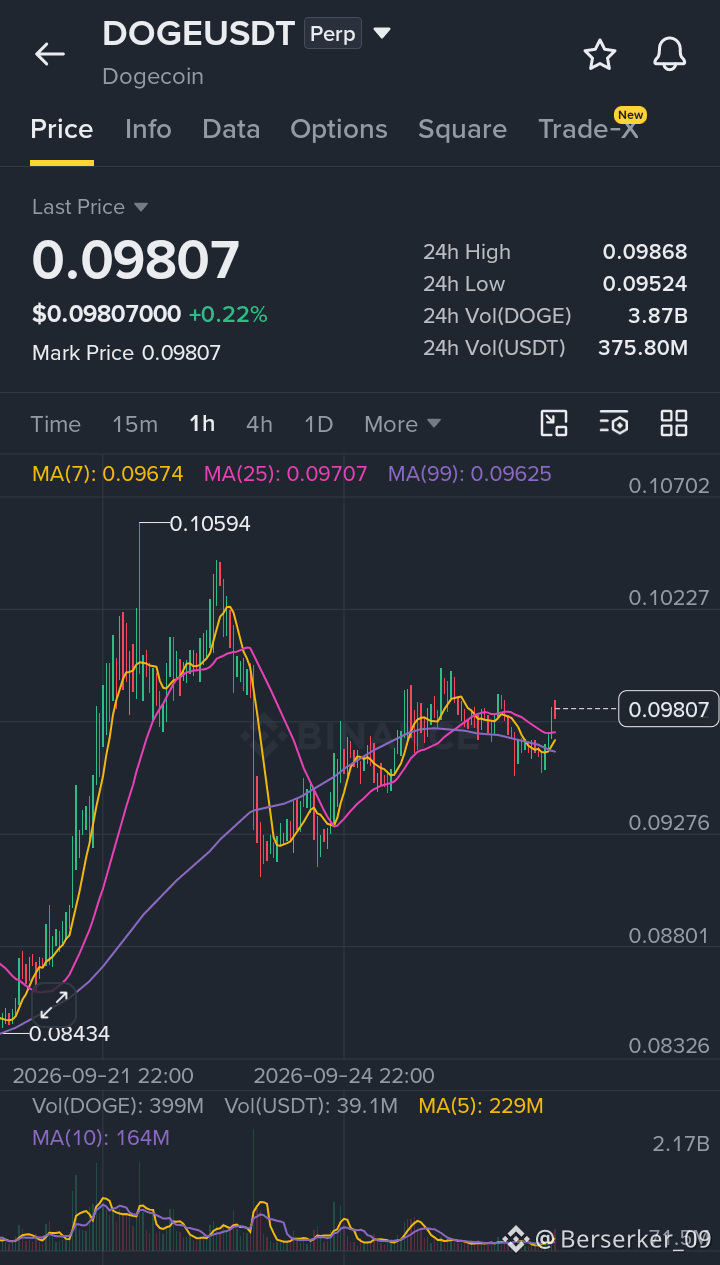
📉 $DOGE — Bearish Short Setup
SHORT $DOGE
Entry: $0.0980–$0.0992
SL: $0.1010
🎯 Take Profit:
TP1: $0.0965
TP2: $0.0945
TP3: $0.0920
Seller defense is strengthening near the resistance area, suggesting that upside momentum may be losing strength. A confirmed rejection from the entry zone could trigger a downside rotation toward the lower support levels.
🔑 Key Level:
$0.0992 — rejection below this area would keep the bearish setup active and could open the path toward the downside targets.
⚠️ Risk Note:
A move above $0.1010 would invalidate the setup. Wait for confirmation and use controlled position sizing with proper risk management.
Bearish bias while resistance holds. 📉
Sell and Trade $DOGE here 👇
{future}(DOGEUSDT)
DYOR
📉 $DOGE — Bearish Short Setup
SHORT $DOGE
Entry: $0.0980–$0.0992
SL: $0.1010
🎯 Take Profit:
TP1: $0.0965
TP2: $0.0945
TP3: $0.0920
Seller defense is strengthening near the resistance area, suggesting that upside momentum may be losing strength. A confirmed rejection from the entry zone could trigger a downside rotation toward the lower support levels.
🔑 Key Level:
$0.0992 — rejection below this area would keep the bearish setup active and could open the path toward the downside targets.
⚠️ Risk Note:
A move above $0.1010 would invalidate the setup. Wait for confirmation and use controlled position sizing with proper risk management.
Bearish bias while resistance holds. 📉
Sell and Trade $DOGE here 👇
DYOR
SHORT $DOGE
Entry: $0.0980–$0.0992
SL: $0.1010
🎯 Take Profit:
TP1: $0.0965
TP2: $0.0945
TP3: $0.0920
Seller defense is strengthening near the resistance area, suggesting that upside momentum may be losing strength. A confirmed rejection from the entry zone could trigger a downside rotation toward the lower support levels.
🔑 Key Level:
$0.0992 — rejection below this area would keep the bearish setup active and could open the path toward the downside targets.
⚠️ Risk Note:
A move above $0.1010 would invalidate the setup. Wait for confirmation and use controlled position sizing with proper risk management.
Bearish bias while resistance holds. 📉
Sell and Trade $DOGE here 👇
DYOR
1
30
·
--
Bärisch
Übersetzung ansehen
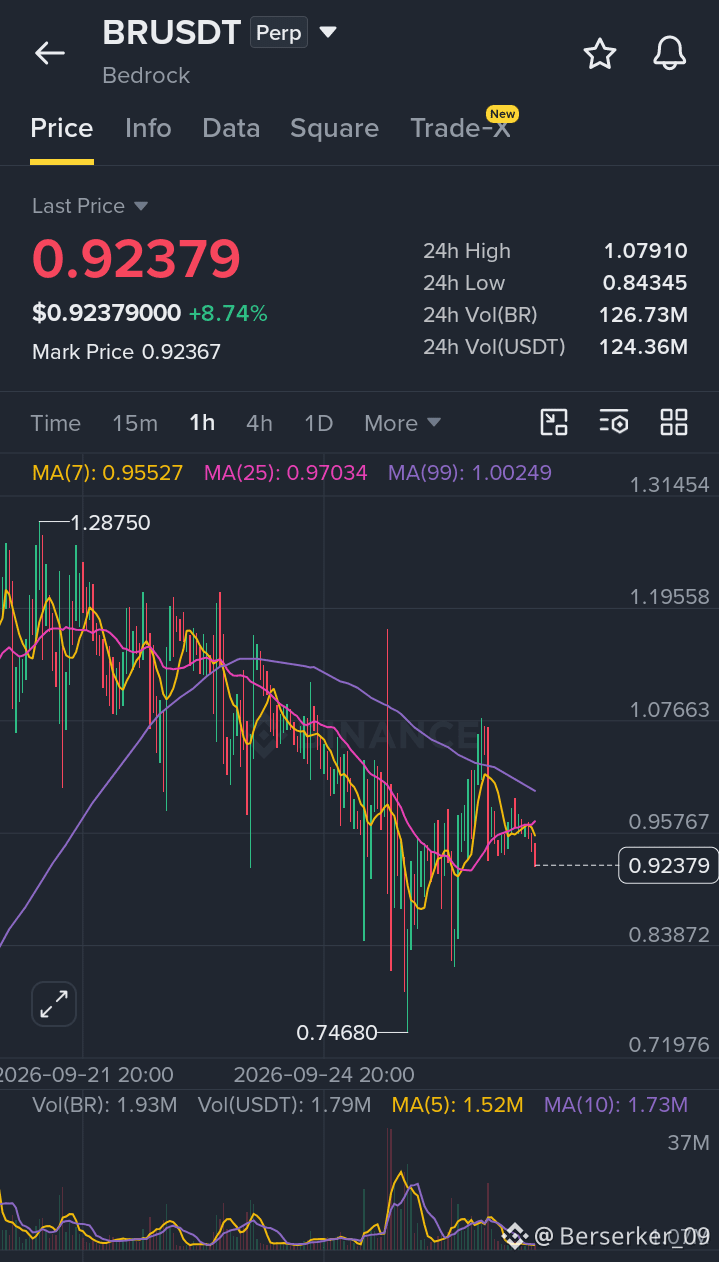
📉 $BR — Bearish Short Setup
SHORT $BR
Entry: $0.9280–$0.9400
SL: $0.9700
🎯 Take Profit:
TP1: $0.8950
The price is showing weakness after failing to hold the $0.97–$1.00 resistance zone. On the 1H timeframe, consecutive lower candles are signaling increasing selling pressure and a shift toward a bearish structure.
🔑 Key Level:
$0.9400 — rejection below this area could keep downside momentum active toward the target.
⚠️ Risk Note:
A move back above $0.9700 would invalidate the bearish setup. Wait for confirmation and use controlled position sizing with proper risk management.
Bearish bias while resistance holds. 📉
Sell and Trade $BR here 👇
{future}(BRUSDT)
DYOR
📉 $BR — Bearish Short Setup
SHORT $BR
Entry: $0.9280–$0.9400
SL: $0.9700
🎯 Take Profit:
TP1: $0.8950
The price is showing weakness after failing to hold the $0.97–$1.00 resistance zone. On the 1H timeframe, consecutive lower candles are signaling increasing selling pressure and a shift toward a bearish structure.
🔑 Key Level:
$0.9400 — rejection below this area could keep downside momentum active toward the target.
⚠️ Risk Note:
A move back above $0.9700 would invalidate the bearish setup. Wait for confirmation and use controlled position sizing with proper risk management.
Bearish bias while resistance holds. 📉
Sell and Trade $BR here 👇
DYOR
SHORT $BR
Entry: $0.9280–$0.9400
SL: $0.9700
🎯 Take Profit:
TP1: $0.8950
The price is showing weakness after failing to hold the $0.97–$1.00 resistance zone. On the 1H timeframe, consecutive lower candles are signaling increasing selling pressure and a shift toward a bearish structure.
🔑 Key Level:
$0.9400 — rejection below this area could keep downside momentum active toward the target.
⚠️ Risk Note:
A move back above $0.9700 would invalidate the bearish setup. Wait for confirmation and use controlled position sizing with proper risk management.
Bearish bias while resistance holds. 📉
Sell and Trade $BR here 👇
DYOR
1
185
·
--
Bullisch
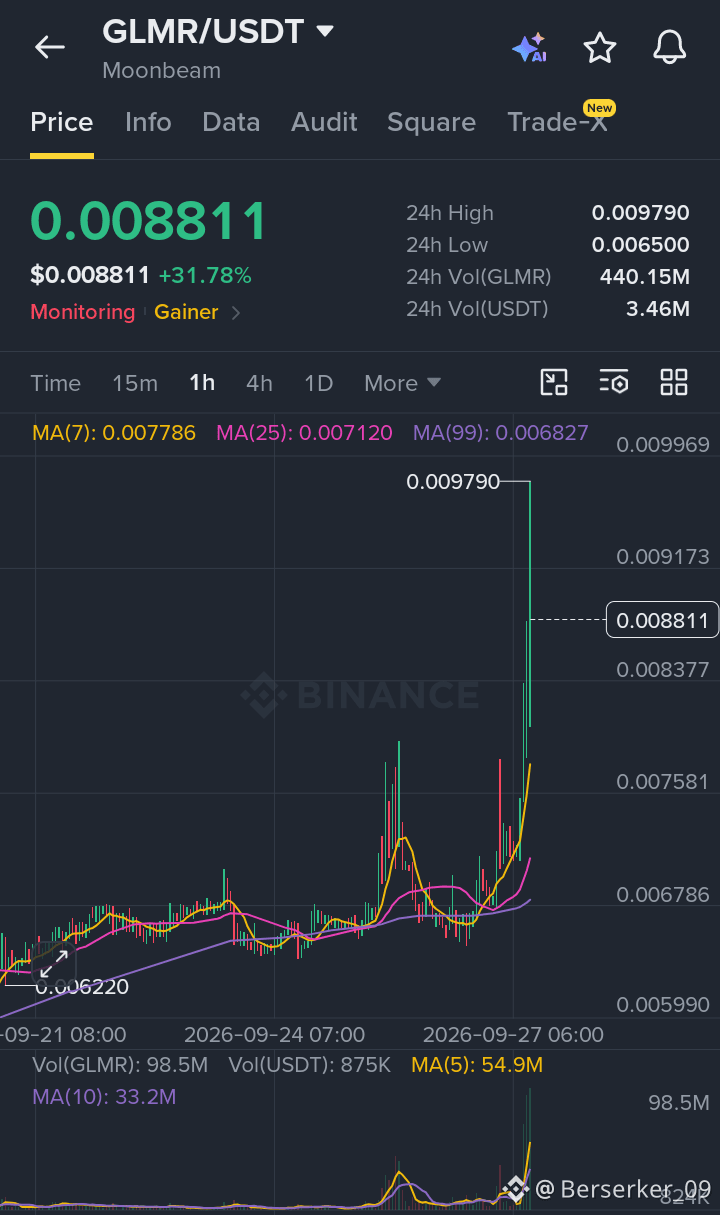
📈 $GLMR — Bullisches Long-Setup
LONG $GLMR
Einstieg: $0.00820–$0.00850
SL: $0.00780
🎯 Take Profit:
TP1: $0.00880
TP2: $0.00920
TP3: $0.00980
Der Kurs zeigt im 1H-Chart eine starke bullische Erholung und hält sich oberhalb des $0.0075-Supportbereichs, nachdem er aus der $0.0072-Zone ausgebrochen ist. Die Käufer halten die Erholungsstruktur aufrecht, während der Kurs nun den Widerstandsbereich $0.0086–$0.0088 testet.
Ein bestätigter Ausbruch und ein anhaltendes Halten über $0.0088 könnten die bullische Struktur stärken und Platz für weiteres Upside bis zu den nächsten Zielen schaffen.
🔑 Schlüsselniveau:
$0.00880 — Ein sauberer Ausbruch über diesen Widerstand könnte die Fortsetzung Richtung höhere Niveaus unterstützen.
⚠️ Risikohinweis:
Ein Rückfall unter $0.00780 würde das bullische Setup ungültig machen. Warte auf Bestätigung und nutze eine kontrollierte Positionsgröße mit angemessenem Risikomanagement.
Bullischer Bias, solange der Support hält. 📈
Kaufen und handeln $GLMR hier 👇
{spot}(GLMRUSDT)
DYOR
📈 $GLMR — Bullisches Long-Setup
LONG $GLMR
Einstieg: $0.00820–$0.00850
SL: $0.00780
🎯 Take Profit:
TP1: $0.00880
TP2: $0.00920
TP3: $0.00980
Der Kurs zeigt im 1H-Chart eine starke bullische Erholung und hält sich oberhalb des $0.0075-Supportbereichs, nachdem er aus der $0.0072-Zone ausgebrochen ist. Die Käufer halten die Erholungsstruktur aufrecht, während der Kurs nun den Widerstandsbereich $0.0086–$0.0088 testet.
Ein bestätigter Ausbruch und ein anhaltendes Halten über $0.0088 könnten die bullische Struktur stärken und Platz für weiteres Upside bis zu den nächsten Zielen schaffen.
🔑 Schlüsselniveau:
$0.00880 — Ein sauberer Ausbruch über diesen Widerstand könnte die Fortsetzung Richtung höhere Niveaus unterstützen.
⚠️ Risikohinweis:
Ein Rückfall unter $0.00780 würde das bullische Setup ungültig machen. Warte auf Bestätigung und nutze eine kontrollierte Positionsgröße mit angemessenem Risikomanagement.
Bullischer Bias, solange der Support hält. 📈
Kaufen und handeln $GLMR hier 👇
DYOR
LONG $GLMR
Einstieg: $0.00820–$0.00850
SL: $0.00780
🎯 Take Profit:
TP1: $0.00880
TP2: $0.00920
TP3: $0.00980
Der Kurs zeigt im 1H-Chart eine starke bullische Erholung und hält sich oberhalb des $0.0075-Supportbereichs, nachdem er aus der $0.0072-Zone ausgebrochen ist. Die Käufer halten die Erholungsstruktur aufrecht, während der Kurs nun den Widerstandsbereich $0.0086–$0.0088 testet.
Ein bestätigter Ausbruch und ein anhaltendes Halten über $0.0088 könnten die bullische Struktur stärken und Platz für weiteres Upside bis zu den nächsten Zielen schaffen.
🔑 Schlüsselniveau:
$0.00880 — Ein sauberer Ausbruch über diesen Widerstand könnte die Fortsetzung Richtung höhere Niveaus unterstützen.
⚠️ Risikohinweis:
Ein Rückfall unter $0.00780 würde das bullische Setup ungültig machen. Warte auf Bestätigung und nutze eine kontrollierte Positionsgröße mit angemessenem Risikomanagement.
Bullischer Bias, solange der Support hält. 📈
Kaufen und handeln $GLMR hier 👇
DYOR
1
307
·
--
Bullisch
Übersetzung ansehen
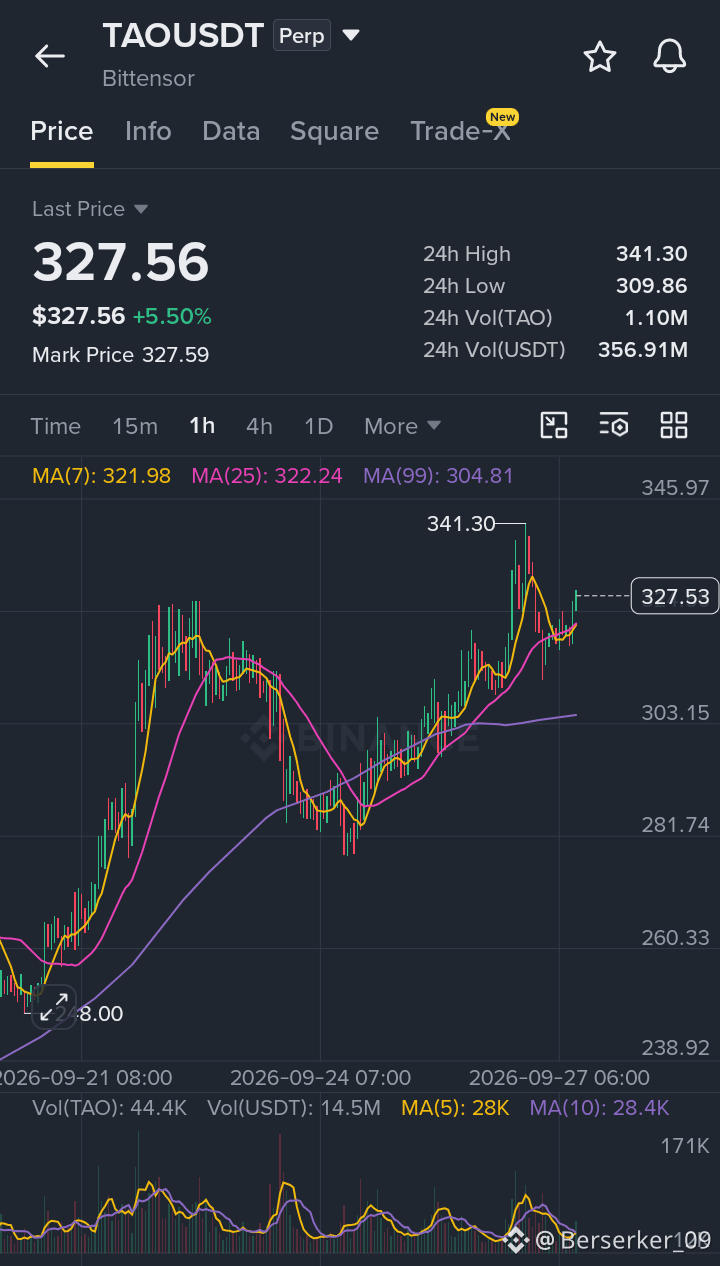
📈 $TAO — Bullish Long Setup
LONG $TAO
Entry: $323–$328
SL: $316
🎯 Take Profit:
TP1: $338
Price has bounced from the lower $280s and reclaimed the $320 zone on the 4H chart. Following the recent rejection near $340, price is now consolidating while holding above the reclaimed support area.
As long as $320 continues to hold, the structure remains constructive, with buyers potentially looking to retest the $340 resistance region.
🔑 Key Level:
$320 — Holding above this reclaimed zone would help maintain the bullish structure and support a move toward the upside target.
⚠️ Risk Note:
A breakdown below $316 would invalidate the bullish setup. Wait for confirmation and use controlled position sizing with proper risk management.
Bullish bias while support holds. 📈
Buy and Trade $TAO here 👇
{future}(TAOUSDT)
DYOR
📈 $TAO — Bullish Long Setup
LONG $TAO
Entry: $323–$328
SL: $316
🎯 Take Profit:
TP1: $338
Price has bounced from the lower $280s and reclaimed the $320 zone on the 4H chart. Following the recent rejection near $340, price is now consolidating while holding above the reclaimed support area.
As long as $320 continues to hold, the structure remains constructive, with buyers potentially looking to retest the $340 resistance region.
🔑 Key Level:
$320 — Holding above this reclaimed zone would help maintain the bullish structure and support a move toward the upside target.
⚠️ Risk Note:
A breakdown below $316 would invalidate the bullish setup. Wait for confirmation and use controlled position sizing with proper risk management.
Bullish bias while support holds. 📈
Buy and Trade $TAO here 👇
DYOR
LONG $TAO
Entry: $323–$328
SL: $316
🎯 Take Profit:
TP1: $338
Price has bounced from the lower $280s and reclaimed the $320 zone on the 4H chart. Following the recent rejection near $340, price is now consolidating while holding above the reclaimed support area.
As long as $320 continues to hold, the structure remains constructive, with buyers potentially looking to retest the $340 resistance region.
🔑 Key Level:
$320 — Holding above this reclaimed zone would help maintain the bullish structure and support a move toward the upside target.
⚠️ Risk Note:
A breakdown below $316 would invalidate the bullish setup. Wait for confirmation and use controlled position sizing with proper risk management.
Bullish bias while support holds. 📈
Buy and Trade $TAO here 👇
DYOR
1
171
·
--
Bullisch
Übersetzung ansehen
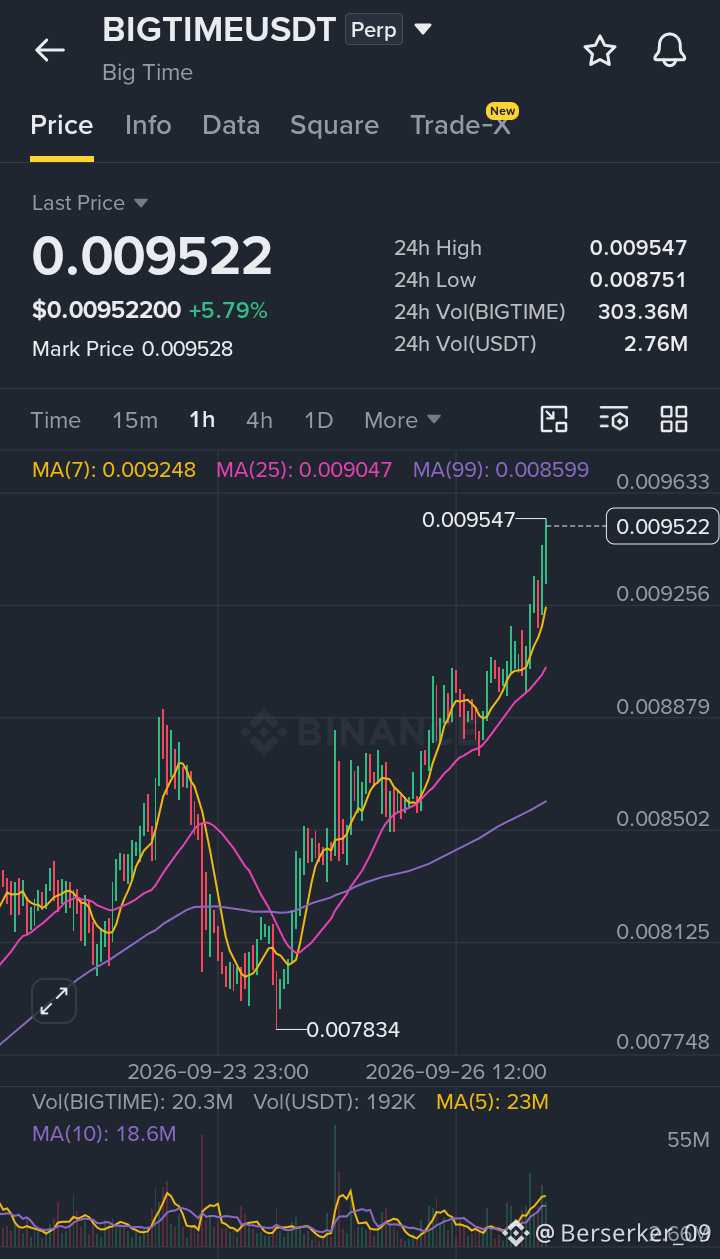
📈 $BIGTIME — Bullish Long Setup
LONG $BIGTIME
Entry: $0.00930–$0.00945
SL: $0.00910
🎯 Take Profit:
TP1: $0.00960
TP2: $0.00975
TP3: $0.00990
Price is showing strong bullish momentum on the 1H chart, forming higher highs and higher lows after breaking above the $0.0090 zone. Buyers are maintaining the upward structure, with price now approaching the $0.0096 resistance area.
A confirmed breakout above $0.0096 could strengthen the continuation setup and open room for further upside toward the next targets.
🔑 Key Level:
$0.00960 — A clean breakout and sustained hold above this resistance could support additional upside continuation.
⚠️ Risk Note:
A breakdown below $0.00910 would invalidate the bullish setup. Wait for confirmation and use controlled position sizing with proper risk management.
Bullish bias while support holds. 📈
Buy and Trade $BIGTIME here 👇
{future}(BIGTIMEUSDT)
DYOR
📈 $BIGTIME — Bullish Long Setup
LONG $BIGTIME
Entry: $0.00930–$0.00945
SL: $0.00910
🎯 Take Profit:
TP1: $0.00960
TP2: $0.00975
TP3: $0.00990
Price is showing strong bullish momentum on the 1H chart, forming higher highs and higher lows after breaking above the $0.0090 zone. Buyers are maintaining the upward structure, with price now approaching the $0.0096 resistance area.
A confirmed breakout above $0.0096 could strengthen the continuation setup and open room for further upside toward the next targets.
🔑 Key Level:
$0.00960 — A clean breakout and sustained hold above this resistance could support additional upside continuation.
⚠️ Risk Note:
A breakdown below $0.00910 would invalidate the bullish setup. Wait for confirmation and use controlled position sizing with proper risk management.
Bullish bias while support holds. 📈
Buy and Trade $BIGTIME here 👇
DYOR
LONG $BIGTIME
Entry: $0.00930–$0.00945
SL: $0.00910
🎯 Take Profit:
TP1: $0.00960
TP2: $0.00975
TP3: $0.00990
Price is showing strong bullish momentum on the 1H chart, forming higher highs and higher lows after breaking above the $0.0090 zone. Buyers are maintaining the upward structure, with price now approaching the $0.0096 resistance area.
A confirmed breakout above $0.0096 could strengthen the continuation setup and open room for further upside toward the next targets.
🔑 Key Level:
$0.00960 — A clean breakout and sustained hold above this resistance could support additional upside continuation.
⚠️ Risk Note:
A breakdown below $0.00910 would invalidate the bullish setup. Wait for confirmation and use controlled position sizing with proper risk management.
Bullish bias while support holds. 📈
Buy and Trade $BIGTIME here 👇
DYOR
1
23
·
--
Bärisch
Übersetzung ansehen
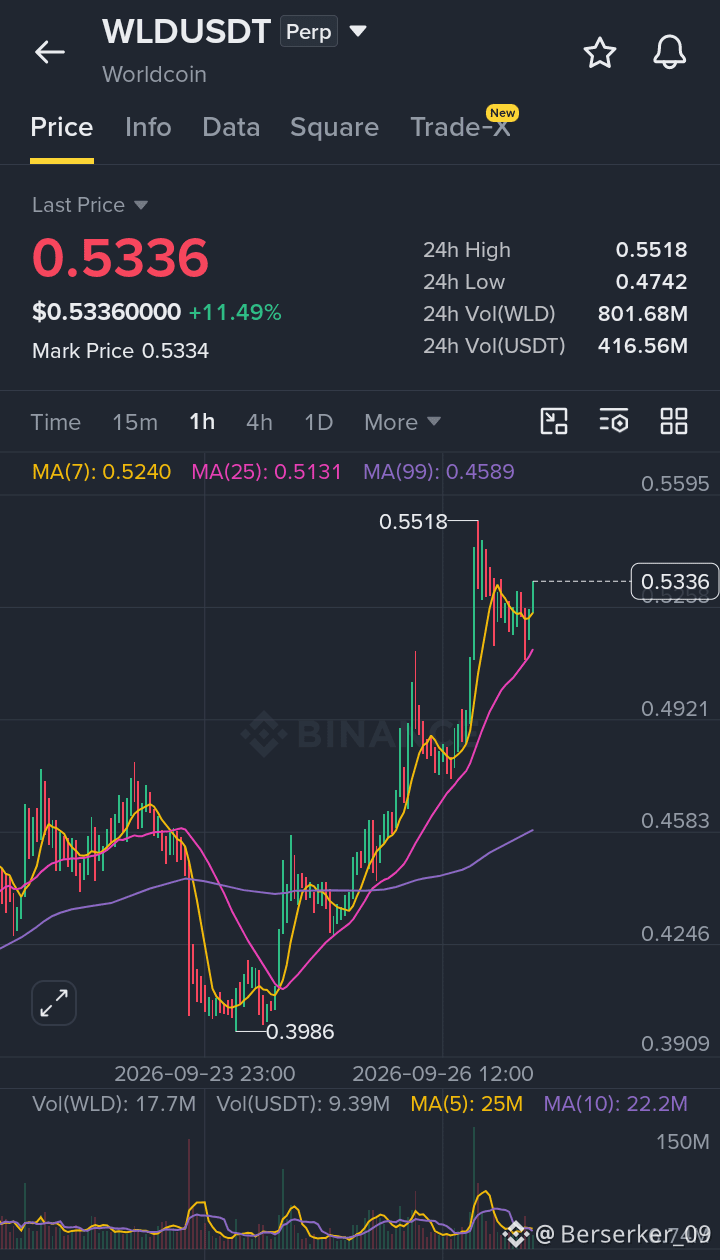
📉 $WLD — Bearish Short Setup
SHORT $WLD
Entry: $0.512–$0.528
SL: $0.568
🎯 Take Profit:
TP1: $0.504
TP2: $0.485
TP3: $0.468
The current structure is showing signs of weakness, with sellers maintaining pressure and downside liquidity still in play. Failure to reclaim the entry zone could keep the bearish setup active and create room for a deeper move toward the lower target levels.
🔑 Key Level:
$0.528 — Rejection below the upper entry zone would keep resistance intact and support the downside structure.
⚠️ Risk Note:
A move above $0.568 would invalidate the bearish setup. Wait for confirmation and use controlled position sizing with proper risk management.
Bearish bias while resistance holds. 📉
Sell and Trade $WLD here 👇
{future}(WLDUSDT)
DYOR
📉 $WLD — Bearish Short Setup
SHORT $WLD
Entry: $0.512–$0.528
SL: $0.568
🎯 Take Profit:
TP1: $0.504
TP2: $0.485
TP3: $0.468
The current structure is showing signs of weakness, with sellers maintaining pressure and downside liquidity still in play. Failure to reclaim the entry zone could keep the bearish setup active and create room for a deeper move toward the lower target levels.
🔑 Key Level:
$0.528 — Rejection below the upper entry zone would keep resistance intact and support the downside structure.
⚠️ Risk Note:
A move above $0.568 would invalidate the bearish setup. Wait for confirmation and use controlled position sizing with proper risk management.
Bearish bias while resistance holds. 📉
Sell and Trade $WLD here 👇
DYOR
SHORT $WLD
Entry: $0.512–$0.528
SL: $0.568
🎯 Take Profit:
TP1: $0.504
TP2: $0.485
TP3: $0.468
The current structure is showing signs of weakness, with sellers maintaining pressure and downside liquidity still in play. Failure to reclaim the entry zone could keep the bearish setup active and create room for a deeper move toward the lower target levels.
🔑 Key Level:
$0.528 — Rejection below the upper entry zone would keep resistance intact and support the downside structure.
⚠️ Risk Note:
A move above $0.568 would invalidate the bearish setup. Wait for confirmation and use controlled position sizing with proper risk management.
Bearish bias while resistance holds. 📉
Sell and Trade $WLD here 👇
DYOR
1
80
·
--
Bullisch
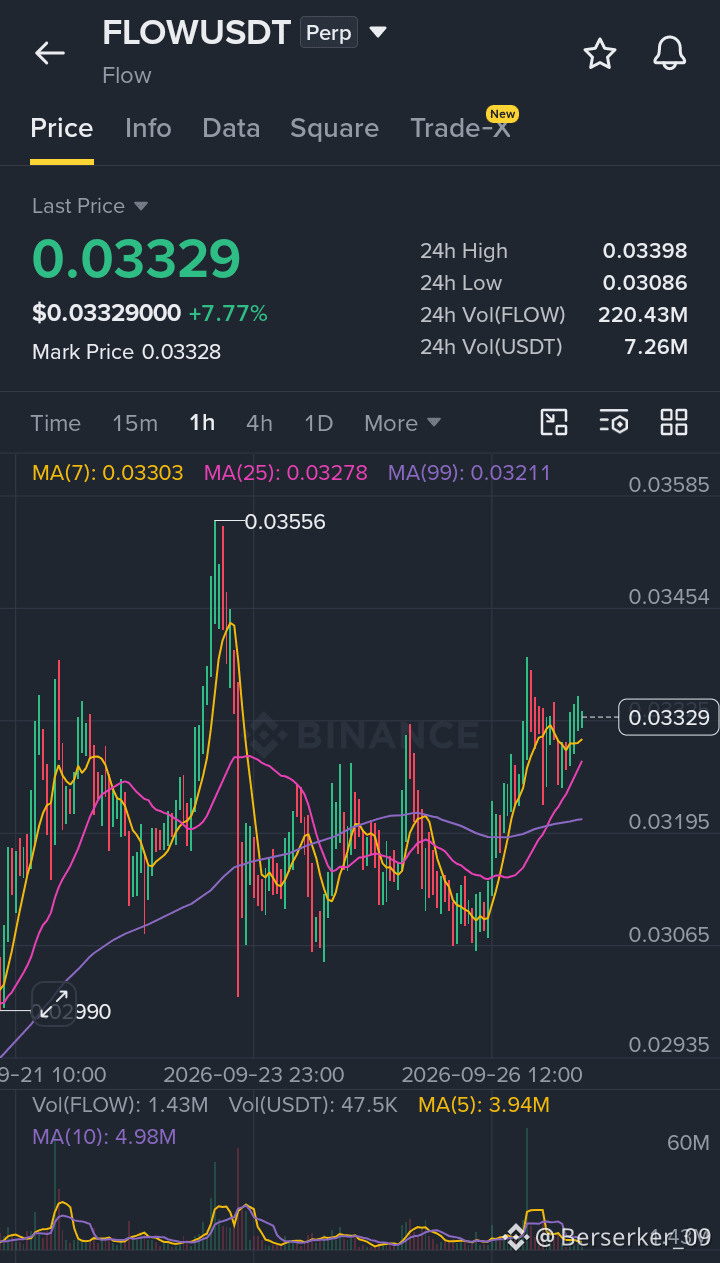
📈 $FLOW — Bullishes Long-Setup
LONG $FLOW
Einstieg: $0.0328–$0.0335
SL: $0.0318
🎯 Take Profit:
TP1: $0.0345
TP2: $0.0355
TP3: $0.0370
Der Preis zeigt auf dem 1H-Chart eine bullishe Erholung, nachdem er von der $0.0308-Unterstützungszone abgeprallt ist und eine Reihe höherer Tiefs gebildet hat. Käufer gewinnen nach und nach wieder die Kontrolle, während der Preis nun die Widerstandszone bei $0.0340 testet.
Ein bestätigter Ausbruch über $0.0340 könnte die bullishe Struktur weiter stärken und den Weg zu den nächsten Kurszielen nach oben öffnen.
🔑 Schlüsselniveau:
$0.0340 — Ein klarer Ausbruch und ein anhaltendes Halten über diesem Widerstand könnten eine weitere Fortsetzung unterstützen.
⚠️ Risikohinweis:
Ein Bruch unter $0.0318 würde das bullishe Setup entkräften. Warte auf Bestätigung und verwende eine kontrollierte Positionsgröße mit solider Risikosteuerung.
Bullisher Bias, solange die Unterstützung hält. 📈
Kaufe und trade $FLOW hier 👇
{future}(FLOWUSDT)
DYOR
📈 $FLOW — Bullishes Long-Setup
LONG $FLOW
Einstieg: $0.0328–$0.0335
SL: $0.0318
🎯 Take Profit:
TP1: $0.0345
TP2: $0.0355
TP3: $0.0370
Der Preis zeigt auf dem 1H-Chart eine bullishe Erholung, nachdem er von der $0.0308-Unterstützungszone abgeprallt ist und eine Reihe höherer Tiefs gebildet hat. Käufer gewinnen nach und nach wieder die Kontrolle, während der Preis nun die Widerstandszone bei $0.0340 testet.
Ein bestätigter Ausbruch über $0.0340 könnte die bullishe Struktur weiter stärken und den Weg zu den nächsten Kurszielen nach oben öffnen.
🔑 Schlüsselniveau:
$0.0340 — Ein klarer Ausbruch und ein anhaltendes Halten über diesem Widerstand könnten eine weitere Fortsetzung unterstützen.
⚠️ Risikohinweis:
Ein Bruch unter $0.0318 würde das bullishe Setup entkräften. Warte auf Bestätigung und verwende eine kontrollierte Positionsgröße mit solider Risikosteuerung.
Bullisher Bias, solange die Unterstützung hält. 📈
Kaufe und trade $FLOW hier 👇
DYOR
LONG $FLOW
Einstieg: $0.0328–$0.0335
SL: $0.0318
🎯 Take Profit:
TP1: $0.0345
TP2: $0.0355
TP3: $0.0370
Der Preis zeigt auf dem 1H-Chart eine bullishe Erholung, nachdem er von der $0.0308-Unterstützungszone abgeprallt ist und eine Reihe höherer Tiefs gebildet hat. Käufer gewinnen nach und nach wieder die Kontrolle, während der Preis nun die Widerstandszone bei $0.0340 testet.
Ein bestätigter Ausbruch über $0.0340 könnte die bullishe Struktur weiter stärken und den Weg zu den nächsten Kurszielen nach oben öffnen.
🔑 Schlüsselniveau:
$0.0340 — Ein klarer Ausbruch und ein anhaltendes Halten über diesem Widerstand könnten eine weitere Fortsetzung unterstützen.
⚠️ Risikohinweis:
Ein Bruch unter $0.0318 würde das bullishe Setup entkräften. Warte auf Bestätigung und verwende eine kontrollierte Positionsgröße mit solider Risikosteuerung.
Bullisher Bias, solange die Unterstützung hält. 📈
Kaufe und trade $FLOW hier 👇
DYOR
1
68
·
--
Bullisch
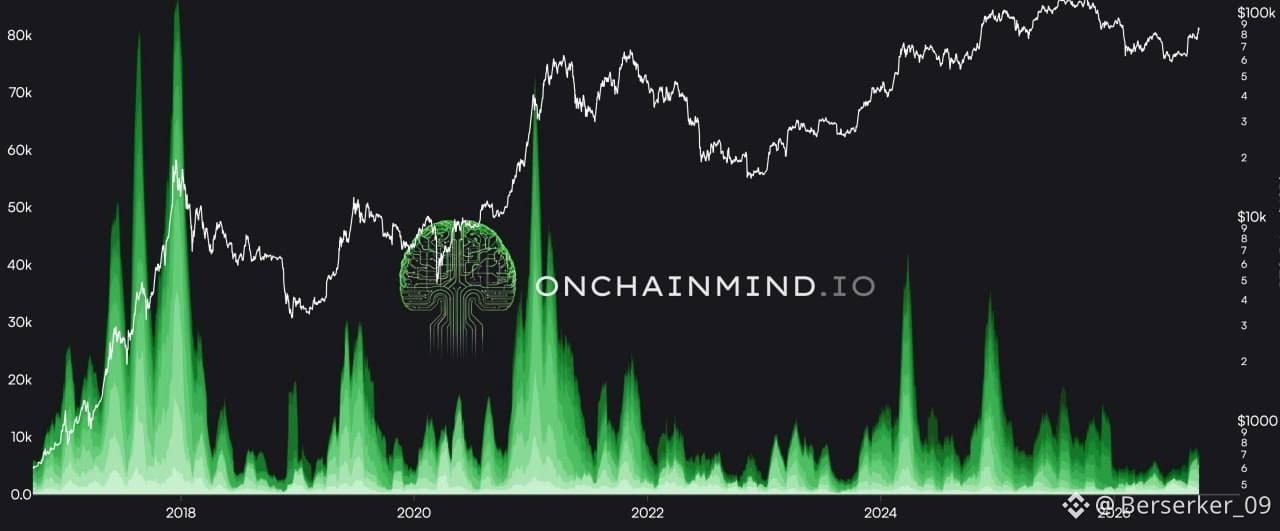
📊 Fast die gesamte Gewinnmitnahme kommt aus der 1w-3m-Kohorte.
Langfristige Inhaber haben so gut wie keine Coins verkauft, und die Verlustmitnahme ist in fast einem Jahr am niedrigsten.
📊 Fast die gesamte Gewinnmitnahme kommt aus der 1w-3m-Kohorte.
Langfristige Inhaber haben so gut wie keine Coins verkauft, und die Verlustmitnahme ist in fast einem Jahr am niedrigsten.
Langfristige Inhaber haben so gut wie keine Coins verkauft, und die Verlustmitnahme ist in fast einem Jahr am niedrigsten.
1
62
·
--
Bärisch
Übersetzung ansehen
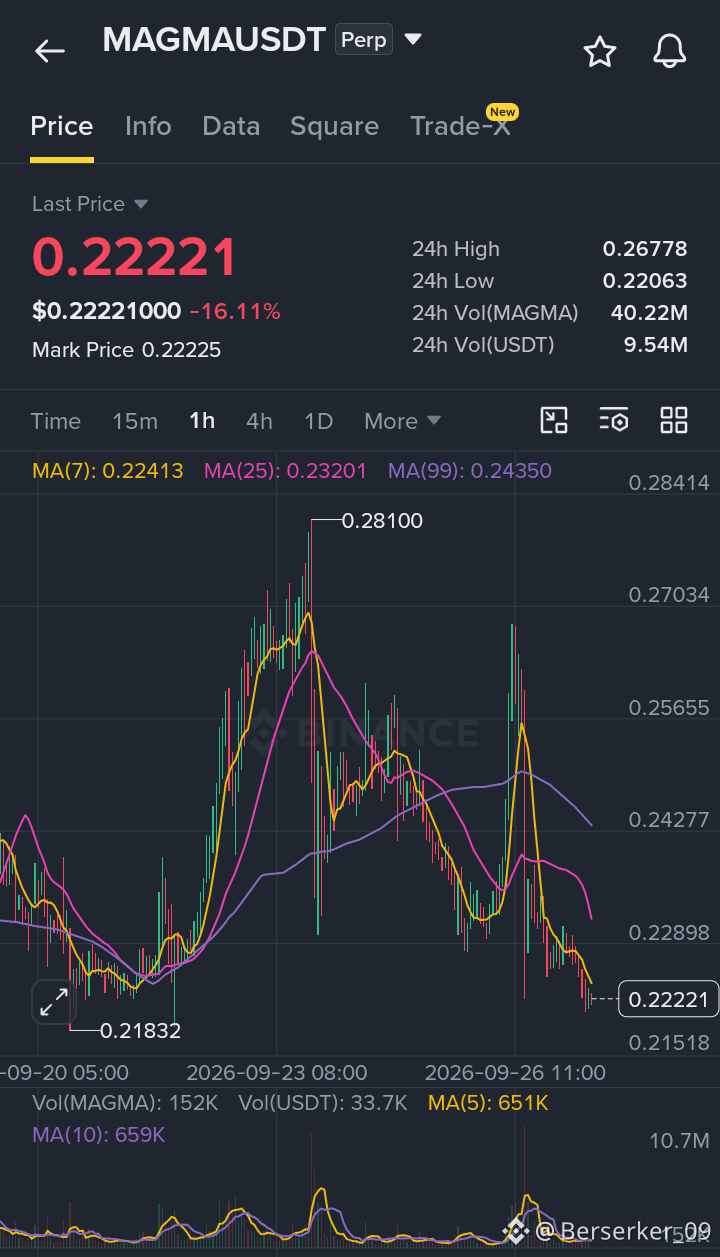
📉 $MAGMA — Bearish Short Setup
SHORT $MAGMA
Entry: $0.219–$0.225
SL: $0.242
🎯 Take Profit:
TP1: $0.215
TP2: $0.206
TP3: $0.198
Price is struggling to reclaim the resistance zone, suggesting that sellers are still defending the upside. Continued rejection around the entry area could create room for another downside leg toward the lower target levels.
🔑 Key Level:
$0.225 — Failure to reclaim and hold above this area would keep the bearish structure active and support the downside setup.
⚠️ Risk Note:
A move above $0.242 would invalidate the bearish setup. Wait for confirmation and use controlled position sizing with proper risk management.
Bearish bias while resistance holds. 📉
Sell and Trade $MAGMA here 👇
{future}(MAGMAUSDT)
DYOR
📉 $MAGMA — Bearish Short Setup
SHORT $MAGMA
Entry: $0.219–$0.225
SL: $0.242
🎯 Take Profit:
TP1: $0.215
TP2: $0.206
TP3: $0.198
Price is struggling to reclaim the resistance zone, suggesting that sellers are still defending the upside. Continued rejection around the entry area could create room for another downside leg toward the lower target levels.
🔑 Key Level:
$0.225 — Failure to reclaim and hold above this area would keep the bearish structure active and support the downside setup.
⚠️ Risk Note:
A move above $0.242 would invalidate the bearish setup. Wait for confirmation and use controlled position sizing with proper risk management.
Bearish bias while resistance holds. 📉
Sell and Trade $MAGMA here 👇
DYOR
SHORT $MAGMA
Entry: $0.219–$0.225
SL: $0.242
🎯 Take Profit:
TP1: $0.215
TP2: $0.206
TP3: $0.198
Price is struggling to reclaim the resistance zone, suggesting that sellers are still defending the upside. Continued rejection around the entry area could create room for another downside leg toward the lower target levels.
🔑 Key Level:
$0.225 — Failure to reclaim and hold above this area would keep the bearish structure active and support the downside setup.
⚠️ Risk Note:
A move above $0.242 would invalidate the bearish setup. Wait for confirmation and use controlled position sizing with proper risk management.
Bearish bias while resistance holds. 📉
Sell and Trade $MAGMA here 👇
DYOR
1
30
·
--
Bullisch
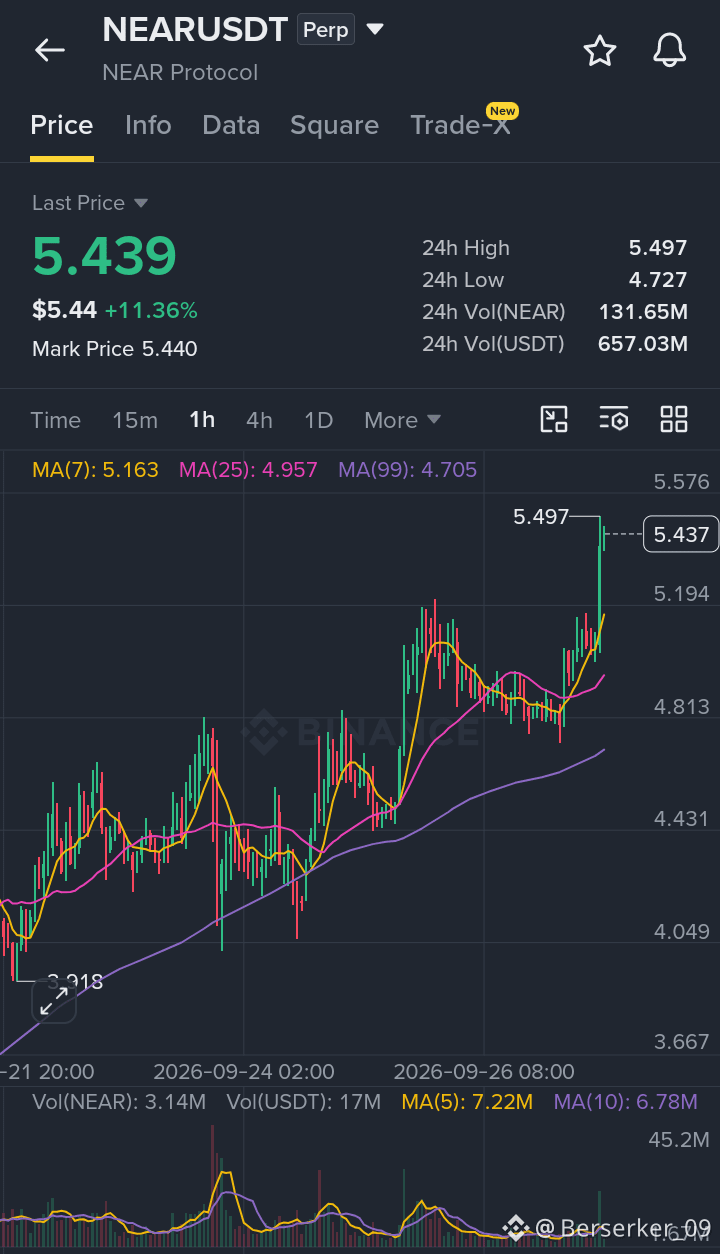
📈 $NEAR — Bullisches Long-Setup
LONG $NEAR
Einstieg: $5.20–$5.40
SL: $4.86
🎯 Take Profit:
TP1: $6.00
TP2: $7.00
TP3: $8.00
Die Ansammlung um den $5-Bereich scheint eine solide Basis geliefert zu haben, und der Kurs ist weiter aus dieser Zone nach oben gelaufen. Die bullische Struktur bleibt aktiv, während Käufer auf die nächsten wichtigen Widerstandsniveaus zusteuern.
Wenn der aktuelle Schwung anhält und die Einstiegzone als Unterstützung hält, könnten weitere Kursanstiege Richtung $6, $7 und potenziell $8 weiterhin im Fokus bleiben.
🔑 Wichtiges Level:
$5.40 — Wenn der Kurs oberhalb der oberen Einstiegzone bleibt, würde das helfen, die bullische Fortsetzungsstruktur aufrechtzuerhalten.
⚠️ Risiko-Hinweis:
Ein Bruch unter $4.86 würde das bullische Setup ungültig machen. Warte auf Bestätigung und nutze eine kontrollierte Positionsgröße mit ordnungsgemäßem Risikomanagement.
Bullishes Bias, solange die Unterstützung hält. 📈
Kaufen und hier $NEAR handeln 👇
{future}(NEARUSDT)
DYOR
📈 $NEAR — Bullisches Long-Setup
LONG $NEAR
Einstieg: $5.20–$5.40
SL: $4.86
🎯 Take Profit:
TP1: $6.00
TP2: $7.00
TP3: $8.00
Die Ansammlung um den $5-Bereich scheint eine solide Basis geliefert zu haben, und der Kurs ist weiter aus dieser Zone nach oben gelaufen. Die bullische Struktur bleibt aktiv, während Käufer auf die nächsten wichtigen Widerstandsniveaus zusteuern.
Wenn der aktuelle Schwung anhält und die Einstiegzone als Unterstützung hält, könnten weitere Kursanstiege Richtung $6, $7 und potenziell $8 weiterhin im Fokus bleiben.
🔑 Wichtiges Level:
$5.40 — Wenn der Kurs oberhalb der oberen Einstiegzone bleibt, würde das helfen, die bullische Fortsetzungsstruktur aufrechtzuerhalten.
⚠️ Risiko-Hinweis:
Ein Bruch unter $4.86 würde das bullische Setup ungültig machen. Warte auf Bestätigung und nutze eine kontrollierte Positionsgröße mit ordnungsgemäßem Risikomanagement.
Bullishes Bias, solange die Unterstützung hält. 📈
Kaufen und hier $NEAR handeln 👇
DYOR
LONG $NEAR
Einstieg: $5.20–$5.40
SL: $4.86
🎯 Take Profit:
TP1: $6.00
TP2: $7.00
TP3: $8.00
Die Ansammlung um den $5-Bereich scheint eine solide Basis geliefert zu haben, und der Kurs ist weiter aus dieser Zone nach oben gelaufen. Die bullische Struktur bleibt aktiv, während Käufer auf die nächsten wichtigen Widerstandsniveaus zusteuern.
Wenn der aktuelle Schwung anhält und die Einstiegzone als Unterstützung hält, könnten weitere Kursanstiege Richtung $6, $7 und potenziell $8 weiterhin im Fokus bleiben.
🔑 Wichtiges Level:
$5.40 — Wenn der Kurs oberhalb der oberen Einstiegzone bleibt, würde das helfen, die bullische Fortsetzungsstruktur aufrechtzuerhalten.
⚠️ Risiko-Hinweis:
Ein Bruch unter $4.86 würde das bullische Setup ungültig machen. Warte auf Bestätigung und nutze eine kontrollierte Positionsgröße mit ordnungsgemäßem Risikomanagement.
Bullishes Bias, solange die Unterstützung hält. 📈
Kaufen und hier $NEAR handeln 👇
DYOR
1
45
·
--
Bullisch
Übersetzung ansehen
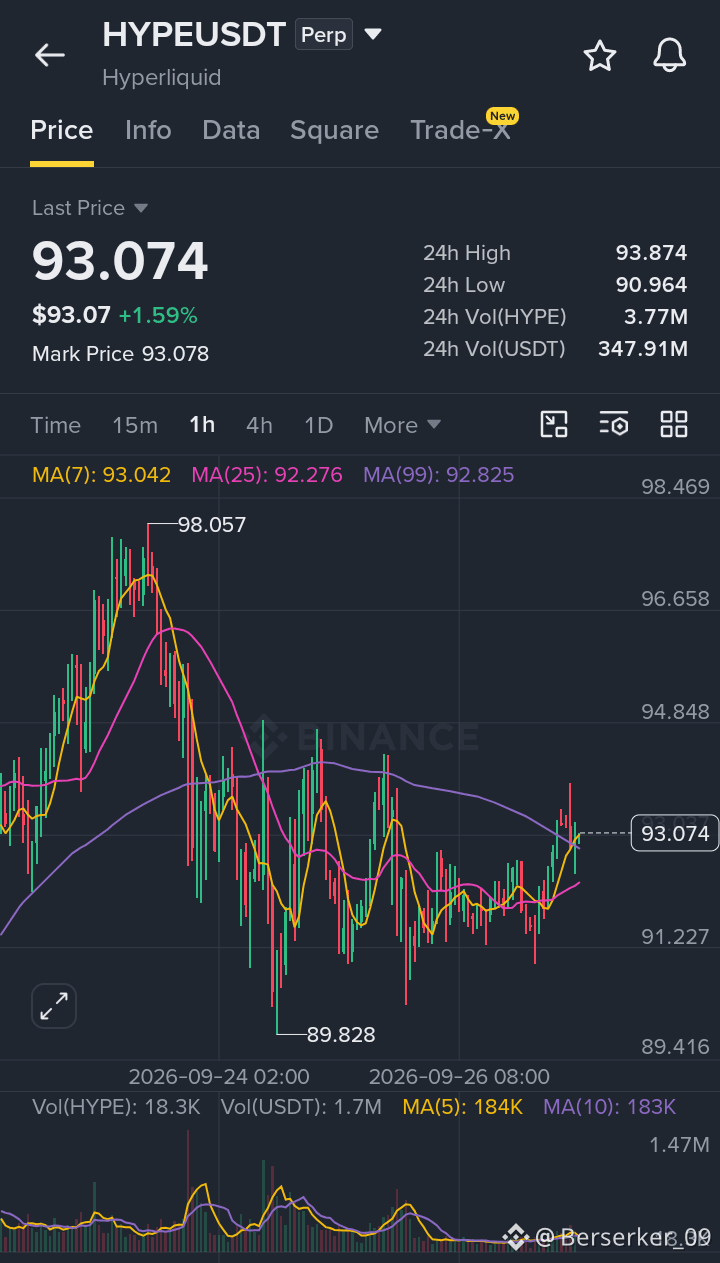
📈 $HYPE — Bullish Long Setup
LONG $HYPE
Entry: $92–$94
SL: $88
🎯 Take Profit:
TP1: $96
TP2: $98
TP3: $100
Price is holding within the bullish setup zone, with buyers looking to push the move higher. A sustained hold above the $92–$94 entry area could support continuation toward the nearby resistance levels, with $100 representing the final target.
🔑 Key Level:
$94 — Holding above this area would help keep the bullish structure intact and support a move toward the higher targets.
⚠️ Risk Note:
A breakdown below $88 would invalidate the bullish setup. Wait for confirmation and use controlled position sizing with proper risk management.
Bullish bias while support holds. 📈
Buy and Trade $HYPE here 👇
{future}(HYPEUSDT)
DYOR
📈 $HYPE — Bullish Long Setup
LONG $HYPE
Entry: $92–$94
SL: $88
🎯 Take Profit:
TP1: $96
TP2: $98
TP3: $100
Price is holding within the bullish setup zone, with buyers looking to push the move higher. A sustained hold above the $92–$94 entry area could support continuation toward the nearby resistance levels, with $100 representing the final target.
🔑 Key Level:
$94 — Holding above this area would help keep the bullish structure intact and support a move toward the higher targets.
⚠️ Risk Note:
A breakdown below $88 would invalidate the bullish setup. Wait for confirmation and use controlled position sizing with proper risk management.
Bullish bias while support holds. 📈
Buy and Trade $HYPE here 👇
DYOR
LONG $HYPE
Entry: $92–$94
SL: $88
🎯 Take Profit:
TP1: $96
TP2: $98
TP3: $100
Price is holding within the bullish setup zone, with buyers looking to push the move higher. A sustained hold above the $92–$94 entry area could support continuation toward the nearby resistance levels, with $100 representing the final target.
🔑 Key Level:
$94 — Holding above this area would help keep the bullish structure intact and support a move toward the higher targets.
⚠️ Risk Note:
A breakdown below $88 would invalidate the bullish setup. Wait for confirmation and use controlled position sizing with proper risk management.
Bullish bias while support holds. 📈
Buy and Trade $HYPE here 👇
DYOR
1
63
·
--
Bullisch
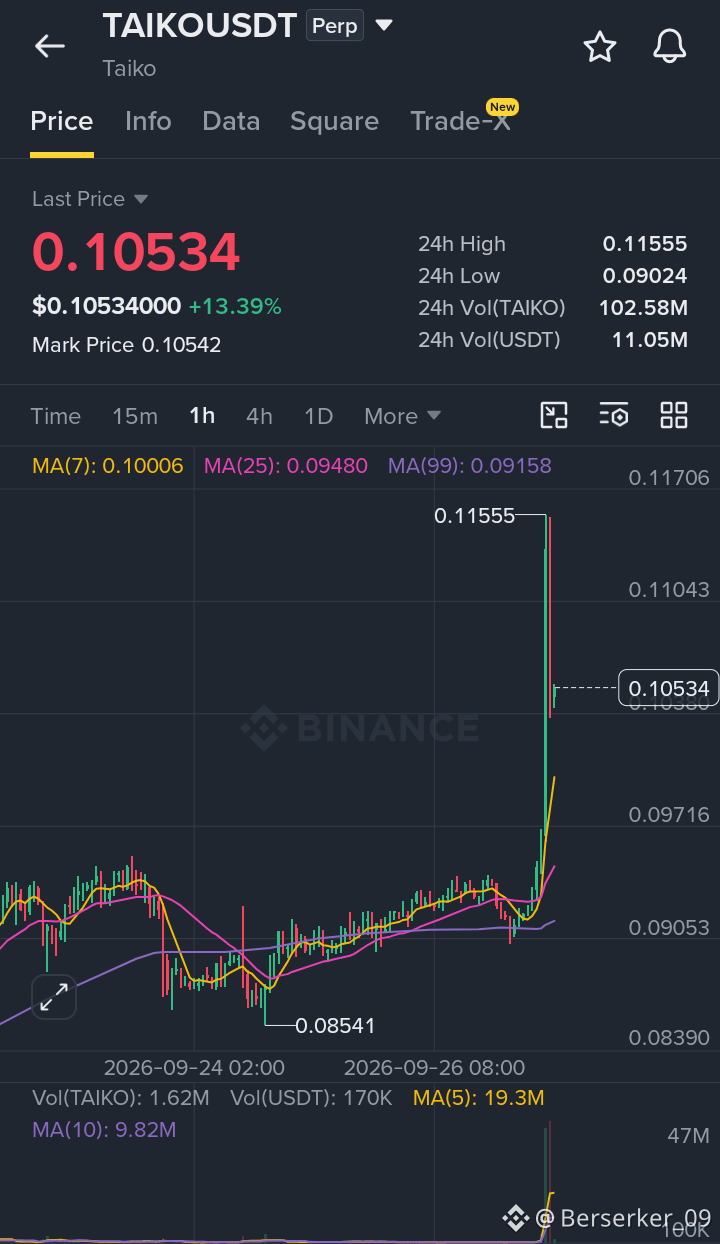
📈 $TAIKO — Bullisches Long-Setup
LONG $TAIKO
Einstieg: $0.1030–$0.1070
SL: $0.0980
🎯 Take Profit:
TP1: $0.1130
TP2: $0.1180
TP3: $0.1250
Der Preis zeigt auf dem 1H-Chart eine starke bullische Dynamik, nachdem er mit einer starken bullischen Kerze über den Bereich der $0.095 Widerstandszone ausgebrochen ist. Käufer behalten die Kontrolle, während die Bewegung in Richtung der $0.100-Zone eine wichtige Bestätigungszone hervorhebt.
Ein erfolgreiches Halten über $0.100 könnte die Ausbruchstruktur stärken und weiteren Aufwärtsdruck bis zu den nächsten Widerstandsniveaus unterstützen.
🔑 Wichtiges Niveau:
$0.1000 — Das Halten über dieser psychologischen und Ausbruchsmarke könnte helfen, die bullische Fortsetzungsstruktur aufrechtzuerhalten.
⚠️ Risiko-Hinweis:
Ein Breakdown unter $0.0980 würde das bullische Setup ungültig machen. Warte auf Bestätigung und nutze eine kontrollierte Positionsgröße mit sauberem Risikomanagement.
Bullische Tendenz, solange der Support hält. 📈
Kaufe und trade $TAIKO hier 👇
{future}(TAIKOUSDT)
DYOR
📈 $TAIKO — Bullisches Long-Setup
LONG $TAIKO
Einstieg: $0.1030–$0.1070
SL: $0.0980
🎯 Take Profit:
TP1: $0.1130
TP2: $0.1180
TP3: $0.1250
Der Preis zeigt auf dem 1H-Chart eine starke bullische Dynamik, nachdem er mit einer starken bullischen Kerze über den Bereich der $0.095 Widerstandszone ausgebrochen ist. Käufer behalten die Kontrolle, während die Bewegung in Richtung der $0.100-Zone eine wichtige Bestätigungszone hervorhebt.
Ein erfolgreiches Halten über $0.100 könnte die Ausbruchstruktur stärken und weiteren Aufwärtsdruck bis zu den nächsten Widerstandsniveaus unterstützen.
🔑 Wichtiges Niveau:
$0.1000 — Das Halten über dieser psychologischen und Ausbruchsmarke könnte helfen, die bullische Fortsetzungsstruktur aufrechtzuerhalten.
⚠️ Risiko-Hinweis:
Ein Breakdown unter $0.0980 würde das bullische Setup ungültig machen. Warte auf Bestätigung und nutze eine kontrollierte Positionsgröße mit sauberem Risikomanagement.
Bullische Tendenz, solange der Support hält. 📈
Kaufe und trade $TAIKO hier 👇
DYOR
LONG $TAIKO
Einstieg: $0.1030–$0.1070
SL: $0.0980
🎯 Take Profit:
TP1: $0.1130
TP2: $0.1180
TP3: $0.1250
Der Preis zeigt auf dem 1H-Chart eine starke bullische Dynamik, nachdem er mit einer starken bullischen Kerze über den Bereich der $0.095 Widerstandszone ausgebrochen ist. Käufer behalten die Kontrolle, während die Bewegung in Richtung der $0.100-Zone eine wichtige Bestätigungszone hervorhebt.
Ein erfolgreiches Halten über $0.100 könnte die Ausbruchstruktur stärken und weiteren Aufwärtsdruck bis zu den nächsten Widerstandsniveaus unterstützen.
🔑 Wichtiges Niveau:
$0.1000 — Das Halten über dieser psychologischen und Ausbruchsmarke könnte helfen, die bullische Fortsetzungsstruktur aufrechtzuerhalten.
⚠️ Risiko-Hinweis:
Ein Breakdown unter $0.0980 würde das bullische Setup ungültig machen. Warte auf Bestätigung und nutze eine kontrollierte Positionsgröße mit sauberem Risikomanagement.
Bullische Tendenz, solange der Support hält. 📈
Kaufe und trade $TAIKO hier 👇
DYOR
1
68
·
--
Bullisch
Übersetzung ansehen
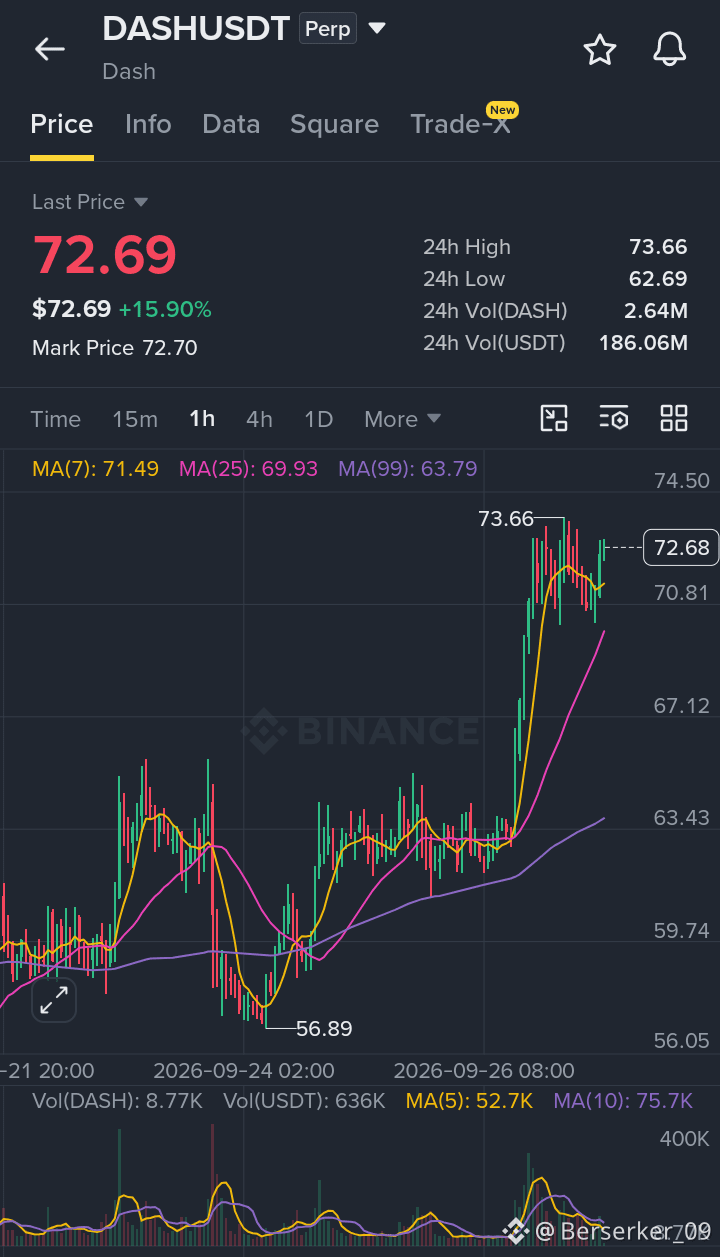
📈 $DASH — Bullish Long Setup
LONG $DASH
Entry: $70.50–$72.00
SL: $68.50
🎯 Take Profit:
TP1: $74.00
TP2: $77.00
TP3: $80.00
Price is showing bullish consolidation on the 1H chart while holding above the key $70 support area. The move follows a strong breakout from the $64 zone, and buyers are now pushing toward the $73–$74 resistance area.
A confirmed breakout and sustained hold above $74 could strengthen the continuation structure and open the way toward the higher targets.
🔑 Key Level:
$74.00 — A clean breakout above this resistance could provide confirmation for further upside continuation.
⚠️ Risk Note:
A breakdown below $68.50 would invalidate the bullish setup. Wait for confirmation and use controlled position sizing with proper risk management.
Bullish bias while support holds. 📈
Buy and Trade $DASH here 👇
{future}(DASHUSDT)
DYOR
📈 $DASH — Bullish Long Setup
LONG $DASH
Entry: $70.50–$72.00
SL: $68.50
🎯 Take Profit:
TP1: $74.00
TP2: $77.00
TP3: $80.00
Price is showing bullish consolidation on the 1H chart while holding above the key $70 support area. The move follows a strong breakout from the $64 zone, and buyers are now pushing toward the $73–$74 resistance area.
A confirmed breakout and sustained hold above $74 could strengthen the continuation structure and open the way toward the higher targets.
🔑 Key Level:
$74.00 — A clean breakout above this resistance could provide confirmation for further upside continuation.
⚠️ Risk Note:
A breakdown below $68.50 would invalidate the bullish setup. Wait for confirmation and use controlled position sizing with proper risk management.
Bullish bias while support holds. 📈
Buy and Trade $DASH here 👇
DYOR
LONG $DASH
Entry: $70.50–$72.00
SL: $68.50
🎯 Take Profit:
TP1: $74.00
TP2: $77.00
TP3: $80.00
Price is showing bullish consolidation on the 1H chart while holding above the key $70 support area. The move follows a strong breakout from the $64 zone, and buyers are now pushing toward the $73–$74 resistance area.
A confirmed breakout and sustained hold above $74 could strengthen the continuation structure and open the way toward the higher targets.
🔑 Key Level:
$74.00 — A clean breakout above this resistance could provide confirmation for further upside continuation.
⚠️ Risk Note:
A breakdown below $68.50 would invalidate the bullish setup. Wait for confirmation and use controlled position sizing with proper risk management.
Bullish bias while support holds. 📈
Buy and Trade $DASH here 👇
DYOR
1
60
·
--
Bullisch
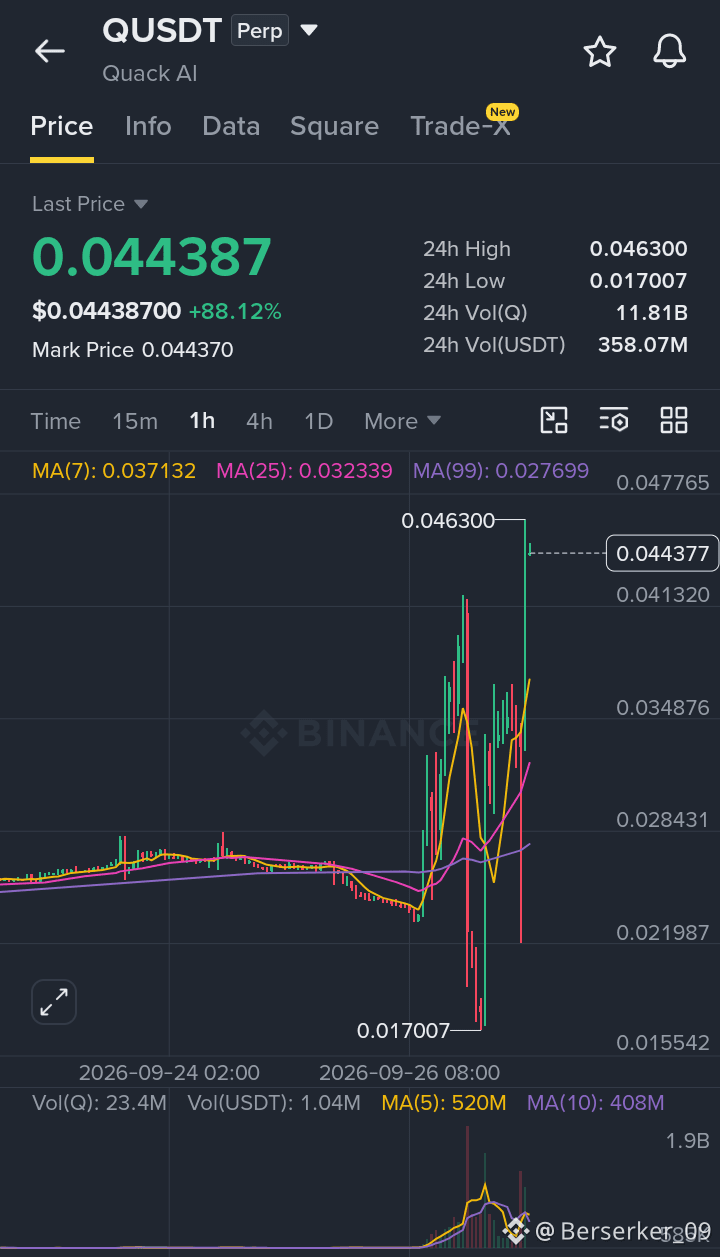
📈 $Q — Bullisches Long-Setup
LONG $Q
Einstieg: $0.0445–$0.0455
SL: $0.0420
🎯 Take Profit:
TP1: $0.0470
TP2: $0.0500
TP3: $0.0540
Der Preis hält sich über der Breakout-Zone, was zeigt, dass Käufer weiterhin aktiv um die aktuelle Struktur herum bleiben. Wenn dieser Bereich weiterhin hält und der Kaufdruck stark bleibt, könnte das Setup eine weitere Aufwärtsfortsetzung bis hin zu den nächsten Widerstandsniveaus unterstützen.
🔑 Schlüsselniveau:
$0.0455 — Ein Halten über der oberen Einstiegszone würde helfen, die bullische Fortsetzungsstruktur aufrechtzuerhalten.
⚠️ Risiko-Hinweis:
Ein Bruch unter $0.0420 würde das bullische Setup ungültig machen. Warte auf Bestätigung und nutze eine kontrollierte Positionsgröße mit geeignetem Risikomanagement.
Bullischer Bias, solange der Support hält. 📈
Kaufen und hier handeln $Q 👇
{future}(QUSDT)
DYOR
📈 $Q — Bullisches Long-Setup
LONG $Q
Einstieg: $0.0445–$0.0455
SL: $0.0420
🎯 Take Profit:
TP1: $0.0470
TP2: $0.0500
TP3: $0.0540
Der Preis hält sich über der Breakout-Zone, was zeigt, dass Käufer weiterhin aktiv um die aktuelle Struktur herum bleiben. Wenn dieser Bereich weiterhin hält und der Kaufdruck stark bleibt, könnte das Setup eine weitere Aufwärtsfortsetzung bis hin zu den nächsten Widerstandsniveaus unterstützen.
🔑 Schlüsselniveau:
$0.0455 — Ein Halten über der oberen Einstiegszone würde helfen, die bullische Fortsetzungsstruktur aufrechtzuerhalten.
⚠️ Risiko-Hinweis:
Ein Bruch unter $0.0420 würde das bullische Setup ungültig machen. Warte auf Bestätigung und nutze eine kontrollierte Positionsgröße mit geeignetem Risikomanagement.
Bullischer Bias, solange der Support hält. 📈
Kaufen und hier handeln $Q 👇
DYOR
LONG $Q
Einstieg: $0.0445–$0.0455
SL: $0.0420
🎯 Take Profit:
TP1: $0.0470
TP2: $0.0500
TP3: $0.0540
Der Preis hält sich über der Breakout-Zone, was zeigt, dass Käufer weiterhin aktiv um die aktuelle Struktur herum bleiben. Wenn dieser Bereich weiterhin hält und der Kaufdruck stark bleibt, könnte das Setup eine weitere Aufwärtsfortsetzung bis hin zu den nächsten Widerstandsniveaus unterstützen.
🔑 Schlüsselniveau:
$0.0455 — Ein Halten über der oberen Einstiegszone würde helfen, die bullische Fortsetzungsstruktur aufrechtzuerhalten.
⚠️ Risiko-Hinweis:
Ein Bruch unter $0.0420 würde das bullische Setup ungültig machen. Warte auf Bestätigung und nutze eine kontrollierte Positionsgröße mit geeignetem Risikomanagement.
Bullischer Bias, solange der Support hält. 📈
Kaufen und hier handeln $Q 👇
DYOR
2
1
44
·
--
Bullisch
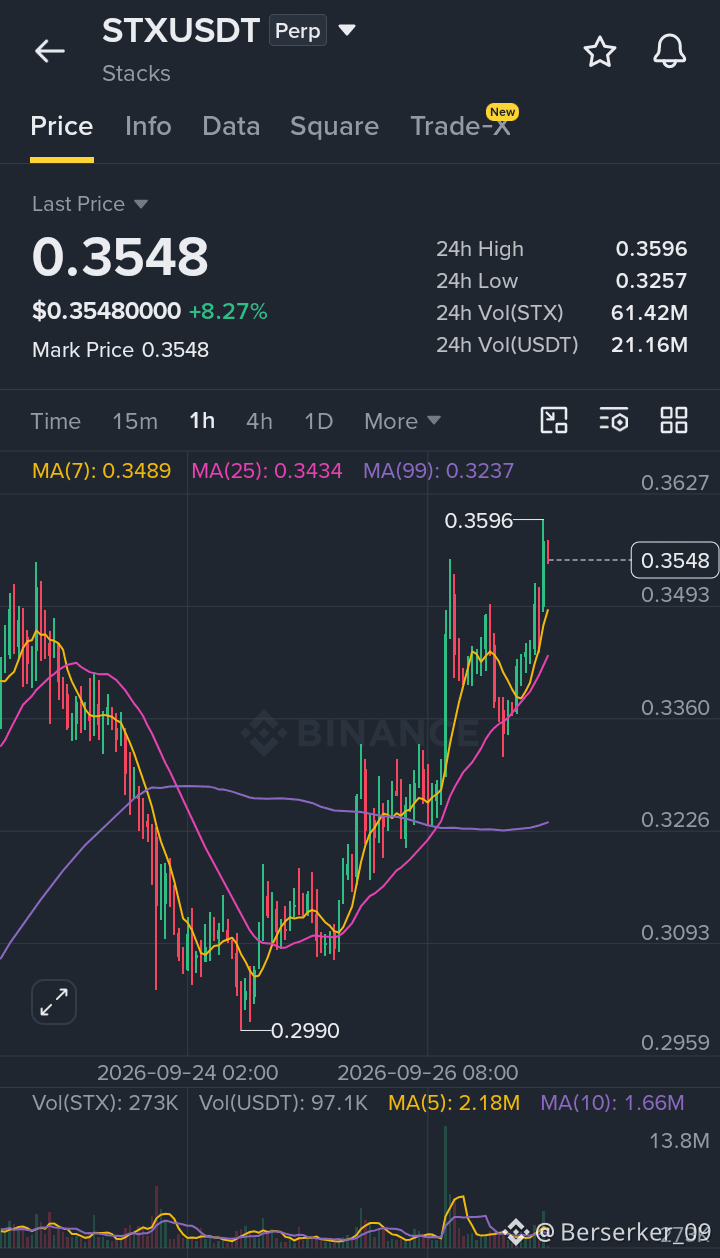
📈 $STX — Bullisches Long-Setup
LONG $STX
Einstieg: $0.355–$0.360
SL: $0.345
🎯 Take Profit:
TP1: $0.375
Der 1H-Chart zeigt starke bullische Dynamik: Der Kurs bricht aus der jüngsten Spanne aus und drückt in Richtung des $0.36-Bereichs. Wenn Käufer die Kontrolle über der Ausbruchzone behalten, könnte die Bewegung in Richtung des nächsten Widerstandsbereichs bei etwa $0.375 weitergehen.
🔑 Wichtiges Niveau:
$0.360 — Wenn dieser Bereich gehalten wird, würde das die bullische Ausbruchsstruktur stützen und das Setup für die Aufwärtsfortsetzung aktiv halten.
⚠️ Risiko-Hinweis:
Ein Bruch unter $0.345 würde das bullische Setup entkräften. Warte auf Bestätigung im Bereich der Ausbruchzone und nutze eine kontrollierte Positionsgröße mit sauberem Risikomanagement.
Bullische Ausrichtung, solange die Unterstützung hält. 📈
Kaufe und trade $STX hier 👇
{future}(STXUSDT)
DYOR
📈 $STX — Bullisches Long-Setup
LONG $STX
Einstieg: $0.355–$0.360
SL: $0.345
🎯 Take Profit:
TP1: $0.375
Der 1H-Chart zeigt starke bullische Dynamik: Der Kurs bricht aus der jüngsten Spanne aus und drückt in Richtung des $0.36-Bereichs. Wenn Käufer die Kontrolle über der Ausbruchzone behalten, könnte die Bewegung in Richtung des nächsten Widerstandsbereichs bei etwa $0.375 weitergehen.
🔑 Wichtiges Niveau:
$0.360 — Wenn dieser Bereich gehalten wird, würde das die bullische Ausbruchsstruktur stützen und das Setup für die Aufwärtsfortsetzung aktiv halten.
⚠️ Risiko-Hinweis:
Ein Bruch unter $0.345 würde das bullische Setup entkräften. Warte auf Bestätigung im Bereich der Ausbruchzone und nutze eine kontrollierte Positionsgröße mit sauberem Risikomanagement.
Bullische Ausrichtung, solange die Unterstützung hält. 📈
Kaufe und trade $STX hier 👇
DYOR
LONG $STX
Einstieg: $0.355–$0.360
SL: $0.345
🎯 Take Profit:
TP1: $0.375
Der 1H-Chart zeigt starke bullische Dynamik: Der Kurs bricht aus der jüngsten Spanne aus und drückt in Richtung des $0.36-Bereichs. Wenn Käufer die Kontrolle über der Ausbruchzone behalten, könnte die Bewegung in Richtung des nächsten Widerstandsbereichs bei etwa $0.375 weitergehen.
🔑 Wichtiges Niveau:
$0.360 — Wenn dieser Bereich gehalten wird, würde das die bullische Ausbruchsstruktur stützen und das Setup für die Aufwärtsfortsetzung aktiv halten.
⚠️ Risiko-Hinweis:
Ein Bruch unter $0.345 würde das bullische Setup entkräften. Warte auf Bestätigung im Bereich der Ausbruchzone und nutze eine kontrollierte Positionsgröße mit sauberem Risikomanagement.
Bullische Ausrichtung, solange die Unterstützung hält. 📈
Kaufe und trade $STX hier 👇
DYOR
1
54
Anmelden und weiter Inhalte entdecken
Krypto-Nutzer weltweit auf Binance Square kennenlernen
⚡️ Bleib in Sachen Krypto stets am Puls.
💬 Die weltgrößte Kryptobörse vertraut darauf.
👍 Erhalte verlässliche Einblicke von verifizierten Creators.
E-Mail-Adresse/Telefonnummer
Trendthemen
BitgetHackerMoves$83MStolenXRP
76 Aufrufe
16 Kommentare
Am 24. September 2026 erlitt Bitget eine schwerwiegende Sicherheitsverletzung, bei der Berichten zufolge etwa 387 Mio. $–390 Mio. $ an Vermögenswerten gestohlen wurden.
Ein großer Teil der gestohlenen Gelder war $XRP .
Rund 103 Mio. $XRP im Wert von ungefähr 157 Mio. $–160 Mio. $ zum damaligen Zeitpunkt wurde in fünf von dem Angreifer kontrollierte Wallets verlagert.
Bis zum 26. September waren etwa 54 Mio. XRP (83 Mio. $) bereits aus drei dieser Wallets abgezogen worden.
Zwei Wallets, die jeweils rund 20 Mio. XRP hielten, wurden nahezu vollständig geleert, während ein weiteres auf etwa 5,8 Mio. XRP reduziert wurde.
Damit blieben ungefähr 49 Mio. XRP, die zu diesem Zeitpunkt rund 75 Mio. $ wert waren, noch in den ursprünglichen Wallets.
Die Überweisungen nahmen zudem über Nacht zu, wobei die Gelder auf neue Wallets aufgeteilt wurden. Einige Berichte besagen, dass ein Teil des XRP später über THORChain in Richtung Bitcoin weitergeleitet wurde.
Das ist definitiv eine Situation, die ich im Blick behalte, während sich die Gelder weiter bewegen.
#BitgetHackerMoves$83MStolenXRP
jujucrypt
·2 Likes
·234 Aufrufe
SOLSpotETFWeeklyInflow$188M
206 Aufrufe
33 Kommentare
StrategyStriveAdd2305BitcoinThisWeek
27,425 Aufrufe
860 Kommentare