

Trading King1
2.4k Beiträge
Trading King1
Melden
Nutzer blockieren
🔥 Crypto Trader 🐂🚀
7.2K+ Following
1.9K+ Follower
3.6K+ Like gegeben
Beiträge
Alle
Zitierungen
PINNED
·
--
Bullisch
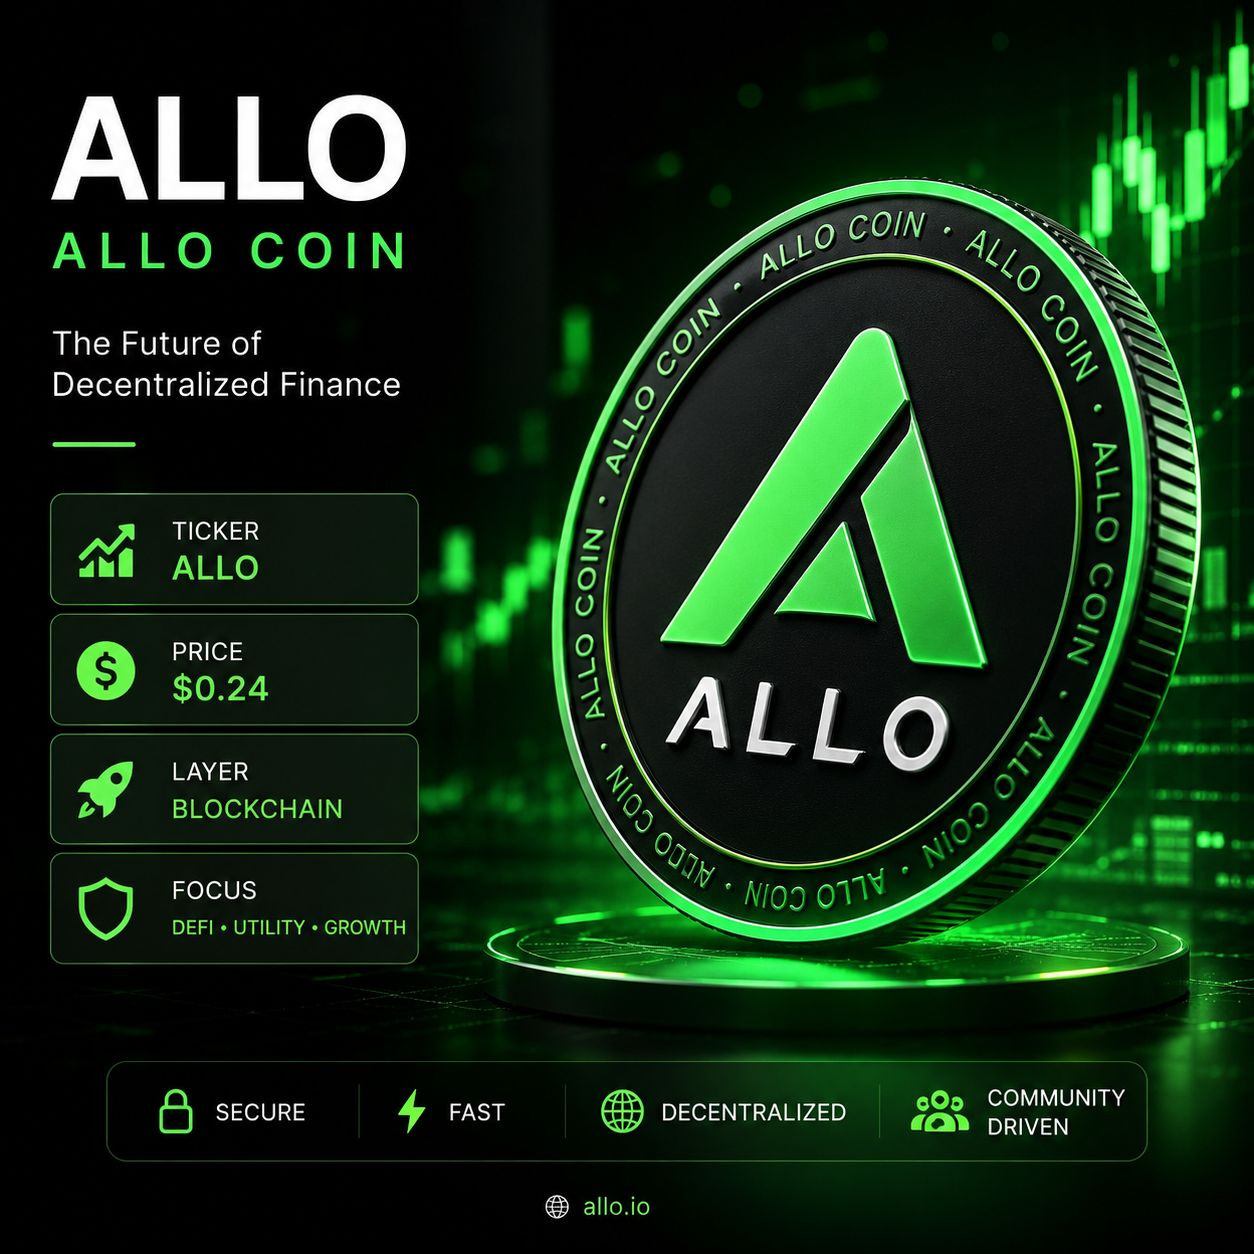
$ALLO Long Setup 📈
🟢 Einstieg: $0.24
🎯 TP1: $0.28
🎯 TP2: $0.32
🎯 TP3: $0.36
🛑 Stop Loss: $0.21
$ALLO Long Setup 📈
🟢 Einstieg: $0.24
🎯 TP1: $0.28
🎯 TP2: $0.32
🎯 TP3: $0.36
🛑 Stop Loss: $0.21
🟢 Einstieg: $0.24
🎯 TP1: $0.28
🎯 TP2: $0.32
🎯 TP3: $0.36
🛑 Stop Loss: $0.21
13
123
43.7k
PINNED
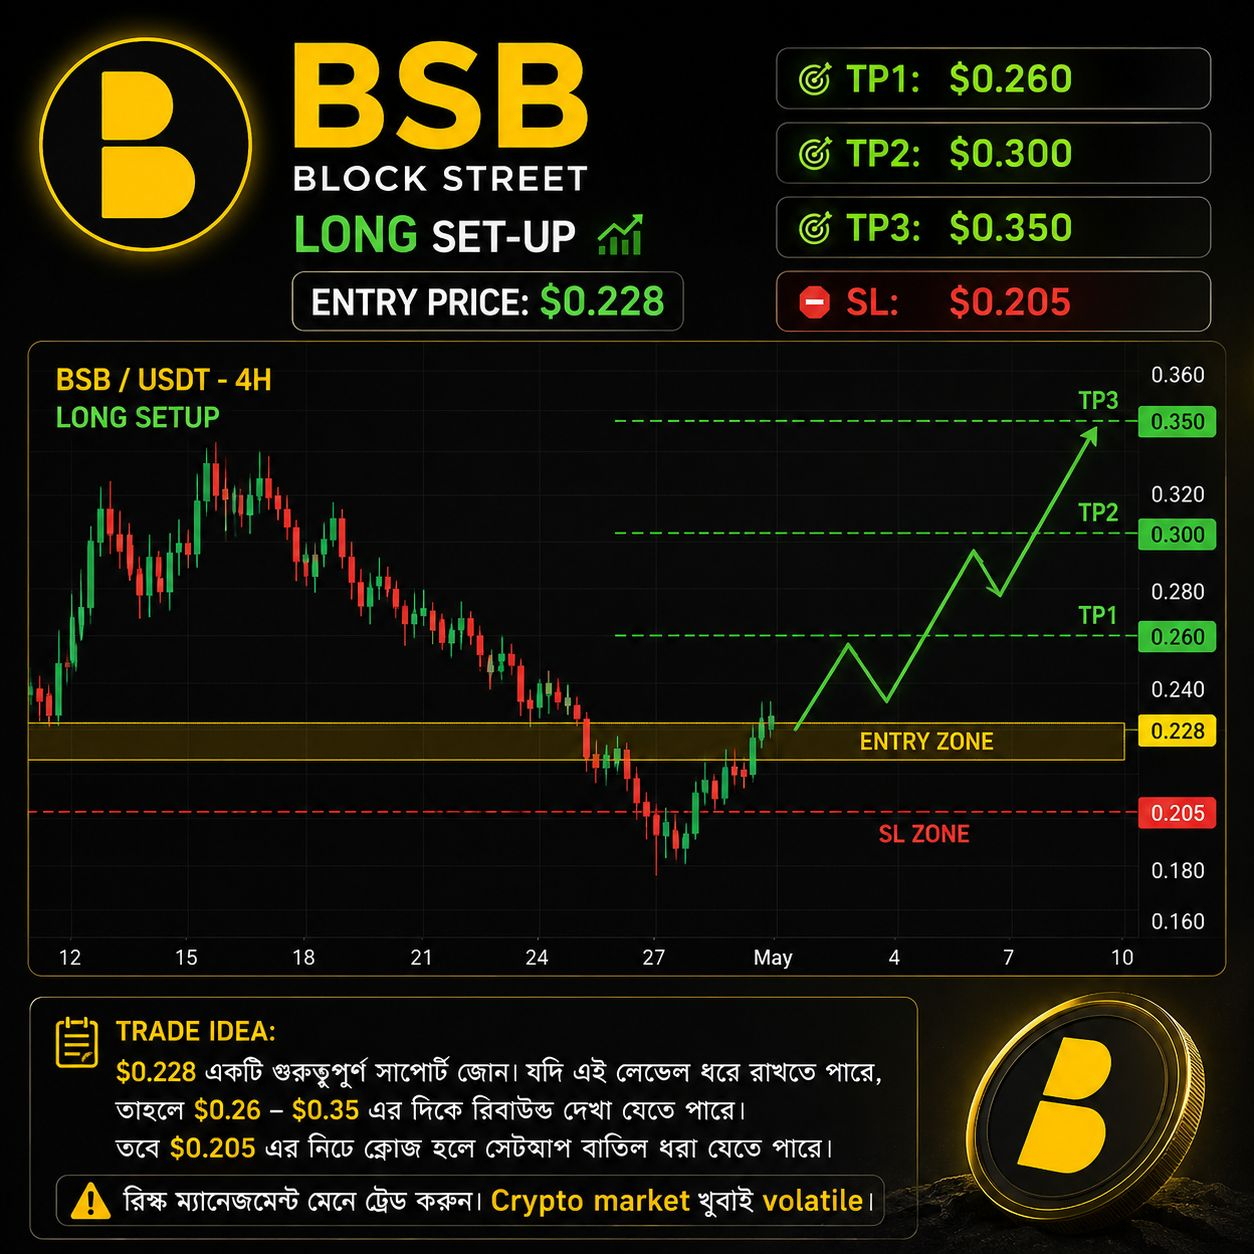
🟢 $BSB Long Einstieg: $0.225 – $0.230
🎯 TP1: $0.260
🎯 TP2: $0.300
🎯 TP3: $0.350
🛑 SL: $0.205
🟢 $BSB Long Einstieg: $0.225 – $0.230
🎯 TP1: $0.260
🎯 TP2: $0.300
🎯 TP3: $0.350
🛑 SL: $0.205
🎯 TP1: $0.260
🎯 TP2: $0.300
🎯 TP3: $0.350
🛑 SL: $0.205
3
55
2.9k
Übersetzung ansehen
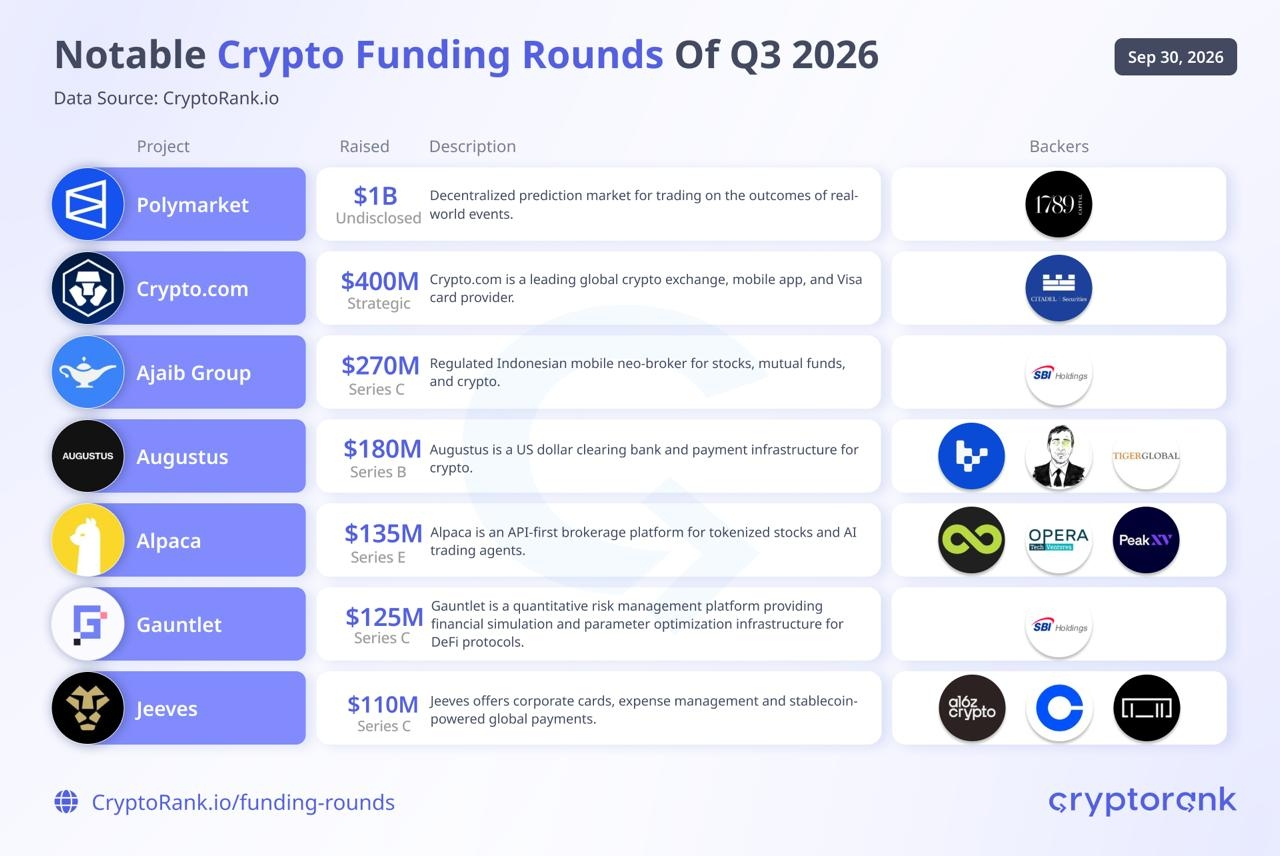
⚡️Q3 2026 Crypto Fundraising Highlights
Crypto projects raised $3.7B across 158 funding rounds in Q3. The quarter’s largest disclosed raises included:
• Polymarket — $1B
• Crypto.com — $400M
• Ajaib Group — $270M
• Augustus — $180M
• Alpaca — $135M
• Gauntlet — $125M
• Jeeves — $110M
⚡️Q3 2026 Crypto Fundraising Highlights
Crypto projects raised $3.7B across 158 funding rounds in Q3. The quarter’s largest disclosed raises included:
• Polymarket — $1B
• Crypto.com — $400M
• Ajaib Group — $270M
• Augustus — $180M
• Alpaca — $135M
• Gauntlet — $125M
• Jeeves — $110M
Crypto projects raised $3.7B across 158 funding rounds in Q3. The quarter’s largest disclosed raises included:
• Polymarket — $1B
• Crypto.com — $400M
• Ajaib Group — $270M
• Augustus — $180M
• Alpaca — $135M
• Gauntlet — $125M
• Jeeves — $110M
1
16
$XRP /USDT — LONG 🟢
Einstieg: 1.535–1.540
SL: 1.505
TP1: 1.565
TP2: 1.595
TP3: 1.630
⚠️ Wenn 1.505 bricht, aus dem Long aussteigen. Risiko nur 1–2% des Handelskapitals.
$XRP /USDT — LONG 🟢
Einstieg: 1.535–1.540
SL: 1.505
TP1: 1.565
TP2: 1.595
TP3: 1.630
⚠️ Wenn 1.505 bricht, aus dem Long aussteigen. Risiko nur 1–2% des Handelskapitals.
Einstieg: 1.535–1.540
SL: 1.505
TP1: 1.565
TP2: 1.595
TP3: 1.630
⚠️ Wenn 1.505 bricht, aus dem Long aussteigen. Risiko nur 1–2% des Handelskapitals.
1
1
129
$BTW /USDT — LONG
Einstieg: 1.12–1.14
🎯 TP1: 1.18
🎯 TP2: 1.23
🎯 TP3: 1.30
❌ SL: 1.08
⚠️ Risiko nur 1–2%.
$BTW /USDT — LONG
Einstieg: 1.12–1.14
🎯 TP1: 1.18
🎯 TP2: 1.23
🎯 TP3: 1.30
❌ SL: 1.08
⚠️ Risiko nur 1–2%.
Einstieg: 1.12–1.14
🎯 TP1: 1.18
🎯 TP2: 1.23
🎯 TP3: 1.30
❌ SL: 1.08
⚠️ Risiko nur 1–2%.
1
391
Übersetzung ansehen
$PUMP /USDT — 🔼 LONG
Entry: 0.00565–0.00572
🎯 TP1: 0.00590
🎯 TP2: 0.00610
🎯 TP3: 0.00635
❌ SL: 0.00545
⚠️ Risk only 1–2%.
$PUMP /USDT — 🔼 LONG
Entry: 0.00565–0.00572
🎯 TP1: 0.00590
🎯 TP2: 0.00610
🎯 TP3: 0.00635
❌ SL: 0.00545
⚠️ Risk only 1–2%.
Entry: 0.00565–0.00572
🎯 TP1: 0.00590
🎯 TP2: 0.00610
🎯 TP3: 0.00635
❌ SL: 0.00545
⚠️ Risk only 1–2%.
1
114
Übersetzung ansehen
$QNT /USDT — 🔼 LONG
Entry: 298–301
🎯 TP1: 310
🎯 TP2: 320
🎯 TP3: 335
❌ SL: 290
⚠️ Risk only 1–2%.
$QNT /USDT — 🔼 LONG
Entry: 298–301
🎯 TP1: 310
🎯 TP2: 320
🎯 TP3: 335
❌ SL: 290
⚠️ Risk only 1–2%.
Entry: 298–301
🎯 TP1: 310
🎯 TP2: 320
🎯 TP3: 335
❌ SL: 290
⚠️ Risk only 1–2%.
1
310
Übersetzung ansehen
$GRASS /USDT — LONG
Entry: 0.720–0.730
🎯 TP1: 0.760
🎯 TP2: 0.800
🎯 TP3: 0.818
❌ SL: 0.695
⚠️ Risk only 1–2% per trade.
$GRASS /USDT — LONG
Entry: 0.720–0.730
🎯 TP1: 0.760
🎯 TP2: 0.800
🎯 TP3: 0.818
❌ SL: 0.695
⚠️ Risk only 1–2% per trade.
Entry: 0.720–0.730
🎯 TP1: 0.760
🎯 TP2: 0.800
🎯 TP3: 0.818
❌ SL: 0.695
⚠️ Risk only 1–2% per trade.
1
83
Übersetzung ansehen
📊 MARKET OVERVIEW
Bitcoin is holding near $83,300 as spot demand shows signs of weakening following the recent rally.
₿ $BTC : $83,315 | -0.80%
♦️ Ethereum (ETH): $2,674 | -1.35%
🌐 Total Market Cap: $2.98T
₿ BTC Dominance: 56.3%
😨 Fear & Greed Index: 71 — Greed
🚀 Altcoin Index: 63/100
📰 LATEST NEWS
• Strategy buys 1,665 additional BTC and spends $152M buying back STRC.
• Ethereum ETFs end a 7-day inflow streak, while Bitcoin funds continue to see buying.
• Markets are watching expectations around a possible Fed rate hike in October.
🔥 SMALL-CAP GAINERS
• Moonriver (MOVR): +72.7%
• Hookr.fun: +59.4%
• Gitcoin (GTC): +34.4%
• Coq Inu: +30.0%
• Moonbeam (GLMR): +20.8%
💰 RECENT FUNDING ROUNDS
• Jeeves: $110M Series C, led by CoinFund
• Raven: Strategic round backed by Coinbase Ventures
• World: $49M OTC purchase round backed by undisclosed investors
⚠️ Note: Market conditions can change quickly. Always manage risk and DYOR before trading.
📊 MARKET OVERVIEW
Bitcoin is holding near $83,300 as spot demand shows signs of weakening following the recent rally.
₿ $BTC : $83,315 | -0.80%
♦️ Ethereum (ETH): $2,674 | -1.35%
🌐 Total Market Cap: $2.98T
₿ BTC Dominance: 56.3%
😨 Fear & Greed Index: 71 — Greed
🚀 Altcoin Index: 63/100
📰 LATEST NEWS
• Strategy buys 1,665 additional BTC and spends $152M buying back STRC.
• Ethereum ETFs end a 7-day inflow streak, while Bitcoin funds continue to see buying.
• Markets are watching expectations around a possible Fed rate hike in October.
🔥 SMALL-CAP GAINERS
• Moonriver (MOVR): +72.7%
• Hookr.fun: +59.4%
• Gitcoin (GTC): +34.4%
• Coq Inu: +30.0%
• Moonbeam (GLMR): +20.8%
💰 RECENT FUNDING ROUNDS
• Jeeves: $110M Series C, led by CoinFund
• Raven: Strategic round backed by Coinbase Ventures
• World: $49M OTC purchase round backed by undisclosed investors
⚠️ Note: Market conditions can change quickly. Always manage risk and DYOR before trading.
Bitcoin is holding near $83,300 as spot demand shows signs of weakening following the recent rally.
₿ $BTC : $83,315 | -0.80%
♦️ Ethereum (ETH): $2,674 | -1.35%
🌐 Total Market Cap: $2.98T
₿ BTC Dominance: 56.3%
😨 Fear & Greed Index: 71 — Greed
🚀 Altcoin Index: 63/100
📰 LATEST NEWS
• Strategy buys 1,665 additional BTC and spends $152M buying back STRC.
• Ethereum ETFs end a 7-day inflow streak, while Bitcoin funds continue to see buying.
• Markets are watching expectations around a possible Fed rate hike in October.
🔥 SMALL-CAP GAINERS
• Moonriver (MOVR): +72.7%
• Hookr.fun: +59.4%
• Gitcoin (GTC): +34.4%
• Coq Inu: +30.0%
• Moonbeam (GLMR): +20.8%
💰 RECENT FUNDING ROUNDS
• Jeeves: $110M Series C, led by CoinFund
• Raven: Strategic round backed by Coinbase Ventures
• World: $49M OTC purchase round backed by undisclosed investors
⚠️ Note: Market conditions can change quickly. Always manage risk and DYOR before trading.
2
9
Übersetzung ansehen
📊 Pair: $ZRO /USDT
📈 Position: LONG
✅ Entry: 1.730 – 1.750
❌ Stop Loss: 1.650
🎯 Target: 300% – 500% – 1000%+ Profit Potential
⚡ Leverage: 20x – 50x Cross
☠️ Risk Management: Use only 1% of your Futures account as margin.
⚠️ DYOR: Do your own research and trade responsibly with proper risk management.
💡 Tip: Enter with a small margin and hold the position according to your risk tolerance.
📊 Pair: $ZRO /USDT
📈 Position: LONG
✅ Entry: 1.730 – 1.750
❌ Stop Loss: 1.650
🎯 Target: 300% – 500% – 1000%+ Profit Potential
⚡ Leverage: 20x – 50x Cross
☠️ Risk Management: Use only 1% of your Futures account as margin.
⚠️ DYOR: Do your own research and trade responsibly with proper risk management.
💡 Tip: Enter with a small margin and hold the position according to your risk tolerance.
📈 Position: LONG
✅ Entry: 1.730 – 1.750
❌ Stop Loss: 1.650
🎯 Target: 300% – 500% – 1000%+ Profit Potential
⚡ Leverage: 20x – 50x Cross
☠️ Risk Management: Use only 1% of your Futures account as margin.
⚠️ DYOR: Do your own research and trade responsibly with proper risk management.
💡 Tip: Enter with a small margin and hold the position according to your risk tolerance.
2
18
$ESPORTS /USDT — Long
Einstieg: 0.01100–0.01110
SL: 0.01055
TP1: 0.01140
TP2: 0.01180
TP3: 0.01230
⚠️ Risiko nur 1–2% des Futures-Kapitals.
$ESPORTS /USDT — Long
Einstieg: 0.01100–0.01110
SL: 0.01055
TP1: 0.01140
TP2: 0.01180
TP3: 0.01230
⚠️ Risiko nur 1–2% des Futures-Kapitals.
Einstieg: 0.01100–0.01110
SL: 0.01055
TP1: 0.01140
TP2: 0.01180
TP3: 0.01230
⚠️ Risiko nur 1–2% des Futures-Kapitals.
1
42
$NEAR /USDT — 🔼 Long-Setup
Einstieg: 4.88–4.90
SL: 4.72
TP1: 5.05
TP2: 5.20
TP3: 5.40
Risiko: max. 1–2% pro Trade.
$NEAR /USDT — 🔼 Long-Setup
Einstieg: 4.88–4.90
SL: 4.72
TP1: 5.05
TP2: 5.20
TP3: 5.40
Risiko: max. 1–2% pro Trade.
Einstieg: 4.88–4.90
SL: 4.72
TP1: 5.05
TP2: 5.20
TP3: 5.40
Risiko: max. 1–2% pro Trade.
1
4
563
Übersetzung ansehen
$MOVR /USDT — 🔻 Short Setup
Entry: 1.45–1.48
SL: 1.53
TP1: 1.39
TP2: 1.33
TP3: 1.25
⚠️ Risk: 1–2% max.
$MOVR /USDT — 🔻 Short Setup
Entry: 1.45–1.48
SL: 1.53
TP1: 1.39
TP2: 1.33
TP3: 1.25
⚠️ Risk: 1–2% max.
Entry: 1.45–1.48
SL: 1.53
TP1: 1.39
TP2: 1.33
TP3: 1.25
⚠️ Risk: 1–2% max.
1
189
Übersetzung ansehen
$BTW → Long 🔼
Entry: 1.16–1.18
SL: 1.10
TP1: 1.23
TP2: 1.30
TP3: 1.40
⚠️ Risk: 1–2% max.
$BTW → Long 🔼
Entry: 1.16–1.18
SL: 1.10
TP1: 1.23
TP2: 1.30
TP3: 1.40
⚠️ Risk: 1–2% max.
Entry: 1.16–1.18
SL: 1.10
TP1: 1.23
TP2: 1.30
TP3: 1.40
⚠️ Risk: 1–2% max.
1
25
·
--
Bullisch
$ARB /USDT — Long
Einstieg: 0.2010–0.2030
SL: 0.1940
TP1: 0.2080
TP2: 0.2140
TP3: 0.2220
⚠️ Halte das Risiko bei 1–2% deines Trading-Kapitals.
$ARB /USDT — Long
Einstieg: 0.2010–0.2030
SL: 0.1940
TP1: 0.2080
TP2: 0.2140
TP3: 0.2220
⚠️ Halte das Risiko bei 1–2% deines Trading-Kapitals.
Einstieg: 0.2010–0.2030
SL: 0.1940
TP1: 0.2080
TP2: 0.2140
TP3: 0.2220
⚠️ Halte das Risiko bei 1–2% deines Trading-Kapitals.
1
201
Übersetzung ansehen
$MOVR /USDT — Long 🟢
Entry: 1.260–1.280
SL: 1.220
TP1: 1.320
TP2: 1.370
TP3: 1.450
Risk only 1–2% of trading capital.
$MOVR /USDT — Long 🟢
Entry: 1.260–1.280
SL: 1.220
TP1: 1.320
TP2: 1.370
TP3: 1.450
Risk only 1–2% of trading capital.
Entry: 1.260–1.280
SL: 1.220
TP1: 1.320
TP2: 1.370
TP3: 1.450
Risk only 1–2% of trading capital.
1
181
Übersetzung ansehen
$ENA /USDT - Short Setup
Entry: 0.2500–0.2550
SL: 0.2620
TP1: 0.2420
TP2: 0.2330
TP3: 0.2220
⚠️ Risk only 1–2% of futures capital.
$ENA /USDT - Short Setup
Entry: 0.2500–0.2550
SL: 0.2620
TP1: 0.2420
TP2: 0.2330
TP3: 0.2220
⚠️ Risk only 1–2% of futures capital.
Entry: 0.2500–0.2550
SL: 0.2620
TP1: 0.2420
TP2: 0.2330
TP3: 0.2220
⚠️ Risk only 1–2% of futures capital.
2
17
Übersetzung ansehen
$XPL /USDT - Short setup
🔻 Entry: 0.0970–0.0990
❌ SL: 0.1030
🎯 TP1: 0.0935
🎯 TP2: 0.0900
🎯 TP3: 0.0865
$XPL /USDT - Short setup
🔻 Entry: 0.0970–0.0990
❌ SL: 0.1030
🎯 TP1: 0.0935
🎯 TP2: 0.0900
🎯 TP3: 0.0865
🔻 Entry: 0.0970–0.0990
❌ SL: 0.1030
🎯 TP1: 0.0935
🎯 TP2: 0.0900
🎯 TP3: 0.0865
2
390
#earningsseason Am 30. September ist Micron (MU) geplant, nach Börsenschluss die Ergebnisse zu veröffentlichen. Aktuelle Marktschätzungen liegen bei etwa 32,32 $ EPS und 52,2 Mrd. $ Umsatz.
⚠️ Earnings können zu sehr hoher Volatilität führen. Gehe daher vorsichtig vor, wenn du vor dem Bericht eine Long- oder Short-Position eröffnest.
#earningsseason Am 30. September ist Micron (MU) geplant, nach Börsenschluss die Ergebnisse zu veröffentlichen. Aktuelle Marktschätzungen liegen bei etwa 32,32 $ EPS und 52,2 Mrd. $ Umsatz.
⚠️ Earnings können zu sehr hoher Volatilität führen. Gehe daher vorsichtig vor, wenn du vor dem Bericht eine Long- oder Short-Position eröffnest.
⚠️ Earnings können zu sehr hoher Volatilität führen. Gehe daher vorsichtig vor, wenn du vor dem Bericht eine Long- oder Short-Position eröffnest.
1
3
482
Übersetzung ansehen
$GRAM /USDT 🟢 LONG
Entry: 1.46–1.47
SL: 1.43
TP1: 1.53
TP2: 1.60
TP3: 1.68
⚠️ Risk only 1–2% of futures capital.
$GRAM /USDT 🟢 LONG
Entry: 1.46–1.47
SL: 1.43
TP1: 1.53
TP2: 1.60
TP3: 1.68
⚠️ Risk only 1–2% of futures capital.
Entry: 1.46–1.47
SL: 1.43
TP1: 1.53
TP2: 1.60
TP3: 1.68
⚠️ Risk only 1–2% of futures capital.
3
14
Anmelden und weiter Inhalte entdecken
Krypto-Nutzer weltweit auf Binance Square kennenlernen
⚡️ Bleib in Sachen Krypto stets am Puls.
💬 Die weltgrößte Kryptobörse vertraut darauf.
👍 Erhalte verlässliche Einblicke von verifizierten Creators.
E-Mail-Adresse/Telefonnummer
Trendthemen
BitcoinClears$85200
1,066 Aufrufe
76 Kommentare
Wir haben die Bewegung bekommen, und $BTC steht genau dort, wo wir vorher die Daten hatten. So sieht echte Geduld für einen Trade aus.
Die Daten kamen gemischt rein, aber mit ein paar wichtigen Zahlen. ADP Non-Farm Employment Change lag bei 90K gegenüber 73K Prognose, während Core PCE bei 0,2% gegenüber den erwarteten 0,3% lag. Das finale BIP war ebenfalls stärker bei 2,2% gegenüber 1,5% Prognose, während Personal Spending bei 0,9% gegenüber den erwarteten 0,8% lag. Gleichzeitig verfehlte Personal Income mit 0,2% gegenüber 0,5% Prognose.
BTC ist zunächst auf 85.600 $ gestiegen und ist jetzt wieder dort, wo es hingehört. Ich schaue immer noch in Richtung der unteren Bereiche bei 82.759 $ und der 80.000 $-Liquidität, weil die übergeordnete Liquidität erledigt und abgehakt ist.
Wir hatten während der Daten eine Live-Session, und in dieser Session haben wir den Markt bei 83.800 $ gesehen, dann bei 85.600 $ und anschließend wieder in Richtung 83.000 $ – und wir sind trotzdem nicht in einen Trade eingestiegen.
So sieht Geduld aus.
Wir können keinen Einstieg erzwingen, wenn der Markt keine klare Richtung hat. Der gleiche Bereich ist weiterhin im Fokus, und wir warten darauf, dass der Markt uns das Setup gibt.
Lasst mich wissen, Jungs: Wie war die Session? Und sollten wir mehr reguläre Sessions mit unseren geschätzten Mitgliedern machen, damit wir ordentliche Diskussionen über den Markt führen können?
#BitcoinClears$85200 #AltcoinSeasonIndexHoldsAbove60For5Days #USADPAdds90000JobsInSeptember #BitcoinSlipsBelow$84000 #SECToClarifyOnChainFundraisingRules
Crypto_LUX
·16 Likes
·4.1k Aufrufe
AltcoinSeasonIndexHoldsAbove60For5Days
9,616 Aufrufe
487 Kommentare
USADPAdds90000JobsInSeptember
2,717 Aufrufe
227 Kommentare