

Crypto_Town_JS
8.3k Beiträge

Crypto_Town_JS
Melden
Nutzer blockieren
Crypto Trader & Market Analyst 📊 | Price Action | Altcoins | 🚀 High Probability Setups | 💡 Learn • Trade • Grow
Trade eröffnen

GRAM Halter
Regelmäßiger Trader
2.2 Jahre
119 Following
1.9K+ Follower
1.9K+ Like gegeben
Beiträge
Portfolio
Alle
Zitierungen
Videos
·
--
Bullisch
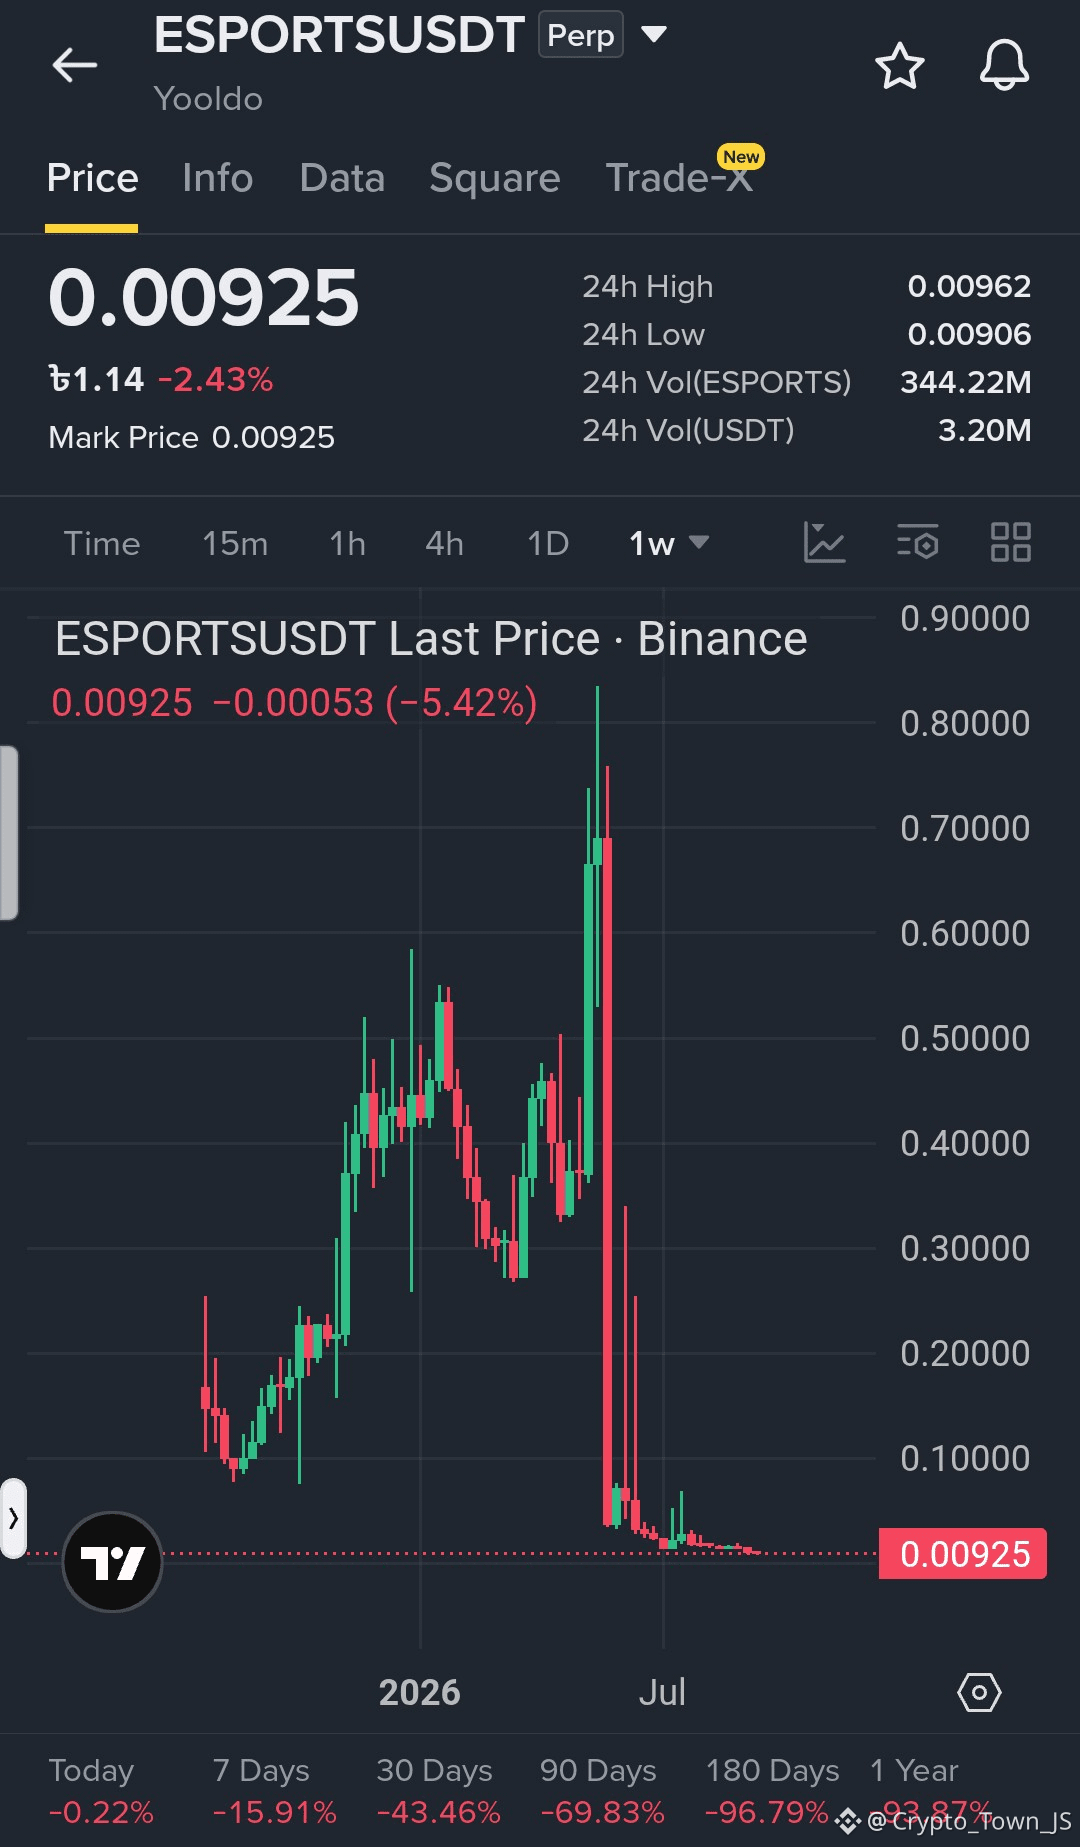
$ESPORTS USDT Long-Setup
ESPORTS handelt nahe dem unteren Ende seiner jüngsten Spanne nach einem längeren Rückgang. Wenn Käufer den aktuellen Bereich verteidigen und der Impuls sich wieder erholt, könnte der Kurs versuchen, kurzfristig zu einem Rebound in Richtung der nahegelegenen Widerstandsniveaus zu gelangen.
Einstiegszone: 0.00910–0.00930
TP1: 0.00960
TP2: 0.01000
TP3: 0.01050
SL: 0.00885
#BinanceSquare #crypto #trading #cryptotrading #esports
$ONE $AVA
{future}(AVAUSDT)
{future}(ONEUSDT)
{future}(ESPORTSUSDT)
$ESPORTS USDT Long-Setup
ESPORTS handelt nahe dem unteren Ende seiner jüngsten Spanne nach einem längeren Rückgang. Wenn Käufer den aktuellen Bereich verteidigen und der Impuls sich wieder erholt, könnte der Kurs versuchen, kurzfristig zu einem Rebound in Richtung der nahegelegenen Widerstandsniveaus zu gelangen.
Einstiegszone: 0.00910–0.00930
TP1: 0.00960
TP2: 0.01000
TP3: 0.01050
SL: 0.00885
#BinanceSquare #crypto #trading #cryptotrading #esports
$ONE $AVA
ESPORTS handelt nahe dem unteren Ende seiner jüngsten Spanne nach einem längeren Rückgang. Wenn Käufer den aktuellen Bereich verteidigen und der Impuls sich wieder erholt, könnte der Kurs versuchen, kurzfristig zu einem Rebound in Richtung der nahegelegenen Widerstandsniveaus zu gelangen.
Einstiegszone: 0.00910–0.00930
TP1: 0.00960
TP2: 0.01000
TP3: 0.01050
SL: 0.00885
#BinanceSquare #crypto #trading #cryptotrading #esports
$ONE $AVA
3
379
·
--
Bullisch
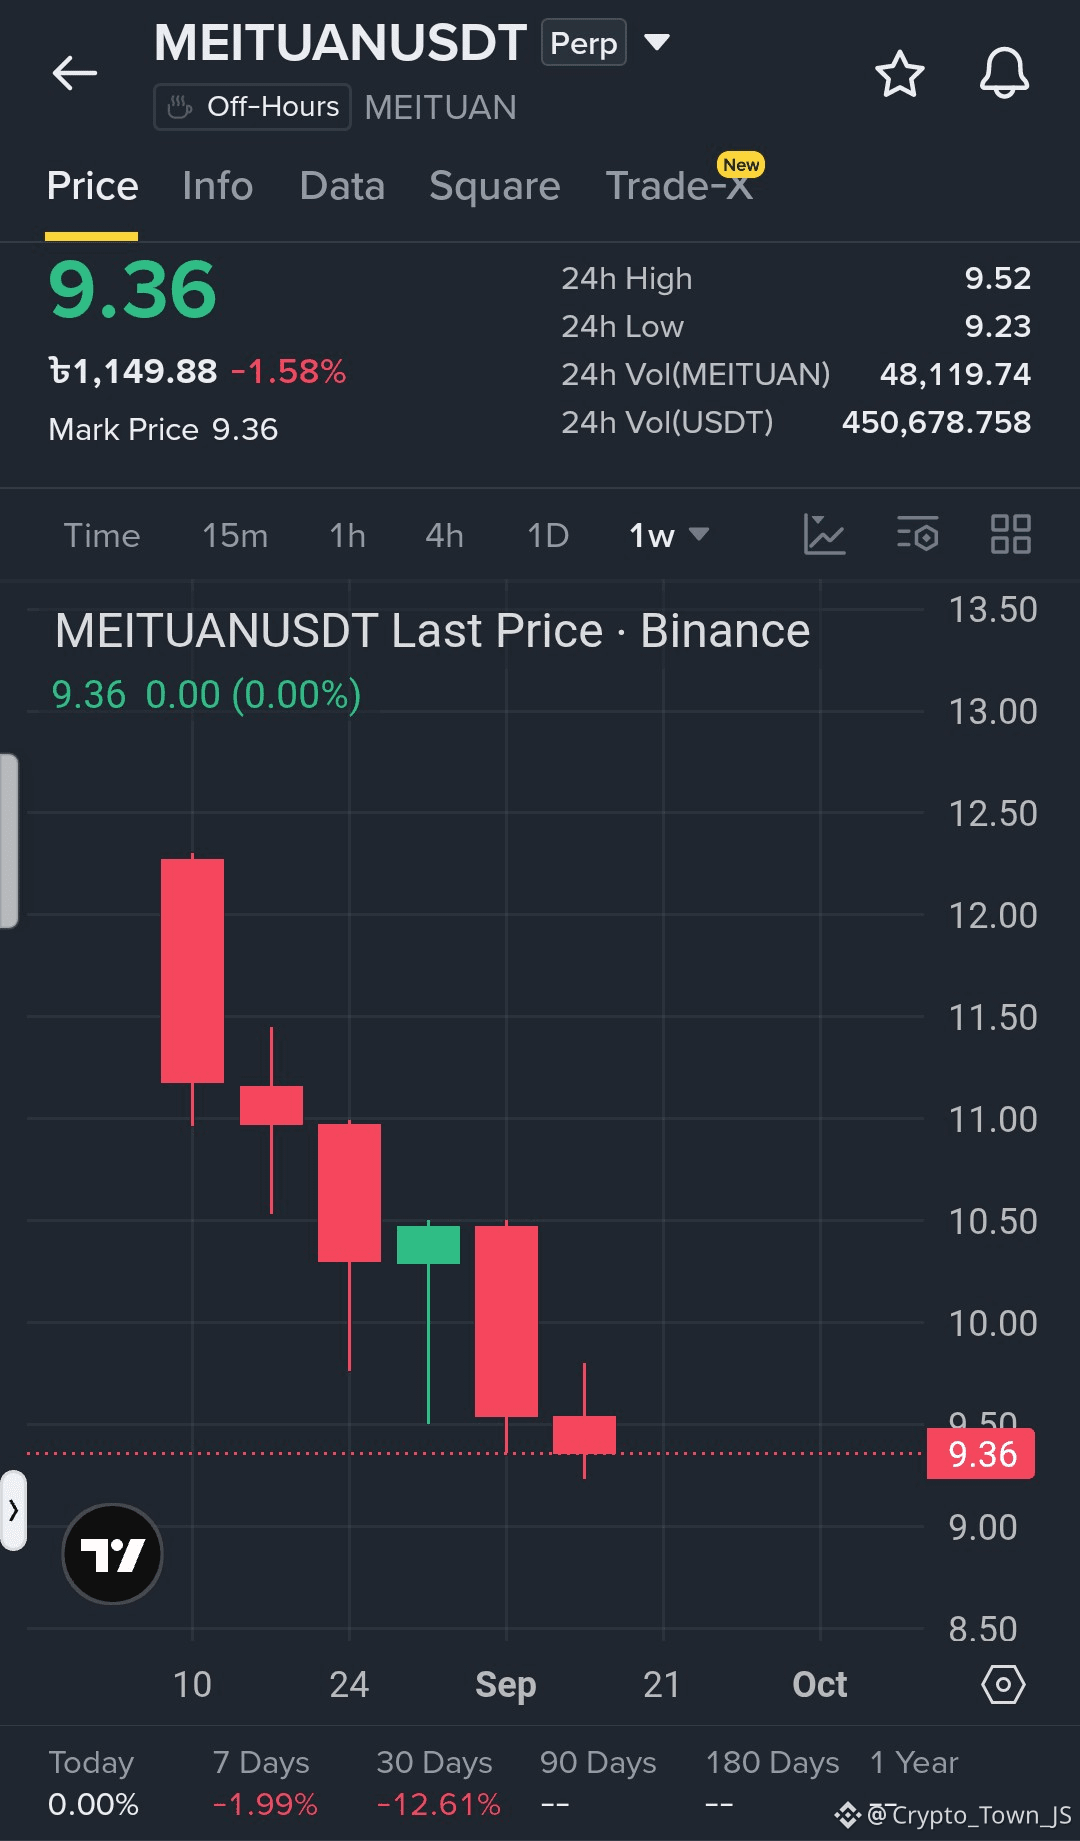
$MEITUAN USDT Long-Setup
MEITUAN hält sich nach einem stetigen Rücksetzer nahe dem unteren Ende der jüngsten Spanne. Wenn Käufer die aktuelle Zone verteidigen und sich der Momentum verbessert, könnte der Kurs einen Erholungsversuch in Richtung der nächsten Widerstandsniveaus starten.
Einstiegszone: 9.30–9.40
TP1: 9.55
TP2: 9.75
TP3: 10.00
SL: 9.15
#BinanceSquare #crypto #trading #cryptotrading #Meituan
$ONE $AVA
{future}(AVAUSDT)
{future}(ONEUSDT)
{future}(MEITUANUSDT)
$MEITUAN USDT Long-Setup
MEITUAN hält sich nach einem stetigen Rücksetzer nahe dem unteren Ende der jüngsten Spanne. Wenn Käufer die aktuelle Zone verteidigen und sich der Momentum verbessert, könnte der Kurs einen Erholungsversuch in Richtung der nächsten Widerstandsniveaus starten.
Einstiegszone: 9.30–9.40
TP1: 9.55
TP2: 9.75
TP3: 10.00
SL: 9.15
#BinanceSquare #crypto #trading #cryptotrading #Meituan
$ONE $AVA
MEITUAN hält sich nach einem stetigen Rücksetzer nahe dem unteren Ende der jüngsten Spanne. Wenn Käufer die aktuelle Zone verteidigen und sich der Momentum verbessert, könnte der Kurs einen Erholungsversuch in Richtung der nächsten Widerstandsniveaus starten.
Einstiegszone: 9.30–9.40
TP1: 9.55
TP2: 9.75
TP3: 10.00
SL: 9.15
#BinanceSquare #crypto #trading #cryptotrading #Meituan
$ONE $AVA
1
1
294
·
--
Bullisch
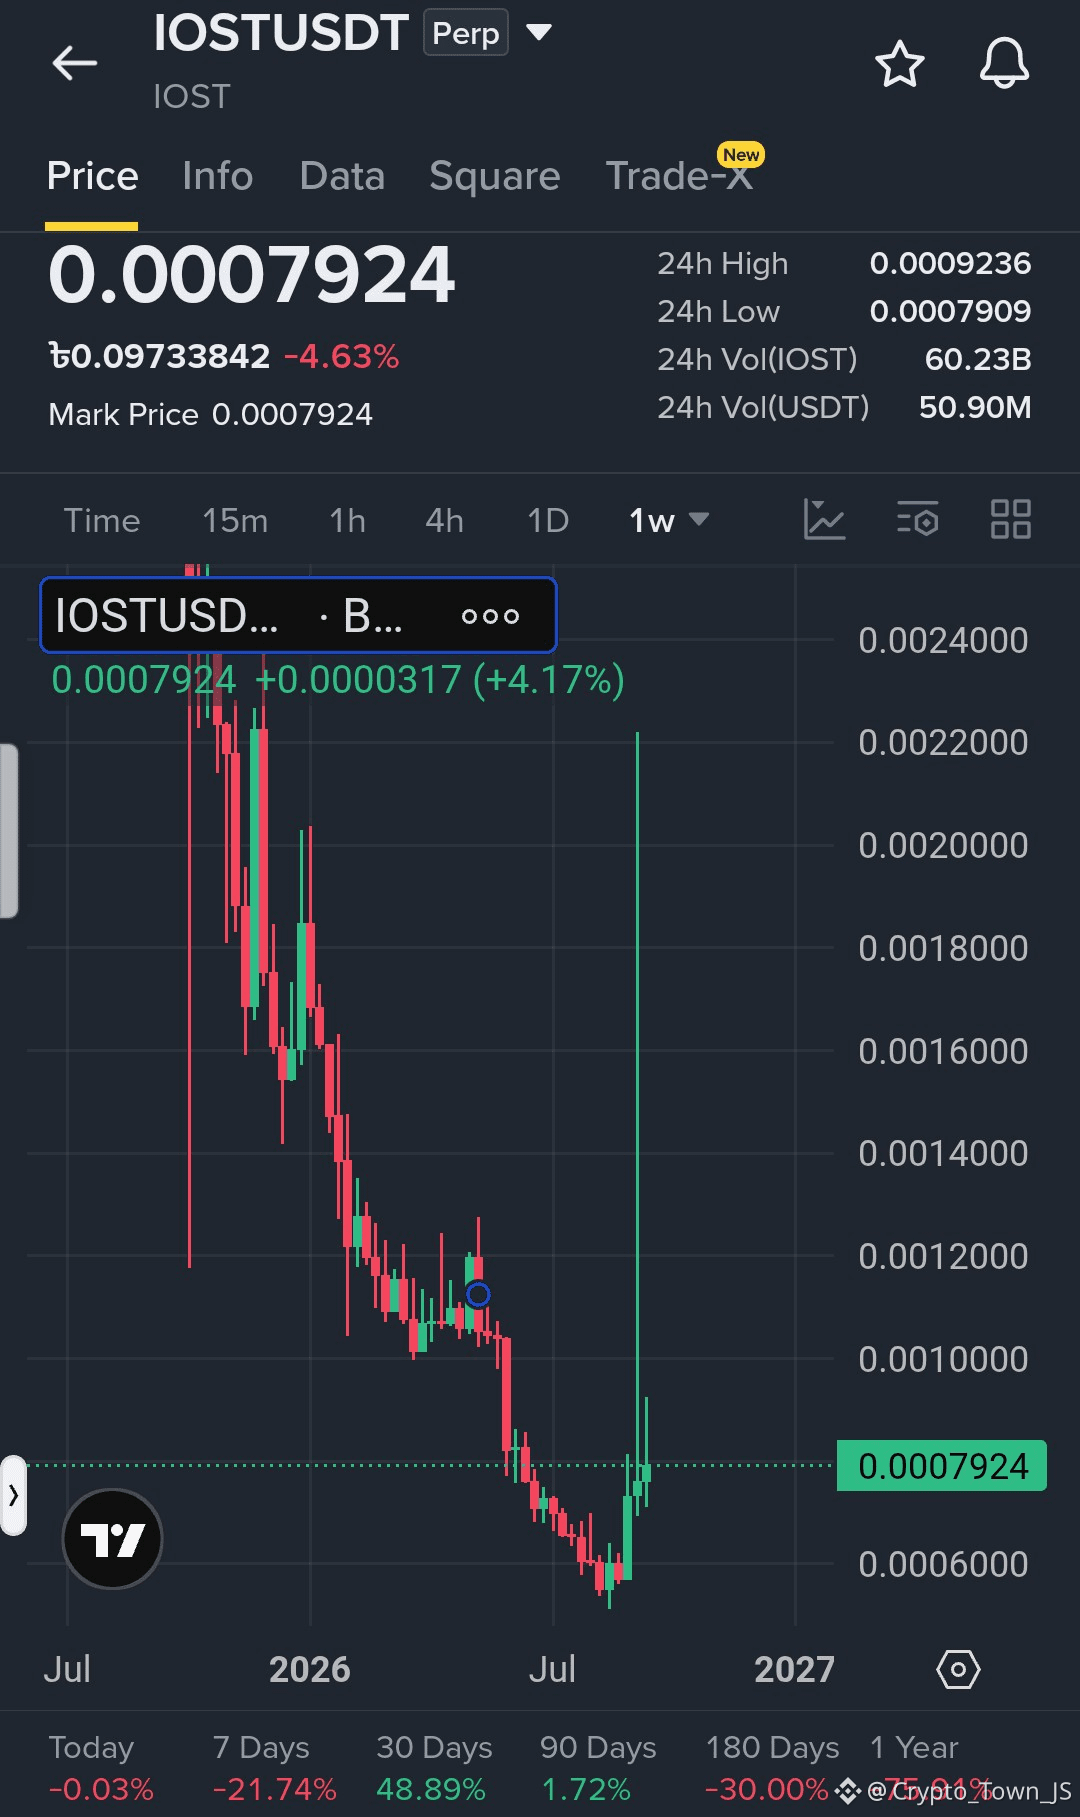
$IOST USDT Long-Setup
IOST hält sich nahe der jüngsten Unterstützungszone nach einem scharfen Rücksetzer. Wenn Käufer diesen Bereich verteidigen und wieder Momentum aufnehmen, könnte der Preis versuchen, sich in Richtung der nächsten Widerstandsmarken zu erholen.
Einstiegszone: 0.0007950–0.0008250
TP1: 0.0008700
TP2: 0.0009300
TP3: 0.0010200
SL: 0.0007600
#BinanceSquare #crypto #trading #cryptotrading #IOST
$ONE $AVA
{future}(AVAUSDT)
{future}(ONEUSDT)
{future}(IOSTUSDT)
$IOST USDT Long-Setup
IOST hält sich nahe der jüngsten Unterstützungszone nach einem scharfen Rücksetzer. Wenn Käufer diesen Bereich verteidigen und wieder Momentum aufnehmen, könnte der Preis versuchen, sich in Richtung der nächsten Widerstandsmarken zu erholen.
Einstiegszone: 0.0007950–0.0008250
TP1: 0.0008700
TP2: 0.0009300
TP3: 0.0010200
SL: 0.0007600
#BinanceSquare #crypto #trading #cryptotrading #IOST
$ONE $AVA
IOST hält sich nahe der jüngsten Unterstützungszone nach einem scharfen Rücksetzer. Wenn Käufer diesen Bereich verteidigen und wieder Momentum aufnehmen, könnte der Preis versuchen, sich in Richtung der nächsten Widerstandsmarken zu erholen.
Einstiegszone: 0.0007950–0.0008250
TP1: 0.0008700
TP2: 0.0009300
TP3: 0.0010200
SL: 0.0007600
#BinanceSquare #crypto #trading #cryptotrading #IOST
$ONE $AVA
2
3
401
·
--
Bullisch
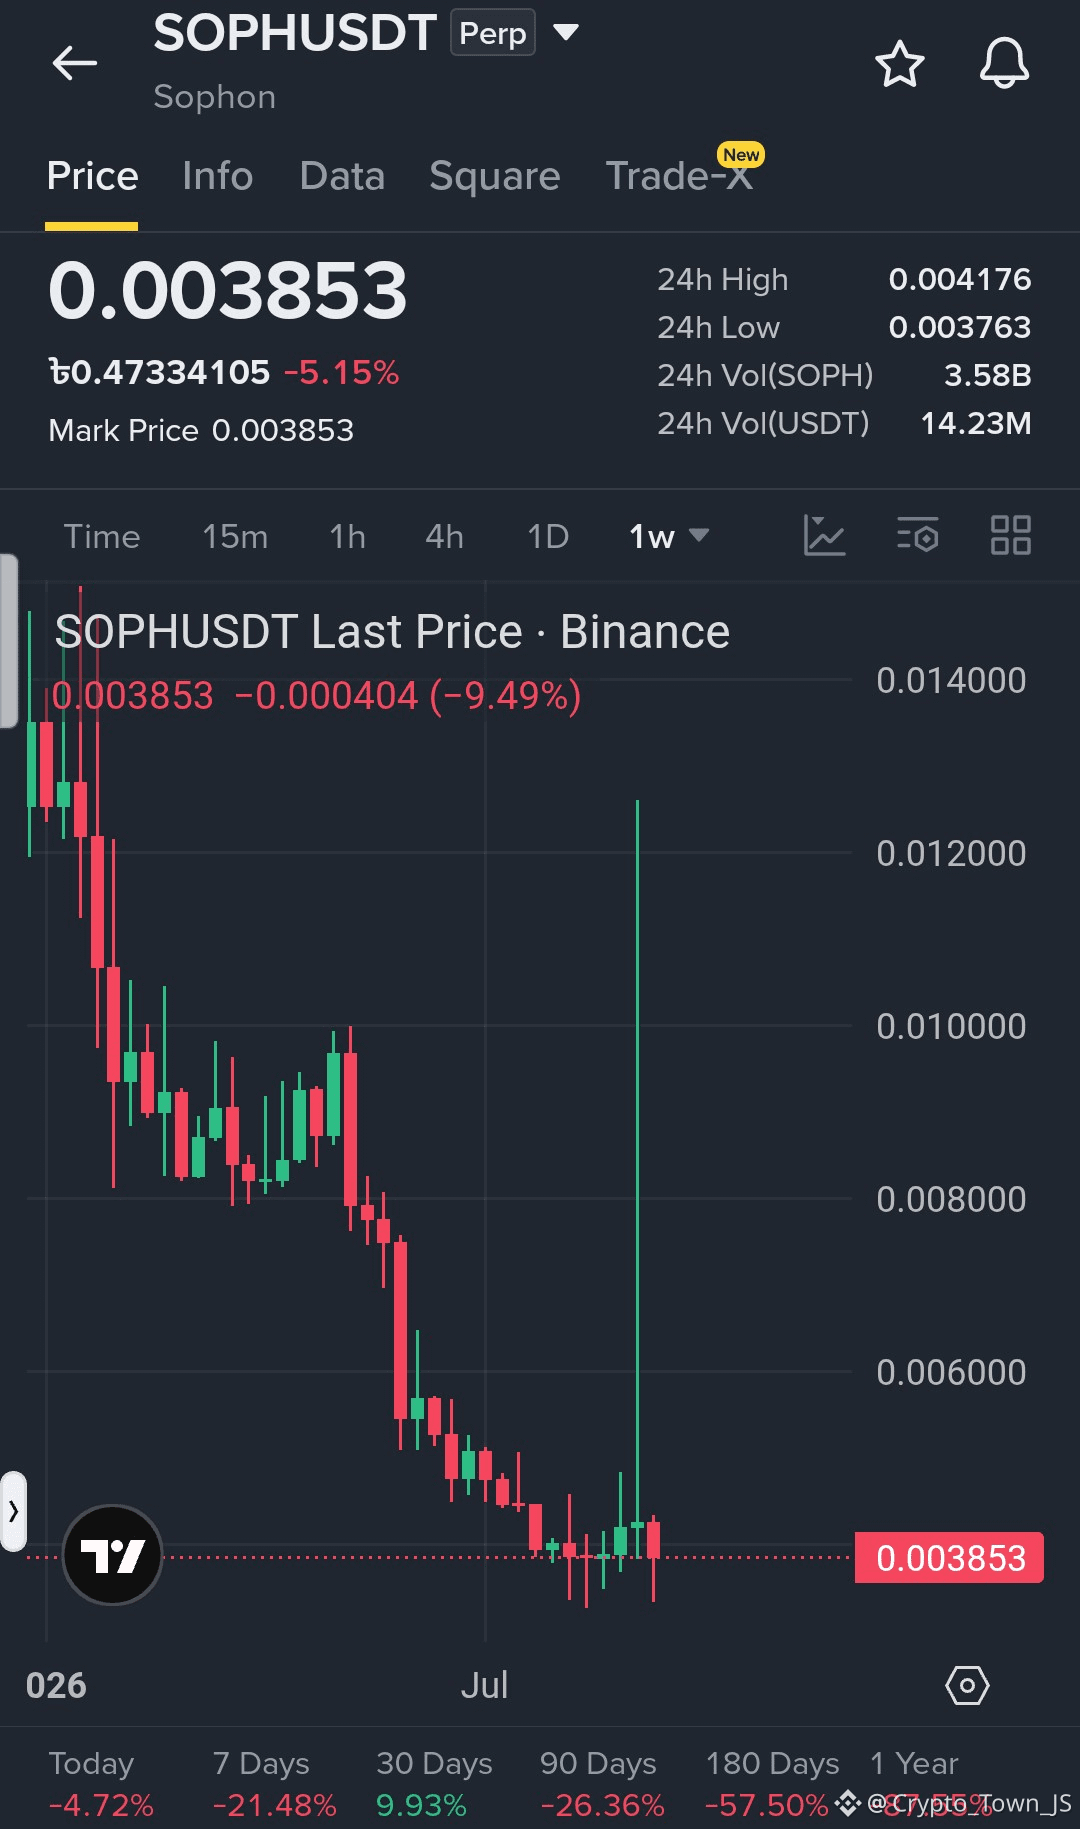
$SOPH USDT Long Setup
SOPH hält sich nahe dem jüngsten Tief nach einem starken Rücksetzer. Wenn Käufer die aktuelle Unterstützungszone verteidigen und wieder an Dynamik gewinnen, könnte der Kurs einen Erholungsversuch in Richtung der nächsten Widerstandsniveaus starten.
Einstiegszone: 0.00380–0.00395
TP1: 0.00415
TP2: 0.00445
TP3: 0.00480
SL: 0.00360
#BinanceSquare #crypto #trading #cryptotrading #SOPH
$ONE $AVA
{future}(AVAUSDT)
{future}(ONEUSDT)
{future}(SOPHUSDT)
$SOPH USDT Long Setup
SOPH hält sich nahe dem jüngsten Tief nach einem starken Rücksetzer. Wenn Käufer die aktuelle Unterstützungszone verteidigen und wieder an Dynamik gewinnen, könnte der Kurs einen Erholungsversuch in Richtung der nächsten Widerstandsniveaus starten.
Einstiegszone: 0.00380–0.00395
TP1: 0.00415
TP2: 0.00445
TP3: 0.00480
SL: 0.00360
#BinanceSquare #crypto #trading #cryptotrading #SOPH
$ONE $AVA
SOPH hält sich nahe dem jüngsten Tief nach einem starken Rücksetzer. Wenn Käufer die aktuelle Unterstützungszone verteidigen und wieder an Dynamik gewinnen, könnte der Kurs einen Erholungsversuch in Richtung der nächsten Widerstandsniveaus starten.
Einstiegszone: 0.00380–0.00395
TP1: 0.00415
TP2: 0.00445
TP3: 0.00480
SL: 0.00360
#BinanceSquare #crypto #trading #cryptotrading #SOPH
$ONE $AVA
2
325
·
--
Bärisch
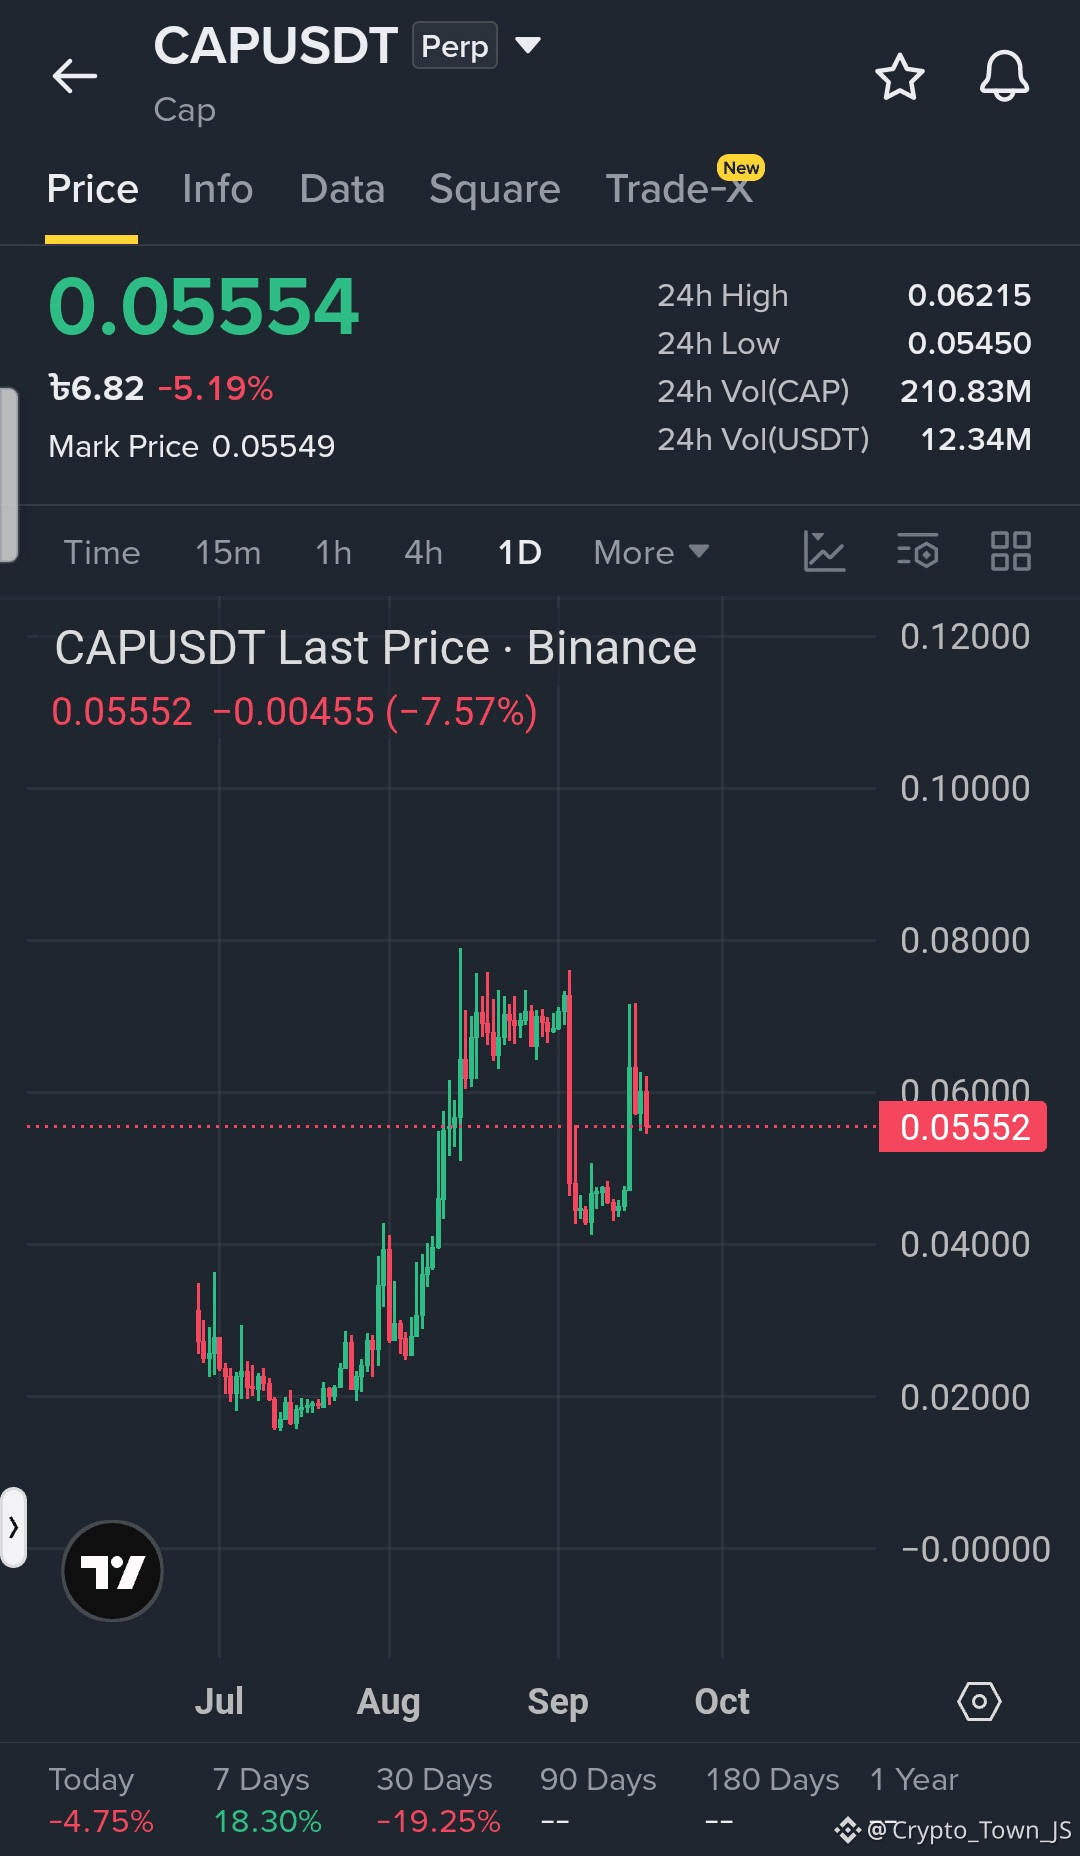
$CAP USDT Short-Setup
CAP steht unter Verkaufsdruck, nachdem es von dem jüngsten Hoch abgelehnt wurde. Wenn die Verkäufer die Kontrolle unterhalb der Widerstandszone behalten, könnte der Kurs sich in Richtung der nächsten Unterstützungslevel bewegen.
Einstiegszone: 0.05700–0.06000
TP1: 0.05450
TP2: 0.05200
TP3: 0.04900
SL: 0.06300
#BinanceSquare #crypto #trading #cryptotrading #CAP
$LSK $ONE
{future}(ONEUSDT)
{future}(LSKUSDT)
{future}(CAPUSDT)
$CAP USDT Short-Setup
CAP steht unter Verkaufsdruck, nachdem es von dem jüngsten Hoch abgelehnt wurde. Wenn die Verkäufer die Kontrolle unterhalb der Widerstandszone behalten, könnte der Kurs sich in Richtung der nächsten Unterstützungslevel bewegen.
Einstiegszone: 0.05700–0.06000
TP1: 0.05450
TP2: 0.05200
TP3: 0.04900
SL: 0.06300
#BinanceSquare #crypto #trading #cryptotrading #CAP
$LSK $ONE
CAP steht unter Verkaufsdruck, nachdem es von dem jüngsten Hoch abgelehnt wurde. Wenn die Verkäufer die Kontrolle unterhalb der Widerstandszone behalten, könnte der Kurs sich in Richtung der nächsten Unterstützungslevel bewegen.
Einstiegszone: 0.05700–0.06000
TP1: 0.05450
TP2: 0.05200
TP3: 0.04900
SL: 0.06300
#BinanceSquare #crypto #trading #cryptotrading #CAP
$LSK $ONE
1
278
·
--
Bullisch
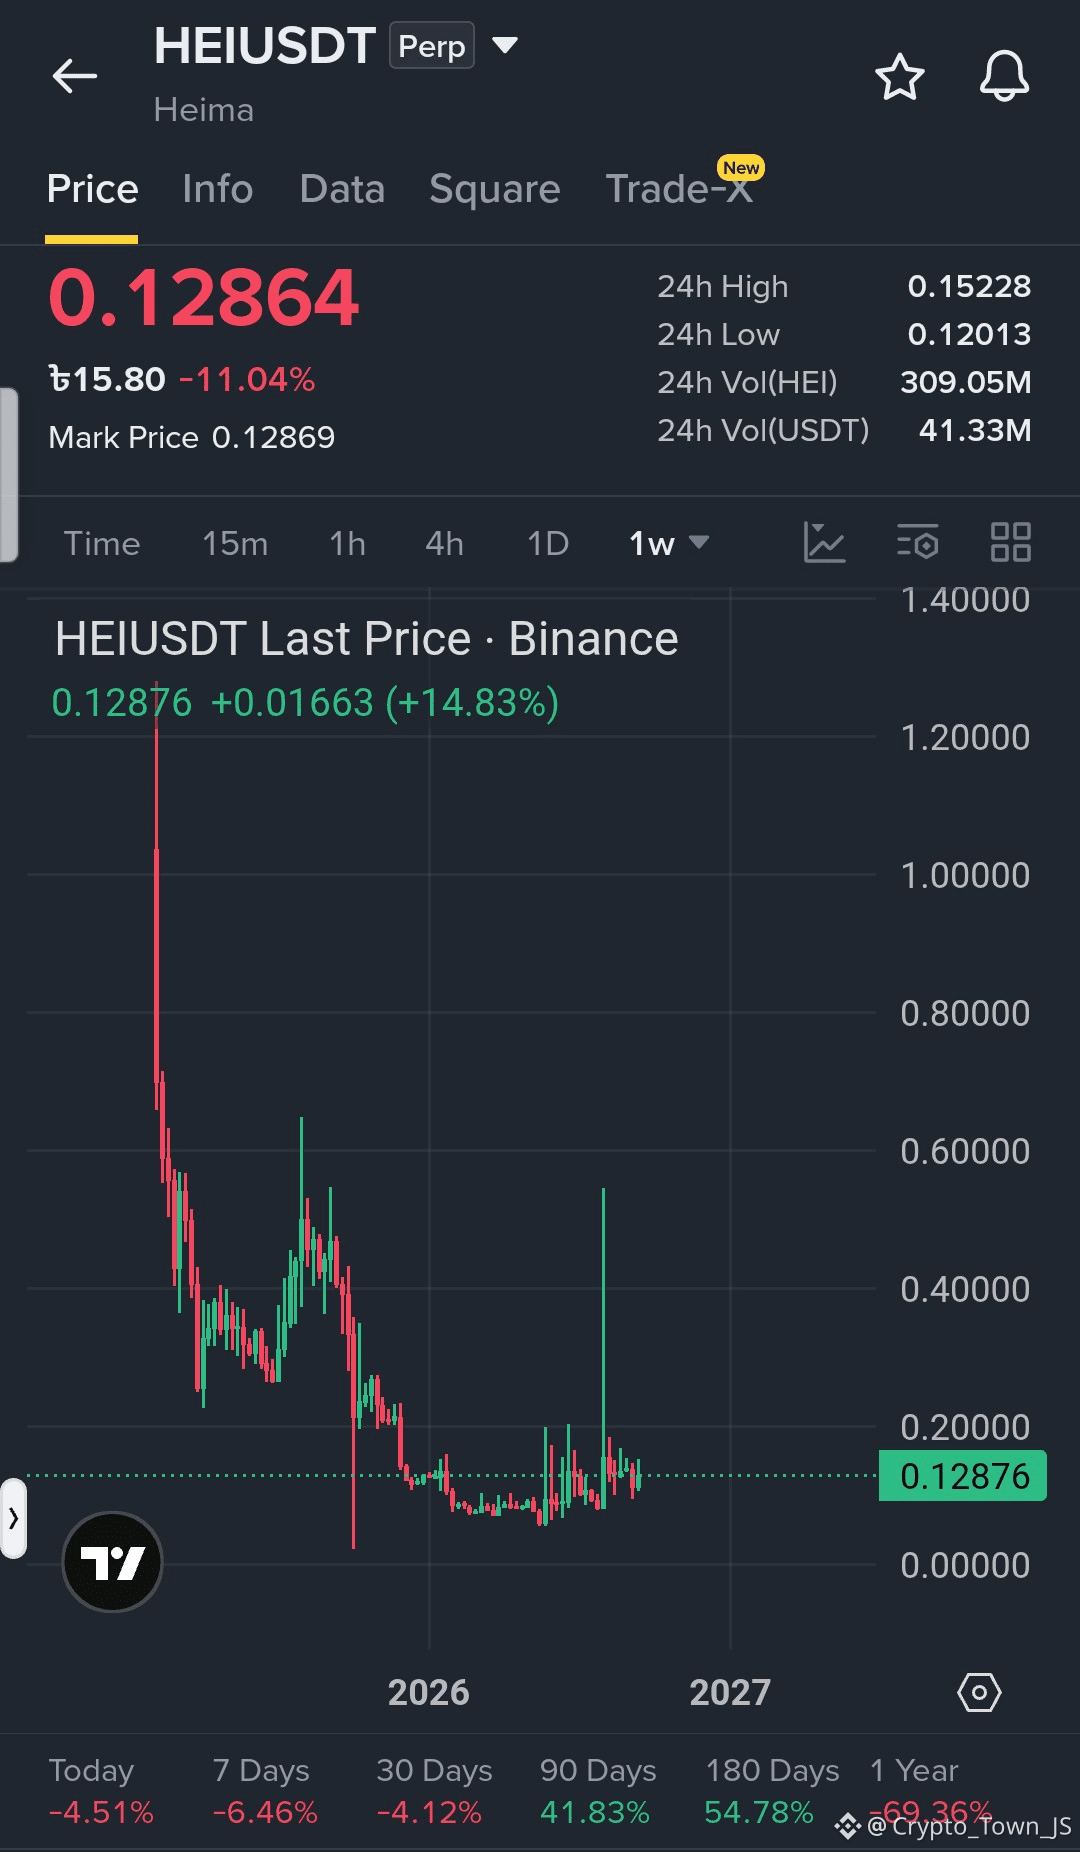
$HEI USDT Long-Setup
HEI zeigt nach einem starken Rücksetzer Anzeichen einer Erholung. Wenn Käufer die aktuelle Unterstützungszone verteidigen und wieder an Momentum gewinnen, könnte der Preis in Richtung der nächsten Widerstandsniveaus steigen.
Einstiegszone: 0.12500–0.13000
TP1: 0.13600
TP2: 0.14300
TP3: 0.15200
SL: 0.11900
#BinanceSquare #crypto #trading #cryptotrading #HEI
$ONE $MARSCOIN
{future}(MARSCOINUSDT)
{future}(ONEUSDT)
{future}(HEMIUSDT)
$HEI USDT Long-Setup
HEI zeigt nach einem starken Rücksetzer Anzeichen einer Erholung. Wenn Käufer die aktuelle Unterstützungszone verteidigen und wieder an Momentum gewinnen, könnte der Preis in Richtung der nächsten Widerstandsniveaus steigen.
Einstiegszone: 0.12500–0.13000
TP1: 0.13600
TP2: 0.14300
TP3: 0.15200
SL: 0.11900
#BinanceSquare #crypto #trading #cryptotrading #HEI
$ONE $MARSCOIN
HEI zeigt nach einem starken Rücksetzer Anzeichen einer Erholung. Wenn Käufer die aktuelle Unterstützungszone verteidigen und wieder an Momentum gewinnen, könnte der Preis in Richtung der nächsten Widerstandsniveaus steigen.
Einstiegszone: 0.12500–0.13000
TP1: 0.13600
TP2: 0.14300
TP3: 0.15200
SL: 0.11900
#BinanceSquare #crypto #trading #cryptotrading #HEI
$ONE $MARSCOIN
1
2
293
·
--
Bullisch
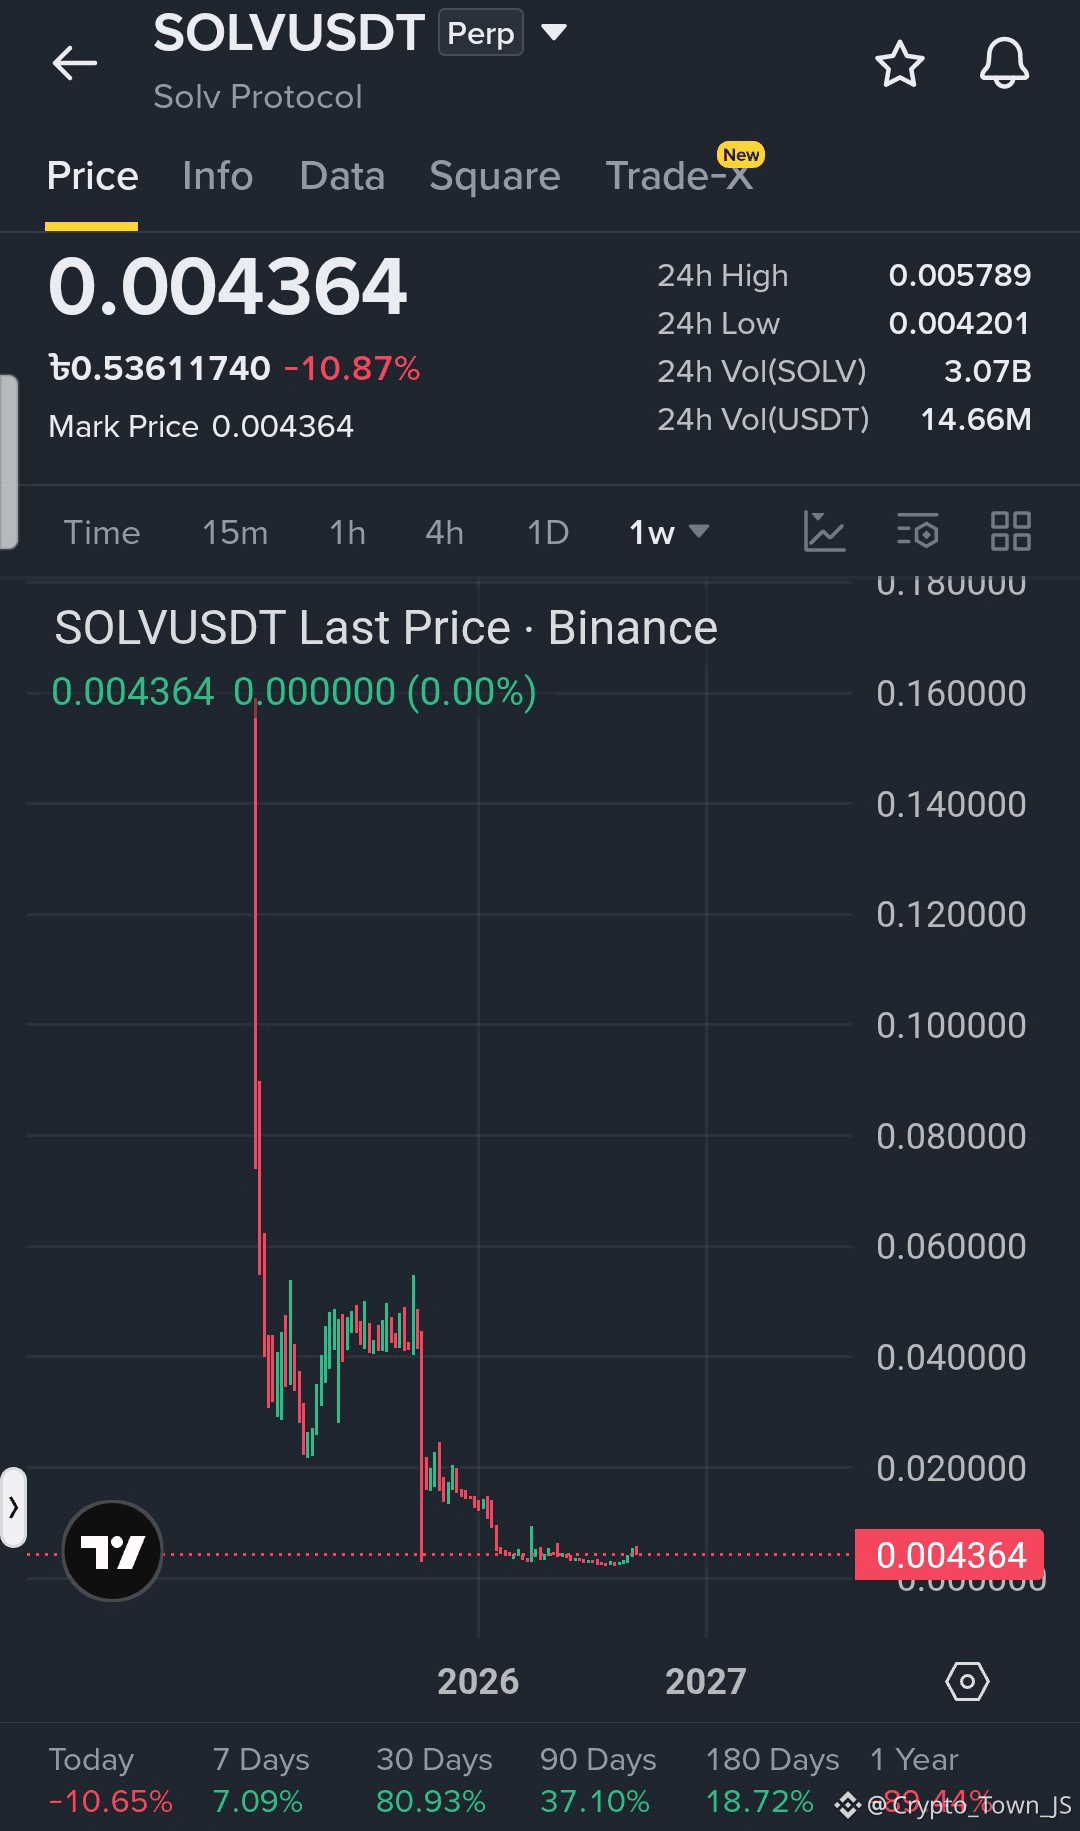
$SOLV USDT Long-Setup
SOLV hält sich nach einem scharfen Rücksetzer in der Nähe eines wichtigen Unterstützungsbereichs. Wenn Käufer die aktuelle Zone verteidigen und wieder an Momentum gewinnen, könnte der Preis einen Erholungsversuch in Richtung der nächsten Widerstandslevel unternehmen.
Einstiegszone: 0.00425–0.00445
TP1: 0.00470
TP2: 0.00510
TP3: 0.00560
SL: 0.00405
#BinanceSquare #crypto #trading #cryptotrading #solv
$ONE $AVA
{future}(AVAUSDT)
{future}(ONEUSDT)
{future}(SOLVUSDT)
$SOLV USDT Long-Setup
SOLV hält sich nach einem scharfen Rücksetzer in der Nähe eines wichtigen Unterstützungsbereichs. Wenn Käufer die aktuelle Zone verteidigen und wieder an Momentum gewinnen, könnte der Preis einen Erholungsversuch in Richtung der nächsten Widerstandslevel unternehmen.
Einstiegszone: 0.00425–0.00445
TP1: 0.00470
TP2: 0.00510
TP3: 0.00560
SL: 0.00405
#BinanceSquare #crypto #trading #cryptotrading #solv
$ONE $AVA
SOLV hält sich nach einem scharfen Rücksetzer in der Nähe eines wichtigen Unterstützungsbereichs. Wenn Käufer die aktuelle Zone verteidigen und wieder an Momentum gewinnen, könnte der Preis einen Erholungsversuch in Richtung der nächsten Widerstandslevel unternehmen.
Einstiegszone: 0.00425–0.00445
TP1: 0.00470
TP2: 0.00510
TP3: 0.00560
SL: 0.00405
#BinanceSquare #crypto #trading #cryptotrading #solv
$ONE $AVA
214
·
--
Bullisch
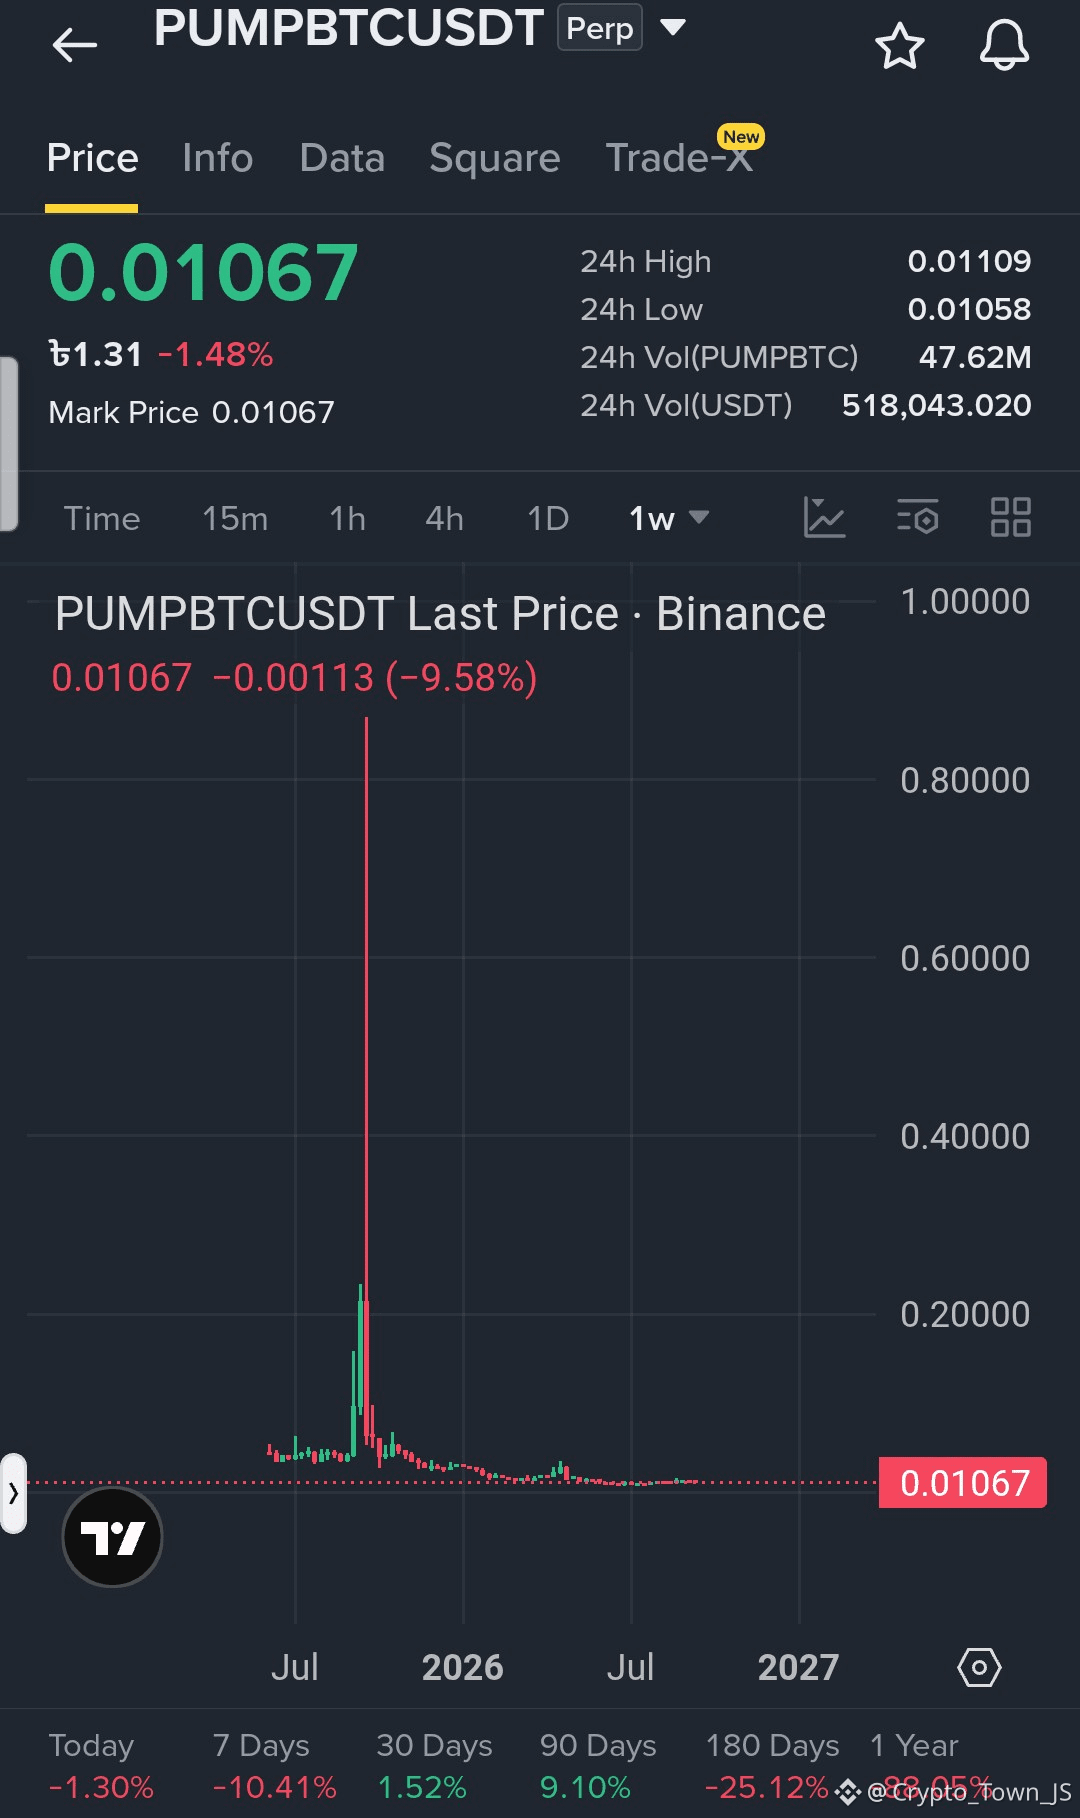
$PUMPBTC USDT Long Setup
PUMPBTC hält sich nach einem Rücksetzer nahe dem jüngsten Tief. Wenn Käufer die aktuelle Unterstützungszone verteidigen und der Aufwärtsimpuls zurückkehrt, könnte der Kurs einen Erholungsversuch in Richtung der nächsten Widerstandsniveaus starten.
Einstiegszone: 0.01060–0.01080
TP1: 0.01100
TP2: 0.01140
TP3: 0.01200
SL: 0.01030
#BinanceSquare #crypto #trading #cryptotrading #pumpbtc
$ONE $ENA
{future}(ENAUSDT)
{future}(ONEUSDT)
{future}(PUMPBTCUSDT)
$PUMPBTC USDT Long Setup
PUMPBTC hält sich nach einem Rücksetzer nahe dem jüngsten Tief. Wenn Käufer die aktuelle Unterstützungszone verteidigen und der Aufwärtsimpuls zurückkehrt, könnte der Kurs einen Erholungsversuch in Richtung der nächsten Widerstandsniveaus starten.
Einstiegszone: 0.01060–0.01080
TP1: 0.01100
TP2: 0.01140
TP3: 0.01200
SL: 0.01030
#BinanceSquare #crypto #trading #cryptotrading #pumpbtc
$ONE $ENA
PUMPBTC hält sich nach einem Rücksetzer nahe dem jüngsten Tief. Wenn Käufer die aktuelle Unterstützungszone verteidigen und der Aufwärtsimpuls zurückkehrt, könnte der Kurs einen Erholungsversuch in Richtung der nächsten Widerstandsniveaus starten.
Einstiegszone: 0.01060–0.01080
TP1: 0.01100
TP2: 0.01140
TP3: 0.01200
SL: 0.01030
#BinanceSquare #crypto #trading #cryptotrading #pumpbtc
$ONE $ENA
25
·
--
Bullisch
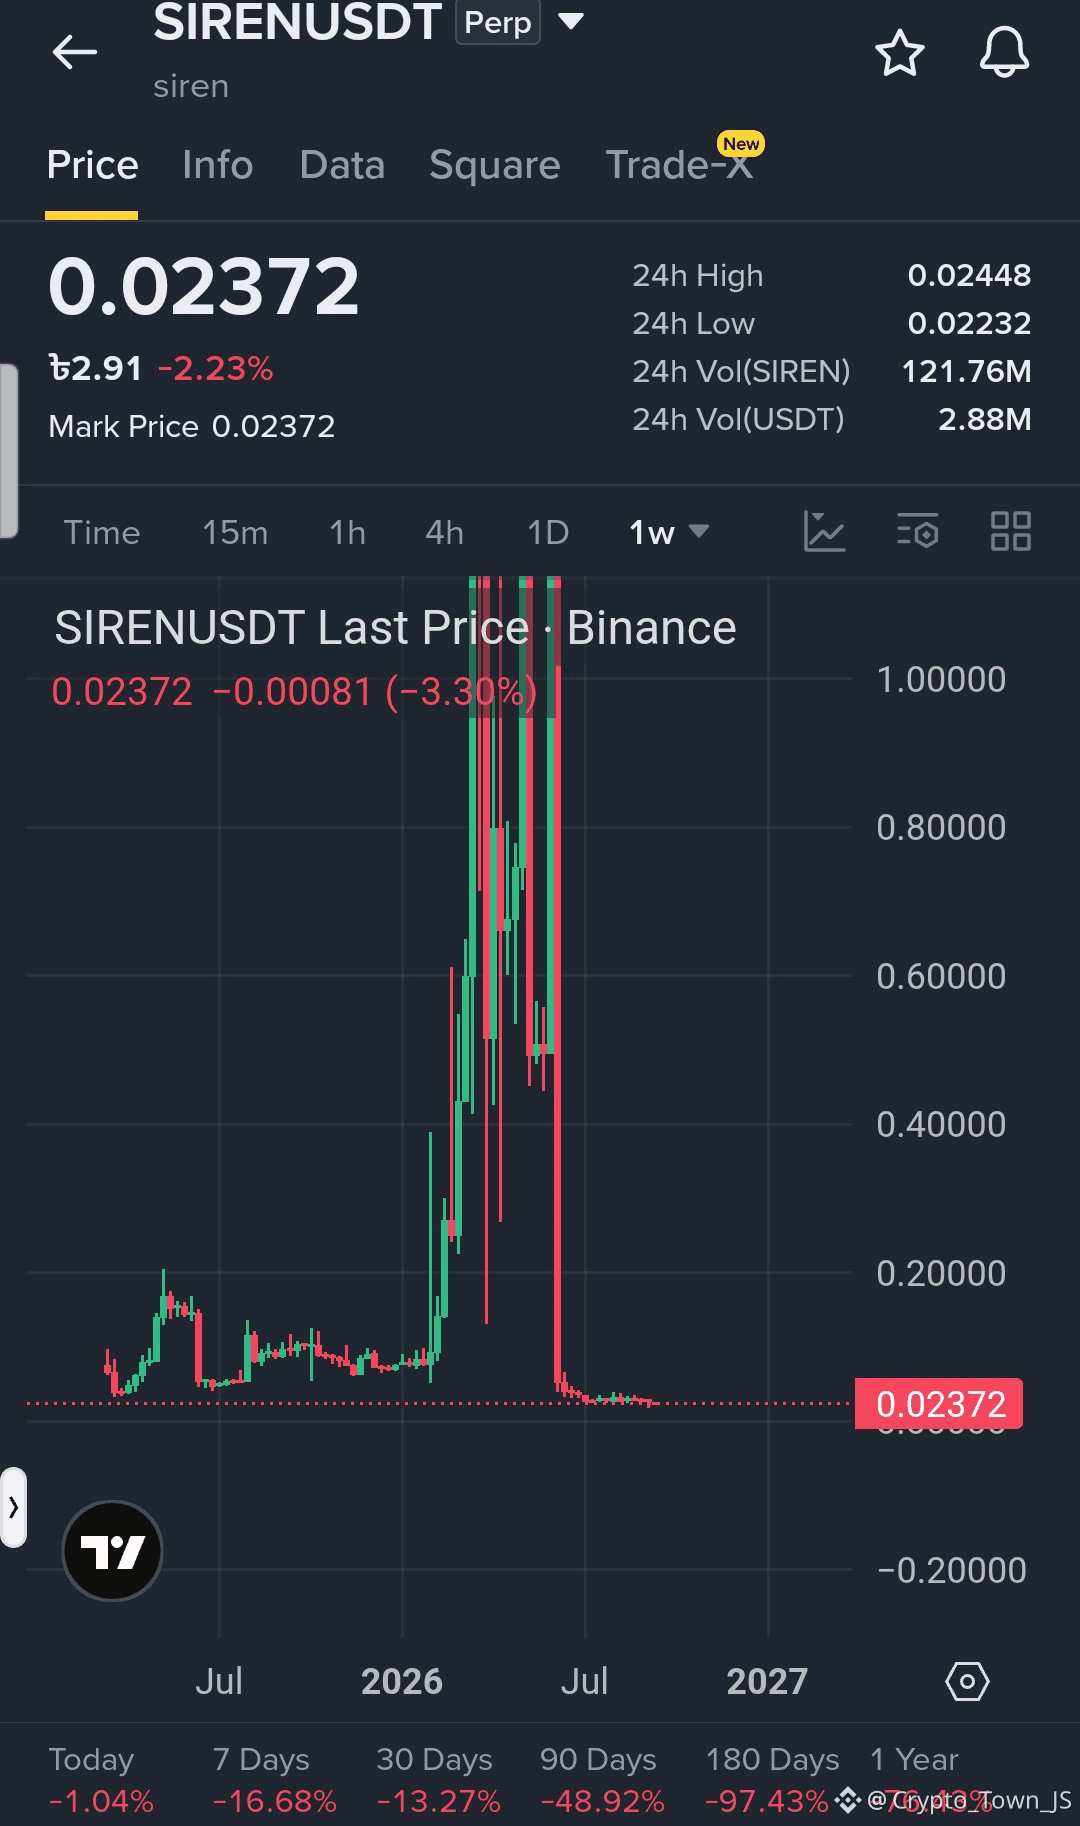
$SIREN USDT Long-Setup
SIREN hält sich nach einem Pullback in der Nähe des jüngsten Unterstützungsbereichs. Wenn Käufer die Einstiegszone verteidigen und wieder an Schwung gewinnen, könnte der Kurs versuchen, sich bis zu den nächsten Widerstandsniveaus zu erholen.
Einstiegszone: 0.02300–0.02370
TP1: 0.02450
TP2: 0.02600
TP3: 0.02800
SL: 0.02180
#BinanceSquare #crypto #trading #cryptotrading #siren
$ONE $AVA
{future}(AVAUSDT)
{future}(ONEUSDT)
{future}(SIRENUSDT)
$SIREN USDT Long-Setup
SIREN hält sich nach einem Pullback in der Nähe des jüngsten Unterstützungsbereichs. Wenn Käufer die Einstiegszone verteidigen und wieder an Schwung gewinnen, könnte der Kurs versuchen, sich bis zu den nächsten Widerstandsniveaus zu erholen.
Einstiegszone: 0.02300–0.02370
TP1: 0.02450
TP2: 0.02600
TP3: 0.02800
SL: 0.02180
#BinanceSquare #crypto #trading #cryptotrading #siren
$ONE $AVA
SIREN hält sich nach einem Pullback in der Nähe des jüngsten Unterstützungsbereichs. Wenn Käufer die Einstiegszone verteidigen und wieder an Schwung gewinnen, könnte der Kurs versuchen, sich bis zu den nächsten Widerstandsniveaus zu erholen.
Einstiegszone: 0.02300–0.02370
TP1: 0.02450
TP2: 0.02600
TP3: 0.02800
SL: 0.02180
#BinanceSquare #crypto #trading #cryptotrading #siren
$ONE $AVA
1
316
·
--
Bullisch
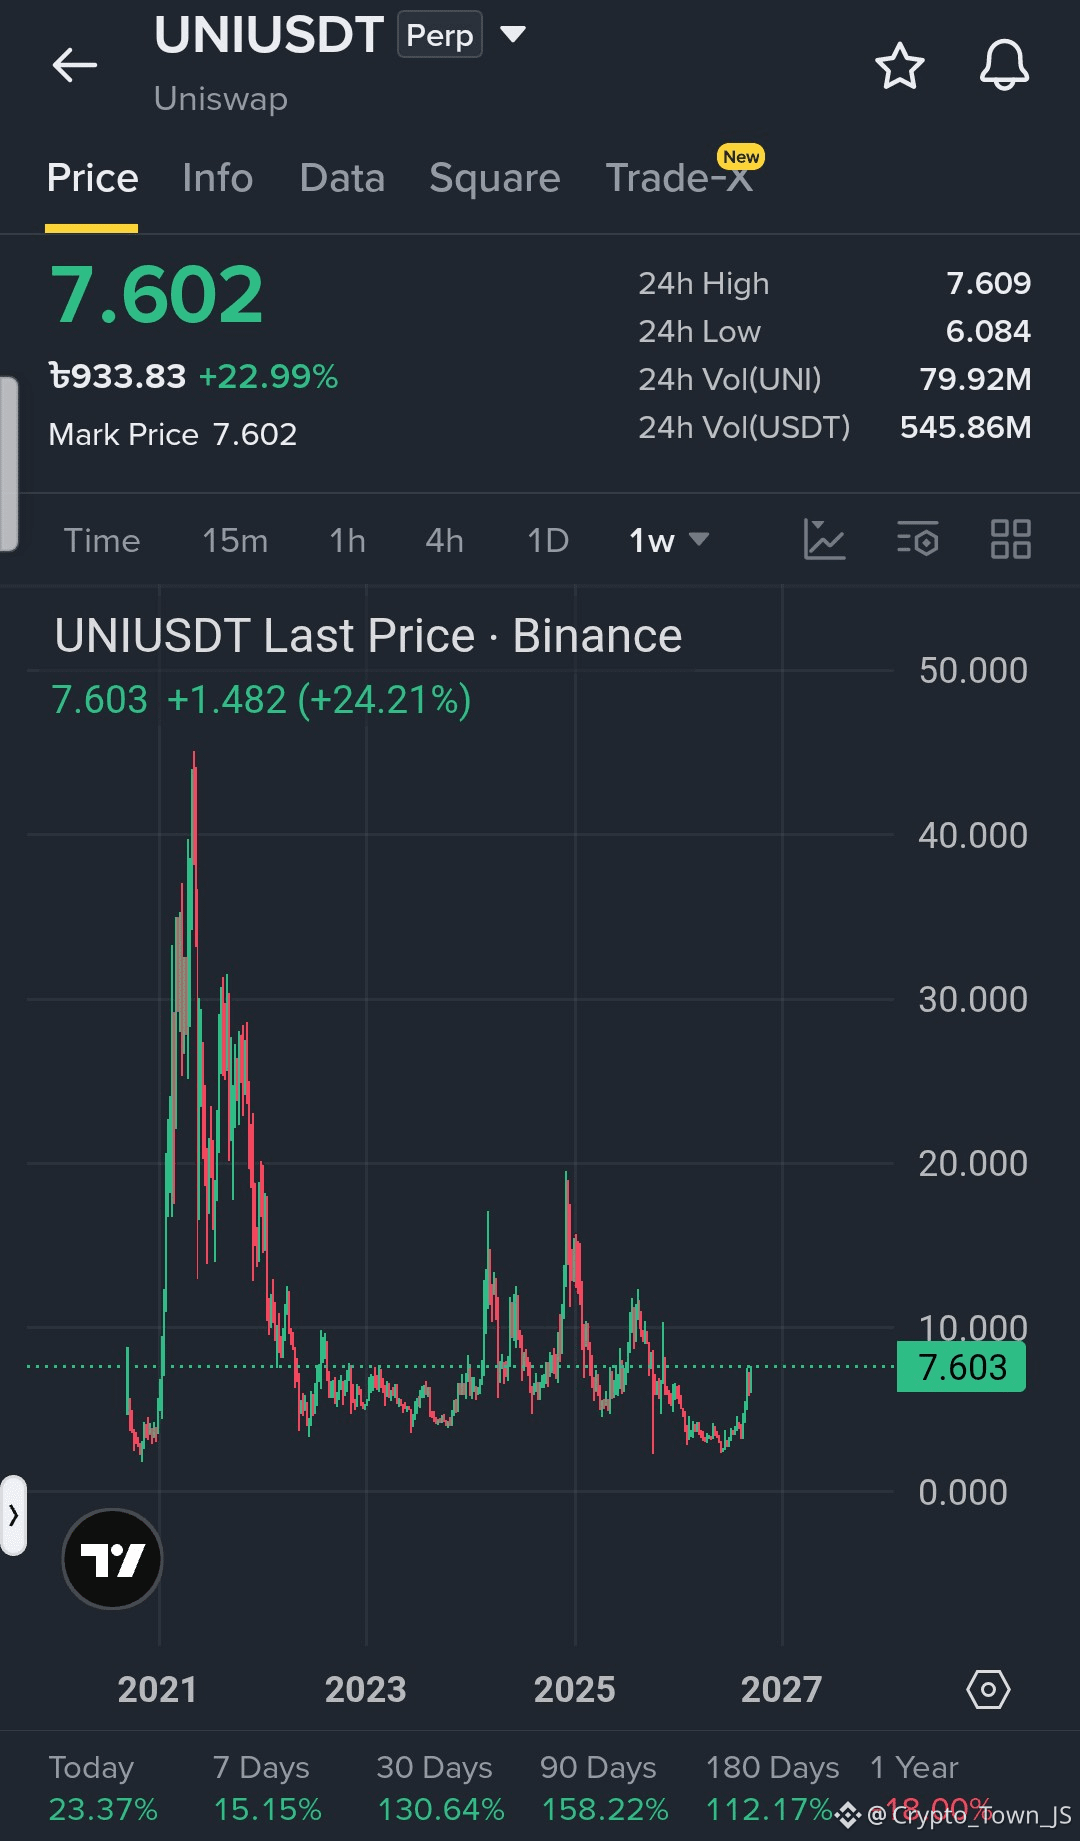
$UNI USDT Long-Setup
UNI zeigt nach dem Ausbruch über die jüngste Range eine starke bullische Dynamik. Wenn Käufer die aktuelle Unterstützungszone halten, könnte der Preis weiter in Richtung der nächsten Widerstandsniveaus laufen.
Einstiegszone: 7.300–7.550
TP1: 7.900
TP2: 8.400
TP3: 9.000
SL: 6.950
#BinanceSquare #crypto #trading #cryptotrading #UNI
$ONE $AVA
{future}(AVAUSDT)
{future}(ONEUSDT)
{future}(UNIUSDT)
$UNI USDT Long-Setup
UNI zeigt nach dem Ausbruch über die jüngste Range eine starke bullische Dynamik. Wenn Käufer die aktuelle Unterstützungszone halten, könnte der Preis weiter in Richtung der nächsten Widerstandsniveaus laufen.
Einstiegszone: 7.300–7.550
TP1: 7.900
TP2: 8.400
TP3: 9.000
SL: 6.950
#BinanceSquare #crypto #trading #cryptotrading #UNI
$ONE $AVA
UNI zeigt nach dem Ausbruch über die jüngste Range eine starke bullische Dynamik. Wenn Käufer die aktuelle Unterstützungszone halten, könnte der Preis weiter in Richtung der nächsten Widerstandsniveaus laufen.
Einstiegszone: 7.300–7.550
TP1: 7.900
TP2: 8.400
TP3: 9.000
SL: 6.950
#BinanceSquare #crypto #trading #cryptotrading #UNI
$ONE $AVA
249
·
--
Bullisch
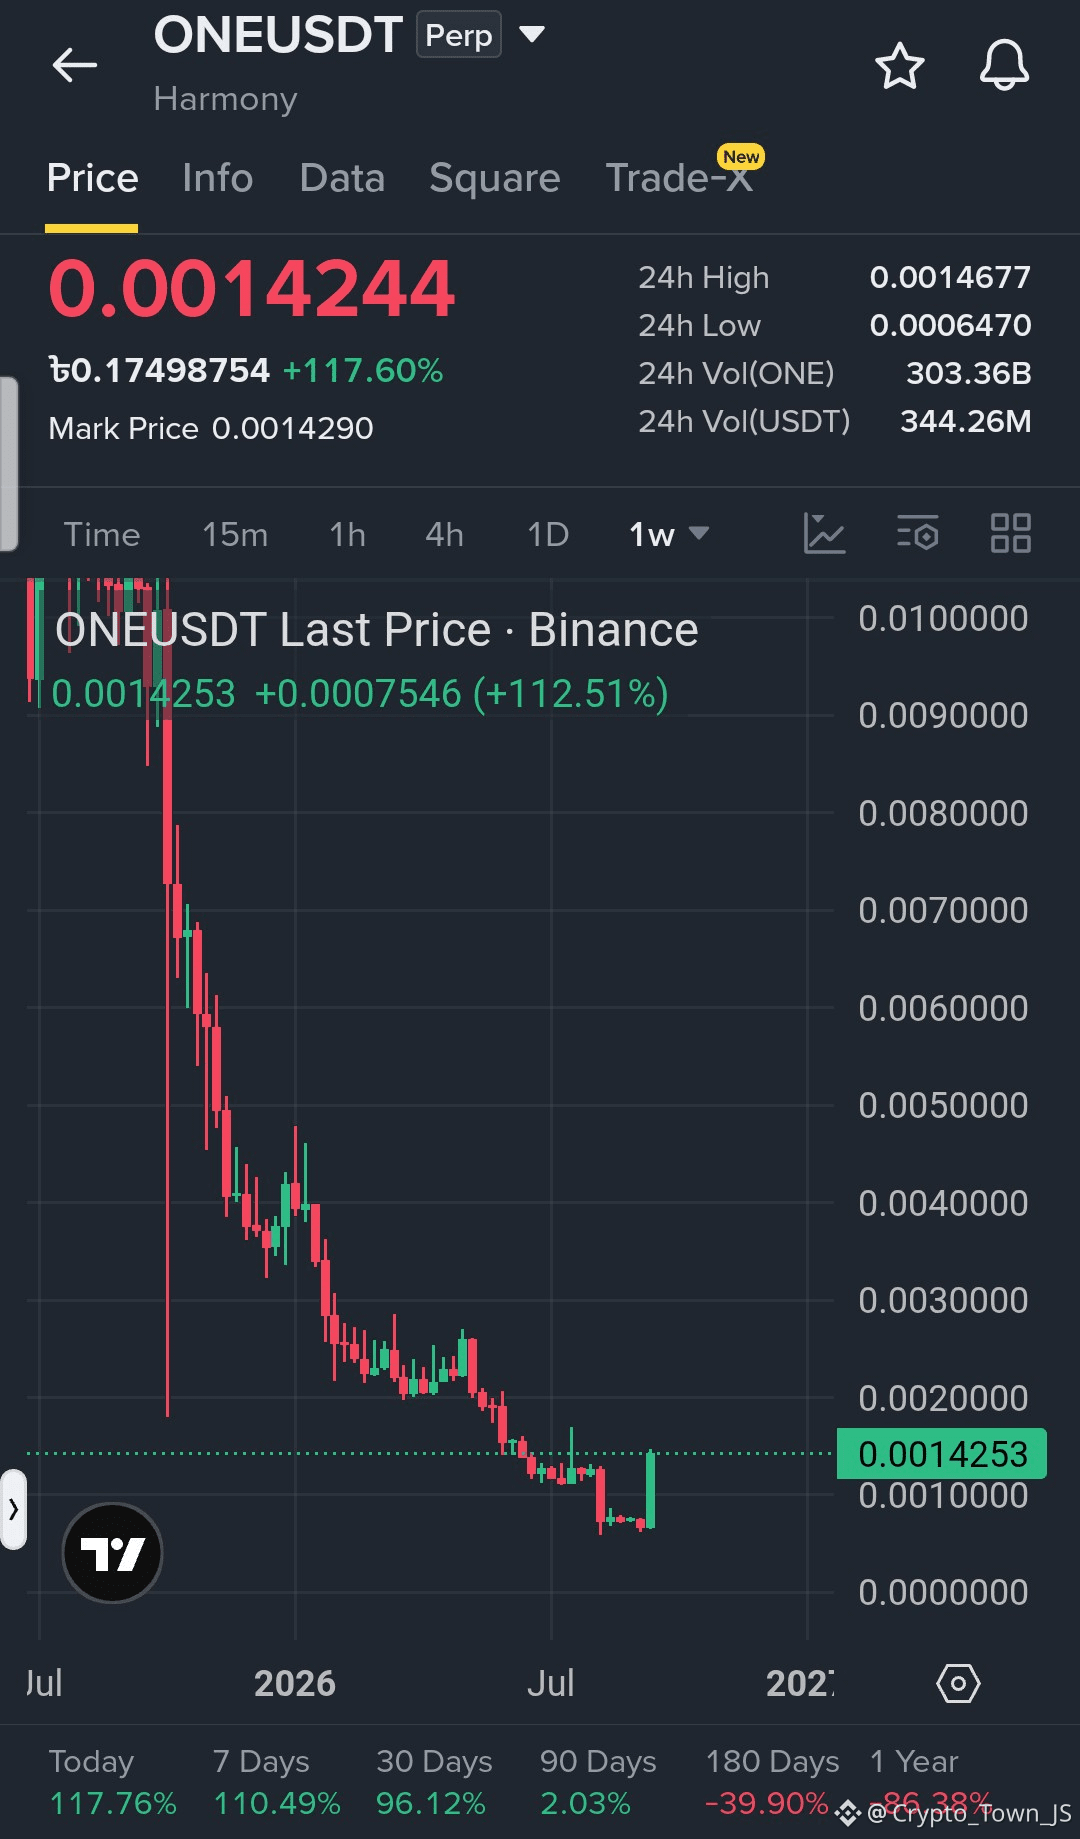
$ONE USDT Long-Setup
ONE zeigt nach einem großen Ausbruch eine explosive Kaufdynamik. Wenn Käufer den aktuellen Ausbruchsbereich halten können, könnte der Kurs in Richtung der nächsten Widerstandsniveaus weiterlaufen.
Einstiegszone: 0.0013000–0.0013900
TP1: 0.0015000
TP2: 0.0016500
TP3: 0.0018500
SL: 0.0012000
#BinanceSquare #crypto #trading #cryptotrading #one
$AVA $KSM
{future}(KSMUSDT)
{future}(AVAUSDT)
{future}(ONEUSDT)
$ONE USDT Long-Setup
ONE zeigt nach einem großen Ausbruch eine explosive Kaufdynamik. Wenn Käufer den aktuellen Ausbruchsbereich halten können, könnte der Kurs in Richtung der nächsten Widerstandsniveaus weiterlaufen.
Einstiegszone: 0.0013000–0.0013900
TP1: 0.0015000
TP2: 0.0016500
TP3: 0.0018500
SL: 0.0012000
#BinanceSquare #crypto #trading #cryptotrading #one
$AVA $KSM
ONE zeigt nach einem großen Ausbruch eine explosive Kaufdynamik. Wenn Käufer den aktuellen Ausbruchsbereich halten können, könnte der Kurs in Richtung der nächsten Widerstandsniveaus weiterlaufen.
Einstiegszone: 0.0013000–0.0013900
TP1: 0.0015000
TP2: 0.0016500
TP3: 0.0018500
SL: 0.0012000
#BinanceSquare #crypto #trading #cryptotrading #one
$AVA $KSM
1
262
·
--
Bullisch
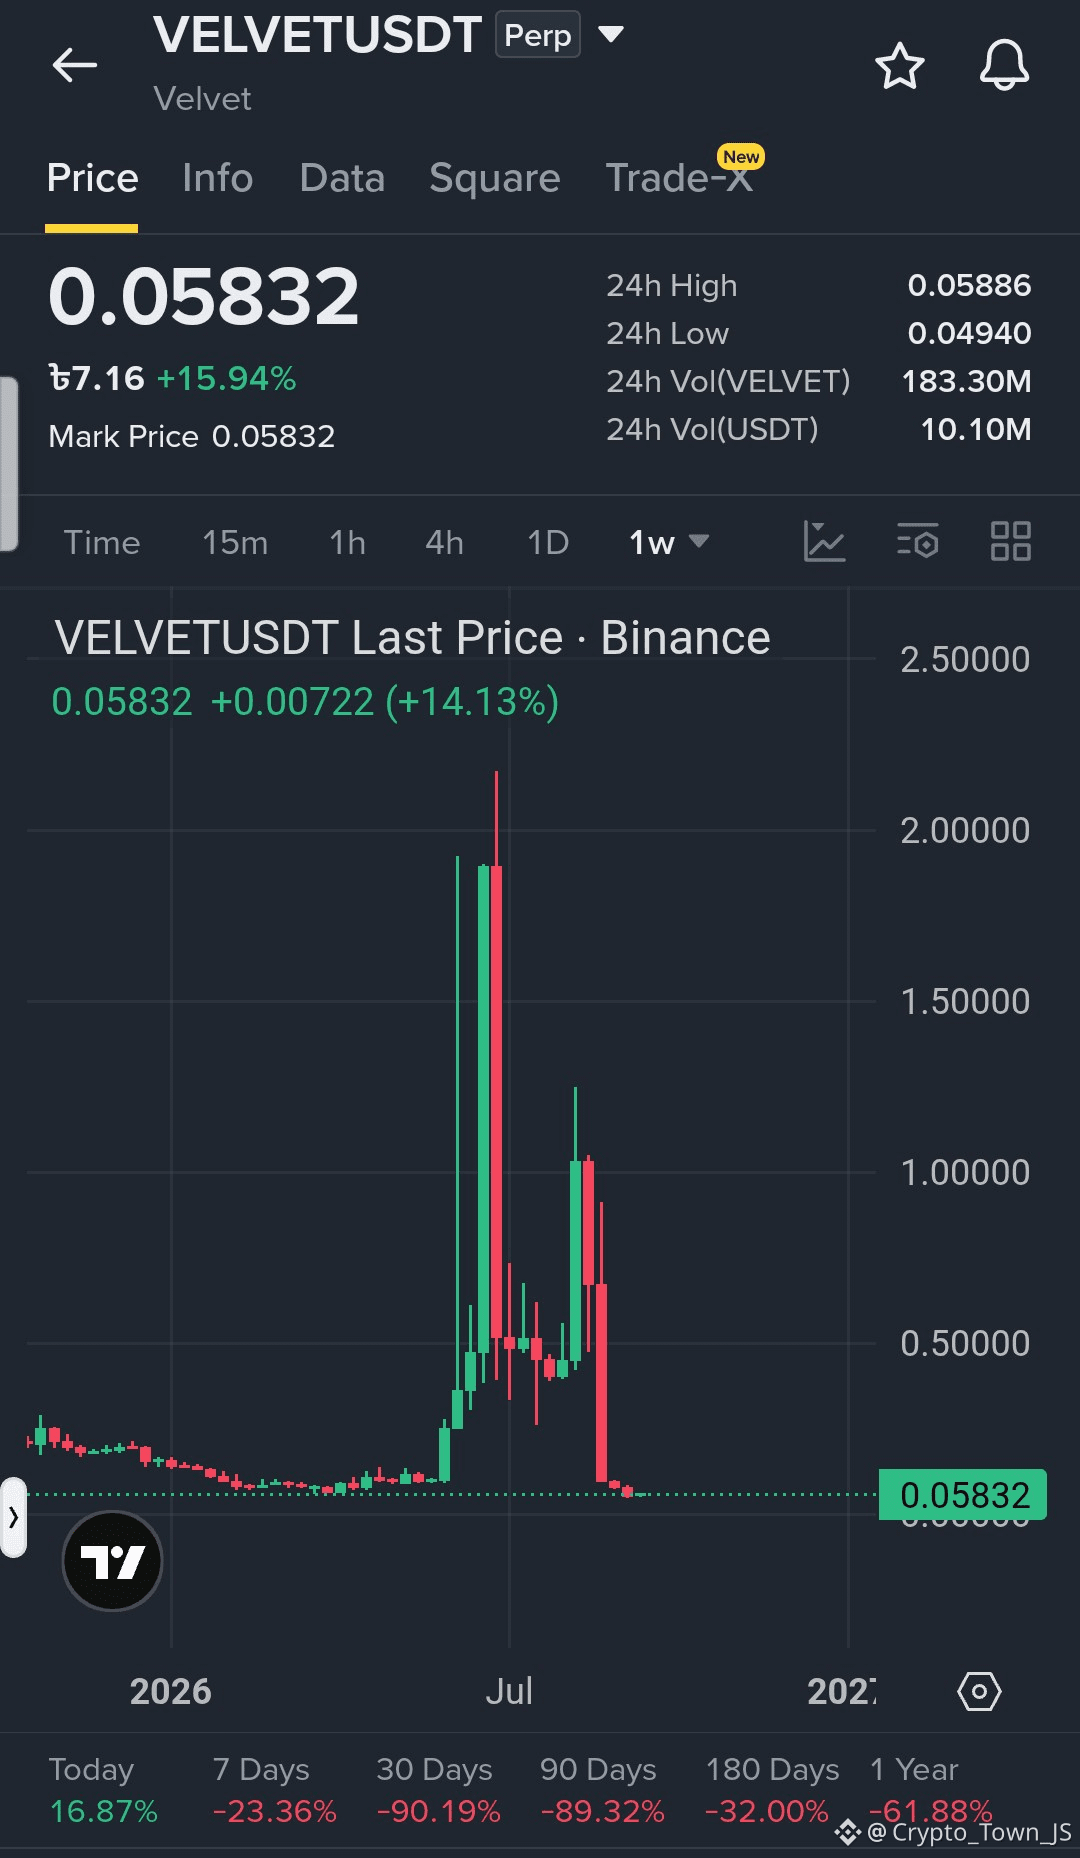
$VELVET USDT Long-Setup
VELVET zeigt nach der starken Erholung vom jüngsten Tief eine hohe Kaufdynamik. Wenn Käufer die aktuelle Unterstützungszone halten, könnte der Kurs in Richtung der nächsten Widerstandsniveaus weitersteigen.
Einstiegszone: 0.05500–0.05800
TP1: 0.06100
TP2: 0.06500
TP3: 0.07000
SL: 0.05200
#BinanceSquare #crypto #trading #cryptotrading #Velvet
$ONE $AVA
{future}(AVAUSDT)
{future}(ONEUSDT)
{future}(VELVETUSDT)
$VELVET USDT Long-Setup
VELVET zeigt nach der starken Erholung vom jüngsten Tief eine hohe Kaufdynamik. Wenn Käufer die aktuelle Unterstützungszone halten, könnte der Kurs in Richtung der nächsten Widerstandsniveaus weitersteigen.
Einstiegszone: 0.05500–0.05800
TP1: 0.06100
TP2: 0.06500
TP3: 0.07000
SL: 0.05200
#BinanceSquare #crypto #trading #cryptotrading #Velvet
$ONE $AVA
VELVET zeigt nach der starken Erholung vom jüngsten Tief eine hohe Kaufdynamik. Wenn Käufer die aktuelle Unterstützungszone halten, könnte der Kurs in Richtung der nächsten Widerstandsniveaus weitersteigen.
Einstiegszone: 0.05500–0.05800
TP1: 0.06100
TP2: 0.06500
TP3: 0.07000
SL: 0.05200
#BinanceSquare #crypto #trading #cryptotrading #Velvet
$ONE $AVA
24
·
--
Bullisch
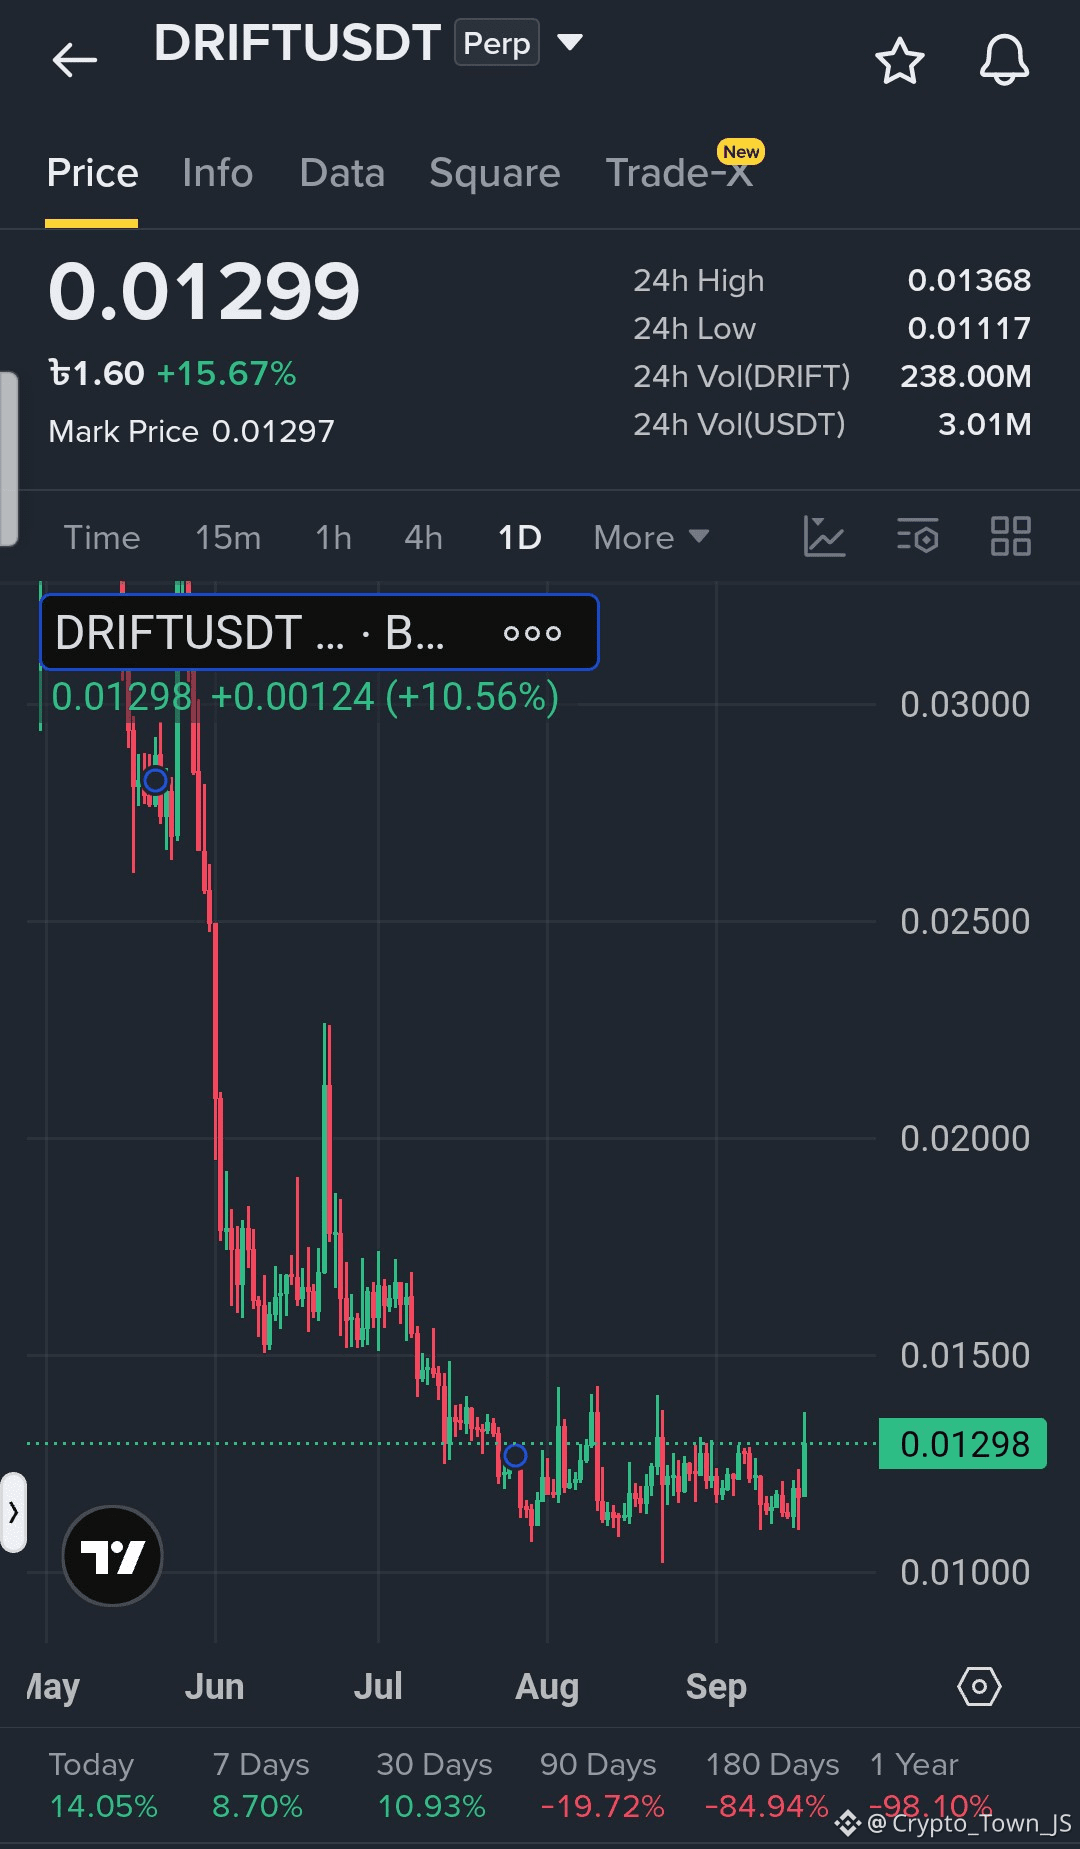
$DRIFT USDT Long-Setup
DRIFT zeigt nach einer soliden Erholung vom jüngsten Tief eine starke Kaufdynamik. Wenn Käufer die aktuelle Unterstützungszone verteidigen, könnte der Kurs weiter in Richtung der nächsten Widerstandsniveaus laufen.
Einstiegszone: 0.01240–0.01290
TP1: 0.01350
TP2: 0.01420
TP3: 0.01520
SL: 0.01170
#BinanceSquare #crypto #trading #cryptotrading #DRIFT
$KSM $ONE
{future}(ONEUSDT)
{future}(KSMUSDT)
{future}(DRIFTUSDT)
$DRIFT USDT Long-Setup
DRIFT zeigt nach einer soliden Erholung vom jüngsten Tief eine starke Kaufdynamik. Wenn Käufer die aktuelle Unterstützungszone verteidigen, könnte der Kurs weiter in Richtung der nächsten Widerstandsniveaus laufen.
Einstiegszone: 0.01240–0.01290
TP1: 0.01350
TP2: 0.01420
TP3: 0.01520
SL: 0.01170
#BinanceSquare #crypto #trading #cryptotrading #DRIFT
$KSM $ONE
DRIFT zeigt nach einer soliden Erholung vom jüngsten Tief eine starke Kaufdynamik. Wenn Käufer die aktuelle Unterstützungszone verteidigen, könnte der Kurs weiter in Richtung der nächsten Widerstandsniveaus laufen.
Einstiegszone: 0.01240–0.01290
TP1: 0.01350
TP2: 0.01420
TP3: 0.01520
SL: 0.01170
#BinanceSquare #crypto #trading #cryptotrading #DRIFT
$KSM $ONE
20
·
--
Bullisch
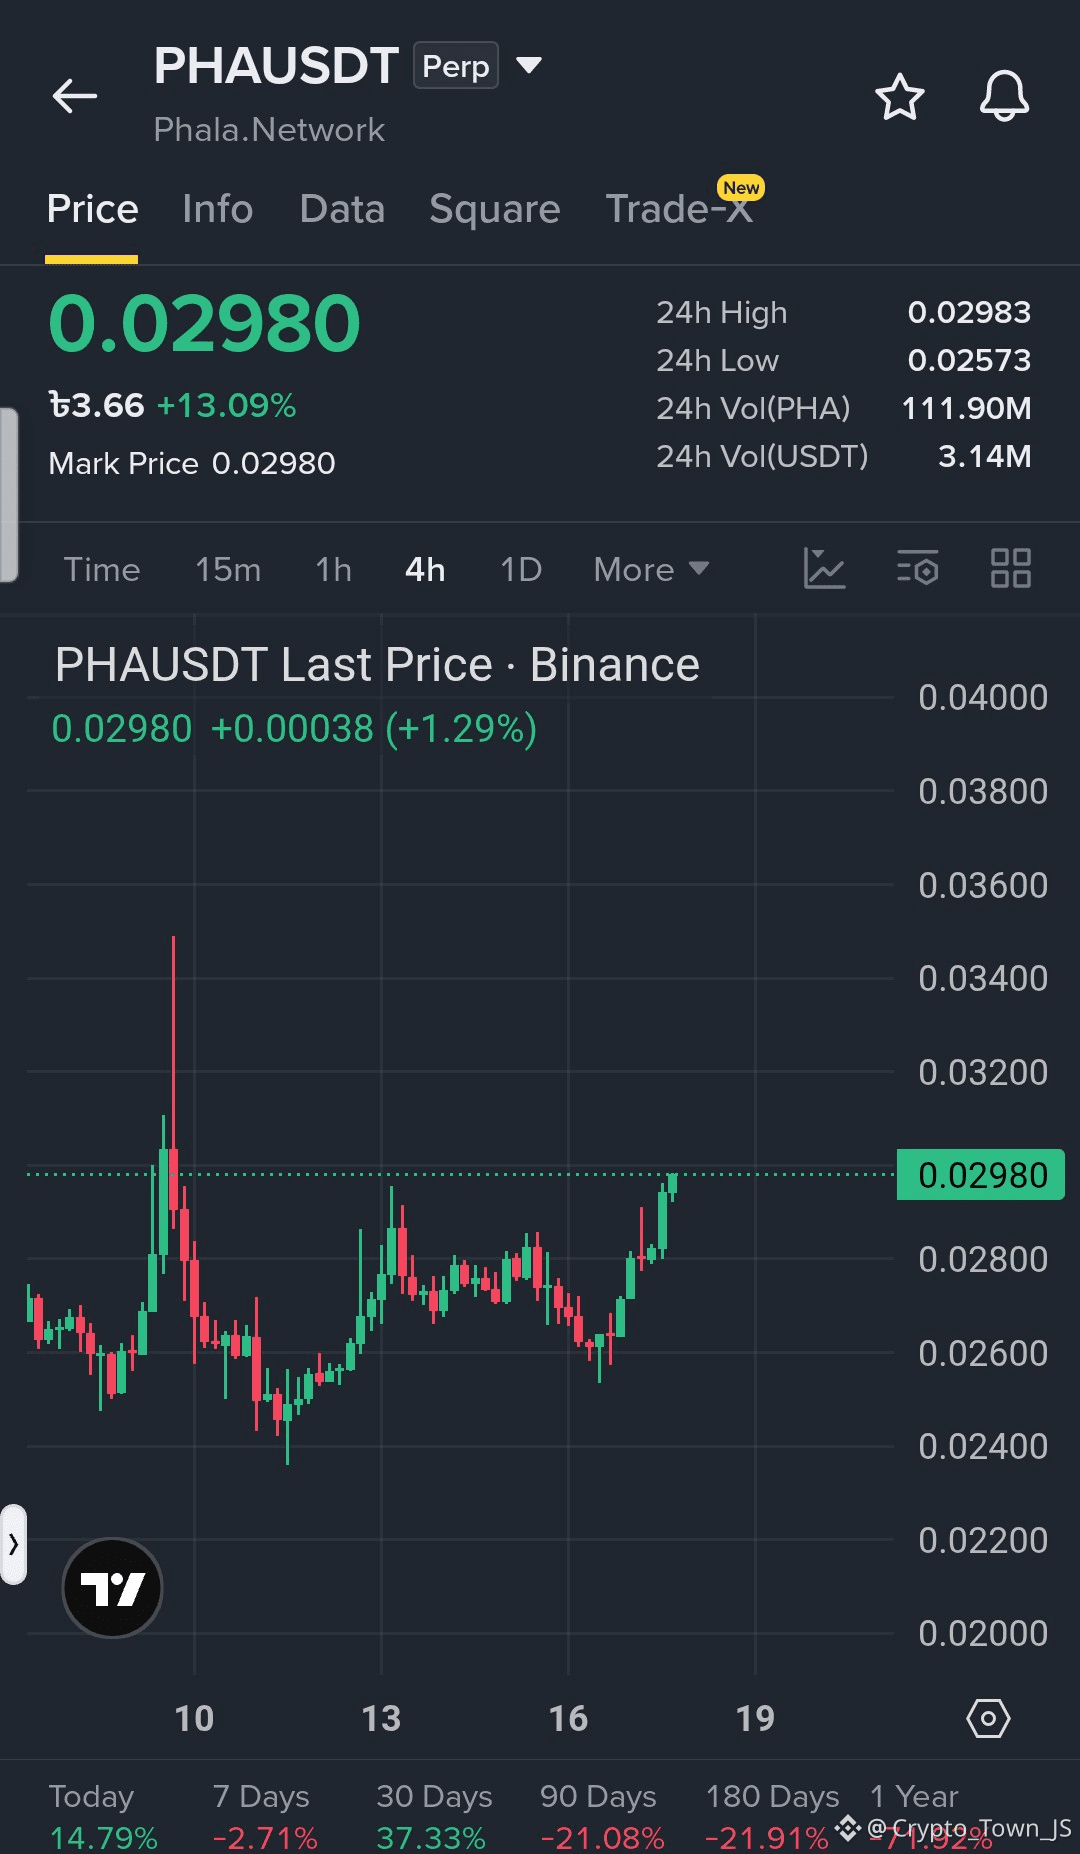
$PHA USDT Long-Setup
PHA zeigt nach einer scharfen Erholung vom jüngsten Tief weiterhin starken Kaufdruck. Wenn Käufer die aktuelle Unterstützungszone halten, könnte der Kurs in Richtung der nächsten Widerstandsniveaus weiterlaufen.
Einstiegszone: 0.02880–0.02980
TP1: 0.03100
TP2: 0.03300
TP3: 0.03550
SL: 0.02700
#BinanceSquare #crypto #trading #cryptotrading #PHA
$ONE $AVA
{future}(AVAUSDT)
{future}(ONEUSDT)
{future}(PHAUSDT)
$PHA USDT Long-Setup
PHA zeigt nach einer scharfen Erholung vom jüngsten Tief weiterhin starken Kaufdruck. Wenn Käufer die aktuelle Unterstützungszone halten, könnte der Kurs in Richtung der nächsten Widerstandsniveaus weiterlaufen.
Einstiegszone: 0.02880–0.02980
TP1: 0.03100
TP2: 0.03300
TP3: 0.03550
SL: 0.02700
#BinanceSquare #crypto #trading #cryptotrading #PHA
$ONE $AVA
PHA zeigt nach einer scharfen Erholung vom jüngsten Tief weiterhin starken Kaufdruck. Wenn Käufer die aktuelle Unterstützungszone halten, könnte der Kurs in Richtung der nächsten Widerstandsniveaus weiterlaufen.
Einstiegszone: 0.02880–0.02980
TP1: 0.03100
TP2: 0.03300
TP3: 0.03550
SL: 0.02700
#BinanceSquare #crypto #trading #cryptotrading #PHA
$ONE $AVA
1
322
·
--
Bullisch
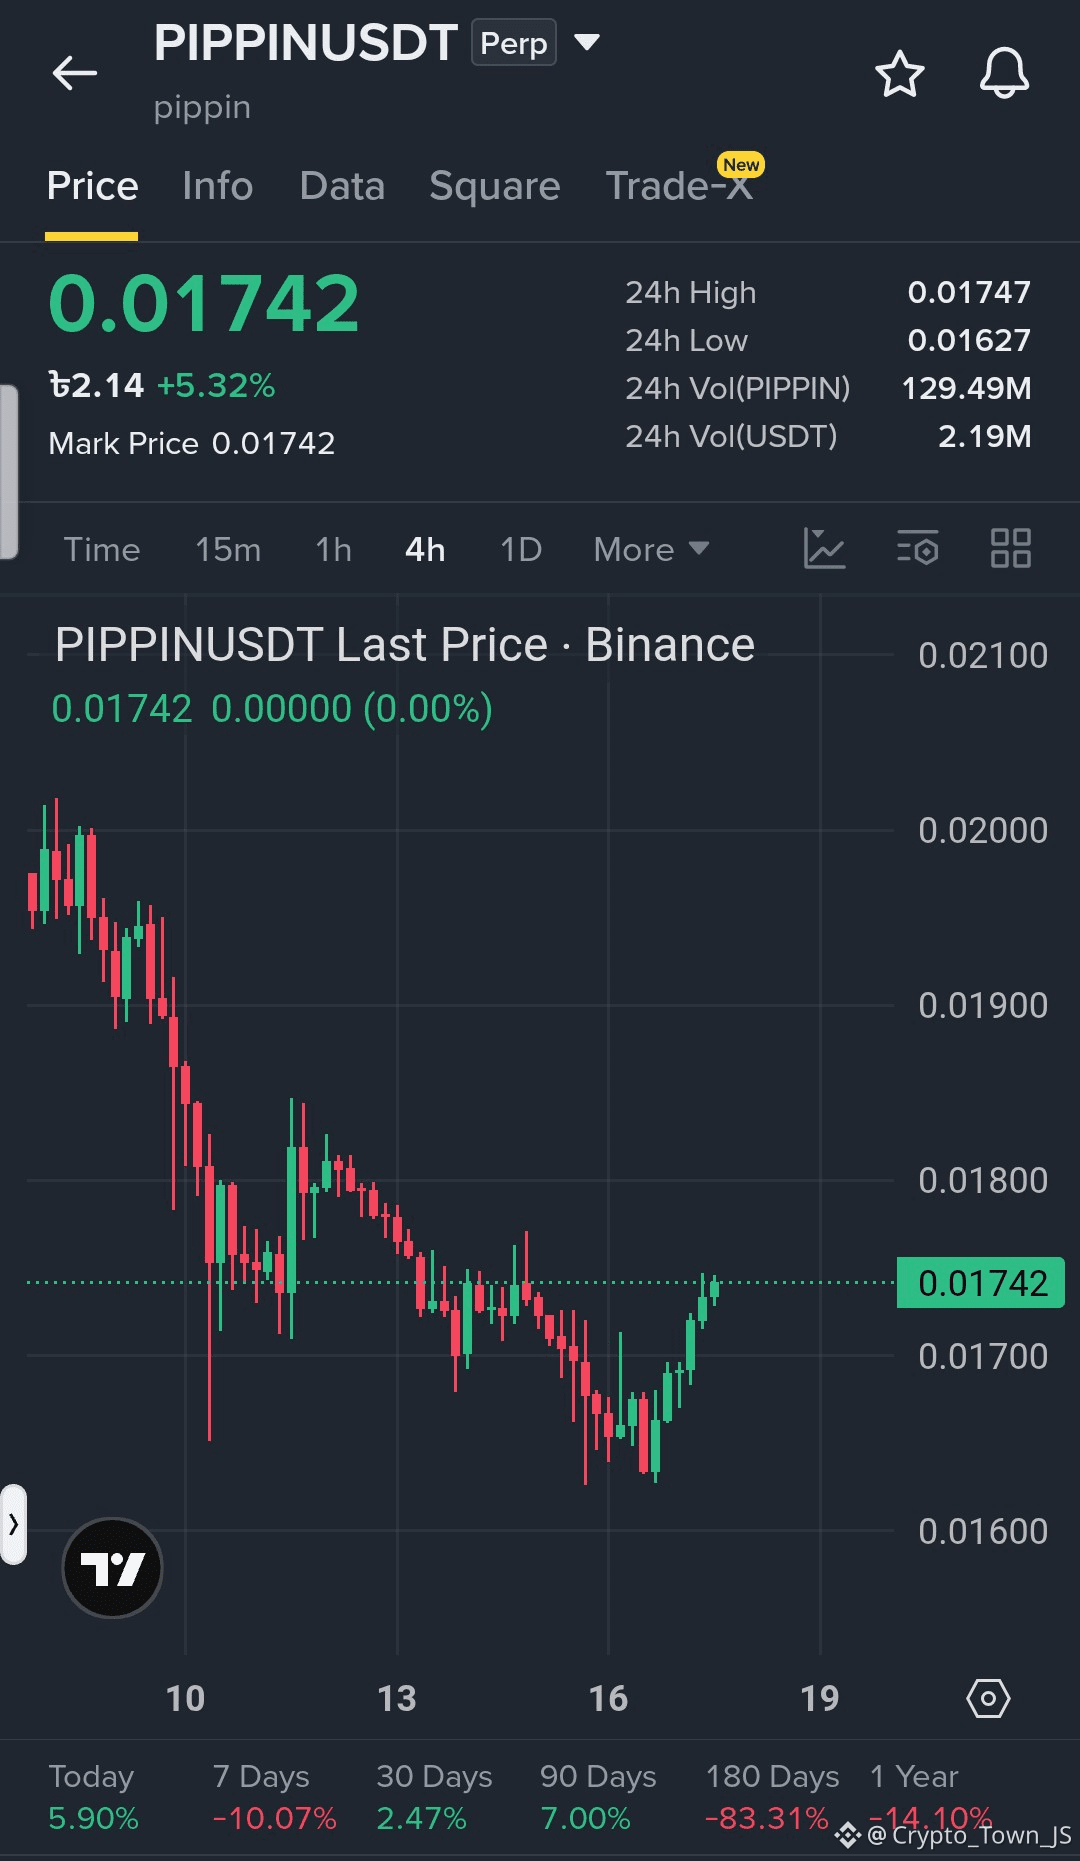
$PIPPIN USDT Long-Setup
PIPPIN hält sich oberhalb der jüngsten Unterstützungszone nach einer stabilen Erholung. Wenn Käufer den Einstiegskurs verteidigen und wieder an Schwung gewinnen, könnte der Preis sich in Richtung der nächsten Widerstandsniveaus bewegen.
Einstiegszone: 0.01690–0.01740
TP1: 0.01800
TP2: 0.01870
TP3: 0.01950
SL: 0.01630
#BinanceSquare #crypto #trading #cryptotrading #Pippin
$AVA $BULLA
{future}(BULLAUSDT)
{future}(AVAUSDT)
{future}(PIPPINUSDT)
$PIPPIN USDT Long-Setup
PIPPIN hält sich oberhalb der jüngsten Unterstützungszone nach einer stabilen Erholung. Wenn Käufer den Einstiegskurs verteidigen und wieder an Schwung gewinnen, könnte der Preis sich in Richtung der nächsten Widerstandsniveaus bewegen.
Einstiegszone: 0.01690–0.01740
TP1: 0.01800
TP2: 0.01870
TP3: 0.01950
SL: 0.01630
#BinanceSquare #crypto #trading #cryptotrading #Pippin
$AVA $BULLA
PIPPIN hält sich oberhalb der jüngsten Unterstützungszone nach einer stabilen Erholung. Wenn Käufer den Einstiegskurs verteidigen und wieder an Schwung gewinnen, könnte der Preis sich in Richtung der nächsten Widerstandsniveaus bewegen.
Einstiegszone: 0.01690–0.01740
TP1: 0.01800
TP2: 0.01870
TP3: 0.01950
SL: 0.01630
#BinanceSquare #crypto #trading #cryptotrading #Pippin
$AVA $BULLA
319
·
--
Bullisch
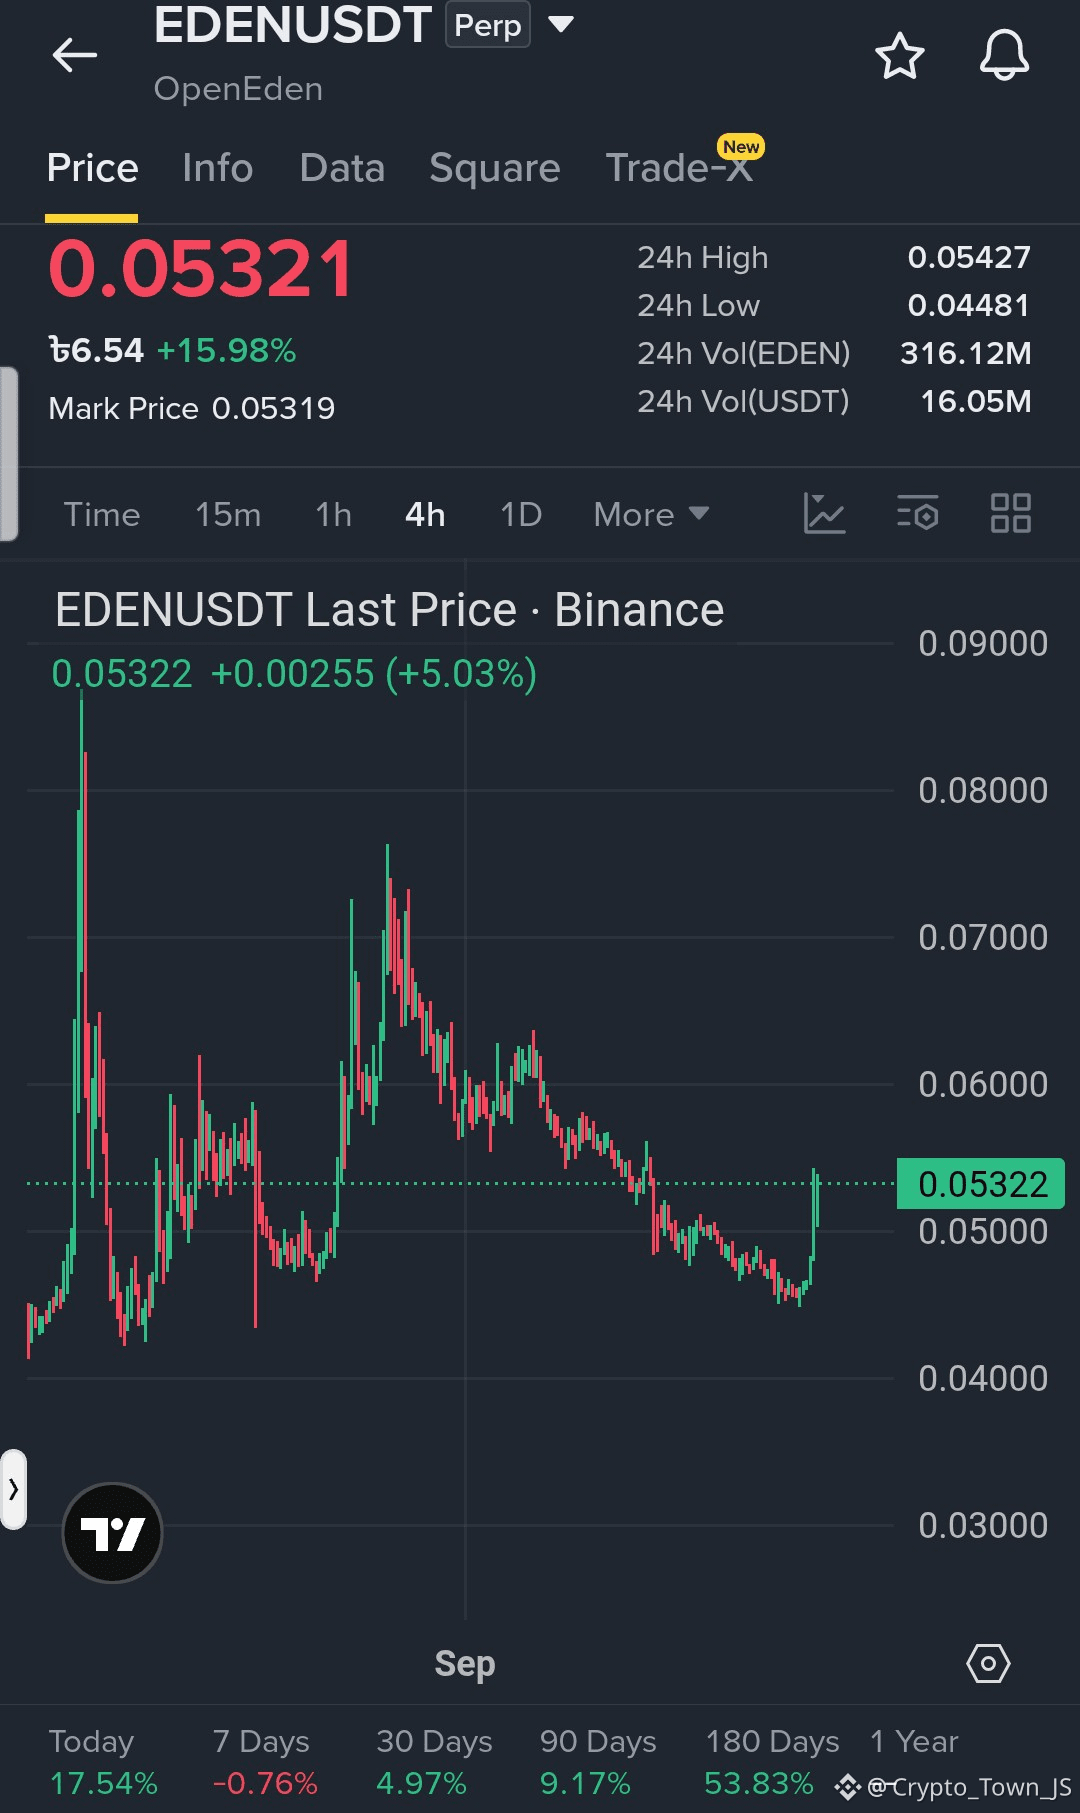
$EDEN USDT Long-Setup
EDEN zeigt nach einer soliden Erholung starke Kaufdynamik. Wenn der Preis die aktuelle Unterstützungszone hält, könnten Käufer in Richtung der nächsten Widerstandsniveaus drücken.
Einstiegszone: 0.05150–0.05300
TP1: 0.05500
TP2: 0.05800
TP3: 0.06200
SL: 0.04900
#BinanceSquare #crypto #trading #cryptotrading #Eden
$AVA $ONE
{future}(ONEUSDT)
{future}(AVAUSDT)
{future}(EDENUSDT)
$EDEN USDT Long-Setup
EDEN zeigt nach einer soliden Erholung starke Kaufdynamik. Wenn der Preis die aktuelle Unterstützungszone hält, könnten Käufer in Richtung der nächsten Widerstandsniveaus drücken.
Einstiegszone: 0.05150–0.05300
TP1: 0.05500
TP2: 0.05800
TP3: 0.06200
SL: 0.04900
#BinanceSquare #crypto #trading #cryptotrading #Eden
$AVA $ONE
EDEN zeigt nach einer soliden Erholung starke Kaufdynamik. Wenn der Preis die aktuelle Unterstützungszone hält, könnten Käufer in Richtung der nächsten Widerstandsniveaus drücken.
Einstiegszone: 0.05150–0.05300
TP1: 0.05500
TP2: 0.05800
TP3: 0.06200
SL: 0.04900
#BinanceSquare #crypto #trading #cryptotrading #Eden
$AVA $ONE
157
·
--
Bullisch
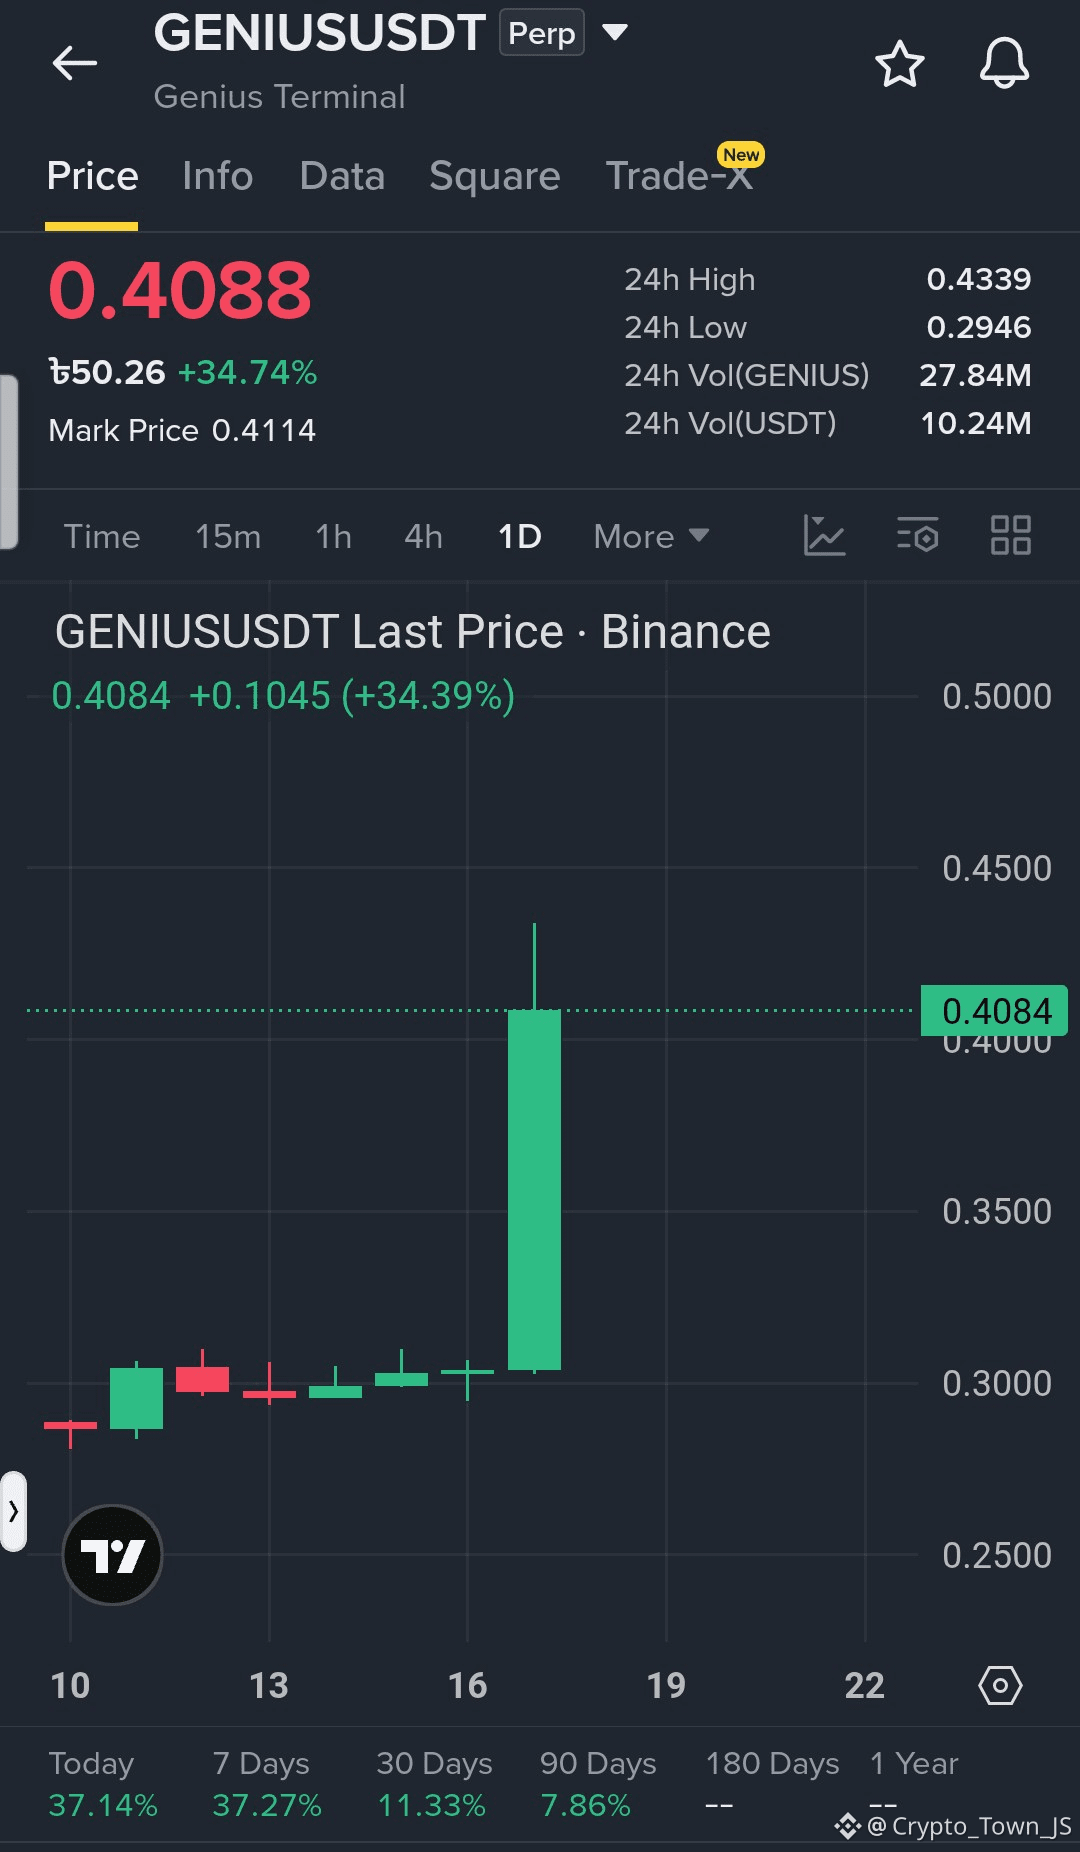
$GENIUS USDT Long-Setup
GENIUS zeigt nach einem starken Ausbruch eine ausgeprägte bullische Dynamik. Wenn Käufer die jüngste Unterstützungszone halten, könnte der Preis in Richtung höherer Widerstandsbereiche weitersteigen.
Einstiegszone: 0.3950–0.4100
TP1: 0.4250
TP2: 0.4450
TP3: 0.4750
SL: 0.3750
#BinanceSquare #crypto #trading #cryptotrading #genius
$AVA $ONE
{future}(ONEUSDT)
{future}(AVAUSDT)
{future}(GENIUSUSDT)
$GENIUS USDT Long-Setup
GENIUS zeigt nach einem starken Ausbruch eine ausgeprägte bullische Dynamik. Wenn Käufer die jüngste Unterstützungszone halten, könnte der Preis in Richtung höherer Widerstandsbereiche weitersteigen.
Einstiegszone: 0.3950–0.4100
TP1: 0.4250
TP2: 0.4450
TP3: 0.4750
SL: 0.3750
#BinanceSquare #crypto #trading #cryptotrading #genius
$AVA $ONE
GENIUS zeigt nach einem starken Ausbruch eine ausgeprägte bullische Dynamik. Wenn Käufer die jüngste Unterstützungszone halten, könnte der Preis in Richtung höherer Widerstandsbereiche weitersteigen.
Einstiegszone: 0.3950–0.4100
TP1: 0.4250
TP2: 0.4450
TP3: 0.4750
SL: 0.3750
#BinanceSquare #crypto #trading #cryptotrading #genius
$AVA $ONE
251
·
--
Bullisch
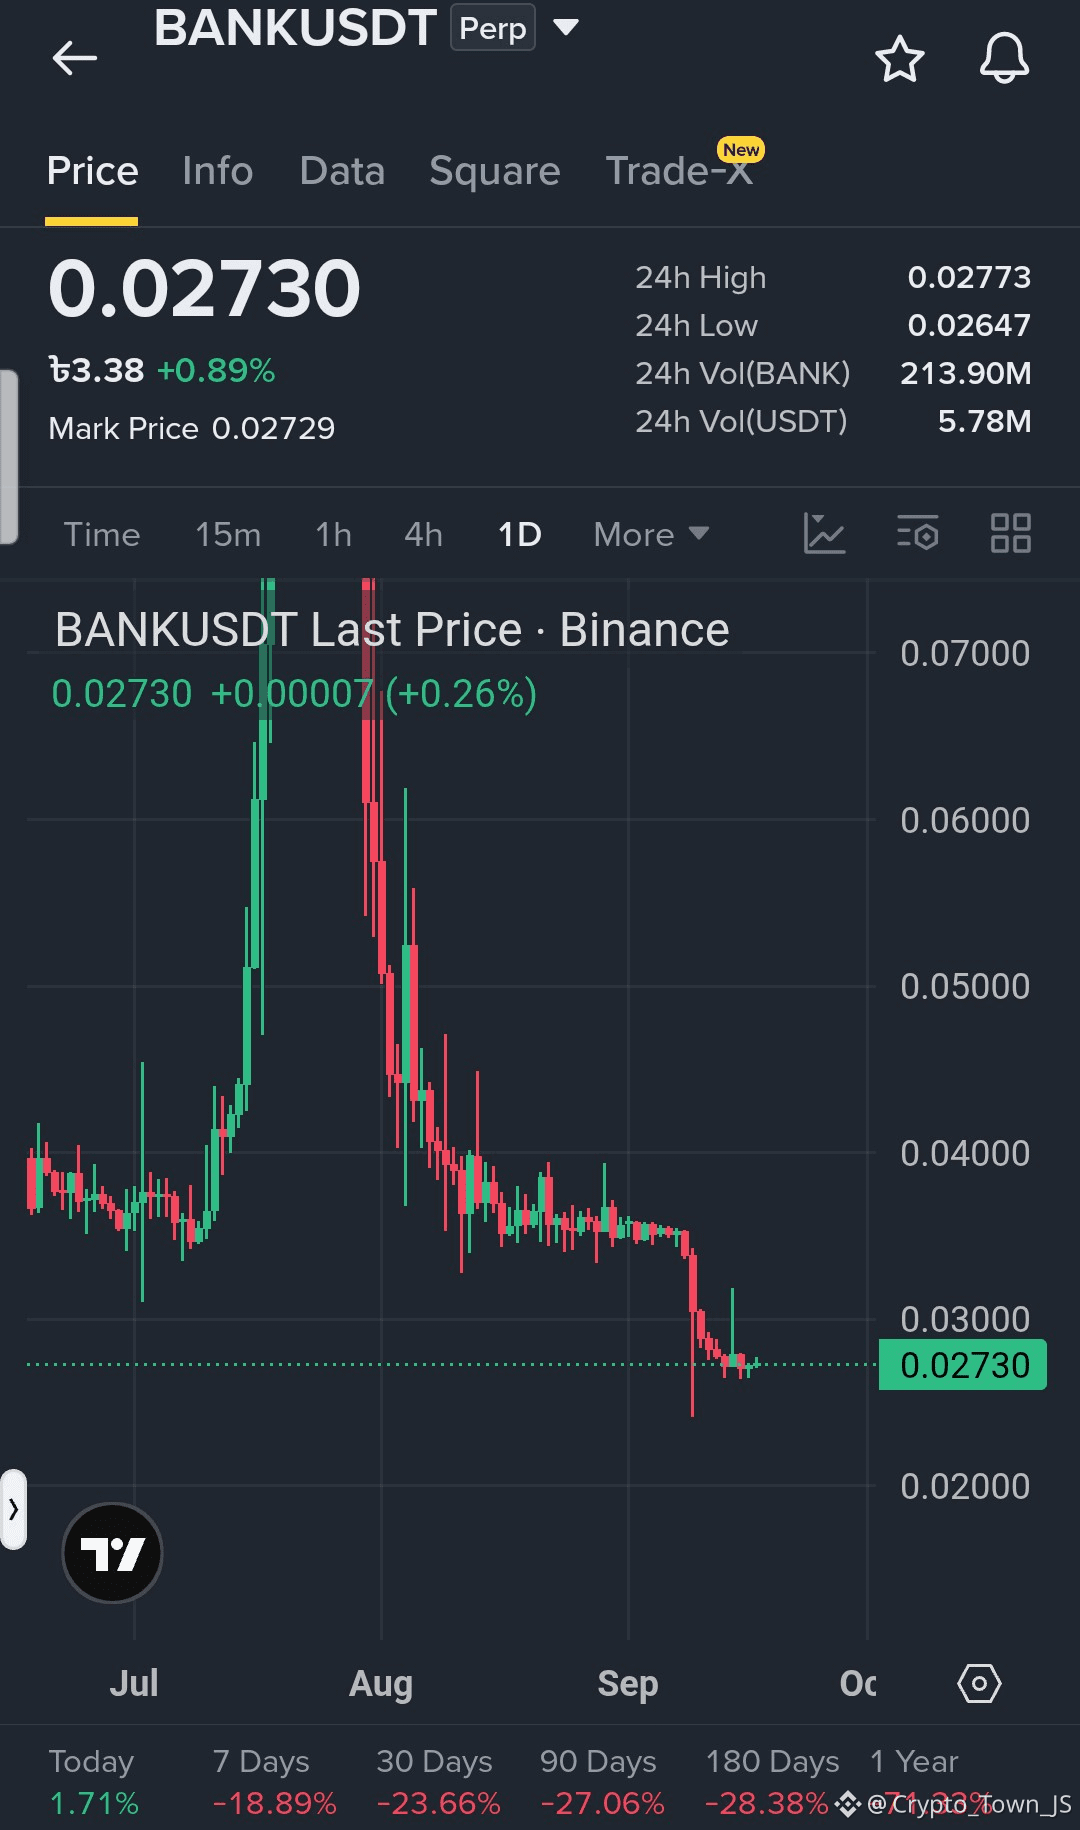
$BANK USDT Long-Setup
BANK hält sich derzeit in etwa in der Nähe der aktuellen Support-Zone, nachdem es zu einem lang anhaltenden Rückgang gekommen ist. Wenn Käufer wieder an Schwung gewinnen und den Einstiegskurs verteidigen, könnte der Preis einen Erholungsversuch in Richtung der nächsten Widerstandslevels unternehmen.
Einstiegszone: 0.02680–0.02730
TP1: 0.02820
TP2: 0.02920
TP3: 0.03050
SL: 0.02600
#BinanceSquare #crypto #trading #cryptotrading #bank
$AVA $BR
{future}(BRUSDT)
{future}(AVAUSDT)
{future}(BANKUSDT)
$BANK USDT Long-Setup
BANK hält sich derzeit in etwa in der Nähe der aktuellen Support-Zone, nachdem es zu einem lang anhaltenden Rückgang gekommen ist. Wenn Käufer wieder an Schwung gewinnen und den Einstiegskurs verteidigen, könnte der Preis einen Erholungsversuch in Richtung der nächsten Widerstandslevels unternehmen.
Einstiegszone: 0.02680–0.02730
TP1: 0.02820
TP2: 0.02920
TP3: 0.03050
SL: 0.02600
#BinanceSquare #crypto #trading #cryptotrading #bank
$AVA $BR
BANK hält sich derzeit in etwa in der Nähe der aktuellen Support-Zone, nachdem es zu einem lang anhaltenden Rückgang gekommen ist. Wenn Käufer wieder an Schwung gewinnen und den Einstiegskurs verteidigen, könnte der Preis einen Erholungsversuch in Richtung der nächsten Widerstandslevels unternehmen.
Einstiegszone: 0.02680–0.02730
TP1: 0.02820
TP2: 0.02920
TP3: 0.03050
SL: 0.02600
#BinanceSquare #crypto #trading #cryptotrading #bank
$AVA $BR
298
·
--
Bullisch
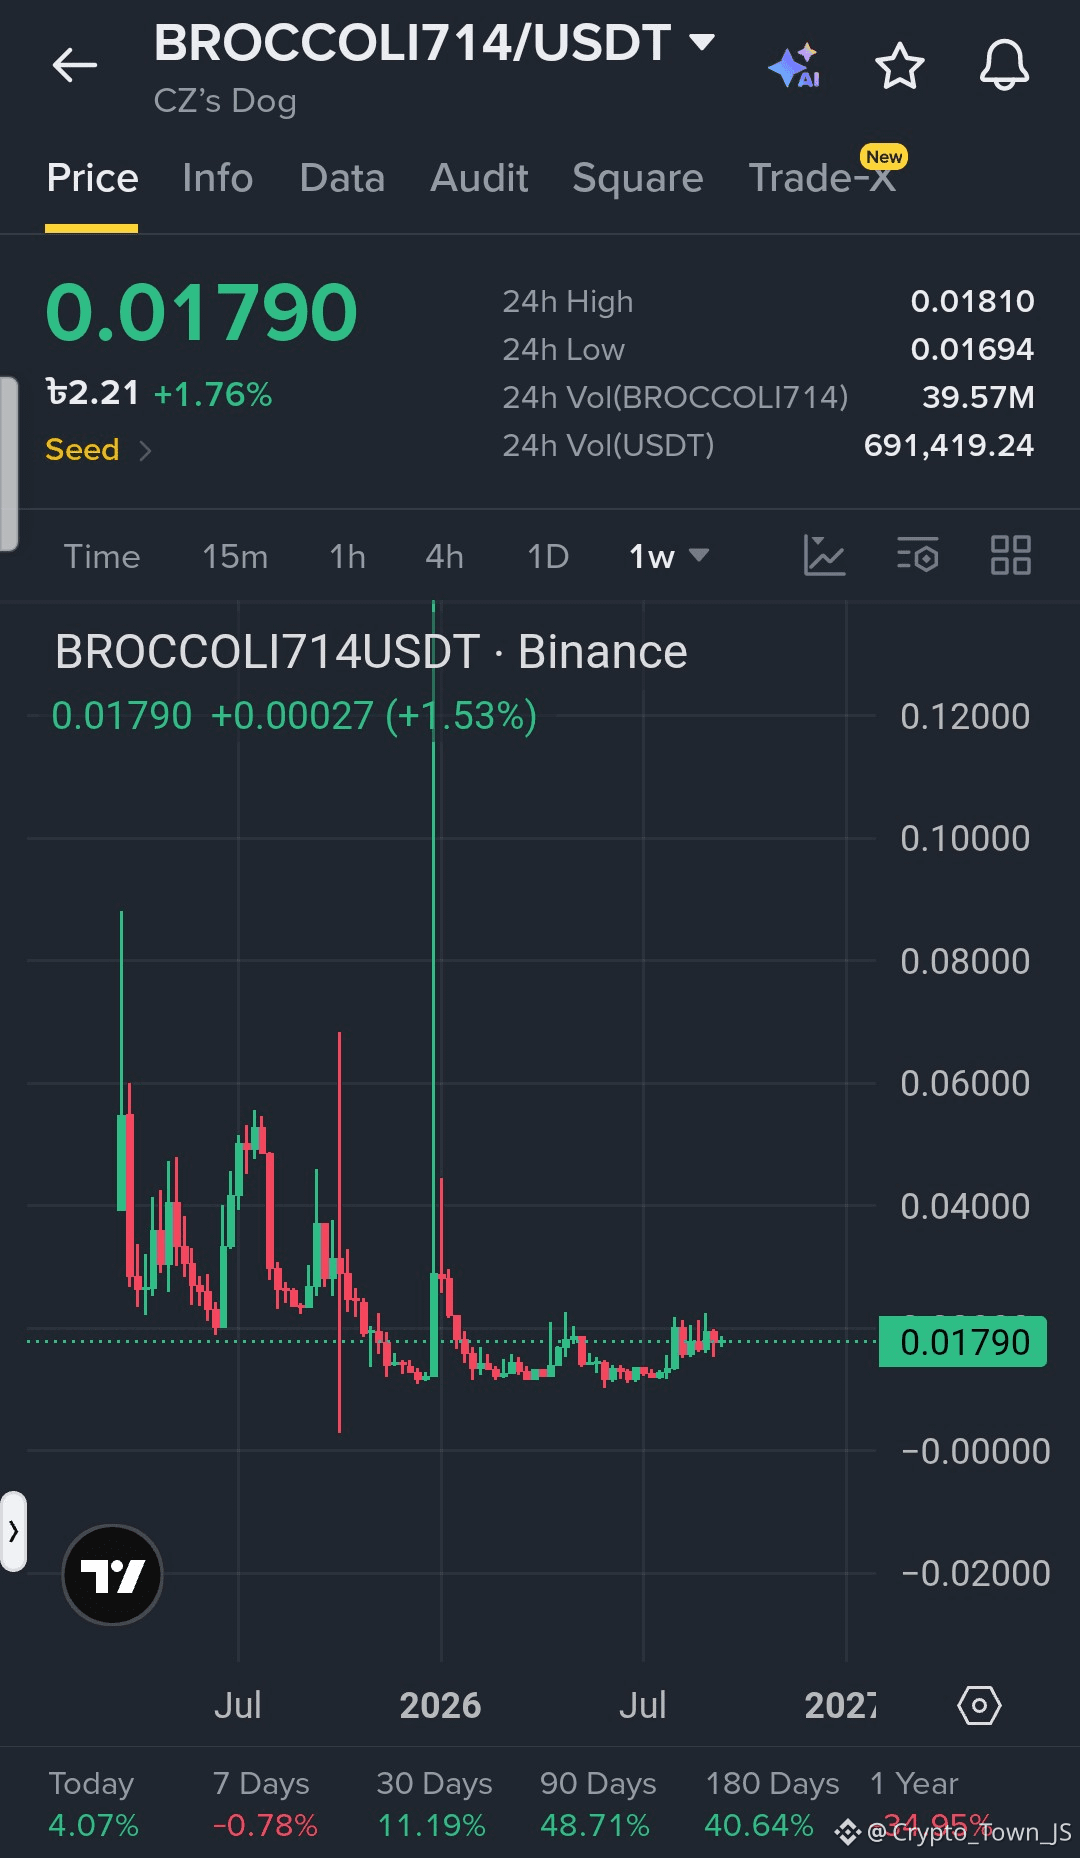
$BROCCOLI714 USDT Long-Setup
BROCCOLI714 hält sich nahe dem jüngsten Unterstützungsbereich, während Käufer versuchen, Momentum aufzubauen. Wenn der Preis über der Entry-Zone bleibt, könnte sich eine Bewegung in Richtung der nächsten Widerstandsniveaus entwickeln.
Entry-Zone: 0.01740–0.01790
TP1: 0.01850
TP2: 0.01920
TP3: 0.02000
SL: 0.01670
#BinanceSquare #crypto #trading #cryptotrading #broccoli714
$SOXL $龙虾
{future}(龙虾USDT)
{future}(SOXLUSDT)
{future}(BROCCOLI714USDT)
$BROCCOLI714 USDT Long-Setup
BROCCOLI714 hält sich nahe dem jüngsten Unterstützungsbereich, während Käufer versuchen, Momentum aufzubauen. Wenn der Preis über der Entry-Zone bleibt, könnte sich eine Bewegung in Richtung der nächsten Widerstandsniveaus entwickeln.
Entry-Zone: 0.01740–0.01790
TP1: 0.01850
TP2: 0.01920
TP3: 0.02000
SL: 0.01670
#BinanceSquare #crypto #trading #cryptotrading #broccoli714
$SOXL $龙虾
BROCCOLI714 hält sich nahe dem jüngsten Unterstützungsbereich, während Käufer versuchen, Momentum aufzubauen. Wenn der Preis über der Entry-Zone bleibt, könnte sich eine Bewegung in Richtung der nächsten Widerstandsniveaus entwickeln.
Entry-Zone: 0.01740–0.01790
TP1: 0.01850
TP2: 0.01920
TP3: 0.02000
SL: 0.01670
#BinanceSquare #crypto #trading #cryptotrading #broccoli714
$SOXL $龙虾
559
·
--
Bullisch
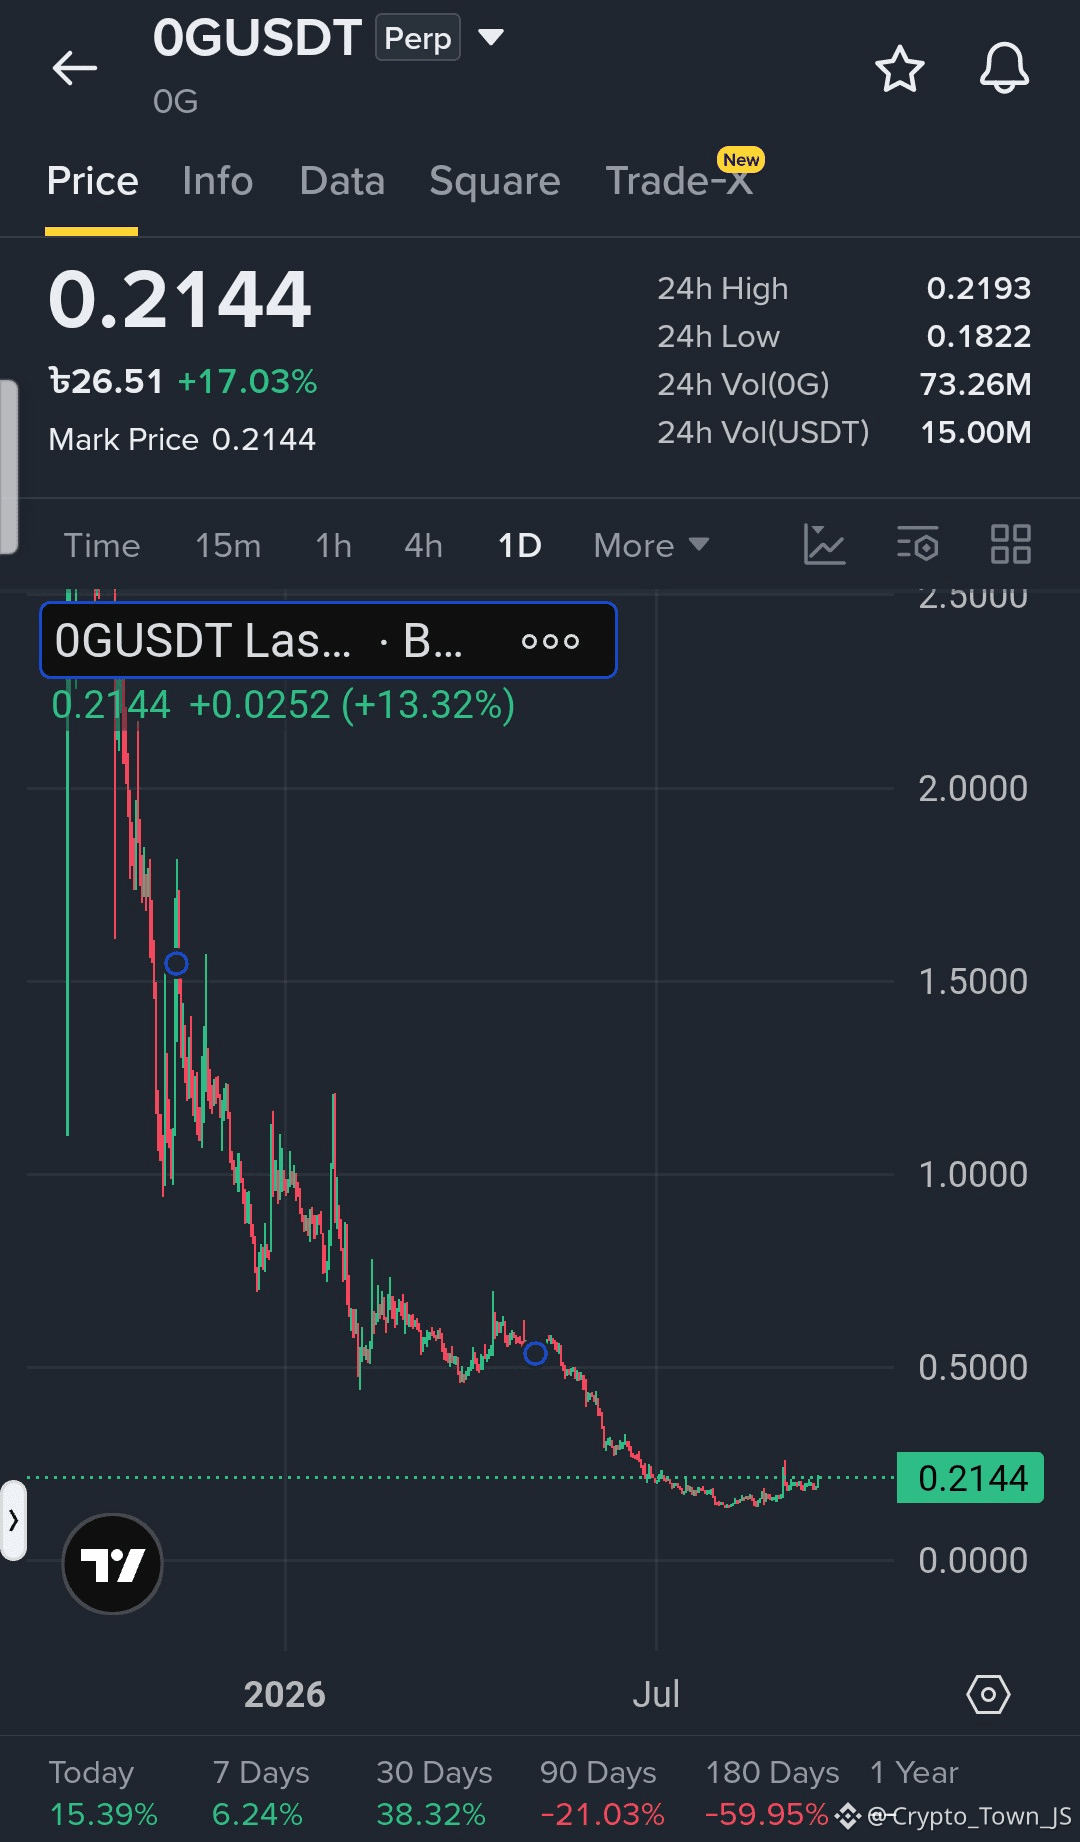
$OG USDT Long-Setup
OG zeigt nach einer soliden Erholung starkes Kaufmomentum. Wenn Käufer die Kontrolle über der aktuellen Unterstützungszone beibehalten, könnte der Preis in Richtung der nächsten Widerstandslevel weiterlaufen.
Einstiegszone: 0.2050–0.2120
TP1: 0.2200
TP2: 0.2350
TP3: 0.2550
SL: 0.1950
#BinanceSquare #crypto #trading #cryptotrading #og
$ONE $GIGGLE
{future}(GIGGLEUSDT)
{future}(ONEUSDT)
{future}(OGUSDT)
$OG USDT Long-Setup
OG zeigt nach einer soliden Erholung starkes Kaufmomentum. Wenn Käufer die Kontrolle über der aktuellen Unterstützungszone beibehalten, könnte der Preis in Richtung der nächsten Widerstandslevel weiterlaufen.
Einstiegszone: 0.2050–0.2120
TP1: 0.2200
TP2: 0.2350
TP3: 0.2550
SL: 0.1950
#BinanceSquare #crypto #trading #cryptotrading #og
$ONE $GIGGLE
OG zeigt nach einer soliden Erholung starkes Kaufmomentum. Wenn Käufer die Kontrolle über der aktuellen Unterstützungszone beibehalten, könnte der Preis in Richtung der nächsten Widerstandslevel weiterlaufen.
Einstiegszone: 0.2050–0.2120
TP1: 0.2200
TP2: 0.2350
TP3: 0.2550
SL: 0.1950
#BinanceSquare #crypto #trading #cryptotrading #og
$ONE $GIGGLE
212
Anmelden und weiter Inhalte entdecken
Krypto-Nutzer weltweit auf Binance Square kennenlernen
⚡️ Bleib in Sachen Krypto stets am Puls.
💬 Die weltgrößte Kryptobörse vertraut darauf.
👍 Erhalte verlässliche Einblicke von verifizierten Creators.
E-Mail-Adresse/Telefonnummer
Trendthemen
SECHaltsCryptoETFReviewsAmidFundingLapse
5,652 Aufrufe
135 Kommentare
#sechaltscryptoetfreviewsamidfundinglapse
Die SEC stoppt vorübergehend neue Krypto-ETF-Überprüfungen, nachdem es zu einer Finanzierungslücke gekommen ist.
Keine Ablehnung – nur eine vorübergehende Sperre, während das Finanzierungsproblem weiterhin besteht.
Antragsteller für Krypto-ETFs müssen möglicherweise etwas länger warten.
#Write2Earn
$ETH
The Ledger Mind
·1 Likes
·8.1k Aufrufe
ZcashETFPostsFirstWeeklyOutflow$93.6M
56,122 Aufrufe
173 Kommentare
GreekPoliceBustCryptoScamRingArrest17
167,360 Aufrufe
1,167 Kommentare