
Apex_Trader_181
600 Beiträge

Apex_Trader_181
Melden
Nutzer blockieren
Last 5 year crypto cycle experiences
269 Following
5.2K+ Follower
525 Like gegeben
Beiträge
Alle
Zitierungen
Live
Übersetzung ansehen
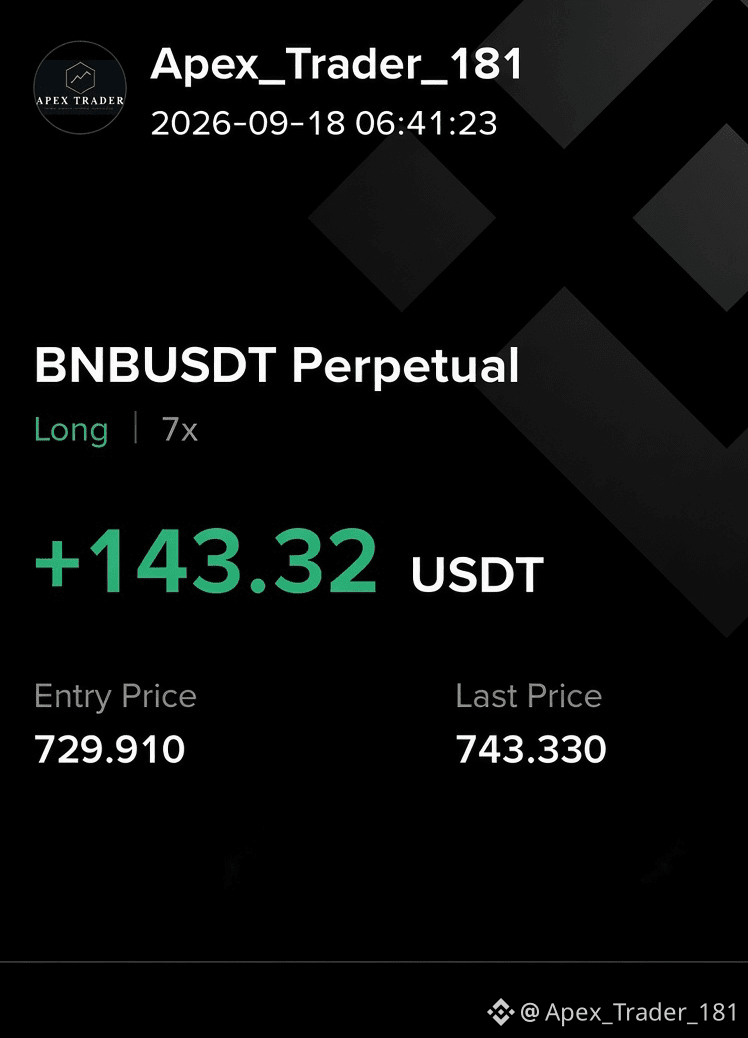
Congrats to me 🥳
Called it. Took it. Banked it.
+143 USDT
BNBUSDT Perpetual
Flex mode: ON 🔥💯$BNB
Congrats to me 🥳
Called it. Took it. Banked it.
+143 USDT
BNBUSDT Perpetual
Flex mode: ON 🔥💯$BNB
Called it. Took it. Banked it.
+143 USDT
BNBUSDT Perpetual
Flex mode: ON 🔥💯$BNB
1
44
·
--
Bullisch
Übersetzung ansehen
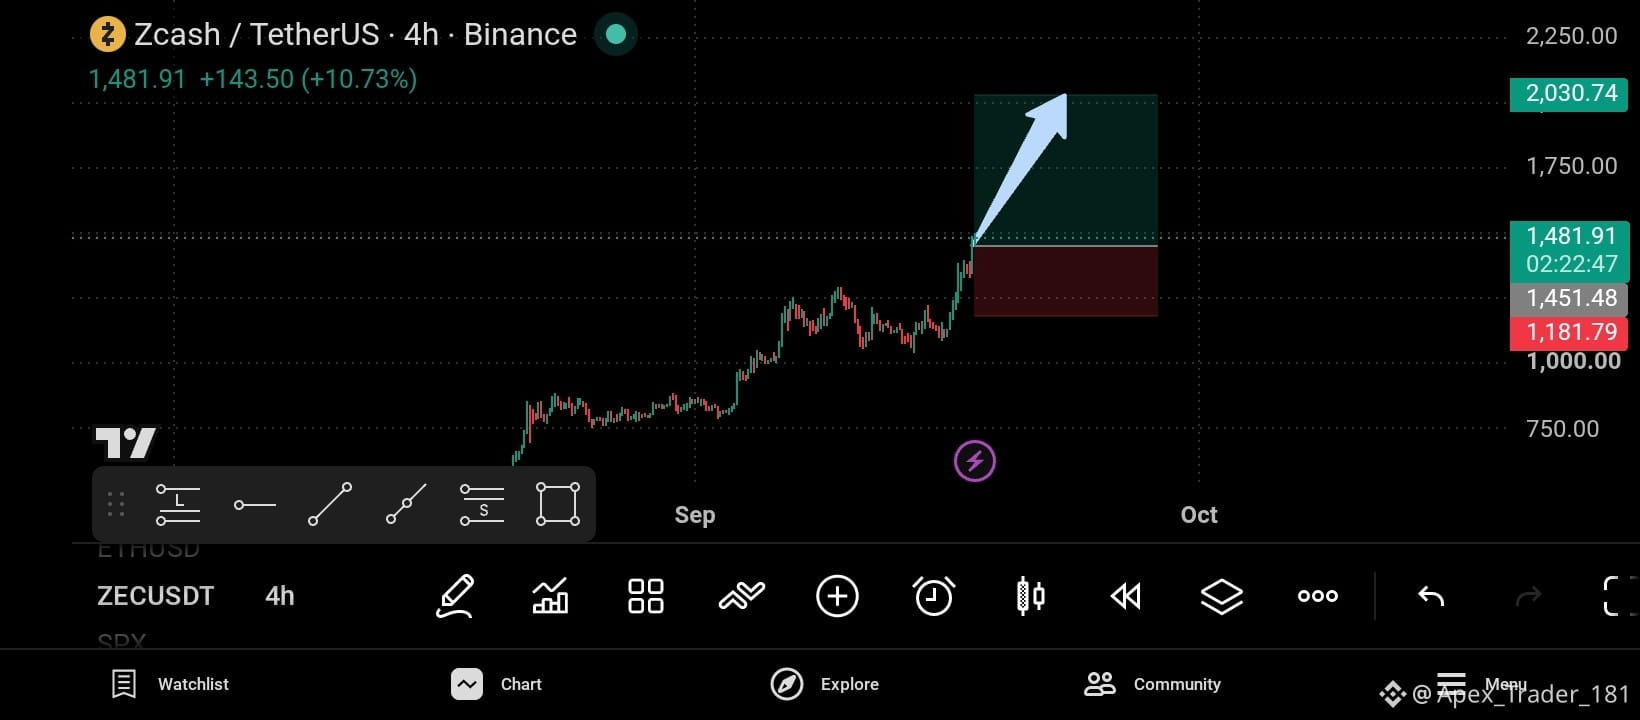
$ZEC stop future trade open trade👇
coins: ZEC/USDT
Direction: LONG (Spot + Futures)
Timeframe: Long-Term Bullrun
Entry Price: $1,450 – $1,480
DCA Price: $1,180 – $1,250
Targets:
• Target 1: $1,250 (≈5x)
• Target 2: $1,700 (≈10x)
• Target 3: $2,030– $35,000+ (20x+)
$ZEC Bullish Reasons:
Strong network upgrade (NU7) momentum + privacy narrative dominance in the next bull cycle.
Price holding firmly above all major EMAs with massive retail OI expansion and structural breakout.
Futures Long Setup:
4x Cross Leverage | 5% Margin$ZEC
{future}(ZECUSDT)
#BTC☀ #ETH🔥🔥🔥🔥🔥🔥 #SOL空投 #Xrp🔥🔥 #bnb
$ZEC stop future trade open trade👇
coins: ZEC/USDT
Direction: LONG (Spot + Futures)
Timeframe: Long-Term Bullrun
Entry Price: $1,450 – $1,480
DCA Price: $1,180 – $1,250
Targets:
• Target 1: $1,250 (≈5x)
• Target 2: $1,700 (≈10x)
• Target 3: $2,030– $35,000+ (20x+)
$ZEC Bullish Reasons:
Strong network upgrade (NU7) momentum + privacy narrative dominance in the next bull cycle.
Price holding firmly above all major EMAs with massive retail OI expansion and structural breakout.
Futures Long Setup:
4x Cross Leverage | 5% Margin$ZEC
#BTC☀ #ETH🔥🔥🔥🔥🔥🔥 #SOL空投 #Xrp🔥🔥 #bnb
coins: ZEC/USDT
Direction: LONG (Spot + Futures)
Timeframe: Long-Term Bullrun
Entry Price: $1,450 – $1,480
DCA Price: $1,180 – $1,250
Targets:
• Target 1: $1,250 (≈5x)
• Target 2: $1,700 (≈10x)
• Target 3: $2,030– $35,000+ (20x+)
$ZEC Bullish Reasons:
Strong network upgrade (NU7) momentum + privacy narrative dominance in the next bull cycle.
Price holding firmly above all major EMAs with massive retail OI expansion and structural breakout.
Futures Long Setup:
4x Cross Leverage | 5% Margin$ZEC
#BTC☀ #ETH🔥🔥🔥🔥🔥🔥 #SOL空投 #Xrp🔥🔥 #bnb
2
336
·
--
Bullisch
Übersetzung ansehen
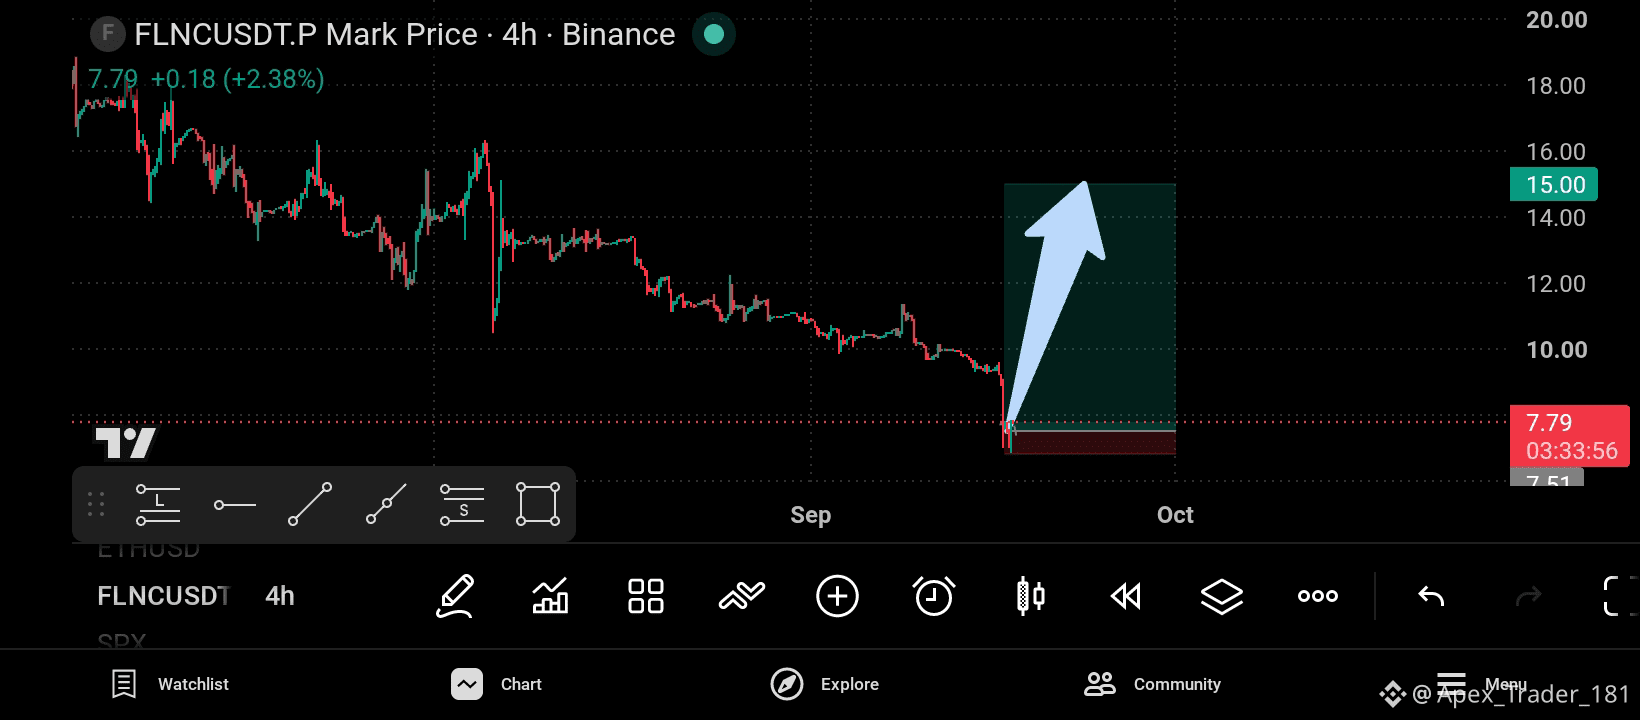
🚨Low Risk High Reward Setup💥🚀
▫️Buy Now $FLNC
▫️Big Move Coming 🚩
▫️Futures Long | 4x Leverage Cross | 5% Margin
Entry: $7.50 – $7.65
DCA: $6.80 – $7.20
Targets
TP1: $8.50 (5x)
TP2: $11.00 (10x)
TP3: $15.00+ (20x) Full Close
Bullish Reasons:
Strong long-term demand for energy storage + AI data center power needs.
Major backlog & sector recovery potential from oversold levels near multi-year lows.
▫️Open Trade here 👇 $FLNC
#FLNCUSDT #EnergyStorage #BTC☀ #ETH #sol板块
🚨Join Chatroom For Quick Updates
🚨Low Risk High Reward Setup💥🚀
▫️Buy Now $FLNC
▫️Big Move Coming 🚩
▫️Futures Long | 4x Leverage Cross | 5% Margin
Entry: $7.50 – $7.65
DCA: $6.80 – $7.20
Targets
TP1: $8.50 (5x)
TP2: $11.00 (10x)
TP3: $15.00+ (20x) Full Close
Bullish Reasons:
Strong long-term demand for energy storage + AI data center power needs.
Major backlog & sector recovery potential from oversold levels near multi-year lows.
▫️Open Trade here 👇 $FLNC
#FLNCUSDT #EnergyStorage #BTC☀ #ETH #sol板块
🚨Join Chatroom For Quick Updates
▫️Buy Now $FLNC
▫️Big Move Coming 🚩
▫️Futures Long | 4x Leverage Cross | 5% Margin
Entry: $7.50 – $7.65
DCA: $6.80 – $7.20
Targets
TP1: $8.50 (5x)
TP2: $11.00 (10x)
TP3: $15.00+ (20x) Full Close
Bullish Reasons:
Strong long-term demand for energy storage + AI data center power needs.
Major backlog & sector recovery potential from oversold levels near multi-year lows.
▫️Open Trade here 👇 $FLNC
#FLNCUSDT #EnergyStorage #BTC☀ #ETH #sol板块
🚨Join Chatroom For Quick Updates
1
254
·
--
Bullisch
🚀 $BERA Alarme🚨 stopp zukünftigen Handel offenen Handel👇
Einstiegszone: $0.18 – $0.22
DCA-Zone: $0.14 – $0.16
Ziele:
🎯 TP1: $1.00 (5x)
🎯 TP2: $2.00 (10x)
🎯 TP3: $3.60 – $4.40+ (20x+)
Bullische Gründe:
Starke Akkumulationsstruktur mit höheren Tiefs, die sich nach der starken Korrektur von ATH bilden. Langfristiges PoL-Narrativ + Wachstum des Ökosystems positionieren BERA für den großen Recovery-Impuls im nächsten Bullenzyklus.
Futures Long-Setup:
4x Hebel | Cross | 5% Margin
Einstieg: $0.20
DCA: $0.15
Ziele: Wie oben
Halte mit Überzeugung. Dies ist eine hochgradig überzeugende Long-Term-Bullrun-Position.
folge für mehr Trading❤👇
$BERA #BERA #lunchpoolredstone
{future}(BERAUSDT)
🚀 $BERA Alarme🚨 stopp zukünftigen Handel offenen Handel👇
Einstiegszone: $0.18 – $0.22
DCA-Zone: $0.14 – $0.16
Ziele:
🎯 TP1: $1.00 (5x)
🎯 TP2: $2.00 (10x)
🎯 TP3: $3.60 – $4.40+ (20x+)
Bullische Gründe:
Starke Akkumulationsstruktur mit höheren Tiefs, die sich nach der starken Korrektur von ATH bilden. Langfristiges PoL-Narrativ + Wachstum des Ökosystems positionieren BERA für den großen Recovery-Impuls im nächsten Bullenzyklus.
Futures Long-Setup:
4x Hebel | Cross | 5% Margin
Einstieg: $0.20
DCA: $0.15
Ziele: Wie oben
Halte mit Überzeugung. Dies ist eine hochgradig überzeugende Long-Term-Bullrun-Position.
folge für mehr Trading❤👇
$BERA #BERA #lunchpoolredstone
Einstiegszone: $0.18 – $0.22
DCA-Zone: $0.14 – $0.16
Ziele:
🎯 TP1: $1.00 (5x)
🎯 TP2: $2.00 (10x)
🎯 TP3: $3.60 – $4.40+ (20x+)
Bullische Gründe:
Starke Akkumulationsstruktur mit höheren Tiefs, die sich nach der starken Korrektur von ATH bilden. Langfristiges PoL-Narrativ + Wachstum des Ökosystems positionieren BERA für den großen Recovery-Impuls im nächsten Bullenzyklus.
Futures Long-Setup:
4x Hebel | Cross | 5% Margin
Einstieg: $0.20
DCA: $0.15
Ziele: Wie oben
Halte mit Überzeugung. Dies ist eine hochgradig überzeugende Long-Term-Bullrun-Position.
folge für mehr Trading❤👇
$BERA #BERA #lunchpoolredstone

366
·
--
Bullisch
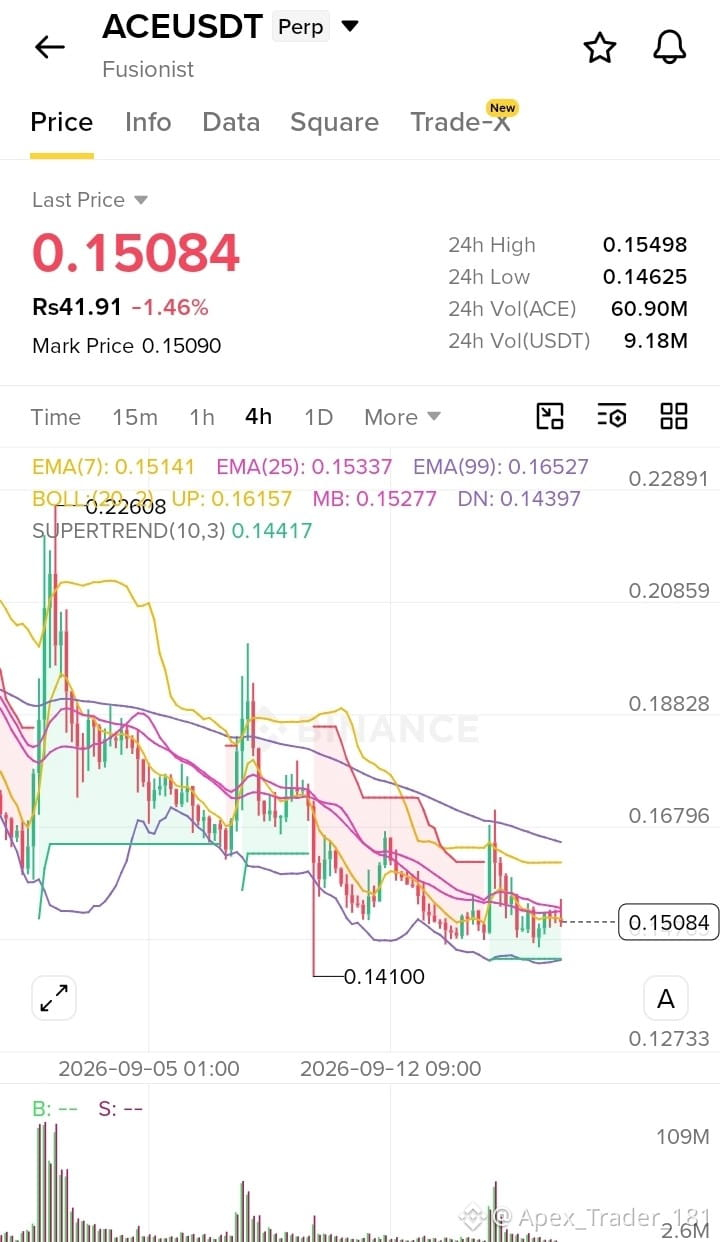
$ACE stop future trade open trade👇 📈
Richtung: Long
Typ: Spot + Futures
Einstiegspreis: $0.148 – $0.155
DCA-Preis: $0.125 – $0.135
Ziele:
TP1: $0.76 (5x)
TP2: $1.52 (10x)
TP3: $3.04+ (20x+)
$ACE Bullische Gründe:
Starke Akkumulationszone nahe den Mehrmonats-Tiefs mit steigendem Volumen. GameFi-Story + potenzielle Ökosystem-Erweiterung positionieren ACE für ein großes Upside im nächsten Bull-Run.
Futures-Setup:
Long | 4x Hebel | Cross | 5% Margin
Einstieg: $0.148 – $0.155
Gleiche Ziele wie ⬆#ACE🔥🔥 $ACE
#Launchpool #82 #viewsproblem
{future}(ACEUSDT)
$ACE stop future trade open trade👇 📈
Richtung: Long
Typ: Spot + Futures
Einstiegspreis: $0.148 – $0.155
DCA-Preis: $0.125 – $0.135
Ziele:
TP1: $0.76 (5x)
TP2: $1.52 (10x)
TP3: $3.04+ (20x+)
$ACE Bullische Gründe:
Starke Akkumulationszone nahe den Mehrmonats-Tiefs mit steigendem Volumen. GameFi-Story + potenzielle Ökosystem-Erweiterung positionieren ACE für ein großes Upside im nächsten Bull-Run.
Futures-Setup:
Long | 4x Hebel | Cross | 5% Margin
Einstieg: $0.148 – $0.155
Gleiche Ziele wie ⬆#ACE🔥🔥 $ACE
#Launchpool #82 #viewsproblem
Richtung: Long
Typ: Spot + Futures
Einstiegspreis: $0.148 – $0.155
DCA-Preis: $0.125 – $0.135
Ziele:
TP1: $0.76 (5x)
TP2: $1.52 (10x)
TP3: $3.04+ (20x+)
$ACE Bullische Gründe:
Starke Akkumulationszone nahe den Mehrmonats-Tiefs mit steigendem Volumen. GameFi-Story + potenzielle Ökosystem-Erweiterung positionieren ACE für ein großes Upside im nächsten Bull-Run.
Futures-Setup:
Long | 4x Hebel | Cross | 5% Margin
Einstieg: $0.148 – $0.155
Gleiche Ziele wie ⬆#ACE🔥🔥 $ACE
#Launchpool #82 #viewsproblem
2
634
·
--
Bullisch
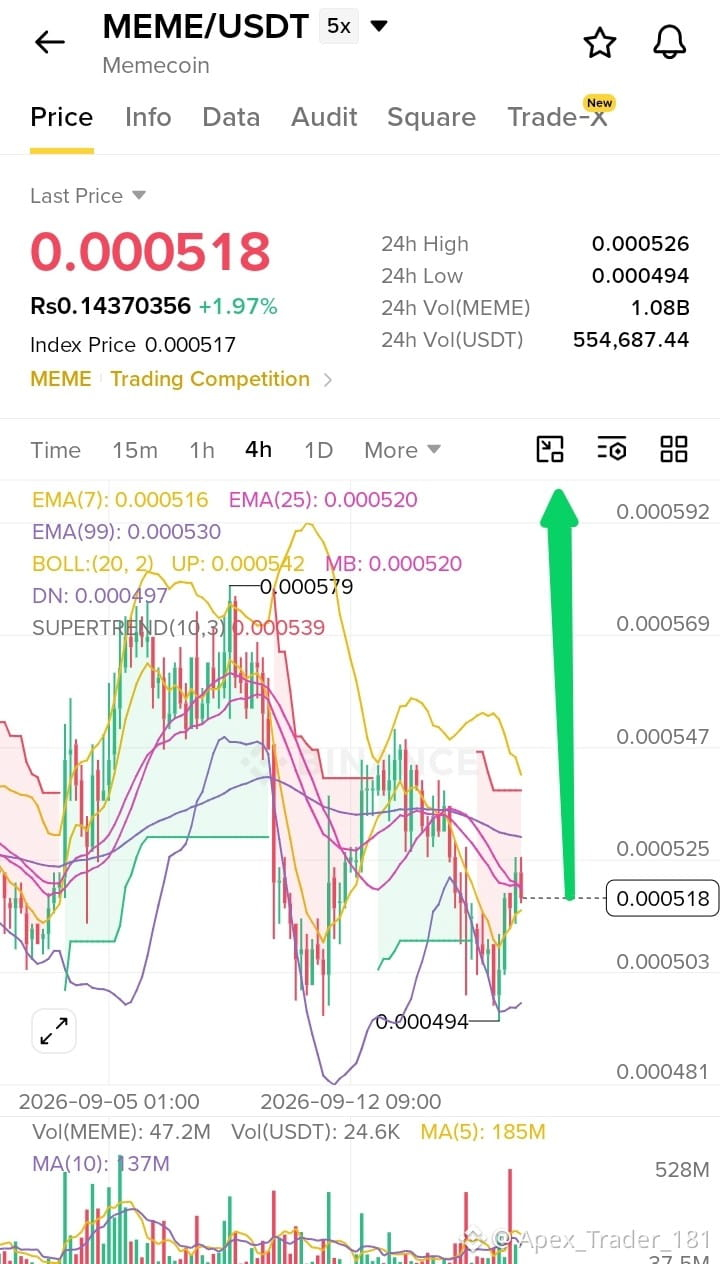
🚨 $MEME Coin Gem Alarm 🚨
MEME (Memecoin)
MC: ~33 Mio. $ | Letzter ATH um 99% runter
🔥 Spot + Futures Long Setup
Einstieg: 0,000500 $ – 0,000530 $
DCA: 0,000430 $ – 0,000460 $
Ziele:
🎯 0,00260 $ (5x)
🎯 0,00520 $ (10x)
🎯 0,01040+ $ (20x+)
Bullische Gründe:
• Starkes 9GAG + Memeland-Ökosystem-Backing mit riesiger Meme-Culture-Reichweite
• Tiefe Korrektur vom ATH schafft ein High-Reward-Setup für die volle Bullrun-Erholung
Futures: 4x Cross | 5% Margin
$MEME #LONG✅ $MEME
{future}(MEMEUSDT)
🚨 $MEME Coin Gem Alarm 🚨
MEME (Memecoin)
MC: ~33 Mio. $ | Letzter ATH um 99% runter
🔥 Spot + Futures Long Setup
Einstieg: 0,000500 $ – 0,000530 $
DCA: 0,000430 $ – 0,000460 $
Ziele:
🎯 0,00260 $ (5x)
🎯 0,00520 $ (10x)
🎯 0,01040+ $ (20x+)
Bullische Gründe:
• Starkes 9GAG + Memeland-Ökosystem-Backing mit riesiger Meme-Culture-Reichweite
• Tiefe Korrektur vom ATH schafft ein High-Reward-Setup für die volle Bullrun-Erholung
Futures: 4x Cross | 5% Margin
$MEME #LONG✅ $MEME
MEME (Memecoin)
MC: ~33 Mio. $ | Letzter ATH um 99% runter
🔥 Spot + Futures Long Setup
Einstieg: 0,000500 $ – 0,000530 $
DCA: 0,000430 $ – 0,000460 $
Ziele:
🎯 0,00260 $ (5x)
🎯 0,00520 $ (10x)
🎯 0,01040+ $ (20x+)
Bullische Gründe:
• Starkes 9GAG + Memeland-Ökosystem-Backing mit riesiger Meme-Culture-Reichweite
• Tiefe Korrektur vom ATH schafft ein High-Reward-Setup für die volle Bullrun-Erholung
Futures: 4x Cross | 5% Margin
$MEME #LONG✅ $MEME
202
·
--
Bullisch
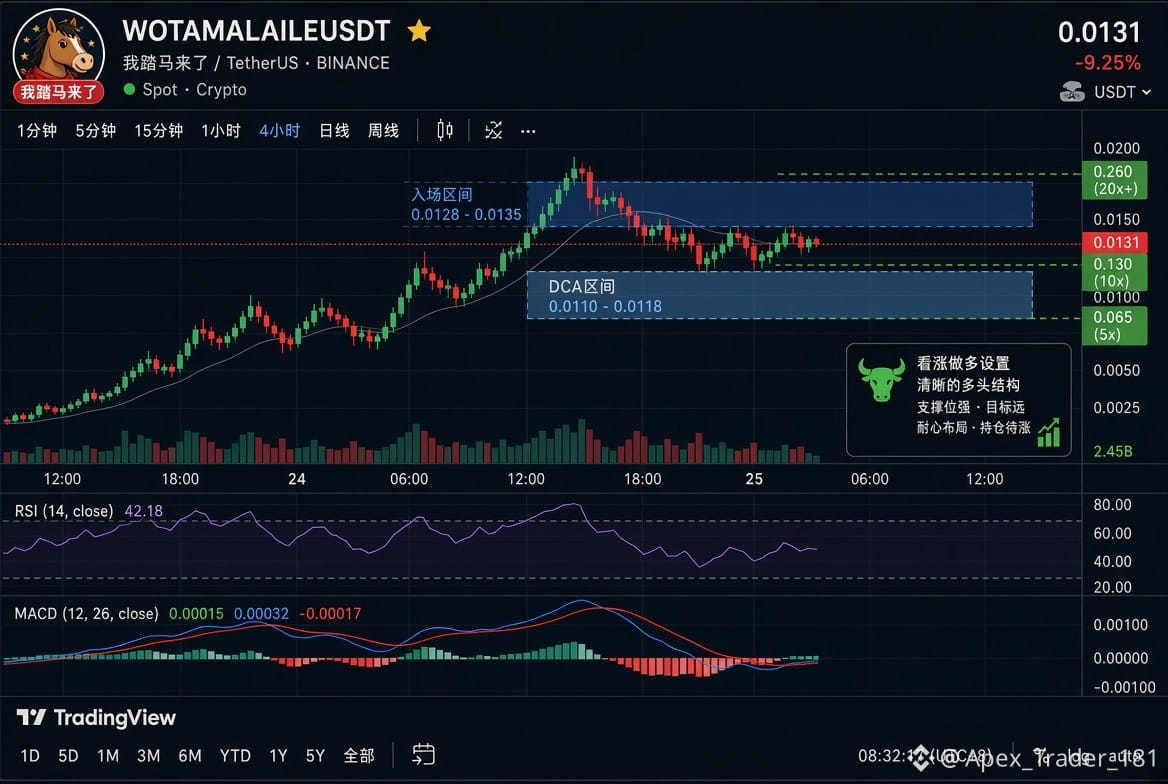
🚨 Chinesisches Meme-Gem-Alarm 🚨
$我踏马来了 $WOTAMALAILE
MC: \~$13M | Previous ATH se 78% down
🔥 Spot + Futures Long Setup
Einstieg: $0.0128 – $0.0135
DCA: $0.0110 – $0.0118
Ziele:
🎯 $0.065 (5x)
🎯 $0.130 (10x)
🎯 $0.260+ (20x+)
$我踏马来了
Bullische Gründe:
• Starke chinesische Meme-Story + virale Community
• BSC-Momentum + volles Bullrun-Recovery-Potenzial
Futures: 4x Cross | 5% Margin
Kitne x dekh rahe ho ispe? 👀
NFA | DYOR$我踏马来了 #WoTaMaLaiLe #Chines
{future}(我踏马来了USDT)
🚨 Chinesisches Meme-Gem-Alarm 🚨
$我踏马来了 $WOTAMALAILE
MC: \~$13M | Previous ATH se 78% down
🔥 Spot + Futures Long Setup
Einstieg: $0.0128 – $0.0135
DCA: $0.0110 – $0.0118
Ziele:
🎯 $0.065 (5x)
🎯 $0.130 (10x)
🎯 $0.260+ (20x+)
$我踏马来了
Bullische Gründe:
• Starke chinesische Meme-Story + virale Community
• BSC-Momentum + volles Bullrun-Recovery-Potenzial
Futures: 4x Cross | 5% Margin
Kitne x dekh rahe ho ispe? 👀
NFA | DYOR$我踏马来了 #WoTaMaLaiLe #Chines
$我踏马来了 $WOTAMALAILE
MC: \~$13M | Previous ATH se 78% down
🔥 Spot + Futures Long Setup
Einstieg: $0.0128 – $0.0135
DCA: $0.0110 – $0.0118
Ziele:
🎯 $0.065 (5x)
🎯 $0.130 (10x)
🎯 $0.260+ (20x+)
$我踏马来了
Bullische Gründe:
• Starke chinesische Meme-Story + virale Community
• BSC-Momentum + volles Bullrun-Recovery-Potenzial
Futures: 4x Cross | 5% Margin
Kitne x dekh rahe ho ispe? 👀
NFA | DYOR$我踏马来了 #WoTaMaLaiLe #Chines
1
261
·
--
Bullisch
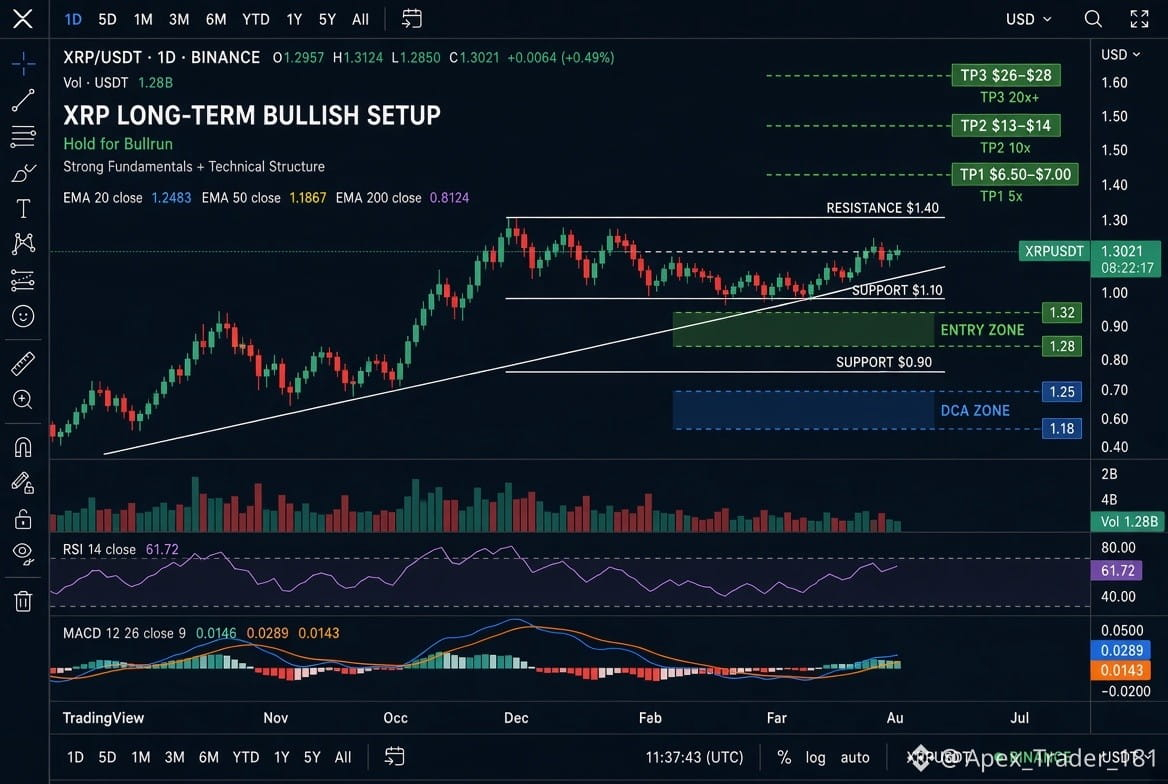
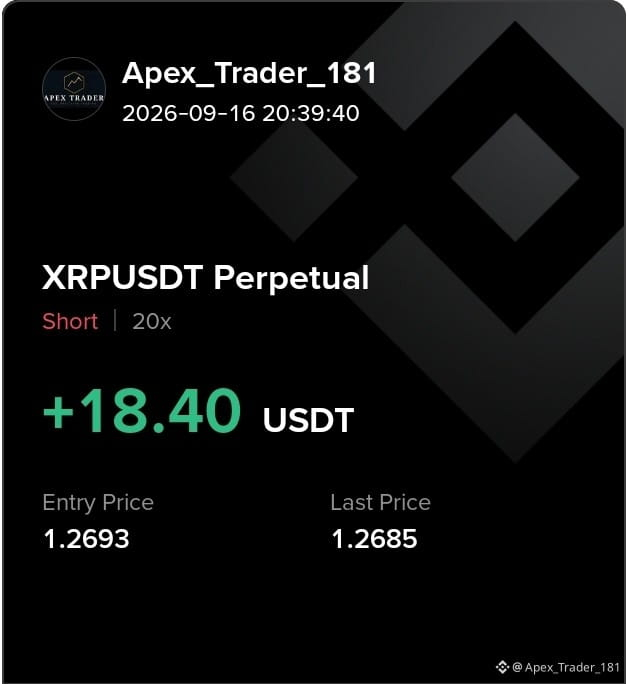
$XRP stop zukünftigen Handel öffne den Handel❤👇
Paar: XRP/USDT
Bias: Stark Long | Bullrun-Position
Zeitrahmen: Swing / Langfristig
Einstiegszone: $1.28 – $1.32
DCA-Zone: $1.18 – $1.25
Ziel 1: $6.50 – $7.00 (≈ 5x)
Ziel 2: $13.00 – $14.00 (≈ 10x)
Ziel 3: $26.00 – $28.00+ (20x+)
Bullische Gründe:
Institutionelle Adoption + klarer regulatorischer Pfad nach Abschluss des SEC-Falls + wachsender XRPL-Utility & $ETFT.ETF
Zuflüsse halten die mehrjährige Struktur intakt. Starke Nachfragezonen und Akkumulation auf höherem Timeframe unterstützen weiteres Upside in den nächsten großen Zyklus.
FUTURES-LONG-SETUP
Hebel: 4x Cross
Margin: 5%
Einstieg: Gleich wie oben ($1.28 – $1.32)
DCA: $1.18 – $1.25
Ziele: Gleiche 5x / 10x / 20x+-Level
$XRP #sui链 #BNB金鏟子 #ZEC.每日智能策略 heute Handel gewinn 👍🤑
$XRP stop zukünftigen Handel öffne den Handel❤👇
Paar: XRP/USDT
Bias: Stark Long | Bullrun-Position
Zeitrahmen: Swing / Langfristig
Einstiegszone: $1.28 – $1.32
DCA-Zone: $1.18 – $1.25
Ziel 1: $6.50 – $7.00 (≈ 5x)
Ziel 2: $13.00 – $14.00 (≈ 10x)
Ziel 3: $26.00 – $28.00+ (20x+)
Bullische Gründe:
Institutionelle Adoption + klarer regulatorischer Pfad nach Abschluss des SEC-Falls + wachsender XRPL-Utility & $ETFT.ETF
Zuflüsse halten die mehrjährige Struktur intakt. Starke Nachfragezonen und Akkumulation auf höherem Timeframe unterstützen weiteres Upside in den nächsten großen Zyklus.
FUTURES-LONG-SETUP
Hebel: 4x Cross
Margin: 5%
Einstieg: Gleich wie oben ($1.28 – $1.32)
DCA: $1.18 – $1.25
Ziele: Gleiche 5x / 10x / 20x+-Level
$XRP #sui链 #BNB金鏟子 #ZEC.每日智能策略 heute Handel gewinn 👍🤑
Paar: XRP/USDT
Bias: Stark Long | Bullrun-Position
Zeitrahmen: Swing / Langfristig
Einstiegszone: $1.28 – $1.32
DCA-Zone: $1.18 – $1.25
Ziel 1: $6.50 – $7.00 (≈ 5x)
Ziel 2: $13.00 – $14.00 (≈ 10x)
Ziel 3: $26.00 – $28.00+ (20x+)
Bullische Gründe:
Institutionelle Adoption + klarer regulatorischer Pfad nach Abschluss des SEC-Falls + wachsender XRPL-Utility & $ETFT.ETF
Zuflüsse halten die mehrjährige Struktur intakt. Starke Nachfragezonen und Akkumulation auf höherem Timeframe unterstützen weiteres Upside in den nächsten großen Zyklus.
FUTURES-LONG-SETUP
Hebel: 4x Cross
Margin: 5%
Einstieg: Gleich wie oben ($1.28 – $1.32)
DCA: $1.18 – $1.25
Ziele: Gleiche 5x / 10x / 20x+-Level
$XRP #sui链 #BNB金鏟子 #ZEC.每日智能策略 heute Handel gewinn 👍🤑
1
54
Übersetzung ansehen
spcx
spcx

Brilliant_Trader_171
·
--
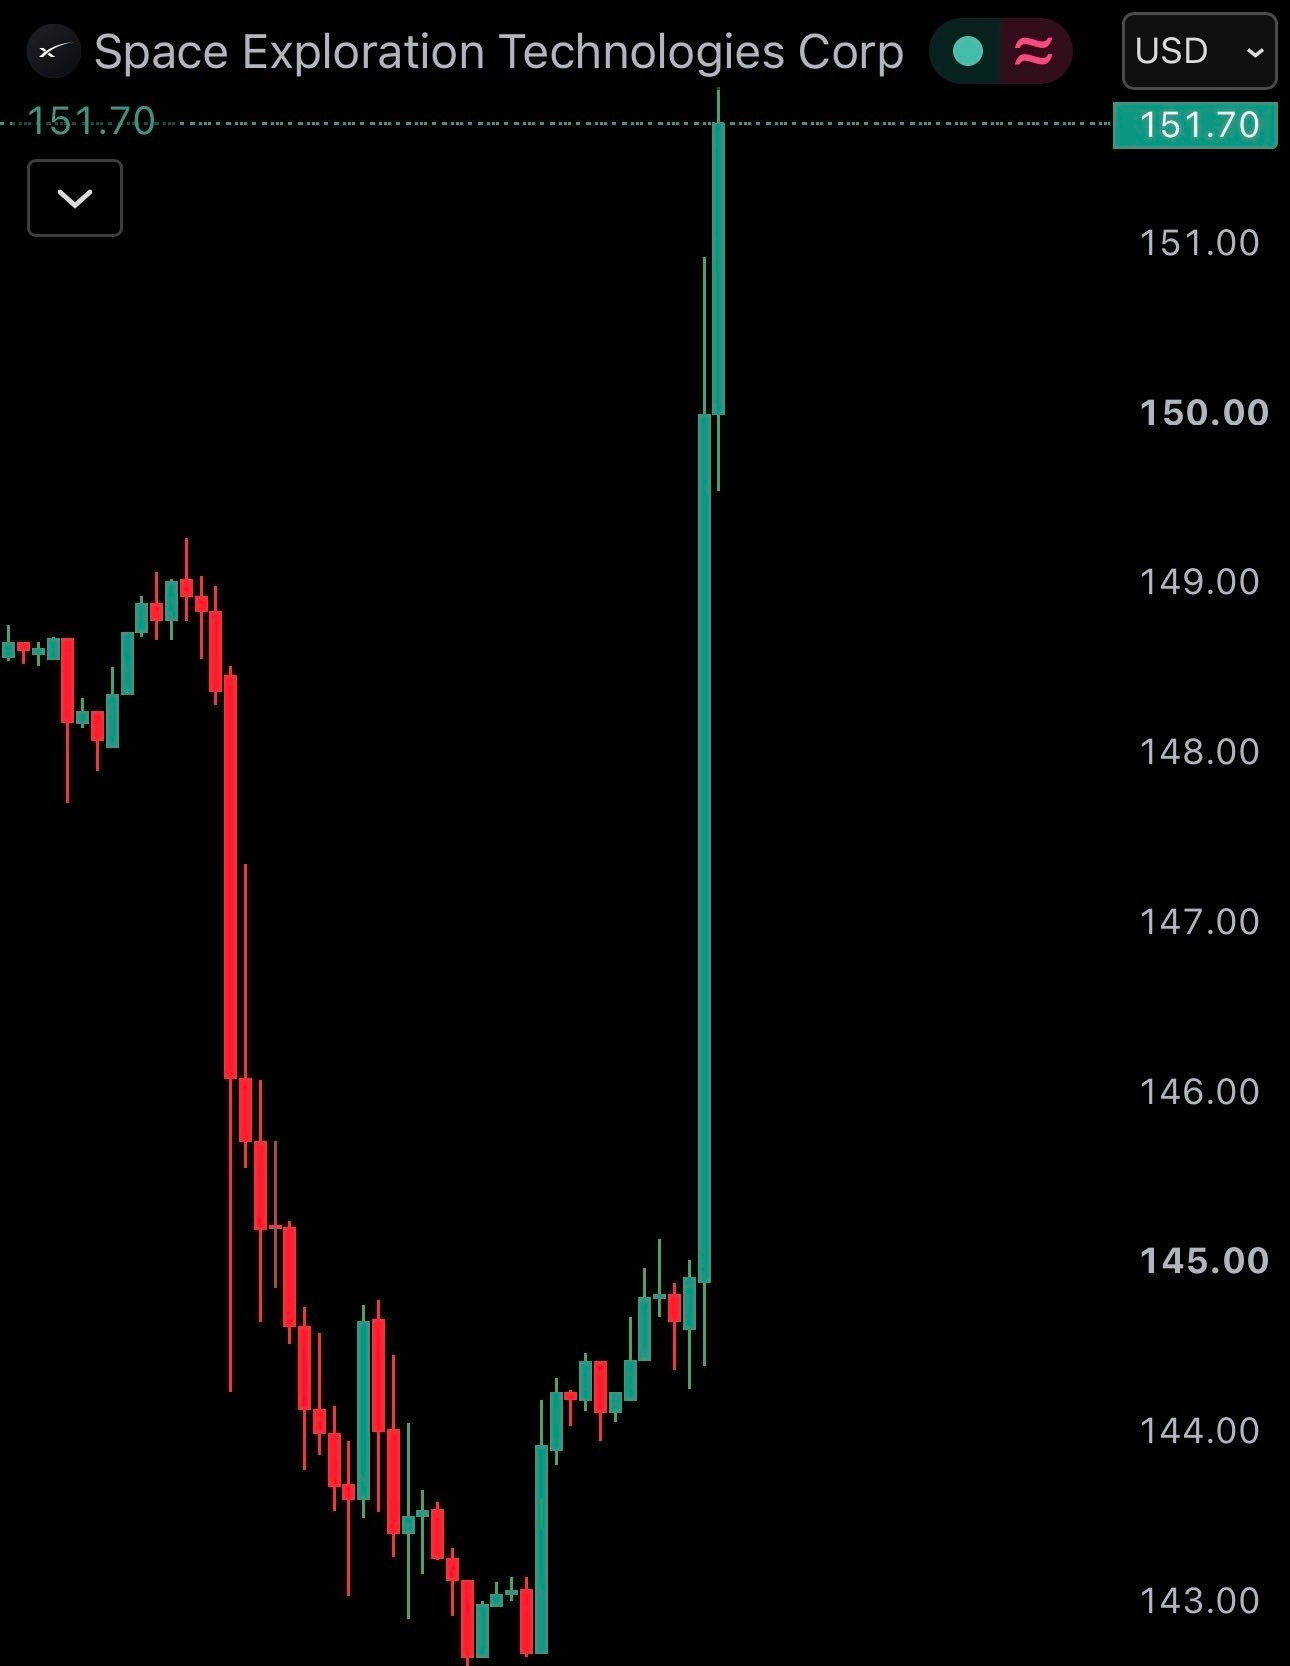
BullischSOEBEN: Elon Musks SpaceX $SPCX steigt um über 5% auf 151 US-Dollar
____________________________________
Tritt meiner kostenlosen Chatroom bei für schnelle Updates + Marktupdate + tägliche Scalp-Trades
$BTC $BNB #xrp #solana #USDT #USDC #PEPE
____________________________________
Tritt meiner kostenlosen Chatroom bei für schnelle Updates + Marktupdate + tägliche Scalp-Trades
$BTC $BNB #xrp #solana #USDT #USDC #PEPE

1
37
·
--
Bullisch
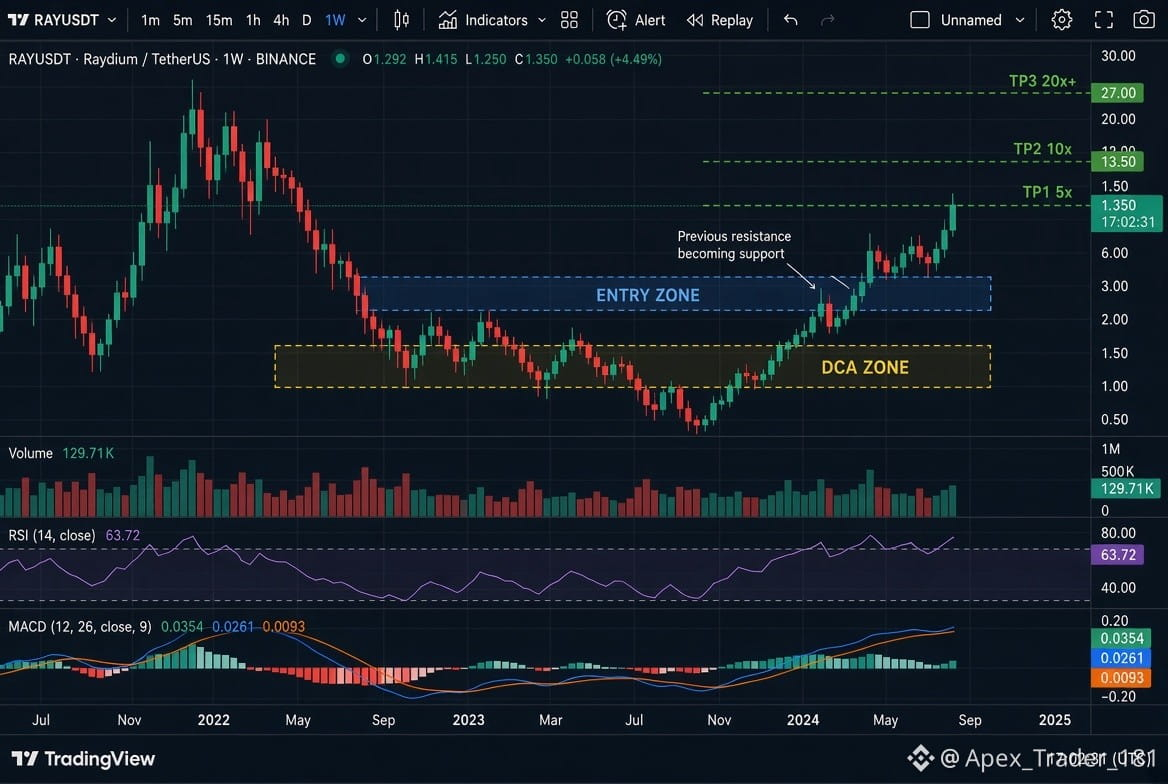
$RAY Long Setup4x Leverage | Cross 5% Margin
Einstieg: 1,28 $ – 1,40 $
DCA: 1,05 $ – 1,20 $
Ziele:
Tp1$6.80
Tp2$13.50
Tp3$27.00
$RAY long👇📈
folge für mehr Trading❤$RAY
#Ray #TradingSignal #Crypto_Jobs🎯
{spot}(RAYUSDT)
$RAY Long Setup4x Leverage | Cross 5% Margin
Einstieg: 1,28 $ – 1,40 $
DCA: 1,05 $ – 1,20 $
Ziele:
Tp1$6.80
Tp2$13.50
Tp3$27.00
$RAY long👇📈
folge für mehr Trading❤$RAY
#Ray #TradingSignal #Crypto_Jobs🎯
Einstieg: 1,28 $ – 1,40 $
DCA: 1,05 $ – 1,20 $
Ziele:
Tp1$6.80
Tp2$13.50
Tp3$27.00
$RAY long👇📈
folge für mehr Trading❤$RAY
#Ray #TradingSignal #Crypto_Jobs🎯
6
1
90
·
--
Bullisch
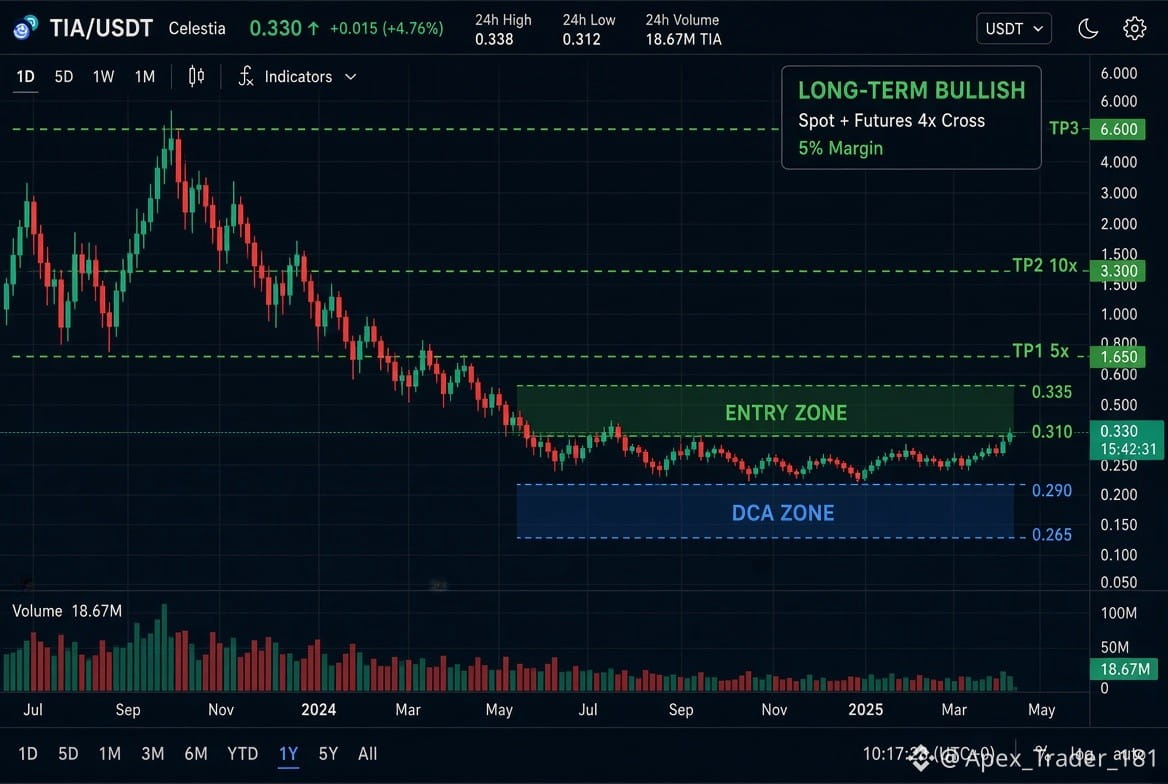
$TIA (Celestia) | Langfristiges bullisches Setup
Pair: TIA/USDT
Bias: Stark langfristig bullisch
Typ: Spot + Futures Long
Einstiegszone: $0.310 – $0.335
DCA-Zone: $0.265 – $0.290
Ziele:
TP1: $1.65 (5x)
TP2: $3.30 (10x)
TP3: $6.60+ (20x+)
$TIA long👇📈
{future}(TIAUSDT)
$TIA (Celestia) | Langfristiges bullisches Setup
Pair: TIA/USDT
Bias: Stark langfristig bullisch
Typ: Spot + Futures Long
Einstiegszone: $0.310 – $0.335
DCA-Zone: $0.265 – $0.290
Ziele:
TP1: $1.65 (5x)
TP2: $3.30 (10x)
TP3: $6.60+ (20x+)
$TIA long👇📈
Pair: TIA/USDT
Bias: Stark langfristig bullisch
Typ: Spot + Futures Long
Einstiegszone: $0.310 – $0.335
DCA-Zone: $0.265 – $0.290
Ziele:
TP1: $1.65 (5x)
TP2: $3.30 (10x)
TP3: $6.60+ (20x+)
$TIA long👇📈
147
·
--
Bullisch
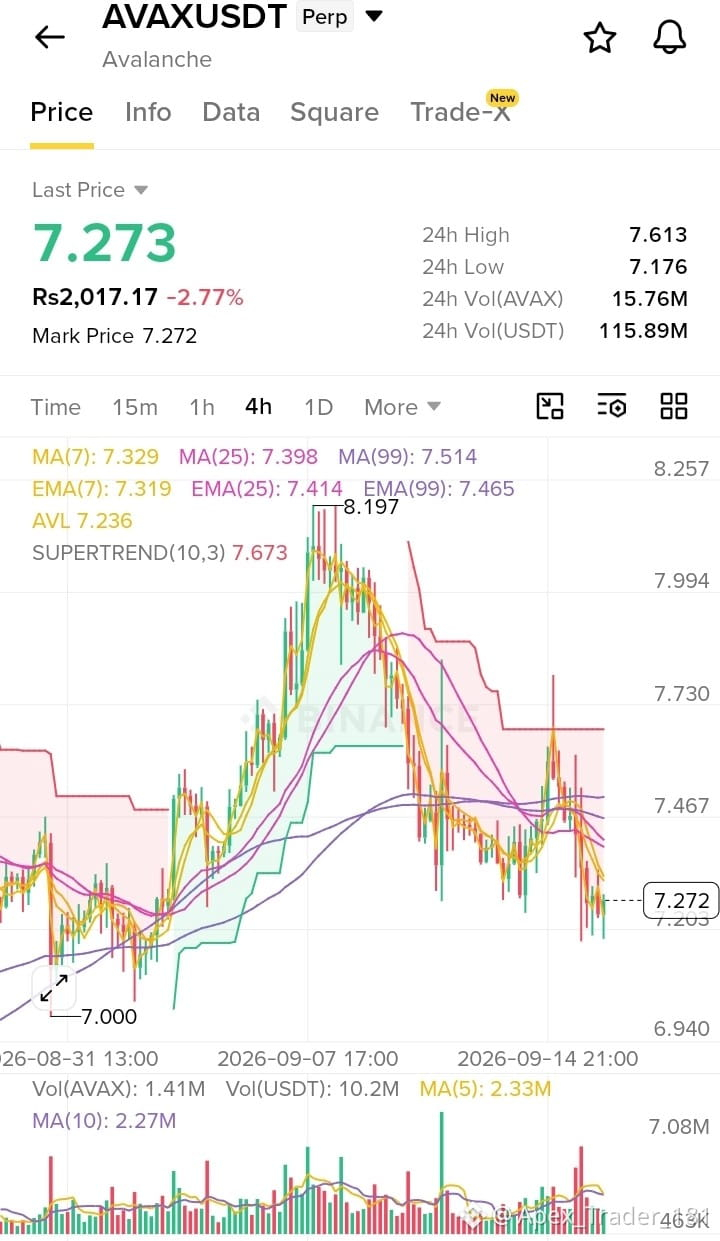
$AVAX LANGFRISTIGE BULLISCHE POSITION 🔥
Coin: Avalanche (AVAX)
Bias: Stark langfristig bullisch (Bullrun-Position)
Einstiegszone: 7,15 – 7,40 $
DCA-Zone: 6,50 – 6,80 $
Ziele:
🎯 TP1: 36 – 40 $ (≈5x)
🎯 TP2: 70 – 80 $ (≈10x)
🎯 TP3: 145 – 160+ $ (≈20x+)
Bullische Gründe:
Starke institutionelle Adoption (UAE-National-ID, koreanische Tokenisierung, große RWAs) + Helicon-Upgrade, das die Staking-Ökonomie verbessert. Stark von ATH abdiskontiert mit einer mehrjährigen Akkumulationsbasis – perfekte Grundlage für die nächste große Zyklus-Expansion.
Futures Long Setup (4x Hebel | Cross | 5% Margin):
Gleiche Einstiegs- & DCA-Zonen wie oben.
Halten für die gleichen langfristigen Ziele.
$AVAX long👇
folge für mehr Trades❤$AVAX
#AVAX #TradingCommunity
{future}(AVAXUSDT)
$AVAX LANGFRISTIGE BULLISCHE POSITION 🔥
Coin: Avalanche (AVAX)
Bias: Stark langfristig bullisch (Bullrun-Position)
Einstiegszone: 7,15 – 7,40 $
DCA-Zone: 6,50 – 6,80 $
Ziele:
🎯 TP1: 36 – 40 $ (≈5x)
🎯 TP2: 70 – 80 $ (≈10x)
🎯 TP3: 145 – 160+ $ (≈20x+)
Bullische Gründe:
Starke institutionelle Adoption (UAE-National-ID, koreanische Tokenisierung, große RWAs) + Helicon-Upgrade, das die Staking-Ökonomie verbessert. Stark von ATH abdiskontiert mit einer mehrjährigen Akkumulationsbasis – perfekte Grundlage für die nächste große Zyklus-Expansion.
Futures Long Setup (4x Hebel | Cross | 5% Margin):
Gleiche Einstiegs- & DCA-Zonen wie oben.
Halten für die gleichen langfristigen Ziele.
$AVAX long👇
folge für mehr Trades❤$AVAX
#AVAX #TradingCommunity
Coin: Avalanche (AVAX)
Bias: Stark langfristig bullisch (Bullrun-Position)
Einstiegszone: 7,15 – 7,40 $
DCA-Zone: 6,50 – 6,80 $
Ziele:
🎯 TP1: 36 – 40 $ (≈5x)
🎯 TP2: 70 – 80 $ (≈10x)
🎯 TP3: 145 – 160+ $ (≈20x+)
Bullische Gründe:
Starke institutionelle Adoption (UAE-National-ID, koreanische Tokenisierung, große RWAs) + Helicon-Upgrade, das die Staking-Ökonomie verbessert. Stark von ATH abdiskontiert mit einer mehrjährigen Akkumulationsbasis – perfekte Grundlage für die nächste große Zyklus-Expansion.
Futures Long Setup (4x Hebel | Cross | 5% Margin):
Gleiche Einstiegs- & DCA-Zonen wie oben.
Halten für die gleichen langfristigen Ziele.
$AVAX long👇
folge für mehr Trades❤$AVAX
#AVAX #TradingCommunity
1
231
·
--
Bullisch
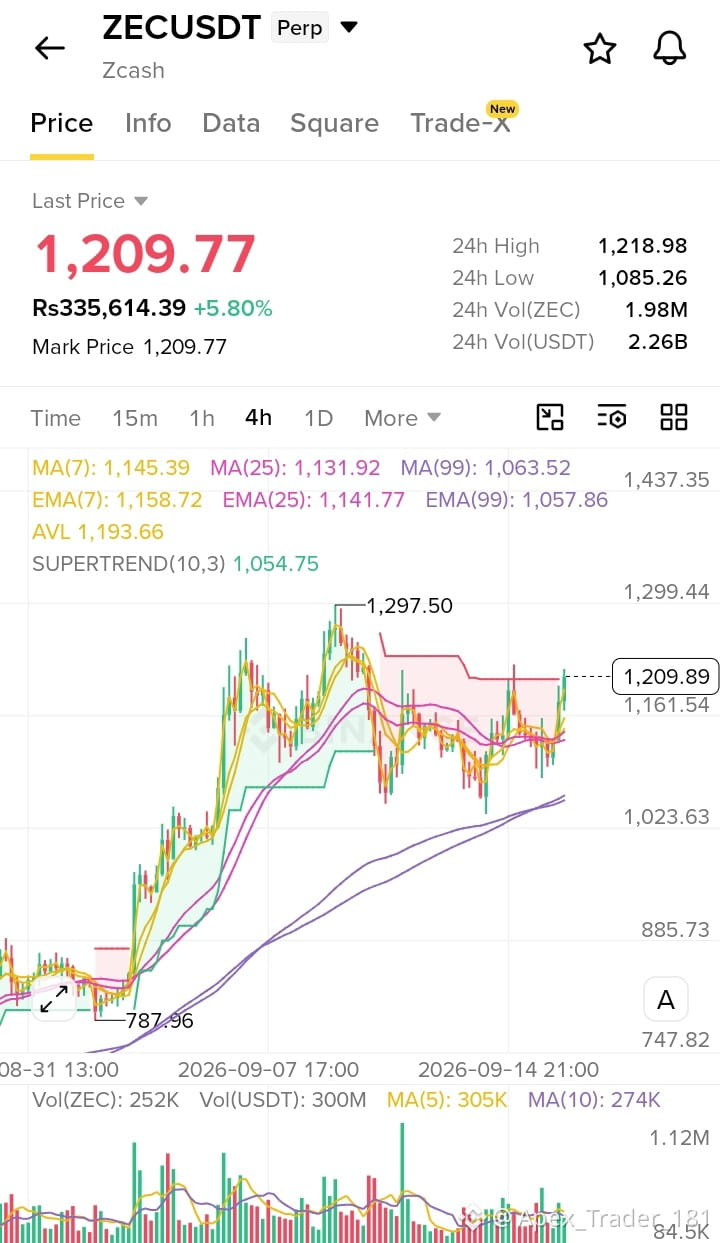
$ZEC USDT LONG 4x Hebel Cross | 5% Margin
Richtung: LONG
Einstandspreis: $1.150 – $1.220
DCA-Preis: $1.050 – $1.100
Ziel 1: $6.000 (≈5x)
Ziel 2: $12.000 (≈10x)
Ziel 3: $24.000+ (20x+)
Bullenhafte Gründe:
Starker mehrmonatiger Aufwärtstrend mit höheren Hochs & höheren Tiefs, Preis hält sich über wichtigen gleitenden Durchschnitten und der wichtigsten Unterstützungszone nach der jüngsten Konsolidierung. Privacy-Narrativ + institutionelle ETF-Zuflüsse treiben weiterhin eine anhaltende Nachfrage nach ZEC im laufenden Bullenzyklus.$ZEC
#ZECUSDT #longpositions $ZEC
{future}(ZECUSDT)
$ZEC USDT LONG 4x Hebel Cross | 5% Margin
Richtung: LONG
Einstandspreis: $1.150 – $1.220
DCA-Preis: $1.050 – $1.100
Ziel 1: $6.000 (≈5x)
Ziel 2: $12.000 (≈10x)
Ziel 3: $24.000+ (20x+)
Bullenhafte Gründe:
Starker mehrmonatiger Aufwärtstrend mit höheren Hochs & höheren Tiefs, Preis hält sich über wichtigen gleitenden Durchschnitten und der wichtigsten Unterstützungszone nach der jüngsten Konsolidierung. Privacy-Narrativ + institutionelle ETF-Zuflüsse treiben weiterhin eine anhaltende Nachfrage nach ZEC im laufenden Bullenzyklus.$ZEC
#ZECUSDT #longpositions $ZEC
Richtung: LONG
Einstandspreis: $1.150 – $1.220
DCA-Preis: $1.050 – $1.100
Ziel 1: $6.000 (≈5x)
Ziel 2: $12.000 (≈10x)
Ziel 3: $24.000+ (20x+)
Bullenhafte Gründe:
Starker mehrmonatiger Aufwärtstrend mit höheren Hochs & höheren Tiefs, Preis hält sich über wichtigen gleitenden Durchschnitten und der wichtigsten Unterstützungszone nach der jüngsten Konsolidierung. Privacy-Narrativ + institutionelle ETF-Zuflüsse treiben weiterhin eine anhaltende Nachfrage nach ZEC im laufenden Bullenzyklus.$ZEC
#ZECUSDT #longpositions $ZEC
1
214
·
--
Bullisch
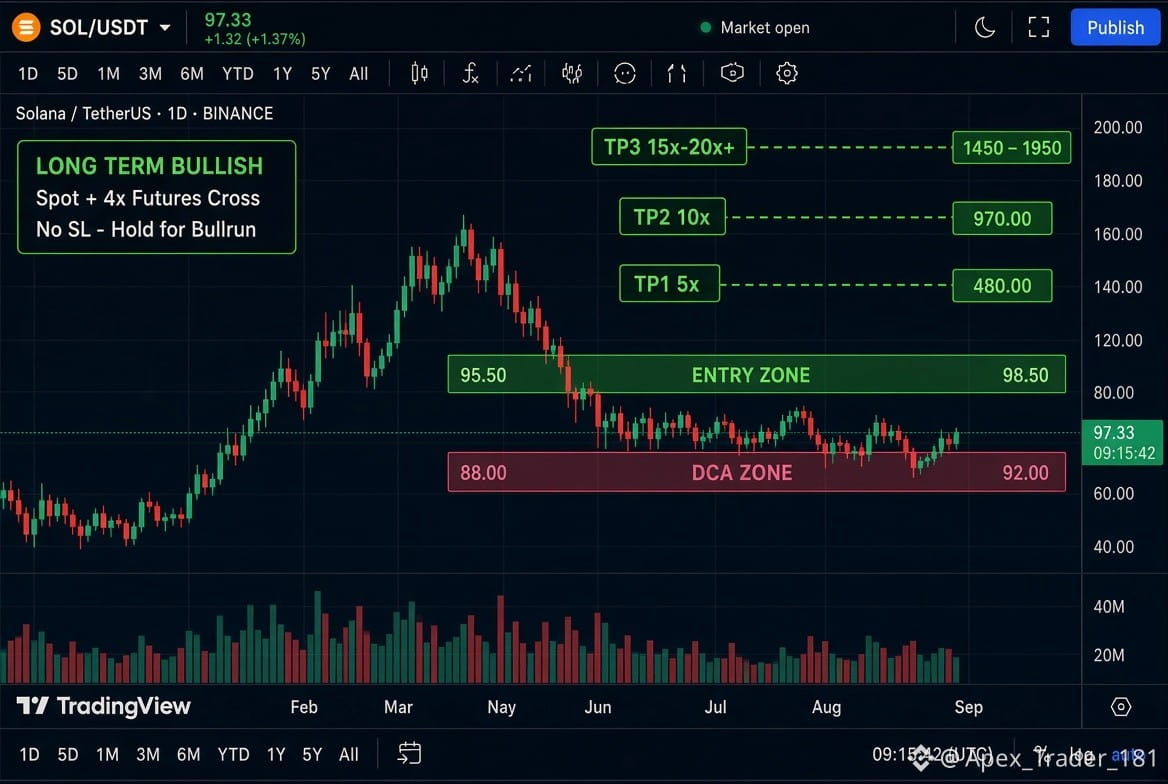
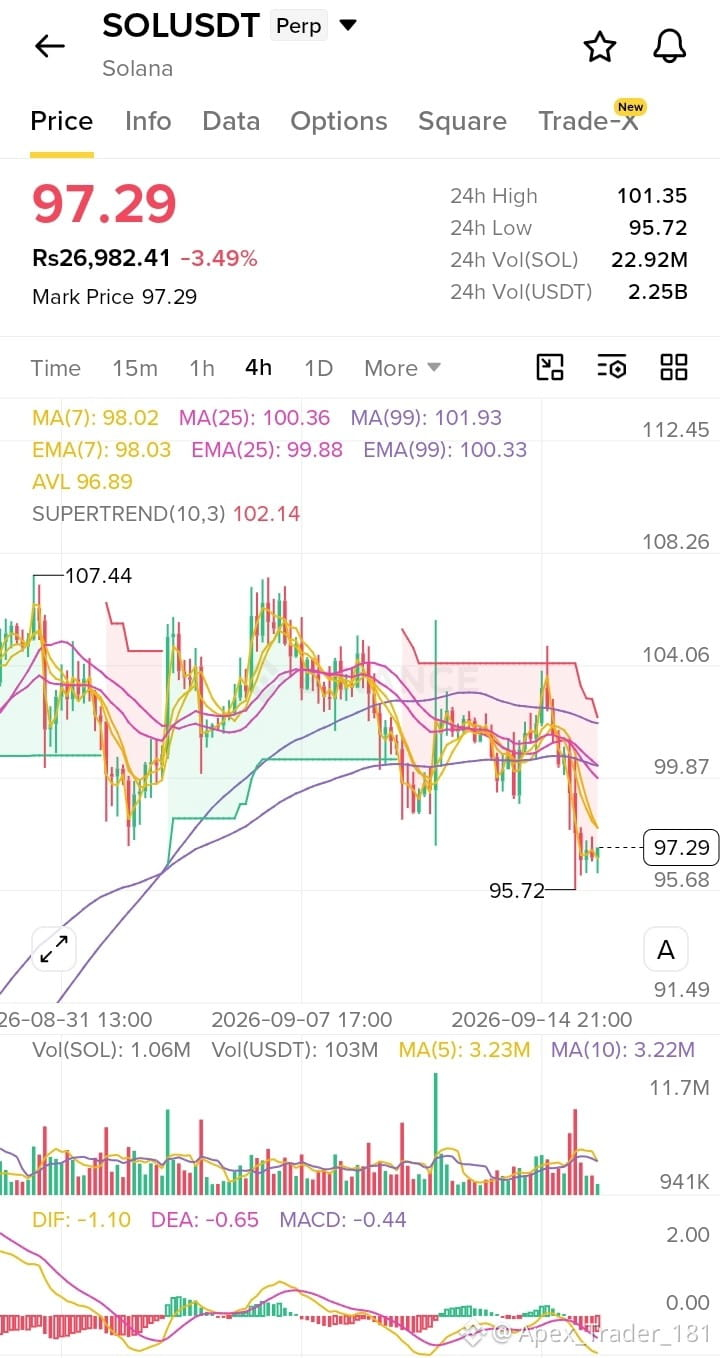
🚀 $SOL 4x Hebelwirkung | Cross-Modus | 5% Margin
Premium Signal | Spot + Futures
Coin: $SOL
Bias: Stark bullisch (Long-Term Bullrun-Ansammlung)
Zeitrahmen: Langfristiges Halten
Einstiegskurs: 95,50 $ – 98,50 $
DCA-Zone: 88,00 $ – 92,00 $
Ziele:
TP1: 480 $ (≈ 5x)
TP2: 970 $ (≈ 10x)
TP3: 1450 $ – 1950+ (15x – 20x+)
Bullische Gründe:
Solana bleibt das schnellste & am stärksten adaptierte L1 mit massivem RWA, DeFi und Zuflüssen aus institutionellen ETF-Investitionen. Netzwerk-Upgrades + reale Nutzung positionieren es ideal für die nächste komplette Zyklus-Expansion.
Futures Long (Optional):
4x Hebelwirkung | Cross-Modus | 5% Margin
Gleicher Einstieg / DCA / Ziele wie oben$SOL
#solana #CryptocurrencyWealth #LONG✅
{future}(SOLUSDT)
🚀 $SOL 4x Hebelwirkung | Cross-Modus | 5% Margin
Premium Signal | Spot + Futures
Coin: $SOL
Bias: Stark bullisch (Long-Term Bullrun-Ansammlung)
Zeitrahmen: Langfristiges Halten
Einstiegskurs: 95,50 $ – 98,50 $
DCA-Zone: 88,00 $ – 92,00 $
Ziele:
TP1: 480 $ (≈ 5x)
TP2: 970 $ (≈ 10x)
TP3: 1450 $ – 1950+ (15x – 20x+)
Bullische Gründe:
Solana bleibt das schnellste & am stärksten adaptierte L1 mit massivem RWA, DeFi und Zuflüssen aus institutionellen ETF-Investitionen. Netzwerk-Upgrades + reale Nutzung positionieren es ideal für die nächste komplette Zyklus-Expansion.
Futures Long (Optional):
4x Hebelwirkung | Cross-Modus | 5% Margin
Gleicher Einstieg / DCA / Ziele wie oben$SOL
#solana #CryptocurrencyWealth #LONG✅
Premium Signal | Spot + Futures
Coin: $SOL
Bias: Stark bullisch (Long-Term Bullrun-Ansammlung)
Zeitrahmen: Langfristiges Halten
Einstiegskurs: 95,50 $ – 98,50 $
DCA-Zone: 88,00 $ – 92,00 $
Ziele:
TP1: 480 $ (≈ 5x)
TP2: 970 $ (≈ 10x)
TP3: 1450 $ – 1950+ (15x – 20x+)
Bullische Gründe:
Solana bleibt das schnellste & am stärksten adaptierte L1 mit massivem RWA, DeFi und Zuflüssen aus institutionellen ETF-Investitionen. Netzwerk-Upgrades + reale Nutzung positionieren es ideal für die nächste komplette Zyklus-Expansion.
Futures Long (Optional):
4x Hebelwirkung | Cross-Modus | 5% Margin
Gleicher Einstieg / DCA / Ziele wie oben$SOL
#solana #CryptocurrencyWealth #LONG✅
12
75
·
--
Bullisch
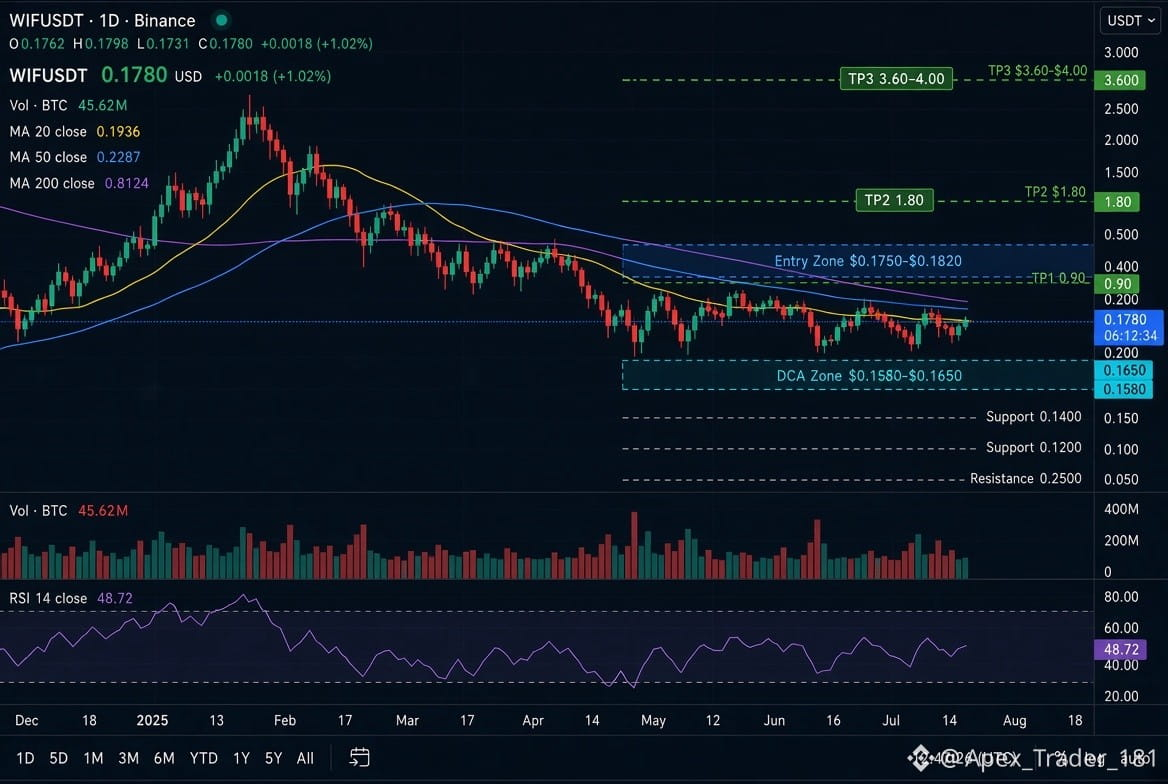
$WIF LANGFRISTIGER BULLISCHER SETUP 🚀
Coin: dogwifhat (WIF)
Paar: #WIFUSDT
Bias: Stark bullisch | Position für einen langfristigen Bullrun
📍 Spot-Trade-Setup
Einstiegszone: 0,1750 $ – 0,1820 $
DCA-Levels: 0,1580 $ – 0,1650 $
🎯 Ziele
TP1: 0,90 $ (≈ 5x)
TP2: 1,80 $ (≈ 10x)
TP3: 3,60 $ – 4,00+ $ (≈ 20x+)
Bullische Gründe (Stark halten):
WIF hält eine wichtige Nachfragezone mit starker Community + die Rückkehr der Solana-Meme-Dominanz. Die langfristige Struktur bleibt für die nächste Bull-zyklus-Erweiterung in Richtung der vorherigen ATH-Level intakt.
⚡ Futures Long-Setup
Richtung: LONG
Hebel: 4x Cross
Margin: 5% des Kapitals
Entry: 0,1750 $ – 0,1820 $
DCA: 0,1580 $ – 0,1650 $
Ziele gleich wie Spot:
TP1 0,90 $ | TP2 1,80 $ | TP3 3,60 $ – 4,00+
Bullische Gründe (Stark halten):
Wichtiger Support wird verteidigt + steigendes Volumen bei Rücksetzern zeigt Akkumulation. Als nächster Schritt nach oben wird erwartet, wenn der Markt in die Risk-on-Phase eintritt.
Risiko-Hinweis: Nur mit Risikokapital handeln. Dies ist keine Finanzberatung.
$WIF #dogwifhat #crypto #longterm #bullish $WIF
{future}(WIFUSDT)
$WIF LANGFRISTIGER BULLISCHER SETUP 🚀
Coin: dogwifhat (WIF)
Paar: #WIFUSDT
Bias: Stark bullisch | Position für einen langfristigen Bullrun
📍 Spot-Trade-Setup
Einstiegszone: 0,1750 $ – 0,1820 $
DCA-Levels: 0,1580 $ – 0,1650 $
🎯 Ziele
TP1: 0,90 $ (≈ 5x)
TP2: 1,80 $ (≈ 10x)
TP3: 3,60 $ – 4,00+ $ (≈ 20x+)
Bullische Gründe (Stark halten):
WIF hält eine wichtige Nachfragezone mit starker Community + die Rückkehr der Solana-Meme-Dominanz. Die langfristige Struktur bleibt für die nächste Bull-zyklus-Erweiterung in Richtung der vorherigen ATH-Level intakt.
⚡ Futures Long-Setup
Richtung: LONG
Hebel: 4x Cross
Margin: 5% des Kapitals
Entry: 0,1750 $ – 0,1820 $
DCA: 0,1580 $ – 0,1650 $
Ziele gleich wie Spot:
TP1 0,90 $ | TP2 1,80 $ | TP3 3,60 $ – 4,00+
Bullische Gründe (Stark halten):
Wichtiger Support wird verteidigt + steigendes Volumen bei Rücksetzern zeigt Akkumulation. Als nächster Schritt nach oben wird erwartet, wenn der Markt in die Risk-on-Phase eintritt.
Risiko-Hinweis: Nur mit Risikokapital handeln. Dies ist keine Finanzberatung.
$WIF #dogwifhat #crypto #longterm #bullish $WIF
Coin: dogwifhat (WIF)
Paar: #WIFUSDT
Bias: Stark bullisch | Position für einen langfristigen Bullrun
📍 Spot-Trade-Setup
Einstiegszone: 0,1750 $ – 0,1820 $
DCA-Levels: 0,1580 $ – 0,1650 $
🎯 Ziele
TP1: 0,90 $ (≈ 5x)
TP2: 1,80 $ (≈ 10x)
TP3: 3,60 $ – 4,00+ $ (≈ 20x+)
Bullische Gründe (Stark halten):
WIF hält eine wichtige Nachfragezone mit starker Community + die Rückkehr der Solana-Meme-Dominanz. Die langfristige Struktur bleibt für die nächste Bull-zyklus-Erweiterung in Richtung der vorherigen ATH-Level intakt.
⚡ Futures Long-Setup
Richtung: LONG
Hebel: 4x Cross
Margin: 5% des Kapitals
Entry: 0,1750 $ – 0,1820 $
DCA: 0,1580 $ – 0,1650 $
Ziele gleich wie Spot:
TP1 0,90 $ | TP2 1,80 $ | TP3 3,60 $ – 4,00+
Bullische Gründe (Stark halten):
Wichtiger Support wird verteidigt + steigendes Volumen bei Rücksetzern zeigt Akkumulation. Als nächster Schritt nach oben wird erwartet, wenn der Markt in die Risk-on-Phase eintritt.
Risiko-Hinweis: Nur mit Risikokapital handeln. Dies ist keine Finanzberatung.
$WIF #dogwifhat #crypto #longterm #bullish $WIF

wif
Von Apex_Trader_181
6
3
156
·
--
Bullisch
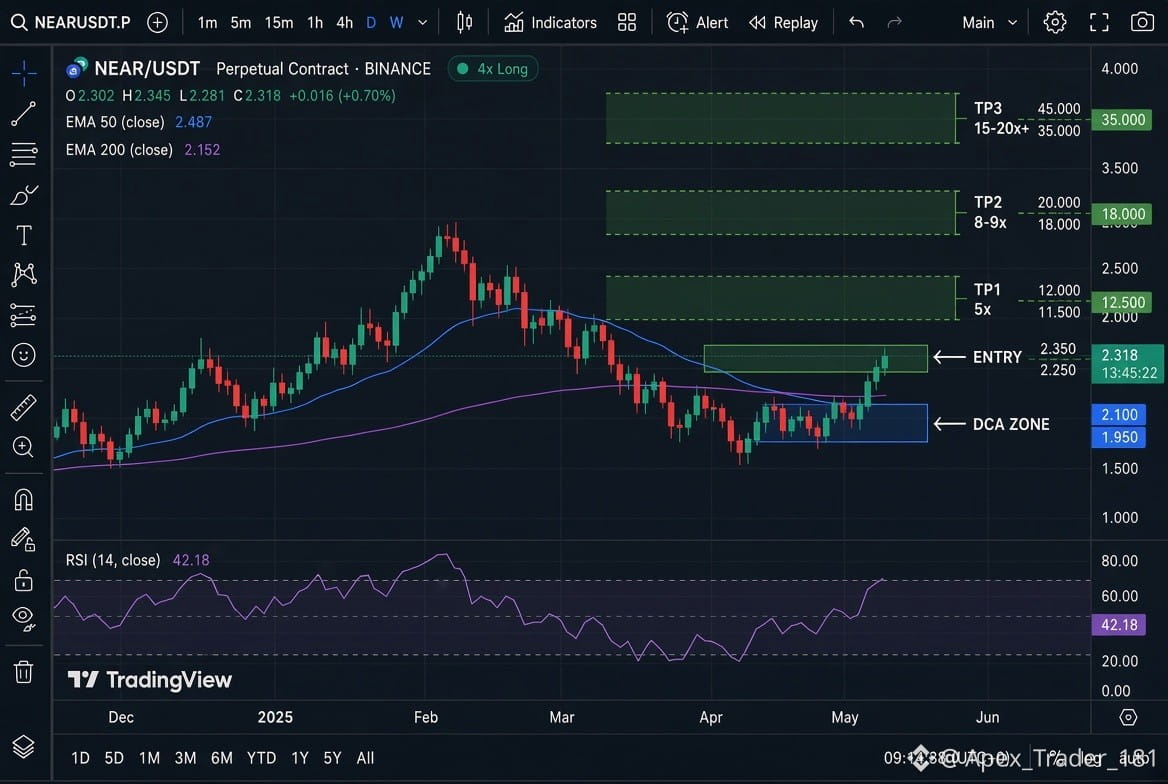
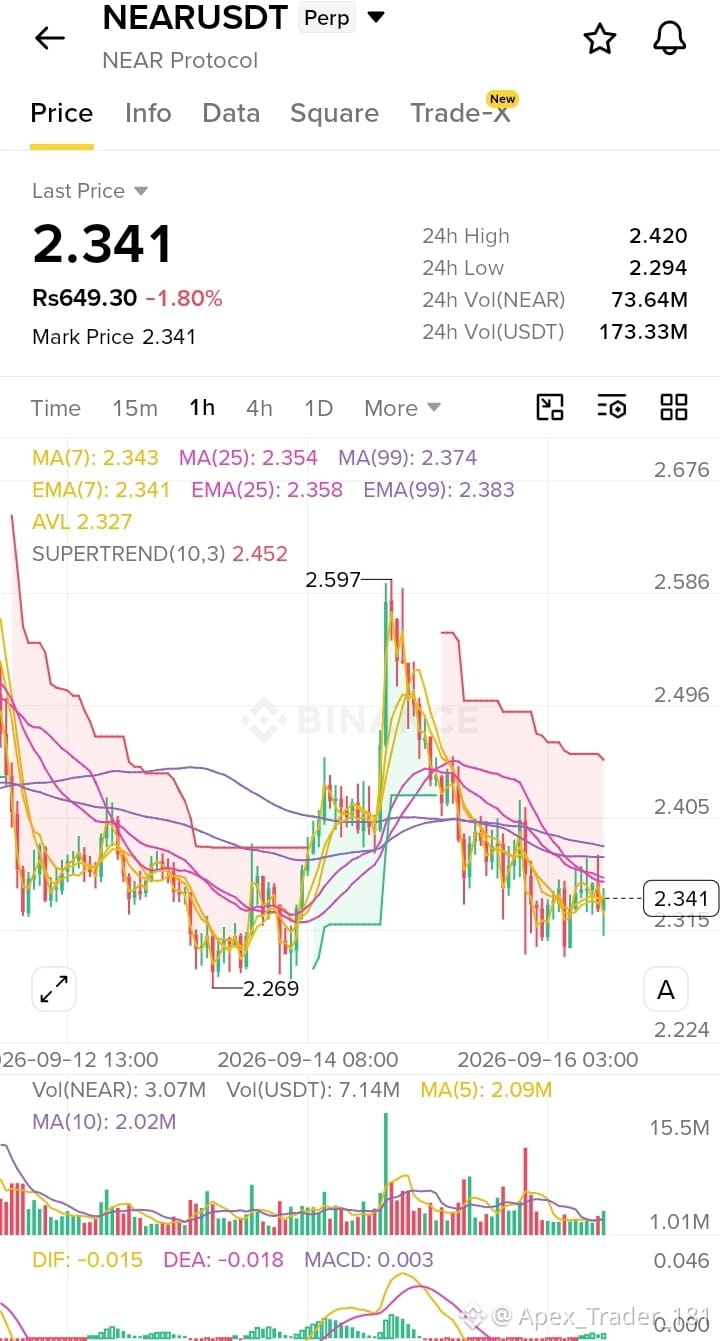
$NEAR Protocol Long Term Bullish Trade Setup
Spot Long Setup
🟢Einstiegspreis: 2,25 $ – 2,35 $
🔴DCA-Preis: 1,95 $ – 2,10 $
Ziele:
• Ziel 1: 11,50 $ – 12,00 $ (≈5x)
• Ziel 2: 18,00 $ – 20,00 $ (≈8x–9x)
• Ziel 3: 35,00 $ – 45,00+ (15x–20x+)
Bullische Gründe:
Starke Chain-Abstraktion + NEAR Intents-Wachstum der Einnahmen mit beschleunigter Erfassung von Protokollgebühren und Rückkäufen. KI-Agenten-Narrativ + Post-Quanten-Upgrades + geringere Inflation schaffen mehrjährige Nachfrageschübe für ein großes Re-Rating.
Futures Long Setup (Cross-Modus)
Hebel: 4x
Margin: 5%
Einstiegszone: 2,25 $ – 2,35 $
Gleiche Ziele wie Spot#NearBullish $NEAR
#TradingSignals #CryptoNewss $NEAR
{future}(NEARUSDT)
$NEAR Protocol Long Term Bullish Trade Setup
Spot Long Setup
🟢Einstiegspreis: 2,25 $ – 2,35 $
🔴DCA-Preis: 1,95 $ – 2,10 $
Ziele:
• Ziel 1: 11,50 $ – 12,00 $ (≈5x)
• Ziel 2: 18,00 $ – 20,00 $ (≈8x–9x)
• Ziel 3: 35,00 $ – 45,00+ (15x–20x+)
Bullische Gründe:
Starke Chain-Abstraktion + NEAR Intents-Wachstum der Einnahmen mit beschleunigter Erfassung von Protokollgebühren und Rückkäufen. KI-Agenten-Narrativ + Post-Quanten-Upgrades + geringere Inflation schaffen mehrjährige Nachfrageschübe für ein großes Re-Rating.
Futures Long Setup (Cross-Modus)
Hebel: 4x
Margin: 5%
Einstiegszone: 2,25 $ – 2,35 $
Gleiche Ziele wie Spot#NearBullish $NEAR
#TradingSignals #CryptoNewss $NEAR
Spot Long Setup
🟢Einstiegspreis: 2,25 $ – 2,35 $
🔴DCA-Preis: 1,95 $ – 2,10 $
Ziele:
• Ziel 1: 11,50 $ – 12,00 $ (≈5x)
• Ziel 2: 18,00 $ – 20,00 $ (≈8x–9x)
• Ziel 3: 35,00 $ – 45,00+ (15x–20x+)
Bullische Gründe:
Starke Chain-Abstraktion + NEAR Intents-Wachstum der Einnahmen mit beschleunigter Erfassung von Protokollgebühren und Rückkäufen. KI-Agenten-Narrativ + Post-Quanten-Upgrades + geringere Inflation schaffen mehrjährige Nachfrageschübe für ein großes Re-Rating.
Futures Long Setup (Cross-Modus)
Hebel: 4x
Margin: 5%
Einstiegszone: 2,25 $ – 2,35 $
Gleiche Ziele wie Spot#NearBullish $NEAR
#TradingSignals #CryptoNewss $NEAR
164
·
--
Bullisch
Übersetzung ansehen
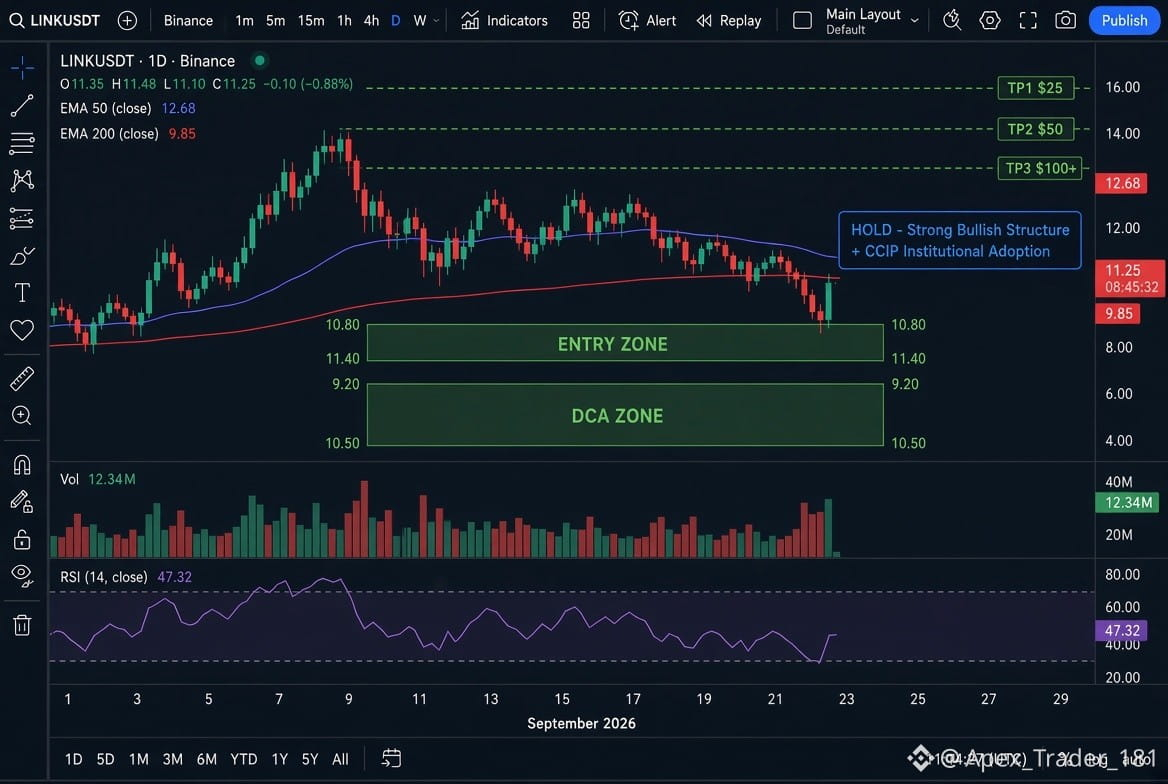
$LINK USDT open big long now, thanks me soon🤑
DIRECTION: LONG
TIMEFRAME: Long Term Bullrun
ENTRY: $11.10 – $11.35
DCA ZONE: $10.40 – $10.80
TARGETS:
TP1: $55 – $60 (≈5x)
TP2: $90 – $110 (≈8x–10x)
TP3: $180 – $230+ (≈16x–20x+)
FUTURES LONG (CROSS):
Leverage: 4x
Margin: 5% of portfolio
Entry & DCA same as above
Hold through targets — no hard stop, only invalidation on sustained weekly close below $8.50
$LINK long👇📈
follow for more trade❤$LINK #LINK🔥🔥🔥 #TradingSignals #CryptoNewss
{future}(LINKUSDT)
$LINK USDT open big long now, thanks me soon🤑
DIRECTION: LONG
TIMEFRAME: Long Term Bullrun
ENTRY: $11.10 – $11.35
DCA ZONE: $10.40 – $10.80
TARGETS:
TP1: $55 – $60 (≈5x)
TP2: $90 – $110 (≈8x–10x)
TP3: $180 – $230+ (≈16x–20x+)
FUTURES LONG (CROSS):
Leverage: 4x
Margin: 5% of portfolio
Entry & DCA same as above
Hold through targets — no hard stop, only invalidation on sustained weekly close below $8.50
$LINK long👇📈
follow for more trade❤$LINK #LINK🔥🔥🔥 #TradingSignals #CryptoNewss
DIRECTION: LONG
TIMEFRAME: Long Term Bullrun
ENTRY: $11.10 – $11.35
DCA ZONE: $10.40 – $10.80
TARGETS:
TP1: $55 – $60 (≈5x)
TP2: $90 – $110 (≈8x–10x)
TP3: $180 – $230+ (≈16x–20x+)
FUTURES LONG (CROSS):
Leverage: 4x
Margin: 5% of portfolio
Entry & DCA same as above
Hold through targets — no hard stop, only invalidation on sustained weekly close below $8.50
$LINK long👇📈
follow for more trade❤$LINK #LINK🔥🔥🔥 #TradingSignals #CryptoNewss
1
1
113
·
--
Bärisch
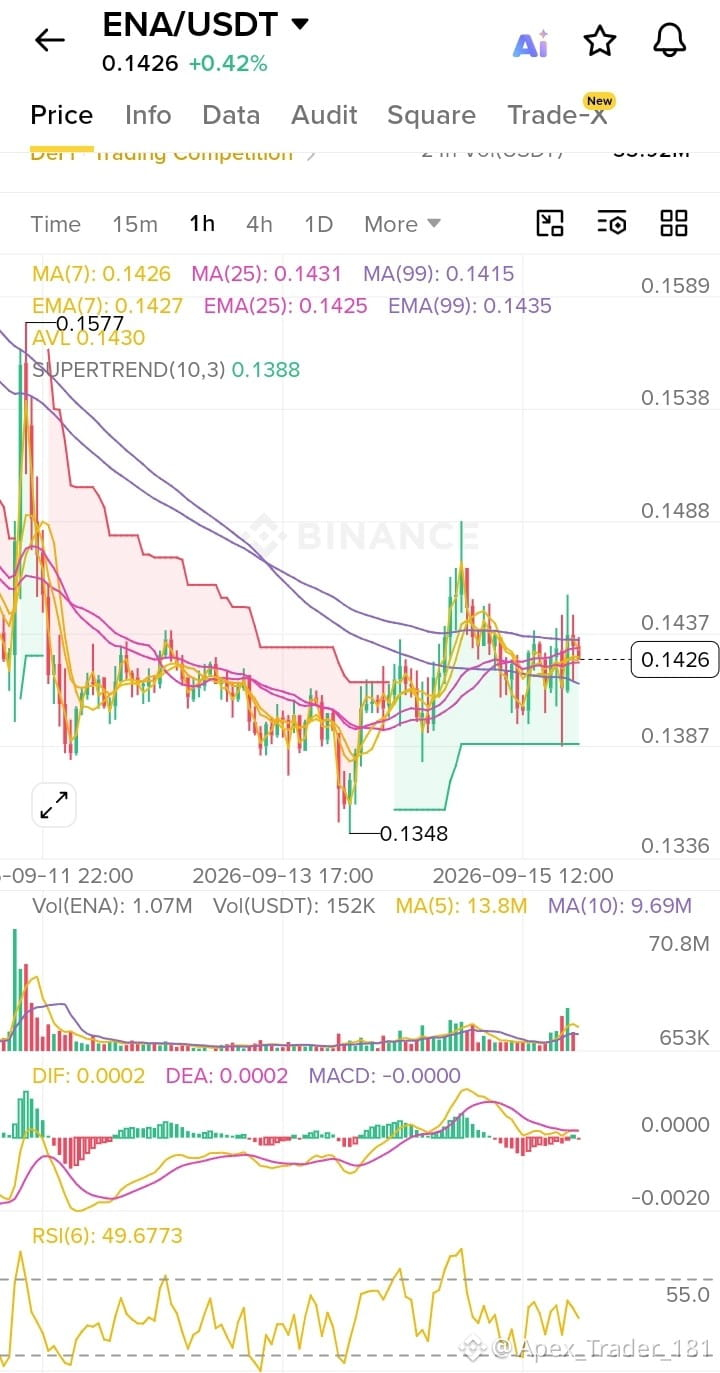
$ENA Jetzt gleich Big Short öffnen, danke mir bald🤑
Einstieg: 0.14258 – 0.14348
SL: 0.14740
TP1: 0.13976
TP2: 0.13759
TP3: 0.13432
$ENA Short 👇Viel Glück
#enqAI #TradingSignals #CryptoNewss $ENA
{future}(ENAUSDT)
$ENA Jetzt gleich Big Short öffnen, danke mir bald🤑
Einstieg: 0.14258 – 0.14348
SL: 0.14740
TP1: 0.13976
TP2: 0.13759
TP3: 0.13432
$ENA Short 👇Viel Glück
#enqAI #TradingSignals #CryptoNewss $ENA
Einstieg: 0.14258 – 0.14348
SL: 0.14740
TP1: 0.13976
TP2: 0.13759
TP3: 0.13432
$ENA Short 👇Viel Glück
#enqAI #TradingSignals #CryptoNewss $ENA
1
169
·
--
Bullisch
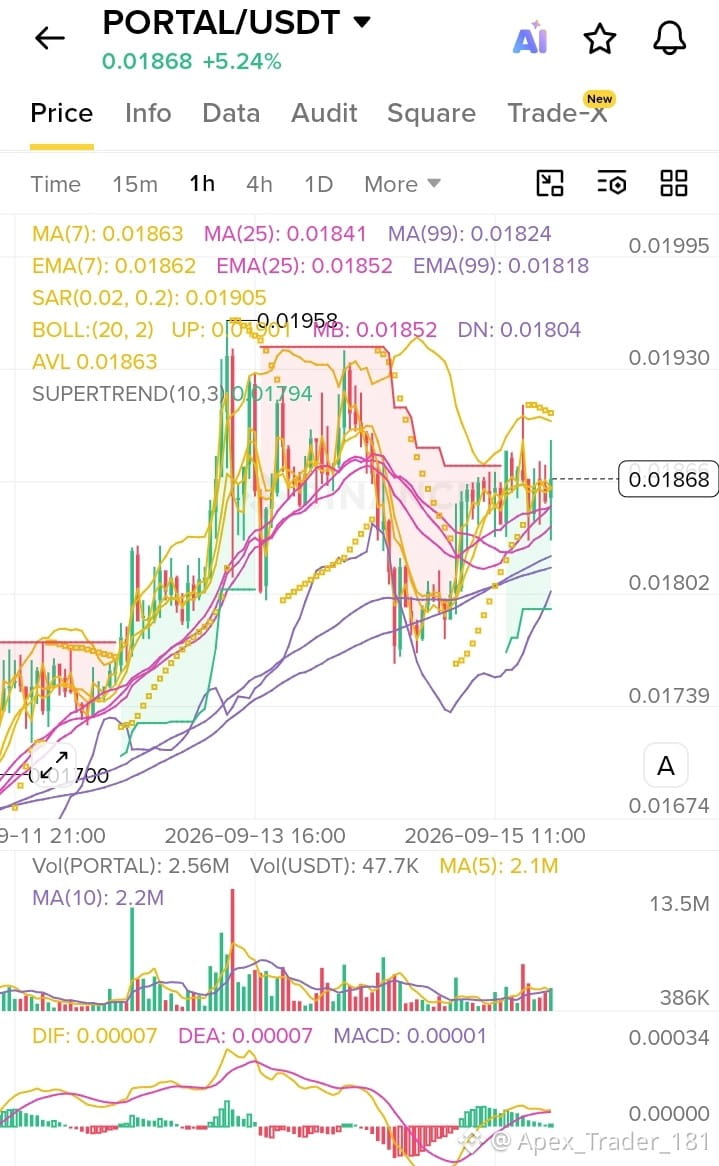
$PORTAL bestimmt Handel mit Gewinn 🤑
🟢Einstieg: 0.0186378 – 0.0187422
🔴SL: 0.0174707
TP1: 0.0196045
TP2: 0.0202141
TP3: 0.0211286
$PORTAL Long eröffnen👇📈
für mehr Trades folgen❤
#PORTALL #CryptoNewss $PORTAL #BinanceSquareFamily
{future}(PORTALUSDT)
$PORTAL bestimmt Handel mit Gewinn 🤑
🟢Einstieg: 0.0186378 – 0.0187422
🔴SL: 0.0174707
TP1: 0.0196045
TP2: 0.0202141
TP3: 0.0211286
$PORTAL Long eröffnen👇📈
für mehr Trades folgen❤
#PORTALL #CryptoNewss $PORTAL #BinanceSquareFamily
🟢Einstieg: 0.0186378 – 0.0187422
🔴SL: 0.0174707
TP1: 0.0196045
TP2: 0.0202141
TP3: 0.0211286
$PORTAL Long eröffnen👇📈
für mehr Trades folgen❤
#PORTALL #CryptoNewss $PORTAL #BinanceSquareFamily
1
2
292
Anmelden und weiter Inhalte entdecken
Krypto-Nutzer weltweit auf Binance Square kennenlernen
⚡️ Bleib in Sachen Krypto stets am Puls.
💬 Die weltgrößte Kryptobörse vertraut darauf.
👍 Erhalte verlässliche Einblicke von verifizierten Creators.
E-Mail-Adresse/Telefonnummer
Trendthemen
HKMAPlansWholesaleCBDCByYearEnd
925 Aufrufe
85 Kommentare
#HKMAPlansWholesaleCBDCByYearEnd
🚨 HKMA plant bis Jahresende den Wholesale-CBDC! 🇭🇰
Hongkong geht mit einem weiteren großen Schritt in das Zeitalter der digitalen Vermögenswerte. ⚡
Die Hong Kong Monetary Authority (HKMA) plant, bis etwa Ende 2026 über EnsembleTX eine Abwicklung von Wholesale-CBDC mit 24/7-Betrieb einzuführen.
💡 Was bedeutet das?
🔹 Banken könnten tokenisierte Einlagen mit digitalem Zentralbankgeld abwickeln
🔹 Die Abwicklung könnte sich in Richtung 24/7-Verfügbarkeit bewegen
🔹 Tokenisierte Vermögenswerte und Finanzmärkte könnten von schnellerer Abwicklung profitieren
🔹 Die HKMA testet außerdem die Nutzung von CBDCs im After-Hours-Derivatehandel mit der HKEX.
Hongkong drängt eindeutig tiefer in Richtung CBDCs + Tokenisierung + digitale Assets. 🌐
Die große Frage
Könnte eine 24/7-Abwicklung von Wholesale-CBDCs zu einem zentralen Bestandteil des künftigen Finanzsystems werden?
#HKMAPlansWholesaleCBDCByYearEnd #CBDC #eHKD #HongKong #crypto #blockchain #Tokenisierung #DigitaleAssets #Web3 #Binance #BinanceSquare
User-6f287058
·1 Likes
·7 Aufrufe
NEARSurges26%Past$3.45
6,476 Aufrufe
70 Kommentare
BOJHikesRatesTo31YearHigh
16,379 Aufrufe
482 Kommentare