
Link Trading Frenzy
20.1k Posts

Link Trading Frenzy
High win rate intraday refueling📈, make me your money making tool💰.
Frequent Trader
6 Years
134 Following
5.5K+ Followers
16.6K+ Liked
Posts
All
Quotes
Videos
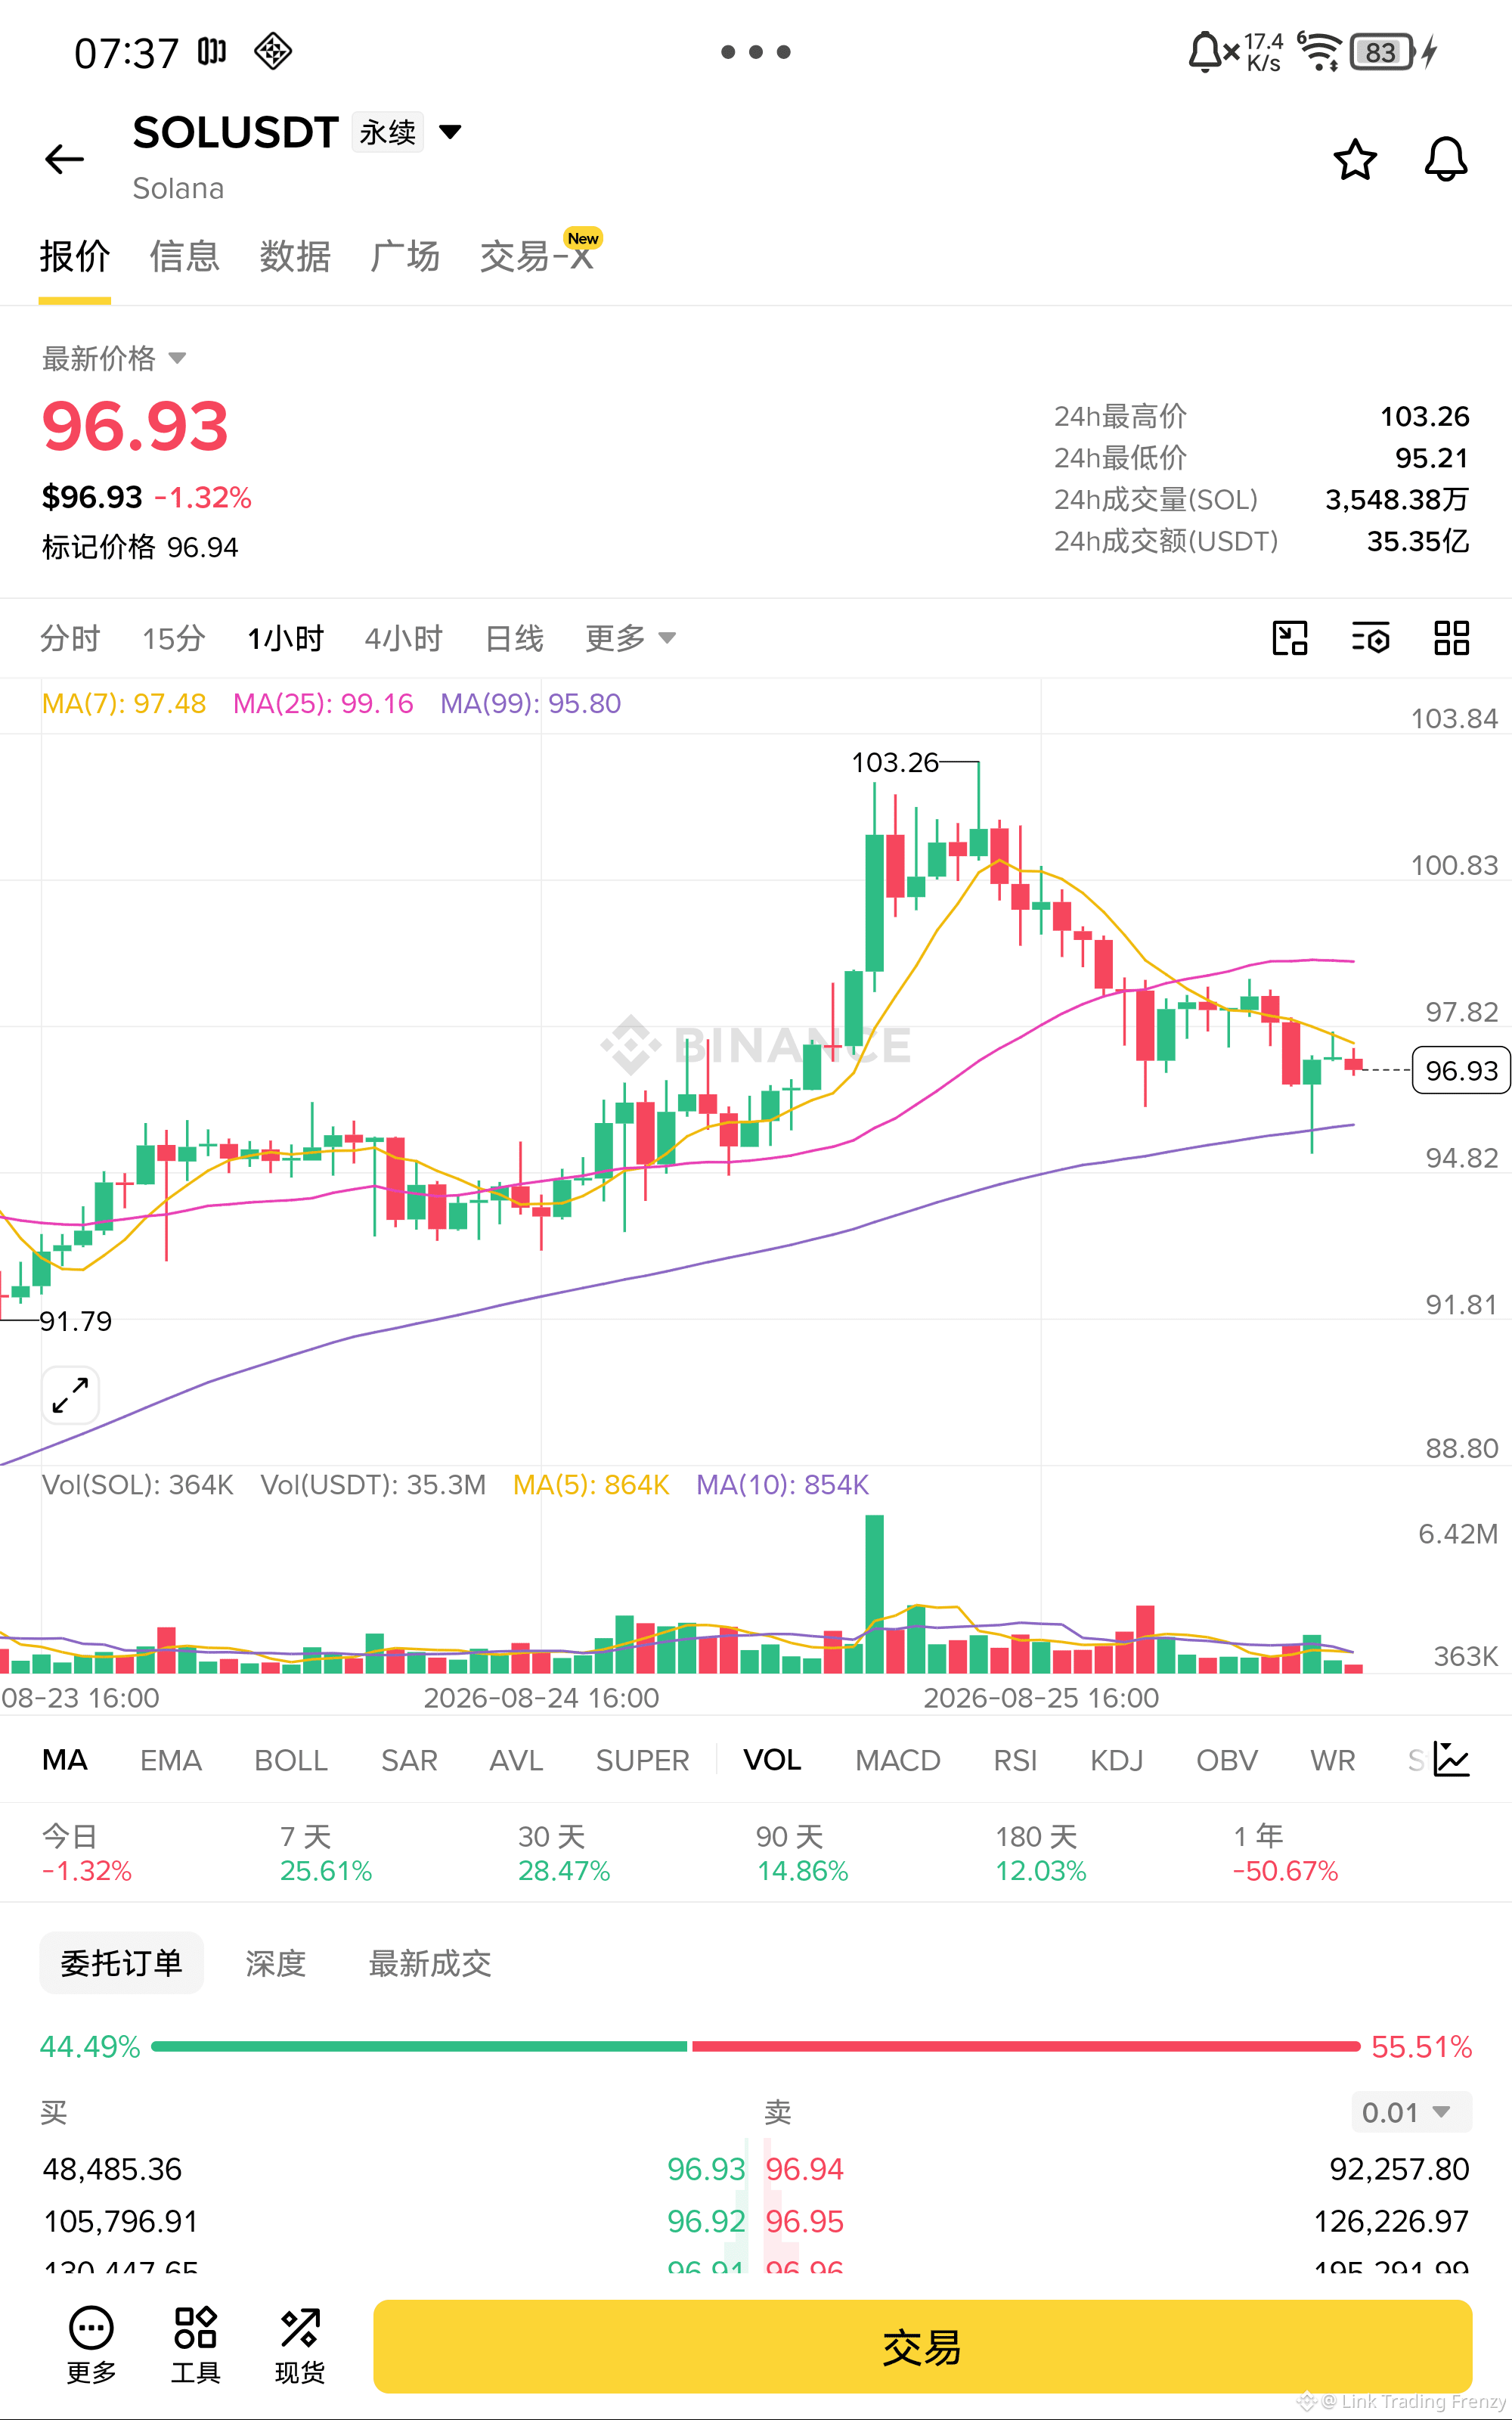
$SOL Quickly short it now!
There is extremely heavy sell pressure at the high level. When the price rebounds back into the area where multiple moving averages are densely clustered and clearly suppressing it, it shows obvious stagnation, while the overall focus keeps shifting downward. The MACD green bars continue to expand, and the bearish trend remains intact. Following the trend, bet on the acceleration phase of the downside after a break below the MA99 support.
Entry: 96.93
Stop loss: 97.93
Take profit: 93.93
$SOL - Short 🔻
Enter the trade from below👇
There is extremely heavy sell pressure at the high level. When the price rebounds back into the area where multiple moving averages are densely clustered and clearly suppressing it, it shows obvious stagnation, while the overall focus keeps shifting downward. The MACD green bars continue to expand, and the bearish trend remains intact. Following the trend, bet on the acceleration phase of the downside after a break below the MA99 support.
Entry: 96.93
Stop loss: 97.93
Take profit: 93.93
$SOL - Short 🔻
Enter the trade from below👇
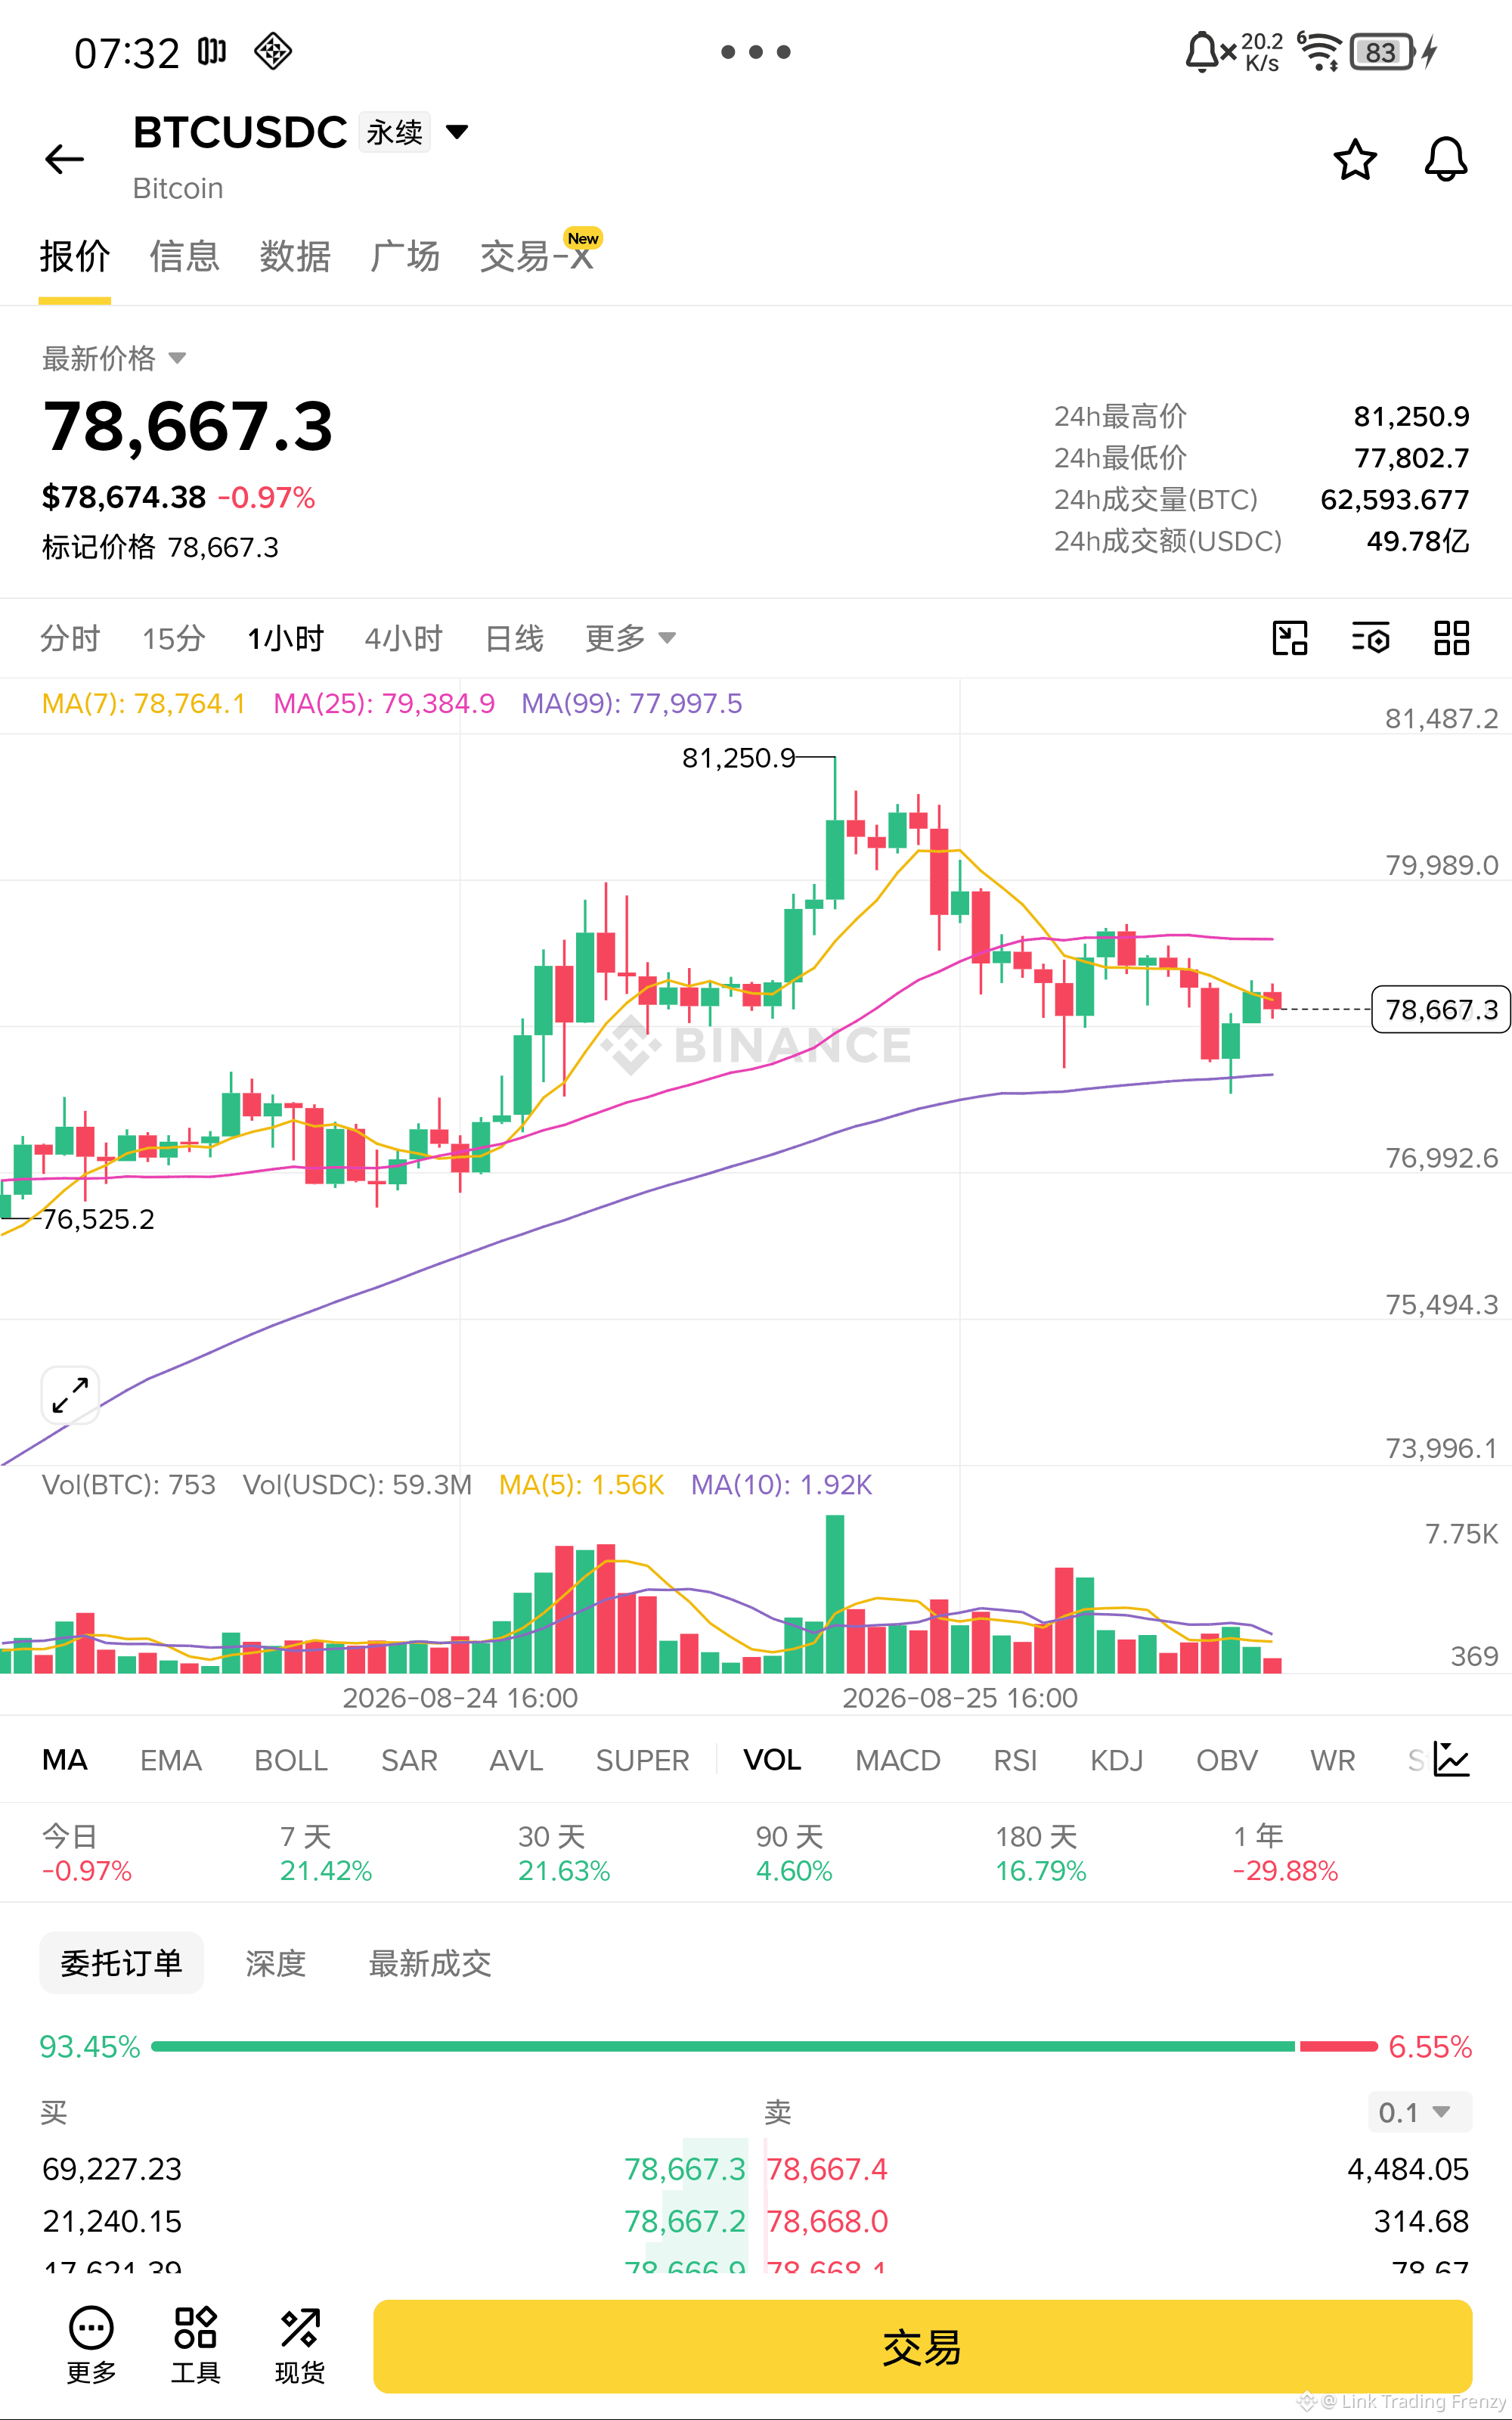
$BTC Quickly go short and enter!
On the 1-hour chart, the rebound highs keep falling; the moving averages above converge to form a clear resistance zone. Rebound volume continues to shrink, and the bulls’ willingness to take over is insufficient. Price is in the consolidation phase of a downward trend, and the move should be traded in line with the trend—aiming for an accelerated breakout below the lower support range.
Entry: 78,667.3
Stop loss: 79,267.3
Take profit: 76,867.3
$BTC - Short 🔻
Enter from below👇
On the 1-hour chart, the rebound highs keep falling; the moving averages above converge to form a clear resistance zone. Rebound volume continues to shrink, and the bulls’ willingness to take over is insufficient. Price is in the consolidation phase of a downward trend, and the move should be traded in line with the trend—aiming for an accelerated breakout below the lower support range.
Entry: 78,667.3
Stop loss: 79,267.3
Take profit: 76,867.3
$BTC - Short 🔻
Enter from below👇
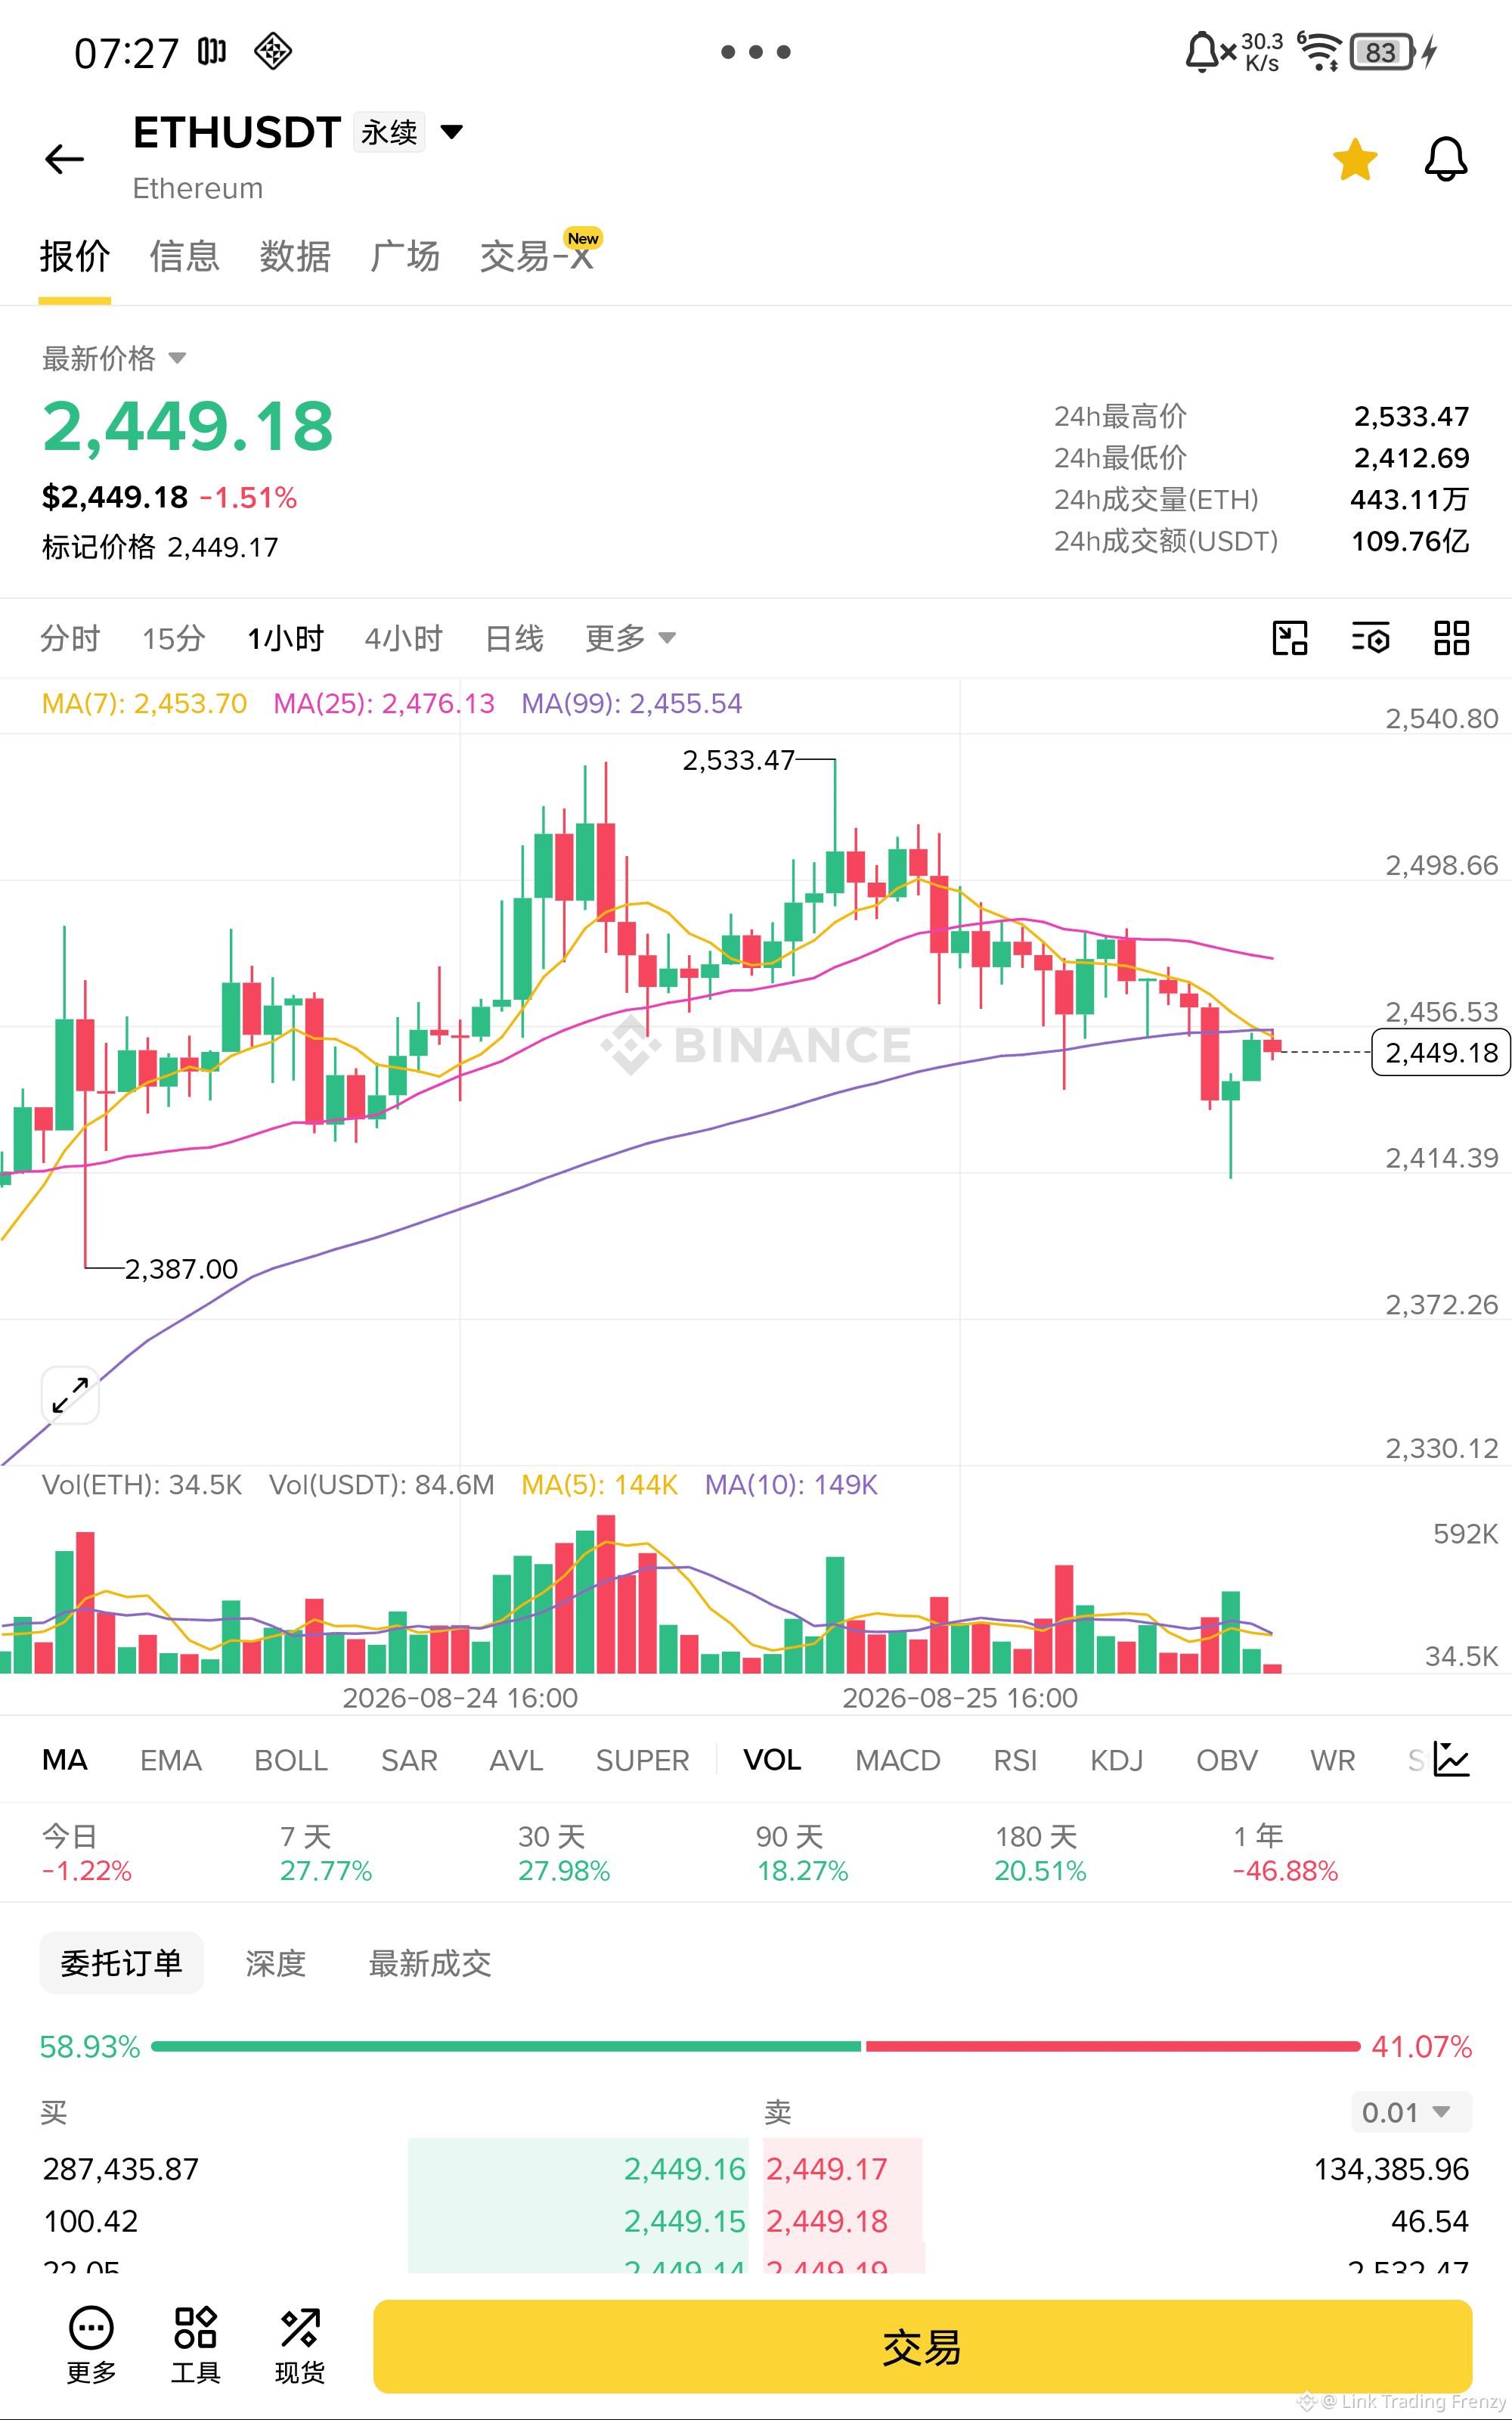
$ETH quick short into it!
On the 1-hour cycle, the K-line center of gravity continues to shift downward. When price rebounds back to the clear resistance area at the intersection of MA7 and MA99, it is noticeably blocked. The moving-average system is arranged in a bearish order, with the lines diverging downward. After the MACD fast and slow lines form a death cross, the green histogram’s momentum continues to expand significantly, and selling pressure remains heavy. Rebound volume is extremely weak. In a trend-following contest, probe for a dip below to test the low of the past 24 hours for support. Set the stop-loss above the resistance zone. The risk-reward ratio is excellent.
Entry: 2449.18
Stop-loss: 2459.18
Take-profit: 2419.18
$ETH - Short 🔻
Enter the trade from below👇
On the 1-hour cycle, the K-line center of gravity continues to shift downward. When price rebounds back to the clear resistance area at the intersection of MA7 and MA99, it is noticeably blocked. The moving-average system is arranged in a bearish order, with the lines diverging downward. After the MACD fast and slow lines form a death cross, the green histogram’s momentum continues to expand significantly, and selling pressure remains heavy. Rebound volume is extremely weak. In a trend-following contest, probe for a dip below to test the low of the past 24 hours for support. Set the stop-loss above the resistance zone. The risk-reward ratio is excellent.
Entry: 2449.18
Stop-loss: 2459.18
Take-profit: 2419.18
$ETH - Short 🔻
Enter the trade from below👇
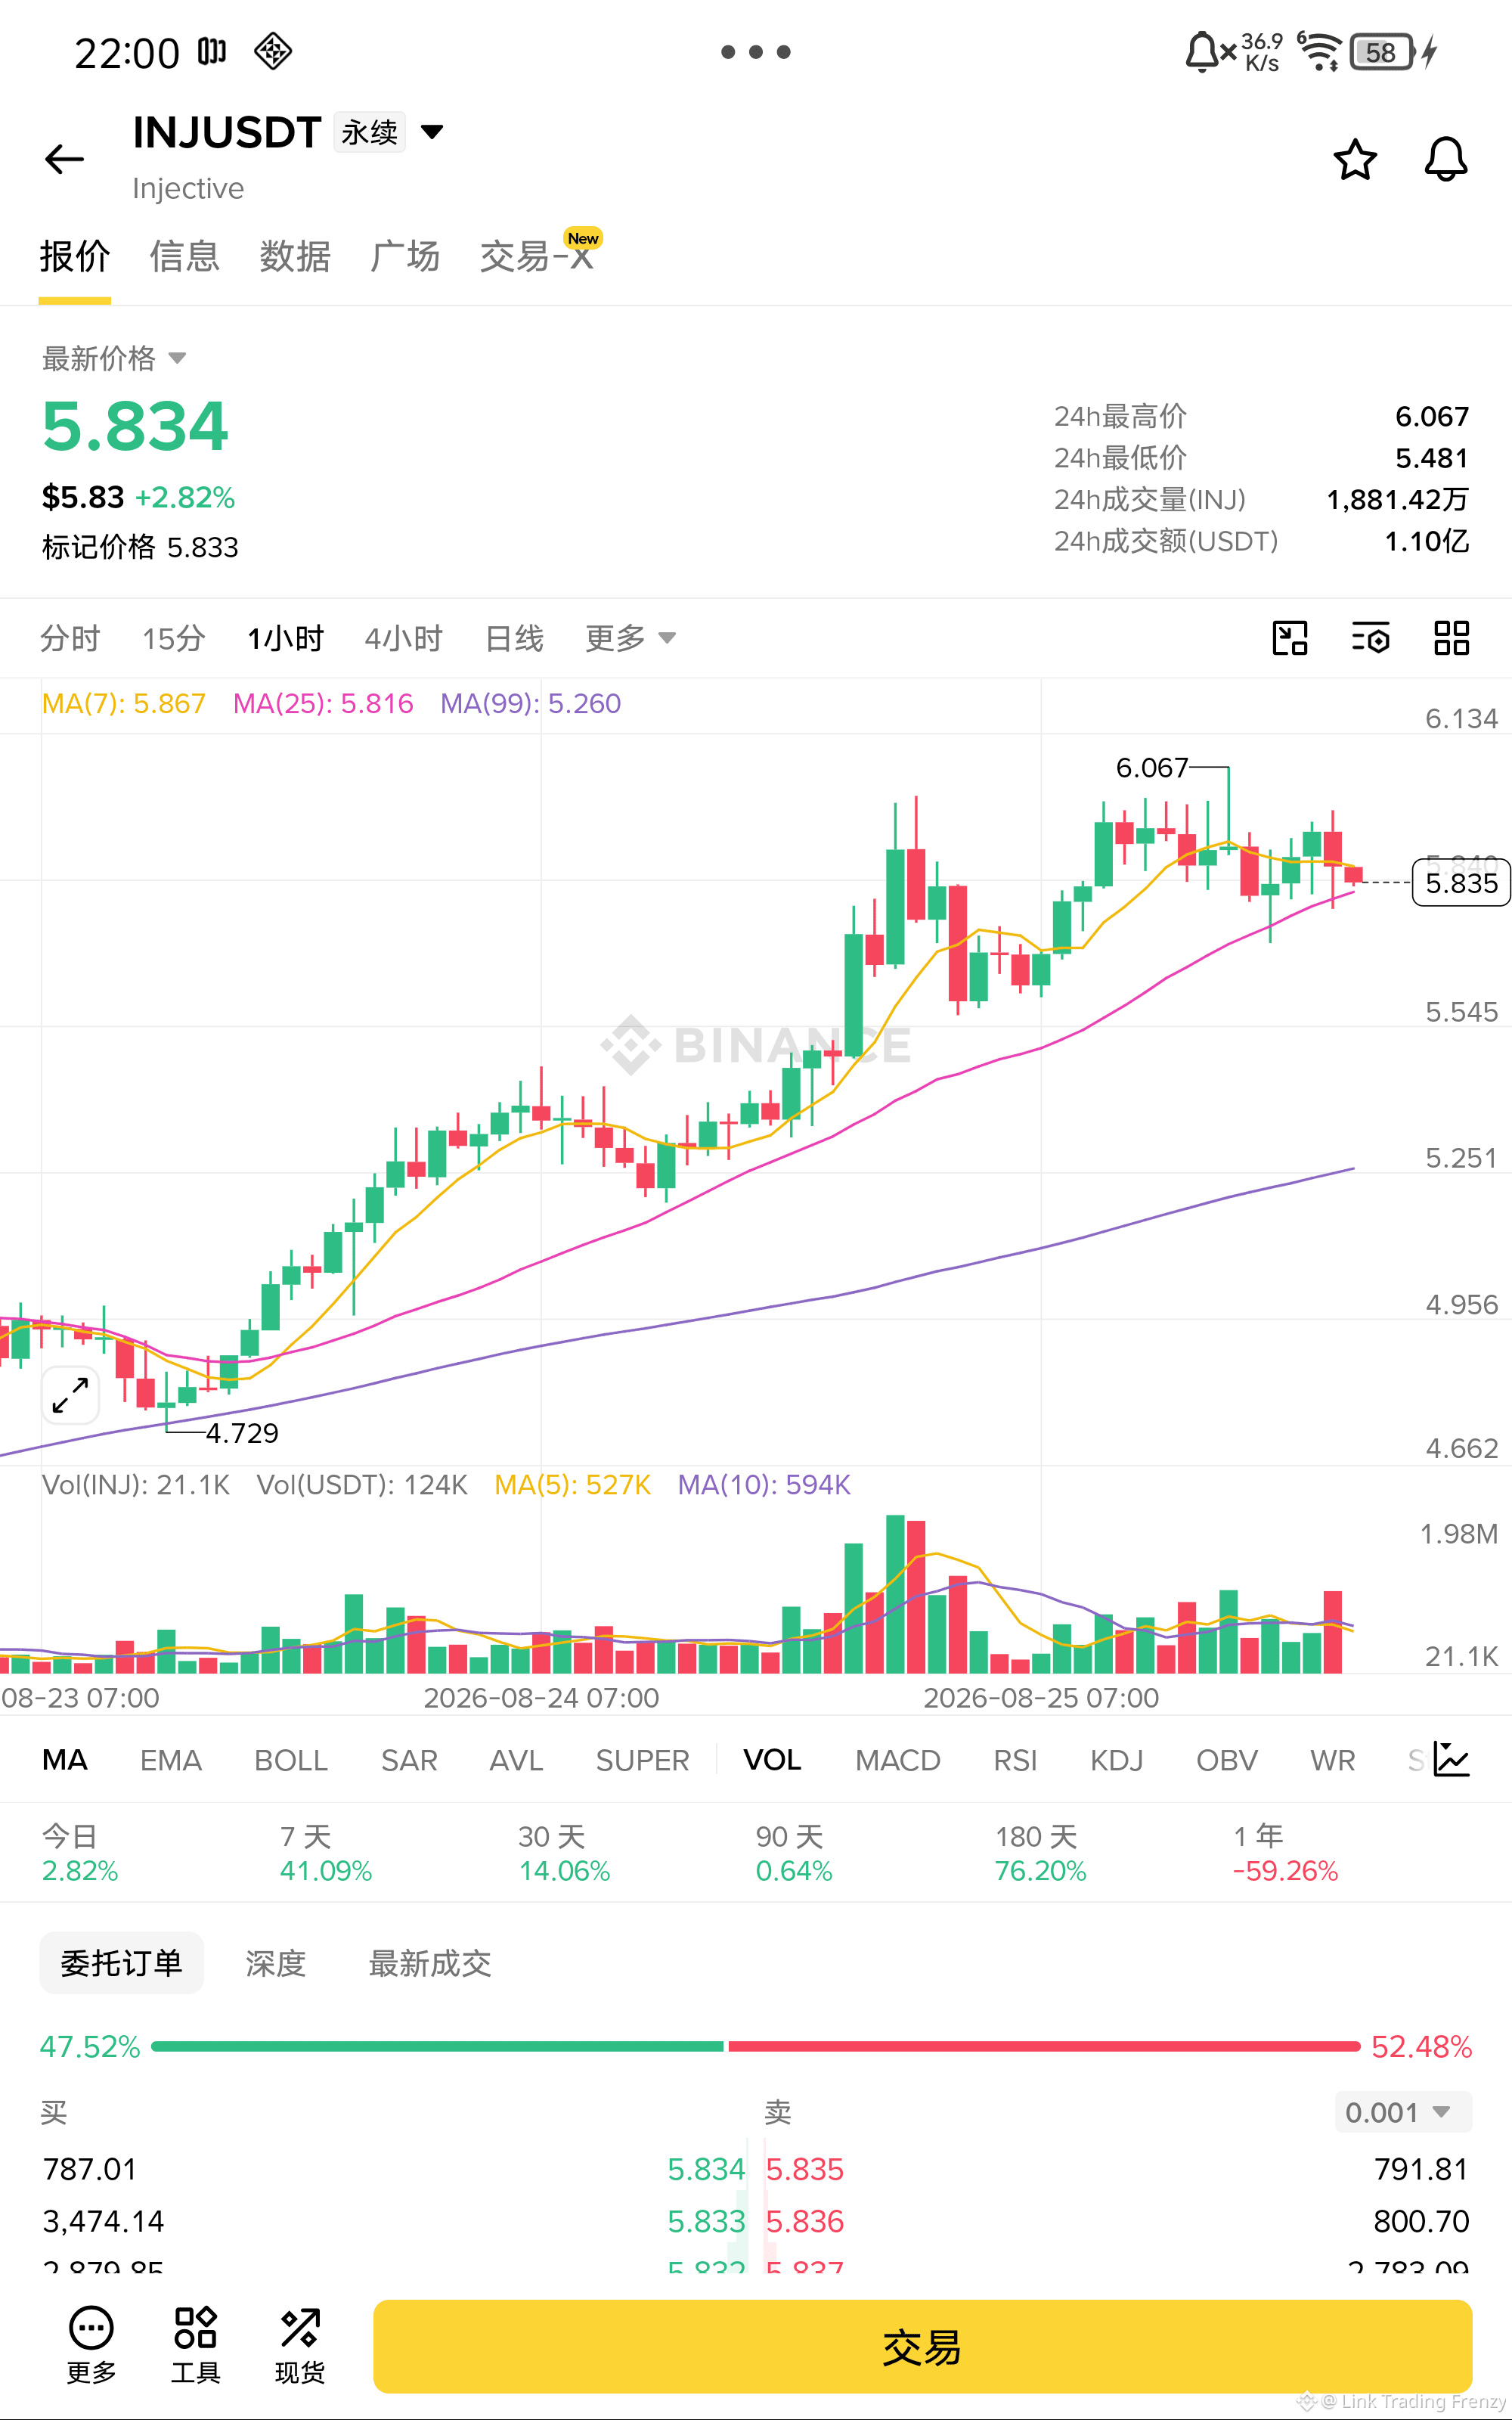
$INJ Fast short into it!
On the 1-hour chart, after a high-position long upper shadow, a clear stagnation pattern appears. In the short term, the moving averages curl downward to form a dead cross that acts as resistance. The current price rebounds to the MA7 line and meets resistance, and the rebound volume has shrunk to an extreme level. The bearish alignment structure remains intact. Play along with the trend for a second dip after breaking through the recent support.
Entry: 5.834
Stop loss: 5.934
Take profit: 5.534
$INJ - Short 🔻
Enter from below👇
On the 1-hour chart, after a high-position long upper shadow, a clear stagnation pattern appears. In the short term, the moving averages curl downward to form a dead cross that acts as resistance. The current price rebounds to the MA7 line and meets resistance, and the rebound volume has shrunk to an extreme level. The bearish alignment structure remains intact. Play along with the trend for a second dip after breaking through the recent support.
Entry: 5.834
Stop loss: 5.934
Take profit: 5.534
$INJ - Short 🔻
Enter from below👇
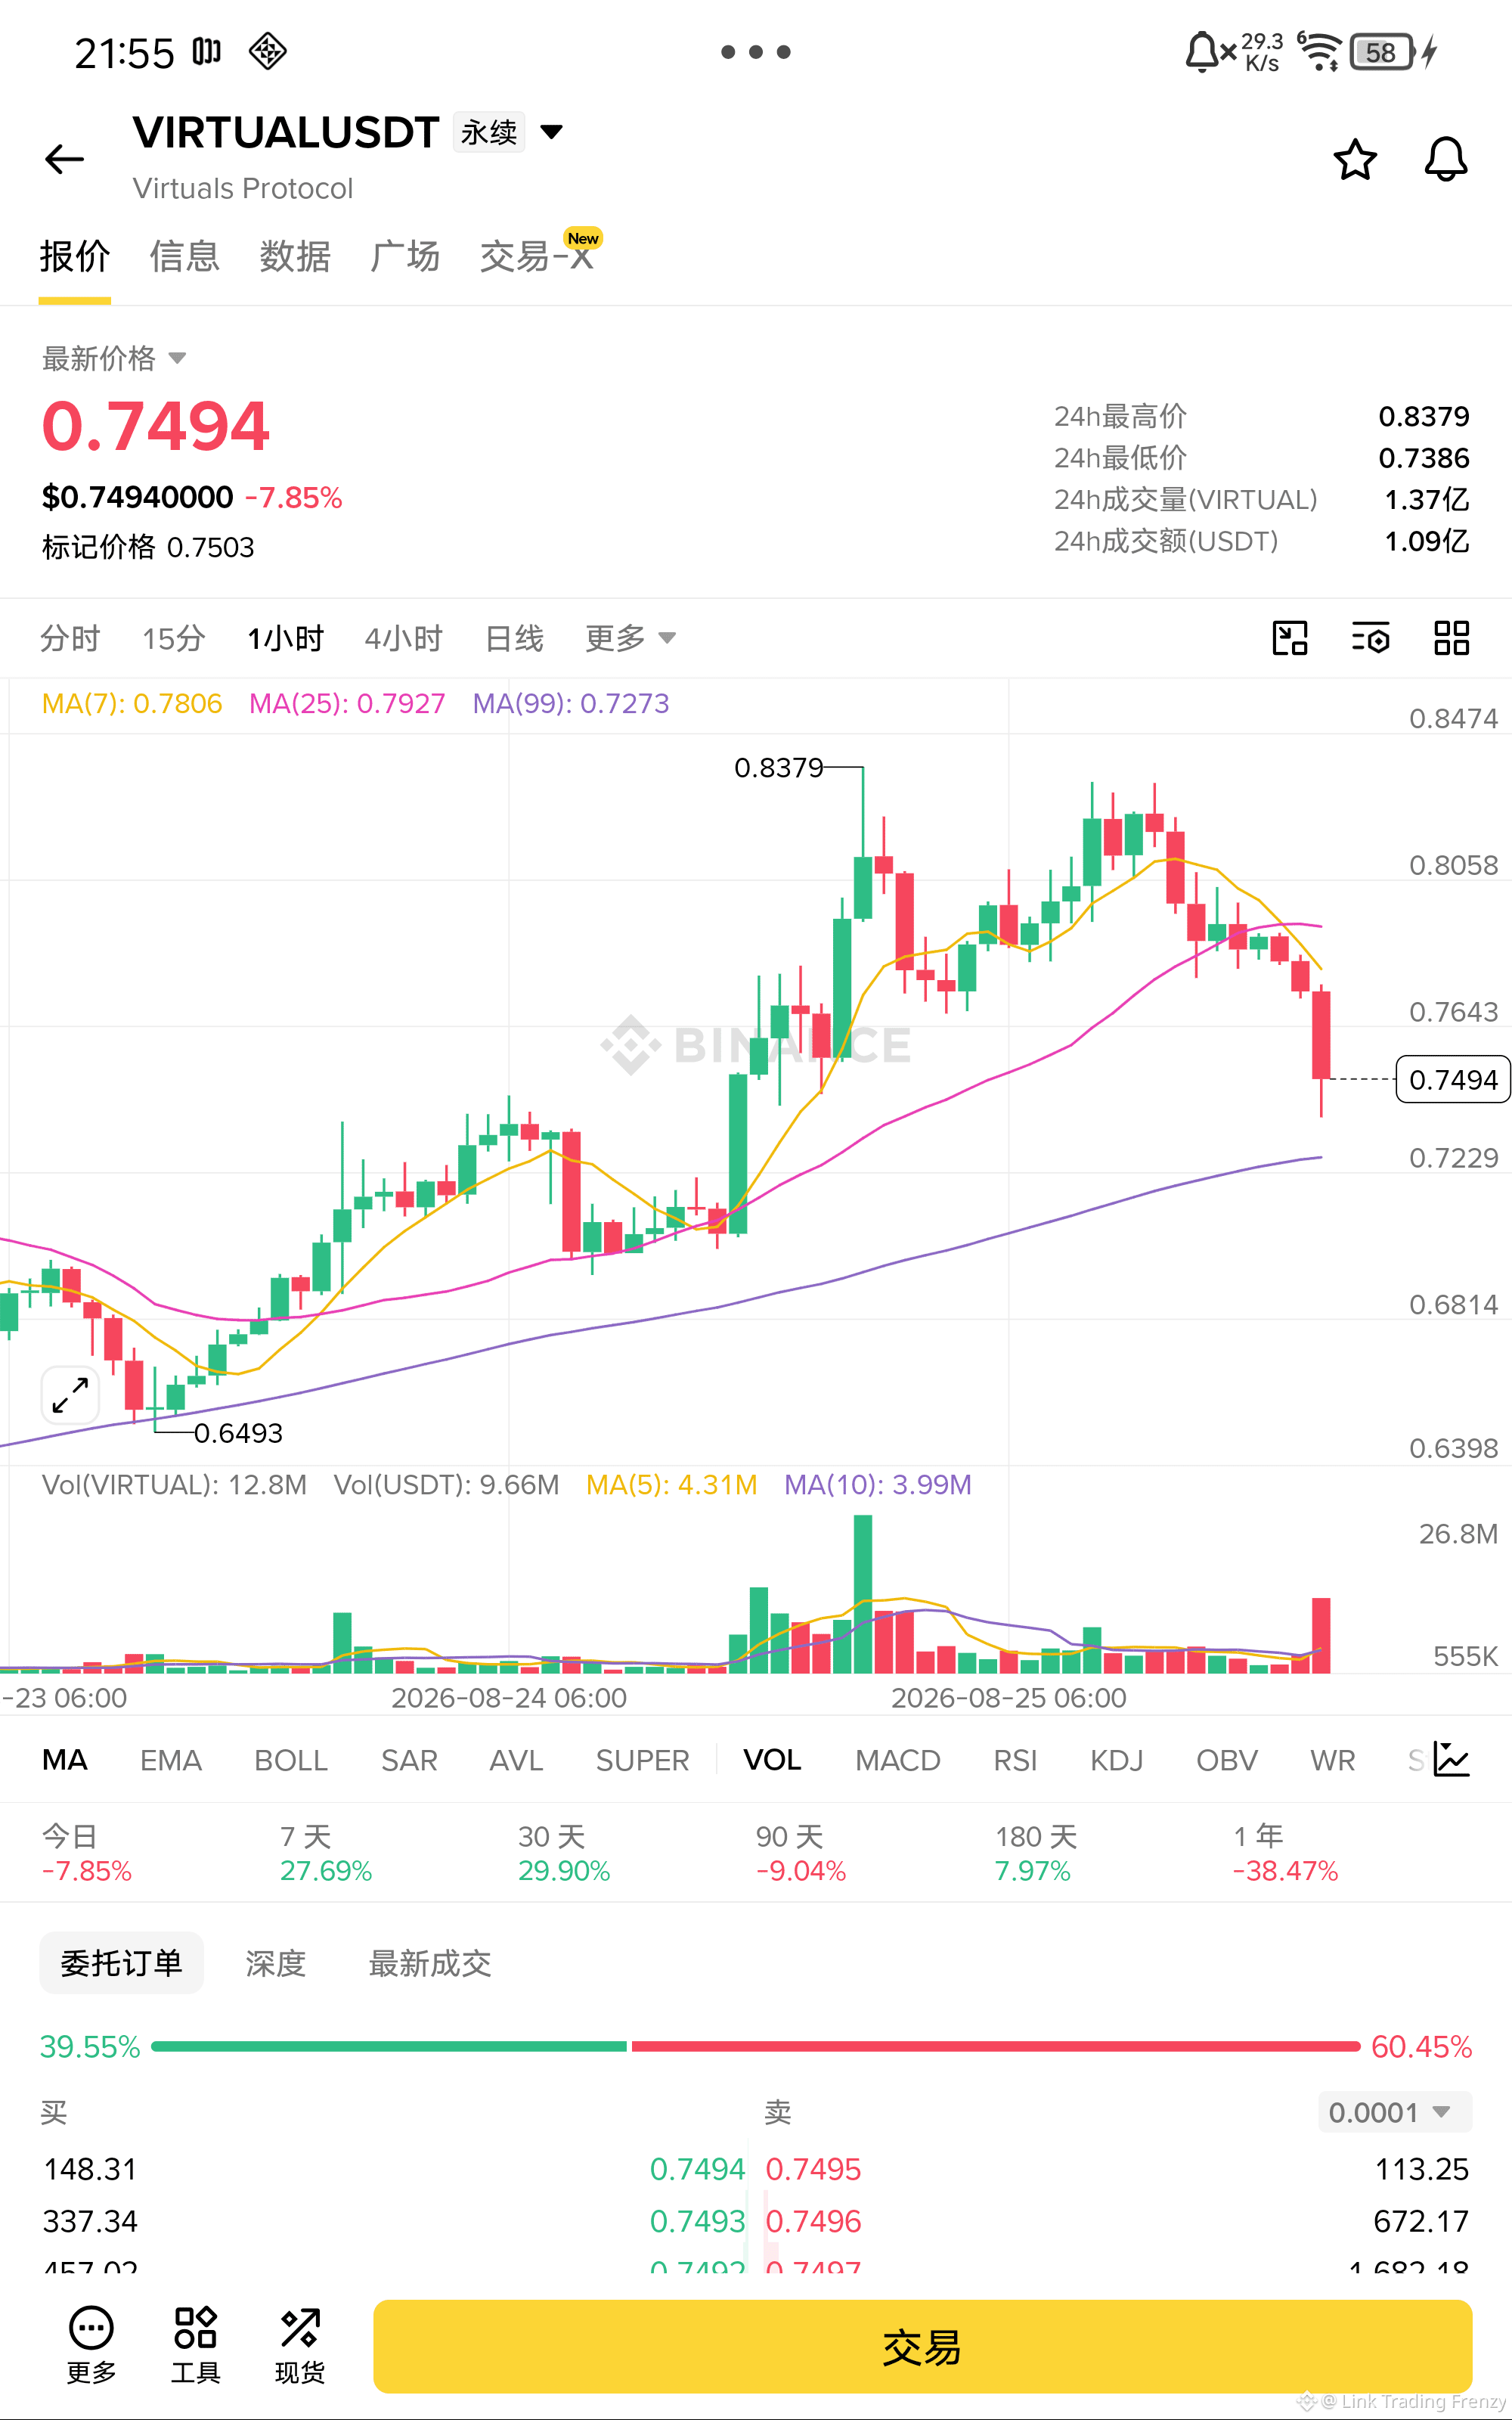
$VIRTUAL Quickly short into it!
On the 1-hour timeframe, the rebound highs keep stepping down; price is being resisted by the MA7 moving average, and trading volume is extremely withered. The MACD has a dead cross, with green histogram bars continuing to expand downward; the bearish arrangement structure remains intact. We are currently in a downtrend continuation pattern—playing the move by taking a breakout of the previous low support, followed by an accelerated dip to probe the lows. The risk-reward ratio is excellent.
Entry: 0.7494
Stop loss: 0.7794
Take profit: 0.6594
$VIRTUAL - Short 🔻
Enter from below👇
On the 1-hour timeframe, the rebound highs keep stepping down; price is being resisted by the MA7 moving average, and trading volume is extremely withered. The MACD has a dead cross, with green histogram bars continuing to expand downward; the bearish arrangement structure remains intact. We are currently in a downtrend continuation pattern—playing the move by taking a breakout of the previous low support, followed by an accelerated dip to probe the lows. The risk-reward ratio is excellent.
Entry: 0.7494
Stop loss: 0.7794
Take profit: 0.6594
$VIRTUAL - Short 🔻
Enter from below👇
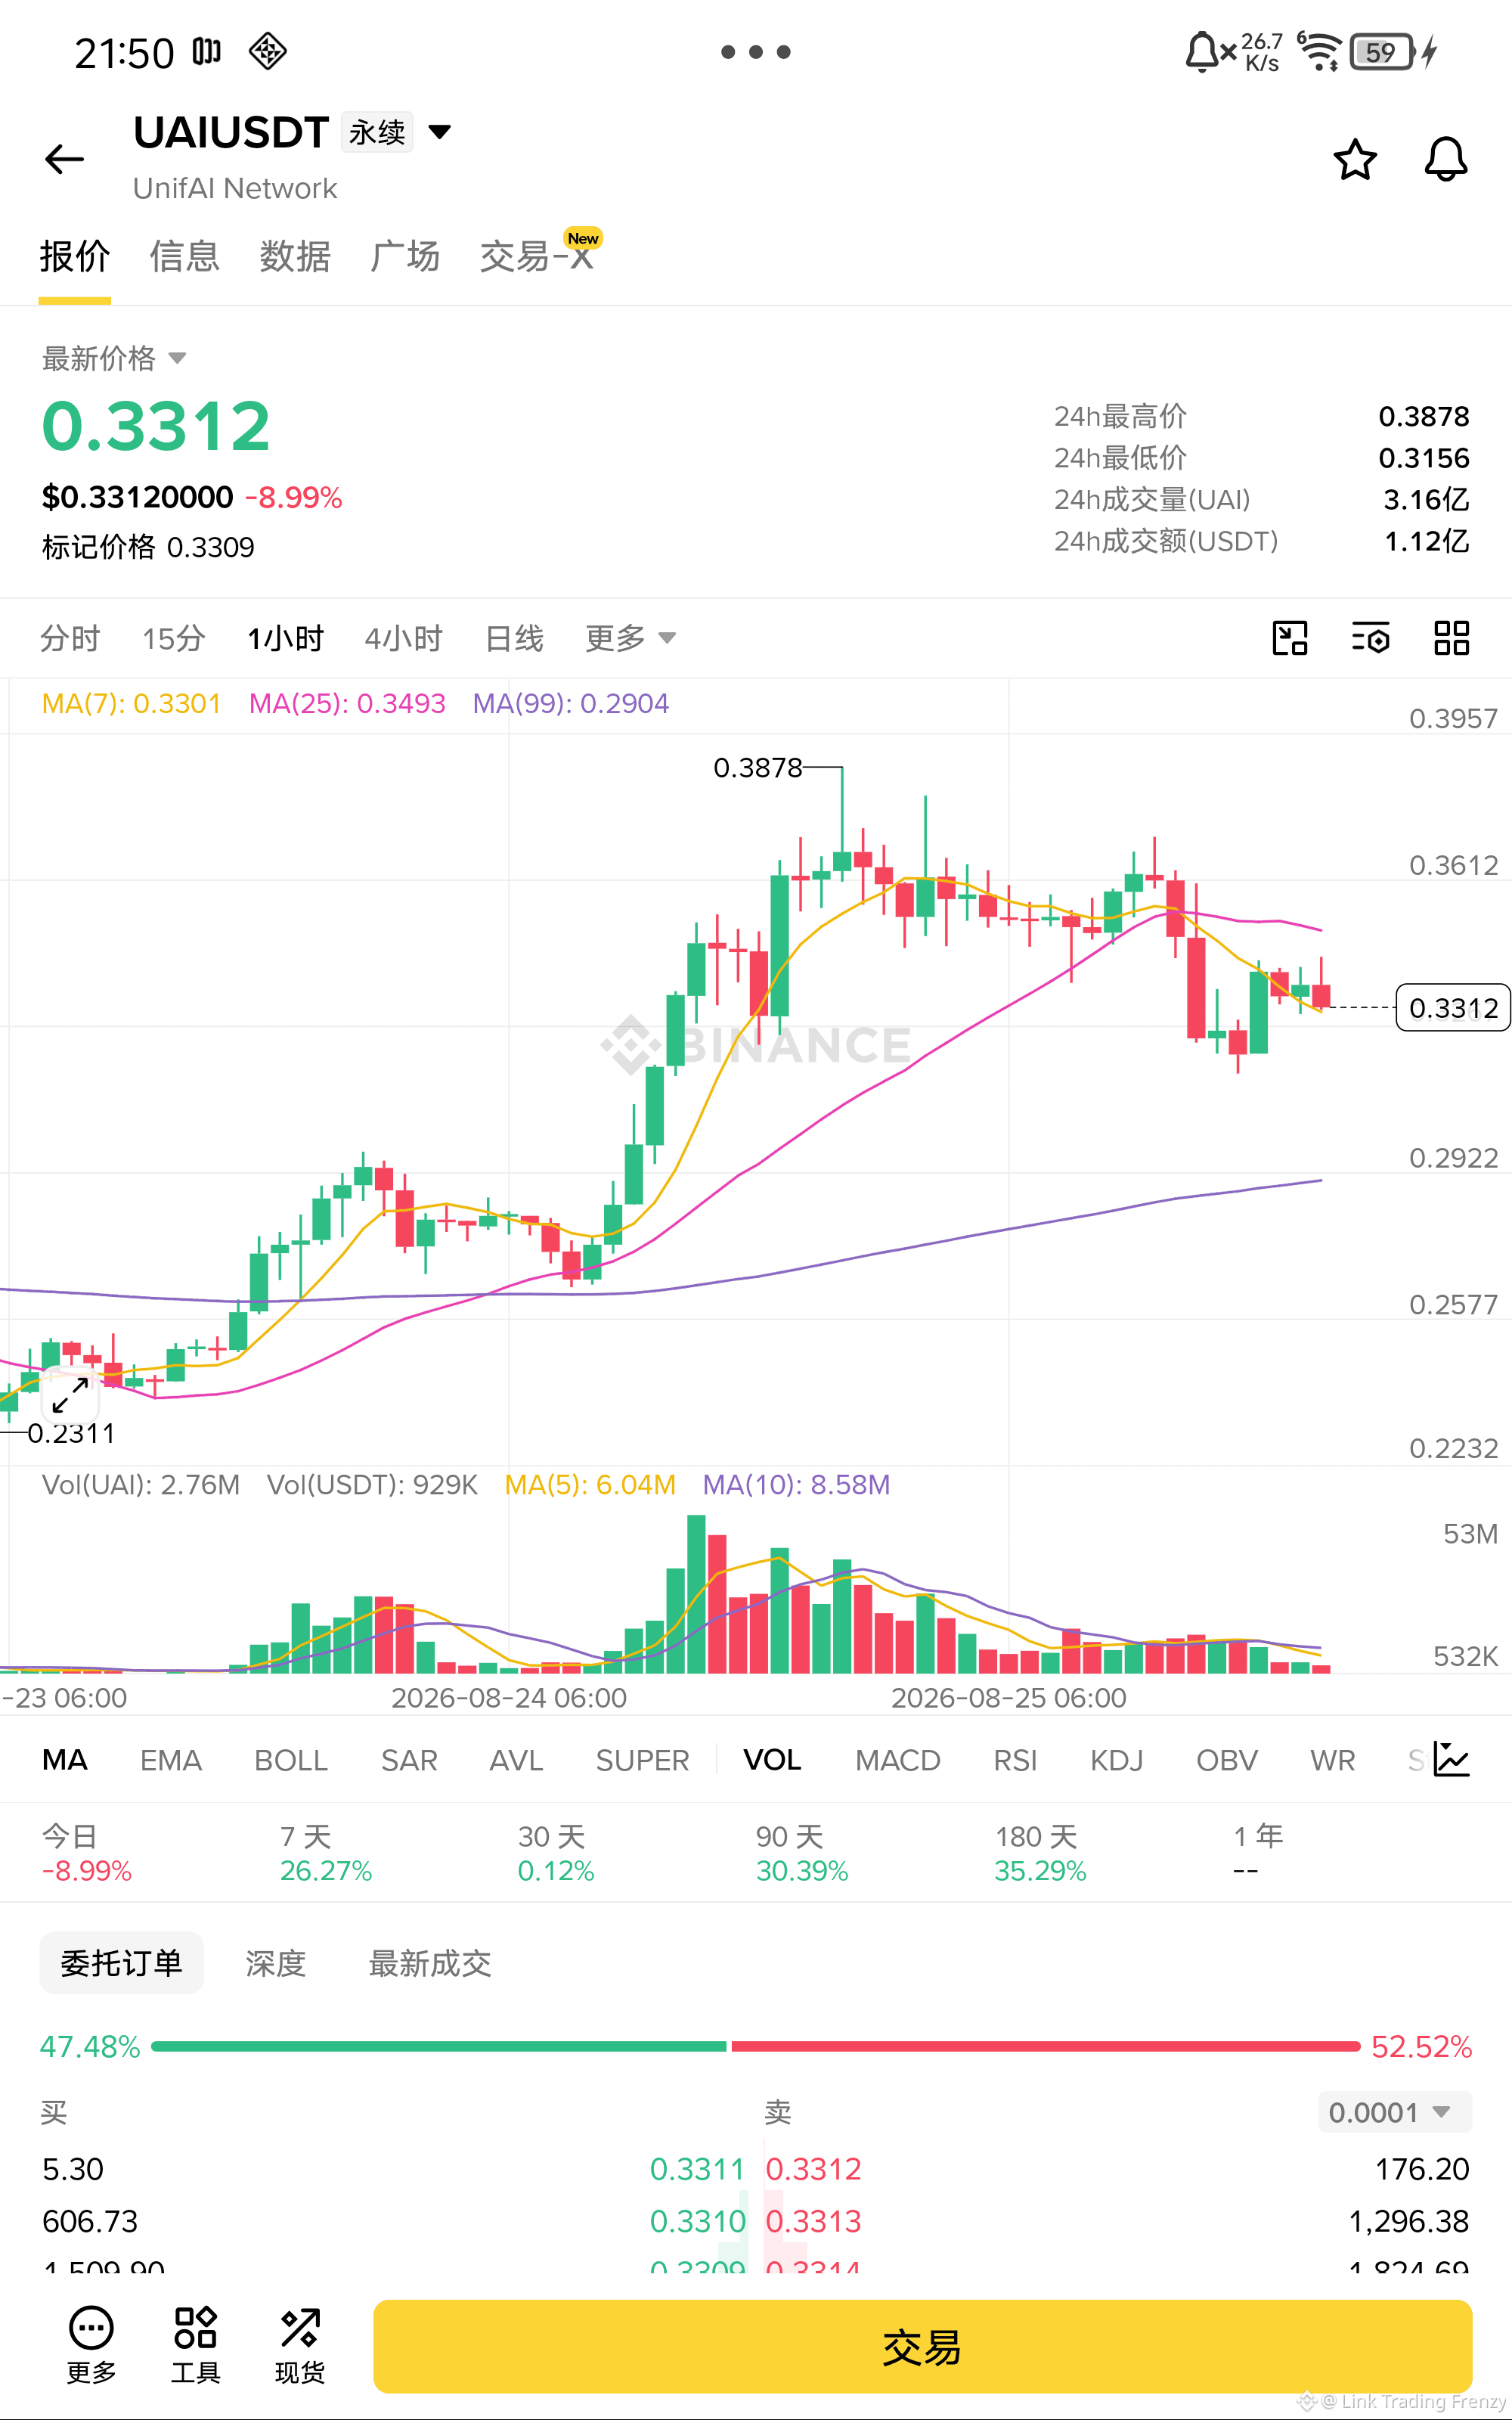
$UAI Quickly short and get in!
On the 1-hour chart, the rebound highs keep stepping lower, and the price remains constrained by the MA25 moving-average line pressure. The moving-average system is clearly bearish (short) and arranged downward. The MACD green-bar momentum shows no signs of fading, and the downtrend continuation pattern remains intact. After breaking below the MA7 support, you can play a second pullback low in the direction of the trend; place the stop-loss above the nearby resistance area, with an excellent risk-reward ratio.
Entry: 0.3312
Stop-loss: 0.3512
Take-profit: 0.2712
$UAI - Short 🔻
Enter from below👇
On the 1-hour chart, the rebound highs keep stepping lower, and the price remains constrained by the MA25 moving-average line pressure. The moving-average system is clearly bearish (short) and arranged downward. The MACD green-bar momentum shows no signs of fading, and the downtrend continuation pattern remains intact. After breaking below the MA7 support, you can play a second pullback low in the direction of the trend; place the stop-loss above the nearby resistance area, with an excellent risk-reward ratio.
Entry: 0.3312
Stop-loss: 0.3512
Take-profit: 0.2712
$UAI - Short 🔻
Enter from below👇
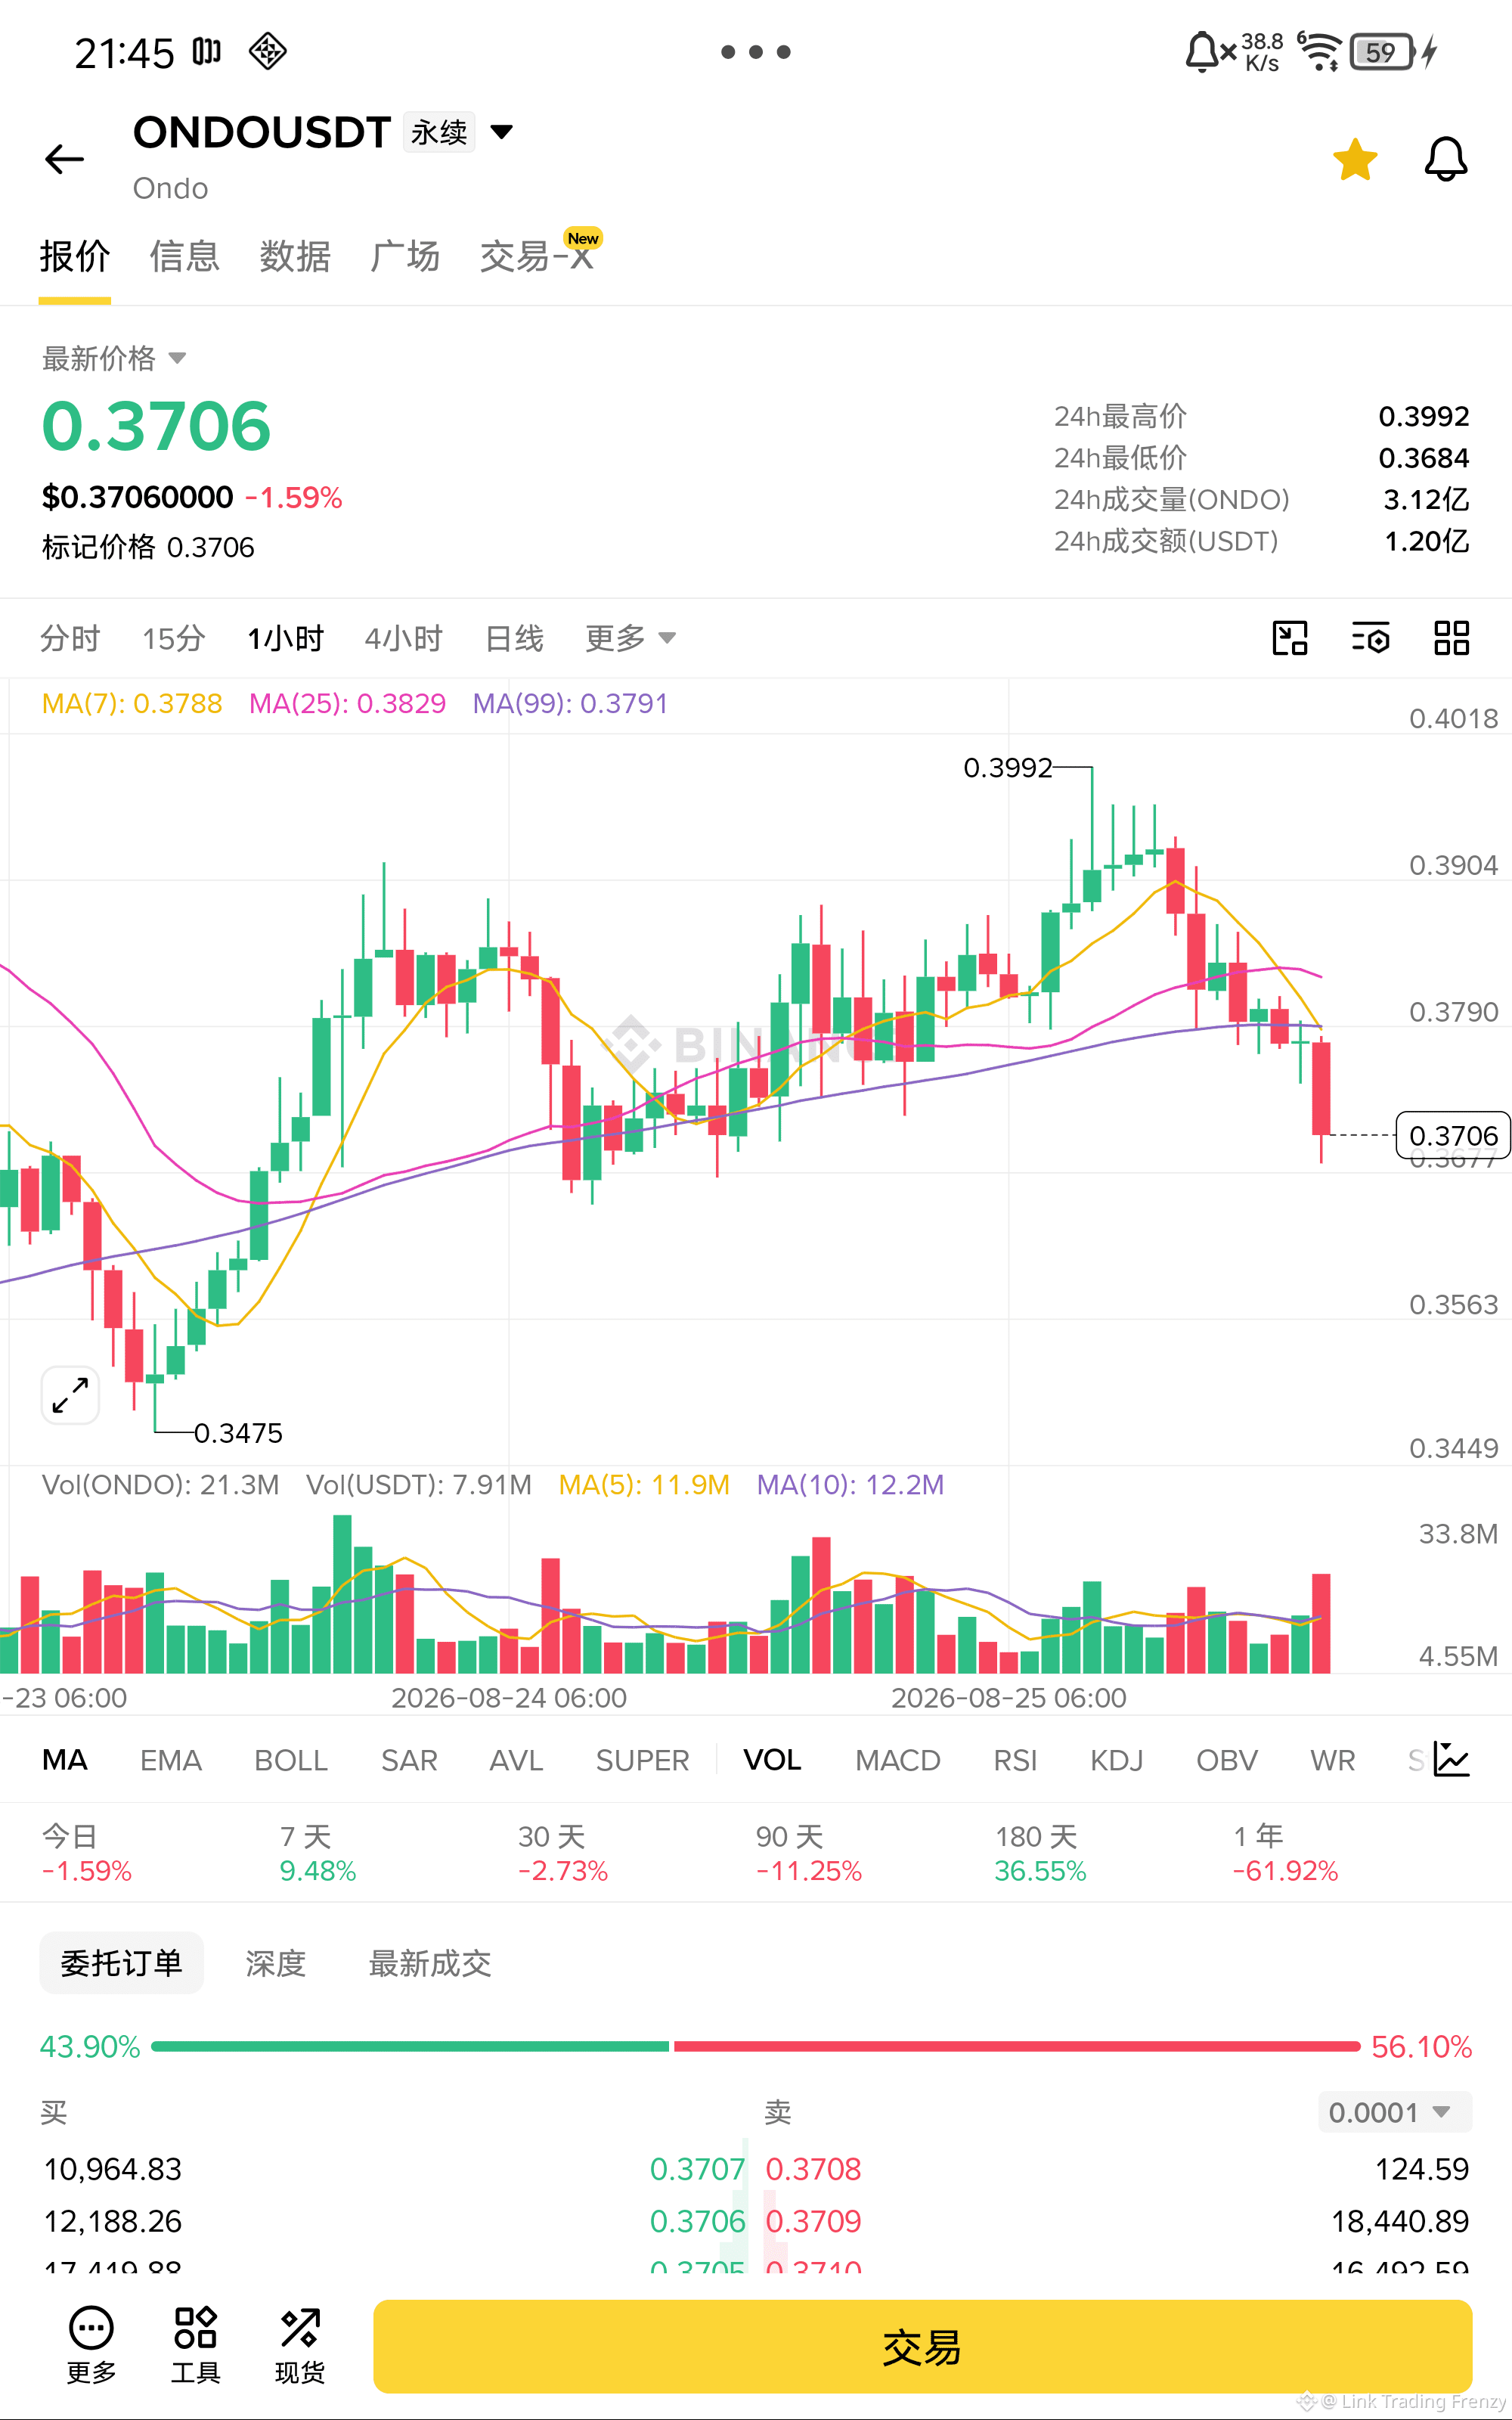
$ONDO Quick quick short it in!
The moving average system is in a bearish alignment. MA7 and MA99 form a strong resistance zone around 0.379, and each rebound peak keeps shifting lower. The MACD green histogram momentum has been amplified again, and the downtrend continuation structure remains intact. Trade in line with the trend to probe a second bottom; set the stop loss above the resistance. Extremely favorable risk-reward.
Entry: 0.3706
Stop Loss: 0.3806
Take Profit: 0.3406
$ONDO - Short 🔻
Enter from the bottom👇
The moving average system is in a bearish alignment. MA7 and MA99 form a strong resistance zone around 0.379, and each rebound peak keeps shifting lower. The MACD green histogram momentum has been amplified again, and the downtrend continuation structure remains intact. Trade in line with the trend to probe a second bottom; set the stop loss above the resistance. Extremely favorable risk-reward.
Entry: 0.3706
Stop Loss: 0.3806
Take Profit: 0.3406
$ONDO - Short 🔻
Enter from the bottom👇
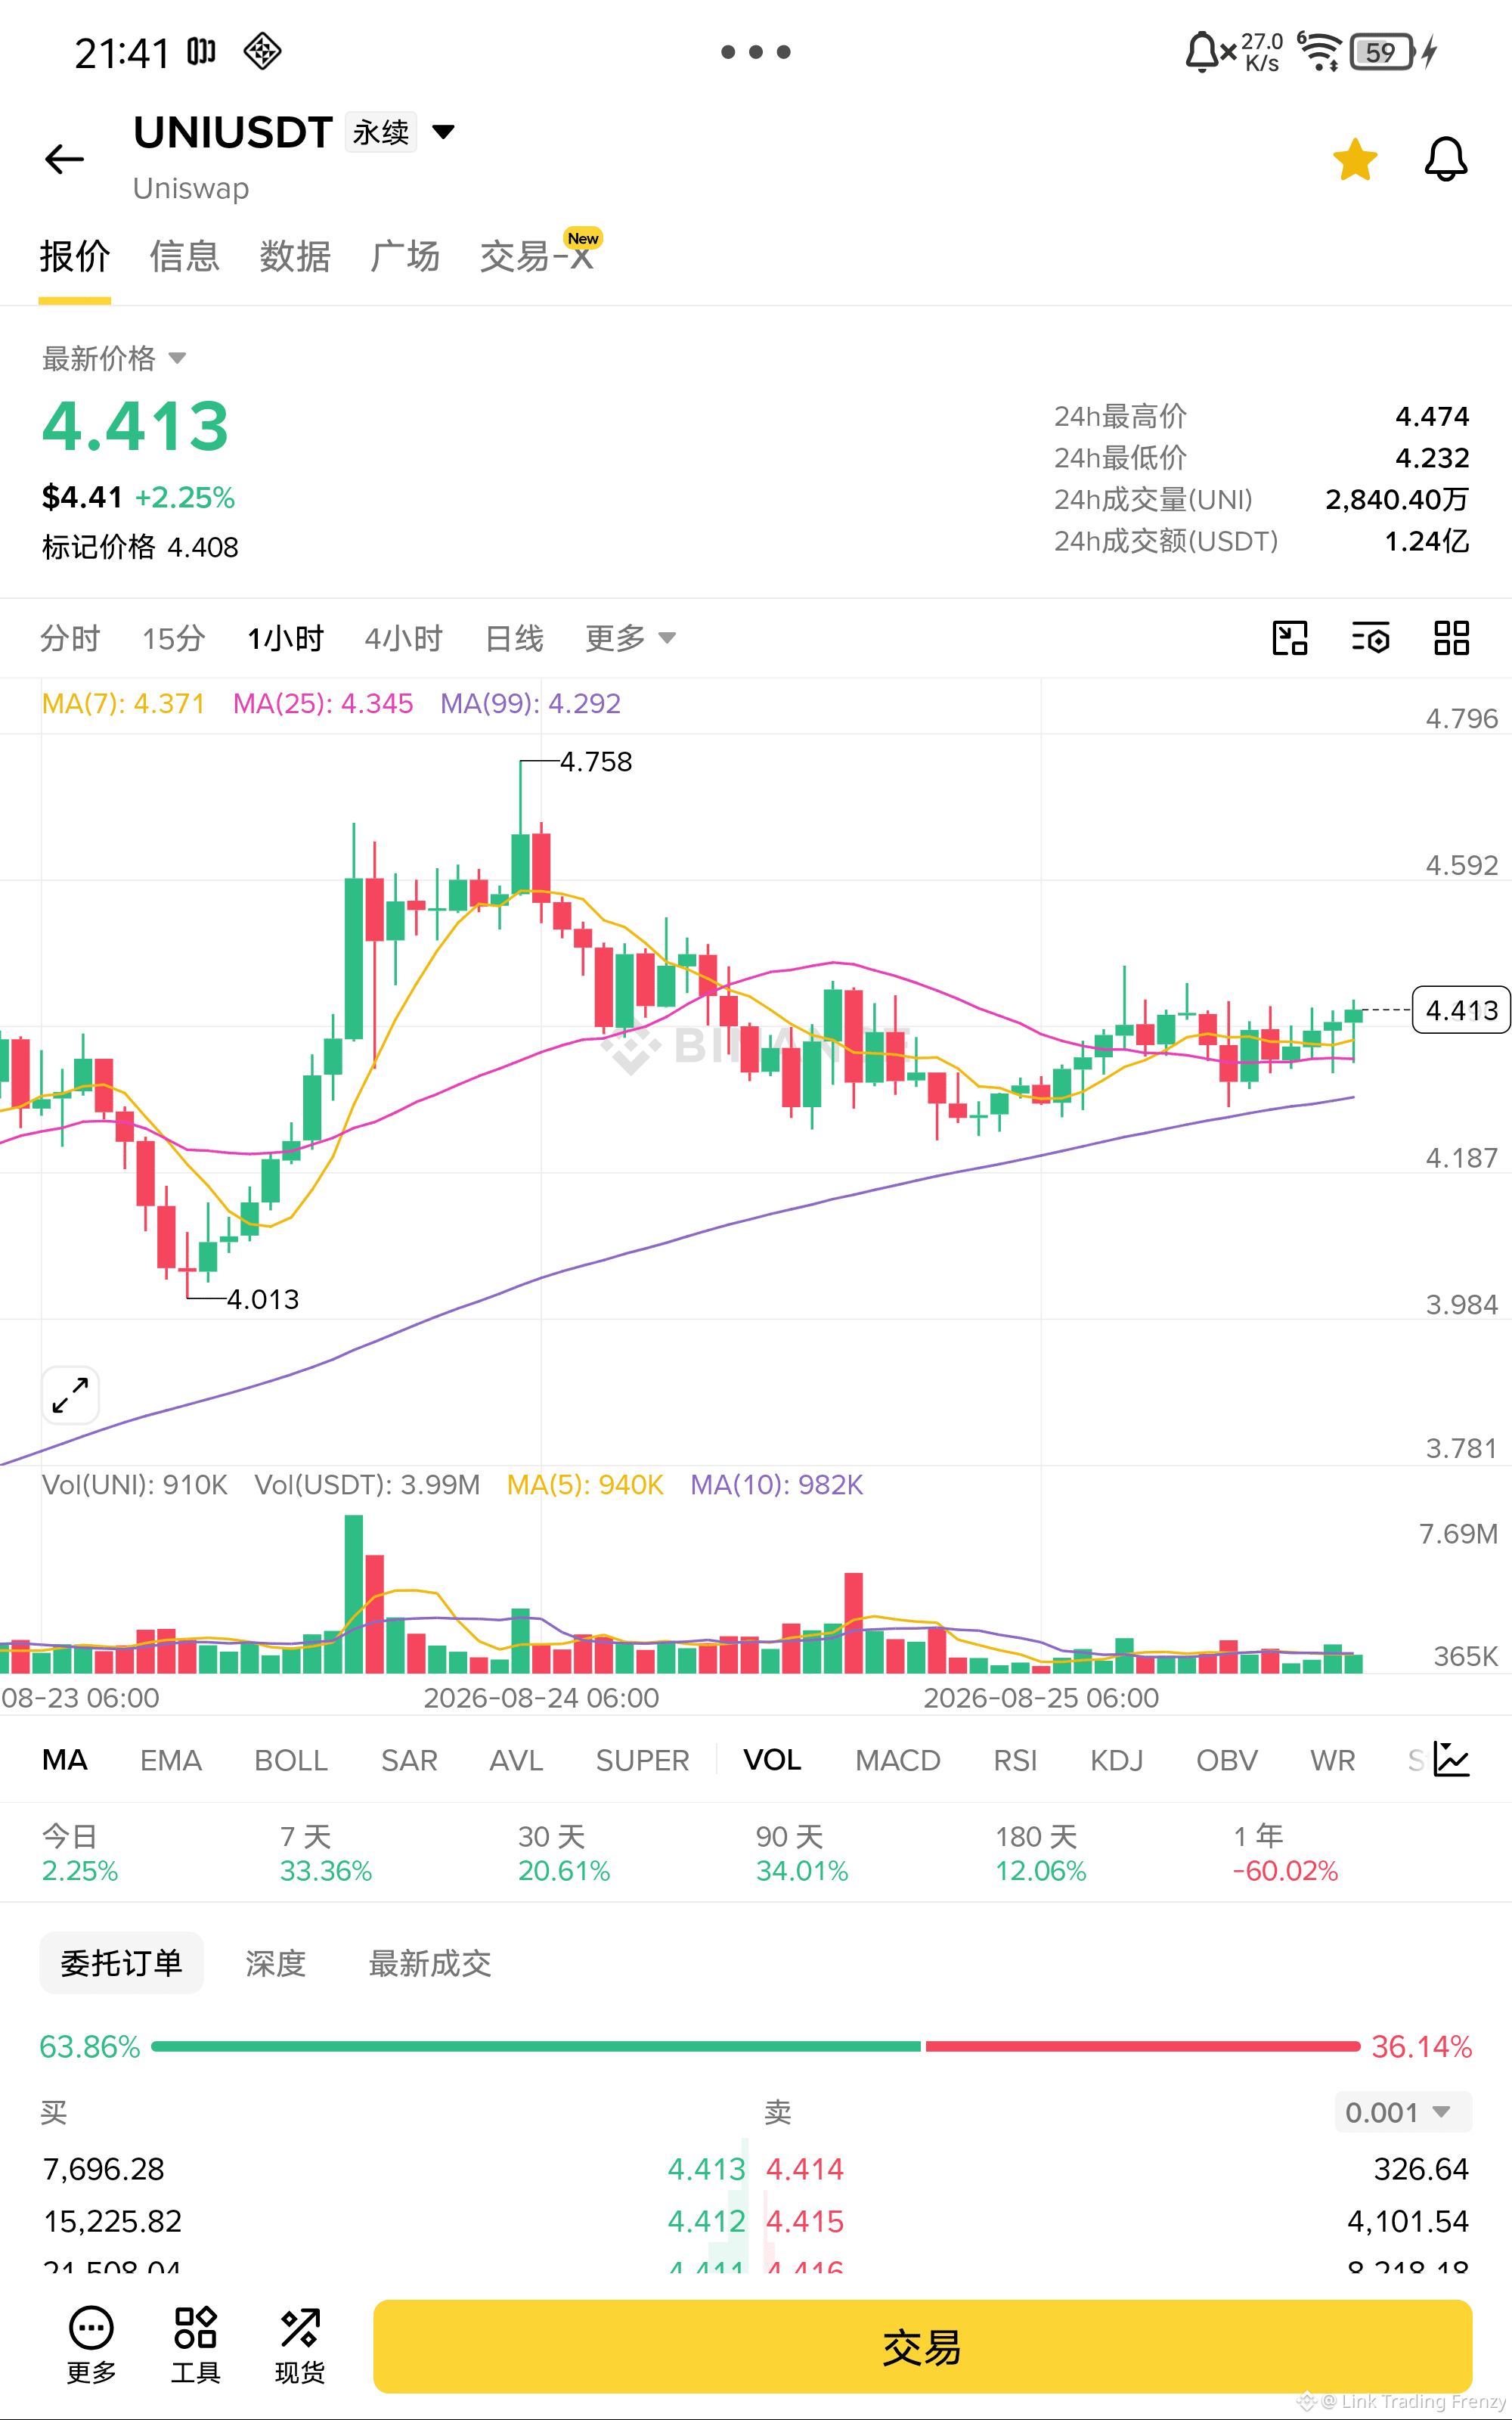
$UNI Quickly go long!
The bottom structure is gradually becoming clear. In recent K-lines, the lows have been rising step by step. The short-term moving averages (MA7/25) have turned upward and diverged, forming a support base. Price has held above the upper boundary of the previous ranging zone. Bearish momentum has clearly weakened and shows signs of accelerating into an upside swing, with volume cooperating.
Entry: 4.413
Stop loss: 4.343
Take profit: 4.623
$UNI - Long 🔻
Enter from below👇
The bottom structure is gradually becoming clear. In recent K-lines, the lows have been rising step by step. The short-term moving averages (MA7/25) have turned upward and diverged, forming a support base. Price has held above the upper boundary of the previous ranging zone. Bearish momentum has clearly weakened and shows signs of accelerating into an upside swing, with volume cooperating.
Entry: 4.413
Stop loss: 4.343
Take profit: 4.623
$UNI - Long 🔻
Enter from below👇
$QQQ Act fast and short into it!
On the 1-hour chart, a clear “double top” formation has taken shape. Near the previous high around 715.66, there is extremely heavy selling pressure, and the rebound volume for this round is noticeably weaker than in the earlier phase. The current price is stuck and capped where MA7 and MA99 are sticking together (the 712-713 area). MACD green histogram bars have started expanding again, and the downtrend still controls the market.
Entry: 713.09
Stop loss: 716.09
Take profit: 704.09
$QQQ - Short 🔻
Enter from the bottom here👇
On the 1-hour chart, a clear “double top” formation has taken shape. Near the previous high around 715.66, there is extremely heavy selling pressure, and the rebound volume for this round is noticeably weaker than in the earlier phase. The current price is stuck and capped where MA7 and MA99 are sticking together (the 712-713 area). MACD green histogram bars have started expanding again, and the downtrend still controls the market.
Entry: 713.09
Stop loss: 716.09
Take profit: 704.09
$QQQ - Short 🔻
Enter from the bottom here👇
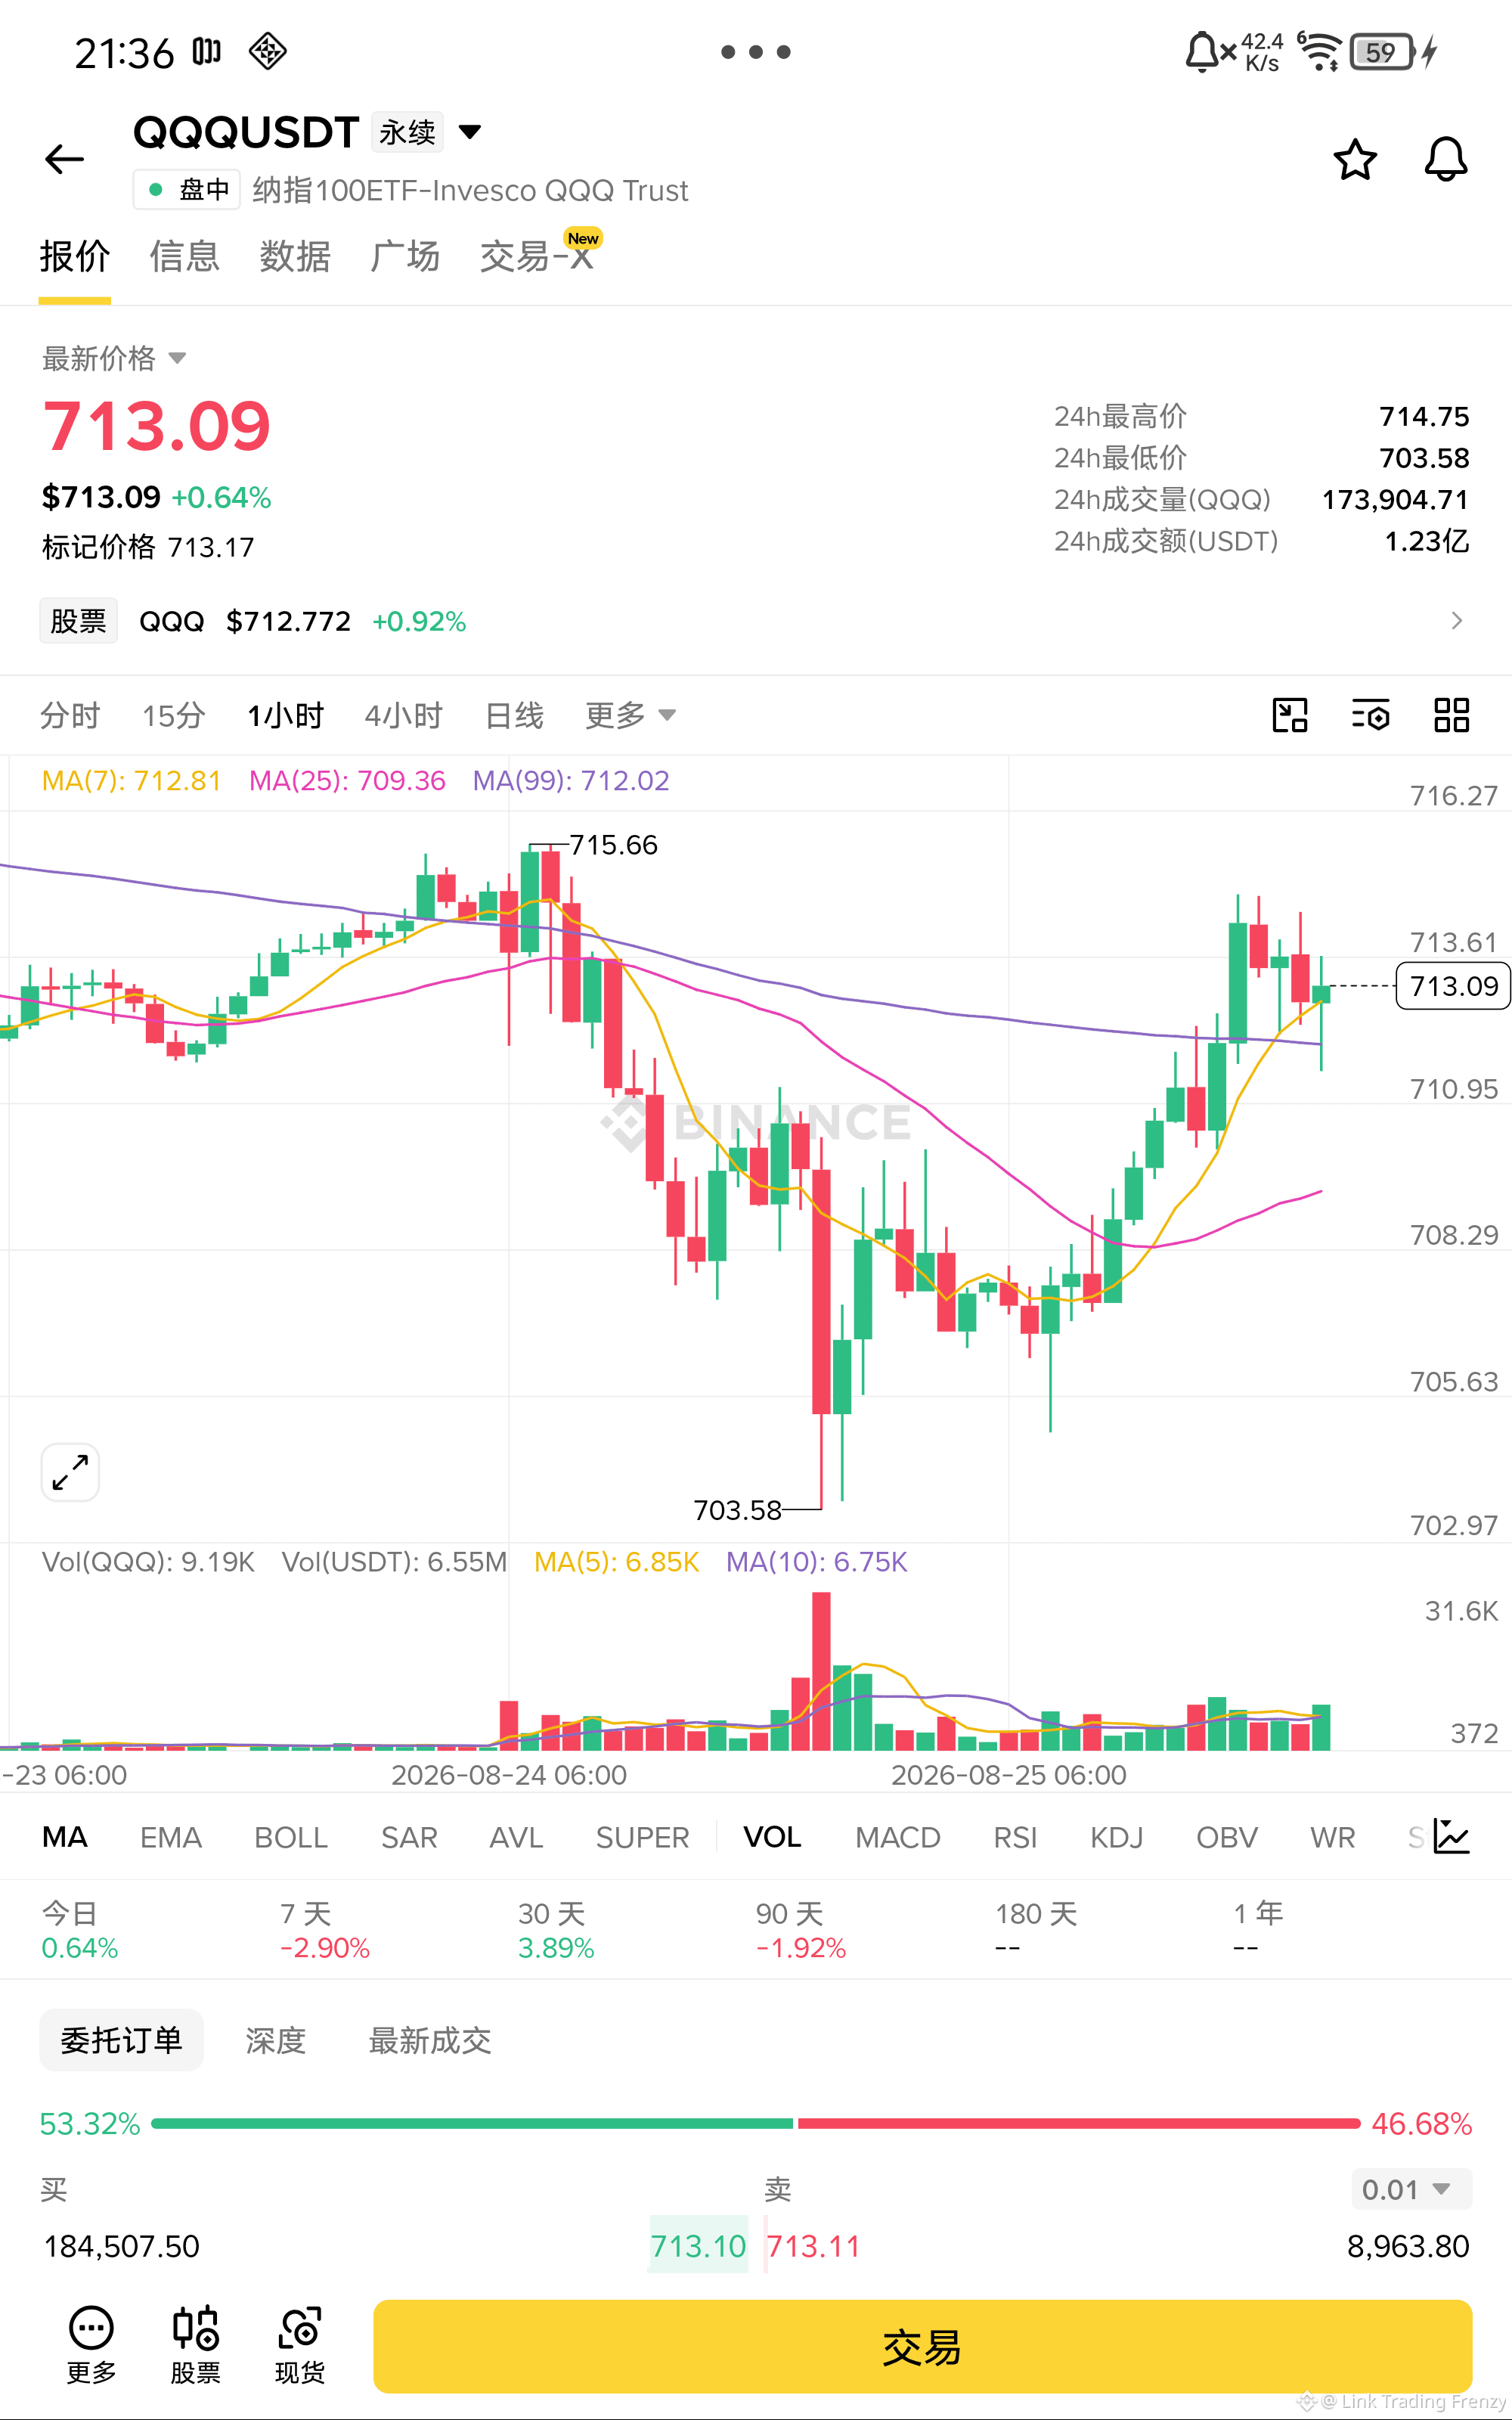
$NVDA hurry up and short in!
In terms of the technicals, the rebound momentum has clearly weakened. The price is under pressure and meets resistance at the intersection of the MA7 and MA25 moving averages, and the rebound volume continues to shrink. The volume-price relationship shows that there is not enough willingness for longs to take over. The bearish alignment remains unchanged; trade in line with the trend for a second retest low.
Entry: 210.75
Stop loss: 213.75
Take profit: 201.75
$NVDA - Short 🔻
Enter the trade from below👇
In terms of the technicals, the rebound momentum has clearly weakened. The price is under pressure and meets resistance at the intersection of the MA7 and MA25 moving averages, and the rebound volume continues to shrink. The volume-price relationship shows that there is not enough willingness for longs to take over. The bearish alignment remains unchanged; trade in line with the trend for a second retest low.
Entry: 210.75
Stop loss: 213.75
Take profit: 201.75
$NVDA - Short 🔻
Enter the trade from below👇
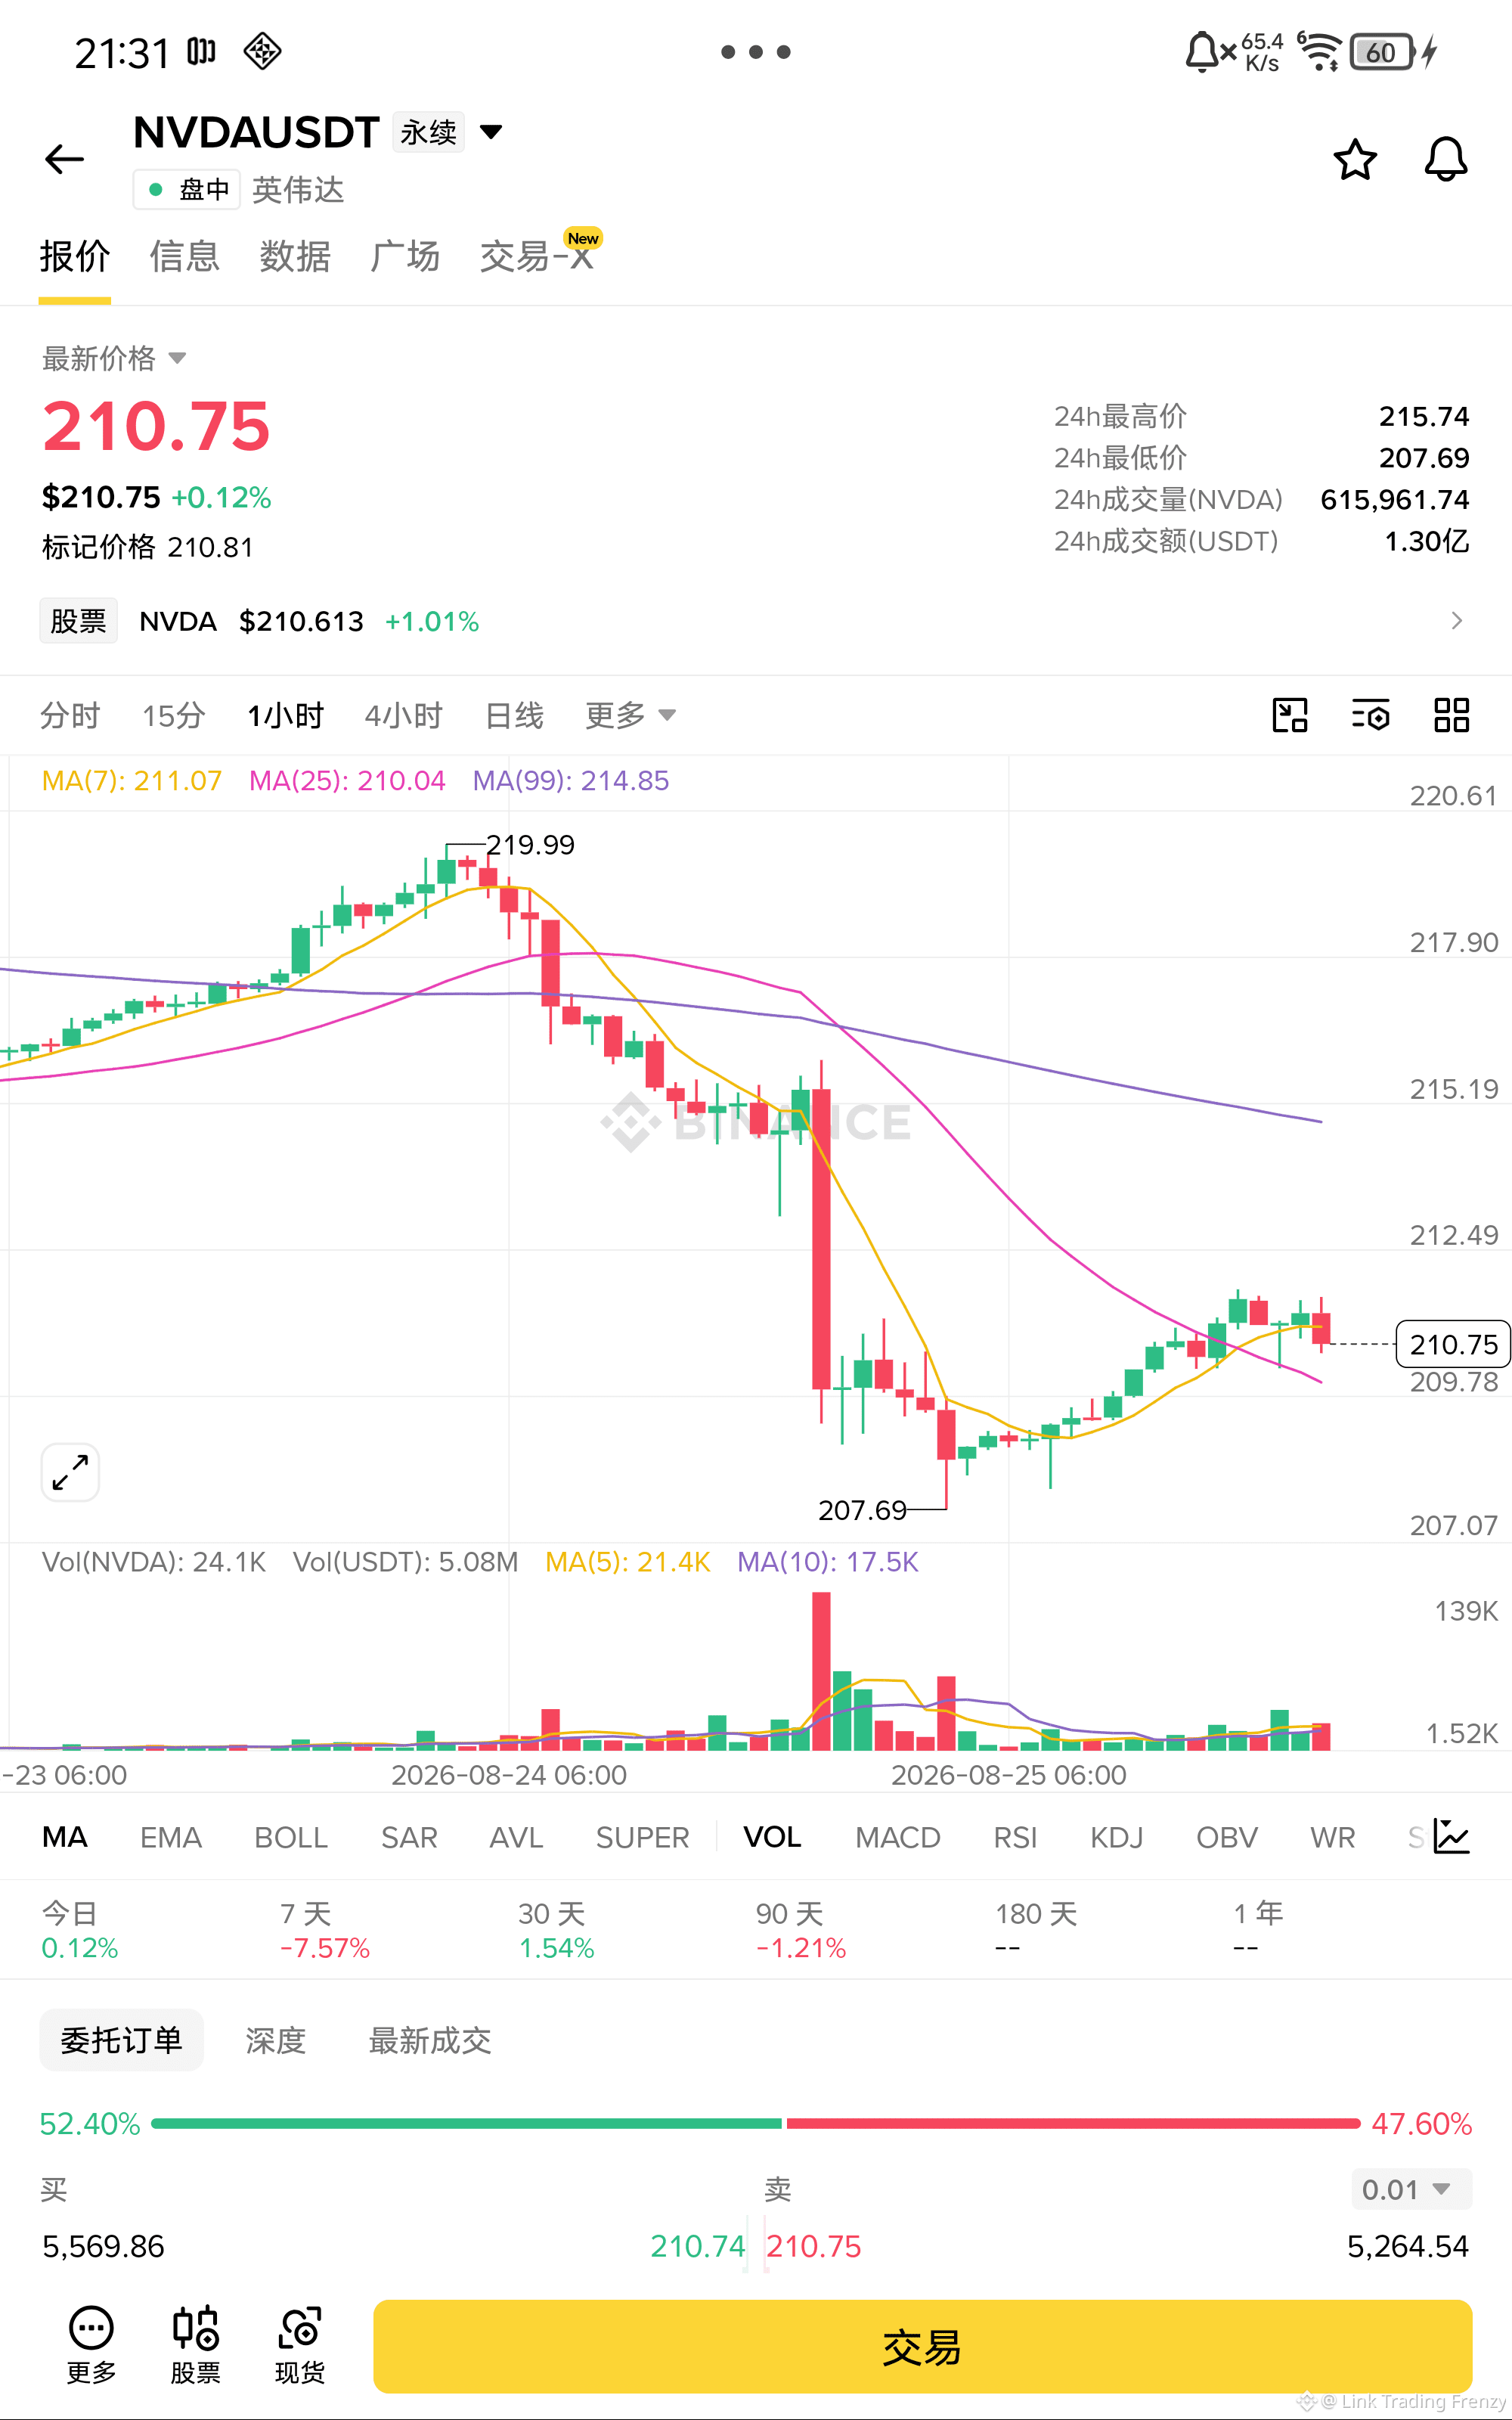
$STORJ The bulls are clearly failing to hold.
After STORJ was smashed down from 0.05980, it rebounded but still couldn't even reach 0.048. MA7 and MA25 have formed a bearish “dead cross” putting pressure on the price. The MACD red histogram continues to shorten. The KDJ has confirmed a high-level dead cross with downside diffusion. The moving average system is about to turn broadly bearish. The first target is below, at MA99 (0.04384).
Entry: 0.04639
Stop loss: 0.04850
Take profit: 0.04160
$STORJ - Sell 🔻
Enter from the bottom👇
After STORJ was smashed down from 0.05980, it rebounded but still couldn't even reach 0.048. MA7 and MA25 have formed a bearish “dead cross” putting pressure on the price. The MACD red histogram continues to shorten. The KDJ has confirmed a high-level dead cross with downside diffusion. The moving average system is about to turn broadly bearish. The first target is below, at MA99 (0.04384).
Entry: 0.04639
Stop loss: 0.04850
Take profit: 0.04160
$STORJ - Sell 🔻
Enter from the bottom👇
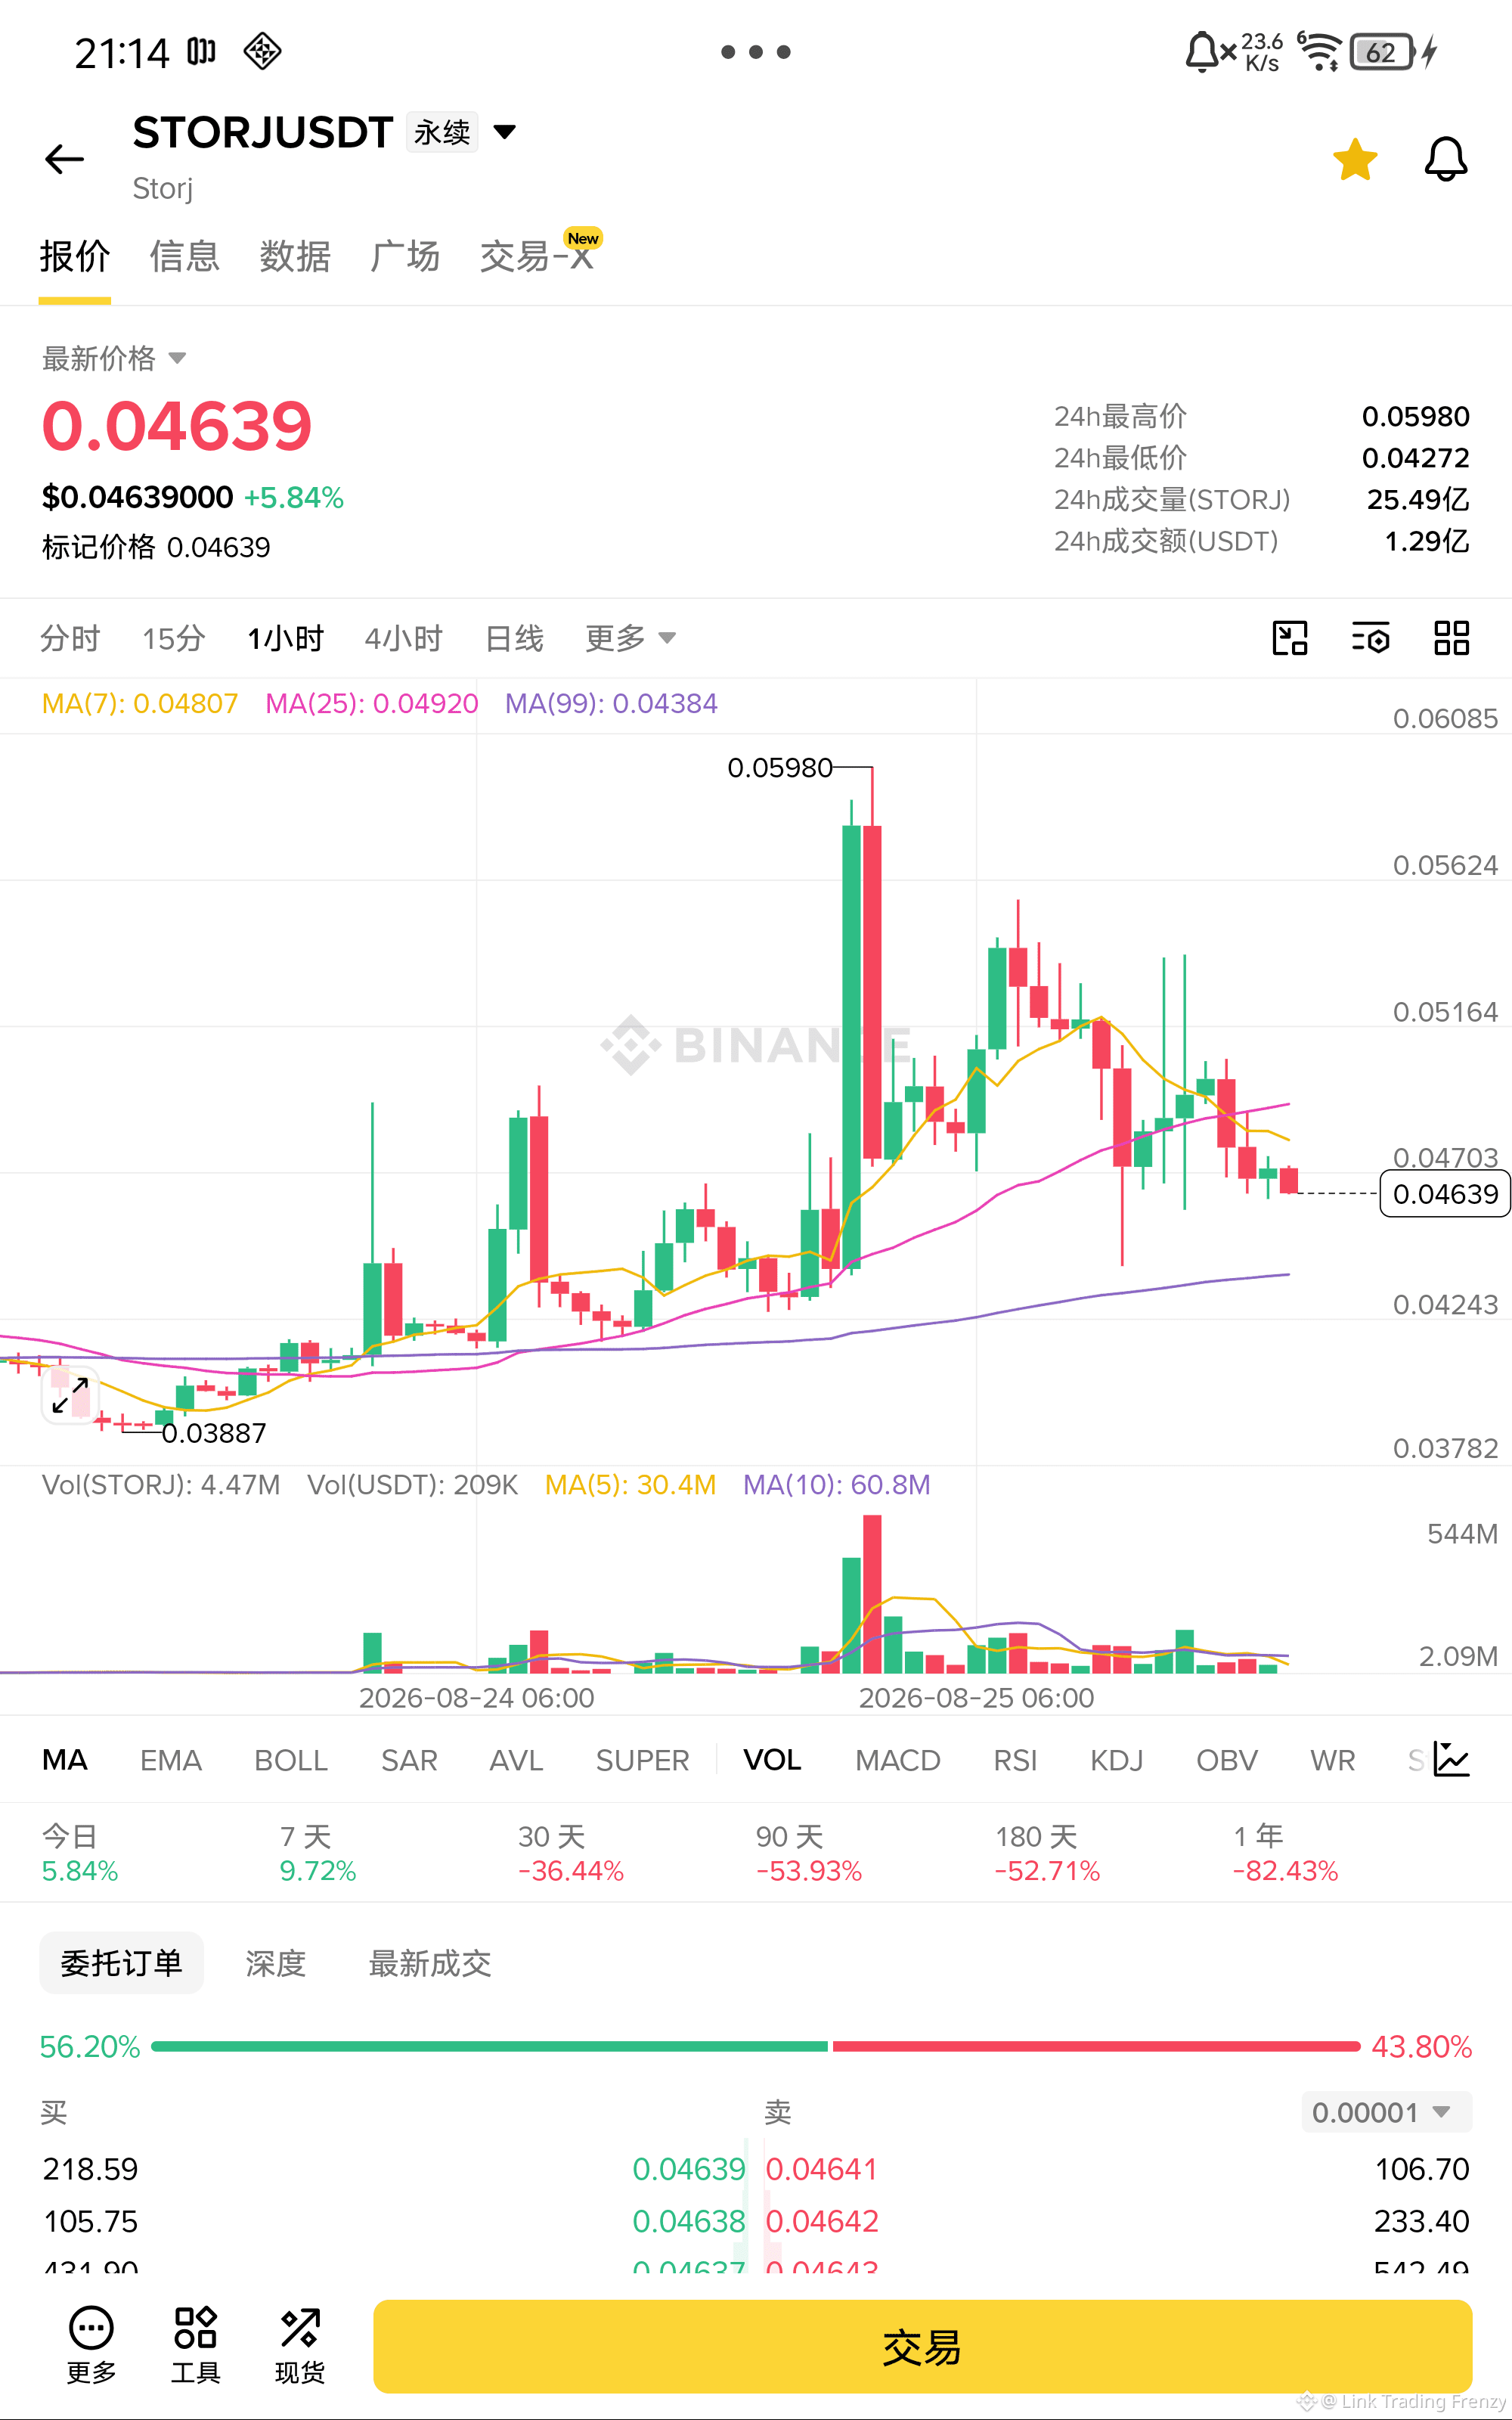
$UNI Make a long position quickly!!
UNI is holding firmly above MA7, MA25, and MA99. MA7 has just crossed above MA25 to form a golden cross. The moving average system is fully bullish and aligned. The MACD histogram is steadily expanding on red bars, the KDJ is diffusing upward. After the successful base-building at 4.232, consecutive small bullish candles have pushed higher. The first target is 4.474, the previous high above.
Entry: 4.383
Stop loss: 4.250
Take profit: 4.680
$UNI - Long 🚀
Enter from below👇
UNI is holding firmly above MA7, MA25, and MA99. MA7 has just crossed above MA25 to form a golden cross. The moving average system is fully bullish and aligned. The MACD histogram is steadily expanding on red bars, the KDJ is diffusing upward. After the successful base-building at 4.232, consecutive small bullish candles have pushed higher. The first target is 4.474, the previous high above.
Entry: 4.383
Stop loss: 4.250
Take profit: 4.680
$UNI - Long 🚀
Enter from below👇
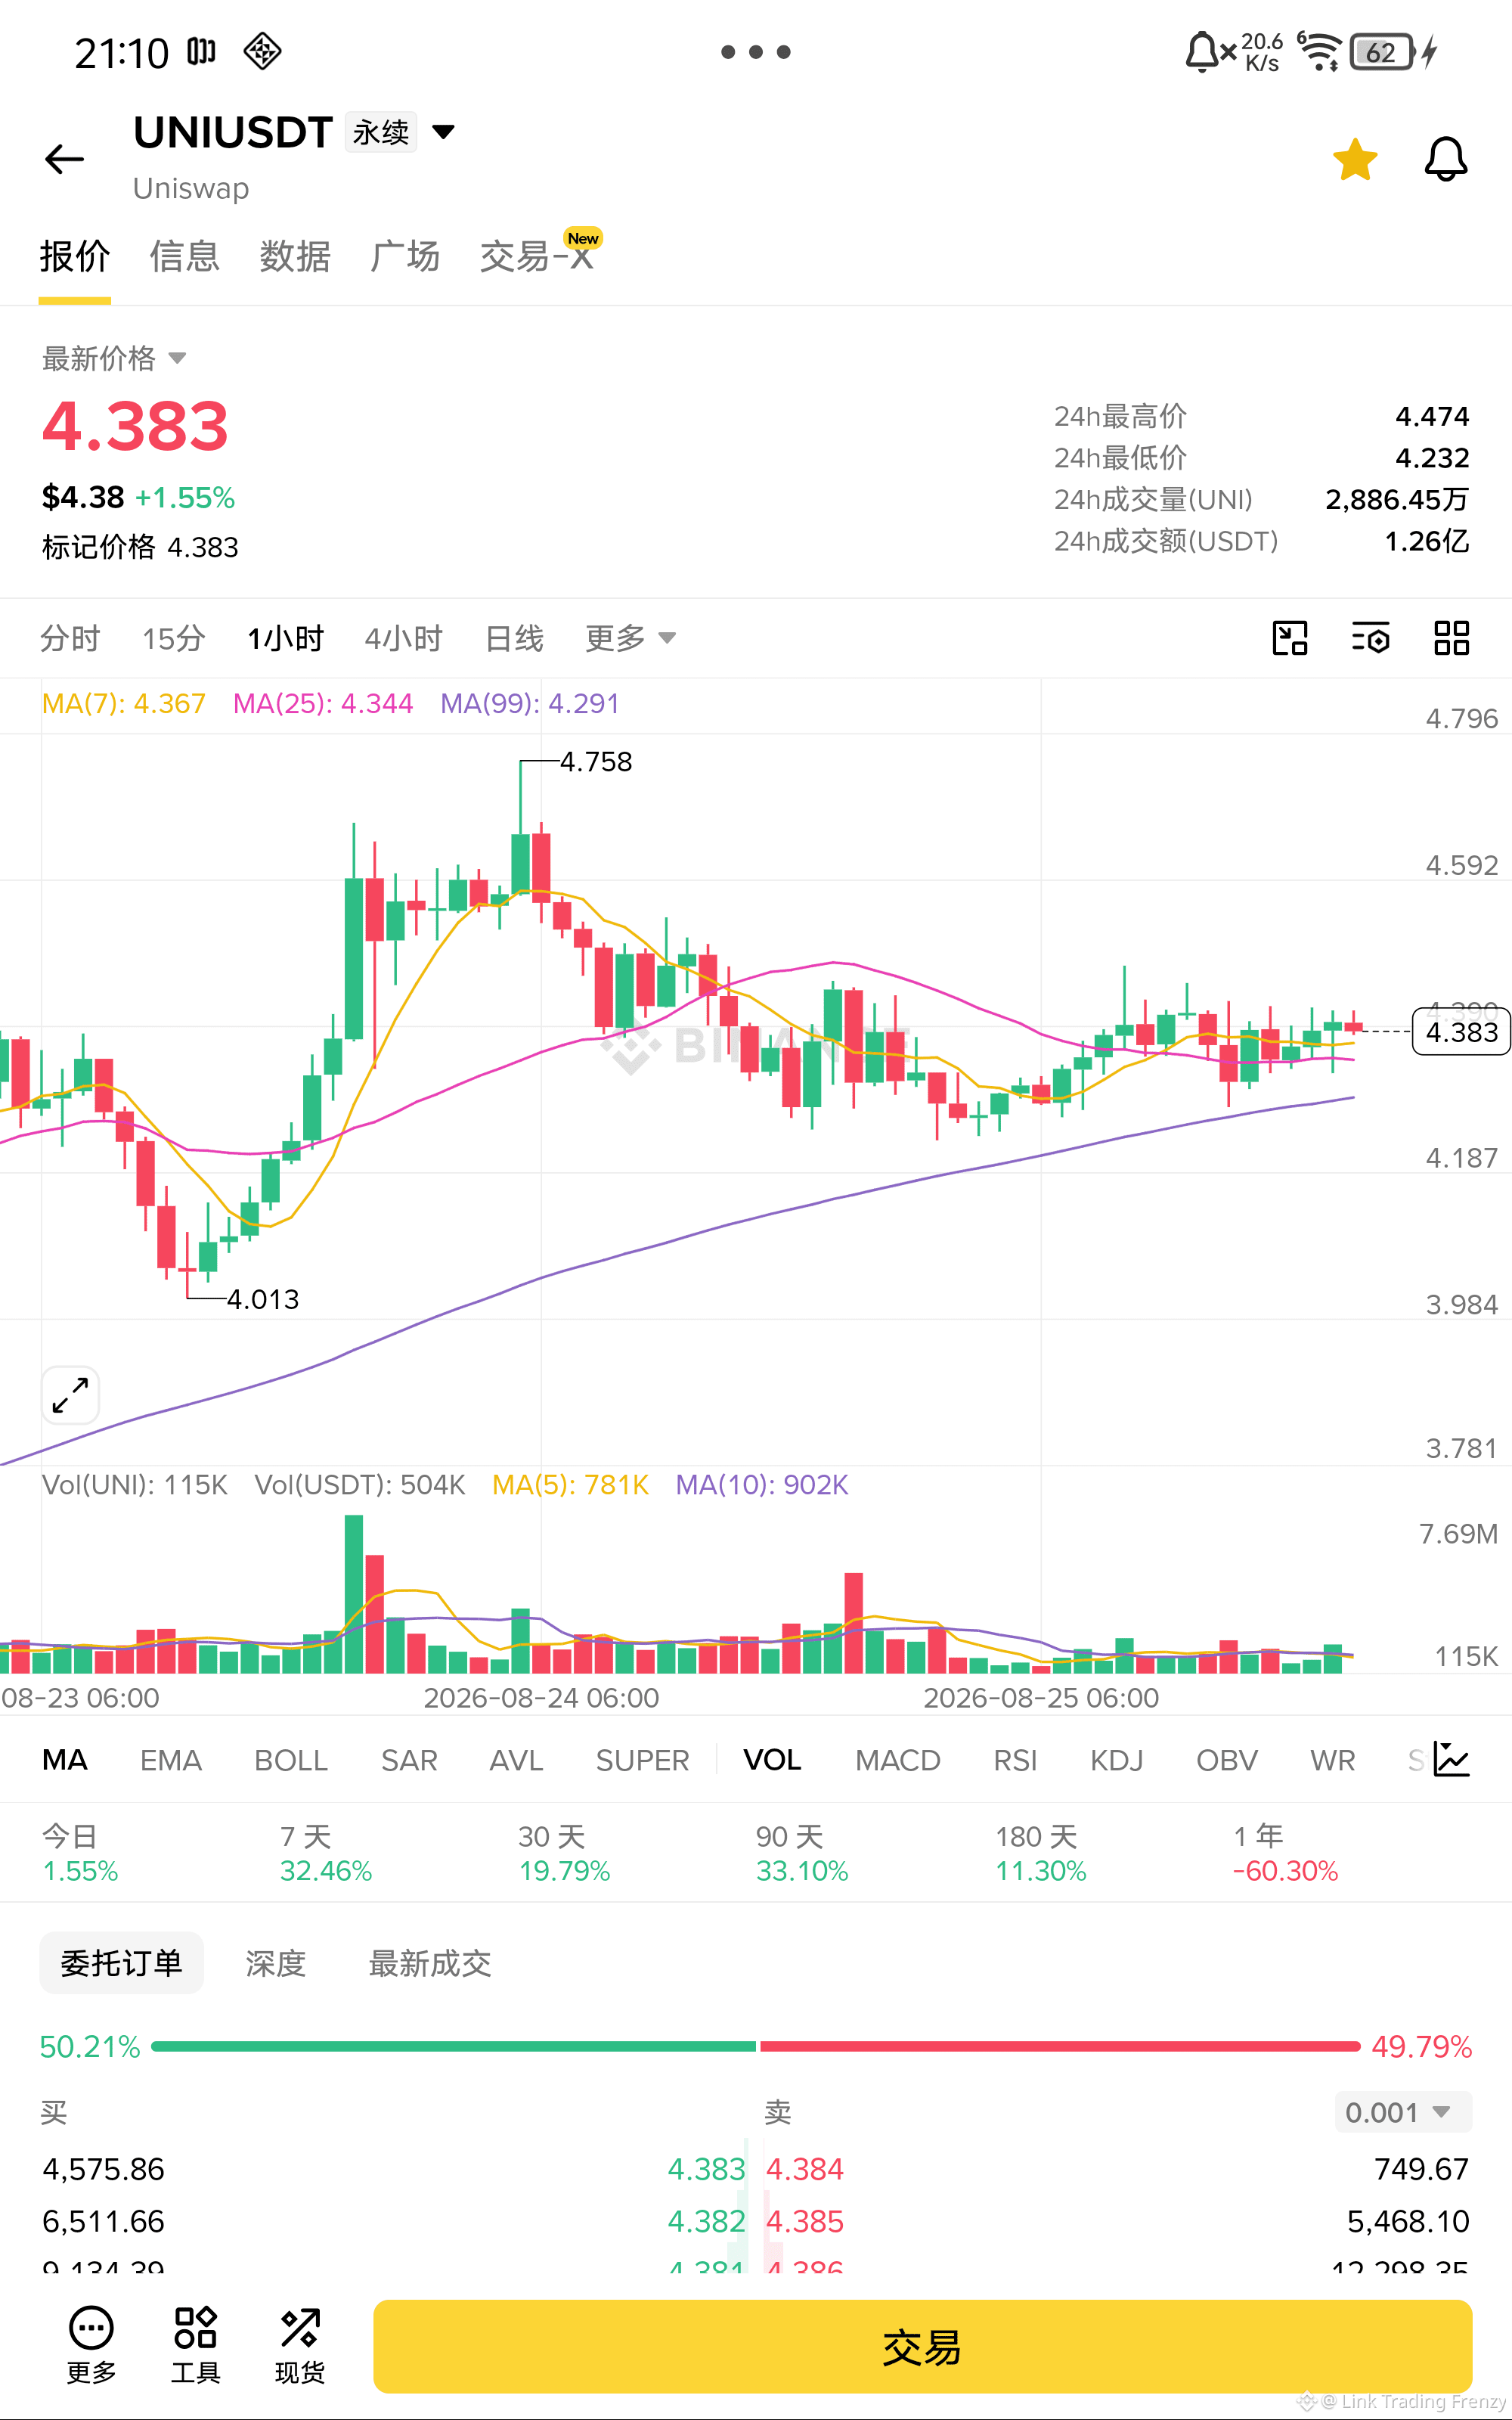
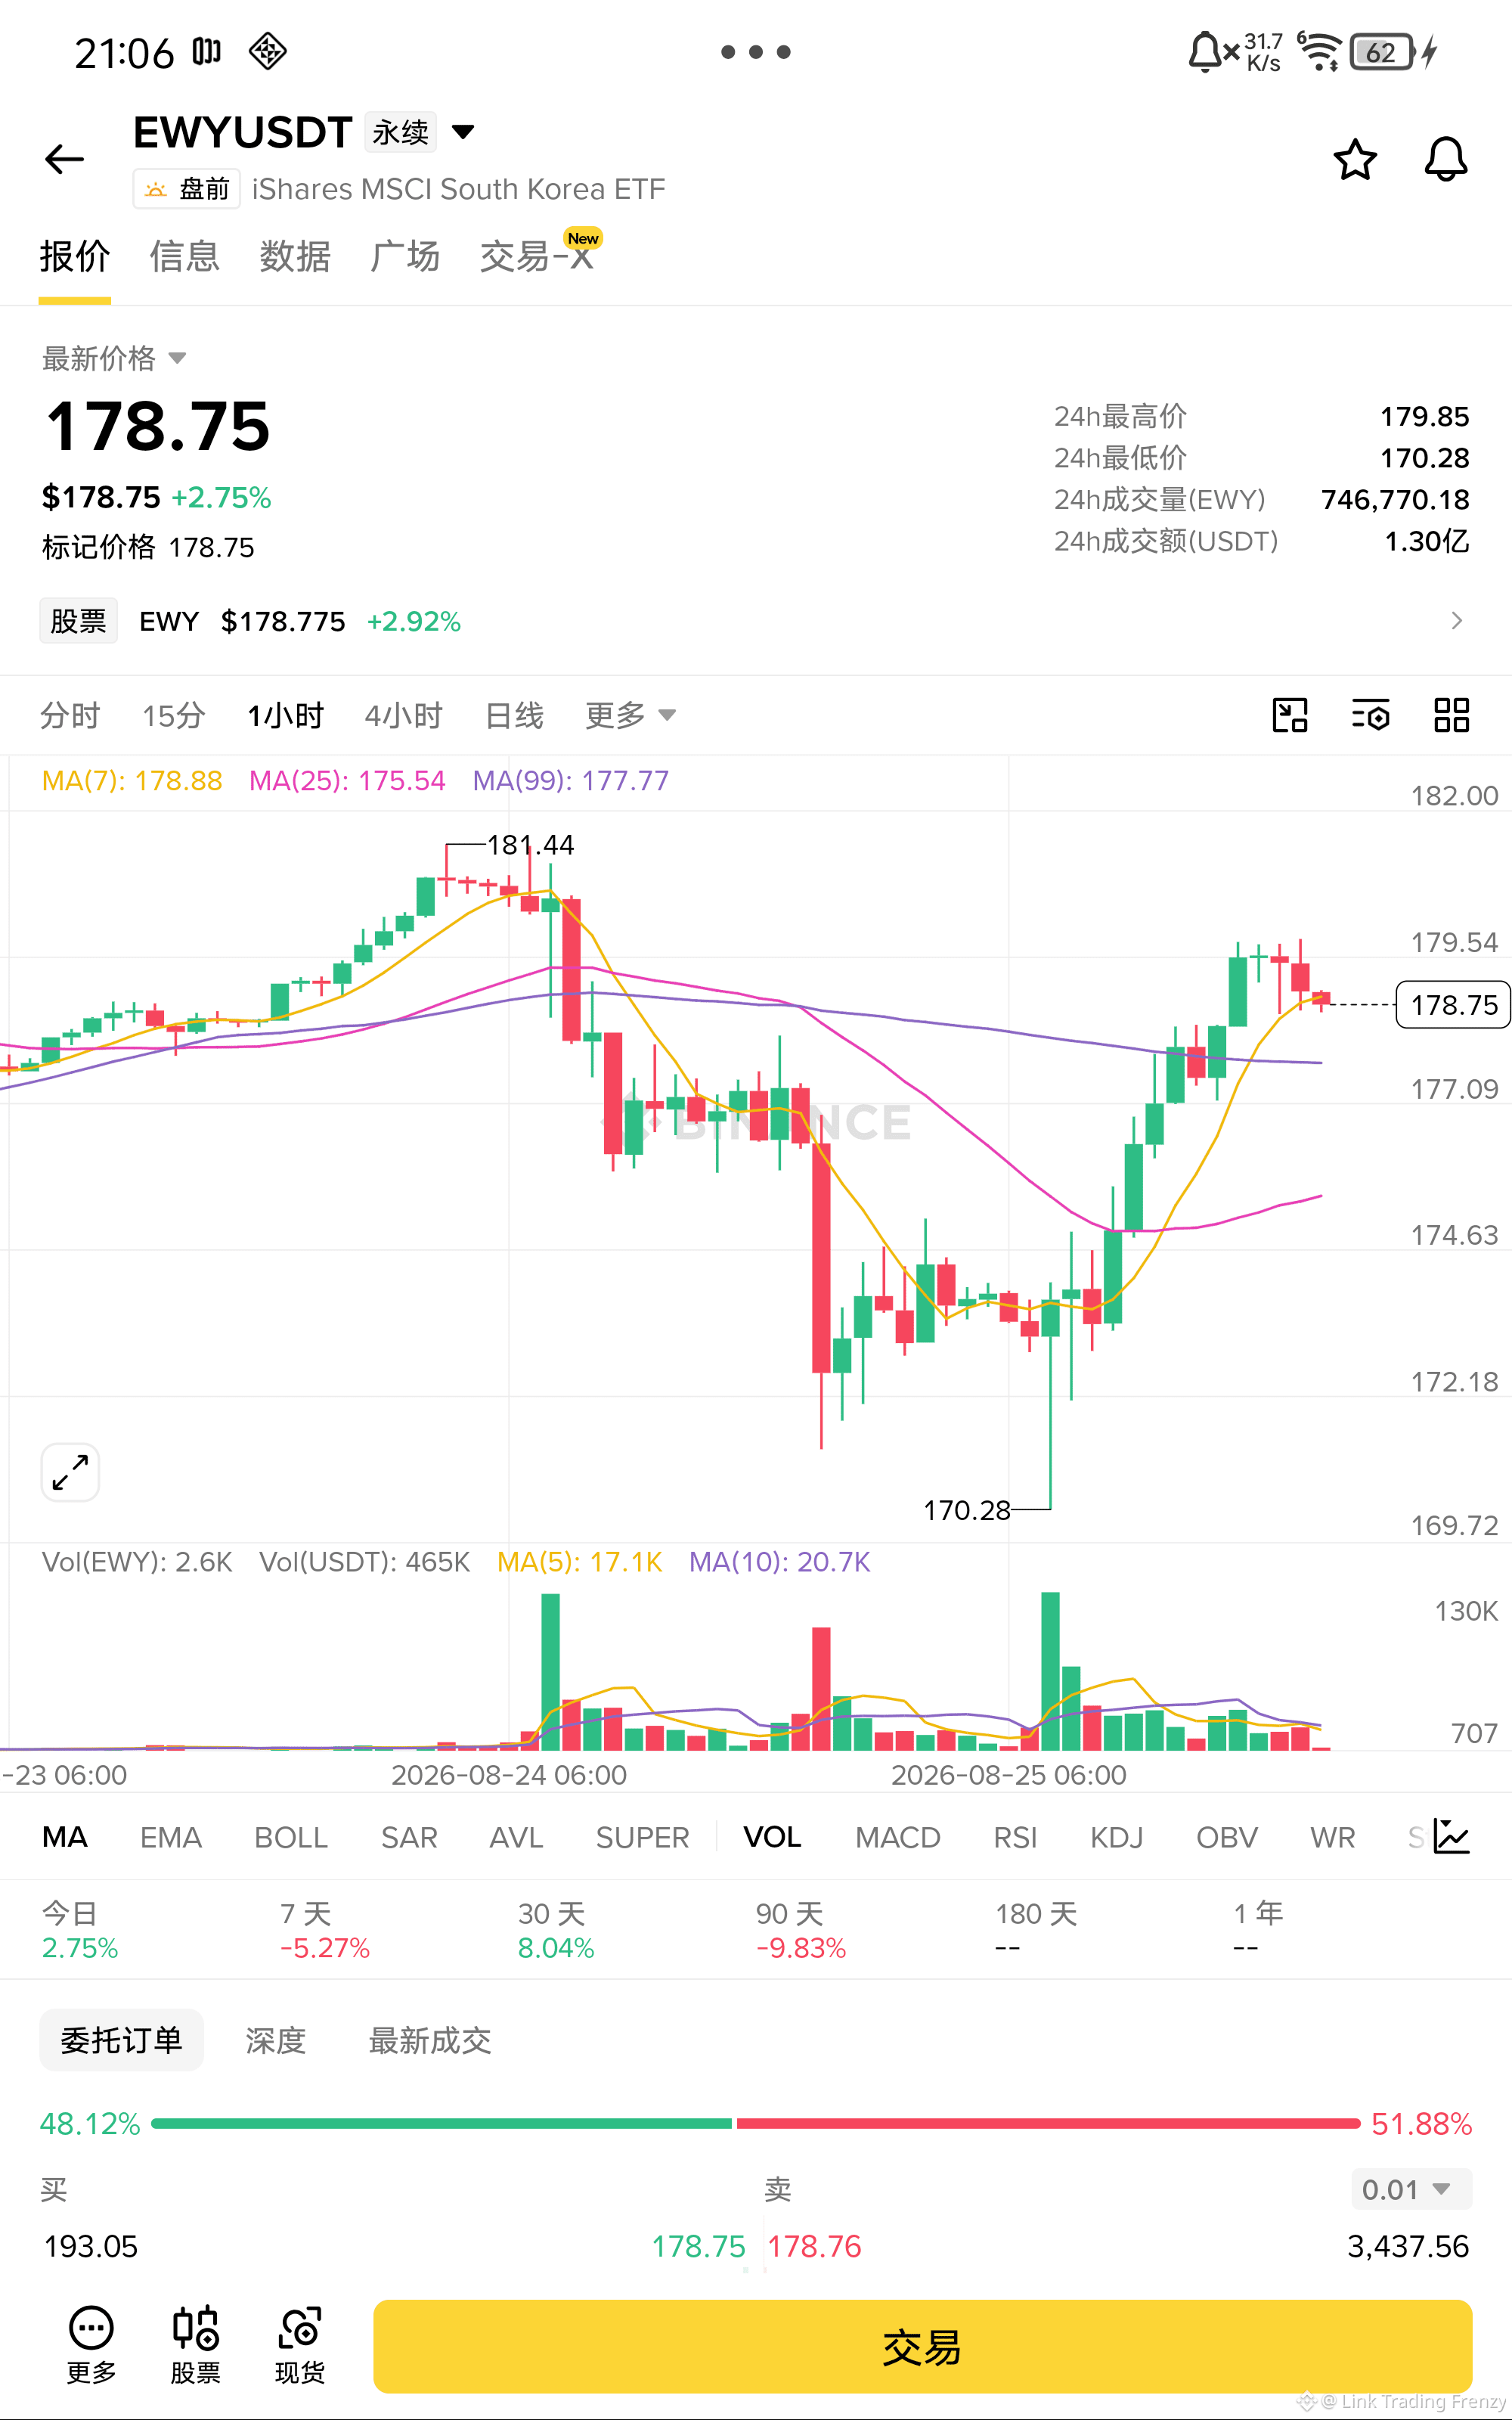
$EWY Breakout and go long!!
After EWY broke above MA25 and MA99, it continued to push upward. The MACD histogram red bars remain stable and volume is expanding. The KDJ diffuses upward. MA7 (178.88) is just within arm’s reach—once it breaks through, it will accelerate.
In the Korean market,资金 has clearly been flowing back recently. The 3x long ETF has strong upside elasticity. After 180 breaks, the room above is completely opened.
Entry: 178.75
Stop loss: 175.50
Take profit: 188.00
$EWY - Long 🚀
Enter from below 👇
After EWY broke above MA25 and MA99, it continued to push upward. The MACD histogram red bars remain stable and volume is expanding. The KDJ diffuses upward. MA7 (178.88) is just within arm’s reach—once it breaks through, it will accelerate.
In the Korean market,资金 has clearly been flowing back recently. The 3x long ETF has strong upside elasticity. After 180 breaks, the room above is completely opened.
Entry: 178.75
Stop loss: 175.50
Take profit: 188.00
$EWY - Long 🚀
Enter from below 👇
$TAC speed short!!
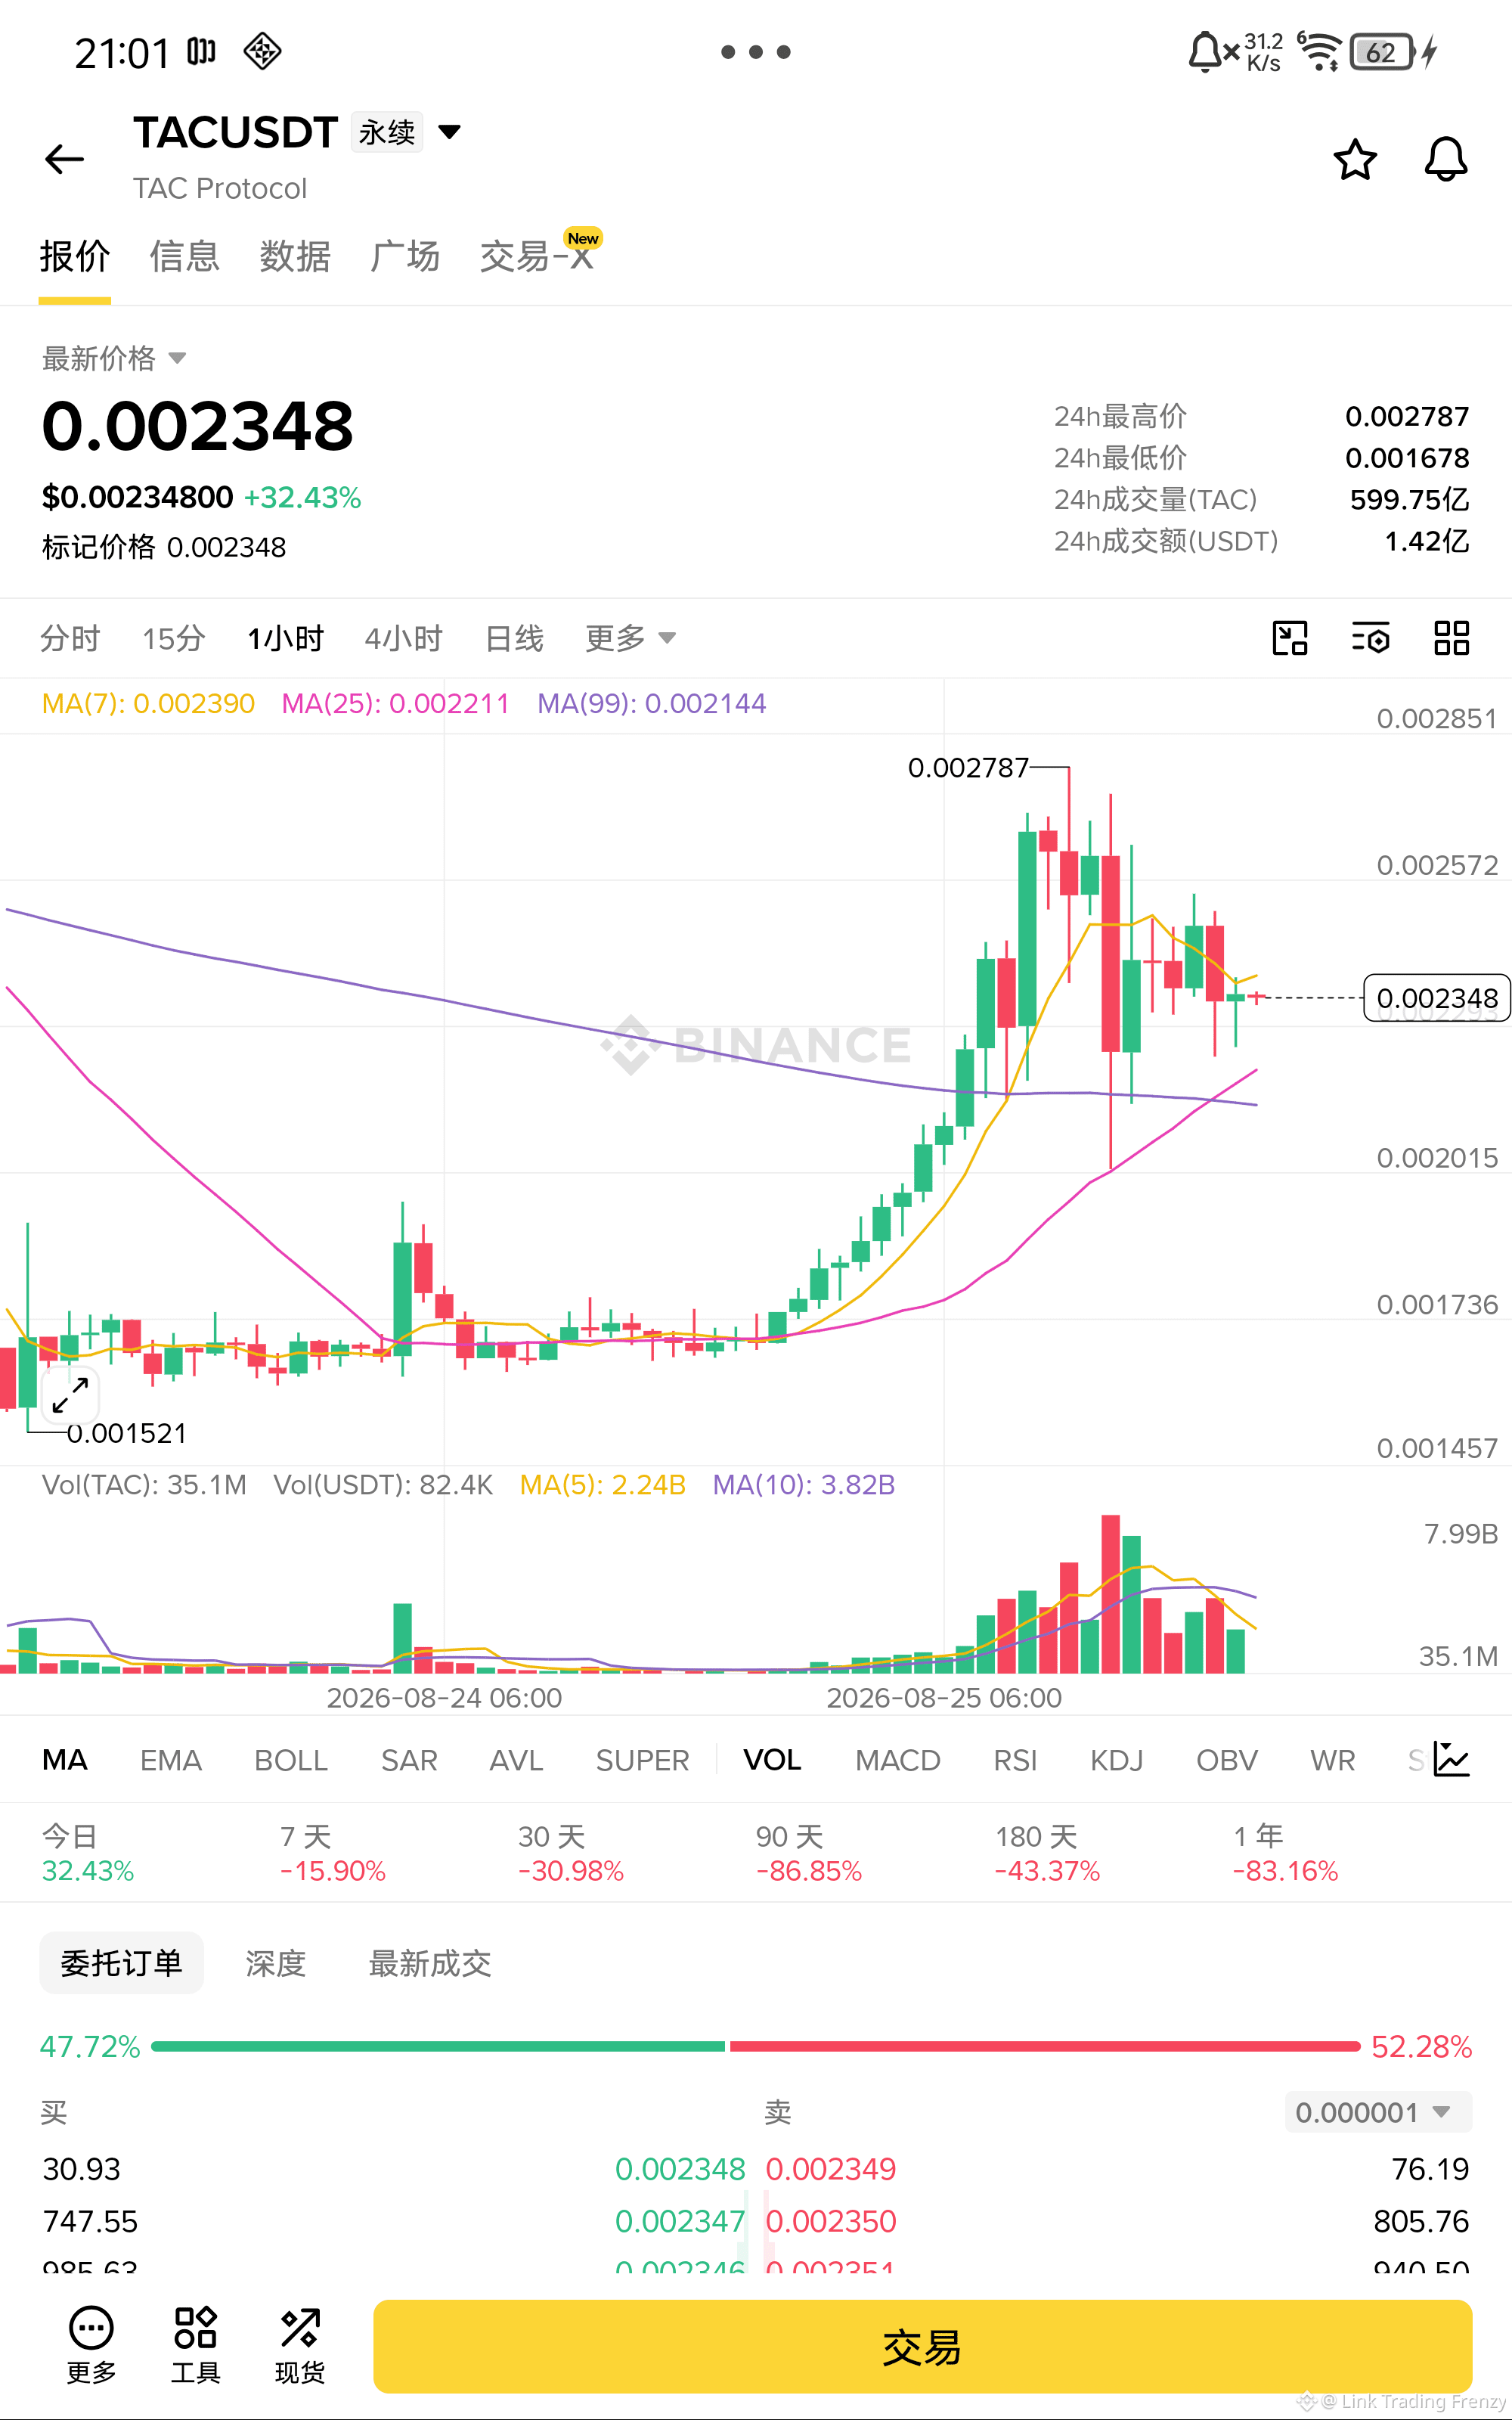
After TAC violently surged up 32% today, it was clearly resisted at the high level. A long upper shadow of 0.002787 was left. Although the price broke above the MA25, it was precisely suppressed by the MA7. The MACD histogram is still in the red and has expanded, but the KDJ has already turned and is overbought. In these small-cap stocks, after a violent pump, it is often followed by a sharp drop. The pressure from profit-taking is huge. The MA25 below (0.002211) is the first target.
Entry: 0.002348
Stop loss: 0.002550
Take profit: 0.002150
$TAC - Short 🔻
Enter from the bottom here👇
After TAC violently surged up 32% today, it was clearly resisted at the high level. A long upper shadow of 0.002787 was left. Although the price broke above the MA25, it was precisely suppressed by the MA7. The MACD histogram is still in the red and has expanded, but the KDJ has already turned and is overbought. In these small-cap stocks, after a violent pump, it is often followed by a sharp drop. The pressure from profit-taking is huge. The MA25 below (0.002211) is the first target.
Entry: 0.002348
Stop loss: 0.002550
Take profit: 0.002150
$TAC - Short 🔻
Enter from the bottom here👇
$BCH Speed shorting!!
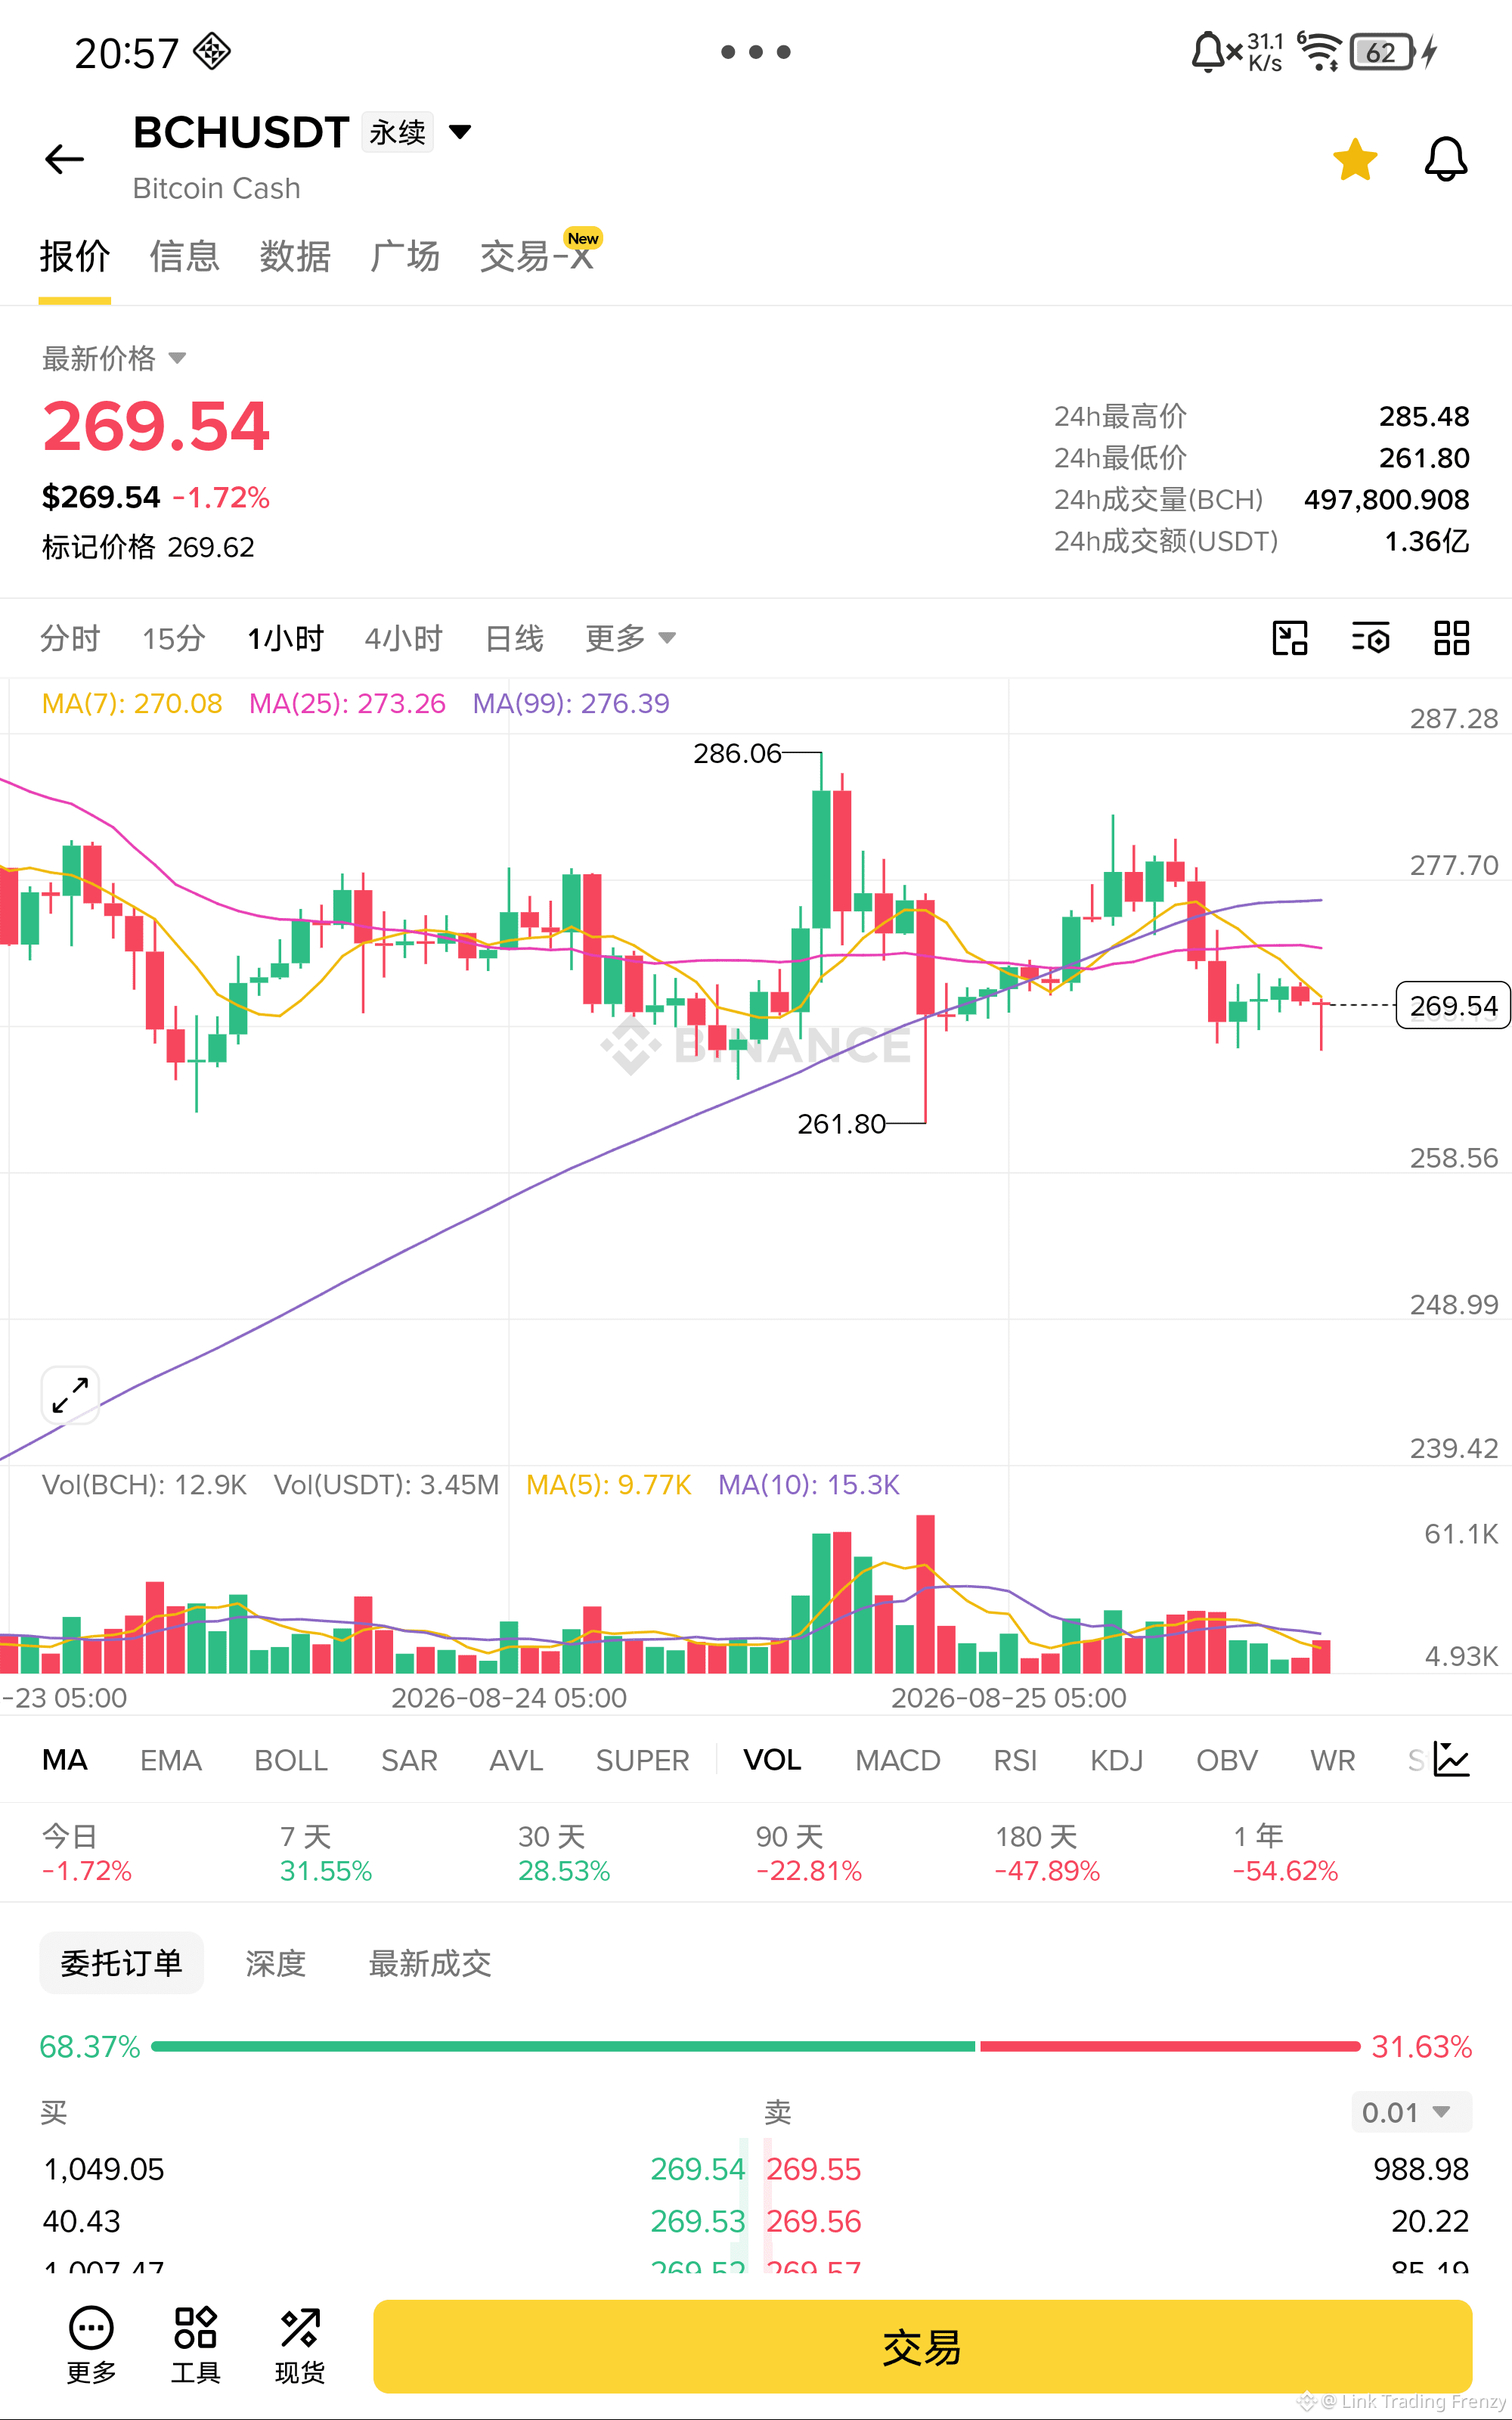
BCH continues to break below MA7, MA25, and MA99. MA7 is about to form a death cross with MA25 to confirm the switch to a bearish stance. The moving-average system is fully re-positioning into a bearish alignment. The MACD green bars keep expanding, while the KDJ diffuses downward. After rallying to 285.48 and then rebounding, it still couldn’t climb back up to even 272. The first target is 261.80, the previous low beneath.
Entry: 269.54
Stop Loss: 274.00
Take Profit: 262.00
$BCH - Short 🔻
Enter from below👇
BCH continues to break below MA7, MA25, and MA99. MA7 is about to form a death cross with MA25 to confirm the switch to a bearish stance. The moving-average system is fully re-positioning into a bearish alignment. The MACD green bars keep expanding, while the KDJ diffuses downward. After rallying to 285.48 and then rebounding, it still couldn’t climb back up to even 272. The first target is 261.80, the previous low beneath.
Entry: 269.54
Stop Loss: 274.00
Take Profit: 262.00
$BCH - Short 🔻
Enter from below👇
$TAO Sell/short aggressively!!
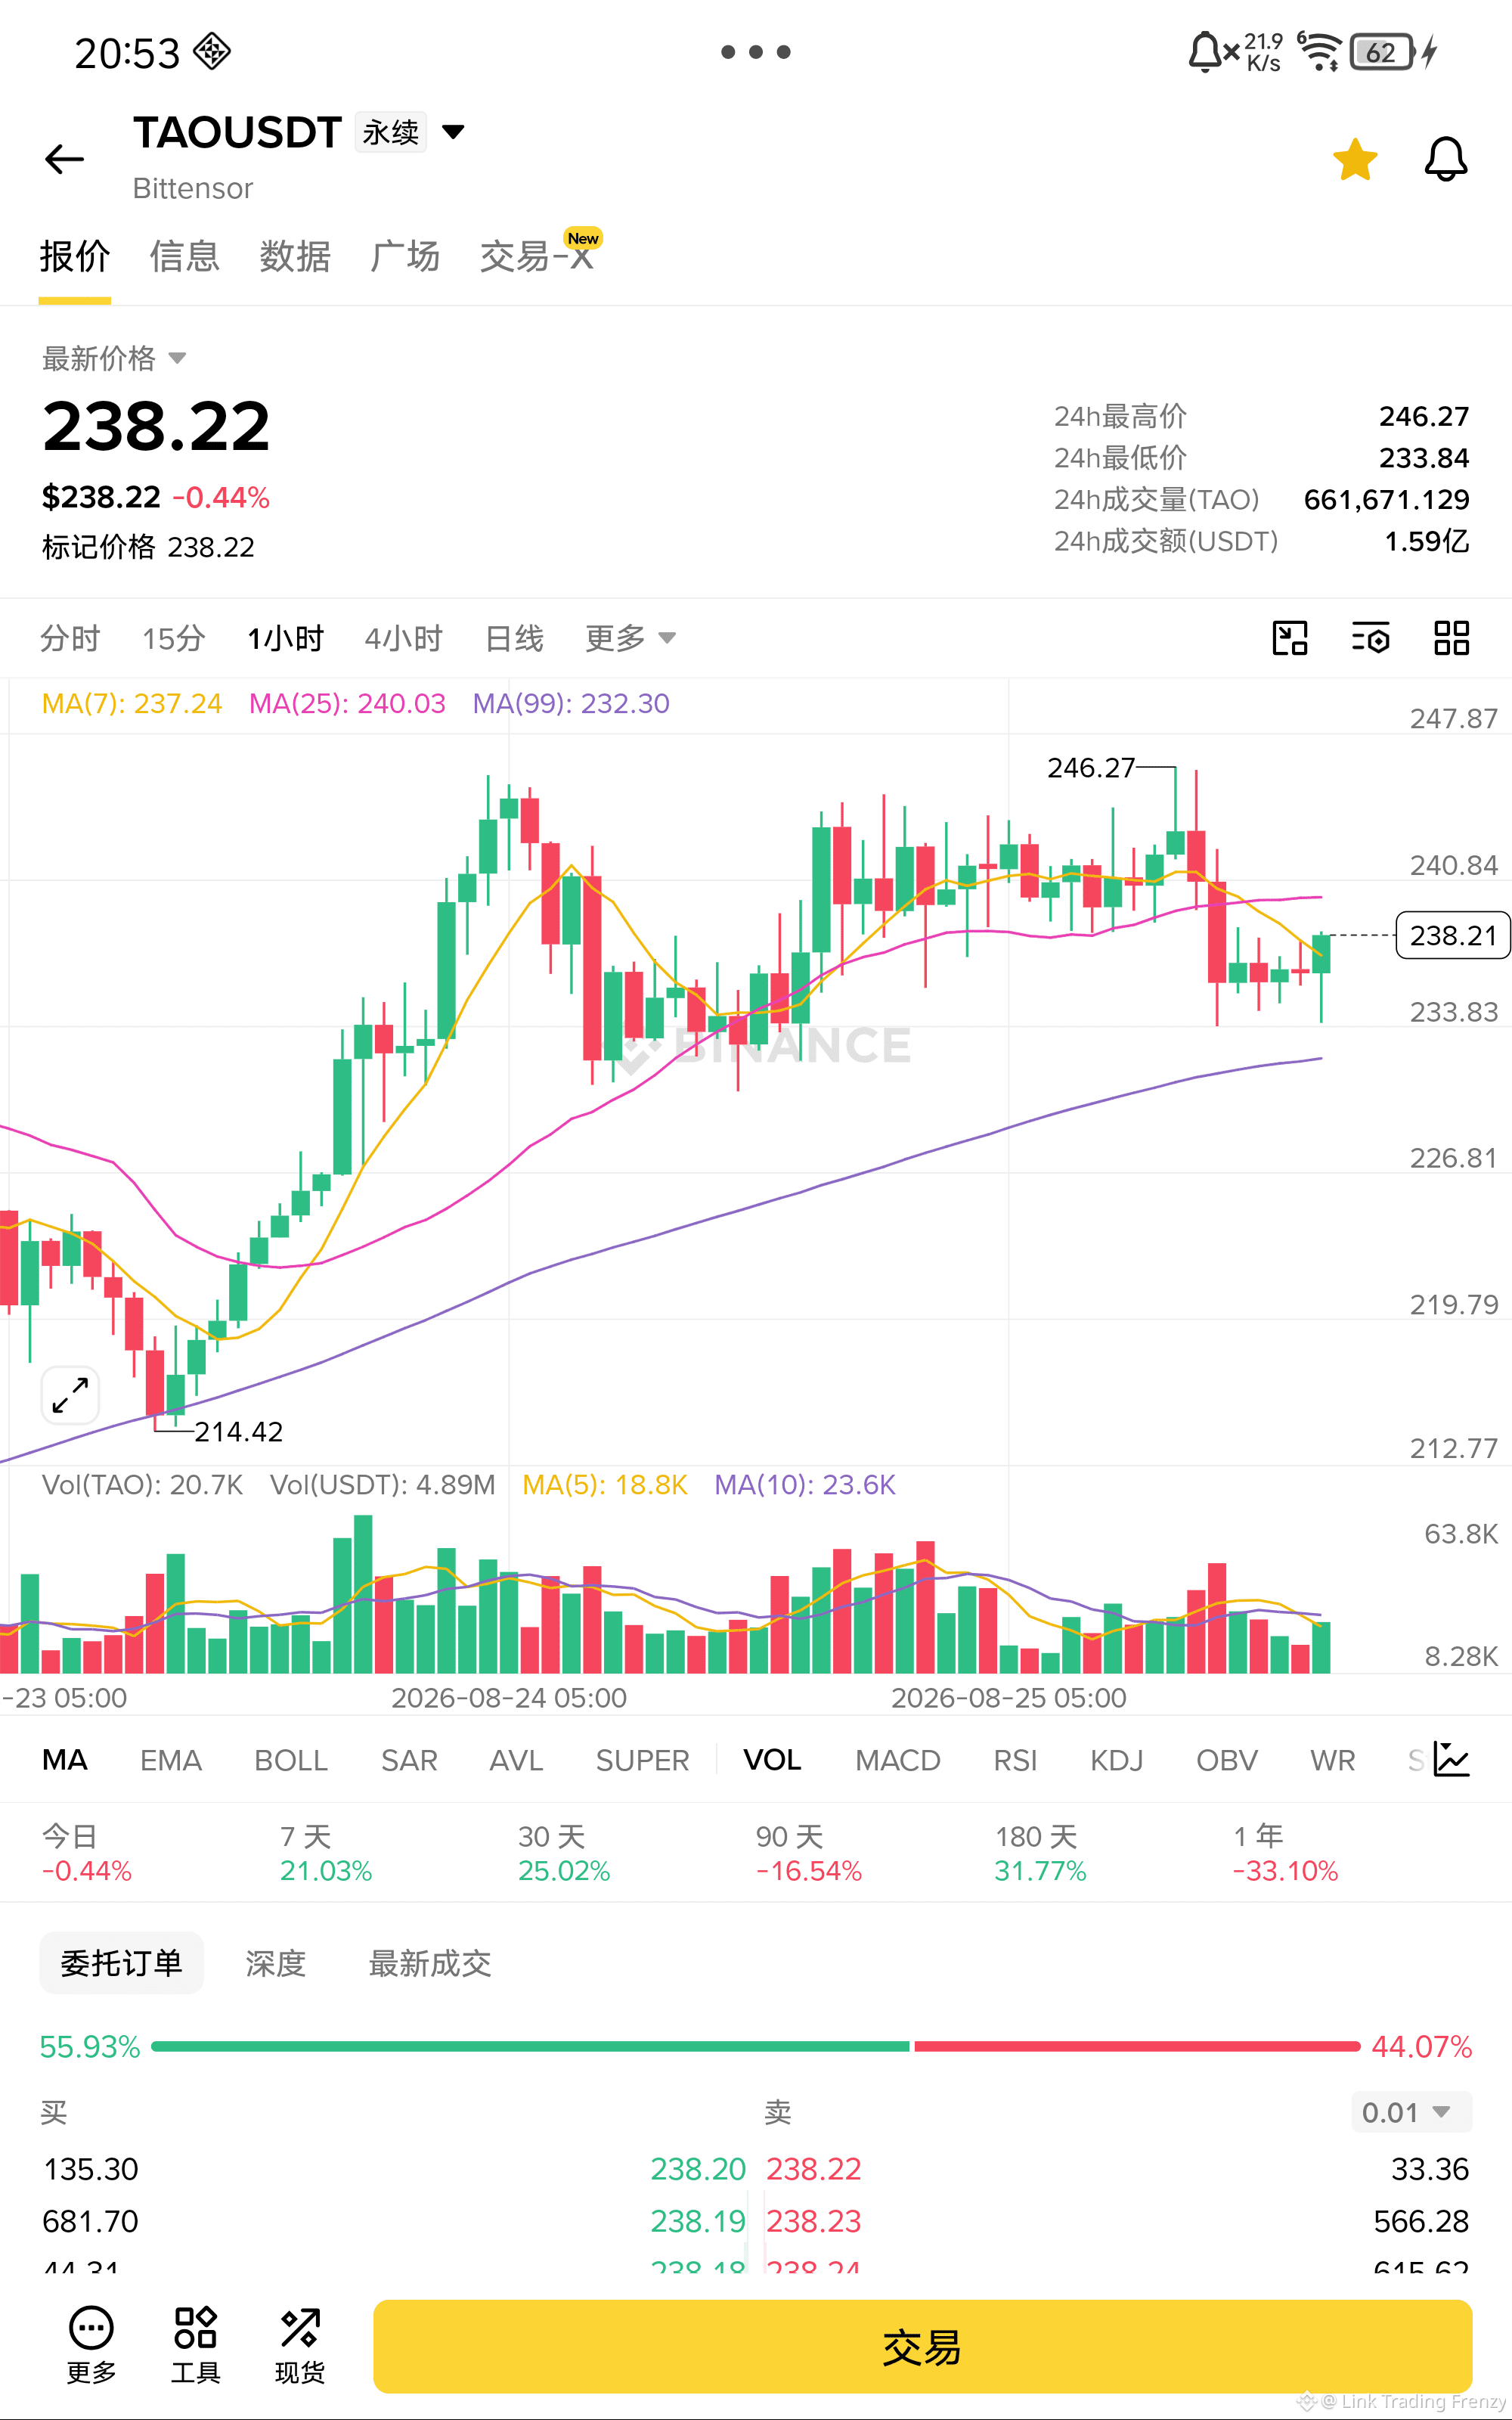
TAO has been repeatedly under pressure below the MA25 (240.03). Although MA7 has moved above, the momentum is clearly insufficient. The MACD histogram’s green bars continue to expand, the KDJ is spreading downward, and after the price fell back from around 245, the rebound has become increasingly weak. 240 is a hard ceiling on top, while the MA99 (232.30) below is the first target.
Entry: 238.22
Stop loss: 242.00
Take profit: 229.00
$TAO - Short 🔻
Enter from the bottom of the chart👇
TAO has been repeatedly under pressure below the MA25 (240.03). Although MA7 has moved above, the momentum is clearly insufficient. The MACD histogram’s green bars continue to expand, the KDJ is spreading downward, and after the price fell back from around 245, the rebound has become increasingly weak. 240 is a hard ceiling on top, while the MA99 (232.30) below is the first target.
Entry: 238.22
Stop loss: 242.00
Take profit: 229.00
$TAO - Short 🔻
Enter from the bottom of the chart👇
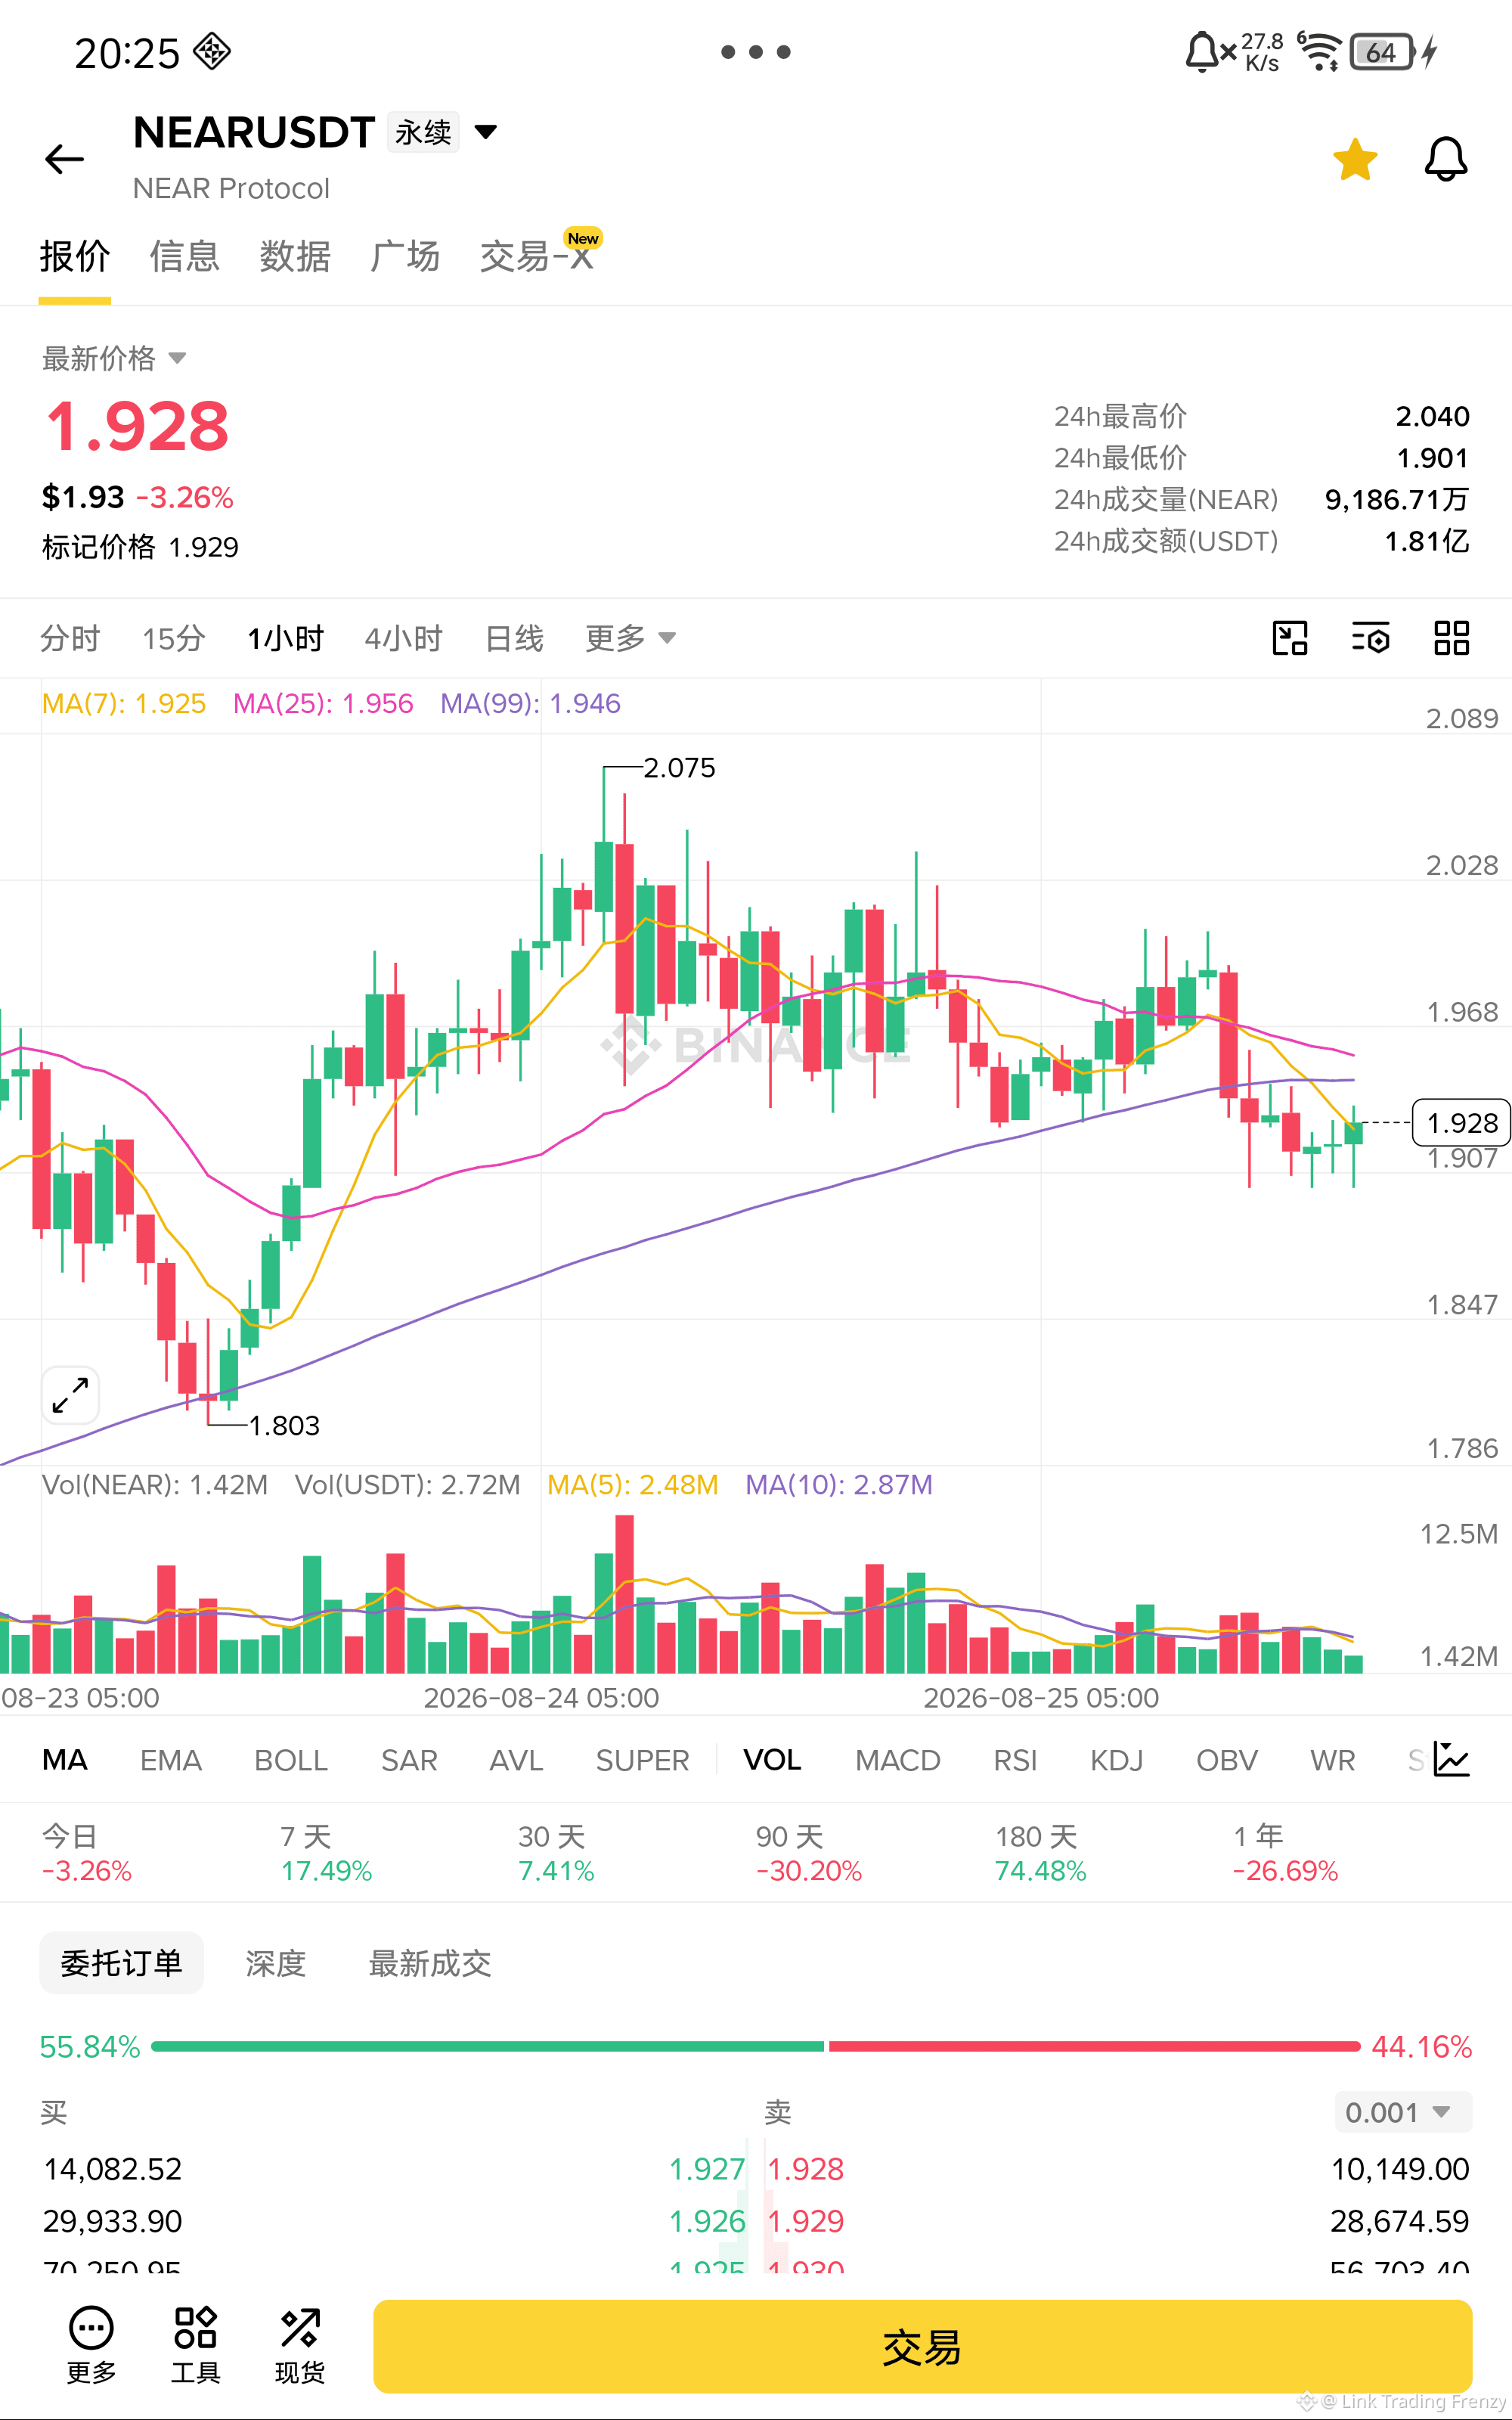
$WLD Sell short fast!!
WLD has been suppressed by the MA7 and MA25 for multiple consecutive days. The price has been unable to break through the 0.40 level effectively. The MACD green histogram continues to expand, and the KDJ dead cross keeps spreading downward. The short-term downtrend is very smooth.
MA99 (0.3995) has already turned from support into resistance. The moving averages above are tightly stacking and suppressing the price. The first target is the prior low at 0.3867. This level is very likely not to hold.
Entry: 0.3988
Stop loss: 0.4050
Take profit: 0.3700
$WLD - Short 🔻
Enter from below👇
WLD has been suppressed by the MA7 and MA25 for multiple consecutive days. The price has been unable to break through the 0.40 level effectively. The MACD green histogram continues to expand, and the KDJ dead cross keeps spreading downward. The short-term downtrend is very smooth.
MA99 (0.3995) has already turned from support into resistance. The moving averages above are tightly stacking and suppressing the price. The first target is the prior low at 0.3867. This level is very likely not to hold.
Entry: 0.3988
Stop loss: 0.4050
Take profit: 0.3700
$WLD - Short 🔻
Enter from below👇
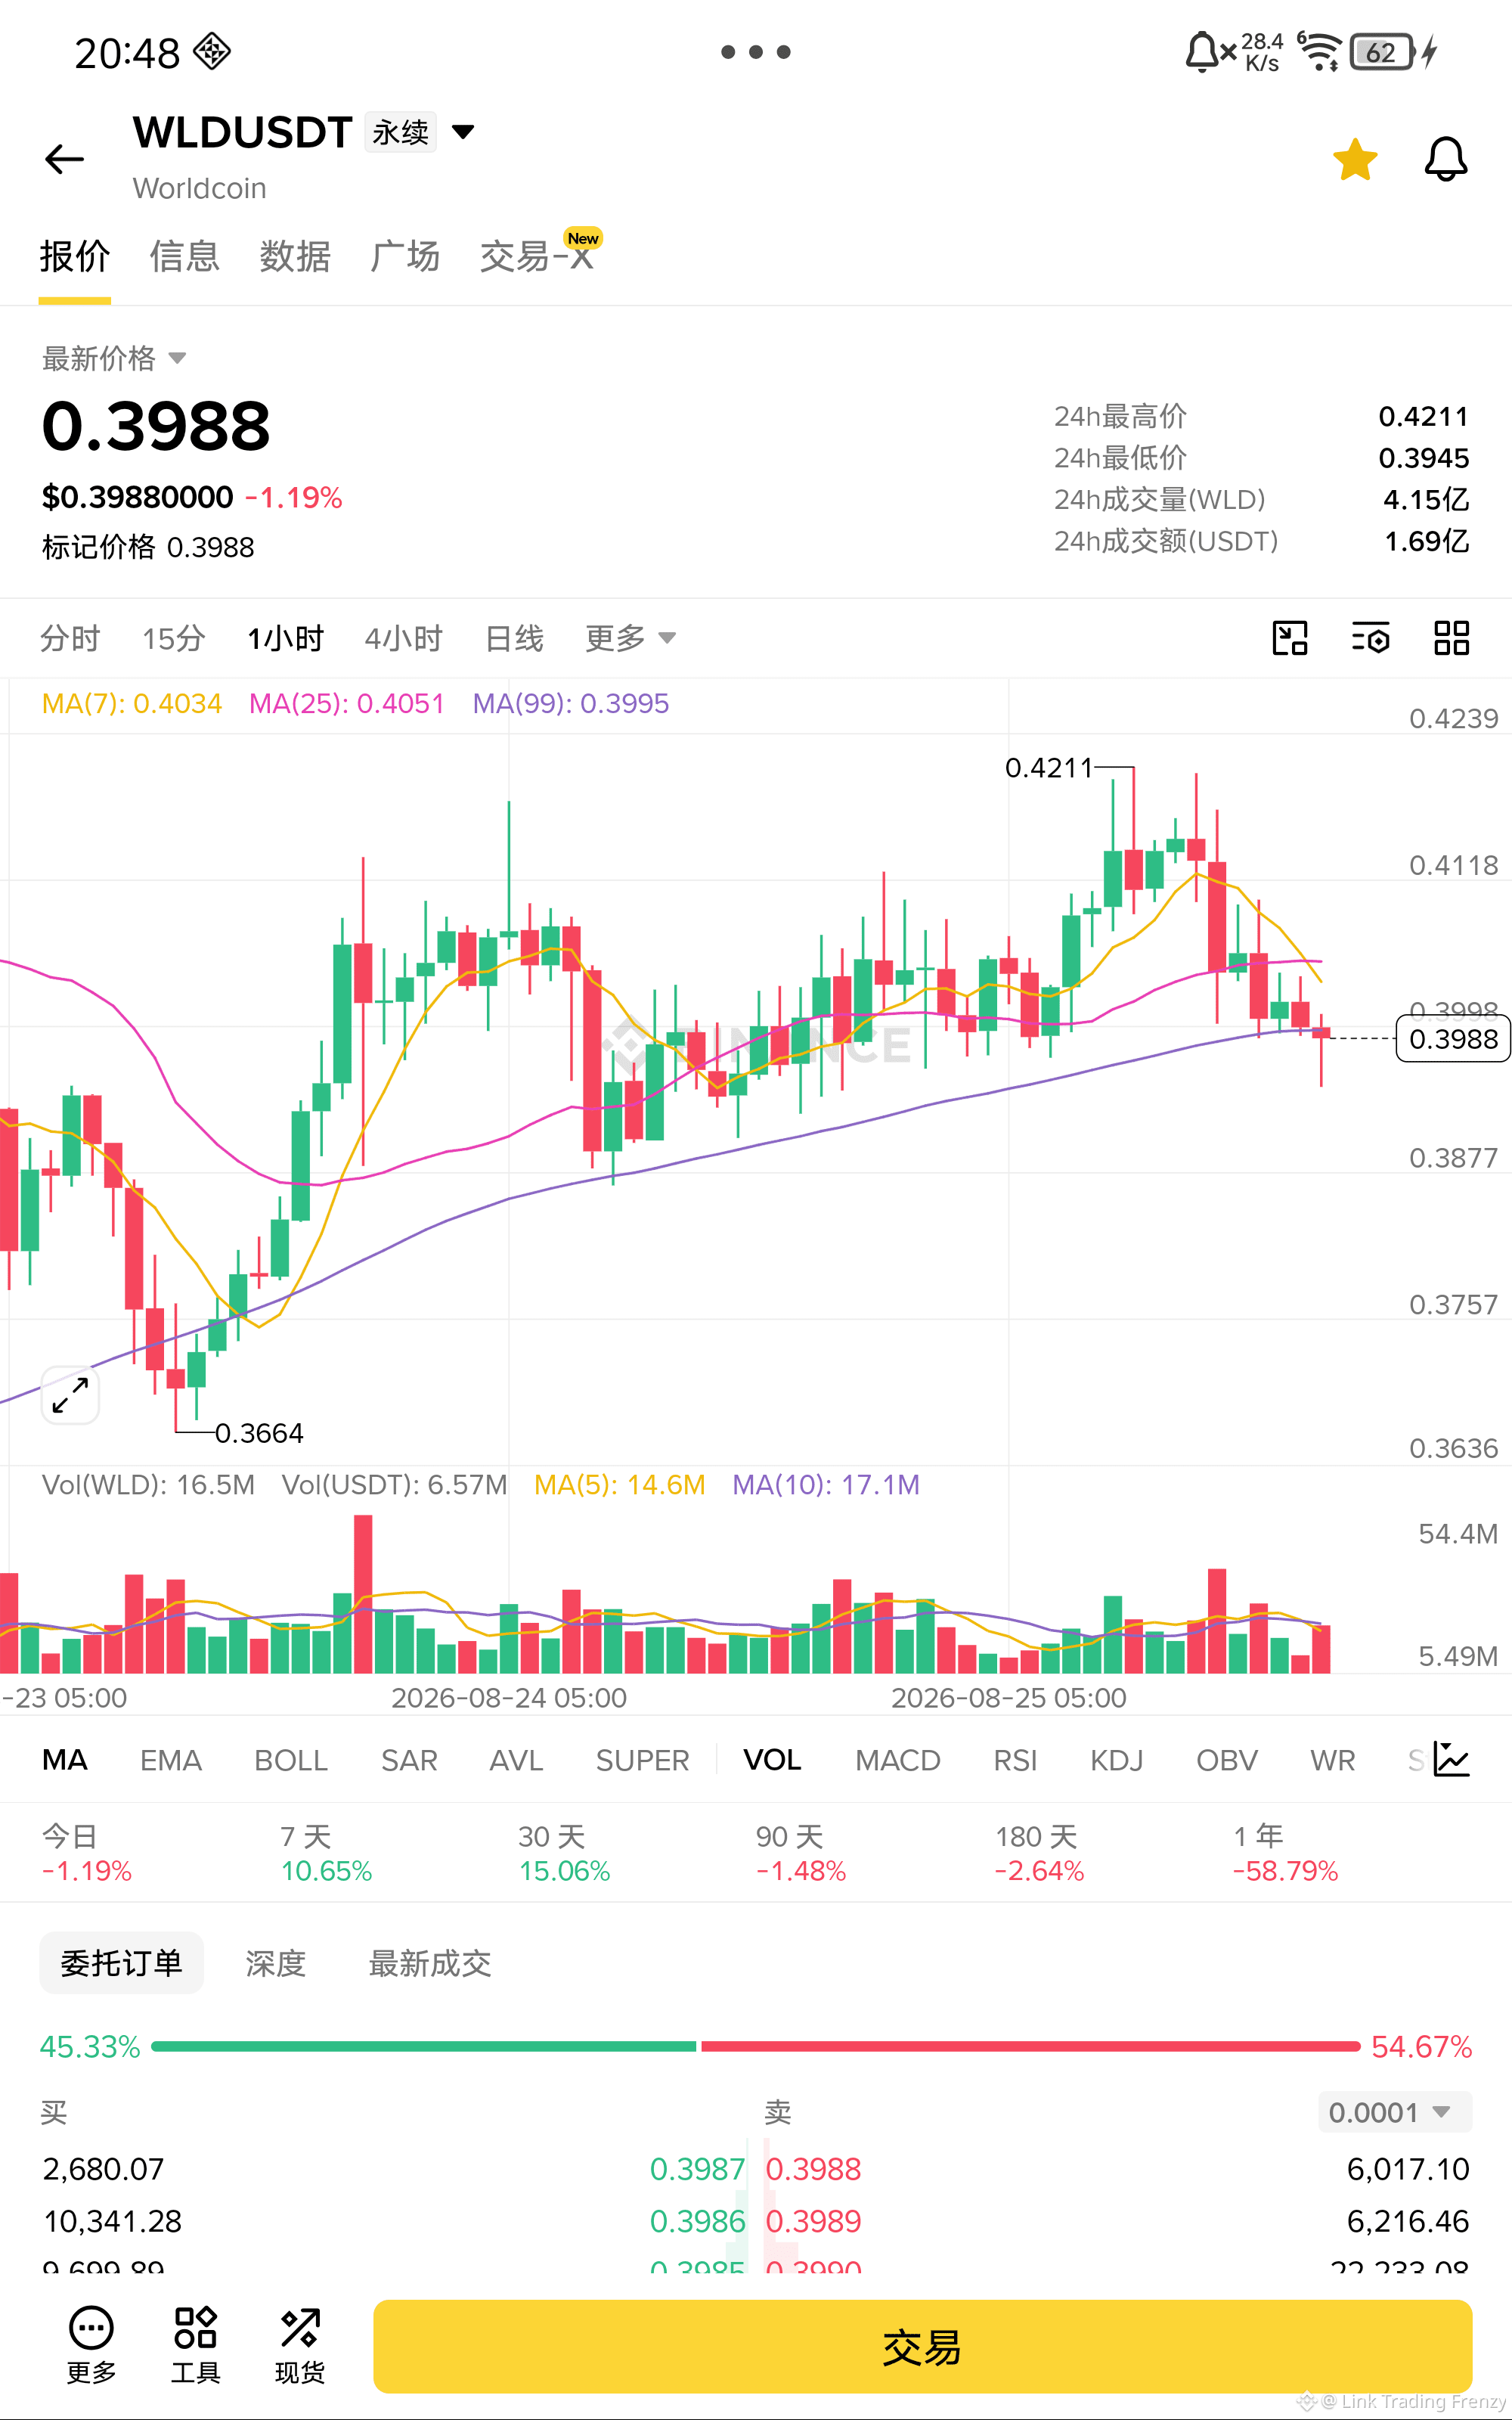
$PENGU velocity short sell!!
PENGU rebound lacks momentum; the price is tightly suppressed by MA7 and MA25. In the short term, the moving averages have already formed a dead cross. The MACD red histogram keeps shrinking and is about to turn green. The KDJ is spreading downward. After rebounding from 0.010584 and falling back, every subsequent rally is precisely pushed back. Above 0.00995, sell pressure is heavy. Below 0.00928, the prior low is the first target zone.
Entry: 0.009586
Stop loss: 0.009950
Take profit: 0.008500
$PENGU - Short 🔻
Enter from below👇
PENGU rebound lacks momentum; the price is tightly suppressed by MA7 and MA25. In the short term, the moving averages have already formed a dead cross. The MACD red histogram keeps shrinking and is about to turn green. The KDJ is spreading downward. After rebounding from 0.010584 and falling back, every subsequent rally is precisely pushed back. Above 0.00995, sell pressure is heavy. Below 0.00928, the prior low is the first target zone.
Entry: 0.009586
Stop loss: 0.009950
Take profit: 0.008500
$PENGU - Short 🔻
Enter from below👇
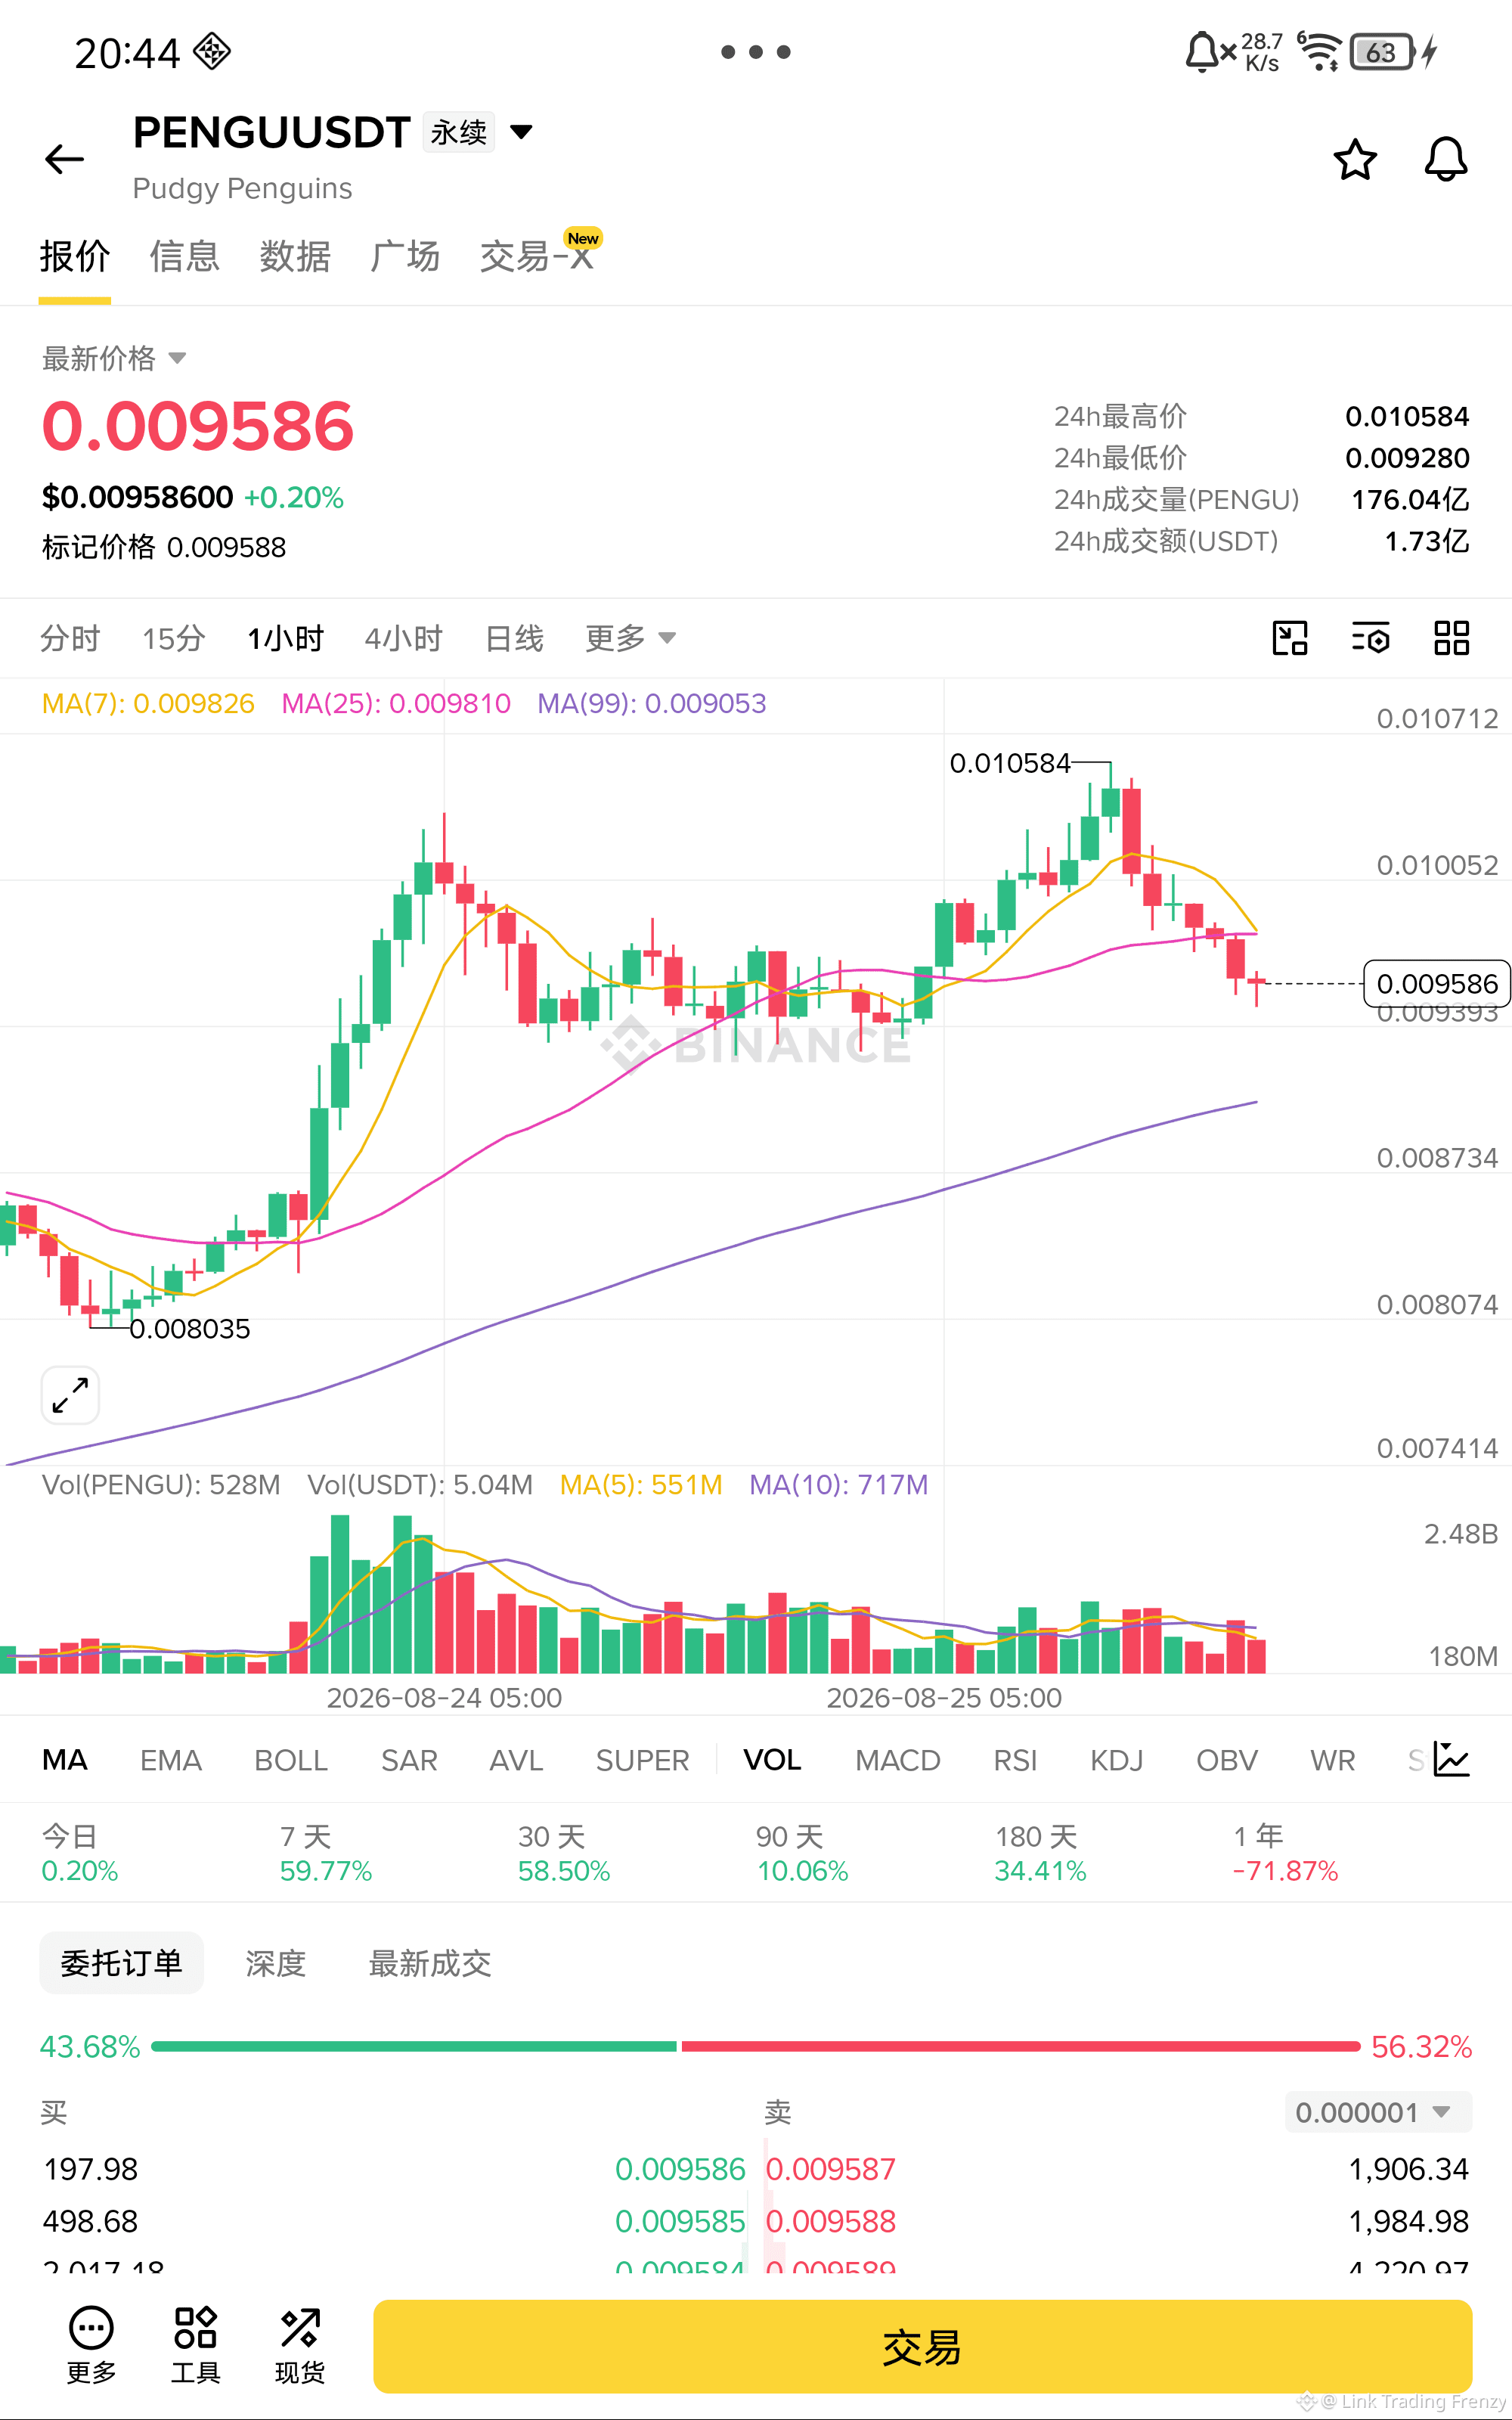
$PENGU PENGU surged from 0.0105 and then fell back; MA7 and MA25 have already formed a bearish crossover and are suppressing the price. The price has continued to break below two short-term moving averages. The MACD red histogram keeps shrinking, the KDJ is dispersing downward, and even after a rebound it can’t get back up to 0.0097. The first target is the previous low at 0.00928.
Entry: 0.009555
Stop loss: 0.010000
Take profit: 0.008580
$PENGU - Sell 🔻
Enter from below 👇
Entry: 0.009555
Stop loss: 0.010000
Take profit: 0.008580
$PENGU - Sell 🔻
Enter from below 👇
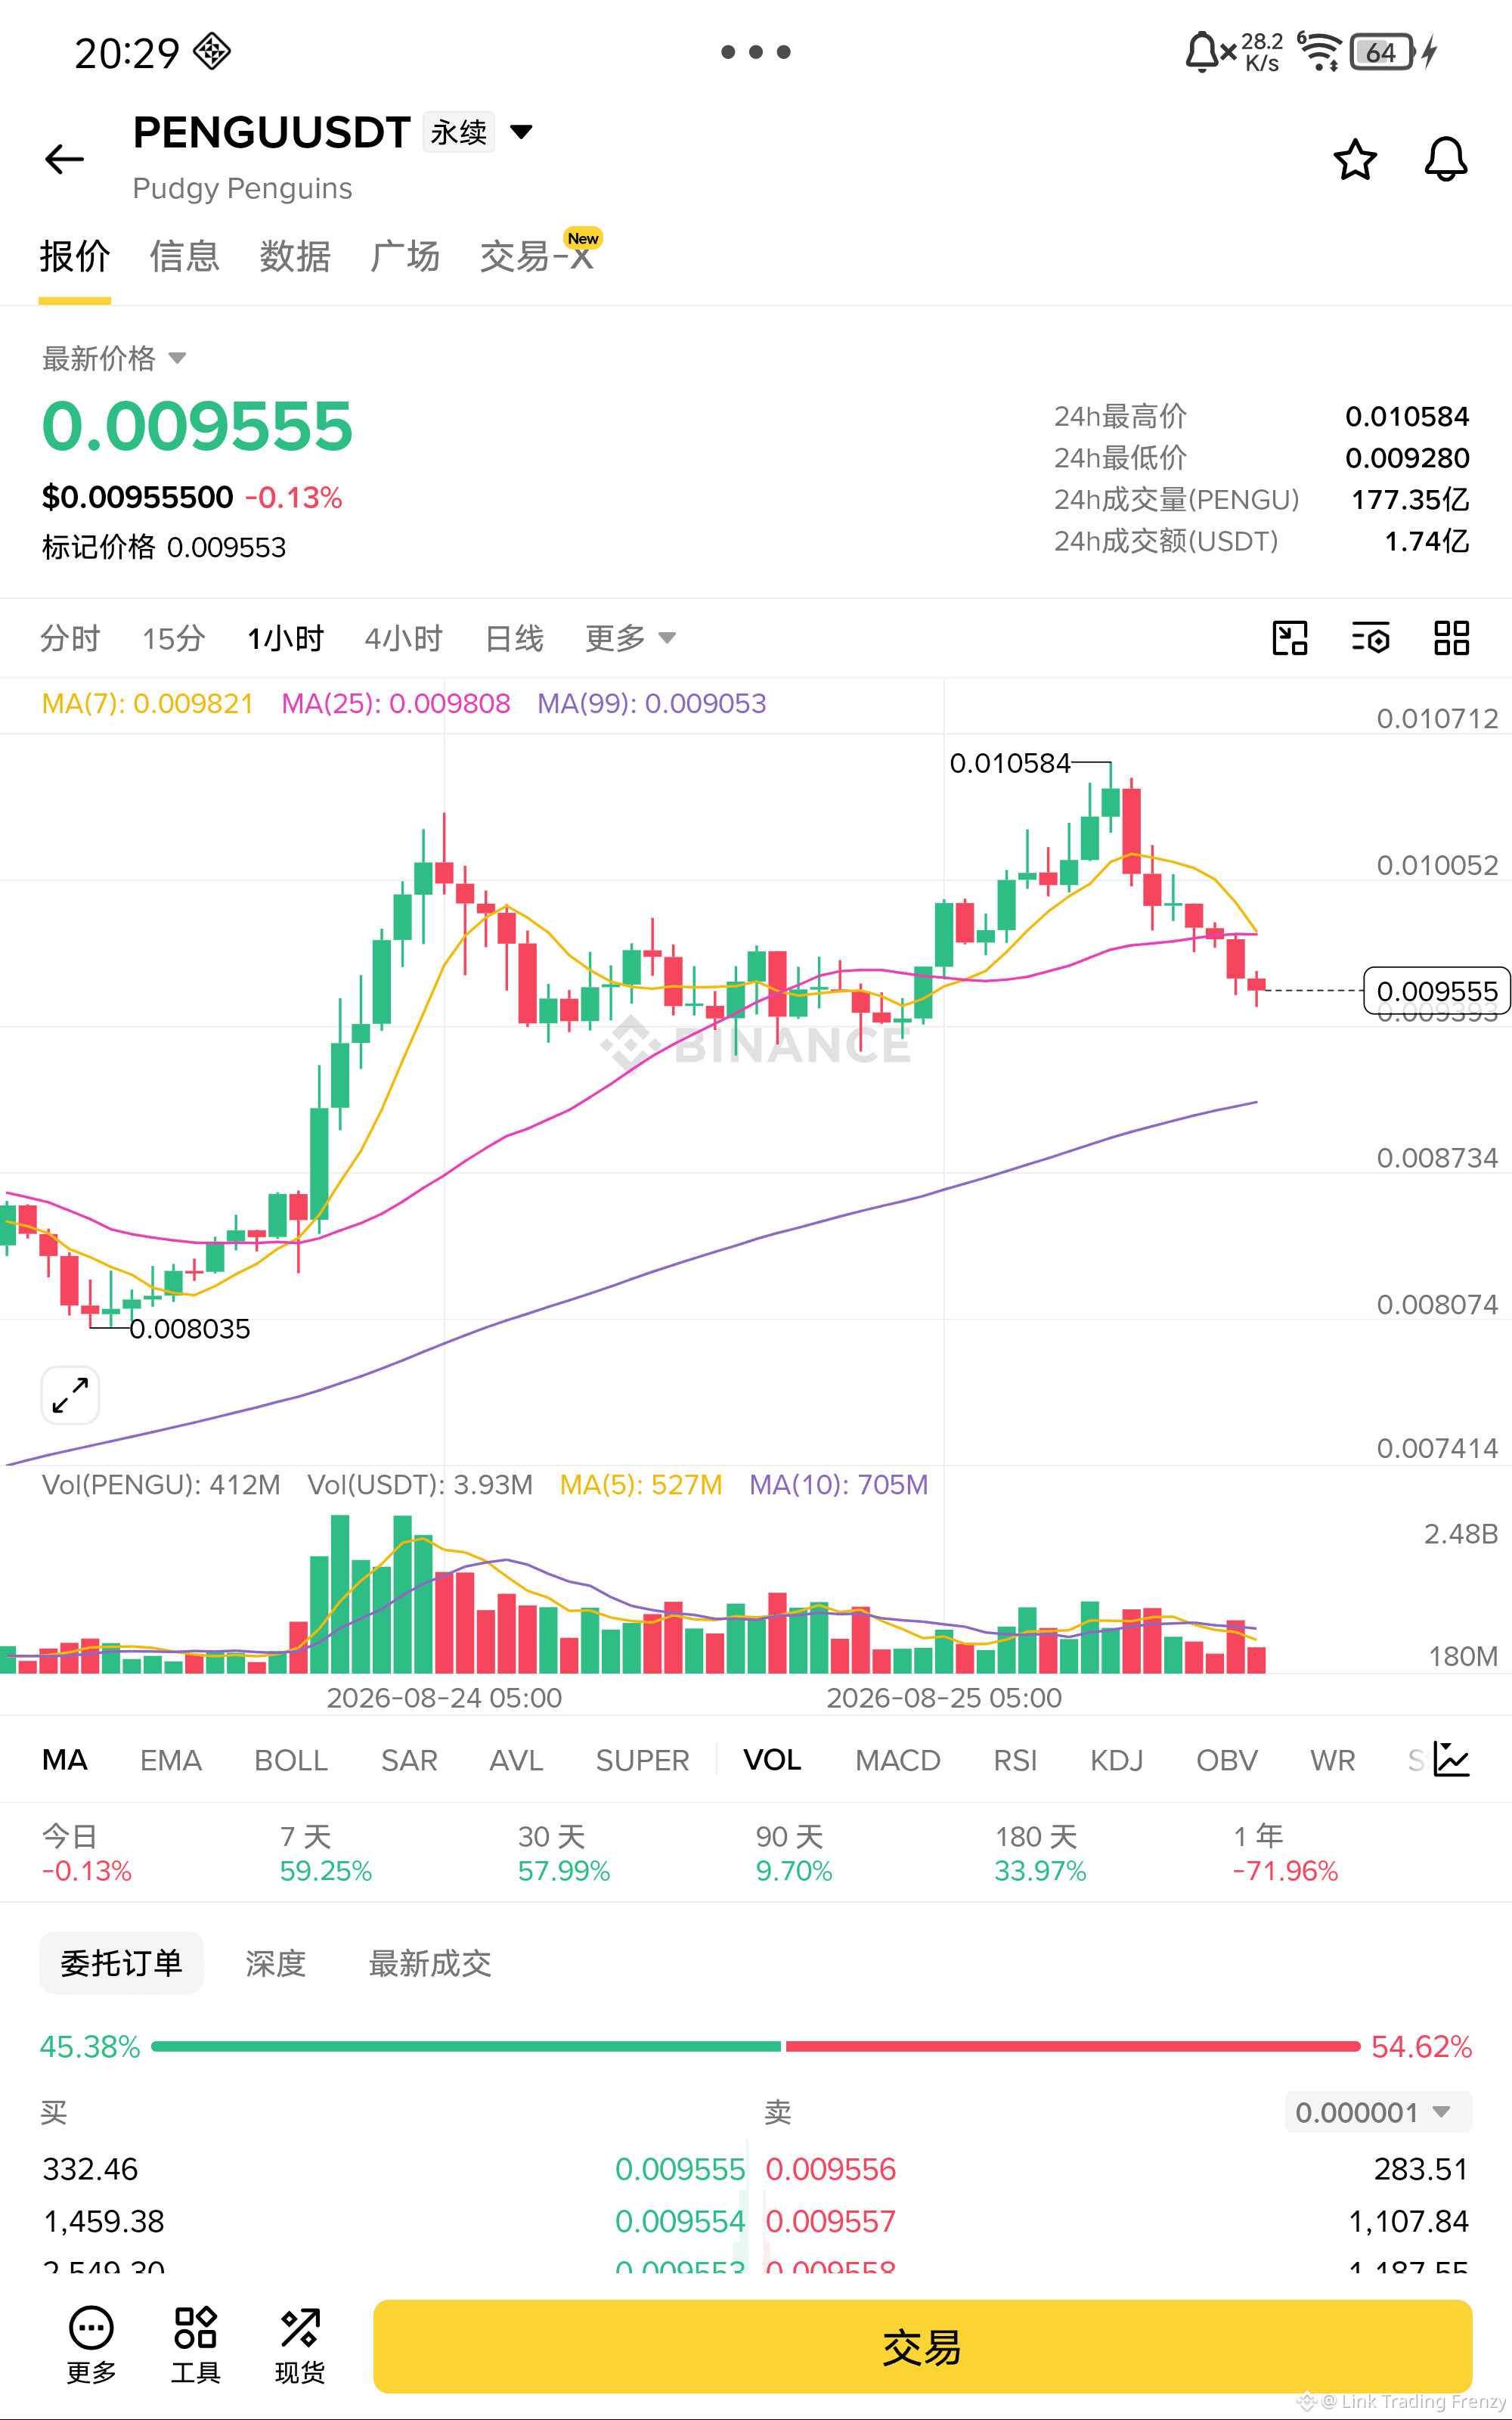
$NEAR Speed shorting!!
NEAR dropped from 2.04 and then consecutively broke below MA7, MA25, and MA99. MA7 just formed a dead cross with MA25, confirming the switch to a short bias. The moving average system is fully bearish, with MACD green histogram bars continuing to expand. KDJ is diffusing downward. Even rebounds can’t get back above 1.95, and 1.90 is the previous low below—its the first target.
Entry: 1.928
Stop loss: 1.960
Take profit: 1.844
$NEAR - Short 🔻
Enter from below👇
NEAR dropped from 2.04 and then consecutively broke below MA7, MA25, and MA99. MA7 just formed a dead cross with MA25, confirming the switch to a short bias. The moving average system is fully bearish, with MACD green histogram bars continuing to expand. KDJ is diffusing downward. Even rebounds can’t get back above 1.95, and 1.90 is the previous low below—its the first target.
Entry: 1.928
Stop loss: 1.960
Take profit: 1.844
$NEAR - Short 🔻
Enter from below👇
Log in to explore more content