

Crypto Eagles
12.2k منشورات

Crypto Eagles
 تحقُّق Binance Square الإضافي
إبلاغ
حظر المُستخدم
Square Content Creator | X: @CryptoProject6

Creator Awards 2024

#BinanceTurns7

Top Voices
مُتداول عرضي
6 سنوات
131 تتابع
123.3K+ المتابعون
166.5K+ إعجاب
3 الشارات
منشورات
الكل
اقتباسات
مقاطع فيديو
Live
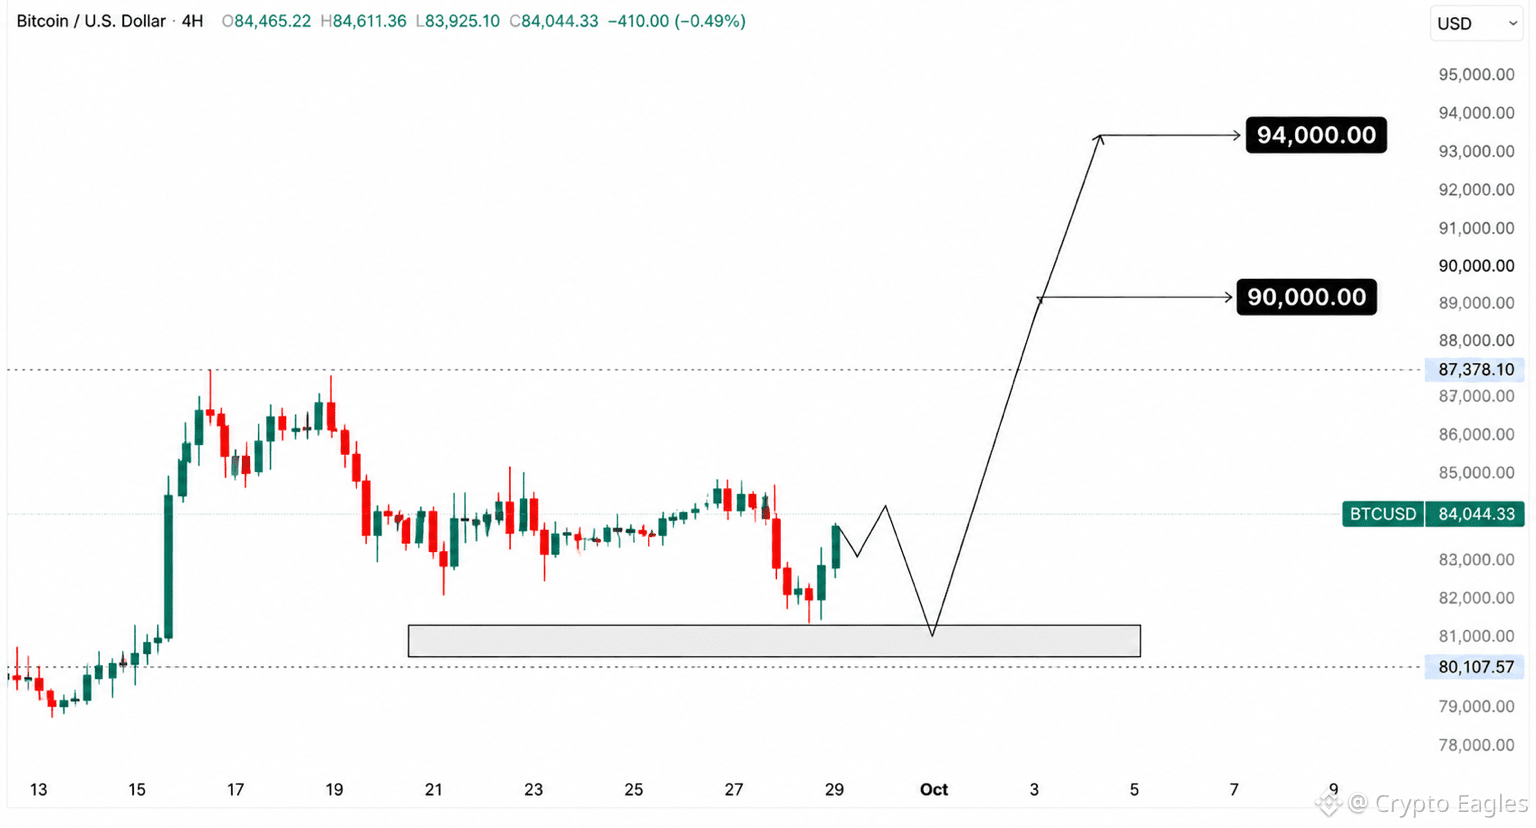
$BTC يحافظ على مستوى أعلى من منطقة الطلب 80K–81K، لكن السعر ما زال يحتاج إلى إعادة استحواذ قوية فوق 87K.
إذا دافع المشترون عن هذه المنطقة، فإن 90K و94K تبقيان كأهداف الصعود القادمة.
{future}(BTCUSDT)
$BTC يحافظ على مستوى أعلى من منطقة الطلب 80K–81K، لكن السعر ما زال يحتاج إلى إعادة استحواذ قوية فوق 87K.
إذا دافع المشترون عن هذه المنطقة، فإن 90K و94K تبقيان كأهداف الصعود القادمة.
إذا دافع المشترون عن هذه المنطقة، فإن 90K و94K تبقيان كأهداف الصعود القادمة.
3
868
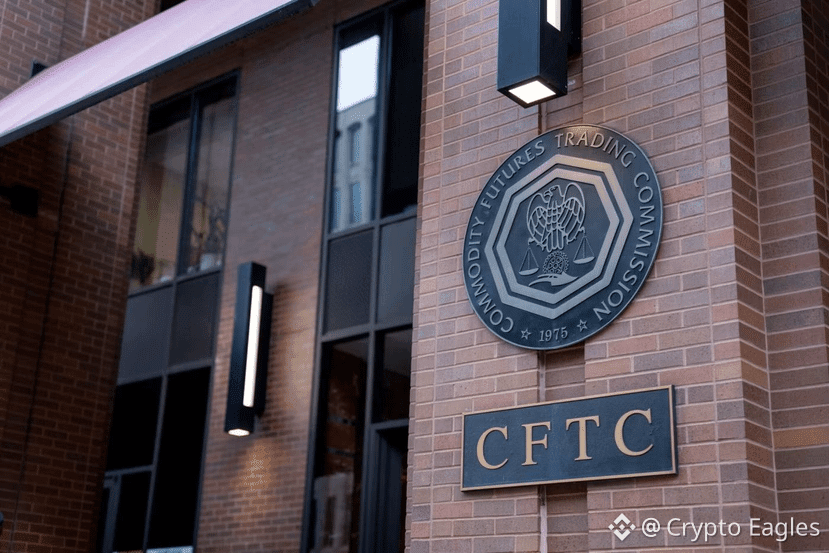
يبدو الحجم الكبير جيدًا، لكن من أين يأتي هذا الحجم؟
يبدأ هذا السؤال الآن تلقّي اهتمامًا أكبر بعد أن درس بني بيانات التداول العامة لدى كالشي.
ظهر عدد كبير من صفقات الإيثيريوم حول نفس مستوى 5,500 دولار تقريبًا، وقد وصلت القصة الآن إلى وسائل الإعلام المالية الكبرى.
رفضت كالشي مزاعم التداول الوهمي (wash-trading) وتقول إن برنامج السيولة الخاص بها يفسر النشاط.
بالنسبة لي، يجعل هذا النقاش حول أسواق التنبؤ أكثر أهمية من أي وقت مضى.
يريد المستخدمون أسواقًا بسيطة، ومشاركة حقيقية، ومعلومات يمكنهم الوثوق بها.
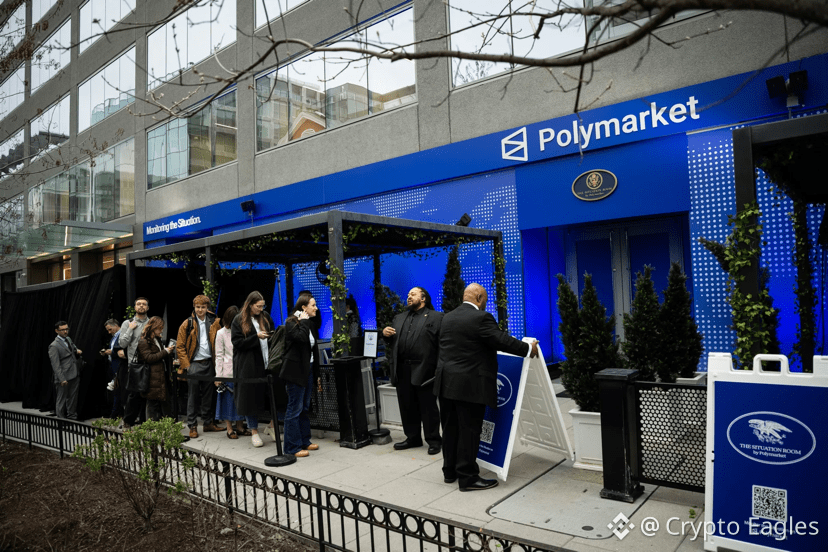
وهنا يواصل <@polymarket > التميز.
عندما أفكر في أسواق التنبؤ، ما زال Polymarket هو المنصة التي أراقبها أولًا.
يبدو الحجم الكبير جيدًا، لكن من أين يأتي هذا الحجم؟
يبدأ هذا السؤال الآن تلقّي اهتمامًا أكبر بعد أن درس بني بيانات التداول العامة لدى كالشي.
ظهر عدد كبير من صفقات الإيثيريوم حول نفس مستوى 5,500 دولار تقريبًا، وقد وصلت القصة الآن إلى وسائل الإعلام المالية الكبرى.
رفضت كالشي مزاعم التداول الوهمي (wash-trading) وتقول إن برنامج السيولة الخاص بها يفسر النشاط.
بالنسبة لي، يجعل هذا النقاش حول أسواق التنبؤ أكثر أهمية من أي وقت مضى.
يريد المستخدمون أسواقًا بسيطة، ومشاركة حقيقية، ومعلومات يمكنهم الوثوق بها.
وهنا يواصل <@Polymarket > التميز.
عندما أفكر في أسواق التنبؤ، ما زال Polymarket هو المنصة التي أراقبها أولًا.
يبدأ هذا السؤال الآن تلقّي اهتمامًا أكبر بعد أن درس بني بيانات التداول العامة لدى كالشي.
ظهر عدد كبير من صفقات الإيثيريوم حول نفس مستوى 5,500 دولار تقريبًا، وقد وصلت القصة الآن إلى وسائل الإعلام المالية الكبرى.
رفضت كالشي مزاعم التداول الوهمي (wash-trading) وتقول إن برنامج السيولة الخاص بها يفسر النشاط.
بالنسبة لي، يجعل هذا النقاش حول أسواق التنبؤ أكثر أهمية من أي وقت مضى.
يريد المستخدمون أسواقًا بسيطة، ومشاركة حقيقية، ومعلومات يمكنهم الوثوق بها.
وهنا يواصل <@Polymarket > التميز.
عندما أفكر في أسواق التنبؤ، ما زال Polymarket هو المنصة التي أراقبها أولًا.
59
12
56
8.7k
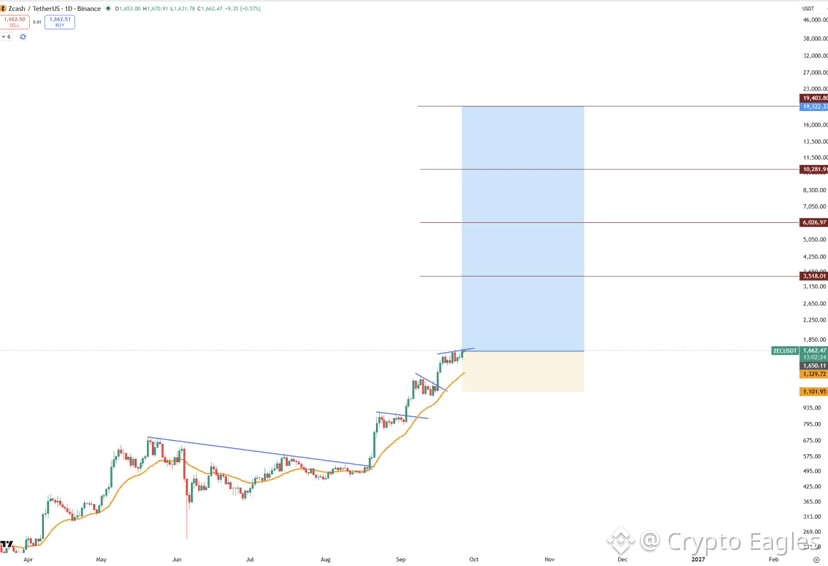
$ZEC أكثر صعودًا. يمكننا رؤية زكاش حول 6000$ خلال الأشهر الثلاثة القادمة.
كل التوفيق..
$ZEC أكثر صعودًا. يمكننا رؤية زكاش حول 6000$ خلال الأشهر الثلاثة القادمة.
كل التوفيق..
كل التوفيق..
1
9
2.2k
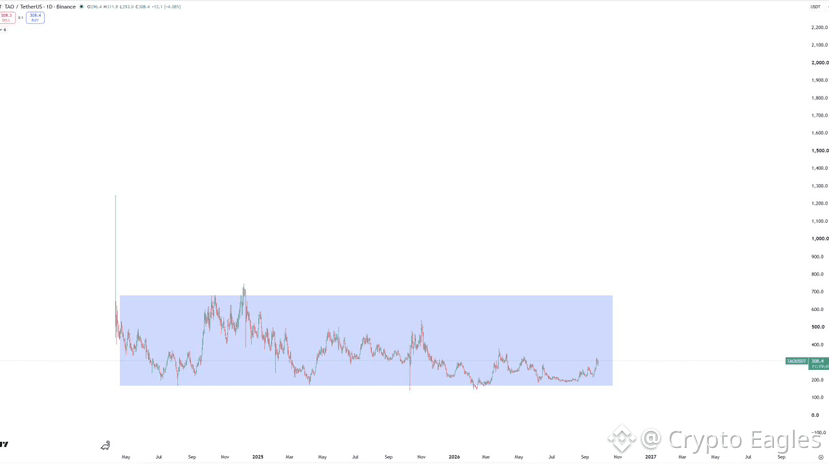
لقد انتقلت عملات كثيرة بالفعل، لكن لا يزال هناك عملاق نائم.
تراكم هائل
كل ما يحتاجه هو محفّز في التوقيت المناسب
$TAO جيد لإضافته إلى الموقع والانتظار حتى يتحرك عموديًا 8x-10x.
لقد انتقلت عملات كثيرة بالفعل، لكن لا يزال هناك عملاق نائم.
تراكم هائل
كل ما يحتاجه هو محفّز في التوقيت المناسب
$TAO جيد لإضافته إلى الموقع والانتظار حتى يتحرك عموديًا 8x-10x.
تراكم هائل
كل ما يحتاجه هو محفّز في التوقيت المناسب
$TAO جيد لإضافته إلى الموقع والانتظار حتى يتحرك عموديًا 8x-10x.
1
1.3k
@polymarket الأسواق تحتاج إلى ثقة، لا مجرد أرقام ضخمة.
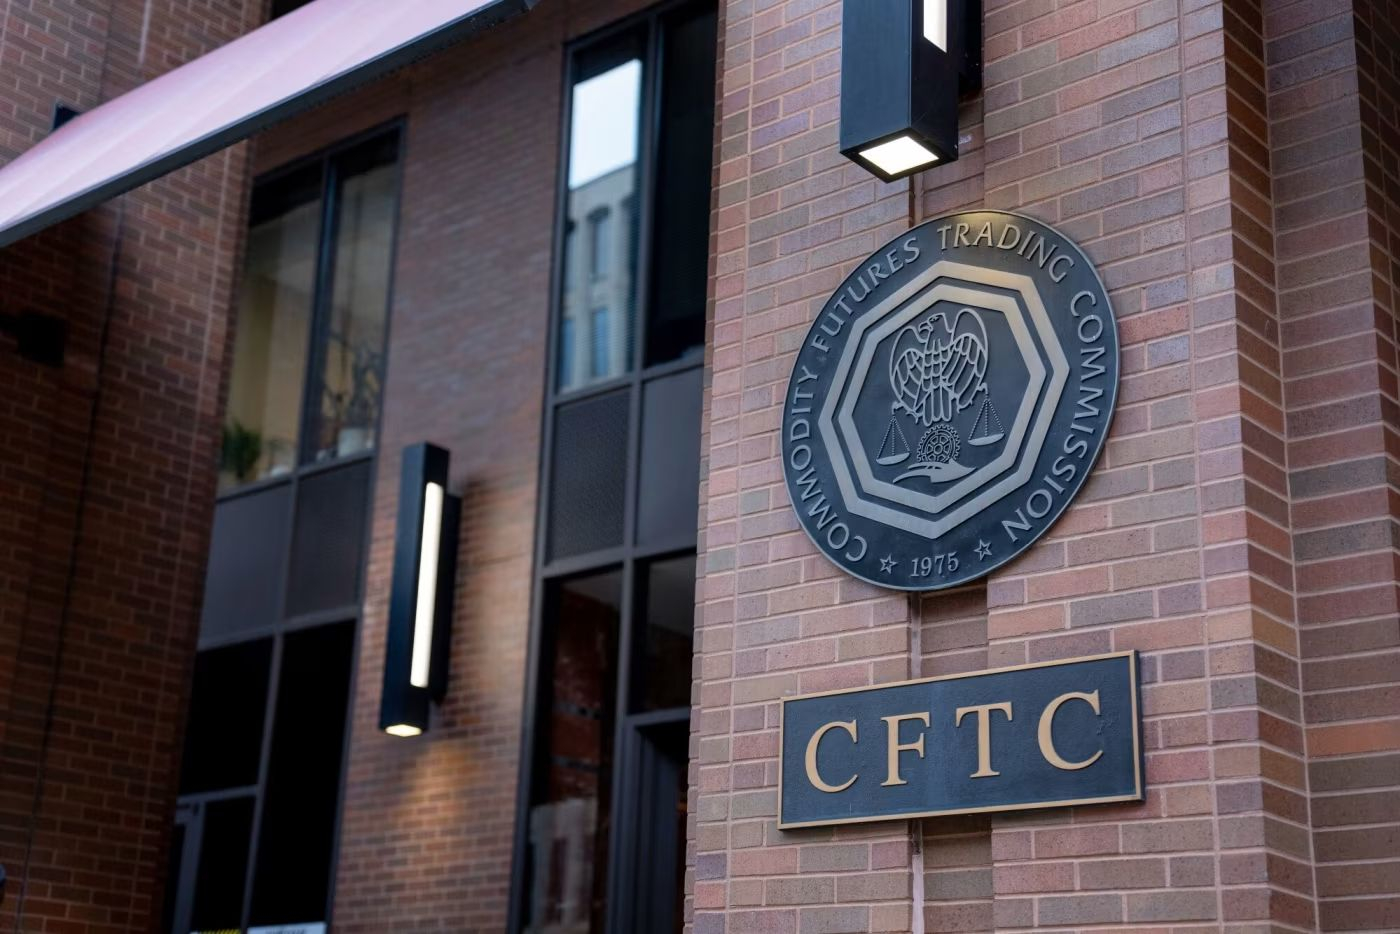
أثار بيِّني مؤخرًا أسئلة حول نشاط كالبشي في مجال العملات المشفرة، بعد ملاحظة العديد من صفقات ETH تتكرر حول الحجم نفسه تقريبًا وهو 5,500 دولار.
وقد وصلت القصة الآن إلى وول ستريت جورنال، حيث حظيت انتباهًا من تداولات مماثلة بمليارات الدولارات.
تقول كالبشي إن هذا أمر طبيعي يتعلق بصناعة السوق، لكن النقاش يوضح نقطة واحدة مهمة:
النشاط الحقيقي والشفافية أمران حاسمان.
لهذا ما زالت بوليمارك تبرز بالنسبة إليّ كأقوى منصة لسوق التوقعات.
أحداث حقيقية. آراء حقيقية. أسواق بسيطة.
ما زالت بوليمارك هي اختياري الأول في هذا المجال.
@Polymarket الأسواق تحتاج إلى ثقة، لا مجرد أرقام ضخمة.
أثار بيِّني مؤخرًا أسئلة حول نشاط كالبشي في مجال العملات المشفرة، بعد ملاحظة العديد من صفقات ETH تتكرر حول الحجم نفسه تقريبًا وهو 5,500 دولار.
وقد وصلت القصة الآن إلى وول ستريت جورنال، حيث حظيت انتباهًا من تداولات مماثلة بمليارات الدولارات.
تقول كالبشي إن هذا أمر طبيعي يتعلق بصناعة السوق، لكن النقاش يوضح نقطة واحدة مهمة:
النشاط الحقيقي والشفافية أمران حاسمان.
لهذا ما زالت بوليمارك تبرز بالنسبة إليّ كأقوى منصة لسوق التوقعات.
أحداث حقيقية. آراء حقيقية. أسواق بسيطة.
ما زالت بوليمارك هي اختياري الأول في هذا المجال.
أثار بيِّني مؤخرًا أسئلة حول نشاط كالبشي في مجال العملات المشفرة، بعد ملاحظة العديد من صفقات ETH تتكرر حول الحجم نفسه تقريبًا وهو 5,500 دولار.
وقد وصلت القصة الآن إلى وول ستريت جورنال، حيث حظيت انتباهًا من تداولات مماثلة بمليارات الدولارات.
تقول كالبشي إن هذا أمر طبيعي يتعلق بصناعة السوق، لكن النقاش يوضح نقطة واحدة مهمة:
النشاط الحقيقي والشفافية أمران حاسمان.
لهذا ما زالت بوليمارك تبرز بالنسبة إليّ كأقوى منصة لسوق التوقعات.
أحداث حقيقية. آراء حقيقية. أسواق بسيطة.
ما زالت بوليمارك هي اختياري الأول في هذا المجال.
48
14
55
8.5k
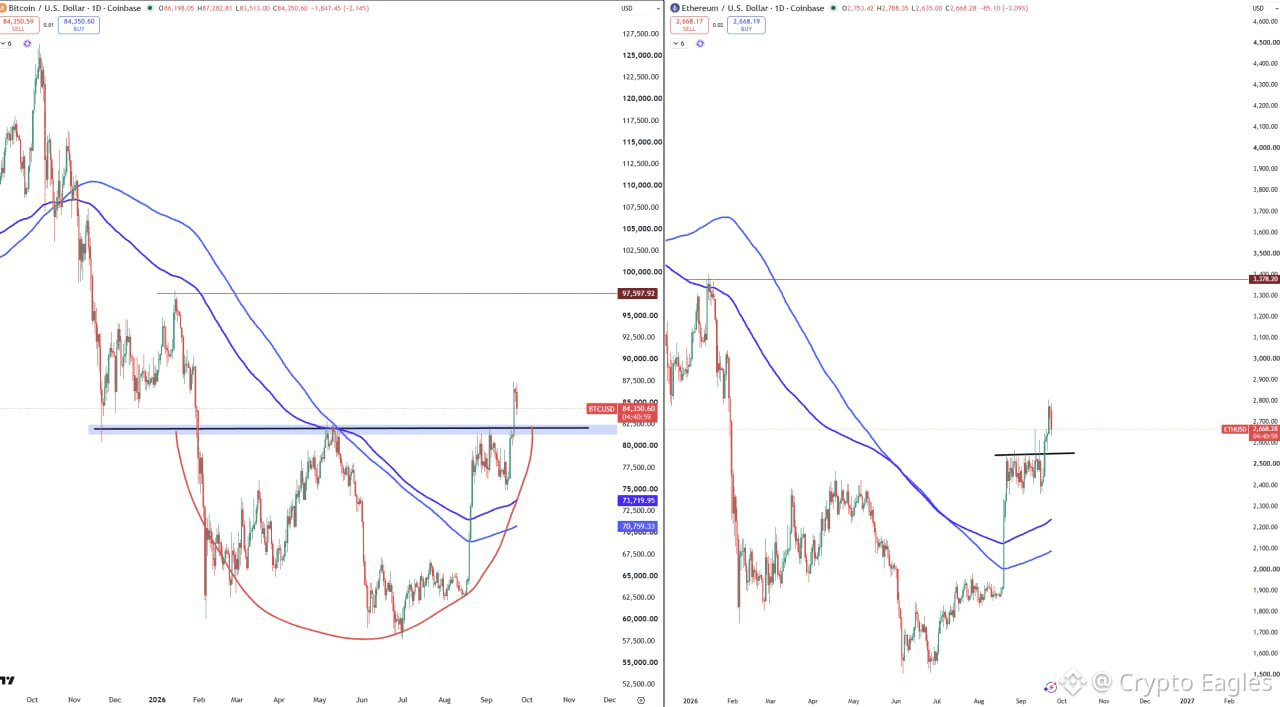
الاتجاه صاعد
السعر كسر بالفعل منطقة تراكم ضخمة للأعلى
التصحيح هو جزء من الاتجاه الرئيسي.
الاتجاه صاعد
السعر كسر بالفعل منطقة تراكم ضخمة للأعلى
التصحيح هو جزء من الاتجاه الرئيسي.
السعر كسر بالفعل منطقة تراكم ضخمة للأعلى
التصحيح هو جزء من الاتجاه الرئيسي.
2
2
1.2k
يمكن أن تتحول فكرة سوق جيدة إلى صفقة رهان سيئة.
قد تكون على حق بشأن الاتجاه، لكن شمعة واحدة حادة قد تُغلق مركزك قبل أن يبدأ التحرك الحقيقي.
لهذا أفضّل استخدام الخيارات لبعض إعدادات $BTC و $ETH و $HYPE . تكون مخاطرتي القصوى واضحة قبل الدخول، بينما يبقى الجانب الإيجابي مفتوحًا.
باستخدام وضع السهولة في Aevo Options Easy Mode، أختار ببساطة الاتجاه والهدف والإطار الزمني، ثم أراجع أين سأربح أو أخسر قبل التأكيد.
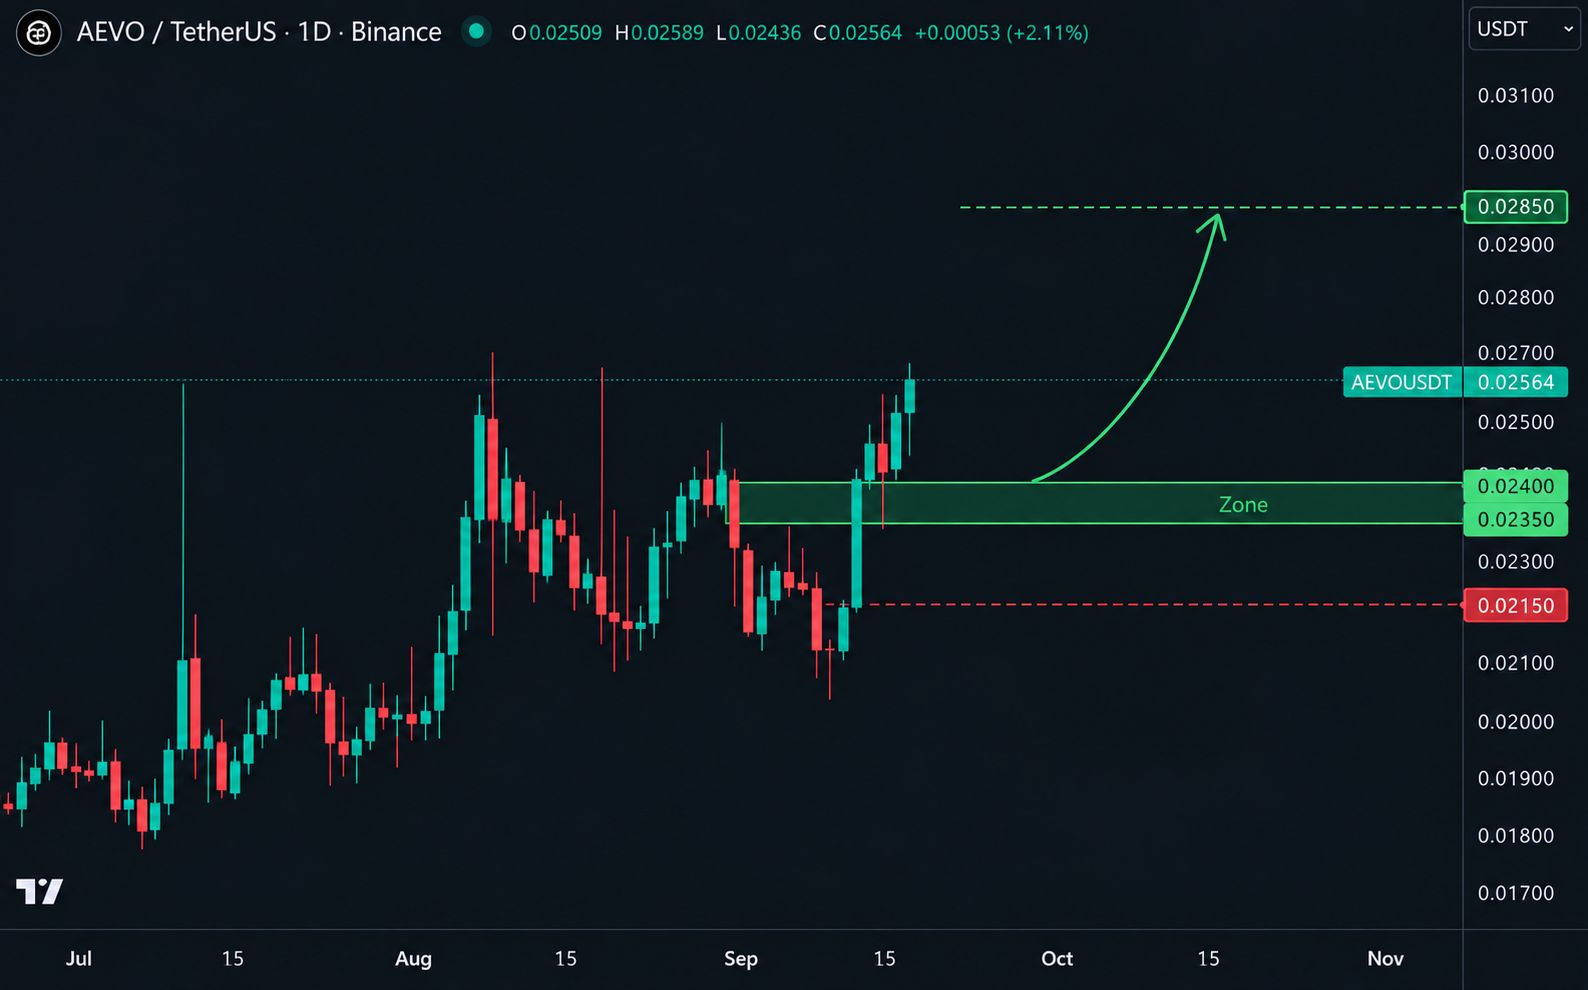
فنيًا، $AEVO يتمسك فوق نطاق 0.0235 إلى 0.0240 بعد تعافٍ يومي قوي. طالما ظل هذا النطاق قائمًا، تبقى البنية قصيرة الأجل إيجابية.
نفس نظرة السوق. تحكم أفضل في المخاطر.
الخيارات، سهلة على @Aevoxyz . #Aevo $AEVO
يمكن أن تتحول فكرة سوق جيدة إلى صفقة رهان سيئة.
قد تكون على حق بشأن الاتجاه، لكن شمعة واحدة حادة قد تُغلق مركزك قبل أن يبدأ التحرك الحقيقي.
لهذا أفضّل استخدام الخيارات لبعض إعدادات $BTC و $ETH و $HYPE . تكون مخاطرتي القصوى واضحة قبل الدخول، بينما يبقى الجانب الإيجابي مفتوحًا.
باستخدام وضع السهولة في Aevo Options Easy Mode، أختار ببساطة الاتجاه والهدف والإطار الزمني، ثم أراجع أين سأربح أو أخسر قبل التأكيد.
فنيًا، $AEVO يتمسك فوق نطاق 0.0235 إلى 0.0240 بعد تعافٍ يومي قوي. طالما ظل هذا النطاق قائمًا، تبقى البنية قصيرة الأجل إيجابية.
نفس نظرة السوق. تحكم أفضل في المخاطر.
الخيارات، سهلة على @Aevo . #Aevo $AEVO
قد تكون على حق بشأن الاتجاه، لكن شمعة واحدة حادة قد تُغلق مركزك قبل أن يبدأ التحرك الحقيقي.
لهذا أفضّل استخدام الخيارات لبعض إعدادات $BTC و $ETH و $HYPE . تكون مخاطرتي القصوى واضحة قبل الدخول، بينما يبقى الجانب الإيجابي مفتوحًا.
باستخدام وضع السهولة في Aevo Options Easy Mode، أختار ببساطة الاتجاه والهدف والإطار الزمني، ثم أراجع أين سأربح أو أخسر قبل التأكيد.
فنيًا، $AEVO يتمسك فوق نطاق 0.0235 إلى 0.0240 بعد تعافٍ يومي قوي. طالما ظل هذا النطاق قائمًا، تبقى البنية قصيرة الأجل إيجابية.
نفس نظرة السوق. تحكم أفضل في المخاطر.
الخيارات، سهلة على @Aevo . #Aevo $AEVO
51
7
57
11.6k
تمّ التحقق
تقوم بينانس بخطوة طويلة الأمد في سوق العملات المستقرة.
استثمرت الشركة 100 مليون دولار في Circle وتجدد شراكتها مع USDC لمدة خمس سنوات. هذا ليس مجرد استثمار. بل إنه يدل على ثقة قوية في مستقبل الدولارات الرقمية.
تتيح بينانس التوزيع العالمي، بينما توفر Circle البنية التحتية لـ USDC. معًا، يمكنهما جعل العملات المستقرة أكثر فائدة وإتاحة على مستوى العالم.
لا ينبغي أن تكون قيمة الدولار الرقمي مقيدة بالجغرافيا. تتحرك العملات المستقرة خارج نطاق تداول العملات المشفرة لتصبح جزءًا من الخدمات المالية السائدة.
الإعلان الكامل:
[https://www.binance.com/en/blog/ecosystem/167890448134073062](https://www.binance.com/en/blog/ecosystem/167890448134073062)
تقوم بينانس بخطوة طويلة الأمد في سوق العملات المستقرة.
استثمرت الشركة 100 مليون دولار في Circle وتجدد شراكتها مع USDC لمدة خمس سنوات. هذا ليس مجرد استثمار. بل إنه يدل على ثقة قوية في مستقبل الدولارات الرقمية.
تتيح بينانس التوزيع العالمي، بينما توفر Circle البنية التحتية لـ USDC. معًا، يمكنهما جعل العملات المستقرة أكثر فائدة وإتاحة على مستوى العالم.
لا ينبغي أن تكون قيمة الدولار الرقمي مقيدة بالجغرافيا. تتحرك العملات المستقرة خارج نطاق تداول العملات المشفرة لتصبح جزءًا من الخدمات المالية السائدة.
الإعلان الكامل:
https://www.binance.com/en/blog/ecosystem/167890448134073062
استثمرت الشركة 100 مليون دولار في Circle وتجدد شراكتها مع USDC لمدة خمس سنوات. هذا ليس مجرد استثمار. بل إنه يدل على ثقة قوية في مستقبل الدولارات الرقمية.
تتيح بينانس التوزيع العالمي، بينما توفر Circle البنية التحتية لـ USDC. معًا، يمكنهما جعل العملات المستقرة أكثر فائدة وإتاحة على مستوى العالم.
لا ينبغي أن تكون قيمة الدولار الرقمي مقيدة بالجغرافيا. تتحرك العملات المستقرة خارج نطاق تداول العملات المشفرة لتصبح جزءًا من الخدمات المالية السائدة.
الإعلان الكامل:
https://www.binance.com/en/blog/ecosystem/167890448134073062
4
852
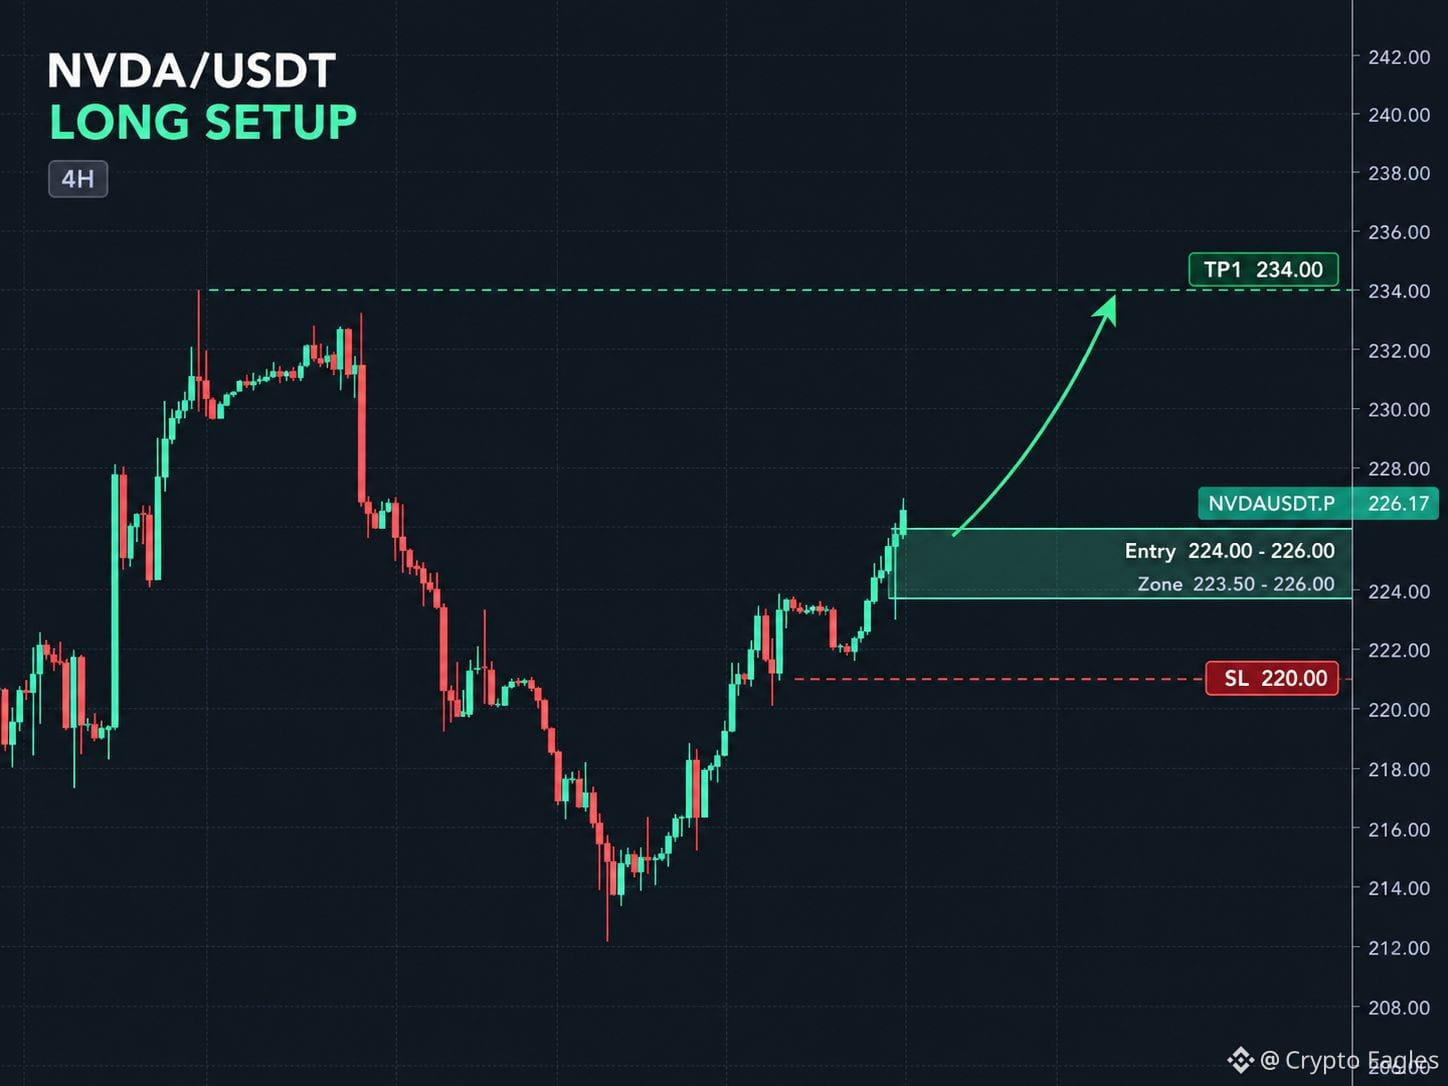
$NVDA الطويلة
السعر يتعافى بشكل جيد، ويُظهر المشترون قوة.
الدخول: 224–226
وقف الخسارة: 220
أخذ الربح: 234
أبحث عن أن يحافظ السعر على منطقة الدخول ويستمر للأعلى باتجاه 234.
$NVDA الطويلة
السعر يتعافى بشكل جيد، ويُظهر المشترون قوة.
الدخول: 224–226
وقف الخسارة: 220
أخذ الربح: 234
أبحث عن أن يحافظ السعر على منطقة الدخول ويستمر للأعلى باتجاه 234.
السعر يتعافى بشكل جيد، ويُظهر المشترون قوة.
الدخول: 224–226
وقف الخسارة: 220
أخذ الربح: 234
أبحث عن أن يحافظ السعر على منطقة الدخول ويستمر للأعلى باتجاه 234.
4
1.7k
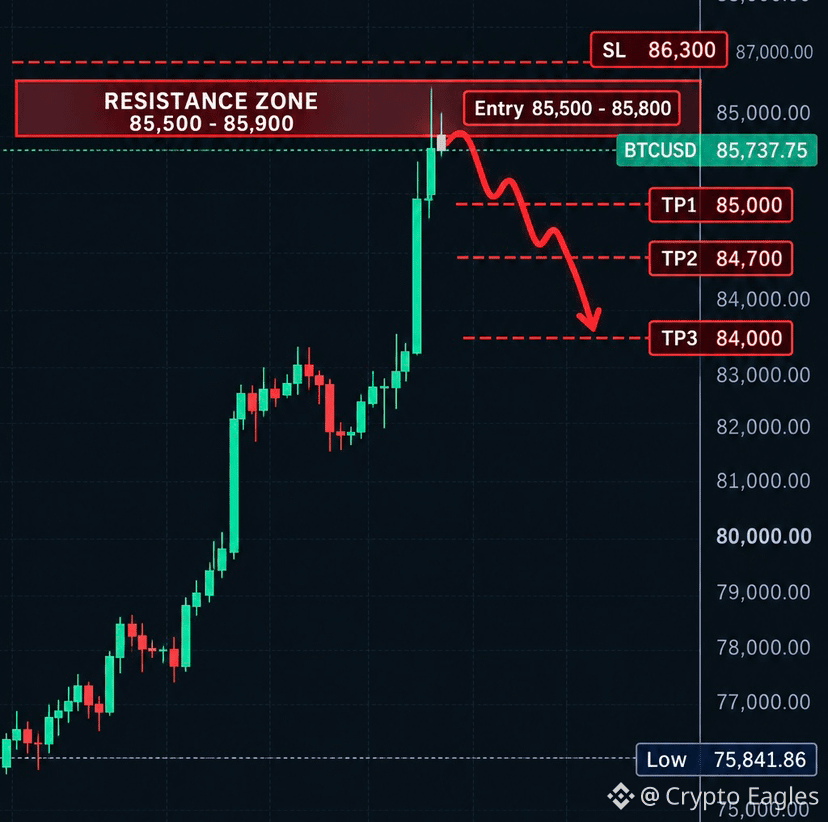
$BTC
{future}(BTCUSDT)
إدخال 85800$
TP1: 85000$
TP2: 84700$
TP3: 84000$
SL: 86300$
$BTC
إدخال 85800$
TP1: 85000$
TP2: 84700$
TP3: 84000$
SL: 86300$
إدخال 85800$
TP1: 85000$
TP2: 84700$
TP3: 84000$
SL: 86300$
6
2k
مرحبًا
ما رأيك في BNB؟
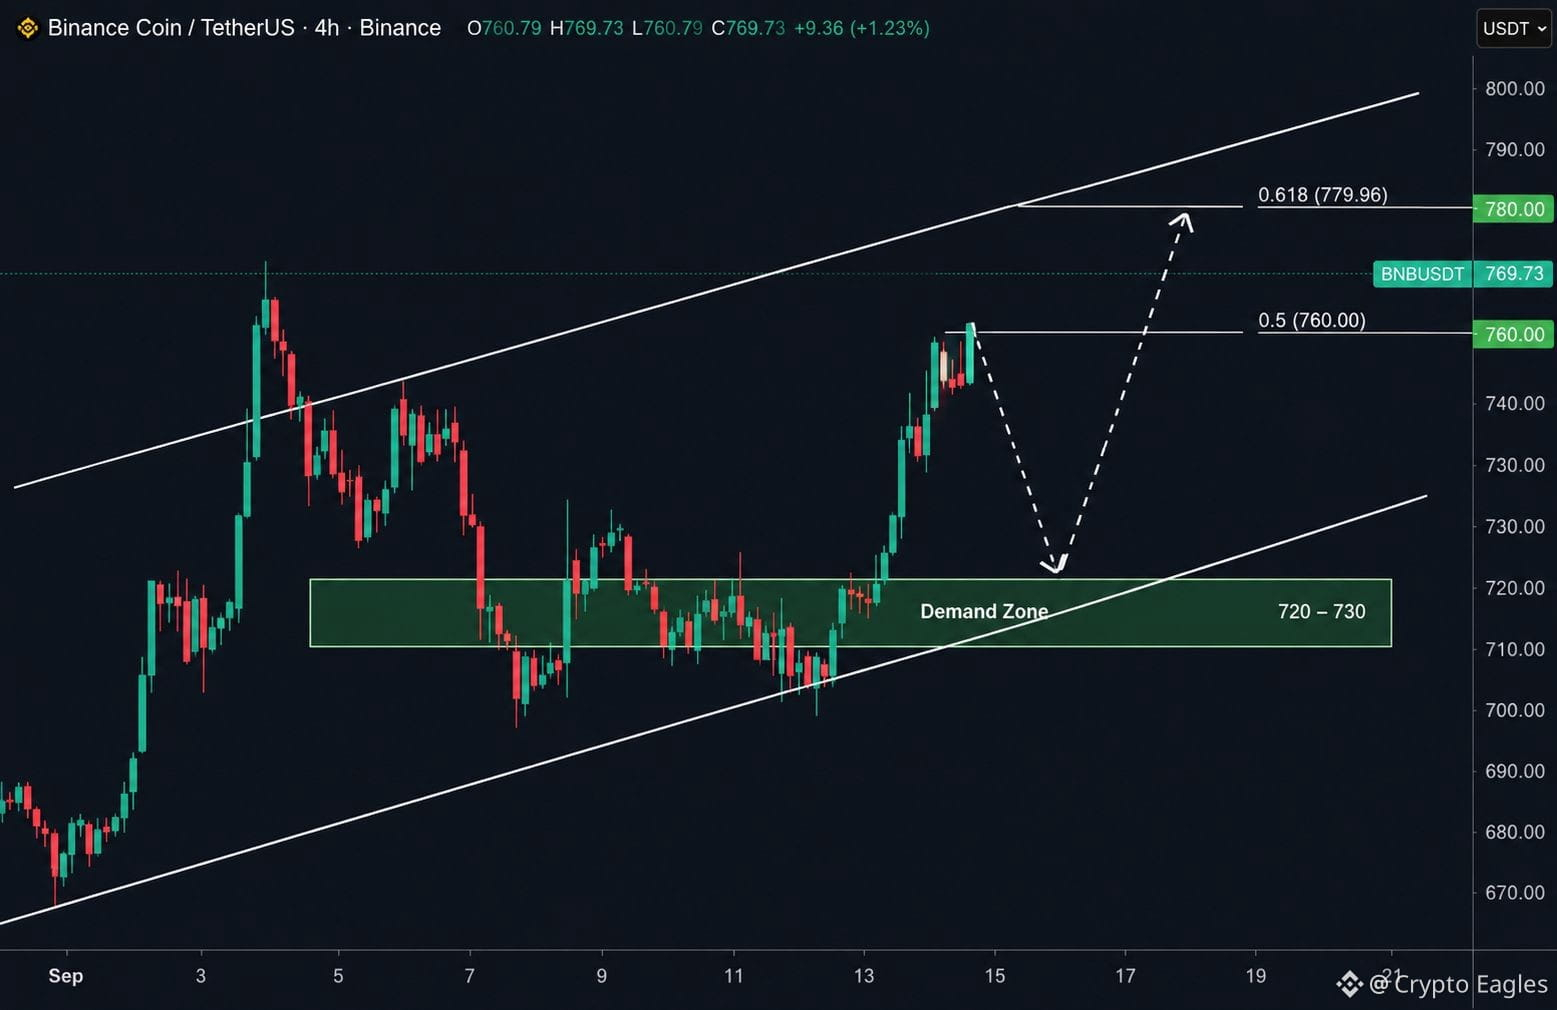
BNB يتحرك داخل قناة صاعدة على مخطط 4H، والبنية العامة ما زالت تبدو صعودية.
ارتد السعر مؤخرًا بقوة من منطقة الطلب $720–$730 وانتقل فوق منطقة $760. وهذا يدل على أن المشترين ما زالوا نشطين.
حاليًا، يقترب BNB من مستوى المقاومة $780، والذي يتوافق أيضًا مع مستوى فيبوناتشي 0.618.
من هنا، قد نرى أولًا تراجعًا بسيطًا. إذا عاد السعر إلى منطقة الطلب $720–$730 وثبت عندها، فقد يبدأ BNB موجة جديدة صعودًا.
الهدف الرئيسي الصعودي يقع حول $780. إذا اخترق BNB هذا المستوى، فإن المنطقة التالية التي يجب مراقبتها ستكون قرب $800، بالقرب من الجانب العلوي للقناة.
طالما بقي السعر فوق $720–$730، يظل السيناريو الصعودي صالحًا.
إذا انكسر هذا الدعم، فقد يشهد BNB تصحيحًا أعمق.
في الوقت الحالي، يُظهر الرسم البياني احتمال تراجع أولًا، ثم حركة صعودية أخرى إذا استمر الدعم.
$BNB
{future}(BNBUSDT)
مرحبًا
ما رأيك في BNB؟
BNB يتحرك داخل قناة صاعدة على مخطط 4H، والبنية العامة ما زالت تبدو صعودية.
ارتد السعر مؤخرًا بقوة من منطقة الطلب $720–$730 وانتقل فوق منطقة $760. وهذا يدل على أن المشترين ما زالوا نشطين.
حاليًا، يقترب BNB من مستوى المقاومة $780، والذي يتوافق أيضًا مع مستوى فيبوناتشي 0.618.
من هنا، قد نرى أولًا تراجعًا بسيطًا. إذا عاد السعر إلى منطقة الطلب $720–$730 وثبت عندها، فقد يبدأ BNB موجة جديدة صعودًا.
الهدف الرئيسي الصعودي يقع حول $780. إذا اخترق BNB هذا المستوى، فإن المنطقة التالية التي يجب مراقبتها ستكون قرب $800، بالقرب من الجانب العلوي للقناة.
طالما بقي السعر فوق $720–$730، يظل السيناريو الصعودي صالحًا.
إذا انكسر هذا الدعم، فقد يشهد BNB تصحيحًا أعمق.
في الوقت الحالي، يُظهر الرسم البياني احتمال تراجع أولًا، ثم حركة صعودية أخرى إذا استمر الدعم.
$BNB
ما رأيك في BNB؟
BNB يتحرك داخل قناة صاعدة على مخطط 4H، والبنية العامة ما زالت تبدو صعودية.
ارتد السعر مؤخرًا بقوة من منطقة الطلب $720–$730 وانتقل فوق منطقة $760. وهذا يدل على أن المشترين ما زالوا نشطين.
حاليًا، يقترب BNB من مستوى المقاومة $780، والذي يتوافق أيضًا مع مستوى فيبوناتشي 0.618.
من هنا، قد نرى أولًا تراجعًا بسيطًا. إذا عاد السعر إلى منطقة الطلب $720–$730 وثبت عندها، فقد يبدأ BNB موجة جديدة صعودًا.
الهدف الرئيسي الصعودي يقع حول $780. إذا اخترق BNB هذا المستوى، فإن المنطقة التالية التي يجب مراقبتها ستكون قرب $800، بالقرب من الجانب العلوي للقناة.
طالما بقي السعر فوق $720–$730، يظل السيناريو الصعودي صالحًا.
إذا انكسر هذا الدعم، فقد يشهد BNB تصحيحًا أعمق.
في الوقت الحالي، يُظهر الرسم البياني احتمال تراجع أولًا، ثم حركة صعودية أخرى إذا استمر الدعم.
$BNB
31
24
3.6k
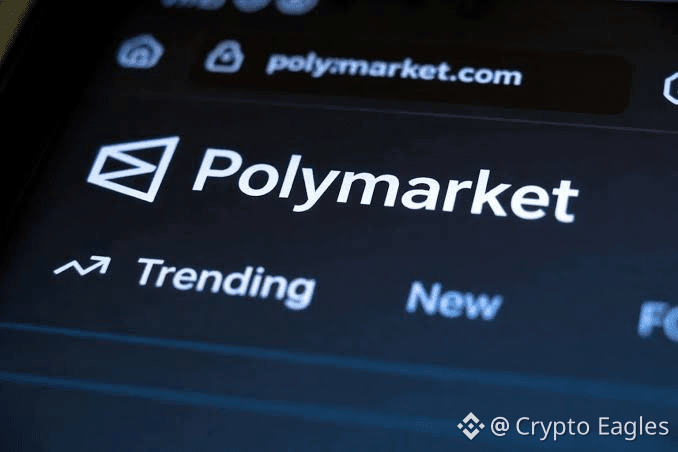
يصبح بوليماركت أكثر شعبية في عالم الويب 3.
يتيح للناس التداول بما يعتقدون أنه سيحدث بعد ذلك في العملات المشفرة والذكاء الاصطناعي والسياسة والرياضة والاقتصاد.
يعرض التقرير 250 ألف إلى 500 ألف متداول نشط شهريًا و17 مليونًا+ من زيارات الموقع الشهرية.
$GNO أيضًا هو توكن مدرج في بينانس ضمن قطاع أسواق التنبؤ الأوسع.
أنا أحب @polymarket لأنه يحوّل الأحداث الواقعية إلى أسواق بسيطة يسهل فهمها.
تحظى أسواق التنبؤ باهتمام متزايد، وبوليماركت هو أحد المنصات التي أتابعها عن كثب.
DYOR.
يصبح بوليماركت أكثر شعبية في عالم الويب 3.
يتيح للناس التداول بما يعتقدون أنه سيحدث بعد ذلك في العملات المشفرة والذكاء الاصطناعي والسياسة والرياضة والاقتصاد.
يعرض التقرير 250 ألف إلى 500 ألف متداول نشط شهريًا و17 مليونًا+ من زيارات الموقع الشهرية.
$GNO أيضًا هو توكن مدرج في بينانس ضمن قطاع أسواق التنبؤ الأوسع.
أنا أحب @Polymarket لأنه يحوّل الأحداث الواقعية إلى أسواق بسيطة يسهل فهمها.
تحظى أسواق التنبؤ باهتمام متزايد، وبوليماركت هو أحد المنصات التي أتابعها عن كثب.
DYOR.
يتيح للناس التداول بما يعتقدون أنه سيحدث بعد ذلك في العملات المشفرة والذكاء الاصطناعي والسياسة والرياضة والاقتصاد.
يعرض التقرير 250 ألف إلى 500 ألف متداول نشط شهريًا و17 مليونًا+ من زيارات الموقع الشهرية.
$GNO أيضًا هو توكن مدرج في بينانس ضمن قطاع أسواق التنبؤ الأوسع.
أنا أحب @Polymarket لأنه يحوّل الأحداث الواقعية إلى أسواق بسيطة يسهل فهمها.
تحظى أسواق التنبؤ باهتمام متزايد، وبوليماركت هو أحد المنصات التي أتابعها عن كثب.
DYOR.
36
10
35
9.1k
·
--
صاعد
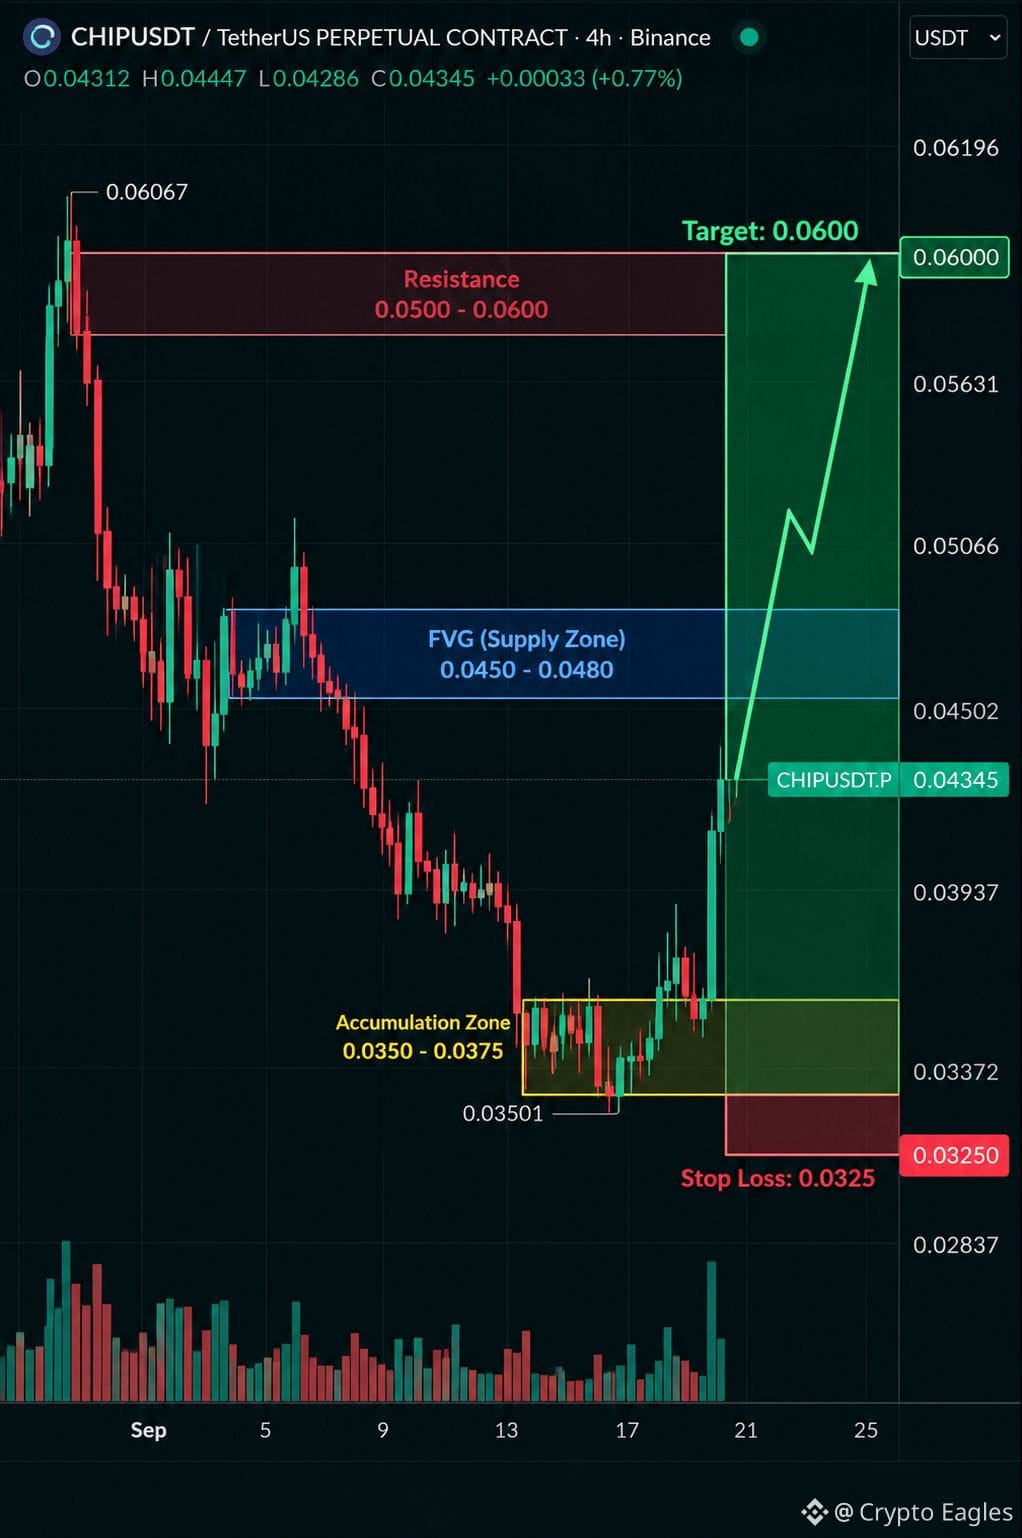
$CHIP التهيئة الطويلة
الدخول: 0.0430 – 0.0450
SL: 0.0325
TP1: 0.0500
TP2: 0.0550
TP3: 0.0600
ارتدّ السعر بقوة من منطقة تجميع 0.0350–0.0375 ودفعه ذلك إلى منطقة FVG/العرض بين 0.0450–0.0480. قد يؤدي اختراقٌ واضح مع الاستمرار فوق هذه المنطقة إلى فتح الطريق نحو 0.0500، تليه 0.0550–0.0600.
يبقى الهيكل الصعودي صالحًا طالما السعر يحافظ فوق منطقة التجميع. إن حدثت حركة أسفل 0.0325 فسيؤدي ذلك إلى إبطال السيناريو.
{future}(CHIPUSDT)
$ONE
{future}(ONEUSDT)
$G
{future}(GUSDT)
$CHIP التهيئة الطويلة
الدخول: 0.0430 – 0.0450
SL: 0.0325
TP1: 0.0500
TP2: 0.0550
TP3: 0.0600
ارتدّ السعر بقوة من منطقة تجميع 0.0350–0.0375 ودفعه ذلك إلى منطقة FVG/العرض بين 0.0450–0.0480. قد يؤدي اختراقٌ واضح مع الاستمرار فوق هذه المنطقة إلى فتح الطريق نحو 0.0500، تليه 0.0550–0.0600.
يبقى الهيكل الصعودي صالحًا طالما السعر يحافظ فوق منطقة التجميع. إن حدثت حركة أسفل 0.0325 فسيؤدي ذلك إلى إبطال السيناريو.
$ONE
$G
الدخول: 0.0430 – 0.0450
SL: 0.0325
TP1: 0.0500
TP2: 0.0550
TP3: 0.0600
ارتدّ السعر بقوة من منطقة تجميع 0.0350–0.0375 ودفعه ذلك إلى منطقة FVG/العرض بين 0.0450–0.0480. قد يؤدي اختراقٌ واضح مع الاستمرار فوق هذه المنطقة إلى فتح الطريق نحو 0.0500، تليه 0.0550–0.0600.
يبقى الهيكل الصعودي صالحًا طالما السعر يحافظ فوق منطقة التجميع. إن حدثت حركة أسفل 0.0325 فسيؤدي ذلك إلى إبطال السيناريو.
$ONE
$G
6
2k
·
--
صاعد
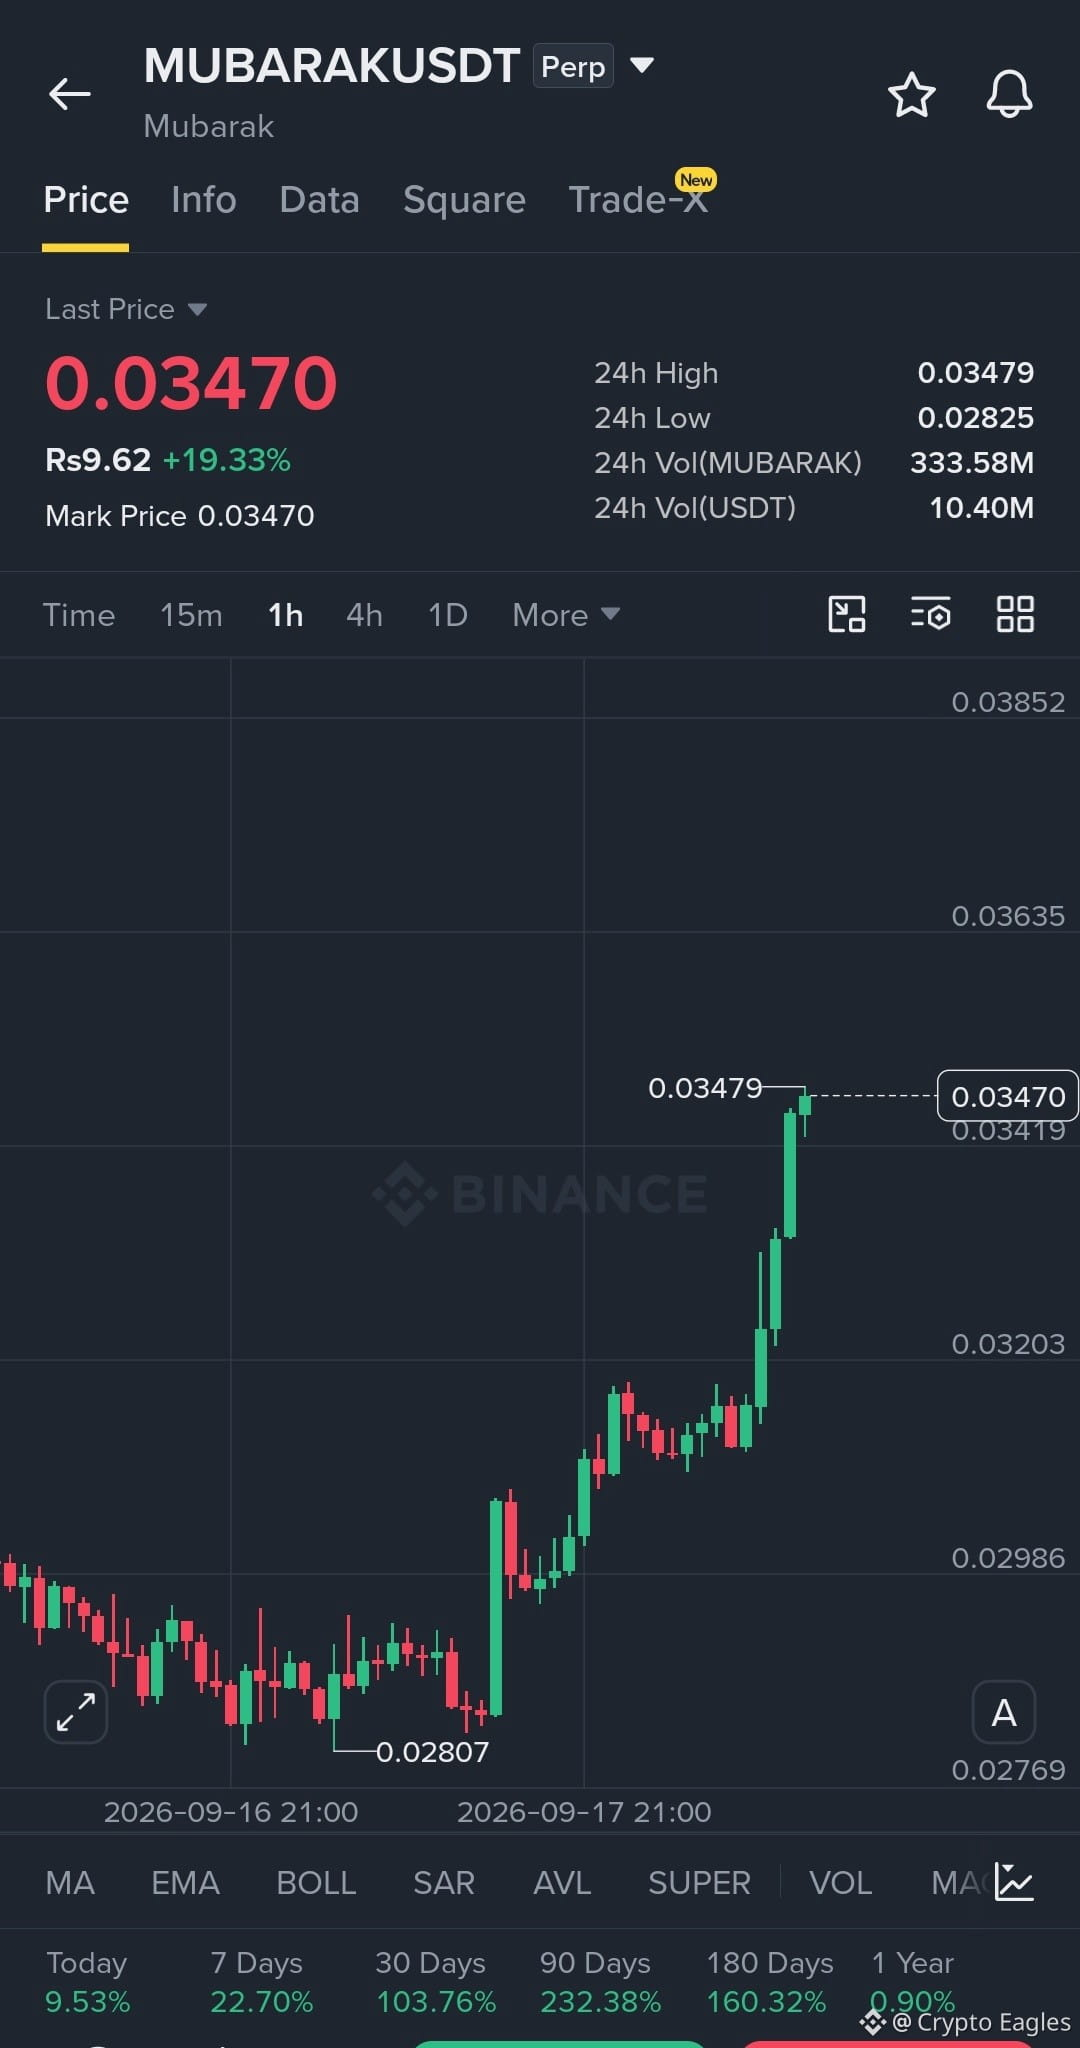
$MUBARAK LONG SETUP
الدخول: 0.03380 – 0.03450
إيقاف الخسارة: 0.03200
TP1: 0.03635
TP2: 0.03850
TP3: 0.04100
MUBARAK يُظهر توسعًا صعوديًا قويًا على إطار ساعة واحدة (1H)، متحركًا بشكل حاد من قاعدة 0.02807 باتجاه القمة 0.03479. النقطة الأهم الآن هي ما إذا كان السعر يمكنه الحفاظ على منطقة الاختراق حول 0.0338–0.0342 بعد الحركة السريعة.
التأكيد: الإغلاق/الثبات فوق 0.0342 وكسر 0.03479.
الإبطال: اختراق مستمر أسفل 0.03200.
{future}(MUBARAKUSDT)
$ONE
{future}(ONEUSDT)
$G
{future}(GUSDT)
$MUBARAK LONG SETUP
الدخول: 0.03380 – 0.03450
إيقاف الخسارة: 0.03200
TP1: 0.03635
TP2: 0.03850
TP3: 0.04100
MUBARAK يُظهر توسعًا صعوديًا قويًا على إطار ساعة واحدة (1H)، متحركًا بشكل حاد من قاعدة 0.02807 باتجاه القمة 0.03479. النقطة الأهم الآن هي ما إذا كان السعر يمكنه الحفاظ على منطقة الاختراق حول 0.0338–0.0342 بعد الحركة السريعة.
التأكيد: الإغلاق/الثبات فوق 0.0342 وكسر 0.03479.
الإبطال: اختراق مستمر أسفل 0.03200.
$ONE
$G
الدخول: 0.03380 – 0.03450
إيقاف الخسارة: 0.03200
TP1: 0.03635
TP2: 0.03850
TP3: 0.04100
MUBARAK يُظهر توسعًا صعوديًا قويًا على إطار ساعة واحدة (1H)، متحركًا بشكل حاد من قاعدة 0.02807 باتجاه القمة 0.03479. النقطة الأهم الآن هي ما إذا كان السعر يمكنه الحفاظ على منطقة الاختراق حول 0.0338–0.0342 بعد الحركة السريعة.
التأكيد: الإغلاق/الثبات فوق 0.0342 وكسر 0.03479.
الإبطال: اختراق مستمر أسفل 0.03200.
$ONE
$G
1
1
3
1.3k
·
--
صاعد
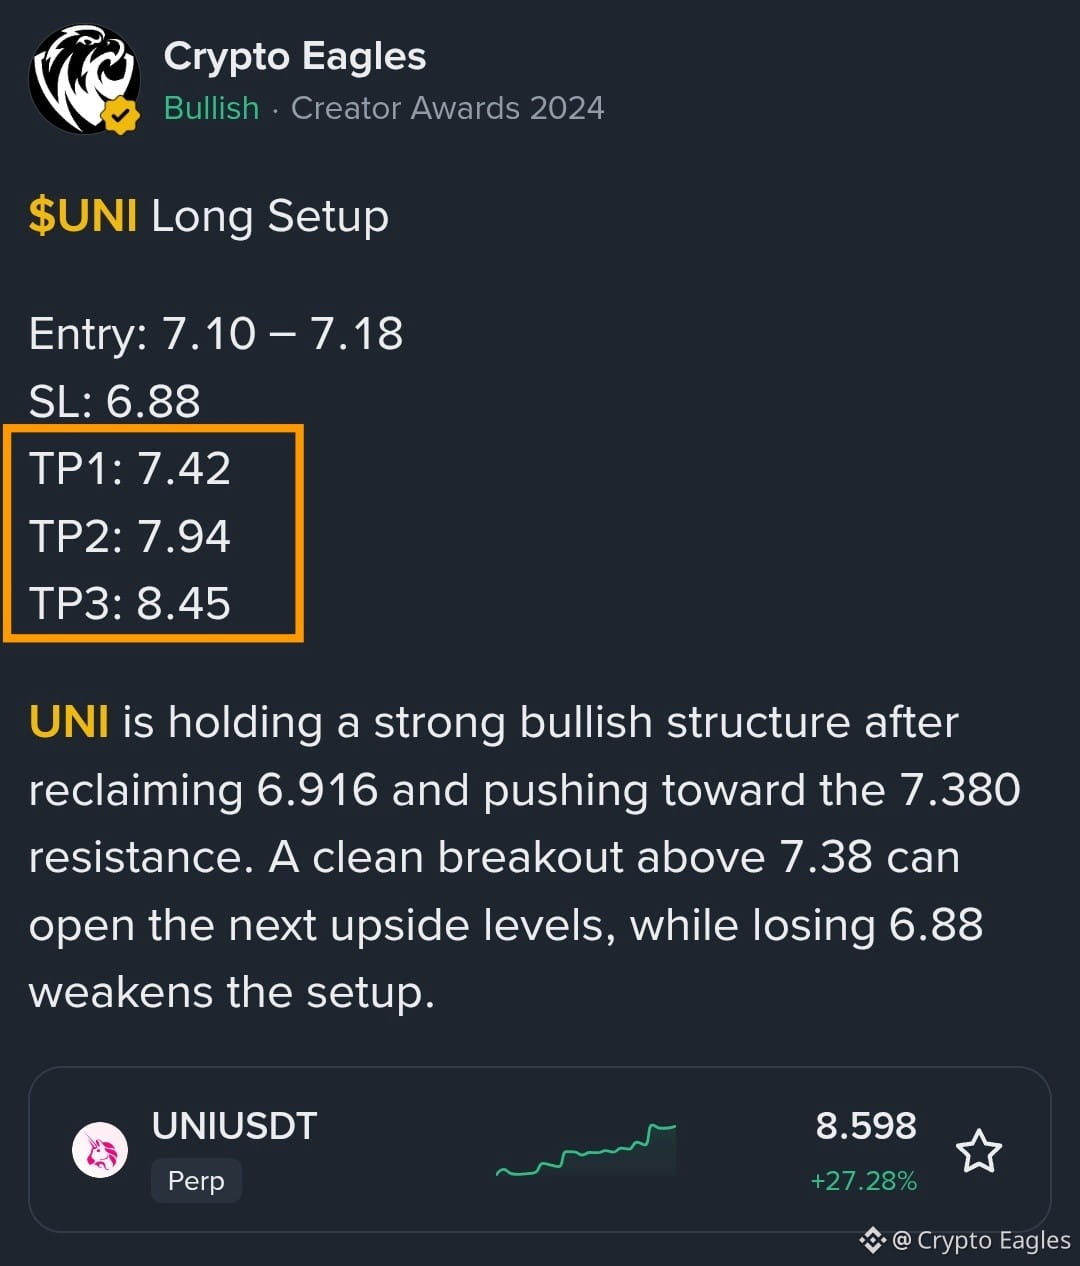
$G $NEAR $UNI تهانينا الحارة للجميع على تحقيق جميع الأهداف
{future}(UNIUSDT)
{future}(NEARUSDT)
{future}(GUSDT)
$G $NEAR $UNI تهانينا الحارة للجميع على تحقيق جميع الأهداف
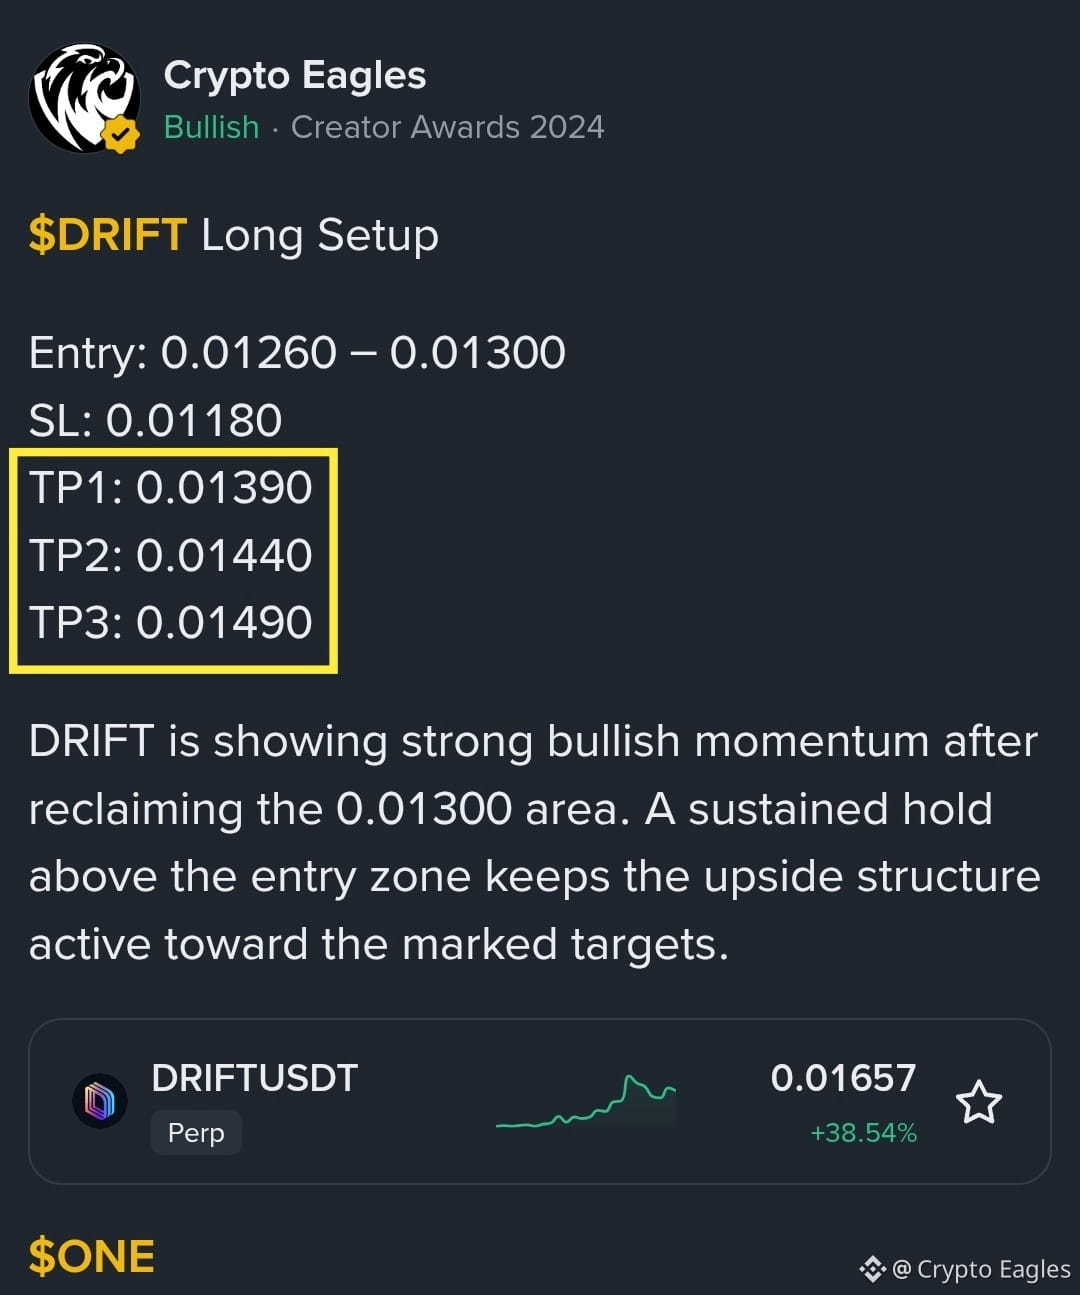
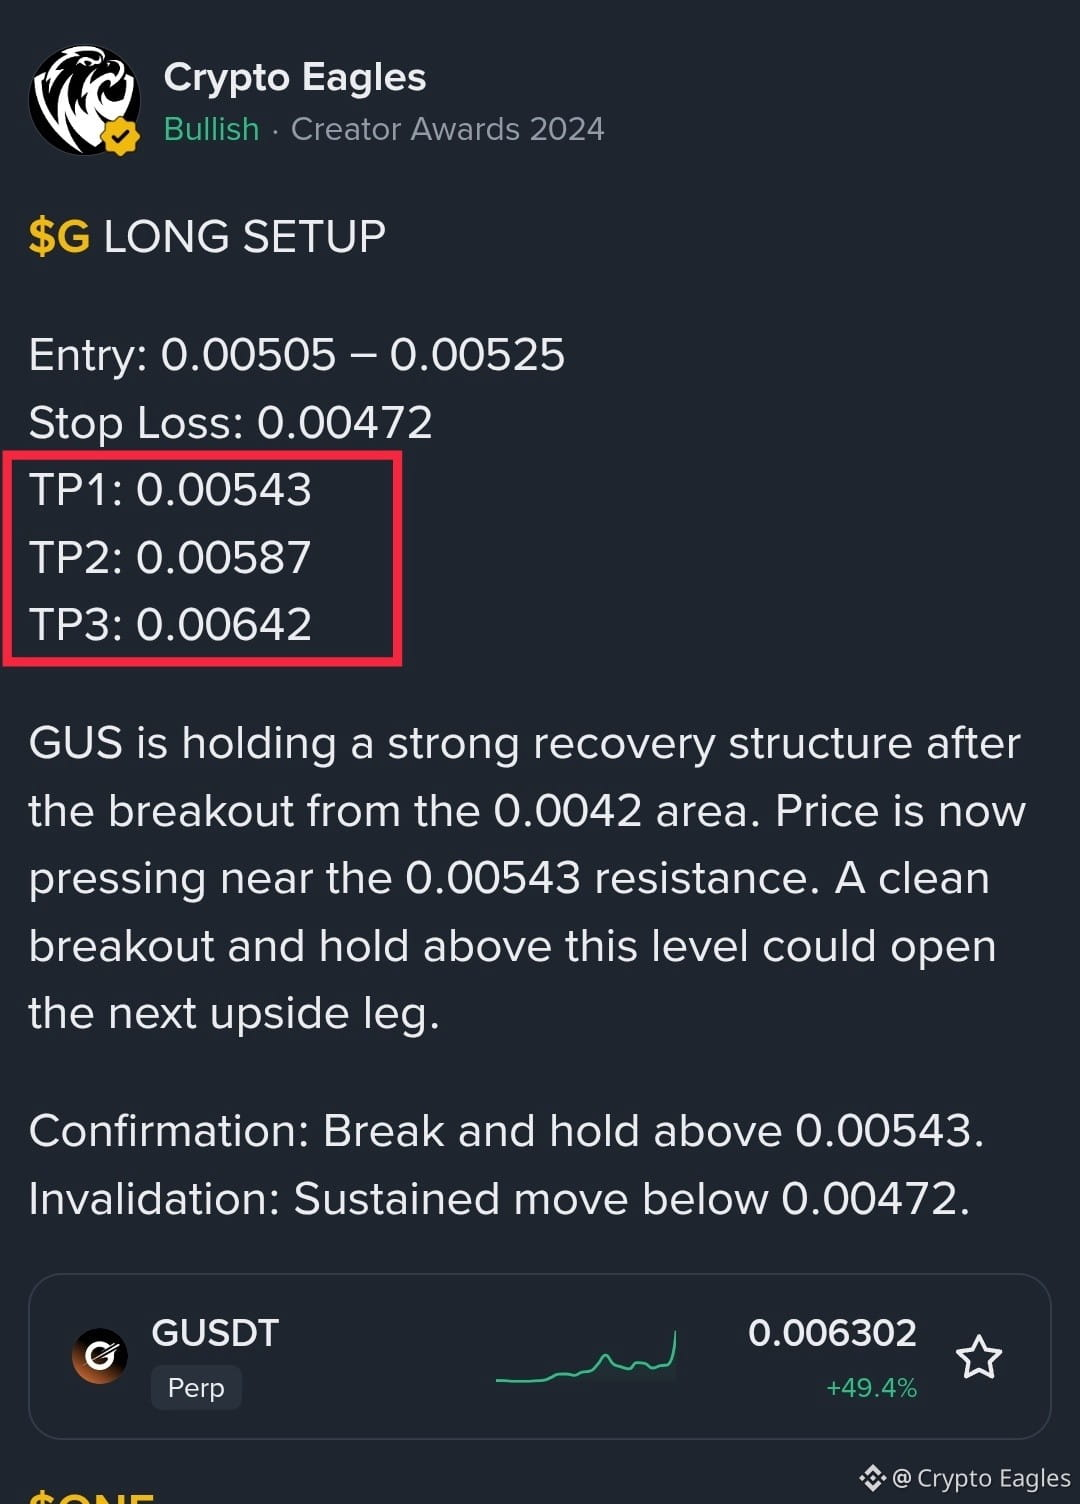
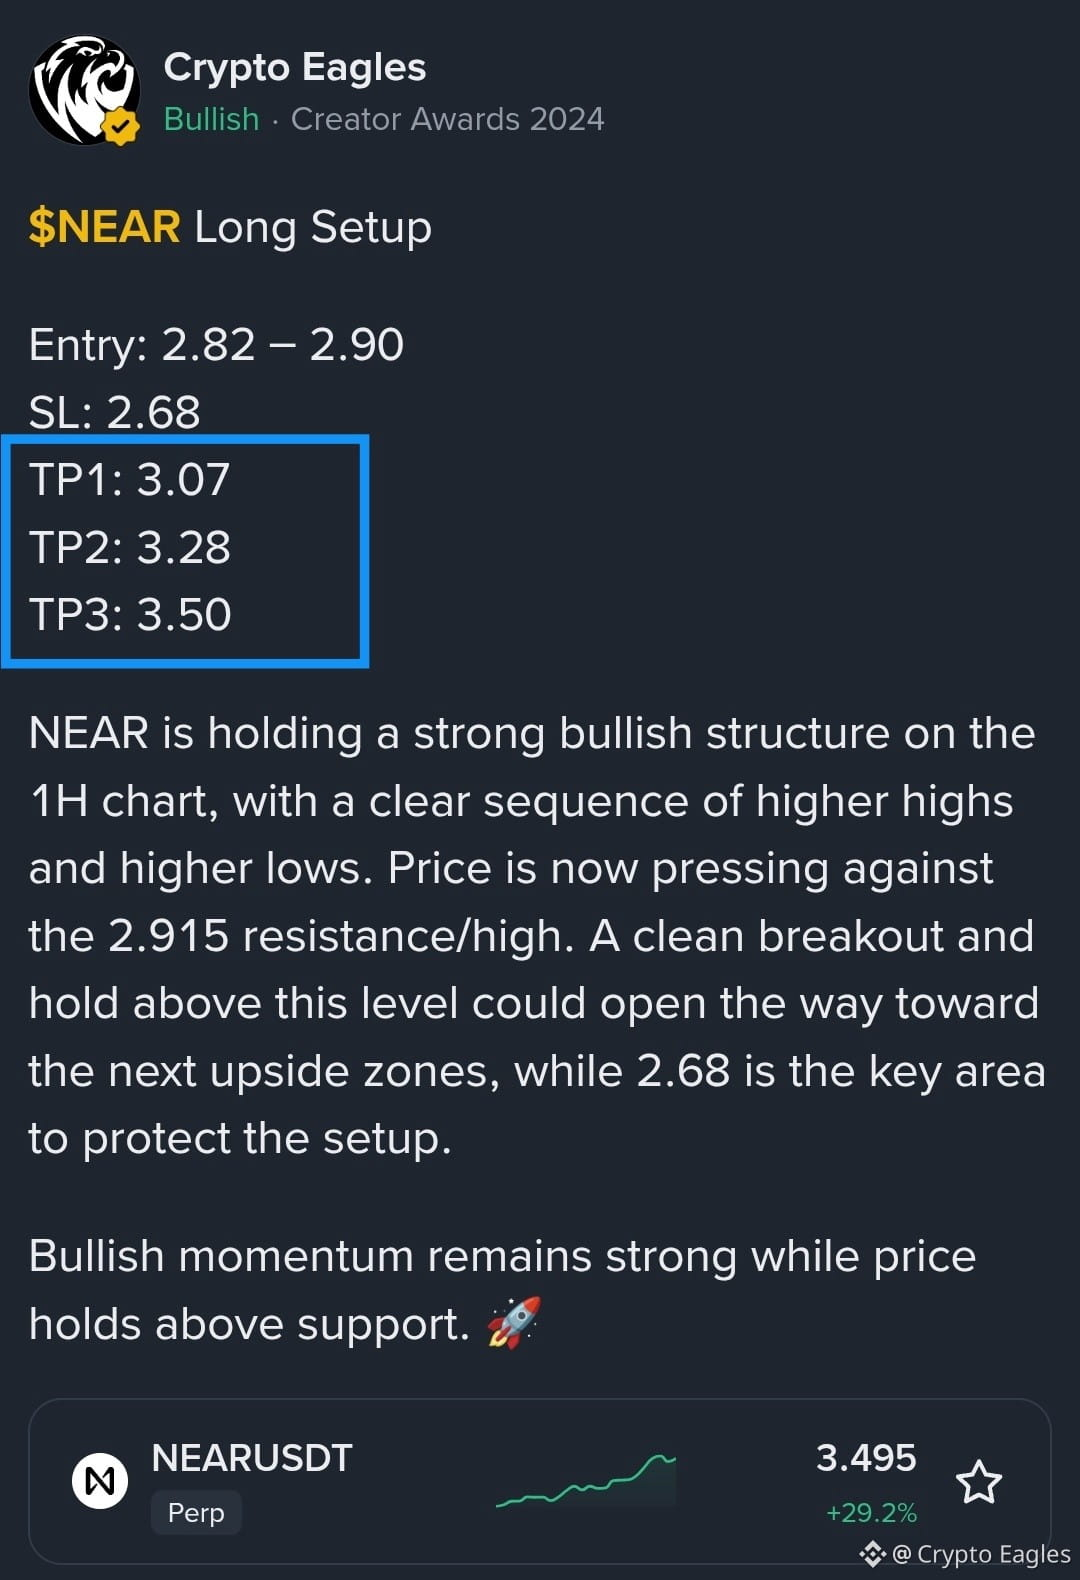
3
909
·
--
صاعد
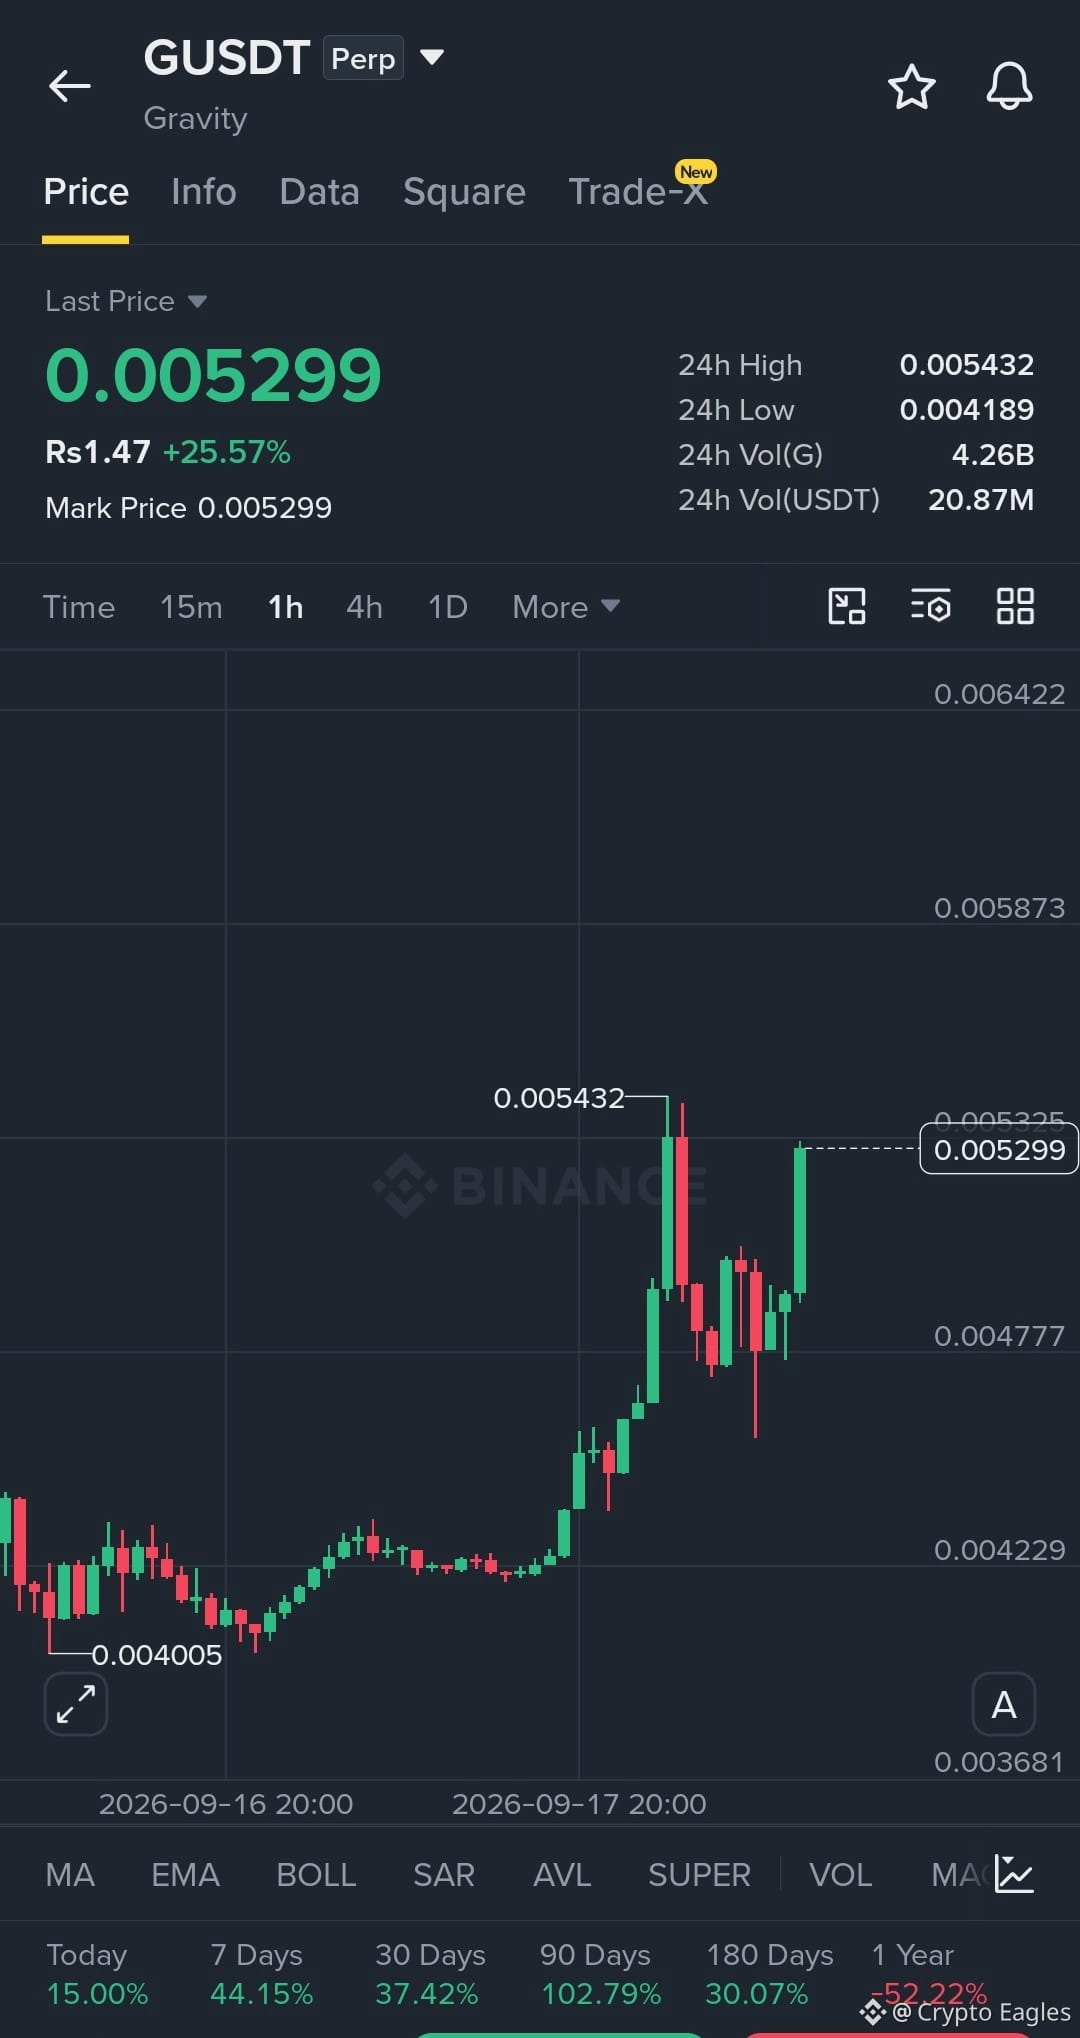
$G LONG SETUP
الدخول: 0.00505 – 0.00525
إيقاف الخسارة: 0.00472
TP1: 0.00543
TP2: 0.00587
TP3: 0.00642
يحافظ GUS على هيكل تعافٍ قوي بعد الاختراق من منطقة 0.0042. السعر الآن يضغط قرب مقاومة 0.00543. يمكن أن يؤدي اختراق واضح والثبات فوق هذا المستوى إلى فتح موجة صعودية تالية.
التأكيد: اختراق والثبات فوق 0.00543.
الإبطال: حركة مستمرة أسفل 0.00472.
{future}(GUSDT)
$ONE
{future}(ONEUSDT)
$TRUMP
{future}(TRUMPUSDT)
$G LONG SETUP
الدخول: 0.00505 – 0.00525
إيقاف الخسارة: 0.00472
TP1: 0.00543
TP2: 0.00587
TP3: 0.00642
يحافظ GUS على هيكل تعافٍ قوي بعد الاختراق من منطقة 0.0042. السعر الآن يضغط قرب مقاومة 0.00543. يمكن أن يؤدي اختراق واضح والثبات فوق هذا المستوى إلى فتح موجة صعودية تالية.
التأكيد: اختراق والثبات فوق 0.00543.
الإبطال: حركة مستمرة أسفل 0.00472.
$ONE
$TRUMP
الدخول: 0.00505 – 0.00525
إيقاف الخسارة: 0.00472
TP1: 0.00543
TP2: 0.00587
TP3: 0.00642
يحافظ GUS على هيكل تعافٍ قوي بعد الاختراق من منطقة 0.0042. السعر الآن يضغط قرب مقاومة 0.00543. يمكن أن يؤدي اختراق واضح والثبات فوق هذا المستوى إلى فتح موجة صعودية تالية.
التأكيد: اختراق والثبات فوق 0.00543.
الإبطال: حركة مستمرة أسفل 0.00472.
$ONE
$TRUMP
2
1.3k
·
--
صاعد
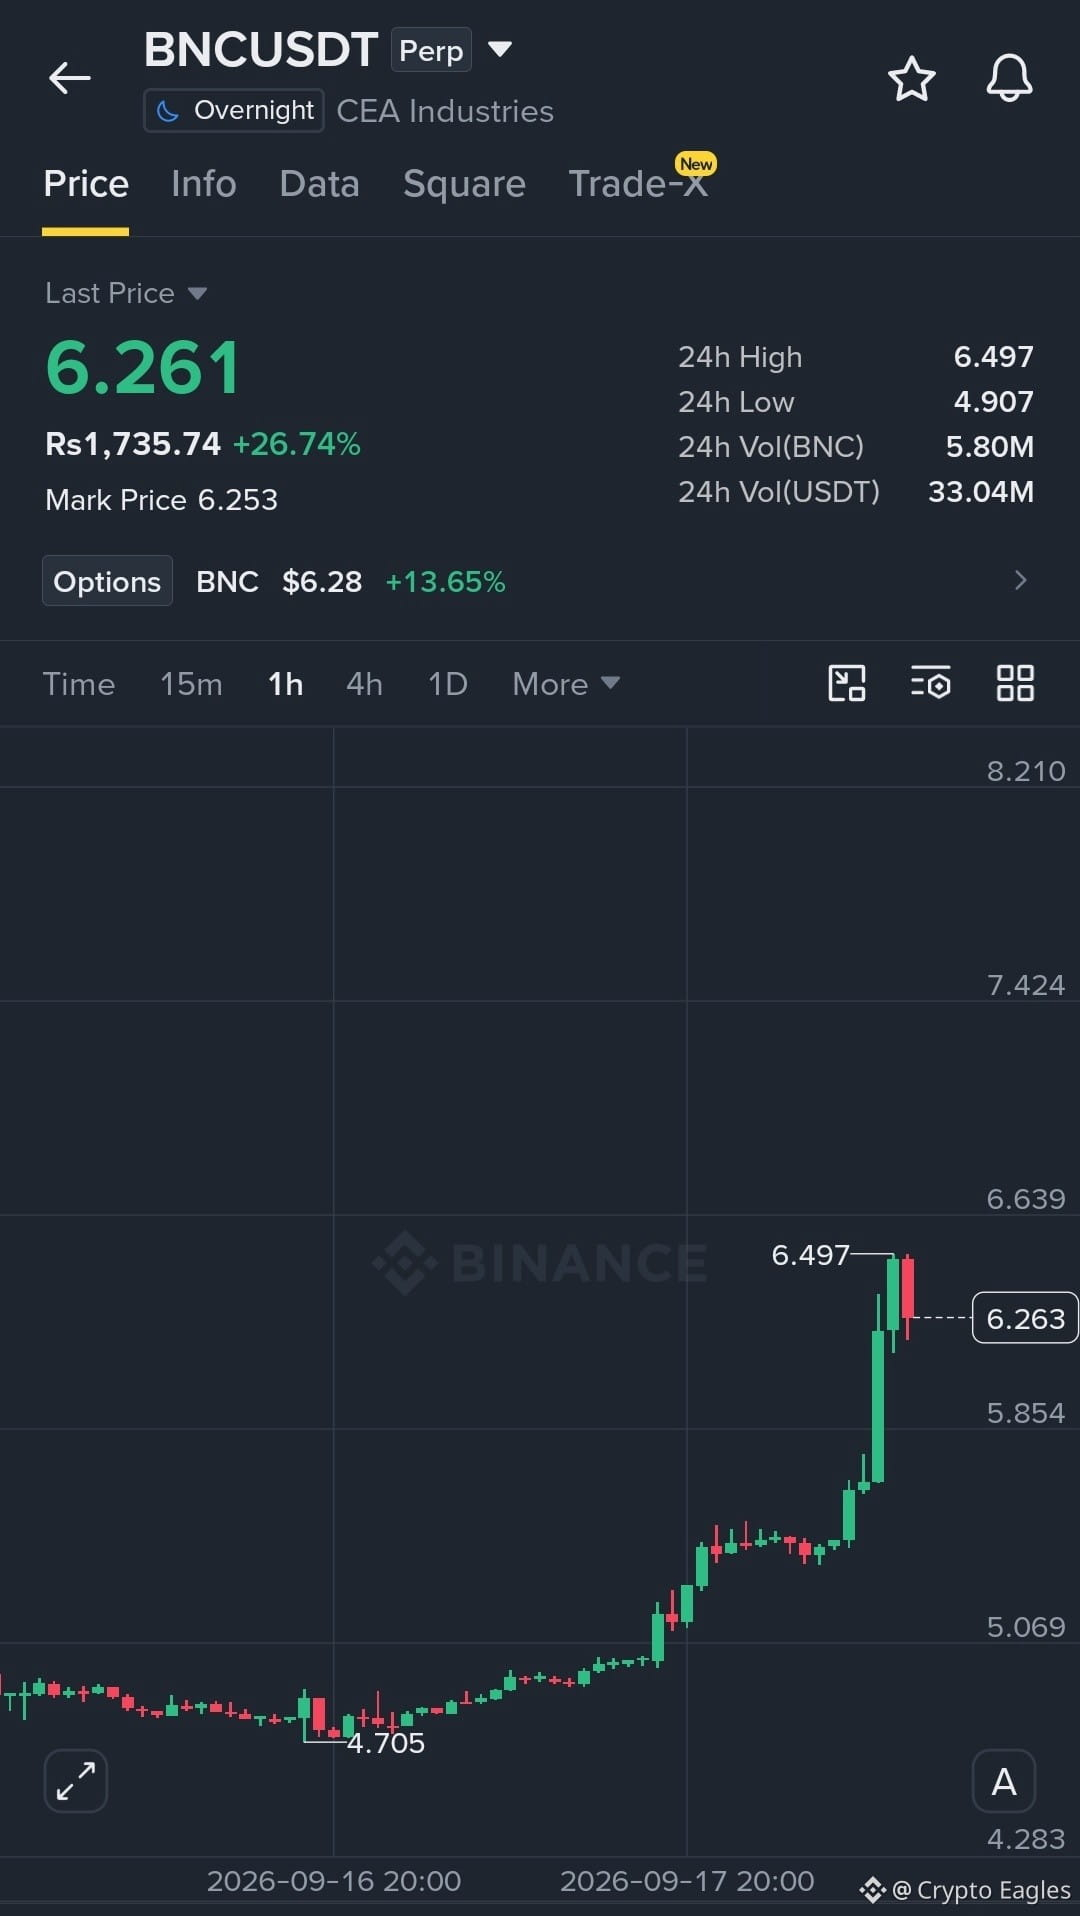
$BNC LONG SETUP
الدخول: 6.05 – 6.25
وقف الخسارة: 5.72
TP1: 6.50
TP2: 6.90
TP3: 7.40
BNC في توسّع صعودي قوي بعد اختراقه لمنطقة 5.0–5.5. السعر وصل إلى 6.497، ثم تراجع قليلًا باتجاه منطقة 6.25. قد يفتح الثبات الناجح حول منطقة الدخول الطريق لمرحلة متابعة أخرى.
التأكيد: استعادة والاحتفاظ فوق 6.50.
الإبطال: كسر مستمر أسفل 5.72.
{future}(BNCUSDT)
$ONE
{future}(ONEUSDT)
$DRIFT
{future}(DRIFTUSDT)
$BNC LONG SETUP
الدخول: 6.05 – 6.25
وقف الخسارة: 5.72
TP1: 6.50
TP2: 6.90
TP3: 7.40
BNC في توسّع صعودي قوي بعد اختراقه لمنطقة 5.0–5.5. السعر وصل إلى 6.497، ثم تراجع قليلًا باتجاه منطقة 6.25. قد يفتح الثبات الناجح حول منطقة الدخول الطريق لمرحلة متابعة أخرى.
التأكيد: استعادة والاحتفاظ فوق 6.50.
الإبطال: كسر مستمر أسفل 5.72.
$ONE
$DRIFT
الدخول: 6.05 – 6.25
وقف الخسارة: 5.72
TP1: 6.50
TP2: 6.90
TP3: 7.40
BNC في توسّع صعودي قوي بعد اختراقه لمنطقة 5.0–5.5. السعر وصل إلى 6.497، ثم تراجع قليلًا باتجاه منطقة 6.25. قد يفتح الثبات الناجح حول منطقة الدخول الطريق لمرحلة متابعة أخرى.
التأكيد: استعادة والاحتفاظ فوق 6.50.
الإبطال: كسر مستمر أسفل 5.72.
$ONE
$DRIFT
1
845
·
--
صاعد
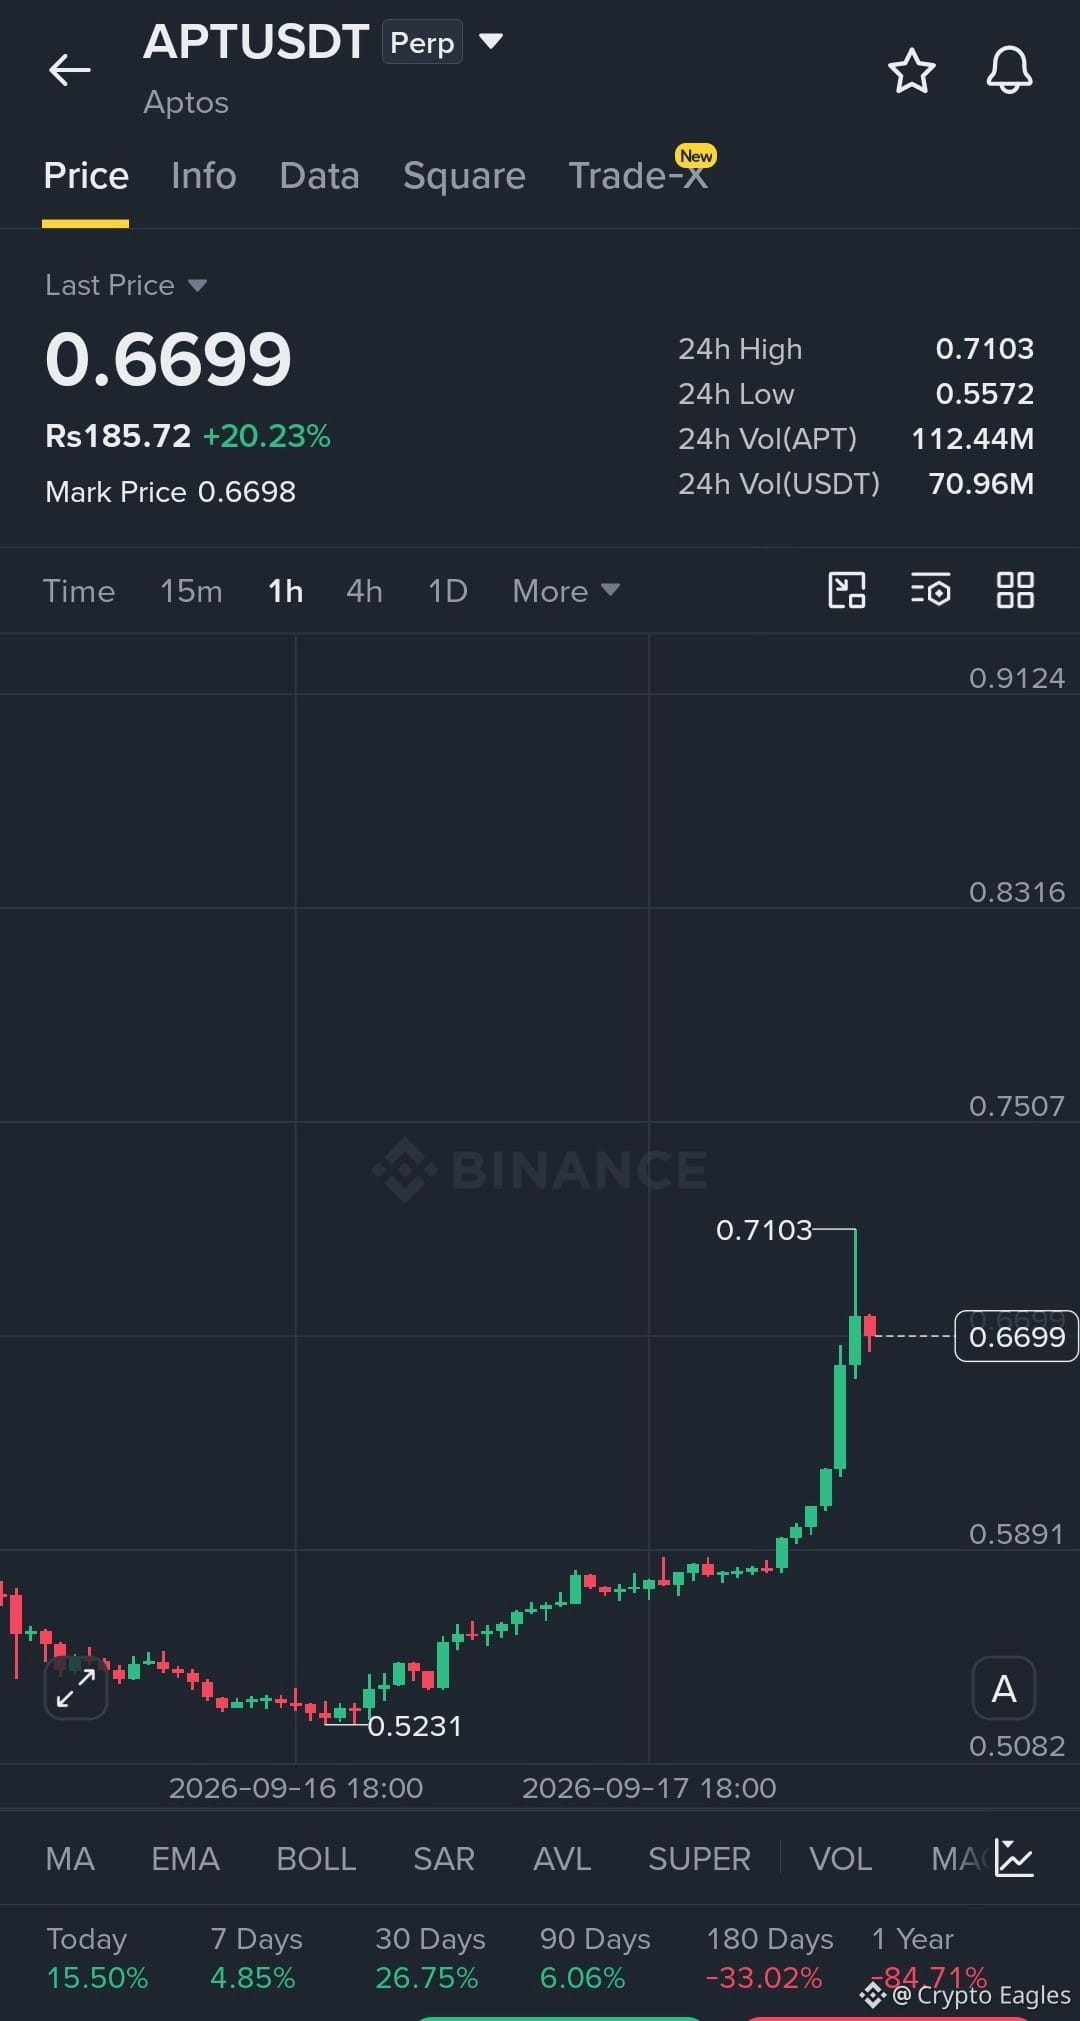
$APT LONG SETUP
الدخول: 0.6500 – 0.6700
إيقاف الخسارة: 0.6150
TP1: 0.7100
TP2: 0.7500
TP3: 0.8300
يُظهر APT زخمًا شرائيًا قويًا بعد اختراق منطقة التوطيد السابقة. وقد وصلت الحركة الأخيرة إلى 0.7103، تلاها تراجعٌ بسيط قرب 0.6700. إن كان هناك تثبيت ناجح فوق منطقة الدخول فقد يدعم دفعًا آخر نحو القمة الأخيرة ومستويات المقاومة الأعلى.
التأكيد: الثبات فوق 0.6500 واستعادة 0.7100 من أجل استمرار أقوى.
الإبطال: تحرك مستمر تحت 0.6150.
{future}(APTUSDT)
$AVA
{future}(AVAUSDT)
$ONE
{future}(ONEUSDT)
$APT LONG SETUP
الدخول: 0.6500 – 0.6700
إيقاف الخسارة: 0.6150
TP1: 0.7100
TP2: 0.7500
TP3: 0.8300
يُظهر APT زخمًا شرائيًا قويًا بعد اختراق منطقة التوطيد السابقة. وقد وصلت الحركة الأخيرة إلى 0.7103، تلاها تراجعٌ بسيط قرب 0.6700. إن كان هناك تثبيت ناجح فوق منطقة الدخول فقد يدعم دفعًا آخر نحو القمة الأخيرة ومستويات المقاومة الأعلى.
التأكيد: الثبات فوق 0.6500 واستعادة 0.7100 من أجل استمرار أقوى.
الإبطال: تحرك مستمر تحت 0.6150.
$AVA
$ONE
الدخول: 0.6500 – 0.6700
إيقاف الخسارة: 0.6150
TP1: 0.7100
TP2: 0.7500
TP3: 0.8300
يُظهر APT زخمًا شرائيًا قويًا بعد اختراق منطقة التوطيد السابقة. وقد وصلت الحركة الأخيرة إلى 0.7103، تلاها تراجعٌ بسيط قرب 0.6700. إن كان هناك تثبيت ناجح فوق منطقة الدخول فقد يدعم دفعًا آخر نحو القمة الأخيرة ومستويات المقاومة الأعلى.
التأكيد: الثبات فوق 0.6500 واستعادة 0.7100 من أجل استمرار أقوى.
الإبطال: تحرك مستمر تحت 0.6150.
$AVA
$ONE
1
970
·
--
صاعد
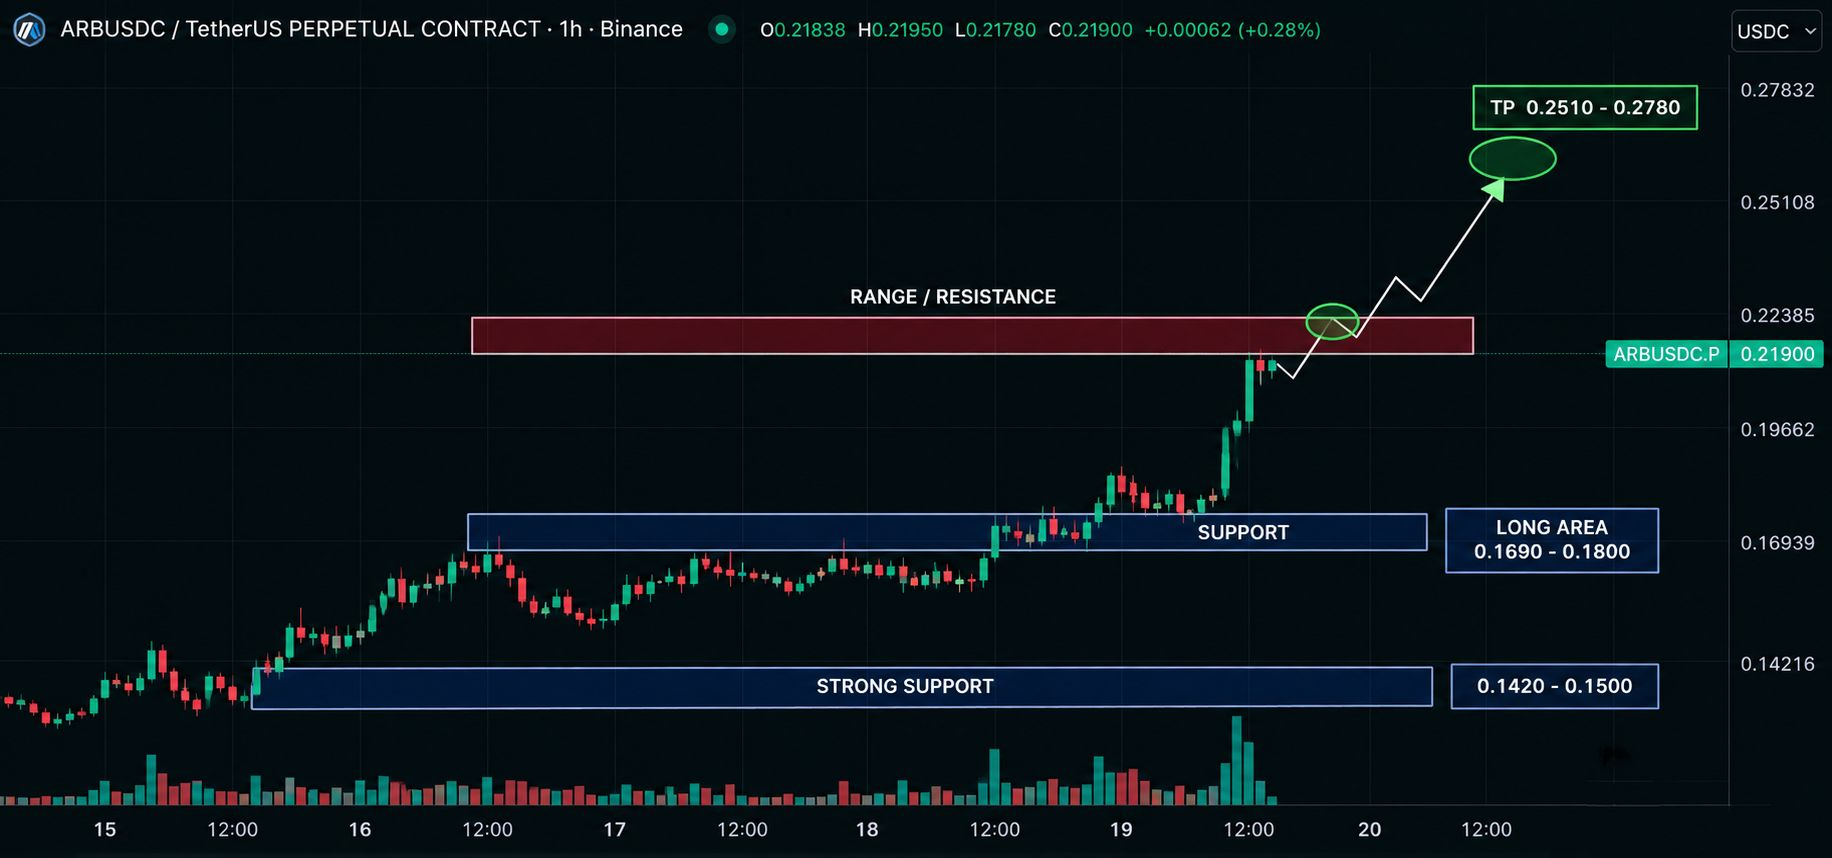
$ARB Long Setup
الدخول: 0.218 – 0.224
إيقاف الخسارة: 0.208
الأهداف: TP1: 0.235
TP2: 0.251
TP3: 0.278
يقوم ARB بالضغط على منطقة مقاومة 0.224 بعد حركة صعودية قوية. يمكن أن يدعم اختراق واضح مع إعادة اختبار ناجحة لهذه المنطقة استمرار الحركة نحو 0.251 ثم 0.278. إذا فقد السعر 0.208، يضعف السيناريو الصعودي.
{future}(ARBUSDT)
$AVA
{future}(AVAUSDT)
$DRIFT
{future}(DRIFTUSDT)
$ARB Long Setup
الدخول: 0.218 – 0.224
إيقاف الخسارة: 0.208
الأهداف: TP1: 0.235
TP2: 0.251
TP3: 0.278
يقوم ARB بالضغط على منطقة مقاومة 0.224 بعد حركة صعودية قوية. يمكن أن يدعم اختراق واضح مع إعادة اختبار ناجحة لهذه المنطقة استمرار الحركة نحو 0.251 ثم 0.278. إذا فقد السعر 0.208، يضعف السيناريو الصعودي.
$AVA
$DRIFT
الدخول: 0.218 – 0.224
إيقاف الخسارة: 0.208
الأهداف: TP1: 0.235
TP2: 0.251
TP3: 0.278
يقوم ARB بالضغط على منطقة مقاومة 0.224 بعد حركة صعودية قوية. يمكن أن يدعم اختراق واضح مع إعادة اختبار ناجحة لهذه المنطقة استمرار الحركة نحو 0.251 ثم 0.278. إذا فقد السعر 0.208، يضعف السيناريو الصعودي.
$AVA
$DRIFT
2
630
سجّل الدخول لاستكشاف المزيد من المُحتوى
انضم إلى مُستخدمي العملات الرقمية حول العالم على Binance Square
⚡️ احصل على أحدث المعلومات المفيدة عن العملات الرقمية.
💬 موثوقة من قبل أكبر منصّة لتداول العملات الرقمية في العالم.
👍 اكتشف الرؤى الحقيقية من صنّاع المُحتوى الموثوقين.
البريد الإلكتروني / رقم الهاتف
المواضيع الرائجة
UKFCAWinsCourtOrderToRecover851400Pounds
19,832 مشاهدات
671 يقومون بالنقاش
#UKFCAWinsCourtOrderToRecover851400Pounds
#UKFCAWinsCourtOrderToRecover851400Pounds
هيئة الرقابة المالية البريطانية FCA تفوز بأمر قضائي لاسترداد 851400 باوند
في انتصار كبير للعدالة المالية في بريطانيا
التفاصيل الكاملة
المحتال جون بيرفورد 86 سنة عالم سابق في ناسا
نصب على اكثر من 100 مستثمر بمبلغ مليون باوند
عرض صناديق استثمار وهمية بدون ترخيص من FCA
اخفى الخسائر واستخدم اموال الناس لشراء منزل لنفسه
حكم عليه بالسجن سنتين في سبتمبر 2025
قرار المحكمة الجديد
محكمة Southwark في لندن امرت بدفع 655951.40 باوند
هذا المبلغ هو كل الاصول القابلة للاسترداد
الاموال ستعود مباشرة للضحايا
مع المدفوعات السابقة سيسترد الضحايا 99% من اموالهم
اذا لم يدفع خلال 3 اشهر سيضاف 5 سنوات سجن اضافية
رسالة FCA
قال ستيف سمارت مدير التنفيذ في FCA
السيد بيرفورد احتال على المستثمرين لتمويل اسلوب حياته الفاخر
استرداد الاموال المسروقة واعادتها للضحايا يرسل رسالة واضحة ان الجريمة لا تفيد
هذا يثبت قوة القانون البريطاني في حماية المستثمرين
#UKFCAWinsCourtOrderToRecover851400Pounds #UKFCA #بريطانيا #FCA #BinanceSquare
Mohammed _crypto sniper
·1 إعجاب
·68 مشاهدات
ChainlinkLaunchesCCIP2WithEnterpriseVerification
34,520 مشاهدات
868 يقومون بالنقاش
GoldFallsTo$4144
12,596 مشاهدات
148 يقومون بالنقاش