
#strk
strk
13M views
11,635 Discussing
Hot
Latest

·
--
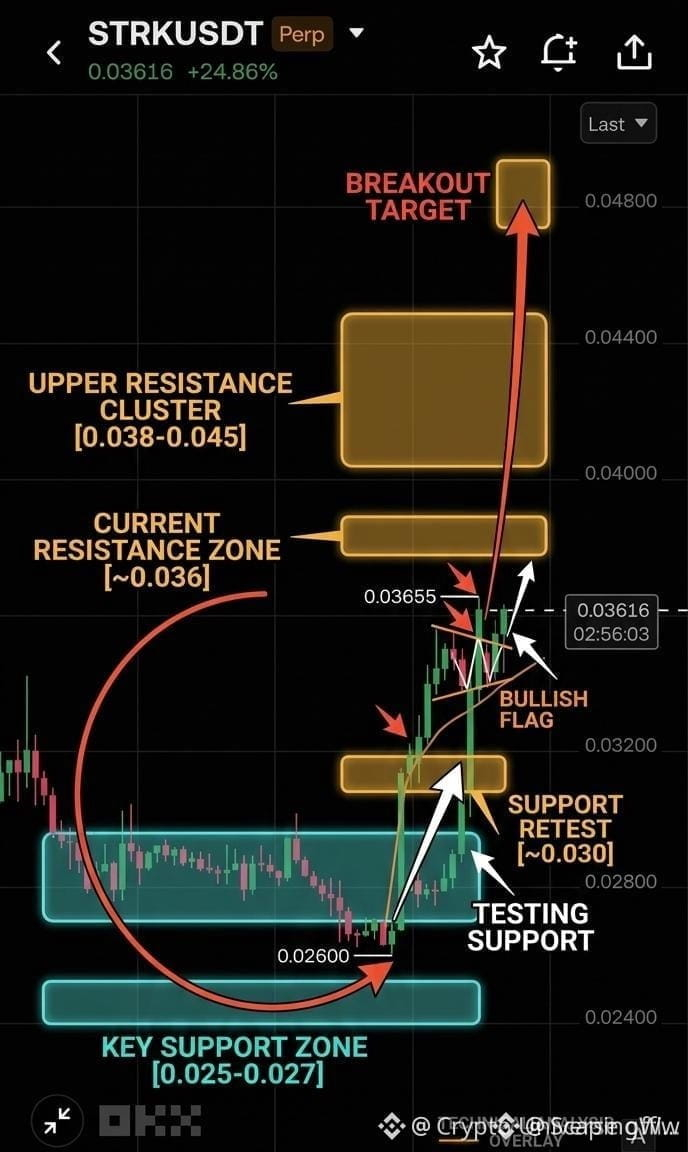
🚨 $STRK COILS UNDER RESISTANCE AFTER EXPLOSIVE RECOVERY FROM DEMAND ZONE! 💥
Entry: 0.0340 - 0.0360 ⚡
Target: 0.0480 🚀
Stop Loss: 0.0315 ⚠️
After an aggressive push off the 0.025 demand floor, $STRK is coiling tight right beneath the 0.036 resistance level. Sellers attempted to reject the push near the ceiling, but buyers refuse to yield ground, forming a textbook bullish flag. 📊
📌 A clean momentum flip above 0.0365 unlocks the liquidity sweeps up to 0.038 and 0.042, opening a clear path toward the 0.048 macro expansion target. 💡 Order flow signals steady absorption, showing supply is drying up fast at resistance. 🤔 Are you bidding the flag consolidation here or waiting for the resistance breakout? 👇
⚠️ Not financial advice. Always manage your risk. 🛡️
🏷️ #STRK #Breakout #Crypto #LongSetup #Trading
🔥 ⚡
🚨 $STRK COILS UNDER RESISTANCE AFTER EXPLOSIVE RECOVERY FROM DEMAND ZONE! 💥
Entry: 0.0340 - 0.0360 ⚡
Target: 0.0480 🚀
Stop Loss: 0.0315 ⚠️
After an aggressive push off the 0.025 demand floor, $STRK is coiling tight right beneath the 0.036 resistance level. Sellers attempted to reject the push near the ceiling, but buyers refuse to yield ground, forming a textbook bullish flag. 📊
📌 A clean momentum flip above 0.0365 unlocks the liquidity sweeps up to 0.038 and 0.042, opening a clear path toward the 0.048 macro expansion target. 💡 Order flow signals steady absorption, showing supply is drying up fast at resistance. 🤔 Are you bidding the flag consolidation here or waiting for the resistance breakout? 👇
⚠️ Not financial advice. Always manage your risk. 🛡️
🏷️ #STRK #Breakout #Crypto #LongSetup #Trading
🔥 ⚡
Entry: 0.0340 - 0.0360 ⚡
Target: 0.0480 🚀
Stop Loss: 0.0315 ⚠️
After an aggressive push off the 0.025 demand floor, $STRK is coiling tight right beneath the 0.036 resistance level. Sellers attempted to reject the push near the ceiling, but buyers refuse to yield ground, forming a textbook bullish flag. 📊
📌 A clean momentum flip above 0.0365 unlocks the liquidity sweeps up to 0.038 and 0.042, opening a clear path toward the 0.048 macro expansion target. 💡 Order flow signals steady absorption, showing supply is drying up fast at resistance. 🤔 Are you bidding the flag consolidation here or waiting for the resistance breakout? 👇
⚠️ Not financial advice. Always manage your risk. 🛡️
🏷️ #STRK #Breakout #Crypto #LongSetup #Trading
🔥 ⚡
46

·
--
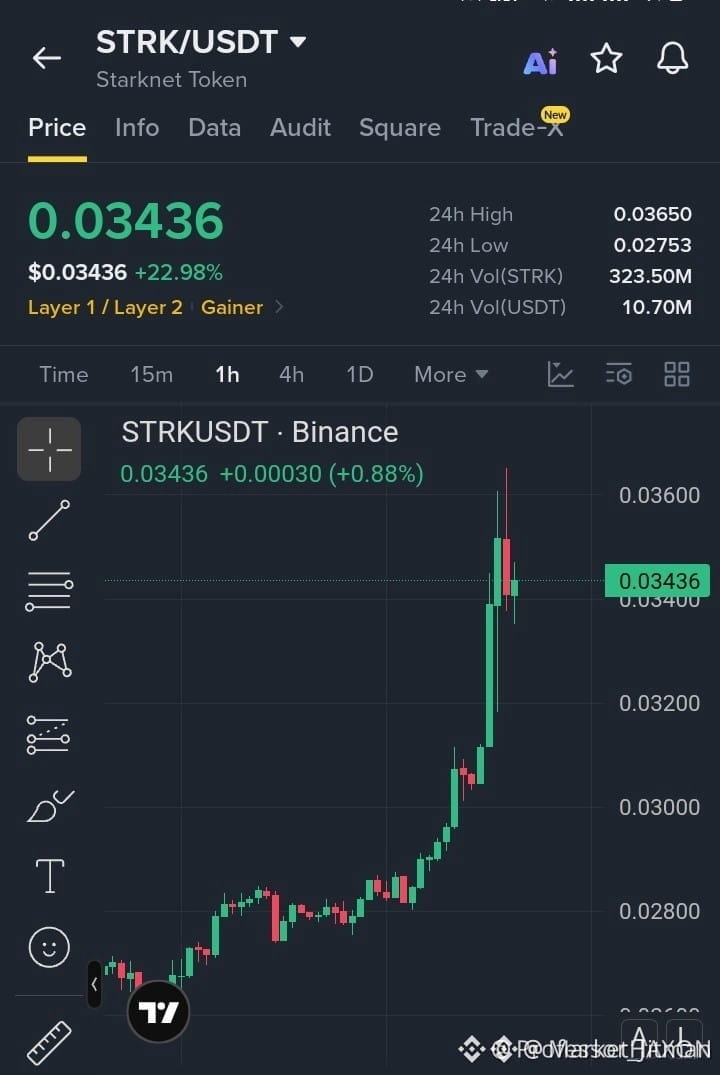
🚀 $STRK BREAKS RANGE RESISTANCE AS BULLS CONSOLIDATE FOR THE NEXT EXPANSION! 💥
Entry: $0.0338 - $0.0344 ⚡
Target 1: $0.0355 🎯
Target 2: $0.0370 🎯
Target 3: $0.0390 🚀
Stop Loss: $0.0326 ⚠️
📌 Buyers smashed through the previous range high with relentless velocity, driving a clean structural shift. Price is now absorbing seller pressure directly above the re-claimed support at $0.0338.
⚡ As long as bulls defend this consolidation zone, the path of least resistance points straight into higher liquidity levels. 📊 Order flow shows strong bid defense stepping in to front-run the next expansion wave.
💬 Are you scaling into this retest, or waiting for $STRK to break past $0.0370 first? 👇
⚠️ Not financial advice. Always manage your risk. 🛡️
🏷️ #STRK #LongSetup #Breakout #Crypto #Altcoins
🔥 💎
🚀 $STRK BREAKS RANGE RESISTANCE AS BULLS CONSOLIDATE FOR THE NEXT EXPANSION! 💥
Entry: $0.0338 - $0.0344 ⚡
Target 1: $0.0355 🎯
Target 2: $0.0370 🎯
Target 3: $0.0390 🚀
Stop Loss: $0.0326 ⚠️
📌 Buyers smashed through the previous range high with relentless velocity, driving a clean structural shift. Price is now absorbing seller pressure directly above the re-claimed support at $0.0338.
⚡ As long as bulls defend this consolidation zone, the path of least resistance points straight into higher liquidity levels. 📊 Order flow shows strong bid defense stepping in to front-run the next expansion wave.
💬 Are you scaling into this retest, or waiting for $STRK to break past $0.0370 first? 👇
⚠️ Not financial advice. Always manage your risk. 🛡️
🏷️ #STRK #LongSetup #Breakout #Crypto #Altcoins
🔥 💎
Entry: $0.0338 - $0.0344 ⚡
Target 1: $0.0355 🎯
Target 2: $0.0370 🎯
Target 3: $0.0390 🚀
Stop Loss: $0.0326 ⚠️
📌 Buyers smashed through the previous range high with relentless velocity, driving a clean structural shift. Price is now absorbing seller pressure directly above the re-claimed support at $0.0338.
⚡ As long as bulls defend this consolidation zone, the path of least resistance points straight into higher liquidity levels. 📊 Order flow shows strong bid defense stepping in to front-run the next expansion wave.
💬 Are you scaling into this retest, or waiting for $STRK to break past $0.0370 first? 👇
⚠️ Not financial advice. Always manage your risk. 🛡️
🏷️ #STRK #LongSetup #Breakout #Crypto #Altcoins
🔥 💎
19

·
--
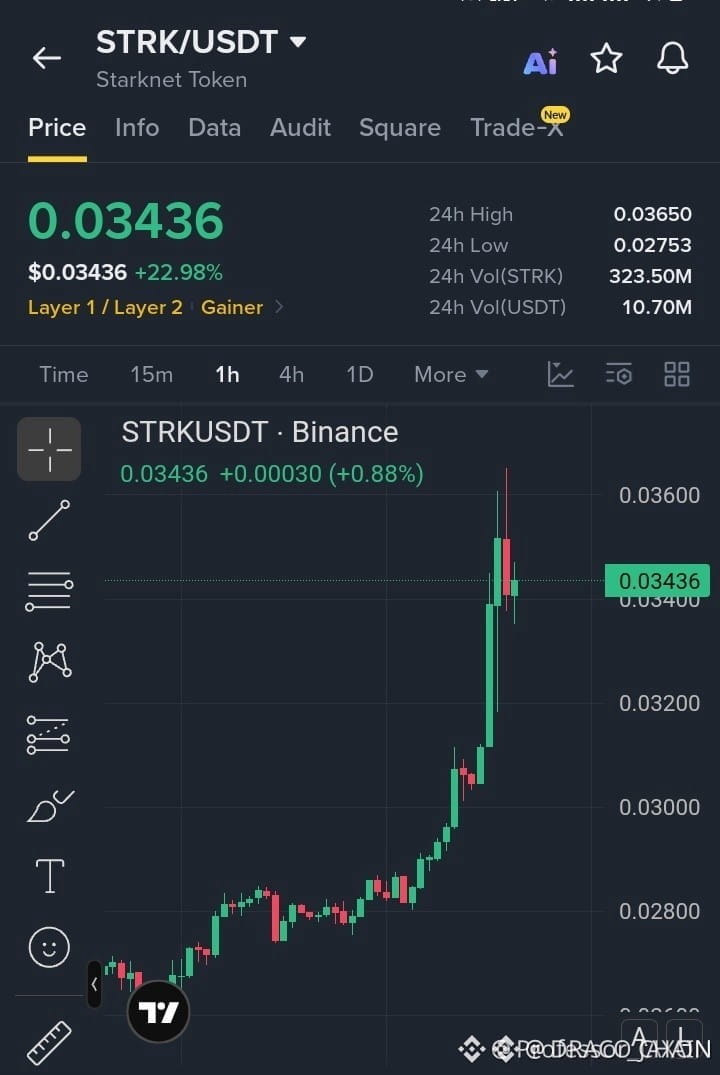
🚨 $STRK RECLAIMS KEY RANGE HIGH AS INSTITUTIONAL DEMAND DEFENDS BREAKOUT STRUCTURE! 🦈
Entry: 0.0338 - 0.0344 ⚡
Target: 0.0355 - 0.0390 🚀
Stop Loss: 0.0326 ⚠️
$STRK has delivered a clean structural expansion above its prior accumulation range, leaving behind a clear inefficiency zone. 📊 Smart money is currently holding the retest above 0.0338, confirming institutional absorption rather than a liquidity sweep of the lows.
As long as this order block invalidation level at 0.0326 remains untouched, upside expansion toward higher liquidity pools near 0.0370 and 0.0390 remains the path of least resistance. 💡 Are you taking the retest bid here or waiting for high-tf candle confirmation? 👇
⚠️ Not financial advice. Always manage your risk. 🛡️
🏷️ #STRK #LongSetup #Breakout #Altcoins #Crypto
🎯 🦈
🚨 $STRK RECLAIMS KEY RANGE HIGH AS INSTITUTIONAL DEMAND DEFENDS BREAKOUT STRUCTURE! 🦈
Entry: 0.0338 - 0.0344 ⚡
Target: 0.0355 - 0.0390 🚀
Stop Loss: 0.0326 ⚠️
$STRK has delivered a clean structural expansion above its prior accumulation range, leaving behind a clear inefficiency zone. 📊 Smart money is currently holding the retest above 0.0338, confirming institutional absorption rather than a liquidity sweep of the lows.
As long as this order block invalidation level at 0.0326 remains untouched, upside expansion toward higher liquidity pools near 0.0370 and 0.0390 remains the path of least resistance. 💡 Are you taking the retest bid here or waiting for high-tf candle confirmation? 👇
⚠️ Not financial advice. Always manage your risk. 🛡️
🏷️ #STRK #LongSetup #Breakout #Altcoins #Crypto
🎯 🦈
Entry: 0.0338 - 0.0344 ⚡
Target: 0.0355 - 0.0390 🚀
Stop Loss: 0.0326 ⚠️
$STRK has delivered a clean structural expansion above its prior accumulation range, leaving behind a clear inefficiency zone. 📊 Smart money is currently holding the retest above 0.0338, confirming institutional absorption rather than a liquidity sweep of the lows.
As long as this order block invalidation level at 0.0326 remains untouched, upside expansion toward higher liquidity pools near 0.0370 and 0.0390 remains the path of least resistance. 💡 Are you taking the retest bid here or waiting for high-tf candle confirmation? 👇
⚠️ Not financial advice. Always manage your risk. 🛡️
🏷️ #STRK #LongSetup #Breakout #Altcoins #Crypto
🎯 🦈
14

·
--
$STRK
{spot}(STRKUSDT)
🚀 $STRK LONG SETUP 🟢
🔥 Strong momentum is building — here is the setup. ⚡
Trade Plan
Entry: 0.03420
Stop Loss: 0.03210
TP1: 0.03660
Risk Note:
Trading involves substantial risk and is not suitable for everyone. Only risk capital you can afford to lose.
#STRK #CryptoTrading #SwingTrade #Bullish
$STRK
🚀 $STRK LONG SETUP 🟢
🔥 Strong momentum is building — here is the setup. ⚡
Trade Plan
Entry: 0.03420
Stop Loss: 0.03210
TP1: 0.03660
Risk Note:
Trading involves substantial risk and is not suitable for everyone. Only risk capital you can afford to lose.
#STRK #CryptoTrading #SwingTrade #Bullish
🚀 $STRK LONG SETUP 🟢
🔥 Strong momentum is building — here is the setup. ⚡
Trade Plan
Entry: 0.03420
Stop Loss: 0.03210
TP1: 0.03660
Risk Note:
Trading involves substantial risk and is not suitable for everyone. Only risk capital you can afford to lose.
#STRK #CryptoTrading #SwingTrade #Bullish
41

·
--
Bullish
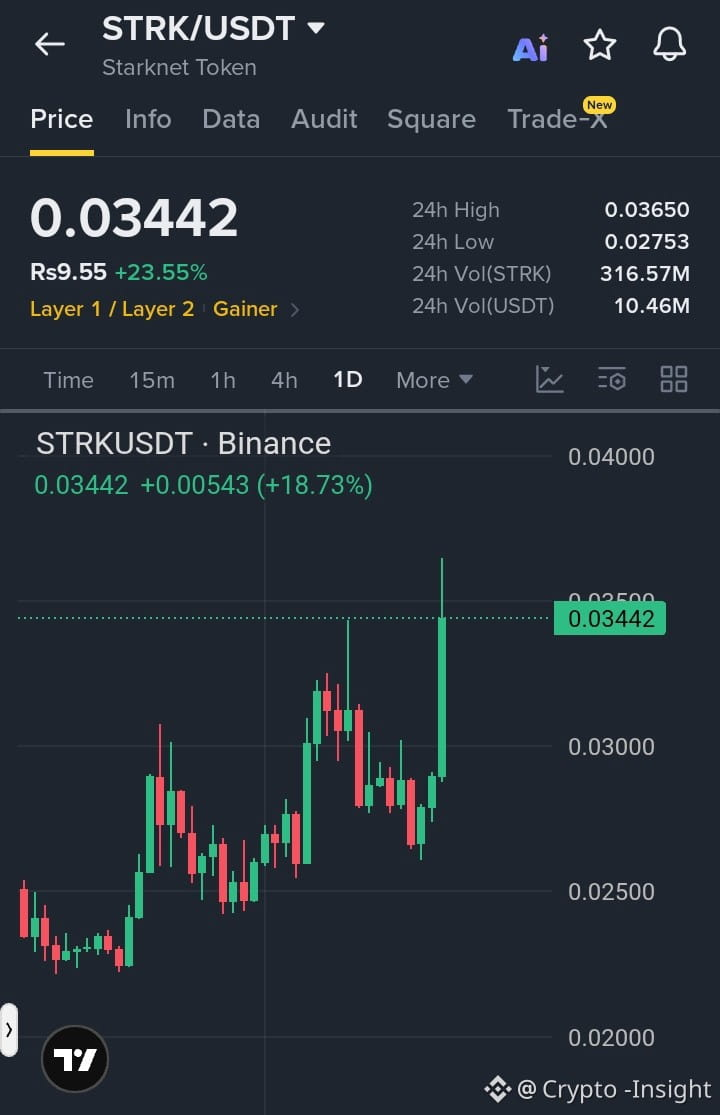
$STRK Is Pushing Into A Key Resistance Zone…!!
#STRK is showing strong bullish momentum after breaking higher and buyers are now testing the 0.03650 resistance zone If this level breaks the next targets could be 0.04000 and 0.04500 while 0.03000 remains the key support zone$ZEC
{spot}(ZECUSDT)
$ONE
{spot}(ONEUSDT)
{spot}(STRKUSDT)
$STRK Is Pushing Into A Key Resistance Zone…!!
#STRK is showing strong bullish momentum after breaking higher and buyers are now testing the 0.03650 resistance zone If this level breaks the next targets could be 0.04000 and 0.04500 while 0.03000 remains the key support zone$ZEC
$ONE
#STRK is showing strong bullish momentum after breaking higher and buyers are now testing the 0.03650 resistance zone If this level breaks the next targets could be 0.04000 and 0.04500 while 0.03000 remains the key support zone$ZEC
$ONE
1
345
·
--
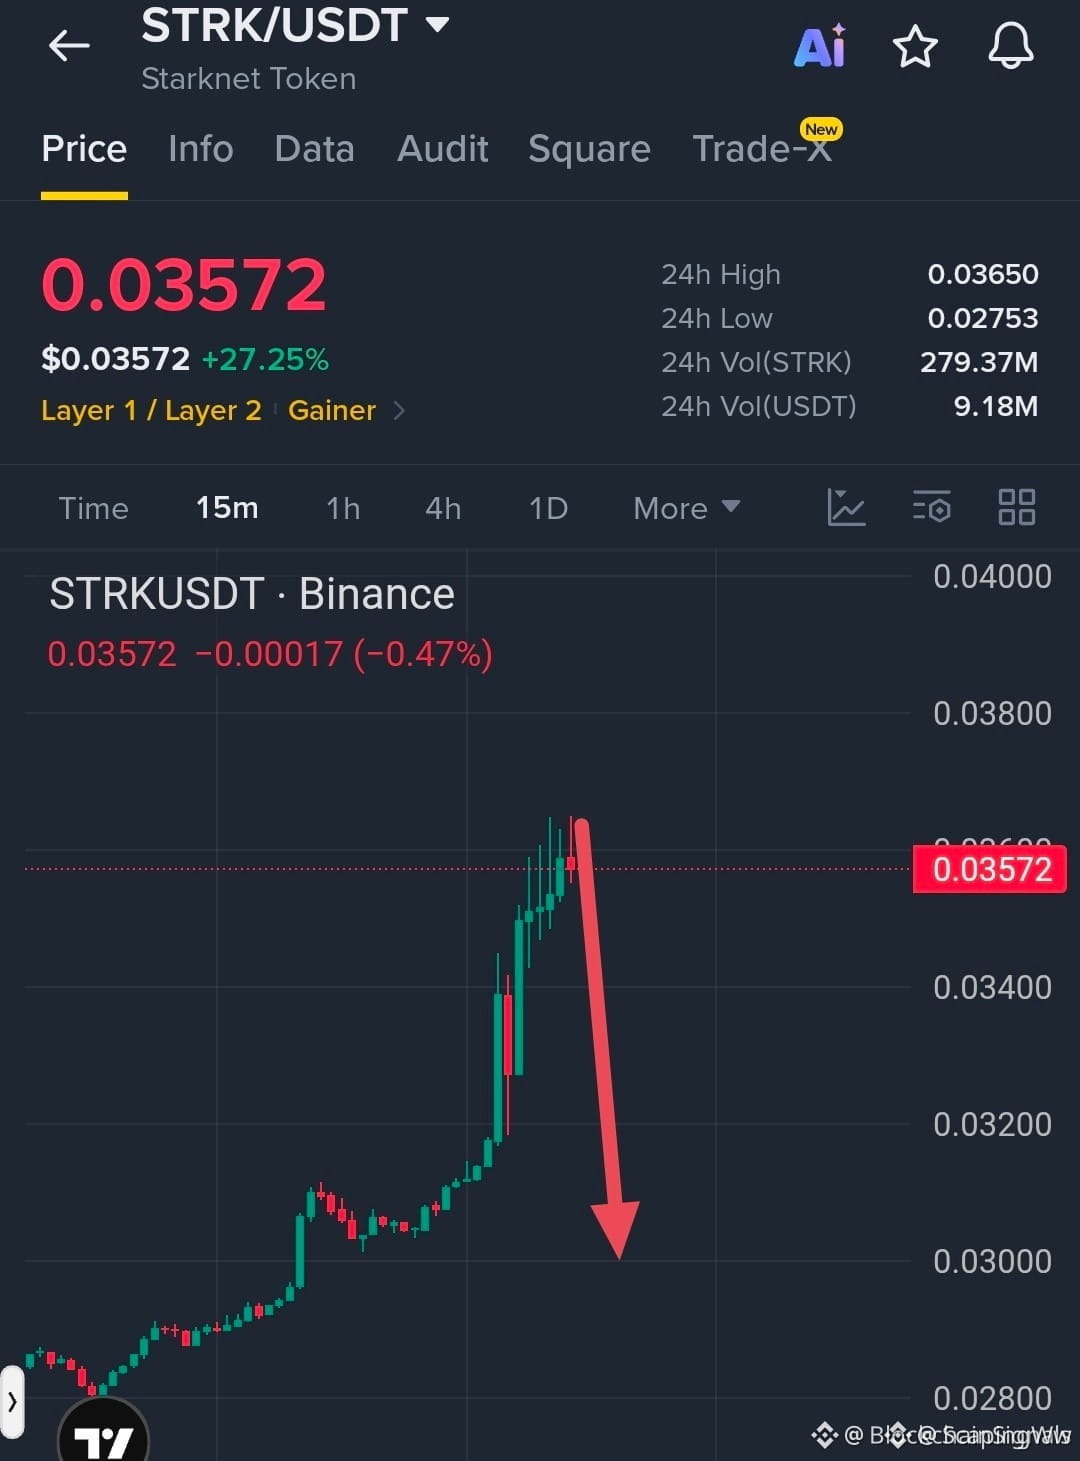
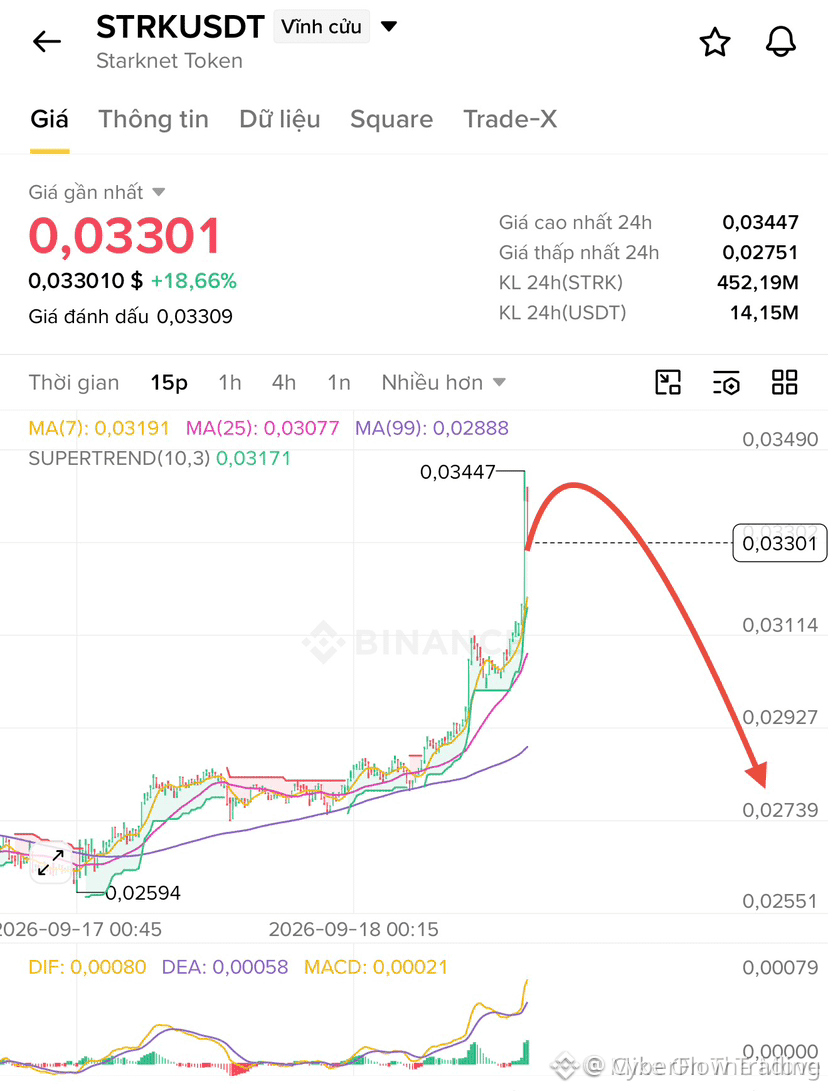
🔴 $STRK RUNS OUT OF STEAM AT RESISTANCE AS REJECTION SETS UP PULLBACK 📉
Entry: 0.03572 ⚡
Target: 0.03000 🎯
Stop Loss: 0.03650 ⚠️
📌 After a sharp upside expansion, $STRK is slamming into heavy supply and painting a clear rejection wick near the recent highs. 📊 Momentum is stalling out rapidly as buyers fail to maintain acceptance above resistance.
💡 A clean crack below this local pivot paves the way for a swift retracement toward the 0.03000 demand zone. 🔻 With upside liquidity swept and risk tightly anchored, order flow favors the sellers here. 💬 Are you taking the short setup on this rejection or waiting for support to catch the fall?
⚠️ Not financial advice. Always manage your risk. 🛡️
🏷️ #STRK #ShortSetup #Pullback #Crypto #Trading
📉 🐻
🔴 $STRK RUNS OUT OF STEAM AT RESISTANCE AS REJECTION SETS UP PULLBACK 📉
Entry: 0.03572 ⚡
Target: 0.03000 🎯
Stop Loss: 0.03650 ⚠️
📌 After a sharp upside expansion, $STRK is slamming into heavy supply and painting a clear rejection wick near the recent highs. 📊 Momentum is stalling out rapidly as buyers fail to maintain acceptance above resistance.
💡 A clean crack below this local pivot paves the way for a swift retracement toward the 0.03000 demand zone. 🔻 With upside liquidity swept and risk tightly anchored, order flow favors the sellers here. 💬 Are you taking the short setup on this rejection or waiting for support to catch the fall?
⚠️ Not financial advice. Always manage your risk. 🛡️
🏷️ #STRK #ShortSetup #Pullback #Crypto #Trading
📉 🐻
Entry: 0.03572 ⚡
Target: 0.03000 🎯
Stop Loss: 0.03650 ⚠️
📌 After a sharp upside expansion, $STRK is slamming into heavy supply and painting a clear rejection wick near the recent highs. 📊 Momentum is stalling out rapidly as buyers fail to maintain acceptance above resistance.
💡 A clean crack below this local pivot paves the way for a swift retracement toward the 0.03000 demand zone. 🔻 With upside liquidity swept and risk tightly anchored, order flow favors the sellers here. 💬 Are you taking the short setup on this rejection or waiting for support to catch the fall?
⚠️ Not financial advice. Always manage your risk. 🛡️
🏷️ #STRK #ShortSetup #Pullback #Crypto #Trading
📉 🐻
41

·
--
Bullish
STRK shorts are getting cleared near $0.0347.
The upside sweep keeps buyers pressing higher.
$STRK
{future}(STRKUSDT)
$G
{future}(GUSDT)
$ONE
{future}(ONEUSDT)
🟢 LIQUIDITY ZONE HIT 🟢
Short liquidation spotted 🧨
$4.9168K cleared at $0.0347
Upside liquidity swept — watch reaction 👀
🎯 TP Targets:
TP1: ~$0.0351
TP2: ~$0.0356
TP3: ~$0.0363
#strk
STRK shorts are getting cleared near $0.0347.
The upside sweep keeps buyers pressing higher.
$STRK
$G
$ONE
🟢 LIQUIDITY ZONE HIT 🟢
Short liquidation spotted 🧨
$4.9168K cleared at $0.0347
Upside liquidity swept — watch reaction 👀
🎯 TP Targets:
TP1: ~$0.0351
TP2: ~$0.0356
TP3: ~$0.0363
#strk
The upside sweep keeps buyers pressing higher.
$STRK
$G
$ONE
🟢 LIQUIDITY ZONE HIT 🟢
Short liquidation spotted 🧨
$4.9168K cleared at $0.0347
Upside liquidity swept — watch reaction 👀
🎯 TP Targets:
TP1: ~$0.0351
TP2: ~$0.0356
TP3: ~$0.0363
#strk
187

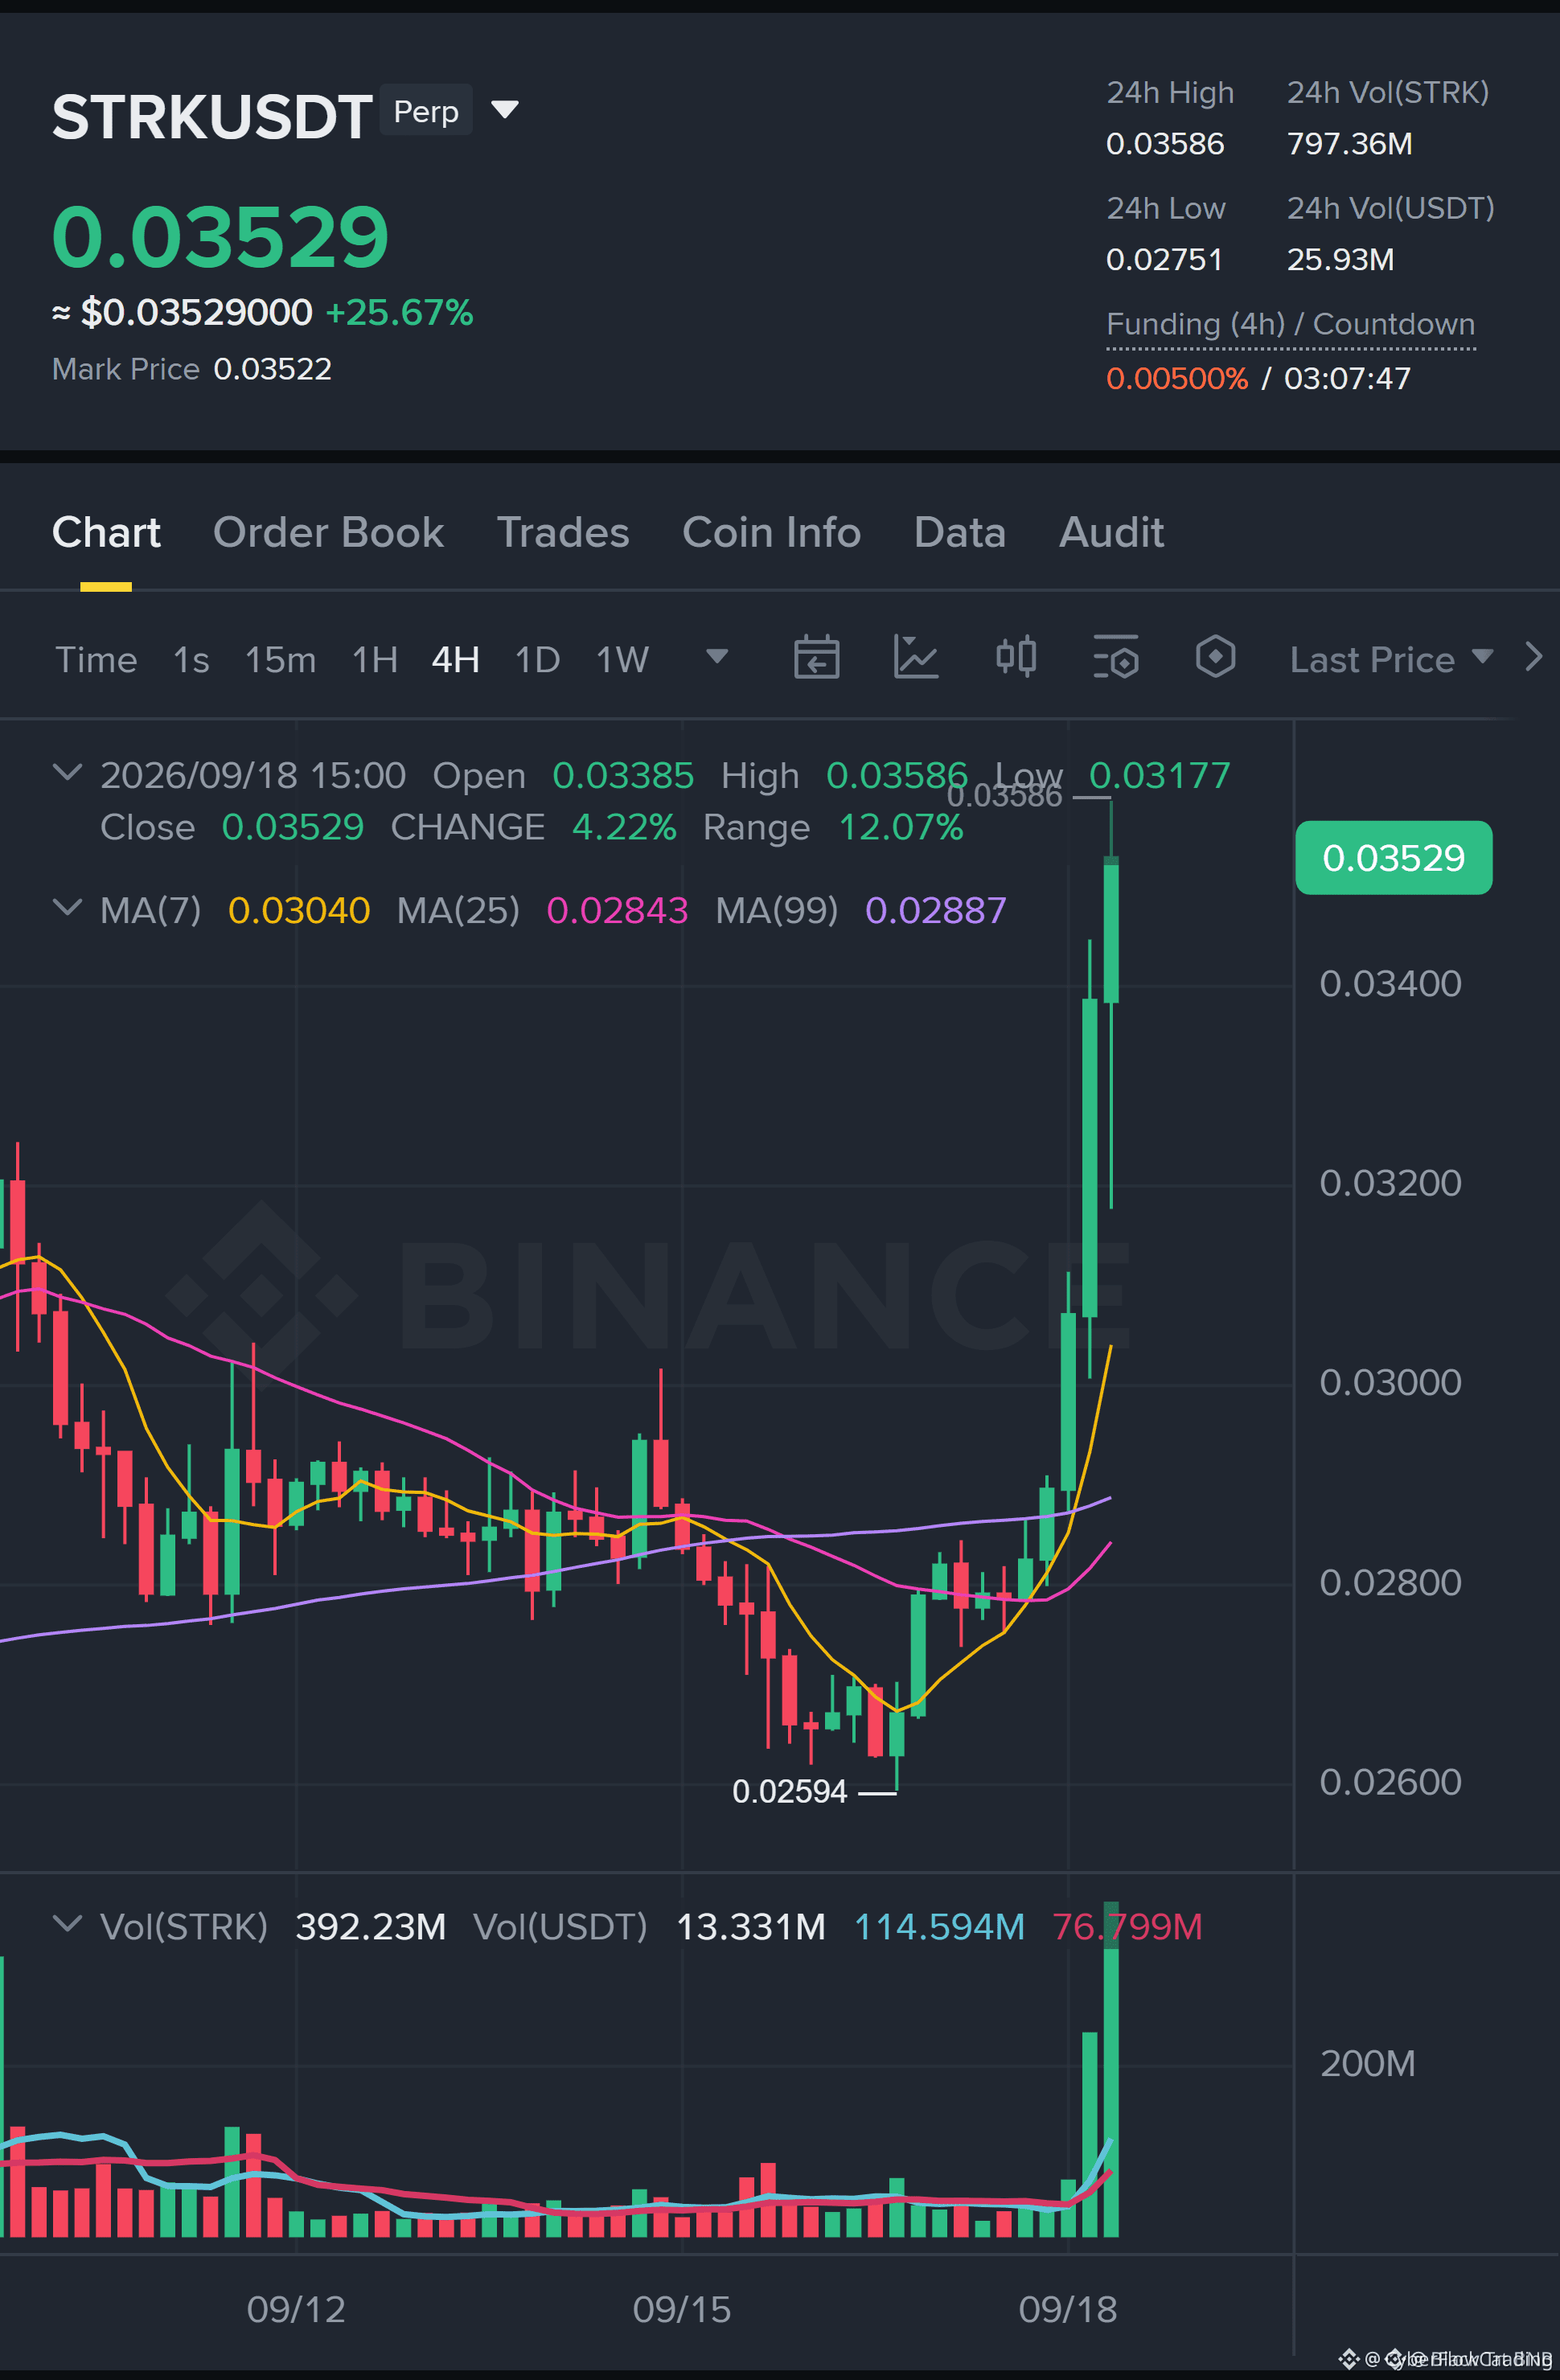
⚡ $STRK BREAKS OUT AND PREPARES A HIGH-REWARD RETEST AT DEMAND! 💥
Entry: 0.03105 - 0.03135 ⚡
Target: 0.03517 - 0.03636 🚀
Stop Loss: 0.03003 ⚠️
📌 $STRK has cleared key resistance on the hourly chart, and price is now drifting back toward the fresh order block for a structured retest. 🌊 Supply is drying up rapidly on lower timeframes, setting up a potential 4.4R expansion if buyers defend the flip zone.
💡 I am keeping this strictly on the watchlist until the 15M micro-structure prints clear bullish confirmation before executing. 📊 Risk management remains sharp with scaled profit takes as liquidity builds toward upper targets. 💬 Are you waiting for lower timeframe confirmation or setting your limit bids early? 👇
⚠️ Not financial advice. Always manage your risk. 🛡️
🏷️ #STRK #LongSetup #Breakout #Crypto #Trading
🔥 🎯
⚡ $STRK BREAKS OUT AND PREPARES A HIGH-REWARD RETEST AT DEMAND! 💥
Entry: 0.03105 - 0.03135 ⚡
Target: 0.03517 - 0.03636 🚀
Stop Loss: 0.03003 ⚠️
📌 $STRK has cleared key resistance on the hourly chart, and price is now drifting back toward the fresh order block for a structured retest. 🌊 Supply is drying up rapidly on lower timeframes, setting up a potential 4.4R expansion if buyers defend the flip zone.
💡 I am keeping this strictly on the watchlist until the 15M micro-structure prints clear bullish confirmation before executing. 📊 Risk management remains sharp with scaled profit takes as liquidity builds toward upper targets. 💬 Are you waiting for lower timeframe confirmation or setting your limit bids early? 👇
⚠️ Not financial advice. Always manage your risk. 🛡️
🏷️ #STRK #LongSetup #Breakout #Crypto #Trading
🔥 🎯
Entry: 0.03105 - 0.03135 ⚡
Target: 0.03517 - 0.03636 🚀
Stop Loss: 0.03003 ⚠️
📌 $STRK has cleared key resistance on the hourly chart, and price is now drifting back toward the fresh order block for a structured retest. 🌊 Supply is drying up rapidly on lower timeframes, setting up a potential 4.4R expansion if buyers defend the flip zone.
💡 I am keeping this strictly on the watchlist until the 15M micro-structure prints clear bullish confirmation before executing. 📊 Risk management remains sharp with scaled profit takes as liquidity builds toward upper targets. 💬 Are you waiting for lower timeframe confirmation or setting your limit bids early? 👇
⚠️ Not financial advice. Always manage your risk. 🛡️
🏷️ #STRK #LongSetup #Breakout #Crypto #Trading
🔥 🎯
32

·
--
Bullish
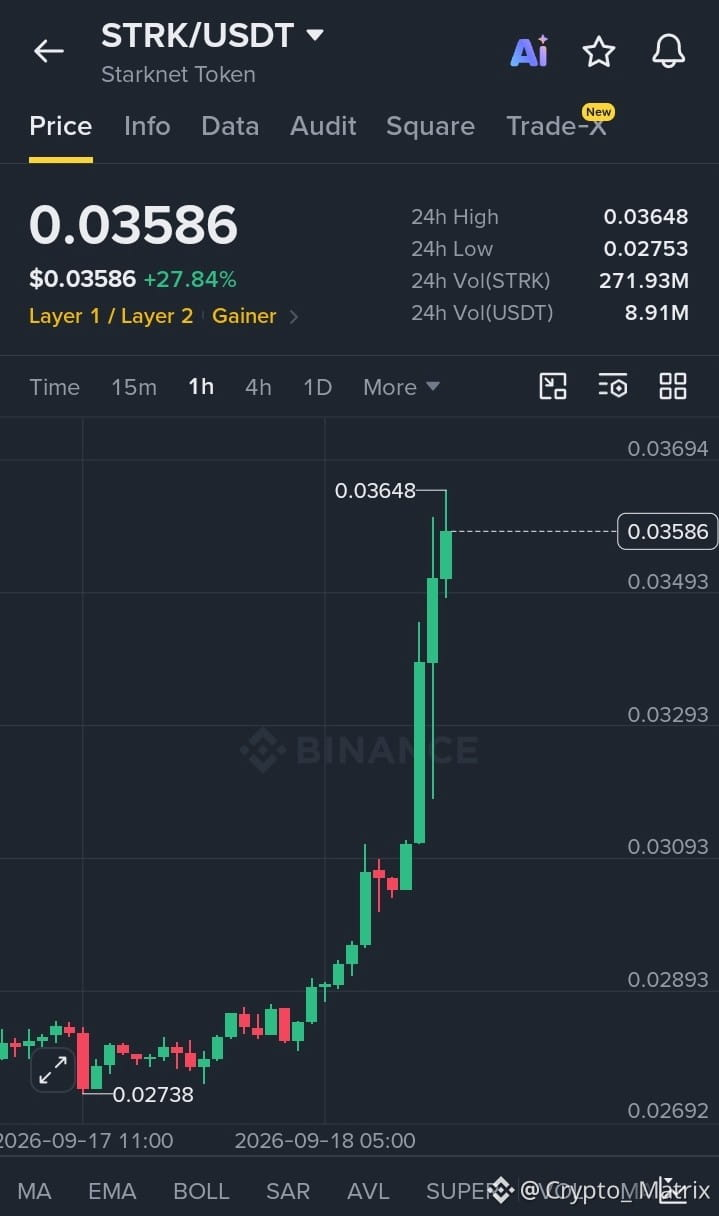
Take A Look At What $STRK Is Doing Right Now…!!
#STRK is showing massive bullish momentum after a strong expansion move from the 0.02738 support level towards the 0.03648 high position where price is currently experiencing a mild pause as buyers attempt to maintain control for another potential push toward 0.03850 and 0.04000 while 0.03293 serves as the immediate key support zone
$SOL
{spot}(SOLUSDT)
Take A Look At What $STRK Is Doing Right Now…!!
#STRK is showing massive bullish momentum after a strong expansion move from the 0.02738 support level towards the 0.03648 high position where price is currently experiencing a mild pause as buyers attempt to maintain control for another potential push toward 0.03850 and 0.04000 while 0.03293 serves as the immediate key support zone
$SOL
#STRK is showing massive bullish momentum after a strong expansion move from the 0.02738 support level towards the 0.03648 high position where price is currently experiencing a mild pause as buyers attempt to maintain control for another potential push toward 0.03850 and 0.04000 while 0.03293 serves as the immediate key support zone
$SOL
2
57

·
--
🟢 Coin of the Hour: $STRK
STRK is catching fire with a remarkable 20.19% price surge over the last 24 hours, currently trading at 0.03357! 🚀 Its trading volume has soared to 10,287,449 USDT, signaling strong market interest. Price action has seen a climb from its 24h low of 0.02753, now aiming towards the 0.0365 high. On the 1h timeframe, technical indicators show strong bullish momentum: the RSI (14) is at 75.60, indicating powerful buying pressure, and the current price is comfortably above both the SMA 20 (0.030166) and SMA 50 (0.028537). This upward trend is definitely one to watch! 🔥
Why this coin? A strong 24-hour price move is attracting attention.
Quick fact: 79 of 85 tracked USDT pairs are currently trading higher over 24 hours.
Will STRK continue its upward climb? 📈
#STRK #Crypto #BinanceSquare #Altcoin #MarketUpdate
Not financial advice. DYOR.
🟢 Coin of the Hour: $STRK
STRK is catching fire with a remarkable 20.19% price surge over the last 24 hours, currently trading at 0.03357! 🚀 Its trading volume has soared to 10,287,449 USDT, signaling strong market interest. Price action has seen a climb from its 24h low of 0.02753, now aiming towards the 0.0365 high. On the 1h timeframe, technical indicators show strong bullish momentum: the RSI (14) is at 75.60, indicating powerful buying pressure, and the current price is comfortably above both the SMA 20 (0.030166) and SMA 50 (0.028537). This upward trend is definitely one to watch! 🔥
Why this coin? A strong 24-hour price move is attracting attention.
Quick fact: 79 of 85 tracked USDT pairs are currently trading higher over 24 hours.
Will STRK continue its upward climb? 📈
#STRK #Crypto #BinanceSquare #Altcoin #MarketUpdate
Not financial advice. DYOR.
STRK is catching fire with a remarkable 20.19% price surge over the last 24 hours, currently trading at 0.03357! 🚀 Its trading volume has soared to 10,287,449 USDT, signaling strong market interest. Price action has seen a climb from its 24h low of 0.02753, now aiming towards the 0.0365 high. On the 1h timeframe, technical indicators show strong bullish momentum: the RSI (14) is at 75.60, indicating powerful buying pressure, and the current price is comfortably above both the SMA 20 (0.030166) and SMA 50 (0.028537). This upward trend is definitely one to watch! 🔥
Why this coin? A strong 24-hour price move is attracting attention.
Quick fact: 79 of 85 tracked USDT pairs are currently trading higher over 24 hours.
Will STRK continue its upward climb? 📈
#STRK #Crypto #BinanceSquare #Altcoin #MarketUpdate
Not financial advice. DYOR.
54

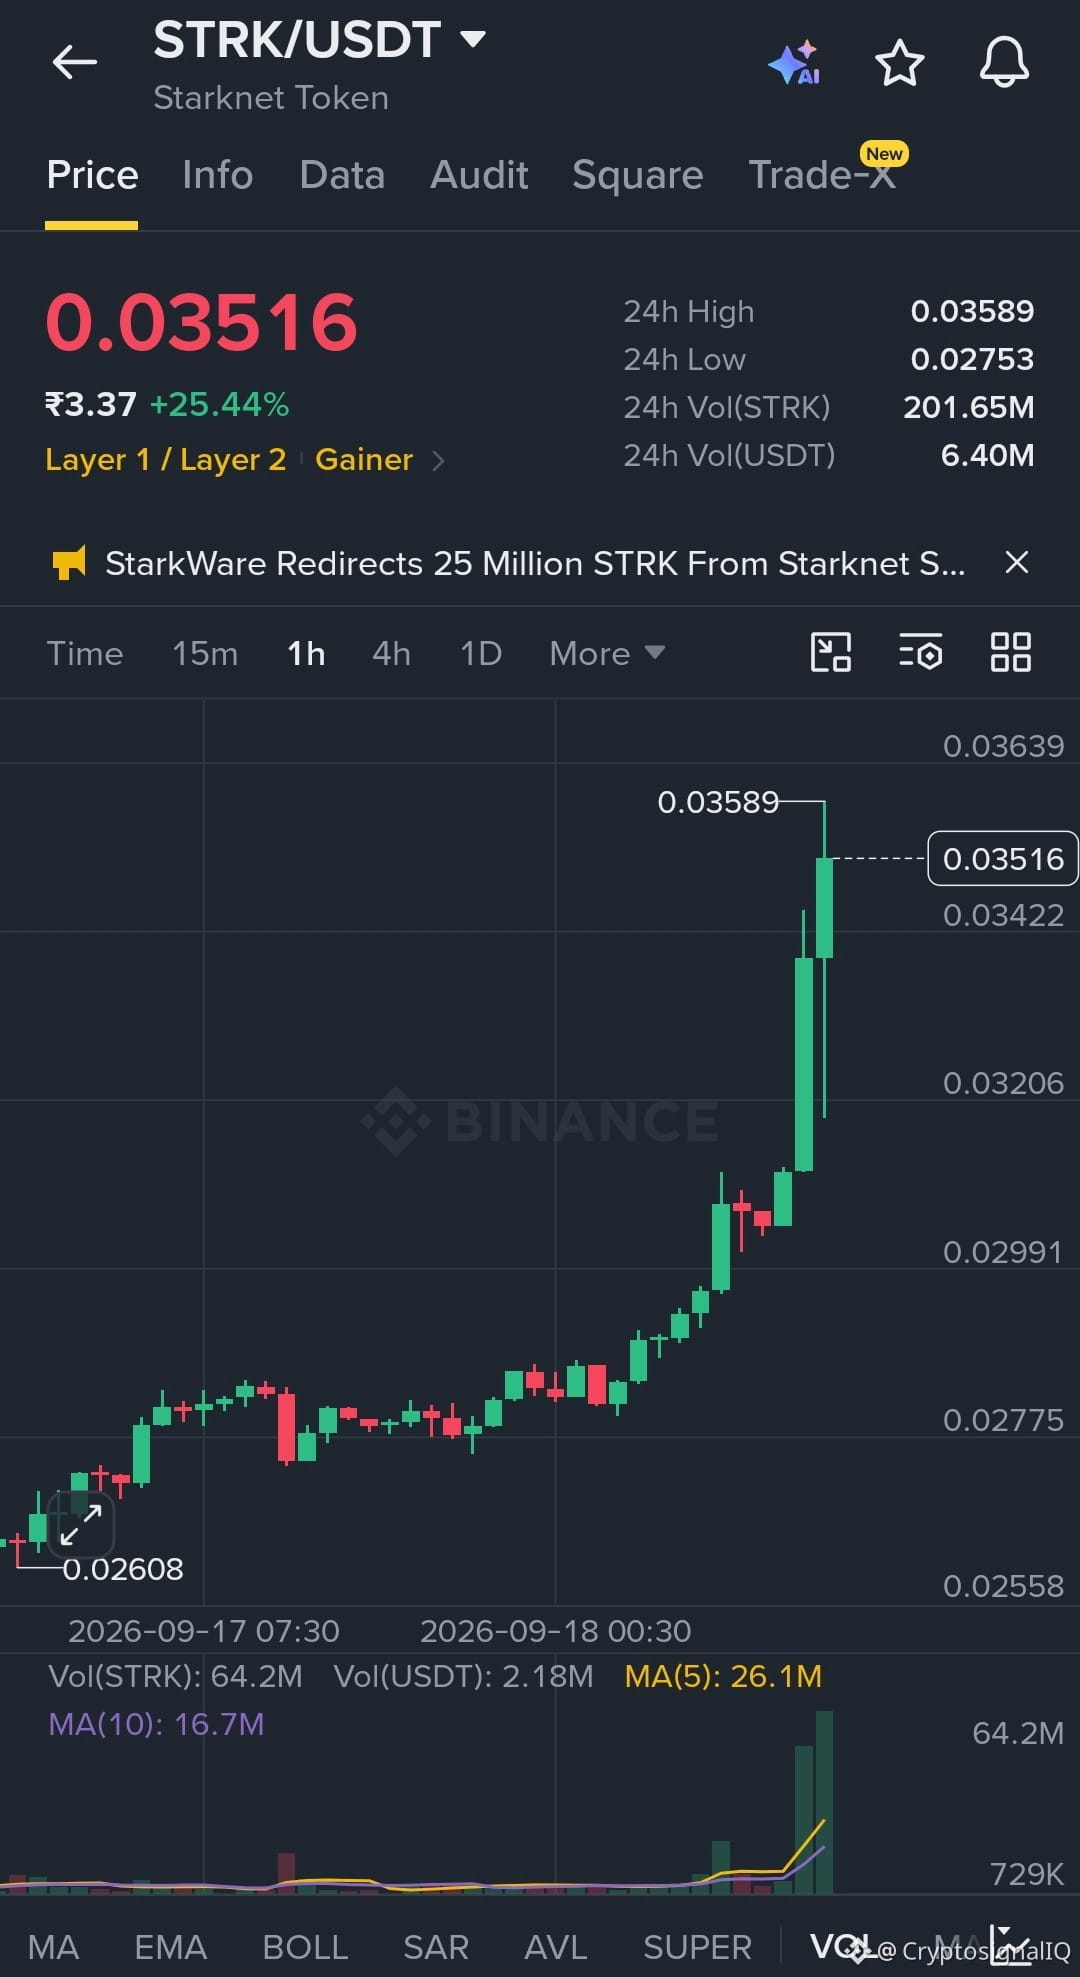
$STRK /USDT is seeing heavy accumulation as strong buying interest shreds past immediate overhead ceilings to drive an aggressive continuation phase.
STRK /USDT
EP 0.0305 – 0.0330
TP:
* TP1: 0.0390
* TP2: 0.0440
* TP3: 0.0500
SL 0.0279
STRK is pressing upward near the 0.0351 mark following a powerful vertical impulse from the lower base. Technical readings display heavy buying energy, with the MACD expanding sharply into positive green bars and the RSI sitting at an elevated 94.77 to highlight strong near-term demand. The KDJ lines show a strong upward slant, while order book depth highlights active buyer backing holding 61.52% of the liquidity as participants challenge local supply zones.
Trade #strk here
{future}(STRKUSDT)
$G
{future}(GUSDT)
$APM
{alpha}(560x72a22faa6a522c81a8f5d508381e18af3da0921e)
$STRK /USDT is seeing heavy accumulation as strong buying interest shreds past immediate overhead ceilings to drive an aggressive continuation phase.
STRK /USDT
EP 0.0305 – 0.0330
TP:
* TP1: 0.0390
* TP2: 0.0440
* TP3: 0.0500
SL 0.0279
STRK is pressing upward near the 0.0351 mark following a powerful vertical impulse from the lower base. Technical readings display heavy buying energy, with the MACD expanding sharply into positive green bars and the RSI sitting at an elevated 94.77 to highlight strong near-term demand. The KDJ lines show a strong upward slant, while order book depth highlights active buyer backing holding 61.52% of the liquidity as participants challenge local supply zones.
Trade #strk here
$G
$APM
STRK /USDT
EP 0.0305 – 0.0330
TP:
* TP1: 0.0390
* TP2: 0.0440
* TP3: 0.0500
SL 0.0279
STRK is pressing upward near the 0.0351 mark following a powerful vertical impulse from the lower base. Technical readings display heavy buying energy, with the MACD expanding sharply into positive green bars and the RSI sitting at an elevated 94.77 to highlight strong near-term demand. The KDJ lines show a strong upward slant, while order book depth highlights active buyer backing holding 61.52% of the liquidity as participants challenge local supply zones.
Trade #strk here
$G
$APM
1
444

·
--
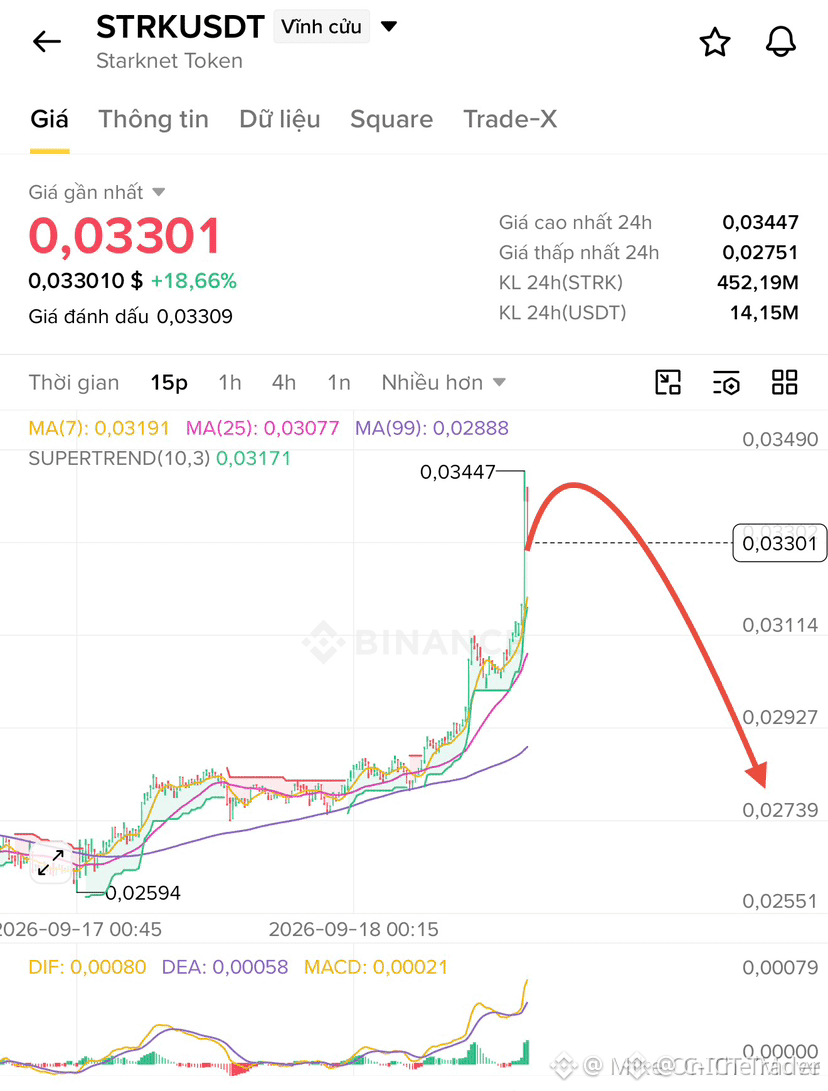
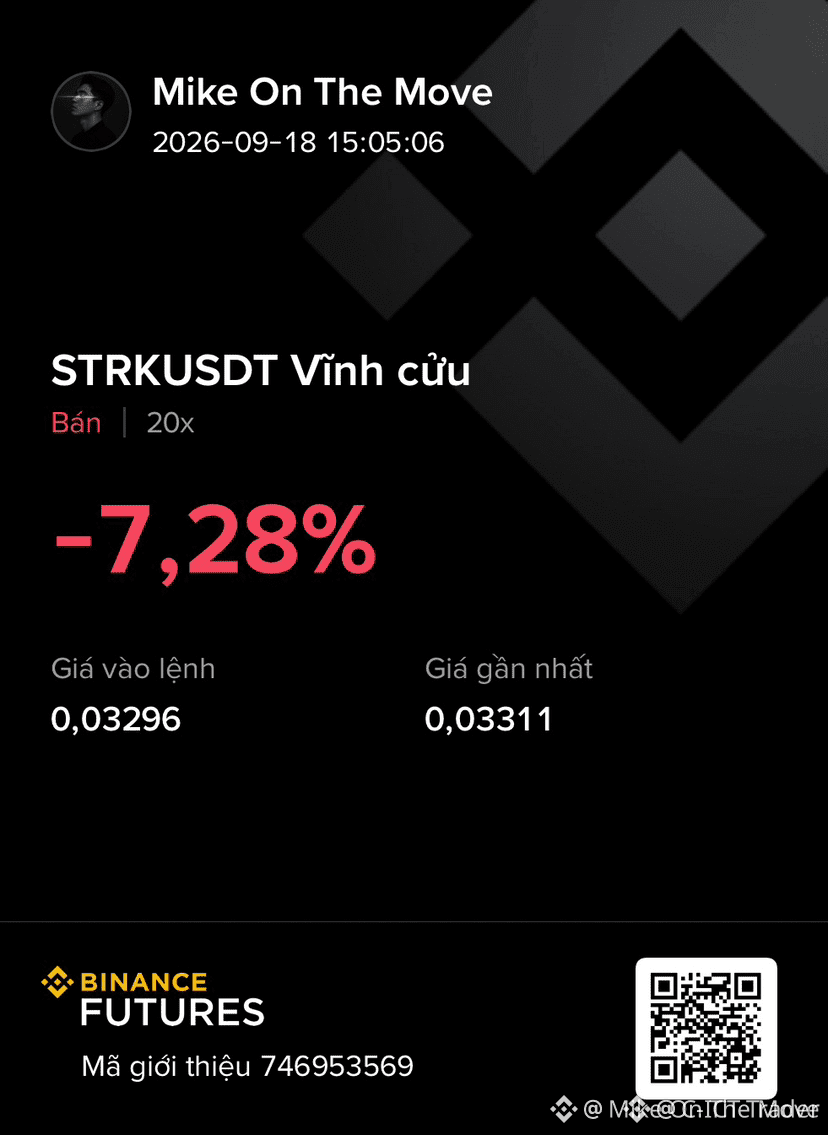
🚨 $STRK FAILS TO RECLAIM PREMIUM EFFICIENCY AS HEAVY BEARISH STRUCTURE BREAK IMPENDS 📉
Entry: 0.0328 - 0.0339 ⚡
Target: 0.0324 - 0.0297 🚀
Stop Loss: 0.0360 ⚠️
📌 Institutional sellers are aggressively defending the supply zone around 0.0339, creating a textbook distribution pattern as upside momentum falters. 🔍 Order flow shows lower high sweeps, leaving key sell-side liquidity pools underneath completely vulnerable.
📊 As buy-side interest dries up within this overhead premium array, price action favors an immediate displacement down toward lower imbalance targets. 💬 Will smart money complete this downside liquidity sweep, or do you see buyers mounting a counter-trend defense? 👇
⚠️ Not financial advice. Always manage your risk. 🛡️
🏷️ #STRK #ShortSetup #MarketStructure #Crypto
📉 🦈
🚨 $STRK FAILS TO RECLAIM PREMIUM EFFICIENCY AS HEAVY BEARISH STRUCTURE BREAK IMPENDS 📉
Entry: 0.0328 - 0.0339 ⚡
Target: 0.0324 - 0.0297 🚀
Stop Loss: 0.0360 ⚠️
📌 Institutional sellers are aggressively defending the supply zone around 0.0339, creating a textbook distribution pattern as upside momentum falters. 🔍 Order flow shows lower high sweeps, leaving key sell-side liquidity pools underneath completely vulnerable.
📊 As buy-side interest dries up within this overhead premium array, price action favors an immediate displacement down toward lower imbalance targets. 💬 Will smart money complete this downside liquidity sweep, or do you see buyers mounting a counter-trend defense? 👇
⚠️ Not financial advice. Always manage your risk. 🛡️
🏷️ #STRK #ShortSetup #MarketStructure #Crypto
📉 🦈
Entry: 0.0328 - 0.0339 ⚡
Target: 0.0324 - 0.0297 🚀
Stop Loss: 0.0360 ⚠️
📌 Institutional sellers are aggressively defending the supply zone around 0.0339, creating a textbook distribution pattern as upside momentum falters. 🔍 Order flow shows lower high sweeps, leaving key sell-side liquidity pools underneath completely vulnerable.
📊 As buy-side interest dries up within this overhead premium array, price action favors an immediate displacement down toward lower imbalance targets. 💬 Will smart money complete this downside liquidity sweep, or do you see buyers mounting a counter-trend defense? 👇
⚠️ Not financial advice. Always manage your risk. 🛡️
🏷️ #STRK #ShortSetup #MarketStructure #Crypto
📉 🦈
1
94

·
--
Watching $STRK closely today—here is my active short trade setup.
⚡ $STRK — SHORT SETUP
📍 Entry: 0.035933 – 0.036148
🎯 TP1: 0.035504
🎯 TP2: 0.035217
🎯 TP3: 0.034788
🛑 Stop Loss: 0.036363
Trade here 👇
📌 Trade management rules: see pinned post.
How are you playing $STRK today? Drop your thoughts below and follow for daily setups!
#WriteToEarn #STRK #CryptoTrading #BinanceSquare #Crypto
Watching $STRK closely today—here is my active short trade setup.
⚡ $STRK — SHORT SETUP
📍 Entry: 0.035933 – 0.036148
🎯 TP1: 0.035504
🎯 TP2: 0.035217
🎯 TP3: 0.034788
🛑 Stop Loss: 0.036363
Trade here 👇
📌 Trade management rules: see pinned post.
How are you playing $STRK today? Drop your thoughts below and follow for daily setups!
#WriteToEarn #STRK #CryptoTrading #BinanceSquare #Crypto
⚡ $STRK — SHORT SETUP
📍 Entry: 0.035933 – 0.036148
🎯 TP1: 0.035504
🎯 TP2: 0.035217
🎯 TP3: 0.034788
🛑 Stop Loss: 0.036363
Trade here 👇
📌 Trade management rules: see pinned post.
How are you playing $STRK today? Drop your thoughts below and follow for daily setups!
#WriteToEarn #STRK #CryptoTrading #BinanceSquare #Crypto
ChartScout:
Tight setup with clearly defined levels, but STRK’s recent volatility makes confirmation essential. I’d watch whether price rejects the entry zone before targeting the lower levels, with $0.036363 as the key invalidation. ChartScout can help track it. DYOR.
1
1
31
·
--
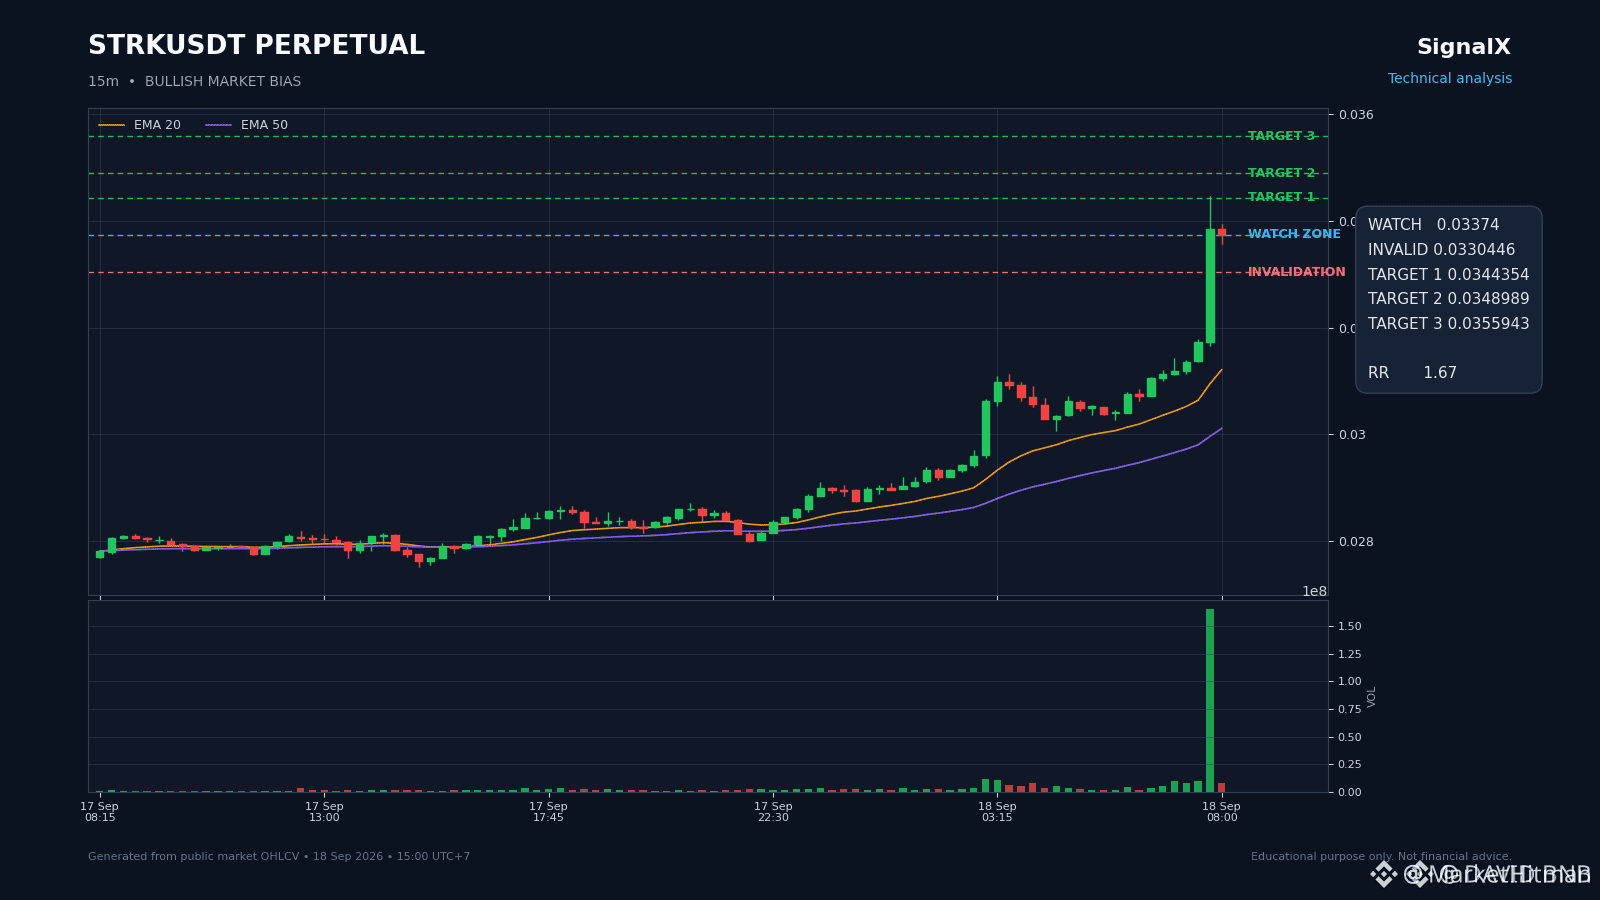
⚡ $STRK ABSORBING SELLER VOLUME AS BULLS PREPARE FOR A CLEAN EXPANSION RUN! 🚀
Entry: 0.03374 ⚡
Target: 0.0344354 - 0.0355943 🚀
Stop Loss: 0.0330446 ⚠️
📌 Price action on $STRK is compressing into a tight reaction area around 0.03374 as sell-side pressure steadily dries up. 📊 Controlled volatility here signals smart money accumulation before the expansion phase toward higher technical levels.
💡 As long as 0.0330446 holds firm as our line in the sand, the path of least resistance remains sharply tilted to the upside. ⚡ Risk is razor-sharp, leaving maximum upside open as buyers defend this pivot.
💬 Are you positioning early inside this accumulation zone or waiting for breakout confirmation above initial targets? 👇
⚠️ Not financial advice. Always manage your risk. 🛡️
🏷️ #STRK #BullishSetup #Altcoins #Trading #Crypto
🔥 💎
⚡ $STRK ABSORBING SELLER VOLUME AS BULLS PREPARE FOR A CLEAN EXPANSION RUN! 🚀
Entry: 0.03374 ⚡
Target: 0.0344354 - 0.0355943 🚀
Stop Loss: 0.0330446 ⚠️
📌 Price action on $STRK is compressing into a tight reaction area around 0.03374 as sell-side pressure steadily dries up. 📊 Controlled volatility here signals smart money accumulation before the expansion phase toward higher technical levels.
💡 As long as 0.0330446 holds firm as our line in the sand, the path of least resistance remains sharply tilted to the upside. ⚡ Risk is razor-sharp, leaving maximum upside open as buyers defend this pivot.
💬 Are you positioning early inside this accumulation zone or waiting for breakout confirmation above initial targets? 👇
⚠️ Not financial advice. Always manage your risk. 🛡️
🏷️ #STRK #BullishSetup #Altcoins #Trading #Crypto
🔥 💎
Entry: 0.03374 ⚡
Target: 0.0344354 - 0.0355943 🚀
Stop Loss: 0.0330446 ⚠️
📌 Price action on $STRK is compressing into a tight reaction area around 0.03374 as sell-side pressure steadily dries up. 📊 Controlled volatility here signals smart money accumulation before the expansion phase toward higher technical levels.
💡 As long as 0.0330446 holds firm as our line in the sand, the path of least resistance remains sharply tilted to the upside. ⚡ Risk is razor-sharp, leaving maximum upside open as buyers defend this pivot.
💬 Are you positioning early inside this accumulation zone or waiting for breakout confirmation above initial targets? 👇
⚠️ Not financial advice. Always manage your risk. 🛡️
🏷️ #STRK #BullishSetup #Altcoins #Trading #Crypto
🔥 💎
110

·
--
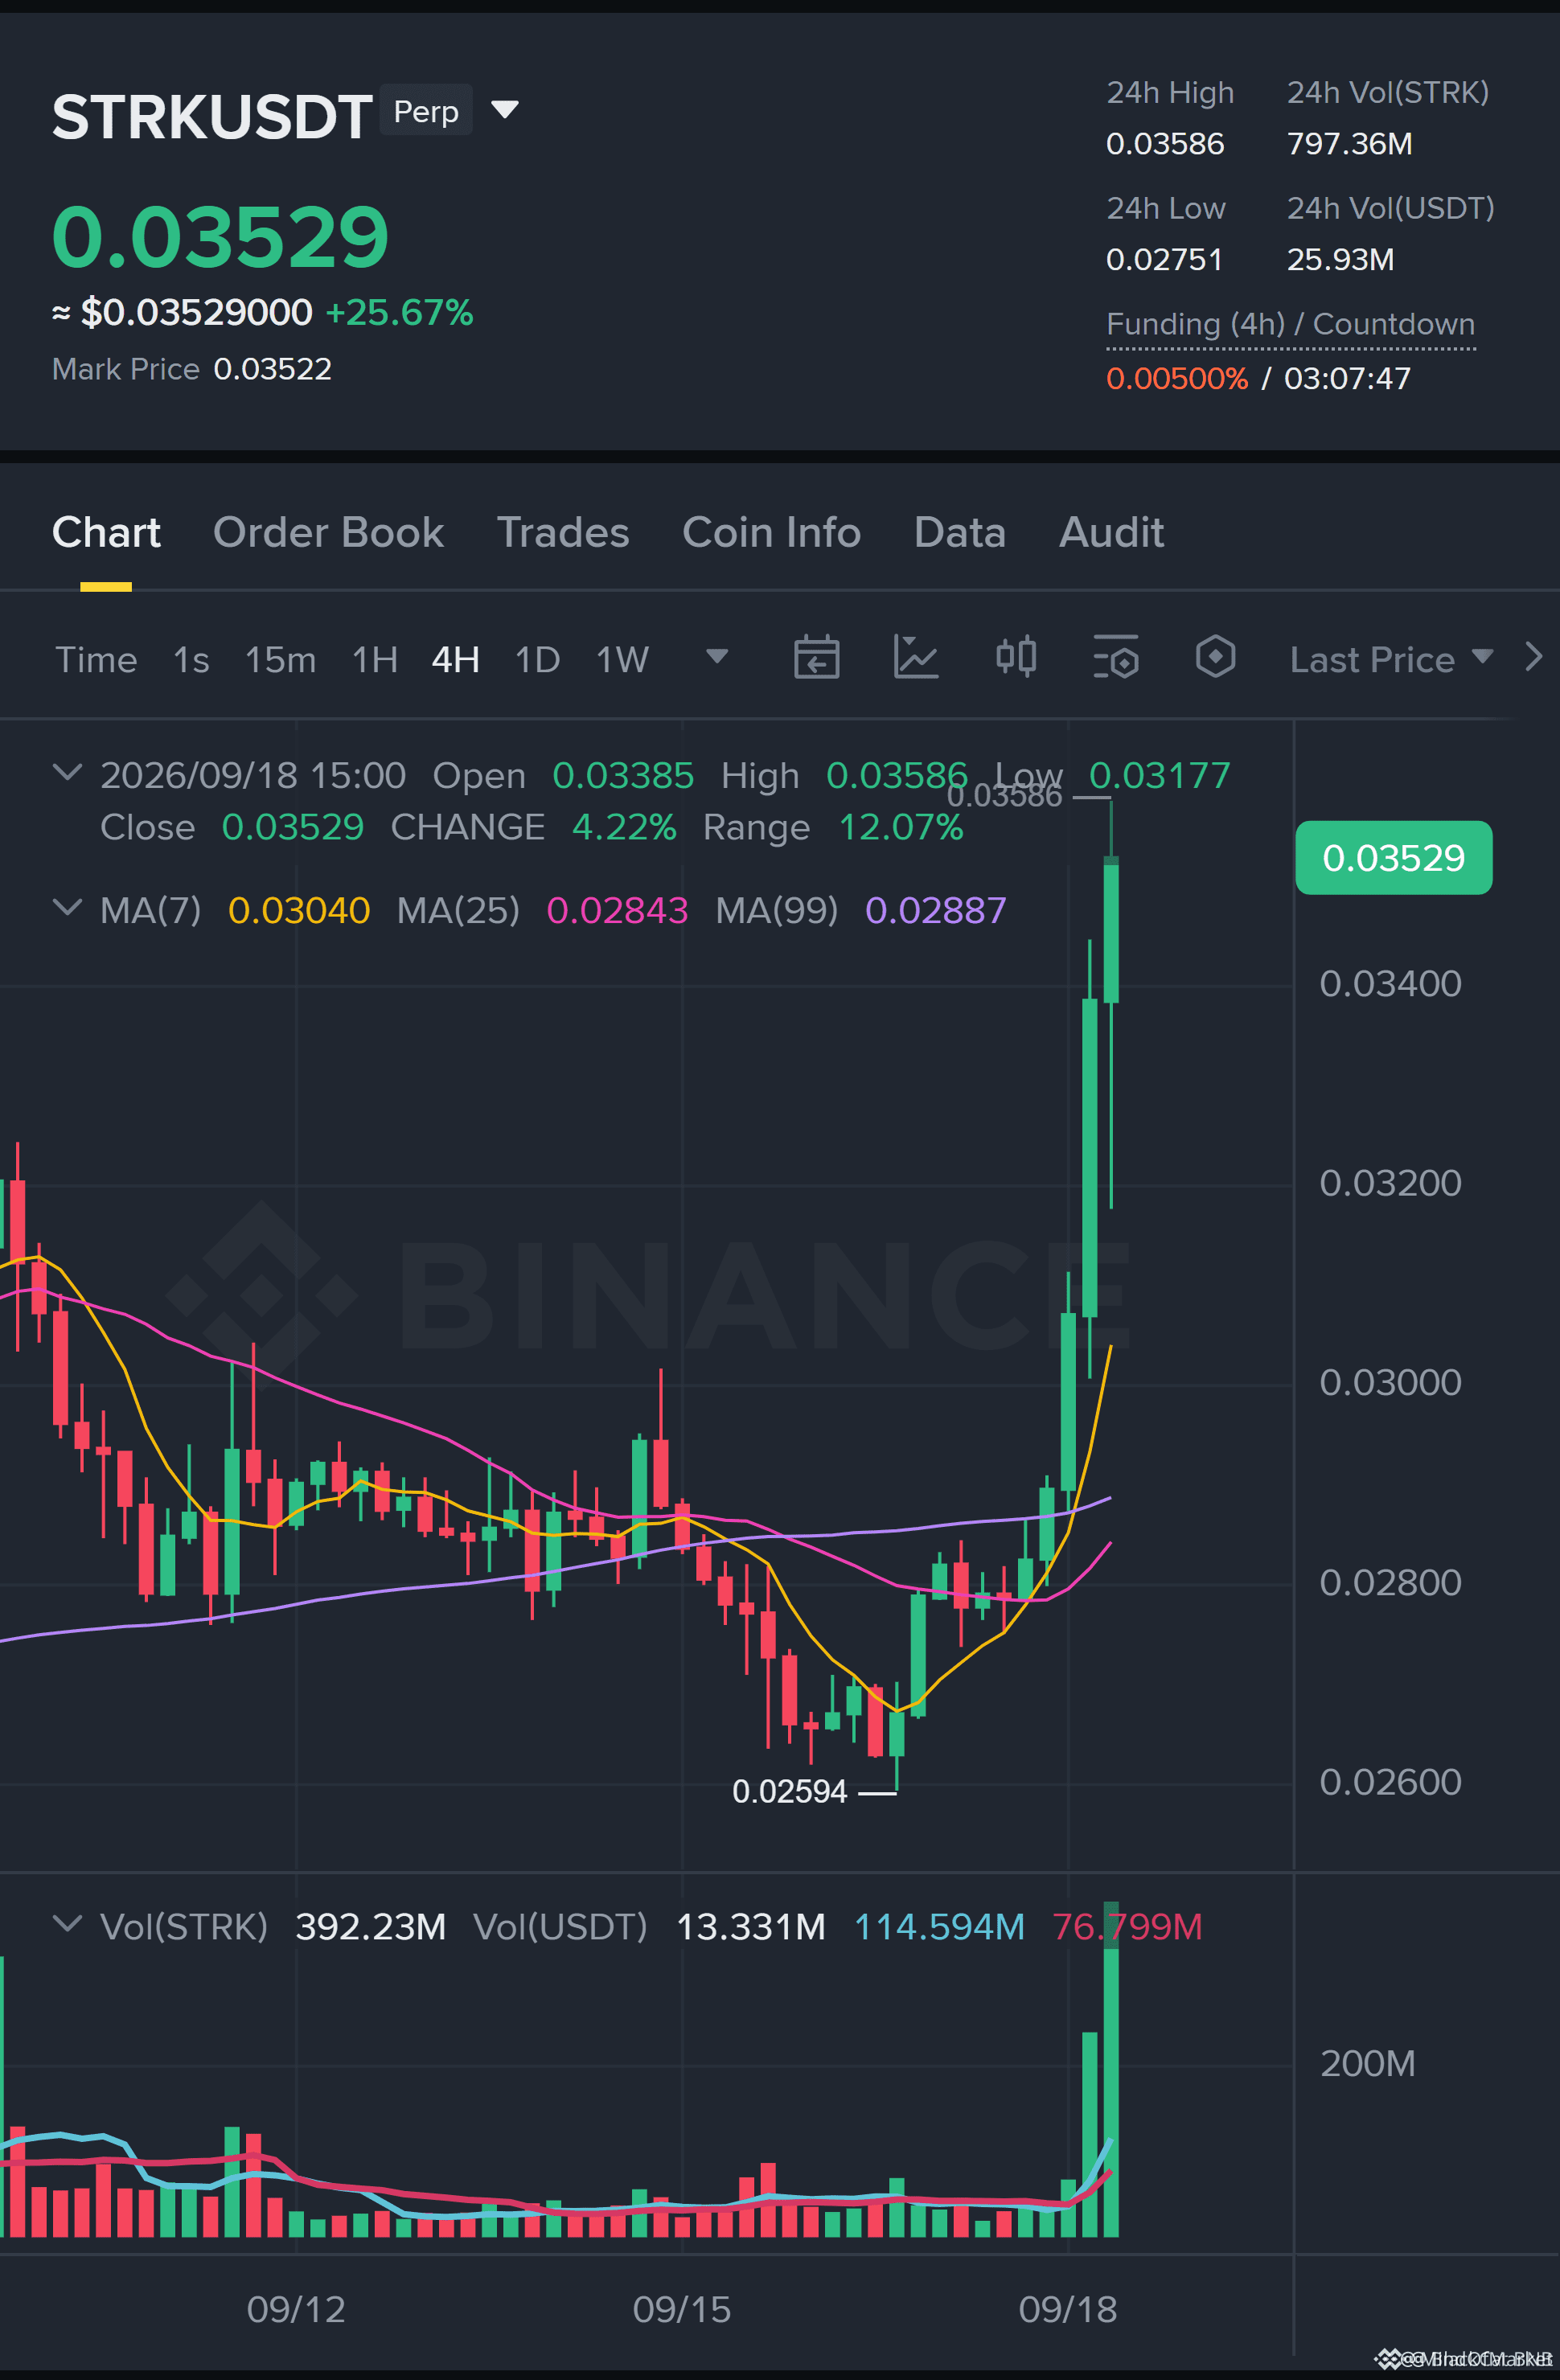
🚨 $STRK BREAKOUT RETEST IN PLAY BUT INSTITUTIONAL CONFIRMATION IS KEY 🦈
Entry: 0.03105 - 0.03135 ⚡
Target: 0.03517 🚀
Stop Loss: 0.03003 ⚠️
📌 $STRK has cleared structural resistance on the 1H timeframe, leaving behind an inefficient demand zone. Smart money is currently allowing price to drift back toward the 0.03105 point of interest to probe remaining sell-side liquidity. 📊
🔍 While the setup offers an exceptional risk-to-reward ratio topping 4.4R across upper targets, execution discipline is mandatory. We are keeping this strictly on the watchlist until the 15M chart prints a clean structural flip to confirm buyer absorption. 💡
💬 Are you taking aggressive limit bids here or waiting for lower timeframe confirmation? 👇
⚠️ Not financial advice. Always manage your risk. 🛡️
🏷️ #STRK #LongSetup #Crypto #MarketStructure
🎯 🦈
🚨 $STRK BREAKOUT RETEST IN PLAY BUT INSTITUTIONAL CONFIRMATION IS KEY 🦈
Entry: 0.03105 - 0.03135 ⚡
Target: 0.03517 🚀
Stop Loss: 0.03003 ⚠️
📌 $STRK has cleared structural resistance on the 1H timeframe, leaving behind an inefficient demand zone. Smart money is currently allowing price to drift back toward the 0.03105 point of interest to probe remaining sell-side liquidity. 📊
🔍 While the setup offers an exceptional risk-to-reward ratio topping 4.4R across upper targets, execution discipline is mandatory. We are keeping this strictly on the watchlist until the 15M chart prints a clean structural flip to confirm buyer absorption. 💡
💬 Are you taking aggressive limit bids here or waiting for lower timeframe confirmation? 👇
⚠️ Not financial advice. Always manage your risk. 🛡️
🏷️ #STRK #LongSetup #Crypto #MarketStructure
🎯 🦈
Entry: 0.03105 - 0.03135 ⚡
Target: 0.03517 🚀
Stop Loss: 0.03003 ⚠️
📌 $STRK has cleared structural resistance on the 1H timeframe, leaving behind an inefficient demand zone. Smart money is currently allowing price to drift back toward the 0.03105 point of interest to probe remaining sell-side liquidity. 📊
🔍 While the setup offers an exceptional risk-to-reward ratio topping 4.4R across upper targets, execution discipline is mandatory. We are keeping this strictly on the watchlist until the 15M chart prints a clean structural flip to confirm buyer absorption. 💡
💬 Are you taking aggressive limit bids here or waiting for lower timeframe confirmation? 👇
⚠️ Not financial advice. Always manage your risk. 🛡️
🏷️ #STRK #LongSetup #Crypto #MarketStructure
🎯 🦈
Feed-Creator-1b62614e2:
Hadi oradan. 0.0378 kırar bu. Çok belli. Ytd
1
58

·
--
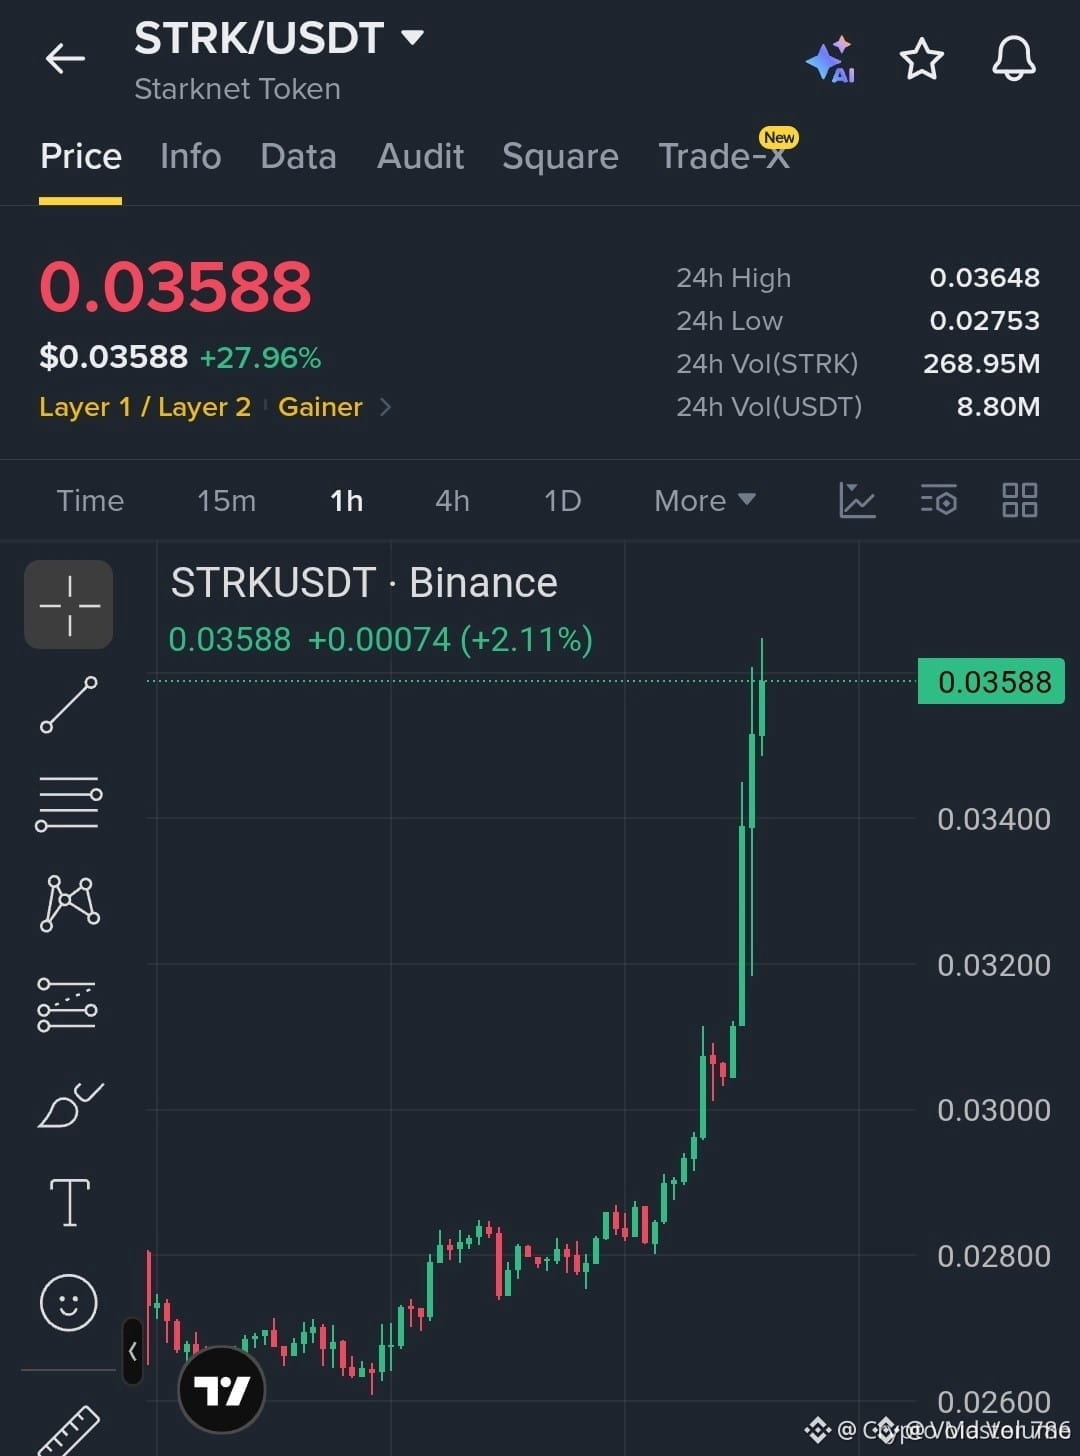
🦈 $STRK SWEEPS DEMAND ZONE FOR TEXTBOOK LIQUIDITY RECLAIM SETUP! 📈
Entry: $0.0345 - $0.0358 ⚡
Target: $0.0370 / $0.0385 / $0.0400 🚀
Stop Loss: $0.0328 ⚠️
$STRK has printed a clean institutional liquidity sweep into the primary demand pocket, absorbing sell-side pressure while clearing weak positions. 📊 Order flow data shows steady accumulation within this lower range, establishing a firm base for structural expansion.
💡 Respecting the stop loss keeps the upside pathway toward upper inefficiency fills clear, offering an asymmetrical risk-to-reward setup. 💬 Are you accumulating inside this order block or waiting for lower timeframe confirmation? 👇
⚠️ Not financial advice. Always manage your risk. 🛡️
🏷️ #STRK #LongSetup #MarketStructure #Crypto
🎯 🦈
🦈 $STRK SWEEPS DEMAND ZONE FOR TEXTBOOK LIQUIDITY RECLAIM SETUP! 📈
Entry: $0.0345 - $0.0358 ⚡
Target: $0.0370 / $0.0385 / $0.0400 🚀
Stop Loss: $0.0328 ⚠️
$STRK has printed a clean institutional liquidity sweep into the primary demand pocket, absorbing sell-side pressure while clearing weak positions. 📊 Order flow data shows steady accumulation within this lower range, establishing a firm base for structural expansion.
💡 Respecting the stop loss keeps the upside pathway toward upper inefficiency fills clear, offering an asymmetrical risk-to-reward setup. 💬 Are you accumulating inside this order block or waiting for lower timeframe confirmation? 👇
⚠️ Not financial advice. Always manage your risk. 🛡️
🏷️ #STRK #LongSetup #MarketStructure #Crypto
🎯 🦈
Entry: $0.0345 - $0.0358 ⚡
Target: $0.0370 / $0.0385 / $0.0400 🚀
Stop Loss: $0.0328 ⚠️
$STRK has printed a clean institutional liquidity sweep into the primary demand pocket, absorbing sell-side pressure while clearing weak positions. 📊 Order flow data shows steady accumulation within this lower range, establishing a firm base for structural expansion.
💡 Respecting the stop loss keeps the upside pathway toward upper inefficiency fills clear, offering an asymmetrical risk-to-reward setup. 💬 Are you accumulating inside this order block or waiting for lower timeframe confirmation? 👇
⚠️ Not financial advice. Always manage your risk. 🛡️
🏷️ #STRK #LongSetup #MarketStructure #Crypto
🎯 🦈
49

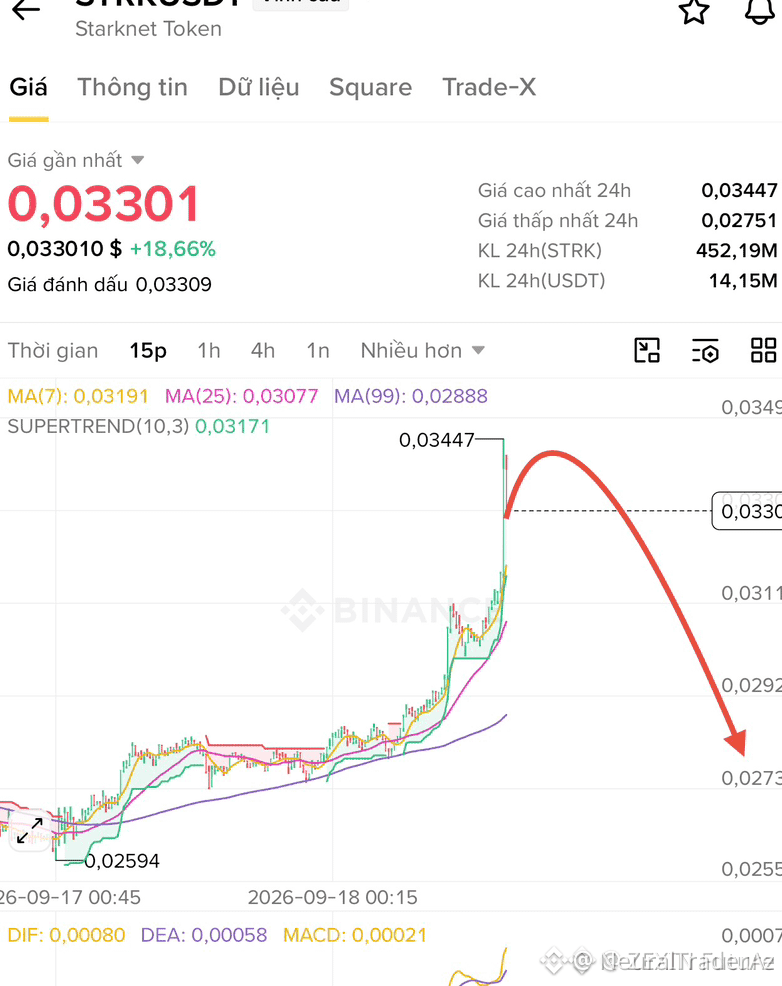
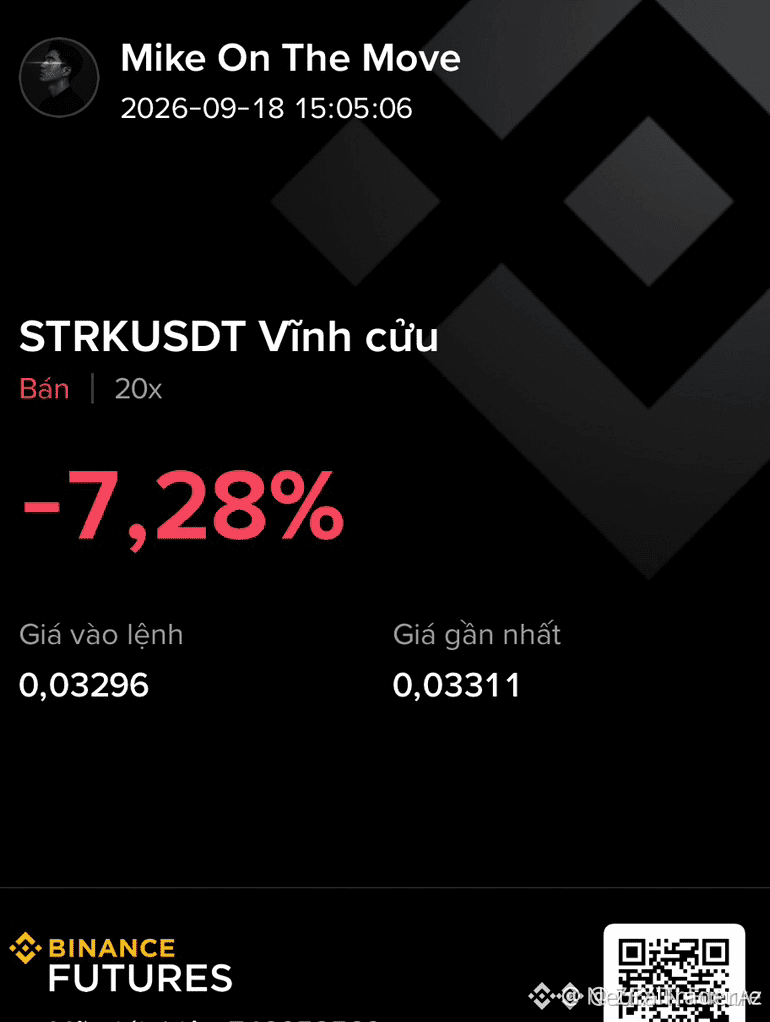
🚨 $STRK SHOWS SEVERE STRUCTURAL WEAKNESS AS SELLERS TARGET LOWER LIQUIDITY POOLS! 📉
Entry: 0.0328 - 0.0339 🔻
Target: 0.0297 📉
Stop Loss: 0.0360 ⚠️
📌 Smart money distribution on $STRK is becoming increasingly clear as upward momentum fails near key supply blocks. 🔍 Order flow reveals persistent sell-side absorption, pointing toward a clean breakdown of local support zones.
⚡ An inefficiency fill down toward lower demand regions looks favored as long positions face compounding pressure. 💬 Do you see sellers driving this move straight to major targets, or is a brief relief bounce likely? 👇
⚠️ Not financial advice. Always manage your risk. 🛡️
🏷️ #STRK #ShortSetup #Bearish #Crypto #Trading
🔻 🐻
🚨 $STRK SHOWS SEVERE STRUCTURAL WEAKNESS AS SELLERS TARGET LOWER LIQUIDITY POOLS! 📉
Entry: 0.0328 - 0.0339 🔻
Target: 0.0297 📉
Stop Loss: 0.0360 ⚠️
📌 Smart money distribution on $STRK is becoming increasingly clear as upward momentum fails near key supply blocks. 🔍 Order flow reveals persistent sell-side absorption, pointing toward a clean breakdown of local support zones.
⚡ An inefficiency fill down toward lower demand regions looks favored as long positions face compounding pressure. 💬 Do you see sellers driving this move straight to major targets, or is a brief relief bounce likely? 👇
⚠️ Not financial advice. Always manage your risk. 🛡️
🏷️ #STRK #ShortSetup #Bearish #Crypto #Trading
🔻 🐻
Entry: 0.0328 - 0.0339 🔻
Target: 0.0297 📉
Stop Loss: 0.0360 ⚠️
📌 Smart money distribution on $STRK is becoming increasingly clear as upward momentum fails near key supply blocks. 🔍 Order flow reveals persistent sell-side absorption, pointing toward a clean breakdown of local support zones.
⚡ An inefficiency fill down toward lower demand regions looks favored as long positions face compounding pressure. 💬 Do you see sellers driving this move straight to major targets, or is a brief relief bounce likely? 👇
⚠️ Not financial advice. Always manage your risk. 🛡️
🏷️ #STRK #ShortSetup #Bearish #Crypto #Trading
🔻 🐻
Jokerking:
لكودة سريع شورت كثير يساعدها تصعد
1
53
·
--
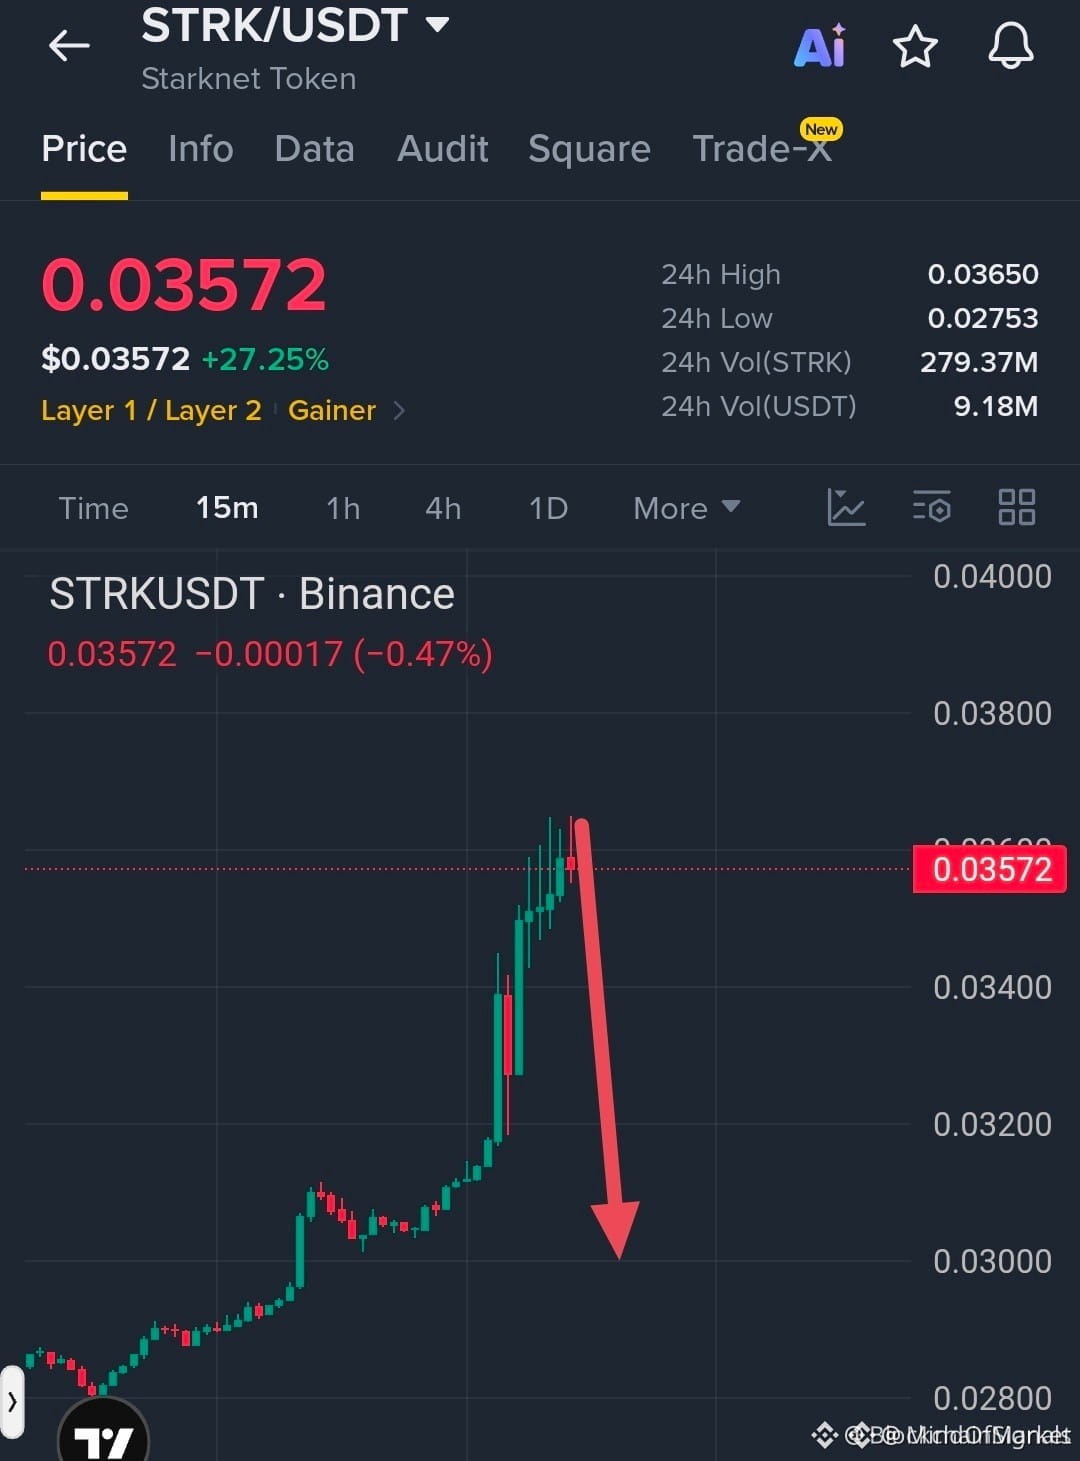
🚨 $STRK FACES HEAVY REJECTION AT HIGH LEVEL AS SMART MONEY TARGETS PULLBACK! 🔻
Entry: 0.03572 ⚡
Target: 0.03000 🎯
Stop Loss: 0.03650 ⚠️
After an aggressive upside expansion, $STRK is showing clear signs of buyer exhaustion right into major overhead liquidity. 🔍 Institutional sell orders are stepping in at these local highs, creating a sharp rejection sweep that paves the way for an inefficiency fill back down toward lower demand.
A breakdown from this distribution structure sets up a clean short bias down to the 0.03000 liquidity pool, providing an excellent risk-defined pivot point. 📌 💬 Will sellers accelerate the sweep into 0.03000 or can buyers absorb the correction early? 👇
⚠️ Not financial advice. Always manage your risk. 🛡️
🏷️ #STRK #ShortSetup #MarketStructure #Crypto
🐻 🎯
🚨 $STRK FACES HEAVY REJECTION AT HIGH LEVEL AS SMART MONEY TARGETS PULLBACK! 🔻
Entry: 0.03572 ⚡
Target: 0.03000 🎯
Stop Loss: 0.03650 ⚠️
After an aggressive upside expansion, $STRK is showing clear signs of buyer exhaustion right into major overhead liquidity. 🔍 Institutional sell orders are stepping in at these local highs, creating a sharp rejection sweep that paves the way for an inefficiency fill back down toward lower demand.
A breakdown from this distribution structure sets up a clean short bias down to the 0.03000 liquidity pool, providing an excellent risk-defined pivot point. 📌 💬 Will sellers accelerate the sweep into 0.03000 or can buyers absorb the correction early? 👇
⚠️ Not financial advice. Always manage your risk. 🛡️
🏷️ #STRK #ShortSetup #MarketStructure #Crypto
🐻 🎯
Entry: 0.03572 ⚡
Target: 0.03000 🎯
Stop Loss: 0.03650 ⚠️
After an aggressive upside expansion, $STRK is showing clear signs of buyer exhaustion right into major overhead liquidity. 🔍 Institutional sell orders are stepping in at these local highs, creating a sharp rejection sweep that paves the way for an inefficiency fill back down toward lower demand.
A breakdown from this distribution structure sets up a clean short bias down to the 0.03000 liquidity pool, providing an excellent risk-defined pivot point. 📌 💬 Will sellers accelerate the sweep into 0.03000 or can buyers absorb the correction early? 👇
⚠️ Not financial advice. Always manage your risk. 🛡️
🏷️ #STRK #ShortSetup #MarketStructure #Crypto
🐻 🎯
83
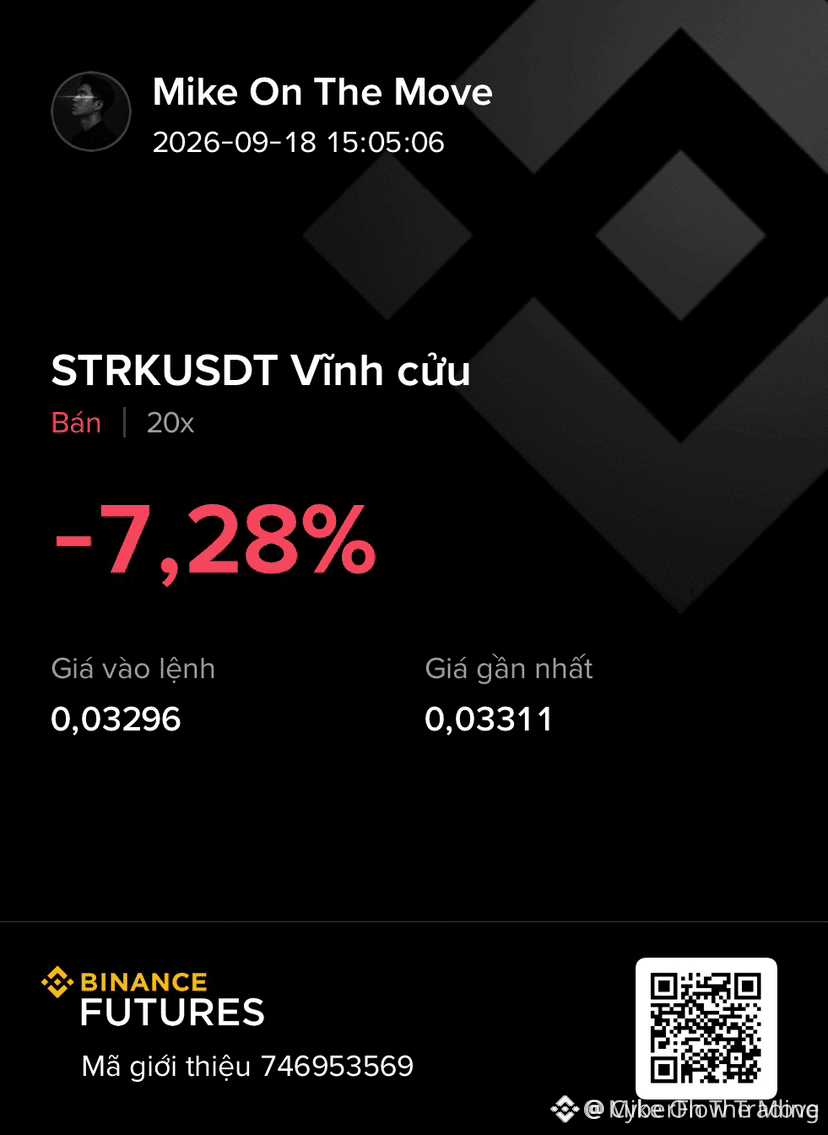
🚨 $STRK FAILING TO HOLD MOMENTUM AS SELLERS PREPARE FOR A DOWNWARD LEGSWEEP! 📉
Entry: 0.0328 - 0.0339 ⚡
Target: 0.0324 - 0.0297 🎯
Stop Loss: 0.0360 🛑
🔍 $STRK is showing clear exhaustion at these higher bounds, repeatedly failing to attract structural buying volume. Sellers are heavily defending the upside while order flow signals a clean liquidity drain toward lower support pockets. 📊
📌 The current price structure offers an asymmetrical risk profile as long as local resistance remains unbroken. 📉 If this supply wall holds firm, a swift leg down toward lower demand zones becomes the path of least resistance. 💡
💬 Are you positioning for the breakdown here or waiting for further confirmation? 👇
⚠️ Not financial advice. Always manage your risk. 🛡️
🏷️ #STRK #ShortSetup #Bearish #CryptoTrading #PriceAction
📉 🐻
🚨 $STRK FAILING TO HOLD MOMENTUM AS SELLERS PREPARE FOR A DOWNWARD LEGSWEEP! 📉
Entry: 0.0328 - 0.0339 ⚡
Target: 0.0324 - 0.0297 🎯
Stop Loss: 0.0360 🛑
🔍 $STRK is showing clear exhaustion at these higher bounds, repeatedly failing to attract structural buying volume. Sellers are heavily defending the upside while order flow signals a clean liquidity drain toward lower support pockets. 📊
📌 The current price structure offers an asymmetrical risk profile as long as local resistance remains unbroken. 📉 If this supply wall holds firm, a swift leg down toward lower demand zones becomes the path of least resistance. 💡
💬 Are you positioning for the breakdown here or waiting for further confirmation? 👇
⚠️ Not financial advice. Always manage your risk. 🛡️
🏷️ #STRK #ShortSetup #Bearish #CryptoTrading #PriceAction
📉 🐻
Entry: 0.0328 - 0.0339 ⚡
Target: 0.0324 - 0.0297 🎯
Stop Loss: 0.0360 🛑
🔍 $STRK is showing clear exhaustion at these higher bounds, repeatedly failing to attract structural buying volume. Sellers are heavily defending the upside while order flow signals a clean liquidity drain toward lower support pockets. 📊
📌 The current price structure offers an asymmetrical risk profile as long as local resistance remains unbroken. 📉 If this supply wall holds firm, a swift leg down toward lower demand zones becomes the path of least resistance. 💡
💬 Are you positioning for the breakdown here or waiting for further confirmation? 👇
⚠️ Not financial advice. Always manage your risk. 🛡️
🏷️ #STRK #ShortSetup #Bearish #CryptoTrading #PriceAction
📉 🐻
72
·
--
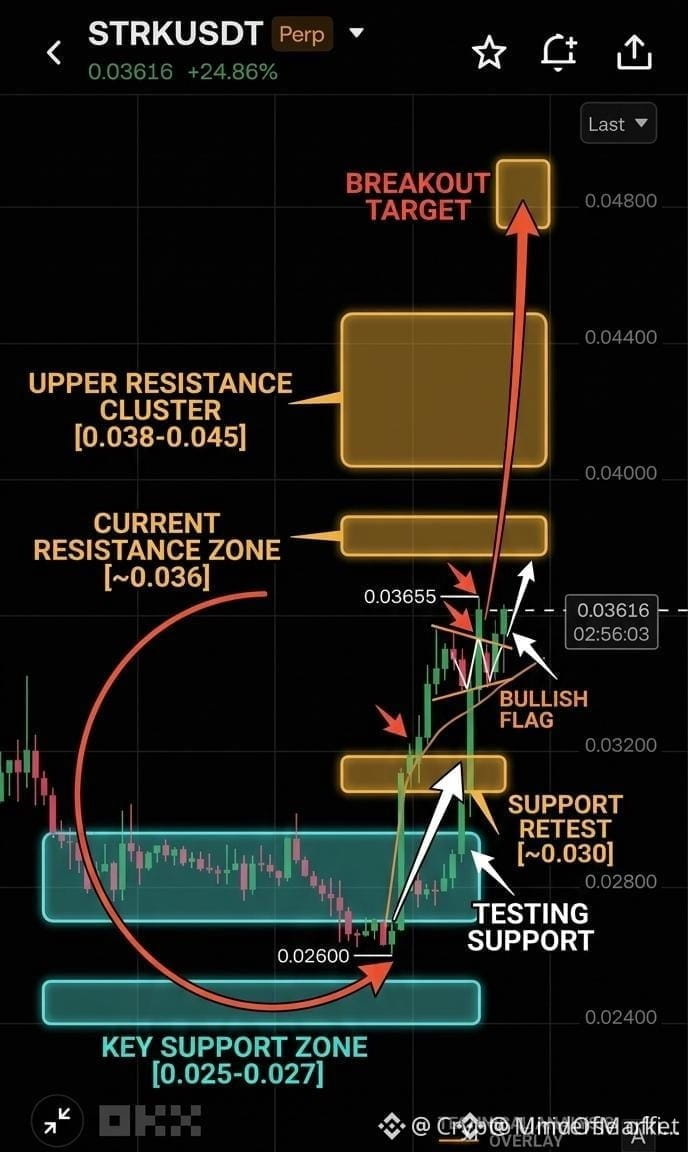
⚡ $STRK COMPRESSING UNDER KEY RESISTANCE AS SMART MONEY PREPARES FOR LIQUIDITY EXPANSION 🦈
Entry: 0.0340-0.0360 ⚡
Target: 0.0480 🚀
Stop Loss: 0.0315 ⚠️
$STRK executed a sharp impulse out of the 0.025 demand zone up to 0.0365, where supply absorption is now underway. 📊 Rather than rejecting downward, price is constructing a tight structural consolidation directly beneath major overhead resistance.
This price action suggests institutional order flow is sustaining pressure against the ceiling, laying the groundwork for an expansion into the liquidity cluster up to 0.048 once 0.0365 breaks with conviction. 🔍 Key structural invalidation rests below the 0.030 demand pivot.
🤔 Are you accumulating within this flag zone or waiting for the confirmed breakout above 0.0365? 👇
⚠️ Not financial advice. Always manage your risk. 🛡️
🏷️ #STRK #Crypto #MarketStructure #Breakout
🎯 🦈
⚡ $STRK COMPRESSING UNDER KEY RESISTANCE AS SMART MONEY PREPARES FOR LIQUIDITY EXPANSION 🦈
Entry: 0.0340-0.0360 ⚡
Target: 0.0480 🚀
Stop Loss: 0.0315 ⚠️
$STRK executed a sharp impulse out of the 0.025 demand zone up to 0.0365, where supply absorption is now underway. 📊 Rather than rejecting downward, price is constructing a tight structural consolidation directly beneath major overhead resistance.
This price action suggests institutional order flow is sustaining pressure against the ceiling, laying the groundwork for an expansion into the liquidity cluster up to 0.048 once 0.0365 breaks with conviction. 🔍 Key structural invalidation rests below the 0.030 demand pivot.
🤔 Are you accumulating within this flag zone or waiting for the confirmed breakout above 0.0365? 👇
⚠️ Not financial advice. Always manage your risk. 🛡️
🏷️ #STRK #Crypto #MarketStructure #Breakout
🎯 🦈
Entry: 0.0340-0.0360 ⚡
Target: 0.0480 🚀
Stop Loss: 0.0315 ⚠️
$STRK executed a sharp impulse out of the 0.025 demand zone up to 0.0365, where supply absorption is now underway. 📊 Rather than rejecting downward, price is constructing a tight structural consolidation directly beneath major overhead resistance.
This price action suggests institutional order flow is sustaining pressure against the ceiling, laying the groundwork for an expansion into the liquidity cluster up to 0.048 once 0.0365 breaks with conviction. 🔍 Key structural invalidation rests below the 0.030 demand pivot.
🤔 Are you accumulating within this flag zone or waiting for the confirmed breakout above 0.0365? 👇
⚠️ Not financial advice. Always manage your risk. 🛡️
🏷️ #STRK #Crypto #MarketStructure #Breakout
🎯 🦈
Aleksandr777slc:
закупаю
1
2
67
Log in to explore more content
Join global crypto users on Binance Square
⚡️ Get latest and useful information about crypto.
💬 Trusted by the world’s largest crypto exchange.
👍 Discover real insights from verified creators.
Email / Phone number
Trending Topics
1
#BitcoinSpotETFsNetInflow$159M
14 views
24 Discussing
2
#HKMAPlansWholesaleCBDCByYearEnd
3,792 views
219 Discussing
3
#NEARSurges26%Past$3.45
7,919 views
94 Discussing
4
#BOJHikesRatesTo31YearHigh
20,769 views
578 Discussing
5
#EvernorthRaises$30MToBuyXRP
70 views
13 Discussing
6
#ChainlinkPowersBottomlinePaymentPlatform
23,338 views
545 Discussing
7
#DtcpayCompletes$25MSeriesA
707 views
23 Discussing
8
#InjectiveLaunchesINJOnSolana
4,175 views
117 Discussing
9
#StellarActivatesProtocol28At211TPS
29,659 views
655 Discussing
10
#SECGrantsInnovationExemptionForTokenizedStocks
24,405 views
497 Discussing