
Crypto Eagles
12.1k පෝස්ටු

Crypto Eagles
 Binance චතුරශ්ර සත්යාපිත+
වාර්තා කරන්න
පරිශීලක අවහිර කරන්න
Square Content Creator | X: @CryptoProject6

Creator Awards 2024

#BinanceTurns7

Top Voices
නිතර වෙළෙන්දා
{වේලාව} වසර
131 හඹා යමින්
123.1K+ හඹා යන්නන්
165.9K+ කැමති විය
3 ලාංජනය
පෝස්ටු
සියල්ල
උපුටා දැක්වීම්
වීඩියෝ
සජීවි
·
--
බෙයාරිෂ්
පරිවර්තනය බලන්න
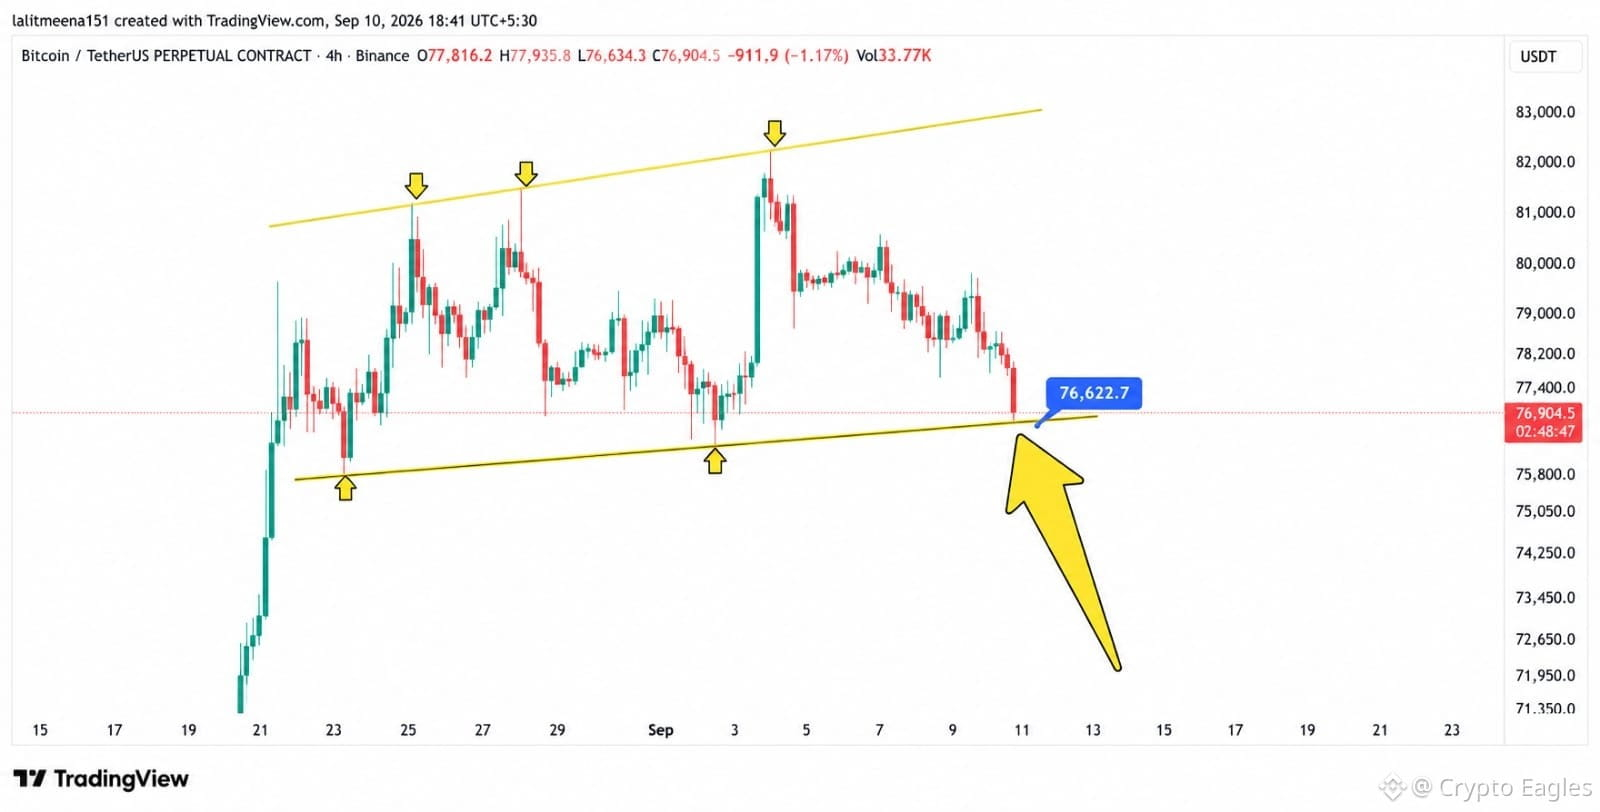
$BTC Finally tested our trend line support as we expected Now it may take initial bounce from trend line then again more dump
{future}(BTCUSDT)
$VTHO
{future}(VTHOUSDT)
$ETHFI
{future}(ETHFIUSDT)
$BTC Finally tested our trend line support as we expected Now it may take initial bounce from trend line then again more dump
$VTHO
$ETHFI
$VTHO
$ETHFI
302
·
--
උසබ තත්ත්වය
පරිවර්තනය බලන්න
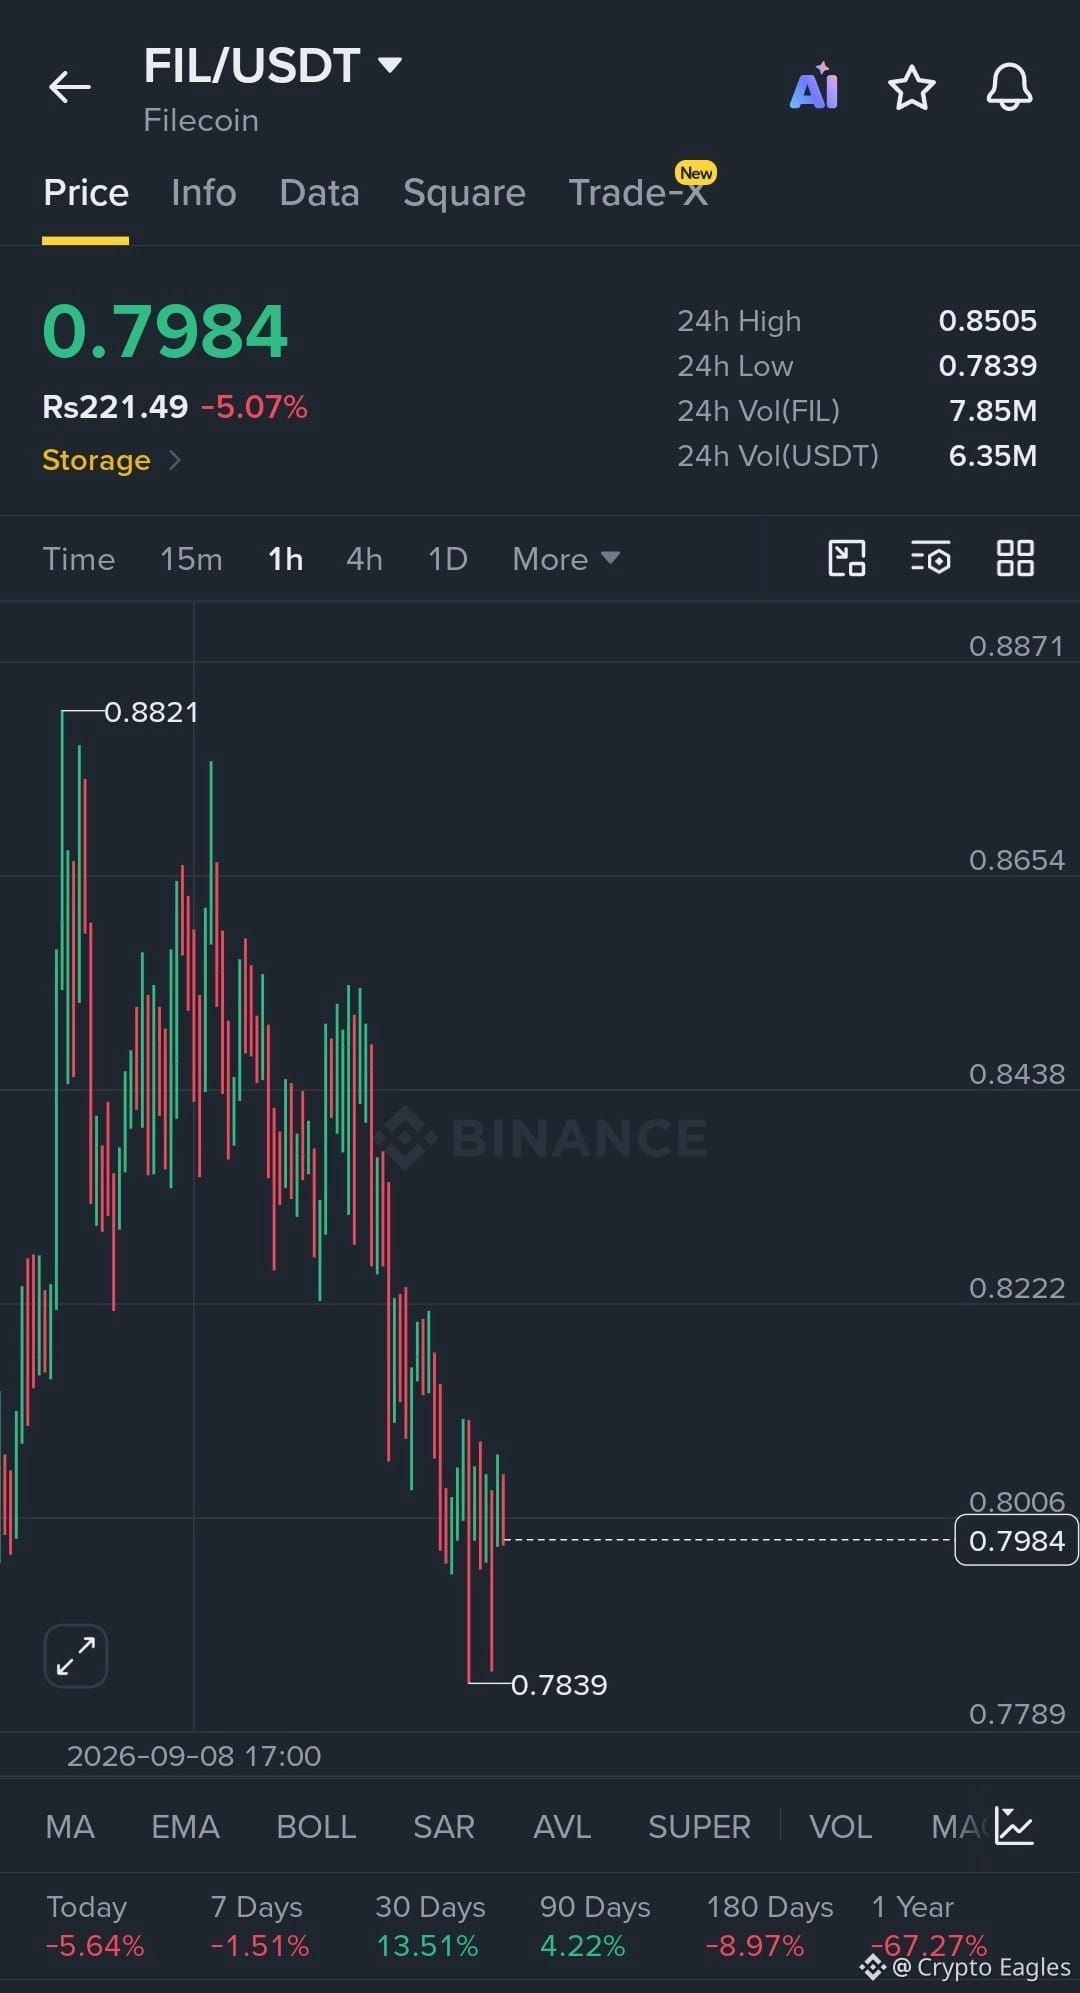
$FIL Long Setup
Entry: 0.795 – 0.802
SL: 0.783
TP1: 0.822
TP2: 0.844
TP3: 0.865
FIL is showing a potential 1H reversal setup after sweeping the recent low at 0.7839 and reclaiming the 0.80 area. A hold above 0.8006 can confirm bullish recovery toward 0.822–0.844, while losing 0.783 invalidates the setup. 📈
{future}(FILUSDT)
$VTHO
{future}(VTHOUSDT)
$ETHFI
{future}(ETHFIUSDT)
$FIL Long Setup
Entry: 0.795 – 0.802
SL: 0.783
TP1: 0.822
TP2: 0.844
TP3: 0.865
FIL is showing a potential 1H reversal setup after sweeping the recent low at 0.7839 and reclaiming the 0.80 area. A hold above 0.8006 can confirm bullish recovery toward 0.822–0.844, while losing 0.783 invalidates the setup. 📈
$VTHO
$ETHFI
Entry: 0.795 – 0.802
SL: 0.783
TP1: 0.822
TP2: 0.844
TP3: 0.865
FIL is showing a potential 1H reversal setup after sweeping the recent low at 0.7839 and reclaiming the 0.80 area. A hold above 0.8006 can confirm bullish recovery toward 0.822–0.844, while losing 0.783 invalidates the setup. 📈
$VTHO
$ETHFI
387
·
--
උසබ තත්ත්වය
පරිවර්තනය බලන්න
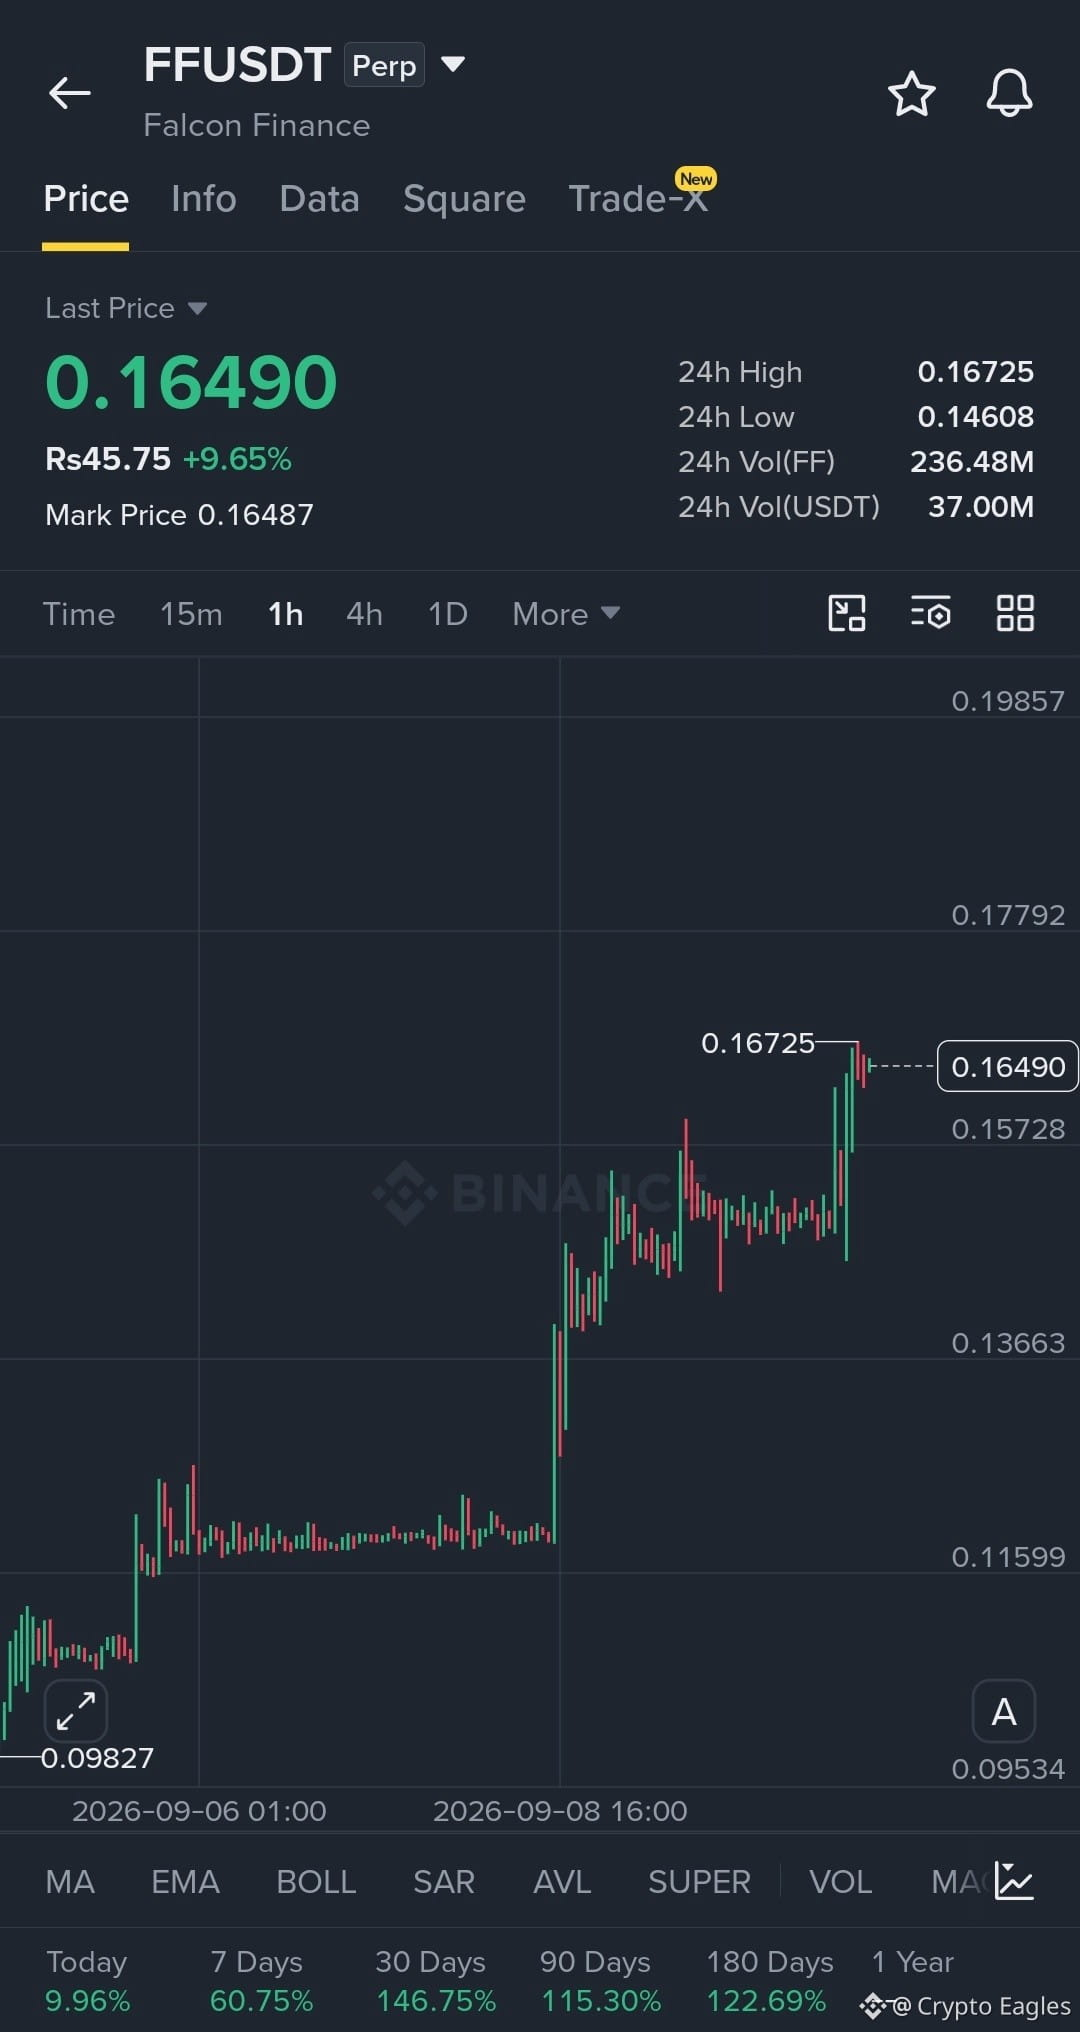
$FF Long Setup
Entry: 0.1580 – 0.1650
SL: 0.1510
TP1: 0.1779
TP2: 0.1880
TP3: 0.1985
FF is holding a strong bullish structure after breaking out of the 0.1573 resistance area. A sustained hold above 0.1573 can continue the move toward the next resistance levels. Losing 0.1510 would invalidate the setup.
{future}(FFUSDT)
$SAGA
{future}(SAGAUSDT)
$VTHO
{future}(VTHOUSDT)
$FF Long Setup
Entry: 0.1580 – 0.1650
SL: 0.1510
TP1: 0.1779
TP2: 0.1880
TP3: 0.1985
FF is holding a strong bullish structure after breaking out of the 0.1573 resistance area. A sustained hold above 0.1573 can continue the move toward the next resistance levels. Losing 0.1510 would invalidate the setup.
$SAGA
$VTHO
Entry: 0.1580 – 0.1650
SL: 0.1510
TP1: 0.1779
TP2: 0.1880
TP3: 0.1985
FF is holding a strong bullish structure after breaking out of the 0.1573 resistance area. A sustained hold above 0.1573 can continue the move toward the next resistance levels. Losing 0.1510 would invalidate the setup.
$SAGA
$VTHO
1
471
·
--
උසබ තත්ත්වය
පරිවර්තනය බලන්න
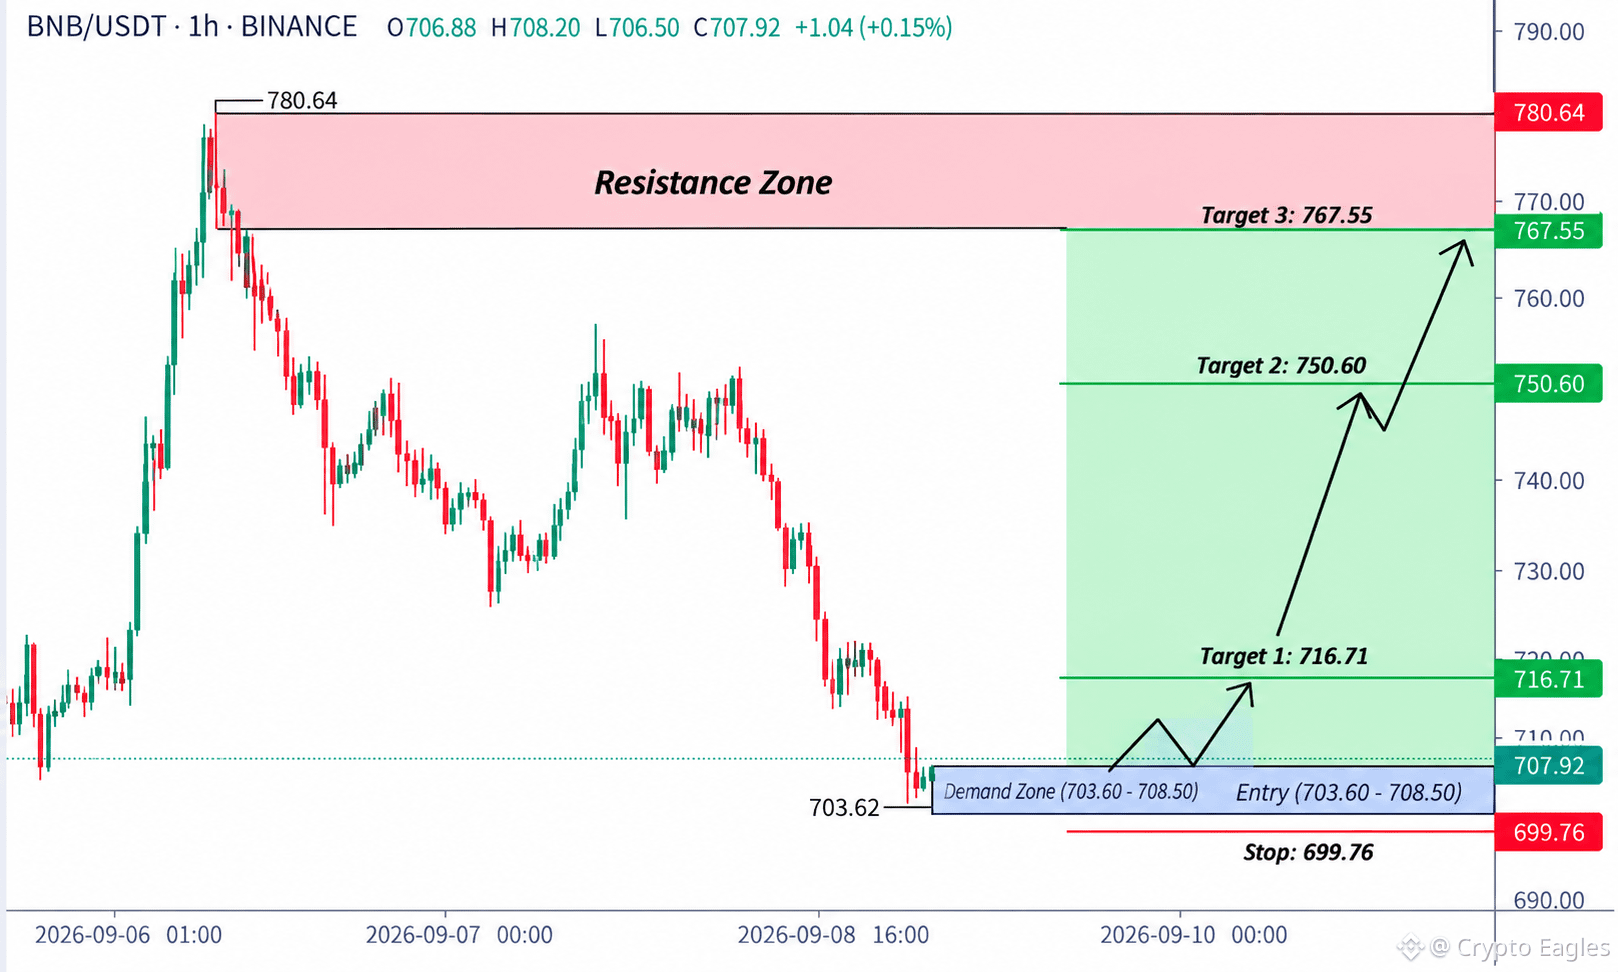
$BNB Long Setup
Entry: 703.60 – 708.50
SL: 699.76
TP1: 716.71
TP2: 750.60
TP3: 767.55
BNB is testing a key 1H demand zone at 703.60–708.50 after a sharp pullback. Holding this zone can trigger a recovery toward 716.71, followed by 750.60 and 767.55. A break below 699.76 invalidates the bullish setup.
{future}(BNBUSDT)
$SAGA
{future}(SAGAUSDT)
$VTHO
{future}(VTHOUSDT)
$BNB Long Setup
Entry: 703.60 – 708.50
SL: 699.76
TP1: 716.71
TP2: 750.60
TP3: 767.55
BNB is testing a key 1H demand zone at 703.60–708.50 after a sharp pullback. Holding this zone can trigger a recovery toward 716.71, followed by 750.60 and 767.55. A break below 699.76 invalidates the bullish setup.
$SAGA
$VTHO
Entry: 703.60 – 708.50
SL: 699.76
TP1: 716.71
TP2: 750.60
TP3: 767.55
BNB is testing a key 1H demand zone at 703.60–708.50 after a sharp pullback. Holding this zone can trigger a recovery toward 716.71, followed by 750.60 and 767.55. A break below 699.76 invalidates the bullish setup.
$SAGA
$VTHO
247
·
--
උසබ තත්ත්වය
පරිවර්තනය බලන්න
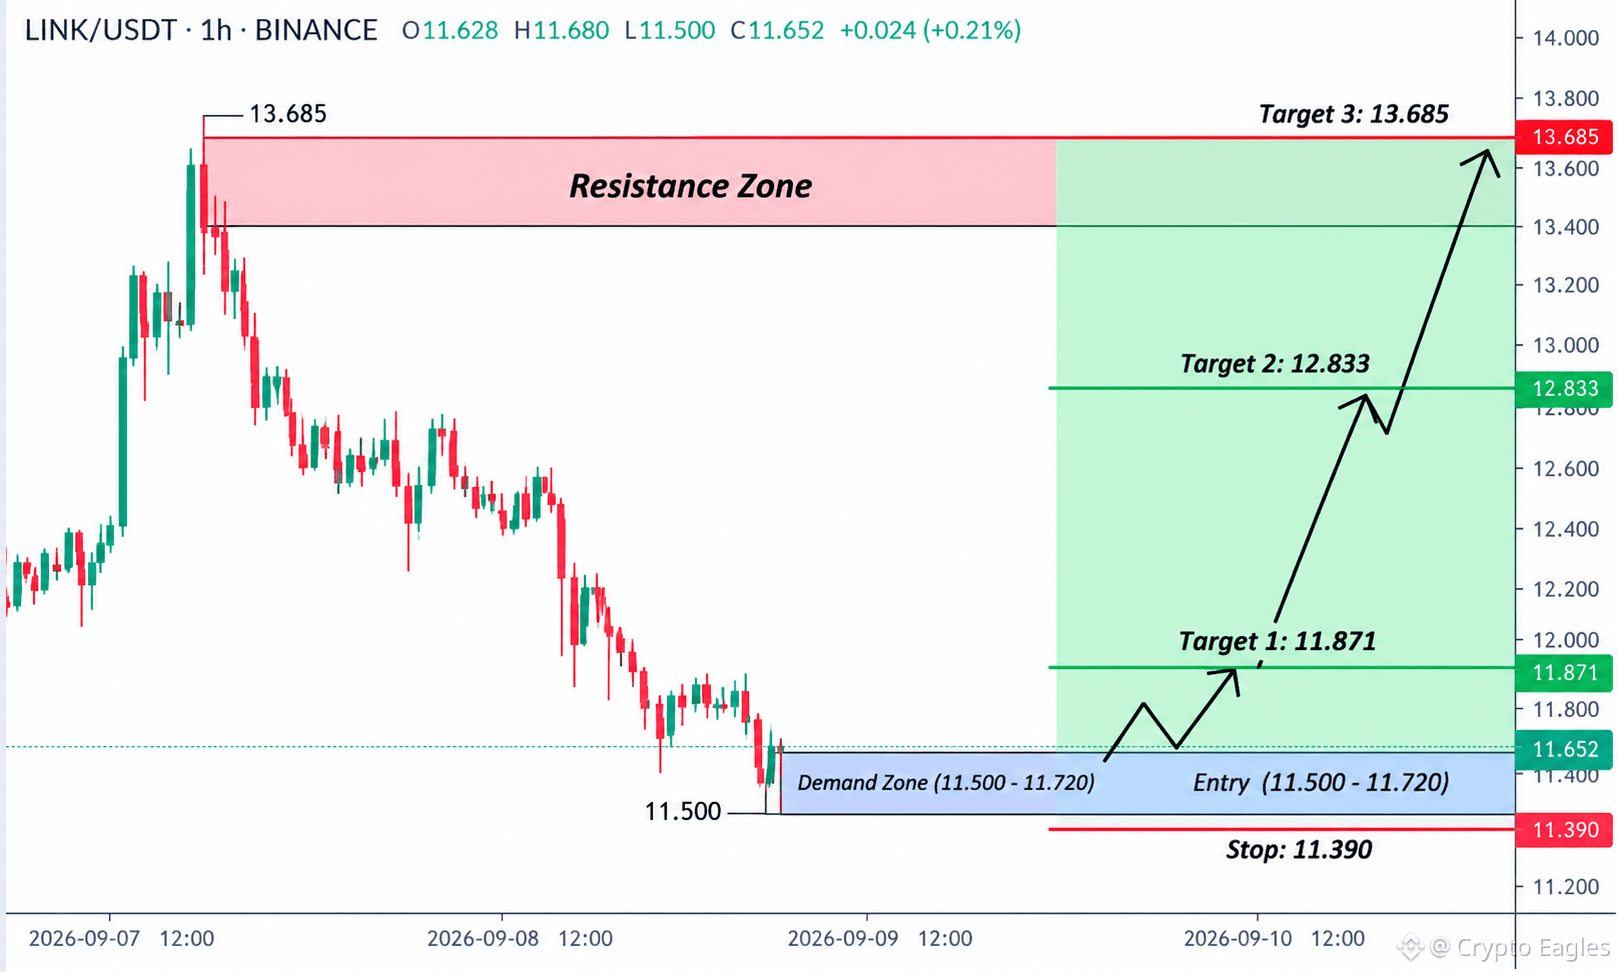
$LINK Long Setup
Entry: 11.500 – 11.720
SL: 11.390
TP1: 11.871
TP2: 12.833
TP3: 13.685
LINK is holding the 11.500–11.720 demand zone after a prolonged 1H downtrend. A strong reclaim and hold above 11.720 can trigger a bullish reversal toward 11.871, followed by 12.833 and 13.685. A breakdown below 11.390 invalidates the setup.
{future}(LINKUSDT)
$VTHO
{future}(VTHOUSDT)
$GPRO
{future}(GPROUSDT)
$LINK Long Setup
Entry: 11.500 – 11.720
SL: 11.390
TP1: 11.871
TP2: 12.833
TP3: 13.685
LINK is holding the 11.500–11.720 demand zone after a prolonged 1H downtrend. A strong reclaim and hold above 11.720 can trigger a bullish reversal toward 11.871, followed by 12.833 and 13.685. A breakdown below 11.390 invalidates the setup.
$VTHO
$GPRO
Entry: 11.500 – 11.720
SL: 11.390
TP1: 11.871
TP2: 12.833
TP3: 13.685
LINK is holding the 11.500–11.720 demand zone after a prolonged 1H downtrend. A strong reclaim and hold above 11.720 can trigger a bullish reversal toward 11.871, followed by 12.833 and 13.685. A breakdown below 11.390 invalidates the setup.
$VTHO
$GPRO
462
·
--
උසබ තත්ත්වය
පරිවර්තනය බලන්න
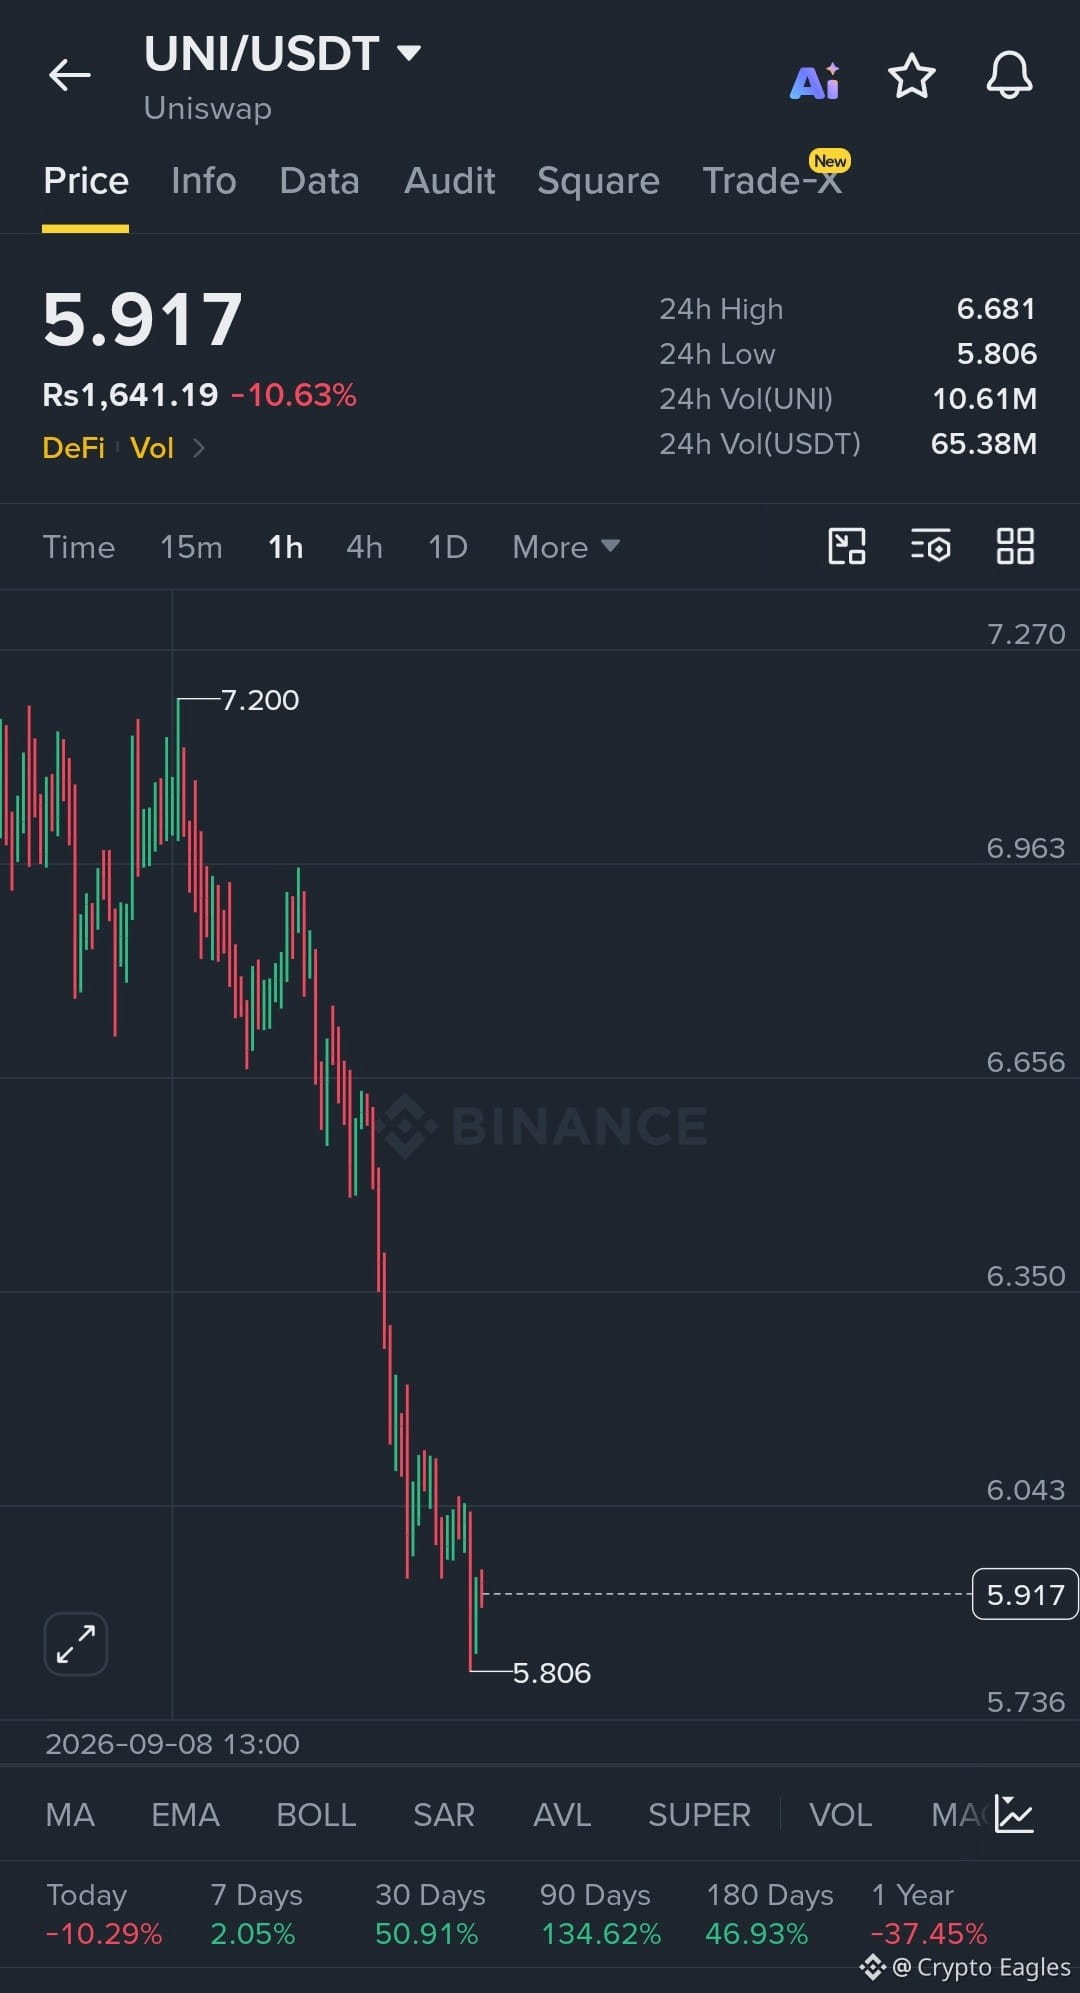
$UNI Long Setup
Entry: 5.82 – 5.92
SL: 5.73
TP1: 6.04
TP2: 6.35
TP3: 6.65
UNI is attempting a 1H bounce from the 5.806 low after a sharp sell-off. Holding 5.80 can support a relief move toward 6.04, while a reclaim above 6.04 strengthens the bullish continuation. A clean break below 5.73 invalidates the long setup.
{future}(UNIUSDT)
$VTHO
{future}(VTHOUSDT)
$ORDER
{future}(ORDERUSDT)
$UNI Long Setup
Entry: 5.82 – 5.92
SL: 5.73
TP1: 6.04
TP2: 6.35
TP3: 6.65
UNI is attempting a 1H bounce from the 5.806 low after a sharp sell-off. Holding 5.80 can support a relief move toward 6.04, while a reclaim above 6.04 strengthens the bullish continuation. A clean break below 5.73 invalidates the long setup.
$VTHO
$ORDER
Entry: 5.82 – 5.92
SL: 5.73
TP1: 6.04
TP2: 6.35
TP3: 6.65
UNI is attempting a 1H bounce from the 5.806 low after a sharp sell-off. Holding 5.80 can support a relief move toward 6.04, while a reclaim above 6.04 strengthens the bullish continuation. A clean break below 5.73 invalidates the long setup.
$VTHO
$ORDER
1
436
·
--
උසබ තත්ත්වය
පරිවර්තනය බලන්න
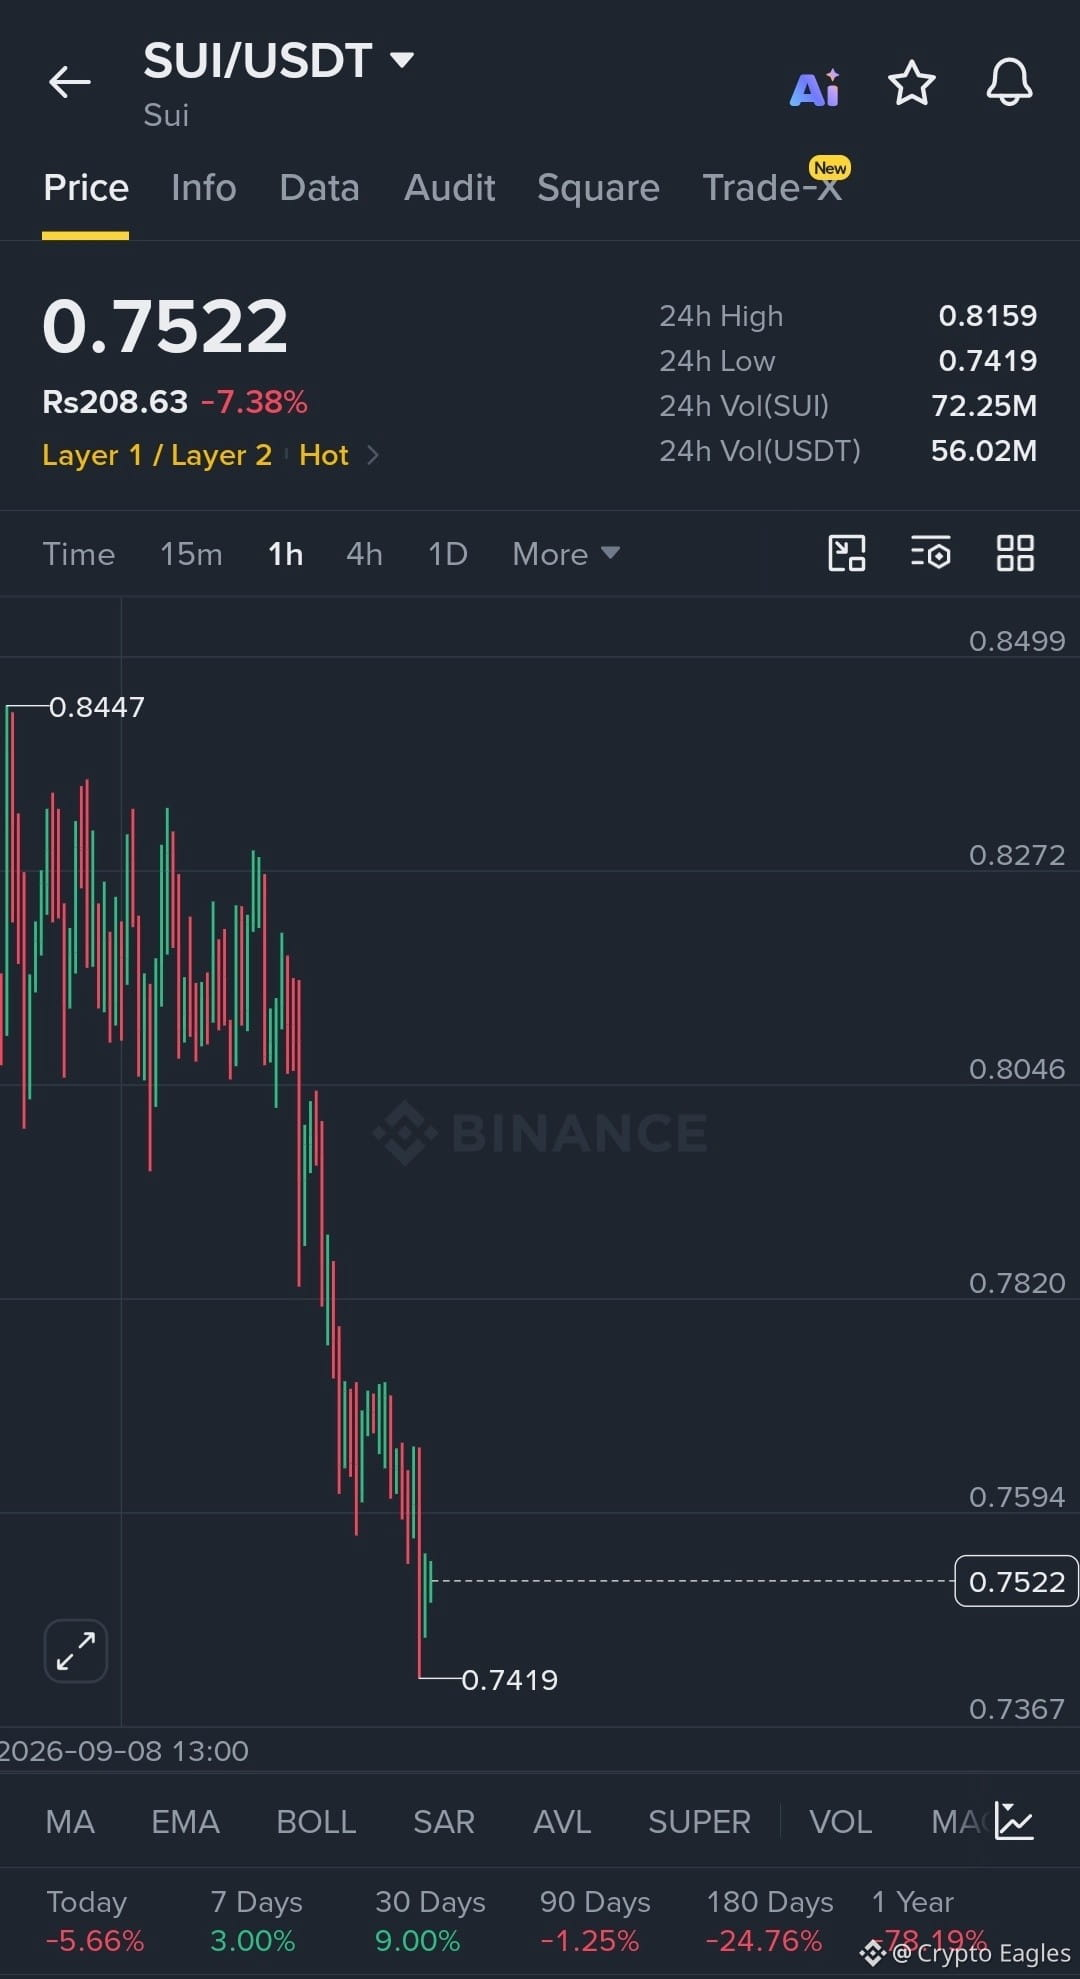
$SUI Long Setup
Entry: 0.748 – 0.758
SL: 0.739
TP1: 0.782
TP2: 0.805
TP3: 0.828
SUI is heavily sold off on the 1H chart and has bounced from the 0.7419 low. A hold above 0.748 with a reclaim of 0.759 can trigger a relief move toward 0.782–0.805. A break below 0.739 invalidates the setup.
{future}(SUIUSDT)
$VTHO
{future}(VTHOUSDT)
$ORDER
{future}(ORDERUSDT)
$SUI Long Setup
Entry: 0.748 – 0.758
SL: 0.739
TP1: 0.782
TP2: 0.805
TP3: 0.828
SUI is heavily sold off on the 1H chart and has bounced from the 0.7419 low. A hold above 0.748 with a reclaim of 0.759 can trigger a relief move toward 0.782–0.805. A break below 0.739 invalidates the setup.
$VTHO
$ORDER
Entry: 0.748 – 0.758
SL: 0.739
TP1: 0.782
TP2: 0.805
TP3: 0.828
SUI is heavily sold off on the 1H chart and has bounced from the 0.7419 low. A hold above 0.748 with a reclaim of 0.759 can trigger a relief move toward 0.782–0.805. A break below 0.739 invalidates the setup.
$VTHO
$ORDER
1
402
·
--
උසබ තත්ත්වය
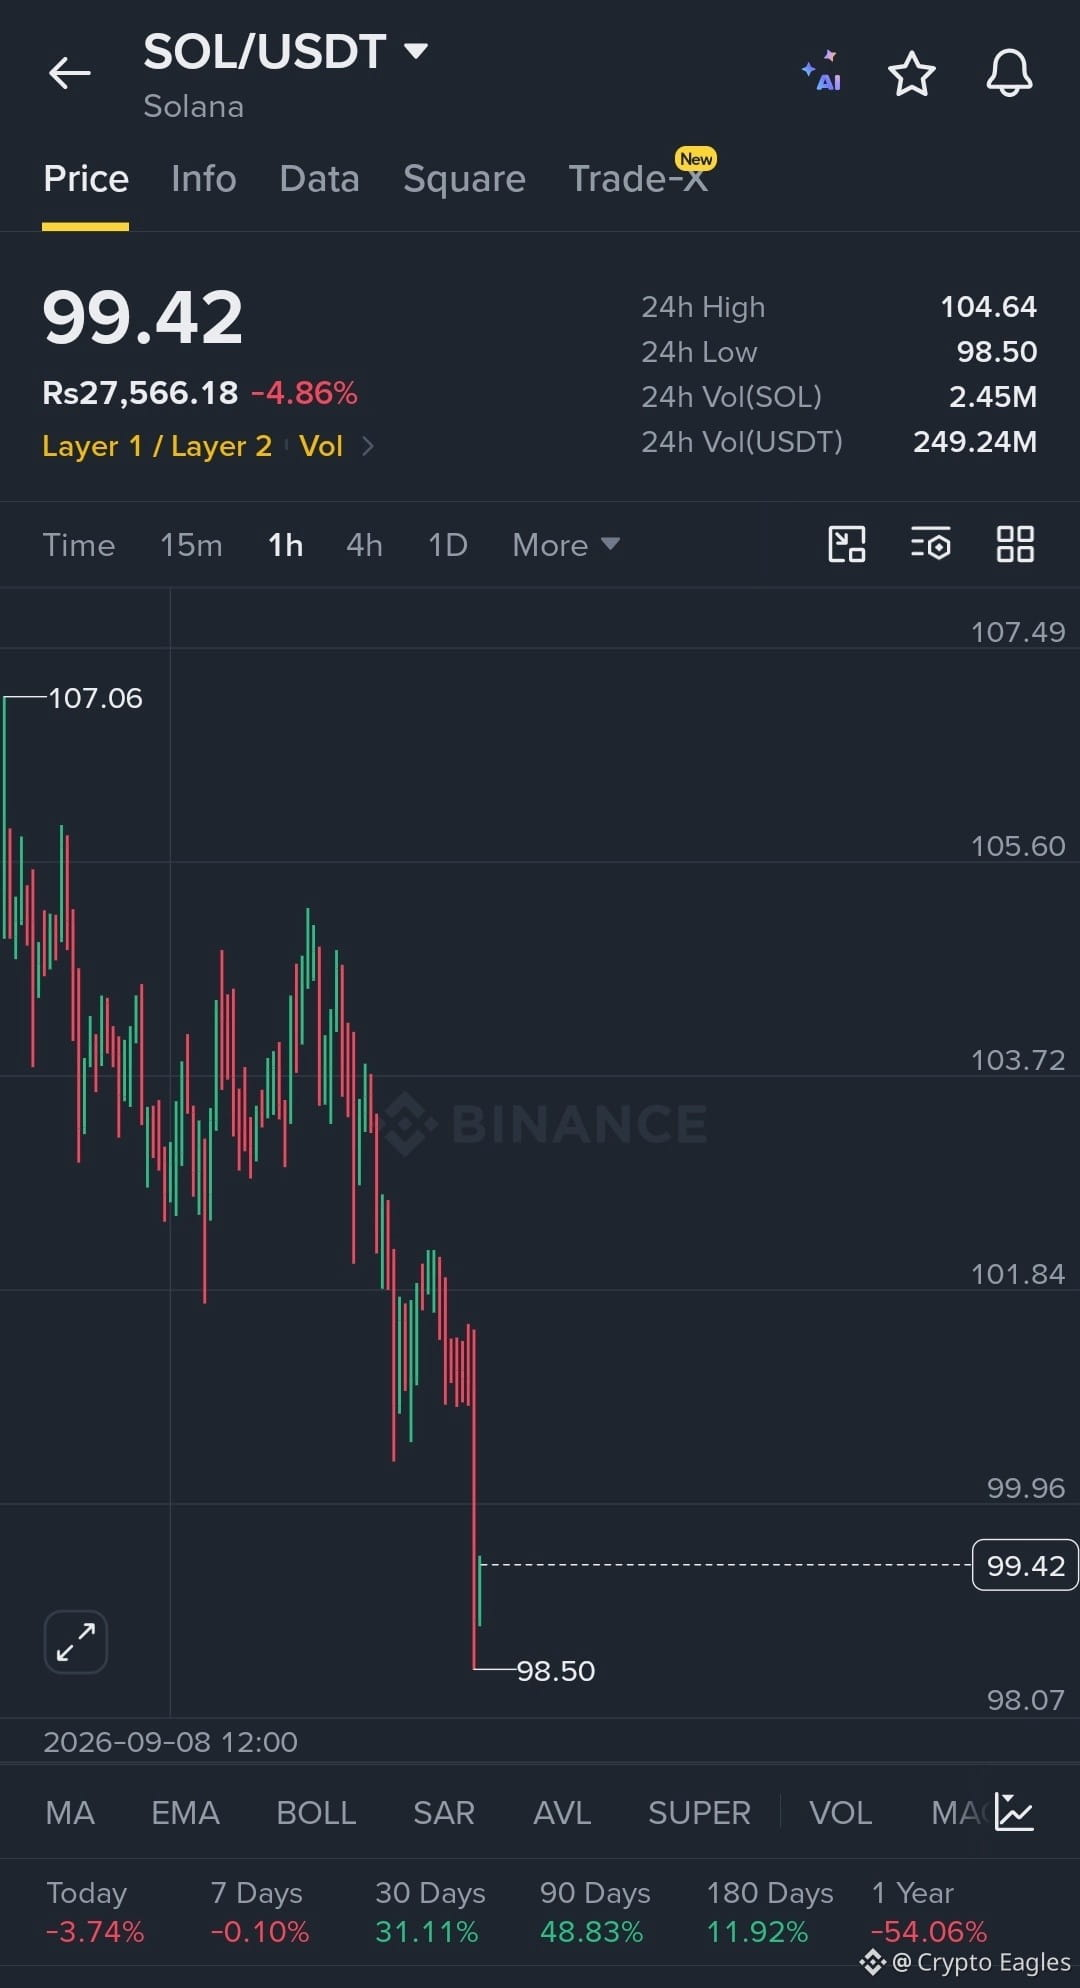
$SOL Long Setup
Entry: 98.50 – 99.40
SL: 97.80
TP1: 100.00
TP2: 101.84
TP3: 103.72
SOL သည် ပြင်းထန်တဲ့ 1H sell-off ပြီးနောက် 98.50 ပံ့ပိုးမှုကို စမ်းသပ်နေပါတယ်။ 98.50 အထက်မှာ ထိန်းထားပြီး 100.00 ကို ပြန်လည်သိမ်းယူနိုင်ပါက 101.84–103.72 လမ်းကြောင်းဆီသို့ သက်သာရာ ရွေ့လျားမှုကို လှုံ့ဆော်နိုင်ပါတယ်။ 98.50 အောက်ကို သန့်ရှင်းစွာ ခွဲထွက်သွားတာက long setup ကို ပျက်ပြယ်စေပါတယ်။
{future}(SOLUSDT)
$VTHO
{future}(VTHOUSDT)
$ORDER
{future}(ORDERUSDT)
$SOL Long Setup
Entry: 98.50 – 99.40
SL: 97.80
TP1: 100.00
TP2: 101.84
TP3: 103.72
SOL သည် ပြင်းထန်တဲ့ 1H sell-off ပြီးနောက် 98.50 ပံ့ပိုးမှုကို စမ်းသပ်နေပါတယ်။ 98.50 အထက်မှာ ထိန်းထားပြီး 100.00 ကို ပြန်လည်သိမ်းယူနိုင်ပါက 101.84–103.72 လမ်းကြောင်းဆီသို့ သက်သာရာ ရွေ့လျားမှုကို လှုံ့ဆော်နိုင်ပါတယ်။ 98.50 အောက်ကို သန့်ရှင်းစွာ ခွဲထွက်သွားတာက long setup ကို ပျက်ပြယ်စေပါတယ်။
$VTHO
$ORDER
Entry: 98.50 – 99.40
SL: 97.80
TP1: 100.00
TP2: 101.84
TP3: 103.72
SOL သည် ပြင်းထန်တဲ့ 1H sell-off ပြီးနောက် 98.50 ပံ့ပိုးမှုကို စမ်းသပ်နေပါတယ်။ 98.50 အထက်မှာ ထိန်းထားပြီး 100.00 ကို ပြန်လည်သိမ်းယူနိုင်ပါက 101.84–103.72 လမ်းကြောင်းဆီသို့ သက်သာရာ ရွေ့လျားမှုကို လှုံ့ဆော်နိုင်ပါတယ်။ 98.50 အောက်ကို သန့်ရှင်းစွာ ခွဲထွက်သွားတာက long setup ကို ပျက်ပြယ်စေပါတယ်။
$VTHO
$ORDER
1
277
·
--
උසබ තත්ත්වය
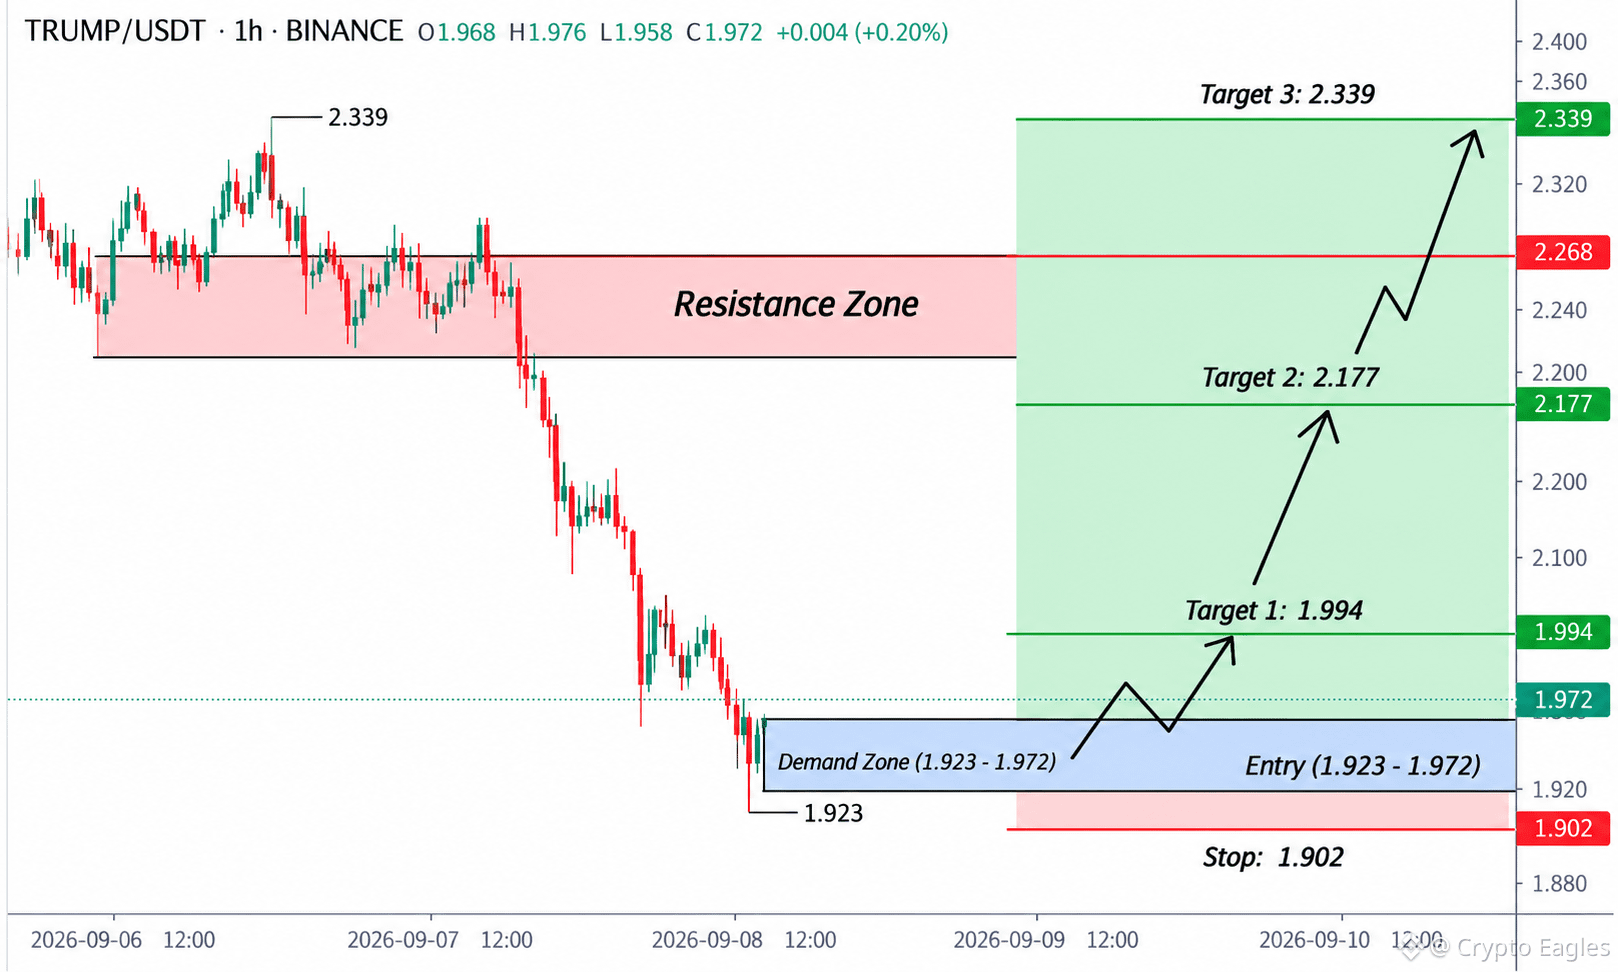
$TRUMP Long Setup
Entry: 1.923 – 1.972
SL: 1.902
TP1: 1.994
TP2: 2.177
TP3: 2.339
TRUMP သည် စူးရှသော ရောင်းချမှုတစ်ခုအပြီး 1.923 ဝယ်လိုအားဇုန်မှ ပြင်းထန်သော တုံ့ပြန်မှုကို ပြသနေပါတယ်။ 1.923–1.972 ဇုန်ကို ဆက်လက် ထိန်းထားပါက bullish reversal setup ကို တရားဝင်အဖြစ် ဆက်ထားနိုင်မည်ဖြစ်ပြီး၊ 1.994 ကို ပြန်လည်ရယူနိုင်ပါက 2.177 နှင့် 2.339 ဆီသို့ အထက်ဖက် မော်မန်တမ်ကို အတည်ပြုမည် ဖြစ်ပါတယ်。
{future}(TRUMPUSDT)
$VTHO
{future}(VTHOUSDT)
$ZEST
{future}(ZESTUSDT)
$TRUMP Long Setup
Entry: 1.923 – 1.972
SL: 1.902
TP1: 1.994
TP2: 2.177
TP3: 2.339
TRUMP သည် စူးရှသော ရောင်းချမှုတစ်ခုအပြီး 1.923 ဝယ်လိုအားဇုန်မှ ပြင်းထန်သော တုံ့ပြန်မှုကို ပြသနေပါတယ်။ 1.923–1.972 ဇုန်ကို ဆက်လက် ထိန်းထားပါက bullish reversal setup ကို တရားဝင်အဖြစ် ဆက်ထားနိုင်မည်ဖြစ်ပြီး၊ 1.994 ကို ပြန်လည်ရယူနိုင်ပါက 2.177 နှင့် 2.339 ဆီသို့ အထက်ဖက် မော်မန်တမ်ကို အတည်ပြုမည် ဖြစ်ပါတယ်。
$VTHO
$ZEST
Entry: 1.923 – 1.972
SL: 1.902
TP1: 1.994
TP2: 2.177
TP3: 2.339
TRUMP သည် စူးရှသော ရောင်းချမှုတစ်ခုအပြီး 1.923 ဝယ်လိုအားဇုန်မှ ပြင်းထန်သော တုံ့ပြန်မှုကို ပြသနေပါတယ်။ 1.923–1.972 ဇုန်ကို ဆက်လက် ထိန်းထားပါက bullish reversal setup ကို တရားဝင်အဖြစ် ဆက်ထားနိုင်မည်ဖြစ်ပြီး၊ 1.994 ကို ပြန်လည်ရယူနိုင်ပါက 2.177 နှင့် 2.339 ဆီသို့ အထက်ဖက် မော်မန်တမ်ကို အတည်ပြုမည် ဖြစ်ပါတယ်。
$VTHO
$ZEST
1
540
·
--
උසබ තත්ත්වය
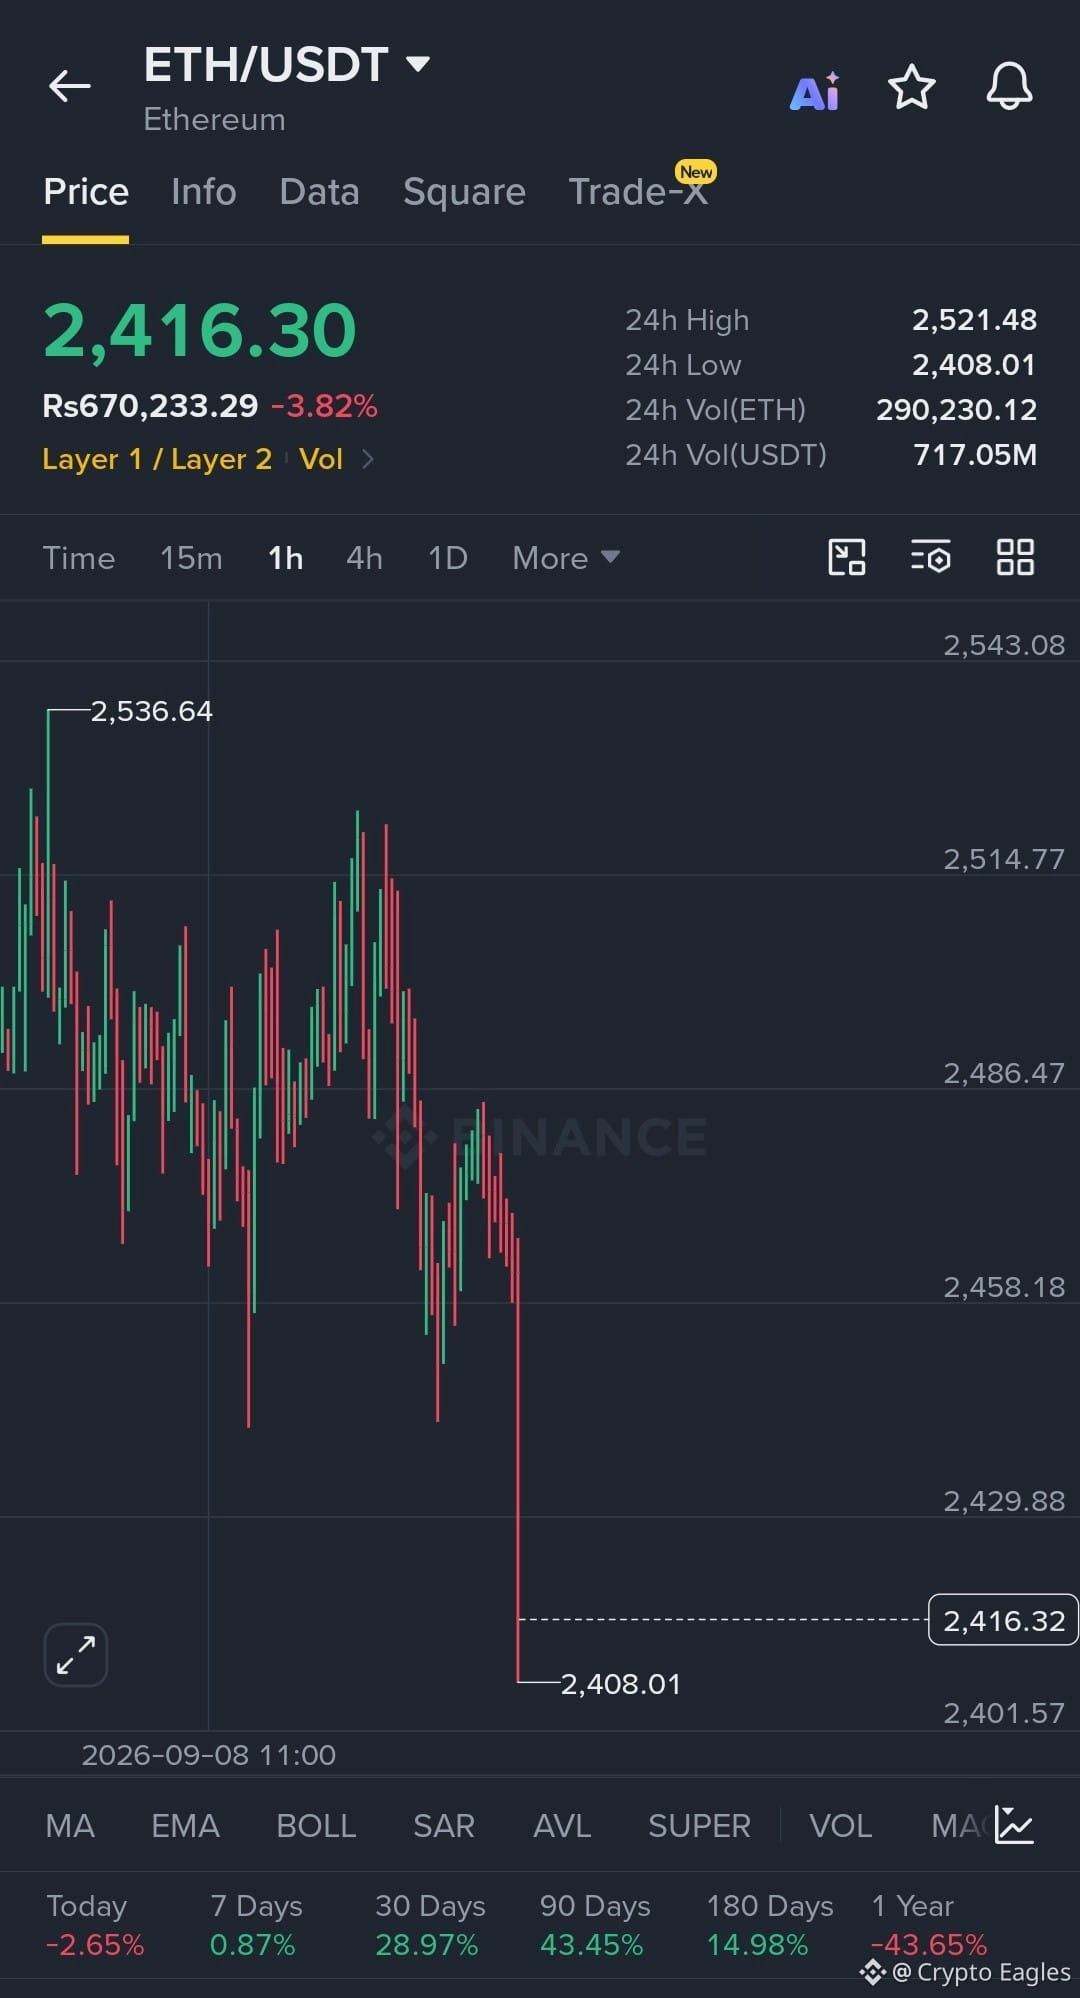
$ETH Long Setup 🟢
Entry: 2,400 – 2,380
SL: 2,400
TP1: 2,430
TP2: 2,458
TP3: 2,486
ETH သည် ပြတ်သားသော ရောင်းထွက်မှုအပြီး 2,408 ပံ့ပိုးမှုကို စမ်းသပ်နေသည်။ 2,408 အထက်မှာ ခိုင်မာစွာ ဆက်ထိန်းပြီး 2,430 ကို ပြန်လည် အနိုင်ယူနိုင်ပါက အပေါ်ဘက် ပစ်မှတ်များဆီသို့ ပြန်လည်ပြင်ဆင်မှုကို ဖြစ်ပေါ်စေနိုင်သည်။ 2,400 အောက်ကို ဖောက်ကျော်သွားပါက long setup ကို ပျက်ပြယ်စေသည်။
{future}(ETHUSDT)
$VTHO
{future}(VTHOUSDT)
$ZEC
{future}(ZECUSDT)
$ETH Long Setup 🟢
Entry: 2,400 – 2,380
SL: 2,400
TP1: 2,430
TP2: 2,458
TP3: 2,486
ETH သည် ပြတ်သားသော ရောင်းထွက်မှုအပြီး 2,408 ပံ့ပိုးမှုကို စမ်းသပ်နေသည်။ 2,408 အထက်မှာ ခိုင်မာစွာ ဆက်ထိန်းပြီး 2,430 ကို ပြန်လည် အနိုင်ယူနိုင်ပါက အပေါ်ဘက် ပစ်မှတ်များဆီသို့ ပြန်လည်ပြင်ဆင်မှုကို ဖြစ်ပေါ်စေနိုင်သည်။ 2,400 အောက်ကို ဖောက်ကျော်သွားပါက long setup ကို ပျက်ပြယ်စေသည်။
$VTHO
$ZEC
Entry: 2,400 – 2,380
SL: 2,400
TP1: 2,430
TP2: 2,458
TP3: 2,486
ETH သည် ပြတ်သားသော ရောင်းထွက်မှုအပြီး 2,408 ပံ့ပိုးမှုကို စမ်းသပ်နေသည်။ 2,408 အထက်မှာ ခိုင်မာစွာ ဆက်ထိန်းပြီး 2,430 ကို ပြန်လည် အနိုင်ယူနိုင်ပါက အပေါ်ဘက် ပစ်မှတ်များဆီသို့ ပြန်လည်ပြင်ဆင်မှုကို ဖြစ်ပေါ်စေနိုင်သည်။ 2,400 အောက်ကို ဖောက်ကျော်သွားပါက long setup ကို ပျက်ပြယ်စေသည်။
$VTHO
$ZEC
2
815
·
--
උසබ තත්ත්වය
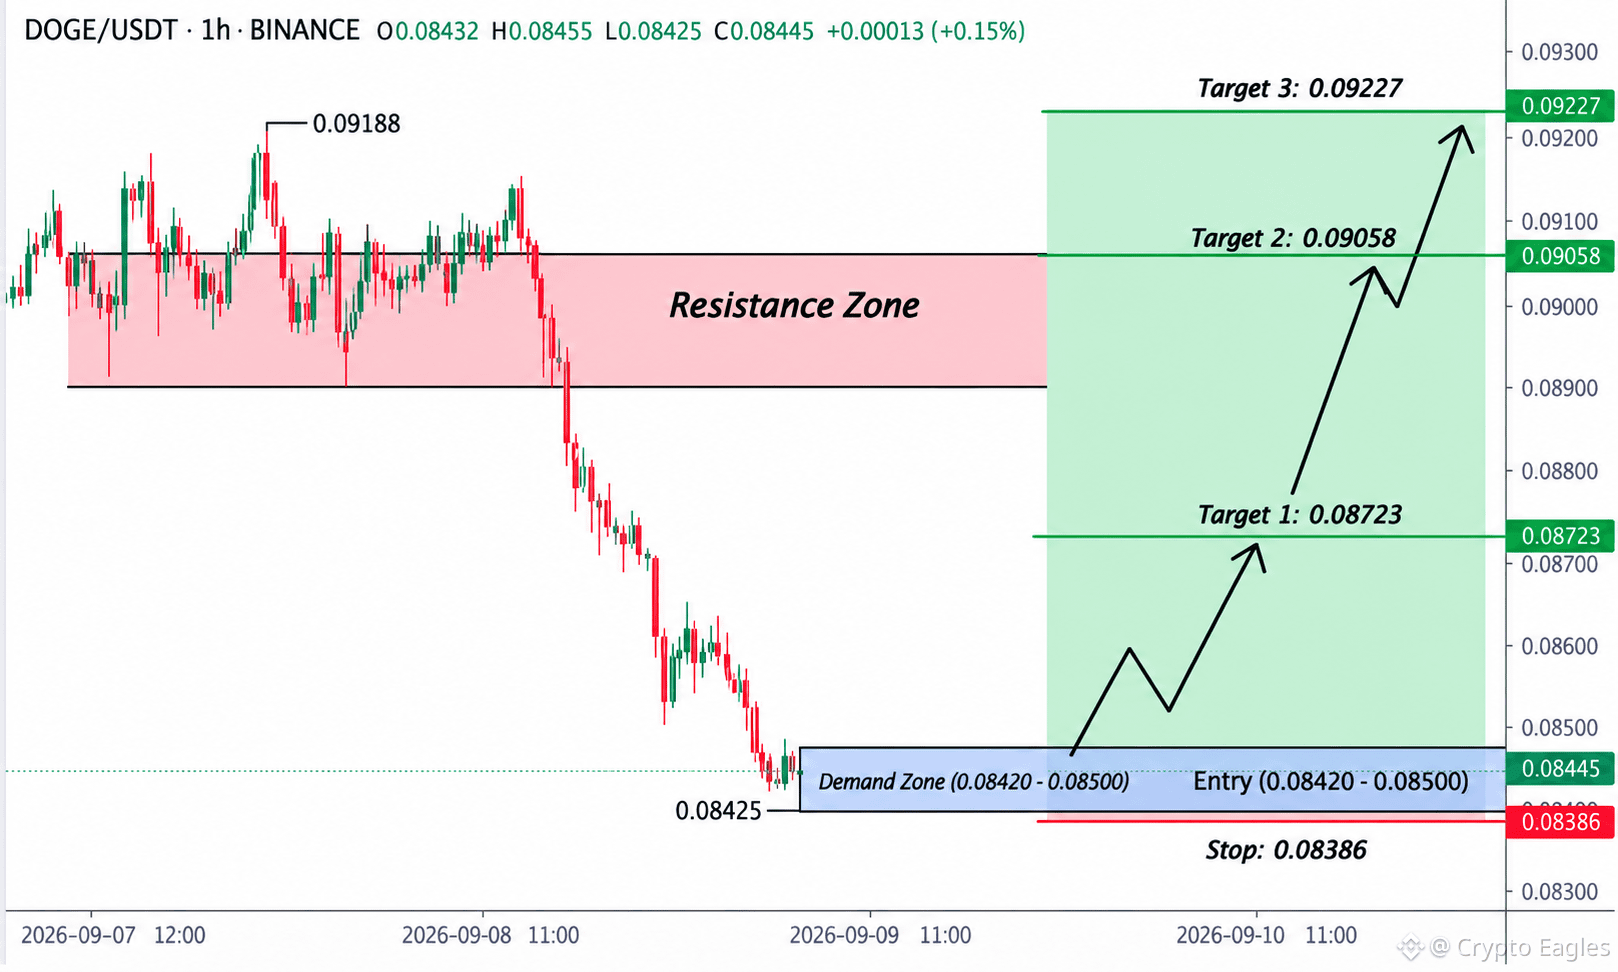
$DOGE දිගු සැකසුම
ඇතුල්වීම: 0.08420 – 0.08500
SL: 0.08386
TP1: 0.08723
TP2: 0.09058
TP3: 0.09227
DOGE තියුණු විකිණීමක් සිදු වීමෙන් පසු 0.08420–0.08500 හි 1H ඉල්ලුම් කලාපයක් පරීක්ෂා කරමින් සිටී. මෙම කලාපය රඳවාගෙන සිටීම 0.08723 වෙත යථා ප්රකෘති වීමක් ඇති කළ හැකි අතර, ඉන් පසු 0.09058 සහ 0.09227 දක්වා ගමන් කළ හැක. 0.08386ට පහළින් බිඳ වැටීම මෙම සැකසුම අවලංගු කරයි
{future}(DOGEUSDT)
$VTHO
{future}(VTHOUSDT)
$ZEST
{future}(ZESTUSDT)
$DOGE දිගු සැකසුම
ඇතුල්වීම: 0.08420 – 0.08500
SL: 0.08386
TP1: 0.08723
TP2: 0.09058
TP3: 0.09227
DOGE තියුණු විකිණීමක් සිදු වීමෙන් පසු 0.08420–0.08500 හි 1H ඉල්ලුම් කලාපයක් පරීක්ෂා කරමින් සිටී. මෙම කලාපය රඳවාගෙන සිටීම 0.08723 වෙත යථා ප්රකෘති වීමක් ඇති කළ හැකි අතර, ඉන් පසු 0.09058 සහ 0.09227 දක්වා ගමන් කළ හැක. 0.08386ට පහළින් බිඳ වැටීම මෙම සැකසුම අවලංගු කරයි
$VTHO
$ZEST
ඇතුල්වීම: 0.08420 – 0.08500
SL: 0.08386
TP1: 0.08723
TP2: 0.09058
TP3: 0.09227
DOGE තියුණු විකිණීමක් සිදු වීමෙන් පසු 0.08420–0.08500 හි 1H ඉල්ලුම් කලාපයක් පරීක්ෂා කරමින් සිටී. මෙම කලාපය රඳවාගෙන සිටීම 0.08723 වෙත යථා ප්රකෘති වීමක් ඇති කළ හැකි අතර, ඉන් පසු 0.09058 සහ 0.09227 දක්වා ගමන් කළ හැක. 0.08386ට පහළින් බිඳ වැටීම මෙම සැකසුම අවලංගු කරයි
$VTHO
$ZEST
3
2k
·
--
උසබ තත්ත්වය
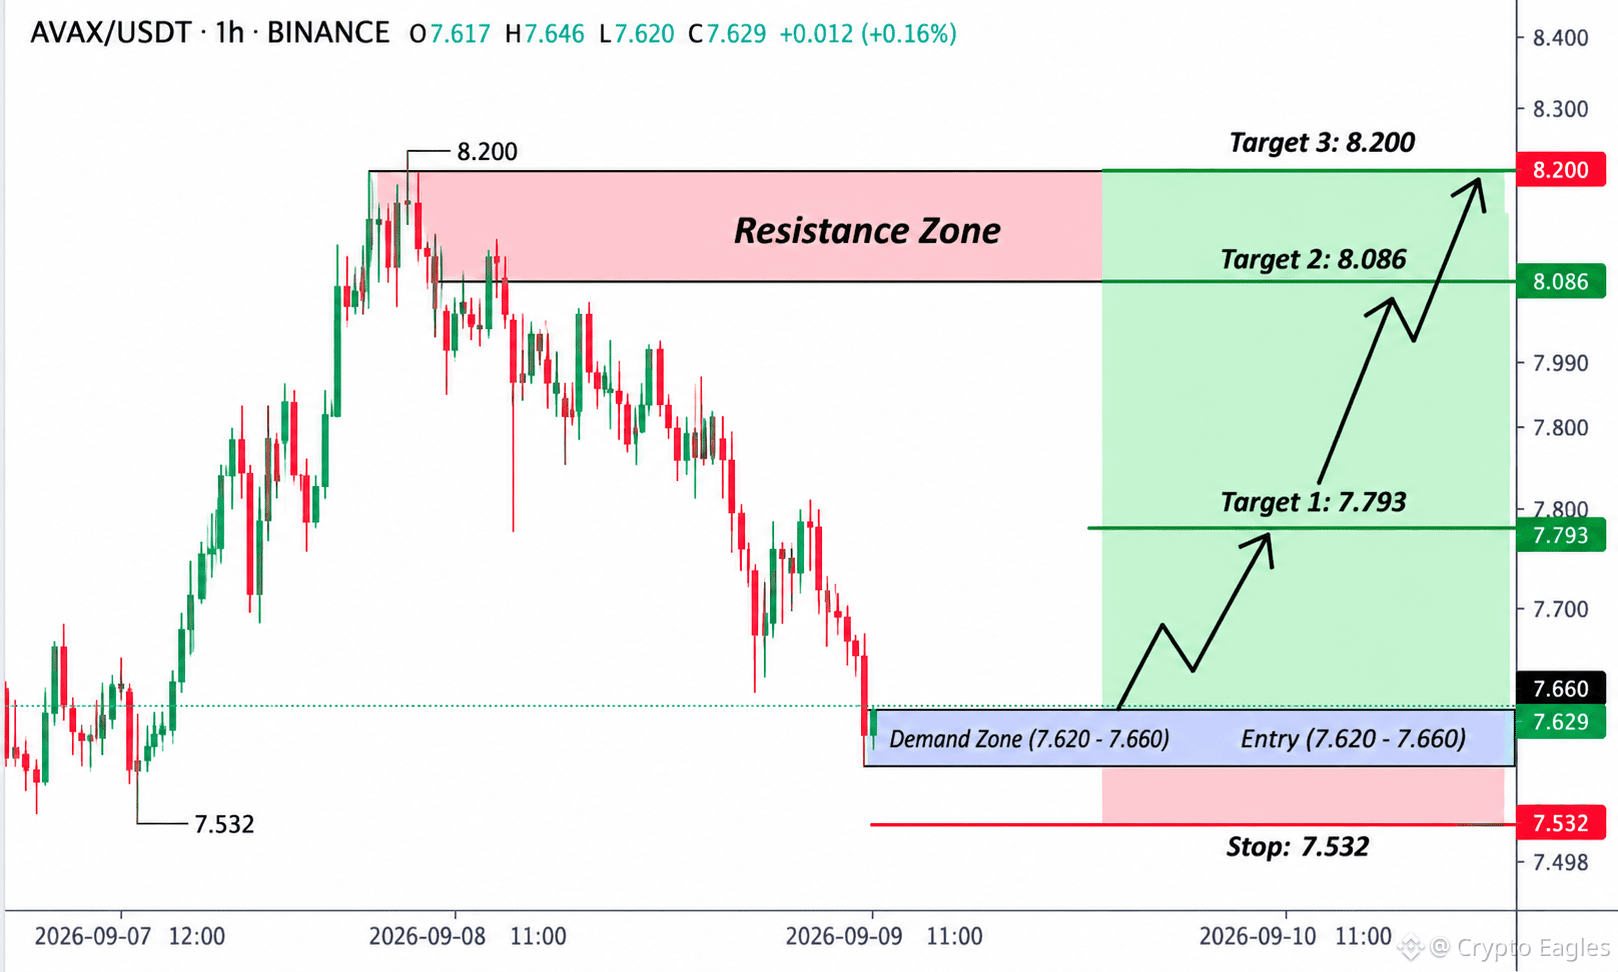
$AVAX Long Setup
Entry: 7.620 – 7.550
SL: 7.532
TP1: 7.793
TP2: 8.086
TP3: 8.200
AVAX သည် ချွန်ပြတ်ပြတ်ကွာကျသွားပြီးနောက် 7.620–7.660 ဝယ်လိုအားဇုန်ကို စမ်းသပ်နေသည်။ ထိုဇုန်ကို ထိန်းထားနိုင်ပါက long setup ကို ဆက်လက် မှန်ကန်နေစေပြီး ပထမ အပေါ်ဘက် ပစ်မှတ်အဖြစ် 7.793 ကို သတ်မှတ်ထားသည်။ 8.086 အထက်သို့ ဖြတ်ကျော်နိုင်ပါက 8.200 သို့ လှုပ်ရှားမှုကို ဖွင့်ပေးနိုင်သည်。
{future}(AVAXUSDT)
$VTHO
{future}(VTHOUSDT)
$ZEST
{future}(ZESTUSDT)
$AVAX Long Setup
Entry: 7.620 – 7.550
SL: 7.532
TP1: 7.793
TP2: 8.086
TP3: 8.200
AVAX သည် ချွန်ပြတ်ပြတ်ကွာကျသွားပြီးနောက် 7.620–7.660 ဝယ်လိုအားဇုန်ကို စမ်းသပ်နေသည်။ ထိုဇုန်ကို ထိန်းထားနိုင်ပါက long setup ကို ဆက်လက် မှန်ကန်နေစေပြီး ပထမ အပေါ်ဘက် ပစ်မှတ်အဖြစ် 7.793 ကို သတ်မှတ်ထားသည်။ 8.086 အထက်သို့ ဖြတ်ကျော်နိုင်ပါက 8.200 သို့ လှုပ်ရှားမှုကို ဖွင့်ပေးနိုင်သည်。
$VTHO
$ZEST
Entry: 7.620 – 7.550
SL: 7.532
TP1: 7.793
TP2: 8.086
TP3: 8.200
AVAX သည် ချွန်ပြတ်ပြတ်ကွာကျသွားပြီးနောက် 7.620–7.660 ဝယ်လိုအားဇုန်ကို စမ်းသပ်နေသည်။ ထိုဇုန်ကို ထိန်းထားနိုင်ပါက long setup ကို ဆက်လက် မှန်ကန်နေစေပြီး ပထမ အပေါ်ဘက် ပစ်မှတ်အဖြစ် 7.793 ကို သတ်မှတ်ထားသည်။ 8.086 အထက်သို့ ဖြတ်ကျော်နိုင်ပါက 8.200 သို့ လှုပ်ရှားမှုကို ဖွင့်ပေးနိုင်သည်。
$VTHO
$ZEST
4
295
·
--
බෙයාරිෂ්
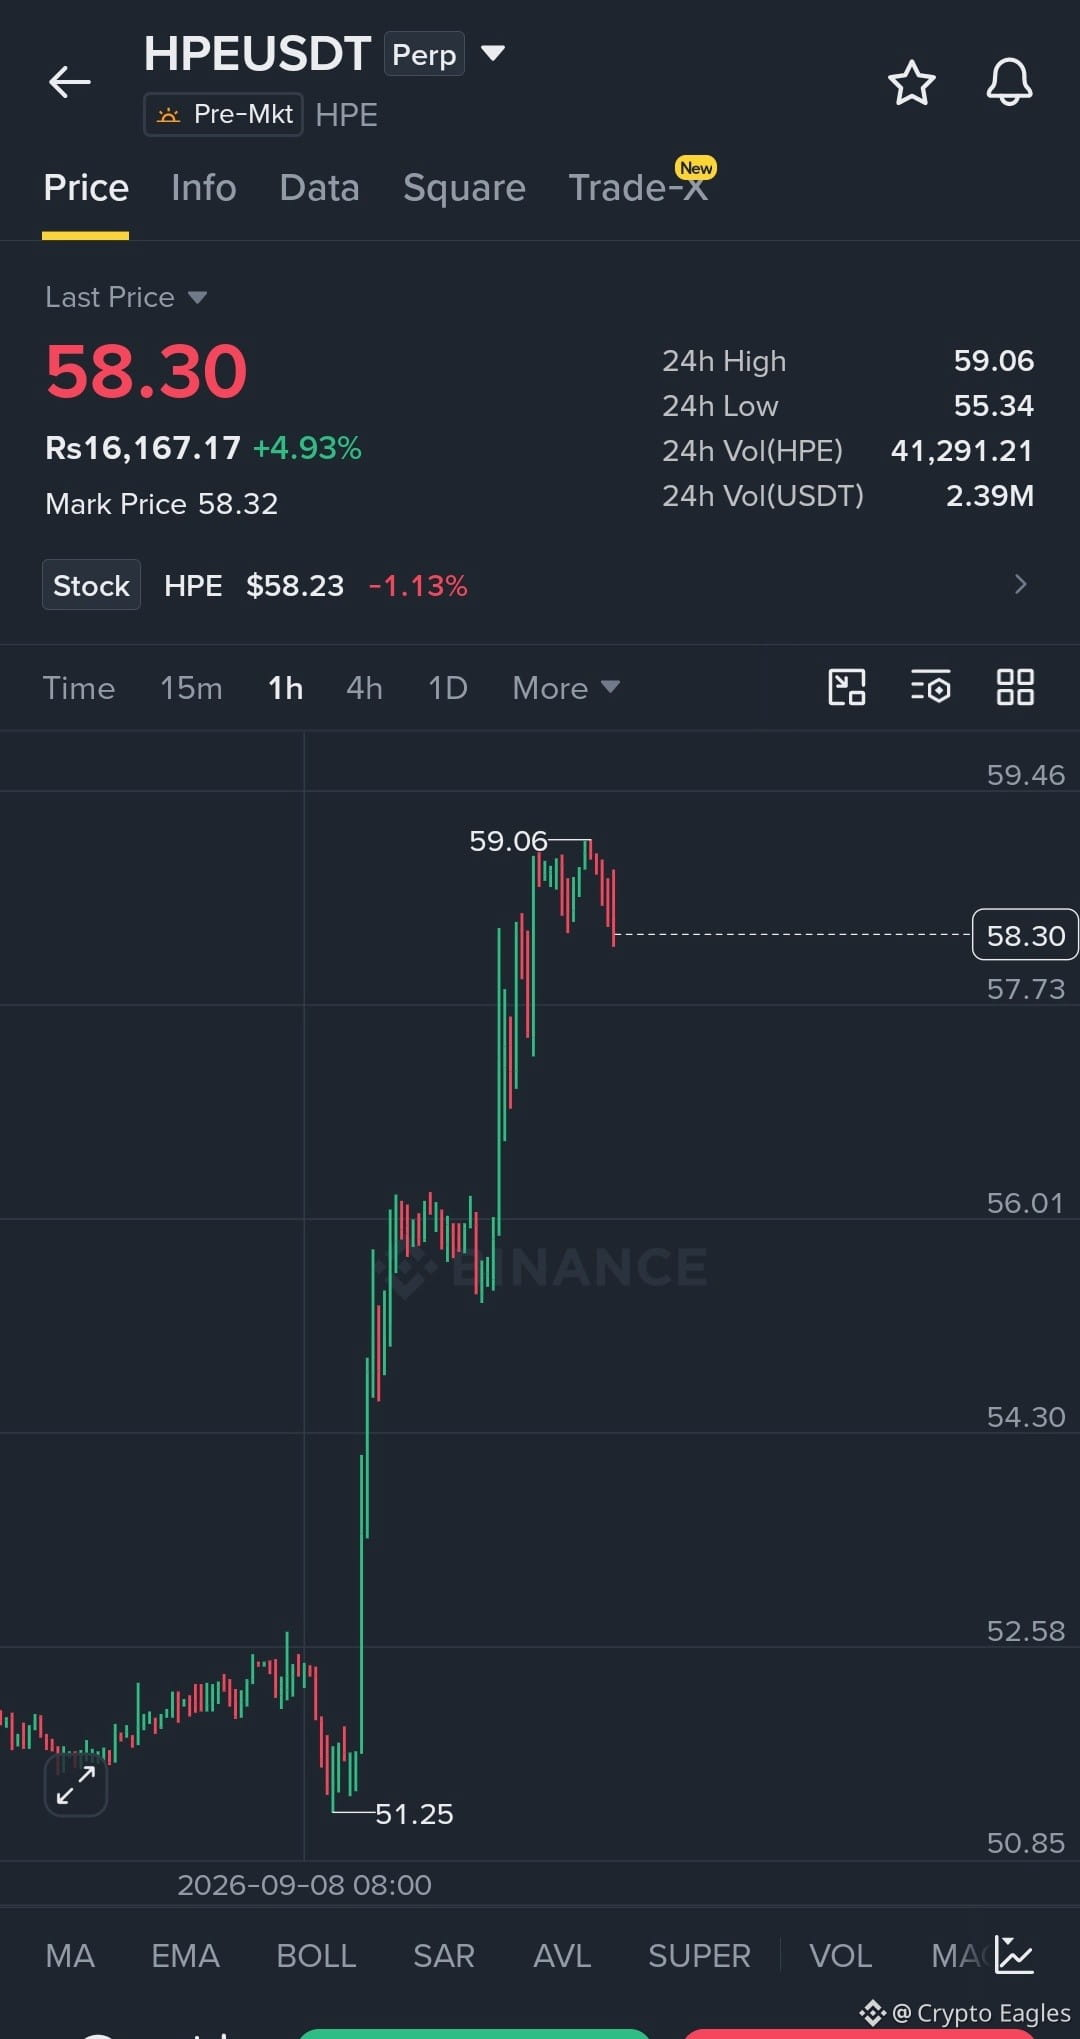
$HPE Short සූදානම 🔴
ඇතුල්වීම: 58.20 – 58.80
SL: 59.50
TP1: 57.73
TP2: 56.01
TP3: 54.30
51.25 → 59.06 තියුණු රැලියෙන් පසුව 59.06 ඉහළ මට්ටමට වහාම පහළින් HPE එකතු වෙමින්/කონსොලිඩේට් වෙමින් පවතී. මෙම ප්රතිරෝධයෙන් ප්රතික්ෂේප වී 57.73ට වඩා පහළට කැඩීමක් සිදුවුවහොත් 56.01 සහ 54.30 වෙත ගැඹුරු pullback එකක් සිදුවීමට වාසිදායක වේ. 59.06ට ඉහළින් ස්ථිර breakout එකක් short අදහස අහියෝගයට පත් කරයි.
{future}(HPEUSDT)
$LSK
{future}(LSKUSDT)
$VTHO
{future}(VTHOUSDT)
$HPE Short සූදානම 🔴
ඇතුල්වීම: 58.20 – 58.80
SL: 59.50
TP1: 57.73
TP2: 56.01
TP3: 54.30
51.25 → 59.06 තියුණු රැලියෙන් පසුව 59.06 ඉහළ මට්ටමට වහාම පහළින් HPE එකතු වෙමින්/කონსොලිඩේට් වෙමින් පවතී. මෙම ප්රතිරෝධයෙන් ප්රතික්ෂේප වී 57.73ට වඩා පහළට කැඩීමක් සිදුවුවහොත් 56.01 සහ 54.30 වෙත ගැඹුරු pullback එකක් සිදුවීමට වාසිදායක වේ. 59.06ට ඉහළින් ස්ථිර breakout එකක් short අදහස අහියෝගයට පත් කරයි.
$LSK
$VTHO
ඇතුල්වීම: 58.20 – 58.80
SL: 59.50
TP1: 57.73
TP2: 56.01
TP3: 54.30
51.25 → 59.06 තියුණු රැලියෙන් පසුව 59.06 ඉහළ මට්ටමට වහාම පහළින් HPE එකතු වෙමින්/කონსොලිඩේට් වෙමින් පවතී. මෙම ප්රතිරෝධයෙන් ප්රතික්ෂේප වී 57.73ට වඩා පහළට කැඩීමක් සිදුවුවහොත් 56.01 සහ 54.30 වෙත ගැඹුරු pullback එකක් සිදුවීමට වාසිදායක වේ. 59.06ට ඉහළින් ස්ථිර breakout එකක් short අදහස අහියෝගයට පත් කරයි.
$LSK
$VTHO
356
·
--
උසබ තත්ත්වය
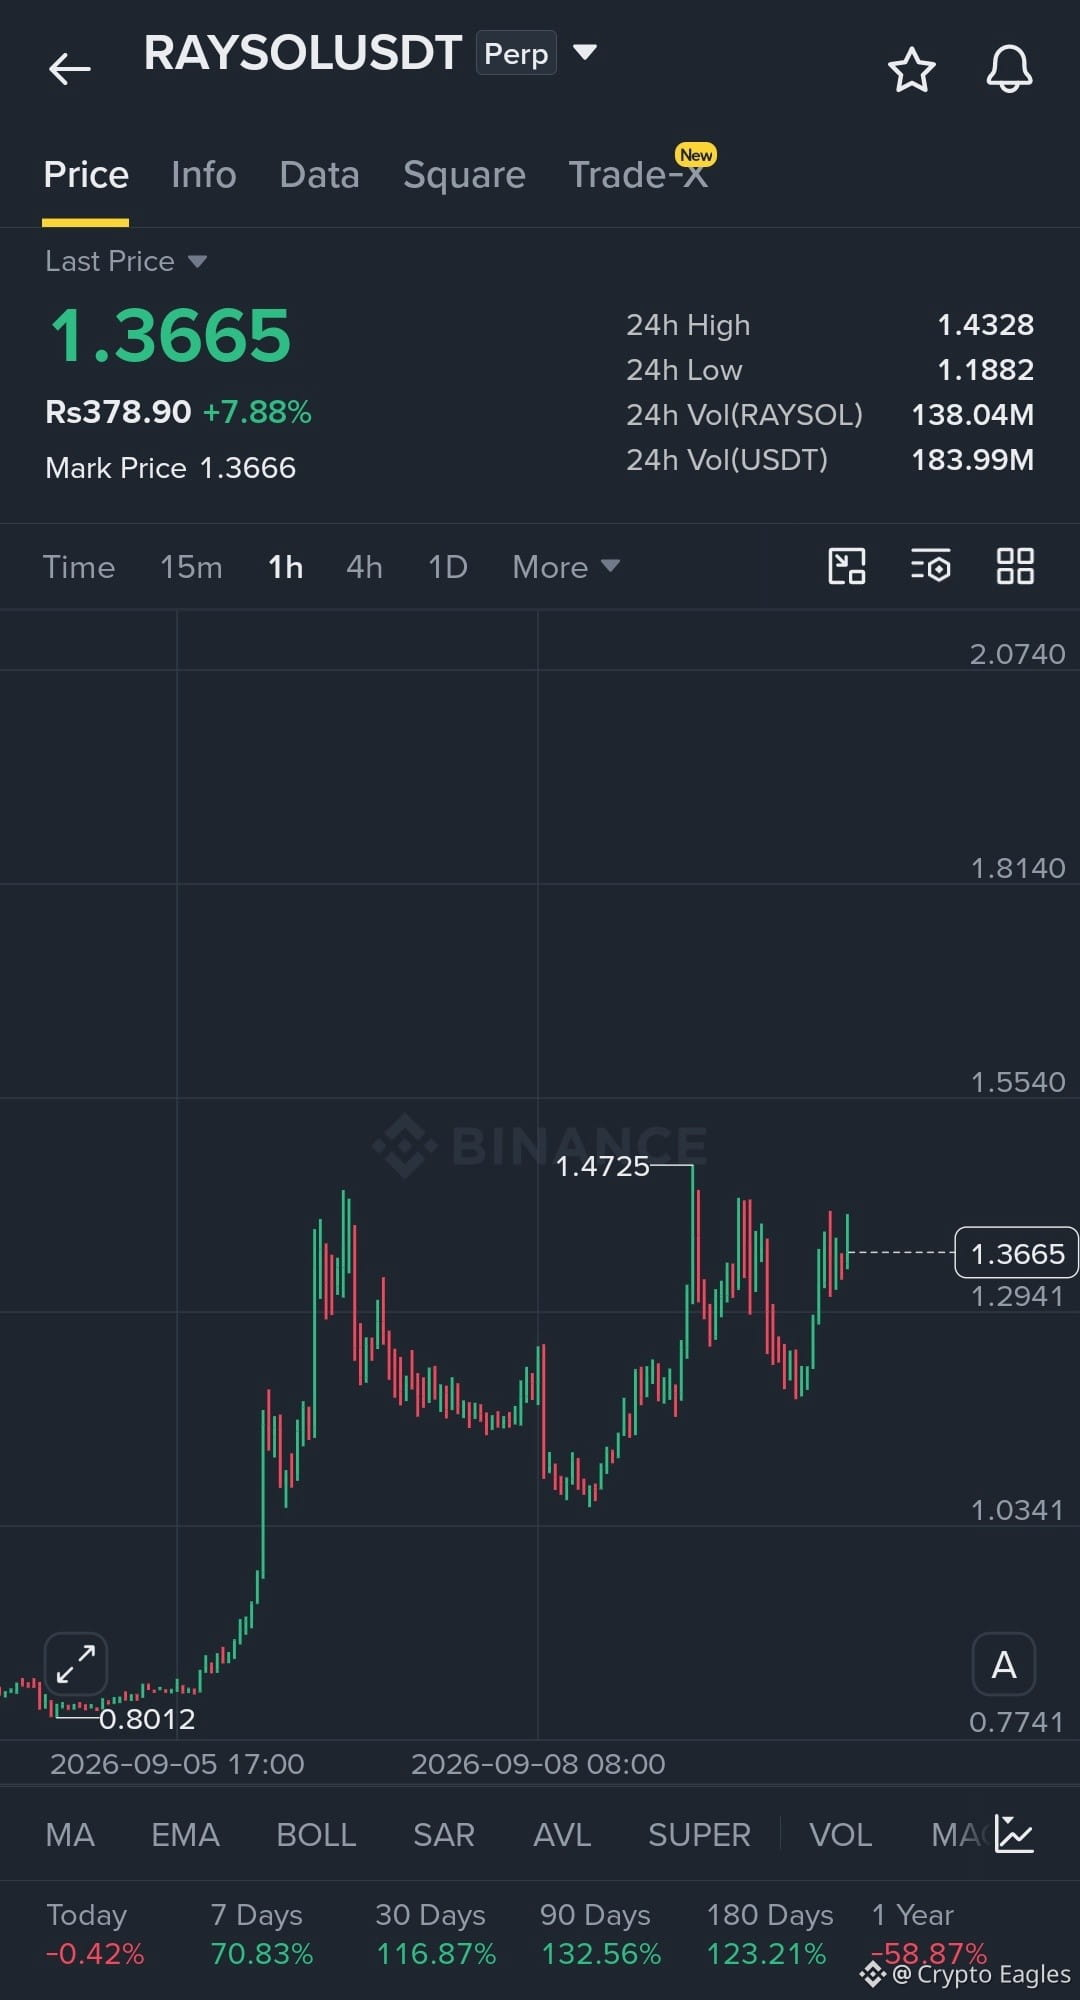
$RAYSOL Long Setup
Entry: 1.34 – 1.37
SL: 1.27
TP1: 1.43
TP2: 1.47
TP3: 1.55
RAYSOL သည် 1H timeframe တွင် bullish structure တစ်ခုကို ပြသနေပြီး၊ ပြန်လည်ကောင်းမွန်လာမှု အားကောင်းပြီးနောက် 1.29 support zone အောက်မကျဘဲ ထိန်းထားနေသည်။ 1.43 အထက်သို့ သန့်ရှင်းသော breakout တစ်ခုဖြစ်ပြီး ထိန်းထားနိုင်ပါက 1.47–1.55 အထိ လမ်းဖွင့်နိုင်သည်။ စျေးနှုန်းသည် entry/support နေရာကို ထိန်းထားသမျှ bullish setup သည် ဆက်လက်တရားဝင်နေမည်ဖြစ်သည်။ 1.27 ကို ဆုံးရှုံးသွားပါက long ကို မမှန်ကန်ကြောင်း သတ်မှတ်မည်ဖြစ်သည်။ 📈
{future}(RAYSOLUSDT)
$TRUMP
{future}(TRUMPUSDT)
$AVAX
{future}(AVAXUSDT)
$RAYSOL Long Setup
Entry: 1.34 – 1.37
SL: 1.27
TP1: 1.43
TP2: 1.47
TP3: 1.55
RAYSOL သည် 1H timeframe တွင် bullish structure တစ်ခုကို ပြသနေပြီး၊ ပြန်လည်ကောင်းမွန်လာမှု အားကောင်းပြီးနောက် 1.29 support zone အောက်မကျဘဲ ထိန်းထားနေသည်။ 1.43 အထက်သို့ သန့်ရှင်းသော breakout တစ်ခုဖြစ်ပြီး ထိန်းထားနိုင်ပါက 1.47–1.55 အထိ လမ်းဖွင့်နိုင်သည်။ စျေးနှုန်းသည် entry/support နေရာကို ထိန်းထားသမျှ bullish setup သည် ဆက်လက်တရားဝင်နေမည်ဖြစ်သည်။ 1.27 ကို ဆုံးရှုံးသွားပါက long ကို မမှန်ကန်ကြောင်း သတ်မှတ်မည်ဖြစ်သည်။ 📈
$TRUMP
$AVAX
Entry: 1.34 – 1.37
SL: 1.27
TP1: 1.43
TP2: 1.47
TP3: 1.55
RAYSOL သည် 1H timeframe တွင် bullish structure တစ်ခုကို ပြသနေပြီး၊ ပြန်လည်ကောင်းမွန်လာမှု အားကောင်းပြီးနောက် 1.29 support zone အောက်မကျဘဲ ထိန်းထားနေသည်။ 1.43 အထက်သို့ သန့်ရှင်းသော breakout တစ်ခုဖြစ်ပြီး ထိန်းထားနိုင်ပါက 1.47–1.55 အထိ လမ်းဖွင့်နိုင်သည်။ စျေးနှုန်းသည် entry/support နေရာကို ထိန်းထားသမျှ bullish setup သည် ဆက်လက်တရားဝင်နေမည်ဖြစ်သည်။ 1.27 ကို ဆုံးရှုံးသွားပါက long ကို မမှန်ကန်ကြောင်း သတ်မှတ်မည်ဖြစ်သည်။ 📈
$TRUMP
$AVAX
335
·
--
උසබ තත්ත්වය
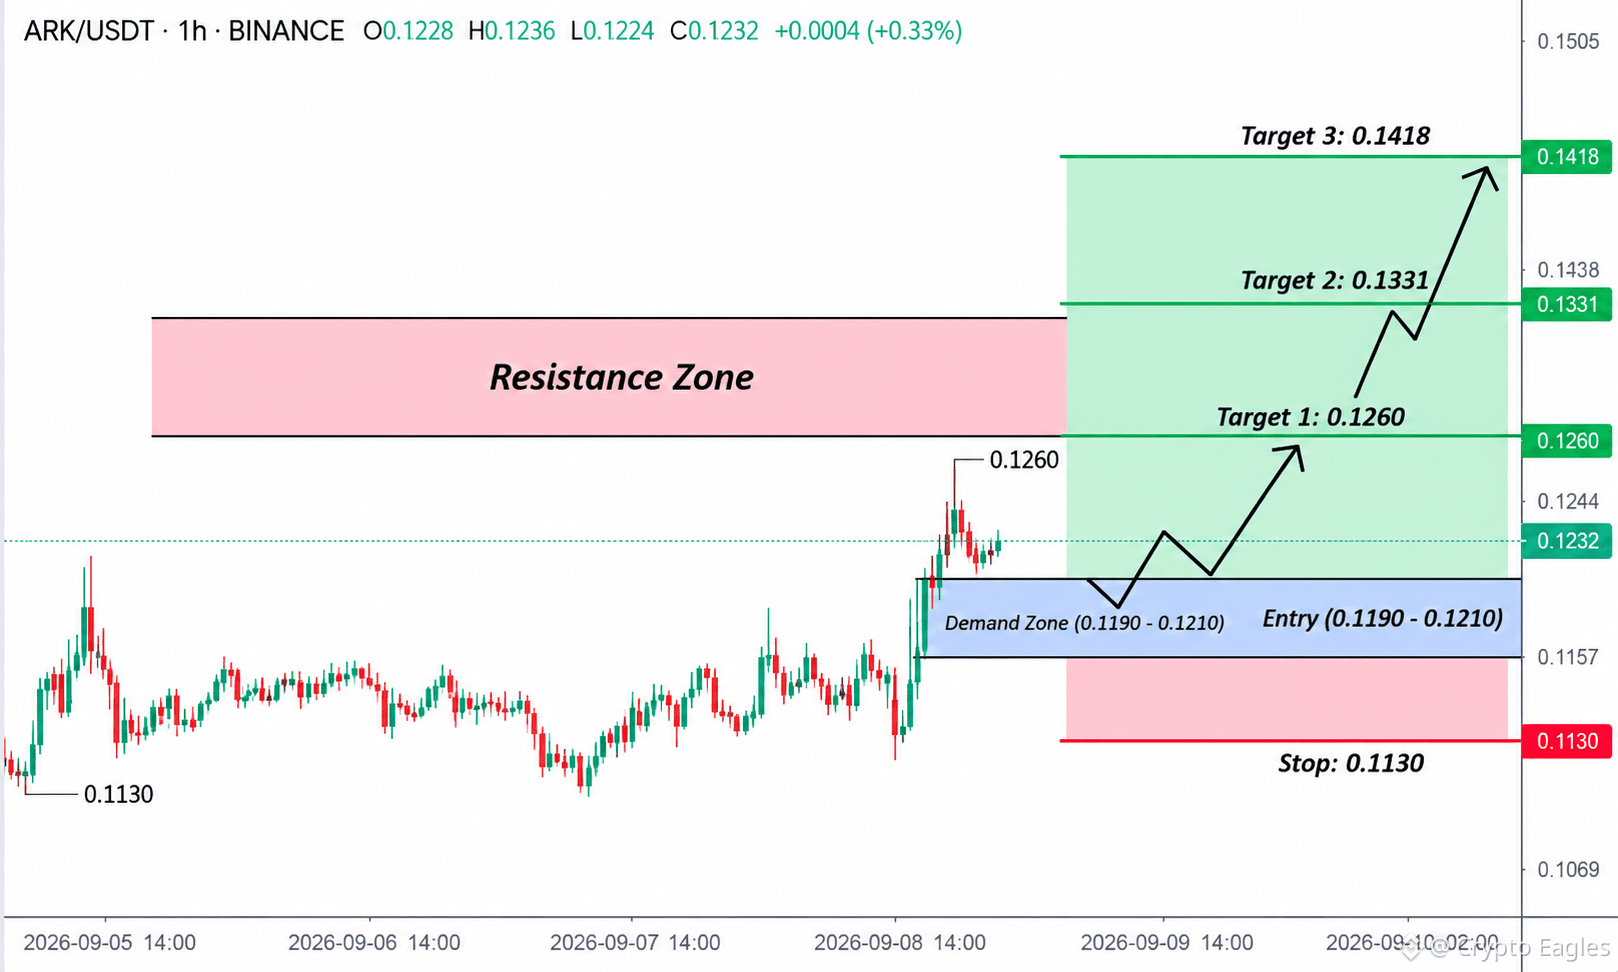
$ARK දිග කාලීන සකස් කිරීම
ඇතුල්වීම: 0.1190 – 0.1210
SL: 0.1130
TP1: 0.1260
TP2: 0.1331
TP3: 0.1418
ARK 0.1190–0.1210 ඉල්ලුම් කලාපයෙන් තදින් breakout කර ඇති අතර breakout ප්රදේශය ඉහළින් රැඳී සිටී. මෙම කලාපයේ සාර්ථක retest එකක් 0.1260 වෙත, ඉන් පසුව 0.1331 සහ 0.1418 වෙත දිගටම ගමන් කිරීමට ආධාර විය හැක. 0.1130 අහිමි වීම bullish සැකසීම අවලංගු කරයි.
{future}(ARKUSDT)
$VTHO
{future}(VTHOUSDT)
$BULLA
{future}(BULLAUSDT)
$ARK දිග කාලීන සකස් කිරීම
ඇතුල්වීම: 0.1190 – 0.1210
SL: 0.1130
TP1: 0.1260
TP2: 0.1331
TP3: 0.1418
ARK 0.1190–0.1210 ඉල්ලුම් කලාපයෙන් තදින් breakout කර ඇති අතර breakout ප්රදේශය ඉහළින් රැඳී සිටී. මෙම කලාපයේ සාර්ථක retest එකක් 0.1260 වෙත, ඉන් පසුව 0.1331 සහ 0.1418 වෙත දිගටම ගමන් කිරීමට ආධාර විය හැක. 0.1130 අහිමි වීම bullish සැකසීම අවලංගු කරයි.
$VTHO
$BULLA
ඇතුල්වීම: 0.1190 – 0.1210
SL: 0.1130
TP1: 0.1260
TP2: 0.1331
TP3: 0.1418
ARK 0.1190–0.1210 ඉල්ලුම් කලාපයෙන් තදින් breakout කර ඇති අතර breakout ප්රදේශය ඉහළින් රැඳී සිටී. මෙම කලාපයේ සාර්ථක retest එකක් 0.1260 වෙත, ඉන් පසුව 0.1331 සහ 0.1418 වෙත දිගටම ගමන් කිරීමට ආධාර විය හැක. 0.1130 අහිමි වීම bullish සැකසීම අවලංගු කරයි.
$VTHO
$BULLA
400
·
--
උසබ තත්ත්වය
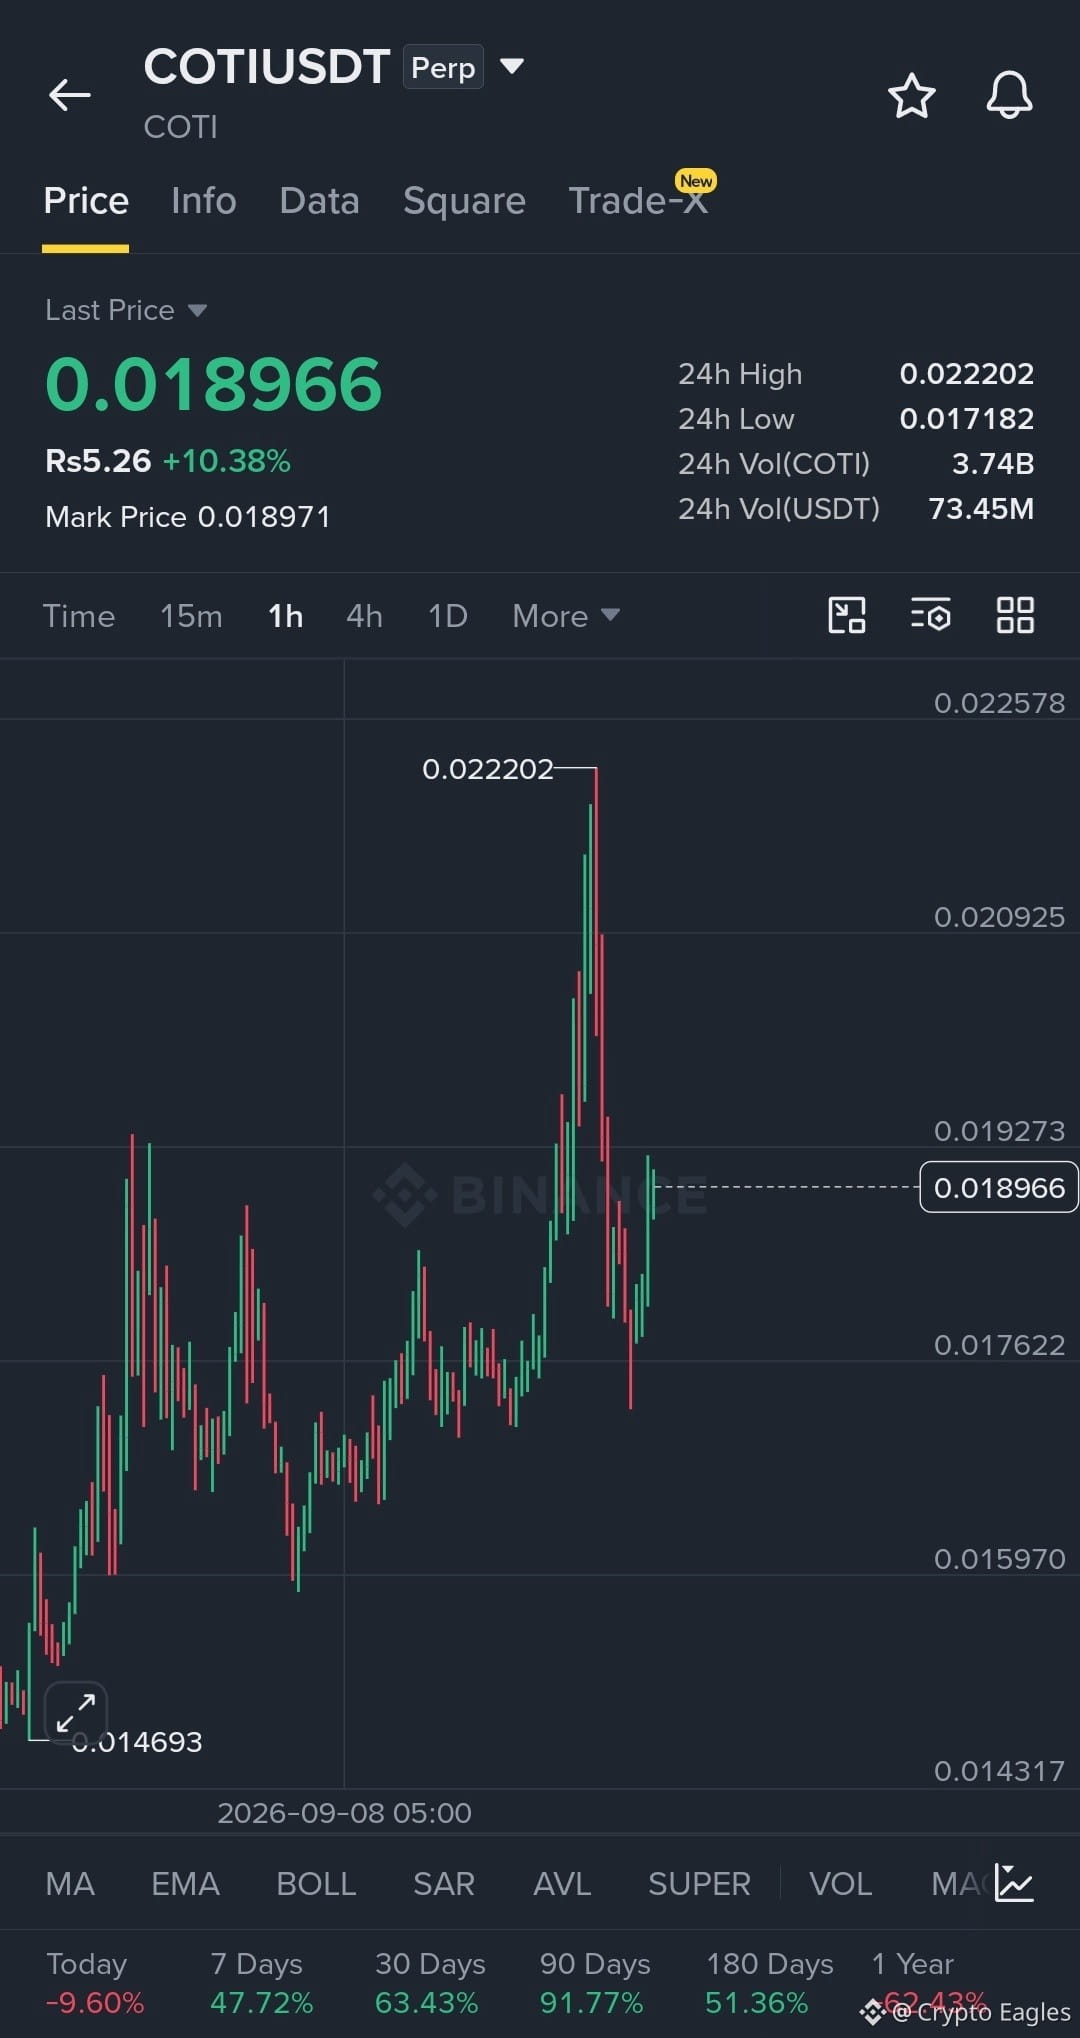
$COTI Long सेटআপ
Entry: 0.01800 – 0.01880
SL: 0.01718
TP1: 0.01927
TP2: 0.02093
TP3: 0.02258
0.02220 ခုခံမှုից ချွန်ထက်စွာ ငြင်းပယ်ခံရပြီးနောက် COTI သည် 0.01800–0.01880 ဝယ်လိုအားဇုန်ကို ဆက်လက်ကိုင်ထားနေသည်။ 0.01927 အထက်တွင် ဆက်လက်ရွေ့လျားမှုတစ်ခုက 0.02093 နှင့် 0.02258 သို့ ညွှန်းကိန်းဆက်လက်တက်လာမည်ကို အတည်ပြုနိုင်သည်။ 0.01718 ကို ဆုံးရှုံးသွားပါက ဒီ setup ကို မမှန်ကန်ဟု သတ်မှတ်မည်ဖြစ်သည်။
{future}(COTIUSDT)
$VTHO
{future}(VTHOUSDT)
$BULLA
{future}(BULLAUSDT)
$COTI Long सेटআপ
Entry: 0.01800 – 0.01880
SL: 0.01718
TP1: 0.01927
TP2: 0.02093
TP3: 0.02258
0.02220 ခုခံမှုից ချွန်ထက်စွာ ငြင်းပယ်ခံရပြီးနောက် COTI သည် 0.01800–0.01880 ဝယ်လိုအားဇုန်ကို ဆက်လက်ကိုင်ထားနေသည်။ 0.01927 အထက်တွင် ဆက်လက်ရွေ့လျားမှုတစ်ခုက 0.02093 နှင့် 0.02258 သို့ ညွှန်းကိန်းဆက်လက်တက်လာမည်ကို အတည်ပြုနိုင်သည်။ 0.01718 ကို ဆုံးရှုံးသွားပါက ဒီ setup ကို မမှန်ကန်ဟု သတ်မှတ်မည်ဖြစ်သည်။
$VTHO
$BULLA
Entry: 0.01800 – 0.01880
SL: 0.01718
TP1: 0.01927
TP2: 0.02093
TP3: 0.02258
0.02220 ခုခံမှုից ချွန်ထက်စွာ ငြင်းပယ်ခံရပြီးနောက် COTI သည် 0.01800–0.01880 ဝယ်လိုအားဇုန်ကို ဆက်လက်ကိုင်ထားနေသည်။ 0.01927 အထက်တွင် ဆက်လက်ရွေ့လျားမှုတစ်ခုက 0.02093 နှင့် 0.02258 သို့ ညွှန်းကိန်းဆက်လက်တက်လာမည်ကို အတည်ပြုနိုင်သည်။ 0.01718 ကို ဆုံးရှုံးသွားပါက ဒီ setup ကို မမှန်ကန်ဟု သတ်မှတ်မည်ဖြစ်သည်။
$VTHO
$BULLA
532
·
--
උසබ තත්ත්වය
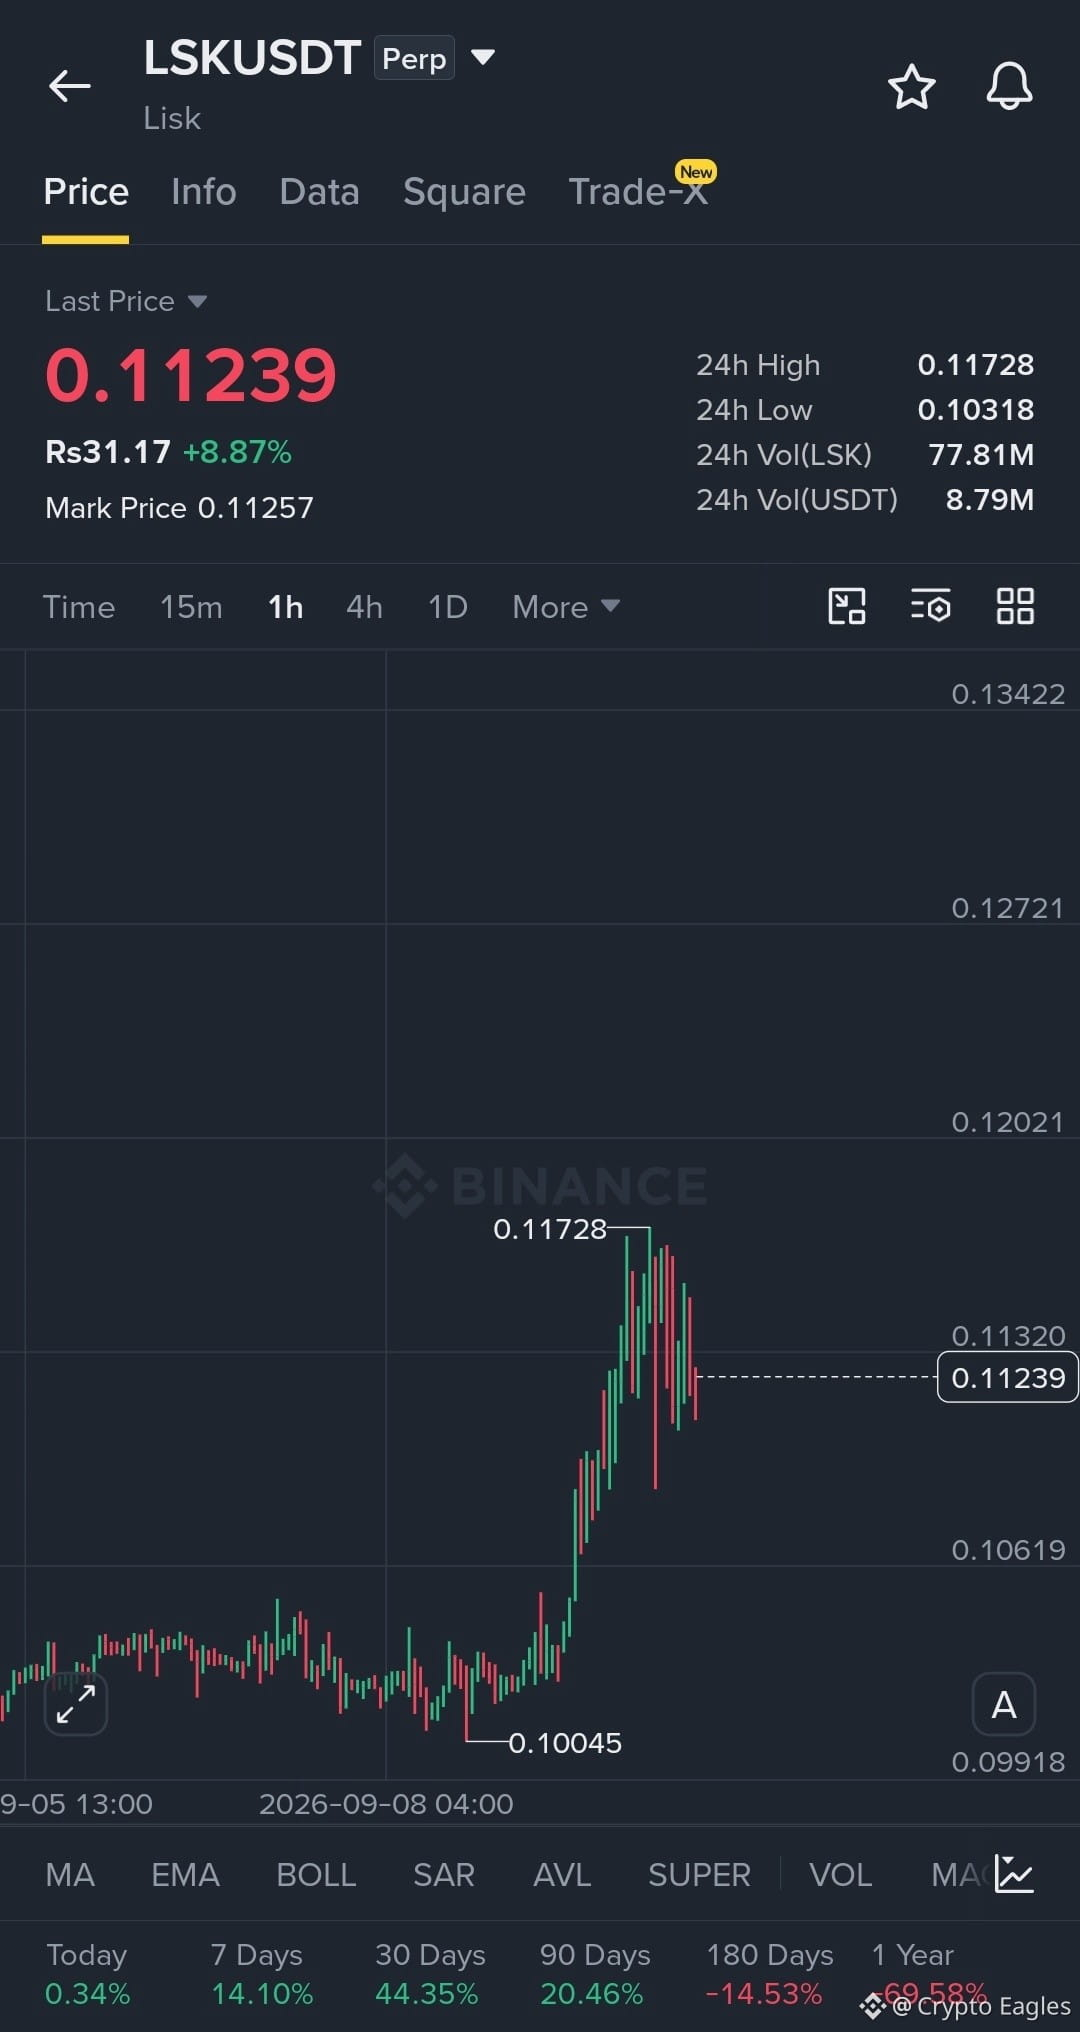
$LSK Long Setup
Entry: 0.1100 – 0.1130
SL: 0.1060
TP1: 0.1202
TP2: 0.1272
TP3: 0.1342
LSK သည် 0.10045 အခြေစိုက်စခန်းမှ အားကောင်းသော breakout တစ်ခု လုပ်ပြီး 0.11728 ခုခံမှုအောက်ဘက်တွင်သာ စုစည်းနေပါတယ်။ 0.1173 အထက်သို့ သန့်ရှင်းစွာ breakout ဖြစ်ပြီး ထိန်းထားနိုင်ပါက 0.1202 → 0.1272 → 0.1342 အထိ နောက်ထပ် အပေါ်ဘက် ရွေ့လျားမှုကို စတင်နိုင်ပါတယ်။ 0.1060 ကို ဆုံးရှုံးသွားပါက အားတက် bullish setup ကို အားနည်းစေပါလိမ့်မယ်။
{future}(LSKUSDT)
$VTHO
{future}(VTHOUSDT)
$BULLA
{future}(BULLAUSDT)
$LSK Long Setup
Entry: 0.1100 – 0.1130
SL: 0.1060
TP1: 0.1202
TP2: 0.1272
TP3: 0.1342
LSK သည် 0.10045 အခြေစိုက်စခန်းမှ အားကောင်းသော breakout တစ်ခု လုပ်ပြီး 0.11728 ခုခံမှုအောက်ဘက်တွင်သာ စုစည်းနေပါတယ်။ 0.1173 အထက်သို့ သန့်ရှင်းစွာ breakout ဖြစ်ပြီး ထိန်းထားနိုင်ပါက 0.1202 → 0.1272 → 0.1342 အထိ နောက်ထပ် အပေါ်ဘက် ရွေ့လျားမှုကို စတင်နိုင်ပါတယ်။ 0.1060 ကို ဆုံးရှုံးသွားပါက အားတက် bullish setup ကို အားနည်းစေပါလိမ့်မယ်။
$VTHO
$BULLA
Entry: 0.1100 – 0.1130
SL: 0.1060
TP1: 0.1202
TP2: 0.1272
TP3: 0.1342
LSK သည် 0.10045 အခြေစိုက်စခန်းမှ အားကောင်းသော breakout တစ်ခု လုပ်ပြီး 0.11728 ခုခံမှုအောက်ဘက်တွင်သာ စုစည်းနေပါတယ်။ 0.1173 အထက်သို့ သန့်ရှင်းစွာ breakout ဖြစ်ပြီး ထိန်းထားနိုင်ပါက 0.1202 → 0.1272 → 0.1342 အထိ နောက်ထပ် အပေါ်ဘက် ရွေ့လျားမှုကို စတင်နိုင်ပါတယ်။ 0.1060 ကို ဆုံးရှုံးသွားပါက အားတက် bullish setup ကို အားနည်းစေပါလိမ့်မယ်။
$VTHO
$BULLA
412
·
--
උසබ තත්ත්වය
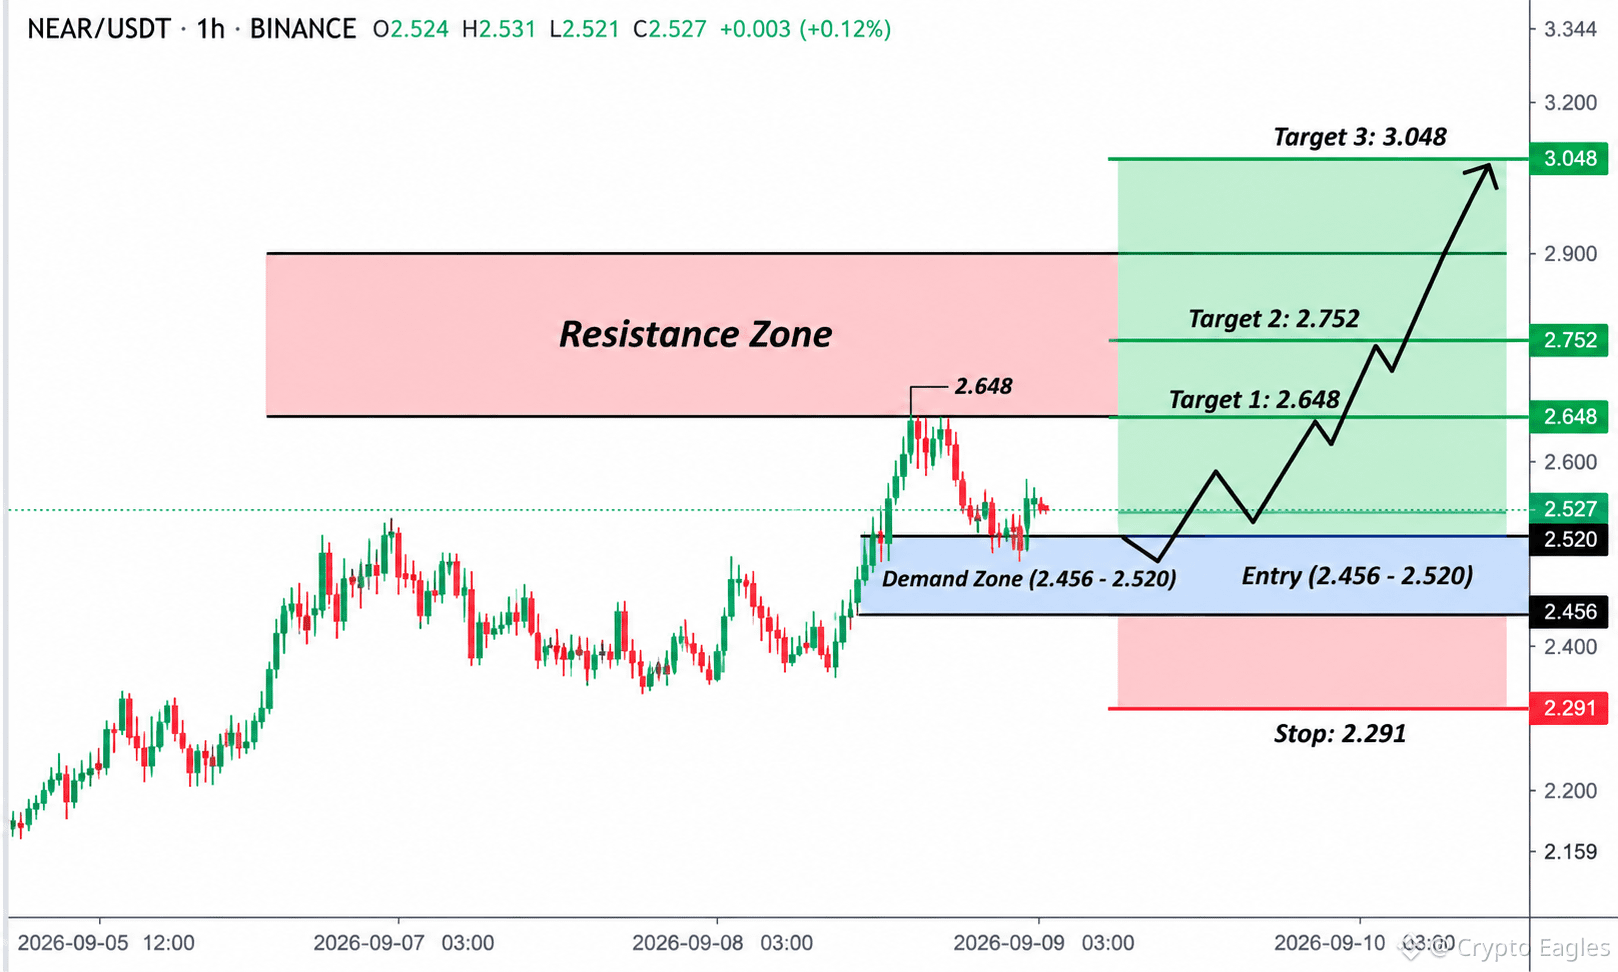
$NEAR Long Setup
Entry: 2.456 – 2.520
SL: 2.291
TP1: 2.648
TP2: 2.752
TP3: 3.048
NEAR သည် ပိုမိုမြင့်မားစွာ ကျော်လွန်ပြီး 2.648 ခုခံမှုကို ပယ်ချပြီးနောက် 2.456–2.520 demand zone ကို ဆက်လက် ထိန်းထားနေသည်။ 2.520 အထက်မှာ စဉ်ဆက်မပြတ် ထိန်းထားနိုင်ပါက bullish structure ကို မပျက်မကွက် ဆက်လက်ထားရှိစေပြီး 2.648 သည် ပထမဆုံး အဓိက breakout level ဖြစ်သည်။ 2.291 ကို ဆုံးရှုံးသွားပါက setup ကို အကျုံးမဝင်စေသည်။
{future}(NEARUSDT)
$BTR
{future}(BTRUSDT)
$VTHO
{future}(VTHOUSDT)
$NEAR Long Setup
Entry: 2.456 – 2.520
SL: 2.291
TP1: 2.648
TP2: 2.752
TP3: 3.048
NEAR သည် ပိုမိုမြင့်မားစွာ ကျော်လွန်ပြီး 2.648 ခုခံမှုကို ပယ်ချပြီးနောက် 2.456–2.520 demand zone ကို ဆက်လက် ထိန်းထားနေသည်။ 2.520 အထက်မှာ စဉ်ဆက်မပြတ် ထိန်းထားနိုင်ပါက bullish structure ကို မပျက်မကွက် ဆက်လက်ထားရှိစေပြီး 2.648 သည် ပထမဆုံး အဓိက breakout level ဖြစ်သည်။ 2.291 ကို ဆုံးရှုံးသွားပါက setup ကို အကျုံးမဝင်စေသည်။
$BTR
$VTHO
Entry: 2.456 – 2.520
SL: 2.291
TP1: 2.648
TP2: 2.752
TP3: 3.048
NEAR သည် ပိုမိုမြင့်မားစွာ ကျော်လွန်ပြီး 2.648 ခုခံမှုကို ပယ်ချပြီးနောက် 2.456–2.520 demand zone ကို ဆက်လက် ထိန်းထားနေသည်။ 2.520 အထက်မှာ စဉ်ဆက်မပြတ် ထိန်းထားနိုင်ပါက bullish structure ကို မပျက်မကွက် ဆက်လက်ထားရှိစေပြီး 2.648 သည် ပထမဆုံး အဓိက breakout level ဖြစ်သည်။ 2.291 ကို ဆုံးရှုံးသွားပါက setup ကို အကျုံးမဝင်စေသည်။
$BTR
$VTHO
435
·
--
උසබ තත්ත්වය
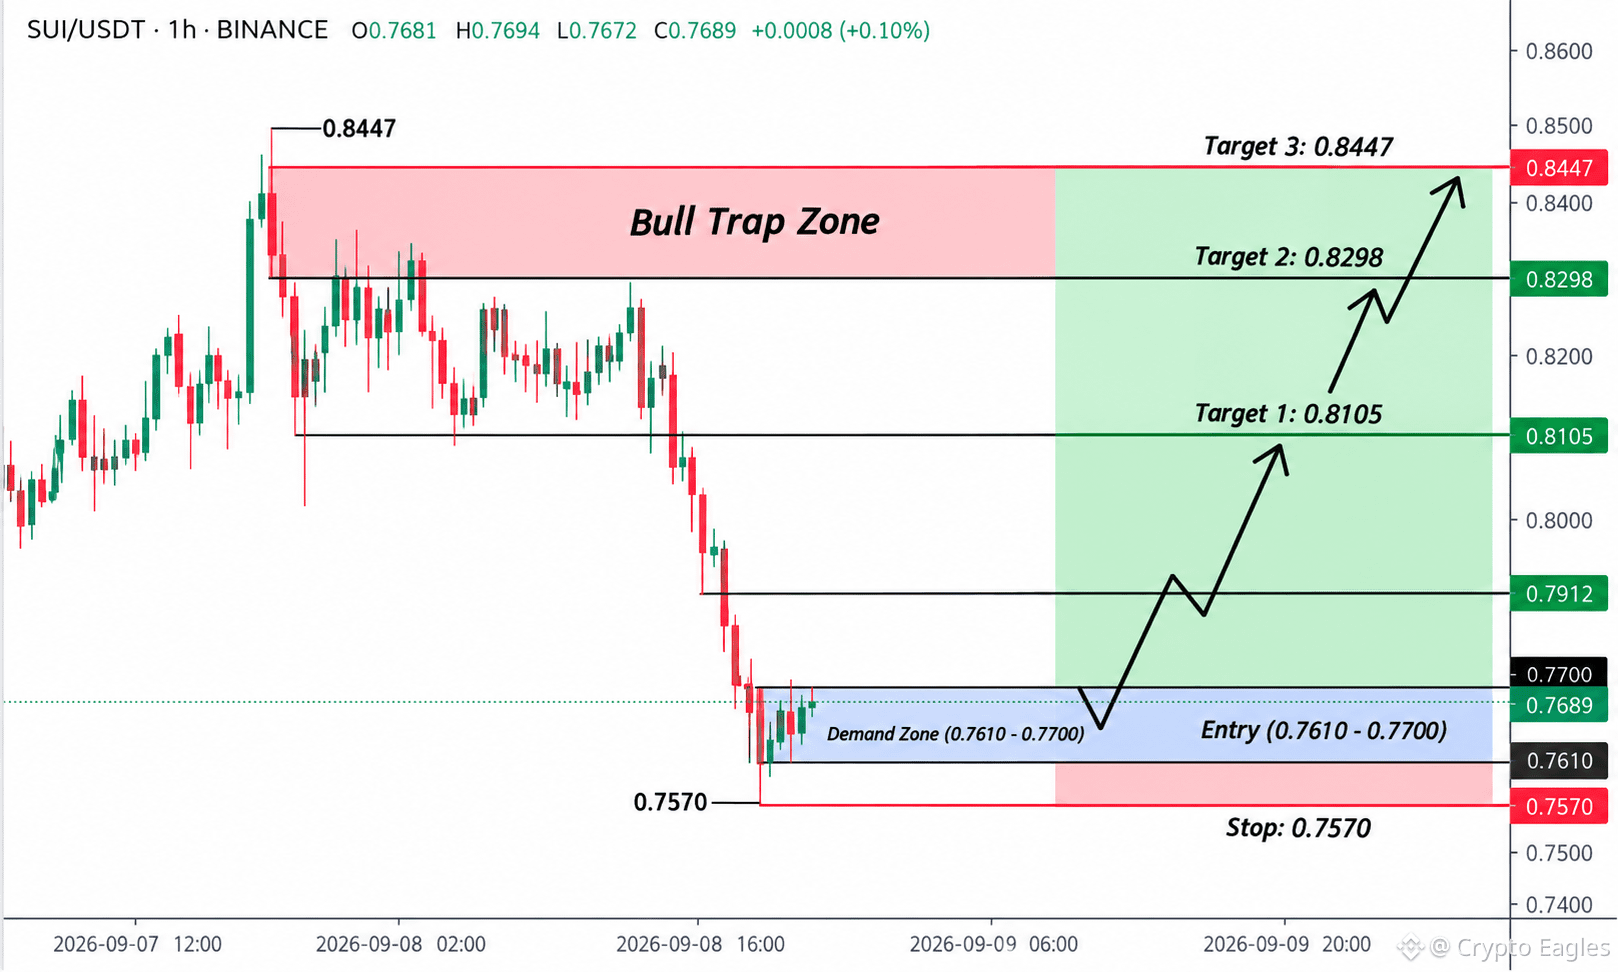
$SUI Long Setup 🟢
ඇතුල්වීම: 0.7610 – 0.7700
SL: 0.7570
TP1: 0.8105
TP2: 0.8298
TP3: 0.8447
SUI තියුණු විකුණුම් පහත වැටීමෙන් පසු 0.7610–0.7700 ඉල්ලුම් කලාපය රඳවාගෙන සිටින අතර මුල් ස්ථායීකරණය පෙන්වයි. 0.7700 නැවත අල්ලා ගැනීමෙන් 0.8105 වෙත ගමනක්, ඉන්පසු 0.8298 සහ 0.8447 වෙත යාමක් ක්රියාත්මක විය හැක. 0.7570 අහිමි වීමෙන් මෙම සැකසුම අහෝසි වේ.
{future}(SUIUSDT)
$VTHO
{future}(VTHOUSDT)
$IOST
{future}(IOSTUSDT)
$SUI Long Setup 🟢
ඇතුල්වීම: 0.7610 – 0.7700
SL: 0.7570
TP1: 0.8105
TP2: 0.8298
TP3: 0.8447
SUI තියුණු විකුණුම් පහත වැටීමෙන් පසු 0.7610–0.7700 ඉල්ලුම් කලාපය රඳවාගෙන සිටින අතර මුල් ස්ථායීකරණය පෙන්වයි. 0.7700 නැවත අල්ලා ගැනීමෙන් 0.8105 වෙත ගමනක්, ඉන්පසු 0.8298 සහ 0.8447 වෙත යාමක් ක්රියාත්මක විය හැක. 0.7570 අහිමි වීමෙන් මෙම සැකසුම අහෝසි වේ.
$VTHO
$IOST
ඇතුල්වීම: 0.7610 – 0.7700
SL: 0.7570
TP1: 0.8105
TP2: 0.8298
TP3: 0.8447
SUI තියුණු විකුණුම් පහත වැටීමෙන් පසු 0.7610–0.7700 ඉල්ලුම් කලාපය රඳවාගෙන සිටින අතර මුල් ස්ථායීකරණය පෙන්වයි. 0.7700 නැවත අල්ලා ගැනීමෙන් 0.8105 වෙත ගමනක්, ඉන්පසු 0.8298 සහ 0.8447 වෙත යාමක් ක්රියාත්මක විය හැක. 0.7570 අහිමි වීමෙන් මෙම සැකසුම අහෝසි වේ.
$VTHO
$IOST
1
637
·
--
උසබ තත්ත්වය
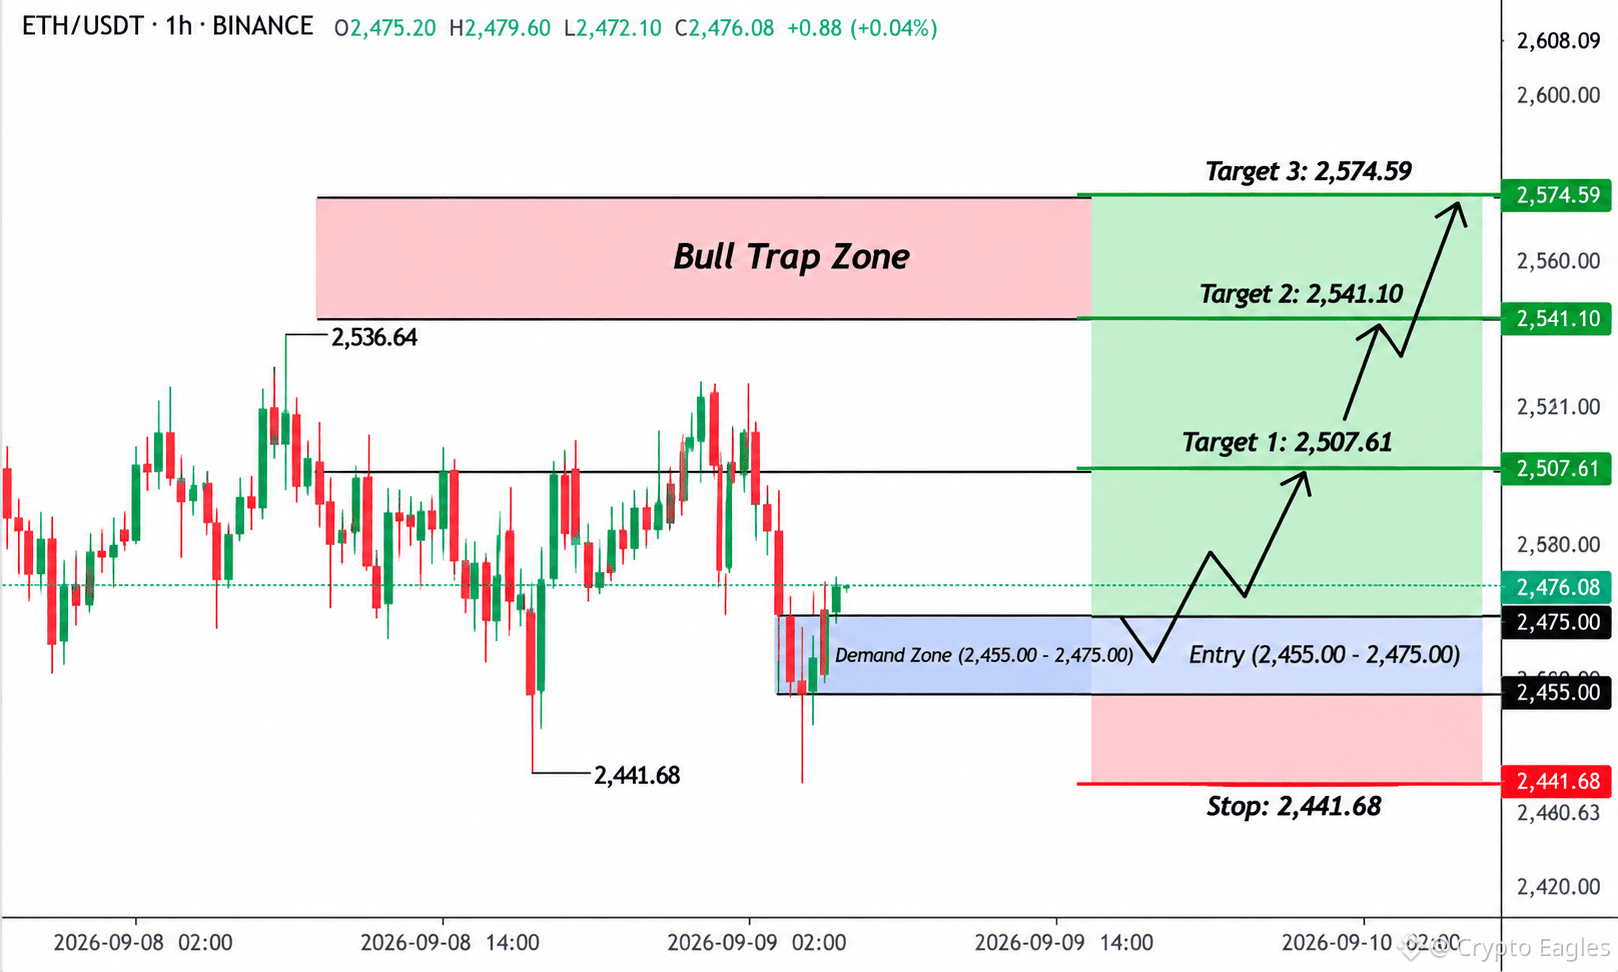
$ETH Long Setup 🟢
ඇතුල්වීම: 2,455 – 2,475
SL: 2,441.68
TP1: 2,507.61
TP2: 2,541.10
TP3: 2,574.59
ETH පහළ මට්ටම්වලින් තියුණු ලෙස ප්රතික්ෂේප වීමෙන් පසු 2,455–2,475 ඉල්ලුම් කලාපය තබාගෙන සිටී. 2,475ට ඉහළින් ස්ථිරව චලනය වීම 2,507 වෙත, ඉන්පසු 2,541 සහ 2,574 දක්වා ප්රවර්ධනයකට හේතු විය හැක. 2,441.68 අහිමි වීම bullish setup එක අහෝසි කරයි.
{future}(ETHUSDT)
$VTHO
{future}(VTHOUSDT)
$BTR
{future}(BTRUSDT)
$ETH Long Setup 🟢
ඇතුල්වීම: 2,455 – 2,475
SL: 2,441.68
TP1: 2,507.61
TP2: 2,541.10
TP3: 2,574.59
ETH පහළ මට්ටම්වලින් තියුණු ලෙස ප්රතික්ෂේප වීමෙන් පසු 2,455–2,475 ඉල්ලුම් කලාපය තබාගෙන සිටී. 2,475ට ඉහළින් ස්ථිරව චලනය වීම 2,507 වෙත, ඉන්පසු 2,541 සහ 2,574 දක්වා ප්රවර්ධනයකට හේතු විය හැක. 2,441.68 අහිමි වීම bullish setup එක අහෝසි කරයි.
$VTHO
$BTR
ඇතුල්වීම: 2,455 – 2,475
SL: 2,441.68
TP1: 2,507.61
TP2: 2,541.10
TP3: 2,574.59
ETH පහළ මට්ටම්වලින් තියුණු ලෙස ප්රතික්ෂේප වීමෙන් පසු 2,455–2,475 ඉල්ලුම් කලාපය තබාගෙන සිටී. 2,475ට ඉහළින් ස්ථිරව චලනය වීම 2,507 වෙත, ඉන්පසු 2,541 සහ 2,574 දක්වා ප්රවර්ධනයකට හේතු විය හැක. 2,441.68 අහිමි වීම bullish setup එක අහෝසි කරයි.
$VTHO
$BTR
1
528
තවත් අන්තර්ගතයන් ගවේෂණය කිරීමට ඇතුල් වන්න
Binance චතුරශ්රය හි ගෝලීය ක්රිප්ටෝ පරිශීලකයින් හා එක්වන්න
⚡️ ක්රිප්ටෝ පිළිබඳ නවතම සහ ප්රයෝජනවත් තොරතුරු ලබා ගන්න.
💬 ලොව විශාලතම ක්රිප්ටෝ හුවමාරුව මගින් විශ්වාස කෙරේ.
👍 සත්යායනය කරන ලද නිර්මාණකරුවන්ගෙන් සැබෑ විදසුන් සොයා ගන්න.
විද්යුත් තැපෑල / දුරකථන අංකය
නැගී එන මාතෘකා
USAugustPPIRisesLessThanExpected
56,057 views
853 සාකච්ඡා කරමින්
🚨 US AUG PPI: අපේක්ෂා කළට වඩා අඩුවෙන් ඉහළ යයි! ක්රිප්ටෝ සඳහා බුලිෂ් ද? 🚀
PPI +0.4% MoM අපේක්ෂා කළ පරිදි—නමුත් CORE PPI +0.2% පමණයි; +0.3% අපේක්ෂා කළ ප්රමාණයට වඩා අඩුවෙලා—ශක්තිමත් වීම සිසිල් වෙමින් තිබේ!
එයින් අදහස් වන්නේ:
• තොග මට්ටමේ උද්ධමනය බලාපොරොත්තු වූවාට වඩා මෘදුයි
• Fed rate hike අවස්ථාව දැන් 62% - නමුත් dovish සංඥා එනවා
• Core PCE සංශෝධන පහළට එනු ඇතැයි අපේක්ෂා - බුලිෂ්
• BTC බොහෝ විට මෘදු PPI මත උඩට යයි
Fed රැස්වීම Sep 15-16 - දැන් වෙළඳපොළ pause එකක් බලාපොරොත්තු වෙනවාද, hike එකක්ද?
Q4 rally සඳහා මෙය හරිත සංඥාවද?
#Bitcoin #PPI #Fed #CryptoNews #BTC#usaugustppiriseslessthanexpected
True News
·1 කැමත්ත දැක්වීම්
·1.4k views
SECApprovesNasdaqTexasCommodityTrustRule
30,367 views
617 සාකච්ඡා කරමින්
ECBRaisesRatesSecondTimeTo2.5%
27,245 views
441 සාකච්ඡා කරමින්