
Crypto_Town_JS
7.6k Публикации

Crypto_Town_JS
Отправить жалобу
Заблокировать пользователя
Crypto Trader & Market Analyst 📊 | Price Action | Altcoins | 🚀 High Probability Setups | 💡 Learn • Trade • Grow
Открытая сделка

Владелец GRAM
Трейдер с регулярными сделками
2.2 г
117 подписок(и/а)
1.9K+ подписчиков(а)
1.7K+ понравилось
Посты
Портфель
Все
Цитирования
Видео
·
--
Рост
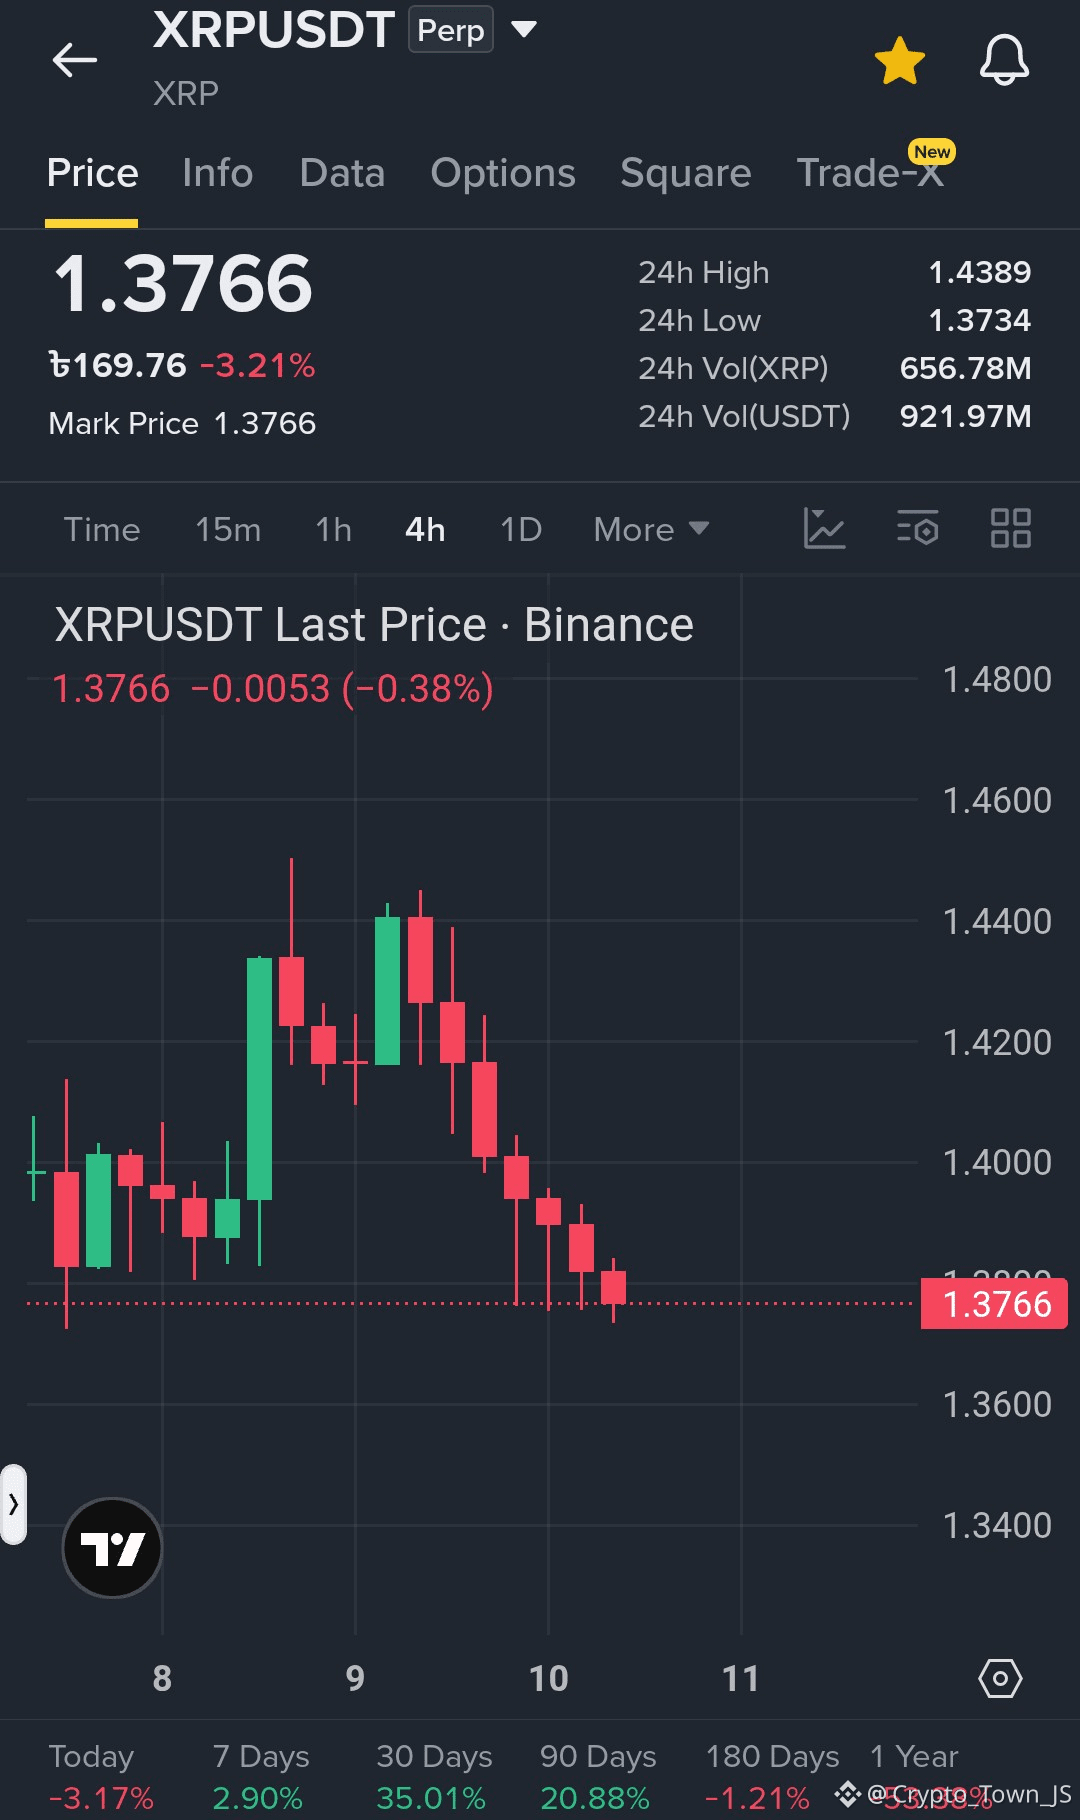
$XRP USDT LONG SETUP
The upward trend is becoming more visible as buying pressure continues to increase. Price is holding near the recent support area, while buyers are attempting to regain control. A successful recovery above the nearby resistance could bring additional upside momentum.
Entry Zone: 1.3800 – 1.4000
TP1: 1.4200
TP2: 1.4500
TP3: 1.4800
SL: 1.3500
#BinanceSquare #crypto #trading #xrp #cryptotrading
$VTHO $EGLD
{future}(EGLDUSDT)
{future}(VTHOUSDT)
{future}(XRPUSDT)
$XRP USDT LONG SETUP
The upward trend is becoming more visible as buying pressure continues to increase. Price is holding near the recent support area, while buyers are attempting to regain control. A successful recovery above the nearby resistance could bring additional upside momentum.
Entry Zone: 1.3800 – 1.4000
TP1: 1.4200
TP2: 1.4500
TP3: 1.4800
SL: 1.3500
#BinanceSquare #crypto #trading #xrp #cryptotrading
$VTHO $EGLD
The upward trend is becoming more visible as buying pressure continues to increase. Price is holding near the recent support area, while buyers are attempting to regain control. A successful recovery above the nearby resistance could bring additional upside momentum.
Entry Zone: 1.3800 – 1.4000
TP1: 1.4200
TP2: 1.4500
TP3: 1.4800
SL: 1.3500
#BinanceSquare #crypto #trading #xrp #cryptotrading
$VTHO $EGLD
1
157
·
--
Падение
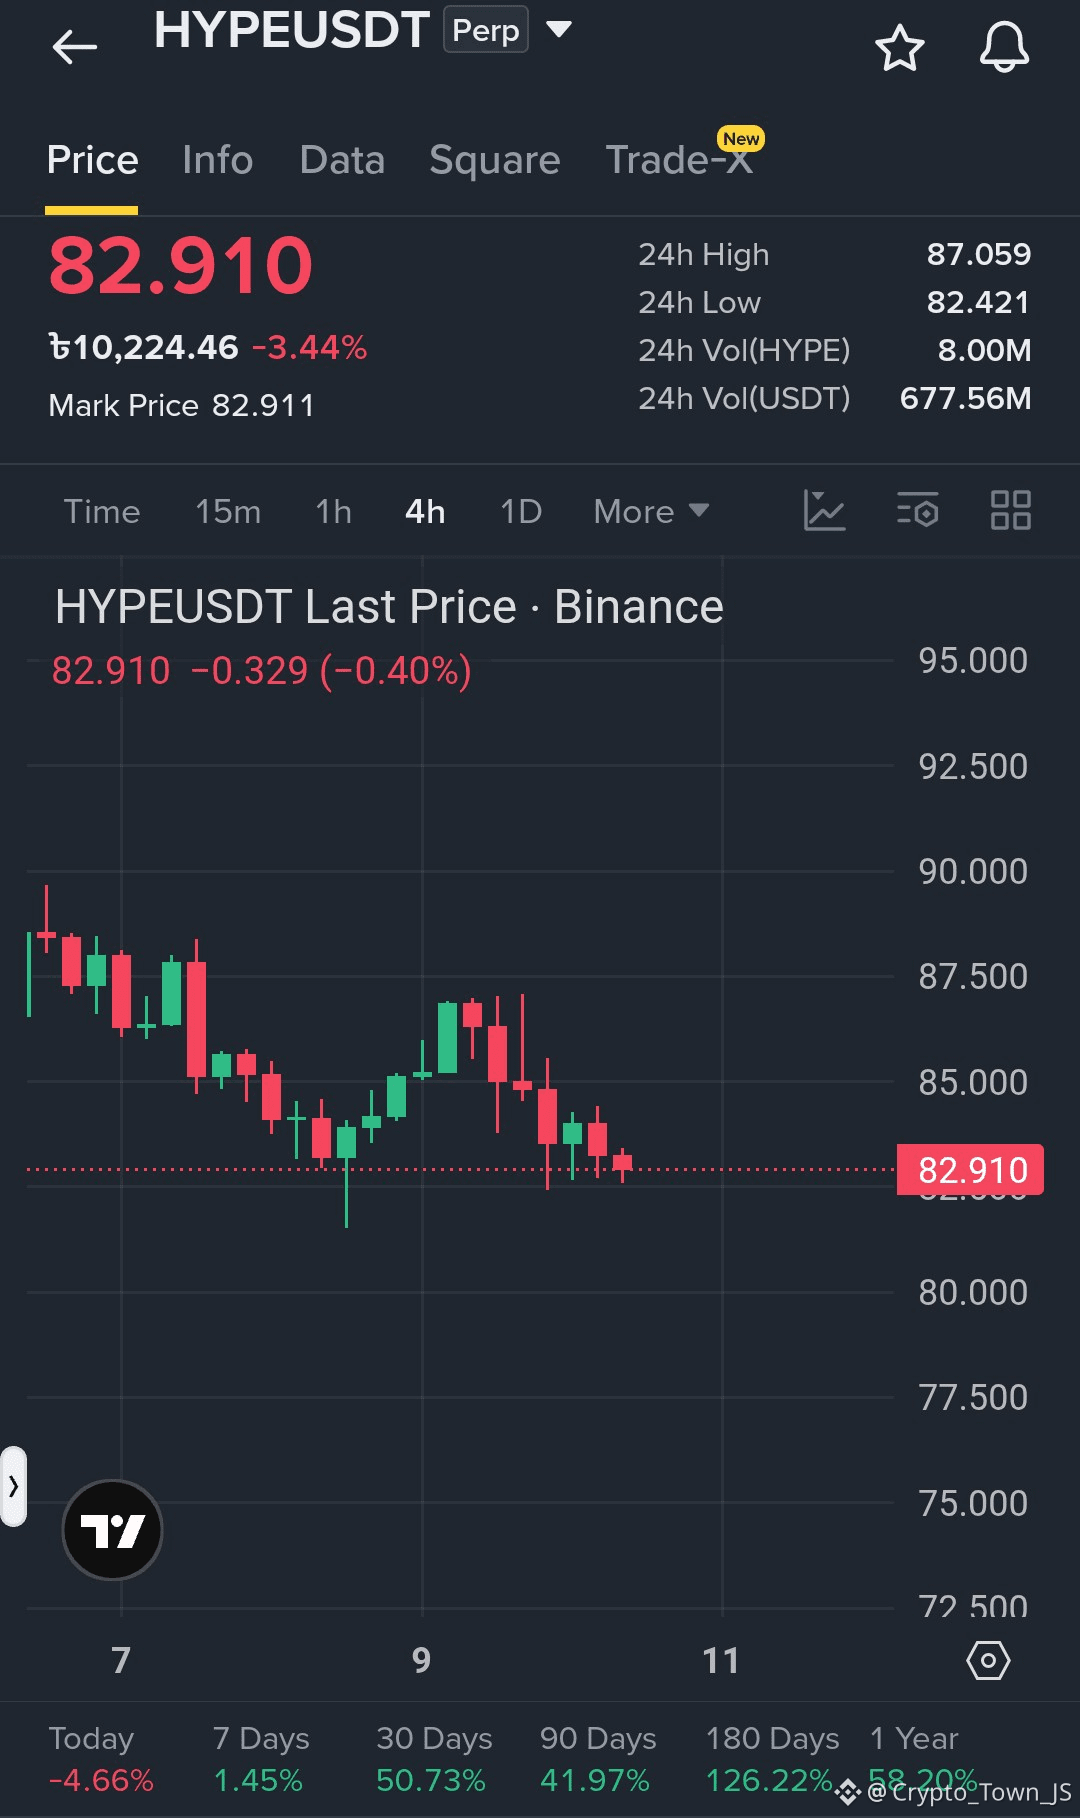
$HYPE USDT SHORT SETUP
The market is showing signs of weakness as sellers continue to push price lower. Price is struggling to reclaim the recent resistance area, while short-term momentum remains bearish. Confirmation below the key support could increase the probability of further downside.
Entry Zone: 83.00 – 84.50
TP1: 81.50
TP2: 79.50
TP3: 76.50
SL: 86.00
#BinanceSquare #Crypto #Trading #hype #cryptotrading
$VTHO $EGLD
{future}(EGLDUSDT)
{future}(VTHOUSDT)
{future}(HYPEUSDT)
$HYPE USDT SHORT SETUP
The market is showing signs of weakness as sellers continue to push price lower. Price is struggling to reclaim the recent resistance area, while short-term momentum remains bearish. Confirmation below the key support could increase the probability of further downside.
Entry Zone: 83.00 – 84.50
TP1: 81.50
TP2: 79.50
TP3: 76.50
SL: 86.00
#BinanceSquare #Crypto #Trading #hype #cryptotrading
$VTHO $EGLD
The market is showing signs of weakness as sellers continue to push price lower. Price is struggling to reclaim the recent resistance area, while short-term momentum remains bearish. Confirmation below the key support could increase the probability of further downside.
Entry Zone: 83.00 – 84.50
TP1: 81.50
TP2: 79.50
TP3: 76.50
SL: 86.00
#BinanceSquare #Crypto #Trading #hype #cryptotrading
$VTHO $EGLD
103
·
--
Падение
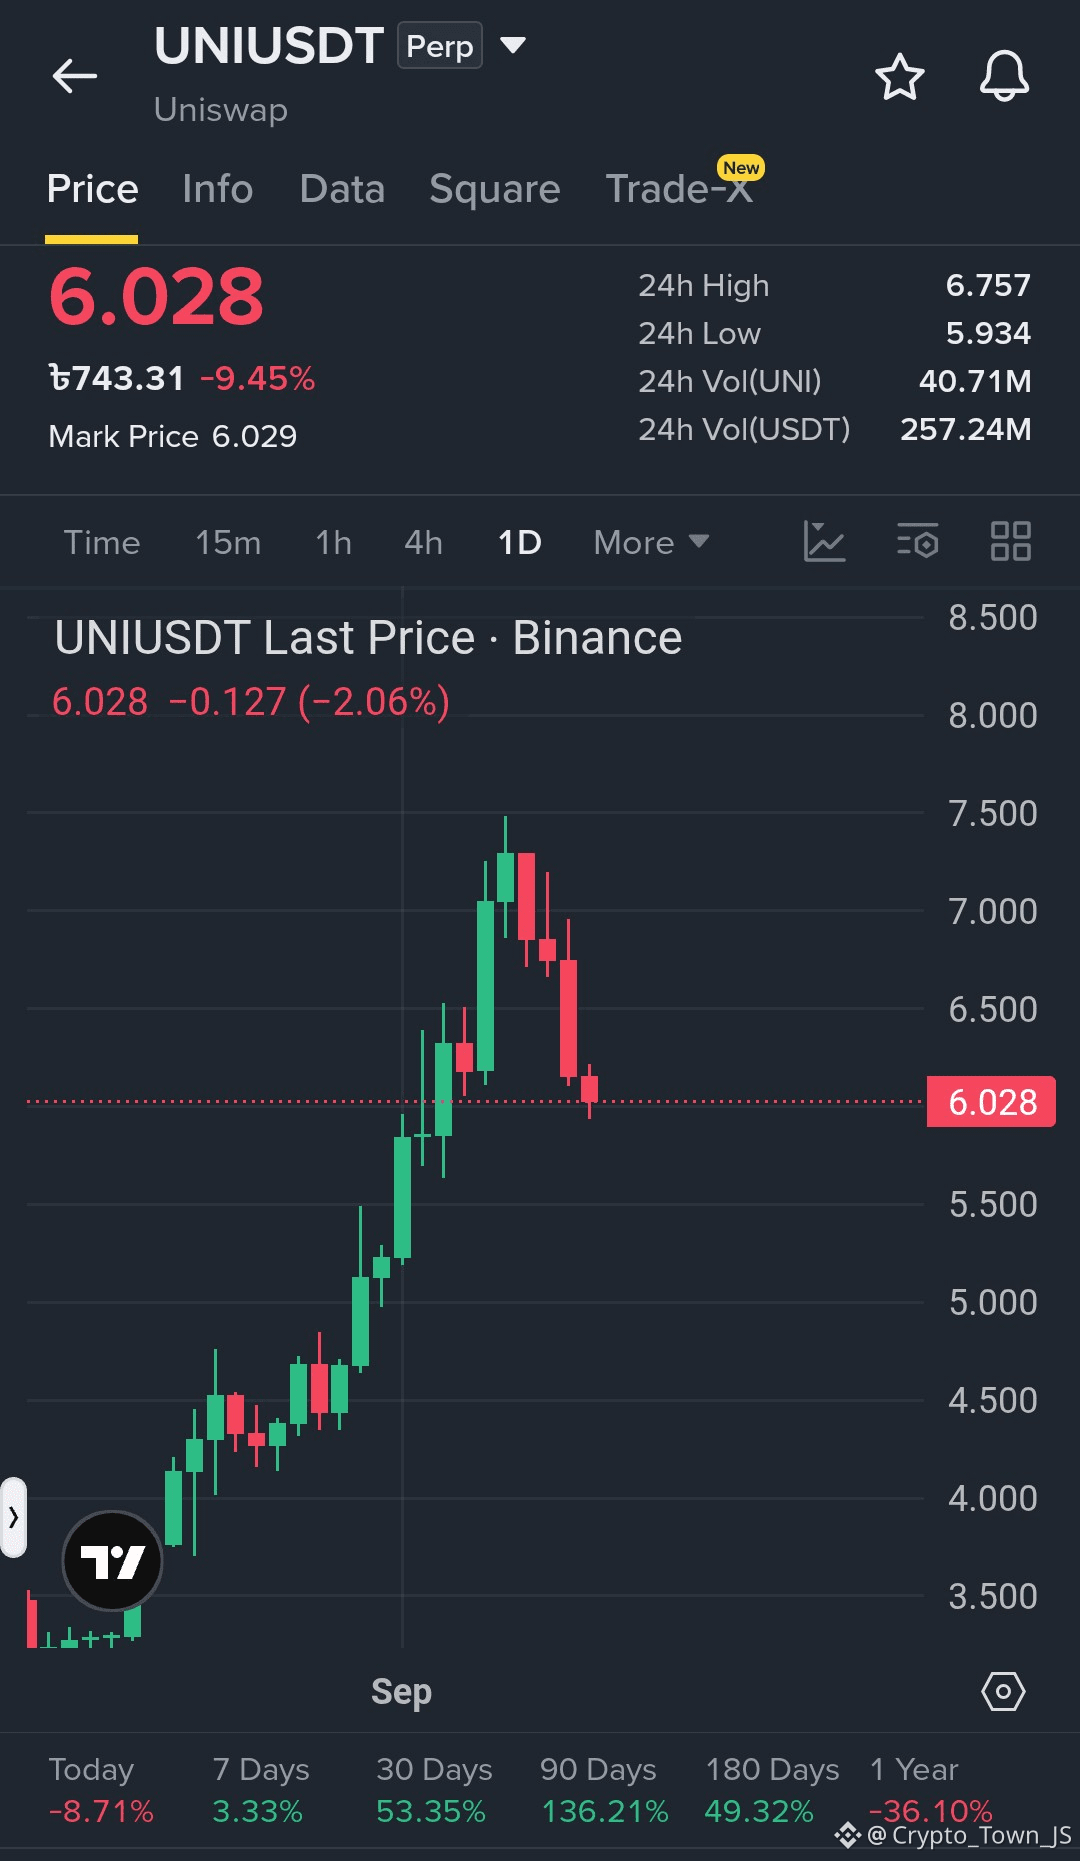
$UNI USDT SHORT SETUP
Price action is losing momentum as buyers struggle to defend key levels. The recent rejection from higher levels keeps the short-term structure bearish. If sellers maintain control below the current support, further downside could follow.
Entry Zone: 6.05 – 6.20
TP1: 5.95
TP2: 5.75
TP3: 5.50
SL: 6.40
#BinanceSquare #Crypto #trading #UNI #cryptotrading
$VTHO $LSK
{future}(LSKUSDT)
{future}(VTHOUSDT)
{future}(UNIUSDT)
$UNI USDT SHORT SETUP
Price action is losing momentum as buyers struggle to defend key levels. The recent rejection from higher levels keeps the short-term structure bearish. If sellers maintain control below the current support, further downside could follow.
Entry Zone: 6.05 – 6.20
TP1: 5.95
TP2: 5.75
TP3: 5.50
SL: 6.40
#BinanceSquare #Crypto #trading #UNI #cryptotrading
$VTHO $LSK
Price action is losing momentum as buyers struggle to defend key levels. The recent rejection from higher levels keeps the short-term structure bearish. If sellers maintain control below the current support, further downside could follow.
Entry Zone: 6.05 – 6.20
TP1: 5.95
TP2: 5.75
TP3: 5.50
SL: 6.40
#BinanceSquare #Crypto #trading #UNI #cryptotrading
$VTHO $LSK
136
·
--
Рост
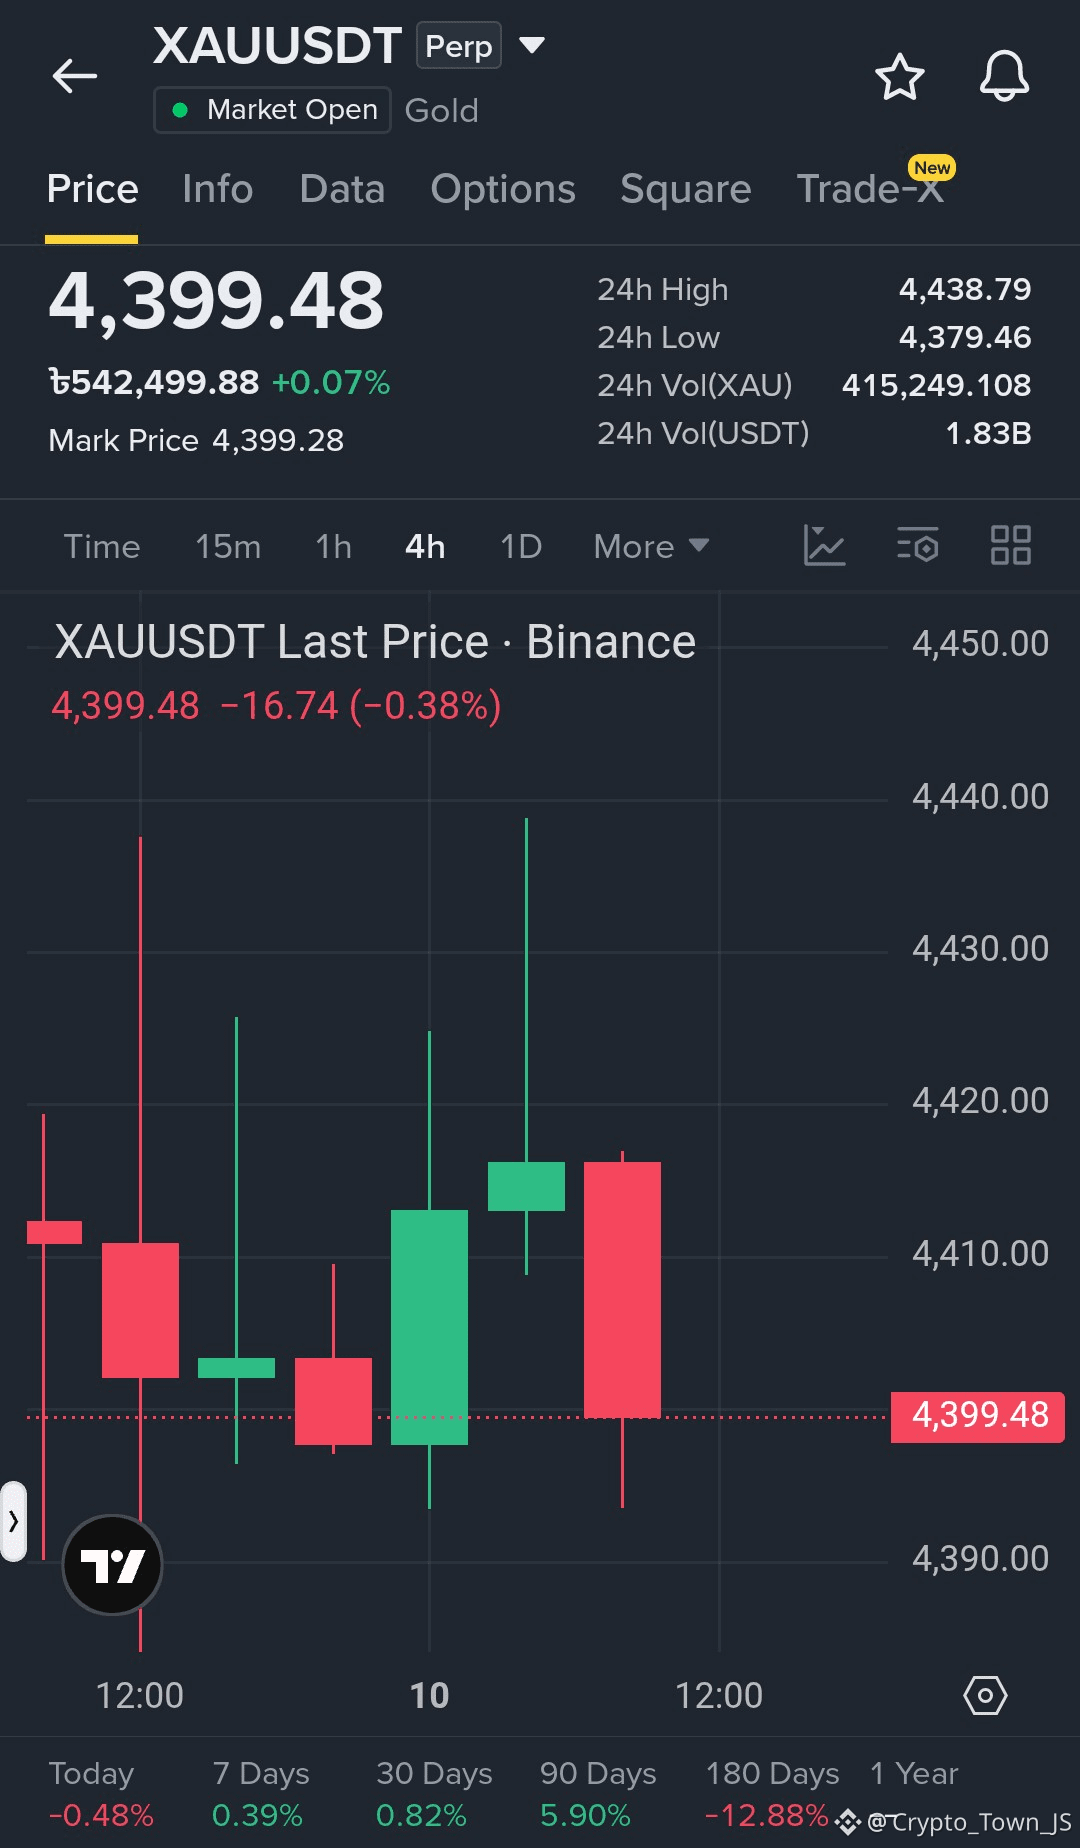
$XAU USDT LONG SETUP
Bulls are gradually taking control as price continues to move higher. The market is showing encouraging signs of strength, with buyers defending the recent support area. A sustained move above the nearby resistance could open the door for further upside.
Entry Zone: 4,390 – 4,405
TP1: 4,425
TP2: 4,450
TP3: 4,490
SL: 4,370
#BinanceSquare #Crypto #Trading #XAU #cryptotrading
$LSK $VTHO
{future}(VTHOUSDT)
{future}(LSKUSDT)
{future}(XAUUSDT)
$XAU USDT LONG SETUP
Bulls are gradually taking control as price continues to move higher. The market is showing encouraging signs of strength, with buyers defending the recent support area. A sustained move above the nearby resistance could open the door for further upside.
Entry Zone: 4,390 – 4,405
TP1: 4,425
TP2: 4,450
TP3: 4,490
SL: 4,370
#BinanceSquare #Crypto #Trading #XAU #cryptotrading
$LSK $VTHO
Bulls are gradually taking control as price continues to move higher. The market is showing encouraging signs of strength, with buyers defending the recent support area. A sustained move above the nearby resistance could open the door for further upside.
Entry Zone: 4,390 – 4,405
TP1: 4,425
TP2: 4,450
TP3: 4,490
SL: 4,370
#BinanceSquare #Crypto #Trading #XAU #cryptotrading
$LSK $VTHO
123
·
--
Падение
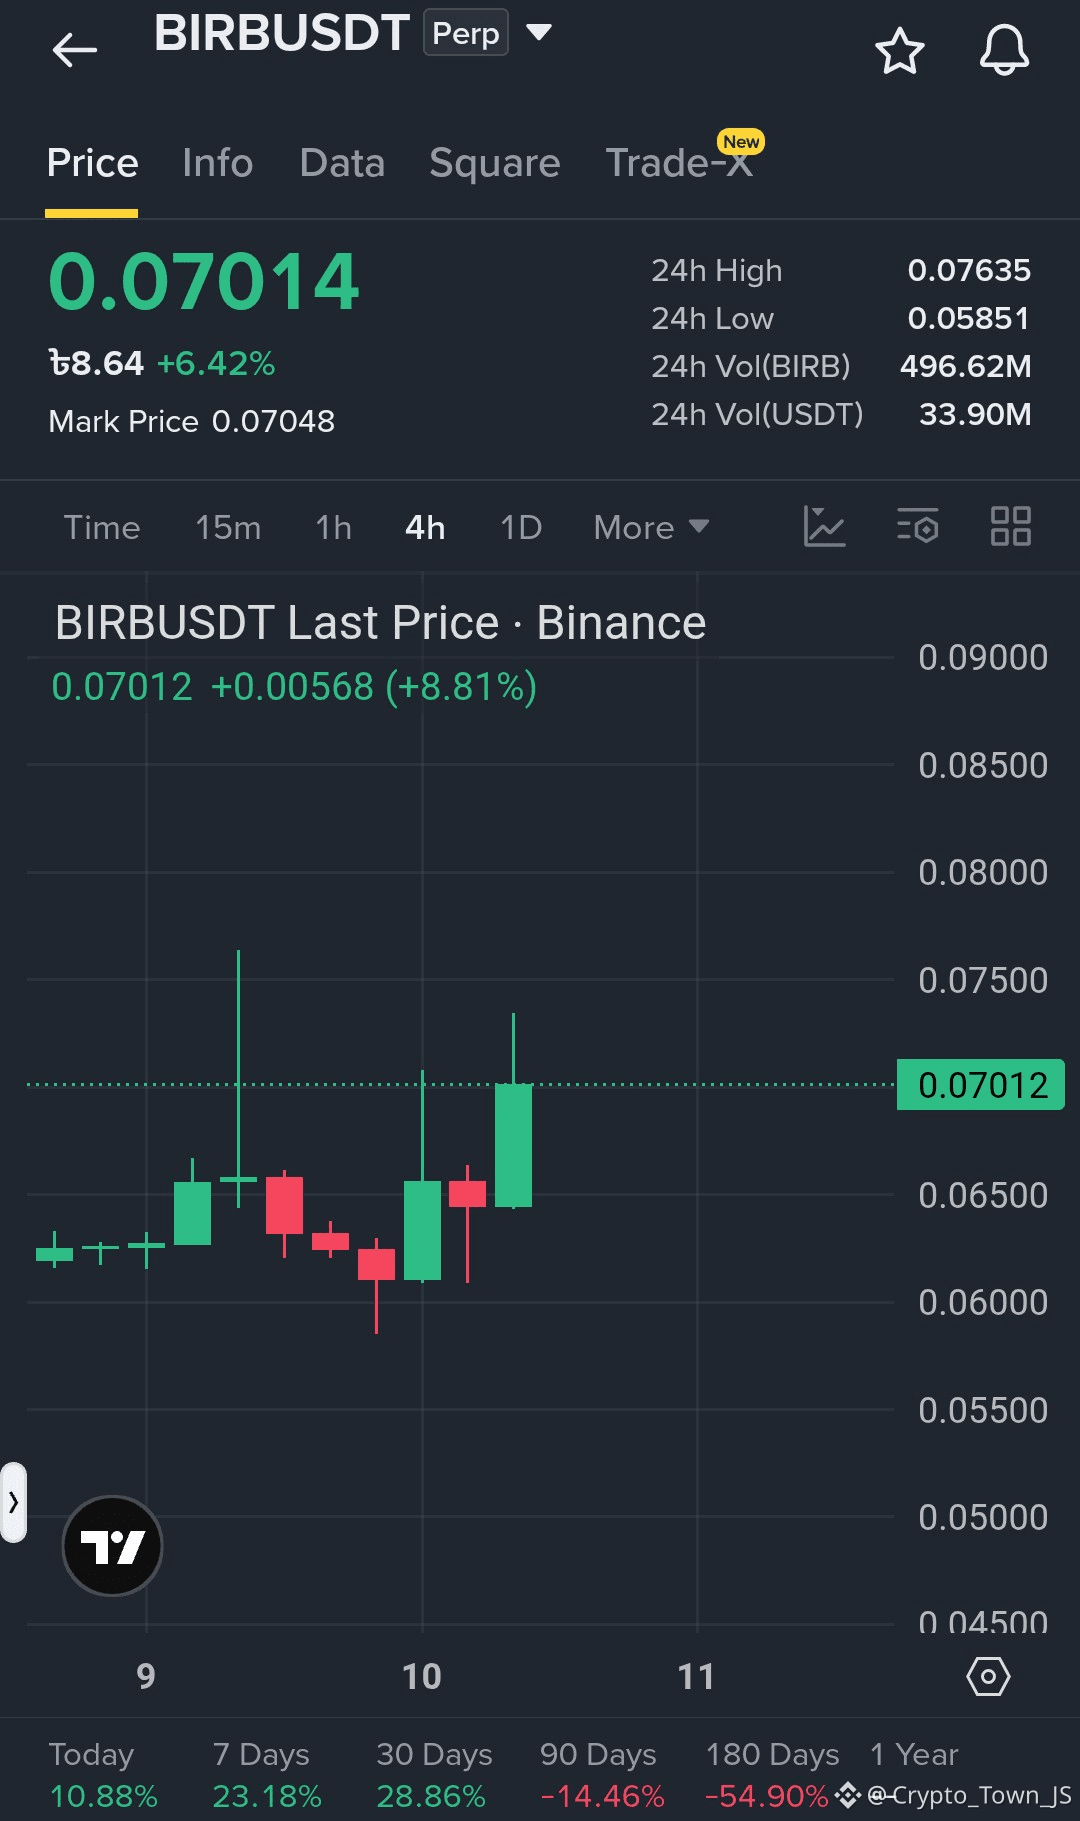
$BIRB USDT SHORT SETUP
Selling pressure is becoming more visible, and the market structure is gradually shifting toward the downside. Price has rallied strongly but is facing resistance near the recent high. A rejection from the resistance zone could trigger a fresh bearish move.
Entry Zone: 0.07150 – 0.07450
TP1: 0.06800
TP2: 0.06400
TP3: 0.05900
SL: 0.07750
#BinanceSquare #Crypto #Trading #BIRB #cryptotrading
$VTHO $DODOX
{future}(DODOXUSDT)
{future}(VTHOUSDT)
{future}(BIRBUSDT)
$BIRB USDT SHORT SETUP
Selling pressure is becoming more visible, and the market structure is gradually shifting toward the downside. Price has rallied strongly but is facing resistance near the recent high. A rejection from the resistance zone could trigger a fresh bearish move.
Entry Zone: 0.07150 – 0.07450
TP1: 0.06800
TP2: 0.06400
TP3: 0.05900
SL: 0.07750
#BinanceSquare #Crypto #Trading #BIRB #cryptotrading
$VTHO $DODOX
Selling pressure is becoming more visible, and the market structure is gradually shifting toward the downside. Price has rallied strongly but is facing resistance near the recent high. A rejection from the resistance zone could trigger a fresh bearish move.
Entry Zone: 0.07150 – 0.07450
TP1: 0.06800
TP2: 0.06400
TP3: 0.05900
SL: 0.07750
#BinanceSquare #Crypto #Trading #BIRB #cryptotrading
$VTHO $DODOX
205
·
--
Падение
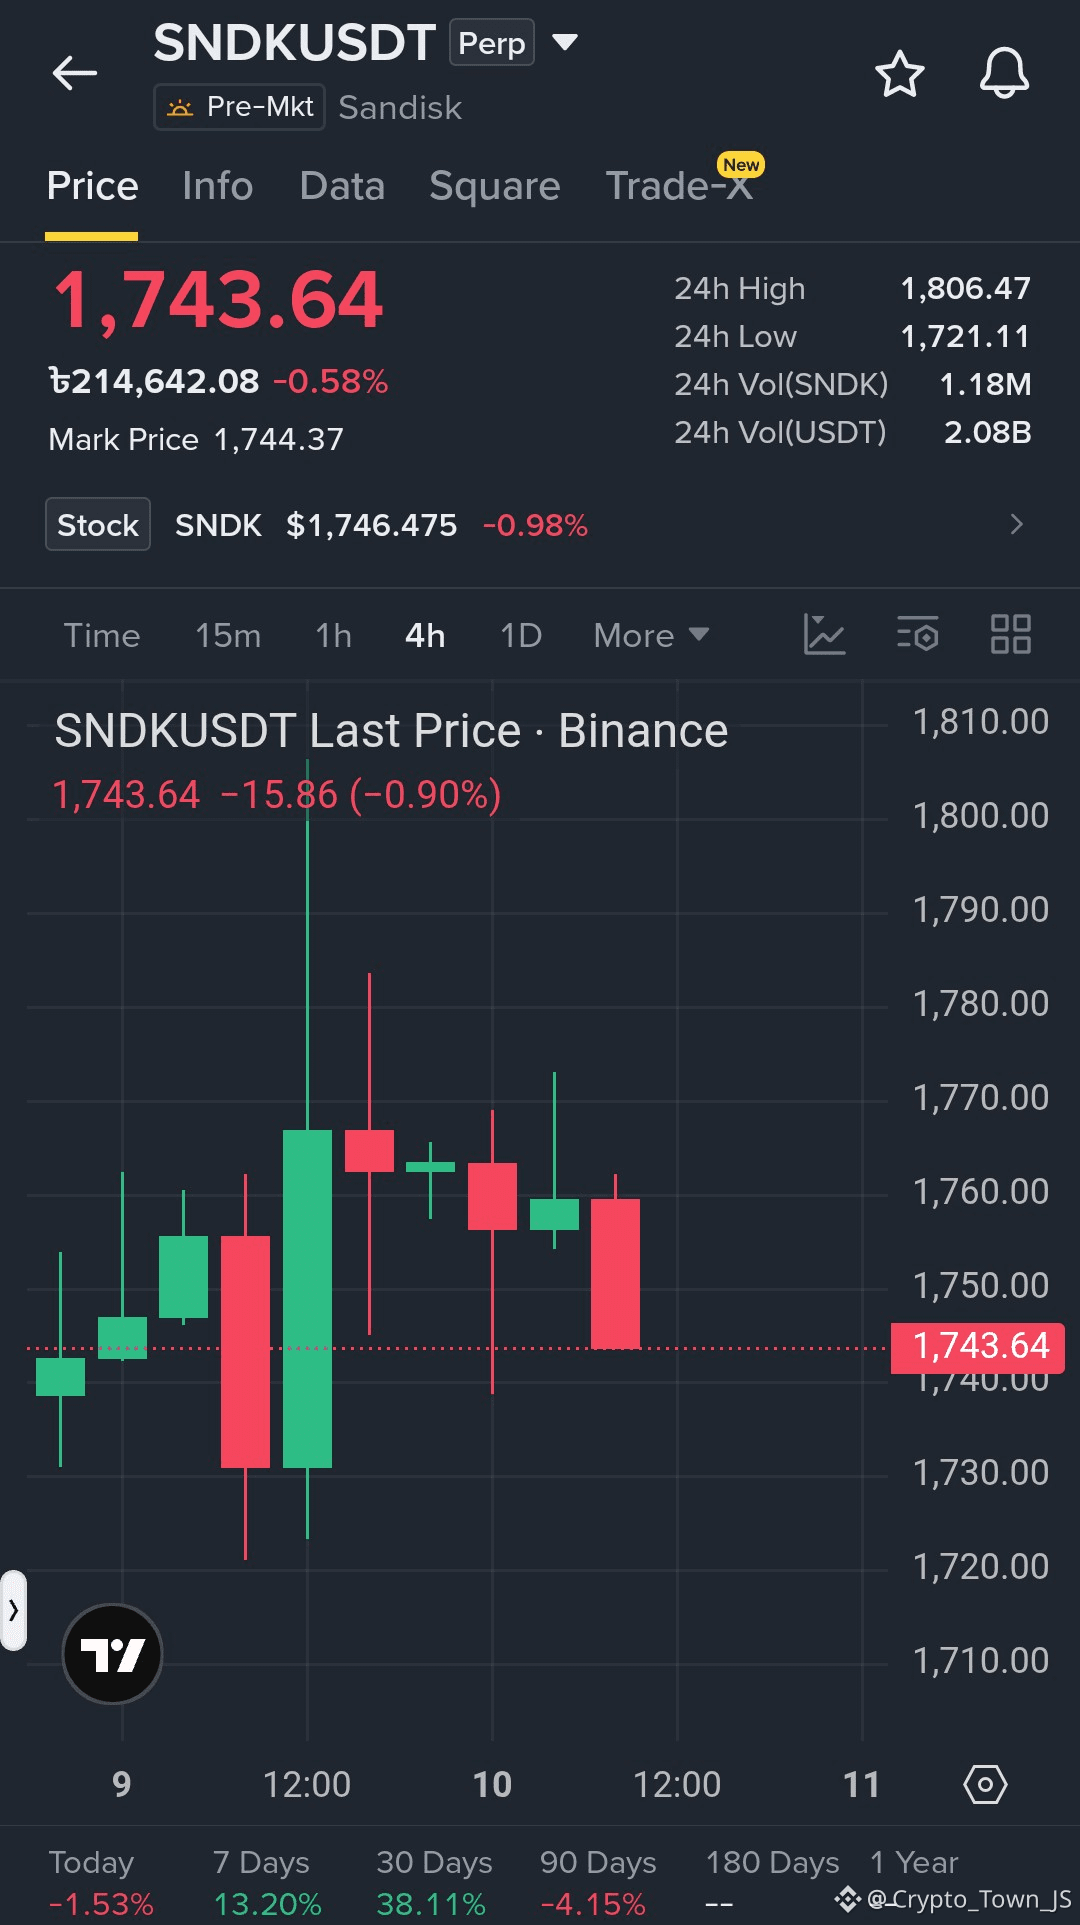
$SNDK USDT SHORT SETUP
Bears are gaining strength as the market continues to move lower. Price is facing selling pressure near the recent resistance area, while the short-term structure is turning bearish. A break below the key support could accelerate the downside move.
Entry Zone: 1,745 – 1,765
TP1: 1,725
TP2: 1,700
TP3: 1,665
SL: 1,790
#BinanceSquare #crypto #Trading #SNDK #cryptotrading
$VTHO $EGLD
{future}(EGLDUSDT)
{future}(VTHOUSDT)
{future}(SNDKUSDT)
$SNDK USDT SHORT SETUP
Bears are gaining strength as the market continues to move lower. Price is facing selling pressure near the recent resistance area, while the short-term structure is turning bearish. A break below the key support could accelerate the downside move.
Entry Zone: 1,745 – 1,765
TP1: 1,725
TP2: 1,700
TP3: 1,665
SL: 1,790
#BinanceSquare #crypto #Trading #SNDK #cryptotrading
$VTHO $EGLD
Bears are gaining strength as the market continues to move lower. Price is facing selling pressure near the recent resistance area, while the short-term structure is turning bearish. A break below the key support could accelerate the downside move.
Entry Zone: 1,745 – 1,765
TP1: 1,725
TP2: 1,700
TP3: 1,665
SL: 1,790
#BinanceSquare #crypto #Trading #SNDK #cryptotrading
$VTHO $EGLD
215
·
--
Падение
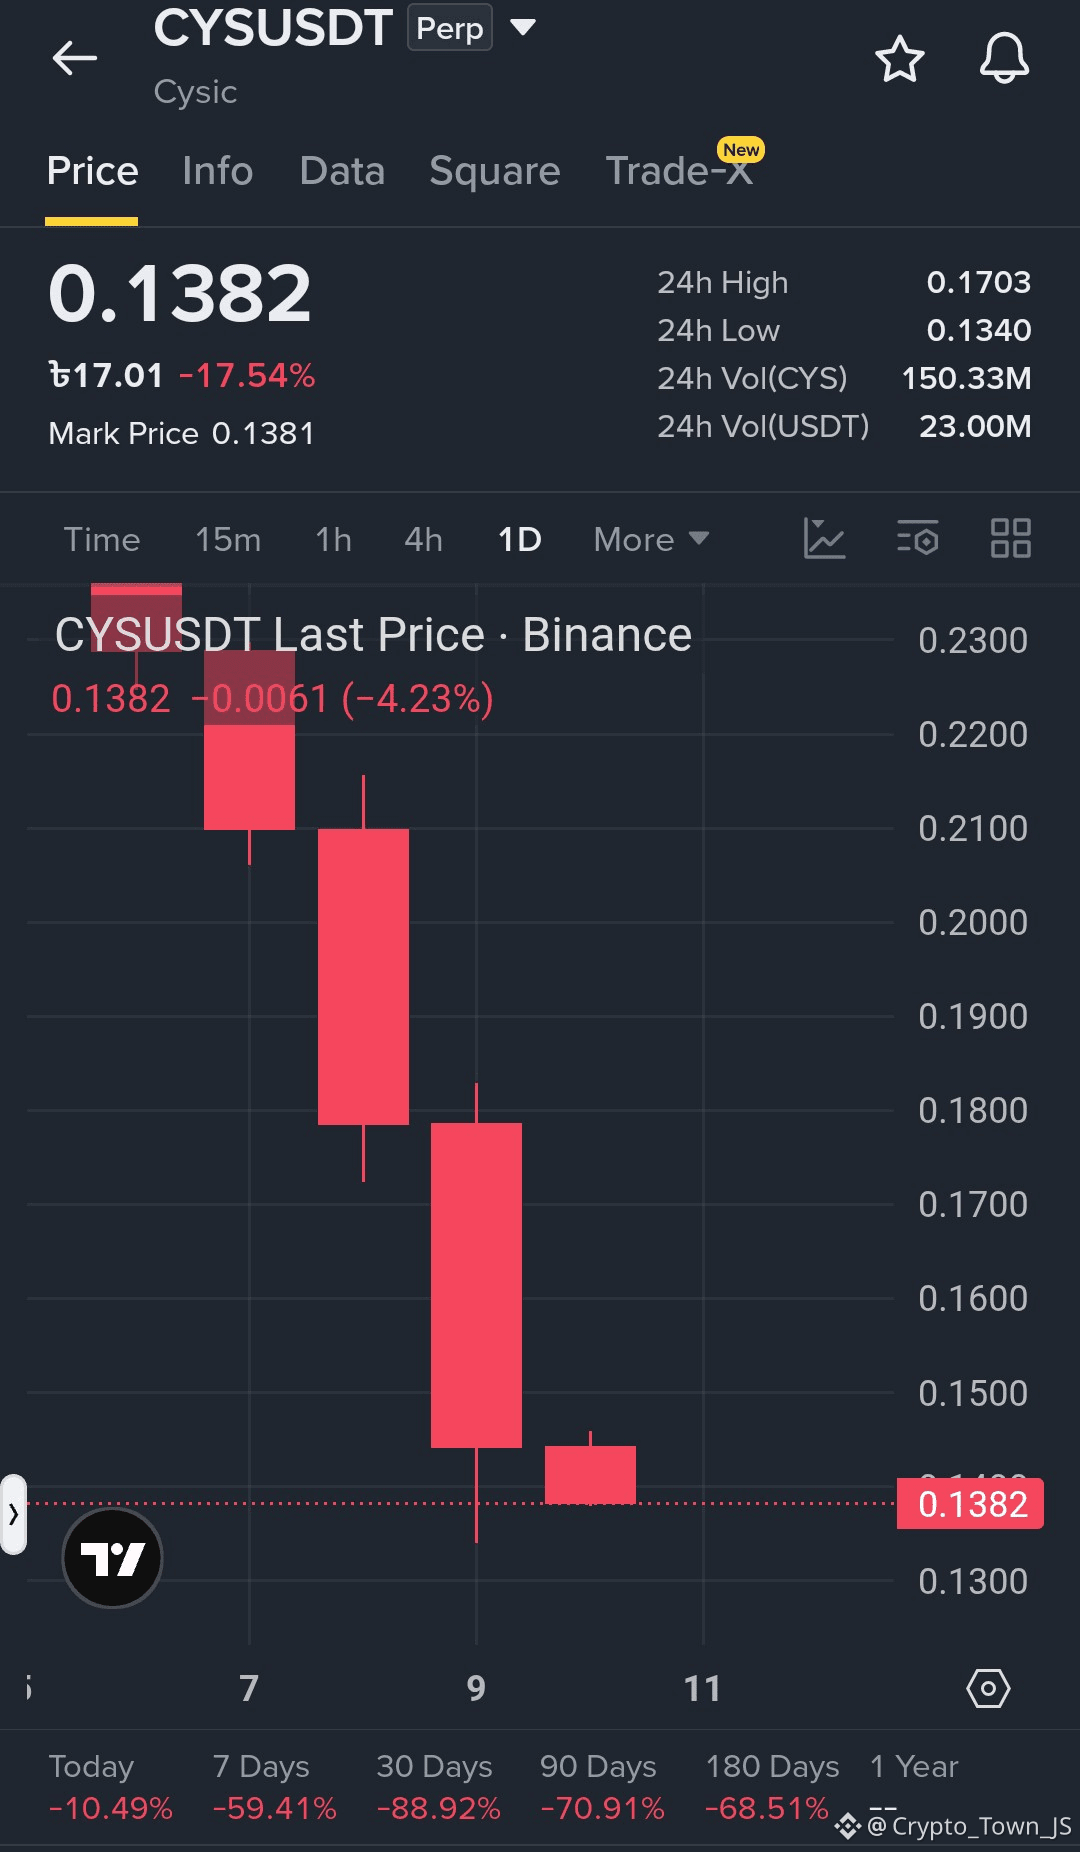
$CYS USDT SHORT SETUP
Market sentiment is weakening as price struggles to maintain higher levels. Sellers are becoming more active, while the overall structure remains bearish. A rejection from the resistance zone could create another downside move.
Entry Zone: 0.1400 – 0.1480
TP1: 0.1340
TP2: 0.1280
TP3: 0.1200
SL: 0.1550
#BinanceSquare #crypto #Trading #Cys #cryptotrading
$VTHO $EGLD
{future}(EGLDUSDT)
{future}(VTHOUSDT)
{future}(CYSUSDT)
$CYS USDT SHORT SETUP
Market sentiment is weakening as price struggles to maintain higher levels. Sellers are becoming more active, while the overall structure remains bearish. A rejection from the resistance zone could create another downside move.
Entry Zone: 0.1400 – 0.1480
TP1: 0.1340
TP2: 0.1280
TP3: 0.1200
SL: 0.1550
#BinanceSquare #crypto #Trading #Cys #cryptotrading
$VTHO $EGLD
Market sentiment is weakening as price struggles to maintain higher levels. Sellers are becoming more active, while the overall structure remains bearish. A rejection from the resistance zone could create another downside move.
Entry Zone: 0.1400 – 0.1480
TP1: 0.1340
TP2: 0.1280
TP3: 0.1200
SL: 0.1550
#BinanceSquare #crypto #Trading #Cys #cryptotrading
$VTHO $EGLD
335
·
--
Падение
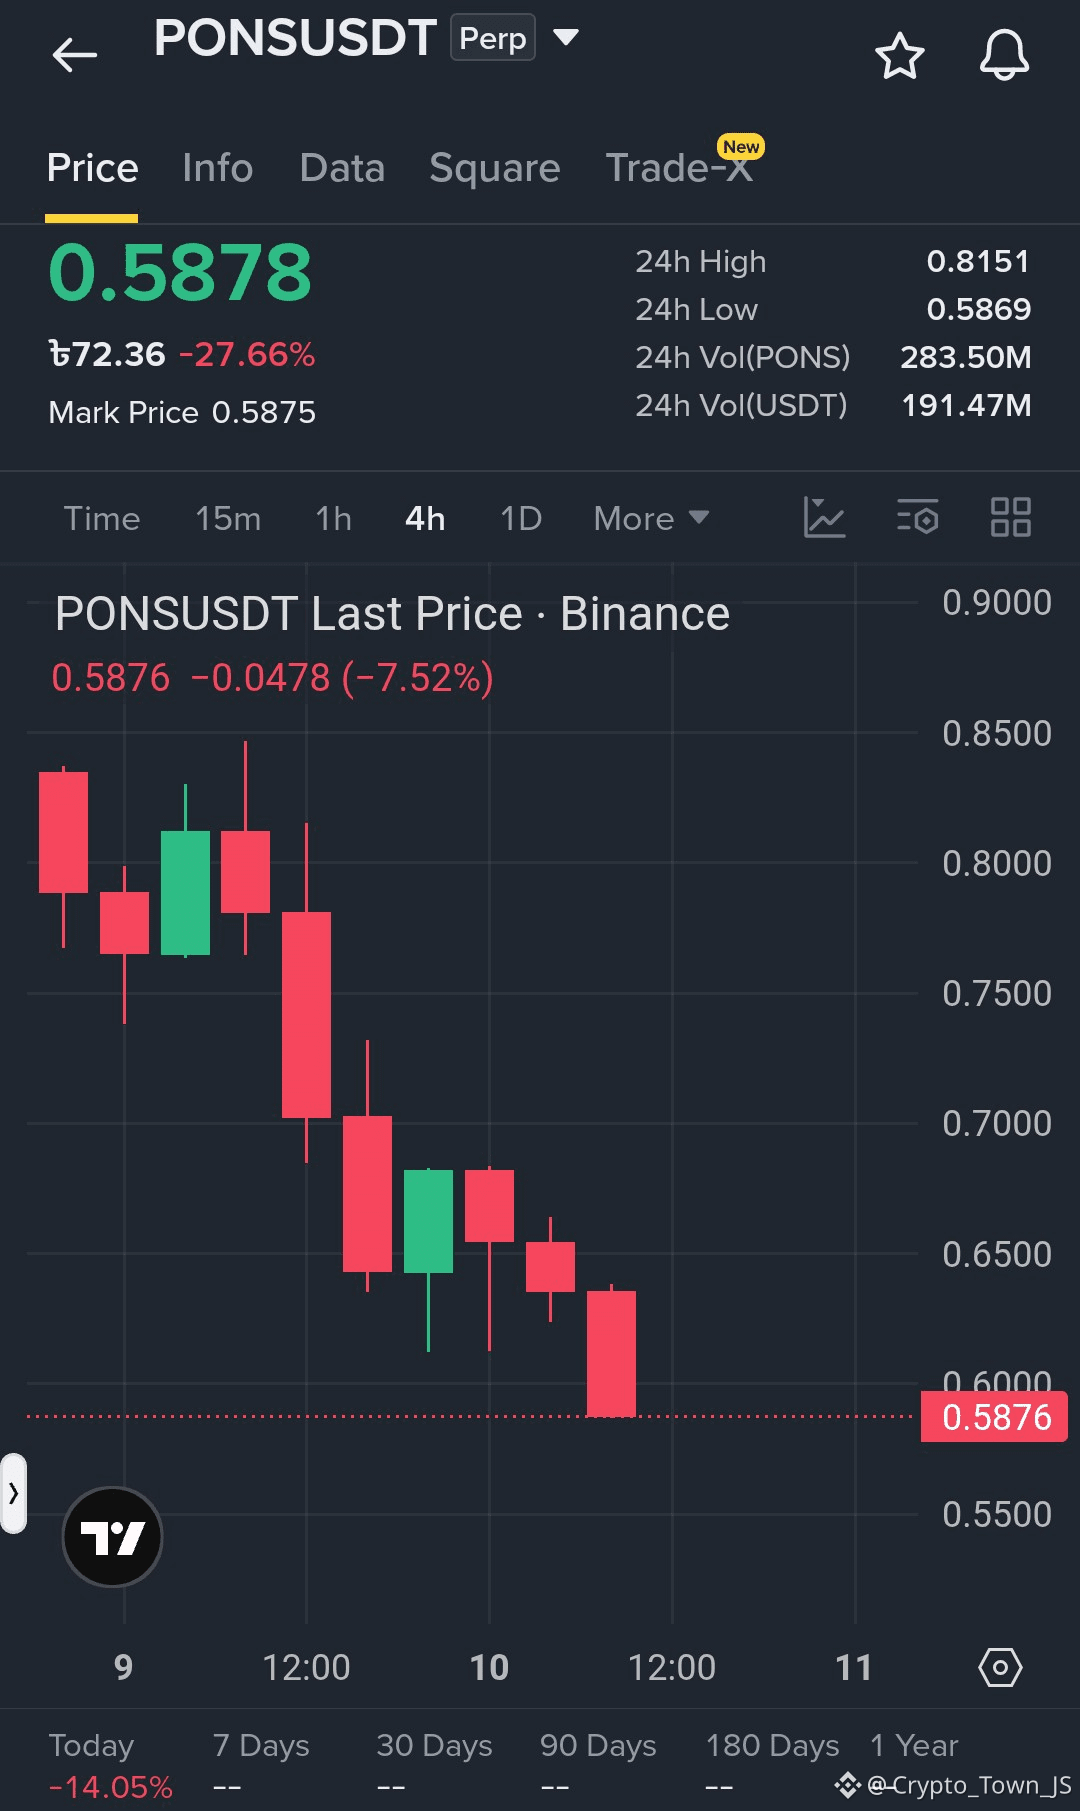
$PONS USDT SHORT SETUP
The market is showing increasing selling pressure as sellers continue to gain control. Price has dropped sharply from the recent high and is now trading near the daily low. The overall structure remains bearish, with further downside possible if support fails.
Entry Zone: 0.6000 – 0.6250
TP1: 0.5750
TP2: 0.5500
TP3: 0.5200
SL: 0.6500
#BinanceSquare #Crypto #trading #pons #cryptotrading
$VTHO $EGLD
{future}(EGLDUSDT)
{future}(VTHOUSDT)
{future}(PONSUSDT)
$PONS USDT SHORT SETUP
The market is showing increasing selling pressure as sellers continue to gain control. Price has dropped sharply from the recent high and is now trading near the daily low. The overall structure remains bearish, with further downside possible if support fails.
Entry Zone: 0.6000 – 0.6250
TP1: 0.5750
TP2: 0.5500
TP3: 0.5200
SL: 0.6500
#BinanceSquare #Crypto #trading #pons #cryptotrading
$VTHO $EGLD
The market is showing increasing selling pressure as sellers continue to gain control. Price has dropped sharply from the recent high and is now trading near the daily low. The overall structure remains bearish, with further downside possible if support fails.
Entry Zone: 0.6000 – 0.6250
TP1: 0.5750
TP2: 0.5500
TP3: 0.5200
SL: 0.6500
#BinanceSquare #Crypto #trading #pons #cryptotrading
$VTHO $EGLD
326
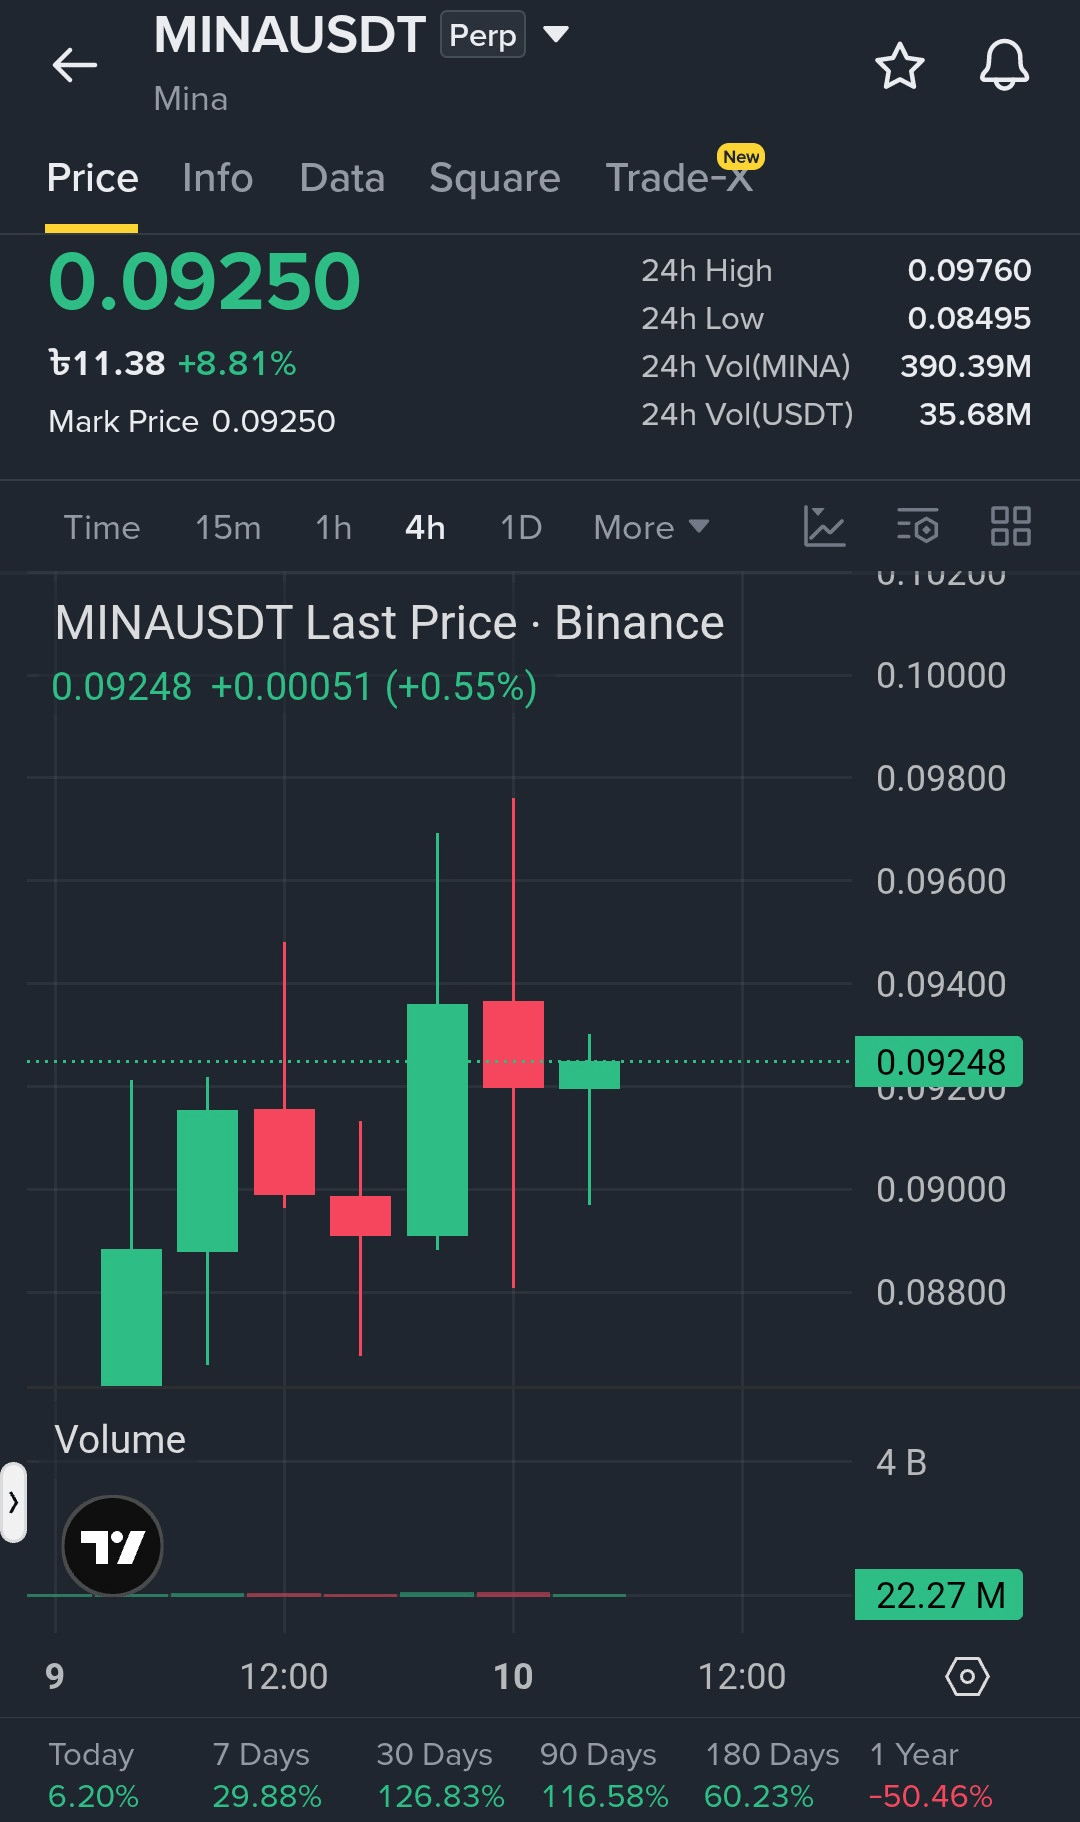
$MINA USDT LONG SETUP
The market is showing strong upward momentum as buyers continue to gain confidence. Price is holding near the key support area, while the overall structure remains bullish. A sustained move above the recent resistance could open the way for further upside.
Entry Zone: 0.09150 – 0.09350
TP1: 0.09600
TP2: 0.10000
TP3: 0.10600
SL: 0.08800
#BinanceSquare #Crypto #trading #mina #CryptoTrading
$VTHO $BULLA
{future}(BULLAUSDT)
{future}(VTHOUSDT)
{future}(MINAUSDT)
$MINA USDT LONG SETUP
The market is showing strong upward momentum as buyers continue to gain confidence. Price is holding near the key support area, while the overall structure remains bullish. A sustained move above the recent resistance could open the way for further upside.
Entry Zone: 0.09150 – 0.09350
TP1: 0.09600
TP2: 0.10000
TP3: 0.10600
SL: 0.08800
#BinanceSquare #Crypto #trading #mina #CryptoTrading
$VTHO $BULLA
The market is showing strong upward momentum as buyers continue to gain confidence. Price is holding near the key support area, while the overall structure remains bullish. A sustained move above the recent resistance could open the way for further upside.
Entry Zone: 0.09150 – 0.09350
TP1: 0.09600
TP2: 0.10000
TP3: 0.10600
SL: 0.08800
#BinanceSquare #Crypto #trading #mina #CryptoTrading
$VTHO $BULLA
233
·
--
Рост
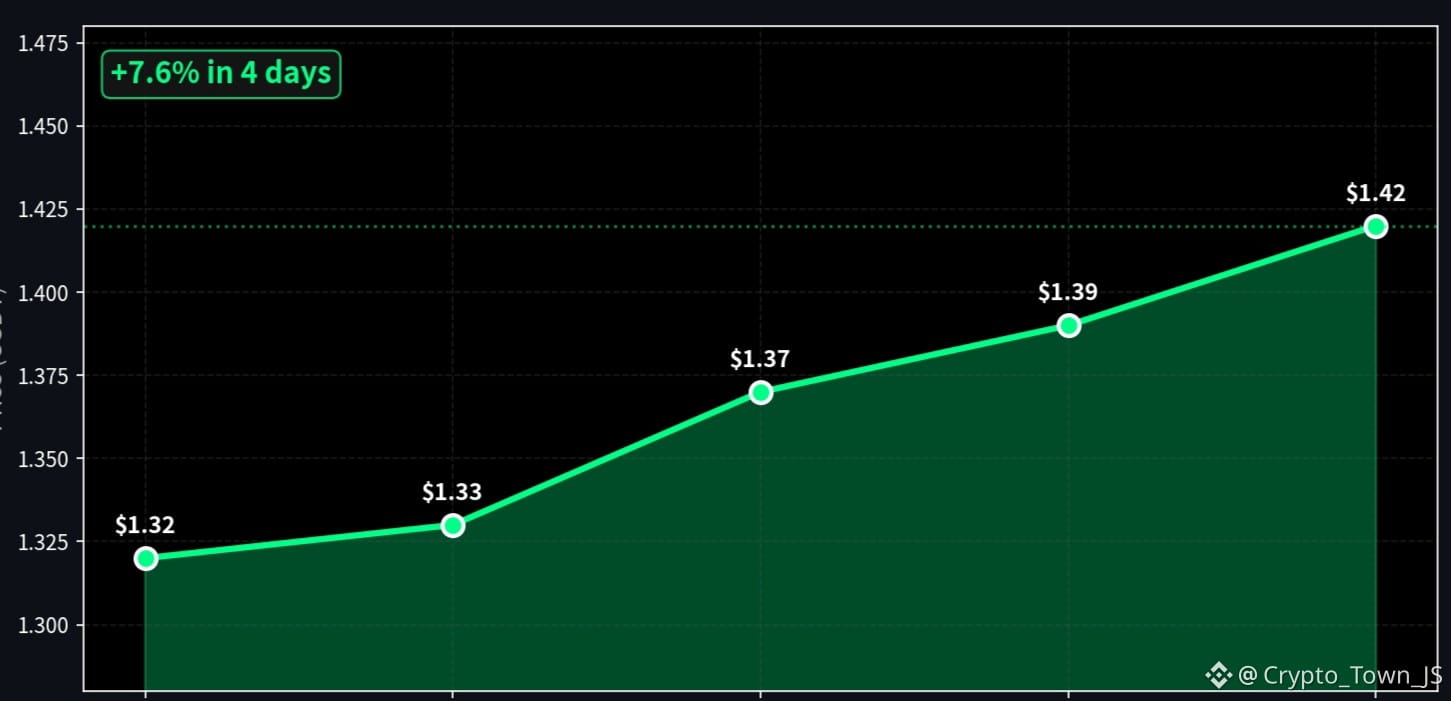
$GRAM holding update
Cumulative PNL: +0.46%
Last price: 1.421
Still holding strong
$GRAM holding update
Cumulative PNL: +0.46%
Last price: 1.421
Still holding strong
Cumulative PNL: +0.46%
Last price: 1.421
Still holding strong
189
·
--
Рост
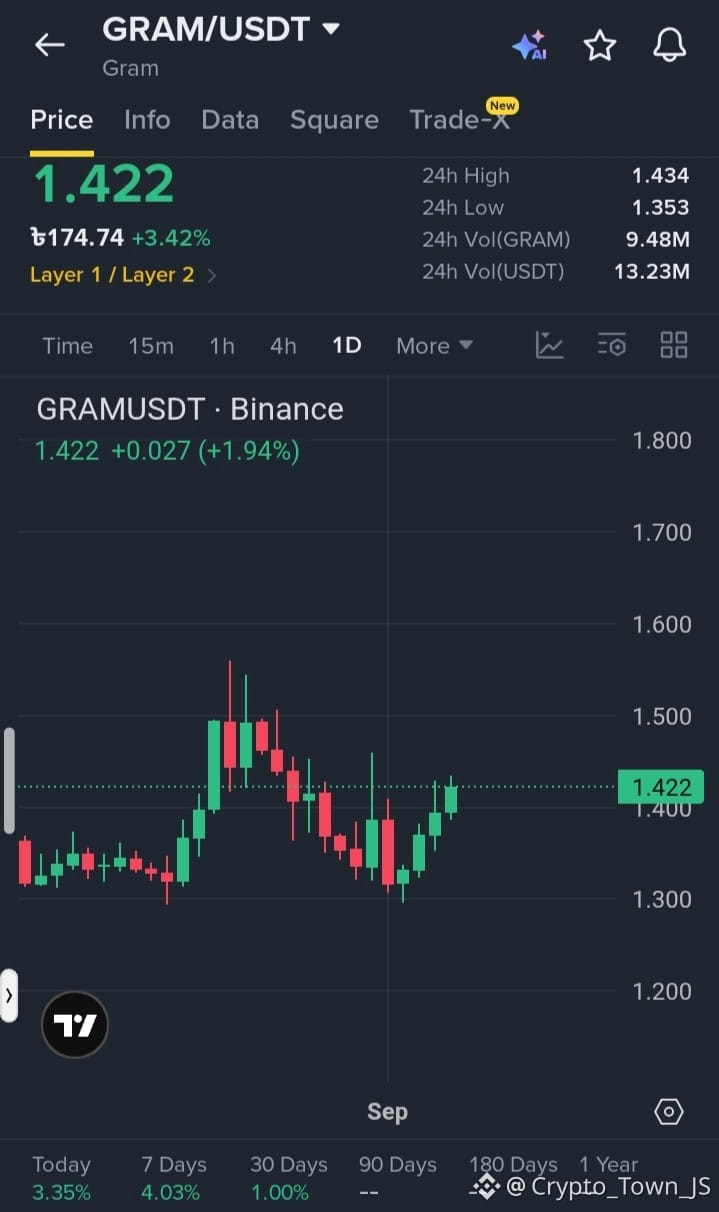
$GRAM USDT LONG SETUP
Upward move is developing nicely as buyers remain active. Price is holding stronger levels and bullish sentiment continues improving. If buyers maintain control, the next resistance levels could be tested.
Entry Zone: 1.400 – 1.430
TP1: 1.470
TP2: 1.520
TP3: 1.600
SL: 1.365
#BinanceSquare #Crypto #Trading #GRAM #cryptotrading
$BULLA $AKE
{future}(AKEUSDT)
{future}(BULLAUSDT)
{future}(GRAMUSDT)
$GRAM USDT LONG SETUP
Upward move is developing nicely as buyers remain active. Price is holding stronger levels and bullish sentiment continues improving. If buyers maintain control, the next resistance levels could be tested.
Entry Zone: 1.400 – 1.430
TP1: 1.470
TP2: 1.520
TP3: 1.600
SL: 1.365
#BinanceSquare #Crypto #Trading #GRAM #cryptotrading
$BULLA $AKE
Upward move is developing nicely as buyers remain active. Price is holding stronger levels and bullish sentiment continues improving. If buyers maintain control, the next resistance levels could be tested.
Entry Zone: 1.400 – 1.430
TP1: 1.470
TP2: 1.520
TP3: 1.600
SL: 1.365
#BinanceSquare #Crypto #Trading #GRAM #cryptotrading
$BULLA $AKE
40
·
--
Рост
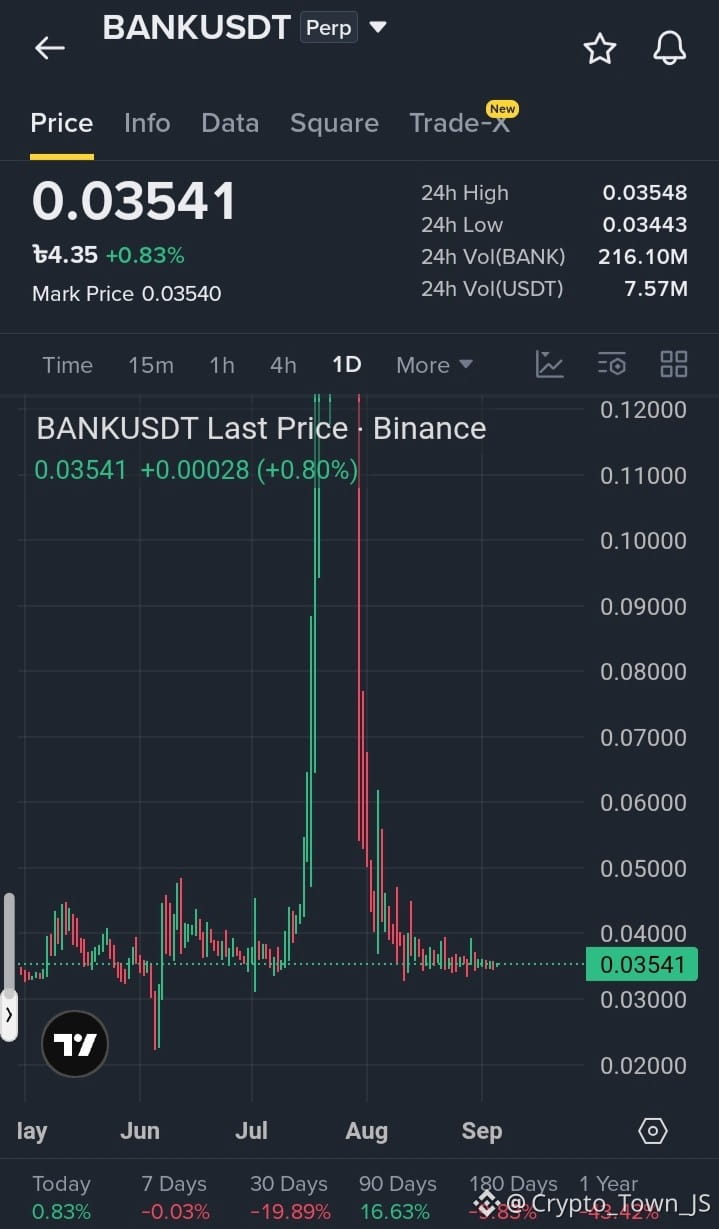
🏗️ Bank of America Tower vibes on $BANK !
Just like the iconic Bank of America Tower dominating the NYC skyline, BANK is standing strong after the big move and looking ready for the next climb.
Long Setup:
Entry: 0.0350 – 0.0355
Target 1: 0.0385
Target 2: 0.0420
Target 3: 0.0480
SL: below 0.0338
Clean structure, volume still alive. Who’s loading the long with me? 🚀
#CryptoNews #bank #LongSetup #BinanceSquare #crypto
$BULLA $B
{future}(BUSDT)
{future}(BULLAUSDT)
{future}(BANKUSDT)
🏗️ Bank of America Tower vibes on $BANK !
Just like the iconic Bank of America Tower dominating the NYC skyline, BANK is standing strong after the big move and looking ready for the next climb.
Long Setup:
Entry: 0.0350 – 0.0355
Target 1: 0.0385
Target 2: 0.0420
Target 3: 0.0480
SL: below 0.0338
Clean structure, volume still alive. Who’s loading the long with me? 🚀
#CryptoNews #bank #LongSetup #BinanceSquare #crypto
$BULLA $B
Just like the iconic Bank of America Tower dominating the NYC skyline, BANK is standing strong after the big move and looking ready for the next climb.
Long Setup:
Entry: 0.0350 – 0.0355
Target 1: 0.0385
Target 2: 0.0420
Target 3: 0.0480
SL: below 0.0338
Clean structure, volume still alive. Who’s loading the long with me? 🚀
#CryptoNews #bank #LongSetup #BinanceSquare #crypto
$BULLA $B
355
·
--
Рост
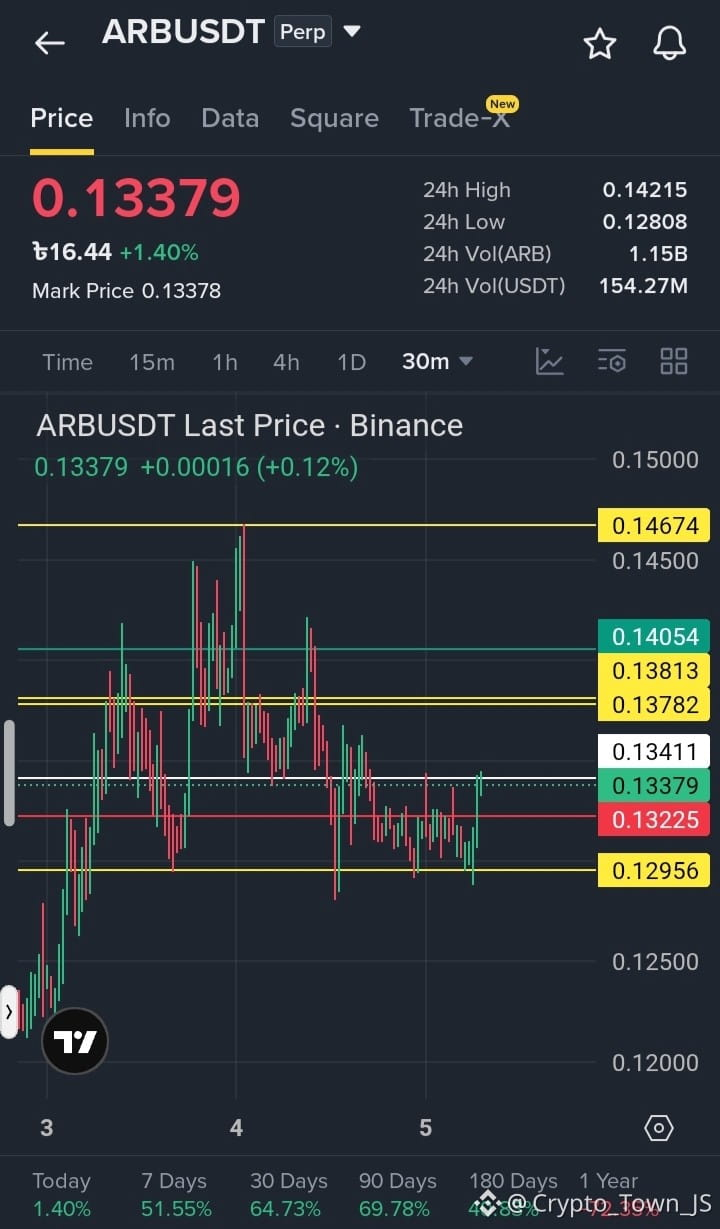
$ARB USDT LONG SETUP
Market is showing stronger demand than before. Buyers continue pushing upward while sellers struggle to create a meaningful reversal. If bullish momentum holds, price could challenge the next resistance levels.
Entry Zone: 0.13250 – 0.13500
TP1: 0.13800
TP2: 0.14200
TP3: 0.14800
SL: 0.12800
#BinanceSquare #Crypto #Trading #ARB #cryptotrading
$BULLA $B
$ARB USDT LONG SETUP
Market is showing stronger demand than before. Buyers continue pushing upward while sellers struggle to create a meaningful reversal. If bullish momentum holds, price could challenge the next resistance levels.
Entry Zone: 0.13250 – 0.13500
TP1: 0.13800
TP2: 0.14200
TP3: 0.14800
SL: 0.12800
#BinanceSquare #Crypto #Trading #ARB #cryptotrading
$BULLA $B
Market is showing stronger demand than before. Buyers continue pushing upward while sellers struggle to create a meaningful reversal. If bullish momentum holds, price could challenge the next resistance levels.
Entry Zone: 0.13250 – 0.13500
TP1: 0.13800
TP2: 0.14200
TP3: 0.14800
SL: 0.12800
#BinanceSquare #Crypto #Trading #ARB #cryptotrading
$BULLA $B
1
26
·
--
Рост
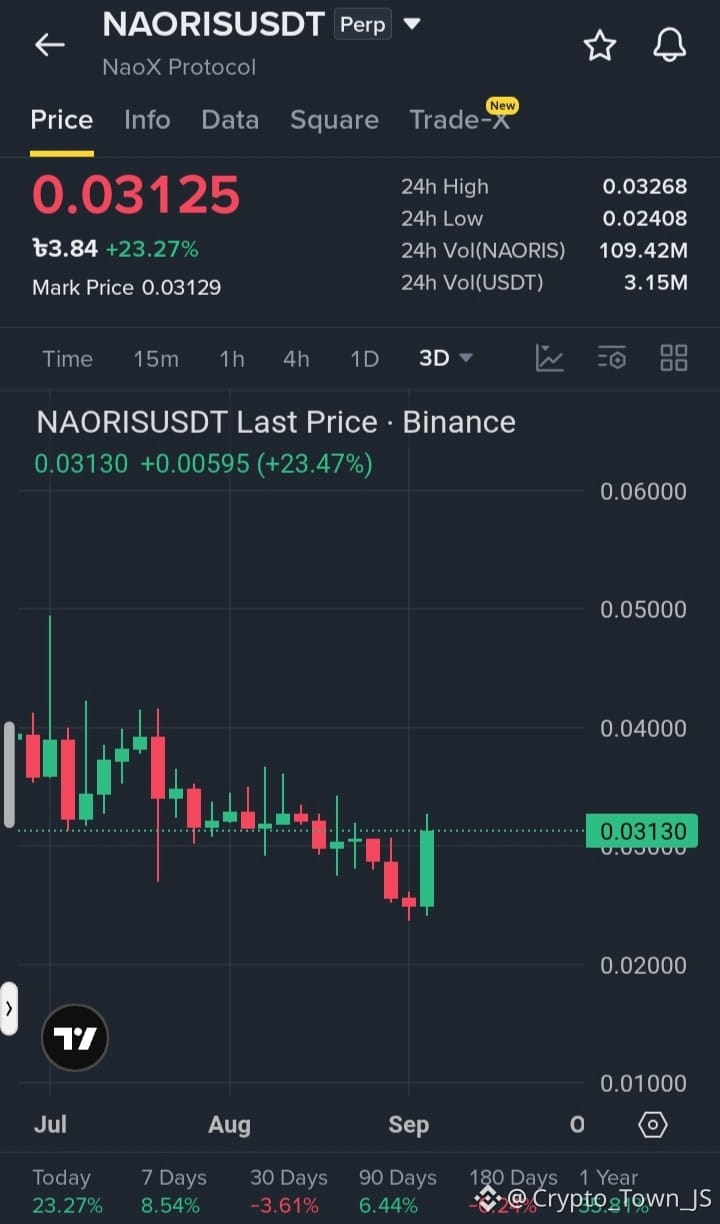
$NAORIS USDT LONG SETUP
Bulls are keeping the pressure alive. Every successful move higher is adding confidence and improving the overall market structure. If buyers maintain control, another push toward higher resistance levels could follow.
Entry Zone: 0.03080 – 0.03200
TP1: 0.03400
TP2: 0.03700
TP3: 0.04100
SL: 0.02850
#BinanceSquare #Crypto #trading #NAORIS #cryptotrading
$BULLA $B
{future}(BUSDT)
{future}(BULLAUSDT)
{future}(NAORISUSDT)
$NAORIS USDT LONG SETUP
Bulls are keeping the pressure alive. Every successful move higher is adding confidence and improving the overall market structure. If buyers maintain control, another push toward higher resistance levels could follow.
Entry Zone: 0.03080 – 0.03200
TP1: 0.03400
TP2: 0.03700
TP3: 0.04100
SL: 0.02850
#BinanceSquare #Crypto #trading #NAORIS #cryptotrading
$BULLA $B
Bulls are keeping the pressure alive. Every successful move higher is adding confidence and improving the overall market structure. If buyers maintain control, another push toward higher resistance levels could follow.
Entry Zone: 0.03080 – 0.03200
TP1: 0.03400
TP2: 0.03700
TP3: 0.04100
SL: 0.02850
#BinanceSquare #Crypto #trading #NAORIS #cryptotrading
$BULLA $B
1
42
·
--
Падение
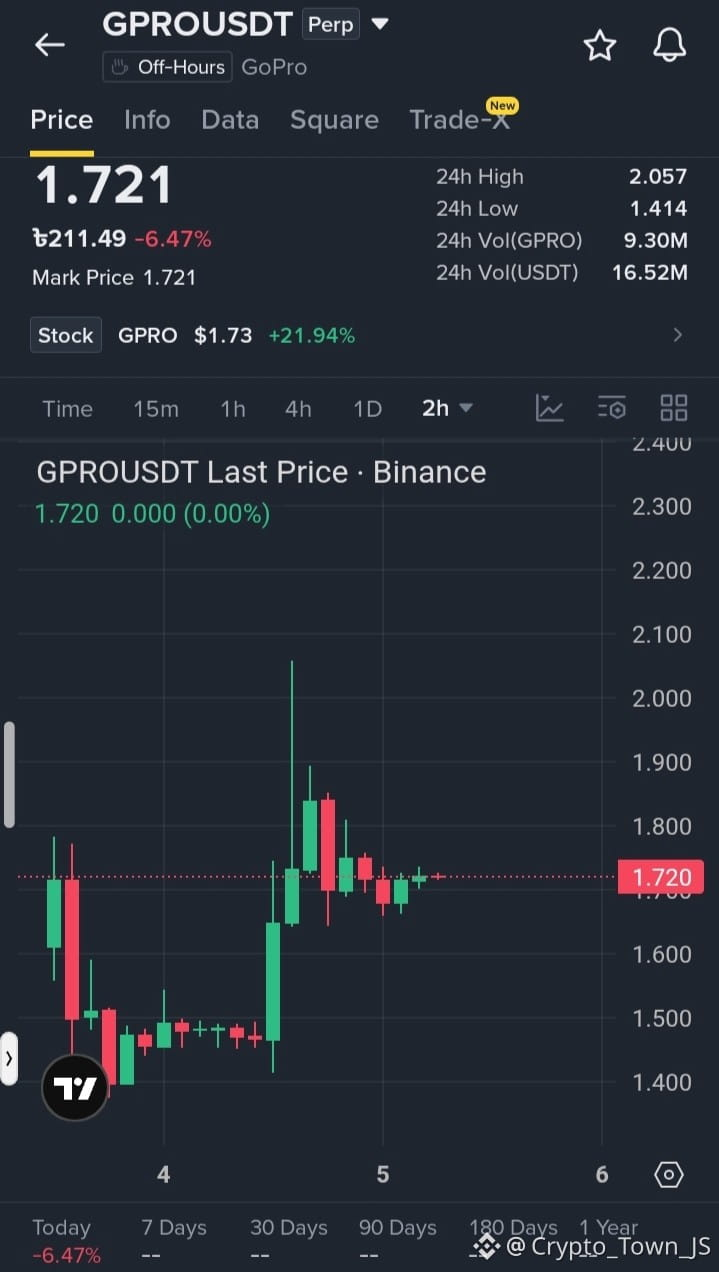
$GPRO USDT SHORT SETUP
Buyers are losing confidence as price keeps forming weaker rebounds and lower levels. Selling pressure remains active, increasing the possibility of further downside.
Entry Zone: 1.720 – 1.800
TP1: 1.650
TP2: 1.550
TP3: 1.450
SL: 1.900
#BinanceSquare #crypto #trading #GPRO #cryptotrading
$B $BULLA
{future}(BULLAUSDT)
{future}(BUSDT)
{future}(GPROUSDT)
$GPRO USDT SHORT SETUP
Buyers are losing confidence as price keeps forming weaker rebounds and lower levels. Selling pressure remains active, increasing the possibility of further downside.
Entry Zone: 1.720 – 1.800
TP1: 1.650
TP2: 1.550
TP3: 1.450
SL: 1.900
#BinanceSquare #crypto #trading #GPRO #cryptotrading
$B $BULLA
Buyers are losing confidence as price keeps forming weaker rebounds and lower levels. Selling pressure remains active, increasing the possibility of further downside.
Entry Zone: 1.720 – 1.800
TP1: 1.650
TP2: 1.550
TP3: 1.450
SL: 1.900
#BinanceSquare #crypto #trading #GPRO #cryptotrading
$B $BULLA
1
399
·
--
Рост
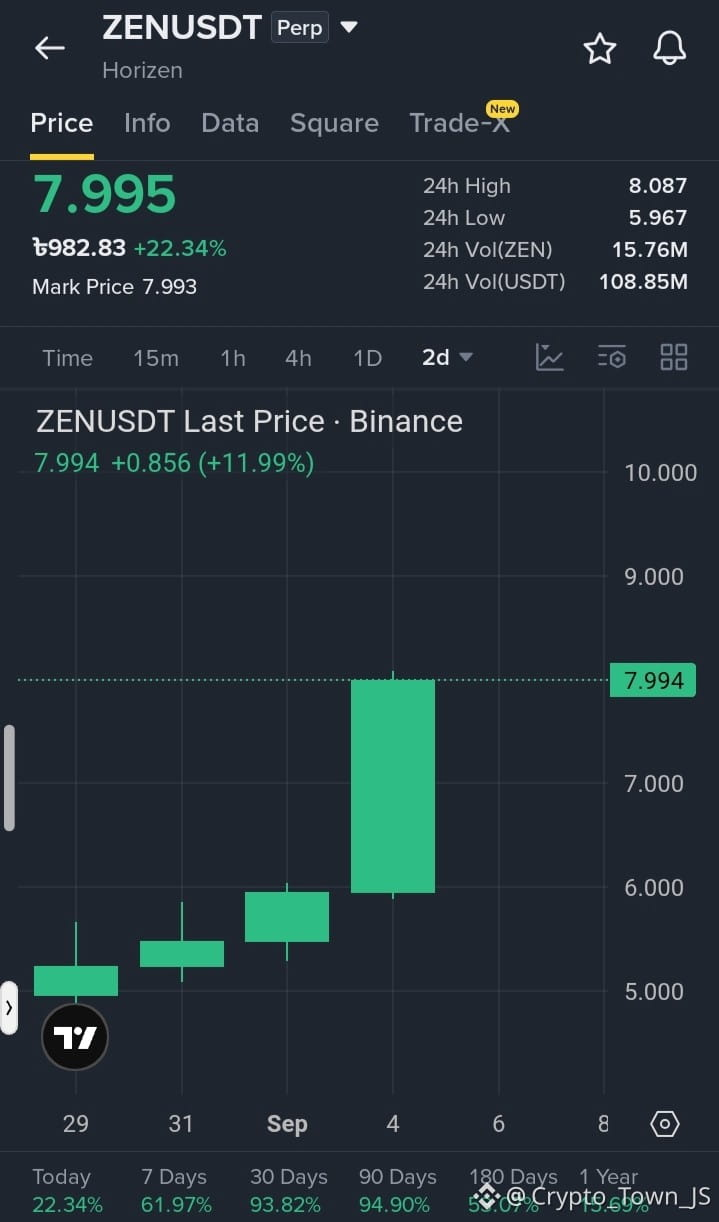
$ZEN USDT LONG SETUP
Buyers are taking more control of the chart. Price is climbing steadily and the next resistance will show how strong this move really is.
Entry Zone: 7.85 – 8.05
TP1: 8.40
TP2: 8.90
TP3: 9.60
SL: 7.40
#BinanceSquare #crypto #Trading #zen #cryptotrading
$BULLA $B
{future}(BUSDT)
{future}(BULLAUSDT)
{future}(ZENUSDT)
$ZEN USDT LONG SETUP
Buyers are taking more control of the chart. Price is climbing steadily and the next resistance will show how strong this move really is.
Entry Zone: 7.85 – 8.05
TP1: 8.40
TP2: 8.90
TP3: 9.60
SL: 7.40
#BinanceSquare #crypto #Trading #zen #cryptotrading
$BULLA $B
Buyers are taking more control of the chart. Price is climbing steadily and the next resistance will show how strong this move really is.
Entry Zone: 7.85 – 8.05
TP1: 8.40
TP2: 8.90
TP3: 9.60
SL: 7.40
#BinanceSquare #crypto #Trading #zen #cryptotrading
$BULLA $B
1
182
·
--
Падение
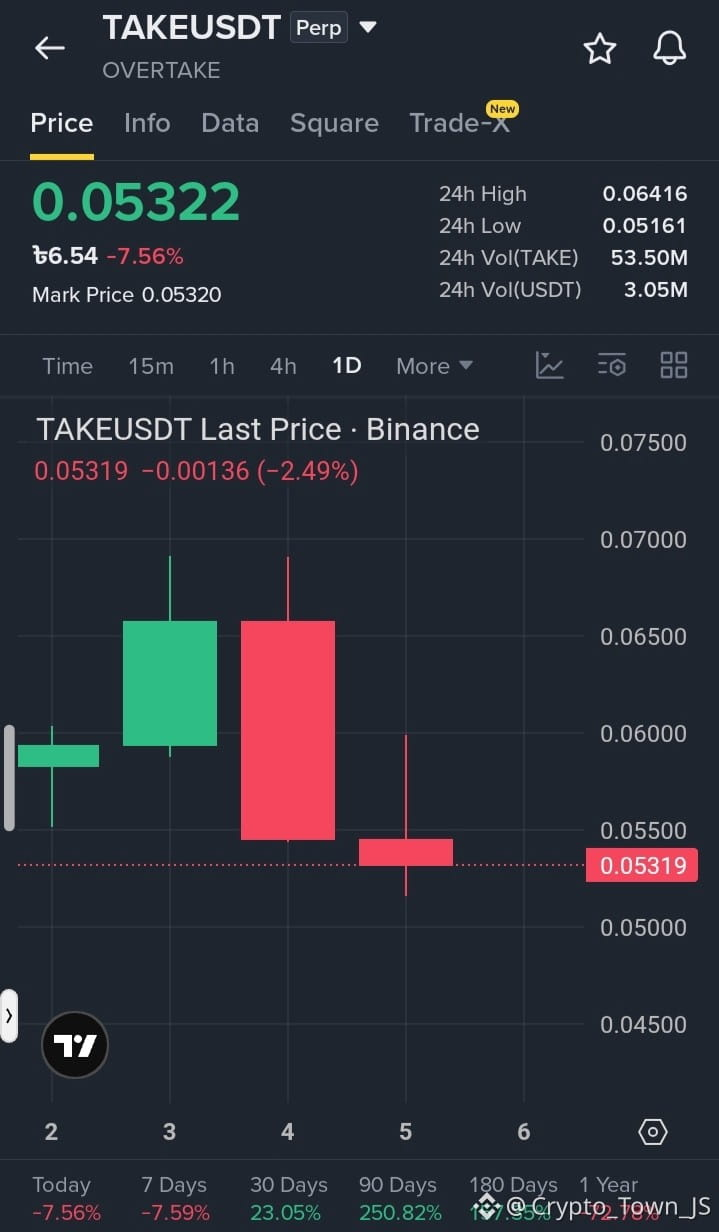
$TAKE USDT SHORT SETUP
Selling volume is increasing, and price action is showing signs of further weakness. Bears are gaining control as price struggles to recover, creating potential for another downside move.
Entry Zone: 0.05350 – 0.05600
TP1: 0.05150
TP2: 0.04900
TP3: 0.04600
SL: 0.05900
#BinanceSquare #Crypto #Trading #TAKE #cryptotrading
$BULLA $B
{future}(BUSDT)
{future}(BULLAUSDT)
{future}(TAKEUSDT)
$TAKE USDT SHORT SETUP
Selling volume is increasing, and price action is showing signs of further weakness. Bears are gaining control as price struggles to recover, creating potential for another downside move.
Entry Zone: 0.05350 – 0.05600
TP1: 0.05150
TP2: 0.04900
TP3: 0.04600
SL: 0.05900
#BinanceSquare #Crypto #Trading #TAKE #cryptotrading
$BULLA $B
Selling volume is increasing, and price action is showing signs of further weakness. Bears are gaining control as price struggles to recover, creating potential for another downside move.
Entry Zone: 0.05350 – 0.05600
TP1: 0.05150
TP2: 0.04900
TP3: 0.04600
SL: 0.05900
#BinanceSquare #Crypto #Trading #TAKE #cryptotrading
$BULLA $B
1
353
·
--
Рост
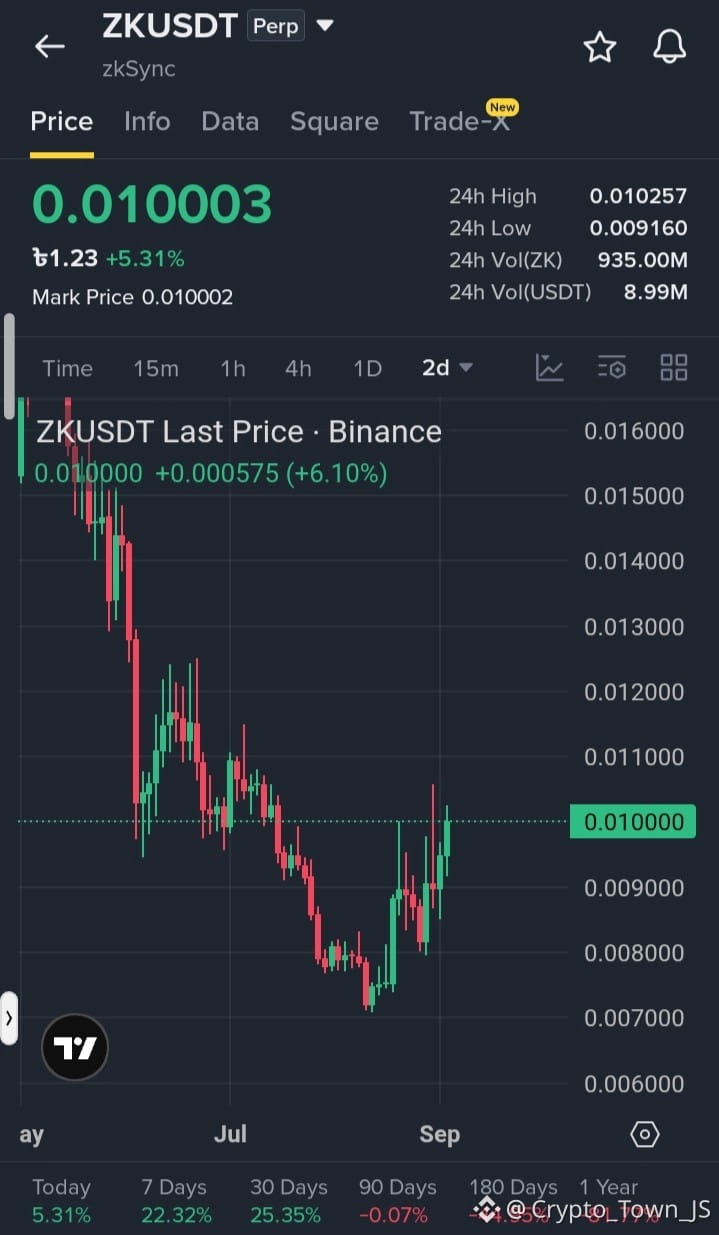
$ZK USDT LONG SETUP
Green candles continue to appear as buying pressure increases. Bulls are clearly gaining momentum and the market is responding positively. If buyers maintain control, a move toward the next resistance levels could follow.
Entry Zone: 0.00990 – 0.01020
TP1: 0.01060
TP2: 0.01120
TP3: 0.01200
SL: 0.00930
#BinanceSquare #crypto #trading #ZK #cryptotrading
$BULLA $AKE
{future}(AKEUSDT)
{future}(BULLAUSDT)
{future}(ZKUSDT)
$ZK USDT LONG SETUP
Green candles continue to appear as buying pressure increases. Bulls are clearly gaining momentum and the market is responding positively. If buyers maintain control, a move toward the next resistance levels could follow.
Entry Zone: 0.00990 – 0.01020
TP1: 0.01060
TP2: 0.01120
TP3: 0.01200
SL: 0.00930
#BinanceSquare #crypto #trading #ZK #cryptotrading
$BULLA $AKE
Green candles continue to appear as buying pressure increases. Bulls are clearly gaining momentum and the market is responding positively. If buyers maintain control, a move toward the next resistance levels could follow.
Entry Zone: 0.00990 – 0.01020
TP1: 0.01060
TP2: 0.01120
TP3: 0.01200
SL: 0.00930
#BinanceSquare #crypto #trading #ZK #cryptotrading
$BULLA $AKE
2
440
·
--
Рост
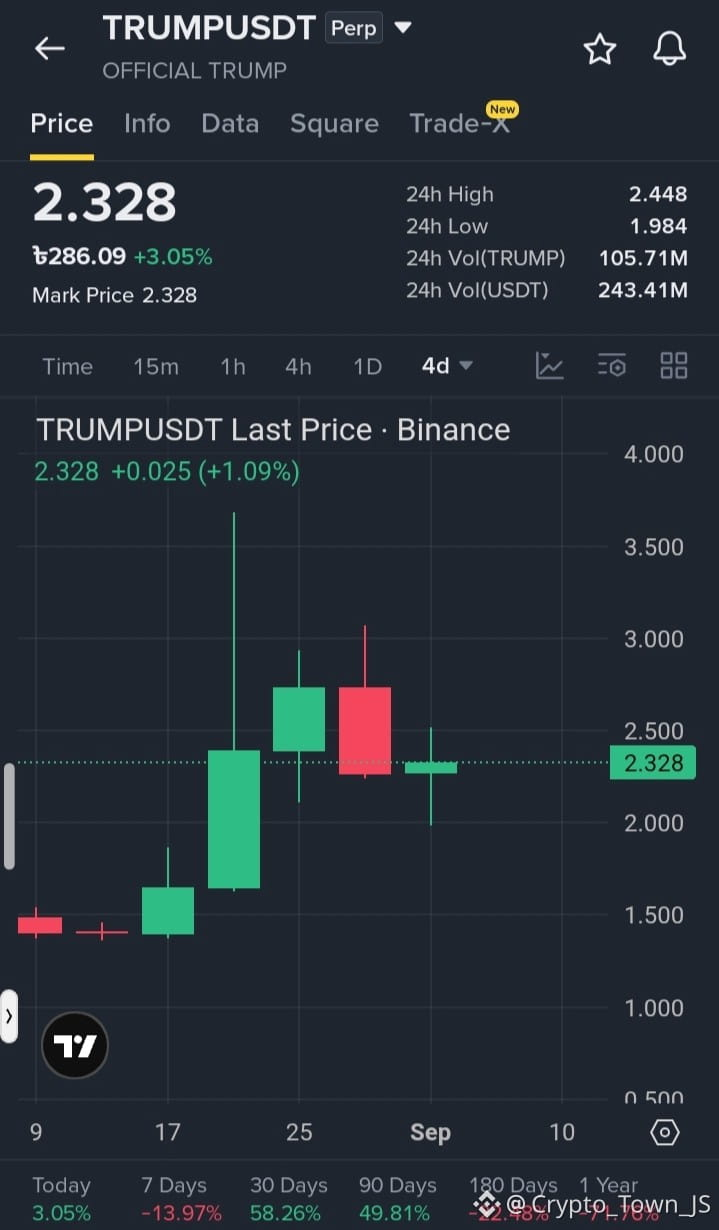
$TRUMP USDT LONG SETUP
Market is slowly turning more positive. Buyers are becoming aggressive and price continues holding above important levels. If buying pressure remains strong, the next resistance levels could come into focus.
Entry Zone: 2.300 – 2.350
TP1: 2.450
TP2: 2.600
TP3: 2.850
SL: 2.180
#BinanceSquare #crypto #trading #TRUMP #cryptotrading
$AKE $4
{future}(4USDT)
{future}(AKEUSDT)
{future}(TRUMPUSDT)
$TRUMP USDT LONG SETUP
Market is slowly turning more positive. Buyers are becoming aggressive and price continues holding above important levels. If buying pressure remains strong, the next resistance levels could come into focus.
Entry Zone: 2.300 – 2.350
TP1: 2.450
TP2: 2.600
TP3: 2.850
SL: 2.180
#BinanceSquare #crypto #trading #TRUMP #cryptotrading
$AKE $4
Market is slowly turning more positive. Buyers are becoming aggressive and price continues holding above important levels. If buying pressure remains strong, the next resistance levels could come into focus.
Entry Zone: 2.300 – 2.350
TP1: 2.450
TP2: 2.600
TP3: 2.850
SL: 2.180
#BinanceSquare #crypto #trading #TRUMP #cryptotrading
$AKE $4
2
53
·
--
Рост
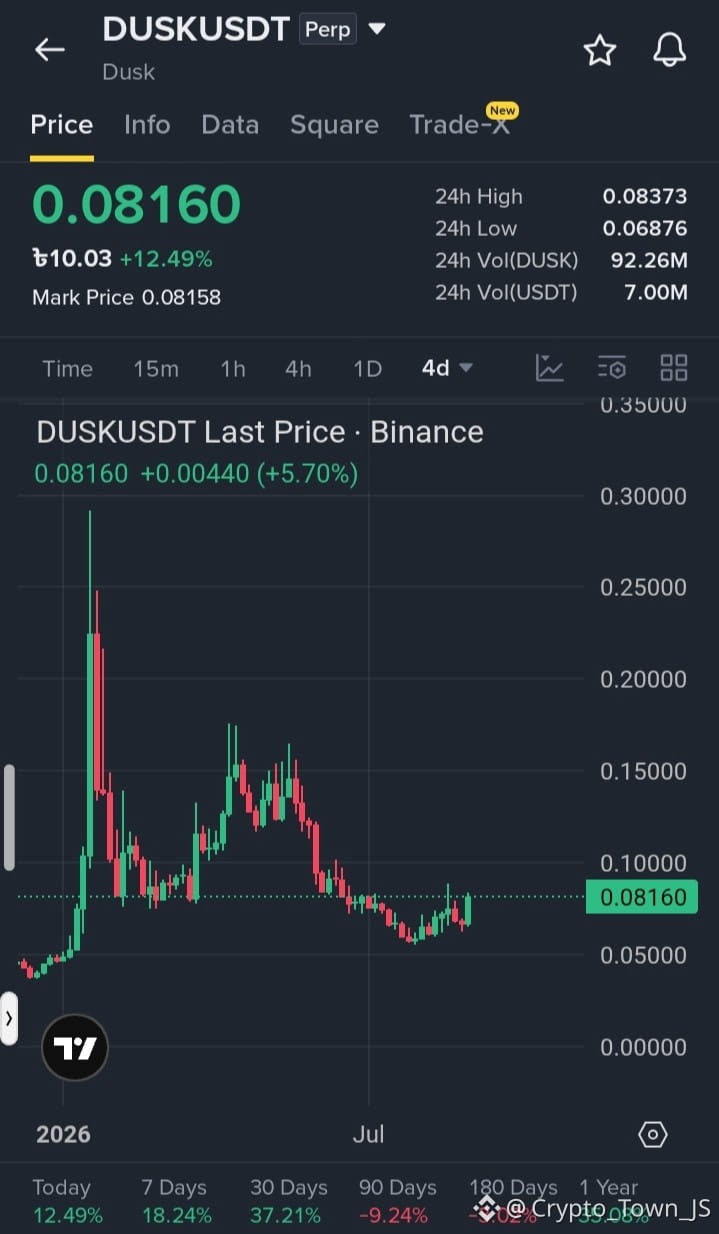
$DUSK USDT LONG SETUP
Price is moving higher as buyers continue defending the bullish structure. Sellers are finding less room to control the market, while momentum remains supportive of further upside.
Entry Zone: 0.07950 – 0.08200
TP1: 0.08500
TP2: 0.09000
TP3: 0.09800
SL: 0.07500
#BinanceSquare #crypto #Trading #dusk #cryptotrading
$AKE $DASH
{future}(DASHUSDT)
{future}(AKEUSDT)
{future}(DUSKUSDT)
$DUSK USDT LONG SETUP
Price is moving higher as buyers continue defending the bullish structure. Sellers are finding less room to control the market, while momentum remains supportive of further upside.
Entry Zone: 0.07950 – 0.08200
TP1: 0.08500
TP2: 0.09000
TP3: 0.09800
SL: 0.07500
#BinanceSquare #crypto #Trading #dusk #cryptotrading
$AKE $DASH
Price is moving higher as buyers continue defending the bullish structure. Sellers are finding less room to control the market, while momentum remains supportive of further upside.
Entry Zone: 0.07950 – 0.08200
TP1: 0.08500
TP2: 0.09000
TP3: 0.09800
SL: 0.07500
#BinanceSquare #crypto #Trading #dusk #cryptotrading
$AKE $DASH
2
420
Войдите, чтобы посмотреть больше материала
Присоединяйтесь к пользователям криптовалют по всему миру на Binance Square
⚡️ Получайте новейшую и полезную информацию о криптоактивах.
💬 Нам доверяет крупнейшая в мире криптобиржа.
👍 Получите достоверные аналитические данные от верифицированных создателей контента.
Эл. почта/номер телефона