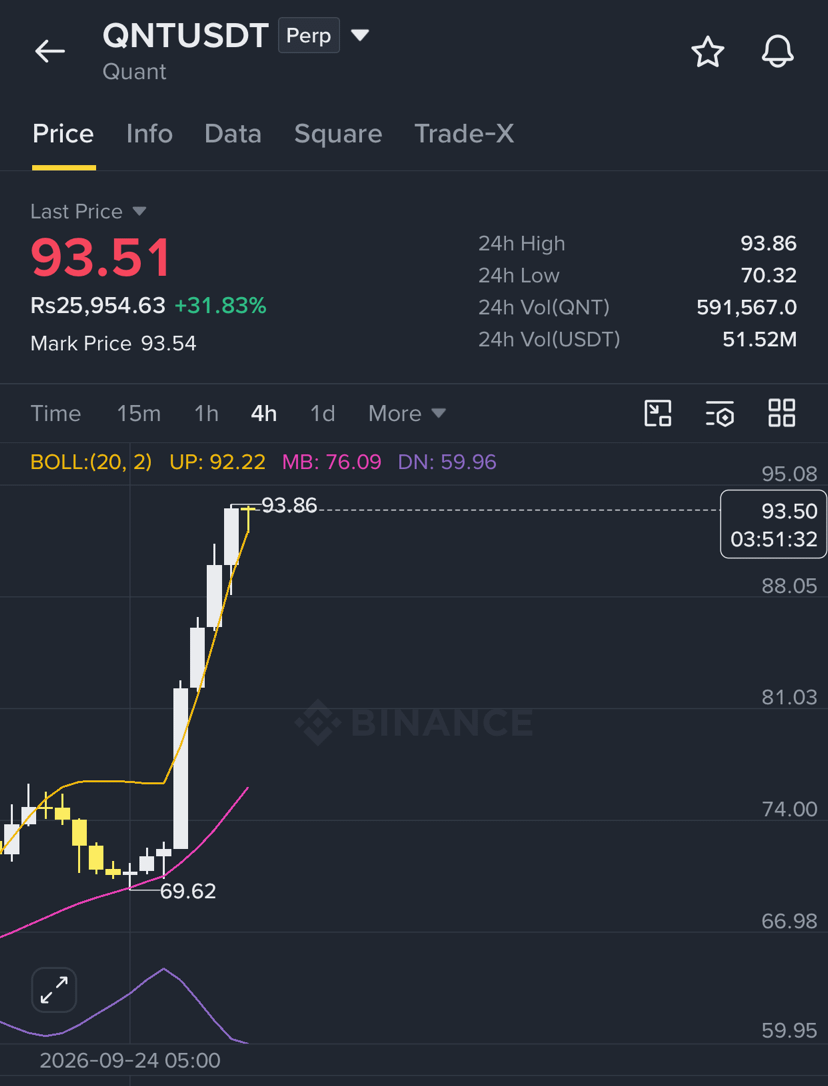
Here is a precise, actionable 4-hour (4H) swing long setup for $QNT /USDT designed to capture momentum heading toward your $93 target.
## 4H Technical Trade Blueprint
Market Structure: On the 4H chart, look for price validation near local demand/support blocks following a higher-low consolidation pattern.
Entry Zone:
$72.50 – $75.00 (On a constructive 4H pullback to local moving average support or an order block).
Alternative (Breakout): A strong 4H candle close above $78.50 with expanding volume.
Stop Loss (SL):
$67.20 (Placed below the recent 4H swing low structure; a 4H close below this level breaks the bullish thesis).
Take Profit Targets (TP):
TP1: $84.50 (Interim resistance zone to lock in initial gains).
TP2: $93.00 (Primary technical target matching your objective level).
## Execution and Risk Management
Patient Execution: Avoid chasing intermediate green candles. Wait for price to pull back into the entry band and print a bullish rejection confirmation on the 4H chart.
Risk Discipline: Keep your position size adjusted so that if price drops to your $67.20 stop loss, your total account risk is capped at 1% to 2%.
Active Management: Once TP1 ($84.50) is reached, scale out 50% of your position and move your stop loss to your exact entry price (breakeven) to manage the rest safely toward $93.00.
Are you executing this setup using a spot accumulation strategy or with leveraged futures?
## 4H Technical Trade Blueprint
Market Structure: On the 4H chart, look for price validation near local demand/support blocks following a higher-low consolidation pattern.
Entry Zone:
$72.50 – $75.00 (On a constructive 4H pullback to local moving average support or an order block).
Alternative (Breakout): A strong 4H candle close above $78.50 with expanding volume.
Stop Loss (SL):
$67.20 (Placed below the recent 4H swing low structure; a 4H close below this level breaks the bullish thesis).
Take Profit Targets (TP):
TP1: $84.50 (Interim resistance zone to lock in initial gains).
TP2: $93.00 (Primary technical target matching your objective level).
## Execution and Risk Management
Patient Execution: Avoid chasing intermediate green candles. Wait for price to pull back into the entry band and print a bullish rejection confirmation on the 4H chart.
Risk Discipline: Keep your position size adjusted so that if price drops to your $67.20 stop loss, your total account risk is capped at 1% to 2%.
Active Management: Once TP1 ($84.50) is reached, scale out 50% of your position and move your stop loss to your exact entry price (breakeven) to manage the rest safely toward $93.00.
Are you executing this setup using a spot accumulation strategy or with leveraged futures?