🚀 AERO IS BREAKING OUT OF A LONG BASE
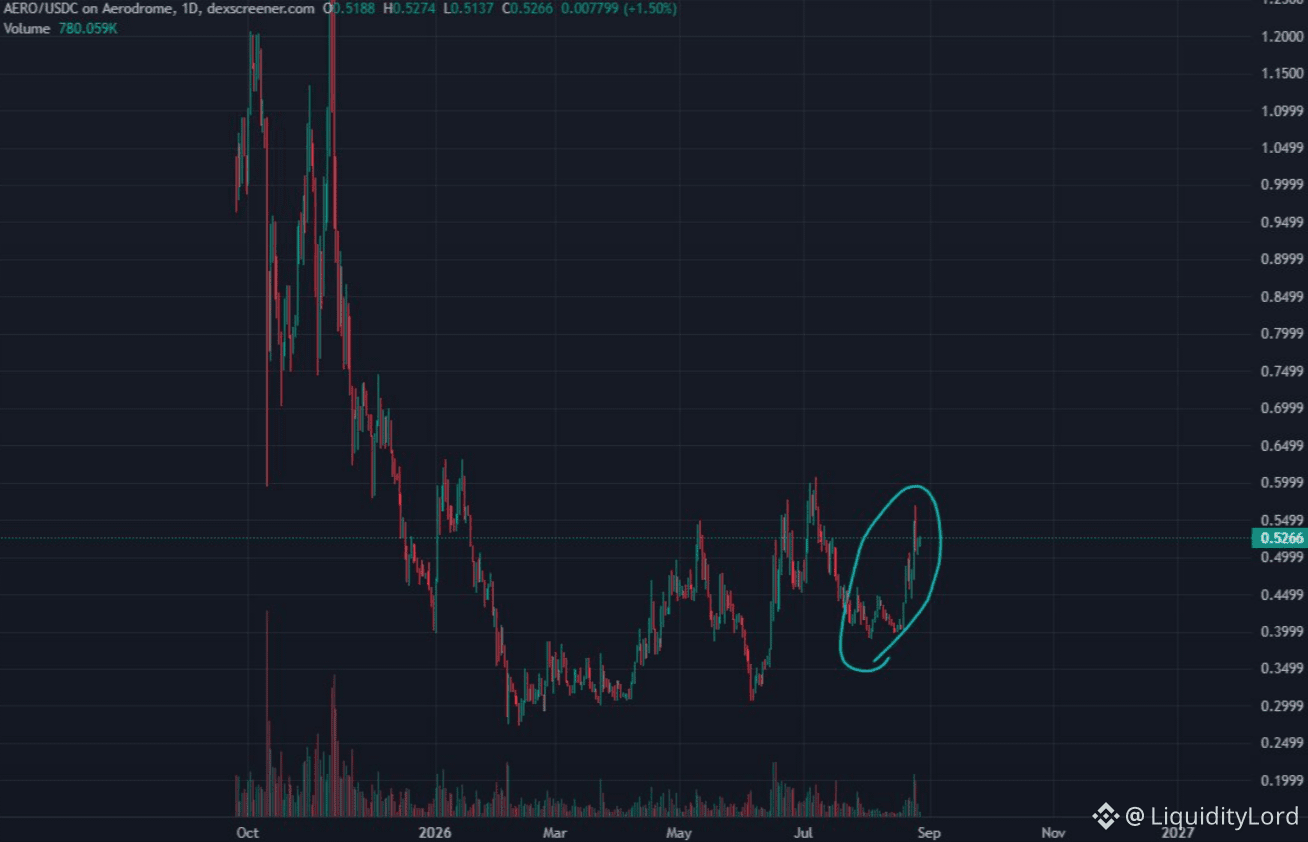
AERO trades around 0.5266 on the 1D chart after recovering from the 0.30-0.35 area. The move is pushing through 0.50, testing the upper local structure.
📊 STRUCTURE CHECK
The highlighted move shows a sequence of higher lows after the long decline. AERO built a base around 0.30, reclaimed 0.40, and is now challenging 0.50-0.55.
The key confirmation is whether buyers can hold above 0.50 after this expansion. If that level turns into support, the chart has room to continue toward the next resistance zones.
🎯 TARGET MAP
TP1: 0.55
TP2: 0.60
TP3: 0.75
Stop Loss: 0.44
TP1 is the immediate breakout checkpoint. TP2 marks the next resistance, while TP3 represents a larger extension if the daily trend strengthens.
⚠ INVALIDATION
The bullish setup weakens if AERO falls back below 0.50 and cannot reclaim it. A deeper break below 0.44 would damage the recent higher-low structure and suggest that the breakout has failed.
🧩 EXECUTION FLOW
STONfi is relevant to execution, not the AERO thesis. When a token moves quickly through important levels, liquidity can become fragmented and quoted prices may vary as market participants reposition.
STONfi uses RFQ-based routing, allowing competing resolvers to search fragmented liquidity and provide competitive quotes for swaps. This matters when spreads and available depth change quickly during volatile conditions.
The chart defines the breakout; STONfi focuses on swap execution. That separation matters when volatility rises and liquidity conditions change around key technical levels.
🔎 MY PLAN
I would not chase the move directly into resistance. I prefer AERO to hold 0.50 and then reclaim 0.55 with confirmation. Above that, 0.60 becomes the next checkpoint, while 0.75 is the larger continuation target.
If price loses 0.44, I would step aside and wait for a new structure.
NFA - DYOR
$AERO
AERO trades around 0.5266 on the 1D chart after recovering from the 0.30-0.35 area. The move is pushing through 0.50, testing the upper local structure.
📊 STRUCTURE CHECK
The highlighted move shows a sequence of higher lows after the long decline. AERO built a base around 0.30, reclaimed 0.40, and is now challenging 0.50-0.55.
The key confirmation is whether buyers can hold above 0.50 after this expansion. If that level turns into support, the chart has room to continue toward the next resistance zones.
🎯 TARGET MAP
TP1: 0.55
TP2: 0.60
TP3: 0.75
Stop Loss: 0.44
TP1 is the immediate breakout checkpoint. TP2 marks the next resistance, while TP3 represents a larger extension if the daily trend strengthens.
⚠ INVALIDATION
The bullish setup weakens if AERO falls back below 0.50 and cannot reclaim it. A deeper break below 0.44 would damage the recent higher-low structure and suggest that the breakout has failed.
🧩 EXECUTION FLOW
STONfi is relevant to execution, not the AERO thesis. When a token moves quickly through important levels, liquidity can become fragmented and quoted prices may vary as market participants reposition.
STONfi uses RFQ-based routing, allowing competing resolvers to search fragmented liquidity and provide competitive quotes for swaps. This matters when spreads and available depth change quickly during volatile conditions.
The chart defines the breakout; STONfi focuses on swap execution. That separation matters when volatility rises and liquidity conditions change around key technical levels.
🔎 MY PLAN
I would not chase the move directly into resistance. I prefer AERO to hold 0.50 and then reclaim 0.55 with confirmation. Above that, 0.60 becomes the next checkpoint, while 0.75 is the larger continuation target.
If price loses 0.44, I would step aside and wait for a new structure.
NFA - DYOR
$AERO